

Page 1

Page 2

FCC INFORMATION (U.S.A.)
1. IMPORTANT NOTICE: DO NOT MODIFY THIS
UNIT!
This product, when installed as indicated in the instructions contained in this manual, meets FCC requirements. Modifications not expressly approved by
Yamaha may void your authority, granted by the FCC,
to use the product.
2. IMPORTANT: When connecting this product to ac-
cessories and/or another product use only high quality
shielded cables. Cable/s supplied with this product
MUST be used. Follow all installation instructions.
Failure to follow instructions could void your FCC
authorization to use this product in the USA.
3. NOTE: This product has been tested and found to
comply with the requirements listed in FCC Regulations, Part 15 for Class “B” digital devices. Compliance
with these requirements provides a reasonable level of
assurance that your use of this product in a residential
environment will not result in harmful interference with
other electronic devices. This equipment generates/
uses radio frequencies and, if not installed and used
according to the instructions found in the users
manual, may cause interference harmful to the operation of other electronic devices. Compliance with FCC
regulations does not guarantee that interference will
not occur in all installations. If this product is found to
be the source of interference, which can be determined by turning the unit “OFF” and “ON”, please try
to eliminate the problem by using one of the following
measures:
Relocate either this product or the device that is being
affected by the interference.
Utilize power outlets that are on different branch (circuit breaker or fuse) circuits or install AC line filter/s.
In the case of radio or TV interference, relocate/
reorient the antenna. If the antenna lead-in is 300 ohm
ribbon lead, change the lead-in to co-axial type cable.
If these corrective measures do not produce satisfactory results, please contact the local retailer authorized
to distribute this type of product. If you can not locate
the appropriate retailer, please contact Yamaha Corporation of America, Electronic Service Division, 6600
Orangethorpe Ave, Buena Park, CA90620
The above statements apply ONLY to those products
distributed by Yamaha Corporation of America or its
subsidiaries.
* This applies only to products distributed by YAMAHA CORPORATION OF AMERICA.
NEDERLAND / NETHERLAND
• Dit apparaat bevat een lithium batterij voor geheugen back-up.
• This apparatus contains a lithium battery for memory back-up.
• Raadpleeg uw leverancier over de verwijdering van de batterij op het
moment dat u het apparaat ann het einde van de levensduur afdankt
of de volgende Yamaha Service Afdeiing:
Yamaha Music Nederland Service Afdeiing
Kanaalweg 18-G, 3526 KL UTRECHT
Tel. 030-2828425
• For the removal of the battery at the moment of the disposal at the
end of the service life please consult your retailer or Yamaha Service
Center as follows:
Yamaha Music Nederland Service Center
Address : Kanaalweg 18-G, 3526 KL UTRECHT
Tel : 030-2828425
• Gooi de batterij niet weg, maar lever hem in als KCA.
• Do not throw away the battery. Instead, hand it in as small chemical
waste.
ADVARSEL!
Lithiumbatteri—Eksplosionsfare ved
fejlagtig håndtering. Udskiftning må kun
ske med batteri af samme fabrikat og
type. Levér det brugte batteri tilbage til
leverandoren.
VARNING
Explosionsfara vid felaktigt batteribyte.
Använd samma batterityp eller en
ekvivalent typ som rekommenderas av
apparattillverkaren. Kassera använt
batteri enlight fabrikantens instruktion.
VAROITUS
Paristo voi räjähtää, jos se on
virheellisesti asennettu. Vaihda paristo
ainoastaan laitevalmistajan
suosittelemaan tyyppiin. Hävitä käytetty
paristo valmistajan ohjeiden mukaisesti.
Page 3

SPECIAL MESSAGE SECTION
This product utilizes batteries or an external power supply
(adapter). DO NOT connect this product to any power supply or
adapter other than one described in the manual, on the name
plate, or specifically recommended by Yamaha.
WARNING: Do not place this product in a position where anyone
could walk on, trip over ,or roll anything over power or connecting
cords of any kind. The use of an extension cord is not recommended! IF you must use an extension cord, the minimum wire size
for a 25' cord (or less ) is 18 AWG. NOTE: The smaller the AWG
number ,the larger the current handling capacity. For longer
extension cords, consult a local electrician.
This product should be used only with the components supplied
or; a cart, rack, or stand that is recommended by Yamaha. If a
cart, etc., is used, please observe all safety markings and instructions that accompany the accessory product.
SPECIFICATIONS SUBJECT TO CHANGE:
The information contained in this manual is believed to be correct
at the time of printing. However, Yamaha reserves the right to
change or modify any of the specifications without notice or obligation to update existing units.
This product, either alone or in combination with an amplifier and
headphones or speaker/s, may be capable of producing sound
levels that could cause permanent hearing loss. DO NOT operate
for long periods of time at a high volume level or at a level that is
uncomfortable. If you experience any hearing loss or ringing in the
ears, you should consult an audiologist.
IMPORTANT: The louder the sound, the shorter the time period
before damage occurs.
Some Yamaha products may have benches and / or accessory
mounting fixtures that are either supplied with the product or as
optional accessories. Some of these items are designed to be
dealer assembled or installed. Please make sure that benches are
stable and any optional fixtures (where applicable) are well secured
BEFORE using.
Benches supplied by Yamaha are designed for seating only. No
other uses are recommended.
NOTICE:
Service charges incurred due to a lack of knowledge relating to
how a function or effect works (when the unit is operating as
designed) are not covered by the manufacturer’s warranty, and
are therefore the owners responsibility. Please study this manual
carefully and consult your dealer before requesting service.
ENVIRONMENTAL ISSUES:
Yamaha strives to produce products that are both user safe and
environmentally friendly. We sincerely believe that our products
and the production methods used to produce them, meet these
goals. In keeping with both the letter and the spirit of the law, we
want you to be aware of the following:
Battery Notice:
This product MAY contain a small non-rechargeable battery which
(if applicable) is soldered in place. The average life span of this
type of battery is approximately five years. When replacement
becomes necessary, contact a qualified service representative to
perform the replacement.
This product may also use “household” type batteries. Some of
these may be rechargeable. Make sure that the battery being
charged is a rechargeable type and that the charger is intended
for the battery being charged.
When installing batteries, do not mix batteries with new, or with
batteries of a different type. Batteries MUST be installed correctly.
Mismatches or incorrect installation may result in overheating and
battery case rupture.
Warning:
Do not attempt to disassemble, or incinerate any battery. Keep all
batteries away from children. Dispose of used batteries promptly
and as regulated by the laws in your area. Note: Check with any
retailer of household type batteries in your area for battery disposal information.
Disposal Notice:
Should this product become damaged beyond repair, or for some
reason its useful life is considered to be at an end, please observe
all local, state, and federal regulations that relate to the disposal of
products that contain lead, batteries, plastics, etc. If your dealer is
unable to assist you, please contact Yamaha directly.
NAME PLATE LOCATION:
The name plate is located on the top of the product, and the
serial number is located at the rear of the product. The power
requirements, etc., are located on this plate. You should record
the serial number, and the date of purchase in the spaces
provided below and retain this manual as a permanent record of
your purchase.
Model G50
Serial No.
Purchase Date
92-BP
PLEASE KEEP THIS MANUAL
Page 4

The G50 is a high-performance Guitar MIDI Converter designed to work in conjunction with the Yamaha G1D Divided
Pickup Unit installed on an electric or steel-string acoustic
guitar. The G50 offers unprecedented MIDI guitar synthesizer
performance with exceptionally fast response and a range of
advanced features that bring the true creative potential of MIDI
control to guitar players for the first time. A MIDI guitar system
incorporating the G50 and G1D is not only great for performance, but it gives guitar players an ideal means for entering
music data in a MIDI sequence recording system.
Please read this owner’s manual carefully, and follow the
instructions within in order to ensure proper operation. Also
keep this manual in a safe place for later reference.
Contents
Precautions ............................................. 2
G50 Overview ........................................... 3
The Controls & Connectors ................................. 4
Front Panel ....................................... 4
Rear Panel ....................................... 5
Setting Up .............................................. 6
■ Power Supply ...................................... 6
■ Tone Generator Connection & MIDI Setup ................ 6
MIDI Channel Settings .............................. 7
Preset Program Sets ................................ 8
■ Guitar/G1D Connection ............................... 8
Input Level Adjustment .................................... 9
Tuning ............................................... 10
Play Mode ............................................. 11
Selecting Programs & Playing In the PLAY Mode ......... 11
G1D [UP]/[DOWN] Button Modes ..................... 12
Playing In the Monophonic Mode .................... 12
Edit Mode ............................................. 1 3
• Edit and Write Operation ...................... 1 3
• The Memory Swap Function .................... 1 3
Guitar Setup ..................................... 14
Tone Generator Setup ............................. 1 5
Real Time Control ................................. 1 6
MIDI Bulk Dump Transmission & Reception ............. 19
Initialize ............................................... 20
Specifications .......................................... 20
Troubleshooting ........................................ 21
Preset Program Lists ..................................... 2 2
■ Guitar/Bass select switch: when “GUITAR” is selected....... 22
■ Guitar/Bass select switch: when “BASS” is selected ......... 25
MIDI Data Format ....................................... 2 8
MIDI Implementation Chart ................................ 32
1
Page 5

Precautions !! PLEASE READ THIS BEFORE PROCEEDING !!
■ Location
Do not expose the G50 to the following conditions to
avoid deformation, discoloration, or more serious damage.
• Direct sunlight (e.g. near a window).
• High temperatures (e.g. near a heat source, outside, or
in a car during the daytime).
• Excessive humidity.
• Excessive dust.
• Strong vibration.
■ USE THE CORRECT POWER SUPPLY
Power to the G50 should be supplied only from the
appropriate Yamaha AC adaptor (the PA-3B or another
adaptor specifically recommended by Yamaha). Use of
another adaptor may cause serious damage to the unit.
Also make sure that the adaptor you have is appropriate
for the AC mains supply voltage in the area where you
intend to use the G50. (The correct input voltage is
marked on the adaptor.)
■ Power Supply
• Turn the power switch OFF when the instrument is not
in use.
• The power adaptor should be unplugged from the AC
outlet if the G50 is not to be used for an extended
period of time.
• Unplug the G50 during electric storms.
• Avoid plugging the G50 into the same AC outlet as
appliances with high power consumption, such as
electric heaters or ovens. Also avoid using multi-plug
adaptors since these can result in reduced sound
quality and possibly damage.
■ Turn Power OFF When Making Connections
• To avoid damage to the G50 and other devices to
which it is connected (a sound system, for example),
turn the power switches of all related devices OFF
prior to connecting or disconnecting audio and MIDI
cables.
■ Handling and Transport
• Never apply excessive force to the controls, connectors or other parts of the instrument.
• Always unplug cables by gripping the plug firmly,
by pulling on the cable.
• Disconnect all cables before moving the instrument.
• Physical shocks caused by dropping, bumping, or
placing heavy objects on the instrument can result in
scratches and more serious damage.
■ Cleaning
• Clean the cabinet and panel with a dry soft cloth.
• A slightly damp cloth may be used to remove stubborn
grime and dirt.
• Never use cleaners such as alcohol or thinner.
• Avoid placing vinyl objects on top of the instrument
(vinyl can stick to and discolor the surface).
■ Electrical Interference
• This instrument contains digital circuitry and may
cause interference if placed too close to radio or
television receivers. If this occurs, move the instrument further away from the affected equipment.
■ Data Backup
• The G50 contains a special long-life battery that
retains the contents of its internal memory even when
the power is turned OFF. The backup battery should
last for several years. When the backup battery needs
to be replaced “BALo” will appear on the display
when the power is turned on. When this happens, have
the backup battery replaced by qualified Yamaha
service personnel. DO NOT ATTEMPT TO REPLACE
THE BACKUP BATTERY YOURSELF!
■ Service and Modification
• The G50 contains no user serviceable parts. Opening it
or tampering with it in any way can lead to irreparable
damage and possibly electric shock. Refer all servicing
to qualified YAMAHA personnel.
not
■ MIDI Connections
• When connecting the G50 to MIDI equipment, be sure
to use high-quality cables made especially for MIDI
data transmission.
• Avoid MIDI cables longer than about 15 meters.
Longer cables can pick up electrical noise that can
causes data errors.
YAMAHA is not responsible for damage caused by improper handling or operation.
Precautions
2
Page 6
G50 Overview
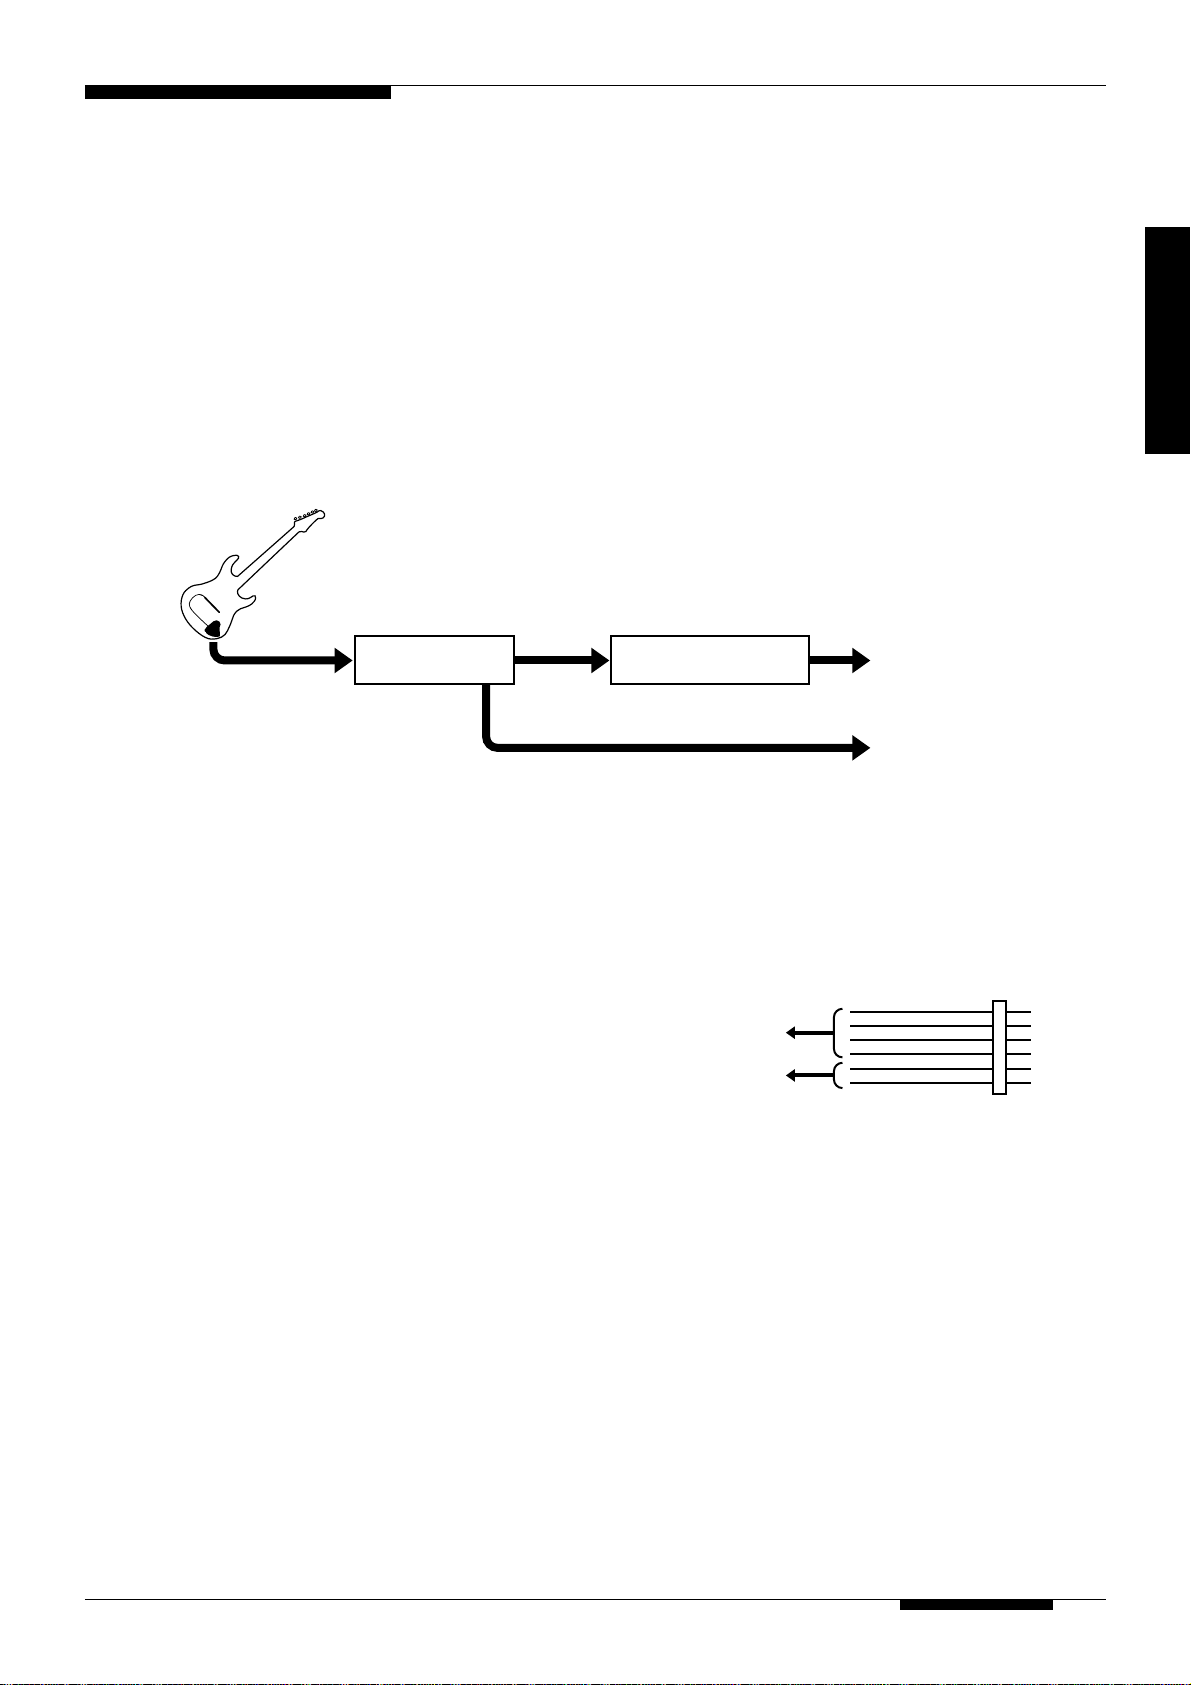
The G50 is basically an “interface” which converts the
analog output from a G1D Divided Pickup Unit installed
on your guitar (or directly from the guitar’s normal output
if used without the G1D in the mono synthesizer mode) to
corresponding MIDI data which is transmitted to a MIDI
tone generator to produce the “synthesized” sound output.
When you play a note or chord on your guitar, the G50
instantly generates MIDI data corresponding to the note(s)
you play — along with the appropriate pitch bend data if
Guitar
MIDI
G1D
G50
OUT
GUITAR
DIRECT OUT
you bend a note — so that you can use most standard
guitar techniques to play any voice that can be produced
by the connected MIDI tone generator — brass, strings,
organ, percussion … anything! You can play just the
synthesized sound, mix the synthesized sound with the
normal guitar sound played through a standard guitar
amplifier or sound system, or just play the normal guitar
sound.
MIDI Tone Generator
Synthesized Sound
Normal Guitar Sound
The G50 has 128 “programs” that you can select and play.
In fact, you can edit each of these programs to provide
precisely the response and playing features you want. You
can, for example, specify the G50’s sensitivity in response
to notes you play on the guitar, the pitch bend range,
which voice on your tone generator will be selected when
the G50 program is selected, and much more. There are
also special “split” functions which let you play different
voices on different strings, or different voices at different
picking positions. You could, for example, play upright
bass on the lowest two strings (5 and 6) while playing
organ on the top 4 strings (1 through 4). The G50 offers
many other features that provide an extraordinary range of
creative possibilities.
● “Split” function example
Organ
Upright bass
G50 Overview
3
Page 7

The Controls & Connectors
Front Panel
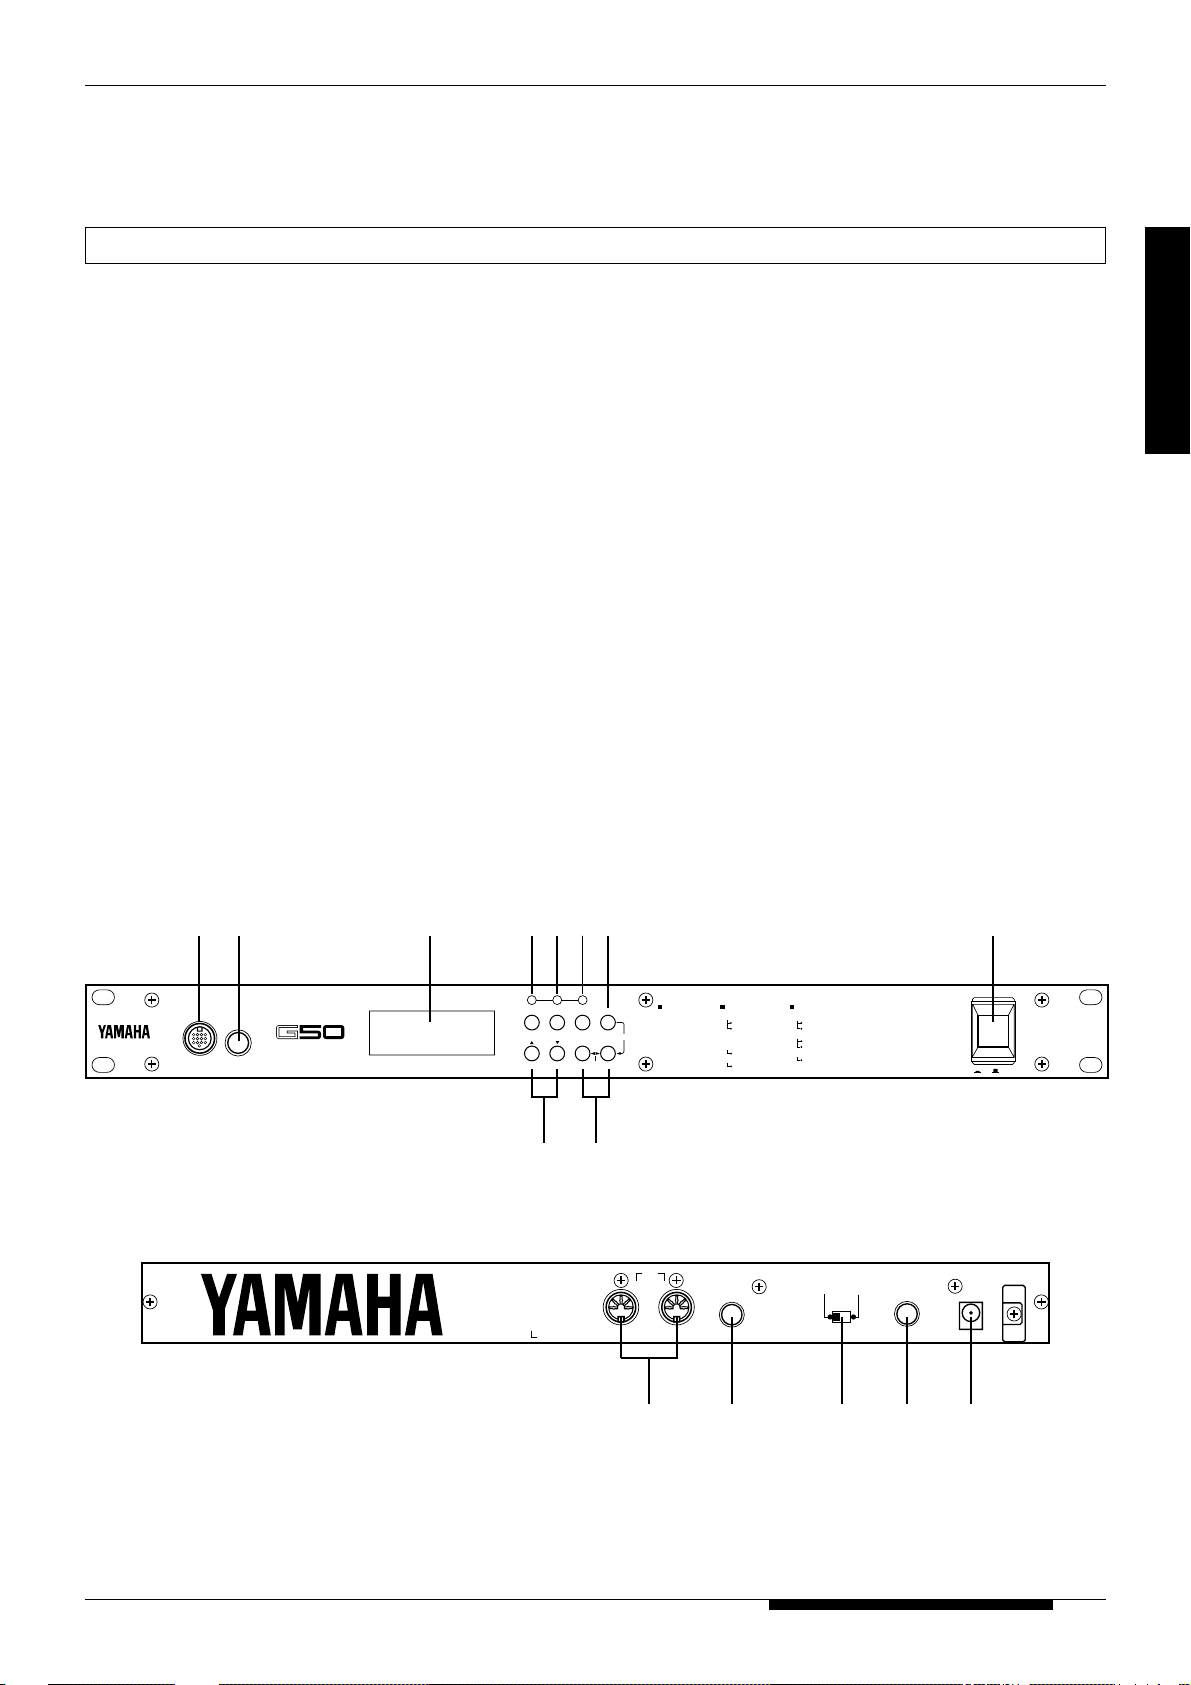
1 [POWER] Switch
Press to turn the G50 power on or off. The PARAMETER
& MEMORY#/VALUE display will light when the power
is on.
2 INPUT-DIVIDED Connector
One end of the multi-pin cable supplied with the G50
plugs in here. The cable plugs in with the release button
facing upward. This is a locking connector — the release
button must be pressed to unplug the cable. The other end
of cable connects to the G1D Divided Pickup Unit (refer
to the G1D owner’s manual for details).
3 MONO SYNTH Jack
The normal output from a guitar can be plugged in here
via a standard 1/4" phone-plug cable if the G50 is to be
used without the G1D Divided Pickup Unit in the monophonic mode. The monophonic mode is automatically
selected when the multi-pin cable is disconnected and a
standard guitar cable is plugged in here.
Page 7 for details.
4 PARAMETER & MEMORY#/VALUE Display
This display shows the current program number when the
G50 is in the PLAY mode, and the appropriate parameters
and/or values when any other mode is engaged.
5 [PLAY] Button
This button engages the normal G50 PLAY mode (the
PLAY mode is selected by default whenever the G50
power switch is turned ON). Any of the G50’s 128
“programs” can be selected and played in this mode.
Page 11 for details.
6 [INPUT] Button
Engages the input adjustment mode in which the G50
input gain can be matched to the output level of each
individual guitar string for optimum playability and
performance.
Page 9 for details.
7 [TUNER] Button
Engages the G50’s built-in guitar tuner, allowing precise,
easy tuning of each guitar string. If pressed while holding
the [PLAY] button, the [TUNER] button also accesses a
selection of preset program sets.
Pages 10, 8 for details.
8 [MIDI] Button
Allows the MIDI transmit/receive channel(s) of the G50
to be set to match the connected MIDI device(s).
It is also possible to transmit MIDI bulk data corresponding to the G50’s 128 programs to an external storage
device by pressing the [MIDI] button while holding the
[PLAY] button.
Page 19 for details.
9 PARAMETER SELECT [▲](NO) and [▼ ](YES) Buttons
These buttons are used to select the G50’s editable
parameters (“A” through “Y”). Press either button briefly
to select the next parameter in the corresponding direction
([▼] to select the next parameter toward “Y”, or [▲] to
select the next parameter toward “A”), or hold either
button for continuous scrolling in the corresponding
direction.
These same buttons are also used to confirm (“YES”) or
cancel (“NO”) the G50 program copy, swap, and other
functions.
Page 13 for details.
J MEMORY#/VALUE [-1] & [+1] Buttons
These buttons are used to increment (increase) or decrement (decrease) program numbers or the value/setting of
any of the G50’s editable parameters. Press either button
briefly to select the next number/setting in the corresponding direction ([+1] to increment; [-1] to decrement),
or hold either button for continuous scrolling in the
corresponding direction. It is also possible to skip in tens
(e.g. 10 → 20 → 30 → etc. or the reverse) by pressing
the opposite button while holding the button corresponding to the direction in which you want to increment/
decrement.
The Controls & Connectors
4
Page 8
Rear Panel
K DC IN Connector
The DC output cable from the Yamaha PA-3B AC adaptor
or another adaptor recomended by Yamaha is plugged in
here.
Page 6 for details.
L GUITAR DIRECT OUT Jack
This jack outputs the direct sound from your guitar (not
the synthesized sound). The output from this jack can be
connected to a guitar amplifier, mixing console, or similar
device via a standard 1/4" phone plug cable.
M GUITAR TYPE Switch
This switch must be set to match the type of guitar and
divided pickup you are using. If you have a G1D Divided
Pickup Unit installed on a six-string guitar, set this switch
to the “GUITAR” position. If you have a bass guitar
divided pickup installed on a bass guitar, set the switch to
the “BASS” position after the turned power off. “BASS”
will appear on the display briefly when the power is
turned on after setting this switch to “BASS”,
N SUSTAIN/HOLD Jack
A Yamaha FC4 or FC5 footswitch can be connected to
this jack for sustain or hold operation.
Page 18 for details.
O MIDI IN and OUT Connectors
The MIDI OUT connector connects to one or more
external tone generators or synthesizers to be driven by
the G50. It can also be connected to a MIDI data recorder
or other MIDI data storage device to store MIDI bulk data
corresponding to the G50’s 128 programs.
The MIDI IN connector can be used to receive previously
stored program data from an external MIDI data storage
device, or control data from a device such as a Yamaha
MFC10 MIDI Foot Controller.
Page 6 for details.
GUITAR MIDI
DIVIDED
MONO SYNTH
CONVERTER
PARAMETER
4
MEMORY#/VALUE
SER NO.
MIDI CH
(MONO/POLY)
PARAMETER
SELECT
NO YES
9 J
TUNER
5678 132
INPUT
LEVEL
MEMORY# / VALUE
–1 +1
±10
DC-IN
POWER
ON/
OFF
PARAMETER
PLAY
GUITAR SETUP EXTERNAL TG SETUP
A PLAYING STYLE
B NOTE ON LEVEL
C NOTE OFF LEVEL
D VELOCITY
WRITE
E CHROMATIC
F TRANSPOSE
G PITCH BEND RANGE
MIDI
OUT IN
H PROGRAM CHANGE #
I BANK MSB
J BANK LSB
K VOLUME
L PAN
M ASSIGNABLE 1
N
VALUE
O ASSIGNABLE 2
P VALUE
SUSTAIN/HOLD
REALTIME CONTROL
Q SPLIT
R MEMORY2#
S MEM2 LOCATION
T PICKING CONTROL
U FRONT
V REAR
W TOUCH CONTROL
X SENSITIVITY
Y SUSTAIN/HOLD PEDAL
GUITAR
BASS
GUITAR
DIRECT OUT
LMNO K
The Controls & Connectors
5
Page 9
Setting Up
DC
-IN
DC-IN
PA-3B
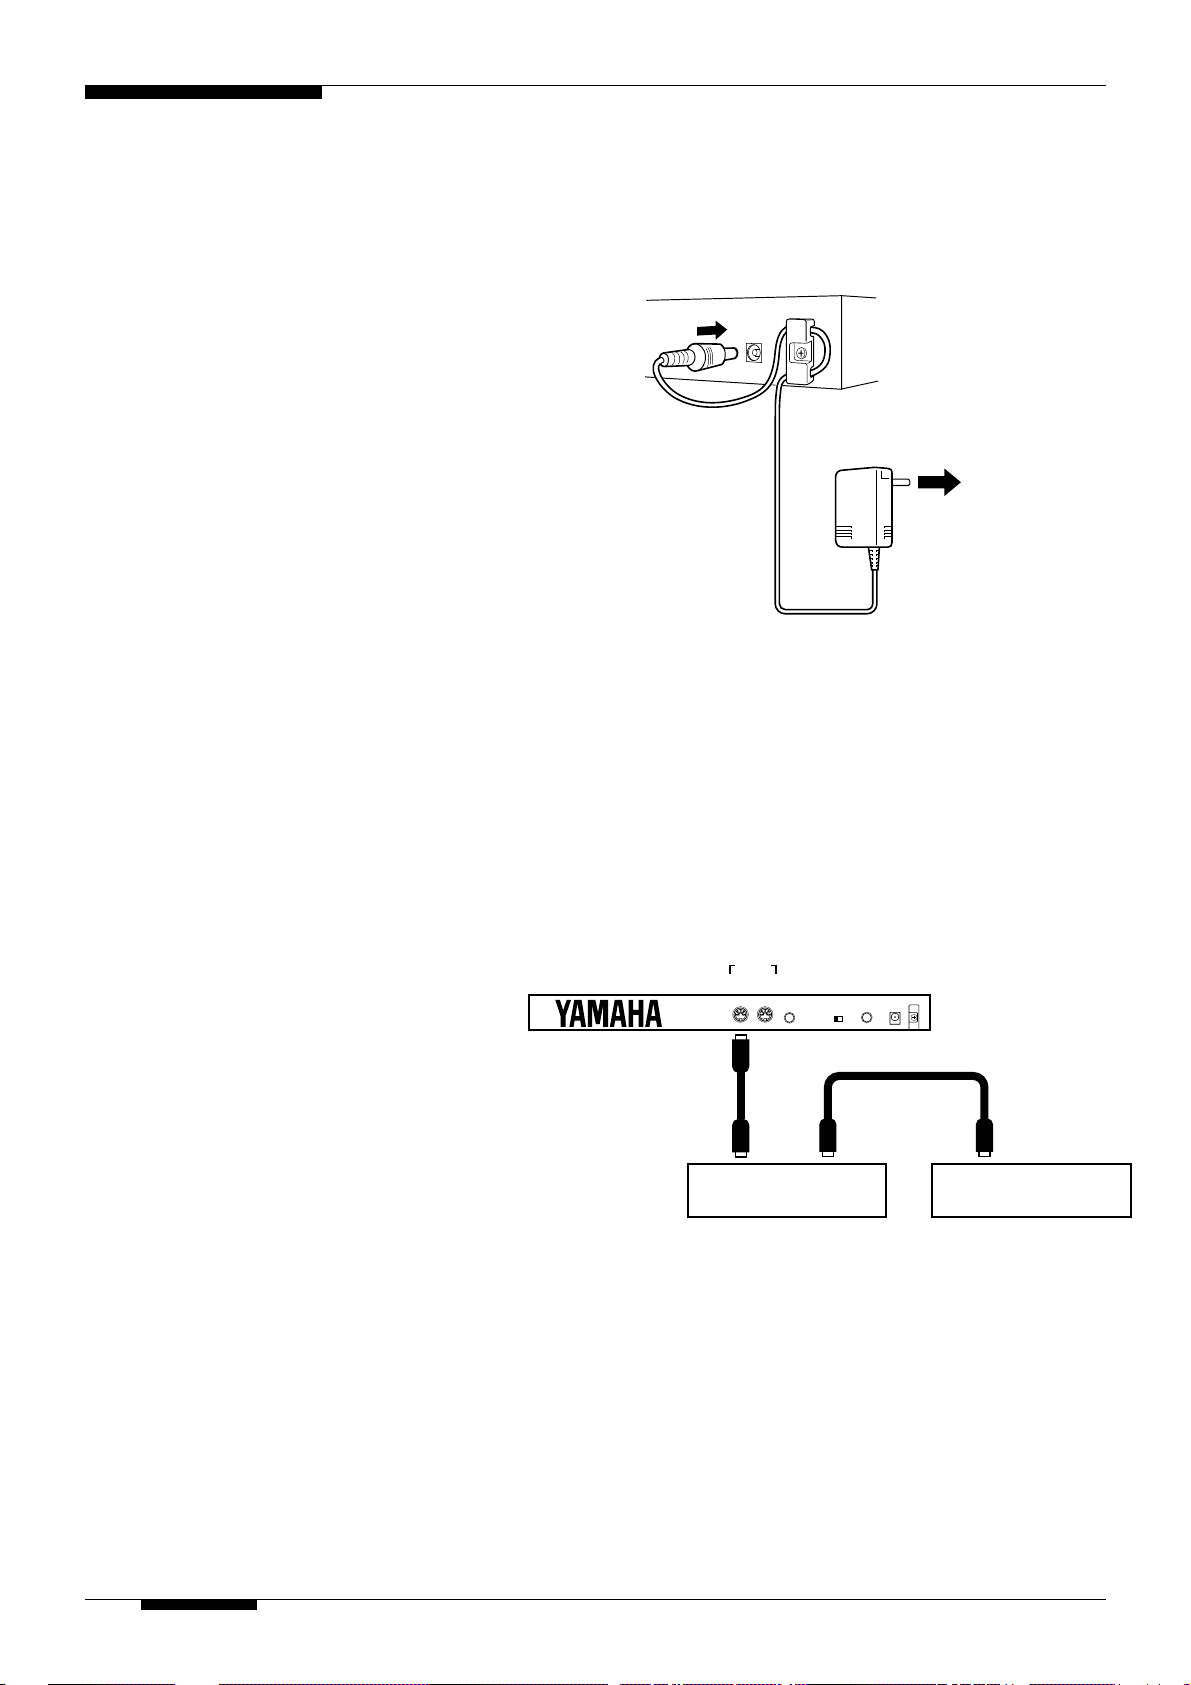
Power Supply
Plug the DC output cable from the AC adaptor into the
DC IN jack on the rear panel, then plug the adaptor into a
convenient wall AC power socket. It is also a good idea
to clip the adaptor’s DC cable into the cable clip on the
G50 rear panel to minimize the possibility of accidentally
unplugging the cable during operation.
■
CAUTION
• Turn your tone generator on before turning on the G50.
This is necessary to ensure that the initial pitch bend, tune,
and other setup parameters transmitted by the G50 at
power-on are received by the tone generator.
• Do not attempt to use an AC adaptor other than the
supplied unit or an appropriate replacement provided by
your Yamaha dealer to power the G50. The use of an
incompatible adaptor may cause irreparable damage to the
G50, and might pose a serious shock hazard!
• Be sure to unplug the AC adaptor from the AC mains socket
when the G50 is not in use.
AC Power Socket
Tone Generator Connection & MIDI Setup
The G50 can drive just about any external tone
generator or synthesizer, although Yamaha
particularly recommends the MU80 or MU50
XG (GM compatible) tone generators for outstanding AWM sound, or the VL1-m Version 2 or
VL70-m if you want the extraordinary sound of
Yamaha’s revolutionary Virtual Acoustic Synthesis tone generation system.
Connect the G50 MIDI OUT connector to the
MIDI IN connector of a single external device,
or the first in a “chain” of devices you want to
control. The MIDI THRU connector of the first
device in the chain should then be connected to
the MIDI IN connector of the second device, and
so on. See below for details on setting the G50
MIDI transmit/receive channel(s).
■
NOTES
• Always use high-quality MIDI cables when connecting MIDI devices, and avoid cables longer than
about 15 meters — longer cables can pick up
electrical noise that can cause data errors.
• Keep to turned the power off before the installing.
G50
MIDI
MIDI
OUT IN
MIDI
IN
1st MIDI Device 2nd MIDI Device
THRU
MIDI
IN
Setting Up
6
Page 10
MIDI Channel Settings
PARAMETER MEMORY#/VALUE
,,
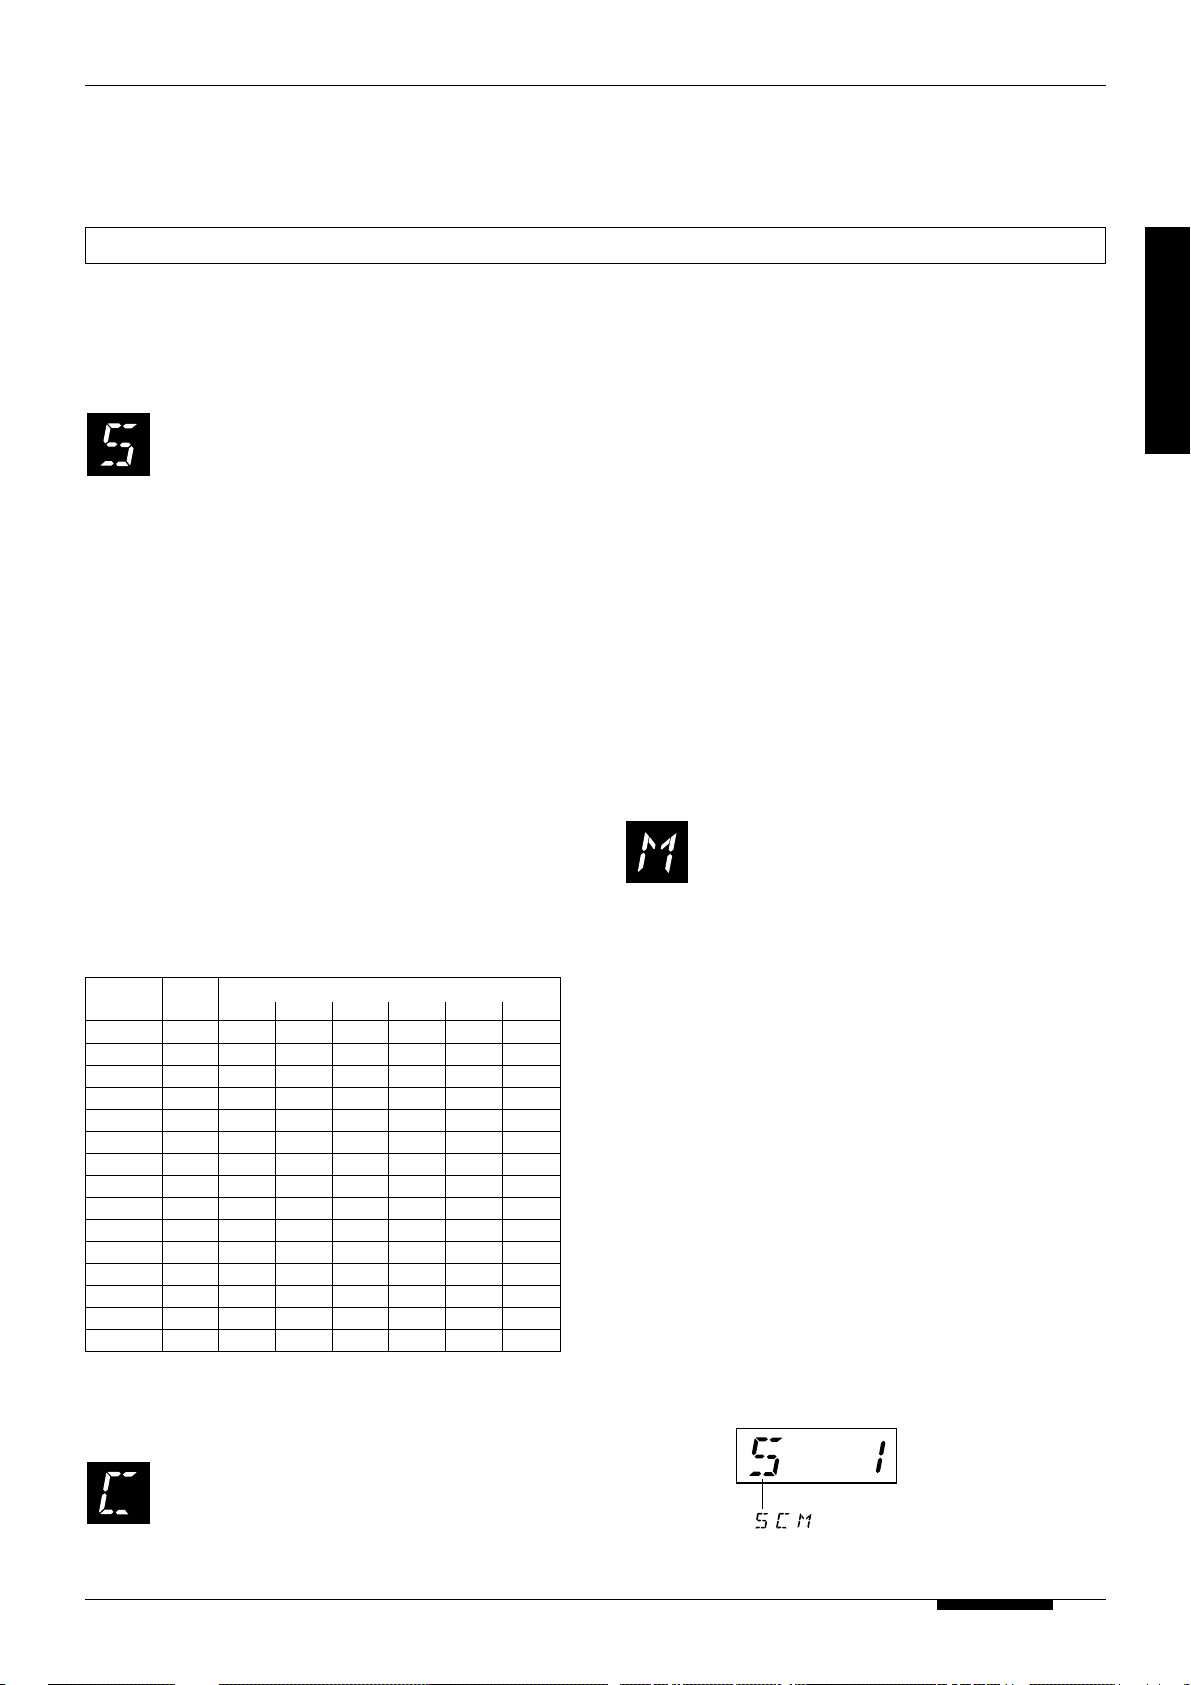
The G50 has three MIDI channel modes. Be sure to select
the right mode for the type of tone generator and setup
you are using.
Multi-channel Mode
(settings “S 1” through “S 16” on the G50
display).
In this mode the MIDI data derived from each
individual guitar string is transmitted from the G50 via a
different MIDI channel. This mode is suited for use with a
“multi-timbral” tone generator such as the Yamaha MU80 or
MU50. This mode is fully polyphonic (i.e. you can play
chords), and with a multi-timbral tone generator it is possible
to have each guitar string play a different voice.
• The MIDI receive channel is set to the “base” channel
(i.e. the channel assigned to the guitar’s 1’s string).
See the “Multi-channel Mode Settings” chart, below, for
•
the actual MIDI channel numbers assigned to each string.
• Since MIDI channel number 10 is reserved for drums
and rhythm in many multi-timbral applications,
channel 10 is not available in the Multi-channel Mode.
• If you want to connect a bass to the G50, set the
GUITAR TYPE switch on the rear panel to the
“BASS” position after turning off the power.
• When a bass is used, pick up speed may be slower
than guitar.
● Multi-channel Mode Settings
Setting HOLD
S1 7654321
S2 8765432
S3 9876543
S4 11987654
S5 121198765
S6 13 12 11 9 8 7 6
S7 14 13 12 11 9 8 7
S8 15 14 13 12 11 9 8
S9 16 15 14 13 12 11 9
S11 1 161514131211
S12 2 1 16 15 14 13 12
S13 3 2 1 16151413
S144321161514
S15543211615
S1665432116
The “HOLD” channel in the above chart is used by the G50
hold function, described on page 18.
654321
String
with tone generators or synthesizers which only allows
reception on a single MIDI channel at a time, and is the
best choice for use with a monophonic tone generator
such as the Yamaha VL1-m Version 2 (of course it can
also be used with multi-timbral tone generators). The
Single-channel Polyphonic Mode is also ideal for MIDI
recording applications (i.e. when recording the output of
the G50 to a MIDI sequencer). This mode is fully polyphonic so you can play chords, but since pitch bend data
is derived from the last note played the results of doublechoking techniques may not be exactly as expected.
Further, if you bend a note more than a semitone, the
pitch will “jump” a semitone).
• The MIDI receive channel in this mode is the same as
the transmit channel.
• The next highest channel is used by the G50 hold
function. (e.g. if “C3” is selected, channel 4 is used
for the hold function.)
Monophonic Mode
(settings “M 1” through “M 16” on the G50
display).
This mode is automaticaly selected when the
multi-pin cable is unplugged and a standard guitar cable is
plugged into the G50 MONO SYNTH jack (see page 5
for details). The data for all strings is transmitted on the
single specified MIDI channel, and only one note can be
played at a time.
• The Q: Split, T: Picking Position Control and A:
Playing Style functions have no effect in this mode.
• The MIDI receive channel in this mode is the same as
the transmit channel.
■ To Select a MIDI Mode & Channel Setting:
1. Engage the MIDI Mode
Press the [MIDI] button. The indicator above the
[MIDI] button will light.
2. Select a Mode/Setting
Use the [-1] and [+1] buttons to select the desired
MIDI mode and channel setting: “”S 1" through “S
16” (“M 1” through “M 16”) or “C 1” through “C 16”.
The “S” and “M” modes are switched automatically.
Single-channel Polyphonic Mode
(settings “C 1” through “C 16” on the G50
display).
In this mode the MIDI data derived from all
strings is transmitted from the G50 on the single specified
MIDI channel (1 through 16). This mode can be used
3. Return to the PLAY Mode
Press the [PLAY] button to return to the PLAY mode.
Setting Up
7
Page 11
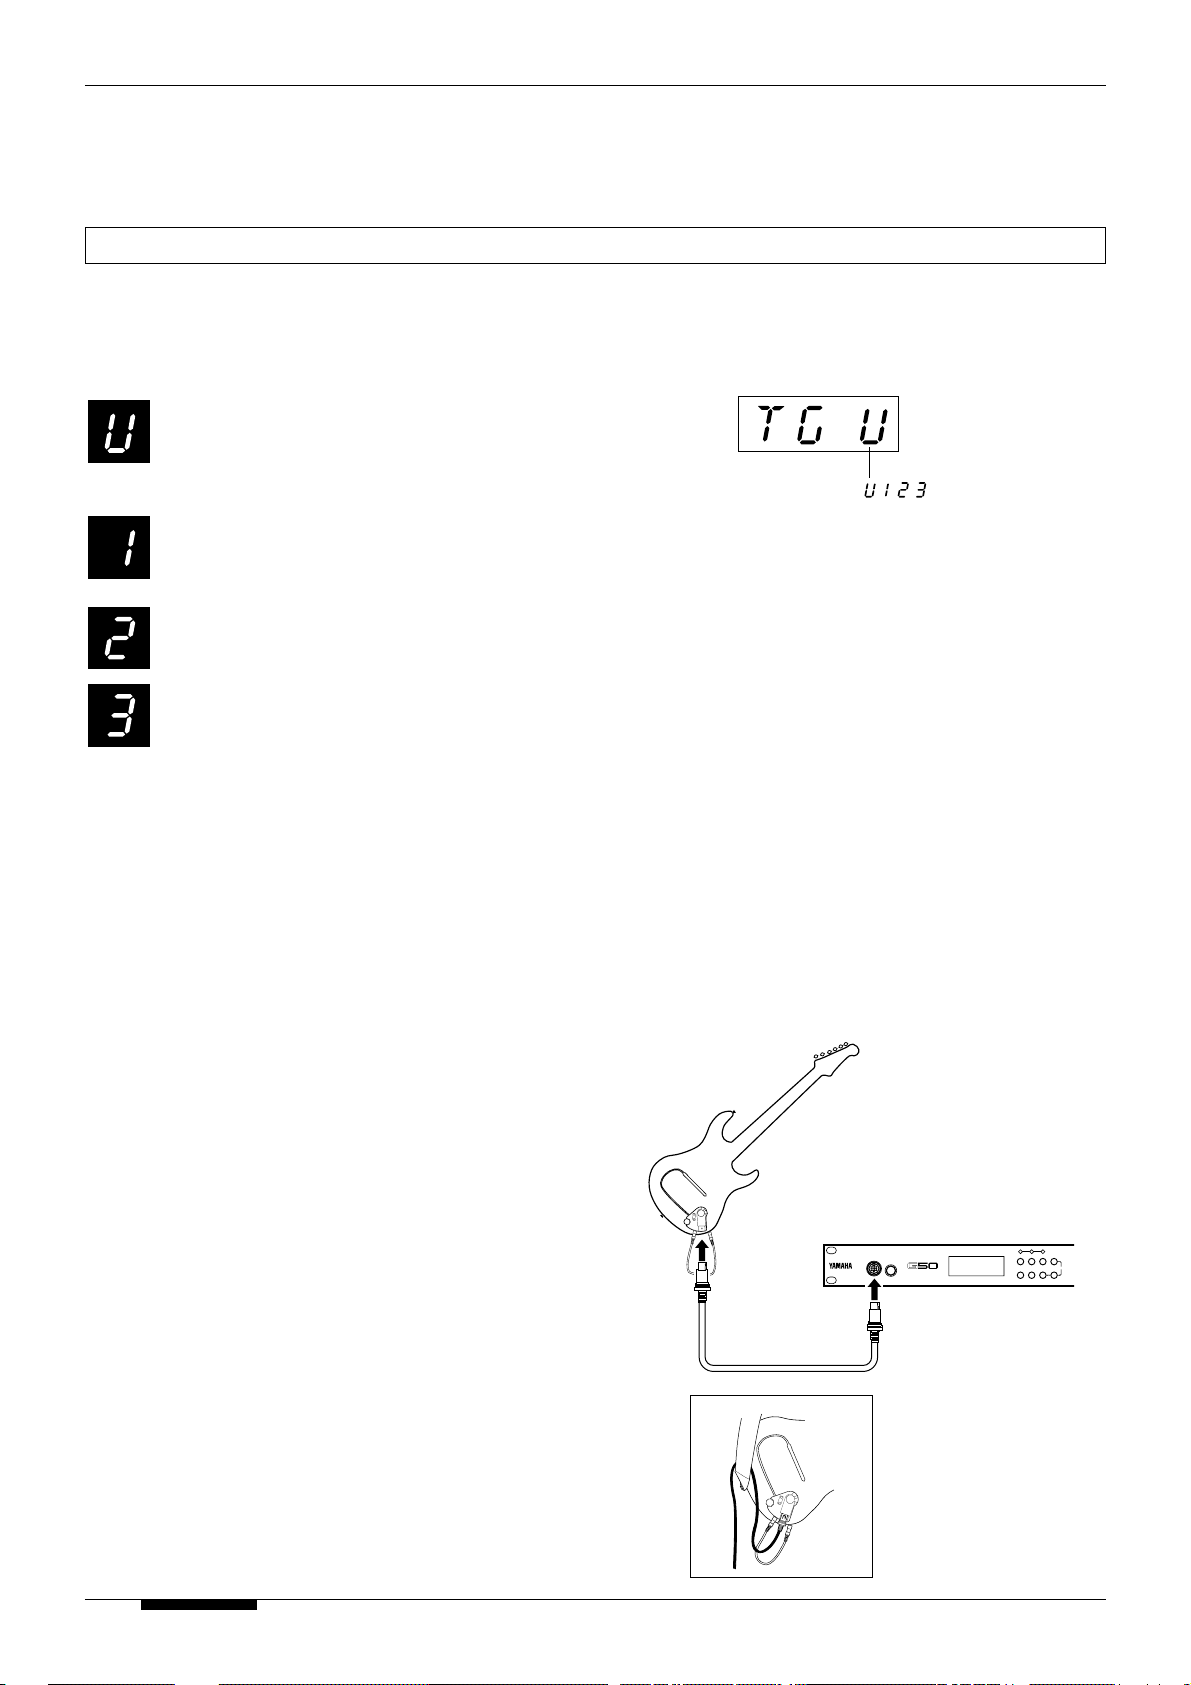
Preset Program Sets
PARAMETER MEMORY#/VALUE
,, ,
In addition to the normal “user” programs, the G50 has 3
preset program sets designed specifically for use with
certain tone generators, as follows:
This is the normal user-programmable G50
memory. The factory preset program conform to
the standard GM (General MIDI) voice assign-
ments.
The “1” preset program set contains a selection
of programs designed for use with the Yamaha
MU80 or MU50.
This set has been created for use with the
Yamaha VL70-m.
This set has been created for use with the
Yamaha VL1-m Version 2.
■ To Select a Preset Program Set:
1. Engage the Preset Selection Mode
Press the [TUNER] button while holding the [PLAY]
button. “TG” followed by the number of the currently
selected preset program set (or “U” for “user”) will
flash on the display.
2. Select a Preset
Select the desired preset program set by using the [-1]
and [+1] buttons.
3. Press [YES]
Press the [YES] button to confirm the selection. “don”
will appear briefly when the selected preset program
set has been activated. When preset “2” or “3” is
selected, pressing the [YES] button also transmits
appropriate voice data to the connected VL70-m or
VL1-m Version 2. Make sure your VL70-m or VL1-m
Version 2 is set up to allow voice data (system exclusive) reception if you want to use these voices. This
voice data will overwrite the previous data in voice
number “Cst 001 through 006 and Int 001”(VL70-m)
or “A01 through A06”(VL1-m Version 2), so be sure
any data you want to keep is backed up before selecting either of these program sets.
■
NOTES
• The user data is kept safe in a special secondary memory
while any of the other preset program sets are active, so
your edited data will be restored when you re-select the
“user” set.
Guitar/G1D Connection
Make sure that your G1D Divided Pickup Unit has been
properly installed and connected to your guitar as described in the G1D Owner’s Manual before connecting it
to the G50.
Make sure that the G50 Guitar MIDI Converter power is
OFF, then plug one end of the multi-pin cable supplied
with the G50 into the G1D multi-pin connector, and the
other end into the DIVIDED INPUT connector on the
G50.
When all connections have been properly made, turn the
G50 power switch ON: the G1D power indicator should
light indicating that it is receiving power from the G50.
■
NOTES
• For extra security and damage prevention it is a good idea
to pass the cable between the strap and guitar body near
the body strap pin.
• The multi-pin cable plug release button must be pressed
when unplugging the multi-pin cable from the G50 or G1D.
Multi-pin cable
G50
GUITAR MIDI
CONVERTER
DIVIDED
WRITE
Setting Up
8
Page 12

PARAMETER MEMORY#/VALUE
Input Level Adjustment
Before actually playing your MIDI guitar it might be a
good idea to adjust the G50 input gain for each string.
This will ensure optimum sensitivity so that picking
nuances will not be lost, while at the same time avoiding
wrong pitch detection.
You may have to re-adjust the input levels if you change
the string height on your guitar, or switch to a different
type of strings.
■
NOTES
• The normal guitar sound received via either the G1D or
MONO SYNTH JACK is not affected by the input level
settings.
1. Engage the Input Level Adjustment Mode
Press the [INPUT LEVEL] button. The indicator above
the [INPUT LEVEL] button will light.
2. Play a Single String
Play a single string on the guitar at the loudest level you
will actually be playing it. The number of the string
played will appear on the left side of the display (“1” for
the high E string through “6” for the low E string) and a
number corresponding to the detected level will appear on
the right of the display while the string is being played.
The level values range from “1” (minimum) to “100”
(maximum).
3. Adjust the Input Gain
When the string stops playing, or when the [-1] or [+1]
button is pressed, the current input gain setting for that
string will appear in place of the detected peak input gain.
The gain setting is preceded by a “G”, and ranges from
“G1” (minimum gain) through “G50” (maximum gain). If
necessary adjust the input gain via the [-1] and [+1]
buttons until the optimum input gain is achieved.
Input gain
4. Repeat for All Strings
Repeat steps 2 and 3 for all strings, then check the
balance between the strings and re-adjust if necessary.
■
NOTES
• If you are using an MU-80 or MU-50 sound module, the
multiple level meters on its display can be used as a handly
level guide (set the “Velocity” parameter to “Wide” see
page 14)
5. Return to the PLAY Mode
Press the [PLAY] button to return to the PLAY mode
when the input gain for all six strings has been properly
adjusted.
PARAMETER MEMORY#/VALUE
String number Input level value
The ideal input level setting should produce an “oLd”
display only on the slightly louder notes.
When if the sound can be heard as double notes, you have
to readjust the input level to lower.
■
NOTES
• No string number will appear when the G50 is being used in
the monophonic mode, and any gain settings made (as
described in the next step) will apply to all strings.
• The [
▲
] and[▼] buttons can be used to select different
string numbers when there is no input from the guitar.
Input Gain Adjustment
9
Page 13

Tuning
The G50’s built-in tuner makes it easy to precisely tune
your guitar — even in a noisy environment.
1. Engage the Tuner Mode
Press the [TUNER] button. The red indicator above the
[TUNER] button will light and the current base tuning
pitch will appear on the display: normally “A 440”.
Although standard “concert pitch” is A = 440 Hz, the base
pitch can be set anywhere from 440 to 445 hertz in 1hertz steps at this point by using the [-1] and [+1] buttons.
PARAMETER MEMORY#/VALUE
■
NOTES
• Tuning pitch is remained in the memory even if power is
turned off. Tuning data is transmitted via the MIDI OUT
terminal when power is turned on or the Tuning pitch is
changed.
2. Play a Single String
Play the first string you want to tune. The closest note to
the current pitch of the string played will appear on the
display: “A” through “G#” (a “#” is indicated by the
small “
” to the upper right of the note name). When the
detected pitch is close to that of the standard tuning for
the guitar string, the string number will also appear on the
left of the display: e.g. “5 A” for the 5th string on a
guitar, normally tuned to “A”.
3. Tune the String
Tune the string while watching the display and the three
indicators above the [TUNER] button (the latter indicate
precise tuning in the TUNER mode). Tune so that the
current sting number and note name appears on the
display, and so that all three indicators above the
[TUNER] button light simultaneously.
— —
— —
— —
— —
No input.
Flat (pitch too low).
Sharp (pitch too high).
Perfect tuning (within ± 3 cents).
4. Repeat for All Strings
Repeat steps 2 and 3 for all strings.
5. Return to the PLAY Mode
Press the [PLAY] button to return to the PLAY mode
when all six strings have been precisely tuned.
MEMORY#/VALUEPARAMETER MEMORY#/VALUE
G#NoteString number
■
NOTES
• The string numbers for guitar are: 6E, 5A, 4d, 3G, 2b, and
1E.
• The string numbers for bass are: 6B, 5E, 4A, 3D, 2G, and 1c.
The “extra” string numbers (6B and 1c) apply to 5-string and
6-string basses.
Tuning
10
Page 14

Play Mode
Any of the G50’s 128 “programs” can be selected and
played in the PLAY mode. Each program includes a range
of settings which determine, for example, how the G50
responds to notes you play on the guitar, which voice is
selected on your tone generator, split modes, and more.
The actual settings for each program can be individually
edited by you via the EDIT mode, described in the
following section.
If you want to start playing right away, before editing any
of the programs, you will be using the default settings
(listed with each parameter in the “Edit Mode” section,
Selecting Programs & Playing In the PLAY Mode
1. Check Your G1D Settings
Make sure your guitar’s volume control and the G1D
volume control are set appropriately (the G1D volume
control affects only the synthesized sound), and that the
G1D GUITAR/MIX/SYNTH selector is set to the desired
position:
GUITAR
MIX
SYNTH
G1D
● GUITAR
Only the direct guitar sound will be sent to the G50 (i.e. no
synthesizer sound will be produced).
● MIX
Both the direct guitar sound and individual-string synthesizer output are sent to the G50.
● SYNTH
Only the individual-string synthesizer output is sent to the
G50 (no direct guitar sound will be heard).
Refer to your G1D Owner’s Manual for details.
2. Make sure the PLAY Mode is Engaged
The PLAY mode is automatically selected whenever the
G50 power is turned on. If another mode is currently
engaged, press the [PLAY] button to return to the PLAY
mode. The number of the last program selected will
appear on the display.
beginning on page 22). With the default settings each G50
program selects the correspondingly numbered voice on
the tone generator. The default settings are designed to
provide basic playability with most tone generators, but
they may not be ideal for your particular system. You may
have to do a little editing to get the best sound and
response. You will definitely have to read the “Edit
Mode” section and do a little editing if you want to use
many of the G50’s advanced features … such as string or
position based voice splitting.
3. Select a Program
You can select any of the G50’s 128 programs via either
the G50 [-1] and [+1] buttons or the [DOWN] and [UP]
buttons on the G1D Divided Pickup Unit. Press either
button briefly to select the next program number in the
corresponding direction ([+1] or [UP] to increment; [-1]
or [DOWN] to decrement), or hold either button for
continuous scrolling in the corresponding direction. When
using the G50 panel buttons it is also possible to skip in
tens (e.g. “010” → “020” → “030” → etc. or the reverse)
by pressing the opposite button while holding the button
corresponding to the direction in which you want to
increment/decrement.
■
NOTES
• The G1D [UP] and [DOWN] buttons can also be set to
directly transmit MIDI program change numbers, or shift
pitch up or down in octave steps. See “G1D [UP]/[DOWN]
Button Functions”, below.
4. Play
Assuming that everything is set up properly you should
now be able to play the selected program and voice. Try
selecting and playing different voices to get a feel for
how they respond when played via the G50.
■
NOTES
• The LED indicator above the [INPUT] button acts as an input
indicator in the PLAY mode, flashing whenever a signal is
detected from any of the guitar’s strings.
Play Mode
11
Page 15

G1D [UP]/[DOWN] Button Modes
As described above, the G1D [DOWN] and [UP] buttons
normally function in the same way as the G50 panel [-1]
and [+1] buttons. This, however, is actually just one of
three possible G1D [UP]/[DOWN] button modes.
Memory/Value Mode (“dE”)
The normal G1D [UP]/[DOWN] button
mode in which the [DOWN] and [UP]
buttons function in the same way as the G50
panel [-1] and [+1] buttons.
Program Change Mode (“PG”)
In this mode the G1D [DOWN] and [UP]
buttons cause the G50 to transmit a program
change number to the connected tone
generator, without actually changing the G50 program.
The [DOWN] and [UP] buttons decrement and increment
the program change number, respectively. In this mode
the number shown on the G50 display is the current
program change number,
not the number of the selected
G50 program (the G50 program does not change).
Octave Shift Mode (“oc”)
In this mode the G1D [DOWN] and [UP]
buttons shift the pitch of the synthesized
sound down or up in octave steps by a
maximum of two octaves. When this mode is selected the
G50 display shows the current octave: “-2oc” (down two
octaves), “-1oc” (down one octave), “0oc” (no octave
shift), “1oc” (up one octave), and “2oc” (up two octaves).
• The Octave Shift mode display is not affected by the
setting of the “F: Transpose” parameter .
To change the G1D [UP]/[DOWN] button mode first
make sure the G50 is in the PLAY mode, then use the
G50 panel [-1] and [+1] buttons to select the desired
mode while simultaneously holding the G1D [DOWN]
and [UP] buttons: “dE” for the Memory/Value mode,
“PG” for the Program Change mode, or “oc” for the
Octave Shift mode. The abbreviation for the current mode
appears on the G50 display when the G1D [DOWN] and
[UP] buttons are pressed simultaneously.
In the “PLAY” mode
G1D G50
UP
DOWN
MEMORY# / VALUE
–1+1
±10
Playing In the Monophonic Mode
If you do not have a G1D Divided Pickup Unit installed
on your guitar, it is still possible to use the G50 in the
monophonic mode, although some features will not be
available.
G50
GUITAR MIDI
12
CONVERTER
MONO SYNTH
Standard guitar cable
Play Mode
WRITE
To use the monophonic mode, unplug the multi-pin cable
from the G50 DIVIDED input, and connect a standard
guitar cable from your guitar’s output jack to the G50
MONO SYNTH input jack.
■ The limitations that apply in the monophonic mode
are as follows:
• Only one note can be played at a time.
• Input gain settings cannot be made for each individual
strings — only all strings at once.
• No string number appears on the display when the
TUNER function is used.
• Neither of the split functions or picking position
parameters are available.
All other operations are the same as described elsewhere
in this owner’s manual.
Page 16

Edit Mode
PARAMETER
The EDIT mode lets you set up each of the G50’s programs for the response and playing features you require.
The EDIT mode includes 25 parameters, each identified
by a letter of the alphabet from “A” to “Y”. The parameters are divided into three groups according to function:
• Guitar Setup (parameters “A” through “G”)
• External TG Setup (parameters “H” through “P”)
• Realtime Control (parameters “Q” through “Y”)
The parameters are accessed and edited as follows:
■ Edit and Write Operation
1. Select a Parameter.
From the PLAY mode, use the [▲] and [▼] buttons to
engage the EDIT mode and select the desired parameter.
The letter corresponding to the currently selected parameter appears on the left side of the display while the
parameter’s current value/setting appears on the right side
of the display. Press either button briefly to select the next
parameter in the corresponding direction ([▼] to select
the next parameter toward “Y”, or [▲] to select the next
parameter toward “A”), or hold either button for continuous scrolling in the corresponding direction.
PARAMETER MEMORY#/VALUE
2. At this point you can choose to save the edited data
to a different program number by using the [-1] and
[+1] buttons to select the destination program
number.
3. Finally, press the [▼] (“YES”) button again to actually
store the data in the specified program number. Press
[ ▲] (“NO”) if you want to cancel the save operation
at this point. If you choose to save, “don” (this stands
for “done”) will appear on the display briefly when
the data has been saved, then the G50 will return to
the PLAY mode with the destination program number
selected.
■
NOTES
• Since you can save program data to a different program
number using the above procedure, you can also copy the
data from one program number to another location where
it can then be edited as required.
■ The Memory Swap Function
In addition to the memory save function described above,
the G50 also has a “Memory Swap” function which
makes it possible to swap the contents of the current
program with any other specified program.
1. Engage the Memory Swap Function
Press the [-1] button while holding the [PLAY] button.
The current program number will flash and a small “s”
will appear on the left side of the display.
SettingParameter letter
2. Edit the Parameter as Required
After selecting the desired parameter, use the [-1] and
[+1] buttons to set the parameter to the required value.
Continue selecting parameters and editing until the entire
program is set up the way you want it
3. Return to the PLAY Mode
Press the [PLAY] button to return to the PLAY mode.
4. Write (save) the Edited Program
Once you have edited a program and returned to the
PLAY mode, the program must saved to memory if you
want to keep the edited
before you select a different
program. If you select a different program without saving
the edited data, the edited data will be lost and the
previous version of that program will be restored. The
save procedure is as follows:
1. To save the edited program, first press the [+1] button
while holding the [PLAY] button. The current program
number will flash. If at least one parameter in the
program has been edited, a small “e” will appear on
the left side of the display.
2. Specify the Program to Swap With
Use the [-1] and [+1] buttons to select the number of the
program you want to swap the current program with.
3. Swap the Programs
Press the [▼] (“YES”) button to swap the data in the
current and specified program number. Press [▲] (“NO”)
if you want to cancel the swap operation at this point. If
you choose to swap, “don” (this stands for “done”) will
appear on the display briefly when the data has been
saved, then the G50 will return to the PLAY mode.
PARAMETER
Edit Mode
13
Page 17

Guitar Setup
The “Guitar Setup” parameters (“A” through “G”) determine how the G50 responds to what you play on the
guitar. These settings are important for achieving optimum response with your own instrument and playing
style.
A: Playing Style
Settings: Pic, Fin (or Pic, SLP for bass), ---
Set according to the playing style you intend to use: “Pic”
for normal pick-style playing, or “Fin” for finger-picking
guitar styles. When using a bass pickup you can select
either “Pic” for normal pick-style or finger-style playing,
or “SLP” for slap styles. You may have to experiment
with different settings to achieve optimum sensitivity,
depending on the type of guitar you use.
If the G50 is being used in the monophonic mode, “---”
appears on the display and this parameter is not available.
B: Note On Level
Settings: 1 … 10
Sets the note-on trigger level of the G50 — i.e. how loud
a note must be played on the guitar before it triggers the
corresponding note on the G50. The range is from 1 to
10, with lower values corresponding to lower trigger
levels (i.e. higher sensitivity). In other words, low values
allow softer notes played on the guitar to trigger the G50.
If the setting is too low, however, the G50 may be triggered by noise from the guitar. The ideal setting will
depend on your guitar’s pickup, noise levels, and the G50
input level settings. It may be necessary to readjust the
Note On Level setting if you change the G50 input level
settings.
● Input Signal ● Recognized signal
Note on
level
Note off
level
no sound
note on
note off
C: Note Off Level
Settings: 1 … 10
Sets the note-off level of the G50 — i.e. the level at
which a triggered note stops playing as the guitar note
decays. The range is from 1 to 10, with lower values
corresponding to lower note-off levels. Set this parameter
carefully to match your instrument and playing style: if
set at too high a value, notes may cut off unnaturally,
while too low a setting may result in notes playing
continuously. The ideal setting will depend on your
guitar’s pickup, noise levels, and the G50 input level
settings. It may be necessary to readjust the Note Off
Level setting if you change the G50 input level settings.
D: Velocity
Settings: Nar, Nor, uui, 1 … 127
Specifies the dynamic range of notes produced by the
G50 — i.e. the range from the softest to loudest notes
produced.
• “Nar” sets a narrow dynamic range.
• “Nor” is the normal setting, setting the normal dynamic range.
• “uui” (this represents “w”) produces the widest
dynamic range.
A value between “1” and “127” produces fixed velocity
(volume) at the specified velocity value. The higher the
value, the louder the notes.
E: Chromatic
Settings: off, on, Au
The G50 converts slides and string bends to the corresponding MIDI pitch bend data which is then transmitted
to the connected tone generator. This parameter determines whether the bend data is transmitted at full resolution (smooth bends), or in chromatic semitone steps for
glissando type effects.
When “off” pitch bend data is transmitted at full resolution over the range specified by the Pitch Bend Range
parameter (parameter “G”, below).
When “on” pitch bend data is transmitted in chromatic
semitone steps.
When “Au” is selected the “on” and “off” modes are
switched automatically according to whether a chord
(chromatic “on”) or single-note line (chromatic “off”) is
being played.
Chromatic: on
(chromatic semitone steps)
4 semitones
3 semitones
2 semitones
1 semitone
Glissando range
F: Transpose
Settings: -24 … 0 … 24
Transposes the pitch of notes played up or down in
semitone steps over a ±2-octave range. The range is from
“-24” (down 2 octaves) through “0” (no transposition) to
“24” (up 2 octaves).
Edit Mode
14
Page 18

G: Pitch Bend Range
Settings: 0 … 24
Sets the maximum range of pitch bend data generated by
the G50. The minimum setting of “0” produces no pitch
bend data, while the maximum setting of “24” allows the
G50 to produce pitch bend data over a 2-octave range.
Each step corresponds to a semitone: a setting of “4”
produces a pitch bend range corresponding to an interval
of a third, a setting of “7” produces a pitch bend range
corresponding to an interval of a fifth, etc. When set to
Tone Generator Setup
“0”, bending a string or using the whammy bar will
produce sudden semitone jumps when the pitch of the
string(s) reaches that of the next note. A setting of “1” is
similar to “0”, but allows a small bend range which is
suitable for vibrato.
■
NOTES
• Whenever this setting is changed the selected pitch bend
range setting is transmitted via MIDI OUT.
• If your tone generator does not recognize MIDI pitch bend
range messages, set the tone generator’s own pitch bend
range parameter as required.
The “Tone Generator Setup” parameters specify a range
of MIDI messages to be transmitted when the current G50
program is selected: e.g. which tone generator voice is
selected, as well as any MIDI volume, pan, or controller
settings you might want to transmit for the selected voice.
The corresponding MIDI sessage is also transmitted when
any of these parameters are edited.
H: Program Number
Settings: off, 1 … 128
Specifies the MIDI program number to be transmitted
when the current G50 program is selected. If, for example, you want the current G50 program to select, say,
voice (or “patch”) number 57 on your synthesizer/tone
generator, set this parameter to “57”.
Turn this parameter “off” if you don’t want any MIDI
data to be transmitted by the current G50 program. The
“off” setting also makes it possible to automatically
switch between the direct guitar sound and the mixed
guitar/synthesized sound when using one of the split
functions described in the “Real Time Control” section,
below (i.e. turn the “H: Program Number” parameter
“off” for one of the programs used in the split setup, so
that only the direct guitar sound is produced by that
program).
(Least Significant Byte). Both the Program Bank MSB
and LSB can be set from “0” to “127”, or turned “off” if
no bank number is to be transmitted. Since the bank
number is always transmitted with a program change
number, “---” appears on the display and the Program
Bank MSB/LSB parameters are not available when the H:
Program Number parameter is turned “off”.
K: Volume
Settings: off, 0 … 127
Sets the Master Volume level of the receiving tone
generator. This parameter is an ideal way to individually
set the volume level of each voice selected by the G50 for
optimum “balance” in your application: e.g. so that there
are no unnatural volume changes when switching between
voices, or so that the volume of the selected voice is just
right for the backing with which it will be used, etc. The
“K: Volume” parameter also specifies the maximum
volume setting which can be received from the G1D
Divided Pickup volume control or an external MIDI
controller such as the Yamaha MFC10 MIDI Foot Controller.
The Volume range is from “0” (minimum volume) to
“127” (maximum volume). This parameter can also be
turned “off” if you want no volume data to be transmitted.
I: Bank MSB
Settings: off, 0 … 127, ---
J: Bank LSB
Settings: off, 0 … 127, ---
These two parameters set the program change bank
number for tone generators which have more than 128
voices with bank selection. The bank number is made up
of two parts: a MSB (Most Significant Byte) and an LSB
L: Pan
Settings: off, L15 … C … R15
Sends a MIDI panpot message which sets the stereo pan
position of the corresponding tone generator voice. The
range is from “L15” (full left) through “C” (center) to
“R15” (full right). No panpot data is transmitted when
this parameter is turned “off” (although a “center” panpot
message is sent the instant that this parameter is actually
set to “off”).
Edit Mode
15
Page 19

M: Assignable Control Number 1
Settings: off, 1 … 31, 33 … 120, AF
N: Assignable Control Value 1
Settings: 0 … 127, ---
O: Assignable Control Number 2
Settings: off, 1 … 31, 33 … 120, AF
P: Assignable Control Value 2
Settings: 0 … 127, ---
These parameters specify one or two MIDI control change
numbers with corresponding values to be transmitted
when the current G50 program is selected. MIDI control
change numbers generally correspond to “controller”
functions such as modulation, sustain pedal, expression,
breath control, etc. Some of the control numbers are
already assigned according to the MIDI specifications
(refer to the owner’s manual of the receiving devices for
details on “MIDI Control Change Numbers”), but many
are unassigned and can sometimes be assigned to voice or
effect parameters via the synthesizer or tone generator.
The Assignable Control Number 1 and 2 parameters (“M”
and “O”) specify the control number(s) to be transmitted.
The range is from “1” through “31”, “33” through “120”,
or “AF” for After Touch. The Assignable Control Value 1
and 2 parameters (“N” and “P”) specify the control
change value to be sent with the corresponding control
change number: “N: Assignable Control Value 1” specifies the control change value for “M: Assignable Control
Number 1”, and “P: Assignable Control Value 2” specifies
the control change value for “O: Assignable Control
Number 2”. The control value range is from “0” to “127”.
“---” will appear on the display and the parameter will be
unavailable if the corresponding Assignable Control
Number parameter is turned “off”.
Real Time Control
The “Real Time Control” group includes a range of
parameters that enable and define the operation of several
advanced real-time performance features.
Q: Split
Settings: off, Sr1 … Sr5, P1 … P10
The G50 has two “split” modes which allow two different
programs to be played at the same time.
● String Split
In this mode the two programs are played on different
groups of strings. For example, you could play acoustic bass
on the two lowest strings (5 and 6) while playing organ on
the remaining four strings (1 through 4).
• The String Split settings are “Sr1” through “Sr5”. The
number represents the string at which the split occurs. With
the “Sr1” setting, the split occurs between the 1st string
(high E) and the lower 5 strings (2 through 6). With the
“Sr5” setting the split occurs between strings 1 through 5
and string 6. Intermediate settings produce a split between
the corresponding string groups.
● Picking Position Split
In the Picking Position Split mode the split is “horizontal”
rather than “vertical” as in the String Split mode. In other
words, one program is played on the neck side of a certain
point on the string, while the second program is played on
the bridge side of the “split” position. The appropriate
program change number is transmitted whenever the split
point is crossed.
• The Picking Position Split settings are “P1” through
“P10”. Lower values move the split position toward the
bridge and higher settings move the split position toward
the neck. Experiment with the settings to find the ideal split
position.
In the split modes the first program is the currently
selected program. The second program is specified by the
“R: Split Memory 2 Number” parameter, below.
No split occurs when this parameter is set to “off”.
If the G50 is being used in the monophonic mode, “---”
appears on the display and this parameter is not available.
Also, the “P1” through “P10” settings are not available
when the “A: Playing Style” parameter is set to “Fin” for
guitar or “SLP” for bass (“---” will appear on the display).
R: Split Memory 2 Number
Settings: 1 … 128, ---
This parameter specifies the second program to played in
the String Split or Picking Position Split mode (see “Q:
Split”, above). The “S: Memory Location” parameter,
below, determines which side of the “split” the second
program is assigned to.
The settings are “1” through “128”, corresponding to the
desired second program number. When the “Q: Split”
parameter is set to “off” (i.e. no split mode is selected),
“---” appears on the display and this parameter is not
available.
Edit Mode
16
Page 20

S: Memory Location
Settings: Lo, Hi, ---
This parameter determines whether the second split-mode
program (specified by the “R: Split Memory 2 Number”
parameter, above) is played on the lower or upper string
group when the String Split mode is selected, or on the
neck or bridge side of the split position when the Picking
Position Split mode is selected.
When set to “Lo”, the second program is played on the
lower-pitched string group in the String Split mode, or on
the nut side of the split position in the Picking Position
Split mode.
When set to “Hi”, the second program is played on the
higher-pitched string group in the String Split mode, or on
the bridge side of the split position in the Picking Position
Split mode.
When the “Q: Split” parameter is set to “off” (i.e. no split
mode is selected), “---” appears on the display and this
parameter is not available.
● String split
change value to be sent: “U: Picking Front Position
Value” specifies the control change value for the nut side
of the split position”, and “V: Picking Rear Position
Value” specifies the control change value for the bridge
side of the split position. The control value range is from
“0” to “127”. “---” will appear on the display and the
parameter will be unavailable if the “T: Picking Position
Control” parameter is turned “off”.
(front) (rear)
127
control data
0
position
current
split position
memory 2
● Picking position split
currentmemory 2
split position
T: Picking Position Control
Settings: off, 1 … 31, 33 … 120, AF, ---
U: Picking Front Position Value
Settings: 0 … 127, ---
V: Picking Rear Position Value
Settings: 0 … 127, ---
The “T: Picking Position Control” parameter specifies the
control change number to be transmitted when the guitar
is played. The range is from “1” through “31”, “33”
through “120”, or “AF” for After Touch. No picking
position control change message will be transmitted when
this parameter is turned “off”.
The “U: Picking Front Position Value” and “V: Picking
Rear Position Value” parameters specify the control
W: Touch Control
Settings: off, 1 … 31, 33 … 120, AF
X: Sensitivity
Settings: -7 … 0 … 7, ---
The G50 is capable of detecting the amplitude envelope
of the guitar output and converting this to MIDI control
change data which can be used to produce interesting
variations in the synthesized sound. You could, for
example, have the guitar envelope control a filter cutoff
frequency to create a “sweep” effect.
The “W: Touch Control” parameter specifies the control
change message to be transmitted in correspondence with
the guitar envelope. The range is from “1” through “31”,
“33” through “120”, or “AF” for After Touch. No touch
control change message will be transmitted when this
parameter is turned “off”.
The “X: Sensitivity” parameter sets the G50’s sensitivity
to the guitar envelope. Higher positive values increase the
sensitivity, and thefore the “range” of the converted
control change data. Negative values produce a corresponding inverted envelope. If the “W: Touch Control”
parameter is turned “off”, “---” appears on the display and
this parameter is not available.
Edit Mode
17
Page 21

transmits the
control data
note-on note-off
127
● Settings
0 - 7
0
0 is the actual envelope
127
● Settings
"-1" through
"-7"
■
NOTES
• When using either “T: Picking Position Control” or “W:
Touch Control” to control a MIDI NRPN function, set the
appropriate NRPN MSB and LSB via the Assignable Control
Number 1 and 2 parameters (page 16) then set the data
entry MSB via the “T: Picking Position Control” or “W: Touch
Control” parameter.
0
-1
Selecting a number between 1 and 128 engages the
HOLD 1 or HOLD 2 mode. The hold modes can be
switched by turning the G50 power ON while pressing the
footswitch. When this is done the current hold mode type
will appear on the display briefly before the normal
PLAY mode display: “HLd1” for the HOLD 1 mode, or
“HLd2” for the HOLD 2 mode.
● HLd1
The HOLD 1 mode: the parameter value (1 … 128) corresponds to a G50 program number. If the pedal is pressed
while a note is played, the note is held and the G50
switches to the program number specified by the SUSTAIN/
HOLD parameter value. New notes played while the pedal is
pressed are played via the hold program. All sound is muted
when the pedal is released.
● HLd2
The HOLD 2 mode: the pedal toggles between the current
G50 program and the program specified by the SUSTAIN/
HOLD parameter value. “HLd” appears on the display while
the hold program is selected.
■ NOTES
• The HOLD function uses one MIDI channel, as listed in the
“Multi-channel Mode Settings” chart on page 7.
• Choose a non-decaying voice (such as ORGAN) when using
the SUS1, SUS2, or HLD1 function.
• MIDI sustain ON/OFF data can be received while the
sustain or hold function is active.
Y: Sustain/Hold Pedal
Settings: SU1, SU2, 1 … 128
An optional Yamaha FC4 or FC5 footswitch can be
connected to the rear-panel SUSTAIN/HOLD jack for
sustain or hold function control, as described below.
When either the “SU1” or “SU2” is selected, the
footswitch functions as a sustain pedal.
● SU1
The SUSTAIN 1 mode: the pedal functions like the sustain
pedal on a piano, sustaining notes played until the pedal is
released. In this mode new notes can be played while the
pedal is held.
● SU2
The SUSTAIN 2 mode: played notes are sustained while the
pedal is held, and pitch bend/vibrato data will be recognized. Subsequent notes played on the same string will not
be recognized while the pedal is held. Other strings are
processed in the normal way. Long tones can be played with
string bends or vibrato without the need for additional
note-on data.
Edit Mode
18
Page 22

MIDI Bulk Dump Transmission & Reception
Editing all 128 of the G50’s programs can involve a fair
amount of time and effort. The MIDI Bulk Dump feature
makes it possible to save single programs or all programs
to an external MIDI data recorder such as the Yamaha
MDF2 or a sequencer with MIDI data recorder capability.
Another use for this feature is to create different sets of
programs for different applications. You can create a
library of G50 programs to cover all your needs.
■ MIDI Bulk Dump Transmission
1. Press [MIDI] While Holding [PLAY]
To transmit the program data from the G50 to an external
device, first press the [MIDI] button while holding the
[PLAY] button. A small “b” will appear to the left of the
program number, and the entire display will flash.
PARAMETER MEMORY#/VALUE
–
,
2. Specify a Program Number or “ALL”
Use the [-1] and [+1] buttons to select a single program to
transmit (“1” through “128”), or select “ALL” to transmit
all 128 programs.
■ MIDI Bulk Dump Reception
Program data can be reloaded from an external storage
device while the G50 is in the PLAY mode. The data is
loaded automatically when received from the external
storage device.
A single program will be loaded into the currently
selected G50 program number, replacing the previous
program. If all programs are received, all 128 of the
G50’s programs will be replaced.
“rEc” will appear on the G50 display during MIDI bulk
dump reception, then “don” will appear when the data has
been successfully received. If an error is encountered
during reception, “MErr” will appear on the display and
the receive operaytion will be aborted. The “don” or
“MErr” message will disappear when any mode button is
pressed.
3. Transmit the Data
Press the [▼] (“YES”) button to begin the actual bulk
dump transmission, or [▲] (“NO”) to cancel. If you start
the transmission, “Snd” will appear on the display while
the data is being transmitted, then “don” will appear
briefly when the transmission is done.
Edit Mode
19
Page 23

Initialize
The Initialize operation resets all of the G50’s internal
settings to their original factory settings. By initializing
the G50, the Preset Program Memory U (User) type is
reset to the factory settings. The tuning pitch is reset to
440.
■
CAUTION
• All Program Data will be erased (overwrite) if the initialize
operation is carried out. All important data should be saved
to an external MIDI device with the MIDI Bulk Dump
operation.
1. While holding both the [PLAY] and [+1] buttons,
switch the [POWER] ON.
Continue to hold both buttons until “FAC” appears in
the display.
PLAY
# / VALUE
±10
WRITE
+1
POWER
ON/
OFF
2. Press the [▼] (“YES”) button to execute the initial-
ize operation.
“ini” will appear in the display after the operation is
finished, and the G50 will return to the play mode.
Memory number “001” will be automatically selected.
To cancel the initialize operation, press the [PLAY]
button. The operation will be aborted and the G50 will
return to the play mode.
PARAMETER MEMORY#/VALUE
■ Specifications
● Main Functions
Memory: 128
Guitar Setup
Playing Style, Note On Level, Note Off Level, Velocity,
Chromatic, Transpose, Pitch Bend Range
External Tone Generator Setup
Program Number, Program Bank MSB, LSB, Volume, Pan,
Assignable Control Number 1, 2, Assignable Control Value 1,
2
Real-time Control
Split, Split Memory 2 Number, Memory Location, Picking
Position Control, Picking Front Position Value, Picking Rear
Position Value, Touch Control, Sensitivity, Sustain/Hold Pedal
System Setup
Input Gain, MIDI Channel
Other
G1D Up/Down Button Function Settings (Data Entry,
Program Number, Octave Shift) Chromatic Tuner (Tuning
Pitch) Memory Save (Write), Memory Swap, Preset Program
Type (User, MU80/MU50, VL70-m, VL 1-m Version 2), MIDI
Bulk Receive and Transmit
● Operation
Single digit union jack LED, 3 digit 7 segment LED, Mode
LED (Green x2, Red x1), Panel Switch x8, Power Switch,
Guitar/Bass Selector Switch
● Connections
DIVIDED Input Jack, MONO SYNTH Input Jack, GUITAR
DIRECT OUT Jack, MIDI IN/OUT Jack, SUSTAIN/HOLD Jack
(Footswitch: sold separately), DC-IN Jack
● Power Supply
PA-3B AC adaptor (or another Yamaha -recomended
adaptor)
● Accessory
13 Pin Cable: 7 m
● Dimensions (W x D x H)
482.6 x 201.8 x 44.0 mm (19" x 8" x 1-3/4")
● Weight
2.2 kg (4 lbs., 14 oz.)
* Specifications subject to change without notice.
Initialize
20
Page 24

Troubleshooting
If you think there is a problem with your G 50, first check
the information below for a possible solution. If that does
not solve the problem, contact the nearest Yamaha dealer
or the music store where you purchased the G 50.
The instrument (guitar) produces no sound.
• Is everything properly connected? (see page 6)
• Is the AC adaptor properly connected?
The synth produces no sound.
• Is the G1D VOL (Volume) properly adjusted?
• Is the tone generator or sound system’s volume
properly adjusted?
• Is the K: Volume setting set to 0? (see page 15)
Can not hear the guitar’s normal sound.
• Is the guitar’s volume properly adjusted?
• Is the guitar amp’s volume properly adjusted?
• Is the G1D’s normal guitar cable properly connected?
There is some noise in the sound.
• Is the G1D’s normal guitar cable properly connected?
Some strings sound yet others do not.
• Check the input gain for each string.(see page 9)
Playing softly does not produce any sound.
• Is the NOTE ON LEVEL setting too high or input
gain setting properly adjusted? (see pages 14, 9)
The sound is suddenly cut off.
• Is the NOTE OFF LEVEL setting too high? (see page
14)
Can not select the Separate Mode.
• Use the 13-pin cable that is supplied with the G1D to
connect the guitar to the unit.
Can not select the Mono Synth Mode.
• Use the MONO SYNTH jack to connect the guitar to
the unit.
• Disconnect the cable from the guitar’s DIVIDED jack.
Can not assign the parameter in the A: Playing Style, Q:
Split, or T: Picking Position Control.
• These settings are invalid in the Monophonic mode.
(see pages 14, 16, 17, 7)
The tone generator’s settings have changed.
• When Type 2 or 3 in the Preset Program Type is
selected, the appropriate bulk data is transmitted
changing the tone generator’s settings accordingly.
(see page 8)
The foot pedal function does not work as expected.
• Adjust the settings for Y: Sustain/Hold Pedal. (see
page 18)
“MErr” appears on the display.
• There is an abnormality in the internal data. The data
was replaced by initializing the unit.
“SErr” appears on the display.
• There is an abnormality in the hardware. Switch the
POWER off and take the unit to your nearest Yamaha
Dealer or the music store where you purchased it for
further evaluation or repair.
The sound does not cut off.
• Is the Note Off Level setting too low? (see page 14)
• Is the Input Gain setting too high? (see page 9)
When you use a double choking technique, only one
choke is heard.
• Is the MIDI Channel set to the Single-channel Polyphonic Mode or Monophonic Mode? (see page 7)
The pitch is not stable when playing with a choke
technique.
• Adjust the G: Pitch Bend Range. (see page 15)
“BuFL” appears on the display.
• The MIDI Buffer is full, and the receive buffer has
been cleared. Set a longer interval between transmitted
blocks on the transmitting device.
“BALo” appears on the display.
• The Back-up Battery’s power is low. Save all data to
an external MIDI device as soon as possible, and take
the unit to your nearest Yamaha Dealer or the music
store to have the back-up battery replaced.
Troubleshooting
21
Page 25

Preset Program Lists / Verzeichnisse der Preset-
■ Guitar/Bass select switch: when “GUITAR” is selected / Wenn der GUITAR TYPE-Schalter auf
• Type: U (User / Anwender / utilisateur)
• When the initialize operation is executed, the
data listed below will be loaded into the G50’s
internal memory.
• Nach einer Initialisierung werden die unten
aufgeführten Daten in den Speicher des G50
geladen.
• Lorsque l’opération d’initialisation est réalisée,
les données listées ci-dessous sont chargées dans
la mémoire interne du G50.
MEM# PGM MSB LSB Voice name Remarks
1 84 0 0 Chiff Lead
2 82 0 0 Saw Lead
3 36 0 0 Fretless
4 39 0 0 Syn Bass
5 115 0 0 Steel Drum
6 49 0 0 Strings
7 63 0 0 Syn Brass
8 91 0 0 Poly Syn Pad
9 2 0 0 Piano
10 66 0 0 Alto Sax
11 33 0 0 Aco Bass
25 0 0 Nylon Guitar *1
12 28 0 0 Clean Guitar
29 0 0 Mute Guitar *2
13 30 0 0 Overdrive
32 0 0 Guitar Harmonics *2
14 34 0 0 Finger Bass
37 0 0 Slap Bass *2
1 5 89 0 0 New Age Pad
16 83 0 0 Calliope Lead
17 86 0 0 Voice Lead
18 12 0 0 Vibes
19 100 0 0 Atmosphere
20 1 7 0 0 Draw Organ *3
*1 String Split (for finger picking)
*2 Picking Position Split
*3 Picking Position Control = Modulation
*1 Saiten-Split (zum Zupfen)
*2 Positions-Split
*3 PICKING CONTROL = Modulation
*1 Partage de corde (pour pincement avec les doigts)
*2 Partage de position de pincement
*3 Contrôle de position de pincement = Modulation
• Type: I
• When Preset Program Type “1” is selected, the
data listed below will be loaded into the G50’s
memory.
• Beim Auswählen von Preset-Programmset “1”
werden die unten aufgeführten Daten in den
Speicher des G50 geladen.
• Lorsque le type de programme préréglé “1” est
sélectionné, les données listées ci-dessous sont
chargées dans la mémoire du G50.
MEM# PGM MSB LSB Voice name Remarks
1 63 0 45 AnaVelBr
2 85 0 65 WireLead
3 34 0 65 ModAlem
4 39 0 64 Oscar
5 115 0 0 SteelDrm
6 50 0 0 Strings2
7 64 0 40 SynBras4
8 91 0 66 Ana Pad
9 5 0 45 VX E1.P1
10 66 0 43 HyprAlto
11 33 0 0 Aco.Bass
25 0 0 NylonGtr *1
12 28 0 0 CleanGtr
29 0 0 Mute.Gtr *2
13 30 0 43 Gt.Pinch *3
14 38 0 43 VeloSlap *3
15 92 0 66 Itopia
16 86 0 64 VoxLead
17 91 0 65 Click Pad
18 79 0 64 HrmoRain
19 1 0 41 Dream
20 17 0 32 DetDrwOr *4
21 12 0 45 HardVibe
22 99 0 69 DigiBell
24 26 0 35 12StrGtr
41 29 0 45 Jazz Man
42 40 0 64 X WireBa
43 41 0 0 Violin
44 43 0 0 Cello
56 56 0 64 Impact
65 64 0 64 AnaBrss2
105 89 0 64 Fantasy2
106 102 0 64 GobSyn
107 96 0 64 PolarPad
10 8 10 5 0 0 Sitar
109 106 0 0 Banjo
110 109 0 0 Kalimba
115 99 0 67 XmasBell
128 17 127 0 Rock Kit
Preset Program Lists / Verzeichnisse der Preset-Programme / Liste des programmes préréglés
22
*1 String Split (for finger picking)
*2 Picking Position Split
*3 The tone will change according to the amount of velocity.
*4 Picking Position Control = Modulation
*1 Saiten-Split (zum Zupfen)
*2 Positions-Split
*3 Der Ton ändert sich mit der Spieldynamik.
*4 PICKING CONTROL = Modulation
*1 Partage de corde (pour pincement avec les doigts)
*2 Partage de position de pincement
*3 La tonalité change selon l’importance de la vélocité.
*4 Contrôle de position de pincement = Modulation
Page 26

Programme / Liste des programmes préréglés
“GUITAR” gestellt ist / Sélecteur guitare/basse : quand “GUITAR” est sélectionné
• Type: 2
• When Preset Program Type “2” is selected, the
data listed below will be loaded into the G50’s
memory. VL 70-m tone data (Cst001-
006.Int001) will also be sent with the bulk.
• Beim Auswählen von Preset-Programmset “2”
werden die unten aufgeführten Daten in den
Speicher des G50 geladen. Zusammen mit den
Bulk-Daten werden auch Sounddaten für den
VL70-m übertragen (Cst001 bis Cst006, Int001).
• Lorsque le type de programme préréglé “2” est
sélectionné, les données listées ci-dessous sont
chargées dans la mémoire du G50. Les données
de sonorités (Cst001-006.Int001) du VL70-m
sont également envoyées en bloc.
MEM# PGM MSB LSB Voice name Remarks
1 1 – 2 Shakuhac *1
2 4 – 0 GuitHero
3 2 – 2 TenorSax *1
4 3 – 2 Birdland
5 4 – 2 OldMini
6 5 – 2 RockPigs *2
7 1 – 2 Shakuhac *1, 3
8 1 – 3 GuitHero *4
9 6 – 2 Yhokihi
10 12 – 0 Igneous
11 15 – 0 Wynth
12 19 – 0 OsciLead
13 20 – 0 SqrLead
14 21 – 0 Bigger
15 22 – 0 AnaSquid
16 23 – 0 SharpSyn
17 29 – 0 Fnground
18 31 – 0 FlageoBs
19 32 – 0 DampBass
20 33 – 0 Fretles!
21 35 – 0 ThumBass
22 38 – 0 WarmBass
23 40 – 0 Box Bass
24 42 – 0 FruitBas
25 44 – 0 SqrBass!
26 45 – 0 PulsClav
27 46 – 0 MogueBas
28 47 – 0 BoppaBas
29 48 – 0 BuzzrBas
30 49 – 0 MuteHrBs
31 51 – 0 TranzBas
32 52 – 0 Chamlion
33 53 – 0 ParaSynB
*1 Touch Control = Breath Noise
*2 Picking Position Control=Modulation
*3 Picking Position Control=Embouchure
*4 Picking Position Control=Tonguing
*1 TOUCH CONTROL = Breath Noise
*2 PICKING CONTROL = Modulation
*3 PICKING CONTROL = Embouchure
*4 PICKING CONTROL = Tonguing
*1 Contrôle de toucher = Bruit de souffle
*2 Contrôle de position de pincement = Modulation
*3 Contrôle de position de pincement = Embouchure
*4 Contrôle de position de pincement = Tongueing
MEM# PGM MSB LSB Voice name Remarks
34 54 – 0 SteamBas
35 55 – 0 BooBass
36 57 – 0 AtackSyn
37 60 – 0 India
38 61 – 0 YamSteel
39 63 – 0 M u
40 65 – 0 DinoPerc
41 66 – 0 Formula
42 67 – 0 Jurassic
43 69 – 0 SpcHorse
44 71 – 0 Suedhead
45 74 – 0 JazzyGtr
46 75 – 0 L7 Pluck
47 80 – 0 Carlos
48 81 – 0 De sti ny
49 83 – 0 Grunge
50 84 – 0 Ossyncro
51 85 – 0 Talk Box
52 86 – 0 SyncLead
53 87 – 0 Old Mini
54 88 – 0 Fat Mini
55 89 – 0 Parlapho
56 90 – 0 SimpleSy
57 91 – 0 Choronic
58 92 – 0 SlitMinu
59 94 – 0 Flaggoot
60 95 – 0 SynSkex
61 98 – 0 FlatLead
62 99 – 0 PhilTur
63 100 – 0 ChalPuls
64 101 – 0 Pluck Ld
65 102 – 0 B r a s s y n
66 103 – 0 AcoSynLd
67 104 – 0 Moby
68 106 – 0 LyricOff
69 107 – 0 Rezzawi
70 108 – 0 Macro
71 109 – 0 Claribo
72 110 – 0 Binaphon
73 113 – 0 Persinet
74 114 – 0 PicoPipe
75 115 – 0 Gertrude
76 116 – 0 Xynth
77 121 – 0 Electrum
78 122 – 0 Edgeopho
79 123 – 0 BassCla!
80 124 – 0 WX Clari
81 125 – 0 WX Oboe
82 127 – 0 Shakuha!
83 128 – 0 LipClari
84 1 – 1 Vento
85 3 – 1 Sintax
86 7 – 1 LiteAlto
87 8 – 1 Trmbone!
88 10 – 1 Air Sax
89 11 – 1 TenrSax!
90 12 – 1 Coca
91 14 – 1 Viol Inn
92 16 – 1 BrethBow
93 17 – 1 Trumpt!2
94 22 – 1 Flumpet
95 23 – 1 WXTrumpt
96 26 – 1 Melwbone
97 27 – 1 NerzoBr
98 30 – 1 NuHorne
99 31 – 1 WX Horn
100 43 – 1 DoublBow
101 48 – 1 C Flute2
102 50 – 1 OakFlute
103 52 – 1 Rz d e F lt
104 54 – 1 Nz Flute
105 58 – 1 Bamboo
Preset Program Lists / Verzeichnisse der Preset-Programme / Liste des programmes préréglés
23
Page 27

MEM# PGM MSB LSB Voice name Remarks
106 60 – 1 Flurinet
107 62 – 1 Flurmod
108 66 – 1 NuSopSax
109 68 – 1 SoprPipe
110 70 – 1 AnaSoprn
111 71 – 1 NuAltSax
112 77 – 1 AcidSax
113 83 – 1 BellMike
114 90 – 1 Oboe!
115 98 – 1 Bassoon!
116 111 – 1 Lonely
11 7 11 4 – 1 MizuHorn
118 117 – 1 BowLead
119 119 – 1 MouthKey
120 120 – 1 AmpdHarp
121 121 – 1 CromHarp
122 122 – 1 WahUpHp
123 123 – 1 YamaBotl
124 124 – 1 Blowsoo
125 125 – 1 Brappo
126 126 – 1 Crumbon
127 127 – 1 Klarina
128 128 – 1 ReedWin
• Type: 3
• When Preset Program Type “3” is selected, the
data listed below will be loaded into the G50’s
memory. VL 1-m Version 2 tone data (A01-A06)
will also be sent with the bulk.
• Beim Auswählen von Preset-Programmset “3”
werden die unten aufgeführten Daten in den
Speicher des G50 geladen. Zusammen mit den
Bulk-Daten werden auch Sounddaten für den
VL1-m Version 2 übertragen (A01 bis A06).
• Lorsque le type de programme préréglé “3” est
sélectionné, les données listées ci-dessous sont
chargées dans la mémoire du G50. Les données
de sonorités (A01-A06) du VL1-m Version 2
sont également envoyées en bloc.
MEM# PGM MSB LSB Voice name Remarks
1 1 – – Shakuhachi *1
2 2 – – GuitarHero
3 3 – – Tenor Sax *2
4 4 – – Birdland
5 5 – – OldMini
6 6 – – Rock Pigs *3
7 1 – – Shakuhachi *2, 4
8 2 – – GuitarHero *5
*1 Touch Control = Breath Noise etc.
*2 Touch Control = Breath Noise
*3 Picking Position Control = Modulation
*4 Picking Position Control = Embouchure
*5 Picking Position Control = Tonguing
*1 TOUCH CONTROL = Breath Noise usw.
*2 TOUCH CONTROL = Breath Noise
*3 PICKING CONTROL = Modulation
*4 PICKING CONTROL = Embouchure
*5 PICKING CONTROL = Tonguing
*1 Contrôle de toucher = Bruit de souffle, etc.
*2 Contrôle de toucher = Bruit de souffle
*3 Contrôle de position de pincement =Modulation
*4 Contrôle de position de pincement = Embouchure
*5 Contrôle de position de pincement = Tongueing
Preset Program Lists / Verzeichnisse der Preset-Programme / Liste des programmes préréglés
24
Page 28

■ Guitar/Bass select switch: when “BASS” is selected /
Wenn der GUITAR TYPE-Schalter auf “BASS” gestellt ist /
Sélecteur Guitar/Bass : Quand “BASS” est sélectionné
• Type: U (User / Anwender / utilisateur)
• When the initialize operation is executed, the
data listed below will be loaded into the G50’s
internal memory.
• Nach einer Initialisierung werden die unten
aufgeführten Daten in den Speicher des G50
geladen.
• Lorsque l’opération d’initialisation est réalisée,
les données listées ci-dessous sont chargées dans
la mémoire interne du G50.
• Type: I
• When Preset Program Type “1” is selected, the
data listed below will be loaded into the G50’s
memory.
• Beim Auswählen von Preset-Programmset “1”
werden die unten aufgeführten Daten in den
Speicher des G50 geladen.
• Lorsque le type de programme préréglé “1” est
sélectionné, les données listées ci-dessous sont
chargées dans la mémoire du G50.
MEM# PGM MSB LSB Voice name Remarks
1 39 0 0 Syn Bass
2 36 0 0 Fretless
3 115 0 0 Steel Drum
4 84 0 0 Chiff Lead
5 82 0 0 Saw Lead
6 49 0 0 Strings
7 63 0 0 Syn Brass
8 91 0 0 Poly Syn Pad
9 2 0 0 Piano
10 66 0 0 Alto Sax
11 34 0 0 FngrBass
37 0 0 SlapSas1 *1
12 35 0 0 PickBass
38 0 0 SlapBas2 *2
13 30 0 0 Overdrive
32 0 0 Guitar Harmonics *2
14 28 0 0 Clean Guitar
29 0 0 Mute Guitar *2
1 5 89 0 0 New Age Pad
16 83 0 0 Calliope Lead
17 86 0 0 Voice Lead
18 12 0 0 Vibes
19 100 0 0 Atmosphere
20 17 0 0 Draw Organ *3
*1 String Split
*2 Picking Position Split
*3 Picking Position Control = Modulation
*1 Saiten-Split
*2 Positions-Split
*3 PICKING CONTROL = Modulation
*1 Partage de corde
*2 Partage de position de pincement
*3 Contrôle de position de pincement = Modulation
MEM# PGM MSB LSB Voice name Remarks
1 39 0 64 Oscar
2 34 0 65 ModAlem
3 115 0 0 SteelDrm
4 63 0 45 AnaVelBr
5 85 0 65 WireLead
6 50 0 0 Strings2
7 64 0 40 SynBras4
8 91 0 66 Ana Pad
9 5 0 45 VX E1.P1
10 66 0 43 HyprAlto
11 34 0 0 FngrBass
37 0 0 SlapSas1 *1
12 35 0 0 PickBass
38 0 0 SlapBas2 *2
13 30 0 43 Gt.Pinch *3
14 38 0 43 VeloSlap *3
15 92 0 66 Itopia
16 86 0 64 VoxLead
17 91 0 65 Click Pad
18 79 0 64 HrmoRain
19 1 0 41 Dream
20 17 0 32 DetDrwOr *4
21 12 0 45 HardVibe
22 99 0 69 DigiBell
24 39 0 35 Clv Bass
41 29 0 45 Jazz Man
42 40 0 64 X WireBa
43 4 1 0 0 Violin
44 43 0 0 Cello
56 56 0 64 Impact
65 64 0 64 AnaBrss2
105 89 0 64 Fantasy2
106 102 0 64 GobSyn
107 96 0 64 PolarPad
10 8 10 5 0 0 Sitar
109 106 0 0 Banjo
110 109 0 0 Kalimba
115 99 0 67 XmasBell
128 17 127 0 Rock Kit
Preset Program Lists / Verzeichnisse der Preset-Programme / Liste des programmes préréglés
*1 String Split
*2 Picking Position Split
*3 The tone will change according to the amount of velocity.
*4 Picking Position Control = Modulation
*1 Saiten-Split
*2 Positions-Split
*3 Der Ton ändert sich mit der Spieldynamik.
*4 PICKING CONTROL = Modulation
*1 Partage de corde
*2 Partage de position de pincement
*3 La tonalité change selon l’importance de la vélocité.
*4 Contrôle de position de pincement = Modulation
25
Page 29

• Type: 2
• When Preset Program Type “2” is selected, the
data listed below will be loaded into the G50’s
memory. VL 70-m tone data (Cst001-
006.Int001) will also be sent with the bulk.
• Beim Auswählen von Preset-Programmset “2”
werden die unten aufgeführten Daten in den
Speicher des G50 geladen. Zusammen mit den
Bulk-Daten werden auch Sounddaten für den
VL70-m übertragen (Cst001 bis Cst006, Int001).
• Lorsque le type de programme préréglé “2” est
sélectionné, les données listées ci-dessous sont
chargées dans la mémoire du G50. Les données
de sonorités (Cst001-006.Int001) du VL70-m
sont également envoyées en bloc.
MEM# PGM MSB LSB Voice name Remarks
1 3 – 2 Birdland
2 4 – 2 OldMini
3 1 – 2 Shakuhac *1
4 4 – 0 GuitHero
5 2 – 2 TenorSax *1
6 5 – 2 RockPigs *2
7 1 – 2 Shakuhac *1, 3
8 1 – 3 GuitHero *4
9 6 – 2 Yhokihi
10 12 – 0 Igneous
11 15 – 0 Wynth
12 19 – 0 OsciLead
13 20 – 0 SqrLead
14 21 – 0 Bigger
15 22 – 0 AnaSquid
16 23 – 0 SharpSyn
17 29 – 0 Fnground
18 31 – 0 FlageoBs
19 32 – 0 DampBass
20 33 – 0 Fretles!
21 35 – 0 ThumBass
22 38 – 0 WarmBass
23 40 – 0 Box Bass
24 42 – 0 FruitBas
25 44 – 0 SqrBass!
26 45 – 0 PulsClav
27 46 – 0 MogueBas
28 47 – 0 BoppaBas
29 48 – 0 BuzzrBas
30 49 – 0 MuteHrBs
31 51 – 0 TranzBas
32 52 – 0 Chamlion
33 53 – 0 ParaSynB
*1 Touch Control = Breath Noise
*2 Picking Position Control = Modulation
*3 Picking Position Control = Embouchure
*4 Picking Position Control = Tonguing
*1 TOUCH CONTROL = Breath Noise
*2 PICKING CONTROL = Modulation
*3 PICKING CONTROL = Embouchure
*4 PICKING CONTROL = Tonguing
*1 Contrôle de toucher = Bruit de souffle
*2 Contrôle de position de pincement =Modulation
*3 Contrôle de position de pincement = Embouchure
*4 Contrôle de position de pincement = Tongueing
MEM# PGM MSB LSB Voice name Remarks
34 54 – 0 SteamBas
35 55 – 0 BooBass
36 57 – 0 AtackSyn
37 60 – 0 India
38 61 – 0 YamSteel
39 63 – 0 M u
40 65 – 0 DinoPerc
41 66 – 0 Formula
42 67 – 0 Jurassic
43 69 – 0 SpcHorse
44 71 – 0 Suedhead
45 74 – 0 JazzyGtr
46 75 – 0 L7 Pluck
47 80 – 0 Carlos
48 81 – 0 Destiny
49 83 – 0 Grunge
50 84 – 0 Ossyncro
51 85 – 0 Talk Box
52 86 – 0 SyncLead
53 87 – 0 Old Mini
54 88 – 0 Fat Mini
55 89 – 0 Parlapho
56 90 – 0 SimpleSy
57 91 – 0 Choronic
58 92 – 0 SlitMinu
59 94 – 0 Flaggoot
60 95 – 0 SynSkex
61 98 – 0 FlatLead
62 99 – 0 PhilTur
63 100 – 0 ChalPuls
64 101 – 0 Pluck Ld
65 102 – 0 Brassyn
66 103 – 0 AcoSynLd
67 104 – 0 Moby
68 106 – 0 LyricOff
69 107 – 0 Rezzawi
70 10 8 – 0 Macro
71 109 – 0 Claribo
72 110 – 0 Binaphon
73 113 – 0 Persinet
74 114 – 0 PicoPipe
75 115 – 0 Gertrude
76 116 – 0 Xynth
77 121 – 0 Electrum
78 122 – 0 Edgeopho
79 123 – 0 BassCla!
80 124 – 0 WX Clari
81 125 – 0 WX Oboe
82 127 – 0 Shakuha!
83 12 8 – 0 LipClari
84 1 – 1 Vento
85 3 – 1 Sintax
86 7 – 1 LiteAlto
87 8 – 1 Trmbone!
88 10 – 1 Air Sax
89 11 – 1 TenrSax!
90 12 – 1 Coca
91 14 – 1 Viol Inn
92 16 – 1 BrethBow
93 17 – 1 Trumpt!2
94 22 – 1 Flumpet
95 23 – 1 WXTrumpt
96 26 – 1 Melwbone
97 27 – 1 NerzoBr
98 30 – 1 NuHorne
99 31 – 1 WX Horn
100 43 – 1 DoublBow
101 48 – 1 C Flute2
102 50 – 1 OakFlute
103 52 – 1 RzdeFlt
104 54 – 1 Nz Flute
105 58 – 1 Bamboo
106 60 – 1 Flurinet
Preset Program Lists / Verzeichnisse der Preset-Programme / Liste des programmes préréglés
26
Page 30

MEM# PGM MSB LSB Voice name Remarks
107 62 – 1 Flurmod
108 66 – 1 NuSopSax
109 68 – 1 SoprPipe
110 70 – 1 AnaSoprn
111 71 – 1 NuAltSax
112 77 – 1 AcidSax
113 83 – 1 BellMike
114 90 – 1 Oboe!
115 98 – 1 Bassoon!
116 111 – 1 Lonely
11 7 114 – 1 MizuHorn
118 117 – 1 BowLead
119 119 – 1 MouthKey
120 120 – 1 AmpdHarp
121 121 – 1 CromHarp
122 122 – 1 WahUpHp
123 123 – 1 YamaBotl
124 124 – 1 Blowsoo
125 125 – 1 Brappo
126 126 – 1 Crumbon
127 127 – 1 Klarina
128 128 – 1 ReedWin
• Type: 3
• When Preset Program Type “3” is selected, the
data listed below will be loaded into the G50’s
memory. VL 1-m Version 2 tone data (A01-A06)
will also be sent with the bulk.
• Beim Auswählen von Preset-Programmset “3”
werden die unten aufgeführten Daten in den
Speicher des G50 geladen. Zusammen mit den
Bulk-Daten werden auch Sounddaten für den
VL1-m Version 2 übertragen (A01 bis A06).
• Lorsque le type de programme préréglé “3” est
sélectionné, les données listées ci-dessous sont
chargées dans la mémoire du G50. Les données
de sonorités (A01-A06) du VL1-m Version 2
sont également envoyées en bloc.
MEM# PGM MSB LSB Voice name Remarks
1 4 – – Birdland
2 5 – – OldMini
3 1 – – Shakuhachi *1
4 2 – – GuitarHero
5 3 – – Tenor Sax *2
6 6 – – Rock Pigs *3
7 1 – – Shakuhachi *2, 4
8 2 – – GuitarHero *5
*1 Touch Control = Breath Noise etc.
*2 Touch Control = Breath Noise
*3 Picking Position Control = Modulation
*4 Picking Position Control = Embouchure
*5 Picking Position Control = Tonguing
*1 TOUCH CONTROL = Breath Noise usw.
*2 TOUCH CONTROL = Breath Noise
*3 PICKING CONTROL = Modulation
*4 PICKING CONTROL = Embouchure
*5 PICKING CONTROL = Tonguing
*1 Contrôle de toucher = Bruit de souffle, etc.
*2 Contrôle de toucher = Bruit de souffle
*3 Contrôle de position de pincement =Modulation
*4 Contrôle de position de pincement = Embouchure
*5 Contrôle de position de pincement = Tongueing
Preset Program Lists / Verzeichnisse der Preset-Programme / Liste des programmes préréglés
27
Page 31

MIDI Data Format / MIDI-Datenformat /
1. MIDI Receive/Send
1.1 Receive/Send Conditions
< MIDI Receive Conditions >
MIDI IN→ $Bn (Control change)
$Cn (Program change)
$Dn (After Touch)
$En (Pitch Bend)
$F0 43 00 7A bb bb LM__0256OM
(1 Memory bulk)
$F0 43 00 7A bb bb LM__0256MA
(All memory bulk)
$F0 43 10 56 gg pp dd dd F7
(Parameter Change)
$F0 43 20 7A LM__0256OM
(1 Memory Dump Request)
$F0 43 20 7A LM__0256MA
(All memory Dump Request)
$F0 43 20 7A LM__0256SY
(System Dump Request)
1.2 Channel Message
Usually during performance, strings 1-6 use 6 separate MIDI
channels however, str ings 1-6 can also be combined to use a
single MIDI channel. Also, the ability to change between 2
voices on the same string is provided with Program changes,
etc.
When the Hold function is used, a 7th MIDI channel is used to
transmit data for the Hold function. Because MIDI channel 10 is
normally reserved for drums and rhythm in many multi-timbral
applications, channel 10 is not available in the Multi-channel
mode.
1.2.1 Note On/Off
Velocity range = 1-127.
Does not receive Note On/Off Messages
1.2.2 Control Change, Pitch Bend, After Touch
Data for Control Change, Pitch Bend and After Touch messages received via MIDI, are only transmitted to the currently
used channels.
However, when Master Volume ($Bn.7.0-127) is received via
MIDI, it will be recognized as the External TG Control Volume’s
maximum volume range (SYNTH VOL=MAX) before volume
control takes place.
Also, when Sustain ($Bn.64.0/127) is received via MIDI,
messages will control the sustain in the same manner (on/off)
as the external sustain pedal.
Pitch Bend Sensitivity of RPN is transmitted accordingly as
Pitch Bend Range settings.
Tuning Pitch settings are transmitted accordingly as RPN Fine
Tuning.
< MIDI Send Conditions >
$9n (Note on/off) →MIDI OUT
$Bn (Control change)
$Cn (Program change)
$Dn (After Touch)
$En (Pitch Bend)
$F0 43 00 7A bb bb LM__0256OM
(1 Memory bulk)
$F0 43 00 7A bb bb LM__0256MA
(All memory bulk)
$F0 43 00 7A bb bb LM__0256SY
(System bulk)
$FE (Active Sensing)
1.2.3 Program Change
In the Play mode, program changes of 0-127, when received,
will change the Memory number 1-128. According to the Edit
Buffer’s Tone Generator Setup, Program Change, etc., data will
be transmitted via MIDI.
In the Edit Mode, Program Changes of 0-127, when received
via MIDI, will not change Memory Numbers but, Program
Changes will be transmitted to the currently used channels
1.2.4 Reset All Controller
The Reset All Controller is transmitted when parameters for the
External TG Setup’s Assignable 1,2 are changed, or Control
Change by Real-time Control parameters are changed or when
the newly selected memory has the above parameters assigned.
1.3 System Real-time Message
1.3.1 Status F8, FA, FB, FC
Does not transmit or receive.
1.3.2 Status F9, FD, FF
Does not transmit or receive.
1.4. Status FE (Active Sensing)
Transmitted every 200ms.
Does not receive.
MIDI Data Format / MIDI-Datenformat / Format des données MIDI
28
Page 32

Format des données MIDI
2. Bulk Dump
Bulk dumps and dump requests are recognized while in the
Play Mode only.
If ALL is selected, all Memory and System Setup data will be
transmitted when MIDI Bulk transmission is carried out.
When Data is divided into several blocks for transmission, there
is an interval of 150ms between the transmission of each block.
Internal parameters are all 8 bit data, bit 7 is assigned as the
1st bit of the MSB (byte), MSB and LSB are always separated
into 2 bytes and transmitted and received in order.
The Dump Request is only received when in the Play Mode.
2.1 Single Memory Data Bulk Dump
0 11110000 F0
1 01000011 43
2 00000000 00 = Device Number (fixed)
3 01111010 7A
4 0bbbbbbb bbbbbbb = Byte Count
5 0bbbbbbb bbbbbbb
6 01001100 4C(ascii"L")
7 01001101 4D(ascii"M")
8 00100000 20(ascii" ")
9 00100000 20(ascii" ")
10 00110000 30(ascii"0")
11 00110010 32(ascii"2")
12 00110101 35(ascii"5")
13 00110110 36(ascii"6")
14 01001111 4F(ascii"O")
15 01001101 4D(ascii"M")
16 00000000 00
↓↓ ↓
31 00000000 00
32 0ddddddd ddddddd = Data
↓↓ ↓
0sssssss sssssss = Check Sum
11110111 F 7
* When received, the currently selected memory of the G50
and its Edit buffer will be overwritten.
See < Table 1 > for more information on the format.
2.2 Single Memory Data Dump Request
0 11110000 F0
1 01000011 43
2 00100000 20 = Device Number (fixed)
3 01111010 7A
4 01001100 4C(ascii"L")
5 01001101 4D(ascii"M")
6 00100000 20(ascii" ")
7 00100000 20(ascii" ")
8 00110000 30(ascii"0")
9 00110010 32(ascii"2")
10 00110101 35(ascii"5")
11 00110110 36(ascii"6")
12 01001111 4F(ascii"O")
13 01001101 4D(ascii"M")
14 00000000 00
↓↓ ↓
28 00000000 00
29 0mmmmmmm mmmmmmm (0-127)
= Memory Number 1-128
30 11110111 F7
2.3 All Memory Data Bulk Dump
0 11110000 F0
1 01000011 43
2 00000000 00 = Device Number (fixed)
3 01111010 7A
4 0bbbbbbb bbbbbbb = Byte Count
5 0bbbbbbb bbbbbbb
6 01001100 4C(ascii"L")
7 01001101 4D(ascii"M")
8 00100000 20(ascii" ")
9 00100000 20(ascii" ")
10 00110000 30(ascii"0")
11 00110010 32(ascii"2")
12 00110101 35(ascii"5")
13 00110110 36(ascii"6")
14 01001101 4D(ascii"M")
15 01000001 41(ascii"A")
16 00000000 00
↓↓ ↓
30 00000000 00
31 000mmmmm mmmmm(0-15,16)
= 0-15=Memory,16=System
32 0ddddddd ddddddd = Data
↓↓
0sssssss sssssss = Check Sum
11110111 F7
* Bulk data for 8 memories is transmited as in sequence as a
single block. After all memory data has been transmitted,
the system data will then be transmitted. See < Table 2 > for
more information on the system data format.
When received, this data overwrites the Edit Buffer’s data.
2.4 All Memory Data Dump Request
0 11110000 F0
1 01000011 43
2 00100000 20 = Device Number (fixed)
3 01111010 7A
4 01001100 4C(ascii"L")
5 01001101 4D(ascii"M")
6 00100000 20(ascii" ")
7 00100000 20(ascii" ")
8 00110000 30(ascii"0")
9 00110010 32(ascii"2")
10 00110101 35(ascii"5")
11 00110110 36(ascii"6")
12 01001101 4D(ascii"M")
13 01000001 41(ascii"A")
14 00000000 00
↓↓ ↓
29 00000000 00
30 11110111 F7
* When received, all memory and the system data will be
transmitted.
* When received, the data bulk of the specified single memory
will be transmitted.
MIDI Data Format / MIDI-Datenformat / Format des données MIDI
29
Page 33

2.5 System Data Bulk Dump
0 11110000 F0
1 01000011 43
2 00000000 00 = Device Number (fixed)
3 01111010 7A
4 0bbbbbbb bbbbbbb = Byte Count
5 0bbbbbbb bbbbbbb
6 01001100 4C(ascii"L")
7 01001101 4D(ascii"M")
8 00100000 20(ascii" ")
9 00100000 20(ascii" ")
10 00110000 30(ascii"0")
11 00110010 32(ascii"2")
12 00110101 35(ascii"5")
13 00110110 36(ascii"6")
14 01010011 53(ascii"S")
15 01011001 59(ascii"Y")
16 00000000 00
↓↓ ↓
31 00000000 00
32 0ddddddd ddddddd = Data
↓↓
0sssssss sssssss = Check Sum
11110111 F 7
* See table 2 for more information on the system data format.
2.6 System Data Dump Request
0 11110000 F0
1 01000011 43
2 00100000 20 = Device Number (fixed)
3 01111010 7A
4 01001100 4C(ascii"L")
5 01001101 4D(ascii"M")
6 00100000 20(ascii" ")
7 00100000 20(ascii" ")
8 00110000 30(ascii"0")
9 00110010 32(ascii"2")
10 00110101 35(ascii"5")
11 00110110 36(ascii"6")
12 01010011 53(ascii"S")
13 01011001 59(ascii"Y")
14 00000000 00
↓↓ ↓
29 00000000 00
30 11110111 F7
3. Parameter Change
Can be received when in the Play Mode only.
Parameter change’s to the currently selected memory are
stored in the edit buffer, if the data is to be saved, it is necessary to execute a write operation, or receive a single memory
data bulk.
Internal parameters are all 8 bit data, the 7th bit is assigned as
the 1st bit of the MSB (byte), MSB and LSB are always
separated into 2 bytes and transmitted and received in order.
0 11110000 F0
1 01000011 43
2 00010000 10 = Device Number (fixed)
3 01010110 56 = Model ID
4 000000gg gg = Parameter Group
5 000ppppp ppppp = Parameter Number
6 0000000d d = MSbit of actual data
7 0ddddddd ddddddd = 7bit data
8 11110111 F7
* Parameter Group = 0 Edit Buffer
1 2nd Memory for Split Function
2 Hold Memory for Hold Function
3 System
For more information on Parameter Number and Data
Range, see < Table 1 > and < Table 2 >.
* When received, the system data bulk will be transmitted.
MIDI Data Format / MIDI-Datenformat / Format des données MIDI
30
Page 34

< Table 1 >
1 Memory Size = 25bytes
All Memory Size = 3200bytes Total MIDI Data Size = 50bytes
PRM# DATA NAME DATA RANGE SIZE
0 Playing Style 0(pick),1(finger/slap) 2
1 Note on Level 0-9(1-10) 4
2 Note off Level 0-9(1-10) 6
3 Velocity 0(narrow),1(normal),2(wide), 8
4 Chromatic 0(off),1(on),2(auto) 10
5 Transpose 0-48(24-+24) 12
6 Pitch Bend Range 0-24(0-24) 14
7 Program Number 0(off),1-128(1-128) 16
8 Program Bank MSB 0(off),1-128(0-127) 18
9 Program Bank LSB 0(off),1-128(0-127) 20
10 Volume 0(off),1-128(0-127) 22
11 Pan 0(off),1-31(L15-R15) 24
12 Assignable Control Number 1 0(off),1-119(1-120),120(AT) 26
13 Assignable Control Value 1 0-127 28
14 Assignable Control Number 2 0(off),1-119(1-120),120(AT) 30
15 Assignable Control Value 2 0-127 32
3-129(fixed1-127)
16 Split 0(off),1-5(string1-5), 34
17 Split Memory2 Number 0-127(1-128) 36
18 Split Memory2 Location 0(lo),1(hi) 38
19 Picking Position Control 0(off),1-119(1-120),120(AT) 40
20 Picking Front Position Value 0-127 42
21 Picking Rear Position Value 0-127 44
22 Touch Control 0(off),1-119(1-120),120(AT) 46
23 Touch Control Sensitivity 0-14(-7-+7) 48
24 Sustain/Hold Pedal 0(sus1),1(sus2),2-129(1-128) 50
6-15(pick1-10)
< Table 2 >
System Size = 10bytes Total MIDI Data Size = 20bytes
PRM# DATA NAME DATA RANGE SIZE
0 MIDI CH 0-14(s1-9,11-16),15-30(c1-16), 2
1 Tuning 0-5(440-445) 4
2 E1 String Sens 0-49(1-50) 6
3 B2 String Sens 0-49(1-50) 8
4 G3 String Sens 0-49(1-50) 10
5 D4 String Sens 0-49(1-50) 12
6 A5 String Sens 0-49(1-50) 14
7 E6 String Sens 0-49(1-50) 16
8 G1D Function 0(DE),1(pgm),2(octave) 18
9 Hold1/2 0(hold1),1(hold2) 20
31-46(m1-16)
MIDI Data Format / MIDI-Datenformat / Format des données MIDI
31
Page 35

YAMAHA [Guitar MIDI Converter] Date:21-MAY-1996
Model G50 MIDI Implementation Chart Version : 1.0
+----------------------------------------------------------------------+
: : Transmitted : Recognized : Remarks :
: Function ... : : : :
:-------------------+----------------+----------------+----------------:
:Basic Default : 1-16 : 1-16 : memorized :
:Channel Changed : 1-16 : 1-16 : :
:-------------------+----------------+----------------+----------------:
: Default : x : x : :
:Mode Messages : x : x : :
: Altered : ************** : x : :
:-------------------+----------------+----------------+----------------:
:Note : 0-127 : x : :
:Number : True voice: ************** : x : :
:-------------------+----------------+----------------+----------------:
:Velocity Note ON : o 9nH,v=1-127 : x : :
: Note OFF : x : x : :
:-------------------+----------------+----------------+----------------:
:After Key's : x : x : :
:Touch Ch's : o : o *1 : :
:-------------------+----------------+----------------+----------------:
:Pitch Bender : o : o *1 : :
:-------------------+----------------+----------------+----------------:
: 0-120 : o : o *1 : :
: : : : :
: : : : :
: : : : :
: Control : : : :
: : : : :
: Change : : : :
: : : : :
: : : : :
: : : : :
: : : : :
: : : : :
: 121 : o : x : Reset All Ctrls:
:-------------------+----------------+----------------+----------------:
:Prog : o 0-127 : o 0-127 *3 : :
:Change : True # : *2 : : :
:-------------------+----------------+----------------+----------------:
:System Exclusive : o : o : :
:-------------------+----------------+----------------+----------------:
:System : Song Pos. : x : x : :
: : Song Sel. : x : x : :
:Common : Tune : x : x : :
:-------------------+----------------+----------------+----------------:
:System :Clock : x : x : :
:Real Time :Commands: x : x : :
:-------------------+----------------+----------------+----------------:
:Aux :Local ON/OFF : x : x : :
: :All Notes OFF: x : x : :
:Mes- :Active Sense : o : x : :
:sages:Reset : x : x : :
:-------------------+----------------+----------------+----------------:
:Note *1 transmits to all occupied channels. :
: *2 in the play mode: transmits pgm changes belonging to :
: H:program memory. :
: *3 in the play mode: changes program memories. :
: in the edit mode: transmits to all occupied channels. :
+-------------------+----------------+----------------+----------------+
Mode 1 : OMNI ON, POLY Mode 2 : OMNI ON, MONO o : Yes
Mode 3 : OMNI OFF, POLY Mode 4 : OMNI OFF, MONO x : No
32
Page 36

Page 37

documentation manual, user maintenance, brochure, user reference, pdf manual
This file has been downloaded from:
User Manual and User Guide for many equipments like mobile phones, photo cameras, monther board, monitors, software, tv, dvd, and othes..
Manual users, user manuals, user guide manual, owners manual, instruction manual, manual owner, manual owner's, manual guide,
manual operation, operating manual, user's manual, operating instructions, manual operators, manual operator, manual product,
 Loading...