

CDX-9
Natural Sound Compact Disc Player
Lecteur de disque audionumérique de la série “Natural Sound”
Natural Sound CD-Spieler
Natural Sound Compact Disc-spelare
Lettore di compact disc a suono naturale
G B R
Tocadiscos de Discos Compactos de Sonido Natural
Natural Sound CD-speler
OWNER’S MANUAL
MODE D’EMPLOI
BEDIENUNGSANLEITUNG
BRUKSANVISNING
MANUALE DI ISTRUZIONI
MANUAL DE INSTRUCCIONES
GEBRUIKSAANWIJZING
CAUTION
VARNING : OSYNLIG LASERSTRÅLNING NÄR DENNA DEL ÄR ÖPPNAD
OCH SPÄRREN ÄR URKOPPLAD. BETRAKTA EJ STRÅLEN. STRÅLEN
ÄR FARLIG.
VARO! : AVATAESSA JA SUOJALUKITUS OHITETTAESSA OLET
ALTTIINA NÄKYMÄTTÖMÄLLE LASERSÄTEILYLLE. ÄLÄ KATSO SÄTEESEEN.
ADVARSEL : USYNLIG LASERSTRALNING VED ÅBNING NÅR SIKKERHETSAF BRYDERE ER UDE AF FUNKTION. UNDGÅ UDSETTELSE FOR STRÅLNING.
As the laser beam used in this compact disc player is harmful
to the eyes, do not attempt to disassemble the cabinet. Refer
servicing to qualified personnel only.
ACHTUNG
Verwendung von Reglern, Einstellungen oder Eingriffe von
anderer Natur als hierin angegeben kann die Aussetzung
gefährlicher Strahlendosen nach sich ziehen.
ADVARSEL
Usynlig laserstråling ved åbning. Undgå udsaettelse for
stråling.
VAROITUS
Laitteen käyttäminen muulla kuin tässä käyttöohjeesa
mainitulla tavalla saattaa altistaa käyttäjän turvallisuusluokan 1
ylittävälle näkymättömälle lasersäteilylle.
VARNING
Om apparaten används på annat sätt än i denna
bruksanvisning specificerats, kan användaren utsättas för
osynlig laserstrålning, som överskrider gränsen för laserklass
1.
LET OP
Aangezien de laserstraal die in deze compact-disc speler
gebruikt wordt gevaar kan opleveren voor de ogen, nooit
proberen de behuizing van het apparaat te verwijderen. Laat
onderhoud uitsluitend uitvoeren door een deskundige
reparateur.
Varningsanvisning för laserstrålning. Placerad i apparaten.
CAUTION
The STANDBY/ON switch does not disconnect the
complete apparatus from the mains line.
ATTENTION
L’appareil reste toujours sous tension lorsque l’interrupteur
d’attente/marche est en position arrêt.
ACHTUNG
Das Gerät kann mit dem Netzschalter (STANDBY/ON)
nicht vollständig von der Stromversorgung getrennt werden.
OBSERVERA!
STANDBY/ON-omkopplaren kopplar inte bort
växelströmskällan (nätet) så länge som apparaten är
ansluten till vägguttaget, även om själva apparaten har
stängts av.
ADVARSEL
Netspændingen STANDBY/ON til dette apparat er IKKE
afbrudt, sålænge netledningen sidder i en stikkontakt, som
er tændt – også selvom der er slukket på apparatets
afbryder.
VAROITUS
Laitteen STANDBY/ON-kytkin ei kytke laitetta
sähköverkosta.
AVVERTENZA
L’apparecchio rimane sotto tensione anche quando viene
spento tramite l’interruttore STANDBY/ON.
For U.K. customers
If the socket outlets in the home are not suitable for the plug
supplied with this appliance, it should be cut off and an
appropriate 3 pin plug fitted. For details, refer to the instructions
described below.
Note: The plug severed from the mains lead must be destroyed,
as a plug with bared flexible cord is hazardous if engaged in a live
socket outlet.
Klassmärkning för Finland
Laser Diode Properties
• Material: GaAlAs
• Wavelength: 780nm
• Emission Duration: continuous
• Laser Output: max. 44.6µW*
* This output is the value measured at a distance of about
200mm from the objective lens surface on the Optical Pickup Block.
SPECIAL INSTRUCTIONS FOR U.K. MODEL
IMPORTANT:
The wire in the mains lead are coloured in accordance with
the following code:
Blue: NEUTRAL
Brown: LIVE
The colours of the wires in the mains lead of this apparatus
may not correspond with the coloured markings identifying
the terminals in your plug. Proceed as follows: the wire
which is coloured BLUE must be connected to the terminal
which is marked with the letter N or coloured BLACK. The
wire which is coloured BROWN must be connected to the
terminal which is marked with the letter L or coloured RED.
Making sure that neither core is connected to the earth
terminal of the three pin plug.
Alleen voor klanten in Nederland
Bij dit produkt zijn batterijen geleverd.
Wanneer deze leeg zijn, moet u ze niet
weggooien maar inleveren als KCA.
2
Thank you for selecting this YAMAHA compact disc player.
FEATURES CONTENTS
English
Random Access Programmable Play
•
Random-Sequence Play
•
Single Track/Entire Disc Repeat Play
•
Automatic Spacing Capability
•
Automatic Programming for Recording to Tape
•
• Automatic Peak Level Searching Capability
• CD Synchronized Recording with a Compatible
YAMAHA Tape Deck
Display Brightness Changing Capability
•
Remote Control Capability
•
Optical Digital Output
•
Caution ......................................................................... 3
Connections .................................................................. 4
Identification of Components ........................................ 5
Basic Operation ............................................................ 7
Random-sequence Play ............................................. 11
Repeat Play ................................................................ 11
Program Play .............................................................. 12
Index Search ............................................................... 13
Track Programming for Recording to Tape ................. 14
CD Synchronized Recording ...................................... 18
Notes about the Remote Control Transmitter ............. 19
Notes about Handling Compact Discs ........................ 19
Troubleshooting .......................................................... 20
Specifications .............................................................. 20
CAUTION: READ THIS BEFORE OPERATING YOUR UNIT.
1. This unit is a sophisticated compact disc player. To ensure proper
operation for the best possible performance, please read this
manual carefully.
2. Choose the installation location of your unit carefully. Avoid
placing it in direct sunlight or close to a source of heat. Also avoid
locations subject to vibration and excessive dust, heat, cold or
moisture. Keep it away from sources of hum such as transformers
or motors.
3. Do not place another component on top of this unit, because to do
so will discolor or damage the surface of the unit.
4. Do not open the cabinet of this unit, because to do so might result
in damage to the unit, or injury by electric shock. If any foreign
object or substance enters the unit, contact your dealer for
assistance.
5. To prevent damage by lightning, disconnect the power cord from
the household AC outlet during an electrical storm.
6. When disconnecting the power cord from the household AC outlet,
grasp the plug; do not pull the cord.
7. Do not apply excessive force when using switches and controls.
8. When moving the unit, be sure to first disconnect the power cord
from the household AC outlet, and disconnect cords connected to
other equipment.
9. Do not attempt to clean the unit with chemical solvent as this
might damage the finish. Use a clean, dry cloth.
To reduce the risk of fire or electric shock, do not expose this appliance
to rain or moisture.
To avoid electrical shock, do not open the cabinet. Refer servicing to
qualified personnel only.
DANGER
Invisible laser radiation when open and interlock failed or defeated.
Avoid direct exposure to beam.
CAUTION
Use of controls or adjustments or performance of procedures other
than those specified herein may result in hazardous radiation
exposure.
CLASS 1 LASER PRODUCT
Laser component in this product is capable of emitting radiation
exceeding the limit for Class 1.
WARNING
This compact disc player is classified
as a CLASS 1 LASER product.
The CLASS 1 LASER PRODUCT
label is located on the rear exterior.
(Europe and U.K. models only)
10. Be sure to read the “TROUBLESHOOTING” section for advice on
common operating errors before concluding that your unit is faulty.
11. Keep this manual in a safe place for future reference.
12. Voltage selector (General model only)
The voltage selector (on the rear panel of this unit) must be
correctly set to the voltage used locally before making any
connection to the AC power supply.
This unit is not disconnected from the AC power source as
long as it is connected to the wall outlet, even if this unit
itself is turned off. (standby mode)
CAUTION (FOR CANADA MODEL)
TO PREVENT ELECTRIC SHOCK, MATCH WIDE BLADE OF
PLUG TO WIDE SLOT AND FULLY INSERT.
FOR CANADIAN CUSTOMER
THIS CLASS B DIGITAL APPARATUS MEETS ALL
REQUIREMENTS OF THE CANADIAN INTERFERENCE-CAUSING
EQUIPMENT REGULATIONS.
IMPORTANT
Please record the serial number of this unit in the space below.
Serial No.:
The serial number is located on the rear of the unit.
Retain this Owner’s Manual in a safe place for future reference.
3
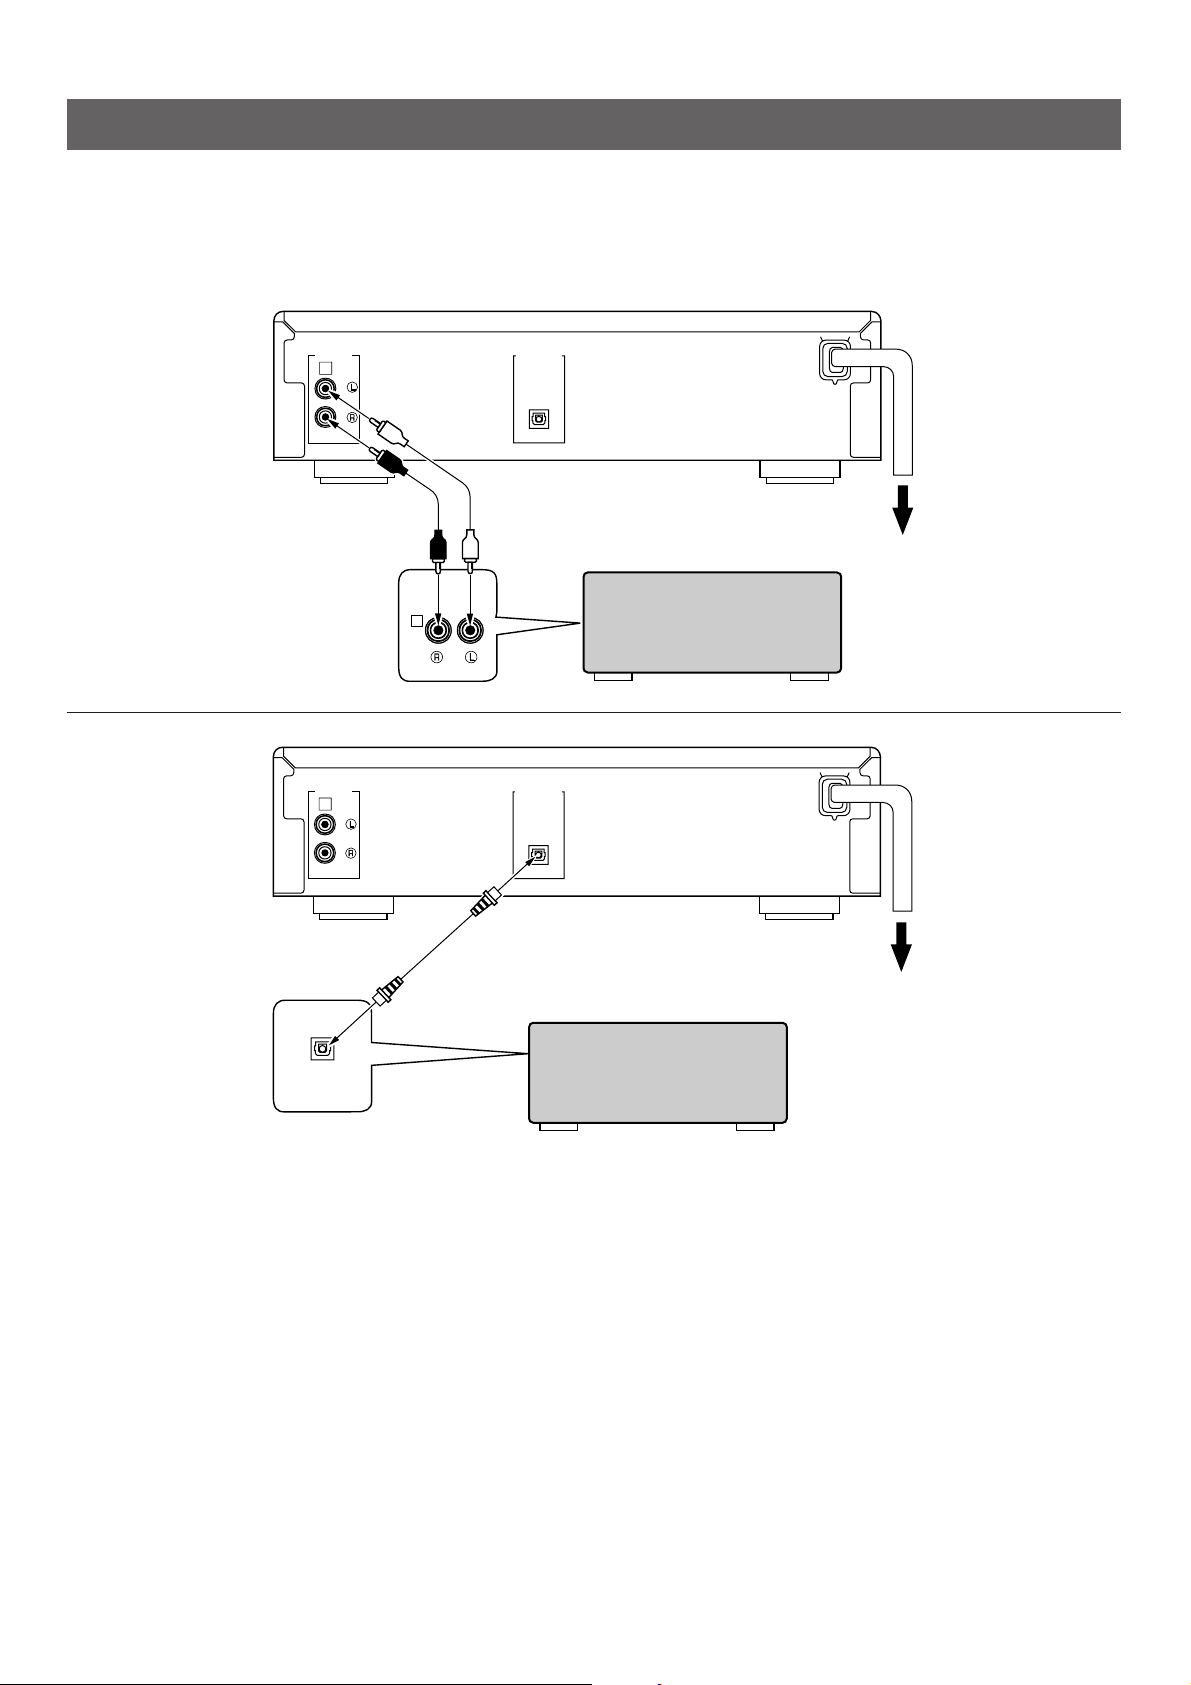
CONNECTIONS
DIGITAL OUT
OPTICAL
1
LINE OUT
CD
1
DIGITAL OUT
OPTICAL
1
LINE OUT
DIGITAL IN
OPTICAL
Never plug in this unit and other components until all connections are completed.
Connections should be made to the correct input terminals of
•
the amplifier or other component.
1
Connection cord
(included)
2
If the placement of this unit causes noise to other equipment,
•
such as a tuner, separate them from each other.
U.S.A. model
To AC outlet
Amplifier or receiver
U.S.A. model
Optical fiber cable
(not included)
Amplifier with an optical
terminal
Choose one of the ways listed below to connect this unit to your amplifier.
When the LINE OUT (analog) terminals of this
unit are used ( 1 )
Be sure that the left (“L”) and right (“R”) LINE OUT terminals
•
are connected to the corresponding (left and right) terminals
of the amplifier or other component.
Connect the “LINE OUT” terminals to the “CD” (or “AUX”)
•
terminals of the amplifier. If the amplifier does not have such
terminals, use the “TAPE PB” terminals. For additional
details concerning these connections, refer to the operation
instructions for the amplifier being used.
• The LINE OUT terminals of this unit are numbered 1. When
connecting this unit with a YAMAHA amplifier or receiver
whose terminals on the rear panel are numbered as 1, 2,
3, etc., connect the LINE OUT terminals of this unit to the
input terminals numbered 1 on the rear of the amplifier or
receiver.
4
When the DIGITAL OUT (OPTICAL) terminal of
this unit is used ( 2 )
Before using this terminal, remove the terminal’s cover by
•
pulling it.
Make the connection from this terminal to the optical input
•
terminal of an amplifier by using a commercially available
optical fiber cable.
* Use an optical fiber cable that conforms to EIAJ
standards. Other cables might not function correctly.
Be sure to attach the terminal’s cover when this terminal is
•
not being used, in order to protect the terminal from dust.
This terminal can also be connected to the optical input
•
terminal of a digital audio tape deck (DAT), MD recorder, etc.
to record CD onto tape or MD directly.
To AC outlet
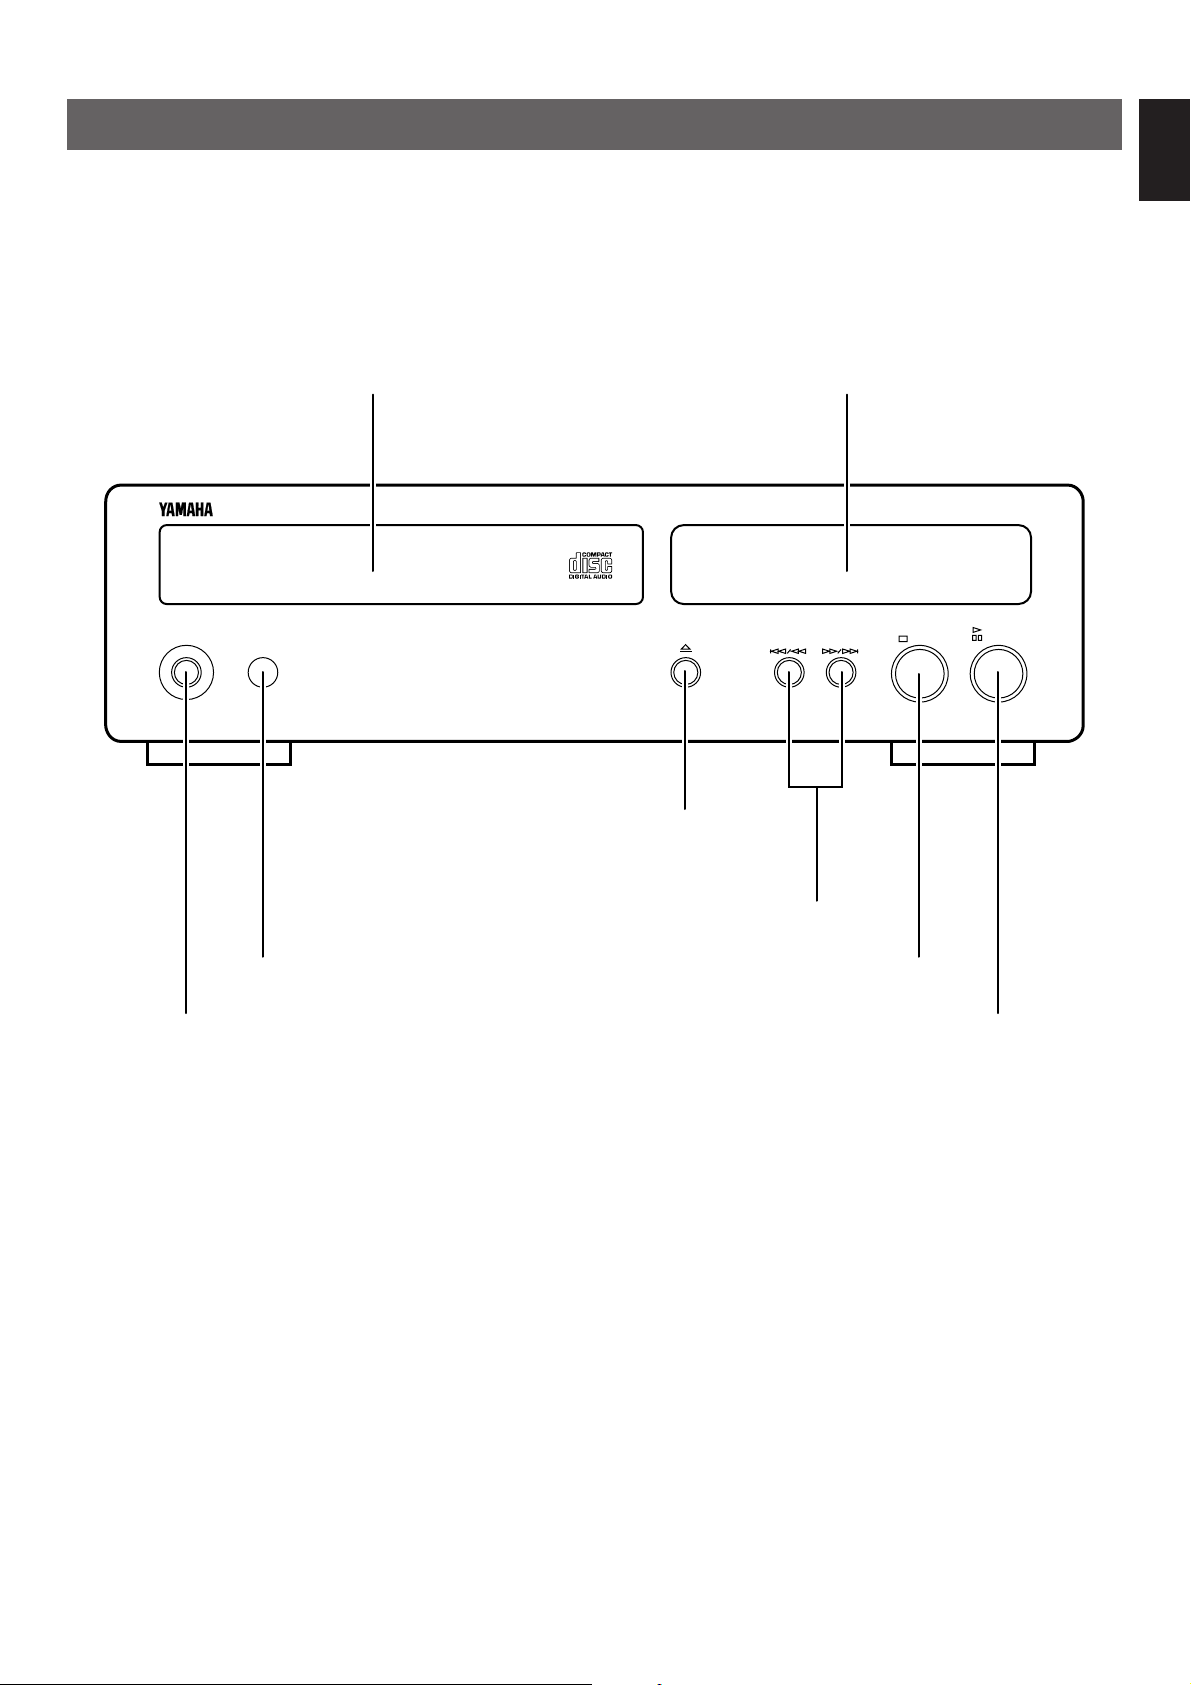
IDENTIFICATION OF COMPONENTS
STANDBY/ON
PLAY/
PAUSE
STOP
NATURAL SOUND COMPACT DISC PLAYER CDX-9
* ( ) indicates the page number on which the control part is best described.
FRONT PANEL
* The SKIP/SEARCH buttons on the main unit have both the
functions of the SKIP button and the SEARCH button on the
remote control transmitter.
* The PLAY/PAUSE button on the main unit has both the
functions of the PLAY button and the PAUSE button on the
remote control transmitter.
English
Display panelDisc tray (p. 7)
Remote control sensor (p. 19)
STANDBY/ON switch (p. 7)
OPEN/CLOSE button (p. 7)
SKIP/SEARCH buttons (p. 8, 9)
STOP button (p. 8)
PLAY/PAUSE button (p. 7, 8)
5

21
SPACE TAPEPEAK
SYNCHRO
3
INDEX
PROGCLEAR
OPEN/
CLOSE
87 9 0
54 6 +I0
DIMMER TIME
REPEAT RANDOM
SEARCH
SKIP
STOP PAUSE PLAY
* ( ) indicates the page number on which the control part is best described.
REMOTE CONTROL TRANSMITTER
TAPE button (p. 14)
DIMMER button (p. 10)
TIME button (p. 10)
SYNCHRO button (p. 18)
PEAK button (p. 17)
SPACE button (p. 9)
Numeric buttons (p. 8)
REPEAT button (p. 11)
STOP button (p. 8)
OPEN/CLOSE button (p. 7)
CLEAR button (p. 13)
PROG button (p. 12)
INDEX button (p. 13)
RANDOM button (p. 11)
SEARCH button (p. 9)
SKIP button (p. 8)
PLAY button (p. 7)
PAUSE button (p. 8)
6
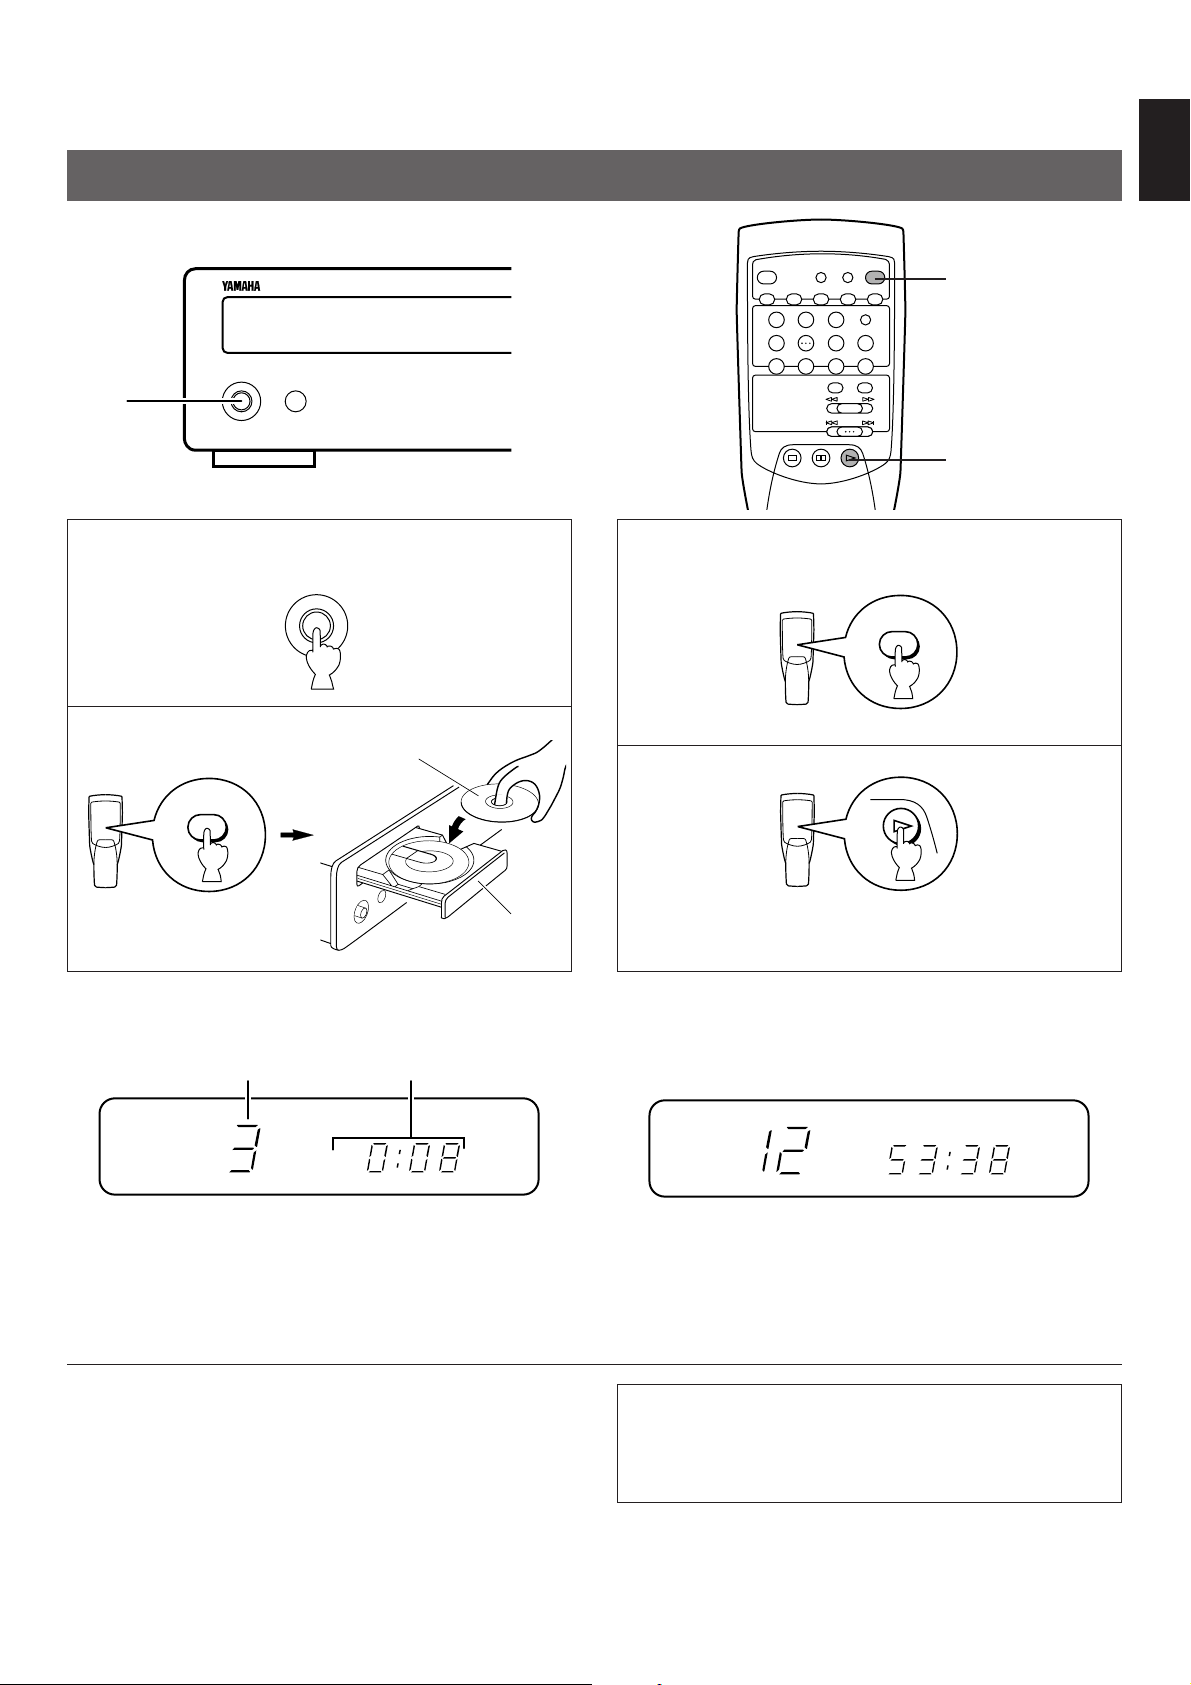
STANDBY/ON
1
This manual describes how to operate this unit by using the remote control transmitter.
To operate this unit on the front panel, use the corresponding buttons on the front panel.
BASIC OPERATION
English
1 Turn the power on.
2 Load a disc.
OPEN/
CLOSE
STANDBY/ON
Label side
upward
SYNCHRO
SPACE TAPEPEAK
STOP PAUSE PLAY
3 Close the disc tray.
4
DIMMER TIME
21
3
54 6 +I0
87 9 0
REPEAT RANDOM
SEARCH
SKIP
INDEX
OPEN/
CLOSE
PROGCLEAR
OPEN/
CLOSE
PLAY
2, 3
4
Disc tray
Display information at disc play
12
1
Shows the track number selected or being played.
2
Shows the time displays. (Refer to “Selecting time
displays” on page 10.)
When you finish using this unit
Press the STANDBY/ON switch again to turn this unit into the
standby mode.
Play will begin from the first track of the disc.
Notes
After closing the disc tray by pressing the OPEN/CLOSE
•
button, the display shows the total number of tracks and the
total recorded time of the disc for a few seconds.
TOTAL
Additionally, you can close the disc tray by pressing the
•
PLAY (PLAY/PAUSE) button, a numeric button or the
RANDOM button, or by pressing the front edge of the disc
tray gently. If the tray is closed in these ways, play will begin
automatically, however, the display will not show the total
number of tracks and the total recorded time of the disc.
Standby mode
In this state, this unit is not disconnected from the source
as long as it is connected to the wall outlet, even if this unit
itself is turned off.
7
 Loading...