

DISC B
Recordable
ReWritable
COPY
REC MODE TRACK NO.
FINALIZE ERASE
INPUT
MULTI JOG
DIGITAL REC LEVEL
DISC A DIGITAL ANALOG
PUSH MODE
ANALOG REC LEVEL
MINFADE IN/OUT MAX
REC MUTE
REC
UCA
CDR-D651
Compact Disc Recorder
Lecteur/Enregistreur CD
OWNER'S MANUAL
MODE D'EMPLOI

GETTING STARTED
ENGLISH
Introduction
Thank you for purchasing this YAMAHA product. We hope it will give you many years of trouble-free enjoyment. For the best
performance, read this manual carefully. It will guide you in operating your YAMAHA product.
Features
GETTING STARTED
• Double Speed CD DIRECT Copy
• CD-R/CD-RW Recording and Playback
• Double Speed Finalization
• Optical Digital Input and Output
Contents
GETTING STARTED
Contents ........................................................... 1
PRECAUTIONS ............................. 2
DISCS COMPATIBLE WITH THIS UNIT .. 3
PREPARATION.............................. 4
Supplied Accessories ....................................... 4
Remote Control ................................................ 5
Connections ..................................................... 6
CD Preventive Care........................................... 7
CONTROLS AND FUNCTIONS ............ 8
Front Panel ....................................................... 8
Remote Control ................................................ 9
Display ........................................................... 10
Menu Setting .................................................. 11
RECORDING
RECORDING TO A DISC ................. 12
Basic Recording Operation ............................. 12
Selecting an Input Source .............................. 14
Selecting a Recording Mode .......................... 14
Setting the Recording Level ........................... 15
Manual Track Marking .................................... 15
RECORDING FUNCTIONS ............... 16
CD DIRECT Copy ............................................ 16
Synchronized Recording ................................ 16
Track and Disc Erase (CD-RW discs only) ...... 18
REC Mute ....................................................... 19
Fade In/Fade Out Function .............................. 19
CD TEXT Copying and Editing ........................ 19
FINALIZATION ............................ 21
Finalization ..................................................... 21
• Various Playback Functions for 2 CDs
Relay Play, Program Play
Repeat Play, Random Play
• CD TEXT Compatible
PLAYBACK
PLAYING 1 OR 2 CDS.................... 22
Basic Playback Operation ............................... 22
Relay Playback of 2 CDs................................. 22
Searching ....................................................... 23
Skipping Tracks .............................................. 23
PLAYBACK FUNCTIONS ................. 24
Program Play ................................................. 24
Random Play .................................................. 25
Single Repeat ................................................. 26
Full Repeat ..................................................... 26
Repeat Relay .................................................. 26
Random Repeat.............................................. 26
Listening with Headphones ............................ 27
Auto Play ........................................................ 27
ADDITIONAL INFORMATION
ADDITIONAL INFORMATION ........... 28
CD-Recorder System Notes and Limitations .. 28
SCMS Copy Protection ................................... 28
Display Messages .......................................... 29
Troubleshooting ............................................. 30
Specifications ................................................. 31
RECORDING
PLAYBACK
INFORMATION
ADDITIONAL
ENGLISH
E-1

PRECAUTIONS: READ THIS BEFORE OPERATING THIS UNIT ............
• To assure the finest performance, please read this
manual carefully. Keep it in a safe place for future
reference.
• Install this unit in a well ventilated, cool, dry, clean place
with at least 5 cm of ventilation space on the top, right
and left, and at the back of this unit – away from direct
sunlight, heat sources, vibration, dust, moisture, and/or
cold.
• Locate this unit away from other electrical appliances,
motors, or transformers to avoid humming sounds. To
prevent fire or electrical shock, do not place this unit
where it may get exposed to rain, water, and/or any type
of liquid.
• Do not expose this unit to sudden temperature changes
from cold to hot, and do not locate this unit in a
environment with high humidity (i.e. a room with a
humidifier) to prevent condensation inside this unit, which
may cause an electrical shock, fire, damage to this unit,
and/or personal injury.
• On the top of this unit, do NOT place:
• Other components, as they may cause damage and/or
discoloration on the surface of this unit.
• Burning objects (i.e. candles), as they may cause fire,
damage to this unit, and/or personal injury.
• Containers with liquid in them, as they may cause
electrical shock to the user and/or damage to this unit.
• Do not cover the rear panel of this unit with a newspaper,
tablecloth, curtain, etc. in order not to obstruct heat
radiation. If the temperature inside this unit rises, it may
cause fire, damage to this unit, and/or personal injury.
• Do not plug in this unit to a wall outlet until all connections
are complete.
• Do not operate this unit upside-down. It may overheat,
possibly causing damage.
• Do not use force on switches, knobs and/or cords.
• When disconnecting the power cord from the wall outlet,
grasp the plug; do not pull the cord.
• Do not clean this unit with chemical solvents; this might
damage the finish. Use a clean, dry cloth.
• Only voltage specified on this unit must be used. Using
this unit with a higher voltage than specified is dangerous
and may cause fire, damage to this unit, and/or personal
injury. YAMAHA will not be held responsible for any
damage resulting from use of this unit with a voltage
other than specified.
• To prevent damage by lightning, disconnect the power
cord from the wall outlet during an electrical storm.
• Take care of this unit so that no foreign objects and/or
liquid drops inside this unit.
• Do not attempt to modify or fix this unit. Contact qualified
YAMAHA service personnel when any service is needed.
The cabinet should never be opened for any reasons.
• When not planning to use this unit for long periods of time
(i.e. vacation), disconnect the AC power plug from the
wall outlet.
• Be sure to read the “Troubleshooting” section on
common operating errors before concluding that this unit
is faulty.
• Before moving this unit, first check that there is no disc in
the disc tray. To prevent damage to this unit, be sure to
insert the transportation pad in the disc tray. Finally,
press POWER to turn off this unit, and disconnect the AC
power plug from the wall outlet. After this unit is moved,
remove the pad to ensure correct operation.
SPECIAL INSTRUCTIONS FOR U.K. MODEL
IMPORTANT:
The wires in the mains lead are coloured in accordance with the
following code:
Blue: NEUTRAL
Brown: LIVE
As the colours of the wires in the mains lead of this apparatus
may not correspond with the coloured markings identifying the
terminals in your plug, proceed as follows: The wire which is
coloured BLUE must be connected to the terminal which is
marked with the letter N or coloured BLACK. The wire which is
coloured BROWN must be connected to the terminal which is
marked with the letter L or coloured RED. Making sure that
neither core is connected to the earth terminal of the three pin
plug.
For U.K. customers
If the socket outlets in the home are not suitable for the plug
supplied with this appliance, it should be cut off and an
appropriate 3 pin plug fitted. For details, refer to the
instructions described above.
Note: The plug severed from the mains lead must be
destroyed, as a plug with bared flexible cord is hazardous if
engaged in a live socket outlet.
Laser component in this product is capable of emitting
radiation exceeding the limit for Class 1.
Voltage Selector (General model only)
The voltage selector on the rear panel of this unit must
be set for your local main voltage BEFORE plugging into
the AC power supply.
Voltages are 110/120/220/240 V AC, 50/60 Hz.
E-2

....................................... DISCS COMPATIBLE WITH THIS UNIT
■ Discs that can be used for recording
Be sure to use only CD-R and CD-RW discs made by
reliable manufacturers.
CD-R and CD-RW digital audio discs that display either of
the following marks can be used with this unit.
■ Discs that can be played back
In addition to CD-R and CD-RW digital audio discs
described above, commercially available pre-recorded CDs
bearing the mark shown below can also be played on this
unit.
GETTING STARTED
In addition to these marks being present on the disc, check
that at least one of the following phrases can also be found
on the disc or disc case.
FOR CONSUMER
FOR CONSUMER USE
FOR MUSIC USE ONLY
● Regarding discs that can be used for recording
• CD-R discs can only be recorded on once, and the recorded
material cannot be erased.
• CD-RW discs can be recorded on, have the recorded material
erased, and then recorded on again any number of times.
● The following discs cannot be used for recording on
this unit.
• Discs bearing marks other than those shown above.
• Discs intended for recording computer data.
• Discs intended for professional use or labeled “FOR
PROFESSIONAL USE ONLY”.
■ Finalization of CD-R discs for playback on
standard CD players
Although a partially recorded CD-R disc can be played on
this unit, it cannot be played on a standard CD player until it
has undergone a process known as “finalization”. In the
finalization process, the Table of Contents (TOC) is written
onto the disc and further recording is not possible.
However, this process makes it possible to play a CD-R
disc on a standard CD player.
Some CD players may not play back the finalized CD-R
discs properly due to differences in the playback system of
different manufacturers.
See page 21 for the finalization procedure.
■ Playback of CD-RW discs
Please note that even after a CD-RW disc has been
finalized, it still cannot be played on a standard CD player.
CD-RW discs can only be played back on CD-RW
compatible players such as this unit.
Additionally, CD-RW discs can be erased even after
finalization has been performed, and recorded onto again.
■ Playback on DVD players
Before playing back a finalized CD-R or CD-RW discs on a
DVD player, please check whether the DVD player is
compatible with CD-R or CD-RW discs or not. Refer to the
owner's manual of the DVD player for more information. If
the DVD player is not compatible with CD-R or CD-RW
discs, do not attempt to play them on the DVD player.
Note
Please check the copyright laws in your country to
record from records, compact discs, radio, etc.
Recording of copyright material may infringe copyright
laws.
RECORDING
PLAYBACK
INFORMATION
ADDITIONAL
■ Regarding erasure or loss of data
Yamaha and suppliers accept no liability for the loss of data
or any problems caused as a result. As a precaution, it is
recommended that the discs are tested after they have
been written to. Furthermore, under no circumstances does
Yamaha and suppliers guarantee the reliability of the discs.
ENGLISH
E-3
PREPARATION..................................................................
Supplied Accessories
After unpacking, make sure the following items are included in your package.
• Remote Control • Batteries (size AA, UM-3, R6) (2)
COPY
A
OPEN/CLOSE
TRACK NO.
REC MUTE
REC
WRITE
FINALIZE ERASE
INPUT
A
/
B
TIME TEXT DIMMER
MENU
EDIT DELETE SET
1
ABC2DEF3GHI
4
JKL5MNO6PQR
7
STU8VWX9YZ
0
+10
PROG
SYMBOL
SPACE
CLEAR
A B
B
• RCA Pin Cables (2)
• Optical Fiber Cable (1)
FADE IN/OUT
REC MODE
DISPLAY
REPEAT RANDOM
• Ferrite core for headphones cable (1)
(U.S.A., Canada, and Australia model only)
When using headphones, be sure to attach the ferrite core
provided to the headphones cable in order to reduce the
electromagnetic interference. Open the cover and fit the
core onto the headphones cable as the illustration below
shows.
E-4
.................................................................. PREPARATION
Remote Control
GETTING STARTED
■ Loading the batteries in the remote control
1
3
2
1.
Remove the battery compartment cover on the
back of the remote control.
2.
Insert the batteries (AA, UM-3 or R6 type)
according to the polarity markings on the inside of
the battery compartment.
3.
Close the battery compartment cover.
Battery replacement
If you find that the remote control must be used closer to
this unit than usual, the batteries are weak. Replace
batteries with new ones.
Notes
• Use only AA, UM-3, R6 batteries for replacement.
• Be sure the polarities are correct. (See the illustration inside the
battery compartment.)
• Remove the batteries if the remote control will not be used for an
extended period of time.
• If batteries leak, dispose of them immediately. Avoid touching
the leaked material or letting it come in contact with clothing,
etc. Clean the battery compartment thoroughly before installing
new batteries.
■ Remote control operation range
NATURAL SOUND CD RECORDER CDR–D651
POWER
DISC A DISC B
DISPLAY A TEXT/TIME DISPLAY B
PHONES LEVEL
MIN MAX
COPY
Remote control
sensor
Within approximately 6 m
(20 feet)
30°
Notes
• There should be no large obstacles between the remote control
and this unit.
• If the remote control sensor is directly illuminated by strong
lighting (especially an inverter type of fluorescent lamp, etc.), it
might cause the remote control not to work correctly. In this
case, reposition the main unit to avoid direct lighting.
REC MODE TRACK NO.
FINALIZE ERASE
30°
MULTI JOG
INPUT
PUSH MODE
DISC A DIGITAL ANALOG
DIGITAL REC LEVEL
Recordable
ReWritable
ANALOG REC LEVEL
REC MUTE
REC
MINFADE IN/OUT MAX
RECORDING
PLAYBACK
INFORMATION
ADDITIONAL
ENGLISH
E-5
PREPARATION..................................................................
Connections
Turn off the power of this unit and the other component, and unplug them from the wall outlet before making any
connections.
• Correctly connect the input and output jacks on this unit to the input and output jacks on the other component.
• Arrow marks (→) in the illustration below indicate the direction of the audio signal.
VOLTAGE SELECTOR
220
V
240V
120V
110V
L
R
ANALOG
LINE IN
REC4PLAY
LINE OUT
3
DIGITAL
IN OUT
OPTICAL
L
R
RCA pin cable
(included)
Optical fiber cables
(One included)
Voltage Selector
(General model)
To wall outlet
RCA pin cable
(included)
PLAY
REC
L
R
L
R
IN
OUT
DIGITAL IN DIGITAL OUT
OPTICAL OPTICAL
Amplifier or Receiver
■ Digital connections
• Remove the jack covers for DIGITAL IN OPTICAL and DIGITAL OUT OPTICAL before starting to make connections.
Using the optical fiber cable, connect the DIGITAL IN OPTICAL on this unit to the DIGITAL OUT OPTICAL on the other
component, and the DIGITAL OUT OPTICAL on this unit to the DIGITAL IN OPTICAL on the other component.
• Keep the jack covers for future use. Replace them in order to protect the digital jacks from dust when the jacks are not
being used.
■ Analog connections
• Make sure to correctly connect the L (left) and R (right) ANALOG LINE IN (REC) and ANALOG LINE OUT (PLAY) jacks
on this unit to the L (left) and R (right) ANALOG LINE OUT (REC) and ANALOG LINE IN (PLAY) jacks on the other
component.
• Connect the ANALOG LINE IN (REC) jack on this unit to the ANALOG LINE OUT (REC) jack on the other component,
and the ANALOG LINE OUT (PLAY) jack on this unit to the ANALOG LINE IN (PLAY) jack on the other component.
• The ANALOG LINE IN (REC) and ANALOG LINE OUT (PLAY) jacks on this unit are numbered 4 and 3 respectively.
Connect these jacks to the jacks with same numbers when connecting this unit with YAMAHA amplifier or receiver.
Plug in this unit to a wall outlet when all connections are complete.
E-6
.................................................................. PREPARATION
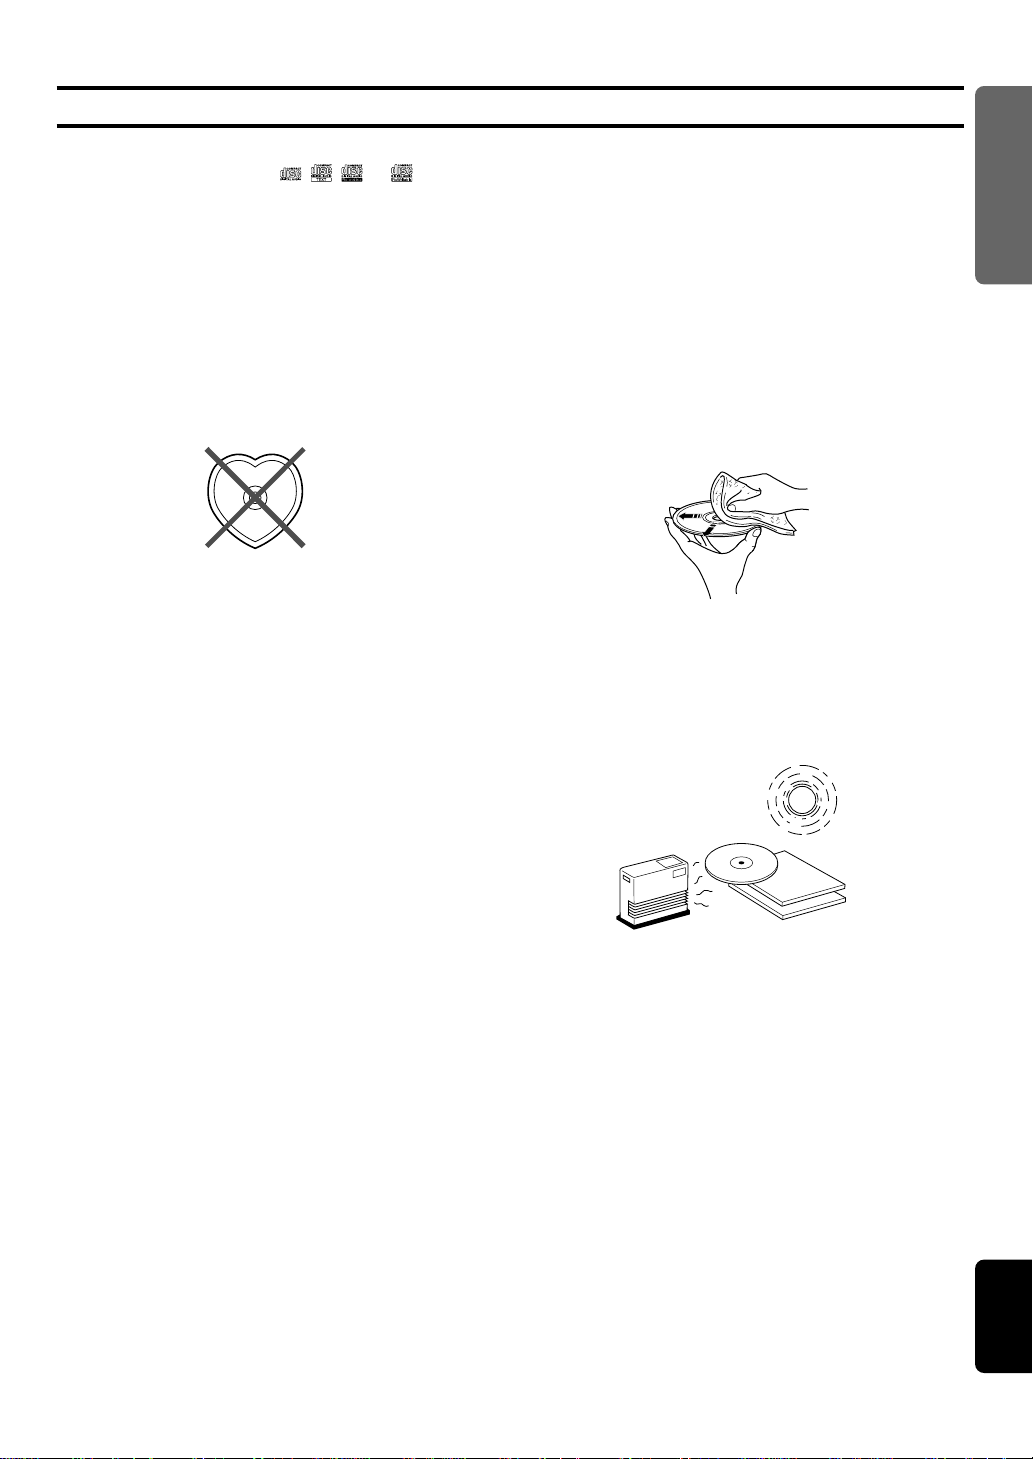
CD Preventive Care
GETTING STARTED
• This compact disc recorder is designed for use with
compact discs bearing the
only. Never attempt to load any other type of disc into
this unit.
This unit will also play 8-cm (3-inch) compact discs.
• Compact discs are not subjected to wear during play,
but damage to the disc surface when the disc is being
handled can adversely affect the disc’s play.
• Do not use cleaning discs or warped discs. All of these
could damage the unit.
, , , or marks
■ To prevent a malfunction of this unit
• Do not use any non-standard shaped CDs (heart, etc.)
available on the market, because it may damage this
unit.
• Do not use a CD with tape, seals, or paste on it, because
damage to this unit may result.
• Be sure to use a felt-tip pen or similar writing tool when
writing on the label side of the disc. Do not use a ballpoint pen, pencil, or other hard-tipped writing tool, as
these may damage the disc and may aversely affect
further recording on the disc.
• Although playback of compact discs is generally not
affected by small particles of dust or fingerprints on their
playing surface, dust, fingerprints, small scratches and
direct sunlight on the recording surface of a CD-R or
CD-RW disc may make recording impossible. Therefore,
for optimal performance of the recorder and for longterm enjoyment of your CD collection, handle discs
correctly as outlined in the following guidelines.
• Hold discs by touching only the edges or center hole.
• When a disc is not currently being used, remove it
from the recorder and store in an appropriate case.
• With proper disc maintenance, cleaning should not
be necessary. However, should cleaning be required,
wipe by using a clean, dry cloth. Do not wipe with a
circular motion; wipe straight outward from the
center.
• Do not try to clean the disc’s surface by using any type
of disc cleaner, record spray, antistatic spray or liquid,
or any other chemical-based liquid, because such
substances might irreparably damage the disc’s surface.
• Do not expose discs to direct sunlight, high temperature,
or high humidity for a long period of time, because these
might warp or otherwise damage the disc.
RECORDING
PLAYBACK
INFORMATION
ADDITIONAL
No!
ENGLISH
E-7
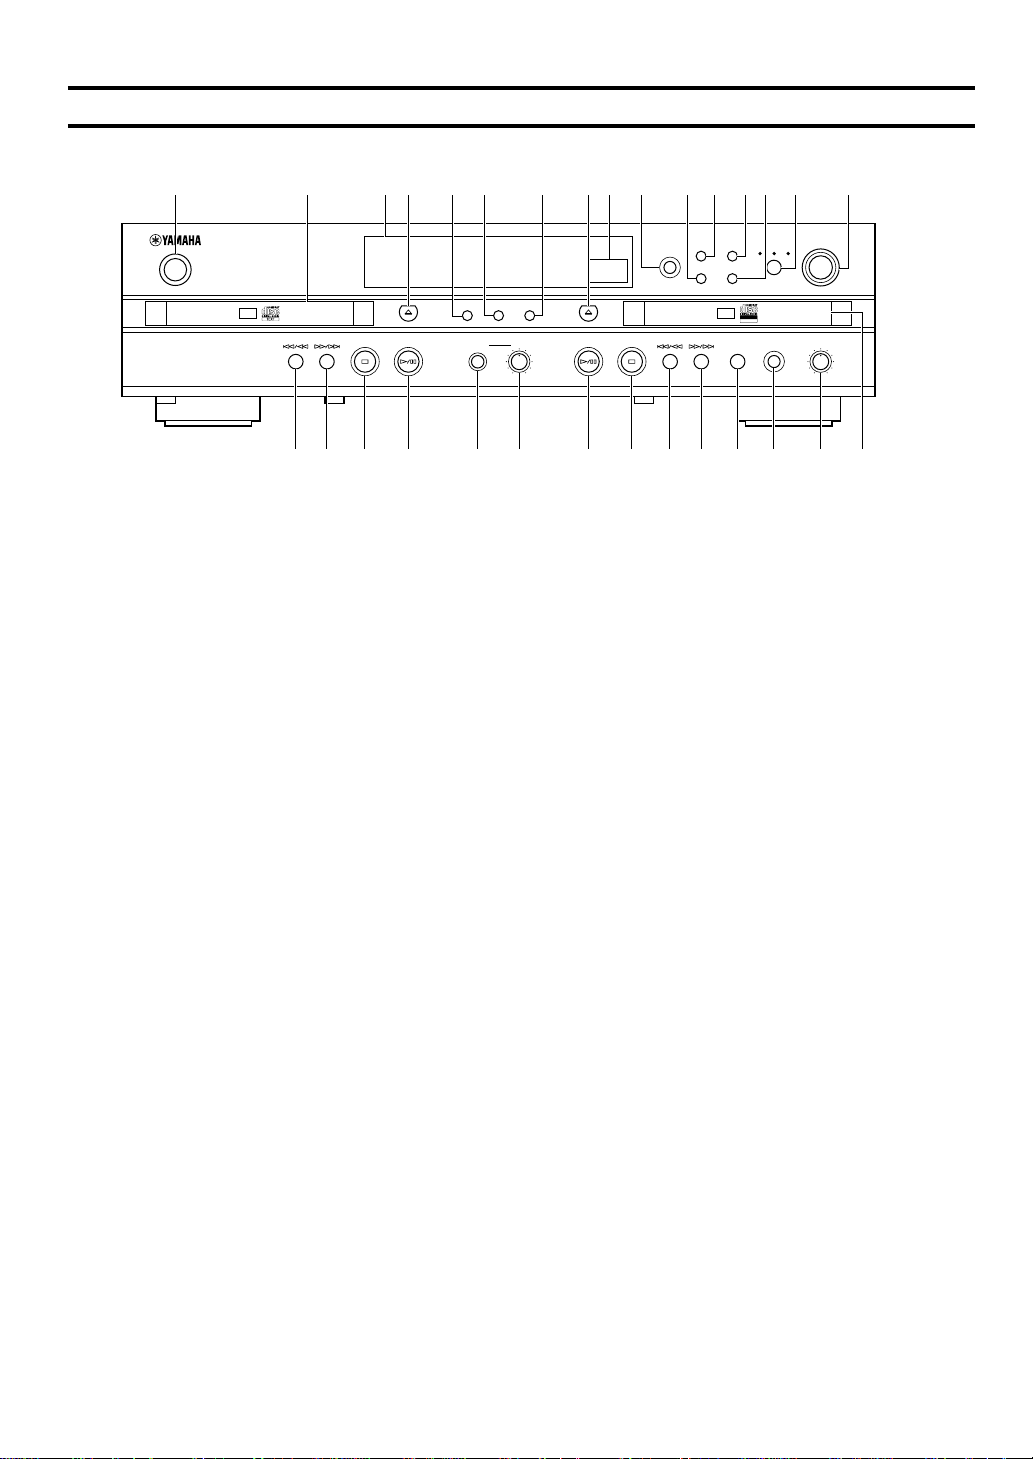
CONTROLS AND FUNCTIONS .................................................
Front Panel
1234567890qwerty
NATURAL SOUND CD RECORDER CDR–D651
POWER
DISC A DISC B
DISPLAY A TEXT/TIME DISPLAY B
PHONES LEVEL
1 POWER ...................................................... P.12,22
2 Disc tray A .................................................. P.14,16
3 Display ............................................................ P.10
4 v (Open/Close for disc tray A)
5 DISPLAY A ..................................................... P.10
6 TEXT/TIME ................................................ P.10,20
MULTI JOG
INPUT
DISC A DIGITAL ANALOG
REC
PUSH MODE
DIGITAL REC LEVEL
ANALOG REC LEVEL
MINFADE IN/OUT MAX
MIN MAX
COPY
REC MODE TRACK NO.
FINALIZE ERASE
REC MUTE
Recordable
ReWritable
uiopasdfghjkl;
u Disc tray B .................................................. P.12,16
i ANALOG REC LEVEL ................................... P.15
o REC FADE IN/OUT .............................. P.13,15,19
p REC MUTE ..................................................... P.19
a r/y (Skip/Search for disc tray B)
s t/e (Skip/Search for disc tray B)
7 DISPLAY B ..................................................... P.10
8 v (Open/Close for disc tray B)
9 Remote control sensor
0 COPY .............................................................. P.16
q FINALIZE ........................................................ P.21
w REC MODE ................................................ P.16,17
e TRACK NO. .................................................... P.15
r ERASE ............................................................ P.18
t INPUT ......................................................... P.13,14
y MULTI JOG ........................................... P.11,15,16
E-8
d a (Stop for disc tray B)
f w/d (Play/Pause for disc tray B)
g PHONES LEVEL ............................................ P.27
h PHONES ......................................................... P.27
j w/d (Play/Pause for disc tray A)
k a (Stop for disc tray A)
l r/y (Skip/Search for disc tray A)
; t/e (Skip/Search for disc tray A)
...................................................CONTROL AND FUNCTIONS
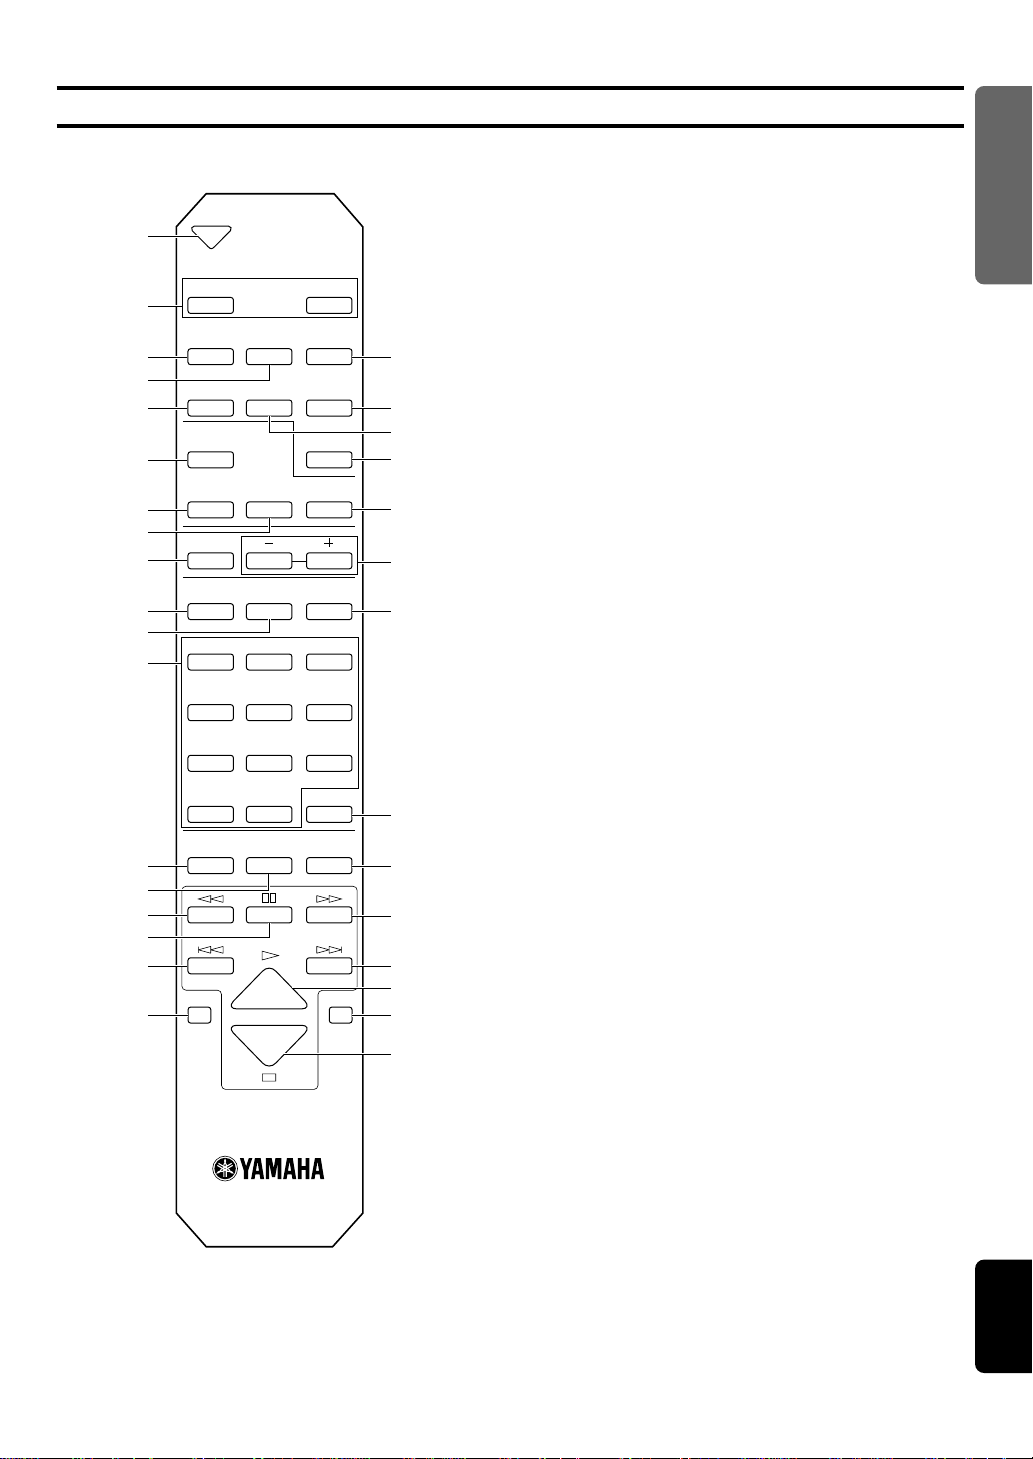
Remote Control
1 COPY .............................................................. P.16
2 OPEN/CLOSE A, B
1
2
3
4
5
6
7
8
9
0
q
w
e
r
t
y
u
i
COPY
A
OPEN/CLOSE
FADE IN/OUT
REC
REC MODE
FINALIZE ERASE
DISPLAY
A/B
TIME TEXT DIMMER
MENU
EDIT DELETE SET
1
ABC2DEF3GHI
4
JKL5MNO6PQR
7
STU8VWX9YZ
0
SPACE
REPEAT RANDOM
A B
TRACK NO.
REC MUTE
+10
SYMBOL
CLEAR
WRITE
INPUT
PROG
B
o
p
a
s
d
f
g
h
j
k
l
;
z
x
3 REC FADE IN/OUT .............................. P.13,15,19
4 REC MUTE ..................................................... P.19
5 REC MODE ................................................ P.16,17
6 DISPLAY A/B ................................................. P.10
7 TIME ................................................................ P.10
8 TEXT .......................................................... P.10,20
9 MENU ......................................................... P.11,16
0 EDIT ................................................................ P.20
q DELETE .......................................................... P.20
w Alphabetical/Numeric buttons ................... P.20,23
e REPEAT .......................................................... P.26
r RANDOM ........................................................ P.25
t e (Search)
y d (Pause)
u t (Skip)
i A (Disc tray A) ................................................ P.24
o TRACK NO. WRITE ....................................... P.15
p ERASE ............................................................ P.18
a FINALIZE ........................................................ P.21
s INPUT ......................................................... P.13,14
d DIMMER .......................................................... P.10
f +, – ............................................................. P.11,16
g SET ................................................................. P.20
h PROG ......................................................... P.24,25
j CLEAR ............................................................ P.25
GETTING STARTED
RECORDING
PLAYBACK
INFORMATION
ADDITIONAL
k r (Search)
l y (Skip)
; w (Play)
z B (Disc tray B) ................................................ P.24
x a (Stop)
E-9
ENGLISH
CONTROL AND FUNCTIONS ...................................................
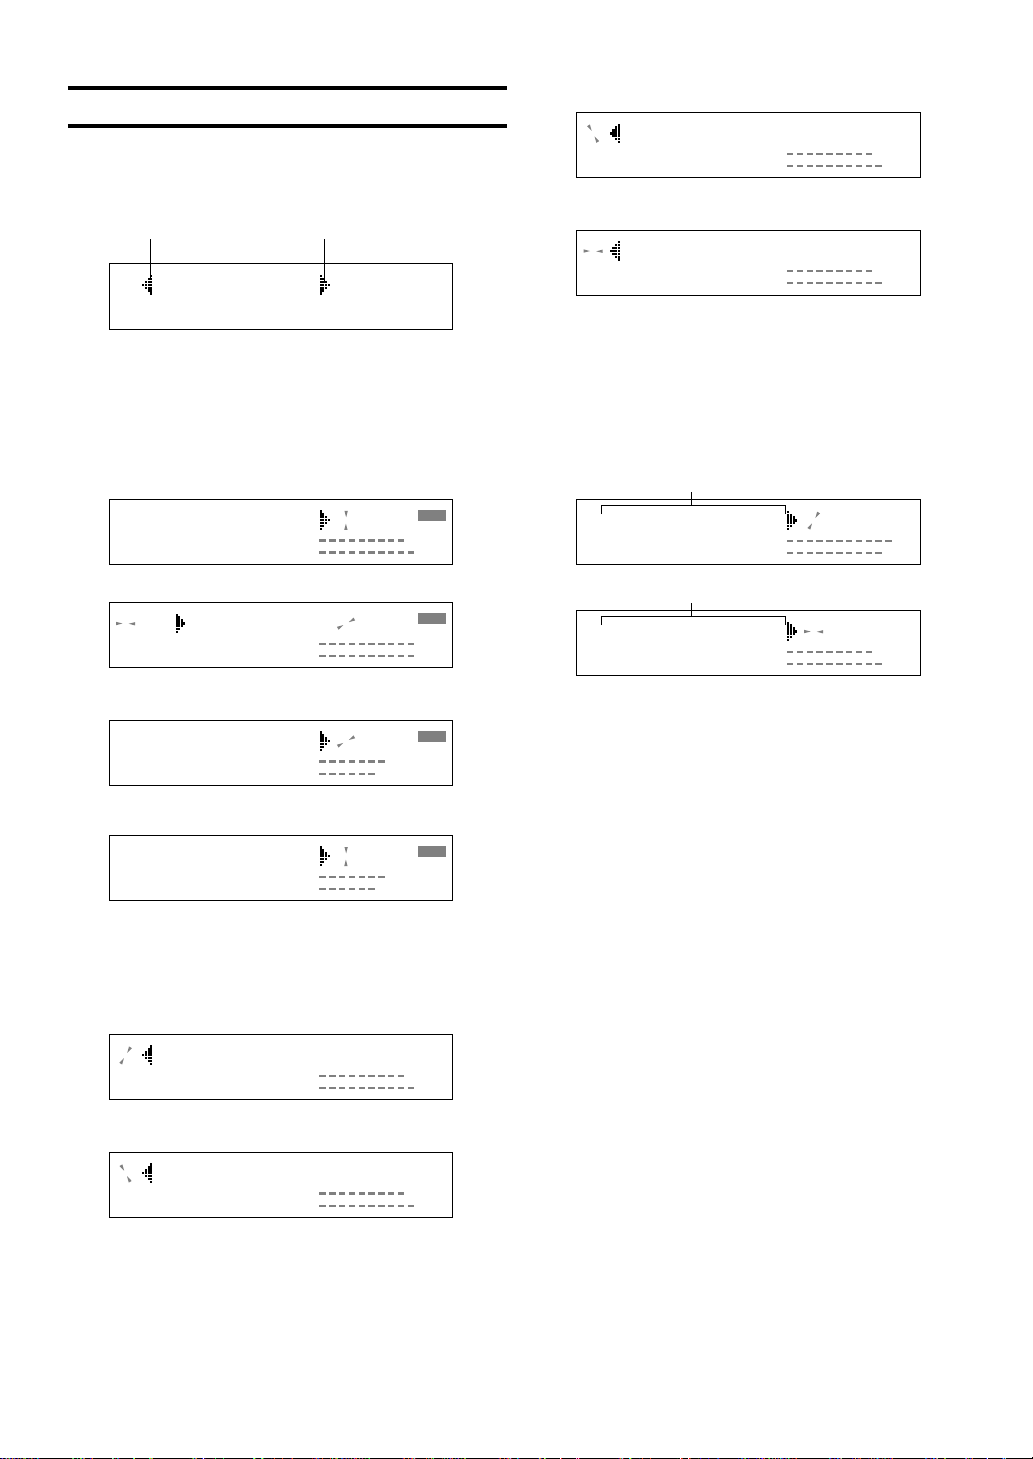
Display
The display located in the center of this unit provides
information about disc A and disc B. Press DISPLAY A or
DISPLAY B on the front panel (DISPLAY A/B on the
remote) to select the disc information you wish to see.
Disc tray A Disc tray B
Open
■ Displays during recording
Recording is done on disc tray B. While recording is being
done, each time TEXT/TIME (TIME on the remote) is
pressed, the display changes as follows:
Elapsed time of the track being recorded
When recording from the LINE IN jack
2 1:41
When making a copy from disc tray A
8 2 1:41
L
–60 –30 –I0 –6 –4 –2 –I0
dB
R
CD–R
L
–60 –30 –I0 –6 –4 –2 –I0
dB
R
CD–R
L
–60 –30 –I0 –6 –4 –2 –I0
dB
R
44.I
44.I
OVER
REC
OVER
REC
OVER
Total disc play time
1 54:36
TOTAL
L
–60 –30 –I0 –6 –4 –2 –I0
dB
R
OVER
Total remaining time on the disc
1 54:24
TOTAL
REMAIN
L
–60 –30 –I0 –6 –4 –2 –I0
dB
R
OVER
■ CD-TEXT displays
This unit is CD-TEXT compatible. When playing a CD with
CD-TEXT data, the disc name and track name are
displayed following after the total remaining time on the
disc, by pressing TEXT/TIME on the front panel. When
using the remote control, press TEXT to display the disc
name and track name.
Disc name
BEATLES BE
TITLE
Track name
YESTERDAY
TRACK
CD
L
–60 –30 –I0 –6 –4 –2 –I0
dB
R
CD
L
–60 –30 –I0 –6 –4 –2 –I0
dB
R
OVER
OVER
Total time recorded on the disc
CD–R
REC
2 7:32
TOTAL
L
–60 –30 –I0 –6 –4 –2 –I0
dB
R
44.I
OVER
Total remaining recording time on the disc
CD–R
REC
2 67:07
TOTAL
REMAIN
L
–60 –30 –I0 –6 –4 –2 –I0
dB
R
44.I
OVER
■ Displays during playback
While a disc is being played, each time TEXT/TIME (TIME
on the remote) is pressed, the display changes as follows:
Elapsed time of the track being played
1 0:12
L
–60 –30 –I0 –6 –4 –2 –I0
dB
R
OVER
Remaining time of the track being played
1 4:27
REMAIN
L
–60 –30 –I0 –6 –4 –2 –I0
dB
R
OVER
When the name contains more than 10 characters, the first
10 characters are displayed after the entire name is shown
scrolled.
■ Display brightness
The brightness of the display can be changed in three
degrees by pressing DIMMER on the remote.
E-10
 Loading...