

Page 1
C D C -7 7 5
NATURAL SOUND COMPACT DISC PLAYER
CHANGEUR AUTOMATIQUE DE COMPACT DISQUES
UCA
OWNER’S MANUAL
CONTENTS
CAUTION ...............................................................4
CONNECTIONS.....................................................5
IDENTIFICATION OF COMPONENTS ..................6
BASIC OPERATION ..............................................8
RANDOM-SEQUENCE PLAY..............................13
PROGRAM PLAY.................................................14
REPEAT PLAY .....................................................16
INDEX SEARCH ..................................................16
DISC FILING ........................................................17
CD SYNCHRONIZED RECORDING ...................20
TRACK PROGRAMMING FOR
RECORDING TO TAPE .......................................21
AUTOMATIC SEARCHING FOR THE PEAK
LEVEL ON A DISC...............................................24
NOTES ABOUT THE REMOTE CONTROL
TRANSMITTER....................................................25
TIMER PLAY ........................................................25
NOTES ABOUT HANDLING
COMPACT DISCS................................................26
TROUBLESHOOTING .........................................27
SPECIFICATIONS ...............................................27
MODE D’EMPLOI
TABLE DES MATIERES
ATTENTION ........................................................ 29
CONNEXIONS .................................................... 30
IDENTIFICATION DES COMPOSANTS............. 31
FONCTIONNEMENT DE BASE.......................... 33
LECTURE EN SÉQUENCE ALÉATOIRE............ 38
LECTURE PROGRAMMÉE ................................ 39
LECTURE REPETÉE.......................................... 41
RECHERCHE D’INDEX ...................................... 41
ARCHIVAGE DES DISQUES...............................42
ENREGISTREMENT SYNCHRONISE D’UN
COMPACT DISQUE............................................ 45
PROGRAMMATION DES PLAGES POUR
ENREGISTREMENT SUR CASSETTE .............. 46
RECHERCHE AUTOMATIQUE DU NIVEAU DE
CRÊTE D’UN DISQUE.........................................49
REMARQUES CONCERNANT LA
TELECOMMANDE.............................................. 50
LECTURE COMMANDÉE PAR
PROGRAMMATEUR............................................50
REMARQUES CONCERNANT LA
MANIPULATION DES DISQUES........................ 51
DEPISTAGE DE PANNES ............. Couverture dos
CARACTERISTIQUES TECHNIQUES
....................................................... Couverture dos
Page 2
CAUTION
RISK OF ELECTRIC SHOCK
DO NOT OPEN
CAUTION: TO REDUCE THE RISK OF
ELECTRIC SHOCK, DO NOT REMOVE
COVER (OR BACK). NO USER-SERVICEABLE
PARTS INSIDE. REFER SERVICING TO
QUALIFIED SERVICE PERSONNEL.
• Explanation of Graphical Symbols
The lightning flash with arrowhead
symbol, within an equilateral triangle, is
intended to alert you to the presence of
uninsulated “dangerous voltage” within
the product’s enclosure that may be of
sufficient magnitude to constitute a risk
of electric shock to persons.
The exclamation point within an
equilateral triangle is intended to alert
you to the presence of important
operating and maintenance (servicing)
instructions in the literature
accompanying the appliance.
IMPORTANT!
Please record the serial number of this unit in
the space below.
Model:
Serial No.:
The serial number is located on the rear of the
unit.
Retain this Owner’s Manual in a safe place for
future reference.
SAFETY INSTRUCTIONS
1 Read Instructions – All the safety and operating
instructions should be read before the unit is operated.
2 Retain Instructions – The safety and operating instructions
should be retained for future reference.
3 Heed Warnings – All warnings on the unit and in the
operating instructions should be adhered to.
4 Follow Instructions – All operating and other instructions
should be followed.
5 Water and Moisture – The unit should not be used near
water – for example, near a bathtub, washbowl, kitchen
sink, laundry tub, in a wet basement, or near a swimming
pool, etc.
WARNING
TO REDUCE THE RISK OF FIRE OR ELECTRIC
SHOCK, DO NOT EXPOSE THIS unit TO RAIN
OR MOISTURE.
11 Power-Cord Protection – Power-supply cords should be
routed so that they are not likely to be walked on or
pinched by items placed upon or against them, paying
particular attention to cords at plugs, convenience
receptacles, and the point where they exit from the unit.
12 Cleaning – The unit should be cleaned only as
recommended by the manufacturer.
13 Nonuse Periods – The power cord of the unit should be
unplugged from the outlet when left unused for a long
period of time.
14 Object and Liquid Entry – Care should be taken so that
objects do not fall into and liquids are not spilled into the
inside of the unit.
6 Carts and Stands – The unit should be used only with a
cart or stand that is recommended by the manufacturer.
6A A unit and cart combination should be
moved with care. Quick stops, excessive
force, and uneven surfaces may cause the
unit and cart combination to overturn.
7 Wall or Ceiling Mounting – The unit should
be mounted to a wall or ceiling only as
recommended by the manufacturer.
8 Ventilation – The unit should be situated so that its location
or position does not interfere with its proper ventilation.
For example, the unit should not be situated on a bed,
sofa, rug, or similar surface, that may block the ventilation
openings; or placed in a built-in installation, such as a
bookcase or cabinet that may impede the flow of air
through the ventilation openings.
9 Heat – The unit should be situated away from heat sources
such as radiators, stoves, or other appliances that produce
heat.
10 Power Sources – The unit should be connected to a power
supply only of the type described in the operating
instructions or as marked on the unit.
2
15 Damage Requiring Service – The unit should be serviced
by qualified service personnel when:
A. The power-supply cord or the plug has been
damaged; or
B. Objects have fallen, or liquid has been spilled into the
unit; or
C. The unit has been exposed to rain; or
D. The unit does not appear to operate normally or
exhibits a marked change in performance; or
E. The unit has been dropped, or the cabinet damaged.
16 Servicing – The user should not attempt to service the unit
beyond those means described in the operating
instructions. All other servicing should be referred to
qualified service personnel.
17 Power Lines – An outdoor antenna should be located away
from power lines.
18 Grounding or Polarization – Precautions should be taken
so that the grounding or polarization is not defeated.
Page 3
FCC INFORMATION (for US customers only)
English
1. IMPORTANT NOTICE : DO NOT MODIFY THIS UNIT!
This product, when installed as indicated in the
instructions contained in this manual, meets FCC
requirements. Modifications not expressly approved by
Yamaha may void your authority, granted by the FCC, to
use the product.
2. IMPORTANT : When connecting this product to
accessories and/or another product use only high quality
shielded cables. Cable/s supplied with this product
MUST be used. Follow all installation instructions.
Failure to follow instructions could void your FCC
authorization to use this product in the USA.
3. NOTE : This product has been tested and found to
comply with the requirements listed in FCC Regulations,
Part 15 for Class “B” digital devices. Compliance with
these requirements provides a reasonable level of
assurance that your use of this product in a residential
environment will not result in harmful interference with
other electronic devices.
This equipment generates/uses radio frequencies and, if
not installed and used according to the instructions found
in the users manual, may cause interference harmful to
the operation of other electronic devices.
Compliance with FCC regulations does not guarantee that
interference will not occur in all installations. If this product
is found to be the source of interference, which can be
determined by turning the unit “OFF” and “ON”, please try
to eliminate the problem by using one of the following
measures:
Relocate either this product or the device that is being
affected by the interference.
Utilize power outlets that are on different branch (circuit
breaker or fuse) circuits or install AC line filter/s.
In the case of radio or TV interference, relocate/reorient the
antenna. If the antenna lead-in is 300 ohm ribbon lead,
change the lead-in to coaxial type cable.
If these corrective measures do not produce satisfactory
results, please contact the local retailer authorized to
distribute this type of product. If you can not locate the
appropriate retailer, please contact Yamaha Electronics
Corp., U.S.A. 6660 Orangethorpe Ave, Buena Park, CA
90620.
The above statements apply ONLY to those products
distributed by Yamaha Corporation of America or its
subsidiaries.
WARNING
CAUTION
Use of controls or adjustments or performance of
procedures other than those specified herein may result in
hazardous radiation exposure.
DANGER
Invisible laser radiation when open and interlock failed or
defeated.
Avoid direct exposure to beam.
Laser Diode Properties
• Material: GaAlAs
• Wavelength: 780nm
• Emission Duration: continuous
• Laser Output: max. 44.6µW*
* This output is the value measured at a distance of about
200mm from the objective lens surface on the Optical Pickup Block.
We Want You Listening For A Lifetime
YAMAHA and the Electronic Industries Association’s Consumer
Electronics Group want you to get the most out of your
equipment by playing it at a safe level. One that lets the sound
come through loud and clear without annoying blaring or
distortion – and, most importantly, without affecting your
sensitive hearing. Since hearing damage from loud sounds is
As the laser beam used in this compact disc player is harmful
to the eyes, do not attempt to disassemble the cabinet. Refer
servicing to qualified personel only.
To avoid electrical shock, do not open the unit. Refer servicing
to qualified personnel only.
DANGER: The use of optical instrument with this product will
increase eye hazard.
For Canadian Customers
To prevent electric shock, match wide blade of plug to wide slot
and fully insert.
This Class B digital apparatus complies with Canadian ICES-003.
often undetectable until it is too late, YAMAHA
and the Electronic Industries Association’s
Consumer Electronics Group recommend you
to avoid prolonged exposure from excessive
volume levels.
3
Page 4
CAUTION: READ THIS BEFORE OPERATING YOUR UNIT
1 To ensure the finest performance, please read this manual
carefully. Keep it in a safe place for future reference.
2 Install your unit in a cool, dry, clean place, and in a
horizontal and stable position – away from windows, heat
sources, vibration, dust, moisture, or cold. To avoid
humming sounds, locate the unit away from other electrical
appliances, motors, and transformers. To prevent fire or
electrical shock, do not expose to rain and water.
3 Do not operate the unit upside-down. It may overheat,
possibly causing damage.
4 Never open the cabinet. If a foreign object drops into the
set, contact your dealer.
5 Do not use force on switches, knobs or cords.
6 Do not attempt to clean the unit with chemical solvents;
this might damage the finish. Use a clean, dry cloth.
7 Be sure to read the “TROUBLESHOOTING” section on
common operating errors before concluding that your unit
is faulty.
8 Do not place another component on top of this unit,
because to do so will discolor or damage the surface of the
unit.
9 To prevent damage by lightning, disconnect the power cord
from the household AC outlet during an electrical storm.
10 When disconnecting the power cord from the household
AC outlet, grasp the plug; do not pull the cord.
CAUTION FOR CARRYING THIS UNIT
Be sure not to carry or tip this unit with discs remaining in it.
CAUTION FOR MOVING THIS UNIT
When moving this unit, first remove all discs from the disc tray and
close the tray by pressing the OPEN/CLOSE button. After you
confirm that the display lights up as shown below, switch off the
power by pressing the POWER switch, and then disconnect the
power plug from the AC outlet.
Never switch off the power until the display lights up as above,
otherwise this unit will break down during moving because the
internal mechanism is not locked.
FEATURES
● 5-Disc Carousel Auto-changer
● Full Opening Disc Tray for Changing 5
Discs at a Time
● PLAYXCHANGE; Disc Changing
Capability while Playing Another
● CD TEXT Compatibility
● Text Search
● Random Access Programmable Play
● Random-Sequence Play
● Single Track/Entire Disc/All Disc Repeat
Play
● Disc Scanning Capability Useful for Disc
Searching or Disc Checking
● CD Synchronized Recording with a
Compatible Y AMAHA Tape Deck
● Optical Digital Output
● Automatic Programming for Recording to
Tape
● Disc/Artist Name Filing Capability
● Favorite Tracks on Each Disc Filing
Capability
● Automatic Peak Level Searching
Capability
● Adjustable Display Brightness
● Remote Control Capability
4
● Timer Play Option
● Adjusting the Output Level
● PHONES jack
Page 5
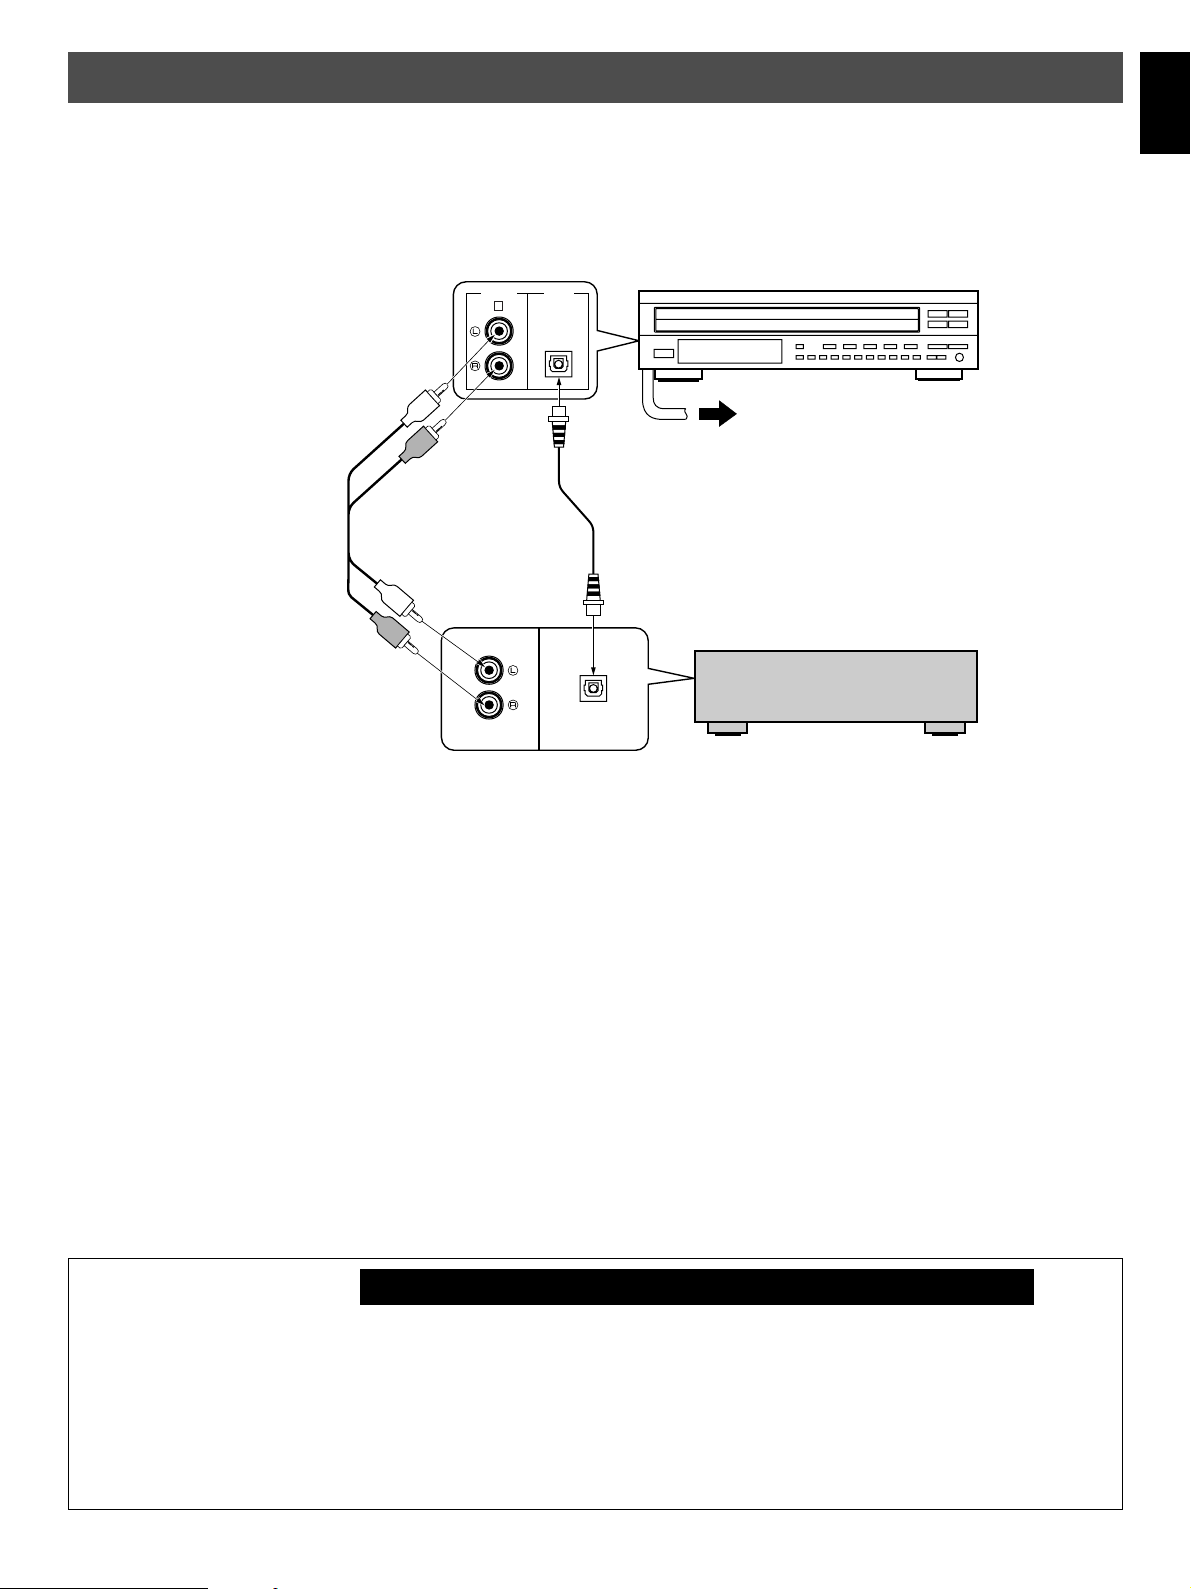
CONNECTIONS
Never plug in this unit and other components until all connections are completed.
English
● Before making any connections, switch OFF the power to
the unit and the amplifier or other components.
● Connections should be made to the correct input terminals
of the amplifier or other components.
L IN E O U T
1
➊ Connection cord
(included)
D I G IT A L
A U D IO
O U T
O P T I C A L
➋
Optical fiber cable
(not included)
O P T I C A L
D IG IT A L INC D
● If the placement of this unit causes noise in other
equipment, such as a tuner, separate them from each other.
CDC-775
T o AC outlet
Amplifier
Choose one of the ways listed below to connect this unit to your amplifier.
When the LINE OUT (analog) terminals of this
unit are used ( ➊ )
● Be sure that the left (“L”) and right (“R”) LINE OUT terminals
are connected to the corresponding (left and right) terminals
of the amplifier or other components.
● Connect the “LINE OUT” terminals to the “CD” (or “AUX”)
terminals of the amplifier. If the amplifier does not have
such terminals, use the “TAPE PB” terminals. For additional
details concerning these connections, refer to the operating
instructions for the amplifier being used.
● The LINE OUT terminals of this unit are numbered 1. When
connecting this unit with a YAMAHA amplifier or receiver
whose terminals on the rear panel are numbered as 1, 2,
3, etc., connect the LINE OUT terminals of this unit to the
input terminals numbered 1 on the rear of the amplifier or
receiver.
For Custom Installer
For U.S.A., Canada and Australia models of CDC-775 only
When the DIGITAL AUDIO OUT (OPTICAL)
terminal of this unit is used ( ➋ )
● Before using this terminal, remove the terminal’s cover by
pulling it.
● Make the connection from this terminal to the optical input
terminal of an amplifier by using a commercially available
optical fiber cable.
* Be sure to use a high quality optical fiber cable. Other
cables might not function correctly.
● This terminal can also be connected to the optical input
terminal of a digital audio tape deck (DAT), etc. to record CD
onto tape directly.
● Be sure to attach the terminal cover when this terminal is not
being used in order to protect the terminal from dust.
● Set the level of signals output into an amplifier to max. by
using the OUTPUT LEVEL buttons.
REMOTE CONTROL (IN, OUT) terminals
These terminals are used for custom installation system.
When this unit is connected to the components for custom
installation system, you can operate this unit with the system
remote control.
Connect the REMOTE CONTROL IN terminal of this unit to
the output terminal of the central controller for custom
installation system.
By connecting the REMOTE CONTROL OUT terminal of this
unit to the REMOTE CONTROL IN terminal of the other
component, you can also operate it with the system remote
control. In this way, up to 6 components can be connected in
series.
5
Page 6
IDENTIFICATION OF COMPONENTS
* ( ) indicates the page number on which the control and its function are best described.
FRONT PANEL
* The control functions on the main unit and on the remote
control transmitter are virtually identical, with the exceptions
below.
DISC-select buttons (p. 8)
AUTO DISPLAY OFF indicator (p. 12)
Disc tray (p. 8)
N A T U R A L S O U N D C O M P A C T D IS C P L A Y E R
A UT O
D IS P LA Y O F F
P O W E R
P R OG
* The
(PLAY/PAUSE) button on the main unit has both
the functions of the PLAY button and the PAUSE button on
the remote control transmitter.
Play/Pause button (p. 8, 9)
PLAYXCHANGE button (p. 9)
O P EN / C LO S E
/
P LA Y X C H A N G E
1 2 3 4
+1 0
2 3 4 5 6 7 8 9 0
1
D IS C
5
PE A K
S K IP /S E A R C H
O U TP U T L E V E L
P HO N E S
+–
Remote control sensor (p. 25)
POWER switch (p. 8)
Display panel
PHONES jack (p. 12)
6
Page 7
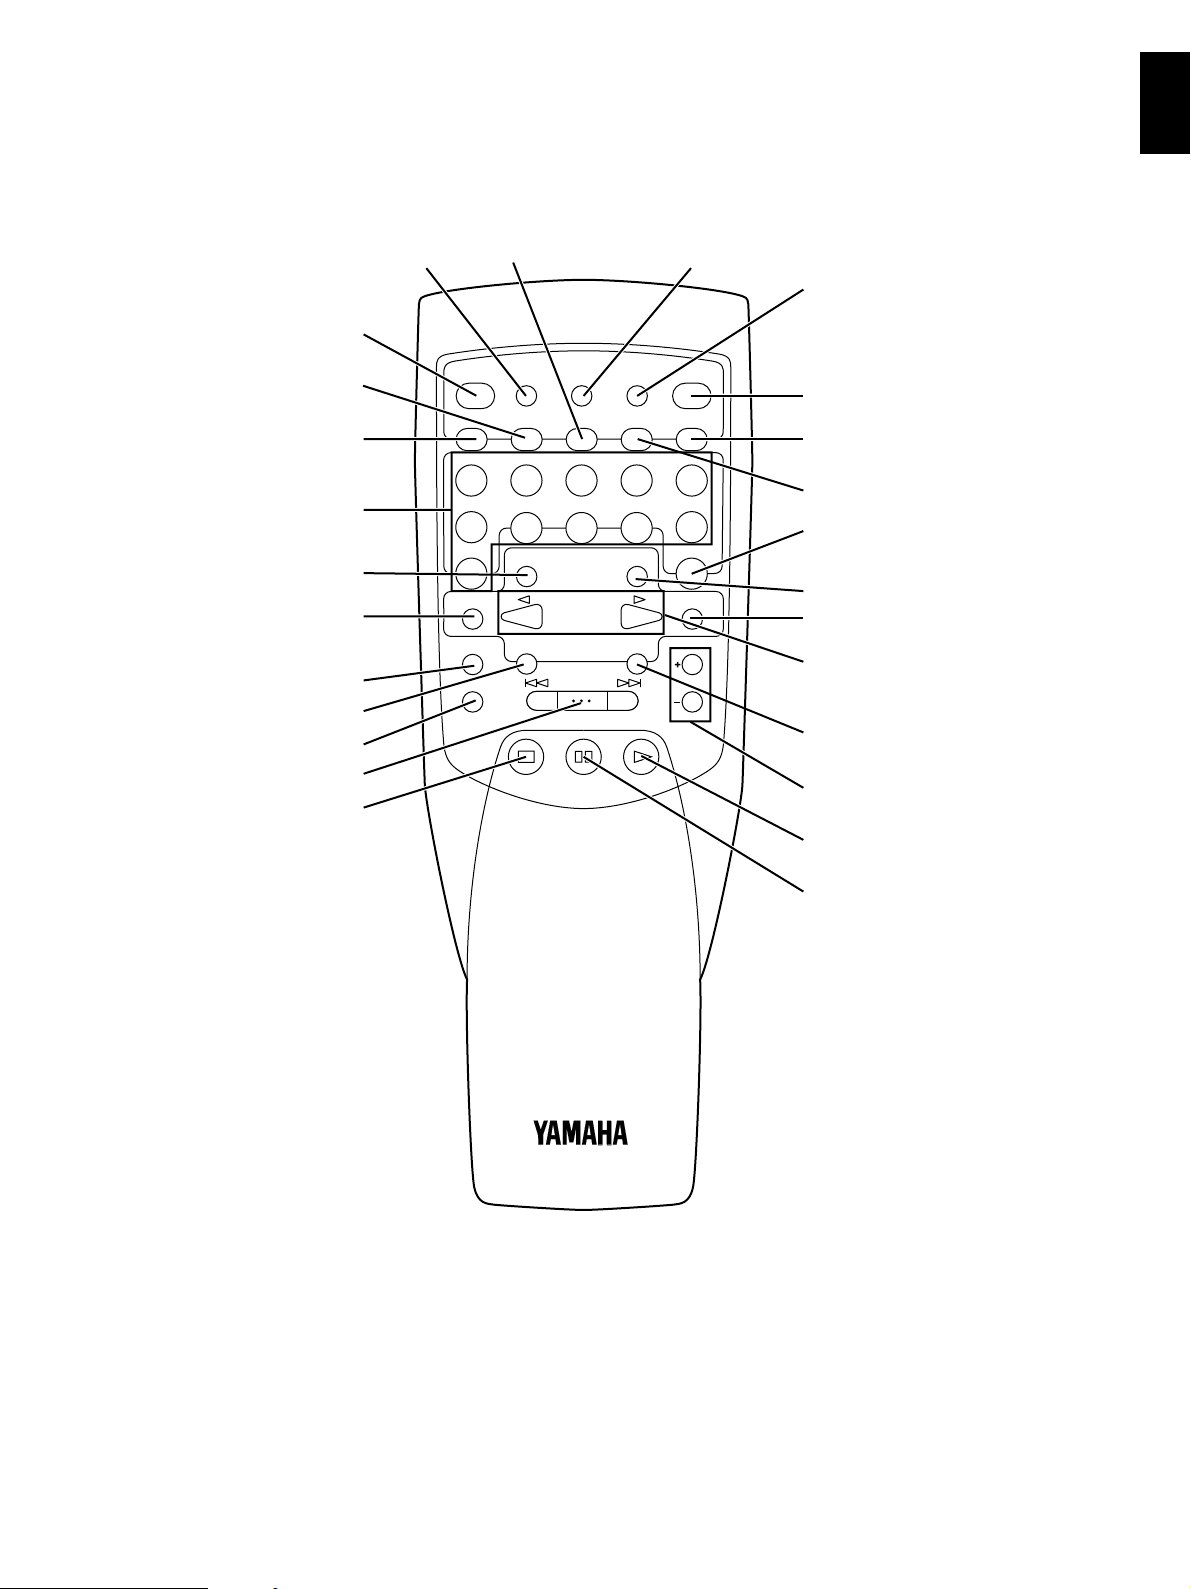
REMOTE CONTROL TRANSMITTER
English
PEAK button (p. 24)
SYNCHRO button (p. 20)
RANDOM button (p. 13)
REPEAT button (p. 16)
Numeric buttons (p. 10)
FILE EDIT button (p. 17)
CAPS button (p. 17)
DISC MODE button (p. 8)
TEXT MODE button (p. 11)
DISC SCAN button (p. 11)
SKIP/SEARCH button (p. 10)
STOP button (p. 9)
TAPE button (p. 21)
S Y N C H R O
R E P E A T R A N D O M T A P E C L E A R
1 2 3 4 5
6 7 8 9 0
+1 0
C A P S E N T E R
D I S C M O D E
D I S C S C A N O U T P U T L E V E L
D I M M E RP E A K T I M E
F I L E M O D EF I L E E D IT
D I S C S K I P /
C H A R A C T E R
T E X T S R C HT E X T M O D E
S K IP /S E A R C H
S T O P P A U S E P L A Y
DIMMER button (p. 12)
O P E N /
C L O S E
P R O G
IN D E X
TIME display mode-select button
(p. 11)
OPEN/CLOSE button (p. 8)
PROG button (p. 14)
CLEAR button (p. 15)
INDEX button (p. 16)
FILE MODE button (p. 19)
ENTER button (p. 17)
DISC SKIP/CHARACTER buttons
(p. 8, 17)
TEXT SRCH button (p. 18)
OUTPUT LEVEL buttons (p. 12)
PLAY button (p. 8)
PAUSE button (p. 9)
7
Page 8
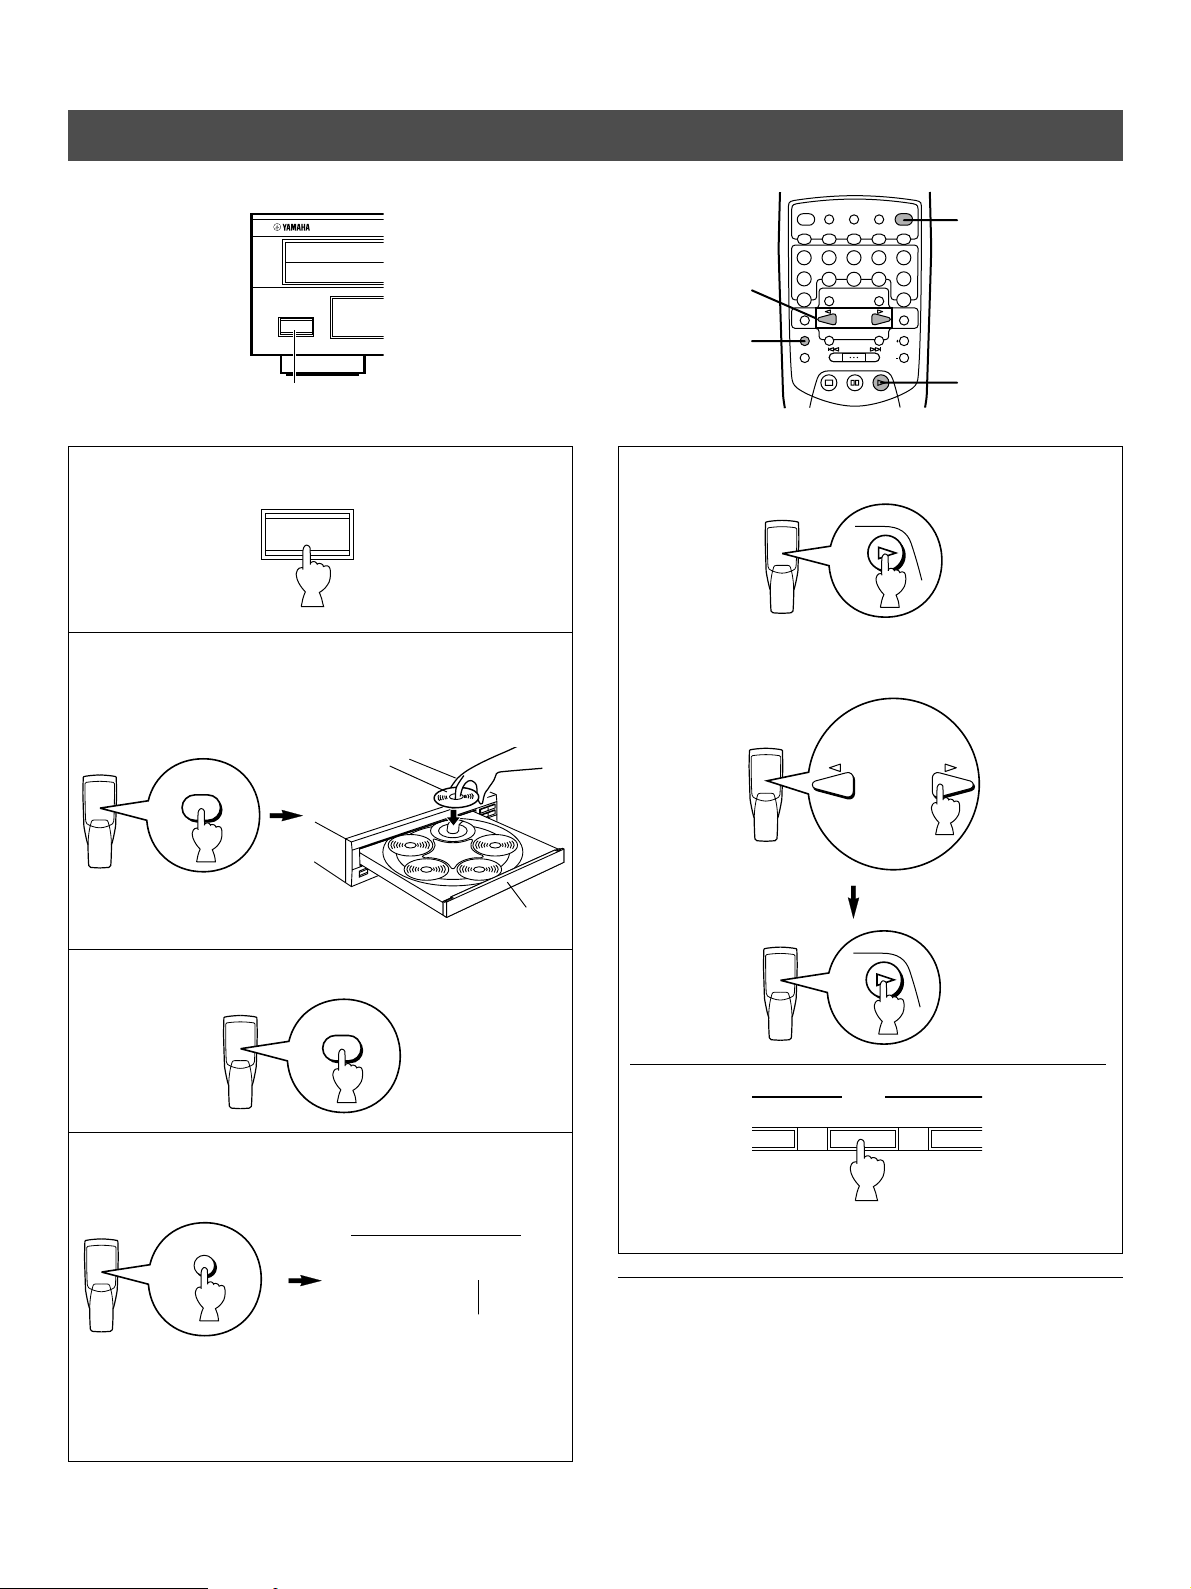
A
This manual describes how to operate this unit by using the remote control transmitter.
D I S C S K I P /
C H A R A C T E R
To operate this unit on the front panel, use the corresponding buttons on the front panel.
BASIC OPERATION
N A TU R A L SO U N D C O M P
PO W E R
1
1 Turn the power on.
P O W E R
2 Open the disc tray and load discs.
Use the disc guides to align the discs correctly in the
tray.
O P E N /
C L O S E
Label side
upward
D IM M E R TI M E
D IS C S K I P/
C H AR A C T ER
S K IP /S E AR C H
O PE N /
C LO S E
P RO G
IN D E X
F ILE M O D EF ILE ED I T
T EX T SR C HT EX T M O D E
2, 3
5
4
S Y N C HR O
P EA K
R EP E A T R A N D O M T A P E C LE A R
1 2 3 4 5
6 7 8 9 0
+1 0
C A PS EN T ER
D IS C M O D E
D IS C S C A N O U TP U T L EV E L
S TO P P A U S E P LA Y
5
5 Start play from the first track of the disc 1.
P L A Y
* If necessary, select a desired disc by using the DISC
SKIP/CHARACTER buttons or a DISC-select button.
Disc tray
3 Close the disc tray.
O P E N /
C L O S E
4 Select a desired disc play mode (1DISC or 5DISCS)
confirming it on the display.
D I S C M O D E
Shows the selected disc
mode.
“1DISC” mode: The unit will play a designated disc only.
“5DISCS” mode: The unit will play all discs on the tray in
sequence.
1DISC
5DISCS
P L A Y
D IS C
2 3 4
(On the front panel)
To turn off the power
Press the POWER switch again.
8
Page 9
Notes
● After closing the disc tray by pressing the OPEN/CLOSE
button or selecting any disc by using the DISC SKIP button
when this unit is stopped, the display shows the total
number of tracks and the total recorded time of the selected
disc for a few seconds.
5DISCS
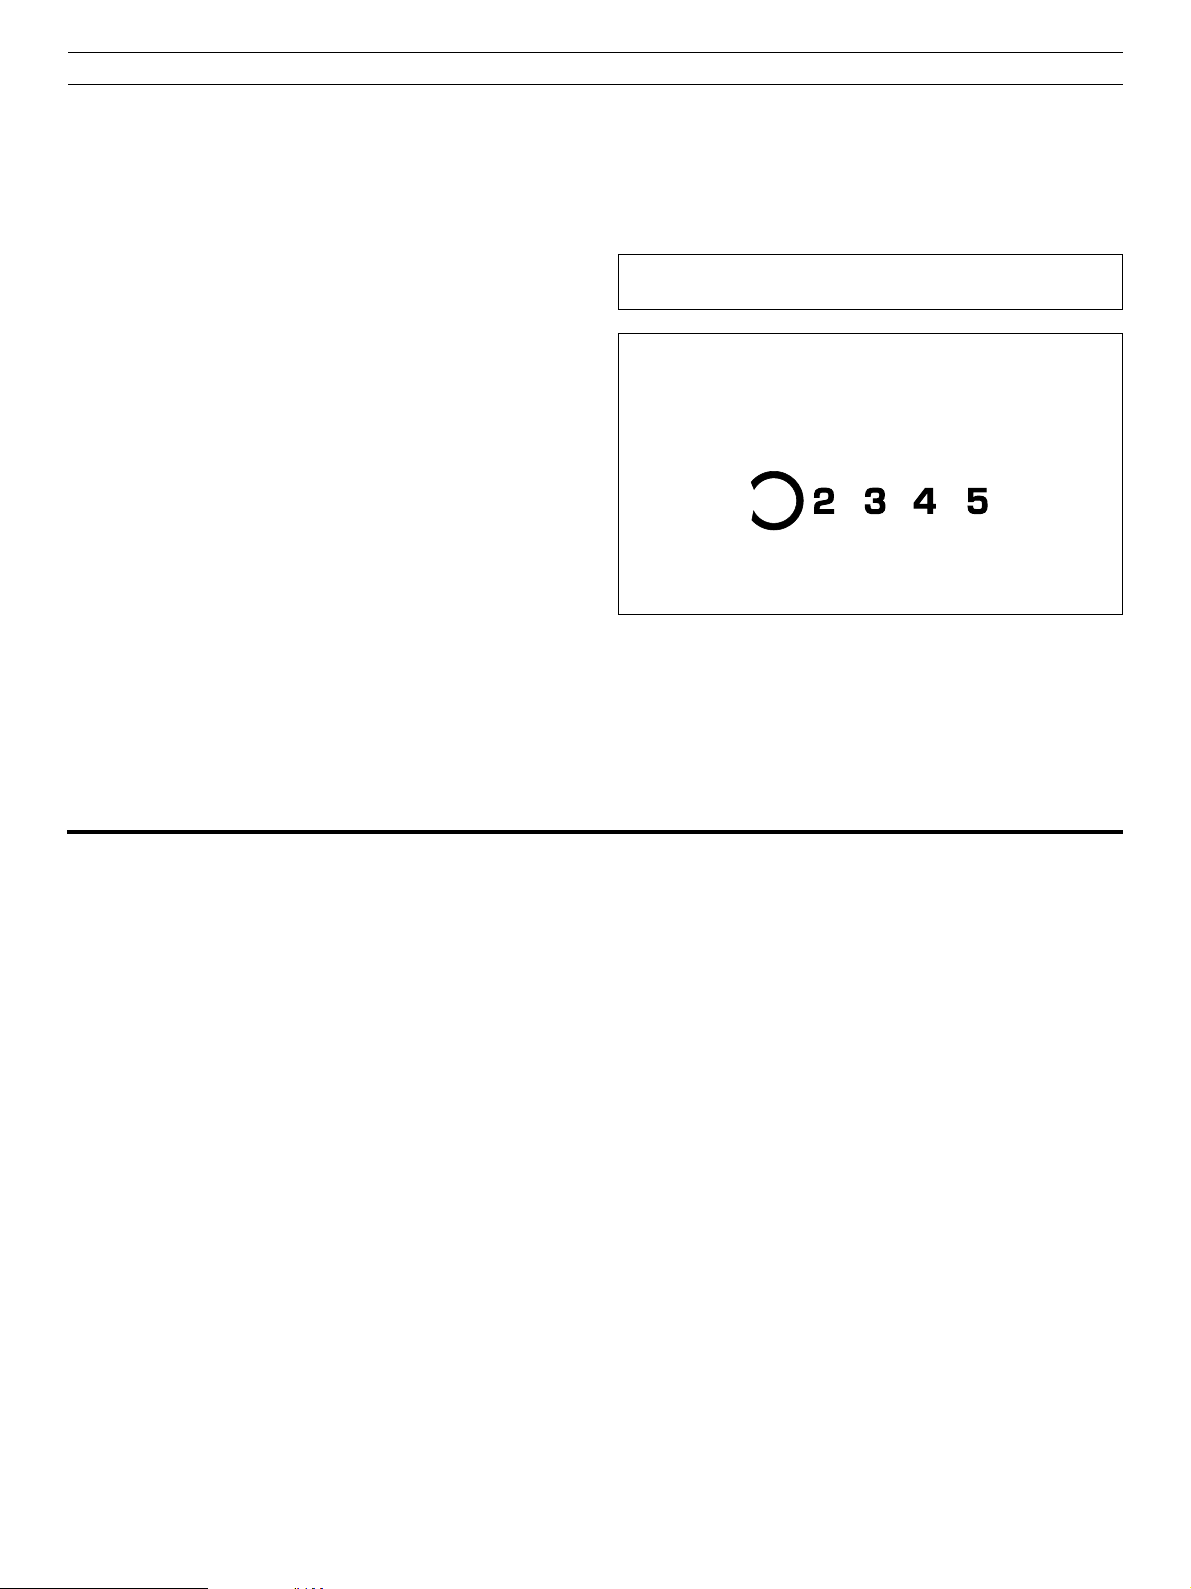
12 34 5
67 8910
11 12
Display information at disc play
➀ ➄
➁
5DISCS
➂➃➅
34 5
67 8910
11 12
English
● You can also close the disc tray by pressing the PLAY
(
) button, a DISC-select button on the front panel, a
numeric button or the RANDOM button, or by pressing the
front edge of the disc tray gently. If the tray is closed in
these ways, play will begin automatically, however, the
display will not show the total number of tracks and the total
recorded time of the first selected disc.
PLAYXCHANGE
During play, you can open the disc tray by pressing the
PLAYXCHANGE button on the front panel without interrupting
disc play . However, in this case, pressing the DISC SKIP
button has no effect. You can load or replace discs on the
trays when the disc tray is opening, however, never load a
disc on the tray hidden inside the unit. If doing so, the
disc and the unit may be damaged, because the tray
already has a disc, which is being played.
To stop play temporarily
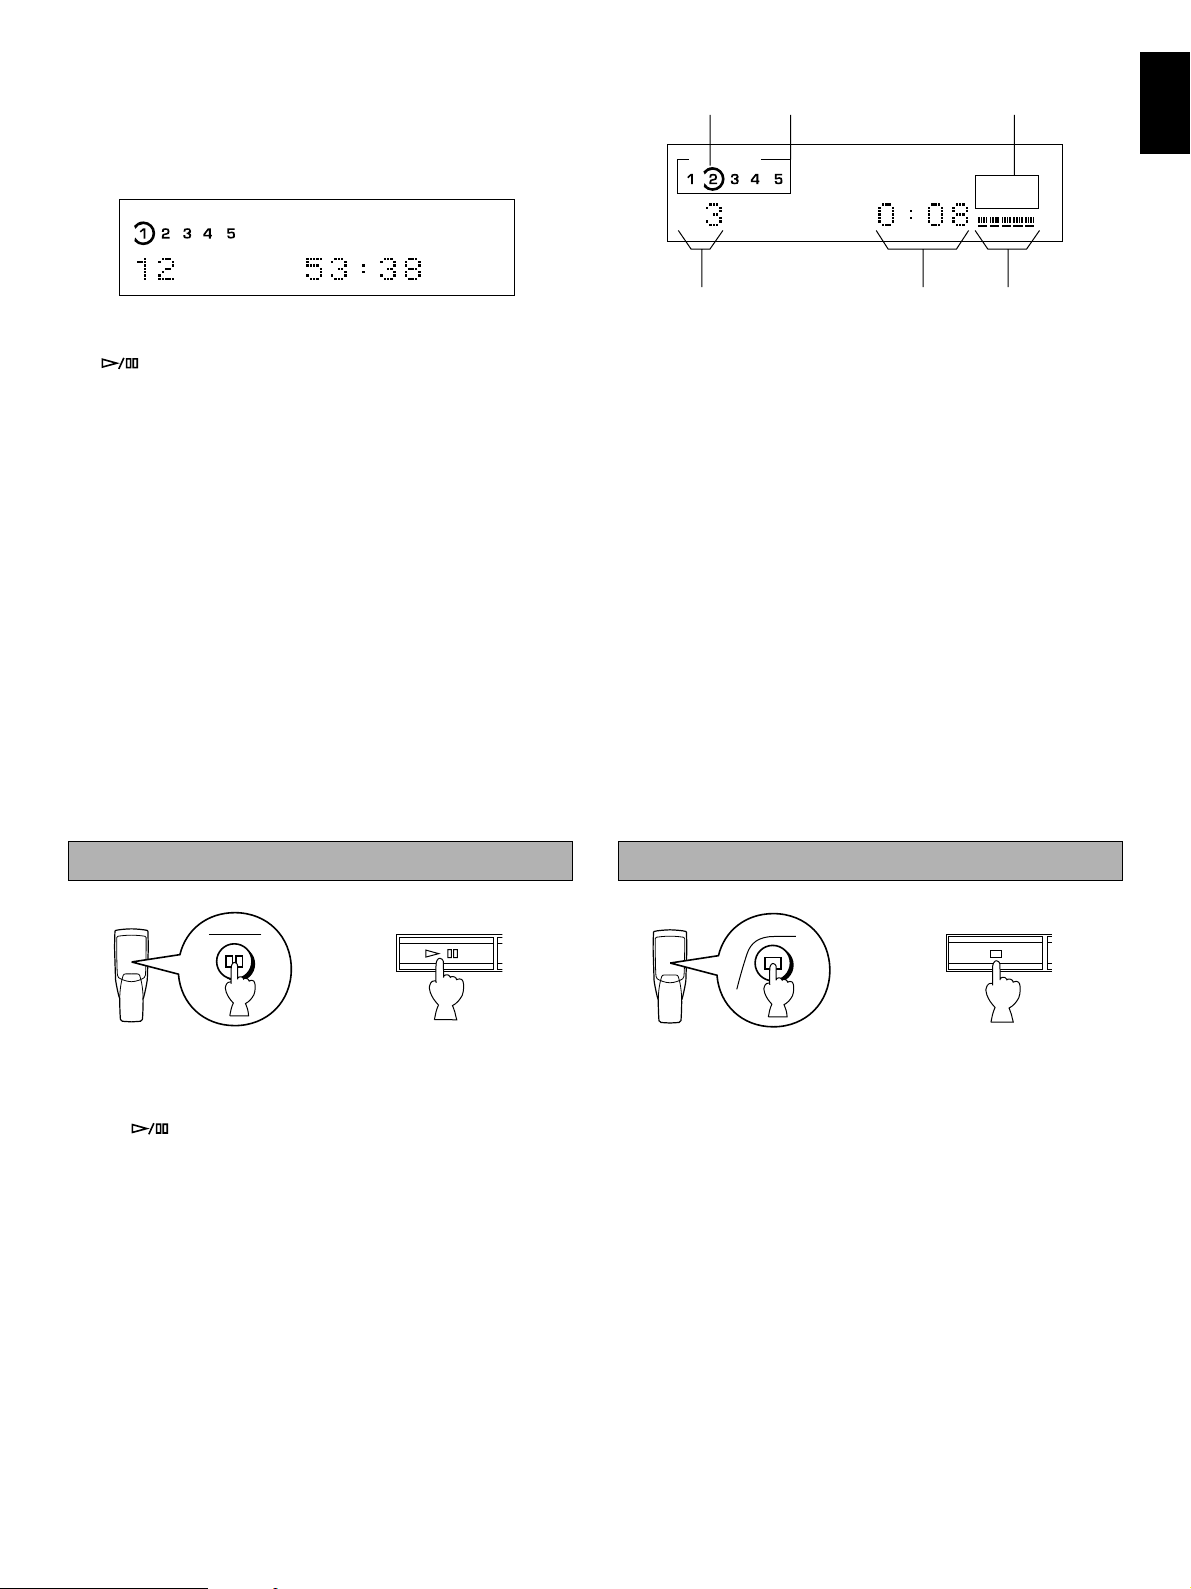
➀ Encloses the tray number of the selected disc.
➁ The numbers corresponding to trays that contain discs light
up after discs are selected.
➂ Shows the selected track number.
➃ Shows the time displays. (Refer to “Selecting time
displays” and “Selecting text displays” on page 11.)
➄ Displays the numbers that correspond to the numbers of
the tracks (as high as number 20) on the selected disc.
After each track is played, its corresponding number
disappears so the number of remaining tracks (and their
numbers) can be seen at a glance.
➅ Shows the level of signals output into an amplifier or the
headphones level adjusted by using the OUTPUT LEVEL
buttons.
To play an 8-cm (3-inch) CD
Place it in the inner recessed area of the disc tray. Do not put
a normal (12-cm/5-inch) CD on top of an 8-cm CD.
To stop play completely
P A U S E
/
or
(On the front panel)
To resume play, press the PAUSE button again (or press the
PLAY button).
* The (PLAY/PAUSE) button on the front panel can also
be used to stop play temporarily or to resume play.
S T O P
or
(On the front panel)
9
Page 10

To play a desired track on the disc
S K IP /S E A R C H
S K IP /S E A R C H
S K IP /S E A R C H
DIRECT PLAY
Select a desired track by using the numeric buttons.
5
1DISC
67 8910
11 12
The selected track number is displayed.
Example: To select track 25
Press ➀ twice, then immediately press ➁ once.
+
1 0
5
➀➁
SKIP PLAY
To play from the beginning of the track following the one now
playing
To play from the beginning of the track now playing
5
To play from the beginning of the track before the one now
playing
* If a track number higher than the highest track number on
the disc is selected, the last track on the disc will be played.
To play forward or backward rapidly (MANUAL SEARCH)
To go forward rapidly
S K IP /S E A R C H
(Press and hold.)
To go backward rapidly
(Twice)
● These operations can also be performed when the unit is
paused or stopped.
● When using the SKIP/SEARCH buttons:
* Be careful not to press and hold a button, otherwise the
selected track is played forward (or backward) rapidly.
●The sound can be heard (although slightly garbled) during
manual search in either direction. This is convenient for
locating a precise position within a track, or for reviewing the
contents quickly.
● Manual search can also be performed while disc play is
paused. In this case, no sound will be heard.
● When using the SKIP/SEARCH buttons:
* Be careful not to release the button just after it is
pressed, otherwise the play is skipped to the beginning of
the next track or returned to the beginning of the current
track.
S K IP /S E A R C H
(Press and hold.)
10
Page 11

Scanning discs to search for a desired disc (or to check discs on the disc tray)
D I S C S C A N
When the DISC SCAN button is pressed in stop mode, this unit
will play a section of each disc in turn for 8 seconds.
If, during this play, you find a disc that you want to listen to,
press the DISC SCAN button once again or press the PLAY
button to cancel this function. The unit will enter into the
normal play mode.
Notes
● During this play, the disc tray numbers blink in the display.
Every time the play of a disc is finished, the corresponding
● If the disc being played has a long blank space between
tracks, you will hear no sound during disc scan.
tray number is changed from flashing to lighting.
Selecting time displays
Y ou can select any of the four time displays by pressing the TIME display mode-select button. Each time you press the TIME display
mode-select button, the display changes as follows.
English
➀ Elapsed time of the track now playing
5DISCS
67 8910
11 12
➃ Total remaining time on the disc
5DISCS
67 8910
11 12
23 45
23 45
➁ Remaining time of the track now playing
5DISCS
T I M E
➂ Total disc play time
5DISCS
23 45
67 8910
11 12
23 45
67 8910
11 12
Note
The remaining time
➁ will not be displayed if the track number
is 21 or higher.
Selecting text displays
Y ou can select any of the text displays by pressing the TEXT MODE button. Each time you press the TEXT MODE button, the
display changes as follows.
When playing back a CD TEXT disc
Elapsed time of the
track now playing
Disc title
Artist name
Track name
Notes
● You cannot change the CD TEXT data.
● The track name is displayed only when the current disc is a
CD TEXT disc and has the track name data.
T E X T M O D E
When playing back a disc without CD TEXT
Elapsed time of the
track now playing
Disc title
Artist name
● Information on CD TEXT discs varies. If the disc title, artist
names, and track names are not present on a CD TEXT
disc, “(NO ENTRY)” appears in the appropriate text display.
● When standard CDs (without CD TEXT) do not have title
and artist information field in memory, “(NO ENTRY)”
appears in the display. For information about filing title and
artist names in memory, see page 17.
11
Page 12

Changing brightness of the display
P H O N E S
You can change the brightness of the display (or turn off the illumination) by pressing the DIMMER button.
During play
Normal illumination
D I M M E R
Dim
“OFF”
* When the display illumination is off,
the AUTO DISPLAY OFF indicator
A U T O
D I S P L A Y O F F
on the front panel lights up.
Adjusting the level of signals output into an
amplifier , etc.
You can adjust the level of sound signals output from the LINE
OUT terminals on the rear panel into an amplifier, etc. as you
prefer by using the OUTPUT LEVEL buttons.
During stopped or paused
Normal illumination
Dim
Dim
(The AUTO DISPLAY OFF indicator lights up.
In this state, if a disc is played, the display
illumination will be turned off.)
When you listen with headphones
Connect the headphones to the PHONES jack and adjust the
volume by using the OUTPUT LEVEL buttons.
* Note that the use of the OUTPUT LEVEL buttons will also
vary the level of the signal output to an amplifier, etc.
O U T P U T L E V E L
or
O U T P U T L E V E L
+–
(On the front panel)
For optimum sound quality
* When the DIGITAL AUDIO OUT (OPTICAL) terminal is used
for the connection, set the level of output signals to max.
* The level of output signals can be checked in the display.
12
Page 13

RANDOM-SEQUENCE PLAY
You can play the tracks in a random sequence (up to 99 tracks). The unit will automatically mix up tracks from all discs or a
designated disc on the disc tray.
English
1 Load one or more discs.
O P E N /
C L O S E
2 Close the disc tray.
4
3
D IM M E R T IM E
D IS C S K IP /
C H AR A C T ER
S K IP /S E AR C H
O PE N /
C LO S E
P RO G
IN D E X
F ILE M O D EF IL E E D IT
T EX T SR C HT E X T M O D E
P EA K
S Y N C HR O
R EP E A T R A N D O M T A P E C LE A R
1 2 3 4 5
6 7 8 9 0
+1 0
C A PS E N T E R
D IS C M O D E
D IS C S C A N OU T P UT LE V E L
S TO P P A U S E P LA Y
3 Select a desired disc play mode (1DISC or 5DISCS).
* If you select “1DISC” mode, next select a desired disc by
1, 2
DISC SKIP/
CHARACTER
D I S C M O D E
using the DISC SKIP/CHARACTER button on the remote
control transmitter or a DISC-select button on the front
panel.
O P E N /
C L O S E
To cancel random-sequence play
Press the STOP button or RANDOM button once again, or
open the disc tray by pressing the OPEN/CLOSE button.
“RNDM” disappears from the display.
4
R A N D O M
“RNDM” lights up on the display.
Notes
● This feature will not function during programming, or during
program play.
● If the SKIP/SEARCH button is pressed during random-
sequence play, the next randomly programmed track will be
played. If the SKIP/SEARCH button is pressed, play
will return to the beginning of the track now being played.
● This indication appears while the unit is
mixing up tracks.
● Total remaining time on the disc will not be displayed during
random-sequence play.
13
Page 14

PROGRAM PLAY
D I S C S K I P /
C H A R A C T E R
2 3 4
D IS C
You can enjoy listening to your favorite tracks selected from one or more discs in any desired order by programming tracks.
S Y N C HR O
R EP E A T R A N D O M T A P E C LE A R
5
2, 4
+1 0
C A PS E N T E R
D IS C M O D E
D IS C S C A N OU T P UT LE V E L
1
1 Stop the unit.
S T O P
2 If you will select tracks from a disc (or discs) other than
the disc on the Disc 1 tray, make this unit display the
total recorded time of each disc to be used by pressing
the DISC SKIP/CHARACTER buttons in turn.
* Without this operation, the total time of the
programmed tracks will not be displayed during
programming.
P EA K
1 2 3 4 5
6 7 8 9 0
S TO P P A U S E P LA Y
D IS C S K IP /
C H AR A C T ER
S K IP /S E AR C H
C LO S E
P RO G
IN D E X
F ILE M O D EF IL E E D IT
T EX T SR C HT E X T M O D E
O PE N /
D IM M E R T IM E
4 If necessary, select a desired disc.
3
7
or
D I S C S K I P /
C H A R A C T E R
3 Press the PROG button to begin programming.
P R O G
PROG
(On the front panel)
5 Program a desired track by pressing the corresponding
numeric button.
5
6 Repeat steps 4 – 5 to program more tracks. You can
select the same track again.
7 When the programming is completed;
P L A Y
14
Page 15

Display information during programming
PROG
➀
➁
PROG
➃
6
➂
➀ Shows the program number for the track to be programmed
next.
➁ Shows the selected disc and track number.
➂ Shows the total time of the tracks currently programmed.
➃ Shows only the numbers of programmed tracks on the
selected disc.
* If “STEP 1” does not appear on the display after the PROG
button is pressed, press the TIME display mode-select
button.
Notes
● You can program as many as 40 tracks at one time.
● You can program a whole disc by pressing “0”, instead of
one track. At that time, “ALL” lights up in the display.
● The total time of the programmed tracks will not be
displayed, if a track number higher than 20 is programmed.
● If, during programming, the TIME display mode-select button
is pressed, the program number display can be changed to
display the total time of the programmed tracks or no
information. To return to the previous display, press the
TIME display mode-select button once again.
● Pressing a numeric button stops the current program and
skips to the beginning of the track of the number pressed.
Once that track has finished playing, the previously
interrupted program resumes play.
● To skip tracks within the program, press the SKIP/SEARCH
and ) buttons during play.
(
● To search all tracks including unprogrammed tracks, press
and hold the SKIP/SEARCH ( and ) buttons during
play .
English
* If the total time exceeds 99 minutes and 59 seconds, the
time will not be displayed.
To stop program play
Press the STOP button. The first programmed track number
will be displayed.
To resume play , press the PLAY button. Play will begin from
the beginning of the program.
To cancel a programmed sequence
There are several methods, as described below.
● Press the STOP button or the CLEAR button while the unit
is stopped.
● Open the disc tray.
● Switch off the power.
To check program data
1. During program play, press the STOP button.
2. Press the PROG button.
3. Each time the SKIP/SEARCH
button is pressed, the
track numbers and sequential order of the programmed
tracks can be checked one after another. The display of
the track number can be returned (sequentially in reverse
order) by pressing the SKIP/SEARCH button.
To correct program data
1. Follow the procedure described in “To check program data”.
2. Display the track number to be corrected by pressing the
SKIP/SEARCH buttons.
3. Press a numeric button to select a track to replace the one
displayed. The previously programmed track will be
cleared from the memory and the new one will be
programmed.
4. After the correction has been completed, press the PROG
button or PLAY button once again.
15
Page 16

REPEAT PLAY
1
You can play any desired track or disc (or a set of discs) repeatedly by pressing the REPEAT button. The repeat play mode will
change whenever you press the REPEAT button.
SINGLE REPEAT (REP S)
A single track is repeatedly played.
* This is also available in the program play mode and the
(OFF)
REP
S
REP
R E P E A T
F
random-sequence play mode. (If the repeat play mode is
switched off, the program play mode or the randomsequence play mode will be resumed.)
FULL REPEAT (REP F)
In the “1DISC” disc play mode: A designated disc is repeatedly
played.
In the “5DISCS” disc play mode: All discs on the disc tray are
repeatedly played.
* In the program play mode, all programmed tracks are
repeatedly played.
* In the random-sequence play mode, all randomly
sequenced tracks are repeatedly played.
INDEX SEARCH
If the disc includes index numbers, play can be started from any desired index number.
1 Select a track which has index numbers.
5
2
IN D E X
67 8910
11 12
5
3 Select the desired index number.
To cancel the index search function
Press the INDEX button.
Notes
● Not all discs have index numbers. The index system has a
method for sub-dividing tracks into smaller divisions (for
example, the movements within classical symphonies) for
easier location of those parts. The liner notes with the disc
usually tell if such index numbers are included.
● If an index number is selected that is higher than any index
number on that disc, play will start from the last index
number point on the disc.
● For some discs, play may begin slightly prior to the actual
designated index point.
● If the disc has no encoded index points, play will begin from
the start of the selected track.
3
16
Page 17

DISC FILING
TEXT FILING
You can file each disc by disc title and/or artist name in the unit’s memory. You can easily search a disc using the filed text data.
D IM M E R T IM E
D IS C S K IP /
C H AR A C T ER
S K IP /S E AR C H
O PE N /
C LO S E
P RO G
4 Repeat step 3 until the all characters you want are
input.
IN D E X
F ILE M O D EF IL E E D IT
T EX T SR C HT E X T M O D E
1, 3
5 Press the FILE EDIT button to store the disc title.
F I L E E D IT
“ARTIST” appears in the display and the cursor flashes.
You can input the artist name.
If you do not need to enter the artist name, skip step 6.
6 Repeat step 3 until the all characters you want are
input.
S Y N C HR O
P EA K
R EP E A T R A N D O M T A P E C LE A R
1 2 3 4 5
6 7 8 9 0
+1 0
2, 5, 7, 8
C A PS EN T E R
D IS C M O D E
D IS C S C A N OU T P U T LE V E L
S TO P P A U S E P LA Y
To input the disc title and artist name for the
selected disc
1 In stop mode, press the DISC SKIP/CHARACTER
buttons to select the disc to which you want to input the
text data.
(Make sure that “PROGRAM” indicator in the display is
turned off before this step.)
English
D IS C S K IP /
C H A R A C T E R
2 Press the FILE EDIT button.
EDIT
TITLE
TEXT
Cursor position
“TITLE” appears in the display and the cursor flashes.
You can input the disc title.
If you do not need to enter the disc title, skip steps 3
and 4.
3 Press the DISC SKIP/CHARACTER button repeatedly
until the character you want to select appears, then
press the ENTER button.
The cursor moves to next position.
Selected character
EDIT
TITLE
TEXT
7 Press the FILE EDIT button to store the artist name.
F I L E E D IT
“BEST” appears in the display.
(For “BEST FILING” program, see page 19.)
8
“SAVE” and “TEXT” appear in the display.
Notes
● When you input a character, each time you press the CAPS
button, the type of character changes as follows.
→ Capital letters (A, B, C, D, ……)
↓
Small letters (a, b, c, d, ……)
↓
Figures (0, 1, 2, 3, 4, ……)
↓
Symbols (!, ”, #, $, %, ……)
F I L E E D IT
For details, see
“Available characters”
on next page.
EDIT
TITLE
TEXT
● Maximum 12 characters can be used in each disc title or
artist name.
17
Page 18

Available characters
● Capital letters
A B C D E F G H I J K L M N O P Q R S T U V W X Y Z
● Small letters
a b c d e f g h i j k l m n o p q r s t u v w x y z
● Figures
0 1 2 3 4 5 6 7 8 9
● Symbols
CD TEXT
This unit is compatible with the CD TEXT function. The CD
TEXT disc has information, such as the disc title, artist names,
and track names. If the current disc is a CD TEXT disc, the unit
reads the disc title, artist name, and track names from the disc.
You can easily search a disc using the text data of a CD TEXT
disc and display the CD TEXT data.
Notes
● The disc title, artist names, or track names may not be
displayed with some CD TEXT discs.
● You cannot change the CD TEXT data.
(space)
To correct the text data
1. In step 4 for “TITLE” or step 6 for “ARTIST” on the previous
page, press the SKIP/SEARCH button to select the cursor
position you want to correct.
2. Press the CLEAR button to delete the character, or press
the DISC SKIP/CHARACTER button to select the new
character.
3. Repeat the above step 2 until all corrections are completed.
4. Press the FILE EDIT button.
Note
The unit’s memory can hold information for about 100 discs.
When the memory is full, “MEMORY FULL” appears in the
display. To add more text data, you must first erase some
unnecessary files from memory (you must erase all kinds of
disc file data (disc title, artist name, and BEST FILING data) for
a disc).
To search the disc by text data
C A PS EN T E R
D IS C S K IP /
C H AR A C T ER
D IS C M O D E
D IS C S C A N OU T P U T LE V E L
T EX T SR C HT E X T M O D E
S K IP /S E AR C H
S TO P P A U S E P LA Y
1
2
To search a disc using the text data
See “To search the disc by text data” on this page for details.
To display the text data
Press the TEXT MODE button.
See “Selecting text displays” on page 11 for details.
1 Press the TEXT SRCH button in stop mode.
Disc titles and artist names appear respectively in the
display for each disc in order from the currently selected
disc.
2 When the text data of the desired CD is displayed,
press the PLAY button.
The unit searches for the disc containing the selected
text data and starts playback.
18
Page 19

BEST FILING
It is possible to file only those tracks you want from each disc (i.e., hide unwanted tracks). You can easily play back the tracks in any
order you set.
D IM M E R T IM E
D IS C S K IP /
C H AR A C T ER
S K IP /S E AR C H
O PE N /
C LO S E
P RO G
IN D E X
F ILE M O D EF IL E E D IT
2, 5
T EX T SR C HT E X T M O D E
1
3
S Y N C HR O
P EA K
R EP E A T R A N D O M T A P E C LE A R
1 2 3 4 5
6 7 8 9 0
+1 0
C A PS E N T E R
D IS C M O D E
D IS C S C A N OU T P UT LE V E L
S TO P P A U S E P LA Y
To input your favorite tracks
1 In stop mode, press the DISC SKIP/CHARACTER
buttons to select the disc to which you want to edit.
(Make sure that “PROGRAM” indicator in the display is
turned off before this step.)
To play a disc with “BEST FILING” program
1. Press the STOP button to stop the unit.
2. Press the FILE MODE button so that “FILE” appears in the
display.
If “SAVE” and “BEST” appear in the display, the unit reads
“BEST FILING” program.
3. Press the PLAY button to start playing.
Notes
● If the disc does not have any “BEST FILING” program data
in the memory, “BEST” does not appear in the display, and
the unit does not perform the “BEST FILING” function.
● When the “FILE” indicator is illuminated in the display, you
can play the filed data in random order by pressing the
RANDOM button.
To check “BEST FILING” program data
English
2 Press the FILE EDIT button repeatedly until “BEST”
appears in the display.
BEST EDIT
3 Press the numeric button of the desired track.
BEST EDIT
Selected track number
5
4 Repeat steps 2 and 3 to program more tracks. You can
select the same track again.
5 Press the FILE EDIT button to store the text data.
“SAVE” and “BEST” appear in the display.
Notes
● You can create as many as 32 edits for a each disc.
● The unit’s memory can hold information for about 100 discs.
When the memory is full, “MEMORY FULL” appears in the
display. To add more text data, you must first erase some
unnecessary files from memory. See “To change “BEST
FILING” program data” on this page.
1. Press the STOP button to stop “BEST FILING” program
play .
2. Press the FILE EDIT button repeatedly until “BEST”
appears in the display.
3. Press the SKIP/SEARCH
button. Each time you
press this button, the track number and the program
number are displayed in the order of the program. When
you want to check the preceding tracks, press the SKIP/
SEARCH
button.
To change “BEST FILING” program data
1. Follow the preceding procedure described in “To check
“BEST FILING” program data.”
2. Display the track number to be deleted or corrected by
pressing the SKIP/SEARCH button.
3. Press the numeric button of the desired track you want to
substitute for the one currently displayed. The previously
programmed track will be cleared from the memory and the
new one will be programmed.
If you press the CLEAR button while programming the
tracks, all of the programmed tracks are deleted.
4. When you are finished, press the FILE EDIT button.
To delete “BEST FILING” program data for all
discs
1. Turn off the power of this unit.
2. While simultaneously pressing and holding the
button and the PEAK button on the front panel, turn the
power of this unit on.
CAUTION
(stop)
Deleting “BEST FILING” program data for all discs will also
erase the entire contents of memory (including disc title or
artist name). Be careful.
19
Page 20

CD SYNCHRONIZED RECORDING
S K IP /S E A R C H
Using a compatible YAMAHA tape deck, you can synchronize the tape deck to start recording automatically when a CD starts
playing. With this function, you can record a CD on tape more easily and precisely. (Refer to the tape deck’s operation manual to
know whether it is compatible or not.)
* This unit and the tape deck must be placed close to each other so that both of them can receive the signals from this unit’s
remote control transmitter at the same time.
1 Select a disc.
D I S C S K I P /
C H A R A C T E R
2 Load a tape on the tape deck.
* The peak level searching function of this unit is
useful for adjusting recording level on the tape deck.
(Refer to page 24.)
3
4
1
D IM M E R T IM E
D IS C S K IP /
C H AR A C T ER
S K IP /S E AR C H
O PE N /
C LO S E
P RO G
IN D E X
F ILE M O D EF IL E E D IT
T EX T SR C HT E X T M O D E
S Y N C HR O
P EA K
R EP E A T R A N D O M T A P E C LE A R
1 2 3 4 5
6 7 8 9 0
+1 0
C A PS E N T E R
D IS C M O D E
D IS C S C A N OU T P UT LE V E L
S TO P P A U S E P LA Y
4 If desired, select the track to be recorded first.
4
5
6
or
3
S Y N C H R O
This unit enters into the pause mode, and the tape deck
enters into the REC/PAUSE mode.
* In this mode, the time display on this unit blinks.
5
P L A Y
Both CD play and tape deck recording begin.
* CD play begins a little later than recording.
6 If you want to stop recording temporarily and restart
recording from a desired track, follow steps 3–5 again.
To cancel this function
Press the STOP button.
Notes
● To finish or stop recording, press the “STOP” button on the
tape deck.
● Programmed sequence of tracks can also be recorded with
this function, instead of recording an entire disc. (Refer to
pages 14–15 for the programming procedure.)
● This function can also be used together with the automatic
tape-programming function. (Refer to pages 21–23.)
20
Page 21

TRACK PROGRAMMING FOR RECORDING TO TAPE
English
This convenient feature can be used to program tracks for
recording to tape. By only memorizing the tape’s total possible
recording time, the unit will automatically program tracks or
help you to program tracks so they will fit onto the tape with the
least amount of unrecorded space remaining at each end of
the tape.
■ Automatic tape programming
The unit will automatically program tracks on a disc with the
original order of tracks unchanged.
1 Stop the unit.
S T O P
2 Select the disc.
D I S C S K I P /
C H A R A C T E R
D IM M E R T IM E
D IS C S K IP /
C H AR A C T ER
S K IP /S E AR C H
O PE N /
C LO S E
P RO G
4
IN D E X
F ILE M O D EF IL E E D IT
T EX T SR C HT E X T M O D E
7
6, 7
5
4
2
1
S Y N C HR O
P EA K
R EP E A T R A N D O M T A P E C LE A R
1 2 3 4 5
6 7 8 9 0
+1 0
C A PS EN T E R
D IS C M O D E
D IS C S C A N OU T P U T LE V E L
S TO P P A U S E P LA Y
5 Press the REPEAT button.
R E P E A T
The unit automatically programs tracks for side A and
side B separately considering the tape’s total time.
* The programmed track numbers and the total
number of tracks for side A and B are displayed for a
short time.
3 The peak level searching function of this unit is useful
for adjusting recording level on the tape deck. (Refer to
page 24.)
4 Enter the tape’s total possible recording time (tape
length).
T A P E
You can select any of four tape lengths by pressing the
TAPE button.
T A P E
(off)
6 Begin recording on the tape deck and press the PLAY
button on this unit’s remote control transmitter at the
same time.
7 The unit will pause at the end of side A of the tape.
Turn the tape over to side B. Resume recording and, at
the same time, press the PLAY or PAUSE button on this
unit’s remote control transmitter.
Notes
● It is recommended that you use a tape that is slightly longer
in length than the CD you are recording, because the
programmed tracks on a CD may not fit properly into the
time allowed on each half of the tape.
● CD synchronized recording function can be used if your tape
deck is compatible with it. In this case, in step 6 and 7,
press the SYNCHRO button and then press the PLAY
button on this unit’s remote control transmitter. Recording
automatically begins. (For details, refer to page 20.)
Display information during programming
➂
PROG
12 34 5
You can also enter the tape’s total possible recording
time manually.
Example: For a C-64 tape (32 minutes on each side)
6
➀
4
➁
➀ ➁
➀ Shows the number of programmed tracks for each side in
turn just after the automatic programming is finished, and
then it is replaced by the number of the first programmed
track for side A.
➁ Shows the total time of programmed tracks for each side.
➂ Shows the programmed track numbers for each side.
21
Page 22

■ Manual tape programming
With this function, you can program tracks from one or more
discs in any order to be recorded onto tape.
8
6
2, 5
1
D IM M E R T IM E
D IS C S K IP /
C H AR A C T ER
S K IP /S E AR C H
O PE N /
C LO S E
P RO G
IN D E X
F ILE M O D EF IL E E D IT
T EX T SR C HT E X T M O D E
S Y N C HR O
P EA K
R EP E A T R A N D O M T A P E C LE A R
1 2 3 4 5
6 7 8 9 0
+1 0
C A PS E N T E R
D IS C M O D E
D IS C S C A N OU T P UT LE V E L
S TO P P A U S E P LA Y
10
4, 10
12
11, 12
1 Stop the unit.
S T O P
2 If you will select tracks from a disc (or discs) other than
the disc on the Disc 1 tray, make this unit display the
total recorded time of each disc to be used by pressing
the DISC SKIP/CHARACTER buttons in turn.
* This unit will read the contents of a disc by this
operation. If there is a disc to which this operation is
omitted, tracks on the disc cannot be programmed.
3 Follow step 4 on page 21.
4
P R O G
PROG
5 If necessary, select a desired disc by pressing the DISC
SKIP/CHARACTER buttons.
9 Repeat steps 5 and 6 to program more tracks for side B
of the tape.
You can select the same track again.
* If “ERROR” appears in the display, the track number just
selected cannot be programmed because there is no
enough time remaining on side B of the tape.
10 The peak level searching function of this unit is
useful for adjusting recording level on the tape deck.
For peak level searching, when the programming for
side B is finished, press the PROG button and then
press the PEAK button. (Refer to page 24.)
11 Start recording on the tape deck and press the PLAY
button on this unit’s remote control transmitter at the
same time.
12 The unit will pause at the end of side A of the tape.
Turn the tape over to side B. Resume recording and,
at the same time, press the PLAY or PAUSE button
on this unit’s remote control transmitter.
6 Select a desired track.
7 Repeat steps 5 and 6 to program more tracks for side A
of the tape. You can select the same track again.
* If “ERROR” appears in the display, the track number just
selected cannot be programmed because there is no
enough time remaining on side A of the tape.
8 When you finish the programming for side A, program
the pause mode by pressing the TAPE button.
T A P E
* “PAUSE” lights up in the display, and after then you can
begin programming for side B.
22
8
Notes
● In steps 7 and 9, even if “ERROR” appears in the display,
you can program another track of which time is shorter than
the remaining time on the side of the tape. At this time, if
any other track number lights up in the display, you can
program it.
● CD synchronized recording function can be used if your tape
deck is compatible with it.
In this case, in steps 11 and 12, press the SYNCHRO button
and then press the PLAY button on this unit’s remote control
transmitter. Recording automatically begins.
(For details, refer to page 20.)
Notes on tape programming
● To check, cancel or correct program data, refer to page 15.
● The maximum number of tracks that can be programmed is
40. If, however, the PAUSE mode is inserted, it is counted
as one track.
● This function can be used to program up to track number 20.
If the disc has more than 20 tracks, tracks with track number
21 and higher cannot be programmed.
Page 23

Display information during programming
PROG
12 34 5
67 8910
➀Shows the side of the tape and the program number for the
track to be programmed next.
➁ Shows the selected disc and track number.
➂ Shows the total remaining time on the side of the tape.
➃ Programmed track numbers light up and programmable
track numbers among the unprogrammed ones blink.
English
➀
➁
PROG
➃
12 34 5
67 8910
➂
■ Random sequential tape programming
The unit will automatically program tracks on a disc in random
sequential order for recording to tape.
* If “A-1” does not appear in the display after the PROG
button is pressed, press the TIME display mode-select
button.
* If, during programming, the TIME display mode-select button
is pressed, the program number display can be changed to
display the total remaining time on the side of the tape. To
return to the previous display, press the TIME display modeselect button once again.
D IM M E R T IM E
D IS C S K IP /
C H AR A C T ER
S K IP /S E AR C H
O PE N /
C LO S E
P RO G
IN D E X
F ILE M O D EF IL E E D IT
T EX T SR C HT E X T M O D E
2
4
S Y N C HR O
P EA K
R EP E A T R A N D O M T A P E C LE A R
1 2 3 4 5
6 7 8 9 0
+1 0
C A PS EN T E R
D IS C M O D E
D IS C S C A N OU T P U T LE V E L
S TO P P A U S E P LA Y
3, 4
1 Follow steps 1 – 4 on page 21.
2
The unit will automatically program tracks for side A and
side B separately considering the tape’s total time.
* The programmed track numbers and the total
number of tracks for side A and B are displayed for a
short time.
R A N D O M
3 Start recording on the tape deck and press the PLAY
button on this unit’s remote control transmitter at the
same time.
4 The unit will pause at the end of side A of the tape.
Turn the tape over to side B. Resume recording and,
at the same time, press the PLAY or PAUSE button on
this unit’s remote control transmitter.
Notes
● Because the programmed data changes every time the
RANDOM button is pressed, the amount of time remaining
at the end of the tape also changes accordingly.
● It is recommended that you use a tape that is slightly longer
in length than the CD you are recording, because the
programmed tracks on a CD may not fit properly into the
time allowed on each half of the tape.
● CD synchronized recording function can be used if your tape
deck is compatible with it.
In this case, in steps 3 and 4, press the SYNCHRO button
and then press the PLAY button on this unit’s remote control
transmitter. Recording automatically begins.
(For details, refer to page 20.)
Display information during programming
➂
PROG
13 5
7
➀➁
➀ Shows the number of programmed tracks for each side in
turn just after the automatic programming is finished, and
then it is replaced by the number of the first programmed
track for side A.
➁ Shows the total time of programmed tracks for each side.
➂ Shows the programmed track numbers for each side.
23
Page 24

AUTOMATIC SEARCHING FOR THE PEAK LEVEL
ON A DISC
This convenient feature automatically searches a disc for a part where the source level peaks, and next plays the part repeatedly.
For recording to tape, this feature is very helpful to adjust the recording level on the tape deck.
D IM M E R T IM E
D IS C S K IP /
C H AR A C T ER
S K IP /S E AR C H
O PE N /
C LO S E
P RO G
IN D E X
F ILE M O D EF IL E E D IT
T EX T SR C HT E X T M O D E
2
S Y N C HR O
P EA K
R EP E A T R A N D O M T A P E C LE A R
1 2 3 4 5
6 7 8 9 0
+1 0
C A PS E N T E R
D IS C M O D E
D IS C S C A N OU T P UT LE V E L
S TO P P A U S E P LA Y
1
1 Stop the unit.
S T O P
2 Select the “1DISC” disc play mode.
D I S C M O D E
4
3
O PE N /CL O SE
/
PL A YX C H AN G E
D IS C
2 3 4
4 56 7 89 0
5
S KI P/S E A RC H
PH O NE S
OU T PU T L EV EL
PE AK
+–
4
4
P E A K
or
(On the front panel)
1DISC
The peak level search is performed on the disc.
0
P E A K
11 1 2
10
1DISC
3 Select the disc.
D I S C S K I P /
C H A R A C T E R
Notes
● Even if the peak level search is performed twice or more on
the same disc, the same part will not be always selected,
because this unit will search for the peak level among parts
on the disc that are randomly selected by the internal
microcomputer.
1DISC REP
1DISC REP
11 1 2
11 1 2
8910
8910
Next, the part where the source level peaks is
repeatedly played. Adjust the recording level on the
tape deck listening to this repeat play.
To cancel this function
Press the STOP button.
● In the program play mode, this feature will function among
the programmed tracks only. If program play is being
performed, first press the STOP button, and then press the
PEAK button. If program play is not being performed, only
press the PEAK button.
● To search for the peak level through all discs on the disc
tray, in step 2, select the “5DISCS” disc play mode.
24
Page 25

NOTES ABOUT THE REMOTE CONTROL TRANSMITTER
English
Battery installation
2
1
3
Battery replacement
If you find that the remote control transmitter must be used
closer to the main unit, the batteries are weak. Replace both
batteries with new ones.
Notes
● Use only AA, R6, UM-3 batteries for replacement.
● Be sure the polarities are correct. (See the illustration inside
the battery compartment.)
● Remove the batteries if the remote control transmitter will
not be used for an extended period of time.
● If batteries leak, dispose of them immediately. Avoid
touching the leaked material or letting it come in contact with
clothing, etc. Clean the battery compartment thoroughly
before installing new batteries.
Remote control transmitter operation range
Remote control sensor
Within approximately
6 m (19.7 feet)
30°
Notes
● There should be no large obstacles between the remote
control transmitter and the main unit.
● If the remote control sensor is directly illuminated by strong
lighting (especially an inverter type of fluorescent lamp,
etc.), it might cause the remote control transmitter not to
work correctly. In this case, reposition the main unit to avoid
direct lighting.
30°
TIMER PLAY
You can start play at any specified time by connecting a timer (sold separately). Refer also to the instructions for the timer.
1. Select the desired play mode (1DISC or 5DISCS).
2. Press the POWER switch to turn the unit off.
3. Press the POWER switch while pressing the PLAY/PAUSE (
Shortly thereafter, “TIMER P. ON” appears in the display and the timer play function is on.
(When the timer play function is already on, in which case, “TIMER P. OFF” appears in the display and timer play function is off.
In this case, repeat the procedure in steps 2 and 3 to set the timer play function to on.)
4. Set the timer to the desired time.
When the set time comes, the unit turns on and starts play.
) button on the front panel.
25
Page 26

NOTES ABOUT HANDLING COMPACT DISCS
● This compact disc player is designed for playing compact
discs bearing the mark only. Never attempt to load any
other type of disc into the unit.
The unit will also play 8-cm (3-inch) compact discs.
● Compact discs are not subjected to wear during play, but
damage to the disc surface when the disc is being handled
can adversely affect the disc’s play.
● Do not use cleaning discs or warped discs. All of these
could damage the unit.
To prevent a malfunction of this unit
● Do not use any non standard shaped CD (heart, etc.)
available on the market, because it may damage the unit.
● Do not use a CD with tape, seals, or paste on it, because
damage to the unit may result.
● Compact discs are not affected by small particles of dust or
fingerprints on their playing surface, but even so they should
be kept clean. Wipe by using a clean, dry cloth. Do not
wipe with a circular motion; wipe straight outward from the
center.
● Do not try to clean the disc’s surface by using any type of
disc cleaner, record spray, anti-static spray or liquid, or any
other chemical-based liquid, because such substances
might irreparably damage the disc’s surface.
● Do not expose discs to direct sunlight, high temperature or
high humidity for a long period of time, because these might
warp or otherwise damage the disc.
NO
26
Page 27

TROUBLESHOOTING
If the unit fails to operate normally, check the following points to determine whether the problem can be corrected by the simple
measures suggested. If it cannot, or if the problem is not listed in the SYMPTOM column, disconnect the unit’s power cord and
contact your authorized YAMAHA dealer or service center for help.
English
SYMPTOM
This unit does not switch ON when the
POWER switch is pressed.
This unit does not work normally.
The disc tray does not close completely.
A disc number does not light up on the
display.
Play does not begin.
Play is delayed, or begins at the wrong
place.
No sound.
Sound “skips”.
Sound “hums”.
Noise from a nearby tuner.
Noise from inside of the disc tray.
The remote control transmitter does not
work.
PROBABLE CA USE
The power cord is not connected or not completely
connected.
There is an influence of strong external noise (lightning,
excessive static electricity, etc.) or a misoperation was
performed while using this unit.
A foreign object is obstructing the tray.
The disc has been loaded upside down.
The disc is damaged.
There is moisture on the laser pickup.
The disc is damaged.
The disc has been loaded upside down.
The disc is dirty.
The disc may be scratched or damaged.
Improper output cable connections.
Improper amplifier operation.
This unit is being subjected to vibrations or impacts.
The disc is dirty.
Improper cable connections.
The tuner is too close to this unit.
The disc may be warped.
The batteries of this remote control transmitter are too
weak.
Direct sunlight or lighting (of an inverter type of
fluorescent lamp, etc.) is striking the remote control
sensor of the main unit.
REMEDY
Securely connect the power cord.
Turn off and disconnect the AC power from the AC
outlet. After about 30 seconds, connect the power and
try again.
Carefully check the disc tray and remove the foreign
object.
Reload the disc with the label side up.
Check the disc carefully; replace it if necessary.
After switching the unit on, wait 20 to 30 minutes before
trying to play a disc.
Check the disc carefully; replace it if necessary.
Reload the disc with the label side up.
Clean the disc.
Check the disc carefully; replace it if necessary.
Connect the cables properly. If the problem persists,
the cables may be defective.
Set the amplifier controls to the correct input selection.
Relocate this unit.
Clean the disc.
Securely connect the audio cables. If the problem
persists, the cables may be defective.
Move the tuner and this unit farther apart.
Replace the disc.
Replace the batteries with new ones.
Change position of the main unit.
SPECIFICATIONS
AUDIO SECTION
Frequency response .......................... 2 Hz – 20 kHz, ±0.5 dB
Harmonic distortion+noise (1 kHz).............. 0.0025% or less
S/N ratio .......................................................... 115 dB or more
Dynamic range ............................................... 100 dB or more
Output level (1 kHz, 0 dB)......................................... 2.0±0.5V
Headphones output (–20 dB) ............. 200±40 mV/150 ohms
GENERAL
Power requirements
U.S.A. and Canada models ............................ 120V, 60 Hz
Australia model............................................... 240V, 50 Hz
Europe model................................................... 230V, 50 Hz
General model....................... 110/120/220/240V, 50/60 Hz
Power consumption........................................................ 20W
Dimensions (W x H x D)......................... 435 x 116 x 404 mm
(17-1/8” x 4-9/16” x 15-7/8”)
Weight ....................................................5.8 kg (12 lbs. 12 oz.)
Accessories .................................................. Connection cord
Remote control transmitter
Batteries (size AA, R6, UM-3)
Please note that all specifications are subject to change
without notice.
27
Page 28

DEPISTAGE DE PANNES
Si l’appareil ne fonctionne pas correctement, avant de conclure qu’il est en panne, le vérifier selon la liste de problèmes possibles
suivante. Cette liste donne des détails sur les solutions que vous pouvez appliquer vous-même sans avoir à appeler un spécialiste.
Si vous avez quelque doute ou question, consulter votre revendeur officiel YAMAHA le plus proche.
SYMPTOME
Cet appareil n’est pas en marche lorsque
l’interrupteur d’alimentation (POWER) est
enclenché.
Cet appareil ne fonctionne pas
normalement.
Le tiroir du disque ne se ferme pas
complètement.
Un numéro de disque ne s’allume pas à
l’affichage.
La lecture ne commence pas.
La lecture est retardée ou commence au
mauvais endroit.
Pas de son.
Existence de “sauts”.
Existence de “ronflement”.
Parasites provenant d’un tuner proche.
Parasites provenant de l’intérieur du tiroir.
La télécommande de fonctionne pas.
CAUSE PROB ABLE
Le cordon d’alimentation n’est pas branché ou la fiche
n’est pas enfoncée correctement.
Il est sous l’influence d’un bruit extérieur puissant
(éclairage, électricité statique, etc.), ou encore une
erreur de commande a eu lieu.
Un objet obstrue le tiroir.
Le disque a été posé en sens inverse.
Le disque est endommagé.
Il y a de l’humidité sur le bloc optique.
Le disque est endommagé.
Le disque est placé en sens inverse.
Le disque est sale.
Le disque est sans doute rayé ou endommagé.
Connexions des câbles incorrectes.
Fonctionnement incorrect de l’amplificateur.
Cet appareil est soumis à des vibrations ou à des
chocs.
Le disque est sale.
Connexions des câbles incorrectes.
Le tuner est trop près de cet appareil.
Le disque est sans doute voilé.
Les piles de cette télécommande sont trop faibles.
Le détecteur de l’appareil principal est exposé à la
lumiére directe du soleil (ou d’une lampe fluorescente
de type inverseur, etc.).
SOLUTIONS
Brancher le cordon convenablement.
Mettre l’appareil à l’arrêt en débranchant la fiche du
cordon d’alimentation. Attendez environ 30 secondes
puis rebranchez la fiche du cordon d’alimentation.
Vérifier attentivement le tiroir et retirer l’objet.
Remettre le disque en place avec son étiquette dirigée
vers le haut.
Vérifier attentivement le disque et le changer si cela
s’avère nécessaire.
Après avoir mis l’appareil sous tension, attendre 20 à
30 minutes avant d’essayer de reproduire un disque.
Vérifier soigneusement le disque; le cas échéant
remplacez-le.
Remettre le disque en place avec son étiquette dirigée
vers le haut.
Nettoyer le disque.
Vérifier le disque et le remplacer si cela s’avère
nécessaire.
Connecter correctement les câbles. Si le problème
persiste, les câbles sont sans doute défectueux.
Régler les commandes de l’amplificateur sur la
sélection d’entrée correcte.
Placer cet appareil dans un autre endroit.
Nettoyer le disque.
Connecter les câbles correctement. Si le problème
persiste, les câbles sont sans doute défectueux.
Eloigner le tuner de cet appareil.
Remplacer le disque.
Remplacer les piles.
Changer la position de l'appareil principal.
CARACTERISTIQUES TECHNIQUES
SECTION AUDIO
Réponse en fréquence....................... 2 Hz – 20 kHz, ±0,5 dB
Distorsion harmonique + bruit (1 kHz).....0,0025% ou moins
Rapport signal/bruit .........................................115 dB ou plus
Gamme dynamique ......................................... 100 dB ou plus
Tension de sortie (1 kHz, 0 dB) ................................ 2,0±0,5V
Sortie de casque d’écoute (–20 dB) ... 200±40 mV/150 ohms
YAMAHA ELECTRONICS CORPORATION, USA 6660 ORANGETHORPE AVE., BUENA PARK, CALIF. 90620, U.S.A.
YAMAHA CANADA MUSIC LTD. 135 MILNER AVE., SCARBOROUGH, ONTARIO M1S 3R1, CANADA
YAMAHA ELECTRONIK EUROPA G.m.b.H. SIEMENSSTR. 22-34, 25462 RELLINGEN BEI HAMBURG, F.R. OF GERMANY
YAMAHA ELECTRONIQUE FRANCE S.A. RUE AMBROISE CROIZAT BP70 CROISSY-BEAUBOURG 77312 MARNE-LA-VALLEE CEDEX02, FRANCE
YAMAHA ELECTRONICS (UK) LTD. YAMAHA HOUSE, 200 RICKMANSWORTH ROAD WATFORD, HERTS WD1 7JS, ENGLAND
YAMAHA SCANDINAVIA A.B. J A WETTERGRENS GATA 1, BOX 30053, 400 43 VÄSTRA FRÖLUNDA, SWEDEN
YAMAHA MUSIC AUSTRALIA PTY, LTD. 17-33 MARKET ST., SOUTH MELBOURNE, 3205 VIC., AUSTRALIA
GENERALES
Alimentation
Modèles pour les Etats-Unis et le Canada .... 120V, 60 Hz
Modèle pour l’Australie................................... 240V, 50 Hz
Modèle pour l’Europe...................................... 230V, 50 Hz
Modèle général ...................... 110/120/220/240V, 50/60 Hz
Consommation ................................................................. 20W
Dimensions (L x H x P) ........................... 435 x 116 x 404 mm
Poids ...............................................................................5,8 kg
Accessoires ........................................... Câbles de connexion
Noter que toutes les caractéristiques techniques sont
modifiables sans préavis.
52
Emetteur de télécommande
Piles (taille AA, R6, UM-3)
Printed in Malaysia
V323380
Page 29

documentation manual, user maintenance, brochure, user reference, pdf manual
This file has been downloaded from:
User Manual and User Guide for many equipments like mobile phones, photo cameras, monther board, monitors, software, tv, dvd, and othes..
Manual users, user manuals, user guide manual, owners manual, instruction manual, manual owner, manual owner's, manual guide,
manual operation, operating manual, user's manual, operating instructions, manual operators, manual operator, manual product,
 Loading...