

Yamaha Audio AW4416 User Manual

Additions and changes
in version 1.2
This manual explains the functions and specifications that have been
added or changed in AW4416 version 1.2. Please also refer to the pages of
the Operation Guide / Reference Guide as specified within the various
topics of this manual.
Table of Contents
Using the EXPORT command to write a WAV file..............................................2
Writing audio data from a track to a WAV file...............................................2
Writing audio from a virtual track to a WAV file............................................6
Use the APPEND command to join regions .......................................................6
Joining regions within a track........................................................................7
Joining regions within a virtual track.............................................................8
WAVE DISPLAY popup window linked with Locate operations..........................9
Changed procedure for deleting a Locate Point or Marker ...............................10
Tempo map editing..........................................................................................11
Use the [REC TRACK SELECT] keys to specify tracks........................................11
Use the [BANK] key / pads 1–8 to specify a pad ..............................................12
Use pads 1–8 to select a pad track...................................................................12
Changed range for the Rollback Time setting ...................................................13
Changed range for the Fade Time setting..........................................................13
Lit/dark status of the [UNDO]/[REDO] keys.....................................................13
Shortcut for saving the current song.................................................................13
Use the TRACK [CUE] key to monitor the stereo track .....................................13
Cue/Review function .......................................................................................14
Automatic updating of the end point ...............................................................14
Use the [SEL] key to temporarily cancel fader grouping ...................................14
Synchronized operation as MTC and word clock slave ....................................15
E
Additions and changes in version 1.2
Using the EXPORT command to write a WAV file
Audio data of a desired track or virtual track can now be converted into a WAV
file and written to an external SCSI device. This is done using the EXPORT command that has been added to TRACK/PART/REGION menu of the EDIT screen /
TR Edit page and V.TR Edit page.
The area that is written as the WAV file can be specified in track, part, or region
units. When specifying in track units (TRACK menu), you can select a desired track
1–16, all tracks 1–16, or the stereo track. When specifying in part units (PART
menu), you can select a desired track or all tracks 1–16 for the selected area.
If you are writing a WAV file to MO or other media formatted on an external SCSI
device, you must use media that is formatted as FAT16.
When writing a WAV file to media that was formatted on an external SCSI
device, it is not possible to write to media that was formatted in the Disk Util.
page with the FORMAT field type set to ORIGINAL. For details refer to Operation
Guide p.251 and p.253.
In the case of a CD-RW, all previously-existing data will be erased when the data
is written.
In order to write a WAV file, the song and hard disk must contain work area that
is equal to or longer than the file that is being written. For details refer to Operation Guide chapter 11 and “Addendum concerning song structure and size.”
❒ Writing audio data from a track to a WAV file
Here’s how to use the EXPORT command in the TR Edit page to export audio data
from a track to a WAV file.
• When writing a WAV file to the CD-RW drive, only one file can be written to
one volume of media. Also, it is not possible to add another WAV file to CD-R/
RW media that already contains a WAV file.
• The EXPORT command requires a longer processing time than the actual time
of the data. Also, the Export command cannot be cancelled once it has been
executed.
1. Into your external SCSI device (e.g., MO drive) or the internal CD-RW drive,
insert the media to which the WAV file will be written.
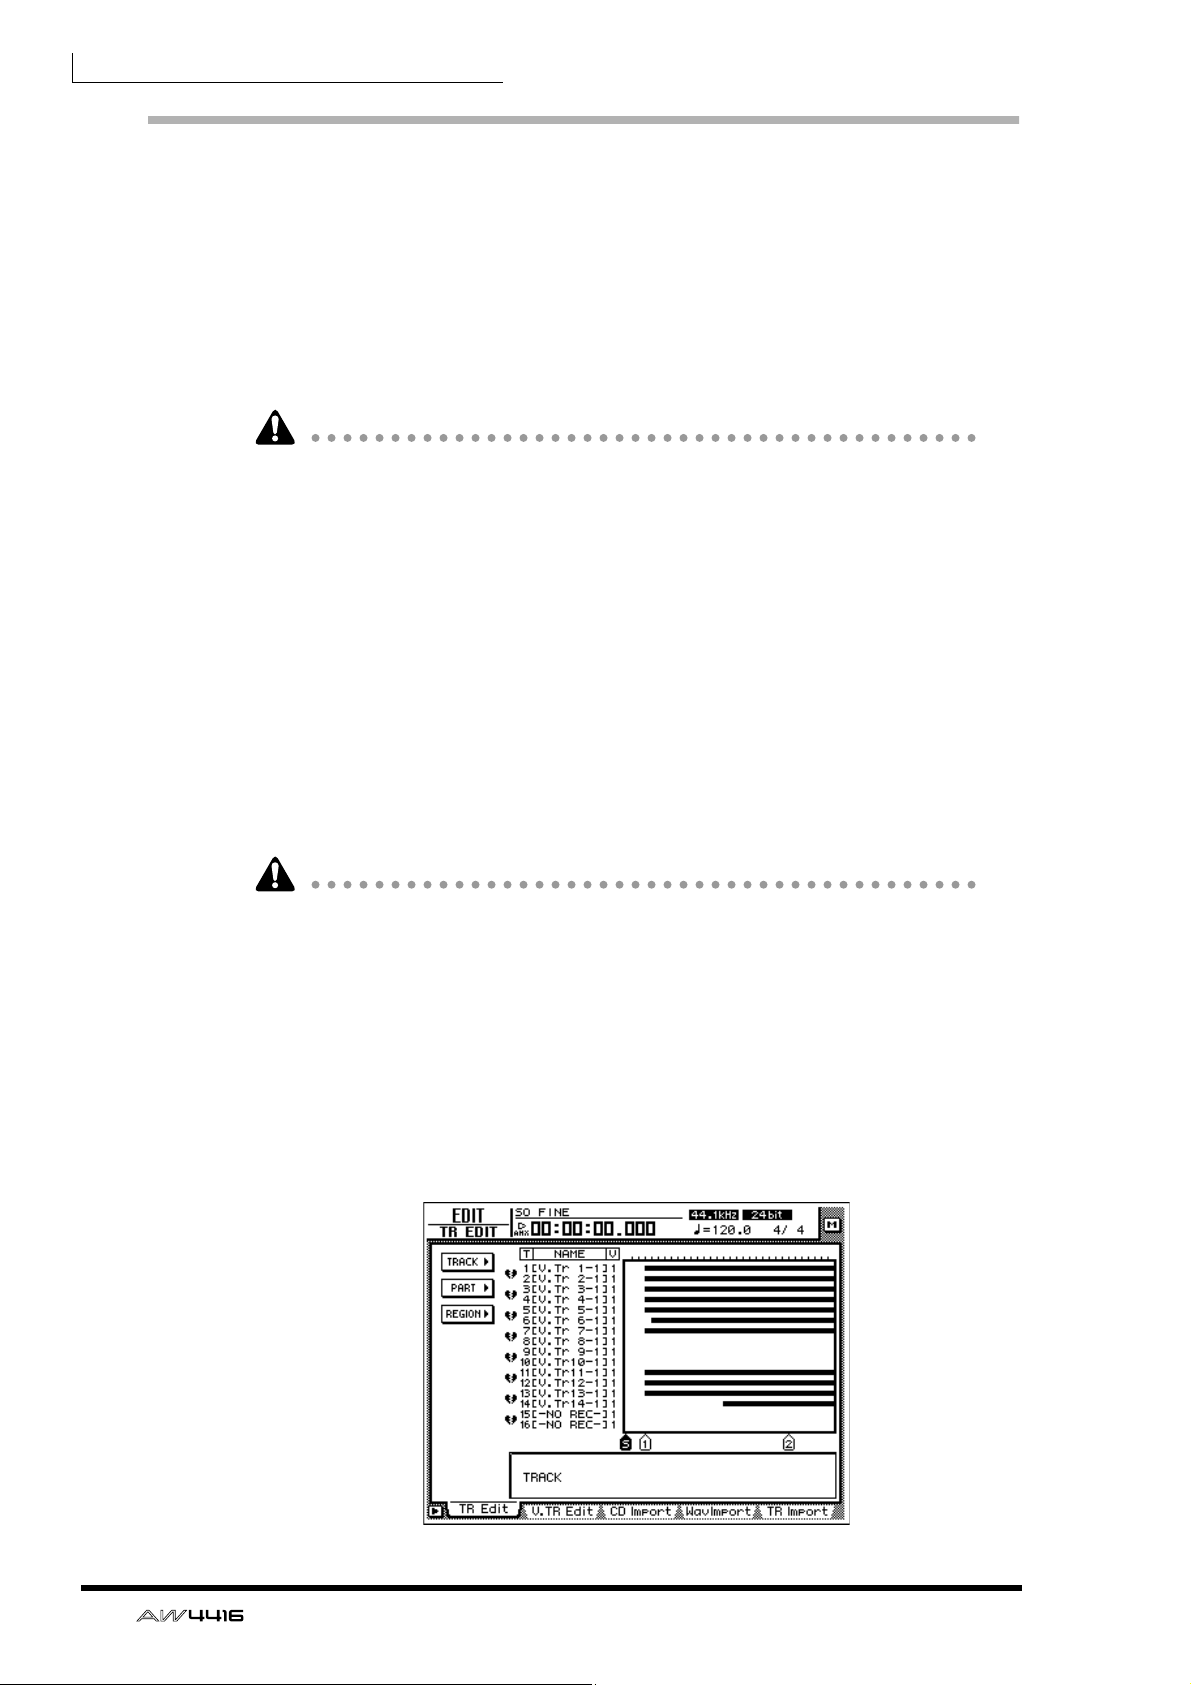
2. In the RECORDER section, press the [EDIT] key → [F1] (TR Edit) key.
The EDIT screen TR Edit page will appear.
2
Additions and changes in version 1.2
3. Move the cursor to the TRACK menu if you wish to write Tracks of data to a
WAV file, to the PART menu if you wish to write Parts, and to the REGION
menu if you wish to write a Region. Then press the [ENTER] key.
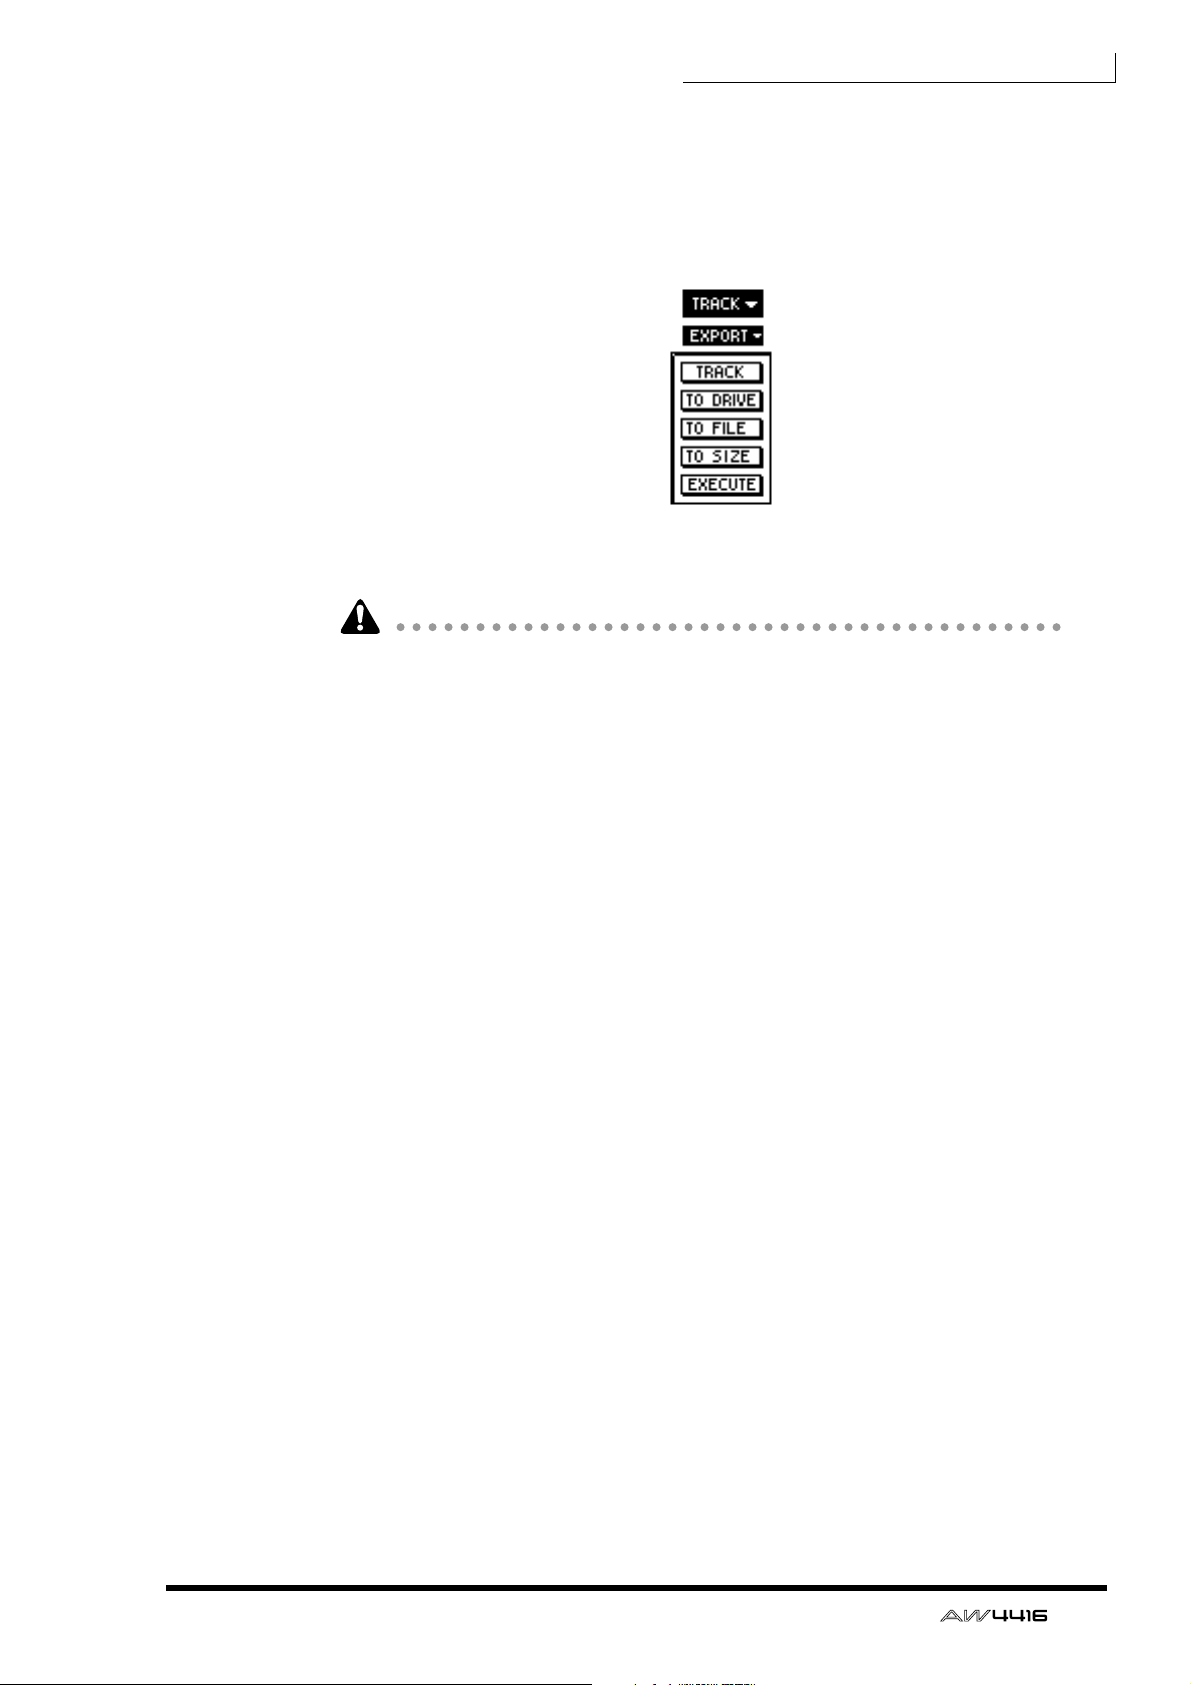
4. Move the cursor to the EXPORT command button, and press the [ENTER] key.
The parameters of the EXPORT command will appear.
5. Depending on the menu you selected in step 3, move the cursor to one of the
following parameters that you wish to set, and press the [ENTER] key.
• If the TRACK/PART menu TRACK parameter is set to “AL,” tracks (or parts) that
contain no region will not be written to the WAV file.
❍ If you selected the TRACK menu
• TRACK
Select the track(s) that will be written as a WAV file. You can select 1–16 (the
specified track), “AL” (all tracks 1–16), or “ST” (stereo track). If you select 1–
16, a monaural WAV file (or a stereo WAV file if the track is paired) will be
created. If you select “AL,” 16 tracks of monaural WAV files will be created. If
you select “ST,” a stereo WAV file will be created.
❍ If you selected the PART menu
• TRACK
Select the track(s) that will be written as a WAV file. The selectable range and
type of WAV files created are the same as the TRACK parameter of the TRACK
menu. (An exception is that you can use the START/END parameter to specify
the area within the track that will be written.)
•START
Specify the starting point of the area that will be written to the WAV file.
• END
Specify the ending point of the area that will be written to the WAV file.
❍ If you selected the REGION menu
• REGION
Select the region that will be written to the WAV file.
3
Additions and changes in version 1.2
6. Use the [DATA/JOG] dial (or the [▲]/[▼] keys if you selected the REGION
menu) to modify the setting, and press the [ENTER] key.
Regions
EXPORT command
of the TRACK menu
Length of the WAV file that is actually written
START
EXPORT command
of the PART menu
Length of the WAV file that is actually written
Execute EXPORT
END
Execute EXPORT
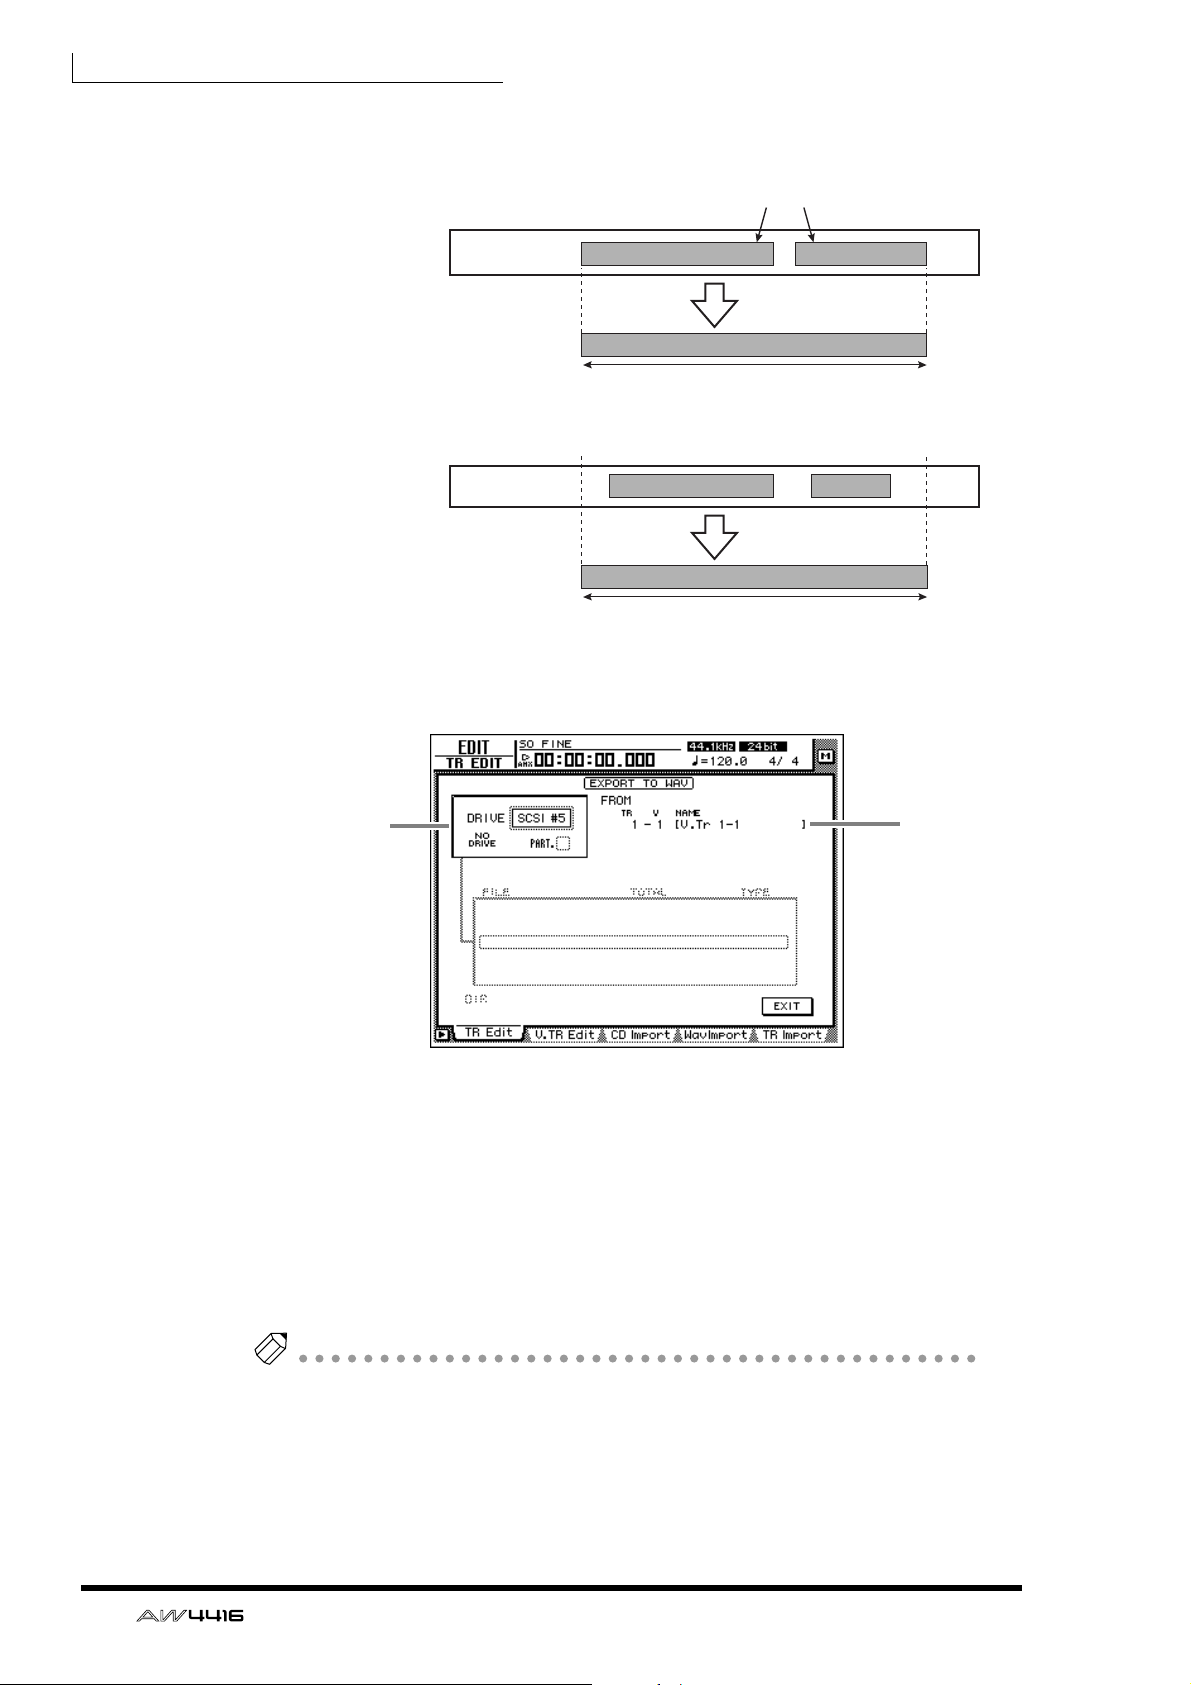
7. Move the cursor to the TO DRIVE parameter, and press the [ENTER] key.
The following display will appear.
1
2
4
1 DRIVE field
Select the internal CD-CD-RW drive or an external SCSI device.
B FROM
If you selected the TRACK/PART menu in step 4, the track number (TR field), virtual track number (V field), and track name (NAME field) will be displayed. If you
selected the REGION menu, the region name will be displayed.
If you selected the PART/REGION menu in step 4, the selected region of audio
will be displayed below these display fields.
Tip
By setting “CD BACKUP/WAV-EXP MODE” in the UTILITY screen Prefer.3 page,
you can test whether an error will occur while writing data, and whether the data
was written correctly. For details refer to Reference Guide p.37. (The setting that was
named “CD BACKUP MODE” in version 1.0 has been changed to “CD BACKUP/
WAV-EXP MODE” in version 1.2.)
Additions and changes in version 1.2
Tip
Tip
8. Move the cursor to the DRIVE area, use the [DATA/JOG] dial to select the SCSI
ID of the drive, and press the [ENTER] key.
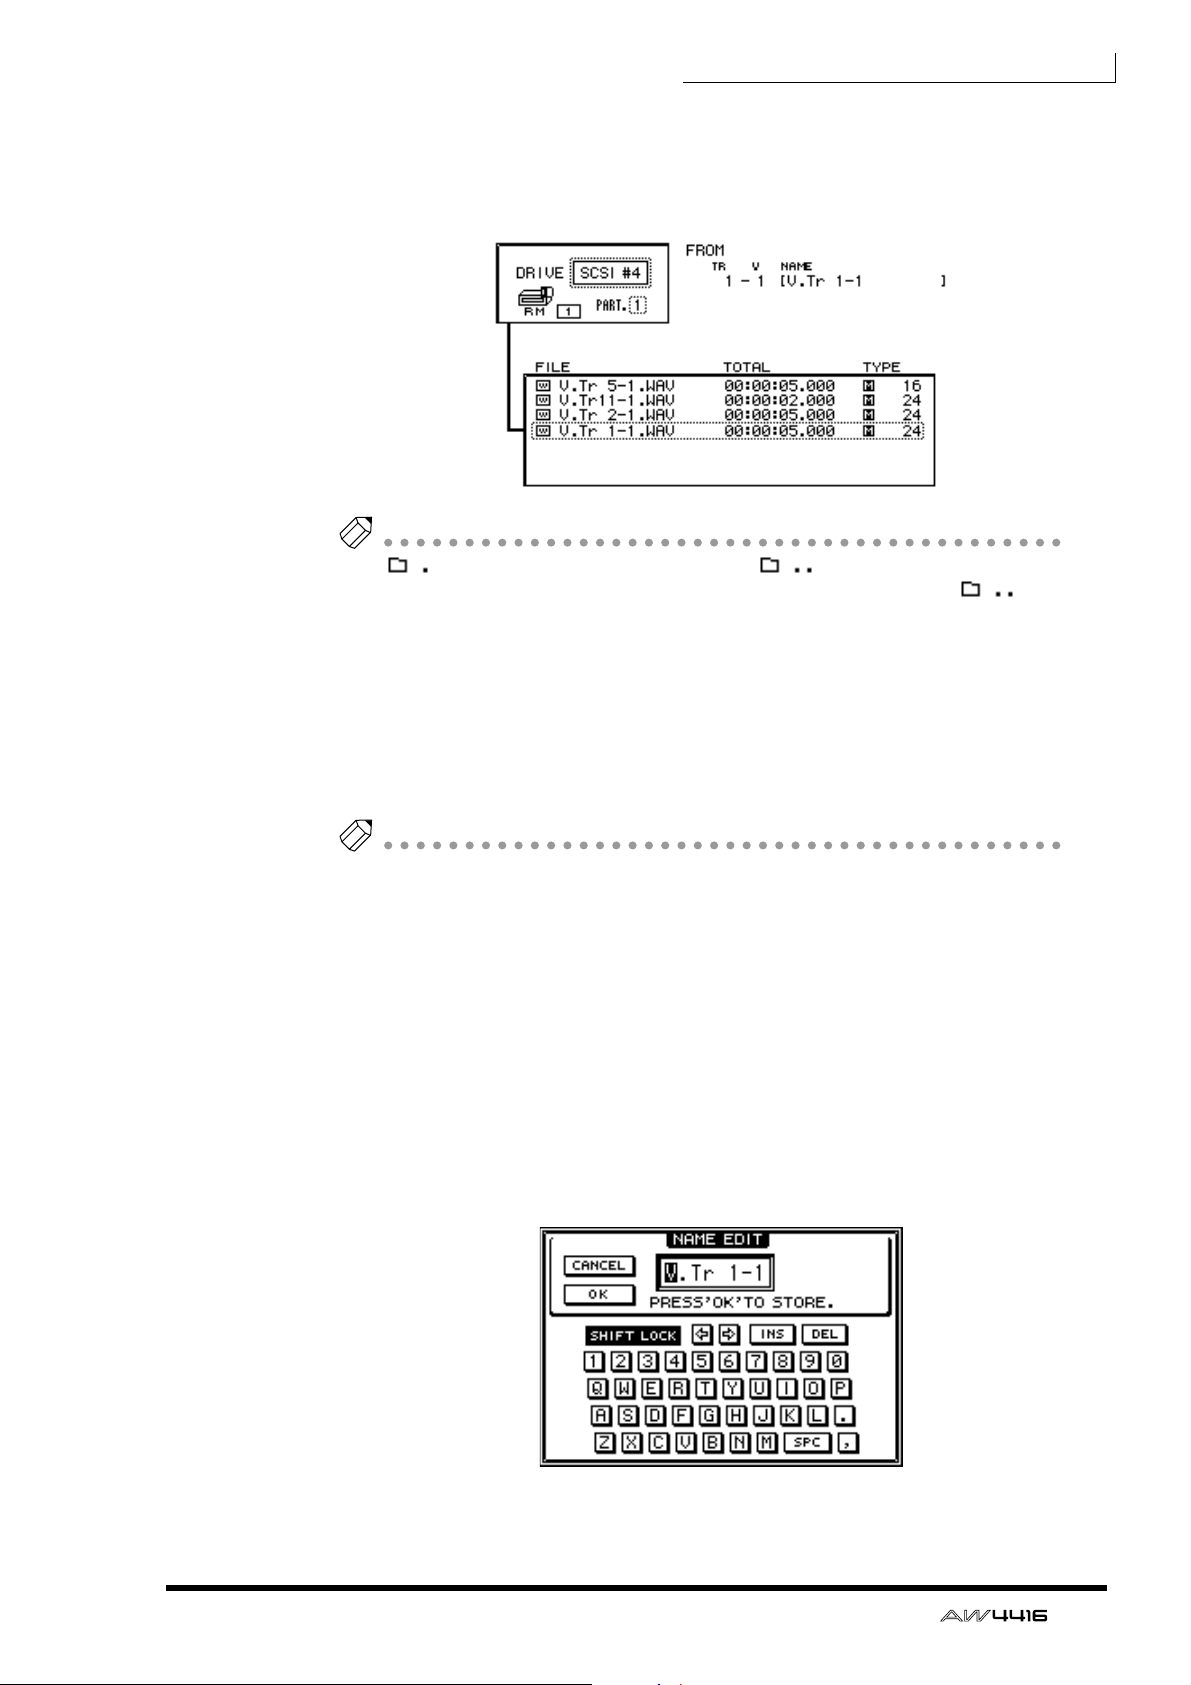
If media (e.g., a MO disk) is inserted, it will be detected automatically. If a WAV
file already exists on the inserted media, the following display will appear.
• “ ” indicates the current directory, and “ ” indicates the next higher
directory. To return to the next higher directory, move the cursor to “ ”
and press the [ENTER] key.
• If you selected a hard disk that has been divided into partitions, you will be
able to switch between partitions in the PART field.
9. Move the cursor to the EXIT button, and press the [ENTER] key.
The drive to which the WAV file will be written will be specified, and you will
return to the screen for selecting the various parameters of the EXPORT command.
• For details on operations in the NAME EDIT popup window, refer to p.60 of
the Operation Guide.
• If you selected “AL” for the TRACK parameter, it is not possible to change the
filename.
• If you are writing to CD-R/RW media, the characters usable in the filename are
limited to uppercase alphabet (A–Z), numerals (0–9), and the underscore character (_). If you input a space in the filename, it will be converted into an
underscore character.
10. If you wish to assign a desired filename to the WAV file, move the cursor to the
TO FILE parameter button, and press the [ENTER] key.
The NAME EDIT popup window will appear, allowing you to specify the filename
of the WAV file. By default, the filename will be the name of the track or region
you selected in step 6, plus .WAV.
11. When you have finished specifying the filename, move the cursor to the OK
button, and press the [ENTER] key.
5
Additions and changes in version 1.2
12. Use the [DATA/JOG] dial to change the setting to 16, and press the [ENTER]
key.
Tip
If a file of the identical name already exists on the writing destination device, a
popup window will appear, asking you whether you wish to overwrite it. If you wish
to overwrite, move the cursor to the OK button. If you do not wish to overwrite,
move the cursor to the CANCEL button. Then press the [ENTER] key. If you used the
CANCEL button, you will return to the screen for setting parameters of the EXPORT
command. Change the filename as necessary.
13. If you are converting a 24 bit audio track to a 16 bit WAV file, move the cursor
to the TO SIZE parameter button, and press the [ENTER] key.
If the sample size of the current song is 24 bit, the lowest 8 bits will be discarded,
and the data will be converted and written as a 16 bit WAV file.
Tip
• If you are writing 24 bit data to a WAV file without conversion, steps 12–13 are
not necessary.
• If the current song is 16 bit, the TO SIZE parameter will be only 16 bit and cannot be changed.
14. To write the WAV file, move the cursor to the EXECUTE button and press the
[ENTER] key.
A popup window will appear, asking you to confirm the operation.
15. Move the cursor to the OK button, and press the [ENTER] key.
The WAV file will be written.
❒ Writing audio from a virtual track to a WAV file
The EXPORT command can also be used in the V.TR Edit page to write audio data
from a desired virtual track to a WAV file. With the difference that you will first
access the EDIT screen V.TR Edit page ([EDIT] key → [F2] key) and select a virtual
track 1–8 as the object of the operation, the procedure is the same as for the
EXPORT command. Refer to the preceding explanation for details.
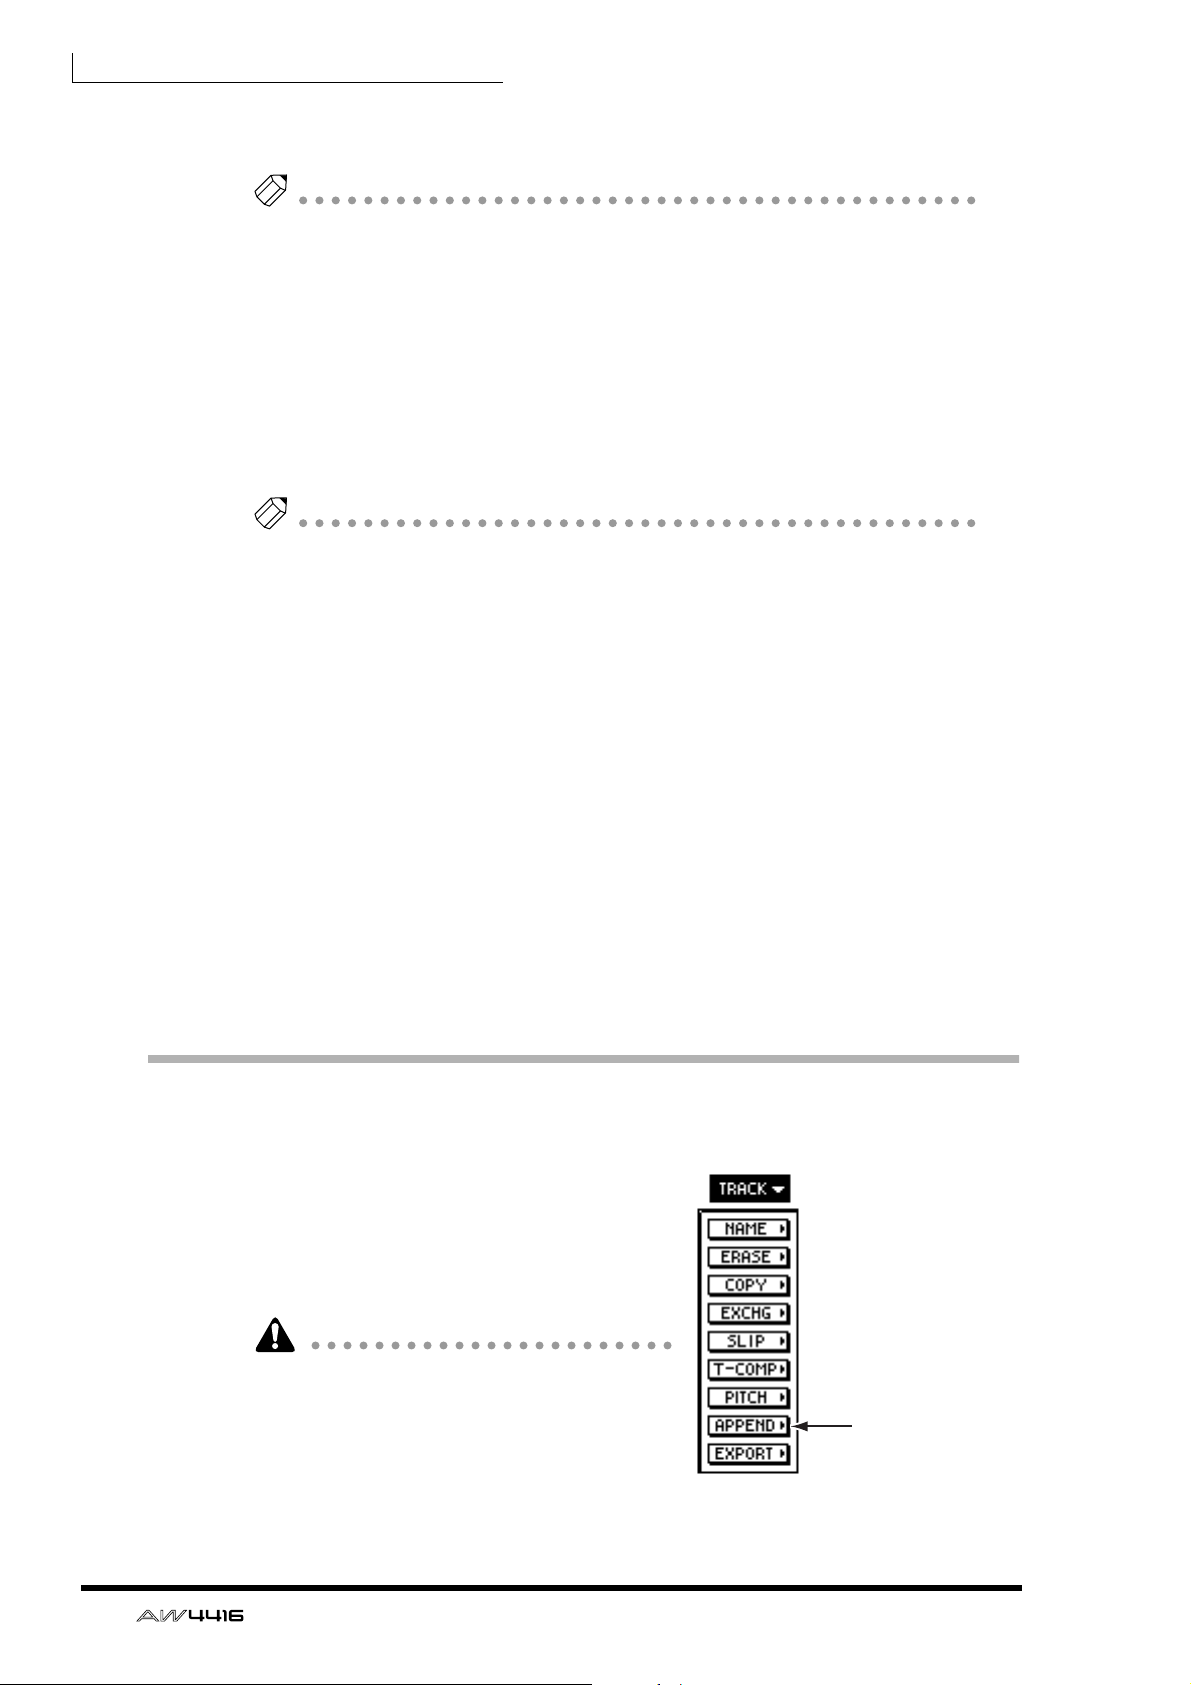
Use the APPEND command to join regions
Multiple regions in a desired track or virtual
track can now be combined into one
region. To do this, use the APPEND command that has been added to the TRACK/
PART menu of the EDIT screen / TR Edit
page, and to the TRACK/PART menu of the
EDIT screen / V.TR Edit page.
When you use the APPEND command, the
gap between regions will be converted as
silent audio data.
The APPEND command will require processing time that is longer than the actual time.
Also, the command cannot be cancelled once
it has been executed.
6
APPEND command
 Loading...