


YVC-300
Unified Communications Speakerphone
Benutzerhandbuch
User’s Manual
Manual del usuario
Manual do usuário
Manuel de l’utilisateur
Manuale dell’utente
Update the firmware and use the latest features.
You can download the latest firmware and user's manual from the following website:
https://uc.yamaha.com/resources/support/
Руководство пользователя
ESFR ITDE
PT
RUEN

YVC-300 User’s Manual
Introduction
Safety Precautions.............................. 2
WARNING ..............................................2
CAUTION ...............................................3
Precautions for Use ............................ 4
Bluetooth®..............................................4
Introduction ......................................... 7
What is supplied in the box.....................7
Conventions used in this manual............7
Using the latest features.........................7
What You Can Do
with the Product .................................. 8
Controls and Functions...................... 9
Top .........................................................9
Side ......................................................11
Bottom ..................................................12
How to use YVC-300
Installing the Product ....................... 13
Connecting to Communication
Equipment.......................................... 14
Connecting to a PC
using the USB cable .............................14
Connecting to a Mac
using the USB cable .............................18
Connecting to a smartphone
or tablet via Bluetooth...........................21
Connecting to a videoconference
system using audio cables ...................25
Contents
Convenient functions
Using Convenient Functions............27
Others
Troubleshooting ................................30
Specifications ....................................34
Customer Support .............................35
English
Adjusting the speaker volume ..............27
Muting the microphone......................... 27
Muting the speaker............................... 27
Accepting an incoming Bluetooth
connection request/ending a call..........28
Selecting a connected device
on the EXT IN/OUT terminals............... 28
Enabling or disabling the Bluetooth
function.................................................28
Returning to the factory settings........... 29
Before contacting Yamaha ................... 30
Q1 An indicator is off or flashing ..........30
Q2 Audio quality issues........................ 30
Q3 Bluetooth connection issues...........33
General specifications.......................... 34
Audio specifications.............................. 35
1

YVC-300 User's Manual
Safety Precautions
For the safe use of the product, make sure that you carefully read "WARNING" and "CAUTION" in
this manual and follow them. The "WARNING" and "CAUTION" provided in this manual concern safe
and appropriate use of the product, and are intended to prevent possible dangers to you and other
third parties as well as any loss of property. Please ensure that you keep this manual so that a user
of the product can refer to it at any time.
WARNING
• Remove the USB cable immediately in any of the following cases:
• Any abnormal odor or noise occurs,
• Smoke is emitted,
• The product is broken, or
• The product has been exposed to water.
Using the product without taking any actions may result in fire or an electric shock.
Always contact your dealer for inspection and repair.
• Do not connect or disconnect any cables with wet hands. Failure to observe this may result in an
electric shock or damage to the product.
• Do not touch terminals with your fingers or metal objec
electric shock or damage to the product.
• Do not drop or apply strong impact to the product. Doing so may cause damage to parts inside the
product, resulting in an electric shock, fire, or damage to the product.
• If the product is damaged, always contact your dealer for inspection and repair. Using the product
without taking any actions may result in fire or an electric shock.
• Do not disassemble or modify the product in any way. Failure to observe this may result in fire, an
electric shock, or damage to the product.
• Do not obstruct heat dissipation.
• Do not cover the product with cloth or a tablecloth.
• Do not place the product on a rug, carpet, or any other covering material for a floor.
• Do not put the product into a small, poorly-ventilated space.
Failure to observe this may cause heat to be trapped inside the product, resulting in fire or damage
to the product.
• Do not install the product outdoors or in wet environments. Failure to obser
an electric shoc
• Do not install the product in an area with heavy dust or high humidity, oil soot or vapor, or corrosive
gas. Failure to observe this may result in fire, an electric shock, or damage to the product.
• Do not place vases, flowerpots, glasses, cosmetics, chemicals, candles, and other objects on the
product. Spilling water into the product or foreign objects entering inside the product may result in
fire or an electric shock.
• Do not insert metal, paper, or other foreign objects into the product. Failure to observe this may
result in fire, an electric shock, or damage to the product.
• Do not touch the product when you hear thunder. Failure to observe this may result in an electric
shock.
•Ensure that you use the product at least 22 centimeters away from people with heart pacemakers,
defibrillators, or other medical devices. Failure to observe this may affect the devices, resulting in
serious accidents.
• Do not use the p
equipment. Avoid using the product in locations where the use of radio waves is prohibited, such
as a place near medical equipment.
k, or damage to the product.
roduct n
ear medical equipment. The radio waves may affect the electrical medical
ts. Failure t
o observe this may result in an
ve this may result in fire,
2

YVC-300 User's Manual
CAUTION
• Make sure that you use the supplied USB cable. Using a different USB cable may result in fire, an
electric shock, or damage to the product.
• Do not damage the USB cable.
• Do not place heavy objects on the cable.
• Do not process the cable in any way.
• Do not staple the cable.
• Do not apply excessive force to the cable.
• Keep the cable away from heat-generating appliances.
Failure to observe this may result in fire, an electric shock, or damage to the product.
• Do not install the product in an unstable location or a location that is exposed to vibration. It may
fall or topple over, thus resulting in injury or damage to the product.
• Do not install the product in a location where it is exposed to direct sunlight or at extraordinarily
high temperatures (for example, near a heater). Failure to observe this may result in damage to the
product.
• Do not sit or stand on the product or place other objects on top of it. Failure to observe this may
result in damage to the product.
down the
•Turn
a sudden loud noise, resulting in hearing impairment.
• Do not use the product in locations where the ambient temperature changes rapidly. Rapid
changes in the ambient temperature may result in condensation on the product. Continued use of
the product with condensation on it may result in damage to the product. If there is condensation
on the product, make sure that you leave the product for a while until it dries off with the power
turned off.
• Make sure that you remove static electricity from your body or clothing before touching the product.
Failure to observe this may result in damage to the product due t
• Mak
e sure that you route and connect the cables correctly. If the cables are pulled or someone
gets caught in the cables, the product or connected equipment may tip over or fall, thus resulting in
injury or damage to the product.
• Before connecting external equipment, thoroughly read the instruction manuals provided with the
equipment and connect the equipment according to the instructions.
•Turn off the product and remove all the connection cables before moving the product. Failure to
observe this may cause the product or connected equipment to fall or topple over, thus resulting in
injury.
WARNING
TO REDUCE THE RISK OF FIRE OR ELECTRIC SHOCK, DO NOT EXPOSE THIS APPARATUS
TO RAIN OR MOISTURE.
volume to the minimum before starting playback. Failure to observe this may create
o the static electricity.
English
3

YVC-300 User's Manual
Precautions for Use
• This product is intended for use in general offices and is not designed for use in any fields requiring
a high degree of reliability, such as the handling of human lives or valuable assets.
• Note that Yamaha cannot assume any responsibility for any loss or damage resulting from
improper use or misconfiguration of the product.
• Depending on the usage environment, the product may generate noise in telephones, radios,
televisions, or other appliances. If this occurs, change the location where it is installed or its
orientation.
• If you transfer this product to a third party, pass this manual and accessories along with it.
• Make sure that you follow the instructions of your local government when disposing of the product.
• Do not connect any equipment that generates noise on the same power line as the product.
Bluetooth
•Bluetooth is a technology for wireless communication employing the 2.4 GHz frequency band,
which can be used without a license.
• The 2.4 GHz band used by Bluet
equipment. While Bluetooth-compatible devices use a technology to minimize the influence from
other components using the same radio band, such influence may reduce the speed or distance of
communications and in some cases interrupt communications.
• The speed or distance of communications differs according to the distance between the
communicating devices, the presence of obstacles, radio wave conditions, and the type of
equipment.
• Yamaha does not guarantee that all wireless connections between this product and devices
compatible with the Bluetooth function.
®
ooth-compatible devices is a r
adio band shared by many types of
4

YVC-300 User's Manual
FCC INFORMATION (for US customers)
1 IMPORTANT NOTICE: DO NOT MODIFY THIS UNIT!
This product, when installed as indicated in the instructions contained in this manual, meets
FCC requirements. Modifications not expressly approved by Yamaha may void your authority,
granted by the FCC, to use the product.
2 IMPORTANT: When connecting this product to accessories and/or another product use only
high quality shielded cables. Cable/s supplied with this product MUST be used. Follow all
installation instructions. Failure to follow instructions could void your FCC authorization to use
this product in the USA.
3 NOTE: This product has been tested and found to comply with the requirements listed in FCC
Regulations, Part 15 for Class “A” digital devices. Compliance with these requirements provides
a reasonable level of assurance that your use of this pr
not result in harmful interference with other electronic devices. However, operation of this
product in a residential area is likely to cause interference in some form. In this case you, the
user, bear the responsibility of correcting this condition.
This product generates/uses radio frequencies and, if not installed and used according to the
instructions found in the users manual, may cause interference harmful to the operation of
other electronic devices. Compliance with FCC regulations does not guarantee that
interference will not occur in all installations. If this product is found to be the source of
interference, which can be determined by turning the product “OFF” and “ON”, please try to
eliminate the problem by using one of the following measures:
Relocate either the product generating the interference or the device that is being affected by
ce.
erferen
the int
Utilize power outlets that are on different branch (circuit breaker or fuse) circuits or install AC
line filter/s.
In the case of radio or TV interference, relocate/reorient the antenna. If the antenna lead-in is
300 ohm ribbon lead, change the lead-in to co-axial type cable.
If these corrective measures do not produce satisfactory results, please contact the local
retailer that is authorized to distribute this type of product. If you can not locate the appropriate
retailer, please contact Yamaha Unified Communications, Inc., 144 North Rd, Suite 3250
Sudbury, MA 01776
The above statements apply ONLY to those products distributed by Yamaha Unified
Communications, Inc.
oduct, in a commer
cial environment, will
English
This device complies with part 15 of FCC Rules and Industry Canada’s licence-exempt RSSs.
Operation is subject to the following two conditions: (1) this device may not cause harmful
interference, and (2) this device must accept any interference received, including interference that
may cause undesired operation.
This transmitter must not be co-located or operated in conjunction with any other antenna or
transmitter.
This equipment compli
environment and meets the FCC radio frequency (RF) Exposure Guidelines and RSS-102 of the
IC radio frequency (RF) Exposure rules. This equipment has very low levels of RF energy that it
deemed to comply without maximum permissive exposure evaluation (MPE). But it is desirable
that it should be installed and operated keeping the radiator at least 20cm or more away from
person’s body.
es with FCC/IC
radiation exposure limits set forth for an uncontrolled
5
YVC-300 User's Manual
Warning: Operation of this equipment in a residential environment could cause radio interference.
Information for users on collection and disposal of old equipment:
This symbol on the products, packaging, and/or accompanying documents
means that used electrical and electronic products should not be mixed with
general household waste.
For proper treatment, recovery and recycling of old products, please take them
to applicable collection points, in accordance with your national legislation.
By disposing of these products correctly, you will help to save valuable
resources and prevent any potential negative effects on human health and the
environment which could otherwise arise from inappropriate waste handling.
For more information about collection and recycling of old products, please
contact your local municipality, your waste disposal service or the point of sale
where you purchased the items.
For business users in the European Union:
If you wish to discard electrical and electronic equipment, please contact your
dealer or supplier for fur
Information on Disposal in other Countries outside the European Union:
This symbol is only valid in the European Union. If you wish to discard these
items, please contact your local authorities or dealer and ask for the correct
method of disposal.
ther infor
mation.
6

YVC-300 User's Manual
Introduction
Thank you for purchasing Yamaha YVC-300. This product is a voice terminal for convenient
teleconferencing and remote talks, when connected to communication equipment, such as a PC or
Mac, a smartphone or tablet, and a videoconference system.
Please read this manual thoroughly before using the product for proper installation and connections.
Keep this manual in a safe place so that it does not become lost.
• The contents of this manual apply to the latest specifications as of the publishing date. To
obtain the latest manual, access the following website then download the manual file.
https://uc.yamaha.com/resources/support/
• No part of this manual may be reproduced or used in any form without permission of Yamaha.
• Yamaha shall not be liable for any loss of or damage to data resulting from use of the product.
Also note that the warranty only covers physical damage to the product.
What is supplied in the box
• Main unit (YVC-300) x1
• USB cable 3 m (9.8 ft) x1
•User's manual (this manual) x1
Conventions used in this manual
■ Abbreviations
This manual uses the following abbreviations for the products below:
• Yamaha YVC-300: The product, this product
•Microsoft
•macOS
■ Trademarks
• Microsoft and Windows are registered trademarks of Microsoft Corporation in the United States
and other countries.
• Mac and macOS are registered trademarks of Apple Inc.
• Android
•Bluetooth
with a license agreement.
• NFC logo (N-Mark) is a trademark or registered trademark of NFC Forum, Inc.
®
Windows®: Windows
®
: macOS
TM
is a trademark or registered trademark of Google Inc.
®
is a registered trademark of the Bluetooth SIG and is used by Yamaha in accordance
English
Using the latest features
Yamaha is making continual improvements in product features.
To m a ke use of the latest features, visit the following website to download the firmware of the
product: https://uc.yamaha.com/resources/support/
7

YVC-300 User's Manual
Mobile network
Internet
Intranet, etc.
Internet
Intranet, etc.
Internet
Intranet, etc.
Bluetooth connection
EXT connection
YVC-300
Smartphone
PC/Mac
Videoconference
system
USB
connection
Audio teleconference, etc.
Smartphone
Web conference, etc.
PC/Mac
Videoconference
system
Video conference
Fixed-line
phone
What You Can Do with the Product
■ "Easy-to-talk" and "easy-to-hear" voice communications
The product is equipped with microphones with high voice-capturing capability and a speaker with
high voice reproduction capability. It also provides high-performance audio signal processing
functions, such as the adaptive echo canceller and noise reduction, providing "easy-to-talk" and
"easy-to-hear" voice communications without skipping or noise.
■ Connection with various communication devices
The product provides three connection interfaces: "USB" for a connection with a PC or Mac,
"Bluetooth" for a smartphone or tablet, and "EXT" for an analog connection with a videoconference
system.
Yo u can also use the "USB, Bluetooth, and EXT" interfaces at the same time (the audio mixer
function enables this).
8

YVC-300 User's Manual
q
e
w
w
q
w
q
!1
r yo!0iut
Controls and Functions
Top
q Microphones
Picks up voice of people who are speaking.
w Microphone indicators
Indicate the level of voice the microphone picks
up. They also indicate incoming Bluetooth
connection requests and a mode of the product.
(→Page 10)
e Speaker
Outputs voices from the remote party.
r Bluetooth button ( )
Press this button to pair the product with or
connect the product to a Bluetooth-compatible
smartphone or tablet.
Pressing the button while the product has an
established connection with a Bluetooth device
will end the connection. (→Page 21)
t Bluetooth indicator
Indicates the product status in conjunction with
the operation of the Bluetooth button.
(→Page 11)
y On/off-hook button ( )
Allows you to take an incoming call or hang up a
call while the product is connected to a
Bluetooth-compatible smar
P
age 28)
(→
tphone or t
ablet.
u On/off-hook indicator
Indicates the product status in conjunction with
the operation of the on/off-hook button.
(→Page 11)
i Microphone mute button ( )
Used to temporarily turn off (mute) the
microphone. The remote party can no longer
hear you. (→Page 27)
o Volume buttons ( )
Press them to adjust the speaker volume.
Holding down either of the buttons for at least
0.5 seconds allows you to continuously turn the
volume up or down. (→Page 27)
Also, when changing settings of the product,
use this button. (→Page 28).
!0 Volume level indicator
Usually indicates the input level of voice from
the remote party. It indicates the volume level of
the speaker output when the speaker volume
level is adjusted. It indicates a setting when it is
changed. (→Page 10)
!1 NFC logo (N-Mark)
Holding a Bluetooth-compatible smartphone or
tablet with the NFC (Near Field Communication)
function over the logo allows it to be paired with,
connected to, or disconnected from the product.
(→Page 24)
English
9
YVC-300 User's Manual
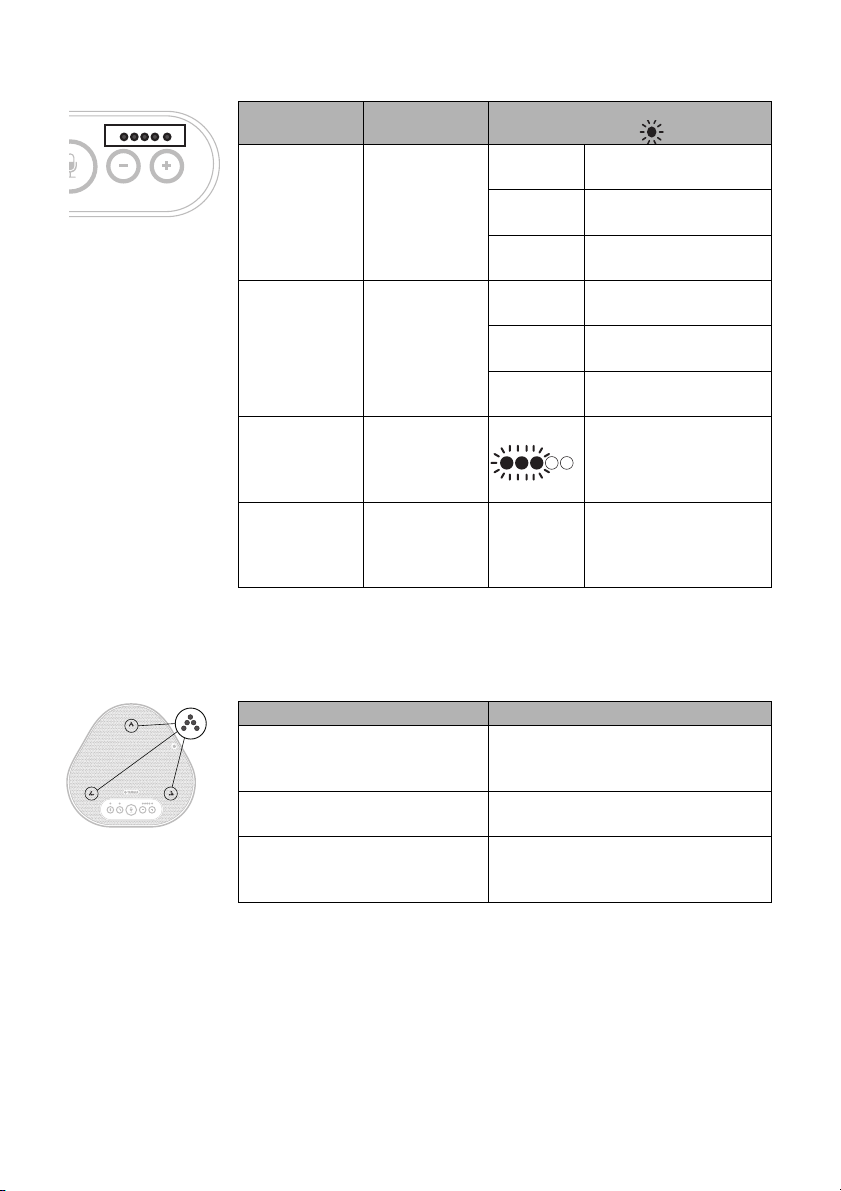
■ How the volume level indicator (Page 9: !0) works
Status Description
Normal
operation
The input level
of incoming
( ● : On, ○ : Off, : Flashing)
○○○○○
audio signals
from the
●●●○○
remote party is
When the
speaker
volume is
being adjusted
indicated.
The specified
speaker
volume level is
indicated.
●●●●●
○○○○○
●●●○○
(→Page 27)
●●●●●
When the
speaker is
muted
(→Page 27)
When the
product is
being started
The indicator
indicates that
the speaker is
muted.
The indicator
indicates that
the product is
now starting.
●●○○○
→
←
○○○●●
In addition to the above, the indicator indicates the setting of the product, as described in
"Selecting a connected device on the EXT IN/OUT terminals" (page 28). Also, when an error
occurs, it displays the details of the error. (→Page 30)
Example
No audio signal is
present.
Audio signals are
present.
Maximum audio signal
input.
The speaker volume
level is set to minimum.
The speaker volume
level is set to medium.
The speaker volume
level is set to maximum.
The indicator symbols
at the current volume
level will flash.
The illuminated symbols
move back and forth
until the product is
completely started.
■ How the microphone indicators (Page 9: w) work
Status Description
Normal operation Lit in green.
They light up brighter when the voice
is input.
When the microphone is muted
Flashes red.
(→Page 27)
When incoming Bluetooth
connection requests are received
(→Page 28)
Flashes green (red when the
microphone is muted) (at 0.25-second
intervals).
In addition to the above, the indicators flash white in various setting modes. (→Page 29)
Also, when an error occurs, they flash red at high speed (at 0.1-second intervals). (→Page 30)
10

YVC-300 User's Manual
q w
■ How the Bluetooth indicator (Page 9: t) works
Indication Status
Off The Bluetooth function is disabled.
Flashing blue at high speed
(at 0.25-second intervals)
Flashing blue at slow
speed (at 0.5-second
intervals)
Non-flashing blue light The Bluetooth connection has been
Green light The Bluetooth connection has not been
■ How the on/off-hook indicator
Indication Status
Off A Bluetooth connection is ended/the
Green light A Bluetooth connection is in progress.
(Page 9: u) works
The function is waiting for the pairing
process to be done.
The Bluetooth function is waiting for the
connection to be established.
established.
established.
product is waiting for an incoming call.
Side
English
q EXT IN/OUT terminals
Connect the terminals to the audio I/O terminals
of a videoconference system. (→Page 25)
w USB terminal
Use the supplied USB cable to connect this
terminal to a PC or Mac for communication and
for power supply.
When you connect this product to a product that
does not supply power, such as a smartphone
or a tablet, use a commercially available USB
power adapter. No USB power adapter is
supplied with this product.
11

YVC-300 User's Manual
q
Bottom
q Nameplate
Provides the following information:
Model No.: Provides the model number of the
product.
SERIAL LABEL: Provides the serial number,
which is used to manage and categorize the
product.
12
YVC-300 User's Manual
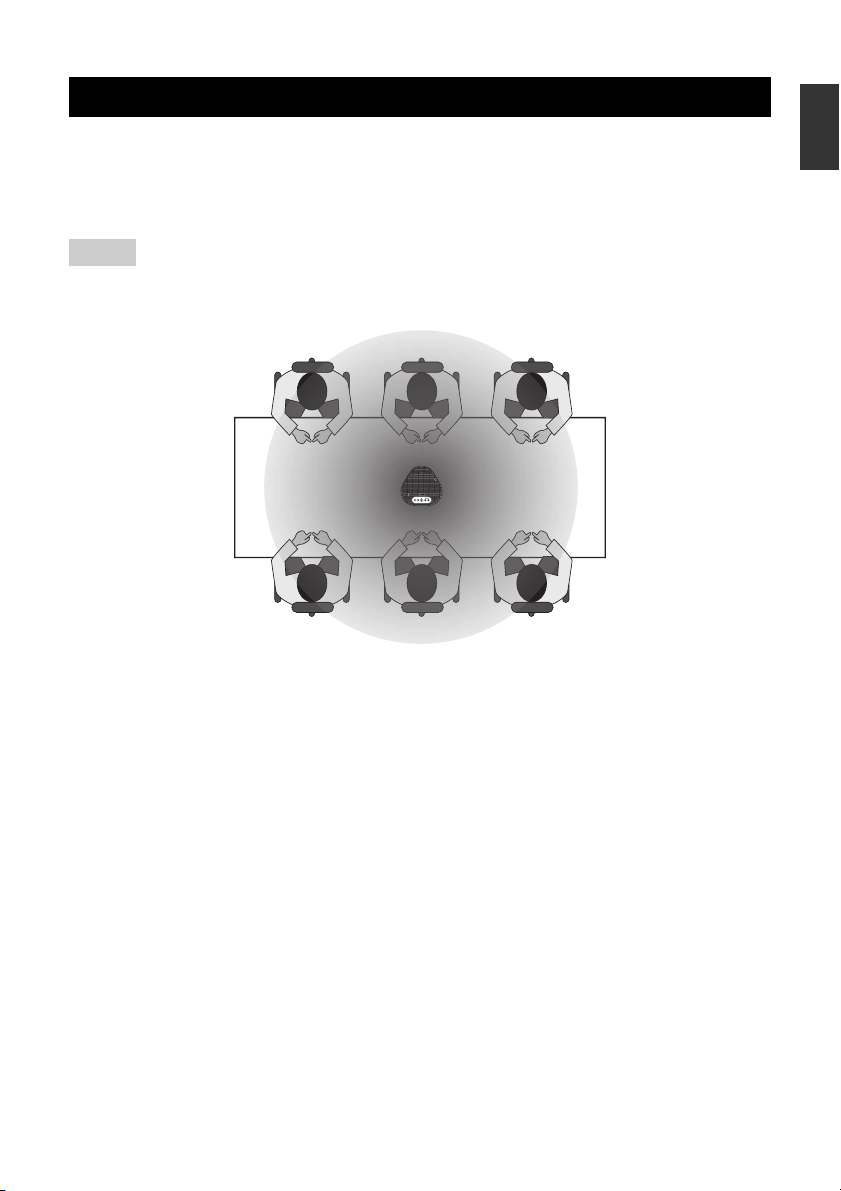
Installing the Product
Install the product in a location where you actually use it, such as a conference room.
■ Installation location
Locate a position where the product can pick up voices of participants well and the participants can
hear audio from the speaker well to place the product there.
Note
Keep the product away from noise sources (such as heat radiation fans of PCs and Macs, and projectors). Otherwise, the
remote party may have poor audio quality.
English
13
YVC-300 User's Manual
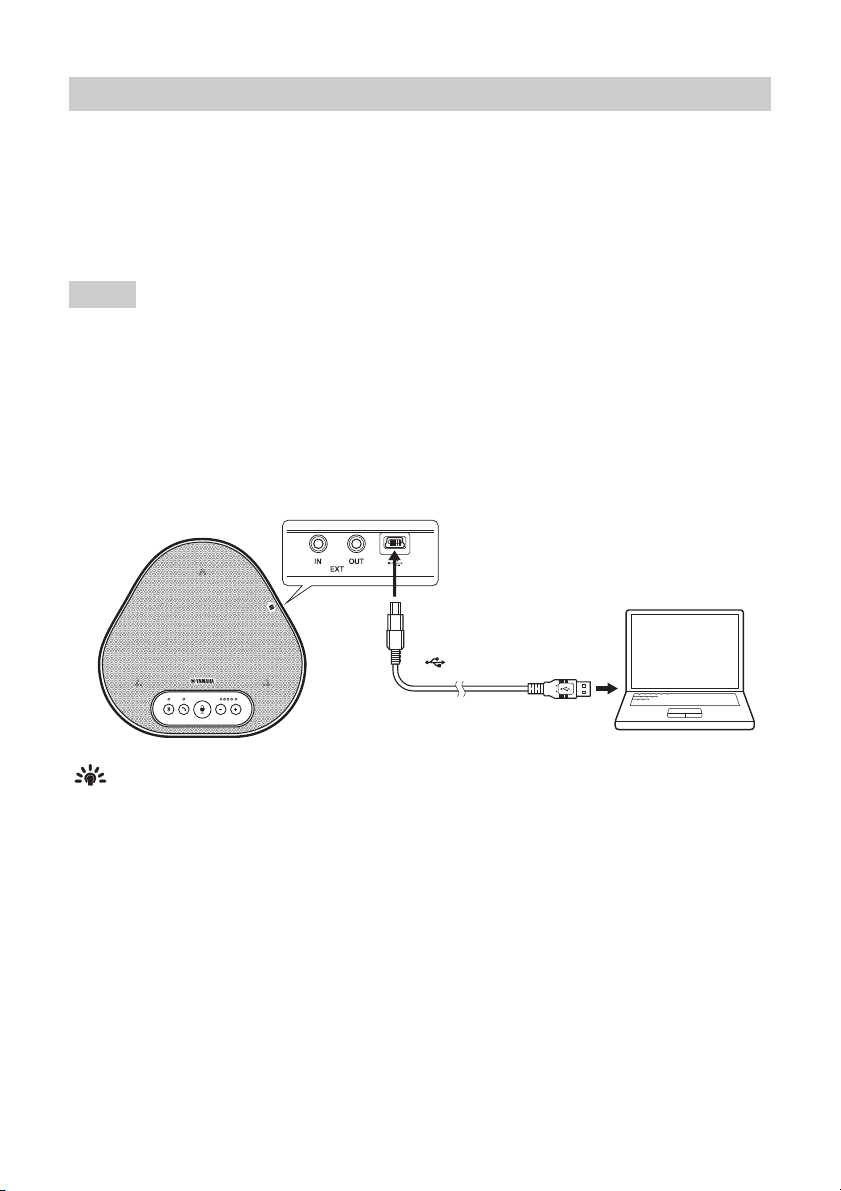
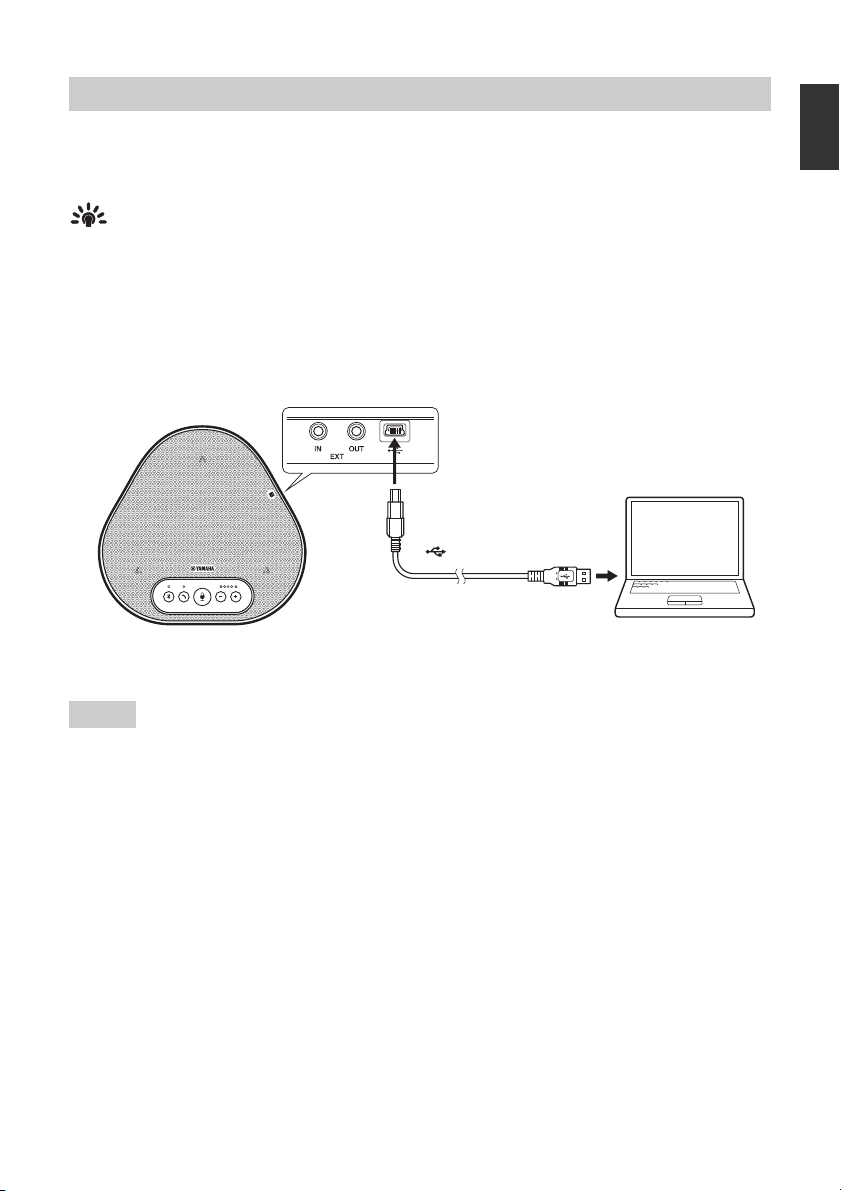
To the USB terminal
Connecting to Communication Equipment
This chapter describes how to connect to each communication device.
After the connection is established, check that sound is output correctly.
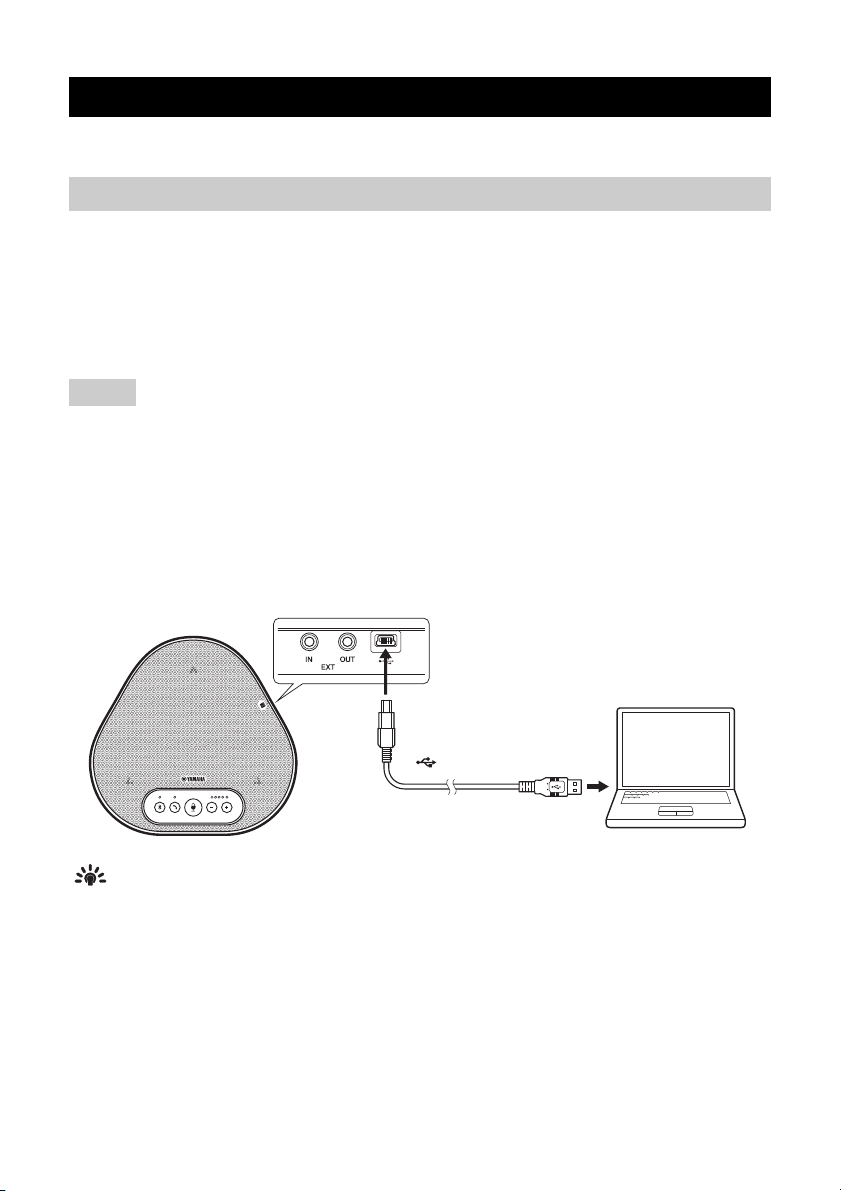
Connecting to a PC using the USB cable
■ Check the following before the connection procedure
Make sure that you have the supplied USB cable available.
In addition, the PC connected to the product must meet the following system requirements:
• OS: Windows (*1)
• USB: USB 2.0 or later
(*1) For the supported versions, refer to the following website:
https://uc.yamaha.com/
Notes
•You cannot connect more than one microphone or speaker including this product to one PC and use them at the same
time.
• Use the supplied USB cable only. Using a different USB cable may cause the product to malfunction.
• The product must be connected directly to a PC. Connecting the product via a USB hub may cause the product to
malfunction.
• In rare cases, an audio playback may be interrupted due to PC usage, such as the workload or limited free space in
memory.
■ Connecting the devices
Connect between the product and a PC through the supplied USB cable.
Tips
• The product receives power from the PC through the USB cable (USB bus powered).
•You do not need to install a separate USB driver because the PC recognizes the product as a standard USB
audio device.
14

YVC-300 User's Manual
Click
Check
Click
■ Checking that the connection has been made correctly
After the connection is established, perform the following steps to check that the PC recognizes the
product correctly.
Note
The items and options in the setting window may vary depending on your PC environment.
1 Open the Control Panel on your PC.
• In Windows 7, click "Start" - "Control
Panel".
• In Windows 8.1, or 10, right-click the
bottom left corner of the Start screen, and
4 Check that "Yamaha YVC-300" is set as
a default device in the "Speakers" field.
If not, click "Yamaha YVC-300" and then
click "Set Default".
then click "Control Panel".
2 Click "Hardware and Sound" - "Sound".
The "Sound" window appears.
3 Click the "Playback" tab.
English
Tip
In most cases, simply connecting the product to a
PC automatically sets "Yamaha YVC-300" as a
default device.
5 Click the "Recording" tab.
15

YVC-300 User's Manual
Check
6 Check that "Yamaha YVC-300" is set as
a default device in the "Microphone"
field.
If not, click "Yamaha YVC-300" and then
click "Set Default".
Tip
In most cases, simply connecting the product to a
PC automatically sets "Yamaha YVC-300" as a
default device.
7 Click "OK" to close the "Sound"
window.
16

YVC-300 User's Manual
Click
Click
Click
Click
Adjust
■ Adjusting the microphone sensitivity
Sound may be distorted or too faint on the remote party depending on your environment. In this
case, adjust the microphone sensitivity.
Note
The items and options in the setting window may vary depending on your PC environment.
1 Open the Control Panel.
5 Click the "Levels" tab.
• In Windows 7, click "Start" - "Control
Panel".
• In Windows 8.1, or 10, right-click the
bottom left corner of the Start screen, and
then click "Control Panel".
2 Click "Hardware and Sound" - "Sound".
The "Sound" window appears.
3 Click the "Recording" tab.
6 In the "Microphone" section, adjust the
microphone sensitivity.
4 Select "Yamaha YVC-300" from
"Microphone" devices and then click
"Properties".
The "Microphone Properties" window appears.
English
17
YVC-300 User's Manual
To the USB terminal
Connecting to a Mac using the USB cable
■ Check the following before the connection procedure
Make sure that you have the supplied USB cable available.
In addition, the Mac connected to the product must meet the following system requirements:
• OS: macOS (*1)
• USB: USB 2.0 or later
(*1) For the supported versions, refer to the following website:
https://uc.yamaha.com/
Notes
•You cannot connect and use more than one microphone or speaker including this product to one Mac at the same
time.
• Use the supplied USB cable only. Using a different USB cable may cause the product to malfunction.
• The product must be connected directly to a Mac. Connecting the product via a USB hub may cause the product to
malfunction.
• In rare cases, an audio playback may be interrupted due to Mac usage, such as the workload or limited free space in
memory.
■ Connecting the devices
Connect between the product and a Mac through the supplied USB cable.
Tips
• The product receives power from the Mac through the USB cable (USB bus powered).
•You do not need to install a separate USB driver because the Mac recognizes the product as a standard USB
audio device.
18
YVC-300 User's Manual
Click
Click
Check
Click
Check
■ Checking that the connection has been made correctly
After the connection is established, perform the following steps to check that the Mac recognizes the
product correctly.
Note
The items and options in the setting window may vary depending on your Mac environment.
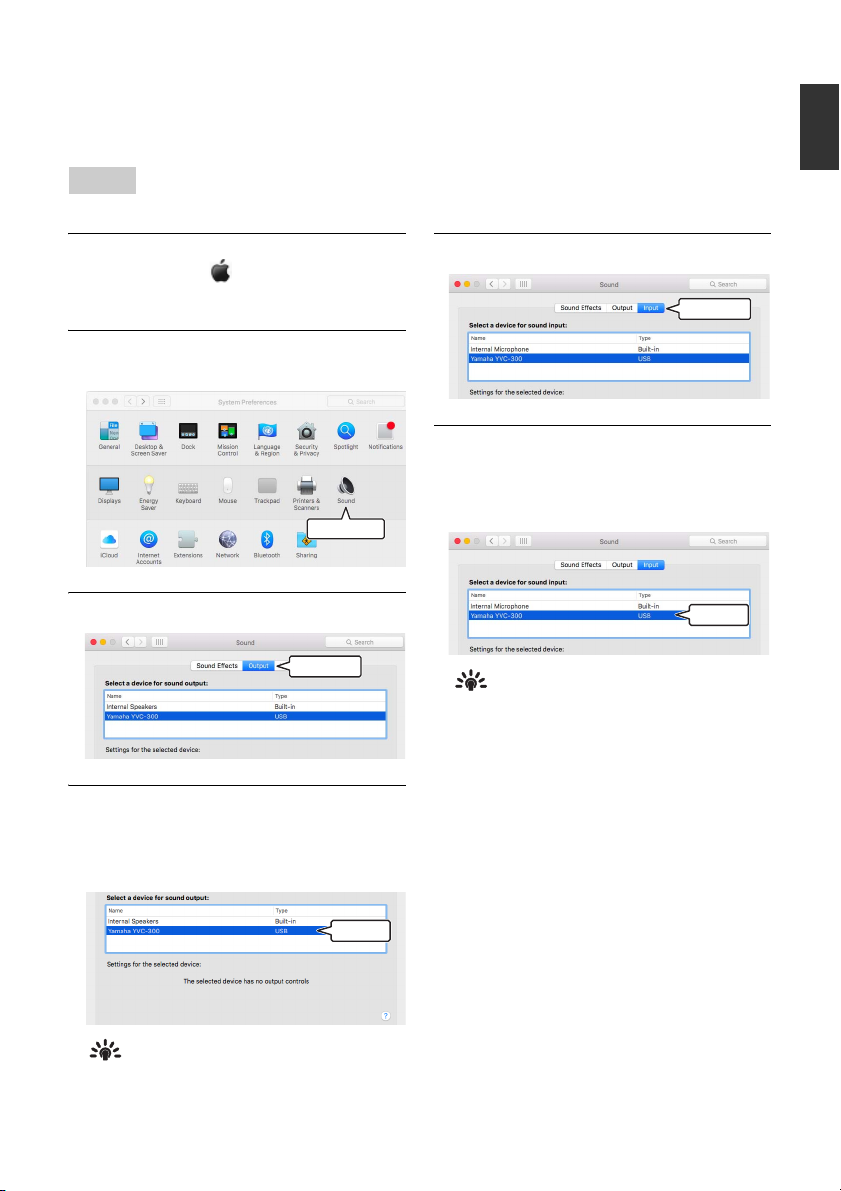
1 At the top left corner of the Mac
desktop, click and then click
5 Click the "Input" tab.
"System Preferences".
2 Click "Sound".
The "Sound" window appears.
6 In the "Select a device for sound
input:" section, check that "Yamaha
YVC-300" is selected.
If not, click "Yamaha YVC-300".
3 Click the "Output" tab.
English
4 In the "Select a device for sound
output:" section, check that "Yamaha
YVC-300" is selected.
If not, click "Yamaha YVC-300".
Tip
In most cases, simply connecting the product to a
Mac automatically selects "Yamaha YVC-300".
Tip
In most cases, simply connecting the product to a
Mac automatically selects "Yamaha YVC-300".
19

YVC-300 User's Manual
Adjust
■ Adjusting the microphone sensitivity
Sound may be distorted or too faint on the remote party depending on your environment. In this
case, adjust the microphone sensitivity.
Note
The items and options in the setting window may vary depending on your Mac environment.
1 From at the top left corner of the
Mac desktop, select "System
Preferences" - "Sound" - "Input" tab.
2 In the "Input volume" field, adjust the
microphone sensitivity.
20

YVC-300 User's Manual
To the USB terminal
Connecting to a smartphone or tablet via Bluetooth
■ Check the following before the connection procedure
Make sure that you have a Bluetooth-compatible smartphone or tablet (hereafter, collectively
referred to as a "smartphone") available.
Also, make sure that you have one PC or Mac for power supply.
Notes
• The smartphone must be within 10 m (32.8 ft) from the product (with no obstacles between them).
• There is no guarantee that the product can connect to any types or models of smartphones via Bluetooth.
Tips
• Smartphones show the product as "YVC-300 Yamaha".
• Only one smartphone can connect to the product via Bluetooth at the same time.
■ Connecting to a power source
Use the supplied USB cable to connect between the product and a PC or Mac.
The product receives power from the PC or Mac.
English
If the product is not connected to the PC or Mac, connect the supplied USB cable to a commercially
available USB power adapter.
Notes
• Make sure to first read the safety precautions for the USB power adapter you are going to use.
• Use the USB power adapter that is capable of supplying power compliant with the USB standard.
Output voltage: 4.8 to 5.2 V
Output current: At least 0.5 A
21
YVC-300 User's Manual
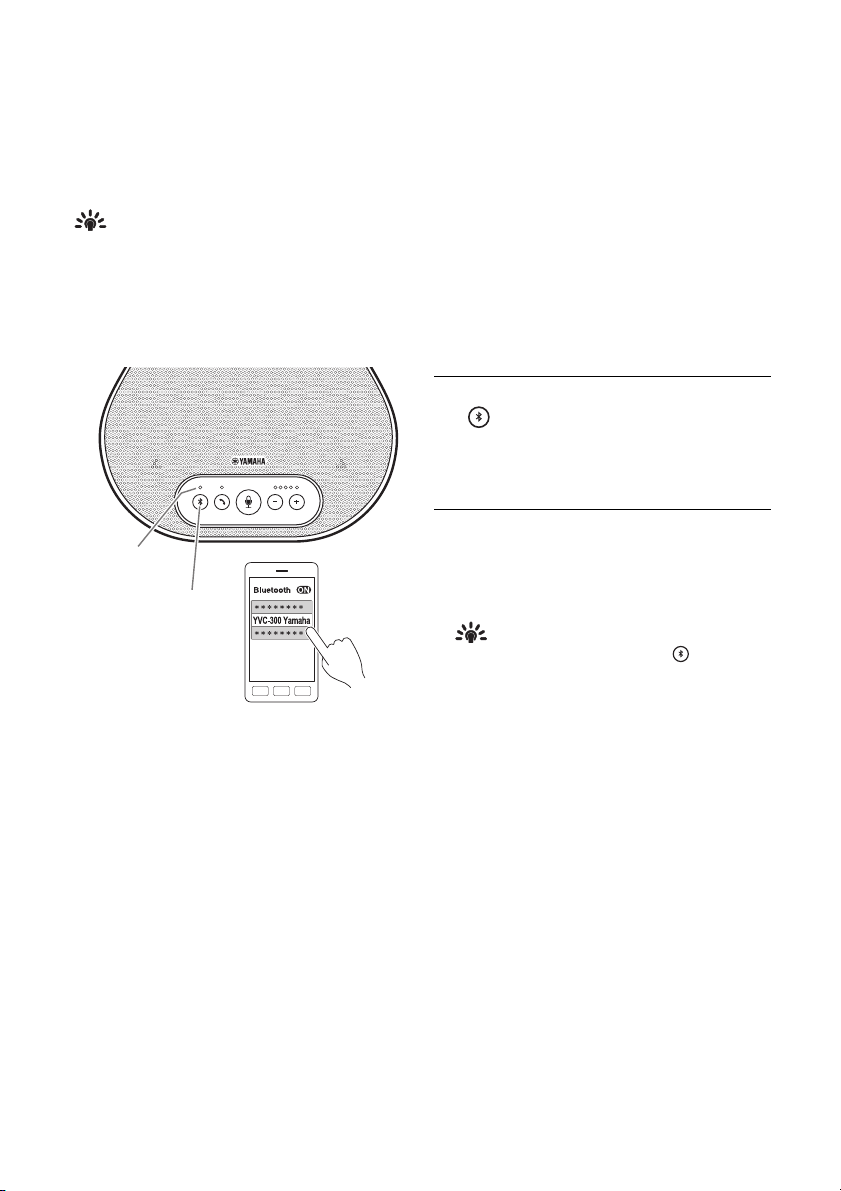
Bluetooth button
Bluetooth
indicator
■ Pairing
Pairing is an operation where a smartphone and the product are registered with each other. When a
Bluetooth connection is used for the first time or when pairing information is deleted, the pairing
process is required.
Once a pairing is completed, you can make a Bluetooth connection in a simple procedure.
Tips
• Check that the pairing is completed on the smartphone. If the pairing is not succeeded, retry it.
•If the power supply to the product is stopped during a pairing operation, the pairing information may be
discarded. In this case, retry pairing.
• The product can be paired with up to eight smartphones. If a ninth smartphone is paired, the product deletes
the pairing information on the device with the oldest Bluetooth connection date and time.
• If the product is connected to another smartphone via Bluetooth, disconnect it from the smartphone before
pairing.
1 Press and hold the Bluetooth button
( ) for at least 2 seconds.
The Bluetooth indicator now flashes blue at
high speed, indicating that the product is
ready for paring.
2 Perform a pairing operation on the
smartphone.
If a message prompts you to enter your
passkey, enter "0000" in figures.
22
Tip
If you press the Bluetooth button ( ) while the
Bluetooth indicator is flashing blue at high speed,
or if 90 seconds elapses without the pairing being
completed, the product is no longer ready for the
pairing.
YVC-300 User's Manual
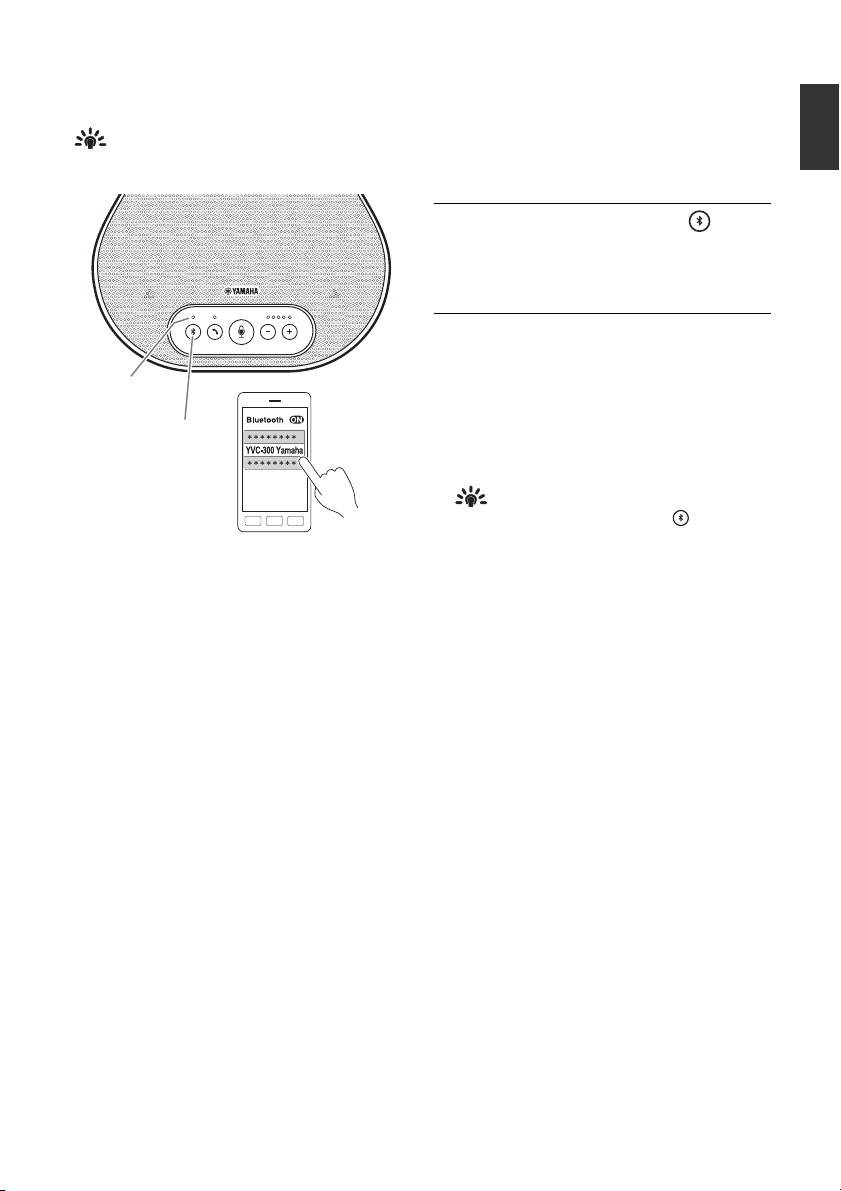
Bluetooth button
Bluetooth
indicator
■ Making a Bluetooth connection with the paired smartphone
Tip
Some smartphones make Bluetooth connections simultaneously with their pairing. In such a case, the procedure
below is not required.
1 Press the Bluetooth button ( ).
The Bluetooth indicator now flashes blue,
indicating that the product is ready for a
Bluetooth connection.
2 Make a Bluetooth connection on the
paired smartphone.
When the connection is established, the
Bluetooth indicator now lights up blue.
Also, a notification sound rings to let the user
know that the Bluetooth connection has
been established.
Tip
If you press the Bluetooth button ( ) while the
Bluetooth indicator is flashing blue, or if 90
seconds elapses without the Bluetooth connection
established, the product is no longer ready for the
Bluetooth connection.
English
23

YVC-300 User's Manual
NFC logo
Bluetooth
indicator
Bluetooth button
■ Making a pair and Bluetooth connection using the NFC function (for NFCcompatible models)
Any of the following smartphone models (hereafter, referred to as an "NFC-compatible model") offers
an easy paring and Bluetooth connection.
• NFC-compatible Android devices
Before starting the procedure below, turn on the NFC function of the smartphone.
Note
The function may not work or the connectable distance may be different depending on smartphones.
Tips
• If the smartphone is in a case, remove it.
• If a pairing or Bluetooth connection does not work well, hold the smartphone differently over the product.
1 Press the Bluetooth button ( ).
The Bluetooth indicator now flashes blue,
indicating that the product is ready for a
Bluetooth connection.
2 Hold the smartphone over the NFC
logo on the product.
When the connection is established, the
Bluetooth indicator now lights up blue.
Also, a notification sound rings to let the user
know that the Bluetooth connection has
been established.
Tip
If you press the Bluetooth button ( ) while the
Bluetooth indicator is flashing blue, or if 90
seconds elapses without the Bluetooth connection
established, the product is no longer ready for the
Bluetooth connection.
■ Disconnecting a Bluetooth connection
To disconnect a Bluetooth connection while the connection is made, perform one of the following
operations:
• Press the Bluetooth button ( ).
• Perform the Bluetooth disconnection procedure on the smartphone.
• Hold the smartphone over the NFC logo on the product (for NFC-compatible models).
When a Bluetooth connection is disconnected, the Bluetooth indicator now lights up green.
Also, a notification sound rings to let the user know that the Bluetooth connection has been
disconnected.
24
YVC-300 User's Manual
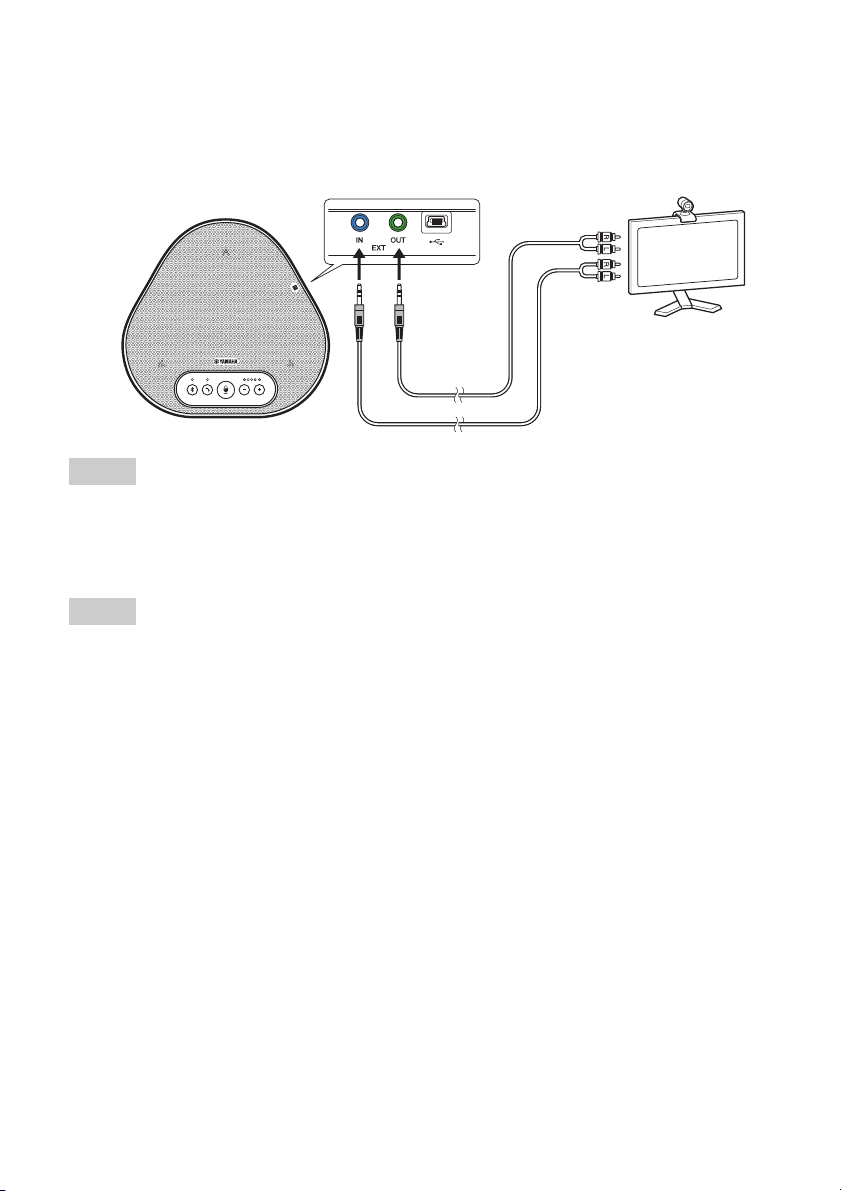
To the USB terminal
Connecting to a videoconference system using audio cables
■ Check the following before the connection procedure
Make sure that you have two audio cables available for input and output.
Also, make sure that you have one PC or Mac for power supply.
Tip
Different models of videoconference systems may have different shapes of audio input and output terminals. Use
audio cables with their connector shapes that match the shapes of the audio input and output terminals of your
videoconference system. The product must be connected to a stereo mini plug, regardless of the type of the plug
connected to the videoconference system.
■ Connecting to a power source
Use the supplied USB cable to connect between the product and a PC or Mac.
The product receives power from the PC or Mac.
If the product is not connected to the PC or Mac, connect the supplied USB cable to a commercially
available USB power adapter.
English
Notes
• Make sure to first read the safety precautions for the USB power adapter you are going to use.
• Use the USB power adapter that is capable of supplying power compliant with the USB standard.
Output voltage: 4.8 to 5.2 V
Output current: At least 0.5 A
■ Setting up the EXT IN/OUT terminals function
Follow the steps in "Selecting a connected device on the EXT IN/OUT terminals" (page 28), switch
the mode of the EXT IN/OUT terminals to the "Videoconference system" in advance.
25
YVC-300 User's Manual
Videoconference
system
Audio
output
terminals
Audio
input
terminals
■ Connecting to a videoconference system
Use audio cables to connect between the product and the videoconference system.
The following figure shows an example of using RCA pin plugs for the audio input/output terminals
on the videoconference system.
Note
If two products are connected for use, they cannot be connected to a videoconference system.
■ Changing settings of the videoconference system
Change audio input/output settings of the videoconference system, so that the product can serve as
a microphone and speaker for that system.
Note
Make sure that you disable the microphone and speaker of the videoconference system.
26
YVC-300 User's Manual
Using Convenient Functions
This chapter describes convenient functions provided by the product.
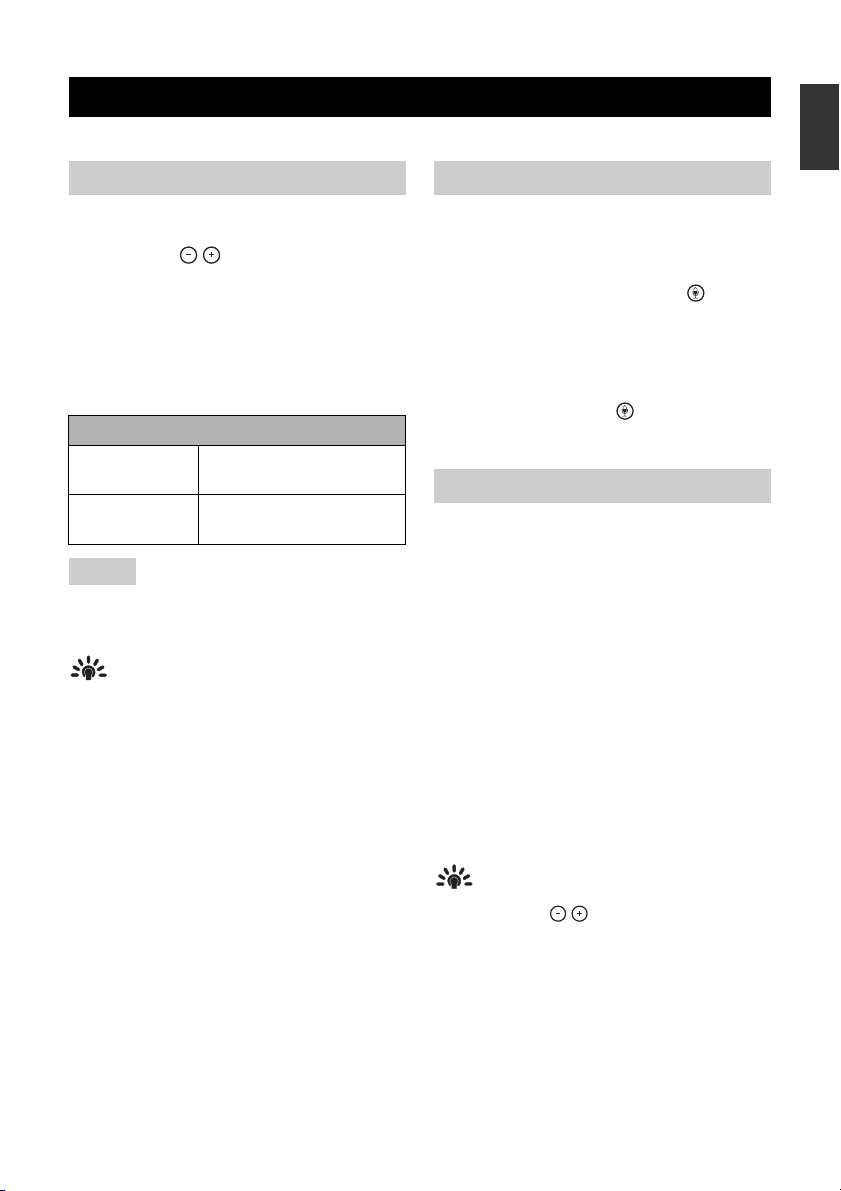
Adjusting the speaker volume
Yo u can adjust the output volume of the speaker
(voices from the remote party) by pressing the
volume buttons ( ). When you press the
volume button, the volume level indicator shows the
volume level.
Every time you press either of the buttons, the
volume is turned up or down in a step-by-step
manner. Holding down the button for at least 0.5
seconds will cause the volume level to be changed
continuously.
Example ( ● : On, ○ : Off)
●○○○○
●●●●●
Note
Adjust the speaker volume level so that the sound is not
distorted. If the sound is distorted, the remote party may
hear echoes.
Tip
If a PC or Mac is connected through a USB cable,
changing the speaker volume level on the PC or Mac
will also change the speaker volume level of the
product according to the volume level of the PC or
Mac.
The speaker volume level
is set to minimum.
The speaker volume level
is set to maximum.
Muting the microphone
Temporarily turn off the microphone so that the
remote party cannot hear you.
■ Muting the microphone
Press the microphone mute bu tton ( ).
The microphone indicator now flashes red,
causing the microphone to be muted.
■ Unmuting the microphone
When the microphone is muted, press the
microphone mute button ( ).
The microphone indicator now lights up green,
causing the microphone to be unmuted.
Muting the speaker
Temporarily turn off the speaker so that you cannot
hear the remote party.
The speaker can be muted only when the PC or
Mac is connected through the USB cable.
■ Muting the speaker
Use the PC or Mac to mute the speaker
(output).
The volume level indicator now flashes green
with the current volume level displayed, causing
the speaker to be muted.
■ Unmuting the speaker
When the speaker is muted, use the PC or Mac
to unmute the speaker (output).
The volume level indicator now stops flashing,
causing the speaker to be unmuted.
English
Tip
Yo u can unmute the speaker by pressing either of the
volume buttons ( ).
27
YVC-300 User's Manual
Accepting an incoming
Bluetooth connection request/
ending a call
The product can work with the phone function of
the Bluetooth-connected smartphone.
■ Taking an incoming call
When the Bluetooth-connected smartphone gets
an incoming call, the microphone indicator flashes
green (red if the microphone is muted) (at 0.25-
second intervals).
By pressing the on/off-hook button ( ) while the
incoming call is received, you can talk with the
remote party through the microphone and speaker
of the product. The on/off-hook indicator lights up
green during the call.
Note
Some smartphones may enable the microphone and
speaker on them after they get an incoming call. To
resolve this situation, select YVC-300 in the audio source
settings of the smartphone to enable the microphone
and speaker of the product.
■ Ending a call
Press the on/off-hook button ( ) during a call. The
on/off-hook indicator turns off and the call is ended.
Selecting a connected device
on the EXT IN/OUT terminals
Based on the device to be connected to the EXT
IN/OUT terminals on the product, follow the steps
below to switch the setting:
1 Press and hold the both volume
buttons ( ) simultaneously for at
least 2 seconds.
A notification sound rings, and the
microphone indicator flashes white.
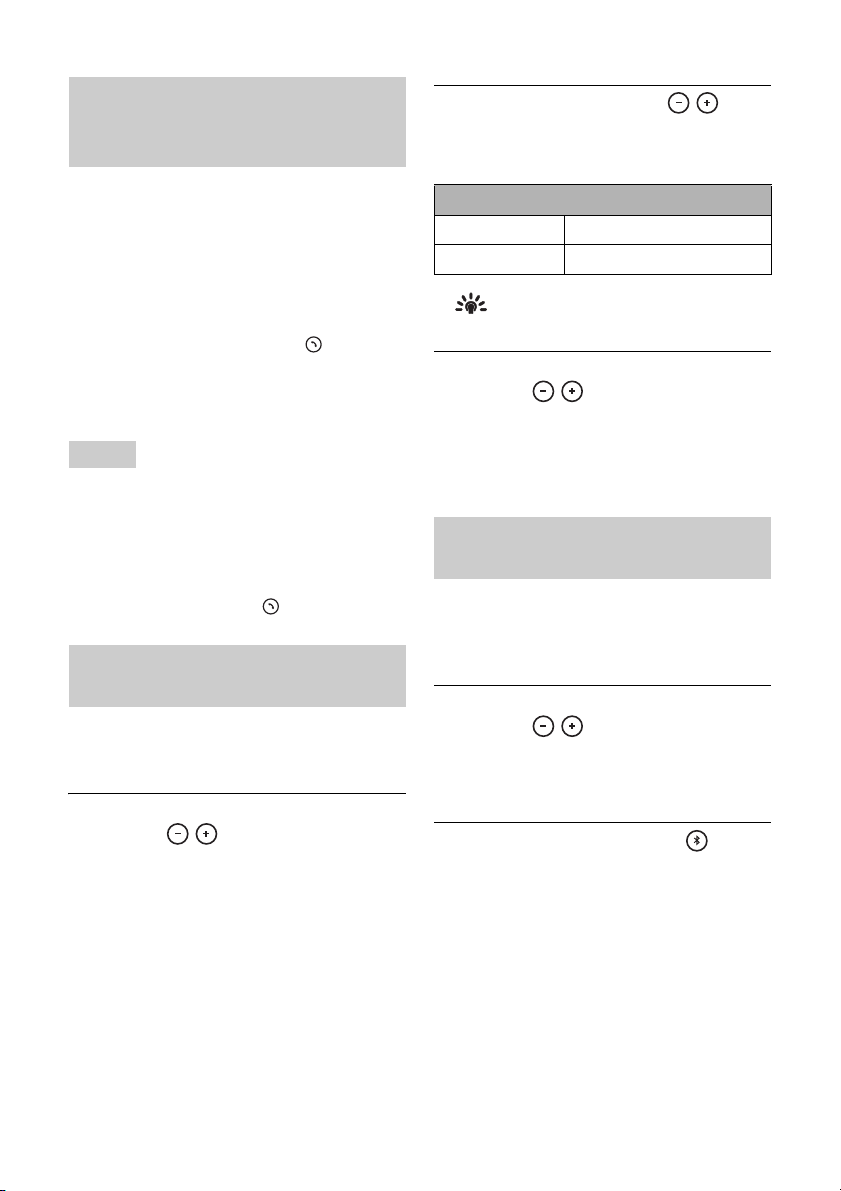
2 Press the volume button ( ) and
set the volume level indicator display
so that the device to be connected is
selected.
Example ( ● : On, ○ : Off)
●○○○○
○●○○○
No connected device
Videoconference system
Tip
The factory setting is set to "no connected device".
3 Press and hold the both volume
buttons ( ) simultaneously for at
least 0.5 seconds.
A notification sound rings when the setting is
applied. The microphone indicator goes
back to the previous state, lighting up green
or flashing red.
Enabling or disabling the
Bluetooth function
When not using a Bluetooth connection, you
can disable the Bluetooth function.
To use a Bluetooth connection again, enable the
Bluetooth function.
1 Press and hold the both volume
buttons ( ) simultaneously for at
least 2 seconds.
A notification sound rings, and the
microphone indicator flashes white.
2 Press the Bluetooth button ( ) to
enable or disable the function.
The Bluetooth indicator that lights up green
indicates that the function is enabled, and
the indicator that is off indicates that the
function is disabled.
28

YVC-300 User's Manual
3 Press and hold the both volume
buttons ( ) simultaneously for at
least 0.5 seconds.
A notification sound rings when the setting is
applied. The microphone indicator goes
back to the previous state, lighting up green
or flashing red.
Returning to the factory
settings
Return the settings of the product to the factory
settings.
1 Press and hold the both volume
buttons ( ) simultaneously for at
least 2 seconds.
A notification sound rings, and the
microphone indicator flashes white.
2 Press and hold the on/off-hook button
( ) and the volume - button ( )
simultaneously for at least 2 seconds.
A notification sound rings. The volume level
indicator lights up green, the illuminated
symbols moving back and forth. The other
indicators turn off.
English
3 When the volume level indicator turns
off and is in the started-up state, the
product now has the factory settings.
Tip
Returning the product to the factory settings will
clear various settings, such as Bluetooth pairing
information. Reconfigure the settings as
necessary.
29
 Loading...