

INDEX
GENERAL
REGULAR
AND
ENGINE
ADJUSTMENTS
MAINTENANCE
REPAIR
CHASSIS
AND
REPAIR
INFORMATION
MAINTENANCE
AND
MAINTENANCE
ELECTRICAL
TROUBLESHOOTING
APPENDICES
D GENERAL
INFORMATION
MACHINE
Vehicle
Engine
CONTROL
FUEL,
Fuel
Engine
Transmission
Coolant
Coolant
Replenishing
SAFETY
Ride
Wear
Be
Careful
Modification
RIDING
Getting
Learning
Turning
Climbing
Riding
Crossing a Slope
Crossing
Riding
Sliding
What
IDENTIFiCATION
Identification
Serial
FUNCTIONS
OIL
AND
.........................................................
Mixing
Level
Draining
INFORMATION
with
Care
Protective
where
YOUR
to
Know
to
Your
Uphill
Downhill
through
over
and
to
Do
....................................
Number
Number
COOLANT
Oil
Oil
................................................
Coolant
and
Clothing
.................................................
TRI-MOTO
Ride
Tri-Moto
..............................................
Rough
Skidding
If
...............................................
....................................
...........................
............................................
...............................
.............................................
.........................................
.............
Good
You
Ride
Your
Tri-Moto
Your
Tri-Moto
.......................................
.............................................
...........
Shallow
Terrain
....................................
................................
.....................................
.
.........................
Judgement
....................................
..................................
.....................................
..............................
..............................
.
.....................
Water
...................................
........................
.............................
.
.............
.
.............
. _
.........
.
'"
....
1-1
1-1
.1-1
1-2
1-4
1-4
1-4
1-4
1-5
1-5
1-6
1-6
1-6
1-7
1-8
1-8
1-9
1-9
1-9
1-10
1-11
1-12
1-12
1-13
1-13
1-13
1-14
PREOPERATION CHECKS
STARTING
Starting a Cold
Starting a Warm
Break-in
CLEANING
Cleaning
Storage
AND
Procedures
AND
.....................................................
......................................................
......................................
BREAK-IN
Engine
Engine
..........................................
STORAGE
....................................
.......................................
......................................
.......................
.
............
1-15
1-16
1-16
1-16
1-16
1-17
1-17
1-18
D GENERAL
INFORMATION
MACHINE
There
are
two
the serial number
1.
When ordering parts, you
number
positive identification
own;
2.
If your machine
will
need
identify your machine.
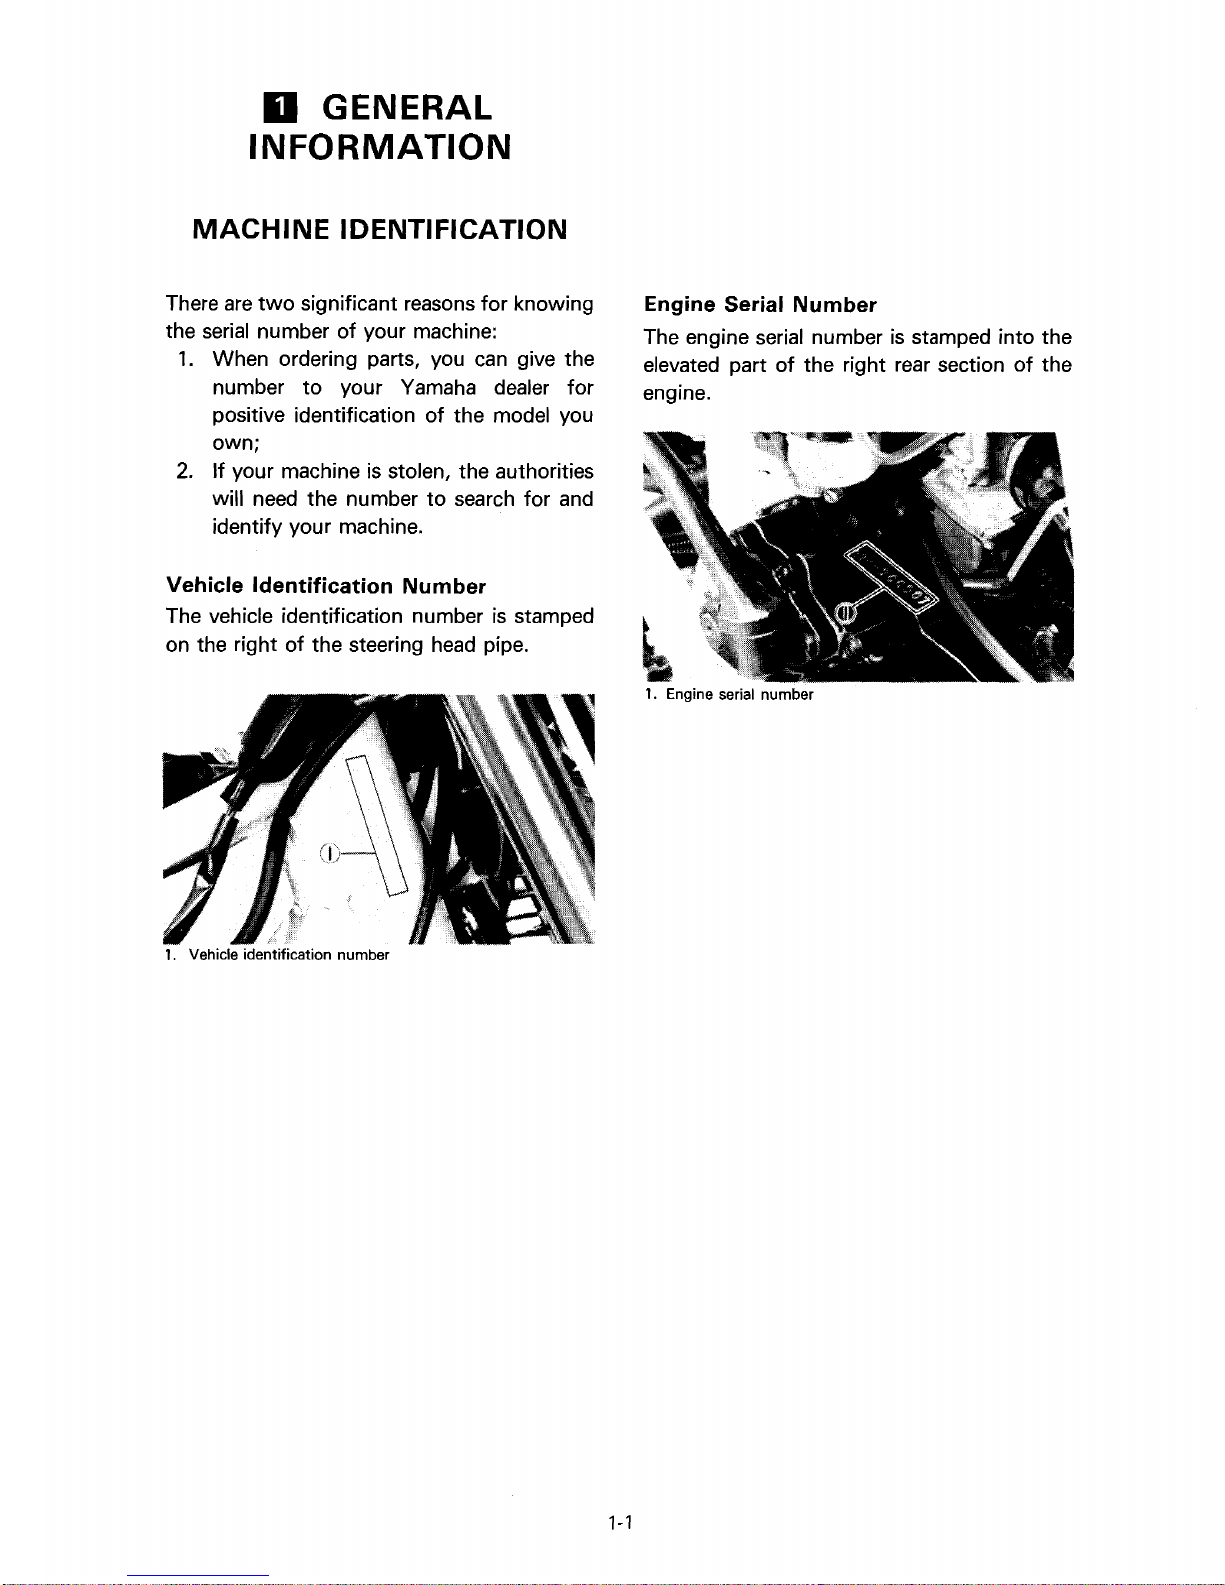
Vehicle Identification Number
IDENTIFICATION
significant reasons for knowing
of
your machine:
can
to
your Yamaha dealer for
of
the model you
is
stolen, the authorities
the number
to
search
The vehicle identification number
on the right
of
the steering
head
give the
is
stamped
pipe.
for
and
Engine Serial Number
The engine serial number
elevated part
engine.
~
.....
..
.
of
the right rear section
II
1.
Engine serial number
is
stamped into the
of
the
1. Vehicle identification number
1-1
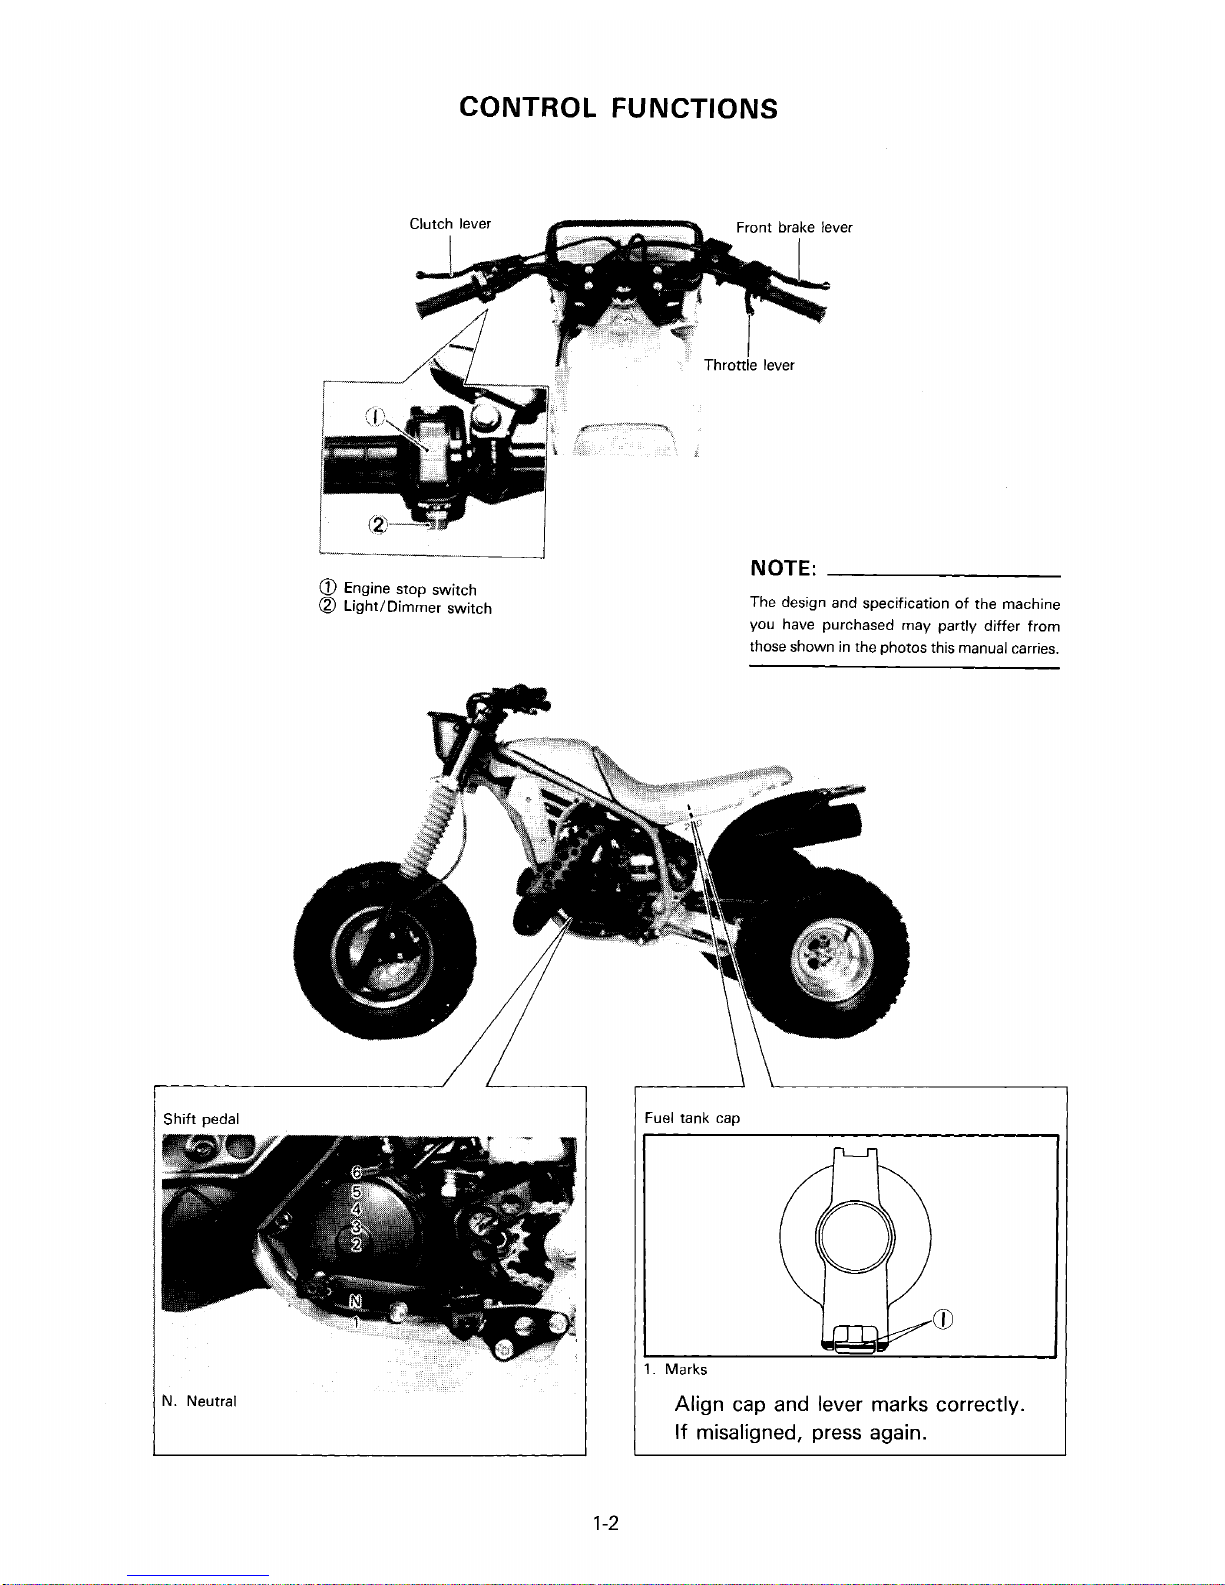
CONTROL FUNCTIONS
Shift pedal
CD
Engine stop switch
~
Light/Dimmer switch
Fuel tank cap
NOTE:
The design and specification
you have purchased may partly differ from
those shown in the photos this manual carries.
of
the machine
N. Neutral
1. Marks
Align cap and lever marks correctly.
If misaligned, press again.
1-2
CD
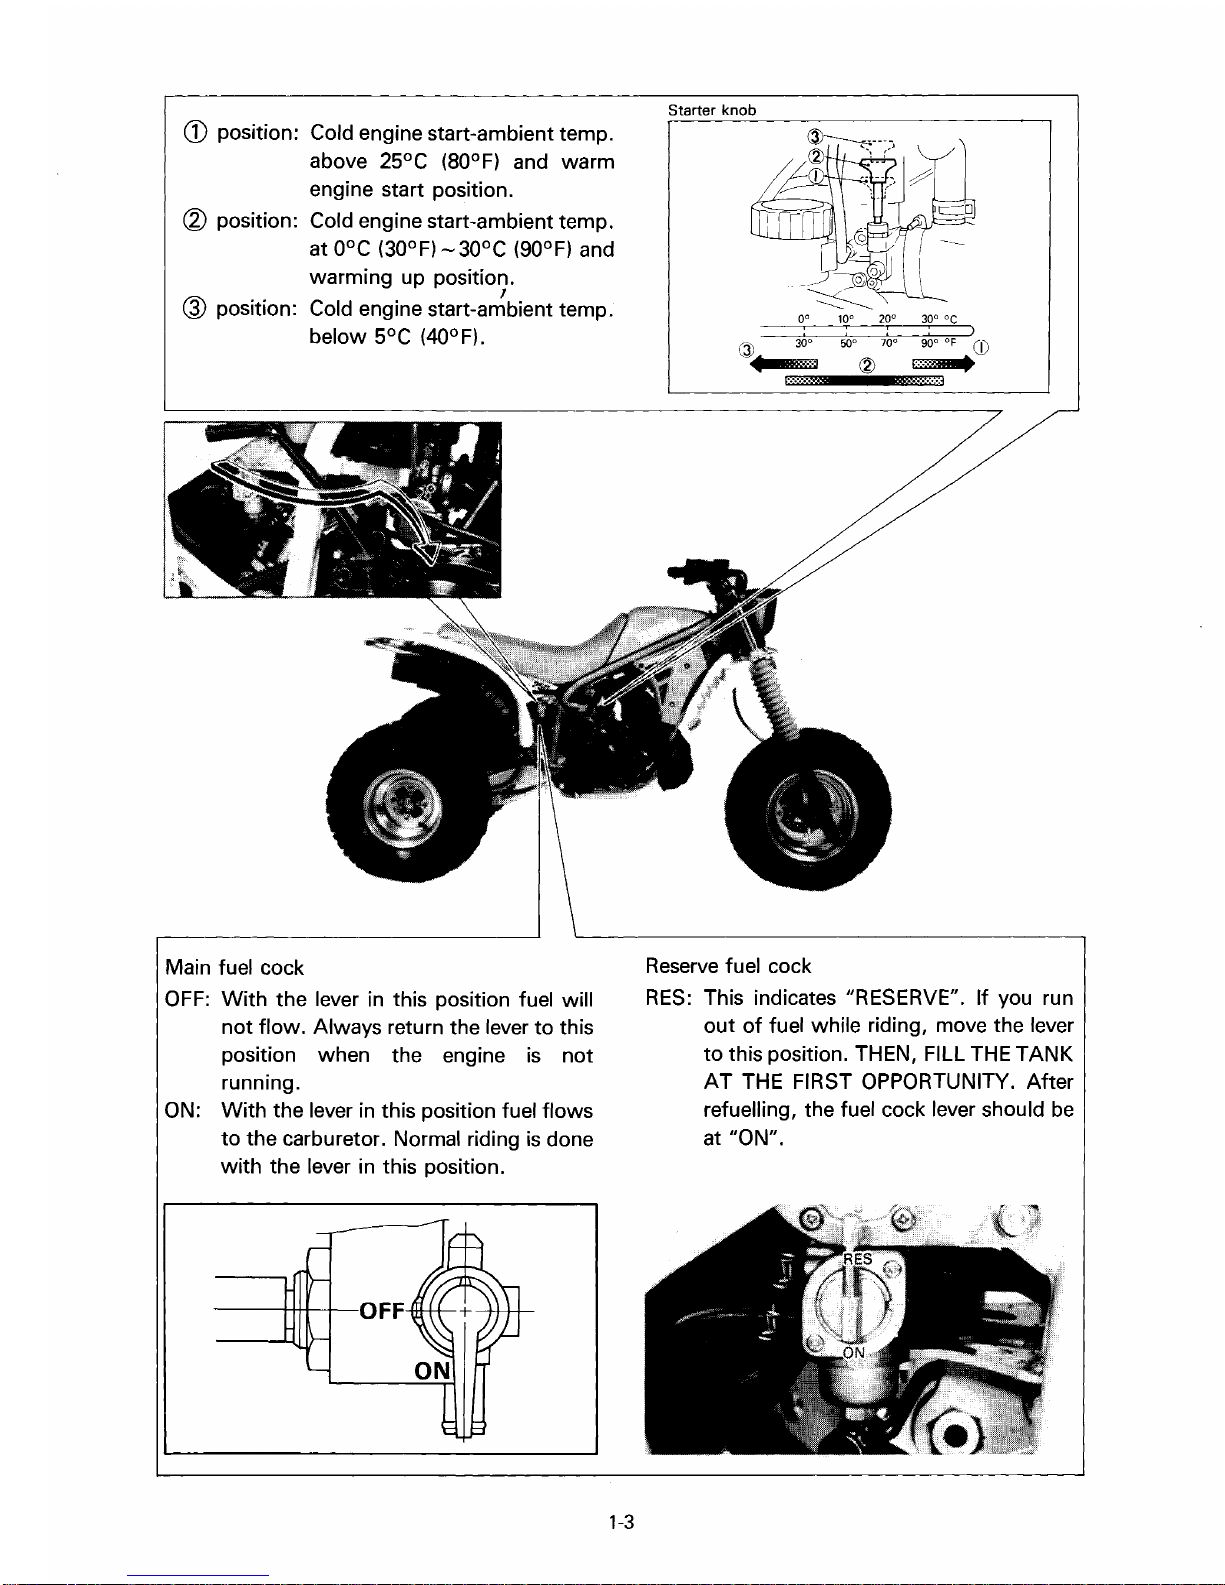
position: Cold engine start-ambient temp.
above 25°C
(SOOF)
and warm
engine start position.
~
position: Cold engine start-ambient temp.
at
O°C
(30°F) - 30°C
warming up position.
(gOOF)
,
and
@ position: Cold engine start-ambient temp.
below 5°C (40°F).
Starter knob
Q)
.
30°
,··········2
0° 10° 20°
: :
••••
:1
70°
50
°
~
: :
{
.......
.!o:·:';·.i
300OC
of
90°
)
CD
•
Main fuel cock
OFF:
With the lever in this position fuel will
not flow. Always return the lever
position when the engine
running.
ON:
With the lever
to
the carburetor. Normal riding
in
this position fuel flows
with the lever in this position.
----++HI-+-OFF
to
is
is
this
not
done
1-3
Reserve
RES:
fuel cock
This indicates "RESERVE".
out
of
fuel while riding, move the lever
to
this position. THEN, FILL THE TANK
AT
THE FIRST OPPORTUNITY. After
refuelling, the fuel cock lever should
at "ON".
If
you run
be
FUEL, OIL
Fuel
Recommended fuel:
Premium fuel
at least
90.
AND
with
an
COOLANT
octane rating
of
Fuel
tank capacity:
10.0 L (2.2 Imp gal, 2.6 US gal)
Engine
Mixing
Oil
Recommended oil: Yamalube
"R"
(Yamalube Racing 2-cycle oil)
Mixing ratio:
If
for
any reason you should use another type,
24:
1
select from the following list.
Recommended oil
Castrol
*In Germany brand name is Castrol T.T.S., but
A545.
R30
A545*
A747
Mixing ratio (Break-in)
20:
1
same
quality
as
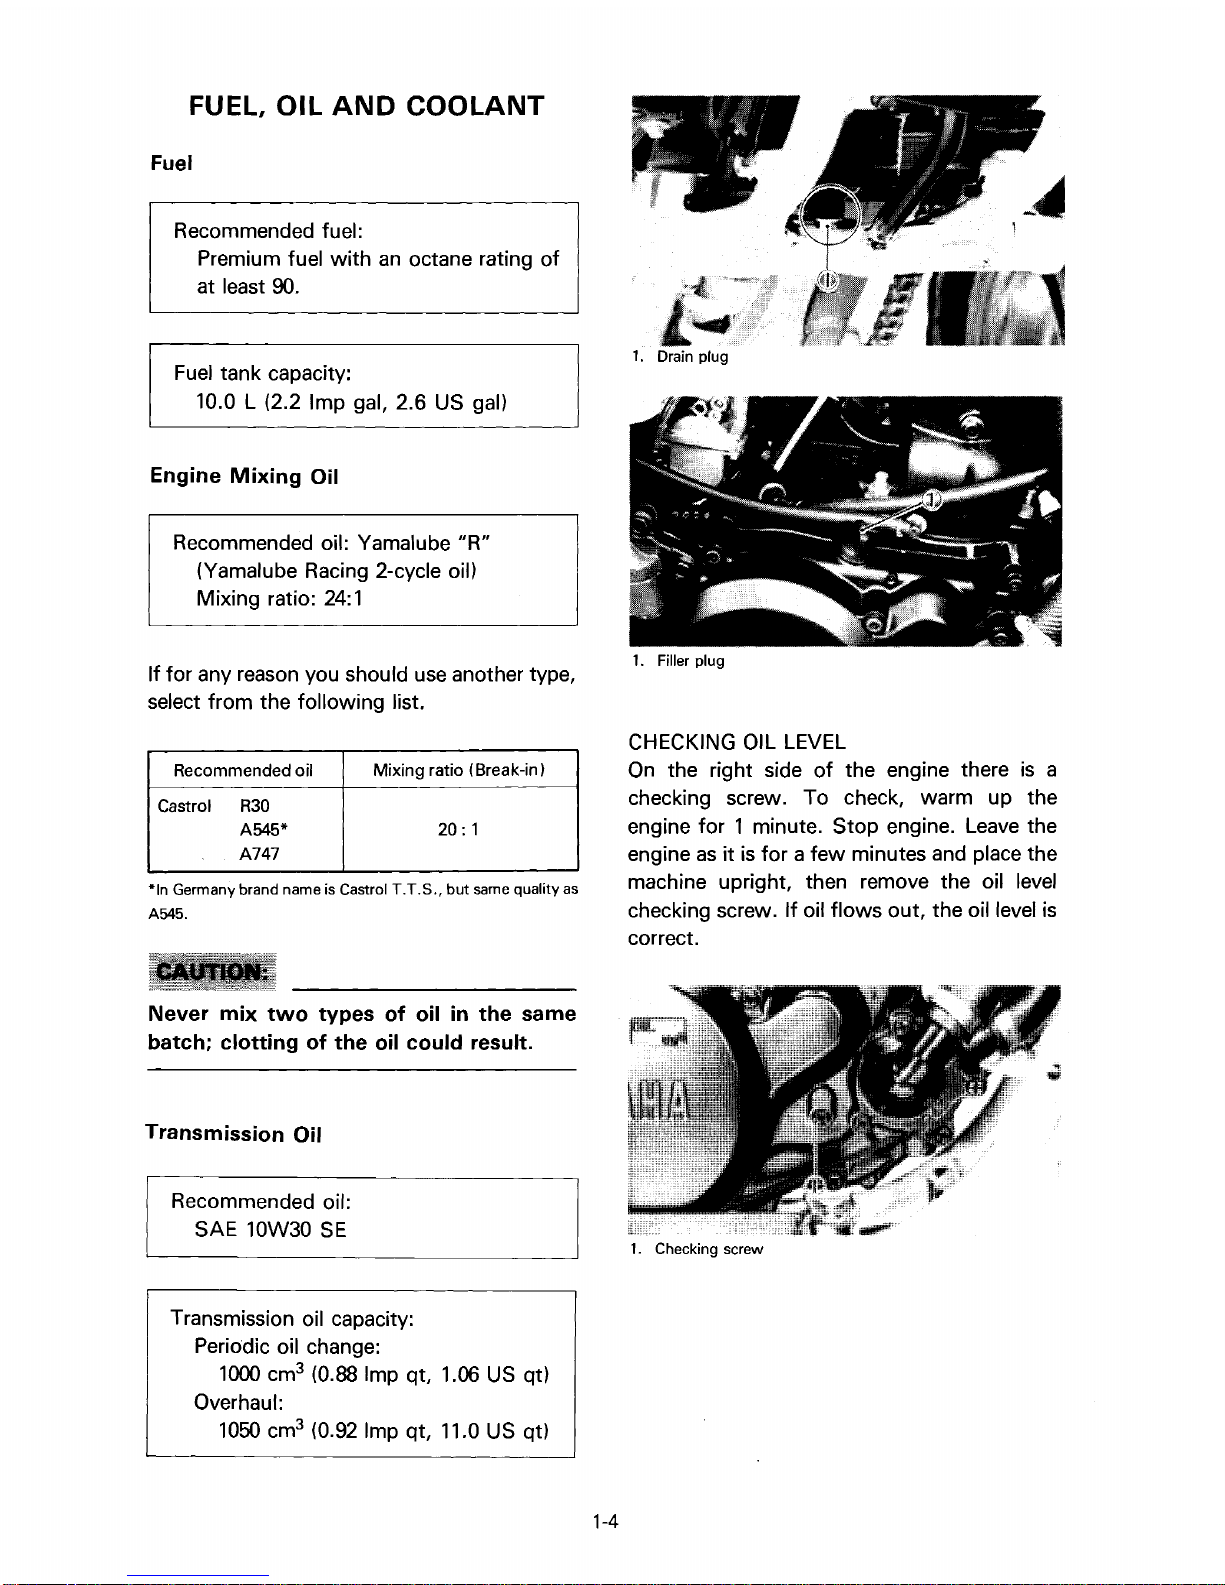
1. Drain plug
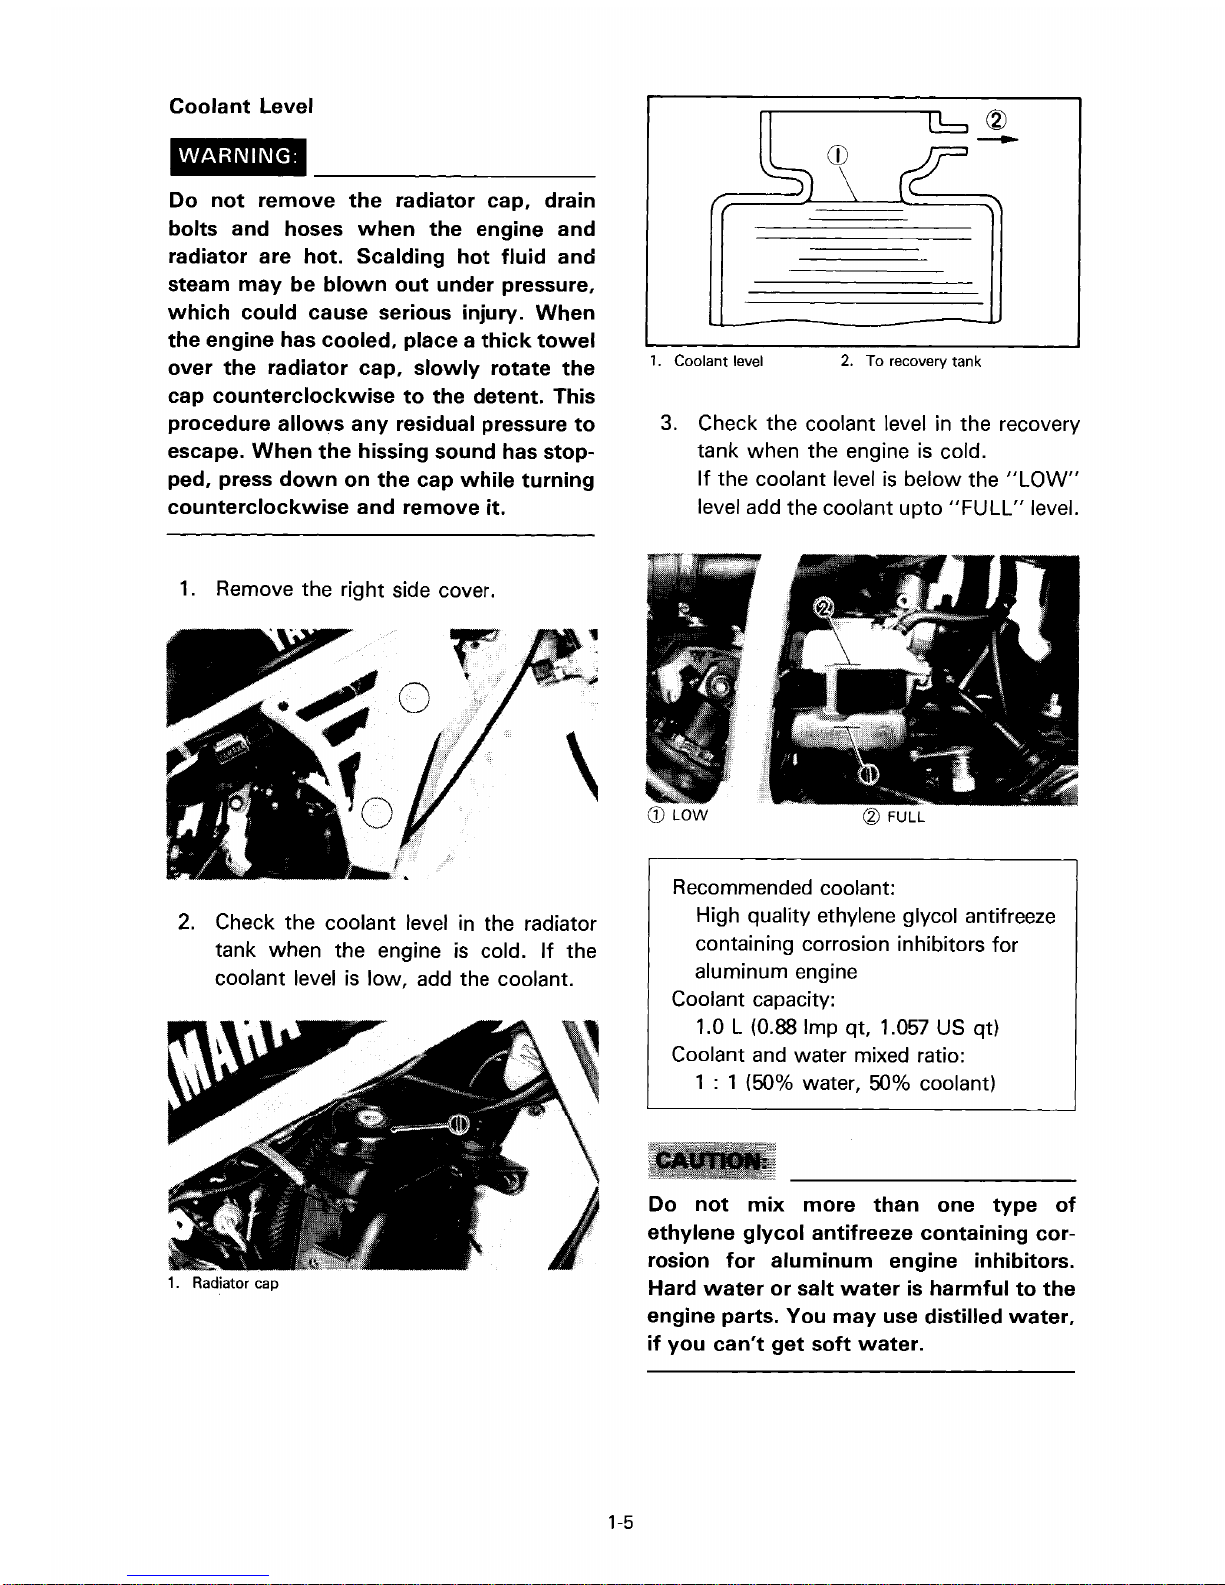
1.
Filler plug
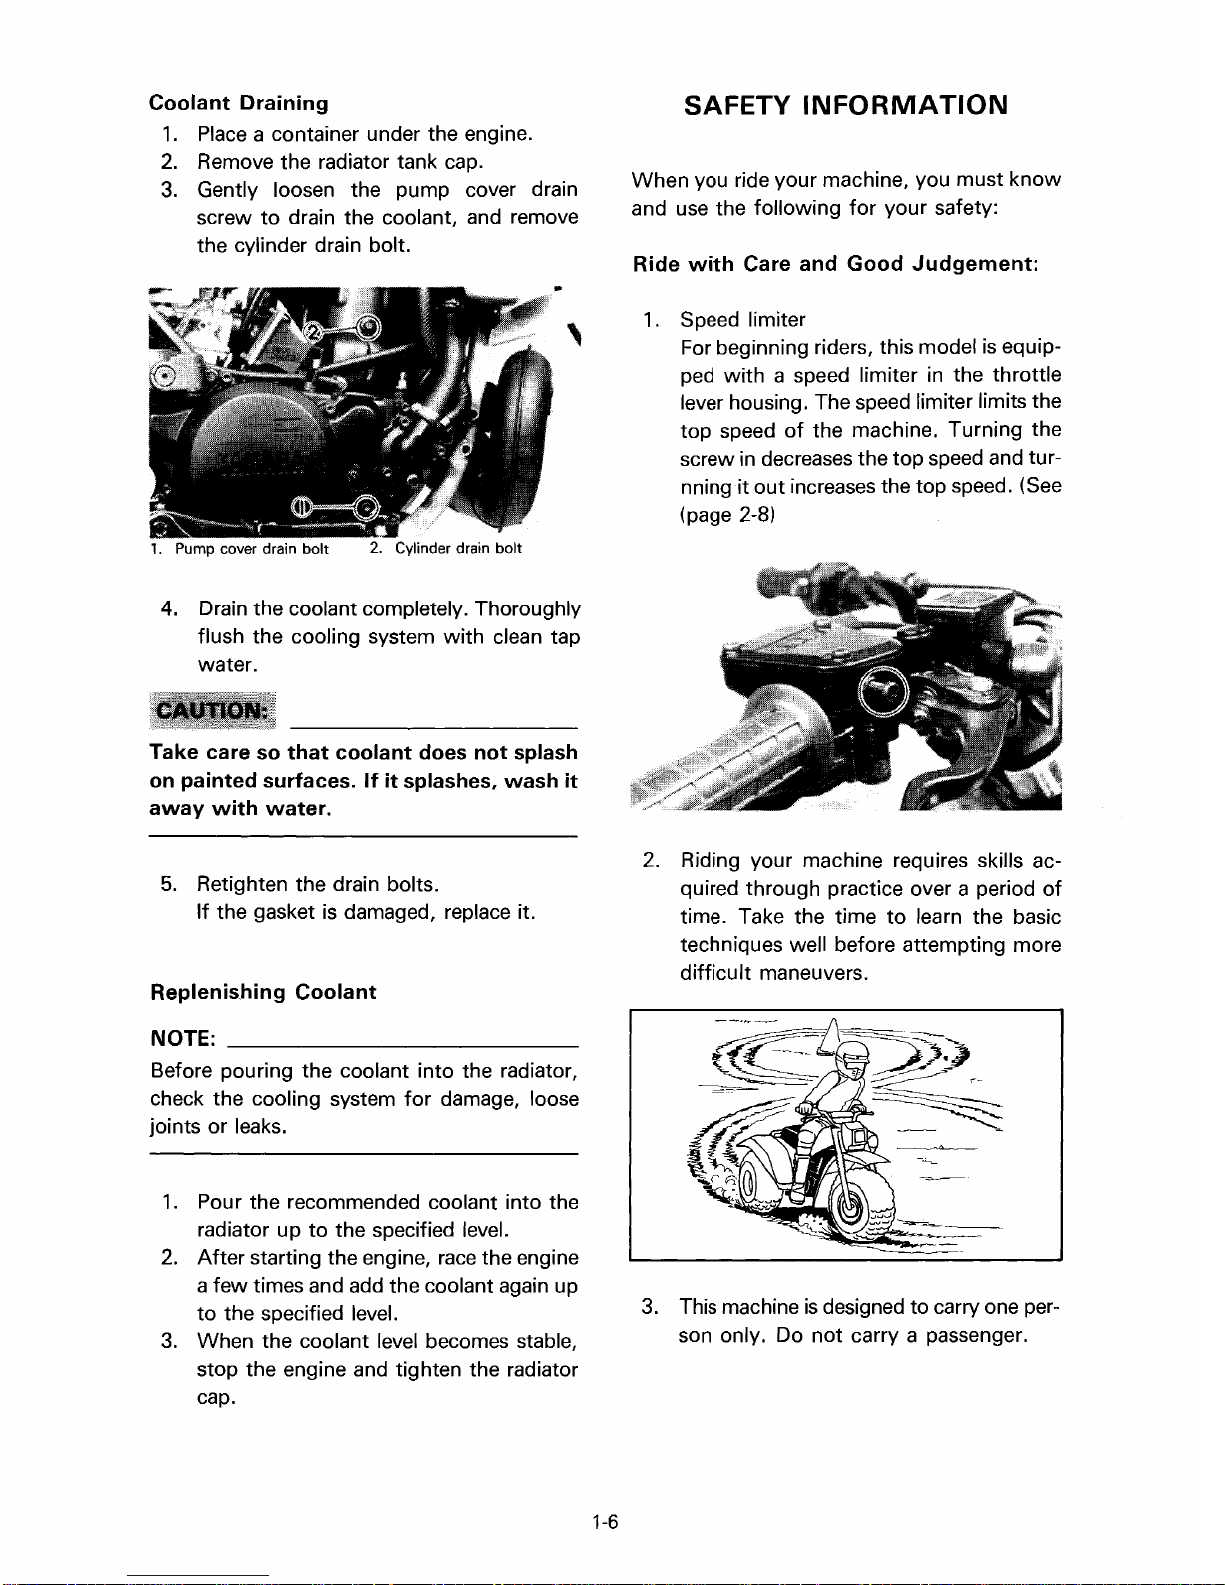
CHECKING OIL LEVEL
On
the right side
of
the engine there
is
a
checking screw. To check, warm up the
engine for 1 minute. Stop engine.
engine
as
it
is
for
a few minutes and place the
Leave
the
machine upright, then remove the oil level
checking screw. If oil flows out, the oil level is
correct.
Never
batch;
Transmission
mix
two
clotting
of
Oil
types
the
of
oil
could
Recommended oil:
SAE 10W30
SE
Transmission oil capacity:
Periodic oil change:
1000
cm3 (0.88 Imp qt, 1.06 US qt)
Overhaul:
1050
cm3 (0.92 Imp qt, 11.0
oil
in
the
result.
US
same
qt)
1-4
1.
Checking screw
Coolant
WARNING:
Do
bolts
radiator
steam
which
the
over
cap
procedure
escape.
ped, press
Level
not
remove
and
hoses
are
hot.
may
be
blown
could
engine
the
cause serious
has
cooled,
radiator
counterclockwise
allows
When
the
down
counterclockwise
1.
Remove
the
the
radiator
when
the
Scalding
out
under
place a thick
cap,
slowly
to
the
any
residual pressure
hissing
on
and
right
sound
the
cap
remove
side cover.
cap,
engine
hot
fluid
pressure,
injury.
rotate
detent.
while
it.
drain
When
towel
has
stop-
turning
and
and
the
This
to
1.
Coolant level
3.
Check
tank
If
level add the coolant
the
when the engine
the
coolant level
2.
To recovery tank
coolant level in the recovery
is
cold.
is
below
upto
the
"LOW"
"FULL"
level.
2.
Check
tank
coolant level is
1.
Radiator cap
the
coolant level in the radiator
when
the
engine is cold.
low,
add
the
If
coolant.
the
Recommended coolant:
High quality ethylene glycol antifreeze
containing corrosion inhibitors
aluminum engine
Coolant capacity:
1.0 L (0.88 Imp
Coolant and water mixed ratio:
1 : 1 (50% water, 50% coolant)
Do
not
mix
ethylene
rosion
Hard
engine
if
you
glycol
for
water
parts.
can't
aluminum
or
get
qt,
more
antifreeze
salt
water
You
may
soft
1.057 US qt)
than
one
containing
engine
is
harmful
use
distilled
water.
for
type
of
cor-
inhibitors.
to
the
water,
1-5
Coolant
1.
2.
3.
Draining
Place
a container under the engine.
Remove the radiator tank cap.
Gently loosen the pump cover drain
screw
the cylinder drain bolt.
to
drain the coolant, and remove
SAFETY
When you ride your machine, you must
and use the following for your safety:
Ride
with
Care
INFORMATION
and
Good
Judgement:
know
2.
,.
Pump cover drain bolt
4.
Drain the coolant completely. Thoroughly
flush the cooling system
water.
Take care so
on
painted
away
Replenis.hing
with
5.
Retighten the drain bolts.
If
the gasket
that
surfaces.
water.
is
Coolant
Cylinder drain bolt
with
coolant
damaged, replace it.
If
it
splashes,
does
clean tap
not
splash
wash
,
it
1. Speed limiter
For beginning riders, this model
ped
with
a speed limiter
lever housing. The speed limiter limits the
top speed
screw
nningit
(page 2-8)
2.
Riding your machine requires skills acquired through practice over a period
time. Take the time
techniques well before attempting more
difficult maneuvers.
of
the machine. Turning the
in
decreases the top speed and tur-
out increases the top speed. (See
in
the throttle
to
learn the basic
is
equip-
of
NOTE:
Before pouring the coolant into the radiator,
check the cooling system
joints or leaks.
1.
2.
3.
______________________
for
Pour the recommended coolant into the
radiator up
After starting the engine,
a few times and add the coolant again up
to
the specified level.
When the coolant
stop the engine and tighten the radiator
cap.
to
the specified level.
level
_
damage, loose
race
the engine
becomes stable,
3. This machine
son only. Do
1-6
is
designed to carry one per-
not
carry a passenger.
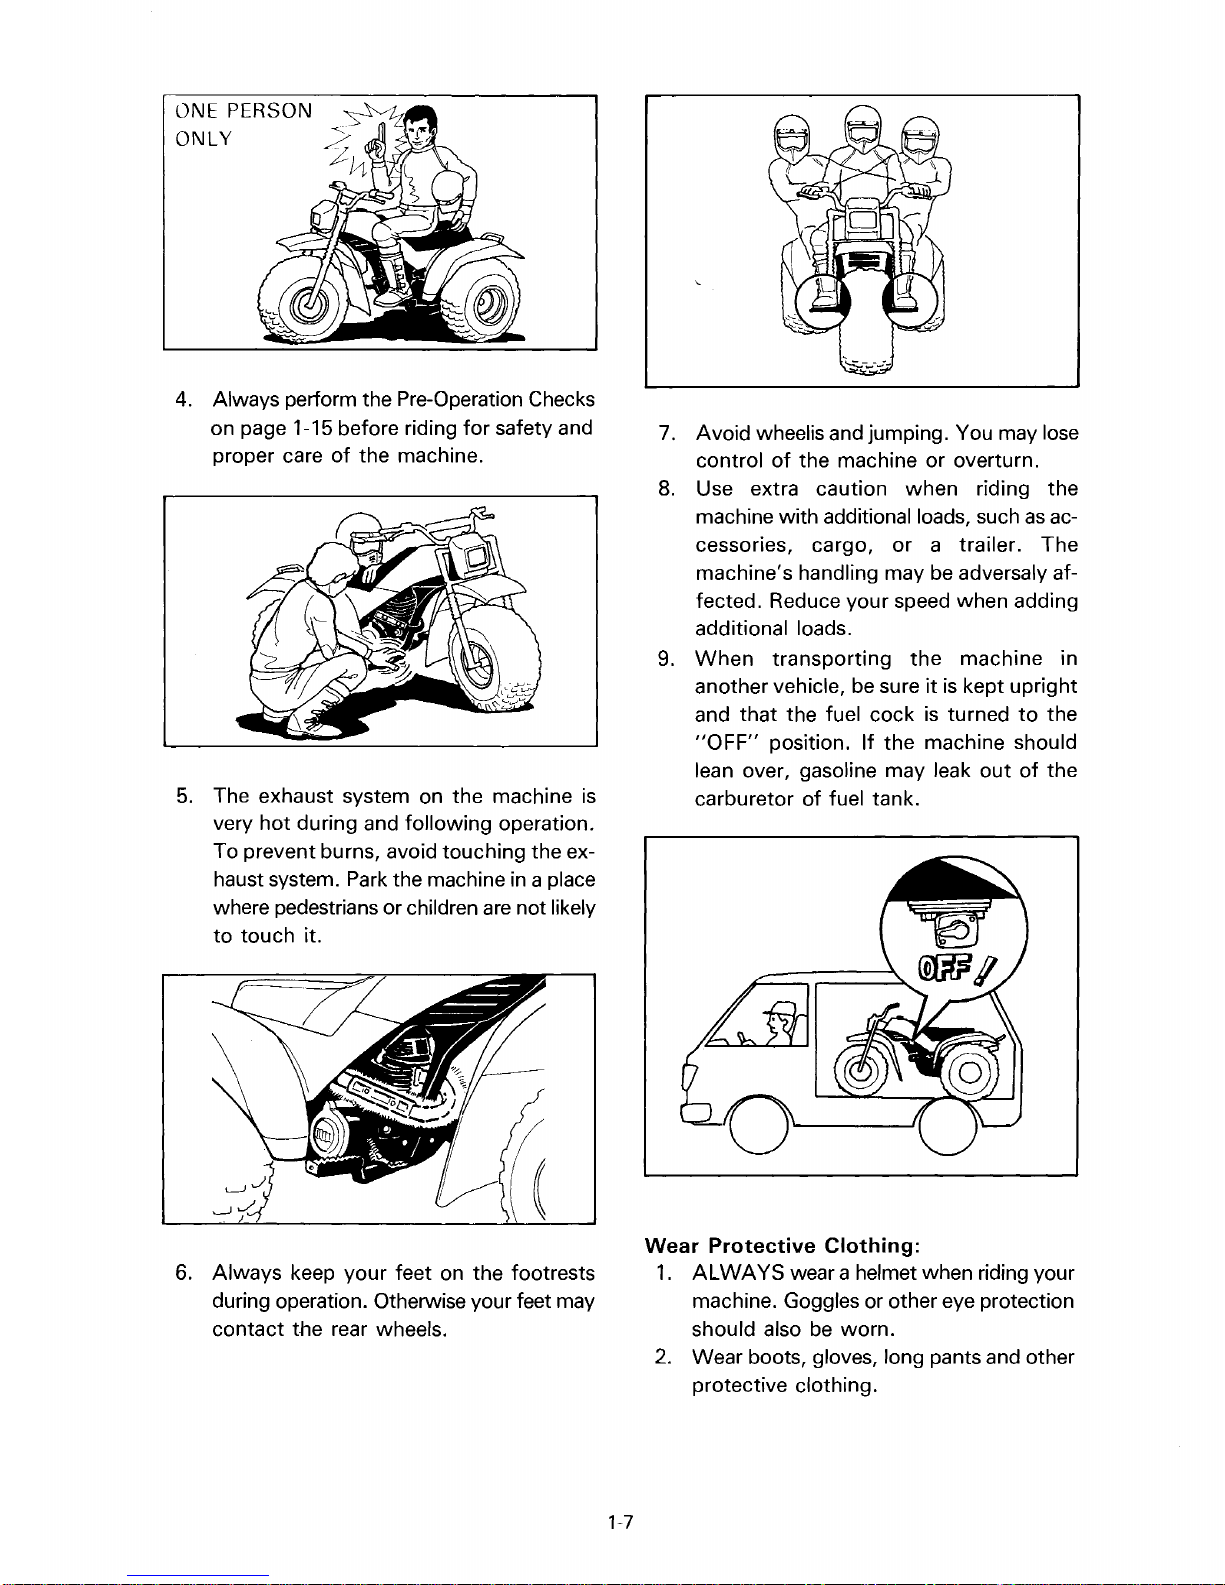
ONE PERSON
ONLY
4.
Always perform the Pre-Operation Checks
on page 1-15 before riding for safety and
proper care
of
the machine.
5. The exhaust system on the machine
very hot during and following operation.
To prevent burns, avoid touching the ex-
Park
haust system.
the machine
where pedestrians or children
to
touch it.
in
are
not likely
a place
is
7.
Avoid wheelis and jumping. You may lose
control
8.
Use extra caution when riding the
of
the machine or overturn.
machine with additional loads, such
cessories, cargo, or a trailer. The
be
machine's handling may
adversaly affected. Reduce your speed when adding
additional loads.
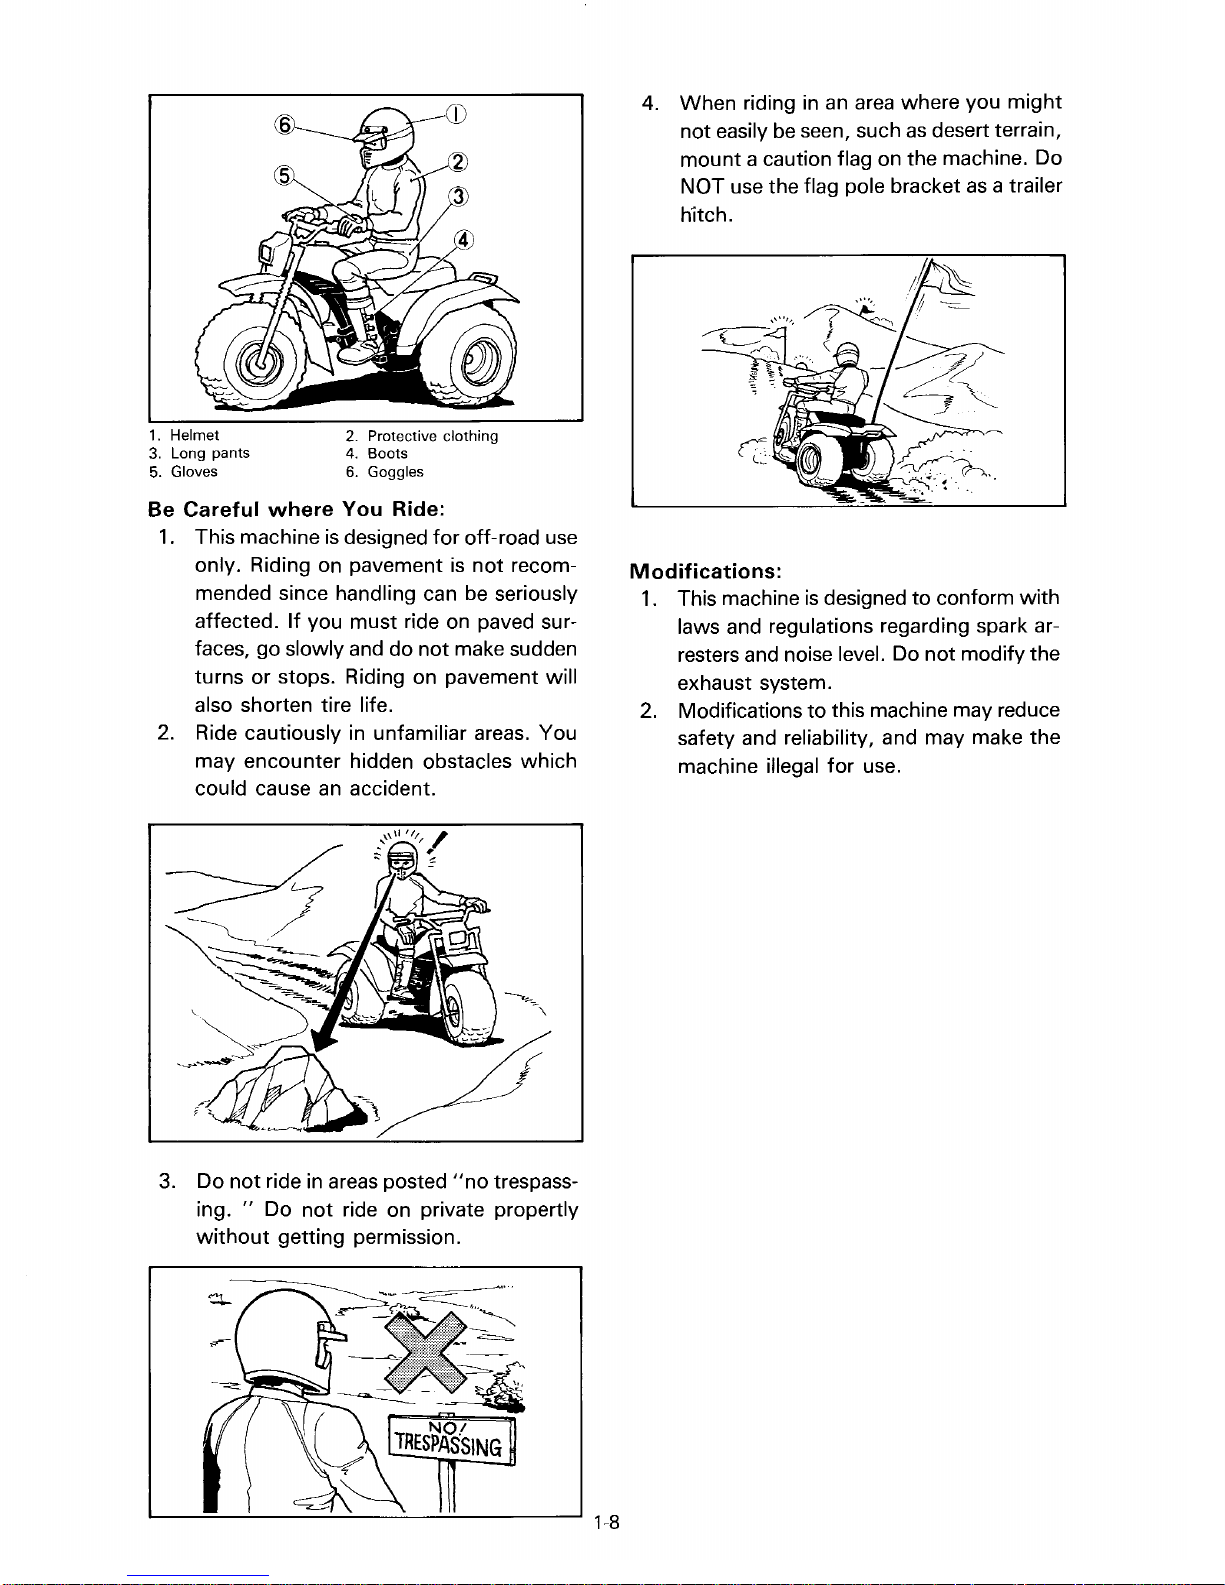
9.
When
another vehicle,
and that the fuel cock
"OFF"
transporting the machine in
be
sure
it
is
kept upright
is
turned
position. If the machine should
lean over, gasoline may leak out
carburetor
of
fuel tank.
as
to
of
ac-
the
the
6.
Always keep your feet on the footrests
during operation. Otherwise your feet may
contact the rear wheels.
1-7
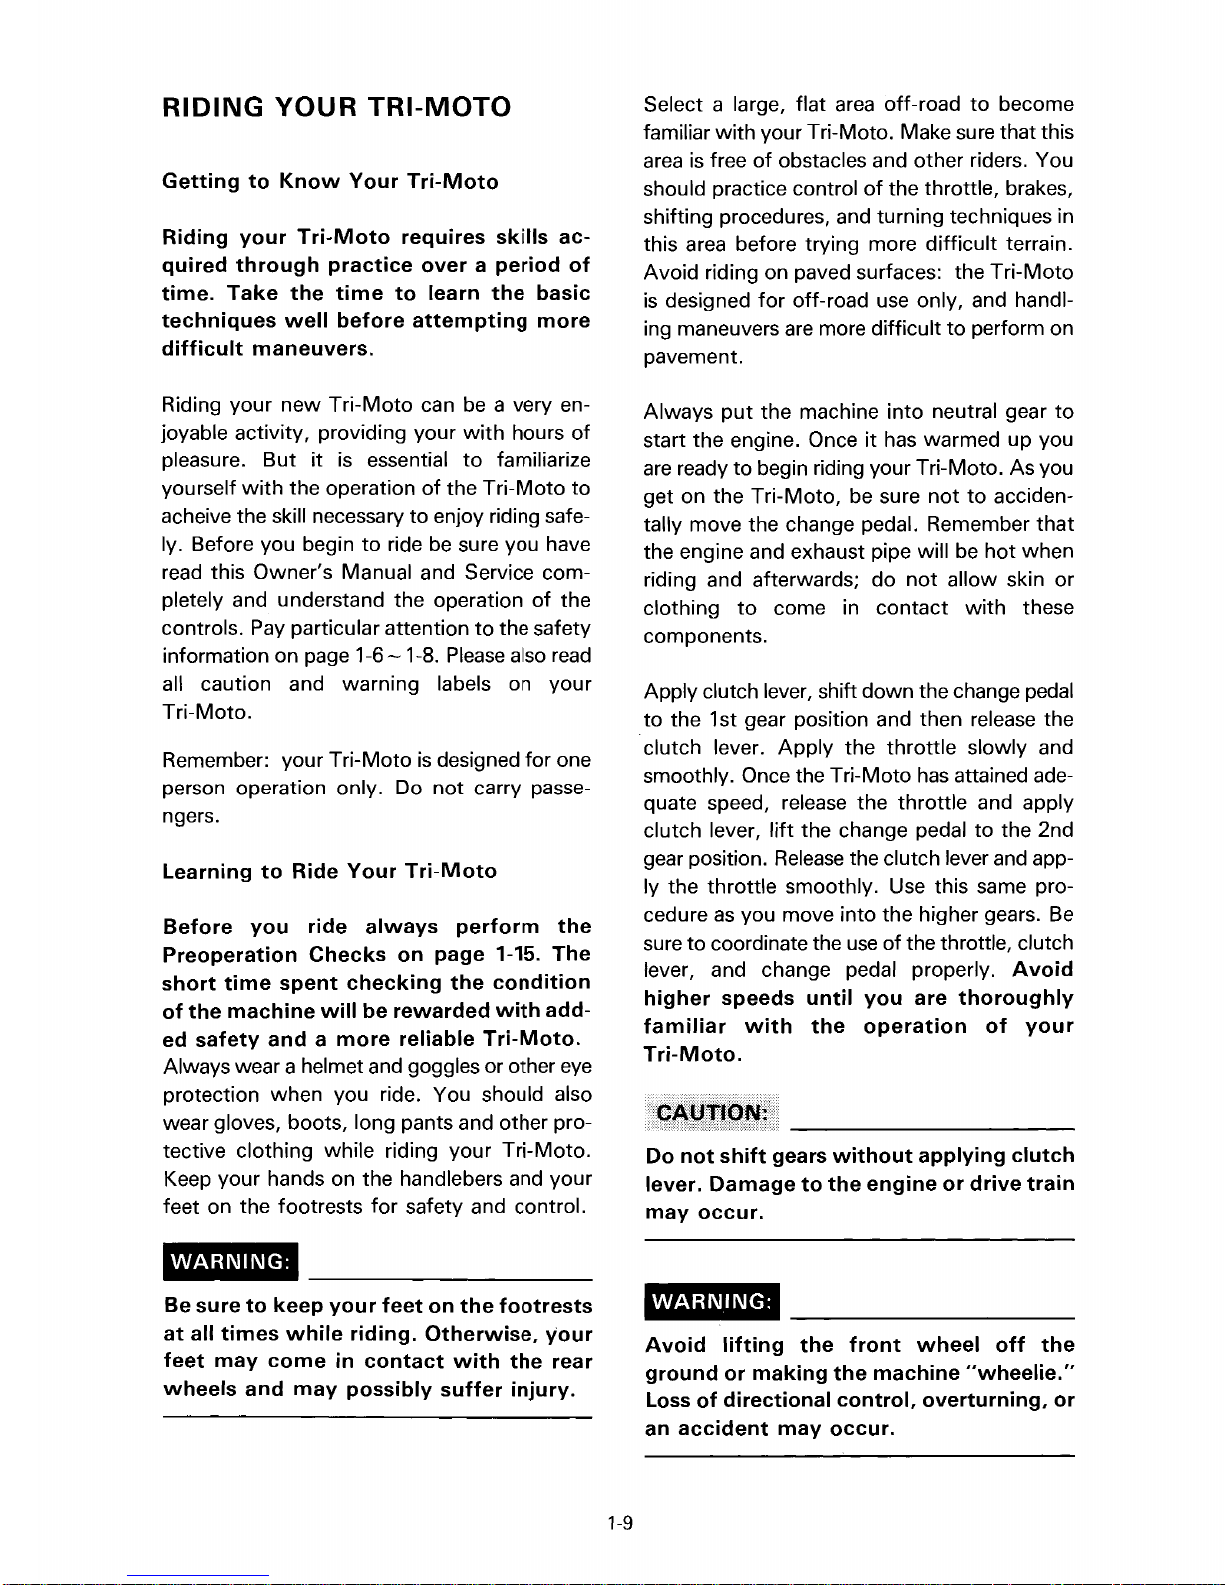
Wear
Protective
1.
ALWAYS wear a helmet when riding your
machine. Goggles or other
should also
2.
Wear boots, gloves, long pants and other
Clothing:
be
worn.
eye
protective clothing.
protection
1.
Helmet
3.
Long pants
5.
Gloves
Be
Careful
1.
This machine
where
only. Riding on pavement
2. Protective clothing
4. Boots
6.
Goggles
You
Ride:
is
designed for off-road
is
not recom-
mended since handling can be seriously
affected.
If
you must ride on paved surfaces, go slowly and do not make sudden
turns or stops. Riding on pavement will
also shorten tire life.
2.
Ride cautiously in unfamiliar areas. You
may encounter hidden obstacles which
an
could cause
accident.
use
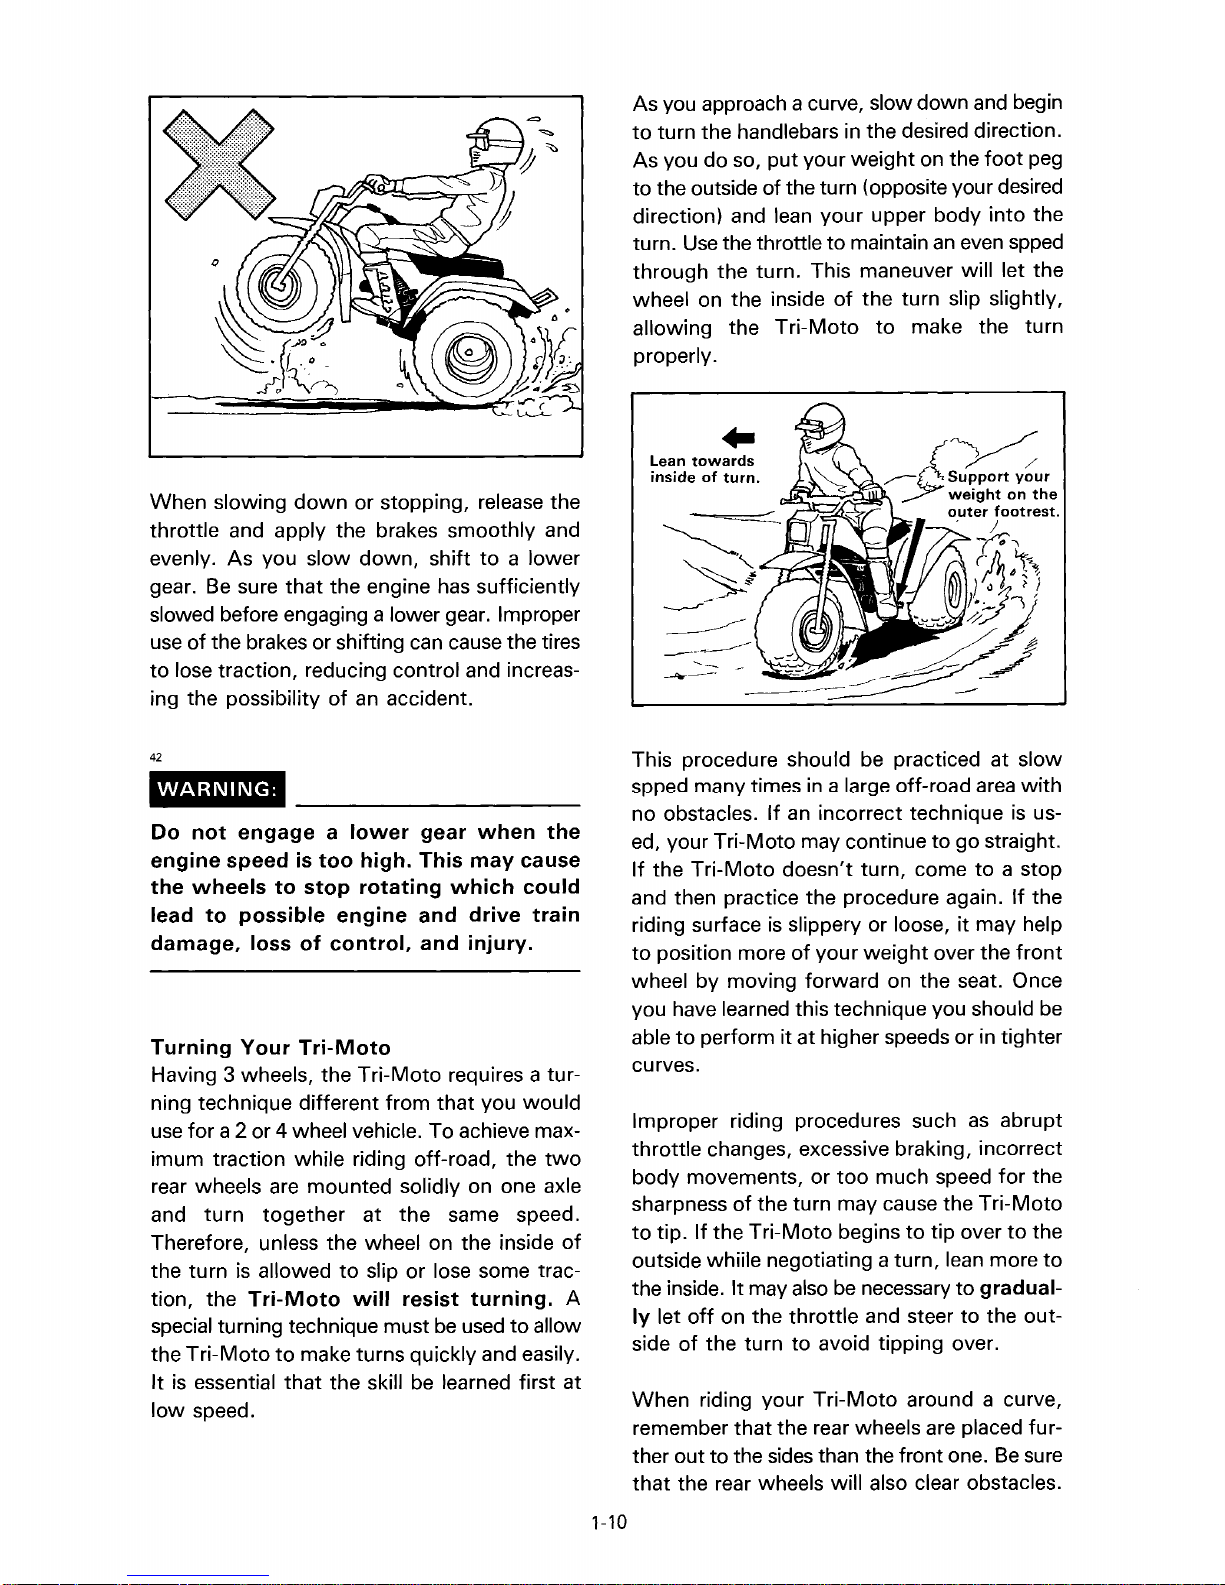
4.
When riding
not easily
in
an
be
seen, such
area
where you might
as
desert terrain,
mount a caution flag on the machine. Do
use
NOT
the flag pole bracket
as
a trailer
hitch.
Modifications:
1.
This machine
is
designed to conform with
laws and regulations regarding spark arresters and noise level. Do not modify the
exhaust system.
2. Modifications to this machine may reduce
safety and reliability, and may make the
machine illegal for use.
3. Do not ride
in
areas posted
ing. " Do not ride on private propertly
without
getting permission.
"no
trespass-
RIDING YOUR
Getting
Riding
quired
time.
techniques
difficult
to
Know
your
Tri-Moto
through
Take
the
well
maneuvers.
practice
time
before
TRI-MOTO
Your
Tri-Moto
requires
over a period
to
learn
attempting
skills
the
ac-
of
basic
more
Select a large, flat
familiar with your Tri-Moto. Make sure that this
area
is
free
of
should practice control
shifting procedures, and turning techniques
this
area
before trying more difficult terrai
Avoid riding on paved surfaces: the Triis
designed
ing maneuvers
pavement.
for
area
off-road
obstacles and other riders. You
of
the throttle, brakes,
off-road use only, and handl-
are
more difficult
to
become
to
perform on
in
n.
Moto
Riding your new Tri-Moto can
joyable activity, providing your
pleasure. But
yourself
acheive the skill necessary
ly. Before you begin
read
pletely and understand the operation
controls.
information on page
all caution and warning labels on your
Tri-Moto.
Remember: your Tri-Moto
person operation only. Do not carry passengers.
Learning
Before
Preoperation
short
of
ed
Always wear a helmet and goggles or other
protection when you ride. You should also
wear gloves, boots, long pants and other pro-
tective clothing while riding your Tri-Moto.
Keep your hands on the handlebers and your
feet on the footrests
with
this Owner's Manual and Service com-
Pay
you
time
the
machine
safety
it
is essential
the operation
to
ride be sure you have
particular attention
1-6 -1-8.
to
Ride
Your
ride
always
Checks
spent
will
and a more
on
checking
be
rewarded
reliable
for
be
a very en-
with
hours
to
familiarize
of
the Tri-Moto
to
enjoy riding safe-
to
the safety
Please
is
designed for one
Tri-Moto
page
safety and control.
also
perform
1-15.
the
condition
with
Tri-Moto.
of
of
to
the
read
the
The
add-
eye
put
Always
start the engine. Once
are
ready
get on the Tri-Moto,
tally move the change pedal. Remember that
the engine and exhaust pipe will
riding and afterwards; do not allow skin or
clothing
components.
Apply clutch lever, shift down the change pedal
to
the 1 st gear position and then release the
. clutch lever. Apply the throttle slowly and
smoothly. Once the Tri-Moto
quate speed, release the throttle and apply
clutch lever,
gear position.
ly the throttle smoothly.
cedure
sure
to
lever, and change pedal properly.
higher
familiar
Tri-Moto.
Do
not
lever.
may
occur.
the machine into neutral gear
it
has warmed up you
to
begin riding your Tri-Moto. As you
be
sure not
to
come
lift
Release
as
you move into the higher gears.
coordinate the
speeds
with
shift
gears
Damage
in
contact
the change pedal
the clutch lever and app-
Use
use
of
the throttle, clutch
until
you
the
operation
without
to
the
engine
to
be
with
has
attained ade-
this same pro-
are
thoroughly
applying
or
acciden-
hot when
to
of
drive
to
these
the 2nd
Be
Avoid
your
clutch
train
WARNING:
Be
sure
to
keep
your
feet
at
all
times
feet
may
wheels
come
and
while
may
riding.
in
contact
possibly
on
the
footrests
Otherwise,
with
the
suffer
injury.
your
rear
WARNING:
Avoid
ground
Loss
an
1-9
lifting
or
making
of
directional
accident
the
may
front
the
machine
control,
occur.
wheel
overturning,
off
"wheelie."
the
or
As you approach a curve, slow down and begin
to
turn the handlebars in the desired direction.
As you do so, put your
to
the outside
direction) and lean your upper body into the
turn.
Use
through
wheel on the inside
allowing the
properlY·
of
the turn (opposite your desired
the throttle
the turn. This maneuver will let the
Tri-Moto
weight
to
maintain
of
on the
the turn slip slightly,
to
make the turn
foot
an
even spped
peg
When slowing
throttle and apply the brakes smoothly and
evenly.
gear.
slowed before engaging a lower gear. Improper
use
to
ing the possibility
42
WARNING:
Do
engine
the
lead
damage,
Turning
Having 3 wheels, the
ning technique different from that you would
use
imum traction while riding off-road, the
rear wheels are mounted solidly on one axle
and
Therefore, unless the wheel on the inside
the turn
tion, the
special turning technique must
the
It
low
As
Be
of
the brakes or shifting can cause the tires
lose traction, reducing control and increas-
not
speed
wheels
to
for
a 2 or 4 wheel vehicle. To achieve max-
turn
is
Tri-Moto
is
essential
speed.
down
or stopping, release the
you slow down, shift
sure
that
the engine has sufficiently
of
an
accident.
engage a lower
is
too
high.
to
stop
rotating
possible
loss
Your
together
allowed
Tri-Moto
to
engine
of
control,
Tri-Moto
Tri-Moto
at
the same speed.
to
slip or lose some trac-
will
resist
make turns quickly and easily.
that
the skill be learned first at
to
gear
when
This
may
which
and
drive
and
injury.
requires a tur-
turning.
be
used
a lower
the
cause
could
train
two
of
A
to
allow
Lean
..
towards
inside
of
turn.
This procedure should be practiced at
spped many times in a large
no obstacles. If
ed, your Tri-Moto may continue
Tri-Moto
If the
and then practice the procedure again.
riding surface
to
position more
wheel by moving forward on the seat. Once
you have learned this technique you should be
able
to
perform it at higher speeds or in tighter
curves.
Improper riding procedures such
throttle
body movements, or
sharpness
to
outside whiile negotiating a turn, lean more
the inside. It may also be necessary
ly
side
When
remember
ther out
that
changes, excessive braking, incorrect
tip. If the
let
off
on the
of
the turn
riding your
to
the rear wheels will also clear obstacles.
an
incorrect technique
doesn't turn, come
is
slippery or loose,
of
your
of
the turn may cause the
Tri-Moto
throttle
to
avoid tipping over.
Tri-Moto
that
the rear wheels are placed fur-
the sides than the front one.
off
weight
too
much speed
begins
and steer
-road
to
go
over the
to
tip over
to
around a curve,
area
is
straight.
to
a stop
If
it
may help
front
as
abrupt
for
Tri-Moto
to
gradual-
to
the out-
Be
slow
with
us-
the
the
the
to
sure
1-10
Remember:
are
thoroughly
of
your
Climbing
Be
sure that you can maneuver your Tri-Moto
Avoid
familiar
Tri-Moto.
Uphill
higher
with
speeds
the
until
you
operation
well on flat ground before attempting any incline and then practice riding first on gentle
slopes. Try more difficult climbs only after you
have developed you skill.
with
clines
slippery or loose surfaces, or
obstacles that might cause you
It
is
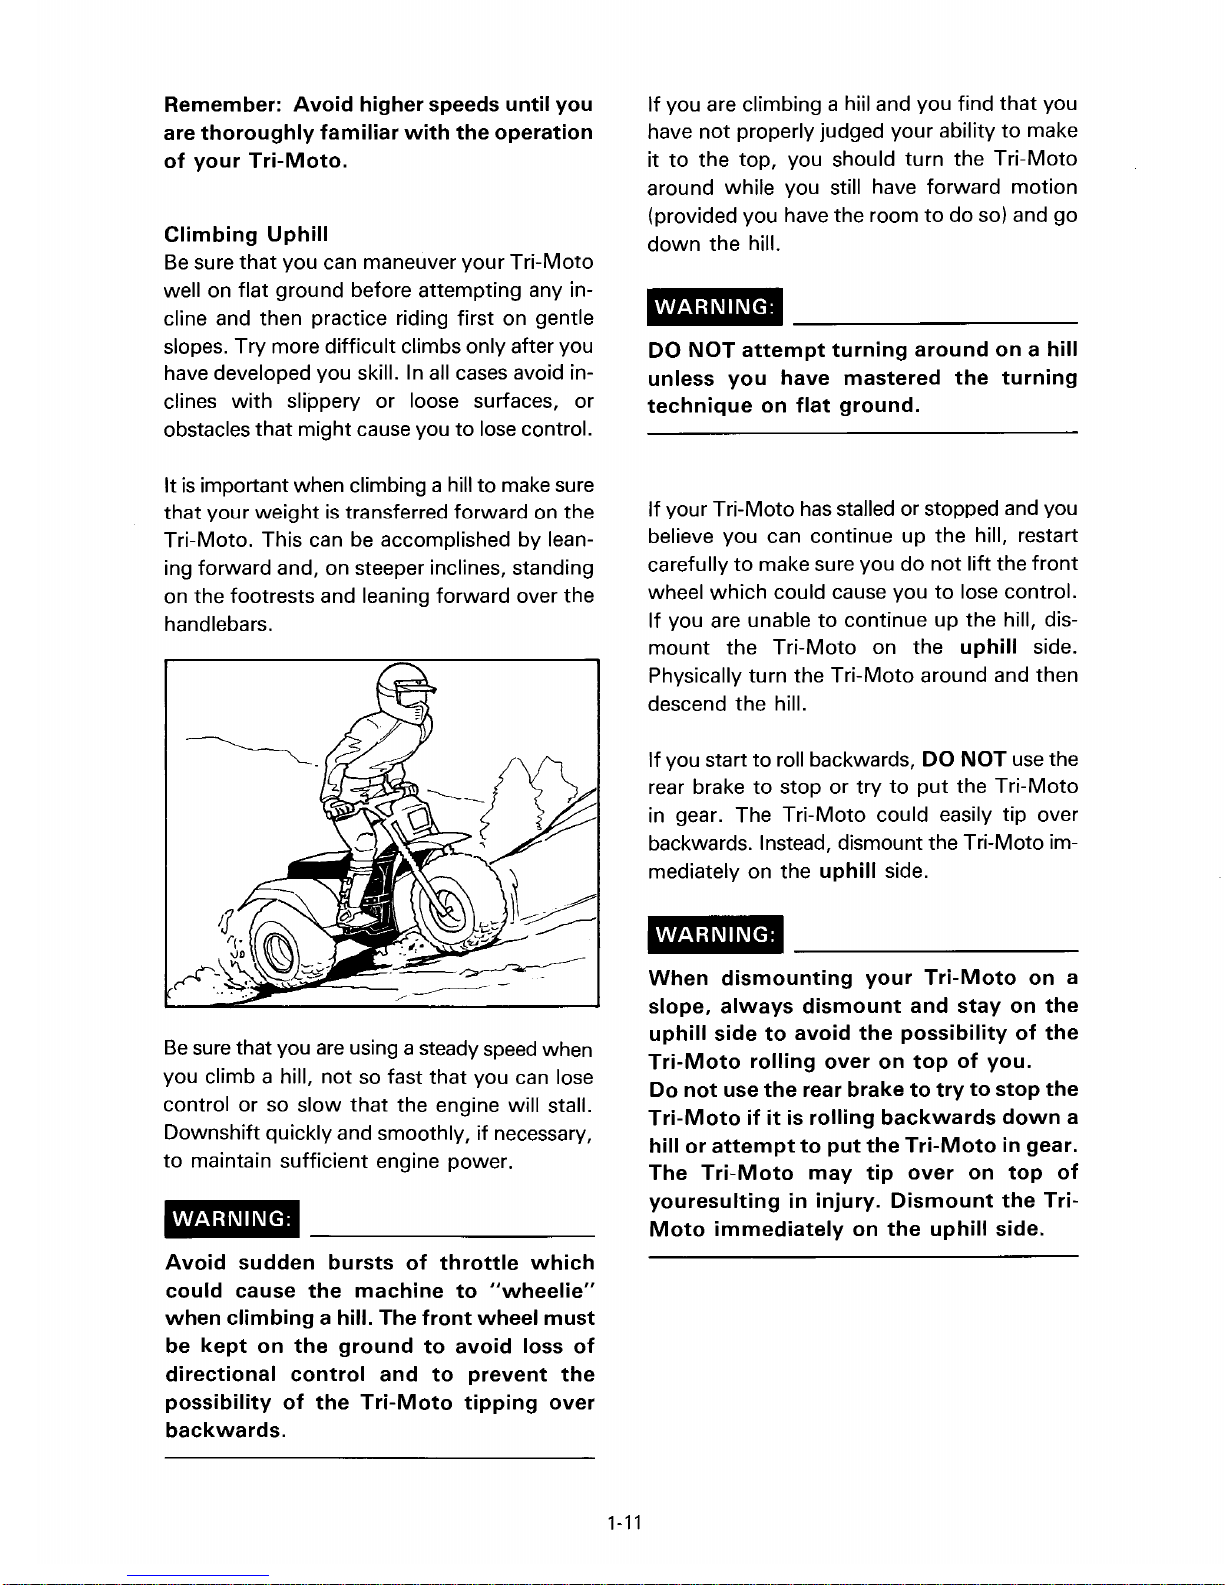
important when climbing a hill to make
that your weight
is
In
all cases avoid in-
to
lose control.
sure
transferred forward on the
Tri-Moto. This can be accomplished by leaning forward and, on steeper inclines, standing
on the footrests and leaning forward over the
handlebars.
If
you are climbing a hiil and you find that you
not
have
it
to
properly judged your ability
the top, you should turn the Tri-Moto
to
make
around while you still have forward motion
(provided you have the room
down
the hill.
to
do so) and go
WARNING:
DO
NOT
attempt
unless
technique
you
on
If your Tri-Moto
turning
have
mastered
flat
ground.
has
stalled or stopped and you
around
the
on a hill
turning
believe you can continue up the hill, restart
carefully
wheel which could cause you
If you
mount the Tri-Moto on the
to
make sure you do not
are
unable
to
continue up the hill, dis-
lift
the
to
lose control.
uphill
front
side.
Physically turn the Tri-Moto around and then
descend the hill.
Be
sure
that you
are
using a steady
speed
when
you climb a hill, not so fast that you can lose
control or so slow that the engine will stall.
Downshift quickly and smoothly,
to
maintain sufficient engine power.
if
necessary,
WARNING:
Avoid
could
when
be
directional
possibility
sudden
cause
climbing
kept
on
of
bursts
the
a hill. The
the
ground
control
the
of
machine
front
to
and
Tri-Moto
throttle
to
wheel
avoid
to
prevent
tipping
which
"wheelie"
must
loss
of
the
over
backwards.
to
If you start
rear brake
in
gear. The Tri-Moto could easily tip over
roll backwards, DO
to
stop or try
to
NOT
put
the Tri-Moto
use
the
backwards. Instead, dismount the Tri-Moto immediately on the
uphill
side.
WARNING:
When
slope,
uphill
Tri-Moto
Do
Tri-Moto
hill
The
youresulting
Moto
dismounting
always
side
to
rolling
not
use
the
if
or
attempt
Tri-Moto
immediately
dismount
avoid
rear
it
is
rolling
to
may
in
your
the
over
brake
put
the
tip
injury.
on
Tri-Moto
and
stay
possibility
on
top
of
to
try
to
backwards
Tri-Moto
over
on
Dismount
the
uphill
on
of
you.
stop
down
in
top
the
side.
on
the
the
the
gear.
of
Tri-
a
a
1-11
Riding
Downhill
When riding your Tri-Moto downhill, shift your
weight
Tri-Moto
and sit
as
far
to
the rear and uphill side
as
possible. Move back on the seat
with
your arms straight. Choose a
of
the
low
gear which will allow the engine compression
to
do most
braking may cause a loss
Use
caution while descending a hill with a loose
of
the braking
for
you. Improper
of
traction.
or slippery surface. Braking ability and traction
may
be
adversely affected by these surfaces.
Improper braking may also cause a loss
of
traction.
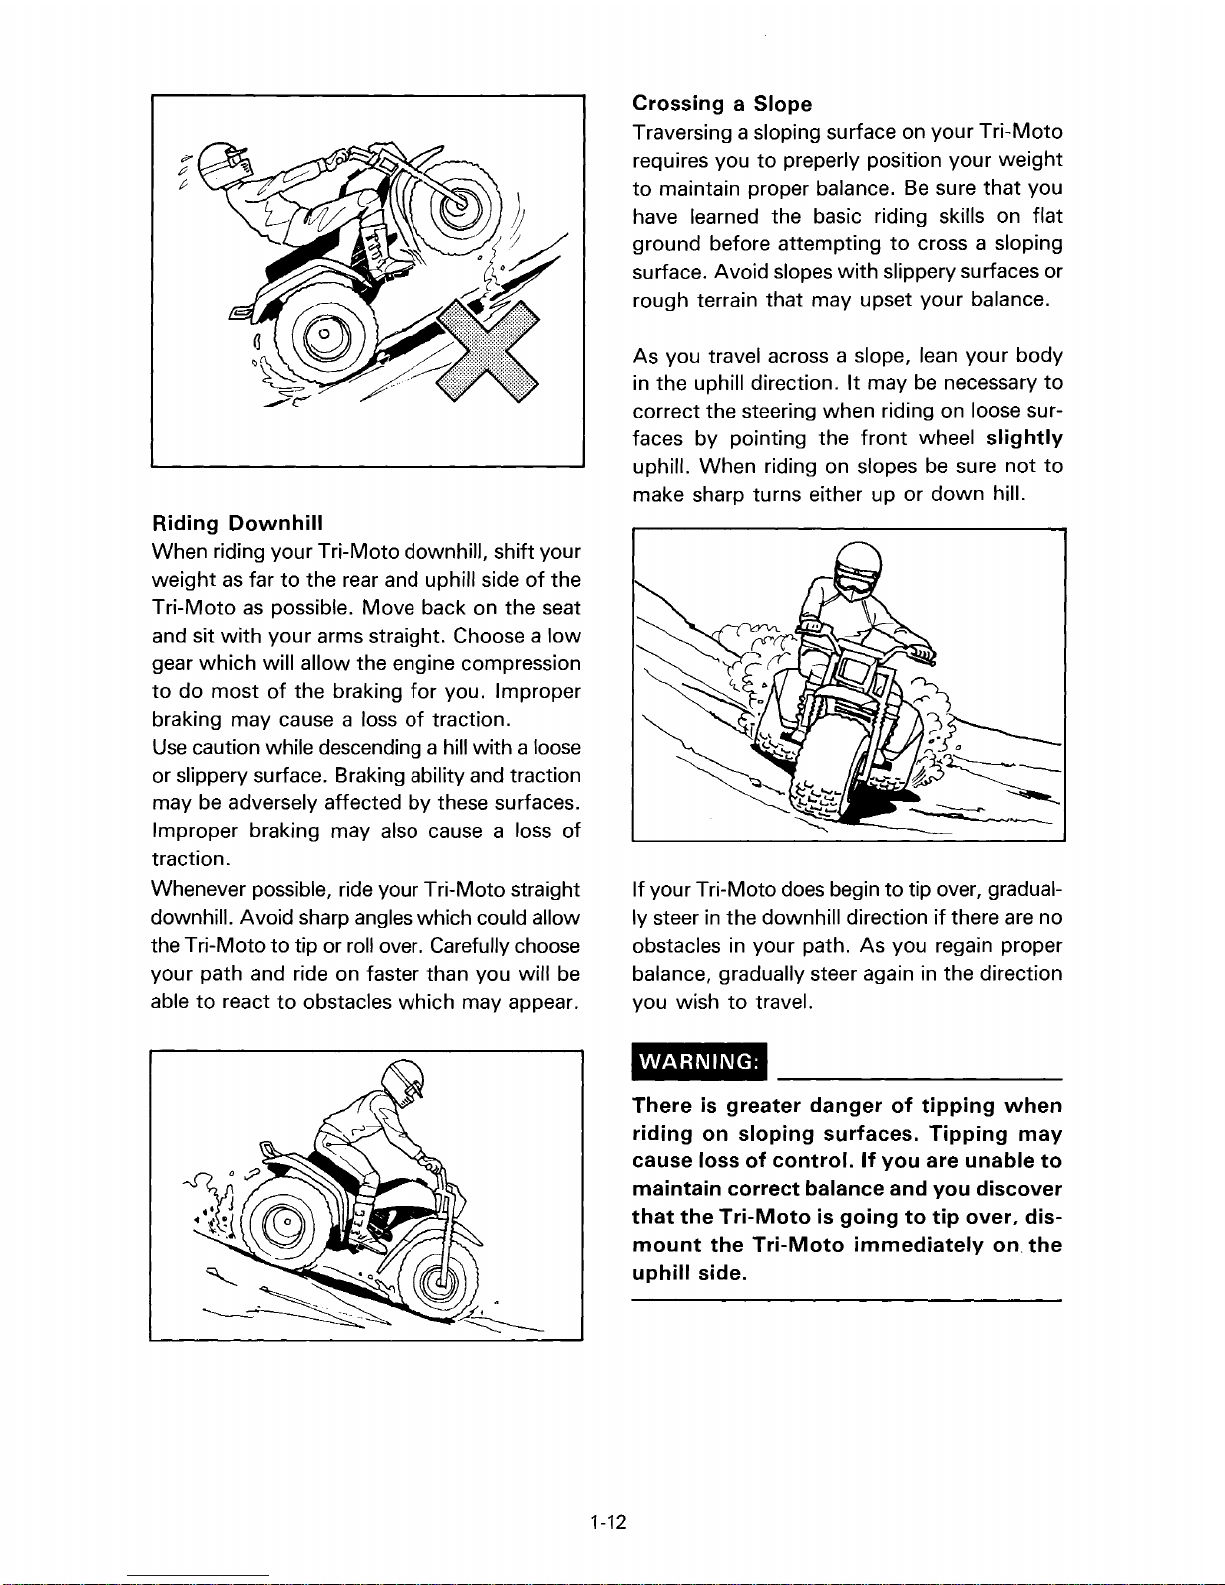
Whenever possible, ride your Tri-
ll.
downhi
Avoid sharp angles whi
Moto
straight
ch
could allow
the Tri-Moto to tip or roll over. Carefully choose
your path and ride on faster than you will
able
to
react
to
obstacles which may appear.
be
Crossing a Slope
Traversing a sloping surface on your Tri-Moto
requires you
to
maintain proper balance.
to
preperly position your weight
Be
sure that you
have learned the basic riding skills on flat
ground before attempting
to
cross a sloping
surface. Avoid slopes with slippery surfaces or
rough terrain that may upset your balance.
As you travel across a slope, lean your body
in
the uphill direction.
It
may
be
necessary
to
correct the steering when riding on loose sur-
faces by pointing the
uphill. When riding on slopes
make sharp turns either up or
wheel
be
sure not
down
slightly
to
hill.
front
If your Tri-Moto does begin to tip over, gradually steer
in
the downhill direction
if
there
are
no
obstacles in your path. As you regain proper
balance, gradually steer again in the direction
to
you wish
travel.
WARNING:
There
riding
cause
maintain
that
mount
uphill
1-12
is
on
loss
the
the
side.
greater
sloping
of
control.
correct
Tri-Moto
Tri-Moto
danger
surfaces.
If
balance
is
going
immediately
of
you
and
to
tipping
Tipping
are
unable
you
discover
tip
over,
when
may
dis-
on
to
the
Crossing
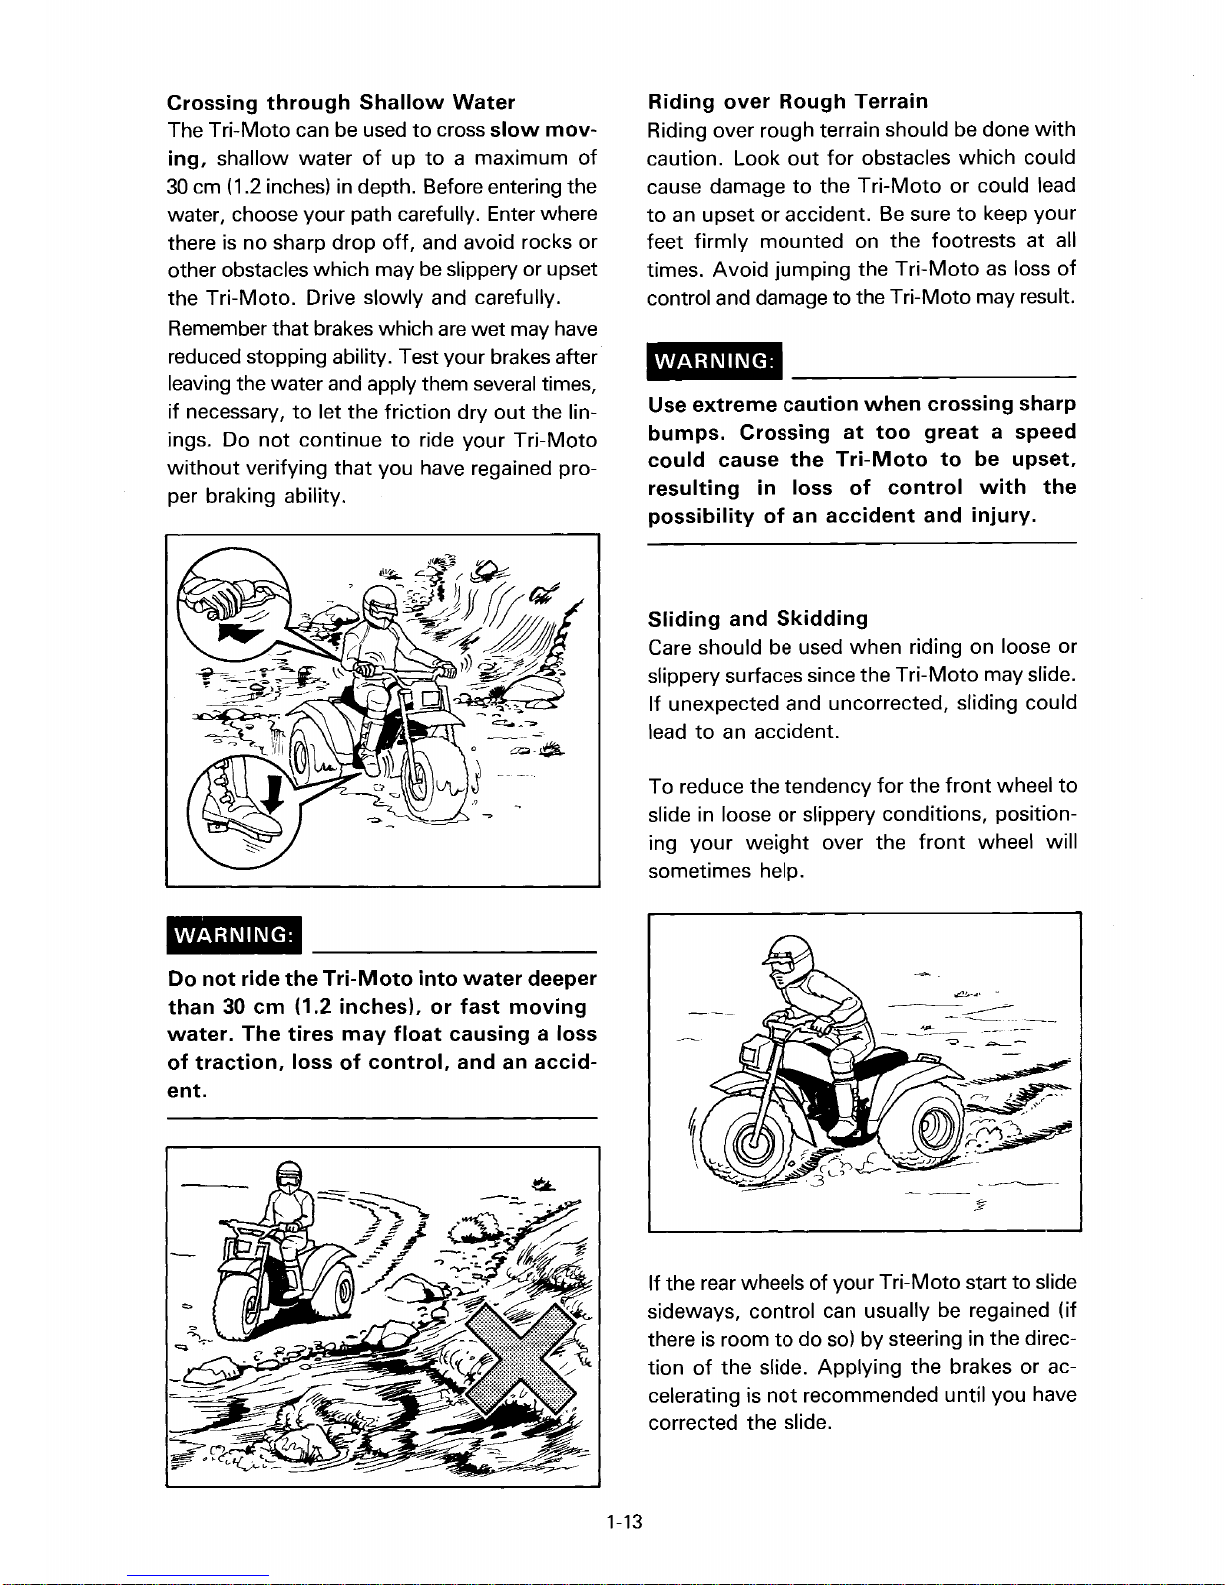
The Tri-Moto can be used
ing,
30
cm (1.2 inches)
water, choose your path carefully. Enter where
there
other obstacles which may be slippery or upset
the Tri-Moto. Drive slowly and carefully.
Remember that brakes which
reduced stopping ability. Test your brakes after
leaving the water and apply them several times,
if
necessary,
ings. Do
without
per braking ability.
through
shallow water
in
is
no sharp drop
to
let the friction dry
not
continue
verifying
that
Shallow
of
up
depth. Before entering the
off,
to
you have regained pro-
Water
to
cross
slow
mov-
to
a maximum
and avoid rocks or
are
wet
may have
out
the lin-
ride your
Tri-Moto
of
Riding
Riding over rough terrain should be done
caution. Look
cause damage
to
feet firmly mounted on the footrests at all
times.
control and damage
WARNING:
Use
bumps.
could
resulting
possibility
over
Rough
out
to
an
upset or accident.
Avoid
extreme
Crossing
cause
in
of
jumping the
caution
the
loss
an
Terrain
for
obstacles
the
Tri-Moto
Be
Tri-Moto
to
the Tri-Moto may result.
when
at
too
Tri-Moto
of
control
accident
which
or could lead
sure
to
keep your
as
crossing
great a speed
to
be
with
and
injury.
with
could
loss
of
sharp
upset,
the
WARNING:
Do
not
ride
than
30
cm
water.
of
ent.
The
traction,
the
(1.2
tires
loss
Tri-Moto
inches),
may
float
of
control,
into
water
or
fast
moving
causing a loss
and
an
deeper
accid-
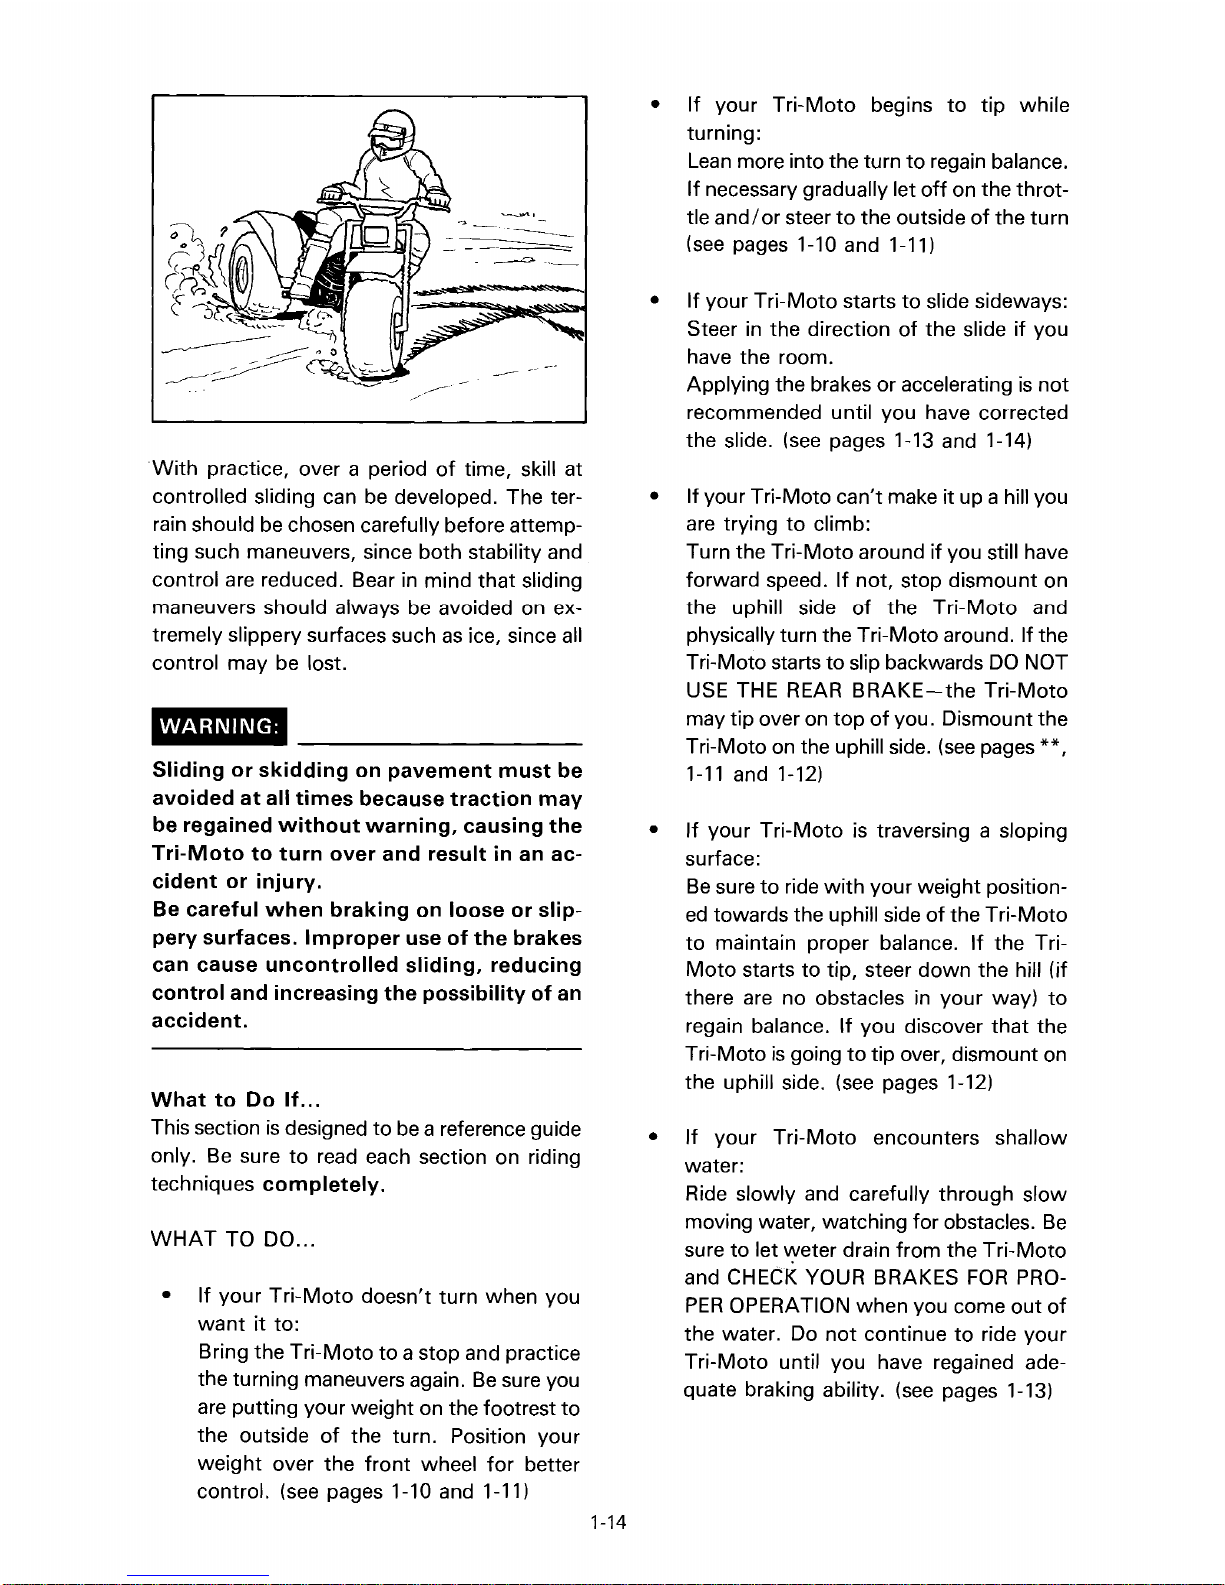
Sliding
Care should be used when riding on loose or
slippery surfaces since the Tri-Moto may slide.
If
unexpected and uncorrected, sliding could
lead
To reduce the tendency
slide in loose or slippery conditions, positioning your
sometimes help.
to
1
\
and
an
accident.
weight
Skidding
over the
for
---
the
front
front
~
---------------
wheel
wheel will
to
--,----
If
the rear wheels
sideways, control can usually be regained
there
is
room
of
tion
celerating
corrected the slide.
1-13
the slide. Applying the brakes or ac-
is
of
your Tri-Moto start
to
do
so)
by steering
not
recommended until you have
to
in
the direc-
slide
(if
With
practice, over a period
controlled sliding can
be
rain should
ting such maneuvers, since both stability and
control are reduced. Bear
maneuvers should always
tremely slippery surfaces such
control may be lost.
WARNING:
Sliding
avoided
be
regained
Tri-Moto
cident
Be
careful
pery
surfaces.
can
cause
control
accident.
What
This section
only.
techniques
WHAT
to
Be
TO
•
If
your Tri-Moto doesn't turn when you
want
Bring the Tri-Moto
the turning maneuvers again.
are
the outside
weight over the
control.
chosen carefully before attemp-
or
skidding
at
all
times
without
to
turn
or
injury.
when
uncontrolled
and
increasing
Do
If
...
is
designed
sure
to
completely.
DO
...
it
to:
putting your weight on the footrest
(see
be
on
because
warning,
over
braking
Improper
to
read each section on riding
of
the turn. Position your
front
pages 1-10 and 1-11)
of
time, skill at
developed. The ter-
in
mind that sliding
be
avoided on ex-
as
ice, since
pavement
and
result
on
use
sliding,
the
possibility
be
a reference guide
to
a stop and practice
wheel
must
traction
causing
in
loose
of
the
reducing
Be
sure
for
an ac-
or
brakes
better
be
may
the
slip-
of
an
you
all
to
•
If
your Tri-Moto begins
turning:
Lean
more into the turn to regain balance.
If
necessary gradually let
tle
and/
or steer
(see
pages 1-10 and 1-11)
If
your Tri-Moto starts
•
in
Steer
have the room.
Applying the brakes or accelerating
recommended until you have corrected
the slide.
• If your Tri-Moto can't make it up a hill you
are
Turn the Tri-Moto around
forward speed.
the uphill side
physically turn the Tri-Moto around. If the
Tri-Moto starts
USE THE
may tip over on top
Tri-Moto on the uphill side.
1-11
If
•
•
1-14
your Tri-Moto
surface:
Be
ed
to
Moto
there
regain balance. If you discover
Tri-Moto
the uphill side.
If
water:
Ride slowly and carefully through slow
moving water, watching for obstacles.
sure to let weter drain from the Tri-Moto
and CHECK YOUR BRAKES
PER
the water. Do not continue
Tri-Moto until you have regained adequate braking ability.
the direction
trying
and 1-12)
sure to ride
towards the uphill side
maintain proper balance.
starts
are
is
your Tri-Moto encounters shallow
OPERATION when you come out
to
the outside
(see
pages 1-13 and 1-14)
to
climb:
If
not, stop dismount on
of
to
slip backwards
REAR
no obstacles in your way)
going
BRAKE-the
is
with
to
tip, steer down the hill
to
(see
off
to
slide sideways:
of
the slide
if
the Tri-Moto and
of
you. Dismount the
(see
traversing a sloping
your weight position-
of
tip over, dismount on
pages
(see
to
tip while
on the throt-
of
the turn
if
you
is
not
you still have
DO
NOT
Tri-Moto
pages
the Tri-Moto
If
1-12)
FOR
to
pages
**,
the Tri-
that
the
Be
PRO-
of
ride your
1-13)
(if
to
PREOPERATION CHECKS
Before riding
race,
or a
operating condition.
INSPECTION
Cooling
Check that water
filler cap.
for
break-in operation, practice
make sure the machine is in good
AND
MAINTENANCE
water
is
filled up
to
the radiator
Front
forks
Check that they operate smoothly and there
no oil leakage.
Cables (Wires)
Check that the clutch, brake and throttle
cables move smoothly. Check that they
not caught when the handlebars
when the
and
rear
shock
front
forks travel up and down.
are
turned or
is
are
Fuel
Check that a fresh mixture
is
filled
in
the fuel tank.
WARNING:
Do
not
overfill
ing
fuel
on
Do
not
fill
or
it
top
up
After
closed
Gear
Check that the gear oil level
Gear
Check that gears
order and that the clutch operates smoothly.
may
later
and
refueling,
securely.
oil
shifter
the
the
the
fuel
overflow
expands.
and
hot
tank
make
clutch
can
of
oil and gasoline
fuel
tank.
engine.
all
the
when
sure
be
the
the
is
correct.
shifted correctly
Avoid
way
fuel
tank
spill-
to
the
heats
cap
is
in
Muffler
Check that the muffler
has
no cracks.
Sprocket
Check that the
is
bolt
Bolts
Check the chassis and engine
and nuts.
Fuel,
Check the fuel tank, fuel cock, carburetor,
engine bottom, and
leakage.
Lead
Check that the
nition coil
not
and
oil
wire
rear
loose.
nuts
and
coolant
connectors
CDI
are
connected tightly.
is
tightly mounted and
wheel sprocket tightening
for
loose bolts
..
cooling system for
magneto,
CDI
unit, and ig-
Brakes
Check the play
and their braking effect.
Chain
Check chain tension and alignment. Check
that the chain
Wheels
Is
the tire pressure correct?
Check for excessive wear.
Steering
Check that the handlebars
smoothly and have no excessive play.
of
both
front
is
lubricated properly.
and
can
rear
be
brakes
turned
Settings
Is
the machine set suitably
the racing course and weather or by taking into account the results
ing?
Is
inspection and maintenance complete-
ly done?
for
the condition
of
test-runs before rac-
* The machine should be checked and
serviced regularly so that only a simple,
1-15
minor adjustment
prior
to
a race.
of
settings
is
of
required
STARTING
Before
checks
WARNING:
•
•
• Never
Starting a Cold
Shift the transmission into neutral. Turn on
the fuel cock and full open the starter knob on
the carburetor.
closed, kickstart the engine with a smooth, firm
stroke. Half-open the starter knob, run the
engine
up; this usually takes about one or
minutes. The engine is warmed up when
responds normally
starter knob pushed completely down.
Do
starting
in
the
Avoid
vent
"wheelies"
loss
Always
during
your
operation.
feet
contact
start
ed area.
onous;
sciousness
time.
Always
a
well-ventilated
at
idle
not
warm
AND
the
BREAK-IN
machine,
preoperation
and
of
control.
put
your
feet
If
you
off
the
footrests,
the
rear
wheels.
or
run
the
The
exhaust
they
can cause loss
and
death
operate
area.
Engine
With
the throttle completely
or
slightly higher until
to
the throttle
up
the
engine
perform
check
jumping
on
the
should
they
engine
fumes
in a very
the
machine
for
extended
the
list.
to
pre-
footrests
take
may
in
a clos-
are
pois-
of
con-
short
in
it
warms
two
with
the
periods.
Starting a Warm
Do
not raise the starter knob. Open the throttle slightly and kickstart the engine
smooth, firm stroke.
Engine
with
a
it
Break-in
1.
Procedures
Before starting the engine, fill the fuel
tank with a break-in oil-fuel mixture
12:
1
to
14:
1.
2. Perform the preoperation checks on the
machine.
3. Start and warm up the engine. Check the
idle speed, and check the operation
the controls and the engine stop switch.
4. Operate the machine in the lower gears
at moderate throttle openings
eight minutes. Stop and check the spark
it
plug condition;
tion during break-in.
5.
Allow the engine
engine and oeprate the machine
step above
briefly shift
full-throttle response. Stop and check
the spark plug.
will show a rich condi-
to
cool. Restart the
for
five minutes. Then, very
to
the higher gears and check
6. After again allowing the engine
restart and run the machine for five more
minutes.
Full throttle and the higher gears may be
used,
tion should be avoided. Check the spark
plug condition.
7. Allow the engine
end, and inspect the piston and cylinder;
instructions
Chapter
any high spots on the piston
6OO-grit,
ponents and carefully reassemble the top
end.
8.
Drain the break-in oil-fuel mixture from
the fuel tank and refill
mix. Check the entire machine
screws, bolts, and nuts.
9.
Restart the engine and check the operation
operating range. Stop and check the
spark plug , condition. Restart the
machine and operate
more minutes. The machine will
ready
but
sustained full-throttle opera-
to
cool, remove the
for
this are described
3 "CYLINDER HEAD". Remove
wet
sandpaper.
with
of
the machine throughout its entire
it
for
to
race.
for
five
as
in the
to
Clean
all
the specified
for
loose
about
10
now
cool,
top
with
com-
to
of
of
to
15
be
Observe
cedures
optimum
the
following
during
initial
performance
operation
and
damage.
break-in
to
avoid
proensure
engine
1-16
CLEANING
AND
STORAGE
1.
After
pleted,
loose
all
2.
When
been
in.
CYLINDER
About
is necessary.
PISTON, RINGS, GEARS:
These
of
or
engine
the
check
fittings
such
fasteners
any
replaced,
one
parts
break-in
less.
Observe
carefully
break-in
the
and
of
the
following
they
AND
CRANKSHAFT:
hour
of
require
operation
the
durin{J
period
entire
fasteners.
as required.
must
break-in
about
at
condition
is
machine
parts
be
operation
30
half-throttle
operation.
com-
for
Tighten
have
broken
minutes
of
the
Cleaning
Frequent cleaning
enhance its appearance, maintain good overall
performance, and extend the life
components.
1.
Before washing the machine, block
the end
water from entering. A plastic bag
secured
for
2.
If
the engine is excessively greasy, apply
some degreaser
Do not apply degreaser
sprockets, or wheel axles.
3.
Rinse the dirt and degreaser
garden hose;
to
Excessive hose pressure
into
wheel
transmission
pressure hoses
coin-operate
of
with
this purpose.
do the job.
bearings,
car
of
your machine will
of
the exhaust pipe
a rubber band may be used
to
it
with
use
only enough pressure
can
front
seals.
Avoid
such
as
washes.
those
to
prevent
a paint brush.
to
the chain,
off
force
fork
seals,
using
found
many
off
with a
water
and
high-
in
4.
After the majority
hosed off, wash
water and a mild detergent.
toothbrush
places.
5.
Rinse the machine
clean water, and dry all surfaces
soft
towel or cloth.
6.
Immediately after washing, remove ex-
cess
water from the chain
towel and lubricate the chain
rust.
7.
Clean the seat
cleaner
glossy.
8.
Automotive wax may be applied
painted or chromed surfaces. Avoid
combination cleaner-waxes,
contain abrasives.
9.
After completing the above, start the
engine and allow
minutes.
to
keep
of
the dirt
all
surfaces
to
clean hard-to-reach
off
immediately
with
a vinyl upholstery
the cover pliable and
it
to
has
with
Use
with
to
as
they may
idle for
been
warm
an
old
with
with
a paper
prevent
to
all
several
a
1-17
Storage
If your machine
is
to
be stored
for
60
days or
more, some preventive measures must
taken
the machine thoroughly, prepare
as
to
avoid deterioration. After cleaning
it
for storage
follows:
1.
Drain the fuel tank, fuel lines, and the
carburetor float bowl.
2.
Remove the spark plug, pour a table-
spoon
of
SAE 10W30 motor oil in the
spark plug hole, and reinstall the plug.
With
the engine stop switch pushed in,
kick the engine over several times
with
the cylinder walls
3.
Remove the drive chain, clean
thoroughly
with
solvent, and lubricate it.
oil.
Reinstall the chain or store
bag tied
4.
Lubricate
5.
Block the frame up
to
the frame.
all
control cables.
to
raise
to
it
in a plastic
the wheels
the ground.
6.
Tie a plastic
to
outlet
7.
If the machine
or salt-air environment, coat
metal surfaces
not
apply oil
bag
over the exhaust pipe
prevent moisture from entering.
is
to
be
stored in a humid
all
exposed
with
a film
of
light oil. Do
to
rubber parts or the seat
cover.
be
coat
it
of
NOTE:
______________________
__
Make any necessary repairs before the
machine
is
stored.
1-18

1-19
fJ
REGULAR
MAINTENANCE
ADJUSTMENT
AND
MAINTENANCE
LUBRICATION
SPECIAL TOOLS
For Tune-up
For Engine Service
For Chassis Service
For Electrical Components
MINOR
Spark
Ignition
Throttle
Idle
Air
Clutch
Front
Rear
Checking
Inspecting
Drive
Drive
Drive
Steering
Wheel
Fuel
Tires
Cable
Brake
Headlight
Headlight
MAINTENANCE
Plug
Timing
Lever
Speed
Filter
..................................................................................
Brake
Brake
Chain
Chain
Chain Cleaning
Bearings
Cock
.....................................................................................
Inspection
and
INTERVALS
...........................................................................
........................................................................
............................................................................
..................................................................
.................................................................
..............................................................................
.......................................................................
Adjustment
..............................................................................
.................................................................................
Adjustment
Pedal
the
the
Head
..............................................................................
Change
Bulb
Beam
Height
Front
Slack
Slack
and
Brake
Check
Adjustment
Adjustment
.....................................................................
and
Pedal/Clutch
Replacement
Adjustment
.......................................................
.......................................................
AND
ADJUSTMENTS
.......................................................
.........................................................
Adjustment
Rear
Brake
Fluid Level
....................................................
and
Lubrication
.....................................................
Lubrication
..................................................
...................................................
......................................
Pads
.............................................
.............................................
.....................................
............................................
and
Brake
.............................
................................
Levers
...................
2-1
2-3
2-5
2-5
2-5
2-6
2-6
2-6
2-6
2-7
2-8
2-8
2-8
2-10
2-10
2-10
2-11
2-11
2-11
2-12
2-12
2-12
2-13
2-14
2-14
2-15
2-15
2-15
2-16
fJ
MAINTENANCE
INTERVALS CHART
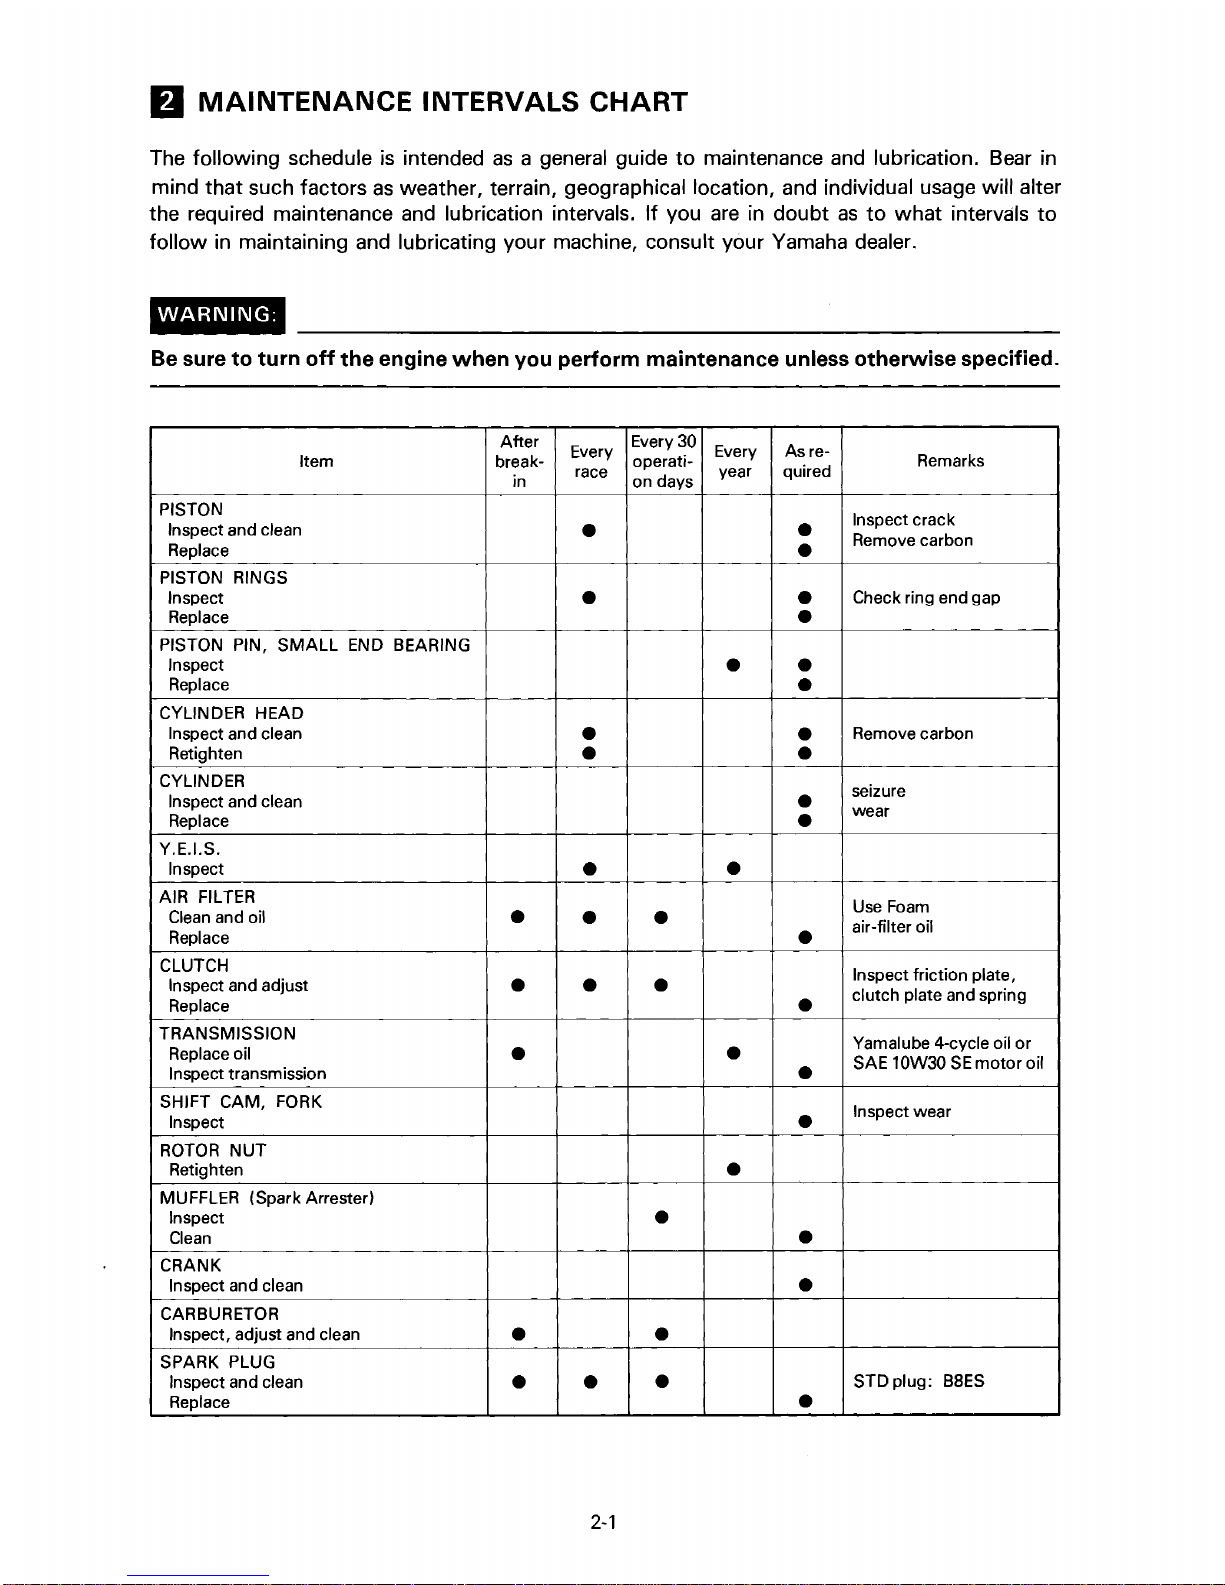
The following schedule
mind
that
such factors
the required maintenance and lubrication intervals. If you
follow in maintaining and lubricating your machine, consult your Yamaha dealer.
WARNING:
Be sure
PISTON
Inspect and clean
Replace
PISTON RINGS
Inspect
Replace
PISTON PIN,
Inspect
Replace
CYLINDER HEAD
Inspect and clean
Retighten
CYLINDER
Inspect and clean
Replace
Y.E.I.S.
Inspect
AIR FILTER
Clean
Replace
CLUTCH
Inspect and adjust
Replace
TRANSMISSION
Replace oil
Inspect transmission
SHIFT
Inspect
ROTOR
Retighten
MUFFLER (Spark Arrester)
Inspect
Oean
CRANK
Inspect and clean
CARBURETOR
Inspect , adjust and clean
SPARK PLUG
Inspect and clean
Replace
to
and oil
CAM,
NUT
turn
off
Item break- operati-
SMALL
FORK
is
intended
as
weather, terrain, geographical location, and individual usage will alter
the
engine
as
when
a general guide
you
perform
After
in
Every
race
• •
to
maintenance and lubrication. Bear in
are
maintenance
Every 30
on days
Every
year quired
in doubt
unless
Asre-
as
to
what
otherwise
Inspect crack
Remove carbon
•
Check ring end gap
•
END BEARING
•
•
• •
•
•
•
•
•
•
Remove carbon
seizure
wear
•
•
Use
Foam
air-filter oil
•
•
•
•
•
Inspect friction plate,
•
• •
clutch plate and spring
•
Yamalube 4-cycle oil
•
•
SAE 10W30
•
Inspect wear
•
•
•
•
•
•
•
•
•
•
STD plug: B8ES
•
intervals
specified.
Remarks
SE
motor
to
or
oil
2-1
Item break-
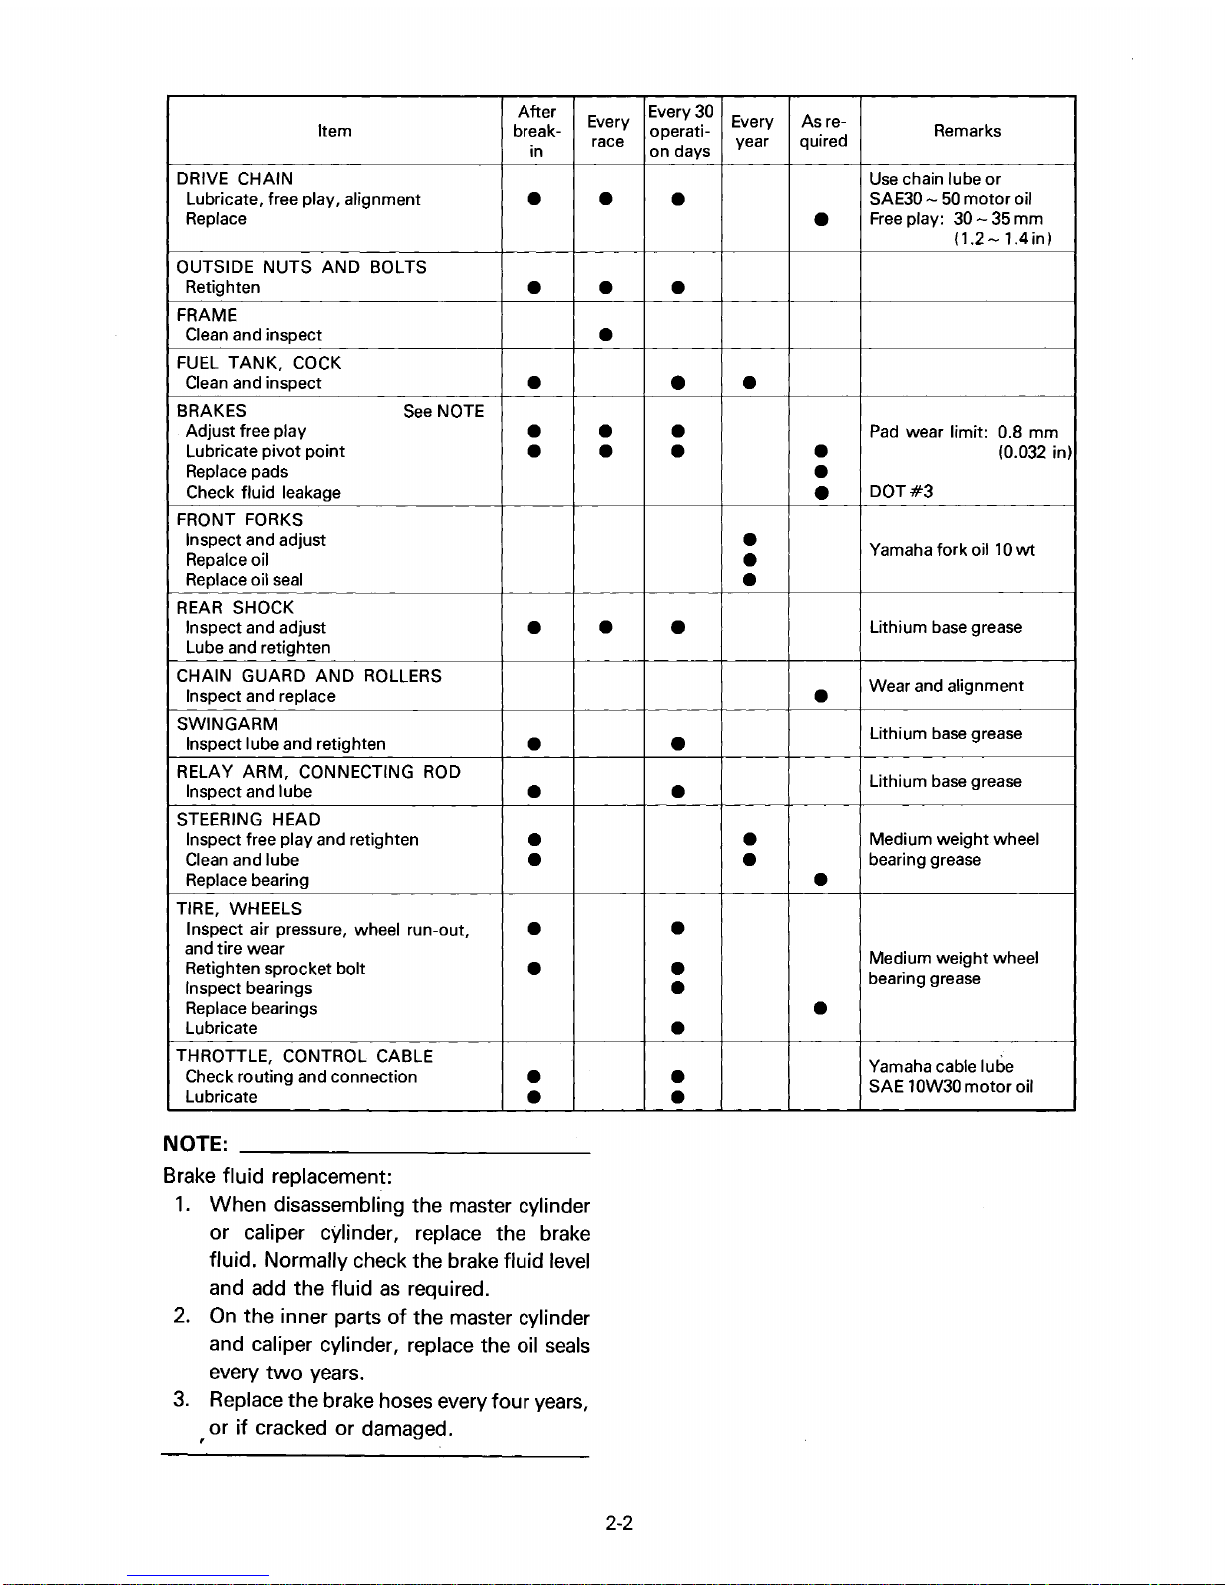
DRIVE CHAIN
Lubricate, free play, alignment
Replace
OUTSIDE NUTS AND BOLTS
Retighten
FRAME
Clean and inspect
FUEL
TANK,
aean
BRAKES
Adjust free play
Lubricate pivot point
Replace pads
Check fluid leakage
FRONT FORKS
Inspect and adjust
Repalceoil
Replace oil
REAR
Inspect and adjust
Lube and retighten
CHAIN GUARD AND ROLLERS
Inspect and replace
SWINGARM
Inspect lube and retighten
RELA Y ARM, CONNECTING
Inspect and lube
STEERING HEAD
Inspect free play and retighten
Clean
Replace bearing
TIRE, WHEELS
Inspect air pressure, wheel run-out,
and tire wear
Retighten sprocket bolt
Inspect bearings
Replace bearings
Lubricate
THROTTLE, CONTROL CABLE
Check routing and connection
Lubricate
NOTE:
COCK
and inspect
See
seal
SHOCK
and lube
______________________
NOTE
ROD
After
in
•
•
•
•
•
•
•
•
•
•
•
•
•
•
Every
race
_
Every 30
operati- Remarks
on days
•
•
•
•
Every
year
Asre-
quired
•
Use
SAE30 Free
•
•
•
•
•
•
Pad
DOT
Yamaha fork oil
•
•
•
•
•
•
•
•
•
Lithium base grease
Wear and alignment
•
Lithium base grease
•
Lithium base grease
•
•
•
Medium weight wheel
bearing grease
•
•
Medium weight wheel
•
bearing grease
•
•
•
Yamaha cable lube
•
SAE 10W30 motor oil
•
chain lube or
50
motor
oil
play:
30 -35
(1.2-1.4in)
wear limit: 0.8 mm
#3
mm
(0.032
10
wt
in)
Brake fluid replacement:
1.
When disassembling the master cylinder
or caliper cylinder, replace the brake
fluid. Normally check the brake fluid level
and add the fluid
2.
On
the inner parts
and caliper cylinder, replace the oil
every
two
years.
3.
Replace the brake hoses every four years,
or
if
cracked or damaged.
,
as
required.
of
the master cylinder
seals
2-2
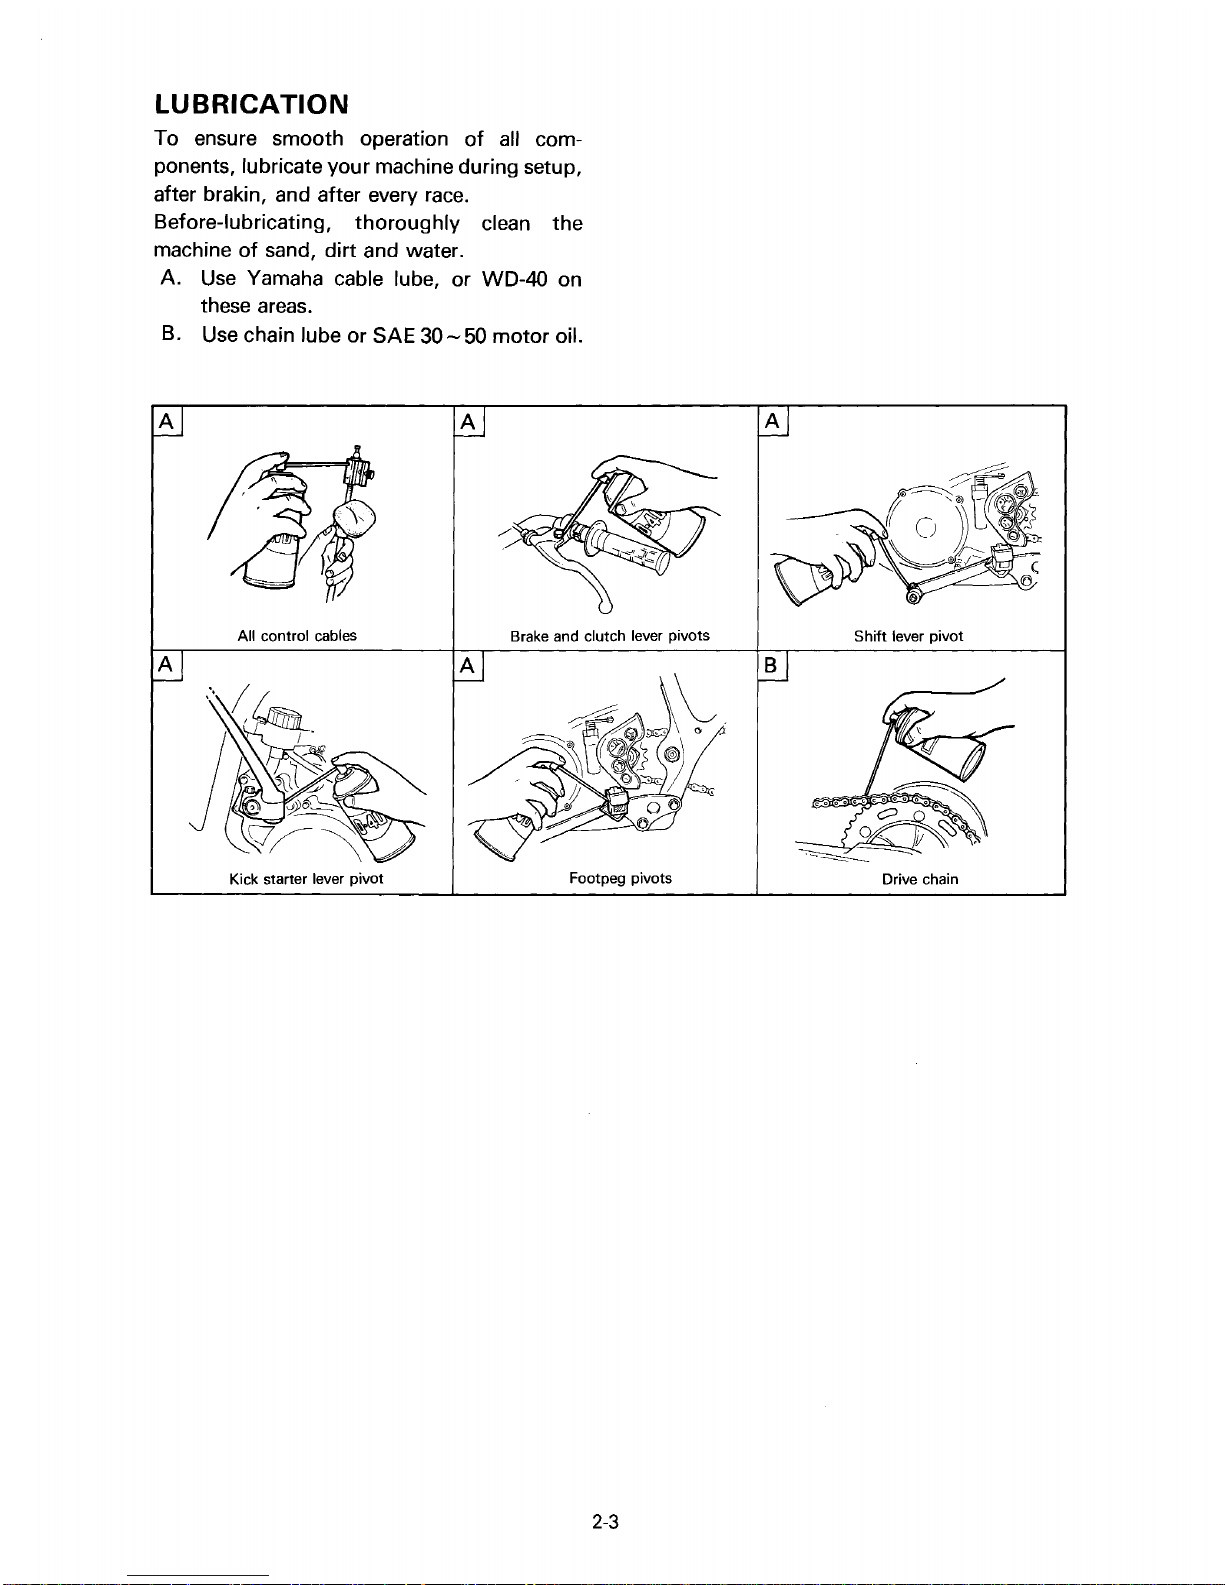
LUBRICATION
To ensure smooth operation
ponents, lubricate your machine during setup,
after brakin, and after every
Before-lubricating, thoroughly clean the
machine
A.
of
sand, dirt and water.
Use
Yamaha cable lube, or WO-40 on
these areas.
B.
Use chain lube
or
SAE
of
race.
30 -50
all com-
motor oil.
A
A
All control cables
Kick starter lever pivot
A
Brake
and clutch lever pivots
Footpeg pivots
A
Shift lever pivot
B
Drive chain
2-3
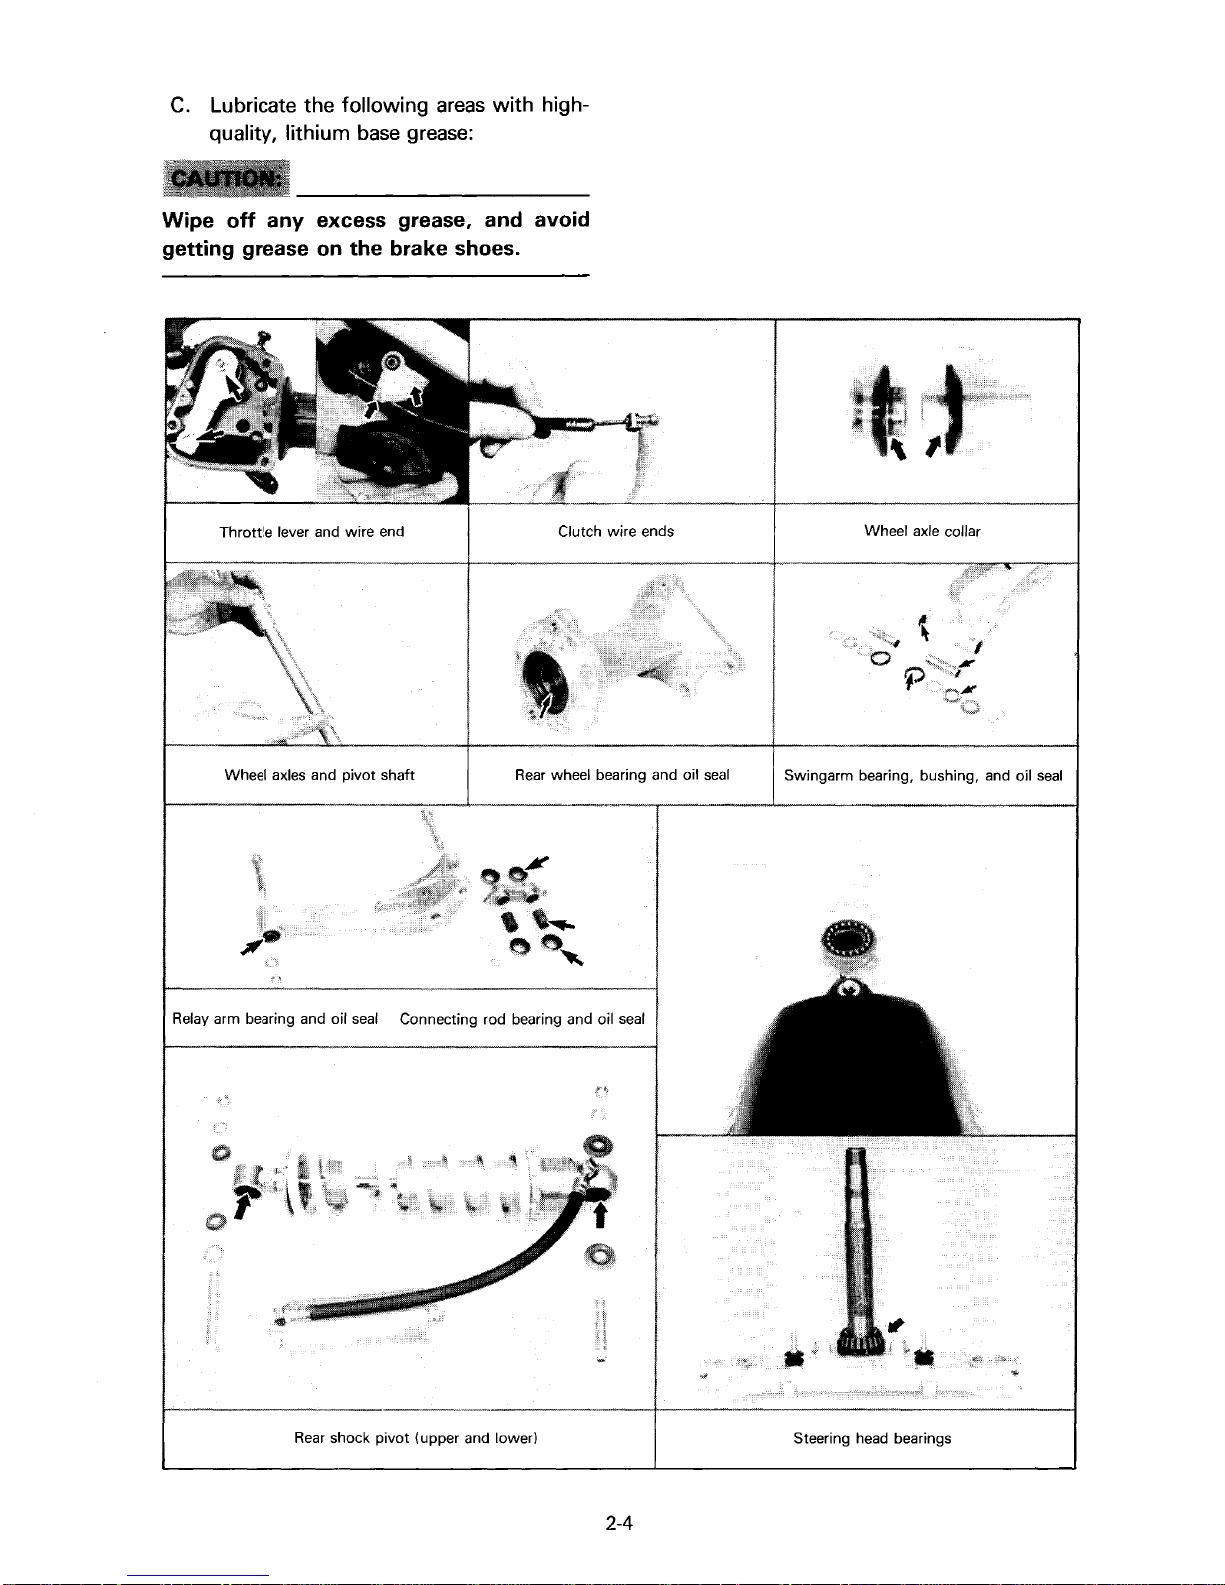
c.
Lubricate the following areas with highquality, lithium base grease:
Wipe
off
any excess grease, and avoid
getting grease on the brake shoes.
Wheel axles
and
pivot shaft
Clutch wire ends
Rear
wheel bearing and oil
seal
Wheel axle collar
Swingarm bearing, bushing, and oil
seal
Relay
arm bearing and oil
seal
Connecting rod bearing and oil
Rear
shock pivot (upper and lower)
seal
Steering head bearings
2-4
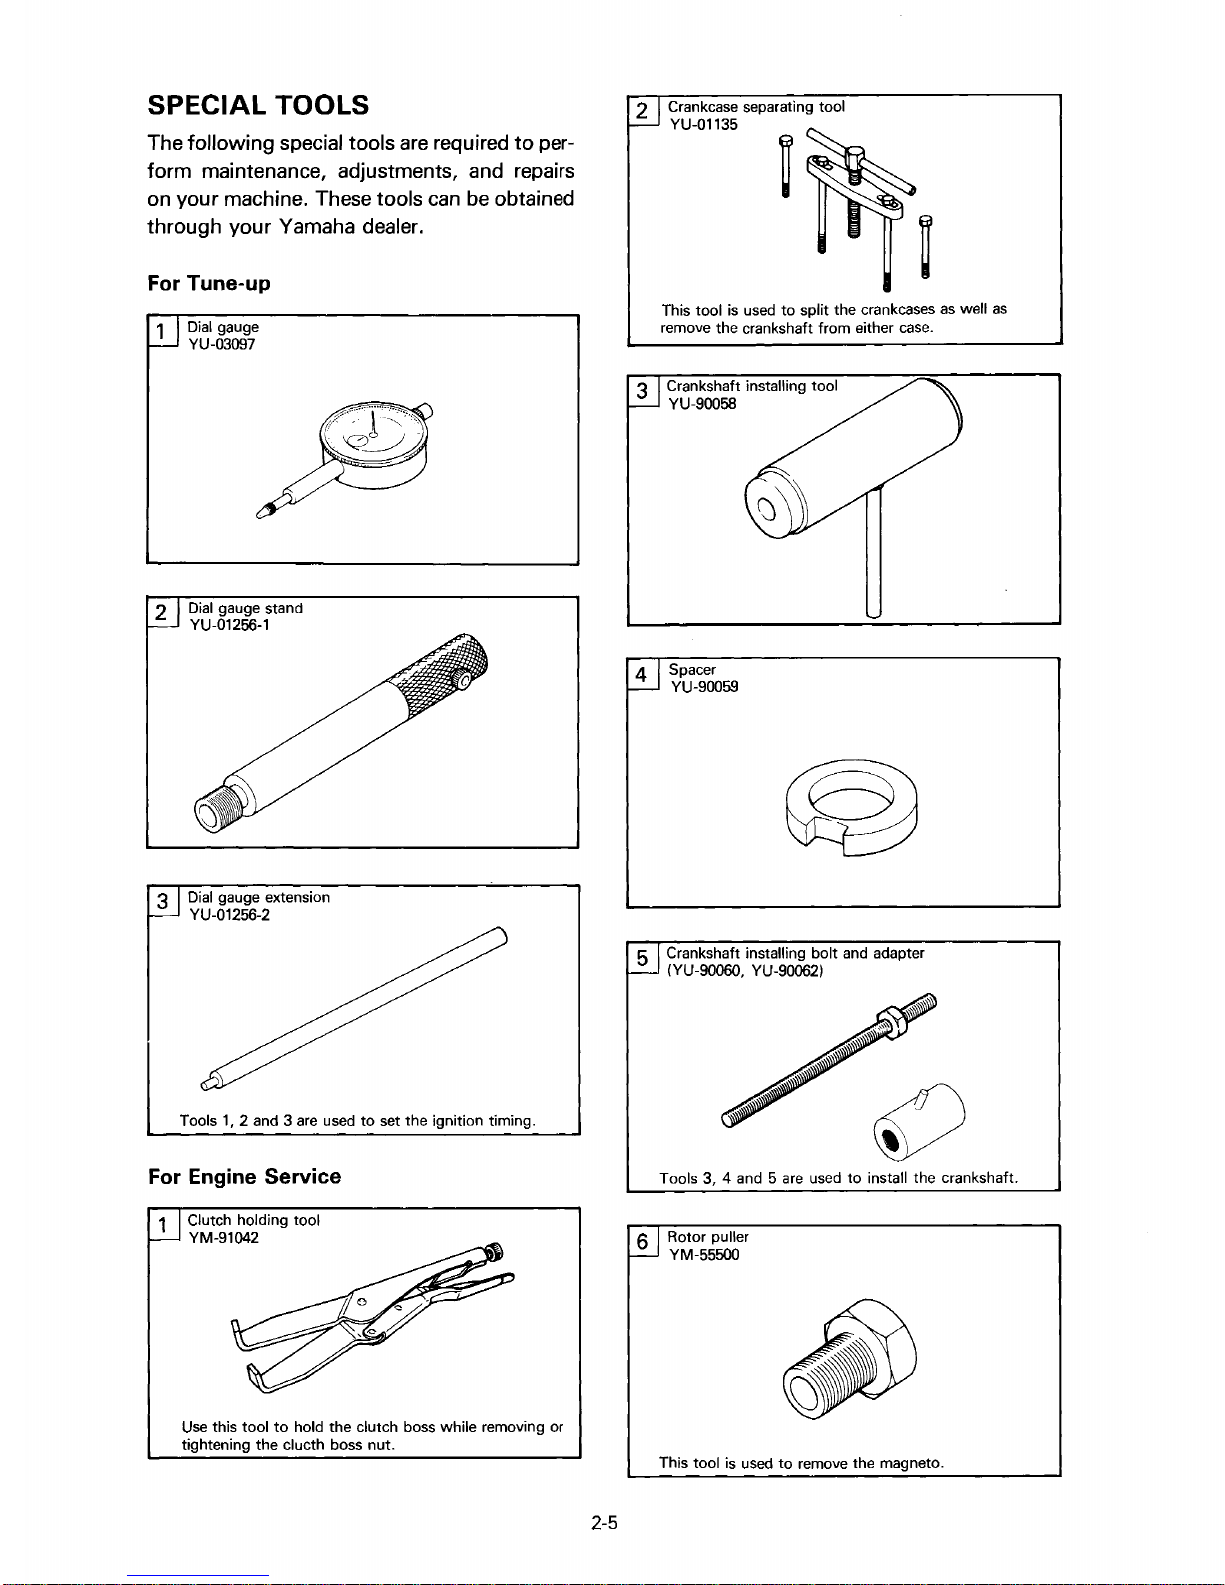
SPECIAL TOOLS
The following special tools are required
form maintenance, adjustments, and repairs
on your machine. These tools can be obtained
through your Yamaha dealer.
For Tune-up
Dial gauge
1
YU-03097
Dial gauge stand
2
YU-01256-1
to
per-
Crankcase separating
2
YU-Ol135
This
tool
is used
to
remove
the
split the crankcases
crankshaft
3 Crankshaft installing tool
YU-90058
14
I Spacer
~
YU-90059
tool
from
either case.
as
well as
3 Dial gauge extension
YU·01256·2
Tools
1,
2 and 3 are used
For Engine Service
Clutch holding
1
YM-91042
Use this
tightening the clucth boss
tool
to
tool
hold
the
to
set the ignition timing.
clutch boss while removing
nut.
or
5 Crankshaft installing
(YU-90060, YU-900621
Tools
3,
4 and 5 are used
6 Rotor puller
YM-55500
This
tool
is used
to
bolt
remove
and adapter
to
install the crankshaft.
the
magneto.
2-5

For Chassis
Service
MINOR
MAINTENANCE
1
Use
this wrench to put the proper tension
on the steering
head
bearings.
2 For cylinder holder and adapter
YM-01300-1, YM-01326
Use
these tools
to
remove and install the fork cylinder.
Spark
Type
Gap
AND
Plug
Standard Spark Plug
Side electrode
ADJUSTMENTS
BSES
(NGK)
0.7
-O.S
mm
031
(0.03 - 0.
in)
3 Fork
seal
YM-33963, YM-34482
This tool
and bushing service tool
is
used
For Electrical
Yamaha pocket tester
1
YU-03112
Use
this tool
the coil resistance,
output voltage
and amperage.
to
to install the fork oil
Components
measure
seal.
1.
Whenever a new spark plug
the gap must be checked and adjusted
properly.
Use
a wire feeler gauge
check the gap, and adjust the gap by
bending the side electrode gently.
2.
Be
sure
to
clean the gasket surface and
threads before installing the spark plug.
Torque the plug
to
specification.
Spark plug torque:
25
Nm
(2.5
m·kg,
18
ft·lb)
NOTE:
not
If a torque wrench is
are
installing a spark plug, a good estimate
the correct torque
finger tight.
correct value
Have
the spark plug torque
as
soon
available when you
is
112
to
114
as
possible
with
wrench.
is
installed,
turns past
to
the
a torque
to
of
2-6
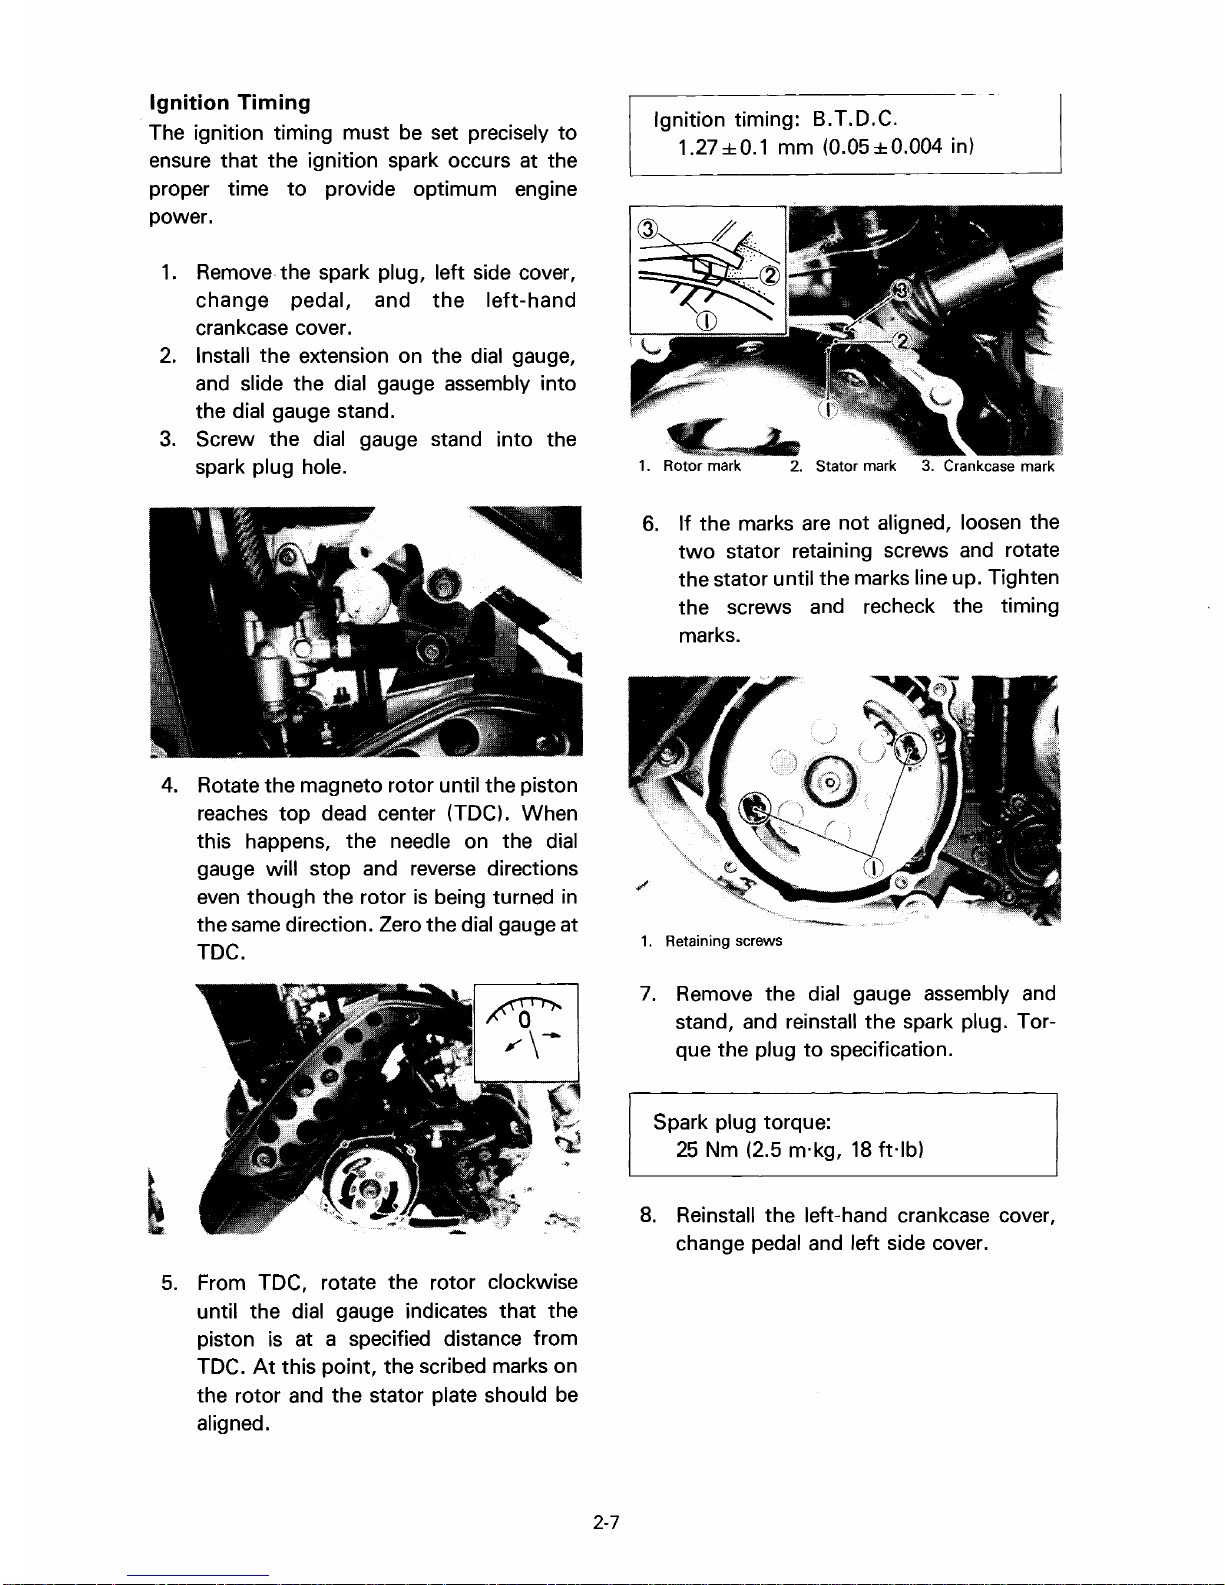
Ignition Timing
The ignition timing must be set precisely
ensure that the ignition spark occurs at the
to
proper time
power.
1.
Remove, the spark plug, left side cover,
change pedal, and
crankcase cover.
2.
Install the extension on the dial gauge,
and slide the dial gauge assembly into
the dial gauge stand.
3.
Screw the dial gauge stand into the
spark plug hole.
provide optimum engine
the
left-hand
to
Ignition timing: B.T.O.C.
1.27
±O.l
mm (O.05±O.004 in)
,
1. Rotor mark 2. Stator mark
6.
If the marks
two
stator retaining screws and rotate
the stator until the marks line up. Tighten
the screws and recheck the timing
marks.
are
not aligned, loosen the
3.
Crankcase mark
4.
Rotate the magneto rotor until the piston
top
reaches
this happens, the needle on the dial
gauge will stop and reverse directions
even
though the rotor
the same direction. Zero the dial gauge at
TOC.
5.
From TOC, rotate the rotor clockwise
until the dial gauge indicates that the
piston
TOC.
At
the rotor and the stator plate should be
aligned.
dead center (TOC). When
is
being turned
is
at a specified distance from
this point, the scribed marks on
in
1. Retaining screws
7.
Remove the dial gauge assembly and
stand, and reinstall the spark plug. Torque the plug
Spark plug torque:
25
Nm (2.5 m'kg,
8.
Reinstall the left-hand crankcase cover,
change pedal and left side cover.
to
specification.
18
ft·lb)
2-7
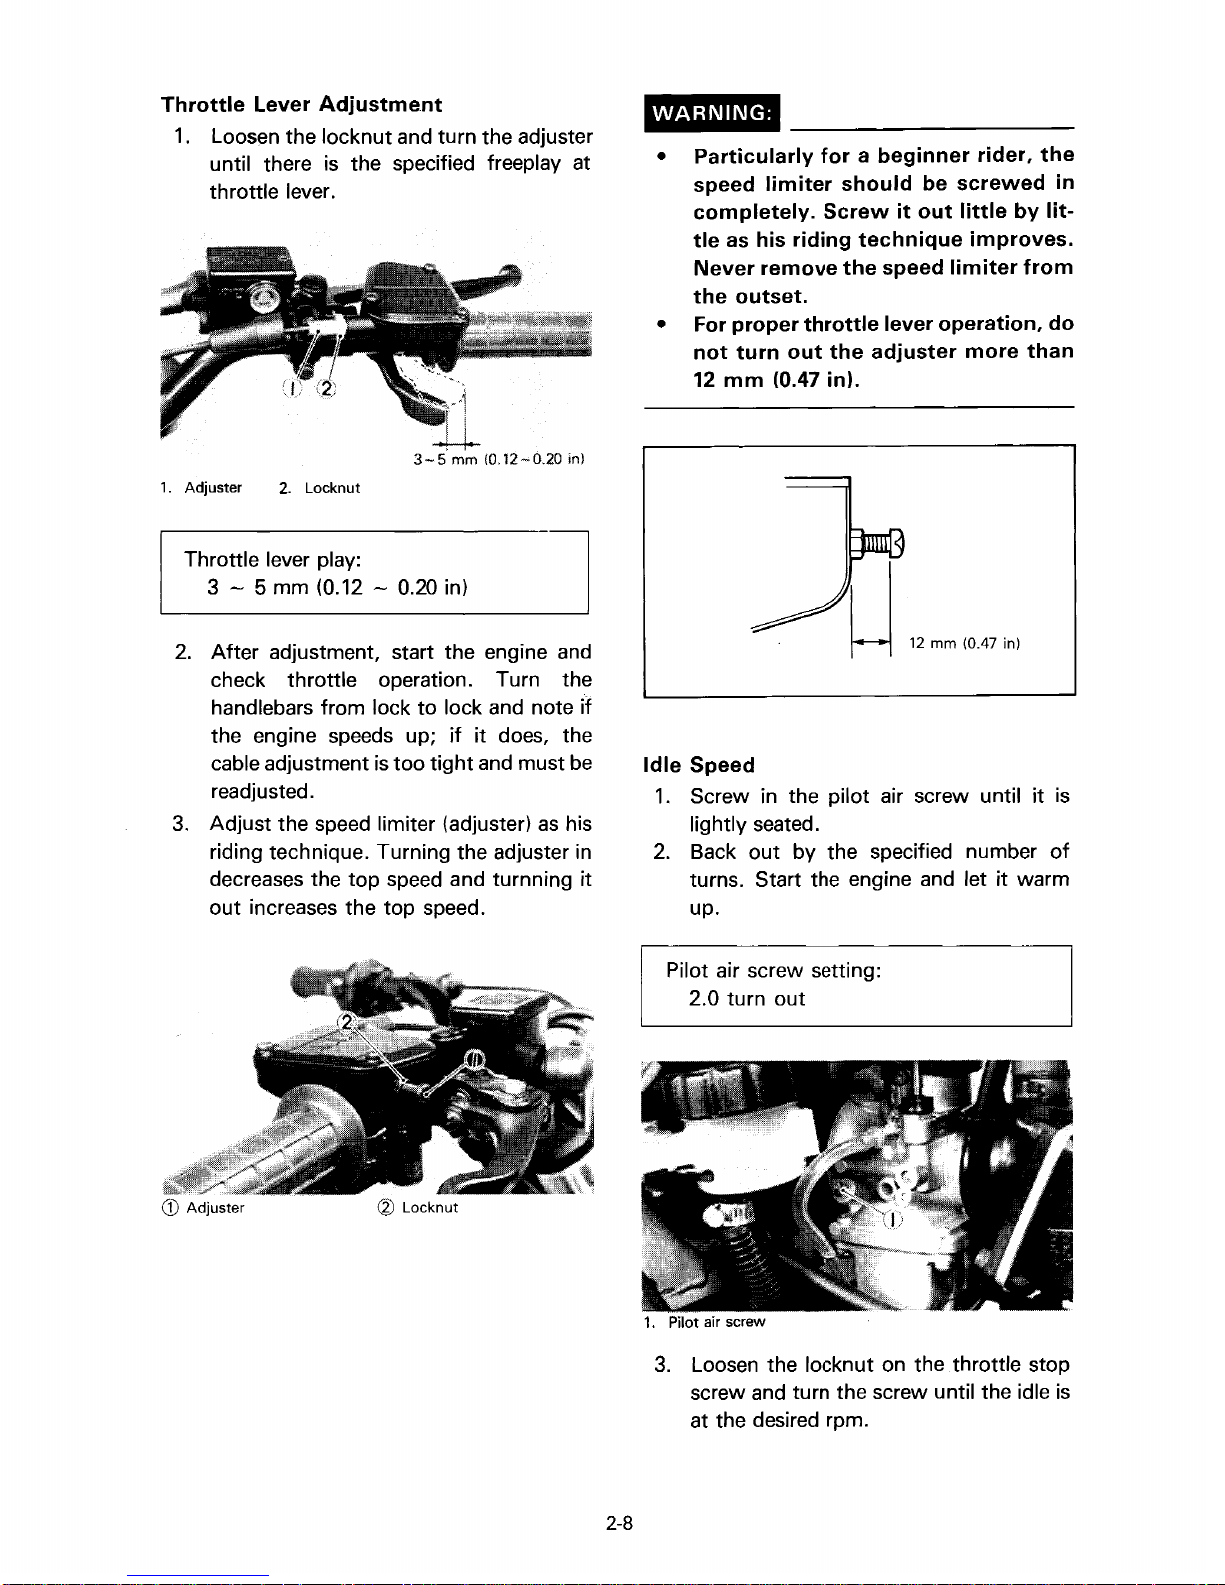
Throttle
1.
Lever
Adjustment
Loosen the locknut and turn the adjuster
until there is the specified freeplay at
throttle lever.
WARNING:
•
Particularly
speed
completely.
tle
as
Never
the
outset.
• For
not
12
proper
turn
mm
limiter
his
riding
remove
throttle
out
(0.47 in).
for a beginner
should
Screw
it
be
out
technique
the
the
speed
lever
adjuster
limiter
operation,
rider,
screwed
little
by
improves.
from
more
than
the
in
lit-
do
1. Adjuster
2.
Locknut
Throttle lever play:
3 - 5 mm (0.12 - 0.20 in)
2.
After adjustment, start the engine and
check throttle operation. Turn the
handlebars from lock
the engine speeds up;
cable adjustment
readjusted.
3.
Adjust the speed limiter (adjuster)
riding technique. Turning the adjuster
decreases the top speed and turnning
out increases the top speed.
is
to
lock and note
if it
too
tight
and must
if
does, the
be
as
his
in
it
Idle
Speed
1.
Screw in the pilot air screw until
lightly seated.
2.
Back out by the specified number
turns. Start the engine and let
up.
Pilot air screw setting:
2.0 turn out
it
it
is
of
warm
~
CD
Adjuster
Locknut
2-8
1.
Pilot air screw
3.
Loosen the locknut on the throttle stop
screw and turn the screw until the idle
at the desired rpm.
is
 Loading...