

YAMAHA YRS-1100 User Manual [fr]
SURROUND SOUND TV STAND
MEUBLE TV SURROUND
YRS-1100
Install Manual
Manuel d’installation
ENGLISH FRANÇAIS
This Install Manual shows how to assemble the YRS-1100. You must
assemble the YRS-1100 before use. Refer to Owner’s Manual for safety
instruction and connection guide.
■ Caution!
● Assembly requires two or more people, especially for the steps marked
with this icon . Attempting to assemble the unit on your own may
result in injury or damage to the unit.
● Do not use electric tool for assembling.
● In case you secure parts with more than 2 screws, tighten all screws
temporarily halfway, then secure them.
● Place the main unit on a soft cloth to prevent scratching the floor and the
main unit.
● Do not apply any force to the speaker grille, as it is easily damaged.
● After assembly, place the unit on a stable surface.
● For maintenance, wipe the surface of the unit using a soft, dry cloth. Do
not use alcohol, benzine or thinner.
● Install your TV in accordance with the manufacturer’s instructions to
prevent it from toppling over.
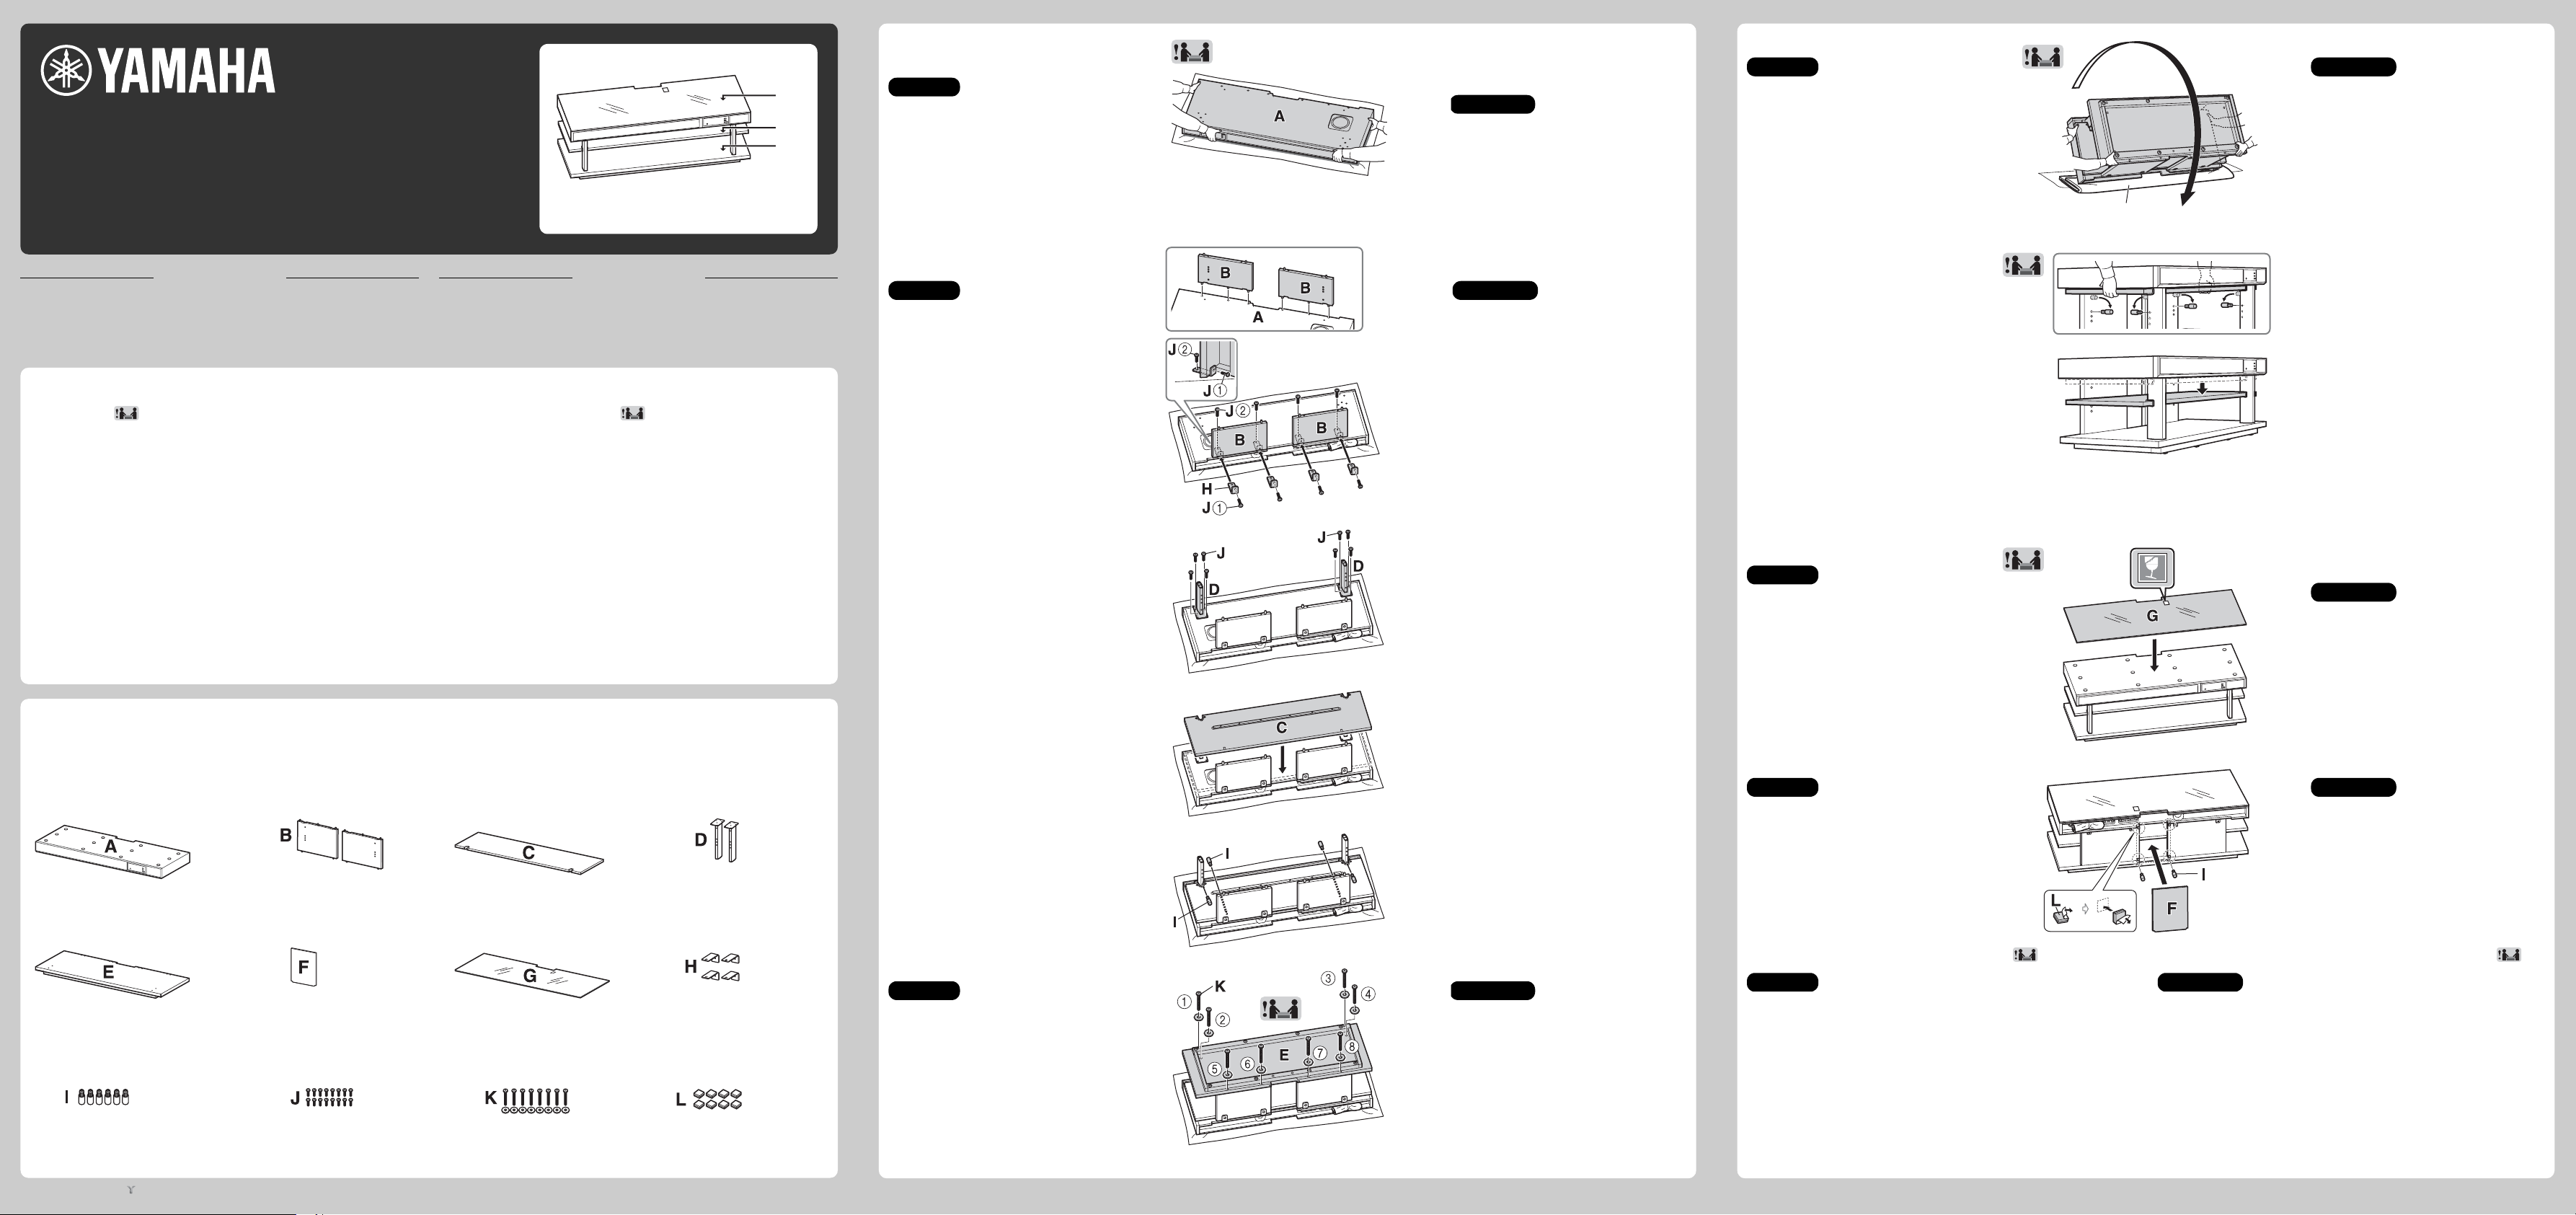
■ Package contents
Make sure all of the following items are included in the package, as they are
all necessary to complete assembly.
50 kg
15 kg
30 kg
Maximum load
Charge maximale
Ce Manuel d’installation montre comment monter l’YRS-1100. Vous devez
monter l’YRS-1100 avant de l’utiliser. Reportez-vous au mode d’emploi
pour en savoir plus sur la sécurité et les connexions.
■ Prudence !
● Le montage nécessite au moins deux personnes, surtout pour les
opérations indiquées par l’icône . Si vous essayez de monter seul ce
produit, vous risquez de vous blesser ou de l’endommager.
● N’utilisez pas d’outil électrique pour le montage.
● Si vous fixez des pièces avec plus de 2 vis, serrez provisoirement toutes
les vis à mi-course, avant de les serrer à fond.
● Placez l’unité principale sur un linge doux pour éviter de griffer le sol et
l’unité principale.
● N’appuyez pas sur la grille de haut-parleur, car elle peut être facilement
endommagée.
● Après le montage, placez le produit sur une surface stable.
● Pour l’entretien, essuyez la surface du produit avec un chiffon sec et doux.
N’utilisez pas d’alcool, de benzène ou de diluant.
● Installez votre téléviseur conformément aux consignes données par le
fabricant pour éviter qu’il bascule.
■ Contenu de l’emballage
Vérifiez que tous les éléments suivants se trouvent dans l’emballage, car ils
sont tous indispensables au montage.
■ Assembly
1. Place the main unit on the floor.
Notes
Position the main unit with the bottom side
up, just as it was packed in the box.
The power cable is wrapped in a plastic
sheet and taped to the main unit. Do not
remove the tape until the unit is moved to its
final location.
2. Attach the rear panels (left and
right).
■ Montage
1. Placez l’unité principale sur le
sol.
Remarques
Placez l’unité principale face arrière vers le
haut, exactement comme elle se trouve
dans l’emballage.
Le câble d’alimentation est entouré d’une
feuille de plastique et est fixé à l’unité
principale. Ne le détachez pas aussi
longtemps que l’unité ne se trouve pas à
son emplacement définitif.
2. Fixez les panneaux arrière
(gauche et droit).
Notes Remarques
Attach the rear panels (left and right) with
the two-dowel-pin side up as shown.
Tighten small screws in numerical order
(1 to 2).
To avoid pinching the tape fixing the power
cable with the rear panel, remove the tape a
little.
Fixez les panneaux arrière (gauche et droit)
en dirigeant vers le haut le côté qui
présente deux chevilles, comme illustré.
Serrez les petites vis dans l’ordre
numérique (1 à 2).
Pour éviter de pincer la bande adhésive
fixant le câble d’alimentation au panneau
arrière, retirez celle-ci.
3. Attach the support posts. 3. Fixez les pieds.
4. Slide the shelf between the
posts.
4. Glissez l’étagère entre les
pieds.
7. Turn the unit over.
Notes
When turning the unit over, hold on to
the main unit and the temporarily
secured shelf so that your fingers do not
become caught between the shelf and
bottom panel.
Place a blanket, etc. under the edge of the
unit as shown. First turn the unit onto its
back, then turn it upright.
Do not exert force on the front cover of the
speaker.
8. Reposition the pins to set the
desired shelf height.
9. Remove the tape holding the
power cable to the main unit.
10
. Place the glass top panel.
Notes
Place the glass top panel with the glass
caution sticker facing up.
Do not remove the glass caution sticker.
11
. Attach the center rear panel.
Blanket
Couverture
7. Retournez l’unité.
Remarques
Lorsque vous retournez l’unité, tenez
l’unité principale et l’étagère que vous
avez provisoirement fixée en veillant à ce
que vos doigts ne se coincent pas entre
l’étagère et le panneau inférieur.
Posez une couverture, par exemple, sous le
bord de l’unité, de la manière illustrée.
Retournez d’abord l’unité sur le dos, puis à
l’endroit.
N’appuyez pas sur la face avant du haut-
parleur.
8. Repositionnez les chevilles à la
hauteur à laquelle vous
souhaitez placer l’étagère.
9. Retirez la bande adhésive qui
maintient le câble
d’alimentation à l’unité
principale.
10
. Placez le panneau supérieur en
verre.
Remarques
Placez le panneau supérieur en verre en
orientant l’autocollant d’avertissement vers
le haut.
Ne retirez pas l’autocollant d’avertissement
du verre.
11
. Fixez le panneau arrière central.
● Main unit
● Système principal
● Rear panels (left and right)
● Panneaux arrière (gauche et droit)
● Shelf
● Étagère
● Support posts (×2)
● Pieds (×2)
5. Attach the pins to the bottom of
pinhole to temporarily secure
the shelf.
5. Fixez les chevilles dans les
trous pour cheville inférieurs
afin de maintenir
provisoirement l’étagère en
Notes Remarques
Remove the backing papers from the
fasteners, then attach the fasteners as
shown in the illustration.
Match the dent part of center rear panel to
the pins attached to the bottom panel.
Retirez les supports en papier des
attaches, puis fixez les attaches de la
manière illustrée.
Alignez l’entaille du panneau arrière central
sur les chevilles fixées au panneau
inférieur.
place.
● Bottom panel
● Panneau inférieur
● Pins (×6)
● Chevilles (×6)
You will need a Phillips screwdriver for assembly. Vous aurez besoin d’un tournevis cruciforme pour le montage.
Printed in Indonesia WV87460 [En/Fr] [De/Sv] © 2010 Yamaha Corporation
● Center rear panel
● Panneau arrière central
● Small screws M4×10 mm (×16)
● Petites vis M4×10 mm (×16)
● Glass top panel
● Panneau supérieur en verre
● Large screws M5×30 mm (×8)
Washers (×8)
● Grandes vis M5×30 mm (×8)
Rondelles (×8)
● Brackets (×4)
● Supports (×4)
● Fasteners (×4)
Spare (×4)
● Pièces de fixation (×4)
Rechange (×4)
6. Attach the bottom panel.
6. Fixez le panneau inférieur.
Notes Remarques
When placing the bottom panel, take care
so that your fingers do not become caught.
Tighten large screws in numerical order
(1 to 8).
Pour placer le panneau inférieur, veillez à
ne pas vous coincer les doigts.
Serrez les grandes vis dans l’ordre
numérique (1 à 8).
12
. Move the unit into its final position.
12
. Déplacez l’unité jusqu’à sa position définitive.
Notes Remarques
Be sure to leave enough space behind the unit and the wall to prevent the
connecter plug from being damaged when installing this unit against a
wall.
Do not place the devices on the shelf before locating.
Veillez à laisser un espace suffisant entre l’unité et le mur pour éviter
d’endommager la fiche du connecteur lorsque vous installez cette unité
contre un mur.
Ne posez aucun appareil sur l’étagère avant que l’unité n’ait rejoint son
emplacement définitif.
 Loading...