

Page 1
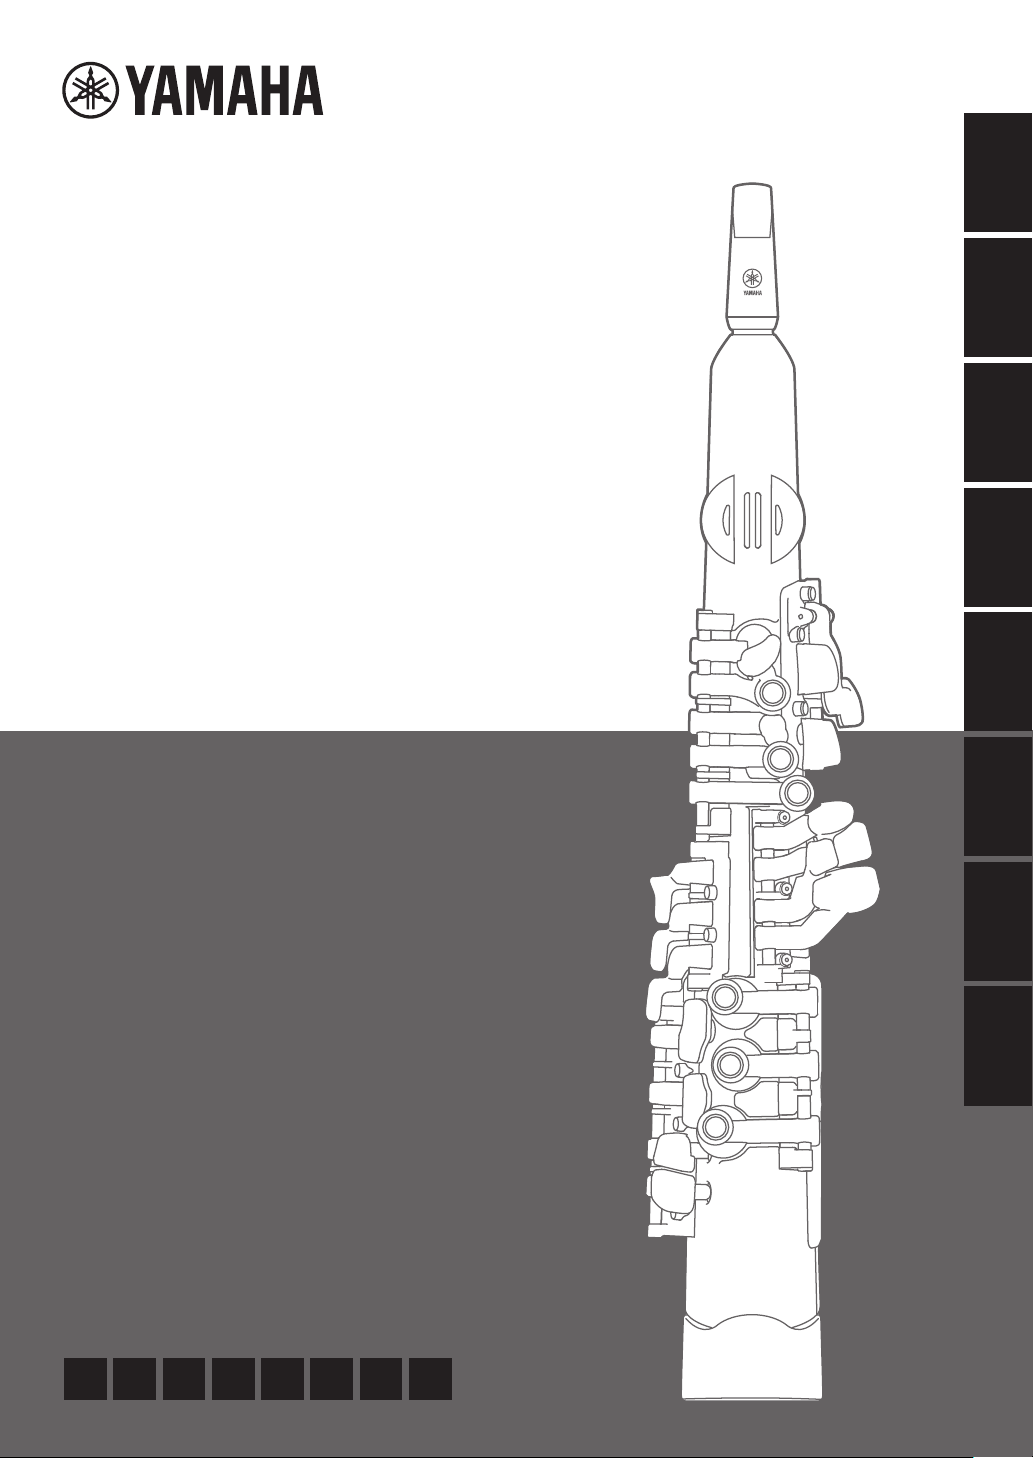
YDS-120
DIGITAL SAXOPHONE
Цифровой саксофон
取扱説明書
Owner’s Manual
Benutzerhandbuch
Mode d’emploi
Manual de instrucciones
Manual do Proprietário
Руководство пользователя
사용설명서
JA EN DE FR ES PT RU KO
日本語
English
Deutsch
Français
Español
Português
한국어
Рycский
YDS-120 取扱説明書
1
Page 2
PLEASE READ CAREFULLY BEFORE PROCEEDING
PRECAUTIONS
Power
Do not open
Water warning
Fire warning
Influences on electro-medical devices
Battery
Please keep this manual in a safe and handy place for future reference.
WARNING
Always follow the basic precautions listed below to avoid the possibility of serious injury or even death from
electrical shock, short-circuiting, damages, fire or other hazards. These precautions include, but are not limited
to, the following:
• Do not place the USB cable near heat sources such as heaters or
radiators. Also, do not excessively bend or otherwise damage the
cord, or place heavy objects on it.
• Do not touch the product or the power plug during an electrical
storm.
• Use only the correct voltage specified for the product. The
required voltage is printed on the name plate of the product.
• Use the specified AC adaptor (page 10).
• Check the power plug periodically and remove any dirt or dust
which may have accumulated on it.
• Insert the power plug firmly all the way into the AC outlet. Using
the product when it is not plugged in sufficiently can cause dust
to accumulate on the plug, possibly resulting in fire or skin
burns.
• When setting up the product, make sure that the AC outlet you
are using is easily accessible. If some trouble or malfunction
occurs, immediately turn off the power switch and disconnect the
plug from the outlet. Even when the power switch is turned off, as
long as the power cord is not unplugged from the wall AC outlet,
the product will not be disconnected from the power source.
• Do not connect the product to an electrical outlet using a multiplug outlet extender. Doing so can result in lower sound quality,
or possibly cause overheating in the outlet.
• When disconnecting the power plug, always hold the plug itself
and not the cable. Pulling by the cable can damage it and cause
electric shocks or a fire.
• If not using the product for long periods of time, be sure to pull
the power plug from the AC outlet.
• This product contains no user-serviceable parts. Do not attempt
to disassemble the internal parts or modify them in any way.
• Do not expose the product to rain, use it near water or in damp or
wet conditions, or place on it any containers (such as vases,
bottles or glasses) containing liquids which might spill into any
openings or places where water may drop. A liquid such as water
YDS-120 Owner’s Manual
4
getting into the product may cause a fire, electric shocks, or
malfunctions.
• Never insert or remove an electric plug with wet hands.
• Do not place any burning items or open flames near the product,
since they may cause a fire.
• Magnetism from this product may affect electro-medical devices,
such as a heart pacemaker implant or defibrillator implant.
- Keep the product away from a heart pacemaker implant or a
defibrillator implant.
• Do not dispose of a battery in a fire.
• Do not expose the battery to conditions of extreme low air
pressure, cold or heat (such as in direct sunlight or a fire) or
excessive dust or humidity.
Doing so may result in the battery bursting, causing a fire or
injury.
• Follow the precautions below. Failure to do so might result in
battery fluid leakage. If the contents of the battery gets on your
hands or in your eyes, it can cause blindness, chemical burns,
and damage of the product.
- Use the specified battery type (page 15) only.
- Do not use new batteries together with old ones.
- Do not mix battery types.
- Always make sure all batteries are inserted in conformity with
the +/- polarity markings.
- Do not disassemble a battery.
- When the batteries run out, or if the product is not to be used
for a long time, remove the batteries from the product.
- Do not attempt to recharge batteries that are not designed to
be charged.
• If the batteries do leak, avoid contact with the leaked fluid. If the
battery fluid should come in contact with your eyes, mouth, or
skin, wash immediately with water and consult a doctor. Battery
fluid is corrosive and may possibly cause loss of sight or
chemical burns.
DMI-10 1/2
Page 3
• Never charge when the product is wet. Doing so may cause
If you notice any abnormality
Location
Connections
Handling
electric shock, fire, or malfunction due to short circuiting.
• When using rechargeable batteries, follow the instructions that
came with the batteries. Use only the specified charger device
and within the specified charging temperature range when
charging.
Charging with an unspecified charger or at a temperature outside
the range may cause leakage, overheating, explosion, or
malfunction.
• Keep batteries away from children. A child could accidentally
swallow a battery. Failure to observe this may also cause
inflammation due to battery fluid leaks.
• Do not put batteries in a pocket or bag, or carry or store them
together with pieces of metal. Batteries kept in such condition
could short, burst, or leak, causing a fire or injury.
• If any of the following problems occur, immediately turn off the
power switch and remove all connected cables. If you are using
batteries, remove all batteries from the product.
Finally have the device inspected by Yamaha service personnel.
- The USB cable or plug becomes frayed or damaged.
- Unusual smells or smoke are emitted.
- Some object, or water has been dropped into the product.
- There is a sudden loss of sound during use of the product.
- Cracks or other visible damage appear on the product.
CAUTION
Always follow the basic precautions listed below to avoid the possibility of physical injury to you or others, or
damage to the instrument or other property. These precautions include, but are not limited to, the following:
• Do not rest your weight on, or place heavy objects on the
product, and do not use excessive force on the buttons, switches
• Do not place the product in an unstable position or a location
with excessive vibration, where it might accidentally fall over and
cause injury.
• Before moving the instrument, remove all connected cables, to
prevent damage to the cables or injury to anyone who might trip
over them.
• Before connecting the product to other electronic components,
turn off the power for all components. Before turning the power
on or off for all components, set all volume levels to minimum.
• Be sure to set the volumes of all components at their minimum
levels and gradually raise the volume controls while playing the
instrument to set the desired listening level.
• Do not insert a finger or hand in any gaps on the product.
• Do not insert foreign materials such as metal or paper into any
openings or gaps of the product. Failure to observe this may
cause a fire, electric shocks, or malfunctions.
or connectors.
• Keep small parts out of the reach of infants. Your children may
accidentally swallow them.
• Do not use the product or headphones for a long period of time
at a high or uncomfortable volume level, since this can cause
permanent hearing loss. If you experience any hearing loss or
ringing in the ears, consult a physician.
• When using a strap, make sure the strap is securely attached to
the instrument.
• Do not lift the instrument by the strap. It can cause serious injury
or damage to the instrument.
• Do not treat the instrument in a rough manner such as swinging
it about, etc. The strap on the instrument may detach causing
unexpected accidents such as the instrument dropping, etc., or
injuring persons close by.
• Remove the power plug from the AC outlet before cleaning the
unit. Failure to observe this may cause electric shocks.
Yamaha cannot be held responsible for damage caused by improper use or modifications to the instrument, or data that is lost or destroyed.
Always turn the power off when the instrument is not in use.
Even when the [ ] (Standby/On) switch is in standby status (power lamp is off), electricity is still flowing to the instrument at the minimum level.
When you are not using the instrument for a long time, make sure you unplug the power cord from the wall AC outlet.
Make sure to discard used batteries according to local regulations.
DMI-10 2/2
YDS-120 Owner’s Manual
5
Page 4

NOTICE
Information
To avoid the possibility of malfunction/ damage to the product, damage to data, or damage to other property, follow
the notices below.
Handling
• Do not connect this product to public Wi-Fi and/or Internet directly. Only connect this product to the Internet
through a router with strong password-protections. Consult your router manufacturer for information on security
best practices.
• Do not use the instrument in the vicinity of a TV, radio,
stereo equipment, mobile phone, or other electric
devices. Otherwise, the instrument, TV, or radio may
generate noise. When you use the instrument along
with an application on your smart device such as a
smartphone or tablet, we recommend that you enable
“Airplane Mode” on the device to avoid noise caused by
communication.
• Do not expose the instrument to excessive dust or vibrations, or extreme cold or heat (such as in direct sunlight,
near a heater, or in a car during the day) to prevent the
possibility of panel disfiguration, damage to the internal
components or unstable operation. (Verified operating
temperature range: 5° – 40°C, or 41° – 104°F.)
• Do not place vinyl, plastic or rubber objects on the
instrument, since this might discolor the panel or keyboard.
• Do not leave the instrument for a long period of time
with a key pressed, since this might damage the key.
About this manual
• The illustrations and LED screen as shown in this manual are for instructional purposes only.
• The company names and product names in this manual
are the trademarks or registered trademarks of their
respective companies.
About disposal
When disposing of this product, please contact the appropriate local authorities.
Maintenance
• When cleaning the instrument, use a soft cloth. Do not
use paint thinners, solvents, alcohol, cleaning fluids, or
chemical-impregnated wiping cloths.
YDS-120 Owner’s Manual
6
Page 5
Thank you for purchasing the Yamaha Digital
Saxophone! This digital saxophone can be used
for playing and practicing at home. We recommend that you read this manual carefully so that
you can fully take advantage of the advanced
and convenient functions of the instrument. We
also recommend that you keep this manual in a
safe and handy place for future reference.
Included Accessories
• Replacement O-ring × 1 set (3 pieces included)
• Owner’s Manual × 1
YDS-120 Owner’s Manual
7
Page 6
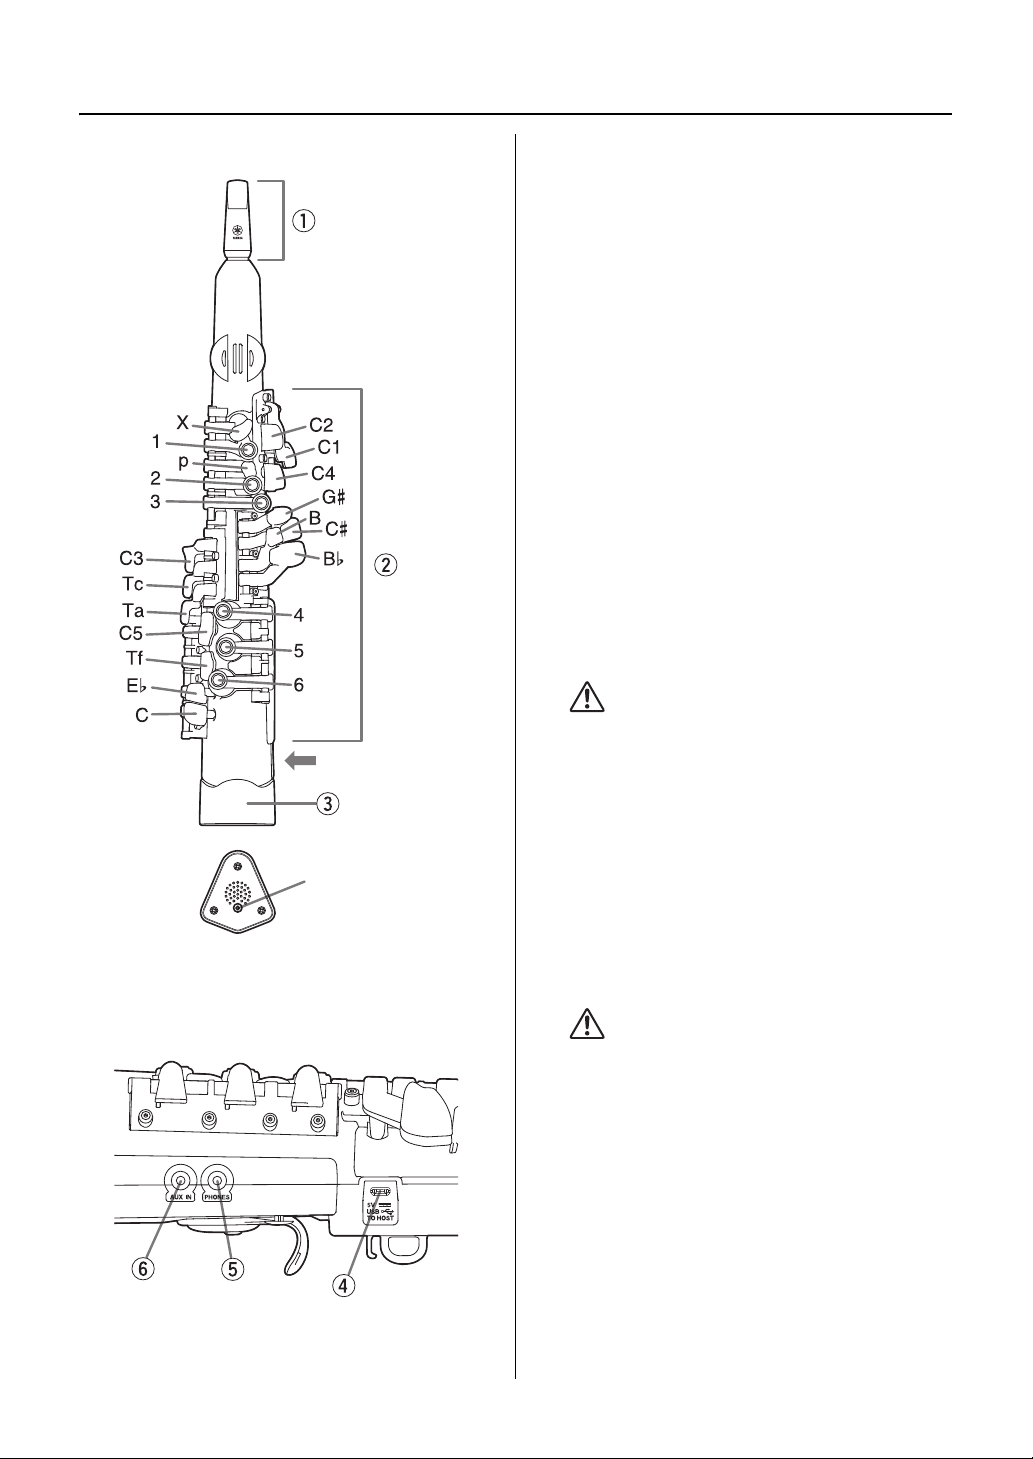
Controls and Functions
Left side
Water drain
CAUTION
CAUTION
Front side
q Mouthpiece set
For use exclusively with this instrument.
w Keys
(Fingering Chart: page 20)
e Bell
There is a water drain inside the bell. Water condensation
and excess breath moisture can be drained from here.
r 5 V DC-IN/USB TO HOST terminal
Micro USB Type-B terminal.
For connection to a USB power adaptor, USB mobile
battery, or PC with a USB cable.
NOTICE
• Use a USB A to micro B cable of less than 3 meters.
Do not use a USB 3.0 cable.
t PHONES jack
For connecting a pair of stereo headphones or other
equipment with a mini stereo phone plug (3.5 mm). The
instrument’s built-in speakers automatically stop producing sound when plugged in.
Left side
• To prevent hearing loss, avoid using headphones
at high volumes for extended periods of time.
• Before connecting the instrument to other electronic components, turn off the power for all components. Before turning the power on or off for all
components, set all volume levels to minimum.
This can cause permanent hearing loss.
y AUX IN jack
For inputting the sound of an audio player and listening
to it through the connected headphones. To adjust the
input volume from the [AUX IN] jack, adjust the audio
playback volume on the audio device.
• To avoid possible damage, first turn on the
power for the external device, and then for the
instrument. When turning off the power, first turn
off the power for the instrument, and then for the
external device. This can cause permanent hearing loss.
NOTE
• Use audio cables and adaptor plugs that have no series
resistors.
• The input audio signals via the AUX IN jack and the
USB TO HOST jack can only be heard on devices connected to the PHONES jack.
YDS-120 Owner’s Manual
8
Page 7
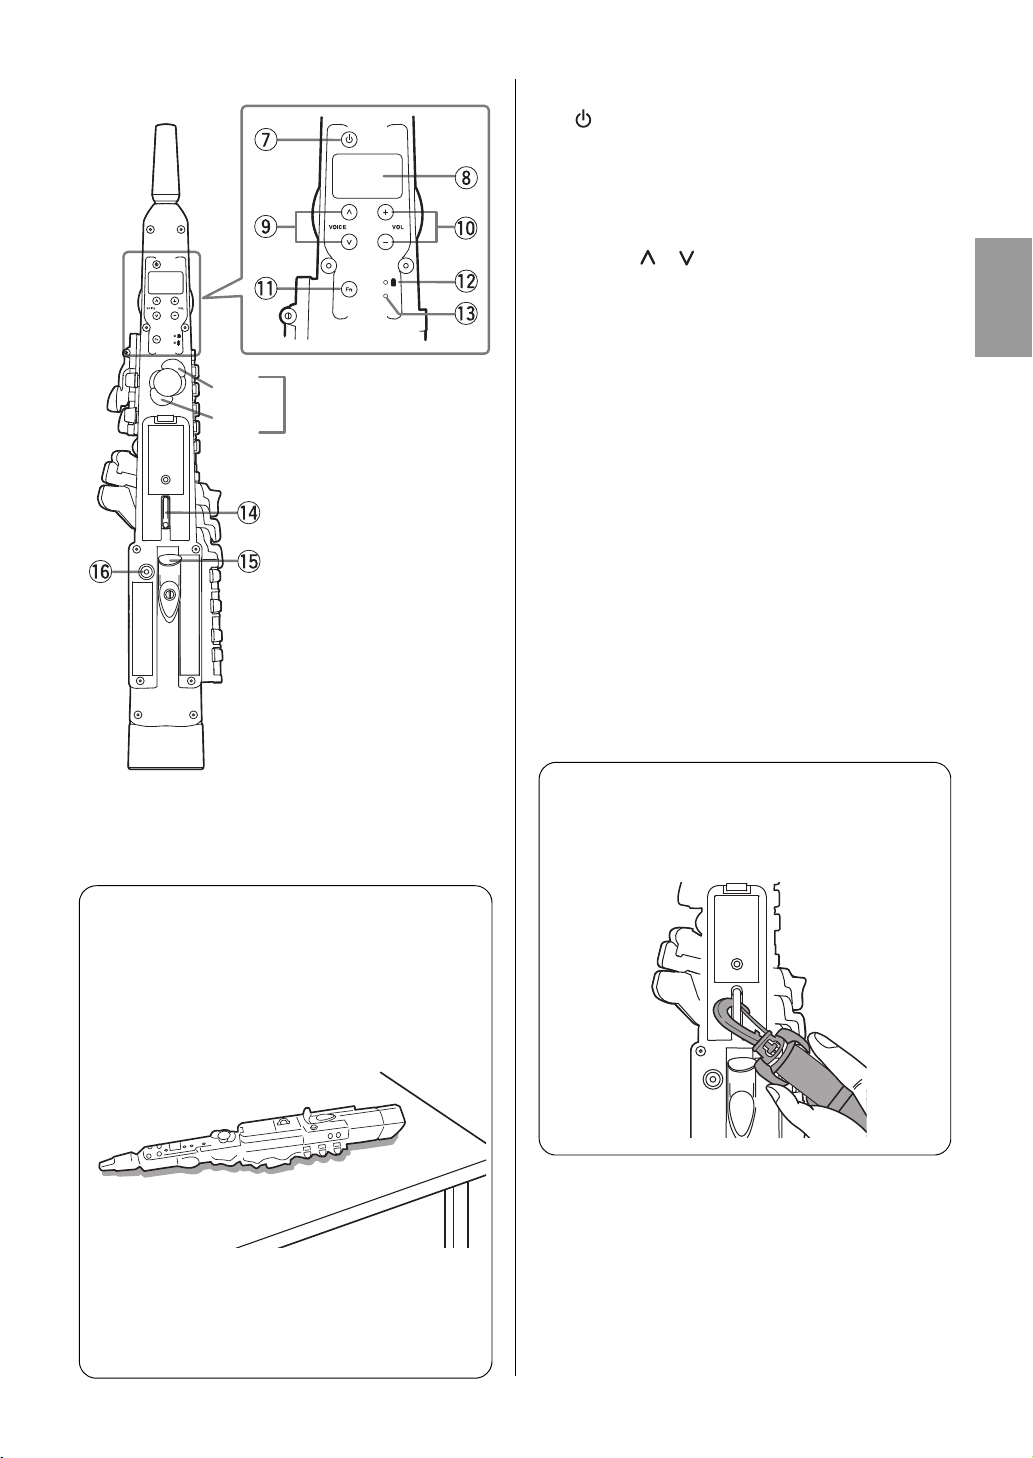
Back side
Oct
Low A
Keys
(Fingering Chart: page 20)
How to attach the strap (sold separately)
Firmly attach the strap (sold separately) to the ring.
You can easily change the length of the strap to
adjust it to a length that is easy for you to use.
u [ ] (Standby/On) button
Press this button to turn on the instrument.
i LED screen
Displays information such as the Voice number in
alphanumeric characters.
o VOICE [ ]/[ ] buttons
Changes the Voice each time a button is pressed.
!0 VOL [-]/[+] buttons
Raises or lowers the instrument volume each time a
button is pressed. Press and hold a button to change
the volume quickly.
• Setting range: 0 to 15, od (Default: 13)
• Press the VOL [-] button and VOL [+] button simultaneously to restore the default volume setting.
!1 [Fn] (Function) button
Press specific keys while holding this button to call up
various functions. This is also used to operate some
functions.
!2 Power lamp
!3 USB connection lamp
This lamp lights in orange when a USB cable is connected to the instrument.
!4 Strap ring
Attach the included strap to this ring.
Laying the instrument down
When the instrument is not being played, place it on
a flat surface as shown in the illustration below. Do
not place the instrument on a chair, music stand, or
other such unstable surface, as there is a risk of the
instrument falling. Also, never lean the instrument up
against a wall, etc.
NOTICE
• Do not stand the instrument up by itself. Doing so can
cause damage to the instrument due to the impact if it
falls down.
!5 Thumb hook
Use this hook to support the instrument with your
thumb when playing. Wrap your right thumb around the
thumb hook to hold the instrument firmly.
!6 Analog controller
Used to apply changes to the Voice.
YDS-120 Owner’s Manual
9
Page 8
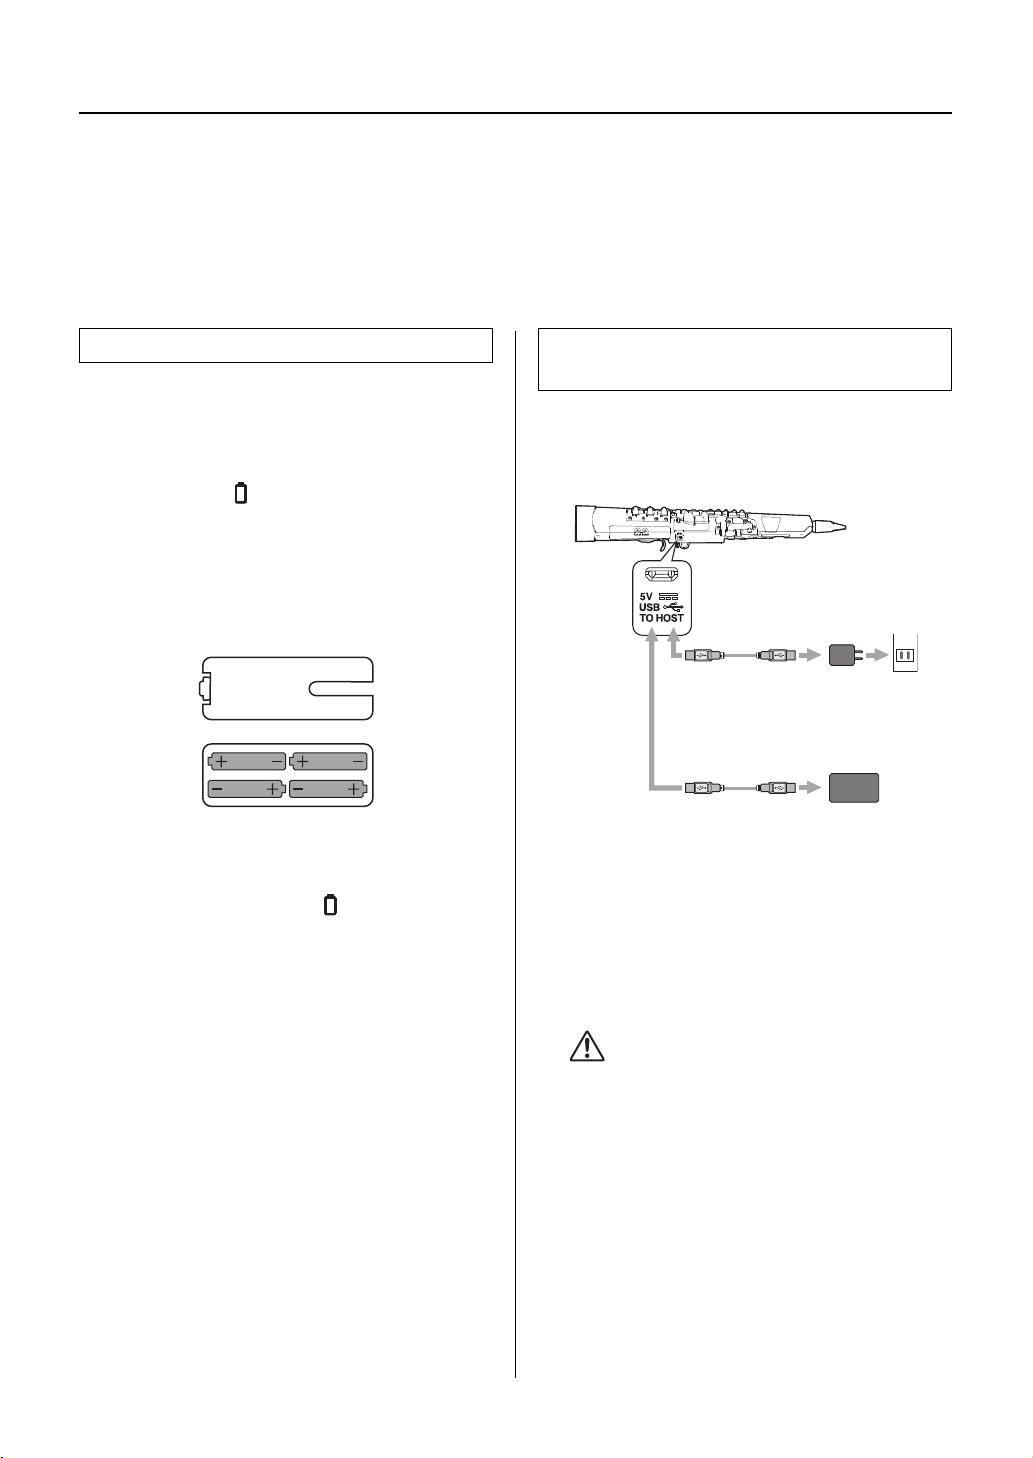
Before Playing
USB cable
USB cable
USB power
adaptor
AC
outlet
USB mobile
battery
q
w
we
or
CAUTION
Power Requirements
This instrument can be powered in one of the two ways listed below. Determine which you intend to use, and follow the
instructions for setting up.
NOTE
• If you connect the instrument to a commercially available USB power adaptor or USB mobile battery while batteries are
in the instrument, priority is given to power from the USB cable.
Using batteries
This instrument requires four “AAA” size, alkaline (LR3) batteries or rechargeable nickel-metal hydride batteries
(rechargeable Ni-MH batteries).
1 Make sure that the power of the instrument is off.
The power lamp ( ) will be off when the power is off.
2 Place the instrument upside-down on a soft cloth
and remove the battery cover.
3 Insert the four new batteries, being careful to fol-
low the polarity markings on the inside of the
compartment.
Remaining Battery Power
When the remaining battery power drops to about 5 or 10
minutes*, the POWER LED lamp ( ) flashes. Furthermore, when there is almost no remaining power, the
POWER LED lamp turns off and the instrument enters
standby mode.
* Varies depending on the usage environment.
NOTE
• You should check the Power lamp frequently and take
precautions that the battery does not run out during a
performance.
Using a USB power adaptor or USB
mobile battery (sold separately)
Connect the USB cable to a USB power adaptor or USB
mobile battery (sold separately) in the order shown in the
illustration. Follow the order shown here in reverse when
disconnecting the USB cable.
Use only a USB power adaptor or USB mobile
battery compatible with the USB standard for
power supply.
Output voltage 4.8 V to 5.2 V
Output current 1.0 A or greater
• Before using a USB power adaptor or USB
mobile battery, be sure to read the relevant precautions.
NOTICE
• Some USB mobile batteries automatically stop supplying power when connected to a device with low current
consumption, such as this instrument. Use a USB
mobile battery that has a low-current mode function,
etc., and can supply power to devices with current consumption of 80 mA or less.
YDS-120 Owner’s Manual
10
Page 9
CAUTION
CAUTION
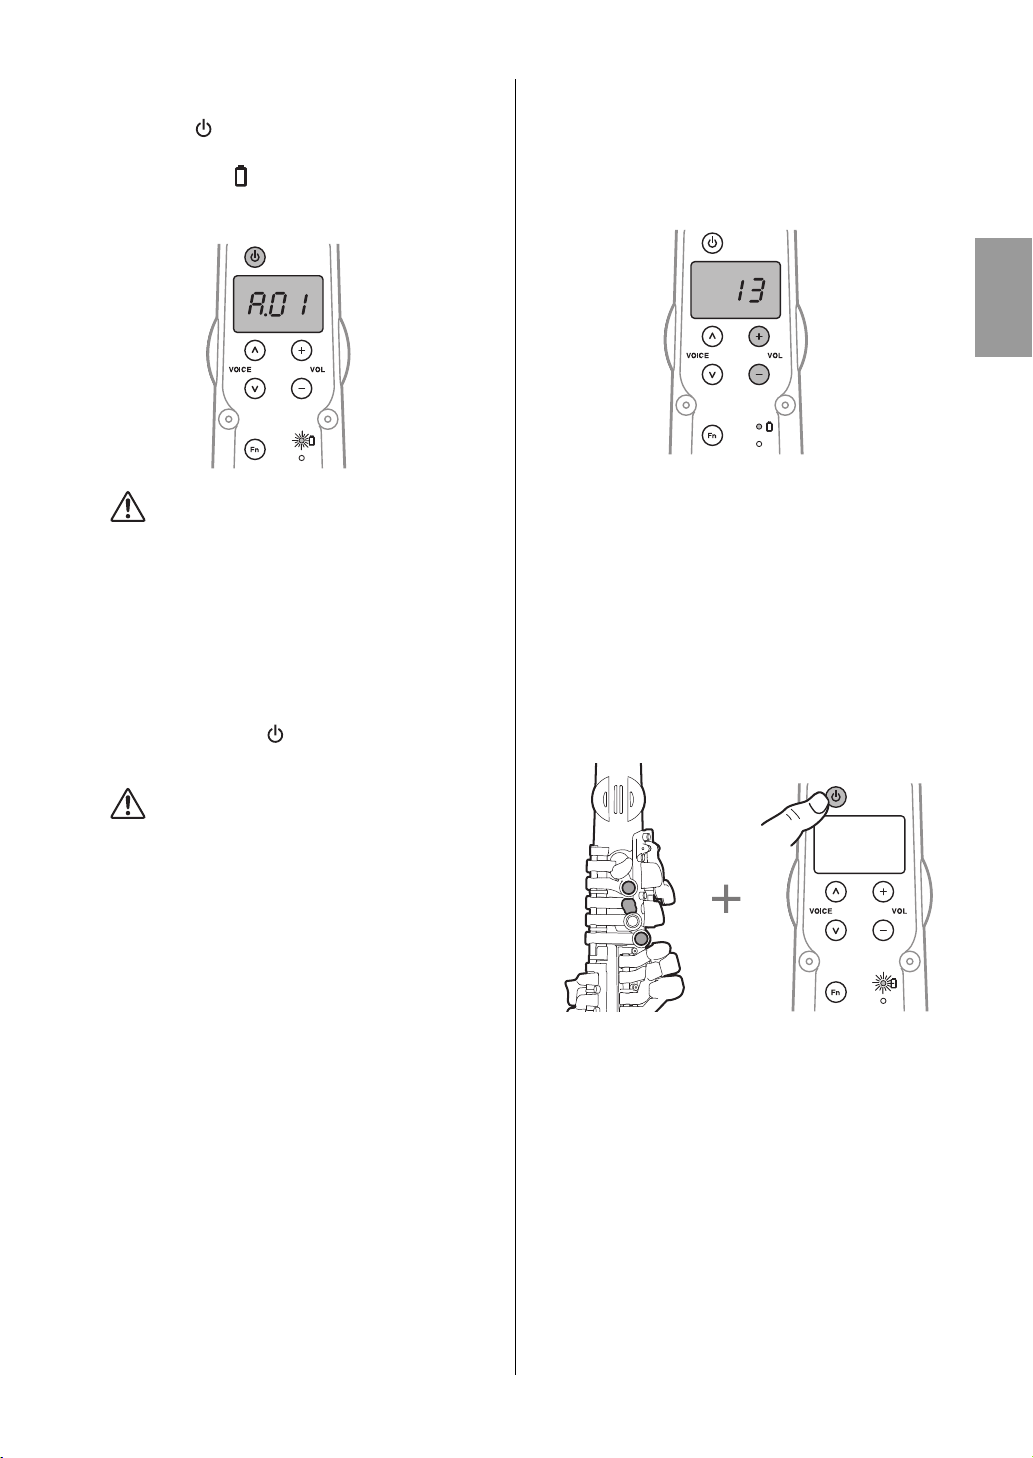
Turning on the Power / Setting to Standby
1 Press the [ ] (Standby/On) button to turn the
power on.
The power lamp ( ) is lit in red when the power is on.
Adjust the volume as desired while blowing into the
mouthpiece.
• Do not use the instrument or headphones for a
long period of time at a high or uncomfortable
volume level, since this can cause permanent
hearing loss.
NOTICE
• While turning on the power, do not attempt any other
operations, such as blowing into the mouthpiece. Doing
so may cause the instrument to malfunction.
2 Press and hold the [ ] (Standby/On) button for
longer than one second to enable standby mode.
Adjusting the Instrument Volume
Adjust the volume.
The volume is increased by 1 each time VOL [+] is
pressed. The volume is decreased by 1 each time VOL [-]
is pressed. You can adjust the volume in a range of 0 to 15,
od. The default value is 13.
* The “od” (overdrive) setting is the maximum volume, for the
most powerful sound. Keep in mind that there may be distortion in the sound for specific Voices and in the lower
ranges.
Initialization
Perform this operation when you want to reset all settings
to their factory defaults.
1 If the power is on, turn the power off.
2 Turn the power on while holding keys [1], [p], and
[3].
• Even when in standby mode, an electric current
is still flowing in the instrument at the minimum
level. When you are not using the instrument for
a long time, make sure to disconnect the USB
power adaptor from the AC outlet, or remove the
batteries from the instrument.
Enabling / Disabling Auto Power Off
To prevent unnecessary power consumption, this instrument features an Auto Power Off function that automatically turns the power off if the instrument is not operated
for a specified period of time (30 minutes). By default, it is
set to On; however, this setting can be changed with the
[Fn] button.
NOTICE
• If your instrument is connected to other equipment such
as amplifiers and speakers but you do not intend to use
it for 30 minutes, we recommend that you turn off all
devices as described in the corresponding owner’s
manuals. Doing so eliminates the risk of damage to the
other equipment. If you do not want the instrument to
turn off automatically when connected to other equipment, disable the Auto Power Off function.
YDS-120 Owner’s Manual
11
Page 10
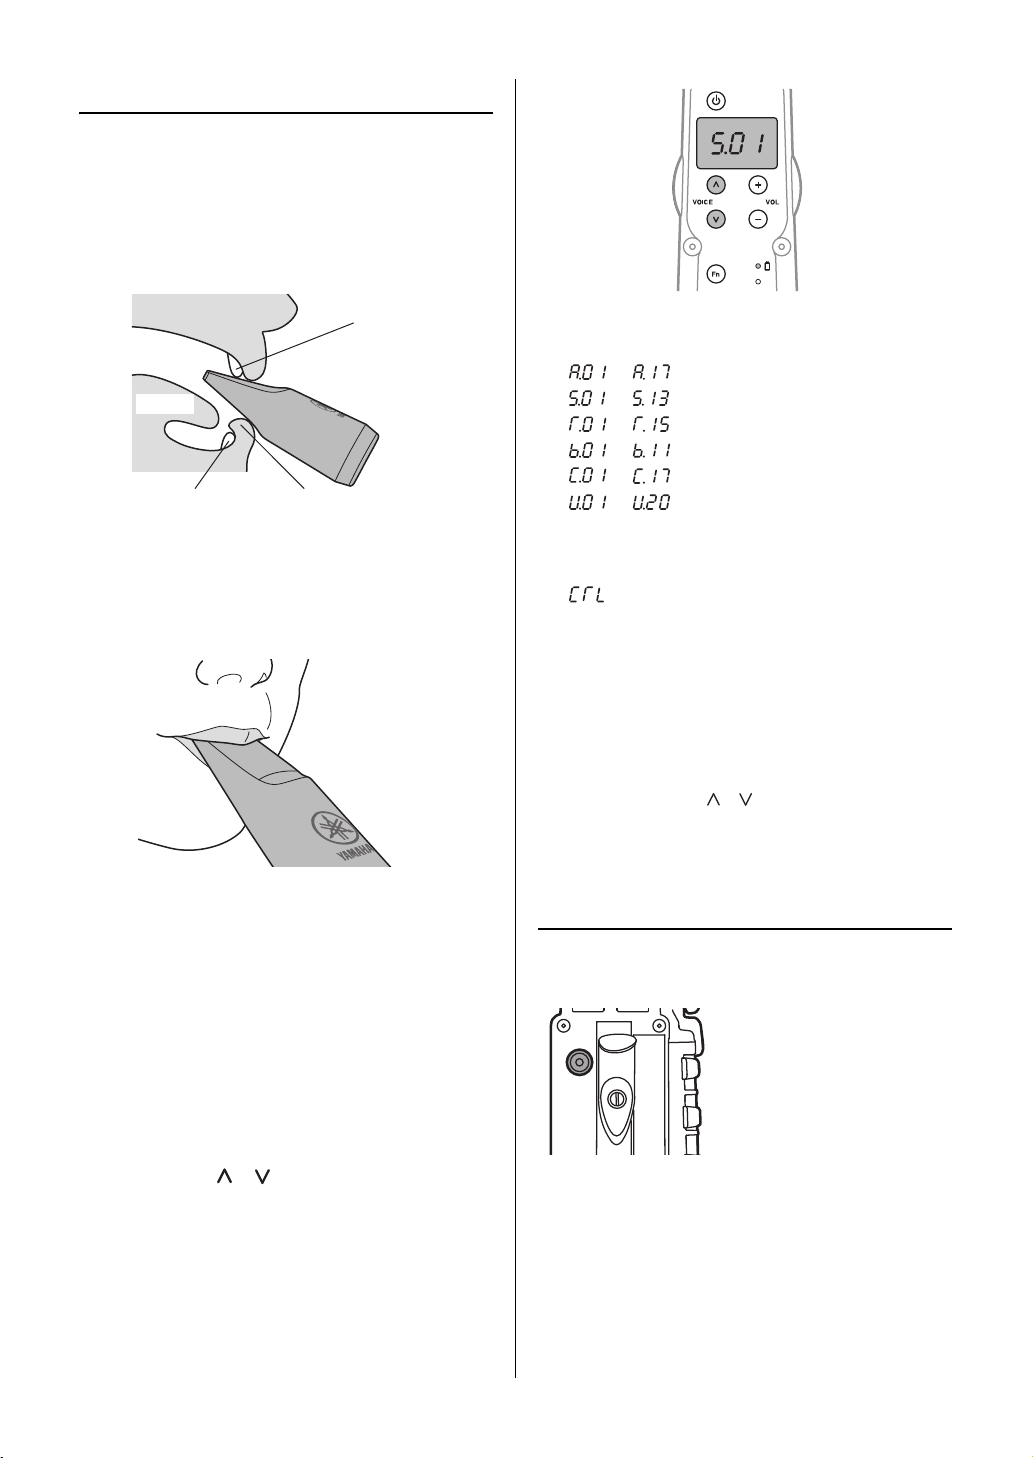
Playing the Instrument
Upper
front teeth
Tongue
Lower
teeth
Lower lip
Mouth Shape
Position the mouthpiece in your mouth with your upper
front teeth resting about 1cm from the tip of the mouthpiece. Cover your lower teeth with your lower lip to keep
your teeth from coming into direct contact with the mouthpiece.
With the mouthpiece resting on your lower lip, seal your
mouth around the mouthpiece to keep air from leaking out
of the corners of your mouth when blowing.
* Do not bite hard on the mouthpiece.
The display on the LED screen has the following meanings.
to : Alto sax Voices (in Eb)
to : Soprano sax Voices (in Bb)
to : Tenor sax Voices (in Bb)
to : Baritone sax Voices (in Eb)
to : Non-sax Voices (in C)
to : You can select user Voices edited in
the dedicated app (page 14). For
details, refer to the manual for the
dedicated app.
: Change to the MIDI controller func-
tion. You can transfer your performance as the MIDI data to your
smart device connected via the USB
cable. Also, you can edit the MIDI
controller settings in the dedicated
app. In this function, the speaker of
this product do not sound.
NOTE
• Press the VOICE [ ]/[ ] button while holding the [Fn]
button to jump to a next/previous Voice group.
How to Play Sound
Put the mouthpiece into your mouth and blow. Blow
strongly for a higher volume, and softly for a lower volume.
NOTE
• Unlike an acoustic saxophone, changing the degree to
which the mouthpiece is inserted into the neck will not
change the pitch of the sound.
Selecting a Voice
It is possible to select a Voice and tonality you like, such as
an alto saxophone, tenor saxophone, etc.
1 Press VOICE [ ]/[ ].
The Voice number is displayed on the LED display. For
the Voice names, refer to the Voice List on page 19.
YDS-120 Owner’s Manual
12
Using the Analog Controller
The analog controller has functions assigned by default
depending on the selected Voice.
• Raising or lowering the
pitch (Pitch Bend)
• Applying vibrato to the
sound. (Modulation)
• Smoothing out the pitch
slide between notes (Portamento)
For details about the functions assigned to the analog controller for each Voice, see the Voice List at the end of this
document.
NOTE
• Portamento is a playing technique that smoothly slides
the pitch of the performance up and down. When using
a Voice with portamento assigned to it, move the thumb
controller to smoothly change the pitch.
Page 11
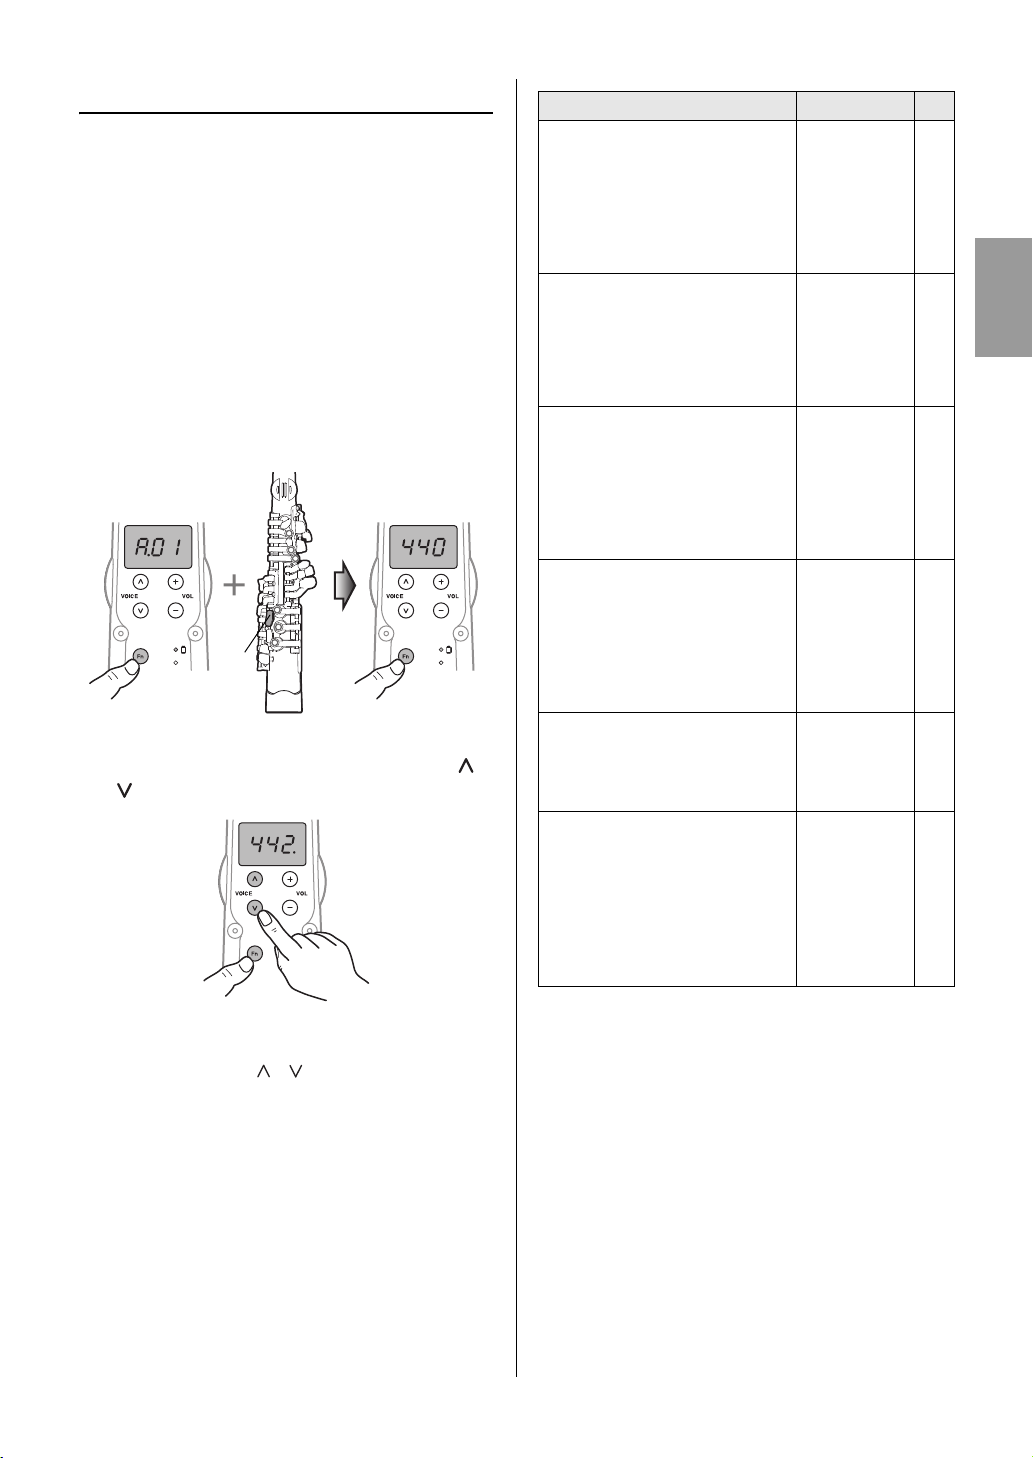
Changing Settings with the [Fn] Button
Example: Tuning
C5
key
Press specific keys while holding the [Fn] button to perform
settings for the various functions of the instrument.
Basic operations
Use the following procedure to perform settings for each
function.
1 While holding the [Fn] button, press the key to
which the function is assigned. Hold the [Fn] button until you finish performing settings. If you
release the button, the value at that moment is
set and operation returns to the Voice selection
screen.
2 While holding the [Fn] button, press VOICE [ ]/
[ ] and select the desired value.
Function Settings Key
Breath pressure resistance
Determines how much the sound volume changes in response to the sustained strength of your breath. The
lower the value, the more responsive
the instrument is to your breath
strength.
Breath response
Determines how much the sound volume changes in response to your initial
breath strength. The higher the value,
the harder you have to initially blow
into the instrument to produce sound.
Key response
Prevents unwanted sounds from being
produced, due to inconsistent timing in
fingering when pressing or releasing
multiple keys simultaneously. The
higher the value, the more unwanted
sounds are suppressed.
Tuning
Adjusts the overall pitch of the instrument. The pitch value is displayed on
the LED screen. You can adjust the
pitch in the range of 427 to 453 Hz in
0.5 Hz steps. The dot in the first digit of
the LED display indicates 0.5 Hz.
Auto power off
Sets the function for automatically
turning the power off. The value is displayed on the LED screen.
Reverb
Set the reverberation effect. The higher
the number, the greater the effect.
Reverberation is applied only to the
headphone output.
NOTE
• Reverberation does not affect the
AUX IN input.
1 to 5
Default: 3
1 to 10
Default: 5
0 to 20
Default: 10
427 to 453 (Hz)
Default: 440
Off, 5, 10, 15,
30, 60, 120
(minutes)
Default: 30
Off, 1 to 5
Default: Off
C3
Tc
Ta
C5
Tf
G#
NOTE
• Press both VOICE [ ]/[ ] buttons simultaneously to
3 When you have finished selecting a value,
release the [Fn] button.
This will complete the setting and return the operation
to the Voice selection screen.
restore the value to the factory default.
YDS-120 Owner’s Manual
13
Page 12
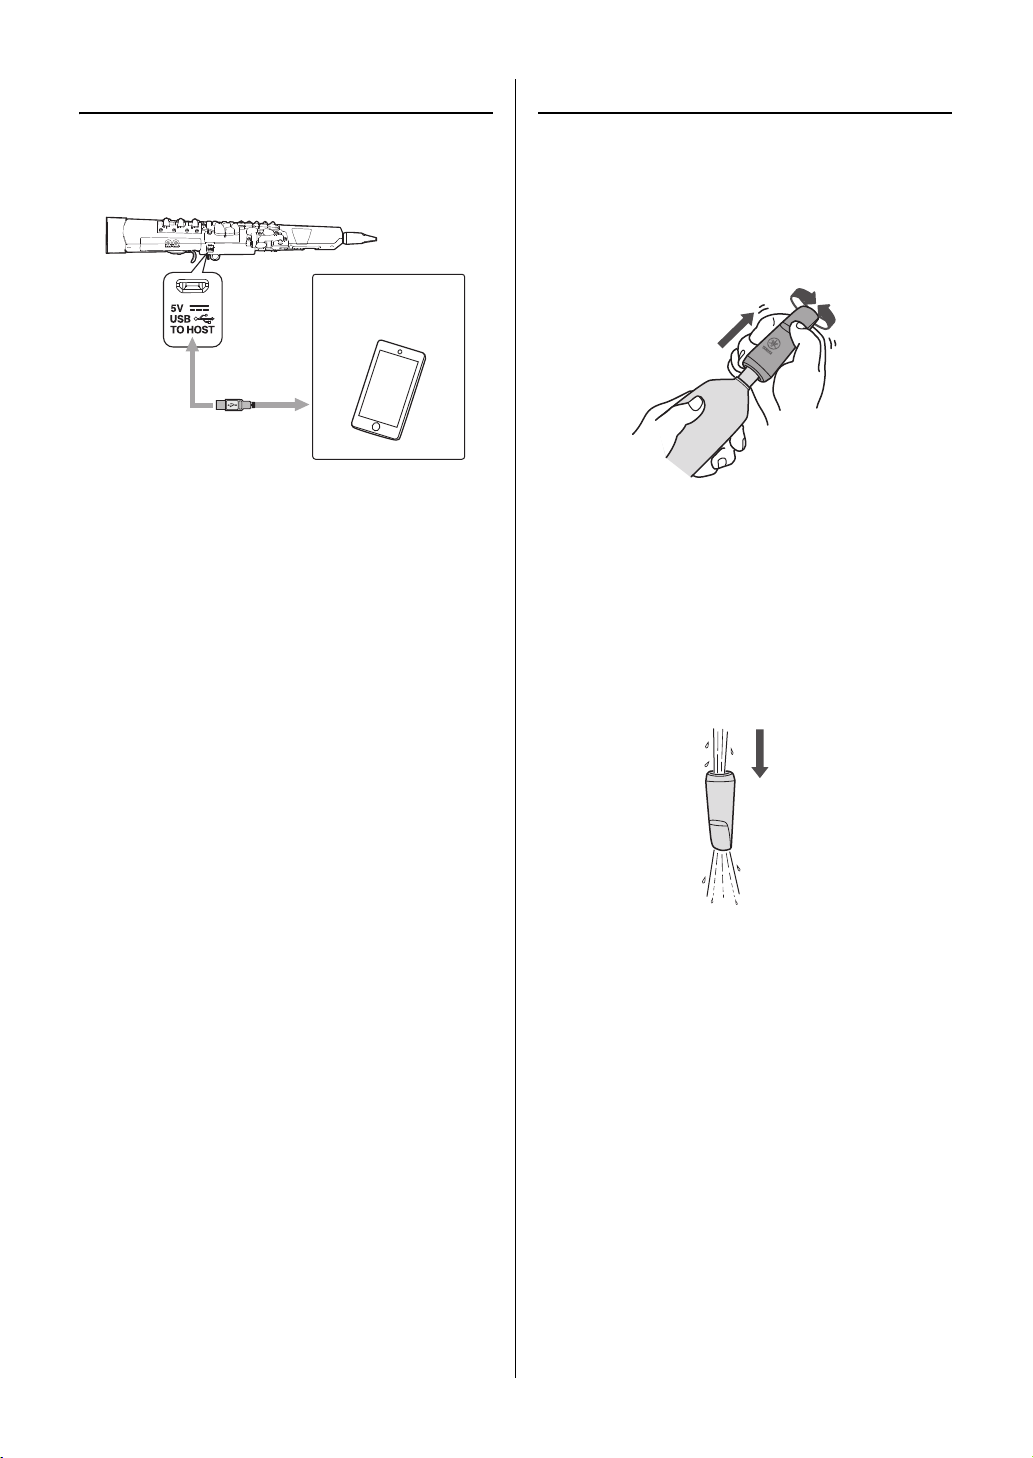
Using the Dedicated App
USB cable
Smart device
(Dedicated app)
Instrument Maintenance after Playing
You can use the dedicated app for this instrument to perform settings for the functions of this instrument more conveniently.
1 Install the dedicated app for this instrument on
your smart device.
2 Connect this instrument and your smart device via
the USB cable.
You can perform the following settings for this instrument
on the app. For details, refer to the manual for the app.
• Editing user Voices / editing fingering information /
enabling and disabling Voice selection shortcuts, etc.
After using this instrument, remove the mouthpiece from
this instrument and wipe off any moisture near the bell and
mouthpiece.
1 Hold the mouthpiece firmly and turn it from side
to side to slide it off from the neck.
NOTICE
• When removing the mouthpiece, avoid applying a bending force to the neck base. Excessive force applied to
the neck can damage it.
2 Rinse the mouthpiece out with clean water.
* Be careful not to damage the tip of the mouthpiece.
* After rinsing the mouthpiece out with clean water,
remove fluid the mouthpiece by using a dry soft cloth or
a slim cotton swab.
YDS-120 Owner’s Manual
14
3 Wipe this instrument and the mouthpiece with a
dry, soft cloth.
NOTICE
• Do not wash this instrument or the instrument interior with
water. Doing so can result in damage to the instrument.
• Do not apply grease to the instrument neck. Doing so can
result in damage to the neck.
Page 13

Troubleshooting
• Sound does not stop.
- Try turning the power on again.
- Fluid remaining on the hole inside the mouthpiece
joint may result in the sound not stopping. Remove
fluid from the hole by using a slim cotton swab.
Specifications
Product name Digital Saxophone
Voices AWM Sampling
Power supply USB AC adaptor: 5 V / 1 A
Self-powered USB hub: 5 V / 1 A
Four “AAA” size alkaline (LR3) or
Ni-MH rechargeable (HR3) batteries
Power
consumption
Auto Power
Off
Size (W x D x H)
Weight 810 g (not including batteries)
4.5 W (when using a USB AC adaptor)
Ye s
567 mm (W) x 110 mm (D) x 94 mm (H)
* The contents of this manual apply to the latest specifica-
tions as of the publishing date. To obtain the latest manual, access the Yamaha website then download the
manual file.
Since specifications, equipment or separately sold
accessories may not be the same in every locale, please
check with your Yamaha dealer.
YDS-120 Owner’s Manual
15
Page 14
For electrical and electronic products using batteries.
Information for users on collection and disposal of old equipment and used batteries:
These symbols on the products, packaging, and/or accompanying documents mean that used electrical and electronic products
and batteries should not be mixed with general household waste.
For proper treatment, recovery and recycling of old products and used batteries, please take them to applicable collection
points, in accordance with your national legislation.
By disposing of these products and batteries correctly, you will help to save valuable resources and prevent any potential negative effects on human health and the environment which could otherwise arise from inappropriate waste handling.
For more information about collection and recycling of old products and batteries, please contact your local municipality, your
waste disposal service or the point of sale where you purchased the items.
For business users in the European Union:
If you wish to discard electrical and electronic equipment, please contact your dealer or supplier for further information.
Information on Disposal in other Countries outside the European Union:
These symbols are only valid in the European Union. If you wish to discard these items, please contact your local authorities
or dealer and ask for the correct method of disposal.
Note for the battery symbol (bottom two symbol examples):
This symbol might be used in combination with a chemical symbol. In this case it complies with the requirement set by the EU
Battery Directive for the chemical involved.
Verbraucherinformation zur Sammlung und Entsorgung alter Elektrogeräte und benutzter Batterien
Befinden sich diese Symbole auf den Produkten, der Verpackung und/oder beiliegenden Unterlagen, so sollten benutzte
elektrische Geräte und Batterien nicht mit dem normalen Haushaltsabfall entsorgt werden.
In Übereinstimmung mit Ihren nationalen Bestimmungen bringen Sie alte Geräte und benutzte Batterien bitte zur fachgerechten Entsorgung, Wiederaufbereitung und Wiederverwendung zu den entsprechenden Sammelstellen.
Durch die fachgerechte Entsorgung der Elektrogeräte und Batterien helfen Sie, wertvolle Ressourcen zu schützen, und verhindern
mögliche negative Auswirkungen auf die menschliche Gesundheit und die Umwelt, die andernfalls durch unsachgerechte Müllentsorgung auftreten könnten.
Für weitere Informationen zum Sammeln und Wiederaufbereiten alter Elektrogeräte und Batterien kontaktieren Sie bitte Ihre
örtliche Stadt- oder Gemeindeverwaltung, Ihren Abfallentsorgungsdienst oder die Verkaufsstelle der Artikel.
Information für geschäftliche Anwender in der Europäischen Union:
Wenn Sie Elektrogeräte ausrangieren möchten, kontaktieren Sie bitte Ihren Händler oder Zulieferer für weitere Informationen.
Entsorgungsinformation für Länder außerhalb der Europäischen Union:
Diese Symbole gelten nur innerhalb der Europäischen Union. Wenn Sie solche Artikel ausrangieren möchten, kontaktieren
Sie bitte Ihre örtlichen Behörden oder Ihren Händler und fragen Sie nach der sachgerechten Entsorgungsmethode.
Anmerkung zum Batteriesymbol (untere zwei Symbolbeispiele):
Dieses Symbol kann auch in Kombination mit einem chemischen Symbol verwendet werden. In diesem Fall entspricht dies den Anforderungen der EU-Batterierichtlinie zur Verwendung chemischer Stoffe.
(58-M03 WEEE battery en 01)
(58-M03 WEEE battery de 01)
Informations concernant la collecte et le traitement des piles usagées et des déchets d’équipements électriques
et électroniques
Les symboles sur les produits, l’emballage et/ou les documents joints signifient que les produits électriques ou électroniques
usagés ainsi que les piles usagées ne doivent pas être mélangés avec les déchets domestiques habituels.
Pour un traitement, une récupération et un recyclage appropriés des déchets d’équipements électriques et électroniques et
des piles usagées, veuillez les déposer aux points de collecte prévus à cet effet, conformément à la réglementation nationale.
En vous débarrassant correctement des déchets d’équipements électriques et électroniques et des piles usagées, vous
contribuerez à la sauvegarde de précieuses ressources et à la prévention de potentiels effets négatifs sur la santé humaine
qui pourraient advenir lors d’un traitement inapproprié des déchets.
Pour plus d’informations à propos de la collecte et du recyclage des déchets d’équipements électriques et électroniques et
des piles usagées, veuillez contacter votre municipalité, votre service de traitement des déchets ou le point de vente où vous
avez acheté les produits.
Pour les professionnels dans l’Union européenne :
Si vous souhaitez vous débarrasser des déchets d’équipements électriques et électroniques, veuillez contacter votre vendeur ou fournisseur pour plus d’informations.
Informations sur la mise au rebut dans d’autres pays en dehors de l’Union européenne :
Ces symboles sont seulement valables dans l’Union européenne. Si vous souhaitez vous débarrasser de déchets d’équipements électriques et électroniques ou de piles usagées, veuillez contacter les autorités locales ou votre fournisseur et demander la méthode de traitement appropriée.
Note pour le symbole « pile » (deux exemples de symbole ci-dessous) :
Ce symbole peut être utilisé en combinaison avec un symbole chimique. Dans ce cas, il respecte les exigences établies par la
directive européenne relative aux piles pour le produit chimique en question.
(58-M03 WEEE battery fr 01)
YDS-120
16
Page 15
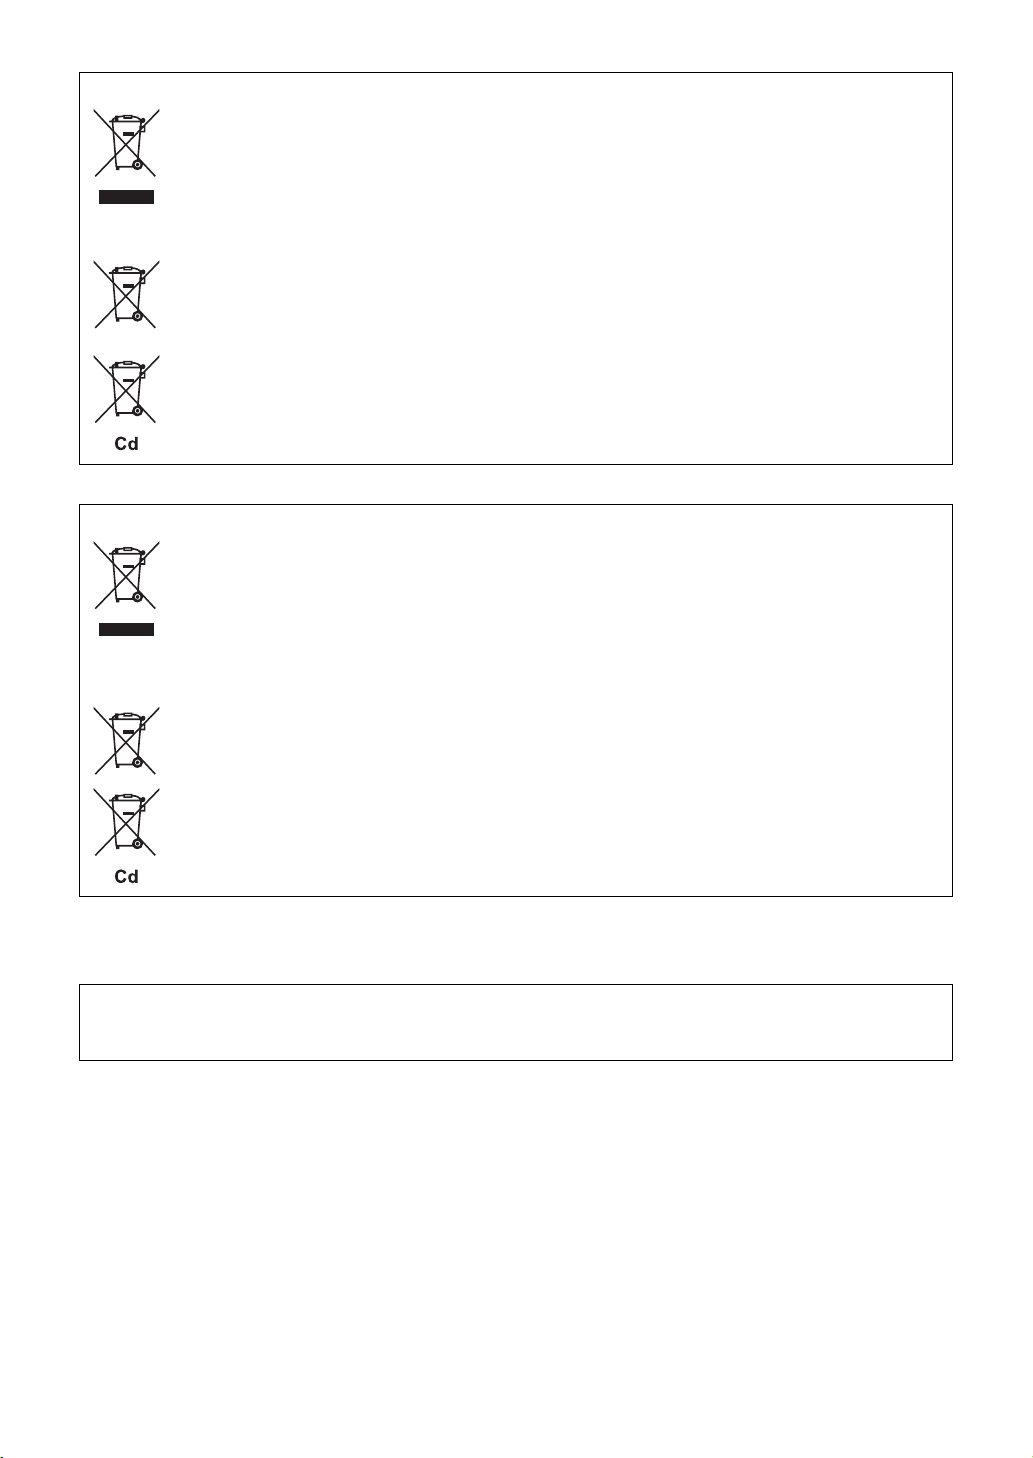
Información para usuarios sobre la recogida y eliminación de los equipos antiguos y las pilas usadas
Estos símbolos en los productos, embalajes y documentos anexos significan que los productos eléctricos y electrónicos y sus
pilas no deben mezclarse con los desperdicios domésticos normales.
Para el tratamiento, recuperación y reciclaje apropiados de los productos antiguos y las pilas usadas, llévelos a puntos de reciclaje correspondientes, de acuerdo con la legislación nacional.
Al deshacerse de estos productos y pilas de forma correcta, ayudará a ahorrar recursos valiosos y a impedir los posibles
efectos desfavorables en la salud humana y en el entorno que de otro modo se producirían si se trataran los desperdicios de
modo inapropiado.
Para obtener más información acerca de la recogida y el reciclaje de los productos antiguos y las pilas, póngase en contacto
con las autoridades locales, con el servicio de eliminación de basuras o con el punto de venta donde adquirió los artículos.
Para los usuarios empresariales de la Unión Europea:
Si desea desechar equipos eléctricos y electrónicos, póngase en contacto con su vendedor o proveedor para obtener más
información.
Información sobre la eliminación en otros países fuera de la Unión Europea:
Estos símbolos solamente son válidos en la Unión Europea. Si desea desechar estos artículos, póngase en contacto con las
autoridades locales o con el vendedor y pregúnteles el método correcto.
Nota sobre el símbolo de pila (dos ejemplos de símbolos en la parte inferior):
Este símbolo se puede utilizar en combinación con un símbolo químico. En este caso, cumple el requisito establecido por la
Directiva de la UE sobre pilas correspondiente a la sustancia química utilizada.
(58-M03 WEEE battery es 01)
Informações para os usuários relativas à coleta e à eliminação de baterias e equipamentos usados
Os símbolos ilustrados, presentes em produtos, embalagens e/ou incluídos na documentação associada, indicam que as
baterias e os produtos elétricos e eletrônicos usados não devem ser descartados juntamente com os resíduos domésticos
em geral.
O procedimento correto consiste no tratamento, na recuperação e na reciclagem de produtos e baterias usados, que devem
ser levados aos pontos de coleta adequados, em conformidade com a legislação nacional em vigor.
O descarte desses produtos e baterias de forma adequada permite poupar recursos valiosos e evitar potenciais efeitos prejudiciais para a saúde pública e para o ambiente, associados ao processamento incorreto dos resíduos.
Para obter mais informações relativas à coleta e à reciclagem de baterias e produtos usados, contate as autoridades locais,
o serviço de descarte de resíduos ou o ponto de venda onde foram adquiridos os itens relevantes.
Informações para usuários empresariais na União Europeia:
Para descartar equipamentos elétricos e eletrônicos, contate o seu revendedor ou fornecedor para obter informações adicionais.
Informações relativas ao descarte em países não pertencentes à União Europeia:
Estes símbolos são válidos exclusivamente na União Europeia. Caso pretenda descartar esses tipos de itens, contate as
autoridades locais ou o seu revendedor e informe-se sobre o procedimento correto de descarte.
Nota relativa ao símbolo referente a baterias (os dois exemplos de símbolos na parte inferior):
Este símbolo poderá ser apresentado juntamente com um símbolo químico. Nesse caso, ele estará em conformidade com
os requisitos estabelecidos na diretiva da UE sobre baterias no âmbito do elemento químico relacionado.
(58-M03 WEEE battery pt-BR 01)
La operación de este equipo está sujeta a las siguientes dos condiciones: (1) es posible que este equipo o dispositivo no
cause interferencia perjudicial y (2) este equipo o dispositivo debe aceptar cualquier interferencia, incluyendo la que
pueda causar su operación no deseada.
YDS-120
17
Page 16

Important Notice:
U.S. LIMITED WARRANTY for Customers in the United States
For detailed information about this Yamaha product and warranty service, please
either visit the following website address (printable file is available at our website)
or contact Customer Service at the address or telephone number identified below.
Website Address:
https://usa.yamaha.com/support/warranty/index.html
Customer Service:
Yamaha Corporation of America
6600 Orangethorpe Avenue, Buena Park, CA
90620-1273 Telephone: 800-854-1569
18
YDS-120
Page 17
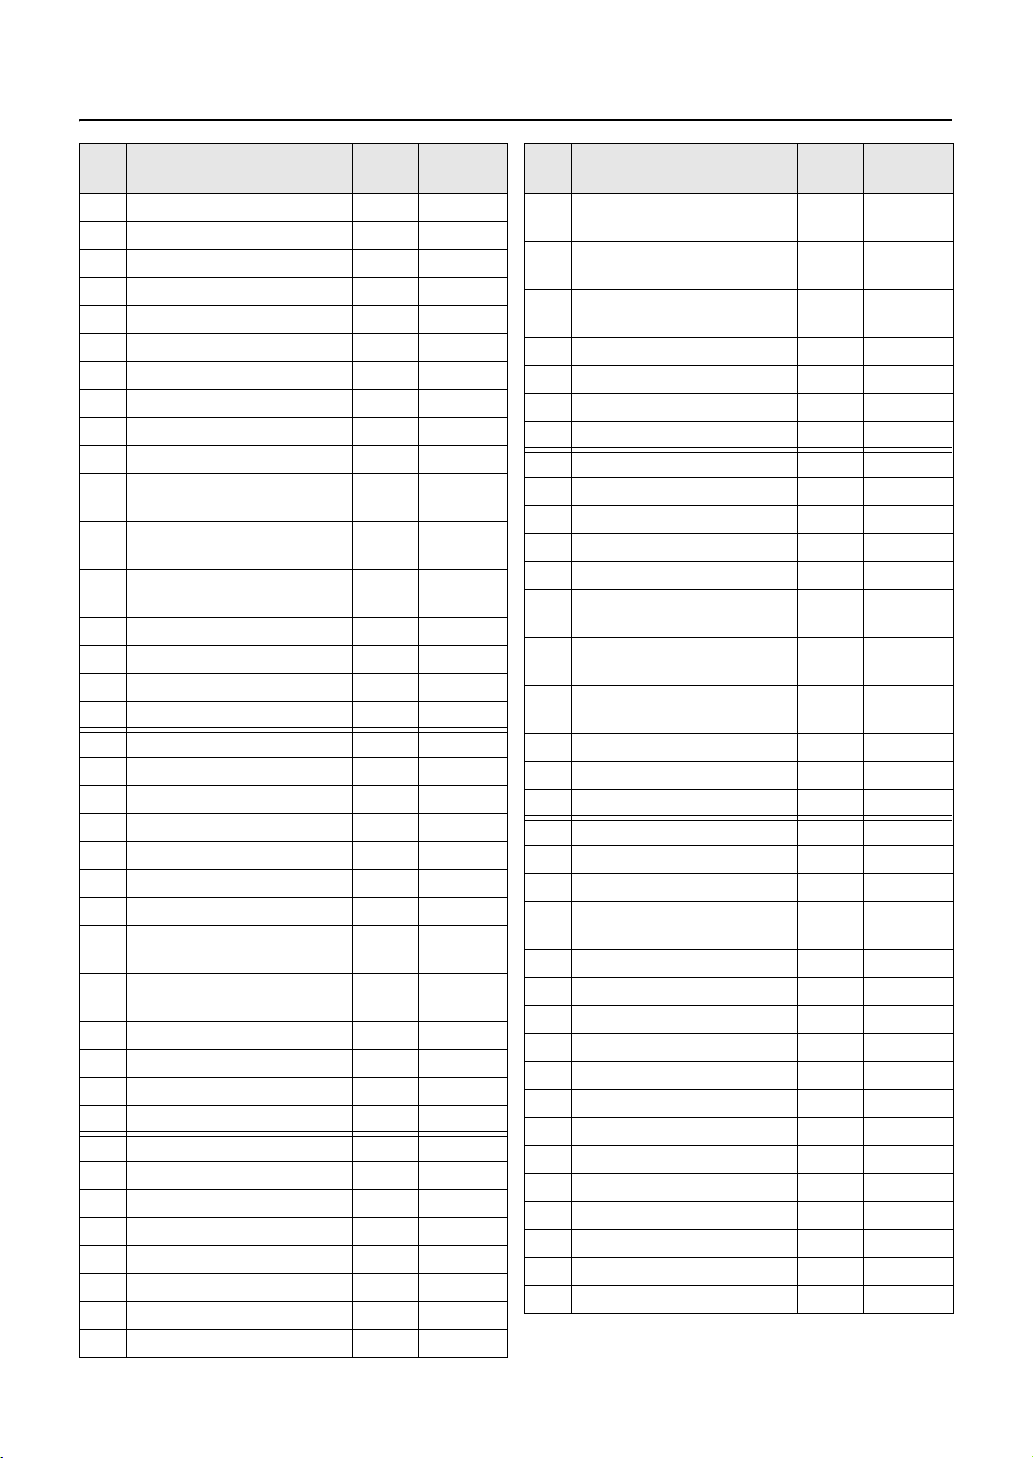
音色リスト / Voice List / Voice-Liste / Liste des sonorités / Lista de voces /
Lista de vozes / Список тембров / 음색 목록
Display
A.01 Alto Sax 1 (Pop) Eb (-9) Pitch Bend
A.02 Alto Sax 2 (Straight) E
A.03 Alto Sax 3 (Jazzy) E
A.04 Alto Sax 4 (Ballad) E
A.05 Alto Sax 5 (Rock) E
A.06 Alto Sax 6 (Funky) E
A.07 Alto Sax 7 (Classic) E
A.08 Alto Sax 8 (Rich Classic) E
A.09 Alto Sax 9 (Rich Vibrato) E
A.10 Alto Sax 10 (Modern Classic) E
A.11 DUAL Alto Sax 1
(Octave Alto and Tenor)
A.12 DUAL Alto Sax 2
(4th Alto and Soprano)
A.13 DUAL Alto Sax 3
(5th Alto and Tenor)
A.14 FX Alto Sax 1 (Distortion Effect) E
A.15 FX Alto Sax 2 (Overdrive Effect) E
A.16 FX Alto Sax 3 (Flanger Effect) E
A.17 FX Alto Sax 4 (Phaser Effect) E
S.01 Soprano Sax 1 (Pop) B
S.02 Soprano Sax 2 (Straight) B
S.03 Soprano Sax 3 (Jazzy) B
S.04 Soprano Sax 4 (Bright Pop) B
S.05 Soprano Sax 5 (Classic) B
S.06 Soprano Sax 6 (Rich Classic) B
S.07 Soprano Sax 7 (Smooth) B
S.08 DUAL Soprano Sax 1
(Octave Soprano and Alto)
S.09 DUAL Soprano Sax 2
(4th Soprano and Alto)
FX Soprano Sax 1 (Overdrive Effect)Bb
S.10
FX Soprano Sax 2 (Overdrive Effect)Bb
S.11
S.12
FX Soprano Sax 3 (Distortion Effect)Bb
FX Soprano Sax 4 (Phaser Effect)
S.13
T.01 Tenor Sax 1 ( Pop) B
T.02 Tenor Sax 2 (Straight) B
T.03 Tenor Sax 3 (Jazzy) B
T.04 Tenor Sax 4 (Breathy) B
T.05 Tenor Sax 5 (Rock) B
T.06 Tenor Sax 6 (Funky) B
T.07 Tenor Sax 7 (Classic) B
T.08 Tenor Sax 8 (Rich Classic) B
Voice Name
Tra ns -
position
b
(-9) Pitch Bend
b
(-9) Pitch Bend
b
(-9) Pitch Bend
b
(-9) Pitch Bend
b
(-9) Pitch Bend
b
(-9) Pitch Bend
b
(-9) Pitch Bend
b
(-9) Pitch Bend
b
(-9) Pitch Bend
b
(-9) Pitch Bend
E
b
(-9) Pitch Bend
E
b
(-9) Pitch Bend
E
b
(-9) Pitch Bend
b
(-9) Pitch Bend
b
(-9) Pitch Bend
b
(-9) Portamento
b
(-2) Pitch Bend
b
(-2) Pitch Bend
b
(-2) Pitch Bend
b
(-2) Pitch Bend
b
(-2) Pitch Bend
b
(-2) Pitch Bend
b
(-2) Pitch Bend
b
(-2) Pitch Bend
B
b
(-2) Pitch Bend
B
(-2) Pitch Bend
(-2) Pitch Bend
(-2) Pitch Bend
Bb (-2) Portamento
b
(-14) Pitch Bend
b
(-14) Pitch Bend
b
(-14) Pitch Bend
b
(-14) Pitch Bend
b
(-14) Pitch Bend
b
(-14) Pitch Bend
b
(-14) Pitch Bend
b
(-14) Pitch Bend
Analog
Controller
Display
T.09 DUAL Tenor Sax 1
(Octave Tenor and Alto)
T.10 DUAL Tenor Sax 2
(Octave Tenor and Baritone)
T.11 DUAL Tenor Sax 3
(4th Tenor and Alto)
T.12 FX Tenor Sax 1 (Distortion Effect) B
T.13 F X Tenor Sax 2 (Ov e r drive Effe ct ) B
T.14 FX Tenor Sax 3 (Flanger Effect) B
T.15 FX Tenor Sax 4 (Phaser Effect) B
B.01 Baritone Sax 1 (Pop) E
B.02 Baritone Sax 2 (Jazzy) E
B.03 Baritone Sax 3 (Ballad) E
B.04 Baritone Sax 4 (Rock) E
B.05 Baritone Sax 5 (Slap) E
B.06 DUAL Baritone Sax 1
(Octave Baritone and Tenor)
B.07 DUAL Baritone Sax 2
(15th Baritone and Soprano)
B.08 DUAL Baritone Sax 3
(5th Baritone and Tenor)
FX Baritone Sax 1 (Distortion Effect)Eb
B.09
FX Baritone Sax 2 (Overdrive Effect)Eb
B.10
B.11 FX Baritone Sax 3 (Phaser Effect) E
C.01 Harmonica C (0) Pitch Bend
C.02 Irish Pipes C (0) Pitch Bend
C.03 Pan Pipes C (0) Pitch Bend
C.04 Shakuhachi
(Japanese Bamboo Flute)
C.05 Di Zi (Chinese Transverse Flute) C (+12) Pitch Bend
C.06 Sawtooth Lead 1 C (0) Pitch Bend
C.07 Sawtooth Lead 2 C (+12) Pitch Bend
C.08 Sawtooth Lead 3 C (0) Pitch Bend
C.09 Sawtooth Lead 4 C (0) Pitch Bend
C.10 Sawtooth Lead 5 C (0) Pitch Bend
C.11 Square Lead 1 C (0) Modulation
C.12 Square Lead 2 C (0) Pitch Bend
C.13 Square Lead 3 C (+12) Portamento
C.14 Resonance Lead 1 C (0) Pitch Bend
C.15 Resonance Lead 2 C (0) Modulation
C.16 Resonance Lead 3 C (-12) Portamento
C.17 Sawtooth Bass C (-24) Pitch Bend
Voice Name
Tra ns -
position
Bb (-14) Pitch Bend
b
(-14) Pitch Bend
B
b
(-14) Pitch Bend
B
b
(-14) Pitch Bend
b
(-14) Pitch Bend
b
(-14) Pitch Bend
b
(-14) Portamento
b
(-21) Pitch Bend
b
(-21) Pitch Bend
b
(-21) Pitch Bend
b
(-21) Pitch Bend
b
(-21) Portamento
E
b
(-21) Pitch Bend
b
(-21) Pitch Bend
E
b
(-21) Pitch Bend
E
(-21) Pitch Bend
(-21) Pitch Bend
b
(-21) Portamento
C (0) Pitch Bend
Analog
Controller
YDS-120
19
Page 18
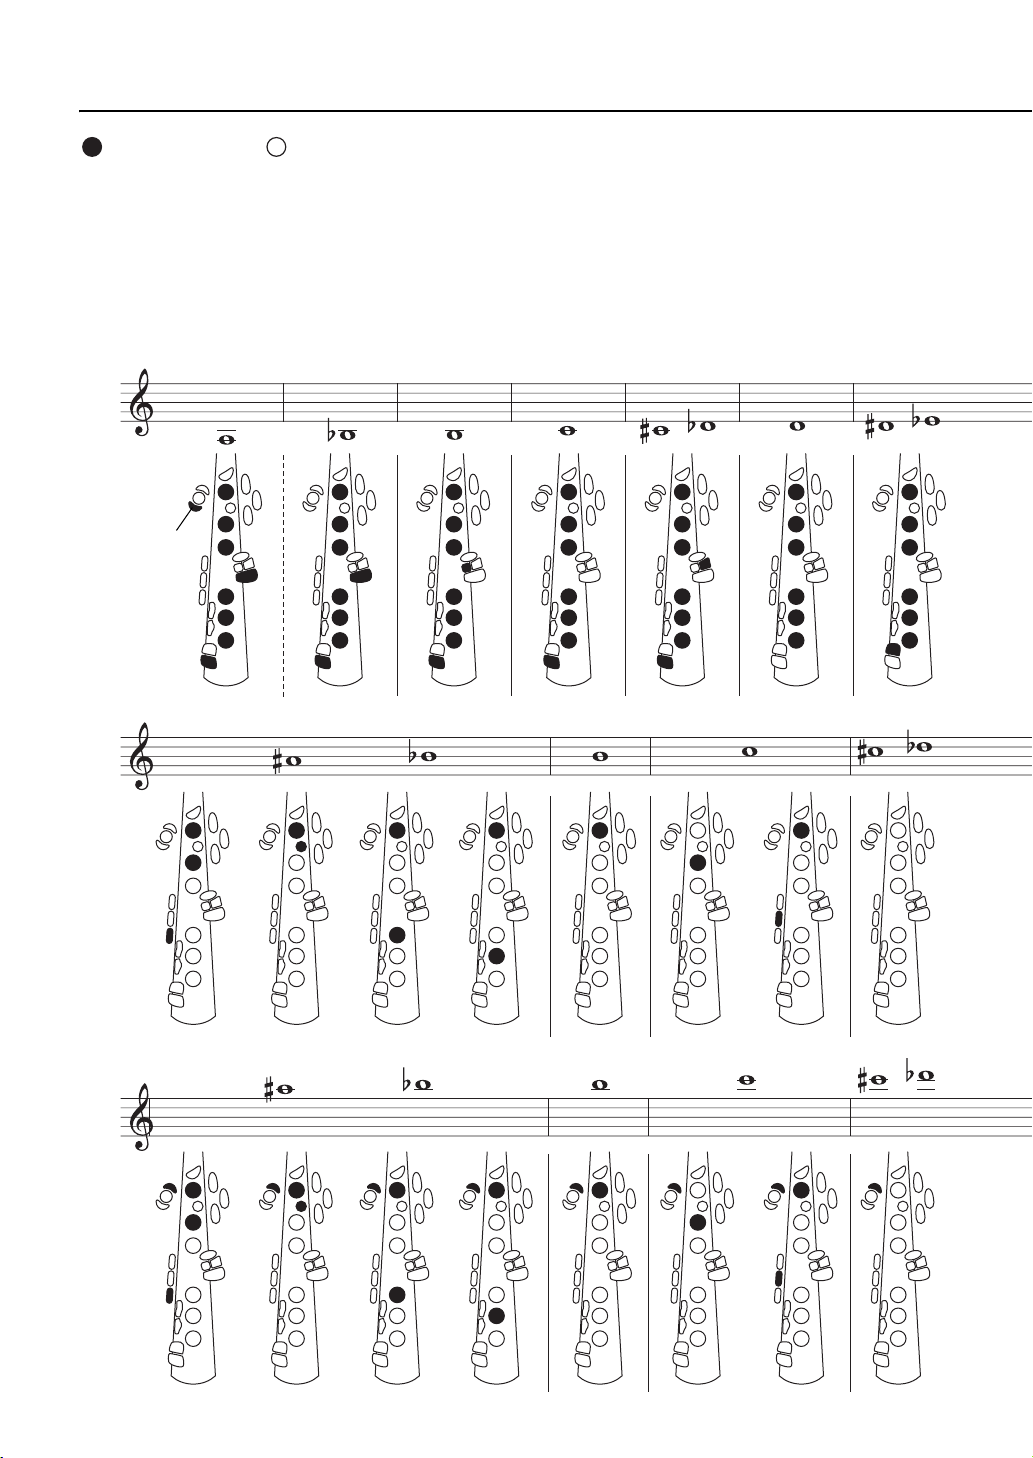
フィンガリングチャート
/ Fingering Chart / Grifftabelle / Tableau des doigtés /
押さえる
Close
Geschlossen
Fermé
Cerrado
Fechado
Закрытый
닫힘
Low A
放す
Open
Offen
Ouvert
Abierto
Aberto
Открытый
열림
この表は代表的な運指を掲載しています。
楽譜は記譜音で表記しています。
This chart shows typical fingerings for saxophones. The music
notation is the written pitch, and not the concert pitch.
Diese Karte zeigt die typischen Griffe für Saxophone.
Die Noten entsprechen der notierten Tonhöhe, nicht dem Kammerton.
20
YDS-120
Page 19
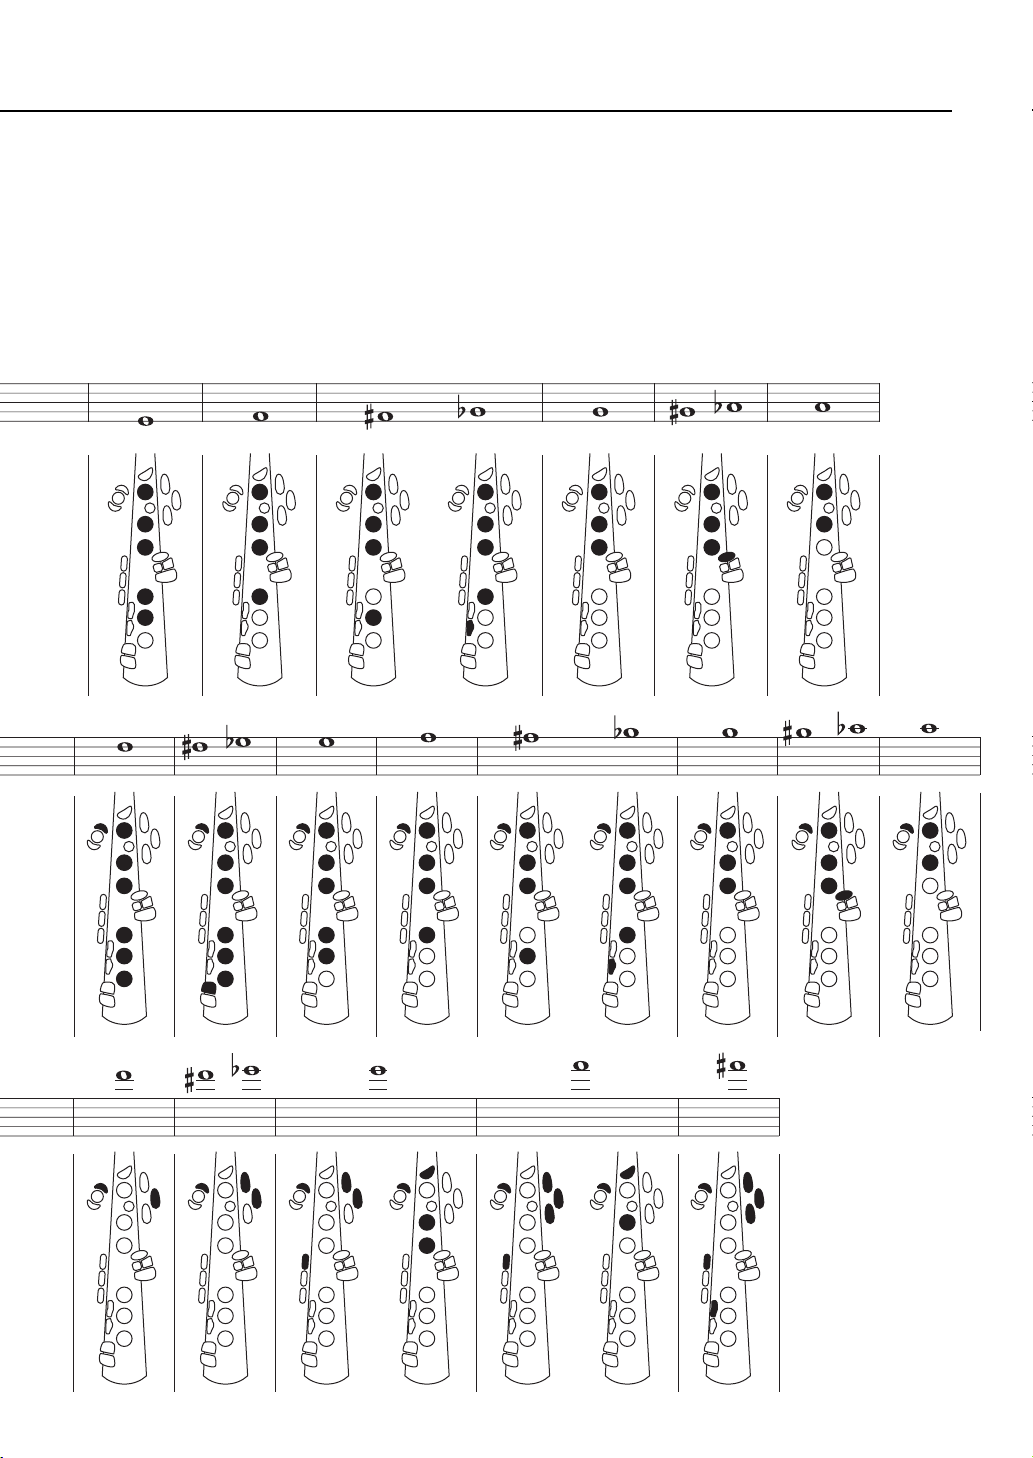
Gráfico de digitado / Tabela de digitação / Аппликатура / 운지법
Ce graphique représente les doigtés types pour les saxophones. La partition musicale correspond au diapason écrit et
non au diapason de concert.
Este gráfico muestra los digitados habituales en los saxofones.
La notación musical es el tono escrito, no el tono de concierto.
Esta tabela mostra as digitações mais comuns para saxofones.
A notação musical corresponde à afinação indicada e não à
afinação de concerto.
Ниже показана типичная аппликатура для саксофонов.
Музыкальная нотация представлена в написанном, а не
концертном строе.
이 표는 색소폰의 일반적인 운지법을 나타냅니다 . 기보는
콘서트 피치가 아닌, 문서로 작성된 피치입니다.
YDS-120
21
Page 20

MEMO
22
YDS-120
Page 21

MEMO
YDS-120
23
Page 22

VEJ3550
©2022 Yamaha Corporation
Published 06/2022
POEI-A1
 Loading...