

Page 1

Owner’s Manual
Mode d’emploi
Инструкция по эксплуатации
EnglishFrançais
Русский
Page 2

This product is designed for use at home to enjoy listening to audio.
PRECAUTIONS
PLEASE READ CAREFULLY BEFORE USE. BE
SURE TO FOLLOW THESE INSTRUCTIONS.
The precautions listed below are to prevent
risk of harm to the user and others, as well as
to prevent property damage, and to help the
user use this unit properly and safely. Be sure
to follow these instructions.
After reading this manual, be sure to keep it in a
safe place where it can be referenced at any time.
• Be sure to request inspections or repairs from
the dealer where you purchased the unit or
from qualified Yamaha service personnel.
• Yamaha cannot be held responsible for injury
to you or damage of the products caused by
improper use or modifications to the unit.
• This product is for ordinary homes. Do not use
for applications requiring high reliability, such
as managing lives, health care or high-value
assets.
WARNING
This content indicates “risk of serious injury
or death.”
Power supply/AC adaptor
• Do not do anything that could damage the power
cord.
- Do not place it near a heater.
- Do not bend it excessively or alter it.
- Do not scratch it.
- Do not place it under a heavy object.
Using the power cord with the core of the cord
exposed could cause electric shocks or a fire.
• Do not touch the power plug or cord if there is a
chance of lightning. Failure to observe this may
cause electric shocks.
• Use this unit with the power supply voltage
printed on it. Failure to connect to an appropriate
AC outlet may cause a fire, electric shocks, or
malfunctions.
• Be sure to use the supplied AC adaptor. Failure to
observe the above may cause a fire, burns, or
malfunctions.
• Check the electric plug periodically and remove
any dirt or dust which may have accumulated on
it. Failure to observe this may cause a fire or
electric shocks.
• When setting up the unit, make sure that the AC
outlet you are using is easily accessible. If some
trouble or malfunction occurs, immediately turn
off the power switch and disconnect the plug
from the AC outlet. Even when the power switch
is turned off, as long as the power cord is not
unplugged from the wall AC outlet, the unit will
not be disconnected from the power source.
• If you hear thunder or suspect approaching
lightning, quickly turn off the power switch and
pull the power plug from the AC outlet. Failure to
observe this may cause a fire or malfunctions.
• If not using the unit for long periods of time, be
sure to pull the power plug from the AC outlet.
Failure to observe this may cause a fire or
malfunctions.
Do not disassemble
• Do not disassemble or modify this unit. Failure to
observe this may cause a fire, electric shocks,
injury, or malfunctions. If you notice any
irregularities, be sure to request an inspection or
repair from the dealer where you purchased the
unit or from qualified Yamaha service personnel.
En
2
Page 3

English
Water warning
• Do not expose the unit to rain, use it near water
or in damp or wet conditions, or place on it any
containers (such as vases, bottles or glasses)
containing liquids which might spill into any
openings or places where water may drop. A
liquid such as water getting into the unit may
cause a fire, electric shocks, or malfunctions. If
any liquid such as water seeps into the device,
turn off the power immediately and unplug the
power cord from the AC outlet. Then, request an
inspection from the dealer where you purchased
the unit or from qualified Yamaha service
personnel.
• Never insert or remove an electric plug with wet
hands. Do not handle this unit with wet hands.
Failure to observe this may cause electric shocks
or malfunctions.
Fire warning
• Do not place any burning items or open flames
near the unit, since they may cause a fire.
If you notice any abnormality
• If any of the following abnormalities occur,
immediately turn off the power and disconnect
the power plug.
- The power cord/plug is damaged.
- An unusual smell or smoke is emitted from the
unit.
- Foreign material gets into the interior of the
unit.
- There is a crack or damage in the unit.
Continued use could cause electric shocks, a fire,
or malfunctions. Immediately request an
inspection or repair from the dealer where you
purchased the unit or from qualified Yamaha
service personnel.
• Be careful not to drop or apply strong impact to
this unit or the AC adaptor. If you suspect the unit
may have been damaged due to dropping or
impact, immediately turn off the power and pull
the power plug from the AC outlet. Failure to
observe this may cause electric shocks, a fire, or
malfunctions. Immediately request an inspection
from the dealer where you purchased the unit or
from qualified Yamaha service personnel.
CAUTION
This content indicates “risk of injury.”
Power supply/AC adaptor
• Do not cover or wrap the AC adaptor with a cloth
or blanket. Failure to observe this may trap heat,
causing deformation in the case or a fire.
• Do not use an AC outlet where the power plug fits
loosely when inserted. Failure to observe this may
cause a fire, electric shocks, or burns.
• When removing the electric plug from the unit or
an AC outlet, always hold the plug itself and not
the cord. Pulling by the cord can damage it and
cause electric shocks or a fire.
• Insert the power plug firmly all the way into the
AC outlet. Using the unit when it is not plugged in
sufficiently can cause dust to accumulate on the
plug, causing a fire or burns.
Installation
• Do not place the unit in an unstable position
where it might accidentally drop or fall over and
cause injuries.
• Ensure that the top is facing upwards. Failure to
observe this may cause malfunctions or for the
unit to fall and cause injury.
• Do not install the unit in places where it may
come into contact with corrosive gases or salt air
or places that have excessive smoke or steam.
Doing so may result in malfunction.
• Avoid being near the unit during a disaster, such
as an earthquake. Since the unit may turn over or
fall and cause injury, quickly move away from the
unit and go to a safe place.
En
3
Page 4

• Before moving this unit, be sure to turn off the
power switch and disconnect all connection cables.
Failure to observe this may damage the cables or
cause you or someone else to trip and fall.
Hearing loss
• Before connecting the unit to other devices, turn
off the power for all devices. Failing to do so may
result in hearing loss, electric shock, or device
damage.
• When turning on the AC power in your audio
system, always turn on the amplifier or receiver
LAST, to avoid hearing loss and speaker damage.
When turning the power off, the amplifier or
receiver should be turned off FIRST for the same
reason. Failure to observe the above may cause
hearing impairment or speaker damage.
Maintenance
• Remove the power plug from the AC outlet before
cleaning the unit. Failure to observe this may
cause electric shocks.
Handling caution
• Keep small parts out of the reach of infants. Your
children may accidentally swallow them.
• Do not do the following:
- stand on or sit on the equipment.
- put heavy items on top of the equipment.
- place the equipment in a stack.
- apply unreasonable force to buttons,
switches, input/output terminals, etc.
- lean against the equipment.
• Avoid pulling the connected cables to prevent
injuries or damage to the unit by causing it to fall.
Notice
Indicates points that you must observe in
order to prevent product failure, damage, or
malfunction.
Power supply/AC adaptor
• If not using the unit for a long period of time, be
sure to pull the power plug from the outlet. A
minute current is still flowing even if the power
has been turned off (the power is in standby).
Installation
• Do not use this unit in the vicinity of other
electronic equipment, such as a TV, radio, or
mobile phone. Failure to observe this may cause
this unit or the TV or radio to produce noise.
• Do not use this unit in a location that is exposed
to direct sunlight that becomes extremely hot,
such as near a heater, or extremely cold, or that is
subject to excessive dust or vibration. Failure to
observe this may cause the unit’s panel to
become deformed, the internal components to
malfunction, or for operation to become unstable.
Connections
• If connecting external units, be sure to thoroughly
read the manual for each unit and connect them
in accordance with the instructions.
Failure to properly handle a unit in accordance
with the instructions could cause malfunctions.
Handling
• Do not place plastic or rubber products on this
unit. Failure to observe this may cause
discoloration or deformation in the panel of this
unit.
• If the ambient temperature changes drastically
(such as during unit transportation or under rapid
heating or cooling) and there is a chance
condensation may have formed in the unit, leave
the unit for several hours without turning on the
power until it is completely dry before use. Using
the unit while there is condensation can cause
malfunctions.
Maintenance
• If the temperature or humidity changes drastically,
water droplets (condensation) may form on the
unit surface. If water droplets form, immediately
wipe them off with a soft cloth. If water droplets
are left on the unit, they may be absorbed into the
wooden parts, causing deformation.
• When cleaning the unit, use a dry, soft cloth.
Using chemicals such as benzine or thinner,
cleaning agents, or chemical scrubbing cloths
can cause discoloration or deformation.
En
4
Page 5

English
Information
About content in this manual
• The illustrations in this manual are for instructional
purposes only.
• The company names and product names in this
manual are the trademarks or registered
trademarks of their respective companies.
About the name plate of the unit
The model number, serial number, power
requirements, etc., may be found on or near the
name plate, which is at the bottom of the unit. You
should note this serial number in the space provided
below and retain this manual as a permanent record
of your purchase to aid identification in the event of
theft.
Model No.
Serial No.
(bottom_en_01)
En
5
Page 6

En
6
Page 7

English
Contents
Before you start 8
Features of this unit . . . . . . . . . . . . . . . . . . . . . . . . . . 8
About this manual . . . . . . . . . . . . . . . . . . . . . . . . . . . 8
Check the supplied accessories . . . . . . . . . . . . . . . . 9
Handling records . . . . . . . . . . . . . . . . . . . . . . . . . . . . 9
Parts and their functions . . . . . . . . . . . . . . . . . . . . . 10
Top panel. . . . . . . . . . . . . . . . . . . . . . . . . . . . . . . . 10
Back panel . . . . . . . . . . . . . . . . . . . . . . . . . . . . . . . 11
Getting ready 12
Location . . . . . . . . . . . . . . . . . . . . . . . . . . . . . . . . . . 12
Assembly . . . . . . . . . . . . . . . . . . . . . . . . . . . . . . . . . 12
Assembling the unit . . . . . . . . . . . . . . . . . . . . . . . . 12
Attaching the dust cover . . . . . . . . . . . . . . . . . . . . 14
Making connections . . . . . . . . . . . . . . . . . . . . . . . . 15
Making adjustments . . . . . . . . . . . . . . . . . . . . . . . . 16
Adjusting the stylus pressure . . . . . . . . . . . . . . . . . 16
Adjusting the anti-skating . . . . . . . . . . . . . . . . . . . . 18
Playback 19
When necessary 22
Care. . . . . . . . . . . . . . . . . . . . . . . . . . . . . . . . . . . . . . 22
Replacement . . . . . . . . . . . . . . . . . . . . . . . . . . . . . . 22
Replacing the belt . . . . . . . . . . . . . . . . . . . . . . . . . . 22
Replacing the record stylus . . . . . . . . . . . . . . . . . . . 23
Moving this unit . . . . . . . . . . . . . . . . . . . . . . . . . . . . 23
Troubleshooting . . . . . . . . . . . . . . . . . . . . . . . . . . . . 24
Specifications. . . . . . . . . . . . . . . . . . . . . . . . . . . . . . 26
Turning the power on . . . . . . . . . . . . . . . . . . . . . . . 18
En
7
Page 8

Before you start
NOTICE
NOTE
Features of this unit
This is a turntable for playing analog records.
Wooden cabinet with a gloss finish
Provides both beauty and practical advantages such as high rigidity and
vibrational damping
Highly rigid straight tone arm virtually eliminates any effect on the
delicate musical signal
Easy switching between LINE output equipped with a high-quality
PHONO EQ circuit and PHONO direct output, giving you flexibility when
setting up your record playback system
High rotational stability is achieved by using an aluminum die cast
platter belt-driven by a high-torque DC motor
Feedback margin is maintained by insulators (feet) that feature excellent
absorption of vibration and shock
About this manual
When reading this manual, please note the following.
Specifications and appearance are subject to change without notice in
order to improve the product.
Explanation of graphic symbols used in this manual:
-“ WARNING” indicates points that you must observe to avoid risk
of death or serious injury.
-“ CAUTION” indicates points that you must observe to avoid risk
of injury.
- indicates points that you must observe to avoid
damaging the product or causing it to malfunction.
- indicates supplementary information that you will find
useful.
8
En
Page 9
Before you start | Check the supplied accessories
English
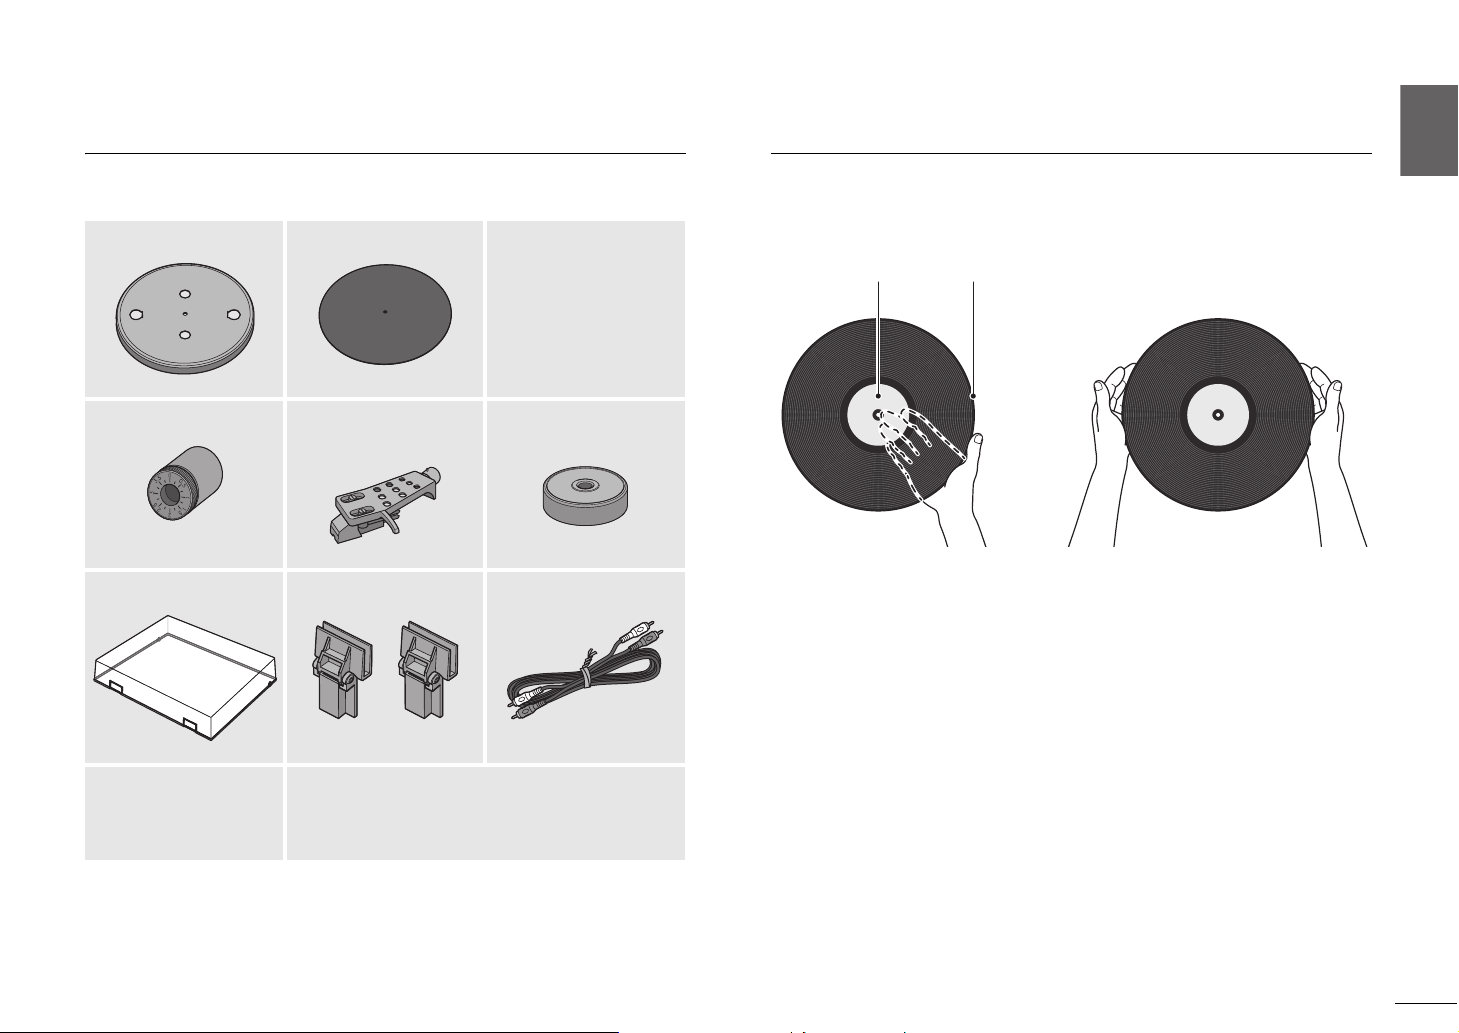
Label area Outer edge
Check the supplied accessories
Make sure that all items are present.
Platter ×1 Platter sheet ×1 Belt ×1
* The belt is installed on the
platter.
Counter weight ×1 Head shell ×1
(with cartridge)
Dust cover ×1 Dust cover hinge ×2 RCA stereo cable ×1
45 rpm adaptor ×1
Handling records
When you hold a record, you should either support the record’s label area and
its outer edge, or hold the record’s outer edges between your two hands.
AC adaptor ×1
* For details, refer to the
included “Supplement”
(leaflet).
Owner’s Manual (this manual)
Supplement (leaflet)
En
9
Page 10
Before you start | Parts and their functions
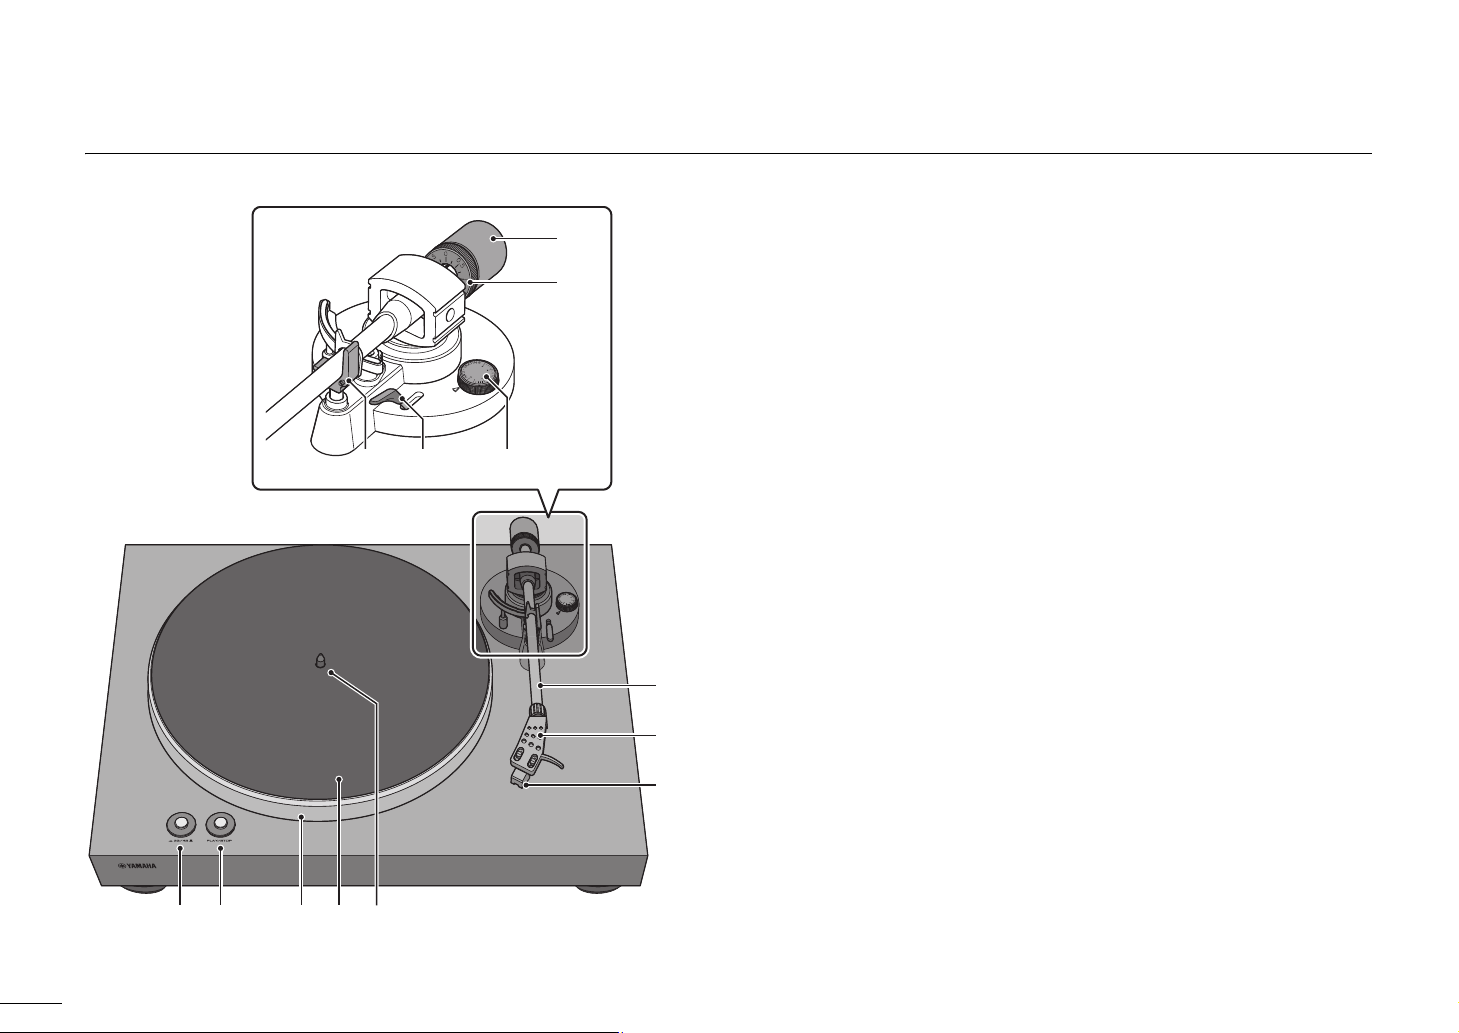
햻
햴 햶햳햲햵
햷
햸
햹
햺
햿
햽햾
Parts and their functions
Top panel
햲 33/45 (speed) ( page 19)
햳 PLAY/STOP (play/stop) ( page 19)
햴 Platter ( page 12)
햵 Platter sheet ( page 13)
햶 Center spindle ( page 12)
햷 Tone arm ( page 13)
햸 Head shell ( page 13)
햹 Cartridge
햺 Counter weight ( page 13)
햻 Counter ring ( page 17)
햽 Arm rest ( page 16)
햾 Lift lever ( page 20)
햿 Anti-skating ( page 18)
10
En
Page 11
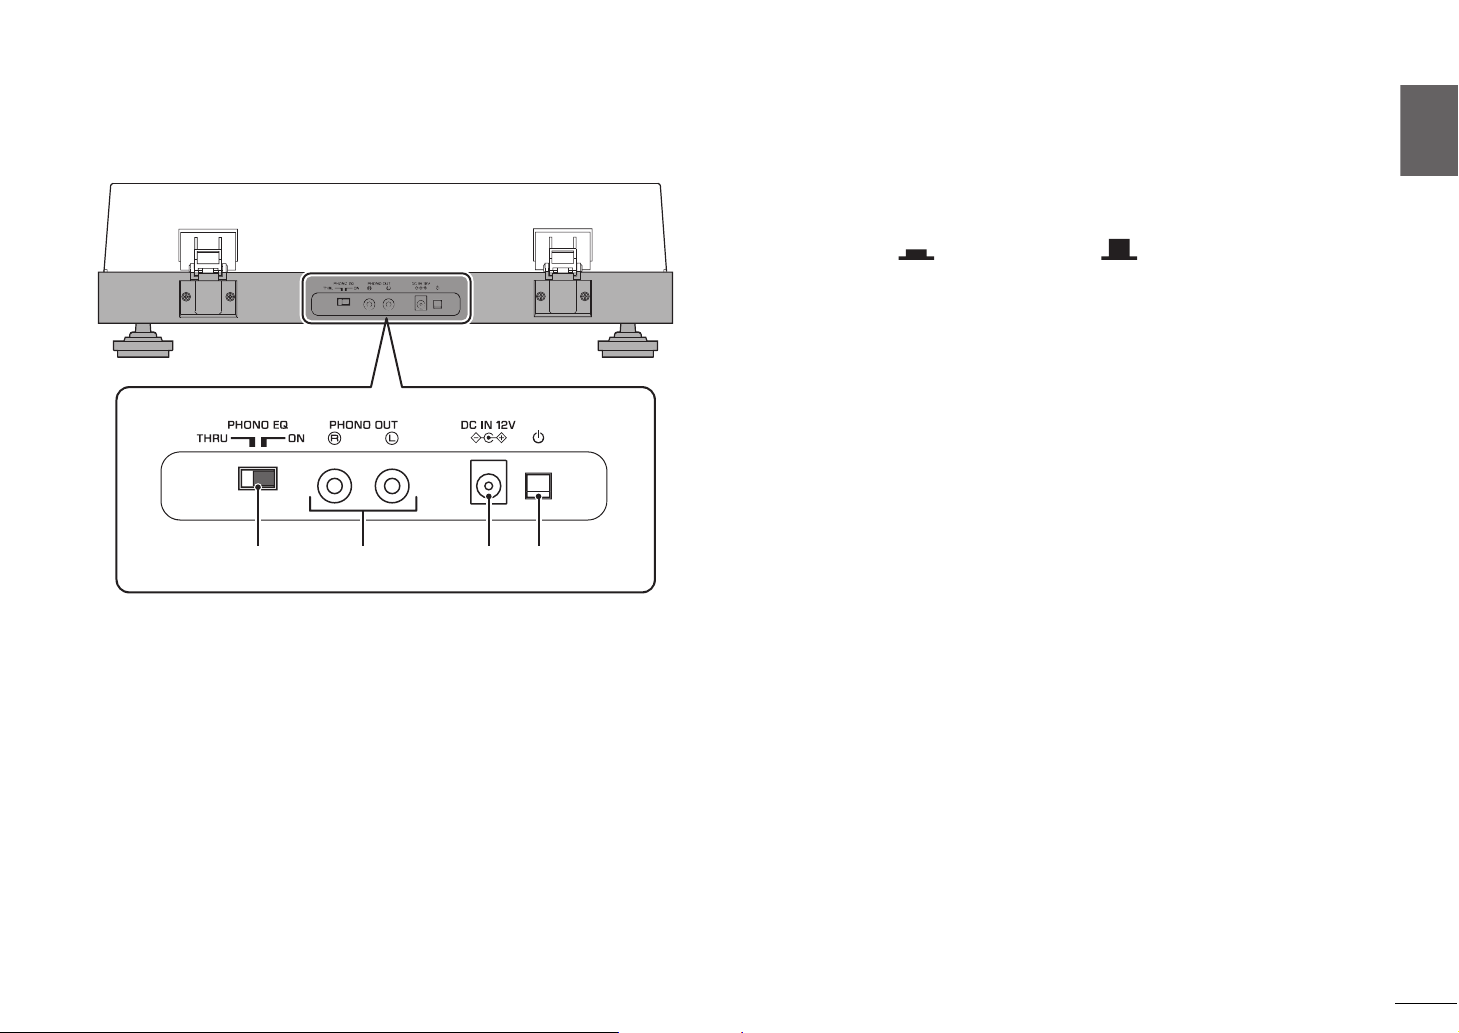
English
Back panel
햵햳햴 햲
: on : off
Before you start | Parts and their functions
햲 z (power)
This turns the unit’s power on/off. ( page 18)
햳 DC IN jack
Connect the AC adaptor (supplied) to this jack. ( page 15)
햴 PHONO OUT jacks
These jacks output the playback audio of the record. ( page 15)
햵 PHONO EQ (phono equalizer) switch
As appropriate for the device that is connected, set this to switch the
signal that is output from the PHONO OUT jacks. ( page 15)
En
11
Page 12
Getting ready
CAUTION
1
2
33
Location
Because record playback is easily affected by vibration, you should place the unit in a level location that is not subject to external vibration.
Place it sufficiently far from your speaker system so that it will not be affected by sound pressure or vibration.
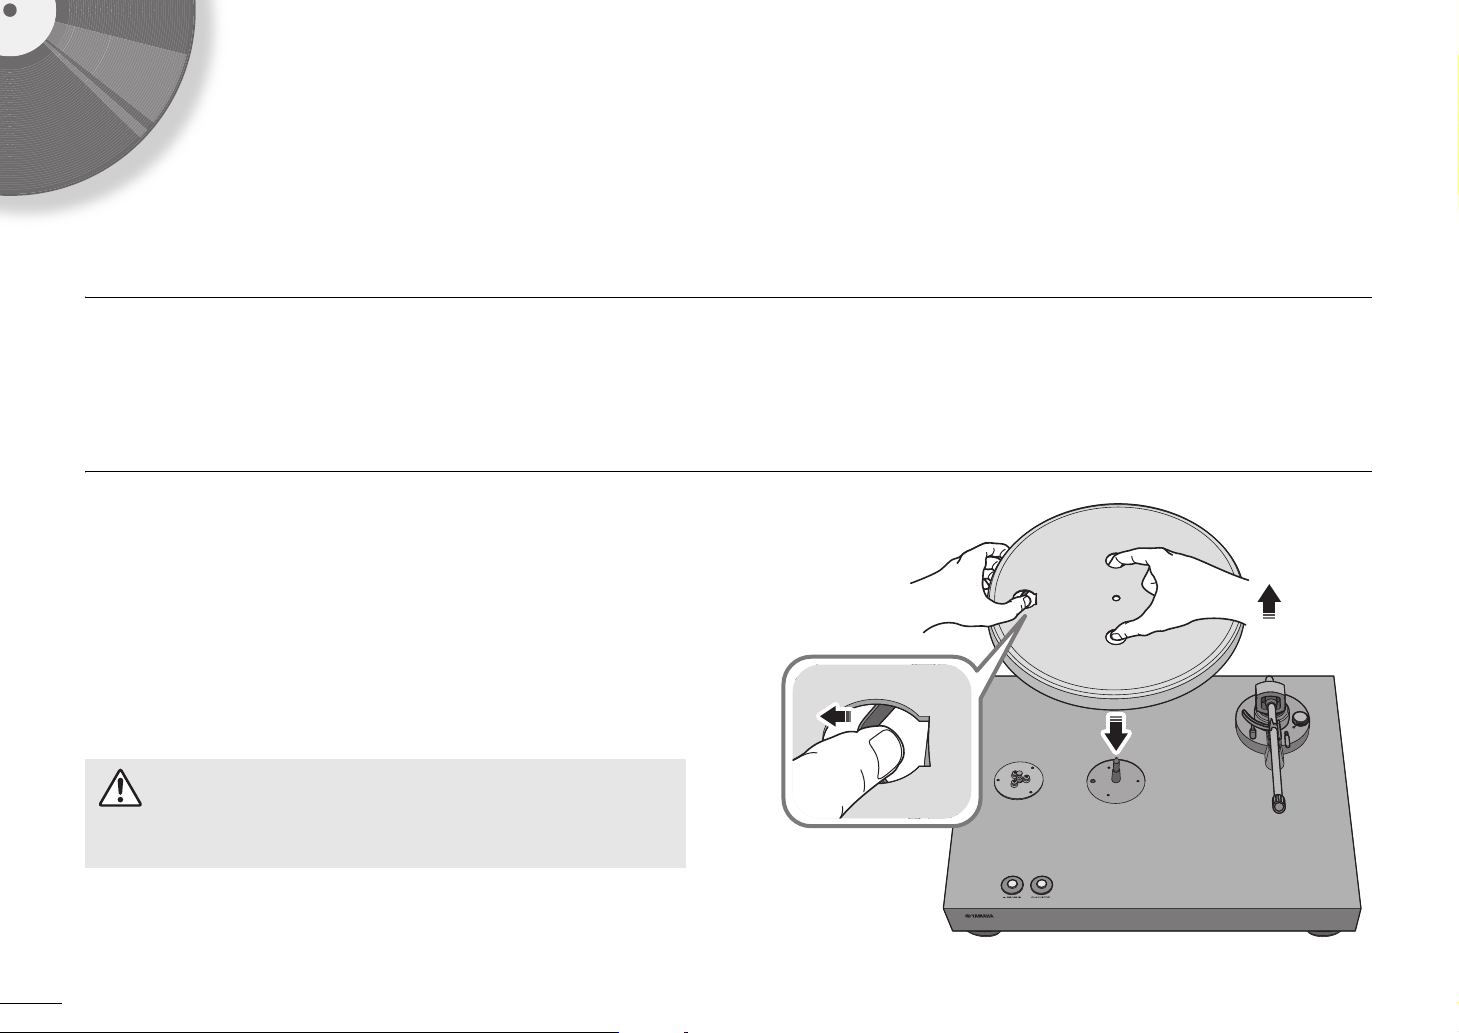
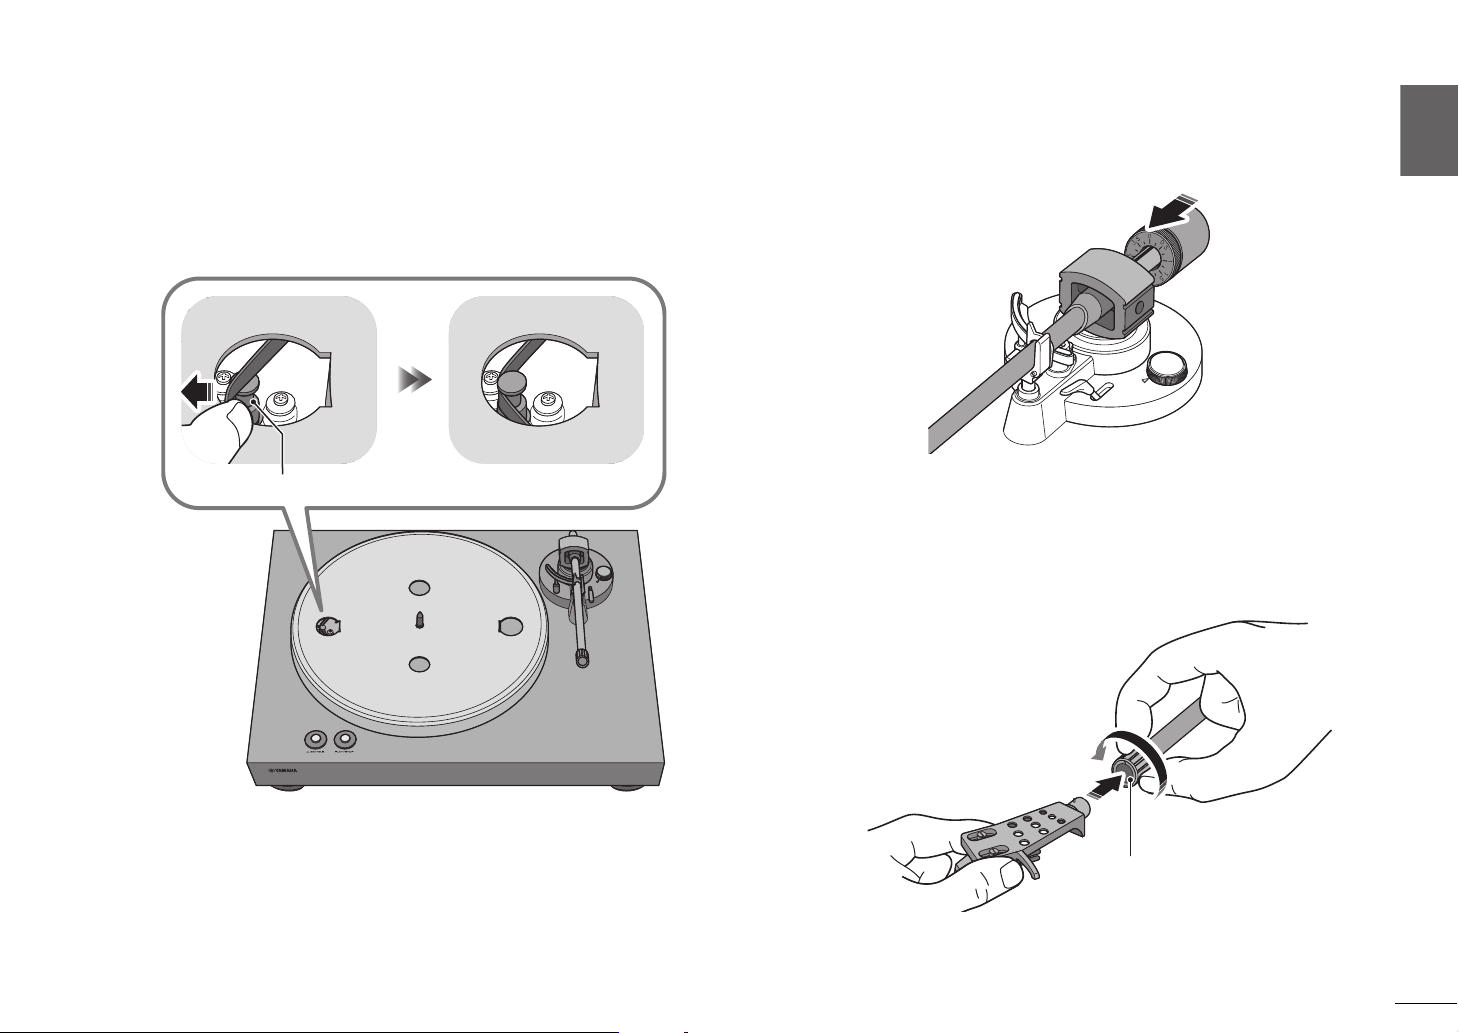
Assembly
Assembling the unit
Lift up the platter.
1
Reaching through the round hole in the platter, pull the belt
2
outward, hooking it over your finger.
En
12
Insert the platter onto the center spindle.
3
Take care not to drop the platter. Dropping it might cause injury, or might
damage the unit.
Page 13
Getting ready | Assembly
English
Pulley
Lock nut
Align the round hole of the platter with the pulley.
4
Use your finger to hook the belt onto the pulley.
5
Take care that the belt is not twisted. After hooking the belt onto the
pulley, rotate the platter several times to ensure that the belt is smoothly
in place.
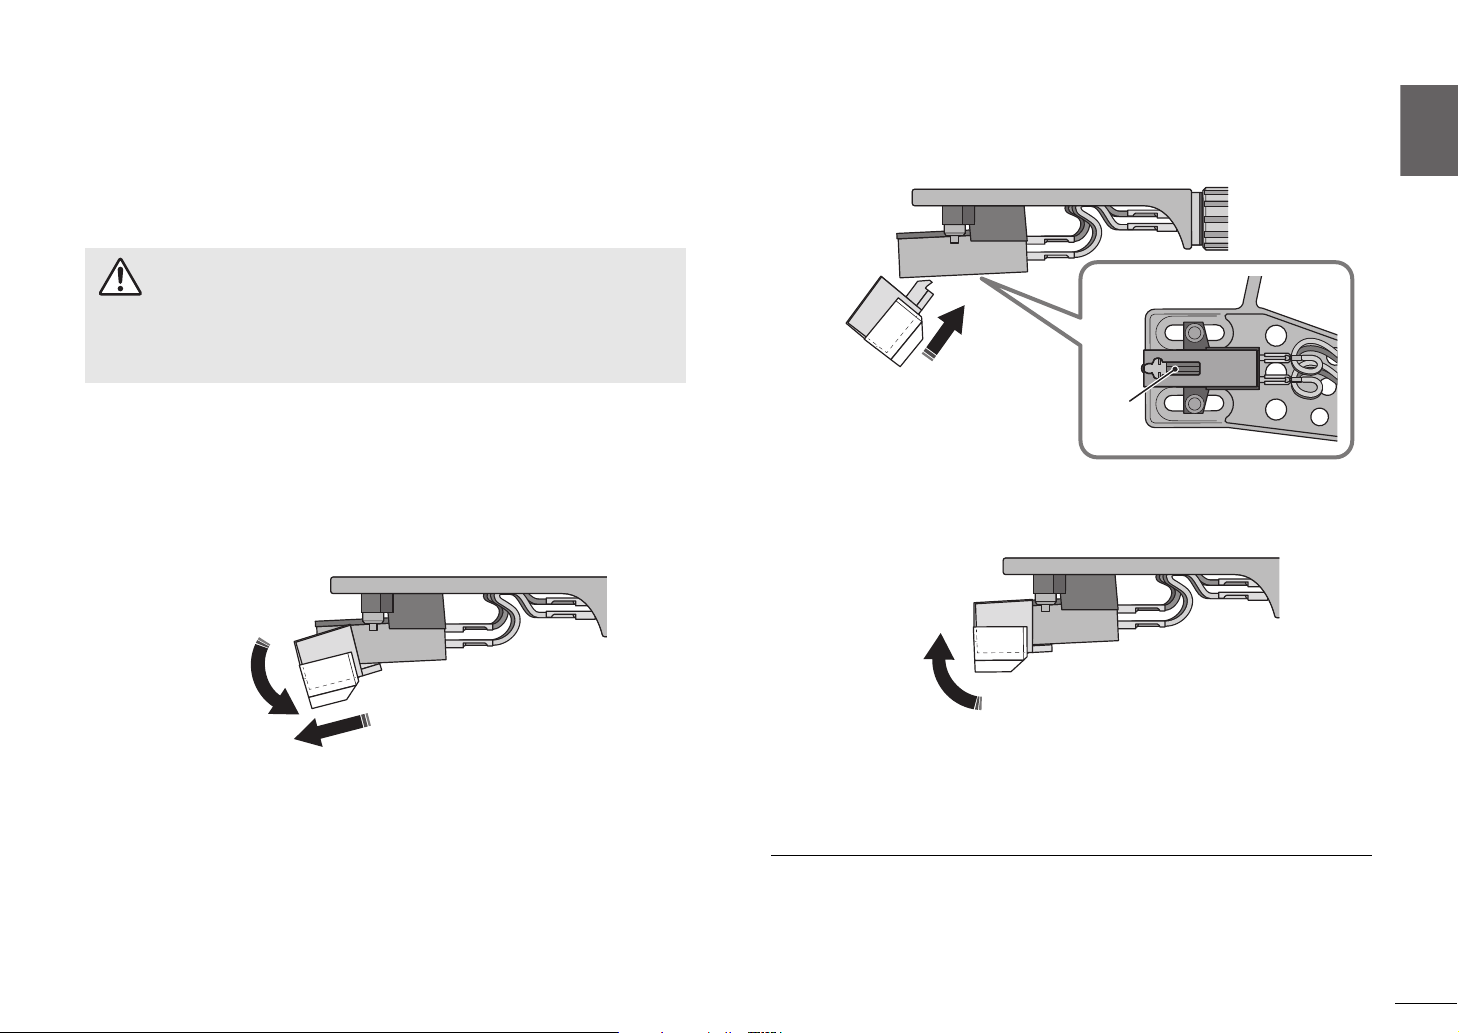
Attach the counter weight to the tone arm.
7
With the markings on the counter weight facing you, slide it onto the
back end of the tone arm.
Attach the head shell to the tone arm.
8
Insert the head shell into the front end of the tone arm, and turn the lock
nut to secure it.
Place the platter sheet on the platter.
6
En
13
Page 14
Getting ready | Assembly
NOTE
CAUTION
Hinge base
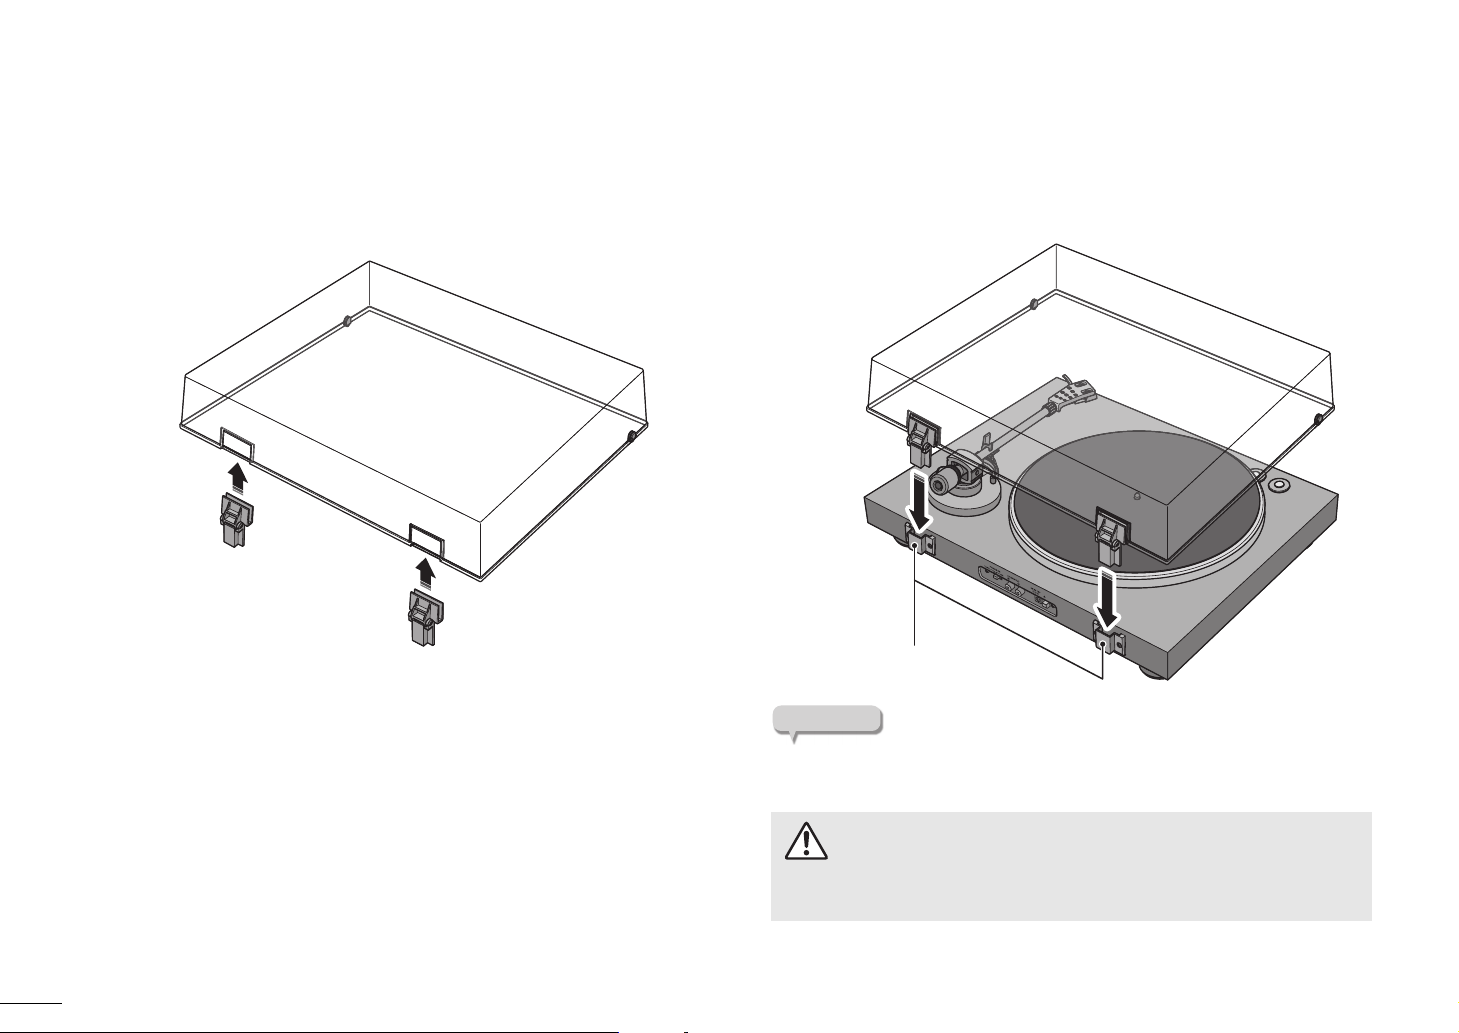
Attaching the dust cover
The dust cover protects this unit from dust etc.
Insert the hinges into the appropriate locations at two sides of the
1
dust cover.
Attach the dust cover by inserting the hinges into the hinge bases
2
located on the back panel of the unit.
To remove the dust cover, grasp the two sides of the dust cover and slowly
lift upward to remove the cover together with its hinges.
14
Take care not to pinch your hands or fingers when opening or closing the
dust cover
En
Page 15
English
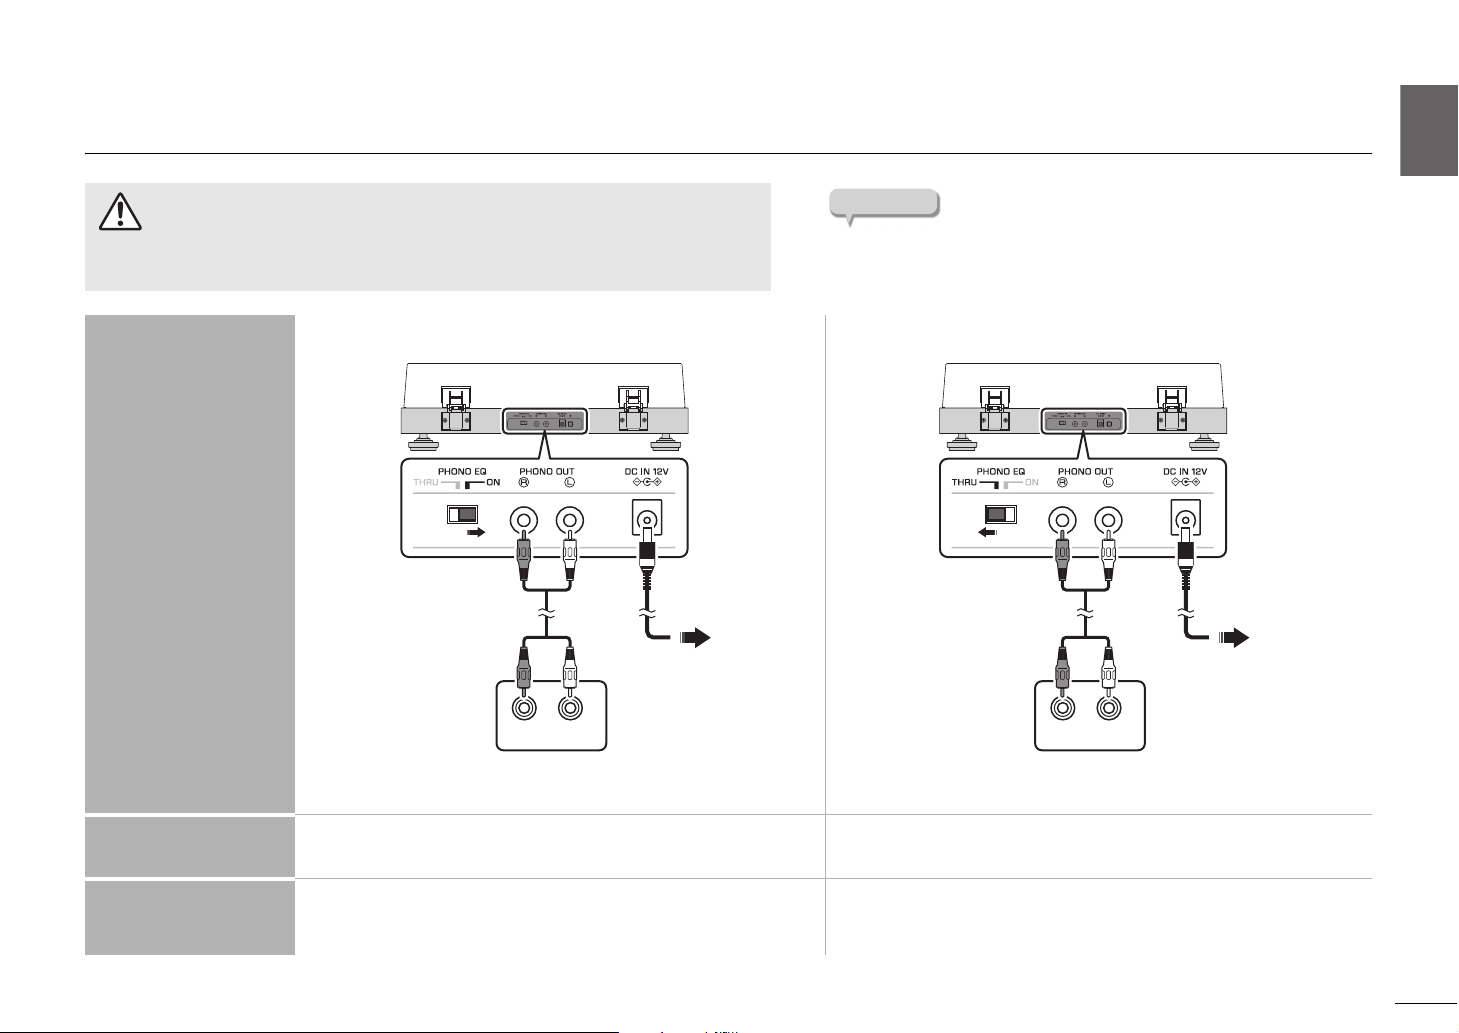
Making connections
NOTE
CAUTION
AUX IN
R L
Pre-main amplifier or component
(external input jacks)
AC adaptor
(supplied)
RCA stereo cable
(supplied)
Connect to
AC outlet
This unit
(back panel)
PHONO IN
R L
AC adaptor
(supplied)
RCA stereo cable
(supplied)
Pre-main amplifier
(PHONO input jacks)
This unit
(back panel)
Connect to
AC outlet
Getting ready | Making connections
Finish making all other connections before you connect the AC adaptor (supplied) to
an AC outlet.
Devices not equipped with PHONO input jacks Devices equipped with PHONO input jacks
Connected devices
Enabled
The signal from the cartridge is amplified by the phono
equalizer that is built into this unit, and is output from
the PHONO OUT jacks.
ON (default) THRU
PHONO EQ switch
setting
This unit’s equalizer
function
Also refer to the owner’s manuals of the device that you are
connecting.
Disabled
The signal from the cartridge is output directly from the
PHONO OUT jacks.
En
15
Page 16
Getting ready | Making adjustments
NOTICE
NOTICE
Making adjustments
Adjusting the stylus pressure
Adjust the tone arm so that the appropriate stylus pressure is applied to the
record.
Detach the stylus cover.
1
Take care that the stylus cover or your finger do not contact the
stylus.
Set the anti-skating adjustment to the “0” position.
2
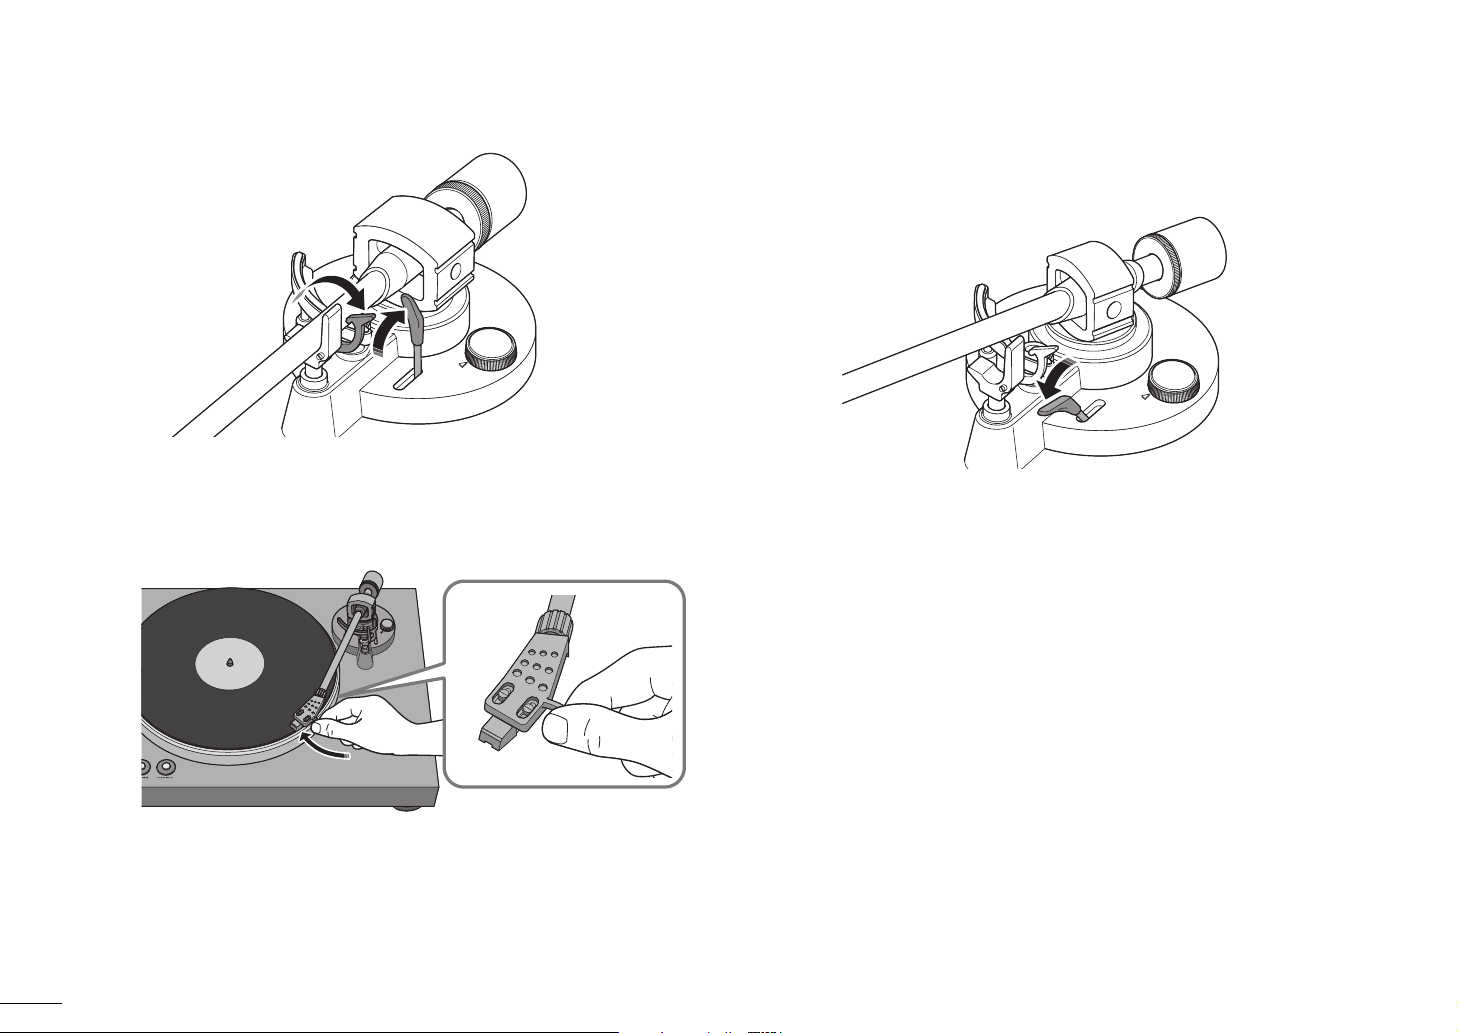
Release the tone arm lock.
3
Move the tone arm off of the arm rest and slightly to the left.
4
16
En
Take care that the needle does not contact any part of the unit.
Page 17

Getting ready | Making adjustments
English
NOTE
NOTE
1
2
Center line
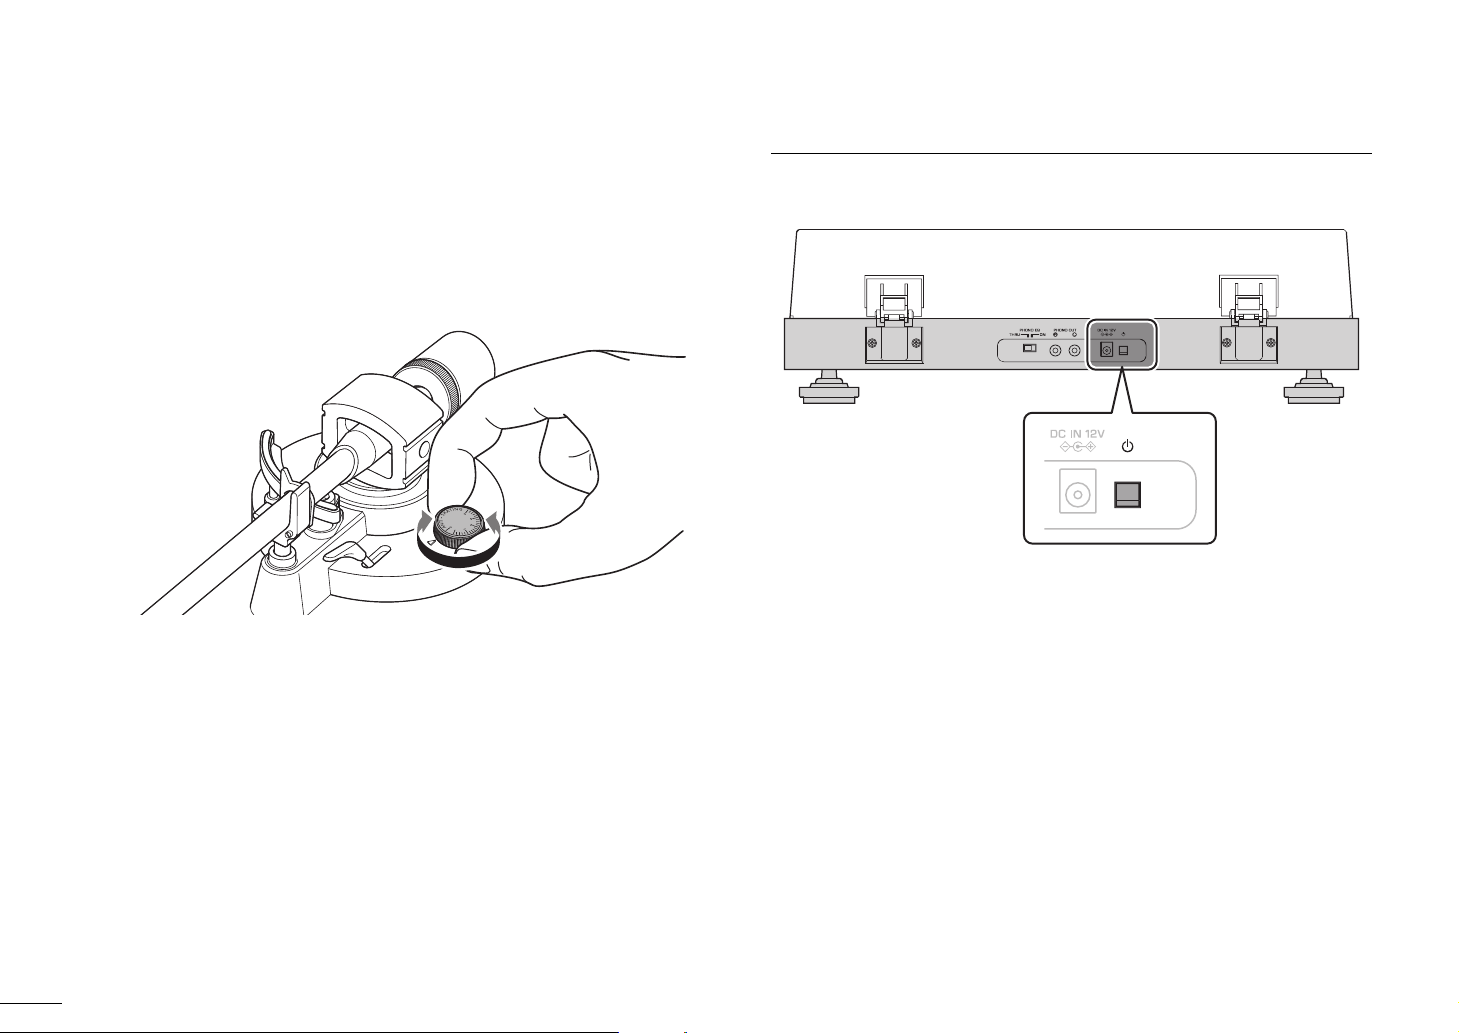
Turn the counter weight so that the tone arm is horizontal.
5
Toward 1: Counter weight moves forward on the tone arm.
Toward
2: Counter weight moves backward on the tone arm.
Correct
Incorrect
Incorrect
Tone arm is horizontal
(balanced)
Counter weight is too far
forward
Counter weight is too far
backward
Turn the counter ring so that the “0” marking is aligned with the
7
center line on the back end of the tone arm.
When turning the counter ring, use your fingers to press the counter
weight so that it does not rotate.
By turning the counter weight, set the counter weight markings to
8
the stylus pressure specified for the cartridge.
The specified stylus pressure for the supplied cartridge is 3.5 g.
Return the tone arm to the arm rest, and lock it in place.
6
Turning the counter weight also turns the counter ring.
En
17
Page 18
Getting ready | Turning the power on
Adjusting the anti-skating
As the platter rotates, the tip of the stylus generates a force that pulls it toward
the center of rotation. If the anti-skating value is set to the same value as the
stylus pressure, a force is generated that pulls the tip of the stylus outward
away from the center of rotation, and the two forces cancel each other.
Turn the anti-skating adjustment to the same value as the stylus
1
pressure of the cartridge.
Turning the power on
On the back panel of the unit, press z (power) to turn on the power of the unit.
18
En
Page 19
English
Playback
CAUTION
: 33 1/3 rpm : 45 rpm
Starting playback
If you play back a record without sufficiently lowering the volume of your
amplifier, a loud sound might occur when the tip of the stylus contacts the
record. This can cause hearing loss and might damage your amplifier and
speaker, so be sure to lower the volume of your amplifier.
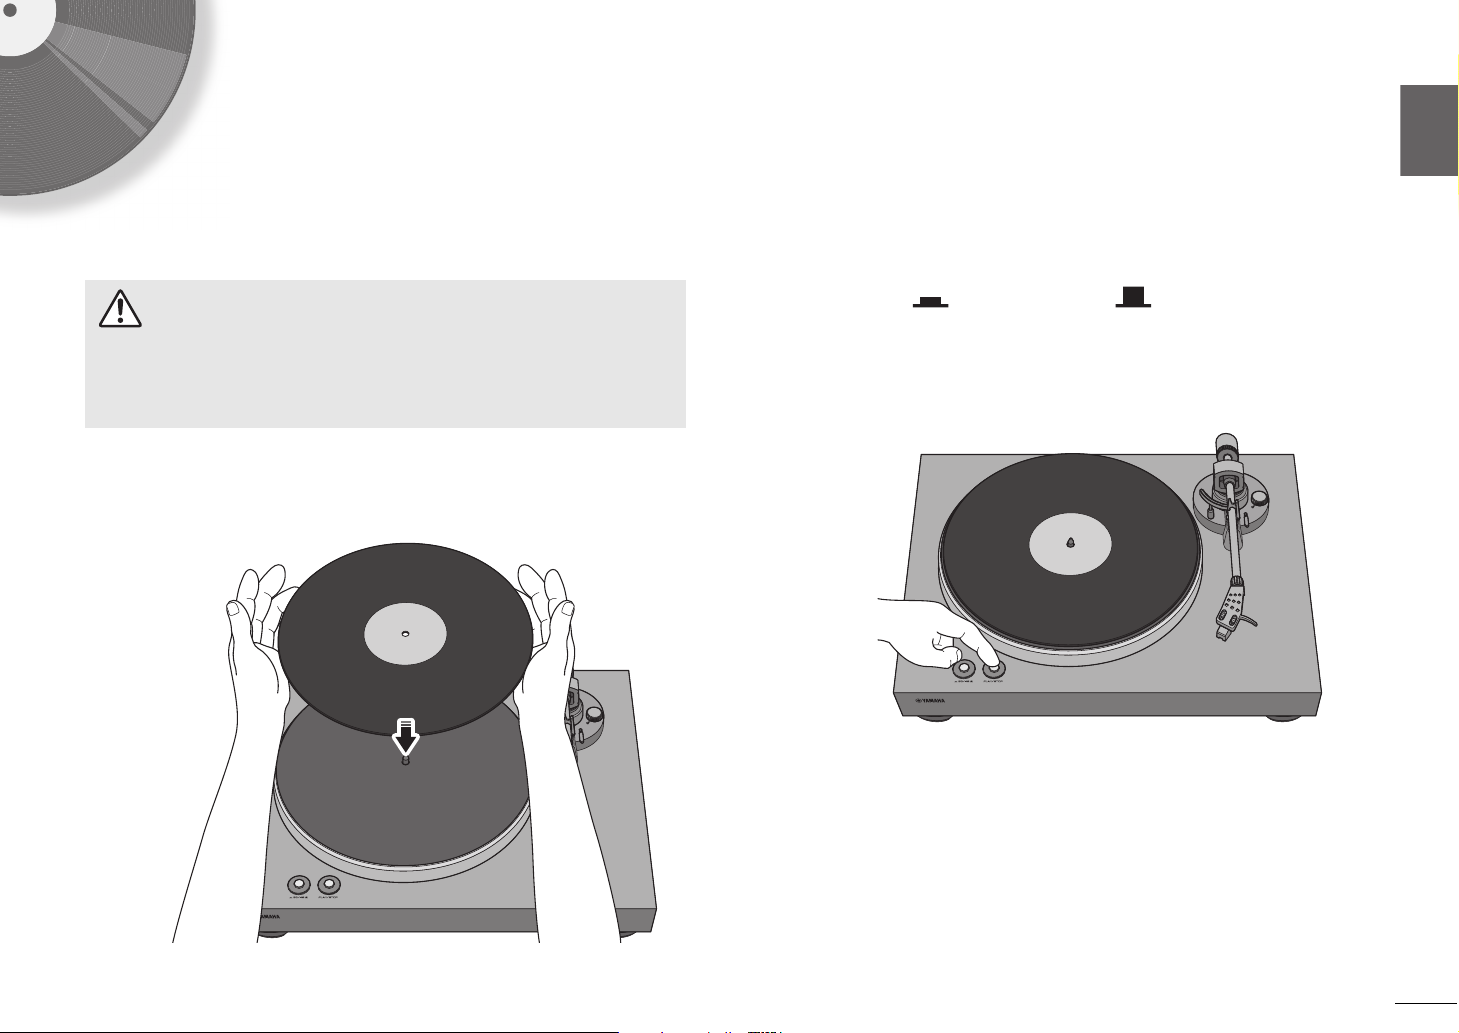
Open the dust cover, and place the record on the platter.
1
If you’re playing a 45 rpm record, use the supplied 45 rpm adaptor.
Press 33/45 (speed) to select the appropriate speed for the record.
2
Press PLAY/STOP (play/stop).
3
The platter rotates.
En
19
Page 20
Playback
Release the tone arm lock, and raise the lift lever.
4
Move the tone arm to the playback position of the record.
5
Lower the lift lever.
6
The tone arm is lowered, and playback starts.
20
En
Page 21

English
Pausing playback
NOTE
If you raise the lift lever, the tone arm rises and playback pauses.
When you lower the lift lever, playback resumes.
Stopping playback
Raise the lift lever.
1
Return the tone arm to the arm rest.
2
Lower the lift lever.
3
Press PLAY/STOP (play/stop).
4
The platter stops rotating.
Lock the tone arm.
5
The tone arm does not automatically rise when the record finishes playing.
If you will not be using the unit for a time, attach the cover to the stylus to
protect it.
Playback
En
21
Page 22
When necessary
CAUTION
Care
Caring for this unit
Wipe it with a soft dry cloth. Do not use chemicals such as benzine or thinner,
since they might damage the surface.
Caring for the record stylus
The tip of the record stylus is extremely delicate. Handle it with care so that it is
not damaged. If dust should adhere to the tip of the stylus, use a soft pointed
brush to wipe it off starting at the base of the stylus and moving toward the tip,
or use a commercially available cleaner made for that purpose.
Caring for records
Dirt adhering to a record can cause skips or noise. Use a commercially available
record cleaner to remove dirt.
Replacement
Replacing the belt
Depending on the conditions of use, the belt can wear out or break. If this
occurs, replace the belt. For a replacement belt, contact your nearest
authorized Yamaha dealer or service center.
Turn off the power of this unit and of the connected devices, and
1
disconnect this unit’s AC adaptor from the AC outlet.
Remove the platter sheet from the platter.
2
Detach the belt from the pulley.
3
Insert your fingers into the round holes of the platter, and lift up the
4
platter.
Take care not to drop the platter. Dropping it might cause injury,
or might damage the unit.
Turn the platter over, and remove the belt.
5
En
22
Install the replacement belt on the platter.
6
Take care that the belt is not twisted.
Install the platter on this unit.
7
For details on installation, refer to “Assembly” on page 12.
Page 23
When necessary | Moving this unit
English
CAUTION
1
2
Groove
Underside
Replacing the record stylus
When the tip of the record stylus becomes worn down or damaged, replace it
immediately.
As the replacement stylus, please purchase an ATN3600L replacement stylus
made by Audio-Technica.
Attach the stylus cover before replacing the stylus. The tip of the stylus
might injure you, or it might become damaged.
Take care that children do not swallow the stylus when it is removed.
Turn off the power of this unit and of the connected devices, and
1
disconnect this unit’s AC adaptor from the AC outlet.
While using your fingers to hold the body of the cartridge, press
2
the stylus down in the direction of 1, and pull it in the direction of
2 to remove it.
While using your fingers to hold the body of the cartridge, insert
3
the tab of the replacement stylus into the groove on the underside
of the cartridge.
Press the stylus upward until you hear a click.
4
Moving this unit
When moving this unit, lock the tone arm so that it does not move.
En
23
Page 24

When necessary | Troubleshooting
Troubleshooting
If the unit stops operating correctly, check the following points.
If taking the appropriate action does not solve the problem, or if there is a problem not listed below, press the z (power) button located on the unit’s back panel to turn
off the power, disconnect the power cord, and contact your nearest authorized Yamaha dealer or service center.
Problem Cause Action
Pressing z (power) does not
turn on the power.
The platter does not rotate.
No sound.
Volume is too weak or too loud.
Something is wrong with the
left/right balance of the sound.
Playback speed is wrong. The speed setting is incorrect.
Hum is audible.
The AC adaptor has come unplugged from this unit’s DC IN
jack or from the AC outlet, or is not firmly plugged in.
The belt is not correctly positioned on the platter and pulley,
or the belt has come off.
z(power) is not on. Turn z(power) on. 18
The head shell is not correctly attached to the tone arm. Attach the head shell correctly to the tone arm. 13
The RCA stereo cable is not connected correctly. Connect the RCA stereo cable correctly. 15
The mute setting of the amplifier is on. Turn off the mute setting of the amplifier. –
The cartridge setting of the amplifier or phono equalizer is
incorrect.
The PHONO EQ switch is set incorrectly.
The turntable is tilted. Place the turntable on a level location. –
The RCA stereo cable is not connected correctly. Connect the RCA stereo cable correctly. 15
The head shell is not firmly secured to the tone arm.
Reference
page
Firmly plug the AC adaptor into this unit’s DC IN jack and into
an AC outlet.
Attach the belt correctly to the platter and the pulley. 12
Set the cartridge setting of the amplifier or phono equalizer
correctly for the type of cartridge that you’re using (MM or
MC).
Set the PHONO EQ switch correctly for the device that is
connected.
Set the 33/45 (speed) setting correctly. This unit does not
support playback of SP records (78 rpm).
Use the lock nut to firmly secure the head shell to the tone
arm.
15
15
19
13
–
24
En
Page 25

When necessary | Troubleshooting
English
Problem Cause Action
Skips occur.
Noise occurs.
The sound is distorted.
Feedback occurs.
Reference
page
The stylus pressure is not adjusted correctly.
The record is scratched or warped. Do not used scratched or warped records. –
The record is dirty.
The record is statically charged. Use an anti-static brush to remove the static charge. –
The stylus is dirty. Remove the dirt from the stylus. 22
The stylus is worn down. Replace the stylus. 23
The unit is placed in a location that is subject to vibration.
The unit is too close to the speakers. Locate the unit farther away from the speakers. –
The playback volume is too high. Adjust the volume of the amplifier. –
Set the counter weight markings to the stylus pressure
specified for the cartridge.
Use a commercially available record cleaner to clean the
record.
Place the unit in a level location that is not subject to
vibration.
16
–
–
En
25
Page 26

When necessary | Specifications
Specifications
The specifications of this unit are as follows.
Platter section
Drive method. . . . . . . . . . . . . . . . . . . . . . . . . . . . . . . . . . . . . . . Belt drive
Motor. . . . . . . . . . . . . . . . . . . . . . . . . . . . . . . . . . . . . . . . . . . . . DC motor
Rotation Speed . . . . . . . . . . . . . . . . . . . . . . . . . . . . . 33 1/3 rpm, 45 rpm
Rotation Speed Variation . . . . . . . . . . . . . . . . . . . . . . . . . . . . . . . . . . ±2%
Wow and flutter . . . . . . . . . . . . . . . . . . . . . . . . . . . . . . . . . . . . . . . . .0.2%
Platter . . . . . . . . . . . . . . . . . . . . . . . . . . . . . . . . . . .Aluminium die-casting
Diameter 30 cm
Tone arm section
Type . . . . . . . . . . . . . . . . . . . . . . . . . . . . Static balance straight tone arm
Effective arm length . . . . . . . . . . . . . . . . . . . . . . . . . . . . . . . . . .223.5 mm
Stylus pressure adjustment range . . . . . . . . . . . . . . . . . . . . . . . . . . 0–4 g
Acceptable cartridge weight . . . . . . . . . . 15.5–19 g (including head shell)
Overhang. . . . . . . . . . . . . . . . . . . . . . . . . . . . . . . . . . . . . . . . . . . . 19 mm
Cartridge section
Type . . . . . . . . . . . . . . . . . . . . . . . . . . . . . . . . . . . . . . . . . . . . . . MM type
Output voltage. . . . . . . . . . . . . . . . . . . . . . . 2.5 mV (1 kHz, 3.54 cm/sec)
Stylus pressure . . . . . . . . . . . . . . . . . . . . . . . . . . . . . . . . . . . . .3.5 ±0.5 g
Cartridge weight . . . . . . . . . . . . . . . . . . . . . . . . . . . . . . . . . . . .5.0 ±0.3 g
Cartridge Height . . . . . . . . . . . . . . . . . . . . . . . . . . . . . . . . .17.0 ±0.7 mm
Head shell weight . . . . . . . . . . . . 10 g (including screws, nuts, and wires)
Audio section
Output level
PHONO EQ THRU (1 kHz, 3.54 cm/sec). . . . . . . . . . . 2.5 mV ±3 dBV
PHONO EQ ON . . . . . . . . . . . . . . . . . . . . . . . . . . . 140 mV (–17 dBV)
Signal to Noise Ratio (A-weighted, 20 kHz LPF) . . . . . . . . 67 dB or higher
Output jack. . . . . . . . . . . . . . . . . . . . PHONO OUT × 1 (RCA unbalanced)
General
AC adaptor power supply
Input . . . . . . . . . . . . . . . . . . . . . . . . . . . . . . . AC 100–240 V 50/60 Hz
Output . . . . . . . . . . . . . . . . . . . . . . . . . . . . . . . . . . . . . . . . . 12V 0.5A
Power consumption
While powered on. . . . . . . . . . . . . . . . . . . . . . . . . . . . . . . . . . . .1.5 W
While powered off. . . . . . . . . . . . . . . . . . . . . . . . . . . . . . . . . . . .0.1 W
Weight . . . . . . . . . . . . . . . . . . . . . . . . . . . . . . . . . . . . . . .4.8 kg / 10.6 lbs
Dimensions (width × height × depth). . . . . . . . . . . . .450 × 136 × 368 mm
. . . . . . . 17-3/4" × 5-3/8" × 14-1/2"
(including legs and protrusions)
The contents of this manual apply to the latest specifications as of the
publishing date. To obtain the latest manual, access the Yamaha website
then download the manual file.
26
En
Page 27

Français
Ce produit est conçu pour l’écoute de sources audio dans le cadre domestique.
PRÉCAUTIONS D’USAGE
LISEZ ATTENTIVEMENT AVANT DE
PROCÉDER À TOUTE UTILISATION. VEILLEZ
À SUIVRE CES INSTRUCTIONS.
Les mises en garde énumérées ci-dessous
sont destinées à prévenir les risques pour
l’utilisateur et les tiers, à éviter les dommages
matériels et à aider l’utilisateur à se servir de
l'appareil correctement et en toute sécurité.
Assurez-vous de suivre ces instructions.
Après avoir consulté ce manuel, conservez-le dans
un endroit sûr de façon à pouvoir vous y reporter
facilement.
• Veillez à faire inspecter ou réparer l’appareil
par le revendeur auprès duquel vous l’avez
acheté ou par un technicien Yamaha qualifié.
• Yamaha ne peut être tenu responsable des
dommages corporels et matériels causés par
une mauvaise manipulation de l’instrument ou
par des modifications apportées à l’appareil.
• Ce produit est conçu pour un usage courant
dans les résidences standard. Ne l’utilisez
pas pour des applications nécessitant une
haute fiabilité, telles que la gestion des gestes
essentiels à la vie, des soins de santé ou des
biens de grande valeur.
AVERTISSEMENT
Ce contenu indique « un risque de blessures
graves ou de mort ».
Alimentation/adaptateur secteur
• Ne faites rien qui pourrait endommager le cordon
d’alimentation.
- Ne le placez pas à proximité d’un radiateur.
- Évitez de le plier excessivement ou de le
modifier.
- Évitez de l’érafler.
- Ne placez pas dessus d’objets lourds.
L’utilisation du cordon d’alimentation en ayant le
conducteur du cordon exposé pourrait provoquer
des chocs électriques ou un incendie.
• En cas de risque d’impact de foudre à proximité
de l’appareil, évitez de toucher la fiche
d’alimentation. Le non-respect de cette consigne
peut entraîner des chocs électriques.
• Assurez-vous d’utiliser l’appareil avec la tension
d’alimentation appropriée, telle qu’imprimée sur
l’appareil. L’absence de raccordement à une
prise secteur appropriée pourrait provoquer un
incendie, des chocs électriques ou des
dysfonctionnements.
• Veillez à utiliser l’adaptateur secteur fourni. Le
non-respect de cette consigne peut entraîner un
incendie, des brûlures ou des
dysfonctionnements.
• Vérifiez périodiquement l’état de la prise
électrique, dépoussiérez-la et nettoyez-la en
prenant soin de retirer toutes les impuretés qui
pourraient s’y accumuler. Le non-respect de
cette consigne peut entraîner un incendie ou des
chocs électriques.
• Lors de l’installation de l’appareil, assurez-vous
que la prise secteur que vous utilisez est
facilement accessible. En cas de problème ou de
dysfonctionnement, désactivez immédiatement
l’interrupteur d’alimentation et retirez la fiche de la
prise secteur. Même lorsque l’interrupteur
d’alimentation est en position désactivée,
l’appareil n’est pas déconnecté de la source
d’électricité tant que le cordon d’alimentation
reste branché à la prise murale.
• Si vous entendez le tonnerre gronder ou
suspectez l’imminence d’un éclair, mettez
immédiatement l’appareil hors tension et
débranchez la fiche d’alimentation de la prise
secteur. Le non-respect de cette consigne peut
entraîner un incendie ou des
dysfonctionnements.
Fr
1
Page 28

• Si vous prévoyez de ne pas utiliser l’appareil
pendant une longue période de temps, assurezvous de retirer la fiche d’alimentation de la prise
secteur. Le non-respect de cette consigne peut
entraîner un incendie ou des
dysfonctionnements.
• N’essayez jamais de retirer ou d’insérer une fiche
électrique avec les mains mouillées. Ne
manipulez pas l’appareil en ayant les mains
mouillées. Le non-respect de cette procédure
risque d’entraîner des chocs électriques ou des
dysfonctionnements.
Le non-respect de cette procédure risque
d’entraîner des chocs électriques, un incendie ou
des dysfonctionnements. Faites immédiatement
inspecter l’appareil par le revendeur auprès
duquel vous l’avez acheté ou par un technicien
Yamaha qu alifi é .
Démontage interdit
• Ne tentez pas de démonter ou de modifier
l’appareil. Le non-respect de cette procédure
risque d’entraîner un incendie, des chocs
électriques, des blessures ou des
dysfonctionnements. En cas d’anomalie, veillez à
faire inspecter ou réparer l’appareil par le
revendeur auprès duquel vous l’avez acheté ou
par un technicien Yamaha qualifié.
Avertissement relatif à la
présence d’eau
• N’exposez pas l’appareil à la pluie, ne l’utilisez
pas près d’une source d’eau ou dans un milieu
humide et ne déposez pas dessus des récipients
(tels que des vases, des bouteilles ou des verres)
contenant des liquides qui risqueraient de
s’infiltrer par les ouvertures ou de dégouliner.
Toute infiltration de liquide tel que de l’eau à
l’intérieur de l’appareil risque de provoquer un
incendie, des chocs électriques ou des
dysfonctionnements. Si un liquide, tel que de
l’eau, pénètre à l’intérieur de l’appareil, mettez
immédiatement ce dernier hors tension et
débranchez le cordon d’alimentation de la prise
secteur. Faites ensuite inspecter l’appareil par le
revendeur auprès duquel vous l’avez acheté ou
par un technicien Yamaha qualifié.
Prévention contre les incendies
• Ne placez pas d’objets brûlants ou de flammes
nues à proximité de l’appareil, au risque de
provoquer un incendie.
En cas d’anomalie
• Si l’un des problèmes suivants se produit, coupez
immédiatement l’alimentation et retirez la fiche
d’alimentation.
- Le cordon/la fiche d’alimentation est
endommagé(e).
- Une odeur inhabituelle ou de la fumée se
dégage de l’appareil.
- Un corps étranger a pénétré à l’intérieur de
l’appareil.
- L’appareil est fissuré ou endommagé.
En continuant d’utiliser l’appareil dans ces
conditions, vous risquez de provoquer des chocs
électriques, un incendie ou des
dysfonctionnements. Faites immédiatement
inspecter ou réparer l’appareil par le revendeur
auprès duquel vous l’avez acheté ou par un
technicien Yamaha qualifié.
• Veillez à ne pas faire tomber l’appareil ni son
adaptateur secteur et à ne pas leur appliquer une
pression excessive. Si vous suspectez que
l’appareil a pu être endommagé à la suite d’une
chute ou d’un impact, coupez immédiatement
l’alimentation et retirez la fiche de la prise secteur.
ATTENTION
Ce contenu indique « un risque de blessures ».
Alimentation/adaptateur secteur
• Ne couvrez pas et n’entourez pas l’adaptateur
secteur avec un chiffon ou une couverture. Le
non-respect de cette consigne peut provoquer la
formation de chaleur à l’intérieur de l’appareil et
cause une déformation en cas d’incendie.
• N’utilisez pas une prise secteur dans laquelle la
fiche d’alimentation ne peut pas s’insérer
fermement. Le non-respect de cette consigne
peut entraîner un incendie, des chocs électriques
ou des brûlures.
• Veillez à toujours saisir la fiche elle-même, et non
le câble, pour la retirer de l’appareil ou de la prise
secteur. Si vous tirez sur le cordon, vous risquez
de l’endommager et de provoquer des chocs
électriques ou un incendie.
• Introduisez complètement la fiche d’alimentation
dans la prise secteur. L’utilisation de l’appareil
alors que la fiche d’alimentation n’est pas
complètement insérée dans la prise peut
entraîner une accumulation de poussière sur la
fiche et provoquer un incendie ou des brûlures.
Fr
2
Page 29

Français
Installation
• Ne placez pas l’appareil dans une position
instable afin d’éviter qu’il ne tombe ou se
renverse accidentellement et ne provoque des
blessures.
• Veillez à ce que la face supérieure soit orientée
vers le haut. Le non-respect de cette consigne
peut causer des dysfonctionnements ou entraîner
la chute de l’appareil et causer des blessures.
• N’installez pas l’appareil dans des endroits où il
pourrait entrer en contact avec des gaz corrosifs
ou de l’air à haute teneur en sel, ou encore des
endroits exposés à une fumée ou une vapeur
excessive. Cela pourrait provoquer des
dysfonctionnements.
• Évitez d’être à proximité de l’appareil lors de la
survenue d’une catastrophe naturelle telle qu’un
tremblement de terre. Compte tenu du risque de
renversement ou de chute de l’appareil pouvant
entraîner des blessures, pensez à vous éloigner
rapidement de l’appareil et à vous réfugier dans
un lieu sûr.
• Avant de déplacer l’appareil, veillez à désactiver
l’interrupteur d’alimentation et à déconnecter
tous les câbles de connexion. Le non-respect de
cette consigne peut entraîner l’endommagement
des câbles ou provoquer le trébuchement et la
chute de l’utilisateur ou d’autres personnes.
Perte de capacités auditives
•Avant de raccorder l’unité à d’autres appareils,
mettez tous les appareils concernés hors tension.
Le non-respect de ces mesures peut provoquer
une perte d’acuité auditive, entraîner un risque
d’électrocution ou endommager l’appareil.
• Lorsque vous mettez le système audio sous
tension, allumez toujours l’amplificateur ou le
récepteur en DERNIER pour éviter
d’endommager votre ouïe et les haut-parleurs.
Lors de la mise hors tension, vous devez éteindre
l’amplificateur ou le récepteur en PREMIER pour
la même raison. Le non-respect des consignes
précédentes risque d’entraîner une déficience
auditive ou d’endommager le casque.
Entretien
• Retirez la fiche d’alimentation de la prise secteur
avant de procéder au nettoyage de l’appareil. Le
non-respect de cette consigne peut entraîner des
chocs électriques.
Précautions d’utilisation
• Conservez les petites pièces hors de portée des
enfants en bas âge. Vos enfants risquent de les
avaler accidentellement.
• Évitez de faire ce qui suit :
- vous mettre debout ou vous assoir sur
l’appareil.
- placer des objets lourds sur l’appareil.
- disposer l’appareil en pile.
- appliquer une force excessive sur les
boutons, les commutateurs, les bornes
d’entrée/sortie, etc.
- vous appuyer sur l’appareil.
• Évitez de débrancher les câbles connectés afin
de ne pas causer de blessures ou de dommages
matériels qui pourraient résulter de la chute de
l’appareil.
Avis
Indique les points que vous devez respecter
afin d’éviter toute défaillance, dommage ou
dysfonctionnement du produit.
Alimentation/adaptateur secteur
• Si vous prévoyez de ne pas utiliser l’appareil
pendant une longue période de temps, assurezvous de retirer le cordon d’alimentation de la prise
secteur. Une quantité infime de courant circule
toujours dans l’appareil même après sa mise hors
tension (en mode veille).
Installation
• N’utilisez pas l’appareil à proximité d’autres
équipements électroniques, tels qu’un téléviseur,
une radio ou un téléphone mobile. Si vous ne
respectez pas cette consigne, l’appareil, le
téléviseur ou la radio risquent de provoquer des
interférences.
• N’utilisez pas l’appareil dans un emplacement
exposé à la lumière directe du soleil, à une
température très élevée (à proximité d’un appareil
de chauffage) ou très basse, à un dépôt de
poussière excessif ou à de fortes vibrations. Le
non-respect de cette consigne peut entraîner la
déformation du panneau de l’appareil, le
dysfonctionnement de ses composants internes
ou l’instabilité de ses opérations.
Fr
3
Page 30

Raccordements
Entretien
Informations
• En cas de connexion d’unités externes, assurezvous de lire attentivement le mode d’emploi de
l’appareil concerné et reliez-le conformément aux
instructions fournies.
La non-conformité aux instructions de
manipulation peut provoquer le
dysfonctionnement de l’appareil.
Manipulation
• Ne placez pas de produits en plastique ou en
caoutchouc sur l’appareil. Le non-respect de
cette consigne peut provoquer une décoloration
ou une déformation du panneau de cet appareil.
• Si la température ambiante change radicalement
(comme pendant le transport de l’appareil ou
dans des conditions de surchauffe ou de
refroidissement rapides) et que de la
condensation se forme dans l’appareil, laissez-le
hors tension pendant plusieurs heures jusqu’à ce
qu’il soit complètement sec avant de le réutiliser.
L’utilisation de l’appareil en cas de formation de
condensation peut entraîner son
dysfonctionnement.
• Si la température ou le degré d’humidité change
radicalement, des gouttelettes d’eau (de la
condensation) pourrait se former sur la surface de
l’appareil. En cas de formation de condensation,
essuyez immédiatement la surface de l’appareil
avec un chiffon doux et sec. Si la condensation
n’est pas éliminée de la surface de l’appareil, elle
risque d’être absorbée par les composants en
bois, causant leur déformation.
• Utilisez un chiffon doux et sec pour le nettoyage
de l’appareil. L’utilisation de produits chimiques
tels que de la benzène ou du diluant, de produits
d’entretien ou de chiffons de lavage chimique
peut causer la décoloration ou la déformation de
l’appareil.
À propos du contenu de ce
manuel
• Les illustrations figurant dans ce manuel servent
uniquement à expliciter les instructions.
• Les noms de société et les noms de produit
mentionnés dans ce manuel sont des marques
commerciales ou des marques déposées de
leurs sociétés respectives.
À propos du nom de l’appareil
Le numéro de modèle, le numéro de série,
l’alimentation requise, etc., se trouvent sur ou près de
la plaque signalétique du produit, située dans la
partie inférieure de l’unité. Notez le numéro de série
dans l’espace fourni ci-dessous et conservez ce
manuel en tant que preuve permanente de votre
achat afin de faciliter l’identification du produit en cas
de vol.
N° de modèle
N° de série
(bottom_fr_01)
Fr
4
Page 31

Français
Table des matières
Prise en main 6
Caractéristiques de cette unité . . . . . . . . . . . . . . . . . 6
À propos de ce manuel . . . . . . . . . . . . . . . . . . . . . . . 6
Vérification du contenu . . . . . . . . . . . . . . . . . . . . . . . 7
Manipulation des disques vinyle. . . . . . . . . . . . . . . . 7
Fonctions et éléments de l’unité . . . . . . . . . . . . . . . . 8
Panneau supérieur . . . . . . . . . . . . . . . . . . . . . . . . . . 8
Panneau arrière . . . . . . . . . . . . . . . . . . . . . . . . . . . . 9
Préparatifs 10
Emplacement . . . . . . . . . . . . . . . . . . . . . . . . . . . . . . 10
Montage . . . . . . . . . . . . . . . . . . . . . . . . . . . . . . . . . . 10
Montage de l’unité . . . . . . . . . . . . . . . . . . . . . . . . . 10
Montage du capot . . . . . . . . . . . . . . . . . . . . . . . . . 12
Effectuer les connexions . . . . . . . . . . . . . . . . . . . . . 13
Effectuer les réglages . . . . . . . . . . . . . . . . . . . . . . . 14
Réglage de la pression du diamant. . . . . . . . . . . . . 14
Réglage du dispositif anti-skating . . . . . . . . . . . . . . 16
Lecture 17
En cas de nécessité 20
Soin et entretien . . . . . . . . . . . . . . . . . . . . . . . . . . . . 20
Remplacement de pièces . . . . . . . . . . . . . . . . . . . . 20
Remplacement de la courroie . . . . . . . . . . . . . . . . . 20
Remplacement du diamant . . . . . . . . . . . . . . . . . . . 21
Déplacement de l’unité . . . . . . . . . . . . . . . . . . . . . . 21
Résolution des problèmes . . . . . . . . . . . . . . . . . . . . 22
Caractéristiques techniques . . . . . . . . . . . . . . . . . . 24
Mise sous tension. . . . . . . . . . . . . . . . . . . . . . . . . . 16
Fr
5
Page 32

Prise en main
AVIS
NOTE
Caractéristiques de cette unité
Cette unité est une platine pour la lecture de disques vinyle.
Meuble en bois de finition brillante
Outre son côté esthétique, ce meuble présente de réels avantages tels
qu’une stabilité et un amortissement des vibrations supérieurs.
Le bras de lecture droit et extrêmement rigide élimine tout effet sur le
signal sonore délicat.
Commutation facile entre sortie LINE dotée d’un circuit de préampli
phono (PHONO EQ) et sortie directe PHONO, pour une flexibilité de
configuration de votre système de lecture de disques vinyle.
Excellente stabilité de rotation obtenue par l’adoption d’un plateau en
aluminium coulé entraîné par courroie via un moteur électrique de
couple élevé.
La marge de réinjection est préservée grâce à des pieds (isolants)
assurant un excellent amortissement des vibrations et chocs.
À propos de ce manuel
Veuillez garder les points suivants à l’esprit quand vous lisez ce manuel.
Les spécifications techniques et l’aspect du produit peuvent être modifiés
sans préavis en vue d’améliorations du produit.
Description des symboles graphiques utilisés dans ce mode d’emploi :
-« AVERTISSEMENT » indique des consignes que vous devez
observer pour éviter les risques de décès ou de blessures graves.
-« ATTENTION » indique des consignes que vous devez observer
pour éviter les risques de blessures.
- indique des consignes que vous devez observer pour
éviter d’endommager le produit ou de causer un fonctionnement
incorrect.
- indique des informations complémentaires qui vous
seront utiles.
6
Fr
Page 33

Prise en main | Vérification du contenu
Français
Étiquette du disque Tranche du disque
Vérification du contenu
Assurez-vous que l’emballage contient tous les éléments suivants.
Plateau ×1 Couvre-plateau ×1 Courroie ×1
* La courroie est installée
sur le plateau.
Contrepoids ×1 Porte-cellule ×1
(avec cellule)
Capot ×1 Charnière de capot ×2 Câble stéréo RCA/
Adaptateur centreur
45 tours ×1
Cinch ×1
Manipulation des disques vinyle
Pour manipuler un disque vinyle, saisissez-le en posant le pouce contre sa
tranche et les autres doigts de la même main sur son étiquette, ou tenez le
disque en maintenant sa tranche des deux mains.
Adaptateur secteur
×1
* Pour des détails, voyez le
« Complément
d’informations » fourni.
Mode d’emploi (ce manuel)
Complément d’informations (dépliant)
Fr
7
Page 34

Prise en main | Fonctions et éléments de l’unité
햻
햴 햶햳햲햵
햷
햸
햹
햺
햿
햽햾
Fonctions et éléments de l’unité
Panneau supérieur
햲 33/45 (tours) ( page 17)
햳 PLAY/STOP (lecture/arrêt) ( page 17)
햴 Plateau ( page 10)
햵 Couvre-plateau ( page 11)
햶 Axe de plateau ( page 10)
햷 Bras de lecture ( page 11)
햸 Porte-cellule ( page 11)
햹 Cellule
햺 Contrepoids ( page 11)
햻 Bague graduée du contrepoids ( page 15)
햽 Repose-bras ( page 14)
햾 Lève-bras ( page 18)
햿 Dispositif anti-skating ( page 16)
Fr
8
Page 35

Français
Panneau arrière
햵햳햴 햲
: sous tension : hors tension
Prise en main | Fonctions et éléments de l’unité
햲 z (alimentation)
Ce bouton met l’unité sous/hors tension. ( page 16)
햳 Prise DC IN
Reliez l’adaptateur secteur (fourni) à cette prise. ( page 13)
햴 Prises PHONO OUT
Ces prises restituent le signal audio du disque vinyle. ( page 13)
햵 Sélecteur PHONO EQ (préampli phono)
Réglez ce sélecteur sur la position correspondant au signal approprié
restitué via les prises PHONO OUT à l’appareil connecté. ( page 13)
Fr
9
Page 36

Préparatifs
ATTENTION
1
2
33
Emplacement
Vu que les vibrations affectent facilement la lecture de disques vinyle, veillez à poser cette unité sur une surface de niveau et à l’abri de toute vibration.
Positionnez l’unité suffisamment à l’écart des enceintes afin d’éviter que la pression sonore ou des vibrations n’affectent la lecture.
Montage
Montage de l’unité
Levez le plateau.
1
Insérez un doigt dans l’ouverture circulaire du plateau et poussez
2
la courroie vers l’extérieur du plateau avec ce doigt.
3
Veillez à ne pas lâcher le plateau. Cela pourrait causer des blessures ou
Fr
10
Glissez le plateau sur l’axe de plateau.
endommager l’unité.
Page 37

Préparatifs | Montage
Français
Poulie
Bague de verrouillage
Alignez l’orifice circulaire du plateau avec la poulie.
4
Mettez la courroie en place sur la poulie avec le doigt la
5
maintenant tendue.
Veillez à ne pas tordre la courroie. Après avoir accroché la courroie sur
la poulie, tournez plusieurs fois le plateau pour vérifier qu’elle est
parfaitement en place.
Montez le contrepoids sur le bras de lecture.
7
Positionnez les repères du contrepoids vers vous et glissez le
contrepoids sur l’arrière du bras de lecture.
Montez le porte-cellule sur le bras de lecture.
8
Insérez le porte-cellule sur l’extrémité avant du bras de lecture et
tournez la bague de verrouillage pour bloquer le porte-cellule.
Posez le couvre-plateau sur le plateau.
6
Fr
11
Page 38

Préparatifs | Montage
NOTE
ATTENTION
Socle de charnière
Montage du capot
Le capot protège l’unité contre la poussière,etc.
Insérez les charnières aux emplacements appropriés des deux
1
côtés du capot.
Montez le capot en insérant les charnières dans les socles de
2
charnière au dos de l’unité.
Pour retirer le capot, saisissez-le des deux côtés et tirez-le lentement vers le
haut afin de déposer le capot et ses charnières.
Fr
12
Veillez à ne pas vous pincer les mains ou les doigts lorsque vous ouvrez
et fermez le capot.
Page 39

Français
Effectuer les connexions
NOTE
ATTENTION
AUX IN
R L
Préampli-ampli de puissance ou composant
(prises d’entrée externe)
Adaptateur secteur
(fourni)
Câble stéréo RCA/Cinch
(fourni)
Vers une prise
de courant
Cette unité
(panneau arrière)
PHONO IN
R L
Adaptateur secteur
(fourni)
Câble stéréo RCA/Cinch
(fourni)
Préampli-ampli de puissance
(prises d’entrée PHONO)
Cette unité
(panneau arrière)
Vers une prise
de courant
Préparatifs | Effectuer les connexions
Effectuez toutes les autres connexions avant de brancher l’adaptateur secteur (fourni)
à une prise de courant.
Appareils connectés
Réglage du sélecteur
PHONO EQ
Fonction de préampli
phono de cette unité
Consultez en outre le mode d’emploi de l’appareil que vous
connectez.
Appareils ne disposant pas de prises d’entrée PHONO Appareils dotés de prises d’entrée PHONO
Activée
Le signal de la cellule est amplifié par le préampli
phono intégré à cette unité et restitué par les prises
PHONO OUT.
ON (par défaut) THRU
Désactivée
Le signal de la cellule est directement restitué par les
prises PHONO OUT.
Fr
13
Page 40

Préparatifs | Effectuer les réglages
AVIS
AVIS
Effectuer les réglages
Réglage de la pression du diamant
Réglez le bras de lecture de sorte que la pression du diamant sur le disque
vinyle soit appropriée.
Retirez le cache du diamant.
1
Veillez à ce que le cache du diamant ou vos doigts n’entrent pas en
contact avec le diamant.
Réglez le dispositif d’anti-skating sur la position « 0 ».
2
Désengagez le verrou du bras de lecture.
3
Levez le bras de lecture du repose-bras et poussez le bras
4
légèrement à gauche.
14
Fr
Veillez à ce que le diamant n’entre en contact avec aucune partie de
l’unité.
Page 41

Préparatifs | Effectuer les réglages
Français
NOTE
NOTE
1
2
Ligne centrale
Tournez le contrepoids de sorte que le bras de lecture soit en
5
position horizontale.
Vers 1 : Le contrepoids se déplace vers l’avant du bras de lecture.
Vers 2 : Le contrepoids se déplace vers l’arrière du bras de lecture.
Correct
Incorrect
Le bras de lecture est en
position horizontale (équilibré)
Le contrepoids est trop en
avant
Tournez la bague graduée du contrepoids de sorte que le repère
7
«0» soit aligné avec la ligne centrale sur l’extrémité arrière du bras
de lecture.
Quand vous tournez la bague graduée, maintenez le contrepoids en
place des doigts de sorte qu’il ne tourne pas.
Veillez à régler le contrepoids sur le repère correspondant à la
8
pression appropriée pour la cellule en place.
La pression spécifiée pour la cellule fournie est de 3,5 g.
Incorrect
Replacez le bras de lecture sur le repose-bras et engagez son
6
verrou.
Le contrepoids est trop en
arrière
Le fait de tourner le contrepoids entraine aussi la rotation de la bague
graduée du contrepoids.
Fr
15
Page 42

Préparatifs | Mise sous tension
Réglage du dispositif anti-skating
Quand le plateau tourne, la pointe du diamant produit une force qui l’entraîne
vers le centre de rotation. Quand la valeur du dispositif d’anti-skating est
identique à la valeur de pression du diamant, une force entraînant la pointe du
diamant vers l’extérieur du centre de rotation est produite, et les deux forces
s’annulent mutuellement.
Réglez le dispositif anti-skating sur la même valeur que la pression
1
du diamant de la cellule en place.
Mise sous tension
Appuyez sur le bouton z (alimentation) du panneau arrière de l’unité pour la
mettre sous tension.
16
Fr
Page 43

Français
Lecture
ATTENTION
: 33/1/3 tr/min : 45 tr/min
Lancement de la lecture
Démarrer la lecture d’un disque vinyle sans diminuer suffisamment le
volume sur l’amplificateur peut causer un bruit important quand le
diamant touche la surface du disque. Cela pourrait provoquer des
dommages de l’ouïe et un endommagement de l’amplificateur et des
haut-parleurs. Veillez donc à baisser le volume sur l’amplificateur.
Ouvrez le capot et posez un disque vinyle sur le plateau.
1
Pour lire un disque 45 tours, utilisez l’adaptateur centreur 45 tours livré.
Choisissez la vitesse de rotation appropriée pour le disque avec le
2
bouton 33/45 (vitesse).
Appuyez sur PLAY/STOP (lecture/arrêt).
3
Le plateau se met à tourner.
Fr
17
Page 44

Lecture
Désengagez le verrou du bras de lecture et relevez le lève-bras.
4
Déplacez le bras de lecture jusqu’à l’emplacement du disque
5
vinyle où vous voulez démarrer la lecture.
Abaissez le lève-bras.
6
Le bras de lecture s’abaisse et la lecture du disque vinyle commence.
18
Fr
Page 45

Français
Arrêt momentané de la lecture
NOTE
Pour arrêter momentanément la lecture du disque vinyle, relevez le lève-bras.
Pour reprendre la lecture, abaissez le lève-bras.
Arrêt de la lecture
Relevez le lève-bras.
1
Replacez le bras de lecture sur le repose-bras.
2
Abaissez le lève-bras.
3
Appuyez sur PLAY/STOP (lecture/arrêt).
4
La rotation du plateau s’arrête.
Engagez le verrou du bras de lecture.
5
Le bras de lecture ne se relève pas automatiquement en fin de lecture d’un
disque vinyle.
Si vous ne comptez pas utiliser l’unité pendant une période prolongée,
remettez le cache du diamant en place pour protéger ce dernier.
Lecture
Fr
19
Page 46

En cas de nécessité
ATTENTION
Soin et entretien
Comment prendre soin de cette unité
Frottez-la avec un chiffon doux et sec. N’utilisez pas de produits chimiques tels
que du benzène ou du diluant, car ils pourraient endommager la finition.
Entretien de la pointe du diamant
La pointe du diamant est extrêmement délicate. Manipulez-la avec soin pour
éviter de l’endommager. Si de la poussière est accrochée à la pointe, éliminezla avec une brosse à poils doux, en commençant par la base du diamant et en
brossant vers la pointe de lecture, ou utilisez un nettoyant spécial pour diamant.
Entretien des disques vinyle
La présence de saleté sur un disque vinyle peut provoquer du bruit ou des
sauts durant la lecture. Éliminez la saleté sur les disques vinyle avec une brosse
disponible dans le commerce.
Remplacement de pièces
Remplacement de la courroie
Selon les conditions d’utilisation, la courroie peut s’user et se rompre. Dans ce
cas, remplacez la courroie. Pour obtenir une courroie de remplacement,
adressez-vous au revendeur ou SAV agréé Yamaha de votre région.
Mettez cette unité et les appareils connectés hors tension, puis
1
débranchez l’adaptateur secteur de cette unité de la prise de
courant.
Retirez le couvre-plateau du plateau.
2
Retirez la courroie de la poulie.
3
Insérez les doigts dans les orifices du plateau et levez ce dernier.
4
Veillez à ne pas lâcher le plateau. Cela pourrait causer des
blessures ou endommager l’unité.
Retournez le plateau et retirez la courroie.
5
Fr
20
Mettez la nouvelle courroie en place sur le plateau.
6
Veillez à ne pas tordre la courroie.
Installez le plateau sur l’unité.
7
Pour plus de détails, reportez-vous à la section «Montage» à la page 10.
Page 47

En cas de nécessité | Déplacement de l’unité
Français
ATTENTION
1
2
Rainure
Dessous
Remplacement du diamant
Quand la pointe de lecture du diamant est usée ou endommagée, remplacez
immédiatement le diamant.
Procurez-vous comme remplacement une pointe de lecture Audio-Technica
ATN3600L.
Mettez en place le cache du diamant avant de changer la pointe de
lecture. Sans cela, la pointe de lecture risquerait de causer des blessures
ou de subir des dommages.
Veillez à conserver le diamant hors de portée des enfants afin d’éviter les
risques d’ingestion.
Mettez cette unité et les appareils connectés hors tension, puis
1
débranchez l’adaptateur secteur de cette unité de la prise de
courant.
Maintenez le corps de la cellule des doigts et poussez le diamant
2
vers le bas
1, puis tirez-le vers vous 2 pour le retirer.
Tout en maintenant toujours le corps de la cellule des doigts,
3
insérez l’onglet du nouveau diamant dans la rainure sur le dessous
de la cellule.
Poussez le diamant vers le haut jusqu’à ce que vous entendiez un
4
déclic.
Déplacement de l’unité
Avant de déplacer l’unité, engagez le verrou du bras de lecture afin
d’immobiliser le bras.
Fr
21
Page 48

En cas de nécessité | Résolution des problèmes
Résolution des problèmes
Si l’unité présente des signes de fonctionnement anormal, vérifiez les points suivants.
Si les solutions proposées ne permettent pas de résoudre le problème ou si le problème rencontré n’est pas décrit ci-dessous, appuyez sur le bouton z (alimentation)
situé sur le panneau arrière de l’unité pour la mettre hors tension, débranchez l’adaptateur secteur et prenez contact avec un revendeur ou SAV agréé Yamaha dans
votre région.
Anomalies Causes possibles Solution
Une pression sur z
(alimentation) ne permet pas de
mettre l’unité sous tension.
Le plateau ne tourne pas.
Aucun son.
Le volume est trop faible ou
trop élevé.
Le rendu de l’image stéréo est
anormal.
La vitesse de lecture est
incorrecte.
Page
L’adaptateur secteur est débranché de la prise DC IN de
cette unité ou de la prise de courant, ou n’est pas fermement
connecté.
La courroie n’est pas ajustée correctement sur le plateau et
la poulie, ou est détachée.
L’unité n’a pas été mise sous tension avec z (alimentation). Mettez l’unité sous tension avec z (alimentation). 16
Le porte-cellule n’est pas fixé correctement sur le bras de
lecture.
Le câble stéréo RCA/Cinch n’est pas raccordé correctement. Raccordez correctement le câble stéréo RCA/Cinch. 13
La fonction de sourdine de l’amplificateur est active. Désactivez la fonction de sourdine de l’amplificateur. –
Le réglage de cellule de l’amplificateur ou du préampli phono
est incorrect.
Le réglage du sélecteur PHONO EQ est incorrect.
La platine vinyle n’est pas de niveau. Placez la platine vinyle sur une surface de niveau. –
Le réglage de vitesse est incorrect.
Raccordez fermement l’adaptateur secteur à la prise DC IN
de cette unité et à la prise de courant.
Ajustez correctement la courroie sur le plateau et la poulie. 10
Montez correctement le porte-cellule sur le bras de lecture. 11
Effectuez correctement le réglage de cellule de
l’amplificateur ou du préampli phono en fonction du type de
cellule utilisée (MM ou MC).
Réglez correctement le sélecteur PHONO EQ en fonction de
l’appareil connecté.
Réglez correctement la vitesse en fonction du disque vinyle
avec le bouton 33/45 (vitesse). Cette unité ne permet pas de
lire des disques 78 tours.
13
13
17
–
22
Fr
Page 49

En cas de nécessité | Résolution des problèmes
Français
Anomalies Causes possibles Solution
Le son comporte un
bourdonnement.
Le disque vinyle saute.
Le son comporte du bruit.
Le son comporte de la
distorsion.
Le son comporte de la
réinjection (Larsen).
Page
Le câble stéréo RCA/Cinch n’est pas raccordé correctement. Raccordez correctement le câble stéréo RCA/Cinch. 13
Le porte-cellule n’est pas enfoncé à fond sur le bras de
lecture.
Le réglage de pression du diamant est incorrect.
Le disque vinyle est rayé ou déformé. N’utilisez pas de disques rayés ni déformés. –
Le disque vinyle est sale.
Le disque vinyle est chargé d’électricité statique.
Le diamant est sale. Nettoyez le diamant. 20
Le diamant est usé. Remplacez le diamant. 21
L’unité se trouve dans un endroit soumis à des vibrations.
L’unité est placée trop près des haut-parleurs. Éloignez l’unité des hauts-parleurs. –
Le volume de lecture est trop élevé. Réglez le volume sur l’amplificateur. –
Serrez la bague de verrouillage pour bloquer le porte-cellule
sur le bras de lecture.
Réglez le contrepoids sur le repère correspondant à la
pression appropriée pour la cellule en place.
Nettoyez le disque vinyle avec une brosse disponible dans le
commerce.
Utilisez une brosse antistatique pour éliminer la charge
statique du disque vinyle.
Placez l’unité à un endroit de niveau et à l’écart de sources
de vibrations.
11
14
–
–
–
Fr
23
Page 50

En cas de nécessité | Caractéristiques techniques
Caractéristiques techniques
Voici les caractéristiques techniques de cette unité.
Section du plateau
Méthode d’entraînement . . . . . . . . . . . . . . . . . . . . . . . . . . . . . .À courroie
Moteur. . . . . . . . . . . . . . . . . . . . . . . . . . . . . . . . . . . . . . Moteur électrique
Vitesse de rotation. . . . . . . . . . . . . . . . . . . . . . . . .33 1/3 tr/min, 45 tr/min
Variation de vitesse de rotation . . . . . . . . . . . . . . . . . . . . . . . . . . . . . ±2%
Pleurage et scintillement . . . . . . . . . . . . . . . . . . . . . . . . . . . . . . . . . .0,2%
Plateau . . . . . . . . . . . . . . . . . . . . . . . . . . . . . . . . . . . En aluminium moulé
Diamètre 30 cm
Section du bras de lecture
Type . . . . . . . . . . . . . . . . . . . . . . Bras de lecture droit à équilibre statique
Longueur effective du bras. . . . . . . . . . . . . . . . . . . . . . . . . . . . .223,5 mm
Plage de réglage de la pression du diamant. . . . . . . . . . . . . . . . . . . 0–4 g
Poids admissible de la cellule. . . . . . 15,5–19 g (y compris le porte-cellule)
Avancée . . . . . . . . . . . . . . . . . . . . . . . . . . . . . . . . . . . . . . . . . . . . 19 mm
Section de la cellule
Type . . . . . . . . . . . . . . . . . . . . . . . . . . . . . . . . . . . . . . . . . . . . . . . . . .MM
Tension de sortie . . . . . . . . . . . . . . . . . . . . . 2,5 mV (1 kHz, 3,54 cm/sec)
Force d’appui du diamant . . . . . . . . . . . . . . . . . . . . . . . . . . . . .3,5 ±0,5 g
Poids de la cellule . . . . . . . . . . . . . . . . . . . . . . . . . . . . . . . . . . .5,0 ±0,3 g
Hauteur de la cellule . . . . . . . . . . . . . . . . . . . . . . . . . . . . . .17,0 ±0,7 mm
Poids du porte-cellule . . . . . . . . . . . 10 g (y compris les vis, écrous et fils)
Section audio
Niveau de sortie
PHONO EQ THRU (1 kHz, 3,54 cm/sec). . . . . . . . . . . 2,5 mV ±3 dBV
PHONO EQ ON . . . . . . . . . . . . . . . . . . . . . . . . . . . 140 mV (–17 dBV)
Rapport signal/bruit (pondéré A, 20 kHz LPF). . . . . . . . . . . 67 dB ou plus
Prise de sortie . . . . . . . . . . . .PHONO OUT × 1 (RCA/Cinch asymétrique)
Généralités
Alimentation de l’adaptateur secteur
Entrée. . . . . . . . . . . . . . . . . . . . . . . . . . . . . . CA 100–240 V 50/60 Hz
Sortie . . . . . . . . . . . . . . . . . . . . . . . . . . . . . . . . . . . . . . . . . 12 V 0,5 A
Consommation
Quand l’unité est sous tension . . . . . . . . . . . . . . . . . . . . . . . . . 1,5 W
Quand l’unité est en veille . . . . . . . . . . . . . . . . . . . . . . . . . . . . . .0,1 W
Poids . . . . . . . . . . . . . . . . . . . . . . . . . . . . . . . . . . . . . . . . . . . . . . . 4,8 kg
Dimensions (largeur × hauteur × profondeur) . . . . . .450 × 136 × 368 mm
(incluant pieds et saillies)
Le contenu de ce mode d’emploi s’applique aux dernières caractéristiques
techniques connues à la date de publication du manuel. Pour obtenir la
version la plus récente du manuel, accédez au site Web de Yamaha puis
téléchargez le fichier du manuel concerné.
24
Fr
Page 51

Русский
Данный продукт предназначен для использования в домашних условиях для прослушивания аудиоисточников.
МЕРЫ ПРЕДОСТОРОЖНОСТИ
ПЕРЕД ИСПОЛЬЗОВАНИЕМ ВНИМАТЕЛЬНО
ПРОЧИТАЙТЕ ДАННЫЕ УКАЗАНИЯ.
СЛЕДУЙТЕ ЭТИМ ИНСТРУКЦИЯМ.
Перечисленные ниже меры
предосторожности предназначены для
предотвращения риска причинения вреда
пользователю и другим людям, а также
для предотвращения повреждения
имущества и оказания помощи
пользователю по надлежащему и
безопасному использованию данного
аппарата. Следуйте этим инструкциям.
После прочтения храните это руководство в
надежном месте, чтобы к нему можно было
обратиться в любое время.
• Для проведения осмотра или ремонта
обязательно обращайтесь к дилеру, у
которого был приобретен аппарат, либо в
сервисный центр Yamaha.
• Yamaha не несет ответственности за
полученные вами травмы или
повреждения изделий в результате
ненадлежащего использования или
модификаций аппарата.
• Данное устройство предназначено для
домашнего использования. Не используйте
его в областях, требующих высокой
надежности, например в сфере
жизнеобеспечения, здравоохранения или
при работе с ценными активами.
ПРЕДУПРЕЖДЕНИЕ
Данная информация предупреждает о
риске гибели или получения серьезных
травм.
Источник питания/адаптер
переменного тока
• Не допускайте повреждений кабеля
питания.
- Не располагайте кабель рядом с
обогревателями.
- Не скручивайте и не сгибайте его.
- Не царапайте кабель питания.
- Не ставьте на кабель питания тяжелые
предметы.
Использование кабеля питания с оголенным
проводом может привести к поражению
электрическим током или пожару.
• Не прикасайтесь к штепселю или кабелю
питания при наличии риска удара молнии.
Несоблюдение этого указания может
привести к поражению электрическим
током.
• Напряжение источника питания должно
соответствовать указанному на нем
значению. Подключение к неправильной
розетке переменного тока может стать
причиной пожара, поражения
электрическим током или неисправности.
• Обязательно используйте прилагаемый
адаптер переменного тока. Несоблюдение
этого указания может привести к пожару,
ожогам или неисправностям.
• Периодически проверяйте штепсель и
очищайте его от скопившейся пыли и грязи.
Несоблюдение этого указания может
привести к пожару или поражению
электрическим током.
• Перед настройкой аппарата убедитесь, что
используемая розетка переменного тока
легко доступна. При возникновении какоголибо сбоя или неисправности немедленно
отключите питание с помощью выключателя
и отсоедините штепсель от розетки
переменного тока. Даже если выключатель
питания находится в выключенном
положении, до тех пор пока штепсель не
отсоединен от розетки, аппарат остается
подключенным к источнику питания.
• В случае грома или приближения грозы
незамедлительно отключите выключатель
питания и отсоедините штепсель от розетки
переменного тока. Несоблюдение этого
указания может привести к пожару или
неисправностям.
• Если аппарат не будет использоваться в
течение длительного времени, отсоедините
штепсель от розетки переменного тока.
Несоблюдение этого указания может
привести к пожару или неисправностям.
Ru
1
Page 52

Не разбирать
• Не разбирайте аппарат и не изменяйте его
конструкцию. Несоблюдение этого указания
может привести к пожару, поражению
электрическим током, травмам или
неисправностям. При появлении неполадок
обращайтесь для осмотра или ремонта в
место приобретения аппарата или в
сервисный центр Yamaha.
Беречь от воды
• Не допускайте попадания аппарата под
дождь, не пользуйтесь им рядом с водой, в
условиях сырости или повышенной
влажности. Не ставьте на аппарат какиелибо емкости с жидкостью (например, вазы,
бутылки или стаканы), которая может
пролиться и попасть в отверстия, а также не
пользуйтесь аппаратом там, где на него
может попасть вода. Попадание жидкости,
например воды, внутрь аппарата может
стать причиной пожара, поражения
электрическим током или неисправности. В
случае попадания в аппарат жидкости,
например воды, немедленно отключите
питание и отсоедините кабель питания от
розетки переменного тока. Затем
обратитесь для осмотра аппарата в место
приобретения или в сервисный центр
Yamaha.
• Ни в коем случае не вставляйте и не
вынимайте штепсель мокрыми руками. Не
беритесь за аппарат влажными руками.
Несоблюдение этого указания может
привести к поражению электрическим
током или неисправностям.
Беречь от огня
• Не размещайте горящие предметы или
источники открытого огня рядом с
аппаратом, поскольку это может привести к
возгоранию.
Нештатные ситуации
• При возникновении любой из указанных
ниже проблем немедленно отключите
питание и отсоедините кабель питания от
электросети.
- Повреждения кабеля питания или штепселя.
- Из аппарата исходит необычный запах или
дым.
- Внутрь аппарата попал посторонний
предмет.
- На аппарате имеются трещины или
повреждения.
Продолжение использования может
вызвать поражение электрическим током,
пожар или привести к неисправности.
Незамедлительно обратитесь для осмотра
аппарата в место его приобретения или в
сервисный центр Yamaha.
• Не роняйте и не подвергайте аппарат или
адаптер переменного тока сильному
физическому воздействию. Если существует
вероятность того, что аппарат был
поврежден в результате падения или
физического воздействия, немедленно
отключите питание и отсоедините штепсель
от розетки переменного тока. Несоблюдение
этого указания может привести к поражению
электрическим током, пожару или
неисправностям. Незамедлительно
обратитесь для осмотра аппарата в место
приобретения или в сервисный центр Yamaha.
ВНИМАНИЕ
Данная информация предупреждает о
риске получения травмы.
Источник питания/адаптер
переменного тока
• Не накрывайте и не оборачивайте адаптер
переменного тока тканью или одеялом.
Несоблюдение этого указания может
привести к задержке тепла и вызвать
деформацию корпуса или пожар.
• Не используйте розетки переменного тока, в
которых штепсель держится ненадежно.
Несоблюдение этого указания может
привести к пожару, поражению
электрическим током или ожогам.
• Вынимая сетевую штепсель из устройства
или розетки переменного тока, держитесь
за сам штепсель. Никогда не тяните за
шнур. Это может привести к повреждению
кабеля и стать причиной поражения
электрическим током или пожара.
• Вставляйте штепсель в розетку
переменного тока плотно и до упора.
Использование устройства, штепсель
которого недостаточно плотно вставлена в
розетку, может вызвать накопление частиц
пыли на штепселе и стать причиной пожара
или ожога.
Ru
2
Page 53

Русский
Установка
• Не оставляйте аппарат в неустойчивом
положении. Аппарат может случайно упасть
и причинить травму.
• убедитесь, что верхняя часть направлена
вверх. Несоблюдение этого указания может
привести к неисправностям или падению
аппарата и причинить травму.
• Не устанавливайте аппарат в местах, где он
может контактировать с коррозионными
газами или соленым воздухом, либо в
местах с чрезмерным количеством дыма
или пара. Это может стать причиной
неисправности.
• Не рекомендуется находиться в
непосредственной близости от аппарата во
время стихийных бедствий, например
землетрясений. Поскольку аппарат может
перевернуться или упасть и причинить
травму, быстро отойдите от аппарата и
перейдите в безопасное место.
• Перед перемещением аппарата отключите
выключатель питания и отсоедините все
подключенные кабели. Несоблюдение этого
указания может привести к повреждению
кабелей или привести к падению вас или
кого-либо еще.
Потеря слуха
• Перед подключением аппарата к другим
устройствам отключите их питание. В
противном случае это может привести к
потере слуха, поражению электрическим
током или повреждению устройства.
• При включении питания переменного тока в
аудиосистеме всегда включайте усилитель
или ресивер В ПОСЛЕДНЮЮ ОЧЕРЕДЬ во
избежание потери слуха и повреждения
динамиков. При выключении питания
усилитель или ресивер следует выключать
ПЕРВЫМ по той же причине. Несоблюдение
этого указания может привести к потере
слуха или повреждению динамиков.
Техническое обслуживание
• Во время чистки отсоединяйте аппарат от
электросети. Несоблюдение этого указания
может привести к поражению
электрическим током.
Меры безопасности при
эксплуатации
• Храните мелкие детали в недоступном для
маленьких детей месте. Дети могут
случайно проглотить их.
• Запрещается:
- вставать или садиться на оборудование;
- ставить на оборудование тяжелые
предметы;
- ставить экземпляры оборудования друг на
друга;
- применять избыточную силу к кнопкам,
переключателям, разъемам ввода-вывода
и т. д.;
- опираться на оборудование.
• Не тяните за подключенные кабели. Это
может привести к травмам или
повреждению аппарата вследствие его
падения.
Уведомление
Указания, которые необходимо соблюдать
во избежание неисправности,
повреждения или нарушения работы
устройства.
Источник питания/адаптер
переменного тока
• Если аппарат не будет использоваться в
течение длительного времени, отсоедините
штепсель от розетки переменного тока.
Слабый ток сохраняется, даже если
питание выключено (питание в режиме
ожидания).
Установка
• Не используйте данный аппарат рядом с
другими электронным оборудованием,
например, телевизором, радио или
мобильным телефоном. Несоблюдение
этого указания может стать причиной
шумов, создаваемых телевизором или
радиоприемником.
• Не используйте этот аппарат в месте,
которое подвержено воздействию прямого
солнечного света, которое может слишком
сильно нагреться (например, рядом с
обогревателем) или охладиться либо
которое подвержено слишком сильному
воздействию пыли или вибрации. Это может
привести к деформации панели аппарата,
вызвать неисправности внутренних
компонентов или стать причиной
нестабильной работы.
Ru
3
Page 54

Подключения
Техническое обслуживание
Информация
• При подключении внешних устройств
обязательно внимательно прочитайте
руководство для каждого устройства и
подключите их в соответствии с
инструкциями.
Неправильное подключение аппарата,
нарушающее инструкции, может привести к
его неправильной работе.
Обращение с аппаратом
• Не ставьте на этот аппарат пластмассовые
и резиновые предметы. Это может стать
причиной деформации или выцветания
панели аппарата.
• Если при резком изменении внешней
температуры (например, при
транспортировке аппарата или при быстром
нагреве либо охлаждении) есть вероятность
образования конденсата в аппарате, перед
использованием оставьте его на несколько
часов, не включая питания, пока он не
высохнет полностью. Использование
аппарата при наличии в нем конденсата
может привести к его повреждению.
• При резком изменении температуры или
влажности есть вероятность образования
капелек (конденсата) на поверхности
аппарата. При образовании капелек воды
немедленно сотрите их мягкой тканью. Если
оставить капельки воды на аппарате, они
могут впитаться в деревянные детали и
вызвать деформацию.
• Для чистки аппарата пользуйтесь мягкой
сухой тканью. Использование химикатов,
таких как бензин или разбавитель, моющих
средств или тканей для химической чистки
может привести к деформации или
обесцвечиванию.
О содержании этого
руководства
• Иллюстрации в данном руководстве
приведены только в качестве примеров.
• Названия компаний и изделий в данном
руководстве являются товарными знаками
или зарегистрированными товарными
знаками соответствующих компаний.
Табличка с названием аппаратаl
Номер модели, серийный номер, требования к
источнику питания и пр. указаны на табличке с
названием изделия в нижней части устройства
или рядом с ней. Запишите серийный номер в
расположенном ниже поле и сохраните данное
руководство как подтверждение покупки; это
поможет идентифицировать принадлежность
устройства в случае кражи.
Номер модели.
Cерийный номер.
(bottom_ru_02)
Ru
4
Page 55

Русский
Cодержание
Перед началом работы 6
Функции аппарата. . . . . . . . . . . . . . . . . . . . . . . . . . 6
Сведения о данном руководстве . . . . . . . . . . . . . 6
Проверка комплектации . . . . . . . . . . . . . . . . . . . . 7
Как держать пластинку? . . . . . . . . . . . . . . . . . . . . 7
Компоненты и их функции. . . . . . . . . . . . . . . . . . . 8
Верхняя панель . . . . . . . . . . . . . . . . . . . . . . . . . . . 8
Задняя панель . . . . . . . . . . . . . . . . . . . . . . . . . . . . 9
Подготовка 10
Расположение . . . . . . . . . . . . . . . . . . . . . . . . . . . . 10
Сборка. . . . . . . . . . . . . . . . . . . . . . . . . . . . . . . . . . . 10
Сборка аппарата . . . . . . . . . . . . . . . . . . . . . . . . . 10
Крепление защитной крышки . . . . . . . . . . . . . . 12
Установка подключений . . . . . . . . . . . . . . . . . . . 13
Воспроизведение 17
Операции, выполняемые по мере
необходимости 20
Уход . . . . . . . . . . . . . . . . . . . . . . . . . . . . . . . . . . . . . 20
Замена . . . . . . . . . . . . . . . . . . . . . . . . . . . . . . . . . . . 20
Замена ремня. . . . . . . . . . . . . . . . . . . . . . . . . . . . 20
Замена иглы пластинки . . . . . . . . . . . . . . . . . . . . 21
Перемещение аппарата . . . . . . . . . . . . . . . . . . . . 21
Поиск и устранение неисправностей . . . . . . . . 22
Технические характеристики . . . . . . . . . . . . . . . 24
Выполнение настроек . . . . . . . . . . . . . . . . . . . . . 14
Настройка давления иглы . . . . . . . . . . . . . . . . . 14
Настройка антискейтинга. . . . . . . . . . . . . . . . . . 16
Включение питания . . . . . . . . . . . . . . . . . . . . . . . 16
Ru
5
Page 56

Перед началом работы
УВЕДОМЛЕНИЕ
ПРИМЕЧАНИЕ
Функции аппарата
Данный аппарат является проигрывателем для воспроизведения
аналоговых пластинок.
Деревянный корпус с глянцевым покрытием
Сочетание красоты и практичности - высокая жесткость корпуса и
поглощение вибрации
Жесткий прямой тонарм отлично устраняет любые эффекты
чувствительного музыкального сигнала
Удобное переключение между выходом LINE, оснащенным
каналом PHONO EQ высокого качества, и прямым выходом
PHONO, что обеспечивает гибкость при настройке системы
воспроизведения пластинок
Высокая стабильность вращения достигается благодаря
алюминиевому литому под давлением опорному диску с ременным
приводом и двигателем постоянного тока с большим крутящим
моментом
Предел резонанса определяется изоляторами (ножками), которые
отлично поглощают вибрацию и толчки
Сведения о данном руководстве
При чтении данного руководства обратите внимание на следующее.
Технические характеристики и внешний вид могут быть изменены
без уведомления в целях улучшения продукта.
Графические обозначения, используемые в данном руководстве.
-“ ПРЕДУПРЕЖДЕНИЕ” обозначает пункты, которые следует
соблюдать, чтобы избежать риска смерти или серьезной
травмы.
-“ ВНИМАНИЕ” обозначает пункты, которые следует
соблюдать, чтобы избежать риска травмы.
- обозначает пункты, которые следует соблюдать,
чтобы избежать повреждения продукта или его неправильной
работы.
- обозначает дополнительную информацию,
которая может быть полезна.
Ru
6
Page 57

Перед началом работы | Проверка комплектации
Русский
Область этикетки Внешний край
Проверка комплектации
Проверьте наличие всех элементов.
Опорный диск ×1 Пластина опорного
диска ×1
Противовес ×1 Каркас головки ×1
(с картриджем)
Защитная крышка ×1
Петля защитной
крышки ×2
Ремень ×1
* Ремень установлен на
опорном диске.
Адаптер 45 об/мин
×1
Стереокабель RCA
×1
Как держать пластинку?
Когда вы держите пластинку, необходимо поддерживать ее за область
этикетки и внешний край либо держать пластинку за внешние края
двумя руками.
Адаптер
переменного тока
×1
* Подробнее см. в
прилагаемом документе
“Приложение”
(брошюра).
Инструкция по эксплуатации
(данное руководство)
Приложение (брошюра)
Ru
7
Page 58

Перед началом работы | Компоненты и их функции
햻
햴 햶햳햲햵
햷
햸
햹
햺
햿
햽햾
Компоненты и их функции
Верхняя панель
햲 33/45 (скорость) ( стр. 17)
햳 PLAY/STOP (воспроизведение/остановка) ( стр. 17)
햴 Опорный диск ( стр. 10)
햵 Пластина опорного диска ( стр. 11)
햶 Центральный шпиндель ( стр. 10)
햷 Тонарм ( стр. 11)
햸 Каркас головки ( стр. 11)
햹 Картридж
햺 Противовес ( стр. 11)
햻 Прижимное кольцо ( стр. 15)
햽 Опора тонарма ( стр. 14)
햾 Рычаг подъема ( стр. 18)
햿 Антискейтинг ( стр. 16)
Ru
8
Page 59

Русский
Задняя панель
햵햳햴 햲
: включено : выключено
Перед началом работы | Компоненты и их функции
햲 z (питание)
Включение/выключение питания аппарата. ( стр. 16)
햳 Гнездо DC IN
Подключите адаптер переменного тока (входит в комплект) к
этому гнезду. ( стр. 13)
햴 Гнезда PHONO OUT
Через эти гнезда выводится воспроизводимый аудиосигнал с
пластинки. ( стр. 13)
햵 Переключатель PHONO EQ (фоноэквалайзер)
В соответствии с подключенным устройством установите
переключатель в нужное положение для вывода сигнала через
гнезда PHONO OUT. ( стр. 13)
Ru
9
Page 60

Подготовка
ВНИМАНИЕ
1
2
33
Расположение
Воспроизведение пластинки чувствительно к вибрации, поэтому следует расположить аппарат на ровной поверхности, которая не подвержена
внешней вибрации.
Расположите его достаточно далеко от акустической системы, чтобы на него не влияло давление звука или вибрация.
Сборка
Сборка аппарата
Поднимите опорный диск.
1
Пропустив ремень через круглое отверстие на опорном
2
диске, вытяните его наружу, зацепив его за палец.
Установите опорный диск на центральный шпиндель.
3
Будьте аккуратны, не роняйте опорный диск. Это может привести к
Ru
10
травме или повредить аппарат.
Page 61

Подготовка | Сборка
Русский
Ролик
Фиксирующая гайка
Совместите круглое отверстие на опорном диске с роликом.
4
С помощью пальца зацепите ремень за ролик.
5
Следите за тем, чтобы ремень не перекручивался. Зацепив
ремень за ролик, поверните опорный диск несколько раз, чтобы
убедиться, что ремень плавно встал на место.
Присоедините противовес к тонарму.
7
Вставьте противовес (маркировкой к себе) в задний конец
тонарма.
Присоедините каркас головки к тонарму.
8
Вставьте каркас головки в передний конец тонарма и поверните
фиксирующую гайку, чтобы его закрепить.
Поместите пластину на опорный диск.
6
Ru
11
Page 62

Подготовка | Сборка
ПРИМЕЧАНИЕ
ВНИМАНИЕ
Основание петли
Крепление защитной крышки
Защитная крышка предохраняет аппарат от пыли и т.д.
Вставьте петли в соответствующие места с двух сторон
1
защитной крышки.
Прикрепите защитную крышку, вставив петли в
2
соответствующие основания на задней панели аппарата.
Чтобы снять защитную крышку, возьмитесь за нее с двух сторон и
медленно поднимите вверх, чтобы снять ее вместе с петлями.
Ru
12
Будьте осторожны, не прищемите руки или пальцы, открывая или
закрывая защитную крышку.
Page 63

Русский
Установка подключений
ПРИМЕЧАНИЕ
ВНИМАНИЕ
AUX IN
R L
Предосновной усилитель или компонент
(внешние входные гнезда)
Адаптер
переменного тока
(прилагается)
Стереокабель RCA
(прилагается)
Подключите
к розетке
переменного
тока
Данный аппарат
(задняя панель)
PHONO IN
R L
Стереокабель RCA
(прилагается)
Предосновной усилитель
(входные гнезда PHONO)
Данный аппарат
(задняя панель)
Адаптер
переменного тока
(прилагается)
Подключите
к розетке
переменного
тока
Подготовка | Установка подключений
Выполните все подключения перед подключением адаптера переменного
тока (прилагается) в розетке переменного тока.
Устройства, не оснащенные входными гнездами PHONO Устройства, оснащенные входными гнездами PHONO
Подключенные
устройства
Настройки
переключателя
PHONO EQ
Функция
эквалайзера
данного аппарата
Вклю-
чена
Сигнал с картриджа усиливается
фоноэквалайзером, который встроен в аппарат, и
выводится через гнезда PHONO OUT.
Ознакомьтесь также с инструкциями по эксплуатации
подключаемого устройства.
ON (по умолчанию) THRU
Выклю-
чена
Сигнал с картриджа выводится напрямую через
гнезда PHONO OUT.
Ru
13
Page 64

Подготовка | Выполнение настроек
УВЕДОМЛЕНИЕ
УВЕДОМЛЕНИЕ
Выполнение настроек
Настройка давления иглы
Настройте тонарм таким образом, чтобы давление иглы на пластинку
было соответствующим.
Снимите крышку иглы.
1
Следите за тем, чтобы крышка иглы или ваш палец не
соприкасались с иглой.
Установите регулятор антискейтинга в положение “0”.
2
Ослабьте фиксатор тонарма.
3
Снимите тонарм с опоры и слегка отведите влево.
4
Ru
14
Следите за тем, чтобы игла не контактировала ни с какой
частью аппарата.
Page 65

Подготовка | Выполнение настроек
Русский
ПРИМЕЧАНИЕ
ПРИМЕЧАНИЕ
1
2
Центральная линия
Поверните противовес таким образом, чтобы тонарм
5
располагался горизонтально.
Направление 1: противовес перемещается вперед на
тонарме.
Направление 2: противовес перемещается назад на
тонарме.
Правильно
Неправильно
Тонарм расположен
горизонтально (сбалансирован)
Противовес смещен слишком
далеко вперед
Поверните кольцо противовеса таким образом, чтобы отметка
7
“0” совпадала с центральной линией на заднем конце тонарма.
Поворачивая кольцо противовеса пальцами нажмите на
противовес, чтобы он не поворачивался.
Поворачивая противовес, установите на нем давление иглы,
8
указанное для картриджа.
Указанное давление иглы для прилагаемого картриджа
составляет 3,5 г.
Неправильно
Верните тонарм на опору и зафиксируйте его.
6
Противовес смещен слишком
далеко назад
При повороте противовеса также поворачивается кольцо
противовеса.
Ru
15
Page 66

Подготовка | Включение питания
Настройка антискейтинга
При повороте опорного диска кончик иглы создает усилие, которое
тянет ее к центру вращения. Если значение антискейтинга совпадает с
давлением иглы, создается усилие, которое тянет кончик иглы наружу
от центра вращения, и два усилия нейтрализуют друг друга.
Установите регулятор антискейтинга в положение,
1
совпадающее с давлением иглы картриджа.
Включение питания
На задней панели аппарата нажмите кнопку z (питание), чтобы
включить питание аппарата.
16
Ru
Page 67

Русский
Воспроизведение
ВНИМАНИЕ
: 33 1/3 об/мин : 45 об/мин
Запуск воспроизведения
Если пластинка воспроизводится без достаточного уменьшения
громкости усилителя, возможно возникновение громкого звука
при соприкосновении кончика иглы с пластинкой. Это может
привести к потере слуха и повредить усилитель и колонки, поэтому
обязательно уменьшайте громкость усилителя.
Откройте защитную крышку и установите пластинку на
1
опорный диск.
При воспроизведении пластинки 45 об/мин используйте
прилагаемый адаптер для скорости 45 об/мин.
Нажмите кнопку 33/45 (скорость), чтобы выбрать
2
соответствующую скорость для пластинки.
Нажмите кнопку PLAY/STOP (воспроизведение/остановка).
3
Опорный диск будет вращаться.
Ru
17
Page 68

Воспроизведение
Ослабьте фиксатор тонарма и поднимите рычаг подъема.
4
Переместите тонарм в положение воспроизведения на
5
пластинке.
Опустите рычаг подъема.
6
Тонарм опустится и начнется воспроизведение.
18
Ru
Page 69

Русский
Приостановка воспроизведения
ПРИМЕЧАНИЕ
Когда вы поднимаете рычаг подъема, тонарм поднимается и
воспроизведение приостанавливается.
Когда вы опускаете рычаг подъема, воспроизведение возобновляется.
Остановка воспроизведения
Поднимите рычаг подъема.
1
Верните тонарм на опору.
2
Опустите рычаг подъема.
3
Нажмите кнопку PLAY/STOP (воспроизведение/остановка).
4
Опорный диск перестанет вращаться.
Зафиксируйте тонарм.
5
Воспроизведение
Тонарм автоматически не поднимается, когда заканчивается
воспроизведение пластинки.
Если вы не планируете использовать аппарат в течение
определенного времени, прикрепите крышку к игле, чтобы ее
защитить.
Ru
19
Page 70

Операции, выполняемые по мере
ВНИМАНИЕ
необходимости
Уход
Уход за аппаратом
Протирайте аппарат мягкой сухой тканью. Не используйте химические
средства такие как бензин или растворитель, т.к. они могут повредить
поверхность.
Уход за иглой пластинки
Кончик иглы пластинки очень чувствительный. Обращайтесь с ним
очень аккуратно, чтобы не повредить. При налипании пыли на кончике
иглы используйте мягкую заостренную кисть, чтобы стереть ее,
начиная от основания иглы в направлении кончика, либо используйте
имеющийся в продаже специальный инструмент для чистки.
Уход за пластинками
Грязь, налипающая на пластинку, может вызвать перескакивание или
шум при воспроизведении. Используйте имеющийся в продаже
инструмент для чистки пластинок, чтобы стереть грязь.
Замена
Замена ремня
В зависимости от условий эксплуатации ремень может износиться или
порваться. Если это произошло, замените ремень. Для замены ремня
обратитесь к ближайшему авторизованному дилеру Yamaha или в
сервисный центр.
Выключите питание аппарата и подключенных устройств и
1
отключите адаптер переменного тока аппарата от розетки.
Снимите пластину с опорного диска.
2
Отсоедините ремень от ролика.
3
Вставьте пальцы в круглые отверстия опорного диска и
4
поднимите его.
Будьте аккуратны, не роняйте опорный диск. Это может
привести к травме или повредить аппарат.
Переверните опорный диск и снимите ремень.
5
Установите новый ремень на опорный диск.
6
Следите за тем, чтобы ремень не перекручивался.
Ru
20
Установите опорный диск на аппарат.
7
Подробнее об установке см. в разделе “Сборка” на стр. 10.
Page 71

Операции, выполняемые по мере необходимости | Перемещение аппарата
Русский
ВНИМАНИЕ
1
2
Углубление
Нижняя сторона
Замена иглы пластинки
Если кончик иглы износился или поврежден, немедленно замените ее.
Для замены следует приобрести сменную иглу ATN3600L
производства Audio-Technica.
Прикрепите крышку иглы перед заменой иглы. Кончик иглы может
поранить вас или он может быть поврежден.
Следите, чтобы дети не проглотили иглу, когда она снята.
Выключите питание аппарата и подключенных устройств и
1
отключите адаптер переменного тока аппарата от розетки.
Удерживая пальцами корпус картриджа, нажмите на иглу в
2
направлении
снять.
1 и потяните ее в направлении 2, чтобы ее
Удерживая пальцами корпус картриджа, вставьте выступ на
3
сменной игле в углубление на нижней стороне картриджа.
Нажмите на иглу в направлении вверх до щелчка.
4
Перемещение аппарата
При перемещении аппарата зафиксируйте тонарм, чтобы он был
неподвижен.
Ru
21
Page 72

Операции, выполняемые по мере необходимости | Поиск и устранение неисправностей
Поиск и устранение неисправностей
Если аппарат перестает работать правильно, проверьте следующее.
Если выполнение соответствующего действия не решает проблему, или проблема не указана в списке ниже, нажмите кнопку z (питание),
расположенную на задней панели аппарата, чтобы выключить питание, отсоедините силовой кабель и обратитесь к ближайшему авторизованному
дилеру Yamaha или в сервисный центр.
Неисправность Причина Действие
При нажатии кнопки z
(питание) питание не
включается.
Опорный диск не вращается.
Нет звука.
Уровень громкости слишком
низкий или слишком
высокий.
Наблюдаются нарушения
баланса левого и правого
канала вывода звука.
Неправильная скорость
воспроизведения.
Адаптер переменного тока отсоединен от гнезда DC IN
на аппарате или от розетки переменного тока либо
вставлен недостаточно плотно.
Ремень неправильно расположен на опорном диске или
ролике либо ремень слетел.
Кнопка z(питание) не нажата.Нажмите кнопку z(питание). 16
Каркас головки неправильно присоединен к тонарму. Правильно присоедините каркас головки к тонарму. 11
Стереокабель RCA подключен неправильно. Правильно подключите стереокабель RCA. 13
Включена функция приглушения звука на усилителе. Выключите функцию приглушения звука на усилителе. –
Неправильно настроен картридж усилителя или
фоноэквалайзера.
Переключатель PHONO EQ установлен в неправильное
положение.
Проигрыватель наклонен. Расположите проигрыватель на ровной поверхности. –
Скорость настроена неправильно.
Плотно вставьте адаптер переменного тока в гнездо DC
IN на аппарате и в розетку.
Прикрепите ремень правильно на опорном диске или
ролике.
Правильно настройте картридж усилителя или
фоноэквалайзера в соответствии с используемым типом
картриджа (MM или MC).
Установите переключатель PHONO EQ в правильное
положение для подключенного устройства.
Выберите правильную настройку 33/45 (скорость).
Данный аппарат не поддерживает воспроизведение
пластинок SP (78 об/мин).
Страница
для справки
13
10
–
13
17
22
Ru
Page 73

Операции, выполняемые по мере необходимости | Поиск и устранение неисправностей
Русский
Неисправность Причина Действие
Стереокабель RCA подключен неправильно. Правильно подключите стереокабель RCA. 13
Слышно гудение.
Возникают пропуски при
воспроизведении.
Возникает шум.
Звук искажен.
Возникает резонанс.
Каркас головки неплотно присоединен к тонарму.
Давление иглы настроено неправильно.
Пластинка поцарапана или деформирована.
Пластинка грязная.
На пластинке имеется статический заряд.
Игла грязная. Сотрите грязь с иглы. 20
Игла изношена. Замените иглу. 21
Аппарат расположен на поверхности, подверженной
вибрации.
Аппарат расположен очень близко к колонкам. Переместите аппарат дальше от колонок. –
Слишком высокий уровень громкости воспроизведения. Настройте громкость усилителя. –
Используйте фиксирующую гайку, чтобы плотно
присоединить каркас головки к тонарму.
Установите отметку на противовесе в соответствии с
давлением иглы, указанным для картриджа.
Не используйте поцарапанные или деформированные
пластинки.
Используйте имеющийся в продаже инструмент для
чистки пластинок, чтобы ее очистить.
Используйте антистатическую кисть, чтобы убрать
статический заряд.
Расположите аппарат на ровной поверхности, которая
не подвержена вибрации.
Страница
для справки
11
14
–
–
–
–
Ru
23
Page 74

Операции, выполняемые по мере необходимости | Технические характеристики
Технические характеристики
Данный аппарат имеет следующие технические характеристики.
Опорный диск
Метод привода . . . . . . . . . . . . . . . . . . . . . . . . . . . . .Ременной привод
Двигатель . . . . . . . . . . . . . . . . . . . . . . . .Двигатель постоянного тока
Скорость вращения . . . . . . . . . . . . . . . . . . .33 1/3 об/мин, 45 об/мин
Изменение скорости вращения. . . . . . . . . . . . . . . . . . . . . . . . . . . ±2%
Коэффициент детонации . . . . . . . . . . . . . . . . . . . . . . . . . . . . . . . 0,2%
Опорный диск . . . . . . . . . . . . . . Алюминиевый литой под давлением
Диаметр 30 см
Тонарм
Тип . . . . . . . . . . . . . . Статически сбалансированный прямой тонарм
Эффективная длина плеча . . . . . . . . . . . . . . . . . . . . . . . . . . 223,5 мм
Диапазон регулировки давления иглы . . . . . . . . . . . . . . . . . . . . 0–4 г
Соответствующий вес картриджа . . . . 15,5–19 г (включая каркас головки)
Вылет . . . . . . . . . . . . . . . . . . . . . . . . . . . . . . . . . . . . . . . . . . . . . . .19 мм
Картридж
Тип . . . . . . . . . . . . . . . . . . . . . . . . . . . . . . . . . . . . . . . . . . . . . . . Тип MM
Выходное напряжение . . . . . . . . . . . . . . . . . .2,5 мВ (1 кГц, 3,54 см/с)
Давление иглы . . . . . . . . . . . . . . . . . . . . . . . . . . . . . . . . . . . . 3,5 ±0,5 г
Вес картриджа . . . . . . . . . . . . . . . . . . . . . . . . . . . . . . . . . . . .5,0 ±0,3 г
Высота картриджа . . . . . . . . . . . . . . . . . . . . . . . . . . . . . . 17,0 ±0,7 мм
Вес каркаса головки . . . . . . 10 г (включая винты, гайки и провода)
Аудио
Уровень выходного сигнала
PHONO EQ THRU (1 кГц, 3,54 см/с) . . . . . . . . . . . . 2,5 мВ ±3 дБВ
PHONO EQ ON . . . . . . . . . . . . . . . . . . . . . . . . . . . 140 мВ (–17 дБВ)
Соотношение сигнал/шум (взвешенный по кривой A, 20 кГц ФНЧ)
. . . . . . . . . . . . . . . . . . . . . . . . . . . .67 дБ или более
Выходное гнездо . . . . . PHONO OUT × 1 (RCA несбалансированный)
Общие характеристики
Питание адаптера переменного тока
Вход . . . . . . . . . . . . . . . . . 100-240 В переменного тока 50/60 Гц
Выход . . . . . . . . . . . . . . . . . . . . . . . . . . . . . . . . . . . . . . . . 12 В 0,5 А
Потребляемая мощность
во включенном состоянии . . . . . . . . . . . . . . . . . . . . . . . . . . 1,5 Вт
в выключенном состоянии . . . . . . . . . . . . . . . . . . . . . . . . . . 0,1 Вт
Вес . . . . . . . . . . . . . . . . . . . . . . . . . . . . . . . . . . . . . . . . . . . . . . . . .4,8 кг
Размеры (ширина × высота × глубина) . . . . . . . . 450 × 136 × 368 мм
(включая ножки и выступы)
В содержании данного руководства приведены последние на
момент публикации технические характеристики. Для получения
последней версии руководства посетите веб-сайт корпорации
Yamaha и загрузите файл с руководством.
24
Ru
Page 75

Page 76

Yamaha Global Site
apan
https://www.yamaha.com/
Yamaha Downloads
https://download.yamaha.com/
Manual Development Group
© 2018 Yamaha Corporation
Published 08/2018 IPOD-A0
10-1 Nakazawa-cho, Naka-ku, Hamamatsu, 430-8650 J
AV17-0340
 Loading...