

Page 1
1
Page 2
About the Manuals
About the Manuals
The TENORI-ON is provided with the four manuals listed below.
Quick Guide
The Quick Guide provides instructions on setup and basic operation that will get you started
as quickly as possible.
TENORI-ON Manual (This manual; PDF)
The manual is provided as an electronic document on the supplied CD-ROM, and it provides
detailed descriptions and procedures that will help you take full advantage of the TENORI-
ON's many advanced features. Refer to the Quick Guide for basic information such as
turning on the power, the functions of the panel controls, and more.
Precautions
This document lists a number of points you need to be aware of in order to use the TENORI-
ON properly and safely. Please read it carefully. Guarantee information and after-service
contact details are also included.
Installation Guide
Explains the procedure for installing the "TENORI-ON User Voice Manager" software that is
included on the supplied CD-ROM on your computer.
Using the PDF Manual
● Click the item you want to refer to in the "Bookmarks" index to the left of the main display
window to go to the corresponding page. Click the "Bookmarks" tab to open the index if it
is not showing.
● Click the page numbers that appear in the table of contents to go directly to the
corresponding page.
● Select "Find" or "Search" from the Adobe Reader "Edit" menu and enter a key word to
locate related information anywhere in the document. Click an item in the list that appears
after searching to go directly to the corresponding page.
NOTE The names and positions of menu items may vary according to the version of Adobe Reader being used.
The illustrations and LCD screens as shown in this owner’s manual are for instructional purposes only, and may appear
somewhat different from those on your instrument. The illustrations and LCD screens from the TNR-W are used for the
instructions and descriptions in this manual.
Copying of the commercially available musical data including but not limited to MIDI data and/or audio data is strictly prohibited
except for your personal use.
When using a power adaptor, even when the STANDBY/ON switch is in the
instrument at the minimum level. When you are not using the instrument for a long time, make sure you unplug the AC power
adaptor from the wall AC outlet.
Please note that there may be slight variations in the color of the LED buttons.
"STANDBY" position, electricity is still flowing to the
TENORI-ON Manual 2
Page 3

Contents
Contents
The TENORI-ON Is … . . . . . . . . . . . . . . 4
Layers and Performance Modes . . . . . . . . . . . . . . . . . . . . . 4
Layers and Blocks . . . . . . . . . . . . . . . . . . . . . . . . . . . . . . . . 5
Voices . . . . . . . . . . . . . . . . . . . . . . . . . . . . . . . . . . . . . . . . . . 6
Connecting to Second TENORI-ON or Computer . . . . . . . 7
Song Recording and Playback . . . . . . . . . . . . . . . . . . . . . . 9
SD Memory Card File Types and Operations . . . . . . . . . . . 9
Non-performance Functions
(Interior and Power Save Modes) . . . . . . . . . . . . . . . . . . . 10
Performance Modes . . . . . . . . . . . . . . . . . . . . . . . . . . . . . . 12
Basic Operation . . . . . . . . . . . . . . . . . . . . . . . . . . . . . . 12
Score Mode . . . . . . . . . . . . . . . . . . . . . . . . . . . . . . . . . . 15
Random Mode . . . . . . . . . . . . . . . . . . . . . . . . . . . . . . . . 17
Draw Mode . . . . . . . . . . . . . . . . . . . . . . . . . . . . . . . . . . 18
Bounce Mode . . . . . . . . . . . . . . . . . . . . . . . . . . . . . . . . 19
Push Mode . . . . . . . . . . . . . . . . . . . . . . . . . . . . . . . . . . 20
Solo Mode . . . . . . . . . . . . . . . . . . . . . . . . . . . . . . . . . . . 21
Parameter Settings . . . . . . . . . . . . . . . 22
Setting Parameters with the Function Buttons . . . . . . . . 23
[L1] Instrument . . . . . . . . . . . . . . . . . . . . . . . . . . . . . . . 24
[L2] Sound Length . . . . . . . . . . . . . . . . . . . . . . . . . . . . 25
[L3] Octave . . . . . . . . . . . . . . . . . . . . . . . . . . . . . . . . . . 26
[L4] Score Mode Loop Point . . . . . . . . . . . . . . . . . . . . 27
[L4] Random Mode Rotation . . . . . . . . . . . . . . . . . . . . 28
[L5] Loop Speed . . . . . . . . . . . . . . . . . . . . . . . . . . . . . . 29
[R1] Layer No. . . . . . . . . . . . . . . . . . . . . . . . . . . . . . . . . 30
[R2] Master Tempo . . . . . . . . . . . . . . . . . . . . . . . . . . . . 31
[R3] Master Transpose . . . . . . . . . . . . . . . . . . . . . . . . . 32
[R4] Volume . . . . . . . . . . . . . . . . . . . . . . . . . . . . . . . . . . 33
[R5] Block Number . . . . . . . . . . . . . . . . . . . . . . . . . . . . 34
Setting Parameters with the Jog Dial . . . . . . . . . . . . . . . . 36
Data Storage and Initialization . . . . . . . . . . . . . . . . . . 39
■ Play Menu . . . . . . . . . . . . . . . . . . . . . . . . . . . . . . . . . 42
1. Hardware Volume . . . . . . . . . . . . . . . . . . . . . . . . 43
2. Master Tempo . . . . . . . . . . . . . . . . . . . . . . . . . . . 43
3. Master Scale . . . . . . . . . . . . . . . . . . . . . . . . . . . . 44
4. Master Transpose . . . . . . . . . . . . . . . . . . . . . . . . 45
5. Master Loop Speed . . . . . . . . . . . . . . . . . . . . . . . 45
6. Master Loop Point . . . . . . . . . . . . . . . . . . . . . . . . 46
7. Reset Loop Timing . . . . . . . . . . . . . . . . . . . . . . . . 46
8. Mute . . . . . . . . . . . . . . . . . . . . . . . . . . . . . . . . . . . 47
■ Layer Menu . . . . . . . . . . . . . . . . . . . . . . . . . . . . . . . . 48
1. Instrument . . . . . . . . . . . . . . . . . . . . . . . . . . . . . . 49
2. Volume . . . . . . . . . . . . . . . . . . . . . . . . . . . . . . . . . 50
3. Loop Speed . . . . . . . . . . . . . . . . . . . . . . . . . . . . . 51
4. Sound Length . . . . . . . . . . . . . . . . . . . . . . . . . . . . 52
5. Panpot . . . . . . . . . . . . . . . . . . . . . . . . . . . . . . . . . 53
6. Animation . . . . . . . . . . . . . . . . . . . . . . . . . . . . . . . 53
■ Edit Menu . . . . . . . . . . . . . . . . . . . . . . . . . . . . . . . . . . 54
1. Copy this Block . . . . . . . . . . . . . . . . . . . . . . . . . . 55
2. Clear this Block . . . . . . . . . . . . . . . . . . . . . . . . . . 55
3. Copy this Layer . . . . . . . . . . . . . . . . . . . . . . . . . . 56
4. Clear this Layer . . . . . . . . . . . . . . . . . . . . . . . . . . 57
5. Clear All Blocks . . . . . . . . . . . . . . . . . . . . . . . . . . 57
6. Reset All Blocks . . . . . . . . . . . . . . . . . . . . . . . . . . 58
■ Preference Menu . . . . . . . . . . . . . . . . . . . . . . . . . . . . 59
1. Quantize . . . . . . . . . . . . . . . . . . . . . . . . . . . . . . . . 60
2. Push Sensitivity . . . . . . . . . . . . . . . . . . . . . . . . . . 60
3. Master Tuning . . . . . . . . . . . . . . . . . . . . . . . . . . . 60
4. Local Control . . . . . . . . . . . . . . . . . . . . . . . . . . . . 61
5. Synchronize . . . . . . . . . . . . . . . . . . . . . . . . . . . . . 61
6. Loop Indicator . . . . . . . . . . . . . . . . . . . . . . . . . . . 61
■ File Menu . . . . . . . . . . . . . . . . . . . . . . . . . . . . . . . . . . 62
1. Song . . . . . . . . . . . . . . . . . . . . . . . . . . . . . . . . . . . 64
2. All Blocks . . . . . . . . . . . . . . . . . . . . . . . . . . . . . . . 68
3. Current Block . . . . . . . . . . . . . . . . . . . . . . . . . . . . 73
4. Current Layer . . . . . . . . . . . . . . . . . . . . . . . . . . . . 78
5. All Settings . . . . . . . . . . . . . . . . . . . . . . . . . . . . . . 83
6. Samplings . . . . . . . . . . . . . . . . . . . . . . . . . . . . . . 88
■ Effect Menu . . . . . . . . . . . . . . . . . . . . . . . . . . . . . . . . 99
1. Reverb Type . . . . . . . . . . . . . . . . . . . . . . . . . . . . . 99
2. Reverb Param . . . . . . . . . . . . . . . . . . . . . . . . . . 100
3. Chorus Type . . . . . . . . . . . . . . . . . . . . . . . . . . . . 100
4. Chorus Param . . . . . . . . . . . . . . . . . . . . . . . . . . 100
■ Interior Menu . . . . . . . . . . . . . . . . . . . . . . . . . . . . . . 101
1. Interior Start . . . . . . . . . . . . . . . . . . . . . . . . . . . . 101
2. Interior Type . . . . . . . . . . . . . . . . . . . . . . . . . . . . 102
3. Saver Type . . . . . . . . . . . . . . . . . . . . . . . . . . . . . 102
4. Saver Time . . . . . . . . . . . . . . . . . . . . . . . . . . . . . 103
5. Time Signal ON/OFF . . . . . . . . . . . . . . . . . . . . . 103
6. Alarm ON/OFF . . . . . . . . . . . . . . . . . . . . . . . . . . 103
7. Set Alarm . . . . . . . . . . . . . . . . . . . . . . . . . . . . . . 104
8. Save As Time Signal . . . . . . . . . . . . . . . . . . . . . 104
9. Save As Alarm . . . . . . . . . . . . . . . . . . . . . . . . . . 105
10. Clock Adjust . . . . . . . . . . . . . . . . . . . . . . . . . . . 105
■ System Menu . . . . . . . . . . . . . . . . . . . . . . . . . . . . . . 106
1. Save As Default . . . . . . . . . . . . . . . . . . . . . . . . . 106
2. SD Format . . . . . . . . . . . . . . . . . . . . . . . . . . . . . 107
3. Owner Name . . . . . . . . . . . . . . . . . . . . . . . . . . . 107
4. Version Check . . . . . . . . . . . . . . . . . . . . . . . . . . 108
5. Factory Reset . . . . . . . . . . . . . . . . . . . . . . . . . . . 108
■ Recording Menu . . . . . . . . . . . . . . . . . . . . . . . . . . . 109
Appendix . . . . . . . . . . . . . . . . . . . . . . 111
Display Message List . . . . . . . . . . . . . . . . . . . . . . . . . . . . 111
Troubleshooting . . . . . . . . . . . . . . . . . . . . . . . . . . . . . . . . 113
MIDI Data Format . . . . . . . . . . . . . . . . . . . . . . . . . . . . . . . 115
TENORI-ON MIDI Transmit/Receive Event Specifications
MIDI Implementation Chart . . . . . . . . . . . . . . . . . . . . . . . 118
Voice List . . . . . . . . . . . . . . . . . . . . . . . . . . . . . . . . . . . . . . 119
Index . . . . . . . . . . . . . . . . . . . . . . . . . . . . . . . . . . . . . . . . . 122
. . 115
TENORI-ON Manual 3
Page 4
The TENORI-ON Is …
Layers and Performance Modes
The TENORI-ON Is …
The TENORI-ON is a new type of musical interface that combines control and display
functions in matrix of 256 LED buttons.
The 16 x 16 TENORI-ON matrix can be operated easily and intuitively, so that anyone can
begin playing the instrument right away. Light animation is generated in synchronization with
the performance and sound.
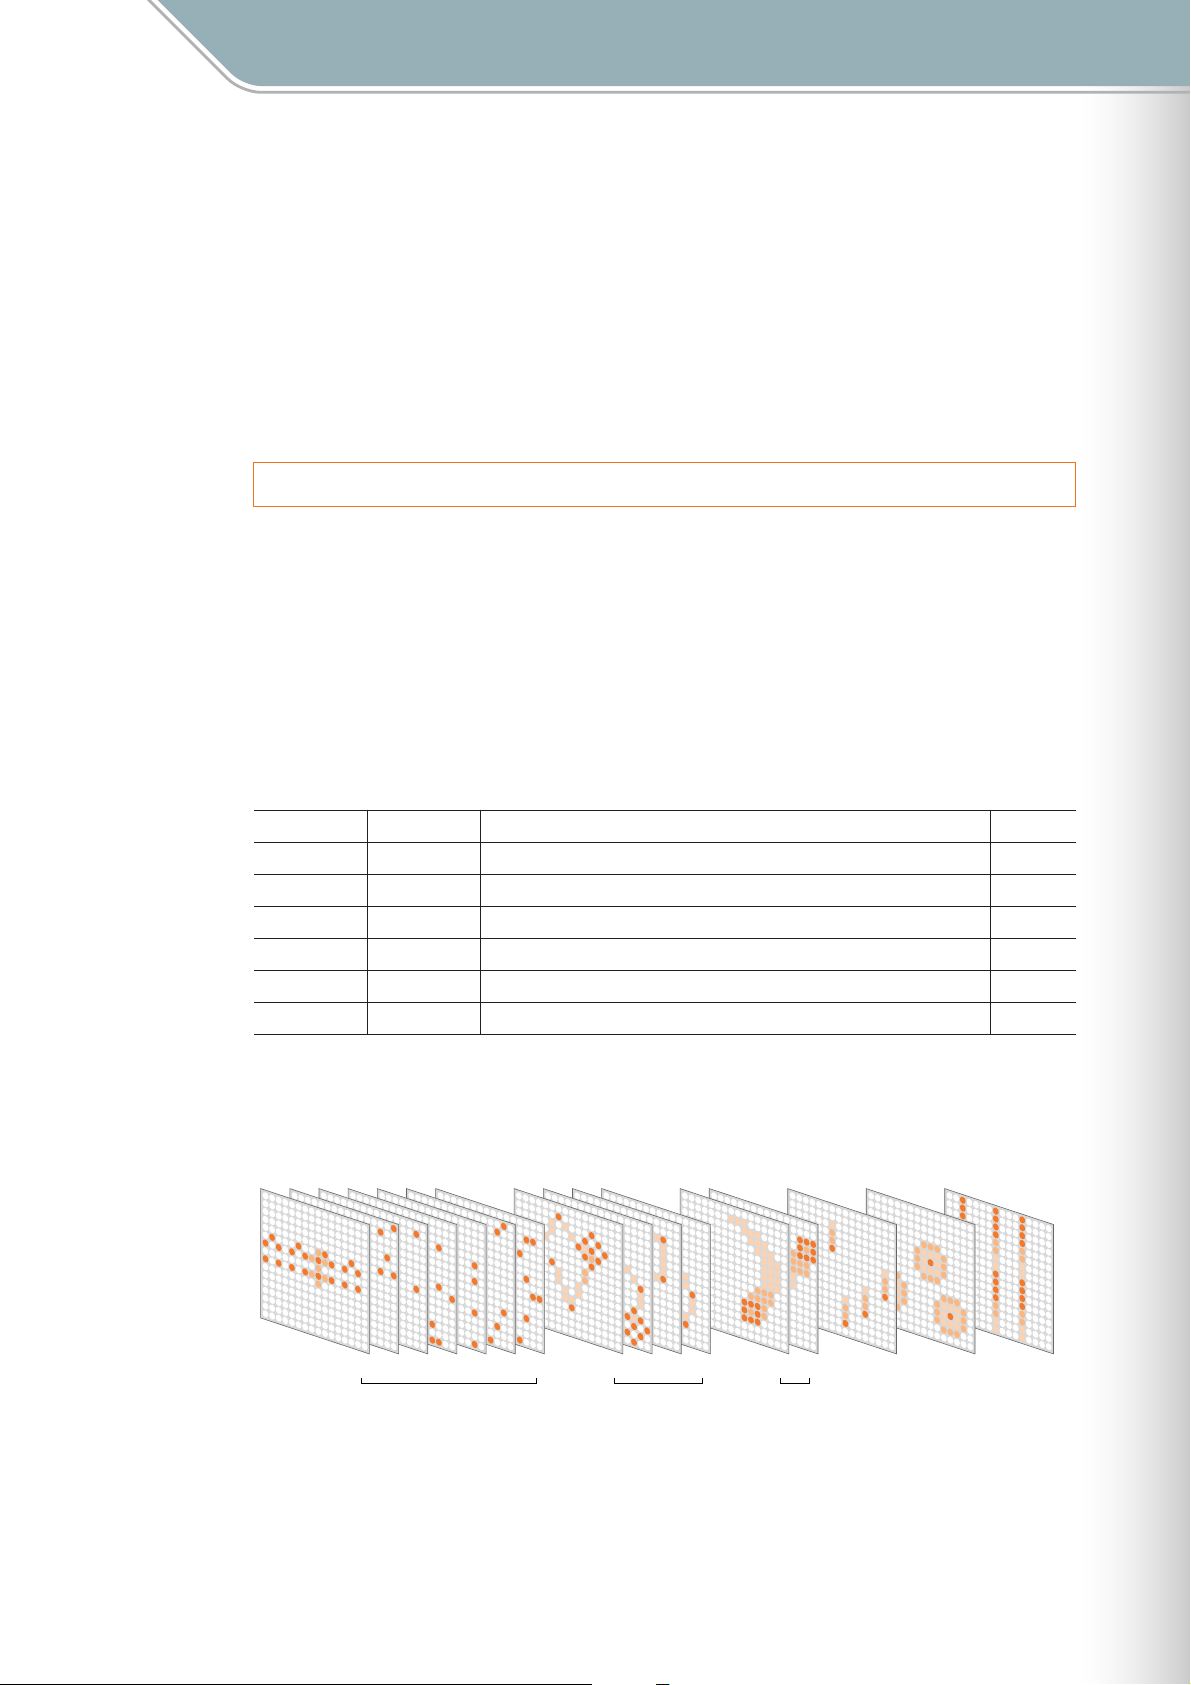
Layers and Performance Modes
The TENORI-ON has 16 layers divided into 6 different "modes" with different input methods
and types of sound/light response.
Each layer individually memorizes note timing, voice, pitch, loop position and other
parameters. The performance modes and the layers they are associated with are listed in
the table below. Up to 16 layers can be played simultaneously, allowing a vast range of
possibilities for rich, complex musical expression and performance.
[Reference]
❊
Switching Layers . . . . . . . . . . . . . . . . . . . . . . . . . Layer Number ➝ Page 30
Layer No. Mode Operation Page
1—7 Score The vertical axis corresponds to pitch while the horizontal axis is looped time. 15
8—11 Random Notes loop and flash in the order in which they were entered. 17
12—13 Draw LED button operation is memorized over a certain time frame and repeated. 18
14 Bounce A "bouncing ball" visual effect with repeated notes. 19
15 Push Press LED buttons for a certain time to produce sustained notes. 20
16 Solo Notes are repeated while the LED buttons are held. 21
The 16-layer Concept
Performance data entered on the LED button matrix.
Layer Number
Mode Score Mode Random Mode Draw Mode Bounce
1234567 891011 1213 14 1516
Mode
Push
Mode
Solo
Mode
TENORI-ON Manual 4
Page 5
The TENORI-ON Is …
Layers and Blocks
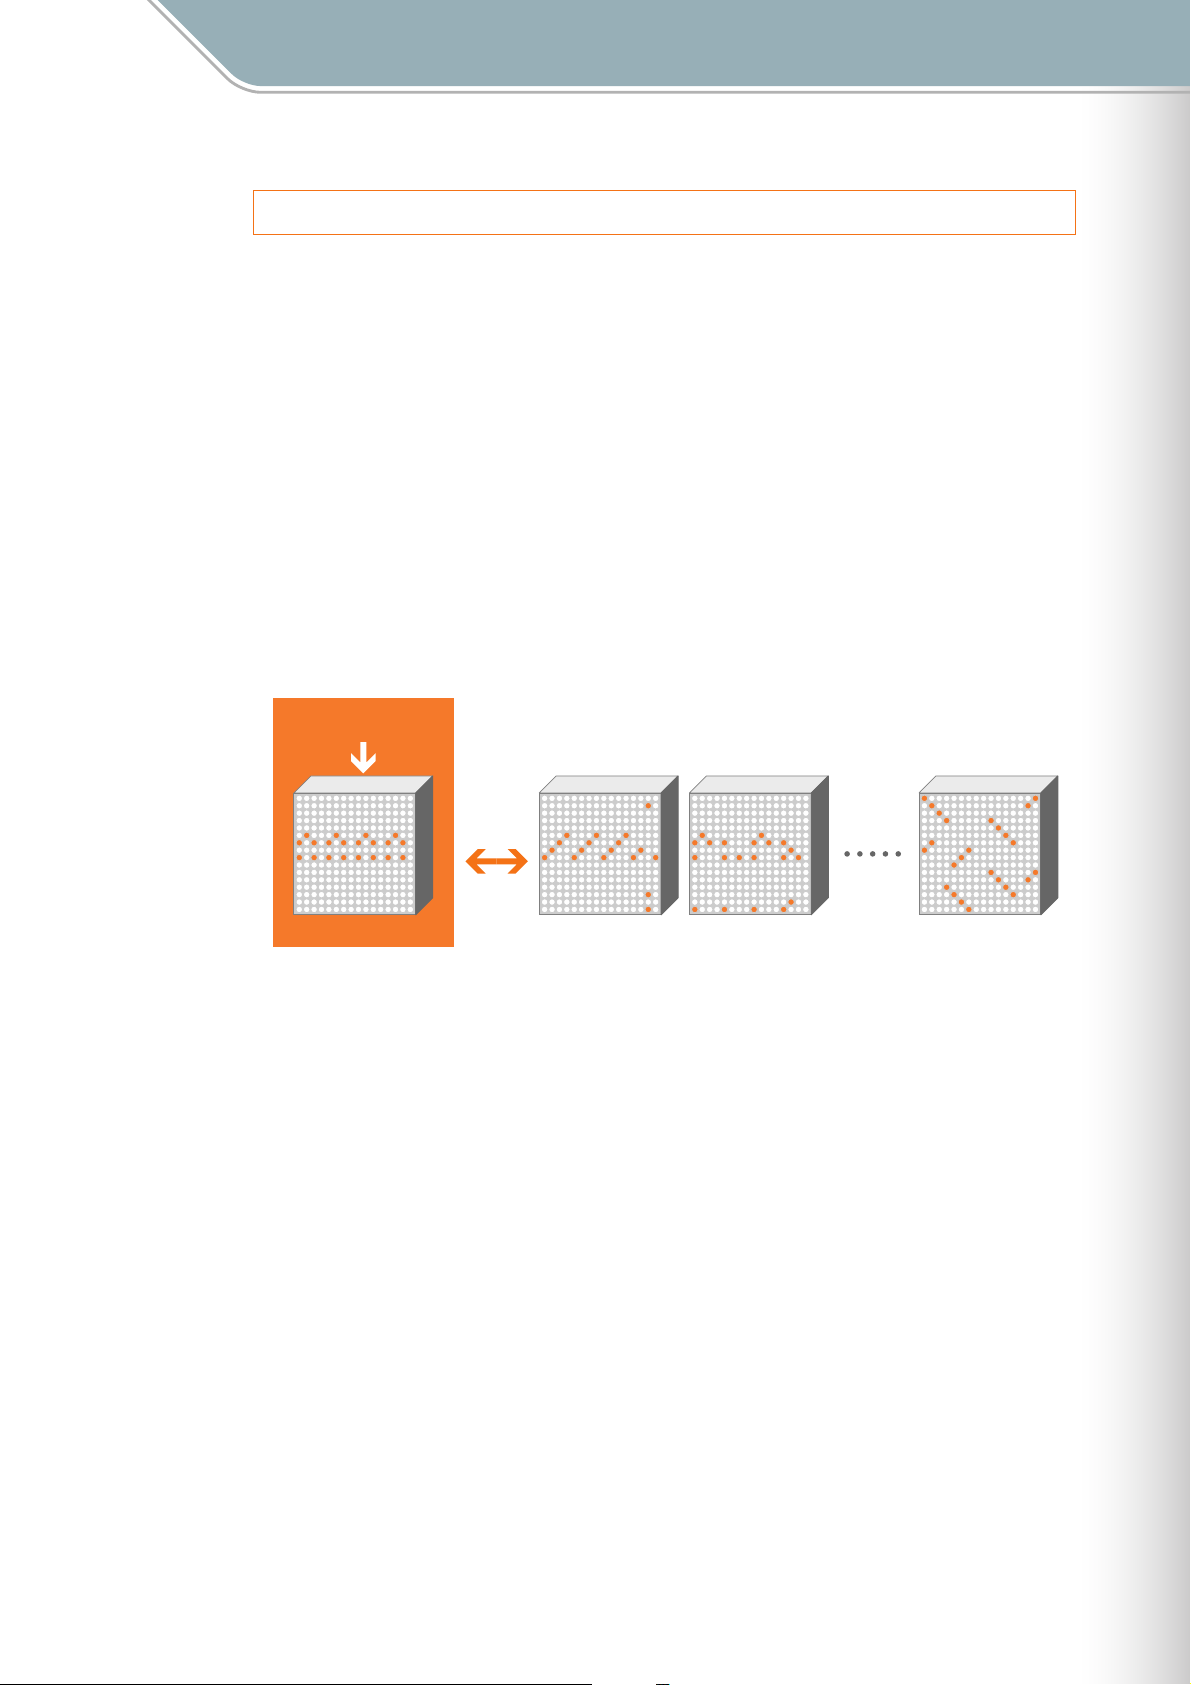
Layers and Blocks
The TENORI-ON handles a complete set of 16 layers as a "block." You can have up to 16
blocks, each with up to 16 layers. You can switch between blocks instantaneously to create
varied performances with plenty of musical interest.
Parameters that apply to individual layers (voice, pitch, note entry position, etc.) are
internally managed separately from parameters that apply to individual blocks (master
tempo, master transpose, master scale, etc.). This makes it possible, for example, to create
variations within the same song in which only the note timing is altered, and instantly switch
between variations. The only exception is that layers have the same voices throughout all
bocks (e.g. layer 3 in block 1 will use the same voice as layer 3 in block 10), so changing
blocks won’t change the voice for a given layer.
The Layer/Block Relationship
Block Settings
Block Switching
Block 1
Block 2
Block 3 Block 16
Since the blocks will usually hold similar performance data, convenient block copy functions
are provided.
[Reference]
Block ➝ Block Copy . . . . . . . . . . . . . . . . . . . . . . Block Number ➝ Page 34
❊
Copy this Block
❊ Layer ➝ Layer Copy . . . . . . . . . . . . . . . . . . . . . . Block Number ➝ Page 34
Copy this Layer
❊ Block Switching . . . . . . . . . . . . . . . . . . . . . . . . . . Block Number ➝ Page 34
➝ Page 55
➝ Page 56
TENORI-ON Manual 5
Page 6

The TENORI-ON Is …
Voices
Voices
The various sounds that can be played by the TENORI-ON are called "voices." The TENORI-
ON can use up to 256 voices, 253 of which are built in and play via the internal MIDI tone
generator. A wide range of voices including piano, strings, drums, percussion, sound
effects, and voices developed specifically for use with the TENORI-ON are provided.
The remaining three voice numbers are reserved for voice samples provided by the user.
Samples you have created using your computer or downloaded can be converted and
assigned for use with the TENORI-ON by using the supplied TENORI-ON User Voice
Manager software, saved to an SD Memory Card, and then loaded into the TENORI-ON.
User voice can be played in the same way as the internal MIDI tone generator voices.
A different voice can be assigned to each layer, and all notes played on a given layer will be
played using the same voice. Multiple layers with different voices assigned to each can be
played simultaneously. But of course you could also assign the same voice to multiple
layers. Maximum polyphony (the maximum number of notes that can be played
simultaneously) is 32. If more than 32 notes are played at the same time, only the last
(newest) 32 notes will be played.
The voices can be varied by adjusting gate time (the length of the notes), transposition,
octave shift, and other parameters. There’s also a Master Tuning parameter that can be used
to tune the MIDI tone generator voices.
The ionian C scale is assigned to layer pitches by default (i.e. the LED buttons produces
pitches corresponding to the white keys on a piano). The default scale can be changed via
the menu.
MIDI drum voices have no pitch variation. Each LED button produces the sound of a different
drum or percussion instrument. For this reason scale, octave shift, and transpose settings
have no effect on drum voices.
Reverb and chorus effects can be applied to the voices. The effect type and depth can be
set as required.
A number of other variations can be applied to voices. Refer to the items listed below for
more information.
[Reference]
Changing Voices . . . . . . . . . . . . . . . . . . . . . . . . . Instrument ➝ Page 24, 49
❊
❊ Adjusting Volume. . . . . . . . . . . . . . . . . . . . . . . . . Hardware Volume ➝ Page 43
Volume ➝ Page 33, 50
❊ Changing Note Length (Gate Time) . . . . . . . . . . Sound Length ➝ Page 25, 52
❊ Octave Shift . . . . . . . . . . . . . . . . . . . . . . . . . . . . . Octave ➝ Page 26
❊ Transposition . . . . . . . . . . . . . . . . . . . . . . . . . . . . Master Transpose ➝ Page 32, 45
❊ Tuning . . . . . . . . . . . . . . . . . . . . . . . . . . . . . . . . . Master Tuning ➝ Page 60
❊ Changing Scales . . . . . . . . . . . . . . . . . . . . . . . . . Master Scale ➝ Page 44
TENORI-ON Manual 6
Page 7
The TENORI-ON Is …
Connecting to Second TENORI-ON or Computer
❊ Panning (Stereo Positioning) . . . . . . . . . . . . . . . . Panpot ➝ Page 53
❊ Effects (Reverb and Chorus) . . . . . . . . . . . . . . . . Effect Menu ➝ Page 99
❊ Loading Samples. . . . . . . . . . . . . . . . . . . . . . . . . Samplings ➝ Page 88
The supplied "TENORI-ON User Voice manager" software
installation guide.
Connecting to Second TENORI-ON or Computer
The TENORI-ON has a mini-DIN type MIDI connector that, via the supplied MIDI cable
adaptor, can be connected to a second TENORI-ON to allow synchronized performance, or
to a computer to allow recording of the instrument’s MIDI output.
[Reference]
❊
MIDI Specifications . . . . . . . . . . . . . . . . . . . . . . . MIDI Data Format ➝ Page 115
MIDI Implementation Chart ➝ Page 118
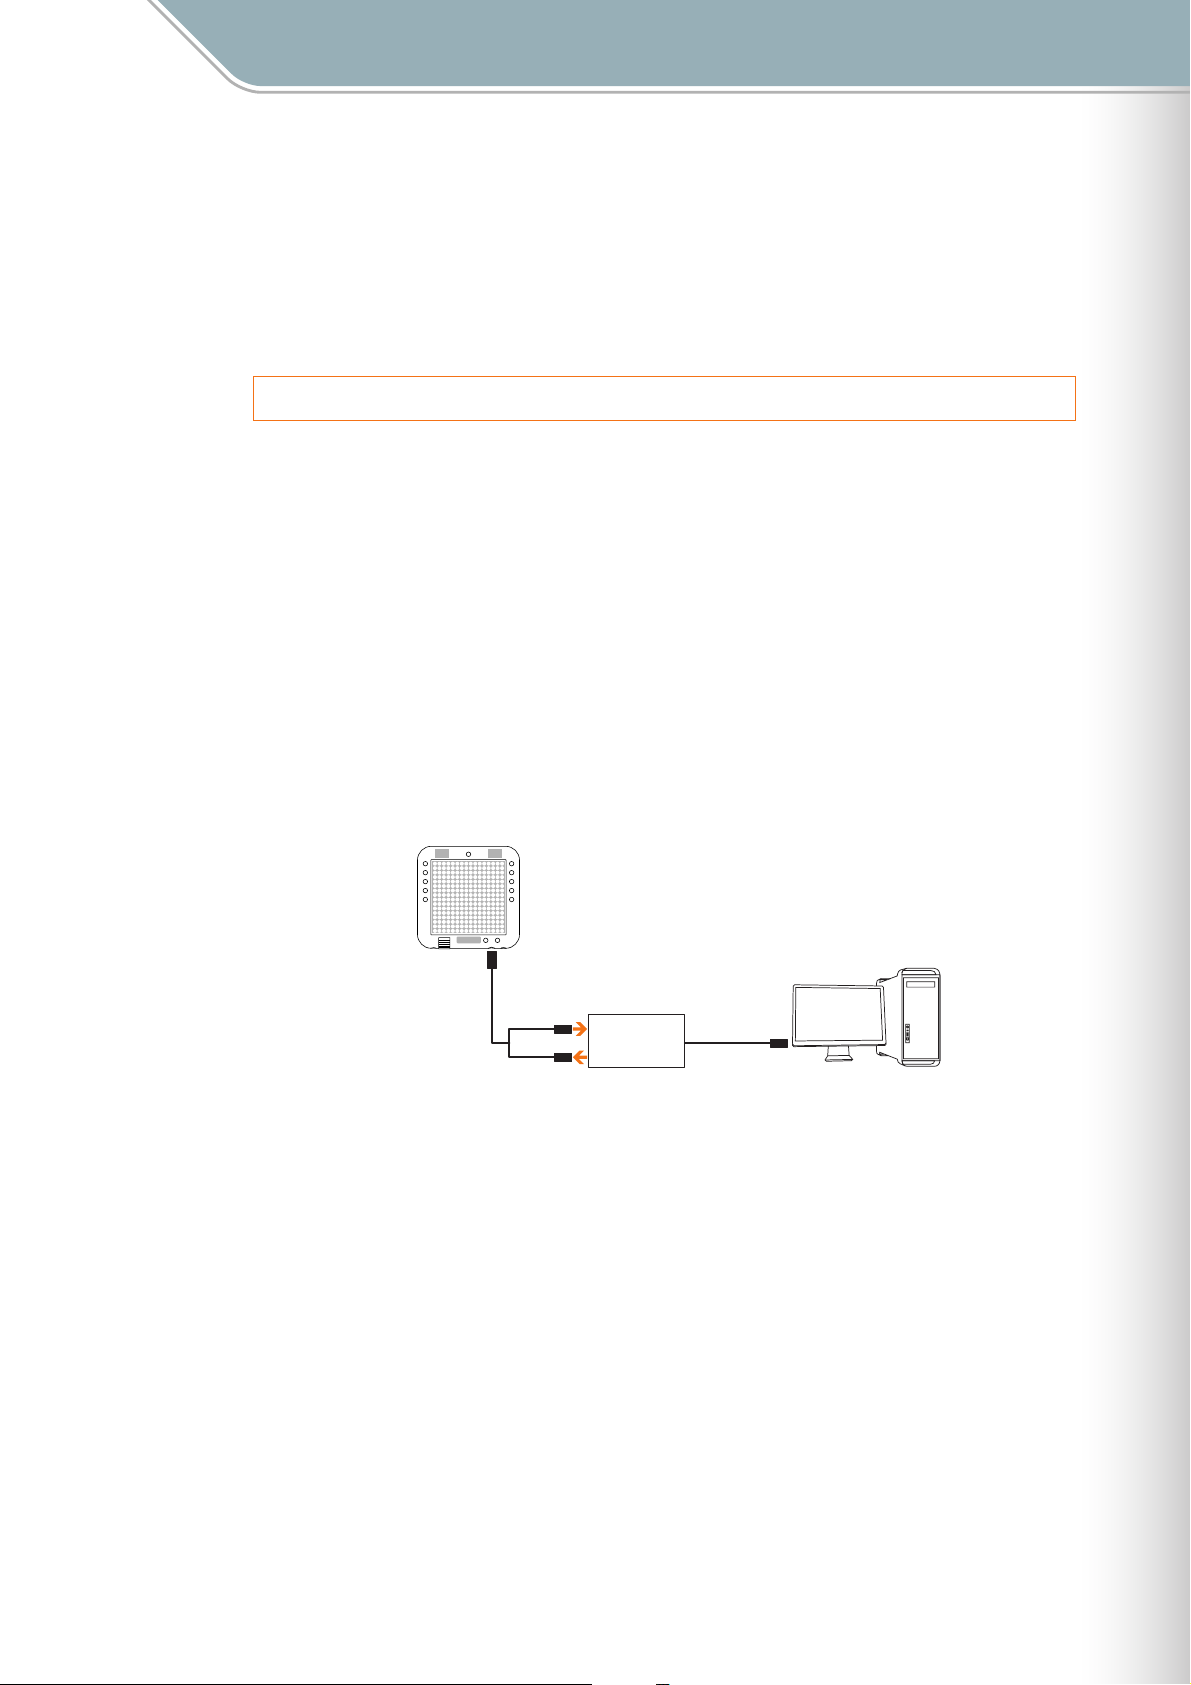
Transmitting the TENORI-ON MIDI Output to a Computer
TENORI-ON performance data (MIDI data) can be transmitted to a computer where it can be
recorded and processed.
● Connecting to a Computer
TENORI-ON
MIDI
MIDI IN
MIDI IN
MIDI
Interface
MIDI OUT
USB, etc.
Computer
MIDI OUT
Supplied MIDI Cable
Adaptor
● Synchronized Performance with Other TENORI-ON Instruments
Two TENORI-ON instruments can be connected via MIDI so that when playback is started or
paused on the "Master" TENORI-ON, the "Slave" TENORI-ON follows. To use this capability
one of the connected TENORI-ON instruments must be set to Master status and the other
must be set to Slave. It is also possible to synchronize more than two TENORI-ON
instruments in this way. In such cases only one TENORI-ON can function as the Master while
all others are Slaves.
[Reference]
Master/Slave Settings for Synchronized PerformanceSynchronize ➝ Page 61
❊
TENORI-ON Manual 7
Page 8
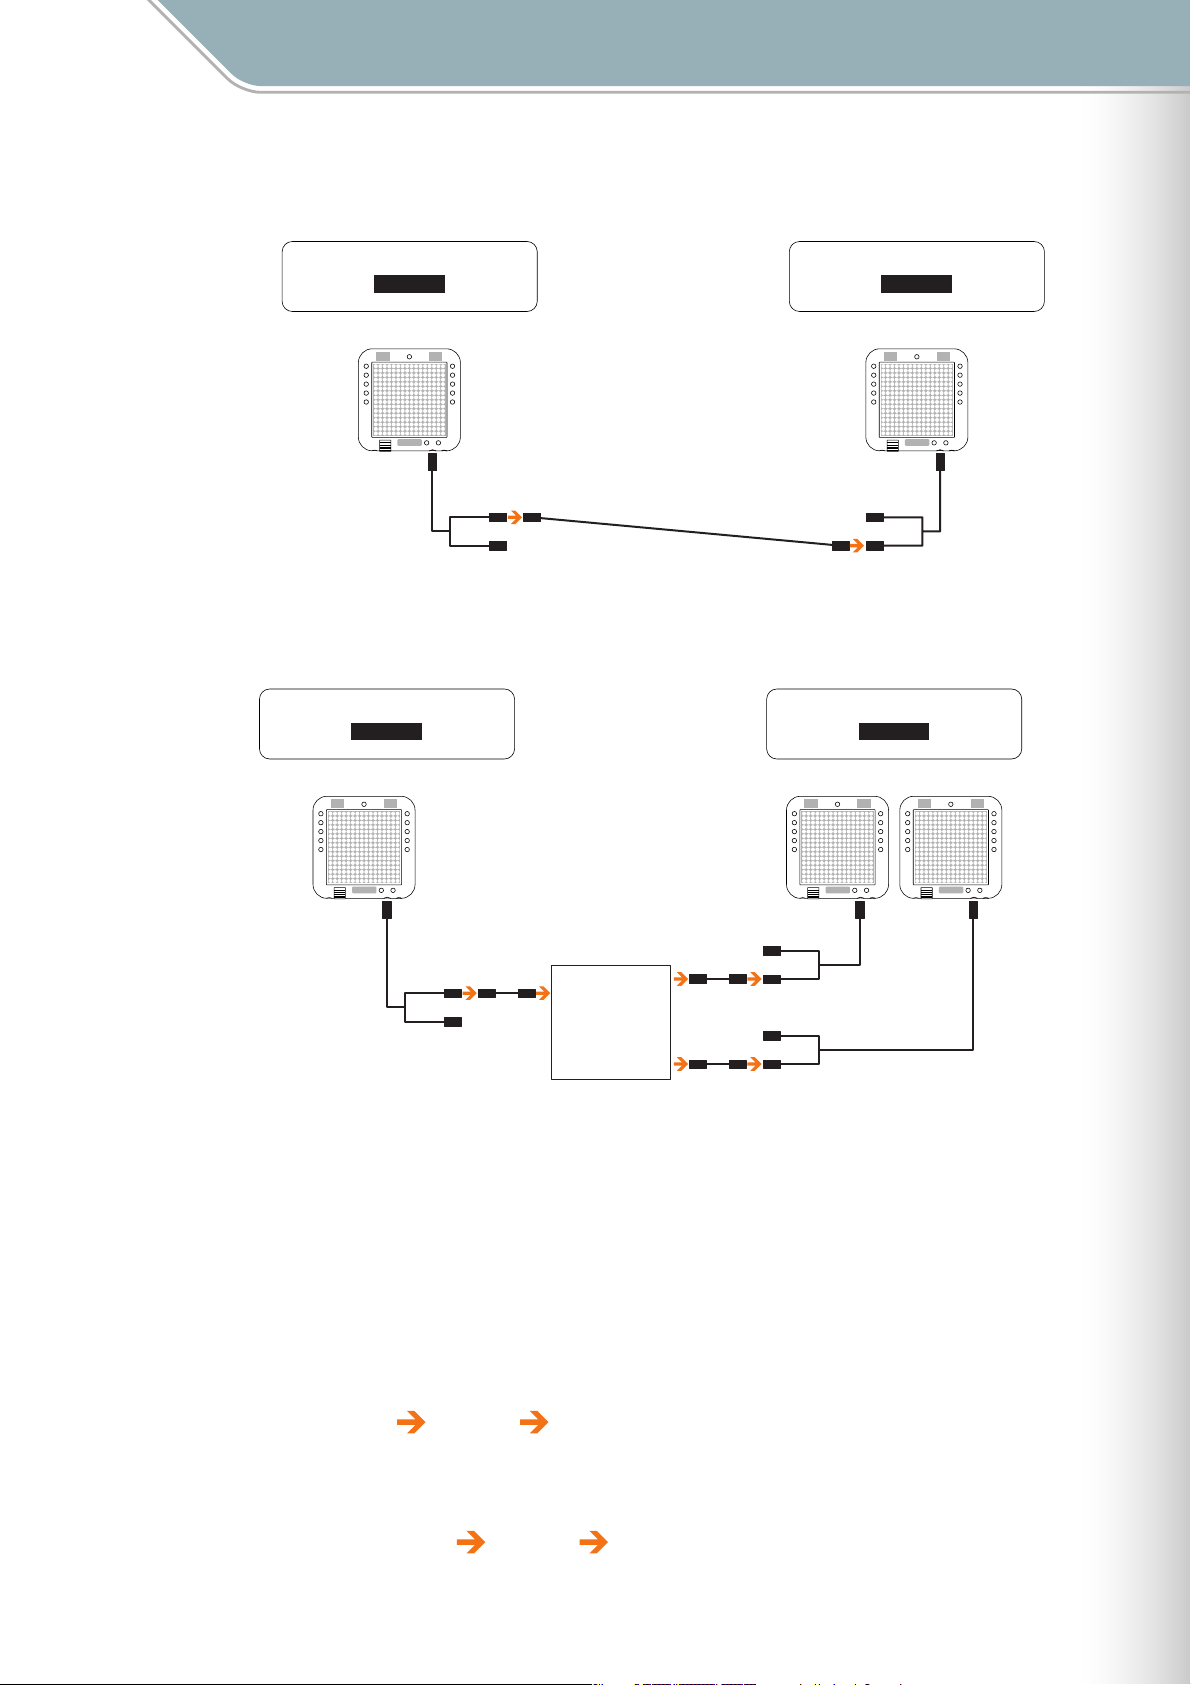
Connecting Two TENORI-ON Instruments
The TENORI-ON Is …
Connecting to Second TENORI-ON or Computer
Synchronize ∞
MASTER
MASTER TENORI-ON SLAVE TENORI-ON
MIDI
Supplied MIDI Cable
Adaptor
MIDI OUT
MIDI IN
MIDI Cable
Connecting More than Two TENORI-ON Instruments
Synchronize ∞
MASTER
MASTER TENORI-ON SLAVE TENORI-ON
Synchronize ∞
SLAVE
MIDI
MIDI OUT
MIDI IN
Supplied MIDI
Cable Adaptor
Synchronize ∞
SLAVE
MIDI
Supplied
MIDI Cable
Adaptor
Supplied
MIDI Cable
Adaptor
MIDI
MIDI OUT
MIDI IN
MIDI
Cable
MIDI IN
MIDI Interface
MIDI OUT
MIDI OUT
MIDI
Cable
MIDI
Cable
MIDI OUT
MIDI IN
MIDI OUT
MIDI IN
MIDI
Supplied
MIDI Cable
Adaptor
Power-on Procedure
If you have the TENORI-ON connected to an external sound system, it is important to turn
the devices in your audio chain on in the correct order to prevent unwanted noise as well as
possible damage to your equipment.
Before turning the power on, make sure that any volume controls on all devices are turned all
the way down.
When turning power on, you should normally begin with the source and end with power
amplifiers or powered speakers. Here’s an example:
1. TENORI-ON 2. Mixer 3. Powered Speakers
The opposite applies when turning power off:
1. Powered Speakers 2. Mixer 3. TENORI-ON
TENORI-ON Manual 8
Page 9
The TENORI-ON Is …
Song Recording and Playback
Song Recording and Playback
Performance operations carried out on the TENORI-ON can be recorded in real time and
saved to an SD Memory Card as a Song File.
Song Files contain all performance operations (note entry, etc.), settings (voice selection,
tempo, etc.) and other user operations carried out in all layers and blocks in real time. A
recorded Song File can then be loaded in into the TENORI-ON and played back, precisely
reproducing LED button and function button operations precisely as they were recorded.
Song files can be transferred to a computer and made available on the Internet or attached
to email messages to other TENORI-ON users.
[Reference]
❊
Recording TENORI-ON Performances . . . . . . . . Recording Menu ➝ Page 109
❊ Song File Operations . . . . . . . . . . . . . . . . . . . . . . File Menu/Song ➝ Page 64
❊ Using the Supplied Software . . . . . . . . . . . . . . . . The supplied "TENORI-ON User Voice manager" software
installation guide.
SD Memory Card File Types and Operations
In addition to Song Files, the following file types can be saved to and loaded from SD
memory cards, as well as renamed or deleted as required.
File Type Content
All Blocks Performance data and settings for all layers and blocks.
Current Block Performance data and settings for all layers in the current block.
Current Layer Performance data and settings for the current layer in the current block.
All Settings All data other than the note entry points for all layers and blocks.
Samples you have created on a computer or downloaded from the Internet can be
Samplings
[Reference]
❊ File Operations. . . . . . . . . . . . . . . . . . . . . . . . . . . File Menu ➝ Page 62
❊ Sample Save/Load. . . . . . . . . . . . . . . . . . . . . . . . Samplings ➝ Page 88
converted to TENORI-ON file format using the supplied TENORI-ON User Voice Manager
and loaded into the instrument’s user voice memories (voice numbers <01/16,> <02/16,>
and <03/16>) for playback. User voices can be saved to and loaded from SD Memory
Cards.
The supplied "TENORI-ON User Voice manager" software
installation guide.
TENORI-ON Manual 9
Page 10
The TENORI-ON Is …
Non-performance Functions (Interior and Power Save Modes)
Non-performance Functions (Interior and Power Save Modes)
When set to the Interior Mode the TENORI-ON will function as a clock and/or play back
songs automatically. There’s also a Power Save Mode that automatically puts the TENORI-
ON to "sleep" if it isn’t operated for a specified period of time.
Interior Mode
You can set up the TENORI-ON to function as a clock and play back songs automatically.
It can play a composition you have created as an alarm or time hourly reminder. Alternatively,
it can be set to play a song you have created or the demo song while the time is being
displayed.
Power Save Mode
This energy-saving feature stops the sequencer and turns all LED buttons off.
● Interior Mode Operation (Interior Types)
Song (DEMO) Plays the pre-programmed TENORI-ON demo song.
SONG (SD) Randomly plays Song Files from an SD Memory Card.
Clock Displays the time on the TENORI-ON matrix.
Clock + Song (DEMO)
Clock + Song (SD)
● Clock Functions
Displays the time on the TENORI-ON matrix while playing the pre-programmed TENORI-ON
demo song. The demo song light animation appears on the matrix in addition to the time.
Displays the time on the TENORI-ON matrix while randomly playing Song Files from an SD
Memory Card. The song light animation appears on the matrix in addition to the time.
• The hour and minute are displayed numerically on the LED button matrix in 24-hour
format. Seconds are indicated by a dot that moves around the outermost 60 LED buttons,
and an "expanding-square" light animation that occurs once per second.
• The hour reminder sound can be turned ON or OFF.
• The alarm can be turned ON or OFF.
• The alarm time can be set as required.
• Original hourly reminder and alarm sounds can be created.
[Reference]
Interior Mode Settings . . . . . . . . . . . . . . . . . . . . . Interior Menu ➝ Page 101
❊
TENORI-ON Manual 10
Page 11
Non-performance Functions (Interior and Power Save Modes)
Example: 15:39:18 (three thirty-nine PM and eighteen seconds)
Hour
The TENORI-ON Is …
151
60
46
16
Second Indicator
Animation
Minute
30
3145
Interior Type
Clock+Song(DEMO) ∞
"DEMO "
Yamaha
15:39:18
Time Display
Owner name
TENORI-ON Manual 11
Page 12
The TENORI-ON Is …
Performance Modes Basic Operation
Performance Modes
This section describes the 6 TENORI-ON performance modes that are assigned to the 16
layers. A thorough understanding of the modes will help you to create more interesting,
unique performances.
Basic Operation
The basic settings and operations used for TENORI-ON performance are described below.
● The Display
When the TENORI-ON is turned on layer 1 and the Score mode will be selected. You can
begin creating compositions right away by simply entering notes via the LED buttons. When
the power is initially turned on the start-up screen will appear for a few seconds, and then
the status display will appear. The status display will be shown during TENORI-ON
performance. To return to the Status display, press the [CANCEL] button as many times as
necessary.
Status Display
23
1
4
5
1 LAYER [≈] . . . . . . . . . . . . . . . . . . . . . . . . . . . The current layer number and mode.
2 BLOCK [Ω] . . . . . . . . . . . . . . . . . . . . . . . . . . . The current block number.
3 POWER [∞]. . . . . . . . . . . . . . . . . . . . . . . . . . . . . Current power status.
* The TNR-O model has no remaining battery indicator, only a power adaptor display.
4 INST [ç]. . . . . . . . . . . . . . . . . . . . . . . . . . . . . . Current voice number and name.
5 TIME [√] / REC [∫] / PLAY [µ] . . . . . . . Displays the time during normal performance: [√ h:m:s].
6 STOP [
÷≥
] / START [
ÅÍÎÏ ∞
≈01-Score Ω01
ç01/01:Photon
√10:08:31 ÷≥
6
[∑] AC adaptor in use.
[∞] Battery full (battery power).
[¢] Battery half full (battery power).
[£] Battery almost depleted (battery power).
[™] Battery depleted (battery power).
Displays elapsed time during recording: [∫ h:m:s].
Displays elapsed time during playing: [µ h:m:s]
] . . . . . . . . . . . . . . [
˙≤
] during normal performance and recording.
÷≥
[
] when playback is stopped.
˙≤
When the power status indicator shows that the batteries are almost depleted ([£]), replace all six
batteries with new ones as soon as possible.
If the remaining battery power drops even lower [™] will be displayed and SD Memory Card access will
not be possible. Change the batteries immediately. (TNR-W only)
TENORI-ON Manual 12
Page 13

The TENORI-ON Is …
Performance Modes Basic Operation
Basic Settings and Editing During Performance
● [CLEAR] button
Press the [CLEAR] button to clear all active notes from the layer.
Clear All Active Notes from the Layer Press the [CLEAR] button briefly.
Clear All Active Notes from All Layers and
Blocks
● Function Button Settings/Edits
Basic settings and edits are made during performance using the [L1] — [L5] functions
buttons, [R1] — [R5] functions buttons, and LED buttons.
[Reference]
❊
Using the Function Buttons . . . . . . . . . . . . . . . . . TENORI-ON Quick Guide,
Press and hold the [CLEAR] button.
Setting Parameters with the Function Buttons ➝ Page 23
Changing Voices
Change Note Length
Change the Octave
Change the Score Mode Loop Range
Rotate Shape in the Random Mode
Adjust Loop Speed
Change Layers
Change the Tempo
Transposition
Adjust the Layer Volume
Change Blocks, Copy Layer, Copy Block
Use the LED buttons while holding the [L1] button (
Use the LED buttons while holding the [L2] button (
Use the LED buttons while holding the [L3] button (
Use the LED buttons while holding the [L4] button (
Use the LED buttons while holding the [L4] button (
Use the LED buttons while holding the [L5] button (
Use the LED buttons while holding the [R1] button (
Use the LED buttons while holding the [R2] button (
Use the LED buttons while holding the [R3] button (
Use the LED buttons while holding the [R4] button (
Use the LED buttons while holding the [R5] button (
➝ Page 24).
➝ Page 25).
➝ Page 26).
➝ Page 27).
➝ Page 28).
➝ Page 29).
➝ Page 30).
➝ Page 31).
➝ Page 32).
➝ Page 33).
➝ Page 34).
TENORI-ON Manual 13
Page 14

The TENORI-ON Is …
Performance Modes Basic Operation
• Menu Settings/Edits
Detailed TENORI-ON settings can be accessed and edited by using the jog dial to select
menu items on the LCD display. File save and load operations can also be accessed this
way.
[Reference]
❊
Using the Menus . . . . . . . . . . . . . . . . . . . . . . . . . Setting Parameters with the Jog Dial ➝ Page 36
Press the [OK] button at the point you want to stop playback while the Status
Stop Playback
Adjust Overall Volume
Mute Output
Adjust Layer Panning
Apply a Reverb or Chorus Effect
Change the Light Animation
Clear All Active Notes from the Layer
Clear All Active Notes from All Layers and
Blocks
Reset All Layers and Blocks
Copy Active Notes
Change Scales
Adjust MIDI Tone Generator Tuning
Reset the Playback Loop
Determines whether notes played on the
TENORI-ON will sound via the internal tone
generator or not
Adjust the LED Button Long-press Time
File Operations
Format an SD Memory Card
Factory Reset
Record a performance
Display is shown. Press the [OK] button a second time and playback will
resume from that point.
Use the jog dial and [OK] button to go to the "Hardware Volume" display (
Page 43).
Use the jog dial and [OK] button to go to the "Mute" display (
Use the jog dial and [OK] button to go to the "Panpot" display (
Use the jog dial and [OK] button to go to the "Effect menu" display (
Page 99).
Use the jog dial and [OK] button to go to the "Animation" display (
Press the [CLEAR] button briefly. Alternatively, use the jog dial and [OK] button
to go to the "Clear this layer" display (
Press and hold the [CLEAR] button. Alternatively, use the jog dial and [OK]
button to go to the "Clear All Blocks" display (➝ Page 57).
Use the jog dial and [OK] button to go to the "Reset All Blocks" display (
Page 58).
Use the jog dial and [OK] button to go to the "Copy this block" display (
Page 55) or "Copy this layer" display (
Use the jog dial and [OK] button to go to the "Master Scale" display (
Page 44).
Use the jog dial and [OK] button to go to the "Master Tuning" display (
Page 60).
Use the jog dial and [OK] button to go to the "Reset Loop Timing" display (
Page 46).
Use the jog dial and [OK] button to go to the "Local Control" display (
Page 61).
Use the jog dial and [OK] button to go to the "Push Sensitivity" display (➝
Page 60).
Use the jog dial and [OK] button to go to the "File menu" display (
Use the jog dial and [OK] button to go to the "SD Format" display (
Page 107).
Use the jog dial and [OK] button to go to the "Factory Reset" display (
Page 108).
Use the jog dial and [OK] button to go to the "Recording Menu" display
(
➝Page 109).
➝ Page 57).
➝ Page 56).
➝ Page 47).
➝ Page 53).
➝
➝
➝ Page 53).
➝
➝
➝
➝
➝
➝ Page 62).
➝
➝
➝
More detailed menu settings than listed in the above chart are described in the
following pages. Understand all the possibilities offered by the TENORI-ON can help
you gain maximum enjoyment from the instrument.
TENORI-ON Manual 14
Page 15

The TENORI-ON Is …
Performance Modes Score Mode
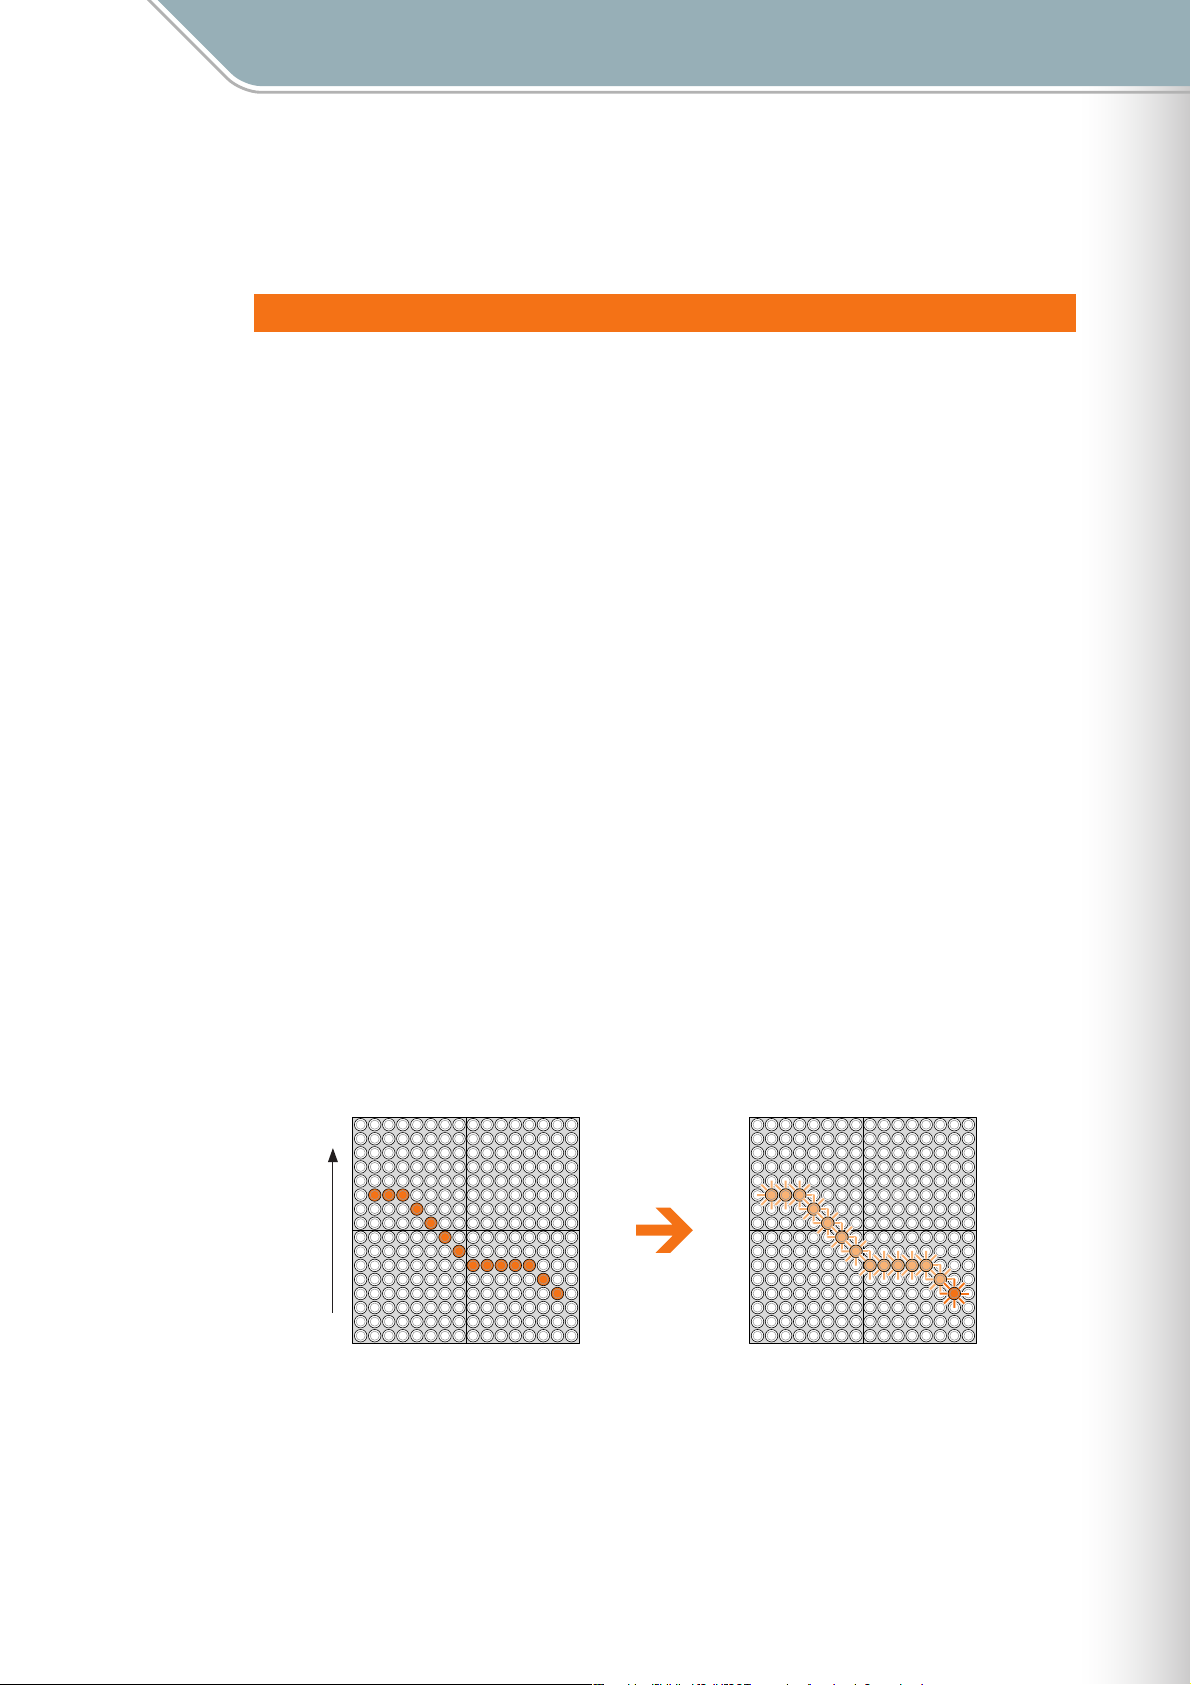
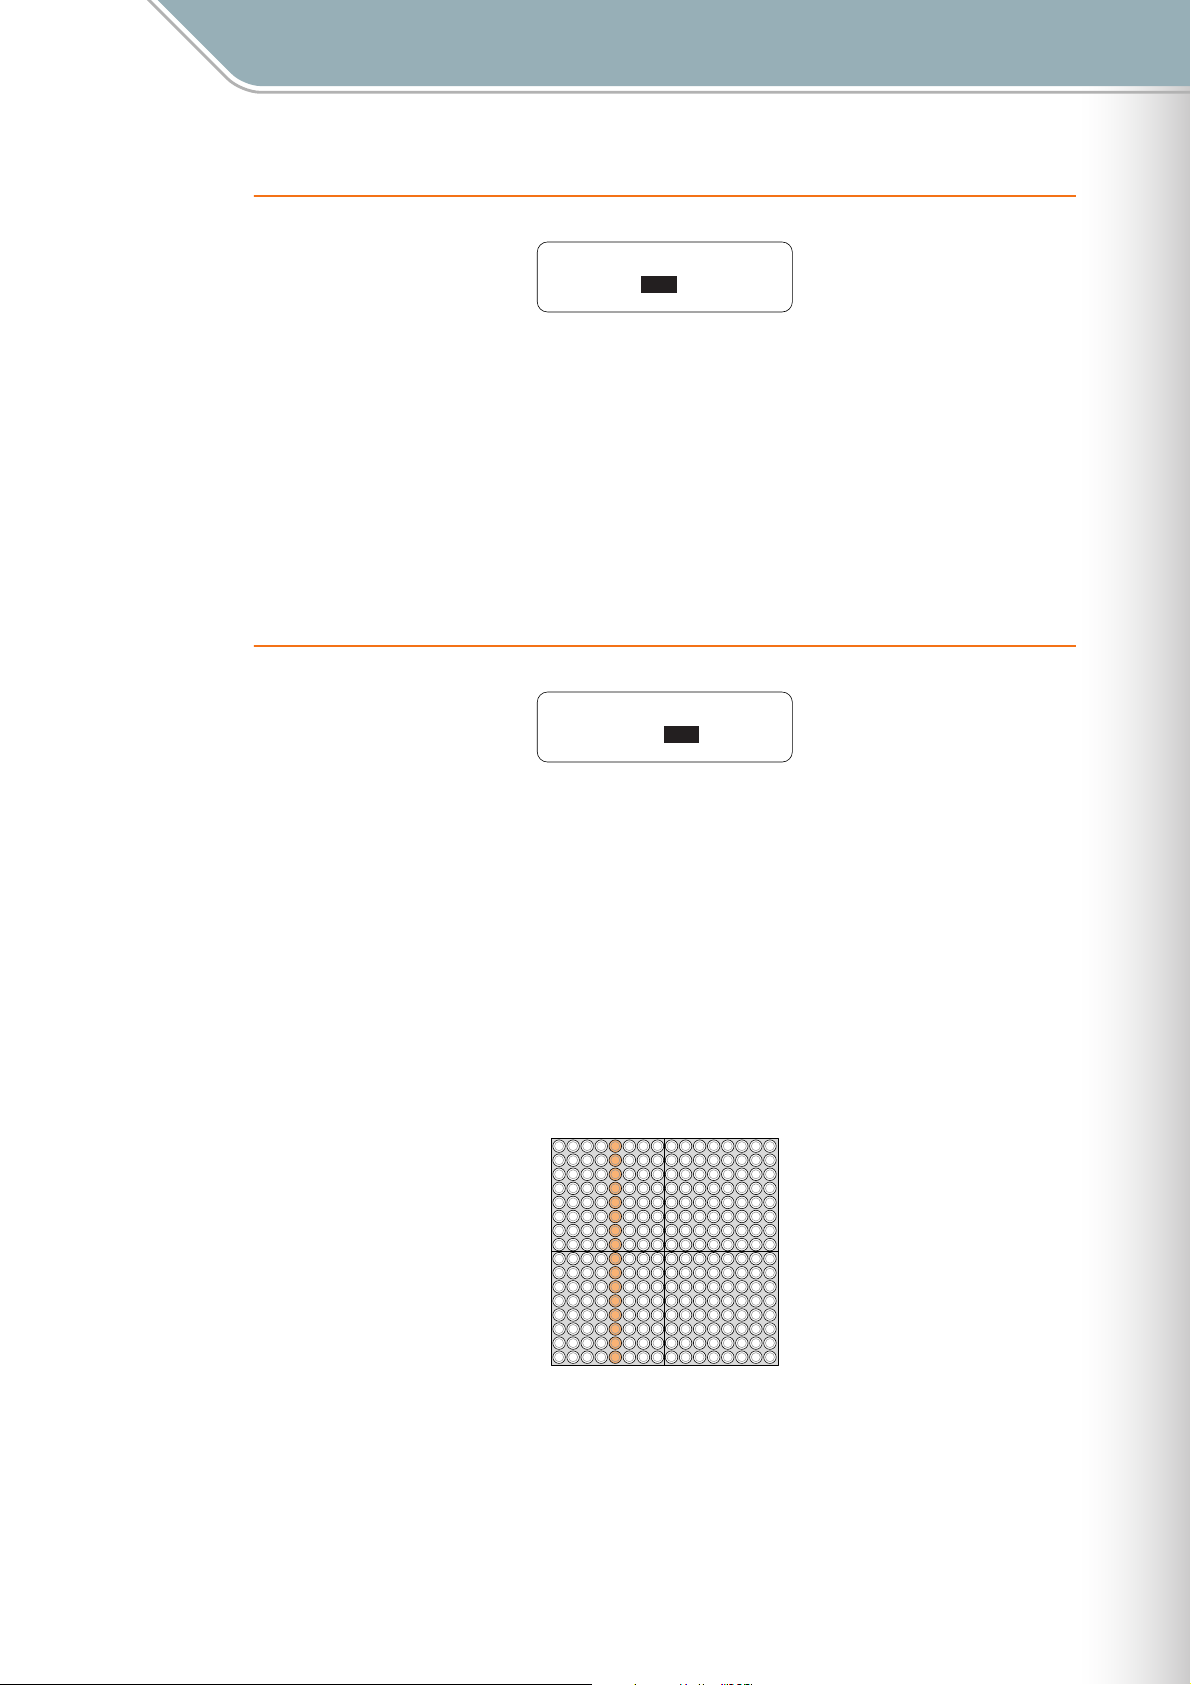
Score Mode
The Score Mode is assigned to TENORI-ON layers 1 — 7.
The Score Mode is selected by default when the power is turned on.
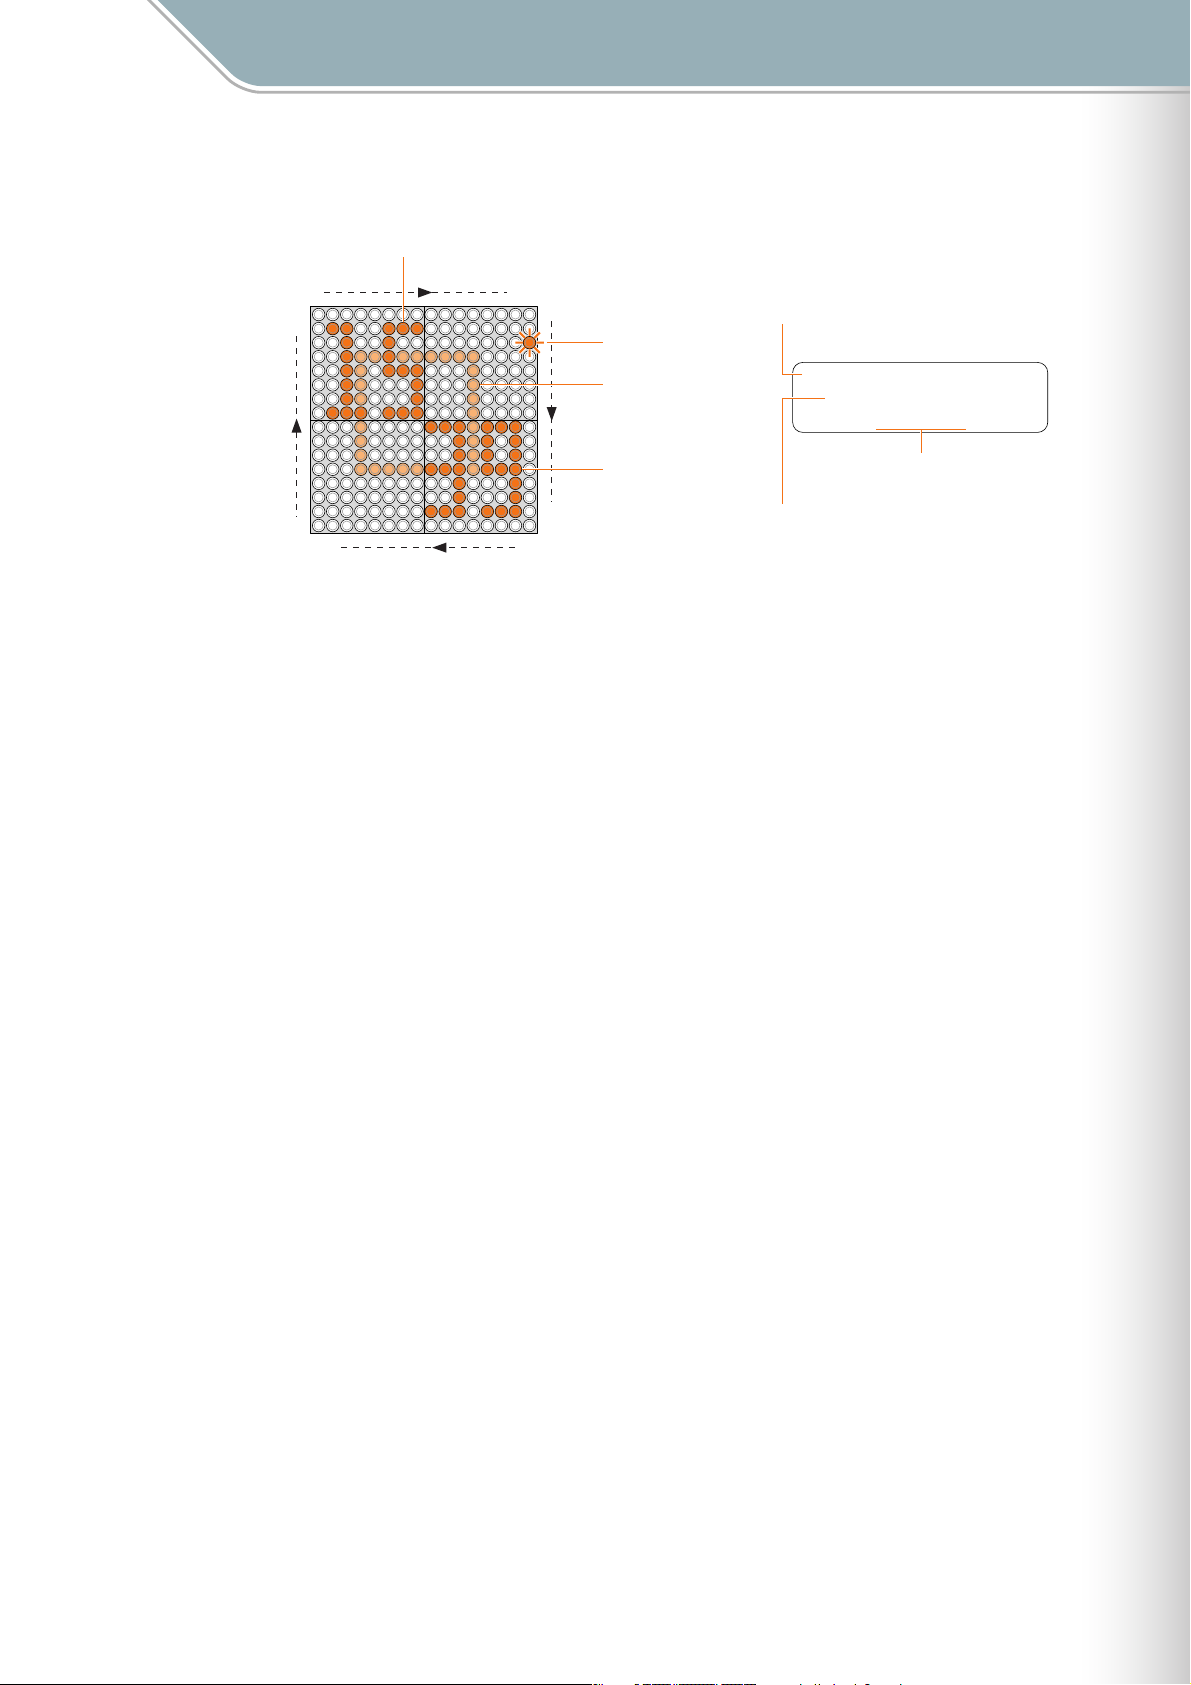
Score Mode Operation
In this mode the TENORI-ON interface functions like a musical "score" on which you can
write the notes to be played in one musical measure via the 16 x 16 LED button matrix.
The "loop indicator" (four lit LED buttons in a vertical column) proceeds from left to right, and
active notes will play when the loop indicator passes over them. Light animation will also
occur for each note played. The loop indicator will loop back to the beginning once the right
edge of the matrix is reached.
Press the [OK] button while the highlighted "STOP" indicator in the lower right corner of the
LCD display is shown to temporarily pause loop playback. The loop indicator will stop at the
position at which the [OK] button is pressed. Press the [OK] button a second time and loop
playback will resume from the point at which it was paused. You can change the point from
which playback will resume by moving the paused loop indicator to the desired position
(press an LED button at the desired start position).
[Reference]
❊
Setting the loop beginning and end points. (Master Loop Point ➝ Page 46, Loop Point ➝ Page 27)
❊ Changing the loop indicator speed (beat speed). (Loop Speed ➝ Page 29, 51)
❊ Turning the loop indicator off. (Loop Indicator ➝ Page 61)
❊ Changing the light animation. (Animation ➝ Page 53)
The horizontal axis corresponds to time and the vertical axis corresponds to the pitch of the
notes played. The factory default scale for the vertical axis is an ionian scale, corresponding
to the white keys on a piano.
[Reference]
Selecting a scale other than the ionian scale. (Master Scale ➝Page 44)
❊
❊ Changing octaves. (Octave ➝ Page 26)
If a drum voice is selected each note on the vertical axis does not correspond to a different
pitch in the scale, but rather to a different instrument in the drum "kit." See "Voices" on
Page 6.
Press an LED button briefly to play the sound assigned to it. If you hold the LED button a bit
longer it will remain lit and will become an active note. Press and hold an active note to de-
activate it (the LED button will go out).
[Reference]
The press-and-hold time for note entry can be changes as required. (Push Sensitivity ➝ Page 60)
❊
❊ The note length (gate time) can be changed as required. (Sound Length ➝ Page 25, 52)
TENORI-ON Manual 15
Page 16
The TENORI-ON Is …
Performance Modes Score Mode
Loop Indicator Active Notes
High
Pitch
Low
Time
Sound/LightLoop Indicator Motion
Light Animation
TENORI-ON Manual 16
Page 17
The TENORI-ON Is …
Performance Modes Random Mode
Random Mode
The Random Mode is assigned to layers 8 — 11.
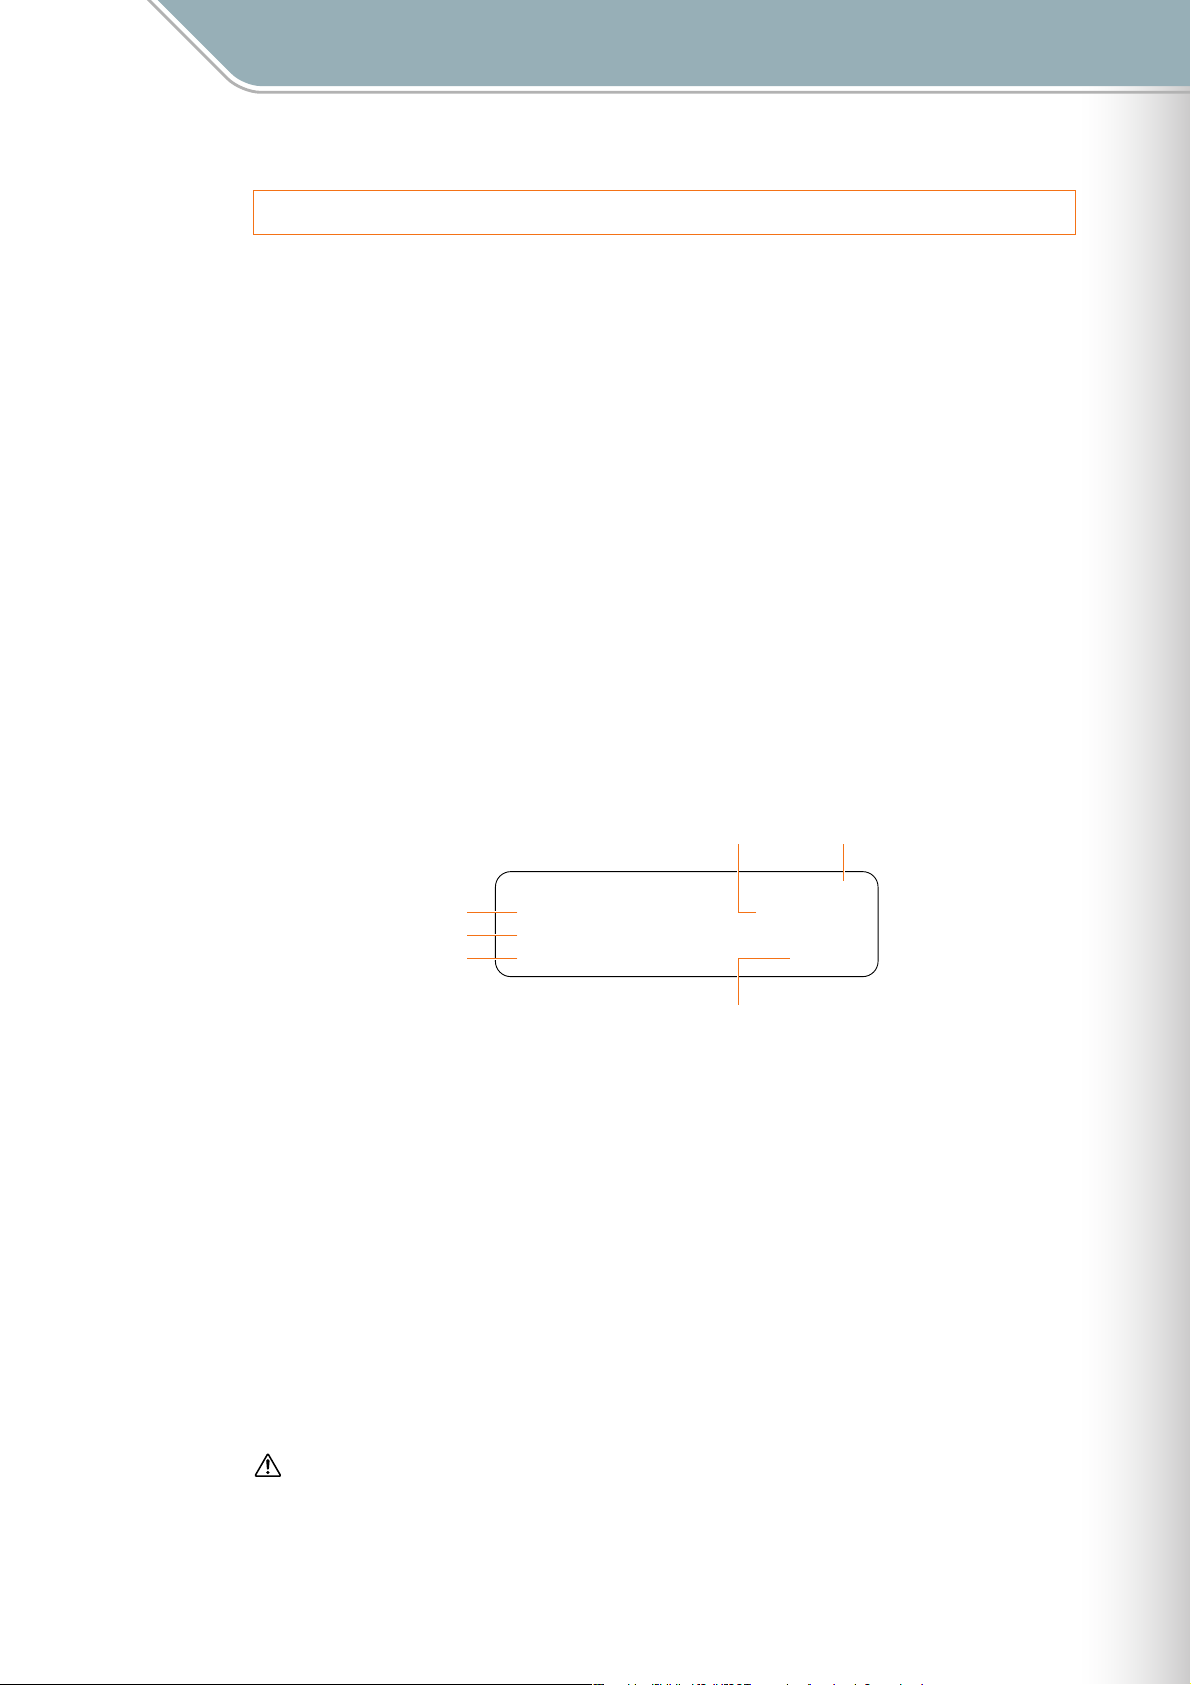
Random Mode Operation
If you press an LED button long enough to enter an active note in the Random Mode, the
active note will play back repeatedly. If you then enter a few more active notes, the lights will
"travel" from note to note, in the order entered, and the active notes will sound when the
traveling light passes over them. The Random Mode thus produces a totally different type of
loop from the Score Mode.
[Reference]
❊
The next active note will play at the specified 1-beat timing. The length of each beat can be adjusted via the
Loop Speed parameter (Loop Speed ➝ Page 29, 51. Master Loop Speed ➝ Page 45).
You can even spin loop-shapes you create in the Random Mode by holding the [L4] button
and running a finger around the matrix in the direction and at the speed of the desired spin.
The pitches of the notes will change accordingly as the shape spins, producing loop sound
effects.
[Reference]
❊
Rotation ➝ Page 28
Press an LED button briefly to play the sound assigned to it. If you hold the LED button a bit
longer it will remain lit and will become an active note. Press and hold an active note to de-
activate it (the LED button will go out).
[Reference]
The press-and-hold time for note entry can be changes as required. (Push Sensitivity ➝ Page 60)
❊
❊ The note length (gate time) can be changed as required. (Sound Length ➝ Page 25, 52)
As in the Score Mode the factory default scale for the vertical axis is an ionian scale,
corresponding to the white keys on a piano. Nothing is assigned to the horizontal axis, but
the timing between notes will depend on the distance between the notes on the matrix.
[Reference]
❊ Selecting a scale other than the ionian scale. (Master Scale ➝ Page 44)
❊ Changing octaves. Octave ➝ Page 26)
❊ Changing the light animation. (Animation ➝ Page 53)
Note entered in order from 1 — 3 will play in the same
sequence.
High
22
When a shape is rotated the notes
will play/light during rotation.
22
33
Pitch
11
33
Low
11
Light Animation
TENORI-ON Manual 17
Page 18
The TENORI-ON Is …
Performance Modes Draw Mode
Draw Mode
The Draw Mode is assigned to layers 12 and 13.
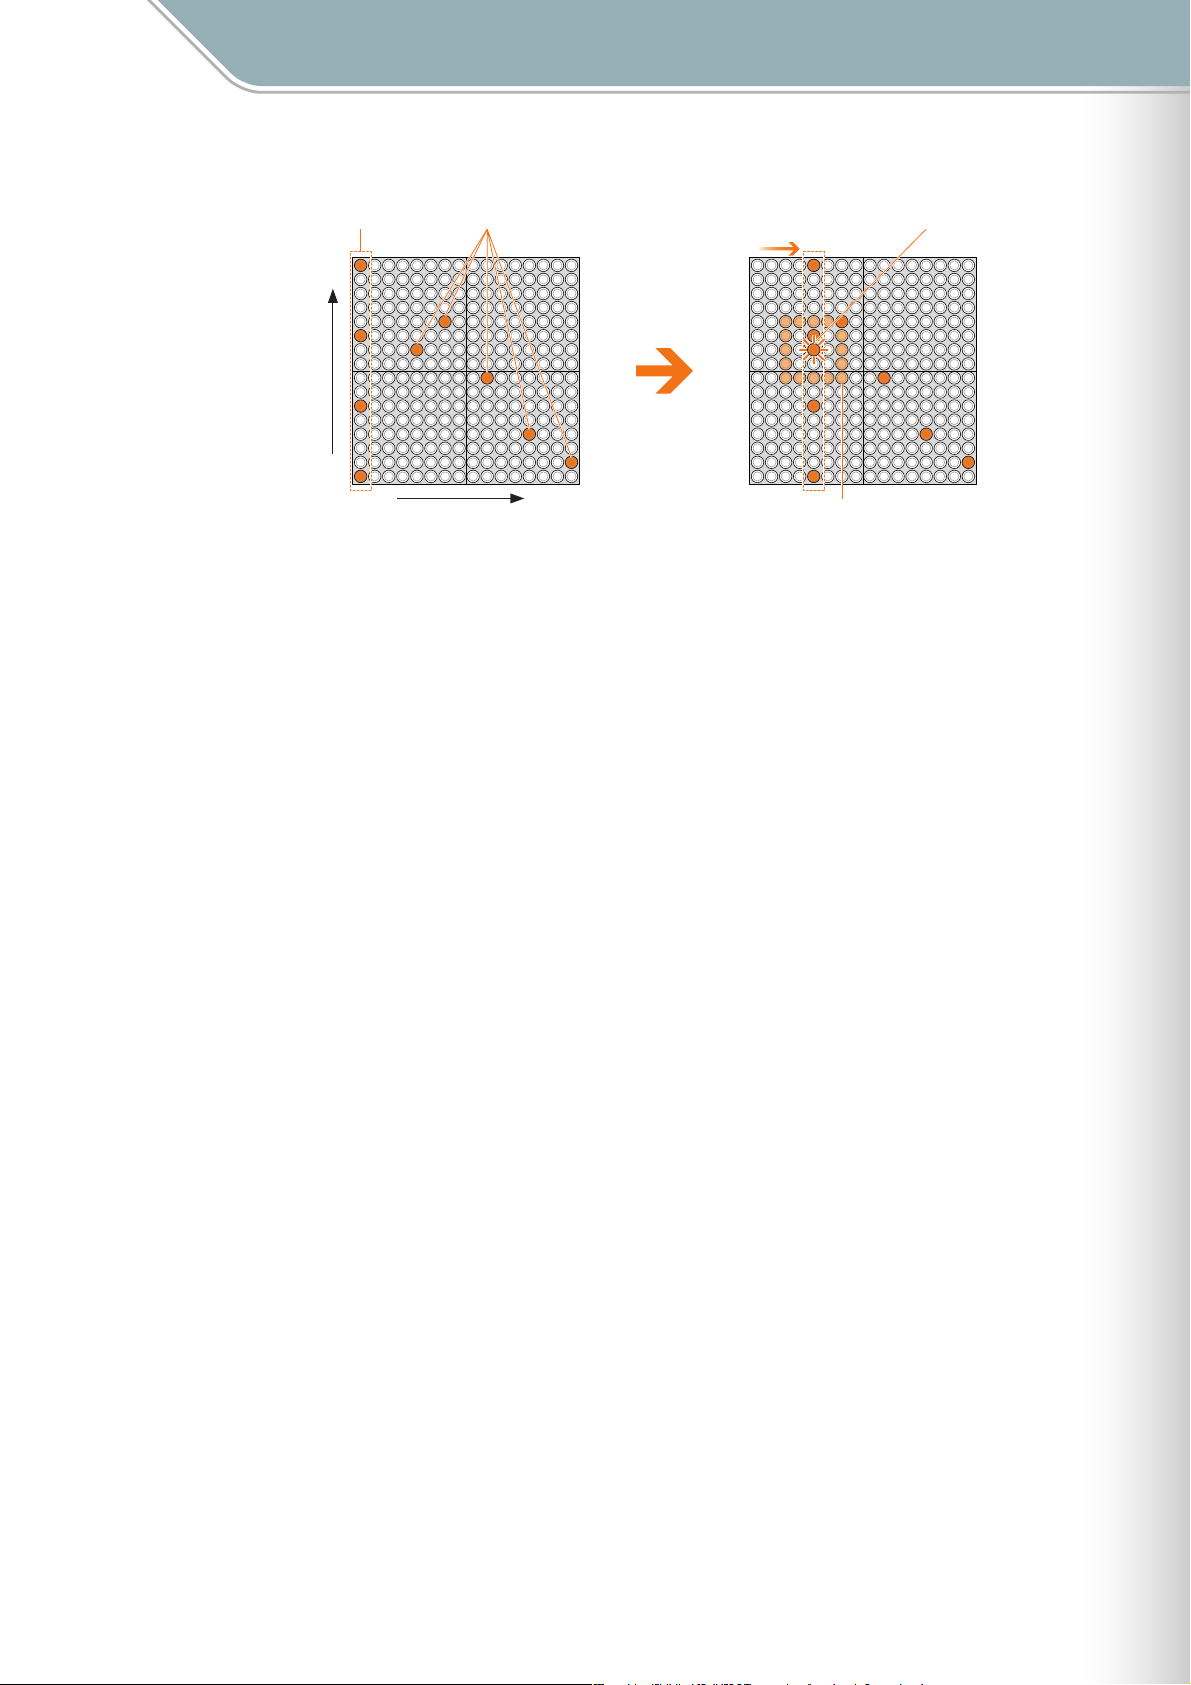
Draw Mode Operation
In this mode you can press individual LED buttons or draw lines or curves on the matrix, and
those actions will be played back and repeated. You can keep adding to your "composition"
during playback to build up thick sonic textures.
[Reference]
❊
Recording and playback of LED button operations loops in 16th-beat increments in the Score mode. LED
button operations are played back in the next loop. The loop length (cycle) can be adjusted via the Loop
Speed parameter (Loop Speed ➝ Page 29, 51. Master Loop Speed ➝ Page 45).
❊ In the Draw Mode you cannot clear only a part of the performance. The entire layer can be cleared by
pressing the [CLEAR] button.
When a button is pressed it will sound and be activated immediately. In the Draw Mode there
is no need to press and hold a button to enter a note. Because this, in the Draw mode is
possible to "draw sounds" by running your finger(s) over the LED button matrix in various
ways.
[Reference]
The note length (gate time) can be changed as required. (Sound Length ➝ Page 25, 52)
❊
As in the Score Mode the factory default scale for the vertical axis is an ionian scale,
corresponding to the white keys on a piano. Nothing is assigned to the horizontal axis, but
you can run your finger over the matrix horizontally to produce notes in quick succession.
[Reference]
Selecting a scale other than the ionian scale. (Master Scale ➝ Page 44)
❊
❊ Changing octaves. (Octave ➝ Page 26)
❊ Changing the light animation. (Animation ➝ Page 53)
Draw curves or shapes on the LED buttons. The sounds/lights of the drawn curve will repeat at a
High
Pitch
Low
pre-determined interval.
TENORI-ON Manual 18
Page 19
The TENORI-ON Is …
Performance Modes Bounce Mode
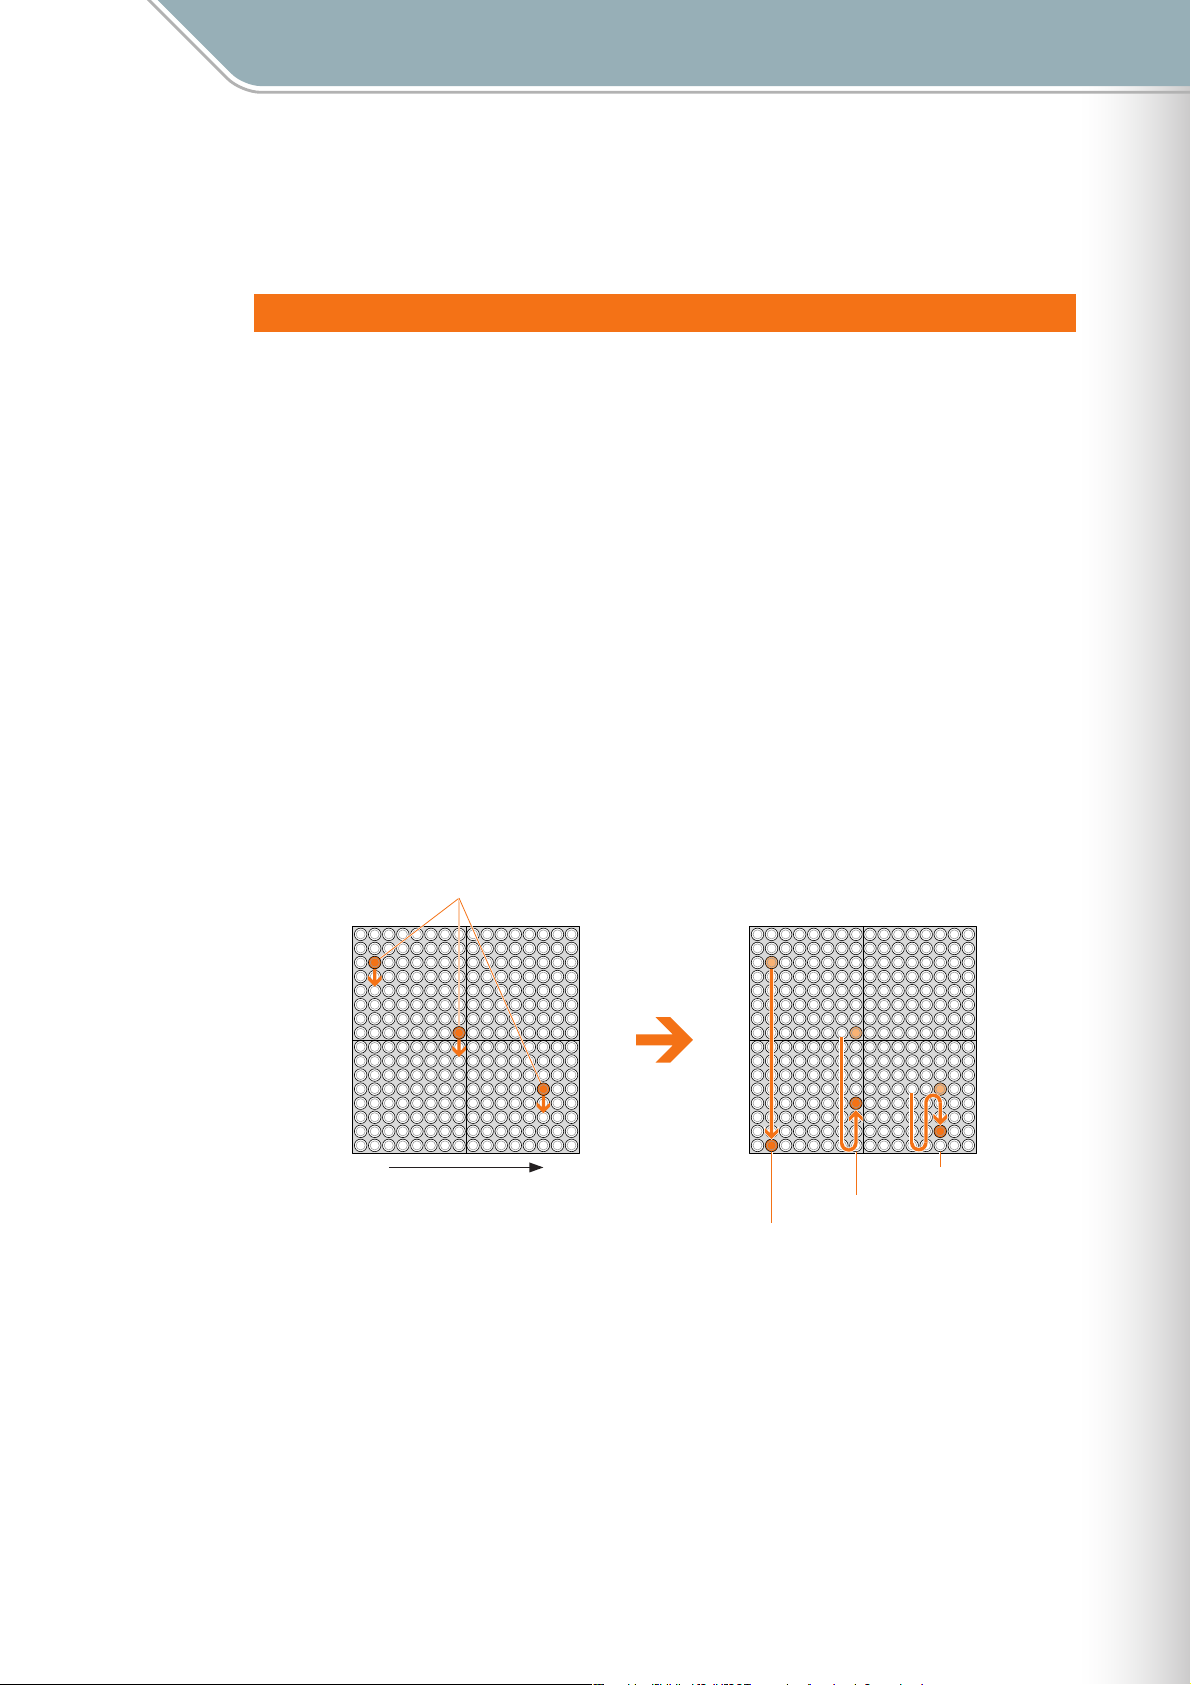
Bounce Mode
The Bounce Mode is assigned to layer 14.
Bounce Mode Operation
Press an LED button and the light will "drop" from that button, bounce back from the bottom
of the matrix, and repeat. The corresponding note will sound when the light bounces at the
bottom row.
The higher the entry point, the longer the interval between the sound. By choosing
appropriate entry points you can set the repeat interval as required.
[Reference]
❊
The illuminated dots move at a speed corresponding to the timing of the LED buttons: i.e. 1 beat per dot.
(Loop Speed ➝ Page 29, 51. Master Loop Speed ➝ Page 45).
In the Bounce Mode the pitches are arranged horizontally. As in the Score Mode the factory
default scale is an ionian scale, corresponding to the white keys on a piano, with the lowest
pitch on the left and the highest on the right.
Press the lowest LED button to stop activity in that column.
[Reference]
❊
Selecting a scale other than the ionian scale. (Master Scale ➝ Page 44)
❊ Changing octaves. (Octave ➝ Page 26)
❊ The note length (gate time) can be changed as required. (Sound Length ➝ Page 25, 52)
Entry Point
Low High
Pitch
The light will drop from the entry
point and sound at the bottom row.
Note sounds at the lowest row.
Bounces back
from the lowest
row.
Bounces between
the entry point
and lowest row.
TENORI-ON Manual 19
Page 20
The TENORI-ON Is …
Performance Modes Push Mode
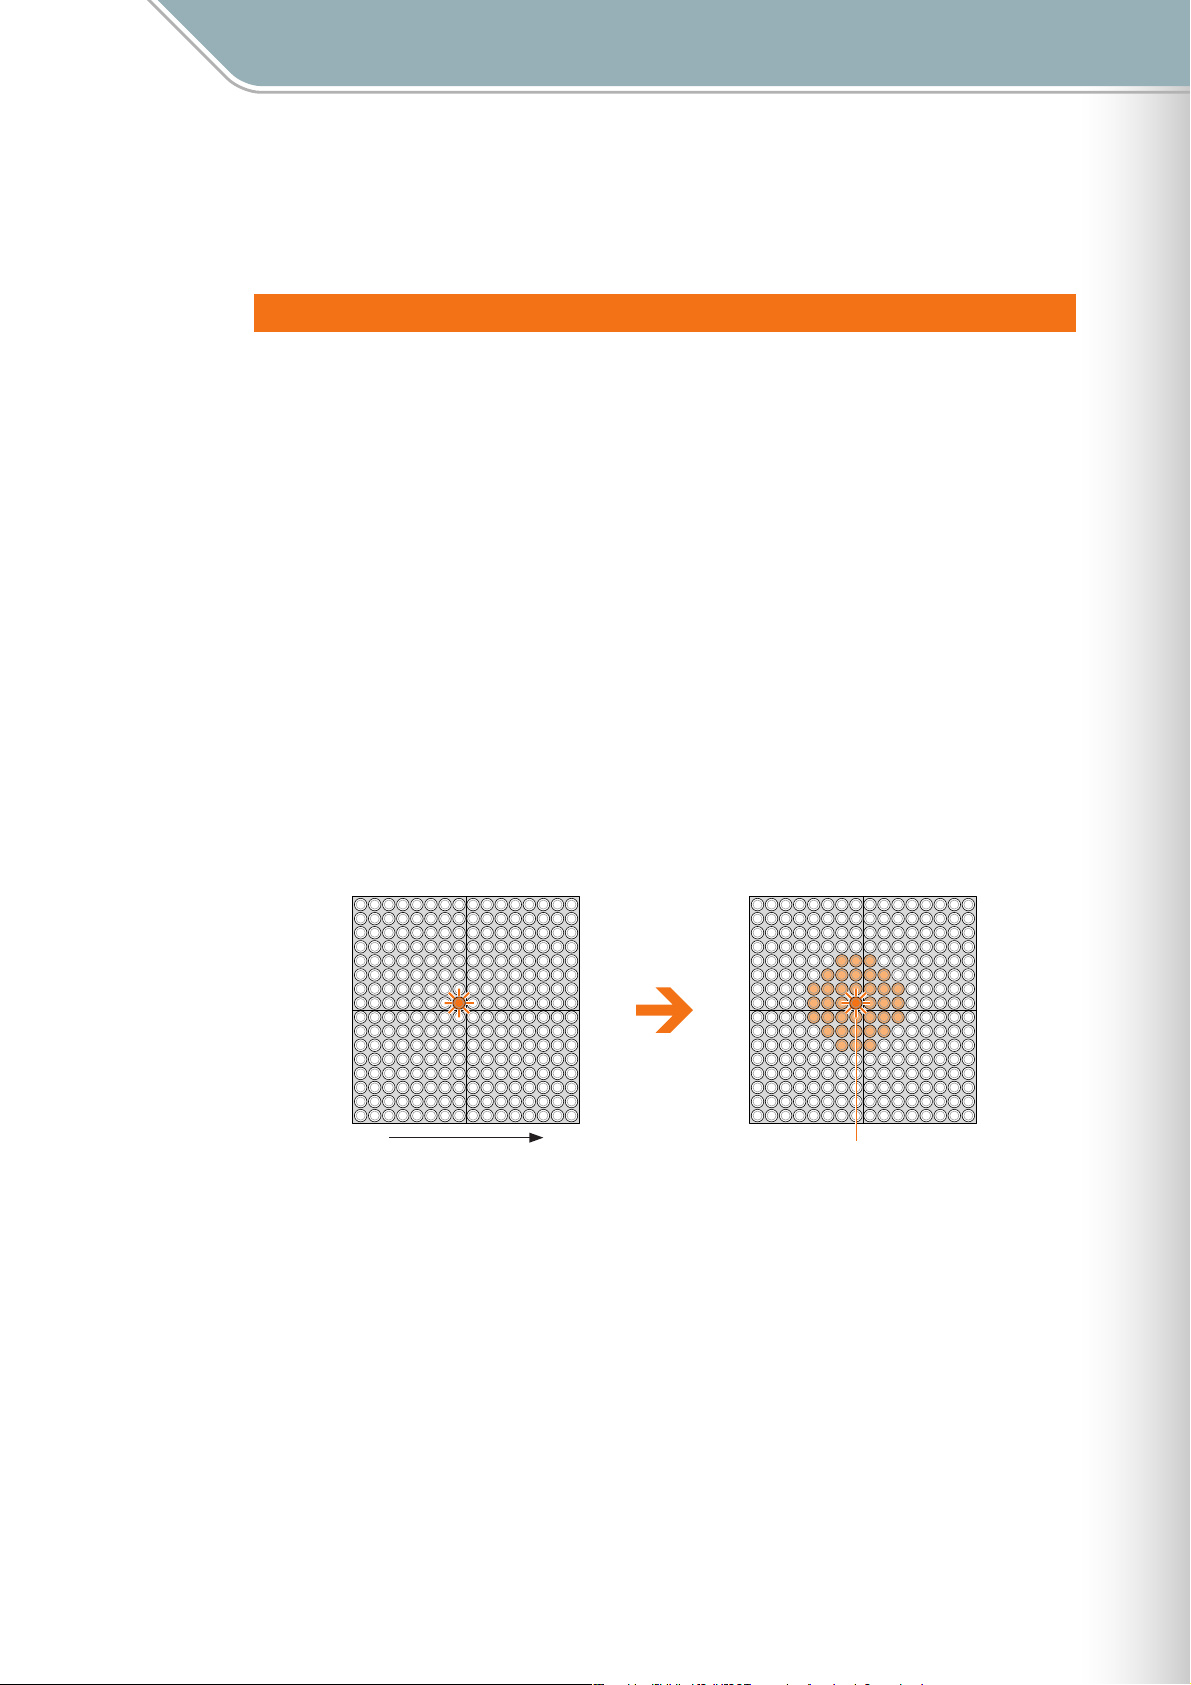
Push Mode
The Push Mode is assigned to layer 15.
Push Mode Operation
In this mode if you press and hold an LED button the sound of the corresponding note will
begin to change gradually. The way the note changes will depend on the voice used (this
feature will only work with sustained voices that have a time-based tonal change in the
sustained portion of the voice’s envelope). Voices 15/01 through 15/16 have been
specifically created for use in the Push mode, and are recommended.
The flashing surrounding the pressed button will gradually get brighter and wider.
If the button is held briefly the note and flashing will stop when you release it, but if you hold
the button for longer the note and flashing will continue even after the button is released.
To stop a note that is sounding, press the corresponding LED button (at the center of the
flashing LED buttons).
The factory default scale for the horizontal axis is an ionian scale, corresponding to the white
keys on a piano. Nothing is assigned to the vertical axis.
[Reference]
❊
Selecting a scale other than the ionian scale. (Master Scale ➝ Page 44)
❊ Changing octaves. (Octave ➝ Page 26)
Hold an LED button and …
Low High
Pitch
The flashing will expand.
Sound/light (changing).
TENORI-ON Manual 20
Page 21
The TENORI-ON Is …
Performance Modes Solo Mode
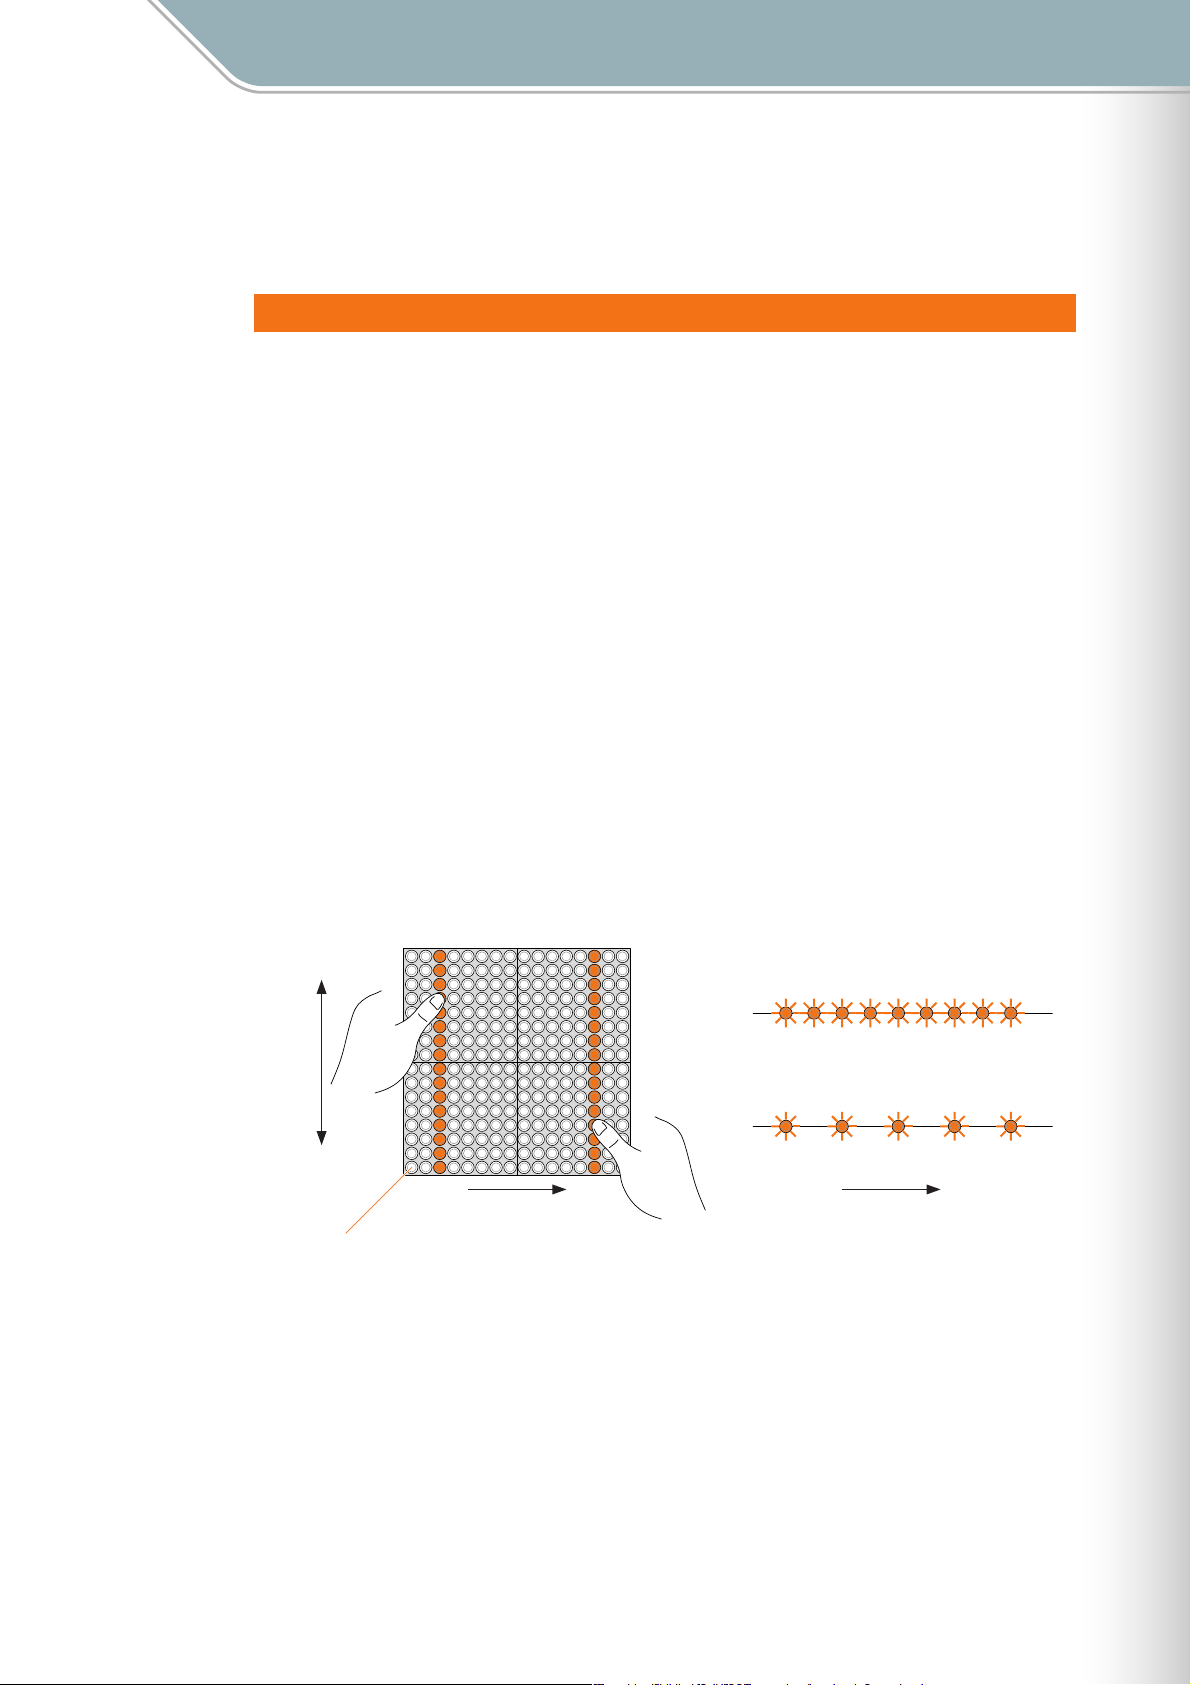
Solo Mode
The Solo Mode is assigned to layer 16.
Solo Mode Operation
Press an LED button and the corresponding note will repeat until the button is released. The
LEDs in a column in which an LED button is pressed will flash upwards.
In the solo mode the pitches are arranged horizontally, like a piano. The vertical axis sets the
interval between repeats: you can change the interval between repeats easily by pressing or
sliding your finger to a lower (longer) or higher (shorter) LED button in the column.
If a sustained voice is used the note will sound for as long as the button is held.
[Reference]
❊
The note length (gate time) can be changed as required. (Sound Length ➝ Page 25, 52)
❊ The interval between repeats can be adjusted by changing the loop speed. The repeat interval of the top row
of LED buttons is 1/2 the loop speed, and the interval doubles for each row down the matrix. (Loop Speed ➝
Page 29, 51. Master Loop Speed ➝ Page 45).
The factory default scale for the horizontal axis is an ionian scale, corresponding to the white
keys on a piano, with the lowest pitch on the left and the highest on the right.
[Reference]
Selecting a scale other than the ionian scale. (Master Scale ➝ Page 44)
❊
❊ Changing octaves. (Octave ➝ Page 26)
❊ Note timing in the Solo Mode will be synchronized to the Score Mode. (Quantize ➝ Page 60)
Short
Left
Repeat
Interval
Right
Long
Low High
Pitch Time
If you press the lowest LED button in a column the note will
sound only once.
Note Repeat Timing
TENORI-ON Manual 21
Page 22

Parameter Settings
Parameter Settings
The TENORI-ON provides the following two methods for setting parameters such as voice
and tempo.
■ The Function Buttons (➝ Page 23)
The function buttons are used in conjunction with the LED buttons to provide fast, easy
access to functions such as voice switching, layer switching, block switching, and more.
Visual feedback from the LED button matrix makes settings intuitive and easy.
■ The Jog Dial and Menu (➝ Page 36)
Detailed parameters, file save and load functions, song recording and other "deep" functions
can be accessed via the jog dial and menu. "Customization" functions such as long-press
time for the LED buttons can also be accessed and adjusted in this way.
● Settings available via the function buttons ([L1] — [L5], [R1] — [R5]) also appear on the LCD display during
adjustment. At this time you can also use the jog dial for finer adjustment.
TENORI-ON Manual 22
Page 23
Parameter Settings
Setting Parameters with the Function Buttons
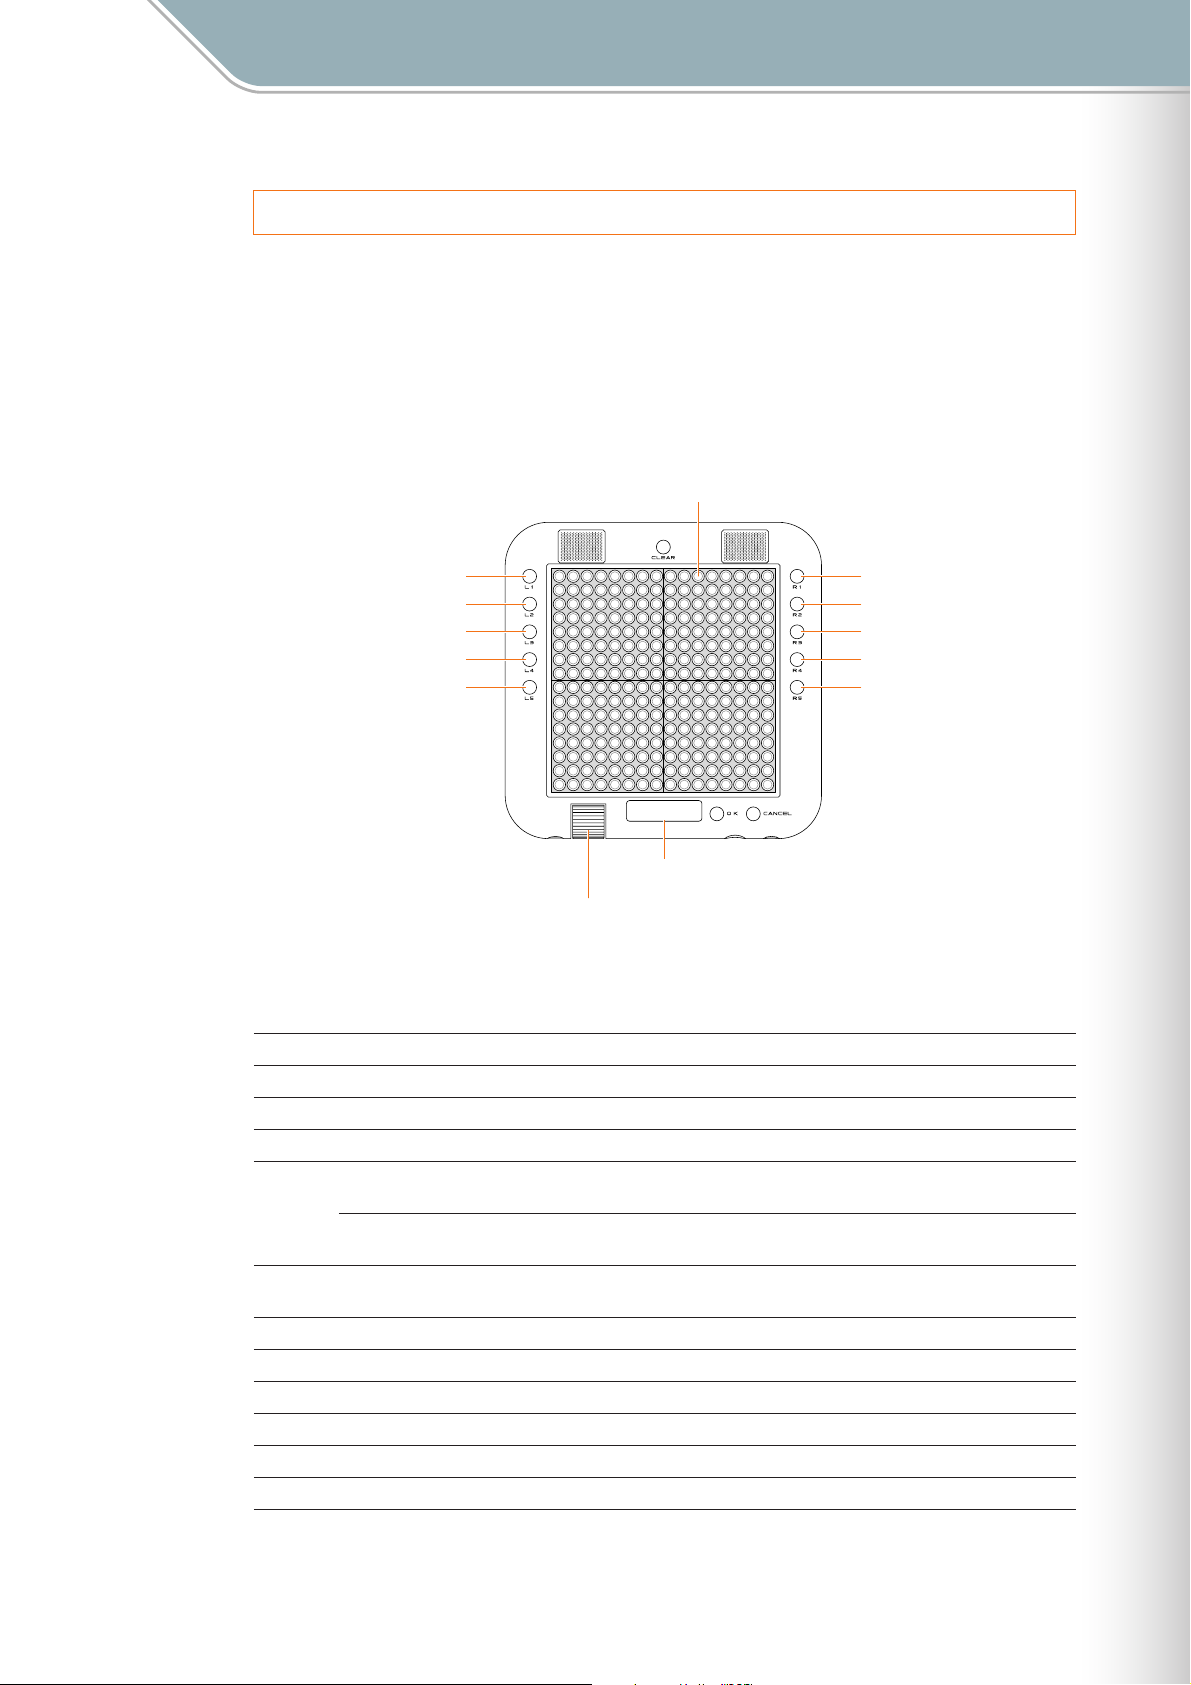
Setting Parameters with the Function Buttons
Settings can be made by holding one of the ten function buttons located on either side of the
TENORI-ON ([L1] — [L5], [R1] — [R5]) and operating the LED buttons.
When a function button is pressed the current setting for that button will appear on the LED
button matrix, and the setting can be changed by pressing the appropriate LED button(s).
Settings available via the function buttons also appear on the LCD display during
adjustment. At this time you can also use the jog dial for finer adjustment.
LED Buttons
Function Buttons Function Buttons
[L1]
[L2]
[L3]
[L4]
[L5]
Jog Dial
ÅÍÎÏ ∞
≈01-Score Ω01
ç01/01:SoftBeep
√00:00:00 ≥
LCD Display
[R1]
[R2]
[R3]
[R4]
[R5]
The settings available via the function buttons are as follows:
Button Function Description Page
[L1] Instrument Selects the voice for the current layer. 24
[L2] Sound Length Sets the gate time (note length) for all active notes in the current layer. 25
[L3] Octave Sets the octave for all active notes in the current layer. 26
Loop Point (Score
[L4]
[L5] Loop Speed
Mode)
Rotation (Random
Mode)
Sets the loop range when a Score Mode layer is selected. 27
Sets the direction and speed of rotation for active note shapes in the Random
Mode.
Sets the beat length (the speed of the loop indicator) for Score Mode layers
only.
28
29
[R1] Layer No. Switches layers. 30
[R2] Master Tempo Sets the tempo for all layers and blocks. 31
[R3] Master Transpose Sets transposition for all layers and blocks. 32
[R4] Volume Sets the volume for each layer (common to all blocks). 33
[R5] Block No. Switches blocks. Also used for layer and block copy. 34
TENORI-ON Manual 23
Page 24

Parameter Settings
Setting Parameters with the Function Buttons [L1] Instrument
[L1] Instrument
Selects the voice for the current layer.
When you press and hold the [L1] button vertical and horizontal lines will light on the matrix,
and the button at their intersection corresponds to the currently selected voice. If you press a
different LED button while these crossed lines are showing the intersection will move to that
button and the corresponding voice will be selected.
Refer to the Voice List on Page 119 for a complete list of voice numbers and names.
Voice numbers <01/16>, <02/16>, and <03/16> are user voices.
● When a user voice is selected from a preset voice, the Sound Length (➝ Page 52) will be set to 1000 (msec).
Conversely, when a preset voice is selected from a user voice the sound length for all other voices will be set
to 100 (msec).
● Changes will not be applied to notes that are already playing in the Push or Solo modes, or currently playing
notes if a long Sound length has been specified.
■ Range . . . . . . . . . . . . Vertical axis: 01 — 16. Horizontal axis: 01 — 16
■ Default . . . . . . . . . . . Different for each layer
16
15
14
13
12
11
10
09
08
07
06
05
04
03
02
01
010203040506070809101112131415
The intersection of the crossed lines is the current voice number
(in this example: <06/10>).
Instrument ∞
Layer[01]
01/01:Photon
Voice Number Voice Name
[Reference]
❊ Layer menu/Instrument (➝ Page 49), Voice List (➝ Page 119)
16
Current Layer Number
TENORI-ON Manual 24
Page 25
Parameter Settings
Setting Parameters with the Function Buttons [L2] Sound Length
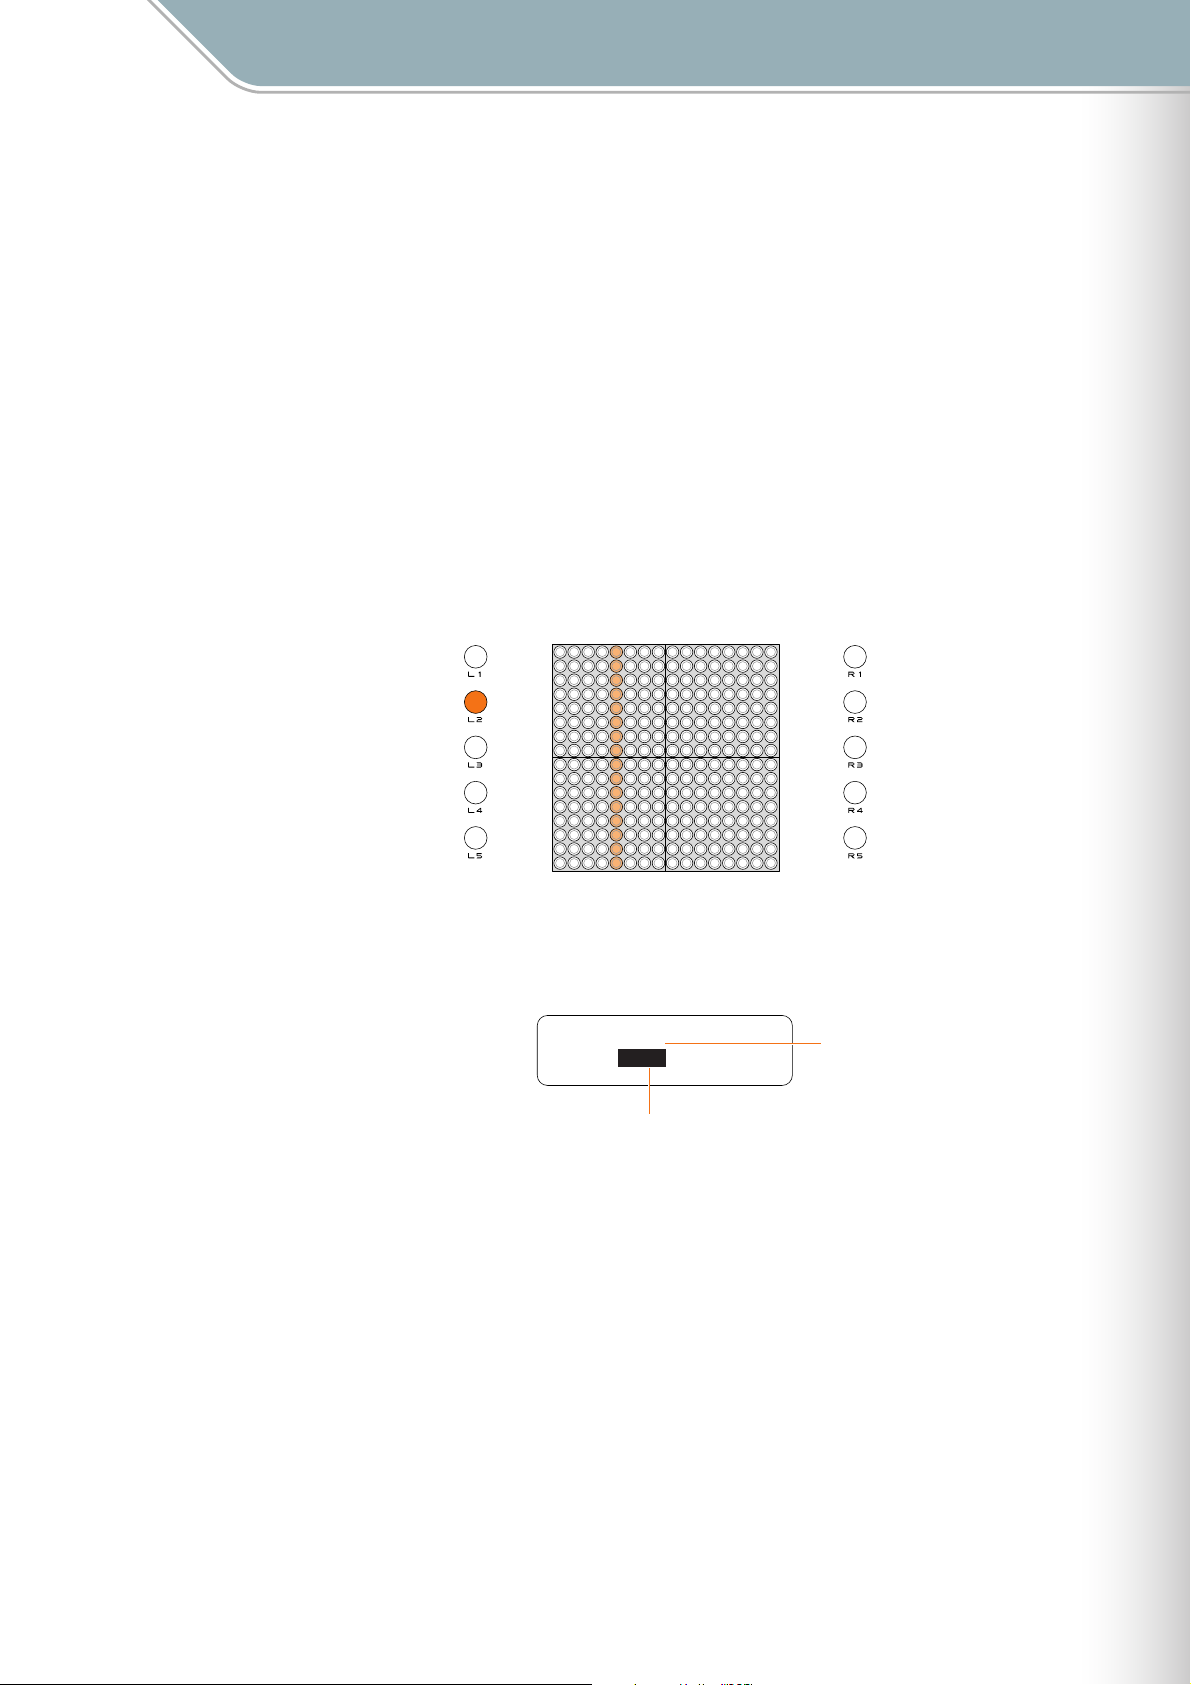
[L2] Sound Length
Sets the note length (gate time) for all active notes in the current layer.
While holding the [L2] button slide your finger horizontally over the matrix to move the lit
vertical line to the desired setting, or simply press an LED button at the appropriate column.
Moving the line to the right increases the note length.
The LED buttons adjust the Sound Length in the increments listed below. You can also use
the jog dial for finer adjustment in +/-10 millisecond increments.
● Depending on the voice used, setting a shorter Sound Length may have no effect, or changing the Sound
Length may result in inconsistent sound. Also, the maximum length of user voices is 0.97 seconds, and
setting a longer Sound length will have no effect.
■ Range . . . . . . . . . . . . 10 msec — 9990 msec
■ Default . . . . . . . . . . . 100 msec (all layers)
Values selected via the LED buttons.
50
100
200
300
400
500
600
800
1000
2000
3000
4000
5000
6000
8000
9990
Matrix display related to settings made via the jog dial.
[Reference]
❊
Layer menu/Sound Length (➝ Page 52)
10-50
60-100
110-200
210-300
310-400
410-500
510-600
610-800
810-1000
1010-2000
2010-3000
3010-4000
4010-5000
5010-6000
6010-8000
Sound Length ∞
Layer[01]
100msec
Gate Time
8010-9990
Current Layer Number
TENORI-ON Manual 25
Page 26
Parameter Settings
Setting Parameters with the Function Buttons [L3] Octave
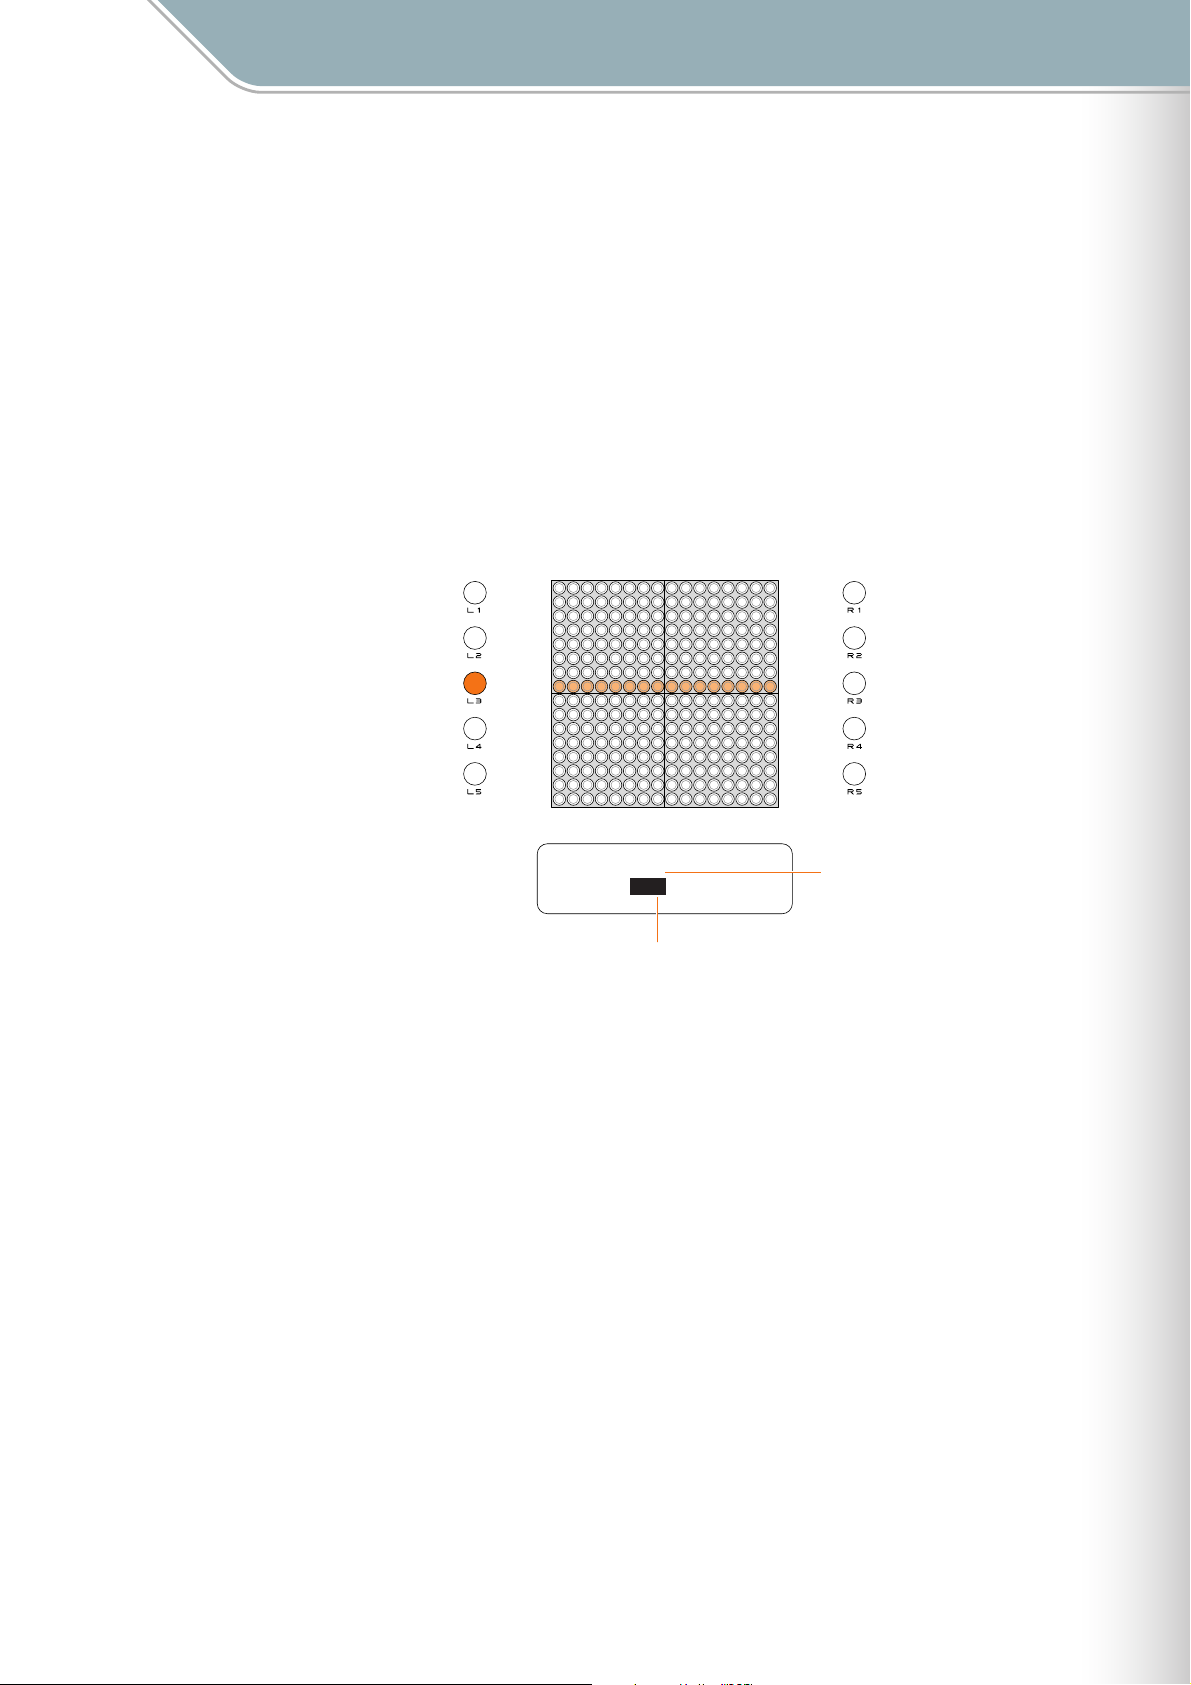
[L3] Octave
Sets the octave for all active notes in the current layer.
While holding the [L3] button slide your finger vertically over the matrix to move the lit
horizontal line to the desired octave, or simply press an LED button in the appropriate row.
The eighth row from the bottom produces no octave shift (a "0" setting). Each row above that
shifts the pitch up by the corresponding number of octaves up to "+5", while each row below
that lowers the pitch by the corresponding number of octaves down to "-5". Pressing an LED
button outside the maximum octave shift range of -5 — +5 has no effect.
● Changes will not be applied to notes that are already playing in the Push or Solo modes, or currently playing
notes if a long Sound length has been specified.
■ Range . . . . . . . . . . . . -5 — +5 octaves
■ Default . . . . . . . . . . . 0 (all layers)
+5
+4
+3
+2
+1
0
-1
-2
-3
-4
-5
Octave ∞
Layer[01]
1
Octave Shift
Current Layer Number
TENORI-ON Manual 26
Page 27
Parameter Settings
Setting Parameters with the Function Buttons [L4] Score Mode Loop Point
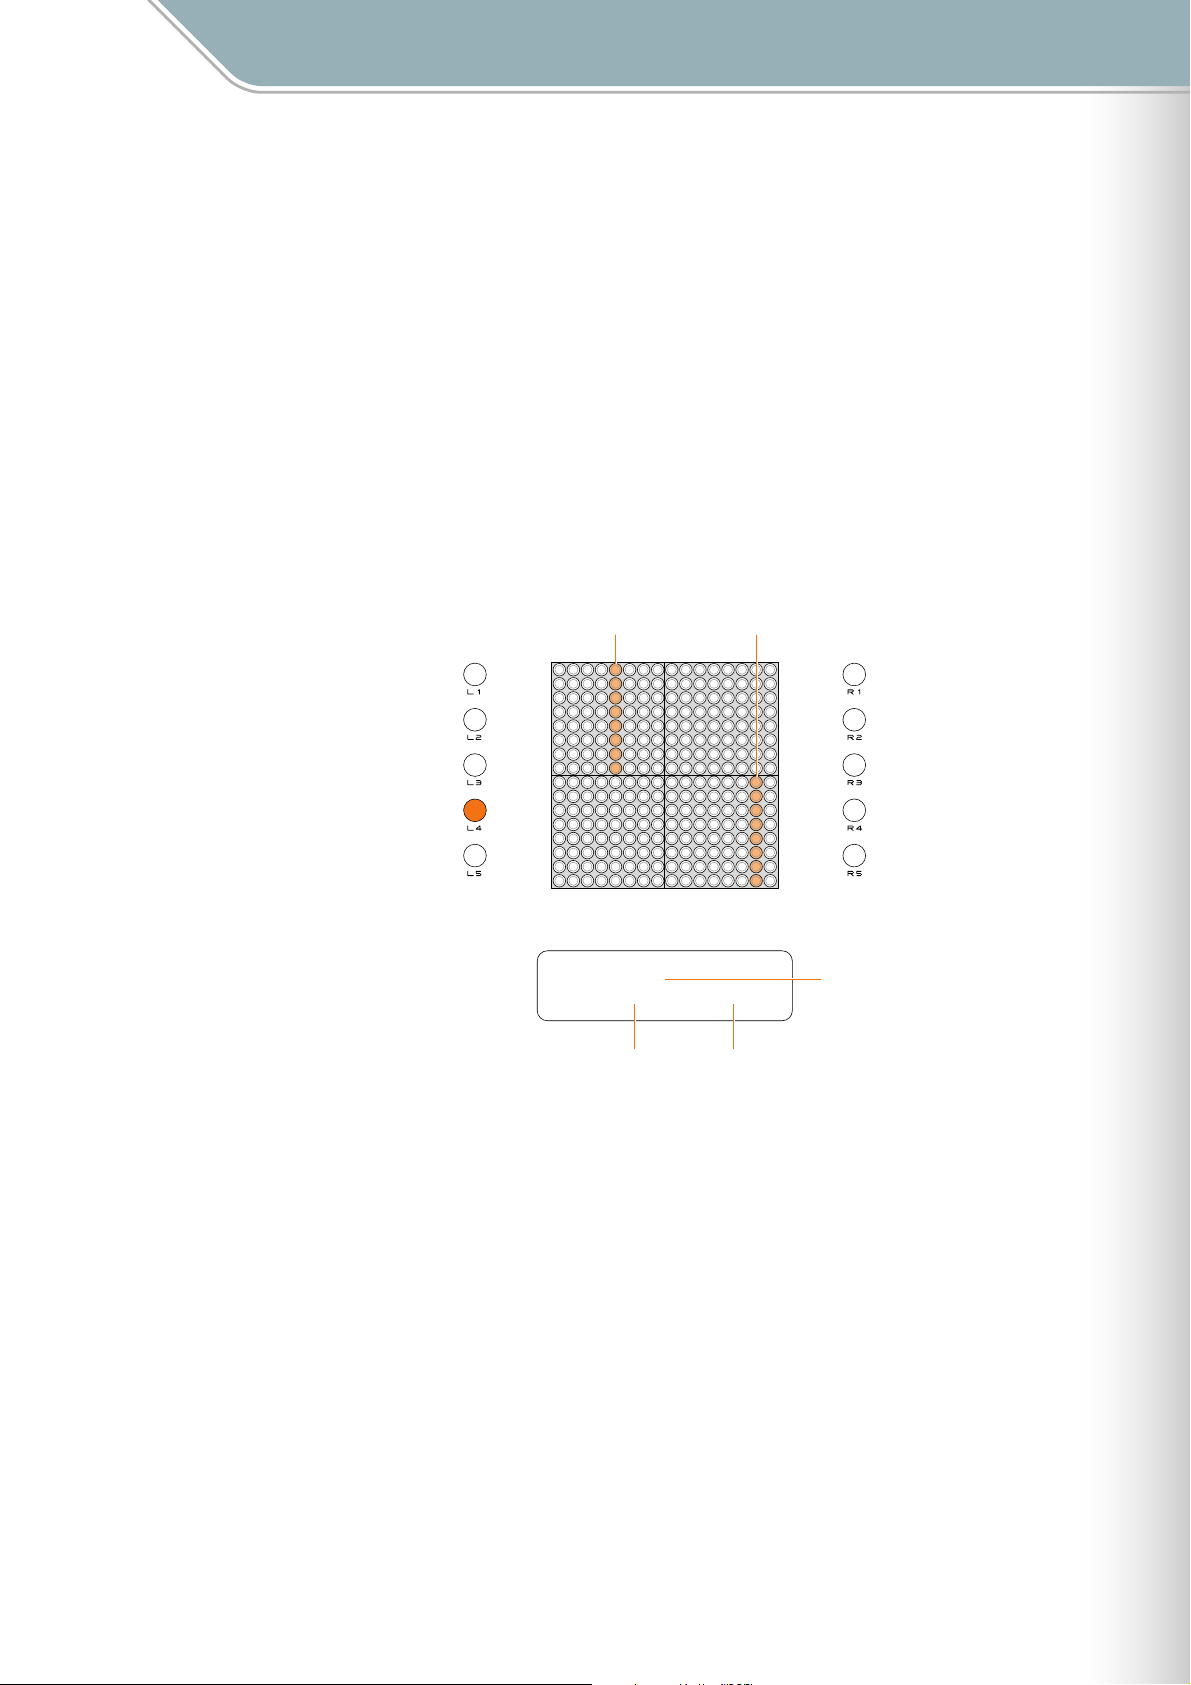
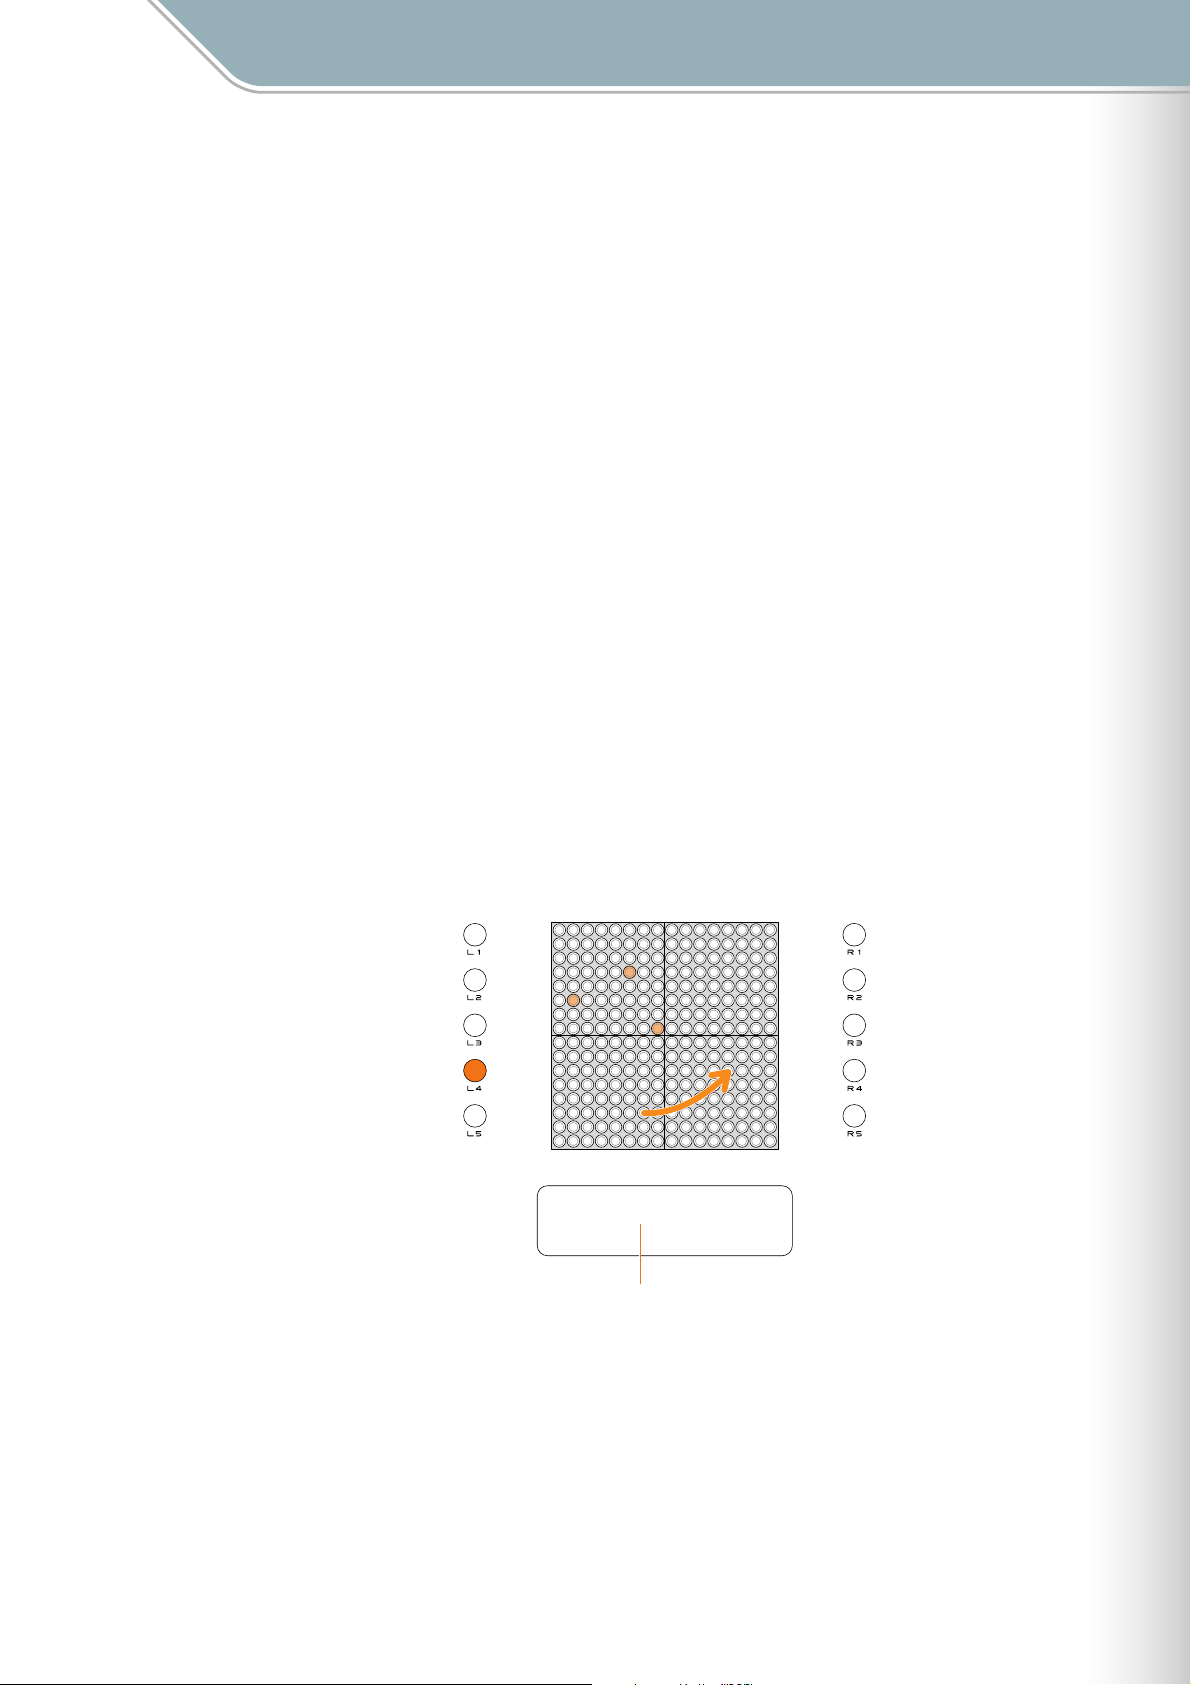
[L4] Score Mode Loop Point
Sets the loop playback range for the current Score Mode layer.
While holding the [L4] button slide your finger horizontally over upper half of the matrix to
move the loop TOP point indicator to the desired point, and slide your finger horizontally over
lower half of the matrix to move the loop END point indicator to the desired point, as
required. Once the start and end points are set you can use the jog dial to move the entire
range to the left or right while maintaining the set distance between the start and end points.
● The END point cannot be moved to a position before (to the left of) the TOP point. The END point can be
moved to the same location as the TOP point, which will produce a 1-beat loop.
● The loop points for all Score Mode layers can be set to the same points simultaneously via the Master Loop
Point (all layers) setting in the Play menu.
■ Range . . . . . . . . . . . . TOP = 1 — 16, END = 1 — 16
■ Default . . . . . . . . . . . TOP = 1, END = 16
END PointTOP Point
[Reference]
Play menu/Master Loop Point (➝ Page 46)
❊
010203040506070809101112131415
Loop Point ∞
Layer[01]
TOP: 5 / END:15
TOP Point END Point
16
Current Layer Number
TENORI-ON Manual 27
Page 28
Parameter Settings
Setting Parameters with the Function Buttons [L4] Random Mode Rotation
[L4] Random Mode Rotation
When a Random Mode layer is selected you can spin loop-shapes by holding the [L4] button
and running a finger around the matrix in the direction and at the speed of the desired spin.
● Rotation direction and speed settings apply to the same layer in all blocks.
● To stop rotation, press and hold the LED button, or press the same LED button twice while holding the [L4]
button. Pressing the [CLEAR] button clears only the active notes, leaving the rotation data active unless
rotation has been stopped.
● Individual notes cannot be entered or cleared by pressing their LED buttons during rotation.
■ Range . . . . . . . . . . . . The speed at which the LED buttons are stroked is detected, and the nearest rotation
speed* is automatically selected from the eight listed below.
4 beats (384 clocks),
3 beats (288 clocks),
2 beats (182 clocks),
1 beat (96 clocks),
3/4 beat (72 clocks),
1/2 beat (48 clocks),
1/4 beat (24 clocks),
1/8 beat (12 clocks)
* Rotation speed: Each complete rotation consists of 32 steps, and thus each step covers
an angle of 11.25°. Rotation speed is specified as the number of beats between steps.
[Reference]
The length of each beat can be adjusted via the Loop Speed parameter (Loop Speed ➝ Page 29, 51. Master
❊
Loop Speed ➝ Page 45).
■ Default . . . . . . . . . . . none
Rotation ∞
Layer[08] [Random]
Current Layer Number
[Reference]
Random Mode (➝ Page 17)
❊
TENORI-ON Manual 28
Page 29
Parameter Settings
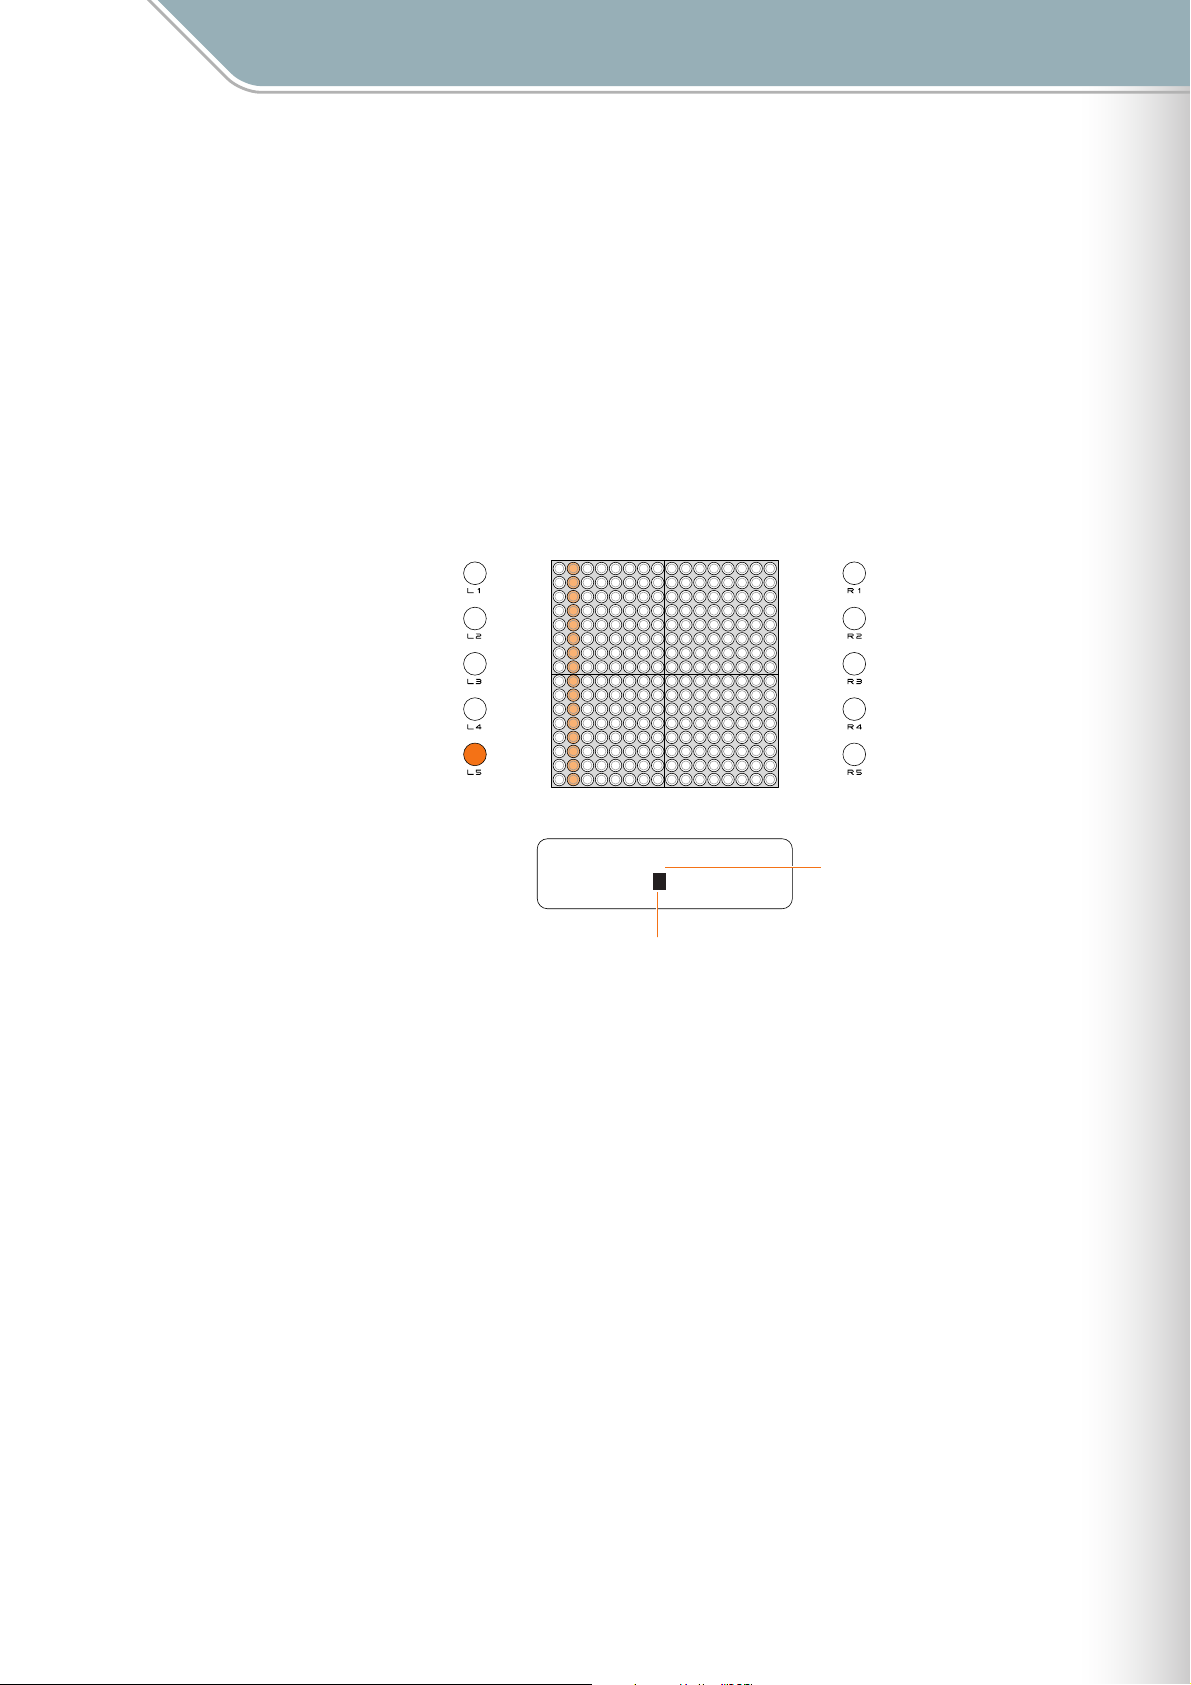
Setting Parameters with the Function Buttons [L5] Loop Speed
[L5] Loop Speed
Sets the loop playback speed (the duration of the beats).
When the [L5] buttons is pressed the LED button column corresponding to the current
setting will light. Four settings are available, set via the leftmost four columns on the matrix:
quarter notes, eighth notes, sixteenth notes, and thirty-second notes.
While holding the [L5] button press a button in the corresponding column. LED buttons in
other columns have no effect.
● Not available in the Push Mode.
● This setting will be changed if the Master Loop Speed (all layers) parameter in the Play menu is changed.
■ Range . . . . . . . . . . . . 1 (quarter note), 2 (eighth note), 4 (sixteenth note), 8 (thirty-second note)
■ Default . . . . . . . . . . . 4 (The layer 14 default is 8)
124
8
Loop Speed ∞
Layer[01]
4
Loop Speed
[Reference]
❊
Play menu/Master Loop Speed (➝ Page 45), Layer menu/Loop Speed (➝ Page 51)
Current Layer Number
TENORI-ON Manual 29
Page 30
Parameter Settings
Setting Parameters with the Function Buttons [R1] Layer No.
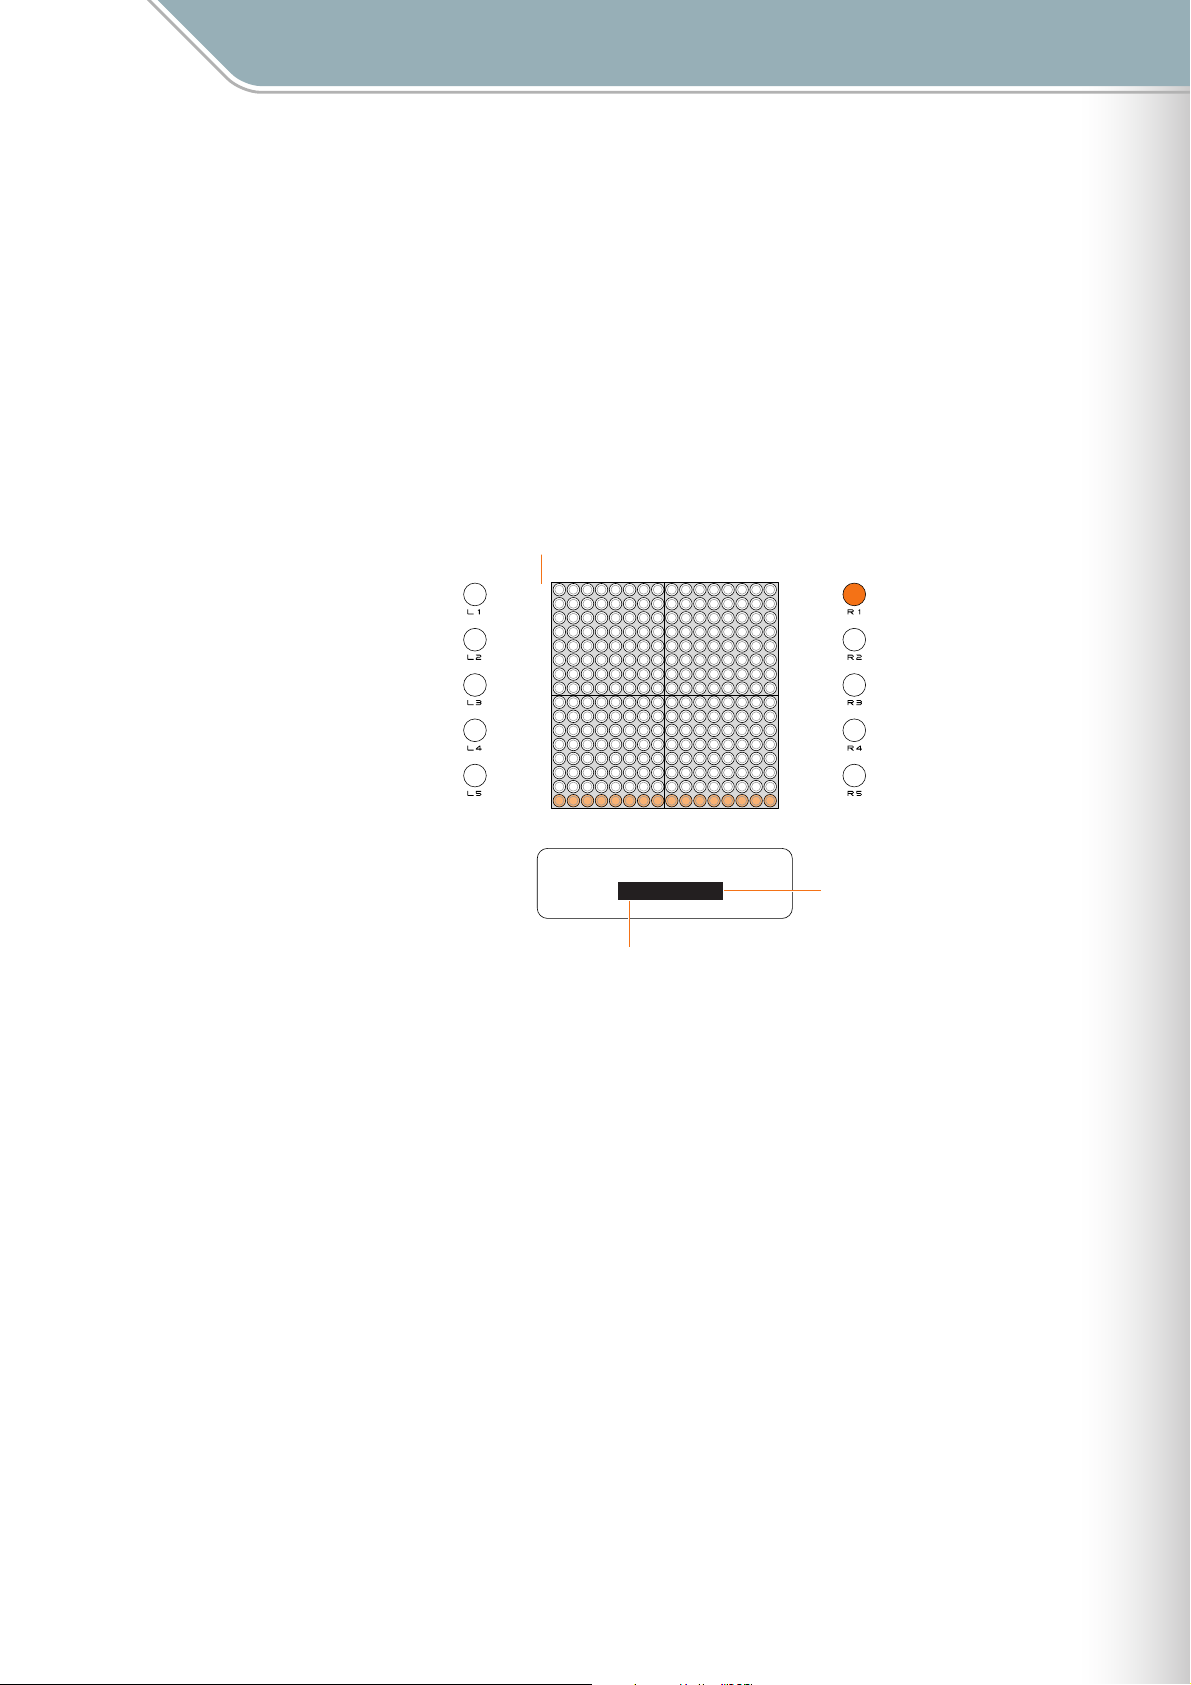
[R1] Layer No.
Switches to a different layer.
When the [R1] button is pressed the LED button row corresponding to the currently selected
layer will light. The lowest row corresponds to layer 1 and the highest row corresponds to
layer 16.
While holding the [R1] button slide your finger vertically over the matrix or simply press an
LED button in the appropriate row to select the desired layer.
The selected layer number will also appear in the LCD display, along with the layer mode.
■ Range . . . . . . . . . . . . 1 — 16
■ Default . . . . . . . . . . . 1
Layer Number
16
15
14
13
12
11
10
09
08
07
06
05
04
03
02
01
Layer No. ∞
01-Score
Layer Number
Mode Name
TENORI-ON Manual 30
Page 31
Parameter Settings
Setting Parameters with the Function Buttons [R2] Master Tempo
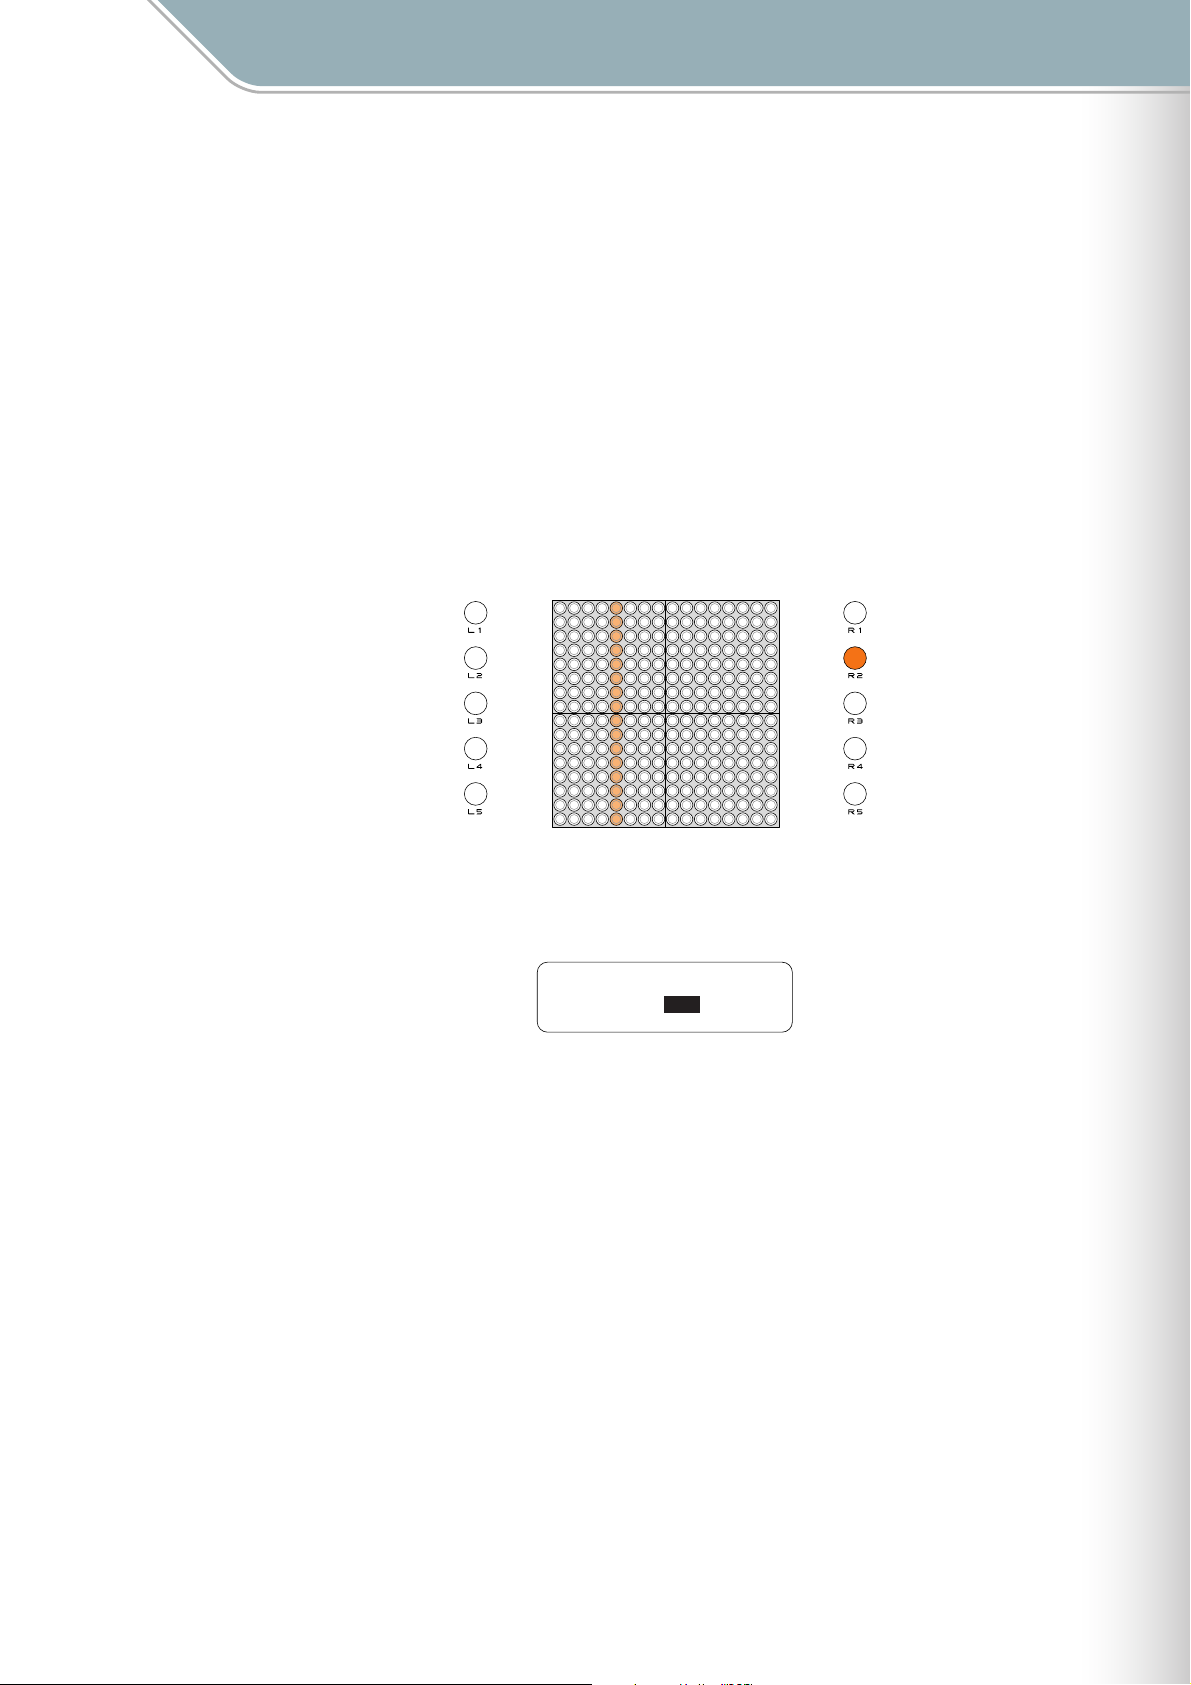
[R2] Master Tempo
Sets the playback tempo for all layers and all blocks.
When the [R2] button is pressed the LED button column corresponding to the current tempo
setting will light. While holding the [R2] button slide your finger horizontally over the matrix or
simply press an LED button in the appropriate column to select the desired tempo setting.
Moving the line to the right produces faster tempos.
The LED buttons adjust the tempo in the increments listed below. You can also use the jog
dial for finer adjustment.
■ Range . . . . . . . . . . . . 40 — 240 (50 — 200 via the LED buttons)
■ Default . . . . . . . . . . . 75
Values selected via the LED buttons.
Matrix display related to settings made via the jog dial.
[Reference]
❊
Play menu/Master Tempo (➝ Page 43)
5060708090
40-50
51-60
61-70
71-80
81-90
100
110
91-100
101-110
120
130
140
111-120
121-130
131-140
150
160
170
141-150
151-160
161-170
180
190
171-180
181-190
Master Tempo ∞
BPM: 75
200
191-240
TENORI-ON Manual 31
Page 32

Parameter Settings
Setting Parameters with the Function Buttons [R3] Master Transpose
[R3] Master Transpose
Adjusts the playback pitch in semitone increments for all layers and all blocks.
When the [R3] button is pressed the LED button row corresponding to the currently selected
transpose value will light. While holding the [R3] button slide your finger vertically over the
matrix or simply press an LED button in the appropriate row to select the desired degree of
transposition.
The eighth row from the bottom produces no transposition (a "0" setting). Each row above
that shifts the pitch up by the corresponding number of semitones up to "+8", while each row
below that lowers the pitch by the corresponding number of semitones down to "-7".
● Changes will not be applied to notes that are already playing in the Push or Solo modes, or currently playing
notes if a long Sound length has been specified.
■ Range . . . . . . . . . . . . -7 — +8 (semitone increments)
■ Default . . . . . . . . . . . 0
+8
+7
+6
+5
+4
+3
+2
+1
0
-1
-2
-3
-4
-5
-6
-7
[Reference]
Play menu/Master Transpose (➝ Page 45)
❊
Master Transpose ∞
+1
TENORI-ON Manual 32
Page 33

Parameter Settings
Setting Parameters with the Function Buttons [R4] Volume
[R4] Volume
Layer Volume
Allows the volume of each layer to be adjusted as required (layer volume common to all
blocks).
When the [R4] button is pressed the current volume settings for all 16 layers are displayed
on the LED button matrix. Each row of LED buttons corresponds to layer, beginning with
layer 01 at the bottom row.
While holding the [R4] button slide your finger horizontally over the row corresponding to the
layer you want to adjust to set the volume as required. Moving a setting to the right increases
the volume of the corresponding layer.
Master Volume
You can also use the jog dial while holding the [R4] button to set the master volume level (all
layers). The master volume value appears on the LCD display only.
■ Range . . . . . . . . . . . . Layer volume: 0 — 127
Master volume: 0 — 127
■ Default . . . . . . . . . . . Layer volume: 96 (all layers)
Master volume: 96
The volume value set via the LED buttons.
0
1020304048566472808896
16
15
14
13
12
11
10
09
08
07
06
05
04
03
02
01
Layer Number
Current Layer Number
Volume ∞
Layer[01] : 96
Master : 96
104
112
120
127
Current Layer Volume
Master Volume
● To adjusts the instrument's basic volume level, refer to Hardware Volume (➝ Page 43).
[Reference]
❊
Layer menu/Volume (➝ Page 50)
TENORI-ON Manual 33
Page 34

Parameter Settings
Setting Parameters with the Function Buttons [R5] Block Number
[R5] Block Number
Switches to a different block.
When the [R5] button is pressed the LED button column corresponding to the currently
selected bock will light. The leftmost column corresponds to block 1 and the rightmost
column corresponds to block 16.
While holding the [R5] button slide your finger horizontally over the matrix or simply press an
LED button in the appropriate column to select the desired block.
● When switching blocks while in the Push Mode the active notes will be retriggered (i.e. they will play from the
beginning again).
● When switching blocks while in the Random Mode, Bounce Mode, the loop point will return to the beginning
of the loop in either of the cases listed below:
• The block that is switched to is not operating in one of the three modes listed above.
• The block that is switched to includes one or more notes in different positions from the current block.
■ Range . . . . . . . . . . . . 1 — 16
■ Default . . . . . . . . . . . 1
010203040506070809101112131415
Block Number
Block No. ∞
Layer[01]
01
Current Block Number
16
Current Layer Number
TENORI-ON Manual 34
Page 35

Parameter Settings
Setting Parameters with the Function Buttons [R5] Block Number
Using the [R5] Button to Copy Layers
By holding the [R5] button and performing the operations described below you can copy
either a single layer or all layers from the current block to another block.
1. If the current block is not the block containing the layers you want to copy, hold the
[R5] button and press the LED button corresponding to the desired "source" Block (the
LEDs in that column will light dimly).
2. If you repeatedly press the lowest LED button in the lit column while holding the [R5]
button, the LED buttons in the lit column will switch between three levels of brightness
in the following sequence: dim ➝ medium ➝ bright ➝ dim. The functions
corresponding to each brightness level are: dim = block move, medium = copy 1 layer,
bright = copy all layers. The procedures to copy 1 or all layers are described below.
To Copy a Single Layer
While holding the [R5] button while the LED buttons are lit dimly, press the lowest LED
button in the lit column once so that the LED buttons shine at medium brightness, and
then press an LED button in column corresponding to the block you want to copy to.
The current layer from the source block will be copied to the same layer in the
destination block. Release the [R5] button.
To Copy All Layers
While holding the [R5] button while the LED buttons are lit dimly, press the lowest LED
button in the lit column twice so that the LED buttons shine at maximum brightness,
and then press an LED button in column corresponding to the block you want to copy
to. All layers from the source block will be copied to the destination block. Release the
[R5] button.
When the copy operation is complete the destination block will be selected and the
LED buttons will automatically return to their minimum brightness level.
TENORI-ON Manual 35
Page 36

Parameter Settings
Setting Parameters with the Jog Dial Basic Operation
Setting Parameters with the Jog Dial
In addition to using the function buttons described in the preceding section, parameters can
be accessed by using the jog dial and menus shown on the LCD display, and edited by
using the jog dial or LED buttons.
Basic Operation
1 When the power is turned on the status display will appear on the LCD following the
initial startup display.
Startup Display
ÅÍÎÏ ∞
TOSHIO IWAI & YAMAHA
Ver x.xx
Status Display
ÅÍÎÏ ∞
≈01-Score Ω01
ç01/01:Photon
√10:08:31 ≥
2 If you rotate the jog dial while the status information is showing the Main Menu will
appear.
Main Menu
[Main menu] ∞
1 Play menu
2 Layer menu
The currently selected item is highlighted on the display.
The Main Menu includes the following nine items:
No. Menu Description Page
1 Play menu Parameters common to all layers and blocks. 42
2 Layer menu Parameters that can be set individually for each layer. 48
3 Edit menu Copy, clear, reset, and other editing commands. 54
4Preference menu Initial settings for the entire instrument. 59
5 File menu Data file save and load. 62
6Effect menu Reverb and chorus effect settings. 99
7 Interior menu Non-performance operations (clock, song playback). 101
8 System menu Factory reset, SD Memory Card format, and others. 106
9 Recording menu Song record and save. 109
TENORI-ON Manual 36
Page 37

Parameter Settings
Setting Parameters with the Jog Dial Basic Operation
3 Rotate the jog dial to select the desired menu item, and then press the [OK] button to go
to the related submenu.
[Main menu] ∞
1 Play menu
2 Layer menu
The Play Menu Submenu
[Play menu] ∞
Hardware Volume
Master Tempo
4 Select a parameter from the submenu and press the [OK] button to go to the related
parameter edit display.
[Play menu] ∞
Hardware Volume
Master Tempo
Hardware Volume Parameter Display
Hardware Volume ∞
96
● The File menu submenu contains a further layer of operations from which the desired operation must
be selected. See "File menu" on Page 62 for details.
5 In the parameter edit display the current parameter value will be highlighted ready for
editing. Use the jog dial to edit the parameter as required. Some parameters can be set
via the LED buttons.
Hardware Volume ∞
120
Parameter Value
TENORI-ON Manual 37
Page 38

Parameter Settings
Setting Parameters with the Jog Dial Basic Operation
6 Press the [OK] button to apply the edit and return to the previous menu layer.
Press the [CANCEL] button to return to the previous menu layer without making any
changes.
● If a parameter edit display includes multiple parameters, pressing the [OK] button after editing one
parameter will apply that edit and highlight the next parameter in the display.
Animation ∞
Layer[01]
Type:Circle
Size:4 Expand
Animation ∞
Layer[01]
Type:Circle
Size: 4 Expand
7 Use the [CANCEL] button to navigate upward through the menu layers.
TENORI-ON Manual 38
Page 39

Parameter Settings
Setting Parameters with the Jog Dial Data Storage and Initialization
Data Storage and Initialization
Data that is Erased When the Power is Turned Off
■ All block set
All active notes and settings for all layers and blocks are not retained in memory when the
power is turned off, so if you want to keep any active notes data you have created you will
need to use the Save All Blocks function described on Page 69 to save it to an SD Memory
Card.
■ Data Listed as "Save as Default" in the "Backup" Column of the Chart Below
These items are not retained in memory when the power is turned off, but can be saved to
the internal flash ROM as the default settings by using the Save As Default function
described on Page 106. Settings saved in this way become the power-on default settings.
Items listed as "Automatic Backup" in the "Backup" column of the chart are automatically
saved as the power-on default settings whenever a change is made.
Initialization
The entire system can be restored to the factory default settings by using the Factory Reset
function described on Page 108. To reset all active notes and settings for all layers and
blocks, use the Reset All Blocks function described on Page 58.
All data will be erased when the Factory Reset function is executed. Be sure to save any data you want
to keep to an SD Memory Card beforehand.
All layer and block data will be erased when the Reset All Blocks function is executed. Be sure to save
any data you want to keep to an SD Memory Card beforehand.
Menu Settings
Parameter Backup Factory Default
Play Menu Hardware Volume Automatic Backup 96
Master Tempo
Master Scale lonian
Master Transpose 0
Master Loop Speed
TOP Cannot be backed up.
Master Loop Point
Reset Loop Timing Cannot be backed up. OK
Mute Save As Default OFF
END 16
Save As Default
Cannot be backed up.
But since this setting is
related to the Layer menu
Loop Speed parameter, it
can be saved as the default
layer setting by using the
Save As Default function.
But since this setting is
related to the Loop Point
settings accessed via the
function buttons, it can be
saved as the default layer
setting by using the Save As
Default function.
75
4
1
TENORI-ON Manual 39
Page 40

Setting Parameters with the Jog Dial Data Storage and Initialization
Parameter Backup Factory Default
Layer Menu
Instrument
Volume Layer 1 — 16 96
Loop Speed Layer 1 — 16 4 (The layer 14 default is 8)
Sound Length Layer 1 — 16 100
Panpot Layer 1 — 16 CENTER
Animation
Layer 1
Layer 2 02/15
Layer 3 03/01
Layer 4 04/08
Layer 5 05/03
Layer 6 06/10
Layer 7 07/10
Layer 8 08/05
Layer 9 09/01
Layer 10 10/13
Layer 11 11/12
Layer 12 12/01
Layer 13 13/01
Layer 14 14/04
Layer 15 15/02
Layer 16 16/02
Type Layer 1 Circle
Size Layer 1 3
Expand/Shrink Layer 1 Expand
Type Layer 2 Square
Size Layer 2 3
Expand/Shrink Layer 2 Expand
Type Layer 3 Diamond
Size Layer 3 4
Expand/Shrink Layer 3 Shrink
Type Layer 4 Cross
Size Layer 4 3
Expand/Shrink Layer 4 Expand
Type Layer 5 Plus
Size Layer 5 3
Expand/Shrink Layer 5 Expand
Type Layer 6 Circle
Size Layer 6 4
Expand/Shrink Layer 6 Shrink
Type Layer 7 Diamond
Size Layer 7 5
Expand/Shrink Layer 7 Expand
Type Layer 8 Circle
Size Layer 8 4
Expand/Shrink Layer 8 Expand
Type Layer 9 Square
Size Layer 9 3
Expand/Shrink Layer 9 Shrink
Type Layer 10 Diamond
Size Layer 10 4
Expand/Shrink Layer 10 Expand
Type Layer 11 Plus
Size Layer 11 6
Expand/Shrink Layer 11 Shrink
Type Layer 12 Circle
Size Layer 12 5
Expand/Shrink Layer 12 Expand
Type Layer 13 Square
Size Layer 13 4
Expand/Shrink Layer 13 Expand
Save As Default
01/01
Parameter Settings
TENORI-ON Manual 40
Page 41

Setting Parameters with the Jog Dial Function Button Settings
Parameter Backup Factory Default
Layer Menu
Animation
Edit Menu – – –
Preference Menu Quantize
Push Sensitivity 120
Master Tuning 0
Local Control ON
Synchronize MASTER
Loop Indicator ON
File Menu – – –
Effect Menu Reverb Type
Reverb Param 40
Chorus Type NO EFFECT
Chorus Param 0
Interior Menu Interior START – –
Interior Type
Saver Type Interior
Saver Time 10
Time Signal On/Off
Alarm On/Off
Set Alarm
Save As Time Signal
Save As Alarm
Clock Adjust
System Menu Save As Default
SD Format
Owner Name Automatic Backup “No Name”
Version Check
Recording Menu –
Expand/Shrink Layer 14
Type Layer 15 Circle
Size Layer 15
Expand/Shrink Layer 15 Expand/Shrink
Type Layer 16 Vertical Line
Size Layer 16 1
Expand/Shrink Layer 16 None
Hour
Minute
Year
Month
Day
Hour
Second
Save As Default
Automatic Backup
Automatic Backup
Automatic Backup
None –
Automatic Backup
(When the clock battery is
depleted the clock will be
reset to "07/01/01 00:00:00")
––
––Factory Reset
None
3→4→5
HALL1
Song (DEMO)
ON
OFF
0
07
01
0Minute
Parameter Settings
Function Button Settings
Parameter Backup Factory Default
Common Layer No
Block No 1
Master Volume 96
Layer Octave Layer 1 — 16 0
Loop Point
TOP Layer 1 — 16 1
END Layer 1 — 16 16
Save As Default
1
TENORI-ON Manual 41
Page 42
Parameter Settings
Setting Parameters with the Jog Dial ■ Play Menu
■ Play Menu
The Play menu provides access to performance parameters that apply all layers and all
blocks.
The Play menu submenu includes the following 8 items.
1. Hardware Volume Page 43
2. Master Tempo Page 43
3. Master Scale Page 44
4. Master Transpose Page 45
5. Master Loop Speed Page 45
6. Master Loop Point Page 46
7. Reset Loop Timing Page 46
8. Mute Page 47
Use the jog dial to highlight a submenu item, then press the [OK] button to go to the
corresponding parameter edit display.
[Play menu] ∞
Hardware Volume
Master Tempo
Master Scale
TENORI-ON Manual 42
Page 43
1. Hardware Volume
Sets the hardware volume.
■ Range . . . . . . . . . . . . 0 — 127
■ Default . . . . . . . . . . . 96
■ LED Buttons . . . . . . . No display
[Reference]
Layer menu/Volume (➝ Page 50)
❊
Parameter Settings
Setting Parameters with the Jog Dial ■ Play Menu
Hardware Volume ∞
96
2. Master Tempo
Master Tempo ∞
BPM: 75
Sets the master tempo for all layers and blocks.
This display also appears when the [R2] button is pressed.
The LED buttons can be used to make adjustments in the increments shown below, while the
jog dial can be used for fine adjustment.
■ Range . . . . . . . . . . . . 40 — 240
■ Default . . . . . . . . . . . 75
■ LED Buttons . . . . . . . Values are displayed on the LED button matrix as illustrated below. Adjustments can be
made via the LED buttons from 50 to 200 in 10-step increments.
Tempo settings available via the LED buttons.
5060708090
100
110
120
130
140
150
160
170
180
190
200
LED button matrix display in relation to tempo settings made via the jog dial.
[Reference]
Function Button [R2] (➝ Page 31)
❊
40-50
51-60
61-70
71-80
81-90
91-100
101-110
111-120
121-130
131-140
141-150
151-160
161-170
171-180
181-190
191-240
TENORI-ON Manual 43
Page 44
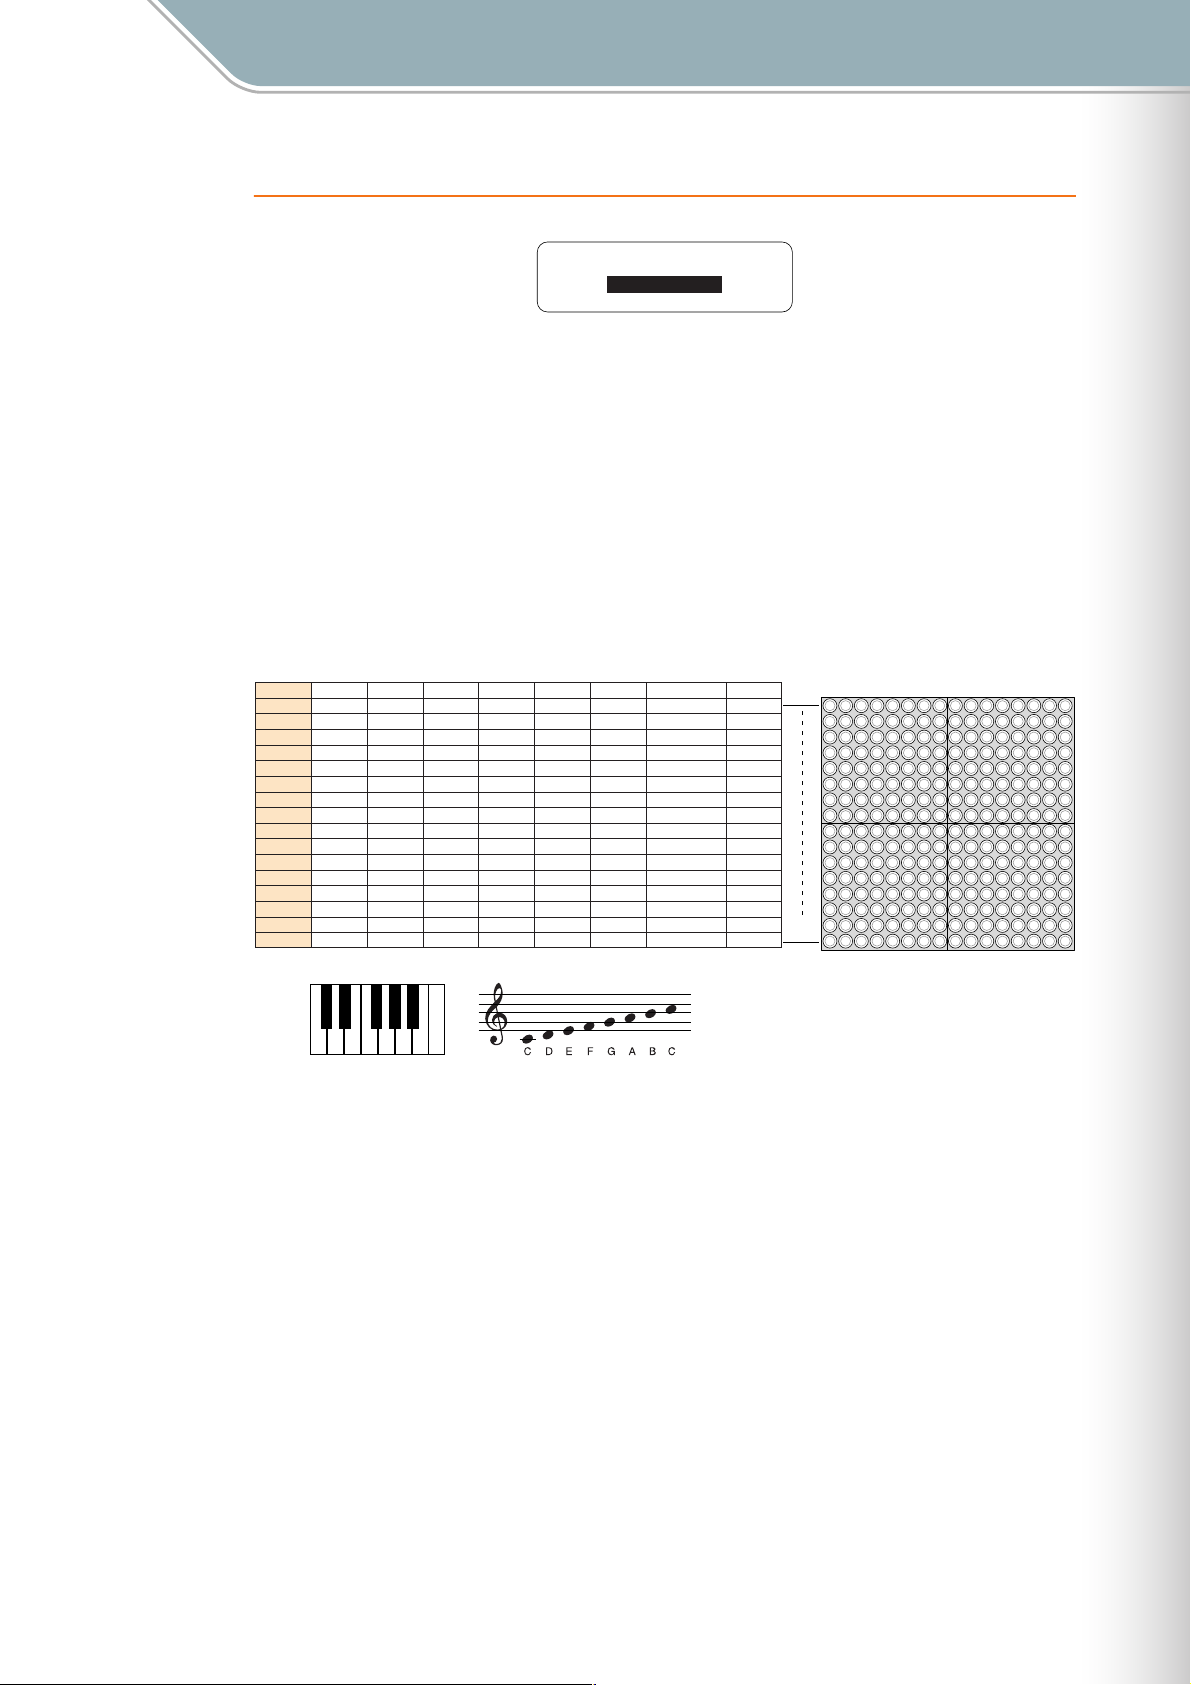
Parameter Settings
Setting Parameters with the Jog Dial ■ Play Menu
3. Master Scale
Master Scale ∞
Ionian
Sets the master scale for all layers and blocks.
● Changes will not be applied to notes that are already playing in the Push or Solo modes, or currently playing
notes if a long Sound length has been specified.
■ Range . . . . . . . . . . . . Ionian, Dorian, Phrygian, Lydian, Mixolydian, Aeolian, Locrian, Chromatic, OKINAWA
■ Default . . . . . . . . . . . Ionian
■ LED Buttons . . . . . . . No display
Note Assignments for Each Scale
Ionian
D5 (86)
C5 (84)
B4 (83)
A4 (81)
G4 (79)
F4 (77)
E4 (76)
D4 (74)
C4 (72)
B3 (71)
A3 (69)
G3 (67)
F3 (65)
E3 (64)
D3 (62)
C3 (60)
Dorian
Phrygian
D5 (86)
D5 (85)
C5 (84)
C5 (84)
B4 (82)
B4 (83)
A4 (81)
A4 (80)
G4 (79)
G4 (79)
F4 (77)
F4 (77)
E4 (75)
E4 (75)
D4 (74)
D4 (73)
C4 (72)
C4 (72)
B3 (70)
B3 (70)
A3 (69)
A3 (68)
G3 (67)
G3 (67)
F3 (65)
F3 (65)
E3 (63)
E3 (63)
D3 (62)
D3 (61)
C3 (60)
C3 (60)
CDFGA
EGAB
D
Lydian
D5 (86)
C5 (84)
B4 (83)
A4 (81)
G4 (79)
F4 (78)
E4 (76)
D4 (74)
C4 (72)
B3 (71)
A3 (69)
G3 (67)
F3 (66)
E3 (64)
D3 (62)
C3 (60)
CCDEFGAB
Octave = 0, Transpose = 0, Center Note = C3
Mixolydian
B4 (82)
B3 (70)
D5 (86)
C5 (84)
A4 (81)
G4 (79)
F4 (77)
E4 (76)
D4 (74)
C4 (72)
A3 (69)
G3 (67)
F3 (65)
E3 (64)
D3 (62)
C3 (60)
Aeolian
D5 (86)
C5 (84)
B4 (82)
A4 (80)
G4 (79)
F4 (77)
E4 (75)
D4 (74)
C4 (72)
B3 (70)
A3 (68)
G3 (67)
F3 (65)
E3 (63)
D3 (62)
C3 (60)
Locrian
D5 (85)
C5 (84)
B4 (82)
A4 (80)
G4 (78)
F4 (77)
E4 (75)
D4 (73)
C4 (72)
B3 (70)
A3 (68)
G3 (66)
F3 (65)
E3 (63)
D3 (61)
C3 (60)
D4/E4 (75)
C4/D4 (73)
A3/B3 (70)
G3/A3 (68)
F3/G3 (66)
C3/D3 (61)
Chromatic
D4 (74)
C4 (72)
B3 (71)
A3 (69)
G3 (67)
F3 (65)
E3 (64)
D3/E3
D3 (62)
C3 (60)
OKINAWA
C6 (96)
B5 (95)
G5 (91)
F5 (89)
E5 (88)
C5 (84)
B4 (83)
G4 (79)
F4 (77)
E4 (76)
C4 (72)
B3 (71)
G3 (67)
F3 (65)
E3 (64)
C3 (60)
16
01
TENORI-ON Manual 44
Page 45
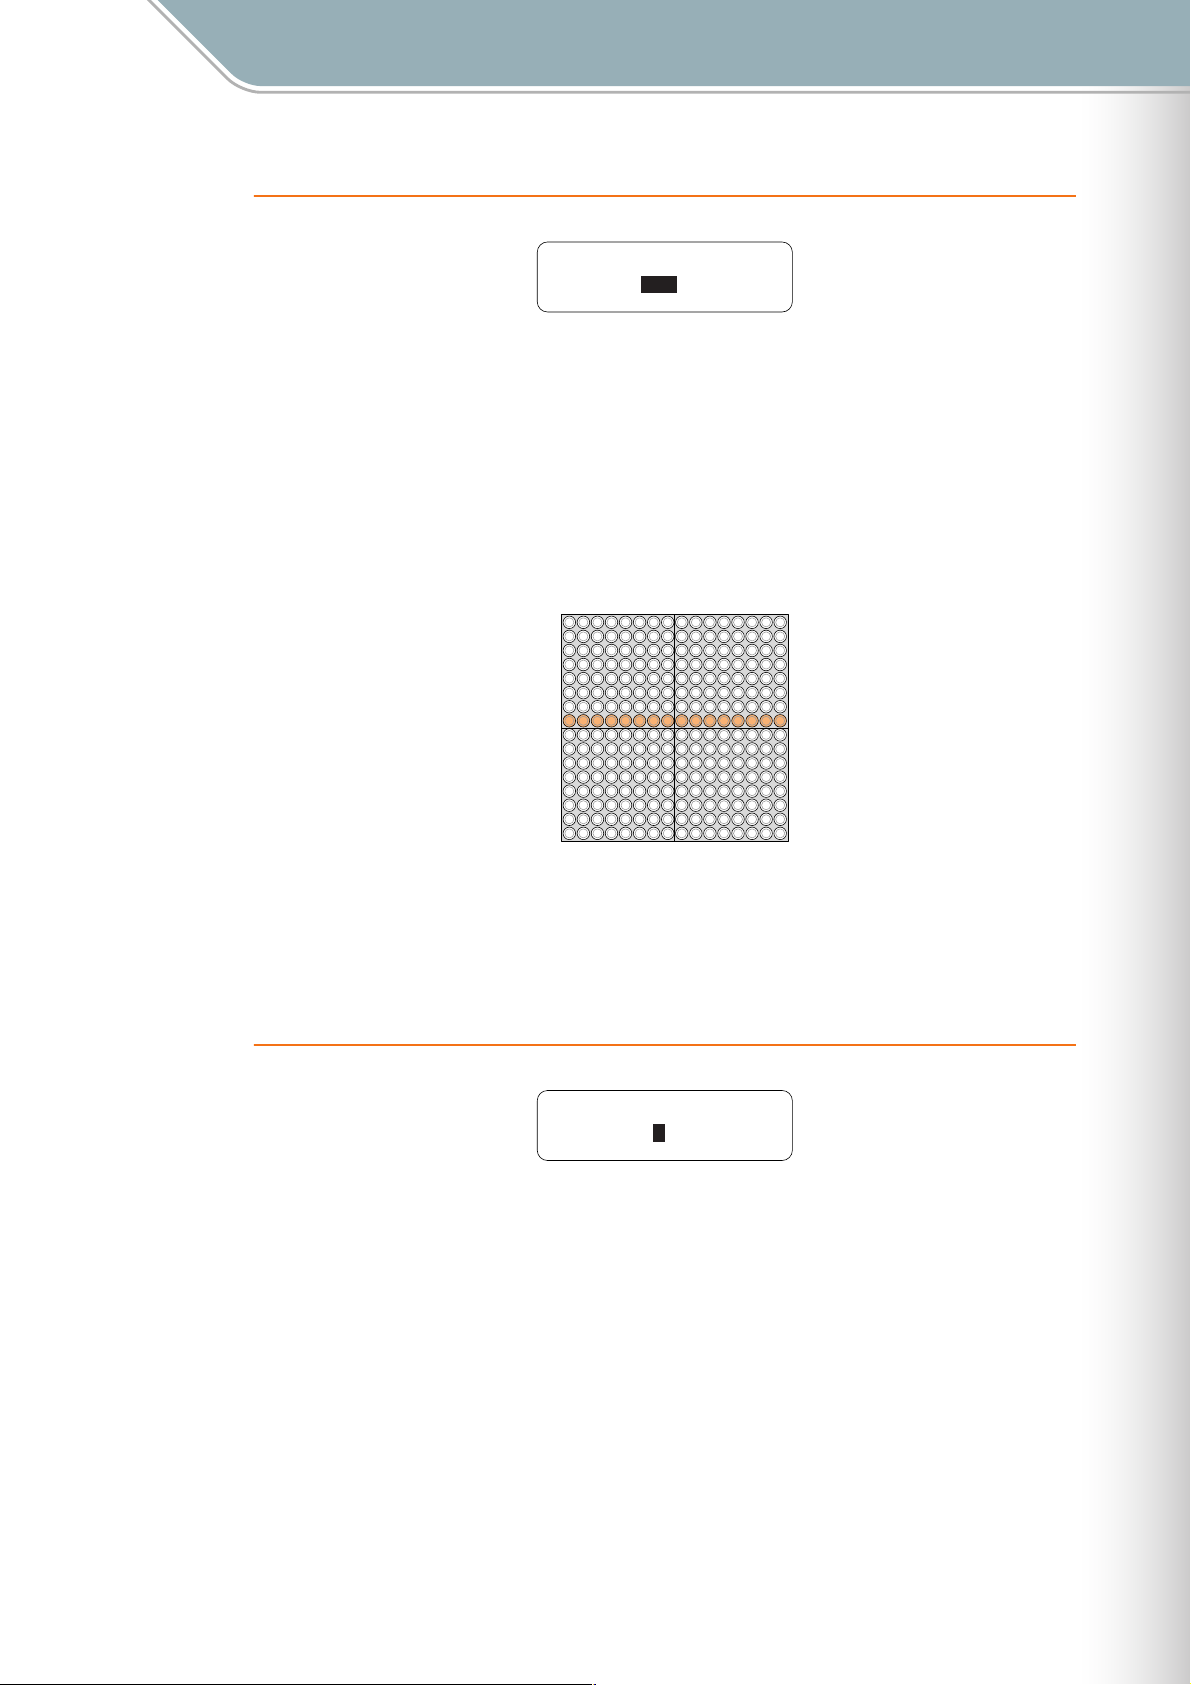
Parameter Settings
Setting Parameters with the Jog Dial ■ Play Menu
4. Master Transpose
Master Transpose ∞
+1
Sets transposition for all layers and blocks.
This display also appears when the [R3] button is pressed.
● Changes will not be applied to notes that are already playing in the Push or Solo modes, or currently playing
notes if a long Sound length has been specified.
■ Range . . . . . . . . . . . . -7 — +8 (semitone increments)
■ Default . . . . . . . . . . . 0
■ LED Buttons . . . . . . . Values are displayed on the LED button matrix as illustrated below. Adjustments can be
made via the LED buttons.
+8
+7
+6
+5
+4
+3
+2
+1
0
-1
-2
-3
-4
-5
-6
-7
The eighth row from the bottom produces no transposition (a "0" setting). Each row above that
shifts the pitch up by the corresponding number of semitones up to "+8", while each row below
that lowers the pitch by the corresponding number of semitones down to "-7".
[Reference]
Function Button [R3] (➝ Page 32)
❊
5. Master Loop Speed
Master Loop Speed ∞
4
Sets the loop speed (the length of each beat) for all layers and blocks.
■ Range . . . . . . . . . . . . 1 (quarter note), 2 (eighth note), 4 (sixteenth note), 8 (thirty-second note)
■ Default . . . . . . . . . . . 4
■ LED Buttons . . . . . . . No display
[Reference]
❊
Layer menu/Loop Speed (➝ Page 51)
TENORI-ON Manual 45
Page 46
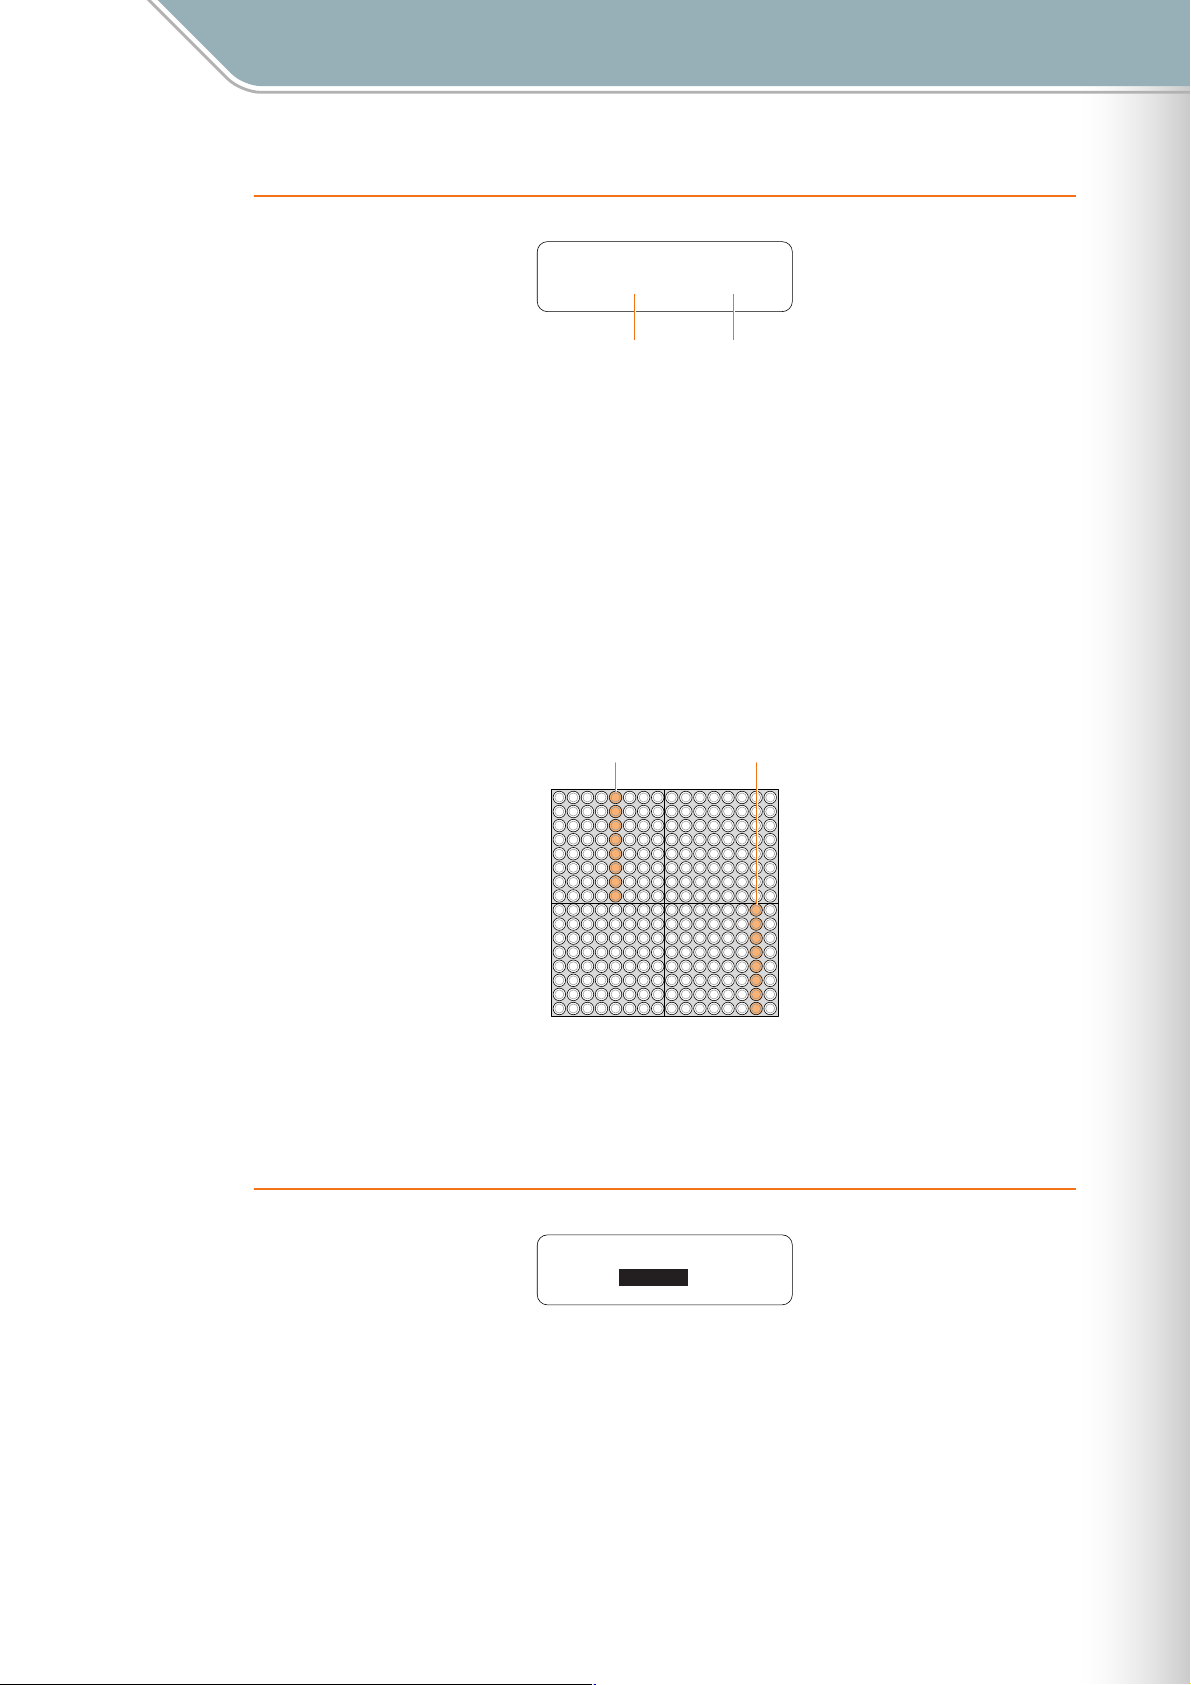
Parameter Settings
Setting Parameters with the Jog Dial ■ Play Menu
6. Master Loop Point
Master Loop Point ∞
TOP: 5 / END:15
TOP Position END Position
Sets the loop points (TOP and END) for all layers and blocks.
The loop includes the TOP and END points.
The TOP and END points are set via the LED buttons, and the jog dial moves the entire loop
range backward or forward.
● The END point cannot be moved to a position before (to the left of) the TOP point. The END point can be
moved to the same location as the TOP point, which will produce a 1-beat loop.
■ Range . . . . . . . . . . . . TOP = 1 — 16, END = 1 — 16
■ Default . . . . . . . . . . . TOP = 1, END = 16
■ LED Buttons . . . . . . . The TOP point is indicated by a lit half-column on the upper half of the matrix, and the END
point is indicated by a lit half-column on the lower half of the matrix, as shown below. The
TOP and END points are set via the LED buttons.
[Reference]
Function Button [L4] (➝ Page 27)
❊
7. Reset Loop Timing
END PointTOP Point
010203040506070809101112131415
Reset Loop Timing ∞
OK
16
Resets the current playback position to the TOP of the loop for all layers and blocks.
■ Range . . . . . . . . . . . . OK, CANCEL
■ Default . . . . . . . . . . . OK
■ LED Buttons . . . . . . . No display
TENORI-ON Manual 46
Page 47

Setting Parameters with the Jog Dial ■ Play Menu
8. Mute
Mute ∞
OFF
All sound output is muted when this function is turned ON.
■ Range . . . . . . . . . . . . ON, OFF
■ Default . . . . . . . . . . . OFF
■ LED Buttons . . . . . . . No display
Parameter Settings
TENORI-ON Manual 47
Page 48

Parameter Settings
Setting Parameters with the Jog Dial ■ Layer Menu
■ Layer Menu
The Layer menu provides access to parameters that apply to individual layers.
The currently selected layer will be affected by the Layer menu parameters.
The Layer menu submenu includes the following 6 items.
1. Instrument Page 49
2. Volume Page 50
3. Loop Speed Page 51
4. Sound Length Page 52
5. Panpot Page 53
6. Animation Page 53
Use the jog dial to highlight a submenu item, then press the [OK] button to go to the
corresponding parameter edit display.
[Layer menu] ∞
Instrument
Volume
Loop Speed
TENORI-ON Manual 48
Page 49

1. Instrument
Parameter Settings
Setting Parameters with the Jog Dial ■ Layer Menu
Instrument ∞
Layer[01]
01/01:Photon
Voice Number Voice Name
Current Layer Number
Selects the voice that will be played in the current layer.
This display also appears when the [R1] button is pressed.
Refer to the Voice List on Page 119 for a complete list of voice numbers and names.
Voice numbers <01/16>, <02/16>, and <03/16> are user voices.
● When a user voice is selected from a preset voice, the Sound Length (➝ Page 52) will be set to 1000 (msec).
Conversely, when a preset voice is selected from a user voice the sound length for all other voices will be set
to 100 (msec).
● Changes will not be applied to notes that are already playing in the Push or Solo modes, or currently playing
notes if a long Sound length has been specified.
■ Range . . . . . . . . . . . . Vertical axis: 01 — 16
Horizontal axis: 01 — 16
■ Default . . . . . . . . . . . Different for each layer
■ LED Buttons . . . . . . . The current voice is indicated by the intersection of the lit row and column. The LED buttons
can be used to select a different voice.
16
15
14
13
12
11
10
09
08
07
06
05
04
03
02
01
010203040506070809101112131415
The intersection of the crossed lines is the current voice number
(in this example: "06/10").
[Reference]
❊ Function Button [L1] (➝ Page 24), Voice List (➝ Page 119)
16
TENORI-ON Manual 49
Page 50

2. Volume
Parameter Settings
Setting Parameters with the Jog Dial ■ Layer Menu
Volume ∞
Layer[01]
96
Volume
Current Layer Number
Sets the volume of individual layers (layer volume common to all blocks).
LED button matrix display and operation are the same as for the [R4] button.
The LED buttons can be used to set the volume of all 16 layers.
The LED buttons adjust the volume in the increments shown below, while the jog dial can be
used for fine adjustment.
■ Range . . . . . . . . . . . . 0 — 127
■ Default . . . . . . . . . . . 96 (all layers)
■ LED Buttons . . . . . . . Each row of LED buttons corresponds to a layer, while the horizontal axis corresponds to
volume level (refer to the illustration below). The LED buttons can be used to adjust the
volume of the corresponding layer.
The volume value set via the LED buttons.
0
1020304048566472808896
16
15
14
13
12
11
10
09
08
07
06
05
04
03
02
01
0
1-10
11-20
21-30
31-40
41-48
49-56
Layer Number
LED button matrix display in relation to layer volume settings made via the jog dial.
57-64
65-72
73-80
81-88
89-96
104
112
97-104
105-112
120
127
113-120
121-127
[Reference]
Function Button [R4] (➝ Page 33)
❊
TENORI-ON Manual 50
Page 51

3. Loop Speed
Parameter Settings
Setting Parameters with the Jog Dial ■ Layer Menu
Loop Speed ∞
Layer[01]
4
Loop Speed
Current Layer Number
Sets the loop playback speed (the duration of the beats).
This display also appears when the [L5] button is pressed.
● This setting will be changed if the Master Loop Speed (all layers) parameter in the Play menu is changed.
■ Range . . . . . . . . . . . . 1 (quarter note), 2 (eighth note), 4 (sixteenth note), 8 (thirty-second note)
■ Default . . . . . . . . . . . 4 (The layer 14 default is 8)
■ LED Buttons . . . . . . . The leftmost four columns on the matrix correspond to the available settings: quarter notes,
eighth notes, sixteenth notes, and thirty-second notes.
Press an LED button in one of these columns to make the corresponding setting.
LED buttons in other columns have no effect.
124
8
Settings are indicated by a lit column.
[Reference]
❊
Play menu/Master Loop Speed (➝ Page 45), Function Button [L5] (➝ Page 29)
TENORI-ON Manual 51
Page 52

4. Sound Length
Parameter Settings
Setting Parameters with the Jog Dial ■ Layer Menu
Sound Length ∞
Layer[01]
100msec
Gate Time
Current Layer Number
Sets the note length (gate time).
This setting applies to all active notes in the current layer.
The LED buttons adjust the Sound Length in the increments listed below. You can also use
the jog dial for finer adjustment in +/-10 millisecond increments.
This display also appears when the [L2] button is pressed.
● Depending on the voice used, setting a shorter Sound Length may have no effect, or changing the Sound
Length may result in inconsistent sound. Also, the maximum length of user voices is 0.97 seconds, and
setting a longer Sound length will have no effect.
■ Range . . . . . . . . . . . . 10 msec — 9990 msec
■ Default . . . . . . . . . . . 100 msec (all layers)
■ LED Buttons . . . . . . . The selected values are displayed as illustrated below. Settings can also be made via the
LED buttons.
Values selected via the LED buttons.
50
100
200
300
400
500
600
800
1000
2000
3000
4000
5000
6000
8000
9990
[Reference]
❊
Function Button [L2] (➝ Page 25)
10-50
60-100
110-200
210-300
310-400
410-500
510-600
610-800
810-1000
1010-2000
2010-3000
3010-4000
4010-5000
5010-6000
6010-8000
8010-9990
Matrix display related to settings made via the jog dial.
TENORI-ON Manual 52
Page 53

5. Panpot
Parameter Settings
Setting Parameters with the Jog Dial ■ Layer Menu
Panpot ∞
Layer[01]
CENTER
Panpot
Sets the stereo pan position for the current layer.
■ Range . . . . . . . . . . . . L64 — L01, CENTER, R01 — R63
■ Default . . . . . . . . . . . CENTER (all layers)
■ LED Buttons . . . . . . . No display
6. Animation
Current Layer Number
Animation ∞
Layer[01]
Type:Circle
Size:4 Expand
Maximum Size
Current Layer Number
Animation Type
Expand/Shrink
Sets the type of light animation that accompanies active notes, including whether the
animation expands or shrinks, and the maximum animation size.
These settings apply to the current layer.
■ Range . . . . . . . . . . . . Type: Simple Circle Square
Diamond Cross Plus
Size: 1 — 22 (maximum expand or shrink size), Expand, Shrink
■ Default . . . . . . . . . . . Different for each layer
■ LED Buttons . . . . . . . No display
TENORI-ON Manual 53
Page 54

Parameter Settings
Setting Parameters with the Jog Dial ■ Edit Menu
■ Edit Menu
The Edit menu provides access to data editing functions such as copy, clear, and reset.
The Edit menu submenu includes the following 6 items.
1. Copy this Block Page 55
2. Clear this Block Page 55
3. Copy this Layer Page 56
4. Clear this Layer Page 57
5. Clear All Blocks Page 57
6. Reset All Blocks Page 58
Use the jog dial to highlight a submenu item, then press the [OK] button to go to the
corresponding parameter edit display.
[Edit menu] ∞
Copy this Block
Clesr this Block
Copy this Layer
The Undo Function
When you press the [OK] button to execute a copy, clear, or reset function from the Edit
menu, the "UNDO" display shown below will appear after the copy, clear, or reset function
has been completed. To undo the function just executed press the [OK] button, or to
continue without undoing the function press an LED button or the [CANCEL] or [CLEAR]
button.
∞
UNDO?
● The UNDO display will time-out after 15 seconds if no operation is performed in that time.
● The Undo display will not appear when the [CLEAR] button is pressed (short or long press) to clear all
active notes from the layer.
TENORI-ON Manual 54
Page 55
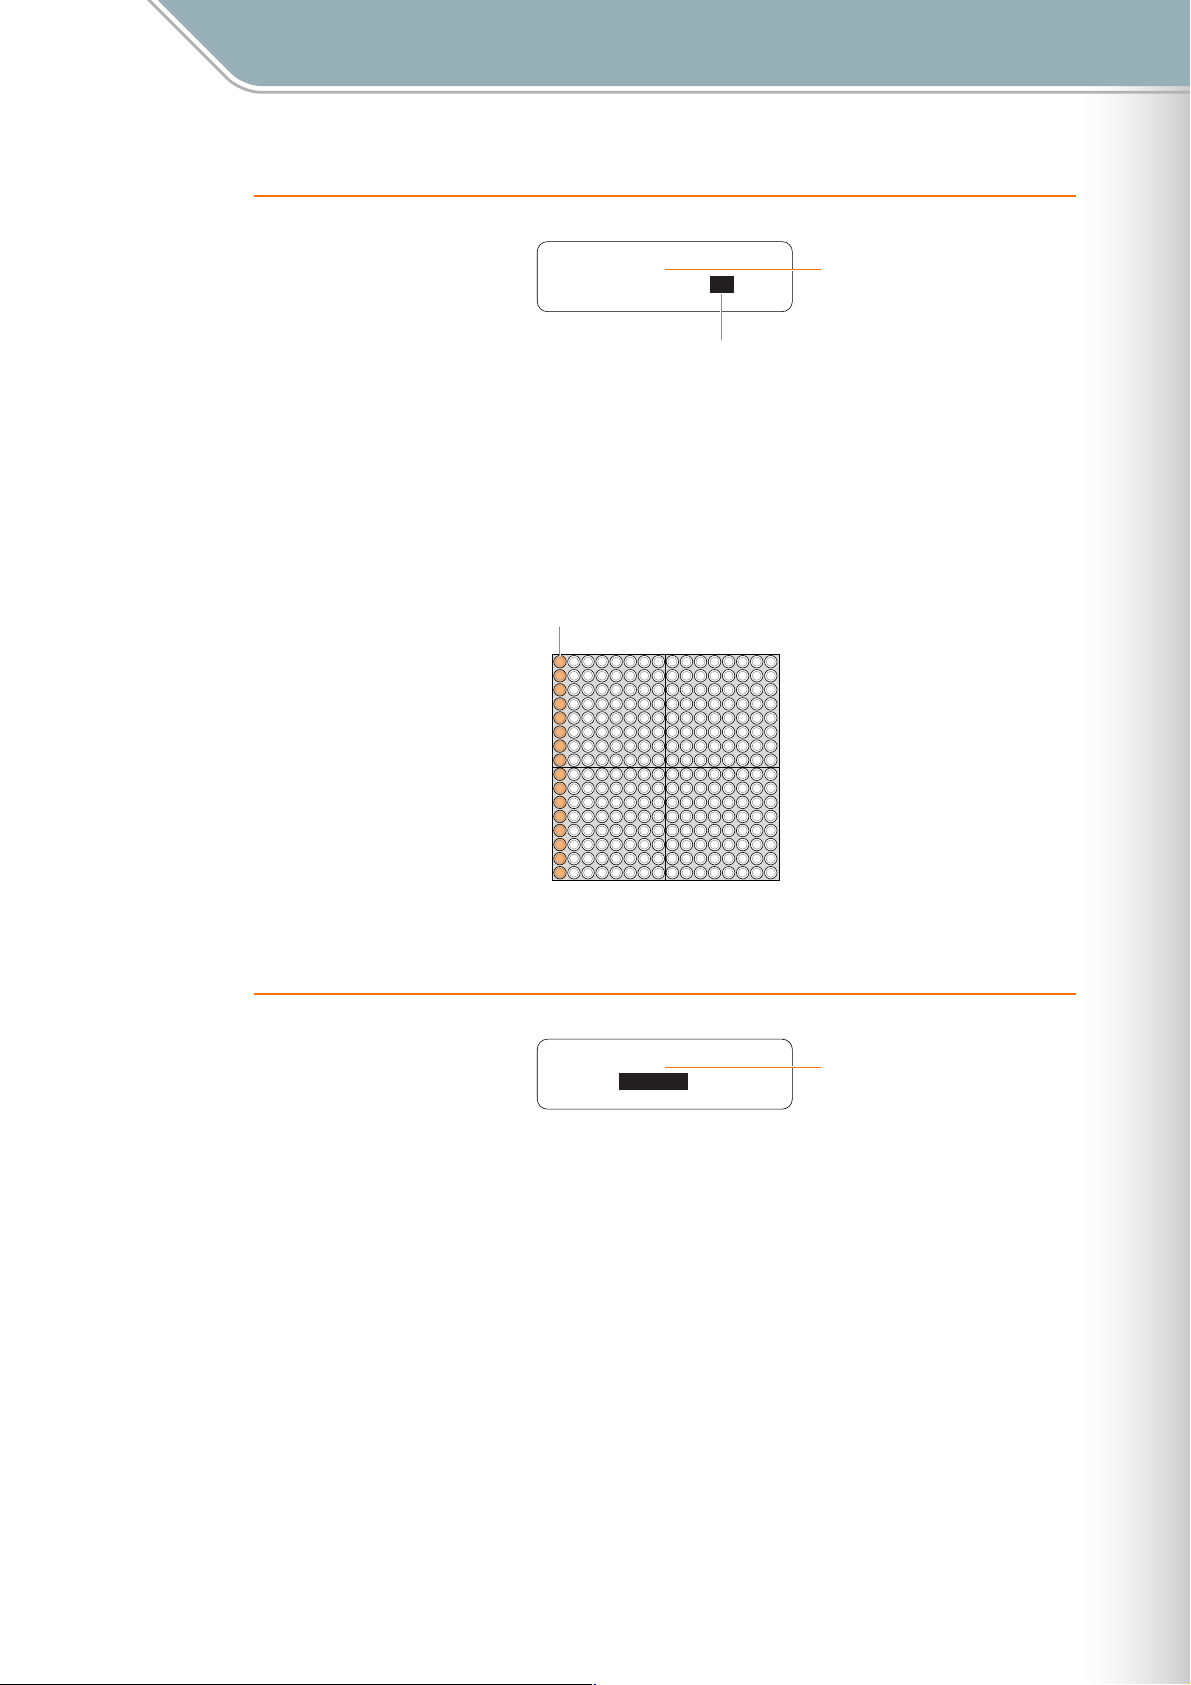
1. Copy this Block
Parameter Settings
Setting Parameters with the Jog Dial ■ Edit Menu
Copy this Block ∞
Block[01]
Dest. Block: 02
Copy Destination Block Number
Current Block Number
(the copy source)
Copy all active notes from all layers in the current block to a different block.
Specify the destination block number and then press the [OK] button.
Press the [CANCEL] button to cancel the copy operation.
■ Range . . . . . . . . . . . . 1 — 16
■ LED Buttons . . . . . . . The copy destination block number is displayed as illustrated below.
The destination block number can also be set via the LED buttons.
Copy Destination Block Number
010203040506070809101112131415
16
2. Clear this Block
Clear this Block ∞
Block[01]
OK
Clears all active notes from all layers in the current block.
Rotate the jog dial to display "OK" if it isn’t already showing, then press the [OK] button.
To cancel the clear operation either press the [CANCEL] button or rotate the jog dial to
display "CANCEL" and press the [OK] button.
● This function clears the active notes, but leaves Random Mode rotation data unaffected and active. The LED
buttons can not be used to enter notes while rotation is active. Refer to Rotation (➝ Page 28) for information
on stopping rotation.
■ Range . . . . . . . . . . . . OK, CANCEL
■ Default . . . . . . . . . . . OK
■ LED Buttons . . . . . . . Animation displayed when clear executed
Current Block Number
(the block to be cleared)
TENORI-ON Manual 55
Page 56

3. Copy this Layer
Parameter Settings
Setting Parameters with the Jog Dial ■ Edit Menu
Current Block Number
Current Layer Number (the copy source)
Copy this Layer ∞
Block[01] Layer[01]
Dest. Block: 02
Dest. Layer: 01
Copy Destination Block Number
Copy Destination Layer Number
Copies all active notes from the current layer in the current block to a layer in a different
block. This function will only work between layers that have the same performance mode.
Example: You can copy from layer 1 (Score Mode) to layer 7 (Score Mode), but from layer 1
(Score Mode) to layer 8 (Random Mode).
Use the LED buttons to select the copy destination block and layer numbers (you can also
use the jog dial to select the copy destination block).
When the destination block and layer have been selected, press the [OK] button to execute
the copy operation.
Press the [CANCEL] button to cancel the operation.
● If the copy source layer has a different performance mode from the destination layer, the "Mode different.
Can’t copy!" message will appear. Press either the [CANCEL] or [OK] button to return to the Edit menu.
■ Range . . . . . . . . . . . . Destination Block: 1 — 16,
Destination Layer: 1 — 16
■ Default . . . . . . . . . . . The currently selected block and layer
■ LED Buttons . . . . . . . The columns correspond to block numbers and the rows correspond to layer numbers as
illustrated below. The intersection between the lit horizontal and vertical lines indicates the
destination block and layer numbers.
In this example the selected copy destination block 2, layer 7.
Copy Destination Layer Number
16
15
14
13
12
11
10
09
08
07
06
05
04
03
02
01
010203040506070809101112131415
Copy Destination Block Number
16
TENORI-ON Manual 56
Page 57

Parameter Settings
Setting Parameters with the Jog Dial ■ Edit Menu
4. Clear this Layer
Current Block Number
Current Layer Number (the layer to be cleared)
Clear this Layer ∞
Block[01] Layer[01]
OK
Clears all active notes from the current block and layer. This produces the same result as
briefly pressing the [CLEAR] button.
Rotate the jog dial to display "OK" if it isn’t already showing, then press the [OK] button.
To cancel the clear operation either press the [CANCEL] button or rotate the jog dial to
display "CANCEL" and press the [OK] button.
● This function clears the active notes, but leaves Random Mode rotation data unaffected and active. The LED
buttons can not be used to enter notes while rotation is active. Refer to Rotation (➝ Page 28) for information
on stopping rotation.
■ Range . . . . . . . . . . . . OK, CANCEL
■ Default . . . . . . . . . . . OK
■ LED Buttons . . . . . . . Animation displayed when clear executed
5. Clear All Blocks
Clear All Blocks ∞
OK
Clears all active notes from all blocks and layers. This produces the same result as pressing
the [CLEAR] button (long press).
Rotate the jog dial to display "OK" if it isn’t already showing, then press the [OK] button.
To cancel the clear operation either press the [CANCEL] button or rotate the jog dial to
display "CANCEL" and press the [OK] button.
■ Range . . . . . . . . . . . . OK, CANCEL
■ Default . . . . . . . . . . . OK
■ LED Buttons . . . . . . . Animation displayed when clear executed
TENORI-ON Manual 57
Page 58

Parameter Settings
Setting Parameters with the Jog Dial ■ Edit Menu
6. Reset All Blocks
Reset All Blocks ∞
OK
Clears all active notes and initializes all settings for all blocks and layers.
Rotate the jog dial to display "OK" if it isn’t already showing, then press the [OK] button.
To cancel the clear operation either press the [CANCEL] button or rotate the jog dial to
display "CANCEL" and press the [OK] button.
■ Range . . . . . . . . . . . . OK, CANCEL
■ Default . . . . . . . . . . . OK
■ LED Buttons . . . . . . . Animation displayed when reset executed
TENORI-ON Manual 58
Page 59
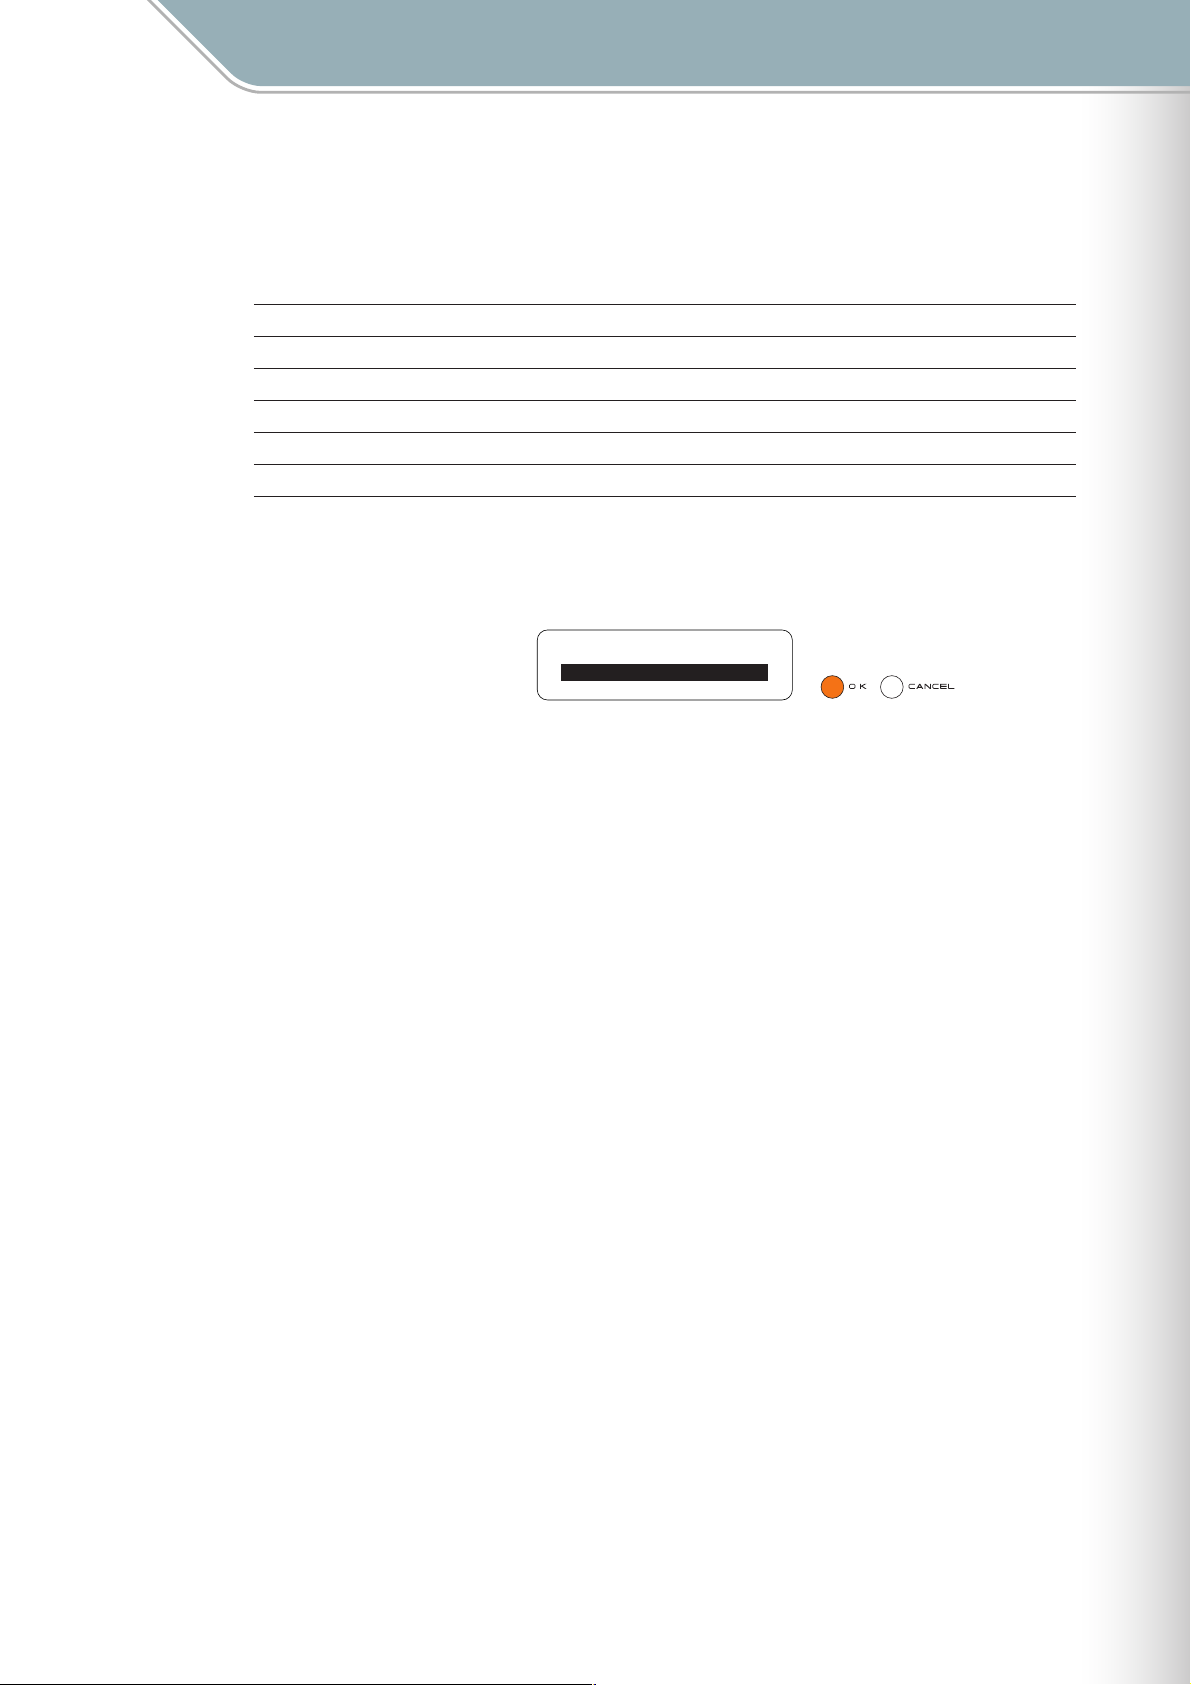
Parameter Settings
Setting Parameters with the Jog Dial ■ Preference Menu
■ Preference Menu
The Preference menu provides access to initial settings that apply to the entire instrument.
The Preference menu submenu includes the following 6 items.
1. Quantize Page 60
2. Push Sensitivity Page 60
3. Master Tuning Page 60
4. Local Control Page 61
5. Synchronize Page 61
6. Loop Indicator Page 61
Use the jog dial to highlight a submenu item, then press the [OK] button to go to the
corresponding parameter edit display.
[Preference menu] ∞
Quantize
Push Sensitivity
Master Tuning
TENORI-ON Manual 59
Page 60
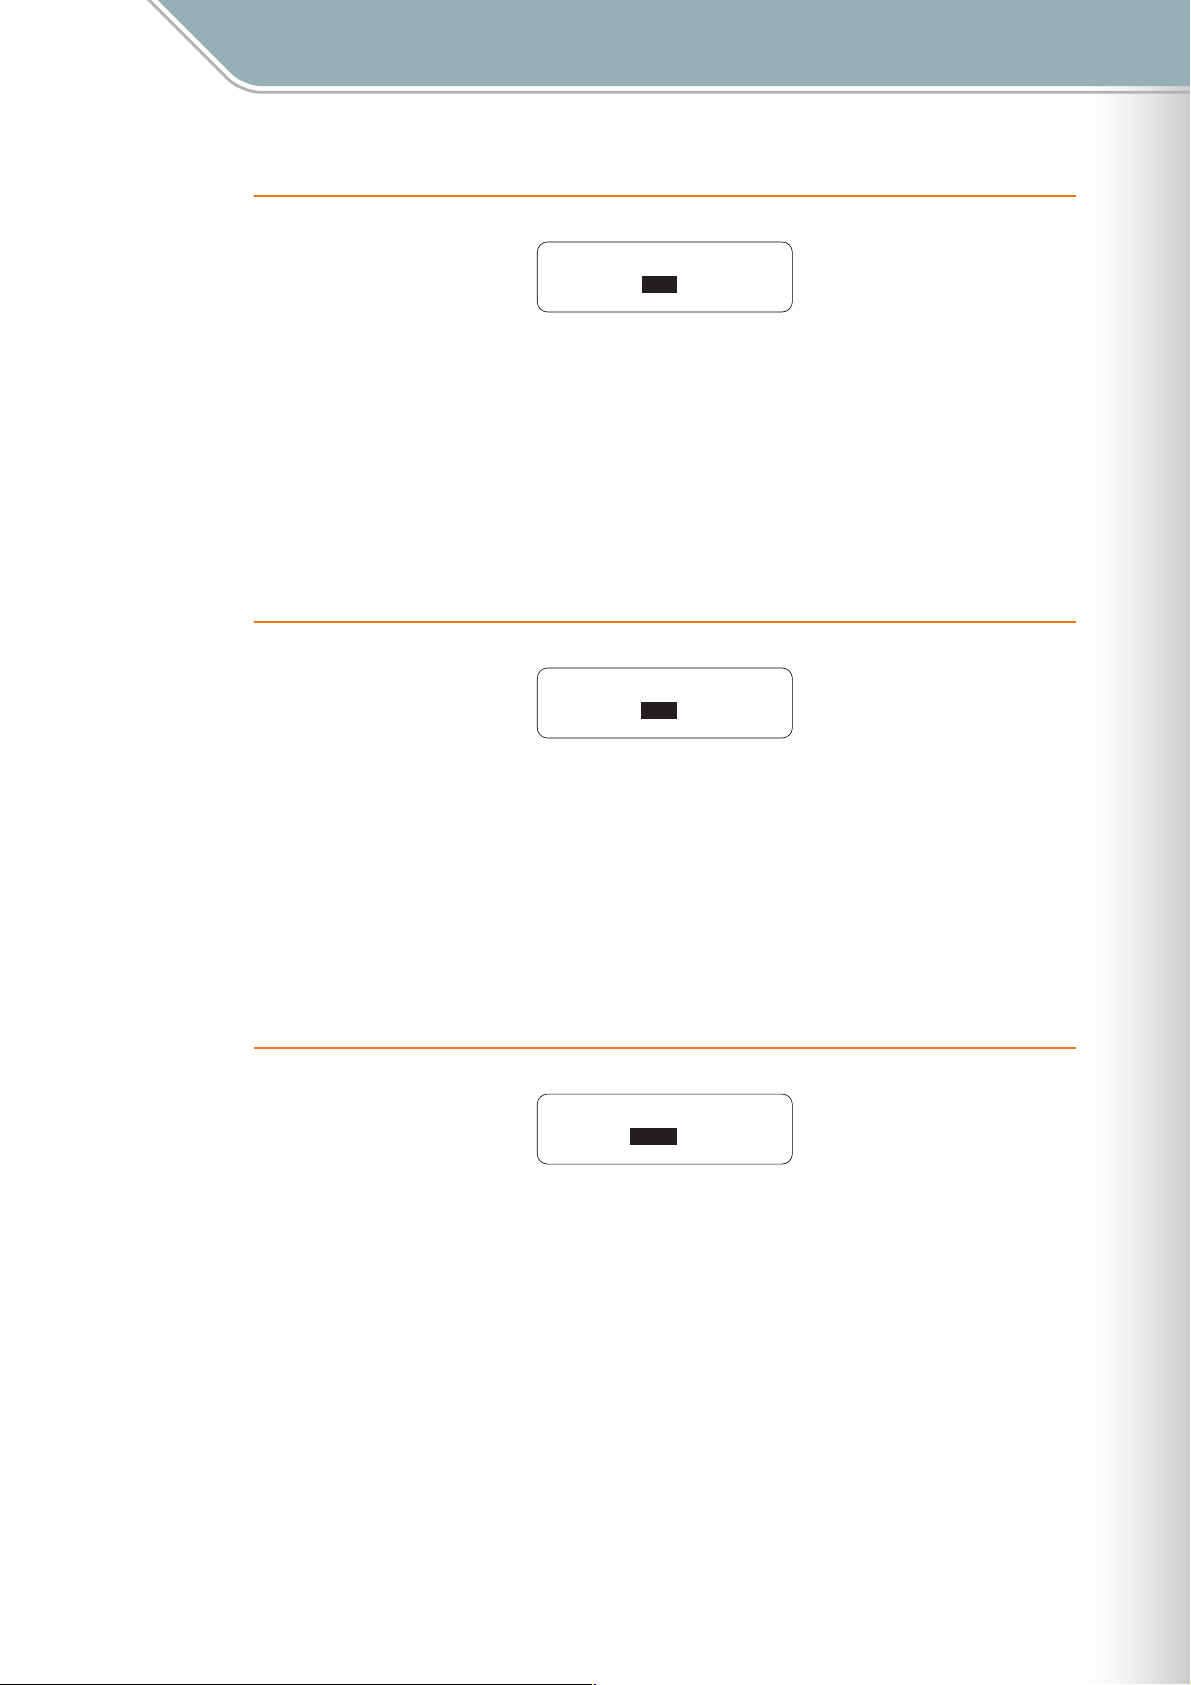
Parameter Settings
Setting Parameters with the Jog Dial ■ Preference Menu
1. Quantize
Quantize ∞
ON
This setting applies to layer 16 (Solo Mode).
When ON the repeat timing of notes played in the Solo Mode is synchronized with playback
timing in the Score Mode (layers 1 — 7).
■ Range . . . . . . . . . . . . ON, OFF
■ Default . . . . . . . . . . . ON
■ LED Buttons . . . . . . . No display
2. Push Sensitivity
Push Sensitivity ∞
150msec
Sets the long-press time for the LED buttons.
The TENORI-ON recognizes a button press as a "long press" when the button is held for
longer than the specified Push Sensitivity setting.
■ Range . . . . . . . . . . . . 50 — 500 (milliseconds)
■ Default . . . . . . . . . . . 120 (milliseconds)
■ LED Buttons . . . . . . . No display
3. Master Tuning
Master Tuning ∞
0CENT
Master tuning for the internal MIDI tone generator and the user voices.
This parameter has no effect on the user voices (numbers <01/16,> <02/16,> and <03/16>).
■ Range . . . . . . . . . . . . -100 — +100 (cents)
■ Default . . . . . . . . . . . 0 (cents)
■ LED Buttons . . . . . . . No display
TENORI-ON Manual 60
Page 61

Parameter Settings
Setting Parameters with the Jog Dial ■ Preference Menu
4. Local Control
Local Control ∞
ON
Determines whether TENORI-ON performance input (data) controls the internal MIDI tone
generator (ON) or not (OFF).
When set to "OFF" no sound will be output from the TENORI-ON speakers or headphone
jack, but performance data will still be transmitted via the MIDI connector. Also, the LED
buttons will produce no sound when operated if this parameter is set to "OFF."
■ Range . . . . . . . . . . . . ON. OFF
■ Default . . . . . . . . . . . ON
■ LED Buttons . . . . . . . No display
5. Synchronize
Synchronize ∞
MASTER
Sets the master or slave status for multiple TENORI-ON units to be synchronized via a MIDI
connection. The "Master" TENORI-ON provides the clock for all "Slave" TENORI-ON units.
● A TENORI-ON set to the Slave mode will only function properly if correctly connected to the Master TENORI-
ON.
● For synchronized operation, make sure that the Master TENORI-ON is playing back at a tempo that is close to
the tempo at which the performance data for the Slave TENORI-ON was created. The Slave performance
may not be reproduced properly if there is too great a difference between the tempos.
■ Range . . . . . . . . . . . . MASTER, SLAVE
■ Default . . . . . . . . . . . MASTER
■ LED Buttons . . . . . . . No display
6. Loop Indicator
Loop Indicator ∞
ON
Determines whether the loop indicator is visible (ON) or not (OFF) in the Score Mode.
This setting applies to all Score Mode layers (layers 1 — 7).
■ Range . . . . . . . . . . . . ON, OFF
■ Default . . . . . . . . . . . ON
■ LED Buttons . . . . . . . Loop indicator
TENORI-ON Manual 61
Page 62
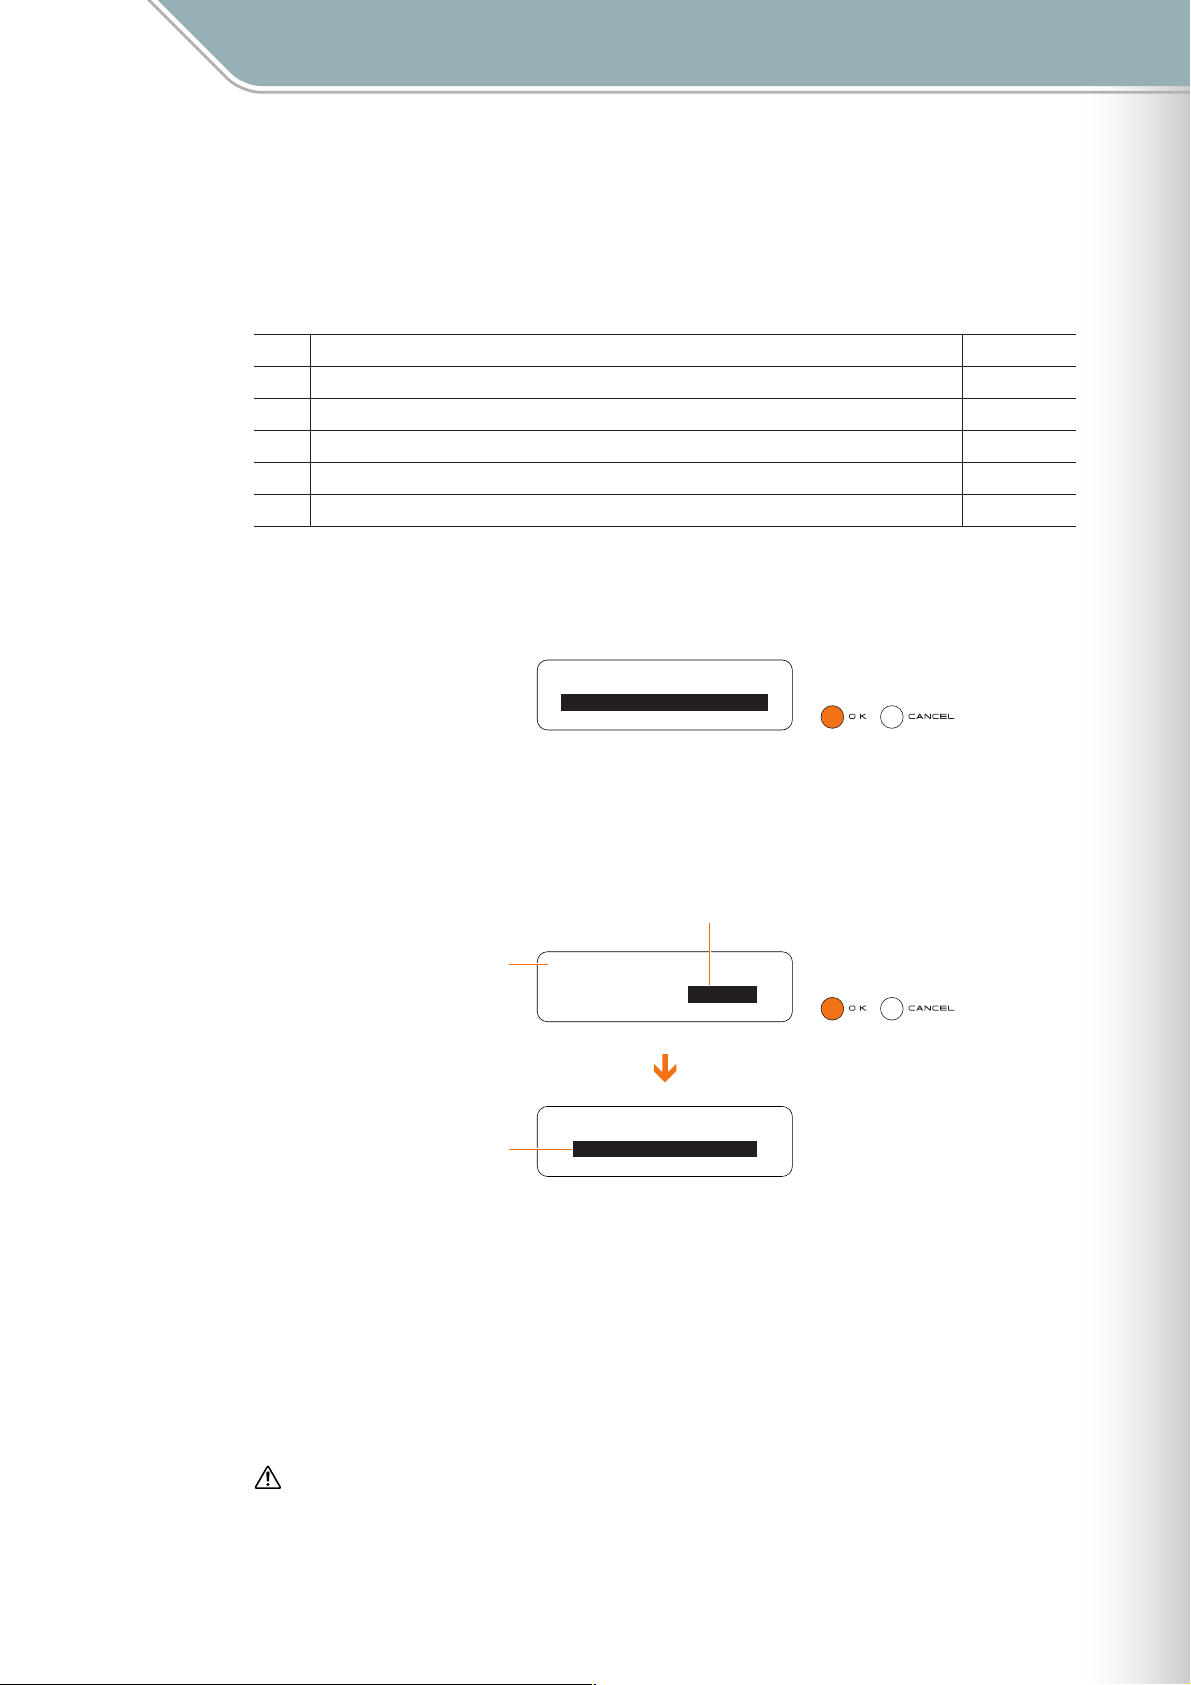
Parameter Settings
Setting Parameters with the Jog Dial ■ File Menu
■ File Menu
The File menu provides access to functions that allow you to save data to an SD Memory
Card, load sample files, and more.
The File menu submenu includes the following 6 items.
1. Song Page 64
2. All Blocks Page 68
3. Current Block Page 73
4. Current Layer Page 78
5. All Settings Page 83
6. Samplings Page 88
Use the jog dial to highlight a submenu item, then press the [OK] button to go to the
corresponding parameter edit display.
[File menu] ∞
Song
All Blocks
Current Block
Each item in the File menu submenu has a further 3 — 5 functions that you will need to select
from.
After accessing a submenu, use the jog dial to highlight the desired function and then press
the [OK] button.
Function Name
Submenu Name
Song ∞
Operation: Load
Song: Load ∞
File Name
0302E-SONG-01
0302E-SONG-02
0302G-SONG-01
Refer to the Display Message List on Page 111 for information about error messages that
may be displayed during SD Memory Card access operations.
● The TENORI-ON can only display file names consisting of up to 16 ASCII characters, not including the file
extension. 2-byte characters cannot be displayed.
Files saved to an SD Memory Card are saved in a "TENORI-ON" folder that is automatically
created on the card. Up to 1,000 files can be stored in the TENORI-ON folder, or up to 256
files of each file-extension type.
Before using SD Memory Cards with the TENORI-ON, be sure to read “Handling SD™ Memory Cards”
on Page 63.
TENORI-ON Manual 62
Page 63
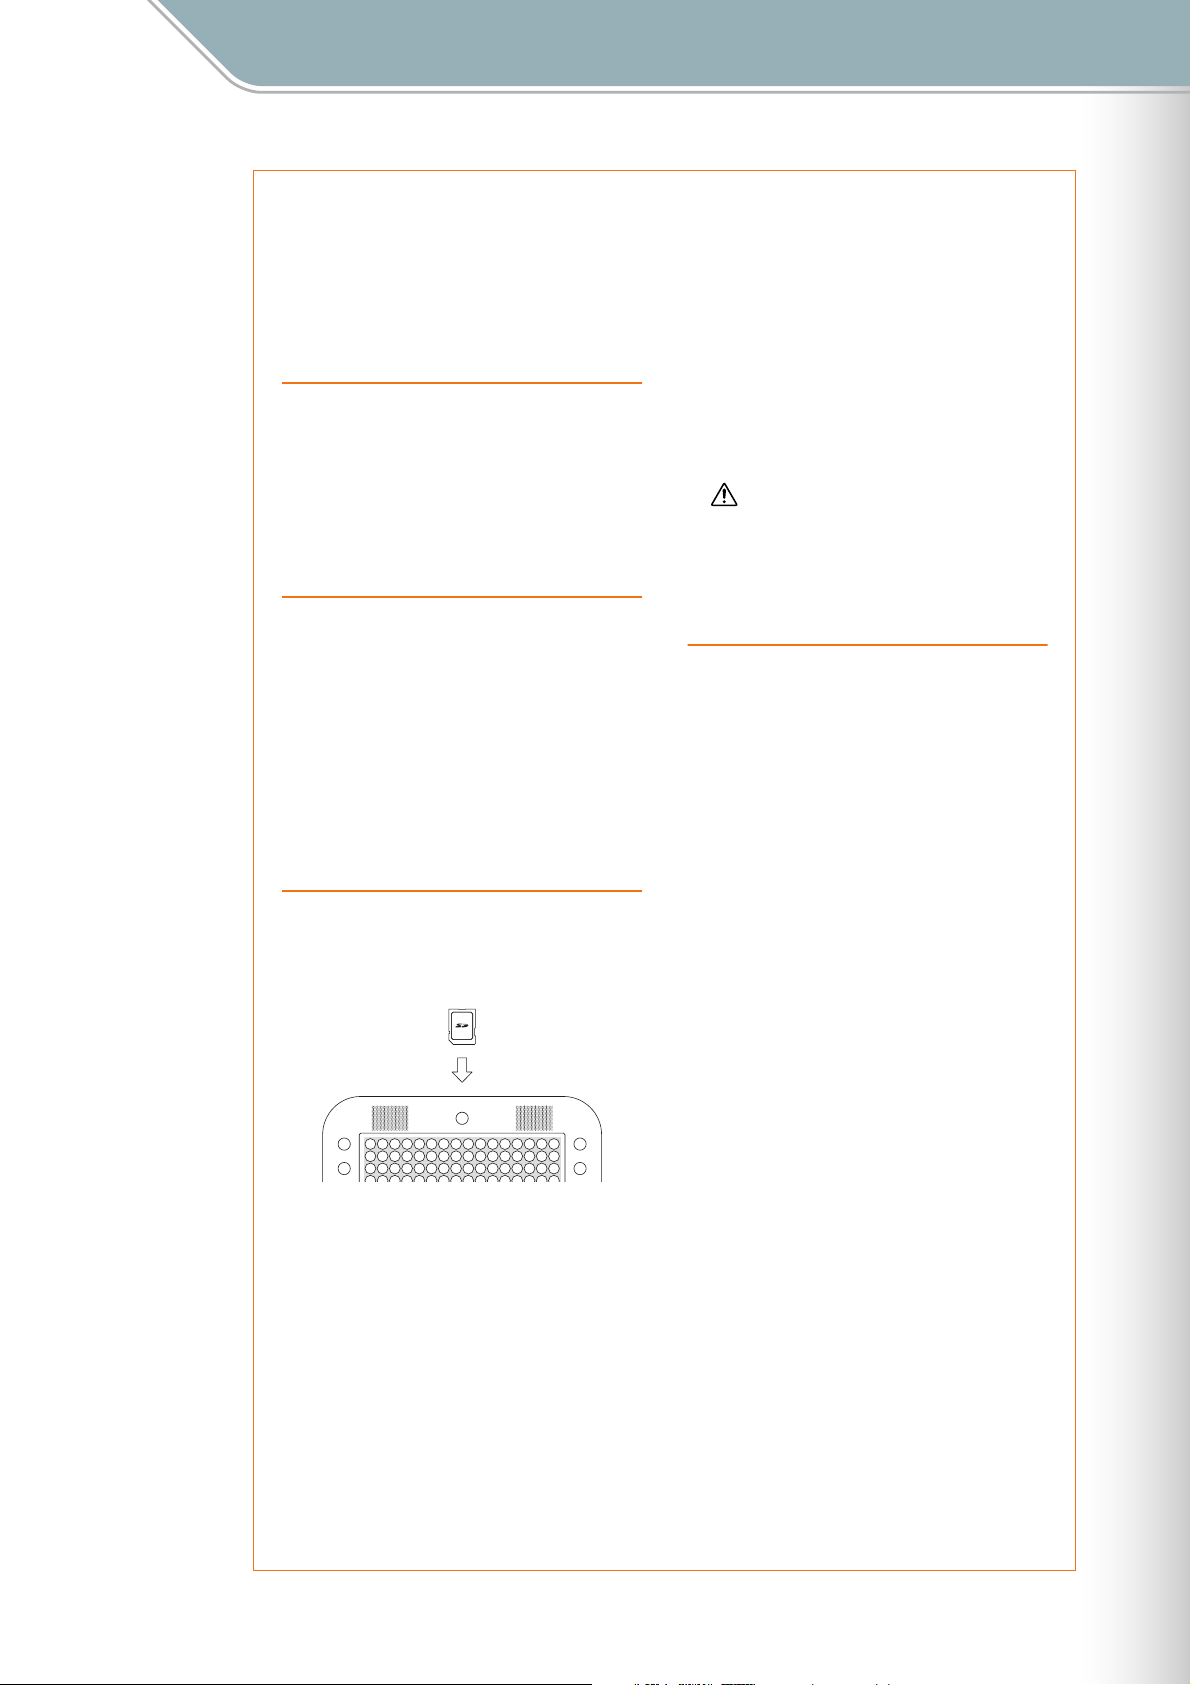
Parameter Settings
Setting Parameters with the Jog Dial ■ File Menu
Handling SD™ Memory Cards
*SD Memory Card is a registered trademark of the SD Card Association.
This instrument features a built-in SD Memory Card slot. It lets you save original data you’ve created on the
instrument to a SD Memory Card, and allows you to load data from a card to the instrument. Be sure to
handle SD Memory Cards with care. Follow the important precautions below.
Compatible SD Memory Card types
● SD Memory Cards with a capacity of two gigabytes or
less.
NOTE:
• SD Memory Cards formatted on this device may or
may not be useable as is on other devices.
• This instrument is not compatible with SDIO and
SDHC cards.
Formatting SD Memory Cards
● If you find that you are unable to use new, blank SD
Memory Cards or cards that have been used with
other devices, you may need to format them. For
details on how to format a SD Memory Card, see
Page 107. Keep in mind that all data on the card will
be lost after formatting. Make sure to check
beforehand whether or not the card contains
important data.
NOTE:
• SD Memory Cards formatted on this device may or
may not be useable as is on other devices.
Inserting/removing SD Memory Cards
Inserting SD Memory Cards
● Insert the SD Memory Card with the terminal (gold-
plated) side face down into the card slot, until it clicks
into place.
* Accessing includes saving, loading, formatting and
deleting. Also, be aware that the instrument will
automatically access the SD Memory Card to check
the media type when it is inserted while the instrument
is turned on.
Never attempt to remove the SD Memory
Card or turn the power off during
accessing. Doing so can damage the
data on the instrument or card and
possibly damage the SD Memory Card
itself.
About SD Memory Cards
Handle SD Memory Cards with care, and follow
these precautions:
● There are times when static electricity affects SD
Memory Card. Before you touch a SD Memory Card,
touch something metallic such as a door knob and
aluminum sash, to reduce the possibility of static
electricity.
● Be sure to remove the SD Memory Card from the SD
Card slot when it is not in use for a long time.
● Do not expose the SD Memory Card to direct sunlight,
extremely high or low temperatures, or excessive
humidity, dust or liquids.
● Do not place heavy objects on a SD Memory Card or
bend or apply pressure to the card in any way.
● Do not touch the gold-plated terminals of the SD
Memory Card or put any metallic plate onto the
terminals.
● Do not expose the SD Memory Card to magnetic
fields, such as those produced by televisions,
speakers, motors, etc., since magnetic fields can
partially or completely erase data on the SD Memory
Card, rendering it unreadable.
● Do not insert the SD Memory Cards in the wrong
direction.
● Do not insert anything other than a SD Memory Card
in the slot.
Removing SD Memory Cards
● After making sure that the instrument is not
accessing* the SD Memory Card, insert the card until
it clicks into place and release it. When the SD
Memory Card is ejected, pull it out of the drive. If the
card cannot be removed because it is stuck, do not
try to force it, but instead try re-inserting the card
completely into the slot and attempt to eject it again.
To protect your data (write-protect switch):
● SD Memory Cards are equipped with a write-protect
switch. To prevent accidental erasure of important
data saved in SD Memory Card, slide the write-protect
switch on the device to the "protect" position. When
saving data, make sure that the write-protect switch is
set to the "overwrite" position.
Data Backup
● For maximum data security, Yamaha recommends that
you keep two copies of important data on separate
SD Memory Cards. This gives you a backup if one
card is lost or damaged.
TENORI-ON Manual 63
Page 64

Parameter Settings
Setting Parameters with the Jog Dial ■ File Menu
1. Song
Provides access to song file operations.
"Song" files are files created by the TENORI-ON song recording function (➝ Page 109).
In addition to performance data (active notes and settings such as voice, tempo, etc.) for all
layers and blocks, all button and jog dial operations are recorded in real time. A recorded
Song file can then be loaded in into the TENORI-ON and played back, precisely reproducing
the entire performance as it occurred.
The following 3 Song file functions are provided:
Load Song Page 64
Rename Song Page 65
Delete Song Page 67
● Load Song
Loads a Song file that has been saved to an SD Memory Card into the TENORI-ON.
1 Insert the SD Memory Card containing the file you want to load into the TENORI-ON
card slot.
2 Use the jog dial and [OK] button to navigate to the Song function menu as follows:
"Main menu" ➝ "File menu" ➝ "Song"
Song ∞
Operation: Load
3 Use the jog dial to highlight the "Load" function, then press the [OK] button.
4 Song files on the card will appear as a list on the LCD display (with no file extension).
Use the jog dial to select the file you want to load.
Song: Load ∞
0302E-SONG-01
0302E-SONG-02
0302G-SONG-01
● Only files that are in song-file format will be displayed.
5 Press the [OK] button to load the selected file.
The display shown below will appear while the file is being loaded.
Press the [OK] or [CANCEL] button to cancel the load operation.
Song: ∞
"0302E-SONG-02 "
Loading... CANCEL
The name of the Song file being
loaded.
TENORI-ON Manual 64
Page 65

Parameter Settings
Setting Parameters with the Jog Dial ■ File Menu
6 When the Song file has been loaded the display shown below will appear, and playback
will begin.
Press the [OK] button when you want to stop playback.
Song: ∞
"0302E-SONG-02 "
TENORI-ON-MASTER
µ00:03:21 ≥
● The composer name that appears on the third line of the display is the registered "Owner Name" for the
TENORI-ON on which the Song file was recorded (➝ Page 107).
● Rename Song
Allows a new name to be entered for a Song file on an SD Memory Card.
Composer Name
1 Insert the SD Memory Card containing the file you want to rename into the TENORI-ON
card slot.
2 Use the jog dial and [OK] button to navigate to the Song function menu as follows:
"Main menu" ➝ "File menu" ➝ "Song"
Song ∞
Operation: Load
3 Use the jog dial to highlight the "Rename" function, then press the [OK] button.
Song ∞
Operation: Rename
4 Song files on the card will appear as a list on the LCD display (with no file extension).
Use the jog dial to select the file you want to rename.
Song: Rename ∞
0302E-SONG-01
0302E-SONG-02
0302G-SONG-01
● Only files that are in song-file format will be displayed.
TENORI-ON Manual 65
Page 66

Parameter Settings
Setting Parameters with the Jog Dial ■ File Menu
5 Press the [OK] button to go to the file name entry display. The name of the currently
selected file will be displayed, and you can enter a new file name as required.
Current Song File Name
Available Characters
Input File Name ∞
[0302E-SONG-02 ]
ABCDEFGHIJKLMNOPQRST
UVWXYZ-0123456789 ª§
Input Cursor
Set File Name
Backspace & Delete 1 Character
The Input cursor "œ" indicates the current entry point in the file name displayed on the
second line of the LCD. Use the jog dial to highlight the character you want to enter in
the list on the third and fourth lines of the LCD, then press the [OK] button to enter that
character at the current entry point. When a character is entered the cursor moves one
character to the right, ready for the next character. If you want to enter a new character
in the middle of the file name, you will need to delete and re-enter all characters up to
that point.
To delete characters, use the jog dial to highlight the "ª" symbol in the lower right corner
of the display and press the [OK] button as many times as necessary.
File names can be up to 16 alphanumeric and hyphen (-) characters in length, not
including the file extension. The file extension will be added automatically.
Character Selected for Input
Input File Name ∞
[0302E-SONG-02 ]
ABCDEFGHIJKLMNOPQRST
UVWXYZ-0123456789 ª§
Input Cursor
Input File Name ∞
[0302E-SONG-02X ]
ABCDEFGHIJKLMNOPQRST
UVWXYZ-0123456789 ª§
Cursor Moves 1 Character
After Input
6 When the file name has been entered as required use the jog dial to highlight the "
symbol in the lower right corner of the display and press the [OK] button.
"Executing …" will appear on the display while the file is being renamed.
File data may be irreparably corrupted if you turn off the power or remove the SD Memory Card while the
"Executing…" display is showing.
● If a file with the same name exists on the SD Memory Card an overwrite confirmation display like the
one shown below will appear.
Song: ∞
"1-ORIGINAL-001 "
Already Exists!
Overwrite? OK
● Press the [OK] button if it’s OK to overwrite the file. Press the [CANCEL] button (or use the jog dial to
select "CANCEL" on the LCD and then press the [OK] button) to cancel the operation and leave the
original file unaltered.
7 The display shown in step 3, above, will reappear when the operation has finished.
"
§
TENORI-ON Manual 66
Page 67

Parameter Settings
Setting Parameters with the Jog Dial ■ File Menu
Delete Song
●
Deletes a specified Song from an SD Memory Card.
1 Insert the SD Memory Card containing the file you want to delete into the TENORI-ON
card slot.
2 Use the jog dial and [OK] button to navigate to the Song function menu as follows:
"Main menu" ➝ "File menu" ➝ "Song"
Song ∞
Operation: Load
3 Use the jog dial to highlight the "Delete" function, then press the [OK] button.
Song ∞
Operation: Delete
4 Song files on the card will appear as a list on the LCD display (with no file extension).
Use the jog dial to select the file you want to delete.
Song: Delete ∞
0302E-SONG-01
0302E-SONG-02
0302G-SONG-01
● Only files that are in song-file format will be displayed.
5 Press the [OK] button to delete the selected file.
A confirmation display like the one shown below will appear.
Press the [OK] button if it’s OK to delete the file. Press the [CANCEL] button (or use the
jog dial to select "CANCEL" on the LCD and then press the [OK] button) to cancel the
operation and leave the file unaltered.
Delete ∞
"0302E-SONG-02 "
OK
If you press the [OK] button to execute the delete operation, "Executing …" will appear
on the display while the file is being deleted.
File data may be irreparably corrupted if you turn off the power or remove the SD Memory Card while the
"Executing…" display is showing.
6 The display shown in step 3, above, will reappear when the operation has finished.
TENORI-ON Manual 67
Page 68

Parameter Settings
Setting Parameters with the Jog Dial ■ File Menu
2. All Blocks
Provides access to All Blocks file operations.
"All Blocks" files include active notes and settings such as voice, tempo, etc., for all layers
and blocks.
The following 4 All Blocks file functions are provided:
Load All Blocks Page 68
Save All Blocks Page 69
Rename All Blocks Page 70
Delete All Blocks Page 71
● Load All Blocks
Loads an All Blocks file that has been saved to an SD Memory Card into the TENORI-ON.
1 Insert the SD Memory Card containing the file you want to load into the TENORI-ON
card slot.
2 Use the jog dial and [OK] button to navigate to the All Blocks function menu as follows:
"Main menu" ➝ "File menu" ➝ "All Blocks"
All Blocks ∞
Operation: Load
3 Use the jog dial to highlight the "Load" function, then press the [OK] button.
4 All Blocks files on the card will appear as a list on the LCD display (with no file
extension). Use the jog dial to select the file you want to load.
Blocks: Load ∞
0302E-BLOCKS-01
0302E-BLOCKS-02
0302G-BLOCKS-01
● Only files that are in All Blocks format will be displayed.
5 Press the [OK] button to load the selected file.
The display shown below will appear while the file is being loaded.
Press the [OK] or [CANCEL] button to cancel the load operation.
Blocks: ∞
"0302E-BLOCKS-02 "
Loading... CANCEL
The name of the All Blocks file being
loaded.
TENORI-ON Manual 68
Page 69

Parameter Settings
Setting Parameters with the Jog Dial ■ File Menu
6 When the All Blocks file has been loaded the display shown in step 2, above, will
appear, and playback of the All Blocks file will begin.
Press the [OK] button in the status display when you want to stop playback.
● Save All Blocks
Saves an All Blocks file containing all active notes and settings such as voice, tempo, etc.,
for all layers and blocks to an SD Memory Card.
1 Insert an SD Memory Card that has sufficient free space for the file to be saved into the
TENORI-ON card slot.
2 Use the jog dial and [OK] button to navigate to the All Blocks function menu as follows:
"Main menu" ➝ "File menu" ➝ "All Blocks"
All Blocks ∞
Operation: Load
3 Use the jog dial to highlight the "Save" function, then press the [OK] button.
All Blocks ∞
Operation: Save
The file name entry display will appear. A default file name will be provided, which you
can either use as-is or replace with a name of your own.
File name entry procedure is described in the Rename Song section on Page 65.
Current All Blocks File Name
Available Characters
Input File Name ∞
[0302E-BLOCKS-02 ]
ABCDEFGHIJKLMNOPQRST
UVWXYZ-0123456789 ª§
Input Cursor
Set File Name
Backspace & Delete 1 Character
4 When the file name has been entered as required use the jog dial to highlight the "
symbol in the lower right corner of the display and press the [OK] button.
The file name will be entered and the save function will be executed.
A display like the one shown below will appear while the All Blocks file is being saved.
You can cancel the operation by pressing the [OK] or [CANCEL] button.
"
§
Blocks: ∞
"1-BLOCKS1020-01 "
Saving... CANCEL
File data may be irreparably corrupted if you turn off the power or remove the SD Memory Card while the
"Saving…" display is showing.
The name of the All Blocks file being
saved.
TENORI-ON Manual 69
Page 70

Parameter Settings
Setting Parameters with the Jog Dial ■ File Menu
● If a file with the same name exists on the SD Memory Card an overwrite confirmation display like the
one shown below will appear.
Blocks: ∞
"1-BLOCKS1020-01 "
Already Exists!
Overwrite? OK
● Press the [OK] button if it’s OK to overwrite the file. Press the [CANCEL] button (or use the jog dial to
select "CANCEL" on the LCD and then press the [OK] button) to cancel the operation and leave the
original file unaltered.
5 The display shown in step 3, above, will reappear when the operation has finished.
● Rename All Blocks
Allows a new name to be entered for an All Blocks file on an SD Memory Card.
1 Insert the SD Memory Card containing the file you want to rename into the TENORI-ON
card slot.
2 Use the jog dial and [OK] button to navigate to the All Blocks function menu as follows:
"Main menu" ➝ "File menu" ➝ "All Blocks"
All Blocks ∞
Operation: Load
3 Use the jog dial to highlight the "Rename" function, then press the [OK] button.
All Blocks ∞
Operation: Rename
4 All Blocks files on the card will appear as a list on the LCD display (with no file
extension). Use the jog dial to select the file you want to rename.
Blocks: Rename ∞
0302E-BLOCKS-01
0302E-BLOCKS-01
0302G-BLOCKS-01
● Only files that are in All Blocks format will be displayed.
TENORI-ON Manual 70
Page 71

Parameter Settings
Setting Parameters with the Jog Dial ■ File Menu
5 Press the [OK] button to go to the file name entry display. The name of the currently
selected All Blocks file will be displayed, and you can enter a new file name as required.
File name entry procedure is described in the Rename Song section on Page 65.
● File names can be up to 16 characters in length. The file extension will be added automatically.
Current All Blocks File Name
Available Characters
Input File Name ∞
[0302E-BLOCKS-02 ]
ABCDEFGHIJKLMNOPQRST
UVWXYZ-0123456789 ª§
Input Cursor
Set File Name
Backspace & Delete 1 Character
6 When the file name has been entered as required use the jog dial to highlight the "
symbol in the lower right corner of the display and press the [OK] button.
"Executing …" will appear on the display while the file is being renamed.
File data may be irreparably corrupted if you turn off the power or remove the SD Memory Card while the
"Executing…" display is showing.
If a file with the same name exists on the SD Memory Card an overwrite confirmation display like the
●
one shown below will appear.
Blocks: ∞
"1-BLOCKS1001-01 "
Already Exists!
Overwrite? OK
● Press the [OK] button if it’s OK to overwrite the file. Press the [CANCEL] button (or use the jog dial to
select "CANCEL" on the LCD and then press the [OK] button) to cancel the operation and leave the
original file unaltered.
7 The display shown in step 3, above, will reappear when the operation has finished.
"
§
● Delete All Blocks
Deletes a specified All Blocks file from an SD Memory Card.
1 Insert the SD Memory Card containing the file you want to delete into the TENORI-ON
card slot.
2 Use the jog dial and [OK] button to navigate to the All Blocks function menu as follows:
"Main menu" ➝ "File menu" ➝ "All Blocks"
All Blocks ∞
Operation: Load
3 Use the jog dial to highlight the "Delete" function, then press the [OK] button.
All Blocks ∞
Operation: Delete
TENORI-ON Manual 71
Page 72

Parameter Settings
Setting Parameters with the Jog Dial ■ File Menu
4 All Blocks files on the card will appear as a list on the LCD display (with no file
extension). Use the jog dial to select the file you want to delete.
Blocks: Delete ∞
0302E-BLOCKS-01
0302E-BLOCKS-01
0302G-BLOCKS-01
● Only files that are in All Blocks format will be displayed.
5 Press the [OK] button to delete the selected file.
A confirmation display like the one shown below will appear.
Press the [OK] button if it’s OK to delete the file. Press the [CANCEL] button (or use the
jog dial to select "CANCEL" on the LCD and then press the [OK] button) to cancel the
operation and leave the file unaltered.
Delete ∞
"0302E-BLOCKS-02 "
OK
If you press the [OK] button to execute the delete operation, "Executing …" will appear
on the display while the file is being deleted.
File data may be irreparably corrupted if you turn off the power or remove the SD Memory Card while the
"Executing…" display is showing.
6 The display shown in step 3, above, will reappear when the operation has finished.
TENORI-ON Manual 72
Page 73

Parameter Settings
Setting Parameters with the Jog Dial ■ File Menu
3. Current Block
Provides access to Current Block file operations.
"Current Block" files include active notes and settings such as voice, tempo, etc., for all
layers in the current block.
The following 4 Current Block file functions are provided:
Load Current Block Page 73
Save Current Block Page 74
Rename Current Block Page 75
Delete Current Block Page 77
● Load Current Block
Loads a Current Block file that has been saved to an SD Memory Card into the TENORI-ON.
When a block is loaded the layer settings for all other blocks will also be overwritten by the loaded
data.
1 Make sure the block that you want to load the data into is selected on the TENORI-ON
(Function Button [R5]: Page 34).
2 Insert the SD Memory Card containing the file you want to load into the TENORI-ON
card slot.
3 Use the jog dial and [OK] button to navigate to the Current Block function menu as
follows:
"Main menu" ➝ "File menu" ➝ "Current Block"
Current Block Number
Block[01]: ∞
Operation: Load
4 Use the jog dial to highlight the "Load" function, then press the [OK] button.
5 Current Block files on the card will appear as a list on the LCD display (with no file
extension). Use the jog dial to select the file you want to load.
Block[01]: Load ∞
0302E-BLOCK-01
0302E-BLOCK-02
0302G-BLOCK-01
● Only files that are in Current Block format will be displayed.
6 Press the [OK] button to load the selected file.
The display shown below will appear while the file is being loaded.
Press the [OK] or [CANCEL] button to cancel the load operation.
TENORI-ON Manual 73
Page 74
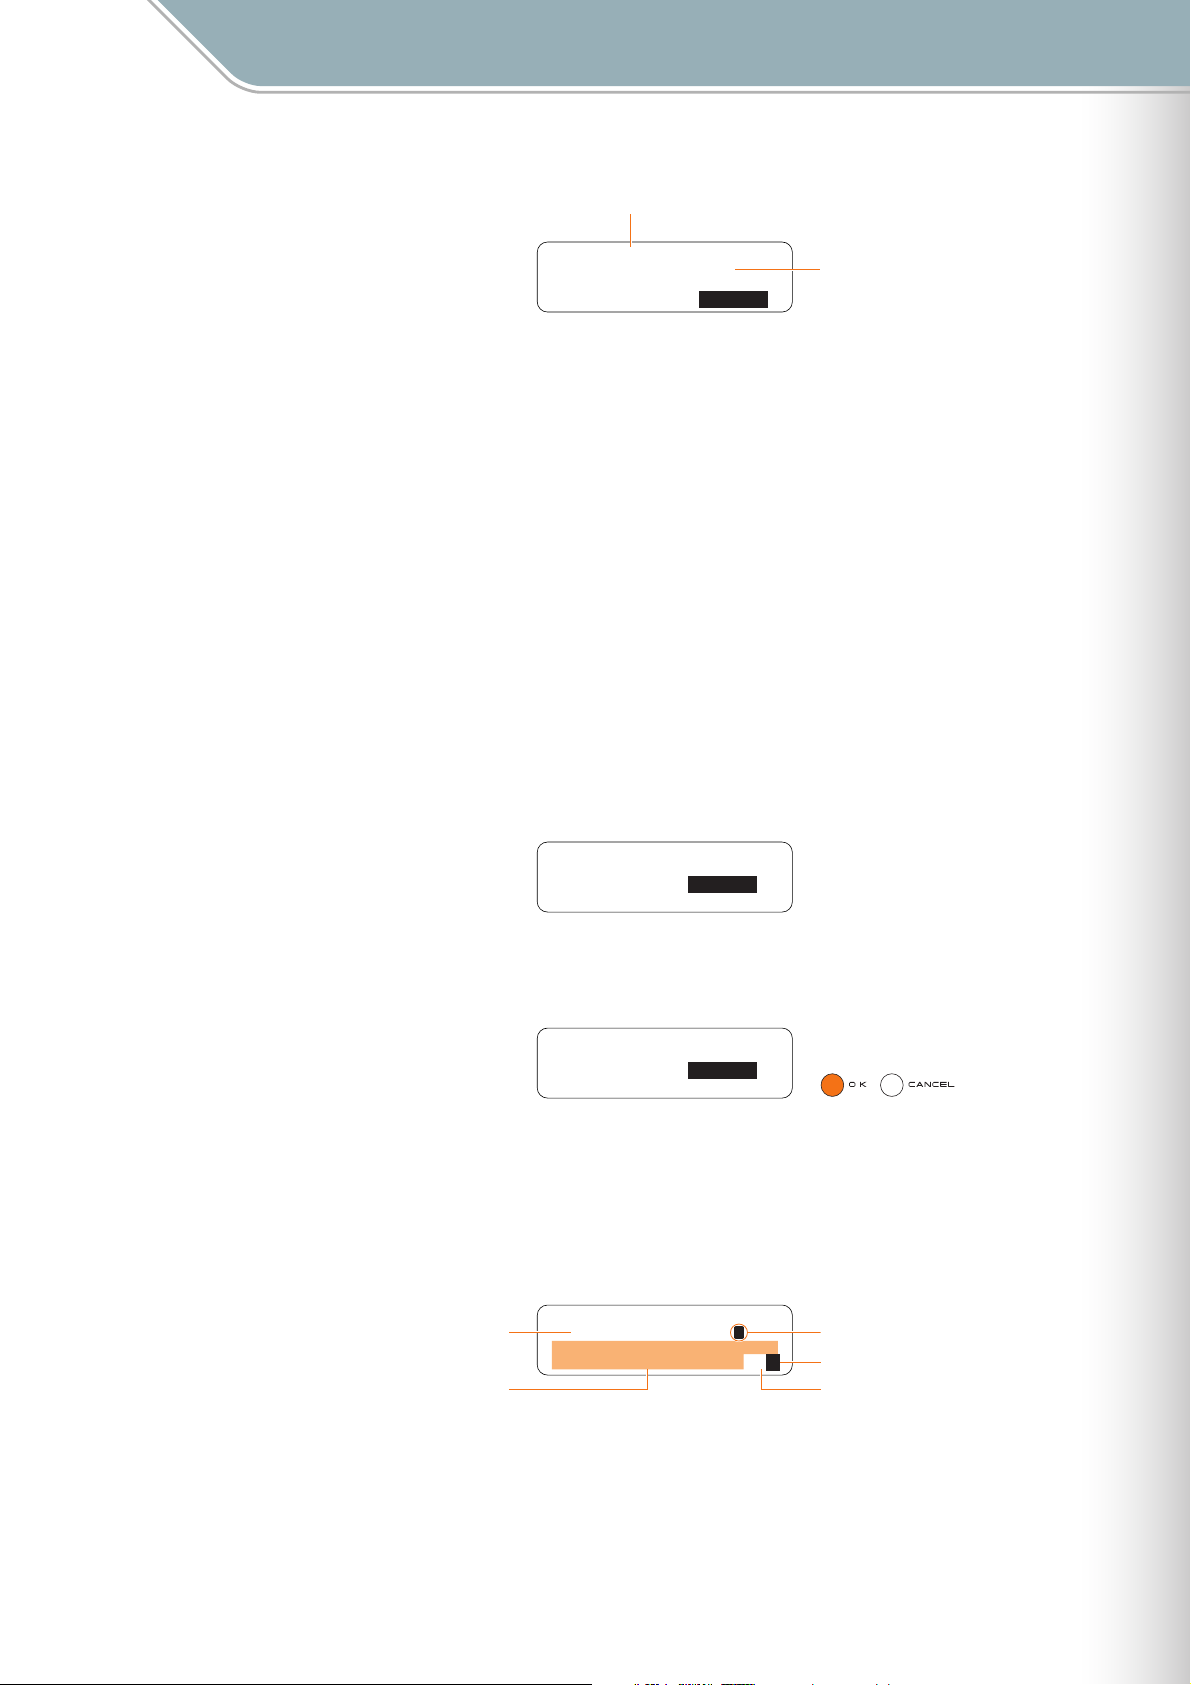
Current Block Number
Parameter Settings
Setting Parameters with the Jog Dial ■ File Menu
Block[01]: ∞
"0302E-BLOCK-02 "
Loading... CANCEL
The name of the Current Block file
being loaded.
7 When the Current Block file has been loaded the display shown in step 3, above, will
appear, and playback of the Current Block file will begin.
Press the [OK] button in the status display when you want to stop playback.
● Save Current Block
Saves a Current Block file containing all active notes and settings such as voice, tempo, etc.,
for all layers in the current block to an SD Memory Card.
1 Insert an SD Memory Card that has sufficient free space for the file to be saved into the
TENORI-ON card slot.
2 Use the jog dial and [OK] button to navigate to the Current Block function menu as
follows:
"Main menu" ➝ "File menu" ➝ "Current Block"
Block[01]: ∞
Operation: Load
3 Use the jog dial to highlight the "Save" function, then press the [OK] button.
Block[01]: ∞
Operation: Save
4 The file name entry display will appear. A default file name will be provided, which you
can either use as-is or replace with a name of your own.
File name entry procedure is described in the Rename Song section on Page 65.
● File names can be up to 16 characters in length. The file extension will be added automatically.
Current Block File Name
Available Characters
Input File Name ∞
[0302E-BLOCK-02 ]
ABCDEFGHIJKLMNOPQRST
UVWXYZ-0123456789 ª§
Input Cursor
Set File Name
Backspace & Delete 1 Character
TENORI-ON Manual 74
Page 75
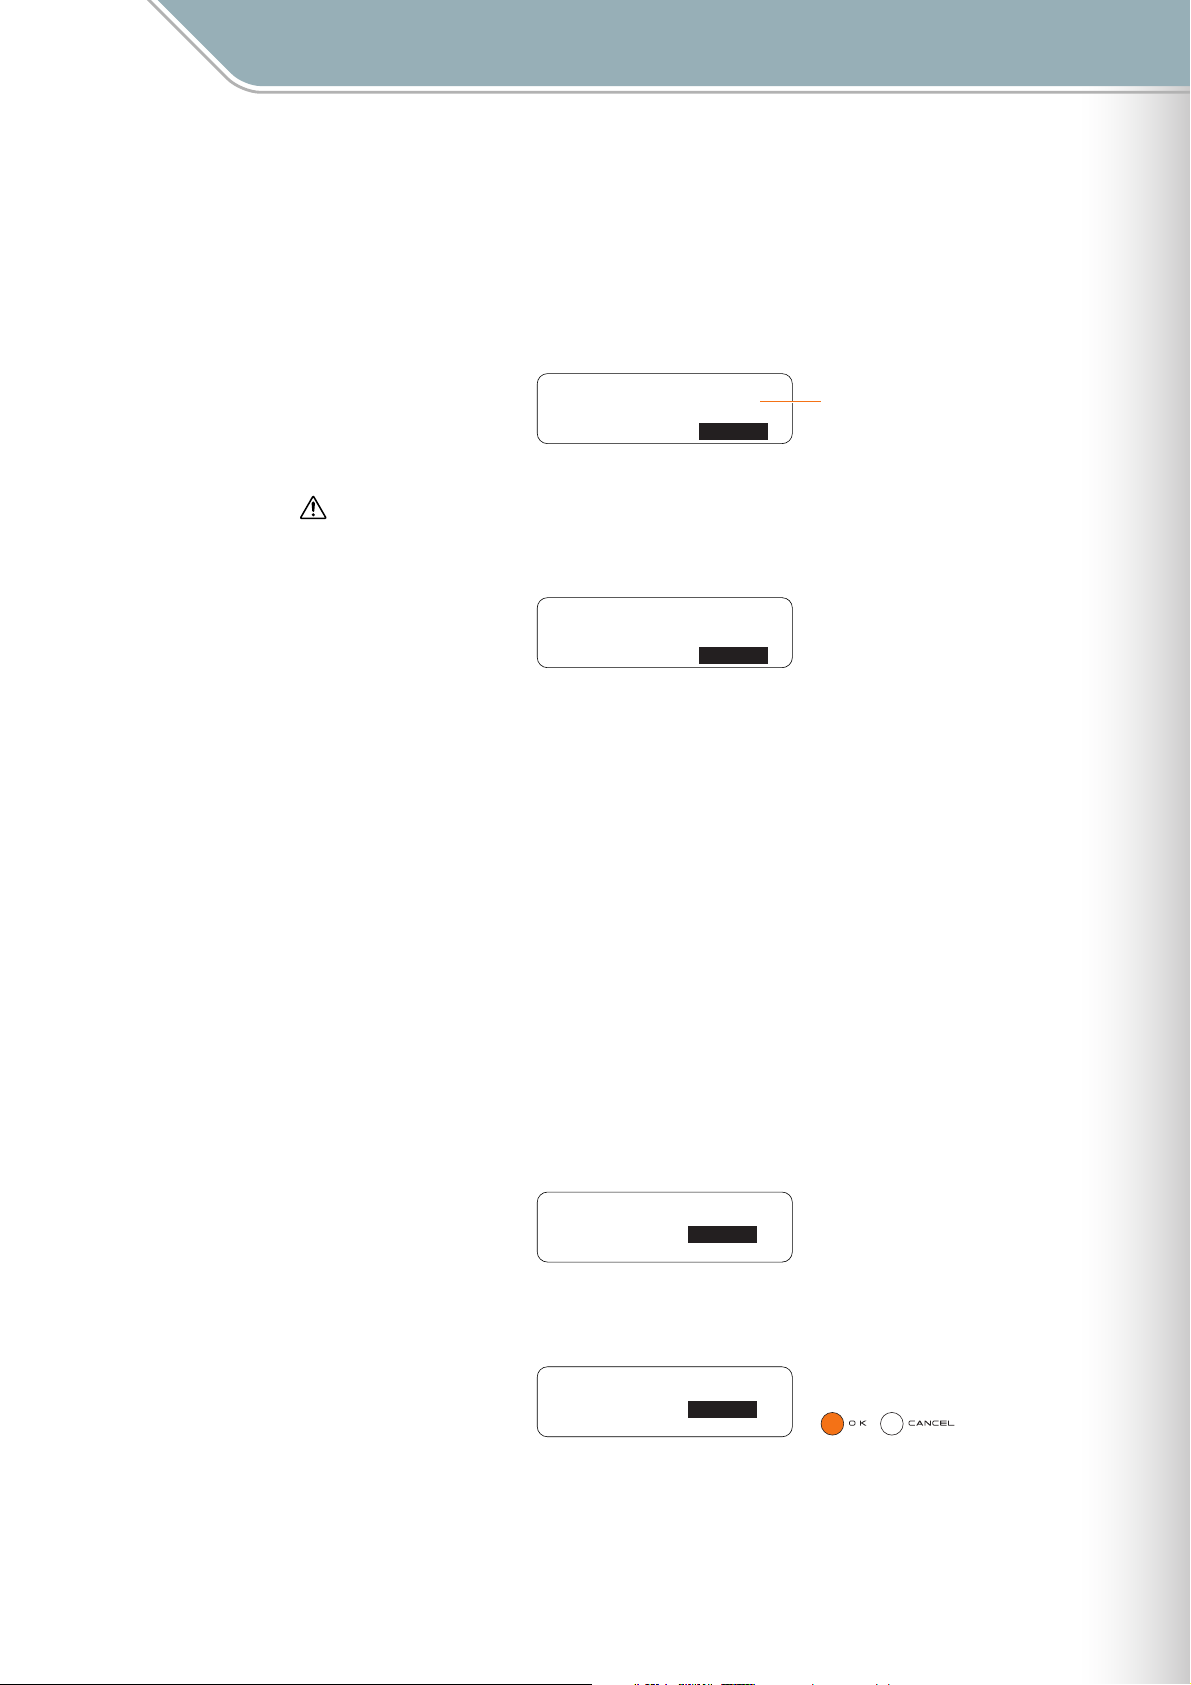
Parameter Settings
Setting Parameters with the Jog Dial ■ File Menu
5 When the file name has been entered as required use the jog dial to highlight the "
symbol in the lower right corner of the display and press the [OK] button.
The file name will be entered and the save function will be executed.
A display like the one shown below will appear while the Current Block file is being
saved.
You can cancel the operation by pressing the [OK] or [CANCEL] button.
Block[01]: ∞
"1-BLOCK1020-01 "
Saving... CANCEL
File data may be irreparably corrupted if you turn off the power or remove the SD Memory Card while the
"Saving…" display is showing.
If a file with the same name exists on the SD Memory Card an overwrite confirmation display like the
●
one shown below will appear.
Block[01]: ∞
"1-BLOCK1020-01 "
Already Exists!
Overwrite? OK
● Press the [OK] button if it’s OK to overwrite the file. Press the [CANCEL] button (or use the jog dial to
select "CANCEL" on the LCD and then press the [OK] button) to cancel the operation and leave the
original file unaltered.
The Current Block file being saved.
"
§
6 The display shown in step 3, above, will reappear when the operation has finished.
● Rename Current Block
Allows a new name to be entered for a Current Block file on an SD Memory Card.
1 Insert the SD Memory Card containing the file you want to rename into the TENORI-ON
card slot.
2 Use the jog dial and [OK] button to navigate to the Current Block function menu as
follows:
"Main menu" ➝ "File menu" ➝ "Current Block"
Block[01]: ∞
Operation: Load
3 Use the jog dial to highlight the "Rename" function, then press the [OK] button.
Block[01]: ∞
Operation: Rename
TENORI-ON Manual 75
Page 76
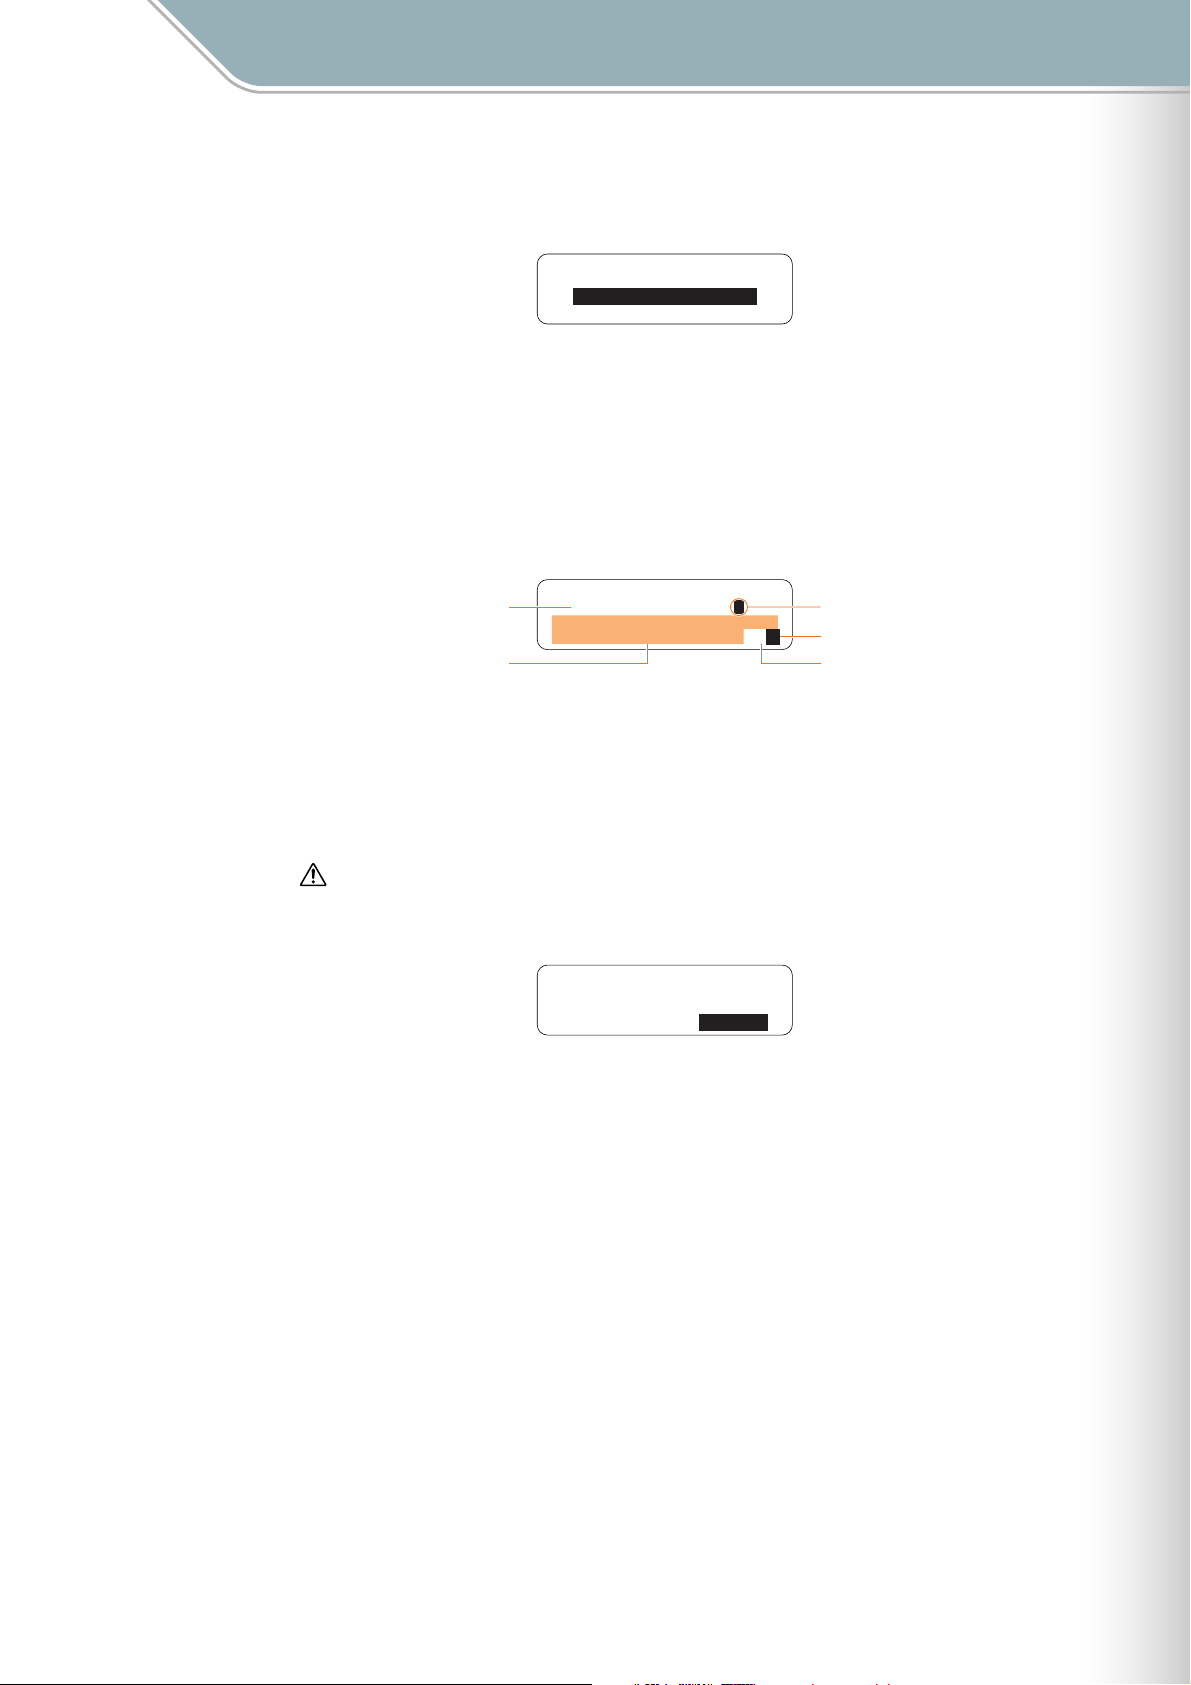
Parameter Settings
Setting Parameters with the Jog Dial ■ File Menu
4 Current Block files on the card will appear as a list on the LCD display (with no file
extension). Use the jog dial to select the file you want to rename.
Block[01]: Load ∞
0302E-BLOCK-01
0302E-BLOCK-02
0302G-BLOCK-01
● Only files that are in Current Block format will be displayed.
Press the [OK] button to go to the file name entry display. The name of the currently
selected Current Block file will be displayed, and you can enter a new file name as
required. File name entry procedure is described in the Rename Song section on
Page 65.
● File names can be up to 16 characters in length. The file extension will be added automatically.
Current Block File Name
Available Characters
Input File Name ∞
[0302E-BLOCK-02 ]
ABCDEFGHIJKLMNOPQRST
UVWXYZ-0123456789 ª§
Input Cursor
Set File Name
Backspace & Delete 1 Character
5 When the file name has been entered as required use the jog dial to highlight the "
symbol in the lower right corner of the display and press the [OK] button.
"Executing …" will appear on the display while the file is being renamed.
File data may be irreparably corrupted if you turn off the power or remove the SD Memory Card while the
"Executing…" display is showing.
If a file with the same name exists on the SD Memory Card an overwrite confirmation display like the
●
one shown below will appear.
Block[01]: ∞
"1-BLOCK1001-01 "
Already Exists!
Overwrite? OK
● Press the [OK] button if it’s OK to overwrite the file. Press the [CANCEL] button (or use the jog dial to
select "CANCEL" on the LCD and then press the [OK] button) to cancel the operation and leave the
original file unaltered.
6 The display shown in step 3, above, will reappear when the operation has finished.
"
§
TENORI-ON Manual 76
Page 77
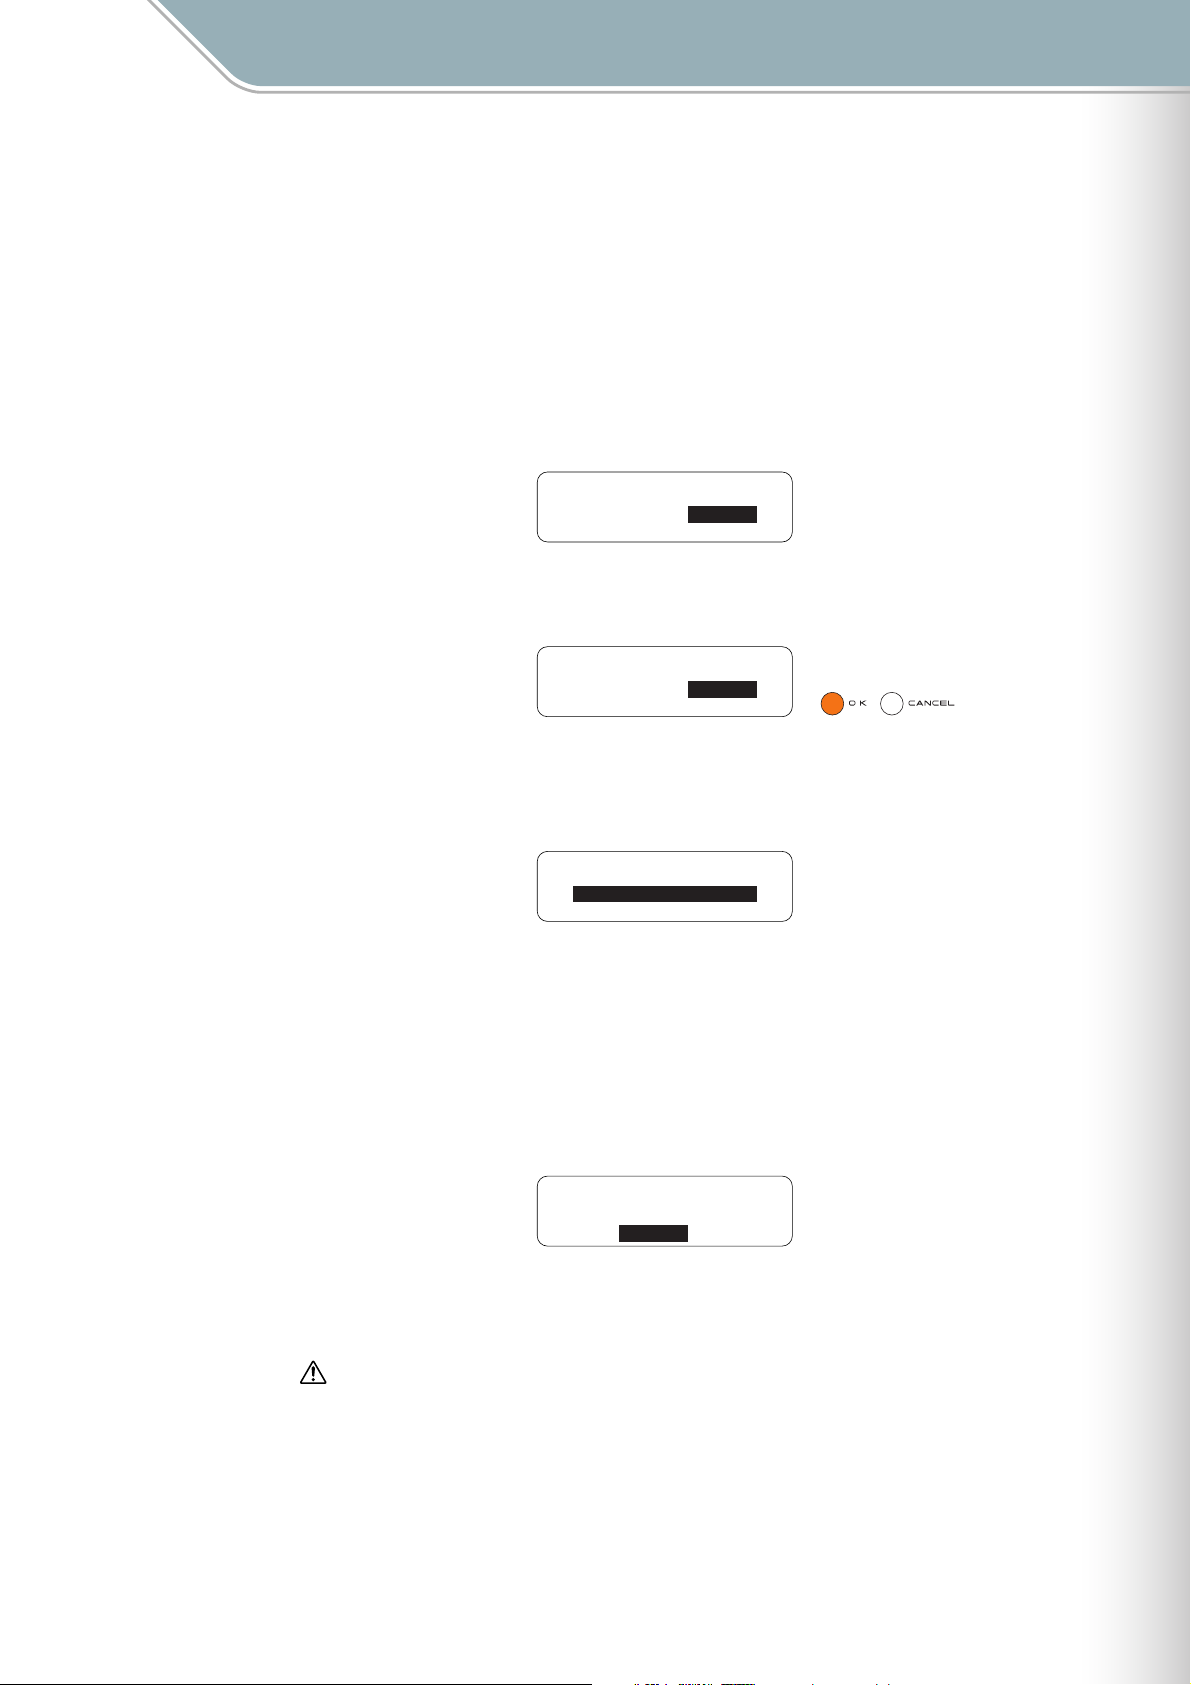
Parameter Settings
Setting Parameters with the Jog Dial ■ File Menu
Delete Current Block
●
Deletes a specified Current Block file from an SD Memory Card.
1 Insert the SD Memory Card containing the file you want to delete into the TENORI-ON
card slot.
2 Use the jog dial and [OK] button to navigate to the Current Block function menu as
follows:
"Main menu" ➝ "File menu" ➝ "Current Block"
Block[01]: ∞
Operation: Load
3 Use the jog dial to highlight the "Delete" function, then press the [OK] button.
Block[01]: ∞
Operation: Delete
4 Current Block files on the card will appear as a list on the LCD display (with no file
extension). Use the jog dial to select the file you want to delete.
Block[01]: Delete ∞
0302E-BLOCK-01
0302E-BLOCK-02
0302G-BLOCK-01
● Only files that are in Current Block format will be displayed.
5 Press the [OK] button to delete the selected file.
A confirmation display like the one shown below will appear.
Press the [OK] button if it’s OK to delete the file. Press the [CANCEL] button (or use the
jog dial to select "CANCEL" on the LCD and then press the [OK] button) to cancel the
operation and leave the file unaltered.
Delete ∞
"0302E-BLOCK-02 "
OK
If you press the [OK] button to execute the delete operation, "Executing …" will appear
on the display while the file is being deleted.
File data may be irreparably corrupted if you turn off the power or remove the SD Memory Card while the
"Executing…" display is showing.
6 The display shown in step 3, above, will reappear when the operation has finished.
TENORI-ON Manual 77
Page 78
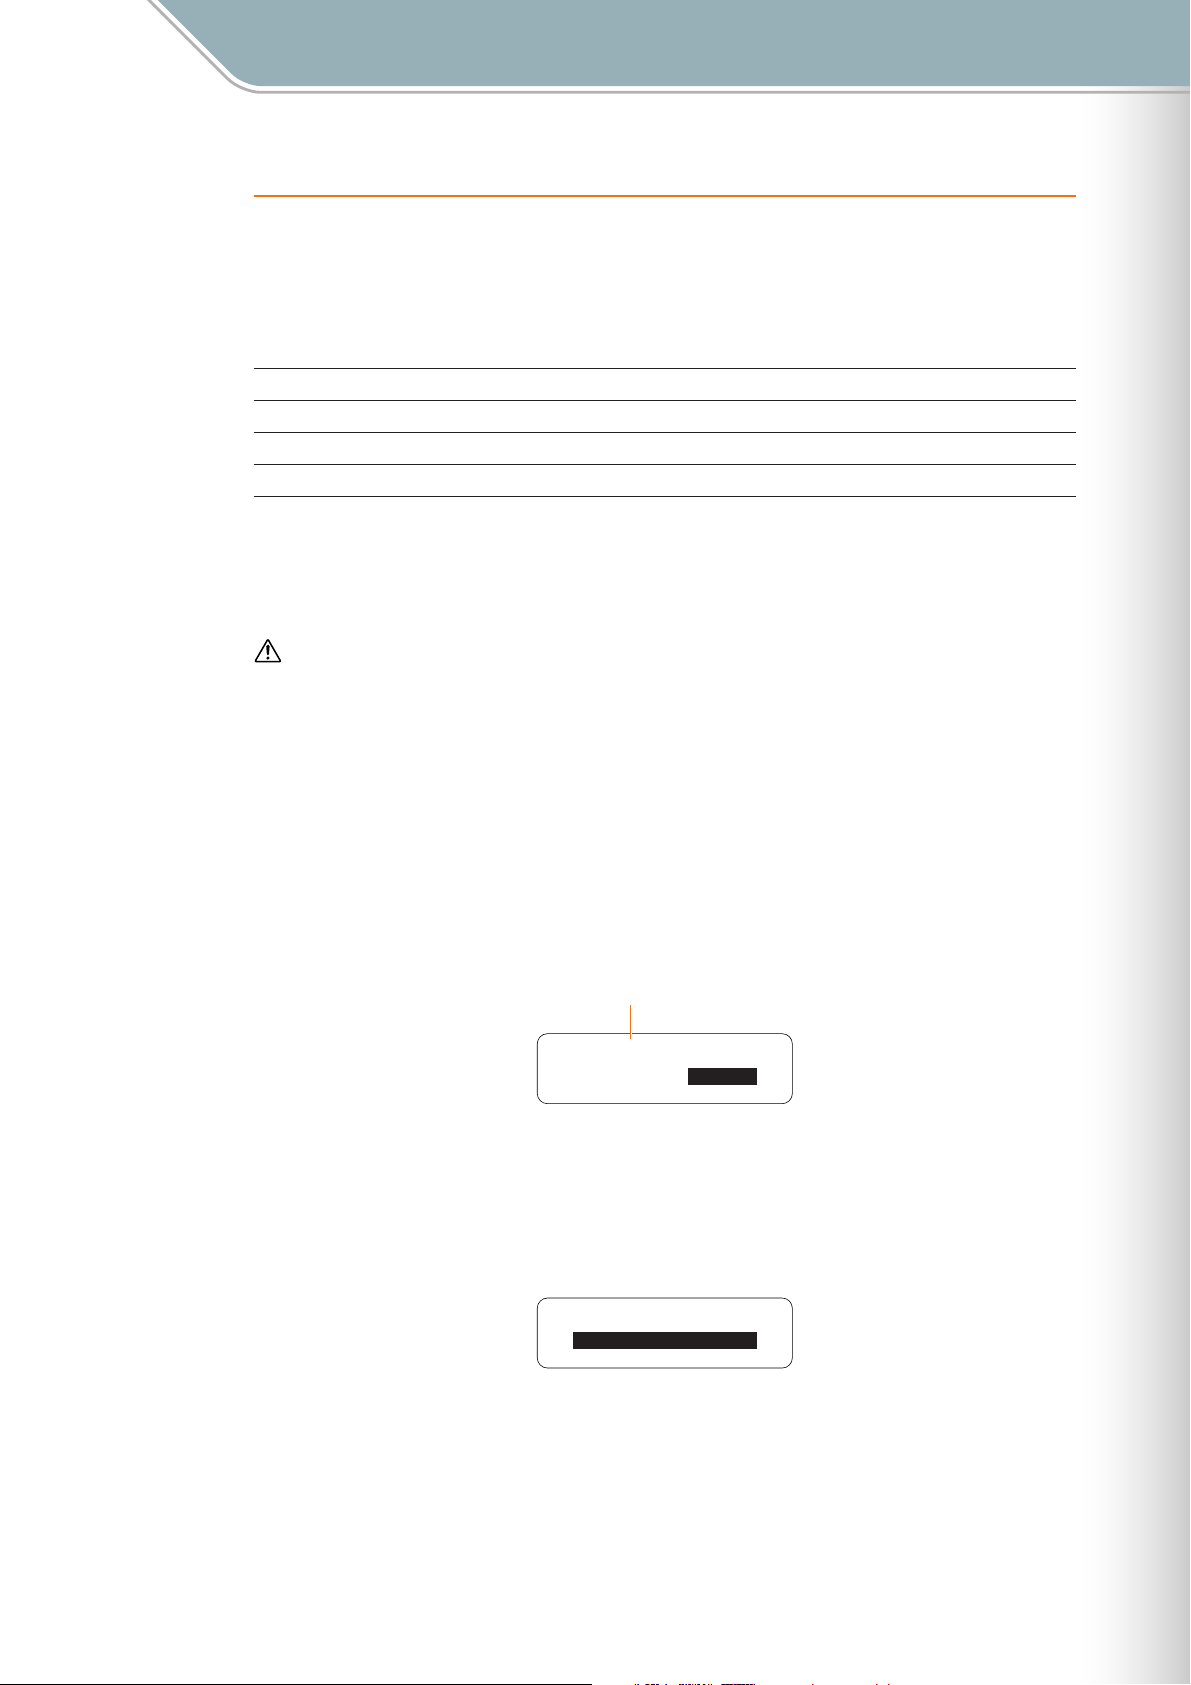
Parameter Settings
Setting Parameters with the Jog Dial ■ File Menu
4. Current Layer
Provides access to Current Layer file operations.
"Current Layer" files include active notes and settings such as voice, tempo, etc., for the
current layer in the current block.
The following 4 Current Layer file functions are provided:
Load Current Layer Page 78
Save Current Layer Page 79
Rename Current Layer Page 80
Delete Current Layer Page 82
● Load Current Layer
Loads a Current Layer file that has been saved to an SD Memory Card into the TENORI-ON.
When a layer is loaded the layer settings for all other blocks will also be overwritten by the loaded data.
1 Make sure the layer that you want to load the data into is selected on the TENORI-ON
(Function Button [R1] Layer Number: Page 30).
2 Insert the SD Memory Card containing the file you want to load into the TENORI-ON
card slot.
3 Use the jog dial and [OK] button to navigate to the Current Layer function menu as
follows:
"Main menu" ➝ "File menu" ➝ "Current Layer"
Current Layer Number
Layer[01]: ∞
Operation: Load
4 Use the jog dial to highlight the "Load" function, then press the [OK] button.
5 Current Layer files on the card will appear as a list on the LCD display (with no file
extension). Use the jog dial to select the file you want to load.
Layer[01]: Load ∞
0302E-LAYER-01
0302E-LAYER-02
0302G-LAYER-01
● Only files that are in Current Layer format will be displayed.
TENORI-ON Manual 78
Page 79
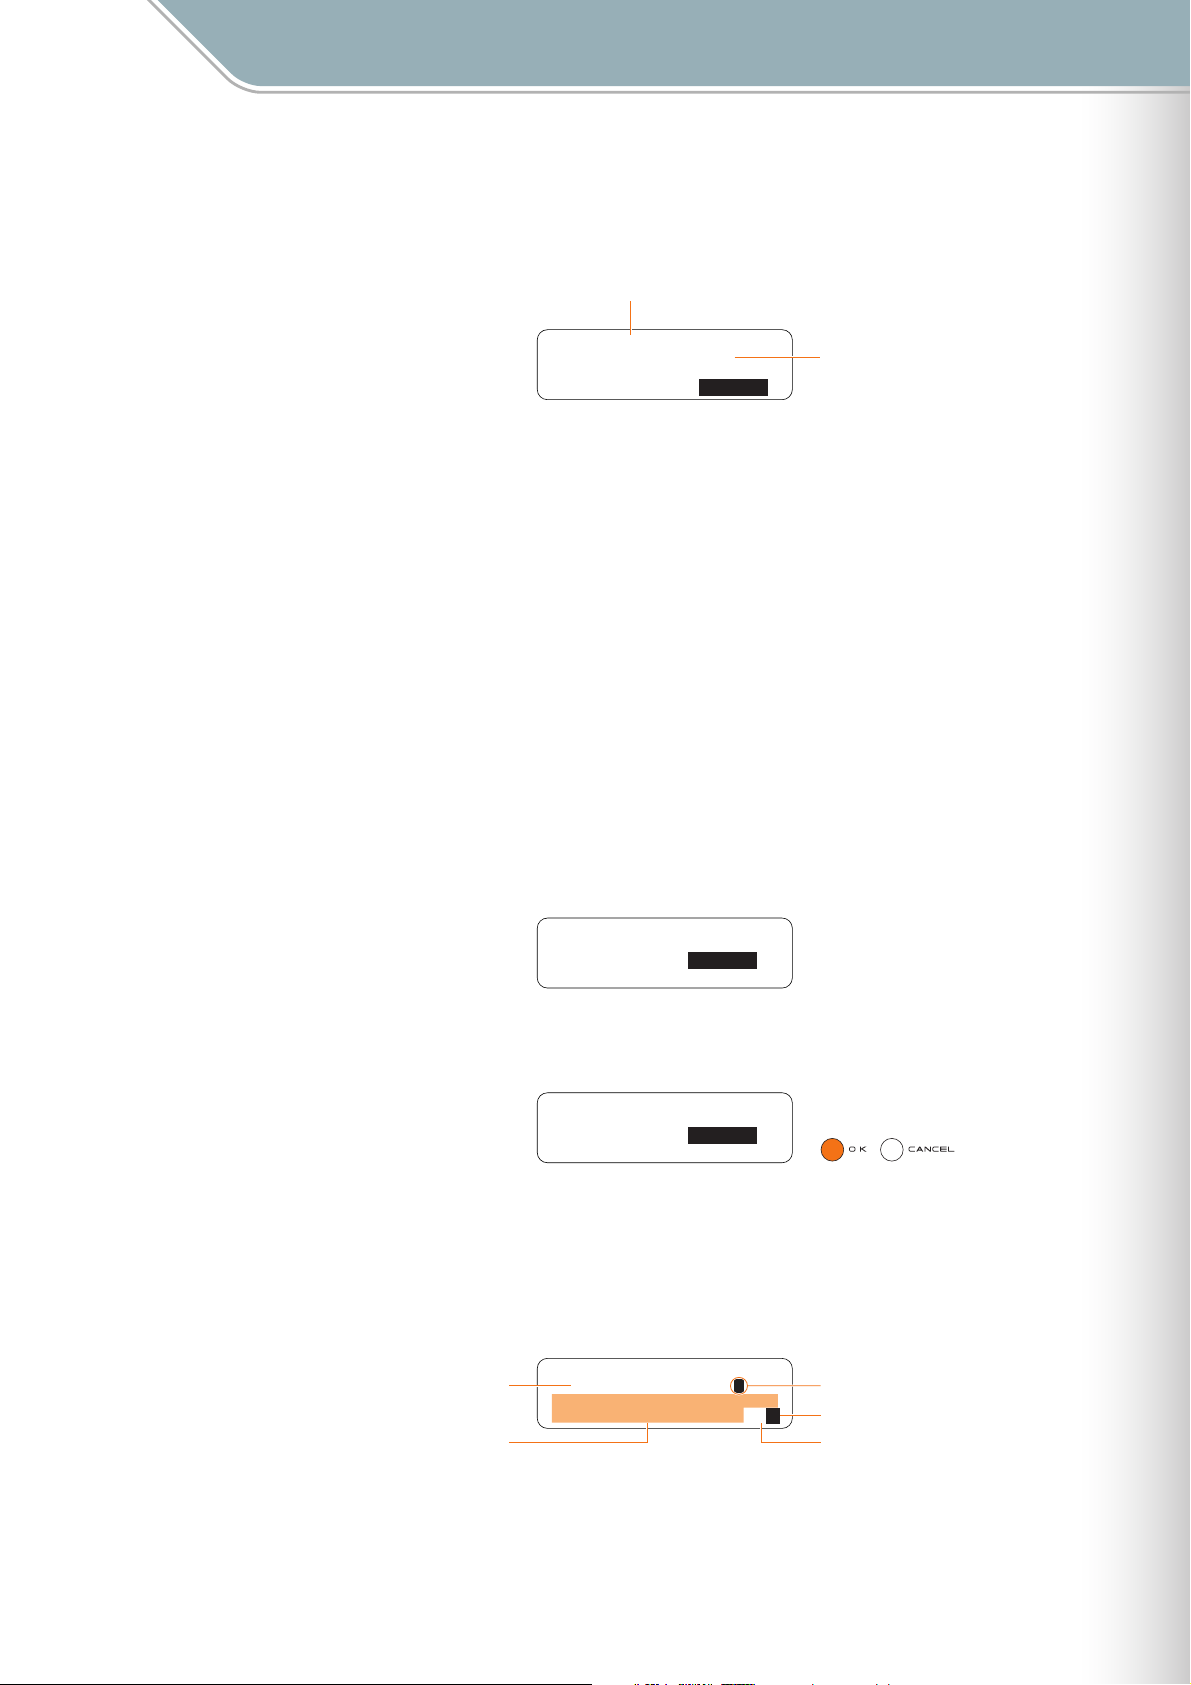
Setting Parameters with the Jog Dial ■ File Menu
6 Press the [OK] button to load the selected file.
The display shown below will appear while the file is being loaded.
Press the [OK] or [CANCEL] button to cancel the load operation.
Current Layer Number
Parameter Settings
Layer[01]: ∞
"0302E-LAYER-02 "
Loading... CANCEL
The name of the Current Layer file
being loaded.
7 When the Current Layer file has been loaded the display shown in step 3, above, will
appear, and playback of the Current Layer file will begin.
Press the [OK] button in the status display when you want to stop playback.
● Save Current Layer
Saves a Current Layer file containing all active notes and settings such as voice, tempo, etc.,
for the current layer in the current block to an SD Memory Card.
1 Insert an SD Memory Card that has sufficient free space for the file to be saved into the
TENORI-ON card slot.
2 Use the jog dial and [OK] button to navigate to the Current Layer function menu as
follows:
"Main menu" ➝ "File menu" ➝ "Current Layer"
Layer[01]: ∞
Operation: Load
3 Use the jog dial to highlight the "Save" function, then press the [OK] button.
Layer[01]: ∞
Operation: Save
4 The file name entry display will appear. A default file name will be provided, which you
can either use as-is or replace with a name of your own.
File name entry procedure is described in the Rename Song section on Page 65.
● File names can be up to 16 characters in length. The file extension will be added automatically.
Current Layer File Name
Available Characters
Input File Name ∞
[0302E-LAYER-02 ]
ABCDEFGHIJKLMNOPQRST
UVWXYZ-0123456789 ª§
Input Cursor
Set File Name
Backspace & Delete 1 Character
TENORI-ON Manual 79
Page 80

Parameter Settings
Setting Parameters with the Jog Dial ■ File Menu
5 When the file name has been entered as required use the jog dial to highlight the "
symbol in the lower right corner of the display and press the [OK] button.
The file name will be entered and the save function will be executed.
A display like the one shown below will appear while the Current Layer file is being
saved.
You can cancel the operation by pressing the [OK] or [CANCEL] button.
Layer[01]: ∞
"1-LAYER1020-01 "
Saving... CANCEL
File data may be irreparably corrupted if you turn off the power or remove the SD Memory Card while the
"Saving…" display is showing.
If a file with the same name exists on the SD Memory Card an overwrite confirmation display like the
●
one shown below will appear.
Layer[01]: ∞
"1-LAYER1020-01 "
Already Exists!
Overwrite? OK
● Press the [OK] button if it’s OK to overwrite the file. Press the [CANCEL] button (or use the jog dial to
select "CANCEL" on the LCD and then press the [OK] button) to cancel the operation and leave the
original file unaltered.
The Current Layer file being saved.
"
§
6 The display shown in step 3, above, will reappear when the operation has finished.
● Rename Current Layer
Allows a new name to be entered for a Current Layer file on an SD Memory Card.
1 Insert the SD Memory Card containing the file you want to rename into the TENORI-ON
card slot.
2 Use the jog dial and [OK] button to navigate to the Current Layer function menu as
follows:
"Main menu" ➝ "File menu" ➝ "Current Layer"
Layer[01]: ∞
Operation: Load
3 Use the jog dial to highlight the "Rename" function, then press the [OK] button.
Layer[01]: ∞
Operation: Rename
TENORI-ON Manual 80
Page 81

Parameter Settings
Setting Parameters with the Jog Dial ■ File Menu
4 Current Layer files on the card will appear as a list on the LCD display (with no file
extension). Use the jog dial to select the file you want to rename.
Layer[01]: Rename ∞
0302E-LAYER-01
0302E-LAYER-02
0302G-LAYER-01
● Only files that are in Current Layer format will be displayed.
Press the [OK] button to go to the file name entry display. The name of the currently
selected Current Layer file will be displayed, and you can enter a new file name as
required. File name entry procedure is described in the Rename Song section on
Page 65.
● File names can be up to 16 characters in length. The file extension will be added automatically.
Current Layer File Name
Available Characters
Input File Name ∞
[0302E-LAYER-02 ]
ABCDEFGHIJKLMNOPQRST
UVWXYZ-0123456789 ª§
Input Cursor
Set File Name
Backspace & Delete 1 Character
5 When the file name has been entered as required use the jog dial to highlight the "
symbol in the lower right corner of the display and press the [OK] button.
"Executing …" will appear on the display while the file is being renamed.
File data may be irreparably corrupted if you turn off the power or remove the SD Memory Card while the
"Executing…" display is showing.
If a file with the same name exists on the SD Memory Card an overwrite confirmation display like the
●
one shown below will appear.
Layer[01]: ∞
"1-LAYER1001-01 "
Already Exists!
Overwrite? OK
● Press the [OK] button if it’s OK to overwrite the file. Press the [CANCEL] button (or use the jog dial to
select "CANCEL" on the LCD and then press the [OK] button) to cancel the operation and leave the
original file unaltered.
6 The display shown in step 3, above, will reappear when the operation has finished.
"
§
TENORI-ON Manual 81
Page 82

Parameter Settings
Setting Parameters with the Jog Dial ■ File Menu
Delete Current Layer
●
Deletes a specified Current Layer file from an SD Memory Card.
1 Insert the SD Memory Card containing the file you want to delete into the TENORI-ON
card slot.
2 Use the jog dial and [OK] button to navigate to the Current Layer function menu as
follows:
"Main menu" ➝ "File menu" ➝ "Current Layer"
Layer[01]: ∞
Operation: Load
3 Use the jog dial to highlight the "Delete" function, then press the [OK] button.
Layer[01]: ∞
Operation: Delete
4 Current Layer files on the card will appear as a list on the LCD display (with no file
extension). Use the jog dial to select the file you want to delete.
Layer[01]: Delete ∞
0302E-LAYER-01
0302E-LAYER-02
0302G-LAYER-01
● Only files that are in Current Layer format will be displayed.
5 Press the [OK] button to delete the selected file.
A confirmation display like the one shown below will appear.
Press the [OK] button if it’s OK to delete the file. Press the [CANCEL] button (or use the
jog dial to select "CANCEL" on the LCD and then press the [OK] button) to cancel the
operation and leave the file unaltered.
Delete ∞
"0302E-LAYER-02 "
OK
If you press the [OK] button to execute the delete operation, "Executing …" will appear
on the display while the file is being deleted.
File data may be irreparably corrupted if you turn off the power or remove the SD Memory Card while the
"Executing…" display is showing.
6 The display shown in step 3, above, will reappear when the operation has finished.
TENORI-ON Manual 82
Page 83

Parameter Settings
Setting Parameters with the Jog Dial ■ File Menu
5. All Settings
Provides access to All Settings file operations.
"All Settings" files include all settings such as voice, tempo, etc., for all layers and blocks.
Active notes are not included.
The following 4 All Settings file functions are provided:
Load All Settings Page 83
Save All Settings Page 84
Rename All Settings Page 85
Delete All Settings Page 86
● Load All Settings
Loads an All Settings file that has been saved to an SD Memory Card into the TENORI-ON.
1 Insert the SD Memory Card containing the file you want to load into the TENORI-ON
card slot.
2 Use the jog dial and [OK] button to navigate to the All Settings function menu as follows:
"Main menu" ➝ "File menu" ➝ "All Settings"
All Settings: ∞
Operation: Load
3 Use the jog dial to highlight the "Load" function, then press the [OK] button.
4 All Settings files on the card will appear as a list on the LCD display (with no file
extension). Use the jog dial to select the file you want to load.
Settings: Load ∞
0302E-SET-01
0302E-SET-02
0302G-SET-01
● Only files that are in All Settings format will be displayed.
5 Press the [OK] button to load the selected file.
The display shown below will appear while the file is being loaded.
Press the [OK] or [CANCEL] button to cancel the load operation.
Settings: ∞
"0302E-SET-02 "
Loading... CANCEL
The name of the All Settings file
being loaded.
TENORI-ON Manual 83
Page 84

Parameter Settings
Setting Parameters with the Jog Dial ■ File Menu
6 When the All Settings file has been loaded the display shown in step 2, above, will
appear, and playback of the existing active notes will begin using the All Settings data
just loaded.
Press the [OK] button in the status display when you want to stop playback.
● Save All Settings
Saves an All Settings file containing all settings such as voice, tempo, etc., for all layers and
blocks to an SD Memory Card. Active notes are not included.
1 Insert an SD Memory Card that has sufficient free space for the file to be saved into the
TENORI-ON card slot.
2 Use the jog dial and [OK] button to navigate to the All Settings function menu as follows:
"Main menu" ➝ "File menu" ➝ "All Settings"
All Settings: ∞
Operation: Load
3 Use the jog dial to highlight the "Save" function, then press the [OK] button.
All Settings: ∞
Operation: Save
4 The file name entry display will appear. A default file name will be provided, which you
can either use as-is or replace with a name of your own.
File name entry procedure is described in the Rename Song section on Page 65.
● File names can be up to 16 characters in length. The file extension will be added automatically.
Current All Settings File Name
Available Characters
Input File Name ∞
[0302E-SET-02 ]
ABCDEFGHIJKLMNOPQRST
UVWXYZ-0123456789 ª§
Input Cursor
Set File Name
Backspace & Delete 1 Character
5 When the file name has been entered as required use the jog dial to highlight the "
symbol in the lower right corner of the display and press the [OK] button.
The file name will be entered and the save function will be executed.
TENORI-ON Manual 84
"
§
Page 85

Parameter Settings
Setting Parameters with the Jog Dial ■ File Menu
A display like the one shown below will appear while the All Settings file is being saved.
You can cancel the operation by pressing the [OK] or [CANCEL] button.
Settings: ∞
"1-SET1020-01 "
Saving... CANCEL
File data may be irreparably corrupted if you turn off the power or remove the SD Memory Card while the
"Saving…" display is showing.
If a file with the same name exists on the SD Memory Card an overwrite confirmation display like the
●
one shown below will appear.
Settings: ∞
"1-SET1020-01 "
Already Exists!
Overwrite? OK
● Press the [OK] button if it’s OK to overwrite the file. Press the [CANCEL] button (or use the jog dial to
select "CANCEL" on the LCD and then press the [OK] button) to cancel the operation and leave the
original file unaltered.
The All Settings file being saved.
6 The display shown in step 3, above, will reappear when the operation has finished.
● Rename All Settings
Allows a new name to be entered for an All Settings file on an SD Memory Card.
1 Insert the SD Memory Card containing the file you want to rename into the TENORI-ON
card slot.
2 Use the jog dial and [OK] button to navigate to the All Settings function menu as follows:
"Main menu" ➝ "File menu" ➝ "All Settings"
All Settings: ∞
Operation: Load
3 Use the jog dial to highlight the "Rename" function, then press the [OK] button.
All Settings: ∞
Operation: Rename
4 All Settings files on the card will appear as a list on the LCD display (with no file
extension). Use the jog dial to select the file you want to rename.
Settings: Rename ∞
0302E-SET-01
0302E-SET-02
0302G-SET-01
● Only files that are in All Settings format will be displayed.
TENORI-ON Manual 85
Page 86

Parameter Settings
Setting Parameters with the Jog Dial ■ File Menu
5 Press the [OK] button to go to the file name entry display. The name of the currently
selected All Settings file will be displayed, and you can enter a new file name as
required. File name entry procedure is described in the Rename Song section on
Page 65.
● File names can be up to 16 characters in length. The file extension will be added automatically.
Current All Settings File Name
Available Characters
Input File Name ∞
[0302E-SET-02 ]
ABCDEFGHIJKLMNOPQRST
UVWXYZ-0123456789 ª§
Input Cursor
Set File Name
Backspace & Delete 1 Character
6 When the file name has been entered as required use the jog dial to highlight the "
symbol in the lower right corner of the display and press the [OK] button.
"Executing …" will appear on the display while the file is being renamed.
File data may be irreparably corrupted if you turn off the power or remove the SD Memory Card while the
"Executing…" display is showing.
If a file with the same name exists on the SD Memory Card an overwrite confirmation display like the
●
one shown below will appear.
Settings: ∞
"1-SET1010-01 "
Already Exists!
Overwrite? OK
● Press the [OK] button if it’s OK to overwrite the file. Press the [CANCEL] button (or use the jog dial to
select "CANCEL" on the LCD and then press the [OK] button) to cancel the operation and leave the
original file unaltered.
7 The display shown in step 3, above, will reappear when the operation has finished.
"
§
● Delete All Settings
Deletes a specified All Settings file from an SD Memory Card.
1 Insert the SD Memory Card containing the file you want to delete into the TENORI-ON
card slot.
2 Use the jog dial and [OK] button to navigate to the All Settings function menu as follows:
"Main menu" ➝ "File menu" ➝ "All Settings"
All Settings: ∞
Operation: Load
3 Use the jog dial to highlight the "Delete" function, then press the [OK] button.
All Settings: ∞
Operation: Delete
TENORI-ON Manual 86
Page 87

Parameter Settings
Setting Parameters with the Jog Dial ■ File Menu
4 All Settings files on the card will appear as a list on the LCD display (with no file
extension). Use the jog dial to select the file you want to delete.
Settings: Delete ∞
0302E-SET-01
0302E-SET-02
0302G-SET-01
● Only files that are in All Settings format will be displayed.
5 Press the [OK] button to delete the selected file.
A confirmation display like the one shown below will appear.
Press the [OK] button if it’s OK to delete the file. Press the [CANCEL] button (or use the
jog dial to select "CANCEL" on the LCD and then press the [OK] button) to cancel the
operation and leave the file unaltered.
Delete ∞
"0302E-SET-02 "
OK
If you press the [OK] button to execute the delete operation, "Executing …" will appear
on the display while the file is being deleted.
File data may be irreparably corrupted if you turn off the power or remove the SD Memory Card while the
"Executing…" display is showing.
6 The display shown in step 3, above, will reappear when the operation has finished.
TENORI-ON Manual 87
Page 88

Parameter Settings
Setting Parameters with the Jog Dial ■ File Menu
6. Samplings
Provides access to Samplings file operations.
The TENORI-ON provides three user voices: <01/16,> <02/16,> and <03/16.> Audio
samples can be loaded into the TENORI-ON and played via these voices.
Audio samples can be converted to the sample format used by the TENORI-ON (.tnw file
extension) using the TENORI-ON User Voice Manager software provided on the supplied
CD-ROM. This menu provides access to a number of functions that can be used to manage
".tnw" files.
The following 5 Samplings file functions are provided:
Load Samplings Page 93
Save Samplings Page 94
Rename Samplings Page 95
Delete Samplings Page 97
Samplings Info Page 98
TENORI-ON Manual 88
Page 89

Parameter Settings
Setting Parameters with the Jog Dial ■ File Menu
■ Creating User Voices (Sampling Files)
Audio files that have been recorded using a computer or downloaded from the Internet
must be converted to the TENORI-ON user voice file format ("sampling" file format with a
".tnw" file name extension) before they can be loaded into the TENORI-ON user voice
numbers and played.
The TENORI-ON User Voice Manager software provided on the supplied CD-ROM can be
used to convert audio files to the appropriate format and assign them to the TENORI-ON
LED buttons. Sampling files thus created can then be transferred to the TENORI-ON using
an SD Memory Card.
Save
Sound Files
(16 Files)
Assign
Sampling File
(Single File)
Conversion
.tnw
SD Memory Card
Card Slot
Loaded into the
internal TENORION user memory.
TENORI-ON User Voice Manager
TENORI-ON
1 Prepare the audio files.
Samples can be extracted from commercially obtainable sample CDs, downloaded
from the Internet, or recorded using your own recording equipment or computer. The
sample files must be in either WAV or AIFF format.
The supported file formats are as follows:
22.05 kHz, 24 kHz, 44.1 kHz, or 48 kHz sampling rate; 8 or 16 bits; stereo or mono.
● Mono files will be converted to stereo files with the same data in the L and R channels.
Up to 16 samples can be assigned to each user voice (one of each of 16 LED
buttons). For a single instrument voice, for example, those samples can be at 16
different pitches. The audio files assigned to a TENORI-ON user voice can be used
in two different ways:
● Sound effects, drum or percussion sounds, or other types of one-shot samples can be individually
played by the LED buttons to which they are assigned.
● Audio files of the same instrument at different pitches can be assigned to the LED buttons in scale
sequence so they can be played in the same way as the internal MIDI tone generator voices.
It is necessary to prepare the appropriate type of audio files according to way they
are to be used.
TENORI-ON Manual 89
Page 90
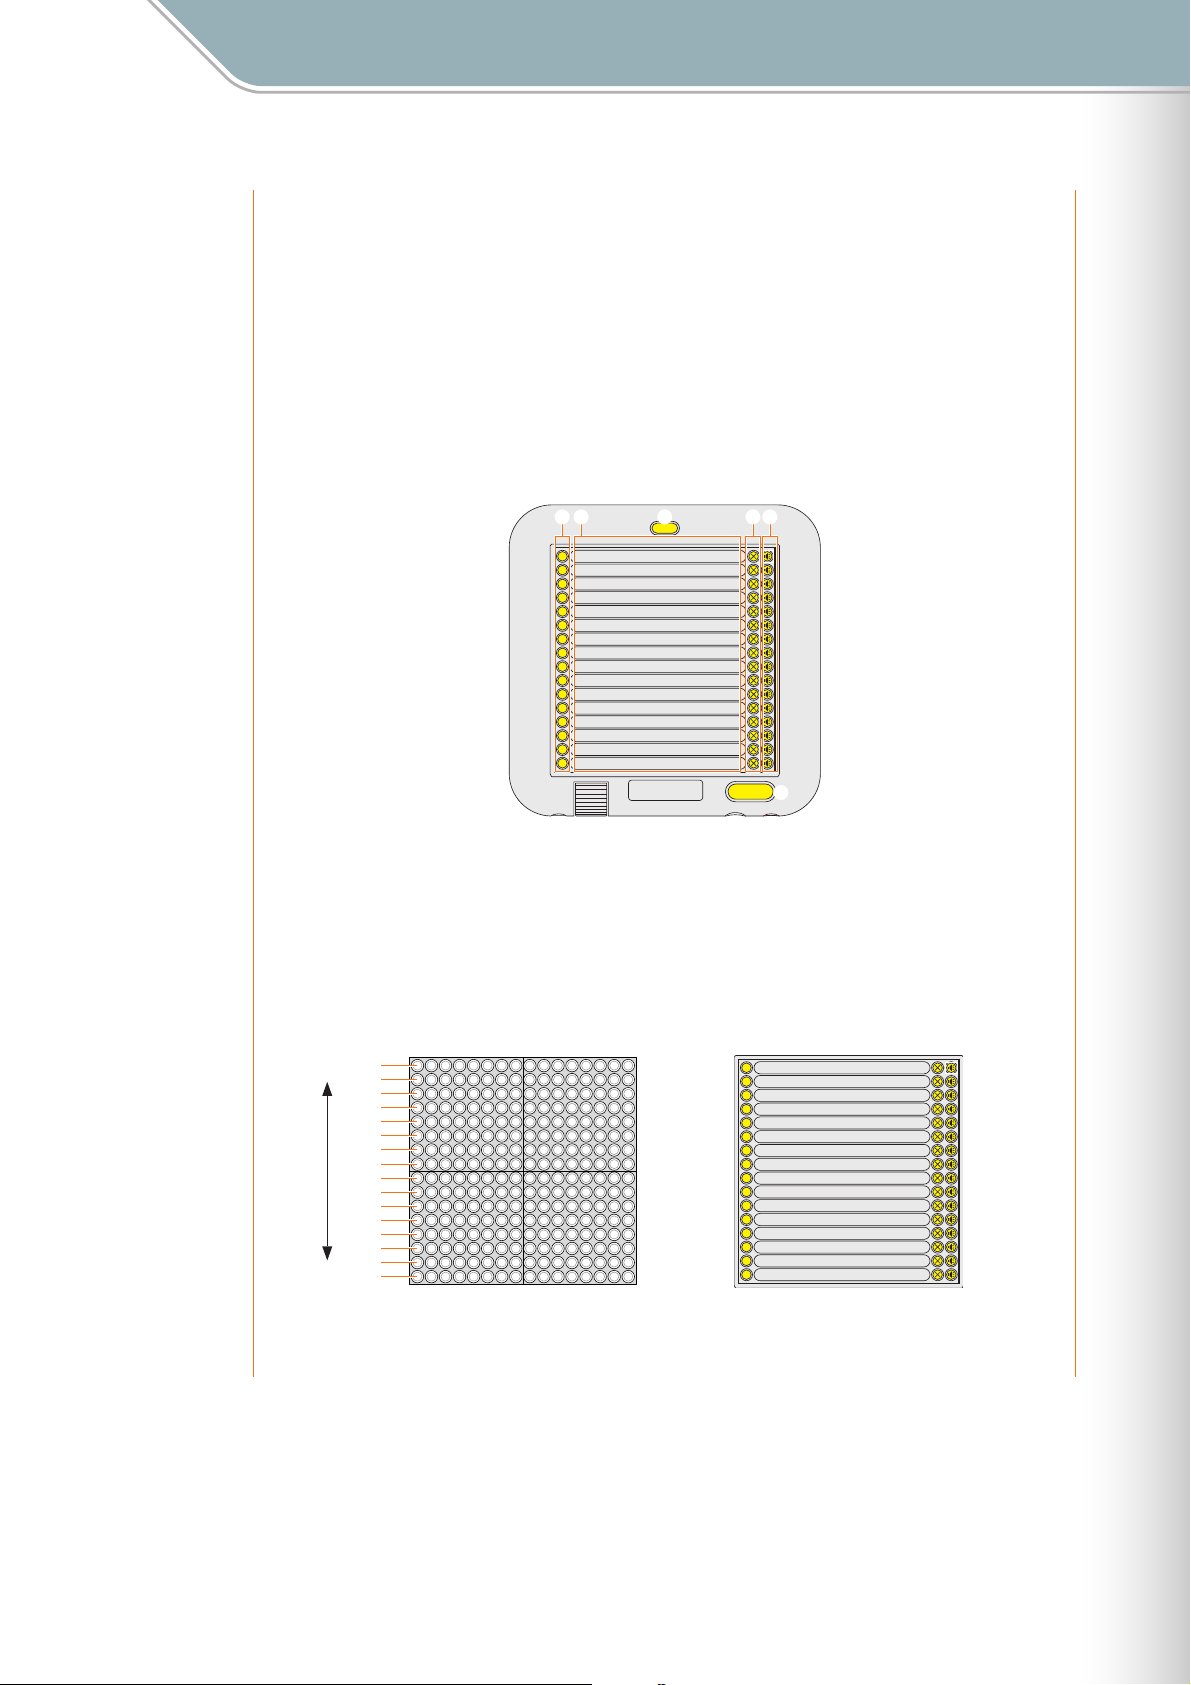
Parameter Settings
Setting Parameters with the Jog Dial ■ File Menu
2 Launch the TENORI-ON User Voice Manager software.
Use the TENORI-ON User Voice Manager software included on the supplied CD-
ROM to convert your files to the TENORI-ON format and assign them to the
appropriate LED buttons.
2-1 Install the TENORI-ON User Voice Manager on your computer following the
procedure outlined in the separate "TENORI-ON User Voice Manager
Installation Guide" document.
2-2 Double click the "TNR_UserVoiceMgr.exe" or "TNR_UserVoiceMgr.app" file on
your computer to launch the software.
1 2 3 4 5
LOAD FILENAME
mysound04
16
mysound03
15
mysound02
14
mysound01
13
special_effect_E
12
special_effect_D
11
special_effect_C
10
special_effect_B
09
special_effect_A
08
voice01_B2
07
voice01_A2
06
voice01_G2
05
voice01_F2
04
voice01_E2
03
voice01_D2
02
voice01_C2
01
EXIT
ÅÍÎÏ
USER VOICE MANAGER
DELETE PLAY
MAKE
USER VOICE
1 [LOAD] Button
2 File Name
3 [EXIT] Button
4 [DELETE] Button
5 [PLAY] Button
6 [MAKE USER VOICE] Button
6
A graphic representation of the TENORI-ON and LED button arrangement in the Score
Mode will appear on the display. [LOAD] buttons 1 through 16 on the display correspond
to the equivalent TENORI-ON LED button positions.
● When shipped from the factory the vertical-axis of the LED button matrix is assigned to a scale
corresponding to the white keys on a piano, as show in the illustration below. If you assign audio files with
pitches corresponding to the default pitches of the buttons, your user voice can be played in the same
way as the internal voices.
mysound04
Higher
Scale
Lower
D
C
B
A
G
F
E
D
C
B
A
G
F
E
D
C
16
15
14
13
12
11
10
09
08
07
06
05
04
03
02
01
mysound03
mysound02
mysound01
special_effect_E
special_effect_D
special_effect_C
special_effect_B
special_effect_A
voice01_B2
voice01_A2
voice01_G2
voice01_F2
voice01_E2
voice01_D2
voice01_C2
TENORI-ON Manual 90
Page 91

Parameter Settings
Setting Parameters with the Jog Dial ■ File Menu
3 Load the audio files.
A dialog window that allows you to select and load an audio file into the TENORI-ON
User Voice Manager will appear when you click one of the [LOAD] buttons.
Select the audio file you want to load and assign to the corresponding button. The
first 0.97 seconds of the selected WAVE or AIFF file will be used. The names of the
assigned audio files will appear to the right of the corresponding [LOAD] buttons
(without the file extension).
Click a [PLAY] button to play the corresponding audio file.
Click a [DELETE] button to delete (cancel assignment of) the corresponding audio
file.
● Audio file icons can also be dragged and dropped on the target [LOAD] button to assign them.
● [LOAD] buttons 01 — 16 correspond to MIDI note numbers 60 — 75. For note numbers outside this range
the assignments are repeated in 16-note groups.
● LED buttons to which no audio file is assigned will produce no sound when pressed.
4 Save in TENORI-ON "Sampling" format.
When the audio files have been assigned as required, convert the entire set (all 16
files) to a single TENORI-ON format user voice file, and save the user voice file to an
SD Memory Card.
● Use an SD Memory Card with a capacity of 2 gigabytes or less that has been properly formatted
using the TENORI-ON formatting function (➝ Page 106: [System menu] ➝ [SD Format]).
Click the [MAKE USER VOICE] button.
The file save dialog window will appear. Specify the location you want to save the file
to (the SD Memory Card) and the file name if necessary. A default file name
consisting of the month and day (e.g. "0901") plus a single character indicating the
hour (0…9, A…N), plus four digits indicating the minute and second (e.g. "3620"),
plus "-VOICE", plus the file extension (.tnw) will be automatically generated. You can
edit the default file name as required, using a maximum of 16 characters. Only
capital alphabetic characters and the hyphen ("-") can be used in file names.
TENORI-ON Manual 91
Page 92
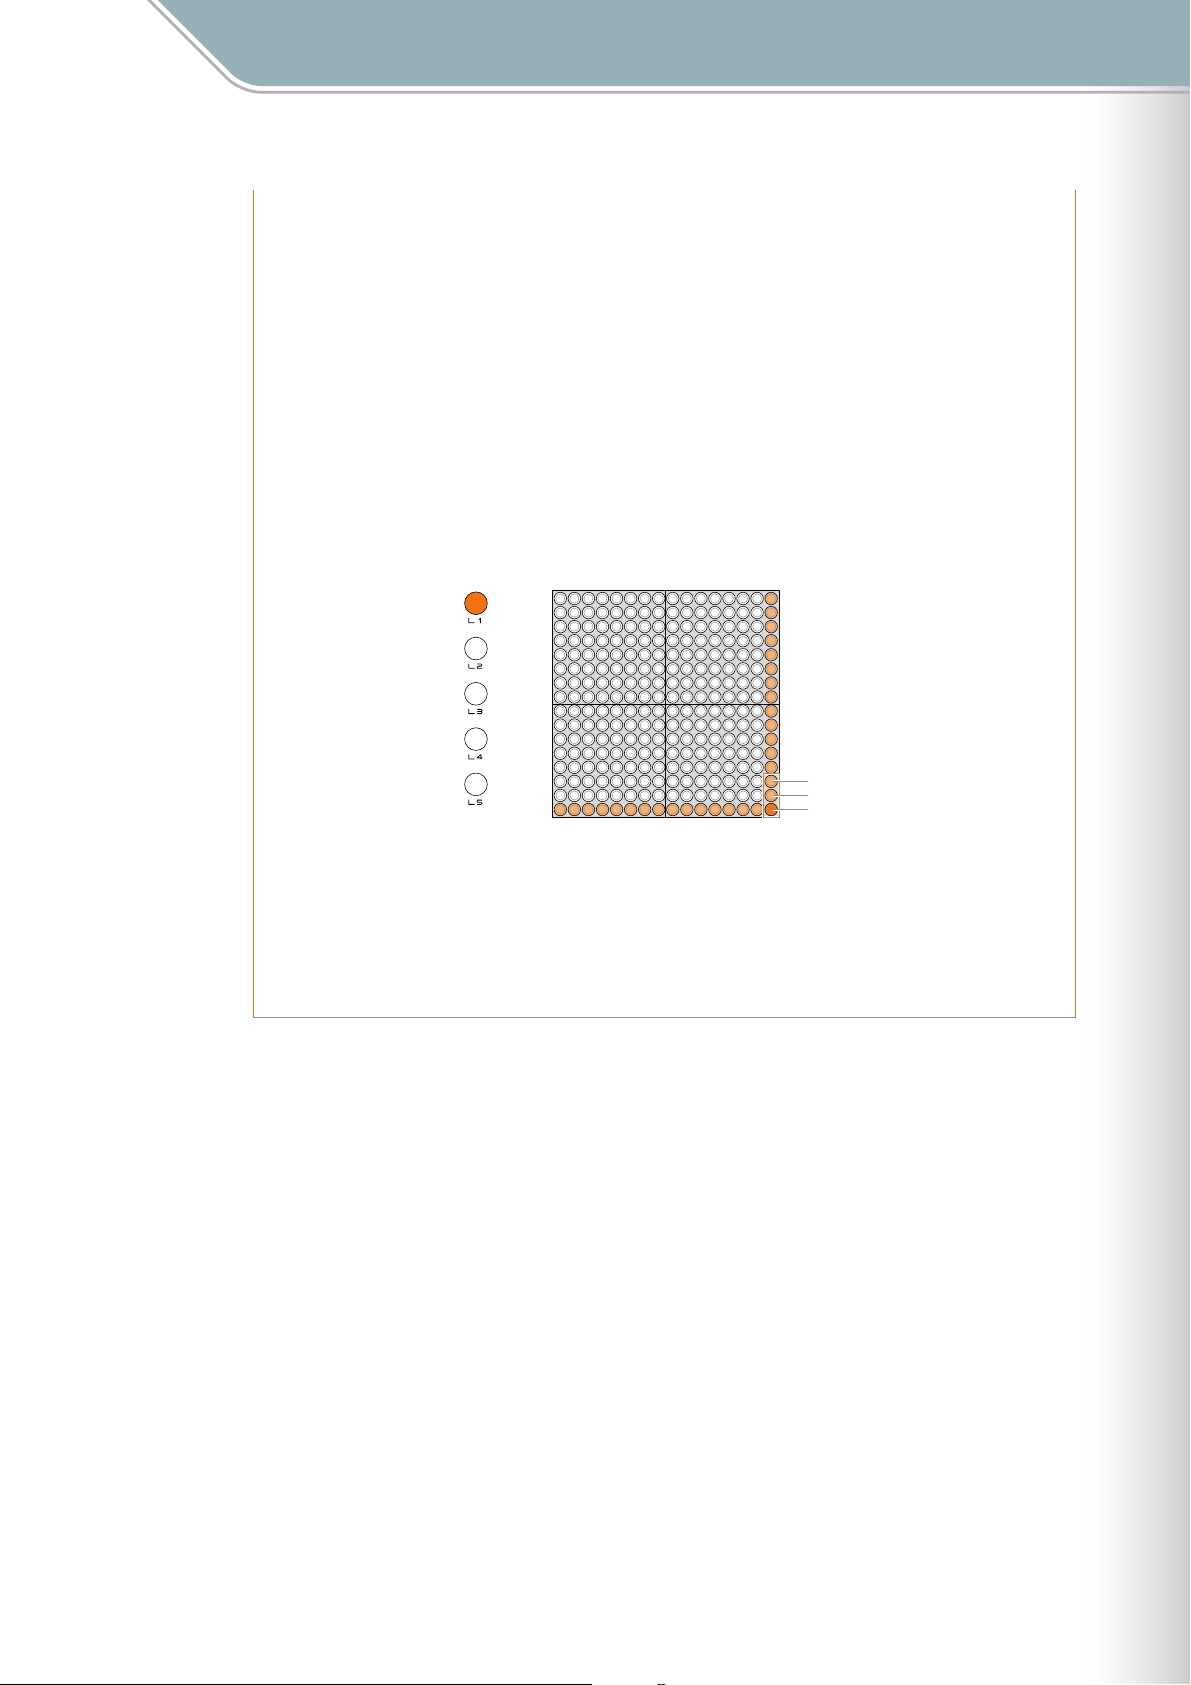
Parameter Settings
Setting Parameters with the Jog Dial ■ File Menu
5 Click the [EXIT] button to quit the software.
6 Insert the SD Memory Card to which the file was saved in step 4, above, into the
TENORI-ON card slot.
7 Load the file from the SD Memory Card into a user memory. Refer to "Load
Samplings" on Page 93 for details.
User voice setup is now complete.
8 Play the user voice.
You can now select the user voice by pressing the corresponding LED button while
holding the [L1] button, in the same way as you select the internal voices.
16
15
14
13
12
11
10
09
08
07
06
05
04
03
02
01
010203040506070809101112131415
USER3<03/16>
USER2<02/16>
USER1<01/16>
16
● Octave, transpose, and scale settings do not affect the user voices.
● User voices are retained in memory even when the TENORI-ON is turned off.
● In order to play a song that uses a user voice on a different TENORI-ON, the user voice file must
first be loaded into the TENORI-ON on which the song is to be played (➝ "Save Samplings" on
Page 94, and "Load Samplings" on Page 93).
TENORI-ON Manual 92
Page 93
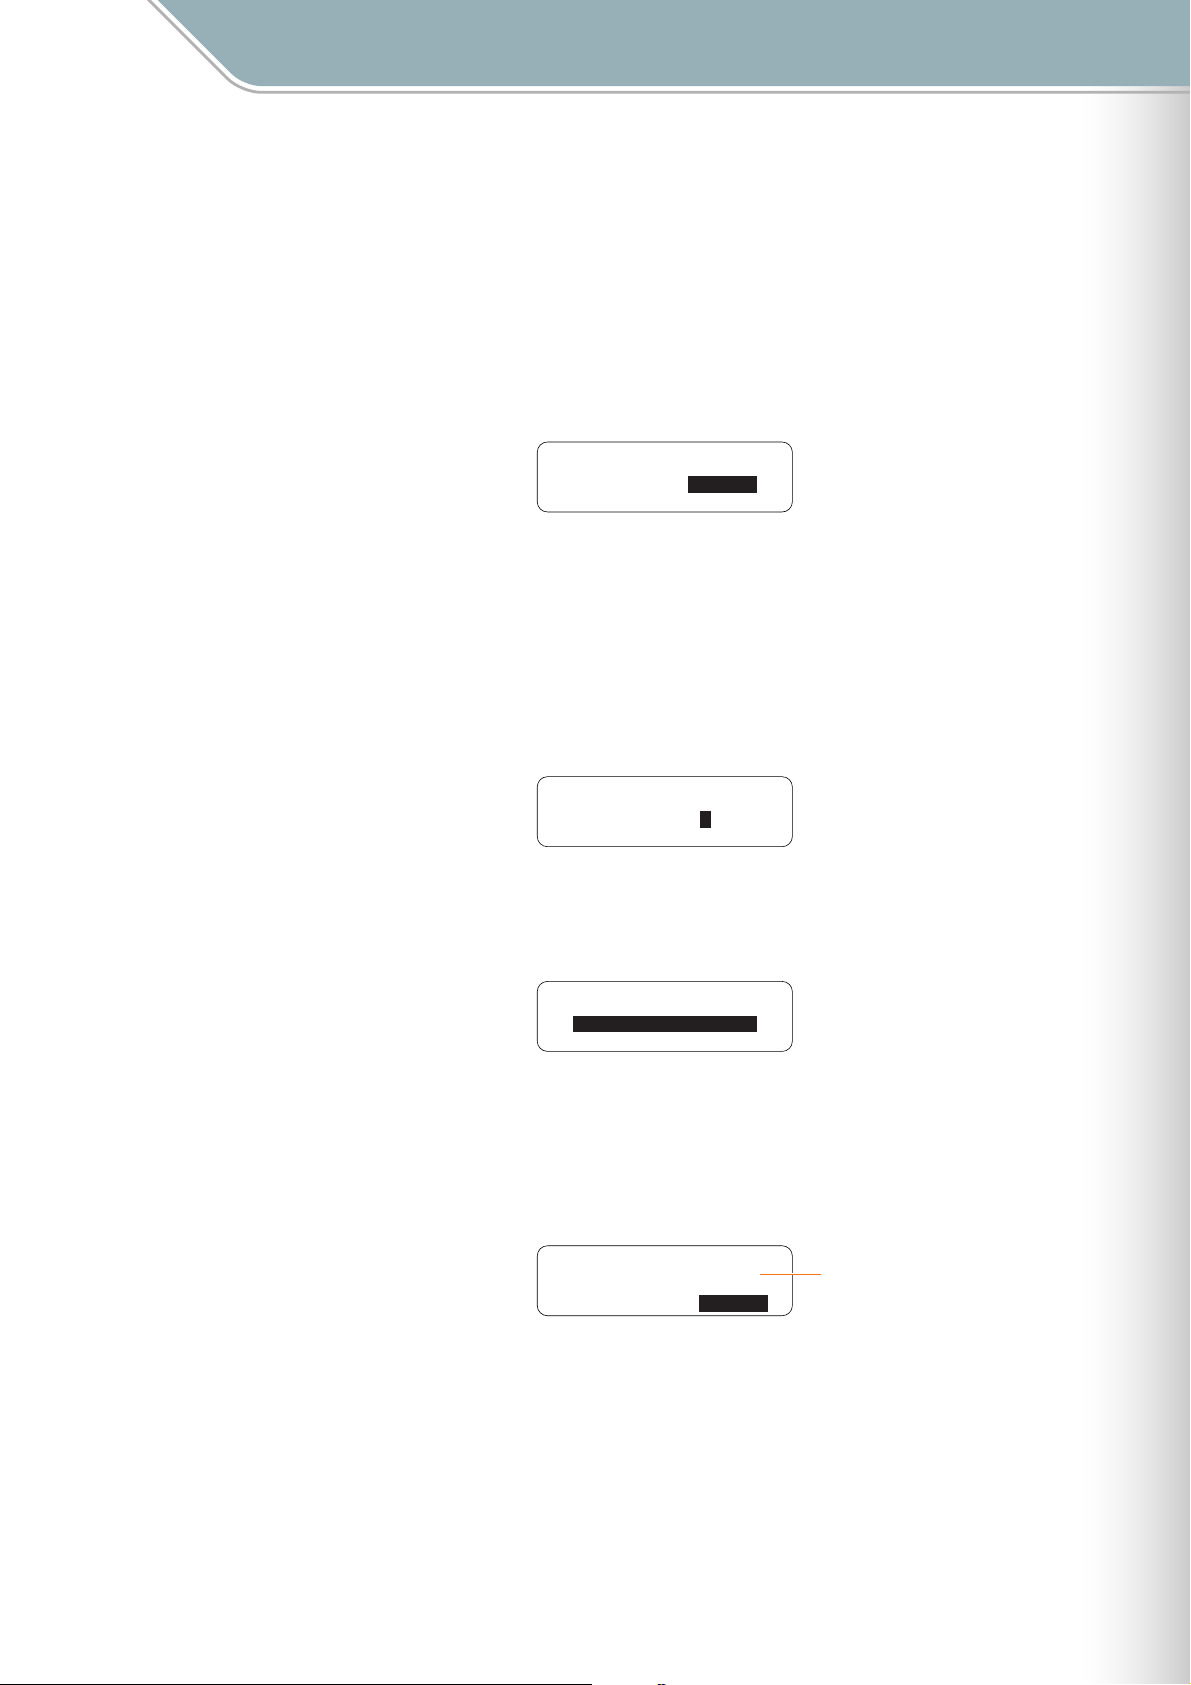
Parameter Settings
Setting Parameters with the Jog Dial ■ File Menu
Load Samplings
●
Loads a Samplings file that has been saved to an SD Memory Card into the TENORI-ON.
1 Insert the SD Memory Card containing the file you want to load into the TENORI-ON
card slot.
2 Use the jog dial and [OK] button to navigate to the Samplings function menu as follows:
"Main menu" ➝ "File menu" ➝ "Samplings"
Samplings: ∞
Operation: Load
3 Use the jog dial to highlight the "Load" function, then press the [OK] button.
A display that allows you to specify the user memory to which the loaded sample file
will be saved will appear. Use the jog dial to select the desired user memory, then press
the [OK] button.
● In this display "User1," "User2," and "User3" correspond to user memory numbers <01/16,> <02/16,>
and <03/16.> The bottom line on the LCD displays the name of the sample file currently loaded in that
user memory. If the user memory is empty, "--------" will be displayed.
Samplings: Load ∞
Dest.= User1
[1-SAMPLE ]
4 Samplings files on the card will appear as a list on the LCD display (with no file
extension). Use the jog dial to select the file you want to load.
Samplings: Load ∞
SAMPLE071006-02
SAMPLE071001-01
SAMPLE071013-01
● Only files that are in "tnw" format will be displayed.
5 Press the [OK] button to load the selected file.
The display shown below will appear while the file is being loaded.
Press the [OK] or [CANCEL] button to cancel the load operation.
Samplings: ∞
"SAMPLE071001-01 "
Loading... CANCEL
The name of the Samplings file being
loaded.
● Sampling file load operations may take a few minutes to complete.
6 When the Samplings file has been loaded the display shown in step 2, above, will
appear.
TENORI-ON Manual 93
Page 94
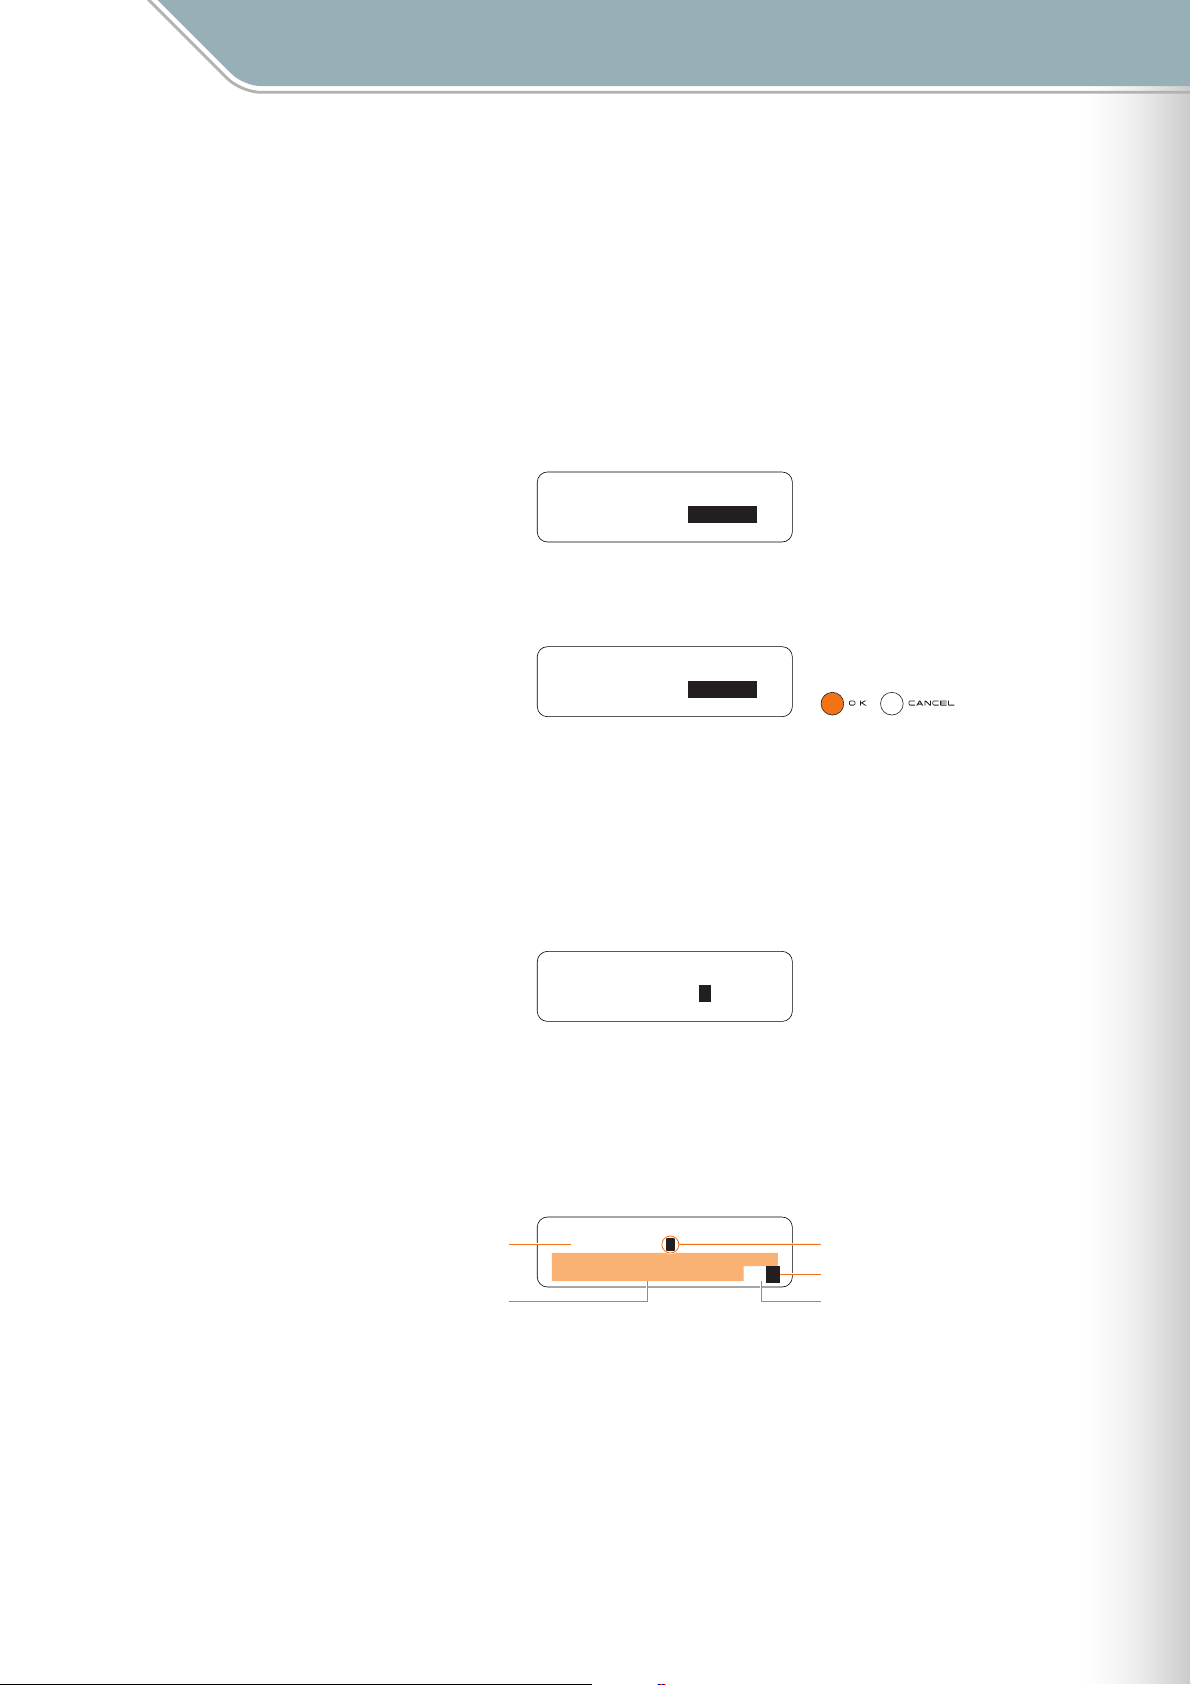
Parameter Settings
Setting Parameters with the Jog Dial ■ File Menu
Save Samplings
●
Saves a Samplings file currently loaded in a user memory to an SD Memory Card in ".tnw"
format.
1 Insert an SD Memory Card that has sufficient free space for the file to be saved into the
TENORI-ON card slot.
2 Use the jog dial and [OK] button to navigate to the Samplings function menu as follows:
"Main menu" ➝ "File menu" ➝ "Samplings"
Samplings: ∞
Operation: Load
3 Use the jog dial to highlight the "Save" function, then press the [OK] button.
Samplings: ∞
Operation: Save
4 A display that allows you to specify the user memory containing the sample to be saved
will appear. Use the jog dial to select the desired user memory (1 — 3), then press the
[OK] button.
● In this display "User1," "User2," and "User3" correspond to user memory numbers <01/16,> <02/16,>
and <03/16.> The bottom line on the LCD displays the name of the sample file currently loaded in that
user memory. If the user memory is empty, "--------" will be displayed.
Samplings: Save ∞
Sour.= User1
[1-SAMPLE ]
5 The file name entry display will appear. A current file name will be displayed, which you
can either use as-is or replace with a different name.
File name entry procedure is described in the Rename Song section on Page 65.
● File names can be up to 16 characters in length. The file extension will be added automatically.
Current User Voice File Name
Available Characters
Input File Name ∞
[1-SAMPLE ]
ABCDEFGHIJKLMNOPQRST
UVWXYZ-0123456789 ª§
Input Cursor
Set File Name
Backspace & Delete 1 Character
TENORI-ON Manual 94
Page 95
Parameter Settings
Setting Parameters with the Jog Dial ■ File Menu
6 When the file name has been entered as required use the jog dial to highlight the "
symbol in the lower right corner of the display and press the [OK] button.
The file name will be entered and the save function will be executed.
A display like the one shown below will appear while the All Settings file is being saved.
You can cancel the operation by pressing the [OK] or [CANCEL] button.
Samplings: ∞
"SAMPLE071020-01 "
Saving... CANCEL
File data may be irreparably corrupted if you turn off the power or remove the SD Memory Card while the
"Saving…" display is showing.
Sampling file save operations may take a few minutes to complete.
●
● If a file with the same name exists on the SD Memory Card an overwrite confirmation display like the
one shown below will appear.
Samplings: ∞
"SAMPLE071020-01 "
Already Exists!
Overwrite? OK
● Press the [OK] button if it’s OK to overwrite the file. Press the [CANCEL] button (or use the jog dial to
select "CANCEL" on the LCD and then press the [OK] button) to cancel the operation and leave the
original file unaltered.
The Samplings file being saved.
"
§
7 The display shown in step 3, above, will reappear when the operation has finished.
● Rename Samplings
Allows a new name to be entered for a Samplings file on an SD Memory Card.
1 Insert the SD Memory Card containing the file you want to rename into the TENORI-ON
card slot.
2 Use the jog dial and [OK] button to navigate to the Samplings function menu as follows:
"Main menu" ➝ "File menu" ➝ "Samplings"
Samplings: ∞
Operation: Load
3 Use the jog dial to highlight the "Rename" function, then press the [OK] button.
Samplings: ∞
Operation: Rename
TENORI-ON Manual 95
Page 96

Parameter Settings
Setting Parameters with the Jog Dial ■ File Menu
4 Samplings files on the card will appear as a list on the LCD display (with no file
extension). Use the jog dial to select the file you want to rename.
Samplings: Rename ∞
SAMPLE071006-02
SAMPLE071001-01
SAMPLE071013-01
● Only files that are in ".tnw" format will be displayed.
Press the [OK] button to go to the file name entry display. The name of the currently
selected Samplings file will be displayed, and you can enter a new file name as
required. File name entry procedure is described in the Rename Song section on
Page 65.
● File names can be up to 16 characters in length. The file extension will be added automatically.
Current Samplings File Name
Available Characters
Input File Name ∞
[SAMPLE071001-01 ]
ABCDEFGHIJKLMNOPQRST
UVWXYZ-0123456789 ª§
Input Cursor
Set File Name
Backspace & Delete 1 Character
5 When the file name has been entered as required use the jog dial to highlight the "
symbol in the lower right corner of the display and press the [OK] button.
"Executing …" will appear on the display while the file is being renamed.
File data may be irreparably corrupted if you turn off the power or remove the SD Memory Card while the
"Executing…" display is showing.
If a file with the same name exists on the SD Memory Card an overwrite confirmation display like the
●
one shown below will appear.
Samplings: ∞
"SAMPLE071001-02 "
Already Exists!
Overwrite? OK
● Press the [OK] button if it’s OK to overwrite the file. Press the [CANCEL] button (or use the jog dial to
select "CANCEL" on the LCD and then press the [OK] button) to cancel the operation and leave the
original file unaltered.
6 The display shown in step 3, above, will reappear when the operation has finished.
"
§
TENORI-ON Manual 96
Page 97

Parameter Settings
Setting Parameters with the Jog Dial ■ File Menu
Delete Samplings
●
Deletes a specified Samplings file from an SD Memory Card.
1 Insert the SD Memory Card containing the file you want to delete into the TENORI-ON
card slot.
2 Use the jog dial and [OK] button to navigate to the Samplings function menu as follows:
"Main menu" ➝ "File menu" ➝ "Samplings"
Samplings: ∞
Operation: Load
3 Use the jog dial to highlight the "Delete" function, then press the [OK] button.
Samplings: ∞
Operation: Delete
4 Samplings files on the card will appear as a list on the LCD display (with no file
extension). Use the jog dial to select the file you want to delete.
Samplings: Delete ∞
SAMPLE071006-02
SAMPLE071001-01
SAMPLE071013-01
● Only files that are in ".tnw" format will be displayed.
5 Press the [OK] button to delete the selected file.
A confirmation display like the one shown below will appear.
Press the [OK] button if it’s OK to delete the file. Press the [CANCEL] button (or use the
jog dial to select "CANCEL" on the LCD and then press the [OK] button) to cancel the
operation and leave the file unaltered.
Delete ∞
"SAMPLE071001-01 "
OK
If you press the [OK] button to execute the delete operation, "Executing …" will appear
on the display while the file is being deleted.
File data may be irreparably corrupted if you turn off the power or remove the SD Memory Card while the
"Executing…" display is showing.
6 The display shown in step 3, above, will reappear when the operation has finished.
TENORI-ON Manual 97
Page 98

Parameter Settings
Setting Parameters with the Jog Dial ■ File Menu
Samplings Info
●
Displays the name of the sample files currently loaded in the TENORI-ON user memories.
1 Use the jog dial and [OK] button to navigate to the Samplings function menu as follows:
"Main menu" ➝ "File menu" ➝ "Samplings"
Samplings: ∞
Operation: Load
2 Use the jog dial to highlight the "Info" function, then press the [OK] button.
Samplings: ∞
Operation: Info
3 A list of the sample files currently loaded in the TENORI-ON user memories 1 — 3 will
be displayed.
● In this display "1," "2," and "3" correspond to user memory numbers <1/16,> <02/16,> and <03/16.> If a
user memory is empty, "--------" will be displayed.
Samplings: Info ∞
1.SAMPLE071006-02
2.SAMPLE071001-01
3.SAMPLE071013-01
4 Press the [OK] or [CANCEL] button to return to the display shown in step 2, above.
TENORI-ON Manual 98
Page 99

Parameter Settings
Setting Parameters with the Jog Dial ■ Effect Menu
■ Effect Menu
The Effect menu provides access to functions that allow you to apply reverb and chorus
effects to the TENORI-ON voices.
The Effect menu submenu includes the following 4 items.
1. Reverb Type Page 99
2. Reverb Param Page 100
3. Chorus Type Page 100
4. Chorus Param Page 100
Use the jog dial to highlight a submenu item, then press the [OK] button to go to the
corresponding parameter edit display.
[Effect menu] ∞
Reverb Type
Reverb Param
Chorus Type
1. Reverb Type
Reverb Type ∞
HALL1
Selects the reverb type.
• NO EFFECT . . . . . . . . . . . . . No reverb effect.
• HALL1, HALL2 . . . . . . . . . . . Concert hall reverb simulations.
• ROOM1, ROOM2, ROOM3 . . . . . . . . .The type of reverb you’d hear in a room.
• STAGE1, STAGE 2 . . . . . . . . Simulations of stage reverb.
• PLATE1, PLATE2 . . . . . . . . . . Simulations of studio plate reverb units.
■ Range . . . . . . . . . . . . NO EFFECT, HALL1, HALL2, ROOM1, ROOM2, ROOM3, STAGE1, STAGE2, PLATE1,
PLATE2
■ Default . . . . . . . . . . . HALL1
■ LED Buttons . . . . . . . No display
TENORI-ON Manual 99
Page 100

Parameter Settings
Setting Parameters with the Jog Dial ■ Effect Menu
2. Reverb Param
Reverb:HALL1 ∞
Param 40
Adjusts the depth of the reverb effect. Higher values produce greater reverb depth.
■ Range . . . . . . . . . . . . 0 — 127
■ Default . . . . . . . . . . . 40
■ LED Buttons . . . . . . . No display
3. Chorus Type
Chorus Type ∞
CHORUS1
Selects the chorus effect type.
• NO EFFECT . . . . . . . . . . . . . . . . . . . . .No chorus effect.
• CHORUS1, CHORUS2 . . . . . . . . . . . .Chorus effects.
• FLANGR1, FLANGR2 . . . . . . . . . . . . .Flanger effects.
■ Range . . . . . . . . . . . . NO EFFECT, CHORUS1, CHORUS2, FLANGR1, FLANGR2
■ Default . . . . . . . . . . . NO EFFECT
■ LED Buttons . . . . . . . No display
4. Chorus Param
Chorus: ∞
Param 60
Adjusts the depth of the chorus effect. Higher values produce greater chorus depth.
■ Range . . . . . . . . . . . . 0 — 127
■ Default . . . . . . . . . . . 0
■ LED Buttons . . . . . . . No display
TENORI-ON Manual 100
 Loading...