

Page 1
Page 2
Introduction
=Supplied Items
c The TENORI-ON instrument
c AC Adaptor
(PA-3C, PA-130 or equivalent Yamaha adaptor)
* May not be included depending on your particular area. Please
check with your Yamaha dealer.
c MIDI cable (Mini MIDI DIN – MIDI IN/OUT)
c CD-ROM
c Quick Guide (This document)
c Installation Guide
c Precautions
03 TENORI-ON Hardware and Nomenclature
Connecting the TENORI-ON to External Devices
04
05 Power Supply Preparation and Switching On /
TENORI-ON Performance Styles
06 Basic TENORI-ON Operation: Score Mode
Basic TENORI-ON Operation: Function Buttons
08
12 Layers and the Performance Modes
13 Random Mode (Layer 08—11)
Draw Mode (Layer 12, 13) / Bounce Mode (Layer 14)
14
15
Push Mode (Layer 15) / Solo Mode (Layer 16)
16 Using Blocks
18 Using the Menu
20 Menu List
22 Song Recording and Playback
23 Using Original Samples
24 The TENORI-ON as “Interior Decoration”
26 TENORI-ON Score Sheet
27 TENORI-ON Specifications
(Please check that these are included.)
=
About the Manuals
The TENORI-ON is provided with the four manuals listed below.
•
Quick Guide
The Quick Guid e provides in structio ns on setup an d basic oper ation that w ill get you sta rted
as quic kly as possible.
•
TENORI-ON Manual
The ma nual is provided as an electronic document on the supplie d CD-ROM, and it
provides de tailed des criptions and procedures th at will help you t ake full advantage of the
TENORI- ON's many ad vanced fe atures. Refer to the Quick Guid e for basic information such
as tur ning on the pow er, the functions of the pan el controls , and more.
•
Precautions
This do cument lists a number of points you nee d to be aware of in order to use the TENORI-
ON prop erly and safely. Ple ase read it care fully. Yamaha r epresentati ve and autho rized
distributo r contact d etails are also included .
•
Installation Guide
Explains the procedure for installing the “ TENORI -ON User Voic e Manager ” softwa re that is
included on the supplied CD -ROM on your computer.
=
About the Supplied CD-ROM
In addition to a pdf manual and demo movie, the CD-ROM includes the “TENORION User Voice manager” software for Windows and Macintosh computers.
=
The illustrations and LCD screens as shown in this manual are for instructional purposes only, and may
appear somewhat different from those on your instrument. The illustrations and LCD screens from the
TNR-W are used for the instructions and descriptions in this manual.
=
is a registered trademark of the SD Card Association.
=
This product incorporates and bundles computer programs and contents in which Yamaha owns
copyrights or with respect to which it has license to use others' copyrights. Such copyrighted materials
include, without limitation, all computer software, style files, MIDI files, WAVE data, musical scores
and sound recordings. Any unauthorized use of such programs and contents outside of personal use
is not permitted under relevant laws. Any violation of copyright has legal consequences. DON'T MAKE,
DISTRIBUTE OR USE ILLEGAL COPIES.
Backup and Initialization
Some data will be lost when the power is turned off. Save important
data to an SD Memory Card using the Save All Blocks function
(TENORI-ON Manual, page 69) before turning off. See page 39 of the
manual for the initialization procedure.
Increasing the volume excessively may cause some voices to
distort. In this case, lower the volume accordingly, or use an external
audio system.
02
Page 3

ÅÍÎÏ ∞
≈01-Score Ω01
ç01/01:Photon
√00:00:00 ÷≥
TENORI-ON Hardware and Nomenclature
SD Memory Card Slot Page 22
The “L” Function Buttons
Pages 08 and 09
[L1] Button
[L2] Button
[L3] Button
[L4] Button
[L5] Button
Jog Dial
DC IN Connector
Page 05
Speaker [CLEAR] Button
LCD Display
Speaker
The “R” Function Buttons
Page 10
[R1] Button
[R2] Button
[R3] Button
[R4] Button
[R5] Button
LED Buttons
Battery
Compartment
Covers
(TNR-W only)
[OK] Button [CANCEL] Button
Headphone Connector
(Stereo Mini Phone)
STANDBY/ON Switch Page 05
MIDI Connector (Mini DIN)
03
Page 4
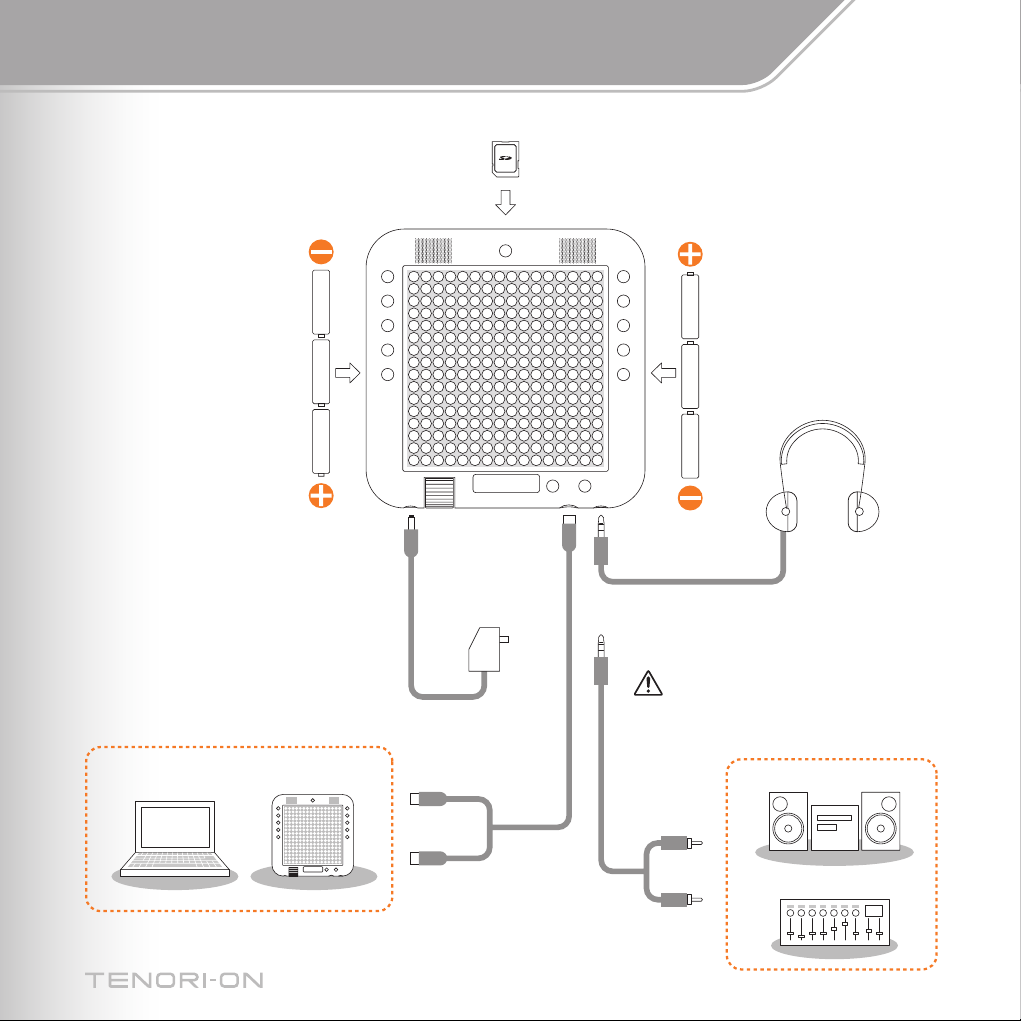
Connecting the TENORI-ON to External Devices
Save and load TENORI-ON performances and settings,
or transfer original voice samples to the TENORI-ON from
SD Memory Card
your computer. SD Memory Cards are also a handy way for
TENORI-ON users to share data.
=
The TENORI-ON is not supplied with an SD Memory Card. Purchase SD Memory Cards
(2 gigabyte capacity or less) at appropriate retail outlets.
=
Before purchasing an SD Memory Card for use
with the TENORI-ON, check the list of compatible
cards at the following web site: http://www.global.
yamaha.com/tenori-on/
“AA” Batteries
(TNR-W only)
DC IN
With the supplied MIDI Cable connected to
the MIDI connector it is possible to connect
multiple TENORI-ON instruments for
synchronized performance, or connect to a
computer which can be used to record the
instrument’s MIDI output. These operations
may also require one or more optional MIDI
cables and a UX16 USB-MIDI Interface.
Other TENORI-ONComputer
AC Adaptor
MIDI IN
MIDI OUT
MIDI
Connector
“AA” Batteries
(TNR-W only)
Headphone
Connector
Headphones
For maximum audio impact either use a pair
of headphones to monitor the TENORI-ON
sound, or use the headphone connector to
connect it to an audio system.
Avoid listening with the headphones at
high volume for long periods of time;
doing so may not only result in ear fatigue, it
may be damaging to your hearing.
Stereo System
Mixer
04
Page 5
Power Supply
Power Supply Preparation and Switching On /
TENORI-ON Performance Styles
Either the supplied AC Adaptor (PA-3C, PA-130 or equivalent Yamaha adaptor) or six “AA” alkaline
batteries can be used to power the TENORI-ON. (The TNR-O model can only be powered from an AC
power adaptor. Batteries cannot be used.)
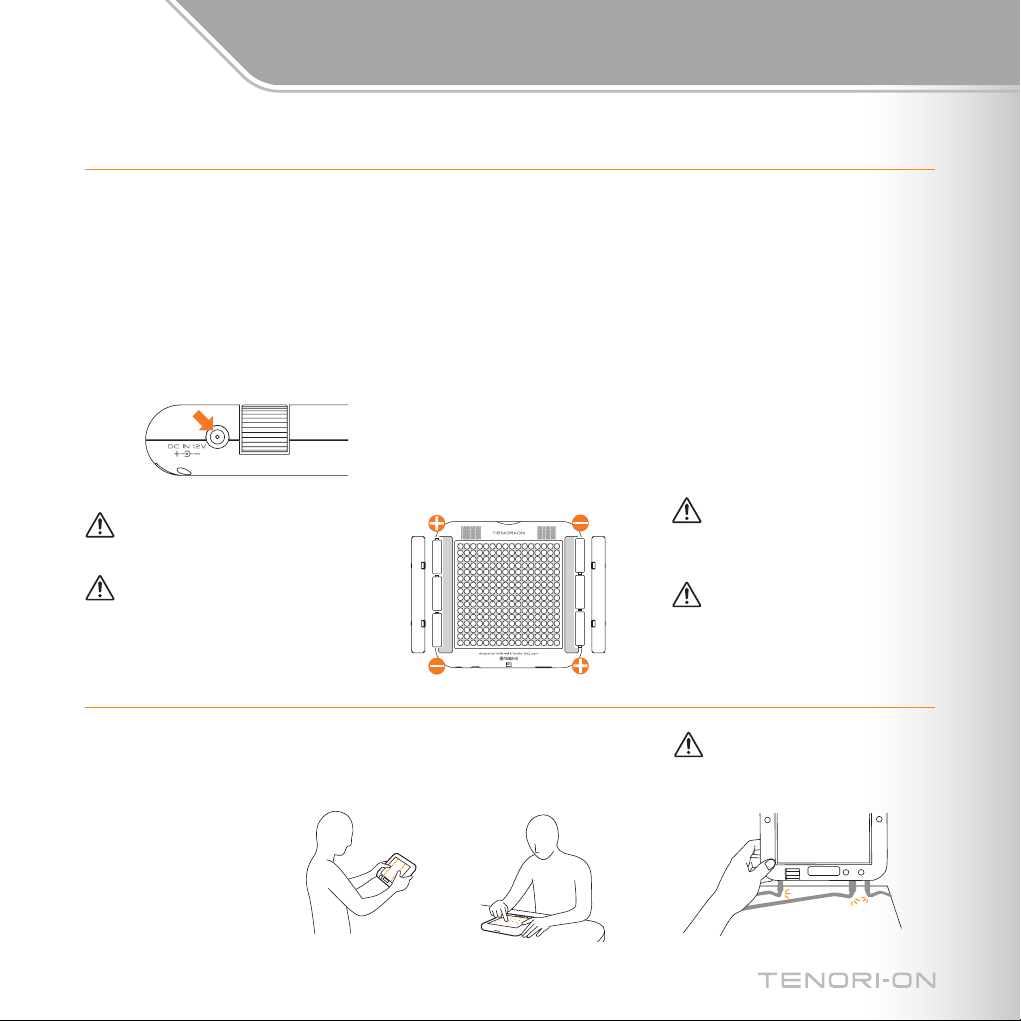
Connecting the AC Adaptor
Make sure the TENORI-ON STANDBY/ON
switch is set to the STANDBY position.
Connect the AC adaptor DC plug to the DC IN
connector, and then plug the AC adaptor’s AC
plug into an appropriate AC power outlet.
Use only the supplied PA-3C,
PA-130 or an equivalent Yamaha
AC adaptor.
Use only alkaline batteries when
powering the TENORI-ON from
batteries. (TNR-W only)
Installing Batteries
(TNR-W only)
Make sure the TENORI-ON STANDBY/ON
switch is set to the STANDBY position, and
remove the battery compartment covers (there
are two battery compartment covers) from
either side of the back of the instrument.
Install six “AA” alkaline type batteries, three
on each side, with the orientation shown
in the illustration and replace the battery
compartment covers.
Performance Styles
Hand-held Performance
Hold the TENORI-ON firmly on both sides. You should be
able to use your thumbs to operate the function buttons,
LED buttons, and the jog dial.
If you can’t reach some of the LED
buttons with your thumbs, or need to
maximum operation speed, you can
alternatively hold the TENORI-ON
firmly with one hand while operating
the LED buttons with your free hand.
Table-top Performance
The TENORI-ON can be operated
while placed on a table, desk, or any
stable flat surface.
Switching On
Slide the STANDBY/ON Switch to the ON
position to turn the power on.
When the power is turned on the status
information will appear on the LCD display,
with the power status indicator in the upper
right corner.
=
When using the AC adaptor.
=
When using batteries. (TNR-W only)
Full Half Full Almost
When the power status indicator
shows that the batteries are almost
depleted replace all six batteries with
new ones as soon as possible.
If the batteries fail during a data
store operation, not only might the
data being transferred be lost but the
data in the destination may be lost or
corrupted as well. Use the AC adaptor
when transferring data.
Be careful not to bend the cables
beneath the device or apply
excessive pressure on them. Doing so
can damage the cable and connectors.
Depleted
Depleted
05
Page 6
Basic TENORI-ON Operation: Score Mode
TENORI-ON “Modes”
The TENORI-ON 16 x 16 LED button matrix is simultaneously a
performance input controller and display. By operating and interacting
with the LED buttons and the light they produce you gain access to the
TENORI-ON’s numerous performance capabilities.
The TENORI-ON provides six different performance and sound/light
modes for broad performance versatility, and these modes can
be combined and used simultaneously for rich, complex musical
expression.
The Six Modes
Score Mode
Random Mode
Draw Mode
Bounce Mode
Push Mode
Solo Mode
Page 13
Page 14
Page 14
Page 15
Page 15
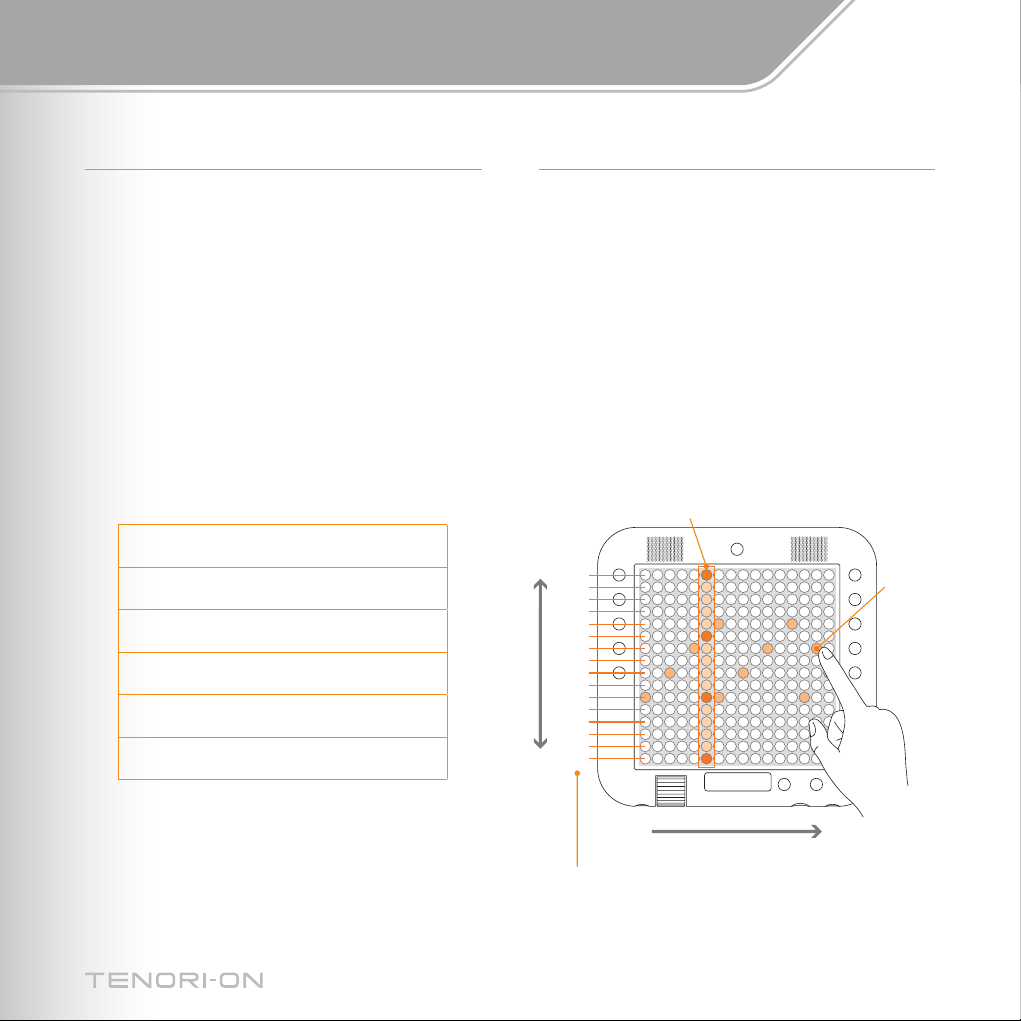
The Score Mode
The Score Mode is the basic TENORI-ON performance mode.
In this mode the TENORI-ON interface functions like a musical “score”
on which you can write the notes to be played in one musical measure
via the 16 x 16 LED button matrix. The time axis of the score proceeds
from left to right (the horizontal axis), beginning at the left edge of the
matrix and then looping back to the beginning once the right edge of
the matrix is reached. The vertical axis corresponds to the pitch
of the notes played. If more than one note is entered on the same
vertical line, for example, those notes will be played simultaneously as
an interval or chord. The maximum number of notes or intervals/chords
that can be entered horizontally is 16, but within that range the number
and playback speed can be set as required, allowing the creation of
complex groupings when multiple Score-Mode layers are combined.
Loop Indicator
High
D
C
B
A
G
F
E
Low
D
C
B
A
G
F
E
D
C
Pitch
Active Note
06
Time
=
The factory default note settings correspond to the white keys on a piano. Semitone
adjustments can be made from the menu. Refer to the “Master Scale” section on
page 44 of the TENORI-ON Manual on the supplied CD-ROM.
Page 7
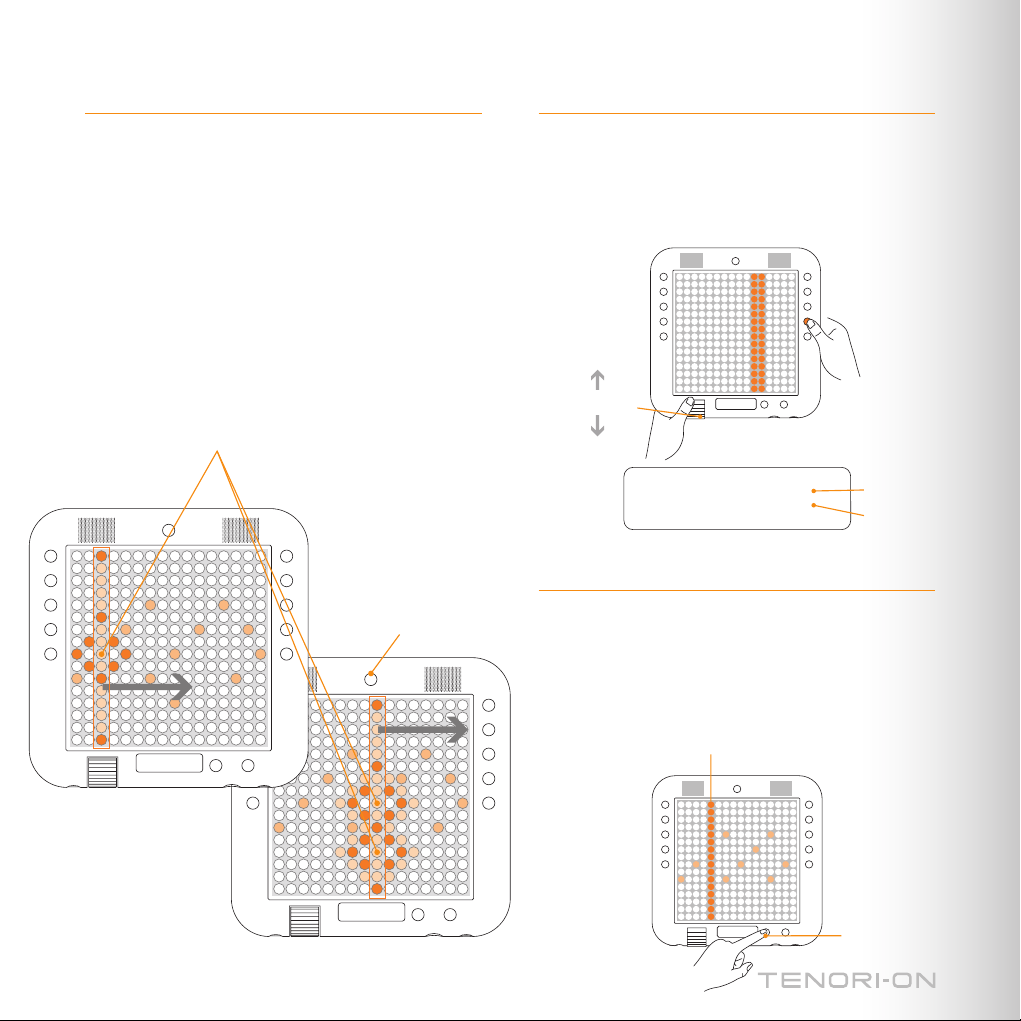
Performance in the Score Mode
Master Volume Adjustment
Press an LED button briefly to play the sound assigned to it. At the
same time the lights will flash outward from the played sound. If you
hold the LED button a bit longer it will remain lit and will become an
active note that will play repeatedly. Press and hold an active note to
de-activate it.
The loop indicator will be continuously cycling from the left to right
edge of the LED button matrix. Active notes will play when the loop
indicator coincides with their positions on the matrix.
=
Press the [CLEAR] button to de-activate all active notes.
Active notes will play and flash when
the loop indicator passes over them.
[CLEAR] Button
To adjust the overall volume of the TENORI-ON, rotate the jog dial
while holding the [R4] function button. The volume setting will appear
in the LCD display.
=
This volume setting is temporary. Refer to page 43 in the TENORI-ON Manual (pdf file) for
details on setting the overall “hardware” volume.
Press and hold
the [R4] button.
Increase
Volume
Jog Dial
Decrease
Volume
Layer Volume
Master Volume
Pausing Loop Playback
Press the [OK] button while the highlighted “STOP" indicator in the
lower right corner of the LCD display is shown to temporarily pause
loop playback. The loop indicator will stop at the position at which
the [OK] button is pressed, and the highlighted “STOP” indicator will
change to “START.” Press the [OK] button a second time and loop
playback will resume from the point at which it was paused.
Current loop indicator position.
[OK] Button
07
Page 8
01
01 02 03 04 05 06 07 08 09 10 11 12 13 14 15 16
02
0
3
03
04
05
06
06/10
16/16
07
08
09
10
11
12
13
14
15
16
16/01
01/01
01/16
Instrument ∞
Layer[01]
06/10:LowBoom
Basic TENORI-ON Operation: Function Buttons
Functions
By holding one of the ten function buttons located on either side of
the TENORI-ON and operating the LED buttons you can change voices,
change octaves, and apply a variety of effects and variations to your
performance.
This unique visual/tactile interface has been specifically designed to
allow intuitive, instantaneous operation of a variety of functions.
Operate the LED buttons while holding a function
08
button.
+ LED Buttons :
L1
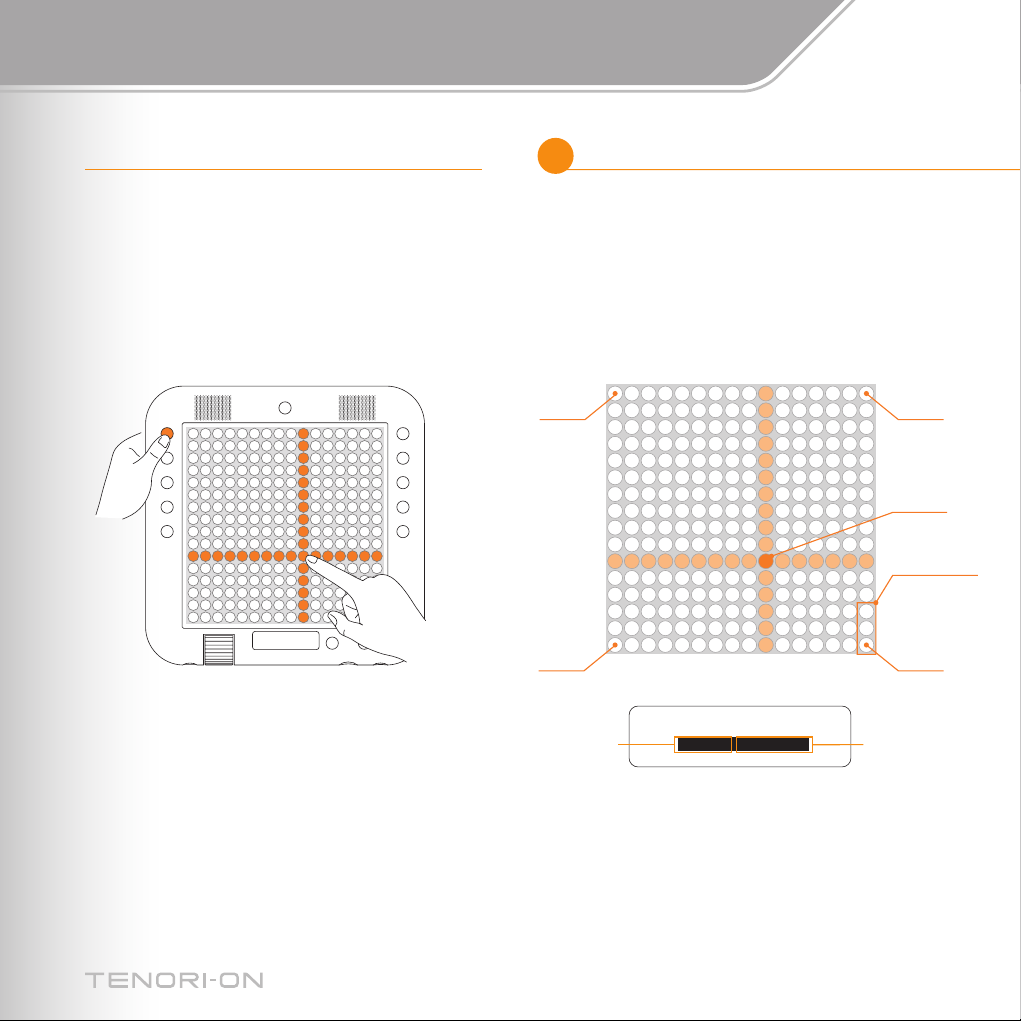
Changing Voices
You can select any voice from the 256 voices available in one quick
operation. When you press and hold the [L1] button vertical and
horizontal lines will light on the matrix, and the button at their intersection
corresponds to the currently selected voice. If you press a different LED
button while these crossed lines are showing the intersection will move to
that button and the corresponding voice will be selected.
Matrix with voice number 06/10 selected.
Voice Number
(Vertical Position/
Horizontal Position)
=
The voice number and name will appear in the LCD display. The voice number corresponds
to the vertical and horizontal button numbers.
=
The TENORI-ON has 253 internal voices. The remaining three voices (numbers <01/16>,
<02/16>, and <03/16>) are “user voices” that can be created by you and loaded into the
TENORI-ON via an SD Memory Card (page 23).
User Voices
Voice Name
Page 9
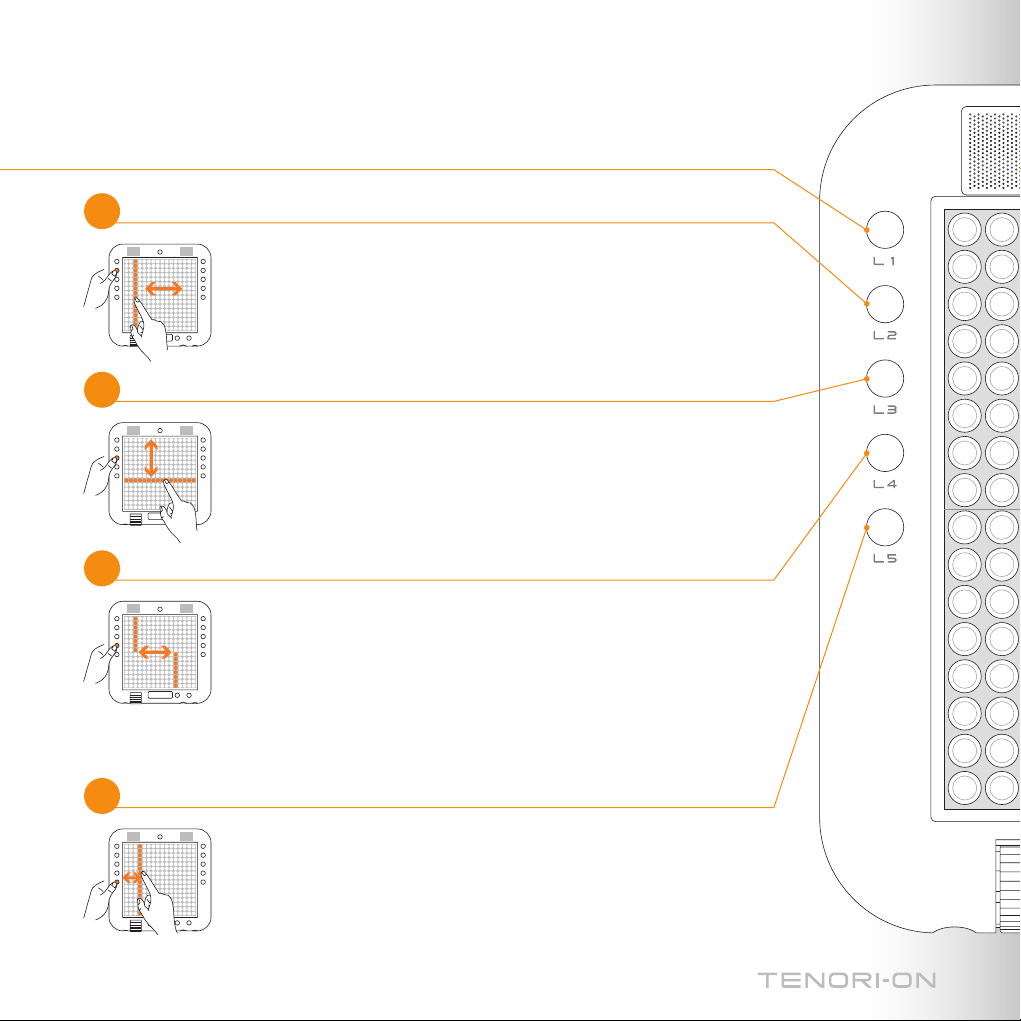
+ LED Buttons :
L2
Changing Note Length
Sets the length of the notes from the time they are triggered to the time they
decay to silence (the gate time).
While holding the [L2] button slide your finger horizontally over the matrix
to move the lit vertical line to the desired setting. Moving the line to the right
increases the note length.
=
Not available in the Push Mode.
+ LED Buttons :
L3
+ LED Buttons :
L4
+ LED Buttons :
L5
Changing Octaves
Sets the playback pitch in octave increments.
While holding the [L3] button slide your finger vertically over the matrix to move
the lit horizontal line to the desired octave.
Changing Loop Points
Sets the loop playback range in the Score Mode.
While holding the [L4] button slide your finger horizontally over upper half of
the matrix to move the loop start point indicator to the desired point, and slide
your finger horizontally over lower half of the matrix to move the loop end point
indicator to the desired point, as required.
=
In the Random Mode this function sets the rotation direction and speed (page 13).
=
Not available in the Draw, Bounce, Push and Solo Modes.
Changing Loop Speed
Sets the loop playback speed (the duration of the beats).
Four settings are available, set via the leftmost four columns on the matrix:
quarter notes, eighth notes, sixteenth notes, and thirty-second notes.
While holding the [L5] button press a button in the corresponding column.
=
Not available in the Push Mode.
09
Page 10

Basic TENORI- ON Operation: Function Buttons
+ LED Buttons:
R1
Switching Layers
Switches to a different layer.
While holding the [R1] button slide your finger vertically over the matrix to move the lit
horizontal line to the desired layer.
Moving the line to the lowest row selects layer 01, the next row up is layer 02, then layer 03,
and so on up to layer 16.
+ LED Buttons:
R2
Changing Tempo
Sets the playback tempo (BPM).
While holding the [R2] button slide your finger horizontally over the matrix to move the
lit vertical line to the desired tempo setting. Moving the line to the right produces faster
tempos.
+ LED Buttons:
R3
Transposition
Adjusts the playback pitch in semitone increments.
While holding the [R3] button slide your finger vertically over the matrix to move the lit
horizontal line to the desired pitch.
+ LED Buttons:
R4
Changing the Layer Volume
Displays the individual volume settings of all 16 layers, and allows the volume of each layer
to be adjusted as required to create the ideal “mix” between layers.
Each row of LED buttons corresponds to a layer, beginning with layer 01 at the bottom row.
While holding the [R4] button slide your finger horizontally over the row corresponding to
the layer you want to adjust to set the volume as required. Each LED button row corresponds
to a layer (01—16 from bottom to top), and the horizontal axis corresponds to volume level
with volume increasing towards the right (the leftmost setting corresponds to “0” volume).
=
You can also use the jog dial to set the overall (Master) volume (the Master volume setting will appear in the
LCD display) ( page 07).
Layer
16
01
Slower Faster
Higher
Lower
Layer
16
01
Lower Volume
Higher Volume
10
+ LED Buttons:
R5
Switching Blocks
Switches to a different block.
While holding the [R5] button slide your finger horizontally over the matrix to move the lit
vertical line to the desired block.
Moving the line to the leftmost column selects block 01, the next column to the right is
block 02, then block 03, and so on up to block 16.
=
You can copy the contents of the current block to another block ( page 17).
Block 01 16
Page 11

Layers
ÅÍÎÏ ∞
≈01-Score Ω01
ç01/01:Photon
√16:37:28 ÷≥
Blocks
TENORI-ON layers can be thought of as “performance parts”
or “recording tracks.” The TENORI-ON has a total of 16 layers.
Separate notes and voices can be assigned to each layer, and
all layers can be played together in synchronization.
The 16 layers are divided into six performance mode groups as
shown in the illustration below. The six modes have different
note entry methods and operation. Up to 16 layers created using
different modes can be combined for rich, complex musical
expression.
Layer Number Performance Mode
Block Number
=
When you switch between layers or blocks, the current layer number, performance mode, and block number will appear in the LCD display.
Layers
Performance Mode:
01 02 03 04 05 06 07 08 09 10 11 12 13 14 15 16
Score Mode
One complete set of 16 layers is called a “block.”
The TENORI-ON can store up to 16 programmed blocks
(16-layer groups) in memory, and you can switch from block to
block instantly during performance.
You could, for example, create a musical composition in one
block, then copy that composition to another block and edit it
to create a variation of the original composition. Or you can
load a number of previously-created compositions into separate
blocks from an SD Memory Card and switch between them to
create variation during playback.
Random Mode Draw Mode
Bounce
Mode
Push
Mode
Solo
Mode
Blocks
01 02 03 04 15 16
=
Press the [CLEAR] button to clear all active notes from all layers and blocks.
11
Page 12

16
15
14
13
12
11
10
09
08
07
06
05
04
03
02
01
Layers and the Performance Modes
The six performance modes are assigned to the 16 layers as shown in the illustration below.
Layer Number Performance Mode
Solo Mode
Push Mode
Bounce Mode
Draw Mode
Random Mode
Score Mode
Layer Number Performance Mode
=
When you switch layers the new layer and performance
mode will appear in the LCD display.
For example, if you press any LED button in the eighth row from the
bottom (any button in this row will do) while holding the [R1] function
button as shown in the illustration, you will select the first Random
Mode layer.
12
Page 13

Random Mode (Layer 08—11)
Random Mode Performance
If you press an LED button long enough to enter an active note in the Random Mode, the active note will play back repeatedly. If you then enter a few
more active notes, the lights will “travel” from note to note, in the order entered, and the active notes will sound when the traveling light passes over
them. The Random Mode thus produces a totally different type of loop from the Score Mode.
Higher
1
Pitch
3
Lower
2
Active notes can be individually deactivated by pressing and holding
the corresponding LED button.
1
2
3
Hold the [L4] button.
You can even spin loop-shapes you create in the Random Mode by
holding the [L4] button and running a finger around the matrix in the
direction and at the speed of the desired spin. The pitches of the notes
will change accordingly as the shape spins, producing loop sound
effects. To stop rotation, press and hold the LED button or press the
same LED button twice while holding the [L4] button.
13
Page 14

Draw Mode (Layer 12, 13) / Bounce Mode (Layer 14)
Draw Mode Performance
In this mode you can press individual LED buttons or draw lines
or curves on the matrix, and those actions will be played back
and repeated. You can keep adding to your “composition” during
playback to build up thick sonic textures.
In the Draw Mode you cannot clear only a part of the performance.
The entire layer can be cleared by pressing the [CLEAR] button.
Bounce Mode Performance
Press an LED button and the light will “drop” from that button,
bounce back from the bottom of the matrix, and repeat. The
corresponding note will sound when the light bounces at the
bottom row. The higher the entry point, the longer the interval
between the sound. In the Bounce Mode the pitches are arranged
horizontally, like a piano, with the lowest pitch on the left and the
highest on the right.
Press the lowest LED button to
stop activity in that column.
14
Bouncing can be individually stopped in any column by simply
pressing the lowest LED button in that column.
Page 15

Push Mode (Layer 15) / Solo Mode (Layer 16)
Push Mode Performance
In this mode if you press and hold an LED button the sound of
the corresponding note will begin to change gradually while
the flashing surrounding that button gets brighter and wider. If
the button is held briefly the note and flashing will stop when
you release it, but if you hold the button for longer the note and
flashing will continue even after the button is released.
Pitch Pitch
Stop a note by
pressing the central
LED button.
Solo Mode Performance
Press an LED button and the corresponding note will repeat until
the button is released. In the Solo Mode the pitches are arranged
horizontally, like a piano. You can change the interval between
repeats by pressing or sliding your finger to a lower (longer) or
higher (shorter) LED button in the column. If you press the lowest
LED button in a column the note will sound once without any
repeats.
* Some voices will decay and stop even if a note is held, and some voices may
not exhibit significant variation. The best voices to use in the Push Mode are
those that sustain continuously.
* If you turn the Quantize function ON, note timing in the Solo Mode will be
synchronized to the Score Mode, making it easy to play solos with rhythm
matching that of a background playing in the Score Mode layers. Refer to
“Quantize” in the TENORI-ON Manual on the supplied CD-ROM.
15
Page 16

01
01
02 03 04 15 16
16
Using Blocks
Some Ideas for Using Blocks
You can leave the current composition in memory while copying it to other blocks where it can be edited to create variations that you can switch between
at any time. You could also create totally different compositions in different blocks, and then switch between them in real time for interesting, varied
performances.
Switching Between Blocks
You can switch between blocks simply by holding the [R5] function button and pressing an LED button in the column corresponding to the block you
want to switch to.
16
Block
Page 17

Copy this Block ∞
Block[03]
Dest. Block:12
Copying from Block to Block
You can copy either a single layer to a different block, or all layers from the current block to another block.
=
Copying via the LED Buttons
. Select the layer or block you want to copy.
1
. Press and hold the [R5] function button. The currently playing block will be displayed.
2
To Copy a Single Layer
While still holding the [R5] button press the lowest LED button in
the lit column (the LEDs in the column will shine brighter), and
then press an LED button in the column corresponding to the block
you want to copy to. The current layer from the source block will be
copied to the same layer in the destination block
To Copy All Layers
While still holding the [R5] button press the lowest LED button in
the lit column twice (the LEDs in the column will shine brighter each
time the button is pressed), and then press an LED button in the
column corresponding to the block you want to copy to. All layers
from the source block will be copied to the destination block.
2nd Brightness Level: 3rd Brightness Level:
Only the selected
layer is copied.
All layers are copied (the
entire block).
=
Copying via the Menu
You can also copy either a single layer or all layers to a different
block via the LCD Menu. Refer to “Edit Menu” in the TENORI-ON
Manual on the supplied CD-ROM.
17
Page 18

[Main menu] ∞
2 Layer menu
3 Edit menu
4 Preference menu
ÅÍÎÏ ∞
≈01-Score Ω01
ç01/01:Photon
√16:37:28 ÷≥
ÅÍÎÏ ∞
≈01-Score Ω01
ç01/01:Photon
√16:37:28 ÷≥
Using the Menu
About the Menu
In addition to the wide range of control available via the function and LED buttons, a number of detailed settings can be made via the TENORI-ON menu,
including tempo, clock display, SD Memory Card save/load, and many more.
Menu items in the LCD display can be selected and executed by using the jog dial and [OK]/[CANCEL] buttons.
Basic Menu Operation
Normally, status information is showing in the LCD display.
If you rotate the jog dial while the status information is showing the Main Menu will appear. Rotate the jog dial to select the desired menu item, and then
press the [OK] button to go to the next display. By repeating these steps you can navigate to a desired function and execute or edit it as required.
To return to the Status display, press the [CANCEL] button as many times as necessary.
18
Rotate the jog dial up or down. [OK] Button [CANCEL] Button
Status Display Main Menu
Page 19

Menu Operation Example
[Main menu] ∞
1 Play menu
2 Layer menu
3 Edit menu
[Layer menu] ∞
Instrument
Volume
Loop Speed
Animation ∞
Layer[03]
Type:Diamond
Size: 4 Expand
Animation ∞
Layer[03]
Type:Circle
Size: 4 Expand
=
Changing the Light Animation
. Rotate the jog dial to go to the Main Menu.
1
. Continue rotating the jog dial to select “2 Layer menu,” then press the [OK] button. The “Layer menu” will appear.
2
. Use the jog dial to select “Animation” and press the [OK] button. The animation setup display will appear.
3
. In the Animation display you can select the animation type, the maximum size of the animated flash, and whether the flash expands outward or
4
shrinks inward. The current settings appear in the Animation display.
The Animation Types
Current Layer Number
Maximum Size Expand or Shrink
. Rotate the jog dial to edit the highlighted parameter in the display. Once the current parameter is set as required, press the [OK] button to go
5
to the next parameter. Once again, use the jog dial to edit the parameter, and then press the [OK] button. When you press the [OK] button after
editing the last parameter in the display, the edits will be applied and the display will revert to the menu.
Animation Type
Simple Circle Square
Diamond Cross Plus
19
Page 20

Menu List
Play menu
Parameters that apply to all layers
and blocks.
Hardware Volume
Master Tempo
Master Scale
..............
................
Master Transpose
Master Loop Speed
Master Loop Point
Reset Loop Timing
..................................
Mute
......
Sets the hardware volume.
Sets the ma ster tempo.
Sets the ma ster scale.
.....
Sets transpostion.
...
Sets the loop speed (beat duration) for all layers.
.....
Sets the loop range for all layers.
....
Resets the playback position to the beginning of the loop.
Mutes sound output.
Layer menu
Parameters that apply to the
currently selected layer.
Edit menu
Data edit functions such as copy,
clear, and reset.
Preference menu
Initial settings that apply to the entire
instrument.
Instrument
Volume
Loop Speed
Sound Length
Panpot
Animation
.....................
............................
..................
..............
...............................
......................
Copy this Block
Clear this Block
Copy this Layer
Clear this Layer
Clear All Blocks
Reset All Blocks
Quantize
...........................
Push Sensitivity
Master Tuning
Local Control
Synchronize
...............
...............
.................
Loop Indicator
Selects the voice.
Sets the layer volume.
Sets the loop speed.
Sets the gate time.
Sets the stereo position of the sound
Specifies the light animation.
..........
Copies the current block to another block.
..........
Clear s the active notes for the current blocks.
..........
Copies the layer.
..........
Clear s the active notes for the current layer.
.........
Clear s the active notes from all blocks (all layers ).
........
Rese ts all blocks ( all layers).
Synchronizes Solo Mode note timing with the Score Mode.
.........
Sets LED-but ton press time for note activation.
Master tuning for the internal voices (MIDI tone generator).
Turns internal tone generator ou tput ON or OFF.
Synchronizes multiple T ENORI-ON instruments.
............
Displays or hides the loop indicator.
20
Page 21

File menu
Data file save, load, rename and
delete functions.
..................................
Song
All Blocks
.......................
Current Block
Current Layer
All Settings
Samplings
...................
.....................
Song file operations.
All Blocks file operations.
..............
Current Block file operations.
................
Current Layer file operations.
All Settings file op erations.
Sampling file operations.
Effect menu
Reverb and chorus effect
settings.
Interior menu
Settings not related to performance
(clock, song playback).
System menu
Factory reset, SD Memory Card format,
and more.
Recording menu
Song recording and song file save.
Reverb Type
Reverb Param
Chorus Type
Chorus Param
Interior START
Interior Type
Saver Type
Saver Time
.................
..............
..................
..............
..............
.................
......................
....................
Time Signal ON/OFF
Alarm ON /OFF
Set Alarm
..............
.........................
SaveAs Time Signal
SaveAs Alarm
Clock Adjust
SaveAs Default
SD Format
Owner Name
Version Check
Factory Reset
Recording
..............
..................
...........
......................
................
.............
..............
.......................
Sets the reverb effe ct type.
Sets the reverb effe ct depth.
Sets the chorus effect ty pe.
Sets the chorus effect depth.
Begins oper ation of the specified Interior Mode.
Selects the type of Interior Mode opera tion.
Select s the t ype of saver operation: Power Save Mode or Interior
Mode.
Sets the amount of time that must elapse before saver operation
begins.
.....
Determines whether the time signal will be played or not.
Determine s whether the ala rm will sound or not.
Sets the alarm time.
......
Saves the dat a in the current block for use as the time signal.
Saves the dat a in the current block for use as the alarm.
Sets the current time and date.
Saves the current settings as the pow er-on d efaults.
Formats an SD Memory Card.
Enter the name of the TENORI-ON owner.
Display the TENORI-ON ROM ver sion number.
TENORI-ON system reset.
Song record and save.
=
Refer to the TENORI-ON Manual on the supplied CD-ROM for menu details.
21
Page 22

Song Recording and Playback
[Main menu] ∞
8 System menu
9 Recording menu
[Recording menu] ∞
START
ÅÍÎÏ ∞
≈01-Score Ω01
ç01/01:Photon
∫00:00:06 ÷≥
Save this Song? ∞
OK
Input File Name ∞
[0302E-SONG-02œ ]
ABCDEFGHIJKLMNOPQRST
UVWXYZ-0123456789 ª§
Song ∞
Operation: Load
Song: Load ∞
0302E-SONG-01
0302E-SONG-02
0302G-SONG-01
Prepare an SD Memory Card
An SD Memory Card is necessary for song recording. Purchase an SD
Memory Card (2 gigabyte capacity or less), and format the card in the
TENORI-ON memory card slot by selecting the “SD Format” function in
the “System menu”.
About Recording and Song Files
Performa nce op erations c arried out on the T ENORI -ON ca n be recorde d in
real t ime and saved to an SD Me mor y Card a s a Song F ile.
Song F iles conta in all opera tions carr ied ou t from the time r ecor ding
is begu n unti l it is en ded: LED button o pera tion s, fun ctio ns but ton
oper ations, and [CLE AR] button oper ations are a ll rec orde d in rea l time.
A recorded S ong File can t hen be l oaded into the TENORI-O N and pl ayed
back , prec isel y repr oduci ng the e ntir e per formance as it occ urre d.
Recording Procedure
1.
Insert an SD Memory Card that has been properly formatted by the TENORI-
ON into the card slot until it clicks firmly into place.
2.
Use the jog dial to select “Main menu” → “Recording menu”, and then press
the [OK] button.
3.
Press the [OK] button to begin recording.
During recording the current settings and elapsed recording time will appear
in the LCD display.
* The menus cannot be accessed during recording.
* The maximum recording time will depend on the performance being recorded.
4.
When the performance is finished, press the [OK] button to stop recording.
A display that will allow the recorded performance to be saved as a Song File
to the SD Memory Card will appear.
22
Elapsed Recording Time
Saving the Song File
5.
Press the [OK] button and the Song File name entry display will appear.
* Press the [CANCEL] button if you do not want to save the Song File.
* A default file name will be automatically assigned. You can use the default file name,
or enter a new one. Song File names can be up to 16 characters long.
Input Cursor
Song File Name
Carriage Return –
confirm and enter the
file name.
Available characters.
6.
When the file name has been entered, select the “
Backspace – erase the preceding character and
move the cursor back one position.
” symbol at the
bottom of the display and press the [OK] button.
7.
“Saving ...” will appear on the display while the file is being saved, and
then the “Recording menu” will reappear.
To prevent file corruption and loss of data never turn the
power off or remove the SD Memory Card while “Saving ...” is
showing on the display. Press the [OK] or [CANCEL] button to
cancel the file save operation at any time.
Song Playback
Load a Song File into t he TENORI- ON and play it back.
1.
Insert the SD Memory Card containing the saved Song File into the TENORI-
ON card slot until it clicks firmly into place.
2.
Use the jog dial and [OK] button to
select “Main Menu”
→
“Song”, and then press the [OK]
→
“File menu”
button.
3.
Rotate the jog dial to select “Operation:
Load,” and then press the [OK] button.
4.
If there is more than one song on the
SD Memory Card, use the jog dial to
select the Song File you want to load and play, and then press the [OK] button
to load the file.
5.
When the load operation is complete playback will begin.
* Song files can be attached to email messages and shared with other TENORI-ON
users.
Page 23

EXIT
16
mysound04
15
mysound03
14
mysound02
13
mysound01
12
special_effect _E
11
special_effect _D
10
special_effect _C
09
special_effect _B
08
special_effect _A
07
voice01_B 2
06
voice01_A 2
05
voice01_G 2
04
voice01_F 2
03
voice01_E 2
02
voice01_D 2
01
voice01_C 2
LOAD FILENAME
DELETE PLAY
MAKE
USER VOICE
USER VOICE MANAGER
Using Original Samples
Using Original Samples
Sound files that you have recorded using your computer or downloaded can be loaded into the TENORI-ON user voice area (voice numbers <01/16,>
<02/16,> and <03/16>) and played in the same way as the internal voices, as described below. Refer to “File menu” in the TENORI-ON Manual on the
supplied CD-ROM for more details.
WAVE or AIFF format audio files (sample files) can be loaded into the TENORI-ON user voice area (voice numbers <01/16,> <02/16,> and <03/16>) and
played in the same way as the internal voices. Each user voice can contain separate sound files that can be independently assigned to 16 LED buttons.
(A maximum of 48 sound files can be used.)
Using the TENORI-ON User Voice Manager
The TENORI-ON User Voice Manager software provided on the supplied CD-ROM can be used to assign sound files to [LOAD] buttons — and
save the result as a User Voice File. Sound files assigned to user voices can be up to 0.97 seconds long. User Voice Files created in this way can be
transferred to the TENORI-ON via an SD Memory Card.
=
Unlike the internal MIDI tone generator, octave, transpose, and scale settings cannot be used with user voices.
=
User voices are retained in memory even if the TENORI-ON power is turned off.
=
To play a song that uses user voices on another TENORI-ON, the appropriate user voices must be loaded in advance.
TENORI-ON User Voice Manager
[L1] Button
USER3 <03/16>
USER2 <02/16>
USER1 <01/16>
23
Page 24

Set Alarm ∞
22:00
[Interior menu] ∞
Saver Time
Time Signal ON/OFF
Alarm ON/OFF
[Interior menu] ∞
Time Signal ON/OFF
Alarm ON/OFF
Set Alarm
The TENORI-ON as “Interior Decoration”
151
16
30
3145
60
46
The Interior Mode
The Interior Mode allows the TENORI-ON to be used as a piece of interior decor.
For example, you can set up the TENORI-ON to function as a clock that plays a
composition you have created as an alarm. Or you could configure the TENORION so that if it isn’t operated for a certain length of time it will automatically
begin playing a Song File from an SD Memory Card.
Hour Second
“Interior menu” Settings
The “Interior menu” provides access to settings that determine what the TENORI-ON does when it is not being used for performance.
..............
Interior START
Interior Type
Saver Type
Saver Time
..................
......................
.....................
Time Signal ON/OFF
Alarm ON /OFF
Begins oper ation of the specified Interior Mode.
Selects the type of Interior Mode opera tion.
Select s the t ype of saver operation: Power Save Mode or Interior Mode.
You can exit from the Saver mode by pressing an LED button or operating
any other control.
Sets the amount of time that must elapse before saver operation begins.
.....
Determines whether the time signal will be played (ON ) or not ( OFF).
..............
Determines whether the alarm w ill sound (ON) or not (OFF).
Minute
Set Alarm
.........................
SaveAs Time Signal
Save As Alarm
Clock Adjust
24
......
..............
..................
Sets the alarm time.
Saves the dat a in the current block for use as the time signal.
Saves the dat a in the current block for use as the alarm.
Sets the current time and date.
Set using the jog dial and [OK] button.
Page 25

Interior Types
Song (DEMO)
................
Plays t he pre -programmed TENORI-ON demo song.
Song (SD)
Clock
........................
..................................
Clock+ Song (DEMO)
Clock+ Song (SD)
Randomly plays Song Files from an SD Memory Card.
Displays the time on the TENORI-ON matrix.
....
Displays the time on the TENORI-ON matrix while
playing the pre-programmed TENORI- ON demo song.
The de mo song light animation appear s on the matrix
in addition to th e time.
........
Displays the time on the TENORI-ON matrix while
randomly playing Song Files from an SD Memory
Card. The song light animation appears on the matrix
in addition to th e time.
25
Page 26

Instrument
Sound Length
Octave
Loop Point
Loop Speed
16 16/16
15
14
13
12
11
10
09
08
07
06
05
04
03
02
01
02 03 04 05 06 07 08 09 10 11 12 13 14 15 16
01
Mode:
Layer
Tempo
Transpose
Volume
Block
Panpot
Scale
24
26
Score No.
Song File Name:
Owner’s Name:
Date:
Time:
User Voice File 3:
User Voice File 2:
User Voice File 1:
Page 27

TENORI-ON Specifications
Sequencer
=
Note Resolution
Gate Time
Octaves
Tempo (BPM)
.......................................9 types
Scales
Transpose
Performance Modes
Other Functions
Maximum Active Notes
Tone Generator
=
Tone Generator Type
Maximum Polyphony
Preset Voices
....................................... 2 processors
Effects
Sampling
Card
=
........................................... Song/Block/Layer/Setting/Sampling
Save
..........................................Song/Block/Layer/Setting/Sampling
Load
Rename
........................................ Song/Block/Layer/Setting/Sampling
Delete
Format
=
Specifications and descriptions in this owner’s manual are for information purposes only. Yamaha Corp. reserves the right to change or modify products or specifications at any time without prior
notice. Since specifications, equipment or options may not be the same in every locale, please check with your Yamaha dealer.
......................q = 96 clocks
................................. 10 ms—9990 ms
.................................... -5—+5
........................... 40—240
................................ -7—+8
............... 6 types: Score, Random, Draw,
Bounce, Push, Solo
...................... Clock, power-save, synchronized
.......................... 253 (239 normal, 14 drum kit)
.................................. 3 voices (Raw audio with a
.................................... Song/Block/Layer/Setting/Sampling
performance with two TENORI-ON
instruments, recording, TENORION song playback
......... Push Mode: 64
Random Mode: 64 points
Draw Mode: 64 points
............. AWM2
............. 32 notes
Reverb: 10 types
Chorus: 5 types
maximum length of 0.97 sec., up to
16 samples per voice)
* Using the supplied TENORI-ON
User Voice Manager software.
Controller & Display
=
LED Buttons
Rear LED Display Points (TNR-W only)
.................................................... 256 (No function)
Function Buttons
CLEAR, OK, CANCEL Buttons
Jog Dial
Display
Sound
=
Stereo Speakers
Connectors
=
Line Out/Phones
Mini DIN
Card Slot
DC In
Power Supply
=
6 “AA” alkaline batteries (TNR-W only)
AC Adaptor
Dimensions & Weight
=
Dimensions
Weight
Supplied Accessories
=
Mini DIN cable, CD-ROM x 1, AC Adaptor (PA-3C, PA-130 or
equivalent Yamaha AC adaptor), Quick Guide, Installation Guide,
Precautions
............................ 256
................... 10 (L1—L5, R1—R5)
. . 1 each
...................................... 122 x 32 dot graphic LCD device
.....................1-watt output power
..................... Stereo mini phone jack x 1
.................................... MIDI IN: for synchronized
..................................SD Memory Card compatible
......................................... Connector for PA-3C, PA-130 or
.............................. PA-3C, PA-130 or equivalent
.............................. 205 x 205 x 32 mm
....................................... TNR-W: Approx. 700g (1 lbs. 9 oz.)
(yellow-green backlight), 20
characters x 4 lines, monochrome
performance using two TENORION instruments
MIDI OUT: for external device
control
equivalent Yamaha AC adaptor
Yamaha AC adaptor
(8-1/16” x 8-1/16” x 1-1/4”)
(without batteries)
TNR-O: Approx. 610g (1 lbs. 6 oz.)
27
Page 28

http://www.global.yamaha.com/tenori-on/
Yamaha Home Keyboards Home Page
http://music.yamaha.com/homekeyboard/
Yamaha Manual Library
http:/ /www.yamaha.co.jp/manual/
U.R.G., Pro Audio & Digital Musical Instrument Division, Yamaha Corporation
© 2007 Yamaha Corporation
WK993 40 701MWCP0.0 -0 0A0
Printed in Japan
 Loading...