

Page 1
Synth Arp & Drum Pad Owner’s Manual
• Copying of the commercially available music sequence data and/or digital audio files is strictly
prohibited except for your personal use.
• The software and this owner’s manual are exclusive copyrights of Yamaha Corporation.
• Copying of the software or reproduction of this manual in whole or in part by any means is expressly
forbidden without the written consent of the manufacturer.
© 2012 Yamaha Corporation. All rights reserved.
• Yamaha makes no representations or warranties with regard to the use of the software and
documentation and cannot be held responsible for the results of the use of this manual and the
software.
• The screen displays as illustrated in this Owner’s Manual are for instructional purposes, and may
appear somewhat different from the screens which appear on your devicer.
• Apple, iPad are trademarks of Apple Inc., registered in the U.S. and other countries.
• The company names and product names in this Owner’s Manual are the trademarks or registered
trademarks of their respective companies.
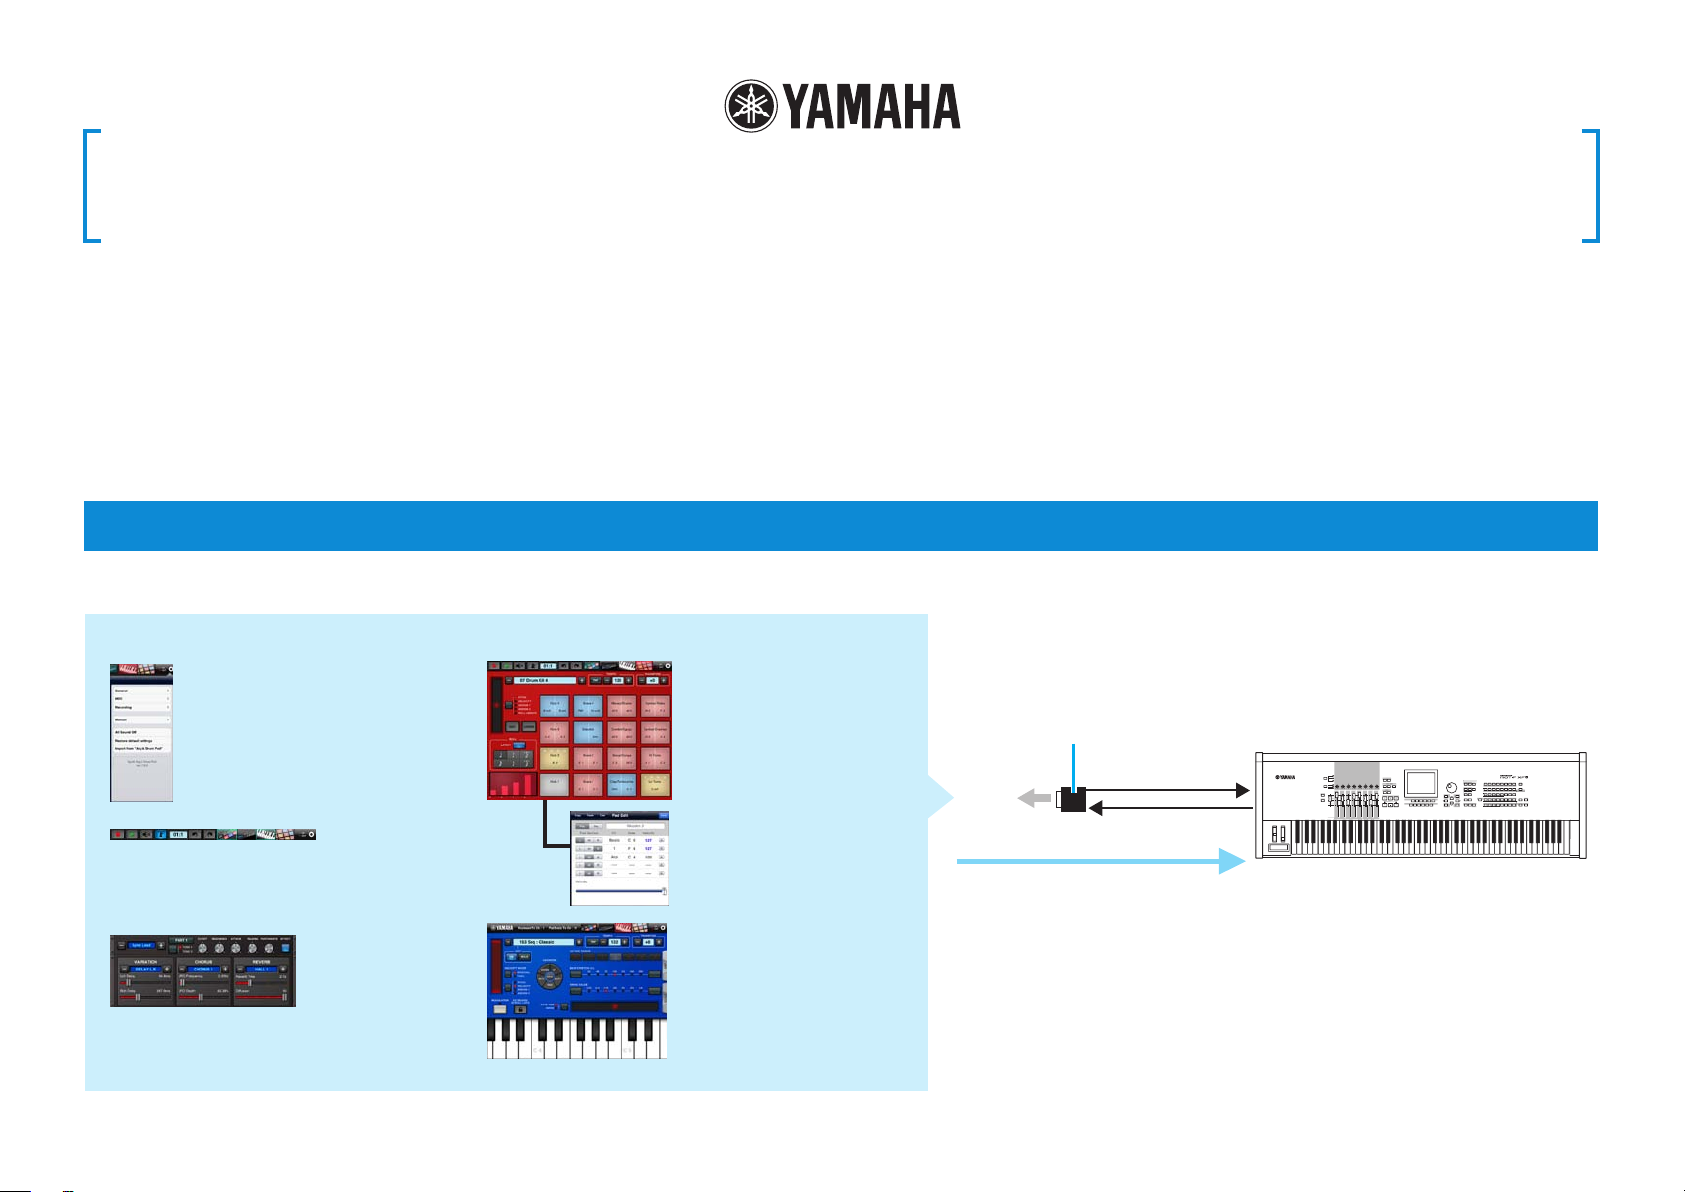
What is Synth Arp & Drum Pad?
This application lets use the iPad as a controller for Arpeggio playback and playing Drum sounds, both on the iPad itself as well as on an external synthesizer.
Synth Arp & Drum Pad
Utility window
For common setting
parameters to the Keyboard
display, Drum Pad display,
Recording window and Tone
Generator window.
Recording window
For recording your performance in the
Keyboard display and the Pad display, or
playing back the recorded data.
Drum Pad display
For playing the Drum sounds
of the synthesizer.
Pad Edit window
For assigning specific MIDI
notes to each Pad.
Keyboard display
For controlling Arpeggio
playback of the synthesizer.
By using MIDI cables and a Yamaha i-MX1, connect the instrument to an iPad.
The MOTIF XF can be connected via wireless Network MIDI. For details about wireless
MIDI connectivity, refer to the “New Functions in MOTIF XF Version 1.20” Manual.
i-MX1
MIDI OUT
MIDI instrument
MIDI IN
iPad
MIDI IN MIDI OUT
The iPad operation will transmit MIDI
note on/off messages to the MIDI
instrument.
NOTE
For information about the MIDI settings of
the instrument, refer to the Owner’s Manual
which came with the instrument.
Tone Generator window
Sets up the tone generator built into this
application.
Page 2
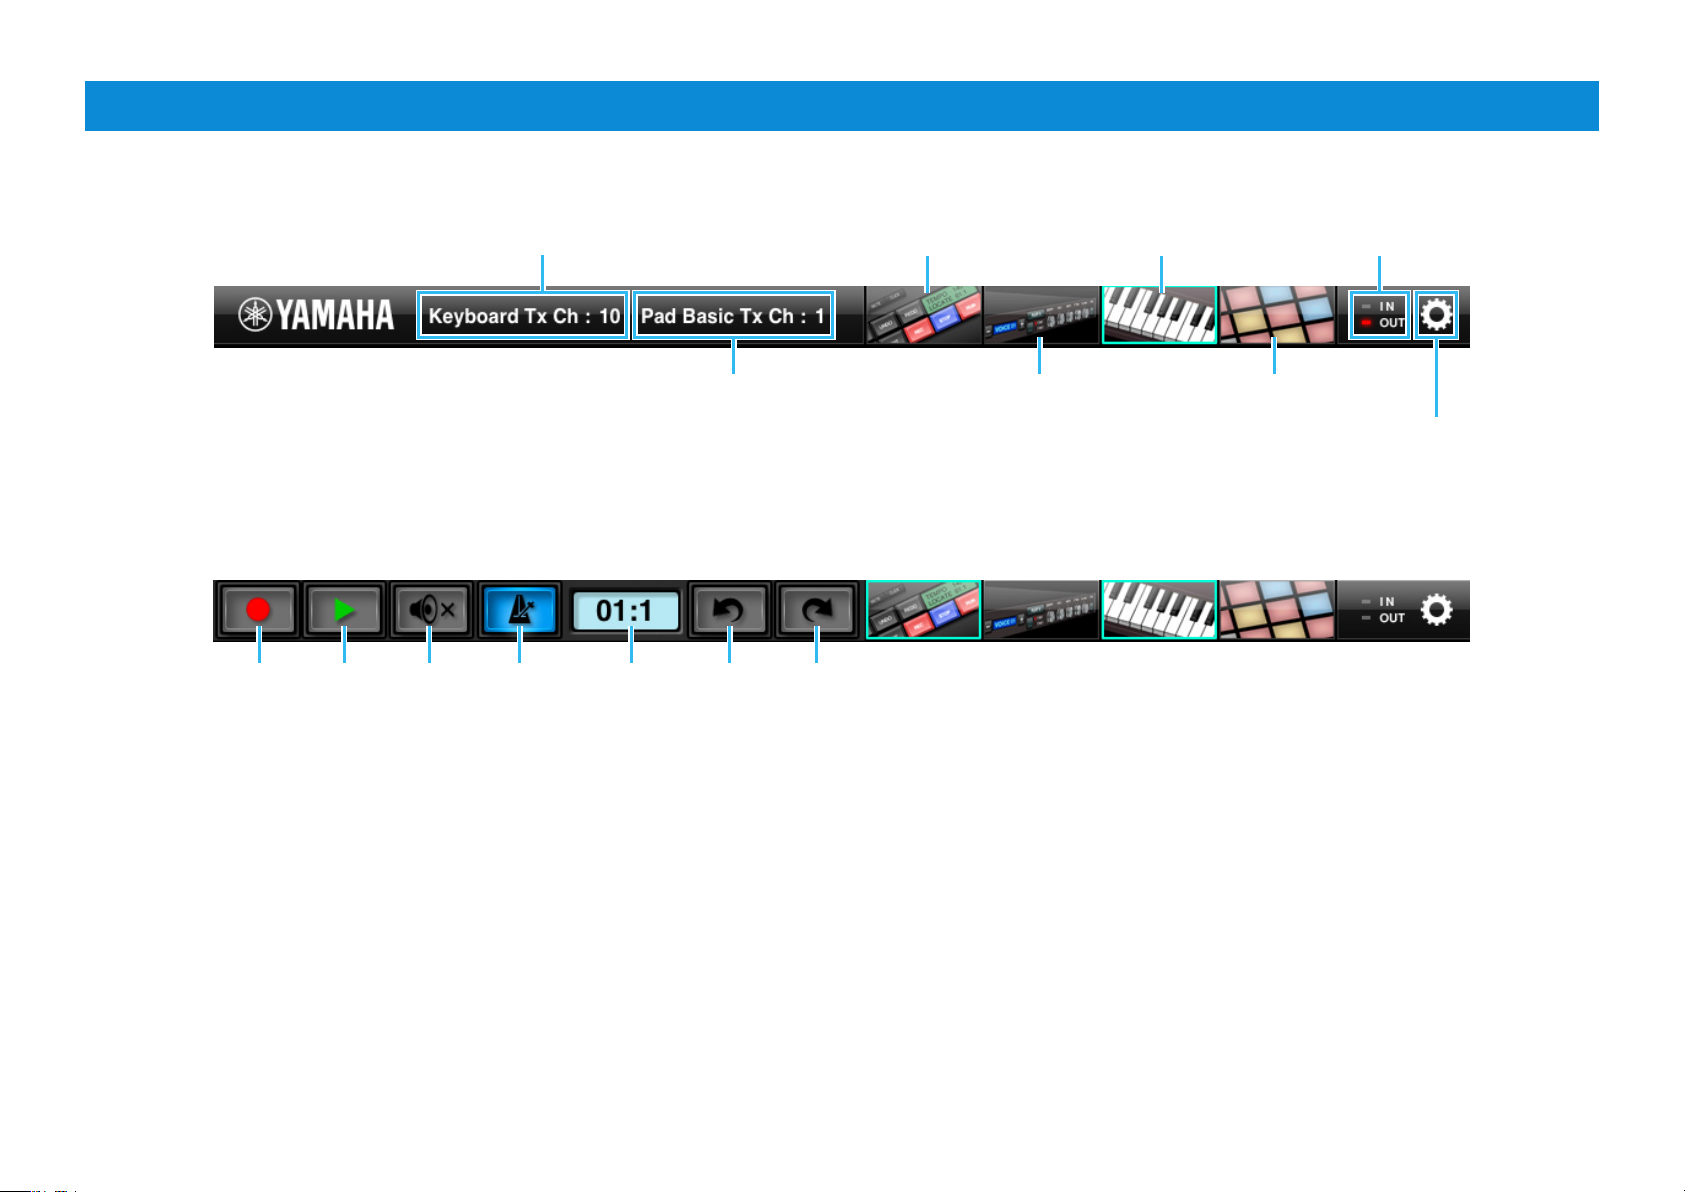
Title bar
Indicates the MIDI Transmit
Channel used in the
Keyboard display.
Indicates the MIDI
Transmit Channel
used in the Drum Pad
display.
Tapping this opens or
closes the Recording
window in the Title bar.
Tapping this opens or closes
the Tone Generator window
beneath the Title bar.
Touching this for a while calls
up the Part Select window.
Tapping this changes
the screen to the
Keyboard display.
Recording window
Records your performance in the Keyboard display and the Pad display, or plays back the recorded data.
1 2 3 4 5 6 7
1 Rec
Tapping this starts or stops the recording.
Touching this for a while opens the Quantize window.
2 Play
Tapping this starts playback or stops playback/recording.
6 Undo
Cancels the last recorded data.
7 Redo
Recovers the Undo data.
Each lamp flashes
according to the MIDI in/out
messages.
Tapping this changes
the screen to the
Drum Pad display.
Tapping this opens
or closes the Utility
window.
3 Mute
Alternately turns the sound of the recorded data on or off.
4 Click
Alternately turns the tempo click sound on or off.
5 Song Length Indicator
Indicates the current measure and beat while recording.
Synth Arp & Drum Pad Owner’s Manual 2
Page 3
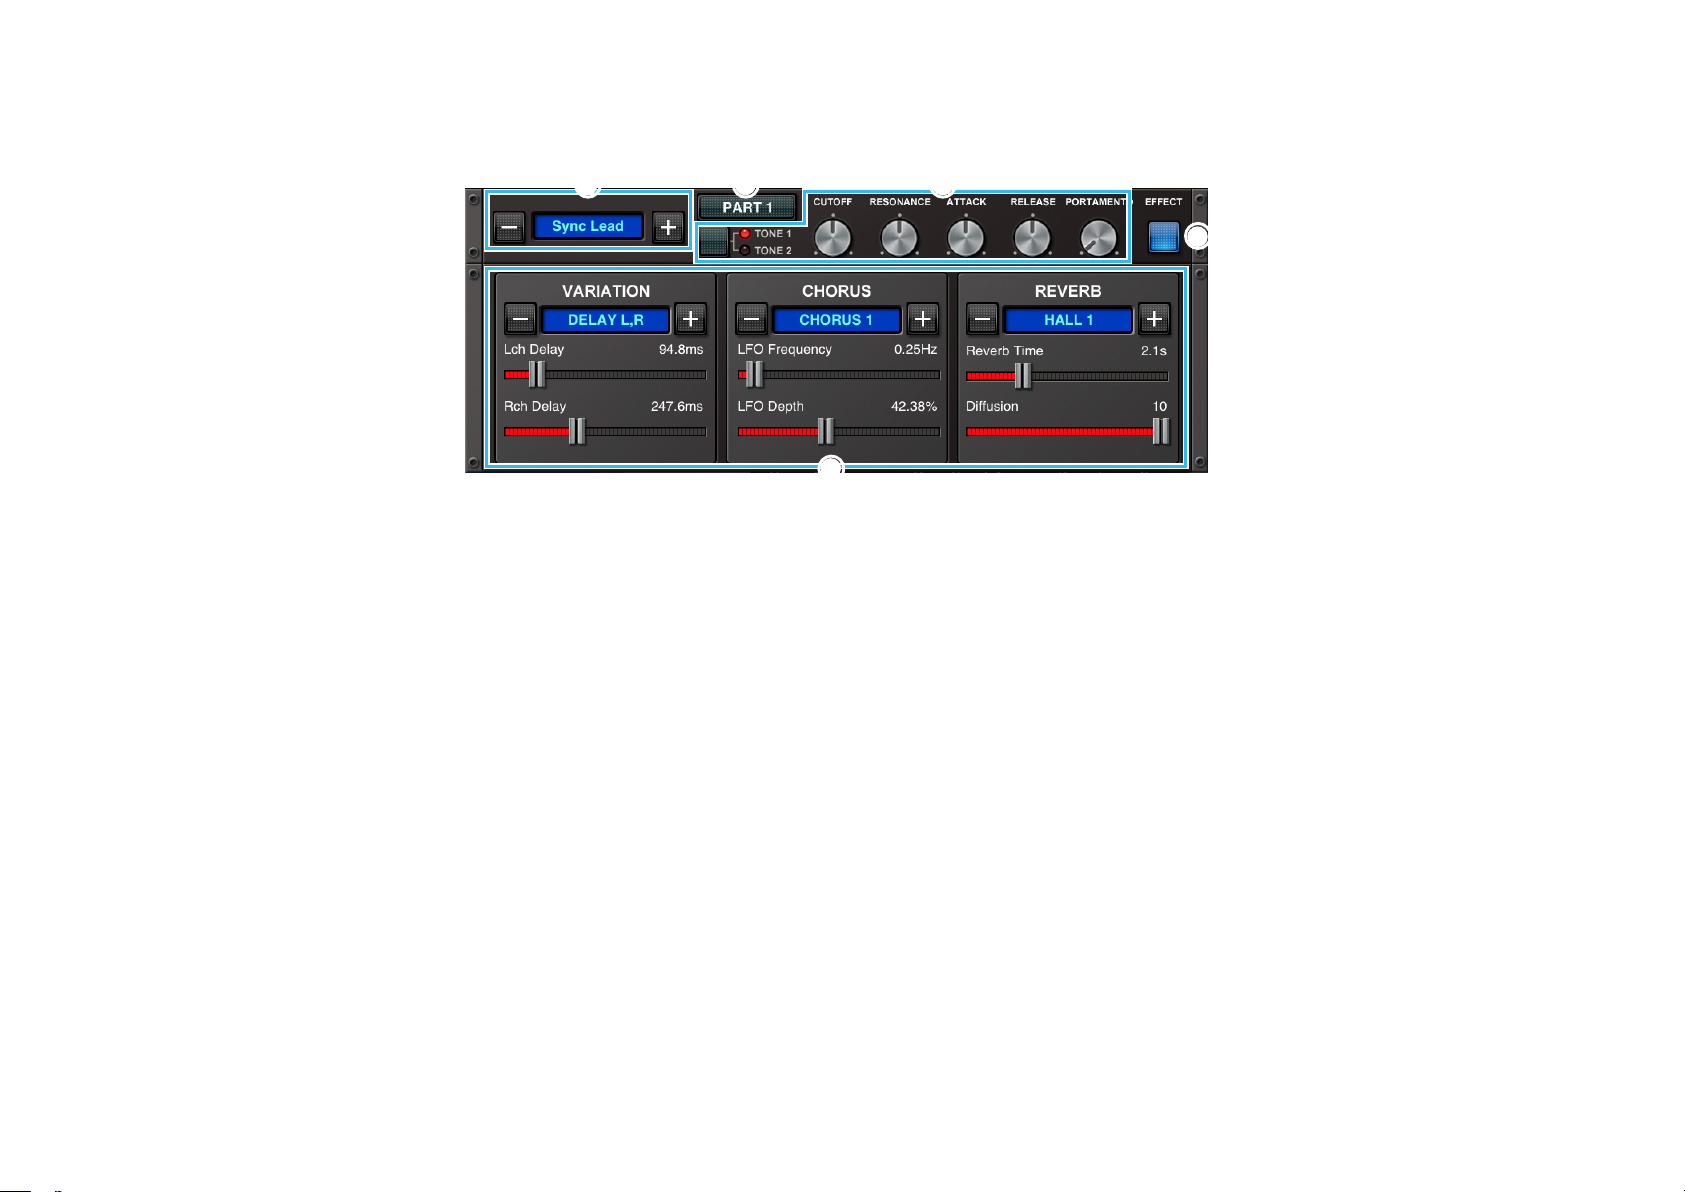
Tone Generator window
Sets up the tone generator for control by the Keyboard or Drum Pad. The tone generator consists of sixteen parts, which can be specified via
the [PART] button.
11 2
1 Indicates the Voice name of the selected Part.
Tapping the Voice name calls up the Voice list, in which you can
select another Voice.
Also, tapping [+]/[-] selects another Voice.
2 Changes the tone generator Part.
3 By using the five knobs called up via the [TONE] button, you can
edit certain Voice parameters of the current Part.
Each time [TONE] is tapped, the TONE 1 and 2 lamps light
alternately, and the assigned five parameters are changed.
4 Opens or closes the Effect window.
2 33
5
5
4
4
5
Effect window
Lets you make settings for the Variation, Chorus and Reverb
effects.
Tapping [+]/[-] or the indicators changes the Effect type.
Each Effect type has two parameters which can be edited via
the sliders.
The settings here are commonly shared among all the sixteen
parts.
Synth Arp & Drum Pad Owner’s Manual 3
Page 4

Utility window
This window lets you set the common parameters of this application. Tapping “General,” “MIDI” or “ Recording” calls up each setting window.
Title bar
Utility window
Tapping this calls up the Owner’s Manual.
Transmits an All Sound Off to the Tone Generator.
Tapping here initializes all the settings.
This is shown only when the application
“Keyboard Arp & Drum Pad” has been installed
in the same iPad.
You can import the data of “Keyboard Arp &
Drum Pad” by tapping here.
Indicates the program version.
General setting parameters
MIDI setting parameters
Recording setting parameters
Synth Arp & Drum Pad Owner’s Manual 4
Page 5
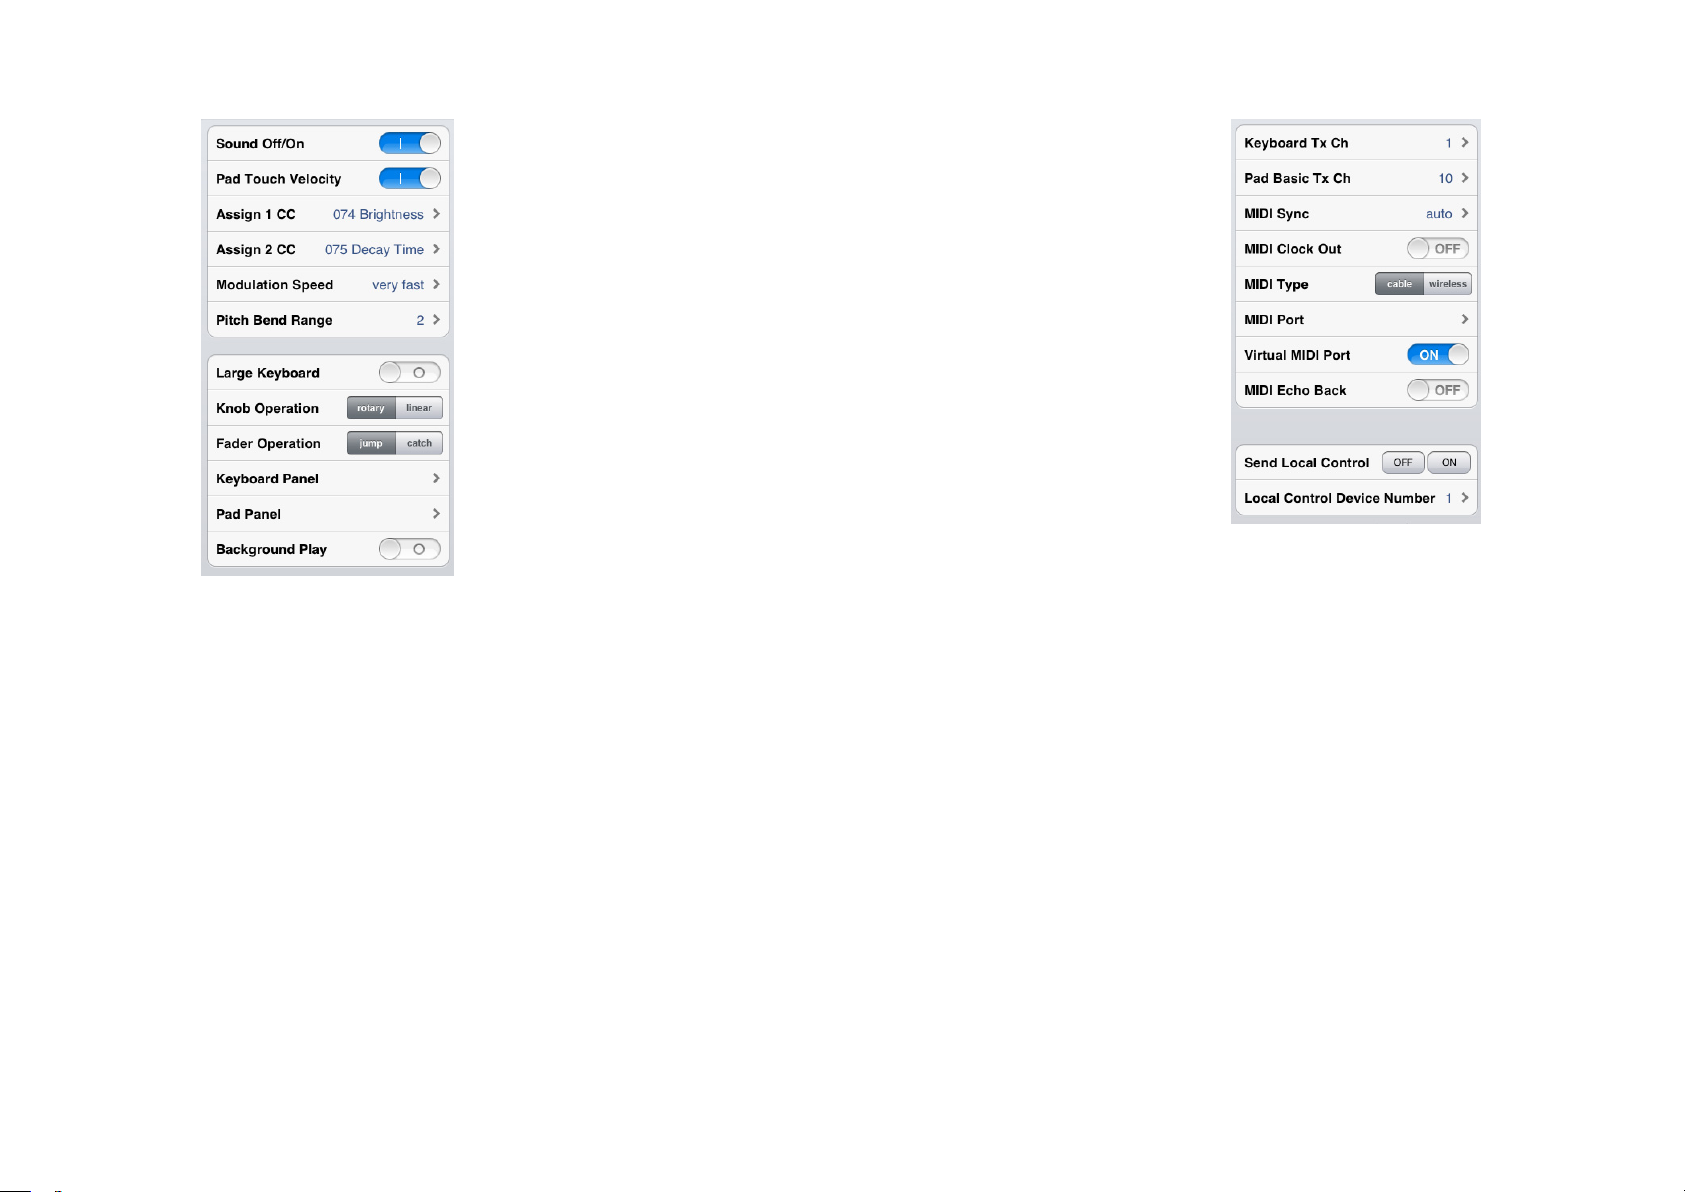
General setting parameters
• Sound Off/On
When this is set to Off, the tone generator of this
application produces no sound.
• Pad Touch Velocity
When this is set to On, your tapping strength affects
the velocity of the sound.
• Assign 1 CC
Determines the MIDI Control Change number
assigned to “ASSIGN1” in the Slider section.
• Assign 2 CC
Determines the MIDI Control Change number
assigned to “ASSIGN2” in the Slider section.
• Modulation Speed
Determines the Modulation speed when
[MODULATION] is tapped.
• Pitch Bend Range
Determines the maximum Pitch Bend range in
semitones.
• Large Keyboard
When this is set to On, the keys in the Keyboard
display are shown in larger size.
• Knob Operation
Determines the knob behavior.
rotary: Dragging around the knob will rotate it in the
same direction.
linear: Dragging vertically upward from the knob
rotates the knob clockwise, and dragging downward
rotates counter-clockwise.
• Fader Operation
Determines the Fader behavior.
jump: The Fader jumps to any tapped location in the
Fader area.
catch: The Fader will be “caught” as you drag on it.
• Keyboard Panel
Selects the background picture of the Keyboard
display.
• Pad Panel
Selects the background picture of the Drum Pad
display.
• Background Play
When this is set to On, this application keeps working
in the background, even if you close it by tapping the
Home button of the iPad.
MIDI setting parameters
• Keyboard Tx Ch
Sets the MIDI Transmit Channel from the Keyboard
display.
• Pad Basic Tx Ch
Sets the MIDI Transmit Channel from the Drum Pad
display.
When set to “Arp,” the Drum Pad display lets you
control Arpeggio playback via the Keyboard Transmit
Channel.
• MIDI Sync
Determines whether Arpeggio/Step Sequencer
playback will be synchronized to the internal clock or
the external MIDI clock.
auto: When MIDI clock continuously comes from an
external MIDI device, playback is synchronized to the
external MIDI clock. When no MIDI clock continuously
comes from an external MIDI device, playback is
synchronized to the internal MIDI clock.
Synth Arp & Drum Pad Owner’s Manual 5
Page 6

internal: Playback is synchronized to the internal
clock.
NOTE
When the MIDI Type is set to “wireless,” only “internal” is available.
• MIDI Clock Out
When this is set to On, F8 tempo clock messages are
transmitted by this application.
• MIDI Type
Determines the connection method between the iPad
and MIDI instrument.
cable: Should be selected when connected via the
i-MX1.
wireless: Should be selected when connected via
wireless Network MIDI.
NOTE
When set to “wireless,” make the Wi-Fi setup in Settings > Wi-Fi in
your iPad.
• MIDI Port
When the MIDI Type is set to “wireless:”
You can select the MIDI port of the instrument
connected to the iPad via wireless.
When the MIDI Type is set to “cable:”
You can select the MIDI port of the instrument
connected to the iPad via a cable or of another
application which is working in the background.
• Virtual MIDI Port
By setting the Virtual MIDI Port to On, you can transmit
MIDI messages from another application to this
application, and vice versa.
• MIDI Echo Back
When the parameter is set to On, this application
“echoes” any received data.
• Send Local Control
Transmits the Local On/Off MIDI message to the
specific instruments which are indicated in the
window.
• Local Control Device Number
Determines the Device Number of the Send Local
Control.
Recording setting parameters
• Rec Type
Determines the recording type.
normal: Repeatedly executes overdub (looped)
recording for the specified measures until manually
stopped.
one loop: Executes recording for the specified
measures in one single pass, then stops.
• Rec Quantize
Determines the quantize resolution for recording.
• Arp Rec Quantize
When this is set to On, the Quantize (specified via
Rec Quantize) is applied to the recording of Arpeggio
playback.
• Rec Tempo
Determines the recording tempo as a ratio of the
Tempo value in the Keyboard and Pad display.
• Rec Precount
Sets the precount before starting the recording
operation.
• Controller Rec
When this is set to Off, control change and pitch bend
data are not recorded.
• Click Type
Determines the Tempo click sound.
• Click Mode
rec: Click sounds in Song recording.
rec/play: Click sounds both in Song recording and
playback.
• Song Number
Selects the Song number as target for recording,
Song Length, and Delete Song data.
• Song Length
Determines the measure amount of a Song specified
via the Song Number.
• Delete Song data
Deletes the Song specified via the Song Number.
Synth Arp & Drum Pad Owner’s Manual 6
Page 7

Keyboard display
This display lets you control Arpeggio playback of the synthesizer. Select the desired Arpeggio Type (5) then tap the keyboard at the bottom.
4Slider and PITCH/VELOCITY/ASSIGN1/ASSIGN2
%
4
4
8
8
7
5
5
9
9
)
)
$
23
23
$
7
!
!
@
@
#
#
$
6
6
6
6
When “PITCH” is selected, the Slider can be used as a Pitch Bend wheel.
When “VELOCITY” is selected, dragging the Slider sets the velocity range,
and tapping any key transmits the corresponding MIDI note message at the
velocity range specified on the Slider.
When “ASSIGN1” or “ASSIGN2” is selected, tapping the Slider transmits the
-1
Controller MIDI message specified in the Utility window.
5 Arpeggio type
Indicates the current Arpeggio type. Tapping [+]/[-] changes the Arpeggio
type in single steps. Or to change the Arpeggio type, tap the Arpeggio type
-3
indicator to call up the Arpeggio Type list, then tap the desired type.
6-1, -2 LIST
Tapping [LIST] calls up the Arpeggio Type list as shown at right. To select a
Type, tap the desired Category at left then tap the desired Type.
Arpeggio Type list
-2
66
1
1
1 Keyboard
Tapping or touching a key will transmit the corresponding MIDI note message.
Dragging this area leftward or rightward will scroll through the entire keyboard.
2 KEYBOARD SCROLL LOCK
Tapping here locks or unlocks keyboard scrolling. The red color indicates the locked
condition.
When this is set to On, selecting an Arpeggio Type calls up the
appropriate Voice.
3 MODULATION
Tapping this transmits Modulation Wheel messages via MIDI.
Synth Arp & Drum Pad Owner’s Manual 7
Page 8

6-3 Scale window
6
Sets the scale of the Keyboard in the Keyboard display.
Selects the root
note for the scale.
A
B
Selects the Scale
type.
C
Tapping here closes the window.
The Keyboard indication differs depending on the selected Scale
type and root note.
Root
Scale
A: When this is set to On, you can modify the sound by sliding your finger
vertically or vibrating your finger horizontally on the Keyboard.
When the SCALE type is Off, this function is not available.
B: Indicates a parameter which can be controlled by sliding your finger vertically
on the Keyboard. Tapping the indicator calls up the parameter list and lets you
select the favorite one.
C: Indicates a parameter which can be controlled by vibrating your finger
horizontally on the Keyboard. Tapping the indicator calls up the parameter list and
lets you select the favorite one.
7 TEMPO
To change the tempo, tap the Tempo value to call up the slider then operate the
slider, or tap [TAP] three times at the desired tempo.
Tapping [-]/[+] changes the value in single steps
8 ARP ON/OFF HOLD
When ARP ON/OFF is turned on, tapping the key will trigger Arpeggio playback.
When HOLD is turned on, the Arpeggio cycles even if you release your fingers
from the Keyboard (1).
9 VARIATION
Determines the playback variation of the Arpeggio.
) VELOCITY MODE
When THRU is turned on, the Arpeggio plays back with your performance velocity.
When ORIGINAL is turned on, the Arpeggio plays back at the velocities included
in the Arpeggio sequence data.
! OCTAVE RANGE
Determines the octave setting of Arpeggio playback.
@ BEAT STRETCH (%)
Determines the actual playback tempo by multiplying the current tempo by the
percentage value selected here. The “50%” setting doubles the tempo while the
“200%” setting halves the tempo.
# SWING VALUE
Determines the type of note that serves as the basis for the Swing parameter:
1/32 (32nd note), 3/16 (16th note triplet), 1/16 (16th note), 3/8 (8th note triplet), 1/8
(8th note), 3/4 (1/4 note triplet), 1/4 (1/4 note)
$ Slider, GATE TIME/SWING
When “GATE TIME” is turned on, the Slider operation controls the gate time of
the Arpeggio notes. When “SWING” is turned on, the Slider operation adjusts
the timing of the even-numbered back-beat notes (according to the note type
specified in the SWING VALUE parameter) to produce a swing feel.
% TRANSPOSE
Shifts the note in semitone steps.
Synth Arp & Drum Pad Owner’s Manual 8
Page 9

Drum Pad display
This display lets you play the Drum sounds of the synthesizer. Select a Drum Set (2), then tap the desired Drum Pads on the display.
Lets you copy and paste all the Drum Set data
from Drum Set to Drum Set. Tap the copy source
Drum Set name, then tap [COPY]. Next, tap
the copy destination Drum Set name, then tap
2
2
Same as those on the Keyboard display.
[PASTE] to execute the Copy operation.
6
3
2
4
7
2
3
3
5
2
Red Pad
Up to one note is assigned
to each of the left and right
sections of the Pad.
Gray Pad
No note is assigned.
11
Yellow Pad
Tapping this starts the Step
Sequencer. The settings can be
made in the Pad Edit window.
Blue Pad
Indicates that two or more notes are
assigned to either the right or left
section of the Pad.
Tapping here calls up the on-screen keyboard
and the e-mail icon which lets you edit the Pad
Set name and send the Pad Set data via e-mail.
Synth Arp & Drum Pad Owner’s Manual 9
Page 10

1 Pad
Tap any Pad to transmit the assigned MIDI note messages. You can assign up to
five MIDI notes to a single Pad, and if desired you can assign the control function
of the Step Sequencer. To make detailed settings, use the Pad Edit window.
2 Pad Set
Indicates the current Pad Set, which includes the settings regarding what notes are
assigned to each of the sixteen Drum Pads. Tapping [+]/[-] changes the Pad Set in
single steps. Or to change the Pad Set, tap the Pad Set name indicator to call up
the Pad Type list, then tap the desired one.
3 EDIT, LEARN
To edit the settings for each Pad:
1) Tap [EDIT].
2) Tap the desired Pad to call up the Pad Edit window and the on-screen keyboard.
3) Make the settings including the note assignment as described below.
You can set the desired Note and Velocity also by tapping [LEARN] then pressing
the key on the actual keyboard of the connected synthesizer.
4 Slider
When “PITCH” is selected, the Slider can be used as a Pitch Bend wheel.
When “VELOCITY” is selected, dragging the Slider sets the velocity range, and
tapping any key transmits the MIDI note message via the velocity range specified
on the Slider.
When “ASSIGN1” or “ASSIGN2” is selected, tapping the Slider transmits the
Controller MIDI message specified in the Utility window.
When “ROLL LENGTH” is selected, controlling the slider will modify the length of
the Roll according to your finger position.
7 Roll indicator
The information of the Roll is shown while holding the Roll Note button.
Velocity
Gate Time
Pinching in and out horizontally adjusts the Gate Time of all the notes. Dragging
each bar vertically adjusts the Velocity.
5 LATCH
When this button is switched to blue by tapping, simply tap the Roll Note button to
hold it.
6 Roll Note buttons
Determines the note length of the roll produced by touching the Pad while holding
a Roll Note button.
Synth Arp & Drum Pad Owner’s Manual 10
Page 11

Pad Edit window
From this window, you can set the MIDI notes assigned to the Pad. Select “Play” or “Seq” (3), then make the settings.
Pad Edit window with “Play”
1
3
4
2
5
6 7
Pad Edit window with “Seq”
! @
Velocity
Gate time
A measure length
$
)
9
8
1 Lets you copy all the Pad data from Pad to Pad.
Open the Pad Edit window of the copy source,
then tap [COPY]. Next, open the Pad Edit window
of the copy destination, then tap [PASTE] to
execute the Copy operation.
2 Clears all note assignments.
3 Play: Tapping the Pad transmits the assigned
MIDI note messages once.
Seq: Tapping the Pad starts playback of the Step
Sequencer, which transmits the assigned MIDI
note messages.
4 L: The Note message is transmitted only when
you tap the left half section of the Pad.
All: The Note message is transmitted when you
tap any location of the Pad.
R: The Note message is transmitted only when
you tap the right half section of the Pad.
5 Determines the MIDI Transmit Channel.
To set the MIDI Transmit Channel, tap the Ch
value to call up the “Pad Individual Channel”
switch in the window.
When the switch is turned to OFF, the Ch is set to
Basic automatically and the value specified via
the Pad Basic Tx Ch of Utility is set as the MIDI
Transmit Channel.
When the switch is turned to ON, the channel
selector is called up and you can select the
channel from “1” to “16” and “Arp.”
When the Arp is selected, Arpeggio playback
is transmitted when ARP ON/OFF is turned ON
in the Keyboard display. In this case, the value
specified via the Keyboard Tx Ch of Utility is set
as the MIDI Transmit Channel.
6 To set the Note, tap the desired key in the on-
screen keyboard.
7 To set the Velocity, tap the Velocity value or
values to call up the slider then adjust the slider.
8 Clears the note assignment.
9 Tapping here calls up the on-screen keyboard
which lets you edit the Pad name.
) Finalizes the settings then closes the window.
! Determines the Note length of the Step
Sequencer.
@ Turns on and off each measure (1 – 4) of the Step
Sequencer.
# Pinching in and out horizontally adjusts the Gate
Time of all the notes.
$ Dragging each bar vertically adjusts the Velocity.
Synth Arp & Drum Pad Owner’s Manual 11
Page 12

Arpeggio Type List
General Voice types which are most suitable for the respective Arpeggio Types are listed in the “Voice Type” column. Among these, the ones in quotation marks are
specific Voices actually provided on the MOTIF XF.
Cate gor y Arp N o. Arp N ame
1 Contmp Rk 4 / 4 4 126 "Power S tandard Kit 2 "
DrPc 2 StndRo ck 4 / 4 4 131 –
DrPc 3 PowerRck 4 / 4 4 120 "Power Standard Kit 1"
DrPc 4 AlternR k 4 / 4 4 10 0 "Roc k Stereo Kit 2 "
DrPc 5 MondoRck 4 / 4 4 94 –
DrPc 6 XoverR k 4 / 4 2 100 " Rock Stere o Kit 1"
DrPc 7 Rck&Roll 4 / 4 4 172 "Power Standard Kit 2"
DrPc 8 GuitrPp1 4 / 4 2 90 "Power Standard Kit 1"
DrPc 9 GuitrPp2 4 / 4 4 100 "D ry Standard Kit"
DrPc 10 Unpluggd 4 / 4 4 120 "Power Standard Kit 1"
DrPc 11 FingrPck 4 / 4 4 94 " Dry S tandard Kit "
DrPc 12 Brit Pop 4 / 4 2 8 6 "Brus h Kit"
DrPc 13 EP Balld 4 / 4 2 60 "Power Sta ndard Kit 2 "
DrPc 14 8 BtBasic 4 / 4 4 120 "Power Standard Kit 1"
DrPc 15 8Bt Sof t 4 / 4 4 10 0 –
DrPc 16 16BtBld1 4 / 4 4 75 –
DrPc 17 16BtBld2 4 / 4 2 64 –
DrPc 18 16Bt Pop 4 / 4 4 103 –
DrPc 19 6/8 Po p 4 / 4 4 100 –
DrPc 20 6/8Balld 4 / 4 2 58 "Power Standard Kit 2"
DrPc 21 Funk 4 / 4 4 107 " Hyper S tandard Kit"
DrPc 22 Funk Rock 4 / 4 4 95 "Power Standard Kit 1"
DrPc 23 JazzFun k 4 / 4 4 120 –
DrPc 24 SlowEasy 4 / 4 4 72 –
DrPc 25 ClubJa zz 4 / 4 4 125 –
DrPc 26 PopS huff 4 / 4 4 94 –
DrPc 27 GosplFnk 4 / 4 4 10 6 –
DrPc 28 Std Disco 4 / 4 4 120 "Po wer Standard Kit 2"
DrPc 29 PhilyDsc 4 / 4 2 100 "Power St andard Kit 1"
DrPc 30 ChartPop 4 / 4 4 92 " Hip Hop K it 3"
DrPc 31 New R&B 4 / 4 1 97 –
DrPc 32 Smooth 4 / 4 4 64 "Hip Ho p Kit 1"
DrPc 33 HipHop1 4 / 4 2 94 "Break K it"
DrPc 34 H ipHop2 4 / 4 2 105 "Hip Ho p Kit 3"
DrPc 35 HipHop3 4 / 4 2 104 –
DrPc 36 Hip Rock 4 / 4 4 132 "H ouse Kit 2 "
Time
Signa ture
Leng th
Original
Tempo
Voice Ty pe
Cate gor y Arp N o. Arp N ame
DrPc 37 Regeto n 4 / 4 4 98 "H ip Hop Kit 1"
DrPc 38 R egetnPc 4 / 4 4 98 " Percussio n Kit"
DrPc 39 S oulBeat 4 / 4 4 124 "Power Standard Kit 1"
DrPc 40 SoulShuf 4 / 4 4 98 " Power St andard Kit 2 "
DrPc 41 Big Beat 4 / 4 4 115 "Break K it"
DrPc 42 Breakbt 4 / 4 4 115 –
DrPc 43 Lo Beat 4 / 4 2 140 –
DrPc 44 DrumnBas 4 / 4 2 154 "Drum'n' Bass Kit "
DrPc 45 Techno 4 / 4 8 13 5 " House Kit 2"
DrPc 46 Trance 4 / 4 4 140 "Analog T9 Kit "
DrPc 47 DreamDnc 4 / 4 4 136 "House Kit 1"
DrPc 48 Ibiza 4 / 4 2 135 –
DrPc 49 EuroTeck 4 / 4 2 140 "Tekno Kit"
DrPc 50 Club Hus 4 / 4 2 128 "House Kit 1"
DrPc 51 House 4 / 4 2 123 "Analog T9 Kit"
DrPc 52 Garage 4 / 4 2 127 "House K it 1"
DrPc 53 AcoJaz z 4 / 4 4 204 "D ry Standard Kit"
DrPc 54 ModernJz 4 / 4 16 218 "Power Standard Kit 1"
DrPc 55 ShfBlues 4 / 4 4 115 "Powe r Standard K it 2"
DrPc 56 Slw Blues 4 / 4 2 49 –
DrPc 57 PnBoogie 4 / 4 8 160 –
DrPc 58 Reggae 4 / 4 4 102 "Dr y Standard K it"
DrPc 59 ReggeShf 4 / 4 4 90 "Power Standard Kit 1"
DrPc 60 Salsa 4 / 4 2 123 "Dry Sta ndard Kit"
DrPc 61 S alsaPc 4 / 4 4 123 –
DrPc 62 Sam ba 4 / 4 4 120 –
DrPc 63 SambaPc 4 / 4 4 120 –
DrPc 64 Bossa 4 / 4 4 124 "Brush K it"
DrPc 65 BossaPc 4 / 4 4 124 –
DrPc 66 Spanish 4 / 4 2 120 "Hyper S tandard Ki t"
CPrc 67 R& B Dsc 4 / 4 2 110 Chromatic Perc.
CPrc 68 Trance 4 / 4 4 140 –
CPrc 69 Ethnic1 6 / 4 5 118 –
CPrc 70 Ethnic2 7 / 4 3 120 –
CPrc 71 MOD 4 / 4 2 120 –
CPrc 72 Trill 4 / 4 1 120 –
Time
Signa ture
Leng th
Original
Tempo
Voice Ty pe
Cate gor y Arp N o. Arp N ame
Bass 73 Cntm pRk1 4 / 4 4 126 Pick Bass
Bass 74 Cntmp Rk2 4 / 4 4 126 –
Bass 75 StndRck1 4 / 4 4 131 Finger Bass
Bass 76 S tndRck 2 4 / 4 4 131 –
Bass 77 Power Rk1 4 / 4 4 120 Pick Bass
Bass 78 PowerR k2 4 / 4 4 120 –
Bass 79 AlternRk 4 / 4 4 10 0 Finger Bass
Bass 80 XoverRk 4 / 4 1 100 –
Bass 81 Rck&Roll 4 / 4 4 172 Pick Bass
Bass 82 GuitrPp1 4 / 4 2 90 Finger Bass
Bass 83 GuitrPp2 4 / 4 4 100 Pick Bass
Bass 84 Unpluggd 4 / 4 4 113 Ac oustic Bas s
Bass 85 FingrPck 4 / 4 1 120 Finger Bass
Bass 86 Brit Pop 4 / 4 2 8 6 –
Bass 87 EP Balld 4 / 4 2 60 –
Bass 88 8 BtBasic 4 / 4 4 120 –
Bass 89 8BtSof t 4 / 4 4 10 0 –
Bass 90 16BtBlld 4 / 4 4 75 –
Bass 91 16Bt Pop 4 / 4 4 103 Slap Bas s
Bass 92 6/8 Po p 4 / 4 4 100 Finger Bass
Bass 93 6/8Balld 4 / 4 2 58 –
Bass 94 FingrBs1 4 / 4 1 115 –
Bass 95 F ingrBs2 4 / 4 3 115 –
Bass 96 F ingrBs3 4 / 4 2 150 –
Bass 97 F ingrBs4 4 / 4 2 89 –
Bass 98 F ingrBs5 4 / 4 1 115 –
Bass 99 SlapBass 4 / 4 3 120 Slap Bass
Bass 100 FunkRock 4 / 4 4 95 Finger Bass
Bass 101 Ja zFunk1 4 / 4 2 120 –
Bass 102 JazFunk2 4 / 4 4 120 –
Bass 103 Sl owEasy 4 / 4 4 72 –
Bass 104 ClubJazz 4 / 4 4 125 –
Bass 105 PopS huff 4 / 4 4 94 S lap Bass
Bass 106 Go splFnk 4 / 4 4 10 6 Finger Bass
Bass 107 StdDisco 4 / 4 1 120 –
Bass 108 PhilyDsc 4 / 4 2 10 0 –
Time
Signa ture
Leng th
Original
Tempo
Voice Ty pe
Synth Arp & Drum Pad Owner’s Manual 12
Page 13

Cate gor y Arp N o. Arp N ame
Bass 109 C hartPop 4 / 4 4 92 Synt h Bass
Bass 110 NewR&B1 4 / 4 1 97 –
Bass 111 NewR&B2 4 / 4 1 97 –
Bass 112 Smooth 4 / 4 2 64 –
Bass 113 Hip Hop1 4 / 4 2 105 –
Bass 114 HipH op2 4 / 4 2 94 –
Bass 115 HipHop3 4 / 4 2 94 –
Bass 116 HipHop4 4 / 4 2 94 –
Bass 117 Hip Rock 4 / 4 4 132 Finger Ba ss
Bass 118 Regeton 4 / 4 4 9 8 Sy nth Bass
Bass 119 GruvBass 4 / 4 2 120 –
Bass 120 SoulBeat 4 / 4 4 124 Finge r Bass
Bass 121 S oulShu f 4 / 4 4 9 8 –
Bass 122 ChillOut 4 / 4 2 79 –
Bass 123 Big Beat 4 / 4 4 115 –
Bass 124 Bre akbt1 4 / 4 4 115 Synth Bas s
Bass 125 Brea kbt2 4 / 4 4 88 –
Bass 126 DrumnB as 4 / 4 4 170 –
Bass 127 Techno 4 / 4 8 135 –
Bass 128 Trance 4 / 4 4 140 –
Bass 129 Tek Bass 4 / 4 1 138 –
Bass 130 DreamDnc 4 / 4 2 136 –
Bass 131 Ibiza 4 / 4 2 135 –
Bass 132 DiscoHus 4 / 4 4 126 –
Bass 133 ClubHus1 4 / 4 1 128 –
Bass 134 ClubHus 2 4 / 4 1 128 –
Bass 135 Garage 4 / 4 2 127 –
Bass 136 Hou seBas 4 / 4 4 12 0 –
Bass 137 AcidBass 4 / 4 1 120 –
Bass 138 AcoJa zz1 4 / 4 4 204 Acoustic Bass
Bass 139 AcoJa zz2 4 / 4 4 204 –
Bass 140 ModrnJz1 4 / 4 16 218 –
Bass 141 Mo drnJz2 4 / 4 16 218 –
Bass 142 ShfBlues 4 / 4 4 115 Pick Bass
Bass 143 Slw Blues 4 / 4 2 49 Fing er Bass
Bass 144 PnBoogie 4 / 4 8 160 Acoustic B ass
Bass 145 Reggae 4 / 4 4 102 Fin ger Bass
Bass 146 ReggeShf 4 / 4 4 90 –
Bass 147 Salsa 4 / 4 4 123 Ac oustic Bas s
Bass 148 Montuno 4 / 4 4 10 0 Finger Bass
Bass 149 Samba 4 / 4 2 120 –
Bass 150 Bossa 4 / 4 4 124 –
Bass 151 LatinHus 4 / 4 4 138 –
Bass 152 S panish 4 / 4 1 120 –
Time
Signa ture
Leng th
Original
Tempo
Voice Ty pe
Cate gor y Arp N o. Arp N ame
Seq 153 Classic 4 / 4 1 120 Sy n Comp/ Lead
Seq 154 Oct Seq 4 / 4 1 130 –
Seq 155 RandmS eq 4 / 4 1 9 0 –
Seq 156 Vel G ruv 4 / 4 1 134 –
Seq 157 X-Sweep 4 / 4 1 140 –
Seq 158 Simpl e1 4 / 4 1 130 –
Seq 159 Simple2 4 / 4 1 130 –
Seq 16 0 Simple3 4 / 4 1 130 –
Seq 161 Basic 4 / 4 1 13 0 –
Seq 162 Fif thSQ1 4 / 4 1 130 –
Seq 16 3 Fif thSQ2 4 / 4 1 130 –
Seq 16 4 MuteLine 4 / 4 1 134 –
Seq 16 5 Chodal 4 / 4 2 150 –
Seq 16 6 A lternRk 4 / 4 4 100 –
Seq 167 Trance1 4 / 4 4 115 –
Seq 16 8 Trance2 4 / 4 1 140 –
Seq 16 9 Trance3 4 / 4 4 140 –
Seq 170 Trance4 4 / 4 1 140 –
Seq 171 Trance5 4 / 4 1 140 –
Seq 172 Trance6 4 / 4 4 140 –
Seq 173 Trance7 4 / 4 1 140 –
Seq 174 Trance8 4 / 4 1 130 –
Seq 175 Trance9 4 / 4 2 145 –
Seq 176 Trance10 4 / 4 2 145 –
Seq 177 DreamDnc 4 / 4 1 136 –
Seq 178 Ibiza1 4 / 4 2 135 –
Seq 179 Ibiza 2 4 / 4 2 135 –
Seq 180 Tekno 4 / 4 2 120 –
Seq 181 SynArp1 4 / 4 1 13 0 –
Seq 182 SynAr p2 4 / 4 1 130 –
Seq 183 SynArp3 4 / 4 1 130 –
Seq 184 SynArp4 4 / 4 1 9 0 –
Seq 185 SynArp5 4 / 4 1 138 –
Seq 186 Melody1 4 / 4 1 70 –
Seq 187 Melody 2 4 / 4 1 70 –
Seq 188 Electro1 4 / 4 1 130 –
Seq 189 Electro2 4 / 4 1 130 –
Seq 19 0 Electro3 4 / 4 1 130 –
Seq 191 Electro4 4 / 4 1 130 –
Seq 192 Electro5 4 / 4 1 130 –
Seq 193 Electro6 4 / 4 1 130 –
Seq 19 4 CompuB as 4 / 4 1 130 –
Seq 19 5 Poly Arp 4 / 4 1 120 –
Seq 19 6 Tek Echo 4 / 4 2 120 –
Time
Signa ture
Leng th
Original
Tempo
Voice Ty pe
Cate gor y Arp N o. Arp N ame
Seq 197 SuperArp 4 / 4 2 120 –
Seq 198 AcidLine 4 / 4 1 120 –
Seq 19 9 Doves 4 / 4 1 150 –
Seq 20 0 P ulsLine 4 / 4 2 120 –
Seq 2 01 SyncpEco 4 / 4 2 120 –
Seq 20 2 Waggle 4 / 4 1 140 –
ChSq 2 03 S ynChrd1 4 / 4 1 130 –
ChSq 2 04 SynChrd2 4 / 4 1 90 –
ChSq 2 05 BasChrd1 4 / 4 2 130 –
ChSq 2 06 Bas Chrd2 4 / 4 1 130 –
ChSq 207 Chill Chd 4 / 4 1 90 –
ChSq 2 08 TrancRtm 4 / 4 4 140 –
ChSq 2 09 Ibiza 4 / 4 2 135 –
ChSq 210 G arage 4 / 4 2 127 –
ChSq 211 Syncopat 4 / 4 2 120 –
HySq 212 Hybrid1 4 / 4 1 13 0 Syn Comp/ Lead/Pad
HySq 213 Hybrid2 4 / 4 1 95 –
HySq 214 Hybrid 3 4 / 4 1 13 0 –
HySq 215 Hybrid4 4 / 4 1 13 0 –
HySq 216 Hybrid 5 4 / 4 1 10 6 –
ApKb 217 Pf Arp1 4 / 4 2 64 Ac oustic Piano
ApKb 218 P f Arp2 4 / 4 2 74 –
ApKb 219 P f Arp3 4 / 4 2 13 0 –
ApKb 220 Pf Arp4 4 / 4 1 116 –
ApKb 2 21 Pf Arp5 4 / 4 1 82 –
ApKb 222 Pf Arp6 4 / 4 2 13 0 –
ApKb 2 23 Pf Arp7 4 / 4 2 13 0 –
ApKb 2 24 Pf Arp8 4 / 4 1 74 –
ApKb 2 25 70s Rock1 4 / 4 2 130 –
ApKb 226 70sR ock2 4 / 4 4 130 –
ApKb 2 27 EP Balld 4 / 4 2 6 0 Electric Pian o
ApKb 2 28 Slowfeel 4 / 4 1 74 –
ApKb 229 16 Bt Pop 4 / 4 4 103 –
ApKb 230 AnalgPop 4 / 4 2 93 –
ApKb 2 31 ClubJ azz 4 / 4 4 125 Acoustic Piano
ApKb 2 32 Chart Pop 4 / 4 1 92 Electric Piano
ApKb 233 Swing E P 4 / 4 1 101 –
ApKb 234 6/8 R&B 4 / 4 2 61 –
ApKb 235 HipH op1 4 / 4 2 105 –
ApKb 236 HipHop2 4 / 4 2 105 –
ApKb 2 37 HipHop 3 4 / 4 2 105 Harpsichord
ApKb 238 Clavi1 4 / 4 1 110 Clavi
ApKb 239 Clavi2 4 / 4 1 110 –
ApKb 24 0 Cl avi3 4 / 4 1 124 –
Time
Signa ture
Leng th
Original
Tempo
Voice Ty pe
Synth Arp & Drum Pad Owner’s Manual 13
Page 14

Cate gor y Arp N o. Arp N ame
ApKb 241 Dr umnBas 4 / 4 4 170 Electric P iano
ApKb 242 ClubHus 4 / 4 2 128 –
ApKb 24 3 H ouseP f 4 / 4 2 130 Acoustic Pian o
ApKb 24 4 Reggae 4 / 4 2 92 Clavi
ApKb 24 5 Salsa 4 / 4 1 123 Acoustic Piano
ApKb 24 6 Montuno 4 / 4 2 100 –
ApKb 247 PnoLatin 4 / 4 2 120 –
Orgn 248 House Org 4 / 4 1 130 Organ
Orgn 249 Reggae 4 / 4 1 92 –
Orgn 250 LatinOrg 4 / 4 1 110 –
GtPl 251 Strum1 4 / 4 2 120 Acoustic Guitar
GtPl 252 S trum2 4 / 4 2 120 –
GtPl 253 S trum3 4 / 4 2 120 –
GtPl 254 SteelGtr 4 / 4 4 120 –
GtPl 255 GtrArp1 4 / 4 1 12 0 –
GtPl 256 GtrArp2 4 / 4 1 12 0 –
GtPl 257 OvdrGtr1 4 / 4 4 120 Od/Dist Gu itar
GtPl 258 OvdrGtr2 4 / 4 4 120 –
GtPl 259 O vdrGtr3 4 / 4 4 120 –
GtPl 260 OvdrGtr4 4 / 4 4 120 –
GtPl 261 ContmpRk 4 / 4 4 126 –
GtPl 262 StndRck1 4 / 4 4 131 –
GtPl 263 StndRc k2 4 / 4 4 131 –
GtPl 264 P owerRk1 4 / 4 4 120 –
GtPl 265 PowerRk2 4 / 4 4 120 –
GtPl 266 Po werRk3 4 / 4 4 120 –
GtPl 267 AlterRk1 4 / 4 4 97 –
GtPl 268 AlterRk2 4 / 4 4 97 –
GtPl 269 Xover Rk1 4 / 4 2 100 –
GtPl 270 XoverR k2 4 / 4 2 100 –
GtPl 271 Rck&R oll 4 / 4 4 172 Clean Guitar
GtPl 272 GuitrPp1 4 / 4 2 90 Acoustic Guitar
GtPl 273 G uitrPp2 4 / 4 1 90 –
GtPl 274 GuitrPp3 4 / 4 4 10 0 –
Time
Signa ture
Leng th
Original
Tempo
Voice Ty pe
Cate gor y Arp N o. Arp N ame
GtPl 275 GuitrPp4 4 / 4 4 10 0 Clean Guitar
GtPl 276 GuitrPp5 4 / 4 1 90 Acoust ic Guitar
GtPl 277 Unplug1 4 / 4 4 120 –
GtPl 278 Unplug2 4 / 4 2 120 –
GtPl 279 Unplug3 4 / 4 2 120 –
GtPl 280 F ingrPk1 4 / 4 2 120 –
GtPl 281 Fi ngrPk2 4 / 4 2 120 –
GtPl 282 BritPop1 4 / 4 2 8 6 –
GtPl 283 BritPop2 4 / 4 2 8 6 Clean Guitar
GtPl 284 EP Balld 4 / 4 2 60 –
GtPl 285 8BtBasic 4 / 4 4 120 –
GtPl 286 8Bt Soft 4 / 4 4 100 A coustic Guitar
GtPl 287 16BtBlld 4 / 4 4 75 Clean Guita r
GtPl 288 6/8 Pop 4 / 4 4 100 –
GtPl 289 6/8 Balld 4 / 4 2 58 –
GtPl 290 Funky1 4 / 4 2 120 –
GtPl 291 Fun ky2 4 / 4 2 120 –
GtPl 292 Funky3 4 / 4 1 120 –
GtPl 293 Cl eanGt1 4 / 4 4 107 –
GtPl 294 Cle anGt2 4 / 4 2 120 –
GtPl 295 Cle anGt3 4 / 4 2 120 –
GtPl 296 Cl eanGt4 4 / 4 4 127 –
GtPl 297 Cle anGt5 4 / 4 4 107 –
GtPl 298 Spank y 4 / 4 2 105 –
GtPl 299 FunkRock 4 / 4 4 9 4 –
GtPl 300 Ja zzFunk 4 / 4 4 120 –
GtPl 301 SlowEasy 4 / 4 4 72 –
GtPl 302 GosplFnk 4 / 4 4 106 –
GtPl 303 PopShuff 4 / 4 4 9 4 –
GtPl 304 StdDisco 4 / 4 4 120 –
GtPl 305 PhilyDsc 4 / 4 2 10 0 –
GtPl 306 New R &B 4 / 4 1 97 Acoustic Guitar
GtPl 307 Smooth 4 / 4 2 64 –
GtPl 308 H ipHop1 4 / 4 2 94 Mute Guitar
Time
Signa ture
Leng th
Original
Tempo
Voice Ty pe
Cate gor y Arp N o. Arp N ame
GtPl 309 Hip Hop2 4 / 4 2 94 –
GtPl 310 HipRoc k1 4 / 4 4 9 0 Od/D ist Guitar
GtPl 311 HipRock 2 4 / 4 4 132 –
GtPl 312 Sou lBeat 4 / 4 4 124 Clean Guitar
GtPl 313 So ulShuf 4 / 4 4 98 –
GtPl 314 Big Beat 4 / 4 4 115 Od/Dist Guitar
GtPl 315 AcoJazz 4 / 4 4 204 Clean Guita r
GtPl 316 ModernJz 4 / 4 16 218 –
GtPl 317 ShfBlues 4 / 4 4 115 M ute Guitar
GtPl 318 SlwBlues 4 / 4 2 4 9 Od/Dist Guita r
GtPl 319 PnBoogie 4 / 4 4 160 Clean G uitar
GtPl 320 Reggae 4 / 4 2 10 2 –
GtPl 321 ReggeShf 4 / 4 4 9 0 –
GtPl 322 Samba 4 / 4 4 120 Acoustic Guitar
GtPl 323 Bossa 4 / 4 4 124 –
GtPl 324 Spanish1 4 / 4 2 120 –
GtPl 325 Spanish2 4 / 4 2 120 –
GtPl 326 Lic k1 4 / 4 4 120 Od/Dist Guitar
GtPl 327 Lick 2 4 / 4 4 120 –
GtPl 328 Lick 3 4 / 4 2 120 –
GtPl 329 Lic k4 4 / 4 4 120 –
GtPl 330 Lick5 4 / 4 1 120 –
Strn 3 31 Strings 4 / 4 1 101 Strings
Strn 3 32 New R&B 4 / 4 2 90 –
Strn 333 Piz z 4 / 4 1 120 Pizzicato S trings
Bras 334 Funk1 4 / 4 4 132 Brass Sectio n
Bras 335 Fun k2 4 / 4 1 132 –
Bras 336 Samba 4 / 4 2 120 –
RdPp 337 Hip Hop 4 / 4 2 105 Saxophone
RdPp 3 38 Soul 4 / 4 4 120 –
RdPp 3 39 Flutter 4 / 4 1 120 Flu te/Ree d
Lead 340 R& B Dsc1 4 / 4 1 110 Synth Lead
Lead 341 R&B Dsc2 4 / 4 2 110 –
Lead 342 Regeton 4 / 4 4 98 –
Time
Signa ture
Leng th
Original
Tempo
Voice Ty pe
U.R.G., Digital Musical Instruments Division
© 2012 Yamaha Corporation
205M W-A0
Synth Arp & Drum Pad Owner’s Manual 14
 Loading...