

Page 1

OWNER’S MANUAL
SNOWMOBILE
LIT-12628-02-40
SXV60L
SXV60ERL
VT60L
8EX-28199-12
Page 2

Page 3

A
ESU00286
1-
MACHINE IDENTIFICATION
Identification number records
A. FRAME NUMBER:
CZ-01E
B
B. ENGINE NUMBER (PRIMARY ID):
CZ-01E
C. KEY NUMBER:
C
CZ-01E
Record the frame number, engine number (Primary ID),
and key number in the spaces provided for assistance
when ordering spare parts from a Yamaha dealer.
1
The
frame number
is the seventeen-digit number
stamped on the frame of the snowmobile. (See
fig.È.)
2
The
engine number
is stamped in the location as
shown. (See fig. É.)
3
Key number
(See fig. Ê.)
Also, record and keep the ID numbers in a separate
place in case the snowmobile is stolen.
Page 4

ESU00011
2-
INTRODUCTION
Congratulations on your purchase of a Yamaha snowmobile. This model is the result of Yamaha’s vast experience
in the production of fine sporting and touring snowmobiles. It represents the high degree of craftsmanship and
reliability that have made Yamaha a leader in these
fields.
This manual will give you an understanding of the operation, inspection, and basic maintenance of this snowmobile. If you have any questions concerning the operation
or maintenance of your snowmobile, please consult a
Yamaha dealer.
To maintain the high quality and performance of this
snowmobile, it is important that you and your Yamaha
dealer pay close attention to the recommended maintenance schedules and operating instructions contained
within this manual.
SXV60L
SXV60ERL
VT60L
OWNER’S MANUAL
©2005 by Yamaha Motor Corporation, U.S.A.
1st Edition, April 2005
All rights reserved.
Any reprinting or unauthorized use
without the written permission of
Yamaha Motor Corporation, U.S.A.
is expressly prohibited.
Printed in Japan
P/N LIT-12628-02-40
Page 5

WARNING
@
PLEASE READ AND UNDERSTAND THIS MANUAL
COMPLETELY BEFORE OPERATING THE SNOWMOBILE.
@
NOTE:
@
●
Yamaha continually seeks advancements in product
design and quality. Therefore, while this manual contains the most current product information available
at the time of printing, there may be minor discrepancies between your snowmobile and this manual. If
there is any question concerning this manual, please
consult a Yamaha dealer.
●
This manual should be considered a permanent part
of this snowmobile and should remain with the snowmobile when resold.
@
Particularly important information is distinguished in this
manual by the following notations.
The Safety Alert Symbol means ATTENTION! BECOME
ALERT! YOUR SAFETY IS INVOLVED!
WARNING
@
Failure to follow WARNING instructions could result in
severe injury or death to the snowmobile operator, a
bystander, or a person inspecting or repairing the snowmobile.
CAUTION
@
:
A CAUTION indicates special precautions that must be
taken to avoid damage to the snowmobile.
NOTE:
@
A NOTE provides key information to make procedures
easier or clearer.
Page 6

ESU00003
CONTENTS
YAMAHA MOTOR
CORPORATION, U.S.A.
SNOWMOBILE LIMITED
WARRANTY
YAMAHA EXTENDED SERVICE
(Y.E.S.)
LOCATION OF THE
IMPORTANT LABELS
SAFETY INFORMATION
DESCRIPTION
CONTROL FUNCTIONS
Main switch......................................5-1
Starter lever (choke) ........................5-2
Throttle lever....................................5-2
Throttle override system
(T.O.R.S.) ........................................5-2
Speedometer unit ............................5-4
High beam indicator light .................5-5
Fuel meter and grip/thumb warmer
level indicator...................................5-5
Fuel level warning indicator .............5-6
Oil level warning indicator................5-7
Coolant temperature warning
indicator ...........................................5-7
Self-diagnosis warning indicator ......5-8
Engine stop switch.........................5-10
Brake lever ....................................5-10
Parking brake lever........................5-11
Shift lever.......................................5-11
Headlight beam switch ..................5-12
Passenger grip warmer switch ......5-12
Shroud latches...............................5-13
Drive guard ....................................5-13
V-belt holders ................................5-14
Spark plug holders.........................5-14
Carburetor coolant shut-off lever ...5-14
.......................................1-1
...............................................1-4
.......................2-1
...................3-1
...................................4-1
....................5-1
Backrest ........................................5-15
Storage compartment....................5-15
PRE-OPERATION CHECKS
Fuel .................................................6-1
Engine oil.........................................6-2
Coolant ............................................6-2
Throttle lever ...................................6-3
Recoil starter ...................................6-3
Throttle override system
(T.O.R.S.) ........................................6-3
Brake ...............................................6-4
Brake fluid leakage..........................6-5
V-belt ...............................................6-5
Drive guard......................................6-5
Drive track .......................................6-6
Slide runners ...................................6-6
Skis and ski runners ........................6-7
Steering system...............................6-7
Lights...............................................6-7
Battery .............................................6-7
Air filter ............................................6-8
Fittings and fasteners ......................6-9
Tool kit and recommended
equipment........................................6-9
OPERATION
Starting the engine ..........................7-1
Emergency engine starting..............7-2
Break-in ...........................................7-4
Riding your snowmobile ..................7-5
Getting to know your snowmobile ...7-5
Learning to ride your snowmobile ...7-5
To start out and accelerate..............7-5
Braking ............................................7-5
Turning ............................................7-6
Riding uphill.....................................7-6
Riding downhill ................................7-7
Traversing a slope...........................7-7
Ice or icy surface .............................7-7
Hard-packed snow ..........................7-8
......................................7-1
..............6-1
Page 7

Operation on surfaces other than
snow or ice ......................................7-8
Maximizing drive track life ...............7-9
Driving ...........................................7-10
Stopping the engine.......................7-11
Transporting ..................................7-12
PERIODIC MAINTENANCE ...............8-1
Periodic maintenance chart .............8-1
Tool kit .............................................8-4
Checking the spark plug ..................8-4
Adjusting the engine idling
speed...............................................8-6
Adjusting the throttle cable ..............8-6
Adjusting the oil pump cable............8-7
Adjusting the carburetors.................8-7
Adjusting the high altitude
settings ..........................................8-10
Cooling system ..............................8-11
Replacing the V-belt ......................8-13
Checking the drive chain housing
oil level and the drive chain
tension ...........................................8-15
Checking the brake pads...............8-17
Checking the parking brake
pads...............................................8-17
Checking the brake fluid level........8-18
Changing the brake fluid................8-18
Suspension....................................8-19
Adjusting the drive track ................8-23
Aligning the skis.............................8-25
Lubrication .....................................8-26
Replacing a headlight bulb ............8-27
Adjusting the headlight beam ........8-27
Battery ...........................................8-28
Replacing a fuse............................8-29
Electric...........................................11-3
WIRING DIAGRAM ..........................12-1
TROUBLESHOOTING .......................9-1
STORAGE ........................................10-1
SPECIFICATIONS............................11-1
Dimensions....................................11-1
Engine ...........................................11-1
Chassis..........................................11-2
Page 8

ESU00004
CW-01E
1-
YAMAHA MOTOR CORPORATION, U.S.A.
SNOWMOBILE LIMITED WARRANTY
1-1
Page 9

CW-02E
1-2
Page 10

CW-03E
1-3
Page 11

ESU04280
CW-06E
YAMAHA EXTENDED SERVICE (Y.E.S.)
1-4
Page 12

1
SXV60
1
SXV60ER
ESU00007
2-
LOCATION OF THE
IMPORTANT LABELS
Please read the following labels carefully before operating this snowmobile.
NOTE:
Maintain or replace safety and instruction labels, as necessary.
8EK-77761-E0
1
8FB-77761-E0
VT60
8DM-77761-E0
2-1
Page 13

2
3 VT60
4AA-22259-60
2-2
Page 14

ESU00090
3-
SAFETY INFORMATION
When you ride your snowmobile, you must know and use
the following for your safety. Severe injury or death may
result if you ignore any of the following.
Before operating
1. Read the Owner’s Manual and all labels before oper-
ating this snowmobile. Become familiar with all of the
operating controls and their function. Consult a
Yamaha dealer about any control or function you do
not understand.
2. This snowmobile was not manufactured for use on
public streets, roads, or highways. Such use is prohibited by law, and you could collide with another
vehicle.
3. SXV60 and SXV60ER are designed to carry the
OPERATOR ONLY.
Passengers are prohibited. Carrying a passenger
can cause loss of control.
4. Do not operate the snowmobile after drinking alcohol
or taking drugs. Your ability to operate the snowmobile is reduced by the influence of alcohol or drugs.
5. For safety and proper care of the snowmobile, always
perform the pre-operation checks on pages 6-1–6-9
before starting the engine. Check the throttle, brake,
and steering for proper operation every time before
starting the engine. Make sure that the throttle lever
moves freely and it returns to the home position when
it is released.
6. Apply the parking brake before starting the engine.
Never drive the snowmobile with the parking brake
applied. This may overheat the brake disc and reduce
braking ability.
3-1
Page 15

7. Do not allow anyone to stand behind the snowmobile
when starting, inspecting, or adjusting the snowmobile. A broken track, track fittings, or debris thrown by
the track could be dangerous to the operator or
bystanders.
8. Handle fuel with care; it is HIGHLY FLAMMABLE.
Never add fuel when the engine is running or hot.
●
Allow the engine to cool for several minutes after
running.
Use an approved fuel container.
●
Fill the fuel tank outdoors with extreme care.
●
Never remove the fuel cap indoors. Never fill the
fuel tank indoors.
Never refuel while smoking or in the vicinity of an
●
open flame.
Make sure that the fuel tank cap is closed securely
●
after refueling. Wipe up any spilled fuel immediately.
9. If you swallow some gasoline, inhale a lot of gasoline
vapor, or get some gasoline into your eyes, see your
doctor immediately. If any gasoline spills on your skin
or clothing, immediately wash your skin with soap
and water, and change your clothes.
10. Wear protective clothing. Wear an approved helmet,
and a face shield or goggles. Also, wear a good quality snowmobile suit, boots, and a pair of gloves or mittens that will permit use of your thumbs and fingers
for operation of the controls.
Operation
1. Do not run the engine indoors, except when starting
the engine to transport the snowmobile in or out of
the building. Open the outside doors; exhaust fumes
are dangerous.
2. Be careful where you ride. There may be obstacles
hidden beneath the snow. Stay on established trails
to minimize your exposure to hazards. Ride slowly
and cautiously when you ride off of established trails.
Hitting a rock or stump, or running into wires could
cause an accident and injury.
3-2
Page 16

3. This snowmobile is not designed for use on surfaces
other than snow or ice. Use on dirt, sand, grass,
rocks, or bare pavement may cause loss of control
and may damage the snowmobile.
4. Avoid operating on glare ice, or on snow which has a
lot of dirt or sand mixed in. Operation under such
conditions will damage or result in rapid wear of ski
runners, drive track, slide runners, and drive sprockets.
5. Always ride with other snowmobilers when going on a
ride. You may need help if you run out of fuel, have an
accident, or damage your snowmobile.
6. Many surfaces such as ice and hard-packed snow
require much longer stopping distances. Be alert,
plan ahead and begin decelerating early. The best
braking method on most surfaces is to release the
throttle and apply the brake gently—not suddenly.
Maintenance and storage
1. Do not leave the snowmobile on its left side for an
extended period of time. Fuel may leak out from the
fuel breather hose.
2. Modifications made to the snowmobile not approved
by Yamaha, or the removal of original equipment may
render your snowmobile unsafe for use that may
cause severe personal injury. Modifications may also
make the snowmobile illegal to use.
3. Never store the snowmobile with fuel in the fuel tank
inside a building where ignition sources are present
such as hot water and space heaters, an open flame,
sparks, clothes dryers, and the like. Allow the engine
to cool off before storing the snowmobile in an
enclosed space.
4. Always refer to the “STORAGE” section if the snow-
mobile is to be stored for an extended period.
5. Maintain or replace safety and instruction labels, as
necessary.
3-3
Page 17
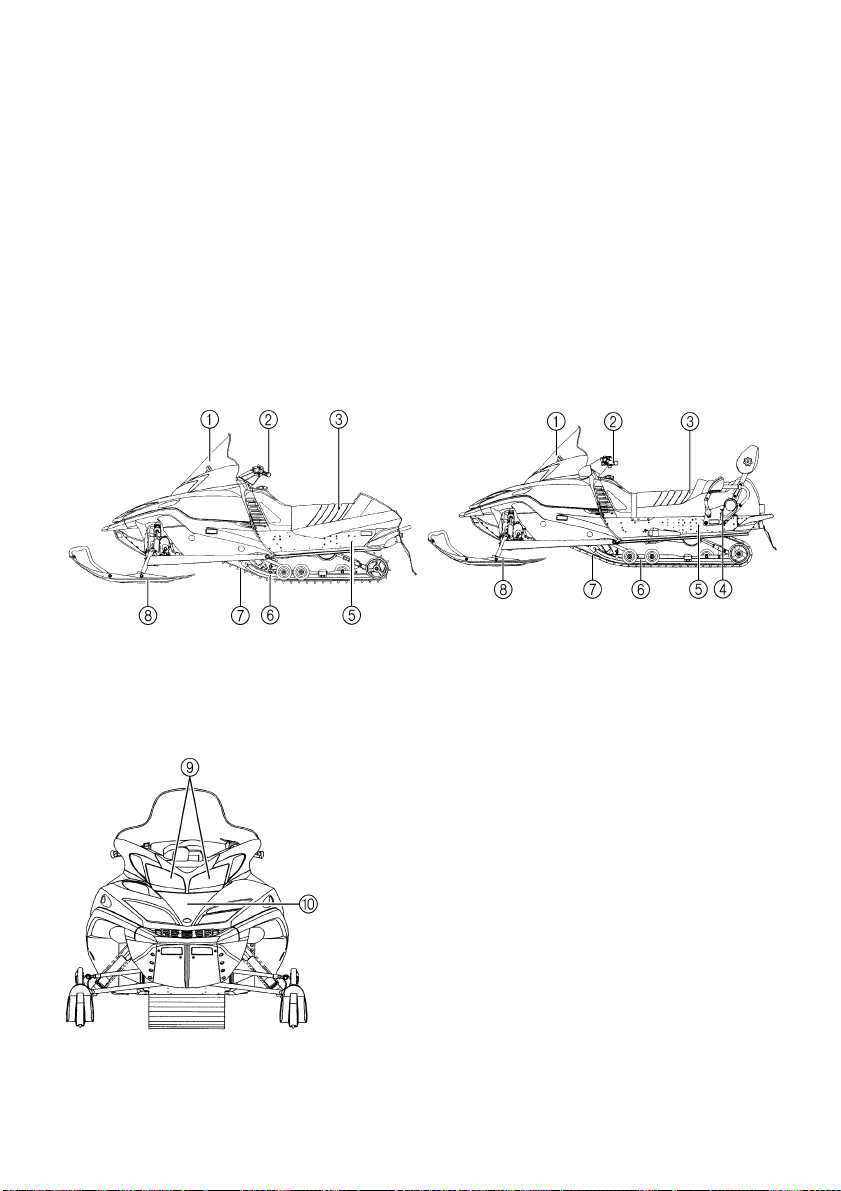
ESU00012
4-
DESCRIPTION
Windshield
1
Steering handlebar
2
Seat
3
Passenger grip warmer switch (VT60)
4
Frame
5
Slide rail suspension
6
Drive track
7
Skis
8
Headlight
9
Shroud
0
VT60SXV60/SXV60ER
4-1
Page 18

VT60
Storage compartment
A
Tail/brake light
B
Snow flap
C
Side mirror (VT60)
D
Brake lever
E
Parking brake lever
F
Grip warmer adjustment switch
G
Headlight beam switch
H
Engine stop switch
I
Thumb warmer adjustment switch
J
Throttle lever
K
Shift lever (SXV60ER/VT60)
L
Starter handle
M
Shroud latch
N
Main switch
O
Starter lever
P
Tachometer
Q
High beam indicator light
R
Warning light
S
Self-diagnosis warning indicator
T
Coolant temperature warning indicator
U
Fuel level warning indicator
V
Oil level warning indicator
W
Speedometer
X
Grip warmer indicator
Y
Select/reset button
Z
Thumb warmer indicator
[
Fuel meter and grip/thumb warmer heat
\
level indicator
Odometer/tripmeter
]
4-2
Page 19

ESU00013
5-
CONTROL FUNCTIONS
ESU00256
Main switch
The main switch controls the following items.
“OFF”
1
The ignition circuit is switched off.
The key can be removed only in this position.
“ON”
A
2
The ignition circuit is switched on.
The engine can be started.
NOTE:
@
The headlight, meter lights, and taillight will come on
after the engine starts.
@
B
For SXV60ER/VT60
“START”
3
The starting circuit is switched on.
The starter motor starts.
CAUTION
@
:
Release the switch immediately after the engine
starts.
@
SXV60
È
SXV60ER/VT60
É
5-1
Page 20

ESU00201
Starter lever (choke)
Use the starter lever (choke) when starting and warming
up a cold engine.
Starter lever (choke)
1
When starting a cold engine.
2
Warming up
3
When the engine is warm.
4
NOTE:
@
Refer the “Starting the engine” section for proper operation.
@
ESU00022
Throttle lever
Once the engine is running cleanly, squeezing a the throttle lever 1 will increase the engine speed and cause
engagement of the drive system. Regulate the speed of
the snowmobile by varying the throttle position. Because
the throttle is spring-loaded, the snowmobile will decelerate, and the engine will return to idle when it is released b.
WARNING
@
Check the throttle, brake, and steering for proper
operation before starting the engine.
@
ESU00231
Throttle override system (T.O.R.S.)
If the carburetor or throttle cable should malfunction during operation, the T.O.R.S. will operate when the throttle
lever is released.
The T.O.R.S. is designed to interrupt the ignition and
keep the engine speed between 2,800 and 3,000 r/min if
the carburetor fails to return to idle when the lever is
released.
5-2
Page 21

WARNING
@
If the T.O.R.S. is activated, make sure that the
●
cause of the malfunction has been corrected and
that the engine can be operated without a problem before restarting the engine.
Be sure to use the specified spark plug and spark
●
A
plug cap. Otherwise, the T.O.R.S. will not work
properly.
@
CA-01E
Mode
Item
A
Idling/
starting
B C
Running Trouble
Throttle switch Off On Off
B
C
Carburetor switch On Off Off
Engine Run Run
Idling/starting
È
Running
É
Tr o u b l e
Ê
Carburetor switch
1
Throttle switch
2
Throttle cable
3
Throttle valve
4
On
a
Off
b
T.O.R.S.
will operate
5-3
Page 22

ESU03901
Speedometer unit
The speedometer unit is equipped with the following:
a digital speedometer (which shows riding speed)
●
an odometer (which shows the total distance trav-
●
eled)
a tripmeter (which shows the distance traveled since
●
it was last set to zero)
warning indicators (which show self-diagnosis, cool-
●
ant temperature, fuel level, and oil level warnings)
a fuel meter (which shows the fuel remaining in the
●
fuel tank)
a grip/thumb warmer level indicator (which shows the
●
grip warmer level or the thumb warmer level)
After the engine is started, the tachometer 1 makes one
sweep, and the warning light 2 and all segments of the
meter 3 turn on and off once.
The grip warmer level is initially displayed for 5 seconds,
then switches to the fuel meter display.
Odometer and tripmeter modes
Pushing the select/reset button 4 switches the display
between the odometer mode “ODO” and the tripmeter
mode “TRIP”.
To reset the tripmeter, push the select/reset button for at
least one second while the tripmeter is displayed.
NOTE:
@
To switch the speedometer, odometer, and tripmeter displays between kilometers and miles, select the odometer
mode “ODO”, and then push the select/reset button
for at least 10 seconds while the snowmobile is stopped.
@
4
5-4
Page 23

ESU03630
High beam indicator light
The high beam indicator light 1 comes on when the high
beams of the headlights are switched on. (See page
5-14 for headlight beam switch operation.)
ESU03821
Fuel meter and grip/thumb warmer level indicator
The fuel meter and grip/thumb warmer level indicator
have eight segments 1 which show the amount of fuel
remaining in the fuel tank, the grip warmer level, or the
thumb warmer level.
Fuel meter
As the fuel level decreases in the fuel tank, the segments
disappear until the level goes down to the last segment
“E” (Empty). When this occurs, the fuel level warning
indicator 2 and the warning light 3 come on.
If the fuel level warning indicator and the warning light
come on, fill the fuel tank at the first opportunity.
NOTE:
@
The snowmobile must be stopped on a level surface to
obtain an accurate fuel meter reading. The fuel meter
reading changes as the snowmobile moves and depending on the inclination of the snowmobile.
@
Grip/thumb warmer level indicator
The grip warmer adjustment switch 1 and the thumb
warmer adjustment switch 2 control the electrically
heated handlebar grips and throttle lever respectively.
To raise the temperature, press each switch to “HI”. To
lower the temperature, press each switch to “LO”.
5-5
Page 24

NOTE:
@
The grip warmer indicator 3 comes on and the dis-
●
play switches to the grip warmer level when the grip
warmer adjustment switch is pressed.
The thumb warmer indicator 4 comes on and the
●
display switches to the thumb warmer level when the
thumb warmer adjustment switch is pressed.
The grip/thumb warmer level is displayed for 5 sec-
●
onds after releasing the grip/thumb warmer adjustment switch, then switches to the fuel meter.
The top segment of the grip/thumb warmer level indi-
●
cator flashes once if the grip/thumb warmer adjustment switch is continually pressed at the maximum
level. The bottom segment of the grip/thumb warmer
level indicator flashes once if the grip/thumb warmer
adjustment switch is continually pressed at the minimum level.
When the engine is started, the grip/thumb warmer
●
levels are set to the levels saved when the engine
was stopped.
@
ESU00287
Fuel level warning indicator
The fuel level warning indicator indicates a malfunctioning sensor, disconnected coupler, broken lead, or short
circuit when detected by the self-diagnosis device of the
snowmobile.
The fuel level warning indicator 1, warning light 2, and
all segments of the fuel meter 3 warn the rider of the
above problems by flashing continuously. (See the table
below for warning indicator, warning light and fuel meter
segment flash pattern.)
When this occurs, have a Yamaha dealer inspect the
snowmobile as soon as possible.
CA-08E
Warning indicator, warning light, and fuel meter segments of the fuel meter flash pattern
12 8
0.5 s 3 s
0.5 s
· · ·
Warning indicator, warning light, and fuel meter
segment flash continuously in this pattern.
: On : Off s: Second
5-6
Page 25

ESU00288
Oil level warning indicator
If the oil level falls below the minimum level, the oil level
warning indicator 1 and the warning light 2 come on.
If the oil level warning indicator and the warning light
come on, add engine oil to the oil tank at the first opportunity.
ESU02891
Coolant temperature warning indicator
If the engine overheats, the coolant temperature warning
indicator 1 and the warning light 2 come on. When this
occurs, stop the engine immediately and allow the
engine to cool down, and then check the coolant level in
the coolant reservoir. (See page 6-2.)
Warning indicator and warning light flash pattern
12 8
0.5 s 3 s
0.5 s
: On : Off s: Second
CAUTION
@
:
Do not operate the engine if it overheats.
@
The coolant temperature warning indicator indicates a
malfunctioning sensor, disconnected coupler, broken
lead, or short circuit when detected by the self-diagnosis
device of the snowmobile.
The coolant temperature warning indicator and warning
light warn the rider of the above problems by flashing
continuously. (See the table below for warning indicator
and warning light flash pattern.)
When this occurs, have a Yamaha dealer inspect the
snowmobile as soon as possible.
CA-09E
· · ·
Warning indicator and warning light flash
continuously in this pattern.
5-7
Page 26

ESU03970
Self-diagnosis warning indicator
The self-diagnosis warning indicator indicates a malfunctioning sensor, disconnected coupler, broken lead, etc.,
when detected by the self-diagnosis device of the snowmobile.
The self-diagnosis warning indicator 1 and warning
light2 warn the rider of the above problems by flashing
continuously. If necessary, ask a Yamaha dealer for further details. (See page 5-9 for warning indicator and
warning light flash patterns.)
WARNING
@
●
If the self-diagnosis warning indicator and warning light flash continuously during operation,
there may be some problem with the electrical
circuit, lead couplers, etc. (See page 5-9 for warning indicator and warning light flash pattern numbers 1–5.)
●
Stop the engine and allow it to cool off. Then,
check that the wire harness couplers are connected properly in the engine compartment.
●
If the self-diagnosis warning indicator and warning light flash after the engine has been started,
note the flash pattern, and then have a Yamaha
dealer inspect the snowmobile as soon as possible.
@
5-8
Page 27

3.5 s
4.5 s
5.5 s
6.5 s
CA-17E
· · ·
· · ·
· · ·
· · ·
Warning indicator and warning
light flash continuously in this
pattern.
Warning indicator and warning
light flash continuously in this
pattern.
Warning indicator and warning
light flash continuously in this
pattern.
Warning indicator and warning
light flash continuously in this
pattern.
Warning indicator and warning
· · ·
light flash continuously in this
pattern.
No. Self-diagnosis warning indicator and warning light flash patterns
1
2
3
4
5
0.75 s
2.5 s
0.75 s
0.25 s
0.75 s
0.25 s
0.75 s
0.25 s
0.75 s
0.25 s
: On : Off s: Second
5-9
Page 28

ESU00031
Engine stop switch
The engine stop switch 1 is used to stop the engine in
an emergency. Simply push 2 the stop switch to stop the
engine. To start the engine, pull 3 the stop switch and
proceed with starting the engine. (See page 7-1 for more
details.)
During the first few rides, practice using the stop switch
so that you can react quickly in an emergency.
ESU00330
Brake lever
The snowmobile is stopped by braking the entire drive
system.
Squeeze the brake lever towards the handlebar grip to
stop the snowmobile.
Brake lever
1
Brake lever end
2
Handlebar end
3
NOTE:
@
When the brake lever is operated, the brake light will illuminate.
@
CAUTION
@
:
Make sure that the brake lever end does not project
out over the handlebar end. This will help prevent
brake lever damage when the snowmobile is placed
on its side for service.
@
The brake lever is equipped with a position adjuster.
To adjust the brake lever position:
1. Loosen the locknut 1.
2. While lightly pushing the brake lever in direction a,
finger tighten the adjusting bolt 2 to set the brake
lever to the desired position.
3. Tighten the locknut securely after adjusting the brake
lever.
5-10
Page 29

A
ESU00035
Parking brake lever
When parking the snowmobile or starting the engine,
apply the parking brake by moving the brake lever 1 to
the left.
To release the parking brake, move the parking brake
lever 1 to the right.
To apply the parking brake
B
È
To release the parking brake
É
WARNING
@
●
Always set the parking brake before attempting to
start the engine.
●
Never run the snowmobile with the parking brake
applied. This may overheat the brake disc and
reduce braking ability.
@
ESU00321
Shift lever
For SXV60ER/VT60
The shift lever is used to put the snowmobile into forward
or reverse. After coming to a complete stop, push the
shift lever down and move it to the desired direction.
Shift lever
1
Push down
2
Move to “FWD”
3
Move to “REV”
4
CA-02E
Snowmobile movement
“FWD” Forward
“REV” Reverse
CAUTION
@
:
Do not shift from “FWD” to “REV” or “REV” to
“FWD” while the snowmobile is moving. Otherwise,
the drive system could be damaged.
@
5-11
Page 30

ESU00039
Headlight beam switch
Push the headlight beam switch to change the headlight
beam to high or low.
Headlight beam switch
1
Push
2
High beam
3
Low beam
4
ESU00440
Passenger grip warmer switch
For VT60
The passenger grip warmer switch controls the electrically heated passenger grips.
Passenger grip warmer switch
1
“OFF”
2
“HI” High
3
“LO” Low
4
5-12
Page 31

ESU00481
Shroud latches
To open the shroud, unhook the shroud latches, and then
slowly raise the shroud forward until it stops. When closing the shroud, slowly lower it to its home position, and
then hook the shroud latches.
Shroud latch
1
Shroud
2
CAUTION
@
:
Make sure that all cables and wires are in place when
closing the shroud.
@
WARNING
@
●
Do not drive the snowmobile with the shroud
open, unlatched, or removed.
●
Keep your body and clothing away from rotating
parts when servicing with the shroud open.
●
Do not touch the hot muffler and engine during or
immediately after operation.
@
ESU00521
Drive guard
The drive guard is designed to cover the V-belt clutch
and V-belt in case parts break or come loose.
WARNING
@
●
Make sure that the drive guard is tightened
securely before operating the snowmobile.
●
Never run the engine with the V-belt or drive
guard removed.
@
5-13
Page 32

ESU00053
V-belt holders
Keep a spare V-belt for emergency use by placing it into
the V-belt holders provided.
CAUTION
@
:
Make sure that the V-belt is installed securely in the
holders.
@
ESU00056
Spark plug holders
Keep spare spark plugs for emergency use by placing
them into the spark plug holders provided.
ESU04080
Carburetor coolant shut-off lever
The carburetor coolant shut-off lever controls the flow of
coolant through the carburetor.
Make sure that the lever is in the “ON” position to allow
the coolant to flow and warm the carburetor while the
ambient temperature is below 0 °C (32 °F).
Carburetor coolant shut-off lever
1
“ON” (open)
2
“OFF” (closed)
3
CAUTION
@
When operating the snowmobile in temperatures
above 0 °C (32 °F), move the carburetor coolant shutoff lever to the “OFF” position to stop the flow of
coolant, since the carburetor does not need to be
warmed.
@
:
5-14
Page 33

ESU00670
Backrest
For VT60
The backrest is adjustable.
Pull the backrest adjusting lever 1 upward to adjust the
backrest position.
Turn the backrest adjusting knob 2 right or left to further
adjust the backrest.
WARNING
@
Do not sit on the backrest.
@
When riding without a passenger, the backrest can be
adjusted for the rider as shown in the illustration.
To adjust the passenger grip position, remove the passenger grip adjusting knobs 3 on both sides of the seat,
and change the position of the passenger grip to any one
of the three positions shown.
A B
WARNING
@
Make sure that the passenger grip adjusting knobs
are tightened securely after adjusting the passenger
grip position.
@
ESU02420
Storage compartment
Open the storage compartment to store the service
tools, spare parts, or other small items.
SXV60/SXV60ER
È
VT60
É
5-15
Page 34

ESU00072
R+M
2
6-
PRE-OPERATION CHECKS
NOTE:
@
Pre-operation checks should be made each time the
snowmobile is used.
@
WARNING
@
The engine and muffler will be very hot after the
engine has been run.
Avoid touching the engine and muffler while they are
still hot with any part of your body or clothing during
inspection or repair.
@
ESU00075
Fuel
Make sure that there is sufficient fuel in the fuel tank.
Recommended fuel:
Unleaded gasoline
Pump octane ; 88 or higher
Fuel tank capacity:
44.3 L (9.7 Imp gal, 11.7 US gal)
WARNING
@
●
Fuel is HIGHLY FLAMMABLE and poisonous.
Check the “SAFETY INFORMATION” section
carefully before refueling. (See page 3-2.)
●
Do not fill the fuel tank above the bottom of the
filler tube 1. Fuel could overflow if the snowmobile is tilted on its side or if the ambient temperature rises, causing the fuel to warm up and
expand.
●
Make sure that the fuel tank cap is closed
securely after refueling. Leaking fuel can catch
fire.
@
Fuel level
2
CAUTION
@
●
Oxygenated fuels (gasohol) containing a maxi-
:
mum 5% of ethanol can be used, although richer
jetting may be required to prevent engine dam-
6-1
Page 35

age. Consult a Yamaha dealer. Gasohol containing methanol is not recommended.
Make sure that snow or ice does not enter the fuel
●
tank when refueling.
Do not use alcohol deicers or water absorbing
●
additives with oxygenated fuel.
The fuel tank should be filled with straight gaso-
●
line as specified.
@
ESU00299
Engine oil
Make sure that there is sufficient oil in the oil tank.
NOTE:
@
Since the fuel tank cap and oil tank cap look similar, be
careful not to mistake the caps.
@
Oil tank capacity: 3.0 L (2.6 Imp qt, 3.2 US qt)
Recommended oil: YAMALUBE 2-cycle oil
ESU00086
Coolant
Check the coolant level in the coolant reservoir when the
engine is cold. If the coolant level is below the
“COLD LEVEL” mark, add soft water until it reaches the
“COLD LEVEL” mark. (See pages 8-11–8-12 for more
details.)
“COLD LEVEL” mark
1
WARNING
@
Do not remove the coolant reservoir cap when the
engine is hot.
@
CAUTION
@
Hard water or salt water is harmful to the engine
●
:
parts. You may use boiled or distilled water, if soft
water is not available.
Tap water can be used temporarily in an emer-
●
gency.
@
6-2
Page 36

ESU00087
Throttle lever
Check the throttle lever operation before starting the
engine.
The throttle lever must open smoothly and spring back to
its home position when released.
ESU00088
Recoil starter
Check the recoil starter for proper operation and the
recoil starter rope for damage.
ESU00090
Throttle override system (T.O.R.S.)
Check the T.O.R.S. for proper operation.
WARNING
@
When checking T.O.R.S.:
●
Make sure that the parking brake is applied.
●
Make sure that the throttle lever moves smoothly.
●
Do not run the engine up to clutch engagement
r/min. Otherwise, the snowmobile could start
moving forward unexpectedly, which could cause
an accident.
@
1. Start the engine.
NOTE:
@
Refer to the “Starting the engine” section.
@
2. Hold the pivot point of the throttle lever away from the
throttle switch by putting your thumb (above) and
forefinger (below) between the throttle lever pivot
and the engine stop switch housing 2.
While holding the pivot point as described above,
press the throttle lever 3 gradually.
The T.O.R.S. will operate and the engine should run
between 2,800 and 3,000 r/min.
1
WARNING
@
If the engine does not run between 2,800 and
3,000 r/min, stop the engine by turning the main switch
to the “OFF” position and consult a Yamaha dealer.
@
6-3
Page 37

ESU00091
Brake
1. Brake lever
Test the brake at a low speed when starting out to
make sure that it is working properly. If the brake
does not provide proper braking performance,
inspect the brake for wear or brake fluid leakage.
(See pages 8-17–8-18 for more details.)
WARNING
@
●
A soft, spongy feeling in the brake lever indicates
a failure in the brake system.
●
Do not operate the snowmobile if you find any
problems in the brake system. You could lose
braking ability, which could lead to an accident.
Ask a Yamaha dealer to inspect and repair the
brake system.
@
CAUTION
@
:
Make sure that the brake lever end does not project
out over the handlebar end. This is to prevent brake
lever damage when the snowmobile is placed on its
side.
@
2. Brake fluid
Check the brake fluid level. (See page 8-18.)
Add fluid if necessary.
Lower level
1
Specified brake fluid: DOT 4
6-4
Page 38

ESU00093
Brake fluid leakage
Apply the brake for a few minutes. Check to see if any
brake fluid leaks out from the brake hose joints or the
master cylinder.
WARNING
@
If brake fluid leakage is found, ask a Yamaha dealer
for immediate repairs.
@
CAUTION
@
:
Brake fluid may deteriorate painted surfaces or plastic parts. Never spill any brake fluid. If any is spilled,
clean it up immediately.
@
ESU00941
V-bel t
Open the shroud and remove the drive guard.
Check the V-belt for wear and damage. Replace if necessary.
Wear limit a:
32.5 mm (1.28 in)
WARNING
@
●
Make sure that the drive guard is tightened
securely before operating the snowmobile.
●
Never run the engine without the V-belt or with
the drive guard removed.
@
ESU00096
Drive guard
Check the drive guard mounts for damage. Make sure
that the drive guard is firmly in place.
6-5
Page 39

ESU00097
Drive track
Check the drive track for deflection, wear, or damage.
Adjust or replace if necessary. (See pages 8-23–8-25 for
more details.)
WARNING
@
Do not operate the snowmobile if you find damage to
the drive track, or if it has been maladjusted. Drive
track damage or failure could result in loss of braking ability and snowmobile control, which could
cause an accident.
@
ESU00982
Slide runners
Check the slide runners for wear and damage.
If the slide runners reach the wear limit, they should be
replaced.
Slide runners
1
Wear limit
a
Wear limit height:
10 mm (0.4 in)
CAUTION
@
:
Ride on fresh snow frequently. Operating on ice or
hard packed snow will rapidly wear the slide runners.
@
6-6
Page 40

ESU01020
Skis and ski runners
Check the skis and ski runners for wear and damage.
Replace if necessary.
Ski runner wear limit a:
8 mm (0.31 in)
Ski wear limit b:
13 mm (0.51 in)
CAUTION
@
:
Avoid scratching the skis when loading and unloading the snowmobile, when riding in areas with little
or no snow, or on sharp edges such as concrete,
curbs, etc. This will wear or damage the skis.
@
ESU00103
Steering system
Check the handlebar for excessive free play:
1. Push the handlebar up and down and back and forth.
2. Turn the handlebar slightly to the right and left.
If excessive free play is noticed, consult a Yamaha
dealer.
ESU00105
Lights
Check the lights.
Replace any burned out bulbs.
CAUTION
@
:
Avoid using a scraper or hot water for cleaning the
plastics lens 1.
@
ESU00106
Battery
For SXV60ER/VT60
Check the fluid level and fill if necessary.
Use only distilled water if refilling is necessary. (See
page 8-31 for more details.)
6-7
Page 41

ESU00239
Air filter
Always check that no snow is on the air filter element. If
there is any snow on the air filter element, take it out and
remove the snow. Then reinstall the air filter element
beneath the holding guides on the case. After riding the
snowmobile, make sure there is no snow on the air filter
element.
NOTE:
@
The air filter element can be removed when the ambi-
●
ent temperature is 5 °C (41.5 °F) or higher.
Before removing the air filter element, consult a
●
Yamaha dealer.
@
6-8
Page 42

ESU00110
Fittings and fasteners
Check the tightness of the fittings and fasteners.
Tighten in proper sequence and torque if necessary.
ESU01111
Tool kit and recommended equipment
It is good practice to carry the tool kit, spare parts, and
other necessary equipment with you while riding the
snowmobile so that minor repairs can be done if necessary. The following should be carried at all times:
Tool kit
●
Flashlight
●
Roll of plastic tape
●
Steel wire
●
Tow rope
●
Emergency starter rope
●
V-belt
●
Light bulbs
●
Spark plugs
●
When you start out for a long distance trip, extra fuel and
oil should be carried as well.
6-9
Page 43

ESU00112
7-
OPERATION
ESU02811
Starting the engine
WARNING
@
●
Be sure to check the “SAFETY INFORMATION”
section carefully before starting the engine.
●
Make sure that the parking brake is applied.
@
NOTE:
@
Make sure that the engine stop switch is in the on position.
@
1. Fully open the starter lever (choke).
Starter lever (choke)
1
Fully open (cold engine starting)
2
Half-open (warm engine up)
3
Closed (warm engine starting)
4
NOTE:
@
The starter lever (choke) is not required when the engine
is warm. Put the starter lever (choke) in the closed position.
@
Manual starting model
For SXV60
2. Turn the main switch to the “ON” position.
“ON”
1
3. Pull slowly on the recoil starter until it is engaged,
then pull it briskly. After the engine starts, put the
starter lever (choke) in the half-open position. Warm
up the engine until it does not run roughly or begin to
stall when the starter lever (choke) is returned to the
closed position.
7-1
Page 44

Electric starting model
For SXV60ER/VT60
2. Turn the main switch to the “START” position. After
the engine starts, put the starter lever (choke) in the
half-open position. Warm up the engine until it does
not run roughly or begin to stall when the starter lever
is returned to the closed position.
“START”
1
CAUTION
@
Release the switch immediately after the engine
●
:
starts.
If the engine fails to start, release the switch, wait
●
a few seconds, then try again. Each attempt
should be as short as possible to preserve the
battery. Do not crank the engine more than
10 seconds on any one attempt.
@
ESU00248
Emergency engine starting
Manual starting model
For SXV60
If the recoil starter system should fail, take the emergency starter rope and the screwdriver handle out of the
tool kit and proceed as follows.
NOTE:
@
The emergency starter rope and a screwdriver handle
are supplied in the tool kit at the factory.
@
1. Proceed with the “Starting the engine” section items
1 and 2 for the “Manual starting model”.
2. Tighten the emergency starter rope on the screwdriver handle.
Screwdriver handle
1
7-2
Page 45

3. Mesh the rope stopper with the edge of the primary
sheave assembly.
Rope stopper
1
Primary sheave assembly edge
2
4. Wind the rope counterclockwise three turns on the
primary sheave assembly.
5. Grasp the screwdriver handle and pull briskly.
WARNING
@
Do not wind the emergency starter rope around your
hand.
@
6. After the engine starts, put the starter lever (choke) in
the half-open position. Warm up the engine until it
does not run roughly or begin to stall when the starter
lever is returned to the closed position.
7. Install the drive guard and shroud.
WARNING
@
Avoid contact with the moving primary sheave
assembly.
@
Electric starting model
For SXV60ER/VT60
Follow the procedures in the “Starting the engine” and
“Manual starting model” sections.
7-3
Page 46

ESU00126
Break-in
There is never a more important period in the life of your
snowmobile than the break-in period. For the first
10 hours, approximately 200 km (125 mi), do not put an
excessive load on the engine. Avoid prolonged full throttle operation.
Also avoid lugging the engine, such as laborious operation in wet snow. If any abnormal condition is noticed,
such as excessive vibration or noise, consult a Yamaha
dealer.
NOTE:
@
To ensure proper engine break-in, use a 50:1 gasoline/oil
mixture when filling the fuel tank of a new snowmobile for
the first time.
For example:
10 L of gasoline per 0.2 L of oil (1 gal of gasoline per
2.6 oz of oil) equals a 50:1 mixing ratio.
(See pages 6-1–6-2 for the recommended gasoline and
oil.)
@
7-4
Page 47

ESU01272
Riding your snowmobile
totally familiar with the snowmobile’s han-
dling and performance characteristics.
Getting to know your snowmobile
A snowmobile is a rider active vehicle, and
your riding position and your balance are
the two basic factors of maneuvering your
snowmobile.
Riding your snowmobile requires skills
acquired through practice over a period of
time. Take the time to learn the basic techniques well before attempting more difficult
maneuvers.
Riding your new snowmobile can be a very
enjoyable activity, providing you with hours
of pleasure. However, it is essential to
familiarize yourself with the operation of
the snowmobile to achieve the skill necessary to enjoy riding safely. Before operating
the snowmobile, read this Owner’s Manual
completely and understand the operation
of the controls.
Pay particular attention to the safety information on pages 3-1–3-3. Please read all
warning and caution labels on your snowmobile. Also, read the Snowmobiler’s
Safety Handbook that is supplied with your
snowmobile.
Set the parking brake and follow the
instructions on pages 7-1–7-2 to start the
engine. Once the engine has warmed up,
you are ready to begin riding your snowmobile.
To start out and accelerate
1. With the engine idling, release the
parking brake.
2. Apply the throttle slowly and smoothly.
The V-belt clutch will engage and you
will start to accelerate.
WARNING
@
The operator should always keep both
hands on the handlebar. Never put your
feet outside the running boards. Avoid
high speeds until you have become
thoroughly familiar with your snowmobile and all of its controls.
@
Braking
When slowing down or stopping, release
the throttle and apply the brake gently—not
suddenly.
Learning to ride your snowmobile
Before you ride, always perform the preoperation checks listed on pages 8-1–8-3.
The short time spent checking the condition of the snowmobile will be rewarded
with added safety and a more reliable
snowmobile. Always wear the proper clothing for both warmth and to help protect you
from injury if an accident occurs.
Become familiar with operating your snowmobile at low speeds, even if you are an
experienced rider. Do not attempt to operate at maximum performance until you are
WARNING
@
●
Many surfaces such as ice and hardpacked snow require much longer
stopping distances. Be alert, plan
ahead, and begin decelerating early.
●
Improper use of the brake can cause
the drive track to lose traction,
reduce control, and increase the
possibility of an accident.
@
7-5
Page 48

Tu rn in g
Riding uphill
For most snow surfaces, “body English” is
the key to turning.
As you approach a curve, slow down and
begin to turn the handlebar in the desired
direction. As you do so, put your weight on
the running board to the inside of the turn
and lean your upper body into the turn.
This procedure should be practiced at low
speeds many times, in a large flat area
with no obstacles. Once you have learned
this technique, you should be able to perform it at higher speeds or in tighter
curves. Lean more as the turn gets
sharper or is made at higher speeds.
Improper riding techniques such as abrupt
throttle changes, excessive braking, incorrect body movements, or too much speed
for the sharpness of the turn may cause
the snowmobile to tip.
If your snowmobile begins to tip while turning, lean more into the turn to regain balance. If necessary, gradually let off on the
throttle or steer to the outside of the turn.
Remember:
Avoid higher speeds until you are thoroughly familiar with the operation of your
snowmobile.
You should practice first on gentle slopes.
Try more difficult climbs only after you have
developed your skill. As you approach a
hill, accelerate before you start the climb,
and then reduce the throttle to prevent
track slippage. It is also important to keep
your weight on the uphill side at all times.
On climbs straight up the hill, this can be
accomplished by leaning forward and, on
steeper inclines, standing on the running
boards and leaning forward over the handlebar. (Also see “Traversing a slope.”)
Slow down as you reach the crest of the
hill, and be prepared to react to obstacles,
sharp drops, or other vehicles or people
which may be on the other side. If you are
unable to continue up a hill, do not spin the
track. Stop the engine and set the parking
brake. Then pull the rear of the snowmobile around to point the snowmobile back
down the hill. When the snowmobile is
pointed downhill, mount your snowmobile
from the uphill side. Restart the engine,
release the parking brake, and descend
the hill.
WARNING
@
Side hills and steep slopes are not recommended for a novice snowmobiler.
@
7-6
Page 49

Riding downhill
When riding downhill, keep speed to a minimum. It is important to apply just enough
throttle to keep the clutch engaged while
descending the hill. This will allow you to
use engine compression to help slow the
snowmobile, and to keep the snowmobile
from rolling freely down the hill. Also apply
the brake frequently, with light pressure.
WARNING
@
Use extra caution when applying the
brake during a descent. Excessive
braking will cause the drive track to
lock, causing a loss of control.
@
Traversing a slope
downhill leg on the seat and the foot of
your uphill leg on the running board. This
position will make it easier for you to shift
your body weight as needed.
Snow and ice are slippery, so be prepared
for the possibility that your snowmobile
could begin to slip sideways on the slope. If
this happens, steer in the direction of the
slide if there are no obstacles in your path.
As you regain proper balance, gradually
steer again in the direction you wish to
travel.
If your snowmobile starts to tip, steer down
the hill to regain balance.
WARNING
@
If you are unable to maintain correct
balance, and your snowmobile is going
to tip over, dismount your snowmobile
immediately on the uphill side.
@
Ice or icy surface
Operating on ice or icy surfaces can be
very dangerous. Traction for turning, stopping, and starting is much less than that on
snow.
WARNING
@
Traversing slopes is not recommended
for a novice snowmobiler.
@
Traversing a slope requires you to properly
position your weight to maintain proper balance. As you travel across the slope, lean
your body to position your weight towards
the uphill side. A recommended riding
position is to kneel with the knee of your
WARNING
@
When you have to operate on ice or icy
surfaces, drive slowly and cautiously.
Avoid accelerating, turning, and braking
rapidly. Steering is minimal and uncontrolled spins are an ever-present danger.
@
7-7
Page 50

Hard-packed snow
It can be more difficult to negotiate on
hard-packed snow as both the skis and
drive track do not have as much traction as
when the snowmobile is operated on fresh
snow. Avoid rapid acceleration, turning,
and braking.
Operation on surfaces other than
snow or ice
Operation of your snowmobile on surfaces
other than snow or ice should be avoided.
Operation under such conditions will damage or result in rapid wear of the ski runners, drive track, slide runners, and drive
sprockets. Operation of the snowmobile on
the following surfaces should be avoided at
all times:
1. Dirt
2. Sand
3. Rocks
4. Grass
5. Bare pavement
Other surfaces that should be avoided for
the sake of drive track and slide runner life
are:
1. Glare ice surfaces
2. Snow mixed with a lot of dirt and sand
All of the above surfaces have one thing in
common in regard to drive track and slide
runners; little or no lubricating ability. Drive
track and all slide rail systems require
lubrication (snow or water) between the
slide runners and the slide metal. In the
absence of lubrication, the slide runners
will rapidly wear and in severe cases, literally melt away, and the drive track will be
subject to damage or failure.
Also traction aids such as studs, cleats,
etc., may cause further track damage or
failure.
WARNING
@
Drive track damage or failure could
result in loss of braking ability and
snowmobile control, which could cause
an accident.
●
Always check the drive track for
damage or maladjustment before
operating the snowmobile.
●
Do not operate the snowmobile if
you find damage to the drive track.
@
CAUTION
@
:
Ride on fresh snow frequently. Operating on ice or hard-packed snow will rapidly wear the slide runners.
@
7-8
Page 51

ESU00251
Maximizing drive track life
Recommendations
Track tension
During initial break-in, the new drive track will tend to
stretch quickly as the track settles. Be sure to correct the
track tension and alignment frequently. (See pages
8-23–8-25 for adjustment procedures.) A loose track can
slip (ratchet), derail or catch on suspension parts causing severe damage. Do not overtighten the drive track,
otherwise it may increase the friction between the track
and the slide runners, resulting in the rapid wear of both
components. Also, this may put an excessive load on the
suspension components, resulting in component failure.
Marginal snow
The drive track and the slide runners are lubricated and
cooled by snow and water. To prevent the drive track and
slide runners from overheating, avoid sustained highspeed usage in areas such as icy trails, frozen lakes and
rivers that have minimal snow coverage. An overheated
track will be weakened internally, which may cause failure or damage.
Off-trail riding
Avoid off-trail riding until there is sufficient snow coverage. It generally takes several feet of snow to provide a
good overall base to properly cover debris, such as
rocks, logs, etc. If snow coverage is not sufficient, stay on
trails to avoid impact damage to the drive track.
Studded track
In general, track life will be shortened when studs are
installed. Drilling stud holes into the drive track will cut
the internal fibers, which weakens the track. Avoid spinning the drive track. Studs may catch on an object and
pull out of the track, leaving tears and damage around
the already weakened area. To minimize possible damage, consult your stud manufacturer for installation and
stud pattern recommendations.
Yamaha does not recommend track studding.
7-9
Page 52

ESU00318
Driving
WARNING
@
Be sure to read the “SAFETY INFORMATION” and
“Riding your snowmobile” sections carefully before
operating the snowmobile.
@
NOTE:
@
Make sure that the engine is warmed up enough before
riding.
@
For SXV60
1. Release the parking brake by moving the parking
brake lever to the right.
2. Press the throttle lever slowly to move the snowmobile.
3. Turn the handlebar in the desired direction.
4. Squeeze the brake lever to stop the snowmobile.
5. Apply the parking brake by moving the parking brake
lever to the left.
For SXV60ER/VT60
1. Select the desirable operating position by moving the
shift lever.
Push down
1
“FWD” Forward
2
“REV” Reverse
3
WARNING
@
●
Make sure that the throttle lever is fully released
and the snowmobile is at a full stop before shifting.
●
Be sure to move the shift lever to forward or
reverse until it stops completely while the engine
is idling.
●
Make sure that the area behind the snowmobile is
clear before reversing. Watch behind.
●
Reduce speed and avoid sharp turning when
operating the snowmobile in reverse.
@
NOTE:
@
The reverse buzzer beeps while the shift lever is in
reverse.
@
7-10
Page 53

2. Release the parking brake by moving the parking
brake lever to the right.
3. Press the throttle lever slowly to move the snowmobile.
4. Turn the handlebar in the desired direction.
5. Squeeze the brake lever to stop the snowmobile.
6. Apply the parking brake by moving the parking brake
lever to the left.
BA
ESU00137
Stopping the engine
Turn the main switch to the “OFF” position to stop the
engine.
“OFF”
1
SXV60
È
SXV60ER/VT60
É
WARNING
@
●
Push down the engine stop switch to stop the
engine in an emergency.
●
Make sure that the key is removed from the main
switch whenever the operator leaves the snowmobile, to prevent accidental starting.
@
7-11
Page 54

ESU00138
Transporting
When transporting your snowmobile on a trailer or in a
truck, observe the following recommendations to help
protect it from damage:
Make sure that the fuel level in the fuel tank is lower
●
than the bottom of the carburetors. Otherwise, the
vibration and bumps from the road surface could
make it possible for fuel to flow through the carburetors into the crankcase. This can result in “hydrostatic
lock,” a condition where the engine cannot rotate
because of fuel accumulated in the engine. Severe
engine damage can result from hydrostatic lock.
When possible, the fuel tank should be empty during
transportation, especially if the trip will be longer than
30 minutes.
If transporting the snowmobile in an open trailer or
●
truck, put a tight fitting cover on the snowmobile. A
cover specifically designed for your snowmobile is
best. This will help keep foreign objects out of the
cooling vents in the shroud, and also help protect the
snowmobile against damage from debris on the road.
If transporting the snowmobile in an open trailer or
●
truck in areas where road salt is used, coat metal
suspension surfaces lightly with oil or other protectant. This will help protect against corrosion. Be
sure to clean the snowmobile when you get to your
destination to remove any corrosive salts.
7-12
Page 55

ESU00139
8-
PERIODIC MAINTENANCE
ESU00140
Periodic maintenance chart
Regular maintenance is most important for best performance and safe operation.
CD-01E
Pre-
Item Remarks
operation
check
(Daily)
Check condition.
Spark plugs
Adjust gap and clean.
Replace if necessary.
Engine oil
Check oil level.
Air bleed the oil pump if
∗
●
necessary.
Fuel Check fuel level.
Fuel filter
∗
Check condition.
Replace if necessary.
●
Check fuel hose for cracks or
Fuel line
∗
damage.
Replace if necessary.
Check oil hose for cracks or
Oil line
∗
damage.
Replace if necessary.
Engine coolant
Check coolant level.
Air bleed the cooling system
∗
●
if necessary.
Carburetor
Check throttle lever operation.
Adjust the jets.
∗
●
Whenever operating condition
(elevation/temperature) is changed.
Check operation and rope
Recoil starter
Engine stop switch
Throttle override
system (T.O.R.S.)
Throttle lever
damage.
Replace if necessary.
∗
Check operation.
Repair if necessary.
∗
Check operation.
Repair if necessary.
∗
Check operation.
Repair if necessary.
∗
●
●
●
●
Check for leakage.
Exhaust system
∗
Tighten or replace gasket if
necessary.
It is recommended that these items be serviced by a Yamaha dealer.
∗
Initial
1 month
or
800 km
(500 mi)
(40 hr)
Every
Seasonally
or
3,200 km
(2,000 mi)
(160 hr)
●
●
●
●
●
●
●
Page
8-4–8-5
6-2
6-1–6-2
6-2,
8-11–8-12
8-11
5-2, 6-3
6-3
5-10
5-2–5-3,
6-3
5-2, 6-3
8-1
Page 56

Pre-
Item Remarks
operation
check
(Daily)
Decarbonization More frequently if necessary.
∗
Check for cracks, bends or
Drive guard
V-belt
Drive track and idler
wheels
Slide runners
Brake and parking
brake
damage.
Replace if necessary.
∗
Check for wear and damage.
Replace if necessary.
Check deflection, and for wear
and damage.
Adjust/replace if necessary.
∗
Check for wear and damage.
Replace if necessary.
∗
Check operation and fluid
leakage.
Adjust free play and/or re-
∗
●
●
●
●
●
place pads if necessary.
Replace brake fluid. See NOTE on page 8-3. 8-18
∗
Disc brake
∗
installation
Drive chain oil
Drive chain
Skis and ski runners
Steering system
Lights
Check for slight free play.
Lubricate shaft with specified
grease as required.
Check oil level.
Replace.
∗
Check deflection.
Adjust if necessary.
∗
Check for wear and damage.
Replace if necessary.
∗
Check operation.
Adjust toe-out if necessary.
∗
Check operation.
Replace bulbs if necessary.
Initial at 500 km (300 mi) and every
800 km (500 mi) thereafter.
●
●
●
Check fluid level.
Battery
(SXV60ER/VT60)
Add only distilled water if necessary.
Check specific gravity and
∗
●
breather hose operation.
Charge/correct if necessary.
It is recommended that these items be serviced by a Yamaha dealer.
∗
Initial
1 month
or
800 km
(500 mi)
(40 hr)
●
Every
Seasonally
or
3,200 km
(2,000 mi)
(160 hr)
●
●
●
Every
1,600 km
(1,000 mi)
●
●
●
●
Page
5-13, 6-5
6-5,
8-13–8-15
6-6,
8-23–8-25
6-6
5-10–5-11,
6-4–6-5
8-17–8-18
8-15–8-16
8-16
6-7
6-7
6-7, 8-27
6-7, 8-28
8-2
Page 57

Pre-
Item Remarks
operation
check
(Daily)
Check engagement and shift
speed.
Adjust if necessary.
Whenever operating elevation is changed.
Inspect sheaves for wear/
damage.
Primary and second-
∗
ary clutches
Inspect weights/rollers and
bushings for wear-for primary.
Inspect ramp shoes/bushings
for wear-for secondary.
Replace if necessary.
Lubricate with specified
grease.
Steering column
∗
bearing
Ski and front
∗
suspension
Suspension
∗
component
Parking brake cable
∗
end and lever end/
throttle cable end
Shroud latches
Fittings and fasteners
Tool kit and recommended equipment
It is recommended that these items be serviced by a Yamaha dealer.
∗
Lubricate with specified
grease.
Lubricate with specified
grease.
Lubricate with specified
grease.
Lubricate with specified
grease.
Check cable damage.
Replace if necessary.
Make sure that the shroud
latches are hooked.
Check tightness.
Repair if necessary.
∗
Check for proper placement.
●
●
●
Initial
1 month
or
800 km
(500 mi)
(40 hr)
Every
Seasonally
or
3,200 km
(2,000 mi)
(160 hr)
●
●
●
●
●
●
●
●
Page
8-26
8-26
8-26
8-26
5-13
6-9
6-9
NOTE:
@
Brake fluid replacement:
1. When disassembling the master cylinder or caliper cylinder, replace the brake fluid.
Normally check the brake fluid level and add the fluid as required.
2. On the inner parts of the master cylinder and caliper cylinder, replace the oil seals
every two years.
3. Replace the brake hose every four years, or if cracked or damaged.
@
8-3
Page 58

A
ESU01430
Tool kit
The owner’s tool kit has the tools which are sufficient for
most periodic maintenance and minor repair. A torque
wrench is also necessary to properly tighten nuts and
bolts.
Tool kit
1
B
SXV60/SXV60ER
È
VT60
É
CAUTION
@
:
Before starting the engine, make sure that the tool
kit is firmly seated in the holder and is secured with
the holding band.
@
NOTE:
@
If you do not have a torque wrench available during a
service operation requiring one, take your snowmobile to
a Yamaha dealer to check the torque settings and adjust
them if necessary.
@
ESU01442
Checking the spark plug
The spark plug is an important engine component and is
easy to inspect. The condition of the spark plug can indicate the condition of the engine. Check the coloration on
the white porcelain insulator around the center electrode.
The ideal coloration at this point is a medium to a light
tan color for a snowmobile that is being ridden normally.
If a spark plug shows a distinctly different color, there
could be something wrong with the engine. For example,
a very white center electrode porcelain color could indicate an intake track air leak or carburetion problem for
that cylinder. Do not attempt to diagnose such problems
yourself. Instead, take the snowmobile to a Yamaha
dealer for inspection and possible repairs. You should
periodically remove and inspect the spark plug because
heat and deposits will cause a spark plug to slowly break
down and erode. Consult a Yamaha dealer before changing to a different type of spark plug.
8-4
Page 59

Specified spark plug:
BR9ES (NGK)
Spark plugs are produced in several different thread
lengths. The thread length or reach is the distance from
the spark plug gasket seat to the end of the threaded
portion. If the reach is too long, overheating and engine
damage may result. If the reach is too short, spark plug
fouling and poor performance may result. Also, if the
reach is too short, carbon will form on the exposed
threads resulting in combustion chamber hot spots and
thread damage. Always use a spark plug with the specified reach.
Spark plug reach a:
19.0 mm (0.75 in)
Before installing any spark plug, measure the electrode
gap with a wire thickness gauge and adjust to specification.
Spark plug gap b:
0.7–0.8 mm (0.028–0.031 in)
When installing the spark plug, always clean the gasket
surface. Wipe off any grime from the threads and tighten
the spark plug to the specified torque.
Spark plug tightening torque:
20 Nm (2.0 m·kgf, 14 ft·lb)
8-5
Page 60

ESU03701
Adjusting the engine idling speed
CAUTION
@
●
Be sure to have a Yamaha dealer make this
:
adjustment.
●
Make sure that the throttle lever moves smoothly.
●
Make sure that the carburetor is synchronized
first.
@
1. Start the engine and warm it up.
NOTE:
@
Refer to the “Starting the engine” section.
@
2. Turn the throttle stop screw 1 in or out to adjust the
engine idle speed.
Standard engine idle speed: 1,600 ± 100 r/min
ESU01472
Adjusting the throttle cable
CAUTION
@
Be sure to adjust the engine idle speed first.
@
1. Loosen the locknut.
2. Turn the adjuster in or out until the proper throttle
lever free play is achieved.
:
Throttle lever free play a:
1.0–2.0 mm (0.04–0.08 in)
Locknut
1
Adjuster
2
3. Tighten the locknut.
8-6
Page 61

ESU01492
Adjusting the oil pump cable
CAUTION
@
:
Be sure to adjust the throttle cable first.
@
1. Loosen the locknut.
2. Pull the oil pump outer cable and adjust the free play
between the adjuster and outer cable by turning the
adjuster in or out.
Pump cable free play a:
23 ± 1 mm (0.91 ± 0.04 in)
Locknut
1
Adjuster
2
3. Tighten the locknut.
ESU01502
Adjusting the carburetors
CAUTION
@
●
Be sure to have a Yamaha dealer make this
adjustment.
●
Make sure that the carburetor silencer is installed
before running to prevent engine damage.
@
Under some operating conditions, the carburetor settings
may have to be changed due to air temperature changes,
elevation changes, use of oxygenated fuels (gasohol),
etc. These settings should be made by a Yamaha dealer.
:
CAUTION
@
:
The drive chain gears and V-belt clutch should be
adjusted when operating at altitudes above 900 m
(3,000 ft). Consult a Yamaha dealer.
@
NOTE:
@
The following settings apply to each carburetor.
@
8-7
Page 62

Adjusting a pilot screw
Turn the pilot screw in or out to adjust the low speed tuning.
Standard pilot screw position:
2.0 turns out from the seated position.
CD-02E
Pilot screw
1
Turn in Lean
Turn out Rich
Mixture Condition
Warm weather
High altitude
Cold weather
Low altitude
Adjusting a jet needle
Adjust the jet needle by changing its clip position according to the setting chart which is available at a Yamaha
dealer.
Standard jet needle clip 1 position:
3rd groove from upper end
CD-03E
Clip position Mixture Condition
Upper end Lean
2
Lower end Rich
3
Warm weather
High altitude
Cold weather
Low altitude
1. Remove the top cover from the carburetor.
2. Change the jet needle clip to the proper position.
Make sure that the plastic washer is in place below
the clip.
3. Assemble by reversing the removal steps.
WARNING
@
Make sure that the throttle outer cable is firmly
seated in the holder and the throttle operates
smoothly after assembling the carburetors.
@
8-8
Page 63

Replacing a main jet
Replace the main jet according to the setting chart which
is available at a Yamaha dealer.
WARNING
@
Never remove the drain plug or the float chamber
●
while the engine is hot. Fuel will flow out from the
float chamber, and could ignite and cause injury.
Place a rag under the carburetor before removing
●
the drain plug or the float chamber to catch any
spilled fuel.
Handle fuel with care: it is HIGHLY FLAMMABLE.
●
@
Standard main jet:
No.1 Carburetor (P.T.O. side)
1
# 138.8
No.2 and No.3 Carburetors (center and magne-
2, 3
to side)
# 136.3
CD-04E
Main jet
4
Small No. Lean
Large No. Rich
Mixture Condition
Warm weather
High altitude
Cold weather
Low altitude
1. Loosen the carburetor clamp and remove the carburetor.
2. Pinch the fuel hose to prevent fuel flowing.
3. Remove the drain plug and install the proper main jet.
4. Assemble by reversing the removal steps.
WARNING
@
Make sure that the throttle outer cable is firmly
seated in the holder and the throttle operates
smoothly after assembling the carburetors.
@
8-9
Page 64

ESU01571
Adjusting the high altitude settings
Operating at high altitude reduces the performance of a
gasoline engine to about 3% for every 305 m (1,000 ft) of
elevation. This is because there is less air as altitude
increases. Less air means less oxygen available for combustion.
Your snowmobile can be adjusted to overcome most of
the problems found in high altitude riding. Carburetor
adjustments are the most important. Less air at high altitude makes the air/fuel ratio too rich, which can cause
poor performance. Common problems are hard starting,
bogging, and plug fouling. Follow the Main Jet Setting
chart which is available at a Yamaha dealer carefully.
Proper carburetion adjustments will correct the air/fuel
ratio.
Remember:
less air at higher altitude means there is
less horsepower available, even with proper carburetion.
Expect acceleration and top speed to be reduced at
higher altitudes.
To overcome operating with less power at high altitudes,
your snowmobile may also require different settings for
the drive chain gears and V-belt clutch to avoid poor performance and rapid wear. If you plan to operate your
snowmobile at an altitude different from the area where
you bought it, be sure to consult a Yamaha dealer. They
can tell you if there are any changes necessary for the
altitude where you plan to ride.
CAUTION
@
:
The drive chain gears and V-belt clutch should be
adjusted when operating over a high altitude of
900 m (3,000 ft). Consult a Yamaha dealer.
@
8-10
Page 65

ESU03173
Cooling system
Bleeding the cooling system
WARNING
@
●
Do not remove the coolant reservoir cap when
the engine is hot. Scalding hot fluid and steam
may be blown out under pressure, which could
cause serious injury.
When the engine has cooled, place a thick rag or
towel over the coolant reservoir cap, and slowly
rotate the cap counterclockwise to the detent.
This procedure allows any residual pressure to
escape. When the hissing sound has stopped,
press down on the cap while turning counterclockwise and remove it.
●
The cooling system must be bled of air if the
coolant reservoir becomes empty, if air can be
seen in the cooling system, or if there is a cooling
system leak. Consult a Yamaha dealer.
@
CAUTION
@
:
Operating the engine with an improperly bled cooling system can cause overheating and severe
engine damage.
@
8-11
Page 66

Replenishing the coolant
1. Remove the coolant reservoir cap and add coolant
until it reaches the “COLD LEVEL” mark.
Recommended coolant:
High quality ethylene glycol antifreeze containing corrosion inhibitors.
Antifreeze and water mixing ratio: 60:40
Total amount:
For SXV60/SXV60ER
4.75 L (4.18 Imp qt, 5.02 US qt)
For VT60
4.95 L (4.36 Imp qt, 5.23 US qt)
“COLD LEVEL” mark
1
Coolant reservoir cap
2
2. Start the engine and add coolant until the coolant
level does not go down, and then stop the engine.
3. Fill the coolant reservoir with coolant until it reaches
the “COLD LEVEL” mark.
4. Install the coolant reservoir cap. Check for any coolant leakage.
NOTE:
@
If you find any leaks, consult a Yamaha dealer.
@
8-12
Page 67

ESU01661
Replacing the V-belt
WARNING
@
When installing the new V-belt, make sure it is positioned from 1.5 mm (0.06 in) above the edge of the
secondary sheave assembly to 0.5 mm (0.02 in)
below the edge a.
If not, the V-belt clutch engagement speed will be
changed. The snowmobile may move unexpectedly
when the engine is started.
Adjust the V-belt position by removing or adding a
spacer 1 on each adjusting bolt.
Have a Yamaha dealer make this adjustment.
@
CAUTION
@
:
As the V-belt wears, adjustment may be necessary.
To ensure proper clutch performance, the V-belt
position should be adjusted by adding a spacer on
each adjusting bolt when the V-belt position reaches
1.5 mm (0.06 in) below the edge.
Have a Yamaha dealer make this adjustment.
@
CD-05E
New belt width 34.5 mm (1.36 in)
Belt wear limit width 32.5 mm (1.28 in)
NOTE:
@
Apply the parking brake before replacing the V-belt.
@
1. Remove the drive guard.
2. Rotate the secondary sliding sheave clockwise
1
and push 2 it so that it separates from the secondary
fixed sheave.
8-13
Page 68

3. Pull 3 the V-belt up over the secondary fixed sheave.
4. Remove the V-belt from the secondary sheave
assembly and primary sheave assembly.
5. Put the new V-belt back on the secondary sheave
assembly only. Do not force the V-belt between the
sheaves; the secondary sliding and fixed sheaves
must touch each other. Measure the V-belt position.
Standard V-belt position a:
From 1.5 mm (0.06 in) above the edge of the secondary sheave to 0.5 mm (0.02 in) below the edge.
6. If the position is incorrect, adjust the V-belt position
by removing or adding a spacer 4 on each adjusting
bolt 5.
CD-06E
V-belt position Adjustment
More than 1.5 mm (0.06 in)
above the edge
From 1.5 mm (0.06 in)
above the edge to 0.5 mm
(0.02 in) below the edge
More than 0.5 mm (0.02 in)
below the edge
Remove spacer
Not necessary
(It is correct.)
Add spacer
7. Tighten each adjusting bolt.
Adjusting bolt tightening torque:
10 Nm (1.0 m·kgf, 7.2 ft·lb)
8-14
Page 69

8. Install the V-belt over the primary sheave assembly.
9. Rotate the secondary sliding sheave clockwise
6
and push 7 it so that it separates from the secondary
fixed sheave.
10. Install the V-belt 8 between the secondary sliding
and secondary fixed sheaves.
11. Install the drive guard.
WARNING
@
Never run the engine with the V-belt or drive guard
removed.
@
ESU01713
Checking the drive chain housing oil level and
the drive chain tension
Checking the oil level
WARNING
@
The engine and muffler will be very hot after the
engine has been run. Avoid touching the engine and
muffler while they are still hot with any part of your
body or clothing during inspection or repair.
@
1. Place the snowmobile on a level surface.
2. Remove the dipstick 1 and wipe it off with a clean
rag. Then, put the dipstick in the hole.
CAUTION
@
:
There is a magnet attached to the end of the dipstick.
It is used to remove any metal particles that may
accumulate in the drive chain housing. When removing the dipstick, be sure to:
Pull it out slowly and gently so the metal particles
●
do not fall off the magnet back into the drive
chain housing.
Wipe off the magnet before reinserting the dip-
●
stick into the drive chain housing.
@
8-15
Page 70

A B
3. Pull up the dipstick and check that the oil is between
the upper and lower levels. If not, add oil to the upper
level.
Upper level
2
Lower level
3
Drive chain oil: GL-3
75W or 80W
For models without reverse transmissions
È
(SXV60)
For models with reverse transmissions
É
(SXV60ER/VT60)
CAUTION
@
:
Make sure that no foreign material enters the drive
chain housing.
@
4. Install the dipstick and fit the loop 4 of the dipstick
handle onto the projection 5 of the drive chain housing.
Adjusting the chain tension
1. Loosen the locknut.
2. Turn the adjusting bolt clockwise until it is finger tight.
3. Hold the adjusting bolt in place while tightening the
locknut.
Locknut
1
Adjusting bolt
2
8-16
Page 71

ESU00174
Checking the brake pads
Check the brake pads for wear.
If the brake pads reach the wear limit, ask a Yamaha
dealer to replace them.
Brake pad wear indicator
1
Wear limit a: 1.5 mm (0.06 in)
ESU00179
Checking the parking brake pads
Check the parking brake pads for wear by measuring the
thickness of the pads.
If the parking brake pads reach the wear limit, ask a
Yamaha dealer to replace them.
Wear limit a: 1.0 mm (0.04 in)
Adjustment
As the parking brake pads wear, adjustment may be necessary to ensure proper brake performance.
WARNING
@
Be sure to have a Yamaha dealer make this adjustment.
@
1. Loosen the locknut 1.
2. Turn the parking brake adjuster 2 in or out to adjust
the clearance between the parking brake pad 3 and
brake disc 4.
Clearance a: 1.2–1.3 mm (0.047–0.051 in)
3. Turn the cable adjuster 5 in or out to adjust the clearance between the parking brake pad 6 and brake
disc 4.
Clearance b: 1.2–1.3 mm (0.047–0.051 in)
4. Tighten the locknut.
8-17
Page 72

ESU00180
Checking the brake fluid level
Place the snowmobile on a level surface. Check that the
brake fluid is above the lower level and replenish when
necessary.
Lower level
1
Specified brake fluid: DOT 4
WARNING
@
Be careful that water does not enter the master cylinder when refilling. Water will significantly lower the
boiling point of the fluid and may result in vapor
lock.
If the brake fluid level goes down, consult a Yamaha
dealer.
@
CAUTION
@
:
Brake fluid may deteriorate painted surfaces or plastic parts. Never spill any fluid. If any is spilled, clean
it up immediately.
@
ESU01811
Changing the brake fluid
Brake fluid replacement is necessary when the following
components are replaced during the periodic maintenance or if they are damaged or leaking.
a.All oil seals of the master cylinder and caliper cylinder
b.The brake hose
WARNING
@
Make sure that the brake fluid and the above parts
are replaced by a Yamaha dealer.
@
8-18
Page 73

ESU00183
Suspension
The suspension can be adjusted to suit rider preference.
A softer setting, for example, may provide greater rider
comfort, while a harder setting may allow more precise
handling and control over certain types of terrain or riding
conditions.
WARNING
@
Be sure to have a Yamaha dealer make this adjustment.
@
ESU03042
Adjusting the ski spring preload
The spring preload can be adjusted by turning the spring
preload adjuster 1.
CD-10E
Spring adjuster position 54321
Preload
Standard 1
Hard Soft
2
3
CAUTION
@
:
The left and right ski spring preload must be set to
the same setting. Uneven settings can cause poor
handling and loss of stability.
@
8-19
Page 74

ESU03871
Adjusting the rear suspension spring preload
The rear suspension is equipped with two shock absorbers. One is in the front 1 and the other is in the rear 2 of
the rear suspension assembly.
The spring preload can be adjusted by turning the spring
preload adjuster 3 on the front and rear shock absorbers.
A
CD-13E
Spring adjuster position 12345
Preload Soft Hard
Standard (front) 3
È
B
For SXV60/SXV60ER
CD-14E
Spring adjuster position 1234567
Preload Soft Hard
Standard (rear) 2
É
8-20
Page 75

B
For VT60
CD-13E
CD-14E
Spring adjuster position 1234567
Preload Soft Hard
Standard (rear) 2
É
WARNING
@
Be sure to have a Yamaha dealer make this adjustment.
This shock absorber contains highly pressurized
nitrogen gas. It could explode by improper handling,
causing injury, or property damage.
Do not tamper with or attempt to open the shock
●
absorber.
Do not subject the shock absorber to an open
●
flame or other high heat sources, which could
cause it to explode.
Do not deform or damage the shock absorber in
●
any way.
Do not dispose of a worn or damaged shock
●
absorber by yourself. Take the unit to a Yamaha
dealer.
@
8-21
Page 76

ESU01974
Adjusting the rear suspension full rate
The total suspension spring rate and damping characteristics can be adjusted by changing the installed position
of the shock absorber.
WARNING
@
Be sure to have a Yamaha dealer make this adjustment.
@
CD-07E
Installation position S M H
Spring rate and
damping
Soft Medium Hard
Standard M
NOTE:
@
Be sure to make this adjustment when there is no load
(rider or cargo) on the snowmobile.
@
1. Loosen the full rate adjusting nut 1 1/2 or 3/4 turn,
while holding the adjusting bolt 2 securely with a
wrench so it does not move.
CAUTION
@
:
Never allow the adjusting bolt 2 to move while loosening the nut.
@
2. Turn the adjusting bolt 2 to the desired position.
CAUTION
@
:
Make sure that the adjusting bolt ends are set at the
same position on each side.
@
3. While holding the adjusting bolt securely, tighten the
full rate adjusting nut 1.
Full rate adjusting nut tightening torque:
49 Nm (4.9 m·kgf, 35 ft·lb)
CAUTION
@
:
Never allow the adjusting bolt to move while tightening the nut.
@
8-22
Page 77

ESU03532
Adjusting the drive track
WARNING
@
A broken track, track fittings or debris thrown by the
drive track could be dangerous to an operator or
bystanders. Observe the following precautions:
●
Do not allow anyone to stand behind the snowmobile when the engine is running.
●
When the rear of the snowmobile is raised to
allow the drive track to spin, a suitable stand
must be used to support the rear of the snowmobile. Never allow anyone to hold the rear of the
snowmobile off the ground to allow the drive
track to spin. Never allow anyone near a rotating
drive track.
●
Inspect the drive track condition frequently.
Replace damaged slide metal. Replace the drive
track if it is damaged to the depth where fabric
reinforcement material is visible or support rods
are broken. Otherwise, track damage or failure
could result in loss of braking ability and snowmobile control, which could cause an accident.
@
Measuring the drive track deflection
1. Lay the snowmobile on its side.
2. Measure the drive track deflection with a spring
scale. Pull at the center of the drive track with a force
of 100 N (10 kg, 22 lb).
NOTE:
@
Measure the gap between the slide runner and the edge
of the track window. Measure both sides.
@
Deflection
1
100 N (10 kg, 22 lb)
2
Standard drive track deflection:
25–30 mm (0.98–1.18 in) / 100 N (10 kg, 22 lb)
3. If the deflection is incorrect, adjust the drive track.
8-23
Page 78

Adjusting the drive track
WARNING
@
Be sure to have a Yamaha dealer make this
●
adjustment.
Support the snowmobile securely on a suitable
●
stand before working underneath the snowmobile.
Operate the engine in a well-ventilated area.
●
@
1. Lift the rear of the snowmobile onto a suitable stand
to raise the drive track off the ground.
2. Loosen the rear axle nut 1.
3. Start the engine and rotate the drive track one or two
turns. Stop the engine.
4. Check the drive track alignment with the slide
runners2. If the alignment is incorrect, align the
drive track by turning the left and right adjusters.
CD-08E
Drive track
alignment
Left adjuster Turn out Turn in
3
Right adjuster Turn in Turn out
4
Shifted to right6 Shifted to left
5
5 6
Slide runners
7
Drive track
8
Slide metal
9
Gap
a
Forward
b
5. Adjust the drive track deflection to specification.
CD-09E
Drive track
deflection
Left adjuster Turn in Turn out
3
Right adjuster Turn in Turn out
4
8-24
More than
specified
Less than
specified
Page 79

CAUTION
@
:
The right and left adjusters should be turned to an
equal amount.
@
6. Recheck alignment and deflection. If necessary,
repeat steps 3 to 5 until the proper adjustment is
achieved.
7. Tighten the rear axle nut.
Rear axle tightening torque:
75 Nm (7.5 m·kgf, 54 ft·lb)
ESU02001
Aligning the skis
1. Turn the handlebar so the skis face straight ahead.
2. Check the following for ski alignment:
a.Skis are facing forward.
b.Ski toe-out (1 – 2) is within specification.
Ski toe-out (1 – 2): 0–15 mm (0–0.59 in)
3. If the alignment is not correct, consult a Yamaha
dealer.
8-25
Page 80

ESU02760
Lubrication
Lubricate the following points.
Lubricant: Low-temperature grease
Throttle cable end
1
22
3
3
4
WARNING
@
Apply a dab of grease onto the cable end only. Do
not grease the brake or throttle cable themselves
because they could become frozen, which could
cause loss of control.
@
Steering
2
Front suspension
3
Rear suspension
4
8-26
Page 81

ESU02081
Replacing a headlight bulb
1. Lift up the shroud.
2. Disconnect the headlight connector.
3. Remove the bulb holder cover.
4. Remove the bulb holder by depressing and turning it
counterclockwise.
Bulb holder cover
1
5. Remove the bulb.
WARNING
@
Keep flammable products or your hands away from
the hot bulb until it cools down.
@
6. Install the new bulb.
Bulb type: 12 V, 60/55 W
CAUTION
@
:
Keep oil or your hands away from the glass part of
the bulb or its life and illumination will be affected.
If the glass is oil stained, thoroughly clean it with a
cloth moistened with alcohol or lacquer thinner.
@
ESU02931
Adjusting the headlight beam
1. Turn the headlight beam adjuster 1 in or out to
adjust the headlight beam.
Headlight beam movement:
Down
a
Up
b
8-27
Page 82

ESU00213
Battery
For SXV60ER/VT60
Replenishing the battery fluid
1. Check the fluid level. The level should be between the
upper and lower level marks.
“UPPER LEVEL”
a
“LOWER LEVEL”
b
2. Add only distilled water if necessary.
CAUTION
@
:
Normal tap water contains minerals which are harmful to a battery; therefore refill only with distilled
water.
@
WARNING
@
Battery electrolyte is poisonous and dangerous. It
contains sulfuric acid and can cause severe burns.
Avoid contact with skin, eyes, or clothing.
ANTIDOTE:
●
EXTERNAL: Flush with water.
●
INTERNAL: Drink large quantities of water or
milk. Follow with milk of magnesia, beaten egg,
or vegetable oil. Call physician immediately.
●
EYES: Flush with water for 15 minutes and get
prompt medical attention.
Batteries produce explosive gases. Keep sparks,
flame, cigarettes, etc. away. Ventilate when charging
or using in an enclosed space. Always shield your
eyes when working near batteries.
KEEP OUT OF THE REACH OF CHILDREN.
@
8-28
Page 83

ESU02822
Replacing a fuse
For SXV60ER/VT60
WARNING
@
Be sure to use the specified fuse. A wrong fuse will
cause electrical system damage and A FIRE HAZARD.
@
CAUTION
@
:
Be sure to turn the main switch off and disconnect
the negative battery lead to prevent accidental shortcircuiting.
@
1. Lift up the shroud.
2. Disconnect the negative battery lead.
3. Replace the blown fuse with one of proper amperage.
4. Connect the negative battery lead.
NOTE:
@
If the fuse immediately blows again, ask a Yamaha
dealer to inspect the snowmobile.
@
Specified fuses:
Main fuse: 30 A
1
“HEAD” fuse: 20 A
2
“TAIL” fuse: 10 A
3
“IGNITION” fuse: 10 A
4
Spare fuses (20 A, 10 A)
5
Spare main fuse
6
8-29
Page 84

ESU00294
9-
TROUBLESHOOTING
A. Engine turns over but does not start
1. Fuel system
No fuel supplied to combustion chamber
No fuel in tank ... Supply fuel.
●
Clogged fuel line ... Clean fuel line.
●
Clogged carburetor ... Clean carbure-
●
tor.
Fuel supplied to combustion chamber
Flooded engine (too much choke) ...
●
Crank engine with throttle open or wipe
the spark plugs dry.
2. Electrical system
Poor or no spark
Spark plugs are dirty with carbon or are
●
wet ... Remove carbon or wipe the
spark plugs dry; replace if necessary.
Faulty ignition system ... Ask a Yamaha
●
dealer to inspect.
T.O.R.S. system malfunction ... Discon-
●
nect the carburetor switch connectors
and connect the wire harness connectors together to bypass the T.O.R.S.
WARNING
@
●
Before bypassing the T.O.R.S., make
sure that the throttle returns properly to the fully-closed position.
●
The T.O.R.S. is an important safety
device; in the case of a malfunction,
take the snowmobile to a Yamaha
dealer immediately for repair.
@
For SXV60
Short circuit in the lighting system, sig-
●
nal system and meter system (except
for the ignition system) ... Disconnect
the relay with the white coupler (not the
black coupler) to activate the ignition
circuit so that the engine can be
started. Ask a Yamaha dealer to
inspect the electrical circuits as soon
as possible.
Relay with the white coupler
1
3. Compression
Insufficient
Loose cylinder head nuts ... Tighten
●
nuts properly.
Worn or damaged gasket ... Replace
●
gasket.
Worn or damaged piston and cylinder
●
... Ask a Yamaha dealer to inspect.
B. Engine does not turn over with the
recoil starter
1. Seized engine ... Seizure is caused by
poor lubrication, inadequate fuel, or an
air leak—Ask a Yamaha dealer to
inspect.
9-1
Page 85

2. “Hydrolock” occurs when fuel has filled
the crankcase when the vehicle has
been transported. ... Remove the spark
plugs and turn the engine over several
times with the ignition off to expel
excess fuel. Ask a Yamaha dealer to
inspect.
C. Electric starter does not operate or
operates slowly
For SXV60ER/VT60
1. Faulty wire connections ... Check connections or ask a Yamaha dealer to
inspect.
2. Discharged battery... Check battery
fluid and charge battery.
3. Engine trouble ... Check B above.
G. Snowmobile does not move
1. Malfunctioning V-belt clutch ... Ask a
Yamaha dealer to inspect.
2. Drive track does not move ... Foreign
object is caught in the drive track, or
slide runners have melted to the slide
metal due to lack of lubrication.
3. Tight, loose, or broken drive chain ...
Ask a Yamaha dealer to inspect.
H. V-belt twists
1. Improper V-belt ... Replace with the
correct V-belt.
2. Incorrect V-belt clutch offset ... Ask a
Yamaha dealer to inspect.
3. Loose or broken engine mount ... Ask a
Yamaha dealer to inspect.
D. Engine power is low
1. Faulty spark plugs ... Clean or replace
the spark plugs.
2. Incorrect jetting for altitude or temperature ... Carburetor. Ask a Yamaha
dealer to inspect.
3. Improper fuel flow ... See A.1. above.
4. Incorrect V-belt clutch settings for altitude or conditions ... Ask a Yamaha
dealer to inspect.
E. Engine constantly backfires or mis-
fires
1. Faulty spark plugs ... Replace the
spark plugs.
2. Clogged fuel system ... See A.1. above.
3. Malfunctioning T.O.R.S. system ... See
A.2. above.
F. Engine overheats
1. Insufficient coolant ... Add coolant.
2. Air in cooling system ... Bleed air or ask
a Yamaha dealer to inspect.
3. Leaking coolant ... Ask a Yamaha
dealer to inspect.
I. V-belt slips or burns
1. Oily or dirty V-belt or primary and secondary sheave assembly surfaces ...
Clean.
2. Problem with the driveline ... See H
above.
J. Engine does not upshift or down-
shift properly or engages harshly
1. Worn or damaged V-belt ... Replace the
V-belt or ask a Yamaha dealer to
inspect.
2. Incorrect V-belt clutch settings for altitude or conditions ... Ask a Yamaha
dealer to inspect.
3. Worn or sticking primary sheave
assembly ... Ask a Yamaha dealer to
inspect.
4. Worn or sticking secondary sheave
assembly ... Ask a Yamaha dealer to
inspect.
9-2
Page 86

K. Noise or excessive vibration in drive
chain and sprockets
1. Broken V-belt clutch components ...
Ask a Yamaha dealer to inspect.
2. Worn or damaged bearings ... Ask a
Yamaha dealer to inspect.
3. Worn or damaged V-belt with flat spots
... Replace.
4. Worn or damaged idler wheels or
shafts ... Ask a Yamaha dealer to
inspect.
5. Worn or damaged drive track ... Ask a
Yamaha dealer to inspect.
9-3
Page 87

ESU02524
10-
STORAGE
Long-term storage requires some preventive procedures to guard against deterioration.
1. Cleaning
Thoroughly clean the snowmobile, inside
and out, to remove the corrosive salts and
acids that can accumulate. Use Yamaha
Mud, Grease, and Engine Cleaner, or an
equivalent product, to loosen mud, grease,
and grime. Wash with mild soap, then rinse
and dry completely.
2. Lubrication
Lubricate moving parts, suspension linkage, and pivot points. Use the grease or
lubricant specified in the MAINTENANCE
section, or Yamaha Lube-Zall general-purpose lubricant. Proper lubrication fights
corrosion while it reduces friction.
bustion chamber and crankshaft from
corrosion. An alternate method is to
remove the carburetor silencer and squirt
oil into the carburetor throats while the
engine is running.
CAUTION
@
:
Do not attempt to store the snowmobile
by simply starting the engine occasionally during the storage period. This can
cause more harm than good! Moisture
and acids form during combustion
which can actually increase the chance
for corrosion damage during the storage period.
@
5. Protection
Apply a coat of wax to painted surfaces.
Apply suitable protectants to the exterior of
the engine, drive track, and to other metal,
plastic, and rubber parts.
3. Fuel system preparation
Add Yamaha Fuel Stabilizer and Conditioner, or an equivalent stabilizer, to the
fuel tank to help prevent fuel oxidation and
gum and varnish deposits, and to inhibit
corrosion in the fuel system and carburetor. In areas where oxygenated fuel (gasohol) is used, completely drain the fuel
system. Ask a Yamaha dealer if further
information is needed.
4. Engine
Proper storage of the engine is essential to
prevent costly rust and corrosion damage
to internal engine components. This is
more important in areas where oxygenated
fuel (gasohol) is used, because the alcohol
content in the fuel increases the chance for
water to enter the engine. Use Yamaha
Stor-Rite Engine Fogging Oil, or an equivalent fogging oil, to protect both the com-
6. Battery
For SXV60ER/VT60
Remove the battery from the snowmobile
and check the fluid level. Add only distilled
water if necessary. (See the “Battery—
Replenishing the battery fluid” section on
page 8-28 for instructions.) After checking
the fluid level, fully charge the battery.
Store it in a cool, dry place that is above
0 °C (32 °F), but less than 30 °C (90 °F).
Check the condition of the battery with a
hydrometer once a month, and charge it as
necessary.
10-1
Page 88

WARNING
@
Never smoke around the battery
●
while it is being charged. Sparks
may ignite the hydrogen gas created
by the battery.
Never connect the battery to or dis-
●
connect it from the snowmobile
while it is being charged. Sparks
may ignite the hydrogen gas created
by the battery.
Make sure that the battery terminals
●
are tight and that the battery vent
tube is properly routed and is
securely attached to the battery.
@
CAUTION
@
:
Do not charge the battery quickly.
Charge the battery for 10 hours at
2.0 amperes.
@
7. Drive track
Loosen the drive track and block up the
chassis so that the track is suspended
above the ground.
Returning to service after storage
When returning your snowmobile to service, reinstall the V-belt and adjust the
drive track. Before installing the battery,
have a Yamaha dealer inspect and fully
charge it. Install the battery, and make sure
that the battery vent tube is properly
installed and that there are no kinks in it.
Remove the spark plugs and clean or
replace them if necessary. Perform all
other pre-operation and seasonal maintenance checks listed in the periodic maintenance chart.
For peak performance, it is recommended
that you have your snowmobile checked
and tuned by a Yamaha dealer. They have
the experience and training to help you get
the maximum performance and use of your
Yamaha snowmobile.
8. V-belt
Remove the V-belt and store separately.
9. Storage
Store the snowmobile in a dry, well-ventilated place out of direct sunlight. Put a fabric cover over the snowmobile, preferably
one that is designed for it. Do not use a
plastic or vinyl cover—condensation could
be trapped underneath which could
increase the chances of rusting.
10-2
Page 89

ESU00228
R + M
2
11-
ESU00229
SPECIFICATIONS
Dimensions
CS-01E
SXV60/SXV60ER/VT60
Overall length 2,780 mm (109.4 in): SXV60/SXV60ER
2,990 mm (117.7 in): VT60
Overall width 1,200 mm ( 47.2 in)
Overall height 1,280 mm ( 50.4 in)
Dry weight 222 kg ( 489 lb): SXV60
234 kg ( 516 lb): SXV60ER
258 kg ( 569 lb): VT60
Ski stance 1,070 mm ( 42.1 in)
ESU00230
Engine
CS-02E
SXV60/SXV60ER/VT60
Type Liquid cooled 2-stroke, 7-port
Cylinder arrangement Parallel 3-cylinder
Displacement 593 cm
Bore × Stroke 65.0 × 59.6 mm (2.56 × 2.35 in)
Idle speed 1,600 ± 100 r/min
Engine oil type YAMALUBE 2-cycle oil
Carburetor type MIKUNI, TM31 × 3
Fuel Unleaded gasoline
3
Pump octane ; 88 or higher
Starting system Manual with recoil starter:
SXV60
Electric and manual with recoil starter:
SXV60ER/VT60
11-1
Page 90

ESU00231
Chassis
CS-03E
SXV60/SXV60ER/VT60
Drive track and suspension:
Track Molded rubber, fiber glass rod reinforced
Width 381 mm (15.0 in)
Track deflection 25–30 mm (0.98–1.18 in)/
100 N (10 kg, 22 lb)
Length on ground 752 mm (29.6 in): SXV60/SXV60ER
944 mm (37.2 in): VT60
Suspension type Slide Rail Suspension
Drive sprocket Quadruple polyethylene, 9 teeth
Transmission:
Type Automatic centrifugal engagement, infinite-
ly variable 3.8:1–1:1
Sheave distance Approx. 268.5 mm (10.57 in)
Sheave offset Approx. 15 mm (0.59 in): SXV60
Approx. 20 mm (0.79 in): SXV60ER/VT60
Engagement speed
Shift speed
∗
∗
Drive chain Silent chain enclosed in oil bath
Reduction ratio 39/20 (1.95)
Fuel tank:
Tank capacity 44.3 L (9.7 lmp gal, 11.7 US gal)
Oil tank:
Tank capacity 3.0 L (2.6 lmp qt, 3.2 US qt)
Brake:
Type Hydraulic disc type (ventilated disc)
Operation Handle lever, left hand operated
Throttle:
Operation Handle lever, right hand operated
Subject to change according to elevation settings.
∗
Approx. 4,300 r/min: SXV60/SXV60ER
Approx. 4,100 r/min: VT60
Approx. 8,500 r/min
11-2
Page 91

ESU00232
Electric
CS-04E
SXV60/SXV60ER/VT60
Ignition system DC-CDI
Spark plug Type BR9ES (NGK)
Gap 0.7–0.8 mm (0.028–0.031 in)
Battery Capacity GM18Z-3A/12 V 20A·h: SXV60ER/VT60
Maximum charge rate 2.0 Amperes/hr for 10 hrs: SXV60ER/
VT60
Headlight Bulb × Quantity 12 V, 60/55 W × 2
Tail/brake light Bulb × Quantity 12 V, 5/21 W × 2: SXV60/SXV60ER
12 V, 8/23 W × 1: VT60
Meter light Bulb × Quantity 14 V, 50 mA × 6
Indicator light Bulb × Quantity 14 V, 80 mA × 2
11-3
Page 92

/R
L
G/Y
B
O/B
SUB-WIRE
Y/G
F
Lg/B
(BLACK)
SUB-WIRE
HARNESS 3
HEADLIGHT
C
Lg/B
Y/G
(BLACK)
IHI
I
H
O
B
Gy
H
B
B
W
B
B
K
J
F
W/B
Br/W
W/B
Br/W
Br
B
R
B
B
R
BB
B
B
R
2
BR
Y/LY/ W
Y/L
Y/W
W/B
Y/W
Y/L
L/G
G Y
Y/R
E
R/W
R
RR
E
B
(BLACK)
WWW
O
B
W
Gy
D
DDD
O
W
Ch
Gy
Y/L
W/B
Y/W
Lg/L
O
ChWGy
Lg/W
D
B
Lg
B/Y
Y/B
Y/R
Y/G
G/R
Br/L
Br/W
W/G
R/W
Lg/B
Y/L
Y/W
Lg/L
Lg/W
W/G
R/W
Br/L
(BLACK)
W/B
L/G
B/Y
B/Y
Y/G
G
Y/BCh
Y
G/R
Lg
Lg/B
(WHITE)
Br/W
O
WBGy Y/ R
WW/G
R/
W
W
W
W/G
R/W
1
W/G
W/R
B/Y
Br/W
Br
R/W
R/Y
R R
W
W
W
RUN
IDLE
A
B
B/YBr
B/YBr
Br/W
W/B
OFF
OPEN
RUN
9:
STOP
Br
R/Y
R/W
Br/W
R/W
Br/W
R
Br
ON
OFF
START
8
R
B
3
R
B
3
W W W
W W W
G
Lg/L
B/L
B/L
Lg/W
(BLACK)
W/B
Lg/W
Lg/L
Lg/W
W/B
E
B
R/W
R
R/W
B
R/W
4
(30A)
R R
6
R Br
R
O/B
W/B
Lg/L
(BLACK)
LO
OFF
G
O/B O/B
L
F
O/B O/B
W/B
W/B
O/B
L/G
Y
(BLACK)
P
L/R
B
Lg
B
W
B
Lg
C
B
B
B
B
E
B B B
5
Br/L
L
Br
B
R
R
7
B
f
Br/L
L
RLL
(10A)(10A)(20A)
L
R
L
(BLACK)
È
YW
Y/BGL/Y
L/W
B
L/W
Y
(BLACK) (BLACK)
W
L/YGY/B
R/BBG/R
B/GG/B
A
R/BG/RB
G/BB/G
Y/L G/R
Y/L
B
HI
O/B
Y/L
Y/R
O/B
Y/L
G/R
Y
O/B
L/R
B
M
G/R
Y/L
L/R
L/RL/R
L/R
B
Y/B Y/B
]
\
L/W Y/B
B
L/W L/ W
R/YL/RL/W
cde
L/R
R/Y
L/W
(BLACK)
È
WIRE HARNESS
SUB-WIRE
HEADLIGHT
WIRE HARNESS
SUB-WIRE
HEADLIGHT
WIRE HARNESS
G/R
(BLACK) (BLACK)
Q
S
[
b
L/W
HARNESS 2
HARNESS 1
P
Br
P
L/R
L/R
G/Y
L
G/Y
ON
OFF
Y
R/B
W
Lg/B
L/Y
G/B
Y/G
G/RY/B
L/W
B/G
L/W
Lg
HI
LO
Lg
L/W
L/W
E
È
D
G/R
C
Y/G Y/G
Y/G
(BLACK)
G
/R
L
É
R
B
R/W
R/W
B
R
OGy
BW
ChW
OGy
L
B
N
R
G/R
P
P
187
G/Y
W
L/Y
O/R
P
U
W
L/Y
B
B
C
W W
L/Y L /Y
Lg/B Lg/B
W
Lg/B
L/Y
Z
Lg
L/W
a
BY
(BLACK)
Lg
HARNESS 3
/B
B
B
O
/R
L
G/Y
G/Y
Ê
WIRE HARNESS
SUB-WIRE
HARNESS 4
(BLACK) (BLACK)
WIRE HARNESS
/B
B
B
O
/R
/R
L
L
G/Y
G/Y
HARNESS
SUB-WIRE
É
HARNESS 1
G
(BLACK) (BLACK)
WIRE HARNESS
B
R
R
L
B
O
R
B
(BLACK) (BLACK)
(BLACK) (BLACK)
R
187
B
T
G
G/Y
G/YFG/Y
G/Y
G
L/RG/Y
L/R
L/RFL/R
L/R
B/G
B/W
B/G
Y
G
Y
B
L
É
(BLACK) (BLACK)
G/B
A
G/B G/B
G/B
Y
B
Lg
R/B
A
A
R/B R/B
G/R G/R
B/G
R/B
G/R
B/G
Z
[
X
Y
Y
Y
B
B
G G
SUB-WIRE
Ê
TAIL / BRAKE LIGHT
/R
L
G/Y
B
O/B
SUB-WIRE
HARNESS 3
B
F
B
BGB
B
T
L/R
B
G/Y
L
B
B
L/R
G/Y
G/Y
Ê
B/G
G/B
(GREEN)
V
B
G
(GREEN)
B/G
B
R/B
Br
Gy
W
B
A
B/G
BY
G
Y G
B
` `
Y G
BBB
A
BY
G
ESU00233
WIRING DIAGRAM
1-
12-1
Page 93

Y....................Yellow
B/G................Black/Green
B/L.................Black/Blue
B/W ...............Black/White
B/Y ................Black/Yellow
Br/L ...............Brown/Blue
Br/W ..............Brown/White
G/B................Green/Black
G/R................Green/Red
G/Y................Green/Yellow
L/R ................Blue/Red
L/W................Blue/White
L/Y.................Blue/Yellow
Lg/B...............Light green/Black
Lg/L...............Light green/Blue
Lg/W..............Light green/White
O/B................Orange/Black
O/R................Orange/Red
R/B................Red/Black
R/W...............Red/White
R/Y................Red/Yellow
W/B ...............White/Black
W/G...............White/Green
W/R...............White/Red
Y/B ................Yellow/Black
Y/G................Yellow/Green
Y/L.................Yellow/Blue
Y/R................Yellow/Red
Y/W ...............Yellow/White
Oil level switchXHigh beam indicator lightYWarning lightZMulti-function meter[Meter light
W
A.C. magneto2Rectifier/regulator3Condenser (SXV60)4Main fuse (SXV60ER/VT60)
1
Tachometer]Meter assembly_HeadlightaHeadlight relay (with the black coupler)
\
Starter relay (SXV60ER/VT60)6Battery (SXV60ER/VT60)7Starter motor (SXV60ER/VT60)8Main switch9Engine stop switch0Throttle switchACarburetor switchBGrip warmerCThumb warmerDCDI unitECoolant temperature sensorFGrip warmer adjustment switchGThumb warmer adjustment switchHIgnition coilISpark plugJEngine groundKFrame groundLPassenger grip warmer switch (VT60)MResistor (VT60)
5
Headlight beam switchc“IGNITION” fuse (SXV60ER/VT60)
“TA I L ” fuse (SXV60ER/VT60)
“HEAD” fuse (SXV60ER/VT60)
Load control relay (with the white
coupler)ÈSXV60ÉSXV60/SXV60ER
b
d
e
f
12-2
VT60
Ê
COLOR CODE
B ................... Black
Br.................. Brown
Passenger grip warmer (left) (VT60)
N
Ch................. Chocolate
G................... Green
Gy................. Gray
L ................... Blue
Lg ................. Light green
O................... Orange
P ................... Pink
Passenger grip warmer (right) (VT60)
Passenger grip warmer relay (VT60)QDC back buzzer (SXV60ER/VT60)
Gear position switch (SXV60ER/VT60)
Brake light switchTTail/brake lightUSpeed sensorVFuel sender
O
P
R
S
R................... Red
W .................. White
Page 94

YAMAHA MOTOR CO., LTD.
PRINTED ON RECYCLED PAPER
PRINTED IN JAPAN
2005.05-0.3×1 CR
(E)
 Loading...