

Page 1

SOUND CARD
SW60XG
OWNER’S MANUAL
Page 2
FCC ID : A6RSW60
This device complies with Part 15 of the FCC rules. Operation is subject to the following two conditions: (1) This
device may not cause harmful interference, and (2) this device must accept any interference received, including
interference that may cause undesired operation.
FCC INFORMATION (U.S.A)
1. IMPORTANT NOTICE: DO NOT MODIFY THIS UNIT!
This product, when installed as indicated in the instructions contained in this manual, meets FCC requirements.
Modifications not expressly approved by Yamaha may void your authority, granted by the FCC, to use the product.
2. IMPORTANT: When connecting this product to accessories and/or another product use only high quality shielded
cables.
Cable/s supplied with this product MUST be used. Follow all installation instructions. Failure to follow instructions
could void your FCC authorization to use this product in the USA.
3. NOTE: This product has been tested and found to comply with the requirements listed in FCC Regulations, Part 15
for Class "B" digital devices. Compliance with these requirements provides a reasonable level of assurance that your
use of this product in a residential environment will not result in harmful interference with other electronic devices. This
equipment generates/uses radio frequencies and, if not installed and used according to the instructions found in the
user's manual, may cause interference harmful to the operation of other electronic devices. Compliance with FCC
regulations does not guarantee that interference will not occur in all installations. If this product is found to be the
source of interference, which can be determined by turning the unit "OFF" and "ON", please try to eliminate the
problem by using one of the following measures :
Relocate either this product or the device that is being affected by the interference.
Utilize power outlets that are on different branch (circuit breaker or fuse) circuits or install AC line filter/s.
In the case of radio or TV interference, relocate/reorient the antenna.
If the antenna lead-in is 300 ohm ribbon lead, change the lead-in to co-axial type cable.
If these corrective measures do not produce satisfactory results, please contact the your local retailer authorized to
distribute this type of product
If you can not locate the appropriate retailer, please contact Yamaha Corporation of America, Electronic Service
Division, 6600 Orangethorpe Ave, Buena Park, CA 90620
The above statements apply ONLY to those products distributed by Yamaha Corporation of America or its subsidiaries.
PRECAUTIONS
● The sound card contains no user-serviceable parts, so never
touch the inside area of the circuit board or tamper with the
electronic circuitry in any way. Doing so may result in
electrical shock or damage to the sound card.
● When holding the sound card, do not touch the inside area
of the circuit board or apply excessive pressure to the card,
and be sure to protect the card from contact with water or
other liquids.
● Before installing the sound card in the computer, unplug
the power connector of your computer.
● Before touching the sound card, be sure to touch a metal
surface to discharge any static electricity from your body.
● Before connecting the computer to other devices, turn off
the power switches of all devices.
● Do not expose the sound card to direct sunlight, excessive
humidity, high temperatures, excessive dust or strong
vibrations.
● The sound card contains digital circuitry and may cause
interference if placed too close to radio or television
receivers.
● It is possible that computer malfunctions or operator actions
might destroy data that was created with the included
application software. We recommend that you back up all
important data onto floppy disks. Yamaha is not responsible
for data loss through computer malfunctions or operator
actions.
Yamaha cannot be held responsible for damage caused
by improper care and use of the sound card and software.
SPECIAL NOTICES
● The software and this owner’s manual are the exclusive
copyrights of Yamaha Corporation.
● Copying of the software or reproduction of this manual in
whole or in part by any means is expressly forbidden without
the written consent of the manufacturer.
● Use of the software and this manual is governed by the
license agreement which the purchaser fully agrees to upon
breaking the seal of the software packaging. (Please read
carefully the Software Licensing Agreement at the end of
this manual before installing the application.)
● Yamaha makes no representations or warranties with regard
to the use of the software and documentation and cannot
be held responsible for the results of the use of this manual
and the software.
● Windows and MS-DOS are the registered trademarks of
Microsoft® Corporation.
● IBM PC/AT™ is a trademark of IBM® Corporation.
● The company names and product names in this Owner’s
Manual are the trademarks or registered trademarks of their
respective companies.
NOTICE: The screen displays as illustrated in this owner’s manual are for instructional purposes, and may appear somewhat different from the screens which
appear on your computer. Future upgrades of application and system software and any changes in specifications and functions will be announced separately.
Page 3
INTRODUCTION
Thank you for purchasing the SW60XG — a high quality sound card with hundreds of musical instrument voices
and a variety of high quality digital effects.
This owner’s manual covers installation of the SW60XG sound card as well as the installation of the applications
and SW60XG driver.
To ensure proper installation and use of the hardware and software, please read this owner’s manual carefully,
and be sure to keep it in a safe place for future reference.
MAIN FEATURES
AWM WAVE TABLE
● Contains 676 Normal voices and 21 Drum voices (sets) generated by Advanced Wave Memory
2 (AWM2) tone generation system with the maximum 32-note polyphony.
Allows you to play and perfect the files compatible with General MIDI (GM) and XG format.
KARAOKE & EFFECTS
● Features versatile DSP effects, 11 Reverb effects, 11 Chorus effects and 44 Variation effects. A/
D inputs allows you to mix external inputs with the internal voices and effects. The EffectGearII,
an Windows application, lets you use a variety of stunning effects, change the pitch of a song, or
reduce the volume of the main vocal from a song playing on a CD (for karaoke sing-along).
The EFFECTCON, a DOS application, lets you control the sounds for the GM compatible DOS
games.
£You can NOT directly select and control the voices and effects from the SW60XG, since neither knob nor
button is furnished on top of the SW60XG.
However, you can select and control them by transmitting the System Exclusive Messages, such as XG System On*, to
the SW60XG. In this case you need an appropriate sequencing software which can configures and edits the System
Exclusive Messages.
As to the MIDI Data Format (including System Exclusive Messages), Normal and Drum Voice Lists, and Effect Type
List, please refer to the SW60XG Folder found in the included froppy disk.
TABLE OF CONTENTS
Package Contents & Minimum System Requirements................. 2
SW60XG Setup ......................................................................... 3
1. Names and Functions ........................................................................... 3
2. Sound Card Installation......................................................................... 4
3. Application Software Installation........................................................... 6
SW60XG Application Software................................................ 10
EffectGearII ............................................................................................. 10
EFFECTCON........................................................................................... 11
Troubleshooting....................................................................................... 12
Specifications .......................................................................................... 13
WINDOWS OPERATION
* XG System On (F0 43 1n 4C 00 00 7E 00 F7)
TG300B Reset (F0 41 1n 42 12 40 00 7F 00 41 F7)
n=Device Number
This owner’s manual assumes that you are already familiar with basic Windows operation. If you are not,
please refer to the owner’s manual which came with your Windows software before using the SW60XG
hardware and software.
Page 4

PACKAGE CONTENTS &
MINIMUM SYSTEM REQUIREMENTS
PACKAGE CONTENTS
The SW60XG package includes the items listed below, so before beginning, please take a
moment to make sure you have everything you need. (If something is missing, please contact
your authorized Yamaha dealer.)
● Sound card SW60XG
● Floppy Disk x 1: Install Disk
● Owner’s Manual x 1: Yamaha SW60XG Owner’s Manual
● User registration card
MINIMUM SYSTEM REQUIREMENTS
Proper use of the Yamaha SW60XG requires at minimum the following:
COMPUTER HARDWARE
● Memory
Requires an 80386SX/33MHz or higher internal CPU with a minimum of 8MB RAM.
● Hard Disk
2
Proper software installation and running the SW60XG requires at least 3MB of free space on
your hard disk.
● Floppy Disk Drive
To install the application software, and to save and load user data.
● Mouse
Requires a Windows 3.1 or Windows 95 compatible mouse.
● Expansion slot (ISA16 bits)
Required for installation of the SW60XG sound card.
DOS
Requires MS DOS Ver. 5.0 or higher to run Windows 3.1.
Windows
Requires Windows 3.1 or higher.
OTHERS
Additional hardware as listed below will permit maximum enjoyment of the SW60XG.
CD-ROM Drive
Connecting CD-ROM’s output with SW60XG’s CD IN lets you control the effects for the sound
from CD-ROM.
POWERED SPEAKERS
You can enjoy powerful and dynamic stereo sound by connecting powered speakers and other
stereo audio components to the OUTPUT jack.
Page 5

SW60XG SETUP
1. NAMES AND FUNCTIONS
214
1
214
214
214
214
1-2 SHORT &
3
3-4 SHORT
1-2 OPEN &
3
3-4 SHORT
1-2 SHORT &
3-4 OPEN
3
1-2 OPEN &
3-4 OPEN
3
1
2
3
4
214
2
214
3
For Panasonic For MITSUMI
1-2 OPEN &
3
3-4 OPEN
1-2 SHORT &
3
3-4 OPEN
1-2 OPEN &
3-4 SHORT
3
214
3
4
214
3
1
2
3
6
5
1 MIC IN jack: Mono mini plug type jack allows connection to the separately available
dynamic microphone (Monaural). MIC TYPE jumper (see below) allows use of a 2-lead or
3-lead condenser type microphone.
2 LINE IN jack: Stereo mini plug type jack allows input of line-level stereo signals from
external audio devices.
3 OUTPUT jack: Stereo mini plug type jack outputs standard line-level stereo signals. Allows
connection to powered speakers or the inputs of a recording mixer and other audio devices
including headphones.
4 CD IN connector: Allows stereo input of line-level signals from a CD-ROM built in the
computer. (Panasonic or MITSUMI)
5 MIC type jumper: Lets you select the type of amplifier configurations depending on the
type of microphone connected. (3-lead condenser or dynamic microphone; 2-lead condenser
microphone.)
1 1-2 Open/3-4 Open: dynamic microphone.
2 1-2 Short/3-4 Open: 2-lead condenser microphone.
3 1-2 Open/3-4 Short: 3-lead condenser microphone.
* Default position is 1: dynamic microphone.
6 MIDI Port Address jumper: Allows to select the appropriate MIDI Port Address for
sending the MIDI signals from the ISA bus to the SW60XG.
You may need to change the MIDI Port Address (default address) if some conflict problem
occurs. Please consider which address to use before the sound card installation.
1 1-2 Short/3-4 Short: 300
2 1-2 Open/3-4 Short: 310
3 1-2 Short/3-4 Open: 320
4 1-2 Open/3-4 Open: 330
3
* Default position is 1: 300.
¢If you change the MIDI Port Address position here, you are required to select the same Address for the
Driver. (See page 9)
Page 6

CONNECTIONS
The following diagram shows how to connect the various devices.
SW20
CD-ROM
SW60XG
Sound Card
Powered Speakers
CD IN
LINE IN
OUTPUT
LINE IN
OUTPUT
MIC
MIC
Microphone
Portable Cassette Recorder
or Stereo (for inputting
external sounds)
CD-ROM
SW60XG
Sound Card
CD IN
LINE IN
OUTPUT
Powered Speakers
Microphone
MIC
Portable Cassette
Recorder or Stereo
(for inputting
external sounds)
¢Before making connections, be sure to UNPLUG THE POWER SUPPLY CORDS OF ALL DEVICES.
After making connections, switch on the power of each device in the following order: External inputting devices
first, then the computer, then external audio devices. (NOTE: MAKE SURE TO TURN DOWN THE VOLUME
LEVELS OF THE EXTERNAL AUDIO DEVICES BEFORE TURNING THEM ON.) When turning off the power of
each device, simply reverse the process.
¢Improper connection of microphone and other external devices may cause ear injury or damage to
hardware.
4
£There are various types of audio in and out jacks, so make sure to select the proper cables and adaptors
according to your respective devices.
2. SOUND CARD INSTALLATION
The sound card fits into an ISA bus expansion slot in your computer.
1. Turn off the computer and unplug its AC power cord.
¢Do not attempt to install your sound card while the computer is plugged in. This can cause irreparable
damage to the sound card, and may pose a serious shock hazard!
2. Remove the top cover of the computer.
£The proper method for removing the top cover varies depending on the type of computer you use, so please
see your computer’s owner’s manual for the proper procedure. Wear gloves to avoid cuts by any sharp edges on the
cover.
Page 7

3. To remove the expansion slot cover, simply unscrew it and take it away.
£Be sure to keep the expansion slot cover in a safe place for future use.
4. Carefully remove the sound card from the anti-static bag.
¢Before touching the sound card, first touch a metal surface to discharge any static electricity in your body;
such static electricity can cause serious damage to your SW60XG. Also do not touch the inside surfaces of your sound
card in order to prevent possible interference with or damage to the circuitry.
5. Hold the sound card with two hands as shown, and slowly and steadily insert it into the
expansion slot, making sure to properly line up the connectors in the card with those in the
slot. To prevent breaking or damaging the sound card during installation, do not use
excessive force when inserting the sound card into the expansion slot.
6. Use the screw from step 3, above, to secure the sound card to the computer.
7. Finally, carefully replace the top cover of your computer.
5
£To remove the sound card, simply reverse the above process.
Page 8
3. SOFTWARE INSTALLATION
To use the SW60XG, the SW60XG driver and the application software should be installed in your computer
properly.
¢If your computer is run by Windows 3.1, the installation program will overwrite the contents of the MIDI
Mapper. The installation program also overwrites the AUTOEXEC.BAT, SYSTEM.INI and CONTROL.INI files. If you
don’t want to lose any existing data, please save them before you install the SW60XG application software.
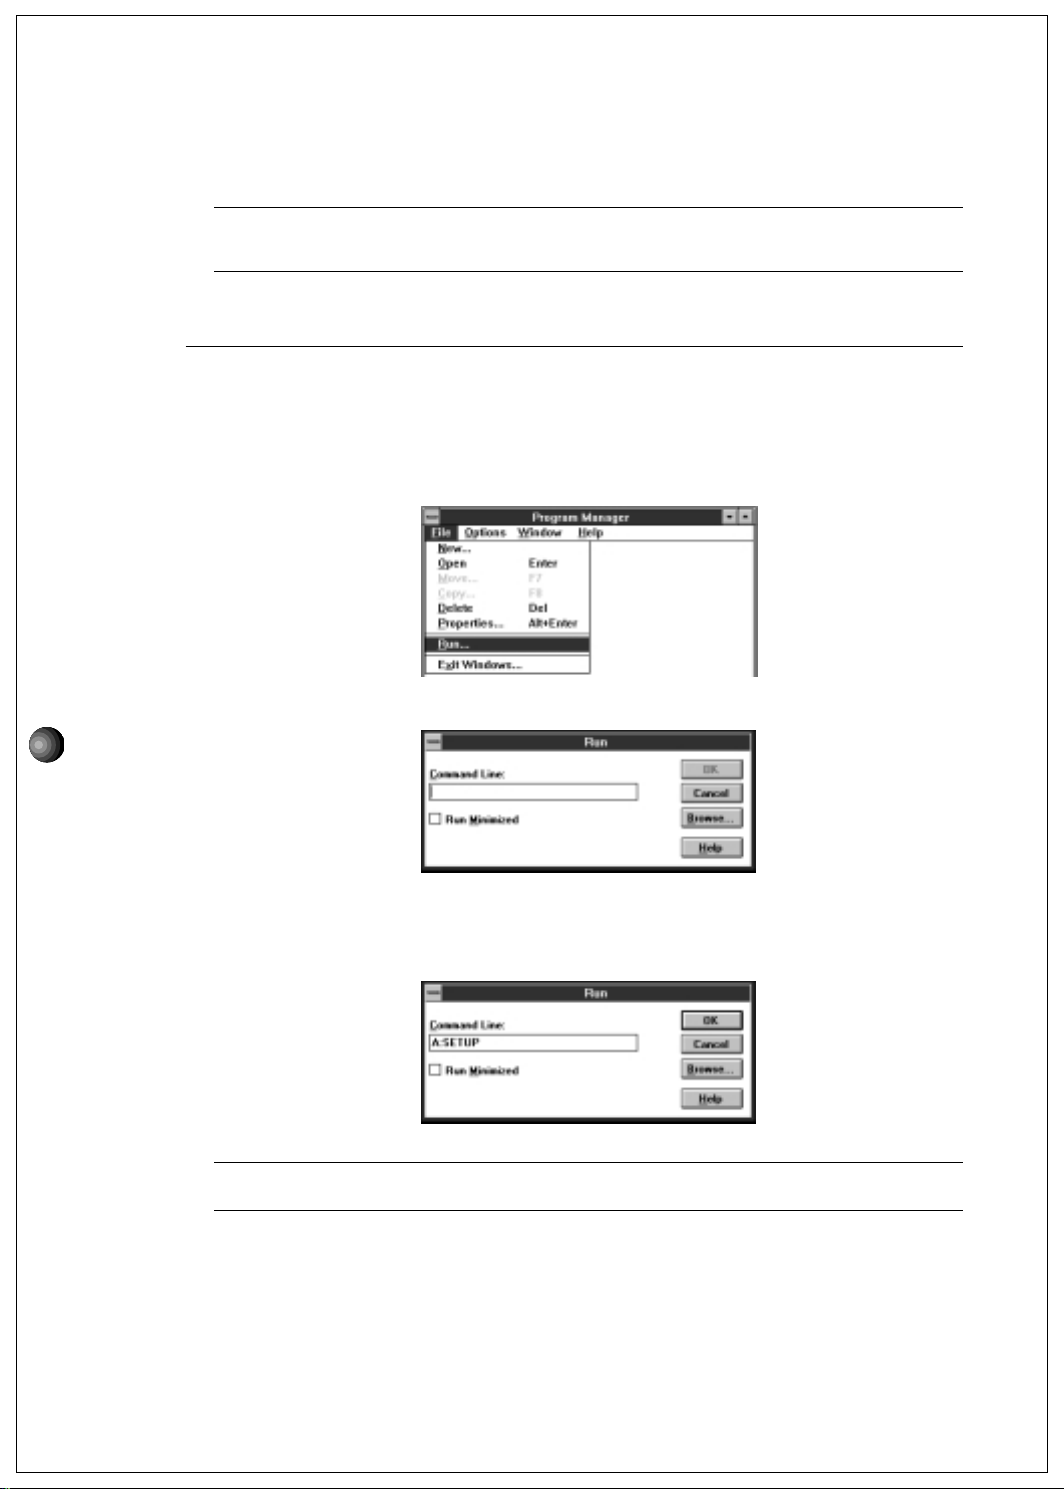
Installation Procedure for Windows 3.1
1. Insert Install Disk into your floppy disk drive.
2. Click [File] in the Menu Bar of the Program Manager window, then click [Run].
Run Dialog Box will appear.
6
3. In the command line text box, type the name of the drive where you inserted Install Disk
and file name “SETUP”.
£This manual assumes that your floppy disk drive is the A drive. If your drive is different, then choose the drive
specified for your computer.
Type A:SETUP, then press the <ENTER> key.
 Loading...