

Page 1

S90
Getting Started
S90 and SQ01
Phil Clendeninn
Senior Product Specialist
Technology Products
©Yamaha Corporation of America
Page 2
S90 and the SQ01 Demystified
The SQ01 is a powerful Windows audio/MIDI
sequencer that can be used with your S90. To
take advantage of this sequencer you will need to
install both the SQ01 and the VOICE EDITOR
for S90 on your computer. Please follow the
installation guide in the TOOLS for S90 booklet
that accompanies your unit.
MULTIPLE PORT USB INTERFACE
If you want to use the S90/SQ01 as a MIDI/Audio
sequencer with Remote Control over the audio,
you need to use the S90 as your USB MIDI
interface. You can send tracks to it from the
external sequencer software to address it via a
Multiple PORT system.
they can be set to receive on MIDI channels 1, 2
and 3 with no conflict, if you have set your PLG
boards to Yamaha USB OUT 0-2 MIDI channel 1-
3. These tracks will be totally discreet because
they are on separate PORTS.
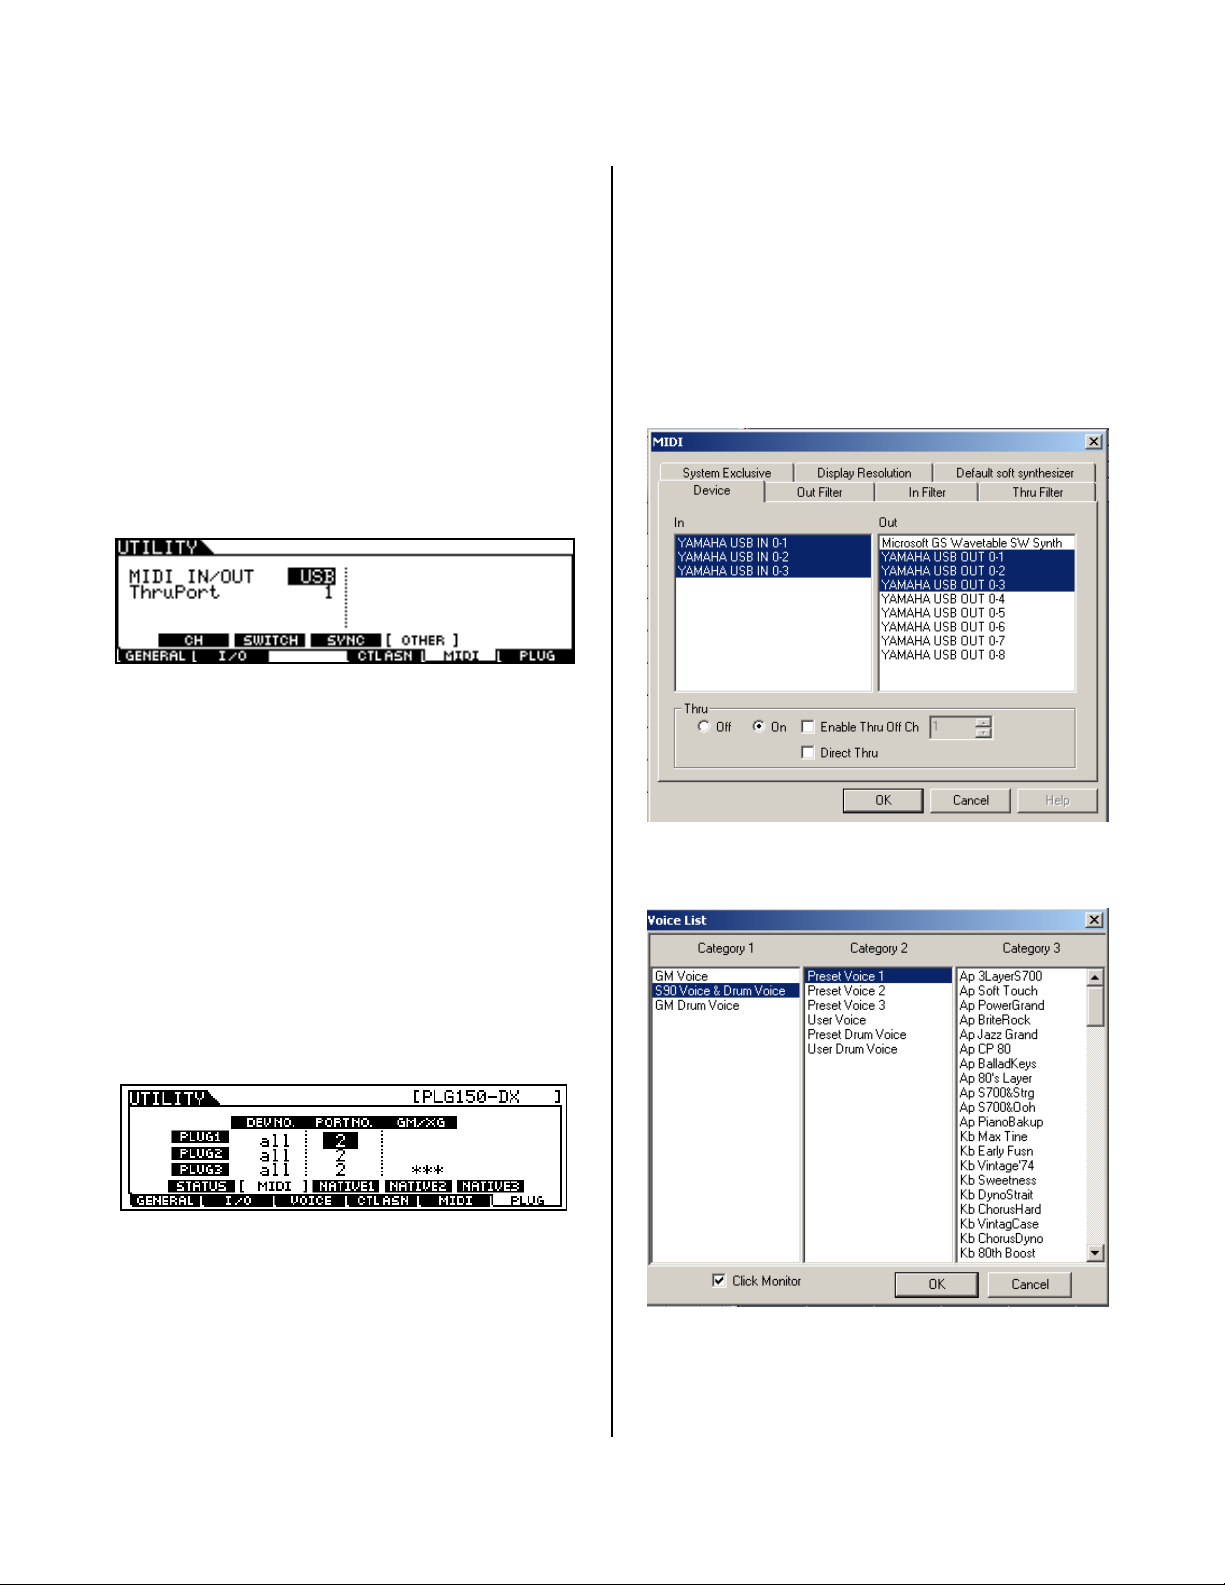
We will be using three Ports. Highlight the USB IN
and OUT devices as shown below. Port 1 will be
internal S90 Parts; Port 2 for PLG150 Boards and
Port 3 will be used for Remote Control functions
for the Audio Mixer.
• Press UTILITY
• Press F5 MIDI
• Press SF4 OTHER
• Set the MIDI IN/OUT to USB
The 5-pin DIN connector on the back (the
standard MIDI jack) is a single PORT system.
USB, on the other hand, is a multiple PORT
system. Each Port can have potentially 16 MIDI
channels. PORT 1 (always) addresses the internal
Parts of the S90. Where Port 2, for example, can
be used to address any PLG150 series Boards that
you may have installed in the unit. Port 3 will be
to control the AUDIO MIXER.
• Press UTILITY
• Press F6 PLUG
• Press SF2 MIDI
• Set the PLG150 Boards to Port 2
When you click on SETUP on the toolbar of the
SQ01 you can select MIDI > Device you can set
the Ports. This will establish communication
between the S90 and the sequencer. Each MIDI
track can be routed to the Yamaha USB OUT and
assigned a specific MIDI channel. For example,
you might have sixteen S90 PARTS, 01-16, on
MIDI channel 1-16: via Yamaha USB OUT 0-1.
You might have several PLG150-series boards -
SELECTING SOUND FROM SQ01
You will be able to select Voices from any bank of
the S90 using a search engine like this:
Here’s how to set this up: In the far left CONTROL
column of the Track View screen of SQ01 (on
MIDI tracks) you will see the GENERATOR and
VOICE boxes. Here you can select Voices for MIDI
tracks by setting the "Generator" to S90 and then
2
Page 3

search for Voices via the "Voice" box. In order for
the S90 to show up as an available SYNTHESIZER
under the Generator function, you must have
installed the VOICE EDITOR FOR S90 on your
computer. This will load in the necessary items so
that S90 appears on the available Tone Generator
list. By clicking on the small chevron next to the
word GENERATOR you will be able to select the
S90 as the TONE GENERATOR (shown below):
On the main toolbar of the SQ01 click on SETUP…
• Select TONE GENERATOR....
• Connect the DEVICE/CH "
Ch1
" through "Yamaha USB OUT 0-1: Ch16" in
the left column with S90 as the TONE
GENERATOR in the right column. (Shown
here):
Yamaha USB OUT 0-1:
• Now open a NEW session by clicking on FILE>
NEW on the toolbar of the SQ01.
This will setup a new song with S90 set as the
Tone Generator for all MIDI tracks and you can
click on the VOICE box and select your sounds
using the software's Category Search. Of course,
you can set the transmit PORT/CH of the Tracks
individually, as necessary, if you are using more
than one synthesizer in your setup.
REMOTE CONTROL
In order to get the S90 Remote Control function
to work, Port 3 is designated as the
communication PORT. Port 1 is always the internal
Parts; Port 2 could be for your PLG boards (as
explained earlier) and Port 3...is selected for
communication with the REMOTE CONTROL
functions for the AUDIO MIXER.
On your S90:
• Press UTILITY
• Press F4 CTL ASN (Control Assign)
• Press SF4 REMOTE
• Set this to SQ01
• Press ENTER
• Press SEQ PLAY
• Press MIX to set the S90 in multi-
timbral/multi-MIDI channel mode.
• Press the REMOTE CONTROL button on the far
right front panel to activate Remote functions
In SQ01 under
• Click REMOTE CONTROL...
If you have SQ01 version 1 it will allow you to set
the MIDI communication CHANNEL, and
DEVICE.
• Set the Channel to 16, and the INPUT DEVICE
to YAMAHA USB 0-3 (if you have a different
version: select STANDARD as the MODE, then
set Channel to 16, USB 0-3 as the IN
Device).
SETUP on the toolbar
INPUT
3
Page 4

MIDI Channel 16 is used as the communication
channel for all AUDIO MIXER communication. This
is a very important step. You will now be able to
use all the Remote Control functions, including the
START/STOP function. For details on what is
available please refer to the S90 Owner’s Manual
page 58-59. The Remote Control functions are
principally used for controlling the AUDIO tracks in
the SQ01 – using the front panel sliders and
buttons to control the audio tracks.
Audio Mixer: Quick Launch [SHIFT] + [7]
AUDIO AUTOMATION
The audio mixer automation icons appear on the
toolbar and under the SETUP menu. When you
select WRITE AUTOMATION the SQ01 will
automatically create the necessary track to
document your moves: Fader, Pan position, Mute
status, Solo status, and Effect send levels. It is
not necessary to create a track to record the
Audio Mixer – the sequencer will allow you to
overlay your automation – it will do the
housekeeping and put it into a folder on the main
Track View screen (typically you will find it at the
bottom of the list of tracks - in a track with a
suitcase icon in the track number column). If you
need to delete or change this data you can open
the suitcase by clicking on it and then double click
on the track to view and edit its data.
Built-in Effects
There are built-in Effects that can be applied to
the audio tracks. Please see the ON LINE Manual
for details on what is available and how to assign
them to an audio track.
On the Audio Mixer select Setup; click on Remote
Control; The Audio Mixer Remote Control will
communicate via the YAMAHA USB IN 0-3 as
shown below. In this example there are eight
audio tracks selected under COMMAND.
• Click OK.
The effects can be applied to any audio track as
necessary.
4
Page 5

MIDI Mixer: Quick Launch [SHIFT] + [6]
The MIDI MIXER is available for creating
automated MIDI mixes within the sequencer. You
can use it to write data into SQ01 tracks. You can
“READ AUTOMATION” and “WRITE AUTOMATION”:
READ from/ WRITE to a sequencer track to control
the channel levels, control effect Send levels, of
your MIDI tracks. Snapshots of settings can be
inserted into the track data. When recording MIDI
track AUTOMATION you will be addressing the
S90 internal PARTS so you will want to use USB
OUT 0-1. The MIDI control data must, like all MIDI
data be recorded to a track of the sequencer.
Select a track that is set to OUT 0-1 but set the
MIDI channel for this (automation) track to ALL.
This will allow data from any fader icon or Effect
knob icon to be recorded to this track.
• Set the MIDI OUT on the toolbar of the MIDI
Mixer to YAMAHA USB OUT 0-1
• Make sure both of the AUTO icons are selected
READ and WRITE (you can view the selection
under the SETUP menu – a check appears
next to READ and WRITE AUTOMATION
• Set the MIDI track to USB OUT 0-1 and the
MIDI channel to ALL (see diagram below)
• Set the TRACK to RECORD READY “R”
• Click the RED Record dot on the main
transport and press START.
The MIDI MIXER is addressing the internal Parts of
the S90 and thus is communicated with via OUT
0-1, only.
what happens on the S90 and to the track
automation of the SQ01 from this MIDI Mixer.
1
This means it is possible to control
Here is a step-by-step:
For example, another good use for the MIDI Mixer
is selection of Voices. Click on the three-digit
number above the Track number at the bottom of
the channel fader. This will open a dialog box that
will allow you to search for S90 Voices and send
out an audition note.
• In the dialog box shown below, you see that
you can select a Voice via the “LIST” and it
will show you the MSB/LSB Bank Select and
Program Change Number.
• If you are using another SQ01 supported
instrument you can select it by selecting
“DEVICE” from the DATABASE.
1
There is no USB IN for MIDI MIXER therefore the
direction of information is from the software to the
synth or to a track, only.
5
Page 6

It will let you view a LIST similar to the one that
the GENERATOR / VOICE routine did. If you select
your VOICE with the MIDI MIXER, when you have
completed selection you can click on the INSERT
PARAMETER icon on the toolbar and the SQ01 will
automatically create the setup data and insert it
into the appropriate tracks.
Saving data
Saving data in the SQ01 should be done in one of
the native formats. The .yws format will save your
entire session but not the audio and there is a
second .yws format (with Samples), which will
save your session and audio included in it.
• Click SAVE AS… and select the appropriate
type file for your purpose
If you are doing a non-audio session, and wish to
send the file to a SmartMedia card for play in real
time from the S90’s playback sequencer:
• Save your data as a SMF TYPE 0
• Send your MIDI MIXER settings to the S90 by
clicking on the TRANSMIT PARAMETERS icon
(a MIDI jack icon). Then you can save the MIX
to an S90 TEMPLATE
• From the MIX area press F5 TEMPLATE
• Name one of the 50 MIX TEMPLATES and
press SF5 PUT to place (or Put) the current
MIX to the location.
• When you transfer your SMF to SmartMedia
card and place it in the S90, you can create a
play list (called a CHAIN) – each Chain can
recall a MIX and then a SMF – you can even
program in stops;
Manually retrieving a Template is called "GET" and
is accessed from F5 Template/ SF4 Get.
You can use the Chain function to automate recall
of mix setups from the FLASH ROM of the S90 and
then play SMF from the SmartMedia card. This
requires that you create several TEMPLATES (one
for each Song setup) – These will be stored in the
S90’s Flash ROM memory. Name your MIX
Templates appropriately, then set up a Chain (F1)
that has steps that look something like this:
01 mix01: Feelings (recalls the Template)
02 SMF: Feelings (plays the song)
03 mix02: My Girl (recalls the Template)
04 SMF: My Girl (plays the song)
05 mix03: SanJose? (recalls the Template)
06 SMF: SanJose? (plays the song)
07 Stop (program a stop for an announcement)
08 mix04: Alfie (recalls the Template)
09 SMF: Alfie (plays the song)
etc., etc. There are 50 TEMPLATES and 100 STEPS
available in a CHAIN. When you push PLAY, the
Mix will be recalled from the internal FLASH ROM
Mix Template and then the Chain will play the
NEXT SMF (song) directly from SmartMedia card.
In other words, to recall mix01 for “Feelings”, you
start at the top of the list. It will instantly recall
the MIX and go on to play the song “Feelings”.
The Chain will advance automatically and wait
after playing “SanJose?” Step 07 is a programmed
stop. When you push PLAY again it will continue
from the current position and recall the mix04
“Alfie” from the internal Template setup, and then
immediately play the song file from the
SmartMedia card.
Phil Clendeninn
Senior Product Specialist
Technology Products
©Yamaha Corporation of America
6
 Loading...