

Page 1

Owner’s Manual
❏
Editor
Owner’s Manual
Special Notices
•The software and this owner’s manual are the exclusive copyrights of Yamaha Corporation.
•Copying of the software or reproduction of this manual in whole or in part by any means is expressly forbidden
without the written consent of the manufacturer.
•Copying of the commercially available music sequence data and/or digital audio files is strictly prohibited except
for your personal use.
•Yamaha makes no representations or warranties with regard to the use of the software and documentation and
cannot be held responsible for the results of the use of this manual and the software.
•The screen displays as illustrated in this owner’s manual are for instructional purposes, and may appear somewhat different from the screens which appear on your computer.
•Future upgrades of application and system software and any changes in specifications and functions will be
announced separately.
•The company names and product names in this Owner’s Manual are the trademarks or registered trademarks of
their respective companies.
YAMAHA PRO AUDIO GLOBAL SITE
http://www.yamahaproaudio.com/
Contents
Getting Started . . . . . . . . . . . . . . . . 2
Configuring the Editor . . . . . . . . . . . . 2
Synchronizing SPX2000 Editor . . . . . . 3
Offline Edit Function . . . . . . . . . . . . . 4
Working with Sessions . . . . . . . . . . . . 4
Undo/Redo Function . . . . . . . . . . . . . 4
*Specifications and descriptions in this owner’s manual are for information purposes only. Yamaha Corp. reserves
the right to change or modify products or specifications at any time without prior notice. Since specifications,
equipment or options may not be the same in every locale, please check with your Yamaha dealer.
Using SPX2000 Editor Windows . . . 5
Library Window. . . . . . . . . . . . . . . . . . 5
Effect Editor Window. . . . . . . . . . . . . . 7
REV-X Window . . . . . . . . . . . . . . . . . . 9
Appendix . . . . . . . . . . . . . . . . . . . . 11
Keyboard Shortcuts. . . . . . . . . . . . . . 11
Compatibility of “.D2E” library files. . 11
1
SPX2000 Editor Owner’s Manual
Page 2
❏
Getting Started
Description of menus and buttons
In the event that menu and button names on the Windows system are different from those on the Macintosh system, this manual uses the Windows menu and button names followed by the Macintosh menu and button names
in parentheses.
SPX2000 Editor enables you to remotely control the SPX2000 unit and to save the effects on your computer.
To use SPX2000 Editor, you must follow these steps:
> Start Studio Manager.
> Configure the SPX2000 Editor.
> Synchronize SPX2000 Editor with your SPX2000 unit.
For more information on using Studio Manager, refer to the Owner’s Manual for Studio Manager.
Configuring the Editor
You must configure the following settings for each open Editor.
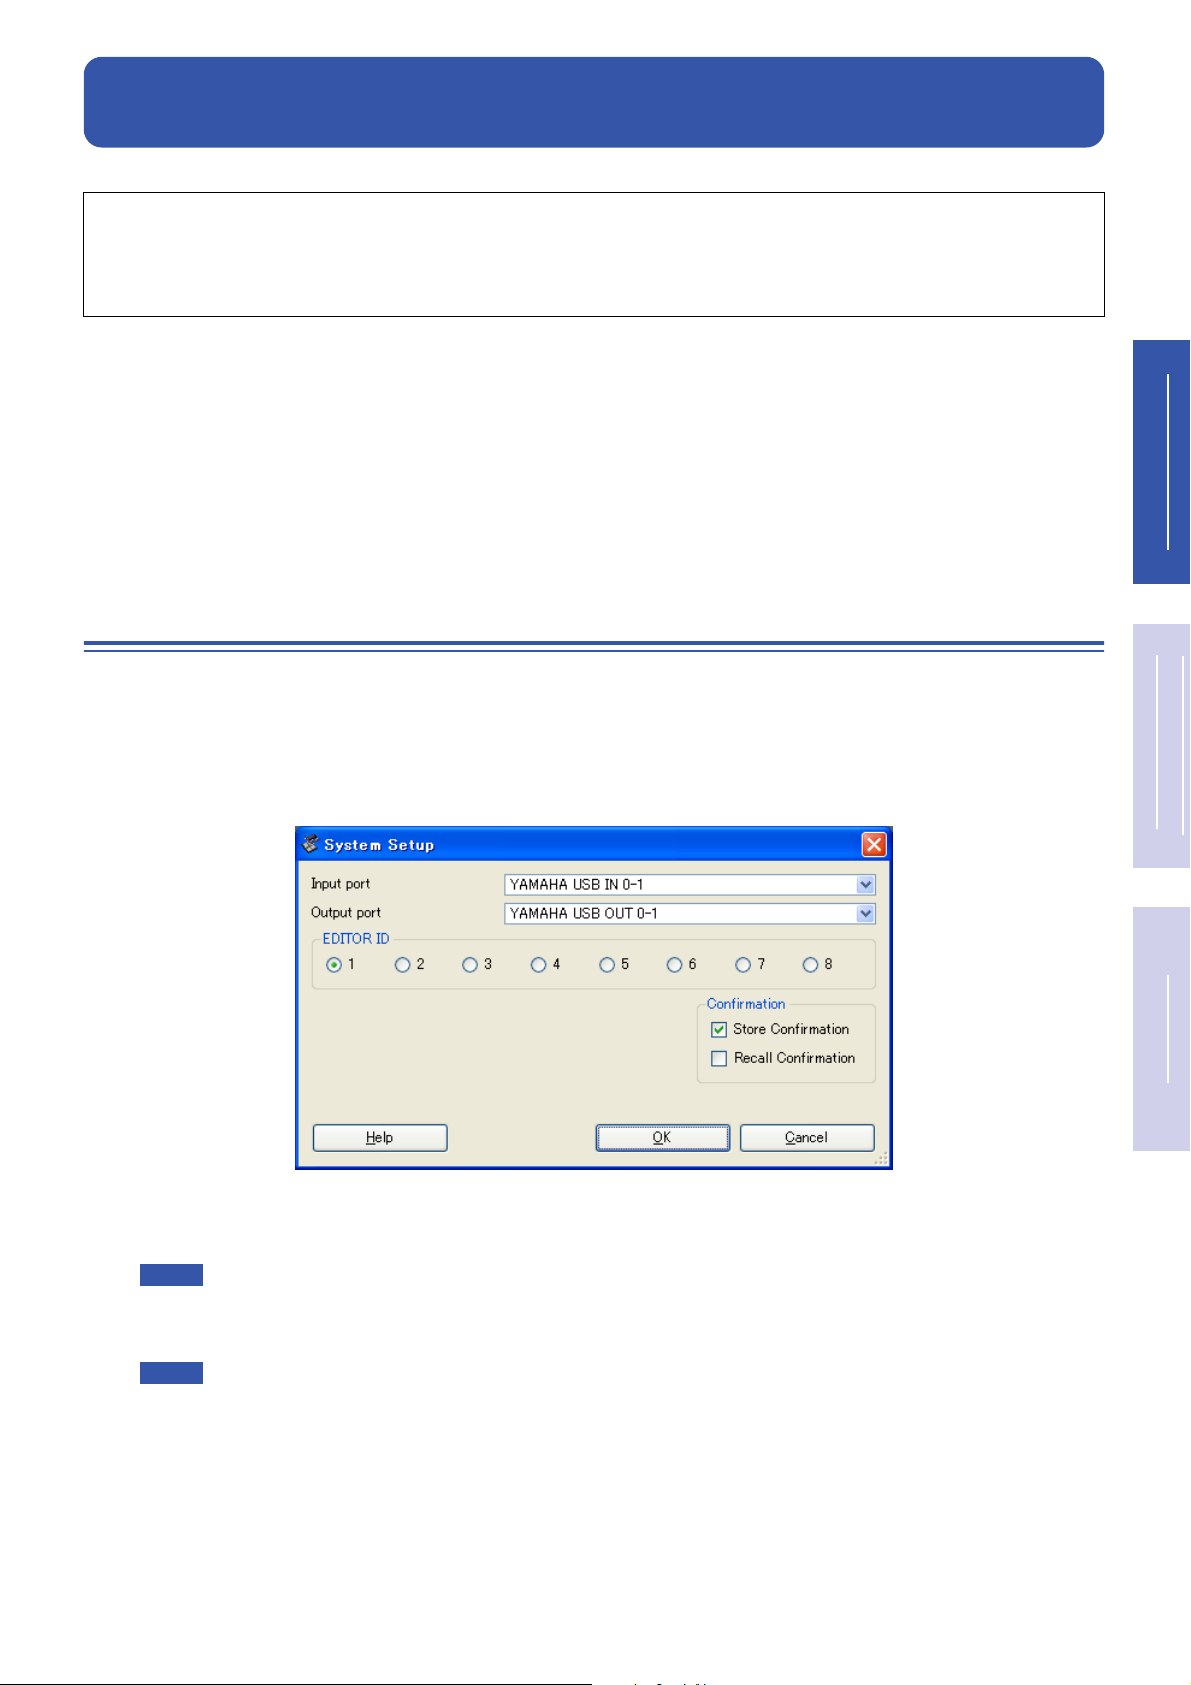
System Setup
To open the Setup window, choose [System Setup] from the [File] menu.
Be sure to specify the Input port and Output port.
Getting Started
Using SPX2000
Editor Windows
Appendix
Input port/Output port : These pop-up menus are used to select the ports through which SPX2000 Editor
will communicate with your SPX2000 unit.
NOTE
EDITOR ID : SPX2000 Editor can control any one of up to eight SPX2000 Professional Multi-Effect Processors,
each with its own exclusive ID. Select the ID of the SPX2000 unit you want to control.
NOTE
Confirmation : These options determine whether or not a confirmation dialog box appears when storing or
recalling.
Specify a MIDI port in the Studio Manager before selecting the Input port/ Output port.
You must set the Editor ID to the same ID number as you specified in your SPX2000 unit.
2
SPX2000 Editor Owner’s Manual
Page 3

❏
Input Signal Setup
To open the Input Signal Setup window, choose [SPX Setup] from the [File] menu.
Input Source : Select a input source: Analog or Digital
Input Mode : Select a input mode: Monaural or Stereo
Synchronizing SPX2000 Editor
When SPX2000 Editor starts up for the first time, the parameter settings on the SPX2000 unit and the parameter settings in SPX2000 Editor be different. Therefore, you must first match the parameter settings on the SPX2000 unit
with those in SPX2000 Editor. This operation is called “synchronization.” Follow the steps below to synchronize
SPX2000 Editor.
Getting StartedAppendix
1
Choose [Re-synchronize] from the [Synchronization] menu.
The following window opens.
2
Select whether you want to transfer your settings to SPX2000 Editor, or vice versa.
At this time, the [All Libs] option determines whether or not Library data is synchronized.
[PC -> SPX2000] : Tr ansfers the settings of the current SPX2000 Editor Session to your SPX2000 unit.
[SPX2000 -> PC] : Tr ansfers the settings of your SPX2000 unit to the current SPX2000 Editor Session.
Click [OK].
3
Do not operate the SPX2000 unit while synchronization is in progress.
NOTE
• If you use the “Total Recall” function in Studio Manager, all selected Editors in Studio Manager are
synchronized with the corresponding devices.
• If the operation lock setting is enabled on the SPX2000 unit, parameters that are blocked will not
change on the SPX2000 unit when you operate SPX2000 Editor; this means that the parameter
settings in SPX2000 Editor and in the SPX2000 unit itself may not match.
For details on the settings that are blocked, refer to the SPX2000 owner’s manual.
Using SPX2000
Editor Windows
3
SPX2000 Editor Owner’s Manual
Page 4

Offline Edit Function
If you do not want to synchronize your SPX2000 unit with SPX2000 Editor, select [Offline Edit] from the [Synchronization] menu. The Offline Edit function is also activated when you click the [ONLINE]/[OFFLINE] button in the
Effect Editor window.
To apply your off-line edits to your SPX2000 unit, synchronize the SPX2000 unit with SPX2000 Editor.
NOTE
Some parameters in the SPX2000 unit change their displayed values depending on the sampling
frequency. If you switch SPX2000 Editor from OFFLINE to ONLINE, displayed parameter values may
change because SPX2000 Editor loads the sampling frequency from the SPX2000 unit and updates
the display.
Working with Sessions
All of the settings in SPX2000 Editor, including the library data, are collectively called a “Session.” The following table
describes how to handle Sessions.
Creating a new Session
Opening a previously saved Session
Saving the current Session
Saving the current Session with a new name
If you save a Session in the SPX2000 Editor window, only that Editor’s settings are saved in a file with a file extension
of “.SPX”.
If you save a Session in the Studio Manager, all selected Editor settings are saved in a file with a file extension of
“. Y SM”.
Choose [New Session] from the [File] menu.
Choose [Open Session] from the [File] menu.
Choose [Save Session] from the [File] menu.
Choose [Save Session As...] from the [File] menu.
Undo/Redo Function
In SPX2000 Editor, you can cancel the latest operation (Undo) and also cancel the cancellation of the latest operation
(Redo). If you perform an Undo operation twice in a row, you can cancel the two most-recent operations. If you perform an Undo operation three times in a row, you can cancel the three most-recent operations. In this way, you can
cancel multiple recent operations. The following table describes how to use the Undo/Redo function.
NOTE
To cancel (i.e., Undo) the most recently-performed operation in the Library window, click the [Undo]
button in the Library window. You cannot execute [Undo]/[Redo] commands from the [Edit] menu.
For details, refer to page 5.
Getting StartedAppendix
Using SPX2000
Editor Windows
Undo
Redo
Please note, however, that after you perform one of the following operations, you cannot successfully undo or redo
any previous operation:
•Closing Studio Manager
•Synchronizing your console or device with Studio Manager
•Creating a new Session
•Opening and closing a Session
•Saving a Session
•Recalling a effect
NOTE
You cannot Undo or Redo the following operations:
• Edits in the Setup window
• Synchronization
• Opening and closing the windows
• Resizing the windows
Choose [Undo] from the [Edit] menu.
Choose [Redo] from the [Edit] menu.
4
SPX2000 Editor Owner’s Manual
Page 5

1
2
Using SPX2000 Editor Windows
Library Window
The Library window enables you to manage libraries (parameter settings for each effect). In addition, libraries can be
saved to disk on your computer as Library files.
To open the Library window, choose [Library] from the [Windows] menu.
The Library window consists of two panes. The pane on the left, called the [FILE] section, displays the contents of the
SPX2000 Editor library file. The pane on the right, called the [INTERNAL DATA] section, displays the Effect list of
the SPX2000 unit.
You can copy and sort the items (effects) in the list by dragging them between the panes. Within the same pane, you
can copy an effect by dropping it on top of another effect, and you can sort effects by dropping an effect between two
effects. Effects can be swapped by holding down the <Shift> key while dragging. In all cases, the contents of the destination effect are overwritten. To edit a effect title, click the title, then type. To select multiple effects, click effects
you want to choose while holding down <Shift> key or <Ctrl> key (< >).
Getting StartedAppendix
1
2 54
3
6 7 6 7
)
!
@
#
$
%
^
Using SPX2000
Editor Windows
89
File name
This is the file name of the currently open Library file.
[OPEN] button
This button is used to open Library files.
NOTE
DM2000/02R96/DM1000/01V96 library files with the “.D2E” extension can also be opened, but
some files may not be compatible with SPX2000 Editor. (see page 11)
5
SPX2000 Editor Owner’s Manual
 Loading...