

Page 1
SPM-K30
WALL MOUNT BRACKET
SUPPORT MURAL
デジタルサウンドプロジェクター壁掛け金具
English Français Deutsch Svenska Italiano Español
Installation Manual
Manuel d’installation
Installationsanleitung
Instllationsanvisningar
Manuale d’installazione
Manual de instalación
Installatiehandleiding
Руководство по установке
取付説明書
Nederlands
Русский
日本語
Page 2
DIMENSIONS
DIMENSIONS
ABMESSUNGEN
MATTSKISSER
DIMENSIONI
DIMENSIONES
AFMETINGEN
Га б а ри ты
各部の寸法
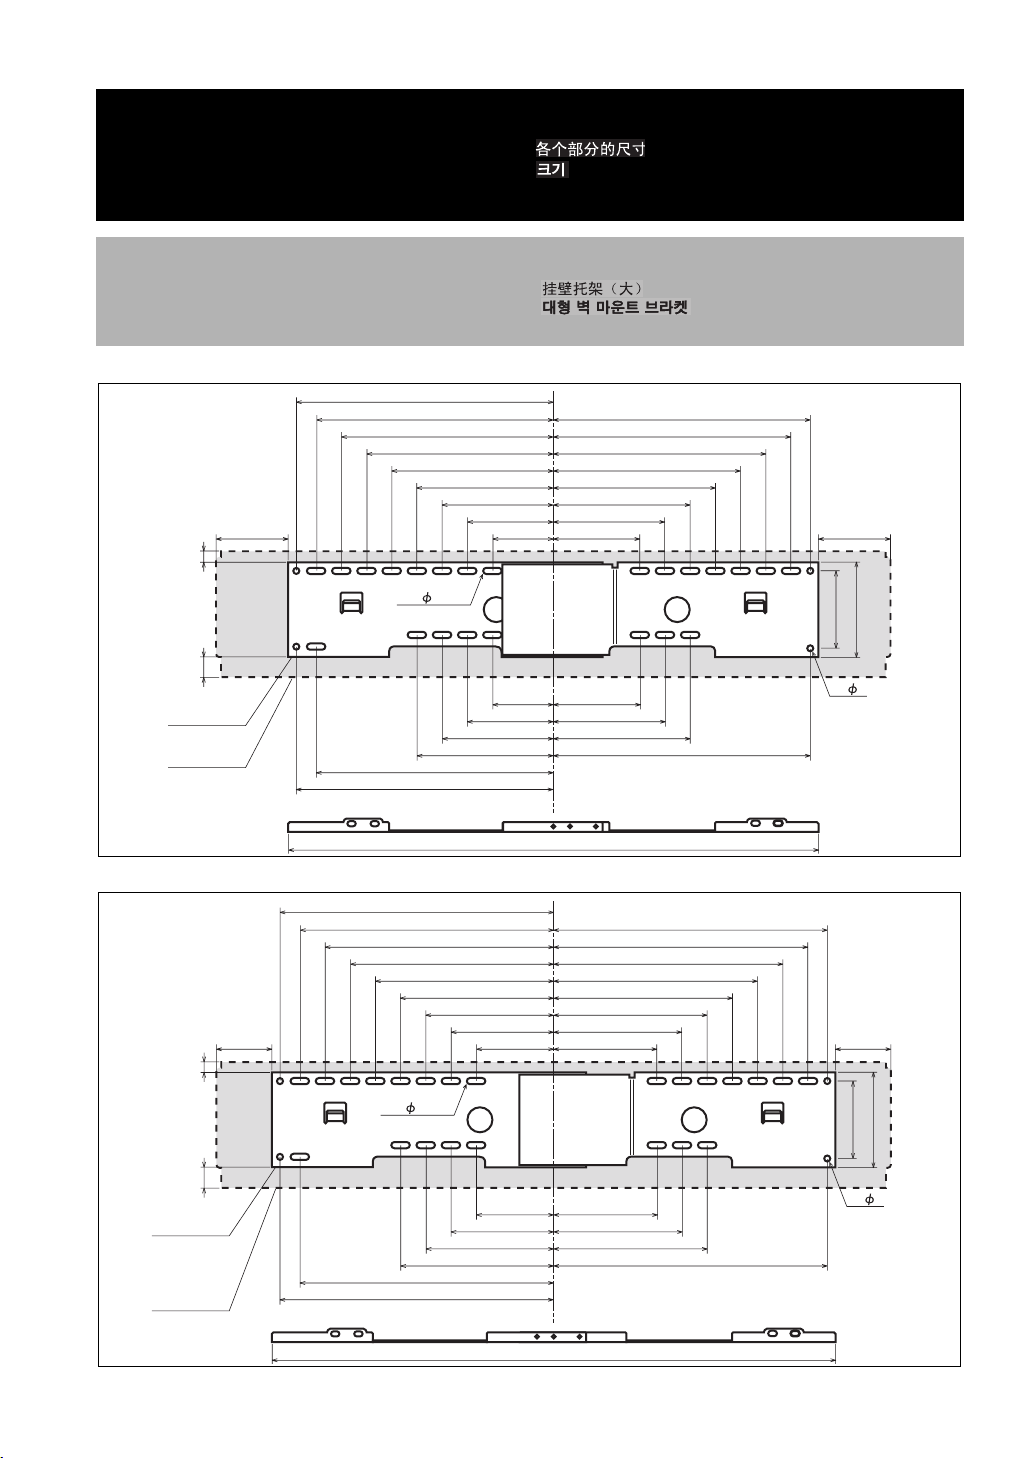
Large wall mount bracket
Grand support mural
Große Wandhalterung
Stort väggmonteringsfäste
Staffa di installazione a muro grande
Soporte de montaje en pared grande
■ YSP-800/YSP-900
85 85
13.328.7
SPM-K30
YSP-800/
YSP-900
305
282.5
252.5
222.5
23- 7x22
282.5
305
192.5
162.5
132.5
132.5
162.5
Grote wandbevestigingsbeugel
Большой кронштейн настенного крепления
壁掛け金具(大)
305
282.5
252.5
222.5
192.5
102.5
72.5 102.5
72.5
102.5
162.5
132.5
102.5
132.5
162.5
305
92
4- 7
1.4kg
112
■ YSP-3000/YSP-30D/YSP-3050/HTY-7030
325
302.5
272.5
65 65
12.629.4
24- 7x22
SPM-K30
YSP-3000/
YSP-30D/
YSP-3050/
HYT-7030
302.5
325
242.5
212.5
182.5
152.5
122.5
92.5 122.5
92.5
122.5
152.5
182.5
630
670
152.5
122.5
152.5
212.5
182.5
182.5
272.5
242.5
325
302.5
325
(mm)
1.4kg
92
112
4- 7
(mm)
i
Page 3
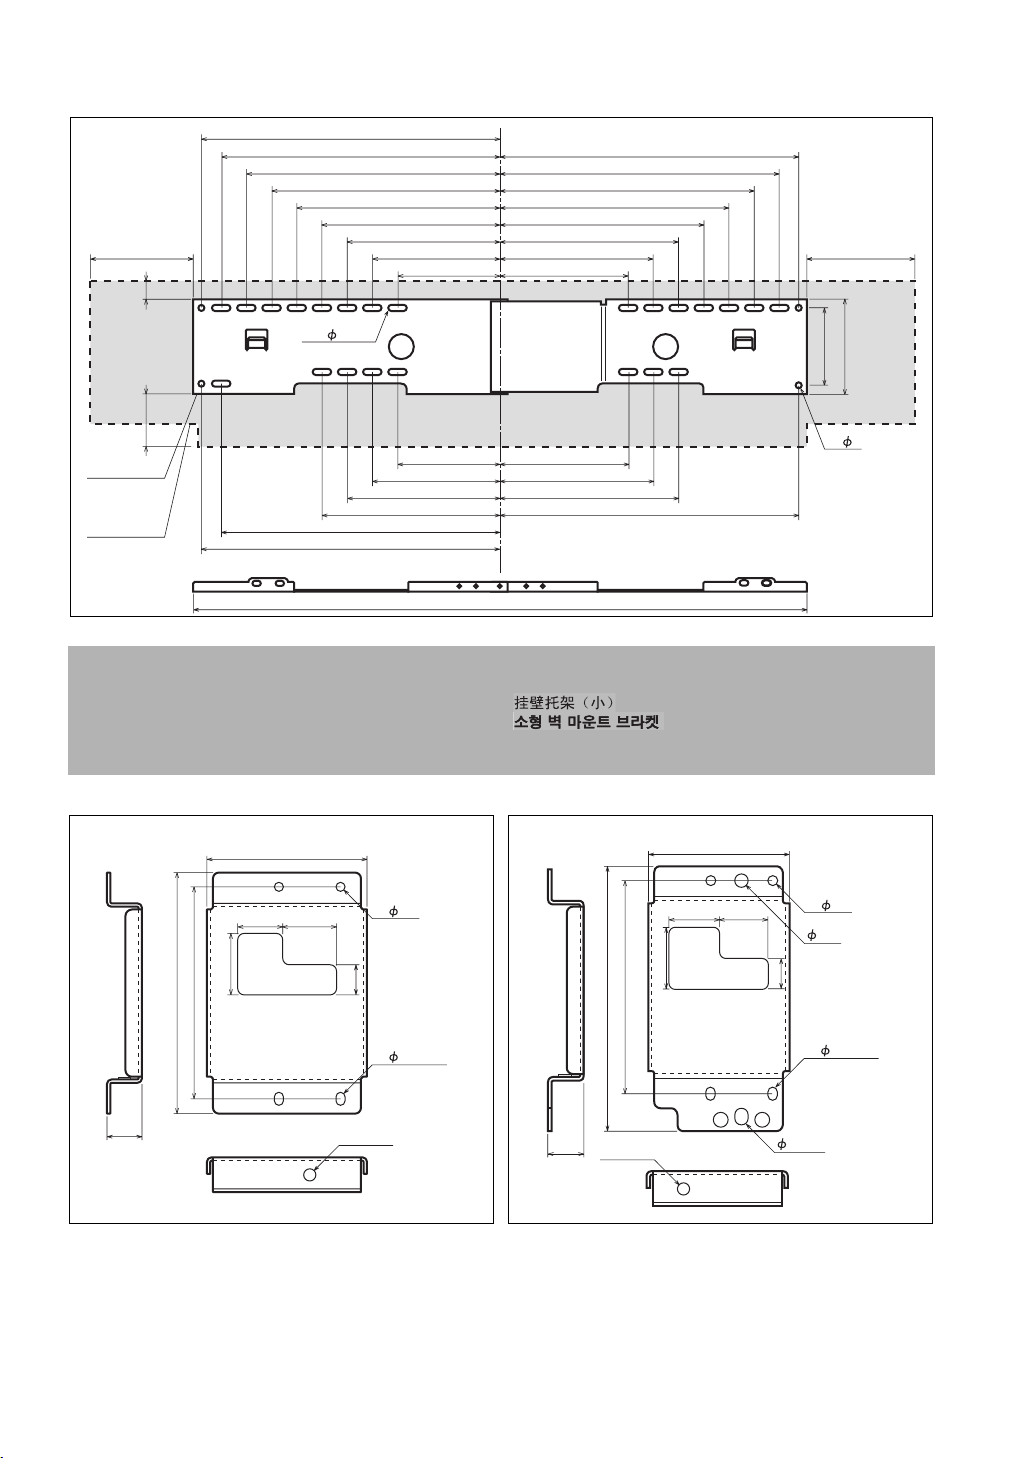
■ YSP-4000/YSP-40D/HTY-7040
150 150
2263
355
332.5
302.5
272.5
242.5
212.5
182.5
152.5
102.5 152.5
212.5
182.5
272.5
242.5
332.5
302.5
355
1.4kg
24- 7x22
SPM-K30
YSP-4000/
YSP-40D/
HTY-7040
Small wall mount bracket
Petit support mural
Kleine Wandhalterung
Litet väggmonteringsfäste
Staffa di installazione a muro piccola
Soporte de montaje en pared pequeño
■ A
78
22 26
30
102.9
116.9
312.5
355
15
92
112
4- 7
(mm)
182.5
212.5
122.5
152.5
152.5
182.5
212.5
355
730
Kleine wandbevestigingsbeugel
Малые кронштейны настенного крепления
壁掛け金具(小)
■ B
0.1kg x 2 0.1kg x 2
2- 4.5
102.9
128
24 24
30
68
2- 4.5
6.2
15
16.9
M6TAP
2- 4.5x6.5
(mm)
16.9
M6TAP
2- 4.5x6.5
6.2x8
(mm)
ii
Page 4
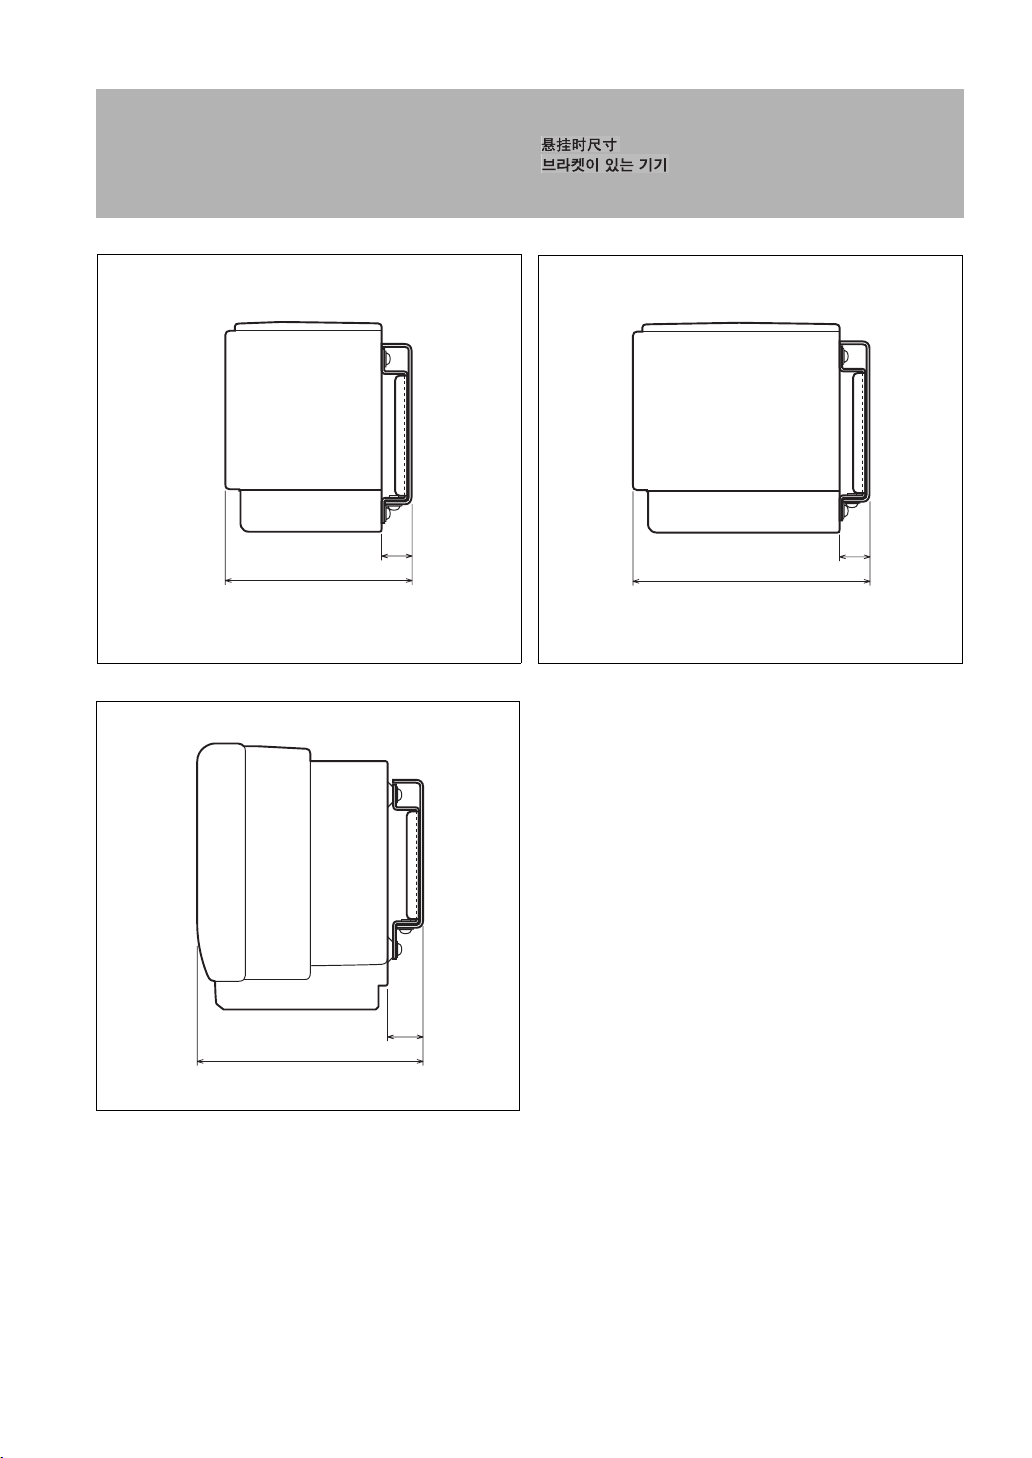
Unit with bracket
Le système avec son support
Einheit mit Halterung
Ljudprojektorn med fästet
Unità con staffa
Unidad con ménsula
■ YSP-800/YSP-900
Toestel met de beugel
Аппарат с кронштейном
取付時の寸法
■ YSP-3000/YSP-30D/YSP-3050/HTY-7030
134
YSP-4000/YSP-40D/HTY-7040
167
19
23
(mm)
(mm)
19
171
(mm)
iii
Page 5

SPM-K30
WALL MOUNT BRACKET
SPM-K30
Installation Manual
Thank you very much for purchasing the Wall Mount Bracket SPM-K30. Be sure to read this manual thoroughly before
using this bracket. After you have read this manual, retain it for future reference.
English
When installing the Digital Sound Projector using this bracket, all installation work must be
performed by a qualified contractor or dealer personnel. The customer must never attempt to
perform this installation work. Improper or inadequate installation could cause the Digital Sound
Projector to fall, resulting in personal injury.
SAFETY INSTRUCTIONS
• Always follow the instructions set forth in this manual when installing the Digital Sound Projector
using this bracket.
Improper or inadequate installation could cause the Digital Sound Projector to fall, resulting in personal injury.
• The installation must be secure enough to bear the weight of the Digital Sound Projector, the wall
bracket and other hardware indefinitely, and must also be secure enough to withstand vibrations.
Improper or inadequate installation could cause the Digital Sound Projector to fall, resulting in personal injury.
• To ensure safety, all screws must be tightened securely.
Loose screws could cause the Digital Sound Projector to fall, resulting in personal injury.
• Make sure to leave adequate ventilation space around the unit to allow heat generated by the Digital
Sound Projector to dissipate.
Failure to provide adequate space around the unit could cause the Digital Sound Projector to overheat internally,
resulting in a fire.
• Never hang from the Digital Sound Projector or the wall bracket.
Hanging from the Digital Sound Projector or the wall bracket could cause the Digital Sound Projector or the wall
bracket to fall, resulting in personal injury.
• Once the Digital Sound Projector is installed, safety checks should be conducted on a regular
basis.
If the Digital Sound Projector is used over an extended period of time, screws can become loose and the installation
can become weaker due to the passage of time, vibrations, etc.
En 1
Page 6

ACCESSORIES
ACCESSORIES
Check that all of the following parts are included.
Large wall mount bracket (LEFT) (x1)
Small wall mount brackets
(Type A) (x2)
Large wall mount bracket (RIGHT) (x1)
Small wall mount brackets
(Type B) (x2)
Safety wires (x2)
Length 300 mm
Projector mounting screws
(M6, 16 mm) (x6)
Note
Prepare at least six sets of commercially available tapping screws ( 4 mm, 25 mm or more in length)
and washers in addition to the accessories shown above.
Projector mounting screws
(M4, 10 mm) (x10)
Washers (for M6, 16 mm of
outer circumference) (x4)
En 2
Page 7

ASSEMBLING PROCEDURE
ASSEMBLING PROCEDURE
The dimensions after assembling the parts vary depending on the type of the Digital Sound Projector. Check the positions
of the screw holes before assembling the parts.
YSP-800, YSP-900
Projector mounting
screws (M4)
(supplied)
C
C
English
630 mm
YSP-3000, YSP-30D, YSP-3050, HTY-7030
B
670 mm
Projector mounting
screws (M4)
(supplied)
B
En 3
Page 8

ASSEMBLING PROCEDURE
YSP-4000, YSP-40D, HTY-7040
A
730 mm
Projector mounting
screws (M4)
(supplied)
A
En 4
Page 9

INSTALLATION PROCEDURE
INSTALLATION PROCEDURE
Make sure to leave adequate ventilation space around the unit and follow the instructions below. The illustrations used in
each step are the examples of YSP-800 and YSP-900.
1 Attach the large wall mount bracket to the wall.
In order to secure the unit to the wall, you will need to attach the bracket to the wall first in a manner befitting the
structure and quality of the wall.
Choose a location where the wall can bear the weight of the whole unit.
Before installing the bracket, make sure of the size (see “DIMENSIONS” on the first page of this manual).
Installation example
Wash er
(commercially
available)
4 mm Tapping Screw (commercially available)
In order to secure the unit to the wall, drive six (or more) tapping
screws from the outside through the holes in the wall mount bracket.
English
Installing into a dry
wall
25 mm or more
Beam, etc.
Note
Choose a secure wall or beam to fasten the screws. Do not install them into walls made of weak
material that can easily come off, such as mortar or plywood wall panels. Loose screws could cause
the projector to fall, resulting in personal injury.
Dry wall
Installing directly
into a wall, etc.
25 mm or more
2 Detach the metal apparatuses from the Digital Sound
Projector. (Some models of YSP-800 only)
If the metal apparatuses are attached to the rear panel of your Digital Sound Projector, detach them from the rear left and
right sides. If the metal apparatuses are not attached to the rear panel of your Digital Sound Projector, proceed to step 3.
Metal
apparatus
Metal
apparatus
En 5
Page 10

INSTALLATION PROCEDURE
3 Attach the small wall mount brackets to the Digital Sound
Projector.
The small wall mount brackets vary depending on the type of the Digital Sound Projector. Refer to the following table for
details on the type of the Digital Sound Projector and the compatible small wall mound brackets (Type A or B).
Use supplied projector mounting screws (M6 x 4 for YSP-4000, YSP-40D or HTY-7040 and M4 x 8 for other models) to
securely attach the two small wall mount brackets to the rear left and right sides of the Digital Sound Projector.
■ YSP-4000/YSP-40D/HTY-7040
Digital Sound
Projector
Small wall
mount bracket
Rear View
Digital Sound Projector
YSP-800
YSP-900
YSP-3000
YSP-30D
YSP-3050
HTY-7030
YSP-4000
YSP-40D
HTY-7040
Attach the brackets to the rear left and
right sides of the Digital Sound Projector.
■ YSP-3000/YSP-30D/HTY-7030/
YSP-3050
Rear View Rear View
Projector mounting
screws (M4)
(supplied)
Type A
Type B
■ YSP-800/YSP-900
Digital Sound Projector
Projector mounting
screws (M4)
(supplied)
Projector mounting
screws (M6)
(supplied)
Small wall mount bracket
(Type B)
Digital Sound Projector
Small wall mount bracket
(Type A)
Small wall mount bracket
(Type B)
Notes
• In the unit of the model that the metal apparatuses are not attached, there are felt covers in the
holes. In this case, tighten the screws to puncture the felt covers.
• If you tighten the screws on the slant, the screw threads in the projector might be broken.
Be careful when using electric tools.
En 6
Page 11

INSTALLATION PROCEDURE
4 Attach the safety wire.
Attach the safety wire to the small wall mount bracket to prevent the Digital Sound Projector from falling.
Slip one end
Safety wire
through the loop
at the other end
Slip the safety wire
between the bracket
and the projector
Repeat the same
procedure for the
other bracket.
5 Mount the Digital Sound Projector on the wall.
Fit the mounting guide hooks of the small wall mount brackets attached to the Digital Sound Projector into the holes on
the left and right sides of the large wall mount bracket and then slide the unit to the right.
Fit the hook into the
hole.
English
Slide the unit to the
right.
Note
Hold the Digital Sound Projector tight with both hands when attaching or removing the Digital Sound
Projector to or from the wall. Holding the Digital Sound Projector loosely could cause the Digital
Sound Projector to fall, resulting in personal injury.
En 7
Page 12

INSTALLATION PROCEDURE
6 Secure the unit.
Align the holes in the large wall mount bracket with the holes in the bottom of the small wall mount brackets, and then
use two of the supplied projector mounting screws (M6 x 16) to secure the unit. The positions of the screw holes vary
depending on the type of the Digital Sound Projector. Refer to the following illustrations and check the correct positions
of the screw holes used to secure your Digital Sound Projector.
■ YSP-800/YSP-900
Digital Sound Projector
■ YSP-3000/YSP-30D/YSP-3050/HTY-7030/
YSP-4000/YSP-40D/HTY-7040
Bottom View
Bottom ViewDigital Sound Projector
Projector mounting
screws (M6) (supplied)
Use the inward screw hole on each
side to secure your Digital Sound
Projector.
Projector mounting
screws (M6) (supplied)
En 8
Use the outward screw hole on each
side to secure your Digital Sound
Projector.
Page 13

INSTALLATION PROCEDURE
7 Attach the safety wires to the wall.
Pass the screws (commercially available) through the loops of the safety wires and then tighten the screws to secure the
safety wires to the wall.
Make sure that the screws are strong enough to bear the weight of the Digital Sound Projector and the brackets in case
they fall.
Screw
(commercially available)
Was he r
(supplied)
Notes
• Attach the safety wires tight.
• Keep the 2 other washers for future use.
Secure the safety wire to
the wall.
Secure the safety wire
to the wall.
English
Limited Guarantee for European Economic Area (EEA) and Switzerland
Thank you for having chosen a Yamaha product. In the unlikely event that your Yamaha product needs guarantee service, please contact the dealer from
whom it was purchased. If you experience any difficulty, please contact Yamaha representative office in your country. You can find full details on our
website (www.yamaha-hifi.com/
The product is guaranteed to be free from defects in workmanship or materials for a period of two years from the date of the original purchase. Yamaha
undertakes, subject to the conditions listed below, to have the faulty product or any part(s) repaired, or replaced at Yamaha’s discretion, without any charge
for parts or labour. Yamaha reserves the right to replace a product with that of a similar kind and/or value and condition, where a model has been
discontinued or is considered uneconomic to repair.
Conditions
1. The original invoice or sales receipt (showing date of purchase, product code and dealer’s name) MUST accompany the defective product, along with a
statement detailing the fault. In the absence of this clear proof of purchase, Yamaha reserves the right to refuse to provide free of charge service and the
product may be returned at the customer’s expense.
2. The product MUST have been purchased from an AUTHORISED Yamaha dealer within the European Economic Area (EEA) or Switzerland.
3. The product must not have been the subject of any modifications or alterations, unless authorised in writing by Yamaha.
4. The following are excluded from this guarantee:
a. Periodic maintenance and repair or replacement of parts due to normal wear and tear.
b. Damage resulting from:
(1) Repairs performed by the customer himself or by an unauthorised third party.
(2) Inadequate packaging or mishandling, when the product is in transit from the customer. Please note that it is the customer’s responsibility to
ensure the product is adequately packaged when returning the product for repair.
(3) Misuse, including but not limited to (a) failure to use the product for its normal purpose or in accordance with Yamaha’s instructions on the proper
use, maintenance and storage, and (b) installation or use of the product in a manner inconsistent with the technical or safety standards in force in
the country where it is used.
(4) Accidents, lightning, water, fire, improper ventilation, battery leakage or any cause beyond Yamaha’s control.
(5) Defects of the system into which this product is incorporated and/or incompatibility with third party products.
(6) Use of a product imported into the EEA and/or Switzerland, not by Yamaha, where that product does not conform to the technical or safety
standards of the country of use and/or to the standard specification of a product sold by Yamaha in the EEA and/or Switzerland.
(7) Non AV (Audio Visual) related products.
(Products subject to “Yamaha AV Guarantee Statement” are defined in our website at www.yamaha-hifi.com/
resident.)
5. Where the guarantee differs between the country of purchase and the country of use of the product, the guarantee of the country of use shall apply.
6. Yamaha may not be held responsible for any losses or damages, whether direct, consequential or otherwise, save for the repair or replacement of the
product.
7. Please backup any custom settings or data, as Yamaha may not be held responsible for any alteration or loss to such settings or data.
8. This guarantee does not affect the consumer’s statutory rights under applicable national laws in force or the consumer’s rights against the dealer arising
from their sales/purchase contract.
or www.yamaha-uk.com/ for U.K. resident).
or www.yamaha-uk.com/ for U.K.
En 9
Page 14

©
YAMAHA ELECTRONICS CORPORATION, USA
YAMAHA CANADA MUSIC LTD.
YAMAHA ELECTRONIK EUROPA G.m.b.H.
YAMAHA ELECTRONIQUE FRANCE S.A.
YAMAHA ELECTRONICS (UK) LTD.
YAMAHA SCANDINAVIA A.B.
YAMAHA MUSIC AUSTRALIA PTY, LTD.
135 MILNER AVE., SCARBOROUGH, ONTARIO M1S 3R1, CANADA
J A WETTERGRENS GATA 1, BOX 30053, 400 43 VÄSTRA FRÖLUNDA, SWEDEN
6660 ORANGETHORPE AVE., BUENA PARK, CALIF. 90620, U.S.A.
SIEMENSSTR. 22-34, 25462 RELLINGEN BEI HAMBURG, GERMANY
RUE AMBROISE CROIZAT BP70 CROISSY-BEAUBOURG 77312 MARNE-LA-VALLEE CEDEX02, FRANCE
YAMAHA HOUSE, 200 RICKMANSWORTH ROAD WATFORD, HERTS WD18 7GQ, ENGLAND
17-33 MARKET ST., SOUTH MELBOURNE, 3205 VIC., AUSTRALIA
2007 All rights reserved.
Printed in Malaysia WK82320
 Loading...