

Page 1
Owner’s Manual
EN
Page 2
EN DE FR
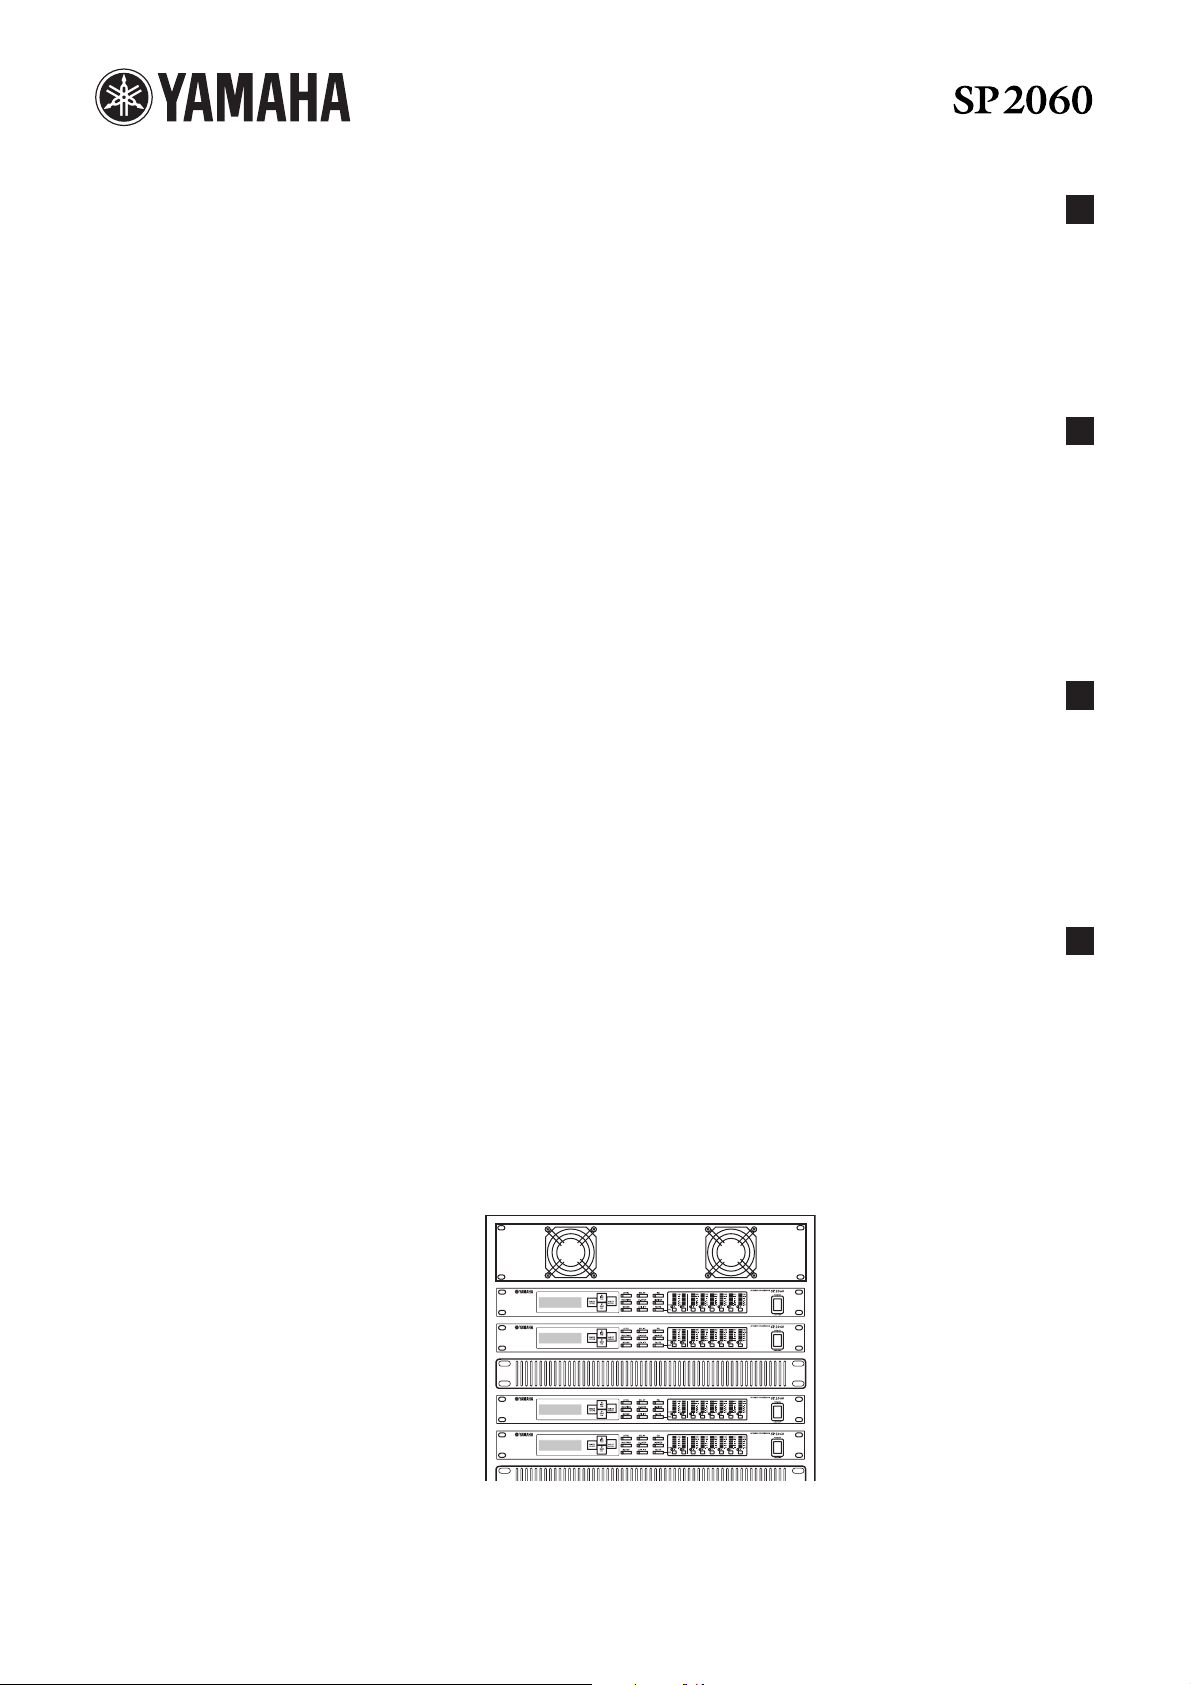
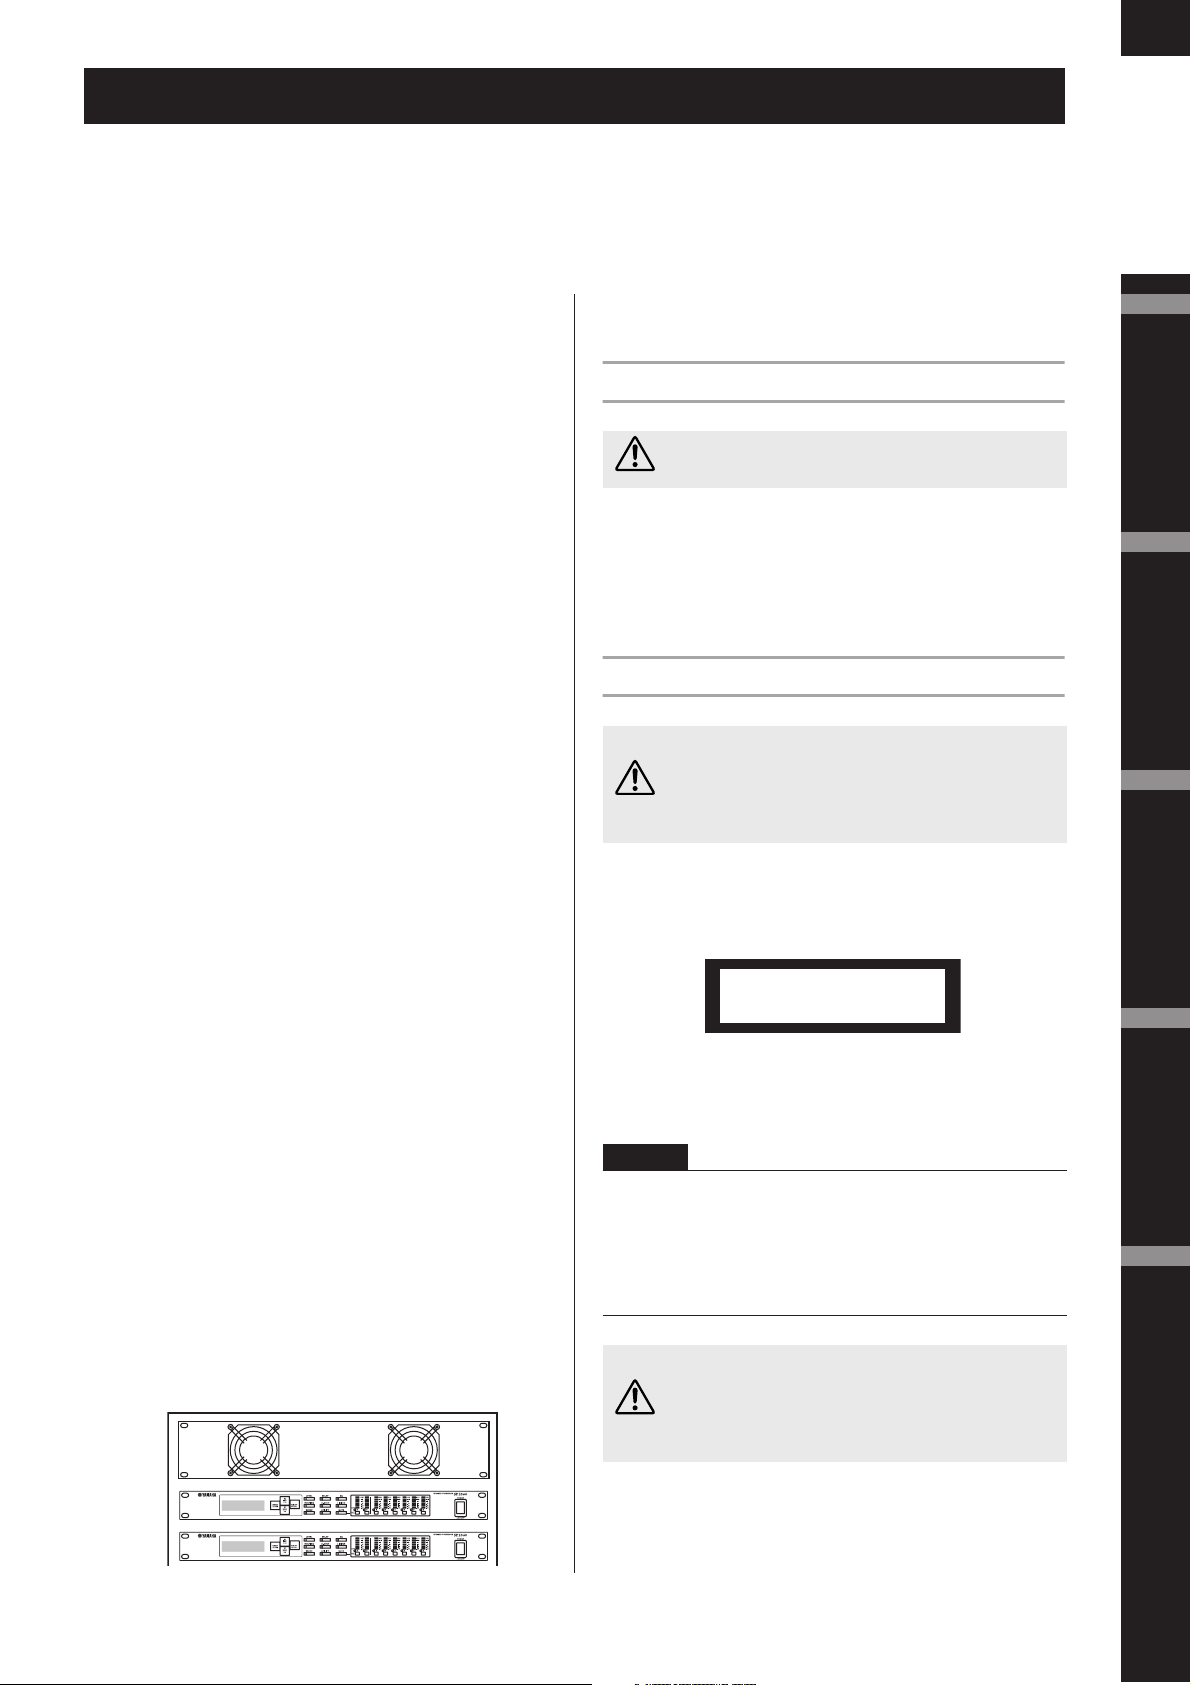
Precautions for Using a Rack-mounted SP2060
If several SP2060 units (or an SP2060 unit together with other
devices) are installed in a poorly-ventilated rack, the heat generated
by each unit may raise the temperature inside the rack, preventing
the SP2060 from performing as designed. When mounting SP2060
units in a rack, please leave one rack space vacant for every two
units. You can attach a ventilation panel to this space or leave it
open to prevent excessive heat build-up.
If the temperature inside the rack is expected to rise above 40
degrees Celsius or 104 degrees Fahrenheit (or if the ambient
temperature outside the rack is expected to rise above 30 degrees
Celsius or 86 Fahrenheit), install a fan kit in the top row of the rack.
The fan must provide airflow of 1.6 m
pressure of 5 mmH
O or more.
2
3
/min or more and static
Vorsichtsmaßnahmen für den Einsatz eines im Rack montierten SP2060
We nn in einem schlecht belüfteten Rack mehrere SP2060Einheiten (oder eine SP2060-Einheit zusammen mit anderen
Geräten) untergebracht sind, kann die von den Geräten erzeugte
Wärme die Temperatur im Rack erhöhen, was die vorgesehene
Leistung des SP2060 beeinträchtigt. Wenn Sie SP2060-Einheiten in
einem Rack einbauen, lassen Sie bitte alle zwei Geräte einen RackPlatz frei. Sie können an diesem Platz eine Lüftungsverkleidung
anbringen oder ihn offen lassen, um die Entwicklung übermäßiger
Hitze zu verhindern.
We nn zu erwarten ist, dass die Temperatur im Rack über 40 Grad
Celsius oder 104 Grad Fahrenheit ansteigt (oder wenn die
Umgebungstemperatur außerhalb des Racks über 30 Grad Celsius
oder 86 Grad Fahrenheit ansteigt), installieren Sie eine
Lüftereinheit im Rack. Der Lüfter muss einen Luftdurchsatz von
mindestens 1,6 m
Druck von 5 mmH
3
/Minute oder mehr haben und einen statischen
O erzeugen können.
2
Précautions à prendre en cas d’utilisation d’un SP2060 monté en rack
Si vous installez plusieurs SP2060 (ou un SP2060 et d’autres
périphériques) dans un rack mal aéré, la chaleur générée par
chaque unité risque d’augmenter la température à l’intérieur du
rack et d’empêcher le SP2060 de fonctionner correctement.
Lorsque vous montez des SP2060 en rack, laissez un espace libre
équivalant à un rack entre deux unités. Vous pouvez recouvrir cet
espace d’un panneau de ventilation ou le laisser ouvert pour éviter
toute accumulation de chaleur excessive.
Precauciones para utilizar una SP2060 de montaje en bastidor
Si se instalan varias unidades SP2060 (o una unidad SP2060 con
otros dispositivos) en un bastidor insuficientemente ventilado, el
calor generado por cada unidad podría aumentar la temperatura en
el interior del bastidor, impidiendo que la unidad SP2060 funcione
de la manera prevista. Cuando monte unidades SP2060 en un
bastidor, deje un espacio de bastidor libre por cada dos unidades.
Puede instalar un panel de ventilación en este espacio, o bien
dejarlo abierto para evitar la acumulación de un calor excesivo.
Fan kit
Si vous craignez que la température à l’intérieur du rack ne dépasse
40 degrés Celsius ou 104 degrés Fahrenheit (ou que la température
ambiante à l’extérieur du rack ne dépasse 30 degrés Celsius ou 86
degrés Fahrenheit), installez un kit de ventilation sur la rangée
supérieure du rack. Le ventilateur doit fournir un flux d’air de
3
1,6 m
/min ou plus et une pression statique de 5 mmH
O ou plus.
2
ES
Si se espera que la temperatura interior del bastidor supere los 40
grados Celsius (o que la temperatura ambiente fuera del bastidor
supere los 30 grados Celsius), instale un kit de ventilación en la fila
superior del bastidor. El ventilador debe proporcionar una
corriente de aire de 1,6 m
3
/min o más y una presión de 5 mmH
O
2
o más.
SP2060
SP2060
Ventilation panel
SP2060
SP2060
U.R.G., Pro Audio & Digital Musical Instrument Division, Yamaha Corporation
© 2007 Yamaha Corporation
Page 3

Explanation of Graphical Symbols
The lightning flash with arrowhead symbol
CAUTION
RISK OF ELECTRIC SHOCK
DO NOT OPEN
CAUTION: TO REDUCE THE RISK OF
ELECTRIC SHOCK, DO NOT REMOVE
COVER (OR BACK). NO USER-SERVICEABLE
PARTS INSIDE. REFER SERVICING TO
QUALIFIED SERVICE PERSONNEL.
The above warning is located on the top of the unit.
within an equilateral triangle is intended to alert
the user to the presence of uninsulated
“dangerous voltage” within the product’s
enclosure that may be of sufficient magnitude to
constitute a risk of electric shock to persons.
The exclamation point within an equilateral
triangle is intended to alert the user to the
presence of important operating and
maintenance (servicing) instructions in the
literature accompanying the product.
IMPORTANT SAFETY INSTRUCTIONS
1 Read these instructions.
2Keep these instructions.
3 Heed all warnings.
4 Follow all instructions.
5 Do not use this apparatus near water.
6 Clean only with dry cloth.
7 Do not block any ventilation openings. Install in
accordance with the manufacturer’s instructions.
8 Do not install near any heat sources such as radiators,
heat registers, stoves, or other apparatus (including
amplifiers) that produce heat.
9 Do not defeat the safety purpose of the polarized or
grounding-type plug. A polarized plug has two blades
with one wider than the other. A grounding type plug
has two blades and a third grounding prong. The wide
blade or the third prong are provided for your safety. If
the provided plug does not fit into your outlet, consult
an electrician for replacement of the obsolete outlet.
10 Protect the power cord from being walked on or pinched
particularly at plugs, convenience receptacles, and the
point where they exit from the apparatus.
WARNING
TO REDUCE THE RISK OF FIRE OR ELECTRIC SHOCK, DO NOT EXPOSE THIS APPARATUS TO RAIN OR MOISTURE.
11 Only use attachments/accessories specified by the
manufacturer.
12 Use only with the cart, stand,
tripod, bracket, or table specified
by the manufacturer, or sold with
the apparatus. When a cart is
used, use caution when moving
the cart/apparatus combination
to avoid injury from tip-over.
13 Unplug this apparatus during
lightning storms or when unused for long periods of
time.
14 Refer all servicing to qualified service personnel.
Servicing is required when the apparatus has been
damaged in any way, such as power-supply cord or plug
is damaged, liquid has been spilled or objects have
fallen into the apparatus, the apparatus has been
exposed to rain or moisture, does not operate normally,
or has been dropped.
(98-6500)
This product contains a battery that contains perchlorate material.
Perchlorate Material—special handling may apply,
See www.dtsc.ca.gov/hazardouswaste/perchlorate.
* This applies only to products distributed by YAMAHA CORPORATION OF AMERICA. (Perchlorate)
Page 4

FCC INFORMATION (U.S.A.)
1. IMPORTANT NOTICE: DO NOT MODIFY THIS UNIT!
This product, when installed as indicated in the instructions contained in this manual, meets FCC requirements. Modifications not
expressly approved by Yamaha may void your authority, granted by
the FCC, to use the product.
2. IMPORTANT:
or another product use only high quality shielded cables. Cable/s
supplied with this product MUST be used. Follow all installation
instructions. Failure to follow instructions could void your FCC
authorization to use this product in the USA.
3. NOTE:
requirements listed in FCC Regulations, Part 15 for Class “B” digital
devices. Compliance with these requirements provides a reasonable level of assurance that your use of this product in a residential
environment will not result in harmful interference with other electronic devices. This equipment generates/uses radio frequencies
and, if not installed and used according to the instructions found in
the users manual, may cause interference harmful to the operation
of other electronic devices. Compliance with FCC regulations does
* This applies only to products distributed by YAMAHA CORPORATION OF AMERICA. (class B)
When connecting this product to accessories and/
This product has been tested and found to comply with the
not guarantee that interference will not occur in all installations. If
this product is found to be the source of interference, which can be
determined by turning the unit “OFF” and “ON”, please try to eliminate the problem by using one of the following measures:
Relocate either this product or the device that is being affected by
the interference.
Utilize power outlets that are on different branch (circuit breaker or
fuse) circuits or install AC line filter/s.
In the case of radio or TV interference, relocate/reorient the
antenna. If the antenna lead-in is 300 ohm ribbon lead, change the
lead-in to co-axial type cable.
If these corrective measures do not produce satisfactory results,
please contact the local retailer authorized to distribute this type of
product. If you can not locate the appropriate retailer, please contact Yamaha Corporation of America, Electronic Service Division,
6600 Orangethorpe Ave, Buena Park, CA90620
The above statements apply ONLY to those products distributed by
Yamaha Corporation of America or its subsidiaries.
COMPLIANCE INFORMATION STATEMENT
(DECLARATION OF CONFORMITY PROCEDURE)
Responsible Party : Yamaha Corporation of America
Address : 6600 Orangethorpe Ave., Buena Park, Calif.
Telephone : 714-522-9011
Type of Equipment : SPEAKER PROCESSOR
Model Name : SP2060
This device complies with Part 15 of the FCC Rules.
Operation is subject to the following conditions:
1) this device may not cause harmful interference, and
2) this device must accept any interference received including interference that may cause undesired operation.
See user manual instructions if interference to radio reception is
suspected.
* This applies only to products distributed by
YAMAHA CORPORATION OF AMERICA.
NEDERLAND / THE NETHERLANDS
• Dit apparaat bevat een lithium batterij voor geheugen back-up.
• This apparatus contains a lithium battery for memory back-up.
• Raadpleeg uw leverancier over de verwijdering van de batterij op
het moment dat u het apparaat ann het einde van de levensduur
afdankt of de volgende Yamaha Service Afdeiing:
•For the removal of the battery at the moment of the disposal at the
end of the service life please consult your retailer or Yamaha Service Center as follows:
• Gooi de batterij niet weg, maar lever hem in als KCA.
• Do not throw away the battery. Instead, hand it in as small chemical waste.
Yamaha Music Nederland Service Afdeiing
Kanaalweg 18-G, 3526 KL UTRECHT
Tel. 030-2828425
Yamaha Music Nederland Service Center
Address : Kanaalweg 18-G, 3526 KL UTRECHT
Te l: 030-2828425
90620
(lithium disposal)
ADVARSEL!
Lithiumbatteri—Eksplosionsfare ved fejlagtig håndtering. Udskiftning må kun ske med batteri af samme fabrikat og type. Levér det
brugte batteri tilbage til leverandoren.
VARNING
Explosionsfara vid felaktigt batteribyte. Använd samma batterityp
eller en ekvivalent typ som rekommenderas av apparattillverkaren.
Kassera använt batteri enligt fabrikantens instruktion.
VAROITUS
Paristo voi räjähtää, jos se on virheellisesti asennettu. Vaihda
paristo ainoastaan laitevalmistajan suosittelemaan tyyppiin. Hävitä
käytetty paristo valmistajan ohjeiden mukaisesti.
(lithium caution)
(FCC DoC)
IMPORTANT NOTICE FOR THE UNITED KINGDOM
Connecting the Plug and Cord
WARNING: THIS APPARATUS MUST BE EARTHED
IMPORTANT. The wires in this mains lead are coloured in accordance with the following code:
GREEN-AND-YELLOW : EARTH
BLUE : NEUTRAL
BROWN : LIVE
As the colours of the wires in the mains lead of this apparatus may
not correspond with the coloured markings identifying the terminals
in your plug proceed as follows:
The wire which is coloured GREEN-and-YELLOW must be connected to the terminal in the plug which is marked by the letter E or
by the safety earth symbol or colored GREEN or GREEN-andYELLOW.
The wire which is coloured BLUE must be connected to the terminal which is marked with the letter N or coloured BLACK.
The wire which is coloured BROWN must be connected to the terminal which is marked with the letter L or coloured RED.
• This applies only to products distributed by Yamaha-Kemble Music (U.K.) Ltd.(3 wires)
Page 5

PRECAUTIONS
PLEASE READ CAREFULLY BEFORE PROCEEDING
* Please keep this manual in a safe place for future reference.
WARNING
Always follow the basic precautions listed below to avoid the possibility of serious injury or even death from electrical
shock, short-circuiting, damages, fire or other hazards. These precautions include, but are not limited to, the following:
Power supply/Power cord
• Only use the voltage specified as correct for the device. The required voltage is
printed on the name plate of the device.
• Use only the included power cord.
If you intend to use the device in an area other than in the one you purchased,
the included power cord may not be compatible. Please check with your Yamaha
dealer.
• Do not place the power cord near heat sources such as heaters or radiators, and
do not excessively bend or otherwise damage the cord, place heavy objects on
it, or place it in a position where anyone could walk on, trip over, or roll anything
over it.
• Be sure to connect to an appropriate outlet with a protective grounding
connection. Improper grounding can result in electrical shock.
Water warning
• Do not expose the device to rain, use it near water or in damp or wet conditions,
or place containers on it containing liquids which might spill into any openings.
• Never insert or remove an electric plug with wet hands.
If you notice any abnormality
• If the power cord or plug becomes frayed or damaged, or if there is a sudden
loss of sound during use of the device, or if any unusual smells or smoke
should appear to be caused by it, immediately turn off the power switch,
disconnect the electric plug from the outlet, and have the device inspected by
qualified Yamaha service personnel.
• If this device should be dropped or damaged, immediately turn off the power
switch, disconnect the electric plug from the outlet, and have the device
inspected by qualified Yamaha service personnel.
Do not open
• Do not open the device or attempt to disassemble the internal parts or modify
them in any way. The device contains no user-serviceable parts. If it should
appear to be malfunctioning, discontinue use immediately and have it inspected
by qualified Yamaha service personnel.
CAUTION
Always follow the basic precautions listed below to avoid the possibility of physical injury to you or others, or damage
to the device or other property. These precautions include, but are not limited to, the following:
Power supply/Power cord
• Remove the electric plug from the outlet when the device is not to be used for
extended periods of time, or during electrical storms.
• When removing the electric plug from the device or an outlet, always hold the
plug itself and not the cord. Pulling by the cord can damage it.
Location
• Before moving the device, remove all connected cables.
• When setting up the product, make sure that the AC outlet you are using is
easily accessible. If some trouble or malfunction occurs, immediately turn off
the power switch and disconnect the plug from the outlet. Even when the power
switch is turned off, electricity is still flowing to the product at the minimum
level. When you are not using the product for a long time, make sure to unplug
the power cord from the wall AC outlet.
•Avoid setting all equalizer controls and faders to their maximum. Depending on
the condition of the connected devices, doing so may cause feedback and may
damage the speakers.
• Do not expose the device to excessive dust or vibrations, or extreme cold or heat
(such as in direct sunlight, near a heater, or in a car during the day) to prevent
the possibility of panel disfiguration or damage to the internal components.
• Do not place the device in an unstable position where it might accidentally fall
over.
• Do not use the device in the vicinity of a TV, radio, stereo equipment, mobile
phone, or other electric devices. Doing so may result in noise, both in the device
itself and in the TV or radio next to it.
Connections
• Before connecting the device to other devices, turn off the power for all devices.
Before turning the power on or off for all devices, set all volume levels to
minimum.
• Be sure to connect to a properly grounded power source. A ground screw is
provided on the rear panel of this device for maximum safety and shock
prevention. If the mains outlet is not grounded, be sure to connect the ground
screw to a confirmed ground point before plugging the device into the mains.
Improper grounding can result in electrical shock.
Maintenance
• Remove the power plug from the AC outlet when cleaning the device.
(5)-4
4/2
4
SP2060 Owner’s Manual
Page 6

Handling caution Backup battery
• Do not use the device for a long period of time at a high or uncomfortable
volume level, since this can cause permanent hearing loss. If you experience
any hearing loss or ringing in the ears, consult a physician.
• Do not rest your weight on the device or place heavy objects on it, and avoid use
excessive force on the buttons, switches or connectors.
The rubber feet included in this package can be attached to the bottom of this device to prevent slippage when it is to be used on a slippery surface.
Yamaha cannot be held responsible for damage caused by improper use or modifications to the device, or data that is lost or destroyed.
Always turn the power off when the device is not in use.
The performance of components with moving contacts, such as switches, volume controls, and connectors, deteriorates over time. Consult qualified Yamaha service
personnel about replacing defective components.
• This device has a built-in backup battery. When you unplug the power cord from
the AC outlet, the current scene data is retained. However, the life of the backup
battery is about five years. If the battery wears out, the current scene data will be
lost. When the backup battery charge becomes low, the unit first displays “LOW
BATTERY” then “CRITICAL BATTERY” when you turn on the power to the unit.
(The Battery page of the Utility display also indicates first “Low Battery” then
“No Battery” when the charge becomes low.) In this case, please have qualified
Yamaha service personnel replace the backup battery.
• The illustrations in this document are for instructional purposes, and may appear somewhat different from the actual equipment.
• CobraNet is a trademark of Cirrus Logic, Inc.
• Ethernet is a trademark of Xerox Corporation.
• All other trademarks are the property of their respective holders and are hereby acknowledged.
(5)-4
5/2
SP2060 Owner’s Manual
5
Page 7

Foreword
Contents
Introduction
to the SP2060
The Controls
and Connectors
Network Settings ReferencesPanel Operation
Foreword .......................................... 7
Accessories (Please make sure the following items are
included in the package.)................................................. 7
About the Firmware Version ........................................... 7
About DME Designer..................................................... 7
Precautions for Using a Rack-mounted SP2060 .............. 7
Preparation...................................................................... 7
Connecting the AC power cord........................................... 7
Turning the power on and off ............................................. 7
Introduction to the SP2060 ..................... 8
Features........................................................................... 8
Glossary for the SP2060.................................................. 8
Configuration ................................................................. 9
3 x 2-way ............................................................................ 9
3 x 2-way Link .................................................................... 9
2 x (2-way + Sub).............................................................. 10
2 x (2-way + Sub) Link...................................................... 10
2 x 2-way + 2 x Aux .......................................................... 11
2 x 2-way + 2 x Aux Link .................................................. 11
2 x 3-way .......................................................................... 12
2 x 3-way Link .................................................................. 12
4 way +2 x Aux ................................................................. 13
5-way + Aux...................................................................... 14
6-way ................................................................................ 15
Multi Zone ....................................................................... 16
System Examples........................................................... 17
Speaker processing ............................................................ 17
Zone processing ................................................................ 18
Multiple SP2060............................................................... 19
The Controls and Connectors.................. 21
Front Panel ................................................................... 21
Rear Panel..................................................................... 22
Panel Operation ................................. 23
Basic Operation............................................................. 23
Changing the parameter values.......................................... 23
LEVEL.......................................................................... 23
DELAY ......................................................................... 24
EQ (Equalizer) .............................................................. 24
Input EQ .......................................................................... 24
Output EQ ....................................................................... 25
ROUTING................................................................... 26
Input routing .................................................................... 26
Output routing ................................................................. 26
X-OVER (Crossover) .................................................... 27
Setting the Crossover ........................................................ 27
LIBRARY...................................................................... 28
Displaying the current library............................................ 28
Recalling a library.............................................................. 28
LIMITER...................................................................... 29
SCENE ......................................................................... 29
About a scene..................................................................... 29
Recalling a scene ................................................................ 30
Storing a scene ................................................................... 31
Changing a scene title ........................................................ 31
Protecting a scene .............................................................. 31
Deleting a scene ................................................................. 32
UTILITY ...................................................................... 32
INPUT A/B LINK ............................................................ 32
User Lock .......................................................................... 33
Setting the Last Memory Resume ...................................... 33
Displaying the label ........................................................... 34
Displaying word clock ....................................................... 34
Checking the backup battery.............................................. 35
Displaying the firmware version......................................... 35
Initializing the SP2060 ...................................................... 35
Mute ............................................................................. 36
Network Settings ................................ 37
Setting a Device Group ................................................. 37
Setting the IP Address ................................................... 37
Setting the Master ID.................................................... 38
Setting Link Mode ........................................................ 38
Viewing the MAC Address ............................................ 39
References ....................................... 40
About Preset Libraries ................................................... 40
File name ........................................................................... 40
Subwoofer.......................................................................... 40
Limiter............................................................................... 40
Libraries for 1-way speaker processors ................................ 41
Libraries for 2-way speaker processors ................................ 42
Libraries for 3-way speaker processors ................................ 43
Display Messages........................................................... 44
Warning and error messages............................................... 44
Status messages .................................................................. 45
Troubleshooting............................................................ 45
General Specifications ................................................... 46
Electrical Characteristics................................................ 46
Input/Output Characteristics ........................................ 47
Connector Pin Assignment............................................ 48
Dimensions ................................................................... 49
Index ............................................................................. 50
6
SP2060 Owner’s Manual
Page 8
Foreword
7
Thank you for purchasing the Yamaha SP2060 Speaker Processor.
In order to take full advantage of the features and performance provided by the SP2060, we urge you to read this owner’s manual
thoroughly before connecting or using the unit. Keep this manual in a safe place for future reference.
Accessories (Please make
Preparation
sure the following items are
included in the package.)
• SP2060 Owner’s Manual (this document)
•AC power cord
•Rubber feet x 4
About the Firmware Version
You can check the firmware version of your SP2060 in the
UTILITY display (see page 28).
You can also download the latest firmware from the following Yamaha website.
http://www.yamahaproaudio.com/
Connecting the AC power cord
Be sure to turn all devices OFF before connecting AC
mains power.
CAUTION
First plug the female-connector end of the AC cord into the
[AC IN] socket on the rear panel of the SP2060, then plug
the male plug into an appropriate AC mains outlet. Be sure
to use the voltage specified for the device. The required volt-
age is printed on the name plate of the device.
Turning the power on and off
Foreword
Introduction
to the SP2060
The Controls
and Connectors
About DME Designer
DME Designer software enables you to control the SP2060
or DME series system from a connected computer.
The DME Designer version 2.0 or later features this function.
You can download DME Designer from the following
Yamaha website.
http://www.yamahaproaudio.com/
Precautions for Using a Rack-mounted SP2060
If you install the SP2060 along with other SP2060 units or
other devices in a poorly ventilated rack, the ambient temperature inside the rack may rise, resulting in inefficient performance. Be sure to install the SP2060 in a well-ventilated
rack and make sure that the heat will be ventilated efficiently.
If the temperature inside the rack is expected to rise above 40
degrees Celsius or 104 degrees Fahrenheit (or if the ambient
temperature outside the rack is expected to rise above 30 degrees Celsius or 86 Fahrenheit), install a fan kit in the top
row of the rack. The fan must provide airflow of 1.6m
or more and static pressure of 5mmH
Fan kit
O or more.
2
3
/min
To prevent the initial power-on surge from generating a
large noise spike or damaging your speaker system, turn
devices on in the following order: audio sources, mixer
CAUTION
(such as M7CL), SP2060, and finally power amplifiers.
Reverse this order when turning power off.
1.
Press the [POWER] switch to turn the power
on to the SP2060.
The SP2060 displays a message.
SpeakerProcessor
SP2060
2.
Press the [POWER] switch again to turn off
the power.
NOTE
The SP2060 remembers the scene settings when you turn off the
power. When you turn on the power to the SP2060, it will start
up with the same scene settings.
You can also set up the SP2060 so that at the startup it will recall
the scene selected before you turned off the power to the device
(See page 33).
Do NOT turn off the power to the SP2060 while the unit
is displaying the message “DO NOT TURN OFF!” at the
bottom of the display, for example, while it is storing the
CAUTION
scene.
Otherwise, a malfunction may occur.
Network Settings Panel Operation
References
SP2060
SP2060
SP2060 Owner’s Manual
Page 9
Foreword
Introduction
to the SP2060
The Controls
and Connectors
Introduction to the SP2060
Features
The Yamaha SP2060 Speaker Processor employs state-of-the-art digital technology and supports 96kHz audio.
The SP2060 features two channel analog input connectors, an AES/EBU connector, and six channel analog output connectors.
Since it includes preset settings for fixed installation speakers (such as the Yamaha IF/IS series), the SP2060 enables
you to take the best advantage of a variety of speakers from 1-way through 6-way speakers. You can also control
the SP2060 remotely using DME Designer application software.
Glossary for the SP2060
This section explains terminology specific to the SP2060.
Components & Parameters
The individual audio modules (equalizers, delays, and speaker processors that feature various speaker adjustment
functions) are called “components.” Various settings included with each component are called “preset parameters.” Changing the parameter values for components enables you to control the effects of the audio process.
Network Settings ReferencesPanel Operation
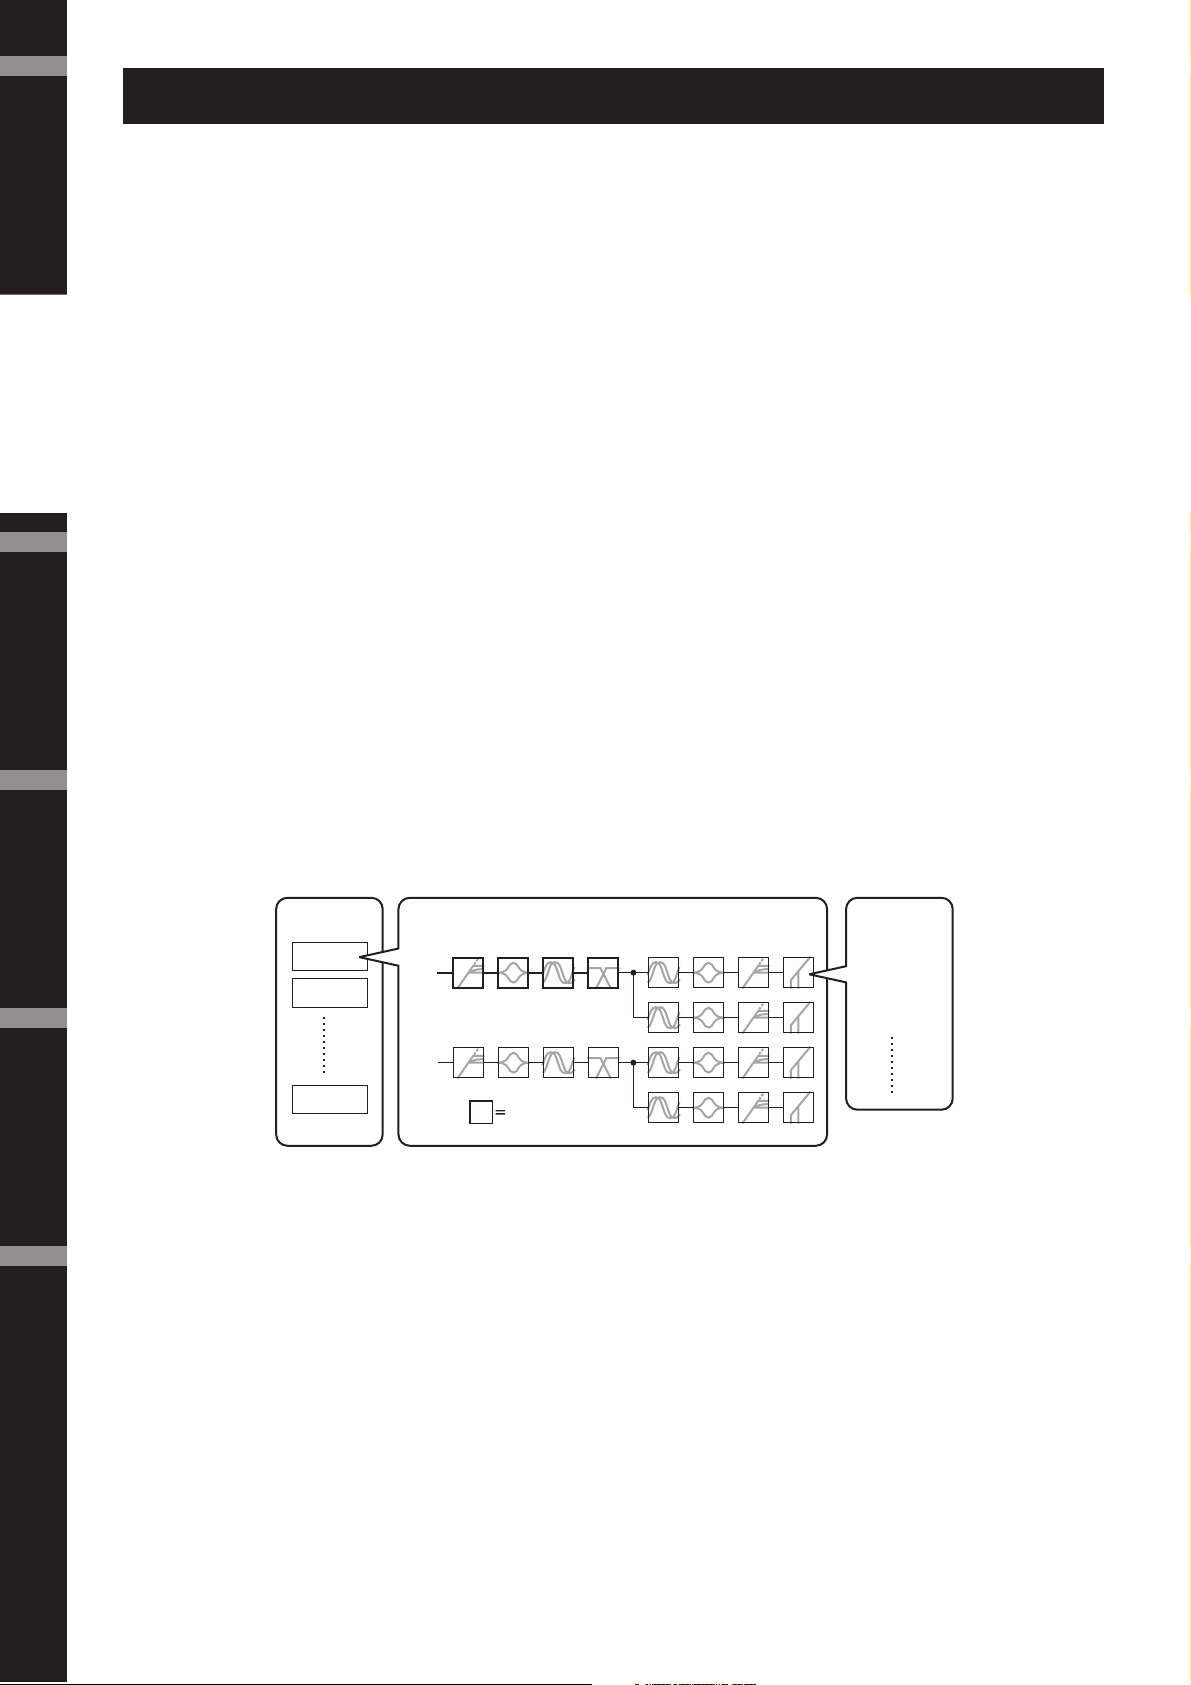
Configuration
A “configuration” is a complete set of components for constructing an optimum audio system that supports the
connected speakers. See page 9.
Each configuration determines the audio function(s) of the corresponding SP2060 unit. All parameter sets included with each component in a configuration are called “preset parameters.”
Scene
A combination of all configuration and preset parameter combinations is called a “scene.” A scene can be recalled
from the panel of each SP2060 or via DME Designer. See page 29.
Component
Configuration
Preset
Parameter
Example: Limiter
• Attack
• Threshold
• Release
Scene
Scene 1
Scene 2
Scene 99
Library
All parameter sets included with each speaker processor component optimized for the connected speakers are
called “libraries.” A library can be recalled from the panel of each SP2060 or via DME Designer. You can also
create a library using DME Designer, then store it in an SP2060.
8
SP2060 Owner’s Manual
Page 10
Introduction to the SP2060
Configuration
The SP2060 features 12 configurations. You can select one that suits the combination and configuration of the
connected speakers.
A configuration is stored as part of each preset scene (read-only scene) in scene memory slots #1 through #12, and
can be recalled along with the corresponding scene. You can also edit parameters of a configuration, then store
them in a user scene (readable and writable scene). Connection between the output port and output connector on
each component is specified and fixed for each configuration.
No.1. [3x2way ] No.5. [2x2way+2xAux ] No.9. [4way+2xAux ]
No.2. [3x2way L ] No.6. [2x2way+2xAuxL ] No.10. [5way+Aux ]
No.3. [2x(2way+Sub) ] No.7. [2x3way ] No.11. [6way ]
No.4. [2x(2way+Sub)L ] No.8. [2x3way L ] No.12. [Multi Zone ]
3 x 2-way
Controls three channel 2-way speakers.
[INPUT A]
[DIGITAL IN]
[INPUT B]
Foreword
Introduction
to the SP2060
Output
Mute
Output
Mute
Output
Mute
Output
Mute
Output
Mute
Output
Mute
Limiter
Limiter
Limiter
Limiter
Limiter
Limiter
LIMIT
LIMIT
LIMIT
LIMIT
LIMIT
LIMIT
DA
[OUTPUT 1]
LOW
The Controls
DA
[OUTPUT 2]
HIGH
DA
[OUTPUT 3]
LOW
DA
[OUTPUT 4]
HIGH
DA
[OUTPUT 5]
LOW
DA
[OUTPUT 6]
HIGH
and Connectors
[Library Data]
Input
Input
AD
Level
Input
AD
Level
Mute
Input
Mute
Input
8BandEQ
Input
+
8BandEQ
Input
8BandEQ
Input
Delay
Input
Delay
Input
Delay
BA SUM
X-Over
[Library Data]
X-Over
[Library Data]
X-Over
LOW
HIGH
LOW
HIGH
LOW
HIGH
Output
Delay
Output
Delay
Output
Delay
Output
Delay
Output
Delay
Output
Delay
Output
6BandEQ
with APF
Output
6BandEQ
with APF
Output
6BandEQ
with APF
Output
6BandEQ
with APF
Output
6BandEQ
with APF
Output
6BandEQ
with APF
Output
Level
Output
Level
Output
Level
Output
Level
Output
Level
Output
Level
Output connector
OUTPUT 1 2-way speaker (1) LOW
OUTPUT 2 2-way speaker (1) HIGH
OUTPUT 3 2-way speaker (2) LOW
OUTPUT 4 2-way speaker (2) HIGH
OUTPUT 5 2-way speaker (3) LOW
OUTPUT 6 2-way speaker (3) HIGH
3 x 2-way Link
Controls three channel 2-way speakers. All parameters for each component such as the Crossover, Delay, EQ, Level, and Limiter (excluding the Mute parameter) are linked.
Speaker’s input connector
SP2060 Owner’s Manual
Network Settings Panel Operation
References
9
Page 11
Foreword
Introduction
to the SP2060
The Controls
and Connectors
Introduction to the SP2060
2 x (2-way + Sub)
Controls two channel 2-way speakers and subwoofers.
[INPUT A]
[DIGITAL IN]
[INPUT B]
Output
Mute
Output
Mute
Output
Mute
Output
Mute
Output
Mute
Output
Mute
Limiter
Limiter
Limiter
Limiter
Limiter
Limiter
LIMIT
LIMIT
LIMIT
LIMIT
LIMIT
LIMIT
DA
[OUTPUT 1]
SUB WOOFER
DA
[OUTPUT 2]
LOW
DA
[OUTPUT 3]
HIGH
DA
[OUTPUT 4]
SUB WOOFER
DA
[OUTPUT 5]
LOW
DA
[OUTPUT 6]
HIGH
[Library Data]
Input
Input
AD
Level
Input
AD
Level
Mute
Input
Mute
Input
8BandEQ
Input
+
8BandEQ
Input
8BandEQ
Input
Delay
Input
Delay
Input
Delay
BA SUM
X-Over
[Library Data]
X-Over
[Library Data]
X-Over
[Library Data]
X-Over
LOW
LOW
HIGH
HIGH
LOW
HIGH
Output
Delay
Output
Delay
Output
Delay
Output
Delay
Output
Delay
Output
Delay
Output
6BandEQ
with APF
Output
6BandEQ
with APF
Output
6BandEQ
with APF
Output
6BandEQ
with APF
Output
6BandEQ
with APF
Output
6BandEQ
with APF
Output
Level
Output
Level
Output
Level
Output
Level
Output
Level
Output
Level
Network Settings ReferencesPanel Operation
2 x (2-way + Sub) Link
Output connector Speaker’s input connector
OUTPUT 1 Subwoofer (1)
OUTPUT 2 2-way speaker (1) LOW
OUTPUT 3 2-way speaker (1) HIGH
OUTPUT 4 Subwoofer (2)
OUTPUT 5 2-way speaker (2) LOW
OUTPUT 6 2-way speaker (2) HIGH
Controls two channel 2-way speakers and subwoofers. All parameters for each component such as the Crossover,
Delay, EQ, Level, and Limiter (excluding the Mute parameter) are linked.
10
SP2060 Owner’s Manual
Page 12
Introduction to the SP2060
2 x 2-way + 2 x Aux
Controls two channel 2-way speakers and two channel subspeakers.
[INPUT A]
[DIGITAL IN]
[INPUT B]
Output connector Speaker’s input connector
OUTPUT 1 2-way speaker (1) LOW
OUTPUT 2 2-way speaker (1) HIGH
OUTPUT 3 2-way speaker (2) LOW
OUTPUT 4 2-way speaker (2) HIGH
OUTPUT 5 1-way subspeaker (1)
OUTPUT 6 1-way subspeaker (2)
Foreword
Output
Mute
Output
Mute
Output
Mute
Output
Mute
Output
Mute
Output
Mute
Limiter
Limiter
Limiter
Limiter
Limiter
Limiter
LIMIT
LIMIT
LIMIT
LIMIT
LIMIT
LIMIT
DA
[OUTPUT 1]
LOW
DA
[OUTPUT 2]
HIGH
DA
[OUTPUT 3]
LOW
DA
[OUTPUT 4]
HIGH
DA
[OUTPUT 5]
SUB SPEAKER
DA
[OUTPUT 6]
SUB SPEAKER
Introduction
to the SP2060
[Library Data]
Input
Input
AD
Level
Input
AD
Level
Mute
Input
Mute
Input
8BandEQ
Input
+
8BandEQ
Input
8BandEQ
Input
Delay
Input
Delay
Input
Delay
BA SUM
X-Over
[Library Data]
X-Over
[Library Data]
X-Over
[Library Data]
X-Over
LOW
HIGH
LOW
HIGH
LOW
HIGH
Output
Delay
Output
Delay
Output
Delay
Output
Delay
Output
Delay
Output
Delay
Output
6BandEQ
with APF
Output
6BandEQ
with APF
Output
6BandEQ
with APF
Output
6BandEQ
with APF
Output
6BandEQ
with APF
Output
6BandEQ
with APF
Output
Level
Output
Level
Output
Level
Output
Level
Output
Level
Output
Level
The Controls
and Connectors
2 x 2-way + 2 x Aux Link
Controls two channel 2-way speakers and two channel subspeakers. All parameters for each component such as
the Crossover, Delay, EQ, Level, and Limiter (excluding the Mute parameter) are linked.
Network Settings Panel Operation
References
SP2060 Owner’s Manual
11
Page 13

Foreword
Introduction
to the SP2060
The Controls
and Connectors
Introduction to the SP2060
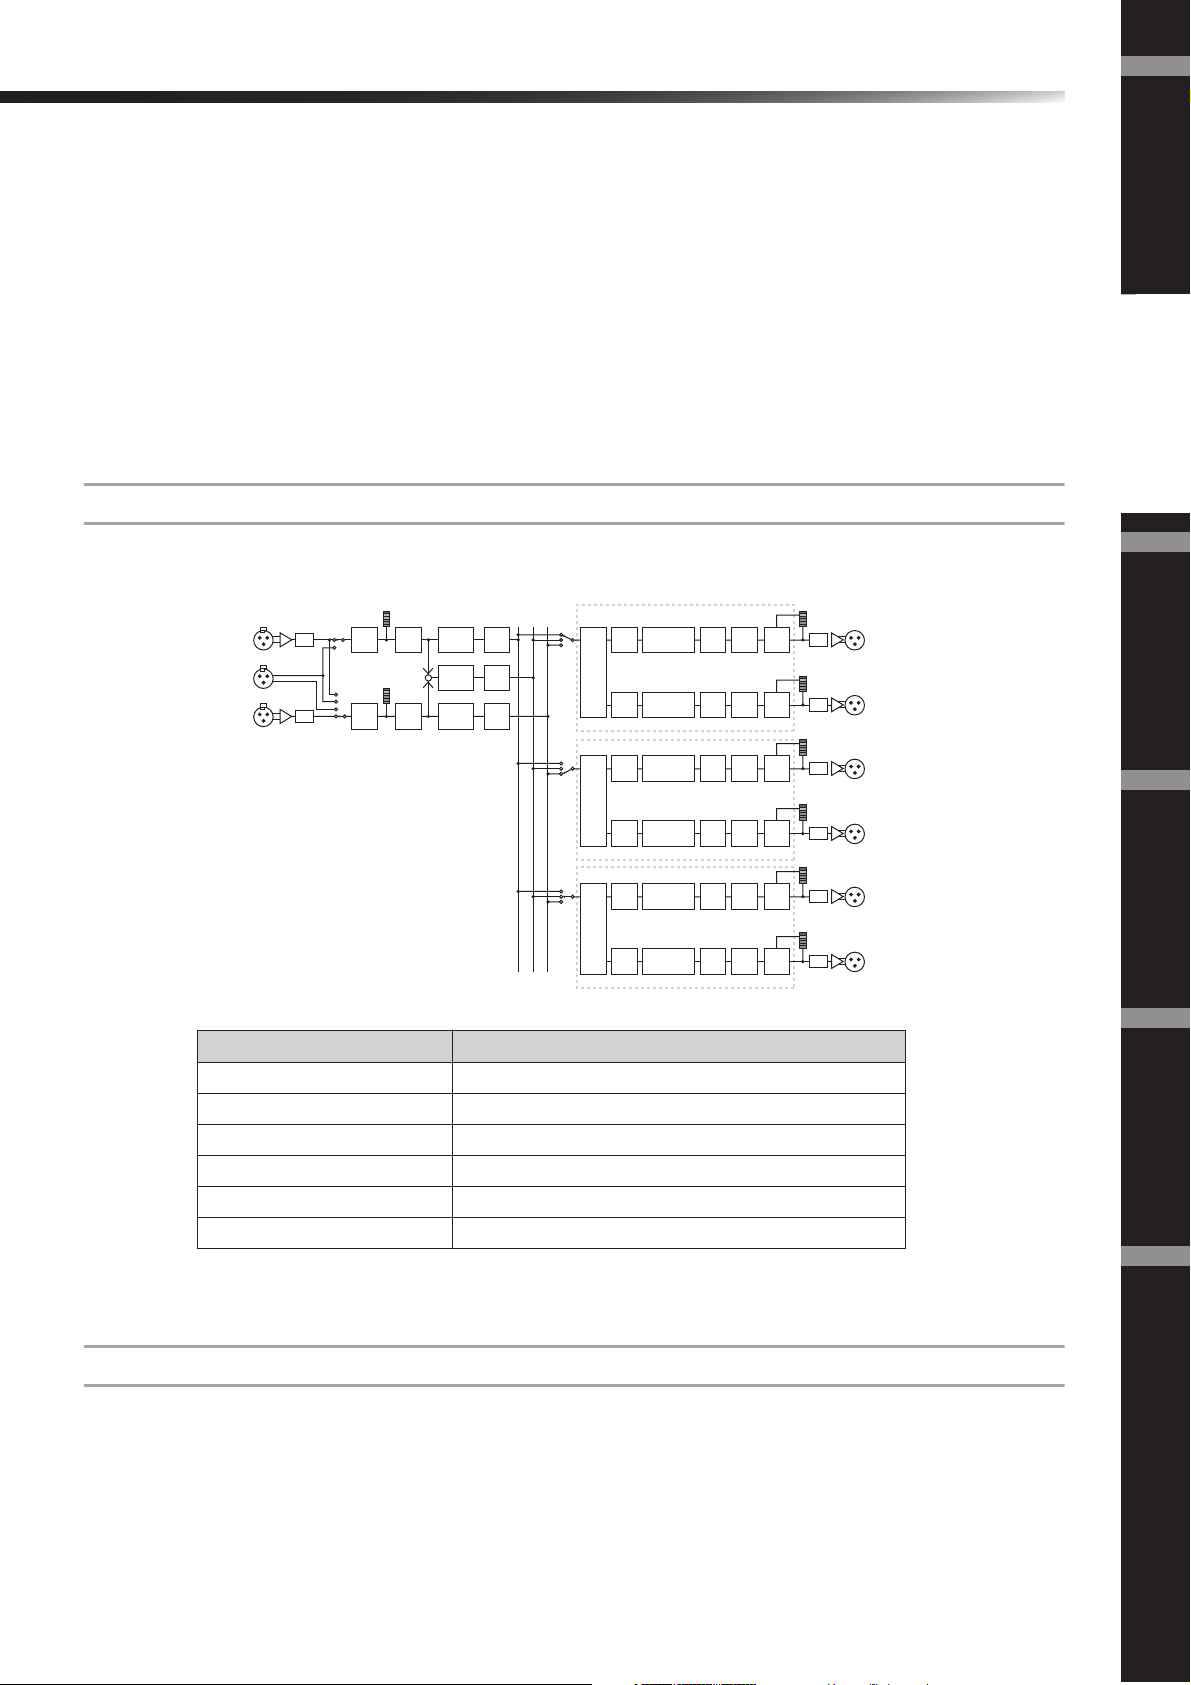
2 x 3-way
Controls two channel 3-way speakers.
[INPUT A]
[DIGITAL IN]
[INPUT B]
Output
Mute
Output
Mute
Output
Mute
Output
Mute
Output
Mute
Output
Mute
Limiter
Limiter
Limiter
Limiter
Limiter
Limiter
LIMIT
LIMIT
LIMIT
LIMIT
LIMIT
LIMIT
DA
[OUTPUT 1]
LOW
DA
[OUTPUT 2]
MID
DA
[OUTPUT 3]
HIGH
DA
[OUTPUT 4]
LOW
DA
[OUTPUT 5]
MID
DA
[OUTPUT 6]
HIGH
[Library Data]
Input
Input
AD
Level
Input
AD
Level
Mute
Input
Mute
Input
8BandEQ
Input
+
8BandEQ
Input
8BandEQ
Input
Delay
Input
Delay
Input
Delay
BA SUM
X-Over
[Library Data]
X-Over
LOW
MID
HIGH
LOW
MID
HIGH
Output
Delay
Output
Delay
Output
Delay
Output
Delay
Output
Delay
Output
Delay
Output
6BandEQ
with APF
Output
6BandEQ
with APF
Output
6BandEQ
with APF
Output
6BandEQ
with APF
Output
6BandEQ
with APF
Output
6BandEQ
with APF
Output
Level
Output
Level
Output
Level
Output
Level
Output
Level
Output
Level
Network Settings ReferencesPanel Operation
2 x 3-way Link
Output connector Speaker’s input connector
OUTPUT 1 3-way speaker (1) LOW
OUTPUT 2 3-way speaker (1) MID
OUTPUT 3 3-way speaker (1) HIGH
OUTPUT 4 3-way speaker (2) LOW
OUTPUT 5 3-way speaker (2) MID
OUTPUT 6 3-way speaker (2) HIGH
Controls two channel 3-way speakers. All parameters for each component such as the Crossover, Delay, EQ, Level,
and Limiter (excluding the Mute parameter) are linked.
12
SP2060 Owner’s Manual
Page 14
Introduction to the SP2060
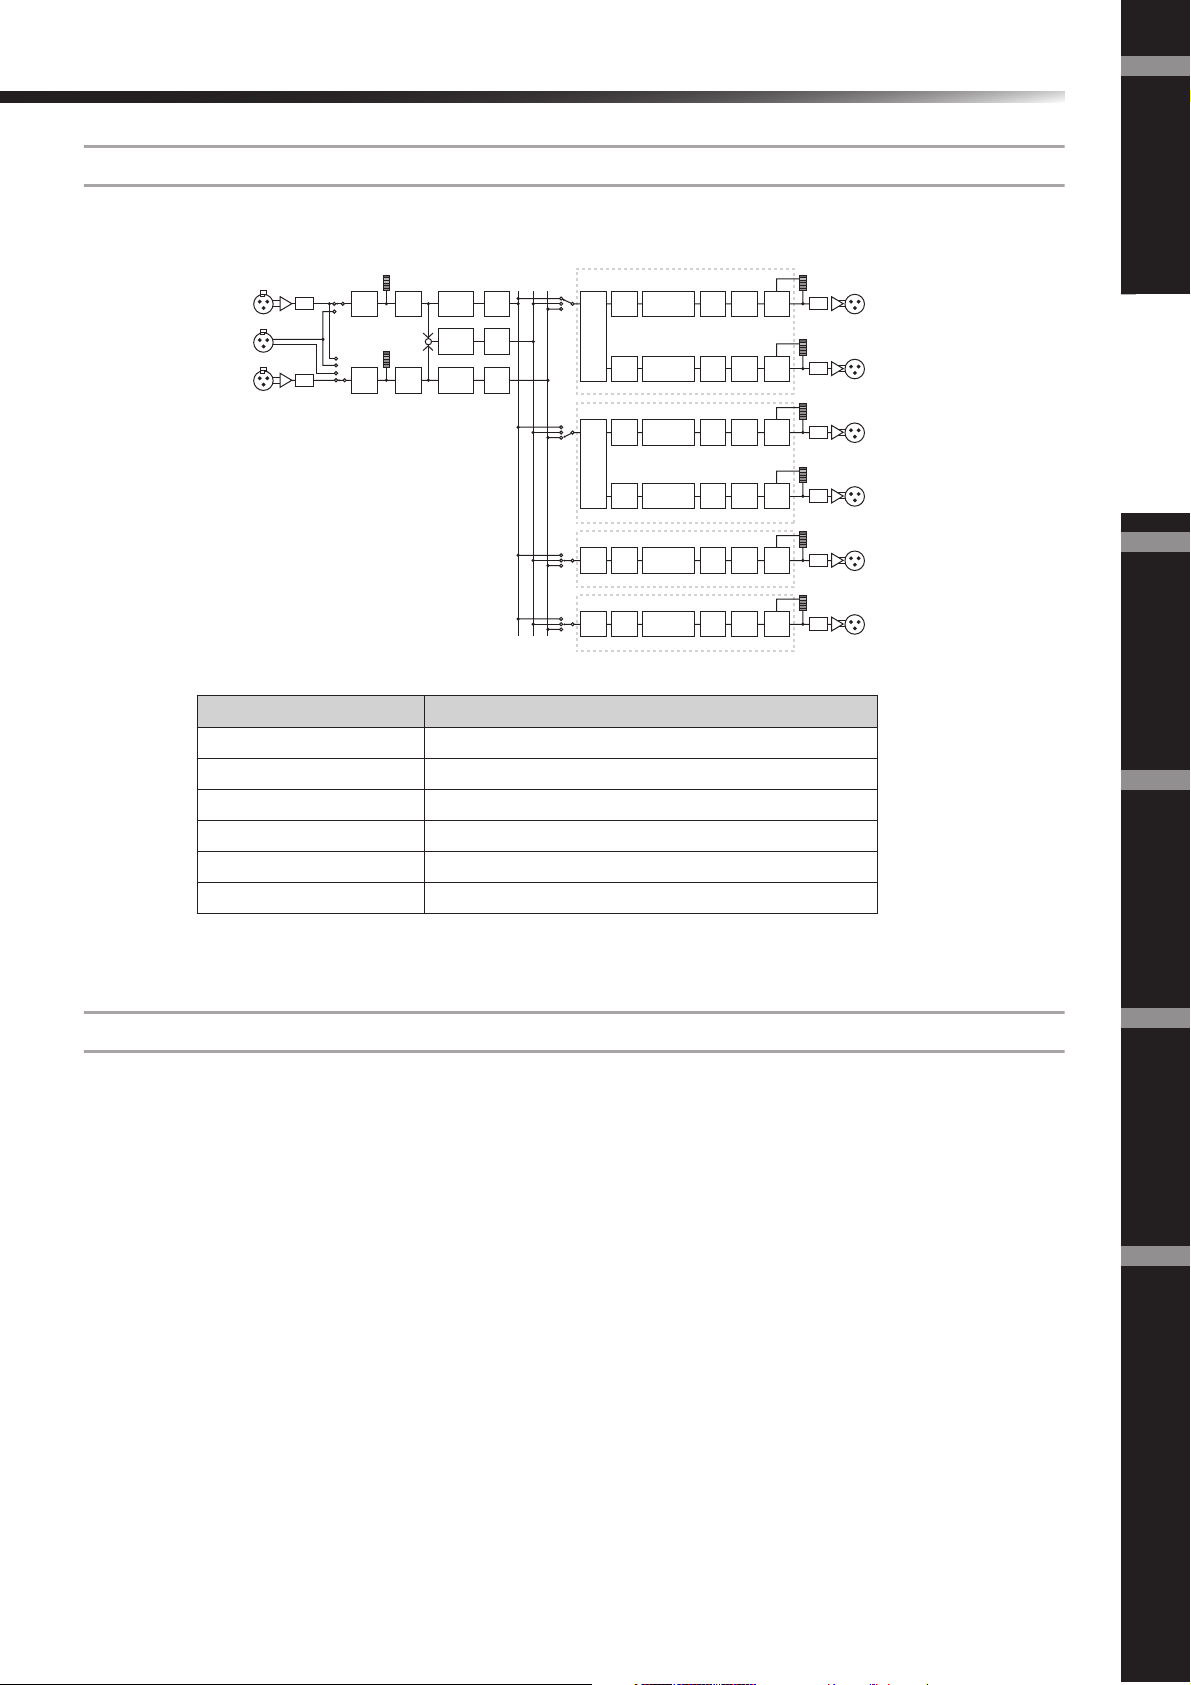
4 way +2 x Aux
Controls one channel 4-way speaker and two channel subspeakers.
[INPUT A]
[DIGITAL IN]
[INPUT B]
Output connector Speaker’s input connector
OUTPUT 1 4-way speaker (1) LOW
OUTPUT 2 4-way speaker (1) LOW-MID
OUTPUT 3 4-way speaker (1) HIGH-MID
OUTPUT 4 4-way speaker (1) HIGH
OUTPUT 5 1-way subspeaker (1)
OUTPUT 6 1-way subspeaker (2)
Foreword
Output
Mute
Output
Mute
Output
Mute
Output
Mute
Output
Mute
Output
Mute
Limiter
Limiter
Limiter
Limiter
Limiter
Limiter
LIMIT
LIMIT
LIMIT
LIMIT
LIMIT
LIMIT
DA
[OUTPUT 1]
LOW
DA
[OUTPUT 2]
LOW-MID
DA
[OUTPUT 3]
HIGH-MID
DA
[OUTPUT 4]
HIGH
DA
[OUTPUT 5]
SUB SPEAKER
DA
[OUTPUT 6]
SUB SPEAKER
Introduction
to the SP2060
[Library Data]
Input
Input
AD
Level
Input
AD
Level
Mute
Input
Mute
Input
8BandEQ
Input
+
8BandEQ
Input
8BandEQ
Input
Delay
Input
Delay
Input
Delay
BA SUM
X-Over
[Library Data]
X-Over
[Library Data]
X-Over
Output
Delay
LOW
Output
Delay
LOW-MID
Output
Delay
HIGH-MID
Output
Delay
HIGH
Output
Delay
LOW
Output
Delay
HIGH
Output
6BandEQ
with APF
Output
6BandEQ
with APF
Output
6BandEQ
with APF
Output
6BandEQ
with APF
Output
6BandEQ
with APF
Output
6BandEQ
with APF
Output
Level
Output
Level
Output
Level
Output
Level
Output
Level
Output
Level
The Controls
and Connectors
SP2060 Owner’s Manual
Network Settings Panel Operation
References
13
Page 15
Foreword
Introduction to the SP2060
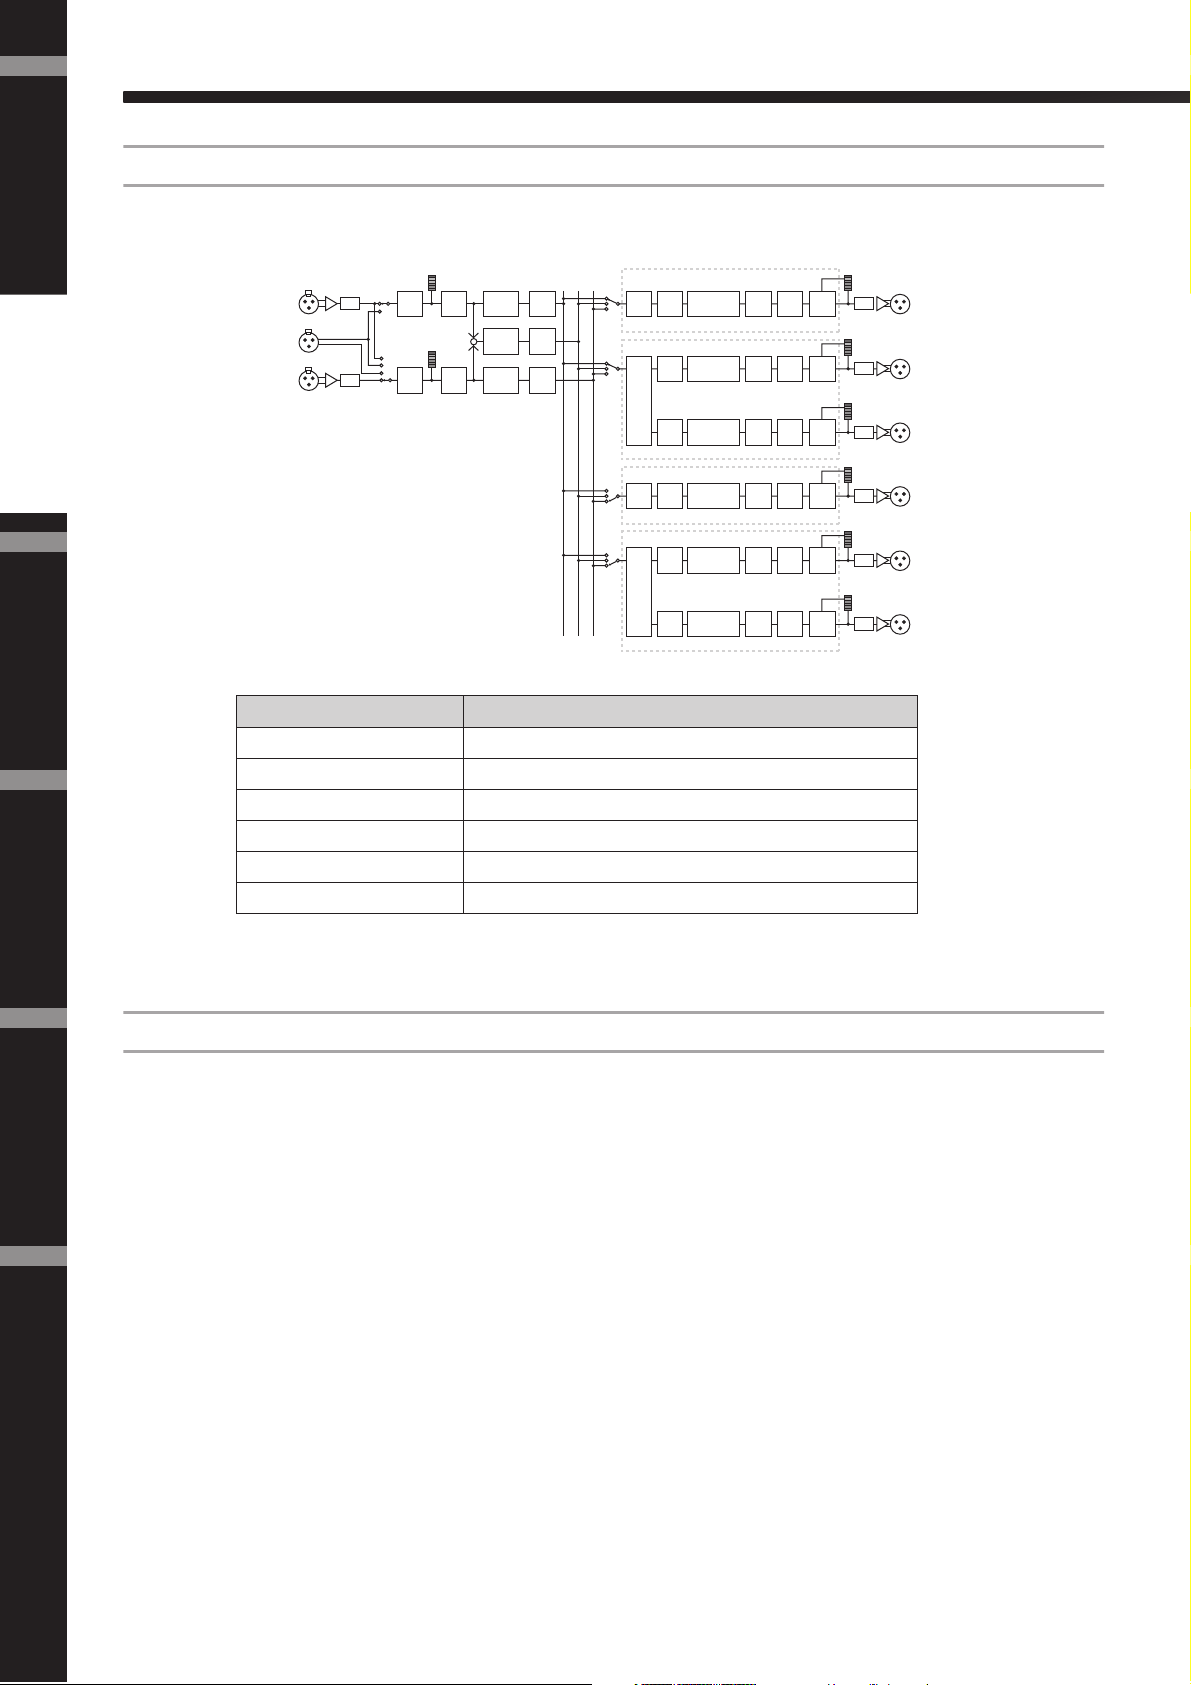
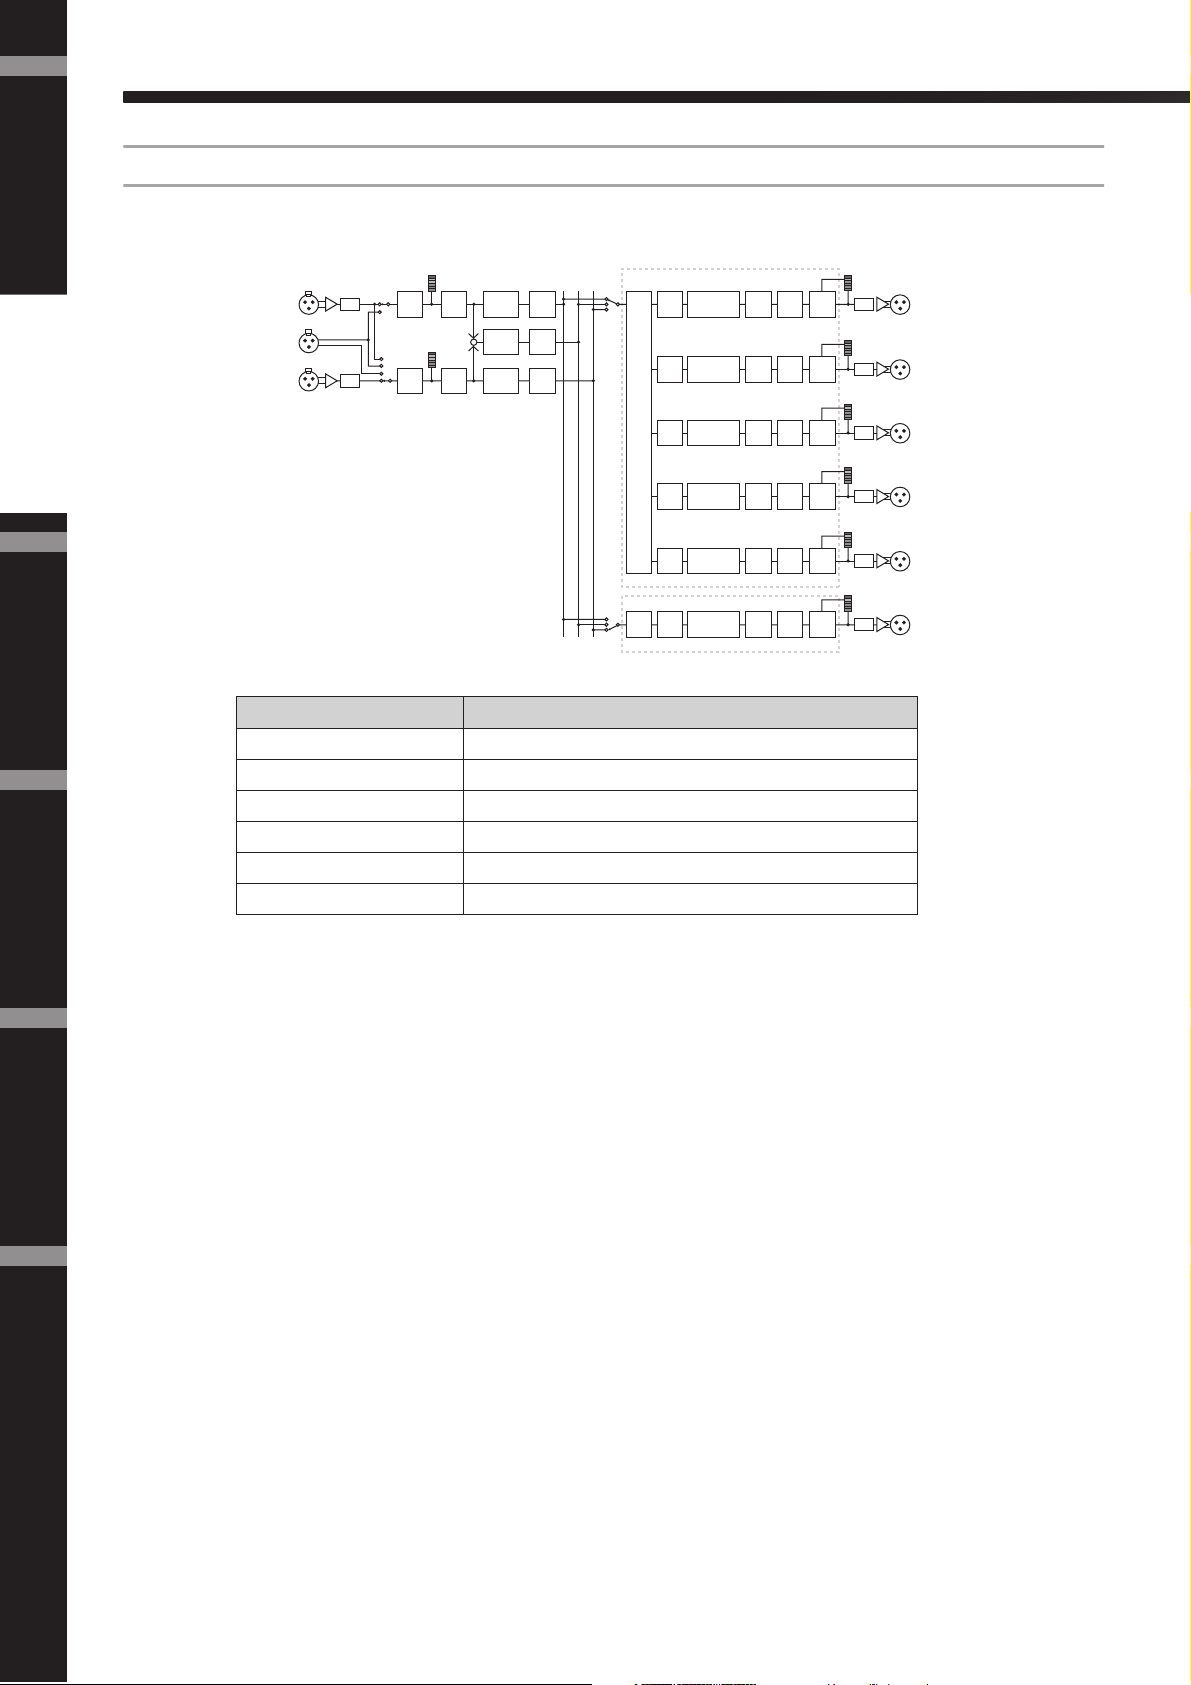
5-way + Aux
Controls one channel 5-way speaker and one channel subspeaker.
Introduction
to the SP2060
The Controls
and Connectors
[Library Data]
[INPUT A]
[DIGITAL IN]
[INPUT B]
Input
Input
AD
Level
Input
AD
Level
Mute
Input
Mute
Input
8BandEQ
Input
+
8BandEQ
Input
8BandEQ
Input
Delay
Input
Delay
Input
Delay
BA SUM
X-Over
[Library Data]
X-Over
Output connector Speaker’s input connector
OUTPUT 1 5-way speaker (1) SUB-LOW
OUTPUT 2 5-way speaker (1) LOW
OUTPUT 3 5-way speaker (1) LOW-MID
OUTPUT 4 5-way speaker (1) HIGH-MID
OUTPUT 5 5-way speaker (1) HIGH
OUTPUT 6 1-way subspeaker (1)
Output
Delay
SUB-LOW
Output
Delay
LOW
Output
Delay
LOW-MID
Output
Delay
HIGH-MID
Output
Delay
HIGH
Output
Delay
HIGH
Output
6BandEQ
with APF
Output
6BandEQ
with APF
Output
6BandEQ
with APF
Output
6BandEQ
with APF
Output
6BandEQ
with APF
Output
6BandEQ
with APF
Output
Level
Output
Level
Output
Level
Output
Level
Output
Level
Output
Level
Output
Mute
Output
Mute
Output
Mute
Output
Mute
Output
Mute
Output
Mute
Limiter
Limiter
Limiter
Limiter
Limiter
Limiter
LIMIT
LIMIT
LIMIT
LIMIT
LIMIT
LIMIT
DA
[OUTPUT 1]
SUB-LOW
DA
[OUTPUT 2]
LOW
DA
[OUTPUT 3]
LOW-MID
DA
[OUTPUT 4]
HIGH-MID
DA
[OUTPUT 5]
HIGH
DA
[OUTPUT 6]
SUB SPEAKER
Network Settings ReferencesPanel Operation
14
SP2060 Owner’s Manual
Page 16

Introduction to the SP2060
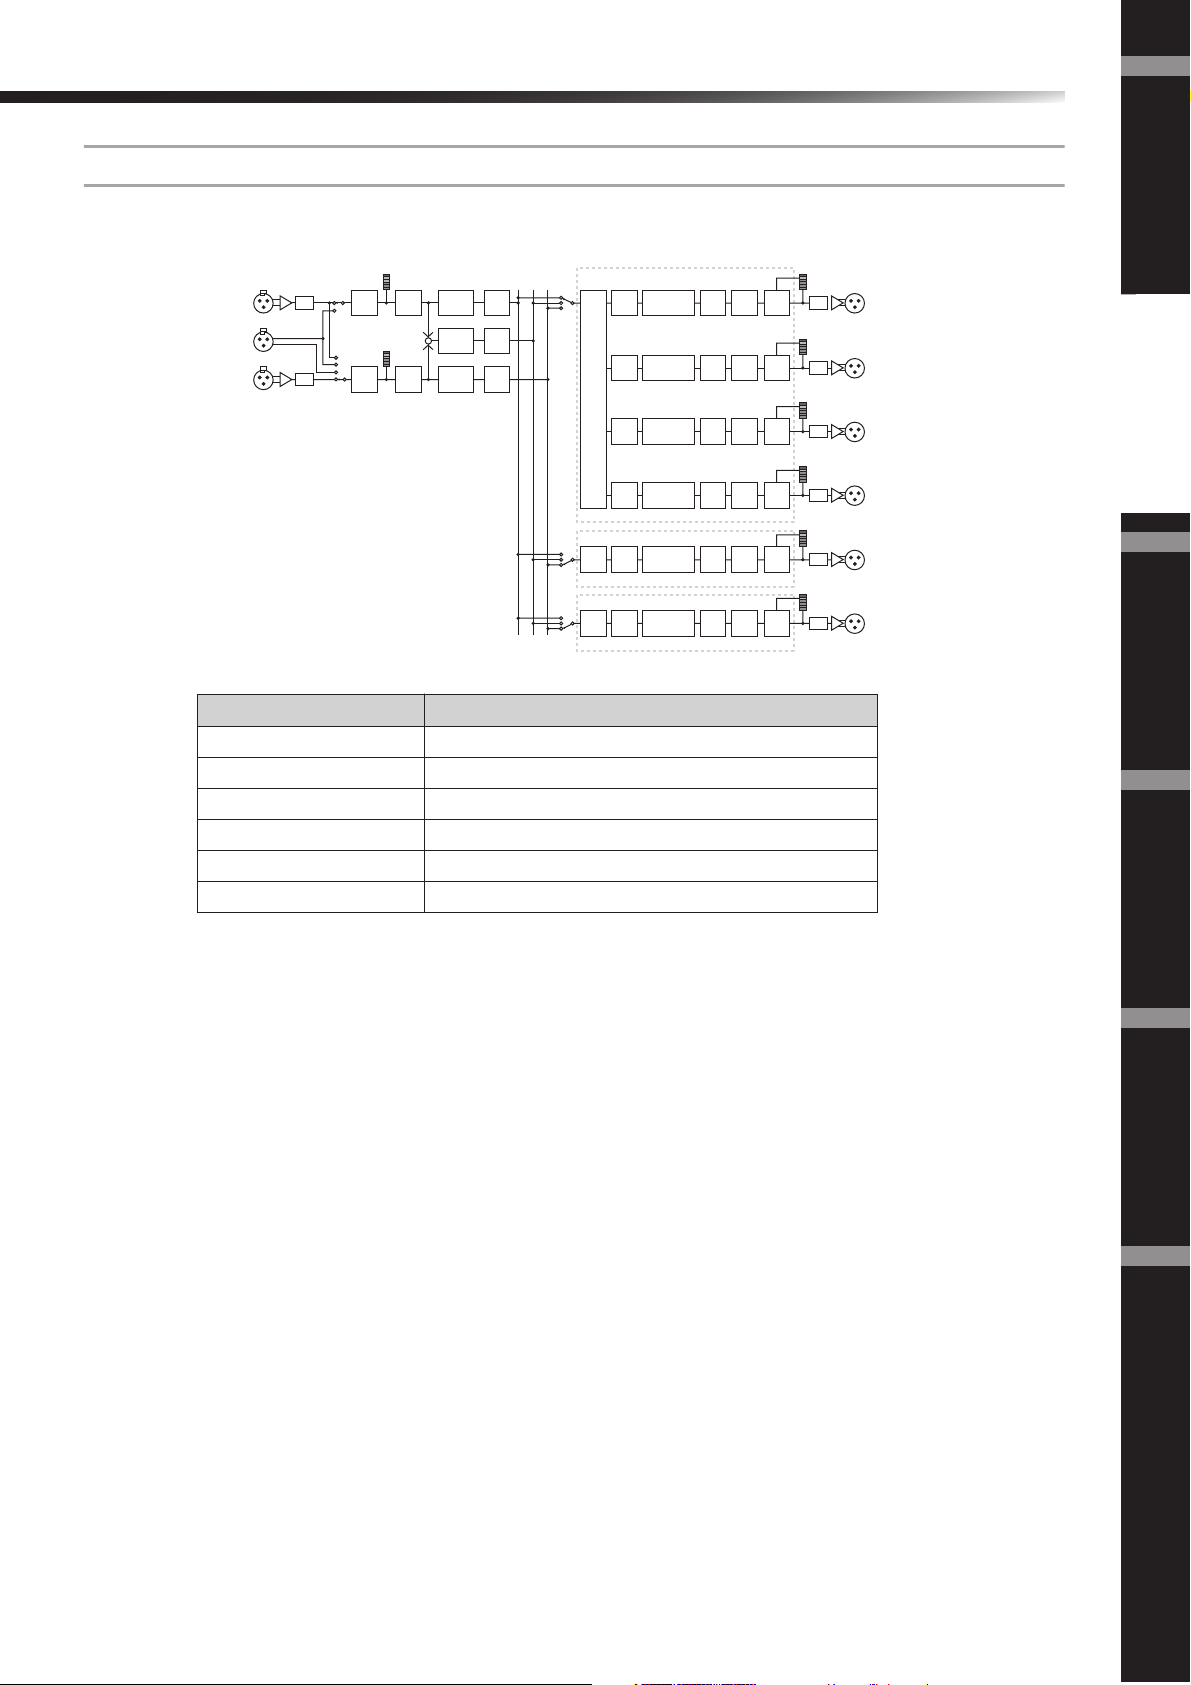
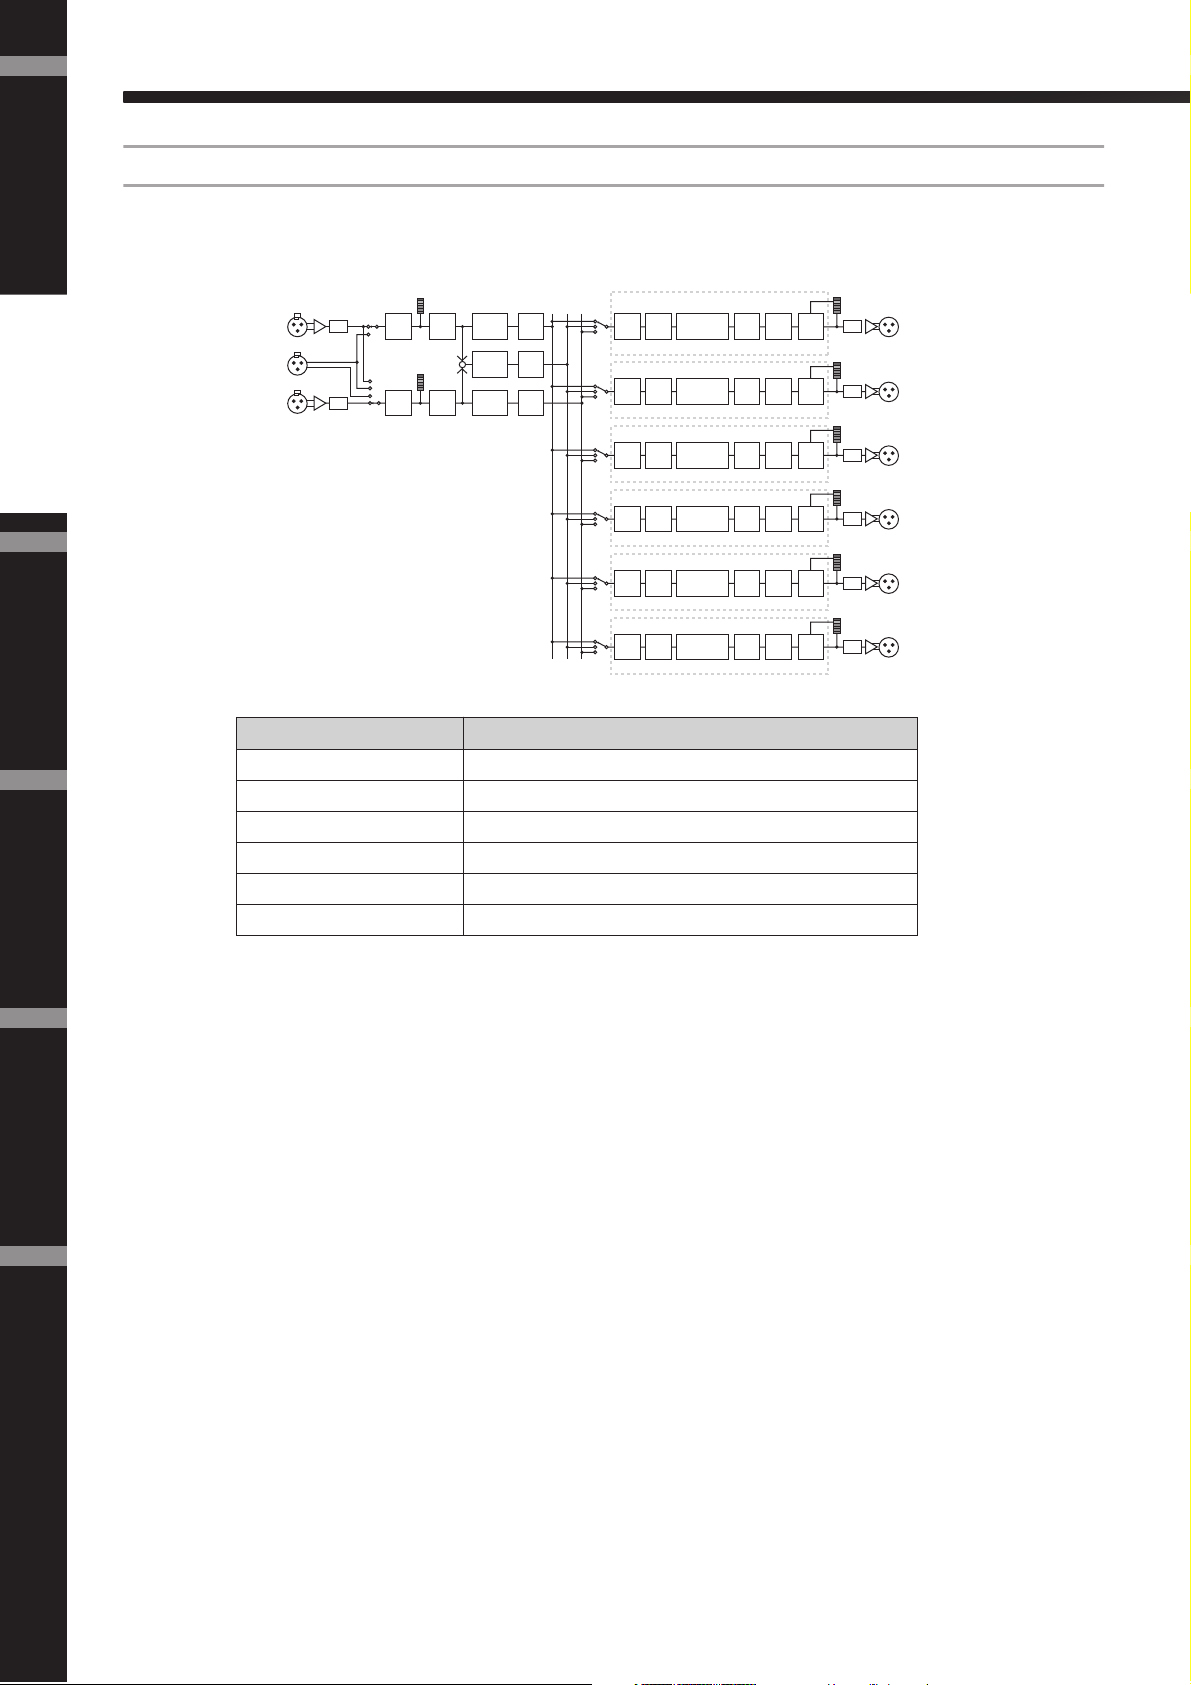
6-way
Controls one channel 6-way speaker.
[Library Data]
Input
Input
[INPUT A]
[DIGITAL IN]
[INPUT B]
AD
Level
Input
AD
Level
Mute
Input
Mute
Input
8BandEQ
Input
+
8BandEQ
Input
8BandEQ
Output connector Speaker’s input connector
OUTPUT 1 6-way speaker (1) SUB-LOW
OUTPUT 2 6-way speaker (1) LOW
OUTPUT 3 6-way speaker (1) LOW-MID
OUTPUT 4 6-way speaker (1) MID
OUTPUT 5 6-way speaker (1) HIGH-MID
OUTPUT 6 6-way speaker (1) HIGH
Input
Delay
Input
Delay
Input
Delay
BA SUM
X-Over
Output
Delay
SUB-LOW
Output
Delay
LOW
Output
Delay
LOW-MID
Output
Delay
MID
Output
Delay
HIGH-MID
Output
Delay
HIGH
Output
6BandEQ
with APF
Output
6BandEQ
with APF
Output
6BandEQ
with APF
Output
6BandEQ
with APF
Output
6BandEQ
with APF
Output
6BandEQ
with APF
Output
Level
Output
Level
Output
Level
Output
Level
Output
Level
Output
Level
Output
Mute
Output
Mute
Output
Mute
Output
Mute
Output
Mute
Output
Mute
Limiter
Limiter
Limiter
Limiter
Limiter
Limiter
LIMIT
LIMIT
LIMIT
LIMIT
LIMIT
LIMIT
Foreword
DA
[OUTPUT 1]
SUB-LOW
DA
[OUTPUT 2]
LOW
DA
[OUTPUT 3]
LOW-MID
DA
[OUTPUT 4]
MID
DA
[OUTPUT 5]
HIGH-MID
DA
[OUTPUT 6]
HIGH
Introduction
to the SP2060
The Controls
and Connectors
SP2060 Owner’s Manual
Network Settings Panel Operation
References
15
Page 17
Foreword
Introduction to the SP2060
Multi Zone
Outputs only the frequency components (by retrieving them from the input signals) that are suitable for the response characteristics of each speaker connected to each of six output connectors.
Introduction
to the SP2060
The Controls
and Connectors
[Library Data]
[INPUT A]
[DIGITAL IN]
[INPUT B]
Input
Input
AD
Level
Input
AD
Level
Mute
Input
Mute
+
Input
8BandEQ
Input
8BandEQ
Input
8BandEQ
Input
Delay
Input
Delay
Input
Delay
BA SUM
X-Over
[Library Data]
X-Over
[Library Data]
X-Over
[Library Data]
X-Over
[Library Data]
X-Over
[Library Data]
X-Over
Output connector Speaker’s input connector
OUTPUT 1 1-way speaker (1)
OUTPUT 2 1-way speaker (2)
OUTPUT 3 1-way speaker (3)
OUTPUT 4 1-way speaker (4)
OUTPUT 5 1-way speaker (5)
OUTPUT 6 1-way speaker (6)
LOW
HIGH
LOW
HIGH
LOW
HIGH
Output
Delay
Output
Delay
Output
Delay
Output
Delay
Output
Delay
Output
Delay
Output
6BandEQ
with APF
Output
6BandEQ
with APF
Output
6BandEQ
with APF
Output
6BandEQ
with APF
Output
6BandEQ
with APF
Output
6BandEQ
with APF
Output
Level
Output
Level
Output
Level
Output
Level
Output
Level
Output
Level
Output
Mute
Output
Mute
Output
Mute
Output
Mute
Output
Mute
Output
Mute
Limiter
Limiter
Limiter
Limiter
Limiter
Limiter
LIMIT
LIMIT
LIMIT
LIMIT
LIMIT
LIMIT
DA
[OUTPUT 1]
HIGH
DA
[OUTPUT 2]
HIGH
DA
[OUTPUT 3]
HIGH
DA
[OUTPUT 4]
HIGH
DA
[OUTPUT 5]
HIGH
DA
[OUTPUT 6]
HIGH
Network Settings ReferencesPanel Operation
16
SP2060 Owner’s Manual
Page 18
Introduction to the SP2060
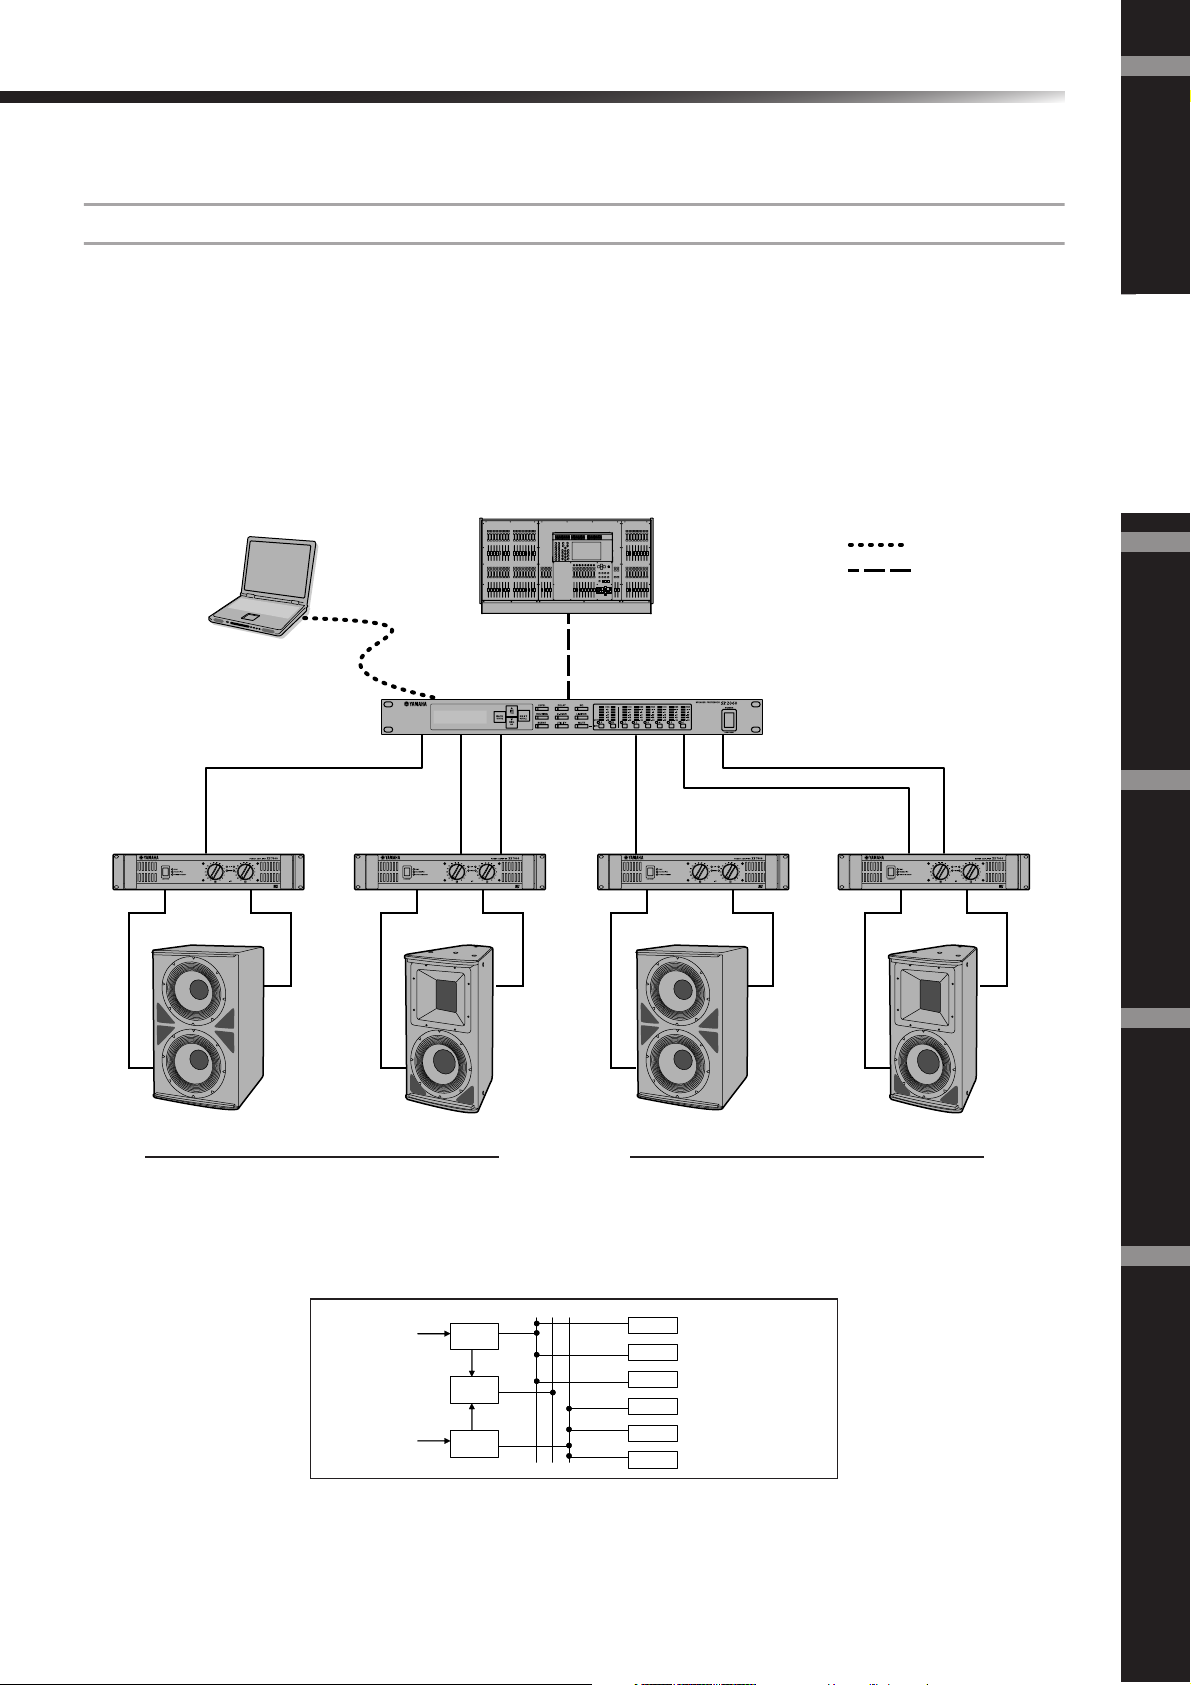
System Examples
Speaker processing
This diagram indicates an example of a stereo 3-way system.
The AES/EBU input connector on the SP2060 enables you to connect it directly to the AES/EBU output on a
digital mixer.
The configuration presets include 3 x 2-way, 2 x 3-way, 4-way + 2 x Aux, 5-way + Aux, and 6-way. (See page 9.)
The SP2060 Routing function enables you to select IN A, IN B, or IN SUM (A+B) as component input. In this
way, you can create a stereo, mono, or stereo mono (full-range stereo plus mono subwoofer) system very easily.
You can also adjust the parameters or recall a scene from the front panel of the SP2060 or from a computer con-
nected via Ethernet.
M7CL
Left/Right (AES/EBU)
* also Analog input available
SP2060
Ethernet
AES/EBU
Foreword
Introduction
to the SP2060
The Controls
and Connectors
1234 56
XP7000 XP7000 XP7000 XP7000
Subwoofer Bi-amp 2way Subwoofer Bi-amp 2way
Main speaker L Main speaker R
Routing
Sub L
L
IN A
IN A+B
R
IN B
OUT 1
OUT 2
OUT 3
OUT 4
OUT 5
OUT 6
Low L
Hi L
Sub R
Low R
Hi R
Network Settings Panel Operation
References
SP2060 Owner’s Manual
17
Page 19

Foreword
Introduction
to the SP2060
The Controls
and Connectors
Introduction to the SP2060
Zone processing
This example is a stereo 3-zone system in which the SP2060 is used as a signal distributor, rather than a crossover.
Adjusting the routing will enable you to create a monaural 6-zone system. You can adjust EQ, Delay, and Level
for each output.
This system is suitable for a facility that requires sound zoning, such as stores, restaurants, hotels, conference facilities, and exhibition halls, or for delay speakers in an SR system.
MG16/4
Network Settings ReferencesPanel Operation
AB
12 3 4 65
XP7000
LR LR LR
ZONE A ZONE B ZONE C
XP7000 XP7000
SP2060
18
Routing
SP2060 Owner’s Manual
L
R
IN A
IN A+B
IN B
OUT 1
OUT 2
OUT 3
OUT 4
OUT 5
OUT 6
ZONE 1L
ZONE 1R
ZONE 2L
ZONE 2R
ZONE 3L
ZONE 3R
Page 20

Introduction to the SP2060
Multiple SP2060
This example is a system that uses CobraNet™ for long-distance digital transfer between the control room and
amp room.
Audio signals from Yamaha PM5D digital mixing console, talkback mic signal, chime source, etc. are input to the
DME64N. The output destination and level settings are specified via the Routing function.
Furthermore, you can process output signals (EQ, Limiter, etc.) by adding an EQ component. The output from
the DME64N is converted to CobraNet™ signals via the MY16-C, then transferred via the Ethernet cable to the
NHB32-C located in the amp room.
In the amp room, this signal is converted to the AES/EBU digital signal via the NHB32-C, then input to the
SP2060, which, in turn, processes the signal using the Crossover, EQ, Delay, and Limiter to suit each speaker.
The SP2060 control signal is also transferred to the amp room via the Ethernet cable. (Yamaha recommends that
you use Giga-bit switching hubs.)
Control Room
PM5D
Cascade
Talkback mic
HOMEHOME UTILITYUTILITYSCENESCENE LEVELLEVEL MUTEMUTE
MY16-C
DME64N
ENTERENTERCANCELCANCEL
Specifying the
destination and
processing (such
as EQ) for the
output signal
Foreword
Introduction
to the SP2060
The Controls
and Connectors
Switching Hub
Switching Hub
Amp Room
Switching Hub Switching Hub
NHB32-C
LINK CONDUCT
ERROR
LOCK
SP2060 SP2060
12 34 56 1234 56
XP7000 XP7000 XP7000
NETWORK HUB AND BRIDGE
88
XM4180 XH200
Ethernet
AES/EBU
CobraNet
Network Settings Panel Operation
Main L Main R
Mono Sub Stair Step
Under Balcony Lobby/
Dressing Room
SP2060 Owner’s Manual
References
19
Page 21

Foreword
Introduction to the SP2060
Routing
Introduction
to the SP2060
The Controls
and Connectors
Low L
L
R
IN A
IN A+B
IN B
OUT 1
OUT 2
OUT 3
OUT 4
OUT 5
OUT 6
Hi L
Low R
Hi R
Mono Sub
Stair Step (Mono)
Under
Balcony
Lobby/
Dressing Room
IN A
IN A+B
IN B
OUT 1
OUT 2
OUT 3
OUT 4
OUT 5
OUT 6
Under Balcony 1
Under Balcony 2
Under Balcony 3
Under Balcony 4
Lobby
Dressing Room
Network Settings ReferencesPanel Operation
20
SP2060 Owner’s Manual
Page 22

The Controls and Connectors
Front Panel
Foreword
1 2 4 5 6 7
3 % ^
YES
STORE RECALL
NO
! @ # $89)
1 Display
Displays the parameters selected for editing and information
about the currently-recalled scene.
Remove the transparent protective film that was applied prior to shipment from the factory.
2 [BACK/STORE] Key
Selects the previous parameter. In the Scene display, it stores
a selected scene.
3 [▲INC/YES]/[▼DEC/NO] Keys
Confirm Yes or No to the change of parameter values or confirmation messages.
4 [NEXT/RECALL] Key
Selects the next parameter. In the Library List display or
Scene display, it recalls a selected library or scene respectively.
5 [LEVEL] Key
Displays the input/output level settings. When these settings
are displayed, the key LED lights up.
6 [DELAY] Key
Displays the signal delay time settings. When these settings
are displayed, the key LED lights up.
7 [EQ] Key
Displays the EQ settings. When these settings are displayed,
the key LED lights up.
8 [ROUTING] Key
Displays the selection of the [INPUT] connectors and Output channel signal sources. When these settings are displayed, the key LED lights up.
654321BA
9 [X-OVER] Key
Displays the Crossover settings or library recall options.
When these settings are displayed, the key LED lights up.
) [LIMITER] Key
Displays the Limiter settings. When these settings are displayed, the key LED lights up.
! [SCENE] Key
Displays scene store or recall options, or scene edit options.
When these settings are displayed, the key LED lights up.
@ [UTILITY] Key
Displays the SP2060 Utility function settings. When these
settings are displayed, the key LED lights up.
# [MUTE] Key
Displays the Mute settings. When these settings are displayed, the key LED lights up. At this time, each [SEL] key
LED indicates the corresponding channel’s Mute On or Off
and the [SEL] keys enable you to turn Mute On or Off for
the corresponding channels.
Holding down the [MUTE] key for two seconds or longer
will turn the User Lock function On or Off.
$ [SEL] Keys
Select the corresponding channels for editing. The [SEL] key
LED for each selected channel lights up.
% Meters
Display the channel level meters and the Limiter indicators
for Output channels.
^ [POWER ON/OFF] Key
Turns mains power to the SP2060 on and off.
Introduction
to the SP2060
The Controls
and Connectors
Network Settings Panel Operation
SP2060 Owner’s Manual
References
21
Page 23

Foreword
& *
The Controls and Connectors
Rear Panel
( º ¡ ™
Introduction
to the SP2060
The Controls
and Connectors
DIGITAL
INPUT
AES/EBU
& Ground Screw
For maximum safety be sure to securely connect the SP2060
ground screw to an earth connection.
The supplied power cable has a three-prong plug that will
ground the unit when plugged into an appropriately grounded three-prong type AC mains outlet. If the AC outlet is not
grounded, be sure to ground the unit by using this ground
screw.
Correct grounding will effectively eliminate hum noise and
interference.
* [AC IN] Connector
Connect to the AC mains using the supplied AC power cord.
First connect the power cord to the SP2060, then insert the
power cord plug into an AC outlet.
OUTPUT
123456
( [NETWORK] Connector
This is a 100Base-TX/10Base-T Ethernet connector for connection to a computer or other device in the network.
NOTE
•Use a CAT5 STP (Shielded Twisted Pair) cable for this
connection to prevent electromagnetic interference. Since the
SP2060 supports Auto MDI/MDI-X, it will automatically
detect whether the connected cable is of the straight type or
crossover type, and will configure itself to create the optimal
connection. Therefore, you can use either a straight or
crossover cable.
• The maximum length of a cable between a switching hub and
the SP2060 is 100 meters. Due to the quality of cables and
switching hub performance, however, proper operation at the
maximum length cannot be guaranteed in some cases.
Network Settings ReferencesPanel Operation
º [DIGITAL INPUT] Connector (AES/EBU)
Connect an output of an AES/EBU (digital signal) compatible device to this XLR-3-31 connector.
¡ [OUTPUT] Connectors
These XLR-3-32 balanced connectors output six channel analog audio signals. Connect them to the inputs on amplifiers.
™ [INPUT] Connectors
These XLR-3-31 balanced connectors input two channel analog audio signals.
22
SP2060 Owner’s Manual
Page 24

Panel Operation
Basic Operation
Foreword
This section describes the function of the panel keys and related displays.
Changing the parameter values
You can adjust the parameter settings, such as EQ, according
to the speaker response or the acoustic environment of a particular venue. This section explains how to change the delay
time for Output channel 1 as an example.
1. Display the parameter setting you wish to
change. To change the delay time, first press
the [DELAY] key to switch to the Delay
display.
Refer to “The Controls and Connectors” on page 21 for
information on the relationship between the parameters
and keys.
OUT 1
ON/OFF = ON
2. Select a channel for which you wish to
change the delay time. In this example, press
the OUTPUT 1 [SEL] key.
Confirmation icon
SCENE EDIT
01:FOH(Event A)
Cursor
Some parameters will prompt you to confirm the operation
to reflect the change in the value.
In this case, a confirmation icon will appear on the display.
Press the [NEXT] key to move the cursor to the icon, then
press the [YES] key. A message prompts you to confirm.
Press the [YES] key to confirm the operation.
LEVEL
You can view and adjust the Input and Output channel levels.
Parameter Range
INPUT A/B/SUM –∞, –138.00 through +10.00dB
OUTPUT 1-6 –
∞, –138.00 through +10.00dB
Introduction
to the SP2060
The Controls
and Connectors
3. Press the [NEXT] key repeatedly until the
parameter you wish to change appears on the
screen. In this example, select the Time
parameter.
OUT 1
TIME = 2.67ms
4. Press the [▲ INC]/[▼ DEC] keys to change the
parameter value.
The parameter value on the screen changes accordingly.
[▲ INC]
key
[▼ DEC]
key
Press the [▲ INC]
key.
Hold down the
[▲ INC] key.
While holding down
the [▲ INC] key,
press the [▼ DEC]
key.
Press the [▼ DEC]
key.
Hold down the
[▼ DEC] key.
While holding down
the [▼ DEC] key,
press the [▲ INC]
key.
The value increases.
The value continues to
increase as long as you
hold down the key.
The value continues to
increase at a rate more
rapid than when you hold
down the [▲ INC] key.
The value decreases.
The value continues to
decrease as long as you
down the key.
The value continues to
decrease at a rate more
rapid than when you hold
down the [▼ DEC] key.
1. Press the [LEVEL] key to select the Level
display.
IN A
LEVEL =-138.00dB
2. Press the [SEL] key for the target channel.
The corresponding channel is selected. The [SEL] key
LED for the selected channel lights up.
IN B
LEVEL =-138.00dB
Network Settings Panel Operation
3. Press the [▲INC]/[▼DEC] keys to adjust the
input or output level.
IN B
LEVEL =-138.00dB
References
NOTE
When INPUT A/B LINK is turned On, the parameters for
channels A and B are linked and set to the same value
automatically.
SP2060 Owner’s Manual
23
Page 25

Foreword
Panel Operation
Introduction
to the SP2060
The Controls
and Connectors
Network Settings ReferencesPanel Operation
DELAY
You can set the signal delay time on each input and output
channel. Set the On/Off parameter to On to delay the signal,
and Off to bypass the delay.
Parameter Range
INPUT A/B/SUM 0–1300.00msec
OUTPUT 1-6 0–500.00msec
NOTE
Channel SUM is a new channel created by applying the Level and
Mute settings to Input channel A and B respectively, then adding
both channel values.
1. Press the [DELAY] key to select the Delay
display.
IN A
ON/OFF = OFF
2. Press the [SEL] key for the target channel.
The [SEL] key LED of the selected channel lights up,
and the corresponding channel name is displayed.
Pressing the [SEL] keys for Input channels A and B simultaneously will turn on the [SEL] key LEDs and select
channel SUM.
IN SUM
ON/OFF = OFF
3. Press the [▲INC]/[▼DEC] keys to select On or
Off.
EQ (Equalizer)
An EQ boosts or cuts the level of specified frequency ranges.
The SP2060’s internal EQ processes input and output sig-
nals.
Input EQ
You can apply eight-band EQ to Input channels A, B, and
SUM.
Set the On/Off parameter to On to apply EQ to the signal,
and Off to not process the signal.
You can set the following parameters for each band.
Parameter Range Function
BYPASS ON/OFF
Q 16.0–0.1
FREQ
(Frequency)
GAIN
20.0Hz–20.0kHz
–18dB through
+18.00dB
You can select a type of filter for band 1 and band 8. All other
bands utilize a fixed parametric EQ.
Parameter Range Function
PEQ
L.SHELF 6dB/Oct
TYPE
L.SHELF 12dB/Oct
H.SHELF 6dB/Oct
H.SHELF 12dB/Oct
HPF
LPF
Sets the bypass for
each frequency range
to On or Off.
Specifies the width of
each frequency range.
Specifies the center
frequency of each
frequency range.
Sets the gain of the
target frequency.
Selects a type of filter.
24
IN SUM
ON/OFF = ON
4. Press the [DELAY] or [NEXT] key to display
the Time parameter.
IN B
TIME = 130.00ms
5. Press the [▲INC]/[▼DEC] keys to adjust the
delay time.
IN B
TIME = 120.00ms
SP2060 Owner’s Manual
• PEQ
This is a standard parametric equalizer.
• L.SHELF(Low Shelving)
Does not cut the lower frequency range, but cuts starting
from the vicinity of the cutoff frequency toward the higher
range at a specific rate. “6dB/Oct” and “12dB/Oct” stand
for the cut amount per octave.
• H.SHELF(High Shelving)
Does not cut the higher frequency range, but cuts starting
from the vicinity of the cutoff frequency toward the lower
range at a specific rate. “6dB/Oct” and “12dB/Oct” stand
for the cut amount per octave.
• HPF
This is a high pass filter (Q=0.7). The low frequency range
is mildly cut (12dB/Oct), creating a slow curve.
• LPF
This is a low pass filter (Q=0.7). The high frequency range
is mildly cut (12dB/Oct), creating a slow curve.
Page 26

Panel Operation
1. Press the [EQ] key repeatedly to select the
EQ display.
IN A
ON/OFF = ON
2. Press the [SEL] key for the target channel.
The [SEL] key LED of the selected channel lights up,
and the corresponding channel name is displayed.
Pressing the [SEL] keys for channels A and B will turn on
the [SEL] key LEDs and select channel SUM.
IN SUM
ON/OFF = ON
3. Press the [EQ], [BACK] or [NEXT] key to
display the On/Off parameter.
4. Press the [▲INC] key to set the On/Off
parameter to On to apply EQ to the signal.
Press the [▼DEC] key to set the On/Off
parameter to Off to not process the signal.
5. Press the [BACK] or [NEXT] key to select the
Bypass, Type, Q, Freq, or Gain parameter.
IN SUM BAND 2
Q = 0.125
6. Pressing the [EQ] key repeatedly will scroll
the bands from 1 through 8.
IN SUM BAND 3
Q = 0.125
7. Press the [▲INC]/[▼DEC] keys to select the
value.
Output EQ
You can apply a 6-band EQ to Output channels 1–6.
Set the On/Off parameter to On to apply EQ to the signal,
and Off to not process the signal.
The parameters are the same as for the input EQ.
You can set the following parameters for each band.
Parameter Range Function
Sets the bypass
BYPASS ON/OFF
PEQ
L.SHELF 6dB/Oct
L.SHELF 12dB/Oct
H.SHELF 6dB/Oct
TYPE
Q 63.0–0.1
FREQ
(Frequency)
GAIN
H.SHELF 12dB/Oct
HPF
LPF
APF 1st
APF 2nd
Horn
20.0Hz–20.0kHz
–18dB through
+18.00dB
• APF (All Pass Filter)
This filter passes all ranges of frequency, but changes only
the phase. It is used to align the phase in the crossover
range.
APF 1st rotates the phase by 0 through 180 degrees, and
APF 2nd rotates the phase by 0 through 360 degrees. APF
2nd requires the Q setting.
• Horn
A horn speaker typically features a roll-off in the higher
frequency component.
Horn EQ corrects this characteristics. For this purpose,
the gain is limited to 0dB or higher, and the frequency to
500Hz or higher.
for each
frequency range
to On or Off.
Selects a type of
filter.
Specifies the
width of each
frequency range.
Specifies the
frequency of each
band.
Sets the gain of
the target
frequency.
Foreword
Introduction
to the SP2060
The Controls
and Connectors
Network Settings Panel Operation
SP2060 Owner’s Manual
References
25
Page 27

Foreword
Panel Operation
Introduction
to the SP2060
The Controls
and Connectors
ROUTING
Input routing
You can select either analog or digital input signals. This selection links to the word clock master setting. You can also
route the left channel of an input signal received at the [INPUT A] or [DIGITAL IN] connector to both Input channels A and B.
Option Input Signal Selection
A signal at the [INPUT A]
ANA A/B
ANA A/A
DIG L/R
DIG L/L
HINT
connector is routed to
channel A, and a signal at
the [INPUT B] connector
to channel B.
A signal at the [INPUT A]
connector is routed to
channels A and B.
A left channel signal is
routed to channel A, and
a right channel signal to
channel B.
A left channel signal is
routed to channels A and
B.
Word Clock
Master
Internal clock:
96kHz
Incoming AES/
EBU signal
Output routing
You can route Input channel A, B, and SUM signals to the
Crossover input.
The following three channels are available:
• IN A
• IN SUM
• IN B
1. Press the [ROUTING] key to select the
Routing display.
OUT 2
SOURCE = IN A
2. Press the [SEL] key for the target Output
channel.
The [SEL] key LED for the selected channel lights up.
The [SEL] key LED for each channel that shares the
same component flashes. The selected channel name appears on the display.
OUT 4
SOURCE = IN A
1. Press the [ROUTING] key to select the
Network Settings ReferencesPanel Operation
2. Press the [▲INC]/[▼DEC] keys to select an
You can check the word clock status on the Utility display. See
page 34.
Routing display.
INPUT SELECT
SOURCE = ANA A/B
input signal source.
INPUT SELECT
SOURCE = ANA A/A
NOTE
Signals are muted while they are switched between analog and
digital to avoid noise.
3. Press the [▲INC]/[▼DEC] keys to select an
input source to be routed to the Crossover.
OUT 4
SOURCE = IN SUM
26
SP2060 Owner’s Manual
Page 28

Panel Operation
X-OVER (Crossover)
Setting the Crossover
Input signals can be divided into specified frequency ranges
to suit speaker response characteristics prior to output.
The number of division is determined to 1-way through 6way, depending on the selected component.
Parameter Range Function
Adjusts the level of the
–
LEVEL
POLARITY
HPF
LPF
∞, –138.00 through
+10.00dB
NORMAL
INVERTED
Refer to Step 4.
1. Press the [X-OVER] key repeatedly until the X-
Over display appears on the screen.
OUT 1 LPF
FREQ = 20.0kHz
2. Press the [SEL] key for the target Output
channel.
The [SEL] key LED of the selected channel lights up,
and the corresponding channel name is displayed.
OUT 3 LPF
FREQ = 20.0kHz
3. Press the [NEXT]/[BACK] keys to select a
parameter to edit.
OUT 3 LPF
TYPE =24AdjustGc
signal input to the
Crossover. The same
Level setting is used
for the output channels
of a component.
The output signal
phase for each
frequency range is
inverted.
4. Press the [▲INC]/[▼DEC] keys to set the
parameter value.
Parameter Range Function
Thru
6dB/Oct
12dB/Oct AdjustGc
12dB/Oct Butrwrth
12dB/Oct Bessel
12dB/Oct Linkwitz
18dB/Oct AdjustGc
18dB/Oct Butrwrth
18dB/Oct Bessel
TYPE
HPF
FREQ
(Frequency)
Gc –6dB through +6dB
TYPE
LPF
FREQ
(Frequency)
Gc –6dB through +6dB
24dB/Oct AdjustGc
24dB/Oct Butrwrth
24dB/Oct Bessel
24dB/Oct Linkwitz
36dB/Oct AdjustGc
36dB/Oct Butrwrth
36dB/Oct Bessel
48dB/Oct AdjustGc
48dB/Oct Butrwrth
48dB/Oct Bessel
48dB/Oct Linkwitz
20.0Hz–20.0kHz
Thru
6dB/Oct
12dB/Oct AdjustGc
12dB/Oct Butrwrth
12dB/Oct Bessel
12dB/Oct Linkwitz
18dB/Oct AdjustGc
18dB/Oct Butrwrth
18dB/Oct Bessel
24dB/Oct AdjustGc
24dB/Oct Butrwrth
24dB/Oct Bessel
24dB/Oct Linkwitz
36dB/Oct AdjustGc
36dB/Oct Butrwrth
36dB/Oct Bessel
48dB/Oct AdjustGc
48dB/Oct Butrwrth
48dB/Oct Bessel
48dB/Oct Linkwitz
20.0Hz–20.0kHz
Selects an
attenuation
amount per
octave, and a
type of filter.
If you select
“Thru,” no filter
will be applied.
Specifies the
cutoff frequency
of the high pass
filter.
You can set the
gain for the cutoff
frequency (Gc)
when you select
“AdjustGc
(Adjustable Gc)”
for the Type
parameter.
Selects an
attenuation
amount per
octave, and a
type of filter.
If you select
“Thru,” no filter
will be applied.
Specifies the
cutoff frequency
of the low pass
filter.
You can set the
gain for the cutoff
frequency (Gc)
when you select
“AdjustGc
(Adjustable Gc)”
for the Type
parameter.
Foreword
Introduction
to the SP2060
The Controls
and Connectors
Network Settings Panel Operation
References
SP2060 Owner’s Manual
27
Page 29

Foreword
Panel Operation
Introduction
to the SP2060
The Controls
and Connectors
NOTE
• The type names are abbreviated on the SP2060 screen.
For example, “24dB/Oct Bessel” is displayed as “24Bessel.”
• Gc page is displayed if you select “Adjust Gc” for the Type
parameter.
• Thru
No filter is applied. The original characteristics are kept
with no attenuation for all frequency ranges.
• AdjustGc (Adjustable Gc)
Filters with an Adjustable Gc enable you to adjust the gain
at the cutoff frequency in the range of –6dB through
+6dB. With Gc set to –3dB, the filter is practically a Butterworth filter. And with Gc set to –6dB, the filter is practically a Linkwitz-Riley filter.
• Butrwrth (Butterworth)
This filter is the most common type of filter. It has a flat
pass band and a –3dB gain at the cutoff frequency.
• Bessel
This filter focuses on the phase characteristics. Although it
has a more gradual roll-off than a Butterworth filter, it will
pass a square wave without causing ringing.
• Linkwitz (Linkwitz-Riley)
This filter features the square of the second order. When
the output signal from its LPF and HPF are combined, the
gain over the entire range is +/–0dB. It has a flat pass band
and a –6dB gain at the cutoff frequency.
LIBRARY
Using libraries facilitates the recall of optimal speaker settings. Up to 60 libraries are available for each component via
the DME Designer application.
Displaying the current library
Pressing the [X-OVER] key repeatedly will select the Current Library display, Library List display, or X-Over display,
in this order.
The title of the library most recently recalled for each component will be displayed.
CURRENT LIBRARY
IF2112/95
NOTE
Libraries cannot be displayed or recalled for Input channels. If
you press an Input channel [SEL] key, a message appears.
Recalling a library
Follow the steps below to recall a library:
1. Press the [X-OVER] key repeatedly until the
Library List display appears on the screen.
Network Settings ReferencesPanel Operation
LIBRARY LIST
IF2112/64
2. Press the [SEL] key of an Output channel for
a component for which you wish to recall a
library.
3. Press the [▲INC]/[▼DEC] keys to select a
library.
LIBRARY LIST
IF2112/64
4. Press the [NEXT/RECALL] key.
A confirmation message will appear.
LIBRARY RECALL
ARE YOU SURE?
28
SP2060 Owner’s Manual
Page 30

Panel Operation
5. To confirm the selection, press the [YES] key.
The library is recalled and the unit returns to the Library
List display.
LIBRARY LIST
IF2112/95
To cancel the recall operation, press the [NO] key, instead of the [YES] key. The unit returns to the Library
List display.
HINT
You can use the library data for speaker processor components for
DME64N/24N that you have created using DME Designer.
LIMITER
You can set up the Output channel limiter.
The Limiter precludes signal levels higher than a specified
threshold to avoid speaker damage from excess output level.
Parameter Range Function
THRESHOLD –54 through 0dB
FAST
ATTACK
RELEASE
MID
SLOW
MANUAL (0–
120.0ms)
FAST
MID
SLOW
MANUAL
44.1kHz: 6ms–46s,
48kHz: 5ms–42.3s,
88.2kHz: 3ms–23s,
96kHz: 3ms–21.1s
Sets the threshold
value.
Sets the attack time.
Sets the release time.
If you select Fast,
Mid, or Slow, the unit
automatically sets the
optimum value based
on the maximum
wave length of audio
input to the Limiter.
1. Press the [LIMITER] key to select the Limiter
display.
OUT 1
ON/OFF = ON
2. Press the [SEL] key for the target channel.
The [SEL] key LED of the selected channel lights up,
and the corresponding channel name is displayed.
OUT 4
ON/OFF = ON
3. Press the [LIMITER], [BACK] or [NEXT] key to
display the On/Off parameter.
4. Press the [▲INC] key to set the On/Off
parameter to On to apply the Limiter to the
signal. Press the [▼DEC] key to set the On/
Off parameter to Off to cancel the Limiter.
5. Press the [NEXT]/[BACK] keys to select a
parameter to edit.
OUT 4
THRESHOLD= -54dB
6. Press the [▲INC]/[▼DEC] keys to set the
parameter value.
SCENE
Foreword
Introduction
to the SP2060
The Controls
and Connectors
NOTE
•You can set the attack time only when “Manual” is selected for
the Attack parameter.
•You can set the release time only when “Manual” is selected for
the Release parameter.
About a scene
The SP2060 enables you to store various parameter settings
as part of scene, and recall them via the front panel or remotely from DME Designer.
You can store the following settings in a scene:
• Configuration
•Routing
•Parameter sets of all components
• Scene titles
• Scene protection status
• INPUT A/B LINK
• The title of the library most recently recalled
HINT
You can protect a scene to forbid overwriting.
SP2060 Owner’s Manual
Network Settings Panel Operation
References
29
Page 31

Foreword
Panel Operation
Introduction
to the SP2060
The Controls
and Connectors
Scenes are stored in the preset area and user area.
Preset area
There is a preset scene for each of 12 configurations. These
scenes are numbered 1 through 12. Each scene title has the
same name as the corresponding configuration title.
No.1. [3x2way ]
No.2. [3x2way L ]
No.3. [2x(2way+Sub) ]
No.4. [2x(2way+Sub)L ]
No.5. [2x2way+2xAux ]
No.6. [2x2way+2xAux L ]
No.7. [2x3way ]
No.8. [2x3way L ]
No.9. [4way+2xAux ]
No.10. [5way+Aux ]
No.11. [6way ]
No.12. [Multi Zone ]
User area
The user area can accommodate up to 87 user scenes, which
you can store and recall at your discretion. These scenes are
numbered 13 through 99.
Scene indication
Scene propertyScene number Title
Recalling a scene
Follow the steps below to recall a scene (1–99):
HINT
You can also recall a scene using the DME Designer application.
NOTE
If recalling a scene has changed the configuration, audio output
will be muted momentarily.
1. Press the [SCENE] key to select the Scene
Selection display.
25:FOH(Event A)
[2x(2way+SUB)L]
2. Press the [▲INC]/[▼DEC] keys to select a
scene number.
While you are selecting a scene, the scene number and title will be flashing.
The upper row indicates a scene number, property, and title.
The bottom row indicates the configuration title.
Scene property includes the following types:
Network Settings ReferencesPanel Operation
25:FOH(Event A)
[2x(2way+SUB)L]
Configuration title
Preset scene
Protected user scene
Unprotected user scene
NOTE
After you recall a scene, if you edit a parameter, an icon
appears in the lower right corner on the screen.
NOTE
If no data is included in the currently-selected scene, the message
“No Scene” appears.
3. Press the [RECALL] key.
A confirmation message will appear.
33:RECALL
ARE YOU SURE?
4. Press the [YES] key.
The scene is recalled and its number becomes the current
scene number.
To cancel the recall operation, press the [NO] key, instead of the [YES] key. The unit returns to the Scene Selection display.
NOTE
If the selected scene contains no data or User Lock is turned on
for the scene, a status message appears.
30
SP2060 Owner’s Manual
Page 32

Panel Operation
Storing a scene
Follow the steps below to store a scene (13–99) to the user
area:
HINT
You can also store a scene using the DME Designer application.
1. Press the [SCENE] key to select the Scene
Selection display.
25:FOH(Event A)
[2x(2way+SUB)L]
2. Press the [▲INC]/[▼DEC] keys to select a
scene number.
3. Press the [BACK/STORE] key.
A confirmation message will appear.
3. Press the [▲INC]/[▼DEC] keys to change the
character.
HINT
Holding down the [▲INC]/[▼DEC] keys will increase the speed
at which the characters scroll.
4. When you finish editing the title, press the
[NEXT] key repeatedly to move the cursor to
the icon, then press the [YES] key.
A confirmation message will appear.
SCENE EDIT
ARE YOU SURE?
5. To confirm the edit, press the [YES] key.
The title is changed and the unit returns to the Scene
Edit display.
Protecting a scene
Foreword
Introduction
to the SP2060
The Controls
and Connectors
72:STORE
ARE YOU SURE?
4. Press the [YES] key.
The scene is stored and its number becomes the current
scene number.
To cancel the store operation, press the [NO] key, instead of the [YES] key. The unit returns to the Scene Selection display.
Changing a scene title
Follow the steps below to change the title (up to 13 characters) of the scene stored for the current scene number:
NOTE
You cannot change the title of any protected User scenes.
1. Press the [SCENE] key repeatedly until the
Scene Edit display appears on the screen.
Follow the steps below to protect a scene:
1. Press the [SCENE] key repeatedly until the
Scene Edit display appears on the screen.
SCENE EDIT
73:FOH(Event A)
2. Press the [▲INC]/[▼DEC] keys to select a
scene number.
3. Press the [NEXT] key to move the cursor to
the scene property icon.
SCENE EDIT
73:FOH(Event A)
Network Settings Panel Operation
4. Press the [▲INC]/[▼DEC] keys to turn
protection on or off.
The protection icon flashes.
SCENE EDIT
73:FOH(Event A)
2. Press the [BACK]/[NEXT] keys to move the
cursor to a character you want to edit.
SCENE EDIT
73:FOH(Event A)
SCENE EDIT
73 FOH(Event A)
SP2060 Owner’s Manual
References
31
Page 33

Foreword
Panel Operation
Introduction
to the SP2060
The Controls
and Connectors
Network Settings ReferencesPanel Operation
5. Press the [NEXT] key repeatedly to move the
cursor to the icon, then press the [YES]
key.
A confirmation message will appear.
SCENE EDIT
ARE YOU SURE?
6. To confirm the edit, press the [YES] key.
The unit reflects the edit and returns to the Scene Edit
display.
HINT
You can turn protection on and off from the DME Designer
application.
Deleting a scene
Follow the steps below to delete a scene:
1. Press the [SCENE] key repeatedly until the
Scene Delete display appears on the screen.
SCENE DELETE
72:FOH(Event A)
2. Press the [▲INC]/[▼DEC] keys to select a
scene to delete.
3. Press the [NEXT] key to move the cursor to
the icon, then press the [YES] key.
A confirmation message will appear.
SCENE DELETE
ARE YOU SURE?
UTILITY
The Utility function enables you to view the word clock status and make network settings. See page 37 for more information on making network settings.
INPUT A/B LINK
Follow the steps below to link the Input channel A and B parameters:
When INPUT A/B LINK is turned On, the parameters for
channel A and B are linked and set to the same value automatically.
NOTE
The channel SUM parameters cannot be linked.
The following components will be linked:
• INPUT LEVEL
• INPUT EQ
• INPUT DELAY
1. Press the [UTILITY] key to select the Utility
display.
The most recently used Utility display will appear.
2. Press the [UTILITY], [NEXT] or [BACK] key
repeatedly until the INPUT A/B LINK page
appears.
INPUT A/B LINK
OFF
3. Press the [▲INC] key to link the parameters.
“ON” flashes on the screen.
INPUT A/B LINK
ON
32
4. To confirm the operation, press the [YES] key.
The operation is executed and the unit returns to the
Scene Delete display.
NOTE
You cannot delete preset scenes, protected scenes, and current
scene.
SP2060 Owner’s Manual
4. Press the [NEXT] key to move the cursor to
the icon.
INPUT A/B LINK
ON
5. Press the [YES] key.
A confirmation message will appear.
INPUT A/B LINK
ARE YOU SURE?
Page 34

Panel Operation
6. To confirm the operation, press the [YES] key.
The flashing “ON” (or “OFF”) lights up steadily, and the
cursor returns to the “ON (or OFF)” position.
INPUT A/B LINK
ARE YOU SURE?
To cancel the operation and return to the original setting, press the [NO] key.
NOTE
If you set INPUT A/B LINK to “ON,” the linked parameters for
channel A will be copied to channel B parameters.
User Lock
Parameter settings can be “locked” temporarily to prevent
accidental mis-operation. This function is useful to avoid
unintentional operations or to prevent others from operating
the panel controls.
The following operations are the User Lock target.
* Editing the parameters
* Recalling and storing a scene
* Changing a scene title
* Changing the scene protection status
* Recalling a library
4. Press the [NEXT] key to move the cursor to
the icon.
USER LOCK
ON
5. Press the [YES] key.
A confirmation message will appear.
USER LOCK
ARE YOU SURE?
6. To confirm the operation, press the [YES] key.
A status message appears, and User Lock becomes active.
Panel Locked
HINT
•A short cut to turn on the User Lock function is to hold down
the [MUTE] key for two seconds or longer.
•A short cut to turn off the User Lock function is to hold down
the [MUTE] key for two seconds or longer.
Foreword
Introduction
to the SP2060
The Controls
and Connectors
NOTE
•You can mute or unmute, or cancel User Lock even if the User
Lock function is turned on.
• The User Lock function is effective only for the panel controls
on the SP2060, and does not affect any control signals from
external devices.
1. Press the [UTILITY] key to select the Utility
display.
The most recently used Utility display will appear.
2. Press the [UTILITY], [NEXT] or [BACK] key
repeatedly until the User Lock page appears.
USER LOCK
OFF
3. Press the [▲INC] key to turn User Lock on. To
cancel User Lock, press the [▼DEC] key.
“ON” flashes on the screen.
Setting the Last Memory Resume
You can select whether at the startup the SP2060 recalls the
scene selected before you turned off the power to the device,
or it starts up with the same status as when it was shut down
last time. The default setting is “ON.”
OFF: At the startup, the SP2060 will recall the scene select-
ed before you turned off the power to the device.
ON: The SP2060 will start up with the same status as
when it was shut down last time.
1. Press the [UTILITY] key to select the Utility
display.
The most recently used Utility display will appear.
2. Press the [UTILITY], [NEXT] or [BACK] key
repeatedly until the Last Memory Resume
page appears.
LAST MEM. RESUME
ON
Network Settings Panel Operation
References
USER LOCK
ON
SP2060 Owner’s Manual
33
Page 35

Foreword
Panel Operation
Introduction
to the SP2060
The Controls
and Connectors
3. Press the [▲INC] key so that the SP2060 will
start up with the same status as when it was
shut down last time. Press the [▼DEC] key so
that at the startup the SP2060 will recall the
scene selected before you turned off the
power to the device.
“ON” flashes on the screen.
LAST MEM. RESUME
ON
4. Press the [NEXT] key to move the cursor to
the icon.
LAST MEM. RESUME
ON
5. Press the [YES] key.
A confirmation message will appear.
LAST MEM. RESUME
ARE YOU SURE?
6. To confirm the operation, press the [YES] key.
The selection is applied and the unit returns to the Last
Memory Resume page.
Displaying word clock
Word clock changes in accordance with input routing settings.
You can view the current word clock status on the display.
One of the following six word clock sources will be dis-
played:
For analog input signals:
The internal clock (Fs=96kHz) is used.
• INT:96kHz : Internal clock (96kHz)
For digital input signals:
The SP2060 synchronizes to an external clock (input at the
AES/EBU connector).
• EXT:44.1kHz : External clock (44.1kHz)
• EXT:48kHz : External clock (48kHz)
• EXT:88.2kHz : External clock (88.2kHz)
• EXT:96kHz : External clock (96kHz)
• EXT:UNLOCK : Unlock to external clock
1. Press the [UTILITY] key to select the Utility
display.
The most recently used Utility display page will appear.
2. Press the [UTILITY], [NEXT] or [BACK] key
repeatedly until the W. Clock page appears.
W.CLOCK
[INT: 96kHz]
Displaying the label
You can view the label for the SP2060 that you have set on
Network Settings ReferencesPanel Operation
DME Designer.
1. Press the [UTILITY] key to select the Utility
2. Press the [UTILITY], [NEXT] or [BACK] key
NOTE
If no signal exists at the [DIGITAL INPUT] connector while
digital input is selected, or if the SP2060 cannot somehow lock to
the incoming signal, an error message appears.
display.
The most recently used Utility display will appear.
repeatedly until the Label page appears.
The unit displays the label you created on DME Designer.
LABEL
[FoH L ]
NOTE
•You cannot edit the label on the SP2060.
•Up to 14 characters from the top can be displayed.
34
SP2060 Owner’s Manual
Page 36

Panel Operation
Checking the backup battery
Follow the steps below to check the internal backup battery
status:
1. Press the [UTILITY] key to select the Utility
display.
The most recently used Utility display will appear.
2. Press the [UTILITY], [NEXT] or [BACK] key
repeatedly until the Battery page appears.
BATTERY
[OK ]
The remaining battery charge is displayed as follows:
[OK ] Plenty of charge
[Low Battery] Charge is getting low.
[No Battery ]
“Low Battery” or “No Battery” will appear when the
battery charge is getting low. In this case, save the data to
an external device (such as a computer) immediately, then
CAUTION
ask the Yamaha dealer to replace the backup battery.
HINT
If there is any issue with the backup battery, the SP2060 displays
“Low Battery,” “Critical Battery,” or “No Battery” when you turn
on the power to the unit.
Memory data may be lost. Or, no battery
is installed.
Initializing the SP2060
Follow the steps below to initialize the internal memory:
You can select one of the following initialization types:
*Initializing the current scene backup [CURRENT
BACKUP]
*Initializing all user settings (excluding the libraries) to
the factory settings [WITHOUT LIB.]
*Initializing all settings to the factory settings
[FACTORY SETUP]
When the internal memory is initialized, all data stored in
the memory will be lost. Use caution when you execute
CAUTION
this function.
1. Turn off the power to the SP2060.
2. Turn on the power to the SP2060 while
holding down the [BACK/STORE] key.
The Initialization display appears.
INITIALIZE
FACTORY SETUP
3. Press the [▲INC]/[▼DEC] keys to select a
type of initialization.
NOTE
To cancel the initialization operation, select “Exit” and confirm
the cancellation. Alternatively, simply turn off the power to the
SP2060.
Foreword
Introduction
to the SP2060
The Controls
and Connectors
Displaying the firmware version
Follow the steps below to view the current firmware version
number:
1. Press the [UTILITY] key to select the Utility
display.
The most recently used Utility display page will appear.
2. Press the [UTILITY], [NEXT] or [BACK] key
repeatedly until the Version page appears.
The page indicates the current firmware version number.
VERSION
[V1.00]
You can update the SP2060 firmware via DME Designer.
Refer to the DME Designer Owner’s Manual for details.
You can also download the latest firmware from the following Yamaha website.
http://www.yamahaproaudio.com/
4. Press the [NEXT] key to move the cursor to
the icon, then press the [YES] key.
The Initialization operation starts. During initialization,
the following status message appears:
INITIALIZE
EXECUTING..
When initialization is completed, the SP2060 displays
the following status message, then automatically restarts.
INITIALIZE
COMPLETED!
Network Settings Panel Operation
References
SP2060 Owner’s Manual
35
Page 37

Foreword
Introduction
to the SP2060
The Controls
and Connectors
Panel Operation
Mute
When Mute is on, the corresponding Input or Output channel audio is muted.
You can determine the channel Mute status by checking the
corresponding channel [MUTE] key LED.
• MUTE OFF : Dark
• MUTE ON : Illuminated
1. Press the [MUTE] key to select the Mute
display.
NOW SELECT KEYS
ACT "MUTE" ->
2. Press the [SEL] key for the target channel.
The channel audio is muted and the [MUTE] key LED
lights up. Pressing the channel [SEL] key repeatedly toggles between Mute on and off.
Network Settings ReferencesPanel Operation
1BA
NOTE
You can mute or unmute even if the User Lock function is turned
on
36
SP2060 Owner’s Manual
Page 38

Network Settings
This section describes the network-related settings on the
SP2060 that you need to make when you connect a computer or other external device to the SP2060 [NETWORK]
connector.
NOTE
When connecting a computer to an SP2060 via Ethernet, you
must install the appropriate DME-N Network driver on the
computer. You can download the DME-N Network driver from
the Yamaha website.
Setting a Device Group
A “device group” is a group of multiple SP2060 units that
can be operated in sync via DME Designer. Follow the steps
below to assign each SP2060 in a device group as master or
slave. Each device group must have one master. All other devices in the group are assigned as slave.
1. Press the [UTILITY] key to select the Utility
display.
The most recently used Utility display will appear.
2. Press the [UTILITY], [NEXT] or [BACK] key
repeatedly until the Device Group page
appears.
DEVICE GROUP
MASTER
Setting the IP Address
Follow the steps below to set the IP address for each SP2060.
IP ADDRESS
192.168.000.003
Network address Host address
NOTE
•Subnet mask is fixed at 255.255.255.0.
•Gateway address is the same network address as the IP address.
The host address is automatically set to 254.
Each group of digits between periods in an IP address is
called “octet.” These groups of digits are called “1st octet,”
“2nd octet,” etc., starting from the left-most digit group.
You cannot specify 0, 127, and 223 through 255 for the 1st
octet of the network address.
You can specify the following range of values for the 4th octet.
Master : 2–253
Slave : 3–253
1. Press the [UTILITY] key to select the Utility
display.
The most recently used Utility display will appear.
2. Press the [UTILITY], [NEXT] or [BACK] key
repeatedly until the IP Address page appears.
Foreword
Introduction
to the SP2060
The Controls
and Connectors
3. Press the [▲INC]/[▼DEC] keys to select
“MASTER” or “SLAVE.”
When you change the setting, the parameter setting
flashes.
DEVICE GROUP
SLAVE
4. Press the [NEXT] key to move the cursor to
the icon, then press the [YES] key.
A confirmation message will appear.
DEVICE GROUP
ARE YOU SURE?
5. To confirm the setting, press the [YES] key.
The selection is applied and the unit returns to the Device Group page.
IP ADDRESS
192.168.000.002
3. Press the [NEXT]/[BACK] keys to move the
cursor to an octet you want to specify.
IP ADDRESS
192.168.000.003
4. Press the [▲INC]/[▼DEC] keys to change the
value.
When you change the value, the octet flashes.
5. Press the [NEXT] key to move the cursor to
the icon, then press the [YES] key.
A confirmation message will appear.
IP ADDRESS
ARE YOU SURE?
Network Settings Panel Operation
References
SP2060 Owner’s Manual
37
Page 39

Foreword
Network Settings
Introduction
to the SP2060
The Controls
and Connectors
6. To confirm the setting, press the [YES] key.
The setting is applied and the unit returns to the IP Address page.
Setting the Master ID
The SP2060 units that are assigned as slaves in a device
group follow the master SP2060 in the same group via communication. Follow the steps below to set the master ID on
the slave SP2060 units. Use the 4th octet of the IP address of
the master unit as the Master ID parameter value.
NOTE
This parameter can be set from 2 through 253.
1. Press the [UTILITY] key to select the Utility
display.
The most recently used Utility display will appear.
2. Press the [UTILITY], [NEXT] or [BACK] key
repeatedly until the Master ID page appears.
Setting Link Mode
Follow the steps below to select 100Base-TX or 10Base-T for
the [NETWORK] connector speed.
100Base-TX
The [NETWORK] connector basically operates as 100BaseTX, but automatically switches to 10Base-T if the network
environment is not compatible with 100Base-TX.
10Base-T
The [NETWORK] connector is compatible with 10Base-T
operation.
1. Press the [UTILITY] key to select the Utility
display.
The most recently used Utility display will appear.
2. Press the [UTILITY], [NEXT] or [BACK] key
repeatedly until the Link Mode page appears.
LINK MODE
100BASE-TX
3. Press the [▲INC]/[▼DEC] keys to set the
4. Press the [NEXT] key to move the cursor to
Network Settings ReferencesPanel Operation
5. To confirm the setting, press the [YES] key.
MASTER ID
253
value to the same number as the 4th octet of
the master SP2060 IP address.
the icon, then press the [YES] key.
A confirmation message will appear.
MASTER ID
ARE YOU SURE?
The setting is applied and the unit returns to the Master
ID page.
To cancel the operation and return to the original setting, press the [NO] key, instead of the [YES] key.
3. Press the [▲INC] key to select 100Base-TX,
and the [▼DEC] key to select 10Base-T.
When you change the setting, the parameter setting
flashes.
LINK MODE
10BASE-T
4. Press the [NEXT] key to move the cursor to
the icon, then press the [YES] key.
A confirmation message will appear.
LINK MODE
ARE YOU SURE?
5. To confirm the setting, press the [YES] key.
The unit reflects the edit and returns to the Link Mode
page.
NOTE
38
Depending on the specifications of the connected network
devices (such as a switching hub, router, etc.), changing Link
Mode may cause the SP2060 to be unable to reconnect to the
network. In this case, turn the power to the SP2060 off and then
on. The SP2060 will reconnect to the network.
SP2060 Owner’s Manual
Page 40

Network Settings
Viewing the MAC Address
Follow the steps below to view the SP2060 MAC address:
NOTE
In some cases, you may not need to set the MAC address via the
DME-N Network driver when the SP2060 is communicating
with DME Designer.
1. Press the [UTILITY] key to select the Utility
display.
The most recently used Utility display will appear.
2. Press the [UTILITY], [NEXT] or [BACK] key
repeatedly until the MAC Address page
appears.
The bottom row indicates the MAC address.
MAC ADDRESS
[00A0DE250123]
Foreword
Introduction
to the SP2060
The Controls
and Connectors
SP2060 Owner’s Manual
Network Settings Panel Operation
References
39
Page 41

Foreword
Introduction
to the SP2060
References
About Preset Libraries
File name
LIBRARY LIST
IF211264_pa_sub
LIBRARY LIST
IF2112AS_bi_moni
Model name Drive
•pa........................ Passive mode*
•bi........................ Bi-amp mode
• tri........................ Tri-amp mode
The Controls
and Connectors
• sub...................... Combining with a subwoofer**
• moni................... For a floor monitor
*Yamaha Installation Series speakers are designed to be used without a speaker processor when Passive mode is
selected. However, using a speaker processor will improve the performance significantly.
** This setting is for full-range speakers. Subwoofer settings are not included.
Subwoofer usage Model name Drive
mode
Floor monitor
mode
Subwoofer
• “_sub” settings for 12-inch or 15-inch 3-way full-range speakers are designed for a combination with IS1118,
IS1215, or IS1218.
• The IS1118, IS1215, and IS1218 settings are specified for a monaural subwoofer usage.
• The full-range and subwoofer level balance varies depending on the number of speakers used, installation
conditions, and applications.
•If the full-range speaker baffle and subwoofer baffle are aligned, the speaker polarity will be positive and inphase.
Depending on the installation conditions of the subwoofers, you might achieve better results if the subwoofer
phase is inverted.
Network Settings ReferencesPanel Operation
Limiter
• The default value of the threshold level has been specified based on the maximum analog output level of
+24dBu and amp voltage gain of 26dB (which corresponds to “ATT –6dB” if you are using a Yamaha PC
series amplifier that features a voltage gain of 32dB).
If you are not using the output levels referenced above, change the threshold level.
For example, if you are using an amplifier with a voltage gain of 30dB, lower the threshold level by 4dB.
•Attack time and Release time are both set to “Mid.”
• The Limiter may not completely protect the speakers. Use the Limiter if they suit your environment.
40
SP2060 Owner’s Manual
Page 42

References
Libraries for 1-way speaker processors
NOTE
These libraries also apply to 2-way speakers that are used in passive mode.
The following table shows typical subwoofer settings when it is combined with Yamaha Installation Series speakers.
Target speakers Library name Meaning
IS1118 and IS1218 IS1118_IS1218
IS1215 IS1215
Standard subwoofer Sub_5inch&8inch
The following table shows the settings for Yamaha Installation Series speakers (full-range,
passive mode).
Target speakers Library name Subwoofer
IF2205
IF2108
IF2208
IF2112/AS
IF2112/64
IF2112/95
IF2112/99
IF2112M/64
IF2112M/95
IF2112M/99
IF2115/AS
IF2115/64
IF2205 – –
IF2205_sub ✓ –
IF2108 – –
IF2108_sub ✓ –
IF2108_moni – ✓
IF2208 – –
IF2208_sub ✓ –
IF2208_moni – ✓
IF2112AS_pa – –
IF2112AS_pa_sub ✓ –
IF2112AS_pa_moni – ✓
IF211264_pa – –
IF211264_pa_sub ✓ –
IF211295_pa – –
IF211295_pa_sub ✓ –
IF211299_pa – –
IF211299_pa_sub ✓ –
IF2112M64_pa – –
IF2112M64_pa_sub ✓ –
IF2112M95_pa – –
IF2112M95_pa_sub ✓ –
IF2112M99_pa – –
IF2112M99_pa_sub ✓ –
IF2115AS_pa – –
IF2115AS_pa_sub ✓ –
IF2115AS_pa_moni – ✓
IF211564_pa – –
IF211564_pa ✓ –
This setting can be shared by IS1118 and IS1218 when IF2112
(M), IF2115 (M) or IF3115 is combined.
This setting is for IS1215 when IF2112 (M), IF2115 (M) or IF3115
is combined.
This LPF setting can be shared by standard subwoofers when
IF2205, IF2108, or IF2208 is combined.
usage*
For a floor
monitor
Foreword
Introduction
to the SP2060
The Controls
and Connectors
Network Settings Panel Operation
References
SP2060 Owner’s Manual
41
Page 43

Foreword
References
Introduction
to the SP2060
The Controls
and Connectors
Target speakers Library name Subwoofer
IF2115/95
IF2115/99
IF2115M/64
IF2115M/95
IF2115M/99
IF211595_pa – –
IF211595_pa_sub ✓ –
IF211599_pa – –
IF211599_pa_sub ✓ –
IF2115M64_pa – –
IF2115M64_pa_sub ✓ –
IF2115M95_pa – –
IF2115M95_pa_sub ✓ –
IF2115M99_pa – –
IF2115M99_pa_sub ✓ –
* This setting is for full-range speakers. Subwoofer settings are not included.
Libraries for 2-way speaker processors
NOTE
These libraries also apply to 3-way speakers (including a combination of IL series and IH series speakers) that are used in biamp mode.
usage*
For a floor
monitor
Network Settings ReferencesPanel Operation
The following table shows the settings for Yamaha Installation Series speakers (full-range,
bi-amp mode).
Target speakers Library name Subwoofer
IF2112AS_bi – –
IF2112/AS
IF2112/64
IF2112/95
IF2112/99
IF2112M/64
IF2112M/95
IF2112M/99
IF2115/AS
IF2115/64
IF2112AS_bi_sub ✓ –
IF2112AS_bi_moni – ✓
IF211264_bi – –
IF211264_bi_sub ✓ –
IF211295_bi – –
IF211295_bi_sub ✓ –
IF211299_bi – –
IF211299_bi_sub ✓ –
IF2112M64_bi – –
IF2112M64_bi_sub ✓ –
IF2112M95_bi – –
IF2112M95_bi_sub ✓ –
IF2112M99_bi – –
IF2112M99_bi_sub ✓ –
IF2115AS_bi – –
IF2115AS_bi_sub ✓ –
IF2115AS_bi_moni – ✓
IF211564_bi – –
IF211564_bi_sub ✓ –
usage*
For a floor
monitor
42
SP2060 Owner’s Manual
Page 44

References
Target speakers Library name Subwoofer
IF2115/95
IF2115/99
IF2115M/64
IF2115M/95
IF2115M/99
IF3115/64
IF3115/95
IH2000/64 IH200064_bi – –
IH2000/95 IH200095_bi – –
IF211595_bi – –
IF211595_bi_sub ✓ –
IF211599_bi – –
IF211599_bi_sub ✓ –
IF2115M64_bi – –
IF2115M64_bi_sub ✓ –
IF2115M95_bi – –
IF2115M95_bi_sub ✓ –
IF2115M99_bi – –
IF2115M99_bi_sub ✓ –
IF311564_bi – –
IF311564_bi_sub ✓ –
IF311595_bi – –
IF311595_bi_sub ✓ –
usage*
For a floor
monitor
* This setting is for full-range speakers. Subwoofer settings are not included.
Foreword
Introduction
to the SP2060
The Controls
and Connectors
The following table shows the settings for Yamaha Installation Series speaker IL series along
with IH series.
Target speakers Library name Meaning
IL1115 and IH2000/64 IL1115+IH64_pa Combination of IL1115 and IH2000/64 (passive mode)
IL1116 and IH2000/95 IL1115+IH95_pa Combination of IL1115 and IH2000/95 (passive mode)
Libraries for 3-way speaker processors
The following table shows the settings for Yamaha Installation Series speakers (full-range,
tri-amp mode).
Target speakers Library name Subwoofer
IF3115/64
IF3115/95
The following table shows the settings for Yamaha Installation Series speaker IL series along
with IH series.
IF311564_tri –
IF311564_tri_sub ✓
IF311595_tri –
IF311595_tri_sub ✓
usage
Network Settings Panel Operation
Target speakers Library name Meaning
IL1115 and IH2000/64 IL1115+IH64_bi Combination of IL1115 and IH2000/64 (bi-amp mode)
IL1115 and IH2000/95 IL1115+IH95_bi Combination of IL1115 and IH2000/95 (bi-amp mode)
SP2060 Owner’s Manual
References
43
Page 45

Foreword
Introduction
to the SP2060
The Controls
and Connectors
Network Settings ReferencesPanel Operation
References
Display Messages
Warning and error messages
Message Meaning Action
Duplicate IP Adr. Duplicate IP addresses. Change the IP addresses so that there are no duplicates.
Illegal MAC Adr. An illegal MAC address has been encountered.
Invalid IP Adr. The IP address is not set properly. Set an appropriate network IP address.
Network Error
No MAC Adr. MAC address not specified.
No Battery
Critical Battery
Low Battery The backup battery voltage is low.
Recovering
Scene Recall Err A scene recall attempt has failed.
Saving Failed A save operation has failed.
Param Access Err Current setting cannot be displayed. Save the current setting by using DME Designer, then
Param Set Err Current setting cannot be changed.
W.Clk Unlocked
DevGrp Sync Err
System Error A system error has occurred.
A cable is disconnected, the power to the
connected switching hub or router is turned off, or a
cable is not in proper condition.
The internal battery is completely discharged or not
installed.
The internal battery is almost discharged. Your data
may be lost.
A program update attempt has failed, and the
previous program is currently being restored.
A usable word clock signal is not being received or
cannot be detected.
The device group configuration set via DME
Designer does not match the real configuration.
This could be due to a hardware malfunction. Refer this
problem to a contact a Yamaha dealer.
Connect the cables properly, and make sure that the hub
and/or router are operating correctly.
This could be due to a hardware malfunction. Refer this
problem to a Yamaha dealer.
If you turn off the power to the unit, the current settings will
be lost and reset to the default values. Stop operating the
unit, and contact a Yamaha dealer for battery replacement.
If you turn off the power to the unit, the current settings may
be lost and reset to the default values. Stop operating the
unit, and contact a Yamaha dealer for battery replacement.
This does not affect the operation of the unit. However, if you
continue using the unit, the settings may be lost and reset to
the default values. Contact a Yamaha dealer for battery
replacement at your earliest convenience.
Do NOT turn power off while the unit is displaying this
message. If the update attempt repeatedly fails, there may
be a hardware malfunction. Refer this problem to a Yamaha
dealer.
Recall the scene again.
If the problem persists, contact a Yamaha dealer.
This could be due to a hardware malfunction. Refer this
problem to a Yamaha dealer.
initialize the unit. If the problem persists, contact a Yamaha
dealer.
Recheck all word clock connections and internal
parameters.
Use DME Designer to go off-line, create a configuration that
correctly matches the actual configuration, and then go
back on-line to synchronize the configuration.
Save the current setting by using DME Designer, then
initialize the unit. If the problem persists, contact a Yamaha
dealer.
44
* Do NOT turn off the power to the SP2060 while the unit displays the message “DO NOT TURN OFF!” at the bottom of the display.
SP2060 Owner’s Manual
Page 46

References
Status messages
Message Meaning
Connecting Connecting to the network.
Download Success The program has been successfully updated.
Downloading Program update in progress. Do NOT turn power off while the unit displays this message.
File Operating
Network Setup Preparing network connection.
Panel Locked The User Lock function is engaged. The panel controls do not work.
Panel Unlocked The User Lock function has been disengaged. Panel operation is now possible.
Scene Recalling Scene recall in progress.
Scene Storing Scene store in progress. Do NOT turn power off while the unit displays this message.
Cannot Recall Recalling scenes or libraries is disabled.
Cannot Store The scene store is disabled.
NO X-OVER Input channels do not feature the X-Over parameter.
NO LIMITER Input channels do not feature the Limiter parameter.
Protected You cannot edit or delete protected scenes.
Panel Protected If the User Lock function is turned on, you cannot change the parameters by using the panel controls.
NO ROUTING Input channel SUM does not feature the Routing parameter.
NO LEVEL Input channel SUM does not feature the Level parameter.
Network Busy There is too much network traffic. Communication is very slow.
Synchronizing Data is being received from the computer. Do NOT turn power off while the unit displays this message.
Scene Deleting Deleting a scene. Do NOT turn power off while the unit displays this message.
A file operation is in progress during which the computer manipulates scene data. Do NOT turn power off
while the unit displays this message.
Foreword
Introduction
to the SP2060
The Controls
and Connectors
* Do NOT turn off the power to the SP2060 while the unit displays the message “DO NOT TURN OFF!” at the bottom of the display.
Troubleshooting
Symptom Possible Causes Possible Solutions
The connection cable is not connected properly. Make sure that the cable is properly connected.
No communication between the
SP2060 and the DME Designer
application software.
No audio output.
The parameters cannot be edited. The User Lock function is turned on. Turn off the User Lock function (see page 33).
The computer's Ethernet port is not functioning
properly.
The DME-N Network driver has not been
installed.
The Mute function is turned on. Turn off the Mute function (see page 36).
The output level is set too low. Increase the output level (see page 23).
Refer to the DME Designer Installation Guide.
Install and set up the DME-N Network driver.
Network Settings Panel Operation
References
SP2060 Owner’s Manual
45
Page 47

Foreword
References
General Specifications
Introduction
to the SP2060
The Controls
and Connectors
Normal Rate: 44.1, 48 kHz (±0.1%)
Double Rate: 88.2, 96 kHz (±0.1%)
Less than 761 µ sec (INPUT to OUTPUT @Fs=96kHz)
Key indicators x 9
MUTE indicators (INPUT A/B, OUTPUT 1–6)
6-segment LED level meters (INPUT A/B, OUTPUT 1–6)
Operating: 5 to 40 ˚C
Storage: –20 to 60 ˚C
Sampling Frequency
Signal Delay
Indicators
Miscellaneous
External
Internal 96 kHz
Power Consumption 30 W
Dimensions (HxDxW) 44 x 361 x 480 mm
Net Weight 4.2 kg
Temperature Range
Included Accessories AC power cord, Rubber feet x 4, Owner’s manual
Electrical Characteristics
Output impedance of signal generator: 150 Ω
Frequency Response
Input Output RL Conditions MIN TYP MAX Units
INPUT A, B OUTPUT 1–6 600 Ω
Fs=96kHz@20Hz–40kHz, reference to
the nominal output level @1kHz
–1.0 0.0 +0.5 dB
Total Harmonic Distortion
Network Settings ReferencesPanel Operation
Hum & Noise
Dynamic Range
Input Output RL Conditions MIN TYP MAX Units
INPUT A, B OUTPUT 1–6 600 Ω
DIGITAL INPUT
AES/EBU
Input Output RL Conditions MIN TYP MAX Units
INPUT A, B OUTPUT 1–6 600 Ω Fs=96kHz, Rs=150 Ω –82 –79 dBu
DIGITAL INPUT
AES/EBU
Input Output RL Conditions MIN TYP MAX Units
INPUT A, B OUTPUT 1–6 600 Ω Fs=96kHz 106 dB
DIGITAL INPUT
AES/EBU
OUTPUT 1–6 600 Ω Fs=48kHz@1kHz, Input level: –1dBFS 0.015 %
* Total Harmonic Distortion is measured with a 18dB/octave filter @80kHz.
OUTPUT 1–6 600 Ω Fs=48kHz, Input level: –∞dBFS –86 dBu
*Hum & Noise are measured with a 6dB/octave filter @12.7kHz; equivalent to a 20kHz filter with infinite dB/octave
attenuation.
OUTPUT 1–6 600 Ω Fs=48kHz 110 dB
*Dynamic range is measured with a 6dB/octave filter @12.7kHz; equivalent to a 20kHz filter with infinite dB/octave
attenuation.
Fs=96kHz, +4dBu@20Hz–40kHz 0.05 %
Fs=96kHz, +22dBu@1kHz 0.007 %
46
SP2060 Owner’s Manual
Page 48

References
Crosstalk@1KHz Fs=96kHz
Input Output Conditions MIN TYP MAX Units
INPUT A OUTPUT 2, 4, 6
INPUT B OUTPUT 1, 3, 5
*Crosstalk is measured with a 18dB/octave filter @80kHz.
INPUT A assigned to OUTPUT 1, 3 or 5
INPUT B assigned to OUTPUT 2, 4 or 6
INPUT A assigned to OUTPUT 1, 3 or 5
INPUT B assigned to OUTPUT 2, 4 or 6
LED Level Meters
Metering points Conditions MIN TYP MAX Units
OVER red LED: On 0 dBFS
–6 amber LED: On –6 dBFS
INPUT A, B
OUTPUT 1–6
*The LED turns on when the internal limiter is activated.
–12 amber LED: On –12 dBFS
–18 amber LED: On –18 dBFS
–30 green LED: On –30 dBFS
–48 green LED: On –48 dBFS
OVER red LED: On 0 dBFS
LIMIT amber LED: On LIMIT*
–6 green LED: On –6 dBFS
–12 green LED: On –12 dBFS
–18 green LED: On –18 dBFS
–40 green LED: On –40 dBFS
–80 dB
–80 dB
Foreword
Introduction
to the SP2060
The Controls
and Connectors
Input/Output Characteristics
Analog Input Characteristics
Input Terminals Actual Load
INPUT A, B 10 k Ω 600 Ω Lines +4 dBu (1.23 V) +24 dBu (12.28 V) XLR-3-31 type (balanced) *1
*1. XLR-3-31 type connectors with latches are balanced. (1=GND, 2=HOT, 3=COLD)
*2. In these specifications, 0 dBu is referenced to 0.775 Vrms.
*3. All AD converters are 24-bit linear, 64-times oversampling. (Fs=96kHz)
Impedance
Analog Output Characteristics
Output
Terminals
OUTPUT 1–6 75 Ω 600 Ω Lines +4 dBu (1.23 V) +24 dBu (12.28 V) XLR-3-32 type (balanced) *1
*1. XLR-3-32 type connectors are balanced. (1=GND, 2=HOT, 3=COLD)
*2. In these specifications, 0 dBu is referenced to 0.775 Vrms.
*3. All DA converters are 24-bit linear, 128-times oversampling (Fs=48kHz) or 64-times oversampling (Fs=96kHz).
Actual Load
Impedance
Digital Input Characteristics
Terminal Format Data length Level Connector
DIGITAL INPUT AES/EBU AES/EBU 24 bit RS422 XLR-3-31 type (balanced) *1 *2
*1. XLR-3-31 type connector with latch is balanced. (1=GND, 2=HOT, 3=COLD)
*2. Only Double Speed Format is supported at 96 kHz. Double Channel or Single Format is not supported.
For Use With
Nominal
For Use With
Nominal
Input level Connector
Nominal Max. before clip
Input level Connector
Nominal Max. before clip
Network Settings Panel Operation
References
SP2060 Owner’s Manual
47
Page 49

Foreword
Introduction
to the SP2060
The Controls
and Connectors
References
Control I/O Characteristics
Terminal Format Level Connector
Network IEEE 802.3 10Base-T/100Base-TX RJ-45
Connector Pin Assignment
[NETWORK] Connector (100Base-TX Ethernet, RJ-45)
Pin Connection
1 TxD+
2 TxD-
3 RxD+
4 Unused
5 Unused
6 RxD-
7 Unused
8 Unused
Network Settings ReferencesPanel Operation
48
SP2060 Owner’s Manual
Page 50

References
Dimensions
361
(4)
354
Foreword
Introduction
to the SP2060
The Controls
and Connectors
440
480
3
44
are included in
Unit: mm
1
Rubber feet
the package.
* Specifications and descriptions in this owner's manual are for information purpose only. Yamaha Corp. reserves the right to
charge or modify products or specifications at any time without prior notice. Since specifications, equipment or options may
not be the same in every locale, please check with your Yamaha dealer.
European models
Purchaser/User Information specified in EN55103-1 and EN55103-2.
Inrush Current: 35A
Conforms to Environments: E1,E2,E3 and E4.
Network Settings Panel Operation
SP2060 Owner’s Manual
References
49
Page 51

Foreword
References
Index
Introduction
to the SP2060
The Controls
and Connectors
Network Settings ReferencesPanel Operation
[▲INC/YES]/[▼DEC/NO] Keys ........................................... 21
100Base-TX
10Base-T
2 x (2-way + Sub)
2 x (2-way + Sub) Link
2 x 2-way + 2 x Aux
2 x 2-way + 2 x Aux Link
2 x 3-way
2 x 3-way Link
3 x 2-way
3 x 2-way Link
4 way +2 x Aux
5-way + Aux
6-way
............................................................................ 38
................................................................................. 38
.................................................................... 10
............................................................ 10
................................................................. 11
........................................................ 11
................................................................................. 12
........................................................................ 12
................................................................................... 9
.......................................................................... 9
........................................................................ 13
............................................................................ 14
...................................................................................... 15
A
About a scene .......................................................................... 29
[AC IN] Connector
AdjustGc (Adjustable Gc)
................................................................. 22
....................................................... 28
B
[BACK/STORE] Key .............................................................. 21
Battery page
Bessel
Butrwrth (Butterworth)
............................................................................ 35
...................................................................................... 28
........................................................... 28
C
Changing a scene title ............................................................. 31
Changing the parameter values
Checking the backup battery
Components
Configuration
Connector Pin Assignment
[CURRENT BACKUP]
............................................................................. 8
.......................................................................8, 9
2 x (2-way + Sub)
2 x (2-way + Sub) Link
2 x 2-way + 2 x Aux
2 x 2-way + 2 x Aux Link
2 x 3-way
2 x 3-way Link
3 x 2-way
3 x 2-way Link
4 way +2 x Aux
5-way + Aux
6-way
Multi Zone
......................................................................... 12
................................................................ 12
........................................................................... 9
.................................................................. 9
................................................................ 13
.................................................................... 14
.............................................................................. 15
..................................................................... 16
................................................ 23
................................................... 35
............................................................ 10
.................................................... 10
......................................................... 11
................................................ 11
...................................................... 48
......................................................... 35
D
DELAY ................................................................................... 24
[DELAY] Key
Deleting a scene
.......................................................................... 21
...................................................................... 32
Device Group page
[DIGITAL INPUT] Connector (AES/EBU)
Dimensions
Display
....................................................................................21
Displaying the current library
Displaying the firmware version
Displaying the label
Displaying word clock
DME Designer
..................................................................37
...........................22
..............................................................................49
..................................................28
...............................................35
..................................................................34
..............................................................34
..........................................................................7
E
Electrical Characteristics ..........................................................46
EQ (Equalizer)
[EQ] Key
.........................................................................24
.................................................................................21
F
[FACTORY SETUP] ..............................................................35
.....................................................................................8
Features
Firmware Version
Front Panel
......................................................................7
..............................................................................21
G
General Specifications ..............................................................46
Ground Screw
..........................................................................22
H
H.SHELF(High Shelving) .......................................................24
HPF
.........................................................................................24
I
Initializing the SP2060 ............................................................35
INPUT A/B LINK
INPUT A/B LINK page
Input channel A
Input channel B
Input channel SUM
[INPUT] Connectors
Input EQ
Input routing
Input/Output Characteristics
IP address
IP Address page
.................................................................................24
.................................................................................37
..................................................................32
..........................................................32
.......................................................................26
.......................................................................26
.................................................................26
...............................................................22
...........................................................................26
...................................................47
........................................................................37
L
L.SHELF(Low Shelving) ..........................................................24
Label page
Last Memory Resume page
LEVEL
[LEVEL] Key
................................................................................34
......................................................33
....................................................................................23
...........................................................................21
50
SP2060 Owner’s Manual
Page 52

References
LIBRARY ............................................................................... 28
Library
...................................................................................... 8
LIMITER
Limiter
[LIMITER] Key
Link Mode page
Linkwitz (Linkwitz-Riley)
LPF
............................................................................... 29
.................................................................................... 40
...................................................................... 21
...................................................................... 38
....................................................... 28
......................................................................................... 24
M
MAC Address page ................................................................. 39
..................................................................................... 37
Master
Master ID page
Meters
..................................................................................... 21
Multi Zone
Multiple SP2060
....................................................................................... 36
Mute
[MUTE] Key
....................................................................... 38
............................................................................. 16
..................................................................... 19
.......................................................................... 21
N
[NETWORK] Connector ....................................................... 22
Network Settings
[NEXT/RECALL] Key
.................................................................... 37
........................................................... 21
O
octet ........................................................................................ 37
[OUTPUT] Connectors
Output EQ
Output routing
............................................................................. 25
....................................................................... 26
......................................................... 22
scene number
scene property
[SEL] Keys
Setting a Device Group
Setting Link Mode
Setting the Crossover
Setting the IP Address
Setting the Last Memory Resume
Setting the Master ID
........................................................................................37
Slave
Speaker
Speaker processing
Status messages
Storing a scene
Subwoofer
System Examples
...........................................................................30
..........................................................................30
...............................................................................21
............................................................37
...................................................................38
...............................................................27
..............................................................37
............................................33
..............................................................38
.................................................................................... 17
...................................................................17
........................................................................45
.........................................................................31
................................................................................40
.....................................................................17
T
Thru ........................................................................................28
Troubleshooting
Turning the power on and off
......................................................................45
....................................................7
U
User area ..................................................................................30
User Lock
User Lock page
user scene (readable and writable scene)
UTILITY
[UTILITY] Key
................................................................................33
........................................................................33
.....................................9
.................................................................................32
.......................................................................21
Foreword
Introduction
to the SP2060
The Controls
and Connectors
P
Parameters ................................................................................ 8
........................................................................................ 24
PEQ
[POWER ON/OFF] Key
Preset area
Preset Libraries
preset parameters
preset scene (read-only scene)
Protecting a scene
............................................................................... 30
........................................................................ 40
........................................................ 21
....................................................................... 8
.................................................... 9
.................................................................... 31
R
Rear Panel ............................................................................... 22
Recalling a library
Recalling a scene
ROUTING
[ROUTING] Key
................................................................... 28
..................................................................... 30
............................................................................. 26
................................................................... 21
S
SCENE ................................................................................... 29
......................................................................................... 8
Scene
[SCENE] Key
......................................................................... 21
V
Version page ............................................................................35
Viewing the MAC Address
......................................................39
W
W. Clock page .........................................................................34
Warning and error messages
[WITHOUT LIB.]
....................................................44
..................................................................35
X
X-OVER (Crossover) ...............................................................27
[X-OVER] Key
........................................................................21
Z
Zone processing .......................................................................18
Network Settings Panel Operation
References
SP2060 Owner’s Manual
51
Page 53

Foreword
Introduction
to the SP2060
The Controls
and Connectors
MEMO
Network Settings ReferencesPanel Operation
52
SP2060 Owner’s Manual
Page 54

MEMO
Foreword
Introduction
to the SP2060
The Controls
and Connectors
SP2060 Owner’s Manual
Network Settings Panel Operation
References
53
Page 55

Foreword
Introduction
to the SP2060
The Controls
and Connectors
MEMO
Network Settings ReferencesPanel Operation
54
SP2060 Owner’s Manual
Page 56

For details of products, please contact your nearest Yamaha
representative or the authorized distributor listed below.
Pour plus de détails sur les produits, veuillez-vous adresser à Yamaha ou
au distributeur le plus proche de vous figurant dans la liste suivante.
Die Einzelheiten zu Produkten sind bei Ihrer unten aufgeführten
Niederlassung und bei Yamaha Vertragshändlern in den jeweiligen
Bestimmungsländern erhältlich.
Para detalles sobre productos, contacte su tienda Yamaha más cercana
o el distribuidor autorizado que se lista debajo.
NORTH AMERICA
CANADA
Yamaha Canada Music Ltd.
135 Milner Avenue, Scarborough, Ontario,
M1S 3R1, Canada
Tel: 416-298-1311
U.S.A.
Yamaha Corporation of America
6600 Orangethorpe Ave., Buena Park, Calif. 90620,
U.S.A.
Tel: 714-522-9011
CENTRAL & SOUTH AMERICA
MEXICO
Yamaha de México S.A. de C.V.
Calz. Javier Rojo Gómez #1149,
Col. Guadalupe del Moral
C.P. 09300, México, D.F., México
Tel: 55-5804-0600
BRAZIL
Yamaha Musical do Brasil Ltda.
Av. Reboucas 2636-Pinheiros CEP: 05402-400
Sao Paulo-SP. Brasil
Tel: 011-3085-1377
ARGENTINA
Yamaha Music Latin America, S.A.
Sucursal de Argentina
Viamonte 1145 Piso2-B 1053,
Buenos Aires, Argentina
Tel: 1-4371-7021
PAN AMA AND OTHER LATIN
AMERICAN COUNTRIES/
CARIBBEAN COUNTRIES
Yamaha Music Latin America, S.A.
Torre Banco General, Piso 7, Urbanización Marbella,
Calle 47 y Aquilino de la Guardia,
Ciudad de Panamá, Panamá
Tel: +507-269-5311
EUROPE
THE UNITED KINGDOM
Yamaha-Kemble Music (U.K.) Ltd.
Sherbourne Drive, Tilbrook, Milton Keynes,
MK7 8BL, England
Tel: 01908-366700
GERMANY
Yamaha Music Central Europe GmbH
Siemensstraße 22-34, 25462 Rellingen, Germany
Tel: 04101-3030
SWITZERLAND/LIECHTENSTEIN
Yamaha Music Central Europe GmbH,
Branch Switzerland
Seefeldstrasse 94, 8008 Zürich, Switzerland
Tel: 01-383 3990
AUSTRIA
Yamaha Music Central Europe GmbH,
Branch Austria
Schleiergasse 20, A-1100 Wien, Austria
Tel: 01-60203900
CZECH REPUBLIC/SLOVAKIA/
HUNGARY/SLOVENIA
Yamaha Music Central Europe GmbH,
Branch Austria, CEE Department
Schleiergasse 20, A-1100 Wien, Austria
Tel: 01-602039025
POLAND
Yamaha Music Central Europe GmbH
Sp.z. o.o. Oddzial w Polsce
ul. 17 Stycznia 56, PL-02-146 Warszawa, Poland
Tel: 022-868-07-57
THE NETHERLANDS/
BELGIUM/LUXEMBOURG
Yamaha Music Central Europe GmbH,
Branch Benelux
Clarissenhof 5-b, 4133 AB Vianen, The Netherlands
Tel: 0347-358 040
FRANCE
Yamaha Musique France
BP 70-77312 Marne-la-Vallée Cedex 2, France
Tel: 01-64-61-4000
ITALY
Yamaha Musica Italia S.P.A.
Combo Division
Viale Italia 88, 20020 Lainate (Milano), Italy
Tel: 02-935-771
SPAIN/PORTUGAL
Yamaha-Hazen Música, S.A.
Ctra. de la Coruna km. 17, 200, 28230
Las Rozas (Madrid), Spain
Tel: 91-639-8888
SWEDEN
Yamaha Scandinavia AB
J. A. Wettergrens Gata 1
Box 30053
S-400 43 Göteborg, Sweden
Tel: 031 89 34 00
DENMARK
YS Copenhagen Liaison Office
Generatorvej 6A
DK-2730 Herlev, Denmark
Tel: 44 92 49 00
NORWAY
Norsk filial av Yamaha Scandinavia AB
Grini Næringspark 1
N-1345 Østerås, Norway
Tel: 67 16 77 70
OTHER EUROPEAN COUNTRIES
Yamaha Music Central Europe GmbH
Siemensstraße 22-34, 25462 Rellingen, Germany
Tel: +49-4101-3030
AFRICA
Yamaha Corporation,
Asia-Pacific Music Marketing Group
Nakazawa-cho 10-1, Hamamatsu, Japan 430-8650
Tel: +81-53-460-2313
MIDDLE EAST
TURKEY/CYPRUS
Yamaha Music Central Europe GmbH
Siemensstraße 22-34, 25462 Rellingen, Germany
Tel: 04101-3030
OTHER COUNTRIES
Yamaha Music Gulf FZE
LB21-128 Jebel Ali Freezone
P.O.Box 17328, Dubai, U.A.E.
Tel: +971-4-881-5868
ASIA
THE PEOPLE’S REPUBLIC OF CHINA
Yamaha Music & Electronics (China) Co.,Ltd.
25/F., United Plaza, 1468 Nanjing Road (West),
Jingan, Shanghai, China
Tel: 021-6247-2211
INDONESIA
PT. Yamaha Music Indonesia (Distributor)
PT. Nusantik
Gedung Yamaha Music Center, Jalan Jend. Gatot
Subroto Kav. 4, Jakarta 12930, Indonesia
Tel: 21-520-2577
KOREA
Yamaha Music Korea Ltd.
Tong-Yang Securities Bldg. 16F 23-8 Yoido-dong,
Youngdungpo-ku, Seoul, Korea
Tel: 02-3770-0660
MALAYSIA
Yamaha Music Malaysia, Sdn., Bhd.
Lot 8, Jalan Perbandaran, 47301 Kelana Jaya,
Petaling Jaya, Selangor, Malaysia
Tel: 3-78030900
SINGAPORE
Yamaha Music Asia Pte., Ltd.
#03-11 A-Z Building
140 Paya Lebor Road, Singapore 409015
Tel: 747-4374
TAIWAN
Yamaha KHS Music Co., Ltd.
3F, #6, Sec.2, Nan Jing E. Rd. Taipei.
Taiwan 104, R.O.C.
Tel: 02-2511-8688
THAILAND
Siam Music Yamaha Co., Ltd.
891/1 Siam Motors Building, 15-16 floor
Rama 1 road, Wangmai, Pathumwan
Bangkok 10330, Thailand
Tel: 02-215-2626
OTHER ASIAN COUNTRIES
Yamaha Corporation,
Asia-Pacific Music Marketing Group
Nakazawa-cho 10-1, Hamamatsu, Japan 430-8650
Tel: +81-53-460-2317
OCEANIA
AUSTRALIA
Yamaha Music Australia Pty. Ltd.
Level 1, 99 Queensbridge Street, Southbank,
Victoria 3006, Australia
Tel: 3-9693-5111
COUNTRIES AND TRUST
TERRITORIES IN PACIFIC OCEAN
Yamaha Corporation,
Asia-Pacific Music Marketing Group
Nakazawa-cho 10-1, Hamamatsu, Japan 430-8650
Tel: +81-53-460-2313
PA13
HEAD OFFICE Yamaha Corporation, Pro Audio & Digital Musical Instrument Division
Nakazawa-cho 10-1, Hamamatsu, Japan 430-8650
Tel: +81-53-460-2441
Page 57

Yamaha Pro Audio global web site:
http://www.yamahaproaudio.com/
Yamaha Manual Library
http://www.yamaha.co.jp/manual/
This document is printed on chlorine free (ECF) paper with soy ink.
U.R.G., Pro Audio & Digital Musical Instrument Division, Yamaha Corporation
© 2006 Yamaha Corporation
WG50780 605IPDHx.x-02B0
Printed in Japan
 Loading...