

Page 1

Receiver
User Guide
EN
Page 2

TABLE OF CONTENTS
TABLE OF CONTENTS
BEFORE USE 7
Please read first........................................................................................7
About this product and manual.. ..............................................................................................................................................7
Terminology and technical explanations.. ...............................................................................................................................8
Input sources playable with this product......................................................9
Compatible input sources.. .......................................................................................................................................................9
Compatibility with MusicCast.................................................................................................................................................. 11
Accessories.............................................................................................12
Checking the accessories.. ...................................................................................................................................................... 12
NAMES OF PARTS AND THEIR FUNCTIONS 14
Unit.......................................................................................................14
Front panel.. .............................................................................................................................................................................14
Front display.. .......................................................................................................................................................................... 17
Rear panel.. .............................................................................................................................................................................. 20
Remote control.......................................................................................22
Remote control.. ......................................................................................................................................................................22
PREPARATION 25
Preparing the remote control....................................................................25
How to insert batteries, and its operating range.. ................................................................................................................. 25
Connecting external devices.....................................................................26
Connecting audio devices.. .....................................................................................................................................................26
Connecting via HDMI to an ARC-compatible TV.. ...................................................................................................................27
Connecting to your computer (USB DAC function).. ..............................................................................................................28
Connecting speakers................................................................................30
Connecting speakers.. ............................................................................................................................................................. 30
Making bi-wiring connections.. ...............................................................................................................................................33
Connecting a subwoofer.......................................................................................................................................................... 34
Trigger connection................................................................................................................................................................... 35
Connecting radio antennas.......................................................................36
Connecting an FM antenna...................................................................................................................................................... 36
Connecting an AM antenna.. ................................................................................................................................................... 37
Connecting a DAB/FM antenna.. ............................................................................................................................................. 38
2
Page 3

TABLE OF CONTENTS
Preparing a network connection................................................................39
To make a network connection............................................................................................................................................... 39
Connecting a network cable (wired connection).. .................................................................................................................40
Preparing the wireless antenna (wireless connection).......................................................................................................... 41
Turning the product ON............................................................................42
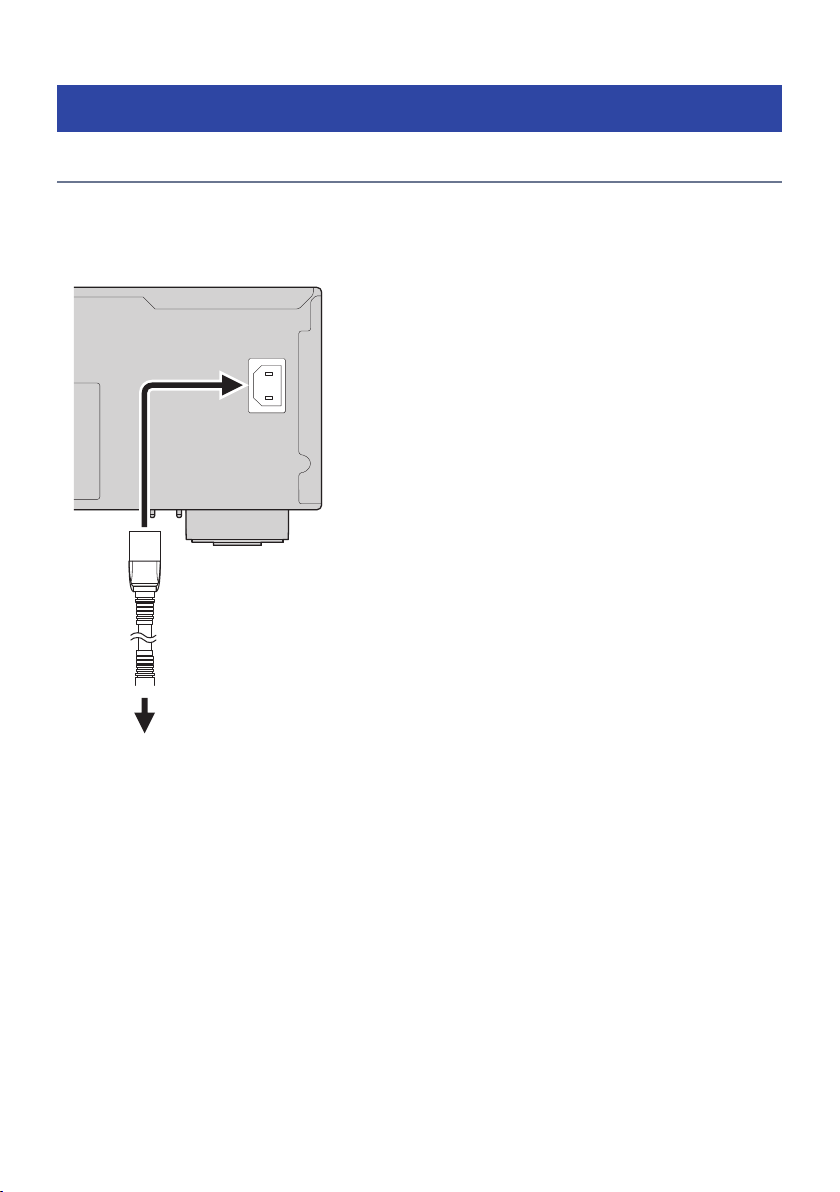
Connecting the power cord..................................................................................................................................................... 42
Turning the power ON.. ........................................................................................................................................................... 43
Configuring MusicCast settings (connecting to a network).. .......................... 45
Registering with the MusicCast network.. .............................................................................................................................. 45
Automatic adjustment of speaker settings (YPAO).. .....................................46
Running YPAO.. ........................................................................................................................................................................ 46
Error and warning messages.. .................................................................................................................................................50
Using the app to check YPAO measurements and change settings.. ....................................................................................52
PLAYBACK 54
Basic operations......................................................................................54
Selecting the output speakers.. .............................................................................................................................................. 54
Selecting an input source.. ......................................................................................................................................................55
Adjusting the volume............................................................................................................................................................... 56
Switching the front display.. ................................................................................................................................................... 57
Adjusting the sound to your preference......................................................58
Enjoying Pure Direct playback (PURE DIRECT)....................................................................................................................... 58
Adjusting bass and treble (BASS/TREBLE).............................................................................................................................. 59
Adjusting left/right volume balance (BALANCE).. .................................................................................................................. 60
Making it easier to hear bass and treble at low volumes (LOUDNESS).. ...............................................................................61
Listening to TV audio.. .............................................................................62
Making settings for listening to TV audio................................................................................................................................ 62
Listening to the audio of an HDMI-connected TV (ARC)......................................................................................................... 63
Listening to the radio...............................................................................64
Preparing to listen to the radio.. .............................................................................................................................................64
Selecting a radio station.......................................................................................................................................................... 67
Displaying the Radio Data System information.. ................................................................................................................... 68
Displaying the DAB information..............................................................................................................................................69
Auto-registering FM radio stations (auto preset).. .................................................................................................................70
Registering radio stations manually.. .....................................................................................................................................71
Removing the registration of a radio station.......................................................................................................................... 72
Playing via a Bluetooth® connection...........................................................73
Playing the audio of a Bluetooth device on this product (audio reception)......................................................................... 73
Playing this product’s audio through Bluetooth speakers/headphones (audio transmission).. ........................................74
3
Page 4

TABLE OF CONTENTS
Listening to music via AirPlay.. .................................................................76
Playing music via AirPlay.........................................................................................................................................................76
Listening to internet radio........................................................................77
Selecting an internet radio station.. .......................................................................................................................................77
Listening to streaming services.................................................................78
Listening to streaming services............................................................................................................................................... 78
Playing songs on media servers (PC/NAS)....................................................79
Playing songs on media servers (PC/NAS)..............................................................................................................................79
Playing audio from your computer (USB DAC)..............................................81
Playing music that is on your computer.. ...............................................................................................................................81
Option menu (settings for each input source)..............................................82
Basic operation of the Option menu....................................................................................................................................... 82
List of Option menu.. ...............................................................................................................................................................83
Correcting volume difference between input sources........................................................................................................... 84
Displaying audio signal information.. .....................................................................................................................................85
Setting the reception mode (stereo/mono) for FM radio.. .................................................................................................... 86
Performing an initial scan for DAB radio reception................................................................................................................ 87
Checking reception strength of each DAB channel label....................................................................................................... 88
Setting volume interlock with this product when playing an AirPlay/Bluetooth device.. ...................................................89
Setting auto playback.............................................................................................................................................................. 90
Improving intermittently disrupted sound from digital audio inputs.. ................................................................................ 91
USEFUL FUNCTIONS 92
Preset functions......................................................................................92
Registering your favorite content to presets.......................................................................................................................... 92
Recalling content registered to a preset................................................................................................................................. 94
Sleep timer function................................................................................96
Configuring the time for the sleep timer.. .............................................................................................................................. 96
SETTINGS 97
Menus....................................................................................................97
Menu structure.........................................................................................................................................................................97
4
Page 5

TABLE OF CONTENTS
Setup menu (changing function settings)....................................................98
Basic operation of the Setup menu.. ...................................................................................................................................... 98
List of Setup menu items......................................................................................................................................................... 99
Configuring a network.. .........................................................................................................................................................100
Configuring Bluetooth.. .........................................................................................................................................................105
Configuring YPAO...................................................................................................................................................................106
Configuring your TV.. .............................................................................................................................................................107
Configuring the volume.. .......................................................................................................................................................108
Configuring auto power standby.. ........................................................................................................................................ 109
Setting the product to ECO mode.. .......................................................................................................................................110
Configuring the front display.. .............................................................................................................................................. 111
Advanced Setup menu (changing system settings).. ...................................112
Basic operation of the Advanced Setup menu.. ...................................................................................................................112
List of Advanced Setup menu items......................................................................................................................................113
Configuring the menu language............................................................................................................................................ 114
Configuring the Remote ID.. ..................................................................................................................................................115
Changing the FM/AM tuning frequency setting.. ..................................................................................................................116
Initializing settings................................................................................................................................................................. 117
Switching speaker impedance.. ............................................................................................................................................118
Correcting the knobs.. ........................................................................................................................................................... 119
UPDATING 120
Checking the version of firmware.. ..........................................................120
Checking the version of firmware.. .......................................................................................................................................120
Updating the firmware...........................................................................121
Updating the firmware.. ........................................................................................................................................................ 121
Updating the firmware via your network.. ........................................................................................................................... 122
5
Page 6

TABLE OF CONTENTS
TROUBLESHOOTING 123
If you think there is a problem................................................................. 123
If you think there is a problem, the 1st step is checking the following.. .............................................................................123
Problems with power, system, and/or remote control........................................................................................................ 124
Problems with the audio.. ..................................................................................................................................................... 126
Problems with TV (HDMI) connections.. ...............................................................................................................................128
Problems with FM radio......................................................................................................................................................... 129
Problems with AM radio......................................................................................................................................................... 130
Problems with DAB radio....................................................................................................................................................... 131
Problems with USB DAC.. ...................................................................................................................................................... 132
Problems with network.. .......................................................................................................................................................134
Problems with Bluetooth.. .................................................................................................................................................... 137
Errors shown on the front display......................................................................................................................................... 138
APPENDIX 139
Product care......................................................................................... 139
Taking care of this product.................................................................................................................................................... 139
Making wireless network connections...................................................... 140
Selecting the wireless method of connecting to the network............................................................................................. 140
Using the WPS button to make a wireless connection.. ...................................................................................................... 141
Making a wireless connection with your iPhone (WAC).. .....................................................................................................142
Making a wireless connection manually............................................................................................................................... 143
Supported devices and formats............................................................... 144
Supported Bluetooth devices.. ............................................................................................................................................. 144
Supported file formats on this product (network)...............................................................................................................145
Playable formats using USB DAC.. ........................................................................................................................................ 146
Trademarks.......................................................................................... 147
Trademarks.. ..........................................................................................................................................................................147
Specifications.. ..................................................................................... 149
Specifications......................................................................................................................................................................... 149
Default values.......................................................................................155
List of default values of the Option menu.. .......................................................................................................................... 155
List of default values of the Setup menu.. ............................................................................................................................156
List of default values of the Advanced Setup menu............................................................................................................. 157
6
Page 7

BEFORE USE > Please read first
BEFORE USE
Please read first
About this product and manual
Thank you very much for purchasing this Yamaha product. This product is a network-compatible Receiver (2channel stereo amplifier) which lets you play music content from the radio or a network in your home as well
as analog and digital audio inputs. With the YPAO function which optimizes the sound field automatically,
you can enjoy the sound that best matches your room.
This manual (guide) is organized as follows. Please be sure to read each of the guides that came with the
product and keep them handy for easy reference.
Safety Guide (Included with the Product)
Lists important safety precautions that should be read prior to use.
Quick Guide (Included with the Product)
This guide explains things from basic connections up through playing Internet radio.
User Guide (This Guide)
This provides explanations of all functions, such as information that is not addressed in the Quick Guide.
(
In the User Guide, iPhone and iPad are referred to collectively as “iPhone”. Unless indicated within an
explanation, references to “iPhone” mean iPhone and iPad.
(
Symbols used in the User Guide
(
(
NOTICE is used with information for preventing product failure, damage or malfunction, and/or loss of
CAUTION is used with information about potential injuries.
data.
(
NOTE is used with supplementary information that is helpful to know.
(
[Search tag] are keywords for searching.
You can download the latest manuals from the following website.
https://download.yamaha.com/
7
Page 8

BEFORE USE > Please read first
Terminology and technical explanations
Following are explanations of terminology used in this guide.
ARC
This is an abbreviation of Audio Return Channel. The audio from a TV can be played on an audio/video device
simply by connecting an HDMI cable between an ARC compatible HDMI IN port on the TV and an ARC
compatible HDMI OUT port on the audio/video device.
HDMI
This is a digital interface that conforms to the HDMI standard (High-Definition Multimedia Interface
Specification), which is a global industry standard. It allows digital audio/video signals to be transmitted
over a single cable, without degradation. It is also compatible with copyright protection technologies (HDCP:
High-bandwidth Digital Content Protection system). For further details, please visit https://www.hdmi.org.
USB DAC
The USB DAC converts digital audio signals, sent via a USB cable connected to a computer, into an analog
audio signal, which allows it to be played. This makes it possible for computer applications to play highquality audio.
YPAO (Yamaha Parametric room Acoustic Optimizer)
This is a proprietary Yamaha technology that automatically optimizes for room acoustics. A special YPAO
microphone is used to detect speaker connections and measure the distance from them to the listening
position. It measures the acoustic characteristics of the space and automatically adjusts parameters such as
volume balance and frequency characteristics.
Bi-wiring Connections
When connecting an amplifier to speakers, this connection method uses separate wires for the lowfrequency speaker unit (woofer) and the mid-high frequency speaker unit (tweeter). This method of
connection is possible if the speakers are bi-wiring compatible (if they have terminals for both lowfrequencies and mid/high frequencies).
Loudness
This function makes it easier to hear bass and treble even at low volumes. It allows the listener to enjoy
natural sound even at low volumes by compensating for the human auditory characteristic that makes it
difficult to hear bass and treble at low volumes.
Please refer to the following website for other terms and technical explanations. It explains terms and
technologies related to Yamaha AV products in general, not just for this product.
https://manual.yamaha.com/av/cm/glossary/
8
Page 9
PHONES
YPAO MIC
SPEAKERS
INPUT BASS TREBLE BALANCE LOUDNESS
VOLUME
FLAT
-30dB
PURE DIRECT
PRESET
RETURN
CONNECT
PUSH - ENTER
SELECT
L R
Built-in Radio
Input: AirPlay/Bluetooth/Various Streaming Services
Audio from Smartphone/Tablet
Computer
USB
CD Player, etc. Turntable
Computer
NAS
Streaming Service/Internet Radio
Audio from Audio System Audio from Networked Device (Content)
Wi-Fi/LAN
Input: Net Radio/Server/MC LINK/
Various Streaming Services
MusicCast Compatible Devices
Wi-Fi/Bluetooth
Smartphone/Tablet
Audio from Radio
Input: Tuner
Input: USB DAC
Audio from Computer
HDMI
(ARC)
ARC Compatible TV
Audio from TV
Input: TV
Input: CD/PHONO/LINE/OPTICAL/COAXIAL
Media Server
Wireless LAN Router
BEFORE USE > Input sources playable with this product
Input sources playable with this product
Compatible input sources
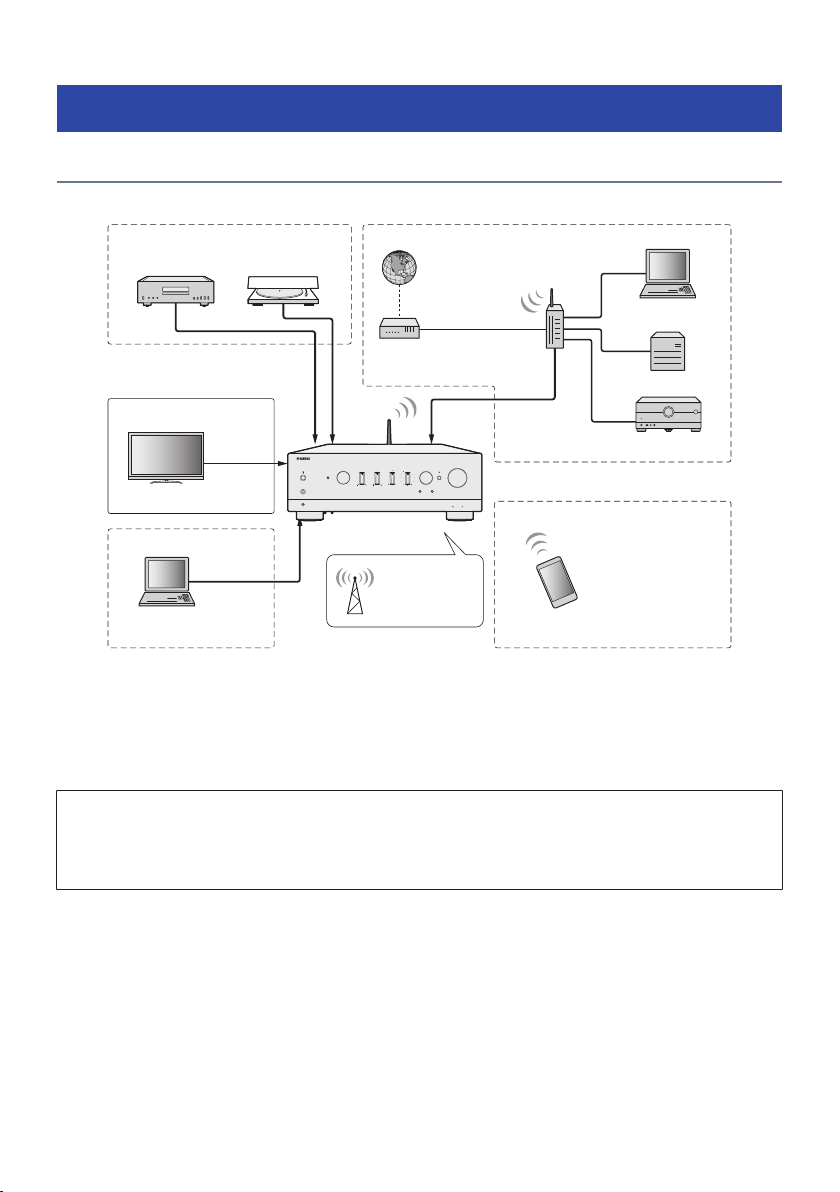
As illustrated below, this product supports playing a variety of input sources.
NOTE
This product cannot be connected to devices like BD/DVD players via HDMI. To play audio from these devices, connect them with one
of the following methods: optical digital (PCM), coaxial digital (PCM), or analog stereo.
Related links (for connection)
(
“Connecting external devices”(p.26)
(
“Connecting radio antennas”(p.36)
(
“To make a network connection”(p.39)
9
Page 10

BEFORE USE > Input sources playable with this product
Related links (for playback)
(
“Selecting an input source”(p.55)
(
“Listening to TV audio”(p.62)
(
“Listening to the radio”(p.64)
(
“Playing via a Bluetooth® connection”(p.73)
(
“Listening to music via AirPlay”(p.76)
(
“Listening to internet radio”(p.77)
(
“Listening to streaming services”(p.78)
(
“Playing songs on media servers (PC/NAS)”(p.79)
(
“Playing audio from your computer (USB DAC)”(p.81)
10
Page 11

BEFORE USE > Input sources playable with this product
Compatibility with MusicCast
This product is compatible with MusicCast. This makes it possible to share music with MusicCast-compatible
devices located in multiple rooms. Its dedicated app, “MusicCast Controller”, is easy to use and allows users
to enjoy music from smartphones, media servers (PC/NAS), Internet radio and streaming services from
anywhere in the home.
For details on MusicCast and compatible devices, please visit the Yamaha website. For more information
about the app, search “MusicCast Controller” in the App Store or Google Play.
11
Page 12
BEFORE USE > Accessories
Accessories
Checking the accessories
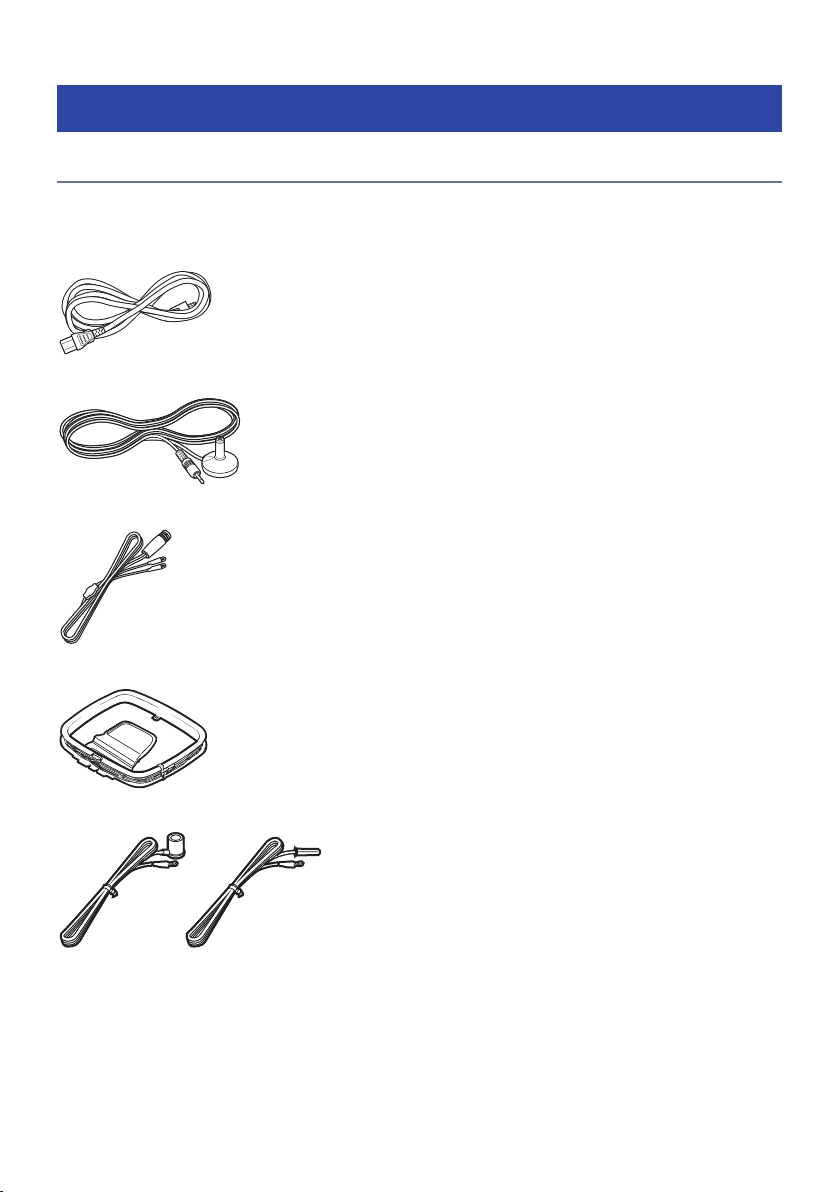
This product comes with the following accessories. Check and make sure that you have all of the included
accessories.
£ Power cord
£ YPAO microphone
£ DAB/FM antenna (Models for U.K., Europe, Russia and Australia)
£ AM antenna (Models for U.S.A., Canada, China, Korea, Asia, and Taiwan)
£ FM antenna (Models for U.S.A., Canada, China, Korea, Asia, and Taiwan)
* One of the above is supplied depending on the region of purchase.
12
Page 13
BEFORE USE > Accessories
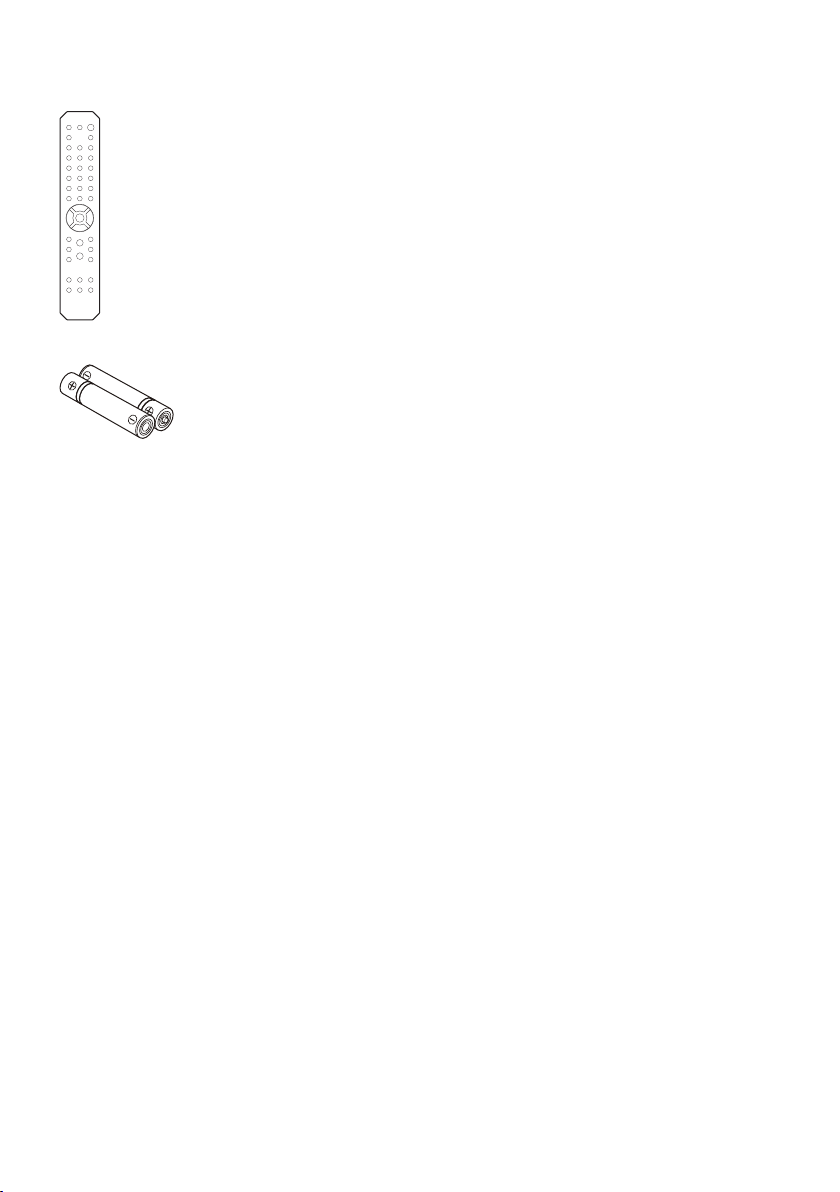
£ Remote control
£ Batteries (AA, R6, UM-3) (×2)
£ Safety Guide
£ Quick Guide
13
Page 14
PHONES
YPAO MIC
SPEAKERS
INPUT BASS TREBLE BALANCE LOUDNESS
VOLUME
FLAT
-30dB
PURE DIRECT
PRESET
RETURN
CONNECT
PUSH
-
ENTER
SELECT
L R
l qm p r s
je f g h
o
c d kia b
n
NAMES OF PARTS AND THEIR FUNCTIONS > Unit
NAMES OF PARTS AND THEIR FUNCTIONS
Unit
Front panel
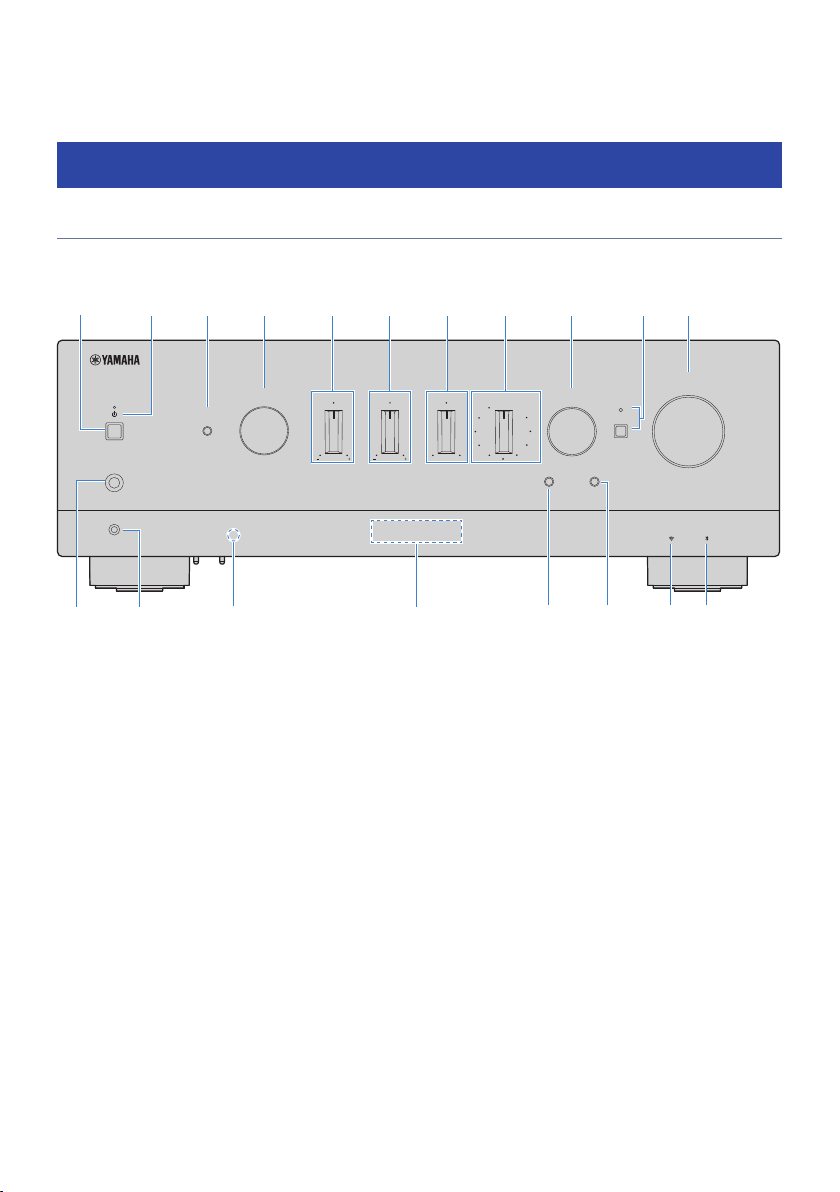
The following are the names of parts on the front of the unit and an explanation of their functions.
a
z (Power) Switch
Turns the power of the product ON (O) / OFF (N) (p.43).
With the power ON, press the z (Power) key on the remote control to switch the power between ON and Standby.
This product also goes into Standby in the following situations.
(
When the Auto Power Standby function is active (p.109)
NOTE
The remote control does not work if the power is OFF. This product cannot also be linked with a Bluetooth device, a network
device, or MusicCast Controller App.
b
Power Indicator
Lights up as follows to indicate the state of power.
Power ON: Indicator lights up.
Power in Standby: Indicator is faintly lit.
Power OFF: Indicator is off.
NOTE
When the indicator is flashing, it means the protective circuit has been activated and the power will not turn ON, in order to
protect the product. Please contact an authorized Yamaha service center to have it repaired.
c
SPEAKERS
Switches the speakers connected to the SPEAKERS L/R A and B jacks on the rear panel (p.54).
14
Page 15

NAMES OF PARTS AND THEIR FUNCTIONS > Unit
d
INPUT
Selects the input source (p.55).
e
BASS
Adjusts the volume of the low-frequency range (p.59).
f
TREBLE
Adjusts the volume of the high-frequency range (p.59).
g
BALANCE
Adjusts the left/right balance of the volume (p.60).
h
LOUDNESS
Adjusts to make it easier to hear bass and treble even at low volumes (p.61). If the YPAO Volume function (p.106) is
enabled, LOUDNESS adjustment cannot be used.
i
SELECT (PUSH-ENTER)
Used for things like operating the menus on the front display. Turn this to select an item, and press it to confirm the
selection.
j
PURE DIRECT/Indicator
Switches the Pure Direct function ON/OFF (p.58). When this is ON, the indicator lights up, and the front display turns
off.
k
VOLUME
Adjusts the volume.
l
PHONES jack
For plugging in headphones (compatible with standard stereo phone plugs).
NOTE
Audio cannot be output to speakers connected to this product when headphones are plugged in. Also, output from the PRE
OUT jack turns OFF.
m
YPAO MIC jack
For connecting the included YPAO microphone (p.46).
n
Remote control signal receiver
Receives the signal (infrared) from the remote control (p.25).
o
Front Display
Displays various information and menus (p.17).
p
PRESET
Used for recalling registered (preset) radio stations (p.67) and registered songs/Internet radio stations (p.94).
q
RETURN/CONNECT
Used for things like operating the menus on the front display.
Also used when registering this product on the MusicCast Network (p.45).
15
Page 16

NAMES OF PARTS AND THEIR FUNCTIONS > Unit
r
Wireless LAN indicator
Lights up when this product is connected to a wireless network (p.140).
s
Bluetooth indicator
Lights up when a Bluetooth device is connected (p.73).
Related links
“Taking care of this product”(p.139)
16
Page 17

a b
c
NAMES OF PARTS AND THEIR FUNCTIONS > Unit
Front display
The following is an explanation of what is shown on the front display.
Basic indication
n
This indication is shown during playback. What is shown differs depending on the current input source. The
following is an example of the indication during playback of a media server.
a
Play status icon
Shown according to the playback status of the song/station (radio station).
Repeat All/1 Song (
Shown when the input is “Server” and Repeat play is set. Please note that it may not be shown when playing music
on a smartphone or tablet, since it depends on the status of the device.
Play/Pause (
Shown when the input is “Server” or “Bluetooth” and it is playing or paused.
Play icon is also shown when the input is “AirPlay” or “Net Radio” and it is playing.
Shuffle (
Shown when the input is “Server” and Shuffle play is set. Please note that it may not be shown when playing music
on a smartphone or tablet, since it depends on the status of the device.
)
/ )
/ )
b
-∞ (When at minimum volume) /MUTE
When the volume is at the minimum, “-∞” is shown flashing. When muted, “MUTE” is shown flashing.
17
Page 18
a
b
ca
NAMES OF PARTS AND THEIR FUNCTIONS > Unit
c
Information area
The following information is shown depending on the selected input.
When selecting CD, PHONO, LINE1, LINE2, OPTICAL1, OPTICAL2, COAXIAL, TV or a music
streaming service
The input name is displayed.
When selecting USB DAC
The audio format and sampling frequency of the playback signal is displayed.
When selecting Server or Net Radio
The information of the current song or station is displayed. To switch the displayed item, press the DISPLAY key on
the remote control.
When selecting AirPlay or Bluetooth
The information of the current song or the input name is displayed. To switch the displayed item, press the DISPLAY
key on the remote control.
When selecting TUNER
The frequency is displayed. The information of Radio Data System (models for U.K., Europe and Russia) or DAB
(models for U.K., Europe, Russia and Australia) is also displayed. To switch the displayed item, press the DISPLAY key
on the remote control.
NOTE
Some text characters may not be available, and “_” is displayed.
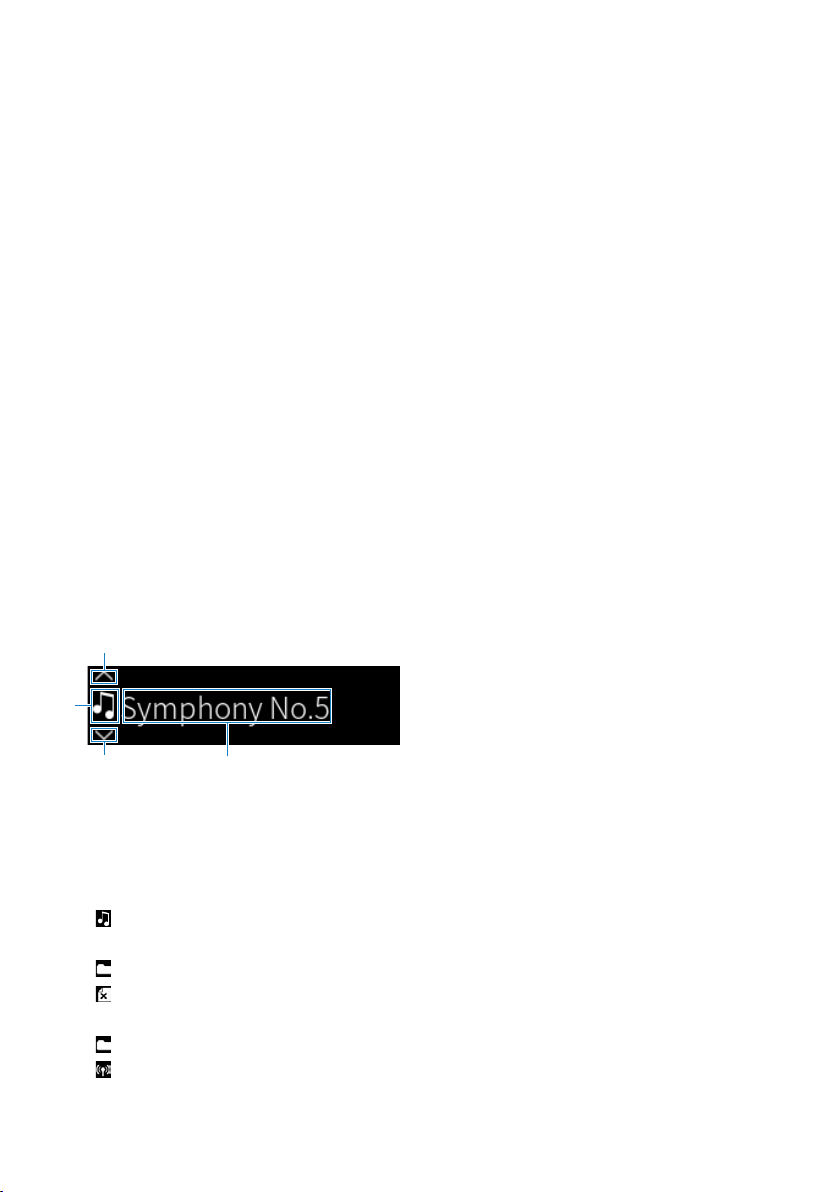
Browse indication
n
This indication is shown only when the input source is “Server” or “Net Radio” and you are selecting the
desired song or station.
a
Operation direction indicator
Available browse direction(s) are shown.
b
File information icon
The type of content currently being shown is indicated by this icon.
When Server is selected
Indicates a music file.
Music files in formats not supported by this product may also be shown (p.145).
Indicates a folder.
Indicates a file that cannot be played.
When Net Radio is selected
Indicates a folder.
Indicates a radio station that can be selected.
18
Page 19
a
Currently warming up. Warmed up.
NAMES OF PARTS AND THEIR FUNCTIONS > Unit
c
Content information area
Information such as file names and station names are shown.
NOTE
Some text characters may not be available, and “_” is displayed.
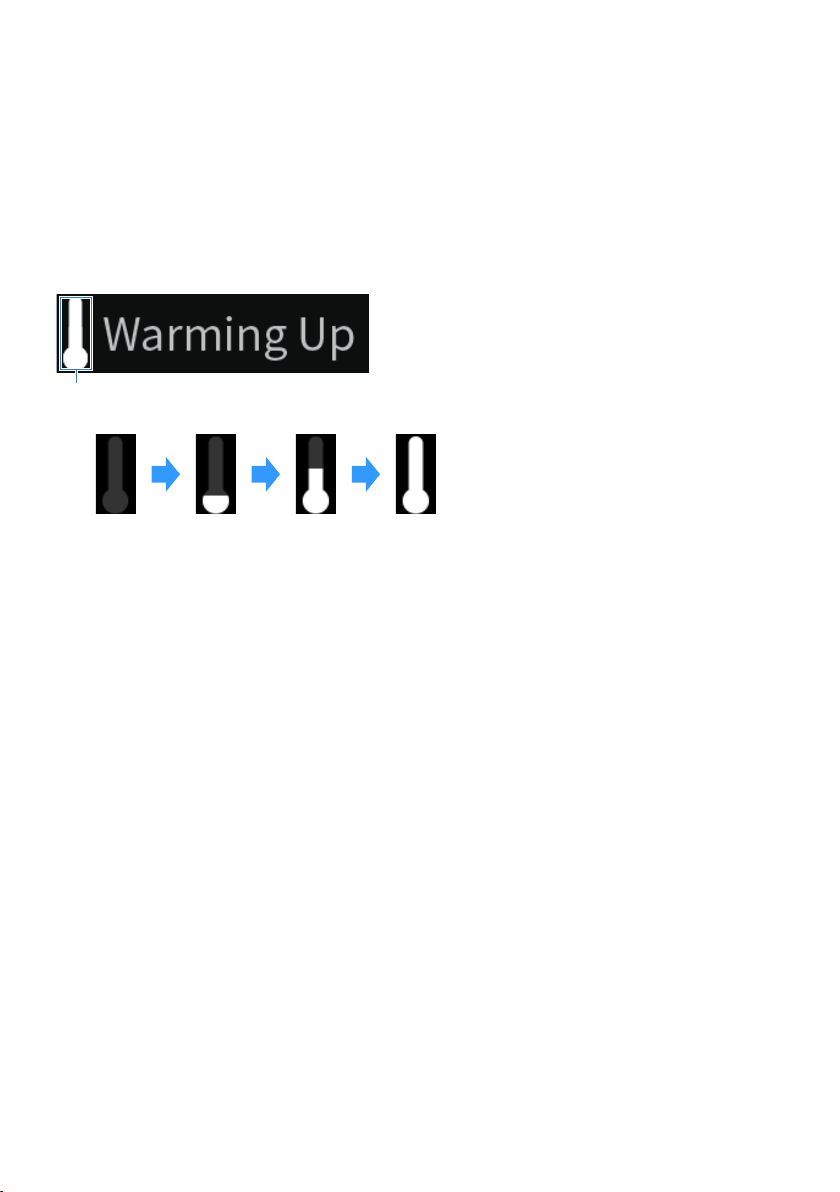
Warming up indication
n
This indication is shown immediately after this product is turned ON. Icons are shown to indicate the
temperature condition of the amp. Use this as an estimate of the time until the sound quality will stabilize.
a
Temperature condition icons
NOTE
(
The brightness of the display is dimmed to protect the display unit when the product is not operated for a certain amount of time.
The display returns to its normal brightness when the remote control or front panel is operated.
(
When PURE DIRECT is ON, the front display turns OFF. After turning OFF, the display comes back ON when the remote control or
front panel is operated.
(
The basic indication turns off if no operations are performed for a certain amount of time. The time until the display turns off can
be changed on the Setup menu.
(
The maximum number of text characters for displaying content information (names of stations/songs, etc.) on the basic indication
or browse indication varies depending on the selected input and the type of characters.
Related links
“Configuring the front display”(p.111)
19
Page 20
ANALOG IN
COAXIALOPTICAL USB
SERVICE
AC IN
NETWORK TV [ARC]
DIGITAL IN
ANTENNA SPEAKERS
CD
LINE
LR
LR
12V 0.1A
TRIGGER
OUT
SUBWOOFER
OUT
FM AM
75
PHONO
LR
PRE OUT
LLR
GND
1
2
R
A
B
21
a gb e h ic d
f
ml pkj on
NAMES OF PARTS AND THEIR FUNCTIONS > Unit
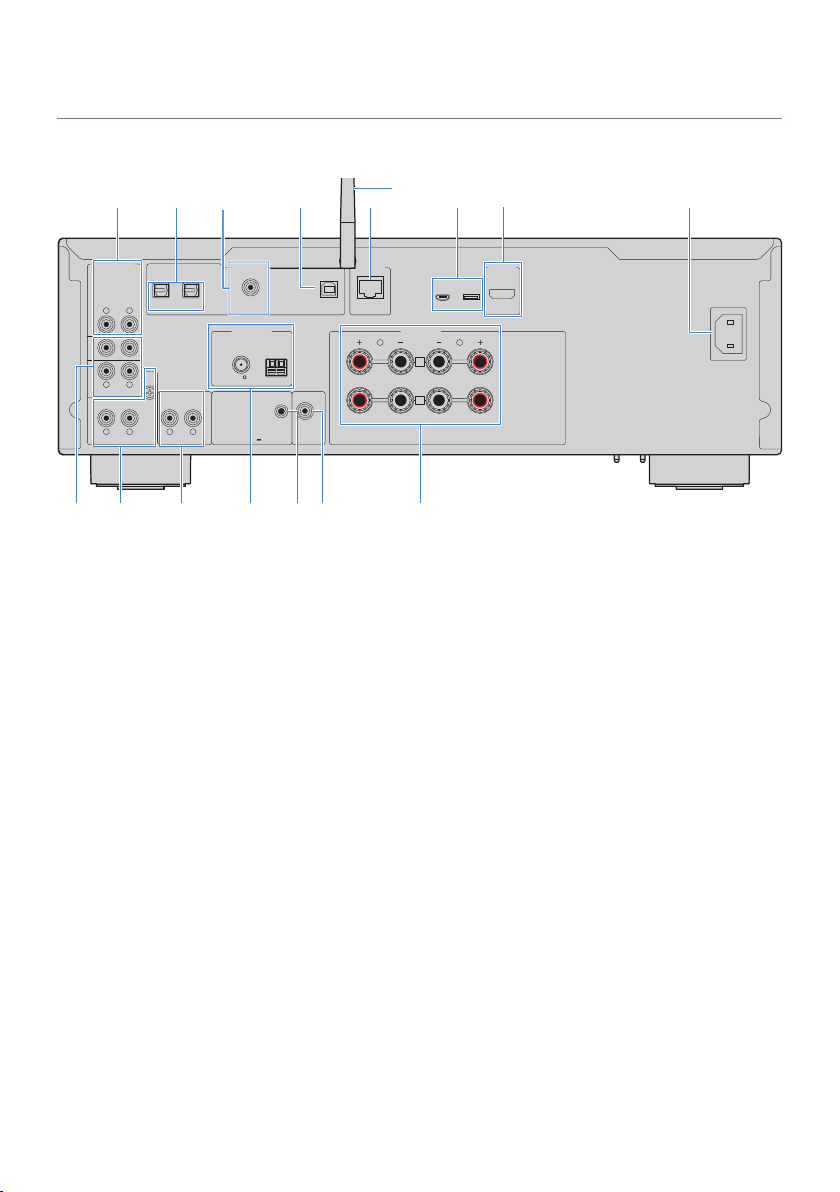
Rear panel
The following are the names of parts on the rear of the unit and an explanation of their functions.
a
CD IN jacks
For connecting to the analog audio OUT of devices like CD players (p.26).
b
OPTICAL 1-2 IN jacks
For connecting to external devices with an optical digital output (p.26).
c
COAXIAL IN jack
For connecting to external devices with a coaxial digital output (p.26).
d
USB port
For connecting to computers (p.28). Compatible with USB type B connectors.
e
NETWORK jack
For connecting a network cable when connecting this product to a wired network (p.40).
f
Wireless antenna
For connecting this product to a wireless network (Wi-Fi) (p.41). It is also used for Bluetooth connections (p.73).
g
SERVICE ports
These are service ports that are used when performing repairs, etc. Do not plug anything into them.
h
TV [ARC] port
For connecting to the HDMI (ARC) IN port of a TV using an HDMI cable (p.27). Be sure to connect to an ARCcompatible HDMI input jack.
NOTE
This port is for connecting to the HDMI IN port of a TV. Do not connect it to the HDMI OUT port of a BD/DVD player, etc.
20
Page 21

NAMES OF PARTS AND THEIR FUNCTIONS > Unit
i
AC IN jack
For connecting the included power cord (p.42).
j
LINE 1-2 IN jacks
For connecting to external devices with analog audio OUT (p.26).
k
PHONO IN jacks
GND jack
For connecting to a turntable (record player) (p.26).
l
PRE OUT jacks
Outputs the same audio signal that is output to the SPEAKERS L/R jacks (p.26).
m
ANTENNA jack
For connecting to a radio antenna (p.36).
n
TRIGGER OUT jack
For connecting to external devices that support the trigger function (p.35).
o
SUBWOOFER OUT jack
For connecting to a subwoofer with a built-in amplifier (p.34).
p
SPEAKERS L/R jacks
For connecting to speakers (p.30).
21
Page 22
VOLUME
PHONO
SLEEP
LINE 1 LINE 2 CD
TV COAX
USB DAC
OPT 1 OPT 2
BLUETOOTH
DISPLAY
HOME RETURN
SETUP OPTION
NOW PLAYING MUTE
TUNER NET
PRESET
REPEAT SHUFFLE
1 2
ENTER
3
MEMORY
A B
SPEAKERS
ENTER
g
f
c
b
d
e
a
h
k
m
l
i
j
o
n
NAMES OF PARTS AND THEIR FUNCTIONS > Remote control
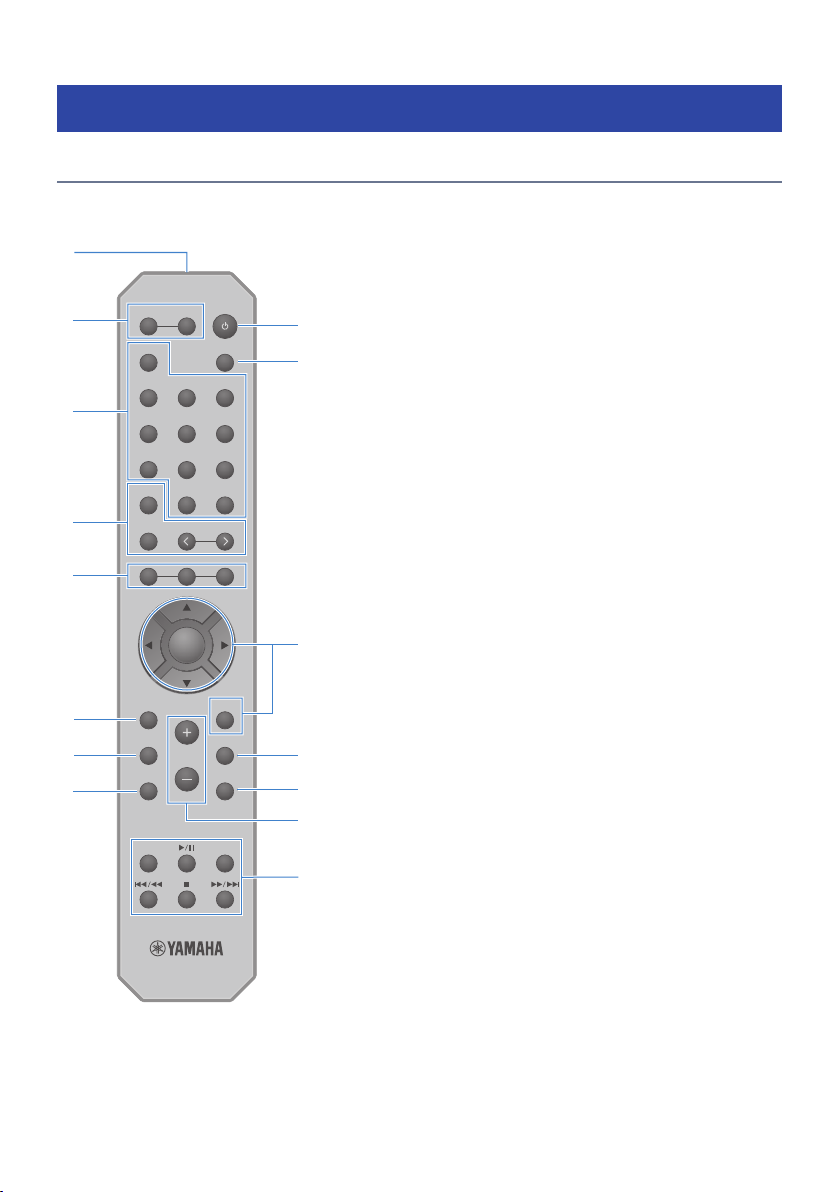
Remote control
Remote control
The following are the names of the parts of the remote control and explanations of their functions.
a
Remote control signal transmitter
Sends the remote control signal (infrared).
22
Page 23

NAMES OF PARTS AND THEIR FUNCTIONS > Remote control
b
SPEAKERS A and B keys
For switching the output speakers. Toggles Speakers A or B ON/OFF each time it is pressed (p.54).
c
Input source selection keys
Selects the input source to play (p.55).
NOTE
Pressing the NET key repeatedly switches between the network sources.
d
DISPLAY key
Switches the display between different kinds of information (p.17).
MEMORY key
For registering radio stations (presets) (p.71). It can also be used for registering songs on media servers or Internet
radio stations (p.92).
PRESET keys
Used for recalling registered (preset) radio stations (p.67) and registered songs/Internet radio stations (p.94).
e
1/2/3 keys
For registering and recalling your favorite radio stations or network content to separate presets (p.92).
f
HOME key
Goes to the very top level when selecting music files, folders, etc.
g
SETUP key
Opens the Setup menu (p.98).
h
NOW PLAYING key
Shows info about the currently playing network content.
i
z (Power) key
Switches the power of this product between ON and Standby (p.43).
j
SLEEP key
Sets the sleep timer (p.96).
k
Menu operation keys
qwer (cursor keys), ENTER, and RETURN
For operating the menus.
l
OPTION key
Opens the Option menu (p.82).
m
MUTE key
Mutes the sound. Pressing it again returns the volume to its previous level.
n
VOLUME +/- keys
Adjusts the volume (p.56).
23
Page 24

NAMES OF PARTS AND THEIR FUNCTIONS > Remote control
o
Playback keys
REPEAT key, r/d (Play/Pause) key, SHUFFLE key, f/h (Skip/Rewind) key, ■ (Stop)
key, j/g (Fast-Forward/Skip) key
For operating playback, such as a media server, Internet radio, or Bluetooth.
24
Page 25
Within 6 m (20 ft)
30° 30°
PREPARATION > Preparing the remote control
PREPARATION
Preparing the remote control
How to insert batteries, and its operating range
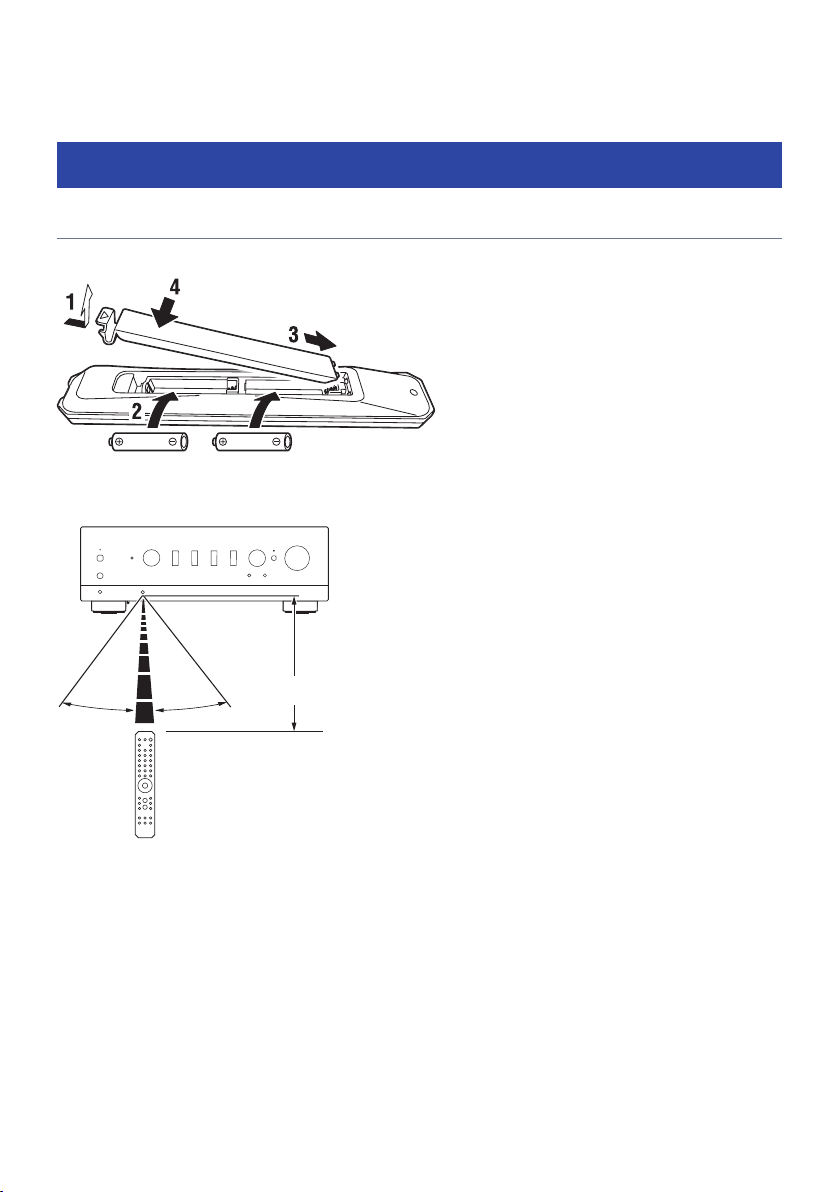
Put the included batteries into the remote control facing the correct way (+/-).
The operating range of the remote control is as illustrated.
Point the remote control at the remote control signal (infrared) receiver when operating it.
25
Page 26
ANALOG IN
COAXIALOPTICAL USB
NETWORK
DIGITAL IN
ANTENNA SPEAKERS
CD
LINE
LR
LR
12V 0.1A
TRIGGER
OUT
SUBWOOFER
OUT
FM AM
75
PHONOLRPRE OUT
LR
GND
1
2
R
A
B
21
PHONO
GND
R
L
COAXIAL
OPTICAL
R
L
PHONO
GND
R
L
LINE
2
COAXIAL
OPTICAL
1
PRE OUT
1
2
LINE
LR
CD
LR
R
L L
R
R
L L
R
L
R
L
R
C
C
O O
Rear panel
DIGITAL IN jacks
Audio outputs (either optical digital, coaxial digital, or
analog stereo)
Audio device
PHONO jacks
Turntable
Ground wire
Audio OUT (PHONO)
External amplifier
PRE OUT jacks
Audio IN (Analog Stereo)
ANALOG IN jacks
PREPARATION > Connecting external devices
Connecting external devices
Connecting audio devices
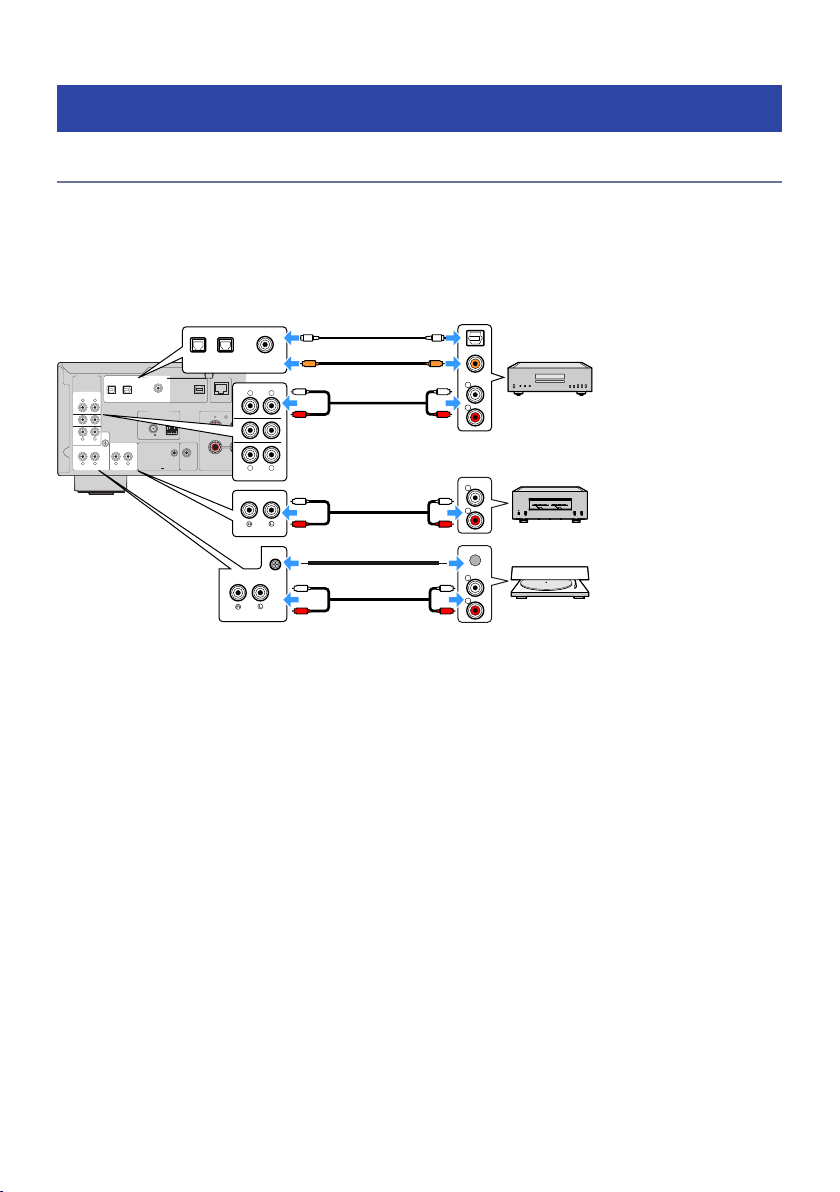
This explains connecting audio devices, such as a CD player, to the product.
Use the type of cable appropriate for the jacks of the device to be connected, such as an RCA cable, optical
fiber cable, or coaxial cable, which are commercially available.
NOTE
(
The DIGITAL IN jacks of this product are only compatible with PCM signal (2-channel).
(
The PHONO jacks of this product are compatible with MM cartridges. Use a step-up transformer or the like when connecting a
turntable (record player) equipped with an MC (low-output) cartridge.
(
For some turntables, connecting to the GND terminal of this product may reduce noise. However, there are also some turntables
that have less noise if they are not connected to the GND jack.
(
The GND terminal is not an electrical ground for safety purposes.
Related links
“Rear panel”(p.20)
26
Page 27
SERVICE
SPEAKERS
LR
A
B
TV [ARC]
HDMI
HDMI
HDMI
HDMI
HDMI
HDMI
(ARC)
Rear panel
TV [ARC] port
HDMI input
TV
PREPARATION > Connecting external devices
Connecting via HDMI to an ARC-compatible TV
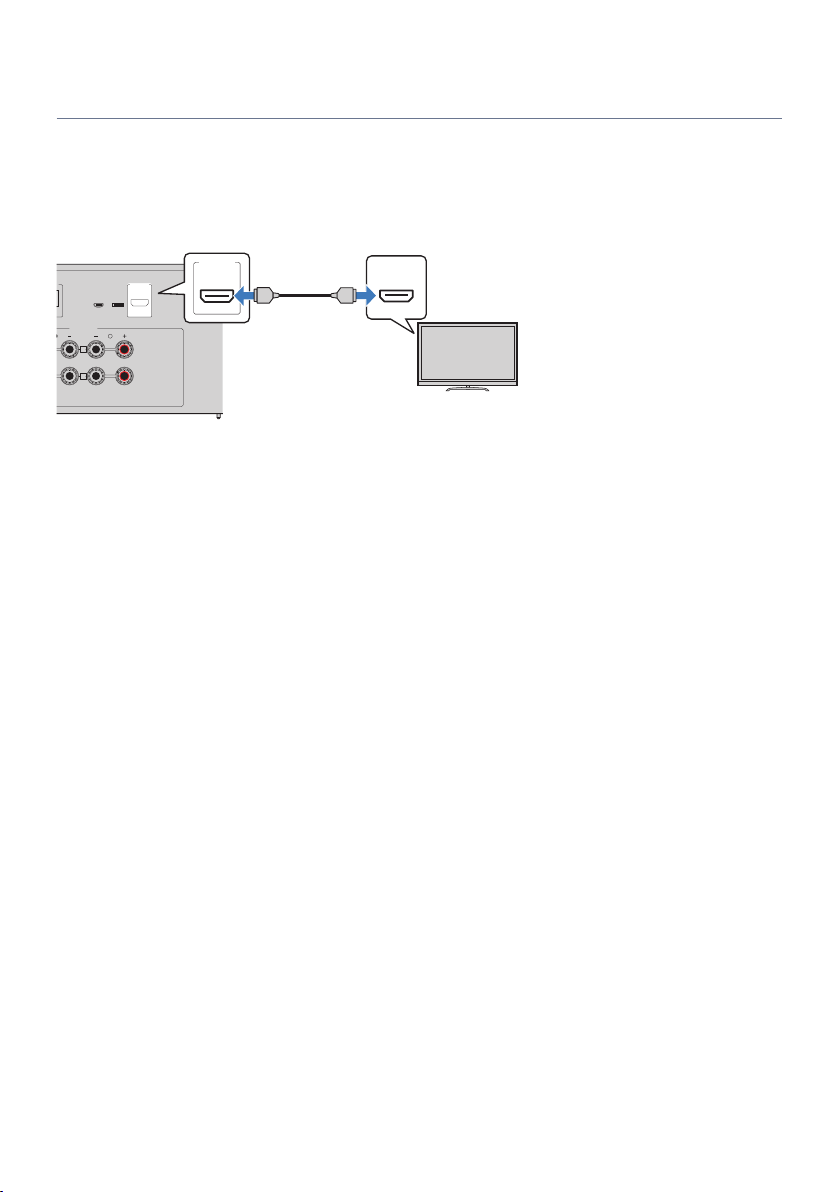
Use a commercially-available HDMI cable to connect an ARC compatible TV to the product. This connections
allows you to play the audio of your TV or of an external device connected via HDMI to your TV. It also allows
the power of the TV and this product to be linked.
NOTE
(
Connect to an HDMI IN port on the TV labeled with either “ARC” or “eARC/ARC”. These labels mean that the port supports “only
ARC” or “both eARC and ARC”. If connected to a port that does not support ARC, audio from the TV cannot be played via HDMI.
(
This product does not support eARC.
(
For this connection, use an HDMI cable (19-pin) with an HDMI logo that indicates it is ARC compatible.
(
You may have to change settings on the TV. Please refer to the user's manual of the TV.
(
Video cannot be output from this product.
(
To play the audio of a TV that does not support ARC, connect an audio OUT jack of the TV to an audio IN jack of this product (either
OPTICAL, COAXIAL, or LINE).
Related links
“Making settings for listening to TV audio”(p.62)
27
Page 28

PREPARATION > Connecting external devices
Connecting to your computer (USB DAC function)
This product is equipped with a USB DAC function. If you connect the USB port of this product to a computer,
you can enjoy the high quality sound of music files on the computer, thanks to the analog conversion process
used by the DAC device of this product. In order to use this function, first install the dedicated drivers
(computer software) provided by Yamaha onto the computer, and then connect the computer to this
product.
Compatible operating systems
n
The following computer operating systems (OS) are supported. (As of May 2023)
(
Windows 10/11
(
macOS 13/12/11/10.15/10.14/10.13
About the drivers (computer software)
n
If the OS of the computer is Windows, it is necessary to install the dedicated driver, “Yamaha Steinberg USB
Driver”. If your computer’s OS is macOS, its standard drivers work, so no special driver needs to be installed.
NOTE
(
Services may not work even on a “compatible OS” due to the computer’s configuration, the environment, and/or version updating
of the OS.
(
Install the driver on your computer before connecting this product to it. If you connect it before installing the software, it may not
work properly.
Installing the dedicated driver (Windows only)
n
Before connecting this product to your computer, install the dedicated driver onto the computer.
1 Access the following URL and search for “Yamaha Steinberg USB Driver”.
Software downloads page
URL: https://download.yamaha.com/
2 Download the latest driver.
3 Extract (uncompress) the downloaded files.
4 Install the driver onto your computer.
To install the driver, follow the installation guide that came with the driver when you
downloaded it.
5 When installation is complete, close all applications that are running.
NOTE
If an old version of the driver is already on your computer, uninstall it and then install the new driver.
28
Page 29
COAXIALOPTICAL USB
NETWORK
DIGITAL IN
ANTENNA SPEAKERS
12V 0.1A
TRIGGER
OUT
SUBWOOFER
OUT
FM AM
75
L
R
A
B
2
USB
Computer
USB cable (Type B)
PREPARATION > Connecting external devices
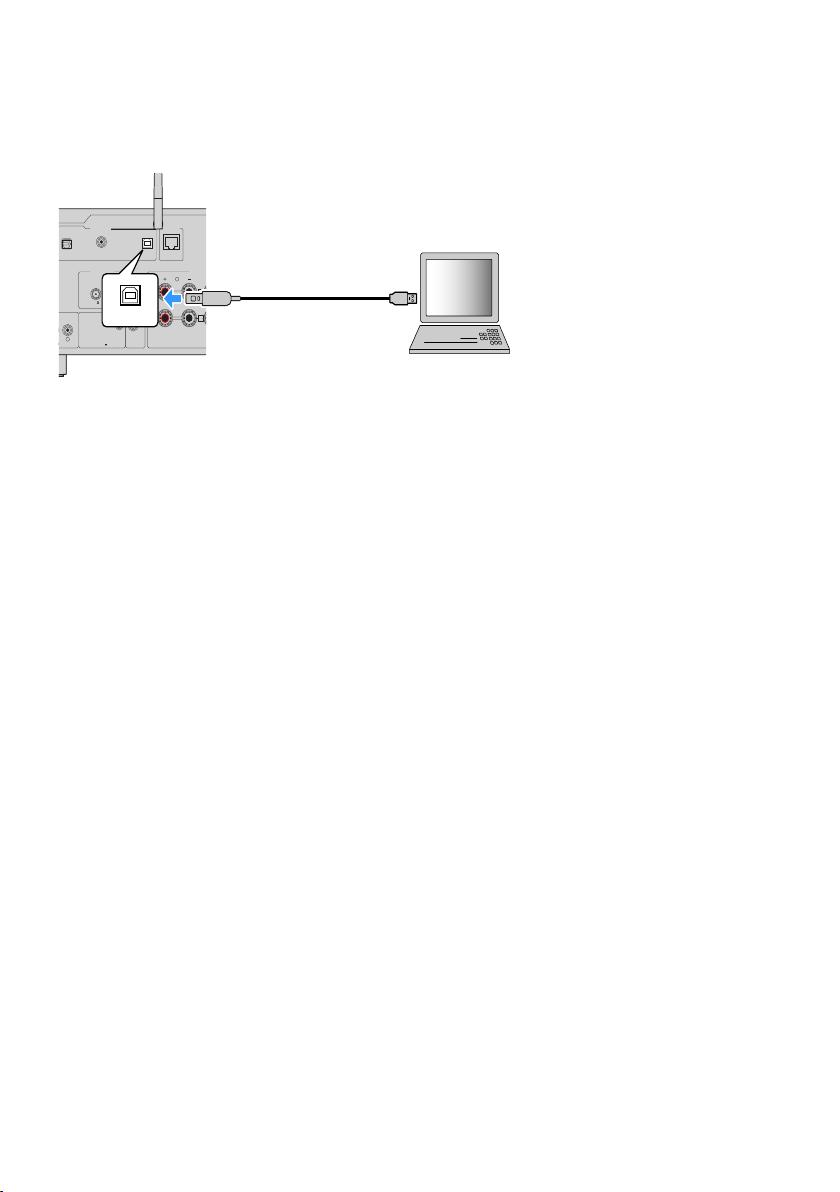
Connect your computer
n
Connect a USB cable (commercially available) to this product and your computer. The USB port of this
product is compatible USB Type B connectors.
NOTE
(
After checking what kind of USB port your computer uses, get the appropriate USB cable (commercially available).
(
Use a USB cable of less than 3 meters.
Related links
“Playing audio from your computer (USB DAC)”(p.81)
29
Page 30
COAXIALOPTICAL USB
SERVICE
NETWORK TV [ARC]
DIGITAL IN
ANTENNA SPEAKERS
12V 0.1A
TRIGGER
OUT
SUBWOOFER
OUT
FM AM
75
PRE OUT
LLR
R
A
B
21
+ –+ –
+ –
– +
Rear panel
Speaker A
(Right channel)
Speaker A
(Left channel)
Speaker B
(Right channel)
Speaker B
(Left channel)
PREPARATION > Connecting speakers
Connecting speakers
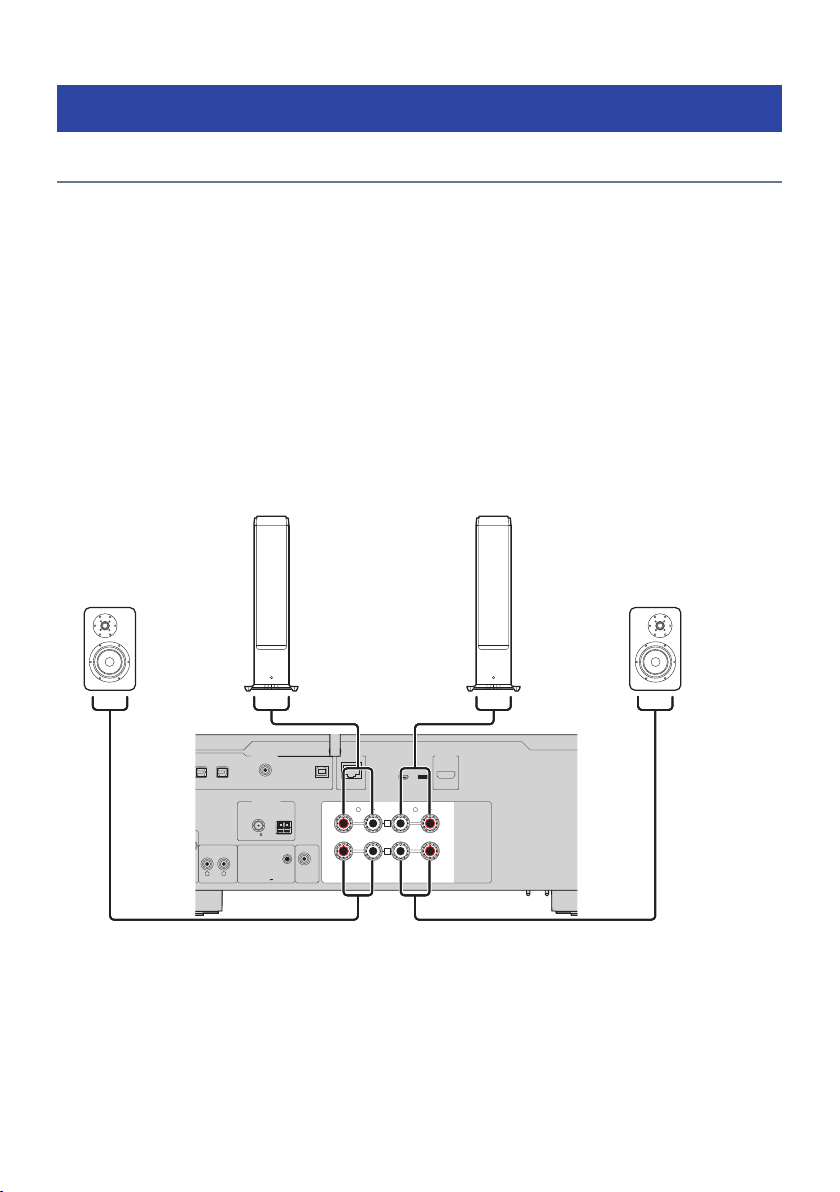
Connecting speakers
Use speaker cable (commercially available) to connect speakers to the product.
About speaker impedance
n
(
Use the speakers with an impedance of at least 4-ohm.
(
Use the speakers with an impedance of at least 8-ohm in the following case.
(
When connecting 2 sets of speakers (Speaker A and Speaker B), and outputting from both the A and B
jacks (selecting the output speaker to A+B).
(
When connecting 4-ohm (4-ohm or more but less than 8-ohm) speakers, change the speaker impedance
on the Advanced Setup menu.
Related links
(
“Selecting the output speakers”(p.54)
(
“Switching speaker impedance”(p.118)
30
Page 31
10 mm
10 mm
(3/8”)
PREPARATION > Connecting speakers
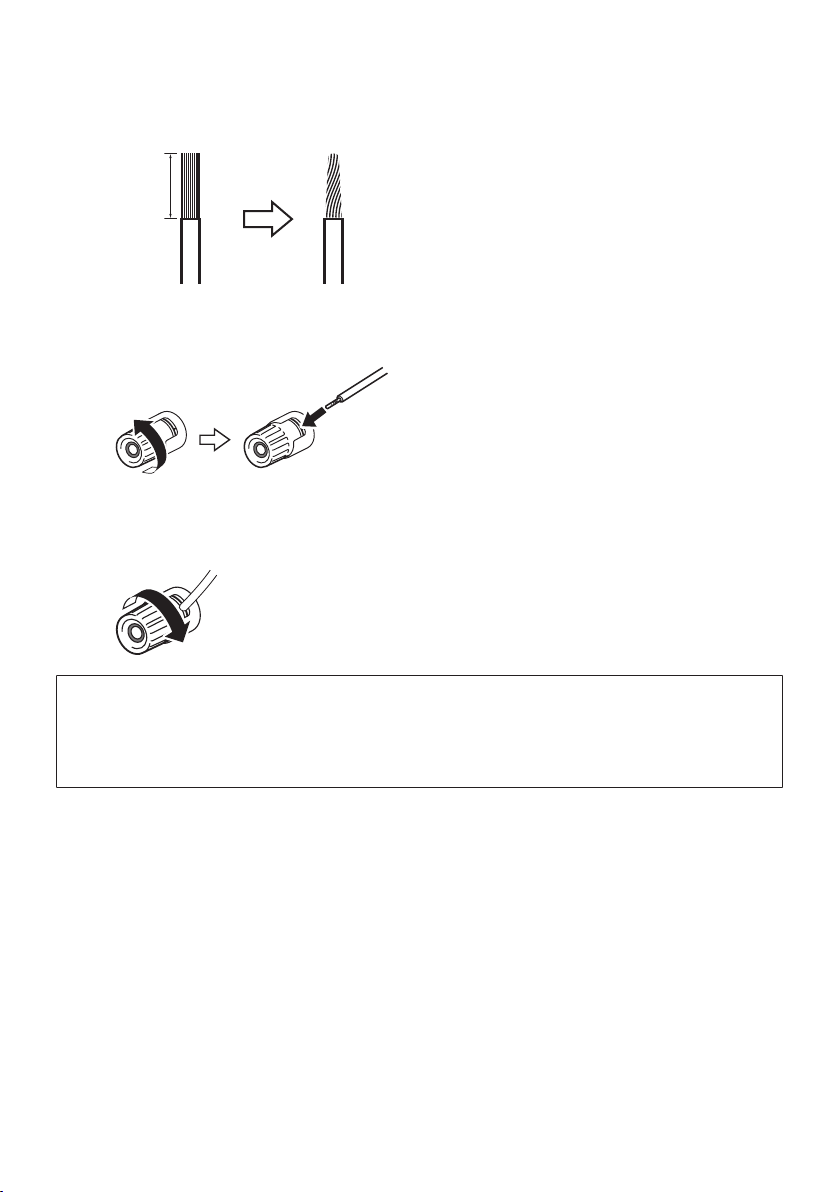
1 Peel off about 10 mm of insulation on the end of the speaker cable and twist its
core tightly.
2 Turn the knob of the speaker jack to the left to loosen it, then insert the core of the
speaker cable into the hole in the jack.
3 Turn the knob back to the right to tighten it.
NOTICE
(
When preparing the speaker cable, do so far away from the product. Pieces of the core wires of the speaker cable may fall inside
the product and cause a short circuit, resulting in malfunction.
(
Do not allow the core wires of a speaker cable to touch the core wires of another speaker cable or any metal parts of the
product. Doing so may damage the product and/or the speakers.
NOTE
Be sure to connect to the jacks correctly: left channel (L), right channel (R) and + (red), - (black). If connected incorrectly, no audio may
be output from the speakers. Also, if the polarity is wrong, the audio may sound strange.
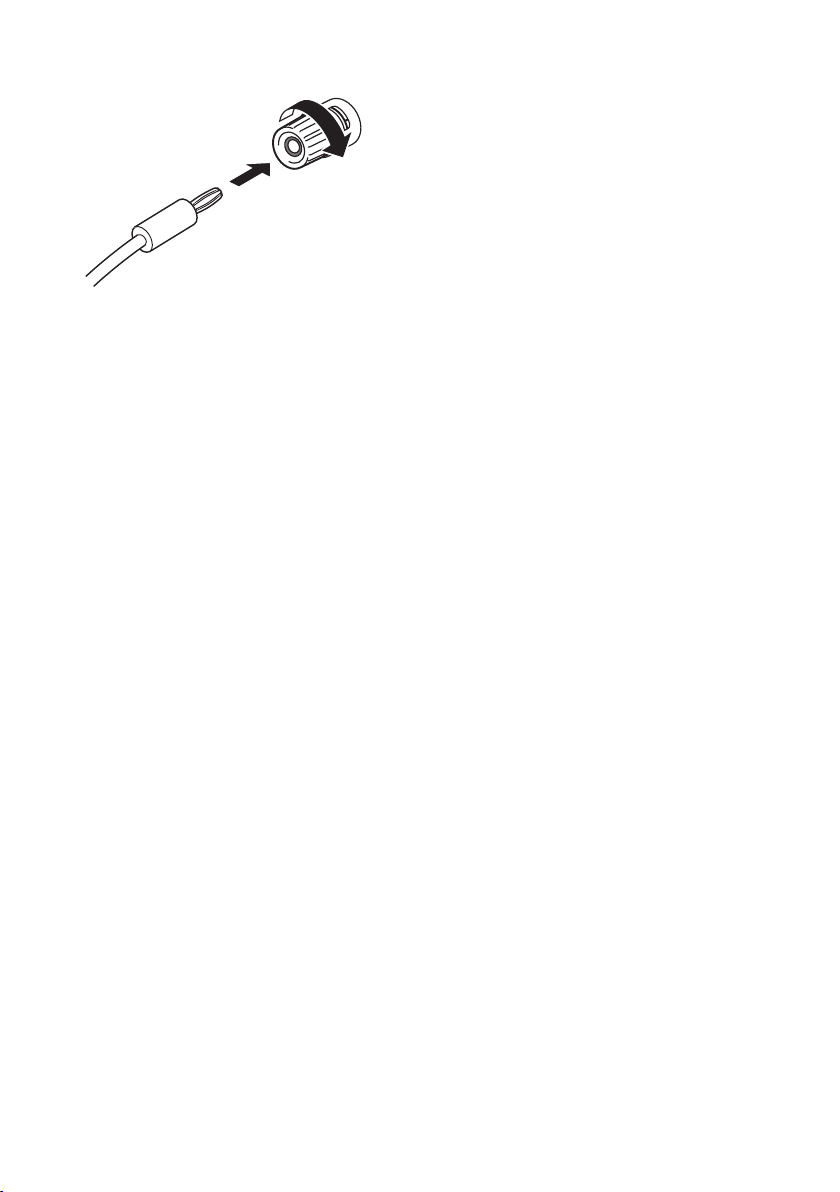
Connecting via banana plug (Models for U.S.A., Canada, China and Taiwan)
n
When using a banana plug, tighten the knob of the speaker terminal and insert a banana plug into the end of
the terminal.
31
Page 32
Banana plug
PREPARATION > Connecting speakers
Related links
(
“Making bi-wiring connections”(p.33)
(
“Connecting a subwoofer”(p.34)
(
“Switching speaker impedance”(p.118)
32
Page 33
SPEAKERS
L
A
B
Rear panel
Speaker
PREPARATION > Connecting speakers
Making bi-wiring connections
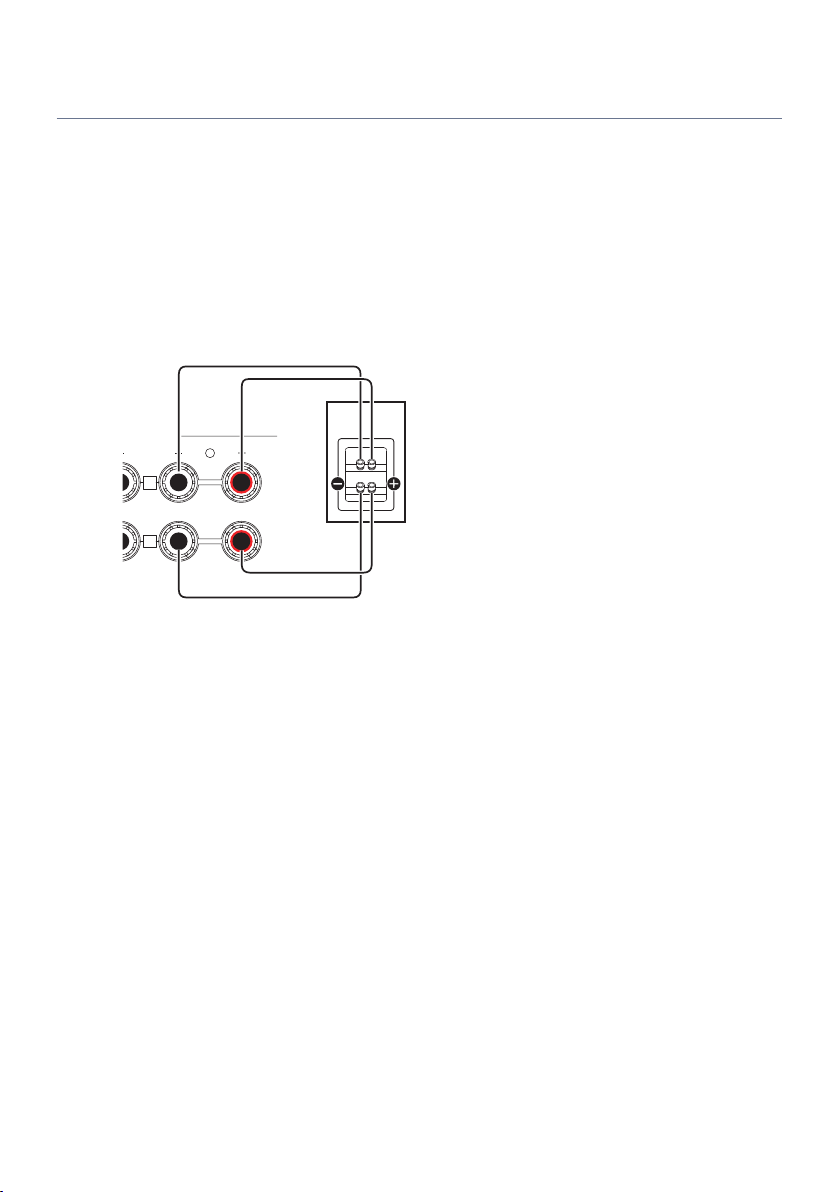
Bi-wiring allows output to the speaker woofers (low frequency) and the tweeter/mid-range (mid to highfrequency) to be split and driven separately. Speakers compatible with bi-wiring are required for these
connections.
1 Remove the short bar or bridge attached to the jacks of the speakers.
2 Connect the product and the speakers as illustrated.
The illustration shows connecting the left channel. Connect the right channel in the same way.
Swapping the connections between speaker jacks A and B is OK.
NOTE
(
If the system is connected with bi-wiring, turn ON both Speakers A and B by pressing the SPEAKERS A and SPEAKERS B keys when
the power is ON.
(
Use speakers with an impedance of at least 4 Ω and that are compatible with bi-wiring connections.
Related links
(
“Running YPAO”(p.46)
(
“Selecting the output speakers”(p.54)
33
Page 34
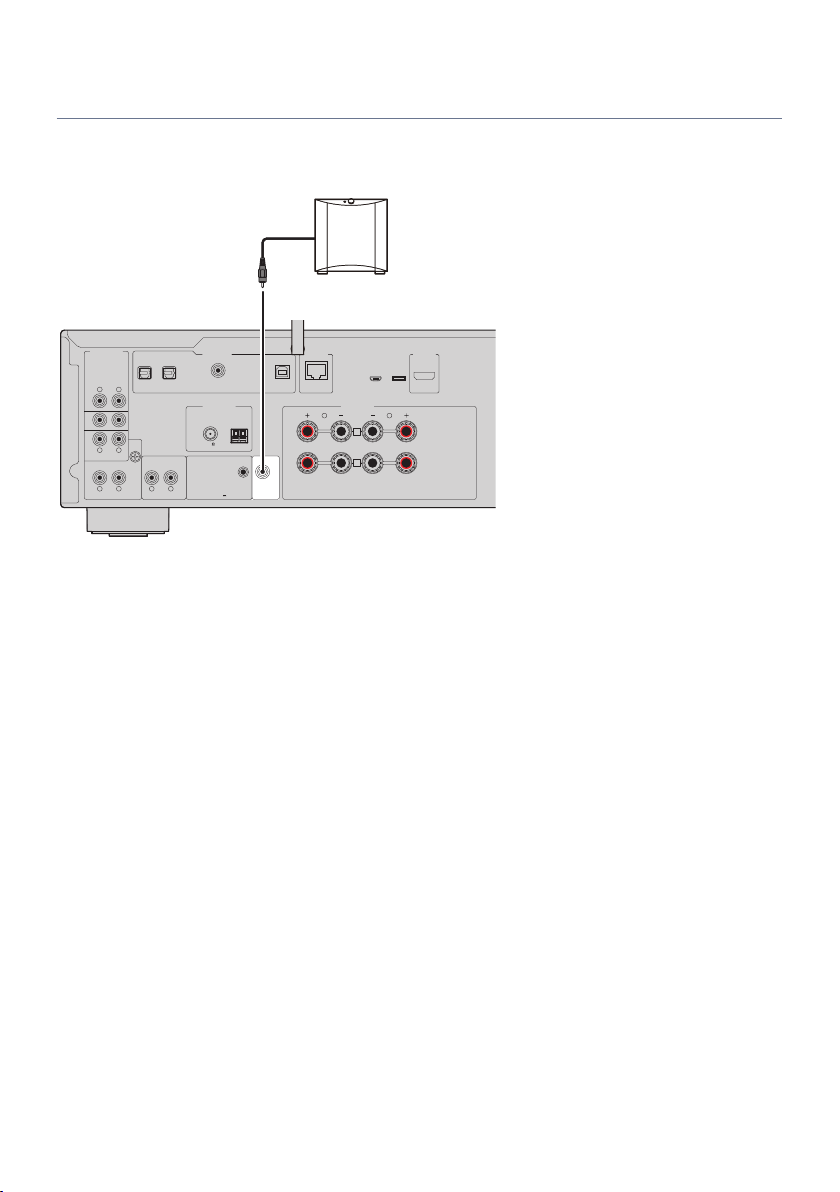
Subwoofer (with built-in amplifier)
ANALOG IN
COAXIALOPTICAL USB
SERVICE
NETWORK TV [ARC]
DIGITAL IN
ANTENNA SPEAKERS
CD
LINE
LR
LR
12V 0.1A
TRIGGER
OUT
SUBWOOFER
OUT
FM AM
75
PHONOLRPRE OUT
LLR
GND
1
2
R
A
B
21
Rear panel
PREPARATION > Connecting speakers
Connecting a subwoofer
To use a subwoofer, connect it to the product with a monaural pin cable (RCA) (commercially available).
34
Page 35
COAXIAL USB
SER
VICE
NETWORK
DIGITAL IN
ANTENNA SPEAKERS
12V 0.1A
TRIGGER
OUT
SUBWOOFER
OUT
FM AM
75
LR
A
B
12V
0.1A
TRIGGER
OUT
Rear panel
TRIGGER OUT jacks
System
Connection
jack
System Connection compatible
Yamaha subwoofer, etc.
PREPARATION > Connecting speakers
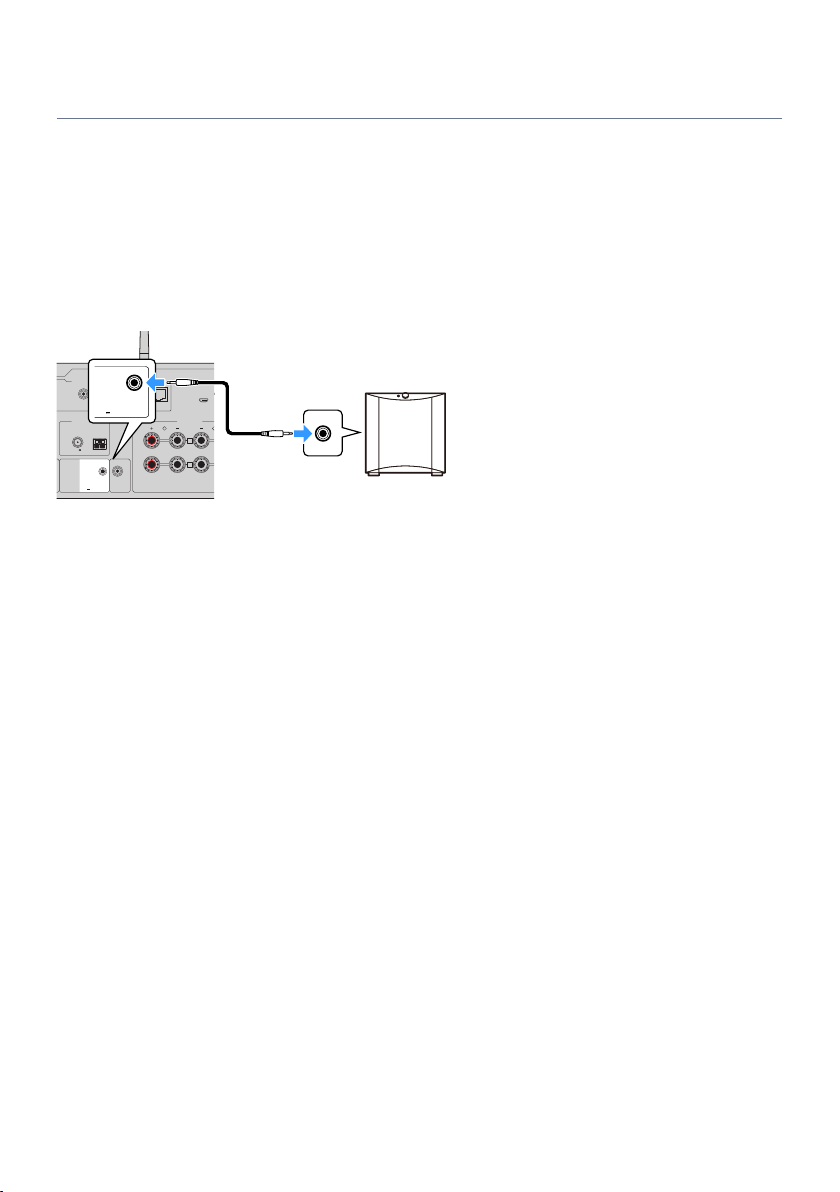
Trigger connection
Connecting a trigger-connection compatible Yamaha device
The trigger function allows external devices to be controlled linked with the operation (power ON/OFF) of
this product. If you are using a Yamaha subwoofer that supports system connections, or a device with a
Trigger IN jack, you can use the trigger function by connecting it to a TRIGGER OUT jack of this product via a
mono mini-plug cable.
When this product is turned ON, it outputs a signal (12 V, 0.1 A) from the TRIGGER OUT jacks, linking them.
NOTE
On some Yamaha subwoofers, the trigger connection may be called “System Connection”.
35
Page 36
ANALOG IN
COAXIALOPTICAL USB
SERVICE
NETWORK TV [ARC]
DIGITAL IN
ANTENNA SPEAKERS
CD
LINE
LR
LR
FM AM
75
L
GND
1
2
R
A
21
Rear panel
FM antenna
PREPARATION > Connecting radio antennas
Connecting radio antennas
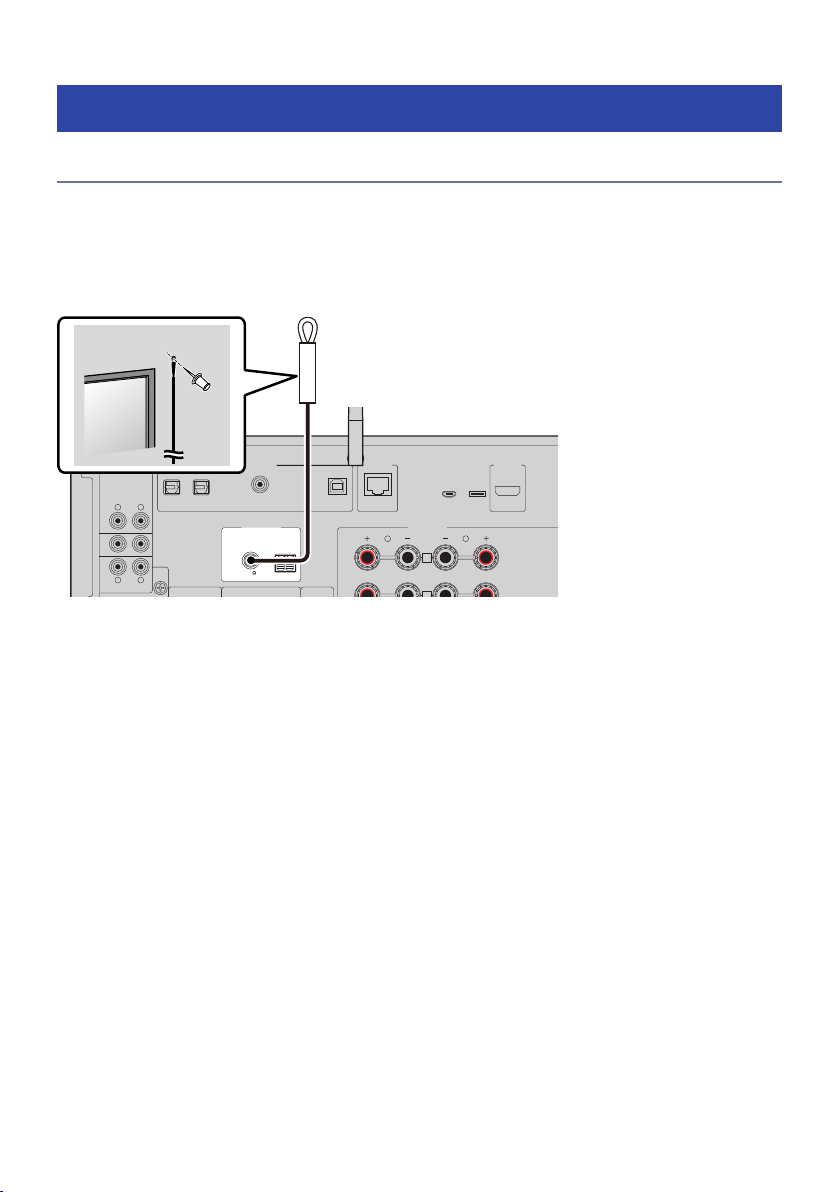
Connecting an FM antenna
Model For
U.S.A., Canada, China, Korea, Asia and Taiwan
Connect the included FM antenna to the product.
After connecting the FM antenna, secure it to a wall.
36
Page 37
Rear panel
AM antenna
COAXIALOPTICAL USB
SERVICE
NETWORK TV [ARC]
DIGITAL IN
ANTENNA SPEAKERS
12V 0.1A
TRIGGER
OUT
SUBWOOFER
OUT
FM AM
75
PRE OUT
LLR
R
A
B
21
ReleaseHold down Insert
PREPARATION > Connecting radio antennas
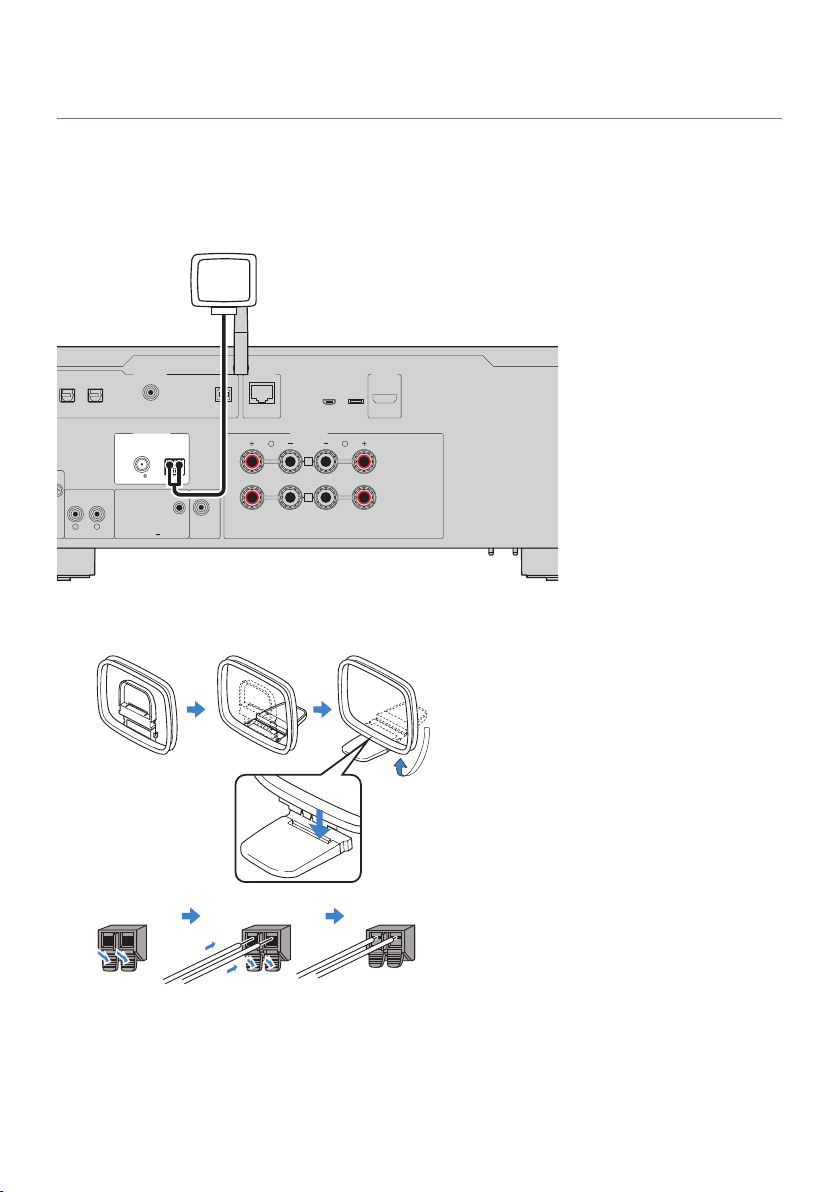
Connecting an AM antenna
Model For
U.S.A., Canada, China, Korea, Asia and Taiwan
Connect the included AM antenna to the product.
Put the AM antenna in a flat location after connecting it.
Assembly and connection of the AM antenna
NOTE
(
Only unwind as much wire from the antenna unit as is required for wiring.
(
The cord of the AM antenna does not have polarity.
37
Page 38
ANALOG IN
COAXIALOPTICAL USB
SERVICE
NETWORK TV [ARC]
DIGITAL IN
ANTENNA SPEAKERS
CD
LINE
LR
LR
DAB/FM
75
L
GND
1
2
R
A
21
Rear panel
DAB/FM antenna
PREPARATION > Connecting radio antennas
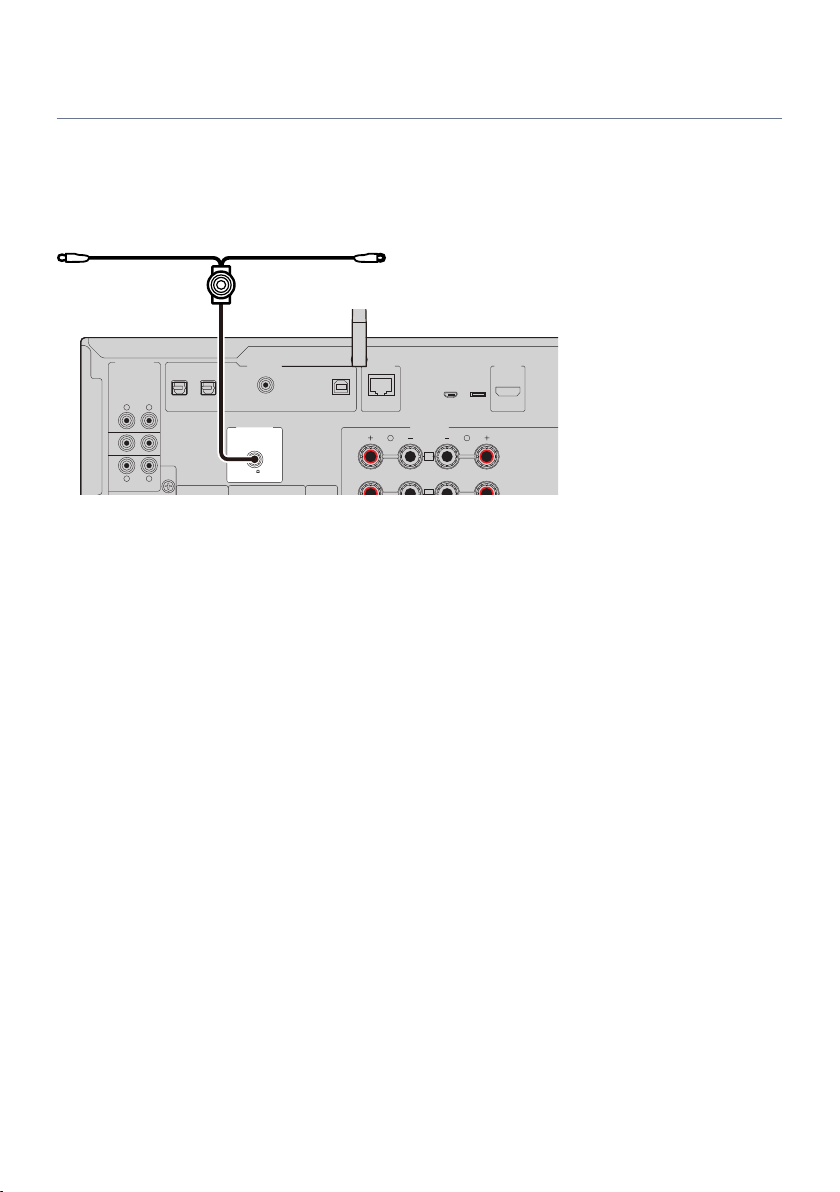
Connecting a DAB/FM antenna
Model For
U.K., Europe, Russia and Australia
Connect the included DAB/FM antenna to the product.
Fix the antenna ends to a wall.
NOTE
(
The antenna should be stretched out horizontally.
(
If you cannot obtain good reception on the radio, adjust the height, direction or placement of the DAB/FM antenna.
38
Page 39
PREPARATION > Preparing a network connection
Preparing a network connection
To make a network connection
This product supports both wired and wireless connections.
Select the connection method according to your network environment.
Connecting to a network allows you to play Internet radio stations and music files stored on media servers
such as computers or network-attached storage (NAS).
NOTICE
(
When connecting the product to the Internet, be sure to connect via a router to ensure security. Set up an appropriate
password for the router that it goes through. Do not connect directly to communication lines (including public LANs) of
telecommunications carriers (mobile communication companies, fixed-line providers, Internet providers, etc.)
Related links
(
“Connecting a network cable (wired connection)”(p.40)
(
“Preparing the wireless antenna (wireless connection)”(p.41)
39
Page 40
COAXIAL USB
SER
VICE
AC IN
NETWORK TV [ARC]
DIGITAL IN
ANTENNA SPEAKERS
LR
LAN
WAN
Network Attached Storage (NAS)
Internet
Router
Computer
Network cable
Rear panel
PREPARATION > Preparing a network connection
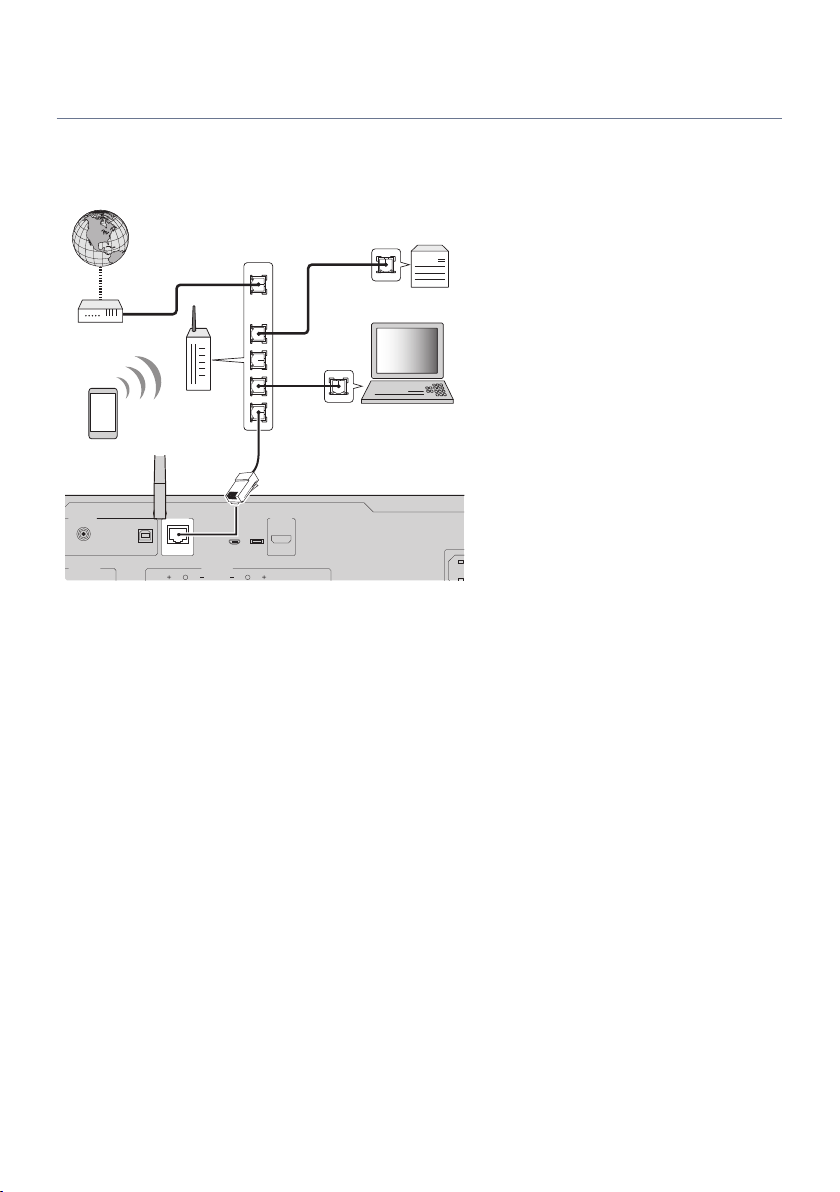
Connecting a network cable (wired connection)
Use a network cable (CAT-5 or higher straight cable) (commercially available) to connect the product to the
router.
If the router is compatible with DHCP servers, network settings do not have to be configured for this product.
NOTE
(
If the router is not compatible with DHCP servers, or if you want to configure the network parameters manually, you must
configure the network settings.
(
Use STP (Shielded Twisted Pair) cable to prevent electromagnetic interference.
Related links
“Configuring a network”(p.100)
40
Page 41
USB
SERVICE
NETWORK TV [ARC]
SPEAKERS
SUBWOOFER
OUT
LR
A
B
PREPARATION > Preparing a network connection
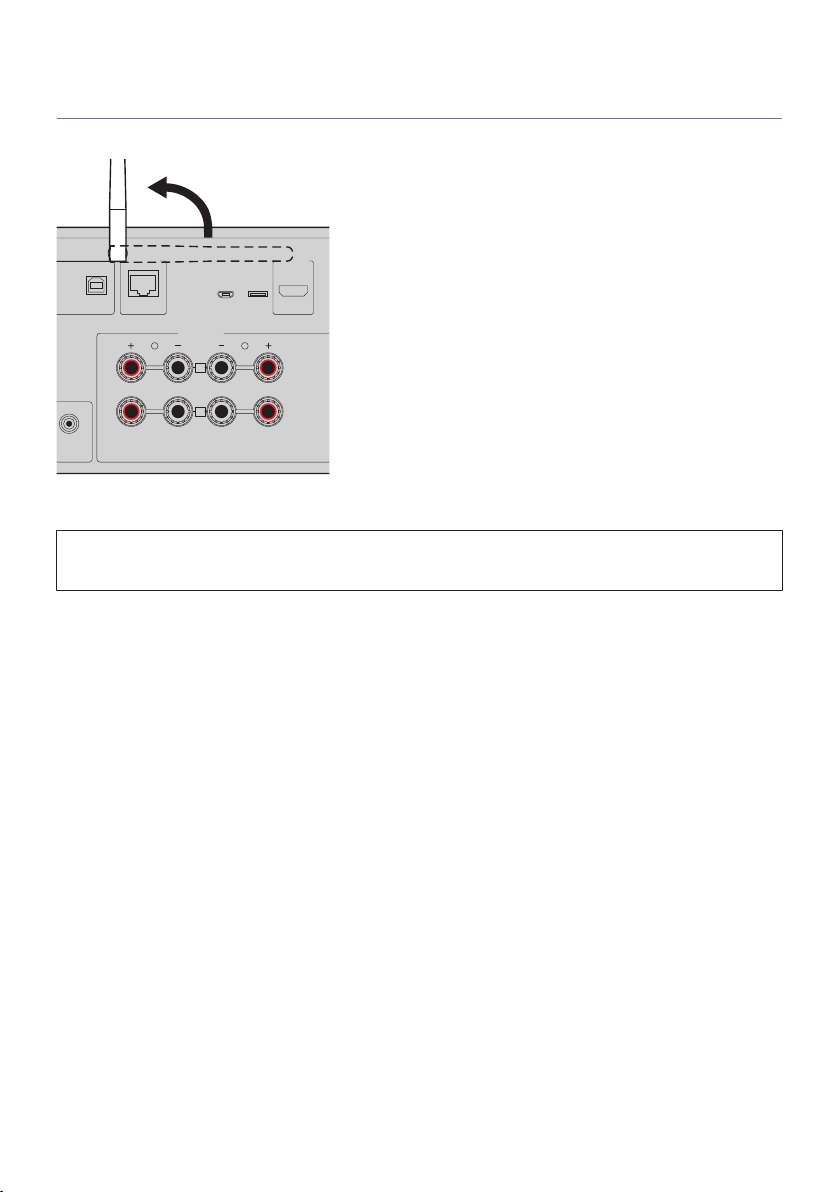
Preparing the wireless antenna (wireless connection)
To use a wireless or Bluetooth connection, flip up the wireless antenna.
NOTICE
(
Do not exert excessive force on the wireless antenna. Doing so may damage it.
Related links
(
“Registering with the MusicCast network”(p.45)
(
“Selecting the wireless method of connecting to the network”(p.140)
41
Page 42
AC IN
Rear panel
Connect to a power outlet
PREPARATION > Turning the product ON
Turning the product ON
Connecting the power cord
After making all the connections, connect the included power cord.
NOTE
Be sure to unplug this product from the power outlet when it will not be used for a long time. This product consumes a small amount
of electricity even when its power is in Standby.
42
Page 43
PHONES
SPEAKERS
INPUT BASS
Power Indicator
Power Switch
*
LOUDNESS
VOLUME
FLAT
-30dB
PURE DIRECT
PRESET
RETURN
CONNECT
PUSH
-
ENTER
SELECT
RETURN
CONNECT
Front panel
PREPARATION > Turning the product ON
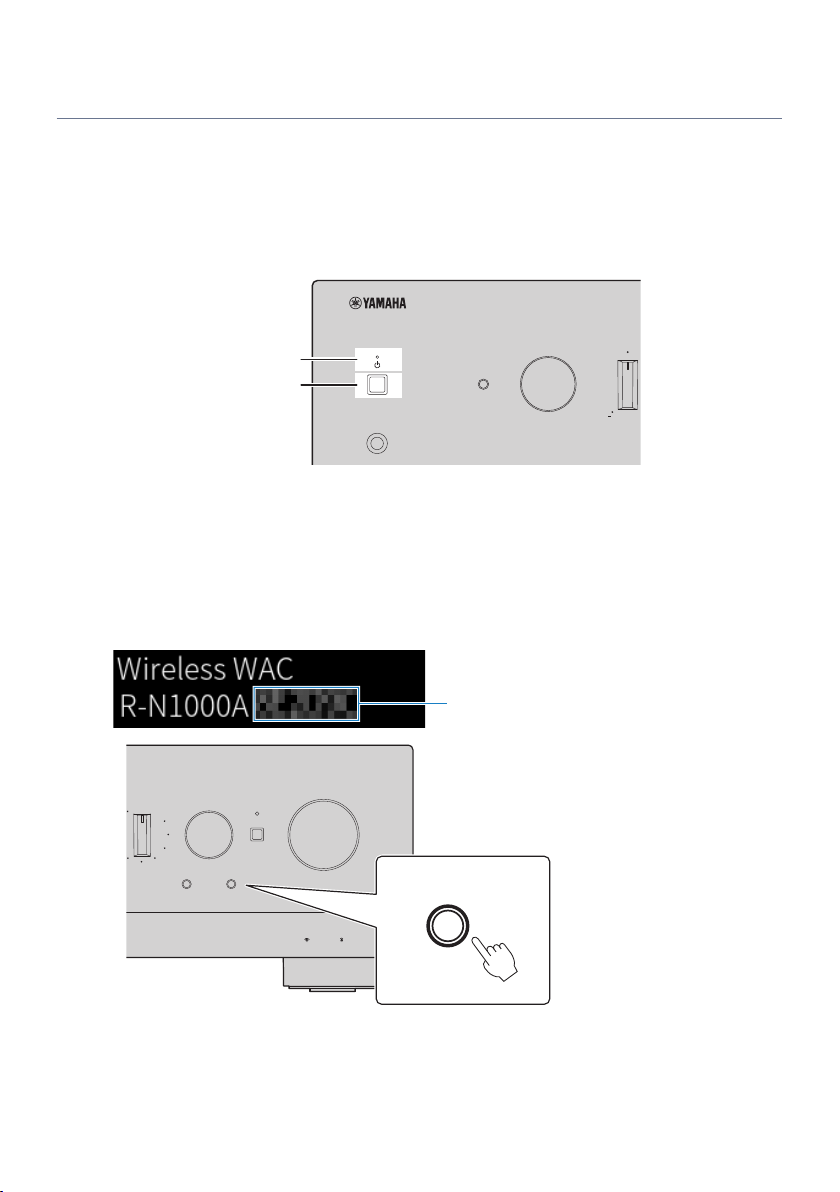
Turning the power ON
Turn the product ON.
1 Press the z (Power) Switch on the front panel.
The power comes ON and the Power Indicator lights up.
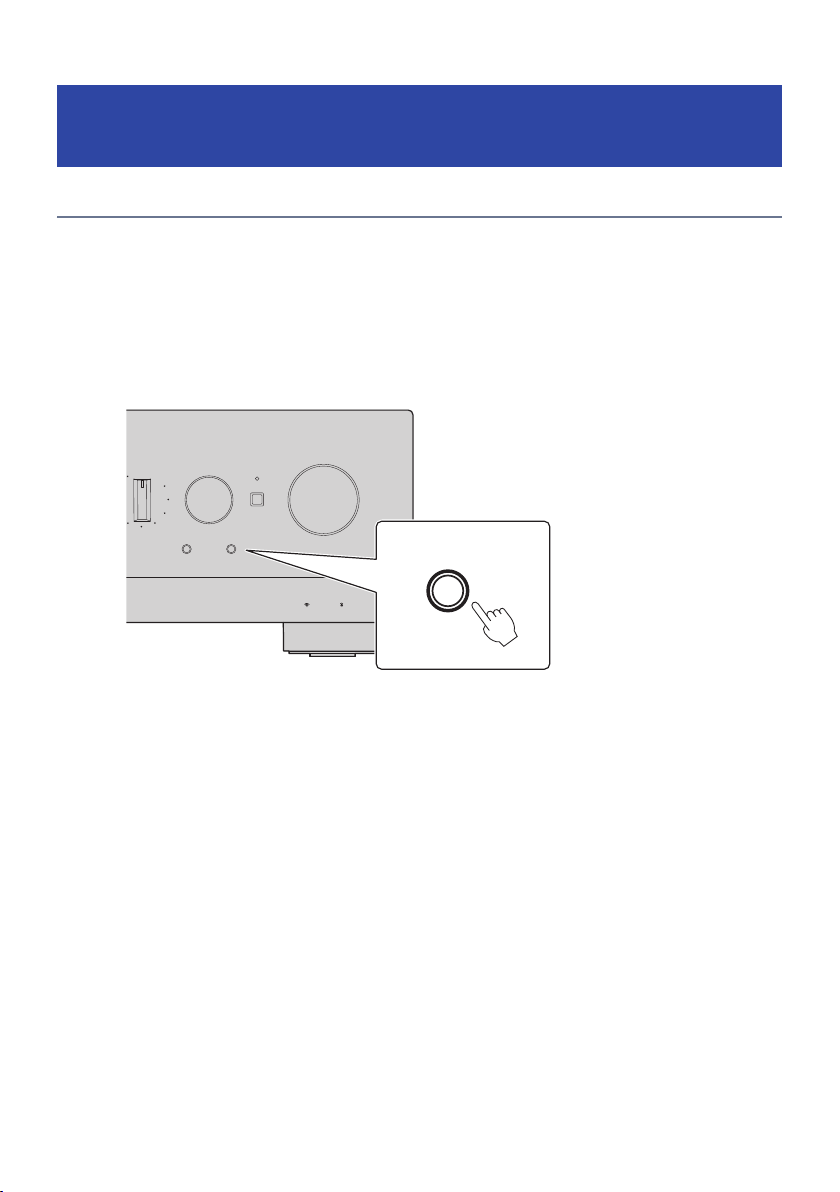
2 When the following message is shown on the front display, press RETURN on the
front panel.
When you connect this product to the router with a network cable (wired connection), this
operation is skipped.
It may take about 30 seconds for the message to be shown. The portion marked with “*” varies
depending on the device.
43
Page 44

PREPARATION > Turning the product ON
“Wireless WAC” Display
(
The WAC (Wireless Accessory Configuration) function is for applying the wireless settings of an iOS device to another device and
wirelessly connecting to the network. The steps for connecting to a network using MusicCast Controller are explained in the
chapter “PREPARATION”. Therefore, how to cancel WAC is explained here.
(
The WAC message is displayed the first time you use the product and after it is initialized.
NOTE
(
It takes several seconds from turning the power ON until audio is played.
(
After turning the power OFF, do not try to turn it ON again for at least 10 seconds. Doing so may generate some noise.
Related links
“Making a wireless connection with your iPhone (WAC)”(p.142)
Operating the power with the remote control
n
When the z (Power) Switch on the front panel is ON, the product switches between ON/Standby each time
the z (Power) key on the remote control is pressed.
NOTE
When the product's power is in Standby, to turn the power ON without using the remote control, press the z (Power) Switch to turn it
OFF momentarily, and then press it again to turn it ON again.
44
Page 45
LOUDNESS
VOLUME
FLAT
-30dB
PURE DIRECT
PRESET
RETURN
CONNECT
PUSH
-
ENTER
SELECT
RETURN
CONNECT
Front panel
PREPARATION > Configuring MusicCast settings (connecting to a network)
Configuring MusicCast settings (connecting to a
network)
Registering with the MusicCast network
Register the product to the MusicCast network. You can configure network connection settings for the
product at the same time. The dedicated app “MusicCast Controller” for mobile devices is required for
making settings. Find “MusicCast Controller” (free) in the App Store or Google Play and install it.
1 Start “MusicCast Controller” on your mobile device(s) and tap “Setup”.
2 Follow the instructions provided by “MusicCast Controller”.
NOTE
(
To connect to the network wirelessly, ensure that you have the SSID and security key of the wireless LAN router (access point) you
wish to use.
(
To configure a second and subsequent MusicCast-compatible devices, tap “Settings” > “Add New Device” in “MusicCast
Controller”.
Related links
“Configuring a network”(p.100)
45
Page 46
VOLUME HIGH CUT
CROSSOVER/
MIN MAXMIN MAX
9
PREPARATION > Automatic adjustment of speaker settings (YPAO)
Automatic adjustment of speaker settings (YPAO)
Running YPAO
To run YPAO, the included YPAO microphone must be used.
YPAO is a function that adjusts acoustic characteristics such as volume balance by detecting speaker
connections and the distance between your listening position and the speakers. This function can be applied
either to speakers directly connected to the speaker jacks of this product, or to speakers driven by an
external amp connected to the PRE OUT jacks.
NOTE
(
YPAO makes loud sounds while it is running. The volume cannot be adjusted.
(
To ensure correct YPAO adjustment, pay attention to the following while it is running.
(
Do not make any loud noises.
(
Do not get in between the speakers and the YPAO microphone.
(
Do not plug in headphones.
(
If you change the speaker’s configuration, such as replacing a speaker or adding/removing a subwoofer, be sure to run YPAO again.
1 On the front panel, check the following before running YPAO.
(
BASS and TREBLE are in their center positions.
(
BALANCE is in its center position.
(
LOUDNESS is in its center position (FLAT).
(
PURE DIRECT is OFF.
2 Press the SPEAKERS A key and/or SPEAKERS B key to select the speakers to use.
(
If they are connected with bi-wiring, turn ON both Speakers A and B (A+B).
(
When using an amplifier connected to the PRE OUT terminal, turn OFF both Speakers A and
B.
NOTE
This operation can be done also with SPEAKERS on the front panel.
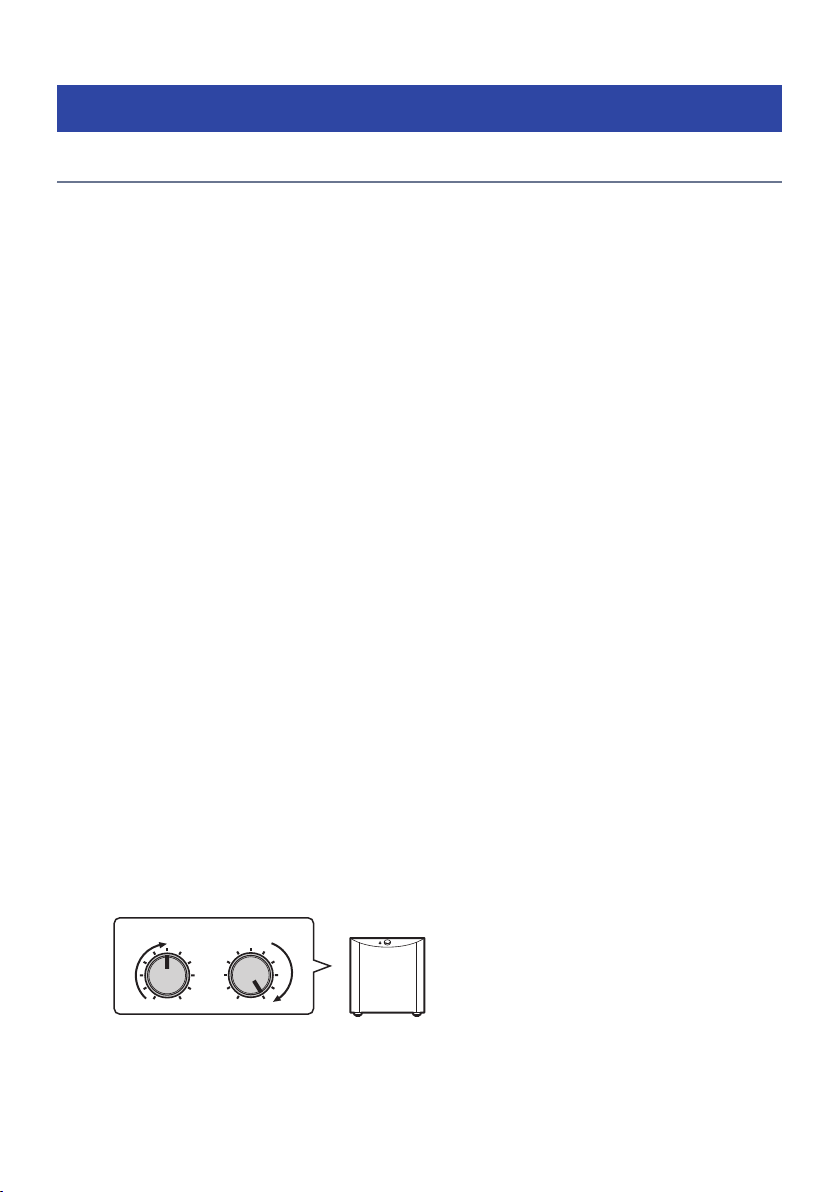
3 If a subwoofer will be used, turn its power ON and adjust the volume to its
midpoint.
If the crossover frequency can be adjusted, set it to the maximum.
If a subwoofer will not be used, go to the next step.
NOTE
The actual subwoofer volume and crossover frequency are set by the YPAO function of this product. However, during Pure
Direct playback, they follow the subwoofer's setting. When using Pure Direct, adjust the subwoofer volume and crossover
frequency to your favorite value, and then run YPAO.
46
Page 47
YPAO MIC
1 2
9
YPAO microphone
Ear height
YPAO MIC jack
Front panel
Listening position
PREPARATION > Automatic adjustment of speaker settings (YPAO)
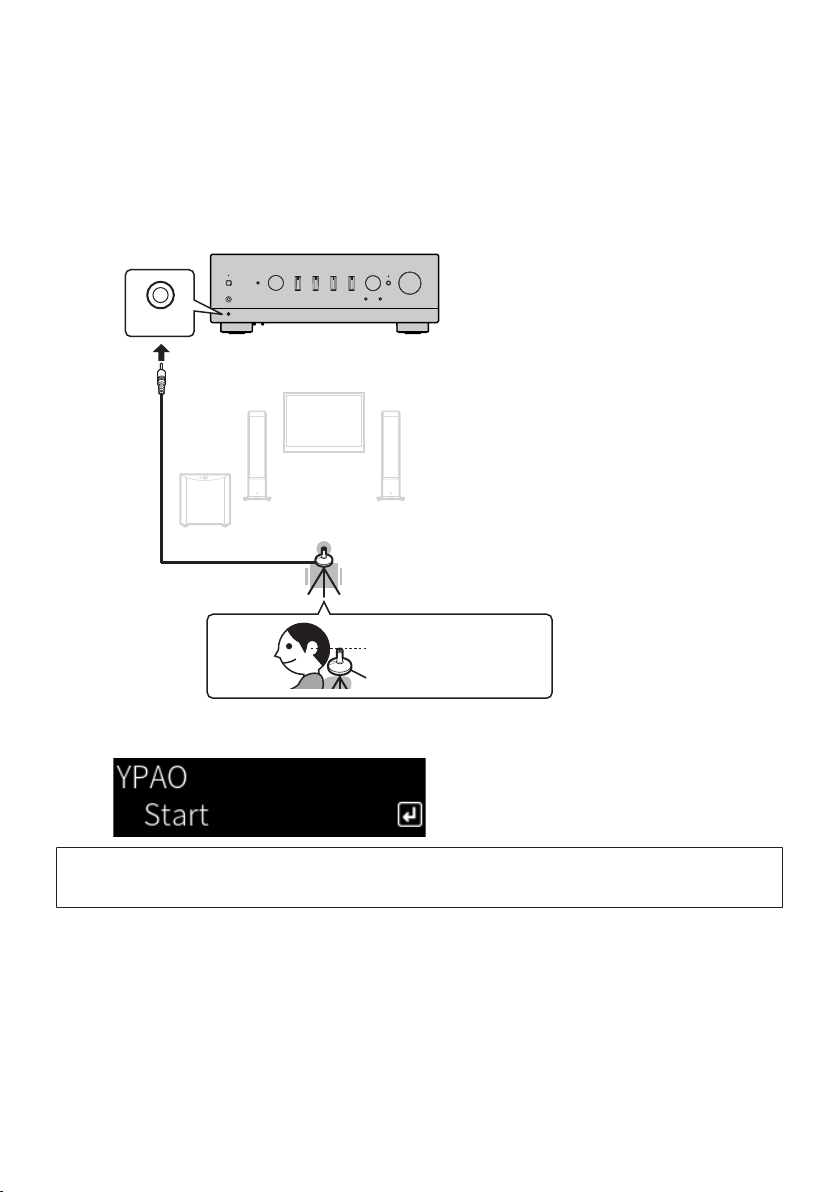
4 Put the included YPAO microphone in the listening position (ear height).
Secure the YPAO microphone in place so it does not move. If a camera tripod is used for the
microphone, its screws can be used to secure the microphone.
5 Plug the YPAO microphone into the YPAO MIC jack on the front panel.
The following message appears on the front display.
NOTICE
(
Be careful not to stumble on the YPAO microphone cable. Doing so may damage the YPAO microphone.
47
Page 48
VOLUME
PHONO
SLEEP
LINE 1 LINE 2 CD
TV COAX
USB DAC
OPT 1 OPT 2
BLUETOOTH
DISPLAY
HOME RETURN
SETUP OPTION
NOW PLAYING MUTE
TUNER NET
PRESET
REPEAT SHUFFLE
1 2
ENTER
3
MEMORY
A B
SPEAKERS
ENTER
PRESET
1 2
ENTER
3
MEMORY
ENTER
PRESET3MEMORY
ENTER
PREPARATION > Automatic adjustment of speaker settings (YPAO)
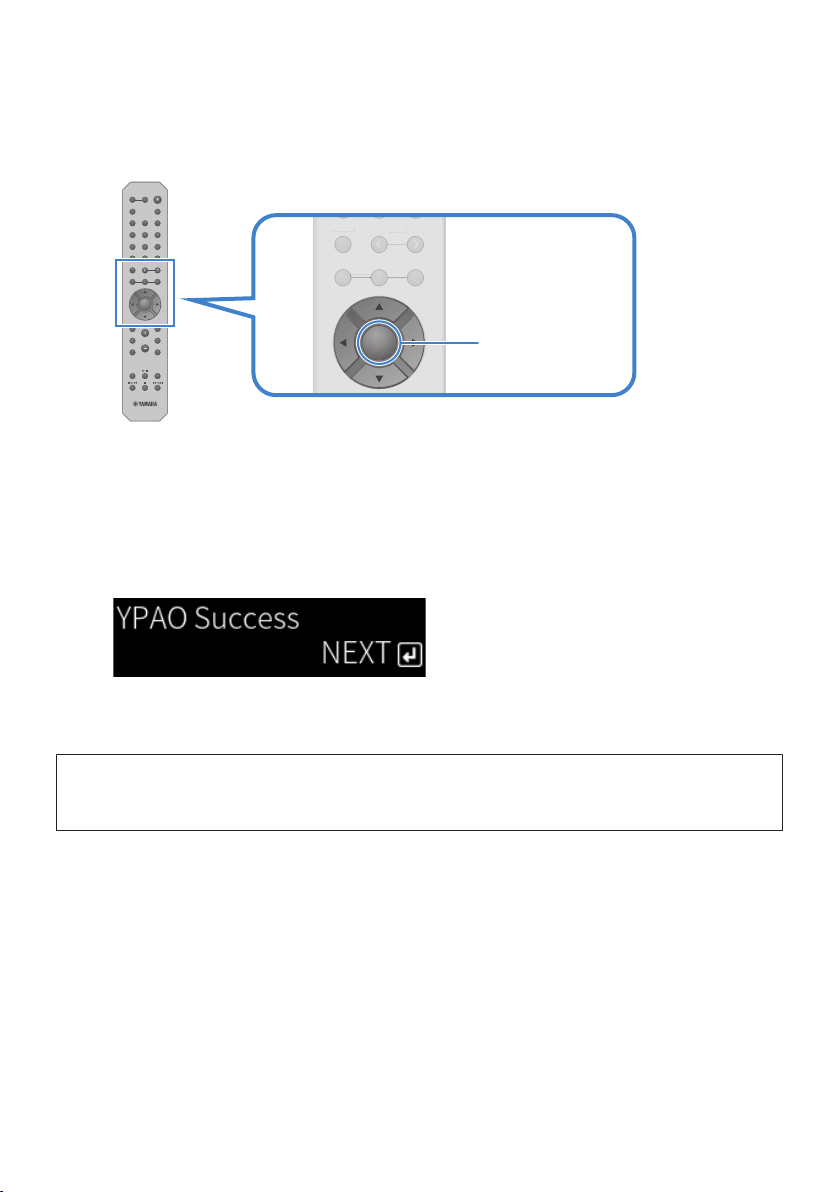
6 Press the ENTER key to start YPAO making the automatic adjustments of speaker
settings.
Adjustments start automatically after about 10 seconds. It takes about one minute.
NOTE
To cancel the operation before starting the YPAO function, unplug the YPAO microphone. After YPAO has started, press the
RETURN key.
7 Check the results on the front display.
After all adjustments are complete, the results are shown on the front display. Follow the
instructions and press the ENTER key to complete the adjustments.
8 Unplug the YPAO microphone from the YPAO MIC jack.
This completes the automatic adjustments of speaker settings via YPAO.
NOTICE
(
The YPAO microphone is sensitive to heat, so avoid hot places (such as on top of an external device) or places in direct sunlight
when storing it.
NOTE
(
Running YPAO automatically enables the YPAO Volume function, which is linked to the volume and automatically adjusts the bass/
treble balance. This allows you to enjoy a natural balance in sound quality, even at low volumes.
(
Run the YPAO process for each set of speakers that will be used. Speaker settings are saved individually for each of the speakers
used (A, B, A+B and Off).
(
Error messages may be displayed during auto-adjustment, and/or warning messages may appear in the results.
(
You can use the dedicated app “MusicCast Controller” to check the results of YPAO measurements and change the speaker
settings.
48
Page 49

PREPARATION > Automatic adjustment of speaker settings (YPAO)
Related links
(
“Front panel”(p.14)
(
“Error and warning messages”(p.50)
(
“Using the app to check YPAO measurements and change settings”(p.52)
(
“Configuring YPAO”(p.106)
49
Page 50

PREPARATION > Automatic adjustment of speaker settings (YPAO)
Error and warning messages
When error or warning messages are displayed, resolve the cause based on the following table and measure
again.
[Search tag]#Q01 YPAO Error and Warning
Error Messages
n
Error Messages Solution
E-1:Noisy
E-2:No Signal
E-3:No MIC
E-4:User Cancel
E-5:Headphone pluged
E-10:Internal Err.
E-20:No Speakers
E-21:Control Knob
E-22:Pure Direct
Measure again after making the room quiet.
Plug the YPAO microphone securely into the YPAO MIC jack and measure again.
If this error occurs frequently, contact the outlet where you bought this
product, or the authorized Yamaha service center.
Plug the YPAO microphone securely into the YPAO MIC jack and measure again.
Depending on your purpose, measure again or close YPAO.
Unplug the headphones and then measure again.
After finishing YPAO, turn this product OFF and back ON. If this error occurs
frequently, contact the outlet where you bought this product, or the authorized
Yamaha service center.
Select the speakers to use (A, B, A+B or Off) and then measure again. If the same
error message appears again, exit YPAO, turn OFF this product, and check the
speaker and/or PRE OUT jack connections. If using an external amp, check its
connections and power.
Make sure the controls on the front panel, BASS, TREBLE, BALANCE and
LOUDNESS, are in the center or FLAT positions, and then measure again.
Turn PURE DIRECT on the front panel OFF (indicator not lit) and then measure
again.
NOTE
(
To exit YPAO in order to resolve the cause, press the ENTER key and then use the cursor keys (q/w) to select “Cancel” and press
the ENTER key.
(
To measure again, press the ENTER key and then use the cursor keys (q/w) to select “Retry” and press the ENTER key.
Warning Messages
n
Even when a warning message is displayed, the measurement results can still be saved. However, to get the
best speaker settings, we recommend resolving the cause and running the measurements again.
50
Page 51

PREPARATION > Automatic adjustment of speaker settings (YPAO)
Warning Messages Solution
Check the cable connections (+ & -) of the corresponding speakers.
If connected incorrectly:
Reconnect the speaker cables.
W-1:Out of Phase
W-2:Over Distance
W-3:Level Error
If connected correctly:
This message may appear even when everything is connected correctly,
depending on the kind of speakers and installation environment. Save the
settings and use the system as-is.
(This message prompts you to check the system and it does not affect playing
this product if used as-is.)
Check the distance between the listening position and the corresponding
speakers.
Correct the connections or placement of the corresponding speakers. Use the
same or similar speakers with similar performance if possible.
If there is a problem with a subwoofer, check that its volume is appropriate.
NOTE
Turn OFF this product before reconnecting or relocating speakers.
51
Page 52
PREPARATION > Automatic adjustment of speaker settings (YPAO)
Using the app to check YPAO measurements and change
settings
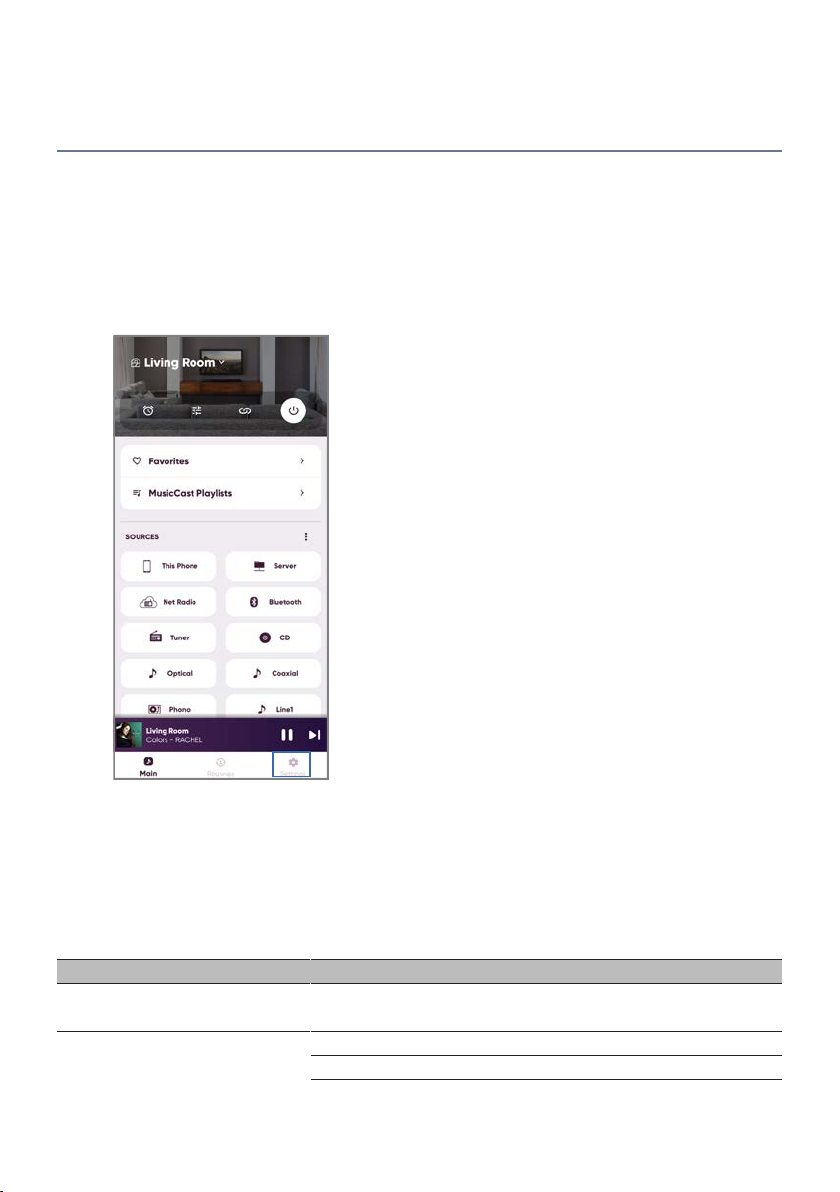
You can use the dedicated app “MusicCast Controller” to check the results of YPAO measurements and
change the settings. Use a mobile device with “MusicCast Controller” installed on it to perform these steps.
The screens shown in the following steps are examples when “Living Room” is set to the name of the room in
which this product is installed.
1 Start “MusicCast Controller” on your mobile device(s), select the room in which
this product is installed, and then tap the settings icon.
2 Tap the room in which this product is installed from “Room Settings” on the
Settings screen.
3 Tap “Speaker Setup” under “YPAO” on the room screen (this product).
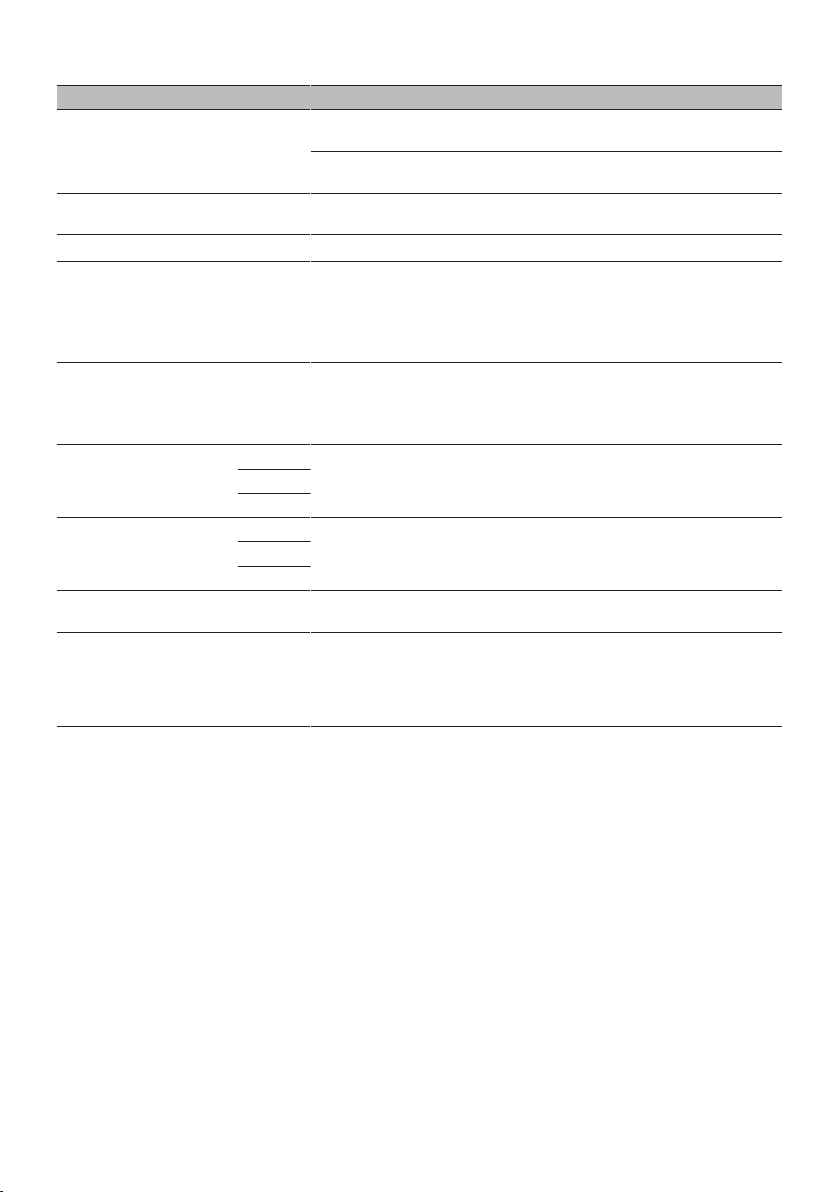
4 Confirm the YPAO measurement results on the Speaker Settings screen.
You can also change the settings from the Speaker Settings screen.
Item Setting Value or Display Description
Speakers
Status
A/B/A+B
No measurement Shown if YPAO has not been run.
Measuring… Shown while YPAO is making measurements.
52
Speaker being used is displayed.
If neither A nor B is selected, the field is blank.
Page 53
PREPARATION > Automatic adjustment of speaker settings (YPAO)
Item Setting Value or Display Description
Not available
Status
Available
YPAO
Subwoofer
Speakers
Crossover
Distance
Level
EQ
YPAO Volume
L
R
SW
L
R
SW
On/Off
Use/Do not use Sets whether to use/not use subwoofer.
Full Band/Low Cut
40 Hz to 200 Hz
0.30 m to 24.00 m
(0.05 m steps)
-10.0 dB to +10.0 dB
(0.5 dB steps)
On/Off
On/Off
Displayed if YPAO measurements are not
reflected in speaker settings.
Displayed if YPAO measurements are reflected in
speaker settings.
Selects whether to reflect YPAO measurements
in speaker settings.
Sets the frequency bandwidth output to the left/
right speakers. If you select low frequency cut,
the configured crossover frequency is applied.
If a subwoofer will not be used, the setting
cannot be made.
Sets the speaker and subwoofer crossover
frequencies.
If a subwoofer will not be used, the setting
cannot be made.
Sets the distance from the listening position to
each speaker individually so the sound from
each of them reaches you at the same time.
Sets speakers individually so the volume from
each sounds the same at the listening position.
Sets whether to use/not use an equalizer based
on YPAO measurements.
When “YPAO Volume” is set to “On”, the balance
between the bass and treble ranges is adjusted
automatically in conjunction with the volume,
which allows you to enjoy a natural sound
quality balance, even at low volumes.
NOTE
If you will use a subwoofer, install it before running YPAO measurements to ensure a smooth connection between the bass and
midrange. If you feel the volume of the bass is too loud or low, adjust to the desired volume with “SW” of “Level” item.
Related links
“Registering with the MusicCast network”(p.45)
53
Page 54
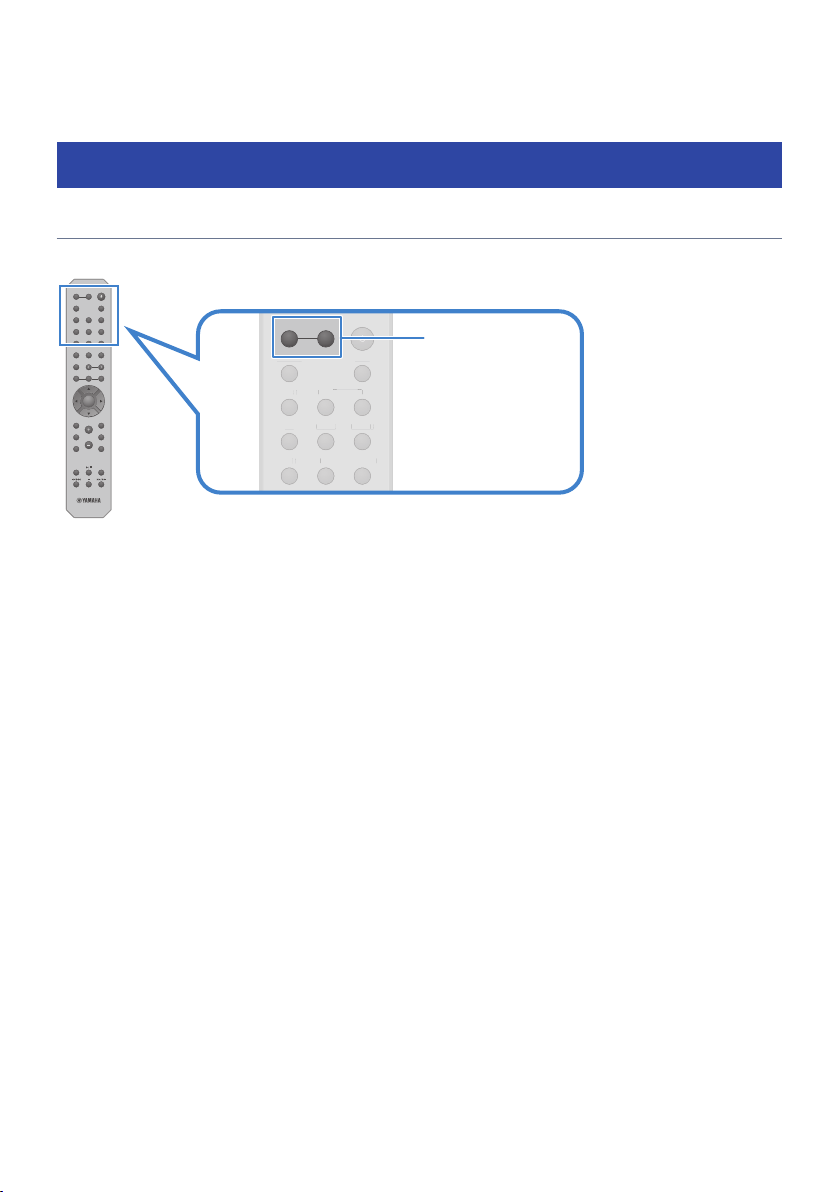
VOLUME
PHONO
SLEEP
LINE 1 LINE 2 CD
TV COAX
USB DAC
OPT 1 OPT 2
BLUETOOTH
DISPLAY
HOME RETURN
SETUP OPTION
NOW PLAYING MUTE
TUNER NET
PRESET
REPEAT SHUFFLE
1 2
ENTER
3
MEMORY
A B
SPEAKERS
ENTER
PHONO
SLEEP
LINE 1 LINE 2 CD
TV COAX
USB DAC
OPT 1 OPT 2
BLUETOOTH
A B
SPEAKERS
PHONO
SLEEP
2 C
TV
COAX
USB DA
C
OPT
1 O
BLUETOOTH
SPEAKERS A and B
PLAYBACK > Basic operations
PLAYBACK
Basic operations
Selecting the output speakers
Press the SPEAKERS A key and/or SPEAKERS B key to select the speakers to output to.
Switches Speakers A or B ON/OFF each time it is pressed. You can check which speakers are selected on the
front display.
(
A: Outputs from Speakers A.
(
B: Outputs from Speakers B.
(
A+B: Outputs from both Speakers A and Speakers B.
(
Off: Does not output from either Speakers A or B.
NOTE
(
This operation can be done also with SPEAKERS on the front panel.
(
Regardless of the speaker selection, audio is always output to the PRE OUT jacks.
(
If the speakers are connected with bi-wiring, select A+B.
(
When headphones are connected, no audio is output from the speakers or PRE OUT jacks.
54
Page 55
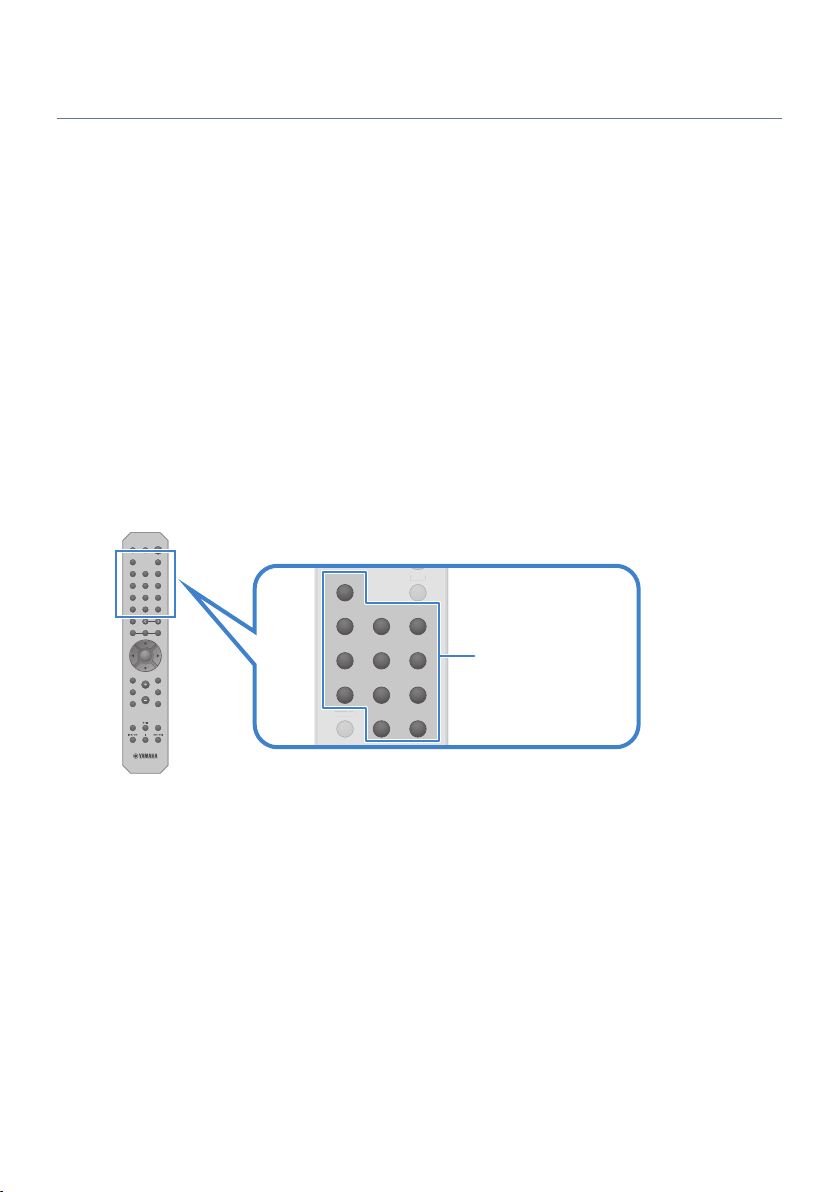
VOLUME
PHONO
SLEEP
LINE 1 LINE 2 CD
TV COAX
USB DAC
OPT 1 OPT 2
BLUETOOTH
DISPLAY
HOME RETURN
SETUP OPTION
NOW PLAYING MUTE
TUNER NET
PRESET
REPEAT SHUFFLE
1 2
ENTER
3
MEMORY
A B
SPEAKERS
ENTER
PHONO
SLEEP
LINE 1 LINE 2 CD
TV COAX
USB DAC
OPT 1 OPT 2
BLUETOOTH
DISPLAY
TUNER NET
SLEEP
DISPLA
Y
Input source selection
keys
PLAYBACK > Basic operations
Selecting an input source
To play music, select the desired input source.
1 Turn ON an external device.
2 Press an input source selection key to select an input source.
Selects the input source from the following.
(
PHONO key: audio from turntable (record player) input via the PHONO jacks.
(
LINE 1/2 keys: audio input via the LINE 1/2 jacks.
(
TV key: ARC-compatible TV audio input via the TV [ARC] port.
(
CD key: audio input via the CD jacks.
(
USB DAC key: computer audio input via the USB port.
(
OPT 1/2 keys: audio input via the OPTICAL 1/2 jacks.
(
COAX key: audio input via the COAXIAL jacks.
(
TUNER key: audio from a radio station.
(
BLUETOOTH key: audio from a device, such as a smartphone, connected via Bluetooth.
(
NET key: audio input via the NETWORK jack or wirelessly.
3 Operate an external device to start playback, or select a radio station with this
product.
NOTE
(
You can also turn INPUT on the front panel to select the input source.
(
For information on operating your external device, refer to its operating manual.
55
Page 56
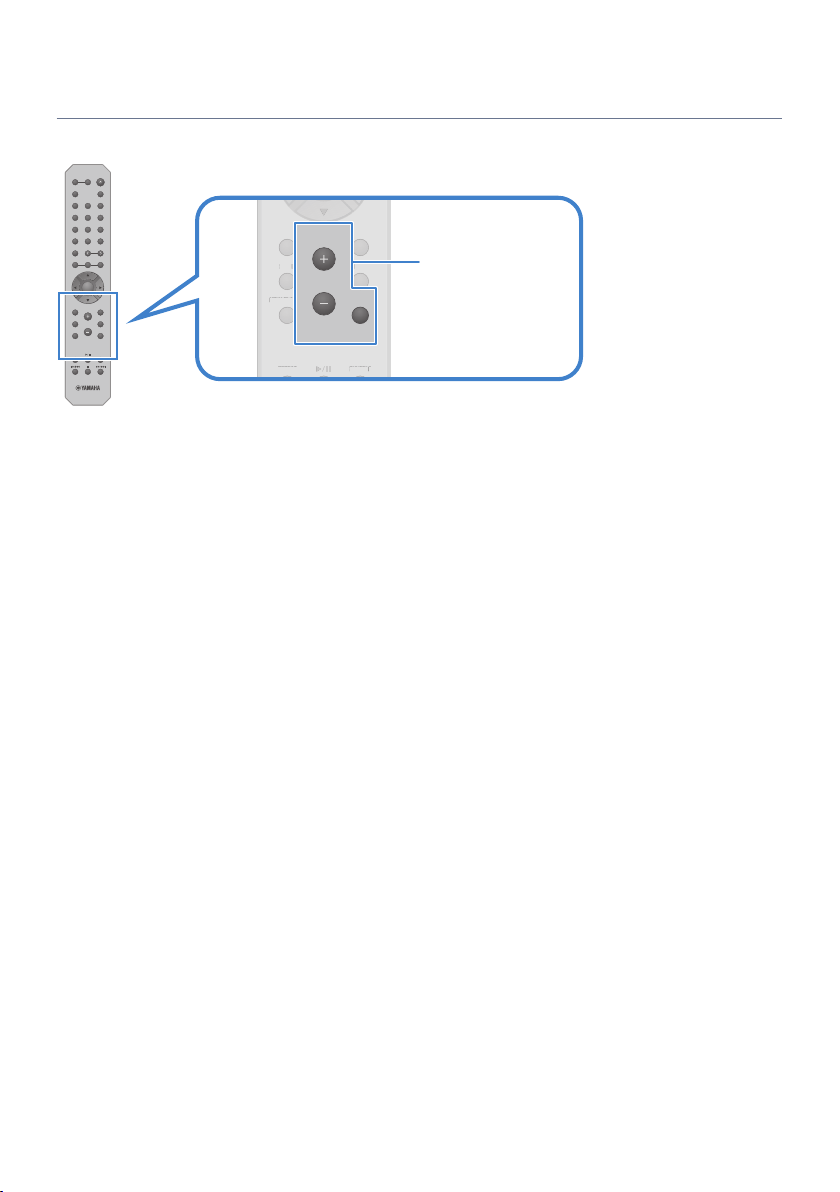
VOLUME
HOME RETURN
SETUP OPTION
NOW PLAYING MUTE
REPEAT SHUFFLE
HOME
SETU
P O
PTION
NOW PLAYIN
REPEAT
SHUFFL
E
VOLUME
PHONO
SLEEP
LINE 1 LINE 2 CD
TV COAX
USB DAC
OPT 1 OPT 2
BLUETOOTH
DISPLAY
HOME RETURN
SETUP OPTION
NOW PLAYING MUTE
TUNER NET
PRESET
REPEAT SHUFFLE
1 2
ENTER
3
MEMORY
A B
SPEAKERS
ENTER
VOLUME +/MUTE
PLAYBACK > Basic operations
Adjusting the volume
Press the VOLUME +/− keys to adjust the volume.
NOTE
(
You can also turn VOLUME on the front panel to adjust it.
(
Pressing the MUTE key mutes the sound. Pressing it again returns the volume to its previous level.
(
You can adjust the sound to your preference with BASS, TREBLE, BALANCE and LOUDNESS on the front panel.
Related links
(
“Adjusting bass and treble (BASS/TREBLE)”(p.59)
(
“Adjusting left/right volume balance (BALANCE)”(p.60)
(
“Making it easier to hear bass and treble at low volumes (LOUDNESS)”(p.61)
56
Page 57
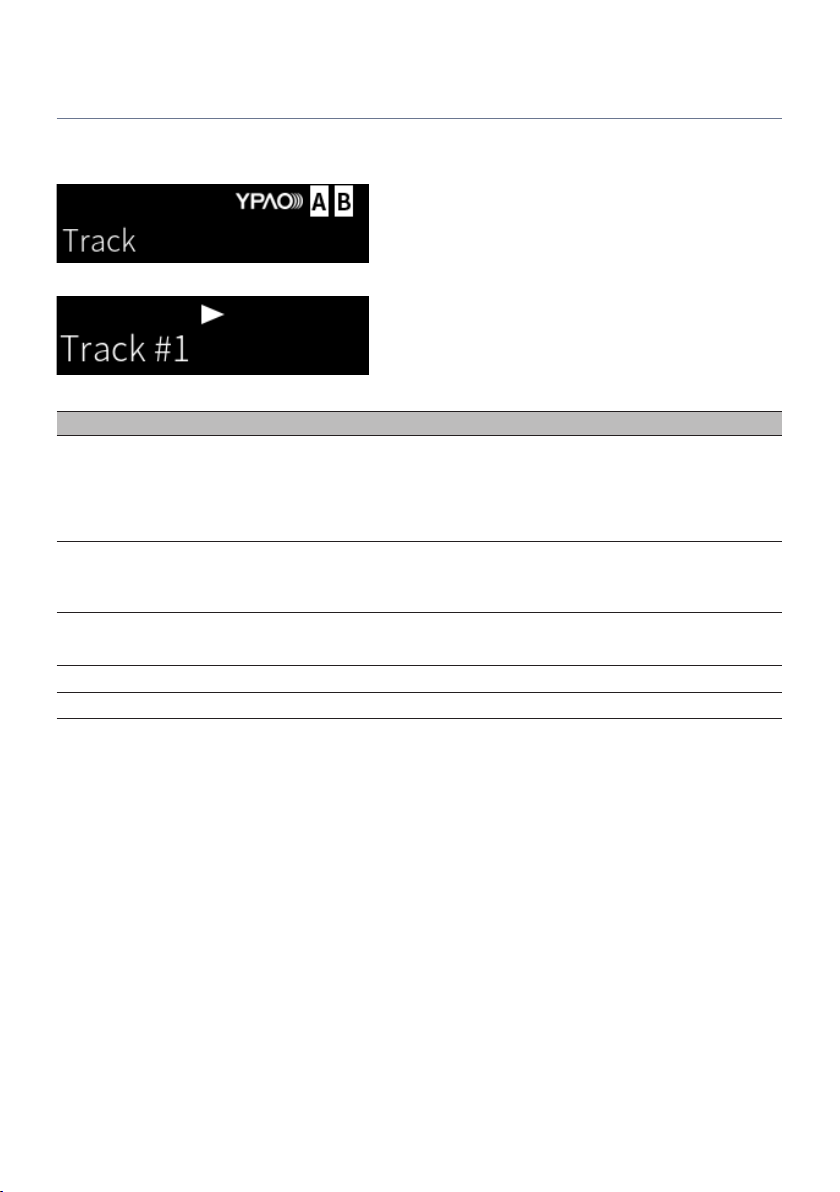
PLAYBACK > Basic operations
Switching the front display
The information shown on the front display can be changed depending on the current input source.
Repeatedly press the DISPLAY key of the remote control to select the desired display item.
The selected information is displayed after 3 seconds.
The following display items are available.
Currently input source Displayed item
Frequency
(Models for U.K., Europe, and Russia) Radio Data System data is also available when this
TUNER (FM/AM)
TUNER (DAB)
Server
AirPlay
Net Radio
Bluetooth
product is tuned into a Radio Data System broadcasting station. For details, see the
following:
(
“Displaying the Radio Data System information”(p.68)
(Models for U.K., Europe, Russia, and Australia)
For details, see the following:
(
“Displaying the DAB information”(p.69)
Track, Artist, Album, Time
Track, Album, Time, Station
Track, Artist, Album
57
Page 58

PLAYBACK > Adjusting the sound to your preference
Adjusting the sound to your preference
Enjoying Pure Direct playback (PURE DIRECT)
Pure Direct stops various processes and circuitry except for the basic ones for playback, letting you enjoy
higher quality sound with reduced noise.
Press PURE DIRECT to turn it ON, and the indicator lights up.
NOTE
(
When using Pure Direct, the following functions are disabled.
(
The various adjustment functions: BASS, TREBLE, BALANCE, and LOUDNESS
(
Settings made via YPAO
(
Operation of Option menu and Setup menu
(
Indications on the front display (when no operations performed)
(
When using Pure Direct, transmissions to the MusicCast Network are not available, except the audio of network content and
Bluetooth devices.
Related links
“Using the app to check YPAO measurements and change settings”(p.52)
58
Page 59

BASS TREBLE
PLAYBACK > Adjusting the sound to your preference
Adjusting bass and treble (BASS/TREBLE)
You can adjust the level of high-frequency range (Treble) and low-frequency range (Bass) individually.
Adjusting the bass
n
When the bass feels too weak, turn BASS to the right to increase it. When it feels too strong, turn BASS to the
left to reduce it.
It has flat characteristics when set to the middle.
Setting range: -10 dB to 0 to +10 dB (20 Hz)
Adjusting the treble
n
When the treble feels too weak, turn TREBLE to the right to increase it. When it feels too strong, turn TREBLE
to the left to reduce it.
It has flat characteristics when set to the middle.
Setting range: -10 dB to 0 to +10 dB (20 kHz)
NOTE
When Pure Direct is used, the settings are disabled (left and right channels are fixed at 0 dB).
59
Page 60

BALANCE
L R
PLAYBACK > Adjusting the sound to your preference
Adjusting left/right volume balance (BALANCE)
Any unbalance in volume due to positioning of the speakers and/or conditions in the room can be corrected
by adjusting the balance of the volume between the left and right speakers.
Turn BALANCE left or right to adjust the left channel (L) or the right channel (R). When turned all the way to
the left or right, it mutes the opposite channel.
NOTE
When Pure Direct is used, the setting is disabled (left and right channels are fixed at 0 dB).
60
Page 61
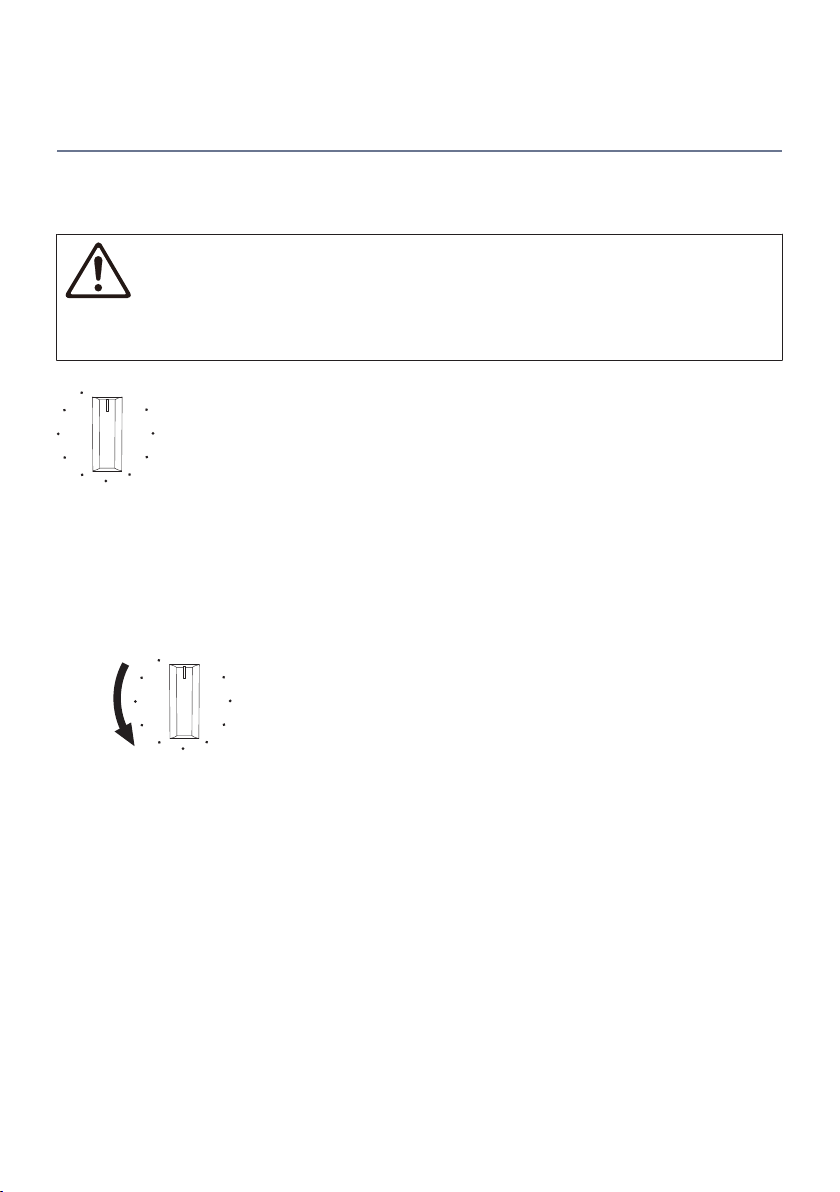
LOUDNESS
FLAT
-30dB
LOUDNESS
FLAT
-30dB
PLAYBACK > Adjusting the sound to your preference
Making it easier to hear bass and treble at low volumes
(LOUDNESS)
It lowers the volume of the midrange and allows the listener to enjoy natural sound even at low volumes by
compensating for the human auditory characteristic that makes it difficult to hear bass and treble at low
volumes.
CAUTION
(
If you enable Pure Direct after adjusting LOUDNESS, the input signal bypasses the loudness adjustment function and the
volume increases suddenly. To protect your ears and the speakers from damage, always check the state of LOUDNESS before
enabling Pure Direct, and if it is set to any position other than FLAT, lower the volume.
1 Put LOUDNESS to the FLAT position.
2 Turn VOLUME up to the maximum level at which you normally listen to music.
3 Turn LOUDNESS counterclockwise to a moderate volume.
NOTE
(
If the YPAO Volume function is enabled, loudness adjustment cannot be used.
(
When Pure Direct is used, the settings are disabled (equivalent to the FLAT position).
(
After making the settings, if the loudness effect is too strong (or weak) when played at your desired volume, adjust it again.
61
Page 62
PLAYBACK > Listening to TV audio
Listening to TV audio
Making settings for listening to TV audio
To listen to the audio of an ARC-compatible TV connected via HDMI cable, enable the HDMI control function
and configure the link between the TV and this product.
1 Press the SETUP key.
The Setup menu opens on the front display.
2 Select “TV” with the cursor keys (q/w) and then press the ENTER key.
“HDMI Control” is displayed.
3 Press the ENTER key.
4 Select “On” with the cursor keys (e/r) and then press the ENTER key.
5 Press the SETUP key.
6 Enable the TV HDMI control function.
Refer to the user's manual of the TV and make the settings.
7 Unplug the TV’s power plug from the outlet, then plug it back in and turn the TV
ON.
The HDMI connection between the TV and this product is configured and the link is set.
NOTE
If the HDMI control function of this product is turned from OFF to ON, the link has to be configured again.
Related links
(
“Connecting via HDMI to an ARC-compatible TV”(p.27)
(
“Listening to the audio of an HDMI-connected TV (ARC)”(p.63)
(
“Configuring your TV”(p.107)
62
Page 63

PLAYBACK > Listening to TV audio
Listening to the audio of an HDMI-connected TV (ARC)
You can play the audio of your TV or of external devices connected via HDMI to the TV on this product by
connecting it to an ARC-compatible TV via HDMI cable and configuring the link.
Switch the input of this product to “TV”, and then the audio output of the TV is switched to this product.
TV settings
n
The only audio that can be played on this product via the TV [ARC] port is PCM 2-channel. First check the
settings on your TV and set the audio format for ARC output to the PCM 2-channel. If the TV is not set to the
PCM 2-channel, the audio may not play at all or play as loud noise. For more details, refer to the user's
manual of the TV.
NOTE
(
In order to use ARC, it is necessary to turn the HDMI control function ON.
(
You can also control audio functions like volume and mute with the TV’s remote control.
Related links
(
“Connecting via HDMI to an ARC-compatible TV”(p.27)
(
“Making settings for listening to TV audio”(p.62)
(
“Configuring your TV”(p.107)
63
Page 64

PLAYBACK > Listening to the radio
Listening to the radio
Preparing to listen to the radio
Setting the frequency steps
Model For
Asia and Taiwan
Set the radio tuning frequency steps of this product depending on your country or region.
At the factory, the frequency step setting is set to 50 kHz for FM and 9 kHz for AM. Depending on your country
or region, set the frequency steps to 100 kHz for FM and 10 kHz for AM.
1 Push the z (Power) Switch on the front panel to turn the power OFF.
2 While pressing RETURN on the front panel, push the z (Power) Switch.
3 Turn SELECT on the front panel to choose “Frequency Step” and press SELECT.
4 Turn SELECT to choose “FM100/AM10” and press SELECT.
5 Push the z (Power) Switch to turn it OFF.
6 Push the z (Power) Switch again to turn it back ON.
This completes the settings.
NOTE
Preset (registered radio stations) and frequency will be initialized if you change the radio tuning frequency steps.
Related links
“Changing the FM/AM tuning frequency setting”(p.116)
64
Page 65
PLAYBACK > Listening to the radio
Preparing the DAB tuning
Model For
U.K., Europe, Russia and Australia
Before listening to DAB (Digital Audio Broadcasting) radio, perform an initial scan to register the DAB radio
stations automatically.
1 Switch the input to “TUNER”.
2 Press the TUNER key to select the DAB band.
After 3 seconds, the initial scan starts. When the initial scan finishes, this product
automatically tunes in to the first DAB radio station in order by frequency.
NOTE
(
DAB uses digital signals for clearer sound and more stable reception compared to analog signals. This product can also receive
DAB+ (an upgraded version of DAB) that allows for more stations using MPEG-4 HE-AAC v2 audio codec, which has a more efficient
transmission method.
(
Be sure to check the DAB coverage in your area in that not all areas are currently being covered. For a list of nationwide DAB
statuses and worldwide DAB frequencies, check WorldDMB online at http://www.worlddab.org/.
(
If no DAB radio stations are found by an initial scan, the front display will change to “Off Air”.
(
To perform an initial scan again after some DAB radio stations are stored, select “Init Scan” in the Option menu. If you perform an
initial scan again, the DAB radio stations currently registered to the preset numbers will be cleared.
(
You can check reception strength of each DAB channel label. Select “Tune AID” in the Option menu.
Related links
(
“Checking reception strength of each DAB channel label”(p.88)
(
“Performing an initial scan for DAB radio reception”(p.87)
DAB frequency information
n
This product supports Band III (174 to 240 MHz) only.
Frequency Channel label
174.928 MHz 5A
176.640 MHz 5B
178.352 MHz 5C
180.064 MHz 5D
181.936 MHz 6A
183.648 MHz 6B
185.360 MHz 6C
187.072 MHz 6D
65
Page 66

PLAYBACK > Listening to the radio
Frequency Channel label
188.928 MHz 7A
190.640 MHz 7B
192.352 MHz 7C
194.064 MHz 7D
195.936 MHz 8A
197.648 MHz 8B
199.360 MHz 8C
201.072 MHz 8D
202.928 MHz 9A
204.640 MHz 9B
206.352 MHz 9C
208.064 MHz 9D
209.936 MHz 10A
211.648 MHz 10B
213.360 MHz 10C
215.072 MHz 10D
216.928 MHz 11A
218.640 MHz 11B
220.352 MHz 11C
222.064 MHz 11D
223.936 MHz 12A
225.648 MHz 12B
227.360 MHz 12C
229.072 MHz 12D
230.784 MHz 13A
232.496 MHz 13B
234.208 MHz 13C
235.776 MHz 13D
237.488 MHz 13E
239.200 MHz 13F
66
Page 67
PLAYBACK > Listening to the radio
Selecting a radio station
You can use the this product’s built-in tuner to listen to the radio.
1 Switch the input to “TUNER”.
The currently selected frequency is shown on the front display.
2 Press the TUNER key to switch to the next reception band.
(
FM/AM (Models for U.S.A., Canada, China, Korea, Asia, and Taiwan)
(
DAB/FM (Models for U.K., Europe, Russia and Australia)
3 Select a radio station.
(
To specify a frequency and select a radio station, press the cursor keys (e/r) repeatedly.
You can also search for stations automatically by long-pressing the cursor keys (e/r).
(
To select a registered radio station, press the PRESET key and choose the desired preset
number. To go back to selecting stations via frequency, press the RETURN key.
NOTE
(
The FM radio reception mode (stereo/mono) can be set via “FM Mode” in the Option menu. When reception of an FM radio is
unstable, it may help to switch to mono reception.
(
You can check reception strength of each DAB channel label. Select “Tune AID” in the Option menu.
Related links
(
“Auto-registering FM radio stations (auto preset)”(p.70)
(
“Registering radio stations manually”(p.71)
(
“Setting the reception mode (stereo/mono) for FM radio”(p.86)
(
“Checking reception strength of each DAB channel label”(p.88)
67
Page 68

PLAYBACK > Listening to the radio
Displaying the Radio Data System information
Model For
U.K., Europe and Russia
Radio Data System is a data transmission system used by FM stations. This product can receive various types
of data, such as “Program Service”, “Program Type”, “Radio Text” and “Clock Time”, when it is tuned in to a
Radio Data System broadcasting station.
1 Tune in to the desired Radio Data System broadcasting station.
2 Press the DISPLAY key on the remote control to select between the various display
items.
The information appears on the front display.
Frequency
Program Service
Program Type
Radio Text
Clock Time
Frequency
Program service name
Current program type
Information on the current program
Current time
NOTE
(
“---” is displayed in “Program Service”, “Program Type”, “Radio Text”, and “Clock Time” if the radio station does not provide the
Radio Data System service.
(
We recommend using “Auto Preset” to tune in to the Radio Data System broadcasting stations.
Related links
“Auto-registering FM radio stations (auto preset)”(p.70)
68
Page 69
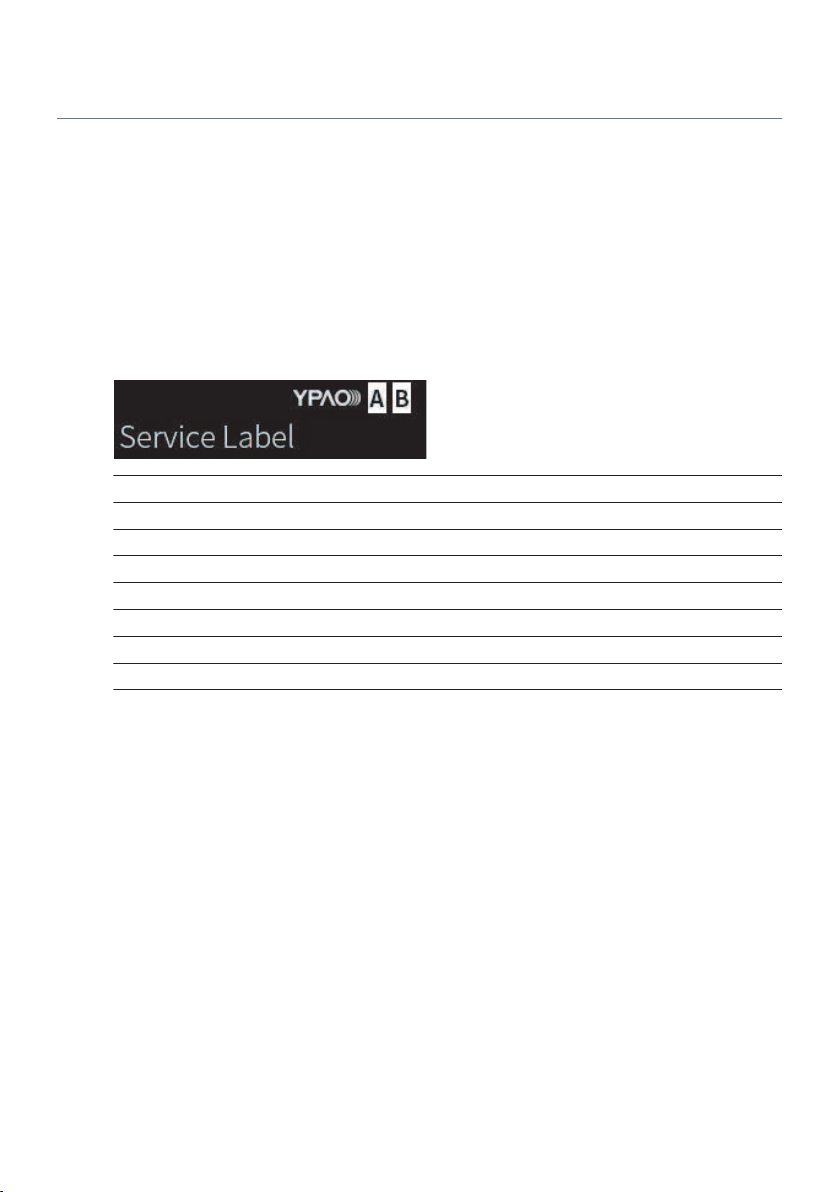
PLAYBACK > Listening to the radio
Displaying the DAB information
Model For
U.K., Europe, Russia and Australia
This product can receive various types of DAB information when it is tuned into a DAB radio station.
1 Tune in to the desired DAB radio station.
2 Press the DISPLAY key on the remote control to select between the various display
items.
The information appears on the front display.
Service Label
Dynamic Label
Ensemble Label
Program Type
Date and Time
Audio Mode
CH Label/Frequency
Signal Quality
NOTE
Some information may not be available depending on the selected DAB radio station, and “---” is displayed.
Station name
Information on the current station
Ensemble name
Station genre
Current date and time
Audio mode (monaural/stereo) and bit rate
Channel label and frequency
Signal reception quality (0 [none] to 100 [best])
69
Page 70

PLAYBACK > Listening to the radio
Auto-registering FM radio stations (auto preset)
This function automatically registers the FM stations with the strongest signal to preset numbers.
1 Switch the input to “TUNER”.
2 Switch the reception band to FM.
3 Press the OPTION key.
4 Select “Auto Preset” with the cursor keys (q/w) and then press the ENTER key.
5 Use the cursor keys (q/w) to select a preset number for starting the auto preset
process.
6 Press the ENTER key.
Auto presetting begins and “Searching” is shown during the auto preset process.
Once auto preset is complete, “Finished” is displayed and the Option menu closes automatically.
NOTE
(
A maximum of 40 radio stations can be registered.
(
To cancel auto preset, press the RETURN key.
(
(Models for U.K., Europe and Russia) Only Radio Data System broadcasting stations are registered automatically by the Auto Preset
function.
Related links
(
“Selecting a radio station”(p.67)
(
“Registering radio stations manually”(p.71)
70
Page 71
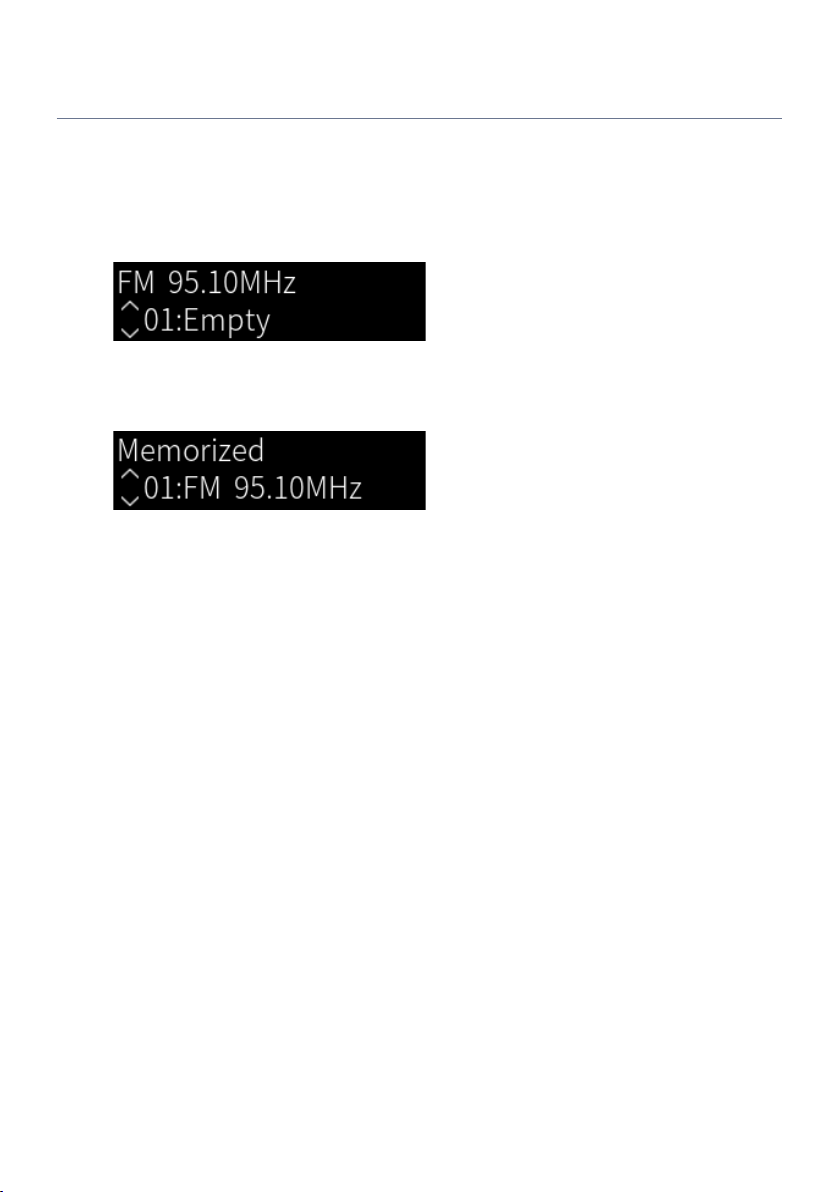
PLAYBACK > Listening to the radio
Registering radio stations manually
You can select a radio station and register it manually to a preset number.
1 Select a radio station.
2 Press the MEMORY key.
3 Press the PRESET key and select the preset number to register.
4 Press the MEMORY key.
This completes the registration.
NOTE
(
A maximum of 40 radio stations can be registered.
(
To register a radio station to the next empty number from the previously preset number, press the MEMORY key for 3 seconds or so
while on the desired radio station.
(
To go back to the original screen without registering, press the RETURN key.
(
After 30 seconds of inactivity, the display automatically returns to the previous screen.
Related links
(
“Selecting a radio station”(p.67)
(
“Auto-registering FM radio stations (auto preset)”(p.70)
71
Page 72

PLAYBACK > Listening to the radio
Removing the registration of a radio station
This explains how to remove the registration of a preset radio station.
1 Switch the input to “TUNER”.
2 Press the OPTION key.
3 Select “Clear Preset” with the cursor keys (q/w) and then press the ENTER key.
4 Press the PRESET key, select the preset number to remove, and then press the
ENTER key.
Once the registration is removed, “Cleared” is displayed and the next registered preset
number is displayed.
5 To remove another preset number, repeat step 4.
6 Press the OPTION key.
This completes removal of the registration.
72
Page 73
Bluetooth device
(smartphone, etc.)
This product
PLAYBACK > Playing via a Bluetooth® connection
Playing via a Bluetooth® connection
Playing the audio of a Bluetooth device on this product (audio
reception)
This product can play music files and the like saved on a Bluetooth device (such as a smartphone).
CAUTION
(
If you adjust the volume on the Bluetooth device, it may get unexpectedly loud and cause damage to your hearing and/or
equipment. If the volume becomes too loud during playback, stop playback immediately.
1 Switch the input to “Bluetooth”.
2 Select this product (network name of this product) on the Bluetooth device.
If a passkey is required, enter the number “0000”.
3 Play the audio of the Bluetooth device.
NOTE
(
If a paired Bluetooth device is detected, the input switches and the device is connected automatically. To connect to a different
Bluetooth device, first disconnect the current connection.
(
Use the playback keys on the remote control to control playback on the Bluetooth device.
(
The volume on this product can be controlled from the Bluetooth device while it is playing (some Bluetooth devices may not be
possible to control the volume).
(
To disconnect the Bluetooth device, do any of the following.
(
Perform a disconnect operation on the Bluetooth device.
(
Press the BLUETOOTH key for 3 seconds (it may take some time to disconnect).
(
Switch the input of this product to anything other than “Bluetooth”.
(
Switch “Bluetooth” on the Setup menu to “Off”.
(
The Bluetooth indicator on the front panel lights up when a Bluetooth device is connected.
(
You can switch the playback information shown on the front display by repeatedly pressing the DISPLAY key while it is playing.
Related links
(
“Configuring Bluetooth”(p.105)
(
“Setting volume interlock with this product when playing an AirPlay/Bluetooth device”(p.89)
(
“Switching the front display”(p.57)
73
Page 74
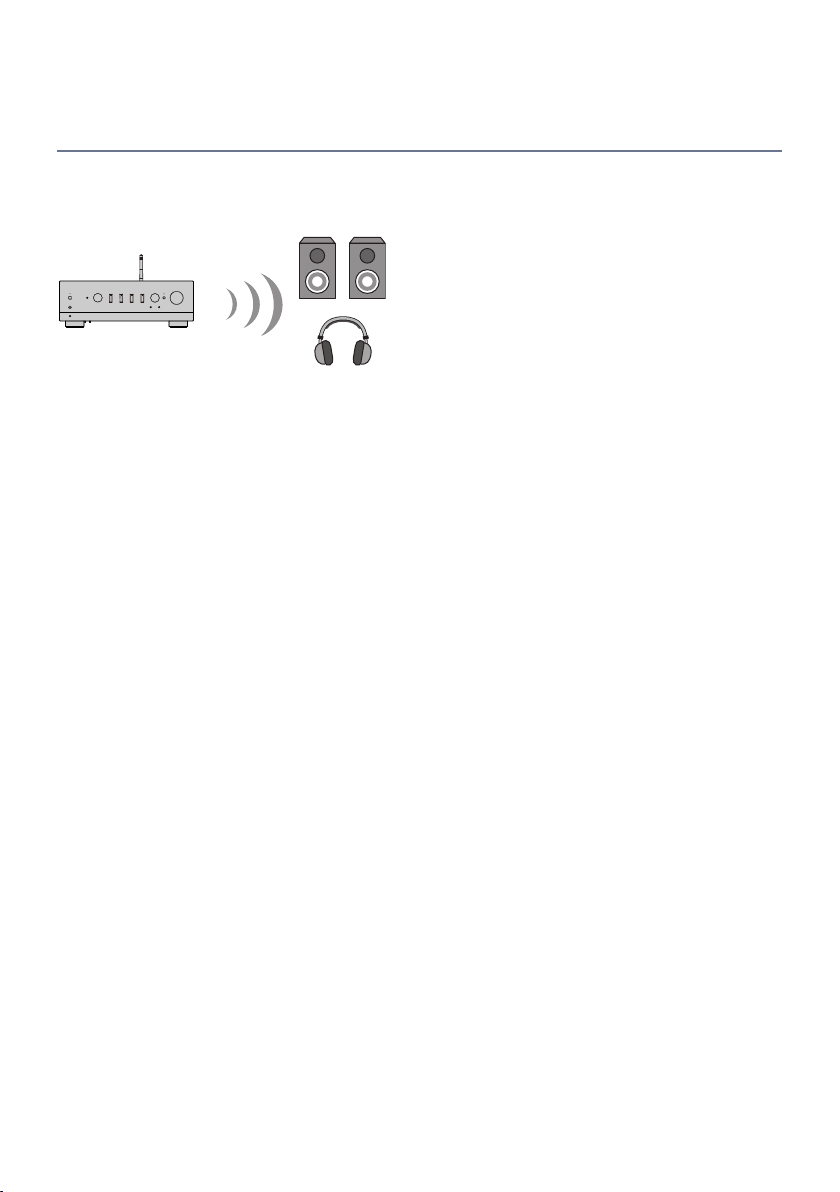
Bluetooth speakers/
headphones
This product
PLAYBACK > Playing via a Bluetooth® connection
Playing this product’s audio through Bluetooth speakers/
headphones (audio transmission)
You can output the audio playing on this product to Bluetooth speakers/headphones.
Only connect to Bluetooth speakers/headphones that have volume adjustment. This product cannot adjust
their volume.
1 Select an input other than “Bluetooth”.
2 Put the Bluetooth speakers/headphones that you wish to connect into pairing
mode.
3 Select the input source with the MusicCast Controller app.
4 Tap the Settings icon on the playback screen.
5 Tap “Bluetooth Transmission” on the Sound Settings screen.
6 Turn “Bluetooth transmission” on from the Bluetooth Transmission settings
screen.
7 Select the Bluetooth speakers/headphones to send to.
Once the connection is complete, audio is output from the Bluetooth speakers/headphones.
NOTE
(
Adjust the volume on the connected Bluetooth device.
(
The audio being played is also output from the speakers connected to this product.
(
AirPlay, DSD, and PCM audio exceeding 192 kHz cannot be transmitted.
(
When using Pure Direct, audio of input sources other than network content cannot be transmitted.
(
Audio cannot be sent and received at the same time via the Bluetooth function.
(
To disconnect the Bluetooth device, do any of the following.
(
Perform a disconnect operation on the Bluetooth device.
(
Switch the input of this product to “Bluetooth”.
(
Switch “Bluetooth” on the Setup menu to “Off”.
(
The Bluetooth indicator on the front panel lights up when a Bluetooth device is connected.
74
Page 75

PLAYBACK > Playing via a Bluetooth® connection
Related links
“Configuring Bluetooth”(p.105)
75
Page 76
PLAYBACK > Listening to music via AirPlay
Listening to music via AirPlay
Playing music via AirPlay
You can play music and other content on this product via AirPlay. Tap (or click) the AirPlay icon on your
iPhone or iTunes/Music and then select this product as the output destination.
CAUTION
(
The volume may become louder than expected when adjusting it on your AirPlay device, which can cause damage to your
hearing and/or your device. If the volume becomes too loud during playback, stop playback immediately.
Explanation of key operations: playback keys
(
r/d (Play/Pause) key: starts or pauses playback.
(
■ (Stop) key: stops playback.
NOTE
(
You can set this product to turn ON automatically when your AirPlay device starts playing.
(
You can change the network name of this product that is displayed on your AirPlay device.
(
You can control the volume of this product from your AirPlay device during playback.
(
You can switch the playback information shown on the front display by repeatedly pressing the DISPLAY key while it is playing.
(
The product is compatible with AirPlay 2.
(
For information about AirPlay, see Apple’s official website.
(
AirPlay audio cannot be transmitted to the MusicCast Network.
Related links
(
“Configuring a network”(p.100)
(
“Setting volume interlock with this product when playing an AirPlay/Bluetooth device”(p.89)
(
“Switching the front display”(p.57)
76
Page 77

PLAYBACK > Listening to internet radio
Listening to internet radio
Selecting an internet radio station
When this product is connected to a network, you can select and play Internet radio stations.
1 Press the NET key on the remote control repeatedly to switch the input to “Net
Radio”.
The browse indication is shown on the front display.
2 Select the content with the cursor keys and press the ENTER key.
It starts playing.
Explanation of key operations: playback keys
(
r/d (Play/Pause) key: starts playback (cannot pause).
(
■ (Stop) key: stops playback.
Explanation of key operations: playback info
(
NOW PLAYING key: shows playback information for the Internet radio station on the front display.
(
DISPLAY key: press repeatedly during playback to switch the playback information shown on the front
display.
Explanation of key operations: content-related
(
Cursor keys: for selecting the Internet radio station, folders, etc. Pressing them during playback changes
the front display to the browse indication, allowing other content to be selected.
(
ENTER key: press when a folder is selected to move one level down. Press when an Internet radio station is
selected to start playing it.
(
RETURN key: displays one level up.
(
HOME key: displays the very top level. Pressing this during playback changes the front display to the top
level in the browse indication, allowing other content to be selected.
NOTE
(
You can register your favorite content to presets and then recall it easily.
(
Some Internet radio stations may not be available at all times.
(
This function uses the airable.Radio service. airable is a service provided by the company airable GmbH. This service is subject to
change, suspension, or termination without notice. Please note that the Yamaha Corporation is in no way responsible for this.
Related links
(
“To make a network connection”(p.39)
(
“Registering your favorite content to presets”(p.92)
(
“Switching the front display”(p.57)
77
Page 78

PLAYBACK > Listening to streaming services
Listening to streaming services
Listening to streaming services
When this product is connected to a network, you can play content distributed by the various streaming
services.
For information on supported streaming services, go to the product information pages of the Yamaha
website or refer to the MusicCast Controller.
The following website also provides supplementary information about different streaming services.
https://manual.yamaha.com/av/mc/ss/
NOTE
(
Some streaming services require a subscription to their paid services. For details on each service provider, see its official website.
(
Streaming services are subject to change, suspension, or termination without notice. Please note that the Yamaha Corporation is
in no way responsible for this.
Related links
(
“Configuring a network”(p.100)
(
“Registering with the MusicCast network”(p.45)
78
Page 79

PLAYBACK > Playing songs on media servers (PC/NAS)
Playing songs on media servers (PC/NAS)
Playing songs on media servers (PC/NAS)
When this product is connected to a network, it can play music files saved on a media server connected to
the same server.
NOTE
It is necessary to enable the media sharing setting on each device or media server software ahead of time. For more details, refer to
the user's manual of each device and software.
1 Press the NET key on the remote control repeatedly to switch the input to
“Server”.
The browse indication is shown on the front display.
2 Select a media server with the cursor keys and then press the ENTER key.
3 Select the content with the cursor keys and press the ENTER key.
Once you select a song, it starts playing.
Explanation of key operations: playback keys
(
r/d (Play/Pause) key: starts or pauses playback.
(
■ (Stop) key: stops playback.
(
f/h (Skip/Rewind) key: skips to the beginning of the current song (continuous press to the previous
song).
(
j/g (Fast-Forward/Skip) key: skips to the beginning of the next song.
(
REPEAT key: changes the playback mode to Repeat. Check the settings on the front display.
(
Off: disables Repeat mode.
(
One: plays the current song repeatedly.
(
All: plays all the songs on the album (or in the folder) repeatedly.
(
SHUFFLE key: changes the playback mode to Shuffle. Check the settings on the front display.
(
Off: disables Shuffle mode.
(
On: plays all the songs on the album (or in the folder) in random order.
Explanation of key operations: playback info
(
NOW PLAYING key: shows playback information on the front display for the song that is playing.
(
DISPLAY key: press repeatedly during playback to switch the playback information shown on the front
display.
Explanation of key operations: content-related
(
Cursor keys: for selecting music files, folders, etc. Pressing them during playback changes the front display
to the browse indication, allowing other content to be selected.
79
Page 80

PLAYBACK > Playing songs on media servers (PC/NAS)
(
ENTER key: press when a folder is selected to move one level down. Press when a music files is selected to
start playing it.
(
RETURN key: displays one level up.
(
HOME key: displays the very top level. Pressing this during playback changes the front display to the top
level in the browse indication, allowing other content to be selected.
NOTE
(
You can configure it so this product turns ON automatically when you start playing music on the media server.
(
If the audio is cut off when connected to a wireless network, connect to a wired network.
(
Playback can be controlled from a digital media controller (DMC).
(
You can register your favorite content to presets and then recall it easily.
(
When playing music on a device such as a smartphone or tablet, the settings of the device for repeat, shuffle, etc. are followed, so
setting these features on the product may not have an effect.
Related links
(
“Setting auto playback”(p.90)
(
“Configuring a network”(p.100)
(
“Registering your favorite content to presets”(p.92)
(
“Supported file formats on this product (network)”(p.145)
(
“Switching the front display”(p.57)
80
Page 81

PLAYBACK > Playing audio from your computer (USB DAC)
Playing audio from your computer (USB DAC)
Playing music that is on your computer
When this product is connected to a computer via USB cable, it can play music that is on the computer.
NOTE
It may be necessary to install drivers when connecting this product to a computer.
1 Switch the input to “USB DAC”.
2 Set the audio output destination of the computer to “Yamaha USB DAC”.
For Windows OS:
Start menu!Settings!System!Sound [Output]
For macOS:
System Preferences!Sound![Output] tab
The method of configuration varies depending on the version of the OS.
3 Play music on your computer.
Confirm that audio is being output from this product.
NOTE
(
Some computer applications have independent settings for the output destination. In such case, check the settings of the
application.
(
Signal format information is displayed on the front display during playback. “---” is displayed when not playing or if the signal
format is not supported.
Adjusting the volume
n
For better sound quality, set the volume on your computer to its maximum, and then gradually increase the
volume on this product from the minimum until it reaches your desired level.
NOTE
(
During playback, do not disconnect the USB cable, turn off this product, or switch the input. Doing so may result in product
malfunction.
(
If you wish to mute the sounds of your computer’s interface when playing music, change the settings of your computer.
(
Music stored on your computer cannot be controlled via this product or its remote control. To control music saved on your
computer, operate the computer.
Related links
(
“Connecting to your computer (USB DAC function)”(p.28)
(
“Playable formats using USB DAC”(p.146)
81
Page 82
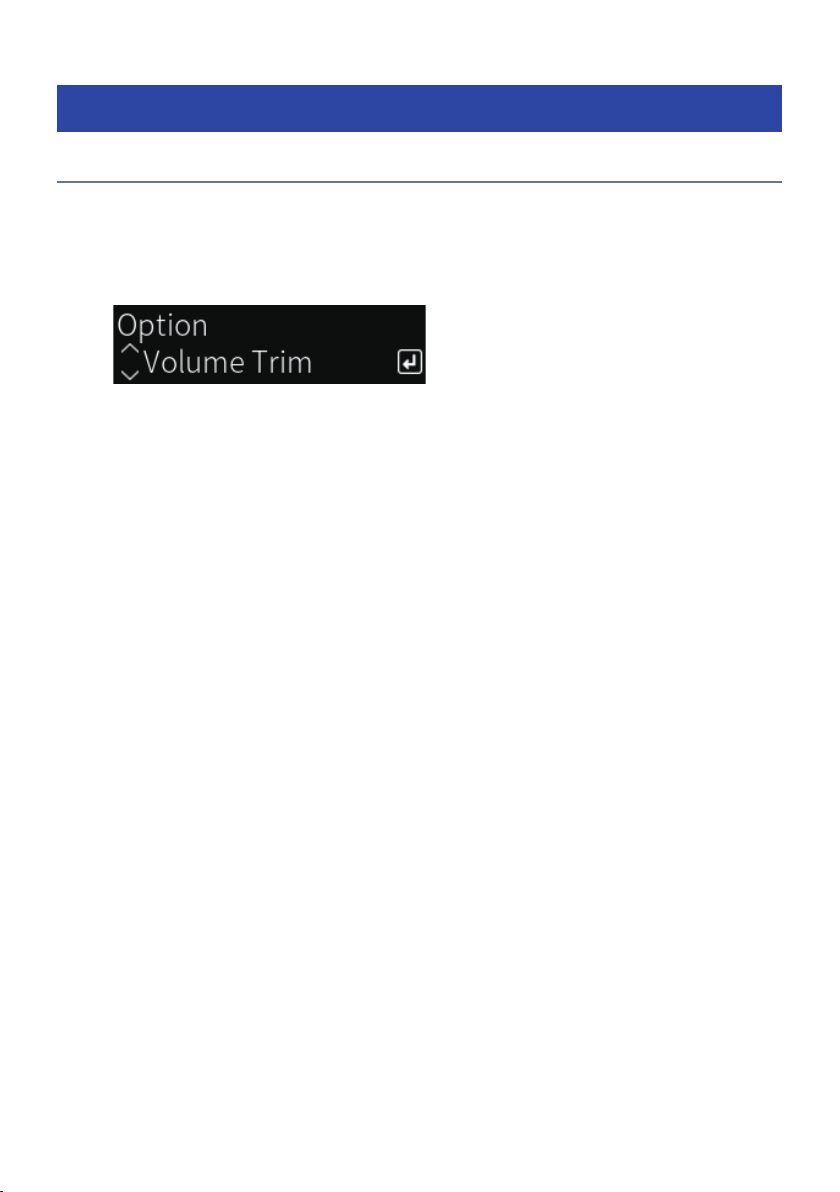
PLAYBACK > Option menu (settings for each input source)
Option menu (settings for each input source)
Basic operation of the Option menu
You can set playback-related functions to suit the source that is currently playing. The basic operating
methods of the Option menu are as follows.
1 Press the OPTION key.
2 Select a setting with the cursor keys and press the ENTER key.
To go back a level of the menu, press the RETURN key.
3 Select the desired setting with the cursor keys (e/r).
4 Press the OPTION key.
This completes the configuration.
Related links
(
“Menu structure”(p.97)
(
“List of Option menu”(p.83)
82
Page 83

PLAYBACK > Option menu (settings for each input source)
List of Option menu
The following settings are available in the Option menu.
Item Page
Volume Trim Input Trim
Signal info
Format
Sampling
Auto Preset
Clear Preset
FM Mode
Init Scan
Tune AID
Volume Interlock
Auto playback
PLL
NOTE
The settings available on the Option menu vary with the input source. Only the items that can be configured are shown on the front
display.
84
85
85
70
72
86
87
88
89
90
91
83
Page 84

PLAYBACK > Option menu (settings for each input source)
Correcting volume difference between input sources
You can correct volume difference between input sources. If it bothers you when the volume becomes
louder/quieter when you change the input source, use this setting to fine tune them.
Option menu
“Volume Trim” > “Input Trim”
Setting value
-10.0 dB to +10.0 dB
NOTE
Each input source can be set individually.
Related links
“Basic operation of the Option menu”(p.82)
84
Page 85

PLAYBACK > Option menu (settings for each input source)
Displaying audio signal information
Displaying format information
n
You can display format information for the audio signal that is playing.
Option menu
“Signal info” > “Format”
Related links
“Basic operation of the Option menu”(p.82)
Displaying the sampling frequency
n
You can display the sampling frequency of the audio signal that is playing.
Option menu
“Signal info” > “Sampling”
Related links
“Basic operation of the Option menu”(p.82)
85
Page 86

PLAYBACK > Option menu (settings for each input source)
Setting the reception mode (stereo/mono) for FM radio
You can set the reception mode (stereo/mono) for FM radio. When reception of an FM radio is unstable, it
may help to switch to mono reception.
Option menu
“FM Mode”
Setting value
Stereo Receives FM radio in stereo.
Mono Receives FM radio in mono.
Related links
“Basic operation of the Option menu”(p.82)
86
Page 87

PLAYBACK > Option menu (settings for each input source)
Performing an initial scan for DAB radio reception
Model For
U.K., Europe, Russia and Australia
Performs an initial scan for searching DAB radio stations.
Option menu
“Init Scan”
1 Select “TUNER” as the input source.
2 Press the TUNER key to select the DAB band.
3 Press the OPTION key.
4 Use the cursor keys to select “Init Scan” and press the ENTER key.
5 Press the ENTER key to start an initial scan.
When the initial scan finishes, this product automatically tunes in to the first DAB radio station
in order by frequency.
NOTE
(
If you perform an initial scan again, the DAB radio stations currently registered to the preset numbers will be cleared.
(
If no DAB radio stations are found by an initial scan, press the ENTER key to start an initial scan again.
Related links
“Basic operation of the Option menu”(p.82)
87
Page 88

PLAYBACK > Option menu (settings for each input source)
Checking reception strength of each DAB channel label
Model For
U.K., Europe, Russia and Australia
You can check reception strength of each DAB channel label.
Option menu
“Tune AID”
1 Select “TUNER” as the input source.
2 Press the TUNER key to select the DAB band.
3 Press the OPTION key.
4 Use the cursor keys to select “Tune AID” and press the ENTER key.
5 Use the cursor keys to select the desired DAB channel label.
The reception strength of DAB channel label is displayed in 0 (none) to 100 (best).
6 Press the OPTION key.
This completes the checking.
Related links
“Basic operation of the Option menu”(p.82)
88
Page 89

PLAYBACK > Option menu (settings for each input source)
Setting volume interlock with this product when playing an
AirPlay/Bluetooth device
When selecting an AirPlay/Bluetooth input, you can set whether to link the volume with this product. If set to
anything other than Off, the volume of this product can be adjusted by the AirPlay or Bluetooth device.
Option menu
“Volume Interlock”
Setting value
Off Disables volume control from AirPlay and Bluetooth devices.
Limited Enables volume control to mute and within the range of -96.5 to -40.0 dB.
Full Enables volume control to mute and within the range of -96.5 to 0.0 dB.
NOTE
Volume interlock is not available on all Bluetooth devices.
Related links
“Basic operation of the Option menu”(p.82)
89
Page 90

PLAYBACK > Option menu (settings for each input source)
Setting auto playback
Sets whether to auto play media server content.
Option menu
“Auto playback”
Setting value
Off Disables auto playback.
On
NOTE
(
The auto play settings are only available when the input is “Server”.
(
Some inputs are always on auto play, such as Internet radio stations and Bluetooth devices.
(
Auto playback may not work with some inputs or content.
Related links
“Basic operation of the Option menu”(p.82)
When the power is turned ON or the input is switched, the content that was last played
starts playing automatically.
90
Page 91

PLAYBACK > Option menu (settings for each input source)
Improving intermittently disrupted sound from digital audio
inputs
Change this setting if the input signal is unstable and the sound is intermittently disrupted. “Mode 3” has the
best sound quality, while “Mode 1” is most resistant to clock fluctuations; the smaller the value, the less
likely to be disrupted.
Option menu
“PLL”
Setting value
Mode 1, Mode 2, Mode 3
NOTE
“PLL” settings are only available when the input is “OPTICAL1”, “OPTICAL2”, “COAXIAL”, or “TV”.
Related links
“Basic operation of the Option menu”(p.82)
91
Page 92
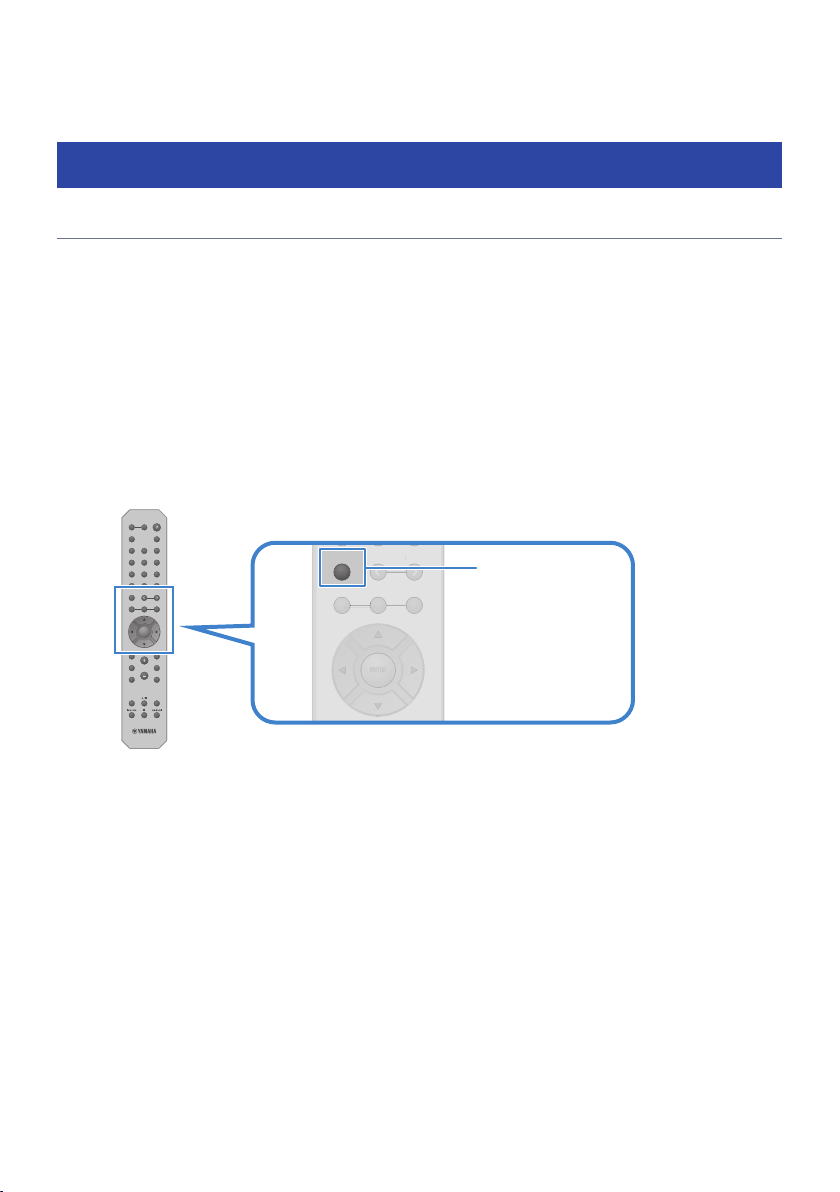
PRESET
1 2
ENTER
3
MEMORY
ENTER
PRESET
3
ENTE
ENTERR
VOLUME
PHONO
SLEEP
LINE 1 LINE 2 CD
TV COAX
USB DAC
OPT 1 OPT 2
BLUETOOTH
DISPLAY
HOME RETURN
SETUP OPTION
NOW PLAYING MUTE
TUNER NET
PRESET
REPEAT SHUFFLE
1 2
ENTER
3
MEMORY
A B
SPEAKERS
ENTER
MEMORY
USEFUL FUNCTIONS > Preset functions
USEFUL FUNCTIONS
Preset functions
Registering your favorite content to presets
Registering your favorite content (media server songs, Internet radio stations, etc.) to presets or the 1/2/3
keys makes it easy to recall it later.
Preset registration
n
“TUNER”, “Server”, “Net Radio” and some streaming services can be registered.
1 Select the radio stations you want to register, or play songs or Internet radio
stations.
2 Press the MEMORY key.
The preset number and content to register are shown on the front display. “Empty” is shown if
not registered.
3 Press the PRESET key and select the preset number to register.
4 Press the MEMORY key.
The registered preset numbers and “Memorized” are shown.
This completes the registration.
NOTE
(
By pressing the MEMORY key for 3 seconds or longer, you can register empty preset numbers automatically.
(
To go back to the original screen without registering, press the RETURN key.
(
(
A total of 80 pieces of content can be registered: 40 for “TUNER” and 40 for network content such as “Server”, “Net Radio”, etc.
The type of content that can be registered may vary for streaming services and “Net Radio” according to the selected radio station
or the service.
92
Page 93

USEFUL FUNCTIONS > Preset functions
Registering a favorite (1/2/3 keys)
n
“TUNER”, “Server”, “Net Radio” and some streaming services can be registered.
1 Select the radio stations you want to register, or play songs or Internet radio
stations.
2 Press a numeric key (either 1/2/3) for 3 seconds or longer.
If a favorite is already registered, it is overwritten.
This completes the registration.
NOTE
(
In addition to presets, favorites can be registered to each numeric key.
(
If they cannot be registered, “Not Available” is shown on the front display.
93
Page 94
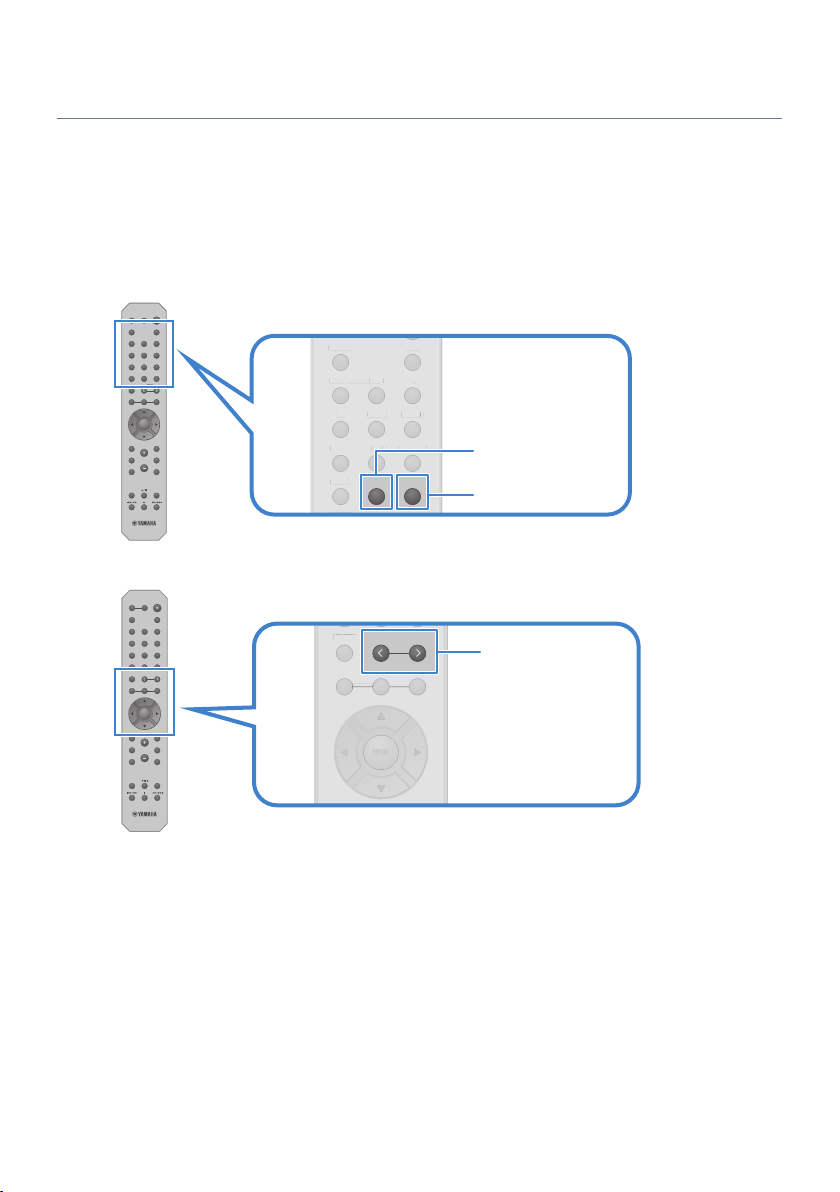
VOLUME
PHONO
SLEEP
LINE 1 LINE 2 CD
TV COAX
USB DAC
OPT 1 OPT 2
BLUETOOTH
DISPLAY
HOME RETURN
SETUP OPTION
NOW PLAYING MUTE
TUNER NET
PRESET
REPEAT SHUFFLE
1 2
ENTER
3
MEMORY
A B
SPEAKERS
ENTER
PHONO
SLEEP
LINE 1 LINE 2 CD
TV COAX
USB DAC
OPT 1 OPT 2
BLUETOOTH
DISPLAY
TUNER NET
PHONO
SLEEP
LINE
1 L
INE
2 C
D
COAX
USB DA
C
OPT
1 O
BLUETOOTH
DISPLA
Y
NET
TUNER
VOLUME
PHONO
SLEEP
LINE 1 LINE 2 CD
TV COAX
USB DAC
OPT 1 OPT 2
BLUETOOTH
DISPLAY
HOME RETURN
SETUP OPTION
NOW PLAYING MUTE
TUNER NET
PRESET
REPEAT SHUFFLE
1 2
ENTER
3
MEMORY
A B
SPEAKERS
ENTER
PRESET
1 2
ENTER
3
MEMORY
ENTER
3
MEMORY
ENTE
ENTERR
PRESET
USEFUL FUNCTIONS > Preset functions
Recalling content registered to a preset
Select the content you want to listen to from the content (songs from a media server or Internet radio)
registered to presets and/or the 1/2/3 keys.
Recalling a preset
n
1 Press the TUNER key or the NET key.
2 Press the PRESET key and select the content you want to listen to.
3 Press the ENTER key.
The selected content starts playing.
NOTE
(
If no presets at all have been registered, “No Presets” is displayed on the front display.
(
You can use MusicCast Controller to view a list of or delete registered content (song name or radio station name).
(
“TUNER” presets can only be recalled when the input is on “TUNER”. Some presets, such as “Server”, “Net Radio” and/or streaming
services, can only be recalled if the input is on “NET” (which can be selected by the NET key).
(
Presets can only be recalled when the power is turned ON.
94
Page 95

USEFUL FUNCTIONS > Preset functions
Recalling a favorite (1/2/3 keys)
n
If you press a numeric key (either 1/2/3), the selected content starts playing.
NOTE
(
When the power is in Standby and a number key is pressed, the power of this product turns ON and playback begins. To play
content other than “TUNER” at this time, set “Network Standby” to “Auto” or “On” ahead of time, in “Network” in the Setup menu.
(
The content can be recalled regardless of the selected input.
Related links
“Configuring a network”(p.100)
95
Page 96
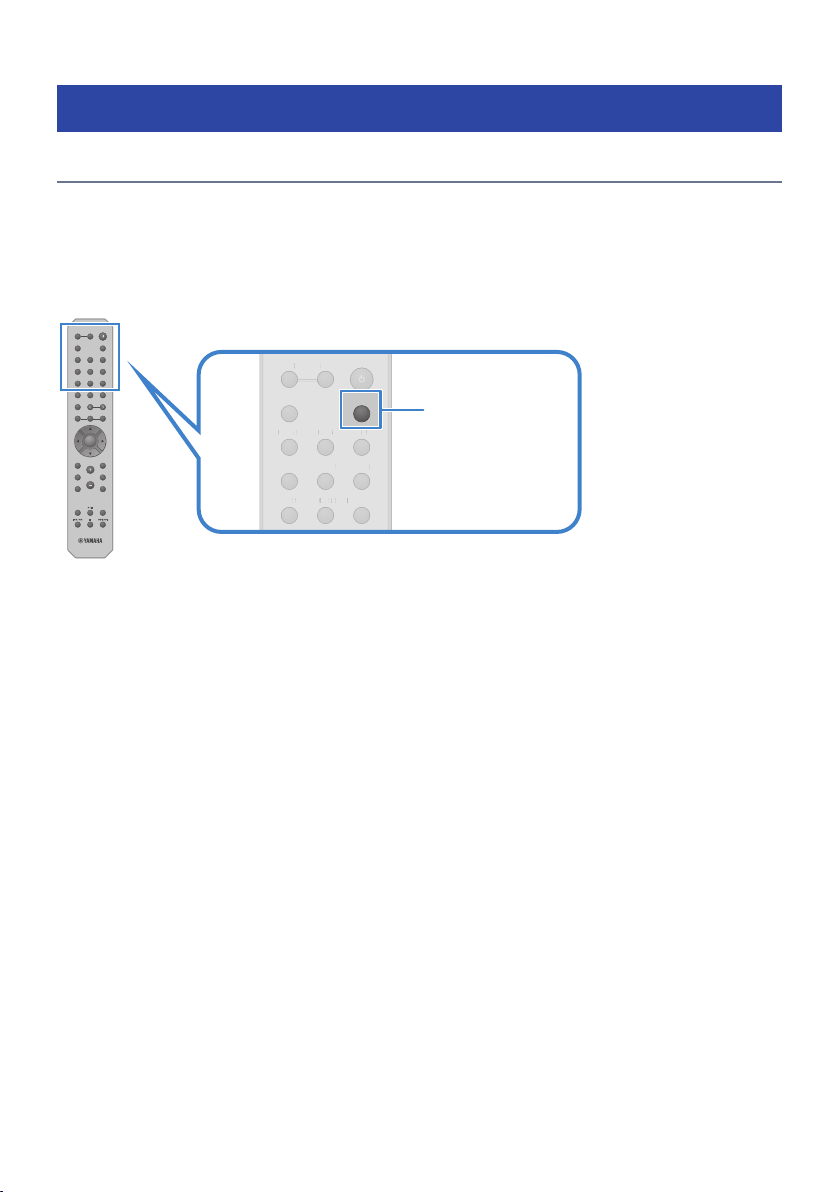
SLEEP
VOLUME
PHONO
SLEEP
LINE 1 LINE 2 CD
TV COAX
USB DAC
OPT 1 OPT 2
BLUETOOTH
DISPLAY
HOME RETURN
SETUP OPTION
NOW PLAYING MUTE
TUNER NET
PRESET
REPEAT SHUFFLE
1 2
ENTER
3
MEMORY
A B
SPEAKERS
ENTER
PHONO
SLEEP
LINE 1 LINE 2 CD
TV COAX
USB DAC
OPT 1 OPT 2
BLUETOOTH
A B
SPEAKERS
PHONO
LINE
1 L
INE
2 C
D
COAX
USB DA
C
OPT
1 O
BLUETOOTH
SPEAKERS
USEFUL FUNCTIONS > Sleep timer function
Sleep timer function
Configuring the time for the sleep timer
Once the specified time elapses, the product goes into Standby.
1 Press the SLEEP key repeatedly to set the desired time for the sleep timer.
You can choose OFF, 120, 90, 60 or 30 minutes.
NOTE
The next time you set the timer, the time set the last time is called up first.
96
Page 97

SETTINGS > Menus
SETTINGS
Menus
Menu structure
This product has the following menus, depending on the use.
Setup menu:
For detailed configuration of the functions of the product. Make settings with the remote control while
looking at the front display.
Advanced Setup menu:
For configuring the product’s system settings, etc. Can only be operated from the front panel.
NOTE
Play-related settings and information can be managed from the Option menu.
Related links
(
“List of Option menu”(p.83)
(
“List of Setup menu items”(p.99)
(
“List of Advanced Setup menu items”(p.113)
97
Page 98
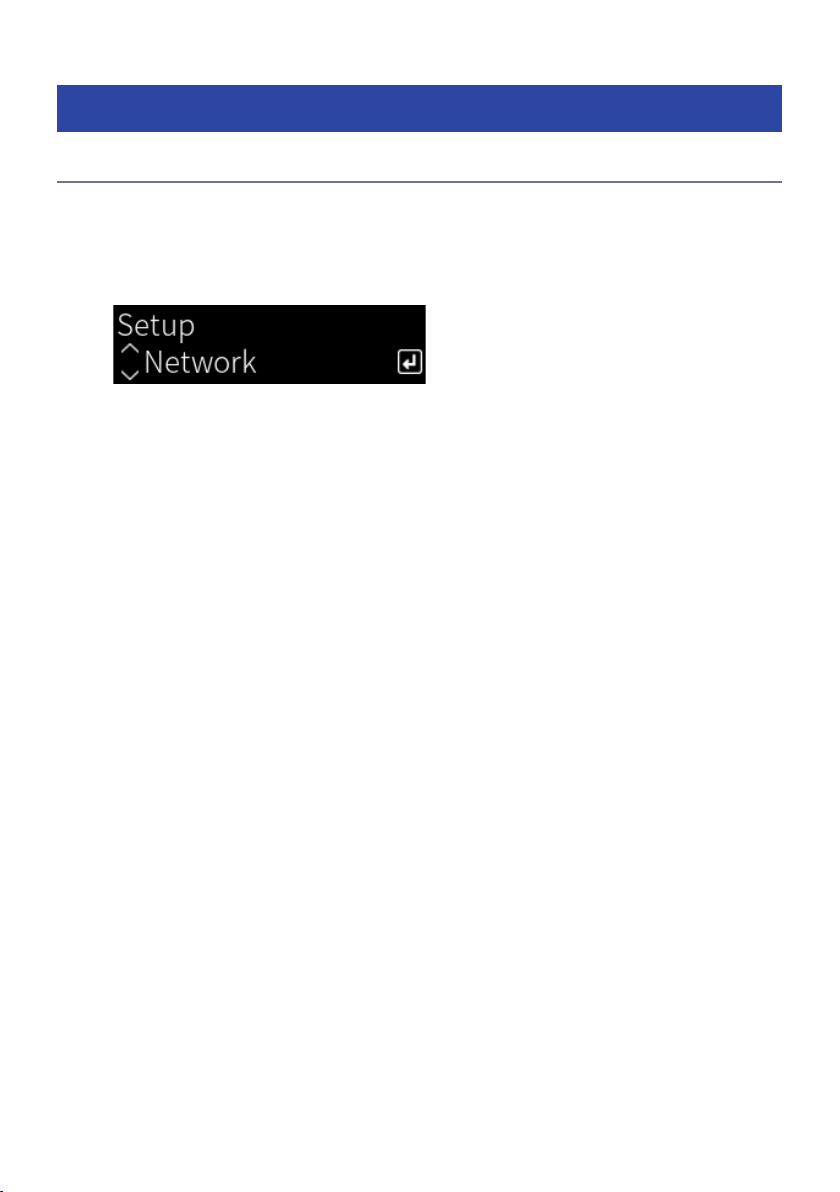
SETTINGS > Setup menu (changing function settings)
Setup menu (changing function settings)
Basic operation of the Setup menu
For detailed configuration of the functions of the product. The basic operating methods of the Setup menu
are as follows.
1 Press the SETUP key.
2 Select a settings item with the cursor keys and press the ENTER key.
To go back a level of the menu, press the RETURN key.
3 Select the desired setting with the cursor keys (e/r).
4 Press the SETUP key.
This completes the configuration.
Related links
(
“Menu structure”(p.97)
(
“List of Setup menu items”(p.99)
98
Page 99

SETTINGS > Setup menu (changing function settings)
List of Setup menu items
Items in the Setup menu are as follows.
Item Page
Connection
Network Info
IP Address
Network
Bluetooth
YPAO
TV HDMI Control
Volume
Auto Power Stdby
ECO Mode
Display
DMC Control
Network Standby
Network Name
Network Update
MCLink Pow Intlck
Bluetooth
Bluetooth Standby
Speaker A
Speaker B
Speaker A+B
Speaker Off
Max Volume
Initial Volume
Brightness
Display Sleep Time
100
105
106
107
108
109
110
111
99
Page 100

SETTINGS > Setup menu (changing function settings)
Configuring a network
Setting the method of connecting (wired/wireless) to a network
n
This sets the method of connecting this product to a network.
Setup menu
“Network” > “Connection”
Setting value
Wired Connects via a network cable.
Wireless (Wi-Fi) Connects via Wi-Fi.
Related links
(
“To make a network connection”(p.39)
(
“Selecting the wireless method of connecting to the network”(p.140)
(
“Basic operation of the Setup menu”(p.98)
Checking network information
n
Displays networking information of this product.
Setup menu
“Network” > “Network Info”
New Firmware Firmware update available or not
Status State of network jack connections
MusicCastNetwork State of MusicCast Network preparations
MAC Address
SSID
IP Address IP address of this product
Subnet Mask Subnet mask
Default Gateway IP address of the default gateway
DNS Server (P) IP address of primary DNS server
DNS Server (S) IP address of secondary DNS server
MAC address of this product (The MAC address is different depending on
whether the connection to the network is wired or wireless)
Access point this product is connected to (only displayed for Wi-Fi
connections)
Related links
“Basic operation of the Setup menu”(p.98)
100
 Loading...