

Page 1

RECORDER
EN
Reference Manual
Using the Reference Manual
The PPOCKETRAK PR7 Reference Manual (this book) enables you to use a
terminology search function and a link function.
Searching for terminology
To search for terminology, use the search function built into the software
application that displays this book.
If you are using Adobe Reader to display this book, type in a term in the search
bar field, then press the <Enter> key on the computer keyboard.
The application will search for the term inside the book.
Viewing the previous or next page
If you are using Adobe Reader to display this book, you can go back to the
previous view, forward to the next view, or jump back and forth to a pre-link
page. This feature is convenient if you want to return to a page after you jump
to a different page via the page link.
Using the functional tree table
The functional tree table for the PR7 is illustrated on page 3.
Use this diagram if you want to refer to a description of the screen or the
various functions of the PR7.
Page 2

Contents
Contents
Using the Reference Manual ............................................................................. 1
Features..................................................................................... 3
List of Functions........................................................................ 3
Controls and Functions ............................................................. 4
Understanding the Information on the LCD Screen................. 6
Preparing the PR7..................................................................... 7
Inserting a battery and a microSD card (sold separately) ................................... 7
Turning the power on or off ............................................................................. 7
Setting the calendar.......................................................................................... 7
HOME screen ............................................................................. 8
Basic Operation......................................................................... 9
Recording/stopping/playing back/setting the recording and playback levels ..... 9
Selecting the save destination for a recorded file ............................................. 10
Changing the recording format (sound quality) .............................................. 11
Adjusting the playback speed.......................................................................... 13
Fast forward and fast reverse........................................................................... 13
Pausing during playback or recording ............................................................. 13
Selecting the next or previous file ................................................................... 13
Reducing noise in the low range ..................................................................... 14
Preventing excessive input levels ..................................................................... 14
Recording with a tonal quality that suits the musical instrument
(Selecting a preset) ......................................................................................... 15
Switching the external device setting .............................................................. 15
Recording slightly earlier than the recording start time ................................... 16
Functions Useful for Musical Instrument Practice .................. 24
Using the tuner............................................................................................... 24
Using the metronome..................................................................................... 25
Adjusting the playback speed ......................................................................... 26
Handling Audio Files ............................................................... 27
Folder structure .............................................................................................. 27
About the limitations of files and folders ......................................................... 27
About the file naming rules............................................................................. 27
About the file format ...................................................................................... 27
Copying files................................................................................................... 28
Dividing a file ................................................................................................. 29
File names after division .................................................................................. 29
Deleting files................................................................................................... 30
File names after deleting ................................................................................. 30
Moving a file .................................................................................................. 31
File names after moving.................................................................................. 31
File naming rules for dividing, deleting or moving a file .................................. 32
Connecting a computer to the PR7 and transferring a file ............................... 32
Moving files from one folder to another inside the MUSIC folder .................... 34
Downloading software.................................................................................... 34
Other Functions....................................................................... 35
Using the system setting menu ....................................................................... 35
Accessing the system setting menu................................................................. 35
Setting the calendar........................................................................................ 35
Initializing all parameters to factory default settings ........................................ 36
Formatting (Initializing) the built-in memory and a microSD card ................... 36
Switching the REC LED on or off ..................................................................... 37
Switching the tuner’s pitch indication ............................................................. 38
Displaying the firmware version ...................................................................... 38
Error Messages ........................................................................ 38
Markers ................................................................................... 17
Marker mode screen ....................................................................................... 17
Adding a marker ............................................................................................. 17
Jumping to a marked position......................................................................... 18
Deleting a marker ........................................................................................... 18
Repeat playback between the markers ............................................................ 18
Overdubbing (Layered Recordings)........................................ 20
Overdubbing mode screen ............................................................................. 20
Overdubbing .................................................................................................. 20
Specifications .......................................................................... 39
Index........................................................................................ 40
* Illustrations and screens that appear in this manual are intended to help explain various
operations. Therefore, they may differ slightly from actual specifications.
2
Reference Manual
Page 3
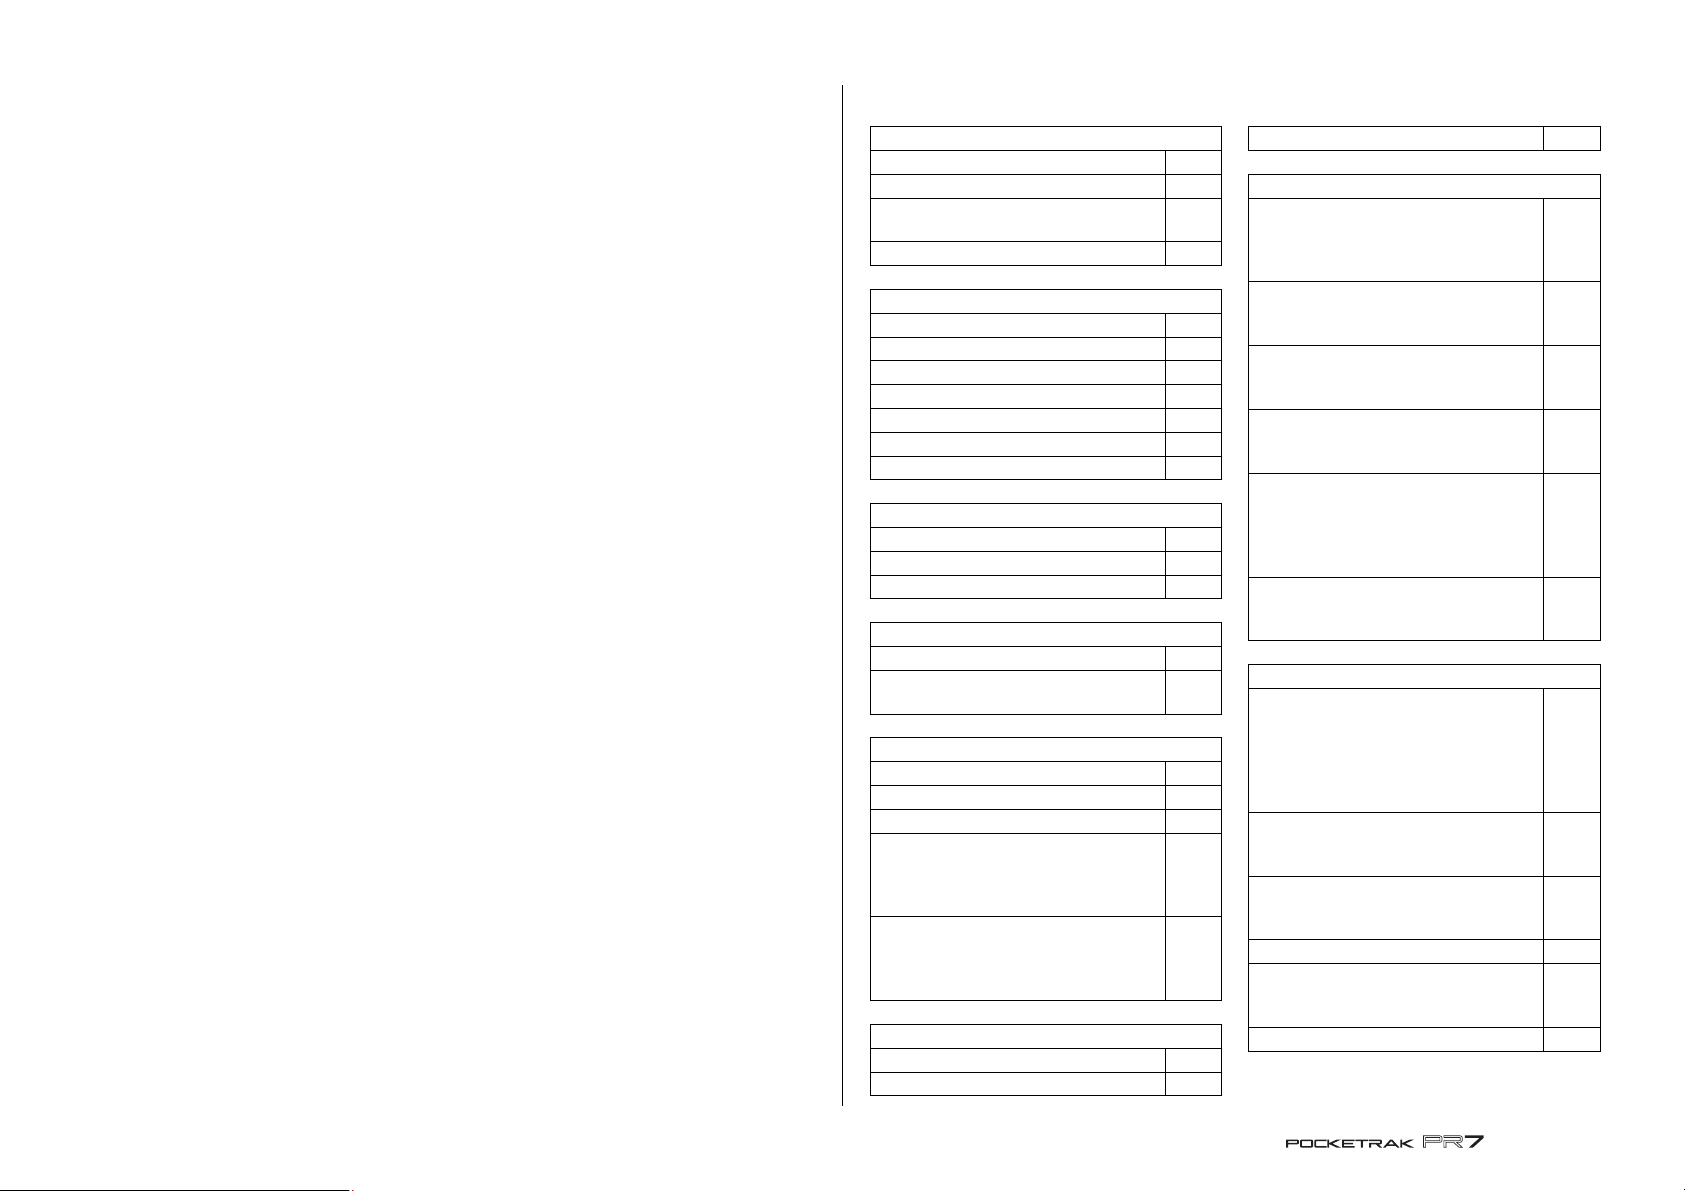
Features
HOME screen
Folder/File number indication 8
File date indication 8
Recording format (sound quality)
indication
8
Available recording time indication 8
Main functions
Stop 9
Playback 9
Recording 9
Playback level adjustment 9
Fast forward/fast reverse 13
File selection 13
Overdubbing 20
Markers
Add 17
Move 18
Delete 18
REC LEVEL (Recording level)
Input level adjustment 9, 21
Playback level adjustment
(Overdubbing)
21
MENU
TUN (Tuner) 24
MET (Metronome) 25
SPD (Playback speed adjustment) 26
FILE (Handling files)
COPY
dIV (Dividing a file)
trnS (Moving a file)
27
28
29
31
DEL (Deleting a file)
FILE (Deleting a selected file)
FOLdEr (Deleting all files in the
folder)
30
30
30
FOLDER (Switching a folder)
rEC (REC folder) 11 , 27
MSC (MUSIC folder) 27, 33
PRESET (Recording preset) 15
REC MENU (Recording settings)
MP3 PCM
(Recording format [sound quality])
PCM (kHz/bit)
MP3 (kbps)
11
11
11
SD (Selecting memory)
Int (Built-in memory)
Sd (microSD card)
10
10
10
PRC (Pre-recording)
On
OFF
16
16
16
HPF (High-pass filter)
On
OFF
14
14
14
DYN (Dynamics control)
OFF
LIM (Limiter)
ALC HI (Auto Level Control: high)
ALC LO (Auto Level Control: low)
14
14
14
14
14
EXT (Switching external input)
LInE (Line-in device)
MIC (External condenser mic)
15
15
15
SYS (System settings)
CAL (Calendar)
YEAR
Mo (Month)
dAY (Day)
hour (Hour)
MIn (Minute)
7
7
8
8
8
8
LEd (REC LED)
On
OFF
37
37
37
TUnEr (Tuner’s pitch indication)
SHrP (Sharp #)
FLAt (Flat
)
38
38
38
rESET (Initializing menu settings) 36
ForMAt (Initializing the memory)
Int (Built-in memory)
Sd (microSD card)
36
36
36
VEr (Version information) 38
Features
• High-performance crossed XY stereo microphones
The crossed XY stereo microphones resolve left and right phase difference, and
enable high-quality, naturally-sounding stereo recording with a deep sound field.
• Overdubbing ➔ page 20
The PR7’s overdubbing feature enables you to record an additional layer of audio
(such as voices or musical performances) on top of an already-recorded sound. This
function is tremendously helpful for recording your song writing ideas or
arrangements.
•Editing markers ➔ page 17
Markers are convenient for locating a playback position or for repeating playback,
and can be edited as many times as you like during recording and/or playback.
•Peak limiter ➔ page 14
The limiter automatically adjusts excessive input levels for distortion-free recording.
• Tuner and metronome ➔ page 24
Tuner and metronome support practicing musical instruments or choir.
• Presets for musicians ➔ page 15
Presets for musicians provide optimal settings for recording different musical
instruments.
List of Functions
3
Reference Manual
Page 4
Controls and Functions
2
1
3
6
4
7
0
8
9
A
C
5
B
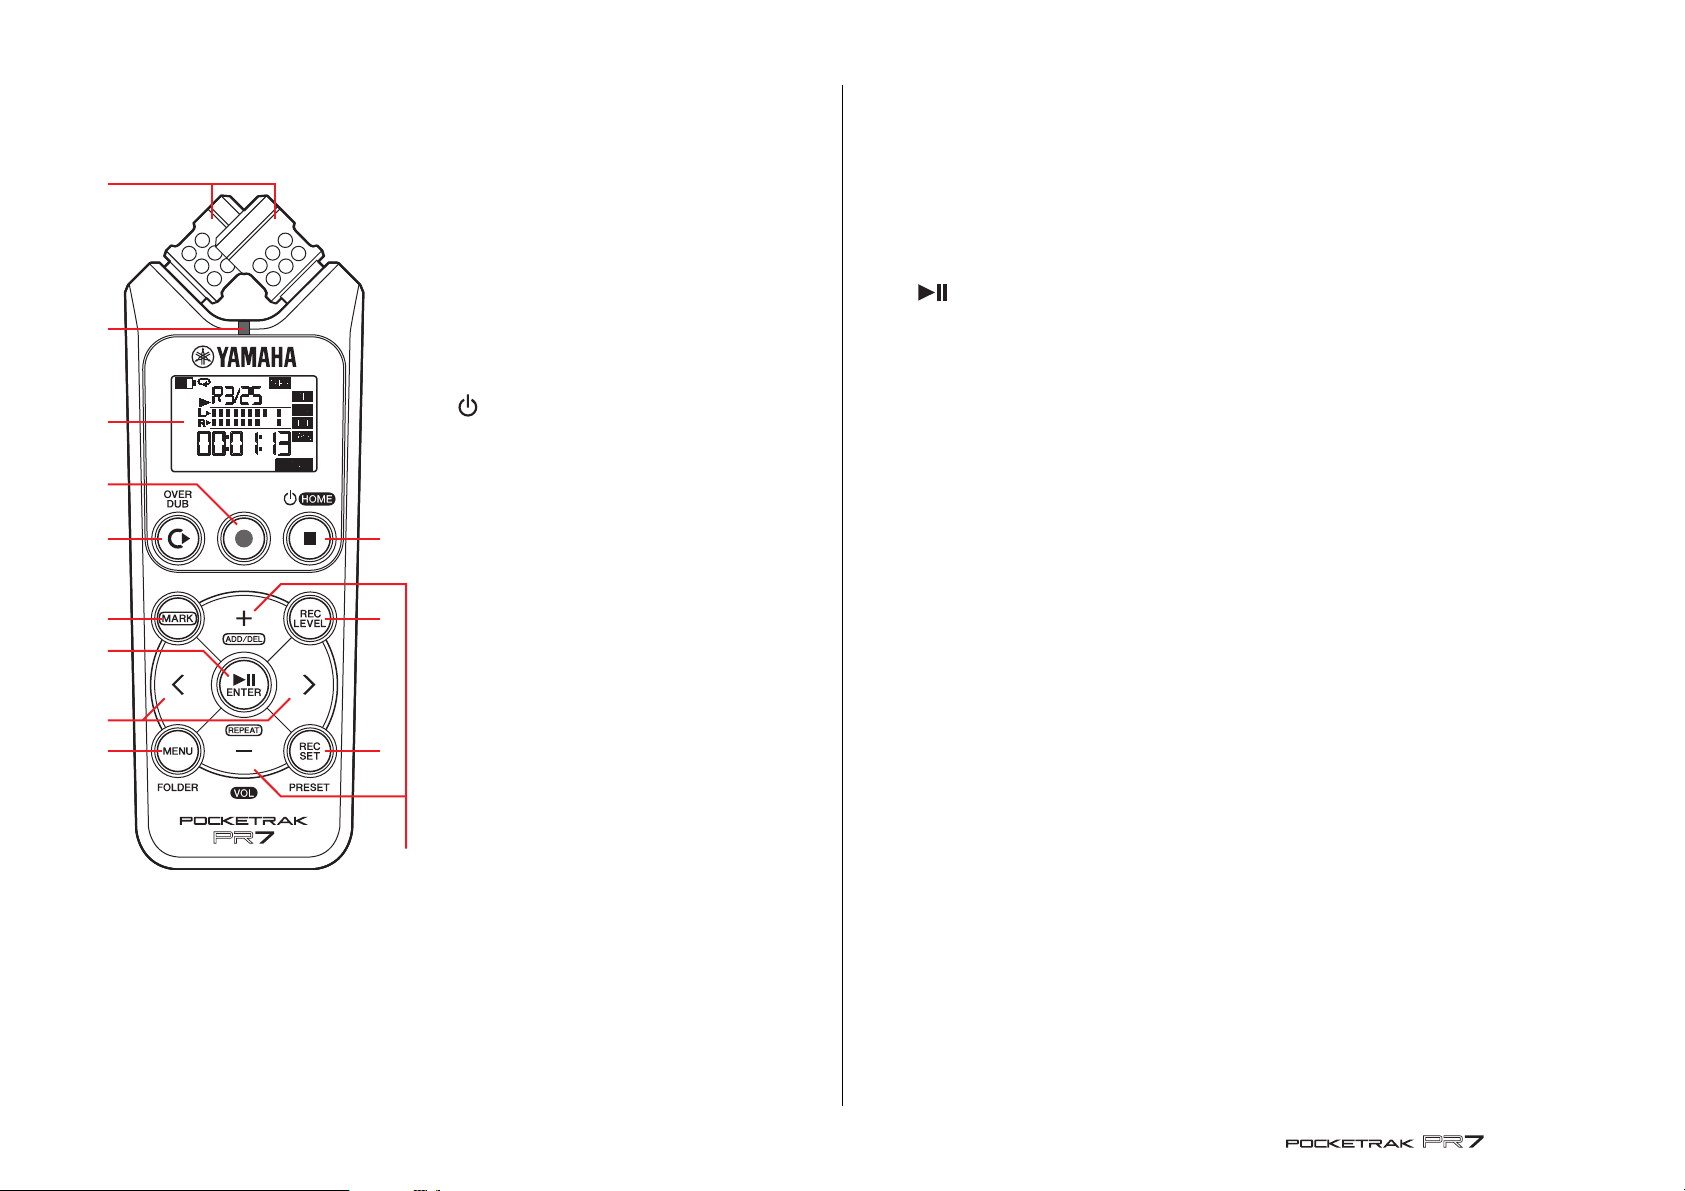
Controls and Functions
1 Built-in microphones
The PR7 features XY-type microphones.
2 REC LED
Lights up steadily or flashes during
recording or operation.
3 LCD screen
Displays various information.
Understanding the Information on the LCD
Screen ➔ page 6
4 (Power on/Standby)/[■] (Stop) button
If the power is off (standby mode), press
this button once briefly to turn the power
on. Press and hold down the button for
about three seconds to turn the power off
(standby).
To stop playback or recording, press this
button.
While the LCD screen displays any mode
screen other than the HOME screen, press
this button to return to the HOME screen.
Press this button repeatedly while the
HOME screen is displayed to switch to the
following screen in the sequence.
Folder name and file number ➔ Date and
time ➔ Recording format for the selected
file (tonal quality) ➔ Available recording
time ➔ Folder name and file number ➔
...
About HOME screen ➔page 8
5 [●] (Record) button
Stands by, starts, or pauses recording.
6 [OVERDUB] button
Places the PR7 into overdubbing mode,
which enables you to overdub an existing
recorded file (page 20).
7 [REC LEVEL] button
Sets the recording level or playback level for overdubbing.
Setting the recording level ➔ page 9
Overdubbing ➔ page 20
8 [MARK] button
Places the PR7 into marker mode, which enables you to insert markers into files
(page 17).
9 [ ] (Play) button
If the HOME screen is displayed this button starts or pauses file playback, or starts
recording.
If the menu or any setting screen is displayed, this button functions as an Enter
(execute) button to confirm parameter settings and edits.
0 [REC SET] button
Enables you to change the recording format (sound quality), switch the save
destination for recorded files between the built-in memory and a microSD card,
and set other recording parameters.
A [MENU] button
Selects functions other than recording, such as the tuner or metronome.
Using the tuner ➔ page 24
Using the metronome ➔ page 25
Adjusting the playback speed ➔ page 26
B [+]/[–] buttons
Adjust the PR7’s audio volume if the HOME screen is displayed.
These buttons also enable you to edit parameter values or select a setting item if a
menu screen or mode screen is displayed.
If the marker mode screen is displayed, this button enables you to add or delete
markers or turn the Repeat function on or off.
C [<]/[>] buttons
Enable you to select an audio file or navigate the screen. During playback, these
buttons are used to fast reverse and fast forward respectively.
4
Reference Manual
Page 5
1
2
3
4
1
2
1
2
3
4
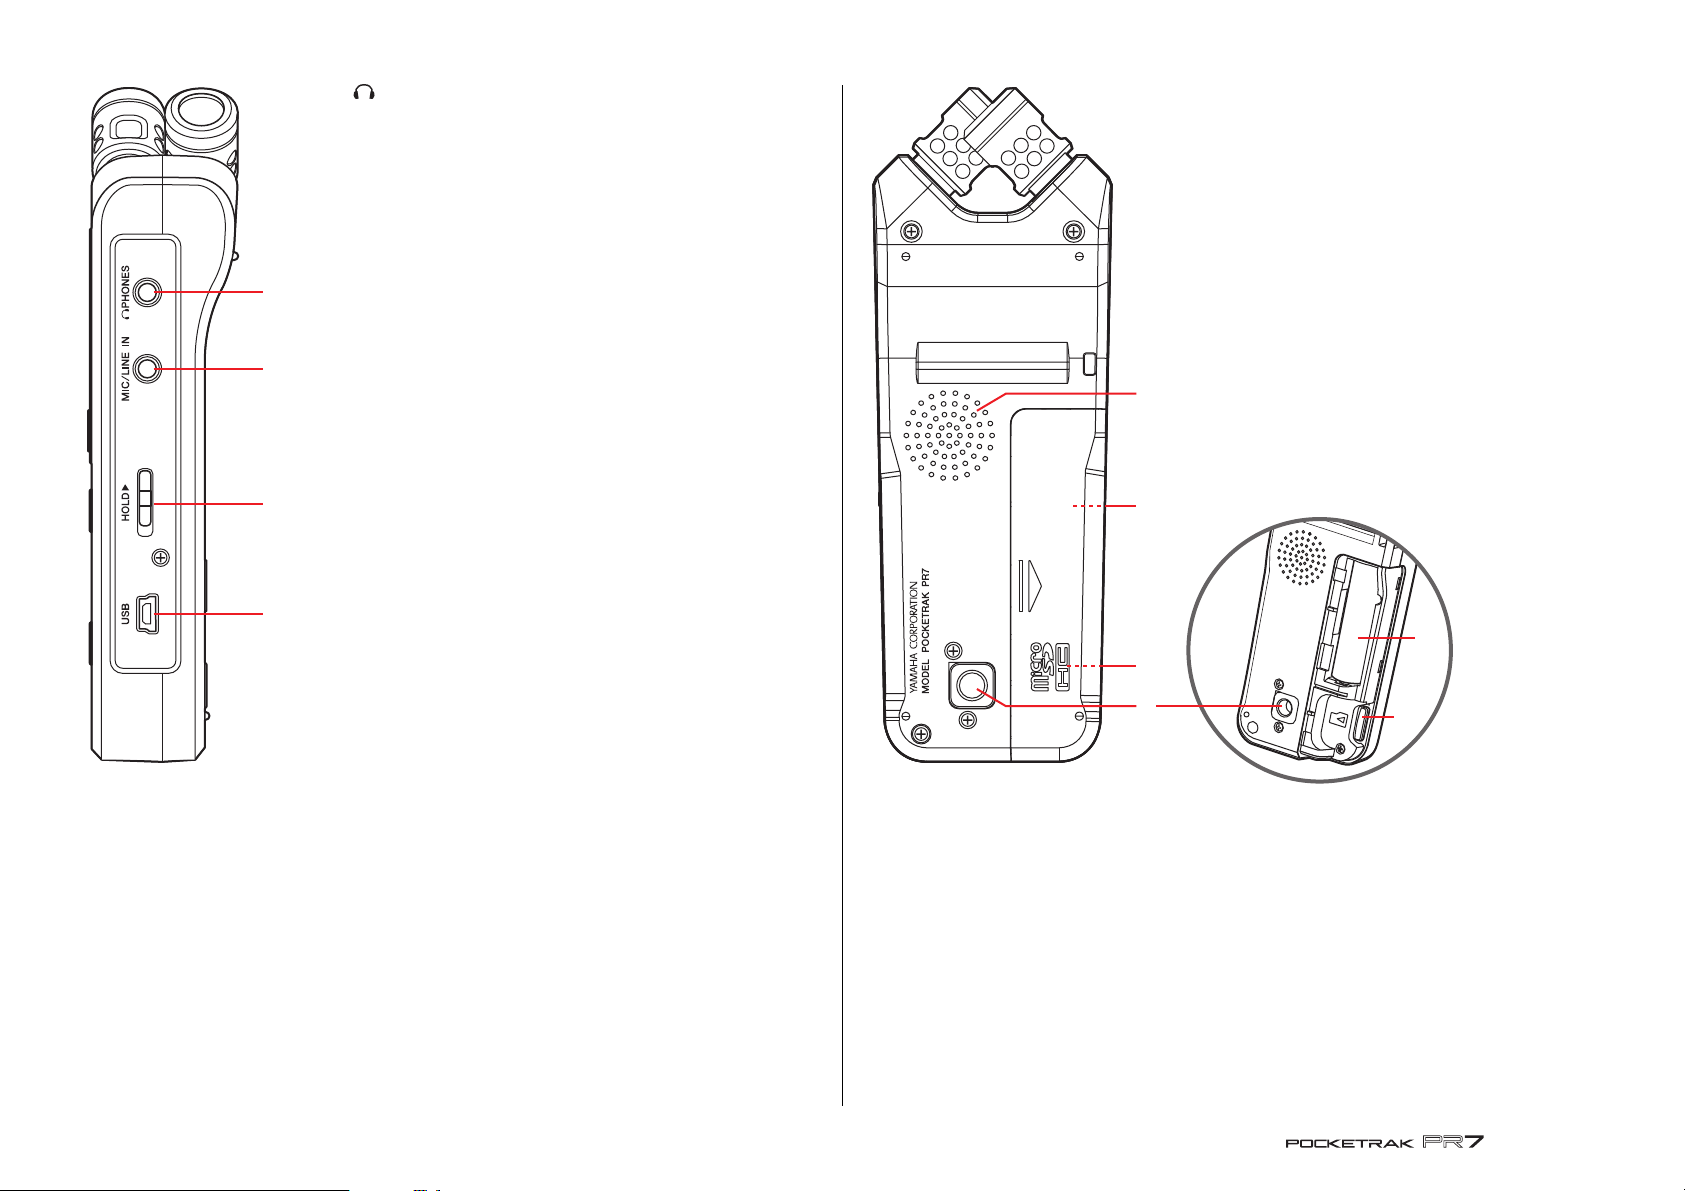
1 Battery compartment
Insert an AAA battery here.
2 microSD card slot
Insert a commercially-available microSD/
microSDHC card here.
3 Threaded socket for a tripod
Use this socket to attach the PR7 to a tripod.
The thread size is 1/4 inch (6.35mm).
4 Speaker
You can listen to a recording on the spot.
1 PHONES jack
This is a stereo mini jack to which you can connect your
headphones or an external device.
While this jack is connected, the built-in speaker is
automatically turned off.
2 MIC/LINE IN (external input) jack
This is a stereo mini jack to which you can connect an
external condenser microphone or an external device,
such as a CD player or electronic musical instrument.
While this jack is connected, the built-in microphones
are automatically turned off.
3 [HOLD] switch
Disables all control buttons on the PR7 to avoid
accidental operation during transport or recording.
If you turn on the Hold function while the unit is
stopped, the unit will display the clock.
4 USB terminal
Connect your computer here to transfer audio files to
and from the built-in memory or the installed microSD
card.
Handling audio files ➔ page 27
Connecting the PR7 to a computer ➔ page 32
Controls and Functions
5
Reference Manual
Page 6
Understanding the Information on the LCD Screen
3
6 7
2
1
8
4
5
Remaining battery power
High Low
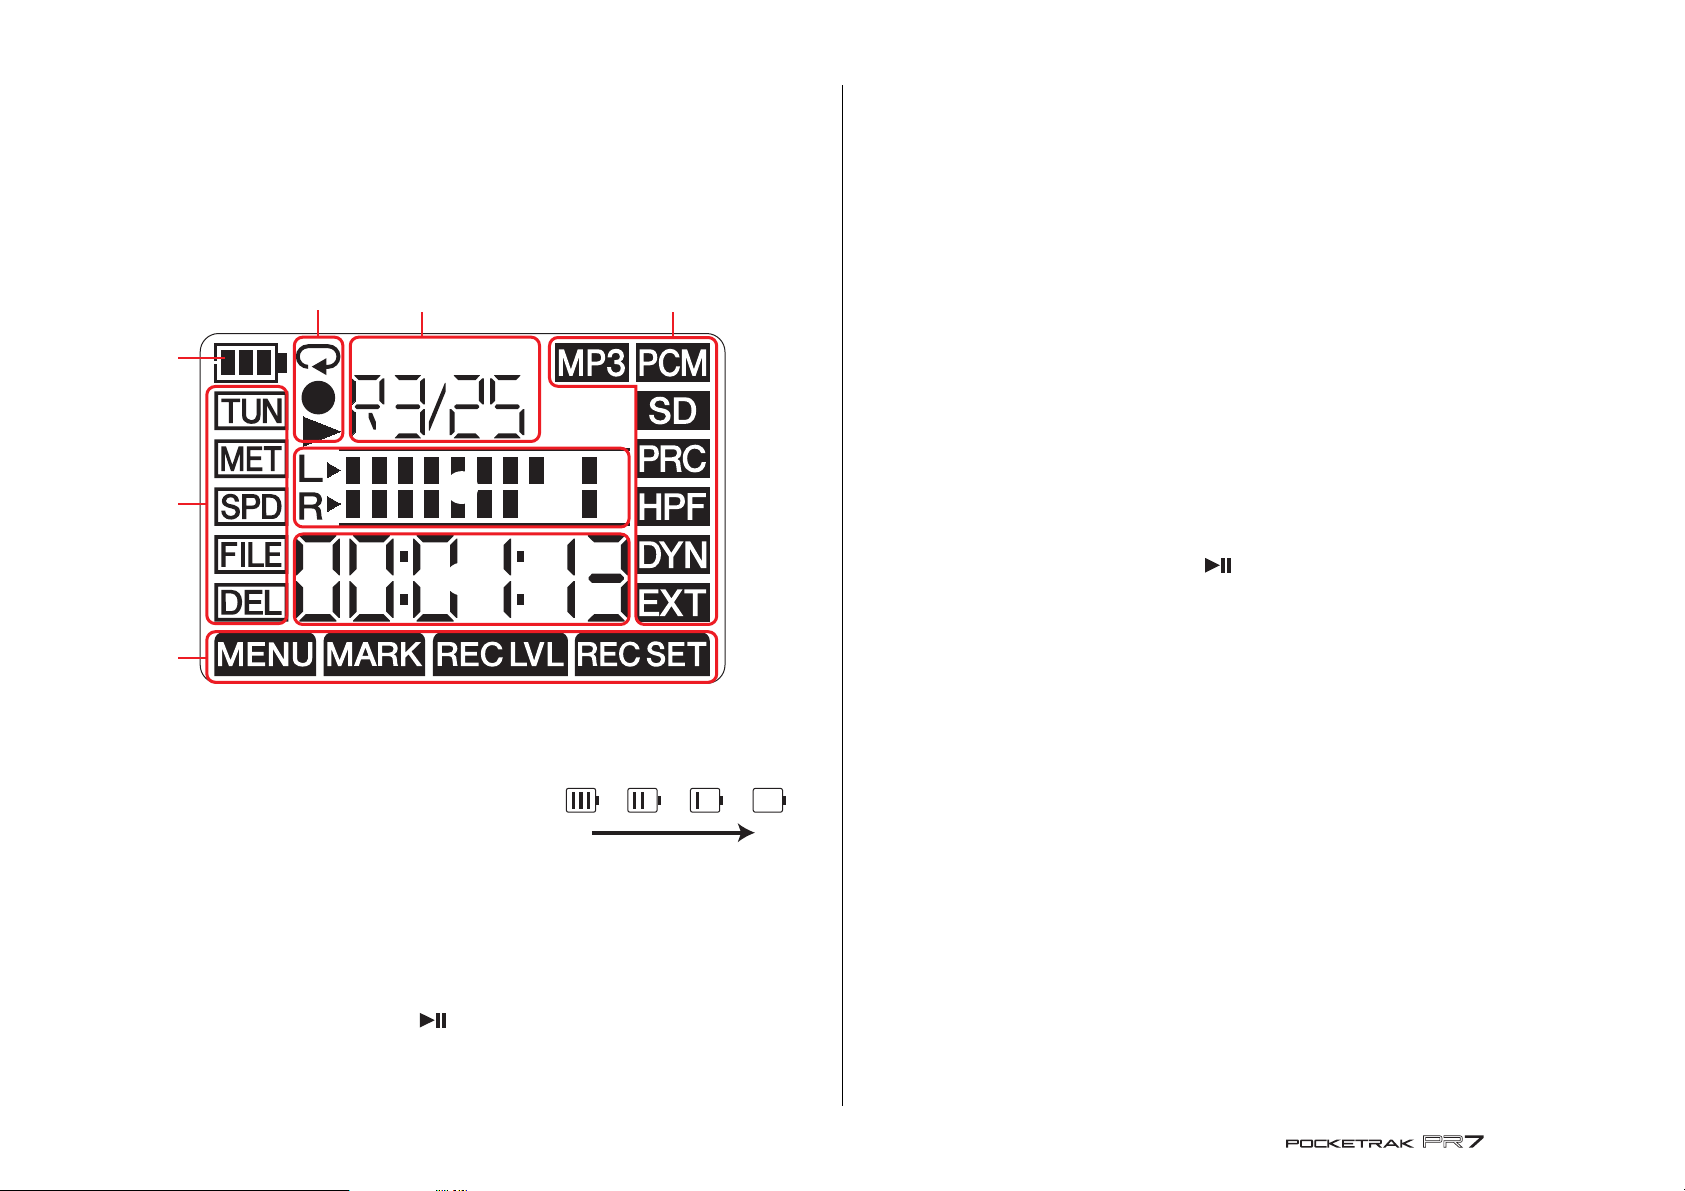
Understanding the Information on the
LCD Screen
NOTE
During operation, the PR7 does not display all of the following indicators and items at
the same time.
1 Remaining battery power
The battery indicator on the LCD screen
indicates the amount of remaining battery
power, as shown on the right.
If the remaining battery power is getting low,
the availability of certain functions, such as
copying or dividing a file, will be limited. Replace the battery with a new one at
your earliest convenience.
3 Recording/Playback/Repeat playback display area
This area indicates the status of the current recording, playback, or repeat playback.
4 Meter area
This area indicates the playback or recording level by using graphic meters.
If you are using the tuner or metronome, this area will display the appropriate
information.
5 Time/Message display area
The HOME screen displays the playback/recording time or remaining time in the
format of hours:minutes:seconds.
Other information or messages may be displayed depending on the selected mode.
6 File/Marker display area
On the HOME screen, this area indicates the folder and file numbers. In Marker
mode, this area indicates the marker number.
Other information displayed here varies depending on the selected mode.
7 Recording setting area
Press the [REC SET] button on the PR7 to display this area.
The indicator of the currently-selected menu will flash. Use the [+] or [–] button to
select a menu item, then press the [ ] (Play) button to display the corresponding
menu screen.
To return to the HOME screen, press the [REC SET] button again or the [■] (Stop)
button.
8 Mode area
This area indicates the parameters of the currently-selected mode. The information
displayed on the screen varies depending on the mode.
2 Menu area
Press the [MENU] button on the PR7 to display this area.
The indicator of the currently-selected menu will flash. Use the [+] or [–] button to
select a menu item, then press the [ ] (Play) button to display the corresponding
menu screen.
To return to the HOME screen, press the [MENU] button again or the [■] (Stop)
button.
6
Reference Manual
Page 7
Preparing the PR7
microSD card
AAA-size
alkaline battery
Preparing the PR7
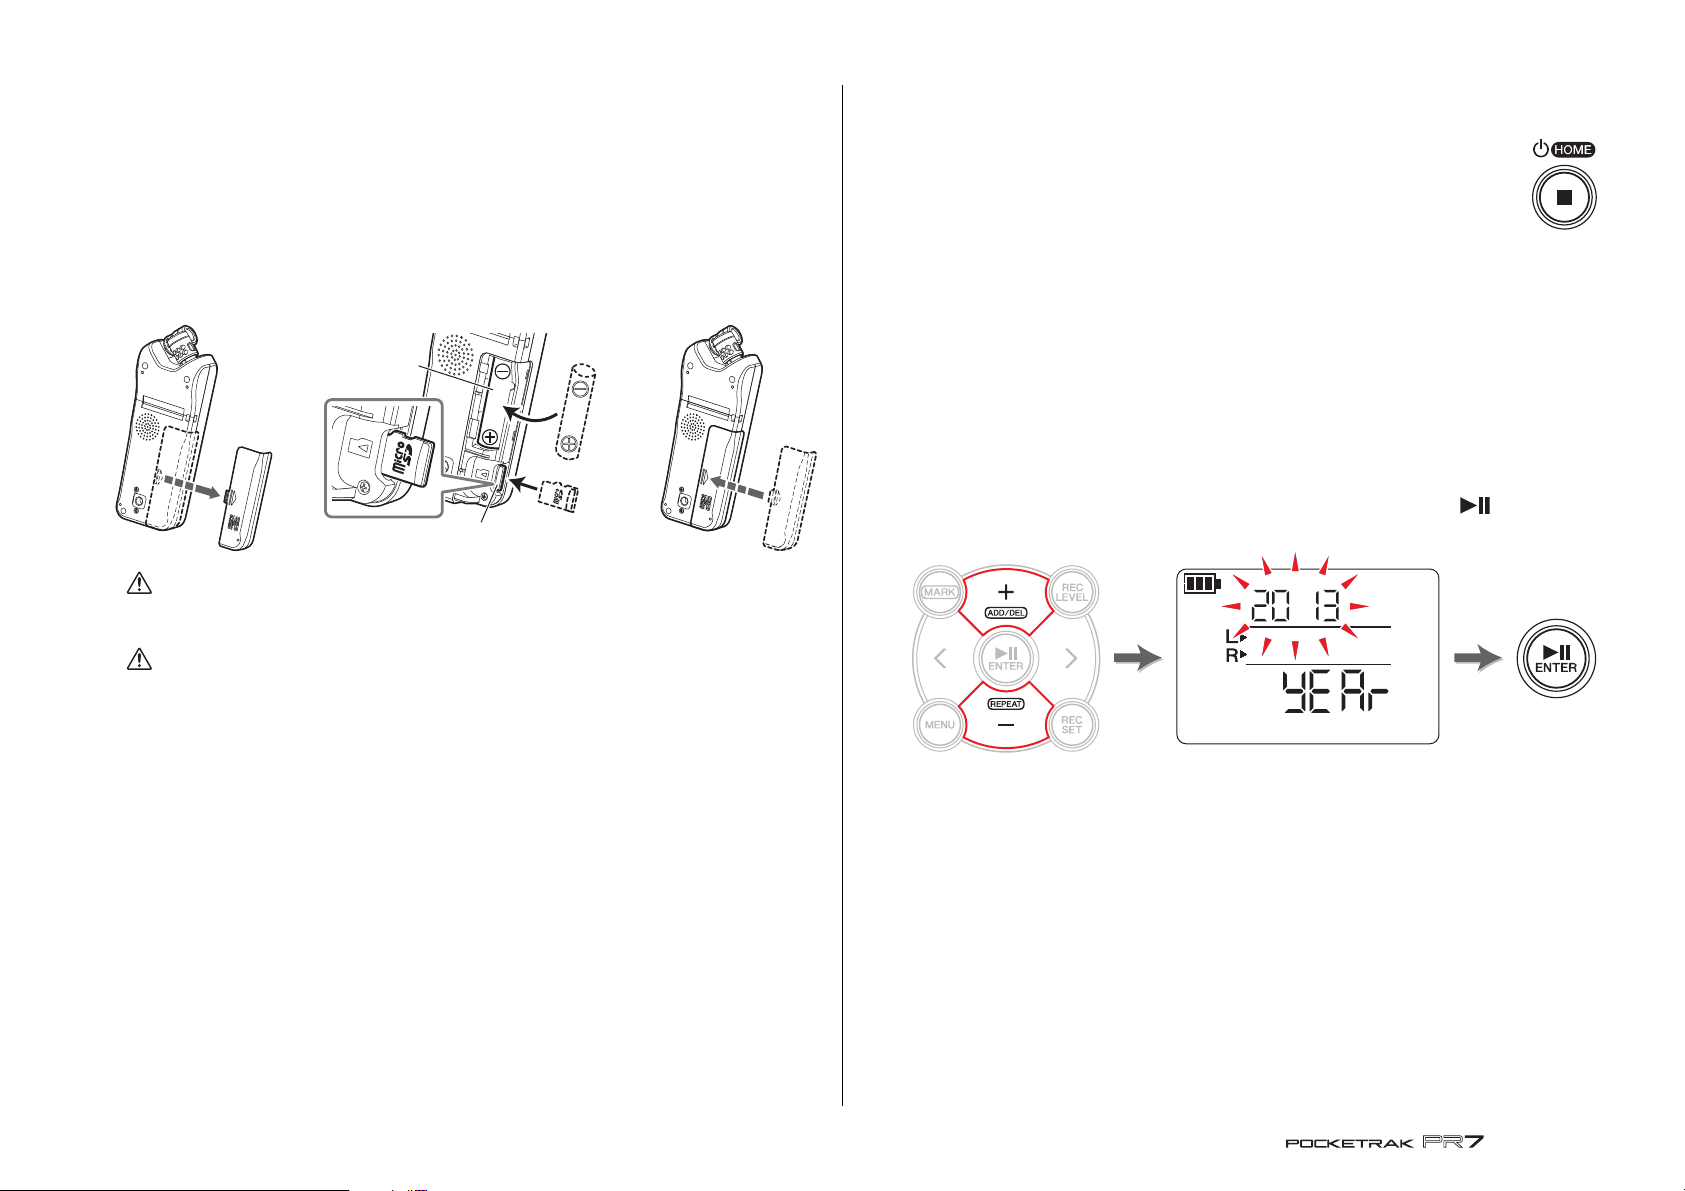
Inserting a battery and a microSD card (sold separately)
1. Open the bat-
tery compartment cover.
WARNING
Use the battery at an ambient temperature of 5 to 35 degrees Celsius (41 to 95
degrees Fahrenheit). Do not leave the unit or the battery in a car.
CAUTION
When you replace the battery, be sure to first turn the power off to the unit. Otherwise,
malfunction or damage to the data may occur.
NOTE
• You can use an AAA rechargeable battery (NiMH battery) instead. NiMH battery life is
estimated to be about 70% of that of an alkaline battery. Also, NiMH battery power
voltage is different from that of an alkaline battery. Therefore, the remaining battery
power may not be displayed correctly. Please note that you cannot recharge an NiMH
battery using the PR7.
• The microSD card slot supports both microSD and microSDHC card formats.
If you plan to use a microSD card, choose a 1GB–2GB microSD card, or a 4GB–32GB
microSDHC card (these cards are compatible as of January 2013). However, some
cards (depending on the manufacturer or type of card) may not work with the unit.
• For more information about microSD cards, please visit the following Yamaha Pro
Audio website:
http://www.yamahaproaudio.com/pr7/
2. Insert a
microSD card.
3. Insert an alka-
line dry-cell
battery.
4. Close the bat-
tery compartment cover.
Turning the power on or off
Turning the power on
Press the [■] (Stop) button.
Turning the power off
Press and hold down the [■] (Stop) button for at least three seconds while the
PR7 is stopped.
The power will also turn off automatically when no operation has been performed on
the device for a certain length of time.
Setting the calendar
When you turn on the power to the PR7 for the first time, set the calendar.
The calendar’s time stamp is used for the file information. We recommend that you set
the calendar correctly.
1. Press the [+] or [–] button to specify the year, then press the [ ] (Play)
button.
(Continued on the next page)
7
Reference Manual
Page 8
HOME screen
Folder/File number
Current position in the file
File date
File recording start time
kbps
Recording format (sound quality)
(If the file format is not supported
for recording on the PR7, “– – – –”
will appear here.)
Duration of the entire file
REMAIN
Available recording time
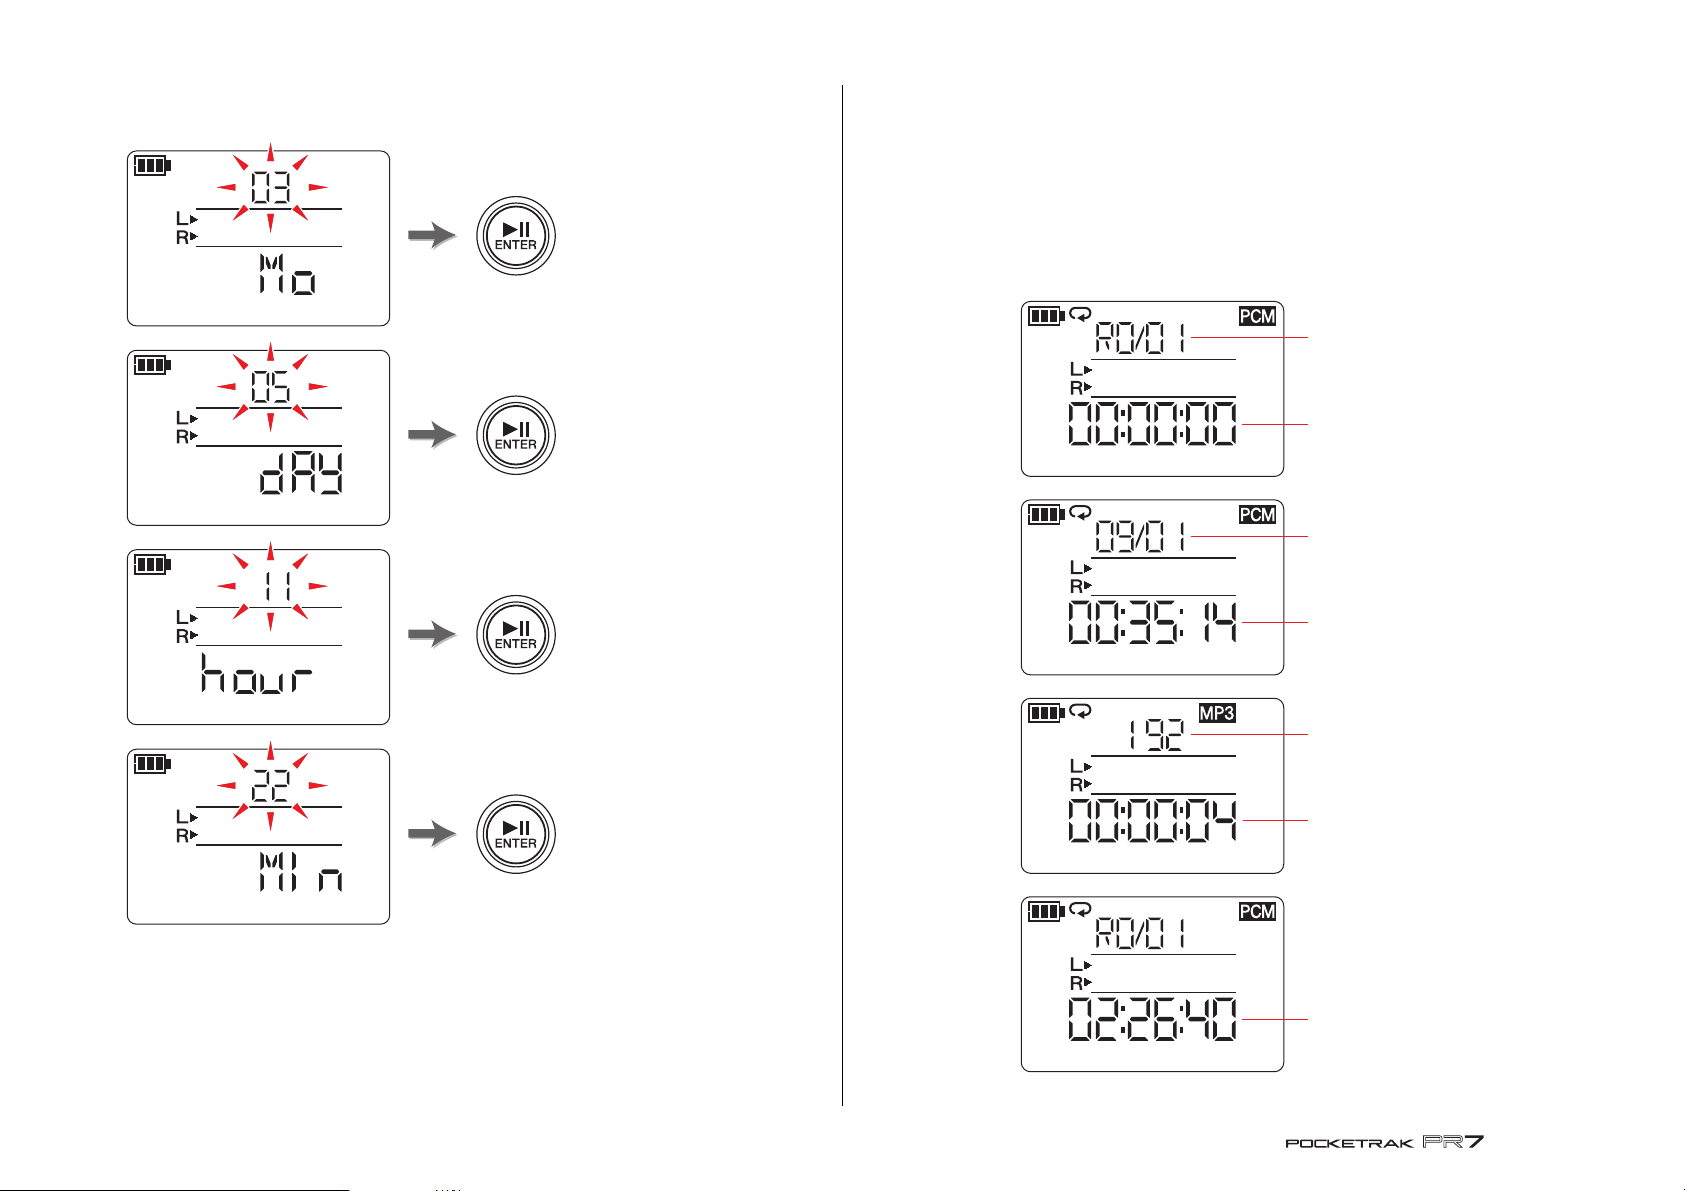
2. In the same way, specify the month, date, hour, and minute values.
To return to the previous parameter, press the [<] button.
HOME screen
The HOME screen features four sets of indicators. You can select one of these four
possible HOME screens using the [■] (Stop) button.
NOTE
If a folder that contains no files is selected, HOME screen options 2 and 3 will be
unavailable.
•Option 1
•Option 2
3. After you complete the settings, press the [■] (Stop) button.
The PR7 displays the HOME screen.
NOTE
You can also set the calendar by using the system setting menu.
About the system setting menu ➔ page 35
8
•Option 3
•Option 4
Reference Manual
Page 9
Basic Operation
3, 8
2, 4
6, 9
1, 5
7
If the level is too high:
Guideline for the
maximum volume
Flash rapidly
Center of the sound
4.
After you finish setting the recording level, press the [REC LEVEL] button again.
The PR7 displays the recording standby screen.
Basic Operation
Recording/stopping/playing back/setting the recording and playback levels
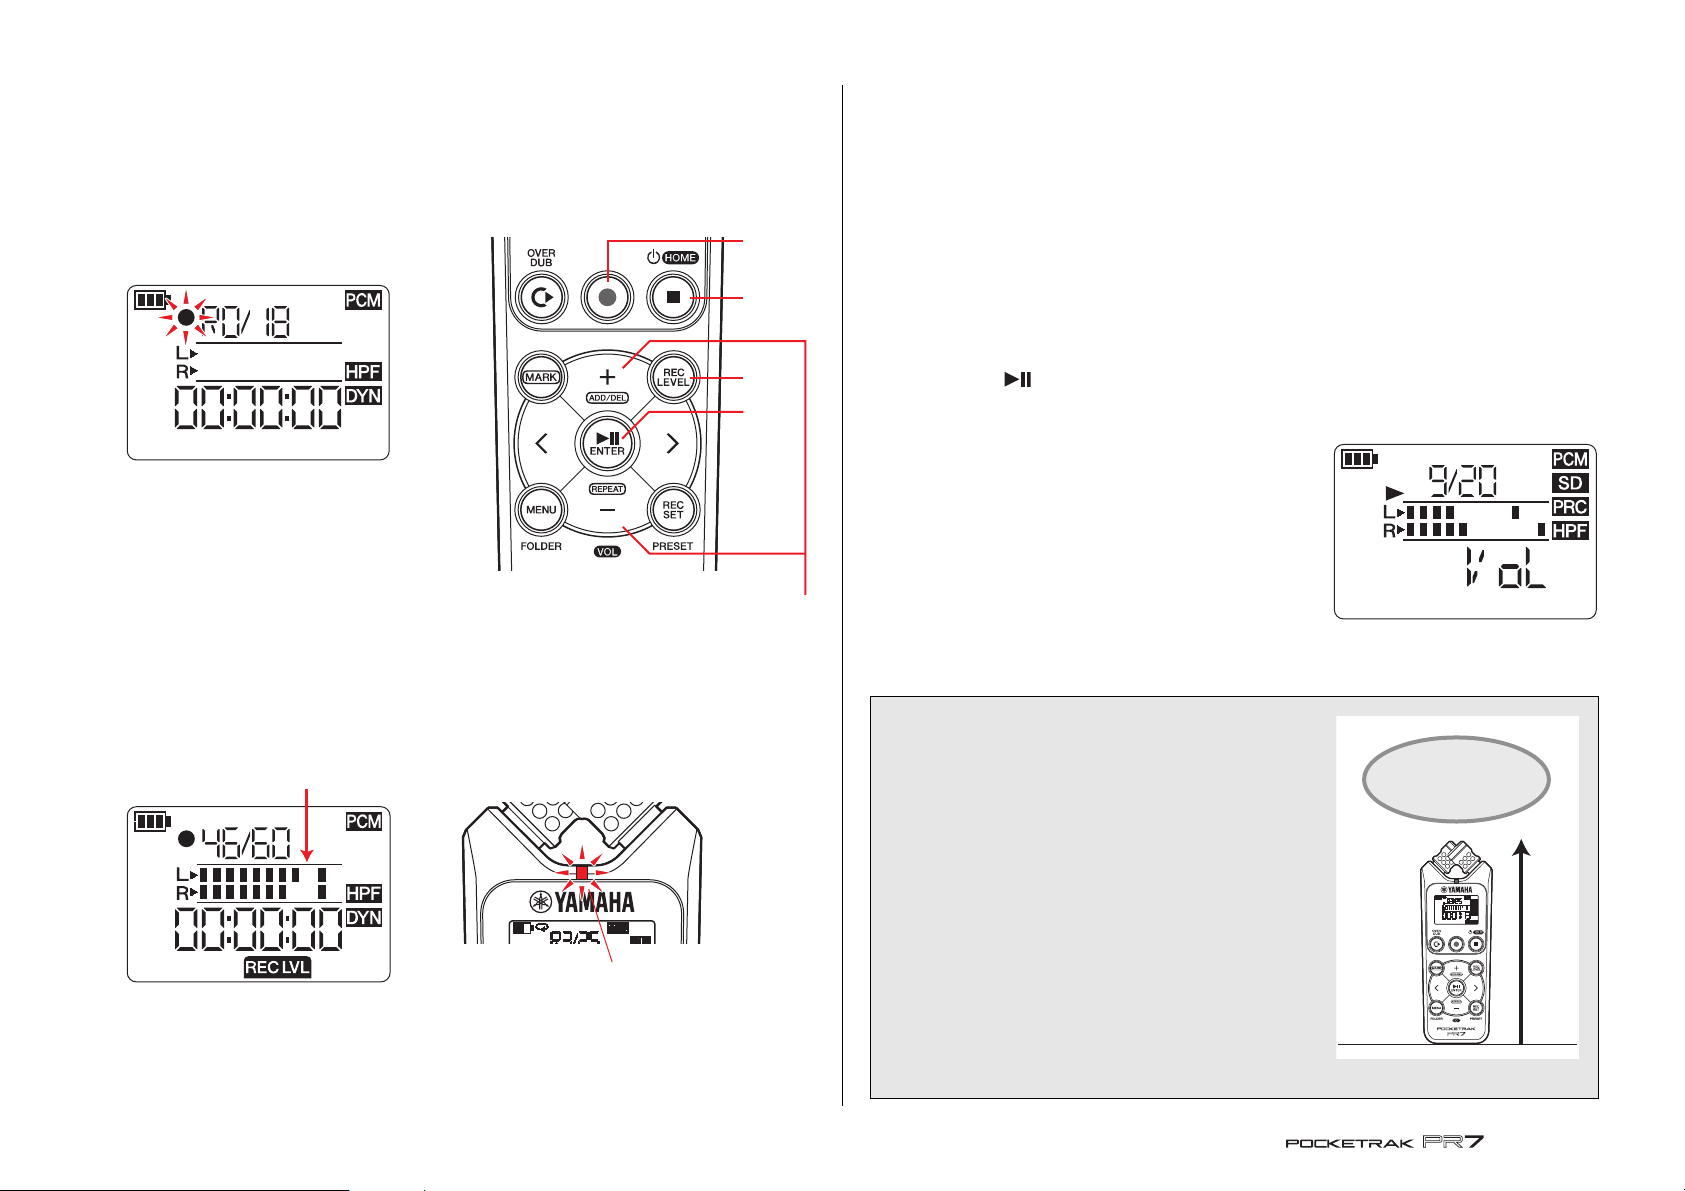
1. Press the [●] (Record) button.
The PR7 enters recording standby mode.
2. To set the recording level, press the
[REC LEVEL] button.
If you already set the recording level or if
the ALC HI or ALC LO (Auto Level
Control) (➔ page 14) was activated as
the dynamics control, proceed to Step 5.
3. While observing the level meter, press
the [+] or [–] button to adjust the recording level.
Set the recording level so that the level meter does not deflect all the way to the
right. The REC LED will flash rapidly if the meter deflects all the way.
5. Press the [●] (Record) button again.
The PR7 starts recording.
You can also press the [REC LEVEL] button to adjust the recording level.
6. After recording is complete, press the [■] (Stop) button.
Recording is complete and an audio file is created.
The playback position will automatically return to the beginning of the recorded
audio file.
7. Press the [ ] (Play) button.
The audio that was just recorded will play back.
8. While the audio file is playing, press the [+] or
[–] button to adjust the playback level.
The PR7 displays the screen shown on the right.
9. To stop playback, press the [■] (Stop) button.
The playback position will automatically return to the top of the original file.
Developer’s column: Tips for recording with the
built-in microphones
NOTE
You can set different recording levels for the built-in microphones, external
microphone, and external input.
While you are setting these levels, the screen will indicate “MIC” or “LInE”, depending
on the recording source.
You might wonder how to best orient and position
the recorder when recording with the built-in
microphones.
One rule of thumb is to point the device straight
ahead (from the built-in microphones) to the center
of the recorded sound stage.
Ideally, you should place the PR7 on a stable surface
that will not be affected by noise from the floor. If
you place the PR7 on top of a desk, place a soft cloth
underneath it so that it will not pick up unnecessary
noise. You should also take advantage of the PR7’s
excellent ability to reduce noise (page 14) and
prevent excessive level of input (page 14).
9
Reference Manual
Page 10
Basic Operation
Selecting the save destination for a recorded file
Follow the steps below to select the save destination for a recorded file:
1 Selecting either the built-in memory or microSD card
2 Selecting a folder in memory
Selecting either the built-in memory or microSD card
You can select either the internal memory or microSD card (sold separately) as the save
destination for recorded audio files.
The default setting is the internal memory.
NOTE
If you plan to use a microSD card, you must first insert a microSD card into the card
slot on the unit.
Preparing the PR7 ➔ page 7
Formatting (Initializing) a microSD card ➔ page 36
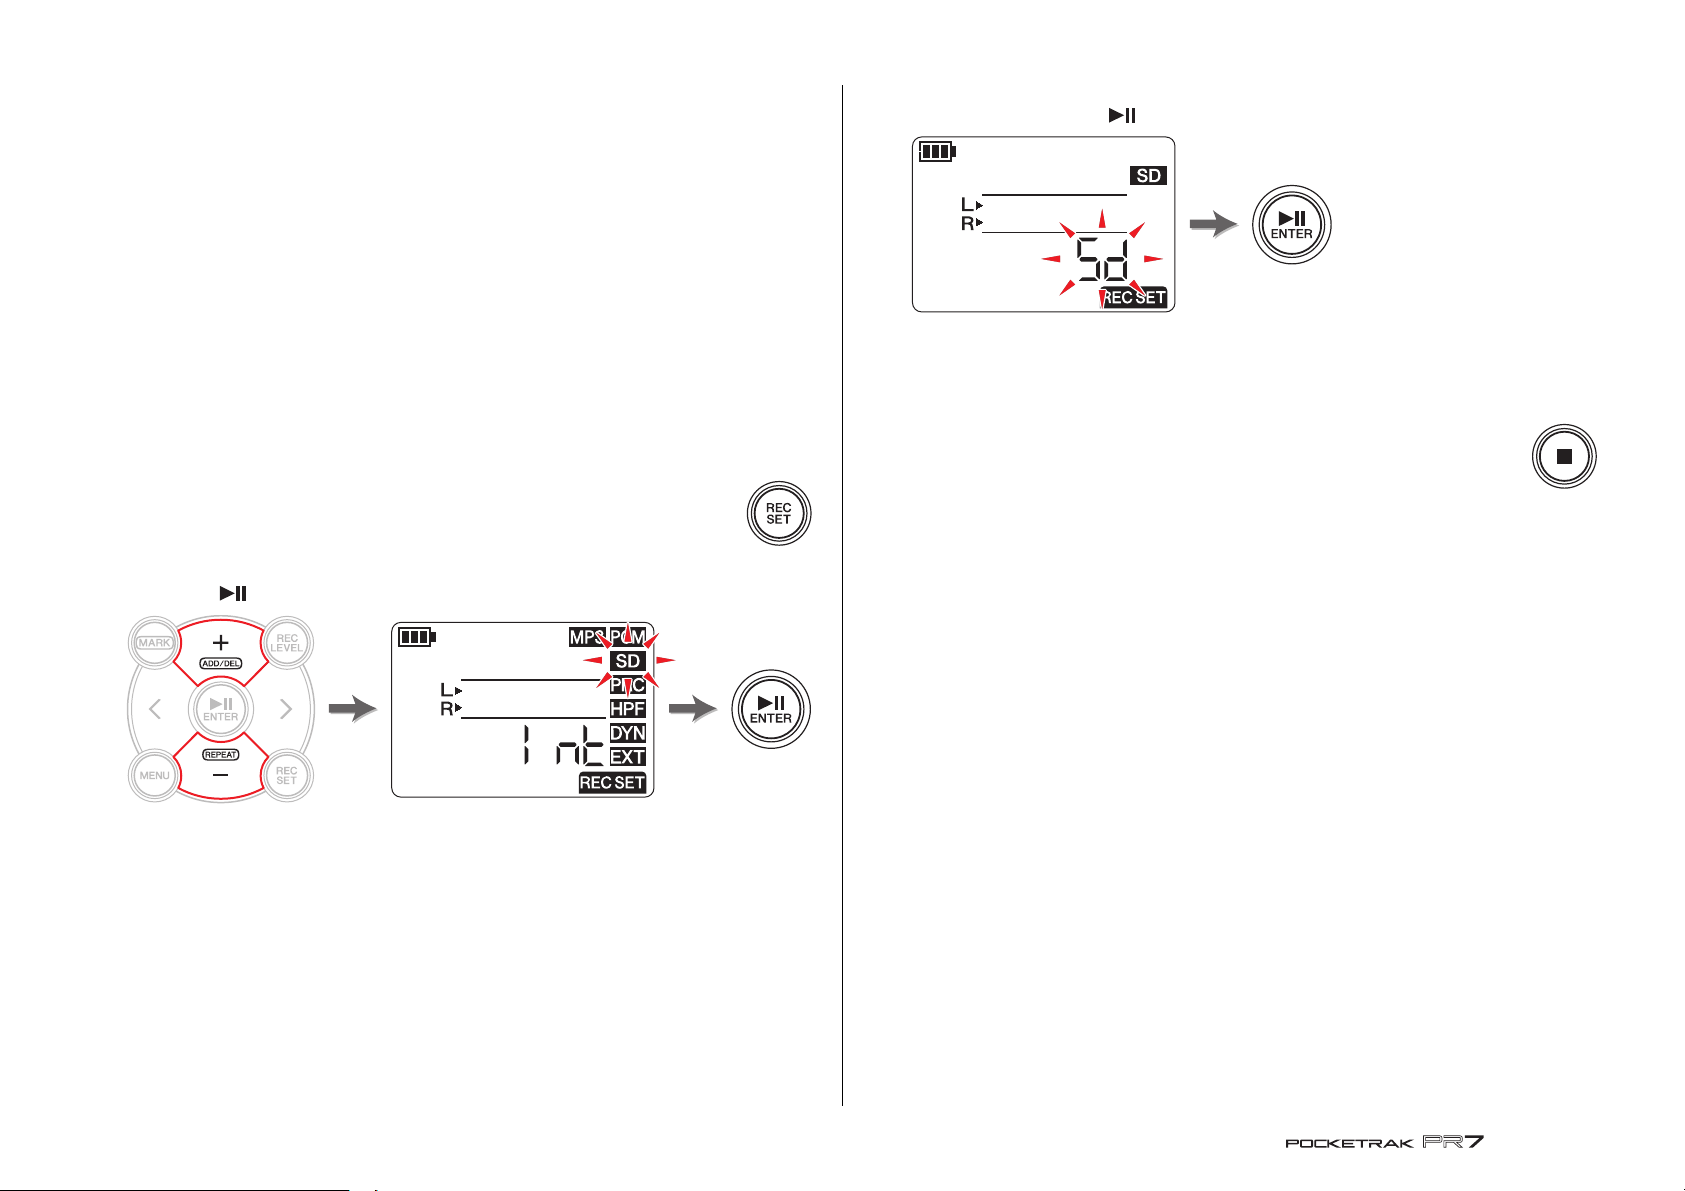
1. Press the [REC SET] button.
2. Press the [+] or [–] button to select the SD icon in the record setting area, then
press the [ ] (Play) button.
3. Press the [+] or [–] button to select “Int” (built-in memory) or “Sd” (microSD
card), then press the [ ] (Play) button.
NOTE
If a microSD card has not been installed in the unit, you can select only the built-in
memory.
4. After the setting is complete, press the [■] (Stop) button.
The PR7 displays the HOME screen.
10
Reference Manual
Page 11
Basic Operation
Press and
hold down
Selecting a folder
A location in which a recorded file is saved is called a “folder.”
You can select a folder in the selected memory as the save destination for recording.
The default setting is the R0 folder in the built-in memory, so you can perform recording
without changing the save destination. The built-in memory provides folders R0
through R9. You can organize the files by folders according to their purpose. For
example, you can store rehearsal files in folder R0 and live performance files in folder R1
so that it will be easier for you to find desired files later. However, if you would prefer to
record audio into a different folder, follow the steps below:
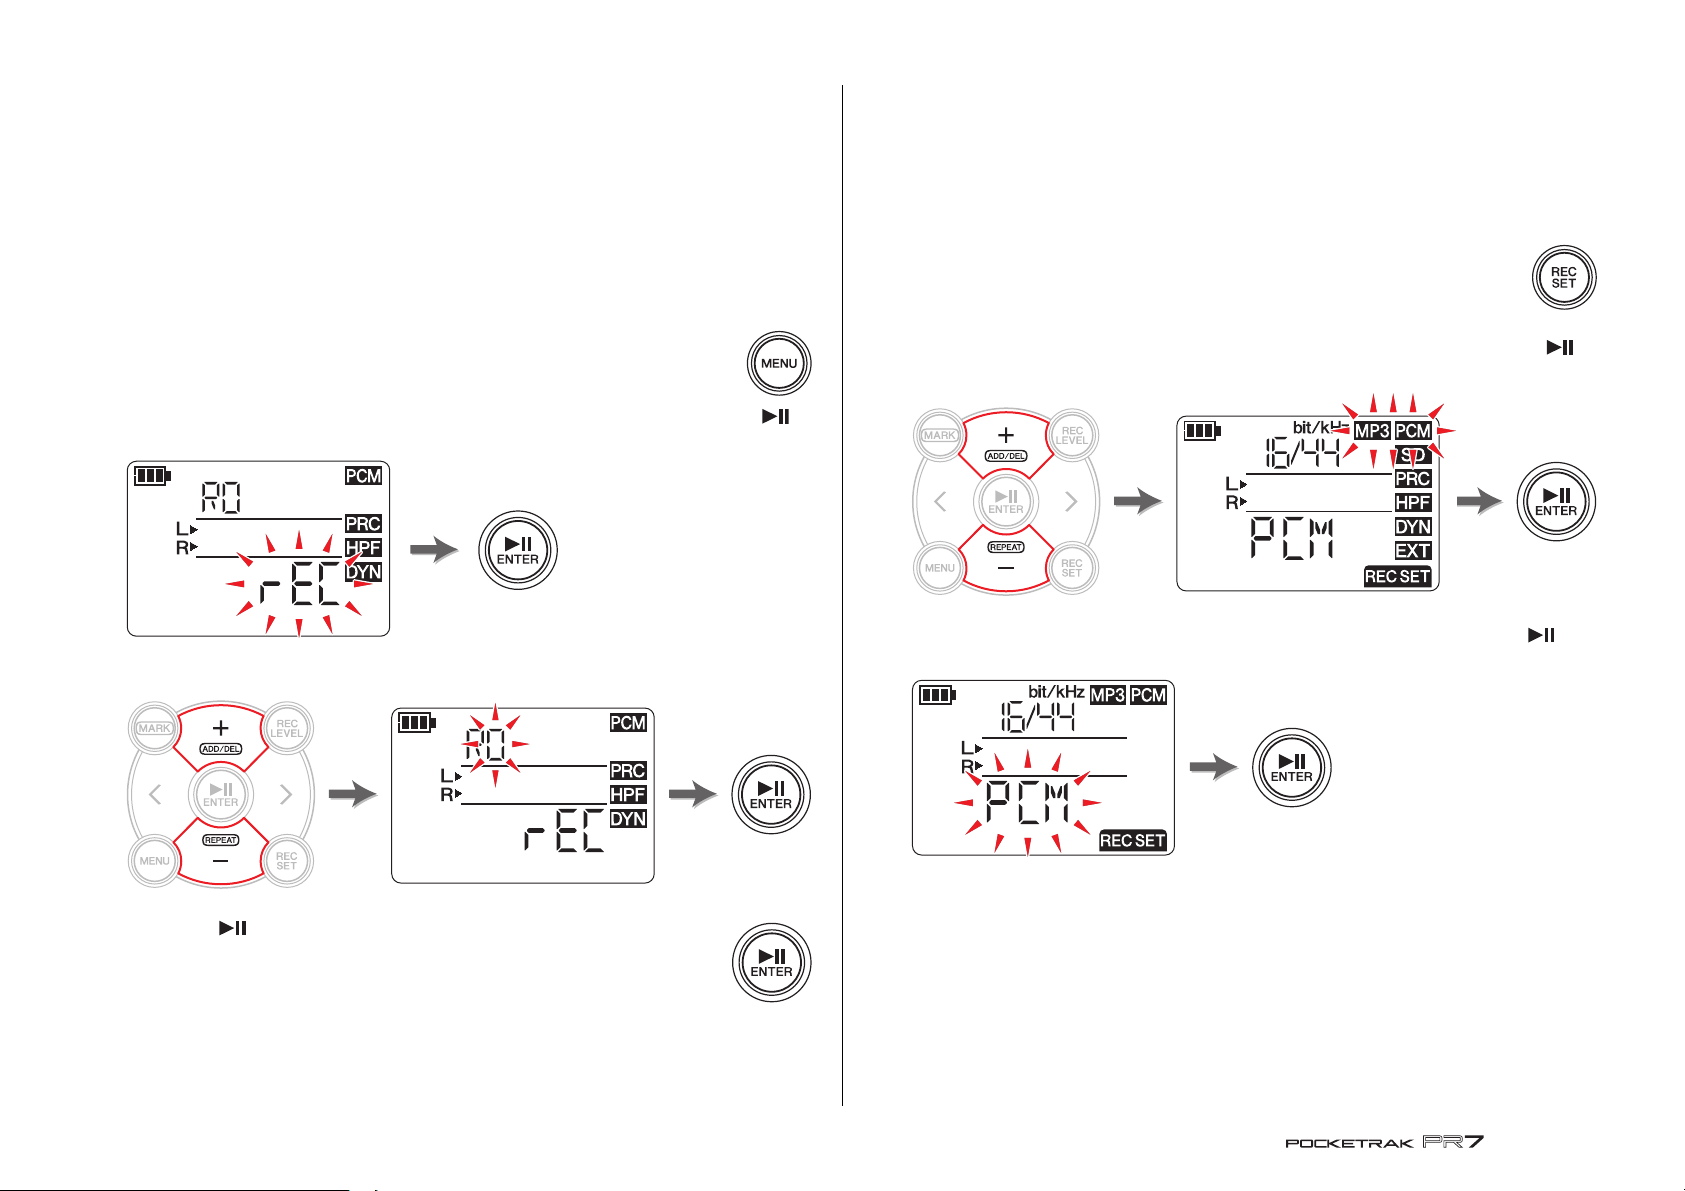
1. Press and hold down the [MENU] button for at least
two seconds.
2. Make sure that the folder select screen indicates “rEC”, then press the [ ]
(Play) button.
3. Press the [+] or [–] button to select the desired REC folder from R0 through R9.
Changing the recording format (sound quality)
You can choose the recording format from thirteen options, ranging from high-quality
PCM to the smallest-size MP3.
The default setting is PCM, 44.1kHz, 16-bit, which is the same as the sound quality of
music CDs.
1. Press the [REC SET] button.
2. Press the [+] or [–] button to select the MP3/PCM icon, then press the [ ]
(Play) button.
3. Press the [+] or [–] button to select “PCM” or “MP3”, then press the [ ]
(Play) button.
4. Press the [ ] (Play) button to confirm the setting.
The PR7 displays the HOME screen.
NOTE
If you start recording while the MUSIC folder is selected, the PR7 will record
automatically to the R0 folder. If the R0 folder is not available for recording for some
reason, the PR7 will check other folders in sequence (R1, R2,...etc.) to find and record
into the available folder.
11
(Continued on the next page)
Reference Manual
Page 12
Basic Operation
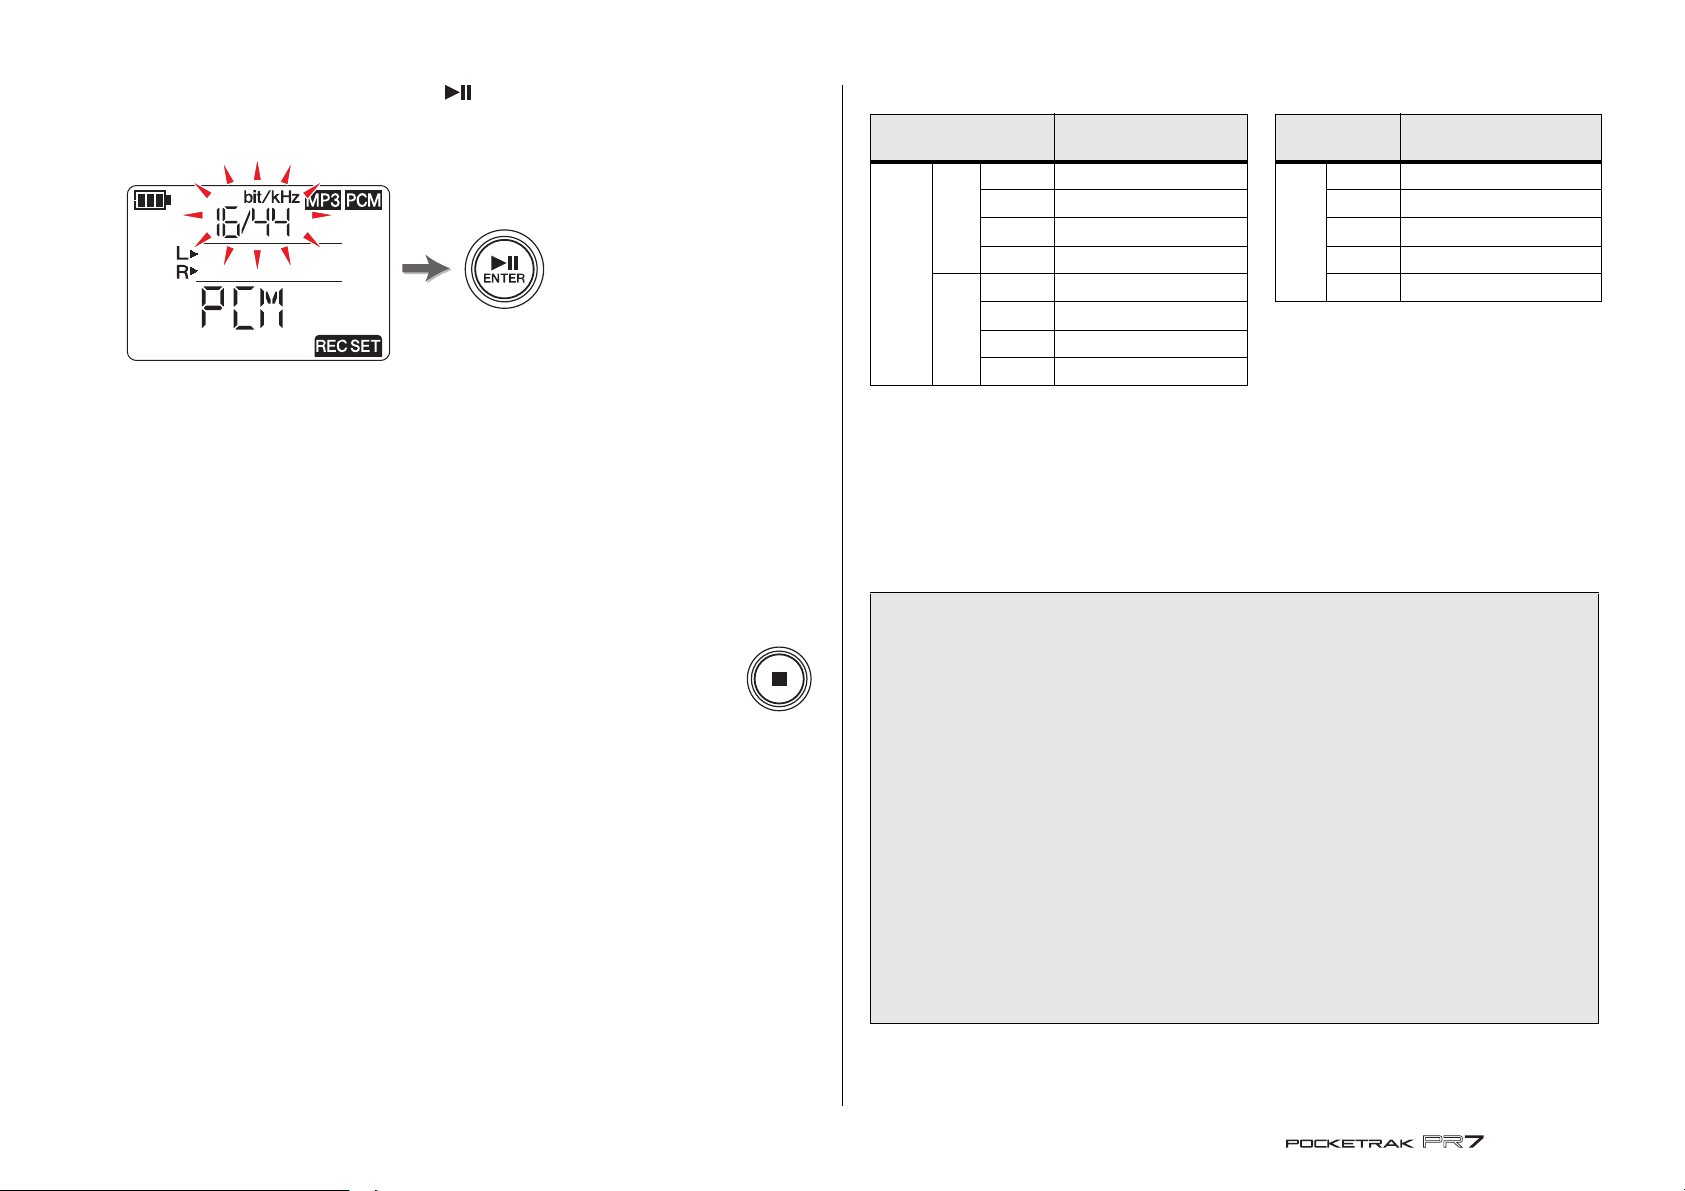
4. Press the [+] or [–] button and then [ ] (Play) button to specify the sampling
frequency (kHz) and the bit rate (bit) (if you selected PCM), or specify the bit
rate (kbps) (if you selected MP3).
The following formats are supported:
• PCM (File extension: wav)
Sampling frequency (kHz): 96, 88.2 (indicated as 88), 48, 44.1 (indicated as 44)
Bit rate (bit): 24, 16
• MP3 (File extension: mp3)
Bit rate (kbps): 320, 192, 128, 64, 32
For both parameters, a higher value will result in better sound quality, but data size
will increase.
5. After the setting process is complete, press the [■] (Stop) button.
The PR7 displays the HOME screen.
Estimated available recording time (with internal 2GB memory)
Recording mode
96kHz About 55 minutes
88.2kHz About 1 hour 192kbps About 21 hours
24bit
PCM
(WAV)
16bit
* If you record multiple files, the total available recording time will be shorter than those estimated above.
* The largest available recording space (for continuous recording) in one file is 2GB. If the recording file
size reaches 2GB, the PR7 will automatically continue recording into a subsequent file in a few
seconds (when using a microSDHC card). However, the unit will be unable to record continuously if the
recording exhausts the battery. Battery life ➔ page 39
* To display the available recording time, press the [■] (Stop) button repeatedly while the HOME screen
is displayed. ➔ page 8
48kHz About 1 hour 45 minutes 128kbps About 32 hours
44.1kHz About 1 hour 55 minutes 64kbps About 64 hours
96kHz About 1 hour 20 minutes 32kbps About 127 hours
88.2kHz About 1 hour 25 minutes
48kHz About 2 hours 40 minutes
44.1kHz About 2 hours 55 minutes
Available recording
time (estimated)
Recording
mode
320kbps About 12 hours 45 minutes
MP3
Available recording time
(estimated)
Developer’s column: Tips for selecting a recording format
When you select a recording format, first consider which is more important: sound
quality or data size. Then, think about how you will use the recording before finally
deciding on the recording format.
For example, music CDs are recorded with rates of 44.1kHz/16-bit. If you are
recording for a CD, you may want to select PCM “16/44.” Generally, in music
production applications, projects use the format of 48kHz/24-bit. In the field
recording industry, in which the sounds of nature are recorded, people often use
96kHz/24-bit format.
On the other hand, music data distributed on the Internet typically features lower
resolution in the range of 320 through 128kbps. If you want to send music data via
e-mail to share a rough sketch of a song idea with your band members, selecting
32 or 64kbps would be a good choice.
It is very important to record audio with a sound quality that suits the purpose. We
recommend that you try out different formats first, and then pick the best one for
your application.
12
Reference Manual
Page 13
Basic Operation
Press and
hold down
Press and
hold down
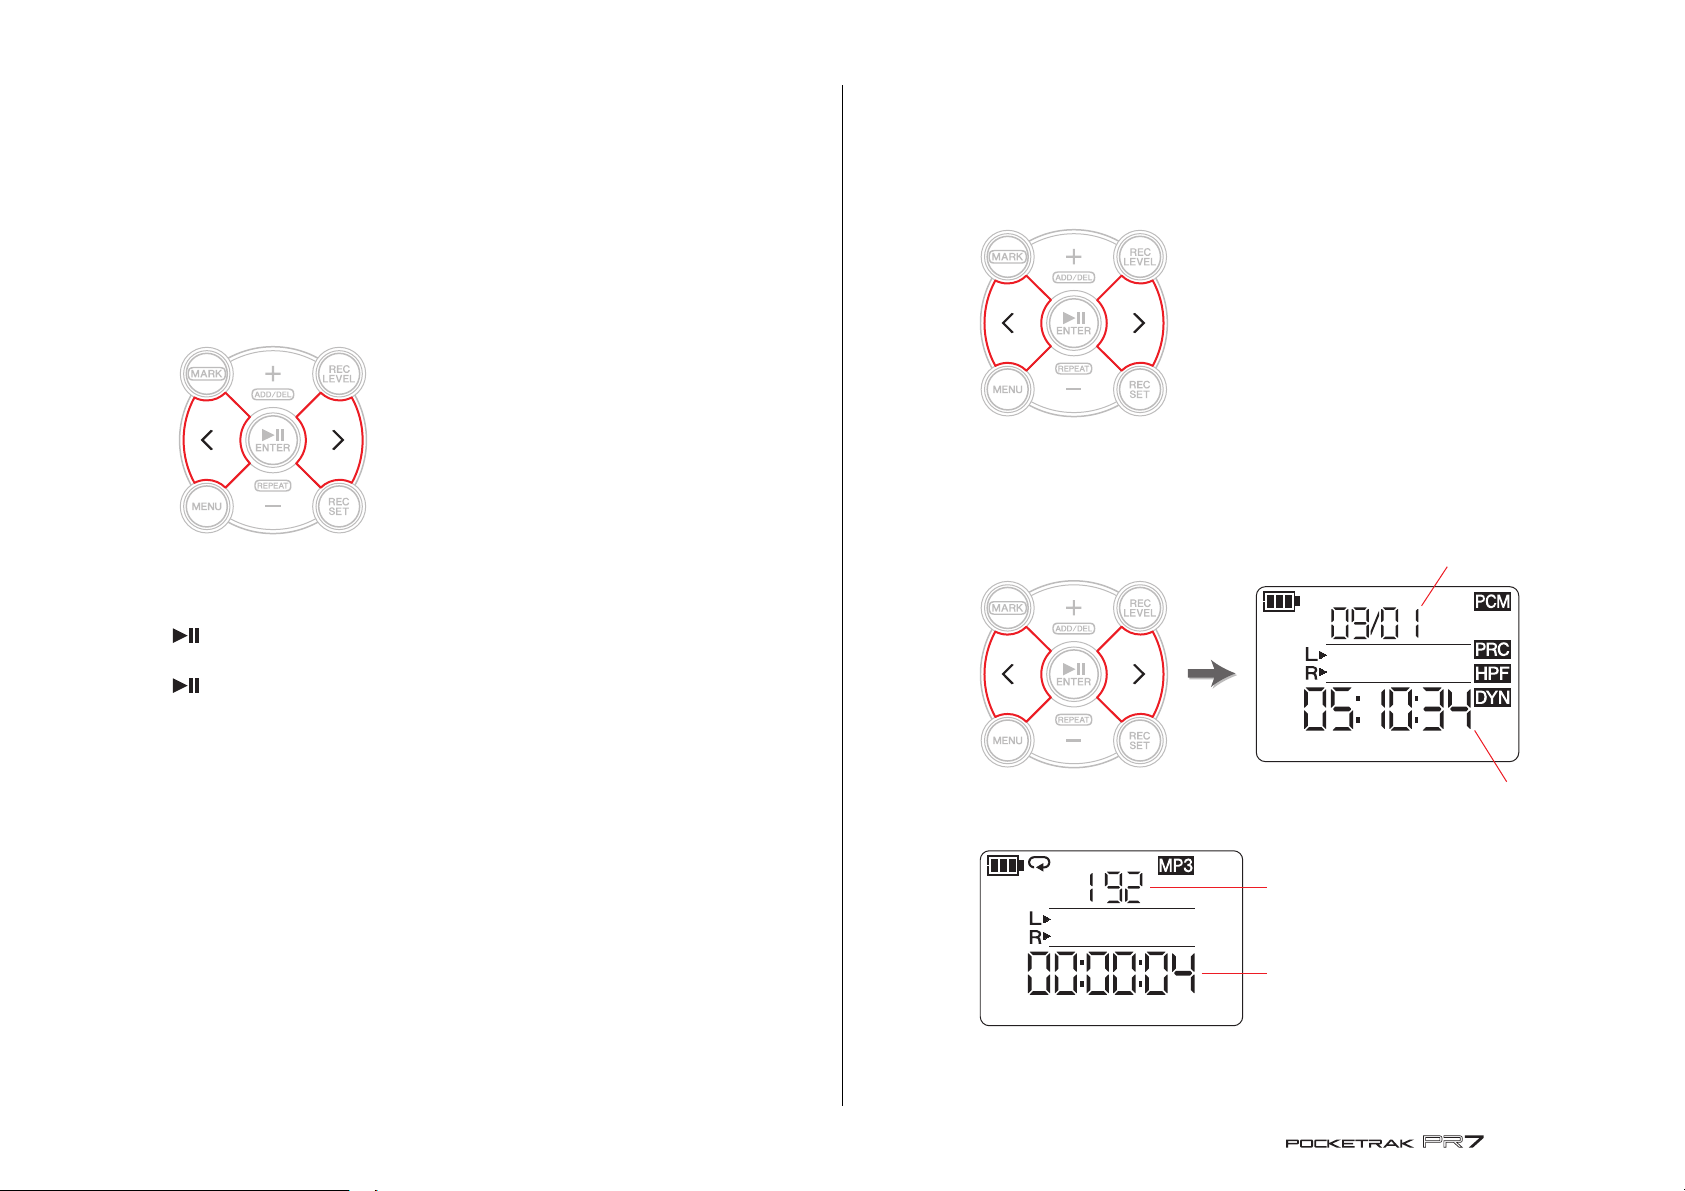
Next filePrevious file
File recording
start time
File date
kbps
Recording format (sound quality)
(If the file format is not supported
for recording on the PR7, “– – – –”
will appear here.)
Duration of the entire file
Adjusting the playback speed
You can adjust the playback speed. This function is useful if you practice fast phrases or
listen to precisely how notes are playing.
Adjusting the playback speed ➔ page 26
Fast forward and fast reverse
While the PR7 is playing or while playback is paused, press and hold down the [>] button
to engage fast forward, or press and hold down the [<] button to engage fast reverse.
Pausing during playback or recording
Press the [ ] (Play) button during playback or recording to pause playback or
recording.
Press the [ ] (Play) button again to resume playback or recording.
Selecting the next or previous file
While operation is stopped or paused, press the [>] button to select the next file. Press
the [<] button to select the previous file.
Press and hold down the [<] or [>] button to continue skipping to the previous or next
file respectively.
NOTE
To search for a file using the information displayed on screen, first press the [■] (Stop)
button repeatedly (while the HOME screen is displayed) to select the desired screen
option. Then press the [<] or [>] button to find a file based on the displayed information.
13
Reference Manual
Page 14

Basic Operation
Reducing noise in the low range
The PR7 features a high pass filter to help reduce noise during recording.
Especially, this filter is effective at reducing foot steps or other low-range noises.
NOTE
You can use this function only when recording with microphones.
1. Press the [REC SET] button.
2. Press the [+] or [–] button to select the HPF icon in the record setting
area, then press the [ ] (Play) button.
3. Press the [+] or [–] button to select “On” or “OFF” for the high-pass filter, then
press the [ ] (Play) button.
4. After the setting process is complete, press the [■] (Stop) button.
The PR7 displays the HOME screen.
If the high pass filter has been turned on, the HPF icon will appear on the
HOME screen.
Preventing excessive input levels
The PR7 features a dynamics control to prevent the recording from distorting in the
event that an excessive level of audio is input unexpectedly.
NOTE
You can use this function only when recording with microphones.
1. Press the [REC SET] button.
2. Press the [+] or [–] button to select the DYN icon in the record setting
area, then press the [ ] (Play) button.
3. Press the [+] or [–] button to select the type of dynamics control from the
following options, then press the [ ] (Play) button.
• OFF ........ The PR7 will record audio without using the dynamics control.
•
LIM
.........The limiter will be activated only if an excessive level of audio is input.
This option is suitable for recording performances of musical instruments.
• ALC HI ... The PR7 will slightly lower higher volume levels of sound, and slightly
raise lower volume levels of sound. The microphone sensitivity is set
slightly higher for this option.
This option is suitable for recording low volume level sounds, such as a
conference or interview.
• ALC LO .. The microphone sensitivity is set slightly lower for this option. This
option is suitable for recording high volume level sounds that could
cause distortion if recorded with the ALC HI setting.
NOTE
• ALC stands for Auto Level Control.
• Please note that you cannot adjust the recording level if ALC HI or ALC LO has already
been selected.
4. After the setting process is complete, press the [■] (Stop) button.
The PR7 displays the HOME screen.
If the type of dynamics control is set to anything other than “OFF,” the
DYN icon will appear on the HOME screen.
14
Reference Manual
Page 15

Basic Operation
Press and
hold down
Recording with a tonal quality that suits the musical instrument (Selecting a preset)
The PR7 offers presets that automatically adjust tonal qualities to optimize the recording
source.
NOTE
You can use this function only when recording with microphones.
1. Press and hold down the [REC SET] button for at
least two seconds.
2. Press the [+] or [–] button to select the desired preset from the following
options, then press the [ ] (Play) button.
Preset Name HPF DYN Application
OFF OFF OFF General setting for musical instrument
bAnd OFF LIM Band recording
SPEECH ON ALC H Conference or speech
FIELd ON OFF Field recording
nEAr OFF LIM
Recording closer to the musical instrument/
close miking
Switching the external device setting
If you record audio from a device connected to the MIC/LINE IN (external input) jack,
you must select MIC (condenser microphone) or LINE (line-in device) for the input
device setting.
NOTE
Yamaha recommends that you use a microphone with the following specifications as
an external condenser microphone.
Type: Electret condenser microphone that features plug-in power operation
Impedance: 2kΩ
Power supply: Operation guaranteed at 1.3V; Plug: mini-plug (3.5mm)
1. Press the [REC SET] button.
2. Press the [+] or [–] button to select the EXT icon, then press the [ ] (Play)
button.
3. Press the [+] or [–] button to select “MIC” (condenser microphone) or LInE
(line-in device), then press the [ ] (Play) button.
After the setting process is complete, the PR7 automatically displays the HOME
screen.
4. After the setting process is complete, press the [■] (Stop) button.
The PR7 displays the HOME screen.
15
Reference Manual
Page 16

Basic Operation
Recording slightly earlier than the recording start time
You can program the PR7 so that a maximum of three (3) seconds of audio prior to the
recording start time will be collected in a buffer, enabling you to record up to an
additional three (3) seconds of audio when the PR7 starts recording.
NOTE
If the recording format (sound quality) is set to 96kHz or 88.2kHz, a maximum of one
(1) second of audio prior to the recording start time will be recorded.
1. Press the [REC SET] button.
2. Press the [+] or [–] button to select the PRC icon, then press the [ ] (Play)
button.
Developer’s column: Using the PRC feature
PRC (Pre-recording) is a feature that enables you to record a few seconds of audio
prior to the actual recording start time. This might seem amazing, as if the
irretrievable past had been recovered. However, how it works is quite simple. The
PR7 is actually recording continually into a three-second memory buffer. Once
recording is started, data in the PRC buffer is added to the beginning of the file. On
the screen, it looks like the recording started prematurely by three seconds, but this
is normal operation.
Have you ever tried to record a band practice or live performance and thought you
had pressed the REC button in time, but later you were disappointed to find out
that the beginning of the recording was cut off? The PRC function enables you to
record extra audio of up to three seconds prior to pressing the REC button, letting
you avoid future frustration. In particular, if you plan to record an important event,
be sure to use the PRC function.
3. Press the [+] or [–] button to select “On” or “OFF,” then press the [ ] (Play)
button.
4. After the setting process is complete, press the [■] (Stop) button.
The PR7 displays the HOME screen.
NOTE
• If the PR7 starts recording after having been placed in standby mode for
less than three seconds, audio will be recorded from the point at which the unit was
placed in recording standby mode.
• This function is disabled during overdubbing.
16
Reference Manual
Page 17

Markers
Current marker position
Total number of markers in the current audio file
Marker mode icon
012
Marker number indication
Top of
the file
Marker 1 Marker 2 End of
the file
Markers
You can insert markers in recorded audio files to quickly locate a playback position, or
repeatedly play the range between two markers. For example, after recording a long live
performance, you can place a marker at the beginning of each song so that you will be
able to quickly locate the songs for playback later.
Marker mode screen
Press the [MARK] button to engage Marker mode. The following screen appears.
Adding a marker
1. Select an audio file.
To select an audio file in the current folder, use the [<]/[>] buttons.
NOTE
To select an audio file from another location, refer to the section below.
Selecting another folder ➔ page 11
Selecting a file on a microSD card ➔ page 10
Copying an audio file from the computer ➔ page 33
2. While the PR7 is in Marker mode, press the [+] button at the location where
you want to add a marker.
“Add” will appear on the screen and a marker will be added.
3. After you finish adding a marker, press the [MARK] button again to
exit Marker mode.
The following rule applies to the indication of marker positions:
If the playback position is located at the beginning of the file, the PR7 will indicate “0”
as the marker number. If the playback position is at the end of the file, the PR7 will
indicate the number of the marker that is closest to the current position within the file.
17
NOTE
You can also add a marker to the current playback position while the unit is stopped.
If you have added a marker during overdubbing, the marker will be inserted in the
overdubbed data.
You can add up to 36 markers per file.
There should be two seconds or longer between markers.
Reference Manual
Page 18

Markers
Jumping to a marked position
Use the [<] or [>] button in Marker mode to locate a marker position.
NOTE
While the PR7 is playing in Marker mode, press and hold down the [<] or [>] button to
engage fast reverse or fast forward.
Deleting a marker
1. While the PR7 is stopped in Marker mode, use the [<]
or [>] button to locate a marker you want to delete.
2. Press the [+] button.
“dEL” will appear on the screen and the marker will be
deleted.
NOTE
You can delete markers only while operation is stopped or
playback is paused.
You can delete only the marker at the current location.
Repeat playback between the markers
You can repeatedly play back between adjacent markers. This is called Repeat playback.
Follow the steps below to set up Repeat playback:
1. Press the [MARK] button.
2. Press the [ ] (Playback) button to
play the song. During playback,
insert markers at the start point and
end point of the Repeat playback
portion.
3. Press the [<] button to locate the
start point of the Repeat playback portion.
18
(Continued on the next page)
Reference Manual
Page 19

4. To activate Repeat playback, press the [–] button in a
location between markers for Repeat playback.
The PR7 enters the Repeat playback mode.
The following icon appears on the screen in Repeat
playback mode.
NOTE
• Even if the PR7 exits Marker mode while the Repeat playback icon is displayed,
Repeat playback mode will continue.
• If an audio file does not include any markers, the PR7 will play the entire file repeatedly
if you activate Repeat playback.
• If you activate Repeat playback during normal playback, the PR7 will play up to the
closest marker, then return to the previous marker and repeatedly play the portion
between these two markers. Refer to page 17 for the rule regarding the indication of
marker position.
Markers
Developer’s column: Mastering difficult phrases by using Repeat playback
and playback speed adjustment
If you practice a song without a score or learn a song by ear, you may frequently
need to play back the same phrase over and over. Back in the day, we often used
cassette tapes. Playing back songs on a tape repeatedly for practice caused the tape
to stretch, resulting in pitch fluctuation.
Then, CDs arrived, bringing with them convenience and no pitch fluctuation.
However, playback speed cannot be changed. Changing playback speed is useful
for learning difficult, fast phrases. I used to dub CDs to cassette tapes, and played
the tapes on a cassette deck that featured speed adjustment. However, I remember
that even that method was not perfect because the pitch fluctuated.
The PR7 enables you to play back a song repeatedly and adjust the playback speed,
with accuracy and high quality. You can slow down the playback speed without
changing the pitch enabling you to master fast phrases by playing them back
slowly and repeatedly.
Take advantage of the Repeat playback function, as well as playback speed
adjustment (which is explained on page 26).
5. To stop Repeat playback, press the [–] button again.
19
Reference Manual
Page 20

Overdubbing (Layered Recordings)
A A + B
B
A
Recording
Playback
Folder name/
File number
Time
Folder name/
File number
Overdubbing (Layered Recordings)
Layering recording over an existing audio file is called “overdubbing.” Using the
Overdubbing function enables you to add a recording [B] of a chorus and/or a guitar
solo to an existing audio file [A] that contains only vocal and rhythm guitar
performances to create a combined audio file [A+B].
Overdubbing mode screen
In Overdubbing mode, the playback icon and recording icons appear at the same time.
Other information on the screen includes the number and time duration of the
currently-selected file.
Overdubbing
Preparing for overdubbing
The following inputs and outputs are available for overdubbing:
Input: Built-in microphones, or MIC/LINE IN (external input) jack
Output: Headphones jack (Listen to audio playback only through the headphones
so that the playback sound will not be recorded again.)
Original audio files that you wish to use for overdubbing must be in an audio format
supported by the PR7 (except MP3: 64kbps/32kbps).
Supported formats ➔ page 11
1. Select an audio file for overdubbing.
To select an audio file in the current folder, use the [<]/[>] buttons.
NOTE
To select an audio file from another location, refer to the section below.
Selecting another folder ➔ page 11
Selecting a file on a microSD card ➔ page 10
Copying an audio file from the computer ➔ page 33
2. Press the [OVERDUB] button.
The PR7 enters Overdubbing Standby mode, and starts playing back the
selected audio file automatically.
At this point you can still select a file for playback or to fast reverse or fast
forward the audio file using the [<] or [>] button. Also, you can switch to
Marker mode and add a marker using the [+] button.
If you select a file in the MUSIC folder as the original file, the PR7 will
automatically create a new file to one of the folders inside the REC folder.
20
Reference Manual
Page 21

Overdubbing (Layered Recordings)
Recording level
Playback level
Adjusting the balance between the playback level and recording
level
1. To adjust the playback volume of the original audio file and the
recording level of the audio signal to be overdubbed, press the
[REC LEVEL] button in Overdubbing Standby mode.
2. Press the [+] or [–] button to adjust the recording level of the audio signal to
be overdubbed.
3. Press the [<] or [>] button to adjust the playback volume level of the original
audio file.
Overdubbing
1. Press the [●] (Record) button while the Overdubbing Standby
screen is displayed.
The playback position will automatically return to the top of the original
file, and overdubbing will start.
NOTE
While the Overdubbing Standby screen is displayed, you can press the
[OVERDUB] button instead of the [●] (Record) button to start overdubbing.
2. After recording is complete and the PR7 plays the original file to the
end, press the [■] (Stop) button.
New audio data will be dubbed over the original file, creating a new file.
The new file will be created in the same format with the original file.
Since the new audio file remains selected, you can continue
overdubbing if you like.
The original file is saved without change, so if you decide to redo the overdubbing
operation, you can select the original file and perform overdubbing once again.
NOTE
This new audio file will contain a recording that ranges from the start till the end of the
overdubbing process. Therefore, please note that if you stop playback of the original
data in the middle of overdubbing, the new file created will end at the point at which
you stopped playback.
4.
After adjusting the recording level, press the [REC LEVEL] button again.
The PR7 displays the Overdubbing Standby screen.
21
Reference Manual
Page 22

Overdubbing (Layered Recordings)
AAA+B
Original file A
Overdubbing B
Dubbing Dubbing
AAA+B
Step 1 Step 2 Step 3 Step 4
Punch in/out
Layering a new recording over only a specific portion of an existing audio file is called
“punching in and out” (punch in/out). With the punch in/out technique, you do not
need to record any portions of a song other than the part you want to record. It is useful,
for example, when you want to add only a guitar solo or chorus at a climactic point.
For all portions over which you do not need to layer a new recording, the original data
will be recorded into a new file as is. This copying operation is called “dubbing.” It is
something similar to what some people call “dubbing” — copying a vinyl record to a
cassette tape or CD-R. Therefore, punch in/out can be viewed as recording only the
necessary parts while dubbing the entire song.
1. Press the [ ] (Play) button while the PR7
displays the Overdubbing Standby screen.
The PR7 enters dubbing mode, and starts
recording only the audio data of the original file,
but not any external source.
3. After recording the necessary part, press the [●] (Record) button
again.
The PR7 returns to dubbing mode, recording only the audio data of the
original file.
4. After the original file is dubbed up to the end, press the [■] (Stop)
button.
The PR7 creates a new audio file with only the necessary part
overdubbed.
NOTE
After overdubbing is complete and playback of the original file is over, the PR7 will
continue normal recording unless you stop the operation.
2. Press the [●] (Record) button slightly before the
point at which you want to start overdubbing.
The PR7 starts overdubbing, recording the external
audio source on top of the original file.
22
Reference Manual
Page 23

Overdubbing (Layered Recordings)
Pausing overdubbing/dubbing
1. Press the [ ] (Play) button during overdubbing/dubbing to
pause overdubbing/dubbing.
Playback of the original file will also pause.
Press the [ ] (Play) button again to resume overdubbing/dubbing
from that point.
Listening to the overdubbed data
The overdubbed file will be created as a new recording in the same folder as the original
file. If you select a file in the MUSIC folder as the original file, the PR7 will automatically
create a new file to one of the folders inside the REC folder. After overdubbing is
complete, the overdubbed file will be automatically selected. Therefore, you can simply
play the file to hear the overdubbed file. If you wish, you can continue with another
round of overdubbing using the steps described in the previous section.
Developer’s column: My first overdub
About 30 years ago, I used to do “one man multiple chorus” sessions by myself. I
had two cassette recorders in front of me. I played a song on one of the recorders,
while singing to the song, and recorded to the other recorder. I repeated this
procedure to layer my vocal and chorus. Sometimes, our dog barked or my mother
knocked on my bedroom door, so I had to re-record some takes. Each time I added
another layer of recording, noise was introduced and would build up. By the fourth
or fifth take, the resultant recording was submerged by white noise. Yet, in those
da ys, it was ju s t fun to lis t e n to my voca l s layered one by one. These days, the audio
devices have advanced and they enable you to perform high-quality overdubbing
easily. But the principal inside these devices is, and was, the same. Younger people
who have only used digital devices may not understand this experience. On the
other hand, previous generations who had to use cassette recorders for airchecks
or dubbing may feel the same as I do.
23
Reference Manual
Page 24

Functions Useful for Musical Instrument Practice
Standard pitch (A=)
Key
Current pitch
Functions Useful for Musical Instrument
Practice
Using the tuner
You can use the tuner function to tune your musical instrument.
1. Point the built-in microphones toward the musical instrument you want to
tune.
To tune an electric musical instrument that can be connected to a line-in jack,
connect the instrument to the unit’s MIC/LINE (external input) jack.
2. While the HOME screen is displayed, press the [MENU] button.
Menu items appear on the left side of the screen.
4. Press the [+] or [–] button to specify the standard pitch, then press the [ ]
(Play) button.
The standard pitch can be set in the range of 430Hz to 450Hz.
5. Play and tune the musical instrument.
Tune the instrument so that the segments in the middle of the L meter will align
with the segments in the middle of the R meter.
If the instrument is correctly tuned, the screen will indicate the following meter
segments.
3. Press the [+] or [–] button to select “TUN”, then press the [ ] (Play) button.
The PR7 displays the tuner screen.
6. After tuning is complete, press the [■] (Stop) button.
The PR7 displays the HOME screen.
24
Reference Manual
Page 25

Functions Useful for Musical Instrument Practice
Beat
Te mp o
Using the metronome
The PR7 features a built-in metronome, which you can use while the unit is stopped or recording.
During recording, the metronome sound is output only from the PHONES (headphone) jack.
1. While the HOME screen is displayed, press the [MENU] button.
Menu items appear on the left side of the screen.
2. Press the [+] or [–] button to select “MET”, then press the [ ] (Play) button.
The PR7 displays the metronome screen.
3. Press the [>] button to select the metronome On/Off parameter, then press
the [ ] (Play) button.
4. Press the [+] or [–] button to select “On”, then press the [ ] (Play) button.
If you turn on the metronome in this step, the metronome will sound during
recording. If you want to use only the metronome function, proceed to step 5.
5. Press the [<] button to select “SEt” then press the [ ] (Play) button.
The PR7 displays the metronome setting screen, and then metronome starts.
The tempo parameter is initially selected on the metronome setting screen.
6. Press the [+] or [–] button to edit the tempo value, then press the [>] button.
7. Press the [+] or [–] button to edit the beat value.
You can set the tempo in the range of 30 to 250, and the beat in the range of 0/4
to 8/4.
If you set the beat to 0/4, the metronome will sound without any accent beats. If
you set it to 4/4, accent beats will fall on the first of every four beats. If you set it to
8/4, accent beats will fall on the first of every eight beats.
To change the tempo, press the [<] button to return to the tempo parameter.
If you select “On” in step 4, the metronome will sound (during recording) at the
beat and tempo you set here.
To return to the metronome screen, press the [<] button while you are setting the
tempo, or press the [ ] (Play) button while you are setting the beat. The
metronome will stop.
8. After the settings are complete, press the [■] (Stop) button.
The PR7 displays the HOME screen.
NOTE
The volume level of the metronome is affected by the playback level of the PR7.
Adjusting the recording level ➔ page 9
25
Reference Manual
Page 26

Functions Useful for Musical Instrument Practice
Playback speed (%)
Adjusting the playback speed
You can change the playback speed of audio files without changing the pitch. This
feature is useful if you practice fast phrases or check the recording quickly.
1. While the HOME screen is displayed, press the [MENU] button.
Menu items appear on the left side of the screen.
2. Press the [+] or [–] button to select “SPD”, then press the [ ] (Play) button.
4. After adjusting the playback speed, press the [ ] (Play) button to
confirm the value.
5. After the setting is complete, press the [■] (Stop) button.
The PR7 displays the HOME screen.
NOTE
Pressing the [MENU] button during playback enables you to change only the
playback speed.
The rate of the playback speed will change even if the unit displays other screens.
If the rate is set to a value other than 100%, the SPD icon will remain displayed on the
screen.
The PR7 displays the playback speed screen.
3. Press the [+] or [–] button to set the playback speed.
You can set the playback speed as a rate in relation to the original speed, in the
range of 50 to 100% (in 5% steps), 100% (original speed), or in the range of 100%
to 200% (in 10% steps).
PCM: With files recorded at sampling rates of 96kHz/88.2kHz, you can set the
playback speed in the range of 50% to 150%.
26
Reference Manual
Page 27

Handling Audio Files
REC MUSIC
R0 R1 R2 R9 M0 M1 M2 M9
MANUAL
REC MUSIC
microSD
R0 R1 R2 R9 M0 M1 M2 M9
Built-in memory
010_130205_1903.wav
File number Date
(year, month, date)
Recording
start time
File extension
(file format)
Handling Audio Files
Recorded audio data is saved in a file. The PR7 comes with folders in which you can save
recorded files. Each folder features a predetermined function.
Folder structure
Folders in the PR7 are structured as follows:
About the limitations of files and folders
The size and the number of folders and files are limited.
• The number of files per folder: Up to 99 files
As soon as you start recording the 100th file, an error message will be displayed and
you will be unable to record.
• Maximum file size: 2GB
If recording is extended and its size exceeds 2GB, the PR7 will automatically create
a new file and continue recording.
NOTE
If you plan to record audio of long duration that may end up larger than 2GB, use a
microSDHC card, which can accommodate files of larger size.
About the file naming rules
The PR7 automatically names recorded files in accordance with the file naming rules
shown below.
The name of files that are saved in the REC folder must conform to these rules. Please
note that if you change a file name, the file will no longer be recognized by the REC
folder.
Files using other name formats will be recognized if they are in the MUSIC folder.
• REC folder ..................Stores audio files that were recorded on the unit.
• MUSIC folder.............. Stores files that were copied from a computer.
PCM, MP3, and WMA files are supported for playback.
• MANUAL folder.......... Stores the Reference Manual (this book). This folder is
NOTE
• Folders can be created on a microSD card if the card is inserted into the unit.
• The PR7 will recognize audio files transferred from the computer only if they are inside
the MUSIC folder.
Refer to page 32 for more information on connecting the unit to a computer.
This folder is used for playback only. You cannot copy or
divide files in this folder.
included only in the built-in memory.
About the file format
The PR7 enables you to edit only files in formats that are available recording format
options on the unit.
Determining the recording format ➔ page 12
27
Reference Manual
Page 28

Handling Audio Files
Folder name/
File number
Copying files
You can copy files between the built-in memory and a microSD card.
Files can be copied from a folder in built-in memory into the folder with the same name
in the microSD card, and vice versa. For example, a file in the R0 folder can be copied
into the R0 folder in the microSD card.
1. Select an audio file.
To select an audio file in the current folder, use the [<]/[>] buttons.
NOTE
• To select an audio file from another location, refer to the section below.
Selecting another folder ➔ page 11
Selecting a file on a microSD card ➔ page 10
• You cannot copy files in the MUSIC folder.
2. Press the [MENU] button.
Menu items appear on the left side of the screen.
3. Press the [+] or [–] button to select “FILE”, then press the [ ] (Play) button.
The PR7 enters File mode.
4. Press the [+] or [–] button to select “COPY”, then press the [ ] (Play) button.
The PR7 displays the copy destination and asks for confirmation of the copy
operation.
5. Press the [<] or [>] button to select “y” (Yes), then press the [ ] (Play)
button.
If you select “no”, the PR7 will return to the screen displayed in step 4.
6. To finish the copy operation, press the [■] (Stop) button.
The PR7 displays the HOME screen.
28
Reference Manual
Page 29

Handling Audio Files
Folder name/
File number
Dividing a file
You can divide the currently-selected file into two. This feature can be convenient, for
example, if you want to create a separate file for each song from a long audio file
recorded at a live performance.
1. Select an audio file.
To select an audio file in the current folder, use the [<]/[>] buttons.
NOTE
• To select an audio file from another location, refer to the section below.
Selecting another folder ➔ page 11
Selecting a file on a microSD card ➔ page 10
• To be divided successfully, a file must be two seconds or longer in duration.
• You cannot divide files in the MUSIC folder.
2. Play or fast forward the file to locate a point at which you wish to divide the
file.
NOTE
It would be convenient if you first insert a marker to the point at which you wish to
divide the file.
Adding a marker ➔ page 17
4. Press the [+] or [–] button to select “FILE”, then press the [ ] (Play) button.
The PR7 enters File mode.
5. Press the [+] or [–] button to select “dIV”, then press the [ ] (Play) button.
6. Press the [<] or [>] button to select “y” (Yes), then press the [ ] (Play)
button.
If you select “no”, the PR7 will return to the screen displayed in step 5 without
processing the file.
3. Press the [MENU] button.
Menu items appear on the left side of the screen.
7. To finish the divide operation, press the [■] (Stop) button.
The PR7 displays the HOME screen.
File names after division
File naming rules for dividing, deleting or moving a file ➔ page 32
29
Reference Manual
Page 30

Handling Audio Files
Folder name/
File number
All files in the
folder
Only the currentlyselected file
Deleting files
You can delete the currently-selected file. You can also delete all files in the same folder
at once.
NOTE
If you delete files, you will be unable to restore those files. Be sure to play the file and
check its contents before you delete it.
1. Select an audio file.
To select an audio file in the current folder, use the [<]/[>] buttons.
NOTE
To select an audio file from another location, refer to the section below.
Selecting another folder ➔ page 11
Selecting a file on a microSD card ➔ page 10
2. Press the [MENU] button.
Menu items appear on the left side on the screen.
4. Press the [+] or [–] button to select whether you want to delete the current file
or all files in the folder.
To delete only the selected file, press the [ ] (Play) button while the “FILE”
indicator is flashing. To delete all files in the current folder, press the [ ] (Play)
button while the “FOLdEr” indicator is flashing.
5. Press the [<] or [>] button to select “y” (Yes), then press the [ ] (Play)
button.
If you select “no”, the PR7 will return to the screen displayed in step 4 without
processing the file.
3. Press the [+] or [–] button to select “DEL”, then press the [ ] (Play) button.
6. To finish the delete operation, press the [■] (Stop) button.
The PR7 displays the HOME screen.
File names after deleting
File naming rules for dividing, deleting or moving a file ➔ page 32
30
Reference Manual
Page 31

Handling Audio Files
Folder name/
File number
Moving a file
You can move a file from one folder to another within the REC folder in memory.
1. Select an audio file.
To select an audio file in the current folder, use the [<]/[>] buttons.
NOTE
To select an audio file from another location, refer to the section below.
Selecting another folder ➔ page 11
Selecting a file on a microSD card ➔ page 10
2. Press the [MENU] button.
Menu items appear on the left side of the screen.
3. Press the [+] or [–] button to select “FILE”, then press the [ ] (Play) button.
4. Press the [+] or [–] button to select “trnS” (transfer), then press the [ ] (Play)
button.
5. Press the [+] or [–] button to select the destination folder from the R0–R9
folders, then press the [ ] (Play) button.
6. Press the [<] or [>] button to select “y” (Yes), then press [ ] (Play) button.
If you select “no”, the PR7 will return to the screen displayed in step 5 without
processing the file.
7. To finish the move operation, press the [■] (Stop) button.
The PR7 displays the HOME screen.
File names after moving
File naming rules for dividing, deleting or moving a file ➔ page 32
31
Reference Manual
Page 32

Handling Audio Files
R0/01 R0/02 R0/03
R0/01 R0/02
R0/01
R0/01 R0/02 R0/03 R0/04
R0/02 R0/03
R0/xx
Built-in memory
microSD card
Folder R0
Folder R0
Folder R1
File naming rules for dividing, deleting or moving a file
During the file operations, file names (numbers) will be changed according to the
following rules.
• If file R0/01 is divided, the resultant files will be named (numbered) R0/01 and R0/02.
The number of existing subsequent files will increase by one (1); for example, file
number “R0/02” will become “R0/03.”
R0/01 R0/02 R0/03
R0/01 R0/02
• I f file R0/01 i s deleted, th e number of ea c h subsequen t file (that ex ists in the R 0 folder)
will decrease by one (1); for example, file number “R0/02” will become “R0/01.”
• If file R0/01 is copied, the copy will be assigned the lowest available file number in the
copy destination folder (R0).
R0/03 R0/04
Connecting a computer to the PR7 and transferring a file
You can connect a computer to the PR7 via a USB cable and transfer audio files.
Connecting a computer
Use the supplied USB cable to connect the USB terminal on the side panel of the PR7 to
a USB port on your computer.
When you connect the PR7 to your Windows computer for the first time, the driver will
automatically be installed on the computer.
The computer will recognize the PR7 as a USB storage device. The computer will display
the PR7 built-in memory as “PR7” and the microSD card as “PR7SD” (if you format the
card on the PR7). You can transfer files between the PR7 and the computer the same
way you transfer files between the computer and an external hard disk drive or USB flash
drive.
• If file R0/01 is moved into the R1 folder:
1) The number of each subsequent file (that exists in the R0 folder) will decrease
by one (1); for example, file number “R0/02” will become “R0/01.”
2) The file that you moved will be assigned the lowest available file number in the
destination folder (R1).
R1/01 R1/02 R1/03 R1/04
R0/01
R0/02 R0/03
R0/01 R0/02
R1/xx
Cautions regarding the use of the USB terminal
Be sure to follow the cautions below if you connect the unit’s USB terminal to the
computer. Otherwise, the computer and/or the PR7 may freeze, resulting in damaged
or lost data.
If the computer or the PR7 freezes, restart the operating system or application software,
or turn the power to the PR7 off and on.
NOTICE
• Be sure to use the USB cable supplied with the unit. The unit does not support a
USB3.0 cable.
• When you disconnect the USB cable, be sure to follow the instructions and
requirements of your computer operating system.
• Before connecting or disconnecting the USB cable, wait for six seconds or longer.
32
Reference Manual
Page 33

Handling Audio Files
Mac Windows
microSD card
Built-in memory
microSD cardBuilt-in memory
Copying a file from the computer
You can transfer audio files from a computer to the PR7 for playback or overdubbing
(➔ page 20).
1. Connect the PR7 to the computer.
2. Once the PR7 is recognized by the computer, if you are using a Mac computer,
double-click the disk icon mounted on the desktop. If you are using a Window
computer, double-click “PR7” in Explorer.
3. Drag and drop the desired audio files from the computer to Mxx (xx
represents a number) folder inside the MUSIC folder of the PR7.
The files are copied.
Copying a file to the computer
You can copy audio files (that were recorded on the PR7 ) to a computer. In th is way, you
can edit the recordings using music production software or send a copy to your band
members.
1. Connect the PR7 to the computer.
2. Once the PR7 is recognized by the computer, if you are using a Mac computer,
double-click the disk icon mounted on the desktop. If you are using a Windows
computer, double-click “PR7” in Explorer.
3. Open the Rxx (xx represents a number) folder inside the REC folder, then copy
a desired file and paste it to the desktop or any other location on the
computer.
NOTE
The PR7 will not recognize files that are stored in any location other than folders M0 M9 in the MUSIC folder. In addition,the unit will not recognize any folders that you create.
33
Reference Manual
Page 34

Moving files from one folder to another inside the MUSIC folder
Follow the steps below to move audio files from one folder to another inside the MUSIC
folder.
1. Connect the PR7 to the computer.
2. Once the PR7 is recognized by the computer, if you are using a Mac computer,
double-click the disk icon mounted on the desktop. If you are using a Windows
computer, double-click “PR7” in Explorer.
3. Open the Mxx (xx represents a number) folder inside the MUSIC folder, then
cut a file that you want to move.
4. Paste the file into another folder.
NOTE
Alternatively, you can open both the source and destination folders, and drag and drop
a file. Either way is a standard computer operation.
Downloading software
Your PR7 comes with a license code that enables you to download “WaveLab LE” wave
editor software for editing audio files. Once you download and install such software on
an Internet-connected computers, you will be able to edit audio data that was recorded
on the PR7.
For more information on downloading software, refer to the Yamaha Pro Audio website.
http://www.yamahaproaudio.com/pr7/
Handling Audio Files
34
Reference Manual
Page 35

Other Functions
Press and
hold down
2: Power on
(Press and hold down this button.)
1: While pressing and holding down
this button
System setting menu
Other Functions
You can set the parameters for other functions from the system setting menu.
Using the system setting menu
The system setting menu enables you to do the following operations:
• Setting the calendar ➔ page 7
• Initializing the PR7 parameters ➔ page 36
• Formatting the built-in memory and a microSD card ➔ page 36
• Switching the REC LED on or off ➔ page 37
• Switching the tuner’s pitch indication ➔ page 38
• Displaying the firmware version information ➔ page 38
Accessing the system setting menu
Follow the steps below to access the system setting menu.
1. Power off the PR7.
2. While pressing and holding down the [REC SET] button, press and hold down
the [■] (Stop) button to power on the PR7.
The PR7 displays the system setting screen.
3. Press the [+] or [–] button to select a system setting menu item.
Setting the calendar
1. While the system setting screen is displayed, use the [+] and [–] buttons to
select “CAL” from the system setting menu items, then press the [ ] (Play)
button.
NOTE
When the PR7 starts up, release the power button.
If you continue holding it, the power will turn off.
2. Follow the steps described in the “Setting the calendar” section on page 7.
35
Reference Manual
Page 36

Other Functions
Built-in memory
microSD card
Initializing all parameters to factory default settings
If you want to initialize PR7 settings due to technical issues, follow the steps below.
Please note that data stored in the built-in memory and on a microSD card, and the
Calender setting will not be initialized.
1. While the system setting screen is displayed, press the [+] or [–] button to
select “rESEt” from the system setting menu items, then press the [ ] (Play)
button.
2. At the confirmation screen, press the [<] or [>] button to select “y” (Yes), then
press the [ ] (Play) button.
Formatting (Initializing) the built-in memory and a microSD card
If you want to initialize the contents of the built-in memory or a microSD card, you must
format the memory or card.
NOTE
We recommend that you format a microSD card on the PR7 if you use the card for the
first time.
1. While the system setting screen is displayed, press the [+] or [–] button to
select “ForMAt” from the system setting menu items, then press the [ ]
(Play) button.
2. Press the [+] or [–] button to select “Int” (built-in memory) or “Sd” (microSD
card), then press the [ ] (Play) button.
The internal settings are initialized.
If you do not want to initialize the settings, select “No” in the confirmation screen.
The PR7 returns to the previous screen. Press the [■] (Stop) button to return to the
HOME screen.
36
(Continued on the next page)
Reference Manual
Page 37

Other Functions
REC LED
3. At the confirmation screen, press the [<] or [>] button to select “y” (Yes), then
press the [ ] (Play) button.
The PR7 formats the memory selected in step 2.
If you do not want to format the memory, select “No” at the confirmation screen.
The PR7 returns to the previous screen.
Press the [■] (Stop) button to return to the HOME screen.
Switching the REC LED on or off
You can program the PR7 so that the REC LED illumination will be on or off. If you set
the LED illumination off, the battery life will be extended.
1. While the system setting screen is displayed, press the [+] or [–] button to
select “LEd” from the system setting menu items, then press the [ ] (Play)
button.
2. Press the [+] or [–] buttons to select “On” or “OFF”, then press the [ ] (Play)
button.
37
NOTE
Even if the REC LED is set to OFF, the REC LED blinks during processing of the
device.
Press the [■] (Stop) button to return to the HOME screen.
Reference Manual
Page 38

Error Messages
Version information
(This indication
means version 1.00.)
Switching the tuner’s pitch indication
You can select # or for a pitch indicated on the tuner screen.
1.
While the system setting screen is displayed, press the [+] or [–] button to select
“tUnEr” from the system setting menu items, then press the [ ] (Play) button.
2. Press the [+] or [–] buttons to select “SHrP” (#) or “FLAt” ( ), then press the
[ ] (Play) button.
Press the [■] (Stop) button to return to the HOME screen.
Displaying the firmware version
While the system setting screen is displayed, use the [+] or [–] button to select “VEr”
from the system setting menu items.
NOTE
Visit the Yamaha Pro Audio website for the latest information on the firmware.
http://www.yamahaproaudio.com/pr7/
Press the [■] (Stop) button to return to the HOME screen.
Error Messages
Unit status or function
Built-in memory error Int Error
microSD card error Sd Error
Low battery Lo bAt Replace the battery with a new one (page 7).
No file no FILE Select a folder that contains a file (page 11).
No microSD card no SD Insert a microSD card (page 7).
File full FILE FULL
Built-in memory full Int FULL
microSD card full Sd FULL
Slow in recording into a
microSD card
File format error during
overdubbing
File is too short.
Dividing position error.
The [FILE] button was
pressed while the MUSIC
folder was selected.
File deletion error dEL Error
Marker addition error Add Error
Recording level setting
disabled error
Recording level was over PEAK
Error
Messages
Initialize the built-in memory (page 36).
➙ Power on while pressing and holding down [REC SET] >
“ForMAt” > “Int” > “y” (Yes) (page 35)
➙ If the error persists after initialization, the unit may be
malfunctioning.
Re-insert the card (page 7) or format the card (page 36).
➙ Power on while pressing and holding down [REC SET] >
“ForMAt” > “Sd” > “y” (Yes) (page 35)
➙ If the error persists after formatting, the unit or the
microSD card may be malfunctioning.
Select a folder that contains fewer than 99 files (page 11), or
delete unnecessary files from the folder (page 30).
Delete unnecessary files from the built-in memory
(page 30), copy files to a microSD card (page 33), or move
files to a computer (page 33).
Delete unnecessary files from the microSD card (page 30),
or move files to a computer (page 33).
Select a lower-quality recording format (page 11) or format
the microSD card (page 36).
REC Error
dUb Error
Edit Error
ALC On Set the type of dynamics control to “OFF” or “LIM” (page 14).
➙ Power on while pressing and holding down [REC SET] >
“ForMAt” > “Sd” > “y” (Yes) (page 35)
➙ If the error persists after formatting, the microSD card may
be malfunctioning.
Select a file in the format that is supported for recording
(page 11).
Select a file that is longer than two seconds (page 29).
Set the dividing position to anywhere in the middle. Avoid the
start or end of the file (page
Select the REC folder (page
From the connected computer, de-select “Read only” in the
file’s property panel, and cancel write-protection for the
microSD card.
Position the marker away from the closest markers by two
seconds or more (page 17).
Set the recording level lower (page 9)
Dynamics control (page 14)
Action
22).
27).
38
Reference Manual
Page 39

Specifications
Specifications
Supported Operating System
Supported media microSD/SDHC card
Recording format and available
recording time (guideline)
(with built-in 2GB memory)
Recording format MP3, PCM (WAV)
Playback format
Sampling frequency 16 kHz–96 kHz
Bit rate (playback)
Jacks
Operating temperature +5°C – +35°C
Power supply AAA alkaline battery cell or AAA NiMH battery x 1
Battery life for recording
Battery life for playback
through headphones
Battery life for playback
through speaker
Windows 8.1, 8, 7, Vista, XP Professional/Home Edition
Mac OS X 10.4, 10.5, 10.6, 10.7, 10.8, 10.9
96 kHz Approx. 55 minutes
24-bit
PCM
16-bit
MP3
MP3 (MPEG1 LAYER3; MPEG2 LAYER3), WMA
PCM
16–320 kbps (MP3)
32–192 kbps (WMA)
USB mini B; Stereo headphone 3.5 mm mini; Stereo
microphone (also for line-in) 3.5 mm mini; microSD card slot
Alkaline battery:
MP3, 64 kbps — approx. 44 hours
PCM 44.1 kHz 16-bit approx. 29 hours 30 minutes
(Recording condition: REC LED off, no recording monitoring)
Alkaline battery:
MP3, 64 kbps — approx. 30 hours
PCM 44.1 kHz 16-bit approx. 22 hours 30 minutes
Alkaline battery:
MP3, 64 kbps — approx. 24 hours 30 minutes
PCM 44.1 kHz 16-bit approx. 18 hours
88.2 kHz Approx. 1 hour
48 kHz Approx. 1 hour 45 minutes
44.1 kHz Approx. 1 hour 55 minutes
96 kHz Approx. 1 hour 20 minutes
88.2 kHz Approx. 1 hour 25 minutes
48 kHz Approx. 2 hours 40 minutes
44.1 kHz Approx. 2 hours 55 minutes
320 kbps Approx. 12 hours 45 minutes
192 kbps Approx. 21 hours
128 kbps Approx. 32 hours
64 kbps Approx. 64 hours
32 kbps Approx. 127 hours
Dimensions Approx. 46.6(W) x 132.1(H) x 28.7(D) mm
Weight Approx. 82 g (including battery)
Accessories
* Specifications and descriptions in this owner’s manual are for information purposes only. Yamaha
Corp. reserves the right to change or modify products or specifications at any time without prior notice.
Since specifications, equipment or options may not be the same in every locale, please check with
your Yamaha dealer.
USB cable; AAA alkaline battery; Owner’s Manual (with the
software download license code)
39
Reference Manual
Page 40

Index
Index
A
Adjusting the playback speed............. 26
ALC
................................................................... 14
Auto Level Control
Available recording time
B
Battery............................................................... 7
Beat parameters
Metronome
C
Calendar .......................................................... 7
Click
Metronome
Connecting a computer
Copying (from the computer)
Copying (to the computer)
Copying files
D
DEL
Deleting files
Disables all control buttons
HOLD switch
Dividing a file
Downloading software
Dubbing
......................................................... 22
DYN
Dynamics control
E
Error Messages............................................ 38
External condenser microphone
.................................... 14
....................... 12
.............................................. 25
.............................................. 25
........................ 32
........... 33
................. 33
................................................ 28
............................................ 30
............................................. 5
.............................................. 29
........................... 34
.................................. 14
....... 15
F
Fast forward and fast reverse ............. 13
Files
.................................................................. 27
Folder
....................................................... 11, 27
Formatting (Initializing)
built-in memory
microSD card
.................................... 36
.......................................... 36
H
Headphones................................................... 5
HOLD switch
.................................................. 5
HOME
screen
............................................................ 8
HPF
High-pass filter
....................................... 14
I
Index
Markers
...................................................... 17
Initializing
Factory default settings
..................... 36
L
LCD Screen..................................................... 6
Limiter
............................................................ 14
Low-cut filter
High-pass filter
....................................... 14
M
MANUAL folder ......................................... 27
Markers
Metronome
microSD card
Moving a file
MUSIC folder
.......................................................... 17
................................................. 25
................................................. 7
............................................... 31
.............................................. 27
O
Overdubbing ....................................... 20, 22
P
Pitch indication (tuner) ......................... 38
Playback level
Playback level (overdubbing)
Playback speed
PRC (Pre-recording)
Pre-recording
Preset
.............................................................. 15
Punch in/out
................................................. 9
............. 20
........................................... 26
................................ 16
.............................................. 16
............................................... 22
R
REC folder..................................................... 27
REC LED
Rechargeable battery (NiMH battery)
Recording format
Recording level
Recording level (overdubbing)
Repeat playback
.................................................... 4, 37
.. 7
...................................... 11
............................................. 9
.......... 21
........................................ 18
S
Selecting a file ............................................ 13
Selecting the save destination for
a file
................................................................. 10
Song data
Files
.............................................................. 27
Sound quality
Recording format
SPD
Playback speed
Standard pitch
System setting menu
................................. 11
...................................... 26
........................................... 24
.............................. 35
T
Tempo parameters
Metronome
.............................................. 25
Transfer (File)
Moving a file
Tuner
............................................................... 24
........................................... 31
U
USB................................................................... 32
V
Version (displaying the firmware) .... 38
40
Reference Manual
Page 41

04/2014 IP-B0
© 2013-2014 Yamaha Corporation
C.S.G., Pro Audio Division
Yamaha Manual Library
http://www.yamaha.co.jp/manual/
Yamaha Pro Audio global web site:
http://www.yamahaproaudio.com/
 Loading...