

Page 1
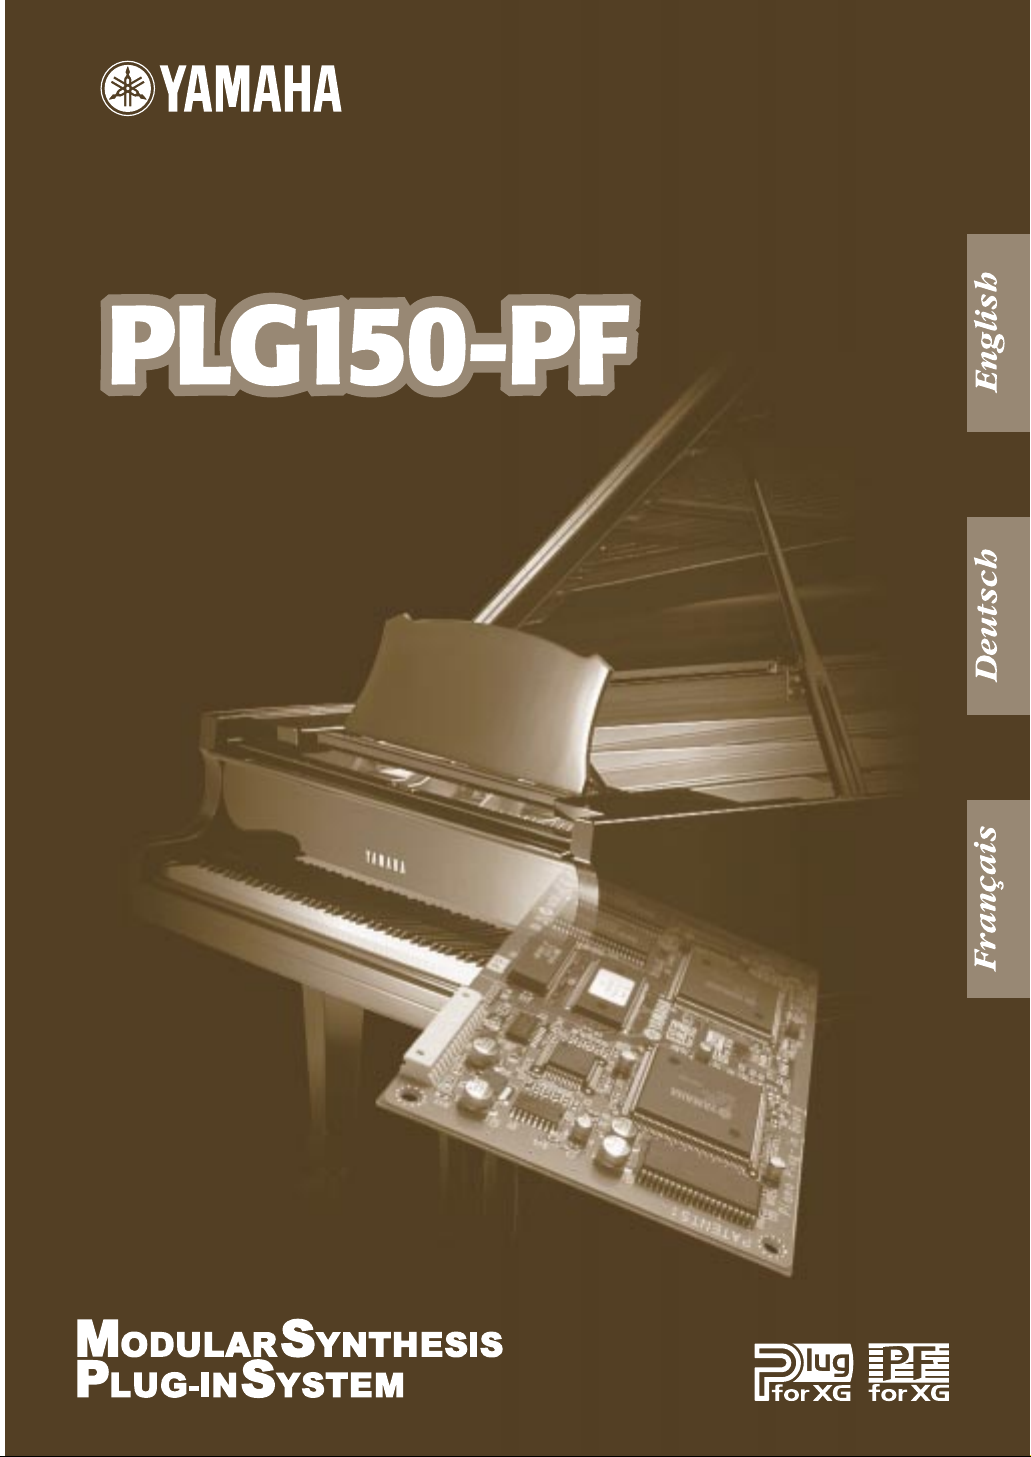
Piano Plug-in Board
Piano Plug-in Board
Carte Plug-in piano
Owner’s Manual
Bedienungsanleitung
Mode d’emploi
Page 2
Precautions
●
Do not expose the plug-in board to direct sunlight,
excessive humidity, high temperatures, excessive dust
or strong vibrations.
●
Before handling the plug-in board, be sure to touch a
metal surface to discharge any static electricity which
may be in your body.
●
When holding the plug-in board, do not touch the inside
area of the circuit board or apply excessive pressure to
the board, and be sure to protect the board from contact
with water or other liquids.
●
Before installing the plug-in board onto a tone generator/sound card, unplug the power connector of your
computer.
* The company names and product names in this Owner’s Manual are the trademarks or registered
trademarks of their respective companies.
* The screens as illustrated in this owner’s manual are for instructional purposes only, and may
appear somewhat different from the ones of your instrument.
●
Before connecting the computer to other devices, turn
off the power switches of all devices.
●
Yamaha is not responsible for loss of data through computer malfunctions or operator actions.
●
The plug-in board contains no user-serviceable parts, so
never touch the inside area of the circuit board or
tamper with the electronic circuitry in any way. Doing
so may result in electrical shock or damage to the plugin board.
YAMAHA CANNOT BE HELD RESPONSIBLE
FOR DAMAGE CAUSED BY IMPROPER
CARE AND USE OF THE PLUG-IN BOARD.
FCC INFORMATION (U.S.A.)
1. IMPORTANT NOTICE: DO NOT MODIFY THIS UNIT!
This product, when installed as indicated in the instructions contained in this manual, meets FCC requirements. Modifications
not expressly approved by Yamaha may void your authority, granted by the FCC, to use the product.
2. IMPORTANT:
Cable/s supplied with this product MUST be used. Follow all installation instructions. Failure to follow instructions could void
your FCC authorization to use this product in the USA.
3. NOTE:
”B” digital devices. Compliance with these requirements provides a reasonable level of assurance that your use of this product
in a residential environment will not result in harmful interference with other electronic devices. This equipment generates/uses
radio frequencies and, if not installed and used according to the instructions found in the users manual, may cause interference
harmful to the operation of other electronic devices. Compliance with FCC regulations does not guarantee that interference will
not occur in all installations. If this product is found to be the source of interference, which can be determined by turning the unit
”OFF” and ”ON”, please try to eliminate the problem by using one of the following measures:
Relocate either this product or the device that is being affected by the interference.
Utilize power outlets that are on different branch (circuit breaker or fuse) circuits or install AC line filter/s.
In the case of radio or TV interference, relocate/reorient the antenna. If the antenna lead-in is 300 ohm ribbon lead, change the
lead-in to co-axial type cable.
If these corrective measures do not produce satisfactory results, please contact the local retailer authorized to distribute this
type of product. If you can not locate the appropriate, please contact Yamaha Corporation of America, Electronic Service Division, 6600 Orangethorpe Ave, Buena Park, CA 90620
* This applies only to products distributed by YAMAHA CORPORATION OF AMERICA.
When connecting this product to accessories and/or another product use only high quality shielded cables.
This product has been tested and found to comply with the requirements listed in FCC Regulations, Part 15 for Class
CANADA
This Class B digital apparatus complies with Canadian ICES-003.
Cet appareil numérique de la classe B est conforme à la norme NMB-003 du Canada.
• This applies only to products distributed by Yamaha Canada Music Ltd.
• Ceci ne s’applique qu’aux produits distribués par Yamaha Canada Musique Ltée.
2
Page 3

Congratulations and thank you for purchasing the Yamaha PLG150-PF Piano Plug-in Board!
The PLG150-PF is a custom tone generator designed for use with a variety of Yamaha elec-
tronic musical instruments. Foremost, the PLG150-PF can be installed to and integrated with
instruments of the Modular Synthesis Plug-in System (such as the CS6x, CS6R, S80, etc.) It
can also be used seamlessly with the MU128 Tone Generator (as well as other MU-series
instruments and the SW1000XG PCI Audio/MIDI Board). The PLG150-PF provides a wide variety of exceptionally high-quality, authentic keyboard instrument sounds — including piano, electric piano, harpsichord, clav, and others. It features its own built-in EQ, Reverb, Chorus, and
Insertion effects, allowing you to process the sound without having to use the effects resources
of the “mother” device.
The settings and parameters of the PLG150-PF can also be conveniently edited with a Windows PC computer by using the PF Easy Editor software module (included in the XGworks
Music Sequencer software).
Overview of the PLG150-PF
Parameter Structure
Specifications
.............................................................7
About the Included Floppy Disks
Installing the PLG150-PF
Included Items
.............................................................9
Required and Recommended Items
Synthesizer/Tone Generator/
Sound Card Compatible with the Modular
Synthesis or XG Plug-in Systems..................10
XGworks or XGworks lite
Music Sequencing Software..........................10
PF Easy Editor ...................................................10
.....................................4
...............................................6
..............................8
...........................................9
......................10
Installing and Starting the Plug-in
Editor Software (Windows 95/98)
Installing the Software........................................11
Starting the PF Easy Editor................................11
...................11
Selecting PF Voices
(Modular Synthesis Plug-in System)
Enabling and Selecting PF Voices.....................12
Table of Contents
Editing the PF Native Part Parameters
(Modular Synthesis Plug-in System)
Selecting/Editing the PF System Parameters
(Modular Synthesis Plug-in System)
Selecting PF Voices (XG Plug-in System)
Enabling and Selecting PF Voices .....................15
Editing the PF Native Part Parameters
(XG Plug-in System)
Selecting/Editing the PF System Parameters
(XG Plug-in System)
Parameters
PF Native Part Parameters.................................19
PF System Parameters ......................................23
................12
Appendix
Voice List
PLG150-PF Voice Effect Parameter List
Effect Data Assign Table
Parameter List (XG / Modular
MIDI Data Format
MIDI Implementation Chart
.....................................................................24
Sysnthesis Plug-in System)
................13
................14
.............15
..............................................17
..............................................18
...............................................................19
................................................................24
...........30
.....................................33
............................34
..................................................35
.................................42
3
Page 4

Overview of the PLG150-PF
The PLG150-PF is a sophisticated tone generator board that provides realistic piano and other keyboard sounds. Utilizing Yamaha’s state-of-the-art AWM2 tone generation system along with true
stereo sampling, the PLG150-PF features exceptionally rich, natural and authentic instrument
voices, to augment the sound palette on the “mother” device.
■
Easy Installation
Once it is connected, the PLG150-PF automatically becomes another sound source in the tone generator/sound card, and can be used as one of the instrument Parts. You can create your own original PF
voices and combine PF voices with the other voices in the “mother” device.
■
136 Voices and 64-note Polyphony
The PLG150-PF is packed with a total of 132 rich and authentic keyboard voices. Man y of the acoustic grand piano sounds have been recorded in stereo for enhanced realism and luxurious tone. The
PLG150-PF also has a huge variety of realistic electric piano voices, covering a broad stylistic range
— from the classic keyboards of the ‘60s and ‘70s, to the crisp and bright digital sounds of recent
years. In addition to the electric grand, harpsichord and clav voices, a variety of combination voices
are also included, letting you play sustained pad and choir sounds, layered with piano. A maximum
64-note polyphony lets you play complex sustained chords and passages, without worrying about
notes being cut off. (For certain stereo and combination voices, the polyphony may be 32 notes or
less.)
■
Built-in Effects
The PLG150-PF also has its own dedicated effects processing. This means that you can apply EQ,
Reverb, Chorus, and even a Insertion effect to the voice, letting you use all of the effects on the
“mother” device for the other Parts.ong.
4
Page 5
Overview of the PLG150-PF
About the Modular Synthesis Plug-in System
The Yamaha Modular Synthesis Plug-in System offers powerful expansion and upgrade capabilities for Modular Synthesis-Plug-in-compatible synthesizers, tone generators and sound
cards. This enables you to easily and effectively take advantage of the latest and most sophisticated synthesizer and effects technology, allowing you to keep pace with the rapid and multifaceted advances in modern music production.
About the XG Plug-in System
The Yamaha XG Plug-in System offers powerful expansion and upgrade capabilities for XGPlug-in-compatible tone generators and sound cards. This enables you to easily and effectively
take advantage of the latest and most sophisticated synthesizer and effects technology, allowing
you to keep pace with the rapid and multi-faceted advances in modern music production.
5
Page 6
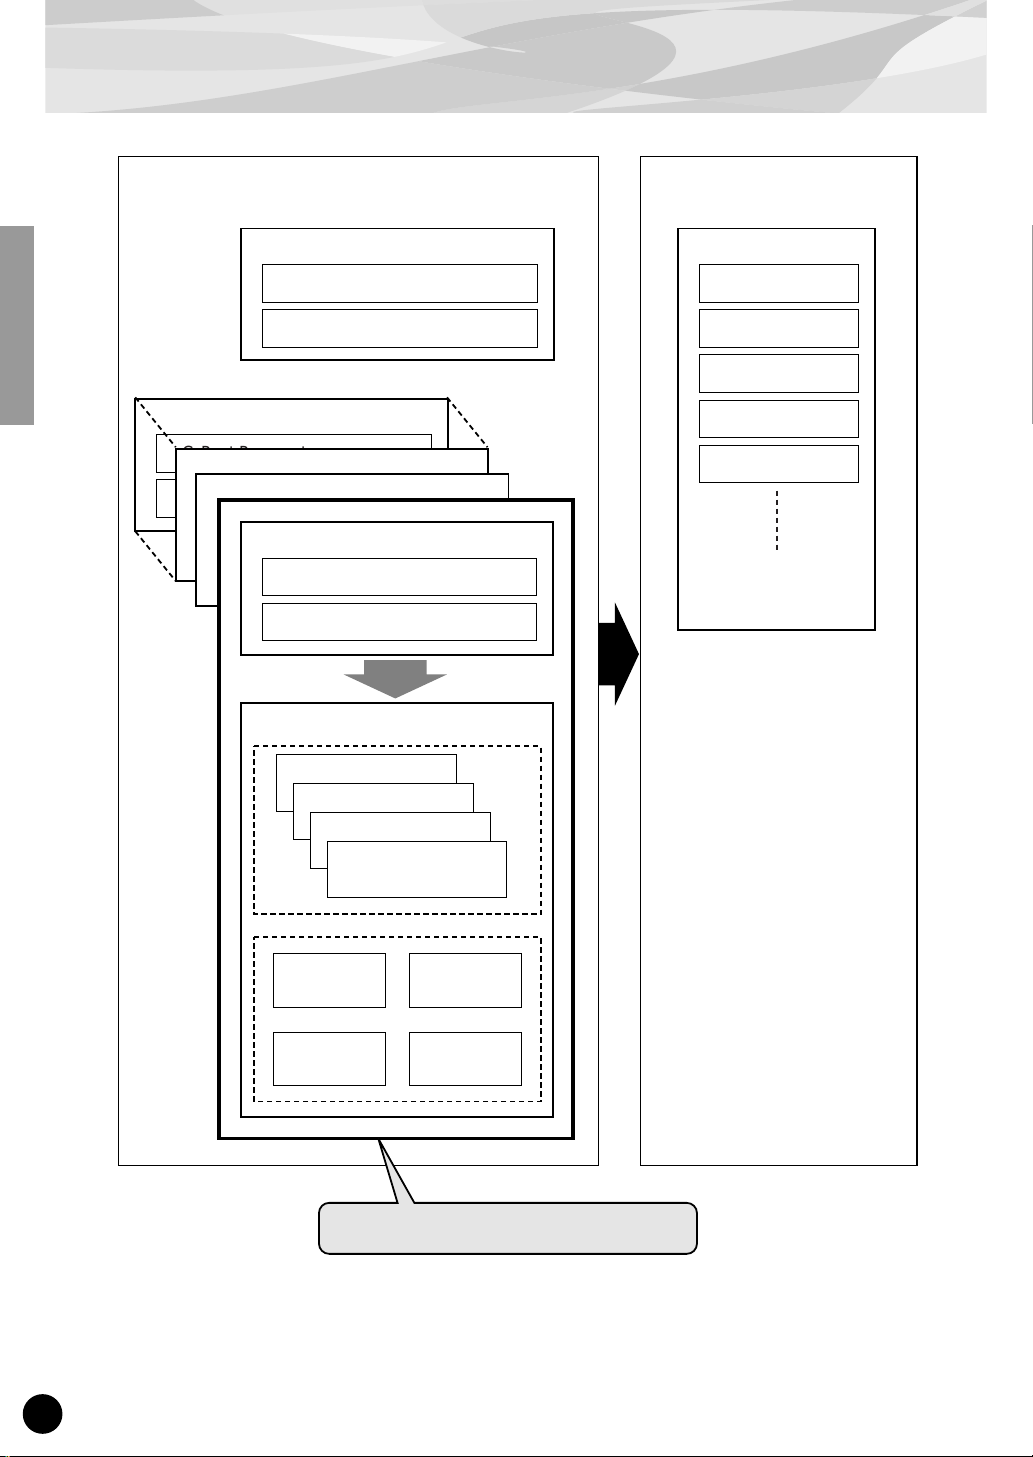
Parameter Structure
Plug-in Board
System Parameter
XG System Parameter
PF Native System Parameter
Part Parameter
XG Part Parameter
Part Parameter
Part Parameter
PF Native Part Parameter
XG Part Parameter
XG Part Parameter
Part Parameter
PF Native Part Parameter
PF Native Part Parameter
XG Part Parameter
PF Native Part Parameter
PF V oice Parameter
Plug-in Platform
XG Effect Parameter
Reverb
Chorus
Variation
Insertion1
Insertion2
Offset
Element4
Element3
Element2
Element1
Voice
Reverb
Voice
Insertion
Voice
Chorus
Voice
EQ
The Plug-in voices are made here.
6
Page 7

Specifications
TONE GENERATOR/MODULES :
POLYPHONY :
NUMBER OF VOICES :
INTERFACE :
EFFECTOR :
DIMENSIONS (W x H x D) :
WEIGHT :
INCLUDED ITEMS :
AWM2
64 notes maximum (latest note priority; polyphony is expandable *1)
*1 On the CS6x, for example, two boards can be installed for a
maximum of 128 notes; on the MU128, three boards can be
installed for a maximum of 192 notes.
136 XG voices (PF-XG/A, PF-XG/B)
128 Preset voices
Plug-in connector
Reverb, Chorus, Insertion, 2-Band EQ
138.5 x 89.0 x 8.5mm
72g
Owner’s Manual, Floppy disk
* Specifications subject to change without notice.
7
Page 8

About the Included Floppy Disk
The included floppy disk contain editing software f or the PLG150-PF as well as demonstr ation songs
and Voice data for the “mother” device.
To use the editing software and transfer the song/Voice data to your particular “mother” device, you
should have a computer (running Windows 95/98) with a MIDI interface, with the MIDI OUT on the
interface connected to the MIDI IN of the “mother” device. You should also have XGworks (v3.0 or
higher) or XGworks lite installed to your computer; this is necessary to use the editing software
(page 10). For playing back the demonstration songs and transferring the Voice data, you can use
any compatible sequence software (such as XGworks/XGworks lite) or hardware sequencer capable of sending bulk data. Insert the disk into the computer and start the installation.
The following software is included on the disk:
■
PF Easy Editor (page 10)
■
Demonstration Songs
(1) “Fantaisie-impromptu op.66” (02Fanta.mid)
By: Frederic Chopin
For: Modular Synthesis Plug-in System devices (CS6x, etc.) and XG Plug-in System devices (MU128, etc.)
(2) “THE PF THEATRE” (02Theatr.mid)
By: Katsunori Ujiie (Idecs, Inc.)
For: XG Plug-in System devices (MU128, etc.)
(3) “SOLO-demo” (02Solo.mid)
By: Katsunori Ujiie (Idecs, Inc.)
For: Modular Synthesis Plug-in System devices (CS6x, etc.) and XG Plug-in System devices (MU128, etc.)
■
Plug-in Voice Data for CS6x/CS6R/S80
(Modular Synthesis Plug-in System)
This is Plug-in voice data, featuring a total of 64 voices that were created using the PLG150-PF Preset
voices. When the PLG150-PF is installed to PLG1, select the file “01PlgVc1.mid”; when the board is
installed to PLG2, select the file “01PlgVc2.mid.”
For a complete list of these voices, refer to the Plug-in Voice List (page 29).
8
Page 9

Installing the PLG150-PF
For detailed instructions on installing the PLG150-PF, refer to the owner’s manual of the Plug-incompatible “mother” device (e.g., CS6x, MU128, etc.).
Included Items
The following items have been included in the package of your new PLG150-PF. Please make sure
that you have them all before starting to setup and use the instrument. If an item is missing, contact
the store or dealer from which you purchased the PLG150-PF.
• PLG150-PF board
• PLG150-PF Owner’s Manual (this book)
• Floppy disk
9
Page 10

Required and Recommended Items
In addition to the included items listed above, you should also have the following:
Synthesizer/Tone Generator/Sound Card Compatible with the Modular Synthesis or XG Plug-in Systems
In order to use the PLG150-PF, you’ll need a synthesizer, tone generator or sound card compatible
with the Modular Synthesis Plug-in System or the XG Plug-in System. Compatible instruments
include the CS6x, MU128, and the SW1000XG. The synthesizer/tone generator/sound card should al
so have an available slot or space for installing the PLG150-PF.
XGworks or XGworks lite Music Sequencing Software
These software sequencers provide convenient tools for taking full advantage of the PLG150-PF, letting you create song data that automatically selects and plays back the PF voices. They also include
the powerful PF Easy Editor (see below) for editing and controlling the PF voices. XGworks lite is
contained on a CD-ROM included with the CS6x, MU128, etc., and XGworks is contained on a CDROM included with the SW1000XG.
PF Easy Editor
The PF Easy Editor is a special plug-in software module for XGworks and XGworks lite. It provides
convenient easy-to-use control over the most important PLG150-PF settings and parameters. It also
provides exceptionally intuitive editing, with a virtual “front panel” display that lets you change the
settings with sliders.
Using the PF Easy Editor is just like using the Part editing controls on your tone generator — it indirectly and temporarily changes the PF voices without making changes to the original voice. The
changed parameters can either be inserted into a song to automate sound changes, or can be saved as
an PF parameter file for future recall. The PF Easy Editor software is contained on the included floppy
disk.
10
Page 11

Installing and Starting the Plug-in Editor Software
(Windows 95/98)
Installing the Software
Double-click the “Setup.exe” file in the “Plug_” folder on the floppy disk to start the installation.
Click “Next” or “Yes” and follow the subsequent instructions on the screen to complete the installation.
Starting the PF Easy Editor
Start XGworks (or XGworks lite).
1
Click the “Plug-in” menu and select “PF
2
Easy Editor.”
Alternately, press Alt + P, then D, and ENTER. The
“Select PF Part” dialog box appears.
Set the desired Part number and click “OK.”
3
The PF Easy Editor window appears.
If the PLG150-PF has been prop-
erly installed and all computer/
MIDI connections have been
properly made, operating the PF
Easy Editor should directly affect
the PLG150-PF. For details on
using the PF Easy Editor, refer to
the on-line help file that is
included with the software.
When using a Modular Synthesis Plug-in System “mother” device, the Part assignment depends on
which mode is used — Voice or Performance — and also on whether the PLG150-PF board is
installed/assigned to PLG1 or PLG2, as described below.
When using the Voice mode:
Depending on which slot the PLG150-PF board has been installed to, press PLG1 or PLG2, then
set the Part to “1” (no matter what the PLG1 or PLG2 assignment is).
When using the Performance (Multi) mode:
If the PLG150-PF board is assigned to PLG1, set the Part to “16.”
If the PLG150-PF board is assigned to PLG2, set the Part to “15.”
11
Page 12

Selecting PF Voices
(Modular Synthesis Plug-in System)
When the PLG150-PF is installed to a CS6x Control Synthesizer, the PF voices can be selected in
the same way as the internal voices of the synthesizer.
The example displays used in the following explanations are all taken from the CS6x.
Enabling and Selecting PF Voices
1
Press the VOICE button.
2
Press the appropriate PLG button (PLG1 or PLG2, depending on which
slot the PLG150-PF board has been installed to), then press the appropriate BANK button and PROGRAM button to select the desired Plug-in
voice.
VCE Play) PLG1:001(A01)[PF:GndPnoSt ]
EQLow-G EQMid-G EQHi-G ------- -------
To select a different bank, simultaneously hold down the appropriate PLG button and turn knob C (or
press the DEC/INC buttons) to select the desired bank.
The bank is expressed in two numbers: MSB and LSB.
VCE Play) PLG1:001(A01)[PF:GndPnoSt ]
BANK= 080/000
If a selected bank is not available, the bank letter indication in the display (A - H) will not change.
For a list of the available banks and their MSB/LSB values, refer to the “PF-XG Voice Map” at
the back of this manual (pages 26 — 28).
12
Page 13

Editing the PF Native Part Parameters
(Modular Synthesis Plug-in System)
Keep in mind that the parameter values and settings below represent offsets of the actual voice settings. This
●
means that adjustments made to the parameters may not make much change in the actual sound, depending
on the original settings of the voice. For parameter values, a setting of “0” results in no change, while positive
and negative values increase and decrease the value respectively.
The following explanations show how to edit the PF native part parameters when creating PLG voices, using
●
the CS6x Control Synthesizer as an example. For information on storing the PLG voices with your particular
Modular Synthesis Plug-in System compatible instrument, refer to the owner’s manual of that instrument.
1
Select the desired PF voice, as described in “Selecting PF Voices” on page
12.
2
Press the EDIT button.
The EDIT menu display appears.
GEN Name) Pf-Sq a-Z 0-? Cursor
Commom [PF:GndPnoSt ]
3
Turn knob A clockwise until “Elem” is shown at the bottom left of the display.
PLG Assign) Bank Number
Elem 080/000 1[GndPnoSt]
4
Turn the PAGE knob clockwise until “PLG150-PF” is shown at the bottom
left of the display.
Keep turning the knob to select the different PF Part parameters, indicated just above knob C and
knob 2.
NTV Param) PF Mode SusCurve
PLG150-PF ON Normal
Use knobs C and 2 to select the desired parameter and change the value.
5
Once one of the parameters is selected (the arrow cursor appears next to the value), you can also
adjust the value with the DATA knob or the DEC/INC buttons.
13
Page 14

Selecting/Editing the PF System Parameters
(Modular Synthesis Plug-in System)
The example displays used in the following explanations are all taken from the CS6x.
Press the UTILITY button.
1
The Utility Mode display appears.
MSTR TG) Vol NtShift Tune
Sys 64 + 0 + 0.0c
2
Turn the PAGE knob clockwise until “PLG150-PF” is shown at the bottom
left of the display.
Keep turning the knob to select the different PF System parameters, indicated just above knob C
and knob 2.
PLG1 MIDI) PartAssign VelCurve
PLG150-PF 01 Normal
Use knobs C and 2 to select the desired PF System parameter and change
3
the value.
Once one of the parameters is selected (the arrow cursor appears next to the value), you can also
adjust the value with the DATA knob or the DEC/INC buttons.
14
Page 15

Selecting PF Voices (XG Plug-in System)
The PLG150-PF voices can be selected just like the voices of the XG tone generator. Keep in mind,
though, that they can only be selected when the Sound Module Mode is set to XG or Performance.
Also, the Part Assign parameter in the Utility mode (see below) must be set to the desired Part.
The example displays used in the following explanations are all taken from the MU128.
Enabling and Selecting PF Voices
1
Set the Sound Module Mode to “XG” or “PFM” (Performance).
Press the MODE button and use the SELECT </> buttons.
The Performance mode is not available on the SW1000XG.
Set the Part Assign parameter to the desired Part number.
2
To do this:
1) Press the UTIL button.
2) Select the “PLUGIN” menu (with the SELECT > button) and press ENTER.
3) Select the “PLG150-PF” menu if necessary (with the SELECT </> buttons), and press
ENTER.
4) Select the Part Assign parameter (with the SELECT
tons or dial to change the Part number.
<
button), and use the VALUE -/+ but-
The Part Assign range for the XG mode is 1 - 16 and “off”; for the Performance mode, it is 1 - 4 and
“off.”
Press the EXIT button to return to the Play mode.
This operation can also be quickly and conveniently done from the PF Easy Editor (in XGworks).
Enable the PLG150-PF board for the desired Part.
3
First, make sure that the appropriate Part is selected (using the PART -/+ buttons), then press the
SELECT button. The icon of the selected board appears in the display and the corresponding
LED at the bottom of the panel (PLG-1, -2, or -3) flashes briefly.
15
Page 16

Selecting PF Voices (XG Plug-in System)
Select the desired bank number.
4
Move the cursor to the Bank Number parameter with the SELECT </> buttons and use the
VALUE -/+ buttons to select the desired bank.
5
Select the desired voice number.
Move the cursor to the Voice (Program) Number parameter with the SELECT </> buttons and
use the VALUE -/+ buttons to select the desired voice.
Voices (and Voice banks) can also be selected by using the Voice Category buttons.
Alternately, you can select v oices from a connected MIDI ke yboard, or from sequencing software
(such as XGworks) on a connected computer.
Bank Number parameter
For a list of available voices and their bank/voice numbers, see page 26.
16
Page 17

Editing the PF Native Part Parameters
(XG Plug-in System)
Any of the PF voices can be freely edited from the front panel with the PF Par t parameters. These
same parameters can also be edited from a computer using the PF Easy Editor software (in
XGworks).
Keep in mind that changing the Par t parameters does not permanently affect the original voice settings. The edits that you make here temporarily change the settings of the currently selected voice.
When you select a different voice for the Part, the settings are applied to the newly selected voice.
● The Part parameter settings cannot be saved in Multi Play mode. If you wish to save your Part parameter
edits, do it from the Performance mode or the PF Easy Editor.
● The example displays used in the following explanations are all taken from the MU128.
1 Select the Part having the PF voice, then select the desired voice.
Select the appropriate Part with the PART -/+ buttons, then, with the cursor at the Voice Number
parameter, select the desired voice.
2 Press the EDIT button to enter the Edit mode.
3 Select the “PLUGIN” menu.
Use the SELECT > button, then press the ENTER button. The PLG150-PF Edit menu appears.
4 Select the desired parameter.
Use the [SELECT </>] buttons.
5 Adjust the value or change the setting for the selected parameter.
Use the [VALUE +/-] buttons.
6 Return to the main Play display.
Press the [EXIT] button several times, or press the [PLAY] button once.
17
Page 18

Selecting/Editing the PF System Parameters
(XG Plug-in System)
The parameters that apply to the entire system of the PLG150-PF are included in the Utility mode
menu of the XG tone generator.
The example displays used in the following explanations are all taken from the MU128.
1 Press the [UTIL] button.
The Utility mode menu appears.
2 Select the “PLUGIN” menu.
Use the [SELECT >] button to highlight “PLUGIN,” then press the [ENTER] button.
3 Select the PLG150-PF board.
If the PLG150-PF board is the only one installed, “PLG150-PF” is already displayed and can be
selected by pressing the [ENTER] button. If additional boards have been installed to the tone
generator, you may need to select “PLG150-PF.” To do this, first use the [SELECT </>] buttons, then press [ENTER].
The System parameter menu for the PLG150-PF appears.
4 Select the desired parameter.
Use the [SELECT </>] buttons.
5 Adjust the value or change the setting for the selected parameter.
Use the [VALUE +/-] buttons.
6 Return to the main Play display.
Press the [EXIT] button several times, or press the [PLAY] button once.
18
Page 19

Parameters
PF Native Part Parameters
Keep in mind that the parameter values and settings represent of fsets of the actual v oice settings. This
means that the actual sound that results from the settings made here depends on the original settings
of the voice.
Also keep in mind that these are “Part” parameters and as such, are temporary; they simply alter or
offset the settings of the currently selected voice. The original voice settings are permanently maintained in memory.
For parameter values, a setting of “0” results in no change, while positiv e and ne gati v e v alues increase
and decrease the value respectively.
Let’s look at a specific example. If the original Bass Frequency parameter of the selected voice is set
to 100, and you set the Bass Frequency (below) to “-25,” the actual Bass Frequency will become “75.”
If you set it to “+10,” the value will become “110.” Naturally, this also means that the parameter
value cannot be increased or decreased beyond its maximum or minimum values. In our example,
Bass Frequency values higher than “+27” have no effect on the sound, since the actual range is 0 —
127.
● Depending on the selected voice and the particular parameter being edited, the sound or actual
parameter value of certain voices may change very little or not at all, even when the parameter
value is changed drastically.
● For Modular Synthesis Plug-in System compatible devices, the voices you edit/create can be stored
to the device as PLG voices. For details on storing voices, ref er to the owner’s manual of your Modular Synthesis Plug-in System compatible instrument.
■ PF Mode
Settings: ON, OFF
This determines whether the PF (Piano) Mode is on or off. When this is set to “ON” and damper (sustain) pedal messages are received, the PLG150-PF simulates the sound of a damper pedal.
■ SusCurve (Sustain Curve)
Settings: Normal, Step
This determines how the voices respond to damper (sustain) pedal messages. When this is set to
“Normal,” the PLG150-PF simulates the actual damper pedal action of an acoustic piano, giving you
continuous control over sustain. When this is set to “Step,” sustain is simply turned on or off in
response to damper pedal messages.
19
Page 20

Parameters
■ Bass Freq (Bass Frequency)
Range: -64 — +00 — +63
This determines the frequency which is boosted or cut (in the Bass Gain parameter below) for each
Part.
■ Bass Gain
Range: -64 — +00 — +63
This determines the level of the selected frequency (in “Bass Freq” above). Positive values boost the
level of the selected frequency and negative values attenuate it.
■ Treble Freq (Treble Frequency)
Range: -64 — +00 — +63
This determines the frequency which is boosted or cut (in the Treble Gain parameter below) for each
Part.
■ Treble Gain
Range: -64 — +00 — +63
This determines the level of the selected frequency (in “Treble Freq” above). Positive values boost the
level of the selected frequency and negative values attenuate it.
■ EL1 Level (Element 1 Level)
■ EL2 Level (Element 2 Level)
■ EL3 Level (Element 3 Level)
■ EL4 Level (Element 4 Level)
Range: -64 — +00 — +63 (“***”: not available)
The voices of the PLG150-PF are made up of one to four sound elements. More sophisticated sounds
have more elements. Though these elements are fix ed f or the various sounds and cannot be changed,
the volume of each element can be set and adjusted. These parameters determine the level of each
corresponding element. (Elements that are not used b y the voice cannot be set here and are indicated
by “***” in the display.)
20
Page 21

Parameters
■ AC1 EL1 Lev (Assignable Controller 1 — Element 1 Level Control)
■ AC1 EL2 Lev (Assignable Controller 1 — Element 2 Level Control)
■ AC1 EL3 Lev (Assignable Controller 1 — Element 3 Level Control)
■ AC1 EL4 Lev (Assignable Controller 1 — Element 4 Level Control)
Range: -64 — +00 — +63 (“***”: not available)
As explained in EL1 - EL4 Level above, the voices of the PLG150-PF are made up of up to four sound
elements. These parameters determine the degree to which the Assignable Controller 1 (AC1) is used
to control the level of each corresponding element. (Elements that are not used by the voice cannot be
set here and are indicated by “***” in the display.) Positive values result in normal level control: Moving
the controller toward the maximum settings increases the level. Negative values result in an inverse
relationship: Moving the controller toward the maximum settings decreases the level. A value of “0”
results in no control.
■ REV Send (Reverb Send)
Range: -127 — +127 (“****”: not available)
This determines the amount of voice signal that is sent to the PLG150-PF’s built-in Reverb effect.
■ CHO Send (Chorus Send)
Range: -127 — +127 (“****”: not available)
This determines the amount of voice signal that is sent to the PLG150-PF’s built-in Chorus effect.
■ INS LFOFrq (Insertion LFO Frequency)
Range: -127 — +127 (“****”: not available)
This determines the frequency of LFO modulation for the PLG150-PF’s built-in Insertion effect.
■ INS LFODpt (Insertion LFO Depth)
Range: -127 — +127 (“****”: not available)
This determines the depth of LFO modulation for the PLG150-PF’s built-in Insertion effect.
■ INS Feedback (Insertion Feedback Level)
Range: -127 — +127 (“***”: not available)
This determines the feedback level for the PLG150-PF’s built-in Insertion effect.
21
Page 22

Parameters
■ INS DryWet (Insertion Dry/Wet Balance)
Range: -127 — +127 (“****”: not available)
This determines the balance between the direct, unprocessed signal (dry) and the Insertion-processed
sound (wet).
■ INS Offset (Insertion Offset)
Range: -64 — +63 (“****”: not available)
This parameter is used to change one specific parameter of the effect; the particular parameter
depends on the effect type.
■ INS Drive (Insertion Drive)
Range: -127 — +127 (“****”: not available)
This determines the amount of distortion overdrive for the PLG150-PF’s built-in Insertion effect.
■ INS ClpCrv (Insertion Clipping Curve)
Range: -127 — +127 (“****”: not available)
This determines the amount of distortion “edge” for the PLG150-PF’s built-in Insertion effect. Higher
values result in harder edged distortion.
■ INS Delay (Insertion Delay Time)
Range: -7149 — +7149 (“*****”: not available)
This determines the delay time for the PLG150-PF’s built-in Insertion effect.
● Keep in mind that these parameters are offset controls; the actual resulting effect sound will differ
from voice to voice. If the currently selected voice does not have any effect or uses an effect type
not corresponding to this parameter, the parameter is unavailable and is indicated by asterisks
("***") in the display.
● Whether this Insertion effect parameter is available or not depends on the selected voice and its
pre-assigned Insertion effect types. (For details on the effect types and parameters for each voice,
see the Preset Voice List on page 24 and the Effect Parameter List on page 30.)
22
Page 23

PF System Parameters
■ Part Assign
Settings: 01 — 16, off
This determines the Part to which the PLG150-PF voice is assigned. If a Part is not properly assigned
here, none of the PLG150-PF voices can be selected for the Part. (This applies to XG Plug-in System
compatible “mother” devices .)
The PLG150-PF voices can only be assigned to a single Part.
■ VelCurve (Velocity Curve)
Settings: Normal, Soft1, Soft2, Soft3, Hard1, Hard2, Cross1, Cross2
This function lets you to produce determine how the volume of the PLG150-PF's Voices respond to
your playing touch (v elocity). Eight different Velocity Curve settings (or curves) are available , letting y ou
tailor the response to your own preference.
Parameters
● The Normal setting provides standard touch response.
● Soft 1 to 3 allow you to produce a reasonably high v olume with a
soft, light touch (low velocities).
● Hard 1 and 2 produce high volume only with a hard, strong touch
(high velocities).
● Cross 1 and 2 are “mirror image” curves, designed to be used
together with different voices in a layer to produce a velocity
crossfade effect. As shown in the illustration, the two curves
complement each other in a way that allows the Cross 2 applied
voice to sound at soft velocities, while the Cross 1 voice sounds
at high velocities.
23
Page 24

Appen-
■ Preset V oice List
No. Voice Name E
1
StGndPSt 2 2 Band EQ 28 69 46 68 9645264
2
GndPnoSt 2 2 Band EQ 28 69 46 68 9645264
3
BrghtGnd 2 2 Band EQ 28 69 52 74 9645876
4
60'sGrnd 1 3 Band EQ 70 44 76 81 59 28 46 9 64 52 64
5
StRichSt 2 2 Band EQ 28 69 49 76 9695270
6
RchGndSt 2 2 Band EQ 28 69 49 76 9695270
7
60'sJazz 2 2 Band EQ 21 52 28 76 30 67 49 56
8
StTghtSt 2 2 Band EQ 28 67 46 73 9695268
9
TghtGdSt 1 2 Band EQ 28 67 46 73 9695268
10
PowerGnd 2 2 Band EQ 28 67 46 76 9765273
11
MildGrnd 2 2 Band EQ 32 66 56 52 9644773
12
Timeworn 1 5685453
13
ChorusMn 1 Chorus 5 54 77 106 28 67 46 71 39 0 9 64 52 64
14
Doom 1 Reverse Gate 1 19 8 3 64 0 47 30 6 3 10 9 76 52 84
15
Phono 1 Distortion 2 20 60 34 75 43 76 10 127 120 9 64 52 64
16
Room 1 ER 1 19 5 16 64 0 46 37 5 0 10 14 71 52 72
17
AmbiGrnd 2 Cross Delay 1700 1750 104 1 10 35 28 67 58 67 9 64 52 64
18
FlngGrnd 2 Flanger 6 46 104 2 28 68 46 76 96 4 9 64 52 64
19
CelesGnd 1 Celeste 3 32 64 0 28 64 46 70 68 1 9 70 52 71
20
Dbl Pno 2 9645264
21
Montuno 3 9664570
22
GrndDyno 3 13 74 51 69
23
David 4 9645271
24
RhodyGnd 3 9705275
25
Perc Pno 4 22 58 52 70
26
GrandDX 3 16 72 50 68
27
GrandDX2 3 16 66 50 68
28
Bob 4 9665271
29
PianoStr 4 13 72 52 69
30
PnoStPad 4 13 72 52 69
31
SynStrPf 3 9644879
32
PianoPad 4 13 72 52 69
33
OctPf+Pd 4 9704567
34
Pf+Choir 3 9644865
35
ModPd Pf 4 9704569
36
Pia-Tron 3 19 55 52 6
37
SitaryPf 4 9704870
38
BrghtPno 1 2 Band EQ 28 64 46 66 9645264
39
Digital 1 2 Band EQ 28 68 46 68 9645264
40
ChorDigi 1 Chorus 5 54 102 106 28 64 46 66 46 0 9 64 52 64
41
Grnd+EP 3 13 71 51 73
42
DigiGrnd 1 9544152
43
Grnd/wDX 4 16 72 50 68
44
ChoDigiP 3 15 58 52 64
45
GlassPno 3 9605884
46
DigiTine 3 14 62 42 64
47
CP 1 2 Band EQ 28 68 46 69 9675268
48
CP-Symph 1 Symphonic 4 25 16 28 63 46 67 127 9 64 52 64
49
Trem CP 1 Auto Pan 34 80 24 0 28 66 46 69 9 69 52 71
50
BrightCP 2 Chorus 6 54 77 55 28 64 46 64 32 0 13 60 51 69
51
Digi CP1 2 9645264
52
Digi CP2 3 4685864
53
Jino 3 9505268
54
Petit CP 2 9704567
55
Hnkytnk1 2 3 Band EQ 58 34 52 10 68 28 46 9 68 52 64
56
Hnkytnk2 2 3 Band EQ 64 34 64 10 64 28 46 9 64 52 64
57
Hnkytnk3 2 3 Band EQ 60 34 64 10 63 28 46 9 64 52 64
58
FMHkytnk 2 3 Band EQ 60 34 59 10 67 28 46 9 64 52 64
59
Tea 1 2 Band EQ 28 64 46 70 9645268
60
Deodar 1 2 Band EQ 28 67 46 70 9645264
61
70's EP 1 2 Band EQ 28 63 46 68 9645264
62
80's EP 1 2 Band EQ 28 64 46 64 9645264
63
Crisp EP 1 3 Band EQ 61 34 62 10 69 28 46 9 64 52 64
64
Sweetnes 1 Phaser 8 111 11 91 28 60 58 64 64 3 1 9 63 52 73
E : Numbers of elements
(*1) : Refer to “PLG150-PF Voice Effect Parameter List” (page 30).
24
Voice List
Insertion
Effect Type
Insertion Effect Parameter No. (*1)
Bass
Freq
Voice EQ
Bass
Gain
Treble
Freq
Treble
Gain1 2 3 4 5 6 7 8 9 10 11 12 13 14 15 16
 Loading...