

Page 1
EnglishFrançaisEspañol
ES
FR
EN
Owner’s Manual
Mode d’emploi
Manual de instrucciones
PIANO DIGITAL
PIANO NUMÉRIQUE
DIGITAL PIANO
P
-
525
Merci d'avoir acheté ce Piano numérique de Yamaha !
Cet instrument offre une qualité de son et une expressivité exceptionnelles pour votre plus grand plaisir.
Nous vous conseillons de lire attentivement ce mode d'emploi afin de tirer pleinement profit des fonctions avancées
et très pratiques de votre instrument.
Nous vous recommandons également de garder ce manuel à portée de main pour toute référence ultérieure.
Avant d’utiliser l’instrument, lisez attentivement la section « PRÉCAUTIONS D’USAGE » aux pages 3 et 4.
Thank you for purchasing this Yamaha Digital Piano!
This instrument provides exceptionally high-quality sound and expressive control for your playing enjoyment.
We recommend that you read this manual carefully so that you can fully take advantage of the advanced and
convenient functions of the instrument.
We also recommend that you keep this manual in a safe and handy place for future reference.
Before using the instrument, be sure to read “PRECAUTIONS” on pages 3−4.
Le damos las gracias por adquirir este Piano Digital Yamaha.
Este instrumento ofrece un sonido de alta calidad y un control expresivo excepcionales para que disfrute tocando.
Le aconsejamos que lea detenidamente este manual para poder disfrutar de las útiles y avanzadas funciones del
instrumento.
Recomendamos guardar el manual en un lugar seguro y accesible, para futuras consultas.
Antes de utilizar el instrumento, lea las “PRECAUCIONES”, en las páginas 3-4.
Page 2
COMPLIANCE INFORMATION STATEMENT
(Supplierʼs declaration of conformity procedure)
Responsible Party : Yamaha Corporation of America
Address : 6600 Orangethorpe Ave., Buena Park, CA 90620, U.S.A.
Telephone : 714-522-9011
Type of Equipment : Digital Piano
Model Name : P-525
This device complies with Part 15 of the FCC Rules.
Operation is subject to the following two conditions:
1) this device may not cause harmful interference, and
2) this device must accept any interference received including interference that may cause undesired operation.
(529-M02 FCC sdoc YCA 02)
FCC INFORMATION (U.S.A.)
1. IMPORTANT NOTICE: DO NOT MODIFY THIS UNIT!
This product, when installed as indicated in the instructions contained in this manual, meets FCC requirements.
Modifications not expressly approved by Yamaha may void your authority, granted by the FCC, to use the product.
2. IMPORTANT: When connecting this product to accessories and/or another product use only high quality shielded
cables. Cable/s supplied with this product MUST be used. Follow all installation instructions. Failure to follow
instructions could void your FCC authorization to use this product in the USA.
3. NOTE: This product has been tested and found to comply with the requirements listed in FCC Regulations, Part
15 for Class “B” digital devices. Compliance with these requirements provides a reasonable level of assurance that
your use of this product in a residential environment will not result in harmful interference with other electronic
devices. This equipment generates/uses radio frequencies and, if not installed and used according to the instructions found in the users manual, may cause interference harmful to the operation of other electronic devices. Compliance with FCC regulations does not guarantee that interference will not occur in all installations. If this product is
found to be the source of interference, which can be determined by turning the unit “OFF” and “ON”, please try to
eliminate the problem by using one of the following measures:
- Relocate either this product or the device that is being affected by the interference.
- Utilize power outlets that are on different branch (circuit breaker or fuse) circuits or install AC line filter/s.
- In the case of radio or TV interference, relocate/reorient the antenna. If the antenna lead-in is 300 ohm ribbon
lead, change the lead-in to co-axial type cable.
If these corrective measures do not produce satisfactory results, please contact the local retailer authorized to distribute this type of product. If you can not locate the appropriate retailer, please contact Yamaha Corporation of
America, 6600 Orangethorpe Avenue, Buena Park, CA 90620, U.S.A.
The above statements apply ONLY to those products distributed by Yamaha Corporation of America or its subsidiaries.
The model number, serial number, power requirements, etc., may be
found on or near the name plate, which is at the bottom of the unit. You
should note this serial number in the space provided below and retain
this manual as a permanent record of your purchase to aid identification
in the event of theft.
Model No.
Serial No.
P-525 Owner’s Manual
2
(529-M04 FCC class B YCA 02)
The name plate is located on the bottom of the unit.
(1003-M06 plate bottom en 01)
Page 3
PRECAUTIONS
PLEASE READ CAREFULLY
BEFORE PROCEEDING
Especially in the case of children, a guardian should
provide guidance on how to properly use and handle the product before actual use.
Please keep this manual in a safe and handy place
for future reference.
WARNING
result in lower sound quality, or possibly cause
overheating in the outlet.
• When disconnecting the power plug, always hold
the plug itself and not the cord. Pulling by the
cord can damage it and cause electric shocks or
a fire.
• If not using the product for long periods of time,
be sure to pull the power plug from the AC outlet.
Do not disassemble
• This product contains no user-serviceable parts.
Do not attempt to disassemble the internal parts
or modify them in any way.
Always follow the basic precautions listed
below to avoid the possibility of serious injury
or even death from electrical shock, shortcircuiting, damages, fire or other hazards.
These precautions include, but are not limited
to, the following:
Power supply
• Do not place the power cord near heat sources
such as heaters or radiators. Also, do not
excessively bend or otherwise damage the cord,
or place heavy objects on it.
• Do not touch the product or the power plug during
an electrical storm.
• Use only the correct voltage specified for the
product. The required voltage is printed on the
name plate of the product.
• Use only the supplied or the specified AC adaptor
(page 118)/power cord. Do not use the AC
adaptor/power cord for other devices.
• Check the power plug periodically and remove
any dirt or dust which may have accumulated on
it.
• Insert the power plug firmly all the way into the
AC outlet. Using the product when it is not
plugged in sufficiently can cause dust to
accumulate on the plug, possibly resulting in fire
or skin burns.
• When setting up the product, make sure that the
AC outlet you are using is easily accessible. If
some trouble or malfunction occurs, immediately
turn off the power switch and disconnect the plug
from the outlet. Even when the power switch is
turned off, as long as the power cord is not
unplugged from the wall AC outlet, the product
will not be disconnected from the power source.
• Do not connect the product to an electrical outlet
using a multi-plug outlet extender. Doing so can
Water warning
• Do not expose the product to rain, use it near
water or in damp or wet conditions, or place on it
any containers (such as vases, bottles or
glasses) containing liquids which might spill into
any openings or places where water may drop. A
liquid such as water getting into the product may
cause a fire, electric shocks, or malfunctions.
• Use the AC adaptor indoors only. Do not use in
any wet environments.
• Never insert or remove a power plug with wet
hands.
Fire warning
• Do not place any burning items or open flames
near the product, since they may cause a fire.
Wireless unit
• Radio waves from this product may affect electromedical devices, such as a heart pacemaker
implant or defibrillator implant.
- Do not use the product near medical devices or
inside medical facilities. Radio waves from this
product may affect electro-medical devices.
- Do not use the product within 15 cm (6 in.) of
persons with a heart pacemaker implant or a
defibrillator implant.
Connections
• Be sure to read the manual of the device to be
connected, and follow the instructions. Failure to
observe this may cause a fire, overheating,
explosion, or malfunction.
P-525 Owner’s Manual
3
Page 4
If you notice any abnormality
Connections
• If any of the following problems occur,
immediately turn off the power switch and
disconnect the power plug from the outlet.
Finally have the device inspected by Yamaha service
personnel.
- The power cord or plug becomes frayed or
damaged.
- Unusual smells or smoke are emitted.
- Some object, or water has been dropped into
the product.
- There is a sudden loss of sound during use of
the product.
- Cracks or other visible damage appear on the
product.
CAUTION
Always follow the basic precautions listed
below to avoid the possibility of physical injury
to you or others, or damage to the instrument or
other property. These precautions include, but
are not limited to, the following:
Location
• Do not place the product in an unstable position
or a location with excessive vibration, where it
might accidentally fall over and cause injury.
• Do not go near the product during an earthquake.
Strong shaking during an earthquake could
cause the product to move or tip over, resulting in
damage to the product or its parts, and possibly
causing injury.
• When transporting or moving the product, always
use two or more people. Attempting to lift the
product by yourself may result in injuries, such as
back injuries, or cause the product to be dropped
and broken, which could lead to other injuries.
• Before moving the product, remove all connected
cables, to prevent damage to the cables or injury
to anyone who might trip over them.
• Use only the stand specified for the product.
When attaching it, use the provided screws only.
Failure to do so could cause damage to the
internal components or result in the product
falling over.
• Before connecting the product to other devices,
turn off the power for all devices. Before turning
the power on or off for all devices, set all volume
levels to minimum.
• Be sure to set the volumes of all devices at their
minimum levels and gradually raise the volume
controls while playing the product to set the
desired listening level.
Handling
• Do not insert foreign materials such as metal or
paper into any openings or gaps of the product.
Failure to observe this may cause a fire, electric
shocks, or malfunctions.
• Do not rest your weight on, or place heavy
objects on the product, and do not use excessive
force on the buttons, switches or connectors.
• Do not use the product or headphones for a long
period of time at a high or uncomfortable volume
level, since this can cause permanent hearing
loss. If you experience any hearing loss or ringing
in the ears, consult a physician.
• Remove the power plug from the AC outlet before
cleaning the unit. Failure to observe this may
cause electric shocks.
Yamaha cannot be held responsible for damage
caused by improper use or modifications to the
product, or data that is lost or destroyed.
Always turn the power off when the instrument is
not in use.
Even when the [ ] (Standby/On) switch is in
standby status (power lamp is off), electricity is still
flowing to the instrument at the minimum level.
When you are not using the instrument for a long
time, make sure you unplug the power cord from
the wall AC outlet.
(DMI-11)
P-525 Owner’s Manual
4
Page 5

NOTICE
Information
To avoid the possibility of malfunction/ damage to the
product, damage to data, or damage to other property,
follow the notices below.
Handling
• Do not connect this product to a public Wi-Fi and/or Internet
service directly. Only connect this product to the Internet
through a router with strong password protections. Consult
your router manufacturer for information on optimum
security practices.
• Do not use this product in the vicinity of a TV, radio, stereo
equipment, mobile phone, or other electric devices.
Otherwise, this product or the other device may generate
noise.
• When you use the product along with an app on your smart
device, such as a smartphone or tablet, we recommend that
you enable “Airplane Mode” on the device to avoid noise
caused by communication. When turning on airplane mode,
Bluetooth® settings may be turned off. Make sure that the
setting is turned on before use.
• Do not expose the product to excessive dust or vibrations, or
extreme cold or heat (such as in direct sunlight, near a heater,
or in a car during the day) to prevent the possibility of
disfiguration, damage to the internal components or unstable
operation. (Verified operating temperature range: 5° – 40°C,
or 41° – 104°F.)
• Do not place vinyl, plastic or rubber objects on the product,
since this might discolor the product.
Maintenance
• When cleaning the product, use a soft and dry (or slightly
damp) cloth. Do not use paint thinners, solvents, alcohol,
cleaning fluids, or chemical-impregnated wiping cloths.
• During extreme changes in temperature or humidity,
condensation may occur and water may collect on the surface
of the product. If water is left, the wooden parts may absorb
the water and be damaged. Make sure to wipe any water off
immediately with a soft cloth.
Saving data
• Some of the data of this product (page 90) and the Song data
saved to the internal memory of this instrument (page 54) are
retained when the power is turned off. However, the saved
data may be lost due to some failure, an operational mistake,
etc. Save your important data onto USB flash drive/an
external device such as a computer (pages 68, 90). Before
using a USB flash drive, make sure to refer to page 75.
• To protect against data loss through USB flash drive damage,
we recommend that you save your important data onto spare
USB flash drive or an external device such as a computer as
backup data.
About copyrights
• The copyright of the “content”*1 installed in this product
belongs to Yamaha Corporation or its copyright holder.
Except as permitted by copyright laws and other relevant
laws, such as copying for personal use, it is prohibited to
“reproduce or divert”
copyright holder. When using the content, consult with a
copyright expert.
If you create music or perform with the contents through the
original use of the product, and then record and distribute
them, the permission of Yamaha Corporation is not required
regardless of whether the distribution method is paid or free
of charge.
*1: The word “content” includes a computer program, audio
data, Accompaniment Style data, MIDI data, waveform
data, voice recording data, music score, and score data, etc.
*2: The phrase “reproduce or divert” includes taking out the
content itself in t his product, or recording and distr ibuting
it without changes in a similar manner.
*2
without the permission of the
About functions/data bundled with the
product
• Some of the preset Songs have been edited for length or
arrangement, and may not be exactly the same as the original.
• This device is capable of using various types/formats of music
data by optimizing them to the proper format music data for
use with the device in advance. As a result, this device may
not play them back precisely as their producers or composers
originally intended.
• The bitmap fonts used in this product have been provided by
and are the property of Ricoh Co., Ltd.
About this manual
• The illustrations and LCD screens as shown in this manual
are for instructional purposes only.
Tuning
• Unlike an acoustic piano, this instrument does not need to be
tuned by an expert (although the pitch can be user-adjusted to
match other instruments). This is because the pitch of digital
instruments is always maintained perfectly.
About disposal
• When disposing of this product, please contact the
appropriate local authorities.
P-525 Owner’s Manual
5
Page 6
Thank you for purchasing this Yamaha Digital Piano!
This instrument provides exceptionally high-quality sound and expressive control for your playing
enjoyment. In order to make the most of your instrument’s performance potential and features, please read
this Owner’s Manual thoroughly, and keep it in a safe place for later reference.
About the Manuals
This instrument has the following manuals.
Supplied with the instrument
P-525 Owner’s Manual
Explains how to use this instrument.
General contents of the notes
WARNING
CAUTION
NOTICE
NOTE
Important information to avoid the possibility of serious injury or even death from electrical shock,
short-circuiting, damages, fire or other hazards.
Important information to avoid the possibility of physical injury to you or others, or damage to the
instrument or other property.
Important information to avoid the possibility of malfunction or damage to the product, damage to
data, or damage to other property.
Helpful information and tips.
Means that operating procedure or explanation continues to the next page.
Available on the website
Smart Pianist User Guide
Explains how to set up and use a smart device with the dedicated Smart Pianist app (page 81) for controlling this
instrument.
Smart Device Connection Manual
Explains how to connect the instrument to smart devices, such as a smartphone, tablet, etc.
Data List
Contains list of XG Voices and XG Drum Kit and MIDI-related information.
To obtain these manuals, access the Yamaha website below:
Yam ah a D o wn l oa d s
https://download.yamaha.com/
After selecting your country and clicking on “Manual Library,” enter the model name, etc.
to search for the desired files.
* For a general overview of MIDI and how you can effectively use it, search for “MIDI Basics” (only in English, German, French
and Spanish) on the website above.
P-525 Owner’s Manual
6
Page 7
Included Accessories
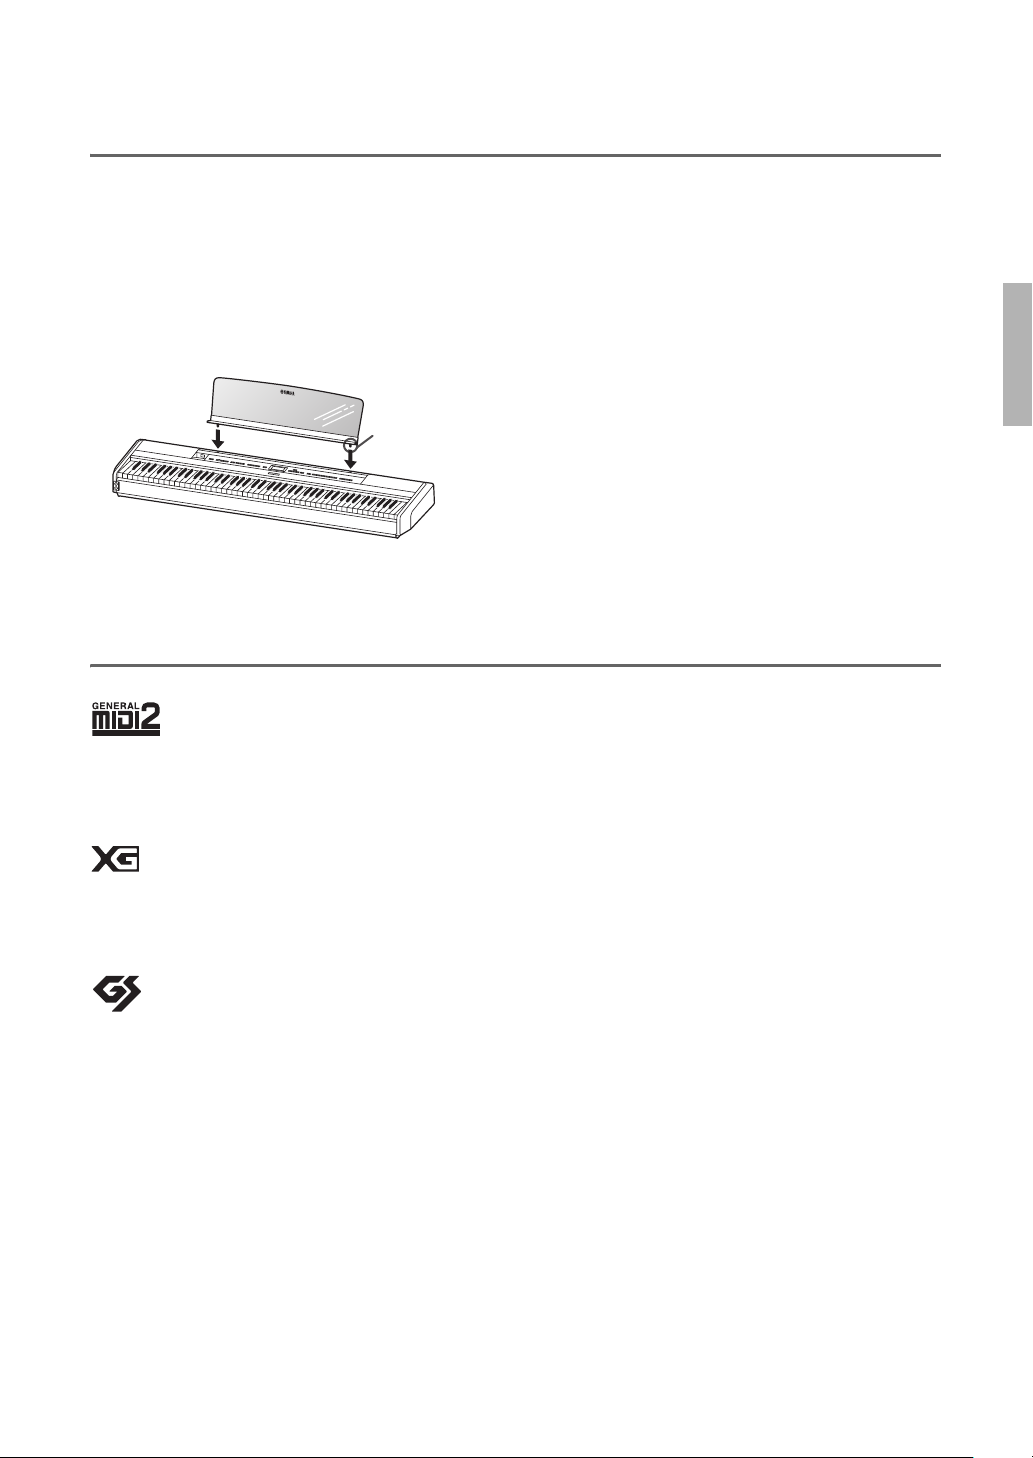
NOTICE
After removing the music rest from the instrument, do not leave it on the
instrument for long time. Doing so may cause color transference or glue to
adhere to it.
Insert into the hole without removing the cap.
Owner’s Manual (this book) × 1
Online Member Product Registration × 1
Foot Pedal ×1
Power cord*, AC adaptor* ×1
* May not be included depending on your particular area. Please check with your Yamaha dealer.
Music Rest ×1
Compatible Formats
GM System Level 2
“GM (General MIDI)” is one of the most common Voice allocation formats. “GM System Level 2” is a
standard specification that enhances the original “GM” and improves Song data compatibility. It provides
for increased polyphony, greater Voice selection, expanded Voice parameters, and integrated effect
processing.
XG
XG is a major enhancement of the GM System Level 1 format, and was developed by Yamaha specifically
to provide more Voices and variations, as well as greater expressive control over Voices and effects, and to
ensure compatibility of data well into the future.
GS
GS was developed by the Roland Corporation. In the same way as Yamaha XG, GS is a major enhancement
of the GM specifically to provide more Voices and Drum kits and their variations, as well as greater
expressive control over Voices and effects.
P-525 Owner’s Manual
7
Page 8

Table of Contents
PRECAUTIONS ....................................................3
NOTICE ......................................................................5
Information ................................................................5
About the Manuals .....................................................6
Included Accessories ..................................................7
Compatible Formats ...................................................7
Features .......................................................................9
Panel Controls and Terminals .................................10
Setting Up .................................................................12
Power Requirements ............................................................12
Turning the Power On or Off .............................................12
Setting the Volume — [VOLUME] ...................................13
Using Headphones ...............................................................14
Using the Pedals ....................................................................15
Basic Operations on Display ....................................18
Playing Various Musical Instrument Sounds (Voices)
....................................................................................20
Selecting Voices ....................................................................20
Listening to the Voice Demos .............................................22
Customizing the Sound and the Touch Response of Piano
Voices (Piano Room) ...........................................................23
Enhancing and Customizing the Sound ............................26
Playing Two Voices Simultaneously (Dual) .....................29
Splitting the Keyboard Range and Playing Two Different
Voices (Split Mode) ..............................................................30
Using Dual and Split Simultaneously ................................31
Playing Duo ...........................................................................32
Transposing the Pitch in Semitones (Transpose) ............34
Fine Tuning the Pitch (Master Tune) ................................35
Changing the Touch Sensitivity (Touch) ..........................36
Boosting the Overall Sound (Sound Boost) ......................37
Adjusting the Sound (Master EQ) ......................................38
Locking the Front Panel ......................................................40
Using the Metronome ..........................................................41
Playing the Keyboard along with Rhythm Playback 43
Playing and Practicing Songs ...................................44
Playback of Songs .................................................................45
Playing a One-hand Part — Part Cancel Function (MIDI
Songs) .....................................................................................48
Playing Back a Song Repeatedly .........................................49
Adjusting the Volume Balance ...........................................52
Useful Playback Functions ..................................................53
Recording Your Performance ..................................54
Recording Methods ..............................................................54
Quick MIDI Recording ........................................................55
MIDI Recording — Independent Tracks ..........................57
MIDI Recording to the USB Flash Drive ..........................59
Audio Recording to the USB Flash Drive .........................61
Other Recording Techniques ..............................................62
Handling Song Files .................................................66
Song Types and File Operation Limitations .................... 66
Basic Song File Operation ................................................... 67
Deleting Files — Delete ....................................................... 68
Copying Files — Copy ......................................................... 68
Moving Files — Move ......................................................... 69
Converting a MIDI Song to an Audio Song during Playback
— MIDI to Audio ................................................................ 70
Renaming Files — Rename ................................................. 71
Saving and Recalling Desired Settings (Registration
Memory) ...................................................................72
Saving the Settings to the Registration Memory ............. 72
Recalling a Registered Setting ............................................ 73
Connecting to Other Devices ...................................74
Connectors ............................................................................ 74
Connecting USB Devices ([ ] (USB TO DEVICE)
Terminal) .............................................................................. 75
Connecting to an Audio Player ([AUX IN] jack) ............ 76
Using an External Speaker System for Playback (AUX OUT
[L/L+R]/[R] jacks) ............................................................... 76
Connecting to a Computer or Smart Device .................... 77
Transmitting/Receiving Audio Data (USB Audio Interface
Function) ............................................................................... 78
Listening to Audio Data from a Smart Device through this
Instrument (Bluetooth Audio Function) .......................... 79
Using Smart Device Apps with a Connected Smart Device
................................................................................................. 81
Connecting External MIDI Devices (MIDI Terminals) . 89
Backup and Initialization .........................................90
Performing Live ........................................................92
Detailed Settings (MENU Display) ..........................94
Common Operations in the Menu Displays ....................94
Voice Menu ........................................................................... 95
Song Menu ............................................................................ 98
Metronome/Rhythm Menu .............................................. 101
Recording Menu ................................................................. 102
System Menu ...................................................................... 103
Appendix ................................................................110
Preset Voice List ................................................................. 110
Song List .............................................................................. 112
Rhythm List ........................................................................ 112
Message List ........................................................................ 113
Troubleshooting ................................................................. 115
Specifications ...................................................................... 117
Index .......................................................................119
*For information on whether Bluetooth functionality is
included or not, refer to page 80.
P-525 Owner’s Manual
8
Page 9
Features
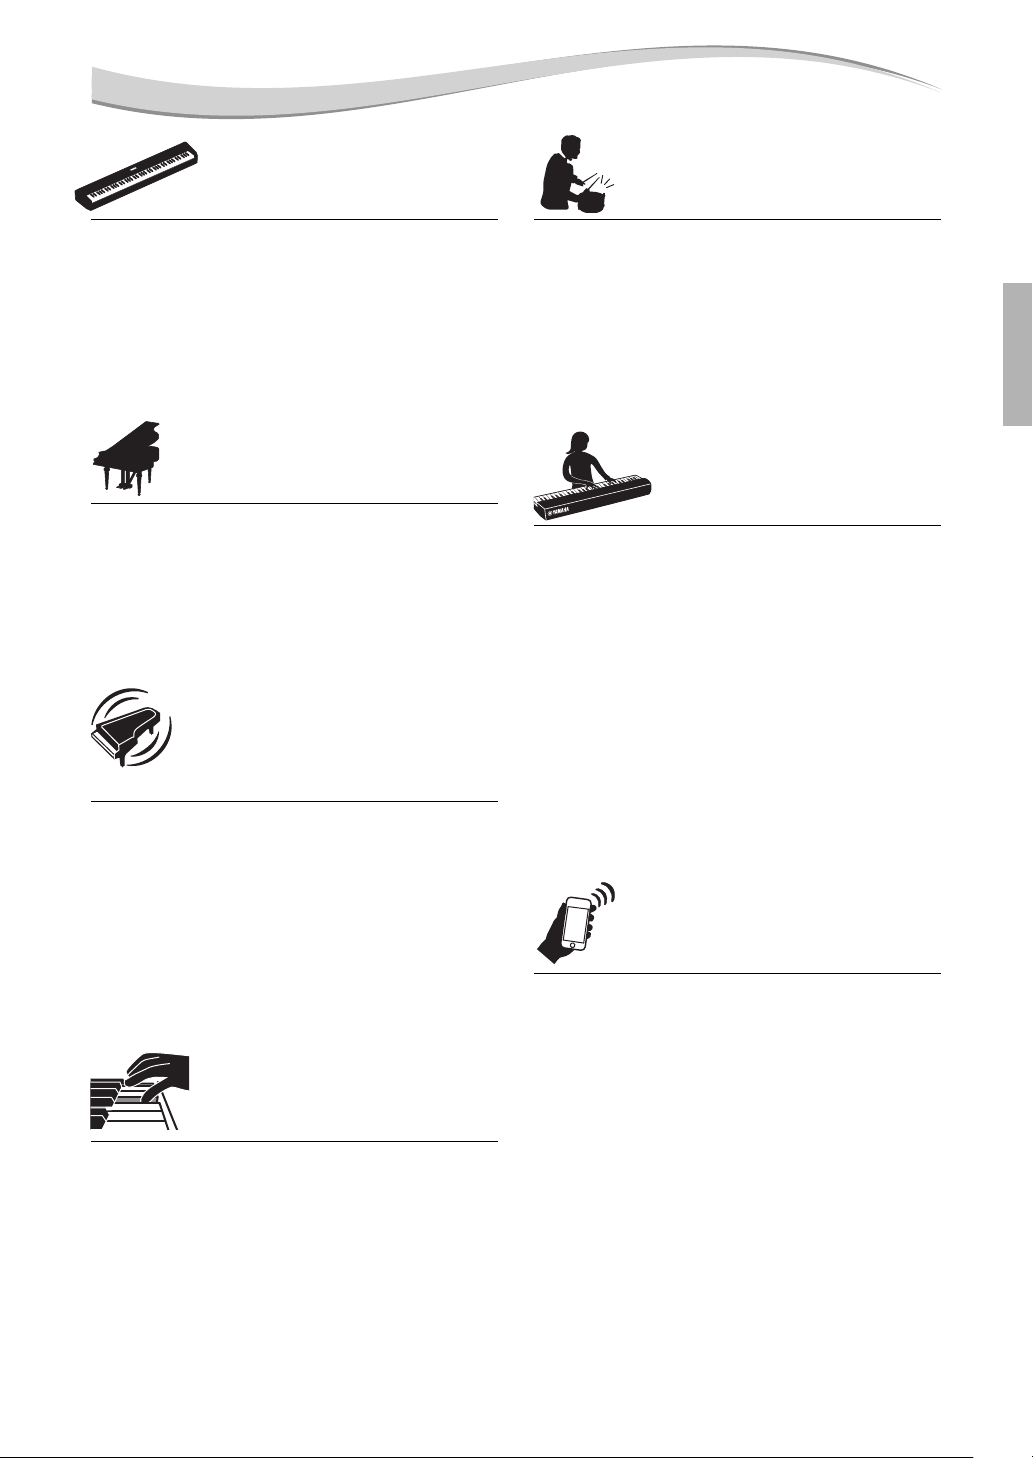
Truly Portable electric piano,
ideal for wide variety of
applications
Dynamic Rhythm Tracks
(page 43)
The P-525 digital piano is exceptionally portable—
allowing you practice it in your bedroom, or perform
with it at a party. You can enjoy it like a normal piano
when using it with the separately sold keyboard stand
(L-515) and pedal unit (LP-1). You can also enjoy
authentic live performances when using it with the
portable pedal unit (FC35).
Yamaha CFX and Bösendorfer
Imperial piano samples
The P-525 features gorgeous piano sounds created with
samples of the Yamaha CFX flagship concert grand piano
and famed Vienna-made Bösendorfer* grand piano.
These piano samples bring two world’s finest and most
prominent concert grand pianos to your fingertips.
* Bösendorfer is a subsidiary company of Yamaha.
Grand Expression Modeling
and Virtual Resonance
Modeling (VRM) — two
powerful, expressive grand
piano-like features (page 24)
“Grand Expression Modeling” technology recreates the
subtle changes in the sound that are produced by
changing your touch from when you press a key to when
you release it. The VRM technology featured in this
instrument reproduces the complicated interaction of
both string and soundboard resonance and makes the
sound more like a real acoustic piano. These two
technologies enables a wide variety of performance
expression.
GrandTouch-S™ keyboard with
real wood keys provides the feel
of an acoustic grand piano
The P-525 features white keys made from select quality
wood and fitted with the highest quality synthetic ivory,
while the black keys are finished in synthetic ebony. This
keyboard features a broad dynamic range and faithful
response to every nuance of touch that puts a wide
expanse of tone—from delicate to bold—at the pianist’s
fingertips.
The P-525 comes complete with forty rhythm patterns
(drums and bass accompaniment) that are perfectly
suited to many types of music regularly performed on
the piano, for even greater performance potential. Simply
playing with your favorite rhythm pattern automatically
triggers and controls the drums and bass accompaniment, and you can enjoy the feeling of playing with a
backing band.
Convenient on-stage
performance functions
(page 92)
The P-525 also features the following useful functions for
performing on stage or in live spaces.
• Sound Boost (page 37)
This helps your sound stand out when playing along with
other instruments or in noisy environments.
• Panel Lock (page 40)
This allows you temporarily disable the front panel
buttons to prevent them being operated unintentionally
while performing.
• Registration Memory (page 72)
This allows you to save (register) your favorite settings to
buttons on the front panel, and then instantly recall the
settings while performing.
Comprehensive compatibility
with smart devices
Connecting the P-525 with a smart device, such as a
smartphone or tablet, gives you even greater musical
enjoyment and performance control.
• Powerful, convenient smart device apps
(page 81)
The P-525 is compatible with two highly convenient
apps: Smart Pianist and Rec'n'Share. Smart Pianist lets
you operate the instrument from your smart device and
even display the notation of Songs, while Rec'n'Share
enables you to film, record, and edit your performances.
• Bluetooth audio function enables audio
playback from a smart device (page 79)
You can use the P-525 as an audio device, and listen to
music from your Bluetooth-equipped device, such as a
smart device, and even enjoy performing with your
favorite music.
P-525 Owner’s Manual
9
Page 10
Panel Controls and Terminals
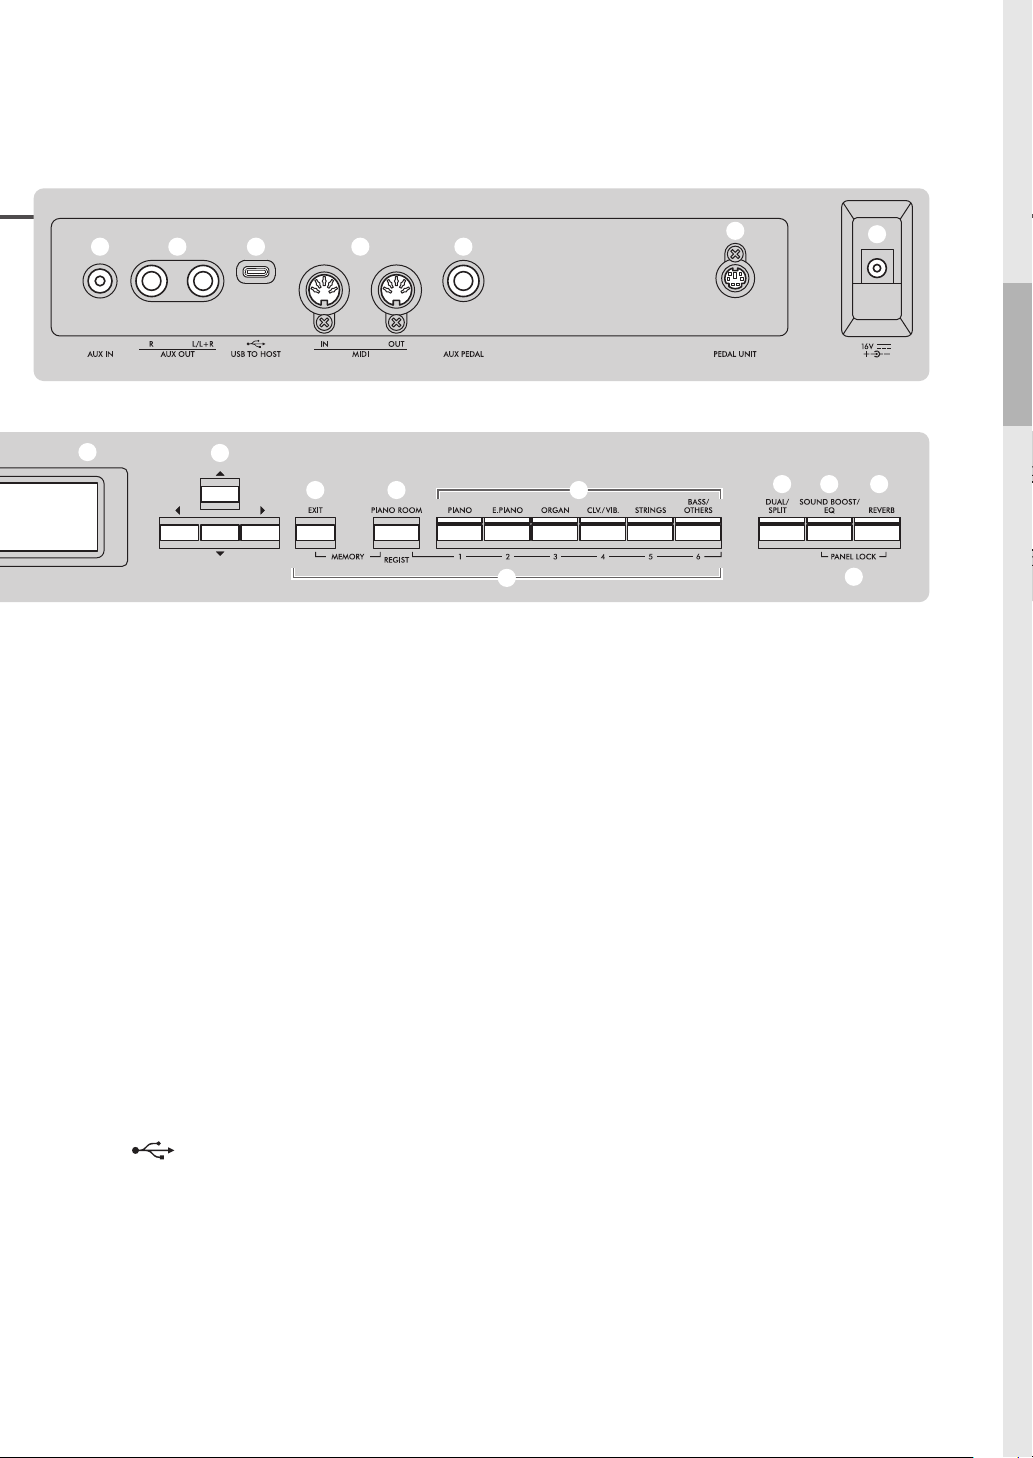
q
w
e r t y u i o !0
@0
@1
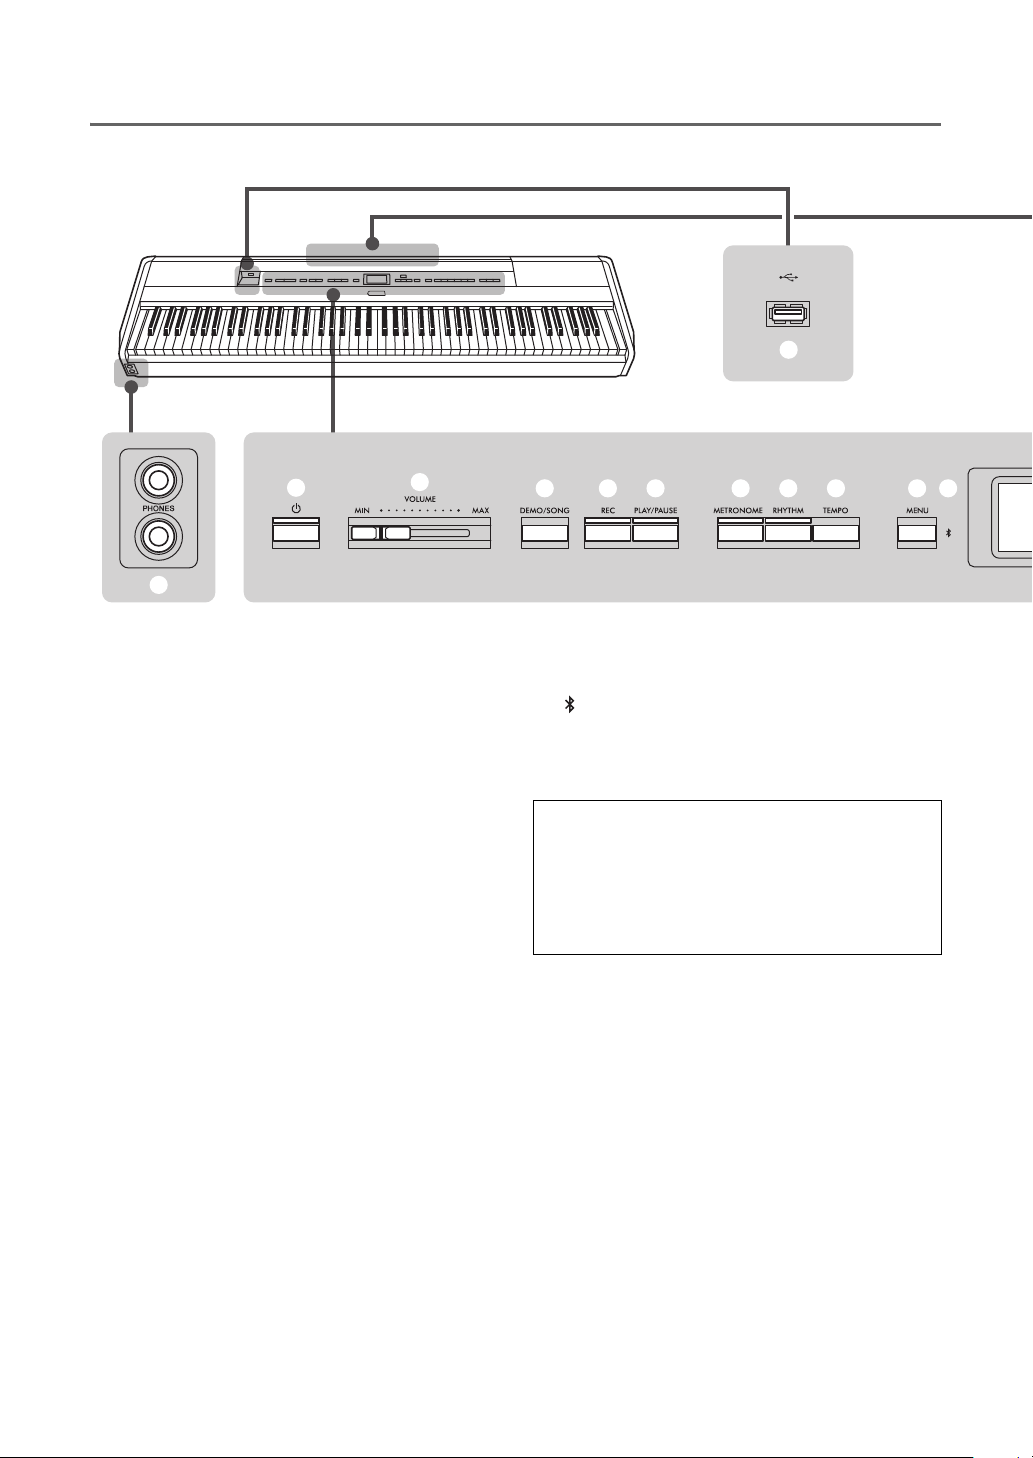
Front Panel
Front Panel
1 [P] (Standby/On) switch.................... page 12
For turning the power on or setting it to standby.
2 [VOLUME] slider ................................ page 13
For adjusting the overall volume.
3 [DEMO/SONG] button................pages 22, 44
Calls up Song List folders for selecting Songs for
playback, etc.
4 [REC] button....................................... page 54
For recording your keyboard performance.
5 [PLAY/PAUSE] button........................ page 45
For alternately playing back and pausing the Preset
Songs or your recorded material.
6 [METRONOME] button .....................page 41
For using the metronome functions.
7 [RHYTHM] button............................. page 43
For using the rhythm functions.
8 [TEMPO] button................................. page 41
For setting the tempo.
9 [MENU] button................................... page 94
Pressing this button alternates the displays among
the “Voice,” “Song,” “Metronome/Rhythm,”
“Recording” and “System” menus, from which you
can make detailed settings for the related functions.
) (Bluetooth)............................... pages 79, 82
The Bluetooth function enables you to listen to audio
data from a smart phone, or use the smart device app
“Smart Pianist.”
Bluetooth capability
Depending on the country in which you purchased
the product, the instrument may not have Bluetooth
capability. If the Bluetooth logo is shown or printed
on the control panel, this means that the product is
equipped with Bluetooth functionality.
! [U]/[D]/[L]/[R] buttons, display..... page 18
For selecting an item or setting a value using the
buttons corresponding to the display indication.
@ [EXIT] button
Pressing this button exits from the current display, or
returns to the Voice or Song display.
# [PIANO ROOM] button..................... page 23
Calls up the Piano Room display where you can
select an optimum piano sound and adjust the touch
response.
$ Voice buttons ...................................... page 20
For selecting the Voice (keyboard sound).
% Registration Memory related buttons
............................................................. page 72
For registering and recalling settings.
P-525 Owner’s Manual
10
Page 11
Panel Controls and Terminals
!1
!1
!2 !3
!6
!7
@2 @3 @4
@8
@7
@6
@5
!8
!9
!4
!5
Rear Panel
^ [DUAL/SPLIT] button ...........pages 29, 30, 31
For playing two Voices simultaneously, or different
Voices on the left- and right-hand sections of the
keyboard.
& [SOUND BOOST/EQ] button .....pages 37, 38
Calls up the Sound Boost or Master EQ display.
These allow you to raise the volume and enhance the
presence of your performance (Sound Boost), or
adjust the tone of the sound (Master EQ).
* [REVERB] button ............................... page 26
Calls up the Reverb display, for adding and changing
reverberation in the sound.
( [PANEL LOCK] buttons ..................... page 40
For temporarily disabling the front panel buttons to
prevent them being operated unintentionally while
performing.
A [PHONES] jacks.................................. page 14
For connecting a pair of headphones.
B [ ] (USB TO DEVICE) terminal
......................................................pages 74, 75
For connecting a USB flash drive or using a USB
wireless LAN adaptor to connect with a smart device
such as a smartphone.
Rear Panel
C [AUX IN] jack.............................. pages 74, 76
For connecting an audio player, such as a portable
audio player.
D AUX OUT [R]/[L/L+R] jacks....... pages 74, 76
For connecting to external powered speaker systems,
etc.
E [USB TO HOST] terminal........... pages 74, 77
For connecting a computer or a smart device, such as
a smartphone or tablet.
F MIDI [IN] [OUT] terminals........ pages 74, 89
For connecting external MIDI devices, such as a
synthesizer or a sequencer.
G [AUX PEDAL] jack ...................... pages 15, 74
For connecting an included foot pedal, or separately
sold foot switch.
H [PEDAL UNIT] terminal.................... page 15
Connecting a separately sold pedal unit.
I DC IN jack .......................................... page 12
For connecting the included or specified AC adaptor.
P-525 Owner’s Manual
11
Page 12
Setting Up
AC
adaptor
AC outlet
DC IN jack
(page 11)
Power cord
DC plug
AC plug
1
2
3
[P] (Standby/On)
switch
The power indicator
lights up.
WARNING
NOTE
NOTICE
WARNING
NOTICE
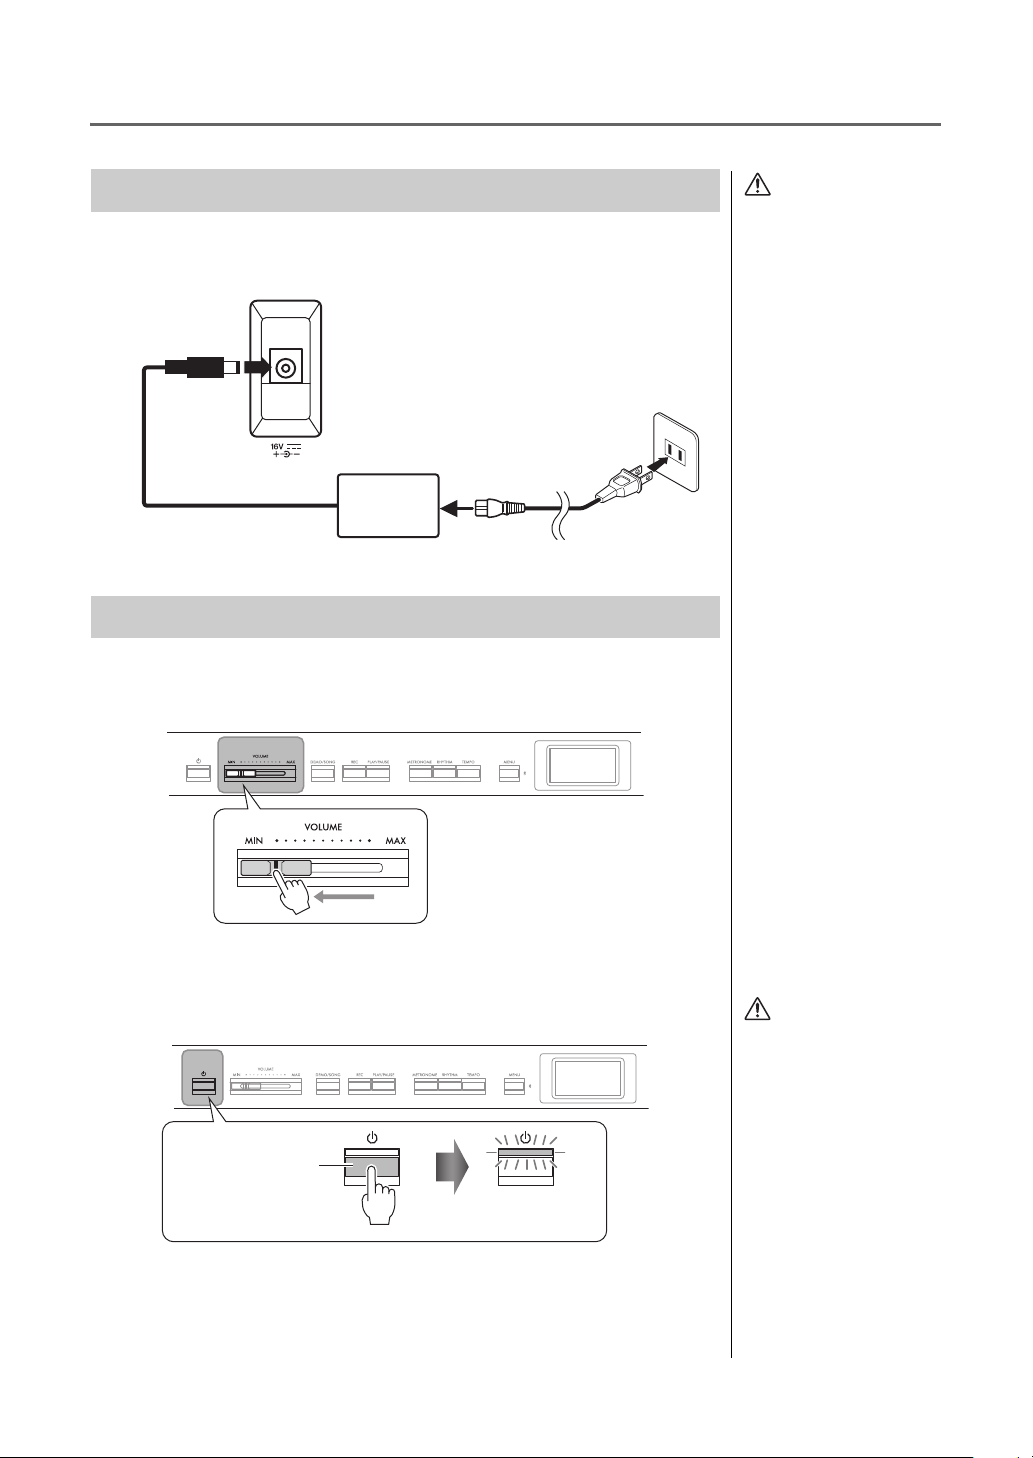
Power Requirements
Connect the AC adaptor and the power cord in the order shown
in the illustration.
Turning the Power On or Off
1. Turn down the [VOLUME] slider at the right end of the
front panel to “MIN.”
• Use only the AC power cord
supplied with your
instrument. If the supplied
cord is lost or damaged and
needs to be replaced,
contact your Yamaha dealer.
The use of an inappropriate
replacement can pose a fire
and shock hazard!
• When setting up the
product, make sure that the
AC outlet you are using is
easily accessible. If some
trouble or malfunction
occurs, immediately turn off
the power switch and
disconnect the plug from
the outlet.
When disconnecting the power
cord/AC adaptor, first turn off
the power, then follow this
procedure in reverse order.
2. Press the [P] (Standby/On) switch to turn the power on.
The [P] (Standby/On) switch lights up and the Voice display appears on the
display at the center of the front panel.
3. Press and hold the [P] (Standby/On) switch for a second
to turn the power off.
The display and the [P] (Standby/On) button lamp both turn off.
P-525 Owner’s Manual
12
Press only the [P] (Standby/On)
switch when turning the power
on. Any other operations, such
as pressing the keys, buttons or
pedals may cause the
instrument to malfunction.
Even when the instrument is
turned off, electricity is still
flowing to the instrument at
the minimum level. When you
are not using the instrument
for a long time or during
electrical storms, make sure
you unplug the AC power
plug from the wall AC outlet.
Turning the power off while
recording or editing might cause
data loss. If you need to forcequit the instrument, hold down
the [P] (Standby/On) switch for
longer than three seconds. Note
that the force-quit operation
might cause loss of the Paring
information for Bluetooth audio
function.
Page 13
Setting Up
+
The lowest key
CAUTION
Decreases
the level.
Increases
the level.
NOTICE
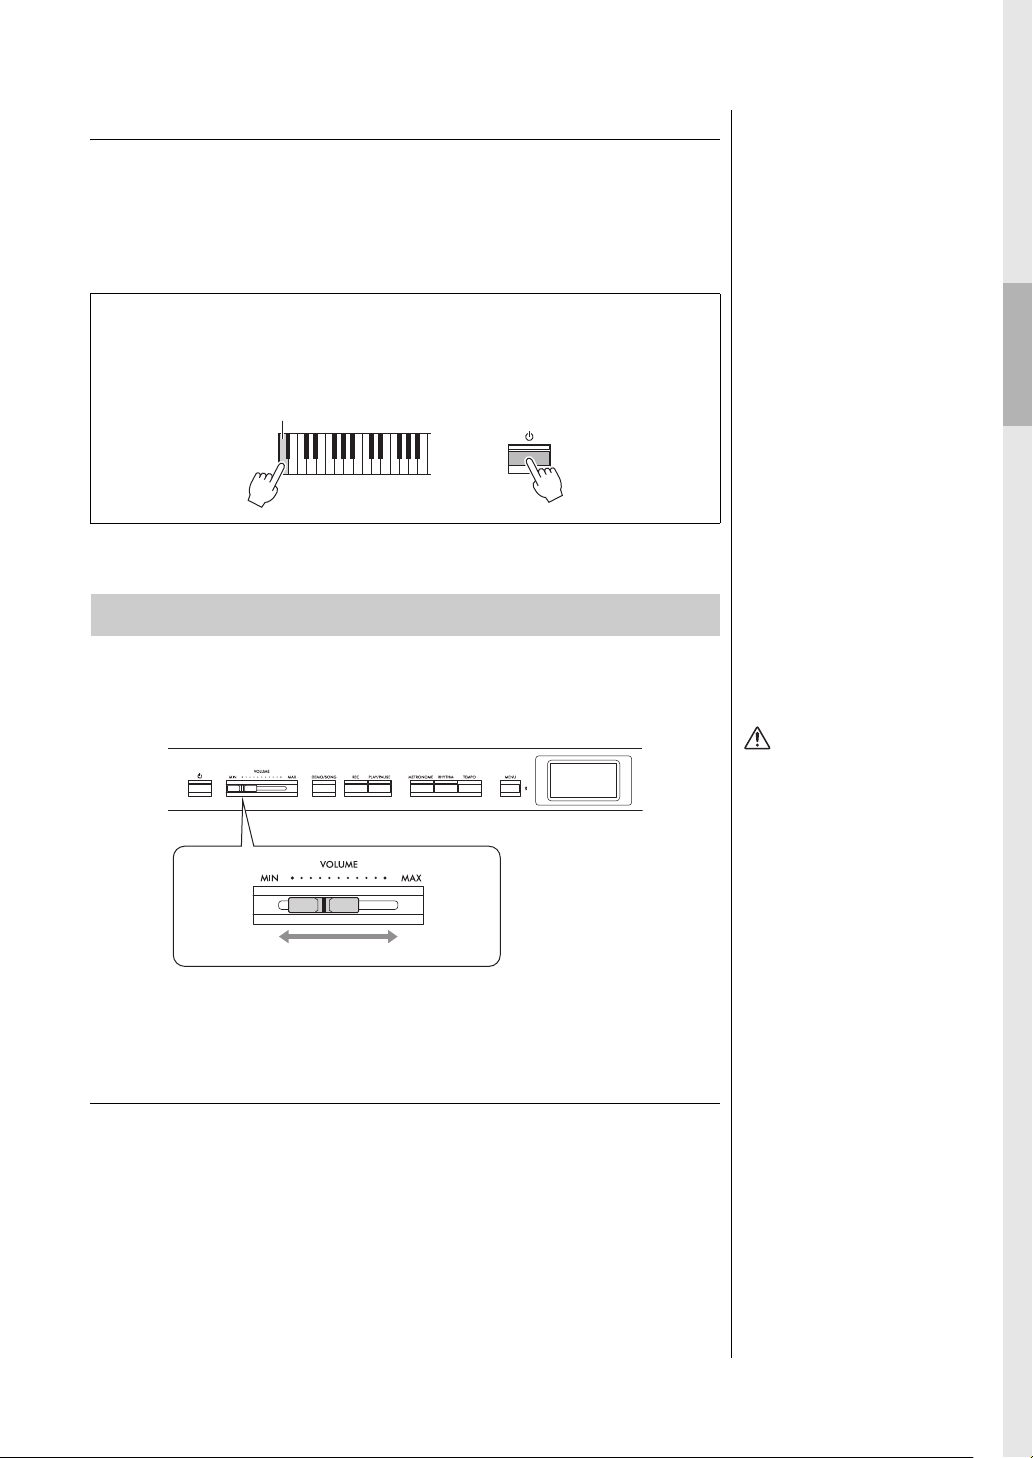
Auto Power Off function
To prevent unnecessary power consumption, this instrument features an Auto
Power Off function that automatically turns the power off if the instrument is
not operated for a specified period of time. The amount of time that elapses
before the power is automatically turned off is approximately 30 minutes by
default; however, you can change the setting (page 106).
Disabling Auto Power Off (simple method)
Turn the power on while holding down the lowest key on the keyboard. An
“Auto power off disabled” message appears briefly and Auto Power Off is
disabled.
Setting the Volume — [VOLUME]
To adjust the volume, use the [VOLUME] slider located at the right of the
panel. Play the keyboard to actually produce sound while you adjust the
volume.
• Any data which are not saved
will be lost if the power
automatically turns off. Make
sure to save your data before
this happens.
• Depending on the instrument
status, the power may not turn
off automatically, even after
the specified period of time
elapses. Always turn off the
power manually when the
instrument is not in use.
Adjusting the [VOLUME] slider also affects the output level of the [PHONES]
jacks (page 14) and the output level of the AUX OUT jacks (page 76).
Intelligent Acoustic Control (IAC)
IAC is a function which automatically adjusts and controls the sound quality
according to the overall volume of the instrument. IAC Control is effective only
on the sound output of the instrument speakers or headphones. Even when the
volume is low, this lets you hear both low sounds and high sounds clearly.
Especially when using the headphones, the burden on the ears is reduced
without raising the overall volume excessively.
You can set the IAC setting On or Off and its depth. For details, refer to “IAC”
and “IAC depth” on page 105. The default setting for this function is “On.”
Do not use the instrument at
a high volume level for a long
period of time, or your
hearing may be damaged.
P-525 Owner’s Manual
13
Page 14
Setting Up
CAUTION
Adaptor plug
(3.5 mm 6.3 mm)
Stereo mini plug
(3.5 mm)
NOTE
NOTE
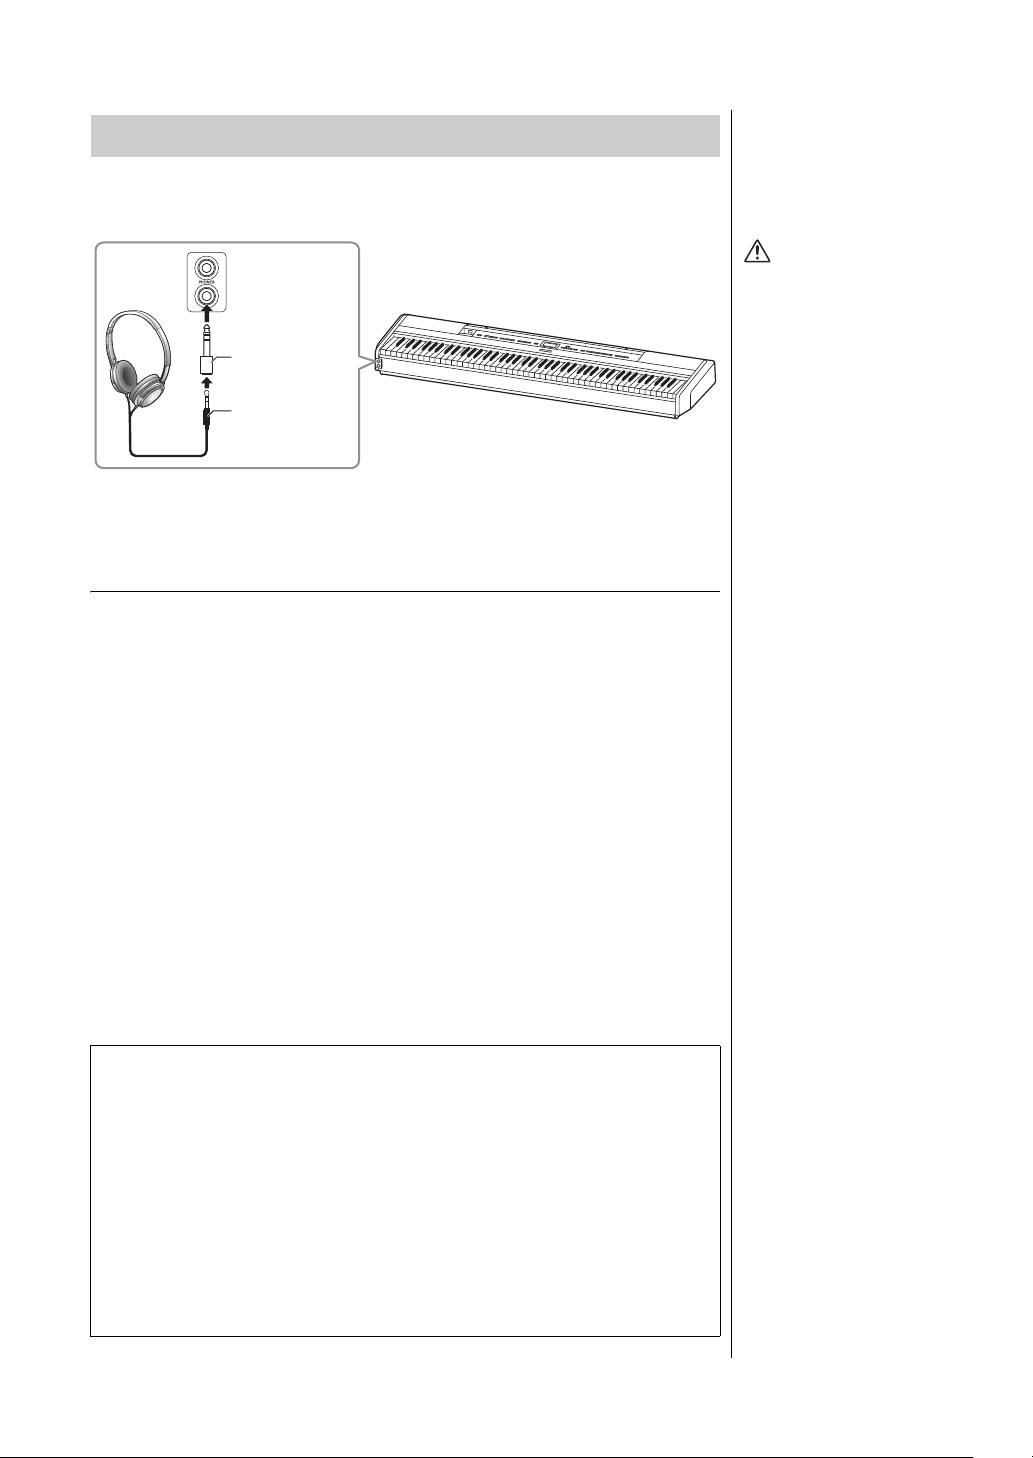
Using Headphones
You can connect two pairs of headphones to the [PHONES] jacks. If you are
using only one pair, insert the plug into either of these jacks.
Reproducing the Natural Sensation of Sound Distance
—Binaural Sampling and Stereophonic Optimizer
This instrument features two advanced technologies that allow you to enjoy
exceptionally realistic, natural sound, even when listening on headphones.
Do not use headphones at a
high volume for an extended
period of time. Doing so may
cause hearing loss.
Binaural Sampling (“CFX Grand” Voice only)
Binaural sampling is a method that uses two special microphones set at the ear
position of a performer and records the sound from a piano as it is. Listening to
the sound with this effect through headphones gives the impression of being
immersed in the sound, as if it was actually emanating from the piano. When
“CFX Grand” (page 110) is selected, connecting the headphones automatically
enables binaural sampling sound.
Stereophonic Optimizer (Voices in the Piano group other than
“CFX Grand”)
The Stereophonic Optimizer is an effect which reproduces natural sound
distance like the sound of binaural sampling even though you hear it on
headphones. When any other Voice in the Piano group besides “CFX Grand” is
selected, connecting the headphones automatically enables the Stereophonic
Optimizer.
This function is turned on by default. Note that when the “Speaker” setting
(page 106) is “On,” this function will always be disabled. Since these sounds are
optimized for listening with headphones, we recommend that you set this function
to “Off” in the following situations.
• Playing the piano sound of this instrument with an external powered speaker
system, while monitoring the sound output from this instrument on connected
headphones.
• Making an audio recording (page 61) while using headphones, and then playing
that recorded audio Song through speakers of this instrument. (Make sure to turn
off these functions before audio recording.)
For details on setting this On or Off, refer to “Binaural” on page 105.
Sampling
A technology which records the
sounds of an acoustic
instrument then stores them to
the tone generator to be played
based on information received
from the keyboard.
Voices in the Piano group are
those contained in the “Piano”
category in the Preset Voice
List (page 110). For details
about selecting Voices, refer to
page 20.
Before connecting an external
powered speaker system, be
sure to read “Connecting to
Other Devices” (page 74).
P-525 Owner’s Manual
14
Page 15
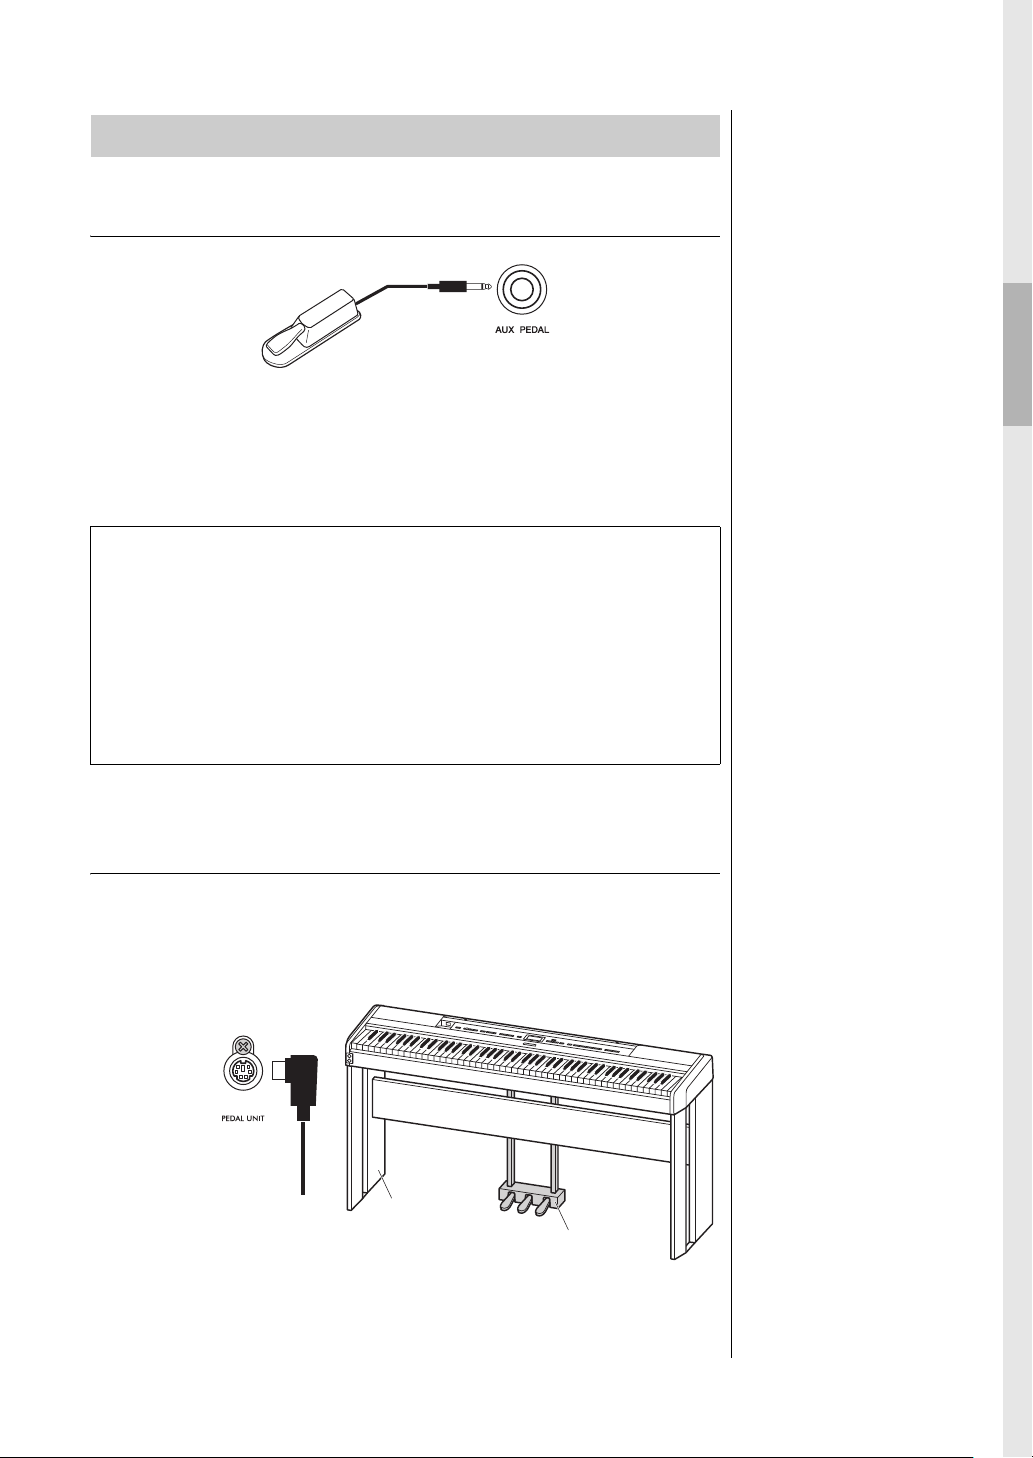
Using the Pedals
NOTE
NOTE
L-5 15
(sold separately)
LP-1
(sold separately)
Insert the connector of the
unit securely until the metal
part of the cord plug
disappears from view in the
same direction as shown in
the illustration.
Otherwise, the connector
may be broken and the pedal
may not function properly.
Using the Foot Pedal
Setting Up
You can switch various selected functions on/off by using the included FC3A
foot pedal connected to the [AUX PEDAL] jack. Also a separately sold FC4A or
FC5 footswitch can be connected to the jack. To select the function, use the
“Aux Assign” (page 104) in the “System” menu display.
Half-pedal function
This function can be used when an included FC3A foot pedal or separately sold
LP-1 or FC-35 pedal unit (see below) is connected and it allows you to vary the
sustain length depending on how far the pedal is pressed. The farther down you
press the pedal, the more the sound sustains. You can specify the point to which
you must depress the foot pedal connected to the [AUX PEDAL] jack or the
damper pedal of the pedal unit (Half Pedal Point). To do this, press the [MENU]
button repeatedly to call up the “System” menu display: “Pedal” → “Half Pedal
Point” (page 104).
Using the Pedal Unit (sold separately)
The [PEDAL UNIT] jack is for connecting a separately sold LP-1 or FC35 pedal
unit. When connecting the LP-1 pedal unit, make sure to also assemble the unit
on a separately sold keyboard stand (L-515). When connecting the FC35 pedal
unit, a keyboard stand is unnecessary.
Make sure that power is off
when connecting or
disconnecting the foot pedal or
footswitch.
Make sure that power is off
when connecting or
disconnecting the pedal unit.
P-525 Owner’s Manual
15
Page 16
Setting Up
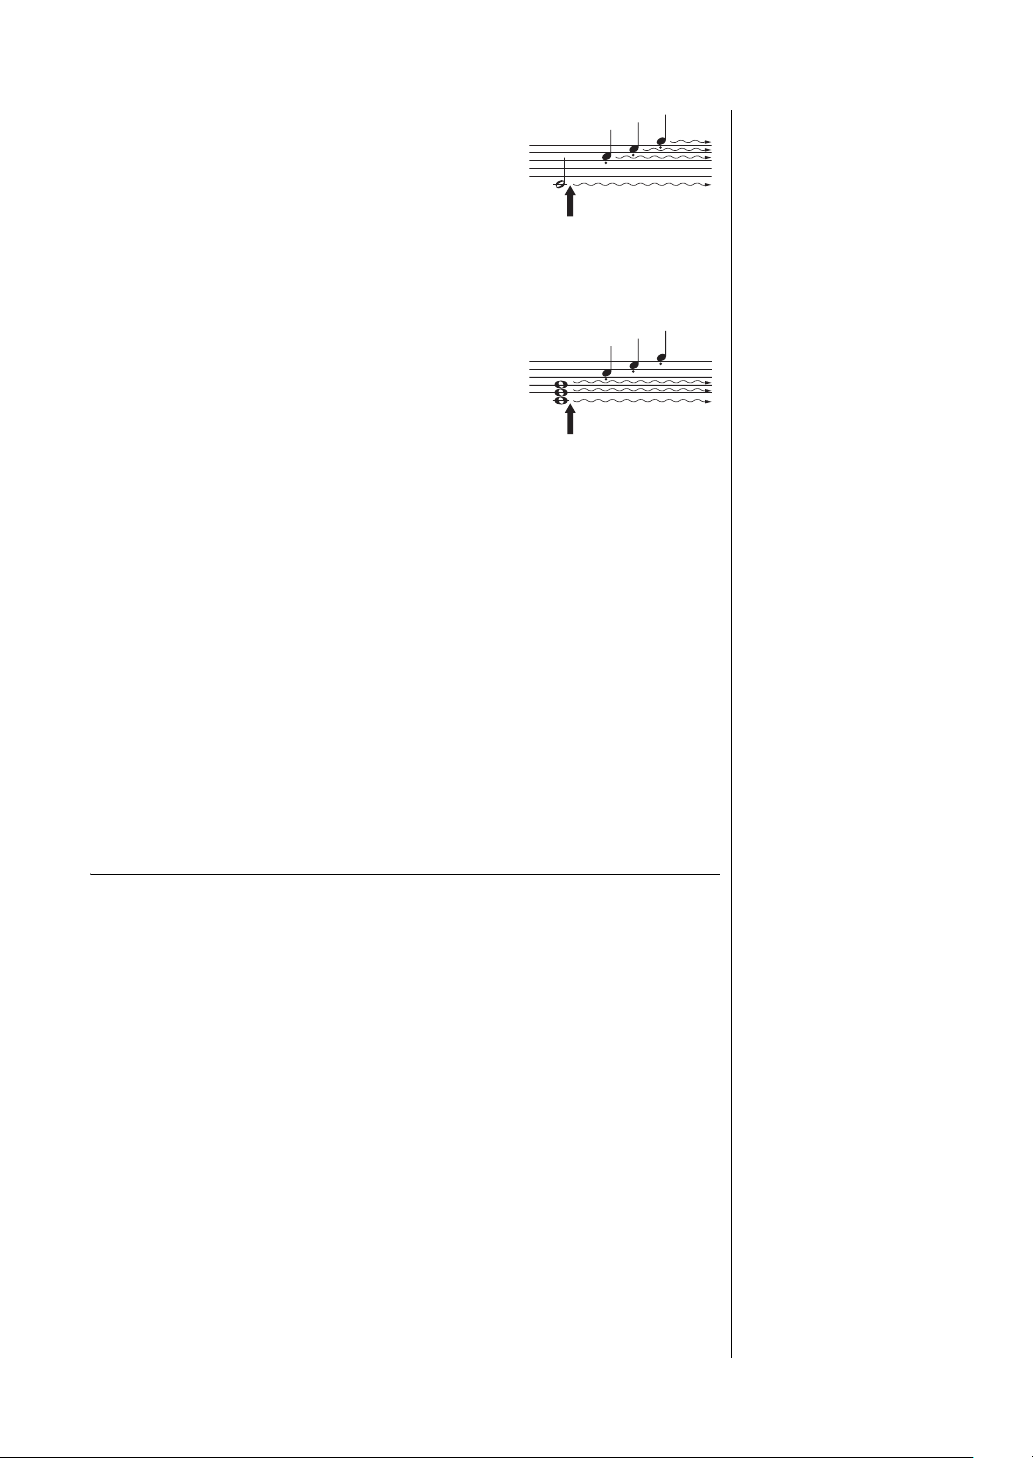
When you press the damper
pedal here, the notes you
play before you release the
pedal have a longer sustain.
NOTE
When you press the
sostenuto pedal here while
holding the note(s), the notes
will sustain as long as you
hold the pedal.
NOTE
NOTE
Damper pedal (right pedal)
When you press the damper pedal, the notes you play
have a longer sustain. When you select a Voice in the
Piano group, pressing the damper pedal activates the
VRM (page 24) to accurately recreate the unique
resonance of an acoustic grand piano’s soundboard
and strings. This pedal features Half-pedal function.
Sostenuto pedal (center pedal)
If you play a note or chord on the keyboard and press
the sostenuto pedal while holding the note(s), the
notes will sustain as long as the pedal is held. All
subsequent notes will not sustain.
Soft pedal (left pedal)
The soft pedal reduces the volume and slightly changes the timbre of notes
played while the pedal is pressed. The soft pedal will not affect notes that are
already playing when it is pressed. In order to apply this effect, play notes after
pressing the pedal.
Keep in mind that this pedal function will be changed from the Soft pedal
depending on the selected Voice (page 20). When “Jazz Organ” or “Rock
Organ” is selected, this pedal switches the Rotary Speaker speed between slow
and fast (“Rotary Speed” on page 96). When “Vibraphone” is selected, this
pedal switches Vibrato on and off (“VibeRotor” on page 96).
Voices in the Piano group are
those contained in the “Piano”
category in the Preset Voice
List (page 110). For details
about selecting Voices, refer to
page 20.
While the sostenuto (center)
pedal is held, a sustained (nondecaying) type of Voice such
as strings or organ may sound
continuously without decay
after the notes have been
released.
Assigning Functions to the Pedals
You can assign a different function to the foot pedal or footswitch connected to
the [AUX PEDAL] jack or left/center/right pedal connected to the [PEDAL
UNIT] jack.
Assigning to the foot pedal/footswitch
Press the [MENU] button repeatedly to call up the “System” menu, and then
select “Pedal” → “Aux Assign” to make the assignment.
Assigning to each pedal of the pedal unit
Press the [MENU] button repeatedly to call up the “Voice” menu, and then
select “Pedal Assign” to make the assignment.
P-525 Owner’s Manual
16
You can assign the Song Play/
Pause function (the same
function as the [PLAY/PAUSE]
button on the front panel) to the
included foot pedal connected
to the [AUX PEDAL] jack or the
footswitch (sold separately) or
the center or left pedal of the
pedal unit (sold separately). For
details, refer to page 104.
Page 17
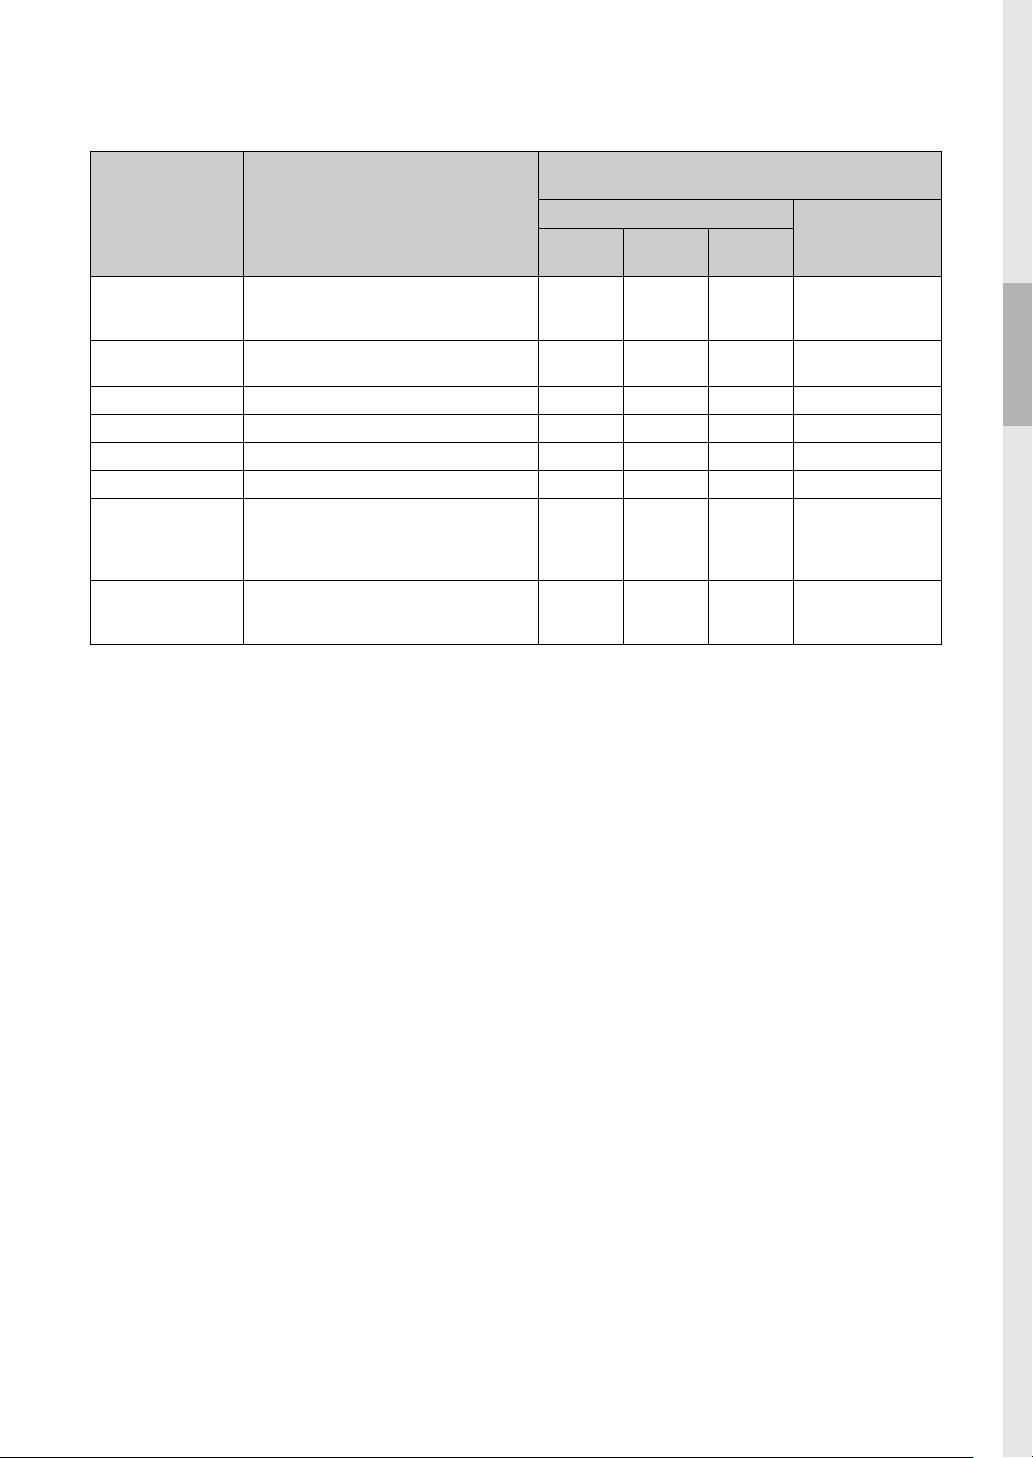
Pedal Function List
Available pedal
(: Can be assigned, ×: Cannot)
Function Description
Left
pedal
Sustain (Switch) A function that sustains the notes you play
while pressing the pedal, even after
releasing your fingers from the keyboard
Sustain (Continuous)* A function that varies the sustain length
depending on how far the pedal is pressed
Sostenuto Sostenuto (page 16) ***
Soft Soft (page 16)
PitchBend Up* A function that smoothly raises the pitch × ×
PitchBend Down* A function that smoothly lowers the pitch × ×
Rotary Speed** Changes the rotational speed of the Jazz
Organ or Rock Organ rotary speaker
(switches between fast and slow each time
you press the pedal)
VibeRotor** Switches the vibraphone vibrato on/off
(switches on/off each time you press the
pedal)
Pedal Unit
Center
pedal
× × *** ***
Right
pedal
Foot pedal or
Footswitch
Setting Up
Jazz Organ, Rock Organ: Rotary Speed, Vibraphone: VibeRotor, Voices other than the above: Soft
*: When you want to assign a function indicated by * to the pedal connected to the [AUX PEDAL] jack, you should use a separately
sold foot pedal (page 15).
**: The functions marked with ** are assigned to the Left pedal automatically when you select the Jazz Organ, Rock Organ, or
Vibraphone Voice.
***: The functions marked with *** is the default function when foot pedal/footswitch/pedal unit is connected.
The default function for the Left pedal differs depending on the current Voice.
P-525 Owner’s Manual
17
Page 18
Basic Operations on Display
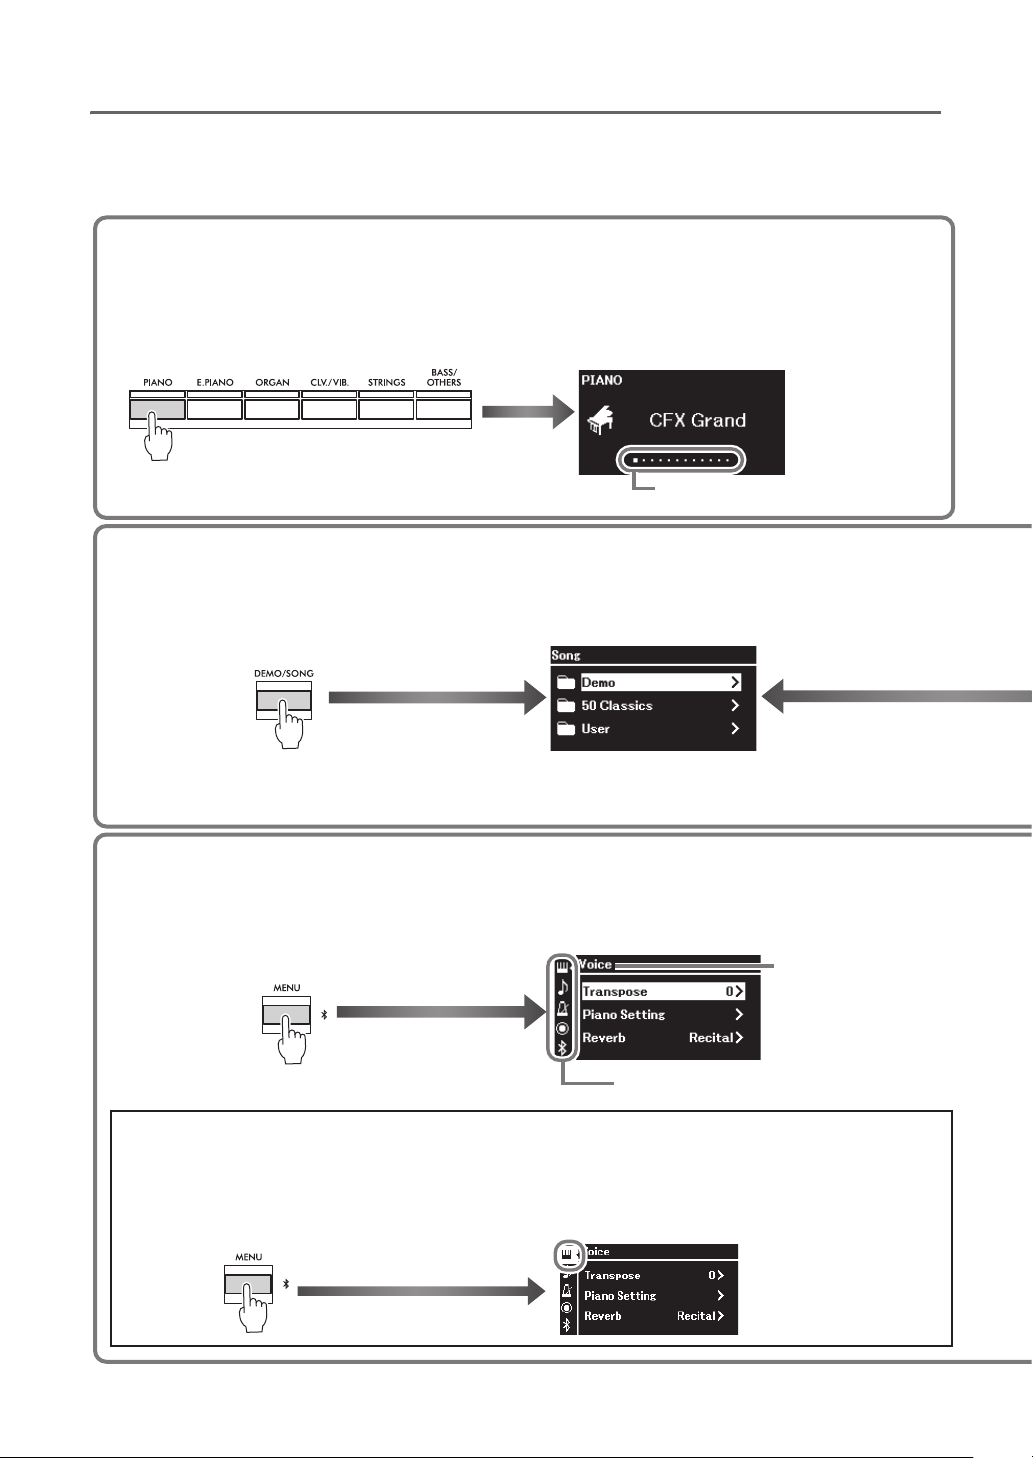
Voice display (page20)
This indicates the current position
in the Voice group.
1.Press a Voice button to call up the Voice
display.
Menu icon
Menu name
2.Use the [L]/[R] buttons to select the previous or
next Voice. Press the [
L]/[R] buttons
simultaneously to select the first Voice in the
Voice g roup.
Song display (page44)
1.Press the [DEMO/SONG] button
to call up the Song category list.
2.Use the [U]/[D] buttons to select
a Song category.
Press [R] to select a
Song category.
Press [L] to return.
Detailed settings (Menu) display (page94)
1.Press the [MENU] button repeatedly
to select the desired menu.
2.Use the [U]/[D] buttons to select a parameter of
the current menu.
You can also select the desired menu by using these alternate steps:
1. Press the [MENU] button once to call up
the detailed setting display.
2. Press the [L] button to highlight the menu icon,
and then use the [
U]/[D] buttons to select the
desired menu.
Note that the hierarchy
depth differs depending on
the selected parameter.
Voice display
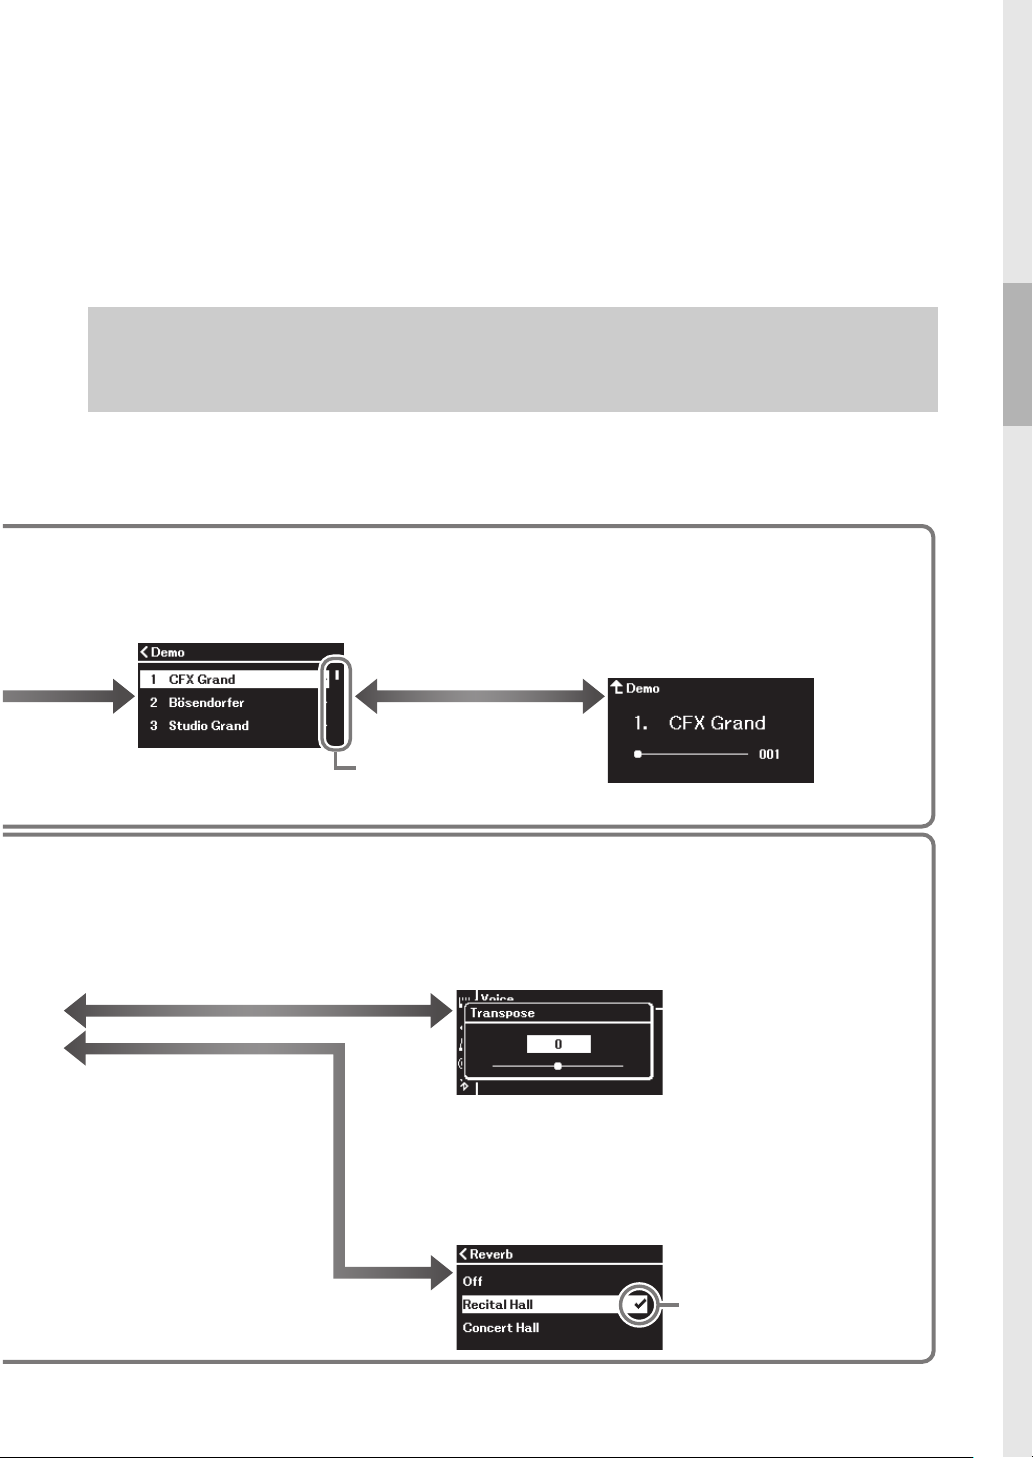
In addition to the front panel buttons, the instrument also features detailed control via the display menus—
allowing you to select from the wealth of Voices and Songs included, as well as changing various detailed
instrument settings, for even greater playability and performance potential.
P-525 Owner’s Manual
18
Page 19
Basic Operations on Display
Press [R] to select a Song.
Press [U] to return.
Press [R] to detailed settings.
Press [EXIT] to return to the
previous display.
Press [R] to detailed settings.
Press [L] to return.
A checkmark is shown at
the right of the selection.
3.Use the [U]/[D] buttons to
select a Song.
4.Press [PLAY/PAUSE] button to playback
the Song.
Use the [L] or [R] buttons to select the previous
or next bars.
When this is shown here,
you can scroll through the
display vertically.
NOTE
Depending the instrument's color, the display background is white and the characters and other marks are black.
Adjusting the value on the slider pop-up window
3.Use the [L]/[R] buttons to adjust the value,
press the [EXIT] button to close the pop-up window.
To reset the default value, press the [
L] and [R
] buttons
simultaneously.
3.Use the [U]/[D] buttons or the [R] button to select
a setting.
Press the [L] button to return to the previous display.
Selecting a value from a list
Song display
Voice di s p l ay : For selecting the Voice (the sound when playing the keyboard).
Song display: For selecting the Song to playback on this instrument.
Detailed setting display: For making detailed settings for about the keyboard performance, such as Voice, or Song
playback, etc. (page94)
P-525 Owner’s Manual
19
Page 20
Playing Various Musical Instrument Sounds (Voices)
NOTE
Voice buttons[U]/[D]/[L]/[R]
buttons
NOTE
Voice button
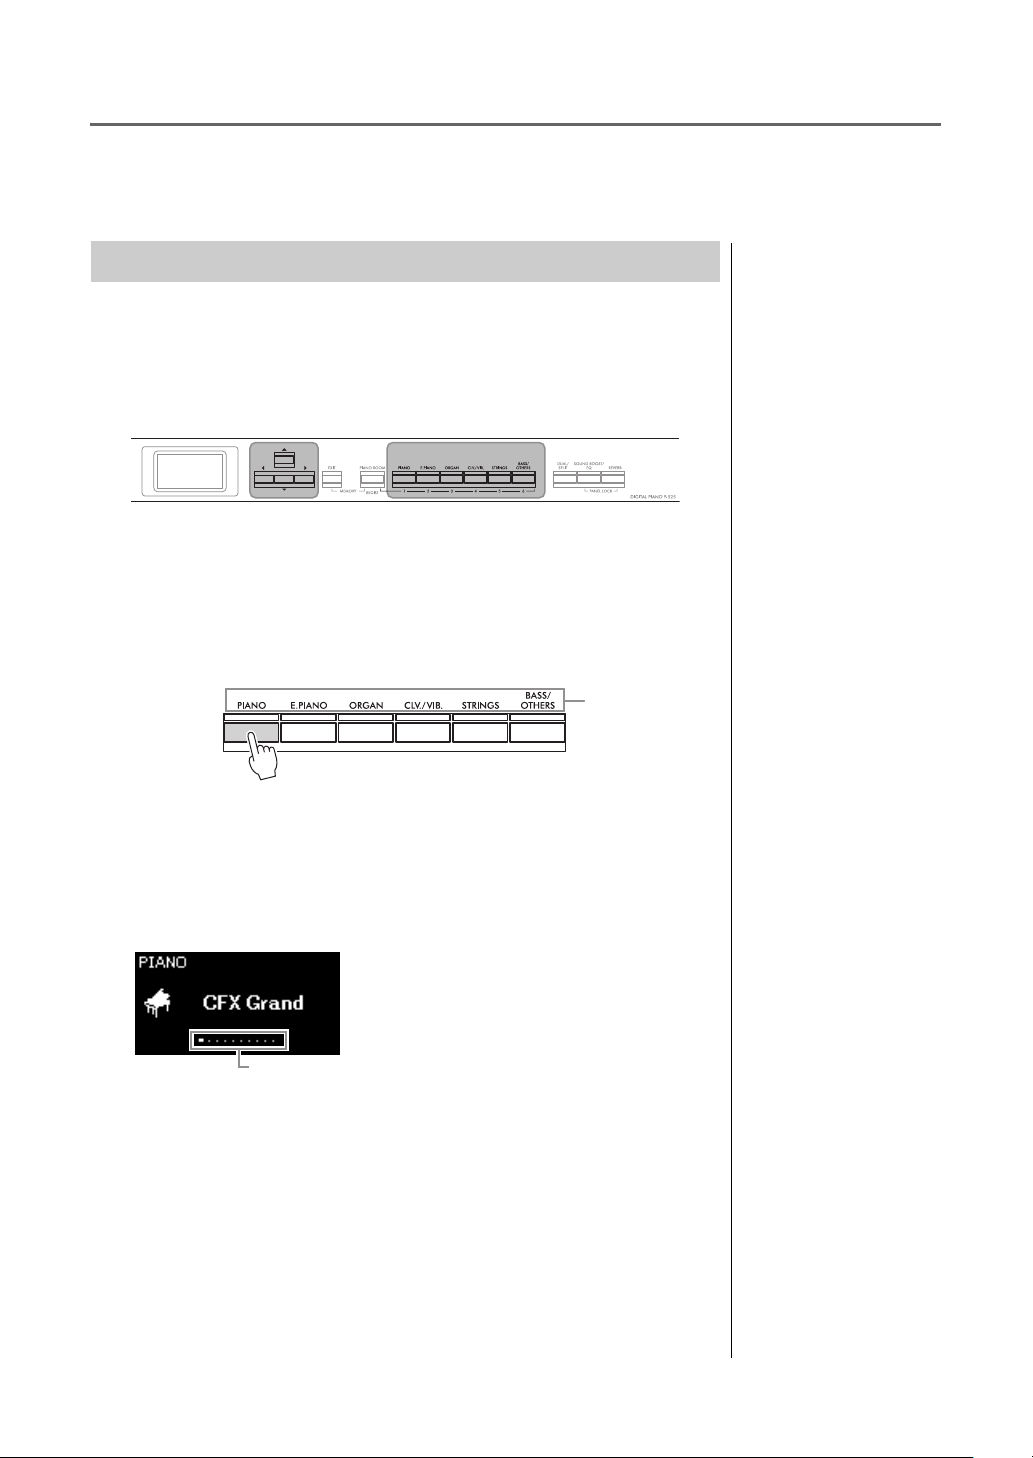
Voice group
Voice display
This indicates the current position in the Voice group.
The Voice display of the currently
selected Voice appears.
NOTE
You can select and play other musical instrument sounds (Voices), such as piano, organ, or stringed
instruments.
Selecting Voices
The Voices of the instrument are conveniently divided into groups of
instrument types. Select a desired Voice and play the piano.
You can also select a Voice from the XG Voices. For instructions, refer to
page 21.
1. Press one of the Voice buttons to select the desired Voice
group.
2. Use the [L] or [R] button to select the desired Voice.
Press the [L] and [R] buttons simultaneously to select the first Voice in
the Voice group.
To hear and experience the
characteristics of the Voices,
listen to the Demo Songs for
each Voice (page 22) or refer to
“Preset Voice List” on
page 110.
For information about the
Voices, refer to the “Preset
Voice List” (page 110).
3. Play the keyboard.
P-525 Owner’s Manual
20
You can specify the Touch
Sensitivity (how the sound
responds to the way you play
the keys). For details, refer to
page 36.
Page 21
Playing Various Musical Instrument Sounds (Voices)
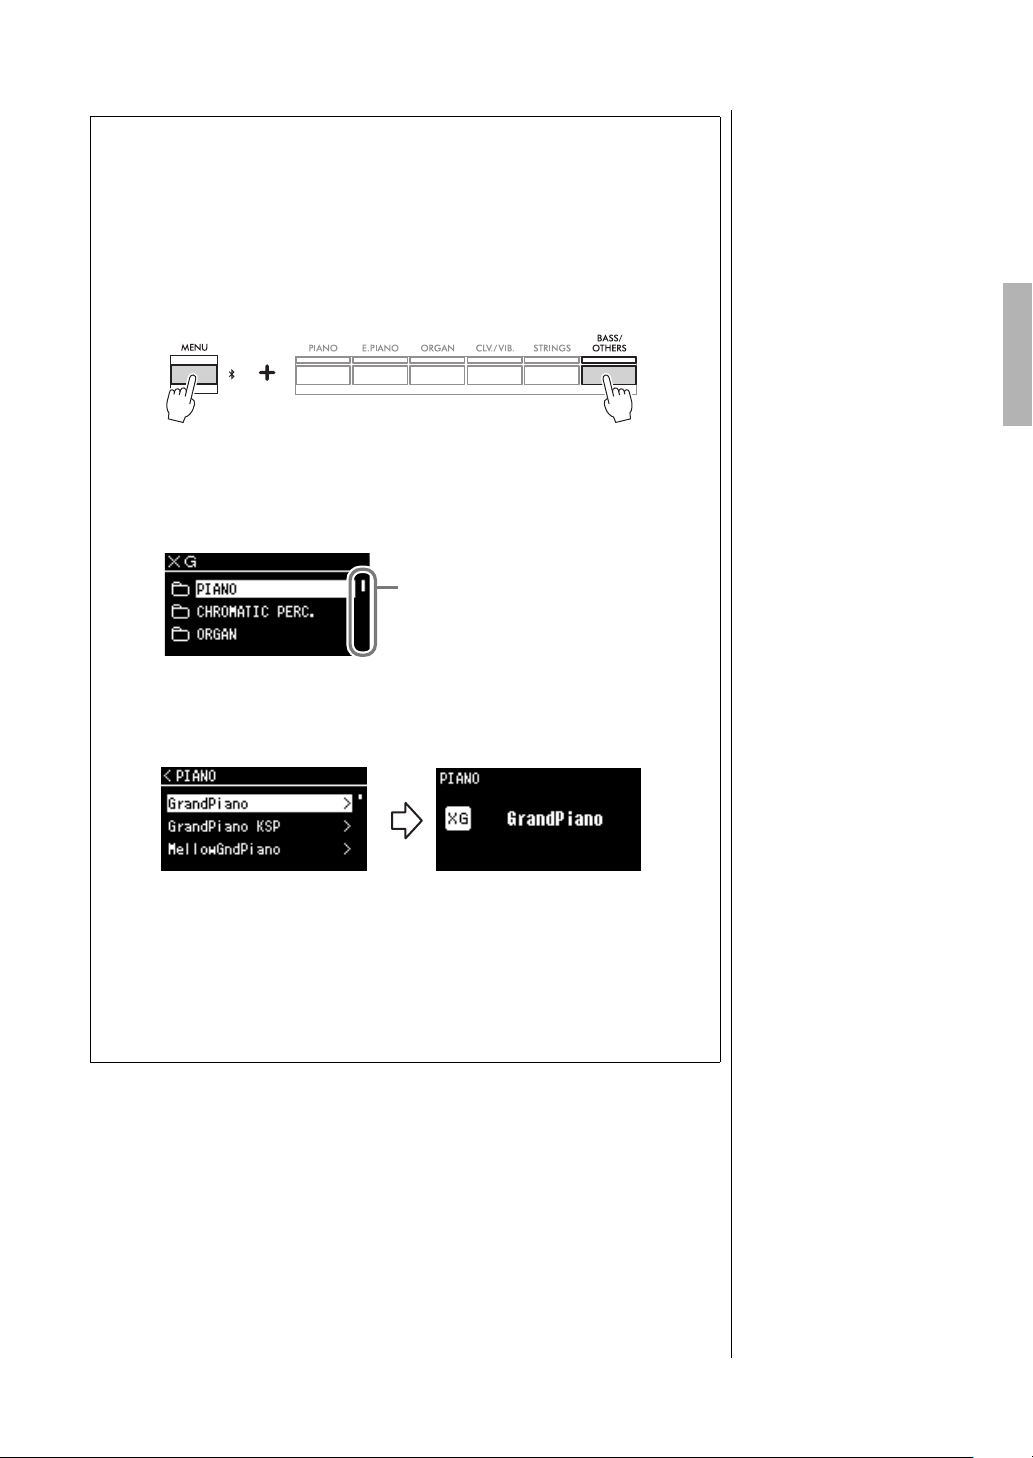
When this is shown here, you can
scroll through the display vertically.
XG Voice group list display
Selecting XG Voices
XG Voice is for playing the XG (page 7) format compatible Song data.
After the Voice display is called up, select a Voice from the XG Voices, following
the instructions below.
1. Press the [BASS/OTHERS] button twice to call up the XG
Voice group list display.
2. Use the [U]/[D] buttons to select one of the XG Voice groups,
then press the [R] button.
3. Use the [U]/[D] buttons to select the desired XG Voice, then
press the [R] button.
To return from the XG Voice name display to the XG Voice list display,
press the [
To return from the XG Voice list display to the XG Voice group list
display (step 2), press the [
*For details on XG Voices, refer to the “XG Voice list” in the Data List on the website (see page 6).
U] button.
L] button.
P-525 Owner’s Manual
21
Page 22
Playing Various Musical Instrument Sounds (Voices)
[DEMO/SONG]
button
[U]/[D]/[L]/[R]
buttons
[PLAY/PAUSE]
button
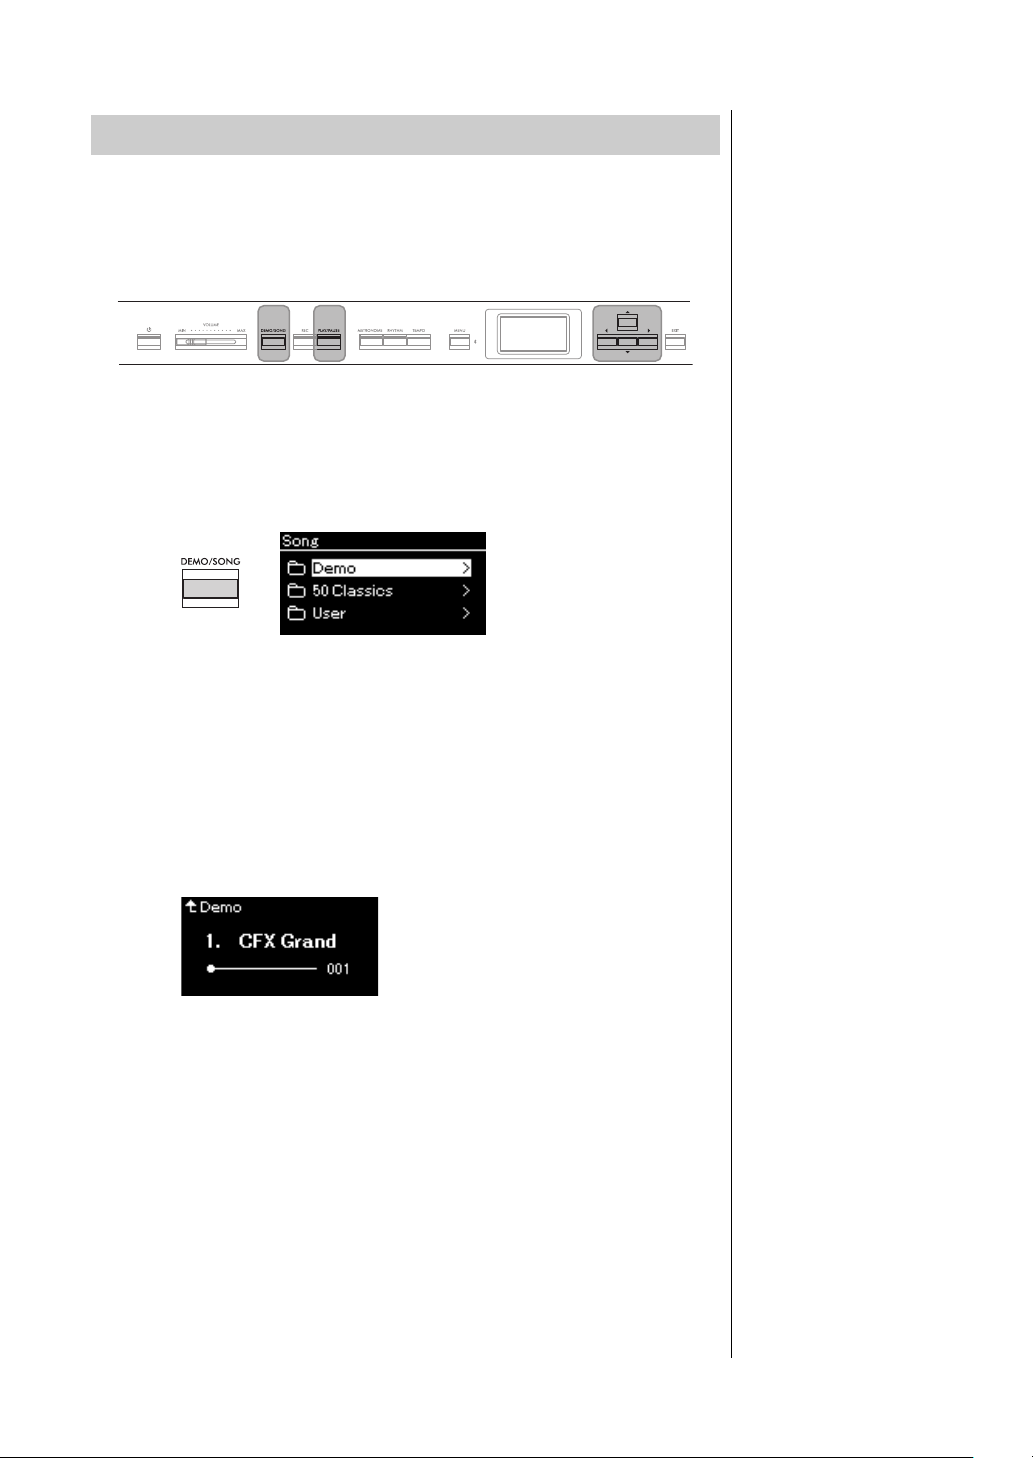
“Demo” display
NOTE
Listening to the Voice Demos
For each Voice group, the instrument contains several Demo recordings that
showcase the special characteristics of the corresponding Voices. For
information about the Voices which feature Demos that can be played back,
refer to the Preset Voice List on page 110.
1. Press the [DEMO/SONG] button to call up the Song list
display.
2. Use the [U]/[D] buttons to select “Demo,” and then press
the [R] button to call up the next display.
3. Use the [U]/[D] buttons to select the desired Voice Demo,
and then press the [R] button to call up the “Demo”
display.
The currently selected Voice Demo name is shown in the display.
4. Press the [PLAY/PAUSE] button to start playback.
5. Press the [PLAY/PAUSE] button again to stop playback.
The Piano Demo stops automatically when Piano Demo playback reaches
the end.
Selecting Other Demos
Press the [U] button to return to the Song list display, then repeat steps 3–
4 of this section. This operation is available even during playback.
Recording operations cannot
be used during Voice Demo
playback.
P-525 Owner’s Manual
22
Page 23
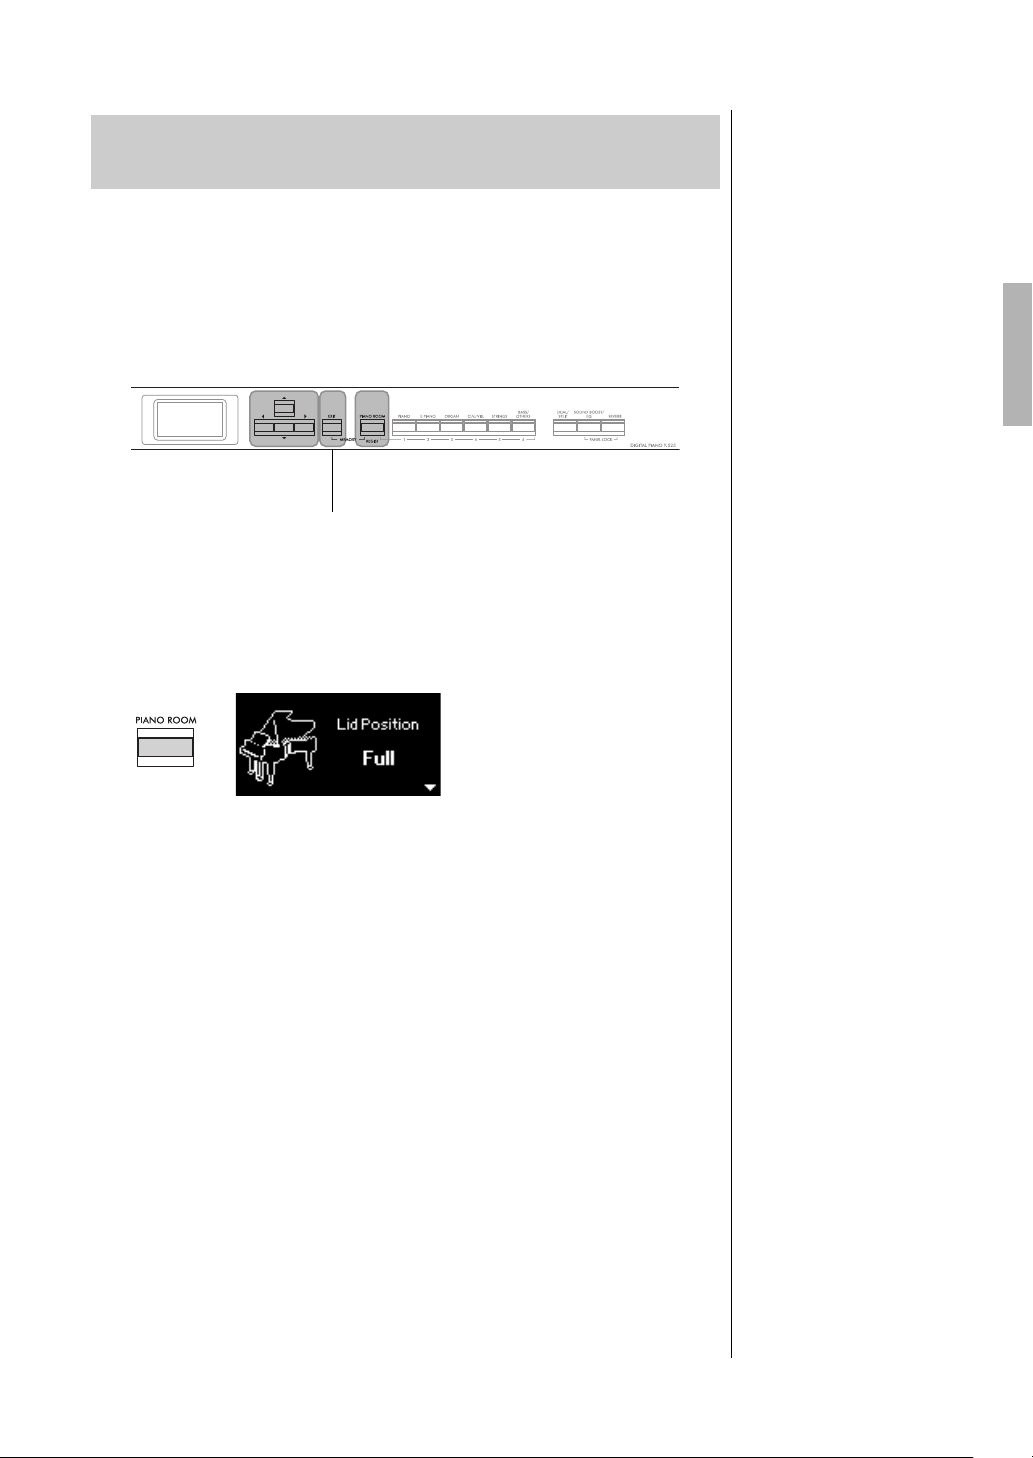
Playing Various Musical Instrument Sounds (Voices)
NOTE
[PIANO ROOM]
button
[U]/[D]/[L]/[R]
buttons
[EXIT] button
NOTE
Piano Room display
Customizing the Sound and the Touch Response of
Piano Voices (Piano Room)
The Piano Room function is for those who want to simply, conveniently, and
fully enjoy playing the instrument as a piano. No matter what Voice or other
settings you've made, you can instantly call up the optimum settings for piano
performance with a single button press. Try creating a custom piano sound by
adjusting the various parameters, such as lid position, string resonance, damper
resonance, touch response and so on.
1. Press the [PIANO ROOM] button to call up the Piano
Room display.
Voices in the Piano group are
those contained in the “Piano”
category in the Preset Voice
List (page 110). For details
about selecting Voices, refer to
page 20.
• If a Voice other than one in the
Piano group is selected,
pressing the [PIANO ROOM]
button changes it to “CFX
Grand.”
• Pressing the [PIANO ROOM]
button disables the Dual/Split/
Duo functions.
2. Press the [U]/[D] buttons to select items (page 24).
3. Press the [L]/[R] buttons to change the settings (page 24).
4. Press the [EXIT] button to exit from the Piano Room
display.
P-525 Owner’s Manual
23
Page 24
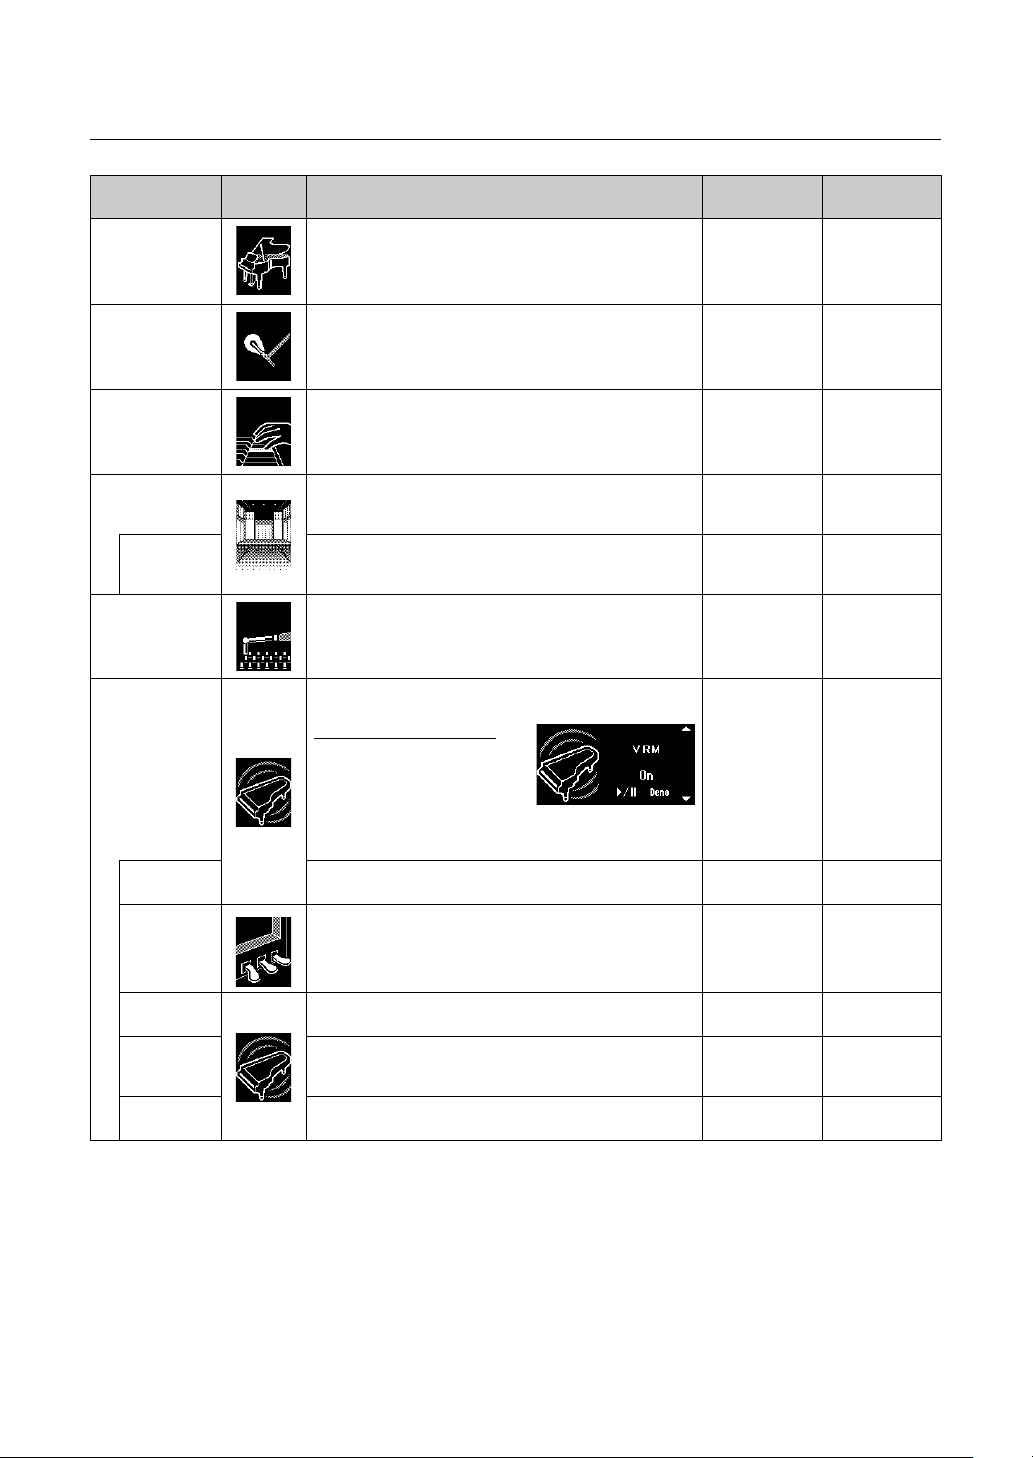
Playing Various Musical Instrument Sounds (Voices)
Parameters you can set in the Piano Room
Item Icon Descriptions
Lid Position Recreates the differences in sound depending on how high
Brightness Adjusts the brilliance of sound. Differs
Touch Determines how the sound responds to your playing
Reverb Determines the Reverb type which is applied to all the entire
Reverb
Depth
Master Tune Fine tunes the pitch of the entire instrument. This function is
VRM Turns the VRM effect on/off. For information about the VRM
the (virtual) grand piano lid is opened.
strength. You should adjust this setting according to the
specific Voice you’re playing or the particular Song you’re
performing, as desired.
sound including the keyboard performance, Song playback
and MIDI data input from an external MIDI device.
Adjusts the Reverb depth. When “Reverb” is set to “off” or a
value of “0,” no effect is produced.
useful when you play this instrument along with other
instruments or CD music.
function, refer to page 25.
Default
settings
Full Full, Half, Close
depending on
the Voice.
Medium Soft2, Soft1,
Differs
depending on
the Voice.
Differs
depending on
the Voice.
A3 = 440.0 Hz A3 = 414.8 Hz –
On On, Off
Listening to the VRM Demo
Press the [PLAY/PAUSE] button
while this display is open to play
back the VRM Demo Song. You
can hear the Demo Song with and
without the effect (VRM on or off).
The five parameters below can be set when “VRM” is On.
Damper
Resonance
Damper
Noise
Determines the depth of the string resonance effect which is
applied when the damper pedal is pressed.
Turns the Damper Noise produced by the VRM function On/
Off. For details on damper noise, refer to page 25.
This function will be disabled when “Damper Resonance” is
set to “0.”
50 – 10
On On, Off
Setting range
0 – 10
Medium, Hard1,
Hard2, Fixed
Refer to the
Reverb Type
List (page 26)
0 – 40
466.8 Hz
(approx. 0.2 Hz
steps)
String
Resonance
Duplex Scale
Resonance
Body
Resonance
P-525 Owner’s Manual
24
Determines the depth of the string resonance effect which is
applied when a note on the keyboard is pressed.
Adjusts the sympathetic vibrations of the duplex scaling
resonance effect in VRM. For details about duplex scaling,
refer to page 25.
Adjusts the resonance of the piano itself (the soundboard,
the sides, the frame and so on) in VRM.
50 – 10
50 – 10
50 – 10
Page 25
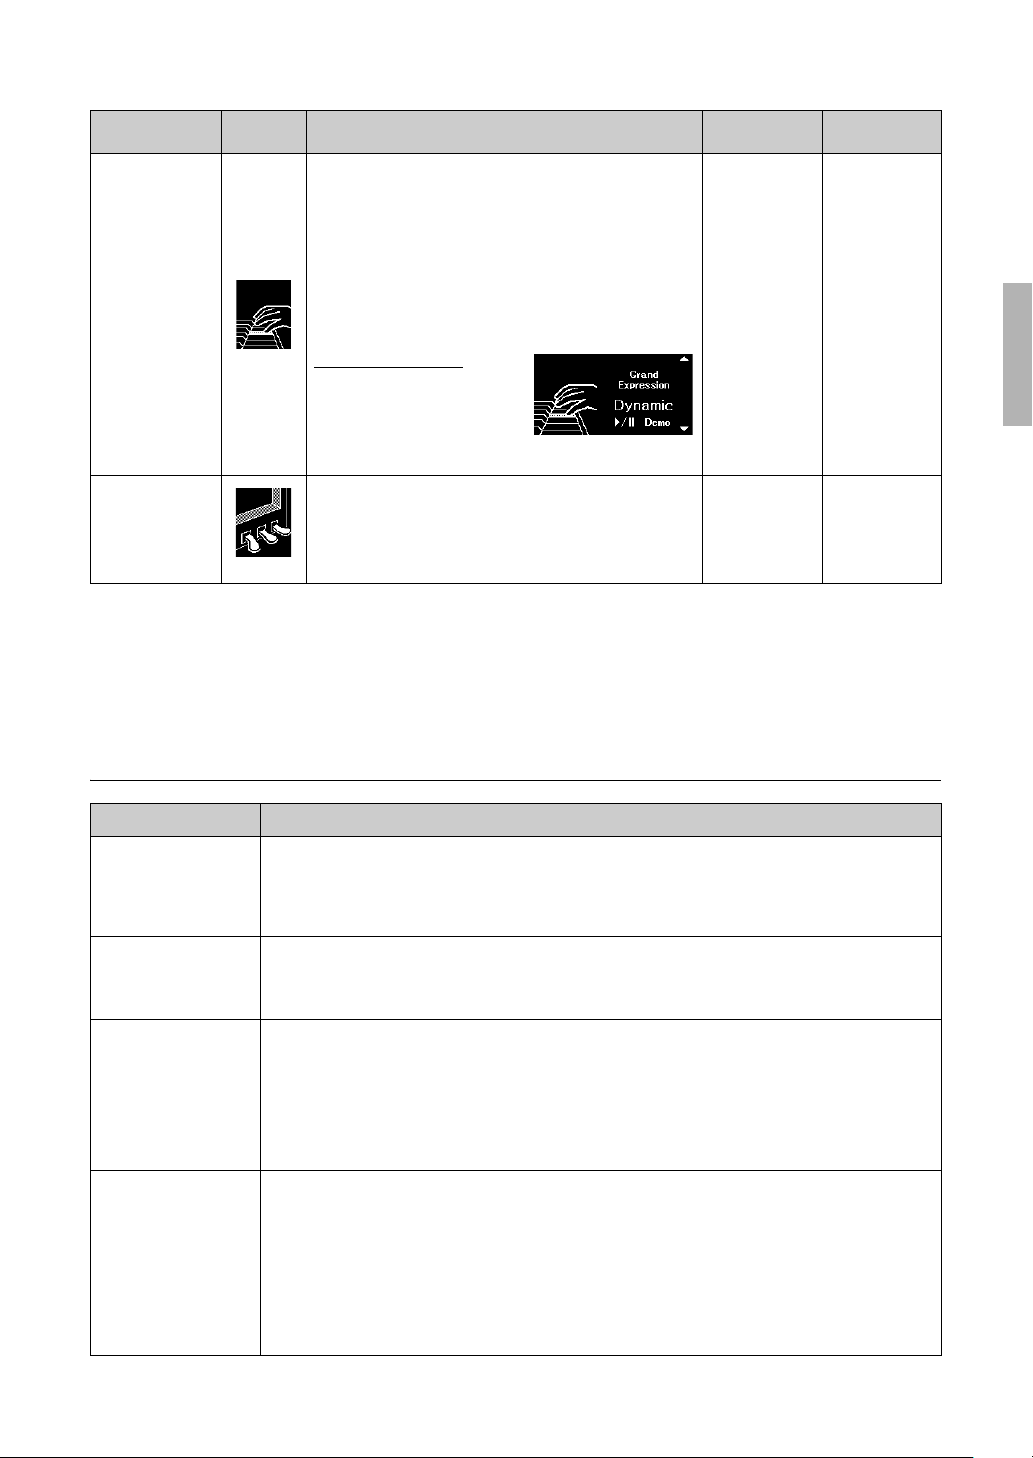
Playing Various Musical Instrument Sounds (Voices)
NOTE
NOTE
Item Icon Descriptions
Grand Expression Selects the type of the Grand Expression Modeling effects,
which simulates the physical sound transitions of an actual
piano. When this feature is set to “Dynamic,” you can control
extremely subtle nuances in the performance and sound by
changing your playing strength or touch. When set to
“Static,” the nuances are generally fixed. For details about
Grand Expression Modeling, refer to the below.
Grand Expression Modeling is effective only for the Voices of
“CFX Grand” and “Bösendorfer.”
Default
settings
Dynamic Dynamic, Static
Setting range
Listening to the Demo
Press the [PLAY/PAUSE] button
while this display is open to play
back the Demo Song of this
function. You can listen to the
Demo song with “Dynamic” or
“Static.”
Half Pedal Point Specify the point to which you must depress the pedal before
• If you wish to keep the Piano Room settings even after turning off the power, set “Voice” and “Other” in the “Backup” setting to “On.” For
details, refer to page 90.
• The items listed above can also be set in the “Voice” menu (page 95) or the “System” menu (page 103). When you change these
settings in the Piano Room display, the settings in the menu displays will also be changed. Conversely, changing the settings in the
menu displays will also change the settings in the Piano Room display.
• To restore the default value, press the [
the effect of “Sustain (Continuous)” begins to be applied.
This setting applies only to the “Sustain (Continuous)” effect
(page 17) that is assigned to the right pedal connected to the
[PEDAL UNIT] jack or the foot pedal/footswitch connected to
the [AUX PEDAL] jack.
L] and [R] buttons simultaneously while the setting value is shown.
0
-2 (effective with
the shallowest
press) – 0 – +4
(effective with the
deepest press)
Glossary of terms
Term Description
Damper Noise Damper noise is the sound made on an acoustic piano when the damper pedal is pressed. The damper
Duplex Scale Duplex scaling is a stringing method for pianos that uses extra, un-struck strings in the upper octaves to
Grand Expression
Modeling
VRM
(Virtual Resonance
Modeling)
noise changes in tone and volume depending on how quickly the damper pedal is pressed down. Pressing
the damper pedal slowly will make a quieter sound when the damper heads are released from the strings.
Pressing the damper pedal with force will transmit the vibrations to the strings, which adds a lower and
louder sound.
enhance the tone. These strings sympathetically vibrate with other strings in an acoustic piano, resonating
with overtones, and adding richness, brilliance and complex color to the sound. Since the dampers do not
touch them, they will continue sounding even after you release your hands from the keyboard.
On an actual acoustic piano, subtle changes in the sound can be produced by changing your playing
touch from when you press a key to when you release it. For example, when you press a key all the way to
its bottom, the key hits the keybed underneath and the noise reaches the strings, changing the sound
slightly. Furthermore, the tone when the damper is lowered onto strings to mute the sound is changed by
how quickly you release the key. Grand Expression Modeling technology recreates these subtle changes in
the sound that respond to your touch. This allows you to add accents by playing strongly or add resonance
by playing softly to produce superbly expressive sound. A crisp tone can be heard when playing staccato
as well as a lingering sound produced when releasing the keys slowly.
The VRM (Virtual Resonance Modeling) function uses sophisticated physical modeling to simulate the
actual string resonance sound that occurs when the damper pedal on a real piano is pressed or keys are
played and held. On an actual acoustic piano, if you press the damper pedal and play a key, not only does
the string of the pressed key vibrate, it also causes other strings and the soundboard to vibrate, each
influencing the rest and creating a rich and brilliant resonance that sustains and spreads. The VRM (Virtual
Resonance Modeling) technology featured in this instrument reproduces the complicated interaction of
both string and soundboard resonance faithfully using a virtual musical instrument (physical modeling),
and makes the sound more like a real acoustic piano. Since instantaneous resonance is made at the
moment according to the state of the keyboard or pedal, you can vary the sound expressively by changing
the timing of your pressing the keys, and the timing and depth of your pressing the pedal.
P-525 Owner’s Manual
25
Page 26
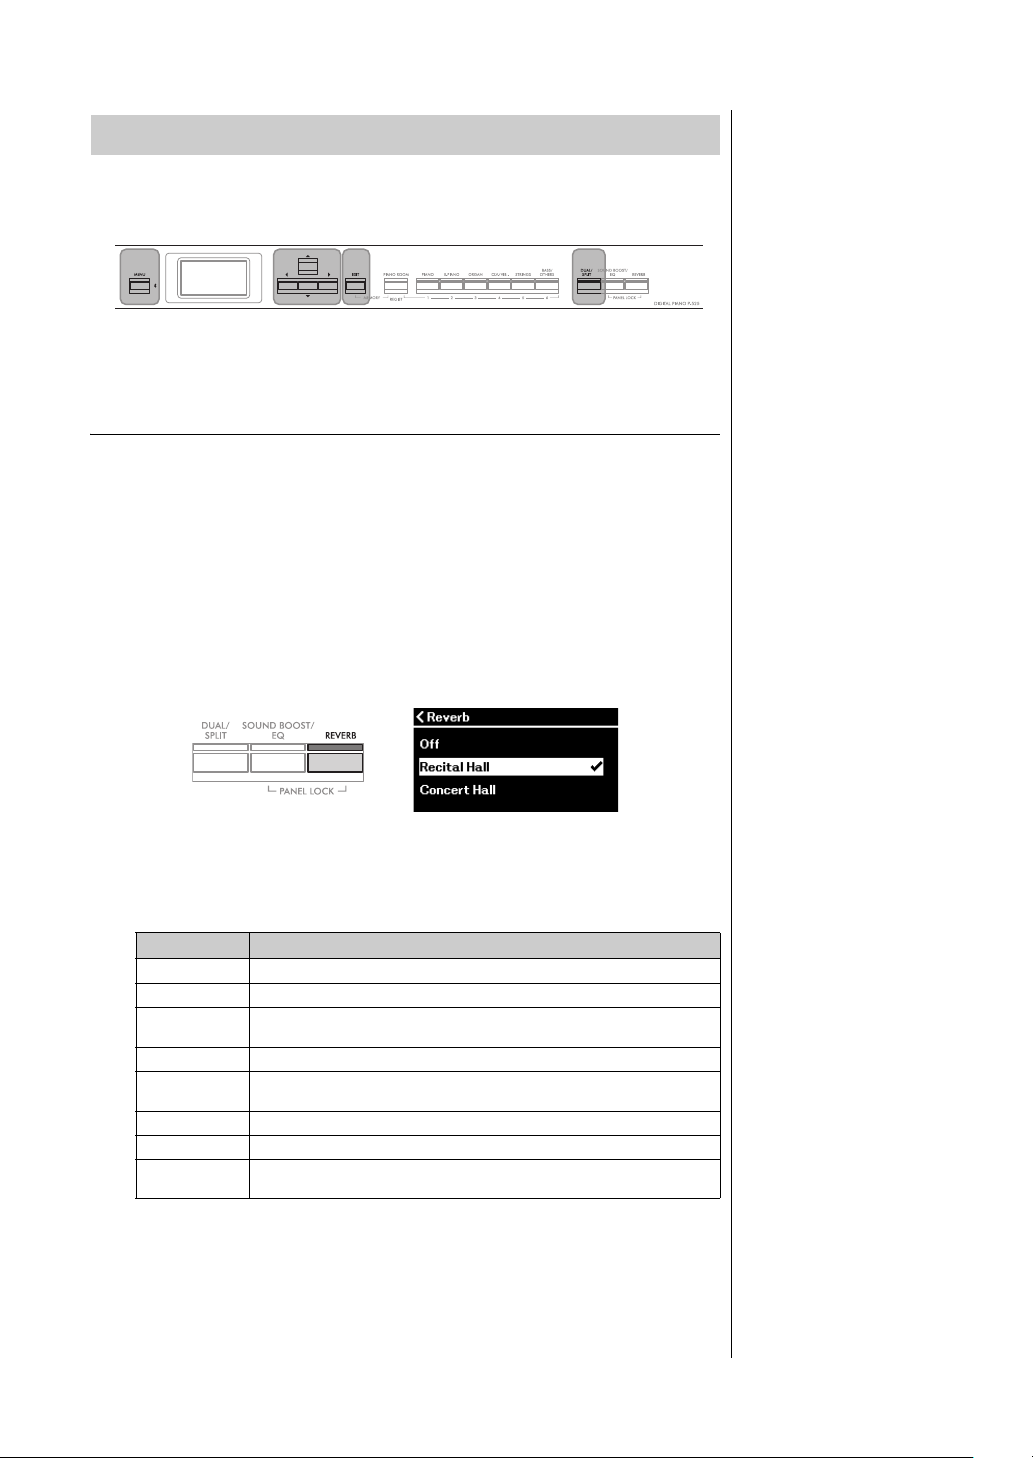
Playing Various Musical Instrument Sounds (Voices)
[U]/[D]/[L]/[R]
buttons
[DUAL/SPLIT]
button
[EXIT] button[MENU] button
“Reverb” display
Enhancing and Customizing the Sound
Applying the following effects gives you greater and richer expressive
capabilities.
Adding reverberation to the Sound (Reverb)
Adding reverberation to the Sound enables you enjoy the realistic feeling of
playing in a concert hall. When you select a Voice, the optimum Reverb Type is
automatically selected, but you can also select it yourself. The Reverb type
selected here is applied to the entire sound, including the keyboard performance,
Song playback and MIDI data input from an external device.
1. Press the [REVERB] button to call up the “Reverb” display.
The Reverb type for Voices in the Piano group can also be set in the Piano
Room display (page 24).
2. Use the [U]/[D] buttons to select the Reverb type.
Reverb Type List
Reverb type Effect
Off No effect
Recital Hall Simulates clear reverberation in a mid-sized hall suitable for piano recital.
Concert Hall Simulates brilliant reverberation in a large hall for public orchestra
Chamber Simulates the elegant reverberation in a small room suitable for chamber music.
Room Simulates the soft reverberation of a smaller performance space, such as a
Cathedral Simulates the solemn reverberation in a high-ceiling stone-made cathedral.
Club Simulates the lively reverberation in a jazz club or a small bar.
Plate Simulates the bright sound of vintage reverb equipment used in recording
You can adjust the Reverb depth for the selected Voice from the “Voice”
menu: “Voice Edit” → “Reverb Depth” (page 96).
3. Press the [EXIT] button to exit from the “Reverb” display.
P-525 Owner’s Manual
26
performances.
room or lounge.
studios.
Default setting: Differs
depending on the Voice or
Voice combination.
Page 27
Playing Various Musical Instrument Sounds (Voices)
“Voice” menu display
NOTE
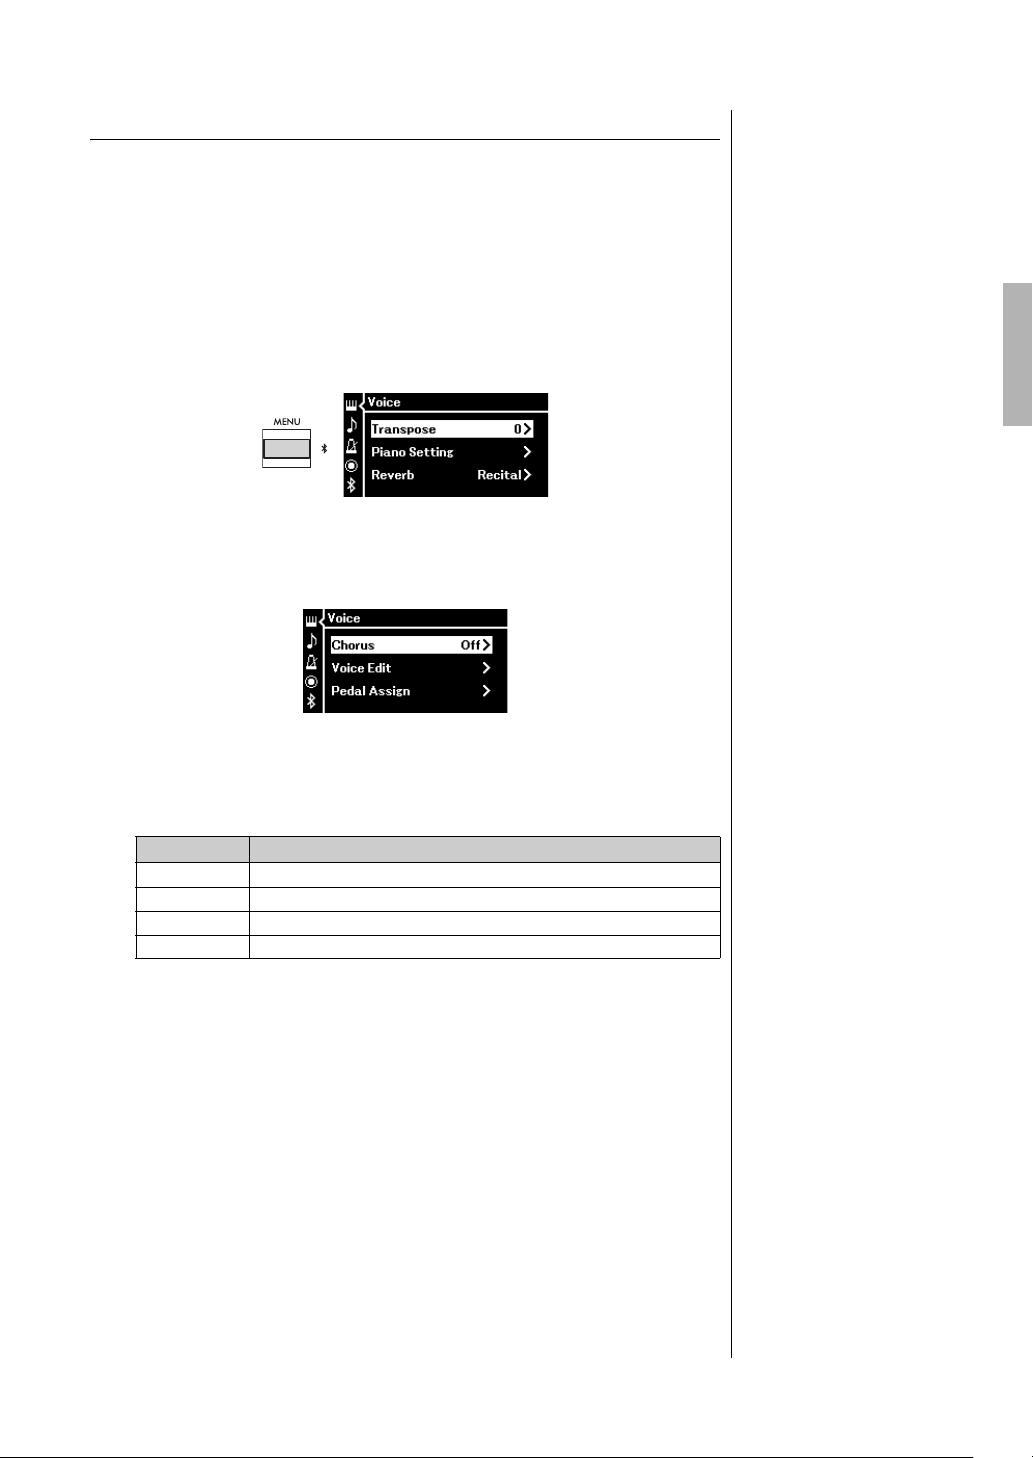
Adding Chorus effect to the Sound
The Chorus adds warmth and spaciousness to the sound. The ideal Chorus
type is automatically selected whenever you select a Voice, but you can select
any of the available Chorus types. This setting is applied to the entire sound,
including the keyboard performance, Song playback and MIDI data input from
an external device.
1. Press the [MENU] button repeatedly to call up the “Voice”
menu display.
2. Use the [U]/[D] buttons to select “Chorus,” and then press
the [R] button.
3. Use the [U]/[D] buttons to select the Chorus type.
Chorus Type List
Chorus type Effect
Off No effect
Chorus Adds a rich, spacious sound.
Celeste Adds swell and a spacious sound.
Flanger Adds swell effects similar to the sound of an ascending or descending jet plane.
You can adjust the Chorus depth for the selected Voice from the “Voice”
menu: “Voice Edit” →“Chorus Depth” (page 96).
4. Press the [EXIT] button to exit from the “Chorus” display.
Default setting: Differs
depending on the Voice or
Voice combination.
When you want to apply the
Chorus effect to a Voice whose
Chorus type is set to off by
default, set the Chorus type to
something other than “Off,”
then set the Chorus depth value
as desired (greater than “0”).
P-525 Owner’s Manual
27
Page 28
Playing Various Musical Instrument Sounds (Voices)
“Voice” menu display
“Voice Edit” display
Applying Effects
This instrument features a wide variety of Effects, letting you apply
enhancements such as Echo or Tremolo to the selected Voice for your keyboard
performance.
1. Select the target Voice.
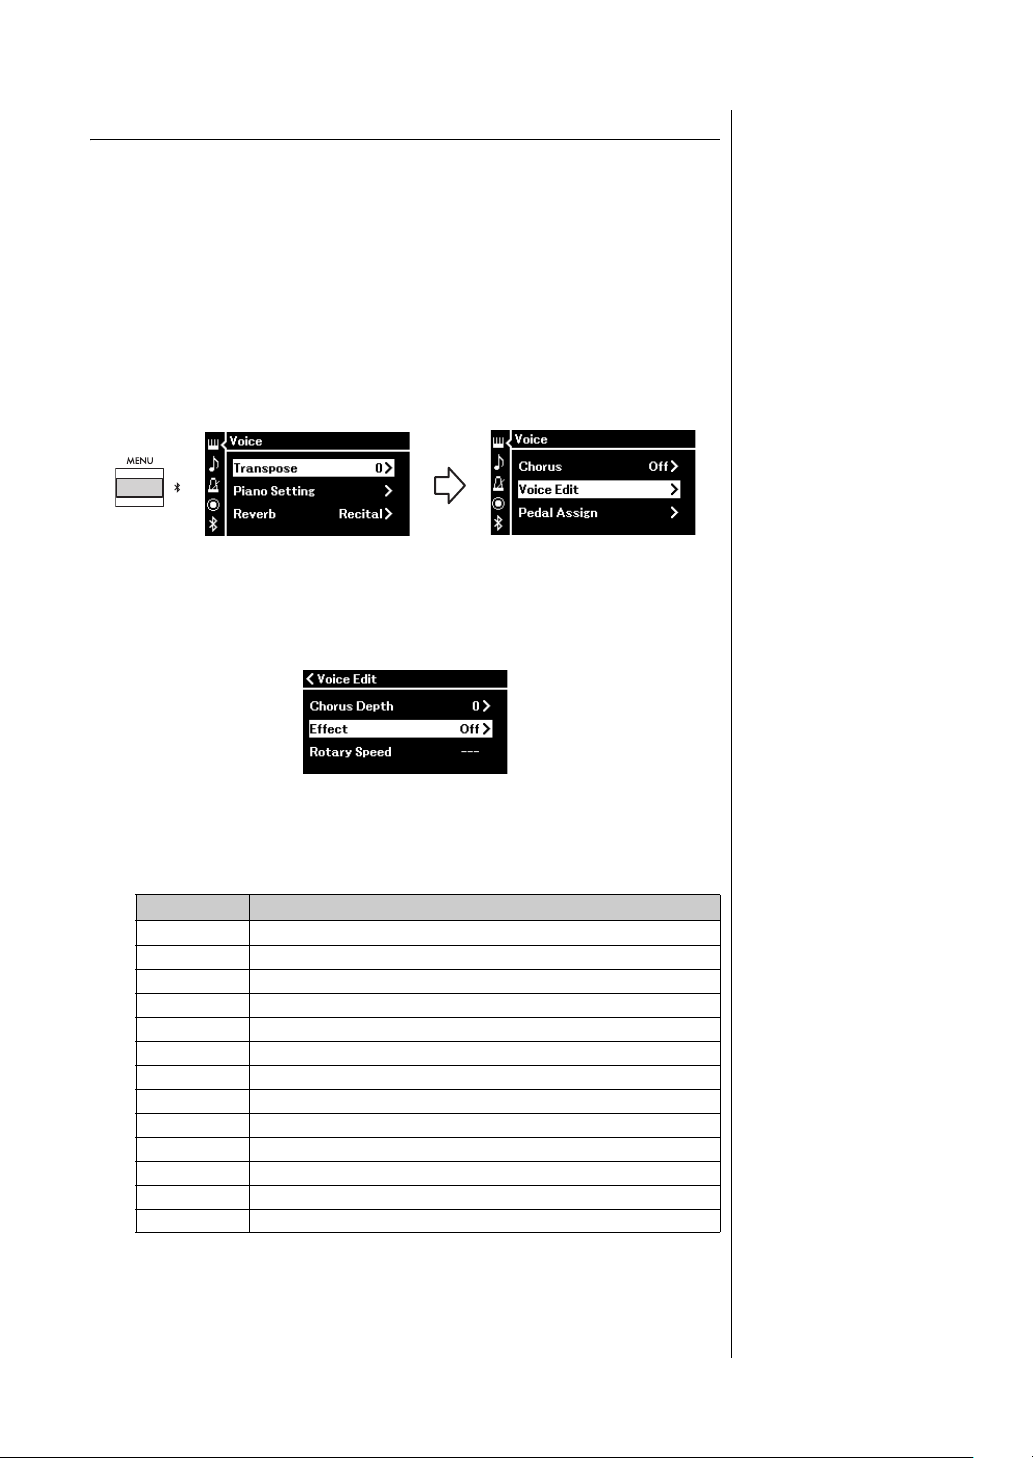
2. Press the [MENU] button repeatedly to call up the “Voice”
menu display, and then use the [U]/[D] buttons to select
“Voice Edit.”
3. Use the [U]/[D] buttons to select “Effect,” and then press
the [R] button.
4. Use the [U]/[D] buttons to select the Effect type.
Effect Type List
Effect type Effect
Off No effect.
DelayLCR Delay applied at left, center, and right positions.
DelayLR Delay applied at left and right positions.
Echo Echo-like delay
CrossDelay Left and right delays cross each other in alternation.
Symphonic Adds a rich and deep acoustic effect.
Rotary Adds the vibrato effect of a rotary speaker.
Tremolo The volume level changes in rapid cycles.
VibeRotor The vibrato effect of a vibraphone.
AutoPan The sound pans left to right and back and forth.
Phaser The phase changes periodically, swelling the sound.
AutoWah The center frequency of the wah filter changes periodically.
Distortion Distorts the sound.
5. Press the [EXIT] button to exit from the “Effect” display.
P-525 Owner’s Manual
28
Default setting:
Differs depending on the Voice
or Voice combination.
Page 29
Playing Various Musical Instrument Sounds (Voices)
[U]/[D]/[L]/[R]
buttons
[DUAL/SPLIT]
button
NOTE
Voi c e 1
Voi c e 2
Lit
Playing Two Voices Simultaneously (Dual)
Two Voices can be played simultaneously. You can create warm and richly
textured Voices by using Voices from different groups simultaneously in a layer,
or by using Voices in the same group.
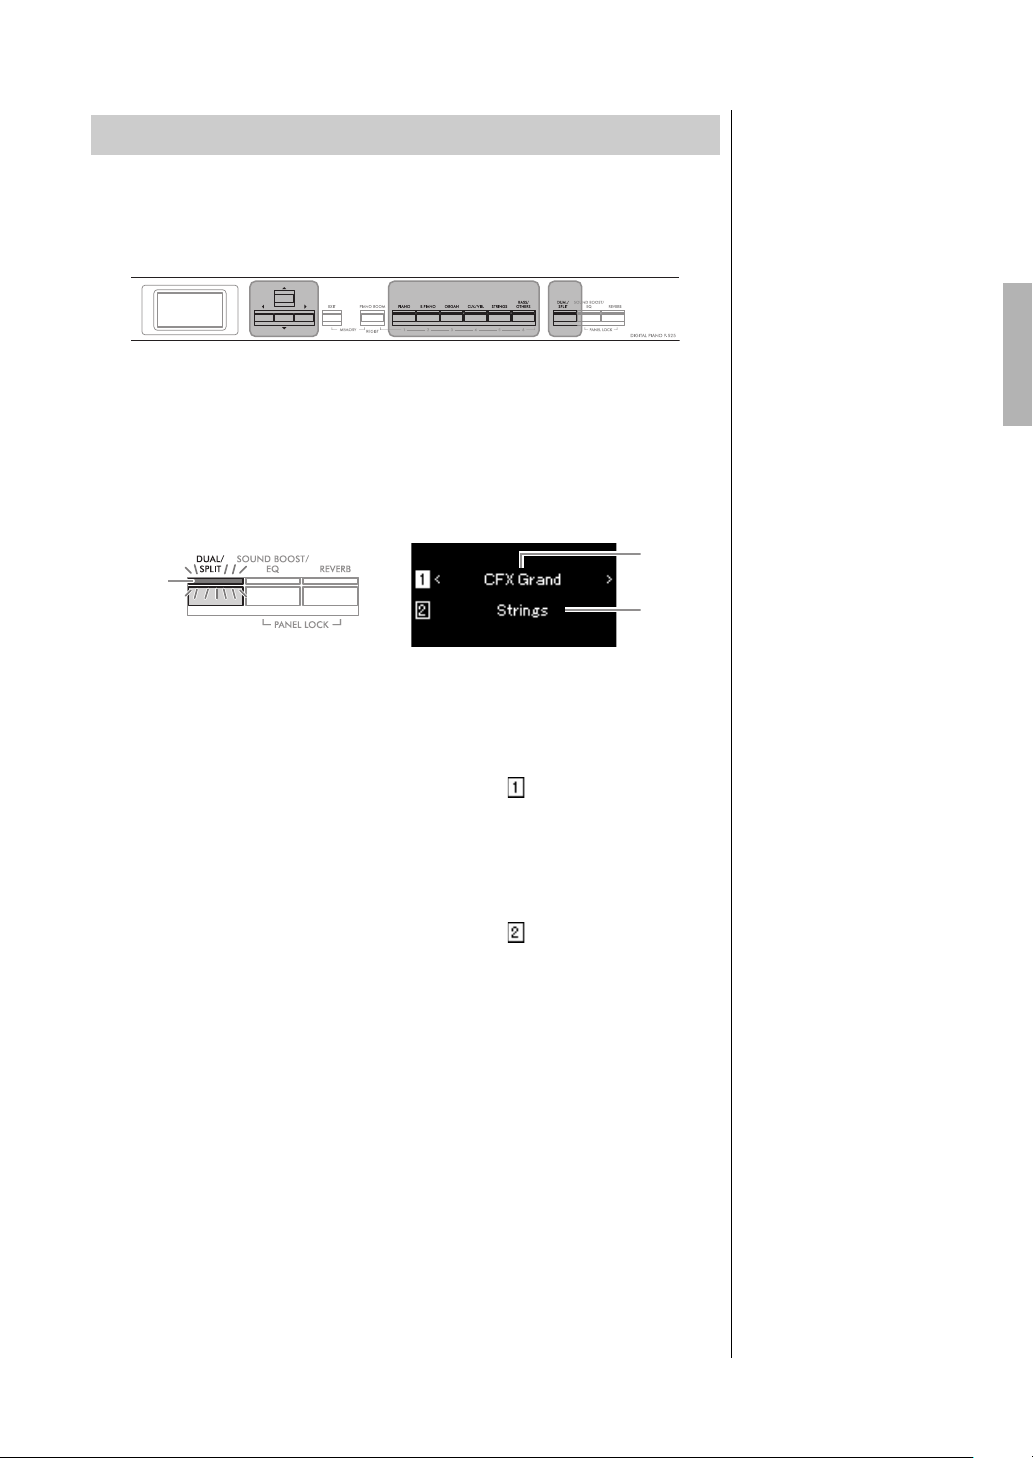
1. To enter the Dual mode, press the [DUAL/SPLIT] button
once.
The [DUAL/SPLIT] button lights up.
The Voice which is displayed at top is Voice 1, and the one at bottom is
Voic e 2.
2. Select the Voices for layering.
2-1. Use the [U]/[D] buttons to highlight (Voice 1) in the
display.
2-2. Press one of the Voice buttons to select the desired Voice
group, and then use the [
Voic e (p ag e 20 ).
L]/[R] button to select the desired
2-3. Use the [U]/[D] buttons to highlight (Voice 2), and then
select a Voice according to step 2-2.
3. Play the keyboard.
You can also enter the Dual
mode by pressing the two Voice
buttons simultaneously.
4. To exit from the Dual mode, press the [DUAL/SPLIT]
button repeatedly until its lamp turns off.
P-525 Owner’s Manual
29
Page 30
Playing Various Musical Instrument Sounds (Voices)
[U]/[D]/[L]/[R]
buttons
[DUAL/SPLIT]
button
Voi c e R
Voi c e L
Lit
NOTE
The Split Point can also be set
via the “System” menu display:
Press the [MENU] button
repeatedly to call up the
“System” menu display
“Keyboard” “Split Point”
(page 104).
Center “C”
Splitting the Keyboard Range and Playing Two
Different Voices (Split Mode)
Split mode enables you to play two different Voices on the keyboard—one with
your left hand and another with your right.
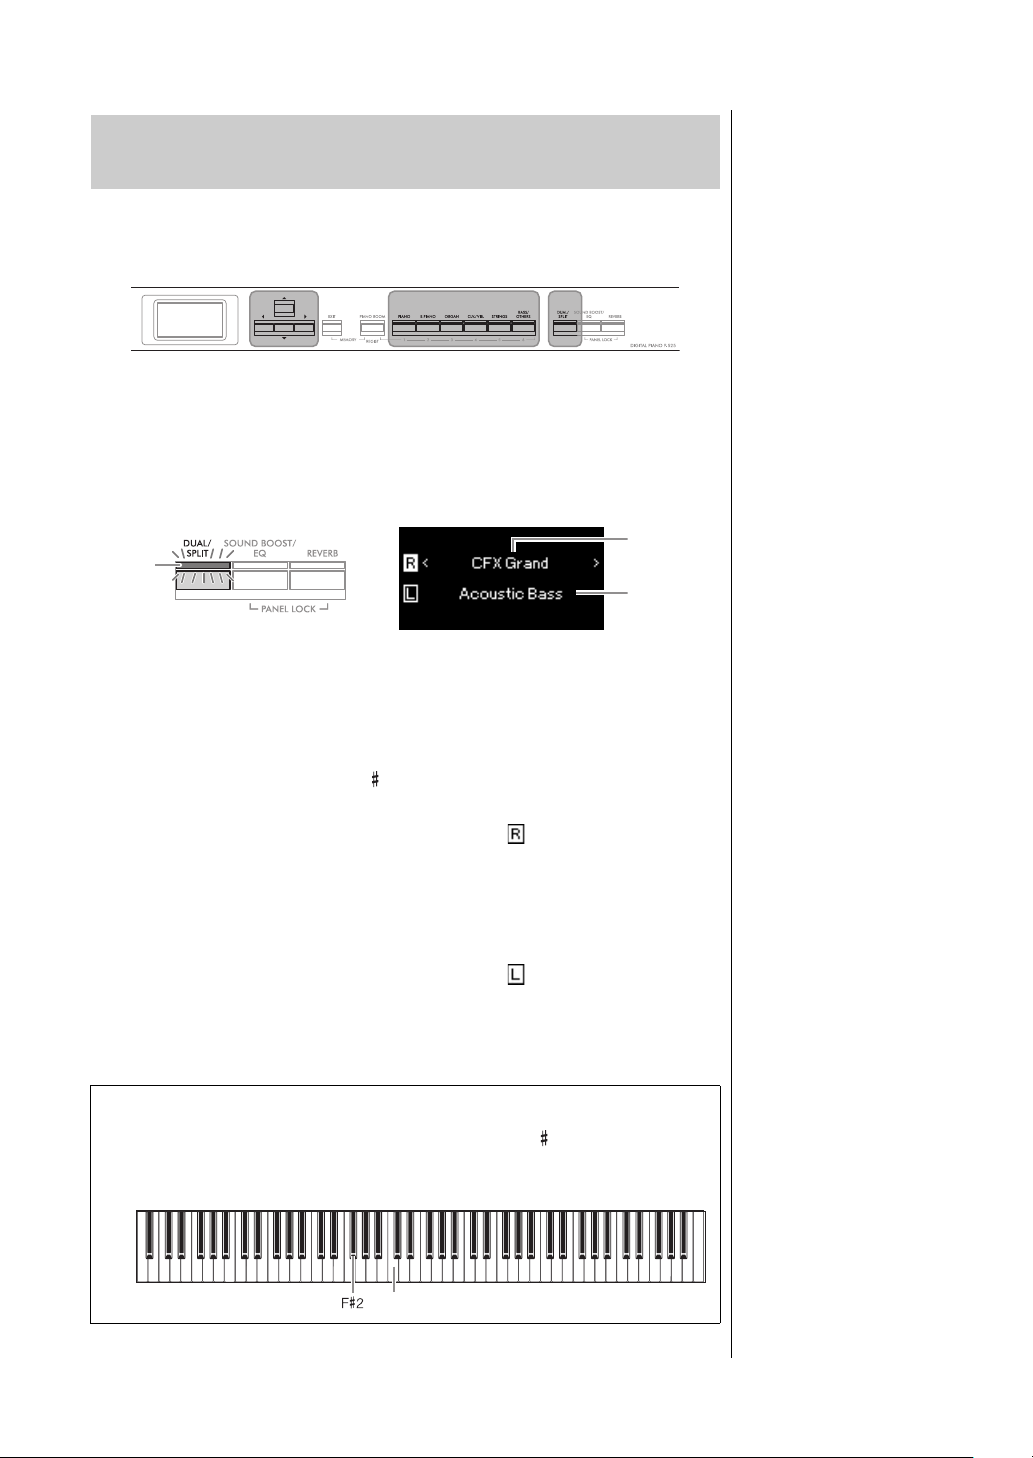
1. To enter the Split mode, press the [DUAL/SPLIT] button
twice.
The [DUAL/SPLIT] button lights.
The Voice which is displayed at top is Voice R, and the one at bottom is
Voic e L.
2. Select a Voice for the right-hand area and left-hand area.
The border between the right- and left-hand ranges is referred to as “Split
Point.” The Split Point key (F 2 as default) is included in the left-hand
range.
2-1. Use the [U]/[D] buttons to highlight (Voice R) in the
display.
2-2. Press one of the Voice buttons to select the desired Voice
group, and then use the [
Voic e (p ag e 20 ).
L]/[R] button to select the desired
2-3. Use the [U]/[D] buttons to highlight (Voice L), and then
select a Voice according to step 2-2.
3. Play the keyboard.
Changing the Split Point
You can change the Split Point from the default setting “F 2” to any other key.
While in the Split mode, hold down the [DUAL/SPLIT] button, and press the
key you wish to assign as the Split Point.
P-525 Owner’s Manual
30
Page 31
Playing Various Musical Instrument Sounds (Voices)
[U]/[D]/[L]/[R]
buttons
[DUAL/SPLIT]
button
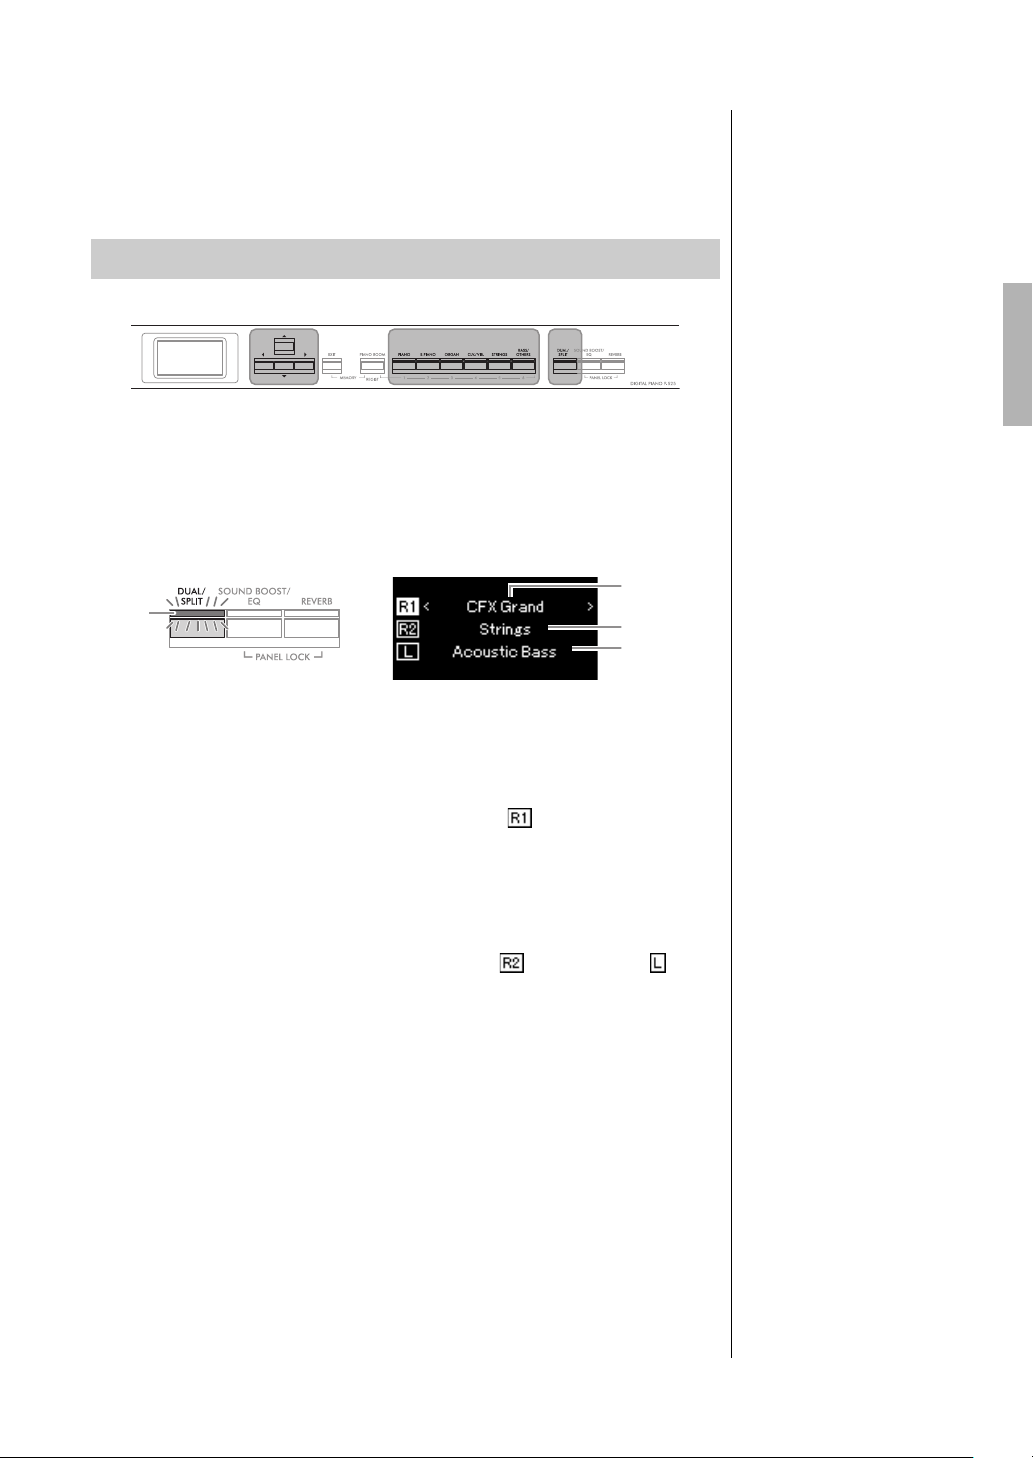
Voice R1
Voice R2
Lit
Voi ce L
NOTE
NOTE
4. To exit from the Split mode, press the [DUAL/SPLIT]
button repeatedly until its lamp turns off.
Using Dual and Split Simultaneously
1. To use both the Dual and Split modes simultaneously,
press the [DUAL/SPLIT] button three times.
The [DUAL/SPLIT] button lights.
The Voice which is displayed at top is Voice R1, and the one in the middle
is Voice R2, and the one at bottom is Voice L.
2. Select the Voices for layering and for the left-hand area.
2-1. Use the [U]/[D] buttons to highlight (Voice R1) in the
display.
2-2. Press one of the Voice buttons to select the desired Voice
group, and then use the [
Voic e (p ag e 20 ).
L]/[R] button to select the desired
2-3. Use the [U]/[D] button to highlight (Voice R2) or
(Voice L), and then select Voices according to step 2-2.
3. Play the keyboard.
4. To exit from the Dual and Split modes, press the [DUAL/
SPLIT] button repeatedly until its lamp turns off.
The specified Split Point key is
included in the left-hand range.
For the information on setting
the Split Point, refer to page 30.
P-525 Owner’s Manual
31
Page 32
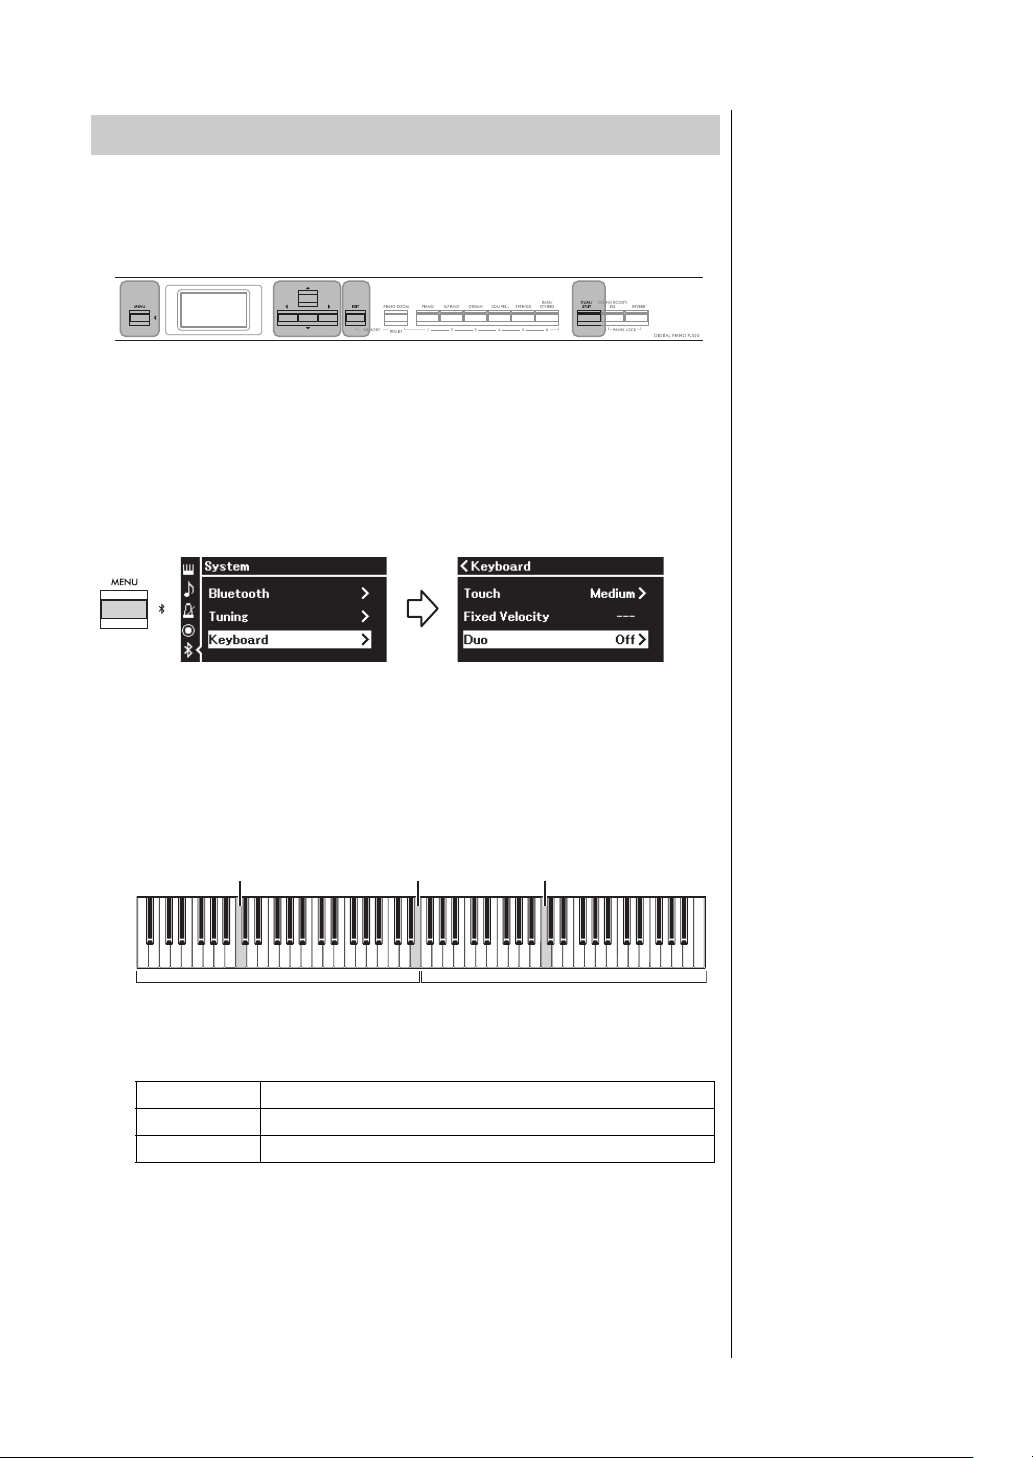
Playing Various Musical Instrument Sounds (Voices)
[U]/[D]/[L]/[R]
buttons
[DUAL/SPLIT]
button
[EXIT] button[MENU] button
“System” menu display
1-1. Use the [ U]/[D] buttons
to select “Keyboard.”
1-2. Press the [R] button to
call up the next display.
1-3. Use the [U]/[D] buttons
to select “Duo.”
1-4. Press the [R] button to
select “On.”
“Keyboard” display
NOTE
NOTE
Left player
Split Point E3Equivalent to C3 (middle C) Equivalent to C3 (middle C)
Right player
Playing Duo
This function allows two different players to play the instrument, one on the
left and the other on the right. This is convenient for practicing duets over the
same octave range.
1. Press the [MENU] button repeatedly to call up the
“System” menu display, and then select the highlighted
item in each display as illustrated below.
The keyboard is divided into two sections, with the E3 key as the Split
Point.
When using the separately sold pedal unit, the pedal function changes as
follows.
Right Pedal Damper pedal for the right-player range
Center Pedal Damper pedal for both the right-player and left-player ranges
Left Pedal Damper pedal for the left-player range
P-525 Owner’s Manual
32
• When Duo is on, the Dual
(page 29), Split (page 30),
and the VRM (page 24)
functions are turned off.
• When the Duo - Type
(page 104) is set to
“Separated,” the Reverb
Depth (page 96) is set to 0
and the Binaural Sampling
function (page 14) is turned
off.
• The specified Split Point key
is included in the left-hand
range.
• The Split Point can be
changed. For details on
setting the Split Point, refer to
page 30.
Page 33

2. Press the [EXIT] button to call up the Voice display.
NOTE
When Duo is on, the [Duo] indication is shown on the Voice display.
Press one of the Voice buttons to select the desired Voice as necessary
(page 20).
Playing Various Musical Instrument Sounds (Voices)
3. Play the keyboard.
By default, the sound of the left player range is emitted from the left
speaker, the sound of the right player range is emitted from the right
speaker.
4. Press the [DUAL/SPLIT] button to exit from the Duo
mode.
The sounds played by both
Right and Left players can be
output through both speakers,
with a natural balance of sound.
You can set this from the
“System” menu: “Keyboard”
“Duo - Type” (page 104).
P-525 Owner’s Manual
33
Page 34
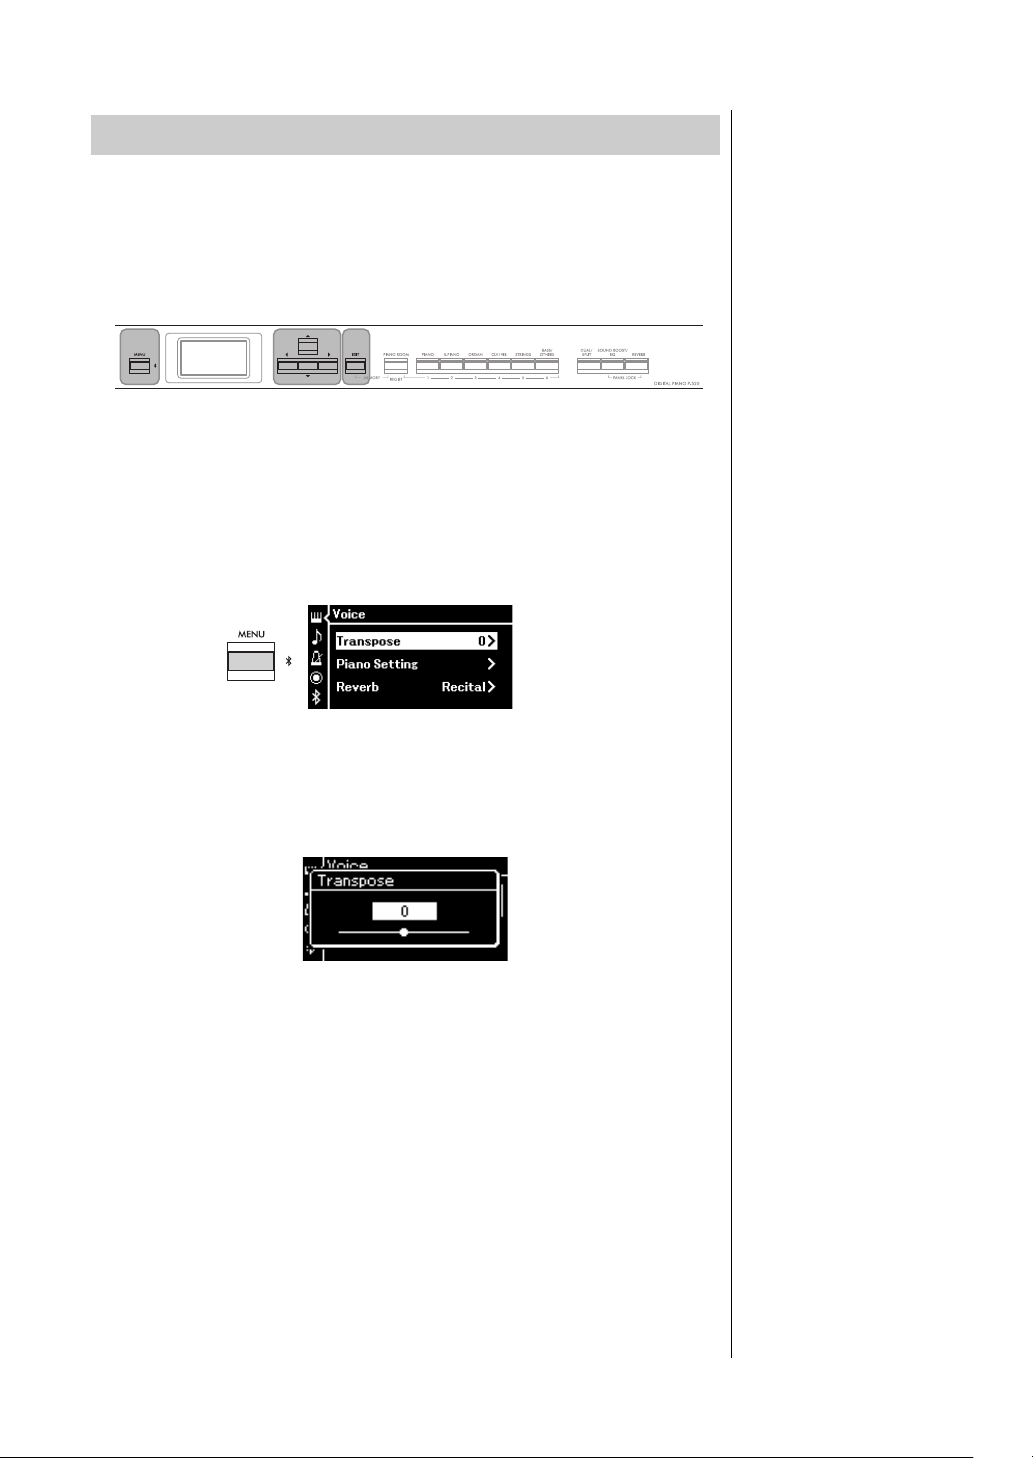
Playing Various Musical Instrument Sounds (Voices)
[U]/[D]/[L]/[R]
buttons
[EXIT] button[MENU] button
“Voice” menu display
Default setting: 0
Setting range: -12 (-1 octave)
– 0 (normal pitch) – +12 (+1
octave)
NOTE
The setting made here does
not affect Song playback.
If you want to transpose Song
playback, use the Transpose
parameter in the “Song” menu
(page 98).
NOTE
Your keyboard performance
data will be transmitted with the
transposed note numbers while
MIDI note numbers received
from an external MIDI device or
computer will not be affected
by the Transpose setting.
Transposing the Pitch in Semitones (Transpose)
You can shift the pitch of the entire keyboard up or down in semitone intervals
to facilitate playing in difficult key signatures, and to let you easily match the
pitch of the keyboard to the range of a singer or other instruments. For
example, if you set this parameter to “5”, playing key C produces pitch F. In this
way, you can play the F major song as if it were in C major.
1. Press the [MENU] button repeatedly to call up the “Voice”
menu display. Select “Transpose,” and then press the [R]
button.
2. Set the Transpose amount by using the [L]/[R] buttons.
To reset the parameter to the default setting, press the [L] and [R]
buttons simultaneously.
3. Press the [EXIT] button to close the “Transpose” display.
P-525 Owner’s Manual
34
Page 35
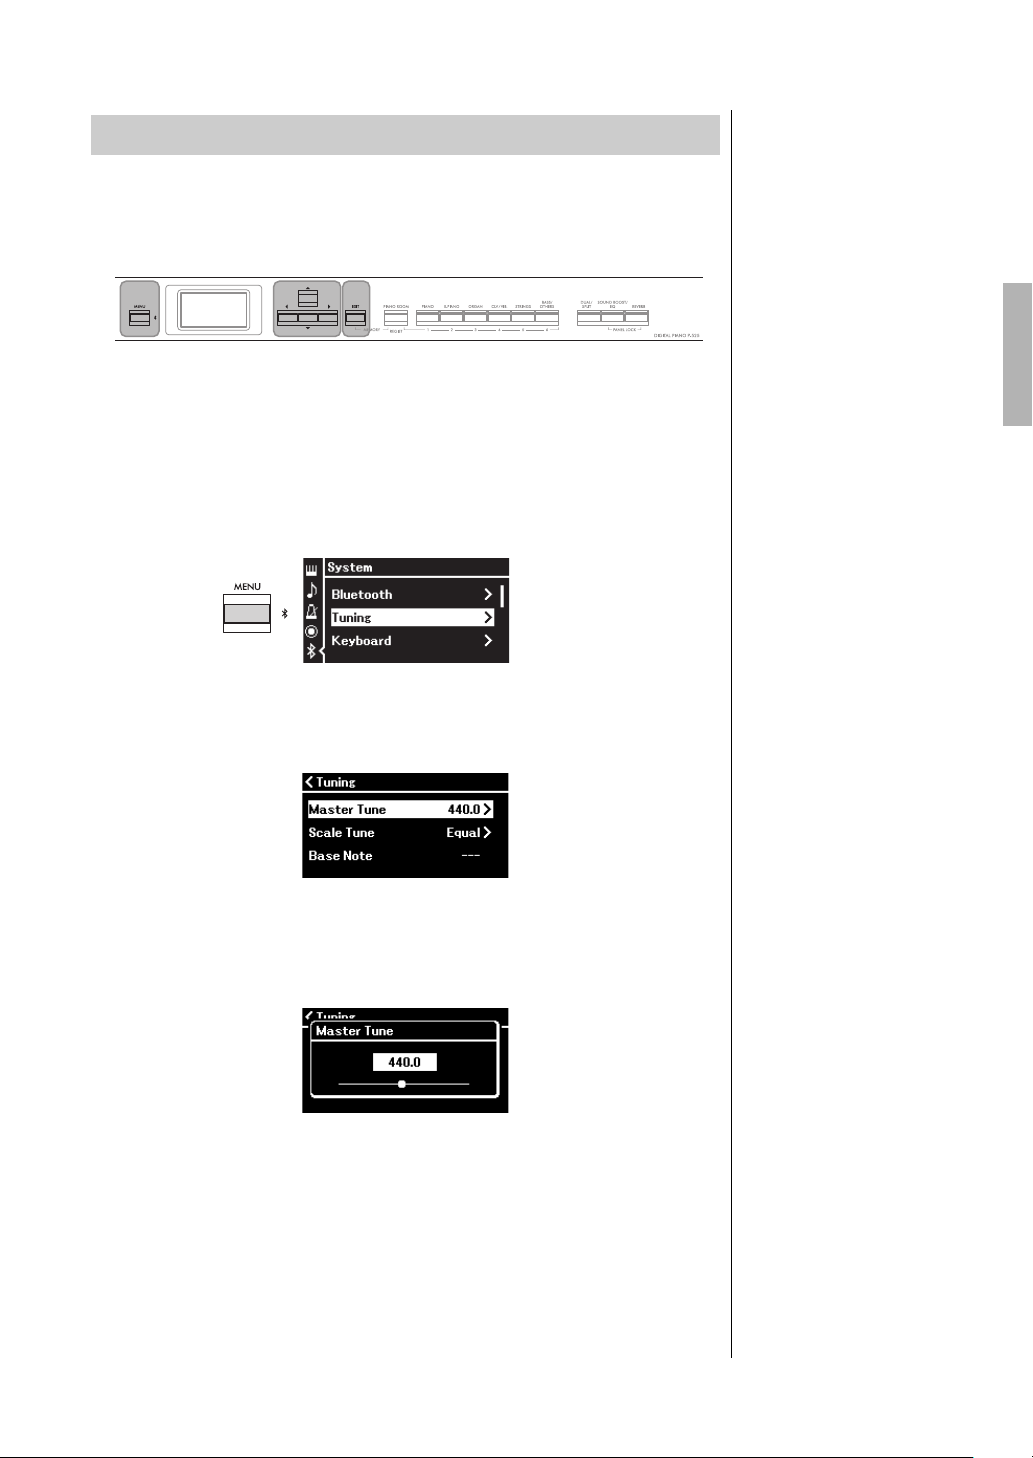
Playing Various Musical Instrument Sounds (Voices)
[U]/[D]/[L]/[R]
buttons
[EXIT] button[MENU] button
“System” menu display
Default setting: A3=440.0Hz
Setting range: A3=414.8Hz –
440.0Hz – 466.8Hz (in
approximately 0.2 Hz
increments)
NOTE
• If you change the tuning
value here, the value in the
Piano Room display
(page 24) is also changed.
• These settings will not be
applied to the Drum Kit
Voices or Audio Song. Also,
these settings will not be
recorded to a MIDI Song.
Fine Tuning the Pitch (Master Tune)
You can fine-tune the pitch of the entire instrument. This function is useful
when you play this instrument along with other instruments or recorded
music.
1. Press the [MENU] button repeatedly to call up the
“System” menu display. Select “Tuning” by using the [U]/
[
D] buttons and then press the [R] button.
2. Use the [U]/[D] buttons to select the “Master Tune,” then
press the [R] button.
3. Set the tuning value by using the [L]/[R] buttons.
To reset the value to the default setting (A3=440.0Hz), press the [L]/[R]
buttons simultaneously.
4. Press the [EXIT] button to close the “Master Tune” display.
P-525 Owner’s Manual
35
Page 36
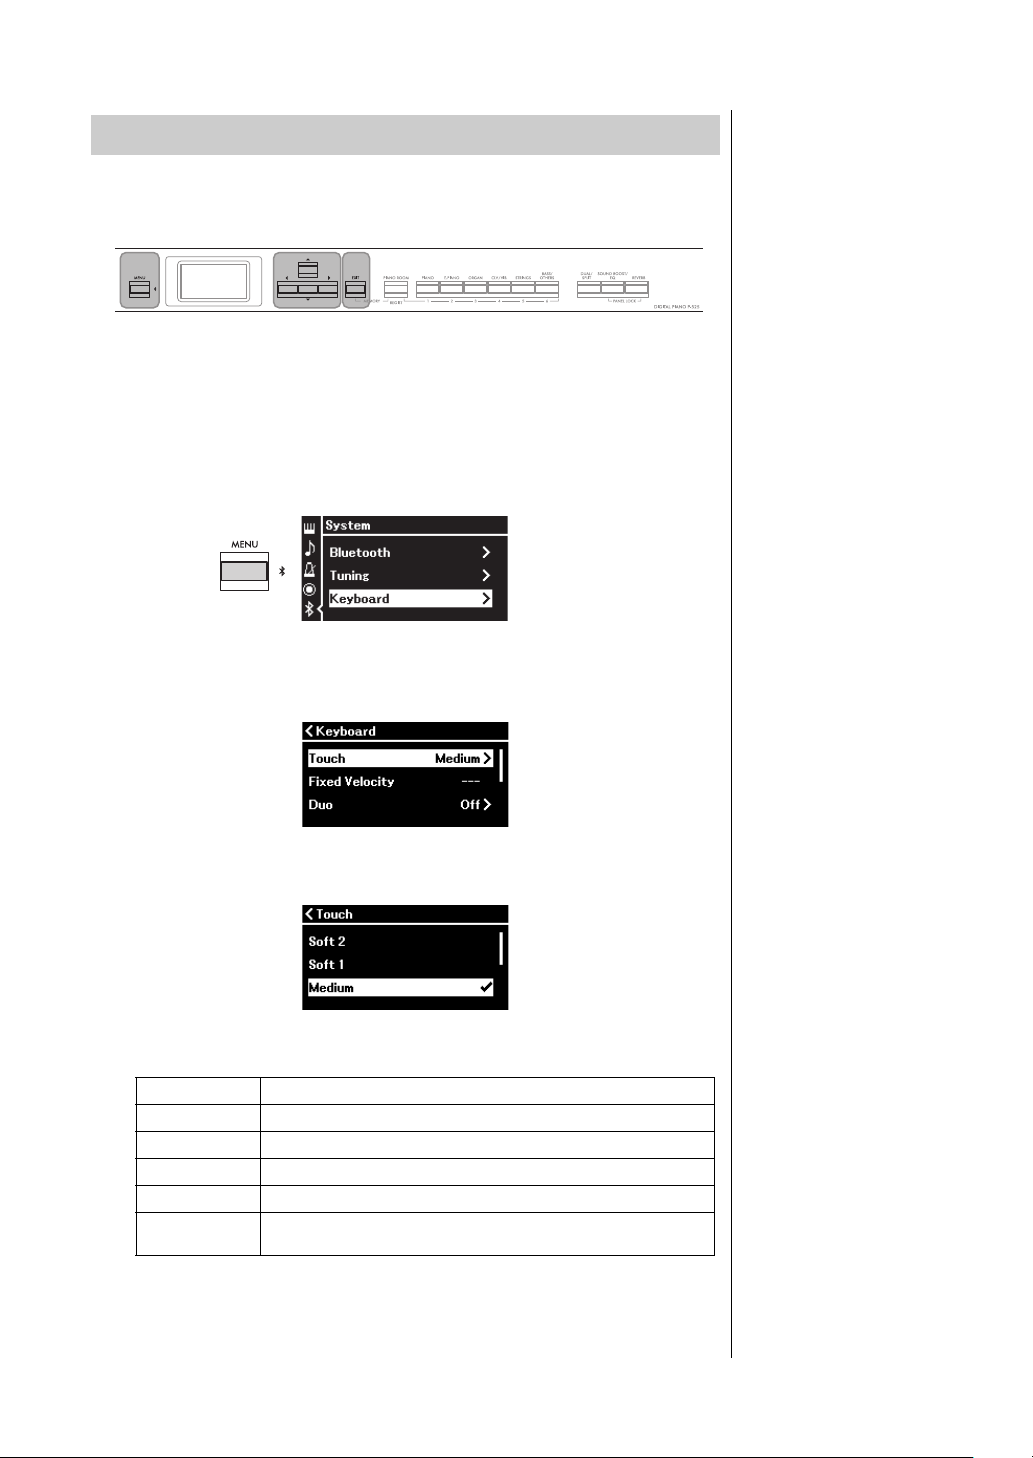
Playing Various Musical Instrument Sounds (Voices)
[U]/[D]/[L]/[R]
buttons
[EXIT] button[MENU] button
NOTE
When playing with Piano
Voices, you can also determine
the touch sensitivity in the
Piano Room display.
For details, refer to
“Parameters you can set in the
Piano Room” on page 24.
“System” menu display
Default setting: Medium
NOTE
• If you change the touch
sensitivity here, the setting in
the Piano Room display
(page 24) is also changed
• The setting here will not be
recorded to a MIDI Song nor
be transmitted as MIDI
messages.
• The touch sensitivity settings
may have no effect with
Organ or Harpsichord
Voices.
Changing the Touch Sensitivity (Touch)
You can determine how the sound responds to your playing strength. This
setting does not change the weight of the keyboard.
1. Press the [MENU] button repeatedly to call up the
“System” menu display. Select “Keyboard” by using the
[U]/[D] buttons, and then press the [R] button.
2. Select “Touch” by using the [U]/[D] buttons, and then
press the [R] button.
3. Use the [U]/[D] buttons to determine the touch sensitivity.
Touch Sensitivity list
36
Soft 2 Produces relatively high volume even with light playing strength.
Soft 1 Produces high volume with moderate playing strength.
Medium Standard touch sensitivity.
Hard 1 Requires moderately strong playing for high volume.
Hard 2 Requires strong playing to produce high volume.
Fixed No touch response. The volume level will be the same regardless of
4. Press the [EXIT] button to exit from the “Touch” display.
P-525 Owner’s Manual
how hard you play the keys.
Page 37
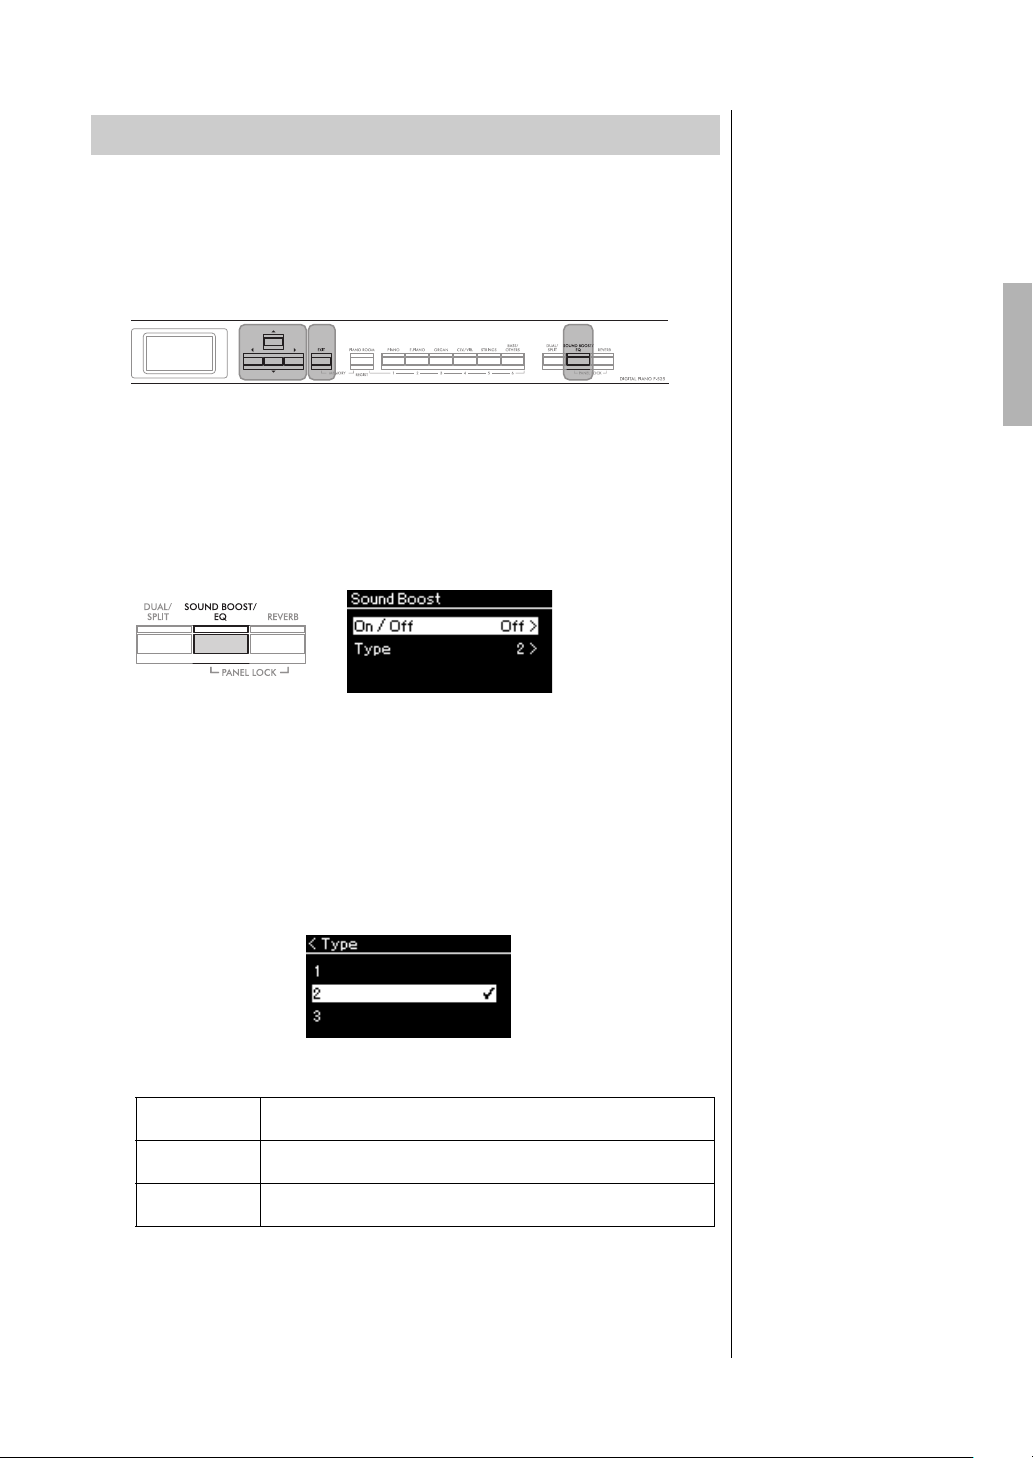
Playing Various Musical Instrument Sounds (Voices)
[U]/[D]/[L]/[R]
buttons
[EXIT] button [SOUND BOOST/
EQ] button
Default setting: Off
“Sound Boost” display
Default setting: 2
Boosting the Overall Sound (Sound Boost)
By using the Sound Boost function when playing along with other instruments,
you can raise the volume and enhance the presence of your performance
without losing any of the expressive range. This function is particularly useful
when you want all the notes you play—both loud and soft—to be clearly
audible.
1. Press the [SOUND BOOST/EQ] button repeatedly to call
up the “Sound Boost” display, and then press the [U]
button to highlight “On/Off.”
2. Press the [R] button to turn on the Sound Boost function.
The [SOUND BOOST/EQ] button lights.
3. Press the [D] button to highlight “Type.”
4. Press the [R] button to call up the “Type” display, then use
the [U]/[D] buttons to select the Sound Boost type.
Sound Boost type list
1 Producing smooth dynamics, this type is ideal for solo performances
2 This type produces a smoother, clearer sound than Type 1, making it
3 In addition to brighter, more-powerful sound than Type 2, this type also
of energetic songs.
the perfect choice when singing and playing at the same time.
has a clearer attack — ideal when performing as part of a band.
5. Press the [EXIT] button to exit from the “Type” display.
P-525 Owner’s Manual
37
Page 38
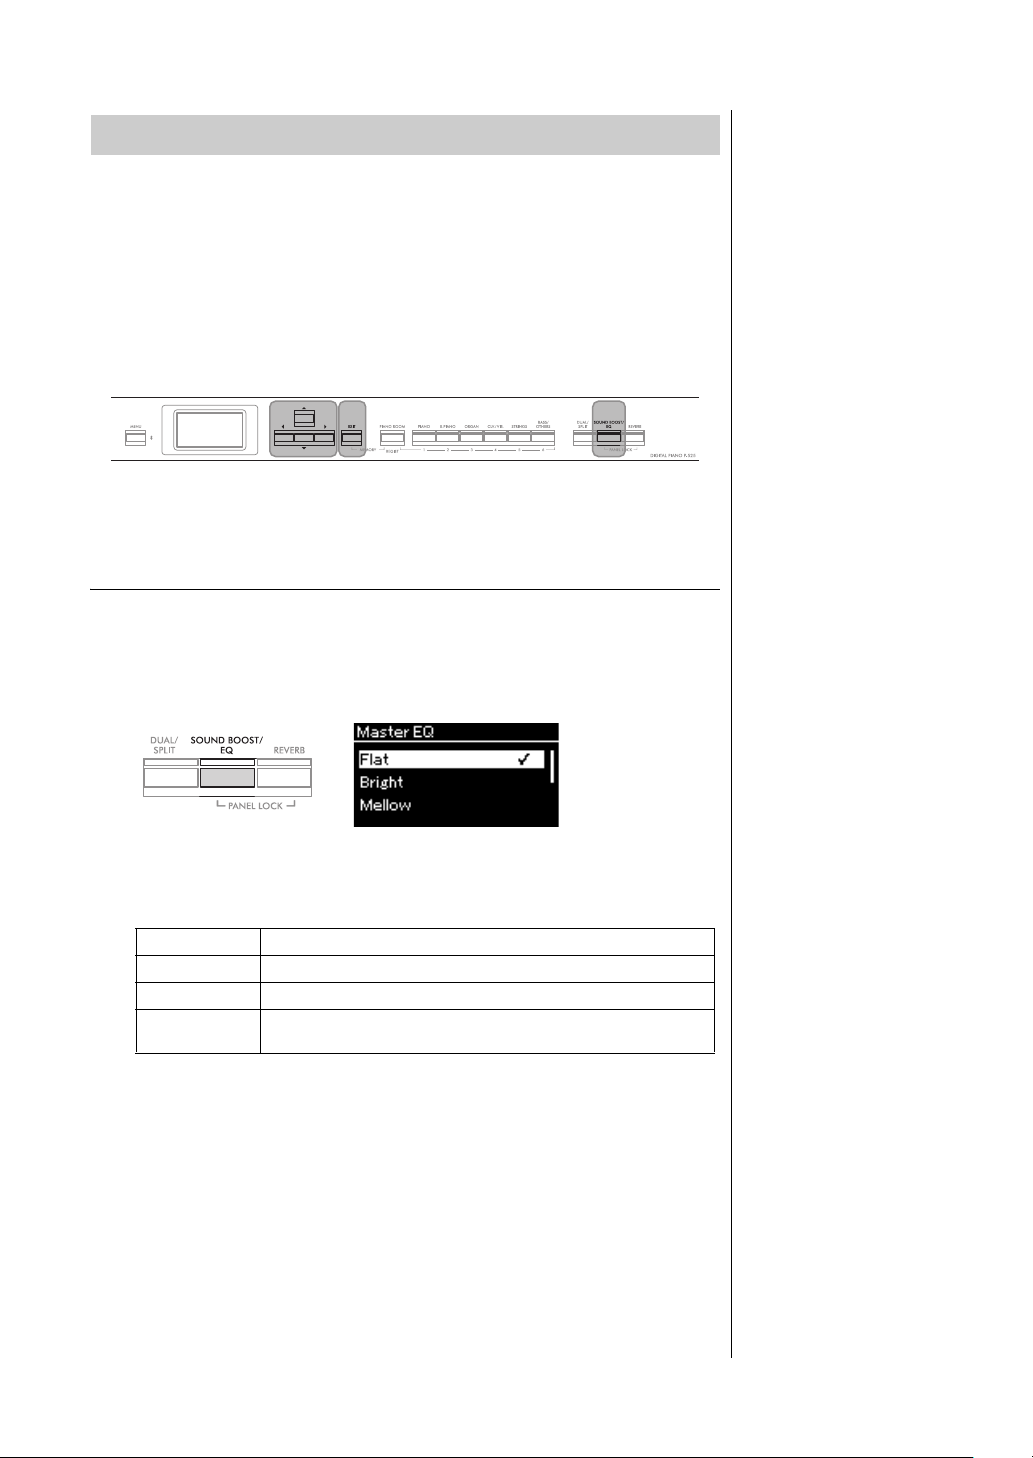
Playing Various Musical Instrument Sounds (Voices)
[U]/[D]/[L]/[R]
buttons
[SOUND BOOST/EQ]
button
[EXIT] button
Default setting: Flat
“Master EQ” display
Adjusting the Sound (Master EQ)
The EQ (Equalizer) processes the sound by dividing the frequency spectrum
into multiple bands, allowing you to boost or cut them as required to tailor the
overall frequency response and provide optimum sound when listening
through the instrument’s internal speaker, or headphones, etc.
This instrument possesses a three-band digital EQ. You can select one of the
three preset EQ types in the “Master EQ” display. You can even create your own
custom EQ settings by adjusting the frequency bands, and save the settings to
the User Master EQ.
Selecting the Master EQ type
1. Press the [SOUND BOOST/EQ] button repeatedly to call
up the “Master EQ” display.
2. Use the [U]/[D] buttons to select the Master EQ type.
Master EQ type list
Flat Flat, unprocessed EQ settings.
Bright EQ settings providing bright sound.
Mellow EQ settings providing mellow sound.
User Your own custom EQ settings saved in “Setting the User Master EQ”
(page 39).
3. Press the [EXIT] button to exit from the “Master EQ”
display.
P-525 Owner’s Manual
38
Page 39
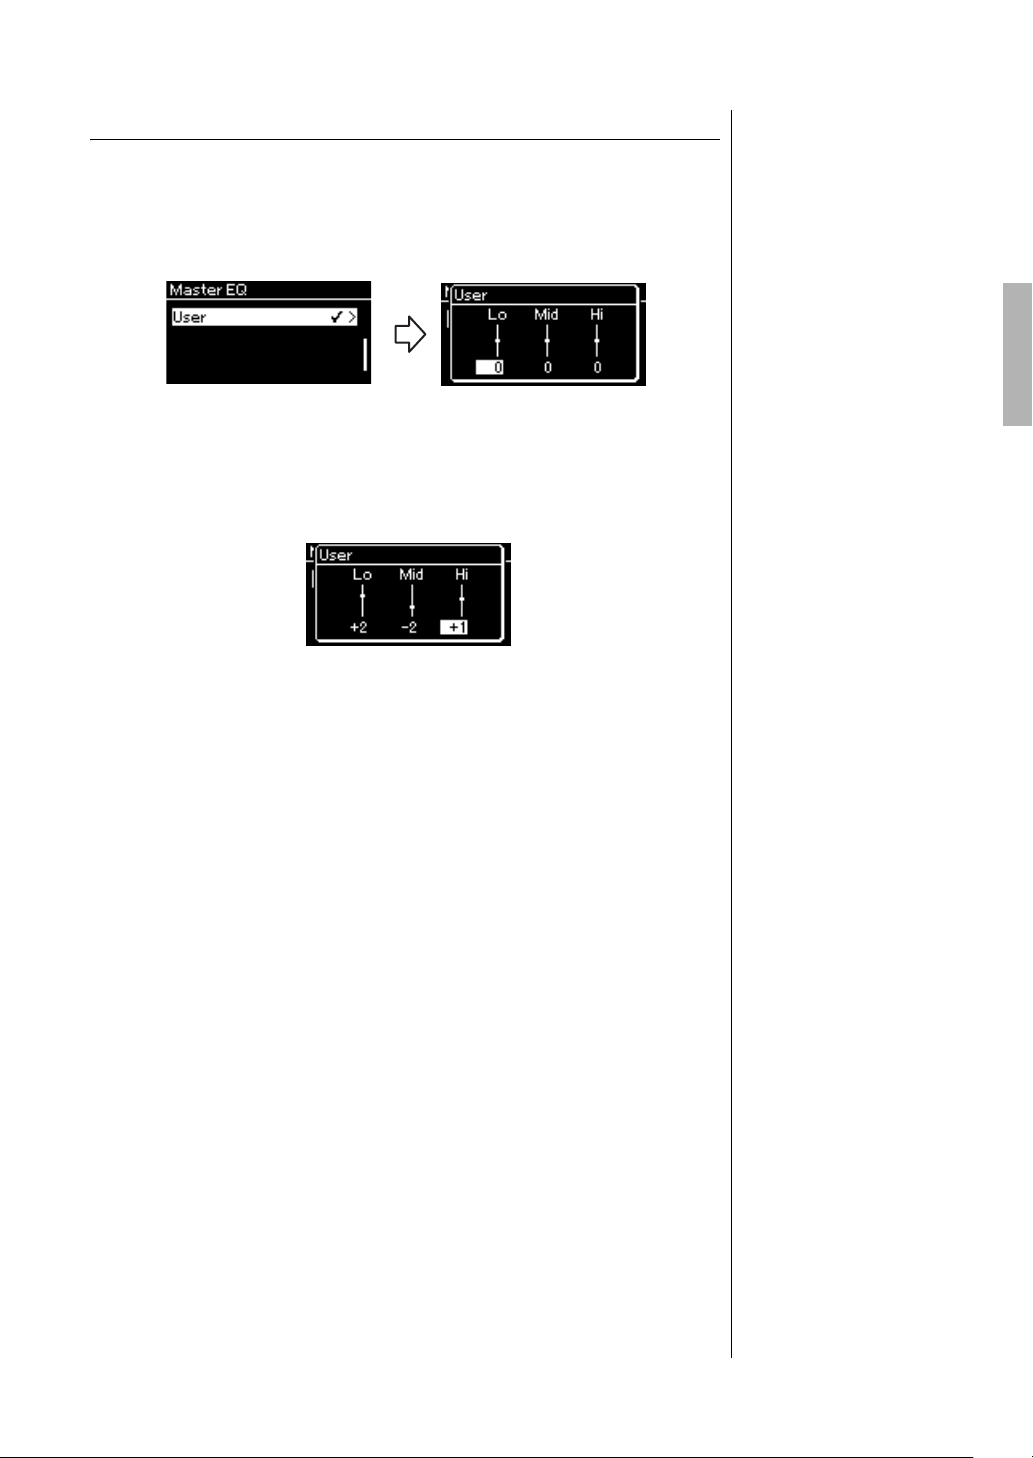
Playing Various Musical Instrument Sounds (Voices)
Default setting: 0 dB
Setting range: -6 dB – 0 – +6
dB
Setting the User Master EQ
1. Press the [D] button to select “User” in the “Master EQ”
display, then press the [R] button to call up the User
display in which the three bands can be boosted or cut.
2. Use the [L]/[R] buttons to select a band, then use [U]/[D]
buttons to boost or cut it.
To reset the setting to the default, press the [U]/[D] buttons
simultaneously.
3. Press the [EXIT] button to close the “User” display.
P-525 Owner’s Manual
39
Page 40
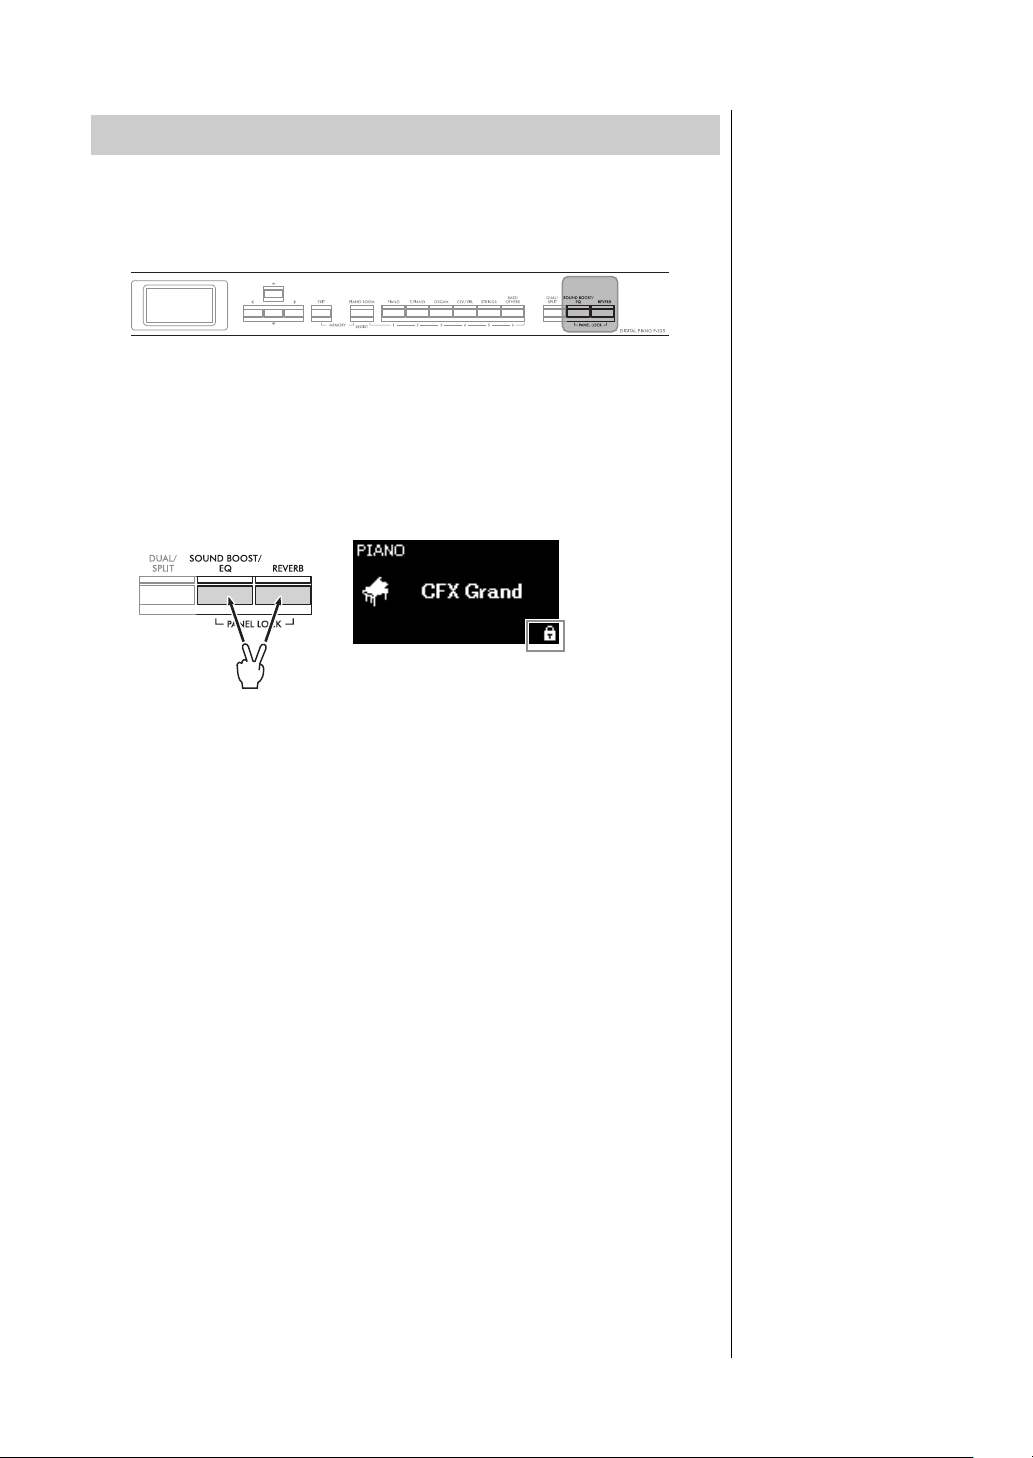
Playing Various Musical Instrument Sounds (Voices)
[PANEL LOCK] buttons
NOTE
• It is impossible to lock the
front panel during Song
playback and recording.
• When the front panel is
locked during playback of
the metronome, rhythm, and
Song, playback cannot be
stopped until the panel is
unlocked.
• When the front panel is
locked, it is impossible to
switch between Song
playback/pause by using the
Aux pedal function
(page 104).
• Even if the front panel is
locked, when the Auto Power
Off function (page 13) is on,
the power is automatically
turned off.
Locking the Front Panel
This instrument features a convenient Panel Lock function that allows you to
temporarily disable the front panel buttons to prevent them being operated
unintentionally while performing.
1. Press the [PANEL LOCK] buttons simultaneously to lock
the front panel.
The Voice display appears on the instrument’s display, and the lock icon is
shown at the lower right on the display.
All front panel buttons with the exception of the [
switch and [VOLUME] slider will be disabled.
2. Press the [PANEL LOCK] buttons simultaneously again to
unlock the front panel.
P-525 Owner’s Manual
40
P] (Standby/On)
Page 41
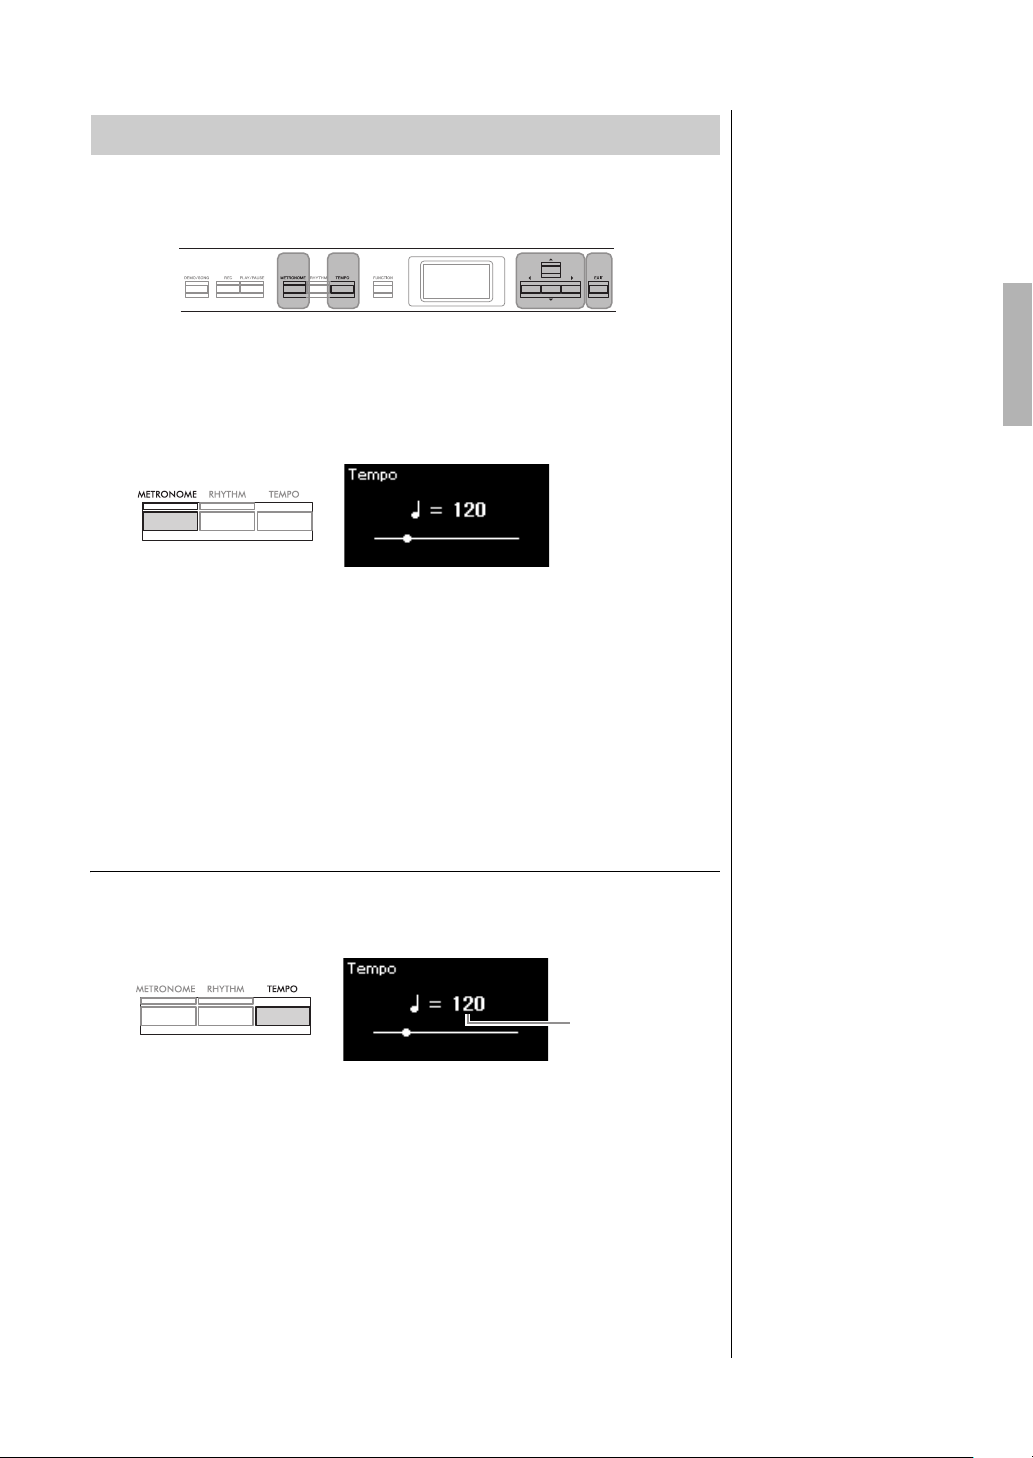
Playing Various Musical Instrument Sounds (Voices)
[U]/[D]/[L]/[R]
buttons
[EXIT] button[METRONOME]
button
[TEMPO]
button
Te m p o v a lu e
Using the Metronome
The instrument has a built-in metronome (a device that keeps an accurate
tempo)—a convenient tool for practice.
1. Press the [METRONOME] button to start the metronome.
This calls up the “Tempo” display, from which you can adjust the tempo.
For information on setting the time signature, refer to page 42.
You can set the metronome volume, BPM and so on from the
“Metronome/Rhythm” menu display (page 101).
2. Press the [METRONOME] button again to stop the
metronome.
To exit from the “Tempo” display, press the [EXIT] button.
Adjusting the Tempo
1. Press the [TEMPO] button to call up the “Tempo” display.
2. Use the [L]/[R] buttons to adjust the tempo.
To reset the tempo to the default setting, press the [L] and [R] buttons
simultaneously.
BPM
You can determine whether the
note type of the tempo
indication is affected by the
metronome time signature
(page 101) or not.
Default setting: 120
Setting range: Depends on the
time signature (page 42).
3. Press the [EXIT] button to exit from the Tempo display.
P-525 Owner’s Manual
41
Page 42
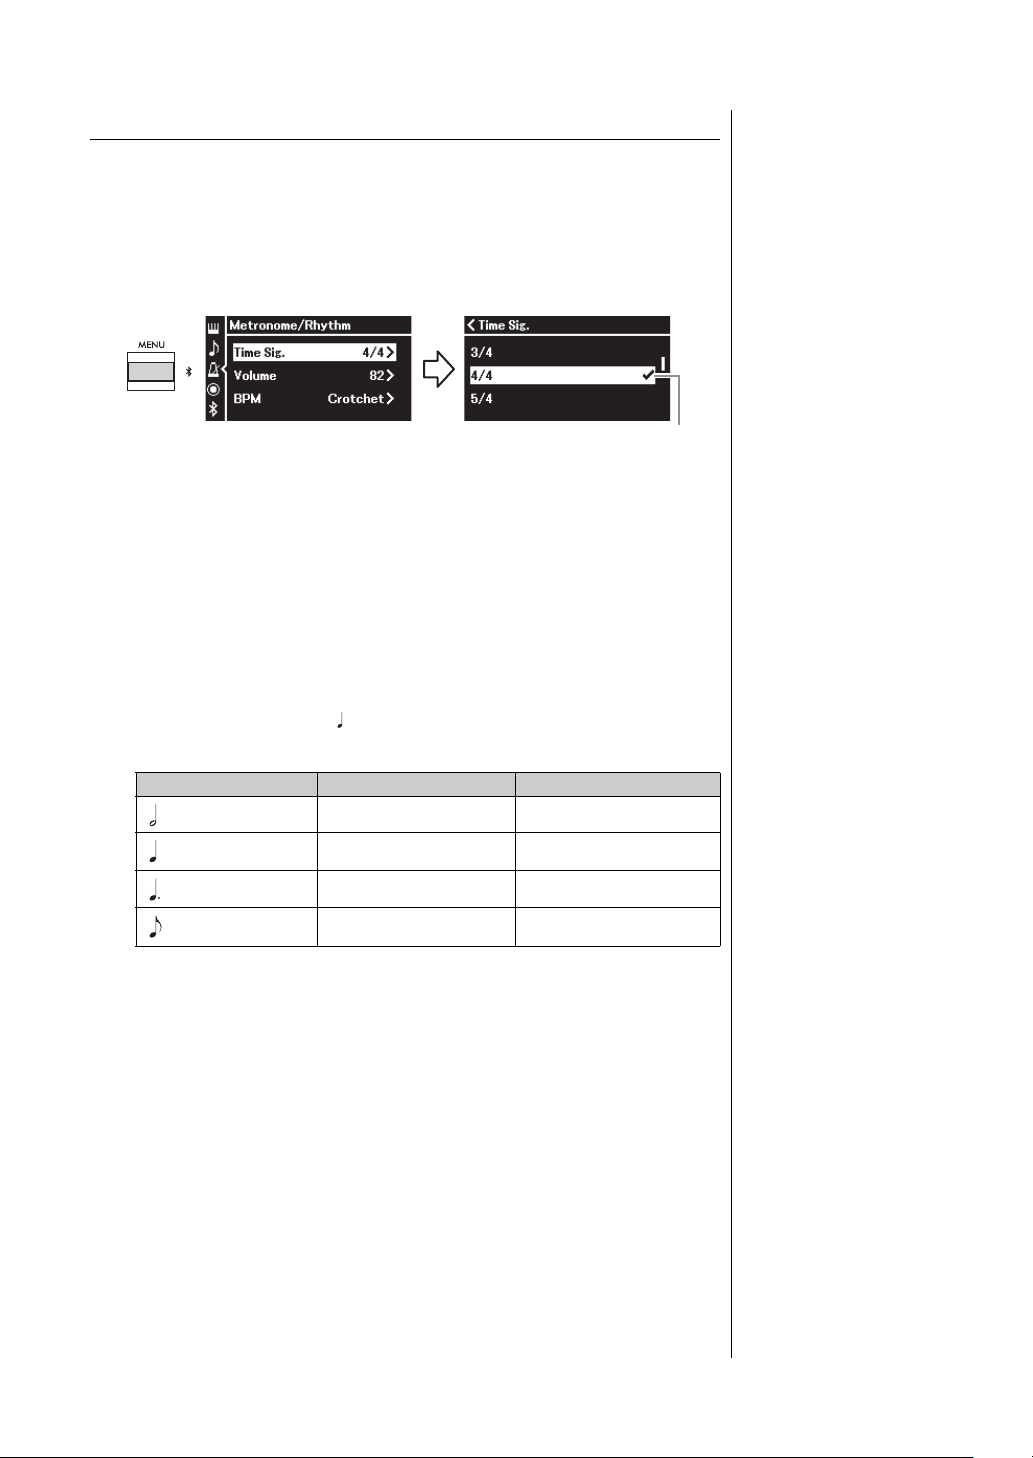
Playing Various Musical Instrument Sounds (Voices)
Time Signature
Time Signature display
“Metronome/Rhythm”
menu display
Half note
Quarter note
Dotted quarter note
Eighth note
Note type
The length of one beat
Metronome detailed
settings
You can set the metronome
volume, BPM and so on from
the “Metronome/Rhythm” menu
display (page 101).
Setting the metronome time signature
1. Press the [MENU] button repeatedly to call up the
“Metronome/Rhythm” menu display. Select the “Time
Sig.”, and then press the [R] button.
2. Use the [U]/[D] buttons to select the desired time
signature.
Setting range: 2/2, 3/2, 1/4, 2/4, 3/4, 4/4, 5/4, 6/4, 7/4, 3/8, 6/8, 7/8, 9/8,
12/8
Default setting: 4/4 (Selecting a MIDI Song will change the tempo value to
that specified in the selected MIDI Song data.)
Tempo indication and Setting range
When pressing the [TEMPO] button, the tempo is displayed as “note
type=xxx” (For example: =120). Selecting the Time Signature changes
the available parameters as follows.
Note type Time Signature Setting range
2/2, 3/2 3 – 250
1/4, 2/4, 3/4, 4/4, 5/4,6/4, 7/4 5 – 500
6/8, 9/8, 12/8 4 – 332 (even numbers only)
3/8, 7/8 10 – 998 (even numbers only)
* When the tempo value of the selected MIDI Song is outside the setting range on the instrument,
the value will be changed to fit within the setting range.
* Note type will be fixed to quarter note as long as the “BPM” parameter in the “Metronome/Rhythm”
menu display is set to “Crotchet” regardless of the Time Signature you set.
and 999
You can playback the metronome with a Bell sound on the first beat of
each measure according to the selected Time Signature.
For details, refer to “Bell” in the “Metronome/Rhythm” menu (page 101).
3. Press the [EXIT] button to exit from the “Metronome/
Rhythm” menu display.
P-525 Owner’s Manual
42
Page 43
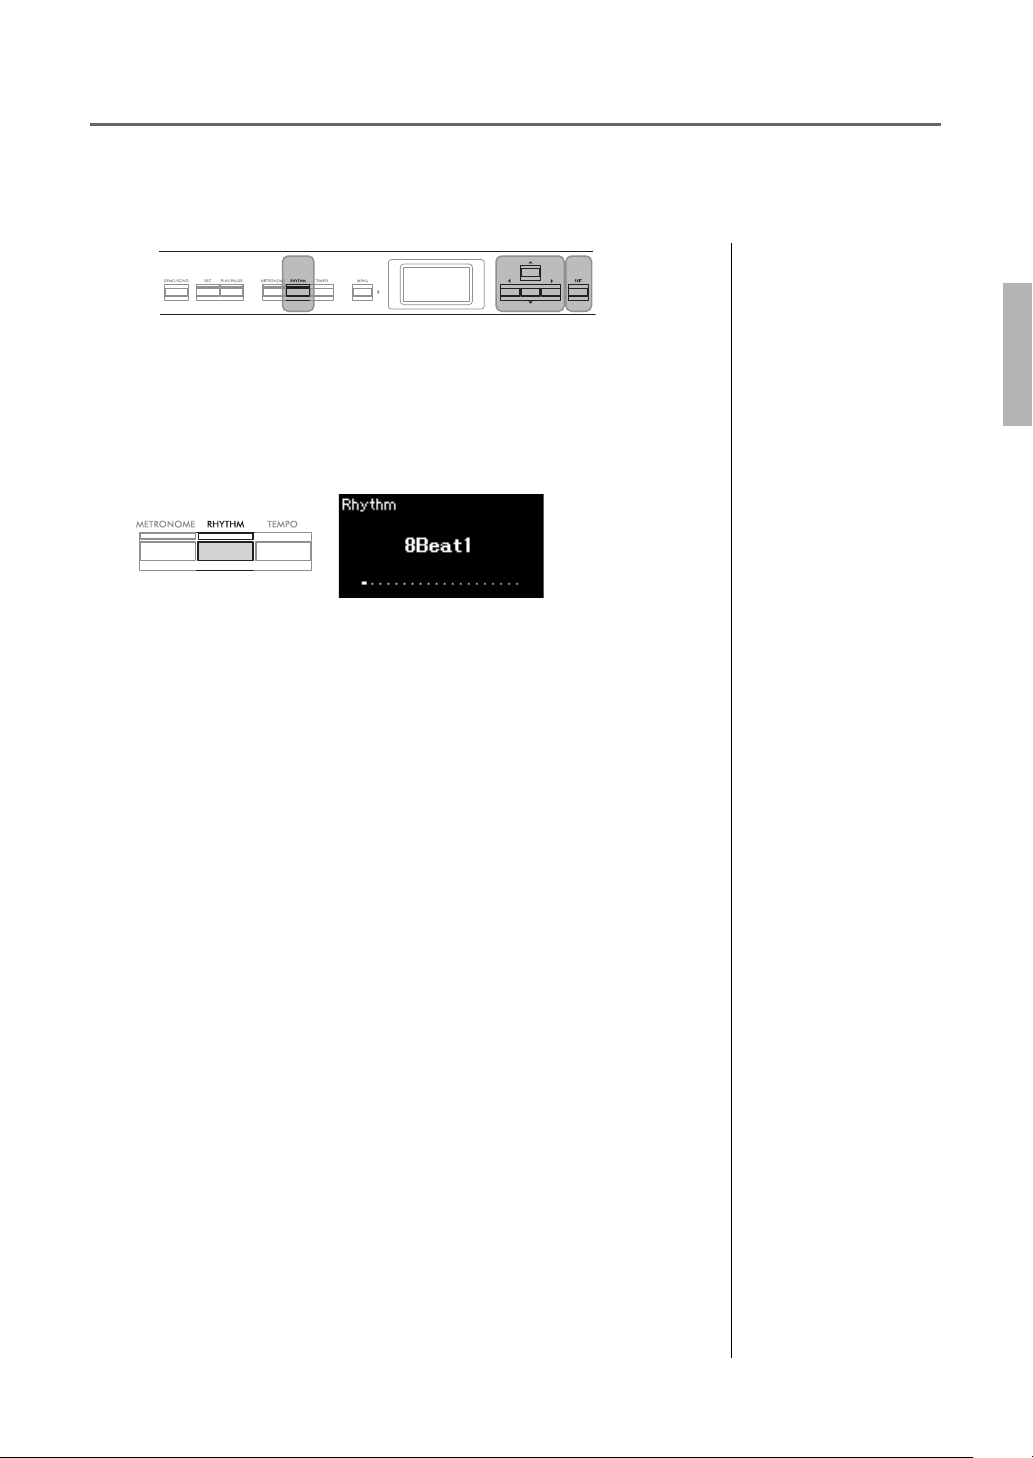
Playing the Keyboard along with Rhythm Playback
[RHYTHM]
button
[U]/[D]/[L]/[R]
buttons
[EXIT] button
About the Rhythm Tempo
• The Rhythm tempo is
equivalent to that set for the
Metronome (page 41).
• Although you set the Rhythm
tempo, selecting a MIDI Song
will change the tempo value
to that specified in the
selected MIDI Song data.
• When you press the [TEMPO]
button to call up the “Tempo”
display to change the
Rhythm tempo, during
Rhythm playback, press the
[EXIT] button to return to the
“Rhythm” display from the
“Tempo” display.
Detailed Settings for the
Rhythm
From the “Metronome/Rhythm”
menu display (page 101), you
can set detailed parameters,
such as Rhythm volume and
Sync Start, with which pressing
a key will start Rhythm
playback.
NOTE
The “Rhythm” display cannot
be called up during the Song
playback or recording.
NOTE
• Some arrangements may not
be suitable for use with this
feature.
• 9th, 11th and 13th chords
cannot be played.
• For details on how to play
chords, refer to commercially
available chord books.
You can select a Rhythm from a variety of musical genres, such as Pops and Jazz, and play along with it.
Refer to “Rhythm List” on page 112.
For this instrument, Rhythm consists of drums and bass accompaniment.
1. Press the [RHYTHM] button to start Rhythm playback.
Intro playback starts followed by the Rhythm playback.
To set the Intro/Ending on or off:
“Intro” and “Ending” allow you to vary the arrangement of the
accompaniment. You can set “Intro” and “Ending” on/off via “Intro” or
“Ending” in the “Metronome/Rhythm” menu display (page 101).
2. Use the [L]/[R] buttons to call up the desired Rhythm.
For details on the available Rhythms, refer to the Rhythm List (page 112).
3. Play the keyboard along with Rhythm playback.
The instrument will automatically create appropriate accompaniment
bass sound while you play, based on the chords you play.
To set the bass sound on/off:
The default setting of the bass sound is “On.”
If you don’t want to have the bass accompaniment sound, set it to “Off.”
You can set “Bass” in the “Metronome/Rhythm” menu display (page 101).
4. To stop Rhythm playback, press the [RHYTHM] button
again.
The Rhythm will automatically stop after the Ending is played.
5. Press the [EXIT] button to exit from the “Rhythm” display.
P-525 Owner’s Manual
43
Page 44
Playing and Practicing Songs
MIDI
Audio
MIDI Audio
Indicates explanation applies only to MIDI Songs
This instrument can play Preset Songs, Songs you recorded on this instrument, or commercially available
Songs. In addition to listening to these Songs, you can play the keyboard as the Song plays back.
There are two kinds of Songs that can be recorded and played back on this instrument: MIDI Songs and
Audio Songs.
•MIDI Song
A MIDI Song is comprised of your keyboard performance information and is not a recording of the actual
sound itself. The performance information refers to which keys are played, at what timing, and at what
strength—just as in a musical score. Based on the recorded performance information, the tone generator
outputs the corresponding sound. A MIDI Song uses a small amount of data capacity in comparison to an
Audio song, and allows you to easily change aspects of the sound, such as Voices used, etc.
•Audio Song
An Audio Song is a recording of the performed sound itself. This data is recorded in the same way as that used
with voice recorders, etc. This data can be played with a portable music player, etc., allowing you to easily let
other people hear your performance.
Availability of functions differs between MIDI Songs and Audio Songs. In this chapter, the following icons
indicate whether or not the explanation applies to MIDI Songs or Audio Songs individually.
Example:
You can play back the following types of Songs in this instrument.
• Voice Demo Songs (Voice Demo).
reset Songs: 50 classical Preset Songs (“50 Classics”)
•P
• Your own recorded Songs (see page 54 for instructions on recording)
• Commercially available MIDI Song data: SMF (Standard MIDI File)
The maximum size for playback on this instrument is approx. 500 KB per single MIDI Song.
• Commercially available Audio Song data: Wav (file extension = .wav with 44.1 kHz sample rate, 16-bit
resolution, stereo, and maximum 80 minutes length)
P-525 Owner’s Manual
44
Page 45
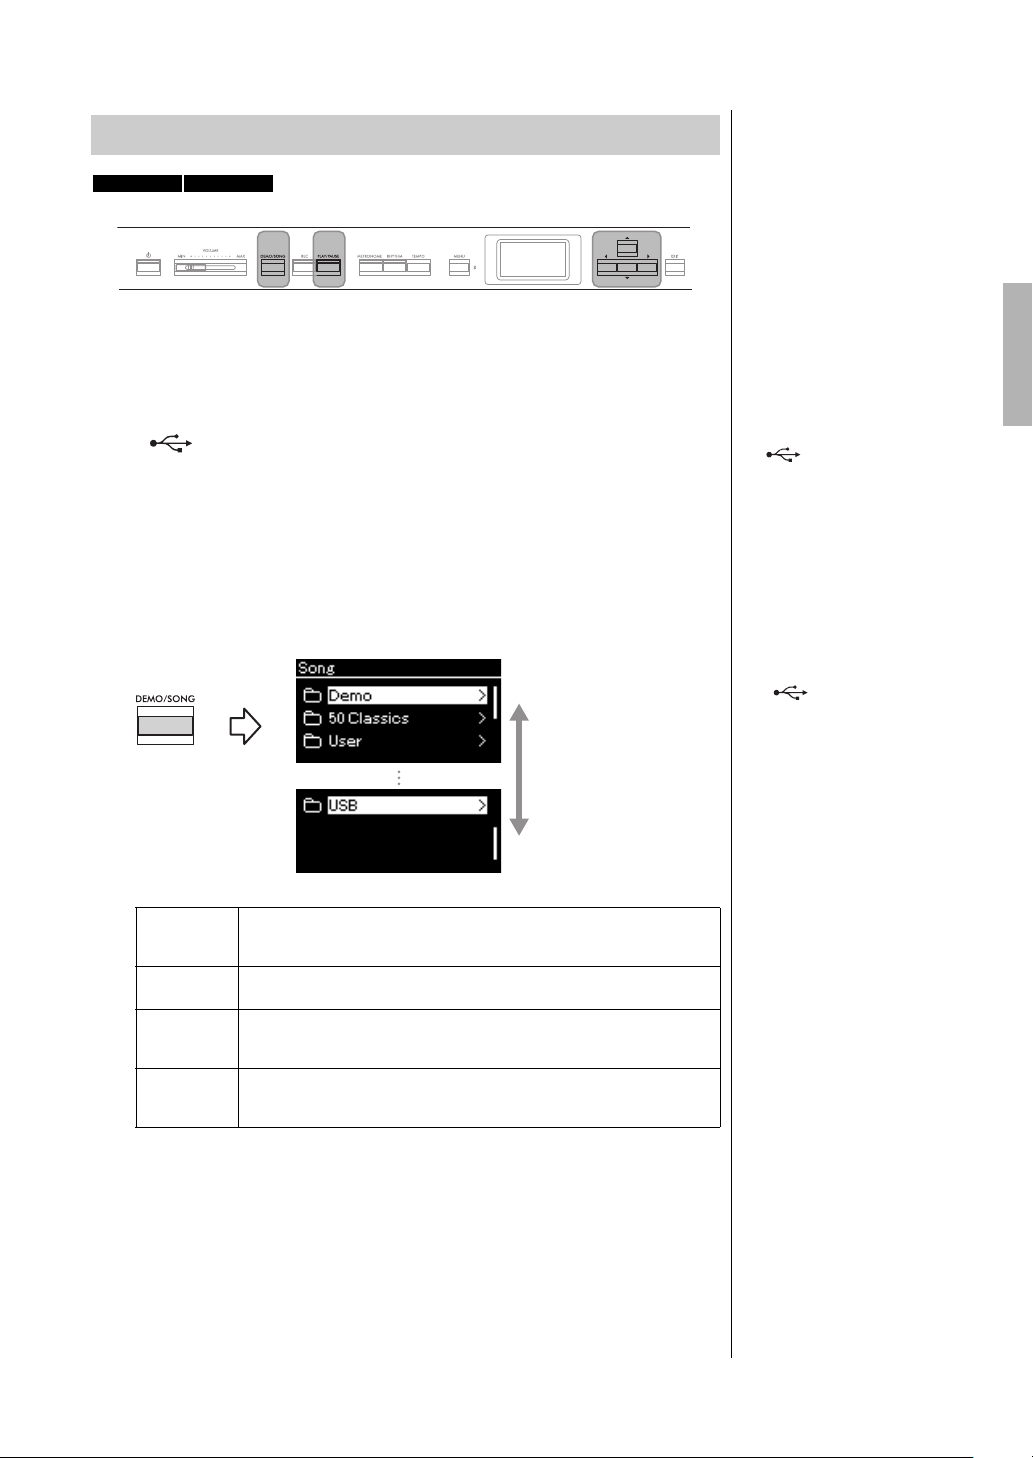
Playback of Songs
MIDI Audio
[DEMO/SONG]
button
[U]/[D]/[L]/[R]
buttons
[PLAY/PAUSE]
button
NOTE
NOTE
Song category
[U]/[D] buttons
NOTE
NOTE
Playing and Practicing Songs
1. If you want to play back a Song in a USB flash drive,
connect the USB flash drive containing Song data to the
[ ] (USB TO DEVICE) terminal beforehand.
2. Press the [DEMO/SONG] button to call up the Song List
display, then select the desired category using [U]/[D]
buttons.
Select the desired one from “50 Classics,” “User” or “USB” referring to the
category descriptions below.
Voice Demos let you experience the characteristics of the Voices
Demo
50 Classics
User
USB
(MIDI Song). Refer to page 22 for how to play back the Demo. For Song
names, refer to the “Voice Demo List” on page 111.
50 classical Preset Songs (MIDI Songs).
For details, refer to the “Song List” on page 112.
MIDI Songs which have been recorded and saved to the instrument by
using the Recording function (page 54), and MIDI Songs which have been
copied/moved to the instrument using File operations (page 66).
MIDI/Audio Songs saved to the USB flash drive by recording them with this
instrument or Audio Songs converted from MIDI Songs (page 70), or MIDI/
Audio Songs saved to the USB flash drive.
• Before using a USB flash
drive, be sure to read
“Connecting USB Devices
([ ] (USB TO DEVICE)
terminal)” on page 75.
• The instrument can
automatically select a Song
file saved in the root directory
of the USB flash drive as soon
as the USB flash drive is
connected. For instructions,
refer to “USB Autoload” on
page 106.
USB folder appears only when
USB flash drive is connected to
the [ ] (USB TO DEVICE)
terminal.
3. Press the [R] button to display the Songs in the specified
category, and then select a desired Song using the [U]/[D]
buttons.
When “User” or “USB” category is selected, the icon indicating Song
types are shown to the left of the Song name.
Press the [L] button to return to
the category/folder.
“NoSong” will be shown in the
display when no data exists in
that folder.
P-525 Owner’s Manual
45
Page 46
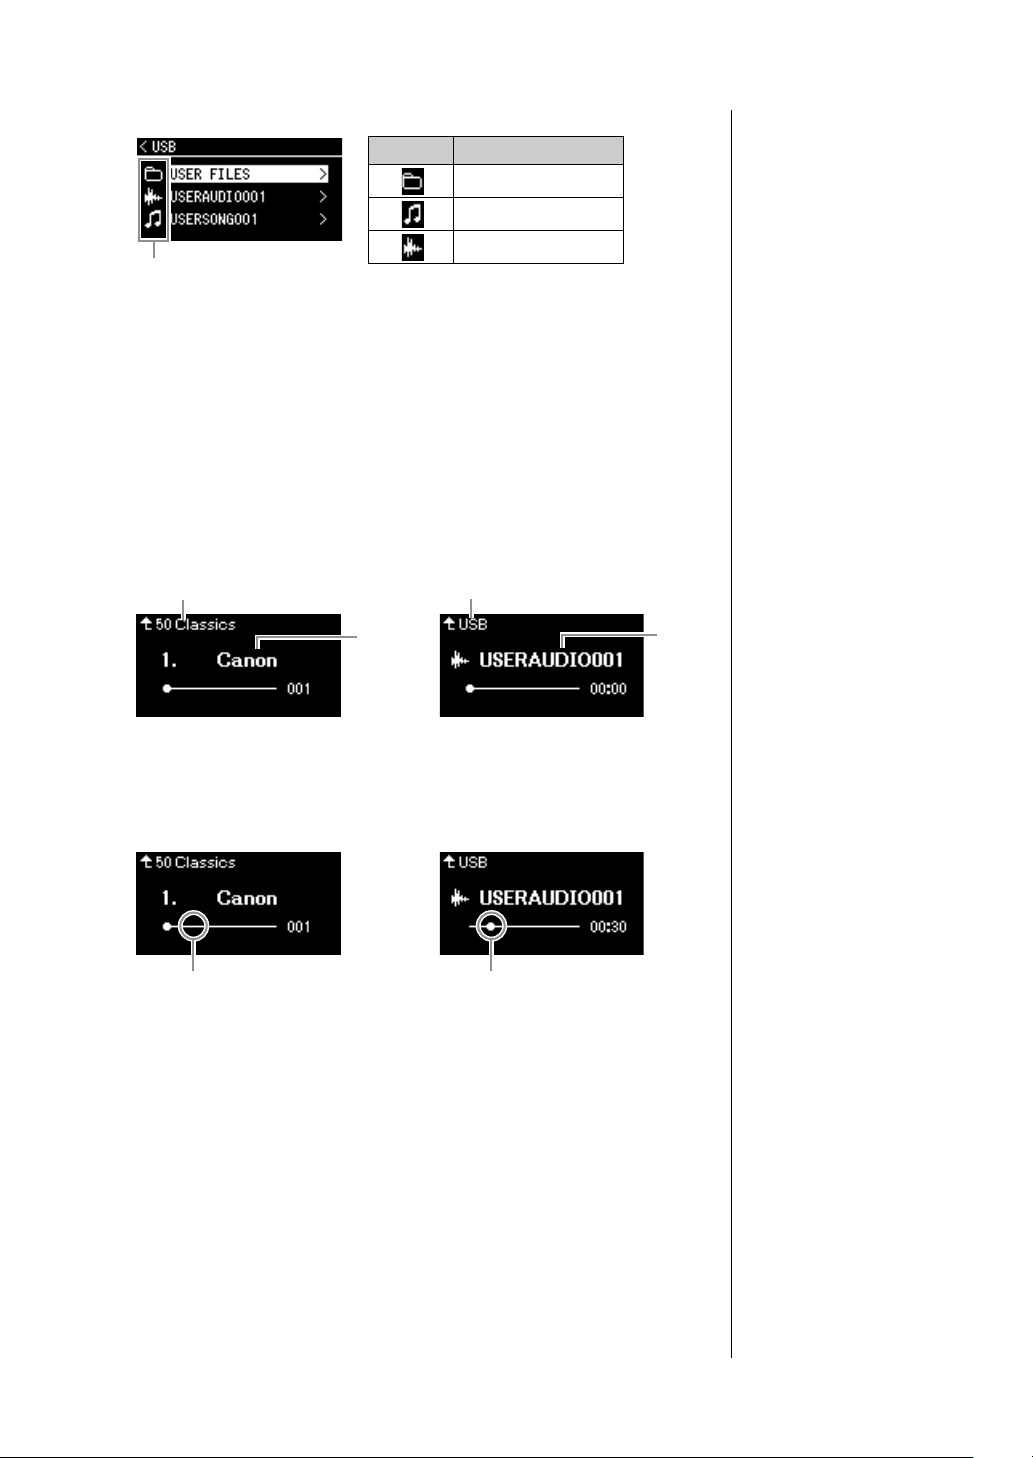
Playing and Practicing Songs
Icon
Song List
icon Data format
Folder
MIDI Songs
Audio Songs
NOTE
Song
name
Song display: MIDI Song Song display: Audio Song
Song
name
Category name Category name
NOTE
Song display: MIDI Song Song display: Audio Song
Current position Current position
NOTE
NOTE
To select a recorded Song saved to USB flash drive:
When you record a Song and save it to a USB flash drive, the recorded
Song will automatically be saved to the USER FILES folder on a USB flash
drive. If you want to select the Song from the USER FILES folder, select
USB in step 2, and USER FILES folder in step 3.
4. Press the [R] button to select the desired Song.
The Song display is shown letting you to see the currently selected Song
name and its category name.
5. Press the [PLAY/PAUSE] button to start playback.
The current position of the Song playback will be shown.
When Songs cannot be
read from a USB flash drive
If the song cannot be read, you
may need to change the
Language setting for the Song
name in the “System” menu
display (page 107).
• Press the [U] button to return
to the Song list.
• When the Song title is too
long to be displayed, hold
down the [
the full title on the pop-up
window.
Songs having titles longer than
48 characters cannot be played
on this instrument.
D] button to see
You can play the keyboard along with Song playback. You can also change
the Voice for your keyboard performance. To adjust the volume balance
between your keyboard performance and MIDI Song playback, or to
adjust the Audio Volume, set the appropriate Volume parameters
individually in the “Song” menu display (page 52).
6. Press the [PLAY/PAUSE] button again to stop playback.
Even if you don’t press the [PLAY/PAUSE] button, the Song stops
automatically when Song playback reaches the end.
P-525 Owner’s Manual
46
If a Song has been selected,
the original tempo of the Song
is used, and the Metronome
setting (page 41) will be
ignored.
Useful playback functions are
described on pages 48 – 53.
Page 47
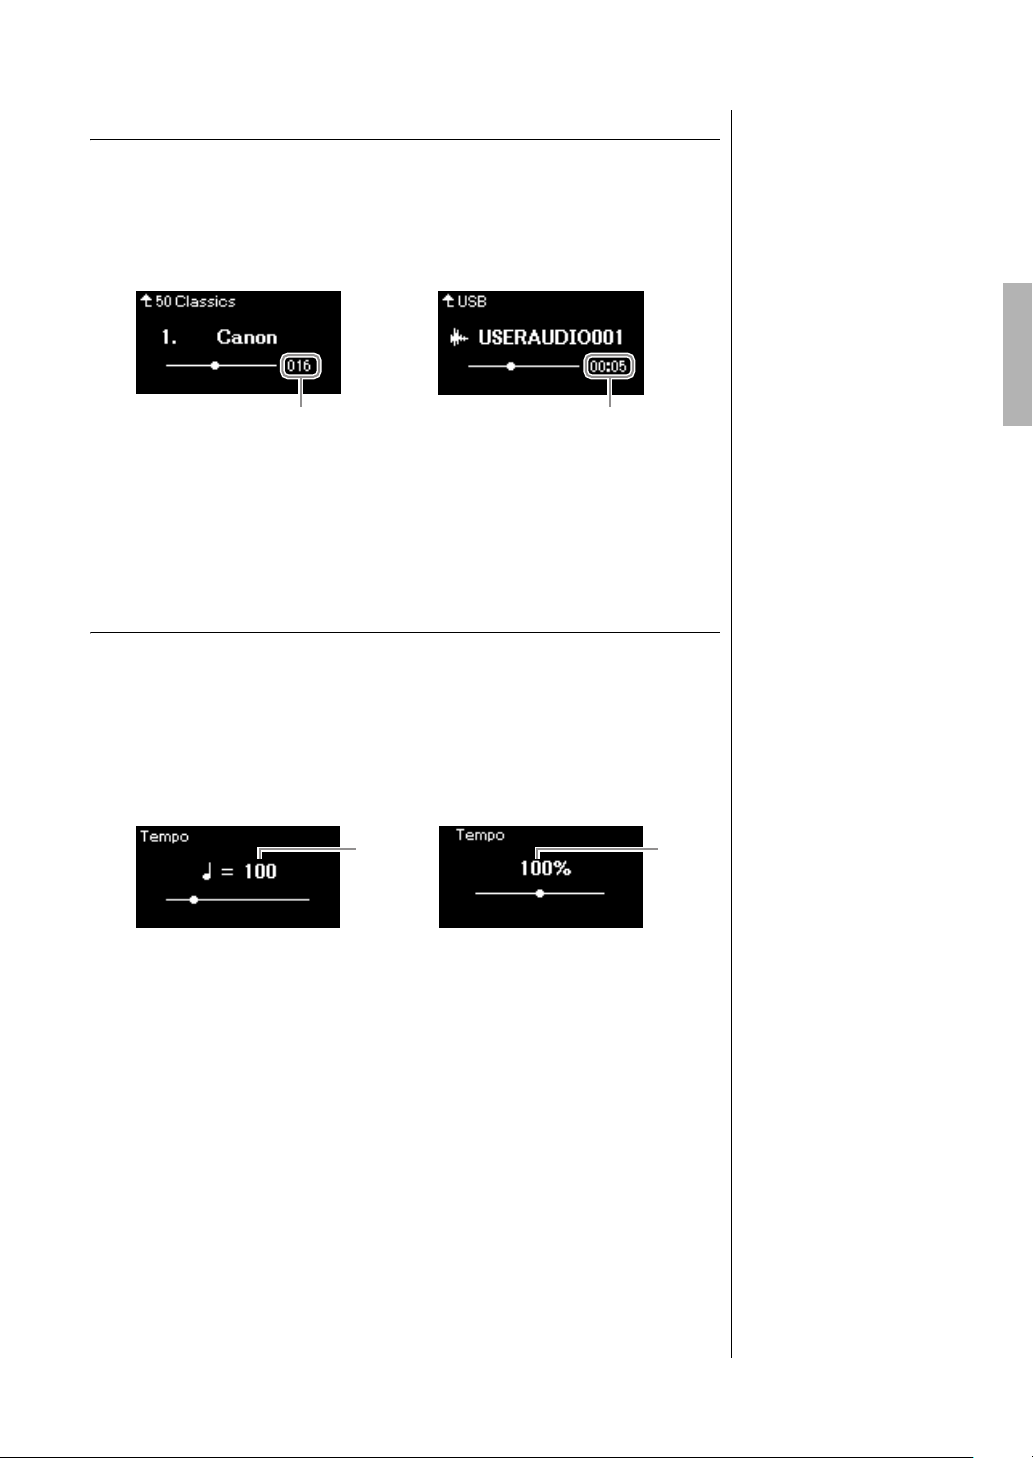
Rewind/Fast forward/Returning to the top of the Song
Song display: MIDI Song Song display: Audio Song
Measure number Elapsed time
NOTE
MIDI Song Audio Song
Tempo Tempo
Rewind/Fast forward
Use the [L] and [R] buttons to move back or forth through the Song (in bars or
seconds), while the Song display is shown.
Holding one of the buttons scrolls backward/forward continuously.
Returning to the top of the Song
Pressing the [L] and [R] buttons simultaneously returns to the top position of
the Song.
Adjusting the tempo
Playing and Practicing Songs
You can adjust the playback tempo of a Song.
1. Press the [TEMPO] button to call up the “Tempo” display.
For a MIDI Song, press the [TEMPO] button during Song playback or
while the Song display is shown. For an Audio Song, press the [TEMPO]
button during Song playback.
2. Change the Tempo value using the [L]/[R] buttons.
The original tempo of the current Song can be recalled by pressing the
L] and [R] buttons simultaneously.
[
For MIDI Songs
The tempo range differs depending on the Time Signature for the selected
MIDI Song. Available setting values may only include even numbers
(multiples of 2), depending on the Time Signature. For more information,
refer to page 42.
For Audio Songs
The tempo range is between 75% – 125%. 100% is the original tempo
value. Higher values result in a faster tempo.
3. Press the [EXIT] button to exit from the “Tempo” display.
Changing the tempo of an
Audio Song may change its
tonal characteristics.
P-525 Owner’s Manual
47
Page 48
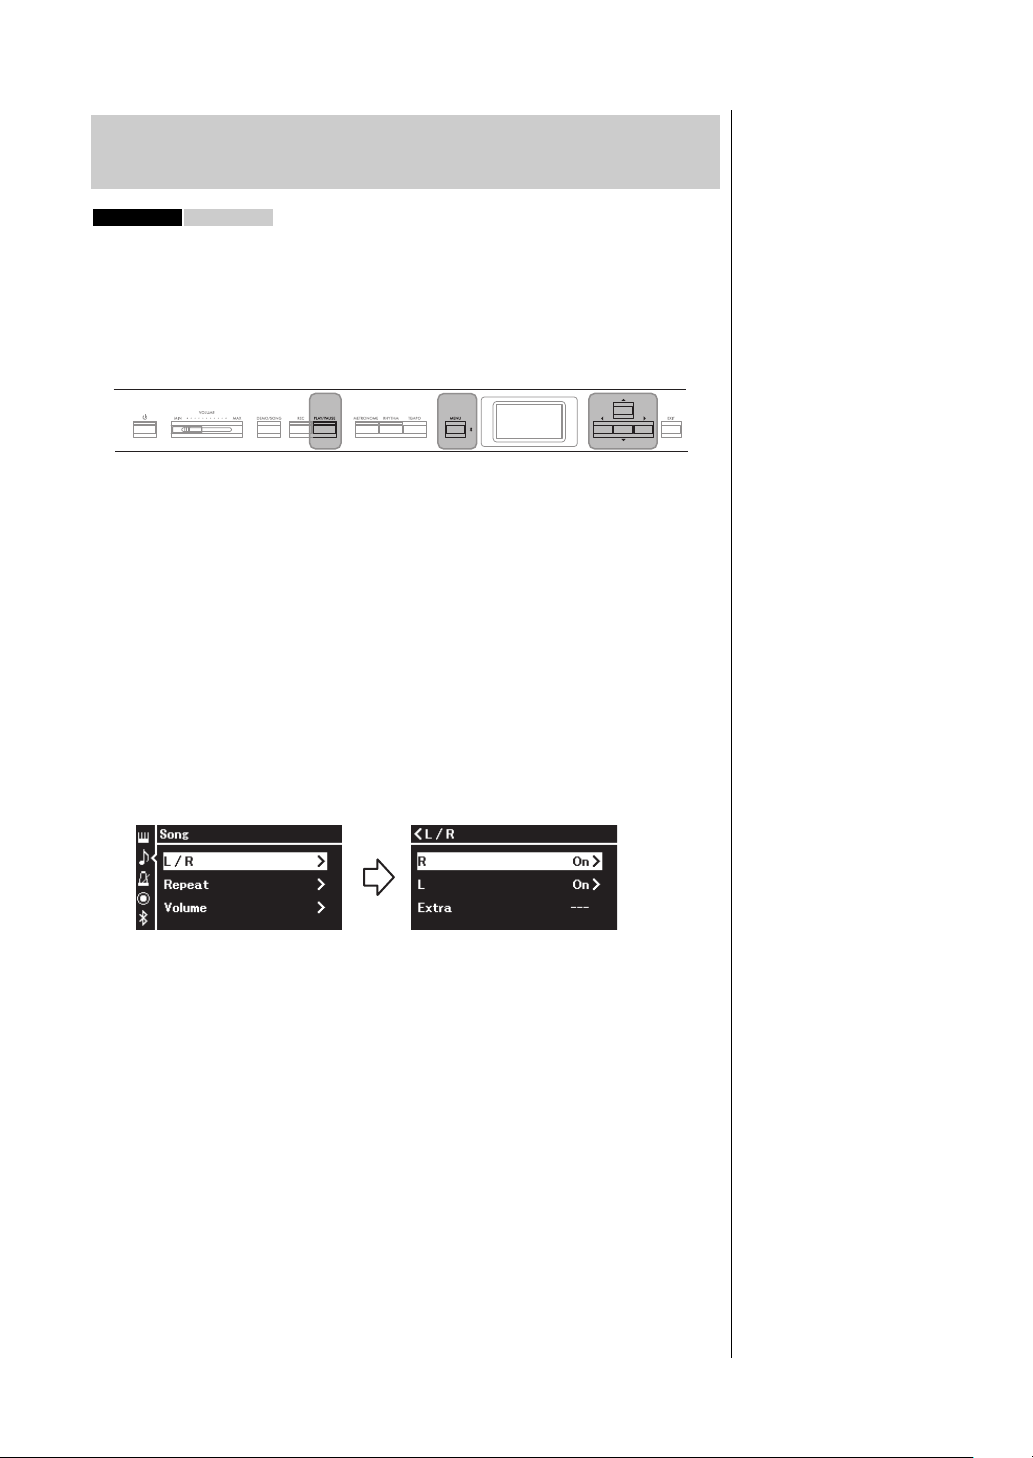
Playing and Practicing Songs
MIDI Audio
[U]/[D]/[L]/[R]
buttons
[PLAY/PAUSE]
button
[MENU] button
NOTE
NOTE
“Song” menu display
2-1. Use the [U]/[D] buttons
to select “L/R.”
2-2. Press the [R] button to
call up the next display.
2-3. Use the [U]/[D] buttons
to select desired track.
“L/R” display
Playing a One-hand Part — Part Cancel Function
(MIDI Songs)
Some MIDI Songs, such as Preset Songs, are divided into right-hand and lefthand parts. By using such Song data, you can practice the left hand by turning
on only the right-hand part, and practice the right hand by turning on only the
left-hand part—allowing you to practice parts separately for easy mastery of
difficult material.
1. Select a Song for practicing.
For instructions, refer to page 45. The Song category “50 Classics” is
recommended.
2. Select a part you want to practice.
Press the [MENU] button repeatedly to call up the “Song” menu display,
then select the highlighted item in each display as illustrated below.
In the “L/R” display, select the part (track) you want to mute for
practicing. Select “R” for practicing the right-hand part, or “L” for the lefthand part.
3. Use the [R] button to select “Off” for the selected part.
Some songs in “50 Classics”
are duet songs. Refer to
page 112 about part
assignment for the duet songs.
• The parts can be turned on or
off even during playback.
• Usually, Channel 1 is
assigned to “R,” Channel 2 is
assigned to “L,” and
Channels 3 – 16 are assigned
to “Extra.” However, the
assignments may differ
depending on the particular
Song. Channels assigned to
“Extra” cannot be set to on or
off individually.
• Whenever you select another
MIDI Song, both parts are
automatically turned on.
4. Press the [PLAY/PAUSE] button to start playback.
Play and practice the part you just muted.
5. Press the [PLAY/PAUSE] button again to stop playback.
48
Even if you don’t press the [PLAY/PAUSE] button, the Song stops
automatically when Song playback reaches the end.
P-525 Owner’s Manual
Page 49
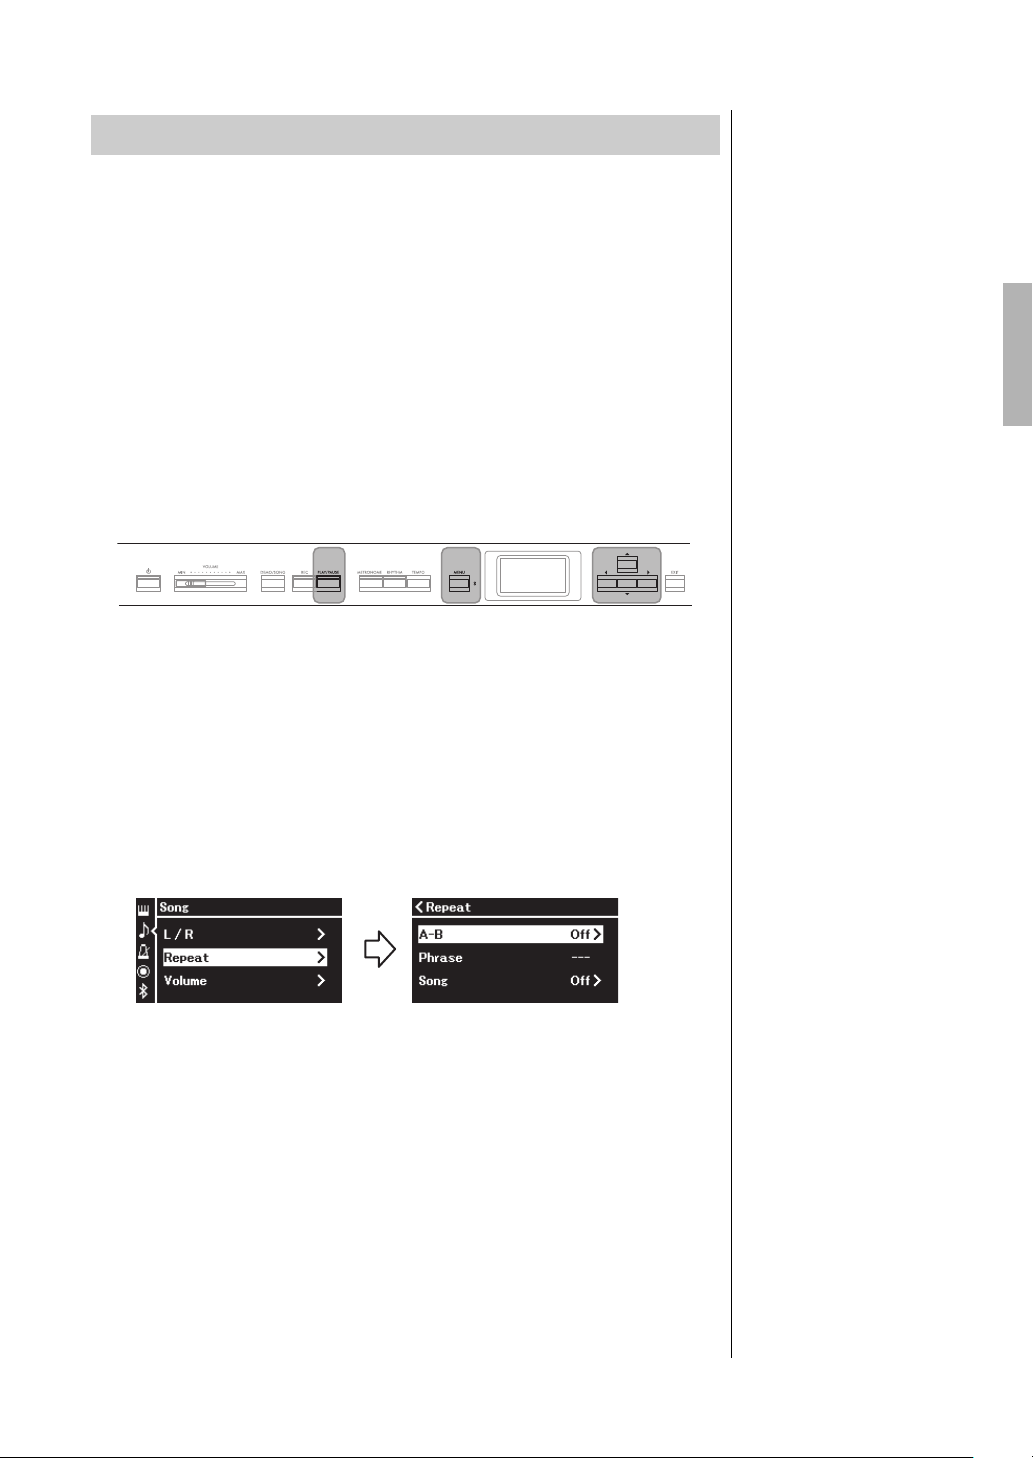
Playing Back a Song Repeatedly
[U]/[D]/[L]/[R]
buttons
[PLAY/PAUSE]
button
[MENU] button
“Song” menu display “Repeat” display
There are three Repeat items as follows. These are convenient for repeatedly
practicing difficult phrases. It is a good idea to use this function and the Part
Cancel function (above) for practicing difficult phrases, in the case of MIDI
Songs.
AB Repeat ............. Plays the specified range of the selected MIDI Song
•
repeatedly.
Phrase Repeat...... Plays a specific phrase of a MIDI Song containing
•
Phrase Marks repeatedly.
•
Song Repeat.......... Plays a MIDI/Audio Song repeatedly, or plays all
MIDI/Audio Songs saved in a selected category (folder)
repeatedly either in order or in random order.
The explanations here apply only to AB Repeat and Song Repeat. For Phrase
Repeat, refer to page 98.
Playing and Practicing Songs
Phrase mark
A pre-programmed marker in
certain MIDI Song data, which
specifies a specific location in
the Song.
1. Select a Song to be played back.
For instructions, refer to page 45.
2. Call up the “Repeat” display.
Press the [MENU] button repeatedly to call up the “Song” menu display.
Select “Repeat,” then press the [
R] button.
3. In the “Repeat” display, select a desired item using the [U]/
[D] buttons, then press the [R] button.
Select “A–B” for AB Repeat, select “Phrase” for Phrase Repeat, or select
“Song” for Song Repeat.
4. Set in the appropriate setting display.
•AB Repeat .................See page 50.
•Phrase Repeat............See page 98 (“Phrase” section in “Repeat”).
•Song Repeat...............See page 51.
P-525 Owner’s Manual
49
Page 50
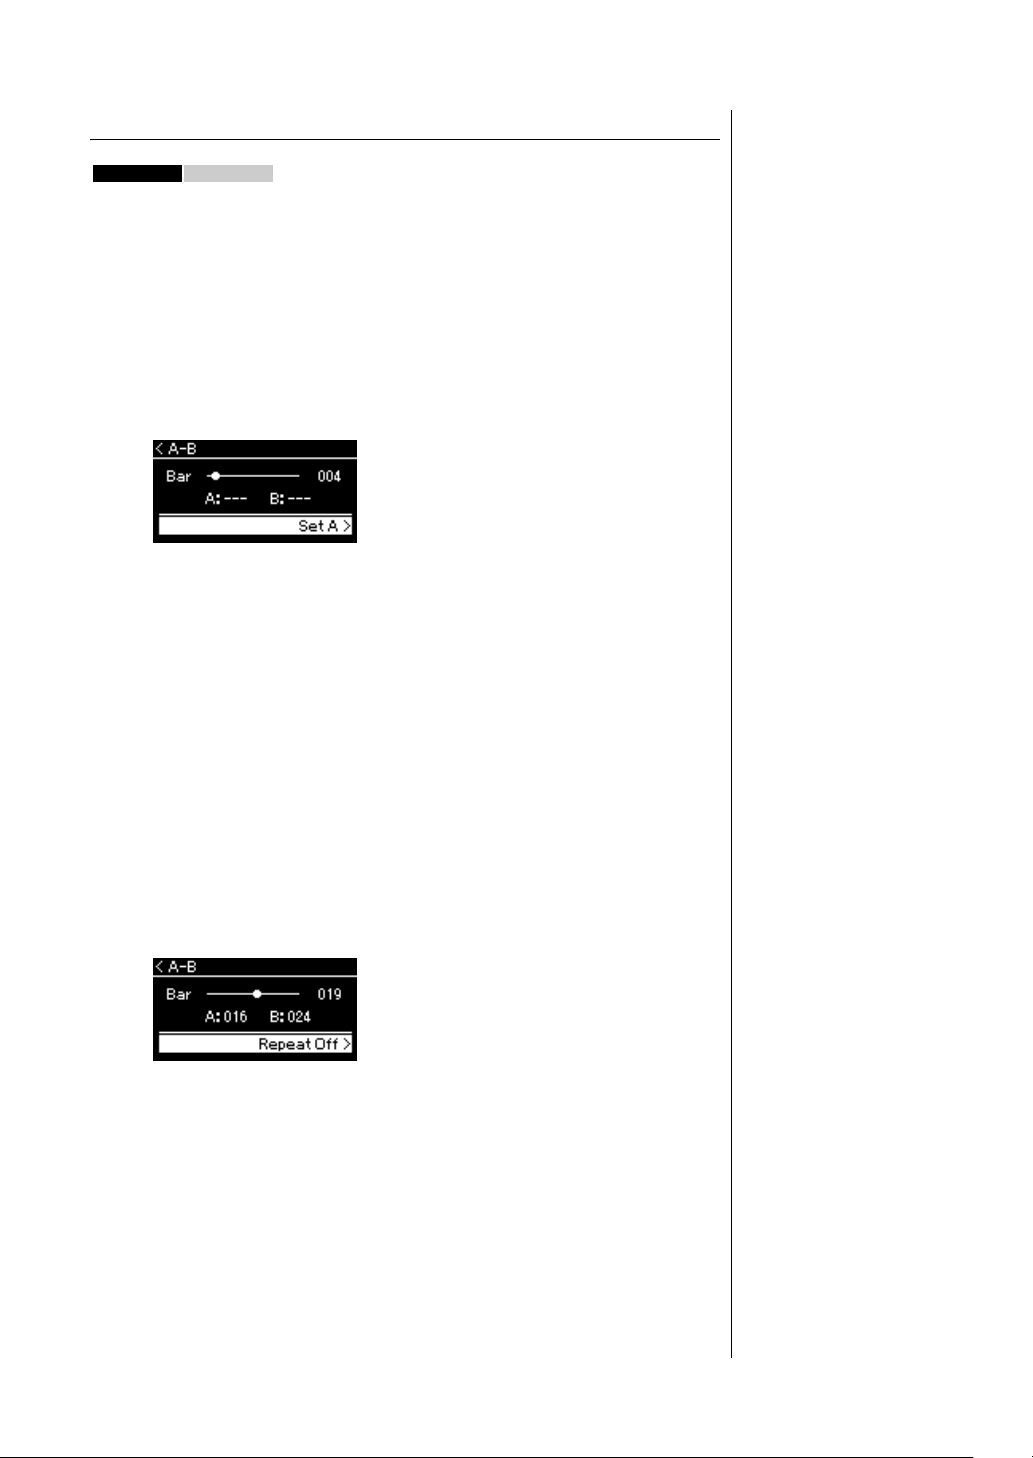
Playing and Practicing Songs
MIDI Audio
NOTE
“A-B” display
AB Repeat setting
See page 49 for information on basic operations. Continuing from step 4 on
that page, follow the procedure below.
4-1. Press the [PLAY/PAUSE] button to start Song playback.
4-2. Press the [R] button at the starting point (A) of the
range to be repeated.
Specifying the top of a Song as Point A
Specify Point A before starting playback, then start playback and
specify Point B.
4-3. Press the [R] button again at the ending point (B).
After an automatic lead-in (to help guide you into the phrase), the
range from Point A to Point B is played back repeatedly.
Specifying the end of a Song as Point B
Specifying only Point A results in repeat playback between Point A and
the Song end (as Point B).
5.
To turn off the Repeat function, press the [R] button
while “Repeat Off” is highlighted, or select another Song
You can also specify the repeat
range by the following
procedure.
1 Highlight the measure
number using the [
then fast-forward the Song to
Point A using the [L]/[R]
buttons.
2 Highlight “Set A” using the
[
D] button, then press the [R]
button.
After specifying Point A, the
display for specifying Point B
is called up.
3 Specify Point B in the same
way as Point A.
.
U] button,
50
P-525 Owner’s Manual
Page 51
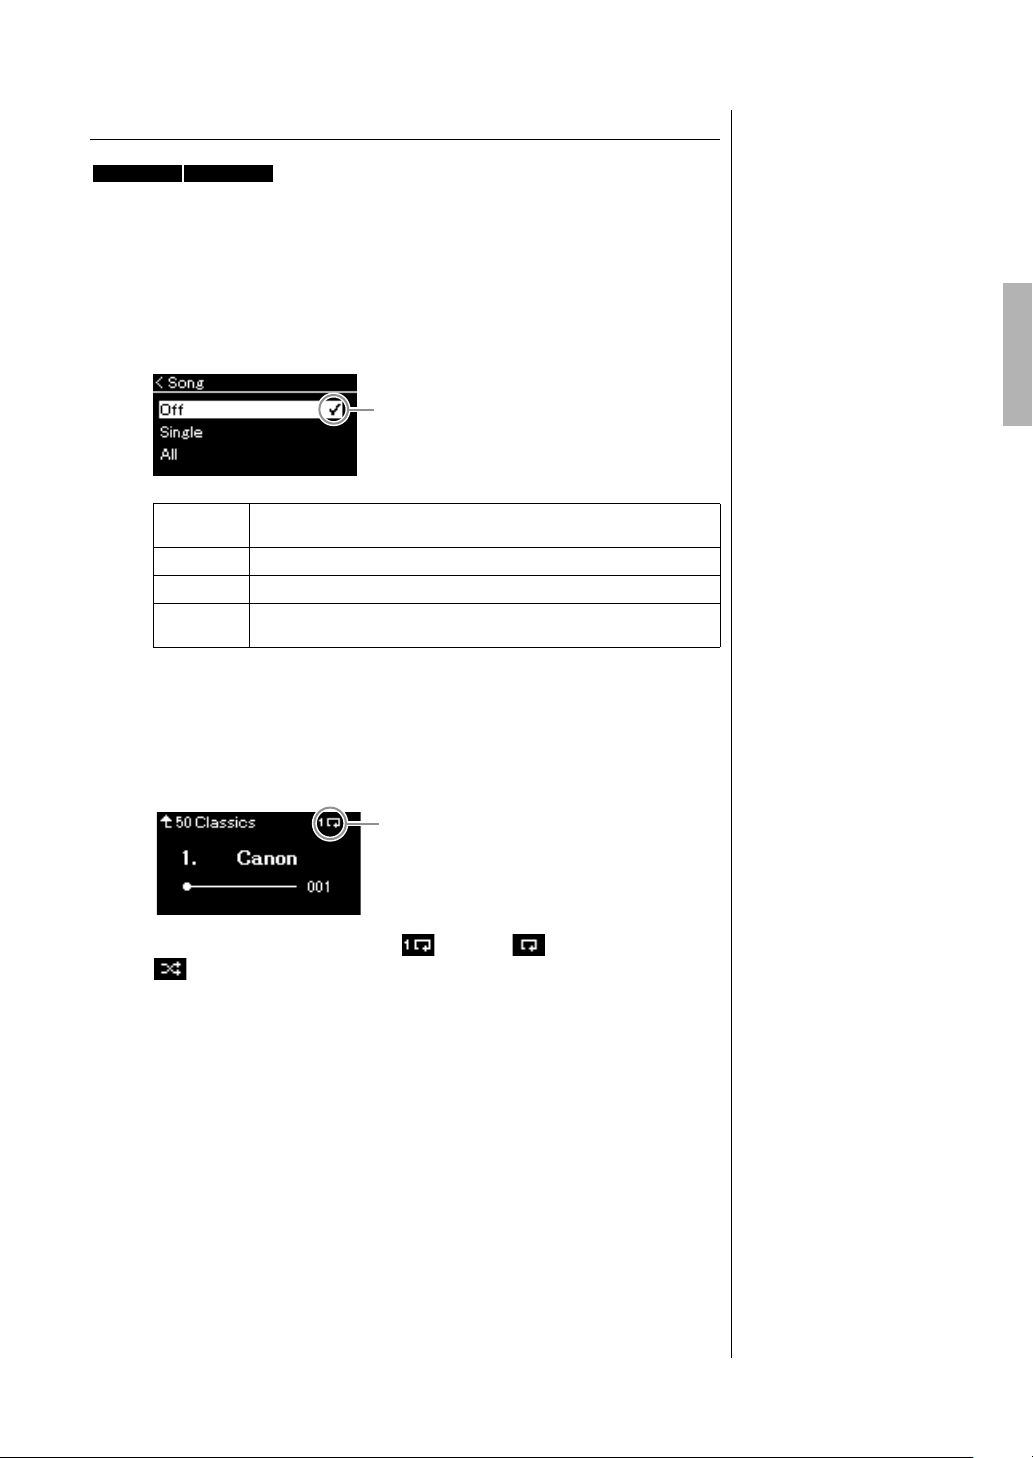
Song Repeat setting
MIDI Audio
Default setting: Off
Setting display
Checkmark
Icon
See page 49 for information on basic operations. Continuing from step 4 on
that page, follow the procedure below.
4-1. Select the desired Repeat type using the [L]/[R] buttons
in the setting display.
Playing and Practicing Songs
Off
Single
All
Random
Disables Repeat playback. The Song stops automatically when playback
of the selected Song reaches the end.
Plays through the selected Song repeatedly.
Continuously plays back all Songs in the selected category in order.
Continuously plays back all Songs in the selected category in random
order.
4-2. Press the [PLAY/PAUSE] button to start Repeat
playback.
Icons corresponding to each Repeat setting are shown on the Song
display.
While the Repeat setting is on, (Single), (All), or
(Random) is shown in the upper right corner of the Song display.
5. To turn off the Repeat function, press the [PLAY/PAUSE]
button again to stop playback, and then select “Off” in
step 4-1.
P-525 Owner’s Manual
51
Page 52
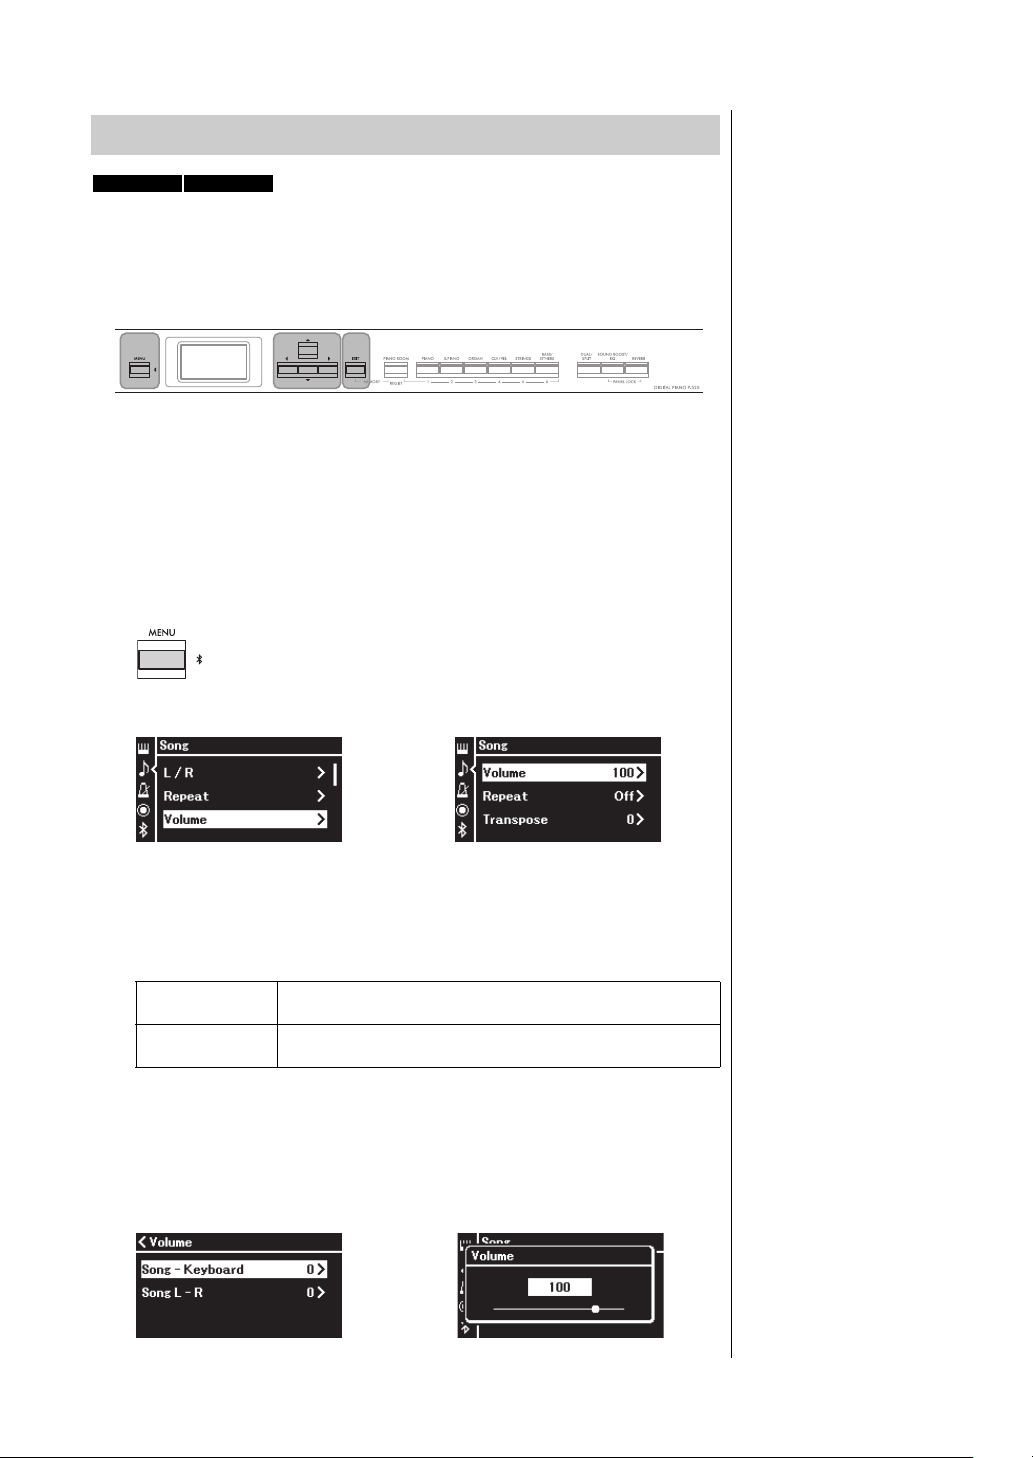
Playing and Practicing Songs
MIDI Audio
[U]/[D]/[L]/[R]
buttons
[EXIT] button[MENU] button
(When a MIDI Song is selected)
“Song” menu display
(When an Audio Song is selected)
“Song” menu display
NOTE
Some commercially available
music data (MIDI Song) play
back at extremely high levels.
When using such data, adjust
the “Song - Keyboard” setting.
(When a MIDI Song is selected) (When an Audio Song is selected)
Adjusting the Volume Balance
When a MIDI Song is selected, you can adjust the Volume balance between the
Song playback and the sound you are playing on the keyboard, or between the
Right and Left parts of the selected Song. When an Audio Song is selected, you
can adjust the Audio Song volume.
1. Select the desired Song beforehand. (page 45)
2. Press the [MENU] button repeatedly to call up the “Song”
menu display. Select “Volume”, and then press the [R]
button.
3. When a MIDI Song is selected, select “Song – Keyboard”
or “Song L – R” using the [U]/[D] buttons, then press the
[R] button to call up the setting display.
Song – Keyboard
Song L – R
When an Audio Song is selected, use the [L]/[R] buttons
to set the Audio playback volume. After setting the value,
go on to step 5.
P-525 Owner’s Manual
52
Adjust the Volume balance between the MIDI Song playback and
your keyboard performance.
Adjust the Volume balance between the Right and Left parts of the
selected MIDI Song.
Page 53
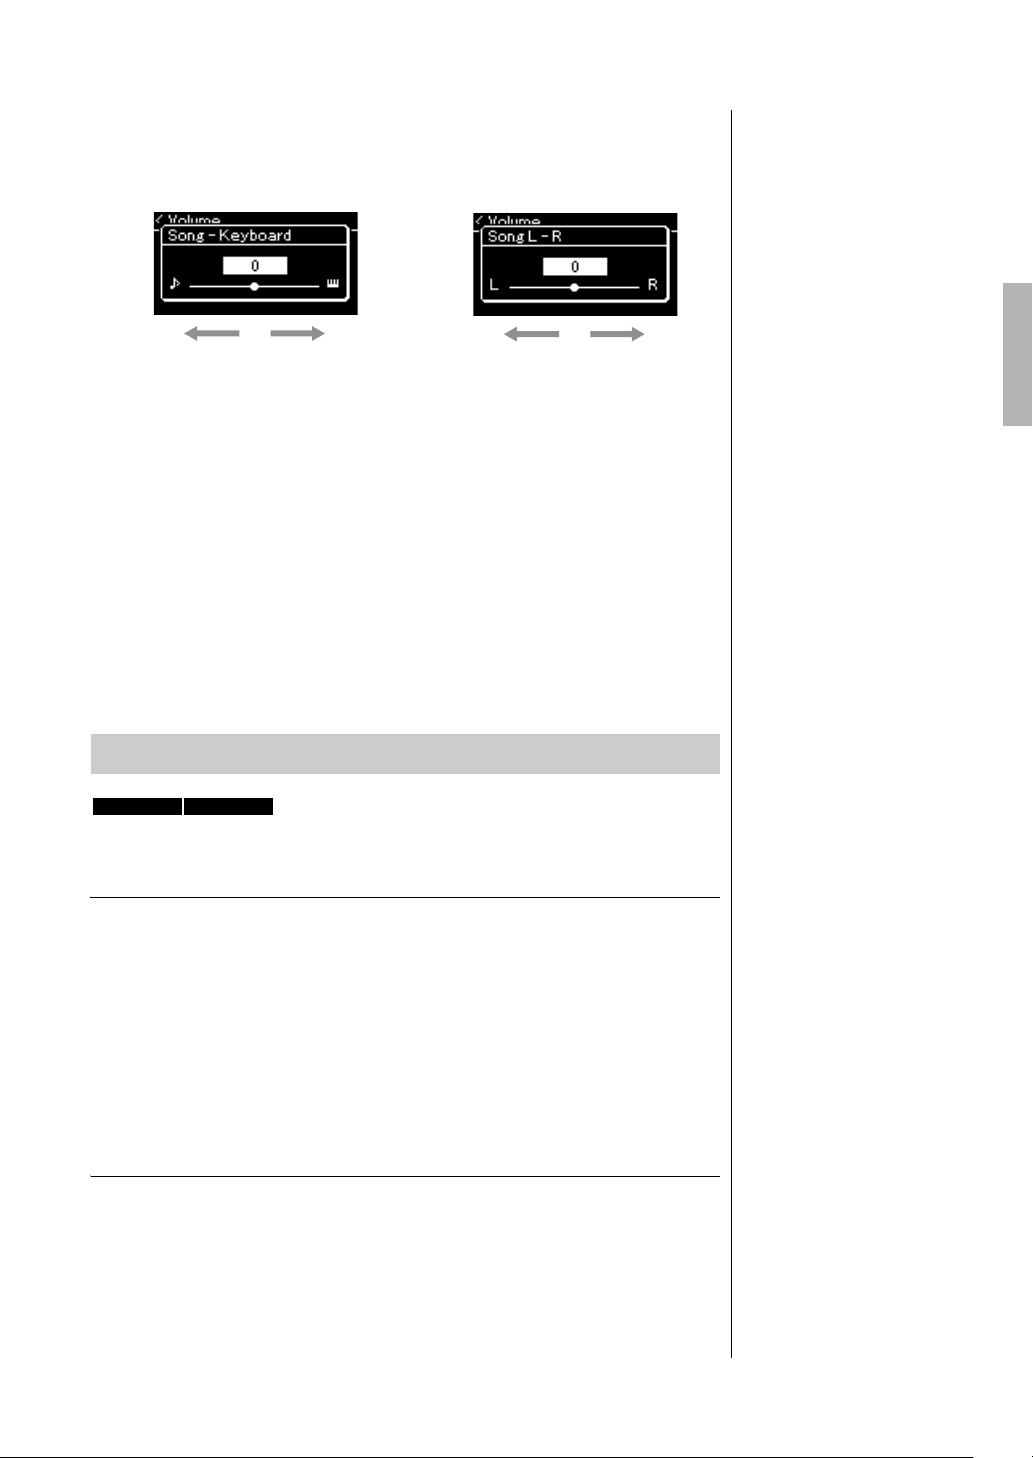
4. Adjust the Volume balance by using the [L]/[R] buttons.
In the case of
“Song – Keyboard”:
In the case of
“Song L – R”:
R part volume
will be lower.
L part volume
will be lower.
The volume of your
keyboard performance
will be lower.
The Song
playback volume
will be lower.
Song - Keyboard
Default setting: 0
Setting range: Key+64 – 0 –
Song+64
Song L - R
Default setting: 0
Setting range: L+64 – 0 –
R+64
NOTE
The selected parameters of
“Song – Keyboard” will be
maintained (Backup Setting)
even when the power is turned
off. Make sure not to set the
volume levels to minimum.
Otherwise the sound of
keyboard or songs will not be
played. You can change the
settings to maintain the
selected parameter or not. For
details, refer to “Backup
Setting” on page 90.
MIDI Audio
NOTE
The audio sound input from an
external device (page 54)
cannot be transposed.
5. Press the [EXIT] button twice to exit from “Song” menu
display.
Whenever you select another MIDI Song, the setting for “Song L – R” is
restored to its default setting. As for “Song – Keyboard” and Audio
Volume, selecting another Song will not reset the value.
Playing and Practicing Songs
Useful Playback Functions
Starting/pausing playback by using a pedal
You can assign the Song Play/Pause function (the same function as the [PLAY/
PAUSE] button on the front panel) to the included foot pedal or the footswitch
(sold separately) connected to the [AUX PEDAL] jack, or the center or left
pedal of the pedal unit (sold separately) connected to the [PEDAL UNIT] jack.
Press the [MENU] button repeatedly to call up the “System” menu display, and
then select “Pedal” → “Play/Pause” to make the assignment.
This is convenient for starting or pausing playback when you are performing
and can’t take your hands from the keyboard.
Transposing the pitch of a S ong
You can shift the pitch of Song playback up or down in semitone intervals. You
can change the settings via the “Song” menu display: Press the [MENU] button
repeatedly to call up the “Song” menu display → “Transpose” (page 98).
P-525 Owner’s Manual
53
Page 54
Recording Your Performance
MIDI
Audio
NOTE
You can re-record a specific
range of the MIDI Song or
change the tempo or the Voice
of the recorded Song. For
details, refer to “Other
Recording Techniques”
(page 62).
MIDI
MIDI
MIDI
Audio
This instrument allows you to record your performance in the following two methods.
• MIDI Recording
With this method, your performances are recorded as an SMF (format 0) MIDI file and saved to the
instrument or a USB flash drive. If you want to re-record a specific section or edit parameters such as Voice,
use this method. Also you can record your performance to each Track one by one. Since a MIDI Song can
be converted to an Audio Song after recording (page 70), you may want to use MIDI recording (with
overdubbing and multiple parts) to first create a complex arrangement you would not otherwise be able to
play live, then convert it to an Audio Song. This instrument allows you to record approximately 500 KB of
data per Song.
•Audio Recording
With this method, recorded performances are saved to a USB flash drive as an Audio file. Recording is done
without designating the recorded part. Since it is saved in stereo WAV format of normal CD quality
resolution (44.1 kHz/16 bit), it can be transmitted to and played on portable music players by using a
computer. Because the audio sound input* from the external device is also recorded, you can record your
keyboard performance along with the performance sound of the connected audio device, computer, or
smart device, etc. This instrument allows you to record up to 80 minutes per single recording.
* Audio sound input (Audio input sound):
Audio data sent to this instrument from the external devices such as a computer or a smart device, etc., when connecting the instrument
with the devices via [AUX IN] jack, [USB TO HOST] terminal, wireless LAN, or Bluetooth). For connection with these devices, refer to the
“Connecting to Other Devices” section from page 74.
For details about the difference between MIDI Songs and Audio Songs, refer to page 44.
Recording Methods
This chapter covers the following four methods. Note that the created data
format differs depending on the method, MIDI or Audio.
• Quick MIDI Recording ....................................... page 55
This method lets you start recording most quickly. Your performance will be
recorded and saved to the “User” category (page 45) in this instrument’s
internal memory.
• MIDI Recording — Independent Tracks ............ page 57
This lets you record the right, left and extra parts separately. Since you can
record the left part while playing back the right, this is useful for recording both
parts of a duet. Since you can record up to sixteen parts separately, record the
performance of each instrument part one by one and create fully orchestrated
compositions.
• MIDI Recording to the USB Flash Drive ............ page 59
This method is useful when you want to overwrite the already recorded MIDI
Song in the USB flash drive or create a New MIDI Song on the USB flash drive.
• Audio Recording to the USB Flash Drive ...........page 61
This method lets you record your performance as Audio data to the USB flash
drive connected to the [ ] (USB TO DEVICE) terminal.
P-525 Owner’s Manual
54
Page 55
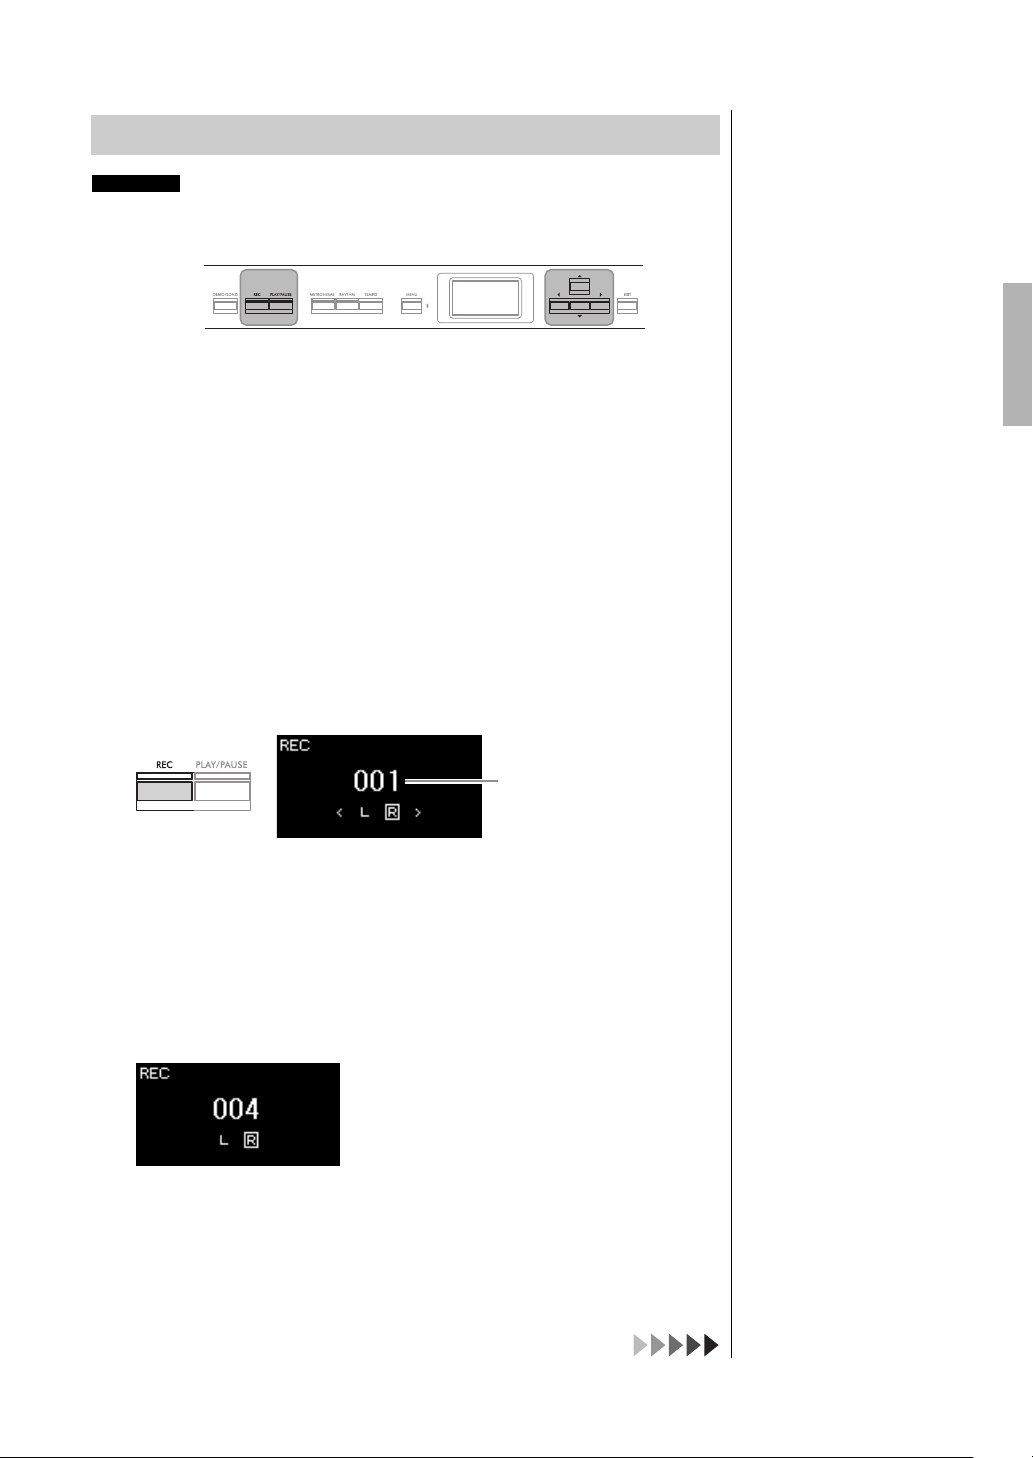
Quick MIDI Recording
MIDI
[REC] button [U]/[D]/[L]/[R]
buttons
[PLAY/PAUSE]
button
NOTE
If you want to record the lefthand and right-hand parts
individually, refer to “MIDI
Recording—independent
Tracks” (page 57), since the
Recording method here
assumes that both the left and
right parts are being recorded
together.
NOTE
• You can use the Metronome/
Rhythm while recording.
While the Metronome sound
cannot be recorded, the
Rhythm sound can. Make
sure to start enter the
Recording mode before
starting Rhythm playback,
since entering the Recording
mode during playback of the
Rhythm stops its playback.
• The “Song – Keyboard”
Volume Balance (page 52)
will not be recorded.
• With MIDI recording, the
performance will be recorded
to Track 1. However, in the
Dual/Split/Duo mode, the
tracks assigned for recording
and the tracks actually used
for recording are different.
For details refer to
“Recording Track
Assignment” on page 57.
NOTE
Pressing and holding the [REC]
button for a second will call up
the display which lists the
Recording Target Songs. In this
case, select “New Song” then
press the [R] button. For
details, refer to the table on
page 60.
NOTE
• When a Rhythm (page 43) is
selected, press the
[RHYTHM] button to start
Rhythm playback and MIDI
recording simultaneously.
• If desired, you can change
the Voice, turn the Dual/Split
on, or recall the settings
registered to the Registration
Memory.
Measure number
“REC” display
“REC” display (during recording)
This method is the quickest way to start recording.
1. Make the necessary settings such as Voice selection and
time signature.
For details on how to select a Voice, refer to page 20.
Before starting the Recording operation, turn Dual/Split/Duo on or off as
desired and select a Reverb/Chorus/Effect type as desired.
Since you can also use the Metronome/Rhythm while recording, set the
tempo and time signature of the Metronome/Rhythm (page 41) before
starting recording.
2. Press the [REC] button to enable Recording ready.
The blank new Song for recording is automatically set.
The [PLAY/PAUSE] button will flash at the current tempo.
To exit from the Recording mode, press the [REC] button again.
Recording Your Performance
3. Play the keyboard to start recording.
When you wish to record an empty section at the start of the Song, press
the [PLAY/PAUSE] button to start recording.
4. After you finish your performance, press the [REC] button
again to stop recording.
This operation exits from the Recording mode and calls up the display for
saving the recorded performance data.
P-525 Owner’s Manual
55
Page 56
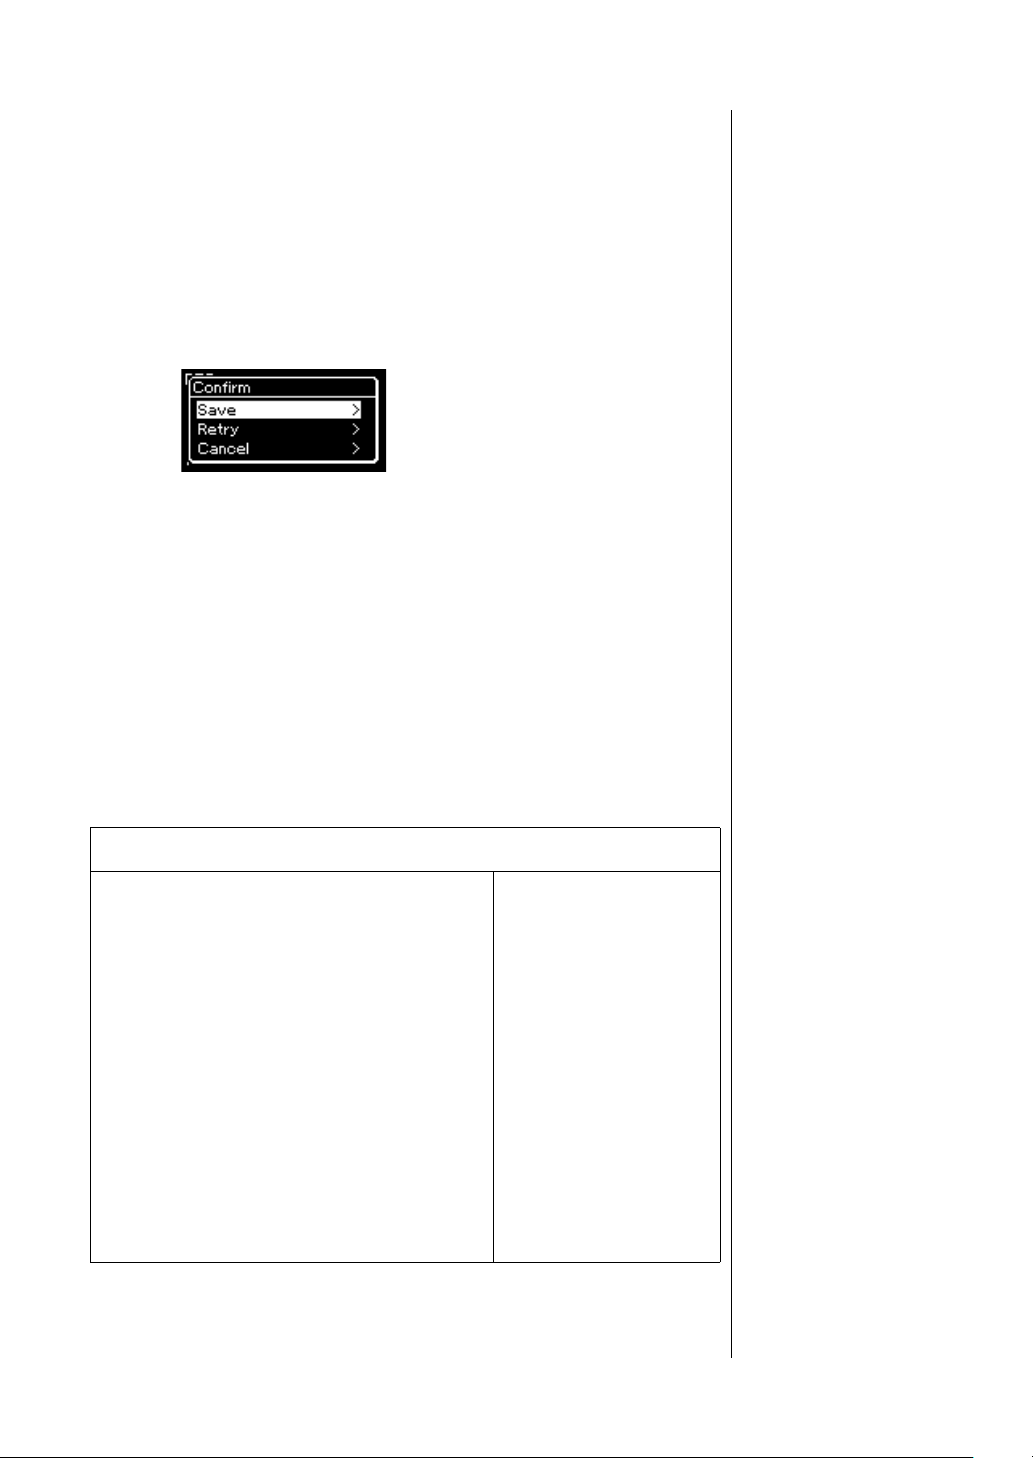
Recording Your Performance
NOTICE
The recorded MIDI Song will be
lost if you change to another
Song or you turn the power off
without executing the Save
operation.
Renaming the recorded
Song
The recorded Songs are
named automatically, but you
can rename Songs as you like
(page 71).
NOTE
Refer to page 68 for how to
delete a Song.
NOTE
Parameter settings other than
Voice and Tempo, such as note
data, pedal (Damper/Soft/
Sostenuto) data, octave setting
and time signature, cannot be
changed after recording.
5. Select “Save” or “Retry” or “Cancel” for the recorded
performance in the “Confirm” display.
• If you want to save the recorded performance, select “Save,” then press
R] button.
the [
• If you are not satisfied with your performance and want to record
again, highlight “Retry” then press the [
from step 3.
• If you do not want to save the recorded data, highlight “Cancel” then
press the [
R] button.
After the Save operation is completed, the display shows “Save
Completed” then returns to the Song display. The recorded Song will be
named “USERSONGxxx” (xxx: number) and saved in the “User”
category.
R] button. Try recording again
6. To hear the recorded performance, press the [PLAY/
PAUSE] button.
Data that can be recorded to MIDI Songs
Data for each Track
• Note data (your keyboard performance)
•Voice selection
• Pedal operations (Damper/Soft/Sostenuto)
•Reverb Depth
•Chorus Depth
•Effect Type
•Effect Depth
• Sound brightness — “Brightness”
• Resonance effect setting — “Harmonic Cont”
•Octave
• Volume setting for each Voice — “Volume”
•Pan for each Voice
•Detune
• Touch Sensitivity — “Touch Sens.”
• Grand Expression Modeling data
P-525 Owner’s Manual
56
Data commonly for all
Tr ac ks
•Scale
•Tempo
•Time Signature
• Reverb Type
•Chorus Type
Page 57
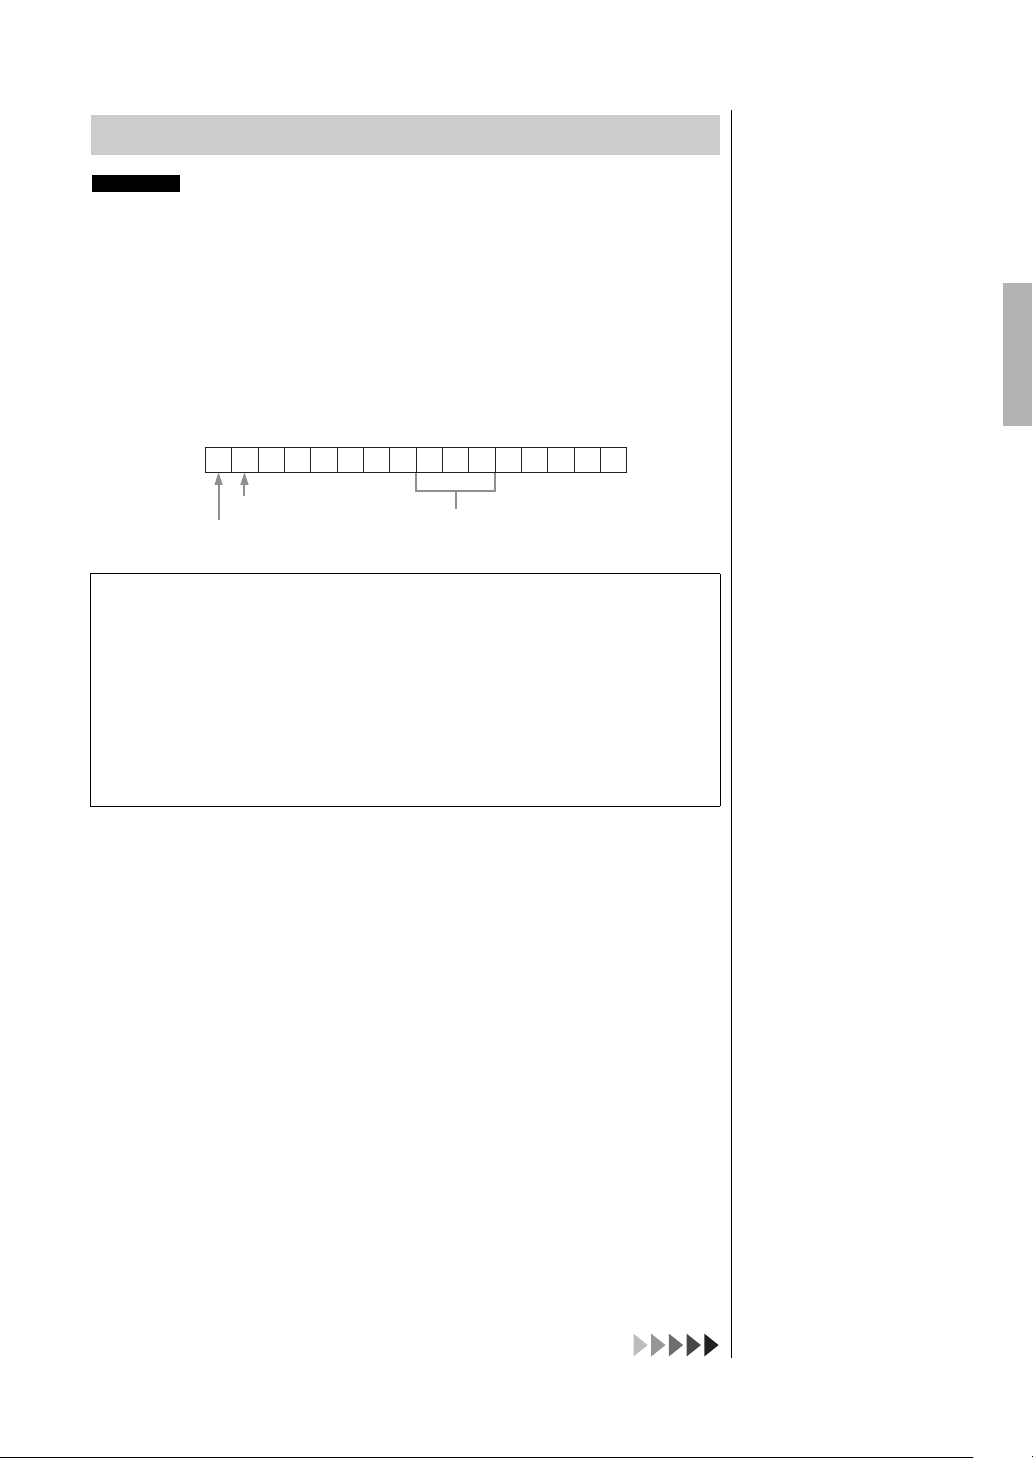
MIDI Recording — Independent Tracks
MIDI
NOTE
If you want to record your
performance to the USB flash
drive or you want to add the
recording to the MIDI Song in
the USB flash drive, refer to
“MIDI Recording to the USB
flash drive” (page 59).
12345678910111213141516
Example:
Right-hand part
Left-hand part
Rhythm
Recording Track
Assignment
•When recording the Rhythm,
you cannot freely select
desired tracks. The Rhythm is
recorded to Tracks 9 – 11.
•When Dual/Split/Duo is on, only
the R1 Voice performance will
be recorded to the selected
Track, and the R2 Voice
performance will be recorded
to the Track number which is 6
plus the selected Track, and
the L Voice performance of
Split/Duo will be recorded to
the Track number which is 3
plus the selected Track.
Rhythm playback will be
recorded to Tracks 9 – 11.
With MIDI Recording, you can create a MIDI Song consisting of 16 tracks by
recording your performance to each track one by one. In recording a piano
piece, for example, you can record the right-hand part to Track 1 then record
the left-hand part to Track 2, allowing you create a complete piece which may
be difficult to play live with both hands together. To record a performance with
Rhythm playback, for example, record Rhythm playback, then record melodies
to Track 1 while listening to the already recorded Rhythm playback. In this way,
you can create an entire Song which would otherwise be difficult, or even
impossible, to play live.
When you want to record a new track of an already recorded MIDI Song:
1. Execute the same operation in step 1 in “Quick MIDI Recording”
(page 55).
2. Select the target MIDI Song (steps 1–4 on page 45).
3. Press and hold the [REC] button for a second to call up the display
which lists recording target Songs (page 59).
4. Select the 4th item (the selected MIDI Song), press the [
and then go to step 2 on this page.
R] button,
Recording Your Performance
1. Execute the same operations as in step 1 and step 2 on
page 55 to enter the Recording mode with a new blank
Song selected.
2. Use the [L]/[R] buttons to select a Recording Track.
Rhythm cannot be added to a recorded Song. When you want to record
Rhythm, make sure to record the Rhythm playback first.
When you want to record the right-hand part, highlight “R” (Track 1).
When you want to record the left-hand part, highlight “L” (Track 2).
Alternately, when you want to record your performance to Tracks 3 – 16,
call up the desired one by pressing the [
If the Rhythm playback was recorded first before other tracks, it is
automatically recorded to one of the Tracks 9 – 11 (or all the three tracks).
If this is the case, select the desired track for recording from any except
for these tracks.
L]/[R] buttons repeatedly.
P-525 Owner’s Manual
57
Page 58
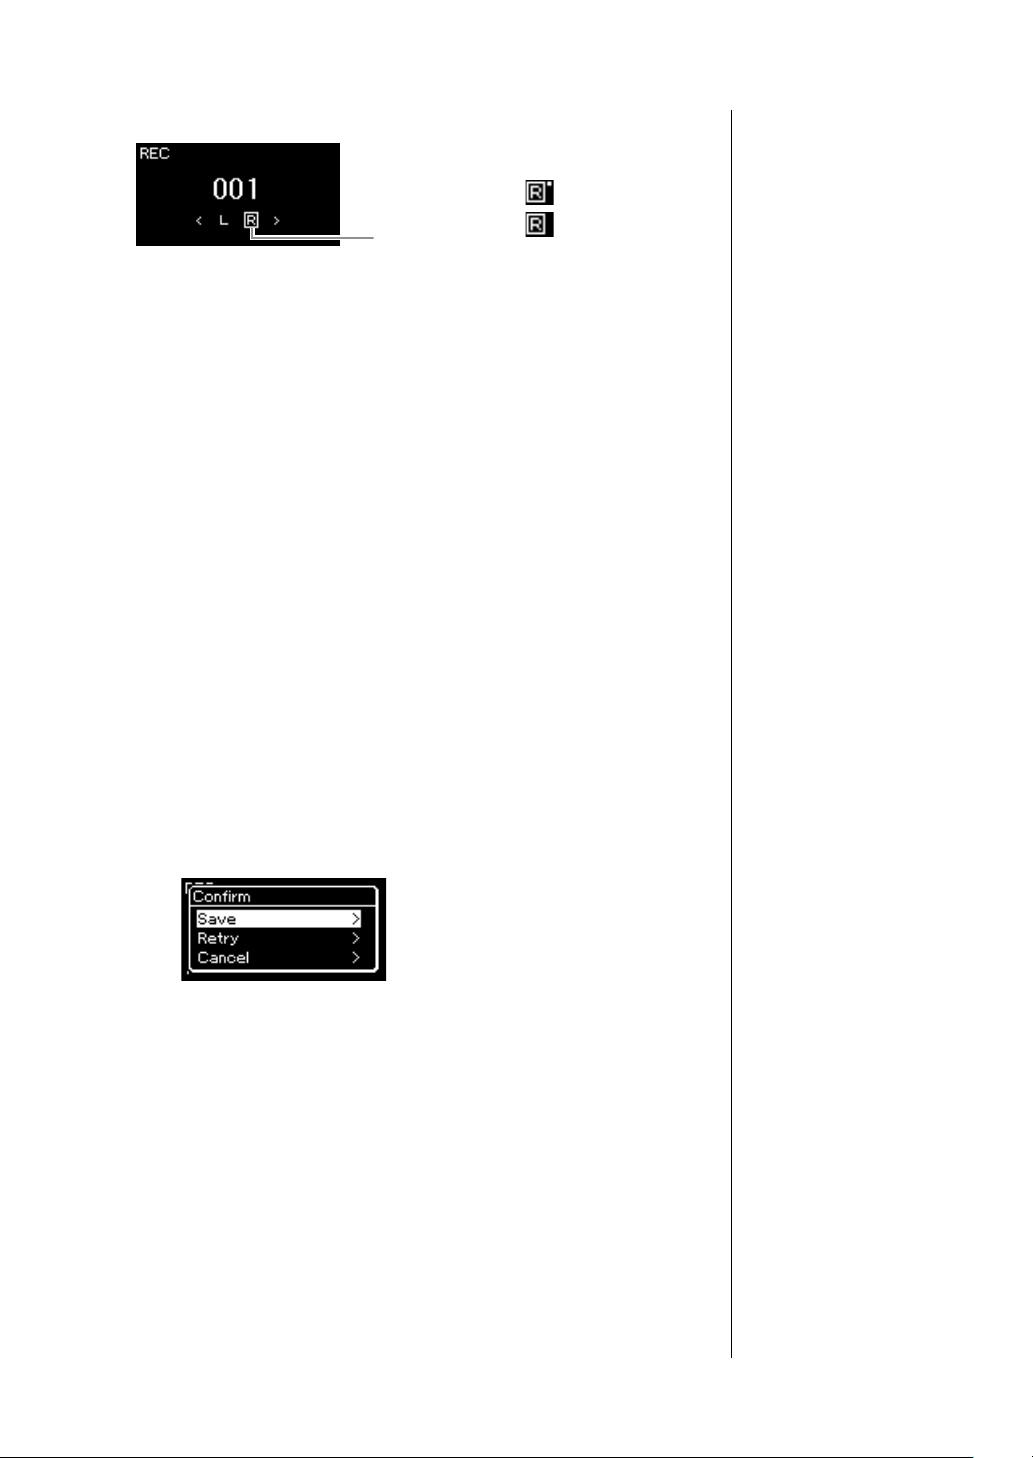
Recording Your Performance
Recording Track
Contains data.
Contains no data.
Track Data Status
NOTICE
Note that recording your
performance to a Track
containing data will overwrite
the previously recorded data.
NOTE
NOTICE
The recorded MIDI Song will be
lost if you change to another
Song or you turn the power off
without executing the save
operation.
NOTE
After saving your recorded
performance, if you want to
record it again, refer to “Rerecording a MIDI Song in
parts” (page 62).
Renaming the recorded
Song
The recorded Songs are
named automatically, but you
can rename Songs as desired
(page 71).
NOTE
For instructions on rewinding,
fast-forwarding and returning
to the top of the Song during
Song playback, refer to
page 47.
3. Start recording.
Play the keyboard to start recording.
When you want to record the Rhythm playback first, press the
[RHYTHM] button to start recording.
When you want to record an empty section at the start of the Song, press
the [PLAY/PAUSE] button to start recording.
4. After you finish your performance, press the [REC] button
to stop recording.
This operation exits from the Recording mode and calls up the display for
saving the recorded performance data.
5. If you want to save the recorded performance, press the
[R] button to execute the Save operation while “Save” is
highlighted.
• If you save the recorded performance, select “Save,” then press the [R]
button.
• If you are not satisfied with your performance and want to record
again, highlight the cursor to “Retry” then press the [
recording again from step 3.
• If you do not want to save the recorded data, highlight “Cancel” then
press the [
R] button.
R] button. Try
Because bass accompaniment
of the Rhythm sounds only
when playing the keyboard, in
order to record the bass
accompaniment, it is necessary
to record keyboard
performance with it as well.
After the Save operation is completed, the display shows “Save
Completed” then returns to the Song display. The recorded Song will be
named “USERSONGxxx” (xxx: number) and saved in the “User”
category.
6. To hear the recorded performance, press the [PLAY/
PAUSE] button.
P-525 Owner’s Manual
58
Page 59
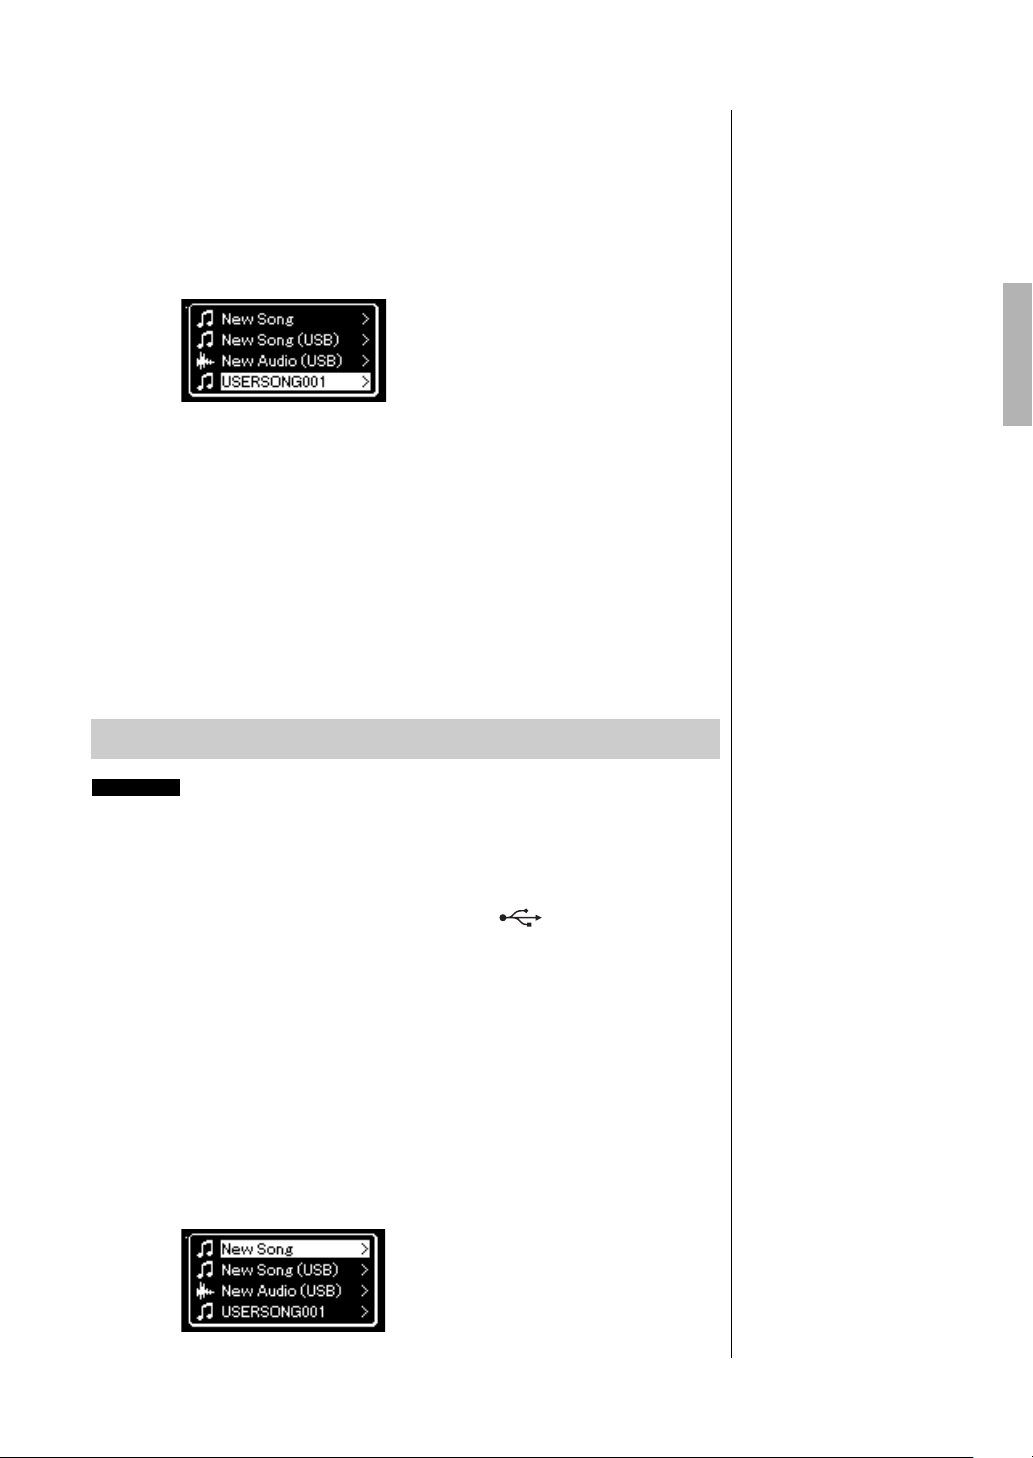
7. To record another Track, enter the Song Recording mode
NOTICE
Note that recording your
performance to a Track
containing data will overwrite
the previously recorded data.
NOTE
Refer to page 68 for how to
delete a Song. Refer to “Track
Delete” on page 99 for how to
delete a track.
MIDI
NOTE
• To connect a USB flash drive,
be sure to read the section
“Connecting USB Devices”
on page 75.
• Before starting the Recording
operation, check the
remaining memory capacity
of the USB flash drive.
“System” menu: “Utility”
“USB Properties” (page 106).
again.
7-1. Press and hold the [REC] (Record) button for a second.
The Recording Target Songs will be listed on the display.
7-2. Use the [D] button to select existing MIDI Song (at the
bottom of the list), then press the [
You can check whether or not each Track contains recorded data by the
indication that appears at the upper right of each Track. For details on the
indication, refer to “Track Data Status” on page 58.
R] button.
8. Record your performance to another track by repeating
steps 2 – 6 of this section.
In step 2, select a track which has no recorded data. In step 3, play the
keyboard while listening to the already recorded data.
Recording Your Performance
MIDI Recording to the USB Flash Drive
These instructions describe how to overwrite an already recorded MIDI Song
in the USB flash drive or how to create a New MIDI Song on the USB flash
drive.
1. Connect the USB flash drive to the [ ] (USB TO
DEVICE) terminal.
2. Select a MIDI Song as Recording target, then enter the
Recording mode.
2-1. If you want to record an additional Track to the already
recorded MIDI Song, select the desired MIDI Song in the USB
flash drive.
If you want to record from scratch, skip this step.
2-2. Press and hold the [REC] button for a second to call up the
display which lists the Recording Target Songs.
P-525 Owner’s Manual
59
Page 60
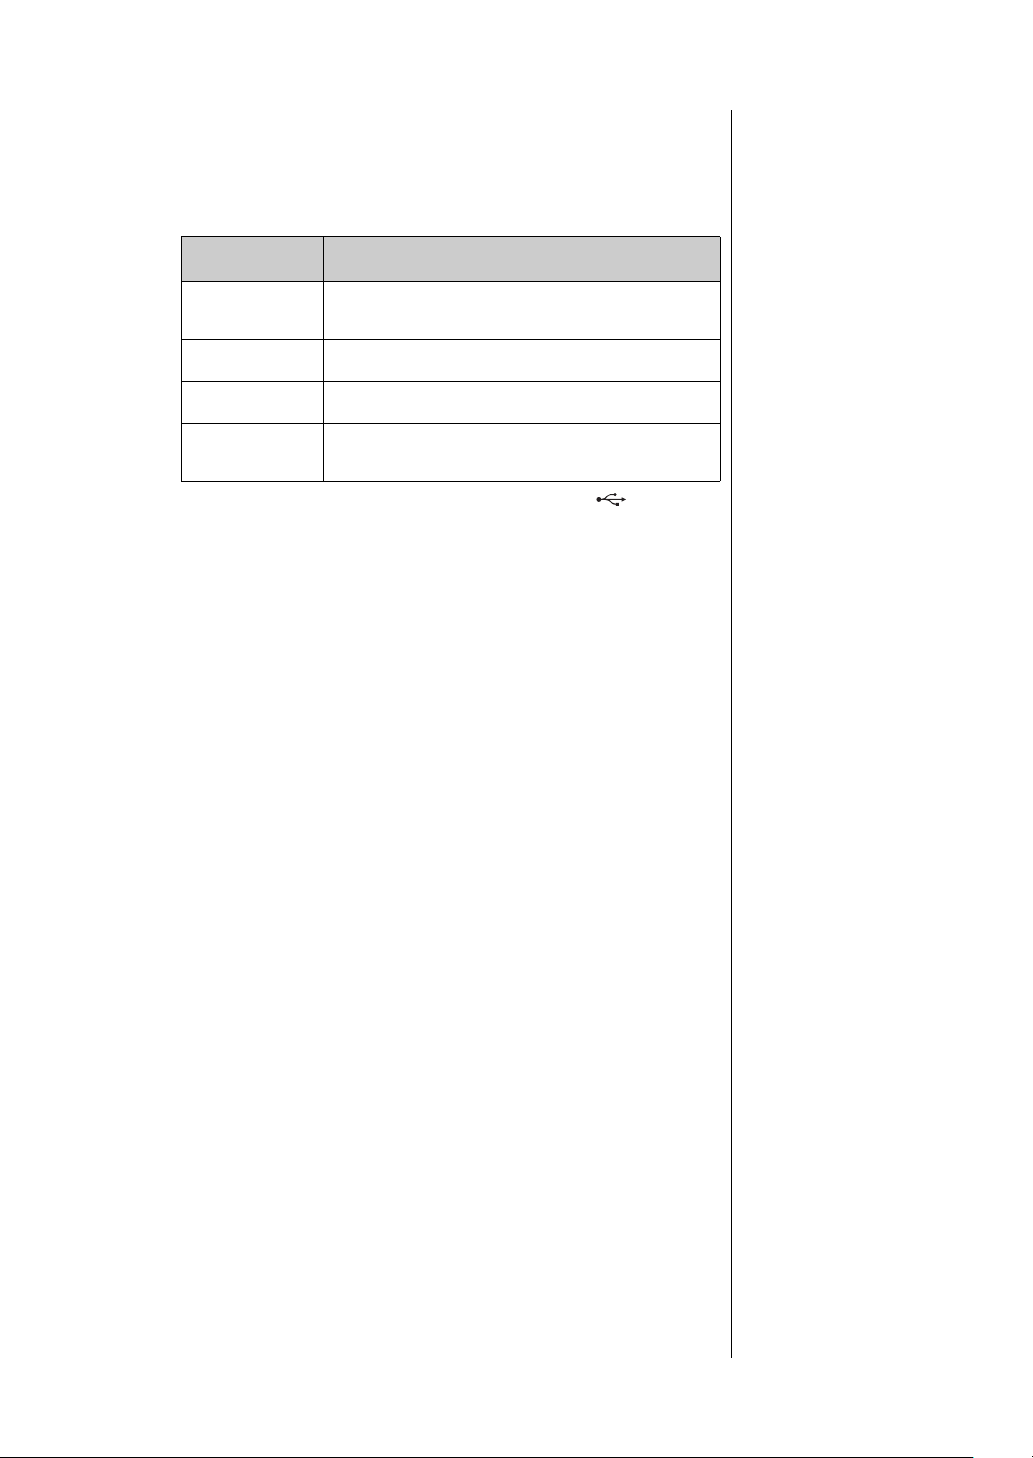
Recording Your Performance
NOTICE
Note that recording your
performance to a Track
containing data will overwrite
the previously recorded data.
NOTE
The time signature and tempo
cannot be changed when
replacing the part of an
existing MIDI Song.
2-3. From the Recording Target Songs, select “New Song (USB)”
or the MIDI Song selected in step 2-1 (4th item below) using
U]/[D] buttons, then press the [R] button to enter the
the [
Recording mode.
Recordin g Target
Song
New Song Select this when you want to record your performance to a
New Song (USB)* Select this when you want to record your performance to a
New Audio (USB)* Select this when you want to record your performance to
XXXXXX (MIDI Song
selected in step 2-1
above)**
* Can be selected only when the USB flash drive is connected to the [ ] (USB TO
DEVICE) terminal.
** Will not be shown when an already recorded MIDI Song is not selected in step 2-1 above,
or when a Preset Song is selected in step 2-1.
blank MIDI Song and save to “User” category in this
instrument’s internal memory.
blank MIDI Song and save to the USB flash drive.
blank audio data and save to the USB flash drive.
Select this when you want to record additionally to/overwrite
the currently selected MIDI Song.
Description
3. Execute the Recording operation, then save the recorded
performance.
• When you want to record additionally to the currently
selected MIDI Song, or record to a specified track on a
blank MIDI Song:
Execute steps 2 – 8 in “MIDI Recording—Independent Tracks” on
page 57.
• When you want to quick record to a blank MIDI Song:
Execute steps 3 – 6 in “Quick MIDI Recording” on page 55.
P-525 Owner’s Manual
60
Page 61
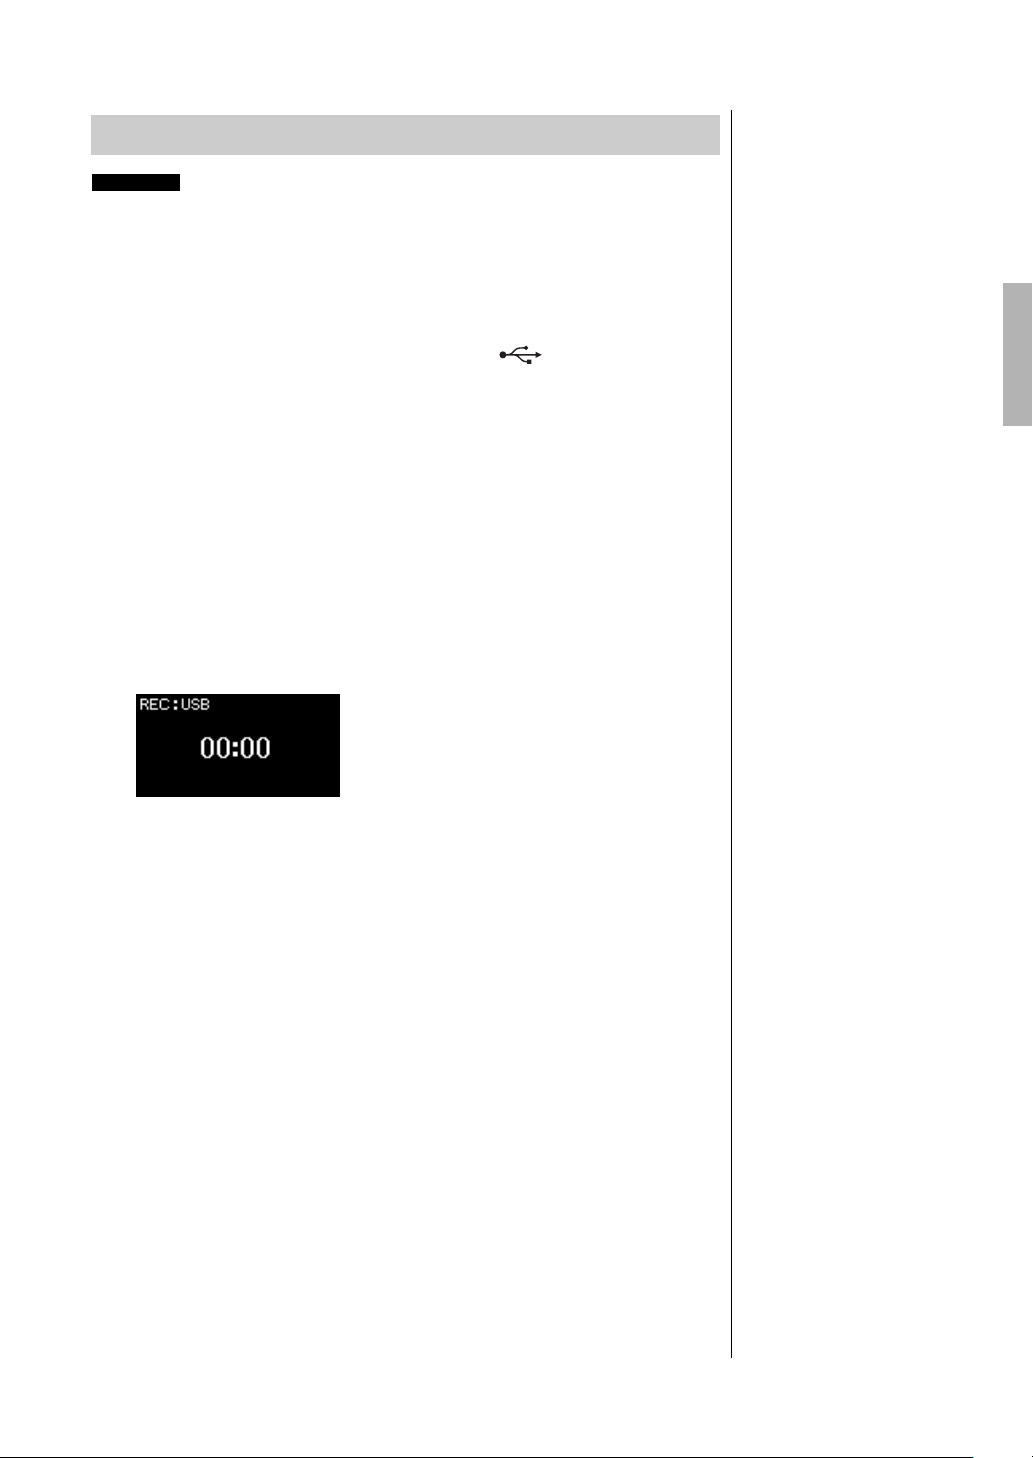
Audio Recording to the USB Flash Drive
Audio
NOTE
To connect a USB flash drive,
be sure to read the section
“Connecting USB Devices” on
page 75.
NOTE
Before starting the Recording
operation, check the remaining
memory capacity of the USB
flash drive. “System” menu:
“Utility” “USB Properties”
(page 106).
NOTE
With Audio recording, distorted
sound may be produced if the
Voice Volume is set to the value
higher than the default setting.
Make sure to set the Voice
Volume to the default value or
less before recording from the
“Voice” menu display: “Voice
Edit” “Volume” (page 95).
These instructions describe how to record your performance as audio data.
Note that an audio file to which your performance is to be recorded can be
saved only to a USB flash drive. This is why you should prepare your USB flash
drive device before starting the Recording operation.
1. Connect the USB flash drive to the [ ] (USB TO
DEVICE) terminal.
2. Press and hold the [REC] (Record) button for a second to
call up the display which lists the Recording Target Songs.
3. Use the [U]/[D] buttons to select “New Audio (USB)” then
press the [R] button.
4. Execute steps 3 – 6 in “Quick MIDI Recording” (page 55).
Unlike with MIDI Recording, the elapsed time is shown on the display
while Audio Recording is being executed.
Recording Your Performance
Along with Audio recording, other audio input sounds (via Bluetooth,
[AUX IN] etc.) from the external device (page 54) are also recorded.
P-525 Owner’s Manual
61
Page 62
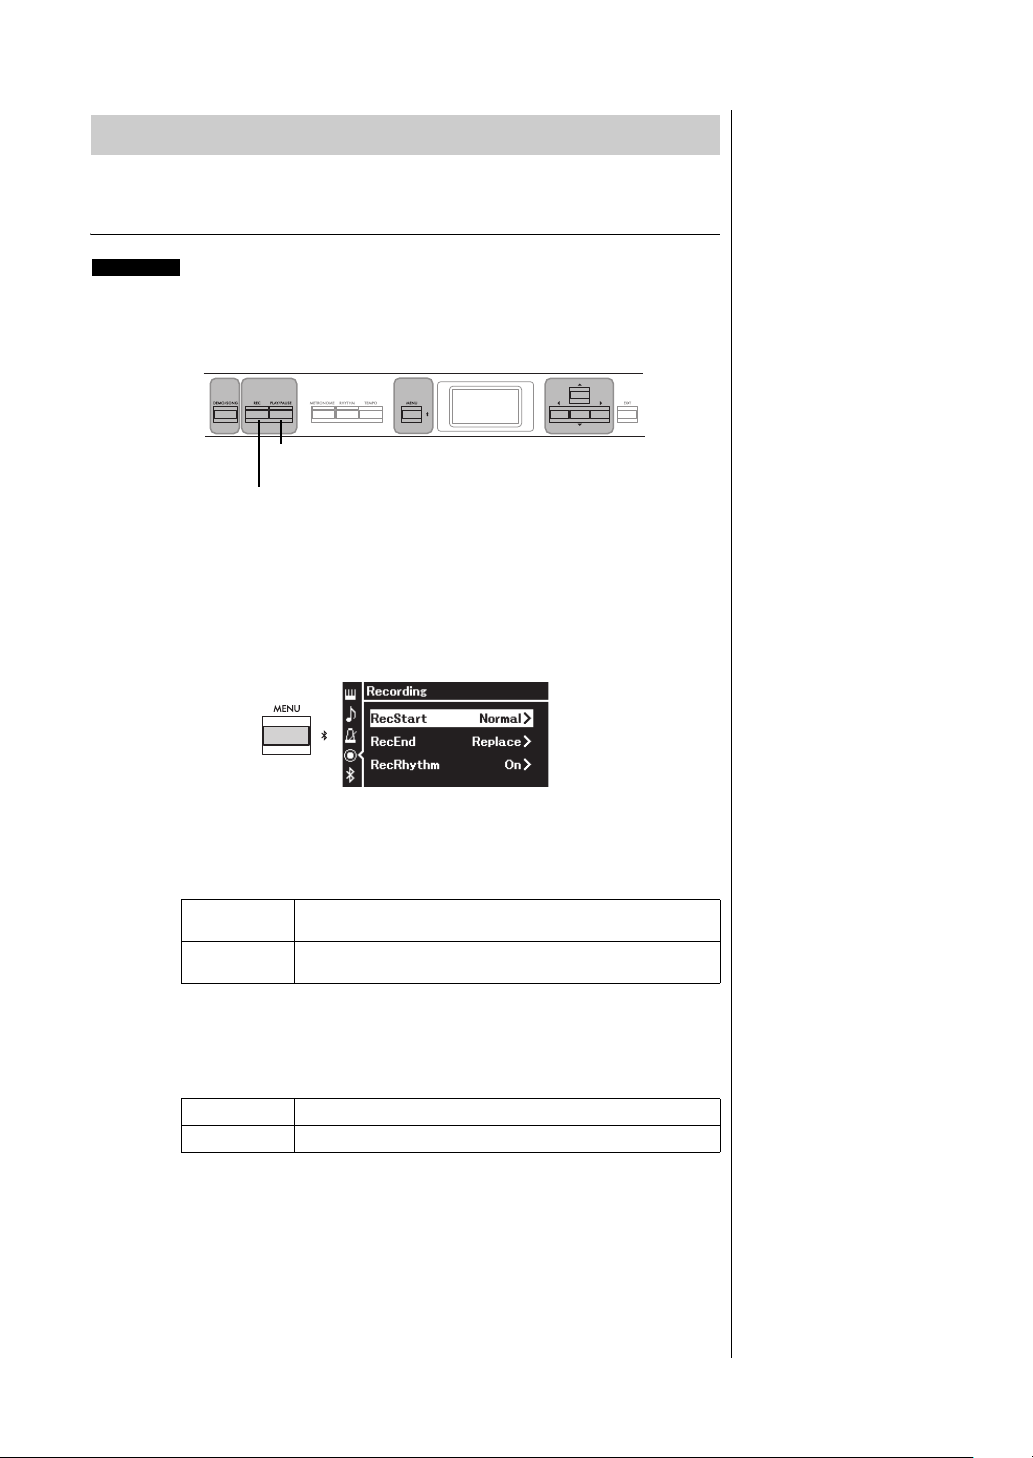
Recording Your Performance
MIDI
[DEMO SONG]
button
[U]/[D]/[L]/[R]
buttons
[PLAY/PAUSE]
button
[MENU] button
[REC] button
Other Recording Techniques
Re-recording a MIDI Song in parts
You can re-record a specific range of the MIDI Song. This is useful when
editing MIDI Songs you have recorded yourself.
1. Set the parameters which determine how recording starts
and stops.
1-1. Press the [MENU] button repeatedly to call up the
“Recording” menu display.
P-525 Owner’s Manual
62
1-2. Use the [U]/[D] buttons to select “RecStart,” then select the
value which determines how recording starts by using the [
button.
Normal
KeyOn
The already recorded data will be replaced with the new one as
soon as recording starts.
The already recorded data will be maintained until you press a
key, and actual recording starts as soon as you press a key.
1-3. Use the [U]/[D] buttons to select “RecEnd,” then select the
value which determines how recording stops by using the [
button.
The data after the point you stop recording will also be erased.
The data after the point you stop recording will remain.
Replace
PunchOut
R]
Default setting: Normal
R]
Default setting: Replace
Page 63
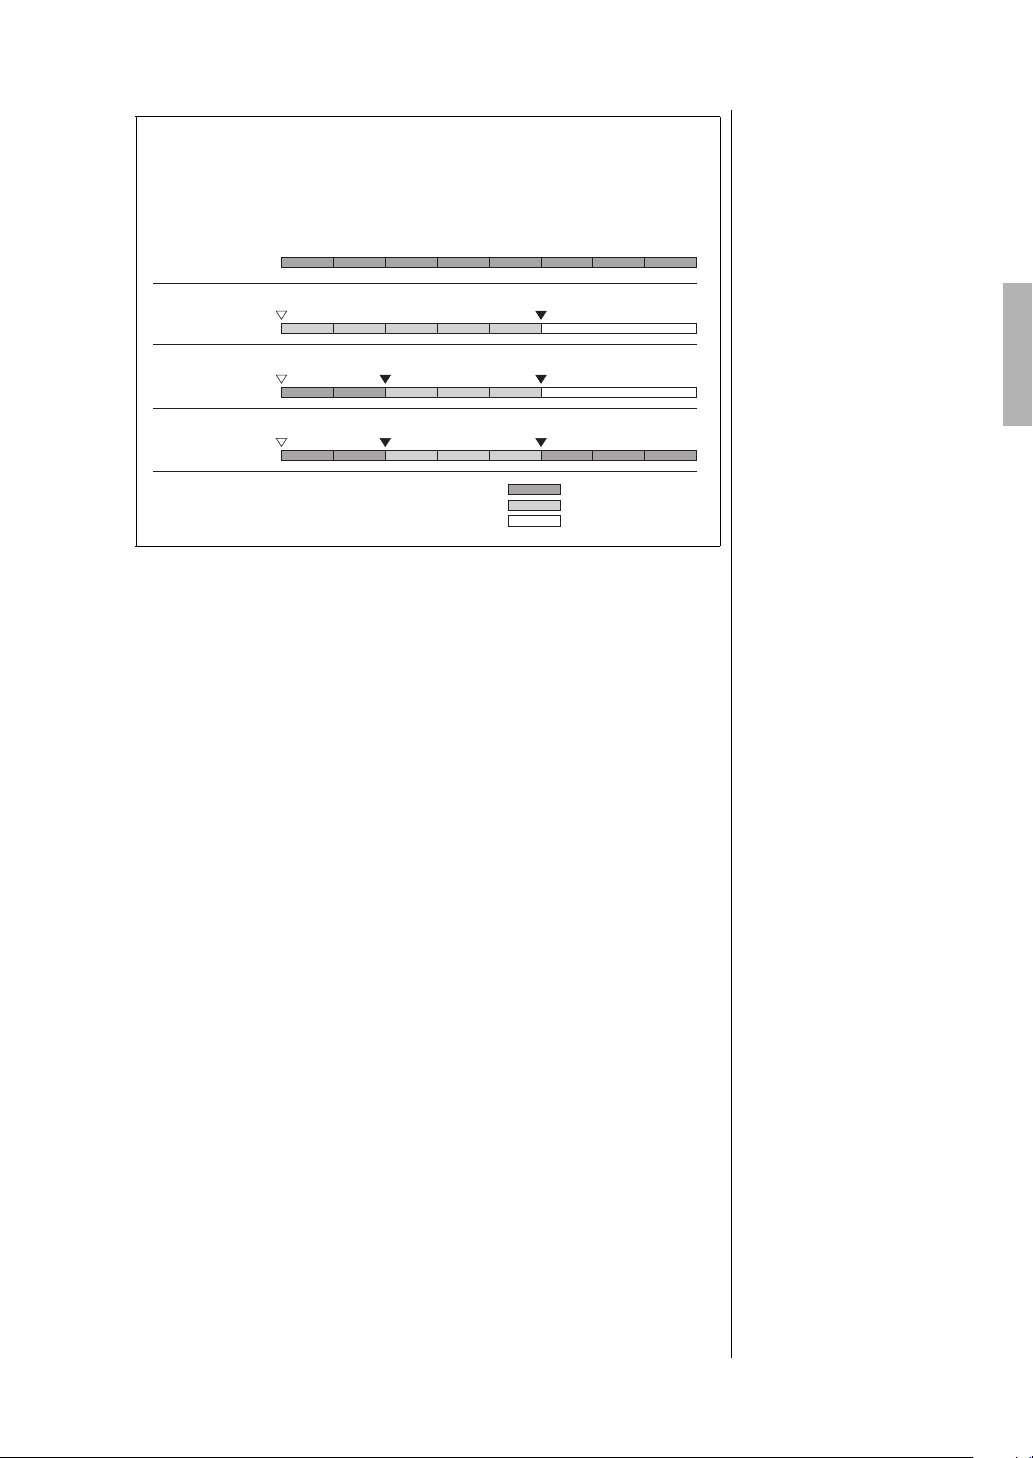
Examples of re-recording with various settings for starting/
12345678
Recording Start setting
Recording Stop setting
12345 Deleted
Deleted
Start overwrite recording
Previously recorded original data
Stop recording
Previously recorded original data
Newly overwritten data
Deleted data
Normal
Replace
12345
Play back original data
Play back original data
Play the keyboard to start
overwrite recording
Play the keyboard to start
overwrite recording
KeyOn
Replace
KeyOn
Punch Out
12345678
*1 To avoid overwriting measures 1 – 2, start recording from measure 3.
*2 To stop recording, press the [REC] button at the end of measure 5.
*1 *2
Stop recording
*2
Stop recording
*2
stopping recording
This instrument features several different ways you can re-record a MIDI
Song.
2. Press the [DEMO/SONG] button to call up the Song
category list display.
Recording Your Performance
3. Select the desired MIDI Song.
For instructions, refer to page 45.
4. Specify the start point you wish to re-record.
Use the [L]/[R] buttons to move the playback position (measure
number) to the desired point. Alternately, press the [PLAY/PAUSE]
button to start playback, then press the [PLAY/PAUSE] button again
slightly prior to the desired point.
If necessary, select the settings (Voice and other parameters).
The time signature cannot be changed when replacing the part of an
existing Song.
5. Press and hold the [REC] button for a second to call up the
display which lists the Recording Target Songs, then select
the 4th item (Song selected in step 3), then press the [R]
button to enter the recording mode.
6. Use the [L]/[R] buttons to select a Track for re-recording.
7. Play the keyboard or press the [PLAY/PAUSE] button to
start recording.
8. Press the [REC] button to stop recording.
9. Save the recorded performance by following step 5 on
10.To hear the recorded performance, press the [PLAY/
page 56.
PAUSE] button.
P-525 Owner’s Manual
63
Page 64
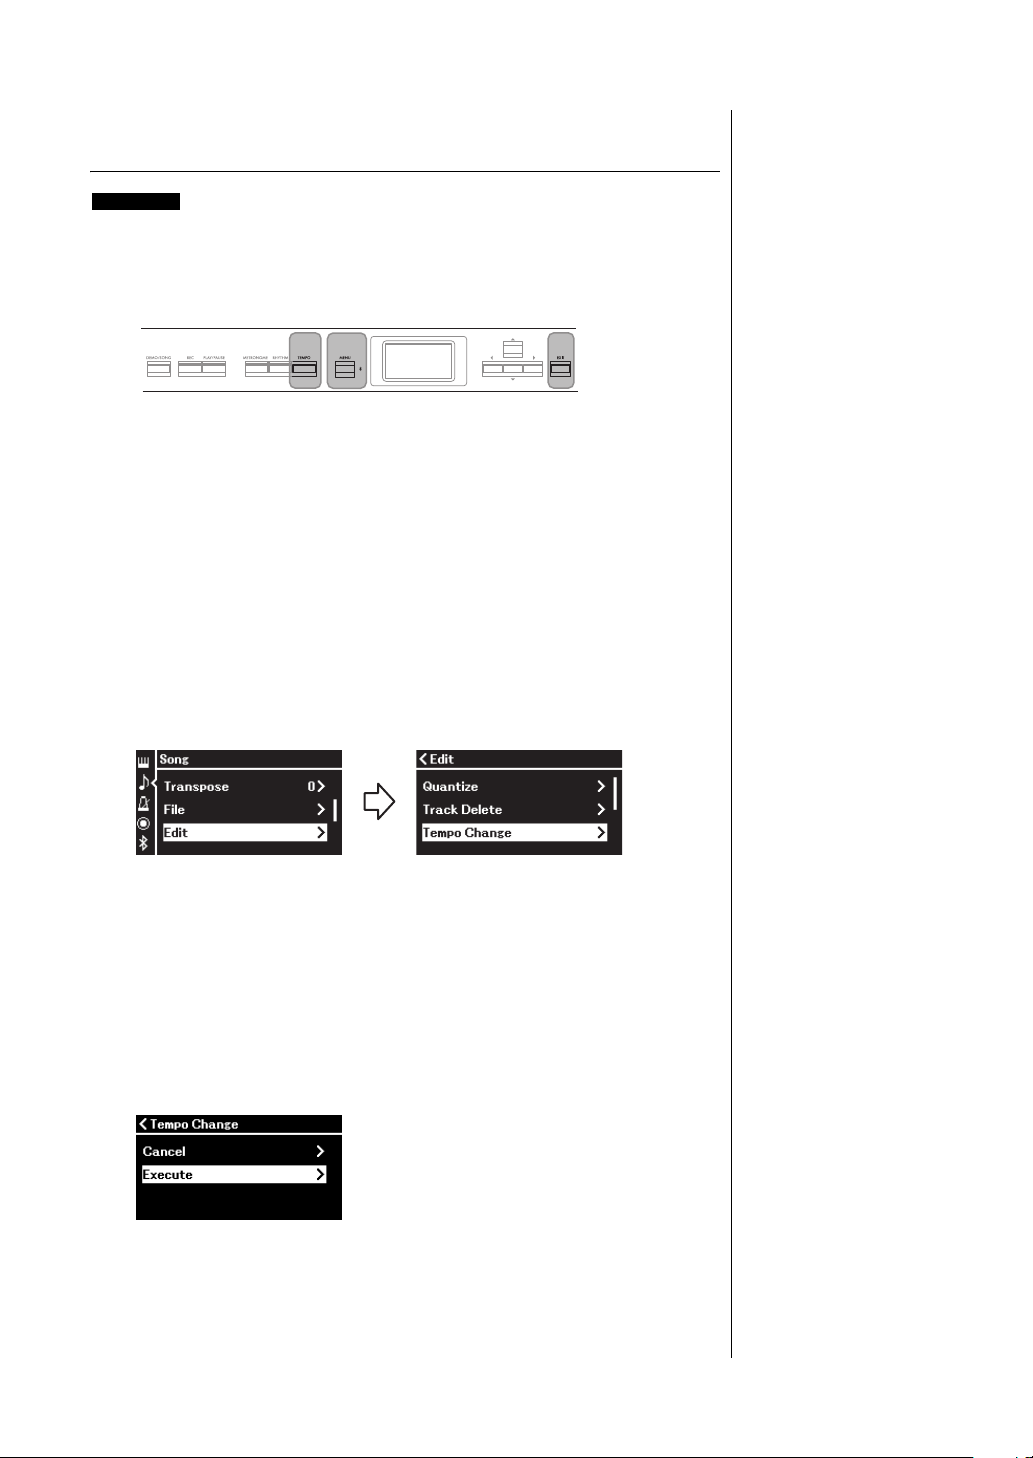
Recording Your Performance
MIDI
[TEMPO]
button
[MENU] button [EXIT] button
“Song” menu display
3-1. Use the [U]/[D] buttons
to select “Edit.”
3-2. Press the [R] button to
call up the next display.
3-3. Use the [U]/[D] buttons
to select “Tempo Change.”
3-4. Press the [R] button to call
up the next display.
“Edit” display
Changing the tempo or the Voice of a previously
recorded MIDI Song
For MIDI Songs, you can change the tempo and Voice after recording to change
a feel or to set a more suitable tempo.
To c h an ge t he te mpo :
1. Select the MIDI Song you wish to change.
For instructions, refer to page 45.
2. Press the [TEMPO] button to call up the “Tempo” display,
then set the desired Tempo.
For instructions, refer to page 41.
3. Press the [MENU] button repeatedly to call up the “Song”
menu display, then select the highlighted item in each
display as illustrated below.
4. Apply the selected Tempo value to the current MIDI Song
data.
Press the [D] button to highlight “Execute,” then press the [R] button to
apply the new Tempo value to the current MIDI Song data.
When this operation is completed, “Completed” is shown on the display,
and the “Tempo Change” display will be restored after a while.
5.
Press the [EXIT] button to exit from the “Song” menu display.
P-525 Owner’s Manual
64
Page 65
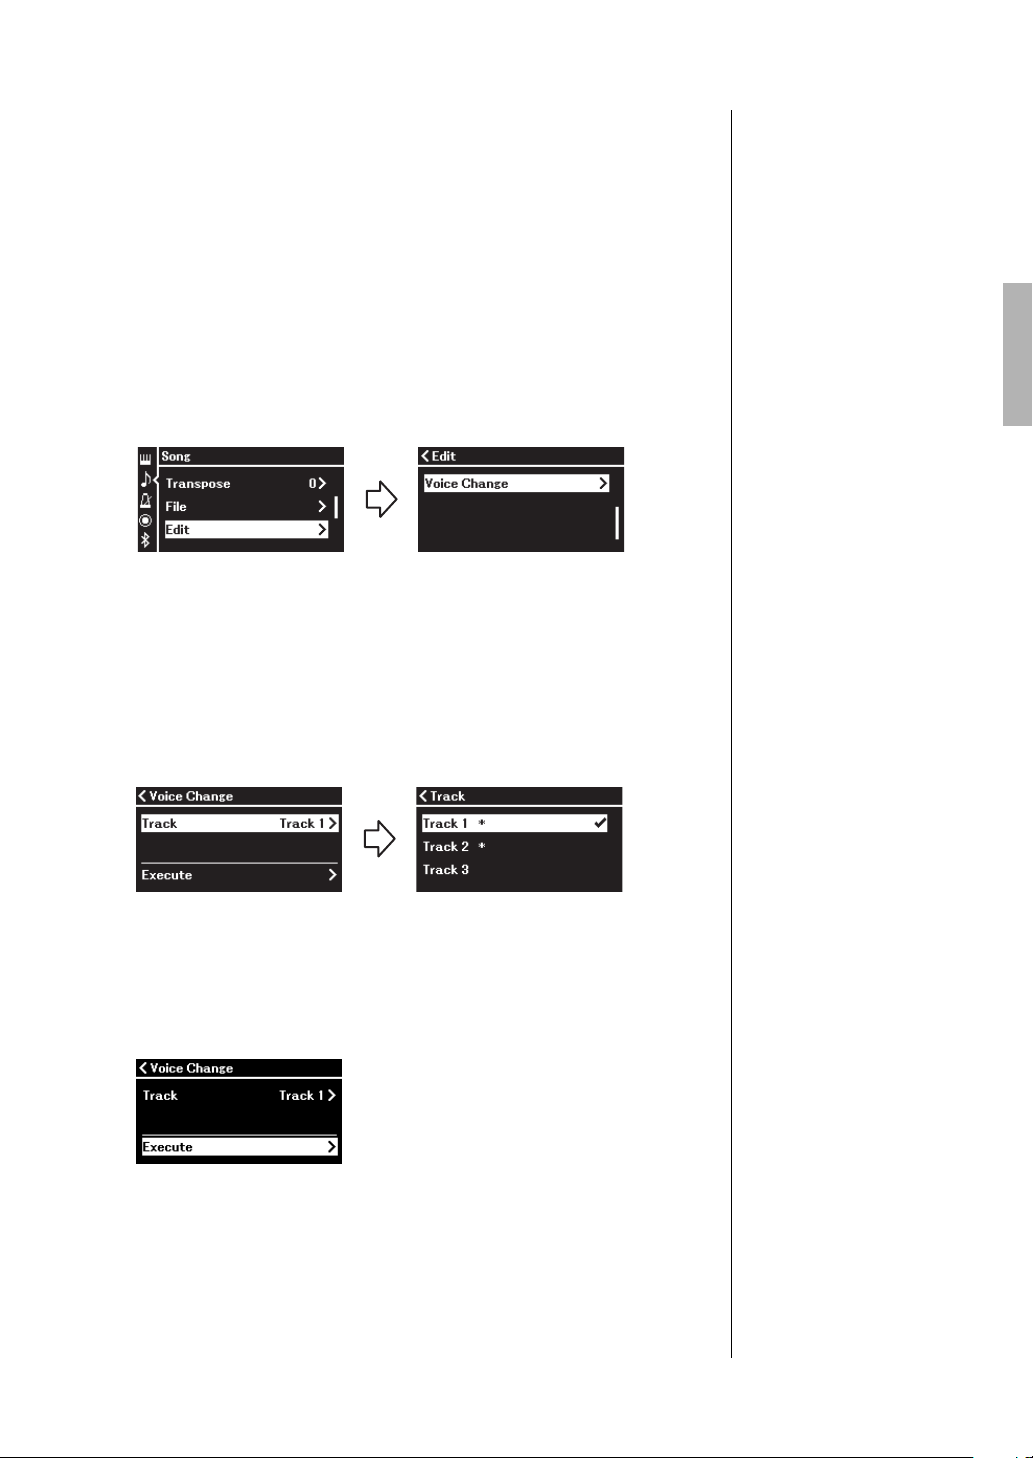
To change the Voice:
“Song” menu display
3-1. Use the [U]/[D] buttons
to select “Edit.”
3-2. Press the [R] button to
call up the next display.
3-3. Use the [U]/[D] buttons
to select “Voice Change.”
3-4. Press the [R] button to
call up the next display.
“Edit” display
“Voice Change” display
1. Select the MIDI Song you wish to change.
For instructions, refer to page 45.
2. Select the desired Voice.
For instructions, refer to page 20.
3. Press the [MENU] button repeatedly to call up the “Song”
menu display, then select the highlighted item in each
display as illustrated below.
Recording Your Performance
4.
Press the [R] button to call up the setting display, then
select the desired Track using the [U]/[D] buttons.
5. After pressing the [L] button to return to the “Voice
Change” display, press the [D] button to highlight
“Execute,” and then press the [R] button.
The Voice selected in step 2 is applied to the Track selected in step 4.
When this operation is completed, “Completed” is shown on the display,
and the “Voice Change” display will be restored after a while.
6. Press the [EXIT] button to exit from the “Song” menu
display.
P-525 Owner’s Manual
65
Page 66
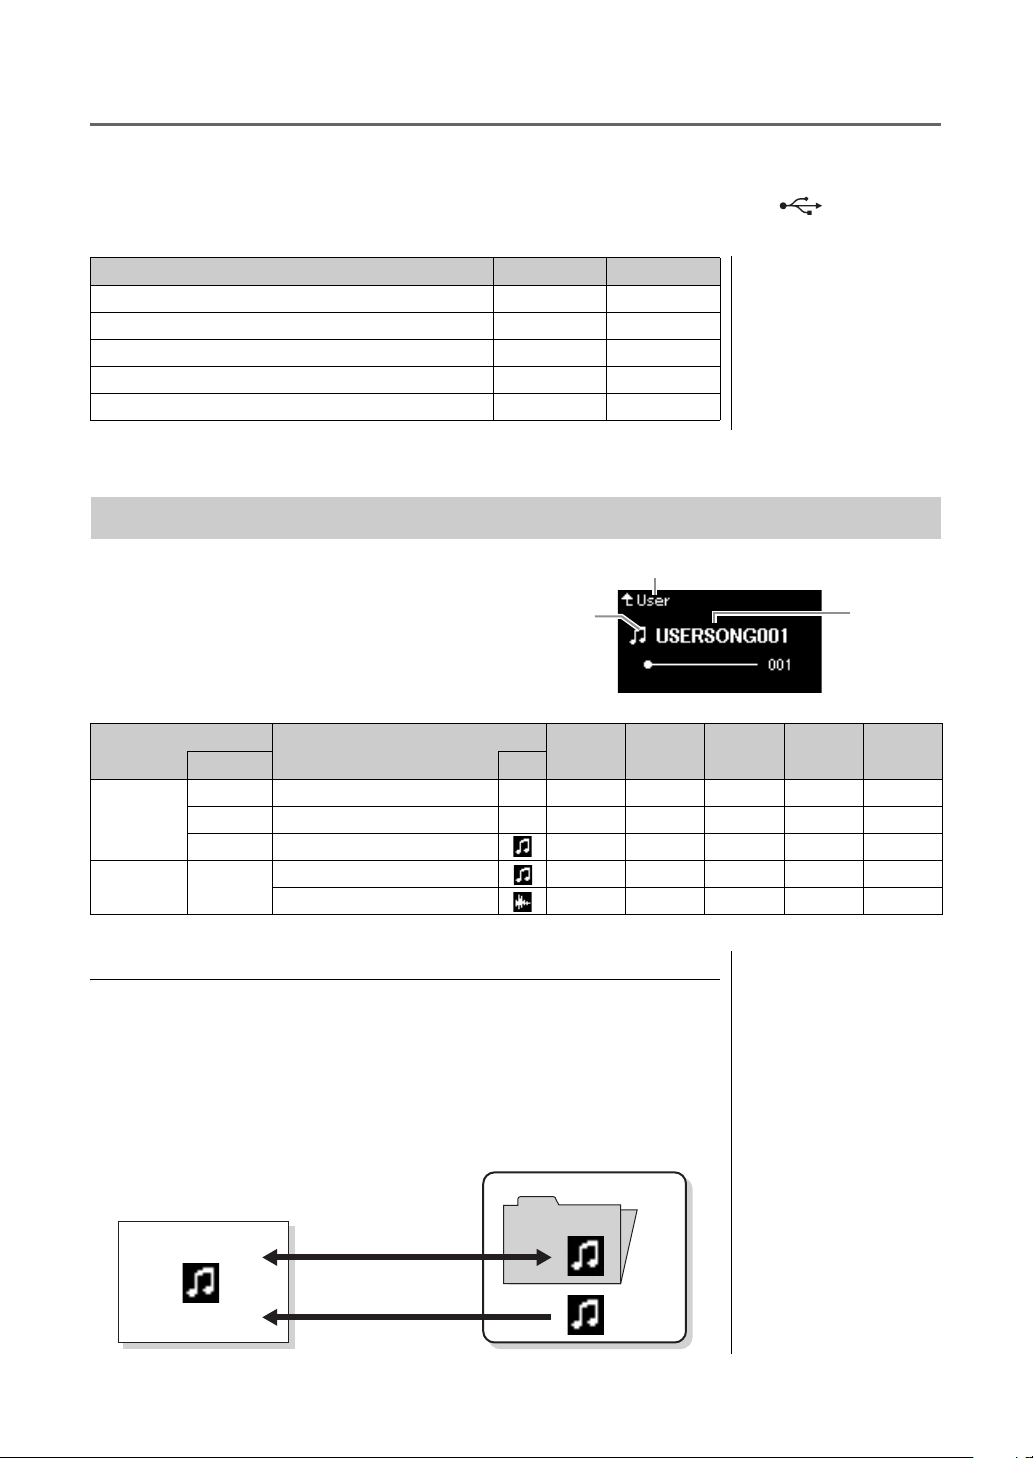
Handling Song Files
File
A file contains a group of data.
On this instrument, a Song file
includes Song data and a Song
name.
Song name
Icon*
Category name
Instrument
USB flash drive
User
Can be copied/moved.
Can be copied/moved.
Root
USER FILES
folder
NOTE
The “File” menu in the “Song” menu display (page 98) enables you to apply various operations to Song files
— Songs you recorded on this instrument or commercially available Songs.
connect a USB flash drive, be sure to read the section “Precautions when using the [ ] (USB TO
To
DEVICE)
Deleting files Delete pages 67, 68
Copying files *Copy pages 67, 68
Moving files *Move pages 67, 69
Converting a MIDI Song to an Audio Song during playback *MIDI to Audio pages 67, 70
Renaming files Rename pages 67, 71
Settings marked with a “*” are effective only when a MIDI Song is selected.
Song Types and File Operation Limitations
Song types are indicated as the category name and
icon in the Song display. The following chart shows
the Song type and restrictions on File operations.
* The icon appears only when you select a Song in the “User” or
“USB” category.
terminal” on page 75.
Operation File menu Page
Data Location
Instrument Demo Demo (Voice Demo) –ЧЧЧЧЧ
USB flash
drive device
Range of the Copy/Move operation
As for a MIDI Song in the “User” category in the instrument, you can Copy/
Move it only to the USER FILES folder on a USB flash drive. Selecting a MIDI
Song from “User” for copying/moving automatically specifies the USER FILES
folder as the destination.
As for a MIDI Song in a USB flash drive, you can Copy/Move it to the “User”
category in the instrument.
66
P-525 Owner’s Manual
: Yes, ×: No
Category Icon
50 Classics
User Your own recorded Songs (MIDI)
USB MIDI Songs
50 classical Preset Songs –ЧЧЧЧЧ
Audio Songs ×××
Song Type Delete Copy Move
MIDI to
Audio
USER FILES folder
If the USB flash drive device
plugged into the instrument
contains no USER FILES folder,
one will be created
automatically when you format
or record a Song to that device.
The recorded Song will then be
saved in that folder.
• Please note that the copy
features are intended for your
personal use only.
• Folders cannot be copied.
Root:
The highest level of a
hierarchical structure. This
indicates an area which does
not belong to a folder.
Rename
Page 67
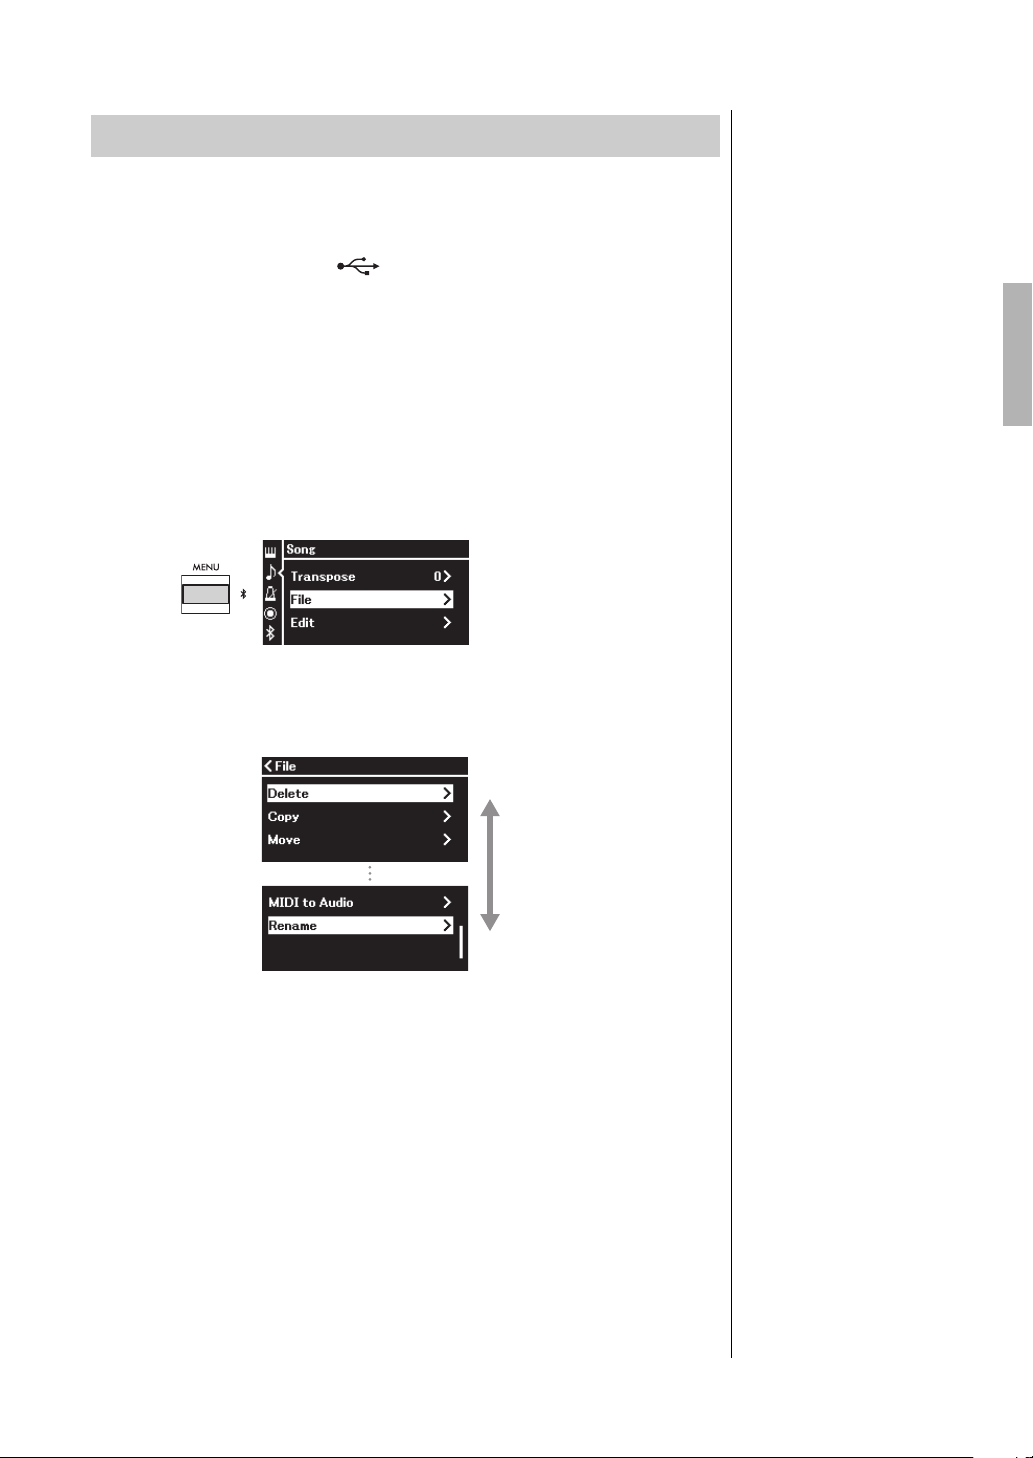
Basic Song File Operation
“Song” menu display
“File” display
[U]/[D] buttons
NOTICE
Do not disconnect the USB
flash drive during file
handling or when a USB flash
drive is mounted. Doing so
may delete all data in the
USB flash drive and the
instrument.
Song files can be handled via the instructions shown below.
1. Connect the appropriate USB flash drive containing the
desired files to the [ ] (USB TO DEVICE) terminal as
necessary.
2. Select a Song for handling.
For information on selecting a Song, see page 45.
3. Select the desired operation.
3-1. Press the [MENU] button repeatedly to call up the “Song”
menu display. Use the [
then press the [
R] button.
U]/[D] buttons to select “File,” and
Handling Song Files
3-2. Use the [U]/[D] buttons to select the desired operation from
“Delete,” “Copy,” “Move,” “MIDI to Audio” or “Rename.”
From here, if you wish to exit from the “File” display, press the [EXIT]
button once or twice.
4. Execute the selected operation.
For specific instructions, refer to the corresponding section.
• Delete ............................page 68
Copy...............................page 68
•
• Move ..............................page 69
• MIDI to Audio..........page 70
Rename.........................page 71
•
During operation, messages (information, confirmation, etc.) may be
shown on the display. For explanations and details, refer to “Message List”
on page 113.
5. Press the [EXIT] button to exit from the “File” display.
P-525 Owner’s Manual
67
Page 68
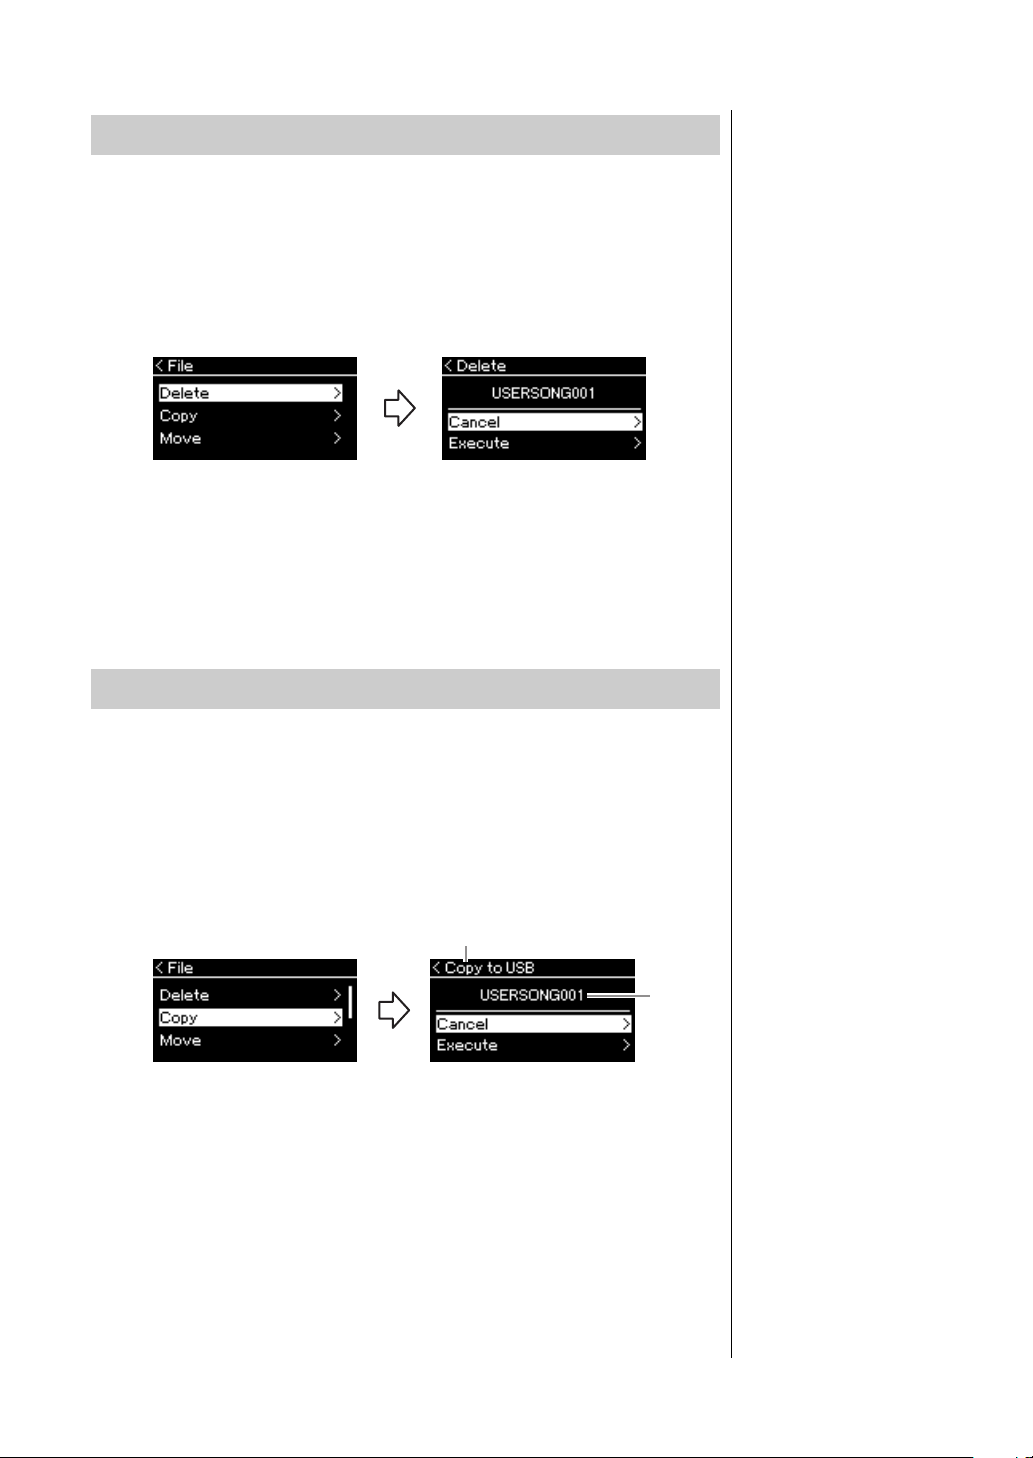
Handling Song Files
NOTICE
NOTE
NOTICE
File
name
Copy destination
Deleting Files — Delete
For details about Song types which can be deleted, refer to page 66.
See page 67 for information on basic operations.
The following is a detailed procedure of step 4 on that page.
4-1. While “Delete” is highlighted, press the [R] button.
The setting display is called up.
4-2. Highlight “Execute” by pressing [D] button, and then
press the [R] button.
After the Song is deleted, the display returns to the Song List display.
Copying Files — Copy
For details about Song types and ranges that can be copied, refer to page 66.
See page 67 for information on basic operations.
The following is a detailed procedure of step 4 on that page.
4-1. While “Copy” is highlighted, press the [R] button.
The setting display is called up.
“USB” will be shown when the copy destination is the USB flash drive
or “User” when the instrument is the copy destination. A file copied to
the USB flash drive is stored to the USER FILES folder on it.
4-2. Highlight “Execute” by pressing [D] button, then press
the [R] button.
The selected Song will be copied to the destination with the same name
as the copy source file.
Do not turn off the power or
eject the USB flash drive
while “Executing” is shown in
the display.
A message appears when a
Song with the same name
already exists in the copy
destination. Select “Overwrite”
when you want to overwrite the
selected Song, or “Cancel” to
cancel by using the [
buttons, and then press the [R]
button.
• Overwrite operations erase
any existing data of the
copy destination file and
overwrite with data of the
copy source file.
• Do not turn off the power or
eject the USB flash drive
while “Executing” is shown
in the display.
U]/[D]
P-525 Owner’s Manual
68
Page 69
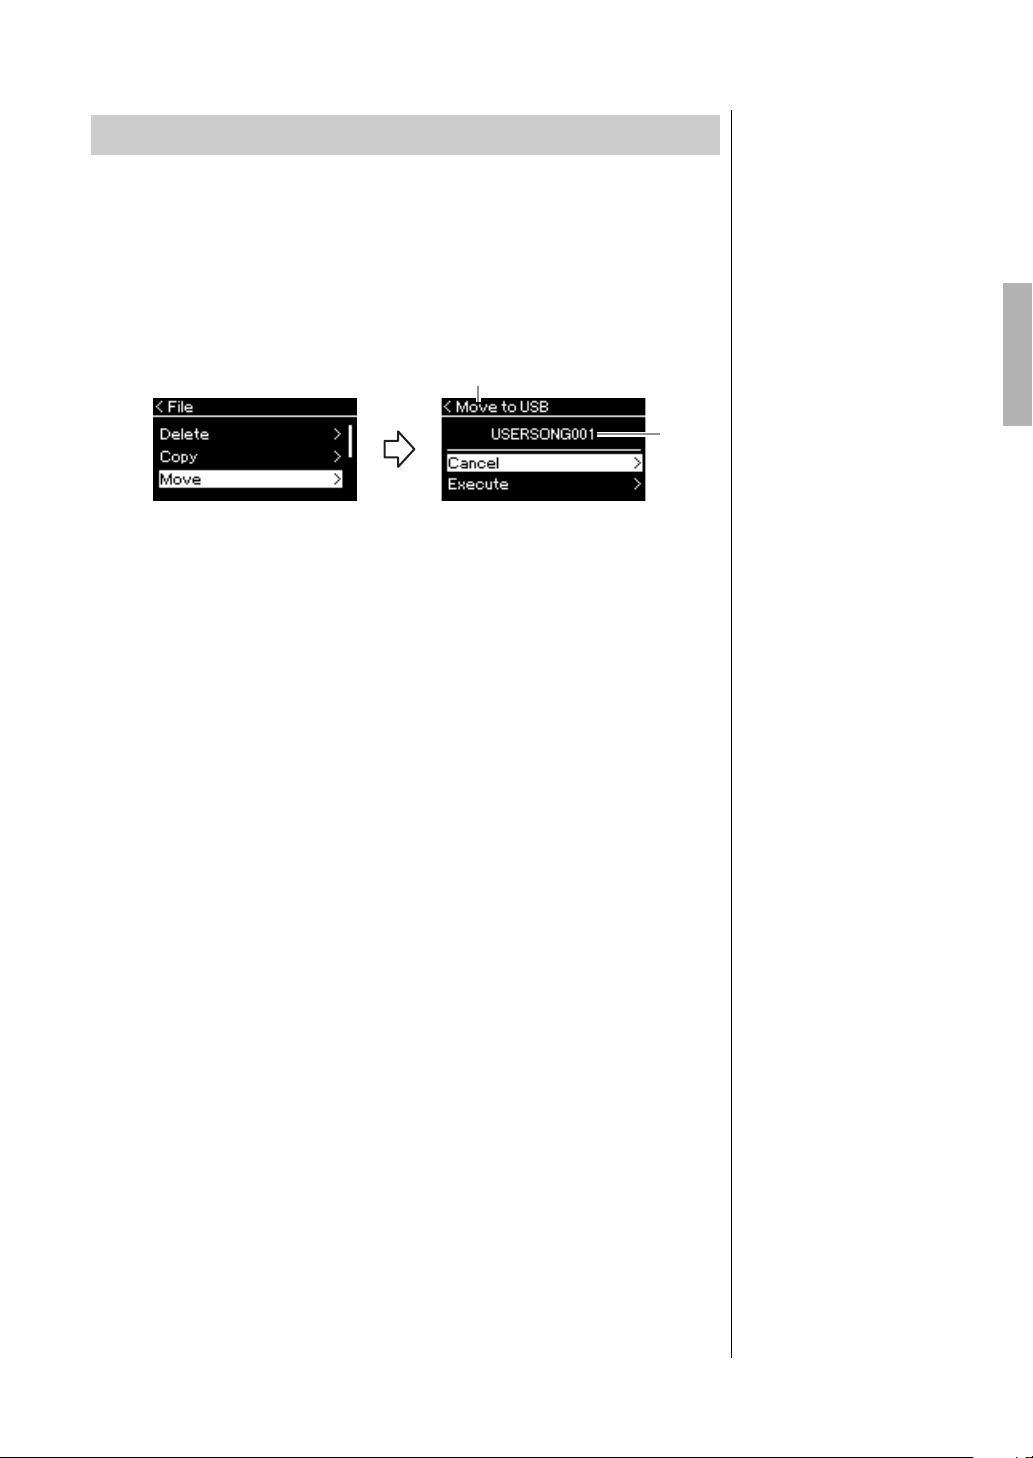
Moving Files — Move
NOTE
NOTICE
Move destination
File
name
For details about Song types and range that can be moved, refer to page 66.
See page 67 for information on basic operations.
The following is a detailed procedure of step 4 on that page.
4-1. While “Move” is highlighted, press the [R] button.
The setting display is called up.
Handling Song Files
A message appears when a
Song with same name already
exists in the move destination.
Select “Overwrite” when you
want to overwrite the selected
Song, or “Cancel” to cancel by
using the [
press the [R] button.
U]/[D] buttons, then
“USB” will be shown when the move destination is the USB flash drive
or “User” when the instrument is the move destination. A file moved to
the USB flash drive is stored to the USER FILES folder on it.
4-2. Highlight “Execute” by pressing the [D] button, then
press the [R] button.
The selected Song will be moved to the destination and the display
returns to the Song list display.
• Overwrite operations erase
any existing data of the
move destination file and
overwrite with data of the
move source file.
• Do not turn off the power or
eject the USB flash drive
while “Executing” is shown
in the display.
P-525 Owner’s Manual
69
Page 70
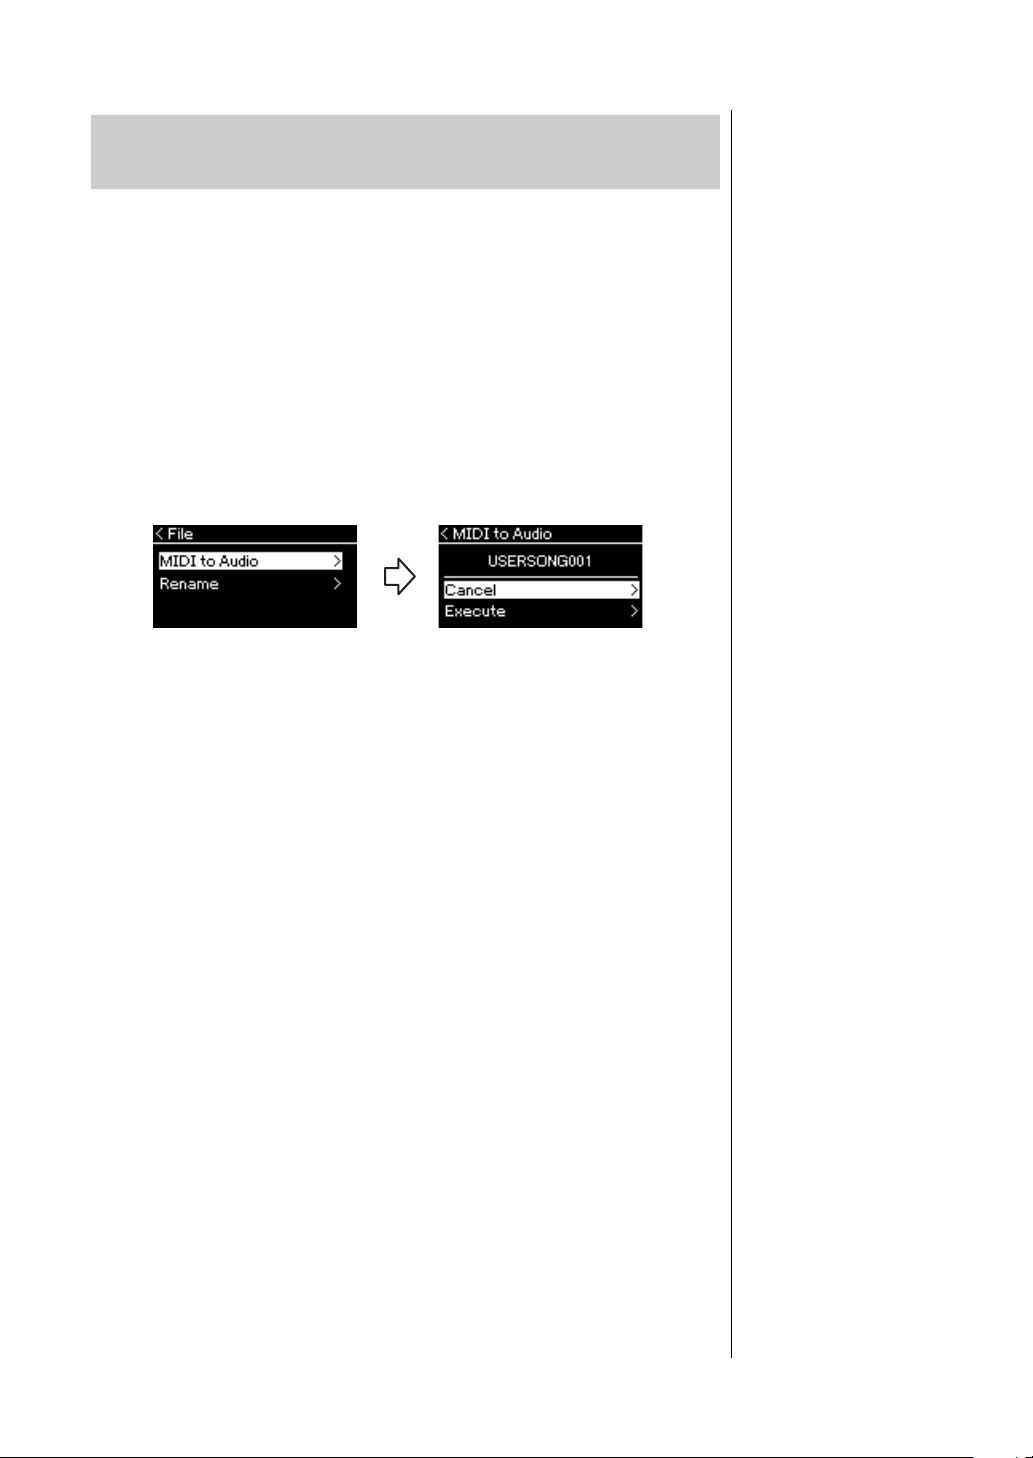
Handling Song Files
NOTE
• After conversion, the MIDI
Song remains in the original
data location.
• If you start conversion before
connecting the USB flash
drive to the instrument, an
error message appears on
the display.
NOTICE
Do not turn off the power or
disconnect the USB flash
drive during the conversion.
Otherwise the data will be
lost.
NOTE
• A message appears when a
Song with same name
already exists in the copy
destination. Select
“Overwrite” when you want to
overwrite the selected Song
by using the [
U]/[D] buttons,
then press the [R] button.
• To cancel this operation,
press the [EXIT] button
during the conversion. When
the operation is canceled, the
converted Audio Song will
not be saved.
Converting a MIDI Song to an Audio Song during
Playback — MIDI to Audio
A MIDI Song in the User memory of the instrument or on a USB flash drive
can be converted to an Audio Song. Since an Audio Song can be saved only to a
USB flash drive, you should start conversion only after connecting the USB
flash drive to the instrument. For information about which Song types can be
converted, refer to page 66.
See page 67 for information on basic operations.
The following is a detailed procedure of step 4 on that page.
4-1. While “MIDI to Audio” is highlighted, press the
[R] button.
The setting display is called up.
4-2. Highlight “Execute” by pressing the [D] button, then
press the [R] button.
This operation starts playback and conversion from MIDI to Audio.
This is basically the same as that of Audio Song Recording, which
allows you to record your keyboard performance and other audio input
sounds (via Bluetooth, [AUX IN] etc.) from the external device
(page 54). After you convert the Song, a message “Convert completed”
will be shown and the display returns to Song List display.
The Audio Song converted from a MIDI Song is saved with the same
name as the MIDI Song. The icon displayed to the left of the Song name
on the instrument display is changed, and the Song file extension on
the computer is changed to “.wav”.
P-525 Owner’s Manual
70
Page 71
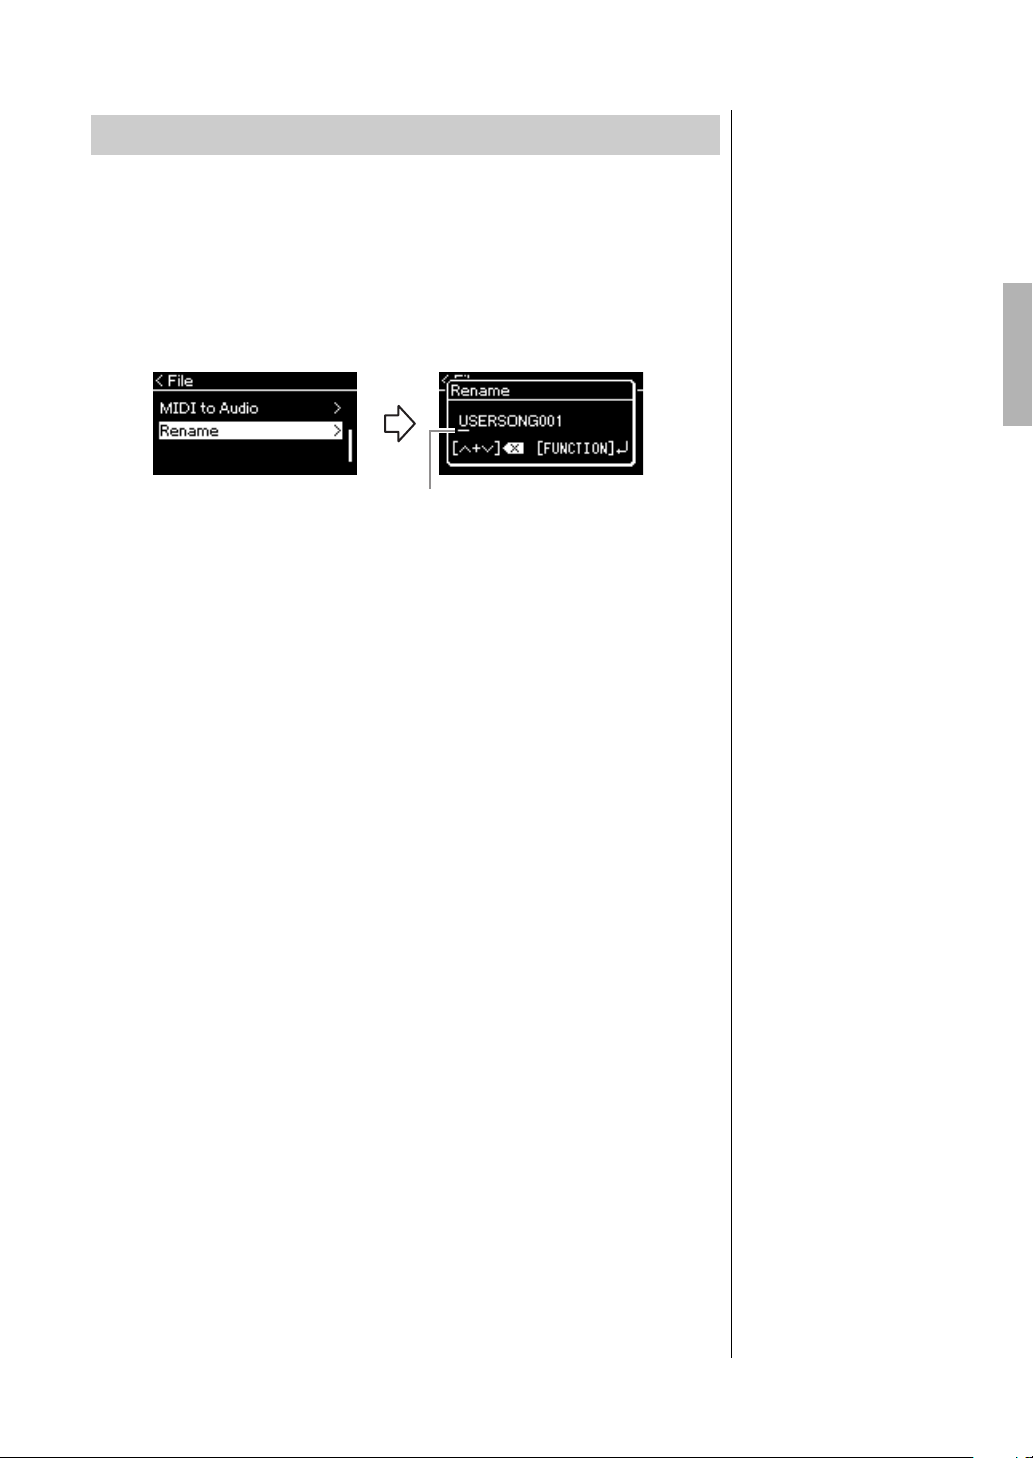
Renaming Files — Rename
Cursor
NOTE
For information about the
character types available for
the Song name, refer to
“Language” on page 107.
NOTICE
Do not turn off the power or
eject the USB flash drive
while “Executing” is shown
in the display.
For details about Song types which can be renamed, refer to page 66.
See page 67 for information on basic operations.
The following is a detailed procedure of step 4 on that page.
4-1. While “Rename” is highlighted, press the [R] button.
The setting display is called up.
4-2. Assign a name to the Song.
Use the [L]/[R] buttons to move the highlight (underline).
Use the [
position. Pressing both buttons simultaneously will delete the character
at the current cursor position.
A Song name can contain up to 48 characters. Characters which extend
beyond the display capacity and are not visible can be viewed by
moving the highlight by using the [
U]/[D] buttons to change the character at the current cursor
L]/[R] buttons.
Handling Song Files
4-3. Press the [MENU] button to actually rename the file.
After the Song is renamed, the display returns to Song List display
where the renamed Song can be selected.
P-525 Owner’s Manual
71
Page 72
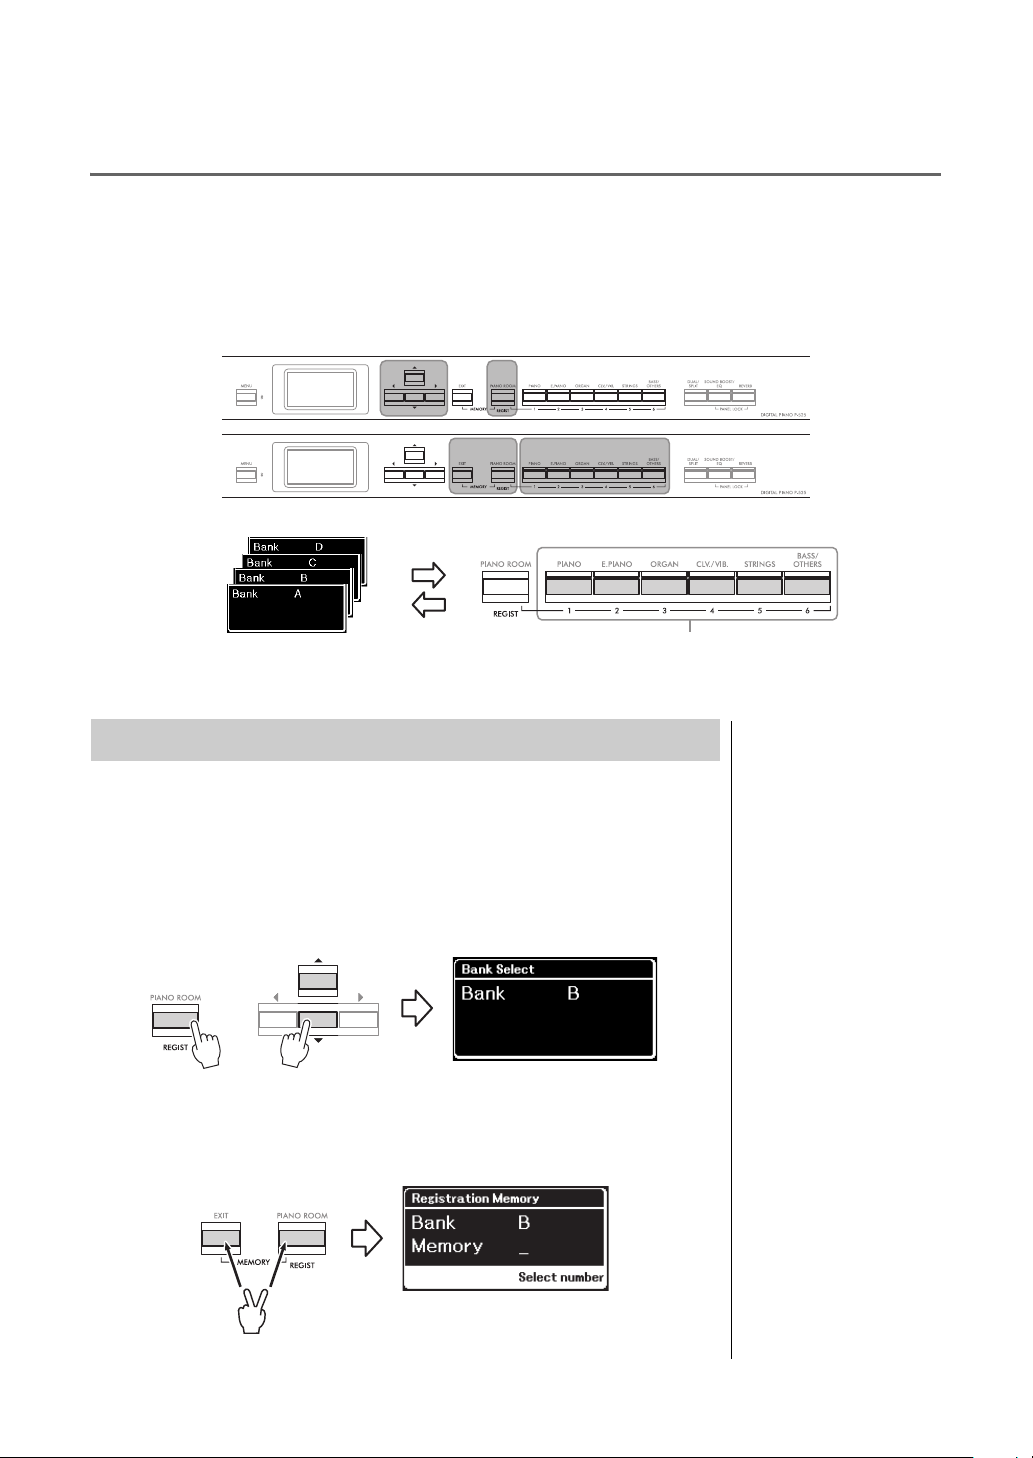
Saving and Recalling Desired Settings
[U]/[D]/[L]/[R] buttons [REGIST] button
[MEMORY] buttons [1]–[6] buttons
Bank A–D
The settings are registered.
Recall
Save
+
(Registration Memory)
The Registration Memory function allows you to save (or “register”) settings such as Voice and Style to
buttons on the front panel, and then instantly recall your desired settings. This instrument has four
memory spaces; Bank A–D and the six settings can be saved to each bank. If a bank has already been
selected, you can recall the saved settings only by holding down the [REGIST] button and pressing one of
[1]–[6] buttons.
Saving the Settings to the Registration Memory
1. Set up the panel controls (such as Voices, Rhythms and so
on) as desired.
2. While holding down the [REGIST] button, use the [U]/[D]
buttons to select the bank.
3. Press both of the [MEMORY] buttons to call up the
“Registration Memory” display.
Parameters that can be
saved to Registration
Memory
• Voice (page 20)
• Dual (page 29)
• Split (page 30)
• Sound Boost (page 37):
On/Off, type
• Master EQ type (page 38),
User Master EQ setting
(page 39)
• Song tempo (page 47)
• Metronome tempo (page 41)
• Rhythm (page 43)
• Voice menu (all menus,
page 95)
• Metronome/Rhythm menu
(page 101)
-Volume
-Intro
-Ending
-Bass
• System menu (page 103)
- Tuning
- Keyboard
- Pedal: Pitch Bend Range,
AUX Polarity, Aux assign,
Aux Area
P-525 Owner’s Manual
72
Page 73
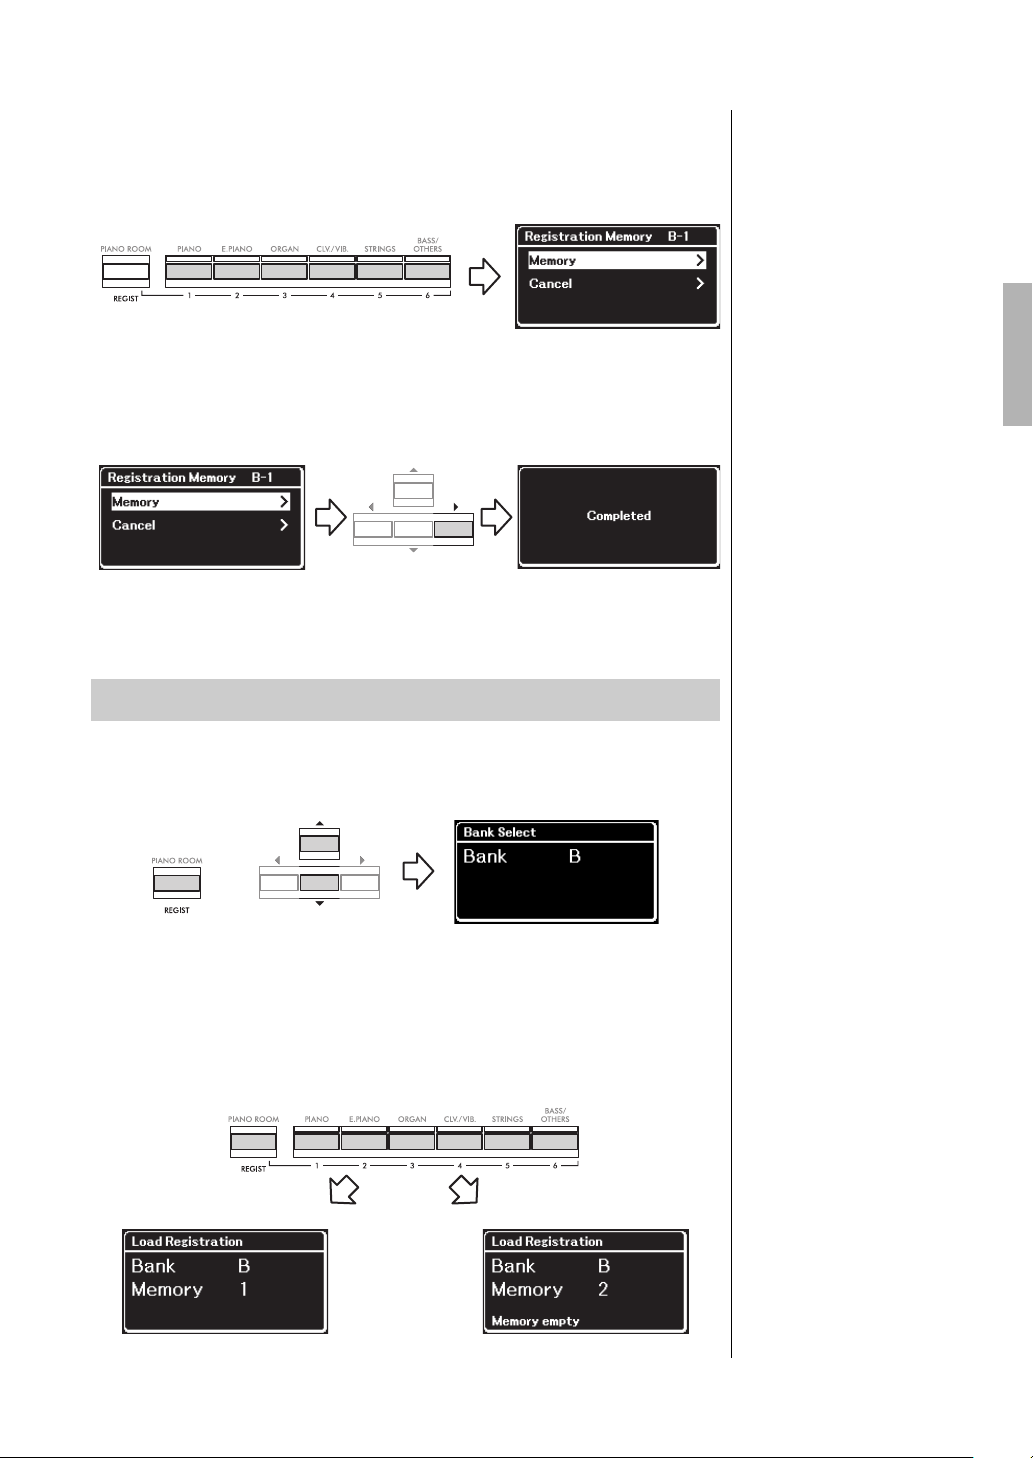
Saving and Recalling Desired Settings (Registration Memory)
NOTICE
NOTICE
NOTE
+
When the setting is registered
When the setting is not registered
4. Press the one of the [1]–[6] button which you want to
register the setting.
The display for registering the setting.
5. Press the [R] button to actually register the setting.
When this operation is completed, “Completed” is shown on the display,
and operation returns to the Voice display will be restored after a while.
To cancel this operation, press the [
press the [
R] button.
Recalling a Registered Setting
D] button to select “Cancel,” and then
If you press a button to which
a setting is already registered,
new setting will replace
already saved setting. If you
want to check whether the
settings are registered to the
corresponding button before
register, perform the step 2 in
“Recalling a Registered
Setting.”
If the power is turned off
during this operation, the
setting registered to the
Registration Memory may be
lost.
It is impossible to check the
registered settings in the list
etc. on this instrument. This is
why, we recommend that you
make a note of the settings you
have registered.
1. While holding down the [REGIST] button, use the [U]/[D]
buttons to select the bank to which the settings are saved.
2. While holding down the [REGIST] button, press the
appropriate [1]–[6] button to which the setting is
registered.
The number of the pressed button appears next to “Memory” in the
display and the registered setting is recalled.
P-525 Owner’s Manual
73
Page 74
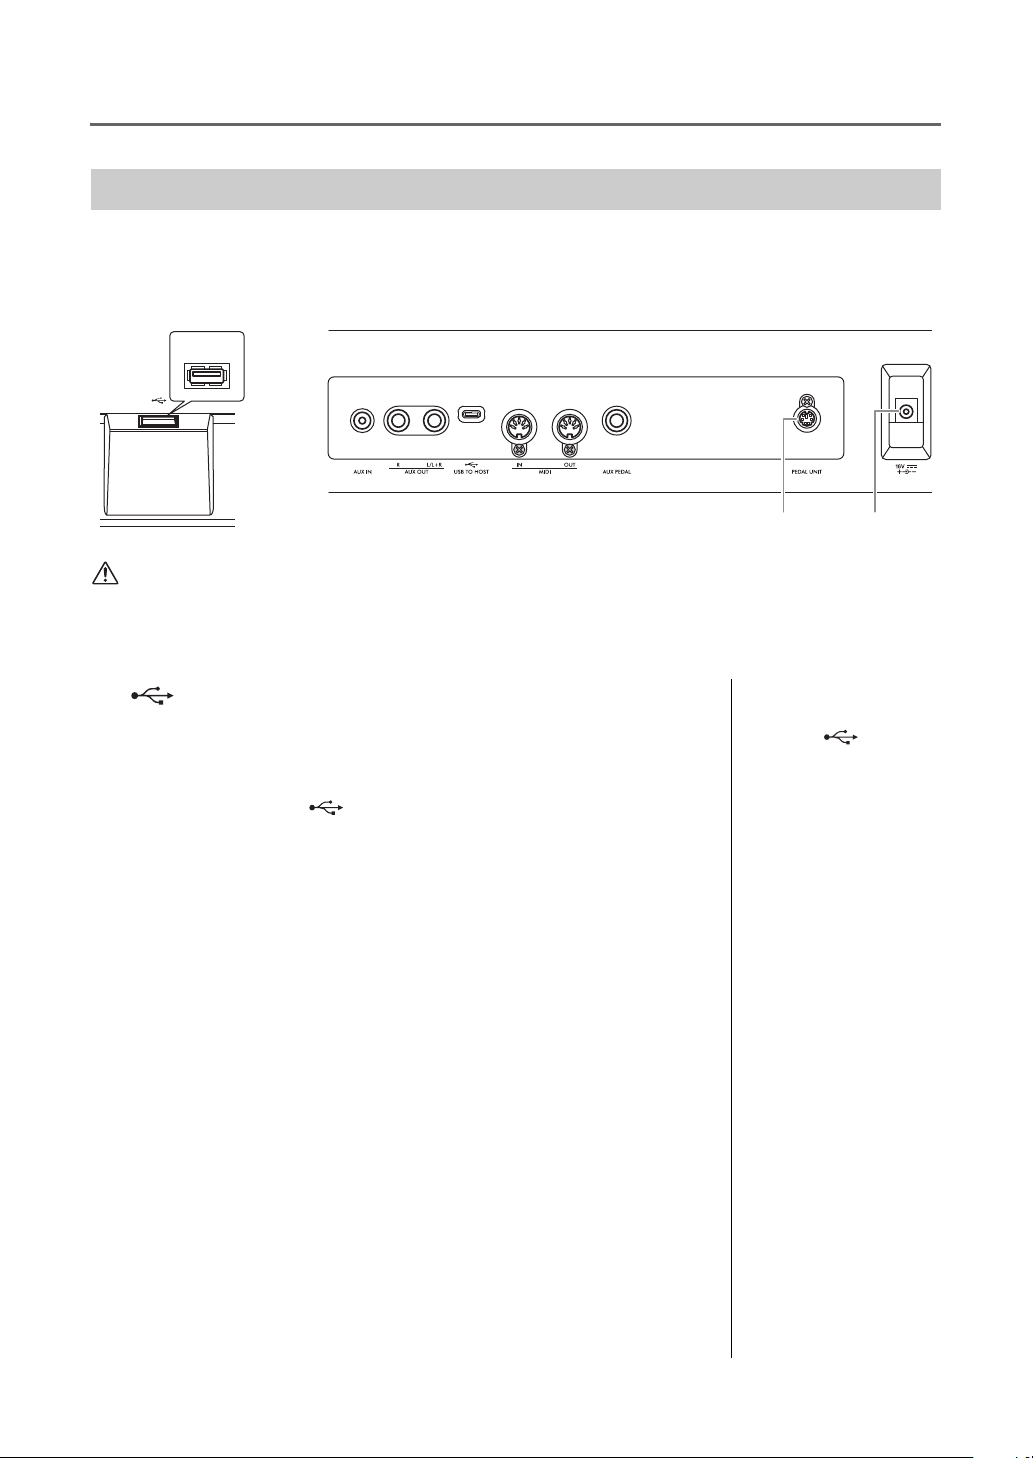
Connecting to Other Devices
CAUTION
w e ytr
q
Rear PanelFront Panel
[PEDAL UNIT] jack
(page 15)
DC IN jack
(page 12)
NOTE
Connectors
You can connect other devices to this instrument’s connectors. For information about location of these
connectors, refer to “Panel Controls and Terminals” on page 11.
Before connecting the instrument to other electronic components, turn off the power of all the components. Also, before turning
any components on or off, make sure to set all volume levels to minimum (0). Otherwise, damage to the components, electrical
shock, or even permanent hearing loss may occur.
1 [ ] (USB TO DEVICE) terminal
You can connect a USB flash drive to this terminal, or use a USB wireless LAN adaptor
UD-WL01 (sold separately) to connect with a smart device such as a smartphone. For
details, refer to “Connecting USB Devices” (page 75) or “Connecting to a Computer or
Smart Device” (page 77). Before using the [USB TO DEVICE] terminal, be sure to read
“Precautions when using the [ ] (USB TO DEVICE) terminal” on page 75.
2 [AUX IN] jack
This jack is used to connect an audio player, such as a smartphone or portable audio
player. For details, refer to “Connecting to an Audio Player” on page 76.
3 AUX OUT [R] [L/L+R] jacks
These jacks are used to connect to external powered speaker systems (page 76).
4 [USB TO HOST] terminal
This terminal allows connection to a computer or a smart device, such as smartphone or
tablet. For details, refer to “Connecting to a Computer or Smart Device” (page 77).
5 MIDI [IN], [OUT] terminals
These terminals are used to connect external MIDI devices, such as a synthesizer or a
sequencer. For details, refer to “Connecting External MIDI Devices” on page 89.
6 [AUX PEDAL] jack
An included FC3A foot pedal, or a separately sold FC4A or FC5 foot switch can be
connected to this jack. For details on the functions assigned to the pedals, refer to “Pedal
Function List” (page 17). To select a different function to be controlled, use “Aux Assign”
(page 104) in the “System” menu display.
There are two different types of
USB terminals on the
instrument: [ ] (USB TO
DEVICE) and [USB TO HOST].
Take care not to confuse the
two terminals and the
corresponding cable
connectors. Be careful to
connect the proper plug in the
proper direction.
P-525 Owner’s Manual
74
Page 75
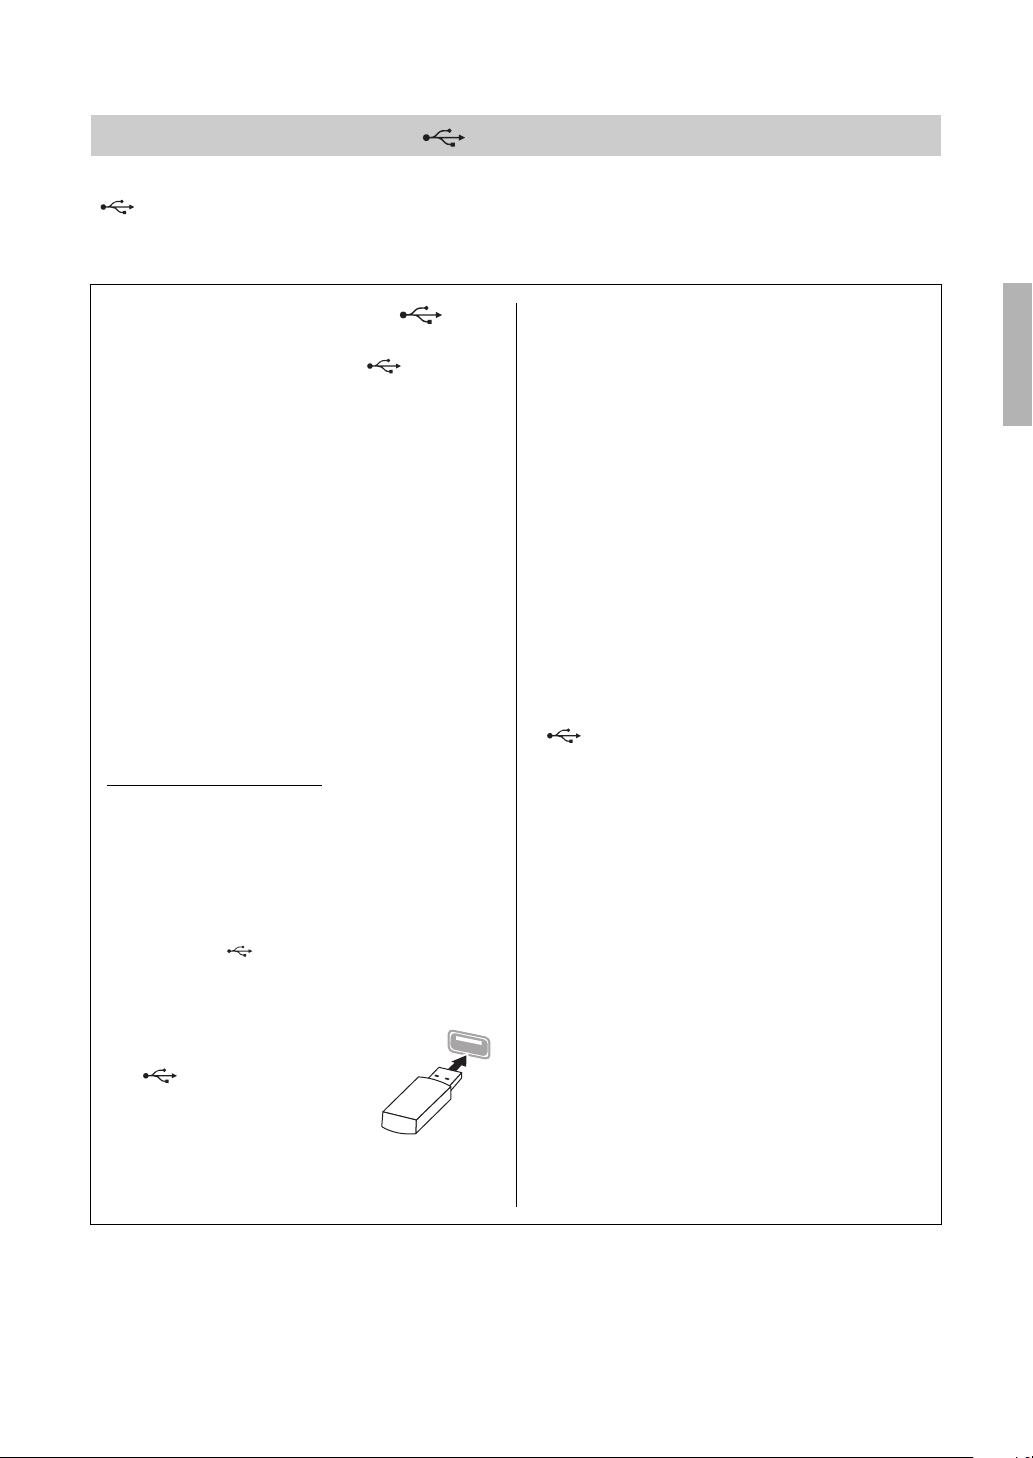
Connecting to Other Devices
NOTE
NOTICE
NOTICE
NOTICE
Connecting USB Devices ([ ] (USB TO DEVICE) Terminal)
You can connect a USB flash drive or a USB wireless LAN adaptor UD-WL01 (sold separately) to the
[ ] (USB TO DEVICE) terminal. You can save data you’ve recorded on the instrument to the USB flash
drive (pages 66, 90), or you can connect the instrument to a smart device such as a smartphone via wireless
LAN (page 83).
Precautions when using the [ ]
(USB TO DEVICE) terminal
This instrument features a built-in [ ] (USB TO
DEVICE) terminal. When connecting a USB device to
the terminal, be sure to handle the USB device with
care. Follow the important precautions below.
For more information about the handling of USB devices, refer
to the owner’s manual of the USB device.
Compatible USB devices
•USB flash drive
• USB wireless LAN adaptor UD-WL01 (sold
separately; may not be available in some areas)
Other USB devices such as a computer keyboard or
mouse cannot be used.
The instrument does not necessarily support all
commercially available USB devices. Yamaha cannot
guarantee operation of USB devices that you
purchase. Before purchasing a USB device for use with
this instrument, please visit the following web page:
https://download.yamaha.com/
Although USB devices 2.0 to 3.0 can be used on this
instrument, the amount of time for saving to or
loading from the USB device may differ depending on
the type of data or the status of the instrument. USB
1.1 devices cannot be used on this instrument.
The rating of the [ ] (USB TO DEVICE) terminal is a
maximum of 5 V/500 mA. Do not connect USB devices
having a rating above this, since this can cause damage to
the instrument itself.
Connecting a USB device
When connecting a USB device to
[ ] (USB TO DEVICE)
the
terminal, make sure that the
connector on the device is
appropriate and that it is
connected in the proper direction.
• Avoid connecting or disconnecting the USB device
during playback/recording and file management
operations (such as Save, Copy, Delete and Format), or
when accessing the USB device. Failure to observe this
may result in “freezing” of the operation of the
instrument or corruption of the USB device and the data.
• When connecting then disconnecting the USB device
(and vice versa), make sure to wait a few seconds
between the two operations.
• Do not use an extension cable when connecting a USB
device.
Using USB Flash Drives
By connecting the instrument to a USB flash drive,
you can save data you’ve created to the connected
device, as well as read data from the connected USB
flash drive.
Number of USB flash drives that can be used
Only one USB storage device can be connected to the
[ ] (USB TO DEVICE)
Formatting a USB flash drive
You should format the USB flash drive only with this
instrument (page 107). A USB flash drive formatted
on another device may not operate properly.
The format operation overwrites any previously existing
data. Make sure that the USB flash drive you are formatting
does not contain important data.
To protect your data (write-protect)
To prevent important data from being inadvertently
erased, apply the write-protect provided with each
USB flash drive. If you are saving data to the USB flash
drive, make sure to disable write-protect.
Turning off the instrument
When turning off the instrument, make sure that the
instrument is NOT accessing the USB flash drive by
playback/recording or file management (such as
during Save, Copy, Delete and Format operations).
Failure to do so may corrupt the USB flash drive and
the data.
terminal.
P-525 Owner’s Manual
75
Page 76
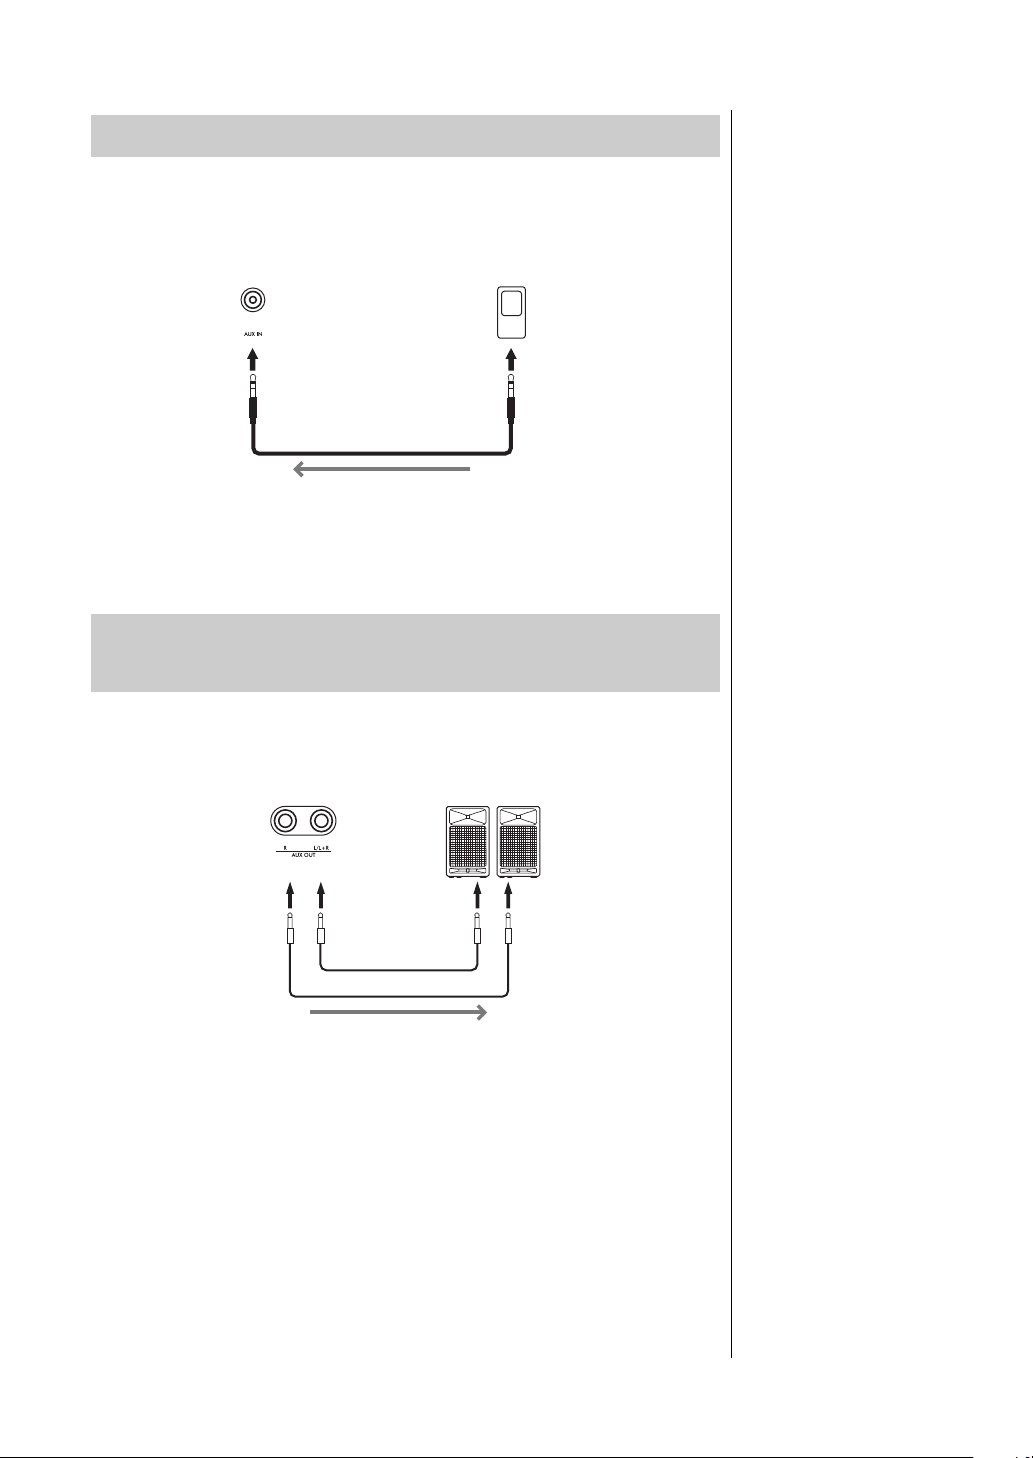
Connecting to Other Devices
NOTICE
NOTICE
NOTE
Instrument
Phone plug (stereo mini) Phone plug (stereo mini)
Portable audio player
Audio cable
Headphone jack
Audio signal
Example
NOTE
Instrument
AUX OUT Input jack
Powered speaker
Audio cable
Phone plug (standard) Phone plug (standard)
Audio signal
Example
Connecting to an Audio Player ([AUX IN] jack)
You can connect the headphone jack of an audio player, such as a smartphone
or portable audio player, to the instrument’s [AUX IN] jack. Audio playback on
the connected device is output from the built-in speakers of this instrument.
To avoid damage to the devices, first turn on the power to the external device, and then to the
instrument. When turning off the power, first turn off the power to the instrument, and then to
the external device.
• The instrument’s [VOLUME]
setting affects the input signal
from the [AUX IN] jack.
• Use audio cables and
adaptor plugs having no
(zero) resistance.
Using an External Speaker System for Playback
(AUX OUT [L/L+R]/[R] jacks)
These jacks let you connect the instrument to external powered speaker
systems, for playing in larger venues at higher volumes.
• To avoid possible damage, first turn on the power to the instrument, then to the external
device. When turning off the power, first turn off the power to the external device, then to the
instrument. Since this instrument’s power may automatically be turned off due to the Auto
Power Off function (page 13), turn off the power to the external device, or disable Auto Power
Off when you do not intend to operate the instrument.
• Do not route the output from the AUX OUT jacks to the [AUX IN] jack. If you make this
connection, the signal input at the [AUX IN] jack is output from the AUX OUT jacks. These
connections could result in a feedback loop that will make normal performance impossible,
and may even damage the equipment.
The output volume from the AUX OUT jacks can be adjusted by the
[VOLUME] slider on the instrument. If you want to mute the speaker of the
instrument while the external speakers are connected to the AUX OUT jacks,
set the “Speaker” parameter to off via the “System” menu: “Utility” → “Speaker”
(page 106).
• Use only the [L/L+R] jack for
connection with a monaural
device.
• Use audio cables and
adaptor plugs having no
(zero) resistance.
• When you are monitoring the
sound output via the AUX
OUT jacks from headphones
connected to the instrument,
we recommend that you set
the Binaural Sampling and
Stereophonic Optimizer
functions to off. For details,
refer to page 14.
P-525 Owner’s Manual
76
Page 77

Connecting to a Computer or Smart Device
NOTICE
Connecting a computer or a smart device such as a smartphone or tablet allows
you to enjoy the features shown below. The method of connections varies
depending on the connected device or your intended use.
• Transmitting/receiving audio data (USB Audio interface
function)
Connect a computer or a smart device to the [USB TO HOST] terminal via a
USB cable. For details, refer to page 78.
• Listening to audio data from a smart device through this
instrument (Bluetooth audio function)
Connect a smart device and this instrument via Bluetooth. For details, refer
to page 79.
• Using smart device apps by connecting to a smart device
The two powerful apps, “Smart Pianist” and “Rec'n'Share,” can be used with
this instrument.
Refer to page 81 for “Smart Pianist” and page 88 for “Rec'n'Share.”
Connecting to Other Devices
Connecting to a computer
By connecting a computer to the [USB TO HOST] terminal via a USB cable,
you can transfer MIDI data or Audio data between the instrument and the
computer. For instructions on connecting to a computer, refer to page 78.
Connecting to a Smart Device
The smart device such as a smartphone or tablet can be connected to this
instrument via the following methods.
• Connecting via USB cables
Connect the smart device to the [USB TO HOST] terminal via USB cables.
For details, refer to page 88.
• Connecting via Bluetooth
Connect the smart device to this instrument wirelessly via Bluetooth.
For details, refer to pages 79 and 82.
• Connecting via Wi-Fi (by using the USB wireless LAN adaptor)
Connect the smart device to this instrument via Wi-Fi by using the
separately sold USB wireless LAN adaptor, UD-WL01.
For details, refer to page 83.
*The USB wireless LAN adaptor UD-WL01 may not be available depending on your area.
Do not place your smart
device in an unstable
position. Doing so may cause
the device to fall and result in
damage.
P-525 Owner’s Manual
77
Page 78
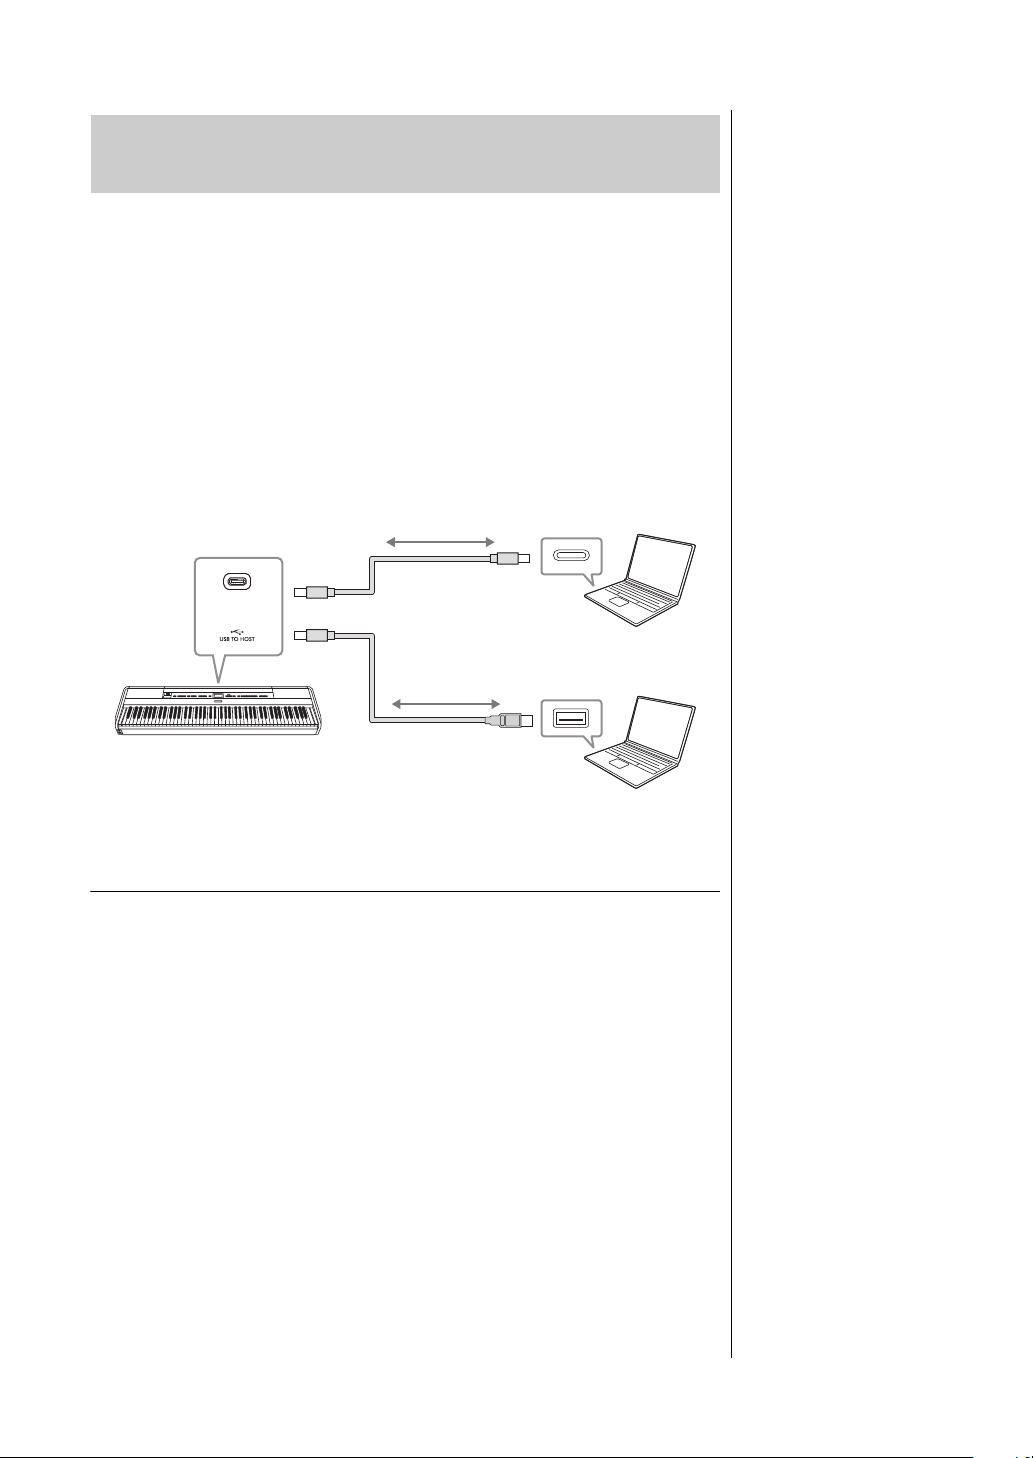
Connecting to Other Devices
Computer
USB cable
(Type C - Type A)
USB terminal (Type C)
P-525
USB terminal (Type A)
Computer
USB cable
(Type C - Type C)
NOTE
NOTE
NOTICE
Transmitting/Receiving Audio Data (USB Audio
Interface Function)
By connecting a computer or a smart device to the [USB TO HOST] terminal
via a USB cable shown in the illustration, digital audio data can be transmitted/
received. This USB Audio Interface function provides the following advantages:
• Playing back audio data with high sound quality
This gives you direct, clear sound in which the sound quality has less noise
and deterioration than that from the [AUX IN] jack.
• Recording performance on the instrument as audio data by
using a recording software or a music production software
The recorded audio data can be played back on the computer or smart
device.
Example:
• When transmitting or
receiving audio signals by
using a computer running
Windows, the Yamaha
Steinberg USB Driver should
be installed to the computer.
• The volume of the audio
sound input can be adjusted
from a computer or smart
device.
• When using a USB cable to
connect the instrument to
your computer, make the
connections directly without
passing through a USB hub.
• Unexpected sounds may
occur if you edit MIDI data
related to the Grand
Expression Modeling
(page 25) on a computer.
• Use an CC or AC type USB
cable of less than 3 meters.
The cable must be a
communication cable
compliant with USB
standards, and not a
charging-only cable.
• If you are using a DAW
(digital audio workstation)
application with this
instrument, set the Audio
Loopback function to off.
Otherwise, a loud sound
may occur, depending on
the settings of the
computer.
Audio Loopback On/Off
This allows you to set whether audio sound input from the connected
computer or smart device, via the USB audio interface function, or Bluetooth
Audio (page 79) / wireless LAN (page 83) / [AUX IN] jack (page 76), is output
to a computer or a smart device or not along with the performance played on
the instrument. To output the audio input sound, set the Audio Loopback to
“On.” However, input sounds via Bluetooth Audio or [AUX IN] jack are always
output regardless of this Audio Loopback on/off setting.
For example, if you want to record the audio input sound as well as the sound
played on the instrument by using the computer or the smart device, set this to
“On.” If you intend to record only the sound played on the instrument by using
the computer or the smart device, set this to “Off.”
For details on the settings, refer to “Audio Loopback” on page 106.
P-525 Owner’s Manual
78
• The audio input sounds are
not output to devices
connected via the Bluetooth
Audio or [AUX IN] jack.
• The playback sound of an
Audio Song (page 44) is also
output to a computer or smart
device when this is set to
“On,” while the sound is not
output when this is set to
“Off.”
• With Audio Recording
(page 54), the audio input
sound from the connected
computer or smart device is
recorded when this is set to
“On,” while the sound is not
recorded when this is set to
“Off.” However, when the
devices are connected via the
Bluetooth Audio or [AUX IN]
jack, the input sounds are
always recorded regardless
of the Audio Loopback on/off
setting.
Page 79
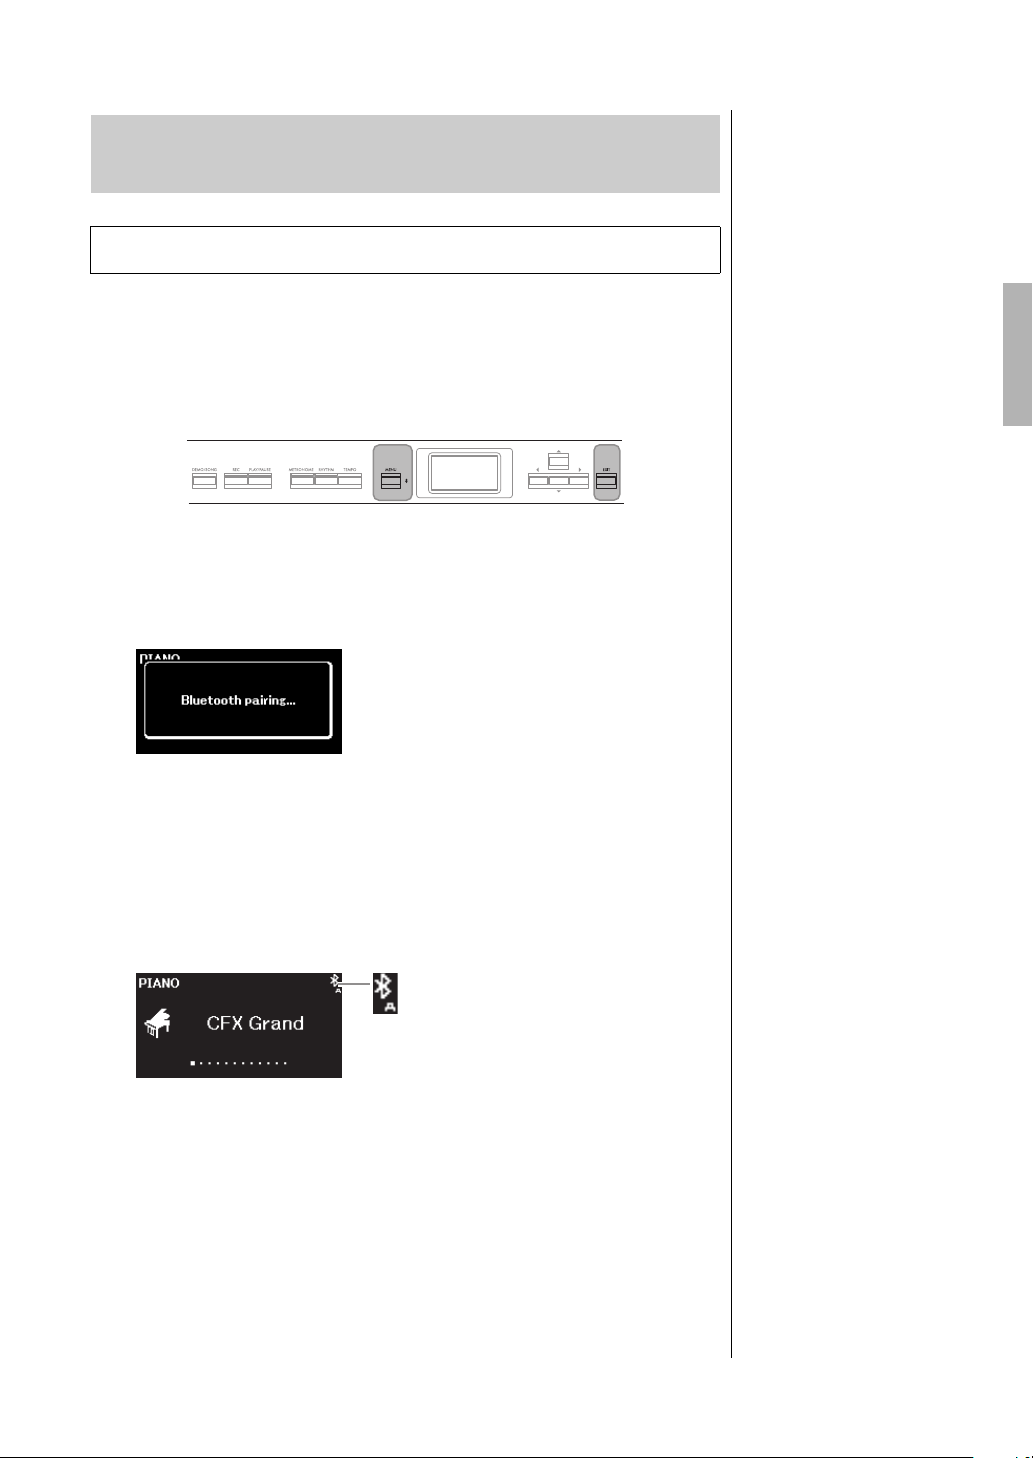
Listening to Audio Data from a Smart Device
NOTE
NOTE
NOTE
[MENU] button [EXIT] button
Can receive audio data
through this Instrument (Bluetooth Audio Function)
Before using the Bluetooth function, be sure to read “About Bluetooth” on page 80.
Connecting to Other Devices
You can input the sound of the audio data saved in a Bluetooth-equipped
device, such as a smart phone or digital audio player, to this instrument and
listen to it through the built-in speaker of the instrument.
To use this function, make sure that Bluetooth is set to “On” (page 80) on the
instrument (default setting: On).
1. Hold down the [MENU] button for 3 seconds.
The pop-up window will appear which indicates that the instrument is
standing by for pairing.
To cancel the pairing, press the [EXIT] button.
2. On the smart device, set the Bluetooth function to on and
select “P-525 AUDIO” from the connection list.
For details, refer to the smart device owner’s manual.
After pairing is completed, the connection status will be shown in the
display.
3. Play back audio data on the smart device to confirm that
the built-in speakers of the instrument can output the
audio sound.
When you turn on the instrument the next time, the last-connected smart
device will be connected to this instrument automatically, if the Bluetooth
function of the smart device and the instrument is set to on. If it is not
connected automatically, select the model name of the instrument from
the connection list on the smart device.
• In this manual, a smart device
is used as an example of a
Bluetooth-equipped device
which allows Bluetooth
transmission of contained
audio data to the instrument,
via wireless communication.
For proper operation, the
device must be compatible
with A2DP (Advanced Audio
Distribution Profile). The
Bluetooth Audio function is
explained here by using a
smart device as an example
of such Bluetooth-equipped
devices.
• Refer to page 82 for
transmitting/receiving the
MIDI data between the
instrument and the smart
device via Bluetooth.
• Bluetooth headphones or
speakers cannot be paired.
Pairing
“Pairing” means to register
Bluetooth-equipped smart
devices on this instrument, and
establish the mutual recognition
for wireless communication
between the two.
• Only one smart device can be
connected to this instrument
at a time (although up to 8
smart devices can be paired
to this instrument). When
pairing with the 9th smart
device has succeeded,
pairing data for the device
with the oldest connection
date will be deleted.
• Make sure to complete the
settings on the smart device
within 5 minutes.
• If you are required to enter a
passkey, enter the numerals
“0000.”
You can adjust the volume of
the sound input via Bluetooth
by the [VOLUME] slider. To
adjust the volume balance
between your keyboard
performance and the input
sound via Bluetooth, adjust the
volume on the smart device.
P-525 Owner’s Manual
79
Page 80
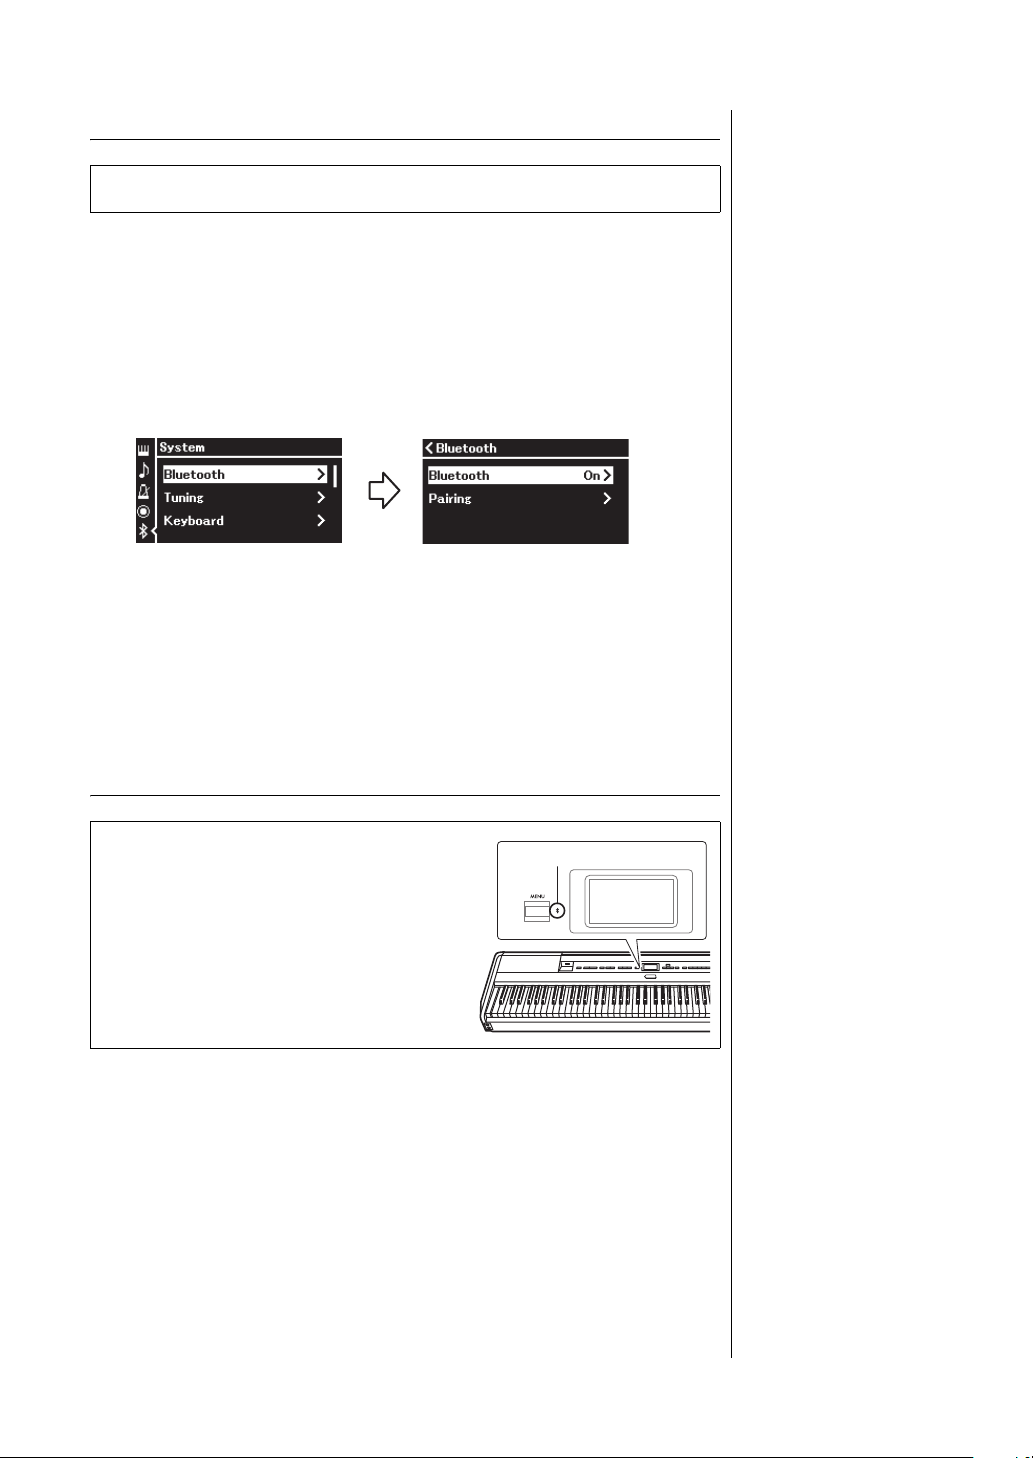
Connecting to Other Devices
“System” menu display
1-1. Confirm that “Bluetooth”
is selected.
1-2. Press the [R] button to
call up the next display.
1-3. Confirm that “Bluetooth” is
selected.
“Bluetooth” display
Bluetooth logo
Switching the Bluetooth Function On/Off
Before using the Bluetooth function, be sure to read “About Bluetooth” (see below).
By default, the Bluetooth function will be on right after turning the
instrument’s power on, however you can set the function to off.
1. Press the [MENU] button repeatedly to call up the
“System” menu display, then select the highlighted item in
each display as illustrated below.
2. Press the [R] button to switch on/off.
To exit from the “System” menu display, press the [EXIT] button.
About Bluetooth
Bluetooth capability
Depending on the country in which you
purchased the product, the instrument may not
have Bluetooth capability. If the Bluetooth logo is
printed on the front panel, this means that the
product is equipped with Bluetooth functionality.
Bluetooth is a technology for wireless communication between devices within an area of
about 10 meters (33 ft.) employing the 2.4 GHz frequency band.
Handling Bluetooth communications
• The 2.4 GHz band used by Bluetooth compatible devices is a radio band shared by
many types of equipment. While Bluetooth compatible devices use a technology
minimizing the influence of other components using the same radio band, such
influence may reduce the speed or distance of communications and in some cases
interrupt communications.
• The speed of signal transfer and the distance at which communication is possible
differs according to the distance between the communicating devices, the presence of
obstacles, radio wave conditions and the type of equipment.
• Yamaha does not guarantee all wireless connections between this unit and devices
compatible with Bluetooth function.
P-525 Owner’s Manual
80
Page 81
Using Smart Device Apps with a Connected
NOTICE
NOTE
Smart Device
You can use the two smart device apps, “Smart Pianist” and “Rec'n'Share”
(page 88) by connecting a smart device such as a smartphone or tablet.
For details on each app, access the website below and visit the page for each
app.
https:/www.yamaha.com/2/apps/
Operating the Instrument with a Smart Device
(Smart Pianist)
Connecting to Other Devices
By using the Smart Pianist app, you can view the score of the preset Songs on
the smart device, record your performance to the smart device, and perform
other convenient operations. The intuitive visual also helps you easily to
confirm the current settings of the instrument.
After installing the “Smart Pianist” app on your smart device from the website
above, connect this instrument to the device via the following three methods.
• Connecting via Bluetooth (page 82)
• Connecting via USB cables (page 82)
• Connecting via Wi-Fi (by using the separately sold UD-WL01 wireless LAN
adaptor) (page 83)
The “Connection Wizard” of Smart Pianist guides you in properly connecting
the smart device to the instrument properly.
For more information on how to connect the device and use the app, refer to
the “Smart Pianist User Guide” on the following website.
https://manual.yamaha.com/mi/app/smartpianist/
• Activating the “Smart
Pianist” app while the
instrument is connected to
the smart device overwrites
the settings on the
instrument by that of
“Smart Pianist.” Save your
important setup data as a
backup file to a USB flash
drive (page 90).
• Do not place your smart
device in an unstable
position. Doing so may
cause the device to fall and
result in damage.
When using the “Smart Pianist”
app, you cannot use any
buttons on the instrument other
than the [EXIT] button.
Control the instrument by using
“Smart Pianist.”
Pressing the [EXIT] button on
the instrument disconnects the
instrument from the “Smart
Pianist” app, and enables you
to control the instrument by
using its buttons.
P-525 Owner’s Manual
81
Page 82
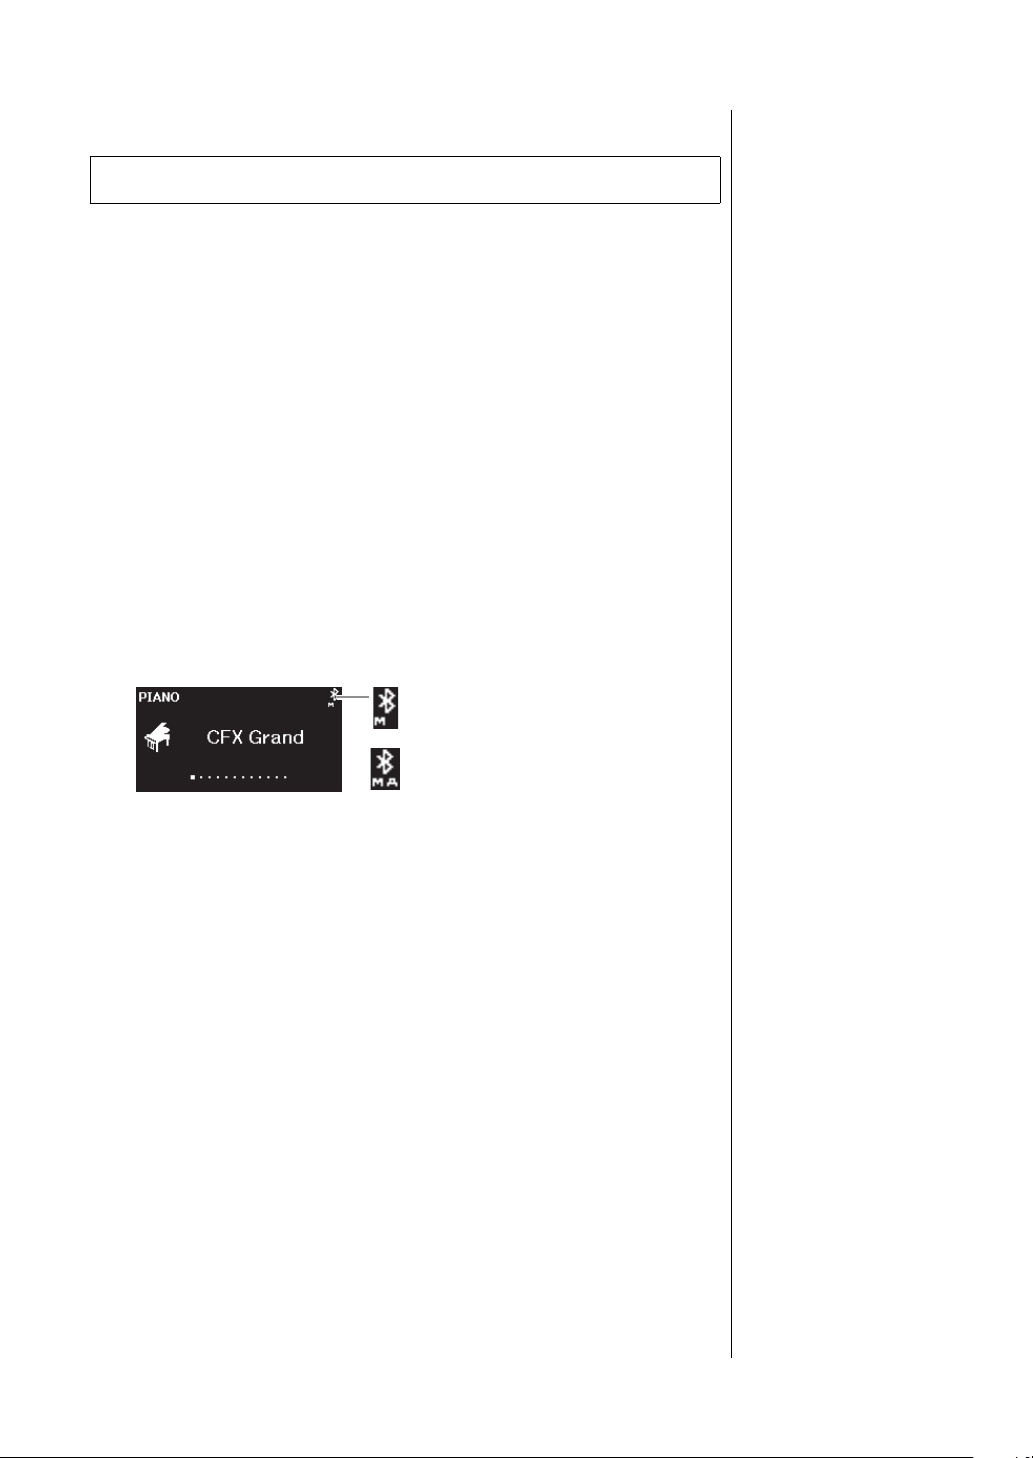
Connecting to Other Devices
NOTE
Can transmit and receive MIDI data
Can transmit and receive MIDI data,
and receive audio data
“Voice” display
Connecting via Bluetooth
Before using the Bluetooth function, be sure to read “About Bluetooth” on page 80.
Two different types of Bluetooth connection are available: “Bluetooth MIDI”
and “Bluetooth Audio” (page 79).
Although a Bluetooth MIDI connection is required for using the Smart Pianist,
a Bluetooth Audio connection is also required for playing back audio data in
your smart device on the Smart Pianist. Connect via Bluetooth Audio first, and
then connect via Bluetooth MIDI.
1. Make the Bluetooth Audio function settings on this
instrument to receive audio data (page 79).
2. Connect with the smart device via Bluetooth MIDI by
using the “Connection Wizard” on the Smart Pianist.
When connecting, select “P-525 MIDI” on Smart Pianist as the device for
connection.
When the Bluetooth connection is made successfully, the connection
status is shown on the Voice display.
Connecting via USB cables
Connect the smart device to the [USB TO HOST] terminal via USB cables.
With this method, audio data as well as MIDI data can be transmitted or
received between the instrument and the smart device. This allows you to play
the audio data in the smart device through Smart Pianist, and also allows you
to record your keyboard performance as audio format on Smart Pianist.
For instructions on how to connect a smart device to this instrument, refer to
the example on page 88.
If the Bluetooth function of this
instrument is set to Off (default
setting: On), the Bluetooth
connection cannot be made.
For information on the setting,
refer to page 80.
P-525 Owner’s Manual
82
Page 83

Connecting to Other Devices
NOTICE
Connecting via Wi-Fi (by using the separately sold
USB wireless LAN adaptor)
*The USB wireless LAN adaptor UD-WL01 may not be available depending on your area.
Connect the smart device via Wi-Fi by connecting the USB wireless LAN
adaptor UD-WL01 (sold separately) to the [ ](USB TO DEVICE) terminal.
With this method, audio data as well as MIDI data can be transmitted or
received between the instrument and the smart device. This allows you to play
the audio data in the smart device through Smart Pianist, and also allows you
to record your keyboard performance as audio format on Smart Pianist.
There are two types of connections via Wi-Fi as described below. The
“Connection Wizard” of Smart Pianist guides you in properly connecting the
smart device to the instrument properly.
Connecting by the Infrastructure mode
The Infrastructure mode uses an access point for data communication between
a USB wireless LAN adaptor and a network. You can use this mode when you
connect to another network while a smart device is connected to the
instrument.
• Displaying the Wireless LAN networks and connecting to a network
(page 84)
• Automatic Setup by WPS (page 85)
• Manual Setup (page 85)
Do not connect this product
to a public Wi-Fi and/or
Internet service directly. Only
connect this product to the
Internet through a router with
strong password protections.
Consult your router
manufacturer for information
on optimum security
practices.
Connecting by the Accesspoint mode (page 87)
The Accesspoint mode allows you to directly connect the USB wireless LAN
adaptor and a smart device, without the need for using an access point. You can
use this mode when no access point is available for connection to the
instrument, or when it is unnecessary to connect to another network while a
smart device is connected to the instrument.
When connected by this mode, Internet access is disabled on your smart
device, and some functions of Smart Pianist cannot be used.
P-525 Owner’s Manual
83
Page 84
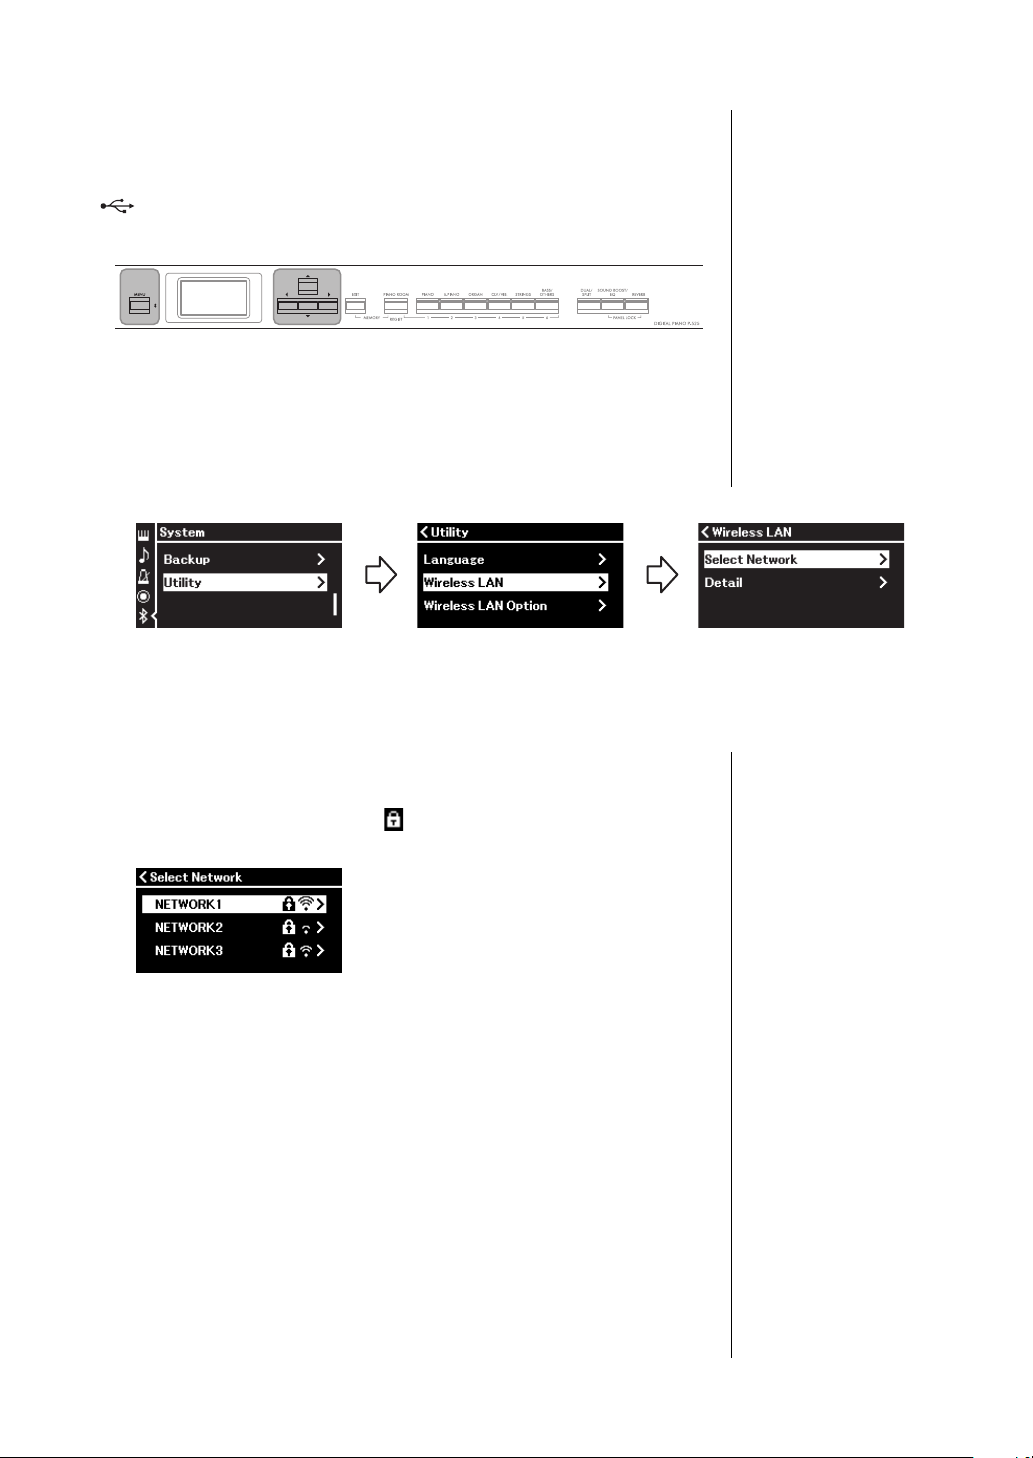
Connecting to Other Devices
NOTE
If the menus shown in the
Wireless LAN display are
different from the instruction
here, the instrument is in the
Accesspoint mode. Set the
Wireless LAN Mode parameter
to “Infrastructure Mode” by
following the step 1 on
page 87.
[U]/[D]/[L]/[R]
buttons
[MENU] button
“System” menu display
1-1. Use the [U]/[D] buttons
to select “Utility.”
1-2. Press the [R] button to
call up the next display.
1-3. Use the [U]/[D] buttons
to select “Wireless LAN.”
1-4. Press the [R] button to
call up the next display.
1-5. Use the [U]/[D] buttons
to select “Select
Network.”
“Utility” display “Wireless LAN” display
NOTE
If no signal from the access
point is received, the access
point cannot be listed. Also,
closed access points cannot
be listed.
• Displaying the Wireless LAN Networks and connecting to
a Network
Make sure to connect the USB wireless LAN adaptor (sold separately) to the
[ ] (USB TO DEVICE) terminal, otherwise the displays for setup below
will not be shown.
1. Press the [MENU] button repeatedly to call up the
“System” menu display, and then select the highlighted
item in each display as illustrated below.
2. Press the [R] button to call up the network list.
For a network with a lock icon , you need to enter the proper
password.
3. Connect the instrument to the Network.
3-1. Select the desired network, then press the [R] button.
The name of the selected network will be fully shown in the display,
letting you confirm this is the network you want to use.
3-2. Press the [R] button.
• For a network without a lock icon:
P-525 Owner’s Manual
84
• For a network with a lock icon:
Connecting starts.
You need to enter the proper password. For details on how to enter
characters, refer to the “Renaming Files — Rename” on page 71.
After entering the password, press the [MENU] button to finalize the
setting. This operation starts connecting automatically.
Page 85
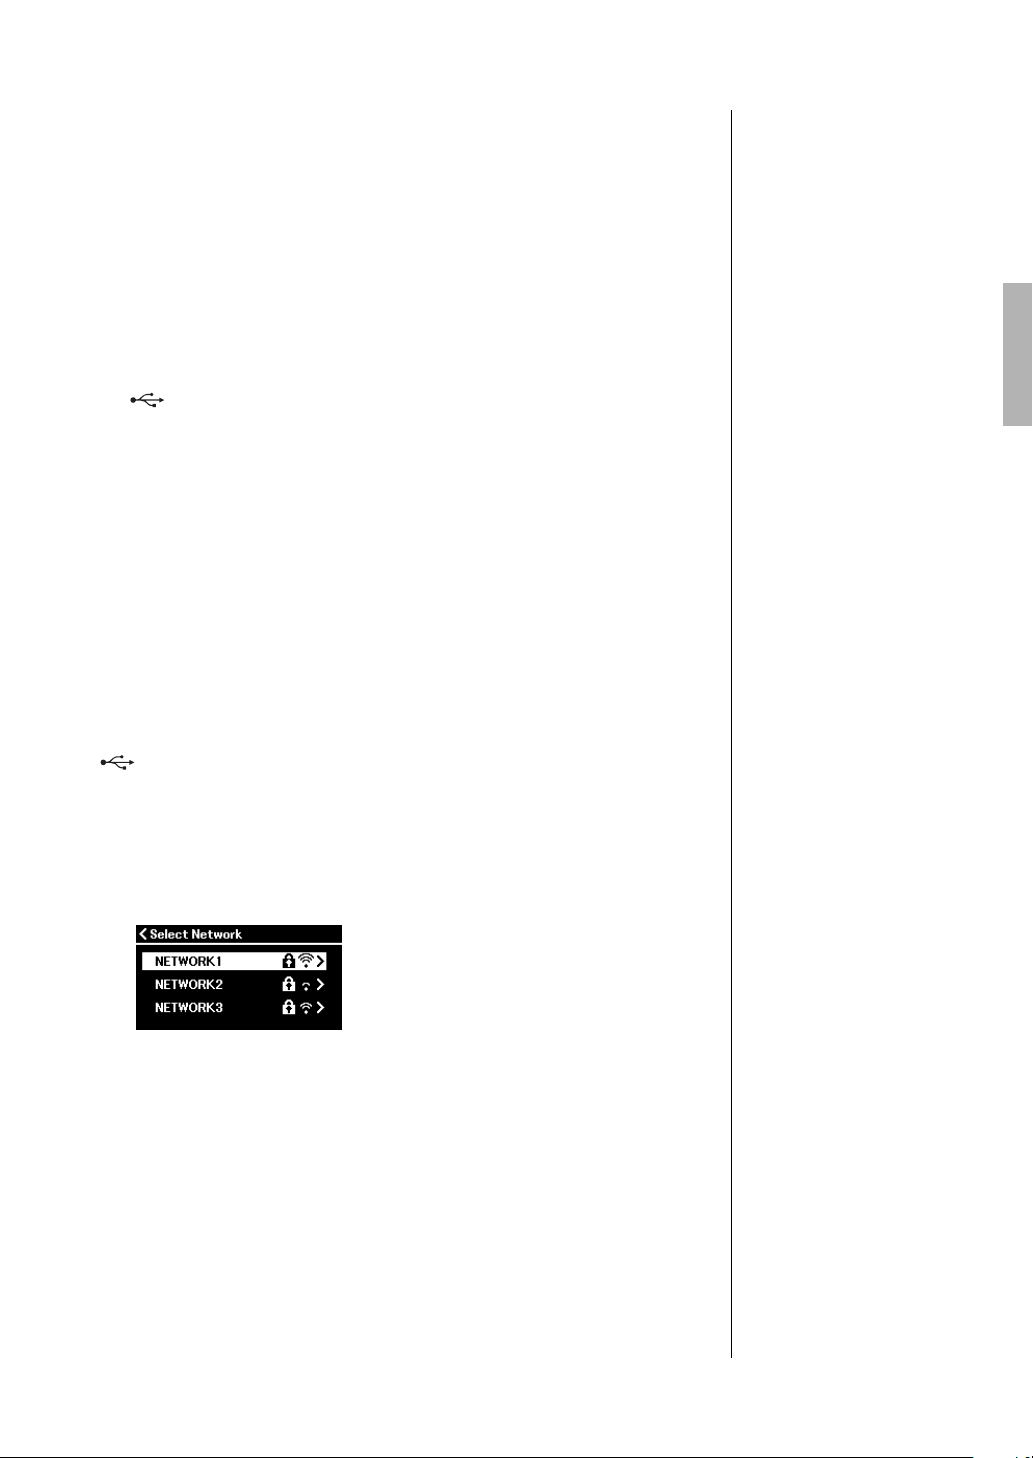
When connection is done successfully, “Completed” is shown in the
NOTE
WPS setup is not available
while the instrument is in the
following modes or conditions:
• While a Song or a Demo
Song is playing back or
being paused temporarily, or
while the instrument is in the
Song Recording mode.
• When Wireless LAN mode is
set to “Accesspoint Mode” in
the “System” menu.
display, and returns to the “Select Network” display.
4. Connect the smart device to the access point.
Open the Wi-Fi settings on your smart device, and select the network
containing “P-525” in the name field.
If a password is requested, input it to connect.
•Automatic Setup by WPS
Please make sure to connect the USB wireless LAN adaptor (sold separately) to
the [ ] (USB TO DEVICE) terminal, otherwise the displays for setup will
not be shown.
If your access point supports WPS, you can easily connect the instrument to
access point by WPS, without making settings, such as password input, etc.
Press the WPS button on the USB wireless LAN adaptor more than 3 seconds,
and press the WPS button on your access point within two minutes.
When connection is done successfully, “Completed” is shown in the display,
and the Voice display will be shown.
Connecting to Other Devices
Finally, connect the smart device to the access point (step 4 above).
•Manual Setup
Make sure to connect the USB wireless LAN adaptor (sold separately) to the
[ ] (USB TO DEVICE) terminal, otherwise the displays for setup will not
be shown.
1. To call up the network list, perform steps 1 – 2 in the
“Displaying the Wireless LAN Networks and connecting to
a Network” (page 84).
2. Select “Other” at the bottom of the network list, then press
the [R] button.
P-525 Owner’s Manual
85
Page 86

Connecting to Other Devices
NOTE
The password cannot be set
when you select “NONE” for
the security setting.
3. Set the SSID, Security and Password to the same as the
settings on the access point.
3-1. Select the “SSID” then press the [R] button to call up the
display for SSID input, then enter the SSID.
For details on how to enter the characters, refer to “Renaming Files —
Rename” on page 71. After entering the SSID, press the [MENU]
button to finalize the setting. Operation returns to the “Other” display.
3-2. Select “Security” then press the [R] button to call up the
Security list. Select the security then return to the “Other”
display by pressing the [
L] button.
3-3. Select “Password,” then set the password in the same way as
SSID.
4. Select “Connect >” at the bottom of the display shown in
step 3, then press the [R] button to start connecting.
When connection is done successfully, “Completed” is shown in the
display, and returns to the “Select Network” display.
5. Connect the smart device to the access point.
This operation is the same as step 4 on page 85.
P-525 Owner’s Manual
86
Page 87
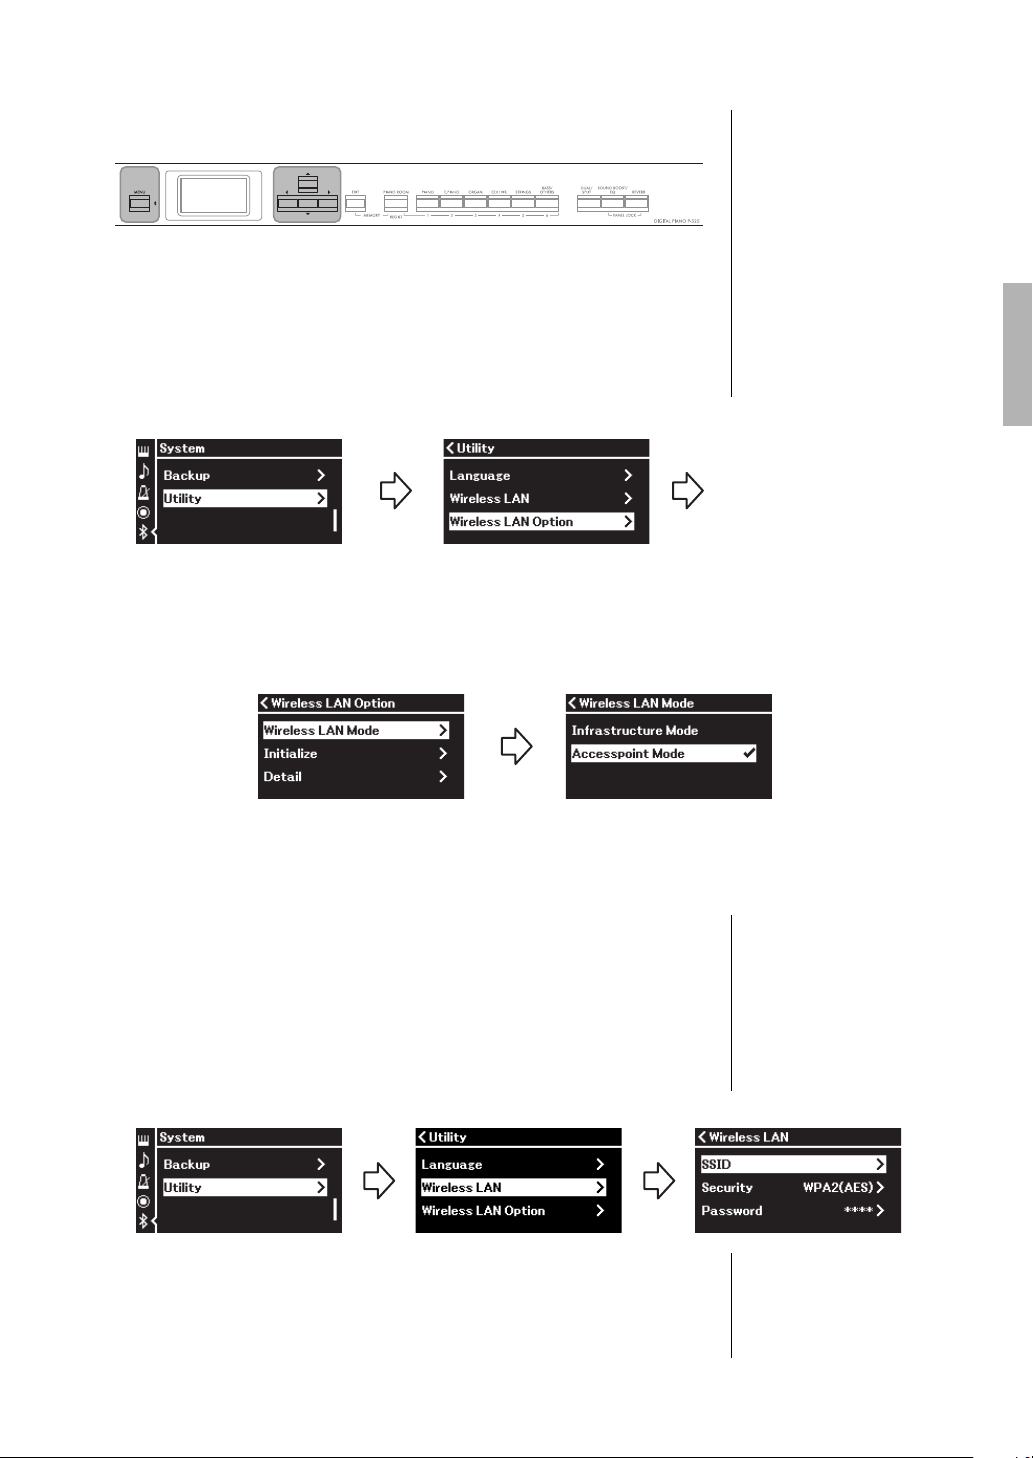
• Connecting by the Accesspoint Mode
[U]/[D]/[L]/[R]
buttons
[MENU] button
“System” menu display
1-1. Use the [U]/[D] buttons
to select “Utility.”
1-2. Press the [R] button to
call up the next display.
1-3. Use the [U]/[D] buttons to
select “Wireless LAN Option.”
1-4. Press the [R] button to call up
the next display.
1-5. Use the [U]/[D] buttons to
select “Wireless LAN Mode.”
1-6. Press the [R] button to call
up the next display.
“Utility” display
“Wireless LAN Option” display
1-7. Use the [ U]/[D] buttons to
select “Accesspoint Mode.”
“Wireless LAN Mode” display
“System” menu display “Utility” display “Wireless LAN” display
1. Switch the instrument to the “Accesspoint Mode.”
Press the [MENU] button repeatedly to call up the “System” menu
display, then select the highlighted item in each display as illustrated
below.
Connecting to Other Devices
When mode change is done successfully, “Completed” is shown in the
display, operation returns to the “Wireless LAN Mode” display.
2. Set SSID, Security, Password and Channel.
2-1. From the “System” menu display, select the highlighted item
in each display as illustrated below.
2-2. Set the SSID, Security, Password and Channel.
Select and enter each value/setting in the same way as in step 3 in
“Manual Setup.” For the setting range for each item, refer to “Wireless
LAN” (In the Accesspoint mode) on page 108.
P-525 Owner’s Manual
87
Page 88
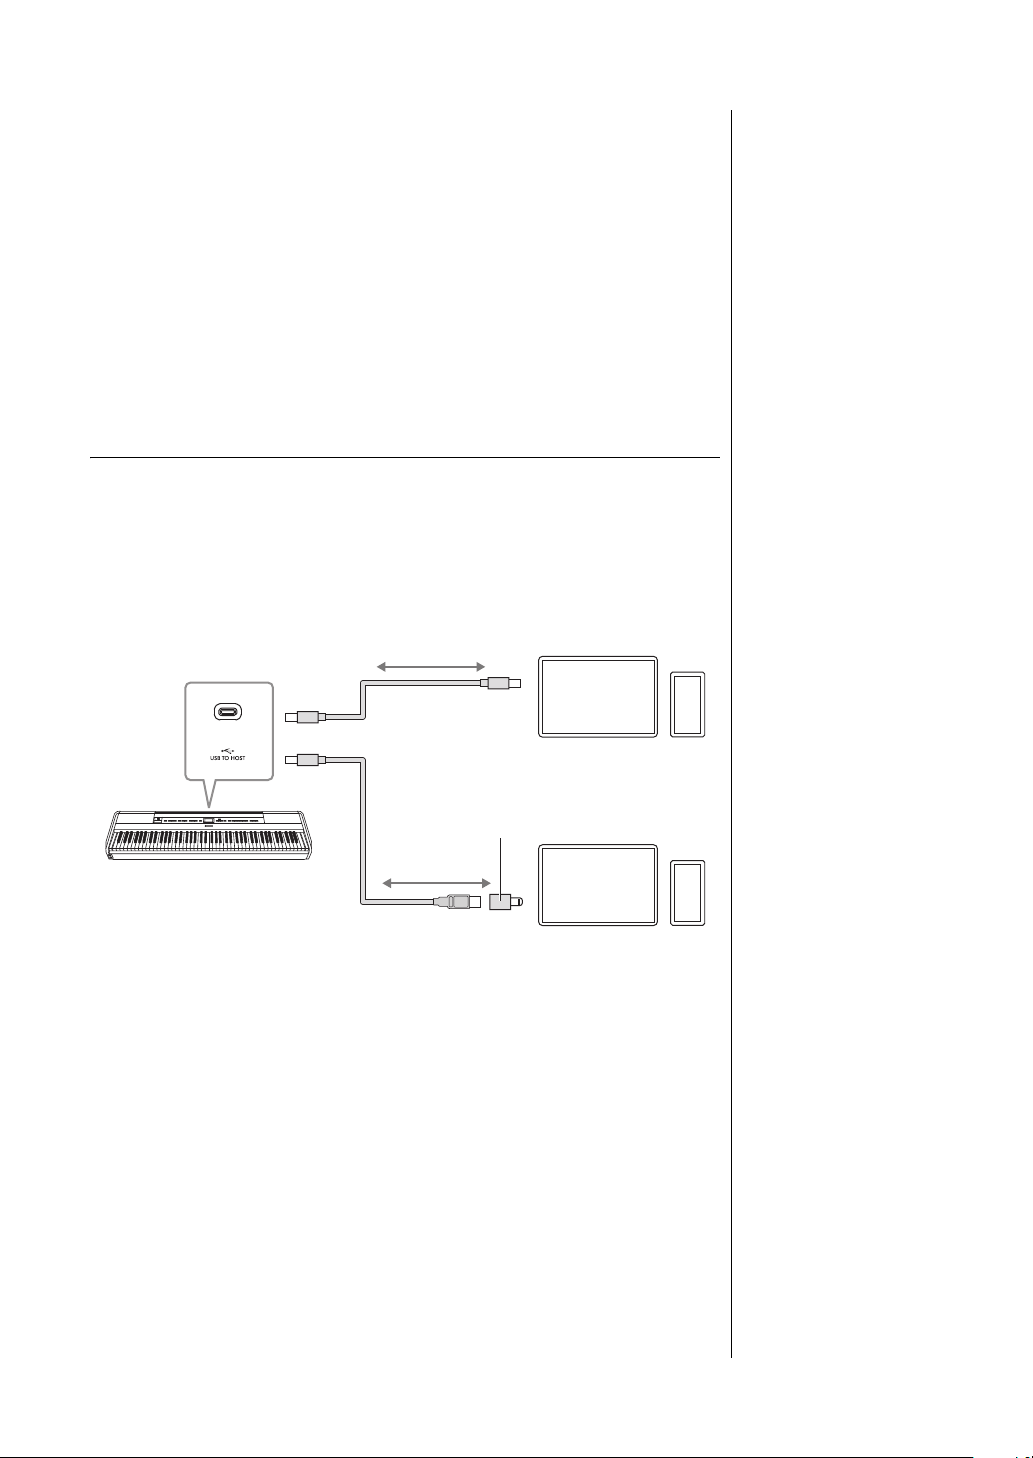
Connecting to Other Devices
NOTICE
Use a CC or AC type USB
cable of less than 3 meters.
The cable must be a
communication cable
compliant with USB
standards, and not a
charging-only cable.
iPad or Android device with
Type C connector
USB cable
(Type C - Type A)
P-525
USB cable
(Type C - Type C)
iPhone or iPad with
Lightning connector
USB conversion adaptor
(Type A - Lightning)
3. Save the setting.
Select “Save >” at the bottom of the “Wireless LAN” display, then press
R] button to start saving.
the [
When saving is done successfully, “Completed” is shown in the display,
and operation returns to the “Utility” display.
4. Connect the smart device to the instrument (as an access
point).
This operation is the same as step 4 on page 85.
Filming, Recording, and Editing Your Performance
(Rec'n'Share)
Rec'n'Share is a smart device app which allows you to film, record, and edit
your performance and helps in uploading the edited data to SNS, etc. For
instructions on how to obtain it, refer to page 81.
To use Rec'n'Share, connect this instrument to your smart device with a
commercially available USB cable (CC or AC type) or a USB conversion
adaptor that matches the connector shape.
Example
P-525 Owner’s Manual
88
Page 89
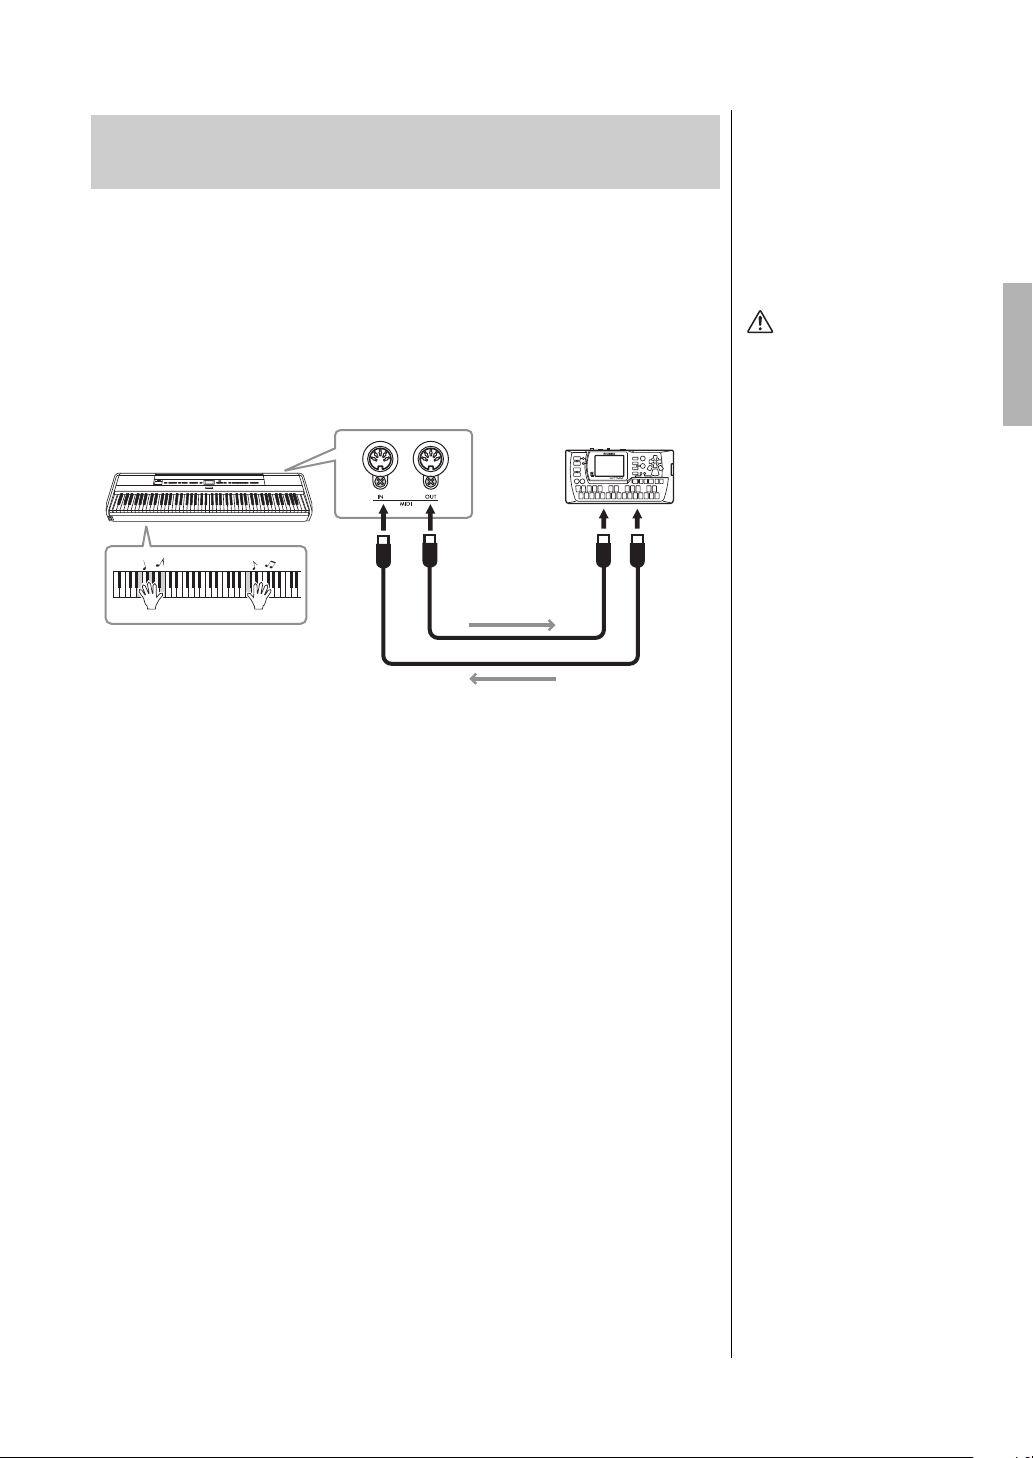
Connecting External MIDI Devices (MIDI
CAUTION
Before connecting the
instrument to other MIDI
devices, turn off the power of
all the components.
NOTE
• For details about MIDI, refer
to “MIDI Basics”
downloadable from the
Yamaha website (page 6).
• Since MIDI data that can be
transmitted or received varies
depending on the type of
MIDI device, check the MIDI
Data Format to find out what
MIDI data and commands
your devices can transmit or
receive. The MIDI Data
Format is contained in the
“Data List” downloadable
from the Yamaha website
(page 6).
• When transmitting MIDI data
from this instrument to an
external MIDI device,
unexpected sounds may
occur because of data
related to the Grand
Expression Modeling.
Instrument
MIDI IN MIDI INMIDI OUT MIDI OUT
MIDI transmit
MIDI receive
External MIDI device
Te r mi n a l s)
The sophisticated MIDI functions give you powerful tools to expand your
music performance and creation possibilities. Use the MIDI terminals and
standard MIDI cables to connect external MIDI devices (keyboard, sequencer,
etc.)
• MIDI [IN]: Receives MIDI messages from another MIDI device.
• MIDI [OUT]: Transmits MIDI messages generated on this instrument to
another MIDI device.
Connecting to Other Devices
P-525 Owner’s Manual
89
Page 90
Backup and Initialization
NOTICE
NOTE
Backup Setting
(Selecting parameters maintained even when the
power is turned off)
This lets you set whether some settings of the
Backup Setting (below) are maintained or not
when the power is turned off. The Backup Setting
consists of two groups, “Voice” (including Voice
related settings such as Voice selection) and
“Other” (including various settings such as Song
Repeat and Tuning), which can be set individually.
Data and settings maintained even when the
power is turned off
• MIDI Song saved in “User” category (page 45)
• “System” menu (page 103)
Bluetooth* On/Off
Keyboard (Duo Type only)
Utility
•Backup Setting (explained here)
• Registration Memory (page 72)
* For information on whether Bluetooth functionality
is included with the instrument or not, refer to page
page 80.
1. Press the [MENU] button several times to
select “System” menu.
2. Use the [U]/[D] buttons to select “Backup,”
use the [
then press the [
Setting.”
R] button to call up the next display,
U] button to select “Backup
3. Use the [R] button to call up the next display,
select “Voice,” then use the [
select “On” or “Off.”
Each “Voice” contains the following settings:
• Voice selection for R1, R2 and L
• All the parameters other than Transpose in the
“Voice” menu
R] button to
4. Press the [D] button to select “Other,” then
use the [
The “Other” contains the following settings:
• “Song” menu (page 98): Song Repeat, Volume
• “Metronome/Rhythm” menu (page 101): Vo lu m e,
R] button to select “On” or “Off.”
(Song-Keyboard), Audio Volume, Quick Play, Play
Tr ac k
BPM, Bell On/Off, Intro, Ending, Bass
• “System” menu (page 103): Tuning, Keyboard
(except “Duo” and “Duo Type”), Pedal, Sound,
MIDI
• Sound Boost, Master EQ
5. Press the [EXIT] button to exit from the
“System” menu display.
Backup
(Saving the Backup file for internal data)
This lets you save data on internal memory to the
connected USB flash drive as a backup file (named
“p-525.bup”). This backup file can be loaded to the
instrument via the Restore function (page 91) for
future. Note that Registration Memory (page 72) is
not included in the backup file.
• It may take 1–2 minutes to complete this operation. Never
turn off the power during this operation (while “Executing”
is shown). Doing so could result in damage to the data.
• If the same backup file (p-525.bup) is already saved in the
USB flash drive, this operation will overwrite or replace this
file with new one.
1. Connect the USB flash drive to the [ ]
(USB TO DEVICE) terminal.
2. Press the [MENU] button several times to
select “System” menu.
3. Use the [U]/[D] buttons to select “Backup,”
use the [
then use the [
“Backup.”
R] button to call up the next display,
U]/[D] buttons to select
4. Use the [R] button to call up the next display,
then press the [
D] button to select “Execute.”
5. Press the [R] button to execute the Backup
operation.
6. Press the [EXIT] button to exit from the
“System” menu display.
When you want to restore the settings in the backup file, execute
the Restore function (page 91).
P-525 Owner’s Manual
90
Page 91
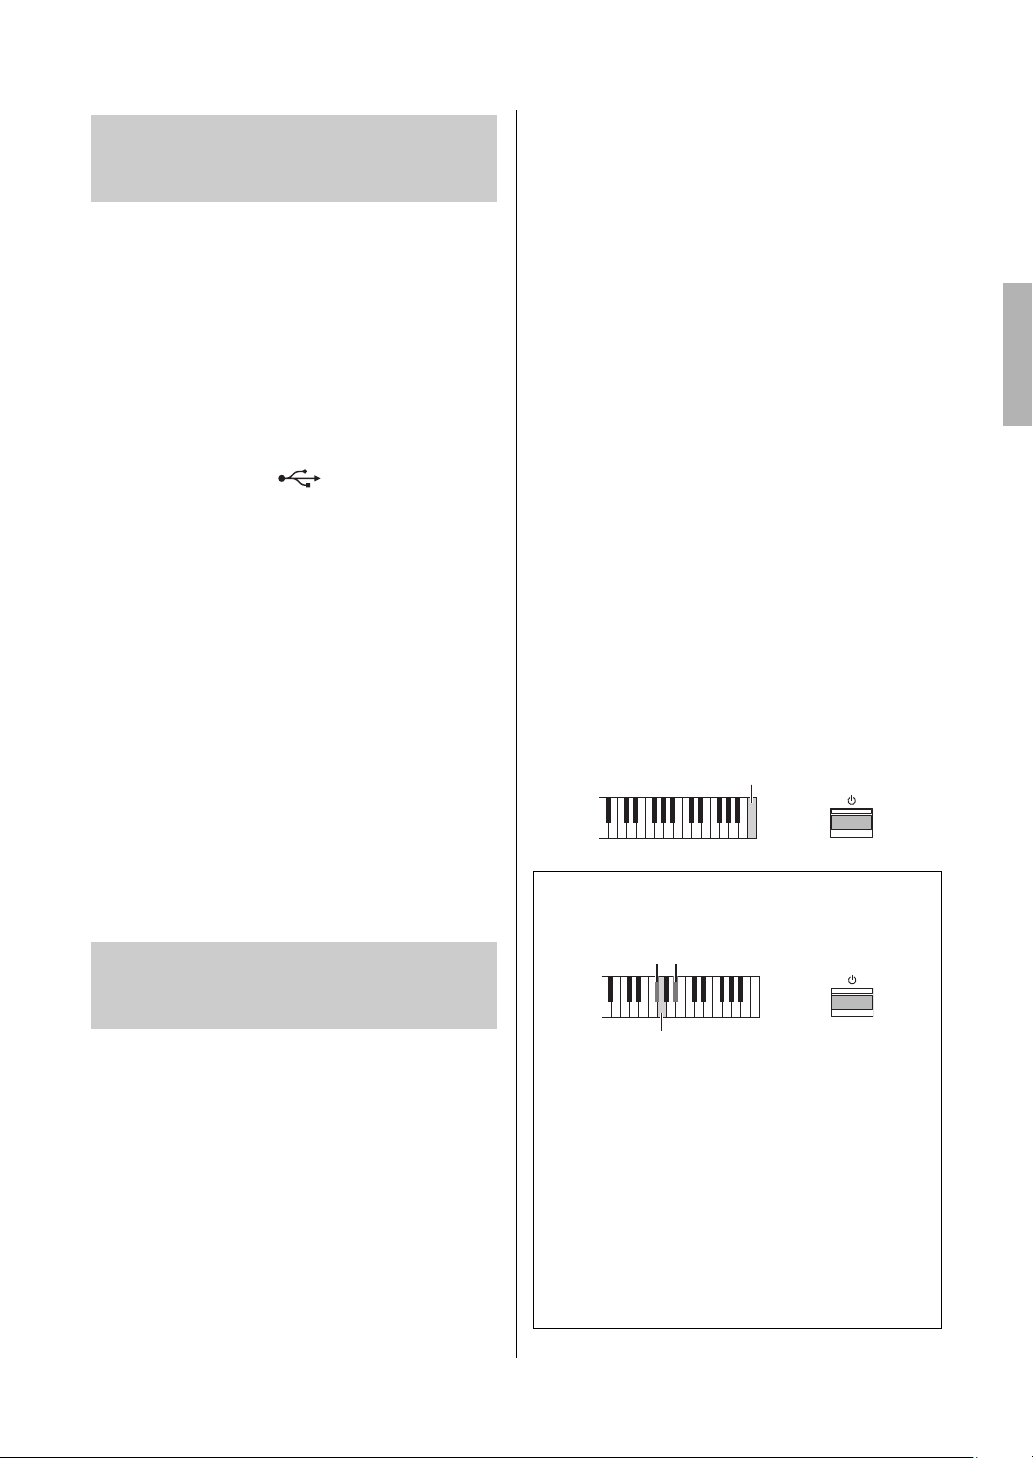
Backup and Initialization
NOTICE
NOTICE
NOTICE
+
[P] Standby/On switch
C7 (Highest key)
+
F♯5 A♯5
G5
Restore
(Restarting the instrument with the Backup file
loaded)
This lets you load the backup file (p-525.bup)
saved via the Backup function (page 90) to the
instrument on.
• It may take 1 – 2 minutes to complete this operation. Never
turn off the power during this operation (while “Executing”
is shown). Doing so could result in damage to the data.
• If recorded Songs reside on “User” memory, make sure to
move the Songs to the USB flash drive by following the
instructions page 69 before executing this operation. If you
do not, the Songs will be deleted via this operation.
1. Connect the USB flash drive containing the
Backup file to the [ ] (USB TO DEVICE)
terminal.
2. Press the [MENU] button several times to
select “System” menu.
3. Use the [U]/[D] buttons to select “Backup,”
use the [
then use the [
“Restore.”
R] button to call up the next display,
U]/[D] buttons to select
4. Use the [R] button to call up the next display,
then press the [
D] button select “Execute.”
Never turn off the power during this operation (while “Factory
reset executing” is shown). Doing so could result in damage
to the data.
1. Press the [MENU] button several times to
select “System” menu.
2. Use the [U]/[D] buttons to select “Backup,”
use the [
then use the [
“Factory Reset.”
R] button to call up the next display,
U]/[D] buttons to select
3. Use the [R] button to call up the next display,
then press the [
D] button to select “Execute.”
4. Press the [R] button to execute the Restore
operation.
A message indicating that the operation is
completed appears, then the instrument will restart
after a while.
Alternate method for restoring the default
settings
Press and hold down the white key on the right end
(C7) and press the [P] (Standby/On) switch to turn
on the power to this instrument. This operation will
not delete any Songs in the User category, Bluetooth
paring information, and Registration Memory.
5. Press the [R] button to execute the Restore
operation.
A message indicating that the operation is
completed appears, then the instrument will restart
after a while.
Factory Reset
(Restarting the instrument with the initial
factory settings loaded)
This lets you reset the Backup settings (page 90) to
their factory defaults (the initial settings
preprogrammed when shipped from the factory),
which are called up when you first turn on the
power to this instrument.
The following settings are not reset.
• MIDI Song saved in the User category (page 45).
• Bluetooth* pairing information (page 79).
• Registration Memory (page 72)
* For information on whether Bluetooth functionality is included
with the instrument or not, refer to page 80.
Restoring all data and settings to their
factory defaults—All Memory Clear
While holding down the F#5, G5 and A#5 keys
together of the, press the [P] (Standby/On) switch
to reset the following data in addition to the
Backup Settings to the factory default settings.
• MIDI Song saved in “User” category
• Bluetooth pairing information
• Registration memory
This operation deletes all data in this instrument. If you have
important data in the instrument that you do not want to delete,
copy and save them to a USB flash drive, etc. (page 90) before
performing this operation.
P-525 Owner’s Manual
91
Page 92
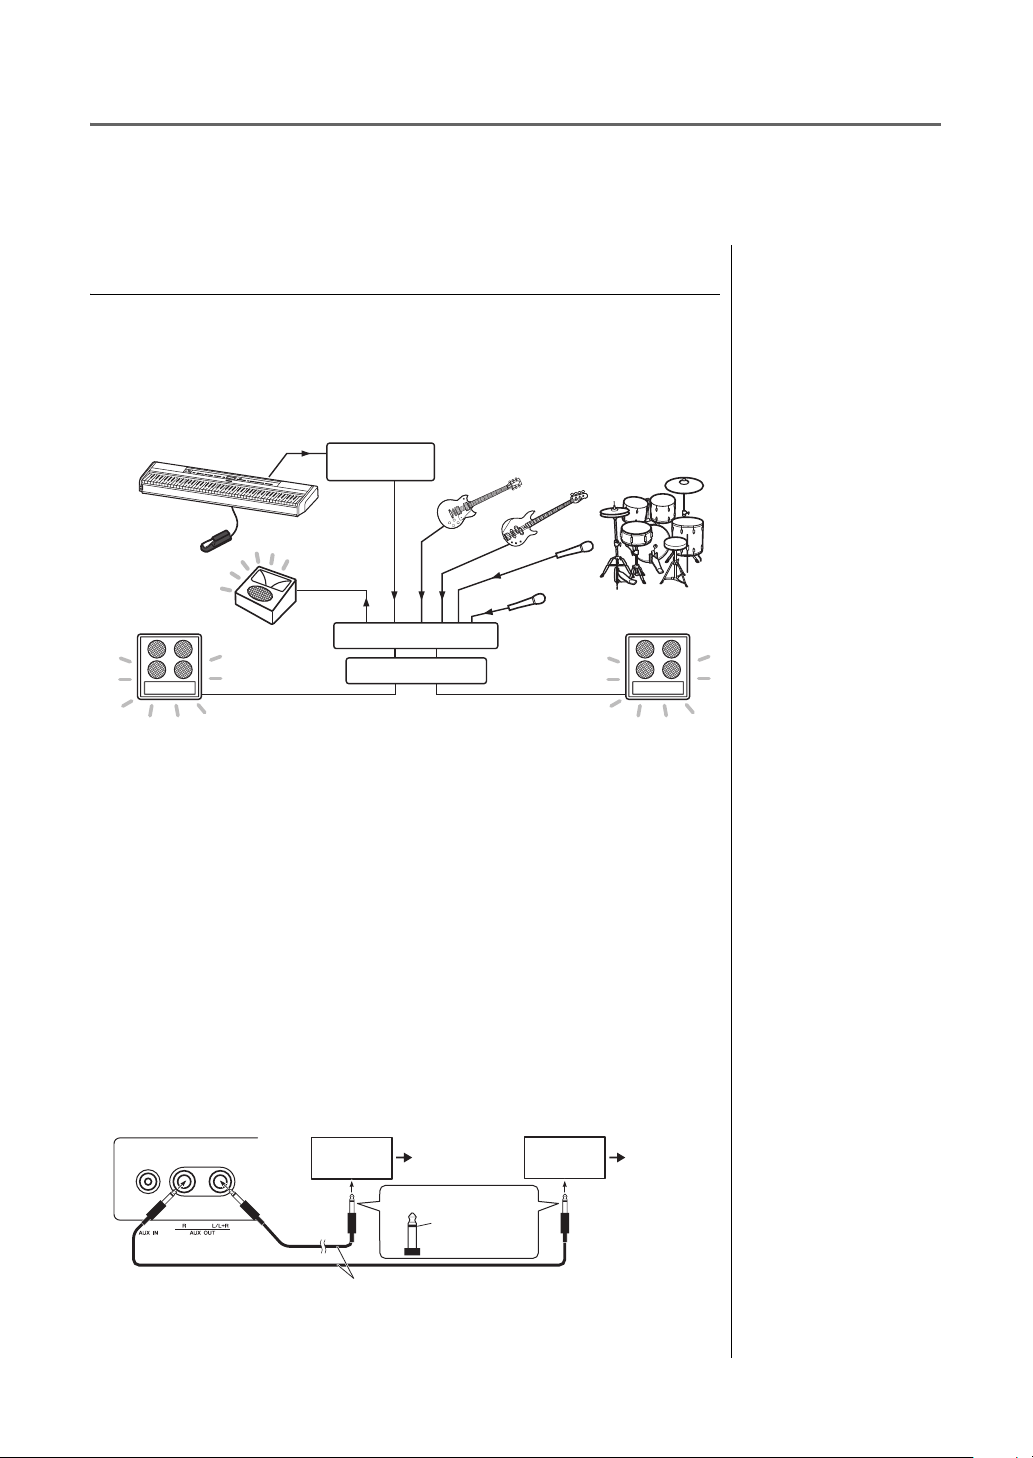
Performing Live
DI box
P-525
PA m i x e r
Powe r a mp
Front-of-house
speaker
Foot switch
or pedal
Front-of-house
speaker
Monitor
speaker
Voc al
microphone
Drums
Guitar
Bass
DI box
P-525 Rear panel
To t h e
PA m i x e r
DI box
Plug configuration:
Mono
(single line)
Input jack
(“IN”, etc.)
Input jack
(“IN”, etc.)
To t h e
PA m i x e r
Commercially available standard mono audio cable
NOTICE
NOTE
Your instrument features a number of convenient functions for use when setting it up on stage in order to
perform live. In order to provide a practical description of the connections and settings required in this
type of situation.
Stage setup and signal flow
The sound from your instrument will be sent to a PA mixer, then the mixed
sound is amplified and sent to the front-of house speakers so that the audience
can hear it. Monitor speakers may be placed on the floor in front of the
musicians so that they can more clearly hear their own sound and that of the
other instruments.
Please read the following
before setting up.
• Ensure that the instrument
is turned off before making
any connections.
• Make sure to check with the
PA operator when
connecting or
disconnecting cables or
turning on/off. Failure to do
so may damage to the PA
system.
Connect your footswitch/foot pedal, or pedal unit.
For details on using foot pedal/footswitch or pedal unit and the functions that
can be assigned to each pedal, refer to page 15.
Connect the instrument’s output to the PA mixer.
In order to be heard, your instrument will need to be connected to the PA
mixer’s inputs. Normally, this connection is made via a DI box (direct box)
located onstage. Connect the AUX OUT [R] and [L/L+R] jacks on the
instrument’s rear panel to the DI box inputs using commercially available
standard mono audio cables.
1 Set the [VOLUME] slider to the MIN position.
2 Check with the PA operator whether you can connect the instrument to the PA
mixer or not.
3 Connect the instrument as the following illustration.
Your instrument should now be fully connected. The next step will be to
balance your performance sounds.
P-525 Owner’s Manual
92
• When playing the piano
sound of this instrument with
an external powered speaker,
and while monitoring the
sound output from this
instrument on connected
headphones, we recommend
that you set the “Binaural
Sampling” or “Stereophonic
Optimizer” functions to “OFF”
(page 14).
• If only one of the DI box
channels is available for use
with your instrument, connect
it to the AUX OUT [L/L+R]
jack using a standard mono
audio cable. In this
configuration, your left and
right signals will be mixed
and output from the
instrument in mono.
• If DI boxes are not being
used, connect the AUX OUT
[R] and [L/L+R] jacks to the
input jacks on the PA mixer or
an on-stage sub-mixer.
Page 93

Sound setup
Once all of the instruments and microphones have been connected, the PA
operator will ask each musician in turn to play his or her instrument. You
should get ready as follows.
Turn on your instrument.
Set the [VOLUME] slider to the MIN position. Check with the PA operator whether you
can turn on the instrument, then press the [P] (Standby/On) switch.
Check your settings.
• Once turned on, ensure that your instrument is set up as follows.
- Tuned to match the other instruments (Master tuning, page 35).
- Auto Power-Off function disabled (page 13).
- Footswitch or foot pedal is operating correctly as an assigned function (page 17).
- Reverb is turned off (page 26).
• Turn off the speaker sound of your instrument (page 106) as necessary.
• Recall the settings saved to Registration Memory (page 72) as necessary.
Determine the optimum levels.
When asked by the PA operator to output a sound, play the digital piano as you would
when performing and determine the best settings for the following.
• Volume when you are playing accompaniment
• Volume when you are playing loudest, such as during a keyboard solo
• Volume of each Voice to be used
Performing Live
Master Volume Setting
Roughly speaking, the [VOLUME] slider should be set between 5 and 7 for playing
accompaniment and to 8 or 9 when you need to play louder. If set too high, your sound
may become distorted; if too low, any background noise will be more noticeable.
Sound Boost (page 37) Setting
Turn on the Sound Boost function if you are finding it difficult to make your instrument
heard within the overall mix. Choose from three different Sound Boost types.
Master EQ (page 38) Setting
The Master EQ function may help in making the optimum sound for performing live.
Balance the overall sound of the band.
After the levels of the various instruments have been set, the PA operator will have
everyone play together in order to balance the overall sound of the band. At this time,
you should listen to the nearest monitor speaker and ensure that you can hear
everything you need to in order to play well. If, for example, you cannot hear your own
sound, the singer, or another instrument well enough, ask the PA operator to raise the
corresponding level in your monitor’s mix.
This completes the setup process. You should now be ready to play live.
Lock the front panel to prevent mistakes.
Your instrument’s Panel Lock function allows you to temporarily disable front
panel buttons to prevent them being operated unintentionally while performing.
For details on this function, refer to page 40.
P-525 Owner’s Manual
93
Page 94
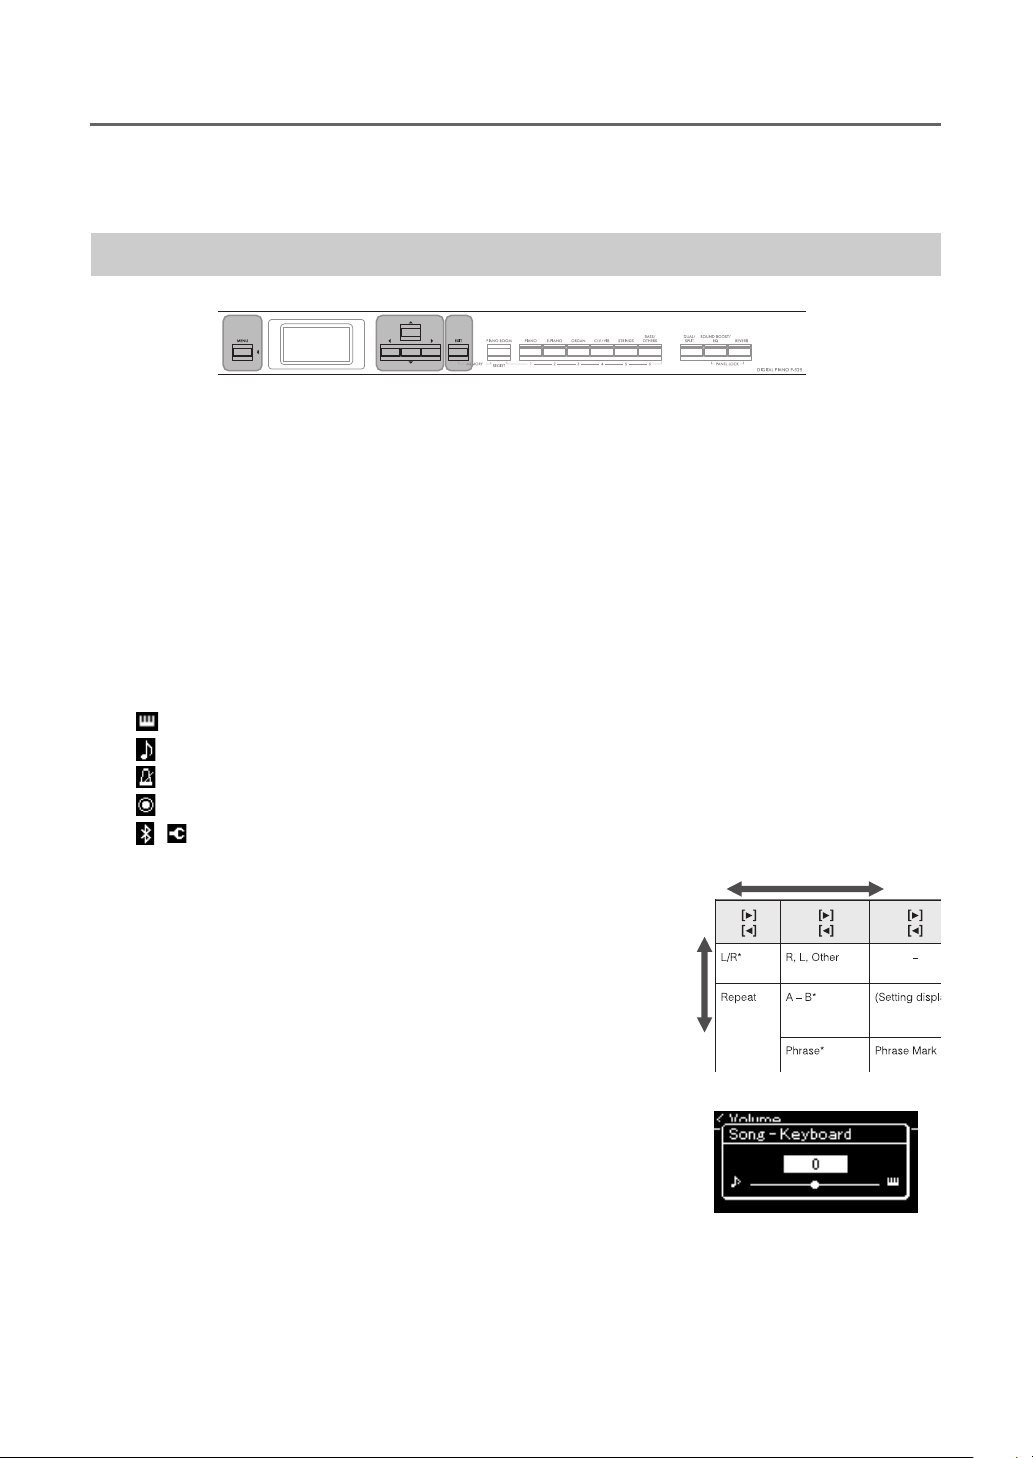
Detailed Settings (MENU Display)
[U]/[D]/[L]/[R]
buttons
[EXIT] button[MENU] button
Pop-up display
Pressing the [MENU] button opens one of the five menu displays (Voice, Song, Metronome/Rhythm,
Recording and System). You can make settings for various functions from these menu displays.
Common Operations in the Menu Displays
1. As necessary, select the desired Voice or Song for editing.
• If you want to edit Voice-related parameters (by calling up the “Voice” menu), select a Voice.
• If you want to edit parameters related to the R1/R2/L voice (pages 29-32), such as volume balance,
turn on Dual/Split/Duo, then select the desired Voices.
• If you want to set Song playback parameters, such as Repeat, select a Song.
• If you want to edit your recorded MIDI Song data select the recorded MIDI Song.
2. Press the [MENU] button several times to select the desired menu.
Pressing the [MENU] button repeatedly will call up the following menu displays in order, according
to the vertical menu at the left of the display.
Voice menu (page 95)
Song menu (page 98)
Metronome/Rhythm menu (page 101)
Recording menu (page 102)
/System menu (page103)
3. Use the [U]/[D]/[L]/[R] buttons to select the
desired parameter.
While referring as needed to the parameter list on each page
listed in step 2, use the [
the display vertically and use the [
navigate through display horizontally.
U]/[D] buttons to navigate through
L]/[R] buttons to
4. In the display called up in step 3, select a value
or execute the operation.
Most displays allow you to select a value by simply using the
U]/[D] buttons, although some, such as Edit in the “Song”
[
menu and Backup in the “System” menu, let you execute an
operation.
If a pop-up window is shown, set the value with the [
buttons, then exit from the window using the [EXIT] button.
Also, when the selected parameter provides only two options (on and off, for example), simply
pressing the [
R] button will alternate the value between the two options.
L]/[R]
5. To exit from the menu display, press the [EXIT] button.
P-525 Owner’s Manual
94
Page 95
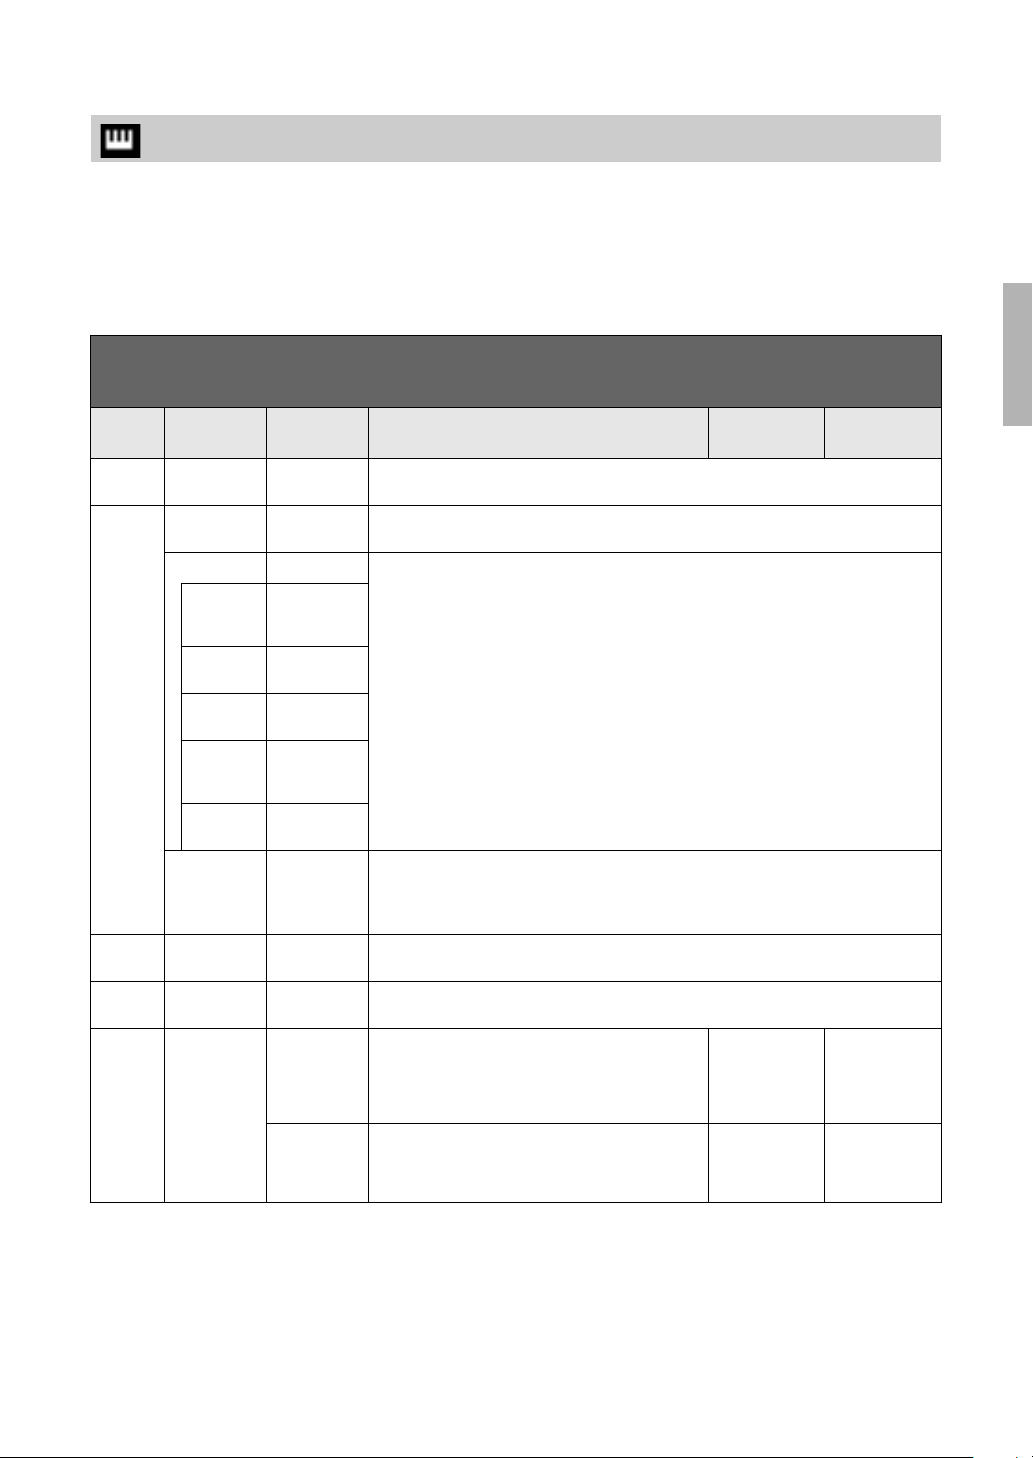
Detailed Settings (MENU Display)
NOTE
Voi ce Menu
This menu lets you edit or set various parameters related to keyboard performance, such as Voice
parameters. By turning on Dual/Split/Duo, you can make the settings for each Voice or each Voice
combination. While playing the keyboard and hearing the sound, change a parameter value to find your
desired sound. Note that you should turn on Dual/Split/Duo before calling up the “Voice” menu display.
Parameters with * are shown only when Dual/Split/Duo is on.
To call up the desired parameter:
Turn on Dual, Split or Duo as necessary, select Voices as necessary, press the [MENU] button several times to select “Voice”
menu, then use the [U]/[D]/[L]/[R] buttons to select the desired parameter.
[R]
[L]
Transpose (Pop-up
Piano
Setting
Reverb (Setting
Chorus (Setting
Voice Edit (Voice names)* Octave Shifts the pitch of the keyboard up and down in octave
[R]
[L]
window)
Lid Position (Setting
VRM – Refer to the description of “VRM” on page 24. Demo cannot be played in “Voice” menu.
Damper
Res.
(Resonance)
Damper
Noise
String Res.
(Resonance)
Duplex
Scale Res.
(Resonance)
Body Res.
(Resonance)
Grand Exp.
(Expression)
display)
display)
[R]
[L]
– Refer to the description of “Transposing the Pitch in Semitones (Transpose)” on page 34.
display)
(Setting
display)
(Setting
display)
(Setting
display)
(Setting
display)
Volume Adjusts the volume for each of the R1/R2/L Voices. This
Refer to the description of “Lid Position” on page 24.
NOTE
VRM is effective only for Voices in the Piano group (page 110).
–
– Refer to the description of “Grand Expression” on page 25. Demo cannot be played in “Voice”
menu.
NOTE
Grand Expression Modeling is effective only for the “CFX Grand” Voice.
– Refer to the description of “Reverb” on page 26.
– Refer to the description of “Chorus” on page 27.
steps. This parameter can be set for each Voices when
Dual/Split/Duo is on.
lets you adjust the balance between the R1/R2/L Voices
when Dual/Split/Duo is on.
Description Default setting Setting range
Differs depending
on the Voice or
Voice
combination.
Differs depending
on the Voice or
Voice
combination.
−2 (two octaves
lower) – 0 (no
pitch shift) – +2
(two octaves
higher)
0 – 127
P-525 Owner’s Manual
95
Page 96
Detailed Settings (MENU Display)
NOTE
To call up the desired parameter:
Turn on Dual, Split or Duo as necessary, select Voices as necessary, press the [MENU] button several times to select “Voice”
menu, then use the [U]/[D]/[L]/[R] buttons to select the desired parameter.
[R]
[L]
Voice Edit (Voice names)* Reverb Depth
[R]
[L]
[R]
[L]
(page 26)
Chorus Depth
(page 27)
Effect Refer to the description of “Effect” on page 28.
Rotary Speed Available only for the Voice of which the Effect Type is set
VibeRotor Available only for the Voice of which the Effect Type is set
VibeRotor
Speed
Effect Depth Adjusts the Effect depth for each of the R1/R2/L Voices.
Pan Adjusts the stereo pan position for each of the selected
Harmonic Cont Produces a distinctive “peaky” tone by raising the
Adjusts the Reverb depth for each of the R1/R2/L Voices.
This lets you adjust the balance between the R1/R2/L
Voices when Dual/Split/Duo is on. The “0” setting will
produce no effect.
NOTE
When a VRM Voice is used for several parts simultaneously,
unexpected sounds may result since the Reverb depth for a
part which has priority will become the common setting for the
parts. During Song playback, setting for a Song part is used
(priority order: Ch. 1, Ch. 2...Ch. 16), while the setting for a
keyboard part is used when Song playback is stopped
(priority order: R1, L and R2 Voices).
Adjusts the Chorus depth for each of the R1/R2/L Voices.
This lets you adjust the balance between the R1/R2/L
Voices when Dual/Split/Duo is on. The “0” setting will
produce no effect.
NOTE
When a VRM Voice is used for several parts simultaneously,
unexpected sounds may result since the Chorus depth for a
part which has priority will become the common setting for the
parts. During Song playback, setting for a Song part is used
(priority order: Ch. 1, Ch. 2...Ch. 16), while the setting for a
keyboard part is used when Song playback is stopped
(priority order: R1, L and R2 Voices).
to “Rotary.” This parameter determines the rotation
speed of the Rotary Speaker effect.
to “VibeRotor.” This parameter turns on or off the
VibeRotor effect.
Available only for the Voice of which the Effect Type is set
to “VibeRotor.” This parameter determines the speed of
the Vibraphone vibrato effect.
Note that some Effect types do not allow you to adjust the
depth.
R1/R2/L Voices.
Resonance value of the Filter. This parameter can be set
for each of the selected R1/R2/L Voices when Dual/Split/
Duo is on.
Description Default setting Setting range
Differs depending
on the Voice or
Voice
combination.
Differs depending
on the Voice or
Voice
combination.
Differs depending
on the Voice or
Voice
combination.
Differs depending
on the Voice or
Voice
combination.
Differs depending
on the Voice or
Voice
combination.
Differs depending
on the Voice or
Voice
combination.
Differs depending
on the Voice or
Voice
combination.
Differs depending
on the Voice or
Voice
combination.
0 – 40
0 – 127
Fast, Slow
On, Off
1 – 10
1 – 127
L64 (leftmost) – C
(center) – R63
(rightmost)
-64 – +63
P-525 Owner’s Manual
96
Harmonic content may have little audible effect or not be
applied to some Voices.
Brightness Adjusts the brightness of the selected R1/R2/L Voices
independently.
Differs depending
on the Voice or
Voice
combination.
-64 – +63
Page 97
Detailed Settings (MENU Display)
To call up the desired parameter:
Turn on Dual, Split or Duo as necessary, select Voices as necessary, press the [MENU] button several times to select “Voice”
menu, then use the [U]/[D]/[L]/[R] buttons to select the desired parameter.
[R]
[L]
Voice Edit (Voice names)* Touch Sens. Determines the degree to which the volume level
Pedal
Assign
(When
using the
separately
sold pedal
unit,
page 15)
Balance* Volume
[R]
[L]
Right (Setting
Center (Setting
Left (Setting
R2 – R1*
Volume L – R* (Pop-up
Detune* (Pop-up
[R]
[L]
RPedal Turns the Right pedal function on or off for each of the
CPedal Turns the Center pedal function on or off for each of the
LPedal Turns the Left pedal function on or off for each of the
display)
display)
display)
(Pop-up
window)
window)
window)
Description Default setting Setting range
changes in response to your touch on the keyboard (how
hard you play). Since the volume level of some Voices
such as Harpsichord and Organ do not change
regardless of how you play the keyboard, the default
setting for these Voices is 127.
selected R1/R2/L Voices. This parameter is useful when
you want to ensure, for example, that the pedal function
affects the Right section but does not affect the Left
section.
selected R1/R2/L Voices. This parameter is useful when
you want to ensure, for example, that the pedal function
affects the Right section but does not affect the Left
section.
selected R1/R2/L Voices. This parameter is useful when
you want to ensure, for example, that the pedal function
affects the Right section but does not affect the Left
section.
Assigns one of various functions (other than the original
one) to the Right pedal.
Assigns one of various functions (other than the original
one) to the Center pedal.
Assigns one of various functions (other than the original
one) to the Left pedal.
Adjusts the volume balance between R1 and R2 Voices
when Dual is on. After adjusting this with the [
buttons, press the [EXIT] button to exit from the pop-up
window.
Adjusts the volume balance between the right and left
sections when Split/Duo is on. After adjusting via the [
R] buttons, press the [EXIT] button to exit from the pop-
[
up window.
Detunes the R1 Voice and R2 Voice in Dual mode to
create a thicker sound.
On the display, move the slider rightward via the [
button will raise the R1 Voice pitch and lower the R2
Voice pitch, and vice versa. After adjusting this, press the
[EXIT] button to exit from the pop-up window.
L]/[R]
L]/
R]
Differs depending
on the Voice or
Voice
combination.
Differs depending
on the Voice or
Voice
combination.
Differs depending
on the Voice or
Voice
combination.
Differs depending
on the Voice or
Voice
combination.
Sustain (Cont.) Refer to the Pedal
Sostenuto Refer to the Pedal
Rotary Speed
(Jazz Organ,
Rock Organ),
VibeRotor
(Vibraphone), Soft
(other Voices)
Differs depending
on the Voice or
Voice
combination.
Differs depending
on the Voice or
Voice
combination.
Differs depending
on the Voice or
Voice
combination.
0 (softest) – 64
(largest changes in
the level) – 127
(which produces the
loudest volume
regardless of how
you play the
keyboard)
On, Off
On, Off
On, Off
Function List
(page 17).
Function List
(page 17).
Refer to the Pedal
Function List
(page 17).
R2+10 – 0 –
R1+10
L+10 – 0 – R+10
R2+20 – 0 –
R1+20
P-525 Owner’s Manual
97
Page 98
Detailed Settings (MENU Display)
NOTE
Song Menu
This menu lets you set various parameters related to Song playback and edit the Song data. Select a desired
Song before beginning the operation.
• The parameters marked with * will be available only when a MIDI Song is selected. These parameters are not shown when an Audio
Song is selected.
• The parameters marked with ** will be available only when an Audio Song is selected.
• When using the “Edit” menu, select a MIDI Song other than the preset Song.
• Execute is a function that edits or changes the current Song data. Note that pressing the [R] button will actually change the Song data.
• The content of the “Song” menu differs depending on the type of Song currently selected (MIDI/Audio).
To call up the desired parameter:
Press the [MENU] button several times to select “Song” menu, then use the [U]/[D]/[L]/[R] buttons to select the desired
parameter.
[R]
[L]
L/R*
(page 48)
Repeat
(page 49)
Volume
(page 52)
Transpose
(page 53)
File Delete
[R]
[L]
R, L, Extra – Turns on (Play) or off (Mute) each of the Song tracks. On On, Off
A – B* (Setting display) Lets you play back a specified range (from Point A to B)
Phrase* Phrase Mark This parameter is available only when a MIDI Song
Song (Setting display) By setting this parameter, you can play back only a
Song –
Keyboard*
Song L – R* (Pop-up
(Pop-up window)** Adjusts the Audio volume. 100 0 – 127
(Setting display) – Shifts the pitch of Song playback up or down in
(page 68)
Copy*
(page 68)
[R]
[L]
of the current Song repeatedly.
containing the Phrase Mark. By specifying a Phrase
number here, you can play back the current Song from
the mark point, or to play back the corresponding
Repeat Off On (repeat
(Pop-up
window)
window)
Cancel Deletes a specific Song. For details about Song types
Execute ––
Cancel Copies a specific MIDI Song then saves it to a different
Execute ––
phrase repeatedly. If you start Song playback with a
Phrase set to “On,” the countdown starts, followed by
repeated playback of the specified phrase or phrases
until you press the [PLAY/PAUSE] button.
specific Song, or specific Songs in order repeatedly or
randomly.
Adjusts the volume balance between the Song
playback sound and keyboard performance.
Adjusts the volume balance between the right-hand
part left-hand parts of Song playback.
semitone intervals. For example, if you set this
parameter to “5,” a Song created in C major will be
played back in F major.
NOTE
• The Transpose setting will not affect the audio signals,
such as those input from the [AUX IN] jack.
• MIDI Song playback data will be transmitted with the
transposed note numbers while MIDI note numbers
received from an external MIDI device or computer will not
be affected by the Transpose setting.
• Applying transpose to an Audio Song may change its
tonal characteristics.
which can be deleted, refer to page 66.
location. For details about Song types which can be
copied, refer to page 66.
Description Default setting Setting range
Off On, Off
000 000 – the last
Off Off, Single, All,
0 Song+64 – 0 –
0 L+64 – 0 – R+64
0 -12 (-1 octave) – 0
––
––
phrase number of
the Song
playback)/Off (no
repeat)
Random
Key+64
(normal pitch) –
+12 (+1 octave)
P-525 Owner’s Manual
98
Page 99
Detailed Settings (MENU Display)
NOTE
To call up the desired parameter:
Press the [MENU] button several times to select “Song” menu, then use the [U]/[D]/[L]/[R] buttons to select the desired
parameter.
[R]
[L]
File Move*
Edit* Quantize Quantize The Quantize function allows you to align all the notes in
Others* Quick Play – This parameter enables you to specify whether a Song
[R]
[L]
(page 69)
MIDI to Audio*
(page 70)
Rename
(page 71)
Track Delete Track Deletes a specific track data of the current MIDI Song.
Tempo Change Cancel Changes the tempo value of the current MIDI Song as
Voice Change Track Changes the Voice of a specific track in the current
Track Listen Track This lets you play back only the selected Track to listen
Play Track – This parameter enables you to specify the tracks for
[R]
[L]
Cancel Moves a MIDI Song to a different location. For details
Execute ––
Cancel Converts a MIDI Song to an Audio file. For details about
Execute ––
(Setting display) Edits a Song name. For details about Song types which
Strength 100% 0% – 100%
Execute ––
Execute ––
Execute ––
Execute ––
Start
about Song types which can be moved, refer to
page 66.
Song types which can be converted, refer to page 66.
can be renamed, refer to page 66.
the current MIDI Song to the correct timing, such as 8th
note or 16th note.
1. Set the Quantize value to the smallest notes in the
MIDI Song.
2. Set the Strength value which determines how
strongly the notes will be quantized.
3. Move the highlight to “Execute” then press the
[R] button to actually change the MIDI Song data.
1. Select the desired track to be deleted.
2. Move the highlight to “Execute,” then press the
[R] button to actually delete the specified track data.
data. Before calling up the “Song” menu display, set the
desired Tempo value for changing.
Move the highlight to “Execute,” then press the
[R] button to actually change the Tempo value as MIDI
Song data.
MIDI Song to the current Voice as data.
1. Select a track of which the Voice will be changed.
2. Move the highlight to “Execute,” then press the
[R] button to actually change the Voice as MIDI Song
data.
that starts from the middle of a bar, or a Song with a
silence prior to the first note, should be played from the
first note or from the top of the bar (rest or blank). This
parameter is useful for a MIDI Song that starts with a
short one-or two-beat pick-up or lead-in.
to its contents. To do this, select a Track, move the
highlight to “Start,” then press and hold the [R] button
to start playback from the first note. Playback continues
while holding the [R] button.
playing back on this instrument. When “1&2” is
selected, only tracks 1 and 2 will be played back, while
tracks 3 to 16 will be transmitted via MIDI. When “All” is
selected, all tracks will be played back on this
instrument.
Description Default setting Setting range
––
––
––
1/16 Refer to “Quantize
Track 1 Track 1 – Track 16
Differs depending
on the Song
Track 1 Track 1 – Track 16
On On, Off
Track 1 Track 1 – Track 16
All All, 1&2
setting range.”
(page 100)
Refer to “Strength
setting range.”
(page 100)
–
Tempo of Song playback can be set on the display called up by pressing the [TEMPO] button. For instructions, refer to page 47.
P-525 Owner’s Manual
99
Page 100
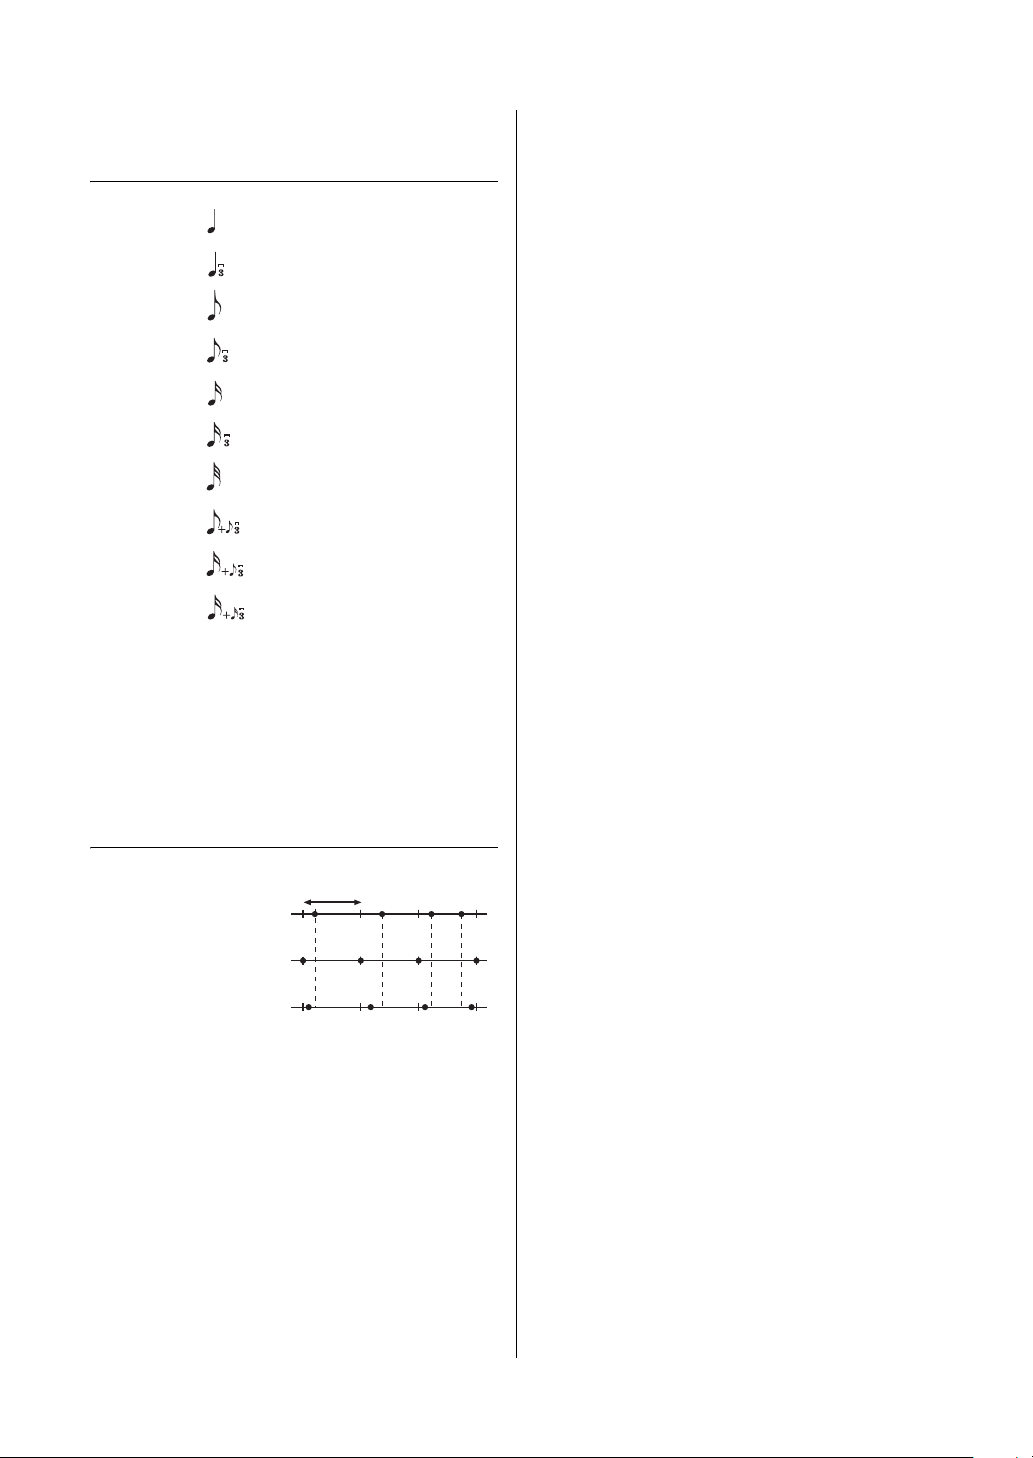
Detailed Settings (MENU Display)
1/4................
1/8................
1/16..............
1/6................
1/12..............
1/24..............
1/8+1/12.......
1/16+1/24.....
1/32..............
1/16+1/12.....
quarter note
quarter note triplet
eighth note
eighth note triplet
sixteenth note
sixteenth note triplet
thirty-second note
eighth note + eighth note triplet*
sixteenth note + eighth note triplet*
sixteenth note + sixteenth triplet*
Original data
Quantizing strength = 100
Quantizing strength = 50
Quarter-note length
Quantize Supplementary
Quantize setting range
The three Quantize settings marked with asterisks (*) are exceptionally
convenient, since they allow you to quantize two different note values
at the same time. For example, when the straight eighth notes and
eighth notes triplet are contained in the same part, if you quantize by
straight eighth notes, all notes in the part are quantized to straight
eighth notes—completely eliminating any triplet feel. However, if you
use the eighth note + eighth note triplet setting, both the straight and
triplet notes will be quantized correctly.
Strength setting range
P-525 Owner’s Manual
100
 Loading...