

Speaker
Enceinte
NS-F500
OWNER’S MANUAL
MODE D’EMPLOI
BEDIENUNGSANLEITUNG
MANUAL DE INSTRUCCIONES
TG
English Français Deutsch Español Русский
中文
Thank you for selecting this YAMAHA product.
PRECAUTIONS
Read this before using the speaker.
• To assure the finest performance, please read this manual
carefully. Keep it in a safe place for future reference.
• Install the speaker in a cool, dry, clean place - away from
windows, heat sources, sources of excessive vibration,
dust, moisture and cold. Avoid sources of electrical noise
(transformers, motors). To prevent fire or electrical
shock, do not expose this unit to rain or water.
• To prevent the enclosure from warping or discoloring, do
not place the speaker where it will be exposed to direct
sunlight or excessive humidity.
• Do not place the following objects on the speaker:
- Glass, china, small metallic etc.
If glass, etc., falls as a result of vibration and breaks, it
may cause personal injury.
- A burning candle, etc.
If the candle falls as a result of vibrations, it may cause
fire and personal injury.
- A vessel with water in it
If the vessel falls as a result of vibrations and water
spills, it may cause damage to the speaker, and/or you
may get an electric shock.
• Do not place the speaker where foreign material such as
dripping water. It might cause fire, damage to this unit,
and/or personal injury.
• Do not place the speaker where it is liable to be knocked
over or struck by falling objects. Stable placement will
also ensure better sound performance.
• Placing the speaker on the same shelf or rack as the
turntable can result in acoustical feedback.
• Never put a hand or a foreign object into the port located
on the rear of the speaker, as this might cause personal
injury and/or damage to the speaker.
• When moving the speaker, do not hold the port, as it
might cause personal injury and/or damage to the
speaker.
• Any time you notice distortion, reduce the volume
control on your amplifier. Never allow your amplifier to
be driven into “clipping.” Otherwise the speaker may be
damaged.
• When using an amplifier with a rated output power
higher than the nominal input power of the speaker, care
should be taken never to exceed the speaker’s maximum
input.
• Do not attempt to clean the speaker with chemical
solvents, as this might damage the finish. Use a clean,
dry cloth.
• Do not attempt to modify or repair the speaker. Contact
qualified YAMAHA service personnel when any service
is needed. The cabinet should never be opened for any
reasons.
• Secure placement and installation is the owner’s
responsibility. YAMAHA shall not be liable for any
accident caused by improper placement or
installation of speakers.
Taking care of the speaker
To maintain the spotless glossy surface of the polished
finish, wipe it with a soft, dry cloth. To avoid damage
to the finish, do not apply chemical solvents, such as
alcohol, benzine, thinner, insecticide, etc. Also, do not
use a damp cloth, or any type of cloth that contains
chemical solvents, or place a plastic or vinyl sheet on
top of the speaker. Otherwise, the finish may peel, the
color may fade, or the sheet may stick to the surface.
Yamaha recommends that you use a Yamaha Unicon
cloth (sold separately). For heavy dirt, use a Yamaha
Piano Unicon (sold separately). You can purchase a
Yamaha Unicon cloth and Piano Unicon at your
nearest Yamaha dealer.
Information for Users on Collection and Disposal of
Old Equipment
This symbol on the products, packaging,
and/or accompanying documents means
that used electrical and electronic products
should not be mixed with general
household waste.
For proper treatment, recovery and
recycling of old products, please take them
to applicable collection points, in
accordance with your national legislation
and the Directives 2002/96/EC.
By disposing of these products correctly,
you will help to save valuable resources
and prevent any potential negative effects
on human health and the environment
which could otherwise arise from
inappropriate waste handling.
For more information about collection and
recycling of old products, please contact
your local municipality, your waste
disposal service or the point of sale where
you purchased the items.
[Information on Disposal in other
Countries outside the European Union]
This symbol is only valid in the European
Union. If you wish to discard these items,
please contact your local authorities or
dealer and ask for the correct method of
disposal.
2 En
CONTENTS
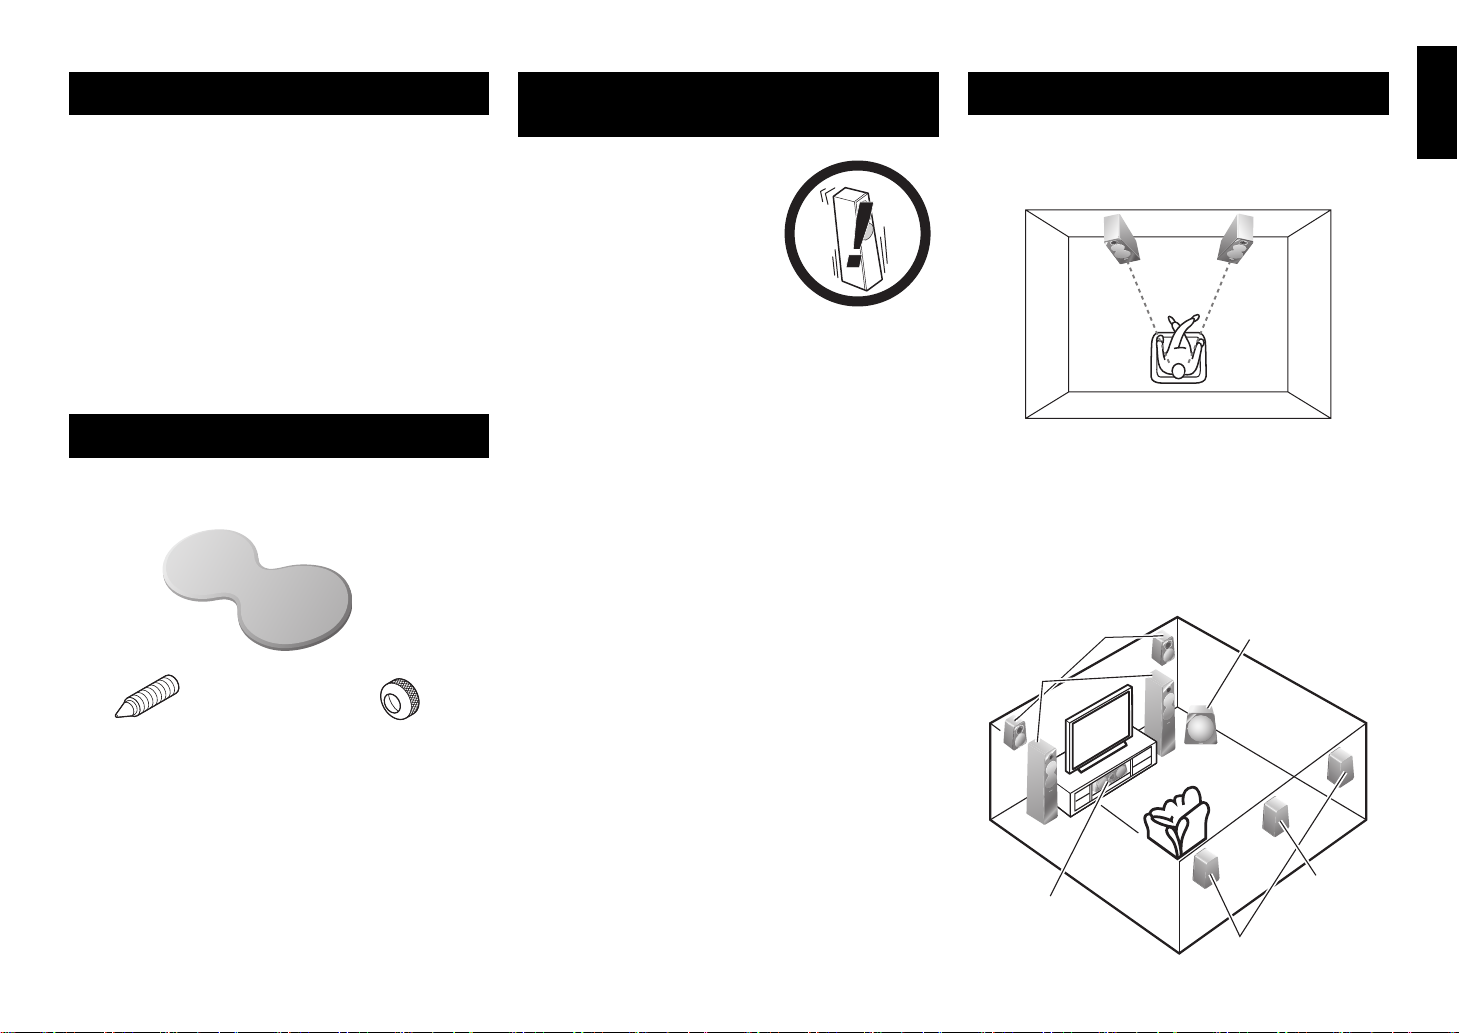
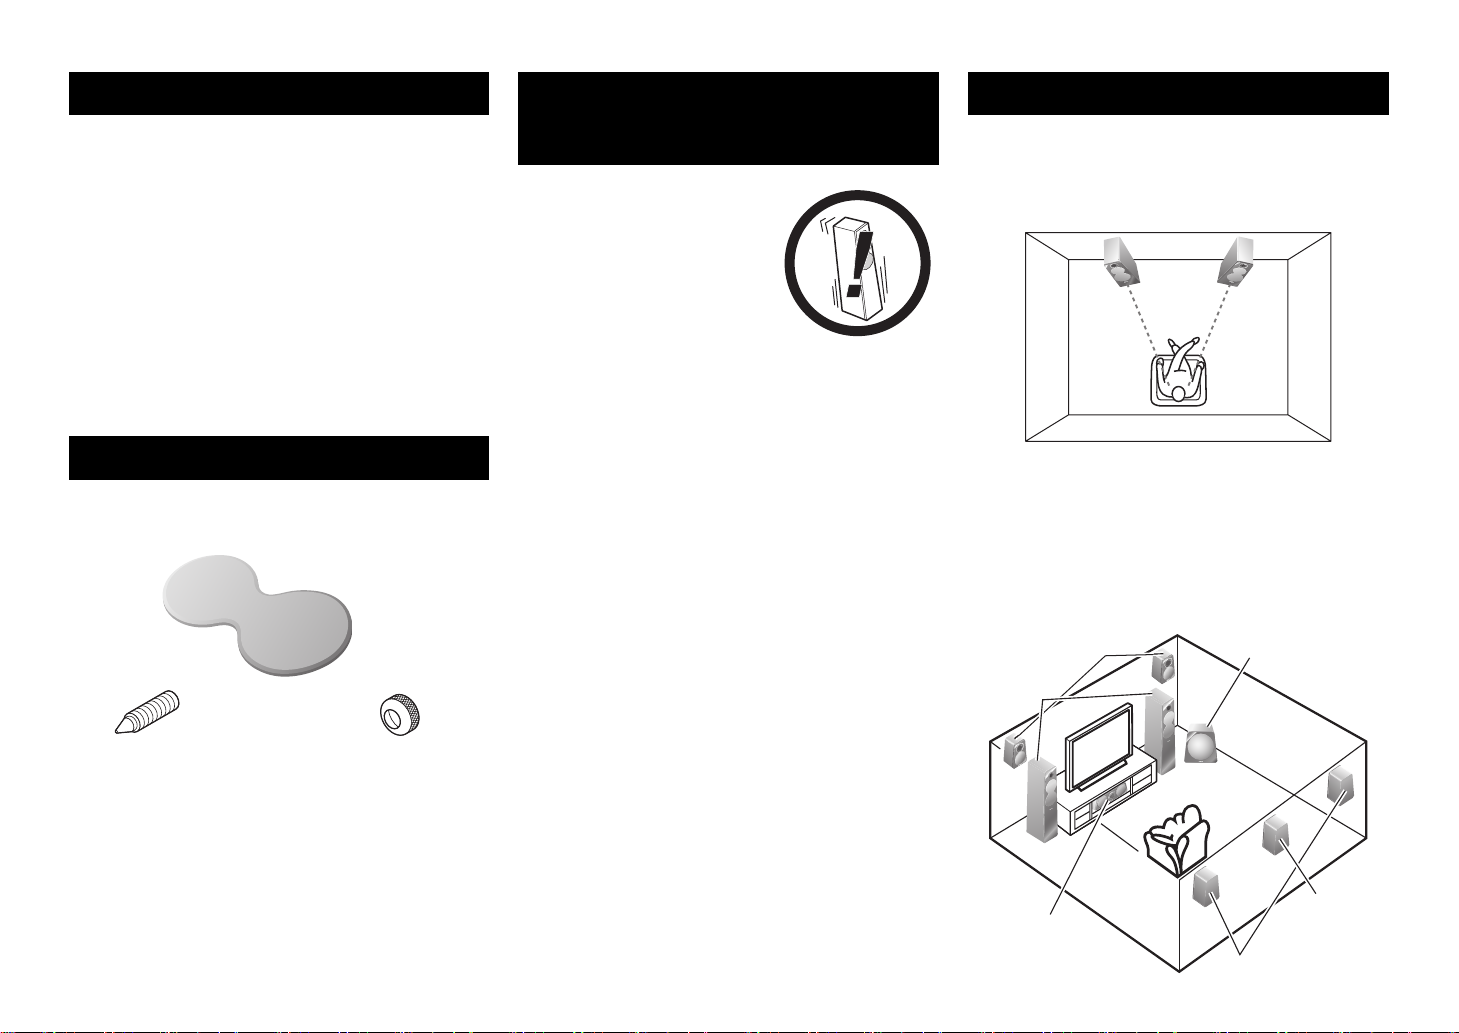
Grille (x1)
Spike (x4) Spike nut (x4)
Subwoofer
Center
NS-F500
Front
Surround
back
Surround
Presence
SUPPLIED ACCESSORIES..................................3
PRECAUTIONS WHEN POSITIONING
THE SPEAKERS...................................................3
PLACING THE SPEAKERS..................................3
CONNECTING TO YOUR AMPLIFIER.................4
ATTACHING THE GRILLE ...................................5
SPECIFICATIONS.................................................5
SUPPLIED ACCESSORIES
After unpacking, make sure that the following accessories
are included.
PRECAUTIONS WHEN
POSITIONING THE SPEAKERS
The speaker is constructed with
the majority of the weight located
in its upper portion, and is thus
susceptible to falling over if
proper care is not taken to ensure
its stability. If the speaker tips
over, the speaker or other personal
property may be damaged or an
individual may be injured
(possibly even fatally injured).
For safe and proper use of the speaker:
• Position the speaker in a location that is solid, level,
smooth, and low (with respect to the floor).
• Do not push or apply pressure to the side of the speaker
when moving, or lean objects against the side of the
speaker.
• Do not sit on or set objects on top of the speaker.
Vibrations or jolts associated with earthquakes and other
phenomena or activities may cause the speaker to fall over.
For safety reasons, using commercially-available products
that increase stability of the speaker is recommended
(metal fittings or chains, etc.).
English
PLACING THE SPEAKERS
■ Using as 2ch stereo speakers
Better stereo images will be obtained when the speakers are
slightly angled in towards the listener.
■ Using as front speakers in a multi-
channel system
Position the speakers on both sides of the TV. The
positioning of speakers is important, since this dictates the
overall sound quality of the multi-channel system. Set up
the speakers on the basis of your listening position by
following the owner’s manual supplied with your
amplifier.
The grille is detached from the speaker and packed
separately. Be careful not to lose it.
3 En
Notes
Leg
Loosen
(higher)
Tighten
(lower)
Spike
Spike nut
Note
Do not insert the insulation into the hole.
If the connections are faulty, you will hear no sound
from the speaker.
Insulation coating
Bare wire
Loosen
Tighten
Black (–)
Red (+)
Amplifier
or Receiver
Speakers
output
terminals
NS-F500 NS-F500
• Be sure to have another person support it.
• Pay extra attention to avoid scratching the speaker’s surface.
• Be careful not to apply force to the side of the speaker,
otherwise the speaker may fall causing damage to the
speaker or personal injury.
• To avoid accidents resulting from tripping over loose
speaker cables, affix them to the floor.
• Placing this unit too close to a CRT TV set might impair
picture color or create a buzzing noise. In this case, move the
speakers away from the TV. This is not an issue with LCD
and plasma TVs.
• The legs feature an adjustment function that enables you to
fine-tune the speaker height. If the speaker rattles on the
floor, adjust the length of the legs by turning them. Do not
loosen the legs too much. Otherwise, they may come off.
■ Attaching the spikes
At the time of shipment, legs are attached to the speaker. When
you use the supplied spikes, please remove the legs first.
If you are setting up the speaker on a thick carpet, you can
replace the legs with the spikes to increase stability and
improve sound quality. Remove the legs by turning them,
then follow the steps below:
Notes
• Be sure to have another person support it.
• The tips of the spikes may scratch or damage the flooring.
Please be careful when positioning the speakers.
• The tips of the spikes ar e sharp. When you adjust the protruding
length of the spikes, be careful not to injure your fingers.
1. Lay the speaker on the floor.
Use a blanket or cushion to avoid scratches.
2. Screw each spike into a spike nut so that the nut will stay
near the tip of the spike.
3. Remove the legs and screw the spikes into the holes on
the bottom of the speaker.
CONNECTING TO YOUR
AMPLIFIER
Before making connections, make sure that the amplifier is
switched off.
Standard connections
4 En
4.
Place the speaker in the desired location in an upright
position. If necessary, adjust the length of the spike to
match the depth of the carpet by repeating the abovementioned steps.
5. When the length adjustment is complete, firmly tighten
the spike nut to the base on the bottom of the speaker.
■ When connecting the speaker cable
10 mm
(3/8")
Good No Good
Banana plug
• Do not let the bare speaker wires touch each other as this
could damage the speaker or the amplifier.
• Make sure you connect the speakers with the correct
polarity—positive (+) terminals to positive (+)
terminals, and negative (–) terminals to negative (–)
terminals. If you get them crossed over, the sound will be
unnatural and lack bass.
• Connect one speaker to the left (marked L) terminals of
your amplifier or receiver, and another speaker to the
right (marked R) terminals.
• Please refer to the owner’s manual that came with your
amplifier or receiver.
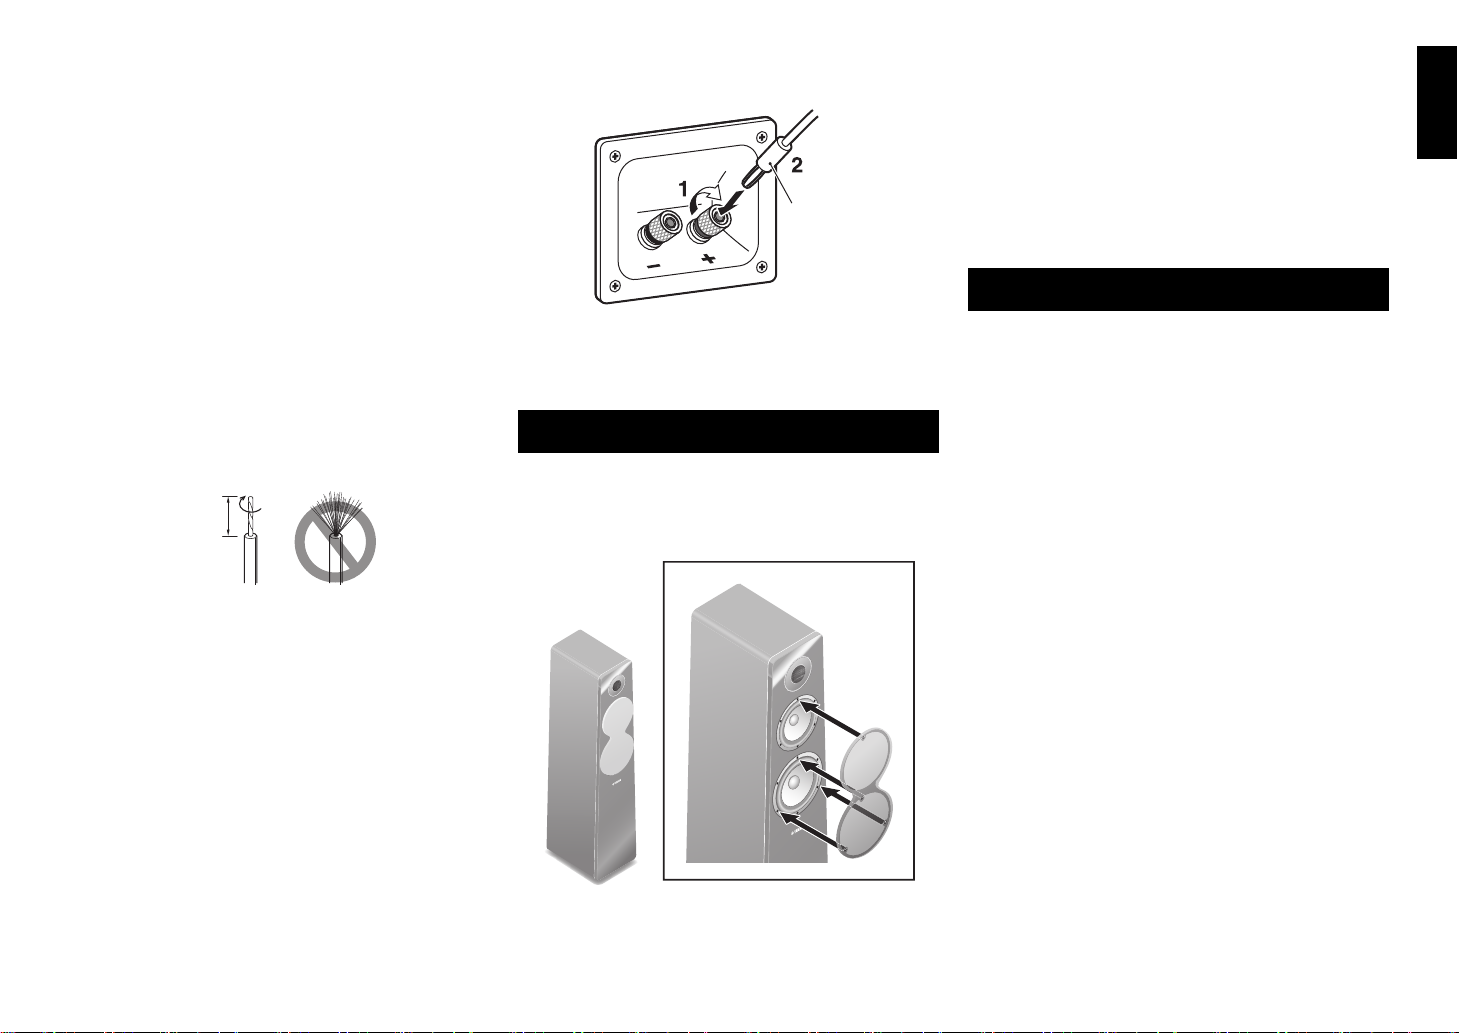
■ How to connect the speaker cables
1. Loosen the terminal knob.
2. Remove 10 mm (3/8") of insulation from each end of the
cables, and twist the exposed conductors together neatly
and tightly, as shown below.
3. Insert the bare wire.
4. Tighten the knob and secure the cable.
5. Test the firmness of the connection by pulling lightly on
the cable at the terminal.
Notes
• When using an amplifier with a rated output power higher
than the nominal input power of the speaker, care should be
taken never to exceed the speaker’s maximum input.
• The speaker may be damaged if certain sounds are
continuously output at high volume level. For example, if sine
waves from a test disc, bass sounds from electronic
instruments, etc., are continuously output, or when the stylus
of a turntable touches the surface of a disc, reduce the volume
level to prevent the speaker from being damaged.
■ When using a banana plug
1. Tighten the terminal knob.
2. Simply insert the banana plug into the terminal.
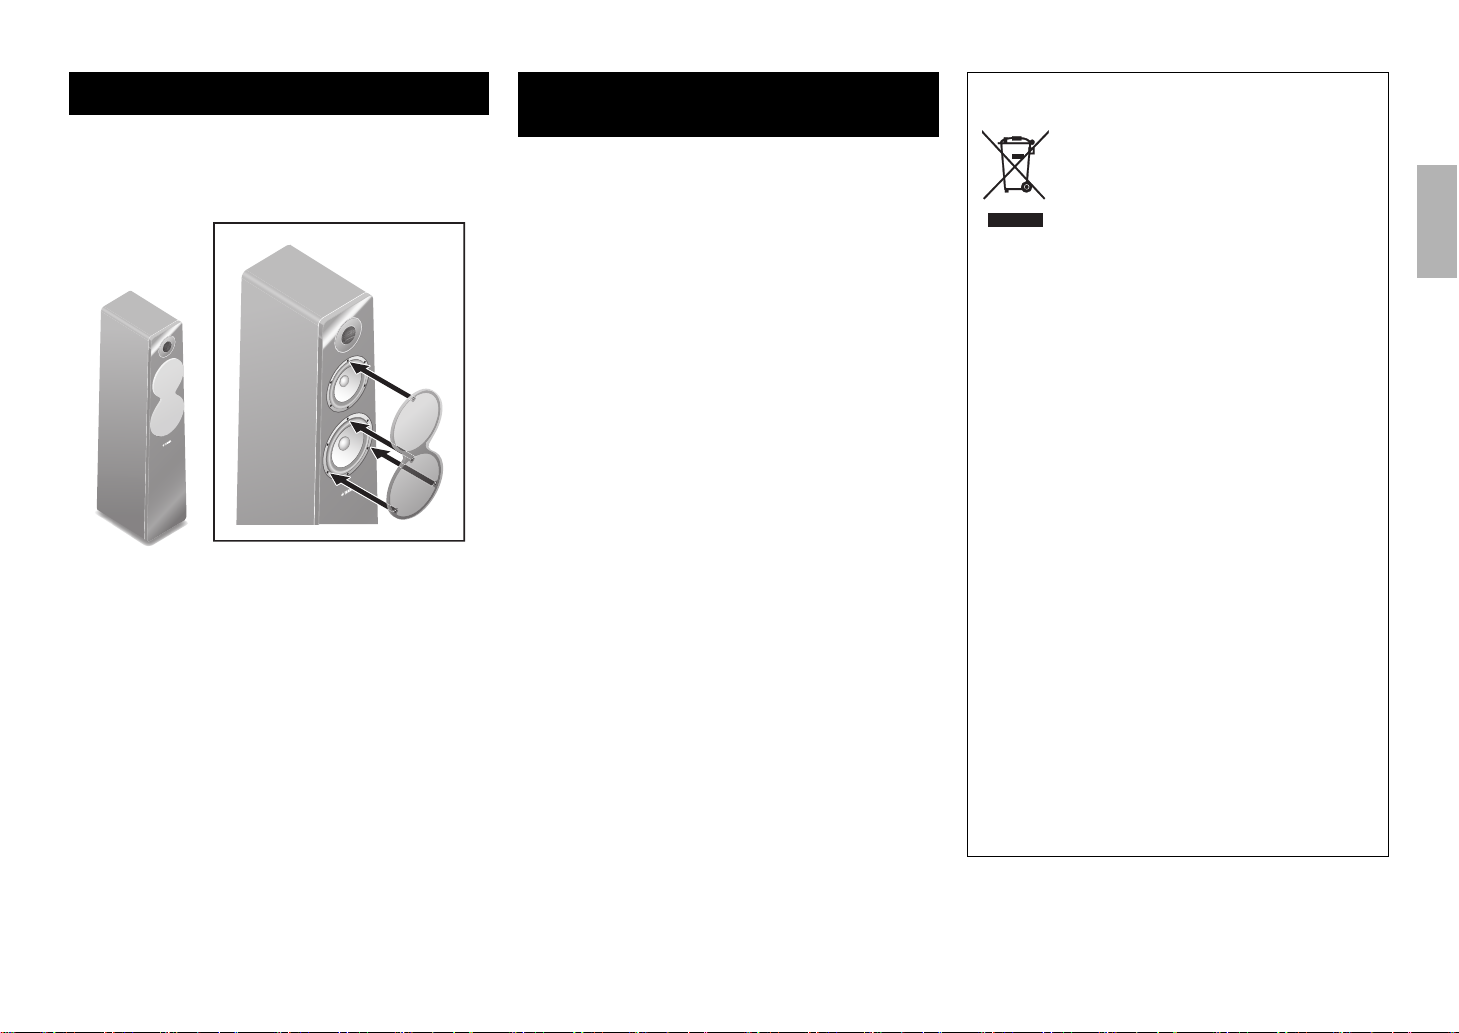
ATTACHING THE GRILLE
The speaker and the grille are packed separately. To attach
the grille, line up the projections (magnets) on the reverse
side of the grille with their corresponding screw heads on
the speaker.
Notes
• When removing the cover, be careful not to touch the drive
units, and not to exert excessive force with any tools.
• Do not touch or apply impact to the speaker’s diaphragm.
Otherwise, the speaker may malfunction.
• There are magnets on the reverse side of the grille. Do not
place the grille close to objects that might be affected by
magnets, such as CRT TV, clock, magnetic card, diskette,
etc., after removing it.
SPECIFICATIONS
Type............................... 3-way bass reflex speaker system
Non-Magnetic shielding type
Driver...............................16 cm (6-1/2") cone woofer × 1
Advanced PMD
13 cm (5") cone mid-range × 1
Advanced PMD
3 cm (1") aluminum dome tweeter
DC diaphragm
Impedance ....................................................................6
Frequency Response ................40 Hz to 50 kHz (–10 dB)
100 kHz (–30 dB)
Nominal Input Power ...............................................40 W
Maximum Input Power.......................................... 160 W
Sensitivity .................................................88 dB/2.83 V/m
Crossover Frequency............................... 580 Hz/4.1 kHz
Dimensions (with legs) (W × H × D)
.................. 224 × 981 × 349 mm (8-7/8" × 38-5/8" × 13-3/4")
Weight............................................. 19.1 kg (42 lbs. 2 oz.)
* Specifications subject to change without notice due to
product improvements.
* A speaker cable is not included with this model.
English
5 En

Limited Guarantee for European Economic Area (EEA)
and Switzerland
Thank you for having chosen a Yamaha product. In the unlikely event that your Yamaha product needs guarantee
service, please contact the dealer from whom it was purchased. If you experience any difficulty, please contact
Yamaha representative office in your country. You can find full details on our website (http://www.yamaha-
hifi.com/ or http://www.yamaha-uk.com/ for U.K. resident).
The product is guaranteed to be free from defects in workmanship or materials for a period of two years from the
date of the original purchase. Yamaha undertakes, subject to the conditions listed below, to have the faulty product
or any part(s) repaired, or replaced at Yamaha’s discretion, without any charge for parts or labour. Yamaha reserves
the right to replace a product with that of a similar kind and/or value and condition, where a model has been
discontinued or is considered uneconomic to repair.
Conditions
1. The original invoice or sales receipt (showing date of purchase, product code and dealer’s name) MUST
accompany the defective product, along with a statement detailing the fault. In the absence of this clear proof of
purchase, Yamaha reserves the right to refuse to provide free of charge service and the product may be returned
at the customer’s expense.
2. The product MUST have been purchased from an AUTHORISED Yamaha dealer within the European
Economic Area (EEA) or Switzerland.
3. The product must not have been the subject of any modifications or alterations, unless authorised in writing by
Yamaha.
4. The following are excluded from this guarantee:
a. Periodic maintenance and repair or replacement of parts due to normal wear and tear.
b. Damage resulting from:
(1) Repairs performed by the customer himself or by an unauthorised third party.
(2) Inadequate packaging or mishandling, when the product is in transit from the customer. Please note that it
is the customer’s responsibility to ensure the product is adequately packaged when returning the product
for repair.
(3) Misuse, including but not limited to (a) failure to use the product for its normal purpose or in accordance
with Yamaha’s instructions on the proper use, maintenance and storage, and (b) installation or use of the
product in a manner inconsistent with the technical or safety standards in force in the country where it is
used.
(4) Accidents, lightning, water, fire, improper ventilation, battery leakage or any cause beyond Yamaha’s
control.
(5) Defects of the system into which this product is incorporated and/or incompatibility with third party
products.
(6) Use of a product imported into the EEA and/or Switzerland, not by Yamaha, where that product does not
conform to the technical or safety standards of the country of use and/or to the standard specification of a
product sold by Yamaha in the EEA and/or Switzerland.
5. Where the guarantee differs between the country of purchase and the country of use of the product, the
guarantee of the country of use shall apply.
6. Yamaha may not be held responsible for any losses or damages, whether direct, consequential or otherwise,
save for the repair or replacement of the product.
7. Please backup any custom settings or data, as Yamaha may not be held responsible for any alteration or loss to
such settings or data.
This guarantee does not affect the consumer’s statutory rights under applicable national laws in force or the
consumer’s rights against the dealer arising from their sales/purchase contract.
6 En

Merci d’avoir porté votre choix sur ce produit YAMAHA.
PRÉCAUTIONS
Lisez les consignes suivantes avant d’utiliser votre
système d’enceintes.
• Pour utiliser l’appareil au mieux de ses possibilités, lisez
attentivement ce mode d’emploi. Conservez-le
soigneusement pour toute référence.
• Installez cette enceinte dans un endroit frais, sec et
propre, à l’écart des fenêtres et à l’abri des sources de
chaleur, des vibrations, de la poussière, de l’humidité et
du froid. Évitez toute source de bruit électrique
(transformateurs, moteurs). Pour éviter un incendie ou
une électrocution, n’exposez pas cette enceinte à la pluie
ni à l’humidité.
• Pour éviter que le coffret se gondole ou se décolore, ne
placez pas l’enceinte dans un endroit exposé aux rayons
directs du soleil ou à une trop forte humidité.
• Ne placez pas les objets suivants sur l’enceinte:
- Un verre, de la porcelaine, des petits objets métalliques,
etc.
Si le verre, etc. devait tomber sous l’effet de vibrations
et se briser, il pourrait causer des blessures.
- Une bougie allumée, etc.
Si la bougie devait tomber sous l’effet de vibrations,
elle pourrait causer un incendie et des blessures.
- Un récipient contenant de l’eau
Si le récipient devait tomber sous l’effet de vibrations
et l’eau se répandre, ceci pourrait endommager
l’enceinte et/ou provoquer une électrocution.
• Ne placez pas l’enceinte à un endroit où elle pourrait être
exposé à des éclaboussures ou des gouttes d’eau. Ceci
peut provoquer un incendie et/ou des blessures.
• Évitez d’installer l’enceinte à un endroit où des objets
peuvent tomber. Un endroit stable améliorera en outre la
qualité du son.
• Si l’enceinte est placée sur la même étagère ou sur le
même meuble que la platine, un effet de retour sonore
risque de se produire.
• Ne placez jamais votre main ou un corps étranger dans le
port situé à l’arrière de l’enceinte ; vous risquez de vous
blesser et/ou d’endommager l’enceinte.
• Lorsque vous déplacez l’enceinte, veillez à ne pas la
saisir par le port ; vous risquez de vous blesser et/ou
d’endommager l’enceinte.
• Si des distorsions se produisent, réduisez le niveau
sonore en baissant la commande de volume de
l’amplificateur. Veillez à éviter tout “écrêtage” de
l’amplificateur. Vous risquez en effet d’endommager
l’enceinte.
• Si vous utilisez un amplificateur dont la puissance de
sortie nominale est supérieure à la puissance d’entrée
nominale de l’enceinte, veillez à ne pas dépasser l’entrée
maximale de l’enceinte.
• Ne nettoyez pas l’appareil au moyen d’un solvant
chimique, car vous risquez d’endommager la finition.
Utilisez un chiffon propre et sec.
• N’essayez pas de modifier ni de réparer l’enceinte.
Contactez un technicien YAMAHA qualifié dès que
l’enceinte nécessite une réparation. Le coffret ne doit
être ouvert sous aucun prétexte.
• Le propriétaire des enceintes est entièrement
responsable du bon positionnement et de la bonne
installation des enceintes. YAMAHA décline toute
responsabilité en cas d’accident provoqué par un
positionnement ou une installation inadéquats des
enceintes.
Entretien de l’enceinte
Pour conserver intact le brillant de la finition laquée,
essuyez-la avec un chiffon doux et sec. Afin d’éviter
d’endommager la finition, n’utilisez jamais de solvants
chimiques tels que de l’alcool, du benzène, du
dissolvant ou d’autres produits comme de
l’insecticide, etc. Veillez en outre à ne pas utiliser de
chiffon humide ni tout type de chiffon contenant des
solvants chimiques; et ne posez pas de film plastique
ou vinyle sur le caisson. Cela risquerait d’écailler la
finition, de décolorer la surface du caisson ou de
provoquer l’adhésion de la feuille.
Yamaha vous recommande d’utiliser un chiffon
Yamaha Unicon (disponible en option). Pour les
taches rebelles, utilisez du produit d’entretien Yamaha
Piano Unicon (disponible en option). Procurez-vous
un chiffon Yamaha Unicon et du produit d’entretien
Yamaha Piano Unicon chez votre revendeur Yamaha.
Français
1 Fr
SOMMAIRE
Grille (x1)
Crampon (x4) Écrou de crampon (x4)
Caisson de graves
Centre
NS-F500
Avant
Surround
arrière
Surround
Présence
ACCESSOIRES FOURNIS....................................2
PRÉCAUTIONS À PRENDRE LORS DU
POSITIONNEMENT DES ENCEINTES.................2
INSTALLATION DES ENCEINTES.......................2
RACCORDEMENT À VOTRE
AMPLIFICATEUR..................................................4
FIXATION DE LA GRILLE ....................................5
CARACTÉRISTIQUES TECHNIQUES .................5
ACCESSOIRES FOURNIS
Après le déballage, assurez-vous que les accessoires
suivants vous ont bien été livrés.
PRÉCAUTIONS À PRENDRE
LORS DU POSITIONNEMENT
DES ENCEINTES
L’enceinte est conçue de telle
sorte que la majeure partie de son
poids est située dans la partie
supérieure, ce qui la rend
potentiellement instable si elle est
mal installée. Si l’enceinte devait
se renverser, l’enceinte ou des
biens personnels pourraient être
endommagés ou une personne
blessée (voir gravement).
Pour utiliser l’enceinte correctement et sans danger :
• Placez-la sur une surface plane, solide, nivelée et basse
(par rapport au niveau du sol).
• N’appuyez pas sur l’enceinte et n’appliquez aucune
force excessive sur la partie latérale lorsque vous la
déplacez ; veillez en outre à ne laisser aucun objet
appuyé contre l’enceinte.
• Ne vous asseyez pas sur l’enceinte et ne posez aucun
objet dessus.
Les vibrations et les secousses dues aux tremblements de
terre ou autres phénomènes naturels peuvent faire tomber
l’enceinte. Pour des raisons de sécurité, il est recommandé
d’utiliser des dispositifs améliorant la stabilité (disponibles
dans le commerce), comme des attaches en métal, des
chaînes, etc.
INSTALLATION DES ENCEINTES
■ Utilisation comme enceintes stéréo à
2 canaux
Une meilleure image stéréo est obtenue si les enceintes sont
légèrement orientées vers l’auditeur.
■ Utilisation des enceintes avant dans
un système multi-canaux
Positionnez les enceintes de chaque côté du téléviseur. Le
positionnement des enceintes est important, car il détermine la
qualité sonore du système multi-canaux. Placez les enceintes
par rapport à votre position d’écoute habituelle en vous
référant au mode d’emploi fourni avec votre amplificateur.
La grille est détachée de l’enceinte et emballée séparément.
Faites attention de ne pas la perdre.
2 Fr

Remarques
Pied
Desserrer
(plus haut)
Serrer
(moins haut)
Crampon
Écrou de
crampon
• Lors de l’installation demandez à une autre personne de
tenir l’enceinte.
• Prenez soin de ne pas rayer la surface de l’enceinte lors de
cette opération.
• Assurez-vous de ne jamais appliquer de force excessive sur la
partie latérale de l’enceinte lors de cette opération ; une
chute de l’enceinte pourrait endommager le haut-parleur ou
causer des blessures.
• Pour éviter de trébucher sur les câbles des enceintes et de
vous blesser, fixez les câbles au sol.
• Pour éviter les interférences et la dégradation des couleurs de
l’image, n’installez pas les enceintes trop près d’un téléviseur
à tube cathodique. Le cas échéant, éloignez les enceintes du
téléviseur. Le problème ne se pose pas avec les téléviseurs à
écran LCD ou plasma.
• Les pieds peuvent être réglés ce qui permet d’ajuster
précisément la hauteur des enceintes. Si l’enceinte bouge sur
le sol, ajustez la hauteur de ses pieds en les tournant. Ne
desserrez pas trop les pieds. Sinon, ils se détacheront.
■ Fixation des crampons
Les pieds ont été fixés aux enceintes en usine. Lorsque vous
utilisez les crampons fournis, veuillez retirer d’abord les pieds.
Si vous installez les enceintes sur un tapis épais, vous pouvez
remplacer les pieds par les crampons pour augmenter la
stabilité des enceintes et améliorer la qualité du son. Tournez
les pieds pour les détacher, puis procédez de la façon
suivante:
Remarques
• Pour ce faire, demandez à une autre personne de tenir
l’enceinte.
• Les extrémités des crampons peuvent rayer ou endommager
le sol. Faites attention lorsque vous positionnez les enceintes.
• Les extrémités des crampons sont aigus. Lorsque vous ajustez la
longueur des crampons, attention de ne pas vous blesser.
1. Posez l’enceinte sur le côté.
Utilisez une couverture ou un coussin pour éviter les
rayures.
2. Vissez un écrou de crampon sur chaque crampon mais
laissez-le à l’extrémité du crampon.
3. Déposez les pieds et vissez les crampons dans les trous
sous l’enceinte.
4. Redressez l’enceinte à l’endroit souhaité. Si nécessaire,
ajustez la longueur du crampon en fonction de la
profondeur du tapis en répétant les opérations
mentionnées ci-dessus.
5. Lorsque le réglage de hauteur est terminé, serrez bien
les écrous de crampons contre la base de la face
inférieure de l’enceinte.
Français
3 Fr

RACCORDEMENT À VOTRE
Remarque
N’insérez pas la gaine isolante dans l’orifice.
Si les raccordements sont mal effectués, les enceintes
n’émettront aucun son.
Gaine isolante
Câble
dénudé
Desserrer
Serrer
Noir (–)
Rouge (+)
Amplificateur
ou Récepteur
Bornes de
sortie
d’enceintes
NS-F500 NS-F500
10 mm
Bon Mauvais
Fiche banane
AMPLIFICATEUR
Avant de raccorder les enceintes, assurez-vous que
l’amplificateur est hors tension.
Raccordements standard
■ Lorsque vous raccordez le câble
d’enceinte
• Ne laissez pas les câbles dénudés entrer en contact les
uns avec les autres. Cela risquerait d’endommager
l’enceinte ou l’amplificateur.
• Veillez à raccorder les enceintes en respectant la
polarité—bornes positives (+) aux bornes positives (+) et
bornes négatives (–) aux bornes négatives (–). Si vous
inversez la polarité, le son ne sera pas naturel et les
graves insuffisants.
• Raccordez une enceinte aux bornes gauches (marquées
L) de l’amplificateur ou du récepteur et l’autre enceinte
aux bornes droites (marquées R).
• Veuillez vous référer au mode d’emploi fourni avec
votre amplificateur ou récepteur.
■ Comment raccorder les câbles
d’enceintes
1. Desserrez le boulon de la borne.
2. Retirez 10 mm de la gaine isolante à l’extrémité de
chaque câble d’enceinte et torsadez proprement et
fermement les fils exposés.
sinusoïdales d’un disque test, les graves d’instruments
électroniques, etc. sont fournis sans interruption, ou si le
stylet d’une platine tourne-disque touche la surface d’un
disque, réduisez le niveau sonore pour éviter d’endommager
l’enceinte.
■ Lorsqu’une fiche banane est utilisée
1. Serrez le boulon de la borne.
2. Insérez simplement la fiche banane dans la borne.
4 Fr
3. Insérez le câble dénudé.
4. Serrez le boulon et fixez le câble.
5. Vérifiez si le câble est fermement inséré en tirant
légèrement dessus au niveau de la borne.
Remarques
• Si vous utilisez un amplificateur dont la puissance de sortie
nominale est supérieure à la puissance d’entrée nominale de
l’enceinte, veillez à ne pas dépasser l’entrée maximale de
l’enceinte.
• L’enceinte peut être endommagée si certains sons sont
produits à volume élevé en continu. Par exemple, si les ondes
FIXATION DE LA GRILLE
L’enceinte et la grille sont emballées séparément. Pour
fixer la grille, alignez les saillies magnétiques situées au
dos de la grille sur les têtes de vis correspondantes de
l’enceinte.
Remarques
• Lorsque vous retirez les grilles, faites attention de ne pas
toucher les excitateurs et de ne pas exercer de force excessive
avec un outil.
• Ne touchez pas ou n’exercez pas de force sur le diaphragme
du haut-parleur. Le haut-parleur risquerait sinon de ne plus
fonctionner correctement.
• Des aimants sont placés au dos de la grille. Après avoir retiré
la grille, ne la placez pas à proximité d’objets sensibles aux
aimants, tels qu’un téléviseur à tube cathodique, une horloge,
une carte magnétique, une disquette, etc.
CARACTÉRISTIQUES
TECHNIQUES
Type..................... Système d’enceintes bass reflex 3 voies
Type à blindage antimagnétique
Excitateur .....Haut-parleur de graves à cône de 16 cm
PMD avancé
Haut-parleur de médiums à cône de 13 cm
PMD avancé
Haut-parleur d’aigus à dôme en aluminium de 3 cm
Diaphragme DC
Impédance ................................................................... 6
Réponse en fréquence ............... 40 Hz à 50 kHz (–10 dB)
100 kHz (–30 dB)
Puissance d’entrée nominale....................................40 W
Puissance d’entrée maximale.................................160 W
Sensibilité..................................................88 dB/2,83 V/m
Fréquence de transfert ............................ 580 Hz/4,1 kHz
Dimensions (avec les pieds) (L × H × P)
...................................... 224 × 981 × 349 mm
Poids........................................................................19,1 kg
* Dans un souci d’amélioration de ses produits, Yamaha se
réserve le droit de modifier les caractéristiques
techniques sans préavis.
* Aucun câble d’enceinte n’est fourni avec ce modèle.
×
×
Information concernant la Collecte et le Traitement des
déchets d’équipements électriques et électroniques.
Le symbole sur les produits, l’emballage et/
ou les documents joints signifie que les
produits électriques ou électroniques usagés
1
1
ne doivent pas être mélangés avec les
déchets domestiques habituels.
Pour un traitement, une récupération et un
recyclage appropriés des déchets
d’équipements électriques et électroniques,
veuillez les déposer aux points de collecte
prévus à cet effet, conformément à la
réglementation nationale et aux Directives
2002/96/EC.
En vous débarrassant correctement des
déchets d’équipements électriques et
électroniques, vous contribuerez à la
sauvegarde de précieuses ressources et à la
prévention de potentiels effets négatifs sur la
santé humaine qui pourraient advenir lors
d’un traitement inapproprié des déchets.
Pour plus d’informations à propos de la
collecte et du recyclage des déchets
d’équipements électriques et électroniques,
veuillez contacter votre municipalité, votre
service de traitement des déchets ou le point
de vente où vous avez acheté les produits.
[Information sur le traitement dans d’autres
pays en dehors de l’Union Européenne]
Ce symbole est seulement valables dans
l’Union Européenne. Si vous souhaitez vous
débarrasser de déchets d’équipements
électriques et électroniques, veuillez
contacter les autorités locales ou votre
fournisseur et demander la méthode de
traitement appropriée.
Français
5 Fr
 Loading...