

Yamaha MCR-750, BRX-750, NS-BP150 Owner's Manual
AB
Micro Component System
OWNER’S MANUAL
CAUTION: READ THIS BEFORE OPERATING YOUR UNIT.
1 To assure the finest performance, please read this manual
carefully. Keep it in a safe place for future reference.
2 Install this sound system in a well ventilated, cool, dry,
clean place - away from direct sunlight, heat sources,
vibration, dust, moisture, and/or cold. For proper
ventilation, allow the following minimum clearances.
Top: 10 cm
Rear: 10 cm
Sides: 10 cm
3 Locate this unit away from other electrical appliances,
motors, or transformers to avoid humming sounds.
4 Do not expose this unit to sudden temperature changes
from cold to hot, and do not locate this unit in an
environment with high humidity (i.e. a room with a
humidifier) to prevent condensation inside this unit,
which may cause an electrical shock, fire, damage to this
unit, and/or personal injury.
5 Avoid installing this unit where foreign object may fall
onto this unit and/or this unit may be exposed to liquid
dripping or splashing. On the top of this unit, do not
place:
– Other components, as they may cause damage and/or
discoloration on the surface of this unit.
– Burning objects (i.e. candles), as they may cause fire,
damage to this unit, and/or personal injury.
– Containers with liquid in them, as they may fall and
liquid may cause electrical shock to the user and/or
damage to this unit.
6 Do not cover this unit with a newspaper, tablecloth,
curtain, etc. in order not to obstruct heat radiation. If the
temperature inside this unit rises, it may cause fire,
damage to this unit, and/or personal injury.
7 Do not plug in this unit to a wall outlet until all
connections are complete.
8 Do not operate this unit upside-down. It may overheat,
possibly causing damage.
9 Do not use force on switches, knobs and/or cords.
10 When disconnecting the power cable from the wall outlet,
grasp the plug; do not pull the cable.
11 Do not clean this unit with chemical solvents; this might
damage the finish. Use a clean, dry cloth.
12 Only voltage specified on this unit must be used. Using
this unit with a higher voltage than specified is dangerous
and may cause fire, damage to this unit, and/or personal
injury. Yamaha will not be held responsible for any
damage resulting from use of this unit with a voltage
other than specified.
13 To prevent damage by lightning, keep the power cable
and outdoor antennas disconnected from a wall outlet or
this unit during a lightning storm.
14 Do not attempt to modify or fix this unit. Contact
qualified Yamaha service personnel when any service is
needed. The cabinet should never be opened for any
reasons.
15 When not planning to use this unit for long periods of
time (i.e. vacation), disconnect the AC power plug from
the wall outlet.
16 Be sure to read the “TROUBLESHOOTING” section on
common operating errors before concluding that this unit
is faulty.
17 Before moving this unit, press to set this unit to the
standby mode, and disconnect the AC power plug from
the wall outlet.
18 Condensation will form when the surrounding
temperature changes suddenly. Disconnect the power
cable from the outlet, then leave this unit alone.
19 When using this unit for a long time, this unit may
become warm. Turn the power off, then leave this unit
alone for cooling.
20 Install this unit near the AC outlet and where the AC
power plug can be reached easily.
21 The batteries shall not be exposed to excessive heat such
as sunshine, fire or the like.
22 Excessive sound pressure from earphones and
headphones can cause hearing loss.
This unit is not disconnected from the AC power source as long as
it is connected to the wall outlet, even if this unit itself is turned off
by . This state is called the standby mode. In this state, this unit is
designed to consume a very small quantity of power.
WARNING
TO REDUCE THE RISK OF FIRE OR ELECTRIC SHOCK, DO
NOT EXPOSE THIS UNIT TO RAIN OR MOISTURE.
LASER SAFETY
This unit employs a laser. Due to possible eye injury, only a qualified
service person should remove the cover or attempt to service this
device.
DANGER
This unit emits visible laser radiation when open. Avoid direct eye
exposure to beam. When this unit is plugged into the wall outlet, do
not place your eyes close to the opening of the disc tray and other
openings to look into inside.
WARNING
DO NOT TOUCH THIS UNIT WHEN IT IS USED
CONTINUOUSLY AT HIGH VOLUME BECAUSE THE
BOTTOM OF THIS UNIT MAY BECOME HOT. IT MAY LEAD
TO INJURIES SUCH AS BURNS, ETC.
i En

CONTENTS
INTRODUCTION
WHAT YOU CAN DO WITH THIS UNIT ......... 2
SUPPLIED PARTS ................................................ 2
ABOUT DISCS AND FILES................................. 3
Types of discs/files that can be used with this unit ... 3
Loading a disc............................................................ 4
Disc precautions.........................................................4
Notice for watching 3D video images....................... 4
FRONT PANEL AND BASIC OPERATION ..... 5
REMOTE CONTROL ........................................... 6
Installing the batteries in the remote control ............. 9
Using the remote control ...........................................9
PREPARATIONS
CONNECTION..................................................... 10
Connecting component system to this unit.............. 10
Other connection...................................................... 11
Connecting to a TV.................................................. 12
HDMI connection.................................................... 12
Video connection.....................................................12
NETWORK AND USB CONNECTION............ 13
Connecting to the NETWORK terminal.................. 13
Connecting to the USB port.....................................13
OPERATIONS
INITIAL WIZARD/EASY SETUP..................... 14
Setting with the Initial Wizard/Easy Setup..............14
BASIC OPERATION........................................... 15
Basic operation using HOME/MEDIA menu.......... 15
Playing back photo/music/video.............................. 16
Using network content............................................. 18
Playing videos from YouTube™.............................18
Basic operation without HOME/MEDIA menu ...... 19
Operation for iPod ................................................... 20
Operation for CDs.................................................... 20
ADVANCED PLAYBACK OPERATION......... 21
On Screen menu....................................................... 21
Status menu..............................................................22
Using Bookmark...................................................... 23
Program play............................................................ 23
Using search.............................................................23
Enjoying BONUSVIEW™ and BD-Live™............ 24
LISTENING TO DAB STATIONS .................... 25
Preparing the DAB tuning .......................................25
Tuning to DAB stations........................................... 25
Presetting DAB stations........................................... 26
Selecting preset DAB stations (Preset tuning)......... 26
DAB station information ......................................... 26
DAB frequency information.................................... 27
Using DAB option menu......................................... 27
LISTENING TO FM RADIO STATIONS ........ 28
Tuning to radio stations ...........................................28
Presetting radio stations...........................................28
Selecting preset radio stations (Preset tuning)......... 28
Displaying Radio Data System information
(U.K. model only) ............................................... 29
USING USEFUL FUNCTIONS .......................... 30
Using option menu on the front panel display......... 30
Setting the clock/timer and sleep timer ...................31
Operating this unit by TV remote control
(the HDMI control function) ...............................32
SETTINGS
SETUP MENU.......................................................34
Operation for SETUP menu .................................... 36
General Setting ........................................................ 37
Display Setting ........................................................ 39
Audio Setting...........................................................41
About the video output formats............................... 42
SOFTWARE UPGRADE .....................................43
Upgrading the software............................................ 43
ADDITIONAL INFORMATION
TROUBLESHOOTING .......................................44
General.....................................................................44
DAB reception......................................................... 45
FM reception............................................................ 46
iPod.......................................................................... 46
USB ......................................................................... 47
Disc playback .......................................................... 48
Remote control ........................................................49
Network ...................................................................49
Messages on the screen............................................ 50
Others....................................................................... 51
GLOSSARY...........................................................52
SPECIFICATIONS...............................................54
■ About this manual
• This manual describes how to operate this unit using a
remote control except when it is not available. Some of
these operations are also available using the front panel
buttons.
• Notes contain important information about safety and
operating instructions. y indicates a tip for your
operation.
• “iPod” described in this manual may also refer to
“iPhone” or “iPad”.
• This manual is printed prior to production. Design and
specifications are subject to change in part as a result of
improvements, etc. In case of differences between the
manual and the product, the product has priority.
The icons used in this manual
Icons are used to indicate available buttons/functions for a
particular format.
: BD-Video
BD
: DVD-Video, DVD-VR, DVD+VR
DVD
: Audio CD
CD
: AVCHD, WMV
VIDEO
: MP3, WMA, WAV
MUSIC
PHOTO
: JPEG
INTRODUCTION PREPARATIONS
OPERATIONS SETTINGS
INFORMATION
ADDITIONAL
English
1 En
INTRODUCTION
WHAT YOU CAN DO WITH THIS UNIT
Play back a commercially-released Blu-ray Disc™/DVD/CD
In addition to a Blu-ray Disc™ (BD disc), this unit also supports playback of a variety of other
discs.
Play back BONUSVIEW™, BD-Live™, etc.
You can enjoy additional movies on the latest BD discs.
*1
Play back Video, Music, Photo files on a disc/USB memory device/
iPod/iPhone/iPad
Files recorded on discs/USB memory devices/iPod/iPhone/iPad can be played back with this
unit.
*1
Play back Video, Music, Photo files on a Home Network Server
PC contents can be played back with TV by connecting this unit to a network server.
Play back YouTube™ contents on the Internet
You can instantly enjoy YouTube™ contents on the Internet with this unit.
*2
*1
*1,2
\ p. 21
\ p. 24
\ p. 15
\ p. 18
\ p. 18
Receive DAB/DAB+ stations \ p. 25
You can enjoy listening to DAB/DAB+ stations. Also you can display station information on the
front panel display.
Receive FM Radio stations and Radio Data System information
\ p. 28
(U.K. model only)
You can enjoy listening to FM radio stations with this unit. Also when the Radio Data System
broadcasting station is received, you can display Radio Data system information on the front
panel display of the unit (U.K. model only).
Perform the Initial Wizard/Easy Setup \ p. 14
You can easily set for language, resolution, screen aspect ratio with the Initial Wizard/Easy
Setup screen.
Operate with the TV remote control \ p. 32
Connecting devices with an HDMI cable, you can control devices with a single remote control
using the HDMI control function.
Play back high-quality virtual surround sounds by AIR
\ p. 16
SURROUND XTREME
You can enjoy Yamaha’s exclusive AIR SURROUND XTREME that reproduces high-quality
virtual surround sounds.
*1 For details on playable discs and files, refer to page 3.
*2 Network setting is needed to use this function.
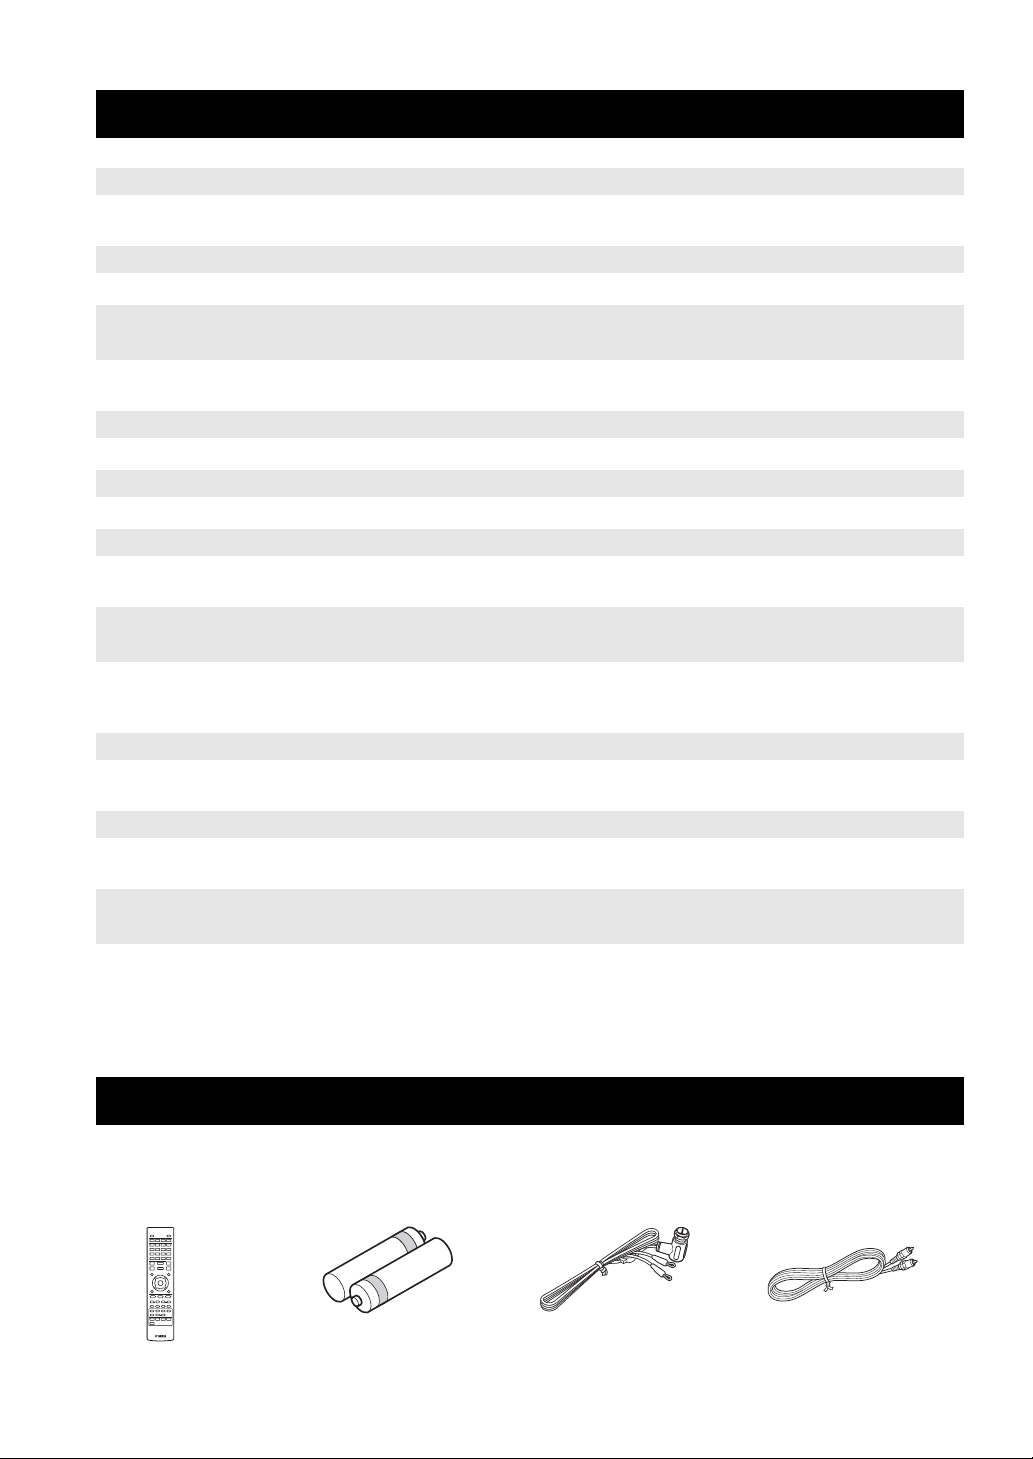
SUPPLIED PARTS
Make sure you have all of the following items.
Remote control Indoor DAB/FM
2 En
Batteries (×2)
(AAA, R03, UM-4)
antenna
Composite video
cable (1.5m)
ABOUT DISCS AND FILES
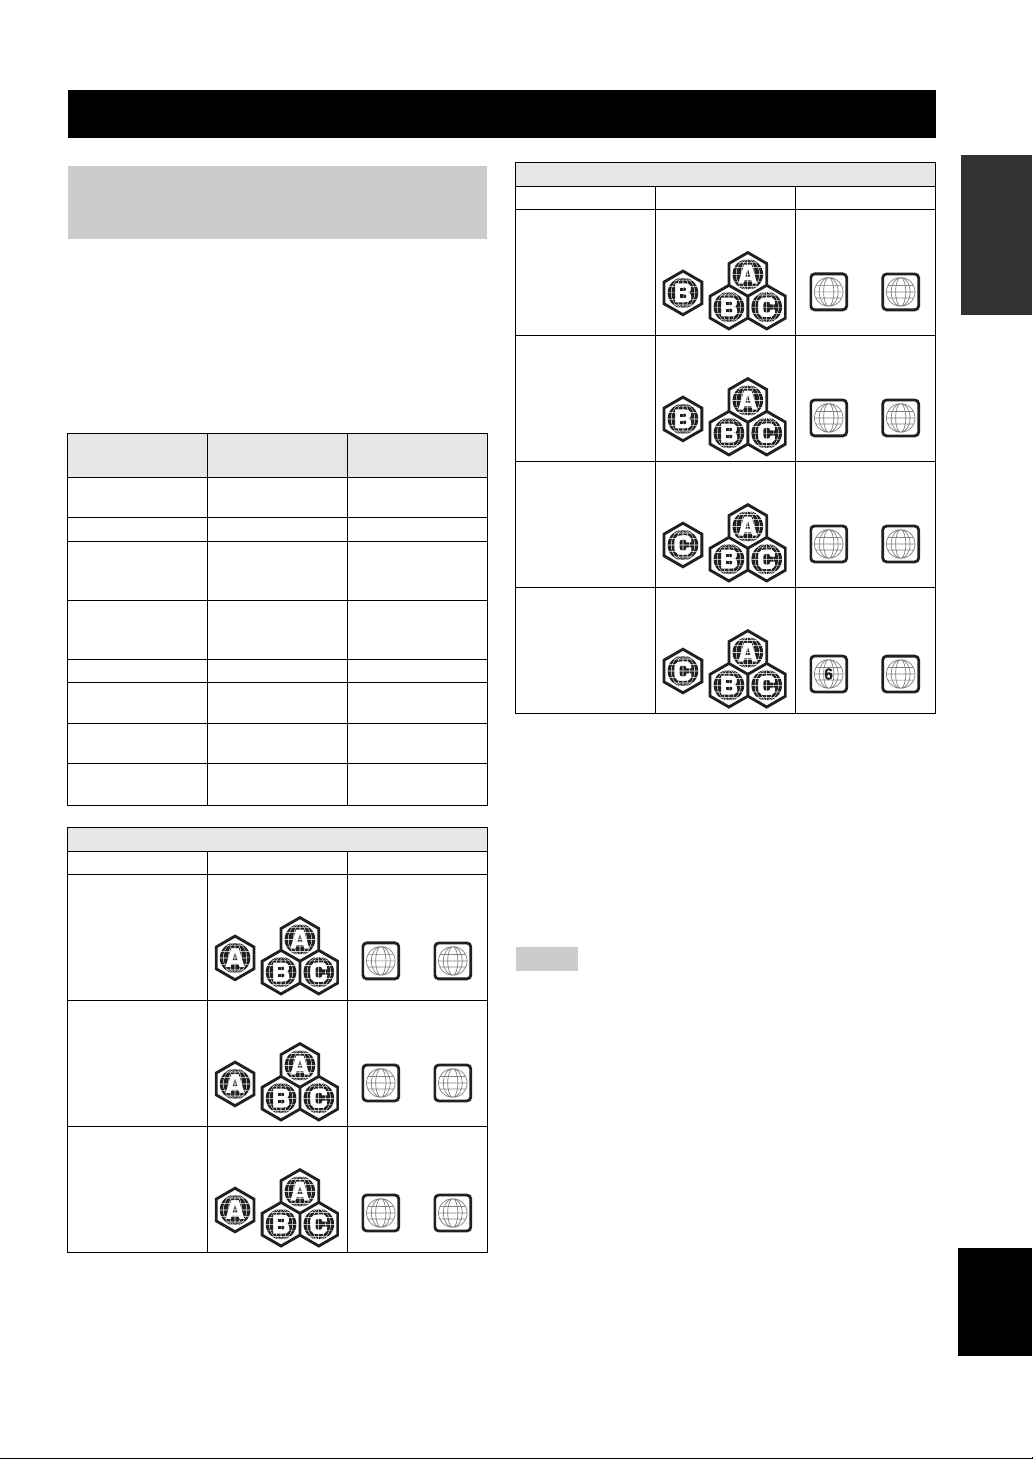
Types of discs/files that can be used with this unit
• 12 cm and 8 cm discs can be played back in this unit.
Do not use an 8 cm to 12 cm adapter.
• Use discs that conform to compatible standards as
indicated by the presence of official logos on the disc
label. Playback of discs not complying with these
standards is not guaranteed. In addition, the image
quality or sound quality is not guaranteed even if the
discs can be played back.
Disc Type
BD-ROM/BD-R/
BD-RE
DVD-ROM DVD-Video --
DVD-R/DVD-R DL/
DVD-RW
DVD+R/DVD+R
DL/DVD+RW
CD-ROM CDDA/HDCD --
CD-R/CD-RW CDDA/Data Disc WMV/MP3/WAV/
USB -- WMV/MP3/WAV/
Network -- WMV/MP3/WMA/
Region management information
Destination BD-Video DVD-Video
Asia Region code “A” or
Recording
Format
BD-Video --
DVD-Video/DVDVR/AVCHD/Data
Disc
DVD-Video/
DVD+VR/AVCHD/
Data Disc
“ALL”
Data Format
WMV/MP3/WAV/
WMA/JPEG
WMV/MP3/WAV/
WMA/JPEG
WMA/JPEG
WMA/JPEG
WAV/JPEG
Region number “3”
or “ALL”
Region management information
Destination BD-Video DVD-Video
Europe Region code “B” or
“ALL”
Australia Region code “B” or
“ALL”
Russia Region code “C” or
“ALL”
China Region code “C” or
“ALL”
Region number “2”
or “ALL”
2
Region number “4”
or “ALL”
4
Region number “5”
or “ALL”
5
Region number “6”
or “ALL”
ALL
ALL
ALL
ALL
• BD/DVD video players and discs have region codes,
which dictate the regions in which a disc can be played.
• BD/DVD Video operations and functions may be
different from the explanations in this manual and some
operations may be prohibited due to disc
manufacturer’s settings.
• If a menu screen or operating instructions are displayed
during playback of a disc, follow the operating
procedure displayed.
INTRODUCTION
Central and South
America
Korea Region code “A” or
Region code “A” or
“ALL”
“ALL”
3
Region number “4”
or “ALL”
4
Region number “3”
or “ALL”
3
ALL
ALL
ALL
Notes
• Playback for some of the discs in the left side column tables
may not be possible depending on the disc.
• Finalize all recording media that is played back in this unit.
• “Finalize” refers to a recorder processing a recorded disc so that
it will play in other players/recorders as well as this unit. Only
finalized discs will play back in this unit. (This unit does not
have a function to finalize discs.)
• Playback of all files on the disc, USB memory device and
network is not guaranteed.
• A copyright protected file cannot be played back via a USB
memory device and network.
MP3/WMA audio file requirement
• Sampling frequency: within 32 - 48 kHz (MP3/WMA),
LPCM 44.1 kHz/16 bit/Stereo (WAV)
• Bitrate: within 8 - 320 kbps (MP3), 32 - 192 kbps
(WMA)
WMV file requirement
• WMV9, maximum resolution is 1,920 × 1,080.
3 En
English

ABOUT DISCS AND FILES
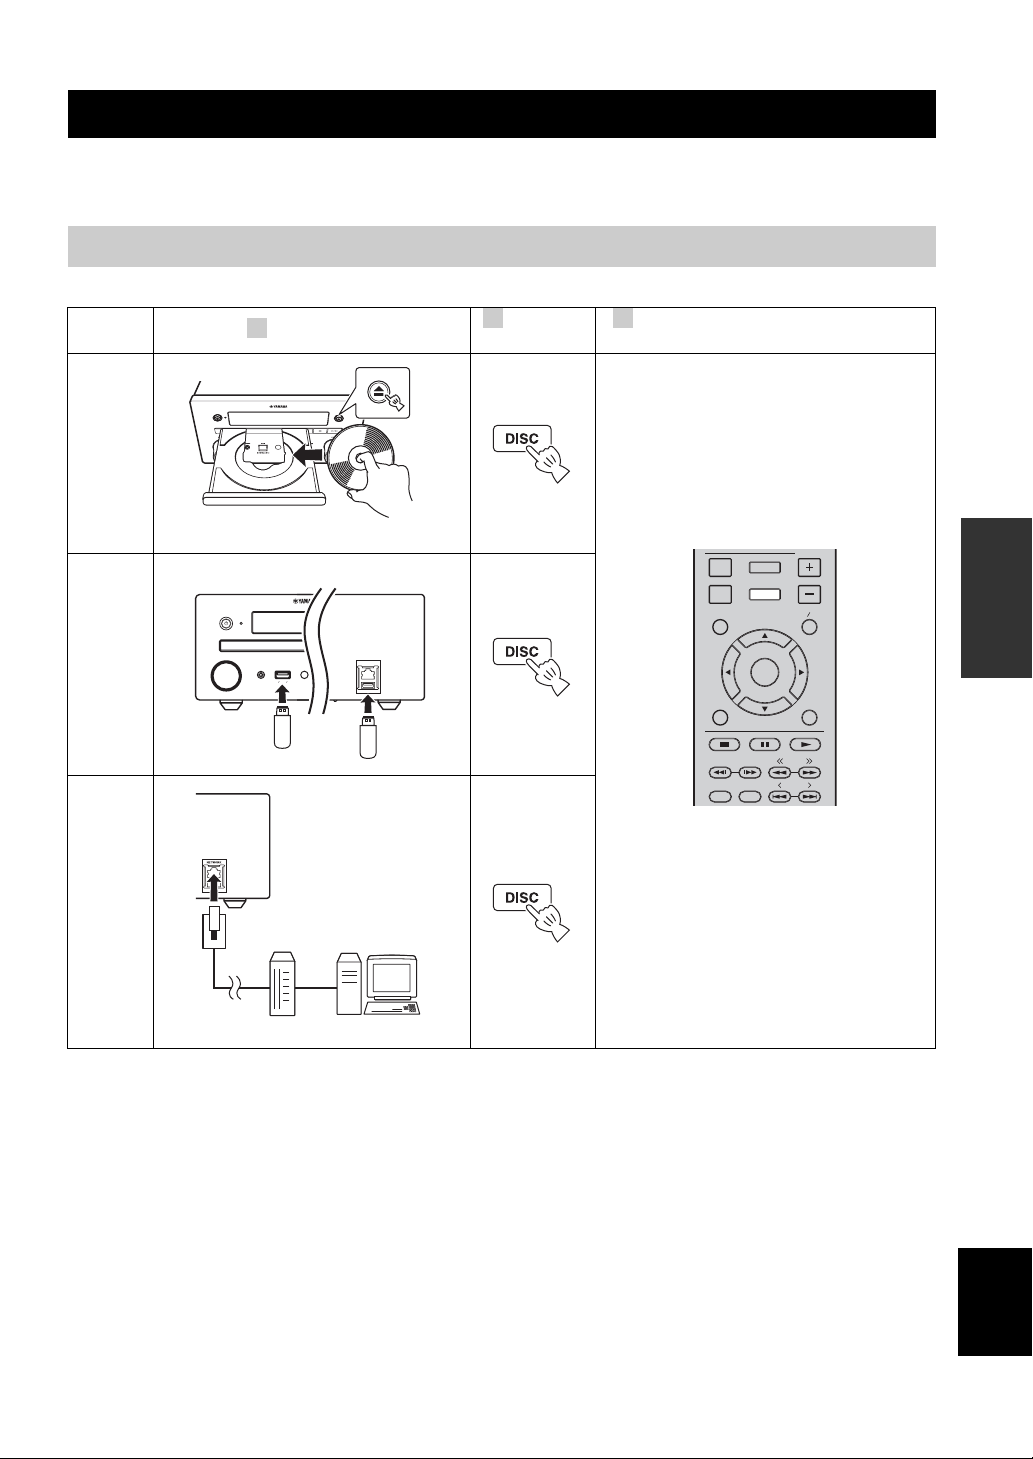
Loading a disc
• Insert the disc with the label facing up.
• In case of the disc recorded on both sides, face down the
side you want to play back.
Notes
• Playback may begin automatically, depending on the disc and
setting of this unit.
• The menu may be displayed first, depending on the disc.
• The disc load time may vary depending on the disc.
Disc precautions
• Do not touch the surface of the
disc. Hold a disc by its edge
(and the center hole).
• Do not use a pencil or pointed
marker to write on the disc.
• Do not put a tape, seal, glue, etc., on a disc.
• Do not use a protective cover to prevent scratches.
• Do not load more than one disc into this unit at one
time. This can cause damage to both this unit and the
discs.
• Do not insert any foreign objects into the disc slot.
• Do not load a cracked, warped, or glued disc.
• Do not expose a disc to
direct sunlight, high
temperature, high
humidity, or a lot of dust.
Caution
Notice for watching 3D video images
• Some people may experience discomfort (such as eye
strain, fatigue, or nausea) while watching 3D video
images. We recommend that all viewers take regular
breaks while watching 3D video images.
• If you experience any discomfort, stop watching the 3D
video images until the discomfort subsides. Consult a
doctor if you experience severe discomfort.
• Read the owner’s manuals (BD disc and TV) and/or the
caution messages that appear on the TV carefully.
• The vision of young children (especially those under six
years old) is still under development. Consult your
doctor (such as a pediatrician or eye doctor) before
allowing young children to watch 3D video images.
• Adults should supervise young children to ensure they
follow the recommendations described above.
• If a disc becomes dirty,
wipe it with a clean, dry
cloth from the center out
to the edge. Do not use
record cleaner or paint
thinner.
• To avoid malfunction, do
not use a commercially
available lens cleaner.
4 En
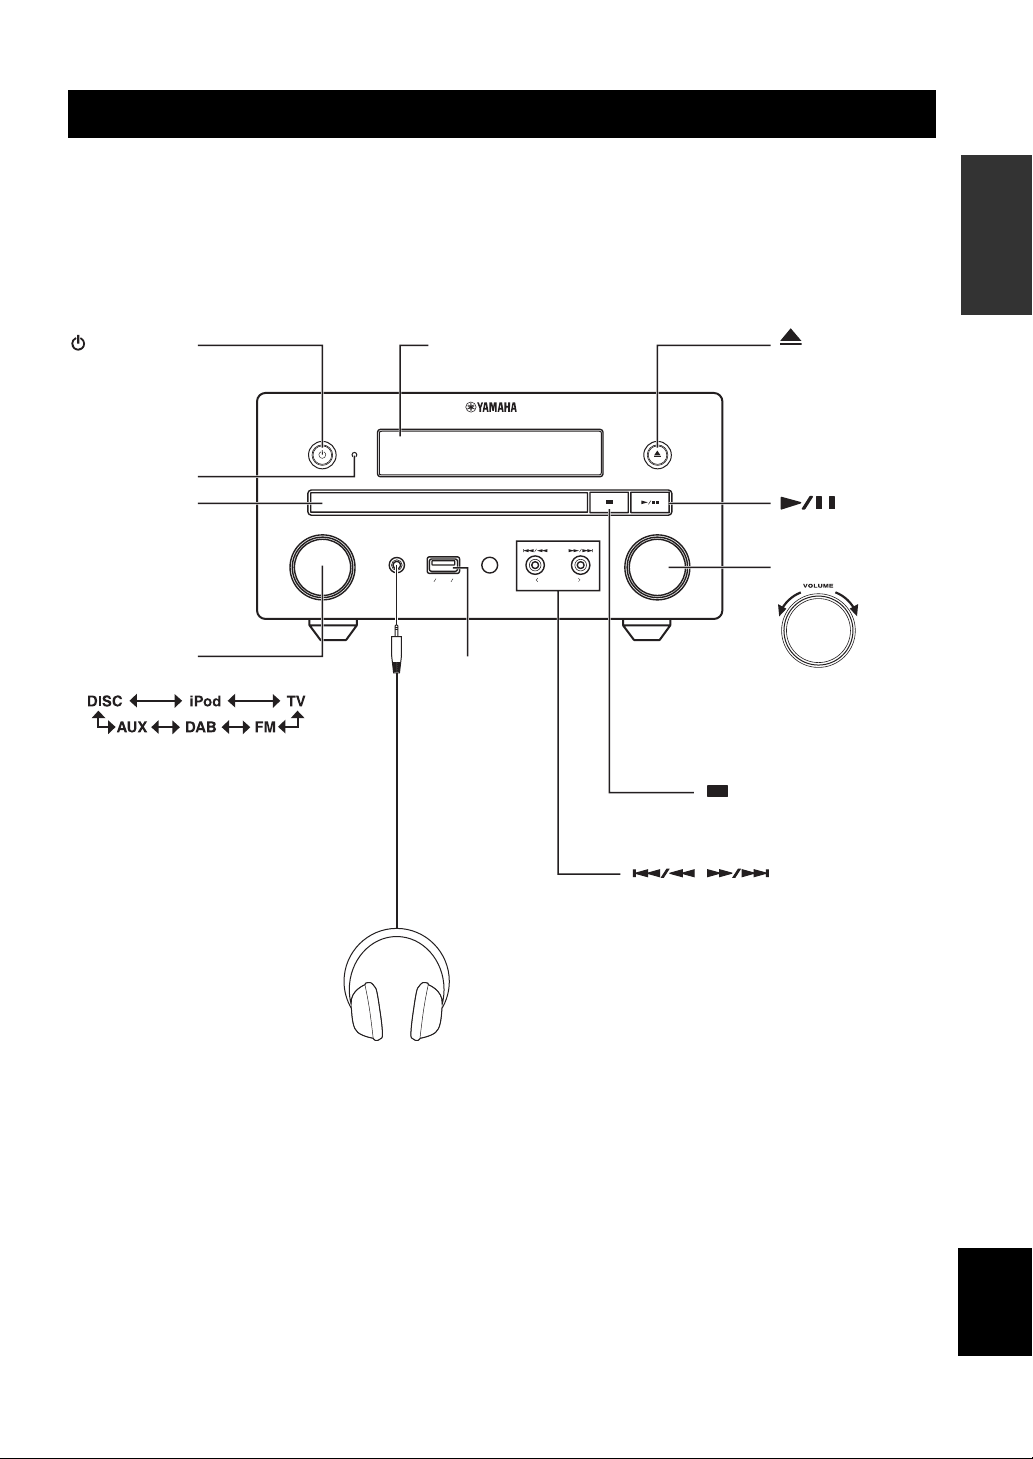
FRONT PANEL AND BASIC OPERATION
y
This unit has an automatic standby function.
• When the source is set to Disc/USB/Network, this unit automatically switches to standby mode if it is left turned on for 1 hour without
playback or any other operation being performed.
• When the source is NOT set to Disc/USB/Network, this unit automatically switches to standby mode if it is left turned on for between
1 to 8 hours without playback or any other operation being performed according to the setting in SETUP menu (p. 37).
(on/standby):
Turns this unit on/
Sets to standby mode.
TIMER indicator:
(p. 31, 32)
Disc tray
INPUT:
Selects an input source.
INPUT
TIMER
Front panel display:
(p. 30)
USBPHONES
iPod iPhone iPod
USB port:
(p. 11, 13)
VOLUME
PRESET
Down Up
:
Opens/Closes the
disc tray.
:
Starts/Pauses
playback.
VOLUME
INTRODUCTION
PHONES:
Connecting headphones
No sound is output from the speakers
when headphones are connected.
:
Stops playback.
Skips backward and forward/Press
/
and hold to rewind and fast-forward.
:
PRESET < >:
Selects a preset station.
English
5 En
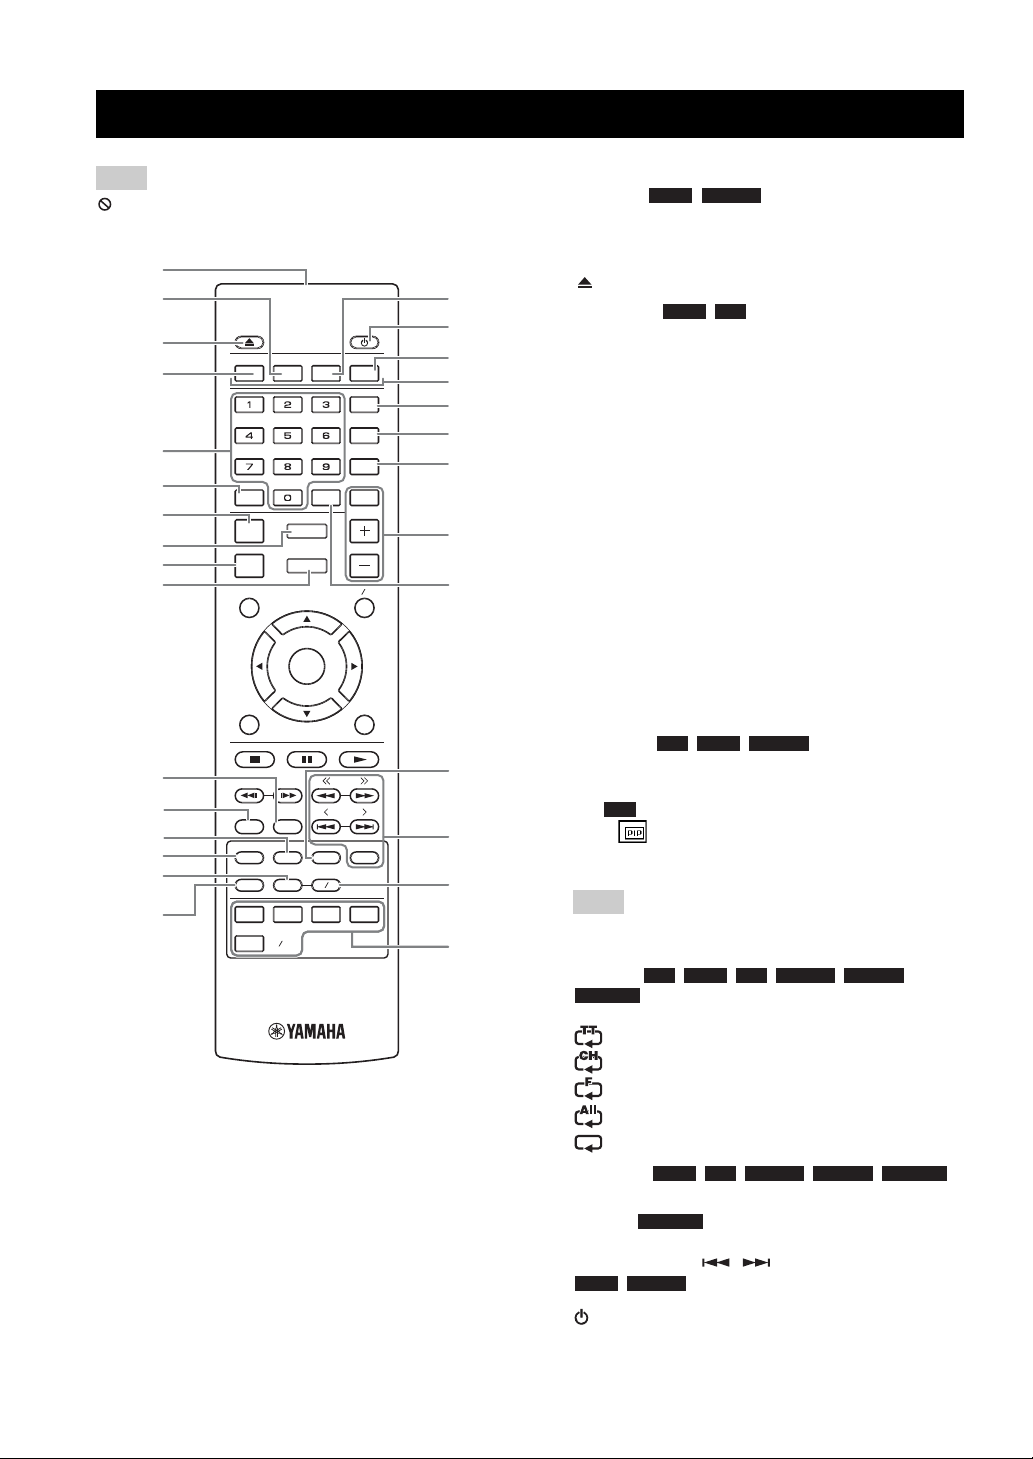
REMOTE CONTROL
Note
will appear on the top left corner of the screen when the
pressed button is not available.
1
2
3
PROGRAM MARKER DIGEST ZOOM
4
SLEEP
TIMER
SETUP
HOME
ENTER
AUDIO
A B
SURROUND
MUTESEARCHCLEAR
VOLUME
POP-UP MENU
TUNING
PRESET
MEMORY
TUNER
5
6
7
8
9
0
A
B
C
D
E
F
DISPLAY
OPTION
TOP MENU
RETURN ON SCREEN
DIMMER
STATUS
PIP
SUBTITLE
SHUFFLE
REPEAT
iPod
TV AUX
DISC
USB NET
G
H
I
J
K
L
M
N
O
P
Q
R
S
1 Infrared signal transmitter (p. 9)
2 MARKER : Sets Bookmark at a specified
DVD VIDEO
point of a movie (p. 23). After Bookmark is set, press
DIGEST to select the set point you want to jump to. You can
set up to 12 Bookmarks.
3 : Opens/Closes the disc tray.
4 PROGRAM : Sets the order of playback
DVD CD
(p. 23). You can set up to 15 tracks of an audio disc or titles/
chapters of a DVD-Video disc.
5 Numeric buttons: Enters numbers, or during playback,
jumps to the track/chapter corresponding to the number you
input. These buttons may not be available depending on the
disc type and playback condition.
6 CLEAR: Clears entered number/set item.
7 DISPLAY: Switches the information shown on the front
panel display (p. 20, 29).
8 SETUP: Displays SETUP menu screen (p. 34).
9 OPTION: Enters option menu mode (p. 30).
0 HOME: Displays HOME menu screen (p. 16).
A STATUS: Displays the playback information on the screen
(p. 22).
B DIMMER: Changes brightness of the front panel display.
Choose brightness between bright or dim by pressing this
button repeatedly.
C SUBTITLE : Changes subtitle
BD DVD VIDEO
languages (p. 53) if available. You can also select this item
from On Screen menu (p. 21).
D PIP : Turns on/off the Picture in Picture (p. 24). PIP
BD
Mark ( ) is displayed on the screen when this function is
available. You can also select this item from On Screen menu
(p. 21).
Note
PIP Mark is displayed only when [PIP Mark] is set to [On]
(p. 38).
E REPEAT
PHOTO
will change each time you press the button (p. 20, 22).
F SHUFFLE :
Selects shuffle play mode (p. 20, 21).
G DIGEST : Shows 12 photo thumbnails. When
thumbnails are displayed, you can proceed to the next/
previous page with / .
DVD VIDEO
H : Turns this unit on or sets it to standby mode.
BD DVD CD VIDEO MUSIC
: Selects repeat mode. Repeat mode shown below
: Repeats the title being played back.
: Repeats the chapter being played back.
: Repeats the folder being played back.
: Repeats all tracks/files on the disc/folder.
: Repeats the track/file being played back.
DVD CD VIDEO MUSIC PHOTO
PHOTO
: Displays Bookmark select bar (p. 23).
6 En

REMOTE CONTROL
\
I ZOOM : Zooms in/out. The
J Color buttons : Use these buttons according to on-
K SLEEP: Sets to sleep mode (p. 32).
L TIMER: Sets to timer mode (p. 31).
M SURROUND: Turns on/off surround playback mode for the
N Volume control buttons: Controls the volume level
O SEARCH : Jumps
P AUDIO : Changes the audio language or
Q DAB/FM control buttons
R A/B : Plays back a
DVD VIDEO PHOTO
size of the screen will change each time you press the button
(zoom in/out: 3 steps each).
BD
screen instructions.
speakers (p. 16). (Does not affect headphone sound.)
(p. 16).
Press MUTE to turn off the volume. Press again to resume
the volume.
BD DVD CD VIDEO MUSIC
to a specified point during playback. For details on this
function, refer to “Using search” (p. 23). You can also select
this item from Status menu (p. 22).
BD DVD
format. You can also select from On Screen menu (p. 21).
TUNING << / >>: Starts manual tuning. Press and hold to
start automatic tuning (p. 28).
PRESET < / >: Selects preset station (p. 28).
MEMORY: Starts preset tuning and stores preset stations
(p. 28).
BD DVD CD VIDEO MUSIC
specific part you want to repeat.
1 Press A/B at the scene where you want to set the start
point. [A-] is displayed on the screen.
2 Press A/B again at the scene where you want to set the end
point. [A-B] is displayed on the screen.
Repeat playback starts.
3 To cancel the repeat playback, press A/B. [A-B]
disappears and the repeat playback is finished.
Note
This function cannot be performed depending on the
specifications of the disc.
S Input select buttons: Selects the input source (p. 15, 19,
28).
INTRODUCTION
Continued to the next page.
English
7 En

REMOTE CONTROL
t
U
V
PROGRAM MARKER DIGEST ZOOM
SLEEP
TIMER
SURROUND
MUTESEARCHCLEAR
SETUP
DISPLAY
OPTION
TOP MENU
RETURN ON SCREEN
DIMMER
STATUS
PIP
SUBTITLE
SHUFFLE
REPEAT
iPod
TV AUX
DISC
USB NET
HOME
ENTER
AUDIO
A B
VOLUME
POP-UP MENU
TUNING
PRESET
MEMORY
TUNER
W
X
Y
T TOP MENU : Displays the top menu screen
BD DVD
(p. 53) if the disc contains a menu. Select the desired item
using 5 /a /2 /3 and ENTER.
Note
Specific operations may be different depending on the disc.
Follow the instructions of each menu screen.
U Cursor buttons (5/a /2 /3 ): Moves to select the focused
item.
ENTER: Confirms the focused menu/item.
V RETURN: Returns to the previous menu or screen, etc.
W POP-UP/MENU : Displays pop-up menu. The
menu contents displayed vary depending on the disc. For
details on how to see and operate the pop-up menu, refer to
the manual for the disc. The top menu screen may be
displayed by pressing POP-UP/MENU depending on the
disc.
X ON SCREEN: Displays On Screen menu (p. 21).
Y Control buttons
:
BD DVD CD VIDEO MUSIC PHOTO
: Plays back contents.
: Stops playback. To stop playback completely, press this
button twice.
: Pauses playback.
:
BD DVD CD VIDEO MUSIC
/ : Skips backward/forward.
/ : Press for instant search/replay. Instant search
skips the content 30 seconds. Instant replay replays the
content from 10 seconds before.
:
BD DVD CD VIDEO MUSIC
/ : Searches backward/forward. The search speed
will change each time you press the button (search backward/
forward: 5 steps each). Press to resume normal playback.
PHOTO
/ : Changes the speed of a slide show (slower/
faster: 3 steps).
BD DVD
:
8 En
Note
Depending on the disc, this unit resumes playback from the
point where the unit was previously stopped. To play back
from the beginning, press and then press .
REMOTE CONTROL
2
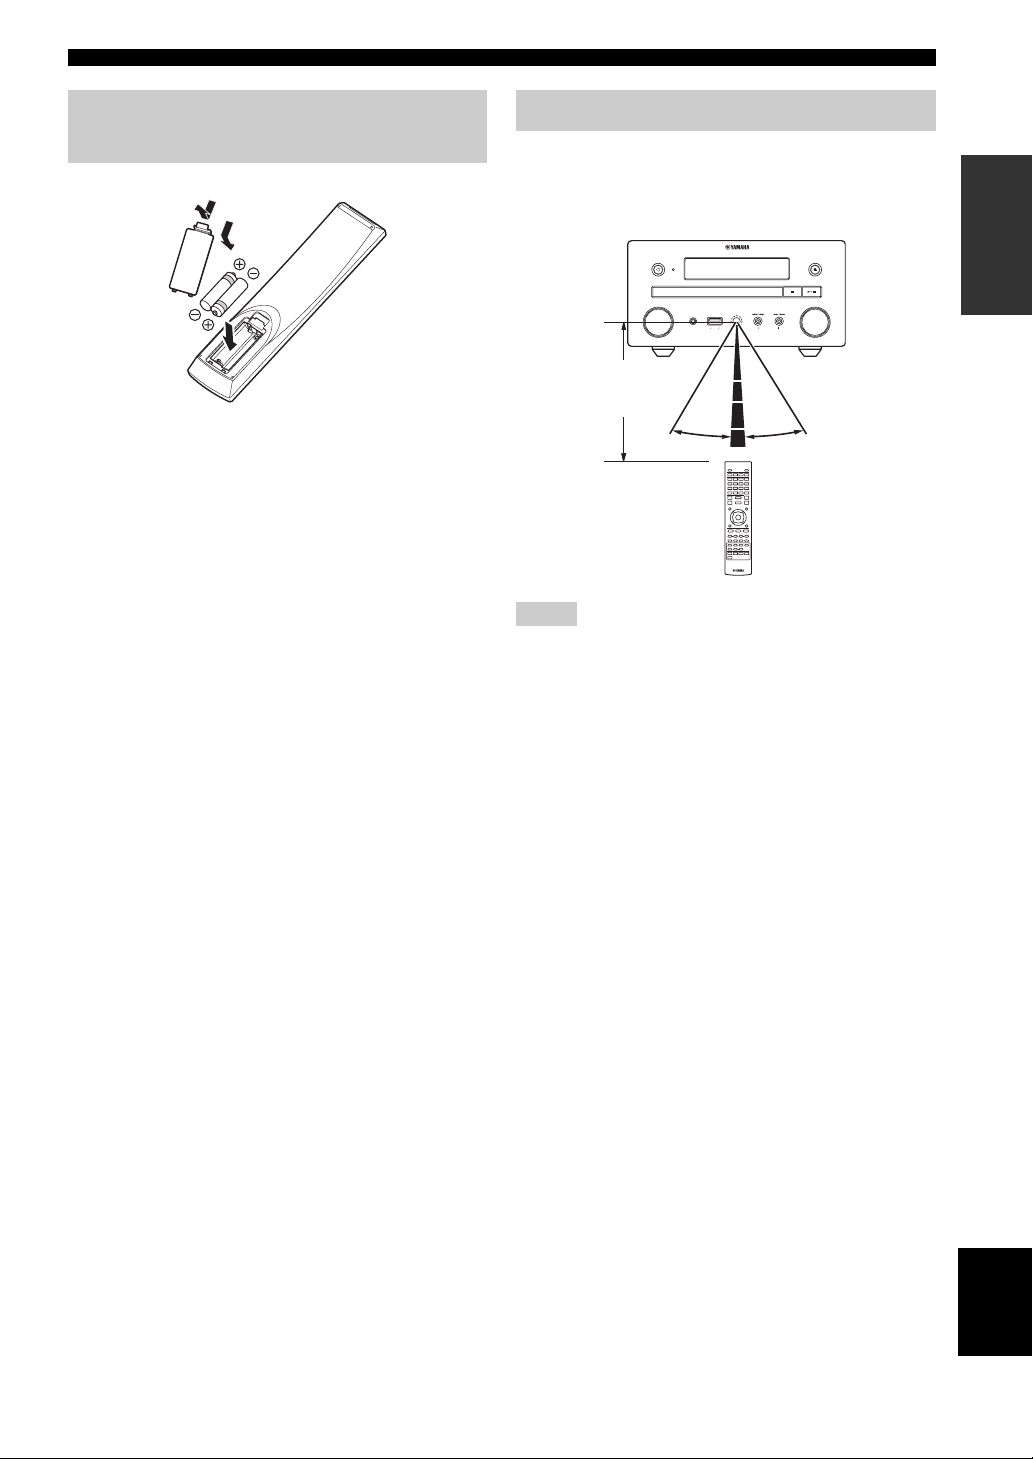
Installing the batteries in the remote control
1
3
2
■ Notes on batteries
• Change both batteries when the operation range of the remote
control decreases.
• Use AAA, R03, UM-4 batteries.
• Make sure that the polarities are correct. Refer to the illustration
inside the battery compartment.
• Remove the batteries if the remote control is not to be used for
an extended period of time.
• Do not use old batteries together with new ones.
• Do not use different types of batteries (such as alkaline and
manganese batteries) together. Read the packaging carefully as
these different types of batteries may have the same shape and
color.
• If the batteries have leaked, dispose of them immediately.
Avoid touching the leaked material or letting it come into
contact with clothing, etc. Clean the battery compartment
thoroughly before installing new batteries.
• Do not throw away batteries with general house waste; dispose
of them correctly in accordance with your local regulations.
• Keep batteries away from children. If a battery is accidentally
swallowed, contact your doctor immediately.
• When not planning to use the remote control for long periods of
time, remove the batteries from the remote control.
• Do not charge or disassemble the supplied batteries.
Using the remote control
The remote control transmits a directional infrared beam.
Be sure to aim the remote control directly at the remote
control sensor on the front panel of this unit during
operation.
TIMER
INPUT
USBPHONES
iPod iPhone iPod
Within 6 m
(20 feet)
30˚ 30˚
Notes
• The area between the remote control and this unit must be clear
of large obstacles.
• Do not spill water or other liquids on this remote control.
• Do not drop the remote control.
• Do not leave or store the remote control in the following types
of conditions:
– high humidity, such as near a bath
– high temperature, such as near a heater or a stove
– extremely low temperatures
– dusty places.
• Do not expose the remote control sensor to strong lighting, in
particular, an inverter type fluorescent lamp; otherwise, the
remote control may not work properly. If necessary, position
the system away from direct lighting.
VOLUME
PRESET
INTRODUCTION
English
9 En
PREPARATIONS
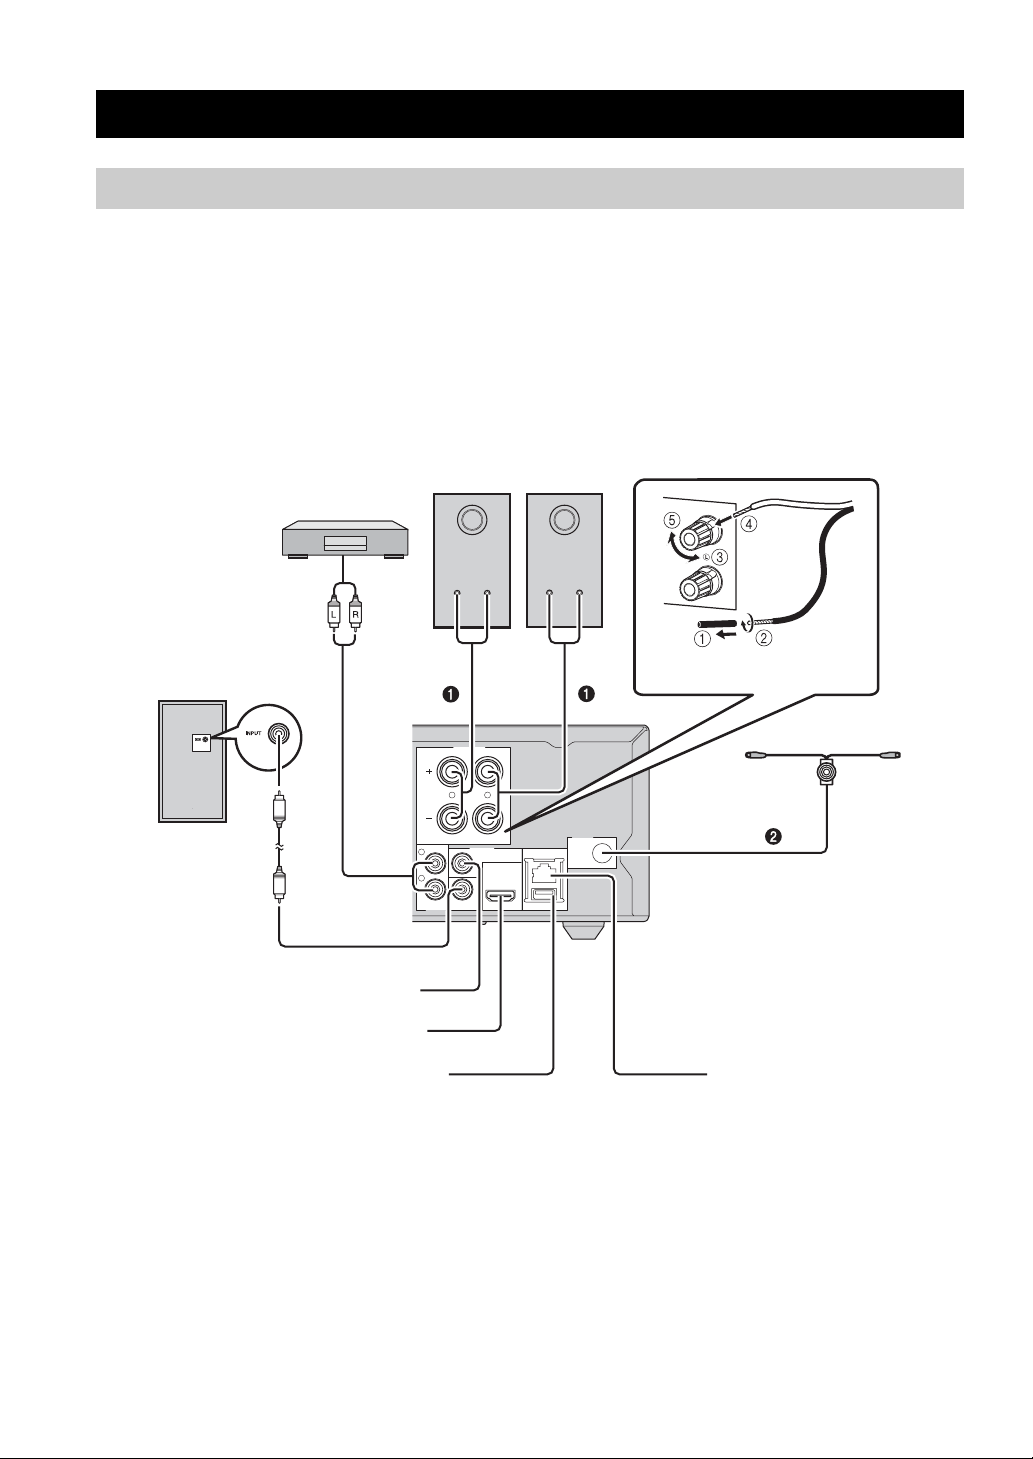
CONNECTION
Connecting component system to this unit
Make sure you read the following procedure and note carefully before connecting the system.
■ Connecting the system
1 Connect the speaker terminals (L) of this unit to the speaker terminals of the left speaker and the speaker terminals
(R) of this unit to the speaker terminals of the right speaker using the speaker cables supplied with the speaker set
(NS-BP150).
2 Connect the supplied DAB/FM antenna to the DAB/FM jack.
Subwoofer
MD player etc.
RCA stereo
cable
Video connection (p. 12)
HDMI connection (p. 12)
Right speaker
(NS-BP150)
SPEAKERS
L
R
6Ω MIN. /SPEAKER
AUX OUTPUT
L
VIDEO
R
AUDIO IN
HDMI
SUBWOOFER
Left speaker
(NS-BP150)
ANTENNA
DAB/FM
75Ω
NETWORK
USB
Be sure to remove insulation from
the end of each speaker cable.
This unit (BRX-750)
10 En
USB connection (p. 13) Network connection (p. 13)
CONNECTION
CAUTION
• Do not connect this unit or other components to the main power
until all connections between components are complete.
• Do not let the bare speaker wires touch each other or any metal
part of this unit. This could damage the unit and/or the speakers.
• All connections must be correct: L (left) to L, R (right) to R,
“+” to “+” and “–” to “–”. If the connections are faulty, no
sound will be heard from the speakers, and if the polarity of the
speaker connections is incorrect, the sound will be unnatural
and lack bass. Also, refer to the owner’s manual for each of
your components.
Notes
• When connecting speakers other than NS-BP150, use speakers
having more than 6Ω impedance.
• If there is a problem of weak radio wave reception in your area
or you want to improve radio reception, we recommend that
you use commercially available outdoor antennas. For details,
consult the nearest authorized Yamaha dealer or service center.
Other connection
■ Connecting iPod
You can enjoy music stored in your iPod by connecting it
to this unit.
Note
This unit is compatible with iPod classic, iPod nano (2nd, 3rd,
4th, 5th and 6th generation), iPod touch (1st, 2nd, 3rd, and 4th
generation), iPhone, iPhone 3G/3GS, iPhone 4, and iPad.
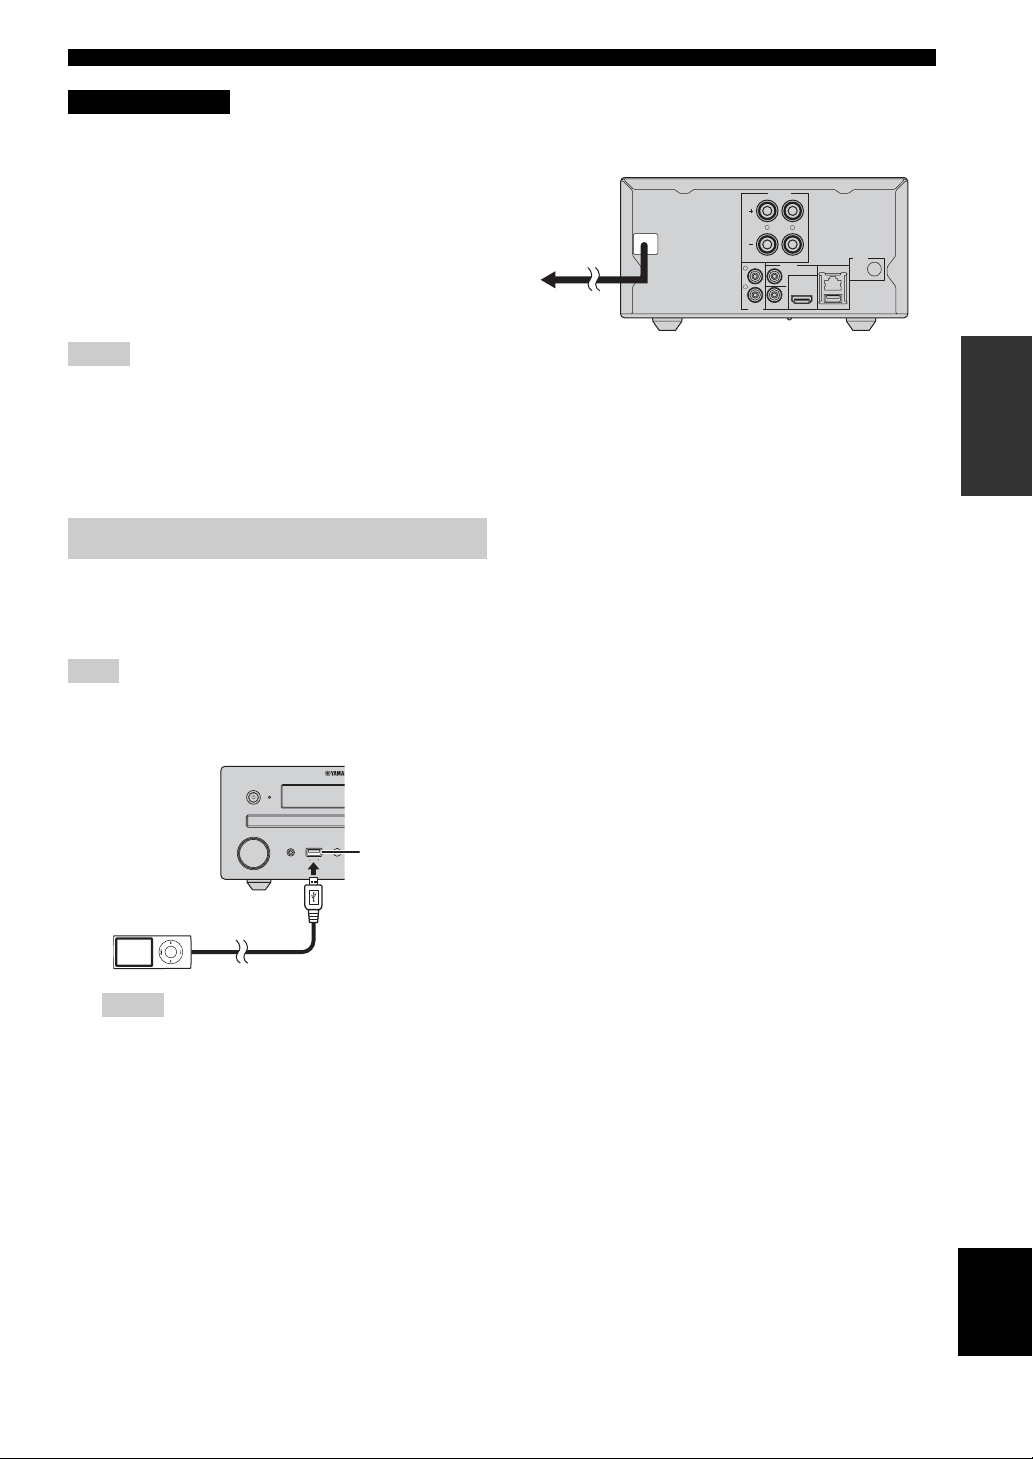
■ Connecting the power cable
After you made all connections, connect the power cables
of this unit.
SPEAKERS
L
MAINS
To an AC
wall outlet
R
6Ω MIN. /SPEAKER
AUX
OUTPUT
L
VIDEO
R
SUBWOOFER
AUDIO IN
ANTENNA
DAB/FM
75Ω
NETWORK
HDMI
USB
PREPARATIONS
USB
iPod iPhone iPod
USB port
Notes
• Make sure the USB cable is connected securely between
your iPod and this unit.
• Connect your iPod to the front USB port of this unit. The
rear USB port is not compatible with your iPod.
English
11 En
CONNECTION
Connecting to a TV
Make sure you refer the following illustration carefully so that connections between this unit and your TV are properly
made.
CAUTION
Do not connect the power cable of this unit until all connections are completed.
This unit
SPEAKERS
R
6Ω MIN. /SPEAKER
AUX OUTPUT
L
R
SUBWOOFER
AUDIO IN
VIDEO
L
ANTENNA
DAB/FM
75Ω
NETWORK
HDMI
USB
HDMI cable
(commercially available)
Video cable
(supplied)
VIDEO
AV INPUT
HDMI IN
1 2 3
(ARC)
TV
HDMI connection
• You can enjoy high quality digital picture and sound
through the HDMI terminals.
• Firmly connect an HDMI cable (commercially
available) to the HDMI terminal of this unit.
• Use HIGH SPEED HDMI cables that have the HDMI
logo (p. 55).
y
• When you use the HDMI control function, refer to “Operating
this unit by TV remote control (the HDMI control function)”
(p. 32) and “[HDMI Control]” (p. 37).
• For information on the output mode of the HDMI terminal,
refer to “[HDMI]” (p. 41).
• When no picture is displayed, refer to
“TROUBLESHOOTING” (p. 44).
■ Connection for the playback of Blu-ray
3D discs
You need the following equipment and connections to
enjoy BD 3D discs on this unit:
– a TV that has 3D functionality.
– a TV and this unit must be connected with HDMI
cables.
– a BD disc should contain 3D images.
■ About audio return channel (ARC)
supported TV
• You can connect an HDMI cable to the audio return
channel supported terminal (the terminal with “ARC”
indicated) on the TV.
• You need to activate the HDMI control function of this
unit so as to activate audio return channel (ARC) (
p. 37).
What is audio return channel (ARC)?
This function allows digital audio signal to be output from
a TV to this unit through an HDMI cable, without using a
digital audio pin cable.
y
If your TV is not ARC supported, connect the TV and this unit
via the AUX jacks on the unit.
Video connection
• Firmly connect the composite video cable (supplied) to
the VIDEO jack.
• Refer to page 42 for information on the video output
formats.
Notes
• If you play back the image via VCR, the image may deteriorate
due to the copy guard function.
• To enjoy BD 3D discs on this unit, you need to connect a TV
and this unit using HDMI cables (commercially available).
12 En
NETWORK AND USB CONNECTION
Connecting to the NETWORK terminal
• PC contents can be played back by connecting this unit to the network.
• You can enjoy a variety of contents with interactive functions by connecting to the internet when playing BD-Live
compatible discs. Refer to page 24 for information on BD-Live functions.
Notes
• Firmly connect a network cable (commercially available) to the NETWORK terminal.
• Use only an STP (shielded twisted pair) network cable.
• When using the internet, a broadband internet connection as shown below is required.
• Connect the other connector of the network cable to the hub/broadband router.
• When using a broadband internet connection, a contract with an internet service provider is required. For more details, contact your
nearest internet service provider.
• Refer to the operation manual of the equipment you have as the connected equipment and connection method may differ depending on
your internet environment.
• Use a network cable/router supporting 10BASE-T/100BASE-TX.
PREPARATIONS
Connecting to the USB port
• You can connect a USB memory device (2 GB or
greater and formatted with FAT 32/16) for BD Local
Storage to the USB port on the rear panel (or front
panel) of this unit to save the BD-Live data (p. 24) or to
upgrade the software of this unit (p. 43).
• Firmly connect a USB memory device (commercially
available) to the USB port.
CAUTION
• Do not remove the USB memory device or unplug the power
cable while the operations for BD-Live or software upgrade are
being performed.
• Do not use a USB extension cable when connecting a USB
memory device to the USB port of this unit. Using a USB
extension cable may prevent the unit from performing correctly.
Notes
• Yamaha cannot guarantee that all brands’ USB memory devices
will operate with this unit.
• For more notes on using USB memory devices, refer to
page 15.
This unit
SPEAKERS
L
R
6Ω MIN. /SPEAKER
AUX OUTPUT
L
R
AUDIO IN
SUBWOOFER
VIDEO
NETWORK
HDMI
USB
To USB
port
USB memory
device
(commercially
available)
y
To save BD-Live data on the USB
memory device on the front
panel, set [Local Storage] to
[Front USB] (p. 37).
ANTENNA
DAB/FM
75Ω
Network cable
(commercially
available)
To NETWORK
terminal
To LAN
terminal
Internet
Modem
■ After connecting
• When you set the Network setting manually, refer to “Network” (p. 38).
• To play back the PC contents on your network, refer to “Using network content” (p. 18).
LAN
Hub or
broadband router
PC
13 En
English
OPERATIONS
INITIAL WIZARD/EASY SETUP
Setting with the Initial Wizard/Easy Setup
Initial Wizard/Easy Setup allows you to set language,
resolution, and screen aspect ratio easily. Initial Wizard
screen is displayed when you turn this unit on for the first
time after purchase or upgrade. Same setting can be
performed from SETUP menu = [System] = [Easy
Setup] (p. 34).
1 When Easy Setup screen is displayed, press ENTER
to start Easy Setup.
2 Press 5 /a to select the language you want to display
on the screen, then press ENTER.
4 Press 5 /a to select the screen aspect ratio, then
press ENTER. For details on setting items, refer to
“[TV Screen]” (p. 39).
Easy Setup is completed.
5 Press ENTER to exit Easy Setup.
3 Press 5 /a to select the resolution, then press
ENTER. For details on setting items, refer to “[Video
Out Select]” (p. 39).
Note
When you connect your TV and this unit via the VIDEO
jack, select [Composite].
14 En
Notes
• When no picture is displayed after Initial Wizard/Easy Setup is
completed, refer to “TROUBLESHOOTING” (p. 44).
• A warning message concerning 3D video playback appears
when this unit is turned on. Press ENTER to dismiss the
message or CLEAR to disable it (p. 37).
BASIC OPERATION
y
When the source is a CD/iPod/FM/TV, refer to “Basic operation without HOME/MEDIA menu” (p. 19). When the source is a BD/
DVD/USB/Network, read the following (a CD can also be played back with HOME/MEDIA menu).
Basic operation using HOME/MEDIA menu
Follow the procedures below to play back the source.
2 3
Disc
Set the source
1
Switch the
input
Refer to the following pages for more
operations
p. 16
DISPLAY
OPTION
TOP MENU
RETURN ON SCREEN
USB
Front Rear
*1
iPod iPhone iPod
USB
NETWORK
USB
p. 13, 16
DIMMER
Network
(PC contents
and
YouTube)
p. 13, 18
1
*
· Some devices may not work properly even if they meet the requirements.
· Playability of and power supply to all kind of USB devices are not guaranteed.
· The reading time may exceed 30 seconds depending on the number of files/folders.
· Yamaha and suppliers accept no liability for the loss of data saved on the USB devices connected to this unit.
As a precaution, it is recommended that the files are made backup copies.
STATUS
SETUP
HOME
ENTER
OPERATIONS
VOLUME
POP-UP MENU
TUNING
PRESET
15 En
English
BASIC OPERATION
■ Controlling the volume level
1 Press the Volume control buttons (+/–) on the
remote control to increase/decrease the volume level
(p. 7).
■ Turning on/off surround playback mode
1 Press SURROUND to turn on/off surround playback
mode (p. 7).
When it is set to on:
– plays back surround sounds using Yamaha’s
exclusive AIR SURROUND XTREME (p. 52) if
the sources is a surround playback source such as
a BD.
– reproduces wider stereo sounds if the source is a
stereo playback source such as an audio CD.
Playing back photo/music/video
HOME and MEDIA menus allow you to browse and play
multi-media files on data discs, USB memory devices and
your network.
Note
For details on playable discs and files, refer to page 3.
■ Basic operation
■ Common operations for playing back
files in a selected folder
Example: Selecting a movie file on a USB memory
device
Note
Stop the playback of the video before you move to MEDIA menu
screen.
1 Press HOME to move to HOME menu screen.
y
HOME menu screen may differ depending on the model.
2 Press 2 /3 /5 to select [MEDIA], then press
ENTER.
MEDIA screen appears.
DISPLAY
SETUP
HOME
ENTER
OPTION
TOP MENU
2
RETURN ON SCREEN
HOME
ENTER
VOLUME
POP-UP MENU
5
a
5 /a : Moves the focus.
2: Returns to the parent folder.
HOME: Moves to/exits HOME menu screen.
ENTER: Confirms the folder/file.
■ Icons on the top of MEDIA menu
: Plays back the disc on the tray, or displays
contents in the data disc.
: Displays contents in the USB memory device
connected to the USB port.
: Searches for a DLNA (p. 18) server on the
network.
: Displays contents on the connected DLNA server.
3 Select the item which contains the file you want to
play back, then press ENTER.
16 En
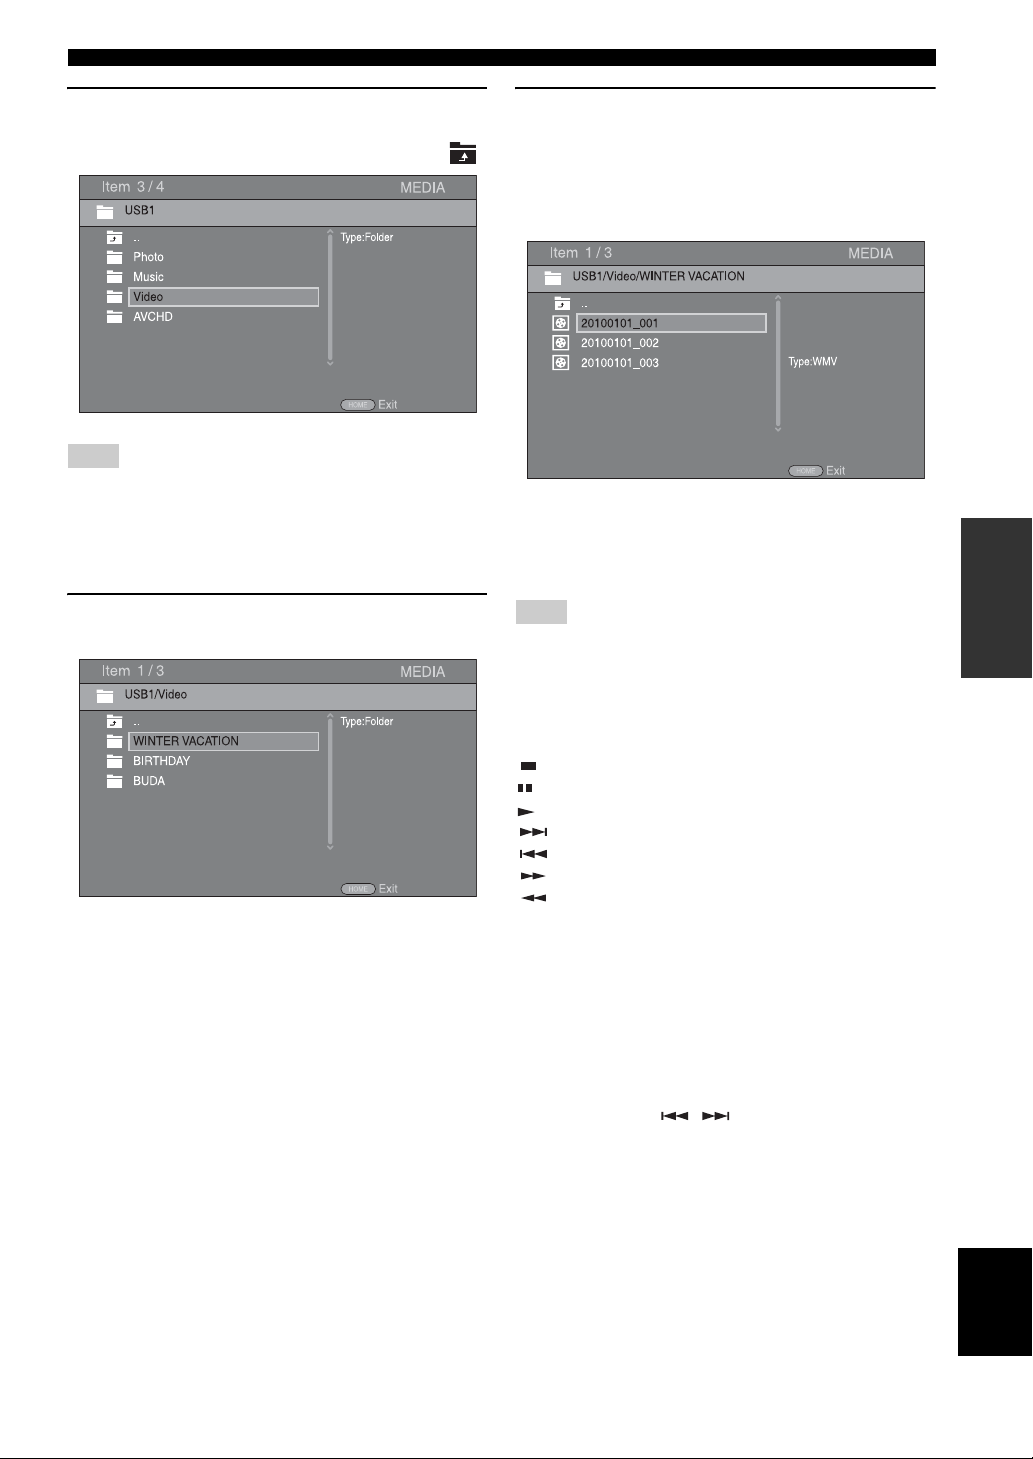
BASIC OPERATION
4 Select the Photo, Music, Video or AVCHD folder
you want to play back, then press ENTER.
To return to the parent folder, press 2 or select .
Note
Note that the only the file type selected on this step will be
displayed in the following step. For example, if you selected the
Photo folder in this step, only photo files are displayed after this
step. When you want to play back other than photo, return to this
step and select file type again.
5 Select the folder(s) containing the file you want to
play back.
6 Select the file you want to play back, then press
ENTER.
When a video file is selected, playback starts.
When a music file is selected, Status menu is
displayed and playback starts.
When a photo file is selected, slide show starts.
y
To enjoy a slide show with music, press HOME to return to
HOME menu screen while music is played back, and select the
photo file.
Note
The displayed file may not be played back depending on the
content.
OPERATIONS
■ Operations for viewing photos
While viewing photos, the buttons on the remote control
work as shown below.
: Stops a slide show and returns to the file browser.
: Pauses a slide show.
: Plays a slide show.
: Moves to a next photo.
: Moves to a previous photo.
: Makes a slide show faster in 3 steps.
: Makes a slide show slower in 3 steps.
5 : Inverts a photo.
a : Reflects a photo.
2 : Rotates a photo counterclockwise.
3 : Rotates a photo clockwise.
ZOOM: Zooms in/out a photo (zoom in/out: 3 steps each).
5 /a /2 /3 :Pans in zoom mode when a photo is
larger than the screen.
DIGEST: Switches to thumbnail mode (p. 6). When
thumbnails are displayed, you can proceed to the next/
previous page with / .
English
17 En
BASIC OPERATION
Using network content
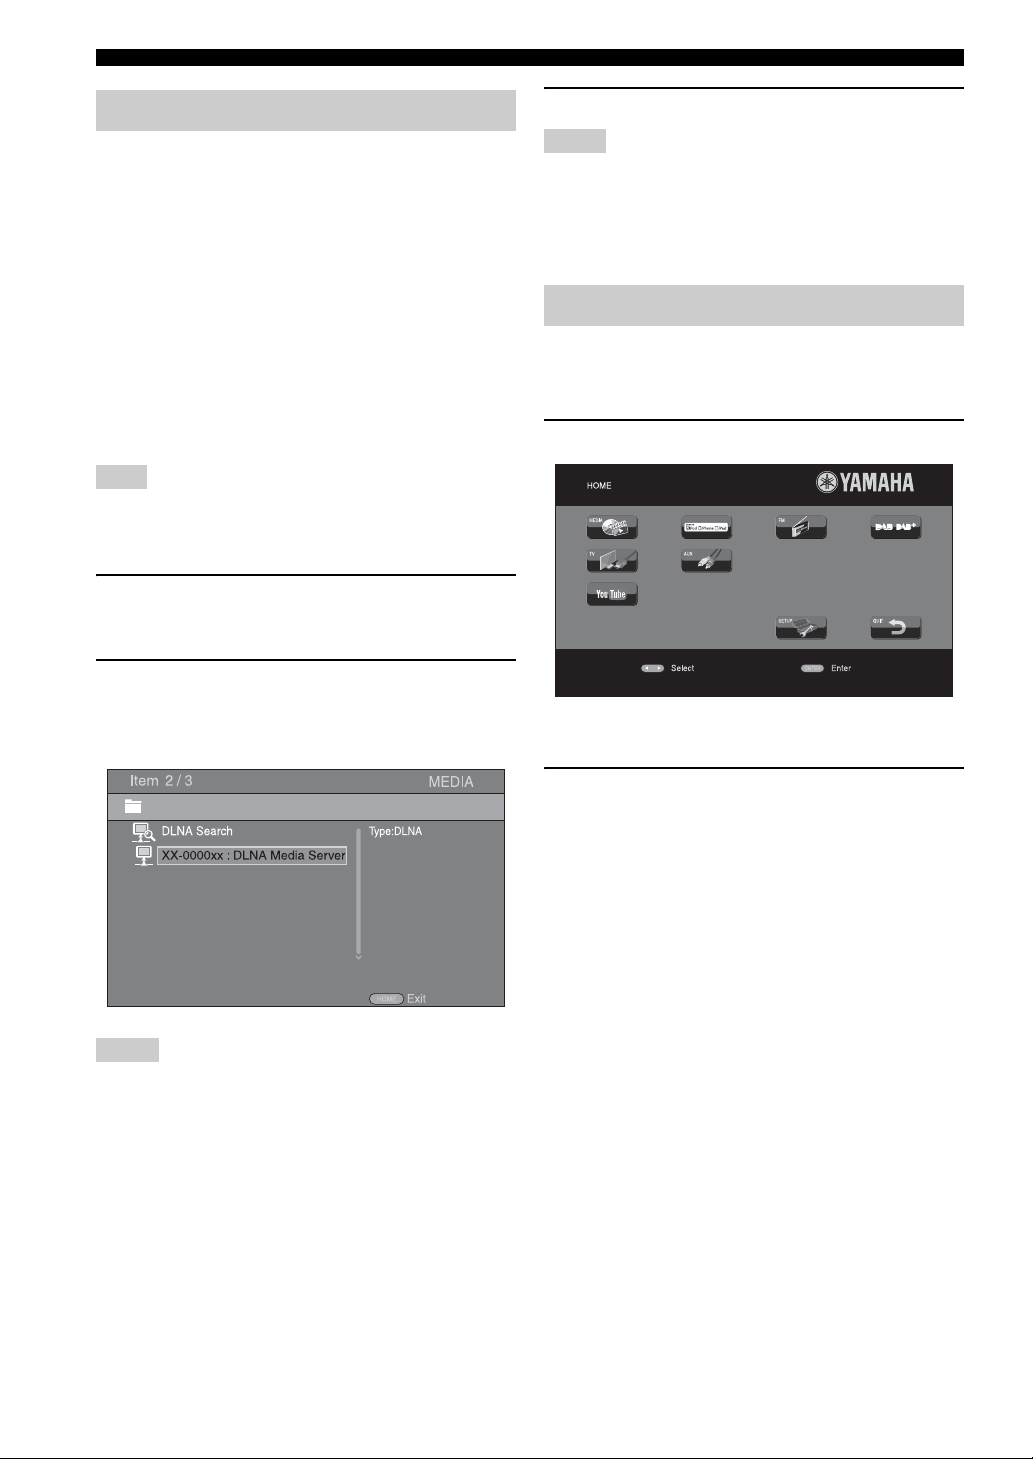
■ About DLNA
This unit is a DLNA certified digital media player. You
can manage photo, music and video contents stored on
DLNA servers on your home network.
DLNA (Digital Living Network Alliance) provides easy
sharing of digital media through network in the home, and
you can enjoy digital contents stored on your DLNAserver-software-installed PC or other DLNA compatible
device with your TV via this unit. To connect this unit to
your DLNA servers, some settings for the DLNA server or
device are required. For details, refer to your DLNA
server software or DLNA device.
■ Playing back shared contents
Note
To play back files on your PC, install a DLNA server software,
such as Windows Media Player 12, and share files you want to
play back.
1 Turn on the PC with DLNA server software installed
or the DLNA device connected to your home
network.
2 Press HOME to display HOME menu screen, then
select [MEDIA] to move to MEDIA menu.
The DLNA servers connected to the network are
listed on the screen.
3 Select the file you want to play back.
Notes
• The playback and operating quality may be affected by your
home network condition.
• The files from removable media, such as USB memory devices
or DVD-drive on your media server, may not be shared
properly.
Playing videos from YouTube™
You can watch movies from YouTube over the internet
using this unit.
The services may be changed without notice.
1 Press HOME to display HOME menu screen.
y
HOME menu screen may differ depending on the model.
Notes
• If your DLNA server is not listed, select [DLNA Search] to find
it.
• Depending on the DLNA server, this unit may need to be
permitted from the server.
• To play the file on the DLNA server, this unit and the server
must be connected to the same access point.
• The file requirements may not always be compatible. There
may be some restrictions depending on file features and DLNA
sever capability.
2 Press 5 /a /2/3 to select [YouTube], then press
ENTER.
y
To return to HOME menu screen, press RETURN.
■ Notices for network services
• Access to content provided by third parties requires a
high speed internet connection and may also require
account registration and a paid subscription.
• Third party content services may be changed,
suspended, interrupted, or discontinued at any time
without notice, and Yamaha disclaims any liability in
connection with such occurrences.
• Some content may only be available for specific
countries and may be presented in specific languages.
• Yamaha does not represent or warrant that content
services will continue to be provided or available for a
particular period of time, and any such warranty,
express or implied, is disclaimed.
18 En
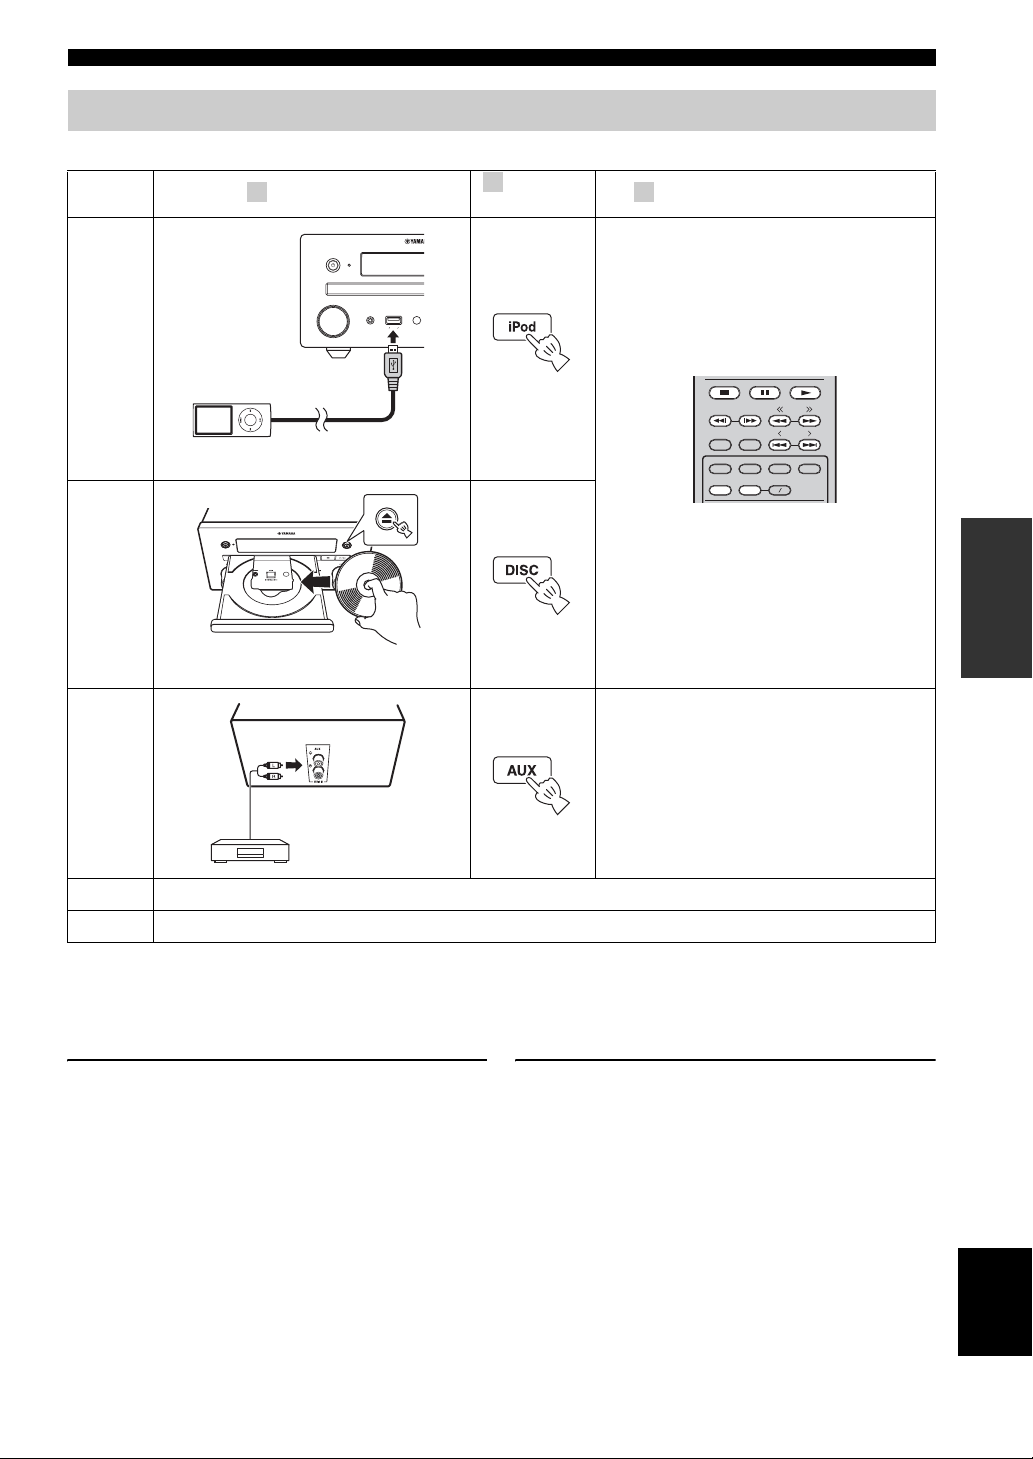
Basic operation without HOME/MEDIA menu
Follow the procedures below to play back the source.
2
Switch the
input
iPod
CD
1
Set the source
USB
iPod iPhone iPod
*1
p. 11, 20
BASIC OPERATION
3
Select music and start playback
TUNING
STATUS
SUBTITLE
REPEAT
AUDIO
A B
PRESET
MEMORY
DIMMER
PIP
SHUFFLE
OPERATIONS
p. 20
AUX
To AUX
DAB/FM
TV
1
*
· Some features may not be available depending on the model or the software version of your iPod.
To output TV sounds, refer to page 12 for connection and select the input source to TV (p. 7).
To receive DAB/FM radio stations, refer to page 25 or 28.
For details on operation, refer to the
instruction manual supplied with the device
connected such as a MD player, etc.
· When you play back your iPod, Music Enhancer feature is enabled to enhance the sound for compressed music by regenerating
musical elements that are lost through compression. (Available only for iPod.)
■ Controlling the volume level
1 Press the Volume control buttons (+/–) on the
remote control to increase/decrease the volume level
(p. 7).
■ Turning on/off surround playback mode
1 Press SURROUND to turn on/off surround playback
mode (p. 7).
When it is set to on:
– plays back surround sounds using Yamaha’s
exclusive AIR SURROUND XTREME (p. 52) if
the sources is a surround playback source such as
a BD.
– reproduces wider stereo sounds if the source is a
stereo playback source such as an audio CD.
English
19 En
 Loading...