

Page 1

FCC INFORMATION (U.S.A.)
1. IMPORTANT NOTICE: DO NOT MODIFY THIS UNIT!
This product, when installed as indicated in the instructions contained in this manual, meets FCC requirements. Modifications not
expressly approved by Yamaha may void your authority, granted by the FCC, to use the product.
2. IMPORTANT: When connecting this product to accessories and/or another product use only high quality shielded cables. Cable/s
supplied with this product MUST be used. Follow all installation instructions. Failure to follow instructions could void your FCC authorization to use this product in the USA.
3. NOTE: This product has been tested and found to comply with the requirements listed in FCC Regulations, Part 15 for Class “B” digital
devices. Compliance with these requirements provides a reasonable level of assurance that your use of this product in a residential
environment will not result in harmful interference with other electronic devices. This equipment generates/uses radio frequencies and,
if not installed and used according to the instructions found in the users manual, may cause interference harmful to the operation of
other electronic devices. Compliance with FCC regulations does not guarantee that interference will not occur in all installations. If this
product is found to be the source of interference, which can be determined by turning the unit “OFF” and “ON”, please try to eliminate
the problem by using one of the following measures:
Relocate either this product or the device that is being affected by the interference.
Utilize power outlets that are on different branch (circuit breaker or fuse) circuits or install AC line filter/s.
In the case of radio or TV interference, relocate/reorient the antenna. If the antenna lead-in is 300 ohm ribbon lead, change the lead-in
to co-axial type cable.
If these corrective measures do not produce satisfactory results, please contact the local retailer authorized to distribute this type of
product. If you can not locate the appropriate retailer, please contact Yamaha Corporation of America, Electronic Service Division, 6600
Orangethorpe Ave, Buena Park, CA90620
The above statements apply ONLY to those products distributed by Yamaha Corporation of America or its subsidiaries.
* This applies only to products distributed by YAMAHA CORPORATION OF AMERICA.
1
Page 2
PRECAUTIONS
PLEASE READ CAREFULLY BEFORE PROCEEDING
* Please keep these precautions in a safe place for future reference.
WARNING
Always follow the basic precautions listed below to avoid the
possibility of serious injury or even death from electrical shock,
short-circuiting, damages, fire or other hazards. These precautions include, but are not limited to, the following:
• Do not open the instrument or attempt to disassemble the internal
parts or modify them in any way.
The instrument contains no userserviceable parts. If it should appear
to be malfunctioning, discontinue
use immediately and have it inspected by qualified Yamaha service personnel.
• Do not expose the instrument to
rain, use it near water or in damp or
wet conditions, or place containers
on it containing liquids which might
spill into any openings.
• If the AC adaptor cord or plug becomes frayed or damaged, or if
there is a sudden loss of sound during use of the instrument, or if any
unusual smells or smoke should
2
appear to be caused by it, immediately turn off the power switch, disconnect the adaptor plug from the
outlet, and have the instrument inspected by qualified Yamaha service personnel.
• Use the specified adaptor (PA-3B or
an equivalent recommended by
Yamaha) only. Using the wrong
adaptor can result in damage to the
instrument or overheating.
• Before cleaning the instrument, always remove the electric plug from
the outlet. Never insert or remove
an electric plug with wet hands.
• Check the electric plug periodically
and remove any dirt or dust which
may have accumulated on it.
CAUTION
Always follow the basic precautions listed below to avoid the
possibility of physical injury to you or others, or damage to the
instrument or other property. These precautions include, but are
not limited to, the following:
• Do not place the AC adaptor cord
near heat sources such as heaters
or radiators, and do not excessively
bend or otherwise damage the cord,
place heavy objects on it, or place it
in a position where anyone could
walk on, trip over, or roll anything
over it.
• When removing the electric plug
from the instrument or an outlet, always hold the plug itself and not the
cord.
• Do not connect the instrument to an
electrical outlet using a multipleconnector. Doing so can result in
lower sound quality, or possibly
cause overheating in the outlet.
• Unplug the AC power adaptor when
not using the instrument, or during
electrical storms.
• Always make sure all batteries are
inserted in conformity with the +/–
polarity markings. Failure to do so
might result in overheating, fire, or
battery fluid leakage.
• Always replace all batteries at the
same time. Do not use new batteries together with old ones. Also, do
not mix battery types, such as alkaline batteries with manganese
batteries, or batteries from different
makers, or different types of batteries from the same maker, since this
can cause overheating, fire, or battery fluid leakage.
• Do not dispose of batteries in fire.
• Do not attempt to recharge batteries that are not intended to be
charged.
(4)
Page 3
PRECAUTIONS
PLEASE READ CAREFULLY BEFORE PROCEEDING
* Please keep these precautions in a safe place for future reference.
CAUTION
Always follow the basic precautions listed below to avoid the possibility of physical injury to you or others, or damage to the instrument or other property. These precautions include, but are not limited to, the following:
• If the instrument is not to be in use
for a long time, remove the batteries from it, in order to prevent possible fluid leakage from the battery.
• Keep batteries away from children.
• Before connecting the instrument to
other electronic components, turn off
the power for all components. Before turning the power on or off for
all components, set all volume levels to minimum.
• Do not expose the instrument to
excessive dust or vibrations, or extreme cold or heat (such as in direct
sunlight, near a heater, or in a car
during the day) to prevent the possibility of panel disfiguration or damage to the internal components.
(4)
• Do not use the instrument near
other electrical products such as
televisions, radios, or speakers,
since this might cause interference
which can affect proper operation of
the other products.
• Do not place the instrument in an
unstable position where it might accidentally fall over.
• Before moving the instrument, remove all connected adaptor and
other cables.
• When cleaning the instrument, use
a soft, dry cloth. Do not use paint
thinners, solvents, cleaning fluids, or
chemical-impregnated wiping
cloths. Also, do not place vinyl or
plastic objects on the instrument,
since this might discolor the panel
or keyboard.
• Do not rest your weight on, or place
heavy objects on the instrument,
and do not use excessive force on
the buttons, switches or connectors.
• Do not operate the instrument for a
long period of time at a high or uncomfortable volume level, since this
can cause permanent hearing loss.
If you experience any hearing loss
or ringing in the ears, consult a physician.
Yamaha cannot be held responsible for
damage caused by improper use or
modifications to the instrument, or
data that is lost or destroyed.
Always turn the power off when the instrument is not in use.
Make sure to discard used batteries
according to local regulations.
3
Page 4
Handling the Floppy Disk Drive(FDD) and Floppy Disk
Precautions
• Be sure to handle floppy disks and treat the disk drive with care. Follow
the important precautions below.
Compatible Disk Type
• 3.5” 2DD and 2HD type floppy disks can be used. A blank 2HD floppy disk
has been included with your instrument for you to record your performances.
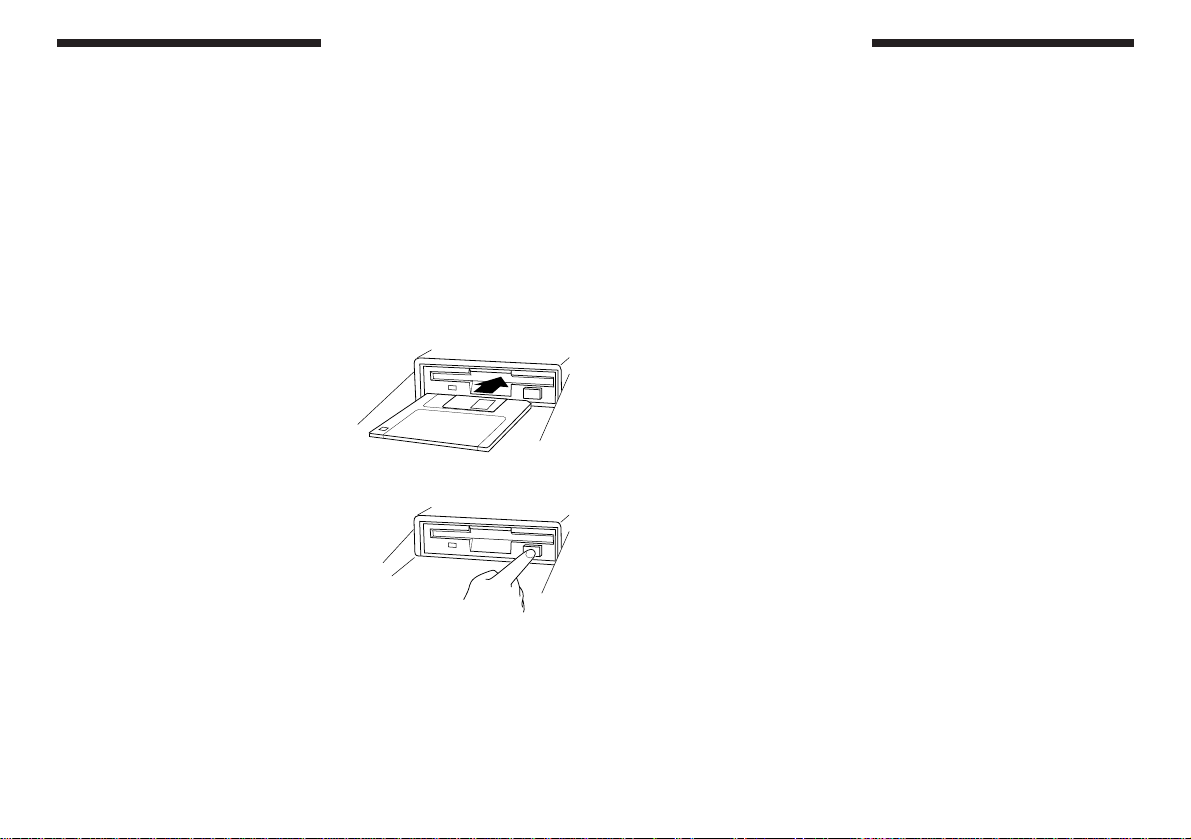
■ Inserting/Ejecting Floppy Disks
To insert a floppy disk into the disk drive:
• Hold the disk so that the label of the disk
is facing upward and the sliding shutter
is facing forward, towards the disk slot.
Carefully insert the disk into the slot,
slowly pushing it all the way in until it
clicks into place and the eject button
pops out.
To eject a floppy disk:
• Before ejecting a floppy disk make sure
that the floppy disk drive is not in operation (the DISK IN USE indicator should
be off.)
• Press the eject button slowly as far as it
will go; the disk will automatically pop
out. When the disk is fully ejected, carefully remove it by hand.
• Never attempt to remove the disk or turn the power off during recording,
reading and playing back. Doing so can damage the disk and possibly the
disk drive.
• If the eject button is pressed too quickly, or if it is not pressed in as far as it
will go, the disk may not eject properly. The eject button may become
stuck in a half-pressed position with the disk extending from the drive slot
by only a few millimeters. If this happens, do not attempt to pull out the
partially ejected disk, since using force in this situation can damage the
disk drive mechanism or the floppy disk. To remove a partially ejected
disk, try pressing the eject button once again, or push the disk back into
the slot and then repeat the eject procedure.
• Be sure to remove the floppy disk from the disk drive before turning off the
power. A floppy disk left in the drive for extended periods can easily pick up
dust and dirt that can cause data read and write errors.
Cleaning the Disk Drive Read/Write Head
• Clean the read/write head regularly. This instrument employs a precision
magnetic read/write head which, after an extended period of use, will pick
up a layer of magnetic particles from the disks used that will eventually
cause read and write errors.
• To maintain the disk drive in optimum working order Yamaha recommends
that you use a commercially-available dry-type head cleaning disk to clean
the head about once a month. Ask your Yamaha dealer about the availability of proper head-cleaning disks.
Never insert anything but floppy disks into the disk drive. Other
objects may cause damage to the disk drive or floppy disks.
4
Page 5
Handling the Floppy Disk Drive(FDD) and Floppy Disk
■ About the Floppy Disks
To handle floppy disks with care:
• Do not place heavy objects on a disk or bend or apply pressure to the disk
in any way. Always keep floppy disks in their protective cases when they
are not in use.
• Do not expose the disk to direct sunlight, extremely high or low temperatures, or excessive humidity, dust or liquids.
• Do not open the sliding shutter and touch the exposed surface of the floppy
disk inside.
• Do not expose the disk to magnetic fields, such as those produced by
televisions, speakers, motors, etc., since magnetic fields can partially or
completely erase data on the disk, rendering it unreadable.
• Never use a floppy disk with a deformed shutter or housing.
• Do not attach anything other than the provided labels to a floppy disk.
Also make sure that labels are attached in the proper location.
YAMAHA is not responsible for damage caused by improper handling or operation.
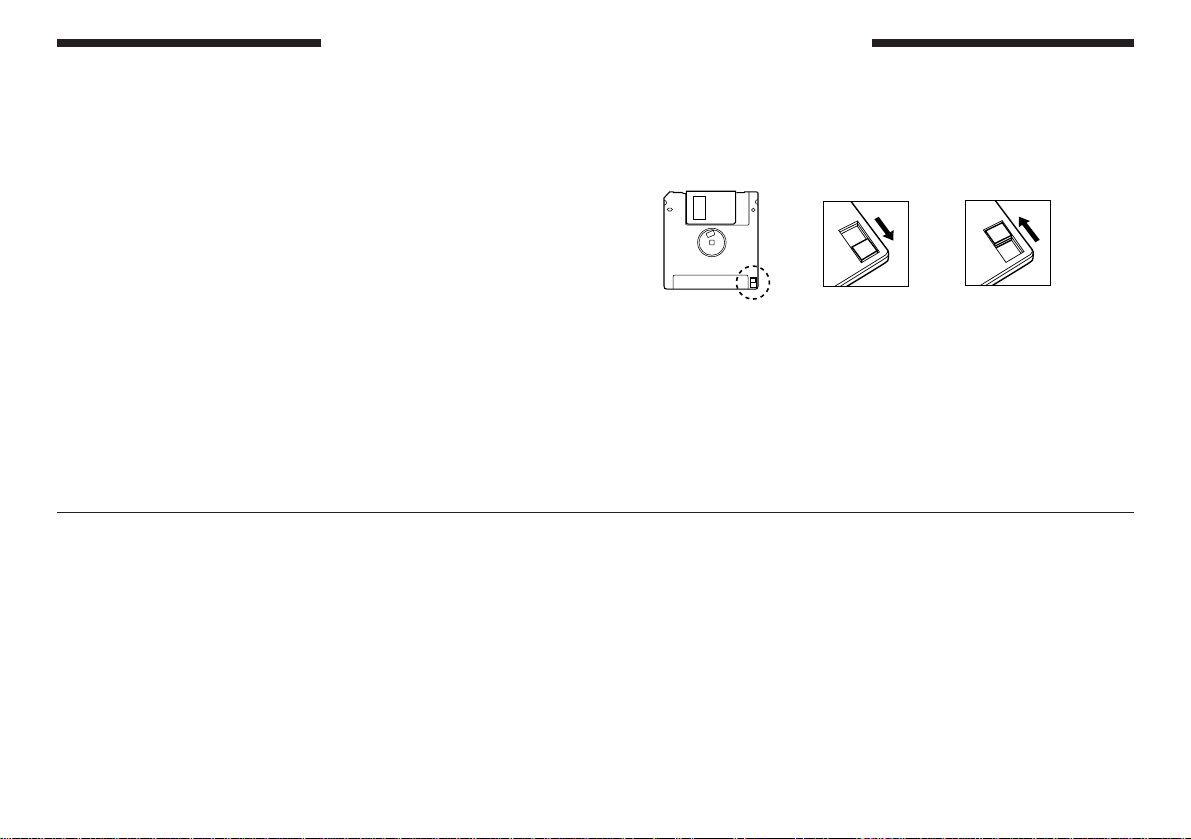
To protect your data (Write-protect Tab):
• To prevent accidental erasure of important data, slide the disk’s writeprotect tab to the “protect” position (tab open).
Write protected Write enabled
Data backup
• For maximum data security Yamaha recommends that you keep two copies of important data on separate floppy disks. This gives you a backup if
one disk is lost or damaged. To make a backup disk use the Backup function on page 54.
YAMAHA provides no guarantee against disk damage.
5
Page 6

* Apple and Macintosh are the registered trademarks of Apple Computer, Incorporated.
* Atari is the registered trademark of Atari Corporation.
* IBM PC/AT is the registered trademark of International Business Machines Corporation.
* MS-DOS is the registered trademark of Microsoft Corporation.
* The company names and product names in this owner’s manual are the trademarks or
registered trademarks of their respective companies.
6
Page 7

C
ONGRATULATIONS
You are now the proud owner of a Yamaha MDF3 MIDI Data Filer. This compact data storage unit is capable of storing bulk data
from nearly any MIDI-equipped synthesizer, tone generator, or sequencer on convenient 3.5" 2HD/2DD floppy disks. The MDF3 is
also able to record and play back sequencer data in realtime, a feature which makes it handy for use as a portable sequencer.
To put the MDF3 to work, you will need to connect it to at least one other MIDI device. If you own the Yamaha QX3 or a MIDIequipped personal computer with a 3.5" disk drive, the MDF3 will also be able to read the data from disks you create with these
devices, for maximum flexibility and convenience in data management.
This Owner’s Manual has been written for easy reference, and includes helpful advice for a wide range of applications. In order
to take full advantage of the many capabilities of your MDF3, we urge you to read through the manual carefully first, then keep
it on hand for future reference.
F
EATURES
!
• MIDI data recorder capability
The MDF3 is able to receive, store, and re-transmit MIDI
System Exclusive data from nearly any MIDI instrument with
bulk data transmission capability, including devices made
by manufacturers other than Yamaha. The MDF3 can also
read and transmit bulk data files created by the Yamaha
MDF2 Data Filer and the QX3 sequencer in that device’s
MDR mode.
• Sequencer capability
The MDF3 is capable of recording sequence data to disk,
and playing back this data in realtime. It can also play back
data files written by other MIDI devices using Standard MIDI
File format 0/1, as well as ESEQ sequence files created by
the Yamaha QX3, etc. (You can also play back the MDF2’s
SEQ data). Other convenient playback functions allow you
to play a program of up to 99 sequence data files in a specified order, and to play back files repeatedly in an endless
loop.
• Ample data storage capacity
The MDF3 can store as many as 99 bulk or sequence files
— on each 2HD/2DD floppy disk. If necessary, a single
bulk or sequence data file can occupy the disk’s total capacity of roughly 1,200/600 kilobytes of data. In sequencer
mode, this corresponds to approximately 150,000/75,000
notes’ worth of sequence data.
7
Page 8

A
BOUT THIS MANUAL
This Owner’s Manual introduces the MDF3’s functions in an order close to that in
which you are most likely to be using them. As you read through the manual, you
will soon learn how the MDF3 works; and you will find, in addition, a number of
hints on how you can put its features to use.
Nearly every operation in this manual is described as a series of simple steps, often
including diagrams that make the procedure easy to follow. Supplementary information about the operation will be preceded by the words ”Note”, “Hint”, or ”Caution”. Hints and notes serve as clues to details about the operation that you will not
want to overlook.
For further information regarding the operation of the MDF3,
you can refer to the following sections:
■
MDF3 Mode Overview (page 20)
This map summarizes the MDF3’s major functions, and
serves as a convenient guide to common operations.
■
What Error Messages Tell You (page 63)
If an error message appears in the LCD while you are using
the MDF3, refer to this appendix for an explanation of the
problem and advice on how to solve it.
8
This manual is accompanied by the following supplementary
documentation:
■
MIDI Implementation Chart
This chart summarizes the MDF3’s MIDI capabilities, and
helps you to determine whether the MDF3 is compatible
with the other equipment you are using.
■
MIDI Data Format
Advanced MIDI users who do their own programming will
want to refer to this document for a detailed description of
the MIDI Data Formats used by the MDF3.
Page 9

T
ABLE OF CONTENTS
ABOUT THIS MANUAL ................................................ 8
BASIC TERMS AND KEYWORDS ............................... 10
INTRODUCING THE MDF3....................................... 12
PREPARING TO USE THE MDF3 ................................ 14
Supplying Power ...................................................... 14
Connecting a MIDI Device ...................................... 15
Turning the Power On .............................................. 15
Formatting a Floppy Disk ......................................... 16
Handling Floppy Disks ............................................. 18
Protecting the data on a disk .................................... 19
MDF3 MODE OVERVIEW .......................................... 20
MDR MODE ................................................................ 23
Receiving Bulk Data ................................................ 24
Transmitting Bulk Data ............................................. 27
Notes on MDR Data Reception and Transmission .... 29
SEQ MODE .................................................................. 31
Recording Sequence Data ........................................ 32
Playing Back Sequence Data .................................... 35
Notes on SEQ Data Recording and Playback ........... 38
JOB MODE .................................................................. 39
Repeating Playback .................................................. 40
Creating a Playback Program ................................... 41
Changing the Record Tempo .................................... 43
Selecting a MIDI Sync Mode .................................... 44
Enabling MIDI Control Messages ............................. 45
Notes on MIDI Synchronization ............................... 46
UTILITY MODE ........................................................... 47
File Names in UTILITY Mode ................................... 48
Renaming Files ........................................................ 49
Deleting Files ........................................................... 51
Copying or Appending Files ..................................... 52
Copying Disks .......................................................... 54
Formatting Disks ...................................................... 56
Displaying Disk Information .................................... 57
THE STANDARD MIDI FILE AND ESEQ FORMATS .... 58
ADVANCED FILE MANAGEMENT TECHNIQUES..... 59
Reading MDF3 Disks with a Computer .................... 59
Changing MDF3 File Name Extensions .................... 60
APPLICATIONS ........................................................... 62
A Portable MIDI Playback System ............................ 62
An Extended MIDI System ........................................ 62
WHAT ERROR MESSAGES TELL YOU ....................... 63
ABOUT THE MIDI IMPLEMENTATION CHART ....... 65
SPECIFICATIONS ........................................................ 66
INDEX .......................................................................... 67
JOBSEQMDR UTIL
9
Page 10

B
ASIC TERMS AND KEYWORDS
MIDI-related terminology
Here we define several basic terms used in this manual. These terms are frequently
used in describing the functions of MIDI equipment.
MIDI An abbreviation for Musical Instrument Digi-
tal Interface, which is the name of an international standard providing for the communication of data between electronic musical instruments. MIDI allows musical instruments such
as synthesizers and drum machines to communicate with each other, and to be controlled
by sequencers or computers.
MIDI Any piece of electronic equipment capable of
device receiving or sending data in a manner that com-
plies with the MIDI standard. This term is often applied to synthesizers, tone generators,
rhythm machines, and sequencers; however,
it also includes a variety of peripheral devices
including signal processors and patch bays, not
to mention MIDI data recorders such as the
MDF3.
MIDI data Data in a format that complies with the MIDI
standard. MIDI data can be divided between
two broad categories : sequence data and bulk
data.
sequence The data used to record and play back music.
data Generally speaking, sequence data consists of
note on and off messages, control change messages, and program change messages. In special cases, however, it may also include certain types of system exclusive data.
bulk data Data transmitted in units known as blocks, usu-
ally for the purpose of storage or retrieval. Each
MIDI device usually transmits bulk data in a
unique format that distinguishes it from the bulk
data of other devices; thus, it is also known by
the name “system exclusive data”. Bulk data is
usually not directly related to a musical performance; rather, it is used as a means for transferring large blocks of data, such as voice data,
samples, or system setup data, between two
MIDI devices.
bulk dump A transmission of bulk data from one MIDI
device to another.
10
Page 11

Keywords for MDF3 operation
The terms defined below are used throughout the manual to describe functions peculiar to the MDF3. The same words are frequently used in describing other MIDI
devices, as well; but keep in mind that in many cases the actual function in question
may differ considerably from that performed by the MDF3.
file A position on a disk where data is stored and
assigned a name. The MDF3 is capable of managing up to 99 files on a single disk. The number of files that can be created on any given
disk is physically limited by the size of the files
and the disk’s capacity of approximately 1,200
(MF2HD)/600 (MF2DD) kilobytes.
MDR mode The mode of operation in which the MDF3 is
used to receive and transmit MIDI bulk data.
MDR data The contents of the data file that is created
when the MDF3 receives bulk data from another MIDI device.
reception Generally, the receiving by one MIDI device
of MIDI data from another. In this manual, “reception” refers specifically to the MDF3’s reception of bulk data. The MDF3 automatically
writes the bulk data it receives to disk as an
MDR data file.
transmission Generally speaking, the sending of data from
one MIDI device to another. In this manual,
“transmission” means specifically the transmission of MDR data by the MDF3. When the
MDF3 transmits the contents of an MDR data
file, it simultaneously reads data from the disk
and outputs it via the MIDI OUT jack.
SEQ mode The mode of operation in which the MDF3 is
used to record and play back sequence data.
SEQ data The contents of the file that is created when
the MDF3 records sequence data. Such data is
often referred to as “song data”. Strictly speaking, however, such a file can contain as many
as several songs, or as little as a single phrase.
recording The reception of MIDI sequence data. Record-
ing is different from the reception of bulk data
in that the data is received in realtime. The
MDF3 automatically writes the sequence data
it receives to disk as a SEQ data file.
playback The transmission of sequence data from one
MIDI device to another. Playback differs from
the transmission of bulk data in that the sequence data is transmitted in realtime. When
the MDF3 plays back a SEQ data file, it simultaneously reads data from the disk and outputs
it via the MIDI OUT jack.
11
Page 12

I
NTRODUCING THE
MDF3
Front panel
r t
w
q
y u i
e
w LCD The LCD displays a variety of information to as-
sist you in operating the MDF3.
e Mode keys These keys allow you to switch between the
MDF3’s four operating modes. The MDF3’s
modes — MDR mode, SEQ mode, JOB mode,
and UTILITY mode — are outlined in the MDF3
Mode Overview on page 20.
r CURSOR keys These keys move the cursor in the LCD to the left
or right. They can also be used to fast forward or
rewind a file during playback in SEQ mode.
t FILE DATA These keys are used to select a file ( in the MDR
keys and SEQ modes) or a function (in the JOB and
UTILITY modes). They can also be used to change
the tempo during playback in SEQ mode.
y REC key This key is used in combination with the START/
STOP key to begin the reception/recording of data
in MDR and SEQ modes.
u PAUSE key This key pauses the recording or playback of a
file in progress in SEQ mode .It can also be used
in combination with the REC key to tell the MDF3
to standby for recording in this mode.
q MIDI LED This LED lights when the MDF3
is receiving MIDI data. Note that
it does not light when data is being transmitted, however.
12
i START/STOP This key is used to start and stop reception/
key recording or transmission/playback in MDR and
SEQ modes. It is also used to execute functions
in the JOB and UTILITY modes.
Page 13

Rear Panel
Side Panel
!4
o !0 !1 !2 !3
o MIDI OUT This jack outputs MIDI data.
!0 MIDI IN Received MIDI data is input via this
jack.
!1 FOOT SW This jack enables START/STOP control
by pressing the foot switch (optional
Yamaha FC4, FC5, etc.) if it is connected.
22
!
2 DC IN The DC plug of an optional AC power
22
adapter (Yamaha PA-3B) can be connected here.
!3 POWER This switch turns the power to the
MDF3 on and off.
!6
!5
!4 Disk Drive This 3.5" disk drive is capable of ac-
cepting both 2HD and 2DD floppy
disks.
!5 Eject button This button ejects the floppy disk from
the disk drive.
!6 Disk Access This LED lights when data is being
LED written to or read from a disk. Never
attempt to remove a disk from the disk
drive while this lamp is lit.
13
Page 14

P
REPARING TO USE THE
Supplying Power
MDF3
Using an Optional AC adaptor
If you use the MDF3 often, you will probably want to power
it with an AC power adaptor. The MDF3 can be powered by
the Yamaha PA-3B power adaptor, which is available for purchase separately.
Before you connect the adaptor, check to make sure that the
POWER switch on the rear panel is turned off.
Plug the round end of the adaptor cord into the DC IN jack
on the back panel of the MDF3, then plug the adaptor itself
into an AC outlet.
PA-3B
DC IN
Caution:
in your locale. Do not use an adaptor other than PA-3B. Any other
AC adaptor using different voltage can damage the MDF3.
Unplug the AC power adaptor when not using the instrument, or
during electrical storms.
14
Be sure to use a power adaptor that is suited to the voltage
Using Batteries
Under normal operating conditions, the MDF3 can be operated continuously for approximately three hours using a fresh
set of batteries.
Before you begin to insert the batteries, check to make sure
that the POWER switch on the rear panel is turned off. Then,
place six size “AA” alkaline batteries in the battery compartment located on the underside of the unit.
+ – + –
+ – + –
+ – + –
Make sure that the batteries are oriented properly. The correct orientation is indicated by the markings on the inside of
the compartment.
Caution:
plete set of six new batteries. NEVER mix old and new batteries.
Do not use different types of batteries (e.g. alkaline and manganese)
at the same time.
Be sure to remove the batteries from the MDF3 when you will not
being using it for an extended period of time. If you leave batteries
in the unit during extended periods of disuse, you run the risk of
damage due to corrosion.
When the batteries run down, replace them with a com-
Page 15

Connecting a MIDI Device
Turning the Power On
You need only one MIDI cable to connect the MDF3 to another MIDI device.
When you will be using the MDF3 to receive or record data,
plug one end of the cable into the MIDI IN jack on the MDF3
back panel, and the other end into the MIDI OUT jack of the
other device.
MIDI cable
MIDI IN
MDF3
MIDI OUT
extemal MIDI device
(keyboard, sequencer, etc)
To transmit or play back data from the MDF3 , simply reverse
these connections.
MIDI cable
MIDI OUT
MDF3
MIDI IN
extemal MIDI device
(keyboard, sequencer, etc)
To turn on the MDF3, simply press the POWER switch on the
rear panel.
The message “YAMAHA MDF3” will appear in the LCD for a
few moments. Then, if there is no disk in the disk drive, this
message will be replaced by the following display:
!~~~~No~disk~~~~
Insert the 3.5" 2HD/2DD floppy disk that came with your
MDF3 in the disk drive. Be sure to insert the disk with the
label side facing up and the arrow pointing toward the disk
drive.
Push the disk in gently, until you hear it settle into the drive
with a click.
If you have two MIDI cables, you can connect the MIDI IN
jack of each device to the MIDI OUT jack of the other. This
convenient arrangement will allow you to avoid the repeated
changing of MIDI cable connections.
Note:
The MDF3 is capable of using 3.5" 2HD/2DD floppy disks.
Please do not try to use any other type of disk.
15
Page 16

Formatting a Floppy Disk
Before the MDF3 can create files on a new disk, it must prepare the disk to accept
the data using a procedure known as “formatting”. Follow the steps below to format
the floppy disk that came with your MDF3.
1.
Enter the UTILITY mode.
Press the UTIL key. The LED
above the key will light.
2.
Select ”05: Format”
Press the FILE DATA [+] key
four times. The following
message will appear in the
LCD.
05:~~~~~~~Format Format~disk
~å
3.
Press the START/STOP
key.
The LED above the key will
flash, and the following message will appear in the LCD:
4.
Insert a disk.
If you have not already done
so, insert the 2HD/2DD disk
to be formatted in the disk
drive.
Note:
If you format a disk that
has been used before, any data
it contains will be erased. Make
absolutely sure that a disk does
not contain any important data
before you format it.
16
Page 17

5.
Press the START/STOP key.
The LED above the key will light steadily,
and the LCD will display a message telling you what percentage of the disk has
been formatted.
Formatting~~~93%
It should take approximately 70 seconds
to format a single floppy disk. When the
disk has been completely formatted, the
START/STOP LED will begin to flash
again, and the “Format disk” message
will reappear.
6.
Format another disk.
If you wish to format another disk at this
point, eject the disk and insert a new one.
Then press the START/STOP key to be-
gin formatting once more.
7.
Exit the function.
When you’re done formatting disks, press
any mode key (MDR, SEQ, JOB, or UTIL)
to exit the “Format” function.
17
Page 18

Handling Floppy Disks
The 3.5" 2HD/2DD floppy disk is a reliable and convenient medium for data storage, capable of
holding large amounts of data in a small package. The disk itself is a delicate piece of magnetic
film, which is protected from dust and dirt by a hard plastic cover and a shutter. This design is
capable of preserving your data against most contingencies. However, for the greatest reliability,
you should observe a few basic cautions when handling your disks.
• Use 2HD/2DD disks. The MDF3 is not designed to handle disks meeting other specifications.
• Never remove a disk from the disk drive while the disk access LED is lit. Doing so can damage
the floppy disk or the disk drive.
• Avoid touching the shutter of a disk. Never open the shutter and touch the actual disk surface.
• Avoid placing disks close to speakers, televisions, magnets, or other objects with magnetic
fields. Even weak magnetic fields can damage or erase the data on a disk.
• Do not leave your disks in cars or other locations where they may be exposed to extreme heat
or cold.
• Do not leave your disks in places where they may be exposed to condensation or extremely
high humidity.
• Avoid using or storing disks in places where they may be exposed to large amounts of dust or
dirt.
18
Follow these cautions scrupulously. Improper handling can render a disk useless, and may cause
damage to the MDF3’s disk drive as well.
Page 19

Protecting the data on a disk
If you turn a disk face down, you will find a small plastic tab in the lower right corner. This tab is
a write-protect switch that you can use to prevent the accidental loss of valuable data. When this
tab is in the up position (so the window is closed), the MDF3 will be able to read and write data
to the disk normally.
To protect the data on a disk, push the tab down so that the window is open. The MDF3 will be
able to read the data on the disk as usual. However, if you try to receive or record data using the
disk, the MDF3 will display an error message telling you that the disk is write-protected.
You will see the same message if you try to format a write-protected disk or change the data it
contains using one of the UTILITY mode functions.
Note:
To protect disks against accidental erasure, it is a good idea to set the protect tab down and keep the
disk in a safe place. You also might consider making a backup copy of the disk using the UTILITY mode
”Backup” function. Finally, clear labeling of disk contents is a simple but effective way to prevent the accidental loss of valuable data.
!~~Disk~protect
19
Page 20

MDF3 M
ODE OVERVIEW
Now that you’ve formatted a floppy disk, you’re ready to start using the
MDF3. The overview below summarizes the use of each of the MDF3’s four
modes, and shows you how to access the JOB and UTILITY mode functions.
MDR mode (page 23)
This mode lets you receive bulk data from a MIDI device and
save it to disk as an MDR data file. In this mode the MDF3
can also transmit the contents of MDR files it creates, as well
as bulk data files created by the Yamaha MDF2 and the QX3
in MDR mode.
JOB mode (page 39)
This mode lets you play back SEQ data files repeatedly, or in
a programmed order. It also allows you to set the sequence
data playback tempo, and to enable or disable the transmission and reception of MIDI sync and system control messages.
20
SEQ mode (page 31)
This mode lets you record sequence data as standard MIDI
files. In this mode, the MDF3 can also play back the SEQ data
files it creates (You can also play back the MDF2’s SEQ data
files), as well as Yamaha ESEQ data files and standard MIDI
files created by other devices.
UTILITY mode (page 47)
The UTILITY mode lets you rename, delete, copy, and append files. It also allows you to format or copy disks, and to
check the amount of space remaining on a disk.
Hint:
In the JOB and UTILITY modes, you can use the FILE DATA
keys to select a function, and the START/STOP key to execute the
function you’ve selected.
Page 21

JOB mode functions
UTILITY mode functions
01:~~Repeat~play
02:~~~~Prog~play
03:~Record~tempo
04:~~~~Sync~mode
05:~MIDI~control
This function lets you repeatedly play back one or more
SEQ data files in an endless
loop. (page 40)
This function lets you create
a program of SEQ data files
to be played back in a specified order. (page 41)
This function allows you to
change the playback tempo
that is recorded for a sequence data file. (page 43)
This function determines
whether the MDF3 runs on
its internal clock, or in sync
with an external MIDI clock.
(page 44)
This function enables or disables the transmission and reception of MIDI realtime
control messages (i.e., START,
CONTINUE, and STOP messages), as well as the transmission of MIDI clock signals. (page 45)
01:~~~~~~~Rename
02:~~~~~~~Delete
03:~~~~~~~Append
04:~~~~~~~Backup
05:~~~~~~~Format
06:~~~Disk~info.
This function lets you change
the names of MDR or SEQ
data files which have been
saved to disk. (page 49)
This function lets you delete
unneeded MDR or SEQ data
files from a disk. (page 51)
This function creates a copy
of a file, or appends the data
of one file to the end of another file. (page 52)
This function lets you copy
the entire contents of one
disk to another disk. (page
54)
This function is used to format new floppy disks for use
by the MDF3. (page 56)
This function displays information about a disk, including the amount of disk space
that has been used, the
amount of available space remaining, the number of files
that have been used, and
their respective sizes. (page
57)
21
Page 22

22
Page 23

MDR M
ODE
In its MIDI data recorder (MDR) mode, the MDF3 is capable of receiving
MIDI bulk data from nearly any MIDI device and saving it to disk as an MDR
data file. It can then transmit this data back to the device that originated it, or
to any other device capable of accepting the data, at any time.
Receiving bulk data
The bulk data reception function is used to receive bulk data sent from another MIDI
device. The MDF3 automatically writes the bulk data it receives to disk as an MDR
data file using Standard MIDI File format 0. You can save up to 99 MDR data files on
a single disk.
Transmitting bulk data
The bulk data transmission function lets the MDF3 output the data which it has
previously saved as an MDR data file to a MIDI device capable of receiving it. The
MDF3 is also able to transmit the data from files created by the Yamaha MDF2 and
the QX3 in that device’s MDR mode.
MDR
23
Page 24

Receiving Bulk Data
1.
Check your MIDI connections.
The MIDI IN jack of the MDF3 should
be connected to the MIDI OUT jack of
the sending device.
MIDI cable
MIDI IN
MDF3
If you have not done so already, place a
formatted disk in the MDF3 disk drive.
MIDI OUT
external MIDI device
(keyboard, sequencer, etc)
2.
Enter MDR mode.
Press the MDR key. The LED above the
key will light, and the name of the currently selected MDR data file will appear
in the LCD.
01~~~MDRå01
~å
3.
Select an empty file.
Using the FILE DATA keys, select the
number of the empty file where you want
to save the data. (The names of empty
files will be blank.)
02
~å
Note:
If you select a file which already contains data, that data will be erased when the
incoming data is received. If you choose such
a file, make sure it does not contain data that
you want to keep.
24
Page 25

4.
Prepare the MDF3 for reception.
While pressing the REC key, press the
START/STOP key.
The LEDs above these keys will light, and
the following display will appear in the
LCD.
5.
Send the bulk data.
Execute the sending device’s bulk dump
procedure to begin sending data. Refer
to the appropriate operation manual for
a description of the correct procedure.
As soon as the MDF3 begins receiving
data, the MIDI LED will light and the display will begin changing to indicate the
amount of data received.
MDR
MDRå03~~~00-000k
default file
name
This display indicates that the MDF3 is
ready to begin receiving block data.
current block
number
total data received
(kilobytes)
MDRå03~~~01-001k
The MIDI LED will go out when all of
the bulk data has been received.
Hint:
To stop reception temporarily, press the
PAUSE key. The LED above the key will blink,
and the MDF3 will complete the reception
of the current data block. Once the block has
been received, the PAUSE key LED will light
steadily to indicate that the MDF3 has paused.
Pressing the PAUSE key again or pressing the
foot switch (if connected) will cause the
MDF3 to resume reception.
You can cancel reception immediately by
pressing the START/STOP key. If you do so,
the MDF3 will not create an MDR data file.
25
Page 26

6.
Send additional data, if any.
You can create MDR data files containing two or more sets of bulk data by executing consecutive bulk dumps. Just repeat step 5 as needed. All of the data you
send will be recorded in sequence to the
file you selected in step 3.
Hint:
This technique can be used to store
multiple data sets for a single MIDI device.
In more complex MIDI systems, you can use
the same technique to store data (e.g., the
settings you will use during a live performance) for a number of different devices.
7.
End MDF3 reception.
When you’ve finished sending data to the
MDF3, make sure that all the data you
sent has been received, then press the
START/STOP key.
The data you sent will be saved to the
MDR data file you selected, using the
default file name “MDR_” followed by
the file number.
Hint:
If you would like to give the file another name, you can do so using the “Rename” function (page 49)
26
Page 27

Transmitting Bulk Data
1.
Check your MIDI connectoins.
The MIDI OUT jack of the MDF3 should
be connected to the MIDI IN jack of the
receiving device.
MIDI cable
MIDI OUT
MDF3
MIDI IN
external MIDI device
(keyboard, sequencer, etc.)
2.
Enter MDR mode.
Press the MDR key. The LED above the
key will light, and the name of the cur-
3.
Select a file to transmit.
Using the FILE DATA keys, select the file
to be transmitted.
rently selected MDR data file will appear
in the LCD.
01~~~MDRå01 03~Pfåsound
~å
MDR
If you have not done already, place a disk
containing the bulk data in the MDF3
disk drive.
file number file name
27
Page 28

4.
Prepare the receiving device.
Prepare the receiving device to receive
the bulk data. The preparations to be
made vary from device to device. Refer
to the appropriate operation manual to
check the correct procedure.
5.
Transmit the MDR data.
Press the START/STOP key to begin trans-
mitting. While the bulk data is being
transmitted, the LCD will display the
amount of data that has been sent.
Pfåsound~01-020k
28
file name block number amount of
transmitted
data
The file selection display will reappear
when the transmission of MDR data is
complete.
Hint:
To stop transmission temporarily, press
the PAUSE key. The LED above the key will
blink, and the MDF3 will complete its trans-
mission of the current data block. Once the
block has been transmitted, the PAUSE key
LED will light steadily to indicate that the
MDF3 has paused. The MDF3 will resume
transmission when you press the PAUSE key
again or press the foot switch if it is con-
nected.
You can cancel transmission by pressing the
START/STOP key. The MDF3 will end trans-
mission after it has sent the current data block.
Page 29

Notes on MDR Data Reception and Transmission
MDR
Reception
MDR file size:
MDR data file can hold up to about 1,200 kilobytes of
data. When using a disk that already contains several files,
check the amount of available space on the disk (page
57) before you try to receive the bulk data.
Bulk data blocks:
by their header (System Exclusive status: F0H) and footer
(End of Exclusive: F7H) values.
Block intervals:
also records timing data at 10 millisecond intervals. If the
interval between any two data blocks exceeds one second, the MDF3 will record it as one second. When receiving data from a MIDI device that will require intervals greater than one second between blocks when you
attempt to transmit the data back to the device, record
the bulk data in SEQ mode. (Refer to “Recording bulk
data” on page 38)
On a newly formatted 2HD disk, a single
The MDF3 recognizes bulk data blocks
When the MDF3 creates MDR files, it
Transmission
MDR file formats:
is capable of transmitting bulk data files which other devices save to disk using Standard MIDI File format 0. Moreover, it can transmit MDR bulk data files written by the
Yamaha MDF2 and the QX3 in that device’s MDR mode.
It distinguishes between these two types of files by checking the header of each file before it begins transmitting
the data in the file.
Transmitting QX3 data:
MDR data files written to a disk by the QX3, it will automatically insert a 100 millisecond interval after every data
block, as well as after each kilobyte of data (when a block
is longer than one kilobyte).
In addition to its own files, the MDF3
When the MDF3 transmits
29
Page 30

30
Page 31

SEQ M
ODE
The following descriptions of the sequence data recording and playback
procedures assume that you will be recording data output by a MIDI keyboard. Of course, you can use the same procedures to record sequence data
played back by a sequencer, a personal computer, or the like.
Recording Sequence Data
When you record data in SEQ mode, the MDF3 automatically writes this data to
disk as a SEQ data file using Standard MIDI File format 0. You can save up to 99 SEQ
data files on a single disk.
Playing Back Sequence Data
The MDF3 can of course play back the files it records in SEQ mode. It can also play
back files written by other devices using Standard MIDI File format 0 or 1, as well as
sequence files written in the ESEQ format used by the QX3 and other Yamaha devices. You can also play back the MDF2’s SEQ data files.
Note:
If you will be using the MDF3 to play sequence files written by other devices, be sure
to keep these files and your SEQ files on separate disks. If you mix SEQ files with other
sequence files on a single disk, the MDF3 will display the names of only the SEQ files. (Please
see ”The Standard MIDI File and ESEQ Formats” on page 58 for details.)
SEQ
31
Page 32

Recording Sequence Data
1.
Check your MIDI connections.
The MIDI IN jack of the MDF3 should
be connected to the MIDI OUT jack of
the sending device.
MIDI cable
MIDI IN
MDF3
MIDI OUT
2.
Enter SEQ mode.
Press the SEQ key. The LED above the
key will light, and the name of the currently selected SEQ data file will appear
in the LCD.
01~~~~~~SONGå01
~å
3.
Select an empty file.
Using the FILE DATA keys, select the
number of the empty file where you want
to record the data. (The names of empty
files will be blank.)
02
~å
If you have not done so already, place a
formatted disk in the MDF3 disk drive.
32
file number file name
Note:
If you select a file which already contains data, that data will be erased when the
incoming data is received. If you choose such
a file, make sure it does not contain data that
you want to keep.
Page 33

4.
Prepare the MDF3 for recording.
While pressing the REC key, press the
PAUSE key.
The LEDs above the REC, PAUSE, and
START/STOP keys will light, and the fol-
lowing display will appear in the LCD.
SONGå03~~~~00:00
default file name time
The MDF3 is now in record standby
mode.
Hint:
If you prefer, you can press the START/
STOP key instead of the PAUSE key to begin
recording immediately.
5.
Start playing.
Begin playing music on your MIDI keyboard. As soon as the MDF3 receives
MIDI data from the keyboard, it will cancel the pause and start recording the data.
Hint:
To pause during recording, simply press
the PAUSE key. The MDF3 will begin recording again as soon as it receives any MIDI data
(except bulk data), or if you press the PAUSE
key once more. You can also resume recording by pressing the foot switch if it is connected.
If you press the START/STOP key while the
recording is paused, the recording will end
and the data up to that point will be saved as
a SEQ file.
SEQ
33
Page 34

6.
End the recording.
When you have finished recording data,
press the START/STOP key again.
The data you sent will be saved to the
SEQ data file you selected, using the default file name “SONG_” followed by the
file number.
03~SONGå03
Hint:
If you would like to give the file another name, you can do so using the “Rename” function (page 49).
34
Page 35

Playing Back Sequence Data
1.
Check your MIDI connections.
The MIDI OUT jack of the MDF3 should
be connected to the MIDI IN jack of the
receiving device.
MIDI cable
MIDI OUT
MDF3
MIDI IN
2.
Enter SEQ mode.
Press the SEQ key. The LED above the
key will light, and the name of the currently selected SEQ data file will appear
in the LCD.
01~~~~~~SONGå01
~å
3.
Select a file to transmit.
Using the FILE DATA keys, select the file
to be played back.
SEQ
If you have not done so already, place a
disk containing the sequence data in the
MDF3 disk drive.
file number file name
35
Page 36

4.
Prepare the receiving device.
Prepare your keyboard or tone generator to receive the sequence data. The
preparations to be made vary depending on the instrument, but may include
the selection of MIDI channels and sound
programs, the adjustment of pitch bend
and modulation ranges, and so on. Refer to the appropriate operation manual
to check the correct procedure.
5.
Start the playback.
Press the START/STOP key. The MDF3
will begin to play back the sequence data
file you’ve selected. While the file is playing, the LCD will indicate the elapsed
performance time.
6.
Change the tempo.
You can use the FILE DATA keys to
change the playback tempo while the file
is playing. When you press one of the
FILE DATA keys, the following display
will appear.
36
SONGå01~~~~00:34
file name performance time
Note:
When you press the START/STOP key,
the MDF3 will hesitate for 1 – 15 seconds as
it reads data from the disk before it begins to
play back the data. If you need to start the
playback with greater accuracy, press the
PAUSE key immediately after pressing the
START/STOP key and wait until the START/
STOP LED lights. The MDF3 will begin playing the file as soon as you press the PAUSE
key a second time or press the foot switch if
it is connected.
SONGå01~~~~œ=120
file name tempo
Note:
Sequence data files created by devices
other than the MDF3 may include tempo
change data that will alter the tempo regardless of the changes you make using the FILE
DATA keys. Since the playback tempo is commonly recorded at the beginning of a file, you
may find that the tempo will return to its original value if you play a file from the top after
changing the tempo using the FILE DATA
keys.
 Loading...