

MCX-C15
Distributed Audio Controller
UB
MCX-C15
MENU
VOL
FAVORITES
2341
OWNER'S MANUAL
00_MCX-C15_Owner_UB.book Page 1 Tuesday, April 20, 2004 9:32 PM

1
INTRODUCTION
LISTENING TO
MUSIC
ADVANCED
OPERATIONS
ADDITIONAL
INFORMATION
FEATURES .............................................2
MusicCAST SYSTEM OVERVIEW.....3
The server ................................................. 4
The client .................................................. 4
The amplifier ............................................ 4
SUPPLIED ACCESSORIES..................5
Before using the remote control ............... 6
Replacing the battery in the
remote control ...................................... 6
CONTROLS AND FUNCTIONS ..........7
Front panel................................................ 7
Rear panel................................................. 8
Bottom panel ............................................ 9
Remote control ....................................... 10
Front panel displays................................ 12
TURNING ON THE POWER .............14
BASIC FUNCTIONS ............................15
Using the remote control ........................ 15
Using the front panel controller.............. 15
Listening to songs stored on the server .. 16
Adjusting the volume ............................. 18
Adjusting the tone................................... 19
Switching the time display mode ........... 20
Repeat playback mode............................ 20
Random playback mode ......................... 21
Group playback mode............................. 22
HANDY FUNCTIONS..........................23
FAVORITES function............................ 23
Song statistics function........................... 28
Using playlists ........................................ 29
Recall Play function ............................... 30
Bookmark function ................................. 31
OFF Timer function................................ 34
ON Timer function ................................. 36
Broadcast function.................................. 38
LISTENING TO EXTERNAL
COMPONENTS ................................40
Listening to components connected
to the MCX-CA15.............................. 40
Listening to YAMAHA AV receiver radio
station presets ..................................... 41
Using YAMAHA AV link technology... 42
Listening to components connected
to the server ........................................ 44
SYSTEM OPTIONS ............................. 46
Auto Play function .................................. 46
Auto Level Control function................... 46
Selecting the output ................................ 47
Sleep mode.............................................. 48
DISPLAY SETTINGS..........................49
Adjusting the display contrast ................ 49
Screen Saver function ............................. 50
SYSTEM SETTINGS ...........................51
Checking system information .................51
Resetting to the factory presets............... 52
CHECKING NETWORK
SETTINGS ........................................54
TROUBLESHOOTING .......................55
QUICK MENU REFERENCE ............58
GLOSSARY .......................................... 59
SPECIFICATIONS ..............................62
CONTENTS
INTRODUCTION
LISTENING TO MUSIC
ADVANCED OPERATIONS
ADDITIONAL INFORMATION
00_MCX-C15_Owner_UB.book Page 1 Tuesday, April 20, 2004 9:32 PM

2
The MusicCAST MCX-C15 Distributed Audio Controller (hereafter, “the client”) is designed to work in
conjunction with the MusicCAST MCX-1000 Digital Audio Server (hereafter, “the server”) to allow you to
store and listen to your entire music collection. With multiple clients, you and others can simultaneously
access and enjoy your music collection from up to seven different locations. The client is designed to bring
you the following features:
◆ Instant access to all music data stored on an
MCX-1000 server
◆ Simultaneous playback from multiple locations
(when using multiple clients)
◆ Modern in-wall design with paintable face plate
to match every interior
◆ Easy-to-read LCD (128 x 32 dots)
◆ IR wireless remote control
◆ Repeat, Random, Bookmark and Auto Play
functions
◆ Four assignable FAVORITES buttons for direct
playback of your favorite music
◆ Playback and sleep timers
◆ Output selection mode for volume and tone
settings
◆ AV link functionality for integrated control of
YAM A HA AV r ec eiv e rs
About this manual
• y indicates a tip for your operation.
• This unit must be installed by a qualified technician as indicated in the Install Manual provided. Do not
attempt to install this unit yourself.
• For details regarding client installation and network configuration, refer to the Install Manual provided.
• This manual explains how to use the various functions of the client using the remote control. While many
functions are accessible from the client’s front panel, some functions are only accessible from the remote
control.
• This manual is printed prior to production. Design and specifications are subject to change in part as a result
of improvements, etc. In case of differences between the manual and the product, the product has priority.
Printing this manual
You can print out a copy of this manual for handy reference from the Owner’s Manual CD-ROM. Before
printing, check that the page settings are correct for your printer. The size of this manual can be adjusted for
printout on A4 and Letter size paper for easier reading.
FEATURES
This unit must be installed by a qualified technician as indicated in the Install Manual provided. Do not
attempt to install this unit yourself.
00_MCX-C15_Owner_UB.book Page 2 Tuesday, April 20, 2004 9:32 PM
3
INTRODUCTION
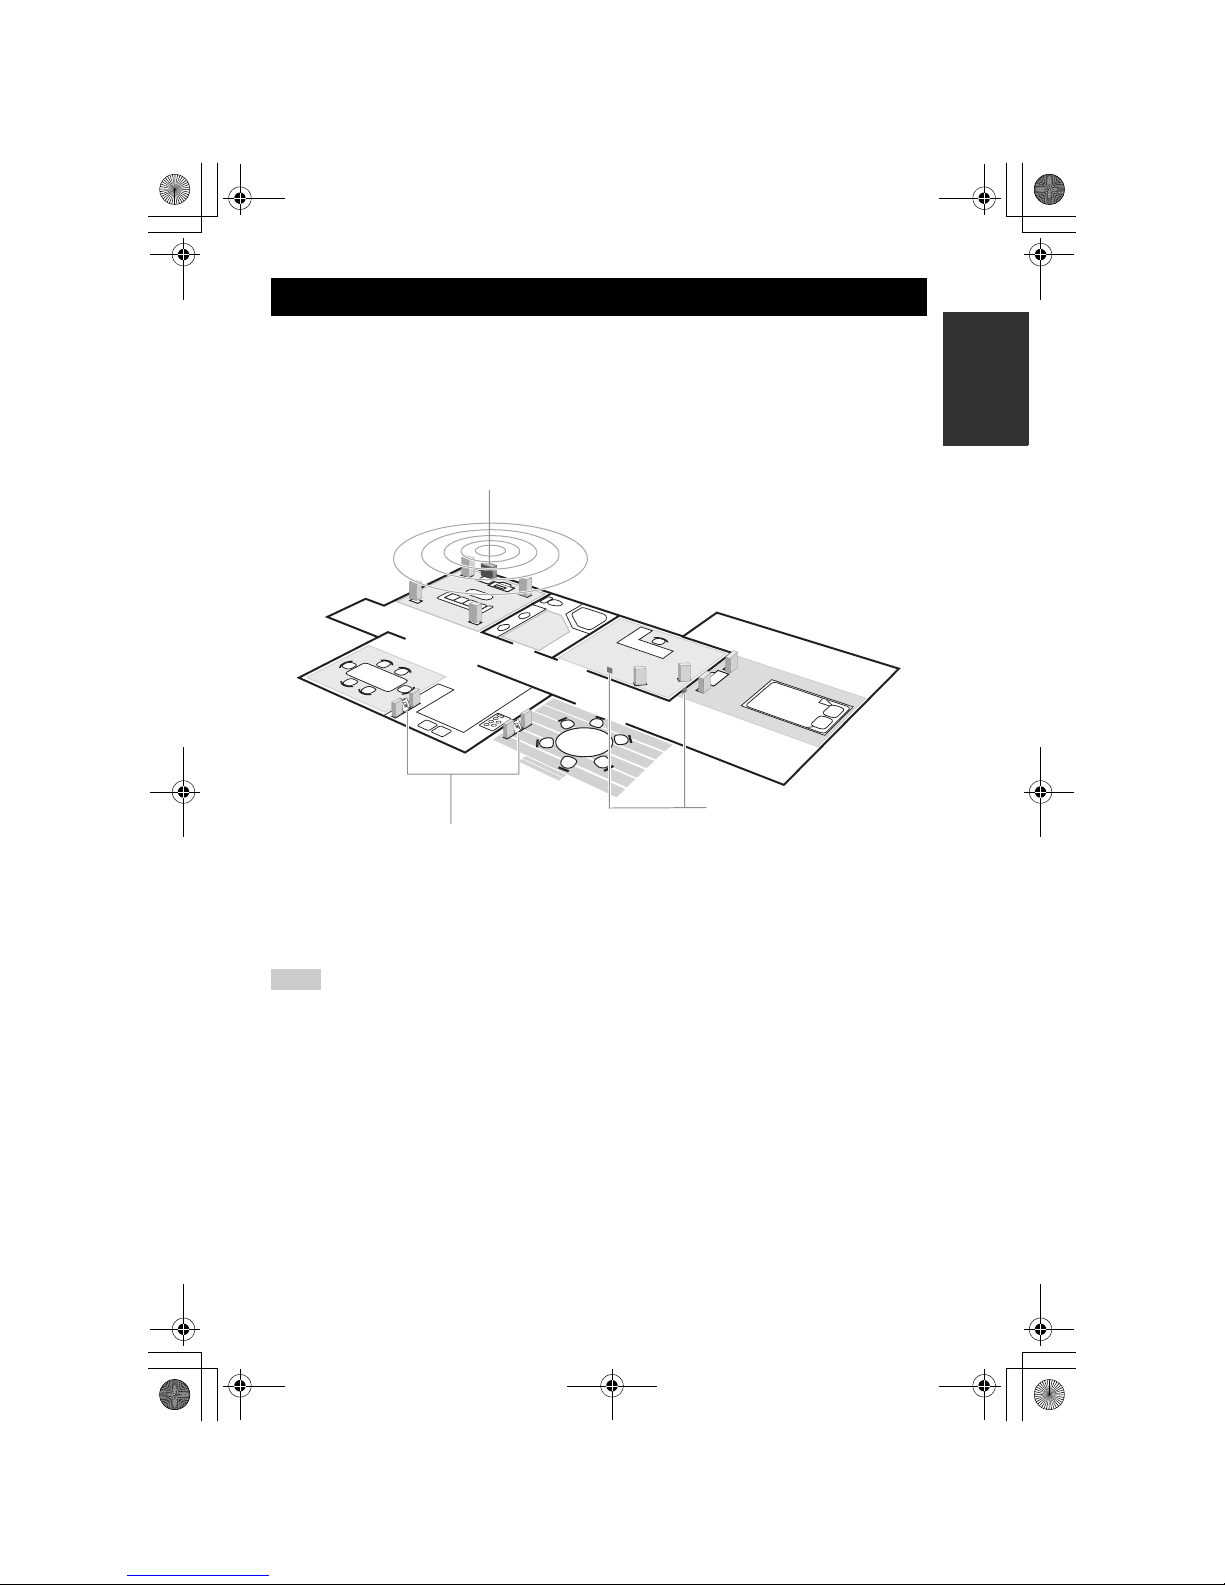
With a variety of network configuration methods possible using a Local Area Network (LAN), the
MusicCAST system allows everyone in the family to store their music collection in one central location for
playback from other locations around your home. Once music data is stored, you can have fun creating
playlists, bookmark songs, and even register your favorite music for instant access at the press of a button.
The advanced MusicCAST system is comprised of a server and its connected clients, and the MCX-CA15
optional amplifier can be connected to provide power to speakers and external components.
y
• You can combine up to seven wired and wireless connections as long as you use no more than five wireless
connections.
• Compared with wireless networks, wired networks can carry data over greater distances and to more clients.
The server supports simultaneous playback for seven clients over a wired network.
• The actual number of CDs the server can store depends on the format in which you choose to store songs.
Typically, the server can store approximately 1,000 CDs on its 80 GB hard disk drive if you choose to store
the songs in MP3 format only, or approximately 100 CDs in PCM format.
• The server can supply different songs to multiple clients simultaneously for up to seven clients via a
combination of wired and wireless connections. Depending on a number of factors, such as the playback
format you are using and the strength of the network signal available, it may be advisable to reduce the
number of clients to which the server is distributing music simultaneously if you encounter problems with
playback.
• To ensure smooth playback, select a low MP3 bitrate when storing songs. See “Setting the data storage
format” in the MCX-1000 Owner’s Manual, page 121.
MusicCAST SYSTEM OVERVIEW
Notes
Client (MCX-A10)
Server (MCX-1000)
Client (MCX-C15)
00_MCX-C15_Owner_UB.book Page 3 Tuesday, April 20, 2004 9:32 PM

MusicCAST SYSTEM OVERVIEW
4
The server can store approximately 1,000 music CDs in MP3 format or 100 music CDs in PCM format on its
internal hard disk drive for playback from the server or its connected clients. The server automatically stores
song, artist and album names as well as genre information for each CD during the recording process, allowing
easy access to your music without the need to enter any data manually. Once stored, songs can be selected,
sorted and played in a variety of quick and simple ways. The server can supply different songs to multiple
clients simultaneously, as well as supply songs in linear PCM format to one client at a time.
Clients themselves do not store or record any music data. Instead, they connect to the server to retrieve stored
music. This allows you to install a server in your living room, and clients in your bedroom and children’s
rooms, and listen to music stored on the server from each of these locations. The client also allows you to
select, sort and play songs in a variety of the ways, just like the server.
The MCX-CA15 Distributed Audio Amplifier can work as a stand alone amplifier for integration with your
existing audio system or paired with your client to complete the MusicCAST system. As a companion to your
client, the MCX-CA15 functions as a power amplifier and DC power distributor. It provides power to all
connected speakers, and can display your client’s on-screen display (OSD) on a TV or monitor connected to
the client. The MCX-CA15 is fully controllable from your client.
The server
MCX-1000 Digital Audio Server
The client
MCX-C15
MENU
VOL
FAVORITES
2341
MCX-A10 Digital Audio Terminal
(wireless or wired type)
MCX-C15 Distributed Audio Controller
(wired type)
The amplifier
MCX-CA15
AUDIO OUT SW OUT
VIDEO OUT
IR/CTRL
STATUS
DC IN 12V
AUDIO IN
MCX-CA15 Distributed Audio
Amplifier
00_MCX-C15_Owner_UB.book Page 4 Tuesday, April 20, 2004 9:32 PM
5
INTRODUCTION
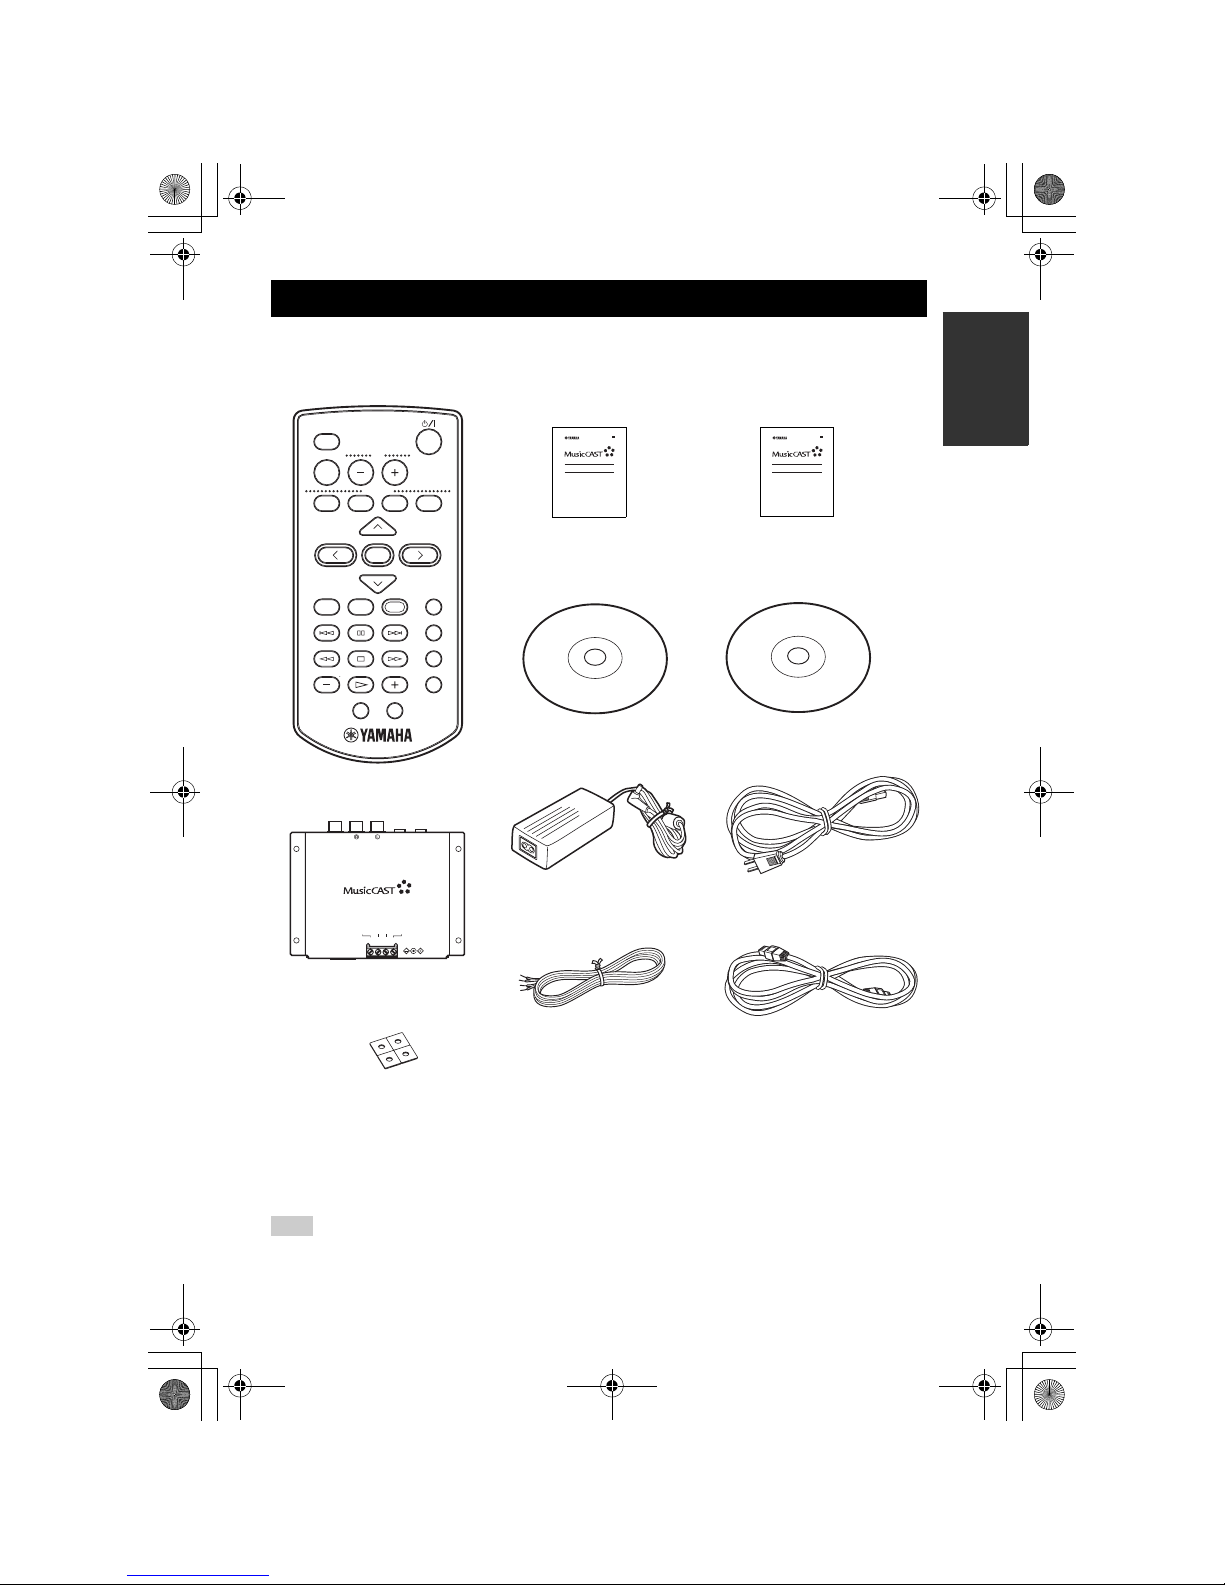
After unpacking, check that you received all of the following parts.
Depending on the wiring configuration method used during installation, additional parts may be required.
SUPPLIED ACCESSORIES
Note
LIBRARY
VOL
FAVORITES
SELECT
BOOKMARK
MENU INPUT
PLAY
INFO.
GROUP GROUPPLAY
OFF TIMER ON TIMER
PAUSE
123
456
7S
STOP
RANDOM
REPEAT
RECALL
MUTE
1234
MCX-C15
Distributed Audio Controller
UB
MCX-1000
Digital Audio Server
QUICK MANUAL
MCX-C15
Distributed Audio Controller
INSTALL MANUAL
UB
MCX-CA15
Distributed Audio Amplifier
ATTENTION: These units must be installed by a qualified technician.
Do not attempt to install these units yourself.
Upgrade CD-ROM
Remote control
Install Manual
Quick Manual
Owner’s Manual CD-ROM
(this manual)
Spacers x 4
VIDEO OUT IR OUT
CONTROL OUT
+12V 20mA MAX
AUDIO OUT
MCX-IB15
DC IN 12V
AV IN
DC OUT
+12V +12VGND GND
I/O box
AC adaptor (LSE0215C1240)
DC power cable (2 m) x 2
CAT-5 cable (straight, 2 m)
Power cable (1.6 m)
00_MCX-C15_Owner_UB.book Page 5 Tuesday, April 20, 2004 9:32 PM

SUPPLIED ACCESSORIES
6
When the remote control is shipped, a thin piece of
plastic film is placed between the battery and remote
control circuitry to prevent operation during
shipping. You must remove this film before using
the remote control for the first time.
If you find that the remote control needs to be used
closer to the front panel than usual, the battery is
weak. Replace the battery with a new one.
1 Slide the battery holder out of the
remote control by pushing a pointed
object (such as a ball-point pen) into the
hole in the holder.
2 Remove the used battery and insert the
new one in the holder so that the “+”
(positive) mark faces upward.
3 Slide the holder back into the remote
control.
The casing of the remote control is very stiff, and
may require significant pressure to remove the
battery holder.
■ Notes on the lithium battery
Please take care when using the lithium battery as it
may explode if mistreated.
• Please use a CR2025 lithium battery.
• Do not recharge the battery.
• Never abuse or disassemble the battery.
• When replacing the battery, make sure the
polarity is correct. If inserted incorrectly, it may
cause a fire or explosion.
• Avoid placing the lithium battery or the remote
control with the battery installed in places of
high temperature, such as in direct sunlight.
• Keep the battery out of reach of children. If
swallowed, seek medical help immediately.
• If the battery leaks, dispose of it immediately.
Avoid touching the leaked material or letting it
come into contact with clothing, etc. Skin
contact may result in burns. If this occurs, wash
the affected area with water promptly and seek
medical attention.
• When disposing of the battery, insulate it with
tape, etc. Never dispose of it in a fire. Further,
dispose of the battery according to local
regulations.
Before using the remote
control
Replacing the battery in the
remote control
Note
00_MCX-C15_Owner_UB.book Page 6 Tuesday, April 20, 2004 9:32 PM

7
INTRODUCTION
1 Front panel display
Displays information on client settings and songs.
2 p / s (play/stop)
Starts and stops playback of the selected song.
3 MENU
Switches the on-screen display between the Menu
and Play Info screens each time this button is
pressed (see page 12).
Displays the clock in the front panel display when
this button is pressed twice in succession.
Displays the Top Menu screen when this button is
pressed and held for an extended period of time.
4 TIMER indicator
Lights up when the ON Timer or OFF Timer
function is activated (see pages 34 and 36).
5 button
Switches the client between the sleep and power on
modes.
Press and hold for 10 seconds to reset your system.
6 Controller
Moves the on-screen cursor and selects chosen
items in the on-screen display.
7 VOL – / VOL +
Increases or decreases the volume level of client
playback.
8 Remote control signal receiver
Receives infrared signals from the client remote
control.
9 FAVORITES (1 through 4)
Use to access your favorite music for instant
playback (see page 23).
CONTROLS AND FUNCTIONS
Front panel
MCX-C15
MENU
VOL
FAVORITES
2341
1
2
3
5
6
7
8
9
4
00_MCX-C15_Owner_UB.book Page 7 Tuesday, April 20, 2004 9:32 PM
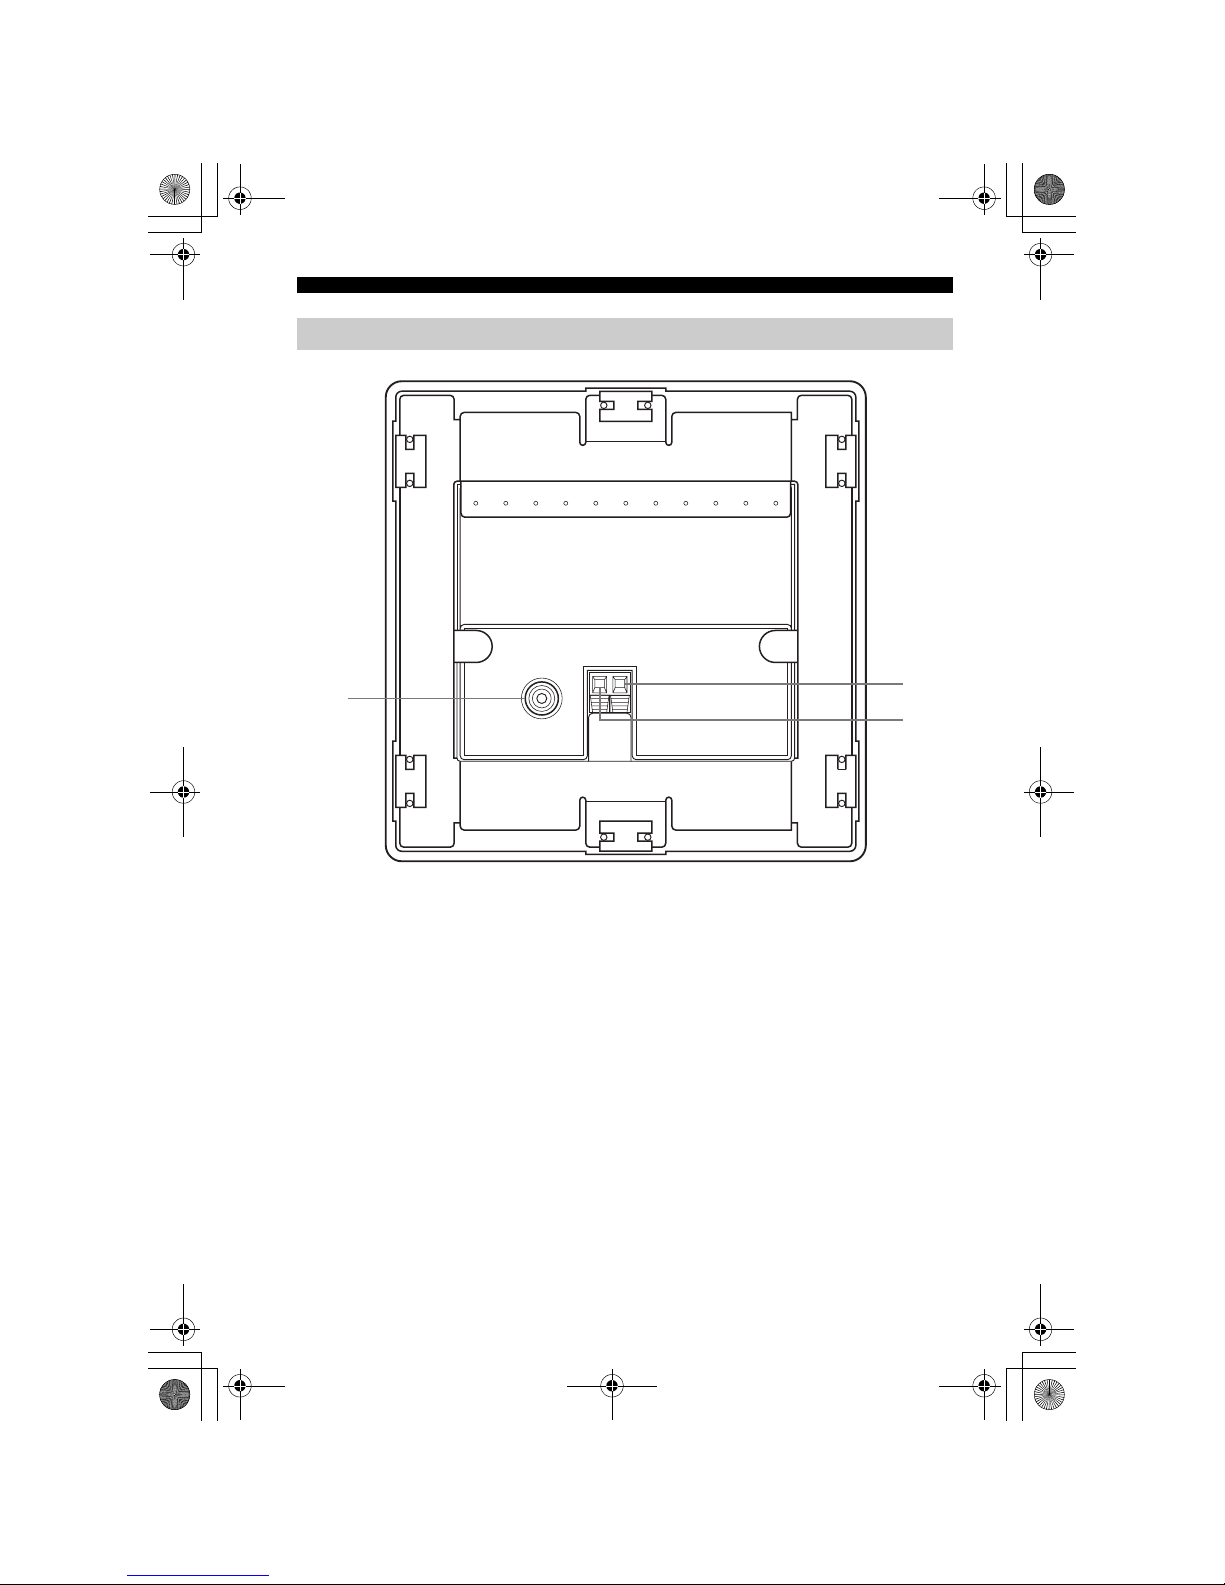
CONTROLS AND FUNCTIONS
8
1 VIDEO OUT jack
Connect to the video input on your TV or monitor to
view the content of the client’s front panel display.
2 +12V terminal
The supplied DC power cable must be connected to
this terminal by a qualified technician during
installation.
3 GND terminal
This terminal must be properly grounded by a
qualified technician during installation.
Rear panel
VIDEO OUT
DC IN
GND +12V
1
2
3
00_MCX-C15_Owner_UB.book Page 8 Tuesday, April 20, 2004 9:32 PM

CONTROLS AND FUNCTIONS
9
INTRODUCTION
1 AV OUT terminal
Connect to the I/O box or MCX-CA15 using the
supplied CAT-5 cable (straight).
2 LAN terminal
Connect to a network using a commercially
available CAT-5 cable (straight).
Bottom panel
LANAV OUT
12
00_MCX-C15_Owner_UB.book Page 9 Tuesday, April 20, 2004 9:32 PM

CONTROLS AND FUNCTIONS
10
1 Infrared window
Outputs infrared control signals to the client. Aim
this window at the client you want to operate.
2 LIBRARY
Use to access the music stored on the server by
artist, album, genre, etc.
3 MUTE
Mutes the sound output by the client.
4 FAVORITES (1 through 4)
Use to access your favorite music for instant
playback (see page 23).
5 Cursor buttons u / d / j / i / SELECT
Moves the on-screen cursor and selects chosen
items in the on-screen display.
6 PLAY INFO.
Displays the Play Info screen on the on-screen
display (see page 12).
7 MENU
Switches the on-screen display to the Menu screen
when the Play Info screen is displayed (see
page 12).
Displays the clock in the front panel display when
this button is pressed twice in succession.
Displays the Top Menu screen when this button is
pressed and held for an extended period of time.
8 Playback control buttons
b / a
Access the previous/next song in the playback
group you are listening to.
e (PAUSE)
Pauses playback on the client.
w / f
Search backward/forward through the song you
are currently listening to.
s (STOP)
Stops playback on the client.
p (PLAY)
Starts playback of the selected item.
9 – (GROUP) / + (GROUP)
Access the previous/next playback group.
0 OFF TIMER
Activates the OFF Timer function (see page 34).
Press this button repeatedly to cycle through the
available timer settings.
Remote control
LIBRARY
VOL
FAVORI TE S
SELECT
BOOKMARK
MENU INPUT
PLAY
INFO.
GROUP GROUPPLAY
OFF TIMER ON TIMER
PAUSE
123
456
7S
STOP
RANDOM
REPEAT
RECALL
MUTE
1234
MCX-3 WD01440
1
2
3
5
4
8
7
0
9
6
B
A
C
D
E
F
G
H
00_MCX-C15_Owner_UB.book Page 10 Tuesday, April 20, 2004 9:32 PM

CONTROLS AND FUNCTIONS
11
INTRODUCTION
A button
Switches the client between the sleep and power on
modes.
B VOL – / VOL +
Increases or decreases the volume level of client
playback.
C INPUT
Switches the client’s input source when using the
AV link function.
D BOOKMARK
Attaches or removes a bookmark from a song (see
page 31).
E RANDOM
Turns the Random playback mode on and off (see
page 21).
F REPEAT
Turns the Repeat playback mode on and off (see
page 20).
G RECALL
Use to start the Recall playback function (see
page 30).
H ON TIMER
Activates the ON Timer function (see page 36).
00_MCX-C15_Owner_UB.book Page 11 Tuesday, April 20, 2004 9:32 PM

CONTROLS AND FUNCTIONS
12
You can access all of the client’s functions and
parameters using the front panel display.
y
You can also output information appearing in the
client’s front panel display to your TV or monitor
using the VIDEO OUT jack (see page 8).
■ Menu screen
Press MENU on the remote control or front panel to
display information about menus.
1 Top bar
Displays the name of the menu currently being
accessed.
2 Cursor
Indicates the currently selected menu.
3 Lock icon
You can lock clients from the server so that only the
volume and mute functions are controllable from the
client. When locked, the client displays the lock
icon in the top bar of the display. You can also
unlock clients from the server (see the MCX-1000
Owner’s Manual, page 93).
4 Playback icon
Indicates that a playback signal is being received
from an external source connected to the server
(including the tuner).
5 Mute icon
Indicates that the client is muted.
6 Network connection icon
Indicates that the client is currently connected to the
server.
7 Menu display area
Displays the contents of the menu currently being
accessed.
■ Play Info screen
Press PLAY INFO. on the remote control or MENU
on the front panel to display information on the song
your client is currently playing, or the last song
played if one is not currently being played.
1 Time counter
Displays the amount of time that has elapsed since
playback of the song began or the time remaining
until playback is complete (see page 20).
2 Album/artist name
Displays the name of the album or artist for the song
currently being played back.
3 Song name
Displays the name of the song currently being
played back.
Front panel displays
Library
Artists
Albums
1
2
6345
7
MENU
Remote control
MENU
or
Front panel
-00:00
Album / Artist
Song
1
2
3
4 5 6
PLAY
INFO.
MENU
Remote control
or
Front panel
00_MCX-C15_Owner_UB.book Page 12 Tuesday, April 20, 2004 9:32 PM

CONTROLS AND FUNCTIONS
13
INTRODUCTION
4 Current action mode icon
Indicates the current action being taken by the
client.
s : Playback is stopped.
p : A song is being played back.
e : Playback is paused.
5 Repeat playback icon
Indicates that the client is in Repeat playback mode
(see page 20).
6 Random playback icon
Indicates that the client is in Random playback
mode (see page 21).
00_MCX-C15_Owner_UB.book Page 13 Tuesday, April 20, 2004 9:32 PM

14
When your client is ready for operation, turn on the
power.
The client has two operation modes:
On The client is connected to a power
source and is in operation mode.
Sleep The client is connected to a power
source and activates only when the
unit is operated or it receives an
infrared signal from the remote
control.
In this mode, this unit consumes a
small amount of power in order to
receive infrared signals from the
remote control.
or
Before proceeding, make sure the power to
the MCX-1000 server is turned on.
1 Press on either the remote control
or front panel.
The client turns on and the MusicCAST Startup
screen is displayed.
2 The client attempts to connect to the
server, and the following screen is
displayed.
3 If the client is able to make a
connection, the Top Menu screen
appears and the network connection
icon appears in the top right corner of
the display.
If the client is unable to connect to the server, it
continues displaying the “Connecting...”
message. Press any button on the client to
cancel the connection process, then check that
your client network connection settings are
correct (see page 54).
If no operation is performed for 30 minutes, the
client automatically switches to sleep mode. Press
SELECT or to reactivate the client.
TURNING ON THE POWER
LIBRARY
VOL
FAVORITE S
SELECT
BOOKMARK
MENU INPUT
PLAY
INFO.
GROUP GROUPPLAY
OFF TIMER ON TIMER
PAUSE
123
456
7S
STOP
RANDOM
REPEAT
RECALL
MUTE
1234
MCX-3 WD01440
1
MCX-C15
MENU
VOL
FAVORITES
2341
1
Note
Connecting...
Top Menu
Library
Recall Play
Network
connection icon
00_MCX-C15_Owner_UB.book Page 14 Tuesday, April 20, 2004 9:32 PM
15
LISTENING TO
MUSIC
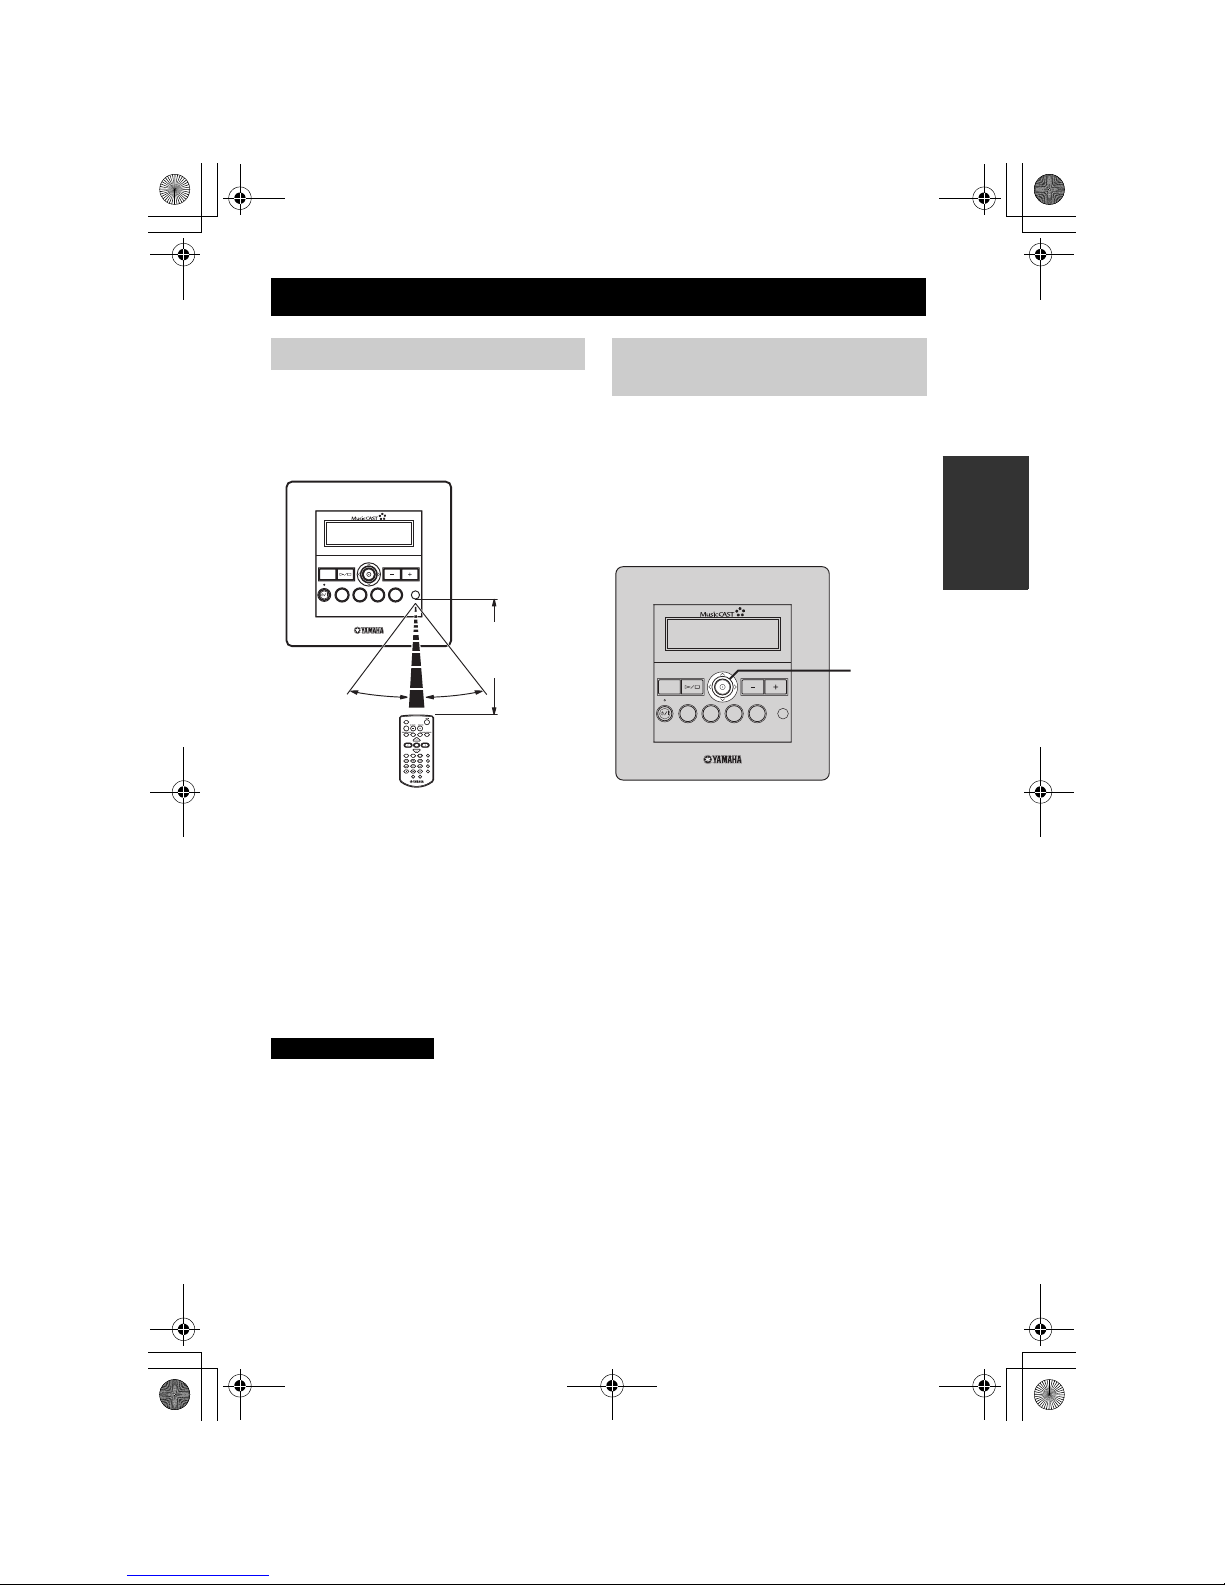
The remote control transmits a directional infrared
beam. Be sure to aim the remote control directly at
the remote control signal receiver on the front panel
during operation.
■ Handling the remote control
• Do not spill water or other liquids on the remote
control.
• Do not drop the remote control.
• Do not leave or store the remote control in the
following types of conditions:
– high humidity, such as near a bath
– high temperature, such as near a heater or
stove
– extremely low temperatures
– dusty places
• If remote control operation of this unit causes
abnormal operation of any other component,
change the placement of that component.
• Make sure the remote control signal receiver is
not exposed to direct sunlight or strong light.
Such exposure may inhibit the remote control’s
functionality.
Moving the controller in the directions indicated on
the front panel of the client performs the same
action as pressing the equivalent cursor key on the
remote control. For example, pushing the client
controller upwards produces the same result as
pressing u on the remote control. Pushing the
controller directly into the front panel has the same
effect as pressing SELECT on the remote control.
BASIC FUNCTIONS
Using the remote control
LIBRARY
VOL
FAVORITES
SELECT
BOOKMARK
MENU INPUT
PLAY
INFO.
GROUP GROUPPLAY
OFF TIMERON TIMER
PAUSE
123
456
7S
STOP
RANDOM
REPEAT
RECALL
MUTE
1234
MCX-C15
MENU
VOL
FAVORITE S
2341
30 30
Within 7 m (23 ft)
of the remote
control signal
receiver
CAUTION
Using the front panel
controller
MCX-C15
MENU
VOL
FAVORITES
2341
Controller
00_MCX-C15_Owner_UB.book Page 15 Tuesday, April 20, 2004 9:32 PM

BASIC FUNCTIONS
16
Two kinds of files are available for playback from
your client: MP3 (MPEG-1 Audio Layer 3) and
PCM (Pulse Code Modulation).
MP3 files do not take up a large amount of space,
enabling you to store approximately 1,000 CDs on
the server.
PCM files provide better sound quality during
playback, they require large amounts of space. You
can store approximately 100 CDs in PCM format.
The client displays an “*” (asterisk) next to the
names of songs stored in this format. If the server is
set to distribute PCM files, you can play back PCM
files on one client at a time. For details, see the
MCX-1000 Owner’s Manual, page 125.
■ Playback groups
The client retrieves and plays back music files
stored on the server. You can play back songs
grouped by artist, album or genre, as well as play
back songs at random, from pre-chosen lists or in
playback groups. Playback groups are defined by
your playback selection. For example, selecting an
album from the “Albums” menu for playback sets
albums as the playback group. Further, you can
choose to play back groups repeatedly (page 20),
play back songs at random from within a playback
group (page 21), or play back all of the songs in the
currently selected group (page 22).
The steps below describe how to access a song
directly from the “Artists” library, but can also be
used to choose songs from the following libraries:
Artists To search for songs by artist.
Albums To search for songs by album.
Genres To search for songs by genre.
All Songs To display a list of all
registered songs in
alphabetical order.
Playlists To view all registered playlists.
Song Statistics To view statistics on songs that
have been played.
Bookmarks To view bookmarked songs.
External Inputs To select an optical, coaxial or
analog input source connected
to the server or an AV receiver
connected to the server.
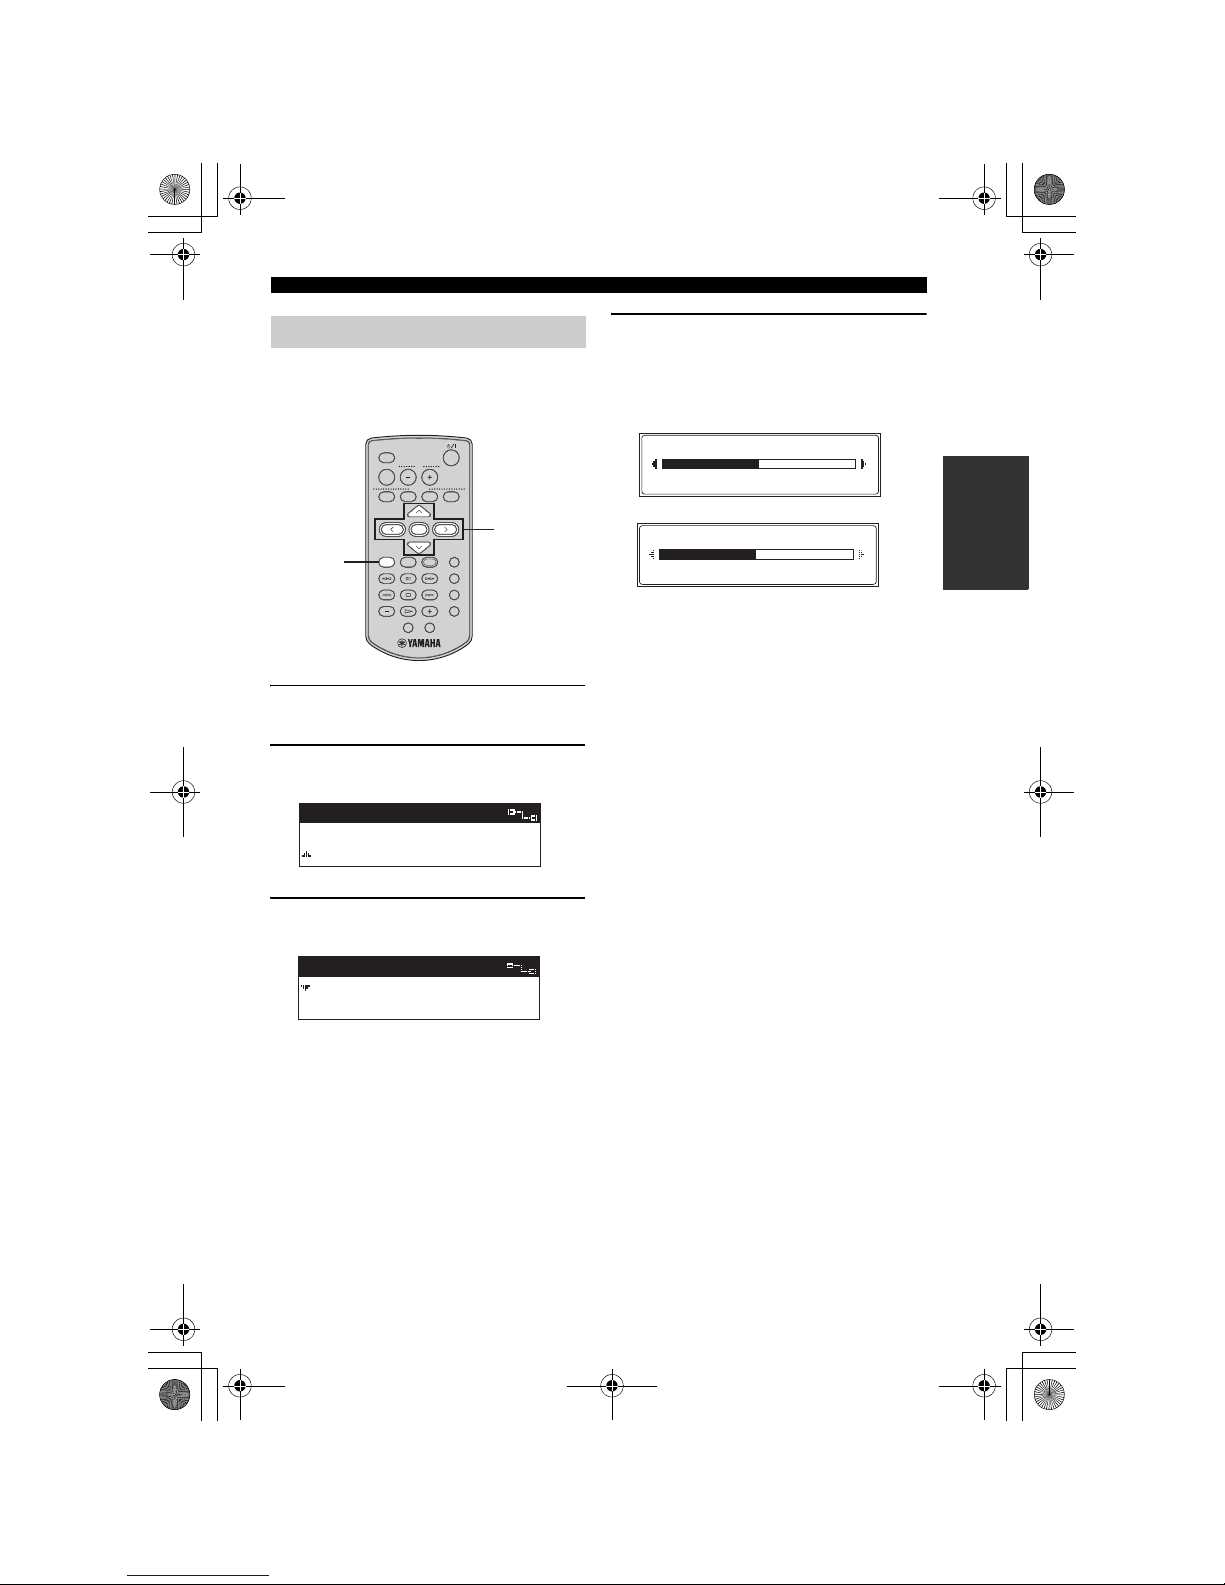
1 Press and hold MENU until the Top
Menu screen is displayed.
2 Press u / d to choose “Library” and
press SELECT.
Listening to songs stored on
the server
LIBRARY
VOL
FAVORITE S
SELECT
BOOKMARK
MENU INPUT
PLAY
INFO.
GROUP GROUPPLAY
OFF TIMER ON TIMER
PAUSE
123
456
7S
STOP
RANDOM
REPEAT
RECALL
MUTE
1234
MCX-3 WD01440
2-7
1
4-6
Top Menu
Library
Recall Play
00_MCX-C15_Owner_UB.book Page 16 Tuesday, April 20, 2004 9:32 PM

BASIC FUNCTIONS
17
LISTENING TO
MUSIC
3 Press u / d to choose “Artists” and
press SELECT.
4 Press u / d to choose an artist.
Press SELECT to display all of the albums
assigned to the artist.
Press p to begin playback of all songs by the
selected artist in alphabetical order.
5 Press u / d to choose the name of the
album you want to listen to.
Press SELECT to display all of the songs on the
album.
Press p to begin playback of the entire album.
6 Press u / d to choose a specific song
and press SELECT or p to begin
playback.
7 Press j if you want to return to the List
screen.
y
When playback is finished, the client begins
playback of the next song stored in the selected
library.
■ To stop playback
Press s .
■ To pause playback
Press e . Press e again to resume playback.
■ To search within a song
Press f to search forward during playback. To
search backward, press w . You cannot search
any farther than the beginning or end of a song using
these buttons.
While f or w is pressed, no sound is output
by the client. However, this is not a malfunction.
Library
Artists
Albums
Artists
Bon Jovi
Bruce Springsteen
Artists-Albums
Born To Run
Darkness On The Edge O
Artists-Songs
Thunder Road
Tenth Avenue Freeze Ou
00:06
Born To Run / Bruce Spr
Tenth Avenue Freeze O
5
STOP
Remote control Front panel
or
PAUS E
2
Remote control
4
6
and
Remote control
Remote control
00_MCX-C15_Owner_UB.book Page 17 Tuesday, April 20, 2004 9:32 PM

BASIC FUNCTIONS
18
■ To skip songs
Playback skips to the next song each time you press
a . To skip to the beginning of the song currently
being played, press b once. To skip to the
beginning of the previous song, press b twice.
You cannot skip through songs when playback is
paused or stopped.
■ To skip playback groups
Press + (GROUP) to skip to the next item in the
playback group (see “Playback groups”, page 16).
Press – (GROUP) to skip to the previous item. If
only one item is registered in a playback group,
pressing – (GROUP) / + (GROUP) does not have
any effect.
■ To display song information
Press PLAY INFO. during playback to switch to the
Play Info screen.
Use the following procedure to increase or decrease
the volume level of the output from the client.
Press VOL + or VOL – to increase or
decrease the volume level.
The volume level changes accordingly.
You can control the volume output level of
registered YAMAHA AV amplifiers via an IR
flasher using the client’s remote control. For details,
see page 42.
1 3
and
Remote control
Remote control
GROUP
S
GROUP
7
and
Remote control
Remote control
PLAY
INFO.
Remote control
Adjusting the volume
Note
LIBRARY
VOL
FAVORITE S
SELECT
BOOKMARK
MENU INPUT
PLAY
INFO.
GROUP GROUPPLAY
OFF TIMER ON TIMER
PAUSE
123
456
7S
STOP
RANDOM
REPEAT
RECALL
MUTE
1234
MCX-3 WD01440
MCX-C15
MENU
VOL
FAVORITES
2341
VOL – / VOL +
buttons
or
VOL – /
VOL +
buttons
00_MCX-C15_Owner_UB.book Page 18 Tuesday, April 20, 2004 9:32 PM
BASIC FUNCTIONS
19
LISTENING TO
MUSIC
You can adjust the nature of the sound output by the
client. You can change these settings to create sound
with strong deep bass, or to emphasize the treble.
1 Press and hold MENU until the Top
Menu screen is displayed.
2 Press u / d to choose “Tone” and press
SELECT.
3 Press u / d to choose “Treble” or
“Bass” and press SELECT.
Tre ble Adjusts the treble for sound output by
the client.
Bass Adjusts the bass for sound output by
the client.
4 Press i to increase the value of the
setting, and press j to decrease the
value.
Press SELECT or MENU to confirm the value
you have set and return to the Tone screen.
Adjusting the tone
LIBRARY
VOL
FAVORITE S
SELECT
BOOKMARK
MENU INPUT
PLAY
INFO.
GROUP GROUPPLAY
OFF TIMER ON TIMER
PAUSE
123
456
7S
STOP
RANDOM
REPEAT
RECALL
MUTE
1234
MCX-3 WD01440
2-4
1
Top Menu
Input
Tone
Tone
Treble
Bass
0.0dB
Treble
0.0dB
Bass
00_MCX-C15_Owner_UB.book Page 19 Tuesday, April 20, 2004 9:32 PM
 Loading...