

Page 1
Lighting Audio System / Sys t e m e A u d i o Lumineux
English Français Deutsch Svenska Italiano Español
OWNER ’ S MANUAL
MODE D ’EMPLOI
BEDIEN U NGSANL E ITUNG
BRUKSA N VISNIN G
Rea d th e su pp li ed b oo kl et “S af et y Br oc hu re” be fo re u si ng t he u ni t.
Lis ez l e li vr et four ni « Broch ure s ur l a sécur it é» ava nt d ’u ti li se r l’ un it é.
Les en S ie d ie „S ic he rh eitsb ro schür e“, b evor S ie d as G er ät verw en de n.
Läs d en m ed fö lj an de b roschyr en ” Sä ke rhets anvi sn in ga r” i nn an d u an vä nd er re ceiv er n.
Pri ma d i ut il iz za re l’ un it à, l egger e il “Vo la ntino s ul la si cu rezza” fo rn it o.
Lea e l “ Fo ll et o de se gu ri da d” qu e se p ro po rc io na a ntes de ut il iz ar l a unida d.
Lee s he t me eg el ever de b oe kj e “Vei li gh ei ds br oc hu re” vo or dat u d it to es tel g eb ru ik t.
Пер ед и сп ол ьз ов ан ие м ап па рата п ро чт ите п ри ла гаем ую “бр ош юру по б ез оп ас но ст и”.
MANUALE DI I S TRUZIO N I
MANUAL DE IN S TRUCCIONE S
GEBRUI K SAANWI J ZING
ИНС ТРУКЦИЯ ПО ЭКСПЛ УАТАЦИИ
Nederlands
Русский
G
Page 2
Contents
Introduction......4
Supplied accessories......4
Placing the unit......4
About this manual......4
Part names......5
Main body......5
Remote control......6
Preparations......7
Installing “DTA CONTROLLER”......7
Turning on the lighting/power......7
Listening to music via Bluetooth connection......8
Pairing a device with the unit......8
Performing pairing and playing back music......9
Connecting a paired Bluetooth device and playing back music......10
Terminating the Bluetooth connection......10
Listening to external sources......11
Connecting an external device......11
Playing back......11
Using the SMART TIMER......12
Setting the SMART TIMER......12
Activating/deactivating the SMART TIMER......12
Troubleshooting......13
Specifications......15
2 En
Page 3

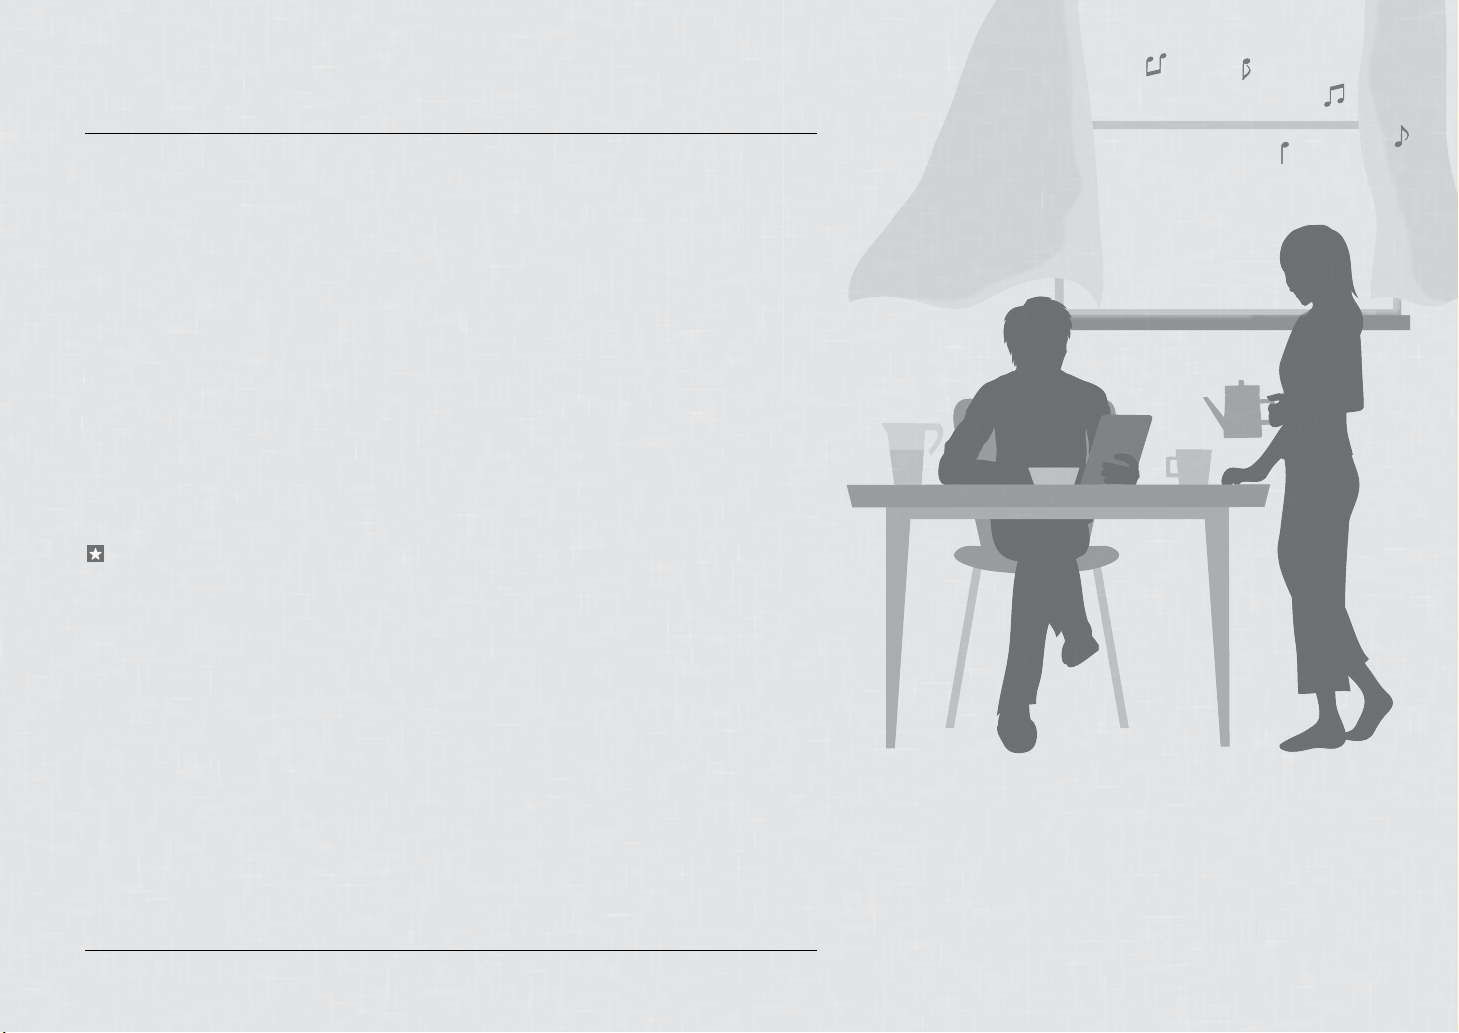
A fusion of music and lighting
Start your day in the right light and on the right note.
Wake to your favorite song in a comfortable atmosphere.
......12
High quality sound
with ease of use
Plug and play convenience of your mobile
devices with enhanced sound.
Convenient remote operation by your
mobile device.
......7
.......8, 11
English
At the end of the day, immerse yourself in a healing
ambience of soft lighting and sound.
......7
En 3
Page 4

Introduction
Confirm the package contents and thoroughly read this manual.
Supplied accessories
Use the following items to assemble the stand. Read the
separate “Assembly Guide” for information on how to
assemble the stand.
•Base
•Screw (M5)
Power cable
Remote control
• Cable clamp
Placing the unit
This unit uses corner or rear wall reflections to expand its sound and light output.
Corner setting Near wall setting
• It is recommended to place the unit 30 cm - 70 cm (1 ft - 2 ft 4 in) from a corner.
When placing it by a wall, place it 20 cm - 50 cm (0.7 ft - 1 ft 7 in) from a rear wall.
About 30 cm - 70 cm
(1 ft - 2 ft 4 in)
About this manual
• Operations
- How to operate this unit is described mainly using
the remote control.
- “iPhone” described in this manual may also refer to
“iPod touch” or “iPad.”
• Illustrations
Illustrations may differ from actual item depicted.
• Symbols
Indicates precautions for use of the unit and
feature limitations.
Indicates supplementary explanations for better
use.
Indicates the corresponding reference page(s).
&
* The light effects represent the sound expansion.
4 En
Front
Page 5
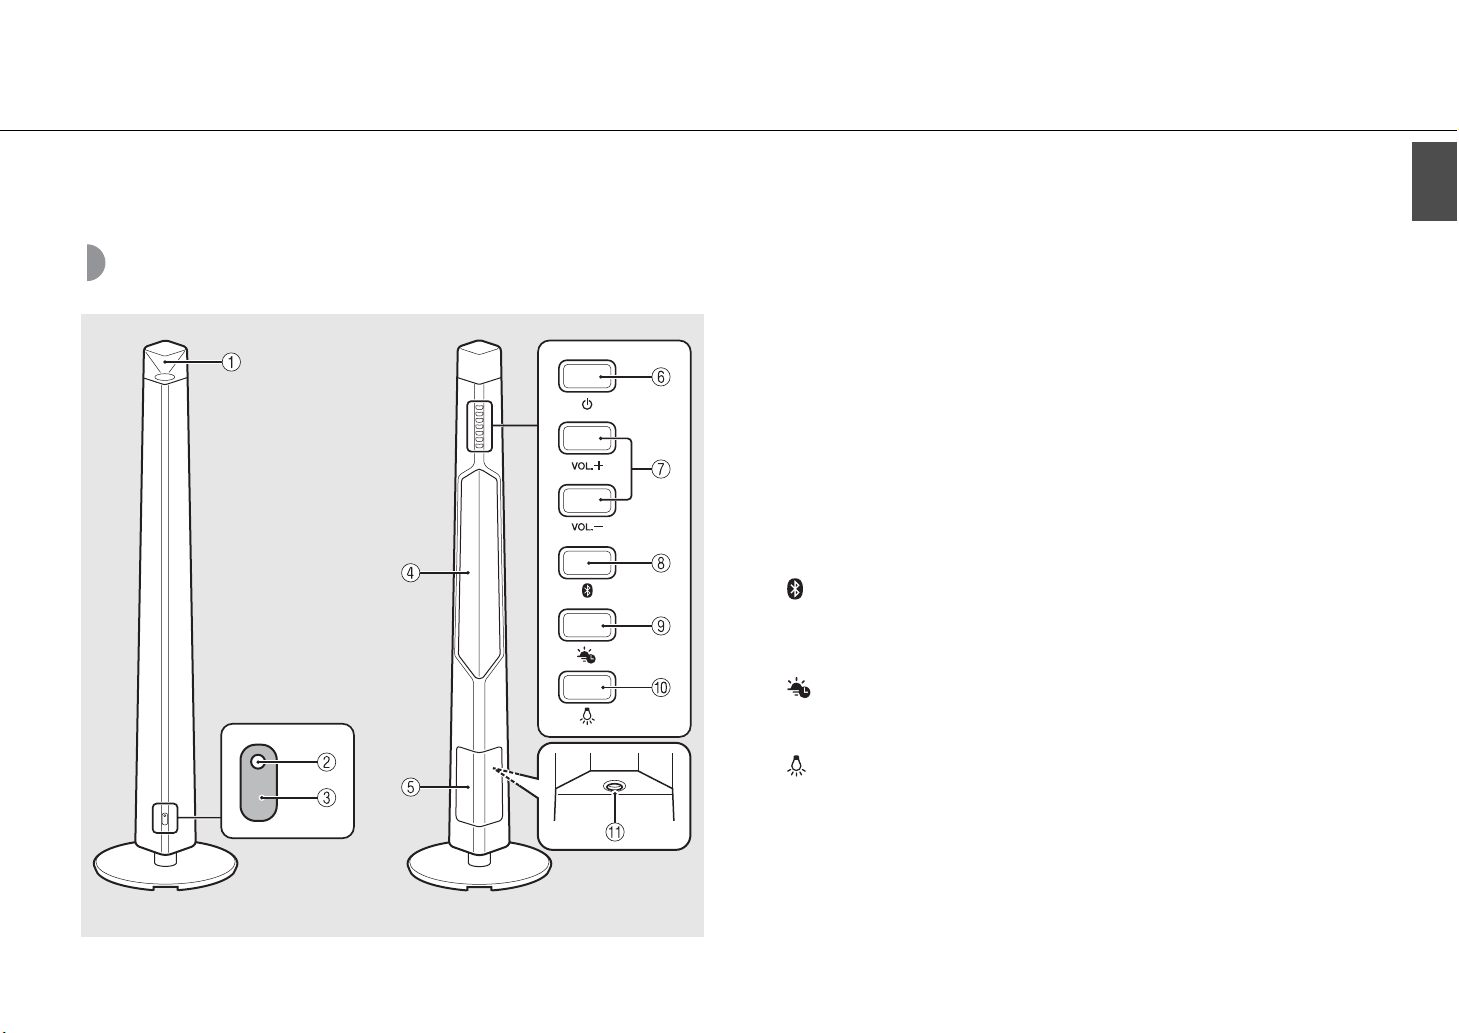
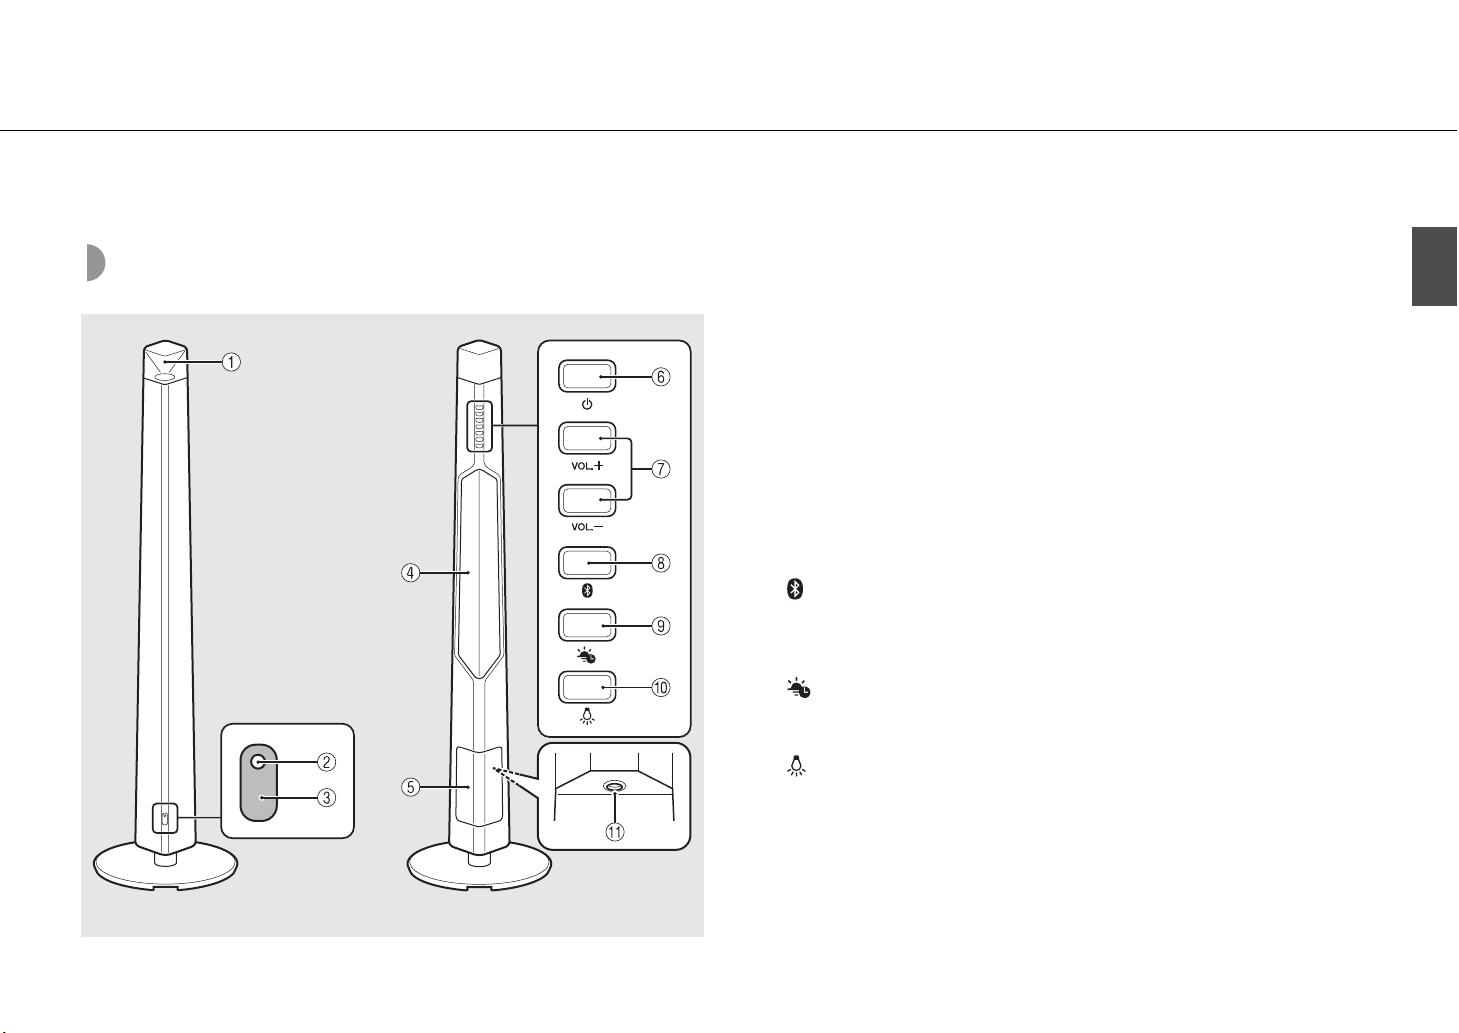
Part names
Familiarize yourself with all parts and these functions.
Main body
English
1 Front light/speaker
2 Status indicator
Lights up when turning on the unit. Blinks when receiving an operation signal, or when the
status of the Bluetoot h connection changes.
3 Remote control signal sensor (& P.6)
4 Back light/speaker
5 Cover (& P.11)
Detaches for access to the AUX IN terminal.
6 A (Power) (& P.7)
Press to turn on or off the unit.
7 VOLUME +/–
Controls the volume.
8 (Bluetooth button/indicator) (& P.9)
Press: Connects to a Bluetooth device.
Press and hold: Disconnects from a Bluetooth device.
Lights up while a Bluetooth device is connected.
9 (SMART TIMER button/indicator) (& P.12)
Enables/disables the SMART TIMER.
Lights up while the SMART TIMER is enabled.
Front Rear
0 (Lighting) (& P.7)
Press to turn on or off the front/back light.
A AUX IN (& P.11)
Connects to an external device via a commercially available 3.5 mm stereo mini-plug cable.
En 5
Page 6

Part names
Remote control
Insulation
sheet*
1 (Power) (& P.7)
Press to turn on or off the unit.
2 VOLUME +/–
Controls the volume.
3 (Bluetooth) (& P.9)
Press: Connects to a Bluetooth device.
Press and hold: Disconnects from a Bluetooth device.
4 (SMART TIMER) (& P.12)
Enables/disables the SMART TIMER.
5 Remote control signal transmitter
6 (Lighting) (& P.7)
Press to turn on or off the lighting.
7 DIMMER +/– (& P.7)
Press to adjust the lighting brightness.
Remote control angle/range
Point the remote control at the remote control signal
sensor on the unit.
Within
6 m (20 ft)
Replacing the battery
• Check the “+” of the battery and insert it the correct way
around.
• While pushing the release tab in direction , slide out
the battery holder in direction .
CR2025 type
lithium battery
* Remove the insulation sheet of the remote control before
using.
6 En
Page 7
Preparations
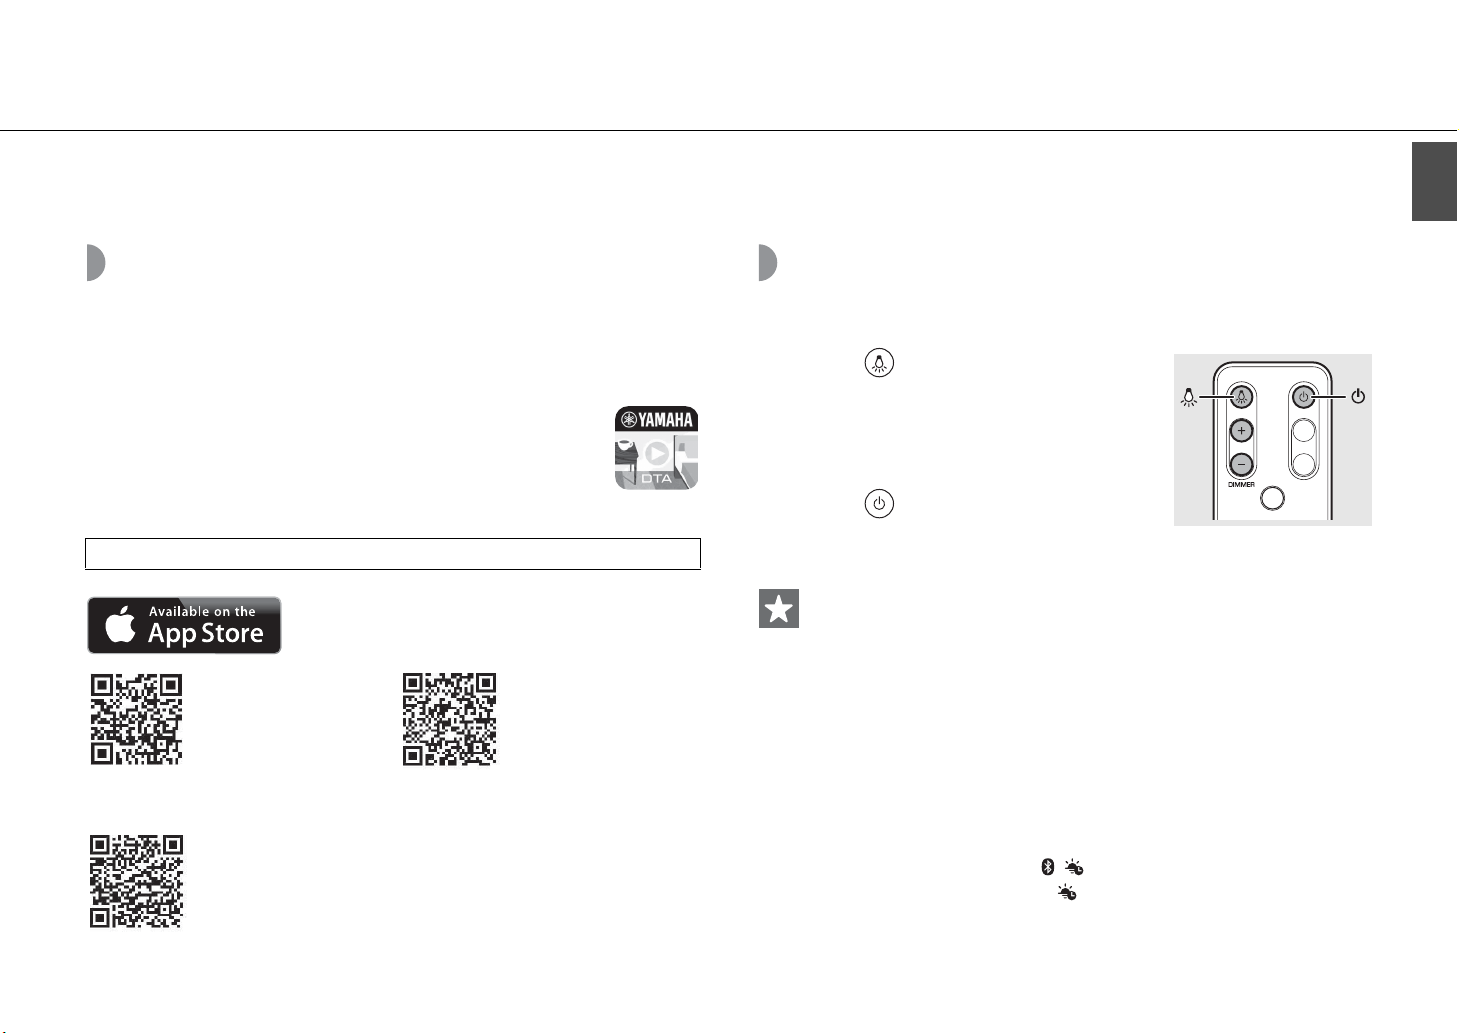
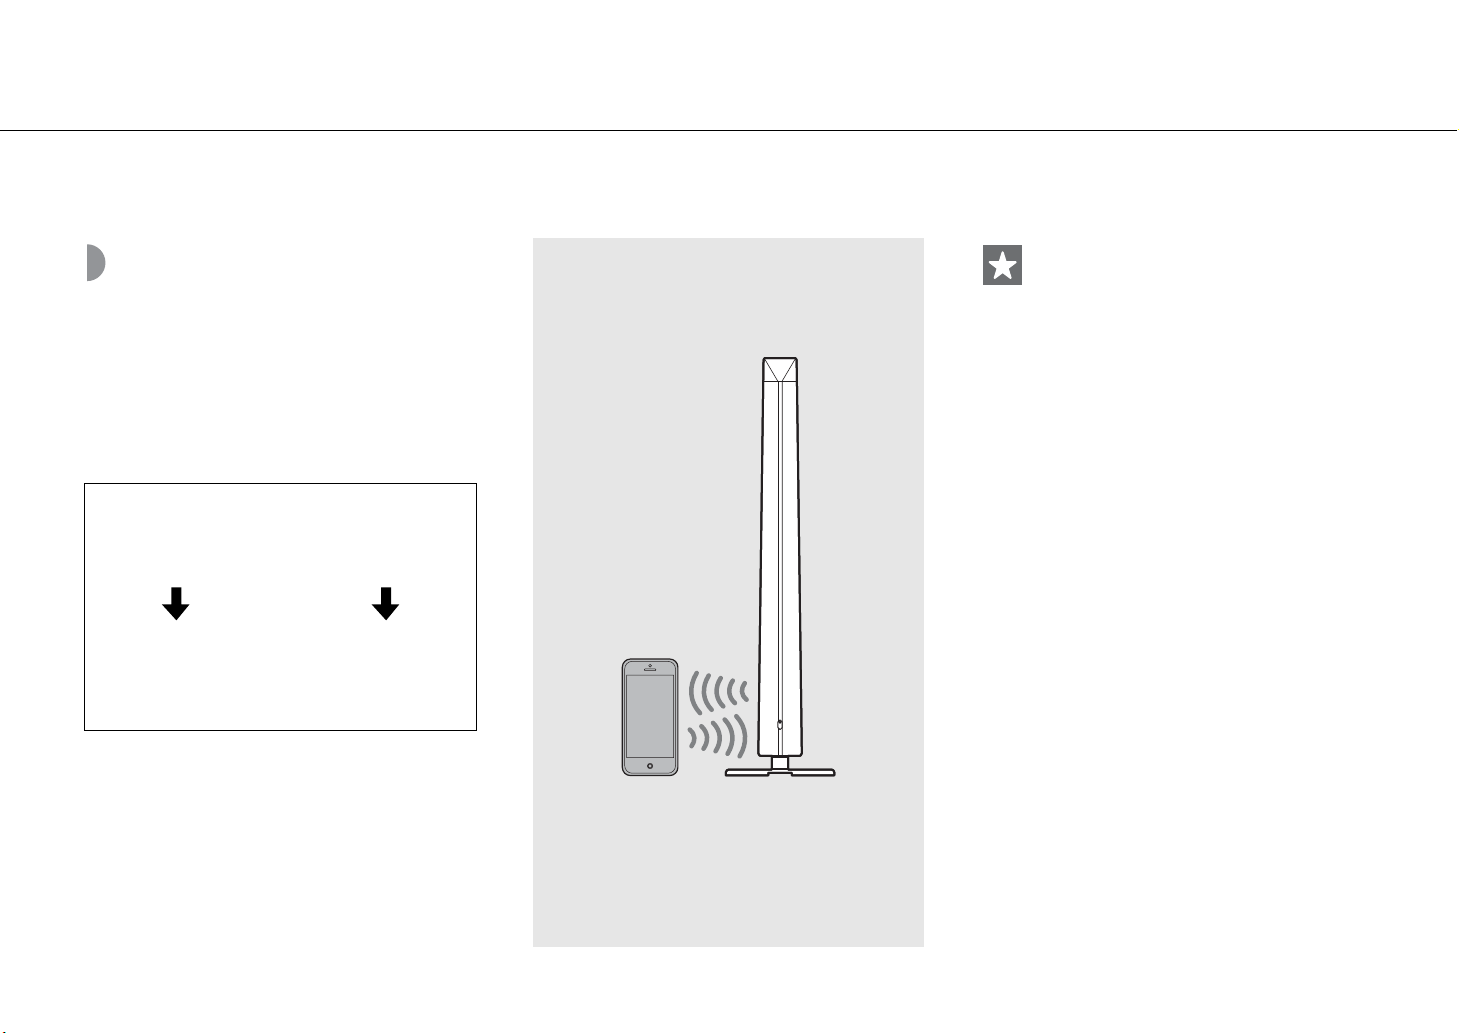
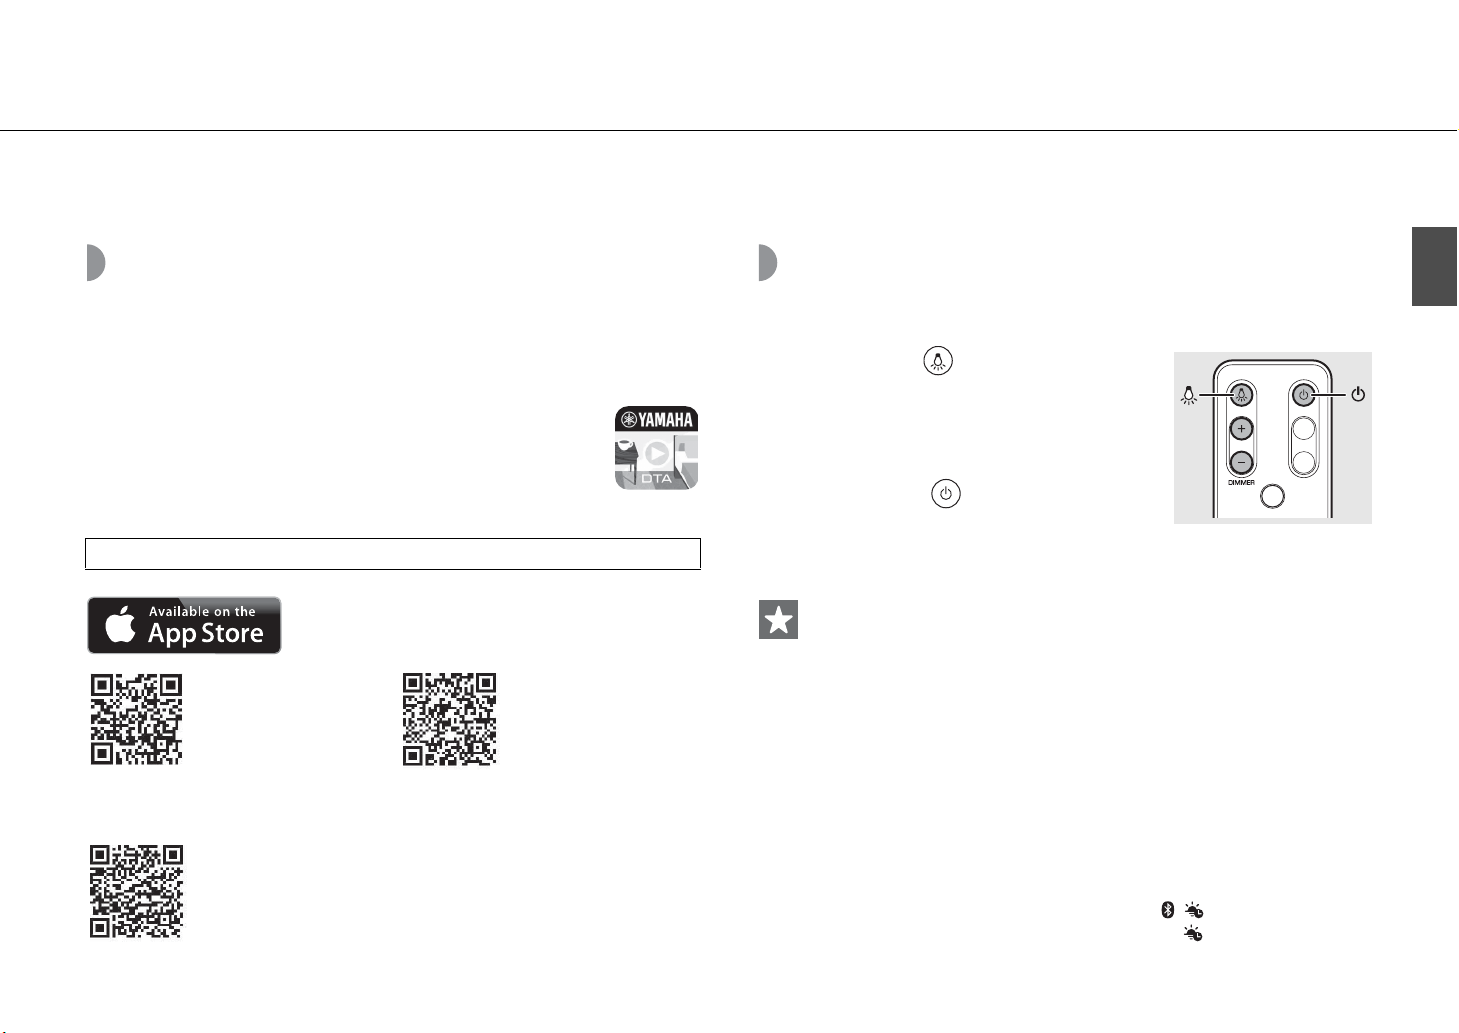
Install Yamaha’s application “DTA CONTROLLER” and turn the unit on.
Installing “DTA CONTROLLER”
Installing DTA CONTROLLER application on a mobile device, such as a smartphone or tablet
computer, allows you to use a variety of additional convenient features of Yamaha desktop
audio systems.
Features
• Turning on/off of the unit, adjusting volume
• Turning on/off the lighting, adjusting the brightness of the lighting
• Setting of the SMART TIMER (& P.12)
• Optimizing unit sound based on placement position
• Playing back songs stored in an iPhone
The mobile device needs to be connected with the unit via Bluetooth connection (& P.8).
(For users in the U.S.A.)
http://itunes.com/app/
dtacontroller
Google Play™
https://play.google.com/
store/apps/
details?id=com.yamaha.av.
dtacontroller
* If access to any of these fails, search for “DTA
CONTROLLER” on the App Store or
Google Play.
https://itunes.apple.com/us/
app/dta-controller-us/
id549333293?mt=8
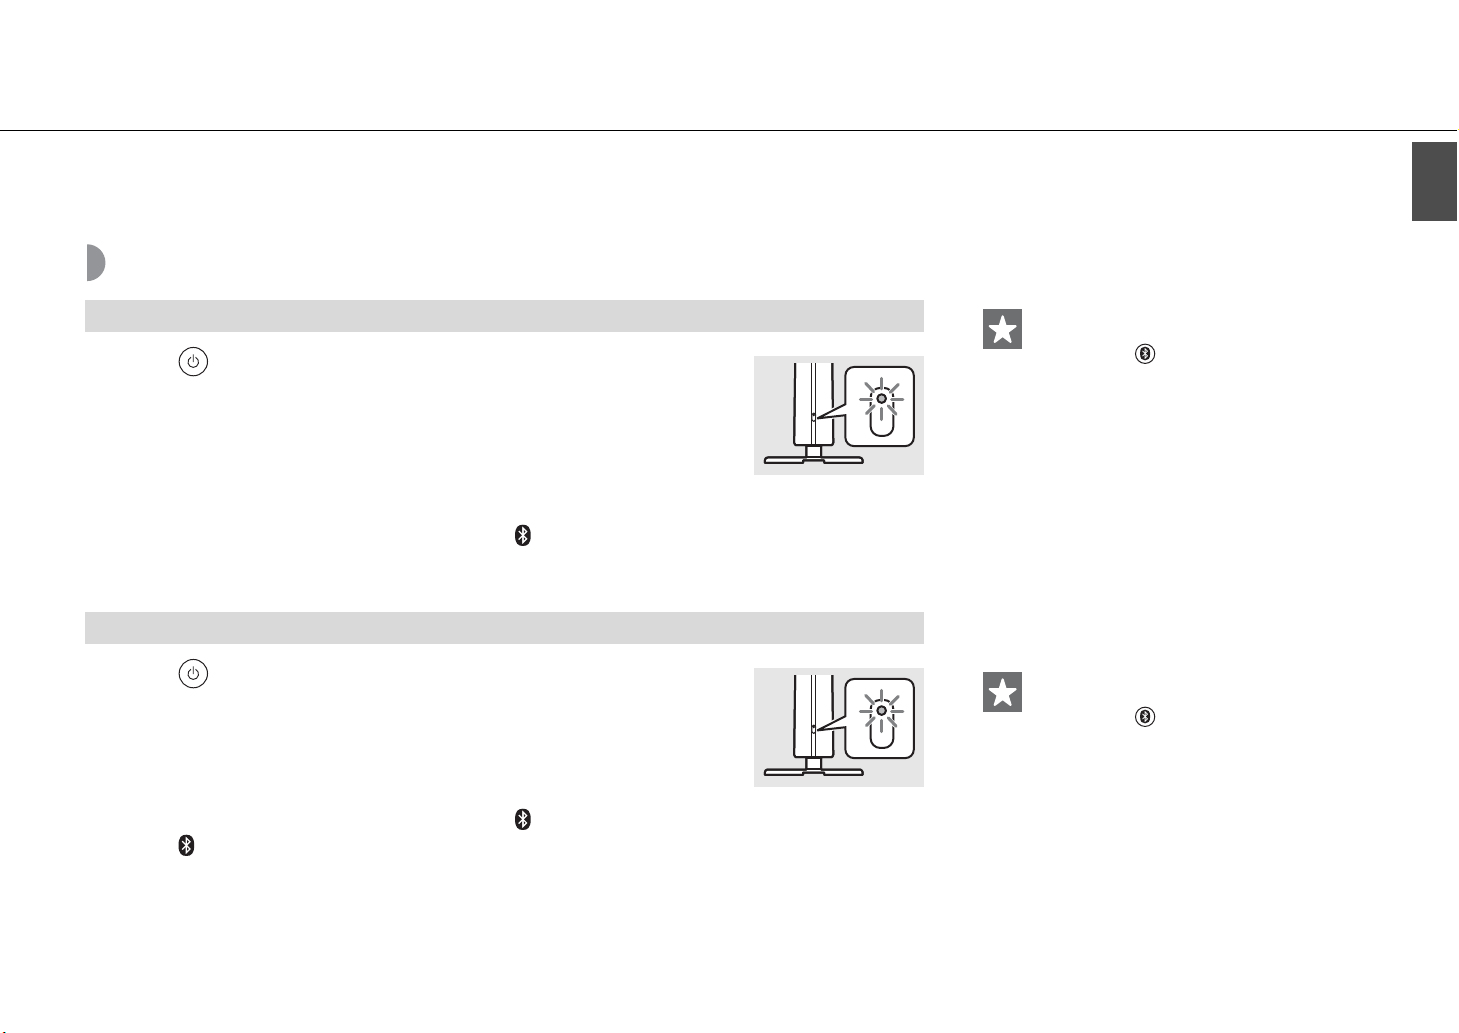
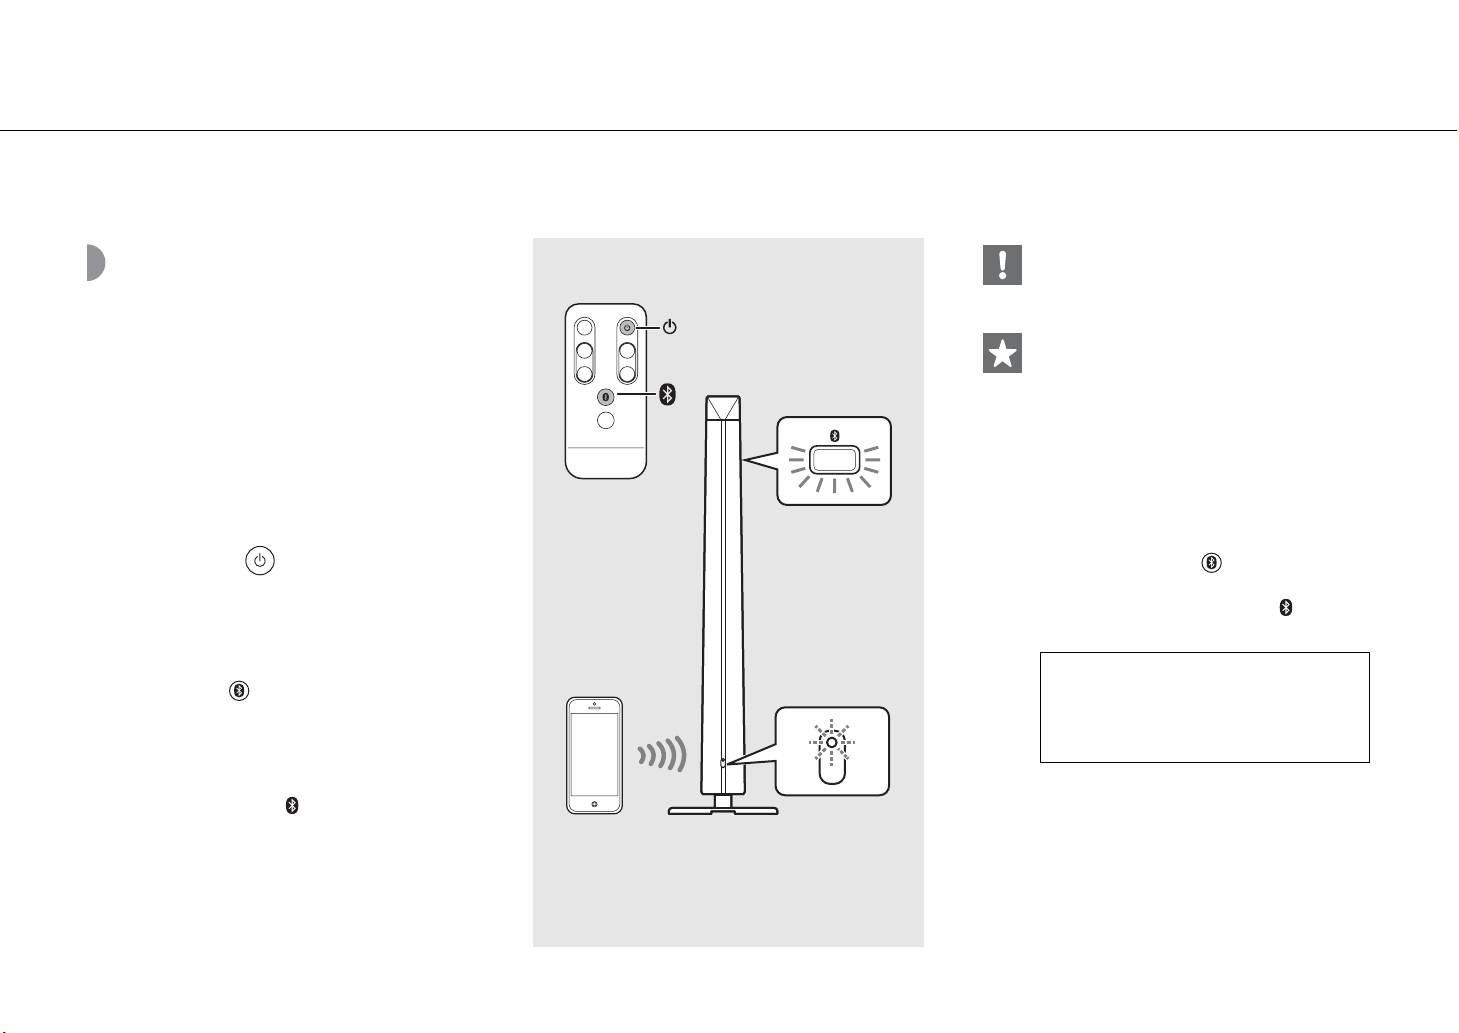
Turning on the lighting/power
1 Plug the power cable into a wall outlet.
2 • Press to turn on the light.
- Lighting can be turned on/off even when the
power of the unit is off.
- To adjust the brightness, press the DIMMER +/–
button on the remote control (10 steps).
• Press to turn on the unit.
- The unit is ready to play back music.
Auto power off function
• The auto power off function will be activated as follows (default setting).
- The unit turns off automatically if no operation has been performed for more than
20 minutes with no device connected to AUX IN or via Bluetooth connection.
- Lighting and the unit turn off automatically if no operation has been performed for
more than 24 hours.
Activating/deactivating the auto power off function
1 While pressing and holding A on the unit, plug the power cable into a wall outlet.
2 Keep pressing A.
• The auto power off function switches and the indicators (& P.5) blink as follows:
- Auto power off is activated:
- Auto power off is deactivated:
,
English
En 7
Page 8
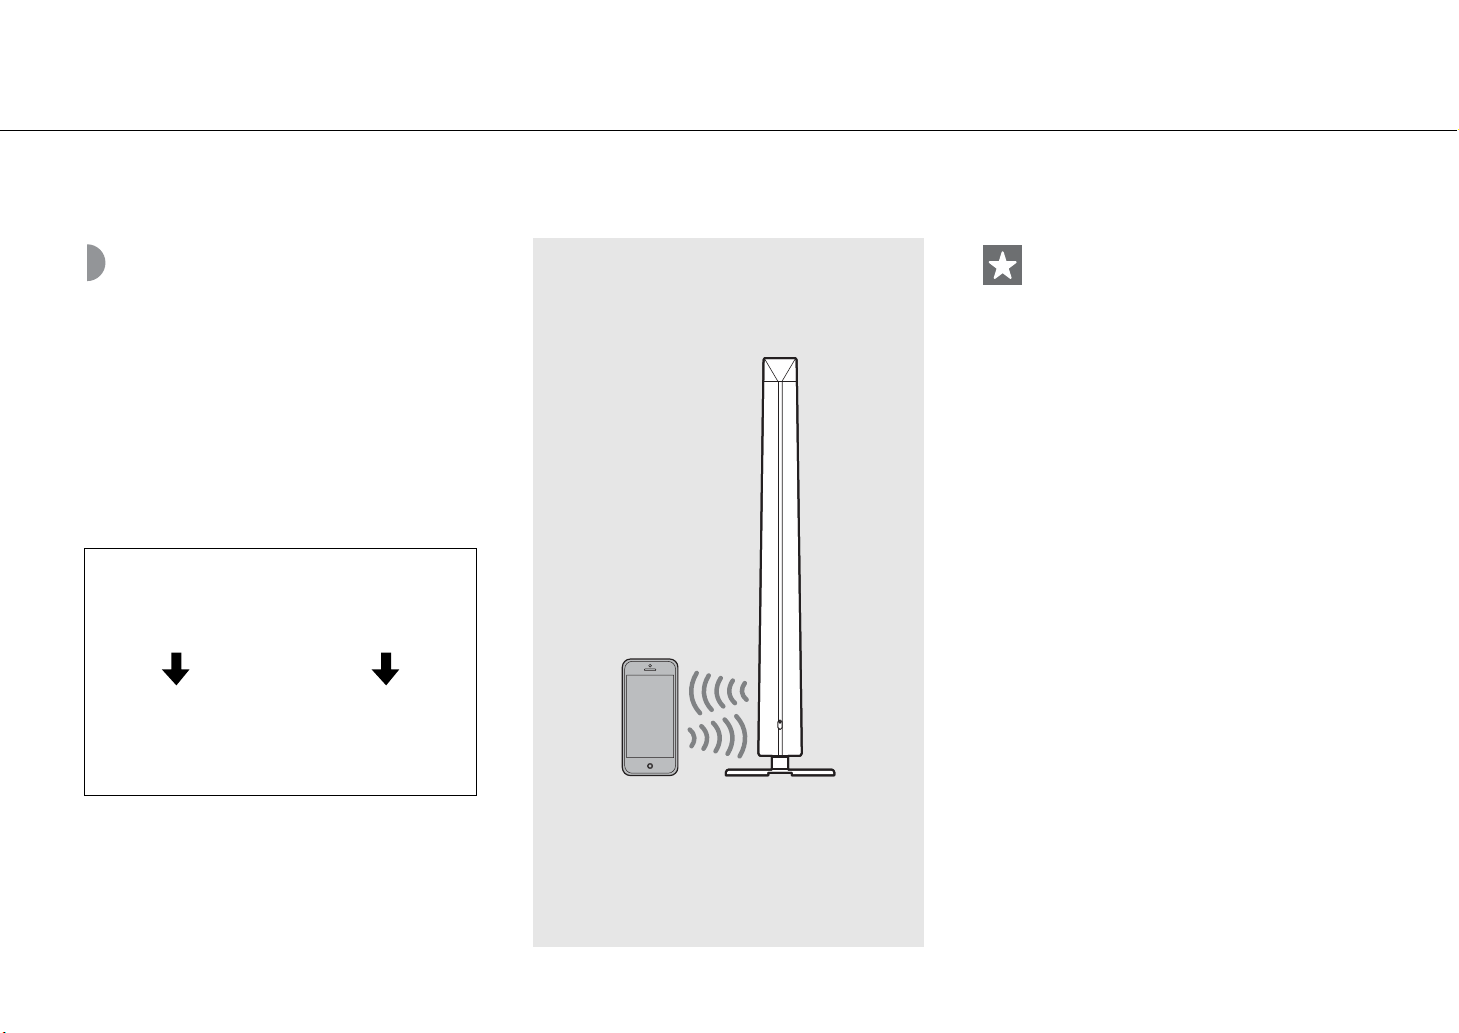
Listening to music via Bluetooth connection
You can listen to sound wirelessly from a Bluetooth compatible device.
Pairing a device with the unit
When connecting a Bluetooth device to the unit for the
first time, the device is required to be registered to the
unit. This process is called “pairing.” Once pairing is
completed, subsequent connection can be made with a
couple of easy steps.
A Bluetooth device
connecting for the first
time
Perform pairing and play
back music (& P.9)
A Bluetooth device
already having been
connected
Establish Bluetooth
connection and play back
music (& P.10)
• If pairing information for a device is deleted, you
will need to perform pairing of that device again in
order to connect it again.
Bluetooth
device
8 En
Page 9
Performing pairing and playing back music
Listening to music via Bluetooth connection
English
iPhone
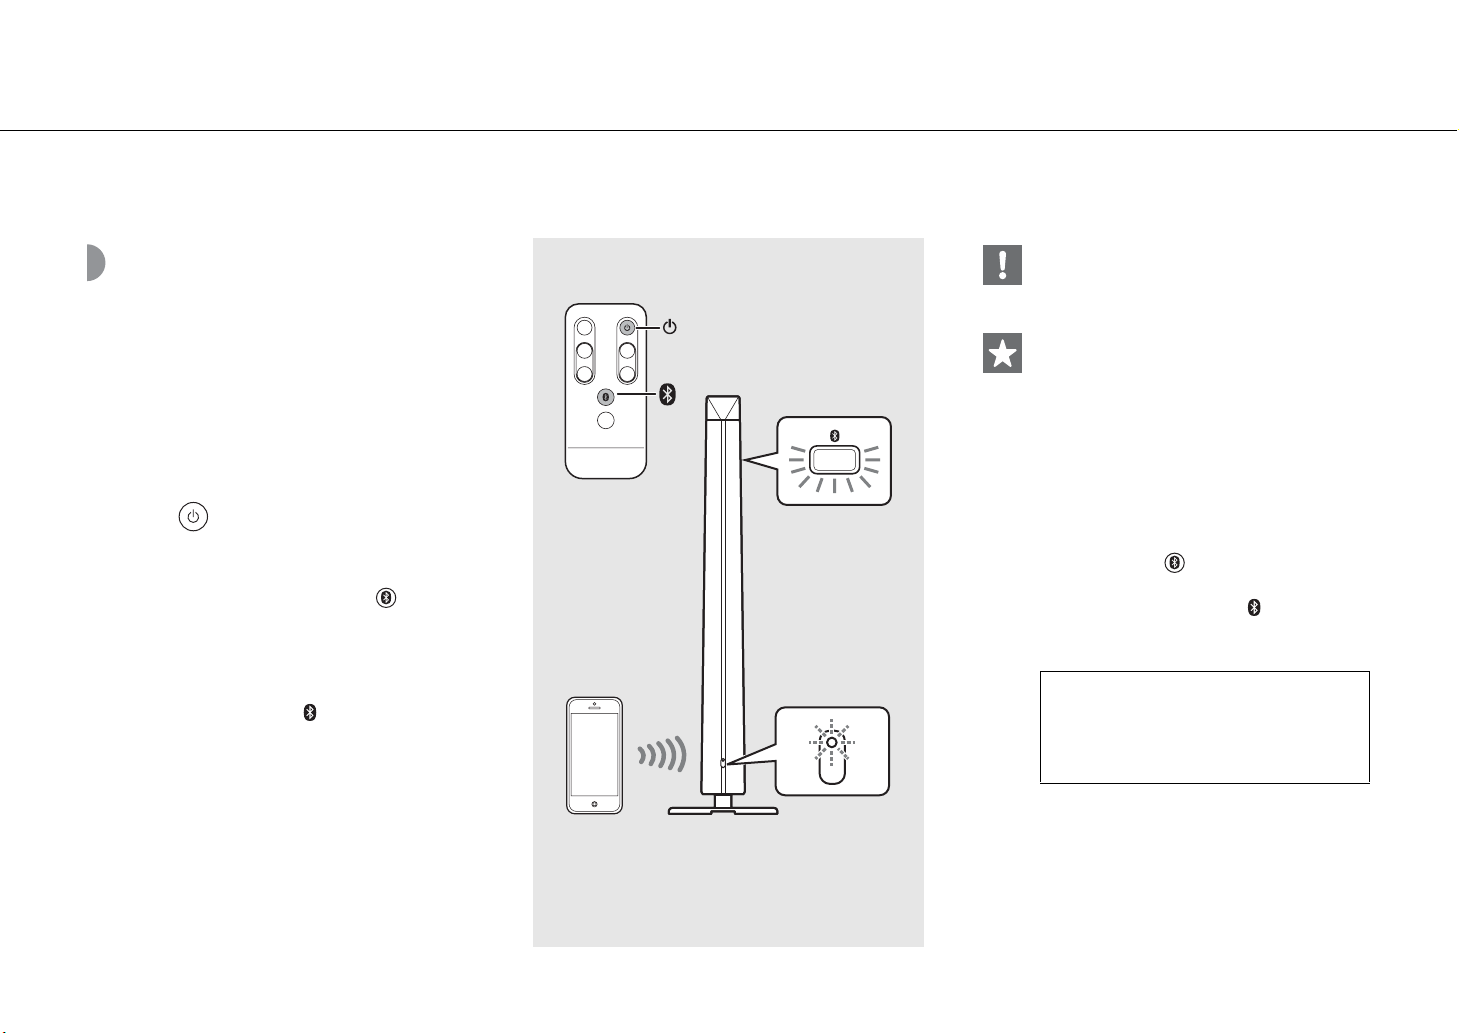
1 Press to turn on the unit (& P.7).
• The status indicator lights up.
2 Tap “Settings” and “Bluetooth” on your iPhone to turn on its
Bluetooth function.
3 On the connecting list in the “Device” field, tap “LSX-700 Yamaha.”
• When the pairing is successful, the status indicator and indicator (& P.5) blink.
4 Play back music on your iPhone.
Other than iPhone
1 Press to turn on the unit (& P.7).
• The status indicator lights up.
2 Turn on the Bluetooth function on your device.
3 In the Bluetooth setting of the device, select “LSX-700 Yamaha.”
• When the pairing is successful, the status indicator and indicator (& P.5) blink.
• If the indicator turns off and the device does not connect to the unit automatically after the pairing is completed,
select “LSX-700 Yamaha” again in the Bluetooth setting on your device.
• For details, see the owner’s manual of your device.
• If another device is already connected to the unit,
terminate that Bluetooth connection by pressing
and holding , then perform pairing with the
new device.
• The pairing operation may differ depending on
your iPhone or version of device OS.
• If another device is already connected to the unit,
terminate that Bluetooth connection by pressing
and holding , then perform pairing with the
new device.
• If a passkey is required during the pairing
operation, enter the number “0000.”
4 Play back music on your device.
En 9
Page 10
Listening to music via Bluetooth connection
Connecting a paired Bluetooth device and playing back music
If the unit is connected to another device via Bluetooth
connection, terminate that connection (see “Terminating
the Bluetooth connection” on the right) before
connecting to the target device.
1 Press to turn on the unit.
2 Perform Bluetooth connection.
• Connecting from the unit: Press .
• Connecting from the Bluetooth device:
Turn on the Bluetooth function on the device and
select “LSX-700 Yamaha.”
• When the connection is established, the status
indicator blinks and the indicator on the unit
lights up.
3 Play back music on the connected
device.
1
2
2, 3
Bluetooth
indicator
Status indicator
• Decrease the volume of the unit before
playback. Otherwise, playback volume may be
too loud.
• If connecting from the unit, the unit searches for
the Bluetooth device connected the last time. In
this case, make sure that device’s Bluetooth
function is turned on.
Terminating the Blueto oth connection
• Bluetooth connection can be terminated by either
one of the following.
- Turn off the Bluetooth function of the connected
device.
- Press and hold .
• When the Bluetooth connection is terminated, the
status indicator blinks and the indicator turns
off.
Music enhancer
This function enhances the sound of compressed
digital sound by regenerating musical elements
that are lost through compression via Bluetooth
connection.
10 En
Page 11
Listening to external sources
This unit allows playback of external devices connected to the AUX IN terminal. A commercially available 3.5 mm stereo mini-plug cable (diameter: 12 mm (0.47 in)
or less) is required for this connection. Be sure to turn off the unit by pressing before connecting the external device.
Connecting an external device
2
1 Remove the cover on the rear of the
unit.
2 Pass the cable through the hole
underneath and pull it out from the
bottom of the base.
1
3
AUX IN
3 Connect the cable to the AUX IN
terminal.
4 Connect the other end of the cable to
the external device.
Playing back
4
External
device
3.5 mm stereo mini-plug cable
1 Press to turn on the unit.
English
2 Play back the external device.
• For details on playback, see the owner’s manual
supplied with the external device.
• Decrease the volume of the unit and the external device before connection.
• If both a Bluetooth device and external device are played back, sound from both devices will be heard.
En 11
Page 12
Using the SMART TIMER
The SMART TIMER allows you to turn on the lighting at the brightness you set and play back your favorite music as a wake-up timer every morning. You can also
turn off the lighting and stop music playback automatically while you are in bed listening to music.
What the SMART TIMER can do
On-timer Off-timer
• Turn on the lighting at a specified time.
• Specify the brightness of the lighting.
• Play back the music of a connected device at a specified time.
• Specify a song.
• Preset the volume level.
• Turn off the lighting at a specified time.
• Turn off the power at a specified time.
Setting the SMART TIMER
SMART TIMER settings can be performed with a smart phone or tablet that has the DTA CONTROLLER
application (& P.7) installed.
1 Connect a device via Bluetooth connection (& P.9, 10).
2 Start DTA CONTROLLER on the device and make the SMART TIMER settings.
3 Synchronize the SMART TIMER with the unit by DTA CONTROLLER.
• Be sure to synchronize the SMART TIMER with the unit every time you perform the SMART TIMER setting.
Activating/deactivating the SMART TIMER
• To play back a song via Bluetooth connection at a
set time, it is required that the Bluetooth function
of your smart phone or tablet is turned on.
Additionally, in the case of an iPhone, do not quit
DTA CONTROLLER while multitasking.
• If another Bluetooth device is connected to the
unit at the time you set, the song you set as the
on-timer will not be played back. Disconnect any
other device before the time you set.
• The on-timer and off-timer of the SMART TIMER
can be activated/deactivated by DTA
CONTROLLER only.
• The SMART TIMER cannot be activated/
deactivated by pressing on the unit or remote
control if you do not set the SMART TIMER from
DTA CONTROLLER.
Inner clock of the unit
• The unit copies the time to the unit’s inner clock
from DTA CONTROLLER when a device connects
to the unit via Bluetooth connection. The SMART
TIMER follows the unit’s inner clock.
• The clock setting will be reset and the SMART
TIMER will be deactivated if the power cable is
kept disconnected from the wall outlet for about a
week.
Press on the unit or on the remote control.
• The indicator lights up when the SMART TIMER is activated.
12 En
Page 13
Troubleshooting
Refer to the table below if the unit does not function properly. If your solution is not listed below or if the instruction below does not help, turn off the unit,
disconnect the power cable, and contact your nearest authorized Yamaha dealer or service center.
General
Problem Cause Solution
The unit turns off soon after the power is
turned on.
The unit does not operate properly.
The speakers make no sound.
The unit and/or lighting turn off suddenly.
The unit and lighting turn on suddenly. The on-timer of the SMART TIMER is set. Check the setting of the on-timer from DTA CONTROLLER.
Cannot turn on the SMART TIMER.
There is noise interference from digital or
high-frequency equipment.
The remote control does not work or does
not function properly.
The power cable is not properly connected. Connect the power cable firmly.
This unit has been exposed to a strong external electric shock such as
lightning or strong static electricity.
The volume is minimum. Turn up the volume.
The power is off. Turn on the unit and play the music again.
The auto power off function is activated. Turn on the unit (& P.7).
The auto power off function is activated. Turn on the unit and/or lighting (& P.7).
The off-timer of the SMART TIMER is set. Check the setting of the off-timer from DTA CONTROLLER.
The power cable has been disconnected for more than a week and the
clock information is cleared.
SMART TIMER is not set from DTA CONTROLLER.
This unit is too close to the digital or high-frequency equipment. Place this unit farther away from such equipment.
The remote control may be operated outside its operation range. Operate the remote control within its operation range (& P.6).
The remote control sensor on this unit may be exposed to direct sunlight or
strong lighting such as an inverter type fluorescent lamp.
The battery may be worn out. Replace the battery with new one (& P.6).
There are obstacles between the sensor of this unit and the remote control. Remove the obstacles.
Turn off the unit and unplug the power cable. Plug it back in after about 30
seconds and then turn the power on again.
Set the SMART TIMER from DTA CONTROLLER and synchronize it to the unit
(& P.12).
Change the orientation of the lighting or unit, or location of the unit.
English
En 13
Page 14
Troubleshooting
Bluetooth
Problem Cause Solution
Cannot make the unit pair with a
Bluetooth device.
Cannot make a Bluetooth connection.
No sound is produced, or the sound is
interrupted during playback.
The unit is turned off. Turn the unit on and perform the paring (& P.9).
Another Bluetooth device is connected.
This unit and the device are too far apart. Pair the unit and device within a distance of 10 m (33 ft).
There is a device (microwave oven, wireless LAN, etc.) that outputs signals
in the 2.4 GHz frequency band nearby.
A Bluetooth adaptor, etc., that you want to pair with this unit has a passkey
other than “0000.”
The Bluetooth device does not support A2DP. Perform pairing with a device which supports A2DP.
The unit is turned off. Turn the unit on.
Another Bluetooth device is connected.
The Bluetooth function of the device is turned off. Turn on the Bluetooth function of the device.
The pairing information has been deleted.
This unit is not registered on the device’s Bluetooth connection list. Perform paring again (& P.9).
The volume of the connecting device is set too low. Turn up the volume of the connecting device.
The connecting device is not set to send Bluetooth audio signals to the unit.
The Bluetooth connection of the unit with the device has terminated. Perform Bluetooth connection operations again (& P.10).
There is a device (microwave oven, wireless LAN, etc.) that outputs signals
in the 2.4 GHz frequency band nearby.
This unit and the connecting device are too far apart. Move the connecting device to within 10 m (33 ft) of the unit.
Terminate current Bluetooth connection, and perform pairing with the new
device.
Move this unit away from the device that is emitting radio-frequency
signals.
Use a Bluetooth adaptor, etc., whose passkey is “0000.”
Terminate current Bluetooth connection, then establish a Bluetooth
connection with that device again.
Perform pairing again (& P.9).
This unit can be paired with eight devices. If pairing with a ninth device is
performed, the pairing information with the earliest connection date will be
deleted.
Switch the output of Bluetooth audio signals of the connecting device to
the unit.
Move this unit away from the device that is emitting radio-frequency
signals.
14 En
Page 15
Specifications
Bluetooth section
Bluetooth version Ver. 2.1+EDR
Supported profile
Compatible codecs SBC, AAC, aptX®
Wireless output Bluetooth Class 2
Maximum communication range 10 m ([33 ft] without obstructions)
A2DP (Advanced Audio Distribution Profile)
AVRCP (Audio/Video Remote Control Profile)
AUX IN section
Input connector 3.5 mm stereo mini jack
Lighting section (LED*)
Lifetime (Luminous flux under 70%) About 40,000 hours
Power consumption (When only the lighting is on) 9 W
General
Power supply AC 100 - 240 V, 50/60 Hz
Power-on condition
(music is played back and the lighting is on):
Power consumption
Dimensions (W × H × D)
Weight 5.5 kg (12.1 lbs.)
20 W
Power-off condition (lighting and SMART TIMER are off and no
Bluetooth connection):
0.5 W or less
300 × 1,152 × 300 mm (11-3/4 × 45-3/8 × 11-3/4 in)
(including the base)
As of October 2013. Specifications are subject to change without notice.
* The estimated lifetime of LED lighting is about 40,000 hours.
This figure is based on the shorter of either the duration until the lighting is worn out, or the
duration before luminous flux drops to below 70% of the original. Note, however, that the
estimated 40,000 hour duration is not guaranteed.
“Made for iPod,” “Made for iPhone,” and “Made for
iPad” mean that an electronic accessory has been
designed to connect specifically to iPod, iPhone, or
iPad, respectively, and has been certified by the
developer to meet Apple performance standards.
Apple is not responsible for the operation of this device or its compliance with safety and
regulatory standards.
Please note that the use of this accessory with iPod, iPhone, or iPad may affect wireless
performance.
iPad, iPhone, iPod and iPod touch are trademarks of Apple Inc., registered in the U.S. and other
countries.
Bluetooth
• Bluetooth is a technology for wireless communication between devices within an area of about
10 meters (33 ft) employing the 2.4 GHz frequency band, a band which can be used without a
license.
• Bluetooth is a registered trademark of the Bluetooth SIG and is used by Yamaha in accordance
with a license agreement.
Handling Bluetooth communications
• The 2.4 GHz band used by Bluetooth compatible devices is a radio band shared by many types of
equipment. While Bluetooth compatible devices use a technology minimizing the influence of
other components using the same radio band, such influence may reduce the speed or distance
of communications and in some cases interrupt communications.
• The speed of signal transfer and the distance at which communication is possible differs
according to the distance between the communicating devices, the presence of obstacles, radio
wave conditions and the type of equipment.
• Yamaha does not guarantee all wireless connections between this unit and devices compatible
with Bluetooth function.
aptX® is a trademark of CSR.
Android™
Android and Google Play are trademarks of Google, Inc.
English
En 15
Page 16

Table des matières
Introduction......4
Accessoires fournis......4
Positionnement de l’appareil......4
Quelques mots sur ce mode d’emploi......4
Nom des pièces......5
Corps principal......5
Télécommande......6
Préparations......7
Installation de « DTA CONTROLLER »......7
Allumage de l’éclairage/Mise sous tension......7
Écoute de musique avec la connexion Bluetooth......8
Jumelage d’un périphérique avec l’appareil......8
Jumelage et lecture de musique......9
Connexion d’un périphérique Bluetooth jumelé et lecture de musique......10
Désactivation de la connexion Bluetooth......10
Écoute de sources externes......11
Raccordement d’un périphérique externe......11
Lecture......11
Utilisation du SMART TIMER......12
Réglage du SMART TIMER......12
Activation/Désactivation du SMART TIMER......12
Guide de dépannage......13
Caractéristiques techniques......15
2 Fr
Page 17
Son de qualité élevée
et simplicité d’utilisation
Fusion de la musique et de l’éclairage
Commencez votre journée sous le bon éclairage et sur une bonne note.
Réveillez-vous au son de votre morceau préféré, dans une ambiance conviviale.
À la fin de la journée, plongez dans une ambiance reposante de
lumière tamisée et de sons calfeutrés.
......7
......12
Aspect pratique de Plug and Play sur vos périphériques
mobiles avec un son amélioré.
Utilisation commode à distance de votre
périphérique mobile.
......8, 11
......7
Français
Fr 3
Page 18

Introduction
Vérifiez le contenu de l’emballage et lisez entièrement ce manuel.
Accessoires fournis
Utilisez les éléments suivants pour assembler le support.
Pour plus d’informations sur l’assemblage du support,
lisez l’autre volume intitulé « Guide d’installation ».
•Socle
•Vis (M5)
Câble d’alimentation
Télécommande
• Bride pour câble
Positionnement de l’appareil
Cet appareil utilise les réflexions coin ou mur arrière pour étendre sa sortie de son et
de lumière.
Réglages coin Réglages mur arrière
• Il est recommandé de placer l’appareil à 30 cm - 70 cm d’un coin. À proximité d’un
mur, placez-le à 20 cm - 50 cm d’un mur arrière.
Environ 30 cm -
Environ
70 cm
30 cm - 70 cm
Quelques mots sur ce mode d’emploi
• Opérations
- Le fonctionnement de cet appareil est décrit
principalement en utilisant la télécommande.
- L’« iPhone », décrit dans ce manuel peut également
faire référence à un « iPod touch» ou à un « iPad ».
• Illustrations
Les illustrations peuvent varier du véritable article
représenté.
• Symboles
Signale les précautions à prendre concernant
l’utilisation de l’appareil et les limites de ses
fonctions.
Donne des explications supplémentaires
permettant une meilleure utilisation.
Indique la ou les pages de référence
&
correspondantes.
* Les effets lumineux représentent l’expansion du son.
4 Fr
Avant
Avant
Page 19
Nom des pièces
Familiarisez-vous avec toutes les pièces et les fonctions suivantes.
Corps principal
1 Enceinte/Lampe avant
Français
2 Témoin d’état
S’allume lorsque vous mettez l’appareil sous tension. Clignote lors de la réception d’un signal
de fonctionnement ou lorsque l’état de la connexion Bluetooth change.
3 Capteur de signal de télécommande (& P.6)
4 Enceinte/Lampe arrière
5 Couvercle (& P.11)
Se détache pour offrir l’accès à la borne AUX IN.
6 A (alimentation) (& P.7)
Appuyez sur cette touche pour mettre l’appareil sous ou hors tension.
7 VOLUME +/–
Pour régler le volume.
8 (touche/témoin Bluetooth) (& P.9)
Si vous appuyez sur cette touche : Se connecte à un périphérique Bluetooth.
Si vous maintenez cette touche enfoncée : Se déconnecte d’un périphérique Bluetooth.
S’allume lorsqu’un périphérique Bluetooth est connecté.
9 (touche/témoin SMART TIMER) (& P.12)
Active/Désactive la fonction SMART TIMER.
S’allume lorsque la fonction SMART TIMER est activée.
0 (éclairage) (& P.7)
Appuyez sur cette touche pour allumer ou éteindre la lampe avant/arrière.
A AUX IN (& P.11)
Se connecte à un périphérique externe via un câble mini-jack stéréo de 3,5 mm disponible
dans le commerce.
Avant Arrière
Fr 5
Page 20

Nom des pièces
Télécommande
Feuille de
protection*
1 (alimentation) (& P.7)
Appuyez sur cette touche pour mettre l’appareil sous ou
hors tension.
2 VOLUME +/–
Pour régler le volume.
3 (Bluetooth) (& P.9)
Si vous appuyez sur cette touche : Se connecte à un
périphérique Bluetooth.
Si vous maintenez cette touche enfoncée : Se
déconnecte d’un périphérique Bluetooth.
4 (SMART TIMER) (& P.12)
Active/Désactive la fonction SMART TIMER.
5 Émetteur de signal de commande
6 (éclairage) (& P.7)
Appuyez sur cette touche pour mettre l’éclairage sous ou
hors tension.
7 DIMMER +/– (& P.7)
Appuyez sur cette touche pour régler la luminosité de
l’éclairage.
Angle/Plage de la télécommande
Pointez la télécommande vers le capteur de signal de
télécommande situé sur l’appareil.
6m au
maximum
Remplacement de la pile
• Vérifiez la borne « + » de la pile et insérez-la dans le bon
sens.
• Tout en poussant la patte de dégagement dans la
direction , faites glisser le porte-pile dans la direction
.
Pile au lithium de
type CR2025
* Retirez la feuille de protection de la télécommande avant
d’utiliser l’appareil.
6 Fr
Page 21
Préparations
Installez l’application « DTA CONTROLLER » de Yamaha et mettez l’appareil sous tension.
Français
Installation de « DTA CONTROLLER »
L’installation de l’application DTA CONTROLLER sur un périphérique mobile, comme un
smartphone ou une tablette, vous permet d’utiliser différentes caractéristiques pratiques
supplémentaires des systèmes audio de bureau Yamaha.
Fonctions
• Mise sous/hors tension de l’appareil, réglage du volume
• Mise sous/hors tension de l’éclairage, réglage de la luminosité de l’éclairage
• Réglage de la fonction SMART TIMER (& P.12)
• Optimisation du son de l’appareil en fonction de la position de placement
• Lecture des morceaux mémorisés sur un iPhone
Le périphérique mobile doit être connecté à l’appareil via Bluetooth (& P.8).
(Pour les utilisateurs aux
http://itunes.com/app/
dtacontroller
Google Play™
https://play.google.com/
store/apps/
details?id=com.yamaha.av.
dtacontroller
* En cas d’échec de l’un de ces accès,
recherchez « DTA CONTROLLER » sur
l’App Store ou sur Google Play.
États-Unis)
https://itunes.apple.com/us/
app/dta-controller-us/
id549333293?mt=8
Allumage de l’éclairage/Mise sous tension
1 Branchez le câble d’alimentation sur une prise murale.
2 • Appuyez sur pour allumer la lumière.
- Il est possible d’allumer/éteindre l’éclairage
même lorsque l’appareil est hors tension.
- Pour régler la luminosité, appuyez sur la touche
DIMMER +/– de la télécommande (10 étapes).
• Appuyez sur pour mettre
l’appareil sous tension.
- L’appareil est prêt à lire de la musique.
Fonction de mise hors tension automatique
• La fonction de mise hors tension automatique sera activée comme suit (réglage par défaut).
- L’appareil se met automatiquement hors tension si aucune opération n’a été
effectuée depuis plus de 20 minutes et qu’aucun périphérique n’est branché à la
borne AUX IN ou via la connexion Bluetooth.
- L’éclairage et l’appareil sont automatiquement coupés si aucune opération n’a été
effectuée depuis plus de 24 heures.
Activation/Désactivation de la fonction de mise hors tension automatique
1 Tout en maintenant enfoncée la touche A de l’appareil, branchez le câble
d’alimentation sur une prise murale.
2 Maintenez toujours la touche A enfoncée.
• La fonction de mise hors tension automatique commute et les témoins (& P.5)
clignotent comme suit :
- La mise hors tension automatique est activée :
- La mise hors tension automatique est désactivée :
,
Fr 7
Page 22
Écoute de musique avec la connexion Bluetooth
Vous pouvez écouter du son sans fil à partir d’un périphérique compatible Bluetooth.
Jumelage d’un périphérique avec l’appareil
Lorsque vous connectez un périphérique Bluetooth à
l’appareil pour la première fois, ce périphérique doit être
enregistré sur l’appareil. Ce processus est appelé
« jumelage ». Une fois le jumelage terminé, il est possible
d’effectuer une connexion ultérieure en suivant quelques
étapes simples.
Un périphérique
Bluetooth qui se connecte
pour la première fois
Procédez au jumelage et
lisez de la musique
(& P.9)
Un périphérique
Bluetooth qui s’est déjà
connecté
Établissez une connexion
Bluetooth et lisez de la
musique (& P.10)
• Si les informations de jumelage d’un périphérique
sont supprimées, vous devrez recommencer le
jumelage de ce périphérique pour pouvoir le
reconnecter.
Périphérique
Bluetooth
8 Fr
Page 23

Jumelage et lecture de musique
Écoute de musique avec la connexion Bluetooth
Français
iPhone
1 Appuyez sur pour mettre l’appareil sous tension (& P.7).
• Le témoin d’état s’allume.
2 Tapez sur « Réglages » et « Bluetooth » sur votre iPhone pour activer
sa fonction Bluetooth.
3 Dans la liste des connexions du champ « Appareils », tapez sur « LSX-700 Yamaha ».
• Lorsque le jumelage est réussi, le témoin d’état et le témoin (& P.5) clignotent.
4 Lisez de la musique sur votre iPhone.
Périphérique autre qu’un iPhone
1 Appuyez sur pour mettre l’appareil sous tension (& P.7).
• Le témoin d’état s’allume.
2 Activez la fonction Bluetooth de votre périphérique.
3
Dans le réglage
• Lorsque le jumelage est réussi, le témoin d’état et le témoin (& P.5) clignotent.
• Si le témoin s’éteint et si le périphérique ne se connecte pas automatiquement l’appareil une fois le jumelage
terminé, sélectionnez à nouveau « LSX-700 Yamaha » dans le réglage Bluetooth de votre périphérique.
• Pour plus de détails, consultez le mode d’emploi de votre périphérique.
Bluetooth
du périphérique, sélectionnez « LSX-700 Yamaha ».
• Si un autre périphérique est déjà connecté à
l’appareil, désactivez cette connexion Bluetooth en
maintenant la touche enfoncée, puis
procédez au jumelage avec le nouveau
périphérique.
• L’opération de jumelage peut varier en fonction
de votre iPhone ou de la version du système
d’exploitation du périphérique.
• Si un autre périphérique est déjà connecté à
l’appareil, désactivez cette connexion Bluetooth en
maintenant la touche enfoncée, puis
procédez au jumelage avec le nouveau
périphérique.
• Si un code d’accès est nécessaire durant
l’opération de jumelage, saisissez le numéro
«0000».
4 Lisez de la musique sur votre périphérique.
Fr 9
Page 24
Écoute de musique avec la connexion Bluetooth
Connexion d’un périphérique Bluetooth jumelé et lecture de musique
Si l’appareil est connecté à un autre périphérique via la
connexion Bluetooth, désactivez cette connexion (voir
« Désactivation de la connexion Bluetooth » sur la droite)
avant la connexion au périphérique cible.
1 Appuyez sur pour mettre
l’appareil sous tension.
2 Établissez la connexion Bluetooth.
• Connexion à partir de l’appareil :
Appuyez sur .
• Connexion à partir du périphérique
Bluetooth : Activez la fonction Bluetooth du
périphérique et sélectionnez « LSX-700 Yamaha ».
• Une fois la connexion établie, le témoin d’état
clignote et le témoin de l’appareil s’allume.
1
2
2, 3
Témoin Bluetooth
Témoin d’état
• Baissez le volume de l’appareil avant de
débuter la lecture. Sinon, le volume de lecture
risque d’être trop fort.
• En cas de connexion à partir de l’appareil, ce
dernier recherche le dernier périphérique
Bluetooth connecté. Dans ce cas, assurez-vous que
la fonction Bluetoot h du périphérique est activée.
Désactivation de la connexion Blue tooth
• La connexion Bluetooth peut être désactivée par
l’une ou l’autre des étapes suivantes.
- Désactivez la fonction Bluetooth du
périphérique connecté.
- Maintenez la touche enfoncée.
• Une fois la connexion Bluetooth désactivée, le
témoin d’état clignote et le témoin .
Amplificateur
Cette fonction améliore le son numérique
compressé en régénérant les éléments musicaux
qui se perdent lors de la compression via la
connexion Bluetooth.
3 Lisez de la musique sur le
périphérique connecté.
10 Fr
Page 25

Écoute de sources externes
Cet appareil permet de lire des périphériques externes branchés à la borne AUX IN. Un câble mini-jack stéréo de 3,5 mm disponible dans le commerce (diamètre : 12 mm au
maximum) est nécessaire à ce raccordement.
Raccordement d’un
Assurez-vous de mettre l’appareil hors tension en appuyant sur avant de raccorder le périphérique externe.
Français
périphérique externe
1 Retirez le couvercle de l’arrière de
l’appareil.
2 Faites passer le câble par l’orifice situé
en-dessous et faites-le sortir par la
partie inférieure du socle.
3 Branchez le câble à la borne AUX IN.
4 Connectez l’autre extrémité du câble
au périphérique externe.
Lecture
1 Appuyez sur pour mettre
l’appareil sous tension.
2 Lisez le périphérique externe.
• Pour plus d’informations sur la lecture, consultez
le mode d’emploi du périphérique externe.
2
AUX IN
1
3
4
Périphérique
externe
• Baissez le volume de l’appareil et du périphérique externe avant la connexion.
• Si un périphérique Bluetooth et un périphérique externe sont lus, le son de chacun des deux périphériques sera
perceptible.
Câble mini-jack stéréo de 3,5 mm
Fr 11
Page 26
Utilisation du SMART TIMER
Le SMART TIMER vous permet d’allumer l’éclairage avec la luminosité que vous avez définie et de lire votre musique favorite en guise de réveil tous les matins. Vous
pouvez également éteindre l’éclairage et arrêter automatiquement la lecture de la musique lorsque vous l’écoutez de votre lit.
Ce que le SMART TIMER peut faire
Minuterie de mise en marche Minuterie d’arrêt
• Allumer l’éclairage à une heure précise.
• Spécifier la luminosité de l’éclairage.
• Lire la musique d’un périphérique connecté à une heure
précise.
• Spécifier un morceau.
• Prérégler le niveau de volume.
• Éteindre l’éclairage à une heure précise.
• Mettre l’appareil hors tension à une heure précise.
Réglage du SMART TIMER
Les réglages du SMART TIMER peuvent être effectués avec un smartphone ou une tablette comportant
l’application DTA CONTROLLER (& P.7).
1 Connectez un périphérique via Bluetooth (& P.9, 10).
2 Lancez le DTA CONTROLLER sur le périphérique et procédez aux réglages du SMART TIMER.
3 Synchronisez le SMART TIMER avec l’appareil au moyen du DTA CONTROLLER.
• Veillez à synchroniser le SMART TIMER avec l’appareil lors de chaque réglage du SMART TIMER.
Activation/Désactivation du SMART TIMER
Appuyez sur la touche de l’appareil ou sur la touche de la télécommande.
• Le témoin s’allume lorsque le SMART TIMER s’active.
• Pour lire un morceau via la connexion Bluetooth à
une heure précise, il faut que la fonction Bluetooth
de votre smartphone ou tablette ait été activée. En
outre, dans le cas d’un iPhone, ne quittez pas le
DTA CONTROLLER pendant des tâches multiples.
• Si un autre périphérique Bluetooth est connecté à
l’appareil à l’heure que vous avez définie, le
morceau que vous avez réglé sur la minuterie de
mise en marche ne sera pas lu. Débranchez tout
autre périphérique avant l’heure que vous avez
définie.
• La minuterie de mise en marche et la minuterie
d’arrêt du SMART TIMER ne peuvent être activées/
désactivées que par le DTA CONTROLLER.
• Le SMART TIMER ne peut pas être activé/désactivé
en appuyant sur la touche de l’appareil ou de
la télécommande si vous ne réglez pas le SMART
TIMER à partir du DTA CONTROLLER.
Horloge interne de l’appareil
• L’appareil copie l’heure du DTA CONTROLLER sur
son horloge interne lorsqu’un périphérique se
connecte à l’appareil via la connexion Blueto oth.
Le SMART TIMER suit l’horloge interne de
l’appareil.
• Le réglage de l’horloge est réinitialisé et SMART
TIMER est désactivé si le câble d’alimentation reste
débranché de la prise murale pendant environ
une semaine.
12 Fr
Page 27
Guide de dépannage
Reportez-vous au tableau suivant si l’appareil ne fonctionne pas convenablement. Si votre solution n’est pas mentionnée ci-dessous, ou encore si l’action corrective suggérée
est sans effet, mettez l’appareil hors tension, débranchez le câble d’alimentation et prenez contact avec votre revendeur ou centre d’entretien Yamaha agréé le plus proche.
Généralités
Anomalies Causes possibles Solution
L’appareil se met hors tension peu de
temps après la mise sous tension.
L’appareil ne fonctionne pas
correctement.
Les enceintes n’émettent aucun son.
L’appareil et/ou l’éclairage s’éteint
soudainement.
L’appareil et l’éclairage s’allument
soudainement.
Impossible d’activer le SMART TIMER.
Un appareil numérique ou un
équipement à haute fréquence génère un
brouillage.
La télécommande ne fonctionne pas
correctement, voire pas du tout.
Le câble d’alimentation n’est pas branché correctement. Branchez correctement le câble d’alimentation.
Cet appareil a été exposé à une forte décharge électrique externe telle que
la foudre ou une forte électricité statique.
Le volume est réduit au minimum. Augmentez le niveau de volume.
L’appareil est hors tension. Mettez l’appareil sous tension et relancez la lecture de la musique.
La fonction de mise hors tension automatique est activée. Mettez l’appareil sous tension (& P.7).
La fonction de mise hors tension automatique est activée. Mettez l’appareil et/ou l’éclairage sous tension (& P.7).
La minuterie d’arrêt du SMART TIMER est réglée. Vérifiez le réglage de la minuterie d’arrêt à partir du DTA CONTROLLER.
La minuterie de mise en marche du SMART TIMER est réglée.
Le câble d’alimentation a été débranché pendant plus d’une semaine et les
informations de l’horloge se sont effacées.
Le SMART TIMER n’a pas été réglé à partir du DTA CONTROLLER.
Cet appareil est trop proche de l’équipement numérique ou à haute
fréquence.
Vous utilisez peut-être la télécommande en dehors de sa portée. Utilisez la télécommande dans son rayon d’action (& P.6).
Le capteur de télécommande de cet appareil est peut-être exposé à la
lumière directe du soleil ou à une lampe fluorescente à onduleur.
La pile est peut-être usée. Remplacez la pile par une neuve (& P.6).
Il y a des obstacles entre le capteur de cet appareil et la télécommande. Éliminez les obstacles.
Mettez l’appareil hors tension et débranchez le câble d’alimentation.
Rebranchez-le au bout de 30 secondes environ, puis remettez l’appareil
sous tension.
Vérifiez le réglage de la minuterie de mise en marche à partir du DTA
CONTROLLER.
Réglez le SMART TIMER à partir du DTA CONTROLLER et synchronisez-le
avec l’appareil (& P.12).
Éloignez cet appareil de l’équipement concerné.
Changez l’orientation de l’éclairage ou de l’appareil, ou encore
l’emplacement de l’appareil.
Français
Fr 13
Page 28

Guide de dépannage
Bluetooth
Anomalies Causes possibles Solution
Jumelage de l’appareil et d’un
périphérique Bluetooth impossible.
Connexion Bluetooth impossible.
Absence de son ou interruption du son
pendant la lecture.
L’appareil est hors tension. Mettez l’appareil sous tension et procédez au jumelage (& P.9).
Un autre périphérique Bluetooth est connecté.
Cet appareil et le périphérique sont trop éloignés l’un de l’autre. Jumelez l’appareil et le périphérique à une distance maximale de 10 m.
Un appareil à proximité (four à micro-ondes, réseau local sans fil, etc.) émet
des signaux de sortie dans la bande de fréquences 2,4 GHz.
Le mot de passe de l’adaptateur Bluetooth, etc. que vous souhaitez jumeler
avec cet appareil est différent de « 0000 ».
Le périphérique Bluetooth ne prend pas en charge le profil A2DP.
L’appareil est hors tension. Mettez l’appareil sous tension.
Un autre périphérique Bluetooth est connecté.
La fonction Bluetooth du périphérique est désactivée. Activez la fonction Bluetooth du périphérique.
Les informations de jumelage ont été supprimées.
Cet appareil n’est pas enregistré dans la liste des connexions du
périphérique Bluetooth.
Le volume du périphérique de connexion est défini à un niveau trop bas. Augmentez le volume du périphérique de connexion.
Le périphérique de connexion n’est pas configuré pour envoyer des
signaux audio Bluetooth à l’appareil.
La connexion Bluetooth de l’appareil avec le périphérique est désactivée. Renouvelez les opérations de connexion Bluetooth (& P.10).
Un appareil à proximité (four à micro-ondes, réseau local sans fil, etc.) émet
des signaux de sortie dans la bande de fréquences 2,4 GHz.
Cet appareil et le périphérique de connexion sont trop éloignés l’un de
l’autre.
Désactivez la connexion Bluetooth en cours, puis procédez au jumelage du
nouveau périphérique.
Éloignez cet appareil du périphérique qui émet des signaux de
radiofréquence.
Utilisez un adaptateur Bluetooth, etc. dont le mot de passe est « 0000 ».
Procédez au jumelage avec un périphérique prenant en charge le profil
A2DP.
Désactivez la connexion Bluetooth en cours, puis ré-établissez la connexion
Bluetooth avec ce périphérique.
Renouvelez le jumelage (& P.9).
Cet appareil peut être jumelé avec huit périphériques. En cas de jumelage
avec un neuvième périphérique, les informations de jumelage portant la
date de connexion la plus ancienne sont supprimées.
Renouvelez le jumelage (& P.9).
Basculez la sortie des signaux audio Bluetooth du périphérique de
connexion vers l’appareil.
Éloignez cet appareil du périphérique qui émet des signaux de
radiofréquence.
Placez le périphérique de connexion à 10 m au maximum de l’appareil.
14 Fr
Page 29
Caractéristiques techniques
Section Bluetooth
Version de Bluetooth Ver. 2.1+EDR
Profil pris en charge
Codecs compatibles SBC, AAC, aptX®
Sortie sans fil Bluetooth Classe 2
Portée de communication
maximale
A2DP (Advanced Audio Distribution Profile)
AVRCP (Audio/Video Remote Control Profile)
10 m (sans obstacles)
Section AUX IN
Connecteur d’entrée Prise mini-jack stéréo de 3,5 mm
Section éclairage (LED*)
Durée de vie (Flux lumineux inférieur à 70 %) Environ 40 000 heures
Consommation (Uniquement lorsque l’éclairage est allumé) 9 W
Généralités
Alimentation 100 - 240 V CA, 50/60 Hz
Condition de la mise sous tension (la musique est lue et
l’éclairage est allumé) :
Consommation
Dimensions (L × H × P) 300 × 1 152 × 300 mm (socle inclus)
Poids 5,5 kg
20 W
Condition de la mise hors tension (l’éclairage et le SMART
TIMER sont éteints et il n’y a aucune connexion Bluetooth):
0,5 W au maximum
À compter d’octobre 2013. Les caractéristiques peuvent être modifiées sans préavis.
* La durée de vie estimée de l’éclairage LED est d’environ 40 000 heures.
Ce chiffre est basé sur la durée la plus courte, c’est-à-dire jusqu’à ce que l’éclairage ait atteint la
fin de sa vie ou avant que le flux lumineux ne chute en dessous de 70 % du flux d’origine. Notez
toutefois que la durée estimée de 40 000 heures n’est pas garantie.
« Made for iPod », « Made for iPhone » et « Made for
iPad » signifient qu’un accessoire électronique a été
conçu pour se raccorder spécifiquement à un iPod,
un iPhone ou un iPad et a été certifié par le
développeur pour répondre aux normes de performance d’Apple.
Apple n’est pas responsable du bon fonctionnement de ce périphérique ou de sa conformité aux
normes de sécurité et à la réglementation en vigueur.
Notez que l’utilisation de cet accessoire avec un iPod, un iPhone ou un iPad peut avoir un effet
néfaste sur ses fonctions de liaison sans fil.
iPad, iPhone, iPod et iPod touch sont des marques d’Apple Inc., déposées aux États-Unis et dans
d’autres pays.
Bluetooth
• Bluetooth est une technologie permettant d’établir des communications sans fil entre des
appareils dans un rayon d’environ 10 mètres dans la bande de fréquences 2,4 GHz, une bande
qui peut être utilisée sans licence.
• Bluetooth est une marque déposée de Bluetooth SIG utilisée par Yamaha conformément à un
accord de licence.
Gestion des communications Bluetooth
• La bande 2,4 GHz utilisée par les périphériques compatibles Bluetooth est une bande radio
partagée par de nombreux types d’équipement. Bien que les périphériques compatibles
Bluetooth fassent appel à une technologie permettant de minimiser l’influence d’autres
équipements qui utilisent la même bande radio, une telle influence peut réduire la vitesse ou la
distance des communications voire, dans certains cas, interrompre les communications.
• La vitesse de transfert du signal et la distance à laquelle il est possible d’établir une
communication diffèrent selon la distance entre les périphériques qui communiquent, la
présence d’obstacles, les ondes radio et le type d’équipement.
• Yamaha ne garantit pas toutes les connexions sans fil entre cet appareil et les périphériques
compatibles Bluetooth.
aptX® est une marque commerciale de CSR.
Android™
Android et Google Play sont des marques commerciales de Google, Inc.
Français
Fr 15
Page 30

Inhalt
Einleitung......4
Mitgeliefertes Zubehör......4
Aufstellen der Einheit......4
Über dieses Handbuch......4
Bezeichnungen der Teile......5
Hauptgehäuse......5
Fernbedienung......6
Vorbereitungen......7
Installieren von „DTA CONTROLLER“......7
Einschalten der Beleuchtung/des Geräts......7
Wiedergeben von Musik über eine Bluetooth-Verbindung......8
Koppeln eines Geräts mit der Einheit......8
Durchführen der Kopplung und Wiedergeben der Musik......9
Verbinden eines gekoppelten Bluetooth-Geräts und Wiedergeben von Musik......10
Beenden der Bluetooth-Verbindung......10
Wiedergabe von externen Quellen......11
Anschließen eines externen Geräts......11
Wiedergabe......11
Verwenden des SMART TIMER......12
Einstellen des SMART TIMER......12
Aktivieren/Deaktivieren des SMART TIMER......12
Problembehebung......13
Technische Daten......15
2 De
Page 31

Hochwertiger Klang
mit einfacher Bedienung
Plug-and-Play-Anschluss Ihrer Mobilgeräte
für verbesserten Klang.
......8, 11
Eine Fusion aus Musik und Licht
Beginnen Sie Ihren Tag mit dem richtigen Licht und der richtigen Musik.
Wachen Sie in angenehmer Atmosphäre mit Ihrem Lieblingssong auf.
Tauchen Sie am Ende des Tages in eine beruhigende
Atmosphäre aus sanfter Beleuchtung und Musik ein.
......7
......12
Praktische Fernbedienung über Ihr
Mobilgerät.
......7
Deutsch
De 3
Page 32

Einleitung
Überprüfen Sie den Inhalt des Pakets und lesen Sie sich diese Anleitung aufmerksam durch.
Mitgeliefertes Zubehör
Verwenden Sie die folgenden Gegenstände zum
Zusammenbauen des Ständers. Informationen zum
Zusammenbau des Ständers finden Sie in der separaten
„Montageanleitung“.
•Sockel
Netzkabel
Fernbedienung
•Schraube (M5)
• Kabelklemme
Aufstellen der Einheit
Diese Einheit nutzt die Reflexion in Ecken oder an der rückwärtigen Wand, um die
Ton- und Lichtausgabe zu verstärken.
Aufstellung in einer Ecke Aufstellung nahe einer Wand
• Es wird empfohlen, die Einheit 30 cm - 70 cm von einer Ecke entfernt aufzustellen.
Wenn Sie das Gerät in der Nähe einer Wand aufstellen, halten Sie einen Abstand
von 20 cm - 50 cm zur rückwärtigen Wand ein.
Ungefähr
30 cm - 70 cm
Über dieses Handbuch
• Bedienung
- Die Bedienung dieses Geräts wird primär mit der
Fernbedienung beschrieben.
- Die Bezeichnung „iPhone“ in dieser Anleitung kann
sich auch auf den „iPod touch“ oder das „iPad“
beziehen.
• Abbildungen
Die Abbildungen können vom aktuellen Produkt
abweichen.
• Symbole
Zeigt Vorsichtsmaßnahmen und
Funktionsbeschränkungen für das Gerät an.
Zeigt zusätzliche Erklärungen zur besseren
Bedienung an.
Verweist auf die entsprechende(n)
&
Referenzseite(n).
* Die Lichteffekte stellen die Ausbreitung des Klangs dar.
4 De
Vorderseite
Page 33

Bezeichnungen der Teile
Machen Sie sich mit allen Teilen und den Funktionen vertraut.
Hauptgehäuse
1 Beleuchtung/Lautsprecher an der Vorderseite
2 Statusanzeige
Leuchtet, wenn das Gerät eingeschaltet ist. Blinkt, wenn ein Bediensignal empfangen wird
oder wenn sich der Status der Bluetooth-Verbindung ändert.
3 Fernbedienungssignal-Sensor (& S.6)
4 Beleuchtung/Lautsprecher an der Rückseite
5 Abdeckung (& S.11)
Lösen Sie die Abdeckung, um Zugang zum AUX IN-Anschluss zu erhalten.
6 A (Netztaste) (& S.7)
Drücken Sie diese Taste, um das Gerät ein- oder auszuschalten.
7 VOLUME +/–
Steuert die Lautstärke.
8 (Bluetooth-Taste/-Anzeige) (& S.9)
Drücken: Stellt eine Verbindung zu einem Bluetooth-Gerät her.
Gedrückt halten: Trennt die Verbindung zu einem Bluetooth-Gerät.
Leuchtet, wenn eine Verbindung zu einem Bluetooth-Gerät besteht.
Deutsch
Vorderseite Rückseite
9 (SMART TIMER-Taste/-Anzeige) (& S.12)
Aktiviert/deaktiviert den SMART TIMER.
Leuchtet, während der SMART TIMER aktiviert ist.
0 (Beleuchtung) (& S.7)
Drücken Sie diese Taste, um die Beleuchtung an der Vorder-/Rückseite ein- oder
auszuschalten.
A AUX IN (& S.11)
Stellen Sie eine Verbindung zu einem externen Gerät über ein im Handel erhältliches
3,5-mm-Stereo-Miniklinkenkabel her.
De 5
Page 34

Bezeichnungen der Teile
Fernbedienung
Schutzfolie*
1 (Netztaste) (& S.7)
Drücken Sie diese Taste, um das Gerät ein- oder
auszuschalten.
2 VOLUME +/–
Steuert die Lautstärke.
3 (Bluetooth) (& S.9)
Drücken: Stellt eine Verbindung zu einem Bluetooth-
Gerät her.
Gedrückt halten: Trennt die Verbindung zu einem
Bluetooth-Gerät.
4 (SMART TIMER) (& S.12)
Aktiviert/deaktiviert den SMART TIMER.
5 Fernbedienungssignal-Sender
6 (Beleuchtung) (& S.7)
Drücken Sie diese Taste, um die Beleuchtung ein- oder
auszuschalten.
7 DIMMER +/– (& S.7)
Drücken Sie diese Taste, um die Helligkeit der
Beleuchtung anzupassen.
Winkel/Reichweite der Fernbedienung
Richten Sie die Fernbedienung auf den
Fernbedienungssignal-Sensor am Gerät.
Maximal
6m
Austauschen der Batterie
• Beachten Sie den Pol „+“ der Batterie und legen Sie sie
richtig herum ein.
• Schieben Sie den Batteriehalter in Richtung ,
während Sie die Entriegelungslasche in Richtung
drücken.
Lithium-Batterie
Typ CR2025
* Entfernen Sie die Schutzfolie vor der Verwendung aus der
Fernbedienung.
6 De
Page 35

Vorbereitungen
Installieren Sie Yamahas Anwendung „DTA CONTROLLER“ und schalten Sie das Gerät ein.
Installieren von „DTA CONTROLLER“
Durch die Installation der Anwendung DTA CONTROLLER auf einem Mobilgerät, wie einem
Smartphone oder Tablet, können Sie verschiedene zusätzliche praktische Funktionen der
Desktop-Audiosysteme von Yamaha nutzen.
Funktionen
• Ein-/Ausschalten des Geräts, Anpassen der Lautstärke
• Ein-/Ausschalten der Beleuchtung, Anpassen der Helligkeit der Beleuchtung
• Einstellen des SMART TIMER (& S.12)
• Optimieren des Geräteklangs basierend auf der Aufstellungsposition
• Wiedergeben der auf einem iPhone gespeicherten Titel
Das Mobilgerät muss mit dem Gerät über Bluetooth verbunden sein (& S.8).
(Für Benutzer in den USA)
http://itunes.com/app/
dtacontroller
Google Play™
https://play.google.com/
store/apps/
details?id=com.yamaha.av.
dtacontroller
* Wenn Sie keinen Zugriff auf eine dieser
Optionen erhalten, suchen Sie nach „DTA
CONTROLLER“ im App Store oder
Google Play.
https://itunes.apple.com/us/
app/dta-controller-us/
id549333293?mt=8
Einschalten der Beleuchtung/des Geräts
1 Stecken Sie das Netzkabel in die Netzsteckdose.
2 • Drücken Sie , um die Beleuchtung
einzuschalten.
- Die Beleuchtung kann auch dann ein-/ausgeschaltet
werden, wenn das Gerät ausgeschaltet ist.
- Um die Helligkeit anzupassen, drücken Sie die Taste
DIMMER +/– auf der Fernbedienung (10 Stufen).
•
Drücken Sie , um das Gerät
einzuschalten.
- Das Gerät ist für die Musikwiedergabe bereit.
Automatische Ausschaltfunktion
• Die automatische Ausschaltfunktion wird wie folgt aktiviert (Standardeinstellung).
- Das Gerät schaltet sich automatisch aus, wenn länger als 20 Minuten lang keine
Bedienung vorgenommen wurde und kein Gerät an AUX IN oder über eine
Bluetooth-Verbindung angeschlossen ist.
- Die Beleuchtung und das Gerät werden automatisch ausgeschaltet, wenn länger
als 24 Stunden keine Bedienung durchgeführt wurde.
Aktivieren/Deaktivieren der automatischen Ausschaltfunktion
1 Stecken Sie das Netzkabel in eine Steckdose, während Sie A am Gerät gedrückt halten.
2 Halten Sie A weiter gedrückt.
• Die automatische Ausschaltfunktion schaltet sich um und die Anzeigen (& S.5)
blinken wie folgt:
- Die automatisch Ausschaltfunktion ist aktiviert:
- Die automatisch Ausschaltfunktion ist deaktiviert:
,
Deutsch
De 7
Page 36

Wiedergeben von Musik über eine
Sie können kabellos über ein Bluetooth-kompatibles Gerät Musik hören.
Bluetooth
-Verbindung
Koppeln eines Geräts mit der Einheit
Wenn Sie ein Bluetooth-Gerät zum ersten Mal mit der
Einheit verbinden, muss das Gerät bei der Einheit
registriert werden. Dieser Prozess wird als „Kopplung“
bezeichnet. Wenn die Kopplung abgeschlossen ist,
können nachfolgende Verbindungen mit einigen
einfachen Schritten hergestellt werden.
Die Verbindung zum
Bluetooth-Gerät wird
zum ersten Mal
hergestellt
Durchführen der
Kopplung und
Wiedergeben der Musik
(& S.9)
Die Verbindung zum
Bluetooth-Gerät wurde
bereits hergestellt
Einrichten der Bluetooth-
Verbindung und
Wiedergeben der Musik
(& S.10)
• Wenn die Kopplungsinformationen für ein Gerät
gelöscht werden, müssen Sie die Kopplung dieses
Geräts erneut durchführen, um die Verbindung
wieder herzustellen.
Bluetooth-
Gerät
8 De
Page 37

Durchführen der Kopplung und Wiedergeben der Musik
Wiedergeben von Musik über eine Bluetooth-Verbindung
iPhone
1 Drücken Sie , um das Gerät einzuschalten (& S.7).
• Die Statusanzeige leuchtet.
2 Tippen Sie auf „Einstellungen“ und „Bluetooth“ auf dem iPhone, um
die Bluetooth-Funktion zu aktivieren.
3 Tippen Sie in der Verbindungsliste im Feld „Geräte“ auf „LSX-700 Yamaha“.
• Wenn die Kopplung erfolgreich ist, blinken die Statusanzeige und die Anzeige (& S.5).
4 Geben Sie Musik auf Ihrem iPhone wieder.
Bei einem anderen Gerät als einem iPhone
1 Drücken Sie , um das Gerät einzuschalten (& S.7).
• Die Statusanzeige leuchtet.
2 Aktivieren Sie die Bluetooth-Funktion Ihres Geräts.
3
Wählen Sie in der
• Wenn die Kopplung erfolgreich ist, blinken die Statusanzeige und die Anzeige (& S.5).
• Wenn die -Anzeige erlischt und das Gerät nach Abschluss der Kopplung keine Verbindung zur Einheit herstellt,
wählen Sie erneut „LSX-700 Yamaha“ in der Bluetooth-Einstellung des Geräts.
• Ausführliche Informationen finden Sie in der Bedienungsanleitung des Geräts.
Bluetooth
-Einstellung des Geräts die Option „LSX-700 Yamaha“.
• Wenn bereits ein anderes Gerät mit der Einheit
verbunden ist, beenden Sie diese Bluetooth-
Verbindung, indem Sie gedrückt halten, und
führen Sie dann die Kopplung mit dem neuen
Gerät durch.
• Der Kopplungsvorgang kann abhängig von Ihrem
iPhone oder der Version des
Gerätebetriebssystems abweichen.
• Wenn bereits ein anderes Gerät mit der Einheit
verbunden ist, beenden Sie diese Bluetooth-
Verbindung, indem Sie gedrückt halten, und
führen Sie dann die Kopplung mit dem neuen
Gerät durch.
• Wenn während des Kopplungsvorgangs ein
Passcode erforderlich ist, geben Sie die Nummer
„0000“ ein.
Deutsch
4 Geben Sie Musik auf dem Gerät wieder.
De 9
Page 38

Wiedergeben von Musik über eine Bluetooth-Verbindung
Verbinden eines gekoppelten Bluetooth-Geräts und Wiedergeben von Musik
Wenn das Gerät über eine Bluetooth-Verbindung mit
einem anderen Gerät verbunden ist, beenden Sie diese
Verbindung (siehe „Beenden der Bluetooth-Verbindung“
rechts), bevor Sie eine Verbindung mit dem Zielgerät
herstellen.
1 Drücken Sie , um das Gerät
einzuschalten.
2 Führen Sie die Bluetooth-Verbindung
durch.
• Verbinden über die Einheit: Drücken Sie .
• Verbinden über das Bluetooth-Gerät:
Aktivieren Sie die Bluetooth-Funktion beim Gerät
und wählen Sie „LSX-700 Yamaha“.
• Wenn die Verbindung eingerichtet ist, blinkt die
Statusanzeige und die -Anzeige an der Einheit
leuchtet.
1
2
2, 3
Bluetooth-
Anzeige
Statusanzeige
• Senken Sie die Lautstärke der Einheit vor der
Wiedergabe. Andernfalls ist die
Wiedergabelautstärke möglicherweise zu laut.
• Wenn Sie eine Verbindung über die Einheit
herstellen, sucht die Einheit nach dem Bluetooth-
Gerät, das zuletzt verbunden war. Stellen Sie in
diesem Fall sicher, dass die Bluetooth-Funktion des
Geräts aktiviert ist.
Beenden der Bluetooth-Verbindung
• Die Bluetooth-Verbindung kann durch einen der
folgenden Schritte beendet werden.
- Deaktivieren Sie die Bluetooth-Funktion beim
verbundenen Gerät.
- Halten Sie gedrückt.
• Wenn die Bluetooth-Verbindung beendet wurde,
blinkt die Statusanzeige und die Anzeige
erlischt.
Musikverstärker
Diese Funktion verstärkt den Ton komprimierter
digitaler Tonquellen, indem musikalische
Elemente re-generiert werden, die bei der
Komprimierung über die Bluetooth-Verbindung
verloren gehen.
3 Geben Sie Musik auf dem
angeschlossenen Gerät wieder.
10 De
Page 39

Wiedergabe von externen Quellen
Diese Einheit ermöglicht die Wiedergabe von externen Geräten, die an den AUX IN-Anschluss angeschlossen sind. Ein handelsübliches 3,5-mm-Stereo-Miniklinkenkabel
(Durchmesser: maximal 12 mm) wird für diese Verbindung benötigt.
Anschließen eines
Achten Sie darauf, dass Sie das Gerät über ausschalten, bevor Sie das externe Gerät anschließen.
externen Geräts
1 Entfernen Sie die Abdeckung an der
Rückseite der Einheit.
2 Führen Sie das Kabel durch die
Aussparung darunter und ziehen Sie es
an der Unterseite des Sockels heraus.
3 Schließen Sie das Kabel an den AUX
IN-Anschluss an.
4 Schließen Sie das andere Ende des
Kabels an das externe Gerät an.
Wiedergabe
1 Drücken Sie , um das Gerät
einzuschalten.
2 Starten Sie die Wiedergabe am
externen Gerät.
• Ausführliche Informationen zur Wiedergabe
finden Sie in der Bedienungsanleitung im
Lieferumfang des externen Geräts.
2
AUX IN
1
3
4
Externes
Gerät
• Senken Sie die Lautstärke des Geräts und des externen Geräts vor der Verbindung.
• Wenn sowohl ein Bluetooth-Gerät als auch ein externes Gerät wiedergegeben werden, ist der Ton von beiden Geräten zu
hören.
3,5-mm-Stereo-Miniklinkenkabel
Deutsch
De 11
Page 40

Verwenden des SMART TIMER
Mit dem SMART TIMER können Sie die Beleuchtung mit der eingestellten Helligkeit einschalten und Ihre Lieblingsmusik jeden Morgen als Aufwach-Timer
wiedergeben. Sie können die Beleuchtung auch ausschalten und die Musikwiedergabe automatisch stoppen, wenn Sie im Bett Musik hören.
Was mit dem SMART TIMER möglich ist
Einschalt-Timer Ausschalt-Timer
• Einschalten der Beleuchtung zur eingestellten Zeit.
• Festlegen der Helligkeit der Beleuchtung.
• Wiedergeben der Musik von einem angeschlossenen Gerät zur
eingestellten Zeit.
• Auswählen eines Titels.
• Einstellen des Lautstärkepegels.
• Ausschalten der Beleuchtung zur eingestellten
Zeit.
• Ausschalten der Einheit zur eingestellten Zeit.
Einstellen des SMART TIMER
SMART TIMER-Einstellungen können mit einem Smartphone oder Tablet vorgenommen werden, auf denen die
Anwendung DTA CONTROLLER (& S.7) installiert ist.
1 Schließen Sie ein Gerät über die Bluetooth-Verbindung an (& S.9, 10).
2
Starten Sie DTA CONTROLLER auf dem Gerät und nehmen Sie die SMART TIMER-Einstellungen vor.
3 Synchronisieren Sie den SMART TIMER mit der Einheit über DTA CONTROLLER.
• Achten Sie darauf, dass Sie den SMART TIMER jedes Mal mit der Einheit synchronisieren, wenn Sie eine SMART TIMEREinstellung vornehmen.
Aktivieren/Deaktivieren des SMART TIMER
Drücken Sie an der Einheit oder auf der Fernbedienung.
• Die -Anzeige leuchtet, wenn der SMART TIMER aktiviert ist.
• Um einen Titel über eine Bluetooth-Verbindung zu
einer eingestellten Zeit wiederzugeben, muss die
Bluetooth-Funktion Ihres Smartphones oder Tablet
aktiviert sein. Im Fall eines iPhone dürfen Sie
außerdem beim Multitasking DTA CONTROLLER
nicht schließen.
• Wenn ein anderes Bluetooth-Gerät zum Zeitpunkt
der Einrichtung mit der Einheit verbunden ist, wird
der Titel, den Sie als Einschalt-Timer eingestellt
haben, nicht wiedergegeben. Trennen Sie
mögliche andere Geräte vor der eingestellten Zeit.
• Der Einschalt- und Ausschalt-Timer des SMART
TIMER können nur über DTA CONTROLLER
aktiviert/deaktiviert werden.
• Der SMART TIMER kann nicht durch Betätigen von
an der Einheit oder auf der Fernbedienung
aktiviert/deaktiviert werden, wenn Sie den SMART
TIMER nicht über DTA CONTROLLER einstellen.
Innere Uhr der Einheit
• Die Einheit kopiert die Uhrzeit von DTA
CONTROLLER in die innere Uhr der Einheit, wenn
ein Gerät über eine Bluetooth-Verbindung mit der
Einheit verbunden ist. Der SMART TIMER folgt der
inneren Uhr der Einheit.
• Die Uhreinstellung wird zurückgesetzt und
SMART TIMER wird deaktiviert, wenn das
Netzkabel ungefähr eine Woche lang von der
Netzsteckdose getrennt ist.
12 De
Page 41

Problembehebung
Schlagen Sie in der nachfolgenden Tabelle nach, wenn das Gerät nicht richtig funktionieren sollte. Falls keine Lösung in der nachfolgenden Tabelle aufgeführt ist, oder wenn die
Anweisungen nicht helfen, schalten Sie das Gerät aus, ziehen Sie den Netzstecker, und wenden Sie sich an den nächsten autorisierten Yamaha-Fachhändler oder -Kundendienst.
Allgemeines
Problem Ursache Lösung
Das Gerät schaltet sich kurz nach dem
Einschalten wieder aus.
Das Gerät funktioniert nicht richtig.
Die Lautsprecher geben keinen Ton aus.
Das Gerät und/oder die Beleuchtung
schalten sich plötzlich aus.
Das Gerät und die Beleuchtung schalten
sich plötzlich ein.
SMART TIMER lässt sich nicht einschalten.
Es treten Rauschinterferenzen von Digitaloder Hochfrequenzgeräten auf.
Die Fernbedienung funktioniert nicht
oder funktioniert nicht ordnungsgemäß.
Das Netzkabel ist nicht ordnungsgemäß angeschlossen. Schließen Sie das Netzkabel fest an.
Das Gerät war einem starken Stromschlag ausgesetzt, wie zum Beispiel
einem Blitz oder starker statischer Elektrizität.
Die Lautstärke ist extrem gering eingestellt. Erhöhen Sie die Lautstärke.
Das Gerät ist ausgeschaltet. Schalten Sie das Gerät ein und geben Sie die Musik erneut wieder.
Die automatische Ausschaltfunktion ist aktiviert. Schalten Sie das Gerät ein (& S.7).
Die automatische Ausschaltfunktion ist aktiviert. Schalten Sie das Gerät und/oder die Beleuchtung ein (& S.7).
Der Ausschalt-Timer des SMART TIMER ist einestellt.
Der Einschalt-Timer des SMART TIMER ist eingestellt.
Das Netzkabel war länger als eine Woche getrennt und die
Uhrinformationen wurden gelöscht.
SMART TIMER wurde nicht über DTA CONTROLLER eingestellt.
Dieses Gerät befindet sich zu nah an Digital- oder Hochfrequenzgeräten. Stellen Sie dieses Gerät weiter entfernt von solchen Geräten auf.
Die Fernbedienung wird möglicherweise außerhalb der Reichweite
betätigt.
Möglicherweise ist der Fernbedienungssensor an diesem Gerät direktem
Sonnen- oder starken Lichtquellen, wie einer wechselgerichteten
Leuchtstofflampe, ausgesetzt.
Möglicherweise ist die Batterie entladen. Tauschen Sie die Batterien gegen neue aus (& S.6).
Es befinden sich Hindernisse zwischen dem Sensor dieses Geräts und der
Fernbedienung.
Schalten Sie das Gerät aus und trennen Sie das Netzkabel. Schließen Sie es
nach ungefähr 30 Sekunden wieder an und schalten Sie es dann wieder ein.
Überprüfen Sie die Einstellung des Ausschalt-Timers über DTA
CONTROLLER.
Überprüfen Sie die Einstellung des Einschalt-Timers über DTA
CONTROLLER.
Stellen Sie SMART TIMER über DTA CONTROLLER ein und synchronisieren
Sie es mit dem Gerät (& S.12).
Bedienen Sie die Fernbedienung innerhalb des Betriebsbereichs (& S.6).
Ändern Sie die Ausrichtung der Lampe oder des Geräts oder den
Aufstellungsort des Geräts.
Entfernen Sie die Hindernisse.
Deutsch
De 13
Page 42
Problembehebung
Bluetooth
Problem Ursache Lösung
Die Einheit lässt sich nicht mit dem
Bluetooth-Gerät koppeln.
Es kann keine Bluetooth-Verbindung
hergestellt werden.
Es wird kein Ton ausgegeben oder der
Ton wird während der Wiedergabe
unterbrochen.
Die Einheit wird ausgeschaltet. Schalten Sie die Einheit ein und führen Sie die Kopplung durch (& S.9).
Es ist ein weiteres Bluetooth-Gerät angeschlossen.
Die Einheit und das Gerät stehen zu weit voneinander entfernt. Koppeln Sie die Einheit und das Gerät innerhalb eines Abstands von 10 m.
In der Nähe befindet sich ein Gerät (Mikrowellenofen, WLAN usw.), das
Signale im 2,4-GHz-Frequenzbereich ausgibt.
Ein Bluetooth-Adapter usw., den Sie mit der Einheit koppeln möchten, hat
einen anderen Passcode als „0000“.
Das Bluetooth-Gerät unterstützt kein A2DP. Führen Sie die Kopplung mit einem Gerät durch, das A2DP unterstützt.
Die Einheit wird ausgeschaltet. Schalten Sie das Gerät ein.
Es ist ein weiteres Bluetooth-Gerät angeschlossen.
Die Bluetooth-Funktion des Geräts ist deaktiviert. Aktivieren Sie die Bluetooth-Funktion des Geräts.
Die Kopplungsinformationen wurden gelöscht.
Diese Einheit wird nicht in der Bluetooth-Verbindungsliste des Geräts
registriert.
Die Lautstärke des verbundenen Geräts ist zu niedrig. Erhöhen Sie die Lautstärke des verbundenen Geräts.
Das verbindende Gerät ist nicht auf die Übertragung von Bluetooth-
Audiosignalen an die Einheit eingestellt.
Die Bluetooth-Verbindung zwischen der Einheit und dem Gerät wurde
getrennt.
In der Nähe befindet sich ein Gerät (Mikrowellenofen, WLAN usw.), das
Signale im 2,4-GHz-Frequenzbereich ausgibt.
Die Einheit und das zu verbindende Gerät stehen zu weit voneinander
entfernt.
Beenden Sie die aktuelle Bluetooth-Verbindung und führen Sie die
Kopplung mit dem neuen Gerät durch.
Stellen Sie das Gerät weiter entfernt von dem Gerät auf, das
Radiofrequenzsignale abgibt.
Verwenden Sie einen Bluetooth-Adapter usw., dessen Passcode „0000“ ist.
Beenden Sie die aktuelle Bluetooth-Verbindung und richten Sie dann
wieder eine Bluetooth-Verbindung mit diesem Gerät ein.
Führen Sie die Kopplung erneut durch (& S.9).
Diese Einheit kann mit acht Geräten gekoppelt werden. Wenn ein neuntes
Gerät gekoppelt wird, werden die Kopplungsinformationen mit dem
ältesten Datum gelöscht.
Führen Sie die Kopplung erneut durch (& S.9).
Aktivieren Sie die Ausgabe von Bluetooth-Audiosignalen des verbindenden
Geräts an diese Einheit.
Führen Sie den Bluetooth-Verbindungsvorgang erneut durch (& S.10).
Stellen Sie das Gerät weiter entfernt von dem Gerät auf, das
Radiofrequenzsignale abgibt.
Stellen Sie das zu verbindende Gerät innerhalb von 10 m zur Einheit auf.
14 De
Page 43
Technische Daten
Bluetooth-Abschnitt
Bluetooth-Version Version 2.1+EDR
Unterstütztes Profil
Kompatible Codecs SBC, AAC, aptX®
Drahtlosausgang Bluetooth Klasse 2
Maximale
Kommunikationsreichweite
A2DP (Advanced Audio Distribution Profile)
AVRCP (Audio/Video Remote Control Profile)
10 m (ohne Hindernisse)
AUX IN-Abschnitt
Eingangsbuchse 3,5-mm-Stereo-Miniklinkenbuchse
Beleuchtungs-Abschnitt (LED*)
Nutzungsdauer (Lichtstrom unter 70 %) Ungefähr 40.000 Stunden
Leistungsaufnahme (Bei aktivierter Beleuchtung) 9 W
Allgemeines
Netzspannung/-frequenz 100 - 240 V Wechselspannung, 50/60 Hz
Einschaltbedingung (Musik wird wiedergegeben und die
Beleuchtung ist eingeschaltet):
Leistungsaufnahme
Abmessungen (B × H × T) 300 × 1.152 × 300 mm (einschließlich sockel)
Gewicht 5,5 kg
20 W
Ausschaltbedingung (Beleuchtung und SMART TIMER sind
deaktiviert und es besteht keine Bluetooth-Verbindung):
maximal 0,5 W
Stand Oktober 2013. Technische Daten können ohne Ankündigung geändert werden.
* Die geschätzte Nutzungsdauer der LED-Beleuchtung liegt bei ungefähr 40.000 Stunden.
Diese Zahl basiert auf dem kleineren Wert entweder der Dauer, bis die Beleuchtung erschöpft ist,
oder der Dauer, bevor der Lichtstrom unter 70 % des ursprünglichen Werts fällt. Beachten Sie
aber, dass die geschätzten 40.000 Stunden Dauer nicht garantiert werden.
„Made for iPod“, „Made for iPhone“ und „Made for
iPad“ bedeuten, dass ein elektronisches Zubehör
speziell konstruiert ist, sodass es entsprechend mit
einem iPod, iPhone oder iPad verbunden werden
kann, und vom Entwickler zertifiziert wurde, um die Standards von Apple zu erfüllen.
Apple ist nicht verantwortlich für den Betrieb dieses Geräts oder dessen Einhaltung der
Sicherheitsstandards und -vorschriften.
Bitte beachten Sie, dass die Verwendung dieses Zubehörs mit iPod, iPhone oder iPad die drahtlose
Übertragungsleistung beeinträchtigen kann.
iPad, iPhone, iPod und iPod touch sind in den USA und anderen Ländern eingetragene
Warenzeichen von Apple Inc.
Bluetooth
• Bluetooth ist eine Technologie zur drahtlosen Kommunikation zwischen Geräten innerhalb eines
Bereichs von ungefähr 10 m, die das 2,4-GHz-Frequenzband verwendet, ein Band, das ohne
Lizenz verwendet werden kann.
• Bluetooth ist ein eingetragenes Markenzeichen von Bluetooth SIG und wird von Yamaha gemäß
der Lizenzvereinbarung verwendet.
Handhabung von Bluetooth-Kommunikationen
• Das von Bluetooth-kompatiblen Geräten verwendete 2,4-GHz-Band ist ein Frequenzband, das
von vielen Gerätearten verwendet wird. Bluetooth-kompatible Geräte verwenden zwar eine
Technologie, welche die Einflüsse anderer Komponenten, die das gleiche Frequenzband
verwenden, minimiert, aber solche Einflüsse können die Kommunikationsgeschwindigkeit oder
die -entfernung reduzieren und in einigen Fällen die Kommunikation unterbrechen.
• Die Geschwindigkeit der Signalübertragung und die Entfernung, in welcher eine
Kommunikation möglich ist, variiert abhängig von der Entfernung zwischen den
kommunizierenden Geräten, dem Vorhandensein von Hindernissen, den Bedingungen der
Funkwellen und der Art des Geräts.
• Yamaha garantiert nicht alle drahtlosen Verbindungen zwischen dieser Einheit und Geräten, die
mit der Bluetooth-Funktion kompatibel sind.
aptX® ist ein Warenzeichen von CSR.
Android™
Android und Google Play sind Marken von Google, Inc.
Deutsch
De 15
Page 44

Innehåll
Introduktion......4
Medföljande tillbehör......4
Placera enheten......4
Om den här bruksanvisningen......4
Delarnas namn......5
Huvudenhet......5
Fjärrkontroll......6
Förberedelser......7
Installera ”DTA CONTROLLER”......7
Slå på belysningen/strömmen......7
Lyssna på musik via Bluetooth-anslutning......8
Para ihop en enhet med enheten......8
Utför ihopparning och spela upp musik......9
Ansluta en ihopparad Bluetooth-enhet och spela upp musik......10
Avbryta Bluetooth-anslutningen......10
Lyssna på externa källor......11
Ansluta en extern enhet......11
Spela upp......11
Använda SMART TIMER......12
Ställa in SMART TIMER......12
Aktivera/avaktivera SMART TIMER......12
Felsökning......13
Tekniska data......15
2 Sv
Page 45

En fusion av musik och belysning
Börja dagen med rätt belysning och på rätt ton.
Vakna till din favoritlåt i en komfortabel omgivning.
......12
Högkvalitativt ljud
med enkel användning
Plug and play-bekvämligheten hos dina mobila
enheten med utökat ljud.
Bekväm fjärrstyrning från din mobila enhet. ......7
......8, 11
Svenska
Vid dagens slut kan du omge dig med en helande
stämning av mjuk belysning och ljud.
......7
Sv 3
Page 46

Introduktion
Kontrollera förpackningens innehåll och läs denna bruksanvisning noga.
Medföljande tillbehör
Använd följande delar för att montera stället. Läs den
separata ”Monteringsanvisning” för information om hur
du monterar stället.
•Sockel
•Skruv (M5)
Strömkabel
Fjärrkontroll
• Kabelklämma
Placera enheten
Den här enheten använder hörn- eller bakväggsreflektioner för att utöka ljudet och
ljuset.
Hörnplacering Nära väggplacering
• Det rekommenderas att du placerar enheten 30 cm - 70 cm från ett hörn. När du
placerar den vid en vägg ska den placeras 20 cm - 50 cm från bakväggen.
Cirka 30 cm - 70 cm
Om den här bruksanvisningen
• Styrning
- Enhetens hantering beskrivs huvudsakligen med
hjälp av fjärrkontrollen.
- Begreppet ”iPhone” i denna bruksanvisning kan även
hänvisa till ”iPod touch” och ”iPad”.
• Illustrationerna
Illustrationerna kan skilja sig från den verkliga
produkten.
• Symboler
Anger varningar som bör iakttas vid användning
av receivern samt begränsningar i funktioner.
Anger extra förklaringar som hjälper dig att
använda enheten bättre.
Ange motsvarande referenssida(or).
&
* Ljuseffekten återspeglar ljudexpansionen.
4 Sv
Front
Page 47
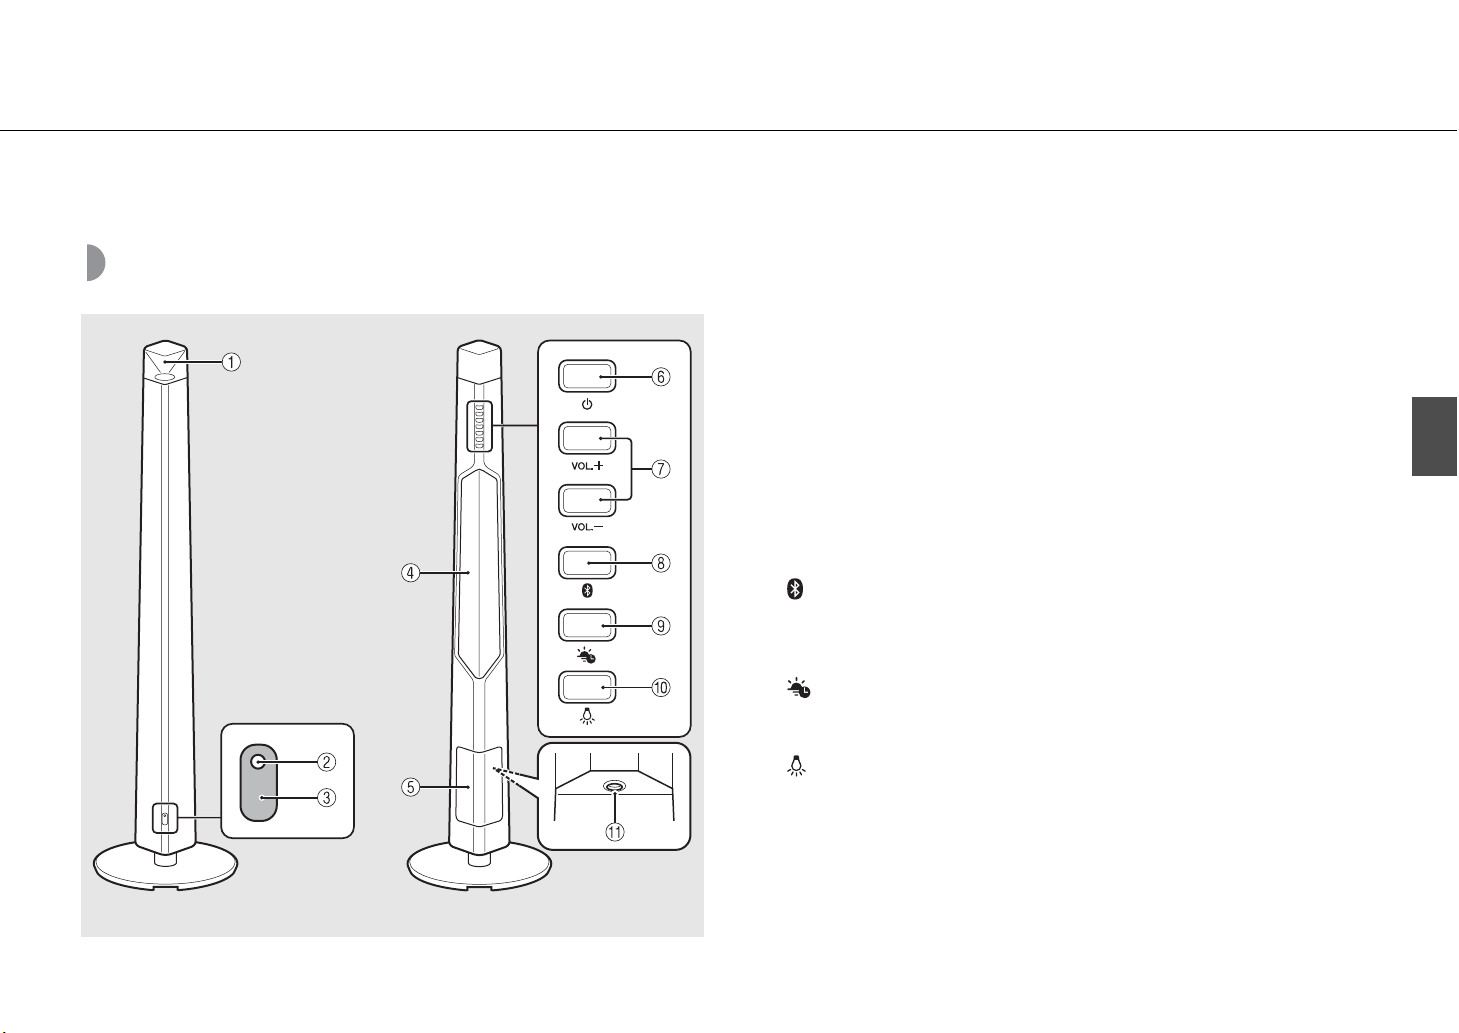
Delarnas namn
Bekanta dig med alla delar och funktioner.
Huvudenhet
1 Frontbelysning/högtalare
2 Statusindikator
Tänds när enheten slås på. Blinkar när en styrningssignal tas emot eller när statusen för
Bluetooth-anslutningen ändras.
3 Fjärrkontrollsignalsensor (& S.6)
Front Bak
4 Bakbelysning/högtalare
5 Kåpa (& S.11)
Tas loss för åtkomst till AUX IN-terminalen.
6 A (Ström) (& S.7)
Tryck på för slå på eller stänga av enheten.
7 VOLUME +/–
Styr volymen.
8 (Bluetooth-knapp/indikator) (& S.9)
Tryck på : ansluts till en Bluetooth-enhet.
Håll ned: kopplas bort från en Bluetooth-enhet.
Tänds när en Bluetooth-enhet är ansluten.
9 (SMART TIMER-knapp/indikator) (& S.12)
Aktiverar/avaktiverar SMART TIMER.
Tänds medan SMART TIMER är aktiverad.
0 (Belysning) (& S.7)
Tryck på för slå på eller stänga av front-/bakbelysningen.
A AUX IN (& S.11)
Ansluts till en extern enhet vanlig 3,5 mm-stereokabel med miniplugg.
Svenska
Sv 5
Page 48

Delarnas namn
Fjärrkontroll
Isoleringsblad*
1 (Ström) (& S.7)
Tryck på för slå på eller stänga av enheten.
2 VOLUME +/–
Styr volymen.
3 (Bluetooth) (& S.9)
Tryck på : ansluts till en Bluetooth-enhet.
Håll ned: kopplas bort från en Bluetooth-enhet.
4 (SMART TIMER) (& S.12)
Aktiverar/avaktiverar SMART TIMER.
5 Fjärrkontrollsignalsändare
6 (Belysning) (& S.7)
Tryck på för slå på eller stänga av belysningen.
7 DIMMER +/– (& S.7)
Tryck för att justera belysningens ljusstyrka.
Fjärrkontrollens vinkel/räckvidd
Rikta fjärrkontrollen mot fjärrkontrollsensorn på enheten.
Inom
6 m
Byta batteriet
• Kontrollera batteriets polaritet (”+”) och sätt i det i rätt
riktning.
• Tryck frigöringsfliken i riktningen och skjut sedan ut
batterihållaren i riktningen .
Litiumbatteri av
typen CR2025
* Ta bort isoleringsbladet i fjärrkontrollen innan användning.
6 Sv
Page 49

Förberedelser
Installera Yamahas app ”DTA CONTROLLER” och slå på enheten.
Installera ”DTA CONTROLLER”
Om du installerar appen DTA CONTROLLER på en mobil enhet, t.ex. en smartphone eller
surfplatta, får du tillgång till många olika praktiska funktioner i Yamahas stationära
ljudsystem.
Funktioner
• Slå på/stänga av enheter, justera volymen
• Slå på/stänga av belysningen, justera belysningens ljusstyrka
• Ställa in SMART TIMER (& S.12)
• Optimera enhetens ljud baserad på placeringen
• Spela upp låtar lagrade på en iPhone
Den mobila enheten måste vara ansluten till enheten via Bluetooth-anslutning (& S.8).
(För användare i USA)
http://itunes.com/app/
dtacontroller
Google Play™
https://play.google.com/
store/apps/
details?id=com.yamaha.av.
dtacontroller
* Om det inte går att använda någon av dessa
länkar söker du efter ”DTA CONTROLLER” på
App Store eller Google Play.
https://itunes.apple.com/us/
app/dta-controller-us/
id549333293?mt=8
Slå på belysningen/strömmen
1 Anslut nätkabeln till ett eluttag.
2 • Tryck på för att slå på belysningen.
- Belysningen kan slås på/stängas av även när
enhetens ström är av.
- Om du vill justera ljusstyrkan trycker du på
knappen DIMMER +/– på fjärrkontrollen (10
steg).
• Tryck på för att slå på enheten.
- Enheten är redo att spela upp musik.
Funktion för automatisk avstängning
• Funktionen för automatisk avstängning aktiveras enligt följande (standardinställning).
- Enheten stängs av automatiskt om ingen åtgärd utförts på mer än 20 minuter och
ingen enhet är ansluten till AUX IN eller via Bluetooth -anslutning.
- Belysningen och enheten stängs av automatiskt om ingen åtgärd har utförts på mer
än 24 timmar.
Aktivera/avaktivera funktionen för automatisk avstängning
1 Håll ned A på enheten och anslut nätkabeln till ett eluttag.
2 Håll A nedtryckt.
• Funktionen för automatisk avstängning växlar och indikatorerna (& S.5) blinkar
enligt följande:
- Automatisk avstängning är aktiverad:
- Automatisk avstängning är avaktiverad:
,
Svenska
Sv 7
Page 50

Lyssna på musik via Bluetooth-anslutning
Du kan lyssna på ljud trådlöst från en Bluetooth-kompatibel enhet.
Para ihop en enhet med enheten
När du ansluter en Bluetooth-enhet till den här enheten
för första gången måste enheten registreras på den här
enheten. Denna process kallas ”ihopparning”. När
ihopparningen är slutförd kan efterföljande anslutning
göras med några enkla steg.
En Bluetooth-enhet som
ansluter för första
gången
Utför ihopparning och
spela upp musik (& S.9)
En Bluetooth-enhet som
redan har anslutits
Upprätta Bluetooth-
anslutning och spela upp
musik (& S.10)
• Om ihopparningsinformationen för en enhet tas
bort måste du utföra ihopparning för den enheten
igen för att ansluta till den igen.
Bluetooth-
enhet
8 Sv
Page 51

Utför ihopparning och spela upp musik
Lyssna på musik via Bluetooth-anslutning
iPhone
1 Tryck på för att slå på enheten (& S.7).
• Statusindikatorn tänds.
2 Tryck på ”Inställningar” och ”Bluetooth” på din iPhone för att slå på
dess Bluetooth-funktion.
3 I anslutningslistan i fältet ”Enheter” trycker du på ”LSX-700 Yamaha”.
• När ihopparningen lyckats blinkar statusindikatorn och -indikatorn (& S.5).
4 Spela upp musik på din iPhone.
En annan enhet än iPhone
1 Tryck på för att slå på enheten (& S.7) .
• Statusindikatorn tänds.
2 Slå på Bluetooth-funktionen på din enhet.
3 I Blue tooth-inställningen på enheten väljer du ”LSX-700 Yamaha”.
• När ihopparningen lyckats blinkar statusindikatorn och -indikatorn (& S.5).
• Om -indikatorn slocknar och enheten inte ansluts till den här enheten automatiskt efter slutför ihopparning, väljer
du ”LSX-700 Yamaha” igen i Bluetooth-inställningen på den här enheten.
• För mer information, se enhetens bruksanvisning.
• Om en annan enhet redan är ansluten till den här
enheten avbryter du den Bluetooth-anslutningen
genom att hålla ned och utför sedan
ihopparning med den nya enheten.
• Ihopparningsåtgärden kan skilja sig beroende på
din iPhone eller version av enhets-OS.
• Om en annan enhet redan är ansluten till den här
enheten avbryter du den Bluetooth-anslutningen
genom att hålla ned och utför sedan
ihopparning med den nya enheten.
• Om en lösenkod krävs under
ihopparningsåtgärden anger du numret ”0000”.
Svenska
4 Spela upp musik på din enhet.
Sv 9
Page 52

Lyssna på musik via Bluetooth-anslutning
Ansluta en ihopparad Bluetooth-enhet och spela upp musik
Om enheten är ansluten till en annan enhet via Bluetooth-
anslutning, avbryter du den anslutningen (se ”Avbryta
Bluetooth-anslutningen” till höger) innan du ansluter
målenheten.
1 Tryck på för att slå på enheten.
2 Utför Bluetooth-anslutning.
• Anslutning från enheten: Tryck på .
• Anslutning från Bluetooth-enheten:
slå på Bluetooth -funktionen på enheten och välj
”LSX-700 Yamaha”.
• När anslutningen har upprättats blinkar
statusindikatorn och -indikatorn på enheten
tänds.
3 Spela upp musik på den anslutna
enheten.
1
2
2, 3
Bluetooth-
indikator
Statusindikator
• Sänk volymen på enheten innan
uppspelning. Annars kan uppspelningsvolymen
bli alltför hög.
• Om du ansluter från enheten söker enheten efter
den Bluetooth-enhet som anslöts den senaste
gången. I det här fallet ser du till att enhetens
Bluetooth-funktion är påslagen.
Avbryta Bluetooth-anslutningen
• Bluetooth-anslutningen kan avbrytas på något av
följande sätt.
- Stäng av Blueto oth-funktionen på den anslutna
enheten.
- Håll ned .
• När Bluetooth-anslutningen avbryts blinkar
statusindikatorn och
Musikförbättrare
Den här funktionen förbättrar ljudet i
komprimerade digitala format genom att
återskapa musikelement som gått förlorade
genom komprimering via Bluetooth-anslutning.
-indikatorn slocknar.
10 Sv
Page 53

Lyssna på externa källor
Den här enheten kan spela upp externa enheter anslutna till AUX IN-terminalen. En vanlig 3,5 mm-stereokabel med miniplugg (diameter: 12 mm eller mindre)
krävs för denna anslutning. Se till att stänga av enheten genom att trycka på innan du ansluter den externa enheten.
Ansluta en extern enhet
1 Ta bort kåpan på enhetens baksida.
2 För in kabeln genom hålet på
undersidan och dra ut den genom
sockelns botten.
3 Anslut kabeln till AUX IN-terminalen.
4 Anslut den andra änden av kabeln till
den externa enheten.
Spela upp
1 Tryck på för att slå på enheten.
2 Spela upp den externa enheten.
• Mer information om uppspelning finns i den
bruksanvisning som medföljde den externa
enheten.
2
AUX IN
1
3
4
Extern
enhet
• Sänk volymen på enheten och den externa enheten innan anslutning.
• Om både en Bluetooth-enhet och den externa enheten spelas upp, hörs ljudet från båda enheterna.
3,5 mm-stereokabel med miniplugg
Svenska
Sv 11
Page 54

Använda SMART TIMER
Med SMART TIMER kan du slå på belysningen med den ljusstyrka du ställer in och spela upp din favoritmusik som uppvakningstimer varje morgon. Du kan också
stänga av belysningen och stoppa musikuppspelningen automatiskt medan du ligger i sängen och lyssnar på musik.
Vad SMART TIMER kan göra
Påslagningstimer Avstängningstimer
• Slå på belysningen vid en angiven tidpunkt.
• Ange belysningens ljusstyrka.
• Spela upp musiken från en ansluten enhet vid en angiven
tidpunkt.
• Ange en låt.
• Förinställ volymnivån.
• Stäng av belysningen vid en angiven tidpunkt.
• Stäng av strömmen vid en angiven tidpunkt.
Ställa in SMART TIMER
SMART TIMER-inställningar kan utföras med en smartphone eller surfplatta som har DTA CONTROLLER-appen
(& S.7) installerad.
1 Anslut en enhet via Bluetooth-anslutning (& S.9, 10).
2 Starta DTA CONTROLLER på enheten och gör SMART TIMER-inställningar.
3 Synkronisera SMART TIMER med enheten via DTA CONTROLLER.
• Se till att synkronisera SMART TIMER med enheten varje gång du utför SMART TIMER-inställningen.
Aktivera/avaktivera SMART TIMER
• Om du vill spela upp en låt via Bluetoothanslutning vid en inställd tidpunkt, måste
Bluetooth-funktionen på din smartphone eller
surfplatta vara påslagen. Dessutom, om du har en
iPhone, får du inte avsluta DTA CONTROLLER
under multitasking.
• Om en annan Bluetooth-enhet är ansluten till
enheten vid den angivna tidpunkten kommer den
låt du ställt in för påslagningstimern inte att spelas
upp. Koppla bort en annan enhet innan den tid du
ställer in.
• Påslagningstimern och avstängningstimern för
SMART TIMER kan bara aktiveras/avaktiveras med
DTA CONTROLLER.
• SMART TIMER kan inte aktiveras/avaktiveras
genom tryck på på enheten eller
fjärrkontrollen om du inte ställer in SMART TIMER
från DTA CONTROLLER.
Enhetens interna klocka
• Enheten kopierar tiden till enhetens interna klocka
från DTA CONTROLLER när en enhet ansluts via
Bluetooth-anslutning. SMART TIMER följer
enhetens interna klocka.
• Klockinställningen återställs och SMART TIMER
avaktiveras om nätkabeln inte är ansluten till
eluttaget under ungefär en vecka.
Tryck på på enheten eller på fjärrkontrollen.
• -indikatorn tänds när SMART TIMER är aktiverad.
12 Sv
Page 55

Felsökning
Gå igenom tabellen nedan om enheten inte fungerar korrekt. Om lösningen inte anges nedan eller om problemet inte kan lösas med hjälp av anvisningarna
nedan, stänger du av enheten, kopplar loss nätkabeln och kontaktar närmaste auktoriserade Yamaha-handlare eller servicecenter.
Allmänt
Problem Orsak Lösning
Enheten stängs inte av kort efter att
strömmen har slagits på.
Enheten fungerar inte på rätt sätt.
Högtalarna avger inget ljud.
Enheten och/eller belysningen stängs av
plötsligt.
Enheten och belysningen stängs av
plötsligt.
Det går inte att slå på SMART TIMER.
Det förekommer störningar från digital
utrustning eller högfrekvensutrustning.
Fjärrkontrollen kan inte användas eller
fungerar dåligt.
Nätkabeln är inte rätt ansluten. Anslut nätkabeln ordentligt.
Enheten har utsatts för en kraftig elektrisk stöt, t.ex. ett blixtnedslag eller
kraftig statisk elektricitet.
Volymen är nedställd. Vrid upp volymen.
Strömmen är avstängd. Slå på enheten och spela upp musiken igen.
Funktionen för automatisk avstängning är aktiverad. Slå på enheten (& S.7).
Funktionen för automatisk avstängning är aktiverad. Slå på enheten och/eller belysningen (& S.7).
Avstängningstimern för SMART TIMER är inställd. Kontrollera inställningen för avstängningstimern från DTA CONTROLLER.
Påslagningstimern för SMART TIMER är inställd. Kontrollera inställningen för påslagningstimern från DTA CONTROLLER.
Nätkabeln har varit urkopplad i mer än en vecka och klockinformationen
har nollställts.
SMART TIMER ställs inte in från DTA CONTROLLER.
Enheten står för nära den digitala utrustningen eller
högfrekvensutrustningen.
Fjärrkontrollen kanske används utanför räckvidden. Använd fjärrkontrollen inom dess räckvidd (& S.6).
Fjärrkontrollsensorn på enheten kanske utsätts för direkt solljus eller
belysning, t.ex. ett lysrör.
Batteriet kanske är slut. Byt till ett nytt batteri (& S.6).
Det finns hinder mellan sensorn på enheten och fjärrkontrollen. Flytta hindren.
Stäng av enheten och koppla sedan bort nätkabeln. Anslut den igen efter
cirka 30 sekunder och slå på strömmen igen.
Ställ in SMART TIMER från DTA CONTROLLER och synkronisera den med
enheten (& S.12).
Flytta enheten längre bort från sådan utrustning.
Ändra riktningen på belysningen eller enheten eller flytta enheten.
Svenska
Sv 13
Page 56

Felsökning
Bluetooth
Problem Orsak Lösning
Det går inte att para ihop enheten med en
Bluetooth-enhet.
Det går inte att upprätta en Bluetooth-
anslutning.
Inget ljud hörs eller så avbryts ljudet under
uppspelningen.
Enheten stängs av. Slå på enheten och utför ihopparningen (& S.9).
En annan Bluetooth-enhet är ansluten.
Enheterna är för långt ifrån varandra. Para ihop enheterna inom ett avstånd på 10 m.
Det finns en enhet (mikrovågsugn, trådlöst LAN etc.) som sänder ut signaler
i 2,4 GHz-frekvensbandet i närheten.
En Bluetooth-adapter eller liknande som du vill para ihop med den här
enheten har en annan lösenord ”0000”.
Bluetooth-enheten stöder inte A2DP. Utför ihopparning med en enhet som stöder A2DP.
Enheten stängs av. Slå på enheten.
En annan Bluetooth-enhet är ansluten.
Bluetooth-funktionen på enheten är avstängd. Slå på Bluetooth-funktionen på enheten.
Ihopparningsinformationen har tagits bort.
Den här enheten är inte registrerad på enhetens Bluetooth-anslutningslista. Utför ihopparningen igen (& S.9).
Volymen från den anslutna enheten är för lågt inställd. Höj volymen på den anslutna enheten.
Den anslutande enheten är inte inställd på att skicka Bluetooth-ljudsignaler
till enheten.
Bluetooth-anslutningen mellan enheterna har kopplats från. Utför Bluetooth-anslutningsåtgärderna igen (& S.10).
Det finns en enhet (mikrovågsugn, trådlöst LAN etc.) som sänder ut signaler
i 2,4 GHz-frekvensbandet i närheten.
Enheterna är för långt ifrån varandra. Flytta enheterna inom 10 m från varandra.
Avbryt den aktuella Bluetooth-anslutningen och utför ihopparningen med
den nya enheten.
Flytta enheten bort från den enhet som avger radiofrekvenssignaler.
Använd en Bluetooth-adapter med lösenkoden ”0000”.
Avbryt den aktuella Bluetooth-anslutningen och upprätta sedan en
Bluetooth-anslutning med den enheten igen.
Utför ihopparningen igen (& S.9).
Den här enheten kan paras ihop med åtta enheter. När du parar ihop en
nionde enhet tas ihopparningsinformationen med det äldsta
anslutningsdatumet bort.
Växla utgången för Bluetooth-ljudsignaler för den anslutande enheten till
enheten.
Flytta enheten bort från den enhet som avger radiofrekvenssignaler.
14 Sv
Page 57

Tekniska data
Bluetooth
Bluetooth-version Ver. 2.1+EDR
Kompatibel profil
Kompatibla codecs SBC, AAC, aptX®
Trådlös utgång Bluetooth klass 2
Max. kommunikationsavstånd 10 m (utan hinder)
A2DP (Advanced Audio Distribution Profile)
AVRCP (Audio/Video Remote Control Profile)
AUX IN
Ingångskontakt 3,5 mm stereominijack
Belysning (LED*)
Livstid (Belysningsflux under 70 %) Cirka 40 000 timmar
Effektförbrukning (När enbart belysningen är på) 9 W
Allmänt
Strömförsörjning AC 100 - 240 V, 50/60 Hz
Vid påslagen ström (musiken spelas upp och belysningen är på):
20 W
Effektförbrukning
Mått (B × H × D) 300 × 1 152 × 300 mm (inklusive sockel)
Vikt 5,5 kg
Vid avslagen ström (belysningen och SMART TIMER är av och
ingen Bluetooth-anslutning):
0,5 W eller mindre
Per oktober 2013. Tekniska data kan ändras utan föregående meddelande.
* Den beräknade livslängden för LED-belysningen är cirka 40 000 timmar.
Detta värde baserat på den kortare av livslängderna tills belysningen är utsliten, eller tills
belysningsfluxen faller till under 70 % av det ursprungliga värdet. Lägg däremot märket till att
den beräknade livslängden på 40 000 timmar inte kan garanteras.
”Made for iPod”, ”Made for iPhone” och ”Made for
iPad” innebär att ett elektroniktillbehör har
konstruerats specifikt för användning med en iPod,
iPhone eller iPad och att tillbehöret är certifierat av
utvecklaren enligt Apples funktionsstandarder.
Apple är varken ansvarigt för den här enhetens funktioner eller dess uppfyllande av
säkerhetsstandarder och lagkrav.
Observera att användningen av det här tillbehöret tillsammans med en iPod, iPhone eller iPad kan
påverka prestandan för trådlös kommunikation.
iPad, iPhone, iPod och iPod touch är varumärken som tillhör Apple Inc. och är registrerade i USA
och andra länder.
Bluetooth
• Bluetooth är en teknik för trådlös kommunikation mellan enheter på högst 10 meters avstånd via
2,4 GHz-frekvensbandet, ett band som kan användas utan licens.
• Bluetooth är ett registrerat varumärke som tillhör Bluetooth SIG och används av Yamaha i enlighet
med ett licensavtal.
Hantera Bluetooth-kommunikationer
• 2,4 GHz-bandet som används av Bluetooth-kompatibla enheter är ett radioband som delas av
många typer av utrustning. Medan Bluetooth-kompatibla enheter använder en teknik som
minimerar inverkan av andra komponenter som använder samma radioband, t.ex. inverkan som
kan sänka hastigheten eller försämra räckvidden för kommunikationen och i vissa fall störa ut
kommunikationen.
• Hastigheten på signalöverföringen och avståndet på vilket kommunikation är möjlig varierar
beroende på avståndet mellan enheterna, närvaron av hinder, radiovågsförhållandena och typ
av utrustning.
• Yamaha garanterar inte att alla trådlösa anslutningar mellan den här enheten och enheter
kompatibla med Bluetooth-funktionen.
aptX® är ett varumärke som tillhör CSR.
Android™
Android och Google Play är varumärken som tillhör Google, Inc.
Svenska
Sv 15
Page 58

Indice
Introduzione......4
Accessori in dotazione......4
Installazione dell’unità......4
Informazioni su questo manuale......4
Nomi delle parti......5
Corpo principale......5
Telecomando......6
Preparativi......7
Installazione di “DTA CONTROLLER”......7
Accensione delle luci/dell’unità......7
Ascolto della musica tramite connessione Bluetooth......8
Associazione di un dispositivo con l’unità......8
Esecuzione dell’associazione e riproduzione musicale......9
Collegamento di un dispositivo Bluetooth associato e riproduzione musicale......10
Termine della connessione Bluetooth......10
Riproduzione da sorgenti esterne......11
Collegamento di un dispositivo esterno......11
Riproduzione......11
Uso di SMART TIMER......12
Impostazione di SMART TIMER......12
Attivazione/disattivazione di SMART TIMER......12
Risoluzione dei problemi......13
Dati tecnici......15
2 It
Page 59

Un’armonia di musica e luci
Inizia la tua giornata nel modo migliore:
lascia che sia la tua musica preferita a svegliarti piacevolmente.
......12
Audio di qualità
e semplicità d’uso
La comodità del sistema “Plug and play” offerta dai
dispositivi mobili con audio potenziato.
Comodo controllo a distanza dal proprio
dispositivo mobile.
......7
......8, 11
Italiano
A fine giornata, immergiti in un’atmosfera rilassante di
raffinate melodie e luci soffuse.
......7
It 3
Page 60

Introduzione
Controllare il contenuto della confezione e leggere attentamente il presente manuale.
Accessori in dotazione
Utilizzare i componenti seguenti per assemblare il
supporto. Leggere la “Guida per l’assemblaggio” separata
per informazioni su come assemblare il supporto.
•Base
•Vite (M5)
Cavo di alimentazione
Telecomando
• Morsetto cavo
Installazione dell’unità
Questa unità utilizza riflessi sulle pareti posteriori e negli angoli per espandere il
suono e la luce.
Installazione in un angolo Installazione vicino a una parete
• Si raccomanda di posizionare l’unità a una distanza compresa tra 30 cm e 70 cm da
un angolo. Se l’unità è installata vicino a una parete, posizionarla a una distanza
compresa tra 20 cm e 50 cm dalla parete posteriore.
Circa 30 cm - 70 cm
Informazioni su questo manuale
• Funzionamento
- L’utilizzo di questa unità è descritto principalmente
tramite l’uso del telecomando.
- Il termine “iPhone” utilizzato in questo manuale può
riferirsi anche a “iPod touch” o “iPad”.
• Illustrazioni
Le illustrazioni potrebbero differire dalle parti effettive.
• Simboli
Indica le precauzioni per l’uso dell’unità e le
limitazioni delle relative funzioni.
Indica spiegazioni aggiuntive per un migliore uso
del prodotto.
Indica la(e) pagina(e) di riferimento
&
corrispondente(i).
* Gli effetti della luce rappresentano l’espansione dell’audio.
4 It
Parte anteriore
Page 61

Nomi delle parti
Imparare a conoscere bene tutte le parti e le funzioni.
Corpo principale
1 Luce anteriore/diffusore
2 Indicatore di stato
Si illumina quando l’unità si accende. Lampeggia quando riceve un segnale o quando lo
stato della connessione Blueto oth cambia.
3 Sensore dei segnali del telecomando (& P.6)
4 Luce posteriore/diffusore
5 Coperchio (& P.11)
Staccare per accedere al terminale AUX IN.
6 A (Accensione) (& P.7)
Premere per accendere o spegnere l’unità.
7 VOLUME +/–
Controlla il volume.
8 (Indicatore/pulsante Bluetooth) (& P.9)
Premere: per effettuare il collegamento a un dispositivo Bluetooth.
Tenere premuto: per scollegarsi da un dispositivo Bluetooth.
Si illumina quando viene collegato un dispositivo Bluetooth.
Italiano
Parte anteriore Parte posteriore
9 (Indicatore/pulsante SMART TIMER) (& P.12)
Attiva/disattiva SMART TIMER.
Si illumina quando è abilitato SMART TIMER.
0 (Luci) (& P.7)
Premere per accendere o spegnere la luce anteriore/posteriore.
A AUX IN (& P.11)
Effettua il collegamento a un dispositivo esterno tramite un cavo mini presa stereo da
3,5 mm disponibile in commercio.
It 5
Page 62

Nomi delle parti
Telecomando
Pellicola
isolante*
1 (Accensione) (& P.7)
Premere per accendere o spegnere l’unità.
2 VOLUME +/–
Controlla il volume.
3 (Bluetooth) (& P.9)
Premere: per effettuare il collegamento a un dispositivo
Bluetooth.
Tenere premuto: per scollegarsi da un dispositivo
Bluetooth.
4 (SMART TIMER) (& P.12)
Attiva/disattiva SMART TIMER.
5 Trasmettitore di segnali del telecomando
6 (Luci) (& P.7)
Premere per accendere o spegnere le luci.
7 DIMMER +/– (& P.7)
Premere per regolare la luminosità delle luci.
Angolazione/portata del telecomando
Puntare il telecomando verso il sensore dei segnali del
telecomando sull’unità.
Entro
6 m
Sostituzione della batteria
• Controllare il simbolo “+” sulla batteria e inserirla nel
modo corretto.
• Tenendo premuta la linguetta di rilascio in direzione ,
far scorrere il portabatteria in direzione .
Batteria al litio tipo
CR2025
* Rimuovere la pellicola isolante dal telecomando prima di
usarlo.
6 It
Page 63

Preparativi
Installare l’applicazione Yamaha “DTA CONTROLLER” e accendere l’unità.
Installazione di “DTA CONTROLLER”
L’installazione dell’applicazione DTA CONTROLLER su un dispositivo mobile, per esempio
uno smartphone o un tablet, consente di utilizzare un’ampia varietà di utili e comode
funzioni dei sistemi audio per desktop Yamaha.
Funzioni
• Accensione/spegnimento dell’unità, regolazione del volume
• Accensione/spegnimento delle luci, regolazione della luminosità delle luci
• Impostazione di SMART TIMER (& P.12)
• Ottimizzazione dell’audio dell’unità sulla base della posizione di installazione
• Riproduzione di brani musicali memorizzati su un iPhone
Il dispositivo mobile deve essere collegato all’unità tramite connessione Bluetooth (& P.8).
(Per i clienti negli Stati Uniti)
http://itunes.com/app/
dtacontroller
Google Play™
https://play.google.com/
store/apps/
details?id=com.yamaha.av.
dtacontroller
* Se l’accesso a questi siti dovesse risultare
impossibile, cercare “DTA CONTROLLER” su
App Store o Google Play.
https://itunes.apple.com/us/
app/dta-controller-us/
id549333293?mt=8
Accensione delle luci/dell’unità
1 Inserire il cavo di alimentazione nella presa di corrente.
2 • Premere per accendere le luci.
- È possibile accendere/spegnere le luci anche
mentre l’unità è spenta.
- Per regolare la luminosità, premere il pulsante
DIMMER +/– sul telecomando (10 livelli).
• Premere per accendere l’unità.
- L’unità è pronta per la riproduzione musicale.
Funzione auto power off
• La funzione auto power off sarà attivata nel modo seguente (impostazione predefinita).
L’unità si spegne automaticamente se non vengono eseguite operazioni per oltre 20 minuti
-
e se nessun dispositivo è collegato al terminale AUX IN o tramite connessione
- Le luci e l’unità si spengono automaticamente se non vengono eseguite operazioni
per più di 24 ore.
Attivazione/disattivazione della funzione auto power off
1 Tenendo premuto A sull’unità, inserire il cavo di alimentazione in una presa di
corrente.
2 Continuare a tenere premuto A.
• La funzione auto power off si attiva o si disattiva e gli indicatori (& P.5)
lampeggiano nel modo seguente:
- Auto power off è attivato:
- Auto power off è disattivato:
,
Bluetooth
Italiano
.
It 7
Page 64

Ascolto della musica tramite connessione Bluetooth
È possibile ascoltare l’audio in modalità wireless da un dispositivo compatibile Bluetooth.
Associazione di un dispositivo con l’unità
Quando un dispositivo Bluetooth viene collegato all’unità
per la prima volta, è necessario che il dispositivo venga
registrato sull’unità. Questa procedura viene definita
“associazione”. Una volta completata l’associazione, il
collegamento successivo può essere effettuato con un
paio di semplici azioni.
Dispositivo Bluetooth
collegato per la prima
volta
Esecuzione
dell’associazione e
riproduzione musicale
(& P.9)
Dispositivo Bluetooth già
collegato altre volte
Impostazione della
connessione Bluetooth e
riproduzione musicale
(& P.10)
• Se vengono eliminate le informazioni di
associazione relative a un dispositivo, sarà
necessario eseguire nuovamente l’associazione
con il dispositivo per ricollegarlo.
Dispositivo
Bluetooth
8 It
Page 65

Esecuzione dell’associazione e riproduzione musicale
Ascolto della musica tramite connessione Bluetooth
iPhone
1 Premere per accendere l’unità (& P.7).
• L’indicatore di stato si accende.
2 Toccare “Impostazioni” e “Bluetooth” sull’iPhone per attivare la
funzione Bluetooth.
3 Nell’elenco di connessioni nel campo “Dispositivi”, toccare “LSX-700 Yamaha”.
• Una volta completata l’associazione, l’indicatore di stato e l’indicatore (& P.5) lampeggiano.
4 Riprodurre la musica desiderata sull’iPhone.
Dispositivo diverso da un iPhone
1 Premere per accendere l’unità (& P.7).
• L’indicatore di stato si accende.
2 Accendere la funzione Bluetooth sul dispositivo.
3
Nell’impostazione
• Una volta completata l’associazione, l’indicatore di stato e l’indicatore (& P.5) lampeggiano.
• Se l’indicatore si spegne e il dispositivo non si connette automaticamente all’unità dopo il completamento
dell’associazione, selezionare nuovamente “LSX-700 Yamaha” nell’impostazione Bluetooth del dispositivo.
• Per informazioni, consultare il manuale di istruzioni del dispositivo.
Bluetooth
del dispositivo, selezionare “LSX-700 Yamaha”.
• Se un altro dispositivo è già collegato all’unità,
terminare quella connessione Bluetooth tenendo
premuto , quindi eseguire l’associazione con il
nuovo dispositivo.
• La procedura di associazione può variare a
seconda dell’iPhone o della versione del sistema
operativo sul dispositivo.
Italiano
• Se un altro dispositivo è già collegato all’unità,
terminare quella connessione Bluetooth tenendo
premuto , quindi eseguire l’associazione con il
nuovo dispositivo.
• Se viene richiesto un codice di protezione durante
la procedura di associazione, digitare il numero
“0000”.
4 Riprodurre la musica desiderata sul dispositivo.
It 9
Page 66

Ascolto della musica tramite connessione Bluetooth
Collegamento di un dispositivo Bluetooth associato e riproduzione musicale
Se l’unità è collegata a un altro dispositivo tramite una
connessione Bluetooth, terminare la connessione (vedere
“Termine della connessione Bluetooth” a destra) prima di
collegare il dispositivo desiderato.
1 Premere per accendere l’unità.
2 Eseguire la connessione Bluetooth.
• Connessione dall’unità: premere .
• Connessione dal dispositivo Bluetooth:
accendere la funzione Bluetooth sul dispositivo e
selezionare “LSX-700 Yamaha”.
• Una volta stabilita la connessione, l’indicatore di
stato lampeggia e l’indicatore sull’unità si
accende.
3 Riprodurre la musica desiderata sul
dispositivo collegato.
1
2
2, 3
Indicatore
Bluetooth
Indicatore di stato
• Abbassare il volume dell’unità prima di
avviare la riproduzione. Diversamente, il
volume della riproduzione potrebbe risultare
eccessivamente forte.
• Se la connessione è effettuata dall’unità,
quest’ultima cerca l’ultimo dispositivo Bluetooth
collegato. In questo caso, accertarsi che la
funzione Blu etooth del dispositivo sia attivata.
Termine della connessione Bluetooth
• La connessione Bluetooth può essere terminata in
uno dei due modi seguenti.
- Spegnere la funzione Bluetooth del dispositivo
collegato.
- Tenere premuto .
• Quando la connessione Bluetooth viene terminata,
l’indicatore di stato lampeggia e l’indicatore si
spegne.
Ottimizzazione della musica
Questa funzione migliora l’audio digitale
compresso rigenerando componenti musicali che
si perdono durante la compressione tramite
connessione Bluetooth.
10 It
Page 67

Riproduzione da sorgenti esterne
Questa unità consente la riproduzione di dispositivi esterni collegati al terminale AUX IN. Per questo collegamento è necessario un cavo mini presa stereo da
3,5 mm disponibile in commercio (diametro massimo: 12 mm). Accertarsi di spegnere l’unità premendo prima di collegare il dispositivo esterno.
Collegamento di un dispositivo esterno
1 Rimuovere il coperchio sul retro
dell’unità.
2 Far passare il cavo attraverso il foro
sottostante e farlo fuoriuscire dal
fondo della base.
3 Collegare il cavo al terminale AUX IN.
4 Collegare l’altra estremità del cavo al
dispositivo esterno.
Riproduzione
1 Premere per accendere l’unità.
2 Riprodurre il dispositivo esterno.
• Per informazioni sulla riproduzione, consultare il
manuale di istruzioni in dotazione con il
dispositivo esterno.
2
AUX IN
1
3
4
Dispositivo
esterno
• Diminuire il volume dell’unità e del dispositivo esterno prima di effettuare il collegamento.
• Se vengono riprodotti sia un dispositivo Bluetooth che un dispositivo esterno, l’audio verrà emesso da entrambi i
dispositivi.
Cavo con presa mini stereo da 3,5 mm
Italiano
It 11
Page 68
Uso di SMART TIMER
SMART TIMER consente di accendere le luci con il livello di luminosità impostato e di riprodurre la propria musica preferita come sveglia ogni mattina. È possibile
anche spegnere le luci e interrompere automaticamente la musica mentre si è a letto.
Funzioni di SMART TIMER
Timer di accensione Timer di spegnimento
• Accendere le luci a un orario specificato.
• Specificare la luminosità delle luci.
• Riprodurre la musica da un dispositivo collegato a un orario
specificato.
• Selezionare un brano.
• Preimpostare il livello del volume.
• Spegnere le luci a un orario specificato.
• Spegnere l’unità a un orario specificato.
Impostazione di SMART TIMER
È possibile impostare SMART TIMER mediante uno smartphone o un tablet su cui è installata l’applicazione DTA
CONTROLLER (& P.7).
1 Collegare un dispositivo tramite una connessione Bluetooth (& P.9, 10).
2 Avviare DTA CONTROLLER sul dispositivo ed effettuare le impostazioni SMART TIMER.
3 Sincronizzare SMART TIMER con l’unità mediante DTA CONTROLLER.
• Accertarsi di sincronizzare SMART TIMER con l’unità ogni volta che si imposta SMART TIMER.
Attivazione/disattivazione di SMART TIMER
Premere sull’unità o sul telecomando.
• L’indicatore si illumina quando è attivato SMART TIMER.
• Per riprodurre un brano mediante la connessione
Bluetooth a un orario impostato, è necessario che
la funzione Bluetooth dello smart phone o del
tablet sia attivata. Inoltre, nel caso di un iPhone,
non uscire da DTA CONTROLLER mentre è attivo
multitasking.
• Se un altro dispositivo Bluetooth è collegato
all’unità all’orario impostato, il brano selezionato
per il timer di accensione non sarà riprodotto.
Scollegare qualsiasi altro dispositivo prima
dell’orario impostato.
• Il timer di accensione e il timer di spegnimento di
SMART TIMER possono essere attivati/disattivati
soltanto mediante DTA CONTROLLER.
• Non è possibile attivare/disattivare SMART TIMER
premendo sull’unità o sul telecomando se
non si imposta SMART TIMER da DTA
CONTROLLER.
Orologio interno dell’unità
• L’unità copia l’orar io sull’orologio interno de ll’unità
da DTA CONTROLLER quando un dispositivo viene
collegato all’unità tramite connessione Bluetooth.
SMART TIMER segue l’orologio interno dell’unità.
• Se il cavo di alimentazione rimane scollegato dalla
presa di corrente per circa una settimana,
l’orologio sarà reimpostato e SMART TIMER sarà
disattivato.
12 It
Page 69

Risoluzione dei problemi
Se l’unità non funzionasse a dovere, consultare la tabella seguente. Se la soluzione non fosse presente nell’elenco o se le istruzioni proposte non fossero di aiuto,
spegnere l’unità, scollegare il cavo di alimentazione e mettersi in contatto col rivenditore autorizzato o centro assistenza Yamaha più vicino.
Generale
Problema Causa Soluzione
L’unità si spegne non appena viene
accesa.
L’unità non funziona correttamente.
I diffusori non emettono alcun suono.
L’unità e/o le luci si spengono
improvvisamente.
L’unità e le luci si accendono
improvvisamente.
Impossibile attivare SMART TIMER.
Si sentono interferenze da dispositivi
digitali o ad alta frequenza.
Il telecomando non funziona o funziona
male.
Il cavo di alimentazione non è collegato correttamente. Collegare bene il cavo di alimentazione.
L’unità ha subito una forte scarica elettrica, per esempio a causa di un
fulmine o di elettricità statica eccessiva.
Il volume è al minimo. Alzare il volume.
L’alimentazione è disattivata. Accendere l’unità e riprodurre nuovamente la musica.
La funzione auto power off è attivata. Accendere l’unità (& P.7).
La funzione auto power off è attivata. Accendere l’unità e/o le luci (& P.7).
È impostato il timer di spegnimento di SMART TIMER. Controllare l’impostazione del timer di spegnimento da DTA CONTROLLER.
È impostato il timer di accensione di SMART TIMER. Controllare l’impostazione del timer di accensione da DTA CONTROLLER.
Il cavo di alimentazione è rimasto scollegato per oltre una settimana e le
informazioni dell’orologio sono state cancellate.
SMART TIMER non è stato impostato da DTA CONTROLLER.
L’unità è troppo vicina a dispositivi digitali o ad alta frequenza. Allontanare l’unità da quei dispositivi.
Il telecomando potrebbe trovarsi al di fuori del proprio raggio di azione. Utilizzare il telecomando entro la distanza operativa (& P.6).
Il sensore del telecomando dell’unità potrebbe essere esposto
direttamente alla luce solare o ad altre fonti di illuminazione forte, per
esempio a lampade fluorescenti del tipo con invertitore.
La batteria potrebbe essere scarica. Sostituire la batteria con una batteria nuova (& P.6).
Ci sono ostacoli fra il sensore dell’unità e il telecomando. Rimuovere gli ostacoli.
Spegnere l’unità e scollegare il cavo di alimentazione. Ricollegare il cavo
dopo circa 30 secondi, quindi riaccendere l’unità.
Impostare SMART TIMER da DTA CONTROLLER e sincronizzarlo con l’unità
(& P.12).
Cambiare l’orientamento dell’illuminazione o dell’unità oppure spostare
l’unità.
Italiano
It 13
Page 70

Risoluzione dei problemi
Bluetooth
Problema Causa Soluzione
Impossibile associare l’unità con il
dispositivo Bluetooth.
Impossibile effettuare la connessione
Bluetooth.
Non viene emesso alcun suono oppure
l’audio è interrotto durante la
riproduzione.
L’unità è spenta. Accendere l’unità ed eseguire l’associazione (& P.9).
Un altro dispositivo Bluetooth è collegato.
L’unità e il dispositivo sono troppo lontani.
Un dispositivo nelle vicinanze (forno a microonde, LAN wireless ecc.)
emette segnali con frequenza 2,4 GHz.
Un adattatore Bluetooth o simile che si desidera associare con l’unità ha un
codice di protezione diverso da “0000”.
Il dispositivo Bluetooth non supporta A2DP. Eseguire l’associazione con un dispositivo che supporta A2DP.
L’unità è spenta. Accendere l’unità.
Un altro dispositivo Bluetooth è collegato.
La funzione Bluetooth del dispositivo è spenta. Accendere la funzione Bluetooth del dispositivo.
Le informazioni sull’associazione sono state cancellate.
Questa unità non è registrata nell’elenco di connessioni Bluetooth del
dispositivo.
Il volume del dispositivo collegato è troppo basso. Alzare il volume del dispositivo collegato.
Il dispositivo di collegamento non è impostato per inviare segnali audio
Bluetooth all’unità.
La connessione Bluetooth dell’unità con il dispositivo è stata interrotta. Eseguire nuovamente la connessione Bluetooth (& P.10).
Un dispositivo nelle vicinanze (forno a microonde, LAN wireless ecc.)
emette segnali con frequenza 2,4 GHz.
L’unità e il dispositivo collegato sono troppo lontani.
Terminare la connessione Bluetooth corrente ed eseguire l’associazione con
il nuovo dispositivo.
Associare l’unità e il dispositivo mantenendo una distanza massima tra di
loro di 10 m.
Allontanare l’unità dal dispositivo che emette segnali in radio frequenza.
Utilizzare un adattatore Bluetooth o simile il cui codice di protezione sia
“0000”.
Terminare la connessione Bluetooth corrente, quindi stabilire nuovamente
una connessione Bluetooth con il dispositivo.
Eseguire nuovamente l’associazione (& P.9).
L’unità può essere associata con otto dispositivi. Quando si associa l’unità
con un nono dispositivo, le informazioni sull’associazione con la data di
connessione più vecchia vengono cancellate.
Eseguire nuovamente l’associazione (& P.9).
Cambiare l’uscita dei segnali audio Bluetooth del dispositivo di
collegamento selezionando l’unità.
Allontanare l’unità dal dispositivo che emette segnali in radio frequenza.
Posizionare il dispositivo collegato a una distanza massima di 10 m
dall’unità.
14 It
Page 71
Dati tecnici
Sezione Bluetooth
Versione Bluetooth Versione 2.1+EDR
Profilo supportato
Codec compatibili SBC, AAC, aptX®
Uscita wireless Bluetooth Classe 2
Portata di comunicazione
massima
A2DP (Advanced Audio Distribution Profile)
AVRCP (Audio/Video Remote Control Profile)
10 m (senza ostruzioni)
Sezione AUX IN
Connettore in ingresso Presa mini stereo da 3,5 mm
Sezione luci (LED*)
Vita utile (Flusso luminoso inferiore al 70%) Circa 40.000 ore
Consumo (Quando sono accese solo le luci) 9 W
Generale
Alimentazione CA 100 - 240 V, 50/60 Hz
Unità accesa (musica in riproduzione e luci accese):
20 W
Consumo
Dimensioni (L × H × P) 300 × 1.152 × 300 mm (inclusa la base)
Peso 5,5 kg
Unità spenta (luci spente, SMART TIMER disattivato e
connessione Bluetooth assente):
0,5 W o meno
A ottobre 2013. Dati tecnici soggetti a modifiche senza preavviso.
* La vita utile stimata delle luci a LED è di circa 40.000 ore.
Questo dato si basa sul periodo più breve trascorso il quale la luce si esaurisce oppure il flusso
luminoso scende al di sotto del 70% del flusso originario. Tuttavia, tenere presente che la durata
stimata di 40.000 ore non può essere garantita.
“Made for iPod”, “Made for iPhone”, e “Made for iPad”
indicano che un accessorio elettronico è stato
progettato specificatamente per essere collegato
all’iPod, all’iPhone o all’iPad e che lo sviluppatore ne
certifica la conformità agli standard Apple.
Apple non è responsabile per l’uso di questo dispositivo né per la rispettiva conformità agli
standard di sicurezza e normativi.
L’uso di questo accessorio con l’iPod, l’iPhone o l’iPad potrebbe influire negativamente sulle
prestazioni wireless.
iPad, iPhone, iPod e iPod touch sono marchi di fabbrica di Apple Inc. registrati negli USA e in altri
paesi.
Bluetooth
• Bluetooth è una tecnologia di comunicazione wireless tra dispositivi che si trovano a una distanza
reciproca massima di 10 metri e che impiegano la banda di frequenza a 2,4 GHz, utilizzabile
senza licenza.
• Bluetooth è un marchio di fabbrica registrato di Bluetooth SIG, utilizzato da Yamaha in base a un
accordo di licenza.
Gestione delle comunicazioni Bluetooth
• La banda a 2,4 GHz utilizzata dai dispositivi compatibili Bluetooth è una banda radio condivisa da
diversi tipi di apparecchiature. Anche se i dispositivi compatibili Bluetooth utilizzano una
tecnologia che riduce al minimo l’influenza di altri componenti che utilizzano la stessa banda
radio, tale influenza può diminuire la velocità o la distanza di comunicazione e, in alcuni casi,
interrompere le comunicazioni.
• La velocità di trasferimento del segnale e la distanza a cui sono possibili le comunicazioni variano
a seconda della distanza tra i dispositivi di comunicazione, della presenza di ostacoli e di onde
radio e del tipo di apparecchiatura.
• Yamaha non può garantire tutte le connessioni wireless tra la presente unità e i dispositivi
compatibili con la funzione Bluetooth.
aptX® è un marchio di fabbrica di CSR.
Android™
Android e Google Play sono marchi di fabbrica di Google, Inc.
Italiano
It 15
Page 72

Índice
Introducción......4
Accesorios suministrados......4
Colocación de la unidad......4
Acerca de este manual......4
Nombres de las piezas......5
Estructura principal......5
Mando a distancia......6
Preparativos......7
Instalación de “DTA CONTROLLER”......7
Encendido de la iluminación/unidad......7
Escuchar música a través de una conexión Bluetooth......8
Emparejamiento de un dispositivo con la unidad......8
Realizar el emparejamiento y reproducir música......9
Conexión de un dispositivo Bluetooth emparejado y reproducción de música......10
Finalización de la conexión Bluetooth......10
Escuchar fuentes externas......11
Conexión de un dispositivo externo......11
Reproducción......11
Utilización del SMART TIMER......12
Ajuste del SMART TIMER......12
Activación/desactivación del SMART TIMER......12
Resolución de problemas......13
Especificaciones......15
2 Es
Page 73

Música y luz se dan la mano
Comience el día con la mejor luz y con el mejor ritmo.
Despiértese con su canción favorita y con una ambientación perfecta.
......12
Sonido de gran calidad
y funcionamiento intuitivo
El mejor sonido desde sus dispositivos móviles con
la máxima comodidad: conectar y listos.
Utilice su dispositivo móvil como mando
a distancia.
......7
......8, 11
Español
Al final del día, déjese llevar por la calidez reparadora del sonido
y la iluminación más sutiles.
......7
Es 3
Page 74

Introducción
Compruebe los contenidos del paquete y lea con atención este manual.
Accesorios suministrados
Monte la base utilizando los siguientes elementos.
Consulte la “Guía de montaje” adicional para obtener
información sobre el montaje de la base.
•Base
•Tornillo (M5)
Cable de alimentación
Mando a distancia
• Abrazadera de cable
Colocación de la unidad
Esta unidad utiliza las reflexiones con la pared posterior y las esquinas para potenciar
el sonido y la luz emitidos.
Ajuste en esquina Ajuste en pared posterior
• Se recomienda instalar la unidad a una distancia de entre 30 cm y 70 cm de
cualquier esquina. Si la instala junto a una pared, colóquela a una distancia de
entre 20 cm y 50 cm de la pared posterior.
Aproximadamente
30 cm - 70 cm
Acerca de este manual
• Funcionamiento
- Las instrucciones de utilización de la unidad utilizan
como ejemplo principalmente el mando a distancia.
- En este manual, “iPhone” puede utilizarse también
en referencia a un “iPod touch” o un “iPad”.
• Ilustraciones
Las ilustraciones pueden no coincidir con el producto
real.
• Símbolos
Indica precauciones de uso de la unidad y las
limitaciones.
Indica explicaciones complementarias para
mejorar el uso.
Indica la página o las páginas de referencia
&
correspondientes.
* Los efectos generados por la luz van en función de la expansión del sonido.
4 Es
Frontal
Page 75

Nombres de las piezas
Familiarícese con todas las piezas y sus funciones.
Estructura principal
1 Luz/altavoz frontal
2 Indicador de estado
Se ilumina al encender la unidad. Parpadea cuando se recibe una señal de funcionamiento o
cuando cambia el estado de la conexión Bluetooth.
3 Sensor de señal del mando a distancia (& P.6)
4 Luz/altavoz posterior
5 Tapa (& P.11)
Se separa para permitir el acceso al terminal AUX IN.
6 A (Encendido) (& P.7)
Presione este botón para encender o apagar la unidad.
7 VOLUME +/–
Controlan el volumen.
Español
8 (Botón/indicador Bluetooth) (& P.9)
Presionar: establece una conexión con un dispositivo Bluetooth.
Mantener presionado: cancela la conexión con el dispositivo Bluetooth.
Se ilumina si hay un dispositivo Bluetooth conectado.
Frontal Posterior
9 (Botón/indicador SMART TIMER) (& P.12)
Activa o desactiva el SMART TIMER.
Se ilumina cuando el SMART TIMER está activado.
0 (Iluminación) (& P.7)
Presione este botón para encender o apagar la luz frontal/posterior.
A AUX IN (& P.11)
Establece una conexión con un dispositivo externo a través de un cable de miniclavija
estéreo de 3,5 mm disponible en el mercado.
Es 5
Page 76

Nombres de las piezas
Mando a distancia
Película
aislante*
1 (Alimentación) (& P.7)
Presione este botón para encender o apagar la unidad.
2 VOLUME +/–
Controlan el volumen.
3 (Bluetooth) (& P.9)
Presionar: establece una conexión con un dispositivo
Bluetooth.
Mantener presionado: cancela la conexión con el
dispositivo Bluetooth.
4 (SMART TIMER) (& P.12)
Activa/desactiva el SMART TIMER.
5 Transmisor de señal del mando a distancia
6 (Iluminación) (& P.7)
Presione este botón para encender o apagar la
iluminación.
7 DIMMER +/– (& P.7)
Presione este botón para ajustar el brillo de la
iluminación.
Ángulo/cobertura del mando a distancia
Apunte el mando a distancia hacia el sensor de señal del
mando a distancia de la unidad.
Menos
de 6 m
Sustitución de la pila
• Compruebe la marca “+” de la pila e introdúzcala en la
dirección correcta.
• Presionando la pestaña de liberación en la dirección ,
deslice el soporte de la pila en la dirección .
Pila de litio tipo
CR2025
* Quite la película aislante del mando a distancia antes de
usarlo.
6 Es
Page 77

Preparativos
Instale la aplicación de Yamaha “DTA CONTROLLER” y encienda la unidad.
Instalación de “DTA CONTROLLER”
Si instala la aplicación DTA CONTROLLER en un dispositivo móvil, como un smartphone o
una tableta, podrá utilizar un amplio abanico de prácticas funciones de los sistemas de
audio de sobremesa de Yamaha.
Funciones
• Encendido y apagado de la unidad y ajuste del volumen
• Encendido y apagado de la iluminación y ajuste del brillo de la iluminación
• Ajuste del SMART TIMER (& P.12)
• Optimización del sonido en función de la posición de instalación
• Reproducción de canciones almacenadas en un iPhone
El dispositivo móvil tiene que estar conectado a la unidad mediante una conexión
(Para los usuarios de EE. UU.)
http://itunes.com/app/
dtacontroller
https://itunes.apple.com/us/
app/dta-controller-us/
id549333293?mt=8
Google Play™
https://play.google.com/
store/apps/
details?id=com.yamaha.av.
dtacontroller
* Si el acceso no es posible, busque “DTA
CONTROLLER” en el App Store o Google Play.
Bluetooth (&
P.8).
Encendido de la iluminación/unidad
1 Conecte el cable de alimentación a la toma de corriente.
2 • Pulse para encender la luz.
- La iluminación puede activarse o desactivarse
incluso si la unidad está apagada.
- Para ajustar el brillo, pulse el botón DIMMER +/–
en el mando a distancia (10 pasos).
• Pulse para encender la unidad.
- La unidad está lista para reproducir música.
Función de apagado automático
• La función de apagado automático se activa de la forma siguiente (configuración
predeterminada).
- La unidad se apaga automáticamente si no se ha realizado ninguna operación en
los últimos 20 minutos y no hay ningún dispositivo conectado a AUX IN o mediante
una conexión Bluetooth.
- La iluminación y la unidad se apagan automáticamente si no se realiza ninguna
operación durante más de 24 horas.
Activación/desactivación de la función de apagado automático
1 Manteniendo pulsado A en la unidad, conecte el cable de alimentación a una
toma de corriente.
2 Continúe pulsando A.
• La función de apagado automático cambia y los indicadores (& P.5) parpadean de
la forma siguiente:
- Apagado automático activado:
- Apagado automático desactivado:
,
Español
Es 7
Page 78
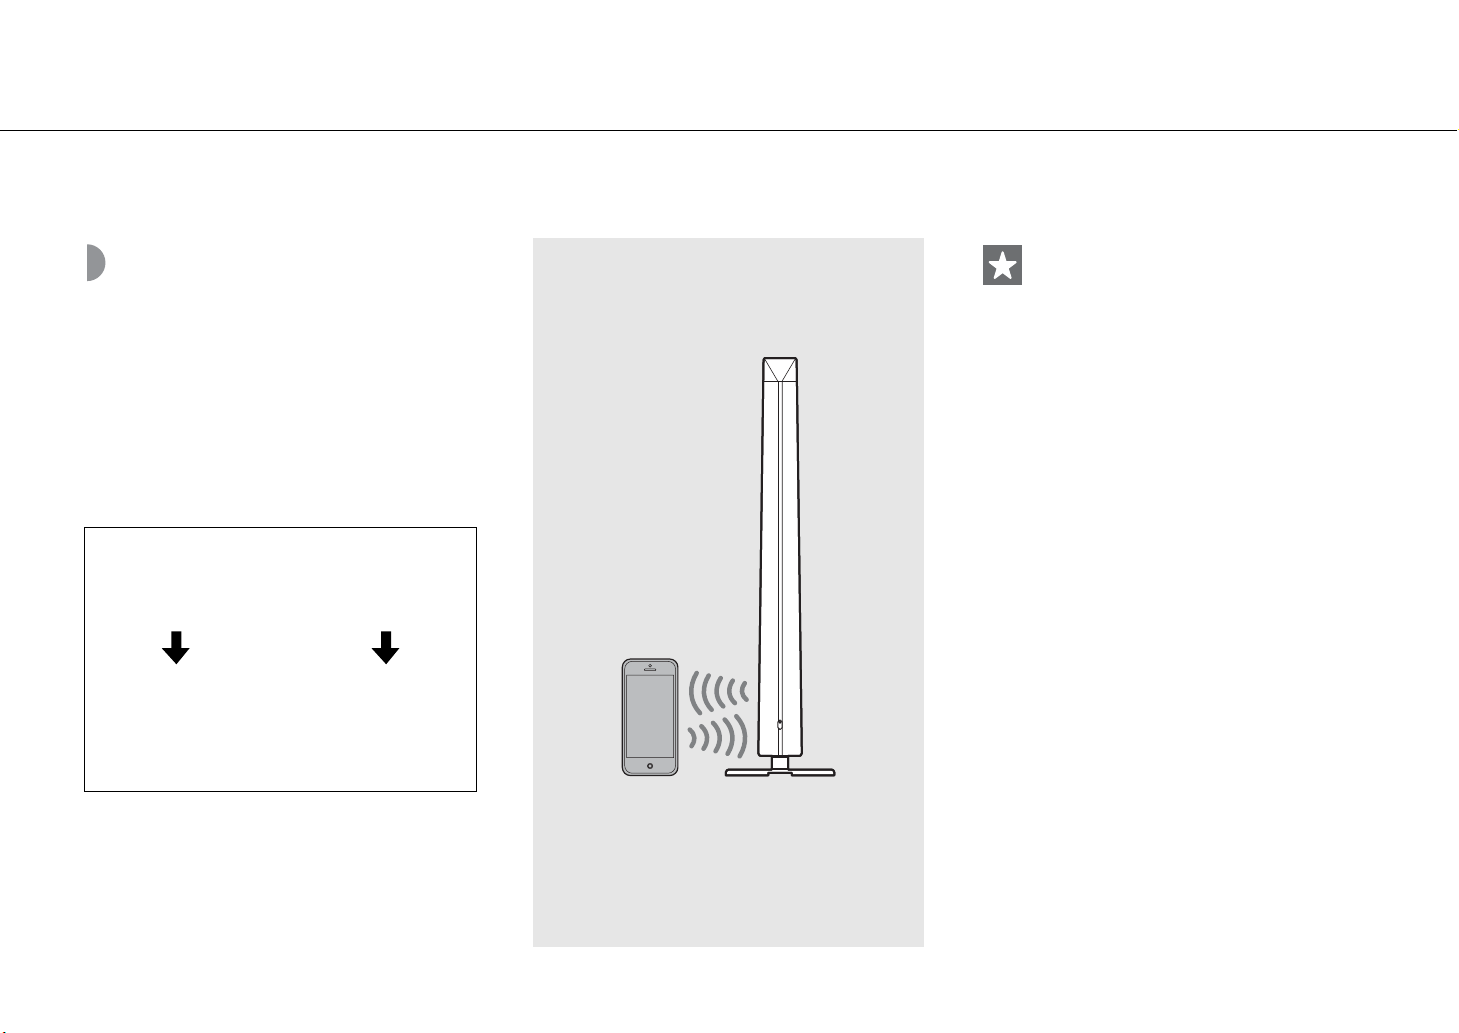
Escuchar música a través de una conexión Bluetooth
Esta unidad permite escuchar música de forma inalámbrica desde un dispositivo compatible con Bluetooth.
Emparejamiento de un dispositivo con la unidad
Al conectar un dispositivo Bluetooth a la unidad por
primera vez, el dispositivo tiene que estar registrado en la
unidad. Este proceso se conoce como “emparejamiento”.
Una vez completado el emparejamiento, es posible
realizar conexiones en un par de sencillos pasos.
Un dispositivo Bluetooth
que se conecte por
primera vez
Realizar el
emparejamiento y
reproducir música
(& P.9)
Un dispositivo Bluetooth
que ya se haya conectado
Establecer la conexión
Bluetooth y reproducir
música (& P.10)
• Si se elimina la información de emparejamiento
de un dispositivo, tendrá que realizar de nuevo el
emparejamiento del dispositivo para volver a
conectarlo.
Dispositivo
Bluetooth
8 Es
Page 79

Realizar el emparejamiento y reproducir música
Escuchar música a través de una conexión Bluetooth
iPhone
1 Pulse para encender la unidad (& P.7).
• Se iluminará el indicador de estado.
2 Toque “Ajustes” y “Bluetooth” en el iPhone para activar la función
Bluetooth.
3 En la lista de conexiones del campo “Dispositivos”, toque “LSX-700 Yamaha”.
• Si el emparejamiento se realiza correctamente, el indicador de estado y el indicador (& P.5) parpadean.
4 Reproduzca música en el iPhone.
Otros dispositivos
1 Pulse para encender la unidad (& P.7).
• Se iluminará el indicador de estado.
2 Active la función Bluetooth en su dispositivo.
3 En el ajuste Bluetooth del dispositivo, seleccione “LSX-700 Yamaha”.
• Si el emparejamiento se realiza correctamente, el indicador de estado y el indicador (& P.5) parpadean.
• Si el indicador se apaga y el dispositivo no se conecta a la unidad automáticamente una vez completado el
emparejamiento, seleccione de nuevo “LSX-700 Yamaha” en el ajuste Bluetooth de su dispositivo.
• Para obtener más información, consulte el manual de instrucciones suministrado con el dispositivo.
• Si ya hay conectado otro dispositivo a la unidad,
finalice la conexión Bluetooth manteniendo
pulsado y lleve a cabo el emparejamiento con
el nuevo dispositivo.
• La operación de emparejamiento puede presentar
diferencias en función del modelo de iPhone o de
la versión del sistema operativo del dispositivo.
Español
• Si ya hay conectado otro dispositivo a la unidad,
finalice la conexión Bluetooth manteniendo
pulsado y lleve a cabo el emparejamiento con
el nuevo dispositivo.
• Si el sistema le pide una contraseña durante la
operación de emparejamiento, introduzca el
número “0000”.
4 Reproduzca música en el dispositivo.
Es 9
Page 80

Escuchar música a través de una conexión Bluetooth
Conexión de un dispositivo Bluetooth emparejado y reproducción de música
Si la unidad está conectada a otro dispositivo a través de
una conexión Bluetooth, finalice dicha conexión (consulte
“Finalización de la conexión Bluetooth” en la parte
derecha) antes de conectarse al dispositivo.
1 Pulse para encender la unidad.
2 Establezca la conexión Bluetooth.
• Conexión desde la unidad: pulse .
• Conexión desde el dispositivo Bluetooth:
active la función Bluetooth en el dispositivo y
seleccione “LSX-700 Yamaha”.
• Una vez establecida la conexión, el indicador de
estado parpadea y se enciende el indicador en
la unidad.
1
2
2, 3
Indicador
Bluetooth
Indicador de
estado
• Baje el volumen de la unidad antes de la
reproducción. De lo contrario, el volumen de la
reproducción podría ser excesivo.
• Si realiza la conexión desde la unidad, la unidad
busca el dispositivo Bluetooth conectado por
última vez. En este caso, asegúrese de que la
función Bluetoot h de dicho dispositivo está
activada.
Finalización de la conexión Bluetooth
• La conexión Bluetooth puede finalizarse realizando
una de las acciones siguientes.
- Desactive la función Bluetooth del dispositivo
conectado.
- Mantenga pulsado .
• Una vez finalizada la conexión Bluetooth, el
indicador de estado parpadea y el indicador se
apaga.
Potenciador de música
Esta función refuerza el sonido de la música
digital comprimida mediante la regeneración de
los elementos musicales perdidos durante la
compresión a través de la conexión Bluetooth.
3 Reproduzca música en el dispositivo
conectado.
10 Es
Page 81

Escuchar fuentes externas
Esta unidad permite la reproducción de dispositivos externos conectados al terminal AUX IN. Para esta conexión es necesario disponer de un cable de miniclavija estéreo de
3,5 mm disponible en el mercado (diámetro de 12 mm o inferior).
Conexión de un
Asegúrese de haber apagado la unidad pulsando antes de la conexión del dispositivo externo.
dispositivo externo
1 Quite la tapa de la parte posterior de la
unidad.
2 Pase el cable por el orificio inferior y
tire del mismo desde la parte inferior
de la base.
3 Conecte el cable al terminal AUX IN.
4 Conecte el otro extremo del cable al
dispositivo externo.
Reproducción
1 Pulse para encender la unidad.
2 Reproduzca el dispositivo externo.
• Para obtener más información sobre la
reproducción, consulte el manual de
instrucciones suministrado con el dispositivo
externo.
2
AUX IN
1
3
4
Dispositivo
externo
• Baje el volumen de la unidad y el dispositivo externo antes de la conexión.
• Si se reproducen un dispositivo Bluetooth y un dispositivo externo a la vez, se escuchará el sonido de los dos dispositivos.
Cable de miniclavija estéreo de 3,5 mm
Español
Es 11
Page 82

Utilización del SMART TIMER
El SMART TIMER permite encender la iluminación en el nivel de brillo definido y reproducir su música favorita como despertador todas las mañanas. También
puede desactivar la iluminación y parar la reproducción de música automáticamente mientras escucha música en la cama.
Funciones del SMART TIMER
Temporizador de activación Temporizador de apagado
• Encender la iluminación a una hora definida.
• Definir el brillo de la iluminación.
• Reproducir la música de un dispositivo conectado a una hora
especificada.
• Especificar una canción.
• Predefinir el nivel de volumen.
• Apagar la iluminación a una hora definida.
• Apagar la alimentación a una hora definida.
Ajuste del SMART TIMER
El SMART TIMER puede configurarse con un smartphone o una tableta con la aplicación DTA CONTROLLER
instalada (& P.7).
1 Conecte un dispositivo a través de una conexión Bluetooth (& P.9, 10).
2 Inicie DTA CONTROLLER en el dispositivo y configure el SMART TIMER.
3 Sincronice el SMART TIMER con la unidad mediante DTA CONTROLLER.
• Asegúrese de sincronizar el SMART TIMER con la unidad cada vez que configure el SMART TIMER.
Activación/desactivación del SMART TIMER
Pulse en la unidad o en el mando a distancia.
• El indicador se enciende cuando el SMART TIMER está activado.
• Para reproducir una canción a través de una
conexión Bluetooth a una hora concreta, la función
Bluetooth del smartphone o la tableta tiene que estar
activada. Además, en el caso del iPhone, no cierre
DTA CONTROLLER al realizar acciones multitarea.
• Si hay otro dispositivo Bluet oot h conectado a la
unidad a la hora definida, la canción seleccionada
para el temporizador de activación no se
reproducirá. Desconecte cualquier otro dispositivo
antes de la hora ajustada.
• El temporizador de activación y el temporizador
de apagado del SMART TIMER pueden activarse y
desactivarse únicamente desde DTA
CONTROLLER.
• El SMART TIMER no puede activarse ni
desactivarse pulsando en la unidad o el
mando a distancia si no configura el SMART TIMER
desde DTA CONTROLLER.
Reloj interno de la unidad
• La unidad copia la hora al reloj interno de la
unidad desde DTA CONTROLLER si un dispositivo
se conecta a la unidad a través de una conexión
Bluetooth. El SMART TIMER se rige por el reloj
interno de la unidad.
• El ajuste del reloj se reiniciará y se desactivará el
SMART TIMER si se deja el cable de alimentación
desconectado de la toma de corriente durante
aproximadamente una semana.
12 Es
Page 83

Resolución de problemas
Consulte la tabla inferior cuando la unidad no funcione correctamente. Si su solución no aparece en la lista a continuación, o si las instrucciones no le sirven de
ayuda, apague la unidad, desenchufe el cable de alimentación y póngase en contacto con un centro Yamaha de atención al cliente o concesionario autorizado.
General
Problema Causa Solución
La unidad se apaga poco después de
conectarse la alimentación.
La unidad no funciona correctamente.
Los altavoces no emiten sonido.
La unidad y/o la iluminación se apagan de
forma repentina.
La unidad y la iluminación se apagan de
forma repentina.
No es posible activar el SMART TIMER.
Hay interferencia de ruido procedente de
un equipo digital o de frecuencias altas.
El mando a distancia no está operativo o
no funciona bien.
El cable de alimentación no está correctamente conectado. Conecte firmemente el cable de alimentación.
La unidad ha estado expuesta a una descarga eléctrica externa de gran
potencia, como un rayo, o a electricidad estática intensa.
El volumen está al mínimo. Suba el volumen.
La unidad se apaga. Encienda la unidad y reproduzca la música de nuevo.
La función de apagado automático está activada. Encienda la unidad (& P.7).
La función de apagado automático está activada. Encienda la unidad y/o la iluminación (& P.7).
El temporizador de apagado del SMART TIMER está configurado. Compruebe el ajuste del temporizador de apagado en DTA CONTROLLER.
El temporizador de activación del SMART TIMER está configurado. Compruebe el ajuste del temporizador de activación en DTA CONTROLLER.
El cable de alimentación lleva más de una semana desconectado y se ha
borrado la información del reloj.
El SMART TIMER no se ha ajustado desde DTA CONTROLLER.
La unidad está demasiado cerca de un equipo digital o de alta frecuencia. Separe más la unidad de dicho equipo.
Tal vez se esté utilizando el mando a distancia fuera de la distancia
necesaria habitual.
Puede que el sensor del mando a distancia de esta unidad esté expuesto a
la luz solar directa o iluminación, como una lámpara fluorescente de
inversor.
Es posible que la pila esté agotada. Cambie la pila por una pila nueva (& P.6).
Hay obstáculos entre el sensor de esta unidad y el mando a distancia. Aparte los obstáculos.
Apague la unidad y desconecte el cable de alimentación. Vuelva a
conectarlo aproximadamente 30 segundos después y vuelva a encender la
unidad.
Ajuste el SMART TIMER desde DTA CONTROLLER y sincronícelo con la
unidad (& P.12).
Utilice el mando a distancia dentro del rango operativo (& P.6).
Cambie la orientación de la iluminación o la unidad o cambie la unidad de
lugar.
Español
Es 13
Page 84

Resolución de problemas
Bluetooth
Problema Causa Solución
No es posible emparejar la unidad con un
dispositivo Bluetooth.
No es posible establecer una conexión
Bluetooth.
No se produce sonido o el sonido se
interrumpe durante la reproducción.
La unidad se apaga. Encienda la unidad y realice el emparejamiento (& P.9).
Hay otro dispositivo Bluetooth conectado.
Esta unidad y el dispositivo están demasiado lejos. Empareje la unidad y el dispositivo a una distancia máxima de 10 m.
Existen señales de salida de un dispositivo (horno microondas, LAN
inalámbrica, etc.) en la banda de frecuencia de 2,4 GHz cercana.
Un adaptador Bluetooth, etc. que quiere emparejar con la unidad tiene una
contraseña distinta de “0000”.
El dispositivo Bluetooth no es compatible con A2DP. Realice el emparejamiento con un dispositivo compatible con A2DP.
La unidad se apaga. Encienda la unidad.
Hay otro dispositivo Bluetooth conectado.
La función Bluetooth del dispositivo está desactivada. Active la función Bluetooth del dispositivo.
Se ha eliminado la información de emparejamiento.
Esta unidad no está registrada en la lista de conexiones del dispositivo
Bluetooth.
El volumen del dispositivo conectado es demasiado bajo. Suba el volumen del dispositivo conectado.
El dispositivo de conexión no está configurado para enviar señales de audio
Bluetooth a la unidad.
La conexión Bluetooth de la unidad con el dispositivo se ha cancelado. Vuelva a realizar el proceso de conexión Bluetooth (& P.10).
Existen señales de salida de un dispositivo (horno microondas, LAN
inalámbrica, etc.) en la banda de frecuencia de 2,4 GHz cercana.
Esta unidad y el dispositivo conectado están demasiado lejos.
Finalice la conexión Bluetooth actual y lleve a cabo el emparejamiento con
el nuevo dispositivo.
Aleje esta unidad del dispositivo que está emitiendo las señales de
radiofrecuencia.
Utilice un adaptador Bluetooth, etc. cuya contraseña sea “0000”.
Finalice la conexión Bluetooth actual y establezca de nuevo una conexión
Bluetooth con el mismo dispositivo.
Vuelva a realizar el emparejamiento (& P.9).
Esta unidad puede emparejarse con ocho dispositivos. Si se empareja un
noveno dispositivo, la información de emparejamiento con la fecha de
conexión más antigua se elimina.
Vuelva a realizar el emparejamiento (& P.9).
Seleccione la unidad como salida de las señales de audio Bluetooth del
dispositivo de conexión.
Aleje esta unidad del dispositivo que está emitiendo las señales de
radiofrecuencia.
Desplace el dispositivo conectado a una distancia inferior a 10 m de la
unidad.
14 Es
Page 85

Especificaciones
Sección Bluetooth
Versión de Bluetooth Ver. 2.1+EDR
Perfil compatible
Códecs compatibles SBC, AAC, aptX®
Salida inalámbrica Bluetooth Clase 2
Rango máximo de comunicación 10 m (sin obstáculos)
A2DP (Advanced Audio Distribution Profile)
AVRCP (Audio/Video Remote Control Profile)
Sección AUX IN
Conector de entrada Minitoma estéreo de 3,5 mm
Sección de iluminación (LED*)
Vida útil (Flujo luminoso inferior al 70%) Aproximadamente 40.000 horas
Consumo (Únicamente con la iluminación encendida) 9 W
General
Alimentación eléctrica CA 100 - 240 V, 50/60 Hz
Condición de activación (reproducción de música e
iluminación encendida):
Consumo
Dimensiones
(Anchura × Altura × Profundidad)
Peso 5,5 kg
20 W
Condición de apagado (iluminación y SMART TIMER apagados
y sin conexión Bluetooth):
0,5 W o menos
300 × 1.152 × 300 mm (incluyendo la base)
Información actualizada a octubre de 2013. Las especificaciones están sujetas a cambios sin
previo aviso.
* La vida útil estimada de la luz LED es de aproximadamente 40.000 horas.
Esta estimación corresponde al momento en el que la luz se agota o en el que el flujo luminoso
desciende por debajo del 70% del nivel original (el que se produzca antes). Sin embargo, no se
garantiza el ciclo de vida de 40.000 horas.
“Made for iPod”, “Made for iPhone” y “Made for iPad”
significa que un accesorio electrónico se ha
diseñado específicamente para conectarse a un
iPod, un iPhone o un iPad, respectivamente y que el
desarrollador ha certificado que cumple con los estándares de rendimiento de Apple.
Apple no se hace responsable del funcionamiento de este dispositivo ni de su cumplimiento con
los estándares normativos y de seguridad.
Tenga en cuenta que el uso de este accesorio con un iPod, un iPhone o un iPad puede afectar al
rendimiento inalámbrico.
iPad, iPhone, iPod y iPod touch son marcas comerciales de Apple Inc., registradas en los EE. UU. y
en otros países.
Bluetooth
• Bluetooth es una tecnología para comunicación inalámbrica entre dispositivos dentro de un área
aproximada de 10 metros a través de la banda de frecuencia de 2,4 GHz, una banda que se
puede usar sin necesidad de licencia.
• Bluetooth es una marca registrada de Bluetooth SIG y Yamaha la utiliza de acuerdo con un
contrato de licencia.
Gestión de las comunicaciones Bluetooth
• La banda de 2,4 GHz utilizada por los dispositivos Bluetooth compatibles es una banda de radio
que muchos otros equipos también utilizan. Aunque los dispositivos Bluetooth compatibles
utilizan una tecnología que reduce al mínimo la influencia de otros componentes que puedan
estar usando la misma banda de radio, esta influencia inevitablemente puede reducir la
velocidad o la distancia de las comunicaciones y, en algunos casos, interrumpir la comunicación.
• La velocidad de transferencia de la señal y la distancia a la que es posible la comunicación varía
en función de la distancia entre los dispositivos comunicantes, la presencia de obstáculos, las
condiciones de las ondas de radio y el tipo de equipo.
• Yamaha no garantiza el funcionamiento de todas las conexiones inalámbricas entre esta unidad
y otros dispositivos compatibles con Bluetooth.
aptX® es una marca comercial de CSR.
Android™
Android y Google Play son marcas comerciales de Google, Inc.
Español
Es 15
Page 86

Inhoudsopgave
Inleiding......4
Bijgeleverde accessoires......4
Het toestel plaatsen......4
Info over deze gebruiksaanwijzing......4
Namen van onderdelen......5
Hoofdapparaat......5
Afstandsbediening......6
Voorbereidingen......7
"DTA CONTROLLER" installeren......7
De verlichting / het toestel inschakelen......7
Muziek beluisteren via Bluetooth......8
Een apparaat koppelen met het toestel......8
Een apparaat koppelen en muziek afspelen......9
Verbinding maken met een gekoppeld Bluetooth-apparaat en muziek afspelen......10
De Bluetooth-verbinding verbreken......10
Luisteren naar externe bronnen......11
Een extern apparaat aansluiten......11
Afspelen......11
De SMART TIMER gebruiken......12
De SMART TIMER instellen......12
De SMART TIMER activeren/deactiveren......12
Problemen oplossen......13
Technische gegevens......15
2 Nl
Page 87

Hoge geluidskwaliteit
en eenvoudig te gebruiken
Plug-and-playfunctie voor uw mobiele apparaten
met een verbeterd geluidsbeeld.
Handige afstandsbediening via uw mobiele
apparaat.
......7
......8, 11
Een mengeling van muziek en verlichting
Start uw dag op een stralende manier en met de juiste toon.
Word wakkergemaakt door uw favoriete nummer in een comfortabele
atmosfeer.
......12
Dompel uzelf aan het einde van de dag onder in een zachte
sfeer van licht en geluid.
......7
Nederlands
Nl 3
Page 88

Inleiding
Controleer de inhoud van de verpakking en neem deze handleiding grondig door.
Bijgeleverde accessoires
Gebruik de volgende items om de standaard te
monteren. Lees de afzonderlijke "Montagehandleiding"
voor meer informatie over het monteren van de
standaard.
•Basis
Stroomkabel
Afstandsbediening
•Schroef (M5)
• Kabelklem
Het toestel plaatsen
Dit toestel gebruikt een hoek of de muur om het geluid en de verlichting te
weerkaatsen en te versterken.
In een hoek Voor een muur
• Wij raden u aan het toestel 30 cm - 70 cm verwijderd van een hoek te plaatsen.
Wanneer u het voor een muur plaatst, dient u een tussenruimte van 20 cm - 50 cm
aan te houden.
Ongeveer
30 cm - 70 cm
Info over deze gebruiksaanwijzing
• Bediening
- De bediening van dit toestel wordt voornamelijk met
behulp van de afstandsbediening uitgelegd.
- De "iPhone" die in deze handleiding wordt
beschreven, kan ook verwijzen naar een "iPod touch"
of "iPad".
• Afbeeldingen
Afbeeldingen kunnen afwijken van het werkelijke item.
• Symbolen
Wijst op voorzorgsmaatregelen bij het gebruik
van het toestel en op functiebeperkingen.
Wijst op aanvullende uitleg voor een beter
gebruik.
Wijst op de overeenstemmende
&
referentiepagina('s).
* De verlichtingseffecten zijn afgestemd op de geluidsuitbreiding.
4 Nl
Voorkant
Page 89

Namen van onderdelen
Maak uzelf vertrouwd met alle onderdelen en deze functies.
Hoofdapparaat
1 Voorverlichting/luidspreker
2 Statusaanduiding
Licht op wanneer u het toestel inschakelt. Knippert wanneer er een bedieningssignaal wordt
ontvangen of wanneer de status van de Bluetooth-verbinding wijzigt.
3 Sensor voor het afstandsbedieningssignaal (& P.6)
4 Achterverlichting/luidspreker
5 Deksel (& P.11)
Kan losgemaakt worden om de AUX IN-aansluiting te kunnen bereiken.
6 A (aan/uit) (& P.7)
Druk hierop om het toestel in of uit te schakelen.
7 VOLUME +/–
Hiermee kunt u het volume regelen.
8 (Bluetooth-knop/-aanduiding) (& P.9)
Indrukken: verbinding maken met een Bluetooth-apparaat.
Ingedrukt houden: de verbinding met een Bluetooth-apparaat verbreken.
Licht op wanneer er een Bluetooth-apparaat verbonden is.
Nederlands
Voorkant Achterkant
9 (SMART TIMER-knop/-aanduiding) (& P.12)
Hiermee kunt u de SMART TIMER in-/uitschakelen.
Licht op wanneer de SMART TIMER ingeschakeld is.
0 (verlichting) (& P.7)
Druk hierop om de voor-/achterverlichting in of uit te schakelen.
A AUX IN (& P.11)
Sluit hier een extern apparaat op aan met behulp van een in de handel verkrijgbare
3,5mm-stereoministekkerkabel.
Nl 5
Page 90

Namen van onderdelen
Afstandsbediening
Isolatievel*
1 (aan/uit) (& P.7)
Druk hierop om het toestel in of uit te schakelen.
2 VOLUME +/–
Hiermee kunt u het volume regelen.
3 (Bluetooth) (& P.9)
Indrukken: verbinding maken met een Bluetooth-
apparaat.
Ingedrukt houden: de verbinding met een Blueto oth-
apparaat verbreken.
4 (SMART TIMER) (& P.12)
Hiermee kunt u de SMART TIMER in-/uitschakelen.
5 Signaalzender van afstandsbediening
6 (verlichting) (& P.7)
Druk hierop om de verlichting in of uit te schakelen.
7 DIMMER +/– (& P.7)
Druk hierop om de helderheid van de verlichting aan te
passen.
Hoek/bereik van de afstandsbediening
Richt de afstandsbediening naar de sensor voor het
afstandsbedieningssignaal op het toestel.
Binnen
6 m
De batterij vervangen
• Controleer de richting van de "+"-pool van de batterij
en plaats deze correct.
• Druk het ontgrendellipje naar en schuif de
batterijhouder naar buiten in de richting van .
CR2025-
lithiumbatterij
* Verwijder het isolatievel van de afstandsbediening voor u
deze gebruikt.
6 Nl
Page 91

Voorbereidingen
Installeer de toepassing "DTA CONTROLLER" van Yamaha en schakel het toestel in.
"DTA CONTROLLER" installeren
Door de toepassing DTA CONTROLLER te installeren op een mobiel apparaat zoals een
smartphone of een tablet, kunt u tal van extra functies gebruiken voor Yamahadesktopaudiosystemen.
Functies
• Het toestel in-/uitschakelen, het volume regelen
• De verlichting in-/uitschakelen, de helderheid van de verlichting regelen
• De SMART TIMER instellen (& P.12)
• Het geluid van het toestel optimaliseren op basis van de plaatsing ervan
• Nummers afspelen die opgeslagen zijn op een iPhone
Het mobiele apparaat moet via Bluetooth verbonden zijn met het toestel (& P.8).
(Voor gebruikers in de VS)
http://itunes.com/app/
dtacontroller
Google Play™
https://play.google.com/
store/apps/
details?id=com.yamaha.av.
dtacontroller
* Als deze tweedimensionale streepjescodes
of koppelingen niet werken, zoekt u naar
"DTA CONTROLLER" in de App Store of
Google Play.
https://itunes.apple.com/us/
app/dta-controller-us/
id549333293?mt=8
De verlichting / het toestel inschakelen
1 Sluit het netsnoer aan op een stopcontact.
2 • Druk op om de verlichting in te
schakelen.
- U kunt de verlichting ook in-/uitschakelen
wanneer het toestel uitgeschakeld is.
- Om de helderheid aan te passen, drukt u op de knop
DIMMER +/– op de afstandsbediening (10 stappen).
• Druk op om het toestel in te
schakelen.
- Het toestel is klaar om muziek af te spelen.
Automatische uitschakelfunctie
• De automatische uitschakelfunctie wordt als volgt geactiveerd (standaardinstelling).
- Het toestel wordt automatisch uitgeschakeld als er gedurende meer dan
20 minuten geen handelingen uitgevoerd worden en er geen apparaat
aangesloten is op de AUX IN-aansluiting of via Bluetooth.
- De verlichting en het toestel worden automatisch uitgeschakeld als er gedurende
meer dan 24 uur geen handelingen uitgevoerd worden.
De automatische uitschakelfunctie activeren/deactiveren
1 Houd A op het toestel ingedrukt en sluit het netsnoer aan op een stopcontact.
2 Blijf A ingedrukt houden.
• De automatische uitschakelfunctie schakelt om en de aanduidingen (& P.5)
knipperen als volgt:
- Automatisch uitschakelen is geactiveerd:
- Automatisch uitschakelen is gedeactiveerd:
,
Nederlands
Nl 7
Page 92

Muziek beluisteren via Bluetooth
U kunt muziek die opgeslagen is op een Bluetooth-apparaat draadloos beluisteren.
Een apparaat koppelen met het toestel
Wanneer u een Bluetooth-apparaat voor het eerst met het
toestel koppelt, moet het apparaat geregistreerd worden
bij het toestel. Dit proces wordt "koppelen" genoemd. Als
de koppeling voltooid is, kunt u verbinding maken door
enkele eenvoudige stappen uit te voeren.
Een Bluetooth-apparaat
dat voor het eerst wordt
verbonden
Koppel het apparaat en
speel de muziek af
(& P.9)
Een Bluetooth-apparaat
dat eerder al werd
verbonden
Maak verbinding via
Bluetooth en speel de
muziek af (& P.10)
• Als de koppelingsinformatie van een apparaat
gewist is, moet u het apparaat opnieuw koppelen
om opnieuw verbinding te kunnen maken.
Bluetooth-
apparaat
8 Nl
Page 93

Een apparaat koppelen en muziek afspelen
Muziek beluisteren via Bluetooth
iPhone
1 Druk op om het toestel in te schakelen (& P.7).
• De statusaanduiding licht op.
2 Tik op "Instellingen" en "Bluetooth" op uw iPhone om de Bluetooth-
functie ervan in te schakelen.
3 Tik in de lijst onder "Apparaten" op "LSX-700 Yamaha".
• Als het koppelen lukt, knipperen de statusaanduiding en de -aanduiding (& P.5).
4 Speel muziek af op de iPhone.
Andere apparaten dan een iPhone
1 Druk op om het toestel in te schakelen (& P.7).
• De statusaanduiding licht op.
2 Schakel de Bluetooth-functie van het apparaat in.
3
Selecteer "LSX-700 Yamaha" bij de
• Als het koppelen lukt, knipperen de statusaanduiding en de -aanduiding (& P.5).
• Als de -aanduiding dooft en het apparaat na de koppeling niet automatisch verbinding maakt met het toestel,
selecteert u nogmaals "LSX-700 Yamaha" bij de Bluetooth-instellingen van het apparaat.
• Raadpleeg de gebruiksaanwijzing van het apparaat voor meer informatie.
Bluetooth
-instellingen van het apparaat.
• Als er al een ander apparaat gekoppeld is met het
toestel, verbreekt u de Bluetooth-verbinding door
ingedrukt te houden en voert u vervolgens de
koppeling met het nieuwe apparaat door.
• De koppelingsmethode kan verschillen afhankelijk
van uw iPhone of de versie van het
besturingssysteem.
Nederlands
• Als er al een ander apparaat gekoppeld is met het
toestel, verbreekt u de Bluetooth-verbinding door
ingedrukt te houden en voert u vervolgens de
koppeling met het nieuwe apparaat door.
• Als er tijdens het koppelen een wachtwoord
wordt gevraagd, voert u het getal "0000" in.
4 Speel muziek af op het apparaat.
Nl 9
Page 94
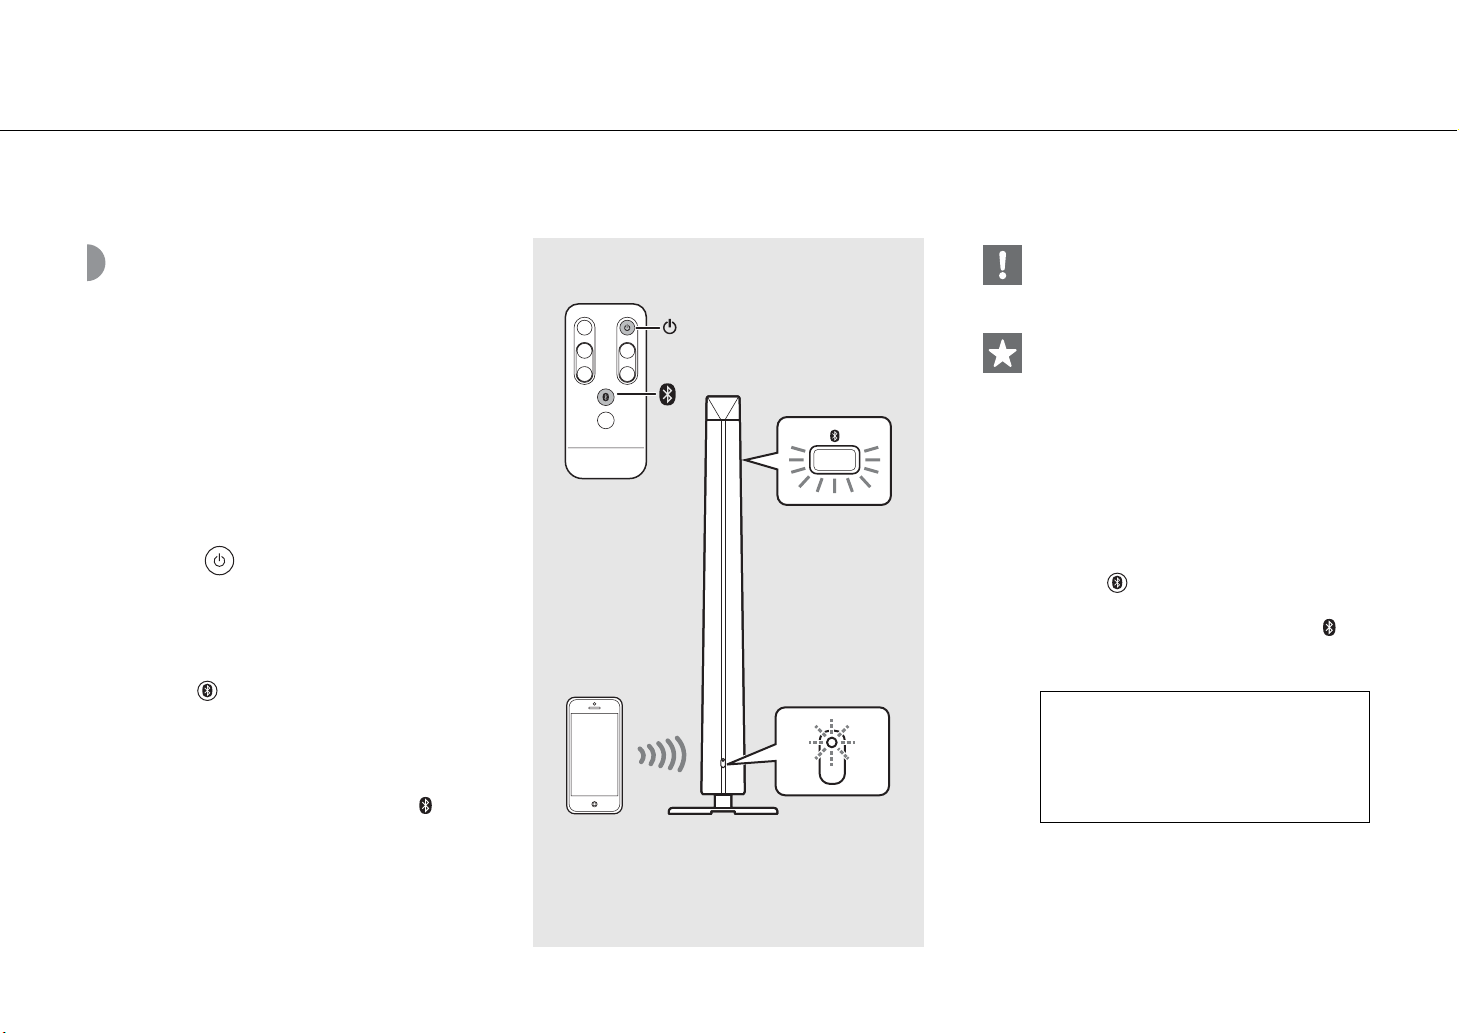
Muziek beluisteren via Bluetooth
Verbinding maken met een gekoppeld Bluetooth-apparaat en muziek afspelen
Als het toestel met een ander apparaat verbonden is via
Bluetooth, verbreekt u die verbinding (zie "De Bluetoothverbinding verbreken" aan de rechterzijde) vooraleer u
verbinding maakt met het gewenste apparaat.
1 Druk op om het toestel in te
schakelen.
2 Maak verbinding via Bluetooth.
• Verbinding maken vanaf het toestel:
druk op .
• Verbinding maken vanaf het Bluetooth-
apparaat: Schakel de Bluetooth-functie van het
apparaat in en selecteer "LSX-700 Yamaha".
• Wanneer de verbinding tot stand is gebracht,
knippert de statusaanduiding en licht de aanduiding op het toestel op.
1
2
2, 3
Bluetooth-
aanduiding
Statusaanduiding
• Verlaag het volume van het toestel vooraleer
u muziek afspeelt. Zoniet kan het volume van
de weergave te luid zijn.
• Als u verbinding maakt vanaf het toestel, zoekt het
toestel na ar het Bluetooth-apparaat waarmee er als
laatste verbinding werd gemaakt. Zorg er in dat
geval voor dat de Bluetooth-functie van het
apparaat ingeschakeld is.
De Bluetooth-verbinding verbreken
• U kunt de Bluetooth-verbinding verbreken door
een van de volgende handelingen uit te voeren.
- Schakel de Bluetooth-functie van het verbonden
apparaat uit.
- Houd ingedrukt.
• Wanneer de Blueto oth-verbinding verbroken is,
knippert de statusaanduiding en dooft de aanduiding.
Muziekverbeteraar
Deze functie zorgt voor een verbetering van
gecomprimeerde digitale geluiden door het
herstellen van muziekelementen die verloren
gegaan zijn door compressie via de Bluetooth-
verbinding.
3 Speel muziek af op het verbonden
apparaat.
10 Nl
Page 95

Luisteren naar externe bronnen
U kunt muziek afspelen op externe apparaten die aangesloten zijn op de AUX IN-aansluiting van dit toestel. Voor deze aansluiting hebt u een in de handel verkrijgbare 3,5mmstereoministekkerkabel nodig (diameter: 12 mm of minder). Vooraleer u het externe apparaat aansluit, moet u het toestel uitschakelen door op te drukken.
Een extern apparaat aansluiten
1 Verwijder het deksel aan de
achterkant van het toestel.
2 Voer de kabel door de opening aan de
onderkant en trek deze via de bodem
van de basis naar buiten.
3 Sluit de kabel aan op de AUX IN-
aansluiting.
4 Sluit het andere uiteinde van de kabel
aan op het externe apparaat.
Afspelen
1 Druk op om het toestel in te
schakelen.
2 Speel muziek af op het externe
apparaat.
• Meer informatie over het afspelen vindt u in de
gebruiksaanwijzing die geleverd is bij het externe
apparaat.
2
AUX IN
1
3
4
Extern
apparaat
• Verminder vóór de verbinding het volume van het toestel en het externe apparaat.
• Als u zowel muziek afspeelt op een Bluetooth-apparaat als op een extern apparaat, zal het geluid van beide apparaten
hoorbaar zijn.
Stereoministekkerkabel van 3,5 mm
Nederlands
Nl 11
Page 96

De SMART TIMER gebruiken
U kunt de SMART TIMER gebruiken om de verlichting met de ingestelde helderheid in te schakelen en uw favoriete muziek af te spelen om elke morgen heerlijk
wakker te worden. Terwijl u in bed ligt en aan het luisteren bent naar de muziek, kunt u de verlichting en de muziek ook automatisch laten beëindigen.
Wat kunt u doen met de SMART TIMER?
Inschakeltimer Uitschakeltimer
• De verlichting op een opgegeven tijdstip inschakelen.
• De helderheid van de verlichting opgeven.
• Muziek op een aangesloten apparaat afspelen op een
opgegeven tijdstip.
• Een nummer opgeven.
• Het volumeniveau vooraf instellen.
• De verlichting op een opgegeven tijdstip
uitschakelen.
• Het toestel op een opgegeven tijdstip
uitschakelen.
De SMART TIMER instellen
U kunt de SMART TIMER-instellingen configureren met behulp van een smartphone of tablet waarop de
toepassing DTA CONTROLLER (& P.7) geïnstalleerd is.
1 Maak verbinding met een apparaat via Bluetooth (& P.9, 10).
2 Start DTA CONTROLLER op het apparaat en configureer de SMART TIMER-instellingen.
3 Synchroniseer de SMART TIMER met het toestel met behulp van DTA CONTROLLER.
• Vergeet de SMART TIMER niet te synchroniseren met het toestel nadat u de SMART TIMER-instellingen geconfigureerd hebt.
De SMART TIMER activeren/deactiveren
Druk op op het toestel of op op de afstandsbediening.
• De -aanduiding licht op wanneer de SMART TIMER geactiveerd is.
• Om een nummer op een ingesteld tijdstip af te
spelen via een Bluetooth-verbinding, moet de
Bluetooth-functie van uw smartphone of tablet
ingeschakeld zijn. Zorg er in het geval van een
iPhone voor dat u DTA CONTROLLER niet afsluit
tijdens het multitasken.
• Als er op het ingestelde tijdstip een ander
Bluetooth-apparaat verbonden is met het toestel,
zal het nummer dat u gekozen hebt voor de
inschakeltimer niet afgespeeld worden. Verbreek
de verbinding met eventuele andere apparaten
vooraleer het ingestelde tijdstip aanbreekt.
• De in- en uitschakeltimer van de SMART TIMER
kunnen alleen via DTA CONTROLLER geactiveerd/
gedeactiveerd worden.
• U kunt de SMART TIMER niet activeren/
deactiveren door op te drukken op het toestel
of op de afstandsbediening als u de SMART TIMER
niet ingesteld hebt via DTA CONTROLLER.
Interne klok van het toestel
• Het toestel kopieert het tijdstip van DTA
CONTROLLER naar zijn interne klok wanneer er
een apparaat via Bluetooth verbonden wordt met
het toestel. De SMART TIMER volgt de interne klok
van het toestel.
• De klokinstelling wordt gereset en de SMART
TIMER wordt gedeactiveerd als het netsnoer
gedurende ongeveer een week niet verbonden is
met een stopcontact.
12 Nl
Page 97

Problemen oplossen
Raadpleeg de onderstaande tabel als het toestel niet naar behoren functioneert. Als de oplossing hieronder niet vermeld staat of als de aanwijzing het probleem
niet verhelpt, schakelt u het toestel uit, haalt u de stekker uit het stopcontact en neemt u contact op met uw dichtstbijzijnde dealer of servicecentrum van Yamaha.
Algemeen
Probleem Oorzaak Oplossing
Het toestel wordt uitgeschakeld kort
nadat het werd ingeschakeld.
Het toestel werkt niet naar behoren.
De luidsprekers produceren geen geluid.
Het toestel en/of de verlichting worden
onverwacht uitgeschakeld.
Het toestel en/of de verlichting worden
onverwacht ingeschakeld.
Het lukt niet om de SMART TIMER in te
schakelen.
U ondervindt storing van digitale of
hoogfrequente apparatuur.
De afstandsbediening werkt niet of niet
naar behoren.
Het netsnoer is niet goed aangesloten. Sluit het netsnoer op de juiste manier aan.
Het toestel werd blootgesteld aan een krachtige elektrische schok,
bijvoorbeeld door een blikseminslag of sterke statische elektriciteit.
Het volume staat op het minimum. Verhoog het volume.
Het toestel is uitgeschakeld. Schakel het toestel in en speel de muziek opnieuw af.
De automatische uitschakelfunctie is geactiveerd. Schakel het toestel in (& P.7).
De automatische uitschakelfunctie is geactiveerd. Schakel het toestel en/of de verlichting in (& P.7).
De uitschakeltimer van de SMART TIMER is ingesteld. Controleer de instelling van de uitschakeltimer bij DTA CONTROLLER.
De inschakeltimer van de SMART TIMER is ingesteld. Controleer de instelling van de inschakeltimer bij DTA CONTROLLER.
Het netsnoer was langer dan een week losgekoppeld, waardoor de
klokinformatie gewist is.
De SMART TIMER werd niet ingesteld via DTA CONTROLLER.
Het toestel staat te dicht bij digitale of hoogfrequente apparatuur. Plaats het toestel verder van dergelijke apparatuur vandaan.
De afstandsbediening wordt mogelijk buiten het werkingsbereik gebruikt. Gebruik de afstandsbediening binnen het werkingsbereik (& P.6).
De afstandsbedieningssensor van dit toestel wordt mogelijk blootgesteld
aan direct zonlicht of sterke belichting zoals een fluorescentielamp met
omzetter.
De batterij is mogelijk leeg. Vervang de batterij door een nieuwe (& P.6).
Er bevinden zich obstakels tussen de sensor van dit toestel en de
afstandsbediening.
Schakel het toestel uit en koppel het netsnoer los. Sluit het netsnoer na
ongeveer 30 seconden opnieuw aan en schakel het toestel opnieuw in.
Configureer de SMART TIMER via DTA CONTROLLER en synchroniseer deze
met het toestel (& P.12).
Wijzig de richting van de belichting of het toestel, of de plaats van het
toestel.
Verwijder de obstakels.
Nederlands
Nl 13
Page 98

Problemen oplossen
Bluetooth
Probleem Oorzaak Oplossing
Kan het toestel niet koppelen met een
Bluetooth-apparaat.
Kan geen verbinding maken via Bluetooth.
Er wordt geen geluid geproduceerd of het
geluid wordt onderbroken tijdens het
afspelen.
Het toestel is uitgeschakeld. Schakel het toestel in en voer de koppeling uit (& P.9).
Er is een ander Bluetooth-apparaat verbonden.
Dit toestel en het apparaat bevinden zich op een te grote afstand van
elkaar.
Er bevindt zich een apparaat (magnetronoven, draadloos LAN enz.) in de
buurt dat signalen binnen de 2,4 GHz-frequentieband uitvoert.
Een Bluetooth-adapter enz. die u met dit toestel wilt koppelen, heeft een
ander wachtwoord dan "0000".
Het Bluetooth-apparaat biedt geen ondersteuning voor A2DP.
Het toestel is uitgeschakeld. Schakel het toestel in.
Er is een ander Bluetooth-apparaat verbonden.
De Bluetooth-functie van het apparaat is uitgeschakeld. Schakel de Bluetooth-functie van het apparaat in.
De koppelingsinformatie is gewist.
Dit toestel is niet geregistreerd in de Bluetooth-verbindingslijst van het
apparaat.
Het volumeniveau van het verbonden apparaat is te laag. Zet het volume van het verbonden apparaat hoger.
Het apparaat dat u wilt verbinden, is niet geconfigureerd om audiosignalen
via Bluetooth naar het toestel te verzenden.
De Bluetooth-verbinding van het toestel met het apparaat is verbroken. Verbind de apparaten opnieuw met elkaar via Bluetooth (& P.10).
Er bevindt zich een apparaat (magnetronoven, draadloos LAN enz.) in de
buurt dat signalen binnen de 2,4 GHz-frequentieband uitvoert.
Dit toestel en het te verbinden apparaat bevinden zich op een te grote
afstand van elkaar.
Verbreek de huidige Bluet oot h-verbinding en maak een koppeling met het
nieuwe apparaat.
Koppel het toestel met het apparaat binnen een afstand van 10 m.
Plaats dit toestel uit de buurt van het apparaat dat radiofrequentiesignalen
uitzendt.
Gebruik een Bluetooth-adapter enz. die "0000" heeft als wachtwoord.
Voer een koppeling door met een apparaat dat ondersteuning biedt voor
A2DP.
Verbreek de huidige Bluetooth-verbinding en maak opnieuw verbinding via
Bluetooth met het betreffende apparaat.
Voer de koppeling opnieuw uit (& P.9).
U kunt dit toestel koppelen met acht apparaten. Als u een negende
apparaat koppelt, wordt de koppelingsinformatie met de oudste
verbindingsdatum gewist.
Voer de koppeling opnieuw uit (& P.9).
Zorg ervoor dat de Bluetooth-audiosignalen van het apparaat dat u wilt
verbinden, uitgevoerd worden naar het toestel.
Plaats dit toestel uit de buurt van het apparaat dat radiofrequentiesignalen
uitzendt.
Breng het te verbinden apparaat binnen een afstand van 10 m van het
toestel.
14 Nl
Page 99

Technische gegevens
Bluetooth-gedeelte
Bluetooth-versie Ver. 2.1+EDR
Ondersteund profiel
Compatibele codecs SBC, AAC, aptX®
Draadloze uitvoer Bluetooth klasse 2
Maximaal communicatiebereik 10 m (zonder hindernissen)
A2DP (Advanced Audio Distribution Profile)
AVRCP (Audio/Video Remote Control Profile)
AUX IN-gedeelte
Ingang Stereo miniaansluiting van 3,5 mm
Verlichtingsgedeelte (led*)
Levensduur Ongeveer 40.000 uur (lichtstroom minder dan 70%)
Stroomverbruik 9 W (wanneer alleen de verlichting ingeschakeld is)
Algemeen
Stroomvoorziening AC 100 - 240 V, 50/60 Hz
Toestel ingeschakeld (er wordt muziek afgespeeld en de
verlichting brandt):
Stroomverbruik
Afmetingen (B × H × D) 300 × 1.152 × 300 mm (inclusief de basis)
Gewicht 5,5 kg
20 W
Toestel uitgeschakeld (de verlichting en de SMART TIMER zijn
uitgeschakeld en er is geen Bluetooth-verbinding):
0,5 W of minder
Vanaf oktober 2013. Wijzigingen in technische gegevens voorbehouden zonder
voorafgaande kennisgeving.
* De geschatte levensduur van ledverlichting is ongeveer 40.000 uur.
Deze waarde is gebaseerd op de duur tot de verlichting versleten is of de duur tot de lichtstroom
minder dan 70% van de oorspronkelijke lichtstroom bedraagt (de kortste duur van beide gevallen is
van toepassing). Merk echter op dat de geschatte levensduur van 40.000 uur niet gegarandeerd wordt.
"Made for iPod", "Made for iPhone" en "Made for
iPad" betekenen dat een elektronisch accessoire
specifiek is ontwikkeld voor aansluiting op
respectievelijk iPod, iPhone of iPad en door de
ontwikkelaar is gecertificeerd en voldoet aan de prestatienormen van Apple.
Apple is niet verantwoordelijk voor de werking van dit apparaat of voor het voldoen aan
veiligheidseisen en wettelijke normen.
Het gebruik van dit accessoire met iPod, iPhone of iPad kan de prestatie van draadloze functies
beïnvloeden.
iPad, iPhone, iPod en iPod touch zijn handelsmerken van Apple Inc., gedeponeerd in de VS en
andere landen.
Bluetooth
• Bluetooth is een technologie voor draadloze communicatie tussen apparaten binnen een gebied
van 10 meter. Deze maakt gebruik van de 2,4 GHz-frequentieband, een band die zonder licentie
kan worden gebruikt.
• Bluetooth is een gedeponeerd handelsmerk van Bluetooth SIG en wordt door Yamaha gebruik in
overeenstemming met een licentieovereenkomst.
Bluetooth-communicatiebeheer
• De 2,4 GHz-band die door Bluetooth-apparaten wordt gebruikt, is een radioband die met vele
soorten apparatuur wordt gedeeld. Hoewel Bluetooth-apparaten een technologie gebruiken die
de invloed van andere componenten op dezelfde radioband minimaliseert, kan die invloed de
snelheid of de afstand van de communicatie beïnvloeden en in sommige gevallen de
communicatie verbreken.
• De snelheid van de signaaloverdracht en de afstand waarbinnen communicatie mogelijk is,
verschillen in functie van de afstand tussen de communicatieapparaten, de aanwezigheid van
obstakels, de toestand van de radiogolven en het soort apparatuur.
• Yamaha biedt geen garantie voor alle draadloze verbindingen tussen dit toestel en apparaten
die compatibel zijn met de Bluetooth-functie.
aptX® is een handelsmerk van CSR.
Android™
Android en Google Play zijn handelsmerken van Google, Inc.
Nederlands
Nl 15
Page 100

Содержание
Введение......4
Прилагаемые аксессуары......4
Размещение аппарата......4
Об этом руководстве......4
Название компонентов......5
Основной корпус......5
Пульт ДУ......6
Подготовка......7
Установка приложения “DTA CONTROLLER”......7
Включение подсветки/питания......7
Прослушивание музыки с помощью подключения Bluetooth......8
Согласование устройства с этим аппаратом......8
Выполнение согласования и воспроизведение музыки......9
Подключение согласованного устройства Bluetooth и воспроизведение музыки......10
Прерывание подключения Bluetooth......10
Прослушивание внешних источников......11
Подключение внешнего устройства......11
Воспроизведение......11
Использование функции SMART TIMER......12
Настройка функции SMART TIMER......12
Включение/выключение функции SMART TIMER......12
Поиск и устранение неисправностей......13
Технические характеристики......15
2 Ru
 Loading...