

Page 1

LS9 Quick Start Guide
A guide for people using LS9 in the real word.
This Quick Start Guide describes practical use and operation of
scenes, the virtual rack, and other useful functions.
The Quick Start Guide is provided for first-time users of the Yamaha
LS9 Digital Mixing Console, and provides a streamlined
introduction to its main features. For more in-depth information refer
the Owner’s Manual supplied with the product.
Page 2

Contents
Check Your Connections �����������������������������������������������������������������������������������������������������������������������������������������������������������������������������������������������������3
Selected Channel Section ���������������������������������������������������������������������������������������������������������������������������������������������������������������������������������������������������4
Sends On Fader Mode ��������������������������������������������������������������������������������������������������������������������������������������������������������������������������������������������������������5
The Virtual Rack ������������������������������������������������������������������������������������������������������������������������������������������������������������������������������������������������������������������6
Selecting, Editing, and Saving Effects ���������������������������������������������������������������������������������������������������������������������������������������������������������������������������������7
Effect/ GEQ Channel Assignment ���������������������������������������������������������������������������������������������������������������������������������������������������������������������������������������8
GEQ Selection and Editing ��������������������������������������������������������������������������������������������������������������������������������������������������������������������������������������������������9
Recalling and Saving Scenes ��������������������������������������������������������������������������������������������������������������������������������������������������������������������������������������������10
Scene Data ������������������������������������������������������������������������������������������������������������������������������������������������������������������������������������������������������������������������ 11
Recall Safe ������������������������������������������������������������������������������������������������������������������������������������������������������������������������������������������������������������������������12
BGM Playback from USB Memory ������������������������������������������������������������������������������������������������������������������������������������������������������������������������������������13
USER DEFINED KEY Assignment ������������������������������������������������������������������������������������������������������������������������������������������������������������������������������������14
Connecting the LS9 to a Computer �����������������������������������������������������������������������������������������������������������������������������������������������������������������������������������15
Network Setup �������������������������������������������������������������������������������������������������������������������������������������������������������������������������������������������������������������������16
Launching and Setting Up the Studio Manager/LS9 Editor �����������������������������������������������������������������������������������������������������������������������������������������������17
Yamaha Technology ����������������������������������������������������������������������������������������������������������������������������������������������������������������������������������������������������������18
Q & A ���������������������������������������������������������������������������������������������������������������������������������������������������������������������������������������������������������������������������������20
Block Diagram �������������������������������������������������������������������������������������������������������������������������������������������������������������������������������������������������������������������22
2
Page 3

Check Your Connections
This document presumes that you have already made the necessary connections and have set up the console for basic
sound output as described in the Quick Start Guide� Check your setup one more time before trying out the functions
described in this document�
Power cable socket.
POWER switch.
Are the main left and right outputs appearing properly at OMNI OUT connectors 15 (7) and 16 (8)?
Console Preparation
When working with an analog console it was always
necessary to check that all controls were “normalized”
before setting up a mix� This meant spending a
considerable amount of time to make sure that more than
1,000 controls (on most large consoles) were set to the
appropriate neutral positions: gain controls to minimum,
EQ controls to their at settings, etc.
Analog input connectors (monaural).
Scene 000
On the LS9 all channel controls are concentrated in the
Selected Channel section, and all default settings are
stored in scene number 000� So all you have to do to
normalize or “reset” the entire console is to recall scene
000�
3
Page 4

The Selected Channel section is located
to the right of the LCD panel.
The channel module controls the parameters shown
in this section of the display. This corresponds to
the lower section of the analog console channel
module, shown to the left.
The Selected Channel section encoders and keys control the parameters that
appear in this section of the display. This includes head amp gain, EQ, two
different dynamics thresholds, panning/balance, and other controls
corresponding to those in the upper section of the analog console channel
module shown to the left. The HPF can be controlled via the display only.
Selected Channel Section
The Selected Channel section on an LS9 console corresponds to the channels modules on a traditional analog console,
providing access to all of the main parameters for the currently selected channel� The channel to be controlled is selected by
pressing it’s [SEL] key� Head amp gain, EQ, dynamics, pan/balance, mix and matrix bus send level, and other parameters can
be controlled via the encoders and keys on the panel�
Module Comparison
●
Analog Mixer Channel
Module
LS9 Selected Channel
Section
LS9 Channel
Module Section
The parameters
for the channel
selected via the
[SEL] keys appear
on the display�
Note:The analog channel module shown is from the MG24/14 mixer, but since it does not have the same number of AUX and EFF controls as the LS9 it should be referred to only as an example.
4
Page 5

Indicates that the SENDS ON FADER mode is active.
This will flash on the actual display.
Displays the currently selected MIX bus.
The bus knobs that were showing in the main display will disappear,
indicating that control has been transferred to the console’s faders.
Same send levels.
In the SENDS ON FADER mode you can directly
control the send levels without having to open
the SEND TO MIX display.
These settings can also be made via the SEND TO
MIX display that appears when you press the
SEND button in the main display.
Sends On Fader Mode
In the Sends On Fader mode you can use the console’s faders to adjust send levels to the MIX buses, or send levels from the
MIX, STEREO (L/R), and MONO buses to the MATRIX buses, and use the ON keys to turn those sends on or off�
The LS9 also allows these adjustments to be made from the main display using the cursor keys and data dial, but by
switching to the physical faders for these operations you have more hands-on, intuitive control�
Sends from the Channels to the MIX Buses
●
1) With a channel layer selected ([1-16] or [17-32] on the LS9-16;
[1-32] or [33-64] on the LS9-32), make sure than only one of the
MIX/MATRIX select buttons to the left of the display is selected and
lit�
2) Use the MIX/MATRIX select buttons to select the MIX bus you
want to edit (press the button once)� The selected MIX bus button
will light�
3) Press the same button a second time and all buttons in the
MIX/MATRIX section while light, while the selected button ashes.
“SENDS ON FADER” will ash at the top of the display.
Signals can be sent to the MATRIX buses from the MIX, STEREO (L/R) and MONO buses in the same way
(the display will be different)�
5
Page 6

The Virtual Rack
The LS9 has an 8-unit “Virtual Rack�” Rack spaces 1 through 4 can be loaded with 31-band or 15-band graphic EQ units,
while rack spaces 5 through 8 can be loaded with GEQ or SPX multi-effect units� Each 31-band GEQ unit provides 31
independently adjustable bands for a single channel� While the 15-band “Flex15 GEQ” units let you control up to 15 of 31
bands for two channels�
Mounting EQ or Effect Units
(1) Press the RACK [1-4] and [5-8]
keys in the DISPLAY ACCESS section
simultaneously to open the Virtual Rack
GEQ/Effect display.
(2) Position the cursor at the RACK button
corresponding to the rack you want to access,
and press the [ENTER] key. The RACK
MOUNTER pop-up window will open.
(3) Use the BLANK, 31BandGEQ, Flex15GEQ, and EFFECT
buttons to select the type of unit you want to mount in the selected
rack space, then press the [OK] button. Press the [CANCEL]
button if you want to close the pop-up window without mounting a
GEQ or effect unit.
In scene 000 4 GEQ units and 4 effect units are already selected� 8 Virtual Rack spaces are always available in the LS9,
although some of them may be blank in some cases�
GEQ units can be loaded into all 8 rack spaces, and you cal select either the single-channel 31-band GEQ type or the dual-
channel 15-band Flex15 GEQ type� Effect units can only be mounted in rack spaces 5 through 8� You can change the type of
unit mounted in any rack space by following steps 2 and 3 in the procedure described above�
6
Page 7
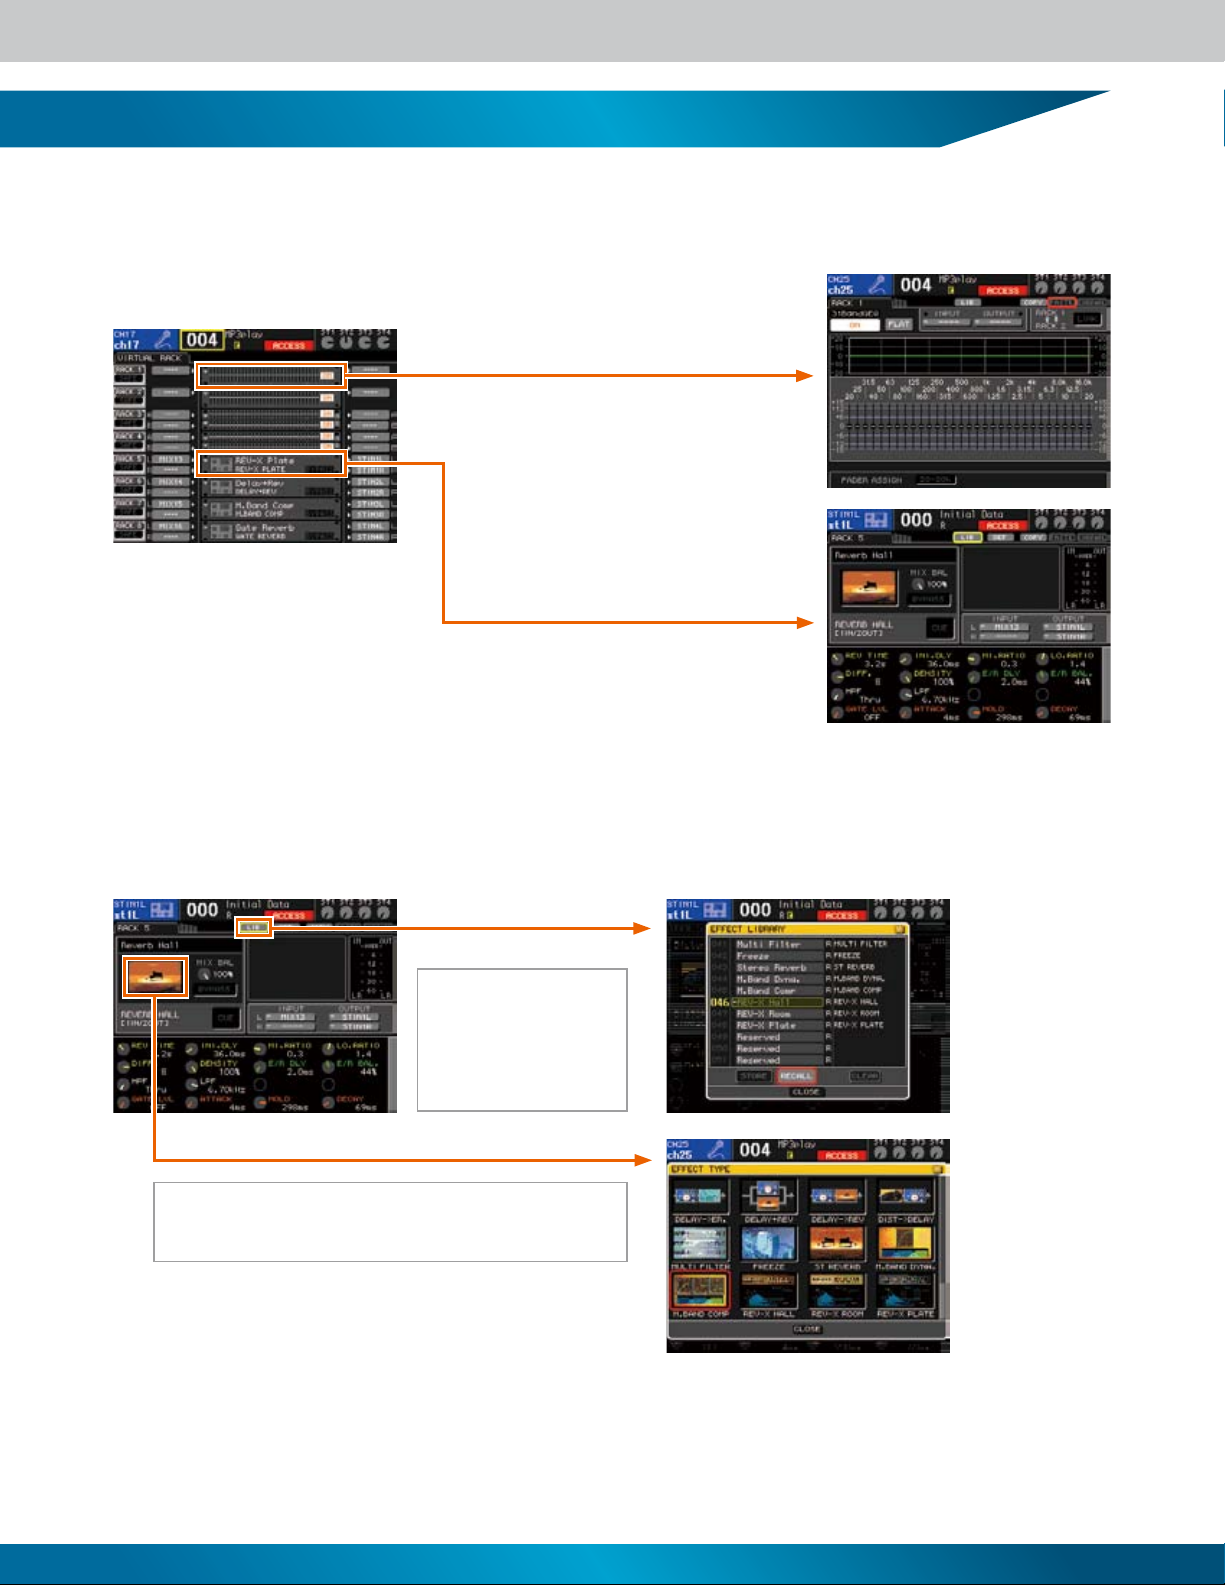
Selecting, Editing, and Saving Effects
If you position the cursor at a mounted effect unit in the VIRTUAL RACK GEQ/EFFECT display and press the [ENTER] key,
the EFFECT pop-up window will open�
If you select a unit in rack space 1 ~ 4 the EQ edit
display will open when you press the [ENTER] key.
If you select an effect unit that has been mounted
in rack space 5 ~ 8 the effect edit display will open,
but if you select an EQ unit that has been mounted in
rack space 5 ~ 8 the EQ edit display will open when
you press the [ENTER] key.
Move the cursor to the parameter you want to edit and use the dial or INC/DEC keys to edit it as required�
There are two ways to change the effect type�
Click the LIB button in the upper
area of the EFFECT window
to open the EFFECT LIBRARY
pop-up window. Use the dial to
select an effect from the list that
appears in the pop-up window.
Click the effect icon to open the EFFECT TYPE pop-up window. You can
then click one of the effect icons that appears to select the corresponding
effect.
You can click the
[RECALL] button to
load the selected
effect. Edited effects
can also be saved
to the library via this
pop-up window.
Recall the effect you
want to use.
Effects you have edited can be store in effect library numbers 058 ~ 199� Effect library numbers 001 ~ 057 are read-only�
Rev-X reverb programs can be recalled from library numbers 046 ~ 048�
7
Page 8

Effect/ GEQ Channel Assignment
In scene 000 MIX channels 13 ~ 16 are assigned as effect sends, and STEREO input channels 1 ~ 4 are assigned as effect
returns� These assignments can be re-patched as required�
Effects can be assigned to channels via these poop-up windows.
LS9 GEQ units can be assigned to the INPUT, MIX, MATRIX, and MASTER channel insert inputs and outputs� Effects can be
assigned to the MIX, MATRIX, and MASTER channel outputs as well as the insert inputs and outputs�
There is no need to assign effect returns to channels� In scene 000 the effect return are assigned to STEREO input channels
1 ~ 4, but these assignments can be changed� Either click the button to the right of the effect unit in the rack to open the
INPUT CH SELECT pop-up window, or open the PATCH/NAME pop-up window from the OVERVIEW display to change the
effect return assignments�
Even if you assign the effect returns to channels other than the STEREO input channels, the original STEREO input channel
assignments remain active unless you specically disengage or change the STEREO input channel assignments.
8
Page 9

GEQ Selection and Editing
If you position the cursor at a mounted GEQ unit in the VIRTUAL RACK GEQ/EFFECT display and press the [ENTER]
key, the GEQ pop-up window will open�
Links the faders to EQ control.
The [ON] keys
above the
faders set the
corresponding
band to it’s “0”
Click the FLAT button to reset all bands to
their “0” settings.
setting.
The 32 channel
faders on the
LS9-32 cover
all 31 EQ bands
at once. The
LS9-16 has three
buttons that
select the range
of bands that
will be controlled
by the channel
faders.
Although you can boost and cut the EQ bands via the display, you can also use the channel faders to directly control the
corresponding bands� Position the cursor at a button in the FADER ASSIGN area at the bottom of the display and press the
[ENTER] key� The channel faders will move to the corresponding settings as soon as a FADER ASSIGN button is engaged (the
button will be highlighted), and the faders can be used to boost/cut the corresponding EQ bands�
You can switch between different GEQ units by repeatedly
pressing the RACK [1-4] or [5-8] button. Flex15 GEQ units can
be selected and edited in the same way. When a Flex15 GEQ
unit is being edited the number of remaining available bands will
be displayed.
9
Page 10

Recalling and Saving Scenes
The LS9 allows you to save mix settings, input and output port patch settings, and other settings as “scenes” with original
names for easy identication. The available scene number range is 000 ~ 300. Scene number 000 is pre-programmed with
the console’s default settings and is read-only� Scene numbers 001 ~ 300 can be written to and read from as required� Scene
data is stored in a special buffer memory that will retain the settings even is there is an unexpected shutdown due to power
trouble�
Scene Recall
●
Let’s begin by recalling the console’s default settings (reset the console)� To recall scene 000 either use the INC/DEC keys or
the dial to display “000” in the SCENE eld, then press the [ENTER] key. A conrmation message will appear, and scene 000
will actually be recalled when you press the [ENTER] key a second time� By recalling scene 000 you “reset” or “normalize” the
entire console in one quick operation�
Note:By assigning scene 000 to one of the USER DEFINED KEYS (to be described later), you can recall it and therefore rest the console by pressing a single key.
Once the console has been reset you can begin to edit the various
parameters for your mix� But of course you can edit parameters from
any scene number� When any changes have been made to the currently
selected scene an (“Edit”) will appear below the scene title� This makes it
E
easy to tell whether the scene has been edited or not�
Scene Save
●
When the required settings have been made, save the scene�
Scene number Scene title
Scene 000 is read-only. When any parameter in
the selected scene has been edited a yellow
appear.
E
will
Press the SCENE MEMORY
key in the DISPLAY ACCESS
section as many times as
necessary until the SCENE
LIST display appears.
Position the cursor at the [STORE] button in the SCENE STORE
pop-up window and press the [ENTER] key. A confirmation
message will appear. Position the cursor at the [OK] button and
press the ENTER key to save the current settings to the selected
scene. The new scene number will appear in the scene number
field on the display, and the edit indicator will disappear.
E
Make sure that the cursor is outside the display area and use the dial or IN/DEC keys to select the scene number you want to
store your new scene to� When you’ve selected a scene position the cursor at the [STORE] button and press the ENTER key�
The SCENE STORE pop-up window via which you can enter a scene name will appear�
10
Page 11

Scene Data
Settings that are Recalled with Scenes
• Channel name and icon.
• Fader position.
• Routing (input, output, insert in/out, direct out, monitor output,
cascade, virtual rack).
• Insert settings (on/off, position).
• Direct out settings (on/off, position, level).
• EQ settings (all parameters, including HPF).
• ATT (digital attenuator).
• Dynamics 1 and 2 settings (all parameters).
• Rack settings (all parameters).
• MIX send settings (pass, on/off, level, pre/post).
• MATRIX send settings (pass, on/off, level, pre/post).
• Pan/balance settings (stereo/mono/LCR).
• MUTE group settings (assignments, on/off).
• Channel link settings.
• Fade function (on, fade time).
• Focus function.
• Routing between rear-panel input and TALKBACK
(TALKBACK IN level setting in the MONITOR display page).
Settings that are Not Recalled with Scenes
• User defined keys.
• Preference settings.
• MONITOR LEVEL knob setting.
• PHONES LEVEL knob setting.
• TALKBACK LEVEL knob setting.
• Touch screen/LED/lamp brightness settings.
• OUTPUT PORT settings (excluding routing).
• MIDI settings.
• Word clock settings.
• Phantom master power settings.
• CUE pop-up window settings
(PFL input trim, DCA trim, PFL output trim).
• MONITOR pop-up window settings
(level, monitor source, monaural monitor, link).
• Oscillator settings (all parameters).
• Mute safe/recall safe function settings.
• Password.
• Screen page or pop-up window.
• SENDS ON FADERS mode settings (on/off, assigned channel).
• Meter point settings.
• Head amp slot input assignments.
When a scene is saved the parameters listed under “Settings that are Recalled with Scenes,” above, are saved in the
specied scene memory.
All parameters listed under “Settings that are Not Recalled with Scenes” above, not including the knob settings, are saved in
the console’s global memory� Those settings are not recalled with scenes, but are retained in memory when the console is
turned off and restored when the console is turned on�
You can specify that certain parameters are not to be recalled when a scene is recalled� This is the “Recall Safe” function, and
it can be accessed by pressing the CHANNEL JOB key in the DISPLAY ACCESS section as many times as necessary until
the RECALL SAFE display appears�
The LS9 actually provides 301 scenes: the read-only
scene 000, 299 user scenes, and the current scene.
11
Page 12

Recall Safe
The Recall Safe function allows you to specify parameters and/or channels that are not to be recalled when a scene is
recalled� The Recall Safe function applies to all scenes, including scene 000�
CH RECALL SAFE Field
CLEAR ALL Button
GLOBAL Field
The GLOBAL field allows you to select global
parameters (parameters that apply to the entire
console, rather than individual channels). These
APPLY TO ALL INPUT Button/
APPLY TO ALL OUTPUT Button
SAFE PARAMETER Field
Recall Safe for Individual Channels (Preventing Recall of Specified Channels)
●
Press the CHANNEL JOB key as many times as necessary until the RECALL SAFE display appears� Then after engaging
the [SEL] of the target channel, use the SAFE buttons in the SAFE PARAMETER eld at the bottom of the display to specify
the parameters you don not want to be recalled� If you engage the SET BY SEL button while the RECALL SAFE display is
showing, you can turn Recall Safe on for any channel simply by pressing it’s [SEL] key�
parameters can be edited even after they have been
assigned Recall Safe status. Parameters that are
highlighted in green are Recall Safe parameters,
while parameters that appear in black are recallable
parameters.
Recall Safe channels are highlighted in green.
Recall Safe for Specified Parameters Within Individual Channels
●
(Preventing recall of Specified Parameters)
You can, for example, specify that the EQ settings for a guitar channel are not to be
changed when a different scene is recalled� This is known as “Partial Safe�”
Select specic parameters for Recall Safe by using the SAFE PARAMETER eld
buttons (any button other than [ALL] = Partial Safe), and engage the SAFE button
in the same was as when specifying channel Recall Safe� A number of Partial Safe
options are available� To specify the same parameter in all channels, engage the
APPLY TO ALL INPUT or APPLY TO ALL OUTPUT button before selecting the
parameter�
Partial Safe channels are highlighted in blue.
Recall Safe
Partial Safe Menu (Input Channel)
< Input Channels >
(Output Channels)
< STEREO/MONO Channels >
< MIX Channels >
< MATRIX Channels >
12
Page 13

BGM Playback from USB Memory
The LS9 features a USM memory recorder function that makes it easy to record the console’s internal signals to a USB
memory, and play back audio les that have been saved to a USB memory. Files can be recorded to USB memory in MP3
(MPEG-1 Audio Layer 3) format. In addition to MP3 les, les in WMA (Windows Media Audio) and AAC (MPEG-4 AAC)
format can be played back� The USB memory recorder function supports 44,1 kHz and 48 kHz sampling rates� The output
from the console’s STEREO bus or MIX buses can be recorded to USB memory, and BGM or sound effect les saved on a
USB memory can be assigned to and played back via any of the console’s input channels�
Assigning the USB Memory Recorder Inputs and Outputs to Channels
●
With the console reset to it’s default state (scene 000), no routing assignments are set up for the USB memory recorder
function. To use the USB memory recorder it is necessary to rst make the appropriate input and output channel assignments.
(1) Press the RECORDER key in the DISPLAY ACCESS section as many times as necessary until the RECORDER display appears.
(2) Assign the required channels to the USB memory recorder inputs via the category tabs and port select buttons. When the selections have been made,
position the cursor at the [CLOSE] button and press the ENTER key. Assign a channel to the other input in the same way.
When the input channels have been assigned, assign the L and R PLAYBACK OUT channels in the same way.
Position the cursor here and
press the ENTER key to
assign the recorder outputs.
The OUTPUT CH SELECT pop-up
window will appear.
Play Audio Files from a USB Memory
●
Position the cursor here and press
the ENTER key to assign the recorder
inputs.
The INPUT CH SELECT pop-up
window will appear.
Save audio les in the SONGS folder inside the YPE folder on the USB memory, or in further folders contained within the SONGS
folder. Files saved in other folders as well as les in unsupported formats will not be recognized.
Plug the USB memory containing
the audio files into the console’s USB
connector, then press the RECORDER
key in the DISPLAY ACCESS section
as many times as necessary until the
TITLE LIST display appears.
Position the cursor at the [
button and press the ENTER key to start playback.
To stop playback position the cursor at the [ ]
(STOP) button and press the ENTER key.
] (PLAY/PAUSE)
/
When playing multiple files in sequence, the
checked files in the list will play.
Select the file you want to play from the list by
using the dial or DEC/INC keys.
Playback will begin at the selected song, and all checked
songs up to the end of the title list will be played in
sequence. Playback will stop automatically when the songs
have been played through once.
Playback will begin at the selected song, and all checked
songs up to the end of the title list will be played in
sequence, then playback will begin again from the first
song. Playback will repeat until the STOP button is clicked.
The selected song will play and repeat until the TOP
button is clicked.
The selected song will play once and then playback
will stop automatically.
New Features
The following features have been added or changed as of firmware version 1.1.
• A SCENE PLAYBACK LINK display has been added. This allows a specified audio file on the USB memory to be played back automatically when a specific scene is recalled. This is handy for automatically playing
sound effects or BGM when a scene is recalled.
• A DIRECT PLAY function can be assigned to the USER DEFINED KEYS. This allows playback of a specified file on the USB memory to be started by simply pressing the assigned USER DEFINED KEY. This
assignment can be made via the PARAMETER 2 field in the USER DEFINED KEY SETUP pop-up window.
• In the TITLE LIST display it is possible to switch between song title and file name display: position the cursor at the [SONG TITLE/FILE NAME] button and press the ENTER key to switch.
13
Page 14

USER DEFINED KEY Assignment
The LS9 has 12 USER DEFINED KEYS to which you can freely assign a range of functions, allowing you to execute the
assigned functions by simply pressing the corresponding keys� The USER ASSIGNED KEYS are initially assigned to default
functions, but you can change these assignments as required via the SETUP page� You could, for example, assign USB
memory recording and playback to the USER DEFINED KEYS so you can instantly begin recording or playback at any time�
Of you could assign a HELP le for fast, easy reference.
USER DEFINED KEY Assignment Procedure
●
(1) Press the SETUP key in the
DISPLAY ACCESS section as
many times as necessary until the
USER SETUP display appears.
(2) Position the cursor at the USER DEFINED
KEYS button and press the ENTER key. The USER
DEFINED KEYS pop-up window will open showing
the current key assignments.
To “bookmark” a specific display page, select
“PAGE CHANGE” in the FUNCTION field, and then
“PAGE BOOKMARK” in the PARAMETER 1 field.
(3) To change the function assigned to a key, press
a USER DEFINED KEY and the corresponding
USER DEFINED KEY SETUP pop-up window will
appear.
(4) Make sure that the FUNCTION field is
highlighted with a yellow frame, then use the
dial or DEC/INC keys to select the function you
want to assign from the list. The functions are
organized by category, and you can select the
target parameter from either the PARAMETER 1 or
PARAMETER 2 field.
In the example above we’ve assigned a display page to be opened when the corresponding USER DEFINED KEY is pressed�
The display page to be opened is actually specied by pressing and holding the USER DEFINED KEY for more than 2
seconds while the target display page is showing� Once assigned, you can instantly open the assigned display page from any
other page by simple pressing the USER DEFINED KEY�
14
Page 15

Connecting the LS9 to a Computer
Using a computer on which the LS9 Editor software has been installed you can edit and save LS9 scene memory and
library data (ofine editing). The LS9 can be connected to the computer via an Ethernet cable for data transfer and
synchronization, allowing the computer to function as a remote controller for the LS9�
Preparing for Connection
●
You will need the software and hardware listed below�
Prepare these items in advance�
So ftware
Download the following software and drivers from the Yamaha Pro Audio website (see below):
1) Studio manager Host software.
2) LS9 Editor software.
3) DME-N Network Driver.
Follow the supplied and on-screen instructions, and install the above software on your computer.
The latest versions of the software items listed above can be
downloaded without charge from the Yamaha Pro Audio website:
http://www.yamaproaudio.com/
Ha rdw ar e
Your computer system must meet the following minimum hardware requirements:
CPU: 800 MHz or higher Intel Pentium or Celeron family processor.
OS: Windows XP Home Edition or XP Professional.
Hard Disk: 30 MB or more free space required.
RAM: 256 MB or more.
Display: 1024 x 768 pixels, 16-bit High Color or better.
Ot hers
Communication Cable: Ethernet CAT5 cable (high-quality cable preferred).
Connecting the LS9 to Your Computer
●
Connect the LS9 to your computer either directly or via a switching hub using a high-quality CAT5 Ethernet cable� Either a
straight or cross Ethernet cable can be used when connecting the LS9 directly to the computer�
CAT5 Ethernet Cable
Press the SETUP key in the DISPLAY ACCESS section as many times as necessary until the MISC SETUP display appears� The LINK
MODE, IP ADDRESS, GATEWAY ADDRESS, SUBNET MASK, and MAC ADDRESS parameters should appear in the NETWORK eld
in the MISC SETUP display. Please note that only class-C IP addresses (the rst three digits are 192 ~ 223) are supported.
15
Page 16

Network Setup
• IP Address
The first three 3-digit groups (from left to right) should be matched to
those of the LS9 IP address. The last 3-digit group should be set to a
different, unique number. In this example the IP address is
192.168.000.052 (or 192.168.0.52).
• Subnet Mask
This should be set to 255.255.255.000
• Default Gateway
It is only necessary to change this setting when connecting to a
separate network. In most cases the default setting can be left as-is.
• Device Name
Specify a name for the device.
• Device IP Address
This should be set the same address as the “IP ADDRESS” in the LS9 NETWORK pop-up
window. The Device IP Address should be different from the computer’ s IP address.
• Device MAC Address
The same address as shown in the LS9 MISC SETUP window MAC ADDRESS (Media
Access Control address) should appear here. This value is automatically read from the LS9
when an Ethernet cable is connected and the network is set up properly with the
appropriate IP addresses.
• Device Port No.
Set to 1 to allow communication with the LS9.
In order to use the LS9 Editor software it is necessary to make the appropriate settings on the LS9 console, the computer (the
DME-N Network Driver), and the LS9 Editor software�
(1) Computer Settings
Set up the computer’s internet protocol (TCP/IP) by following the procedure outlined below�
From the computer’s START menu select [Settings] -> [Control Panel] -> [Network Connection] -> [Local Area Connection]
-> [Properties]� In the “Local Area Properties” window select “Internet Protocol (TCP/IP)” from the list, then click the
[Properties] button�
(2) LS9 Settings
Set the LS9 network settings as shown in the NETWORK
pop-up window illustration to the right�
(3) Computer Settings
The driver used to connect a computer to the LS9 was originally developed for use with Yamaha DME series Digital Mixing
Engines, thus the “DME” in the name� But through successive versions it has grown to provide TCP/IP functionality for a
wide range of Yamaha products�
From the computer’s START menu select [Control Panel] -> [DME-N Network Driver] to launch the DME-N Driver�
Depending on the way your computer is set up you might be able to launch the driver directly from the START menu, or
you might have to open the Control panel folder and double click it’s icon�
When all four device settings have been made, click the [APPLY] button and the device will appear in the Target Device List at
the top of the window� This indicates that the MAC address has been successfully read and the network is operating properly�
Click the [Save and Close] button to exit from the DME-N Driver�
16
Page 17

Launching and Setting Up the Studio Manager/LS9 Editor
(1) Launch the YAMAHA Studio Manager either from the Programs menu or from the desktop shortcut�
Select [Setup] from the Studio Manager [File] menu� Select “LS9” in the list on the left side of the window, then click the [Add] button� Confirm
that “LS9” has been added to the list on the right side of the window�
(2) Next, click the MIDI Ports tab to open the MIDI Ports window. The Device Name specied in the DME-N Driver will appear
in both the Input Ports and Output Ports windows, and both should be checked� Click the [OK] button and the LS9 icon should
appear in the Studio Manager window� Double-click the LS9 icon to launch the LS9 Editor�
Double-click.
(3) When the LS9 Editor has launched, select [System Setup]
from the [File] menu� Select the port you intend to use for
communication in the window that opens� Both the Input Port
and Output Port settings should be matched to the settings
you made in the Studio Manager (LS9-32 in this example)�
If an administrator password has been set for the LS9, enter
the password in the [Administrator Password] eld. When all
settings have been made as required, click the [OK] button to
close the window�
Click the [RE SYNC] button to open the “Re Synchronize” window via which
you can synchronize the LS9 and computer settings�
If the LS9 scene and library have already been stored, use [Direction] in the
window to select [Console -> PC] and then click the [OK] button to backup
the LS9 settings to the computer� Always make sure that you have selected
the appropriate direction when synchronizing the console and computer�
If you click [Set Default], the
settings you have been made
will be loaded as the initial
defaults the next time the LS9
Editor is launched.
If the LS9 and computer
are properly connected, the
[ONLINE] indicator will be
highlighted in green. In this
state the LS9 and LS9 Editor
parameters are synchronized
so that when a parameter
is edited the change is
reflected on both the LS9
and the computer.
17
Page 18

Yamaha Technology
1 2 3 4 5 6 7 8
1 2 3 4 5 6 7 8
9 10 11 12 13 14 15 16
CH
Mix Out
Matrix
Out
Main Stereo
Out
Bus
FOH R
Stage Monitor 1 ~ 4
FOH L
1 2 3 4 5 6 7 8
1 2 3 4 5 6 7 8
9 10 11 12 13 14 15 16
CH
Mix Out
Matrix
Out
Main Stereo
Out
Bus
OMNI Out
FOH R
Stage Monitor 1 ~ 4
FOH L
Example 2 : You could modify the output assignments as follows:
(If a mistake is made in the physical wiring, you can re-assign the signals internally.)
Omni Outs
●
Yamaha’s OMNI outputs are user-assignable – i.e. he user can specify what signal is output via which connector – for exible signal routing and system
conguration. Since the outputs are internally assignable, you can change output signal routing without having to actually physically reconnect cables. The LS9
allows you to assign any of the 16 MIX bus, 8 MATRIX bus, stereo out, mono out, monitor out, and even the input channel direct out signals to any o the OMNI
output connectors� For example, when using the LS9-16 for a small live sound application you might use two outputs for the main stereo outputs that will drive
the house system, four outputs from MIX buses for stage monitoring, and one output from a MATRIX bus to feed a dressing-room system� That’s seven out of
eight outputs assigned in a meaningful and practical way for the application� In a digital mixer like the LS9 that provides all the necessary dynamic, EQ, and effect
processing built in, the OMNI OUT approach makes maximum use of the available space and resources while allowing the user to customize the console’s output
conguration to suit his or her particular needs.
MIX Bus
●
Mix buses allow you to group input sources into “stems” for specic purposes. Stage monitor sends, effect
sends, and recording feeds are all good examples of signals that can be conveniently grouped using the mix
buses� A number of operational variations are provided to optimally suit the application: the mix bus signal can
be derived before (PRE) or after (POST) the channel fader, it can be linked to master level control (VARI), or
it can be xed at nominal level (FIXED). Since the pre-fader signal is not affected by the setting of the channel
fader, a PRE/VARI mix bus output is idea for stage monitor feeds, for example, whereas POST/VARI or POST/
FIXED mix bus output is generally preferable for a front-of-house or broadcast feed� This type of versatility
means that the console has high utility value and can easily adapt to a wide range of system needs�
Mini-YGDAI Expansion Slots
●
The Mini-YGDAI (Yamaha General Digital Audio Interface) slot format has been specically designed to
provide open-ended expansion capability� Input and output expansion in a variety of analog and digital audio
formats is provided via Mini-YGDAI cards that install easily in the slots� An impressive selection of I/O cards is
available, including several from third-party manufacturers� The system was originally designed to allow direct
digital connection to multi-track recording equipment for high-quality recording applications, but it soon grew
to include analog I/O expansion capabilities that could be used to add input and/or output channel capacity to
a mixer without having to add a complete sub-mixer� Mini-YGDAI expansion slots can also be used for digital
connection to remote stage boxes. Remote stage boxes complete with high-performance head ampliers
and A/D conversion capability can be remotely controlled from the console, while digital audio signals are
transferred to the console over long distances with no signal degradation� This type of setup offers the dual
benets of dramatically reduced physical cabling requirements and freedom from induced noise. Ethernet-
based audio networking systems such as CobraNet™ can be implemented via Mini-YGDAI cards to enable a
vast range of network functionality�
SPX Effect Processors
●
Ever since their introduction in the 80’s, the DSP LSIs and algorithms used in Yamaha SPX effect processors
have undergone continuous growth and improvement that have made them the rst choice for outboard
processing in critical recording and live sound applications� Nowadays SPX processors are built right into
high-performance Yamaha mixers and related sound gear� SPX processing delivers not only some of the
nest reverb and delay effects available, but also a variety of other effects such as angers, chorus, distortion,
and more� The LS9 consoles feature four built-in SPX effect stages that can, for example, be used to
18
Page 19

simultaneously add top-class echo to vocal channels, chorus to keyboard channels, short delay and gating to
drum channels, and master reverb to the overall mix� Internal signal routing eliminates the need for complex
external patching as well as the associated noise and interference problems� You can select, edit, and blend
effects until the desired mood and texture are achieved without sacricing performance or exibility. The fact
that the equivalent of four high-performance digital effect processors are built right into the console actually
delivers performance and versatility that exceed what you’d have with external effects�
SPX2000
Virtual Rack
●
Yamaha’s Virtual Rack concept lets you approach and manage the console’s internal effects and EQ in the same way you
would with an external rack system, for intuitive, efficient operation� You can stack effect and EQ units in the rack and patch
them into the system via a comprehensive interface that effectively simulates a hardware rack environment� For example,
you could mount a graphic equalizer for the main outputs in the topmost rack space, and another for monitor output in
the second rack space, and so on� And since input and output patching is handled using easy-to-understand bus names,
there’s less chance of making connection errors than when using unmarked or numbered cables�
Selected Channel
●
The Selected Channel section is a common feature on Yamaha digital consoles, and it includes all the controls and
functions you’d normally find in each channels module of a conventional analog mixer, and plenty more� You select the
channel you want to work on by pressing it’s [SEL] key, then use the Select Channel encoders and keys to directly edit the
channel parameters: input gain, EQ, dynamics, panning, MIX/MATRIX bus send level, and more� And with this interface
you can control the entire console without having to move from the optimum listening position� In addition to hands-on
operation via the Selected Channel controls, parameter values and graphs displayed on the console’s LCD panel provide
precise visual feedback and confirmation� This type of centralized operation and display allows the engineer to concentrate
more fully on the job at hand while providing operating ease that allows extra leeway for creativity�
Sends On Fader
●
The Sends On Fader mode allows the mix bus send levels to be directly controlled via the channel faders� Since the send
levels to the mix buses appear on the physical faders in this mode, you can visualize the relative levels of the entire send
mix at a glance, which can be a great advantage for monitor mixing applications, for example� In actually operation you
select a mix bus and the send levels to that mix bus appear on the faders, so if a player asks for “a little more kick and
snare,” or wants you to “boost the vocals and bass a bit,” you can simply reach for the appropriate faders and make the
required adjustments immediately�
User Defined Keys
●
As their name implies, these keys can be user-defined to perform a range of functions� You could, for example, assign mute
group [1] ~ [8] to USER DEFINED KEYS [1] ~ [8], allowing you to instantly mute or un-mute any group by simply pressing
the assigned key� The USER DEFINED KEYS are also a great way to control the LS9’s new USB Memory recorder
function� Instead of having to call up the recorder’s transport controls on the display, you could assign USER DEFINED
KEY [11] to start recording, and key [12] to stop recording, for example� That way you can quick start and stop recording
whenever necessary� Other functions you might want to assign to the USER DEFINED KEYS include scene recall, tap
tempo entry, and oscillator on/off, and you can bookmark display pages you use frequently for instant recall� In a compact
digital mixer with this many features and functions it is simply not possible to make all of them directly accessible via the
panel at all times� But with the USER DEFINED KEYS you can make the functions you need to access most often easily
available at all times�
The Selected Channel interface allows
complete control from the display position.
Press one of the 16 MIX/MATRIX keys twice and
all other MIX/MATRIX keys will light while the
pressed button flashes. At the same time “SENDS
ON FADER” will flash on the display to indicate
that the Sends On fader mode is active.
19
Page 20

Q & A
How can the inter nal GEQs be set up to work on the console’s outputs?
Press the [RACK 1-4] and [RACK 5-8] keys simultaneously to open the Virtual Rack, and set up
the required input and output routing from there. These settings can also be made from the individual
RACK displays: refer to page 159 of the Owner’s Manual.
How can the inter nal GEQs be connected into the system?
Specify the IN and OUT points to insert a GEQ unit into the desired point in the signal path. Prefer
to page 161 of the Owner’s Manual.
What is Flex15GEQ?
Flex15GEQ is a stereo 31-band graphic equalizer that allows you to use up to 15 bands at a time.
Can I copy the settings from channel A of a Flex15EQ equalizer from the library to a 31-band GEQ?
The equalizer librar y settings are saved with the equalizer type, so it is not possible to copy the
settings from one type of equalizer to another. Refer to page 174 of the Owner’s Manual.
How is Rev-X different from other reverb effects?
The Rev-X reverb effect is smoother and has superior high-frequency characteristics. This new
algorithm was originally an option that was sold separately, but it is now included in the LS9 consoles.
How can I apply the inter nal reverb to the monitor outputs?
Press the [RACK 1-4] and [RACK 5-8] keys simultaneously to open the Virtual Rack, and set up
the required input and output routing from there. These settings can also be made from the individual
RACK displays: refer to page 159 of the Owner’s Manual.
RACK 6 and 8 seem to have fewer inter nal effects than RACK 5 and 7.
RACK 5 and 7 additionally have Freeze (a simple sampler) and HQ.Pitch effects.
What’s the difference between EQ Type 1 and Type 2?
When boosting two adjacent frequency bands the Type 2 equalizer produces less interference
between bands. But when cutting adjacent bands the Type 1 equalizer has a deeper effect.
Can MY cards be used to expand I/O capacity?
A variety of Mini-YGDAI cards offering I/O expansion in a range of audio formats can be
used. The MY4-DA card can be used, for example, to add four more analog MIX outputs with XLR
connectors. An MY8-ADDA card could be used to add 8 analog inputs and 8 analog outputs via
Euroblock connectors. For digital I/O the MY16-AE could be used to provide 16 inputs and outputs in
AES/EBU format. Refer to page 187 of the Owner’s Manual for details on supported cards.
Can 96 kHz cards such as the MY16-AE96 be used?
Yes. The card can be used, but the LS9 and card sampling rate will be either 44.1 kHz or 48 kHz.
Can outboard devices be inserted into the signal path?
An optional I/O card can be used for outboard inserts. Refer to page 101 of the Owner’s Manual
for details.
Can the inputs and outputs of the MY8-ADDA96 card be used as inserts?
Yes. Select the slot in which the MY8-ADDA is installed from INSERT the channel HOME display.
Are there any MY cards with built-in head amplifiers?
There are no MY cards with built-in head amplifiers, but you can combine an MY16-AE card with
the AD8HR remote head amplifier or the MY8-ADDA96 card with the MLA8 to provide additional
head amplifiers for microphone input.
Does the AD8HR allow remote control?
Not currently. I/O cards with HA remote protocol communication capability are planned for the
future. Check our home page for release details.
Can litlight lamps be used? What are the lamp specifications?
2-volt 5-watt lamps can be used.
How can the Ether connector be used with the Studio Manager?
To connect via the Ether connector, the DME-N Network Driver must be installed in addition to the
Studio manager, and the LS9 must be registered in the DME-N Network Driver.
I can’t connect to the Studio Manager.
Since the connection is made via the Ether net connector, the proper settings must be made to
allow communication. Refer to page 216 of the Owner’s Manual for details.
I’ve checked and re-checked my connections, and I keep getting a “Wrong Port Setting” error.
The computer is connected properly.
Connect the LS9 to the computer using a CAT-5 cross cable. Some computers are capable of
automatically rectifying this problem.
When I LINK with the Studio Manager, I’m asked for a password.
The user status is “Administrator” and a password has been specified. Check with the system
administrator for the password, or change the user status to “Guest.” Refer to page 187 of the Owner’
s Manual for details.
What’s the difference between the MIX and MATRIX buses?
MIX buses have VARI and FIXED types. The VARI type allows the send level to be varied for AUX
type operation, while the send level of the FIXED type is fixed at nominal for BUS type operation. The
MATRIX buses are used to further group the MIX bus signals. MATRIX buses have variable send level
and no other types. Refer to pages 213 and 14 of the Owner’s Manual for details.
How are the MIX buses used? Are there no AUX or GROUP outputs?
The MIX buses have VARI and FIXED types. Use VARI type is ideal for AUX send applications,
while the FIXED type is suitable for group sends. Refer to pages 213 and 14 of the Owner’s Manual for
details.
The number of MIX outputs and OMNI OUTs are different.
The OMNI outputs are the physical output connectors on the rear panel. The stereo outputs,
16 MIX bus outputs, 8 MATRIX bus outputs, and monitor outputs are all internal signals that can
be assigned to the OMNI OUT connectors. Only the signals that will actually be used need to be
assigned to the OMNI OUT connectors. If you need more physical outputs, you can expand the
console’s output capacity by installing Mini-YGDAI cards in the expansion slot(s). Refer to page 97 of
the Owner’s Manual for details.
What’s the difference between the MIX bus VARI and FIXED types, and how are they switched?
MIX buses have VARI and FIXED types. The VARI type allows the send level to be varied, while
the send level of the FIXED type is fixed at nominal. The type can be switched via the MIX parameters
in the SETUP display. Refer to page 213 of the Owner’s Manual for details.
What’s the difference between the OMNI OUTs and AUX or BUS outputs?
The OMNI outputs are the physical output connectors on the rear panel. The MIX bus output
signals (AUX and GROUP) can be assigned to these connectors as required. Refer to page 97 of the
Owner’s Manual for details.
There is no ST OUT connector. Where’s the stereo output?
Output signals are assigned to the rear-panel OMNI OUT connectors for physical connection
to external devices. With the initial default setup the stereo outputs are assigned to OMNI OUT
connectors 7 and 8 on the LS9-16, and to OMNI OUT connectors 15 and 16 on the LS9-32. Refer to
page 95 of the Owner’s Manual for details.
What can you do via the RECORD display?
The RECORD display makes it easy to record to a USB memory, or play back audio files saved on
a USB memory. Refer to page 105 of the Owner’s Manual for details.
What kind of files are used by the USB Memory Recorder?
Files recorded on the LS9 are recorded in MP3 format. In addition to MP3 files, WMA and AAC
files can be played back. Refer to page 105 of the Owner’s Manual for details.
I copied some MP3 files from my computer to a USB memory that I then connected to the LS9, but
I can’t see the files.
Audio files will only be recognized by the LS9 if they are placed in the SONG folder inside the YPE
folder on the USB memory. Refer to page 108 of the Owner’s Manual for details.
How long can I record or play to or from a USB memory using the USB Memory Recorder?
10 minutes of 128 kbps audio data corresponds to about 10 megabytes of memory, so with a 128
MB USB memory you can record or play back for up to approximately 2 hours.
Can I monitor the recorder’s playback output while recording?
You cannot record to and playback from a USB memory at the same time. Refer to page 105 of
the Owner’s Manual for details.
Can I connect an exter nal hard disk to the USB connector?
Only operation of USB memor y devices with a capacity of 2 gigabytes or less is guaranteed.
External hard disks cannot be used.
What is the quality level of the head amplifiers?
The head amplifiers are inherited from Yamaha’s top-line PM consoles, and have been specially
tuned for exceptionally musical response. The HA gain setting can be stored with scene data.
When adjusting the head amp gain the sound cuts out at some points.
The inter nal gain control is designed to switch over every 6 dB, causing a brief interruption output.
What’s the difference between the Flex15GEQ and the 31Band GEQ?
The 31Band GEQ modules are single-channel 31-band graphic equalizer on which you can boost
and/or cut all 31 bands. The Flex15GEQ units are stereo graphic equalizers with 31 bands, 15 of
which can be boosted or cut simultaneously. You can also use the faders to directly control boost or
cut in individual bands. Refer to pages 161 and 163 of the Owner’s Manual for details.
Does the LS9 suppor t multi-speaker surround?
The LS9 has an LCR mode (using L, R and Center buses), but you also use the MIX or MATRIX
buses to control other multi-speaker setups. If you need surround panning for recording or post-
production applications, however, you might need to consider one of Yamaha’s digital production
20
Page 21

consoles such as the DM2000, 02R96, or DM1000. Refer to pages 58 and 67 of the Owner’s Manual
for details.
What is a “Scene Memor y”?
Complete console setups including mix parameters and I/O por t patches can be given a name
and saved in memory for instant recall whenever needed. The LS9 provides a total of 300 scene
memories. Refer to page 129 of the Owner’s Manual for details.
What’s a good use for the Recall Safe function?
Use this function to prevent specified parameters from being changed when a scene is recalled.
For example, if you’ve spent a lot of time setting up the head amp gain and EQ for one or more
microphone channels, you won’t want those settings to be changed if a previously saved scene is
recalled. In this case you’d assign Recall Safe status to the gain and EQ parameters. Refer to page
140 of the Owner’s Manual for details.
I recalled scene 000, but the faders and other parameters aren’t reset.
Maybe the Recall Safe function is engaged. Use the CHANNEL JOB key to open the RECALL
SAFE display and check the Recall Safe settings. Disengage all recall Safe settings by clicking the
[CLEAR ALL] button, then try recalling scene 000 again.
What’s a good use for the Scene Focus function?
This function allows you to specify settings that you want to be recalled with a scene. Unlike
Recall Safe, Scene Focus can be specified for each individual scene. You could use this function to
set up a scene so that all parameters other than the output settings are recalled. Refer to page 139 of
the Owner’s Manual for details.
What is the Channel Link function?
The faders, EQ, on/off status and other functions of input channels can be linked for simultaneous
control. A group of linked channels is known as a “link group”, and multiple link groups can be
operational at the same time. Refer to page 124 of the Owner’s Manual for details.
What’s the difference between channel linking and a channel pair?
The channel linking function can be used to link the gain, EQ, fader, send levels, and other
parameters of multiple channels. Of course you can also link two channels to conveniently handle
stereo sources. Refer to page 124 of the Owner’s Manual for details.
Does the LS9 have a VCA function?
Multiple channels can be linked so that the level relationship is retained between their faders
when any channel in the link group is adjusted. Refer to page 124 of the Owner’s Manual for details.
Does the LS9 have dedicated stereo inputs?
Any specified input connectors and the return signal from the internal effects can be assigned to
the stereo inputs. With the initial default settings the stereo returns from Virtual Rack modules 5 ~ 8
are patched to ST IN channels 1 ~ 4. Refer to page 99 of the Owner’s Manual for details.
How are the stereo channels used?
With the initial default settings the stereo returns from Virtual Rack modules 5 ~ 8 are patched to
ST IN channels 1 ~ 4. With these settings they can be used as return channels for the internal effects.
Refer to page 99 of the Owner’s Manual for details.
What do the USER DEFINED KEYS do?
You can specify the functions that are assigned to the keys, and then operate the assigned
functions by simply pressing the corresponding key. You can, for example, assign keys to star t and
stop the recorder, engage and disengage mute groups, or recall display pages you use frequently.
Refer to page 196 of the Owner’s Manual for details.
I can’t get back to the Selected Channel View.
Press the HOME key.
Where are the monitor outputs?
The monitor signals need to be assigned to the rear-panel OMNI OUT connectors. Press the
MONITOR key in the DISPLAY ACCESS section to access the monitor out port settings (below the
level meters). Refer to page 146 of the Owner’s Manual for details.
Can the monitor output level be adjusted by any means other than via the display?
Assign MONITOR ON MASTER FADER to a USER DEFINED KEY in the USER DEFINED KEY
SETUP display. Then when the assigned key is pressed you can use the STEREO Master section [ON]
key and fader turn monitor output on and off and adjust the monitor level. Refer to page 18 of the
Owner’s Manual for details. You can also assign faders to monitor level control via the custom fader
layer. Refer to page 93 of the Owner’s Manual for details.
How do I switch between the MIX bus PRE and POST settings?
After pressing the HOME key, position the cursor at the target MIX bus and press the ENTER key.
A pop-up window will appear in which you can select PRE or POST. ALL Pre and ALL Post buttons
are also provided so you can set all buses to PRE or POST with one quick operation. Refer to page
64 of the Owner’s Manual for details.
I want to use AUX sends to feed the stage monitors. How do I assign the signal to the OMNI OUT
connectors?
The MIX buses are usually used for AUX send type operation. MIX buses can be assigned to
the OMNI OUT connectors either via SYSTEM SETUP -> OUT PORT SETUP, or via PATCH in the MIX
display accessible from the MASTER Layer HOME display.
I want to copy MIX bus send settings to a different channel.
Copy the channel parameters with the WITH MIX SEND/WITH MATRIX SEND button checked.
Refer to page 126 of the Owner’s Manual for details.
How can I set up por t delay?
Press the SETUP key as many times as necessary until the SYSTEM SETUP display appears.
Click the button in the OUTPUT PORT SETUP field that includes the desired port. The OUTPORT pop-
up window will open. The output port delay time can be set here. The delay time increments can be
specified via the DELAY SCALE parameter.
Are there any handy shortcut functions?
• 8-module Virtual Rack display: RACK [1-4] + [5-8] keys.
• Flat EQ response in band groups: [Q] + [GAIN] keys.
• EQ all flat: EQ [HI] + [LOW] keys.
• Activate SENDS ON FADER mode: Pres MIX select key twice.
• Display contrast adjustment: [HOME] key + jog dial.
• Display tab selection: Long press to reverse direction.
How can the custom fader layer be used?
Both input and output signals can be assigned to the custom fader layer. You can assign inputs
and outputs that you need to adjust frequently to the custom fader layer so you have direct, quick
access. This can eliminate the need for input channel layer switching, and you can assign any one
fader from a link group that will be used to control the entire group. Refer to page 91 of the Owner’s
Manual for details.
Can the LS9-16 MATRIX signals be adjusted without assigning them to the custom fader layer?
Position the cursor at the CH section of the HOME display and use the jog dial to select a MATRIX
and open the related MATRIX display.
How can exter nal signals be fed to STEREO inputs 1~4?
Signals received at the rear-pane XLR inputs or the expansion slots can be patched to the
STEREO inputs. With the initial default settings the returns from the internal effects are patched to the
STEREO inputs, so you’ll need to change these settings via the PATCH display. Refer to page 99 of
the Owner’s Manual for details.
Is there an easy way to set up input patching?
With the input patching display open you can press any [SEL] key to call the patch display for the
corresponding channel. Make the required patch settings in the pop-up window, then when you close
the pop-up window there’s no need re-select the channel.
How is the phantom power supply tur ned on?
The phantom power ON/OFF parameters for individual channels can be accessed via the HA
setup item. The SETUP -> SYSTEM SETUP display includes a [+48V] master on/off switch for the
entire console. Refer to page 49 of the Owner’s Manual for details.
Can channels in different layers be linked?
Both mono and stereo channels can be linked between layers. Refer to page 125 of the Owner’s
Manual for details.
How can the console be initialized?
To completely reset the console to it’s factory settings and clear the password if one has been set,
turn the power on while holding the SCENE MEMORY key. Refer to page 222 of the Owner’s Manual
for details.
Where should a talkback microphone be connected??
Use any convenient input connector. There’s a dedicated TALKBACK display page that includes
phantom power and gain settings. Refer to page 151 of the Owner’s Manual for details.
Is the LS9 RoHS compliant?
Yes. As of 2006 all Yamaha products are RoHS compliant.
How are firmware updates implemented? Can I update the firmware myself?
Fir mware updates can be downloaded from the Yamaha Pro Audio website when they become
available. Simply copy the downloaded “LS9Px_xx.PGM” file (“x_xx” is the version number) to the root
directory of a USB memory (don’t put it in a folder), and connect the USB memory to the LS9 USB
connector while the LS9 power is off. Then when you turn on the power the “Start Loading? CANCEL
[DEC]/OK [INC]” message will appear. Press the [INC] key to begin the automatic firmware update
process.
21
Page 22

Block Diagram
22
Page 23

23
 Loading...