

Yamaha LLX6 User Manual [de]
TEILEBEZEICHNUNGEN
ELEKTRISCH-
AKUSTISCHE GITARRE
Bedienungsanleitung
Zunächst einmal vielen Dank dafür, daß Sie sich für eine
elektrisch-akustische Gitarre von Yamaha entschieden haben.
Damit Sie die fortschrittlichen Funktionen und
Leistungsmerkmale Ihrer Gitarre voll nutzen können, sollten
Sie sich vor dem Spielen auf dem Instrument die Zeit nehmen,
die vorliegende Anleitung aufmerksam zu studieren.
VORSICHTSMASSREGELN
Bei der Ausgangsbuchse handelt es sich um eine 1/4-Zoll-
Klinkenbuchse (EIAJ-Norm). Verwenden Sie ein geeignetes
Verbindungskabel.
Der eingebaute Vorverstärker wird automatisch eingeschaltet,
wenn Sie ein Kabel an die Ausgangsbuchse anschließen. Wenn
Sie das Instrument nicht benutzen oder ohne Verstärkung
spielen, sollten Sie das Versbindungskabel stets abtrennen, um
den Vorverstärker auszuschalten.
Stellen Sie vor dem Anschließen oder Abtrennen des Instruments
den Lautstärkeregler des Aktivlautsprechers (Verstärkers) auf “0”.
Wenn Sie das Instrument voraussichtlich längere Zeit nicht
brauchen, sollten Sie die Batterie herausnehmen, um Schäden
durch auslaufenden Elektrolyt zu vermeiden.
VERWENDUNG DER GITARRE
1 Verbinden Sie die Ausgangsbuchse im Knauf der Gitarre über ein
Kabel mit Standard-Klinkenstecker mit der Eingangsbuchse eines
Gitarrenverstärkers, Aktivlautsprechers o. dgl.
* Vergewissern Sie sich vor der Herstellen oder Trennen von Verbindungen
davon, dass die Lautstärke am Gitarrenverstärker, Aktivlautsprecher o. dgl.
auf Minimum eingestellt oder das betreffende Gerät ausgeschaltet ist.
* Bei beschalteter Ausgangsbuchse zieht das Instrument Batteriestrom. Ziehen
Sie daher nach Gebrauch immer den Kabelstecker aus der Buchse.
2 Stellen Sie Lautstärke und Klang mit den Reglern am
Gitarrenverstärker oder Aktivlautsprecher ein.
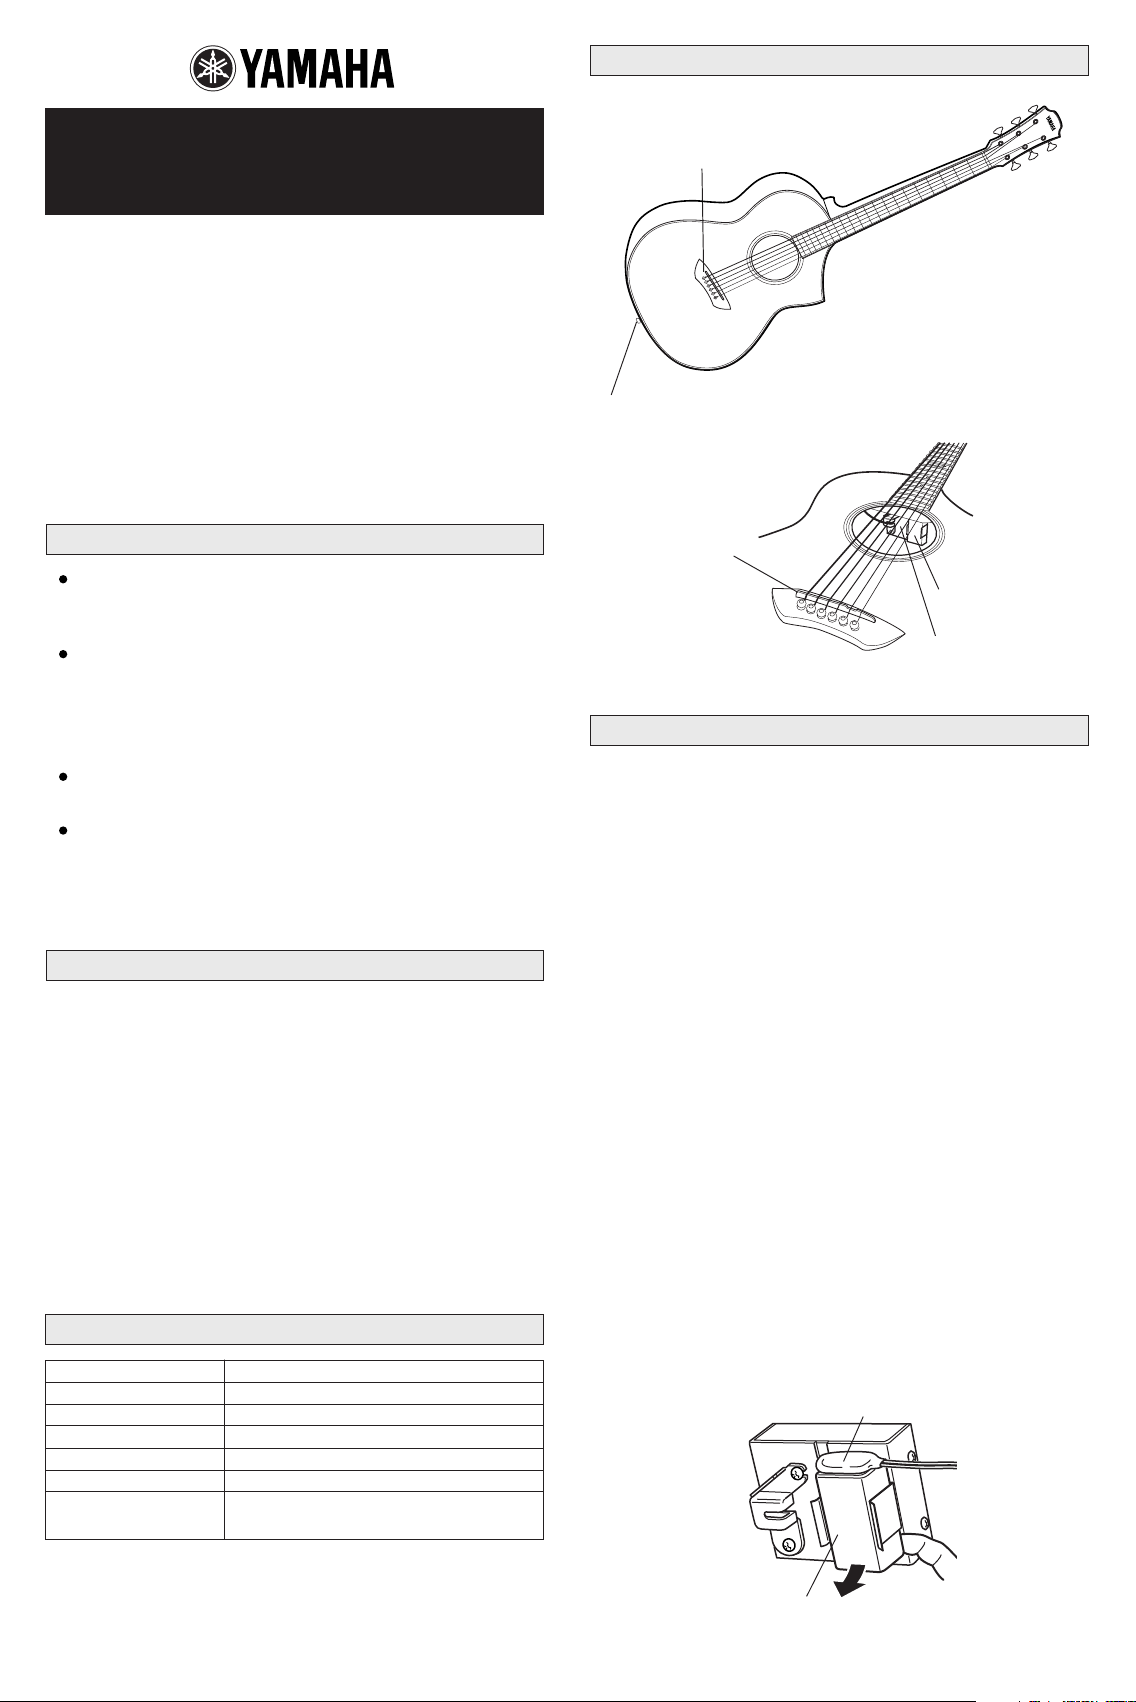
Tonabnehmer
Balkensensor
Ausgangsbuchse (mit Ein-/Ausschaltfunktion)
Sattel
Batteriehalter
Vorverstärker
BATTERIEWECHSEL
Bei schwächer werdender Batterie treten in zunehmendem Maße
Klangverzerrungen auf, und die Lautstärke nimmt ab. Wenn sich diese
Symptome bemerkbar machen, ersetzen Sie die Batterie durch eine
frische, wie in der untenstehenden Abbildung dargestellt.
* Achten Sie auf korrekte Orientierung der Batteriepole (+/-). Eine
Vertauschung kann einen Brand verursachen.
* Wenn Sie das Instrument voraussichtlich längere Zeit nicht brauchen,
sollten Sie die Batterie herausnehmen, um Schäden durch auslaufenden
Elektrolyt zu verhüten.
1 Lassen Sie die 6. Saite aufgezogen, und entfernen Sie die 1. bis 5.
Saite.
* Vermeiden Sie ein gleichzeitiges Entfernen aller 6 Saiten. Wenn eine
Reparatur ein Entfernen aller sechs Saiten erfordert, achten Sie darauf,
dass sich der Sattel auf dem Querriegel nicht verschiebt, da dies die
Funktion des Balkensensors und damit den Klang beeinträchtigen kann.
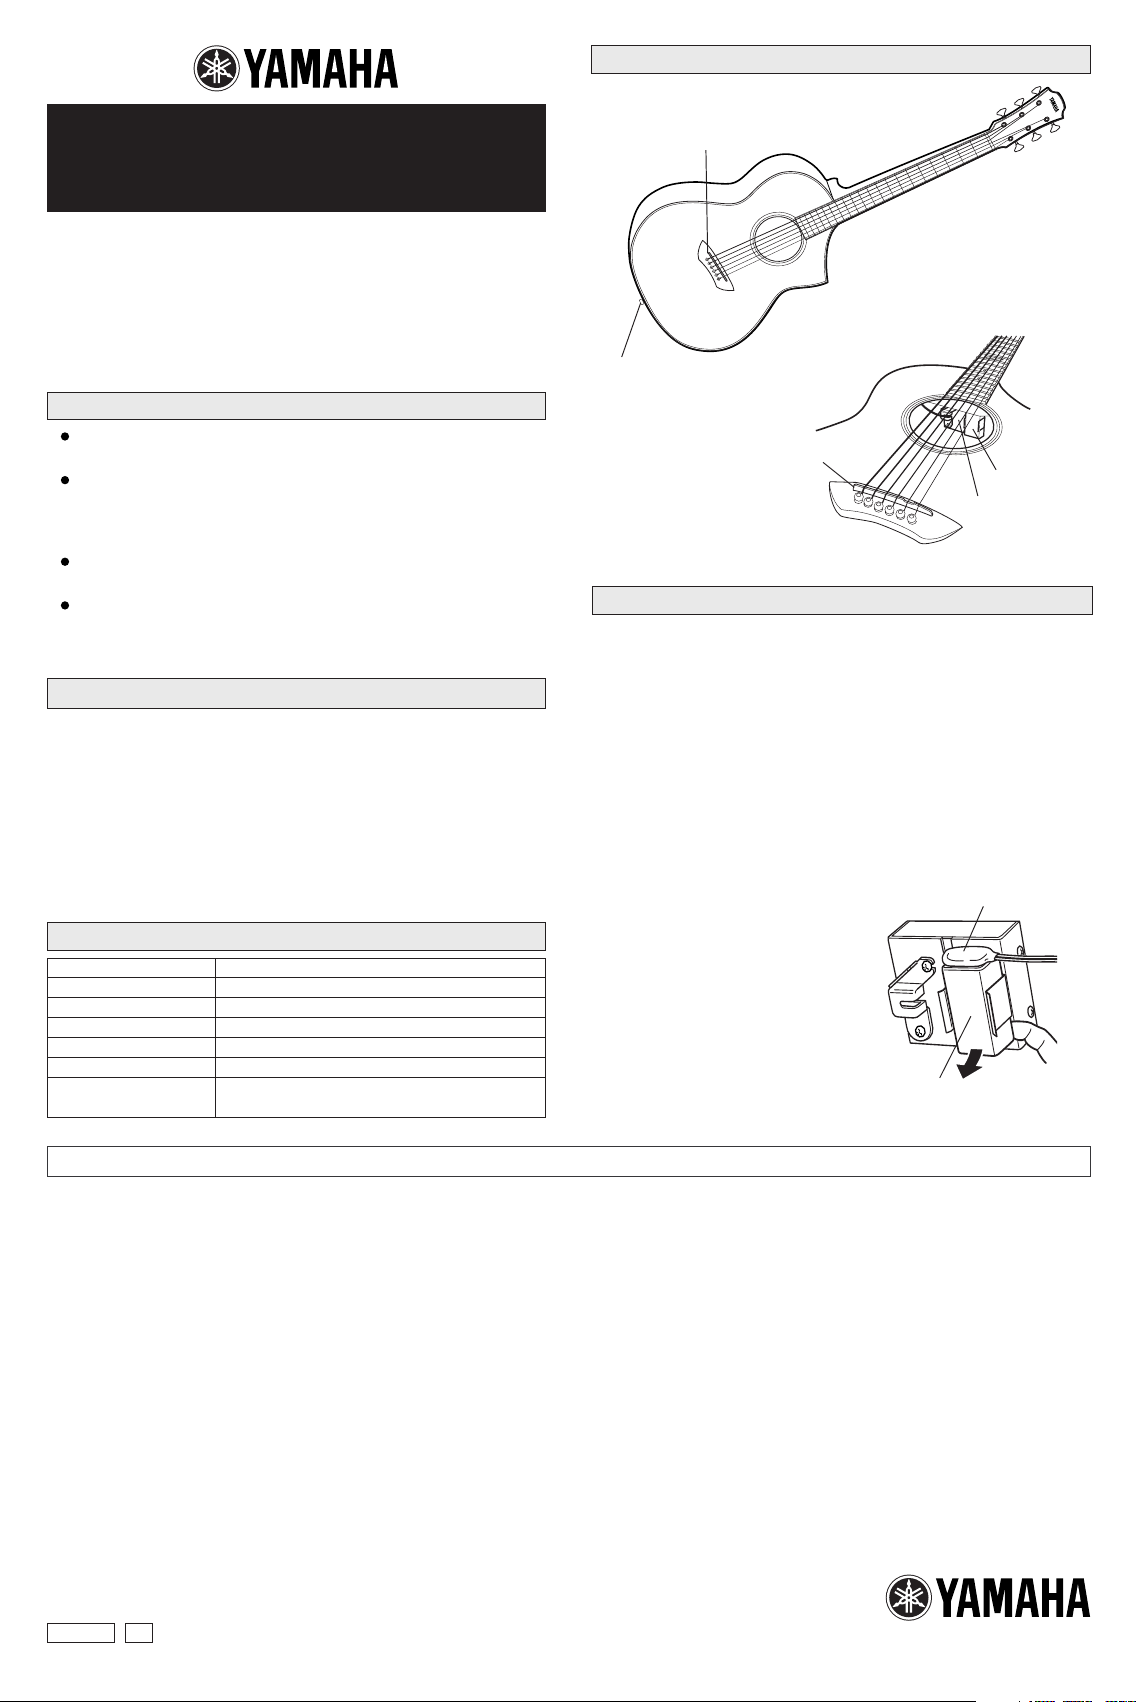
2 Stecken Sie Ihre Hand in das Schallloch und ziehen Sie die Batterie
mit dem Finger aus ihrer Halterung, wie in der Abbildung angedeutet.
Lösen Sie den Batteriestecker und entfernen Sie die Batterie.
TECHNISCHE DATEN
System SYSTEM-54 (Mono, 1 Weg)
Tonabnehmer Balkensensor (Piezo-Typ)
Ausgangsbuchse Im Knauf, mit Ein-/Ausschaltfunktion
Ausgangsimpedanz 10 kΩ
Spannungsversorgung Trockenzellenbatterie, 9V, 6LR61
Batterie-Lebensdauer Ca. 1,000 Stunden
Zubehör • Sechskantschlüssel für Halseinstellung x1
• Trockenzellenbatterie 6LR61 x 1
3 Schließen Sie eine neue Batterie (6LR61) an den Batteriestecker an
und drücken Sie die Batterie bis zum Einrasten in den Halter.
* Damit die Batterie und das Kabel durch das Schallloch möglichst nicht
zu sehen sind, befestigen Sie die Batterie so am Halter, dass das Kabel
in die in der Abbildung dargestellte Richtung weist.
Batteriestecker
Trockenzellenbatterie
6LR61
ELECTRIC
ACOUSTIC GUITAR
Owner’s Manual
Thank you for choosing a Yamaha electric-acoustic guitar.
In order to make the most of the advanced features and
performance provided by your guitar, please read this
manual carefully before using the instrument.
PRECAUTIONS
The output jack is an EIAJ-standard 1/4" phone jack. Be sure to use an
appropriate connection cable.
The built-in preamplifier is automatically switched on when a plug is
inserted into the output jack. When not using the instrument, or when
playing it without amplification, be sure to remove the plug from the
output jack to preserve battery life.
Before connecting or disconnecting the instrument, always make sure
that the speaker’s (amplifier) volume control is set to “0”.
Be sure to remove the battery if the instrument will not be used for an
extended period of time in order to prevent possible damage due to
battery leakage.
USING THE GUITAR
1
Using a cable with a standard phone plug, connect the guitar’s end pin output
jack to the input jack on a guitar amplifier, powered speaker, or similar device.
* Before making any connections or disconnections, always make sure that
the volume is turned all the way down or the power is switched “OFF” on
the guitar amplifier or powered speaker, etc.
* Power is drawn from the battery when the cable is connected to the output
jack, so make sure you unplug the cable when the guitar is not in use.
2 Adjust the volume and tone using the controls on the guitar amplifier or
powered speaker.
SPECIFICATIONS
System SYSTEM-54 (Monaural 1 way)
Pickup Bar Sensor (Piezo type)
Output jack Combination end pin/power switch
Output impedance 10 kΩ
Power supply 9V DC, 6LR61 dry cell battery
Battery life Approx. 1,000 hours
Accessories • Hexagonal wrench for neck adjustment x1
• 6LR61 dry cell battery x1
NOMENCLATURE
Pickup
Bar Sensor
Output Jack
(with power switch function)
Saddle
Battery
Pre-amplifier
BATTERY REPLACEMENT
When battery power becomes low the guitar’s sound will become distorted or
the volume level will decrease, etc. When these symptoms appear, replace
the battery as shown in the illustration below.
* Make sure that the battery’s +/- poles are properly aligned. Improper
alignment can result in fire.
*
Be sure to remove the battery if the instrument will not be used for an extended
period of time in order to prevent possible damage due to battery leakage.
1 Leaving the 6th string in place, remove the 1st through 5th strings.
* Avoid removing all 6 strings at once. If a repair necessitates the removal of
all six strings, please be careful not to dislodge the bridge saddle, as this can
damage the bar sensor’s balance, resulting in reduced sound output.
2 Place your hand into the sound hole
and as shown in the illustration, use
your finger to lift the battery out from
its holder, disconnect the battery
snap, and remove the battery.
3 Connect a new battery (6LR61) to
the battery snap and set the battery
in the battery holder.
* To keep the battery cord from being
seen through the sound hole, insert
the battery so the cord is facing the
same direction as shown in the
illustration on the right.
6LR61 battery
Battery snap
SERVICE
If your guitar should need any parts or service, or if you need any information, including the address of your nearest YAMAHA dealer, contact:
YAMAHA CORPORATION OF AMERICA
Guitar Service Department
6600 Orangethorpe Avenue
Buena Park, Calif. 90620 Calif. U.S.A.
TEL: 714 522 9433
YAMAHA EUROPA G.M.B.H.
2084 Rellingen, b. Hamburg
Siemensstr. 22/34 Germany
TEL: 04101 30 30
YAMAHA-KEMBLE MUSIC (U.K.) LTD.
Sherbourne Drive, Tilbrook,
Milton Keynes MK7 8BL, England
TEL: 0908-366 700
QC76350 R2
YAMAHA MUSIQUE FRANCE S.A.
Parc D’activités De Paris Est
Rue Ambroise Croizat
77183 Croissy Beaubourg France
TEL: 64 61 4000
YAMAHA CANADA MUSIC LTD.
135 Milner Avenue Scarborough
Ontario MIS 3R1 Canada
TEL: 416 298 1311
YAMAHA DE MEXICO S.A. DE C.V.
Apdo. Postal No.28-207
Mexico 1, D.F., Mexico
TEL: 686 0033
YAMAHA MUSIC LATIN AMERICA CORP.
6303 Blue Lagoon Drive, Suite 330
Miami Florida 33126 U.S.A.
TEL: 305 264 2581
YAMAHA SCANDINAVIA A.B.
Box 300 53 400 43 Göteborg, Sweden
TEL: 031 496090
YAMAHA-HAZEN ELECTRONICA MUSICAL S.A.
Jorge Juan 30, 28001 Madrid Spain
TEL: 593 2554
YAMAHA MUSICA ITALIA S.P.A.
Viale Italia 88, 20020 Lainate (Milano)
Italia
TEL: 2 93577 1
YAMAHA MUSIC AUSTRALIA PTY., LTD.
17-33 Market Street
South Melbourne, Vic. 3205 Australia
TEL: 699 2388
0306 Printed in Japan
 Loading...