

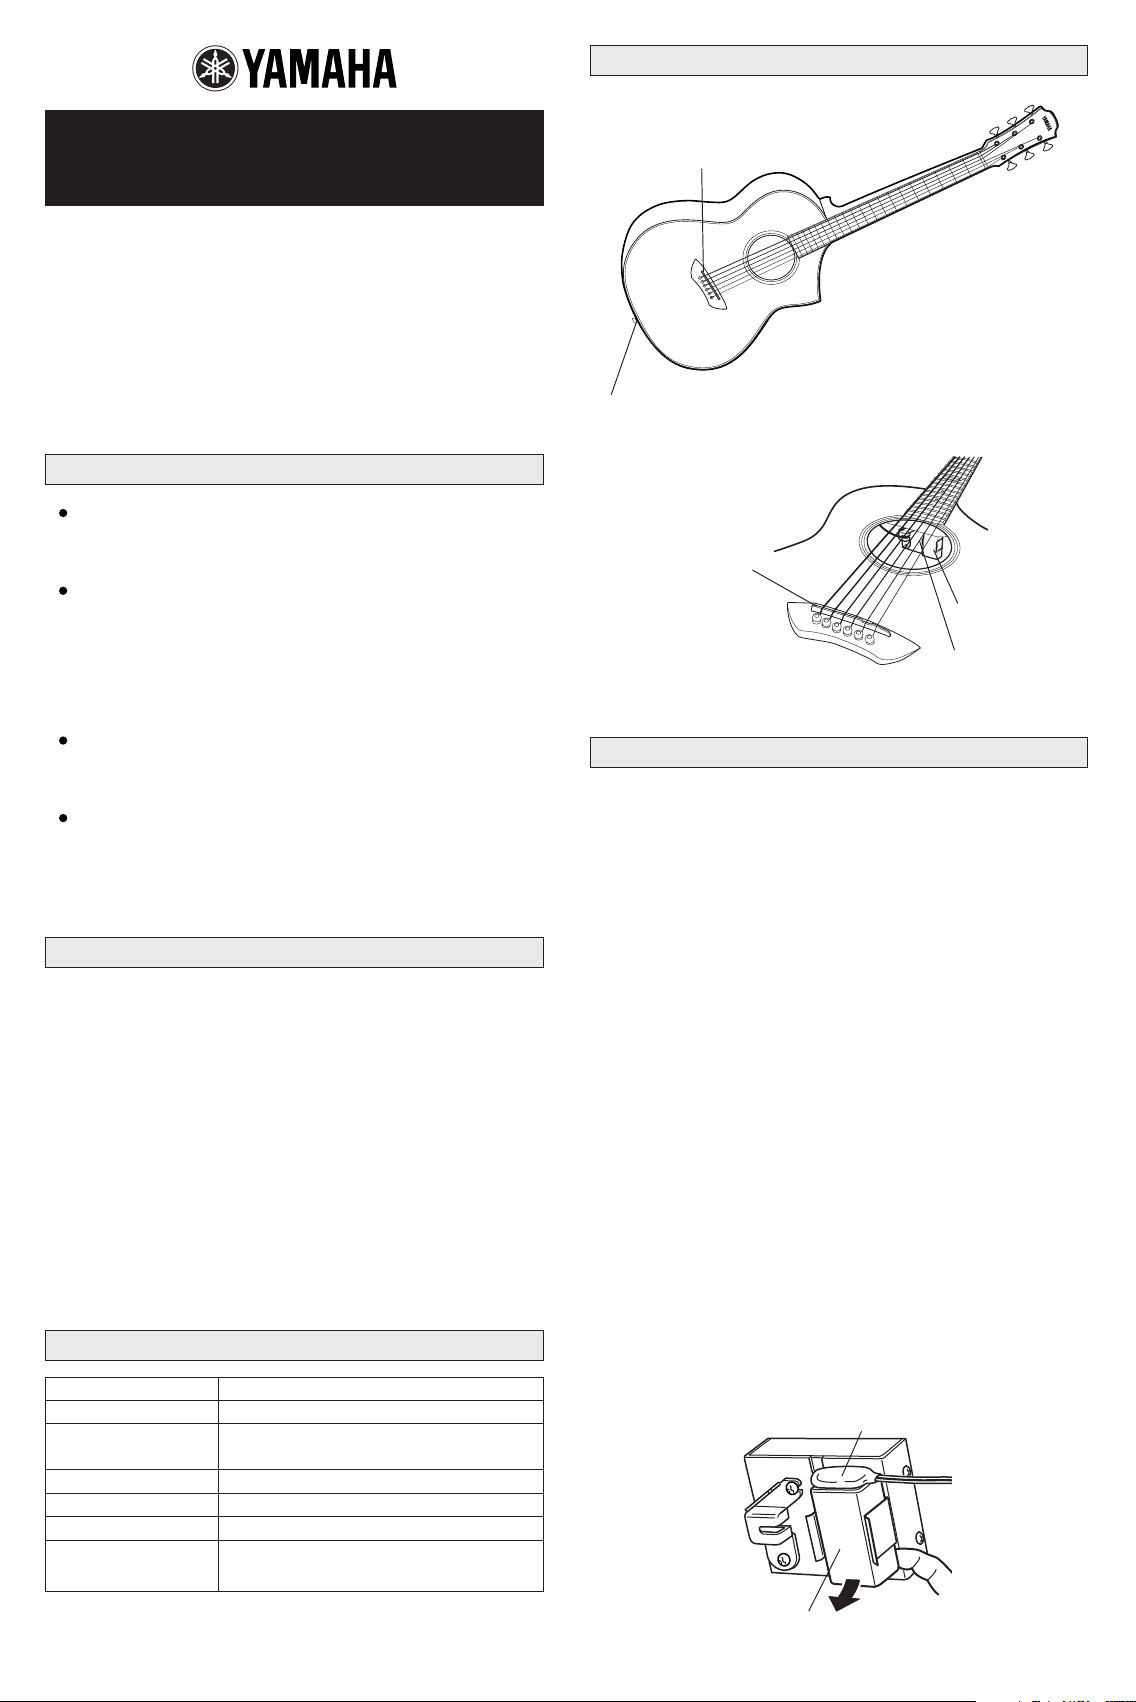
NOMENCLATURA
Guitarra
electroacústica
Manual de instrucciones
Le agradecemos la adquisición de una guitarra eléctro
acústica Yamaha.
Antes de utilizar la guitarra, tenga la amabilidad de leer
con atención este manual para poder aprovechar al
máximo las ventajas y funciones de la guitarra.
PRECAUCIONES
La toma de salida cumple las normas EIAJ y es de tipo telefónico
de 1/4 pulgadas. Asegúrese de emplear un cable de conexión
que sea apropiado.
El preamplificador incorporado se conecta automáticamente
cuando se inserta una clavija en la toma de salida. Cuando no
utilice el instrumento, o cuando toque con la guitarra sin
amplificación, no se olvide de desenchufar la clavija de la toma de
salida para que la alimentación del preamplificador quede
desconectada.
Antes de conectar o desconectar el instrumento, asegúrese
siempre que el control del volumen del altavoz (amplificador) esté
ajustado en “0”.
Asegúrese de extraer la pila si no va a utilizar el instrumento
durante períodos prolongados de tiempo para evitar posibles
daños debidos a fugas de la pila.
UTILIZACIÓN DE LA GUITARRA
1 Empleando un cable con clavija jack, conecte la toma de salida del
lado de la guitarra a la toma de entrada de un amplificador de
guitarra, altavoz autoamplificado, o equipo similar.
* Antes de hacer cualquier conexión o desconexión, asegúrese siempre
que el volumen esté completamente bajado o que la alimentación del
amplificador de guitarra, altavoz autoamplificado, etc. esté desconecta.
* Se consume energía de la pila cuando el cable está conectado a la toma
de salida, por lo que deberá asegurarse de que el cable esté desenchufado
cuando no utilice la guitarra.
2 Ajuste el volumen y el tono con los controles del amplificador de
guitarra, o altavoz autoamplificado.
ESPECIFICACIONES
Sistema SYSTEM-54 (Monofónico de 1 vía)
Fonocaptor Tipo piezoeléctrico (tipo piezoeléctrico)
Salida Clavija de extremo combinado/
interruptor de la alimentación
Impedancia de salida 10 kΩ
Alimentación Una pila de 9 V CC, 6LR61
Duración de la pila Aprox. 1,000 horas
Accesorios • Llave hexagonal para ajuste del mástil x 1
• Pila 6LR61 x 1
Fonocaptor
Piezo electrico
Salida
(con función de interruptor de la alimentación)
Soporte
Portapilas
Preamplificador
SUSTITUCIÓN DE LA PILA
Cuando la carga de la pila se haya gastado, el sonido de la guitarra se
distorsionará o se reducirá el nivel de volumen, etc. Cuando aparezcan estos
síntomas, reemplace la pila como se muestra en la ilustración de abajo.
* Asegúrese de que las polaridades +/- de la pila estén correctamente
alineadas. La alineación incorrecta puede ocasionar fuego.
* Asegúrese de extraer la pila si no va a utilizar el instrumento durante
períodos prolongados de tiempo para evitar posibles daños debidos a
fugas de la pila.
1 Dejando la sexta cuerda en su lugar, quite de la primera a la quinta
cuerda.
* No quite las 6 cuerdas a la vez. Si una reparación hace que sea
imprescindible quitar las seis cuerdas, deberá tener cuidado de que el
soporte del puente no se salga su sitio, porque podría dañar el equilibrio
del sensor, ocasionando la reducción de la salida de sonido.
2 Ponga la mano en el orificio acústico como se muestra en la ilustra-
ción, emplee el dedo para levantar la pila y sacarla del portapilas,
desconecte el conector de la pila, y extraiga la pila.
3 Conecte una pila nueva (6LR61) al conector de la pila y ponga la pila
en el portapilas.
* Para evitar que el cable de la pila pueda verse por el orificio acústico,
inserte la pila de modo que el cable quede encarado en la misma
dirección que la mostrada en la ilustración.
Conector de la pila
Pila 6LR61
ELECTRIC
ACOUSTIC GUITAR
Owner’s Manual
Thank you for choosing a Yamaha electric-acoustic guitar.
In order to make the most of the advanced features and
performance provided by your guitar, please read this
manual carefully before using the instrument.
PRECAUTIONS
The output jack is an EIAJ-standard 1/4" phone jack. Be sure to use an
appropriate connection cable.
The built-in preamplifier is automatically switched on when a plug is
inserted into the output jack. When not using the instrument, or when
playing it without amplification, be sure to remove the plug from the
output jack to preserve battery life.
Before connecting or disconnecting the instrument, always make sure
that the speaker’s (amplifier) volume control is set to “0”.
Be sure to remove the battery if the instrument will not be used for an
extended period of time in order to prevent possible damage due to
battery leakage.
USING THE GUITAR
1
Using a cable with a standard phone plug, connect the guitar’s end pin output
jack to the input jack on a guitar amplifier, powered speaker, or similar device.
* Before making any connections or disconnections, always make sure that
the volume is turned all the way down or the power is switched “OFF” on
the guitar amplifier or powered speaker, etc.
* Power is drawn from the battery when the cable is connected to the output
jack, so make sure you unplug the cable when the guitar is not in use.
2 Adjust the volume and tone using the controls on the guitar amplifier or
powered speaker.
SPECIFICATIONS
System SYSTEM-54 (Monaural 1 way)
Pickup Bar Sensor (Piezo type)
Output jack Combination end pin/power switch
Output impedance 10 kΩ
Power supply 9V DC, 6LR61 dry cell battery
Battery life Approx. 1,000 hours
Accessories • Hexagonal wrench for neck adjustment x1
• 6LR61 dry cell battery x1
NOMENCLATURE
Pickup
Bar Sensor
Output Jack
(with power switch function)
Saddle
Battery
Pre-amplifier
BATTERY REPLACEMENT
When battery power becomes low the guitar’s sound will become distorted or
the volume level will decrease, etc. When these symptoms appear, replace
the battery as shown in the illustration below.
* Make sure that the battery’s +/- poles are properly aligned. Improper
alignment can result in fire.
*
Be sure to remove the battery if the instrument will not be used for an extended
period of time in order to prevent possible damage due to battery leakage.
1 Leaving the 6th string in place, remove the 1st through 5th strings.
* Avoid removing all 6 strings at once. If a repair necessitates the removal of
all six strings, please be careful not to dislodge the bridge saddle, as this can
damage the bar sensor’s balance, resulting in reduced sound output.
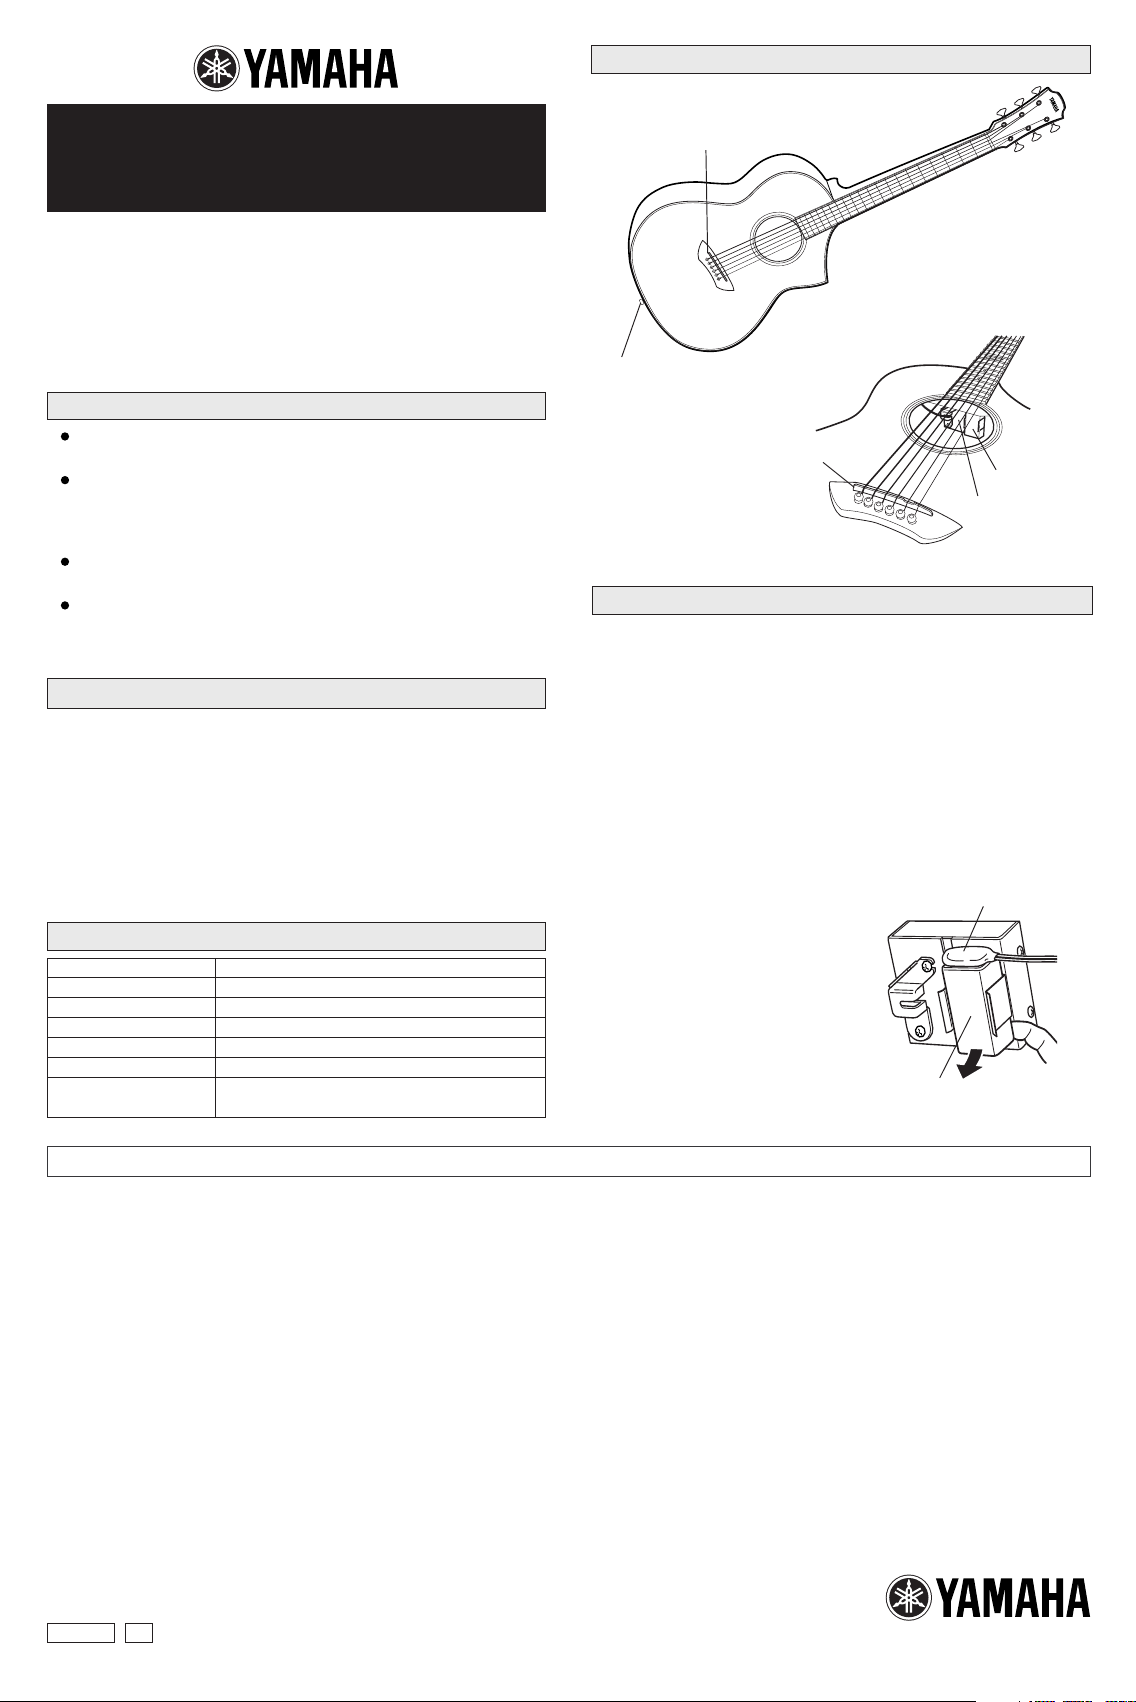
2 Place your hand into the sound hole
and as shown in the illustration, use
your finger to lift the battery out from
its holder, disconnect the battery
snap, and remove the battery.
3 Connect a new battery (6LR61) to
the battery snap and set the battery
in the battery holder.
* To keep the battery cord from being
seen through the sound hole, insert
the battery so the cord is facing the
same direction as shown in the
illustration on the right.
6LR61 battery
Battery snap
SERVICE
If your guitar should need any parts or service, or if you need any information, including the address of your nearest YAMAHA dealer, contact:
YAMAHA CORPORATION OF AMERICA
Guitar Service Department
6600 Orangethorpe Avenue
Buena Park, Calif. 90620 Calif. U.S.A.
TEL: 714 522 9433
YAMAHA EUROPA G.M.B.H.
2084 Rellingen, b. Hamburg
Siemensstr. 22/34 Germany
TEL: 04101 30 30
YAMAHA-KEMBLE MUSIC (U.K.) LTD.
Sherbourne Drive, Tilbrook,
Milton Keynes MK7 8BL, England
TEL: 0908-366 700
QC76350 R2
YAMAHA MUSIQUE FRANCE S.A.
Parc D’activités De Paris Est
Rue Ambroise Croizat
77183 Croissy Beaubourg France
TEL: 64 61 4000
YAMAHA CANADA MUSIC LTD.
135 Milner Avenue Scarborough
Ontario MIS 3R1 Canada
TEL: 416 298 1311
YAMAHA DE MEXICO S.A. DE C.V.
Apdo. Postal No.28-207
Mexico 1, D.F., Mexico
TEL: 686 0033
YAMAHA MUSIC LATIN AMERICA CORP.
6303 Blue Lagoon Drive, Suite 330
Miami Florida 33126 U.S.A.
TEL: 305 264 2581
YAMAHA SCANDINAVIA A.B.
Box 300 53 400 43 Göteborg, Sweden
TEL: 031 496090
YAMAHA-HAZEN ELECTRONICA MUSICAL S.A.
Jorge Juan 30, 28001 Madrid Spain
TEL: 593 2554
YAMAHA MUSICA ITALIA S.P.A.
Viale Italia 88, 20020 Lainate (Milano)
Italia
TEL: 2 93577 1
YAMAHA MUSIC AUSTRALIA PTY., LTD.
17-33 Market Street
South Melbourne, Vic. 3205 Australia
TEL: 699 2388
0306 Printed in Japan
 Loading...