

Page 1
KMA-700/KMA-500
Digital Karaoke Mixing Amplifier
L
OWNER’S MANUAL
MANUAL DE INSTRUCCIONES
ИНСТРУКЦИЯ ПО ЭКСПЛУАТАЦИИ
Page 2

IMPORTANT SAFETY INSTRUCTIONS
CAUTION
RISK OF ELECTRIC SHOCK DO
NOT OPEN
CAUTION: TO REDUCE THE RISK OF
ELECTRIC SHOCK, DO NOT REMOVE COVER
(OR BACK). NO USER-SERVICEABLE PARTS
INSIDE. REFER SERVICING TO QUALIFIED
IMPORTANT
Please record the serial number of this unit in the space
below.
MODEL:
Serial No.:
The serial number is located on the rear of the unit.
Retain this Owner’s Manual in a safe place for future
reference.
SERVICE PERSONNEL.
• Explanation of Graphical Symbols
The lightning flash with arrowhead symbol, within an
equilateral triangle, is intended to alert you to the
presence of uninsulated “dangerous voltage” within
the product’s enclosure that may be of sufficient
magnitude to constitute a risk of electric shock to
persons.
The exclamation point within an equilateral triangle
is intended to alert you to the presence of important
operating and maintenance (servicing) instructions in
the literature accompanying the appliance.
1 Read these instructions.
2 Keep these instructions.
3 Heed all warnings.
4 Follow all instructions.
5 Do not use this apparatus near water.
6 Clean only with dry cloth.
7 Do not block any ventilation openings. Install in accordance
with the manufacturer’s instructions.
8 Do not install near any heat sources such as radiators, heat
registers, stoves, or other apparatus (including amplifiers) that
produce heat.
9 Do not defeat the safety purpose of the polarized or
grounding-type plug. A polarized plug has two blades with
one wider than the other. A grounding type plug has two
blades and a third grounding prong. The wide blade or the
third prong are provided for your safety. If the provided plug
does not fit into your outlet, consult an electrician for
replacement of the obsolete outlet.
10 Protect the power cord from being walked on or pinched
particularly at plugs, convenience receptacles, and the point
where they exit from the apparatus.
11 Only use attachments/accessories specified by the
manufacturer.
12 Use only with the cart, stand, tripod, bracket,
or table specified by the manufacturer, or sold
with the apparatus. When a cart is used, use
caution when moving the cart/apparatus
combination to avoid injury from tip-over.
13 Unplug this apparatus during lightning storms or when unused
for long periods of time.
14 Refer all servicing to qualified service personnel. Servicing is
required when the apparatus has been damaged in any way,
such as power cord or plug is damaged, liquid has been spilled
or objects have fallen into the apparatus, the apparatus has
been exposed to rain or moisture, does not operate normally,
or has been dropped.
i En
Page 3
IMPORTANT SAFETY INSTRUCTIONS
FCC INFORMATION (for US customers)
1 IMPORTANT NOTICE: DO NOT MODIFY THIS
UNIT!
This product, when installed as indicated in the
instructions contained in this manual, meets FCC
requirements. Modifications not expressly approved by
Yamaha may void your authority, granted by the FCC, to
use the product.
2IMPORTANT: When connecting this product to
accessories and/or another product use only high quality
shielded cables. Cable/s supplied with this product MUST
be used. Follow all installation instructions. Failure to
follow instructions could void your FCC authorization to
use this product in the USA.
3 NOTE: This product has been tested and found to comply
with the requirements listed in FCC Regulations, Part 15
for Class “B” digital devices. Compliance with these
requirements provides a reasonable level of assurance that
your use of this product in a residential environment will
not result in harmful interference with other electronic
devices.
This equipment generates/uses radio frequencies and, if
not installed and used according to the instructions found
in the users manual, may cause interference harmful to the
operation of other electronic devices.
Compliance with FCC regulations does not guarantee that
interference will not occur in all installations. If this
product is found to be the source of interference, which can
be determined by turning the unit “OFF” and “ON”, please
try to eliminate the problem by using one of the following
measures:
Relocate either this product or the device that is being
affected by the interference.
Utilize power outlets that are on different branch (circuit
breaker or fuse) circuits or install AC line filter/s.
In the case of radio or TV interference, relocate/reorient
the antenna. If the antenna lead-in is 300 ohm ribbon lead,
change the lead-in to coaxial type cable.
If these corrective measures do not produce satisfactory
results, please contact the local retailer authorized to
distribute this type of product. If you can not locate the
appropriate retailer, please contact Yamaha Electronics
Corp., U.S.A. 6660 Orangethorpe Ave., Buena Park, CA
90620.
The above statements apply ONLY to those products
distributed by Yamaha Corporation of America or its
subsidiaries.
We Want You Listening For A Lifetime
Yamaha and the Electronic Industries Association’s Consumer Electronics Group want you to get the most out of your
equipment by playing it at a safe level. One that lets the sound come through loud and clear without annoying blaring or
distortion – and, most importantly, without affecting your sensitive hearing. Since hearing damage from loud sounds is
often undetectable until it is too late, Yamaha and the Electronic Industries Association’s Consumer Electronics Group
recommend you to avoid prolonged exposure from excessive volume levels.
ii En
Page 4
Caution: Read this before operating your unit
1 To assure the finest performance, please read this manual
carefully. Keep it in a safe place for future reference.
2 Install this sound system in a well ventilated, cool, dry, clean
place – away from direct sunlight, heat sources, vibration,
dust, moisture, and/or cold. Allow ventilation space of at least
10 cm (3-15/16”) on the top, left and right of this unit, and
20 cm (7-7/8”) on the back.
3 Locate this unit away from other electrical appliances, motors,
or transformers to avoid humming sounds.
4 Do not expose this unit to sudden temperature changes from
cold to hot, and do not locate this unit in an environment with
high humidity (i.e. a room with a humidifier) to prevent
condensation inside this unit, which may cause an electrical
shock, fire, damage to this unit, and/or personal injury.
5 Avoid installing this unit where foreign objects may fall onto
this unit and/or this unit may be exposed to liquid dripping or
splashing. On the top of this unit, do not place:
– Other components, as they may cause damage and/or
discoloration on the surface of this unit.
– Burning objects (i.e. candles), as they may cause fire,
damage to this unit, and/or personal injury.
– Containers with liquid in them, as they may fall and liquid
may cause electrical shock to the user and/or damage to
this unit.
6 Do not cover this unit with a newspaper, tablecloth, curtain,
etc. in order not to obstruct heat radiation. If the temperature
inside this unit rises, it may cause fire, damage to this unit,
and/or personal injury.
7 Do not plug in this unit to an AC wall outlet until all
connections are complete.
8 Do not operate this unit upside-down. It may overheat,
possibly causing damage.
9 Do not use force on switches, knobs and/or cords.
10 When disconnecting the power cord from the AC wall outlet,
grasp the plug; do not pull the cord.
11 Do not clean this unit with chemical solvents; this might
damage the finish. Use a clean, dry cloth.
12 Only voltage specified on this unit must be used. Using this
unit with a higher voltage than specified is dangerous and may
cause fire, damage to this unit, and/or personal injury.
Yamaha will not be held responsible for any damage resulting
from use of this unit with a voltage other than specified.
13 To prevent damage by lightning, keep the power cord
disconnected from an AC wall outlet or the unit during a
lightning storm.
14 Do not attempt to modify or fix this unit. Contact qualified
Yamaha service personnel when any service is needed. The
cabinet should never be opened for any reasons.
15 When not planning to use this unit for long periods of time
(i.e. vacation), disconnect the AC power plug from the AC
wall outlet.
16 Install this unit near the wall outlet and where the AC power
plug can be reached easily.
17 Be sure to read the “Troubleshooting” section on common
operating errors before concluding that this unit is faulty.
18 Before moving this unit, press POWER switch to turn this
unit off, and disconnect the power cord from the AC wall
outlet.
19 The batteries shall not be exposed to excessive heat such as
sunshine, fire or like.
20 Condensation will form when the surrounding temperature
changes suddenly. Disconnect the power supply cable from
the outlet, then leave the unit alone.
21 When using the unit for a long time, the unit may become
warm. Turn the power off, then leave the unit alone for
cooling.
22 VOLTAGE SELECTOR (Except U.S.A. model)
The VOLTAGE SELECTOR on the rear panel of this unit
must be set for your local main voltage BEFORE plugging
into the AC wall outlet.
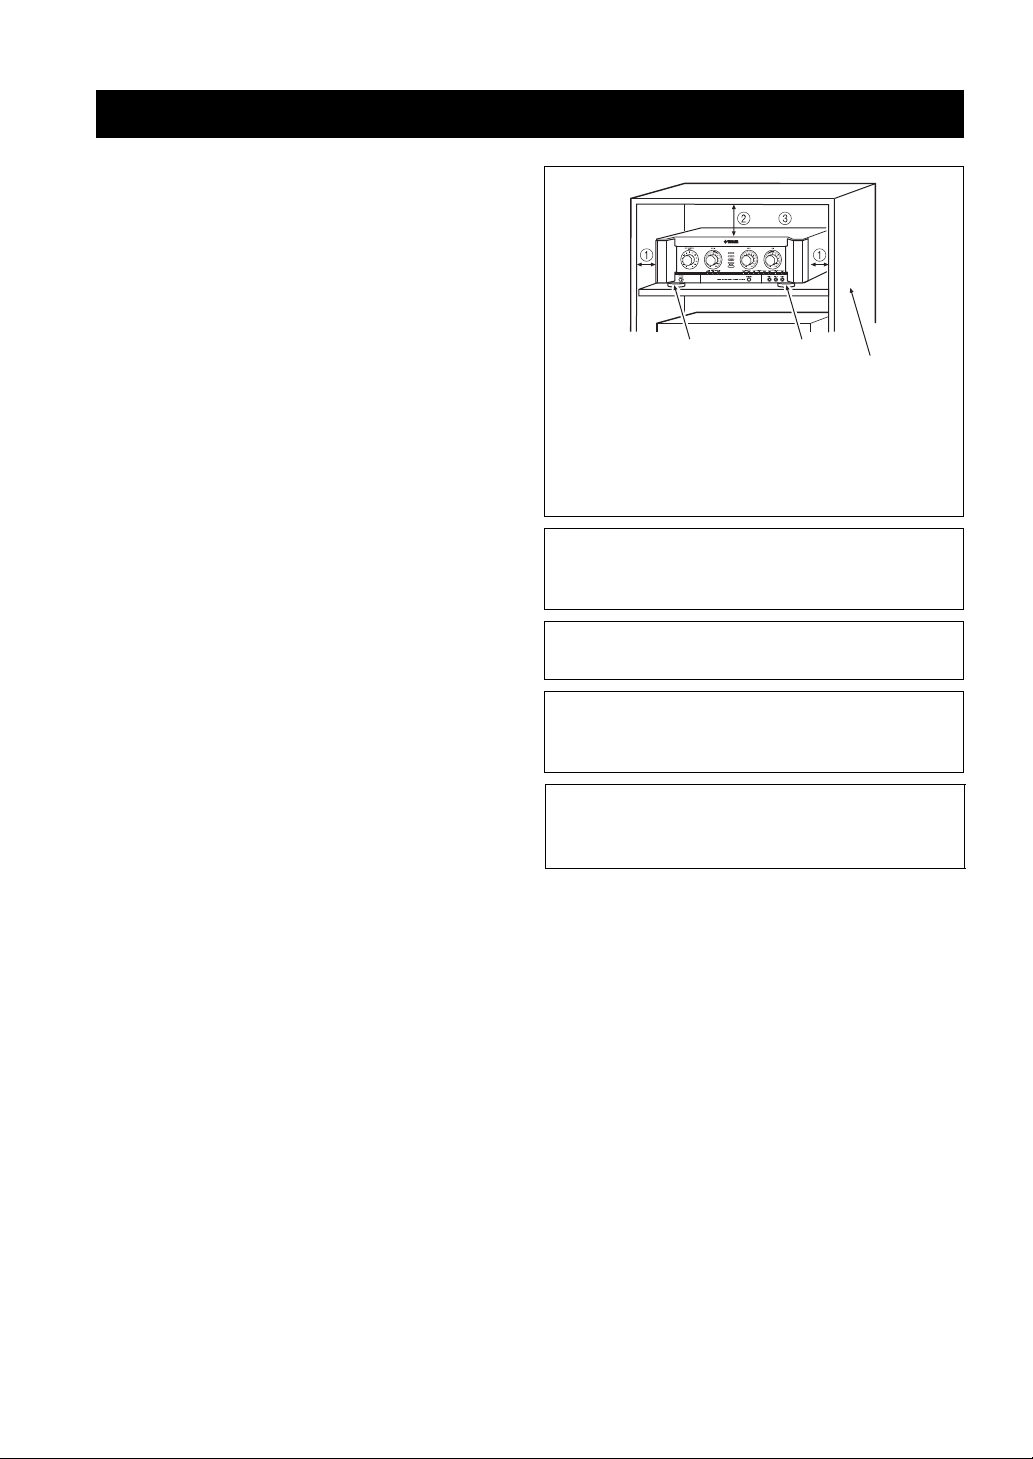
foot foot
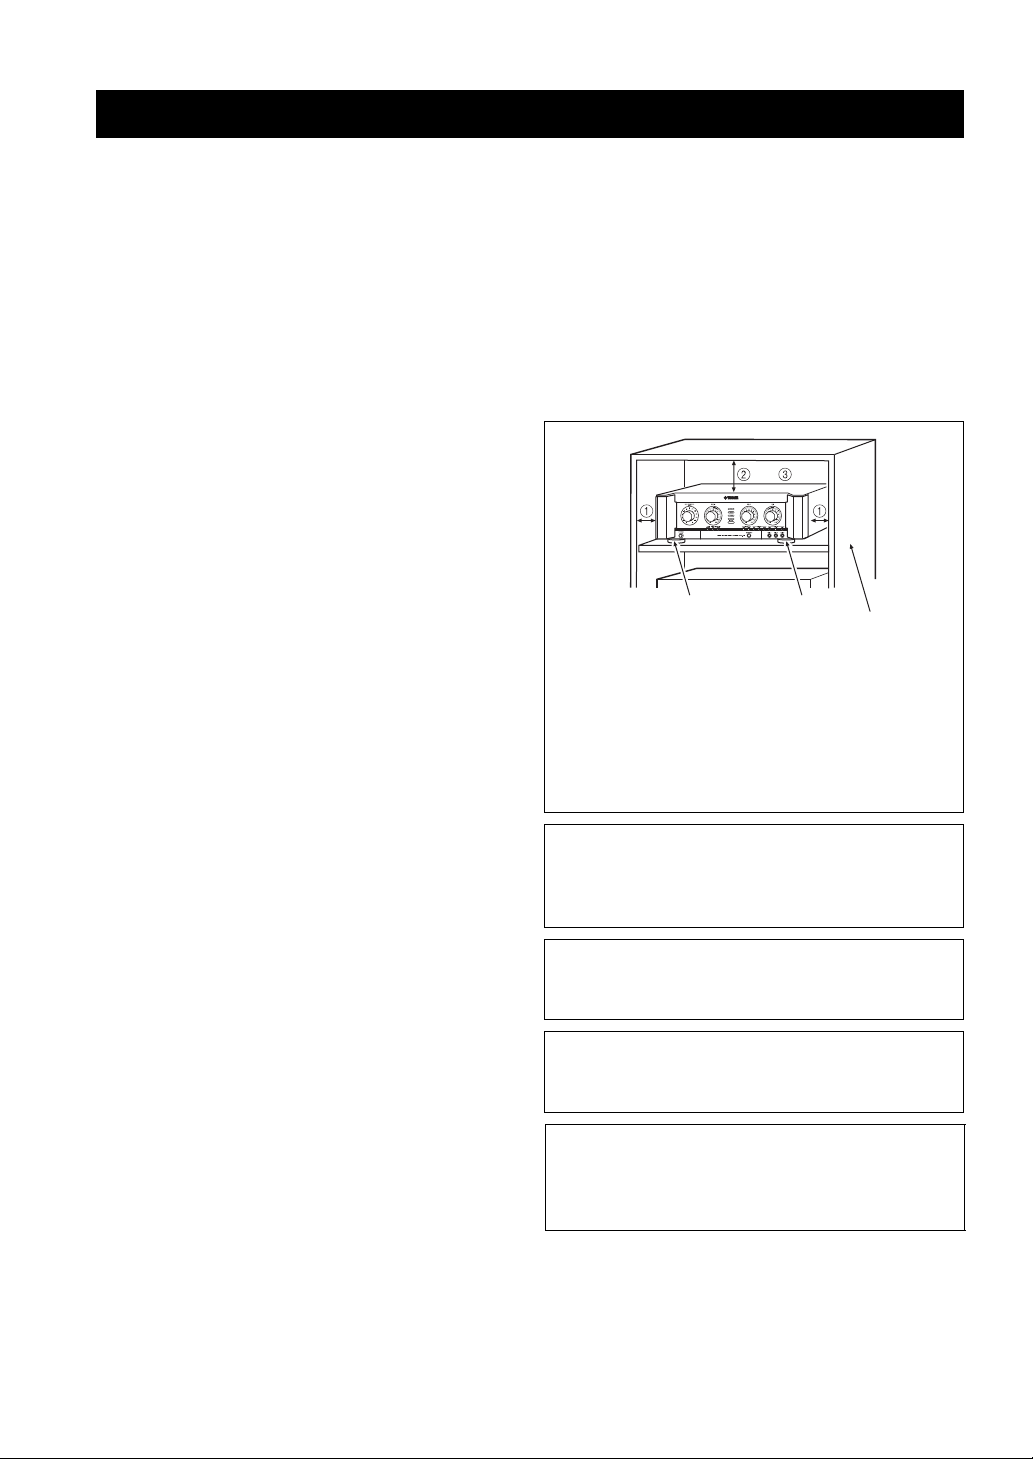
The following rack size measurements must be adhered to:
rack
12 The ventilation space on the top, left and right of this
unit; more than 10 cm (3-15/16”)
3 The ventilation space on the back of this unit; more
than 20 cm (7-7/8”)
4 Do not remove the feet.
WARNING
TO REDUCE THE RISK OF FIRE OR ELECTRIC
SHOCK, DO NOT EXPOSE THIS UNIT TO RAIN
OR MOISTURE.
As long as this unit is connected to the AC wall outlet,
it is not disconnected from the AC power source even
if you turn off this unit by POWER switch.
CAUTION
Danger of explosion if battery is incorrectly replaced.
Replace only with the same or equivalent type.
CAUTION
Use of controls or adjustments or performance of
procedures other than those specified herein may result
in hazardous radiation exposure.
iii En
Page 5
INTRODUCTION
HANDLING PRECAUTIONS ..............................2
BEFORE CONNECTING ..................................... 2
PREPARATION
NAMES OF PARTS AND THEIR FUNCTIONS
..............................................................................3
OPERATION
SYSTEM CONNECTIONS................................... 6
CONNECTIONS ....................................................7
CONFIGURATION DIAGRAM ........................10
REMOTE CONTROL .........................................11
GENERAL OPERATION ................................... 13
SETUP MODE...................................................... 14
ADDITIONAL INFORMATION
TROUBLESHOOTING.......................................16
MAINTENANCE ................................................. 16
AFTER-SALES SERVICING.............................17
KARAOKE ETIQUETTE ................................... 17
COPYRIGHT .......................................................17
SPECIFICATIONS .............................................. 18
CONTENTS
PREPARATIONINTRODUCTION
OPERATION
INFORMATION
ADDITIONAL
1 En
English
Page 6

INTRODUCTION
Thank you for your purchase of the Yamaha KMA-700/KMA-500 Digital Karaoke Mixing Amplifier.
This document is the owner’s manual for both KMA-700 and KMA-500. Model names are given where the details of
functions are unique to each model. Illustrations for KMA-700 are mainly used for explanations.
Before using this unit, be sure to read this manual so that you can take full advantage of the features of this unit.
After you finish reading, keep this manual in a safe place in case you need it in the future. The manual should be very
helpful in understanding the Digital Karaoke Mixing Amplifier and solving any difficulties that may arise during use.
HANDLING PRECAUTIONS
■ Do not install the unit in the following
locations:
• In places exposed to direct sunlight or near heat
sources, such as a radiator.
• In places where heat cannot escape due to poor
ventilation, or are very humid or dusty.
• On a sloping surface or exposed to excessive vibration.
BEFORE CONNECTING
■ Connection precautions
• Be sure to switch off the power of the relevant
equipment before making any connection.
• The white input/output jacks of the amplifier are
designed for the left channel, while the red input/output
jacks are for the right channels. Be sure to connect the
cords without making a mistake in the color codes for
the left and right channels.
• Insert the plugs of the connection cords securely into
the jacks. If the connection is incomplete, there may be
no sound produced or noise may be generated.
• When unplugging the power cable from the AC wall
outlet, be sure to hold the plastic molding of the plug
itself and pull.
• For KMA-700, set IMPEDANCE SELECTOR on the
rear panel before turning on the unit. Refer to
“IMPEDANCE SELECTOR” on page 7.
• Except in the case of the U.S.A. model, VOLTAGE
SELECTOR on the rear panel of this unit must be set
for your local main voltage BEFORE plugging the
power cable into the AC wall outlet. Refer to
“VOLTAGE SELECTOR” on page 9.
• In places which may be exposed to rain, such as near a
window.
• In places which may be exposed to soot, vapor or heat,
such as near cooking facilities.
■ Power consumption of AC OUTLETS
(U.S.A. model only)
• Be careful that the total power consumption does not
exceed the wattage marked on the rear panel. Do not
connect appliances other than system components to
the AC OUTLETS of this unit.
• Do not connect a TV set to this unit; even if it indicates
a power consumption value below the permissible
value when the TV power is turned on.
2 En
Page 7
PREPARATION
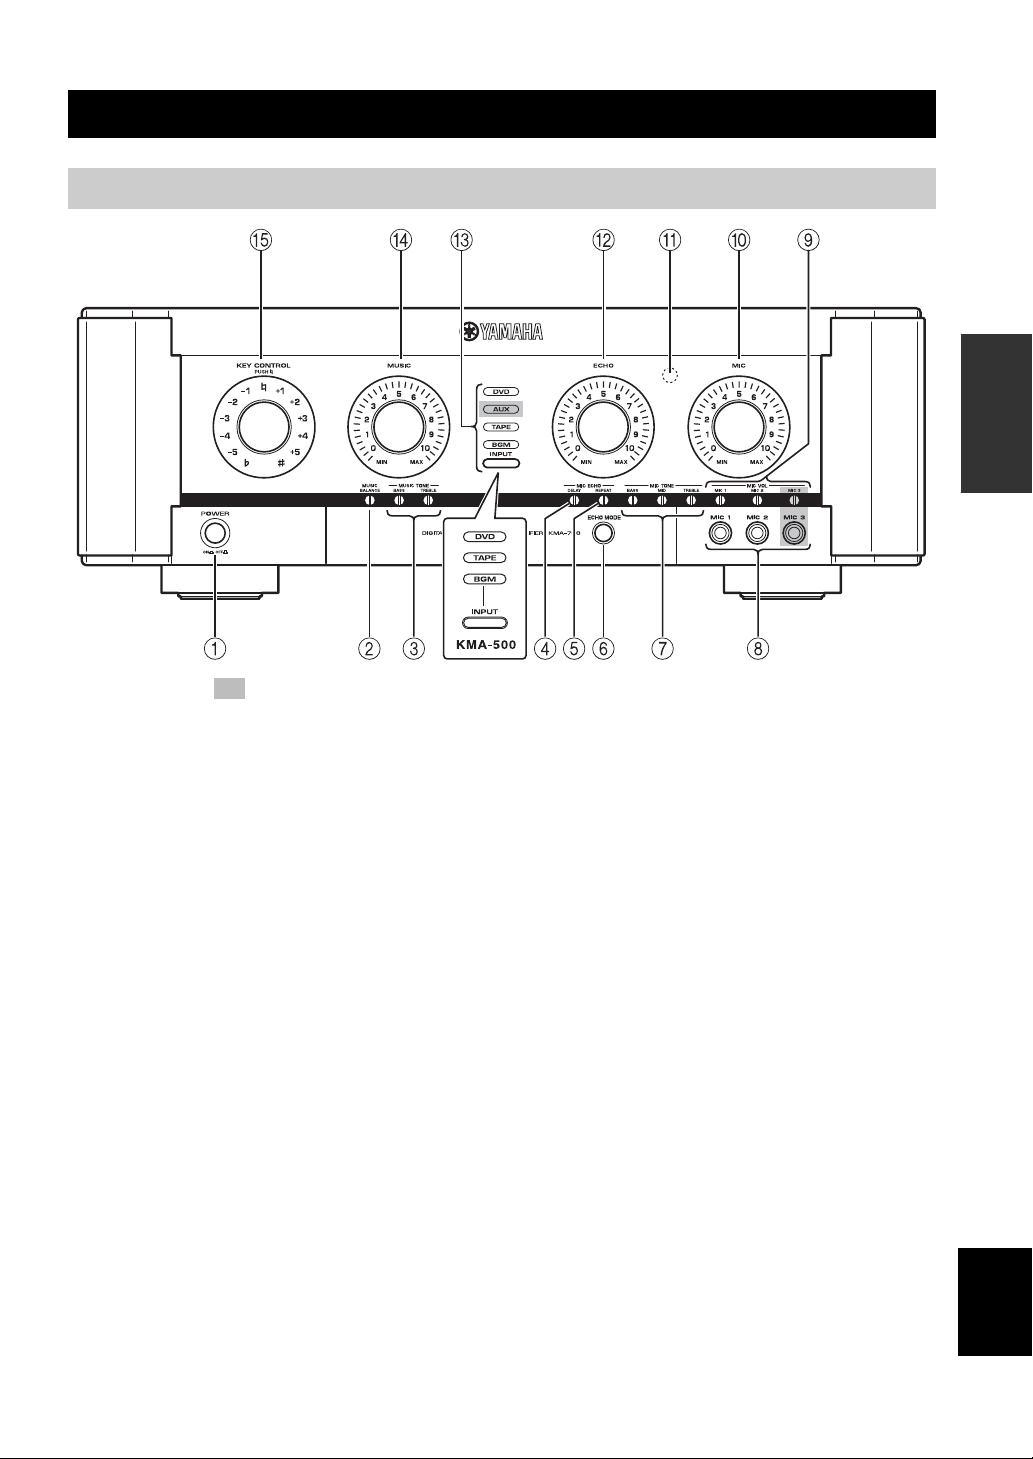
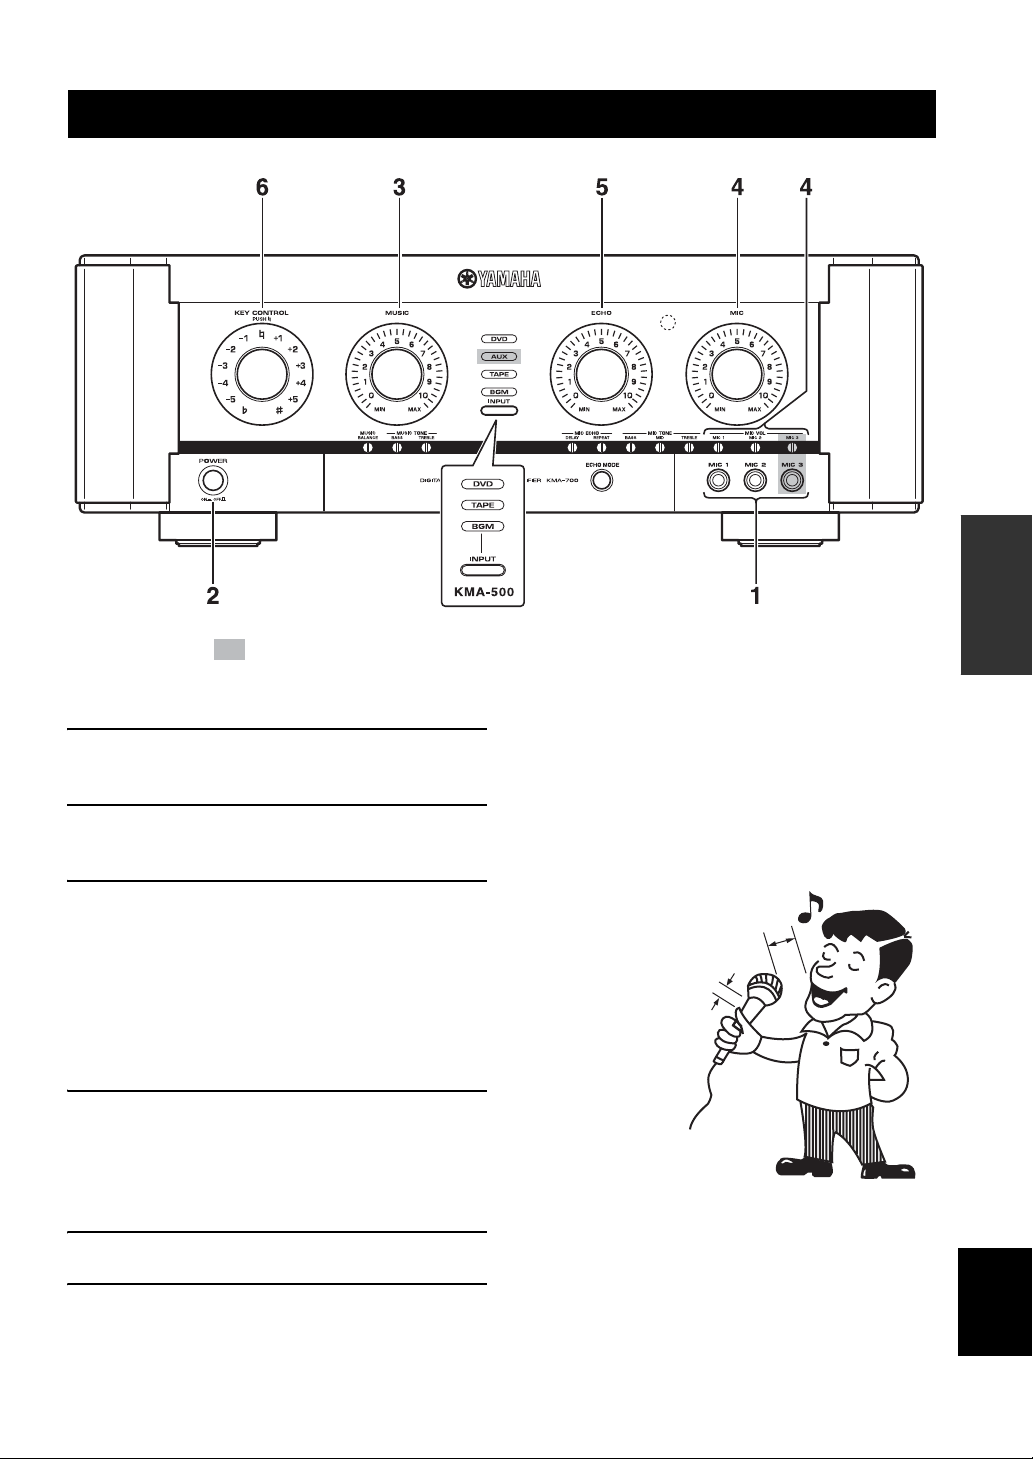
Front panel
NAMES OF PARTS AND THEIR FUNCTIONS
PREPARATION
The shaded part ( ) is provided for KMA-700 only.
1 POWER (ON/OFF)
Turn the power ON/OFF.
2 MUSIC BALANCE
Adjust the volume balance.*
3 MUSIC TONE (BASS/TREBLE)
Adjust the low/high frequency response.*
4 MIC ECHO DELAY
Adjust the delay time between echoes.*
5 MIC ECHO REPEAT
Adjust the amount of feedback.*
6 ECHO MODE
Select NORMAL, WIDE (stereo) or SPACIOUS** echo.
SPACIOUS echo is an effect that produces both
NORMAL and WIDE echo with a time lag. The LED
lights up in amber/green** when WIDE/SPACIOUS**
echo is selected.
7 MIC TONE (BASS/MID/TREBLE)
Adjust the low/middle/high frequency response of
microphones.*
8 MIC jacks (1/2/3**)
Connect microphones to these jacks.
9 MIC VOL (1/2/3**)
Adjust the microphone input level.*
0 MIC
Adjust the overall volume of all microphones.
A Remote sensor
This sensor receives signals from the remote control.
B ECHO
Adjust the amount of echo.
C INPUT/Input source indicators (DVD/AUX**/
TAPE/BGM)
INPUT is not available in the default setting.
To activate INPUT, refer to “Input mode” on page 14.
Input source indicators indicate the input source currently
active.
D MUSIC
Adjust the volume of the music source.
E KEY CONTROL
To transpose the key of the played music, rotate this
control. The key can be changed in halftone steps in 5
steps; either higher or lower. To reset the key to the
natural key, press this control. If over 4 seconds of silence
occurs, the unit assumes the played song has finished and
resets the key to natural.
* Use a flathead screwdriver to adjust.
** KMA-700 only
English
3 En
Page 8
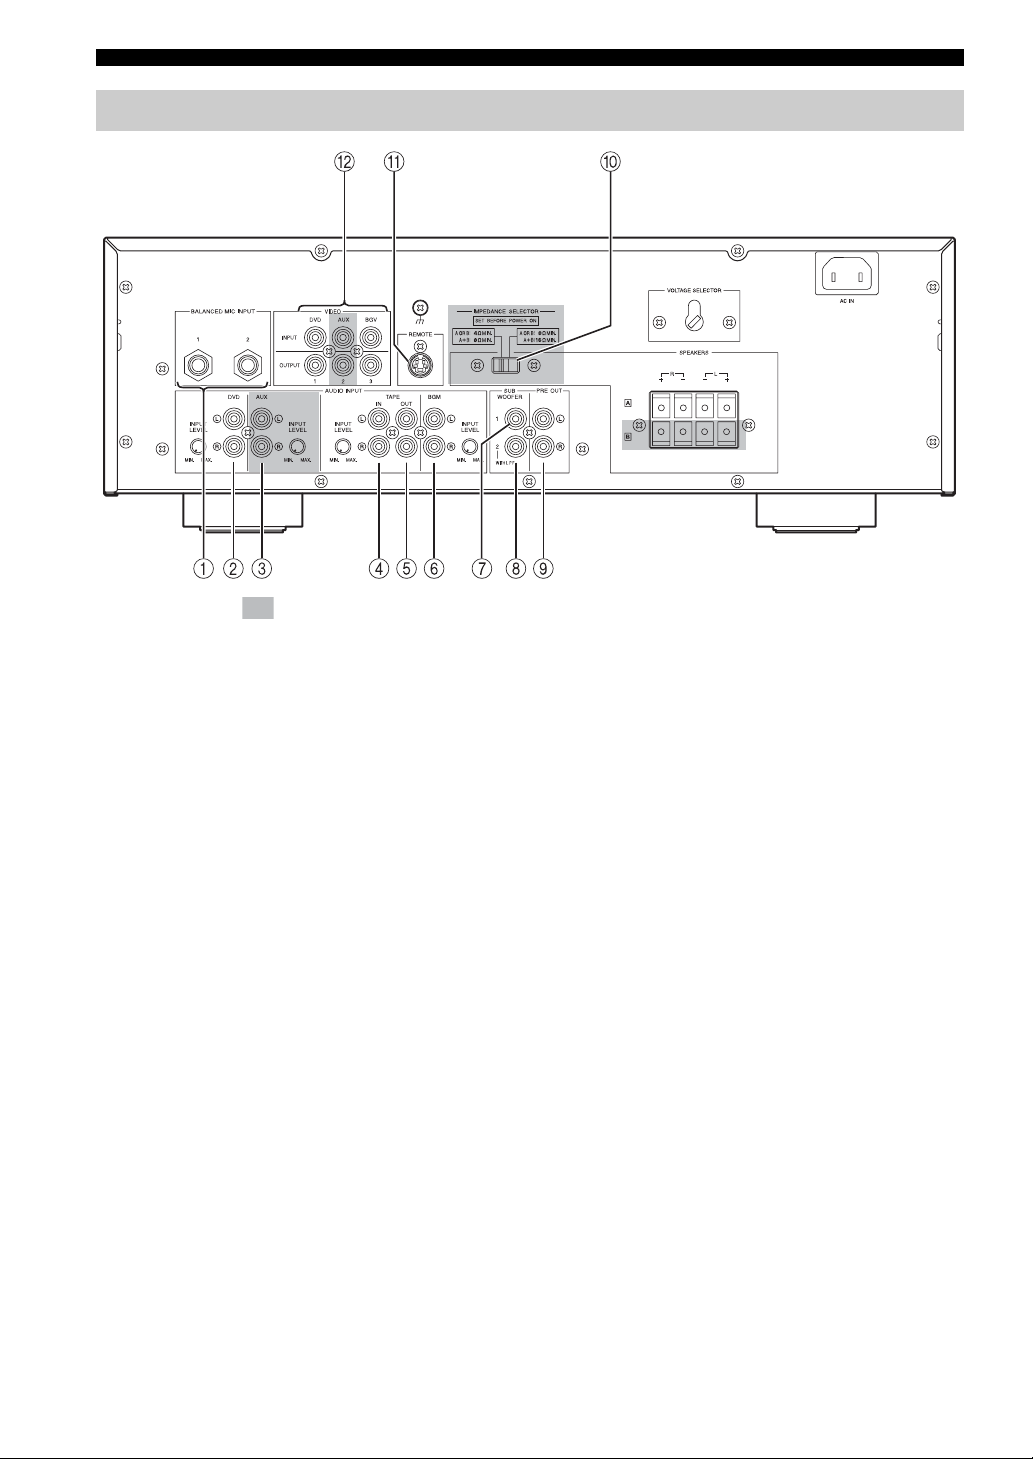
NAMES OF PARTS AND THEIR FUNCTIONS
Rear panel
The shaded part ( ) is provided for KMA-700 only.
(Asia model)
For details on component connection, refer to “SYSTEM
CONNECTIONS” on page 6.
1 BALANCED MIC INPUT jacks (1/2)
Connect microphones to these jacks.
These are balanced inputs and each connects to the same
circuit MIC 1 and 2 on the front panel.
2 DVD audio input jacks
Connect to the output jacks of KARAOKE equipment or
DVD player.
3 AUX audio input jacks*
Connect to the output jacks of a TAPE player, VCR, etc.
4 TAPE audio input jacks
Connect to the output jacks of a TAPE player, VCR, etc.
5 TAPE audio output jacks
Connect to the input jacks of a TAPE player, VCR, etc.
6 BGM audio input jacks
Connect to the output jacks of the source component of
background music.
7 SUBWOOFER jack without low-pass filter
Connect to the input jack of the subwoofer with a lowpass filter. This jack outputs the monaural signal directly.
8 SUBWOOFER jack with low-pass filter
Connect to the input jack of the subwoofer.
9 PRE OUT jacks
Connect to the input jacks of the extension power
amplifier.
0 IMPEDANCE SELECTOR*
Refer to “IMPEDANCE SELECTOR” on page 7.
A REMOTE jack
Connect to an external remote control.
Refer to “Connecting an external remote control” on page
8.
B VIDEO INPUT jacks
Connect to the input jack of the video output of a DVD,
AUX*, or background video player or video camera, etc.
* KMA-700 only
4 En
Page 9
(Asia model)
The shaded part ( ) is provided for KMA-700 only.
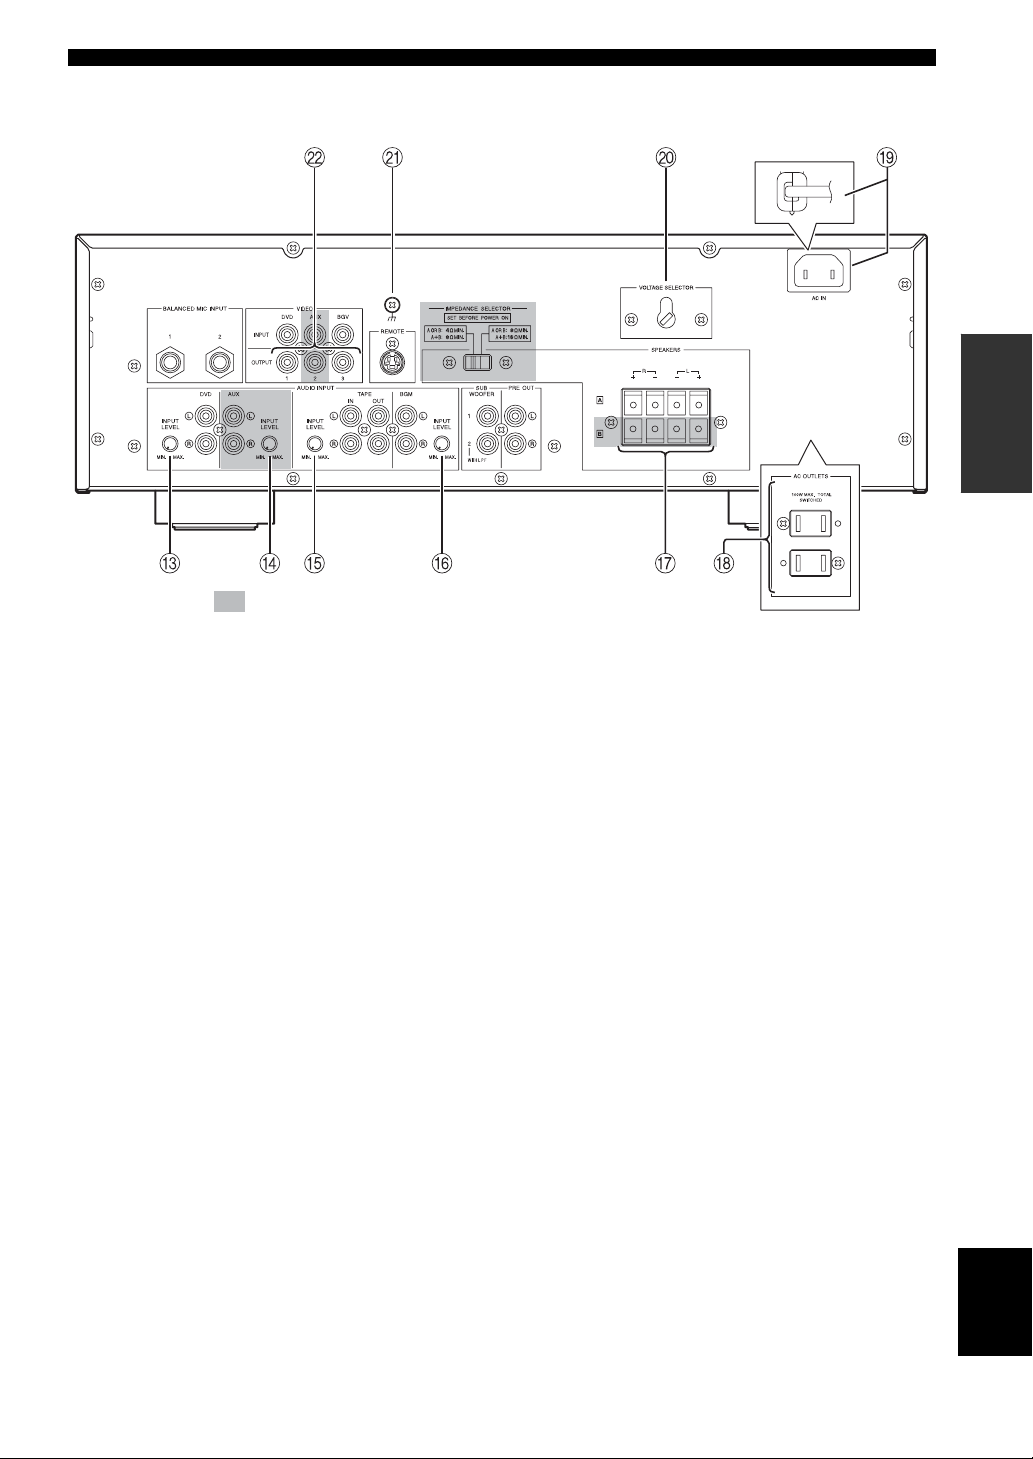
NAMES OF PARTS AND THEIR FUNCTIONS
PREPARATION
C DVD INPUT LEVEL
Adjust the balance of the DVD input level with respect to
other inputs (AUX*, TAPE, BGM).
D AUX INPUT LEVEL*
Adjust the balance of the AUX input level with respect to
other inputs (DVD, TAPE, BGM).
E TAPE INPUT LEVEL
Adjust the balance of the TAPE input level with respect to
other inputs (DVD, AUX*, BGM).
F BGM INPUT LEVEL
Adjust the balance of the BGM input level with respect to
other inputs (DVD, AUX*, TAPE).
G SPEAKERS (Speaker system terminal(s))
Connect to the speaker system(s).
For KMA-500, only one speaker system is available.
H AC OUTLETS (Max. total power consumption:
100 W. U.S.A. model only)
Refer to “AC OUTLETS” on page 9.
I AC IN (Except U.S.A. model)
Refer to “AC IN” on page 9.
Power cable (U.S.A. model only)
Plug this cable into an AC wall outlet.
J VOLTAGE SELECTOR (Except U.S.A. model)
Refer to “VOLTAGE SELECTOR” on page 9.
K Signal ground terminal
Connect this terminal if a humming noise is emitted when
connecting this amplifier.
L VIDEO OUTPUT jacks
Connect to the video input of the monitor.
* KMA-700 only
English
5 En
Page 10
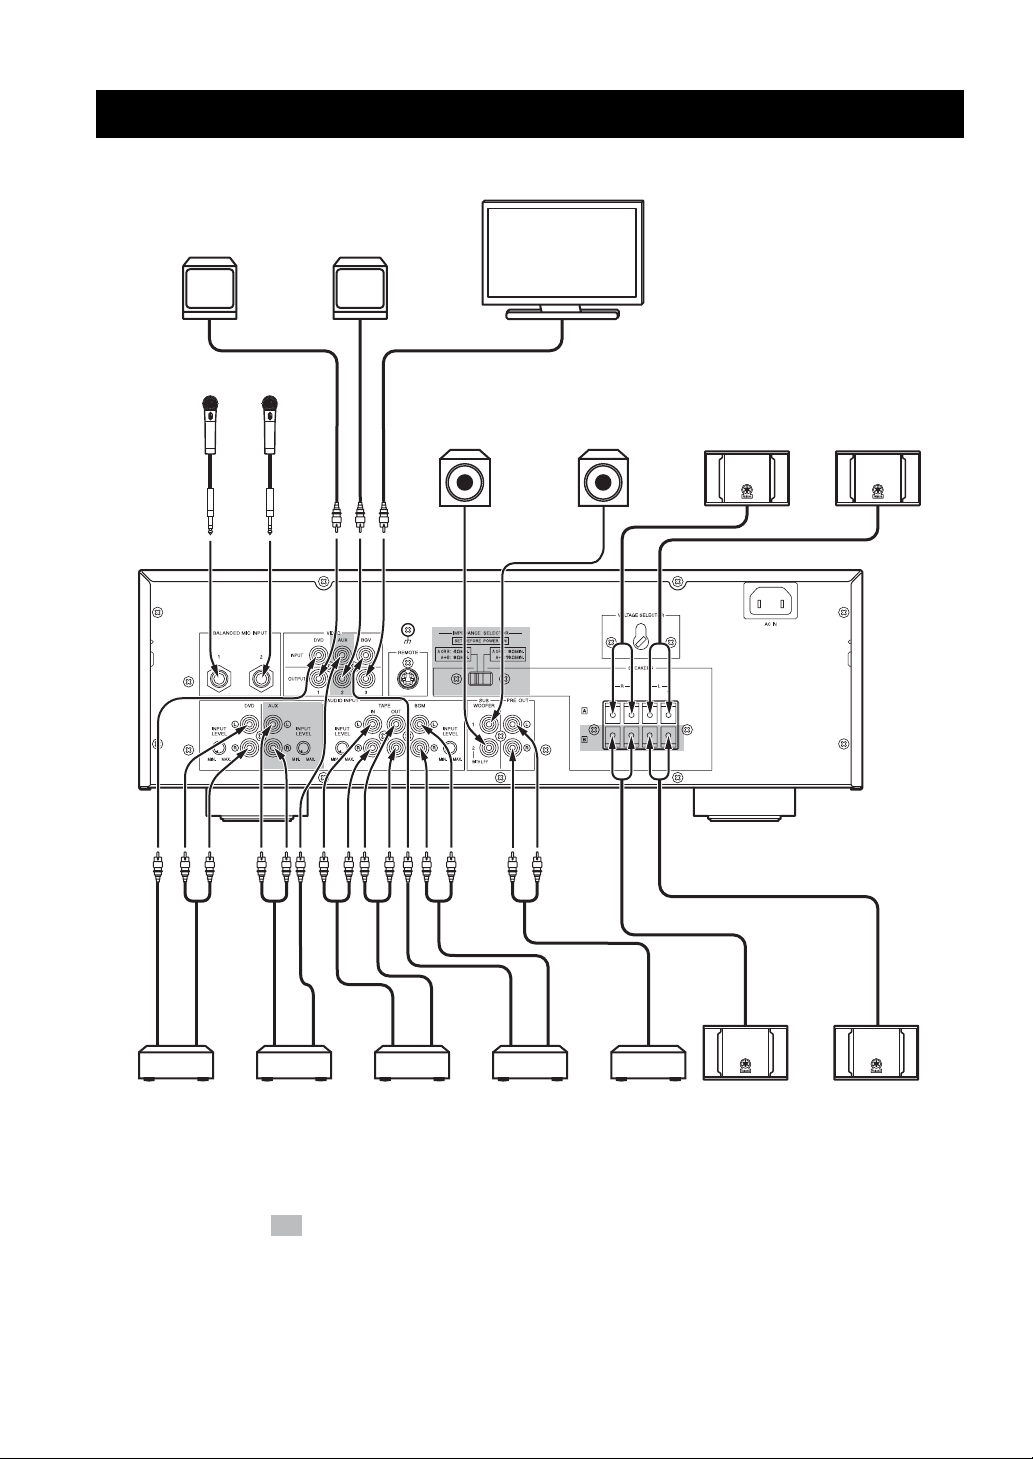
OPERATION
SYSTEM CONNECTIONS
Monitor TV
Monitor TV
MIC
MIC
Monitor TV
System 2
Active subwoofer
System 1
Active subwoofer
(With lowpass filter)
System A
Right Left
KARAOKE/
DVD player
The shaded part ( ) is provided for KMA-700 only.
VTR/LD
player
(KMA-700
only)
TAPE
recorder
Background
music/video
player
Power
amplifier
(Asia model)
Right Left
System B
(KMA-700 only)
6 En
Page 11
CONNECTIONS
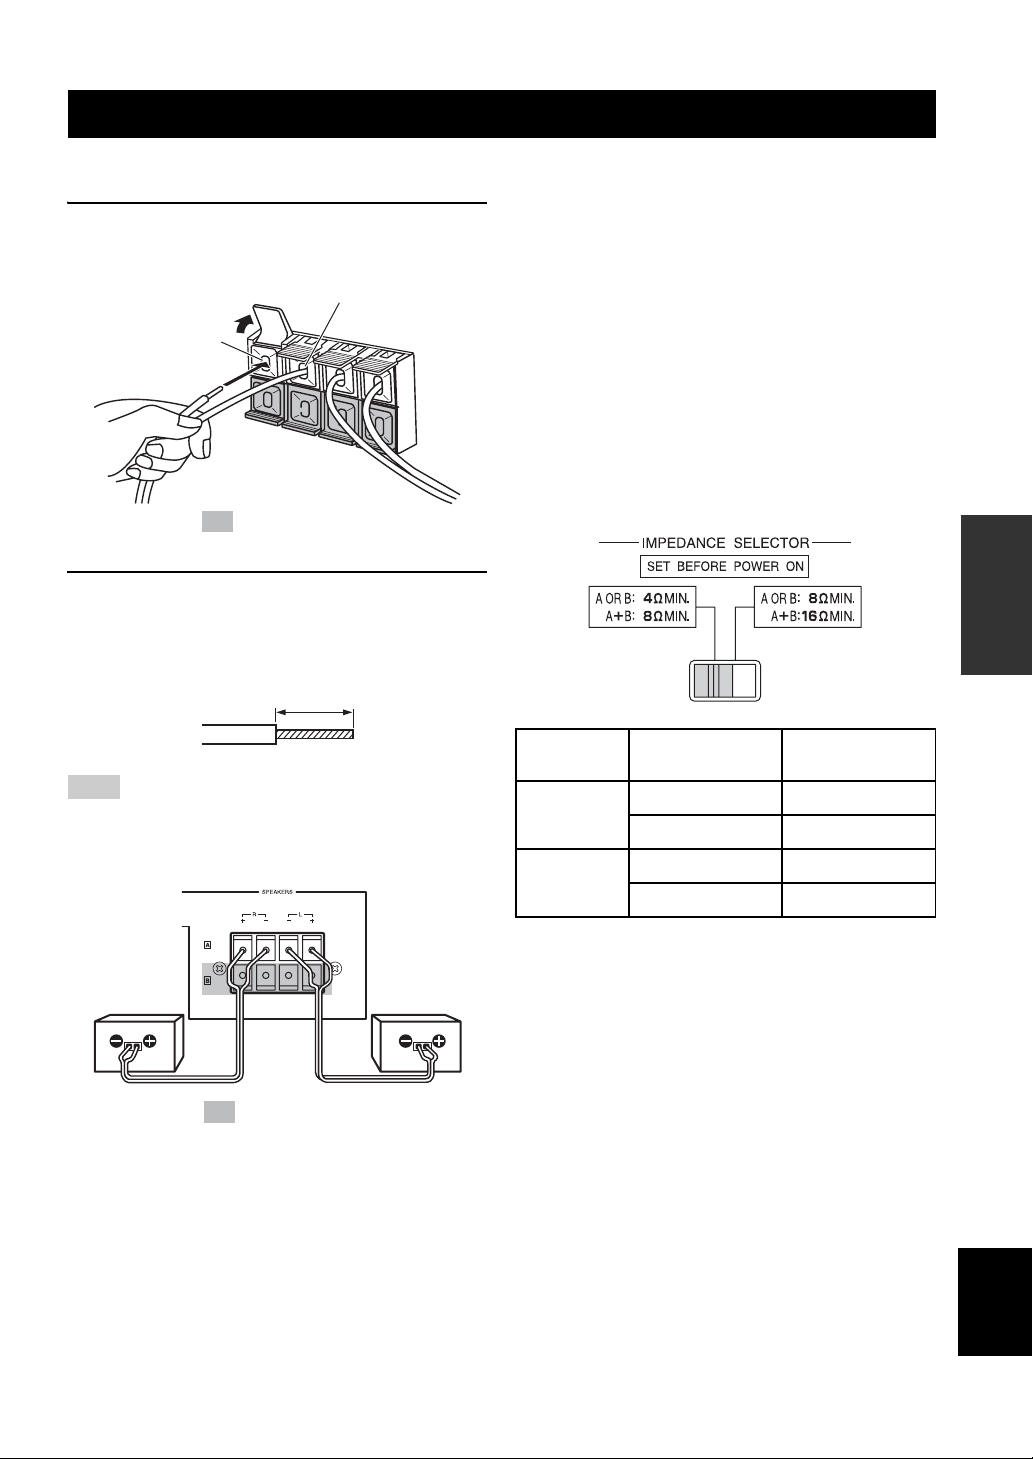
■ Connecting speaker cords
1 Pull the lever up to open, then insert the
conductor wire into the hole.
(–) cord to (–) terminal
(+) cord to
(+) terminal
The shaded part ( ) is provided for KMA-700 only.
2 Close the lever to secure the conductor wire.
Before connection, strip a section of coating 15 mm
(9/16”) in length from the end of each cord using a
tool such as pliers.
15 mm (9/16”)
Note
Be careful that the cord conductors projected from a terminal do
not contact with another cord. Contact from the conductors of
different speaker cords may cause damage to the system.
■ Important precautions for speaker
connection
• The maximum outputs of this unit are as follows:
KMA-700..................................................120 W + 120 W
KMA-500..................................................100 W + 100 W
Accordingly, the maximum input power of the speakers
used must exceed the above.
• Use Yamaha speakers to prevent any trouble or
damage caused by mismatching.
[For KMA-700]
IMPEDANCE SELECTOR
• Before turning on this unit, be sure to set
IMPEDANCE SELECTOR on the rear panel to the
position whose requirements your speaker system
meets.
(Low) (High)
Switch
position
Low
High
If your system
uses:
One speaker system
Two speaker systems
One speaker system
Two speaker systems
Speaker
impedance level
4
Ω or higher
8
Ω or higher
Ω or higher
8
Ω or higher
16
OPERATION
Right
speaker
The shaded part ( ) is provided for KMA-700 only.
Left
speaker
• Do not change IMPEDANCE SELECTOR setting
while the power to this unit is on, otherwise this unit
may be damaged.
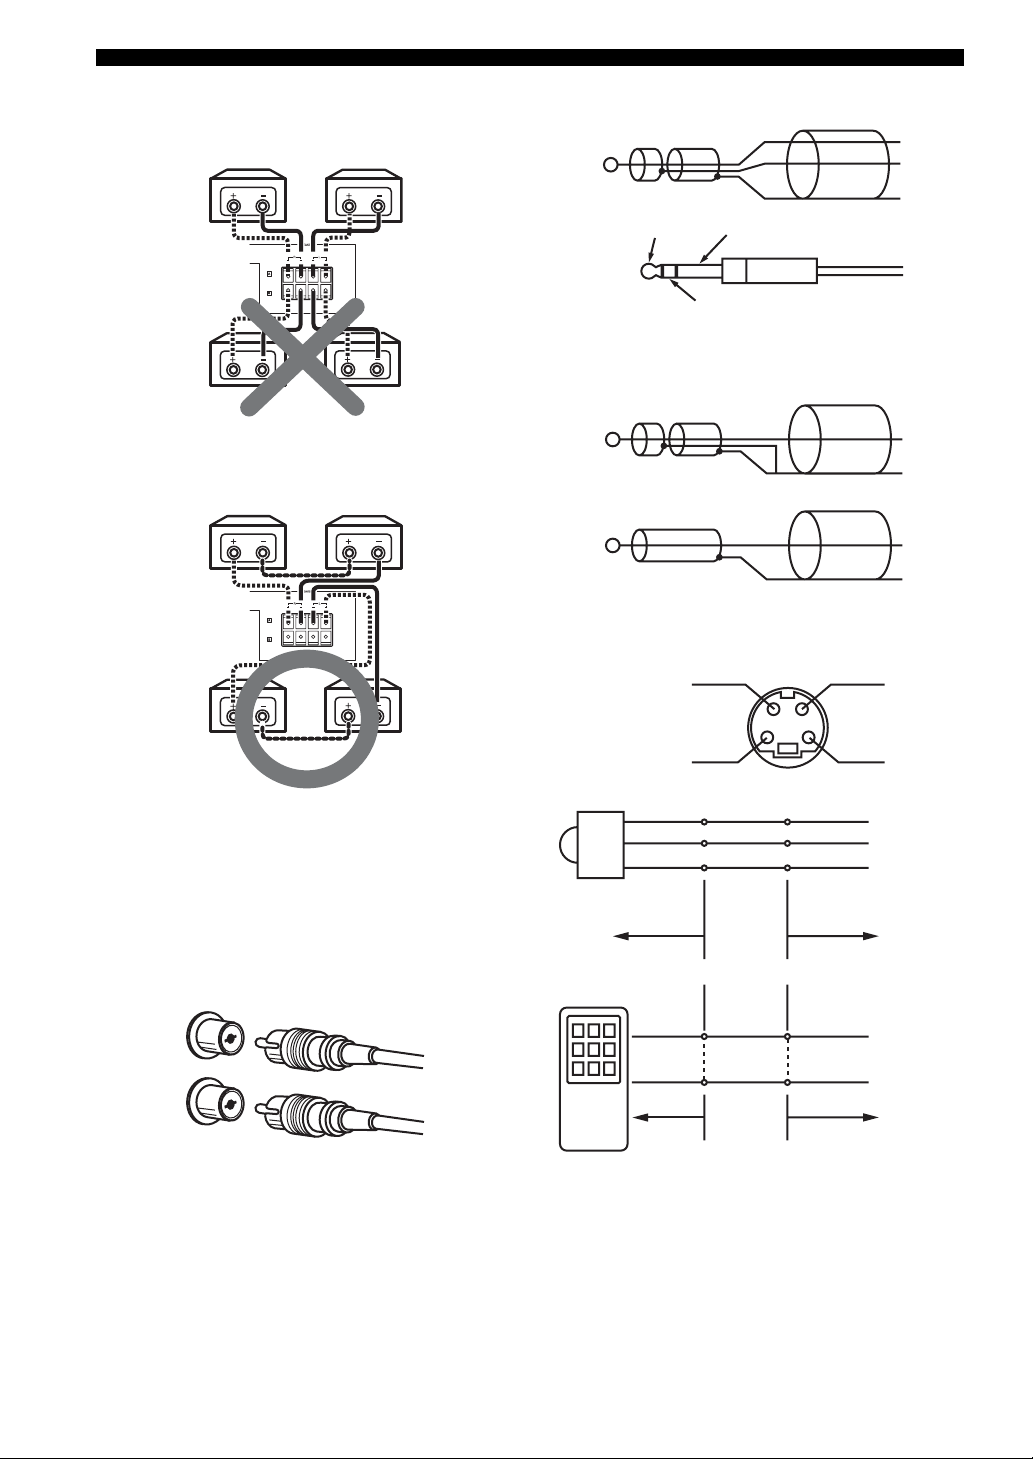
Connection examples
The minimum speaker impedance is 4 Ω. If two 6 Ω
speaker systems are connected in parallel, this will exceed
the design value and trigger a safety protector device.
When two speaker systems are used and the protector is
frequently activated, the speaker systems should be
connected serially instead.
English
7 En
Page 12
CONNECTIONS
1. Parallel connection
(each speaker should be 8 Ω or more)
6 Ω 6 Ω
6 Ω + 6 Ω ➝ 3 Ω
(<4 Ω : NG)
2. Series connection
(total: over 4 Ω is available)
6 Ω 6 Ω
6 Ω + 6 Ω = 12 Ω
(>4 Ω : OK)
■ Connecting to the balanced input
HOT
COLD
GND
HOT
GND
COLD
■ Connecting to the unbalanced input
HOT
GND
or
HOT
GND
■ Connecting an external remote control
[For KMA-500]
The speaker impedance must be between 8 Ω to 16 Ω.
■ Connecting the RCA pin plugs
When connecting RCA pin plugs, be sure to insert the red
plug into the red jack and the white plug into the white
jack.
White
Left
White
Right
Red
Red
REMOTE
(Direct)
REMOTE
+5V
OUT
GND
External remote control
satellite
RMC KMA-700/
RMC KMA-700/
GND
+5V_OUT
+5V_OUT
REMOTE
GND
KMA-500
REMOTE (Direct)
GND
KMA-500
8 En
Page 13
CONNECTIONS
1. External remote control satellite
Connect to +5V_OUT, REMOTE and GND.
Note
By connecting the remote control satellite to this input, this unit
can receive the signal of the remote control.
2. REMOTE (Direct)
Connect to REMOTE (Direct) and GND.
Connect to the infrared diode output (open collector) of
RMC.
Note
By connecting the REMOTE (Direct) to this input, this unit can
receive the signal of the REMOTE.
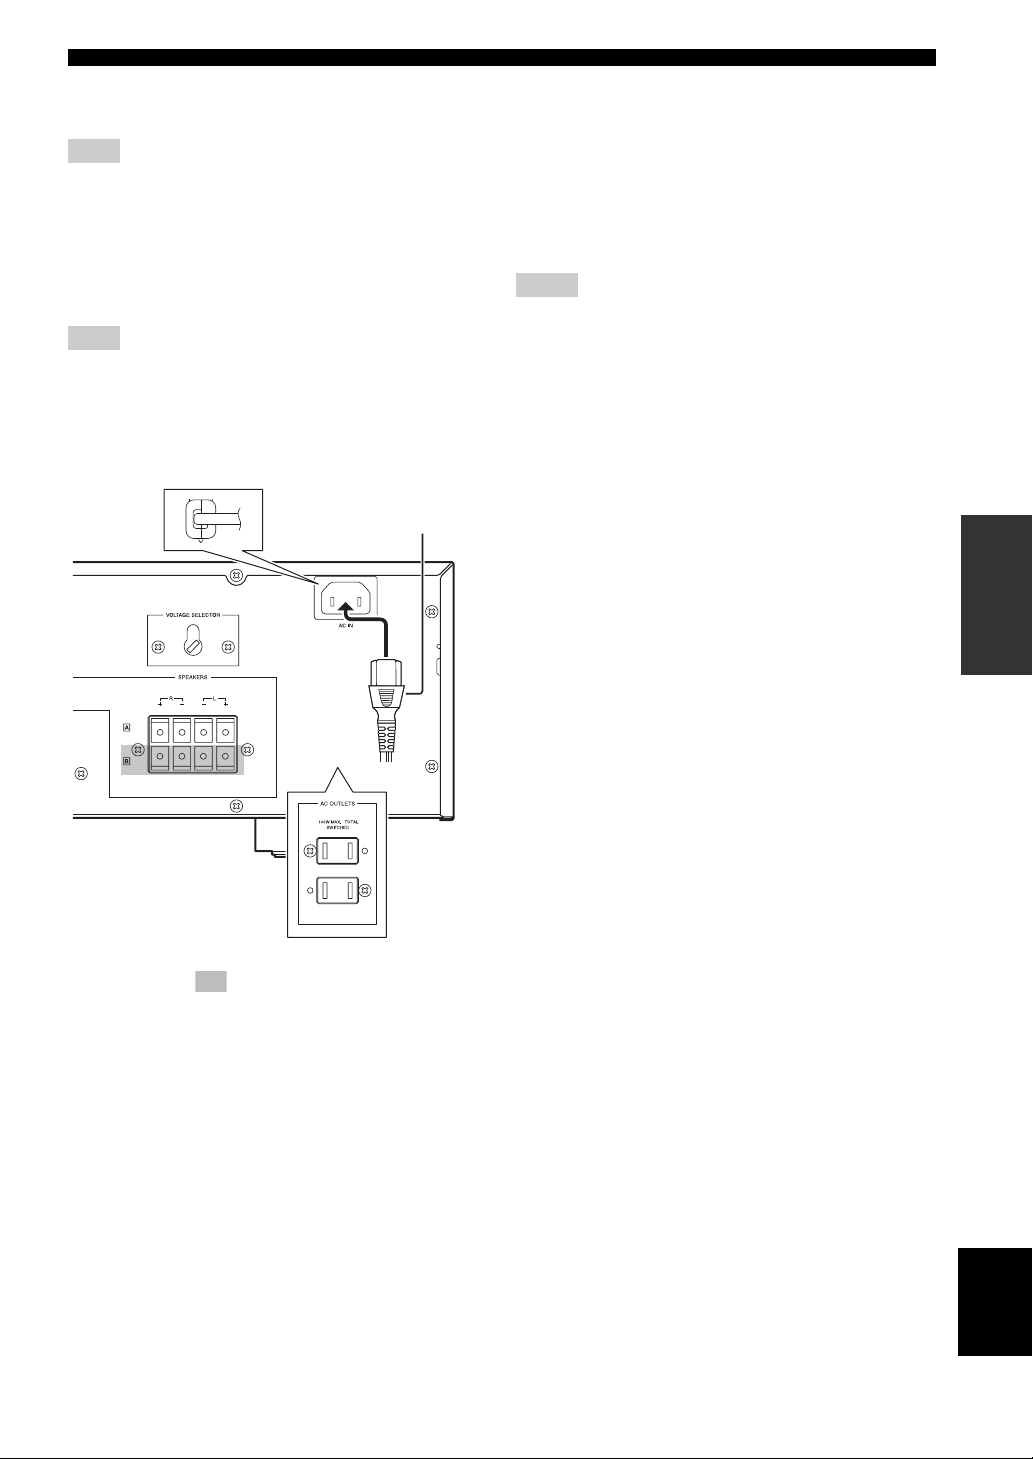
■ Power related switch and connections
on the rear panel
Supplied power cable
(Except U.S.A. model)
AC OUTLETS
(SWITCHED. U.S.A. model only)
Use these outlets to connect the power cables from your
other components to this unit. The power to AC
OUTLETS is controlled by POWER on the front panel of
this unit. The outlets supply power to any connected
component whenever the power of this unit is turned on.
Total power consumption is 100 W.
Notes
• Be careful that the total power consumption does not exceed the
wattage marked on the rear panel. Do not connect appliances
other than system components to the power outlets of this unit.
• Do not connect a TV set to this unit; even if it indicates a power
consumption value below the permissible value when the TV
power is turned on.
OPERATION
(Asia model)
The shaded part ( ) is provided for KMA-700 only.
The parts in the sub illustrations are provided for U.S.A.
model only.
AC IN
(Except U.S.A. model)
Connect the supplied power cable to AC IN.
Power cable
Plug the power cable into the AC wall outlet after all other
connections are complete.
VOLTAGE SELECTOR
(Except U.S.A. model)
VOLTAGE SELECTOR on the rear panel of this unit
must be set for your local main voltage BEFORE plugging
the power cable into the AC wall outlet.
English
9 En
Page 14
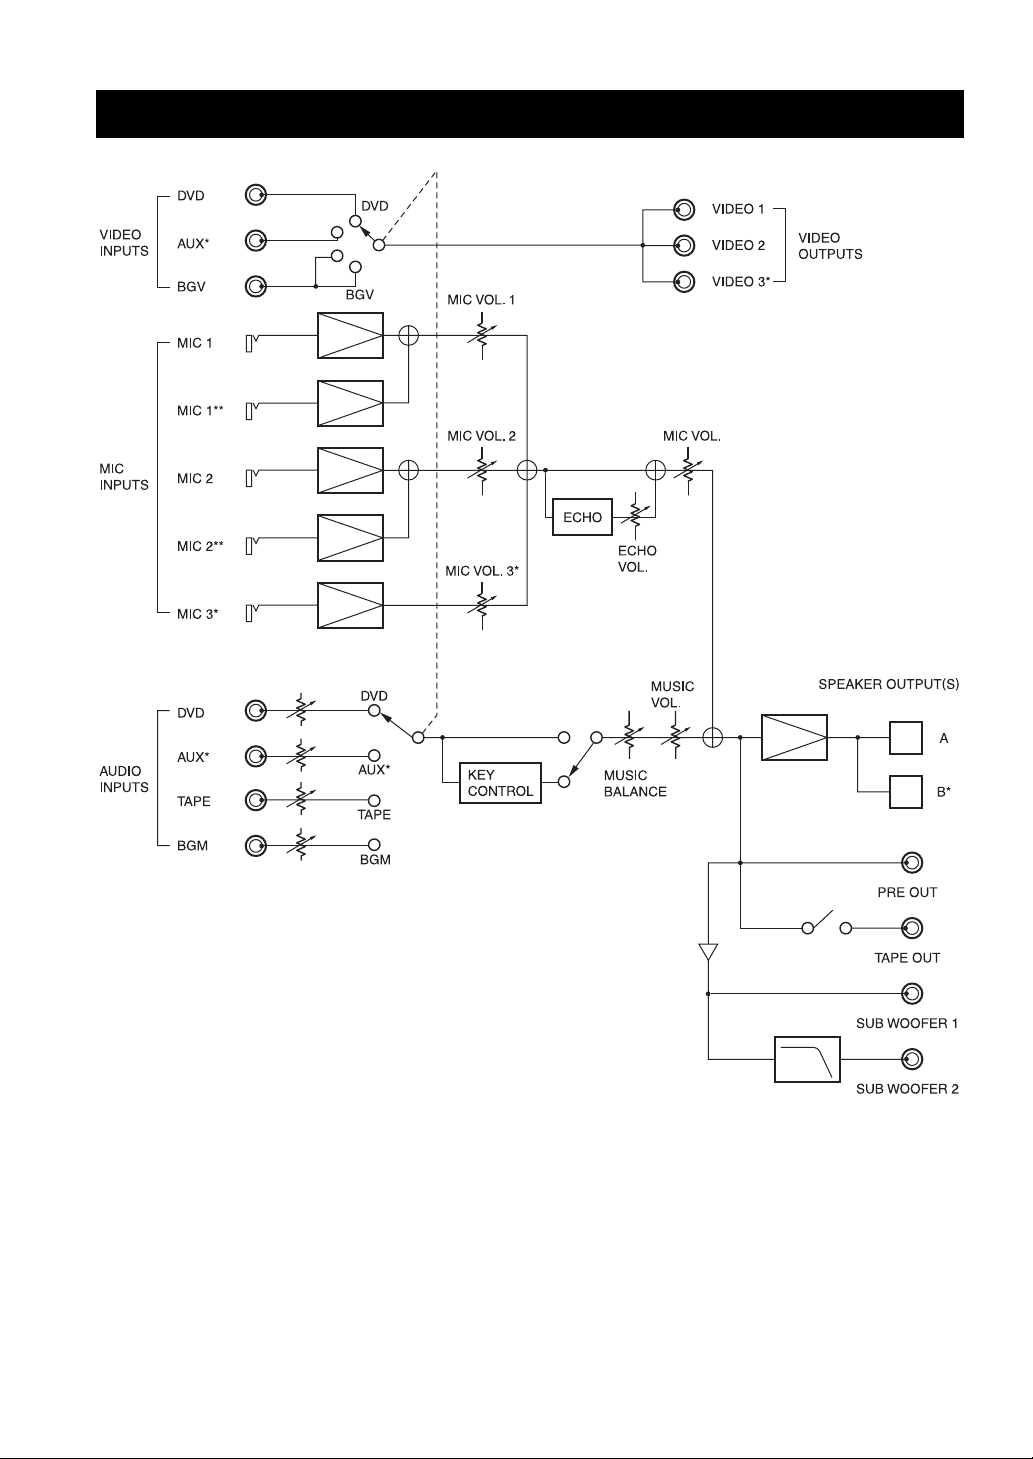
CONFIGURATION DIAGRAM
* KMA-700 only
** Balanced input, on the rear panel
10 En
Page 15
REMOTE CONTROL
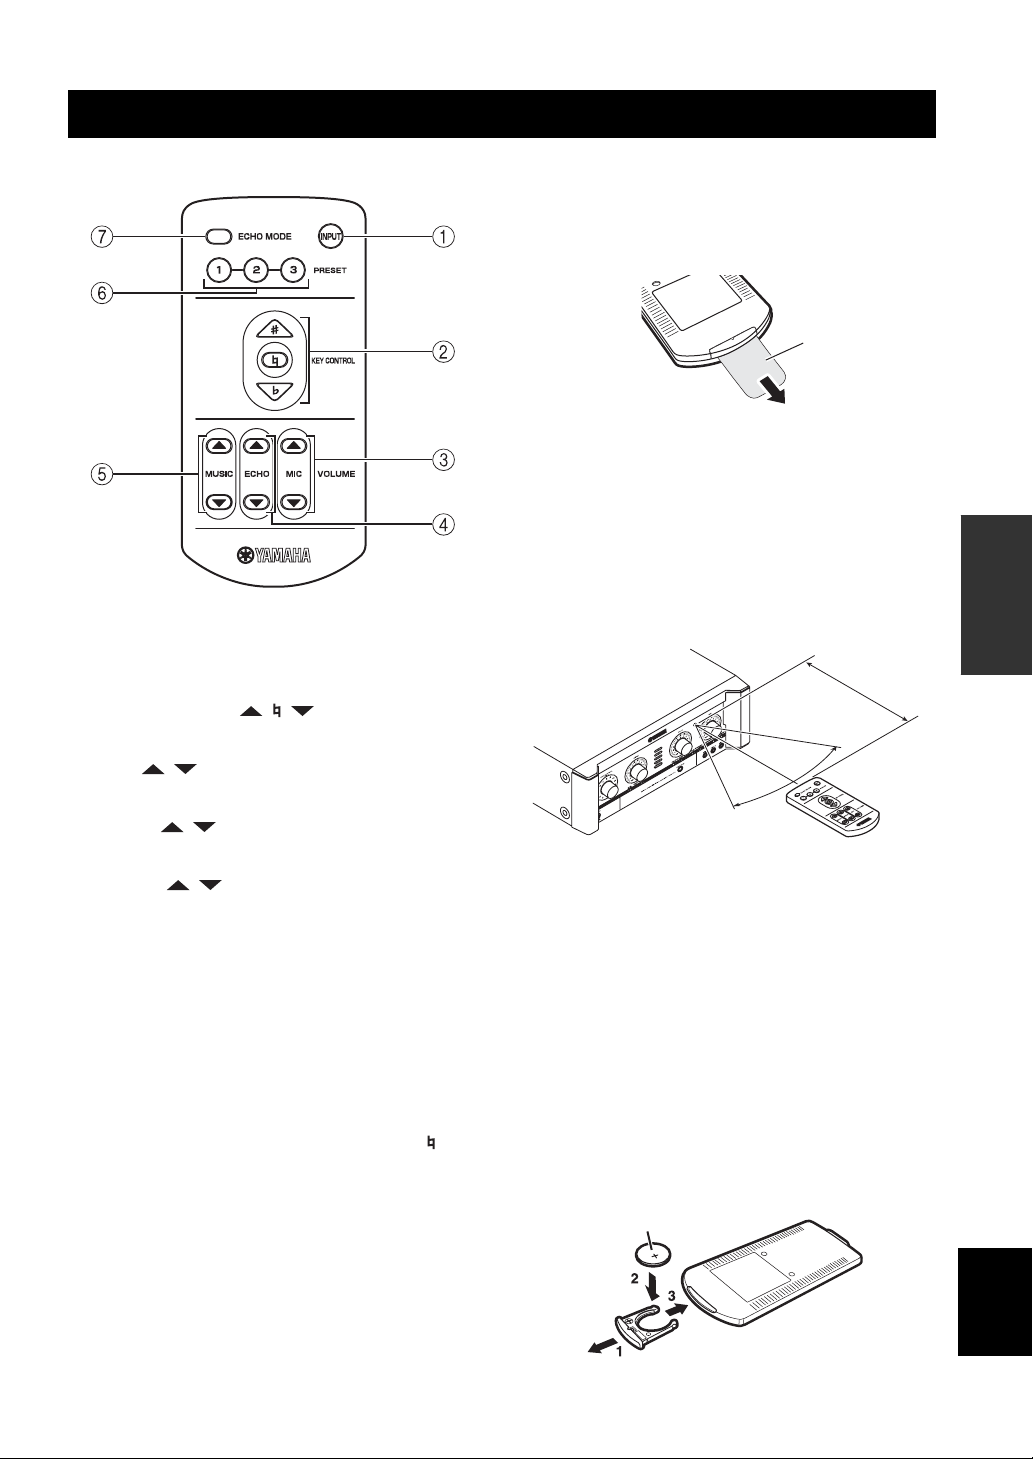
■ Names of parts and their functions
1 INPUT
INPUT is not available in default setting.
To activate INPUT, refer to “Input mode” on page 14.
2 KEY CONTROL ( / / )
Transpose the key of the played music.
3 MIC ( / )*
Adjust the overall volume of the microphones.
4 ECHO ( / )*
Adjust the amount of echo.
5 MUSIC ( / )*
Adjust the music volume.
* The LED on the corresponding control on the front panel blinks
during adjustment.
6 PRESET (1/2/3)
Recall saved preset settings for MIC volume/ECHO
amount/MUSIC volume/ECHO MODE.
To save current settings of the above, press the desired
button (PRESET 1, 2, 3 or KEY CONTROL on the front
panel) for 3 seconds. Pressing KEY CONTROL saves
settings to PRESET 1. When save is completed, “ ” on
the KEY CONTROL blinks once. You can save up to 3
presets (PRESET 1/2/3) on this unit. Refer to “Power ON
recall” on page 14.
7 ECHO MODE
Select NORMAL, WIDE or SPACIOUS (KMA-700 only)
echo.
■ Preparing the remote control
The remote control comes with the battery already
installed. Before using the remote control for the very first
time, pull out the plastic tab, as shown.
Plastic tab
For information on replacing the battery, refer to next
section.
■ Operation of remote control
1. Remote control
The distance between the remote control and the remote
sensor of this unit should be within 6 m (20’). Be sure to
aim the remote control directly at the remote sensor on the
front panel.
Within 6 m
(20’)
30°
30°
2. Loading a battery
The life of the battery used in the remote control is about
half a year under normal use. Remove the battery if the
remote control is not used for an extended period. When
the battery becomes weak, replace with a new CR2025
battery.
To replace the battery:
1. Using a small screwdriver, carefully slide out the
battery holder.
2. Remove the expired battery, and place the new
CR2025 battery onto the battery holder with the + side
facing up.
3. Slide the battery holder into the remote control, and
push it so that it clicks shut.
+ side up
OPERATION
English
11 En
Page 16
REMOTE CONTROL
Improper use of batteries may cause a risk of battery
leakage and explosion.
Adhere to the following guidelines:
• Do not attempt to recharge the old battery.
• Insert a battery so that the positive (+) and negative (–)
poles are positioned as shown.
• Even if the shapes are the same, the voltage of batteries
may vary depending on the models. Be careful not to
use different model of battery.
• Dispose of the old battery in accordance with local
regulations.
Information for Users on Collection and
Disposal of Old Equipment and Used
Batteries
These symbols on the products,
packaging, and/or accompanying
documents mean that used electrical and
electronic products and batteries should
not be mixed with general household
waste.
For proper treatment, recovery and
recycling of old products and used
batteries, please take them to applicable
collection points, in accordance with your
national legislation and the Directives
2002/96/EC and 2006/66/EC.
By disposing of these products and
batteries correctly, you will help to save
valuable resources and prevent any
potential negative effects on human
health and the environment which could
otherwise arise from inappropriate waste
handling.
For more information about collection
and recycling of old products and
batteries, please contact your local
municipality, your waste disposal service
or the point of sale where you purchased
the items.
[Information on Disposal in other
Countries outside the European
Union]
These symbols are only valid in the
European Union. If you wish to discard
these items, please contact your local
authorities or dealer and ask for the
correct method of disposal.
Note for the battery symbol
(bottom two symbol examples):
This symbol might be used in
combination with a chemical symbol. In
this case it complies with the requirement
set by the Directive for the chemical
involved.
12 En
Page 17
GENERAL OPERATION
The shaded part ( ) is provided for KMA-700 only.
OPERATION
1 Connect the required number of
microphones.
2 Set the POWER switches of this unit and
other required components to ON.
3 Play the KARAOKE music source
component, and adjust the volume by
rotating MUSIC.
The music source is selected automatically in default
setting. To set the conditions for selection, refer to
“Auto input condition” on page 14. To select the
music source manually, refer to “Input mode” on
page 14.
4 Adjust the microphone volume by rotating
MIC.
When different microphone volumes are not
balanced, adjust MIC VOL using a flathead
screwdriver.
5 Adjust the ECHO amount by rotating ECHO.
6 Adjust the key by rotating KEY CONTROL.
■ Notes for the proper use of microphones
• Sing into the microphone by holding it at a distance of 5 to
10 cm (2 to 3-15/16”) from your mouth.
• To ensure clear sound, grasp the microphone below the mic
head.
• Do not block the lower part of the windscreen. This will disturb
proper voice reproduction with unclear bass. Howling also
tends to occur in such cases.
5 to 10 cm (2 to 3-15/16”)
away from your mouth.
Grasp the microphone below
the head.
English
13 En
Page 18
SETUP MODE
You can set the following menu in Setup mode:
• Power ON recall
• Input mode
• Auto input condition
•Enable remote
• Remote mode
• MIC/MUSIC max level
• MIC/MUSIC volume select
• Initializing
To set each menu above, set the corresponding controls as
shown in the “Setup mode table” on page 15 according to
the following procedure.
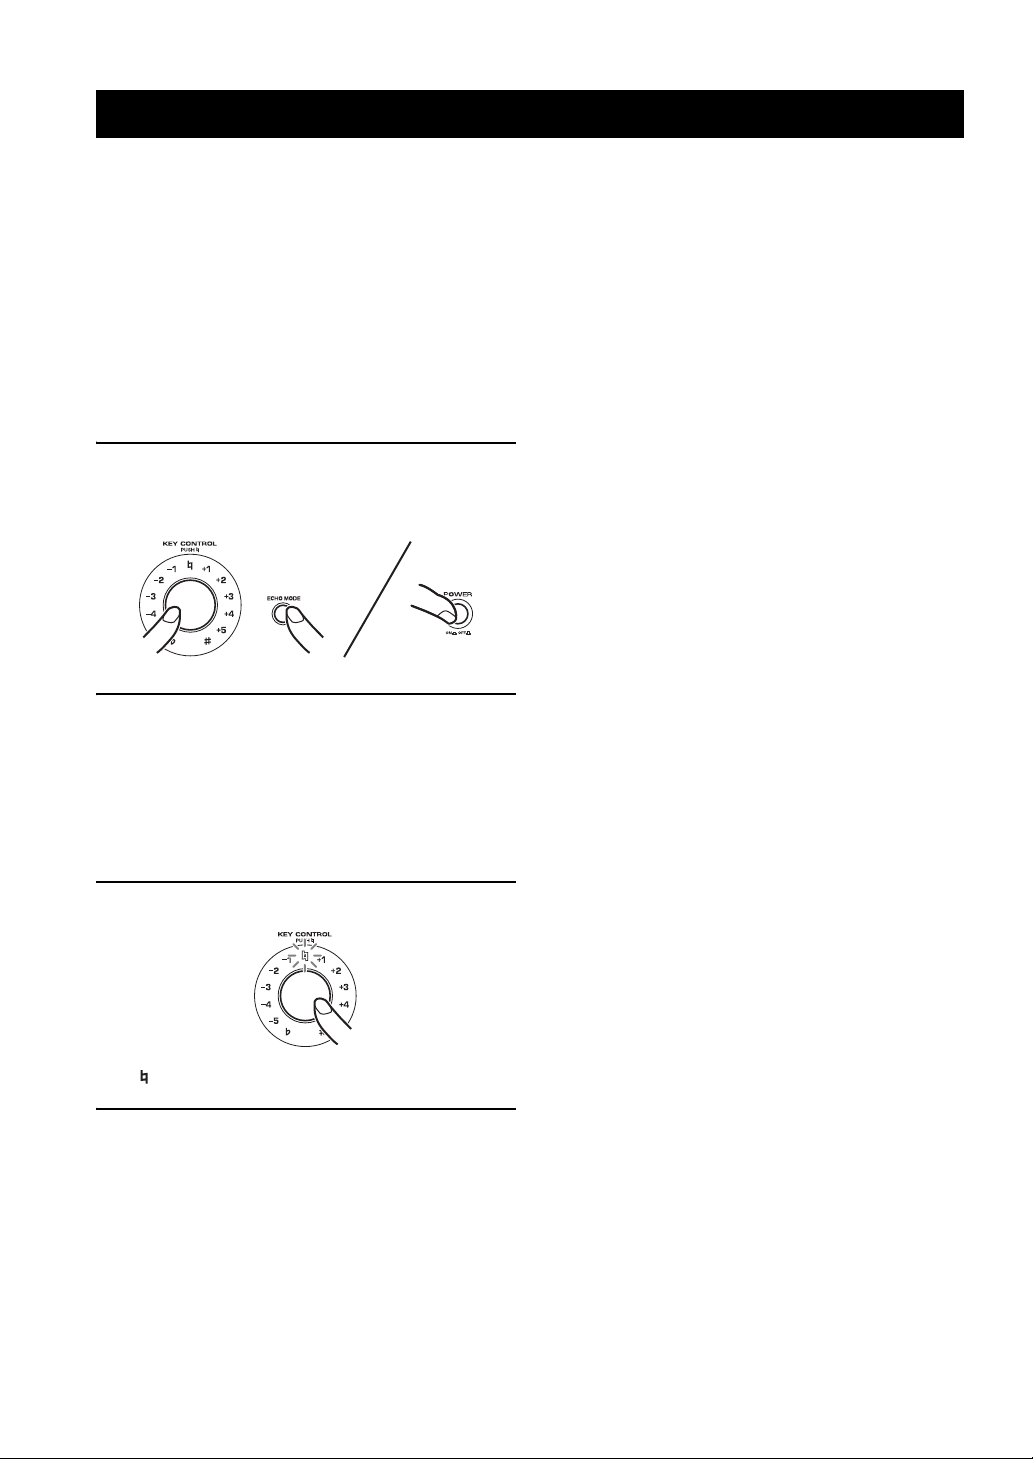
1 To enter Setup mode, turn off the main unit
and press POWER while pressing KEY
CONTROL and ECHO MODE.
2 Set KEY CONTROL and MUSIC according to
the “Setup mode table” on page 15 to set
desired menus and items.
For Auto input condition, select the desired source
before selecting the item.
Set all settings you want to change before moving to
step 3.
3 Press KEY CONTROL to enter the settings.
“ ” blinks once when the settings are entered.
4 To terminate Setup mode, turn off the main
unit.
■ Menus in Setup mode
1. Power ON recall
Select Last memory or Preset, to recall the settings of MIC
volume/ECHO amount/MUSIC volume/ECHO MODE
when the unit is turned on.
Last memory*: The settings when the unit was turned off
last are recalled.
Preset: The settings saved to PRESET 1 are recalled.
2. Input mode
Set Input mode to Auto or Manual.
Auto*: The input source is set automatically.
Manual: The input source is selected by INPUT.
Source is selected in order of DVD, AUX**, TAPE,
BGM.
3. Auto input condition
Set the conditions for each source (DVD, AUX** and
TAPE) for Auto Input mode described in 2.
Audio*: The source is switched based on audio signal.
Video: The source is switched based on video signal.
Audio/Video: The source is switched based on audio or
video signal.
For only this menu, select desired source by INPUT
before selecting the desired item.
4. Enable remote
Enable or disable remote control.
Enable*: The remote control is enabled.
Disable: The remote control is disabled.
5. Remote mode
Set the light receiving device.
Front&Ext.*: Both the front panel and external remote
control satellite receive the signal from the remote control.
Front: Only the front panel receives the signal.
Ext.: Only the external remote control satellite receives
the signal.
6. MIC/MUSIC max level
Set the maximum volume of MIC and MUSIC.
10*: No setting.
9 to 3: The maximum volume is set to the level indicated
(2 to 0 cannot be set).
7. MIC/MUSIC volume select
Select how MIC and MUSIC volumes increase/decrease
(i.e., the volume curve) when the controls are turned.
Pattern 1*: Steep curve
Pattern 2: Less steep curve
Pattern 3: Least steep curve, and is most suitable for fine
adjustment.
8. Initializing
Reset all the settings set in Setup mode to the defaults.
Cancel: Initializing is not executed.
Initialize: Initializing is executed.
When pressing KEY CONTROL with MUSIC set to 3,
Initializing is executed.
* Default setting
** KMA-700 only
14 En
Page 19

■ Setup mode table
Menu KEY CONTROL Items/MUSIC
1. Power ON recall
SETUP MODE
+1 Last memory: 1 Preset: 2
2. Input mode
3. Auto input condition
4. Enable remote
5. Remote mode
+2 Auto: 1 Manual: 2
+3
Select desired source
by INPUT.
Example: DVD
Audio: 1 Video: 2 Audio/Video: 3
+4 Enable: 1 Disable: 2
+5 Front&Ext.: 1 Front: 2 Ext.: 3
OPERATION
6. MIC/MUSIC max
level
7. MIC/MUSIC volume
select
8. Initializing
–1
–2
–5
No setting: 10 Set to the indicated level: 9 to 3
Example: 3
Pattern 1: 1 Pattern 2: 2 Pattern 3: 3
Cancel: 1 Initialize: 3
English
15 En
Page 20
ADDITIONAL INFORMATION
TROUBLESHOOTING
If problems should occur, check the following table for simple remedies.
If the problem still cannot be solved, please consult your dealer.
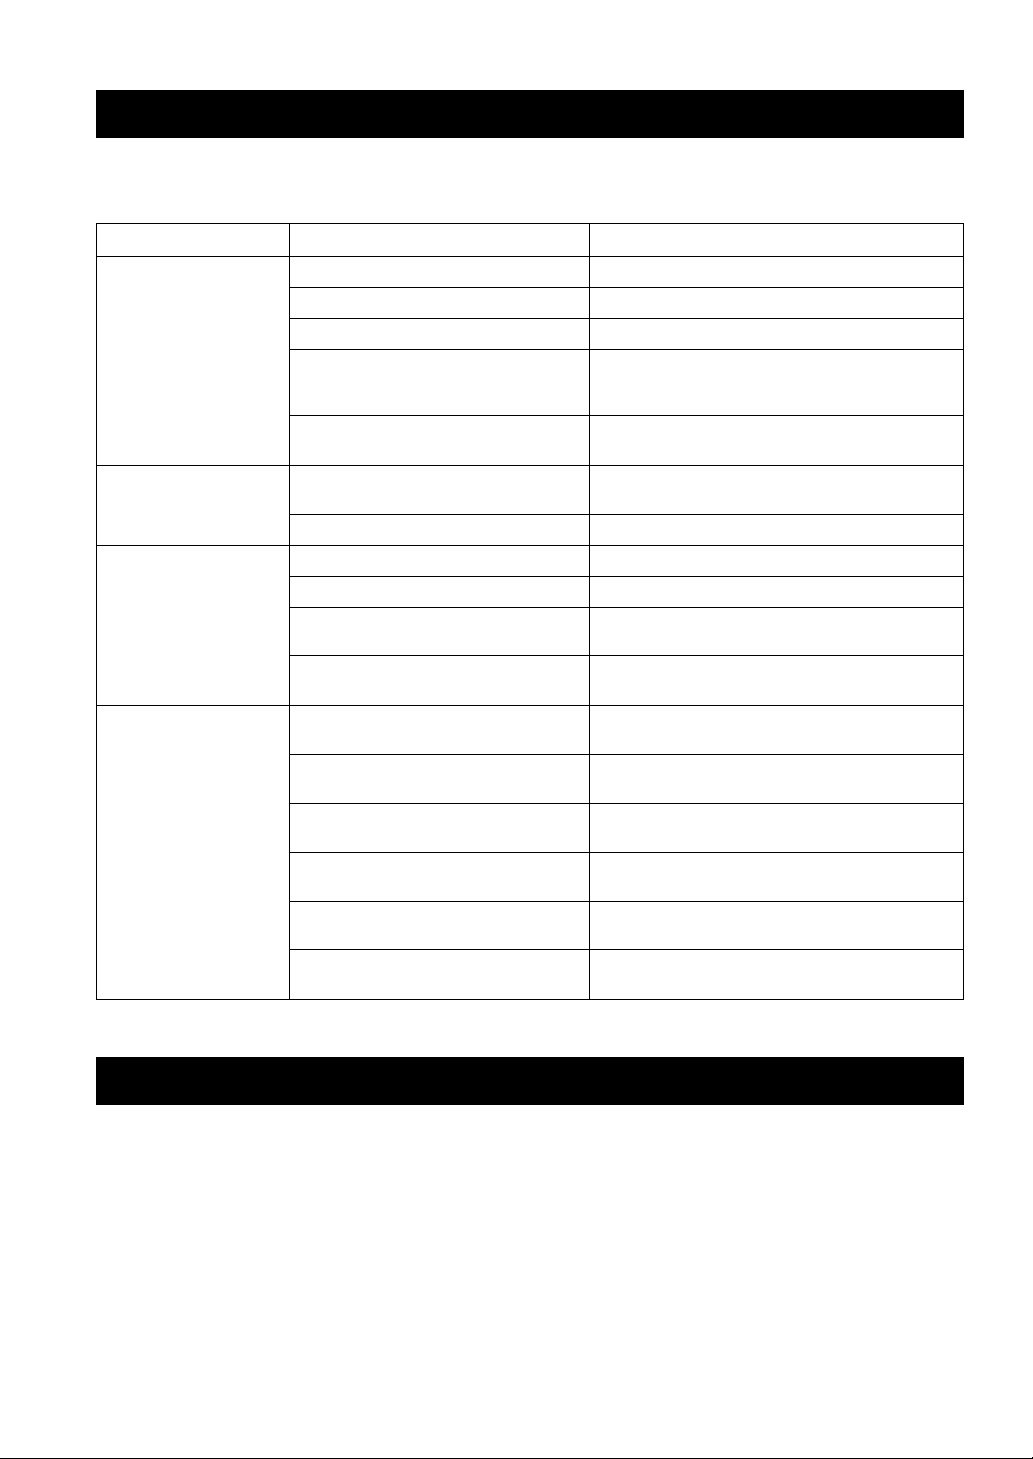
Problems Possible causes Solutions
No speaker sound is
output at all.
No sound is output from
one of the speakers.
No microphone sound is
output.
The remote control does
not work, or does not
function properly.
POWER is set to OFF. Set POWER to ON.
The power cable is unplugged. Plug the power cable securely into the AC wall outlet.
MUSIC is in the lowest position. Adjust MUSIC.
The wrong music source is selected when
Input mode is set to Manual in Setup mode.
The sound is cut off due to a temperature rise
in the unit.
MUSIC BALANCE is turned fully to one
speaker.
One of the speaker cords is disconnected. Insert the cord securely into the terminals.
The microphone plug is not fully inserted. Insert the plug securely into the jack.
The switch on the microphone is set to OFF. Set the switch on the microphone to ON.
The corresponding MIC VOL or MIC controls
are in the minimum position.
The microphone is too far from your mouth, or
the microphone handling is incorrect.
The remote control is too far away or tilted too
much.
Direct sunlight or lighting is striking the
remote control sensor of this unit.
Enable remote is set to Disable in Setup mode. Set Enable remote to Enable in Setup mode. Refer to
The wrong Remote mode is set in Setup mode. Set the correct Remote mode in Setup mode. Refer to
The battery is weak. Replace with a new CR2025 battery. Refer to “Loading a
When INPUT does not work, Input mode is set
to Auto.
Select the correct music source with INPUT or set Input
mode to Auto in Setup mode. Refer to “Input mode” on
page 14.
Turn the power off, then leave the unit alone for cooling.
Set the control to the center position.
Adjust the control.
Refer to the user’s manual supplied with your microphone.
The remote control will function within 6 m (20’) and no
more than 30 degrees off-center from the front panel.
Reposition this unit.
“Enable remote” on page 14.
“Remote mode” on page 14.
battery” on page 11.
Set Input mode to Manual in Setup mode. Refer to “Input
mode” on page 14.
MAINTENANCE
When the set gets dirty, wipe it with a soft, dry cloth.
Never use alcohol, thinner, benzene, insecticide or other volatile agents, for they may damage the surface paint or gloss
of the set.
Also do not wipe the set with a chemical cloth or leave it on the set for a long period, for the surface finish may
deteriorate or the paint may be stripped off.
16 En
Page 21
AFTER-SALES SERVICING
• If this unit is found to be defective, your local dealer
will repair or replace defective parts at charge on
request.
• Before requesting a repair from your local dealer, see
the “TROUBLESHOOTING” for possible remedies.
KARAOKE ETIQUETTE
The KARAOKE performance you enjoy may be disturbing to others. When performing
KARAOKE, be sure to consider your neighbors.
You can control the volume of KARAOKE. Remember that even small sounds travel easily
during quiet nights, so be especially careful during KARAOKE performances at night. We
recommend consideration for your neighbors by closing your windows.
COPYRIGHT
For the dealer:
If the customer requests after-sales service, please first
check the following points:
• Confirm the details of any accident.
• Check out all cables and connections.
• Confirm cautions regarding operation and instructions
on using the system with your customer.
If the unit is found to be defective and it is difficult to
repair, bring the defective unit to your nearest Yamaha
authorized service center.
INFORMATION
ADDITIONAL
• Broadcasting and music sources such as recorded music tapes, DVDs, video tapes, CDs and so on are strictly
protected under copyright law.
• You require permission from the copyright holder to use, distribute, or rent these music sources for commercial use,
or sell dubbed media to other people; except when enjoying these sources by yourself.
English
17 En
Page 22
SPECIFICATIONS
AMPLIFIER
• Maximum output
[KMA-700]
(1 kHz, 8 Ω, 10%THD)........................................ 120 W+120 W
[KMA-500]
(1 kHz, 8 Ω, 10%THD)........................................ 100 W+100 W
• Total harmonic distortion
[KMA-700]
(1 kHz, 93 W, 8 Ω)..................................................................1%
[KMA-500]
(1 kHz, 76 W, 8 Ω)..................................................................1%
• Audio input (Sensitivity/Impedance)
DVD, TAPE, AUX (KMA-700 only).................... 200 mV/42 k Ω
BGM.......................................................................200 mV/42 k Ω
MIC .........................................................................6.0 mV/20 k Ω
• Audio output (Output level/Output impedance)
PRE OUT ..................................................................1.0 V/1.2 k Ω
SUBWOOFER..........................................................2.0 V/1.2 k Ω
• Frequency response
MUSIC...........................................20 Hz to 15 kHz, +1.5/–0.5 dB
MIC ................................................40 Hz to 15 kHz, +1.0/–0.5 dB
• Tone control characteristics
MUSIC
BASS................................................................. ±12 dB (100 Hz)
TREBLE............................................................±12 dB (10 kHz)
MIC
BASS................................................................. ±12 dB (100 Hz)
MID.....................................................................±12 dB (1 kHz)
TREBLE............................................................±10 dB (10 kHz)
• Speaker impedance
[KMA-700]
(1 system only A or B)...........................4 Ω to 8 Ω /8 Ω to 16 Ω
(2-system operation A and B)...................................8 Ω to 16 Ω
[KMA-500]
(1 system only)..........................................................8 Ω to 16 Ω
• Key control range............................................... ±5 steps, ±2.5 tones
• Video input
(Sensitivity/Input impedance).....................................1 Vp-p/75 Ω
• Video output
(Output level/Impedance)............................................1 Vp-p/75 Ω
ACCESSORIES
• Owner’s manual................................................................................1
• Remote control .................................................................................1
• Power cable (Except U.S.A. model).................................................1
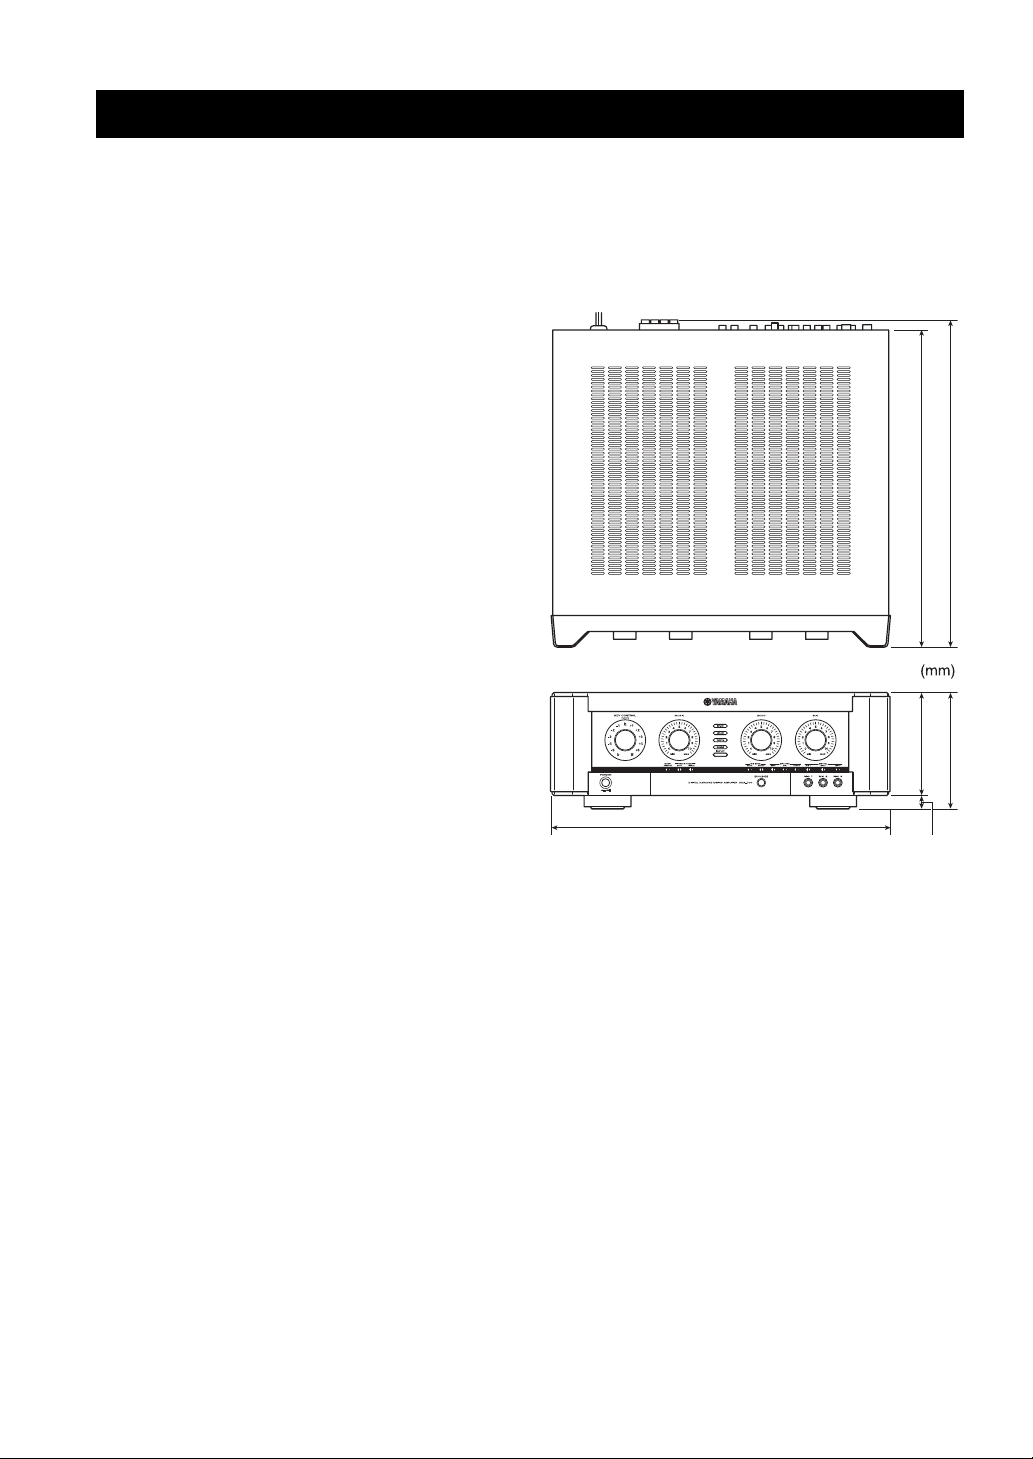
DIMENSIONS
416 (16-3/8”)
429 (16-7/8”)
132 (5-3/16”)
435 (17-1/8”)
Design and specifications are subject to change without notice.
150 (5-15/16”)
18 (11/16”)
POWER SUPPLY, ETC.
• Supply voltage
Asia and Other models ....... AC 110/120/220/230-240 V 50/60 Hz
U.S.A. model........................................................ AC 120 V 60 Hz
• Power consumption
[KMA-700]
(IEC 60065)....................................................................... 190 W
(Idling) ................................................................................ 25 W
[KMA-500]
(IEC 60065)....................................................................... 165 W
(Idling) ................................................................................ 25 W
• AC OUTLETS (U.S.A. model only)
SWITCHED (100 W max.)........................................................... 2
• Dimensions (W × H × D)...................435 mm × 150 mm × 416 mm
• Weight....................................................................................... 10 kg
(17-1/8” × 5-15/16” × 16-3/8”)
(22 lbs. 1 oz.)
18 En
Page 23

Page 24
警告:操作本机前请认真阅读
1 为了保证最佳的性能,请仔细阅读本手册。请妥善保管以
备日后查阅。
2 请将本音响系统安装在通风良好、阴凉、干燥、干净的位
置 - 远离直射阳光、热源、振动、灰尘、潮湿和 / 或寒
冷。请在本机的上方、左侧、右侧留出至少 10 cm 的通风
空间,背后留出至少 20 cm 的通风空间。
3 将本机远离其他电器,马达或变压器放置,以避免产生蜂
鸣噪声。
4 不要将本机突然从低温环境转移到高温环境,也不要将其
置于高湿场所(例如,放置有加湿器的房间),以防止机
器内部结露。结露可能导致触电,火灾,机器损坏甚至人
员伤害。
5 不要将本机放置于异物容易落入的场所,也不要放置在液
体飞溅的地方。在本机顶部,不要放置以下物品:
– 其他装置,因为它们可能损害本机或使本机的外表变
色。
– 易燃物品(比如,蜡烛等),因为它们会引起火灾,机
器损坏甚至人员伤害。
– 盛有液体的容器,因为其中的液体有可能倾倒进入本
机,使得用户触电或损坏本机。
6 不要使用报纸,桌布,窗帘等物遮盖本机,以免妨碍散
热。如果本机内部温度升高,会引起火灾,机器损坏甚至
人员伤害。
7 请在完成所有连接之后,再将本机插入交流电源插座。
8 不可将机器顶部与底部反向放置。这样会产生过热并损坏
机器。
9 不要对螺钉,旋钮,缆线等过度施力。
10 从交流电源插座上拔出电源线时,请抓住插头拔,不要拉
电线。
11 不要使用化学溶剂清洗本机。因为这样会损坏表层。请使
用干净的布匹。
12 只能使用本机指定电压。使用高于本机额定的电压会产生
危险,会引起火灾,机器损坏甚至人员伤害。因为使用非
指定电压电源造成的一切损害,Yamaha 将不负任何责任。
13 若要防止因闪电而损坏,请在雷雨时从交流电源插座或本
机上断开电源线的连接。
14 不要试图修理或改造本机。当需要维修时,请与有资格的
Yamaha 维修人员联系。没有任何理由打开机壳。
15 当计划长时间(比如,假期)不使用本机时,请将电源插
头从墙壁上的插座上拔下。
16 请将本机安装在电源插座附近,并且容易插拔 AC 电源插
头的地方。
17 在做出机器故障的结论之前,请务必参考通常操作的“故
障排除”一节。
18 移动本机之前,请按 POWER 开关关闭本机,然后拔掉交流
电源插座中的电源线。
19 电池不能置于高热环境,比如火或直射日光等。
20 当环绕温度突然改变时会形成冷凝。从插座上断开电源
线,然后将本机单独搁置。
21 长时间使用本机时,本机会变热。关闭电源,然后搁置本
机使其冷却。
22 VOLTAGE SELECTOR (美国型号除外)
将电源插头插入交流电源插座之前,必须将本机后面板上
的 VOLTAGE SELECTOR 设定为本地电源电压。
支脚
机架尺寸必须遵守下面的规定:
支脚
机架
12 本机上方、左侧和右侧的通风空间; 10 cm 以上
3 本机背后的通风空间; 20 cm 以上
4 请勿抓除支脚。
警告
为了减小火灾或电击的风险,不要将本机暴露在雨
中或潮湿的地方。
只要本机连接在交流电源插座上,即使用 POWER 开
关关闭本机,本机也不会与交流电源断开连接。
注意
如果电池更换不正确,可能会有爆炸危险。只能用
相同或相当类型的电池进行更换。
注意
未按照此处指定说明使用控制器或调节器,或者操
作步骤,可能会造成辐射暴露的危险。
i Zh
Page 25
目录
前言
使用注意事项 ............................. 2
连接前的准备 ............................. 2
准备
部件名称及其功能 .........................3
操作
系统连接 ................................. 6
连接 ..................................... 7
配置图 .................................. 10
遥控器 .................................. 11
一般操作 ................................ 13
设定模式 ................................ 14
附加信息
故障排除 ................................16
保养 ....................................16
售后服务 ................................17
卡拉 OK 礼仪 .............................17
版权 ....................................17
技术规格 ................................18
准备前言
操作
附加信息
10
○ : 表示该有毒有害物质在该部件所有均质材料中的含量均在 SJ/T 11363-2006 标准规定的限量要求以下。
× : 表示该有毒有害物质至少在该部件的某一均质材料中的含量超出 SJ/T 11363-2006 标准规定的限量要求。
该标记附加在出售到中华人民共和国的电子信息产品上。
环形中的数字表示的是环境保护使用期限的年数。
有毒有害物质或元素
部件名称
电路板
外壳箱体
前部面板显示器
铅
(Pb)
×
×
×
汞
(Hg)
镉
(Cd)
六价铬
(Cr(VI))
多溴联苯
(PBB)
多溴二苯醚
(PBDE)
○○○○○
○○○○○
○○○○○
1 Zh
中文
Page 26

前言
感谢您购买 Yamaha KMA-700/KMA-500 卡拉 OK 数码功放。
KMA-700 和 KMA-500 均适用本使用说明书。各机型独有功能的详细说明处注有型号名称。使用说明中主要使用
KMA-700 作为插图。
在使用本机之前,请务必通读本使用手册,以有效利用本机的所有功能。
阅读之后,请将本手册妥善保管,以备将来查阅。本手册对于理解卡拉 OK 数码功放和解决使用中出现的问题很
有帮助。
使用注意事项
■ 勿将本机设置在下列场所:
• 遭受直射阳光或附近有诸如取暖器之类的热源的地
方。
• 因通风差而不易散热的地方,或是非常潮湿、多尘
的场所。
• 斜面上或受到过多振动之处。
连接前的准备
■ 连接注意事项
• 在进行任何连接之前,确认各有关电器的电源都处
于关闭状态。
• 放大器上白色的输入 / 输出插孔用来连接左声道,
而红色的输入 / 输出插孔用来连接右声道。必须按
照左、右声道的色码正确连接导线。
• 将所要连接的导线的插头完全地插入插孔。如果连
接不牢固,可能没有声音或产生噪音。
• 当从交流电源插座上拔下电源线时,必须握住电源
线插头部分的塑造物拔取。
• 对于 KMA-700,请在打开电源之前设置后面板上的
IMPEDANCE SELECTOR。请参阅第 7 页 “IMPEDANCE
SELECTOR”。
• 除美国型号以外,在将电源线插入交流电源插座之
前,必须将本机后面板上的 VOLTAGE SELECTOR 设定
为适合本地区的电源电压。请参阅第 9 页“VOLTAGE
SELECTOR”。
• 靠近窗边等有雨水的地方。
• 靠近厨房等散发煤烟、蒸汽或热量的地方。
■ AC OUTLETS 的功耗 (仅限美国型号)
• 注意总功耗不能超过后面板标出的瓦数。除系统组
件外,请勿将其他设备连接到本机的 AC OUTLETS。
• 请勿将电视机连接至本机,即使电视机标出的功耗
值小于允许值,因为当电视机打开时,功耗会增
大。
2 Zh
Page 27

准备
前面板
部件名称及其功能
准备
阴影部位 ( )仅适用 KMA-700。
1 POWER (ON/OFF)
打开 / 关闭电源 (ON/OFF)。
2 MUSIC BALANCE
调节音量平衡。 *
3 MUSIC TONE (BASS/TREBLE)
调节低 / 高频响应。 *
4 MIC ECHO DELAY
调节回声之间的延迟时间。 *
5 MIC ECHO REPEAT
调节回馈量。 *
6 ECHO MODE
选择 NORMAL、WIDE (立体声)或 SPACIOUS** 回声。
SPACIOUS 回声是一种能产生带有时间间隔的 NORMAL
和 WIDE 回声效果。选择 WIDE/SPACIOUS** 回声后,LED
指示灯点亮琥珀色 / 绿色 **。
7 MIC TONE (BASS/MID/TREBLE)
调节麦克风的低 / 中 / 高频响应。 *
8 MIC 插孔 (1/2/3**)
将麦克风连接至这些插孔。
9 MIC VOL (1/2/3**)
调节麦克风输入电平。 *
0 MIC
调节所有麦克风的整体音量。
A 遥感器
接收遥控信号。
B ECHO
调节回声量。
C INPUT/ 输入源指示灯 (DVD/AUX**/TAPE/BGM)
默认设定中 INPUT 无效。
若要启用 INPUT,请参阅第 14 页 “输入模式”。
输入源指示灯表示当前启用的输入源。
D MUSIC
调节音源设备的音量。
E KEY CONTROL
若要变换所播放音乐的基调,则转动此控制钮。基调
可以在 5 档内以半音为步幅进行高低调节。若要将基
调复位至自然基调,则按此控制钮。如果发生无声状
况超过 4 秒钟,本机将认为所播放的歌曲已经结束,
并将基调复位至自然基调。
中文
* 使用一字螺丝刀进行调节。
** 仅适用 KMA-700
3 Zh
Page 28

部件名称及其功能
后面板
阴影部位 ( )仅适用 KMA-700。
(亚洲型号)
关于组件连接的详细说明,请参阅第 6 页 “系统连
接”。
1 BALANCED MIC INPUT 插孔 (1/2)
将麦克风连接至这些插孔。
这些是平衡输入端子,每个端子连接至前面板上相同
电路 MIC 1 和 2。
2 DVD 音频输入插孔
连接至卡拉 OK 装置或 DVD 播放机的输出插孔。
3 AUX 音频输入插孔 *
连接至磁带播放机、录像机等装置的输出插孔。
4 TAPE 音频输入插孔
连接至磁带播放机、录像机等装置的输出插孔。
5 TAPE 音频输出插孔
连接至磁带播放机、录像机等装置的输入插孔。
6 BGM 音频输入插孔
连接至背景音源装置的输出插孔。
7 无低通滤波器 SUBWOOFER 插孔
连接至含低通滤波器的重低音扬声器的输入插孔。此
插孔直接输出单声道信号。
8 含低通滤波器 SUBWOOFER 插孔
连接至重低音扬声器的输入插孔。
9 PRE OUT 插孔
连接至外接功放的输入插孔。
0 IMPEDANCE SELECTOR*
请参阅第 7 页 “IMPEDANCE SELECTOR”。
A REMOTE 插孔
连接至外部遥控。
请参阅第 8 页 “连接外接遥控器”。
B VIDEO INPUT 插孔
连接至 DVD、AUX*、或背景视频播放机或摄像机等装置
的视频输出的输入插孔。
* 仅适用 KMA-700
4 Zh
Page 29

(亚洲型号)
阴影部位 ( )仅适用 KMA-700。
部件名称及其功能
准备
C DVD INPUT LEVEL
调节 DVD 输入电平的平衡而不妨碍其他输入
(AUX*、TAPE、BGM)。
D AUX INPUT LEVEL*
调节 AUX 输入电平的平衡而不妨碍其他输入
(DVD、TAPE、BGM)。
E TAPE INPUT LEVEL
调节 TAPE 输入电平的平衡而不妨碍其他输入
(DVD、AUX*、BGM)。
F BGM INPUT LEVEL
调节 BGM 输入电平的平衡而不妨碍其他输入
(DVD、AUX*、TAPE)。
G SPEAKERS (扬声器系统端子)
连接至扬声器系统。
对于 KMA-500,只能使用一个扬声器系统。
H AC OUTLETS(最大总功耗:100 W,仅限美国型号)
请参阅第 9 页 “AC OUTLETS”。
I AC IN (美国型号除外)
请参阅第 9 页 “AC IN”。
电源线 (仅限美国型号)
将此电源线插入交流电源插座。
J VOLTAGE SELECTOR (美国型号除外)
请参阅第 9 页 “VOLTAGE SELECTOR”。
K 信号接地端子
连接此放大器时如果发出嗡嗡噪音,则连接此端子。
L VIDEO OUTPUT 插孔
连接至显示器的视频输入。
* 仅适用 KMA-700
中文
5 Zh
Page 30

操作
系统连接
显示器
显示器
麦克风
麦克风
显示器
系统 2
有源重低音扬声器
系统 1
有源重低音扬声器
(含低通滤波器)
系统 A
右左
卡拉 OK/
DVD 播放机
阴影部位 ( )仅适用 KMA-700。
磁带录像机 /
LD 播放机
(仅适用
KMA-700)
磁带录音机
背景音乐 / 视频
播放机
功率放大器
(亚洲型号)
右左
系统 B
(仅适用 KMA-700)
6 Zh
Page 31

连接
■ 连接扬声器导线
1 向上扳开拉杆,然后将导线插入孔穴。
(-)导线连接至 (-)端子
(+)导线连接
至 (+)端子
阴影部位 ( )仅适用 KMA-700。
2 按下拉杆固定导线。
在连接之前,用钳子等工具剥去各导线头部约
15 mm 皮层。
15 mm
注意
请小心露出端子的导线导体部分切勿接触到其他导线。接触
到其他扬声器导线的导体部分会损坏系统。
■ 扬声器连接的重要注意事项
• 本机的最大输出如下:
KMA-700 ..........................120 W + 120 W
KMA-500 ..........................100 W + 100 W
因此,所使用的扬声器最大输入功率必须超过上述参
数。
• 请使用 Yamaha 扬声器以防止因不匹配所引起的故
障或损坏。
[对于 KMA-700]
IMPEDANCE SELECTOR
• 打开本机之前,必须将后面板上的 IMPEDANCE
SELECTOR 设置到符合扬声器系统要求的位置。
(低) (高)
开关位置 如果系统使用: 扬声器阻抗等级
低
高
单扬声器系统 4 Ω 或更高
双扬声器系统 8
单扬声器系统 8 Ω 或更高
双扬声器系统 16
Ω 或更高
Ω 或更高
操作
右扬声器
阴影部位 ( )仅适用 KMA-700。
左扬声器
• 本机电源开启状态下切勿改变IMPEDANCE SELECTOR
设定,否则可能损坏本机。
连接示例
最小扬声器阻抗为 4 Ω。如果两个 6 Ω 扬声器系统并
联连接,则将会超过设计值并触发安全保护装置。如
果使用两个扬声器系统,并且频繁启动保护装置,则
扬声器系统应改为串联连接。
中文
7 Zh
Page 32

连接
1. 并联
(每个扬声器应为 8 Ω 或以上)
6 Ω 6 Ω
2. 串联
(总计:可以超过 4 Ω)
6 Ω 6 Ω
6 Ω + 6 Ω ➝ 3 Ω
(<4 Ω:NG)
6 Ω + 6 Ω = 12 Ω
(>4 Ω : OK)
■ 连接至平衡输入
HOT
GND
COLD
■ 连接至非平衡输入
或
■ 连接外接遥控器
REMOTE
(Direct)
HOT
COLD
GND
HOT
GND
HOT
GND
GND
[对于 KMA-500]
扬声器阻抗必须在 8 Ω 至16 Ω 之间。
■ 连接 RCA 针插头
连接 RCA 针插头时,必须将红色插头插入红色插孔,
白色插头插入白色插孔。
白色
左
白色
右
红色
红色
外部遥控卫星
REMOTE
+5V
OUT
GND
RMC KMA-700/
RMC KMA-700/
+5V_OUT
+5V_OUT
REMOTE
GND
KMA-500
REMOTE (Direct)
GND
KMA-500
8 Zh
Page 33

连接
1. 外部遥控卫星
连接至 +5V_OUT、REMOTE 和 GND。
注意
将遥控卫星连接至此输入端子,本机即可接收遥控信号。
2. REMOTE (Direct)
连接至 REMOTE (Direct) 和 GND。
连接至 RMC 的红外线二极管输出 (开集)。
注意
将 REMOTE (Direct) 连接至此输入端子,本机即可接收
REMOTE 信号。
■ 后面板上电源开关和接口
附带电源线
(美国型号除外)
AC OUTLETS
(SWITCHED. 仅限美国型号)
使用这些插座将其他装置的电源线连接至本机。连接
至 AC OUTLETS 的电源由本机前面板上的 POWER 控制。
只要本机电源打开,这些插座就将接通任何所连接装
置的电源。总功耗为 100 W。
注意
• 注意总功耗不能超过后面板上标出的瓦数。除系统组件外,
请勿将其他设备连接到本机的电源插座上。
• 请勿将电视机连接至本机,即使电视机标出的功耗值小于
允许值,因为当电视机打开时,功耗会增大。
操作
(亚洲型号)
阴影部位 ( )仅适用 KMA-700。
副图中的部位仅适用美国型号。
AC IN
(美国型号除外)
将附带的电源线连接至 AC IN。
电源线
完成所有连接后再将电源线插入交流电源插座。
VOLTAGE SELECTOR
(美国型号除外)
将电源线插入交流电源插座之前,必须将本机后面板
上的 VOLTAGE SELECTOR 设定为本地电源电压。
中文
9 Zh
Page 34

配置图
* 仅适用 KMA-700
**平衡输入在后面板上
10 Zh
Page 35

遥控器
■ 部件名称及其功能
1 INPUT
默认设定中 INPUT 无效。
若要启用 INPUT,请参阅第 14 页 “输入模式”。
2 KEY CONTROL ( / / )
变换所播放音乐的基调。
■ 准备遥控器
遥控器内已安装电池。第一次使用遥控器之前,如图
所示抽出塑料片。
塑料片
关于更换电池信息,请参阅下一段落。
■ 遥控器操作
1. 遥控器
遥控器与本机遥感器之间的距离应在 6 m 范围内。必
须将遥控器直接对准前面板上的遥感器。
6 m 内
30°
30°
操作
3 MIC ( / ) *
调节麦克风的整体音量。
4 ECHO ( / ) *
调节回声量。
5 MUSIC ( / ) *
调节音乐音量。
* 在调节过程中,前面板上的相应控制的 LED 指示灯闪烁。
6 PRESET (1/2/3)
调用 MIC 音量 /ECHO 量 /MUSIC 音量 /ECHO MODE 的预
设设定。
若要保存上述项目的当前设定,则按住想要的按钮
(前面板上的 PRESET 1、2、3 或 KEY CONTROL)3 秒
钟。按 KEY CONTROL 将设定保存至 PRESET 1。保存完
成后,KEY CONTROL 上的 “ ”闪烁一次。本机中最多
可以保存 3 组预设 (PRESET 1/2/3)。请参阅第 14 页
“开机 ON 调用”。
7 ECHO MODE
选择 NORMAL、WIDE 或 SPACIOUS (仅限 KMA-700)回
声。
2. 安装电池
遥控器内的电池在正常情况下约能使用半年。如果长
期不使用遥控器,请取出电池。电池电量微弱时,请
更换新的 CR2025 电池。
更换电池:
1. 使用小螺丝刀,小心抠出电池架。
2. 取出旧电池,将新的 CR2025 电池装入电池架,+ 面
朝上。
3. 将电池架推入遥控器,至听到喀哒声为止。
+面朝上
电池使用不当可能会造成电池漏液和爆炸。
请遵守下列规定:
• 切勿对旧电池进行充电。
• 必须按照指示确定正极(+)和负极(-)位置以插
入电池。
• 即使形状相同,电池的电压也可能因型号不同而不
同。请小心,不要使用不同型号的电池。
• 请根据当地规定废弃旧电池。
中文
11 Zh
Page 36

12 Zh
Page 37

阴影部位 ( )仅适用 KMA-700。
一般操作
操作
1 连接所需数量的麦克风。
2 将本机和其他所需装置的 POWER 开关设定至 ON。
3 播放卡拉 OK 音乐源装置,转动 MUSIC 调节音量。
默认设定为自动选择音乐源。若要设定选择条
件,请参阅第 14 页 “自动输入条件”。若要手动
选择音乐源,请参阅第 14 页 “输入模式”。
4 转动 MIC 调节麦克风音量。
如果各麦克风音量不平衡,请使用一字螺丝刀调
节 MIC VOL。
5 转动 ECHO 调节 ECHO 量。
6 转动 KEY CONTROL 调节基调。
■ 正确使用麦克风的注意事项
• 将麦克风握在距嘴 5 至 10 cm 处唱歌。
• 为保证声音清晰,所握的地方要在麦克风头部以下部位。
• 切勿挡住网罩的下方部位。否则会干扰正常的声音,且低音
不清晰。在此情况下还会产生啸叫声。
与口部保持 5 至 10 cm 距离。
抓住麦克风头部以下部位。
中文
13 Zh
Page 38

设定模式
在设定模式中可以设定以下菜单:
• 开机 ON 调用
• 输入模式
• 自动输入条件
• 启用遥控器
• 遥控模式
• MIC/MUSIC 最大电平
• MIC/MUSIC 音量选择
• 初始化
若要设定上述每个菜单,请根据以下步骤按照第 15 页
上 “设定模式表”中的说明设定相应的控制钮。
1 若要进入设定模式,先关闭主机,然后按住 KEY
CONTROL 和 ECHO MODE,同时按 POWER。
2 根据第 15 页 “设定模式表”将 KEY CONTROL 和
MUSIC 设定为想要的菜单和项目。
对于自动输入条件,在选择项目之前选择想要的
播放源。
操作步骤 3 之前设定要更改的所有设定。
3 按 KEY CONTROL 输入设定。
3. 自动输入条件
设定步骤 2 所述的自动输入模式中每个来源 (DVD、
AUX** 和 TAPE)的条件。
音频 *:根据音频信号切换来源。
视频:根据视频信号切换来源。
音频 / 视频:根据音频或视频信号切换来源。
仅对于此菜单,在选择想要项目之前通过 INPUT 选择
想要的来源。
4. 启用遥控器
启用或禁用遥控器。
启用 *:启用遥控器。
禁用:禁用遥控器。
5. 遥控模式
设定接收设备。
前面板和外部 *:前面板和外部遥控卫星均接收遥控
信号。
前面板:仅前面板接收信号。
外部:仅外部遥控卫星接收信号。
6. MIC/MUSIC 最大电平
设定 MIC 和 MUSIC 的最大音量。
10*:无设定。
9-3:最大音量设定至指示的音量(不能设定为 2-0)。
7. MIC/MUSIC 音量选择
选择转动控制钮时 MIC 和 MUSIC 音量如何增大 / 减小
(如,音量曲线)。
模式 1*:陡峭曲线。
模式 2:一般陡峭曲线。
模式 3:最小陡峭曲线,最适合微调。
8. 初始化
设定模式中设定的所有设定复位至默认设定。
取消:不执行初始化。
初始化:执行初始化。
在 MUSIC 设定为 3 时按 KEY CONTROL,即执行初始化。
设定输入时 “ ”闪烁一次。
4 若要停止设定模式,关闭主机。
■ 设定模式中的菜单
1. 开机 ON 调用
选择最后记忆或预设,在本机打开时调用 MIC 音量 /
ECHO 量 /MUSIC 音量 /ECHO MODE 设定。
最后记忆 *:调用本机最后一次关闭时的设定。
预设:调用保存至 PRESET 1 的设定。
2. 输入模式
将输入模式设定为自动或手动。
自动 *:自动设定输入源。
手动:通过 INPUT 选择输入源。
按照 DVD、AUX**、TAPE、BGM 顺序选择来源。
14 Zh
* 默认设置
** 仅适用 KMA-700
Page 39

■ 设定模式表
菜单 KEY CONTROL 项目 /MUSIC
1. 开机 ON 调用
设定模式
+1 最后记忆:1 预设:2
2. 输入模式
3. 自动输入条件
4. 启用遥控器
5. 遥控模式
+2 自动:1 手动:2
+3
使用 INPUT 选择
想要来源。
例如:DVD
操作
音频:1 视频:2 音频/视频:3
+4 启用:1 禁用:2
+5 前面板和外部:1 前面板:2 外部:3
6. MIC/MUSIC 最大音量
7. MIC/MUSIC 音量选择
8. 初始化
-1
-2
-5
无设定:10 设定至指示音量:9-3
例如:3
模式 1:1 模式 2:2 模式 3:3
取消:1 初始化:3
中文
15 Zh
Page 40

附加信息
故障排除
如果发生故障,请查看下表进行简单修正。
如果仍无法解决问题,请联络经销商。
问题 可能的原因 解决方法
扬声器无声音输出。 POWER 设定为 OFF。 将 POWER 设定为 ON。
电源线插头松脱。 将电源线牢固插入交流电源插座。
MUSIC 处于最低位置。 调节 MUSIC。
在设定模式中将输入模式设定为手动时选
择了错误的音乐来源。
由于本机内温度上升导致声音中断。 关闭电源,让本机进行冷却。
其中一个扬声器没有声音
输出。
麦克风没有声音输出。 麦克风插头未完全插入。 将插头牢固插入插孔。
遥控器无效,或无法正常
操作。
MUSIC BALANCE 完全转动到一个扬声器。 将控制钮设定至中间位置。
其中一个扬声器导线连接断开。 将导线牢固插入端子。
麦克风上的开关设定在 OFF。 将麦克风上的开关设定至 ON。
对应的 MIC VOL 或 MIC 控制钮处于最小位置。调节控制钮。
麦克风距嘴太远,或麦克风握法不正确。 请参考麦克风使用说明书。
遥控器太远或倾斜太大。 遥控器在距前面板 6 m 及偏离中心不超过 30 度范围内
直射阳光或灯光正照着本机的遥感器。 重新放置本机。
在设定模式中将启用遥控器设定为禁用。 在设定模式中将启用遥控器设定为启用。请参阅第 14
在设定模式中设定了错误的遥控模式。 在设定模式中设定正确的遥控模式。请参阅第 14 页
电池电量微弱。 更换新的 CR2025 电池。请参阅第 11 页 “安装电池”。
INPUT 不起作用时,将输入模式设定为自动。在设定模式中将输入模式设定为手动。请参阅第 14 页
用 INPUT 选择正确的音乐来源,或在设定模式中将输
入模式设定为自动。请参阅第 14 页 “输入模式”。
有效。
页 “启用遥控器”。
“遥控模式”。
“输入模式”。
保养
设备脏了,请用软的干布擦拭干净。
切勿使用酒精、稀释剂、苯、杀虫剂或其他挥发性溶剂,这些物质可能会损坏设备表面涂层或失去光泽。
也不能用含有化学物品的布料擦拭或长时间放在设备上,这些物质可能会使表面处理退化或涂层脱落。
16 Zh
Page 41

售后服务
• 如果发现本机有问题,当地的经销商会按您的要求
有偿修理或更换有问题的零件。
• 在要求当地经销商进行修理之前,请先参阅 “故障
排除”进行可行的修理。
致经销商:
如果您的客户要求进行售后服务,请先检查以下内容:
• 确认所有意外细节。
• 检查所有电缆和连接。
• 为客户讲解使用本系统的操作注意事项和使用说
明。
如果发现本机有问题,且不能修理,请将有问题的机
器送到最近的 Yamaha 授权服务中心。
卡拉 OK 礼仪
您所喜爱的卡拉 OK 演唱可能正在打扰他人。进行卡拉 OK 演唱时,必须照顾到周围的
邻居。
您可以控制卡拉 OK 的音量。请记住,在深夜即使很小的音量也会很容易传播,因此在
夜晚进行卡拉 OK 演唱要特别注意。我们建议您关闭窗户以体谅您的邻居。
版权
• 录制的音乐磁带、DVD、录像带、CD 等广播和音乐来源受版权法的严格保护。
• 这些资源除用于自己欣赏外,为商业用途而使用、经销、租借这些音源,或将复制的媒体销售给他人,都需
要有版权所有者的许可。
附加信息
17 Zh
中文
Page 42

技术规格
放大器
• 最大输出
[KMA-700]
(1 kHz, 8 Ω, 10%THD)............... 120 W + 120 W
[KMA-500]
(1 kHz, 8 Ω, 10%THD)............... 100 W + 100 W
• 总谐调失真
[KMA-700]
(1 kHz, 93 W, 8 Ω)............................ 1%
[KMA-500]
(1 kHz, 76 W, 8 Ω)............................ 1%
• 音频输入插孔 (灵敏度 / 阻抗)
DVD, TAPE, AUX (仅限 KMA-700)......... 200 mV/42 kΩ
BGM..................................... 200 mV/42 kΩ
MIC..................................... 6.0 mV/20 kΩ
• 音频输出插孔 (输出水平 / 输出阻抗)
PRE OUT................................. 1.0 V/1.2 kΩ
SUBWOOFER............................... 2.0 V/1.2 kΩ
• 频率响应
MUSIC.................. 20 Hz 到 15 kHz, +1.5/–0.5 dB
MIC.................... 40 Hz 到 15 kHz, +1.0/–0.5 dB
• 音质控制特性
MUSIC
BASS..............................................................±12 dB (100 Hz)
TREBLE..........................................................±12 dB (10 kHz)
MIC
BASS..............................................................±12 dB (100 Hz)
MID..................................................................±12 dB (1 kHz)
TREBLE..........................................................±10 dB (10 kHz)
• 扬声器阻抗
[KMA-700]
(仅A或B的单系统)....... 4 Ω 到 8 Ω /8 Ω 到 16 Ω
(A和B双系统运行).................... 8 Ω 到 16 Ω
[KMA-500]
(仅单系统)........................... 8 Ω 到 16 Ω
• 主调控制范围 ........................ ±5 步, ±2.5 音调
• 视频输入插孔
(灵敏度 / 输入阻抗)...................... 1 Vp-p/75 Ω
• 视频输出插孔
(灵敏度 / 输出阻抗)...................... 1 Vp-p/75 Ω
• AC OUTLETS (仅限美国型号)
SWITCHED (最大总功耗 : 100 W) ..................... 2
• 尺寸 (宽 × 高 × 深)......... 435 mm × 150 mm × 416 mm
• 重量 ............................................ 10 kg
附属品
• 使用说明书 .......................................... 1
• 遥控器 .............................................. 1
• 电源线 (美国型号除外) .............................. 1
尺寸
416
429
132
150
435
18
设计和规格时有变化,恕不另行通知。
电源
• 电源电压
亚洲和其他型号..... AC 110/120/220/230-240 V 50/60 Hz
美国型号.............................. AC 120 V 60 Hz
• 功率消耗
[KMA-700]
(IEC 60065)................................. 190 W
(待机)....................................... 25 W
[KMA-500]
(IEC 60065)................................. 165 W
(待机)....................................... 25 W
18 Zh
Page 43

Page 44

Precaución: lea las indicaciones siguientes antes de
utilizar este aparato
1 Para asegurar el mejor rendimiento de este aparato, lea
atentamente este manual. Y luego guárdelo en un lugar seguro
para poder consultarlo en el futuro en caso de ser necesario.
2 Instale este sistema de sonido en un lugar bien ventilado,
fresco, seco y limpio, alejado de la luz solar directa, de
fuentes de calor, vibraciones, polvo, humedad y frío. Deje un
espacio para ventilación de por lo menos 10 cm arriba y a
izquierda y derecha de la unidad, y de 20 cm en la parte
posterior.
3 Coloque este aparato lejos de otros aparatos eléctricos,
motores o transformadores, para evitar así los ruidos de
zumbido.
4 No exponga este aparato a cambios bruscos de temperaturas,
del frío al calor, ni lo coloque en lugares muy húmedos (una
habitación con deshumidificador, por ejemplo), para impedir
así que se forme condensación en su interior, lo que podría
causar una descarga eléctrica, un incendio, daños en el aparato
y/o lesiones a las personas.
5 Evite instalar este aparato en un lugar donde puedan caerle
encima objetos extraños o donde quede expuesto al goteo o a
la salpicadura de líquidos. Encima de este aparato no ponga:
– Otros componentes, porque pueden causar daños y/o
decoloración en la superficie de este aparato.
– Objetos con fuego (velas, por ejemplo), porque pueden
causar un incendio, daños en el aparato y/o lesiones a las
personas.
– Recipientes con líquidos, porque pueden caerse y
derramar el líquido, causando descargas eléctricas al
usuario y/o dañando el aparato.
6 No tape este aparato con un periódico, mantel, cortina, etc.
para no impedir el escape del calor. Si aumenta la temperatura
en el interior del aparato, esto puede causar un incendio,
daños en el aparato y/o lesiones a las personas.
7 No conecte la unidad a una toma de pared de CA hasta que
haya realizado todas las conexiones.
8 No ponga el aparato al revés. Podría recalentarse y
posiblemente causar daños.
9 No utilice una fuerza excesiva con los conmutadores, los
controles y/o los cables.
10 Al desconectar el cable de alimentación de la toma de pared
de CA, sujételo por el enchufe, y no por el cable.
11 No limpie este aparato con disolventes químicos porque
podría estropear el acabado. Utilice un paño limpio y seco
para limpiar el aparato.
12 Utilice solamente la tensión especificada en este aparato.
Utilizar el aparato con una tensión superior a la especificada
resulta peligroso y puede producir un incendio, daños en el
aparato y/o lesiones a las personas. Yamaha no se hará
responsable de ningún daño debido al uso de este aparato con
una tensión diferente de la especificada.
13 Para evitar que la unidad quede dañada, desconecte el cable
de la toma de pared de CA o de la unidad durante una
tormenta eléctrica.
14 No intente modificar ni arreglar este aparato. Póngase en
contacto con el personal de servicio Yamaha cualificado
cuando necesite realizar alguna reparación. La caja no deberá
abrirse nunca por ninguna razón.
15 Si tiene previsto no utilizar la unidad durante un cierto tiempo
(si se va de vacaciones, por ejemplo), desconecte la
alimentación de la toma de pared de CA.
16 Instale esta unidad cerca de la toma de corriente y en un lugar
en el que pueda llegar al conector de alimentación de CA
fácilmente.
17 Asegúrese de leer la sección “SOLUCIÓN DE
PROBLEMAS” antes de dar por concluido que su aparato
está averiado.
18 Antes de trasladar la unidad, pulse el interruptor POWER para
apagarla y desconecte el cable de alimentación de la toma de
pared de CA.
19 Las pilas no deberán exponerse a un calor excesivo como, por
ejemplo, la luz solar directa, el fuego o algo similar.
20 Si la temperatura de alrededor cambia repentinamente se
formará condensación. Desconecte el cable de alimentación
de la toma de corriente y, a continuación, deje la unidad en su
lugar.
21 Si utiliza la unidad de forma intensiva, puede que se caliente.
En este caso, desconecte la unidad y deje que se enfríe.
22 VOLTAGE SELECTOR (Excepto el modelo de EE.UU.)
La opción VOLTAGE SELECTOR del panel posterior de la
unidad debe ajustarse a la tensión de su red ANTES de
conectar el cable de alimentación a la toma de pared de CA.
pie pie
Tenga siempre en cuenta las siguientes dimensiones:
mueble
12 Espacio de ventilación arriba, a izquierda y a derecha
de la unidad: superior a 10 cm
3 Espacio de ventilación en la parte posterior de la
unidad: superior a 20 cm
4 No quite nunca los pies.
ADVERTENCIA
PARA REDUCIR EL RIESGO DE INCENDIO O
DESCARGA ELÉCTRICA, NO EXPONGA ESTA
UNIDAD A LA LLUVIA NI A LA HUMEDAD.
Si la unidad continúa conectada a la toma de pared de
CA, no deja de recibir alimentación, aunque apague la
unidad pulsando el interruptor POWER.
i Es
Page 45

PRECAUCIÓN
Si coloca la pila de forma incorrecta, existe riesgo de
explosión. Reemplácela solo con pilas idénticas o de
características equivalentes.
PRECAUCIÓN
El uso de controles, ajustes o procedimientos distintos
de los expuestos en este manual puede conllevar una
exposición peligrosa a radiaciones.
ÍNDICE
INTRODUCCIÓN
PRECAUCIONES DE MANIPULACIÓN...........2
ANTES DE REALIZAR LAS CONEXIONES ....2
PREPARACIÓN
NOMBRES Y FUNCIONES DE LAS PIEZAS
...............................................................................3
FUNCIONAMIENTO
CONEXIONES DEL SISTEMA............................6
CONEXIONES........................................................7
DIAGRAMA DE CONFIGURACIÓN ...............10
MANDO A DISTANCIA......................................11
FUNCIONAMIENTO GENERAL......................13
MODO DE CONFIGURACIÓN .........................14
INFORMACIÓN ADICIONAL
SOLUCIÓN DE PROBLEMAS...........................16
MANTENIMIENTO.............................................16
SERVICIO POSVENTA ......................................17
CONSEJOS PARA LOS USUARIOS DEL
KARAOKE ........................................................17
COPYRIGHT ........................................................17
ESPECIFICACIONES .........................................18
PREPARACIÓNINTRODUCCIÓN
FUNCIONAMIENTO
INFORMACIÓN
ADICIONAL
1 Es
Español
Page 46

INTRODUCCIÓN
Gracias por adquirir el amplificador mezclador digital de karaoke Yamaha KMA-700/KMA-500.
El presente documento es el manual del producto de los modelos KMA-700 y KMA-500. Los nombres de cada modelo
se indican solo en las funciones exclusivas de cada modelo. Para ilustrar las explicaciones, se utilizan principalmente las
imágenes de KMA-700.
Antes de utilizar la unidad, lea atentamente este manual para sacar el máximo provecho de las prestaciones del producto.
Una vez leído el manual, consérvelo en un lugar seguro por si lo necesita más adelante. Este manual puede resultarle de
gran ayuda para entender mejor el funcionamiento del amplificador mezclador digital de karaoke y resolver cualquier
problema que pueda plantearle.
PRECAUCIONES DE MANIPULACIÓN
■ No instale la unidad en lugares como los
siguientes:
• Lugares expuestos a la luz solar directa o próximos a
fuentes de calor, como un radiador.
• Lugares con mala ventilación que no permitan la
circulación del aire o bien con mucha humedad o
polvo.
ANTES DE REALIZAR LAS CONEXIONES
■ Precauciones relacionadas con las
conexiones
• Apague todos los aparatos antes de realizar una
conexión.
• Las tomas blancas de entrada/salida del amplificador
están pensadas para el canal izquierdo, mientras que las
tomas rojas de entrada/salida están pensadas para los
canales derechos. Conecte los cables sin equivocarse
en los colores de los canales izquierdo y derecho.
• Introduzca los cables de conexión firmemente en las
tomas. Si la conexión no queda bien fijada, puede que
no escuche ningún sonido o que se genere ruido.
• Al desconectar el cable de alimentación de la toma de
pared de CA, tire del enchufe sujetándolo por la parte
de plástico.
• En el caso de KMA-700, ajuste la opción
IMPEDANCE SELECTOR en el panel posterior antes
de encender la unidad. Consulte “IMPEDANCE
SELECTOR”, en la página 7.
• Salvo en el caso del modelo para EE.UU., debe ajustar
VOLTAGE SELECTOR en el panel posterior de la
unidad en función de la tensión de la red local ANTES
de conectar el cable de alimentación a la toma de pared
de CA. Consulte “VOLTAGE SELECTOR”, en la
página 9.
• Superficies inclinadas o expuestas a vibraciones
excesivas.
• Lugares expuestos a la lluvia, como por ejemplo cerca
de una ventana.
• Lugares con presencia de hollín, vapor o calor, como
por ejemplo cocinas o zonas próximas.
■ Consumo de energía de AC OUTLETS
(Solo el modelo de EE.UU.)
• Procure que el consumo de energía total no supere los
vatios indicados en el panel posterior. No conecte a las
AC OUTLETS de la unidad dispositivos que no sean
componentes del sistema.
• No conecte ningún televisor a la unidad, aunque
indique un valor de consumo de energía por debajo del
valor aceptado al encender el televisor.
2 Es
Page 47

PREPARACIÓN
Panel frontal
NOMBRES Y FUNCIONES DE LAS PIEZAS
PREPARACIÓN
Los elementos sombreados ( ) solo están presentes en los modelos KMA-700.
1 POWER (ON/OFF)
Enciende el dispositivo (ON/OFF).
2 MUSIC BALANCE
Ajusta el balance de volumen.*
3 MUSIC TONE (BASS/TREBLE)
Ajusta la respuesta de frecuencia baja/alta.*
4 MIC ECHO DELAY
Ajusta el tiempo de retardo entre ecos.*
5 MIC ECHO REPEAT
Ajusta el nivel de retroalimentación.*
6 ECHO MODE
Seleccione eco NORMAL, WIDE (estéreo) o
SPACIOUS**. El eco SPACIOUS es un efecto que
genera eco NORMAL y WIDE con un intervalo de
tiempo. El LED se ilumina de color ámbar o verde** si se
selecciona el eco WIDE/SPACIOUS**.
7 MIC TONE (BASS/MID/TREBLE)
Ajusta la respuesta de frecuencia baja/media/alta de los
micrófonos.*
8 Tomas de MIC (1/2/3**)
Tomas para conectar los micrófonos.
9 MIC VOL (1/2/3**)
Ajusta el nivel de entrada del micrófono.*
0 MIC
Ajusta el volumen global de todos los micrófonos.
A Sensor del mando a distancia
Este sensor recibe las señales del mando a distancia.
B ECHO
Ajusta el nivel de eco.
C INPUT/Indicadores de fuente de entrada
(DVD/AUX**/TAPE/BGM)
La opción INPUT no está disponible con la configuración
predeterminada.
Para activar INPUT, consulte “Modo de entrada”, en la
página 14.
Los indicadores de la fuente de entrada indican la fuente
de entrada activa en cada momento.
D MUSIC
Ajusta el volumen de la fuente de música.
E KEY CONTROL
Para transportar la clave de la música reproducida, debe
girar este control. La clave puede cambiarse en cinco
pasos, en pasos de medio tono, hacia arriba o hacia abajo.
Para volver a situar la clave en la clave natural, pulse el
control. Si el silencio se prolonga durante 4 segundos o
más, la unidad considera que la canción ha terminado y
restablece la clave natural.
* Utilice un destornillador plano para
realizar el ajuste.
** Solo KMA-700
Español
3 Es
Page 48

NOMBRES Y FUNCIONES DE LAS PIEZAS
Panel posterior
Los elementos sombreados ( ) solo están presentes en los modelos KMA-700.
(Modelo Asia)
Para obtener más información sobre la conexión de los
componentes, consulte “CONEXIONES DEL
SISTEMA”, en la página 6.
1 Tomas de BALANCED MIC INPUT (1/2)
Tomas para conectar los micrófonos.
Se trata de entradas de balance y cada una conecta con el
mismo circuito MIC 1 y 2 en el panel frontal.
2 Tomas de entrada de audio DVD
Conectan con las tomas de salida del karaoke o el
reproductor de DVD.
3 Tomas de entrada de audio AUX*
Conectan con las tomas de salida de un reproductor de
cintas, un vídeo, etc.
4 Tomas de entrada de audio TAPE
Conectan con las tomas de salida de un reproductor de
cintas, un vídeo, etc.
5 Tomas de salida de audio TAPE
Conectan con las tomas de entrada de un reproductor de
cintas, un vídeo, etc.
6 Tomas de entrada de audio BGM
Conectan con las tomas de salida del componente fuente
de la música de fondo.
7 Toma SUBWOOFER sin filtro de paso bajo
Conecta con la toma de entrada del subwoofer con filtro
de paso bajo. Esta toma emite directamente la señal
monoaural.
8 Toma SUBWOOFER con filtro de paso bajo
Conecta con la toma de entrada del subwoofer.
9 Tomas de PRE OUT
Conectan con las tomas de entrada del amplificador de
alimentación adicional.
0 IMPEDANCE SELECTOR*
Consulte “IMPEDANCE SELECTOR”, en la página 7.
A Toma de REMOTE
Conecta con un mando a distancia externo.
Consulte “Conexión con un mando a distancia externo”,
en la página 8.
B Tomas VIDEO INPUT
Conectan con la toma de entrada de la salida de vídeo de
un DVD, AUX* o un reproductor de vídeo de fondo o una
cámara, entre otros dispositivos.
* Solo KMA-700
4 Es
Page 49

NOMBRES Y FUNCIONES DE LAS PIEZAS
(Modelo Asia)
Los elementos sombreados ( ) solo están presentes en los modelos KMA-700.
PREPARACIÓN
C DVD INPUT LEVEL
Permite ajustar el balance del nivel de entrada de DVD en
relación con las demás entradas (AUX*, TAPE, BGM).
D AUX INPUT LEVEL*
Permite ajustar el balance del nivel de entrada de AUX en
relación con las demás entradas (DVD, TAPE, BGM).
E TAPE INPUT LEVEL
Permite ajustar el balance del nivel de entrada de TAPE en
relación con las demás entradas (DVD, AUX*, BGM).
F BGM INPUT LEVEL
Permite ajustar el balance del nivel de entrada de BGM en
relación con las demás entradas (DVD, AUX*, TAPE).
G SPEAKERS (Terminales del sistema de
altavoces)
Conecta con el sistema de altavoces.
En el caso de KMA-500, solo hay un sistema de altavoces
disponible.
H AC OUTLETS (Consumo de energía total
máx.: 100 W. Solo para el modelo de EE.UU.)
Consulte “AC OUTLETS”, en la página 9.
I AC IN (Excepto el modelo de EE.UU.)
Consulte “AC IN”, en la página 9.
Cable de alimentación (Solo el modelo de
EE.UU.)
Conecte este cable a una toma de pared de CA.
J VOLTAGE SELECTOR (Excepto el modelo de
EE.UU.)
Consulte “VOLTAGE SELECTOR”, en la página 9.
K Terminal de tierra de señal
Conecte este terminal si escucha un ruido de peonza al
conectar el amplificador.
L Tomas VIDEO OUTPUT
Conectan con la entrada de vídeo del monitor.
* Solo KMA-700
Español
5 Es
Page 50

FUNCIONAMIENTO
CONEXIONES DEL SISTEMA
Pantalla de televisor
Pantalla de televisor
MIC
MIC
Pantalla de televisor
Subwoofer activo
Sistema 2
Sistema 1
Subwoofer activo
(con filtro de paso bajo)
Sistema A
Derecho Izquierdo
Karaoke/
reproductor de
DVD
Los elementos sombreados ( ) solo están presentes en los modelos KMA-700.
Reproductor
de VTR/LD
(Solo
KMA-700)
Grabador de
cintas
Reproductor de
música/vídeo
de fondo
Amplificador
de
alimentación
(Modelo Asia)
Derecho Izquierdo
Sistema B
(Solo KMA-700)
6 Es
Page 51

CONEXIONES
■ Conexión de los cables de los altavoces
1 Levante el resorte para abrir la toma e
introduzca el cable conductor en el orificio.
cable (–) con terminal (–)
cable (+) con
terminal (+)
Los elementos sombreados ( ) solo están presentes
en los modelos KMA-700.
2 Cierre el resorte para fijar el cable conductor.
Antes de realizar la conexión, pele un trozo de 15 mm
de longitud del recubrimiento del extremo de cada
cable utilizando unos alicates u otra herramienta
similar.
15 mm
Nota
Vigile que los conductores del cable que sobresalen de un
terminal no entren en contacto con otro cable, ya que el contacto
entre conductores de diferentes cables de altavoces podría
provocar daños en el sistema.
■ Precauciones importantes para la
conexión de los altavoces
• Las salidas máximas de la unidad son las siguientes:
KMA-700..................................................120 W + 120 W
KMA-500..................................................100 W + 100 W
Por tanto, la alimentación de entrada máxima de los
altavoces debe ser superior a los límites anteriores.
• Utilice altavoces Yamaha para evitar cualquier
problema o daño derivado de desequilibrios.
[Para KMA-700]
IMPEDANCE SELECTOR
• Antes de encender la unidad, ajuste el IMPEDANCE
SELECTOR del panel posterior en la posición que
cumpla con los requisitos de su sistema de altavoces.
(Bajo) (Alto)
Posición del
interruptor
Bajo
Alto
Si el sistema
utiliza:
Un sistema de
altavoces
Dos sistemas de
altavoces
Un sistema de
altavoces
Dos sistemas de
altavoces
Nivel de
impedancia de
los altavoces
Ω o superior
4
Ω o superior
8
Ω o superior
8
Ω o superior
16
FUNCIONAMIENTO
Altavoz
derecho
Los elementos sombreados ( ) solo están presentes
en los modelos KMA-700.
Altavoz
izquierdo
• No modifique el ajuste del IMPEDANCE SELECTOR
mientras la unidad esté encendida, ya que podría
resultar dañada.
Ejemplos de conexión
La impedancia mínima de los altavoces es de 4 Ω. Si hay
dos sistemas de altavoces de 6 Ω conectados en paralelo,
se superará el valor establecido y se activará un
dispositivo de protección de seguridad. Si se utilizan dos
sistemas de altavoces y este mecanismo de protección se
activa muy a menudo, los sistemas de altavoces deberían
conectarse de forma serial.
Español
7 Es
Page 52

CONEXIONES
1. Conexión en paralelo
(cada altavoz debe ser de 8 Ω o más)
6 Ω 6 Ω
6 Ω + 6 Ω ➝ 3 Ω
(<4 Ω: NG)
2. Conexión serial
(total: es posible utilizar más de 4 Ω)
6 Ω 6 Ω
6 Ω + 6 Ω = 12 Ω
(>4 Ω: Correcto)
■ Conexión a la entrada de balance
HOT
COLD
GND
HOT
GND
COLD
■ Conexión a la entrada de desequilibrio
HOT
GND
o
HOT
GND
■ Conexión con un mando a distancia
externo
[Para KMA-500]
La impedancia de los altavoces debe estar situada entre
8 Ω y 16 Ω.
■ Conexión de los conectores de clavijas
RCA
Al conectar los conectores de clavija RCA, asegúrese de
introducir la clavija roja en la toma roja y la clavija blanca
en la toma blanca.
Blanco
Izquierdo
Blanco
Derecho
Rojo
Rojo
REMOTE (Direct)
REMOTE
+5V
OUT
GND
Satélite del mando a
distancia externo
RMC KMA-700/
RMC KMA-700/
GND
+5V_OUT
+5V_OUT
REMOTE
GND
KMA-500
REMOTE (Direct)
GND
KMA-500
8 Es
Page 53

CONEXIONES
1. Satélite del mando a distancia externo
Conecte con +5V_OUT, REMOTE y GND.
Nota
Si conecta el satélite del mando a distancia a esta entrada, la
unidad podrá recibir la señal del mando a distancia.
2. REMOTE (Direct)
Conecte con REMOTE (Direct) y GND.
Conecte la salida del diodo de infrarrojos (colector
abierto) de RMC.
Nota
Si conecta el REMOTE (Direct) a esta entrada, la unidad podrá
recibir la señal del REMOTE.
■ Interruptor de alimentación y
conexiones del panel posterior
Cable de alimentación
suministrado
(Excepto el modelo de
EE.UU.)
VOLTAGE SELECTOR
(Excepto el modelo de EE.UU.)
La opción VOLTAGE SELECTOR del panel posterior de
la unidad debe ajustarse a la tensión de su red ANTES de
conectar el cable de alimentación a la toma de pared de
CA.
AC OUTLETS
(SWITCHED. Solo para el modelo de EE.UU.)
Utilice estas salidas para conectar los cables de
alimentación de los demás componentes a la unidad. La
alimentación que reciben las AC OUTLETS se controla
mediante la opción POWER del panel frontal de la unidad.
Las salidas suministran alimentación a cualquier
componente conectado siempre que se encienda esta
unidad. El consumo total de energía es de 100 W.
Notas
• Procure que el consumo de energía total no supere los vatios
indicados en el panel posterior. No conecte a las salidas de
alimentación de la unidad dispositivos que no sean
componentes del sistema.
• No conecte ningún televisor a la unidad, aunque indique un
valor de consumo de energía por debajo del valor aceptado al
encender el televisor.
FUNCIONAMIENTO
(Modelo Asia)
Los elementos sombreados ( ) solo están presentes
en los modelos KMA-700.
Los elementos de las ilustraciones corresponden
únicamente al modelo de EE.UU.
AC IN
(Excepto el modelo de EE.UU.)
Conecte el cable de alimentación suministrado a AC IN.
Cable de alimentación
Conecte el cable de alimentación a la toma de pared de
CA una vez realizadas todas las demás conexiones.
Español
9 Es
Page 54

DIAGRAMA DE CONFIGURACIÓN
* Solo KMA-700
** Entrada de balance, en el panel posterior
10 Es
Page 55

MANDO A DISTANCIA
■ Nombres y funciones de las piezas
1 INPUT
La opción INPUT no está disponible con la configuración
predeterminada.
Para activar INPUT, consulte “Modo de entrada” en la
página 14.
2 KEY CONTROL ( / / )
Transporta la clave de la música reproducida.
3 MIC ( / )*
Ajusta el volumen global de los micrófonos.
4 ECHO ( / )*
Ajusta el nivel de eco.
5 MUSIC ( / )*
Ajusta el volumen de la música.
* El indicador LED del control correspondiente del panel frontal
parpadea durante el proceso de ajuste.
6 PRESET (1/2/3)
Recupera los ajustes predefinidos guardados del volumen
del MIC, el nivel de ECHO, el volumen de la MUSIC y el
modo ECHO MODE.
Para guardar los ajustes actuales en los elementos
anteriores, pulse el botón que desee (PRESET 1, 2, 3 o
KEY CONTROL en el panel frontal) durante tres
segundos. Si pulsa KEY CONTROL los ajustes se
guardan en PRESET 1. Una vez completado el proceso,
parpadeará “ ” en KEY CONTROL una sola vez. Puede
guardar hasta tres preajustes (PRESET 1/2/3) en esta
unidad. Consulte “Recuperación ON” en la página 14.
7 ECHO MODE
Seleccione eco NORMAL, WIDE o SPACIOUS (solo el
modelo KMA-700).
■ Preparativos del mando a distancia
El mando a distancia se suministra con la pila ya instalada.
Antes de utilizarlo por primera vez, tire de la lengüeta de
plástico, tal y como muestra la imagen.
Lengüeta de
plástico
Para obtener más información sobre como reemplazar la
pila, consulte el apartado siguiente.
■ Funcionamiento del mando a distancia
1. Mando a distancia
La distancia entre el mando y el sensor del mando a
distancia de la unidad debe ser inferior a 6 m. Apunte
siempre el mando a distancia directamente hacia el sensor
del panel frontal.
Menos de 6 m
30°
30°
2. Carga de la pila
La pila que utiliza el mando a distancia tiene una vida útil
de aproximadamente medio año, en condiciones de uso
normales. Retire la pila si tiene previsto no utilizar el
mando durante un cierto tiempo. Si nota que la pila pierde
potencia, reemplácela con una pila CR2025 nueva.
Para reemplazar la pila:
1. Con la ayuda de un destornillador pequeño, retire con
cuidado el soporte de la pila.
2. Retire la pila agotada y coloque la nueva pila CR2025
en el soporte con la cara + mirando hacia arriba.
3. Introduzca el soporte de la pila en el mando a distancia
y presiónelo hasta que oiga un clic.
Cara + hacia arriba
FUNCIONAMIENTO
Español
11 Es
Page 56

MANDO A DISTANCIA
Un mal uso de las pilas puede traducirse en riesgos de
fugas o de explosión de las mismas.
Siga las recomendaciones siguientes:
• No intente cargar las pilas agotadas.
• Introduzca las pilas de modo que sus polos positivo (+)
y negativo (–) queden situados tal y como se ilustra.
• Aunque tengan la misma forma, la tensión de las pilas
puede variar en función de los modelos. No utilice
nunca diferentes modelos de pila.
• Deseche las pilas agotadas de conformidad con las
normativas de cada región.
Información para Usuarios sobre
Recolección y Disposición de
Equipamiento Viejo y Baterías Usadas
Estos símbolos en los productos, embalaje,
y/o documentación que se acompañe
significan que los productos electrónicos y
eléctricos usados y las baterías usadas no
deben ser mezclados con desechos
hogareños corrientes.
Para el tratamiento, recuperación y reciclado
apropiado de los productos viejos y las
baterías usadas, por favor llévelos a puntos
de recolección aplicables, de acuerdo a su
legislación nacional y las directivas
2002/96/EC y 2006/66/EC.
Al disponer de estos productos y baterías
correctamente, ayudará a ahorrar recursos
valiosos y a prevenir cualquier potencial
efecto negativo sobre la salud humana y el
medio ambiente, el cual podría surgir de un
inapropiado manejo de los desechos.
Para mayor información sobre recolección y
reciclado de productos viejos y baterías, por
favor contacte a su municipio local, su
servicio de gestión de residuos o el punto de
venta en el cual usted adquirió los artículos.
[Información sobre la Disposición
en otros países fuera de la Unión
Europea]
Estos símbolos sólo son válidos en la Unión
Europea. Si desea deshacerse de estos
artículos, por favor contacte a sus
autoridades locales y pregunte por el método
correcto de disposición.
Nota sobre el símbolo de la batería
(ejemplos de dos símbolos de la
parte inferior):
Este símbolo podría ser utilizado en
combinación con un símbolo químico. En
este caso el mismo obedece a un
requerimiento dispuesto por la Directiva
para el elemento químico involucrado.
12 Es
Page 57

FUNCIONAMIENTO GENERAL
Los elementos sombreados ( ) solo están presentes en los modelos KMA-700.
FUNCIONAMIENTO
1 Conecte el número de micrófonos necesario.
2 Sitúe los interruptores POWER de esta
unidad y del resto de componentes en ON.
3 Reproduzca el componente de la fuente de
música karaoke y ajuste el volumen girando
MUSIC.
La fuente de música se selecciona automáticamente
con la configuración predeterminada. Para definir las
condiciones de selección, consulte “Condición de
entrada automática” en la página 14. Para seleccionar
la fuente de música manualmente, consulte “Modo de
entrada”, en la página 14.
4 Ajuste el volumen del micrófono girando
MIC.
Si los volúmenes de los diferentes micrófonos no
están equilibrados, ajuste MIC VOL con la ayuda de
un destornillador plano.
5 Ajuste el nivel de ECHO girando ECHO.
6 Ajuste la clave girando KEY CONTROL.
■ Notas para utilizar correctamente los
micrófonos
• Al cantar, sujete el micrófono a una distancia de entre 5 y 10 cm
de la boca.
• Para obtener un sonido nítido, sujete el micrófono por debajo de
su cabezal.
• No obstruya la parte inferior del paravientos, ya que interferiría
en los graves y dificultaría la reproducción de la voz. Además,
también podría provocar un efecto de aullido.
A entre 5 y 10 cm de la boca.
Sujete el micrófono por
debajo del cabezal.
Español
13 Es
Page 58

MODO DE CONFIGURACIÓN
En el menú de configuración puede administrar el siguiente
menú:
• Recuperación ON
• Modo de entrada
• Condición de entrada automática
• Habilitar mando a distancia
• Modo de mando a distancia
• Nivel máximo de MIC/MUSIC
• Selección de volumen de MIC/MUSIC
• Inicialización
Para configurar los menús anteriores, ajuste los controles
correspondientes según las indicaciones de “Tabla de modo
de configuración”, en la página 15, siguiendo el
procedimiento explicado a continuación.
1 Para entrar en el modo de configuración,
apague la unidad y pulse POWER manteniendo
pulsados a la vez KEY CONTROL y ECHO
MODE.
2 Ajuste KEY CONTROL y MUSIC de conformidad
con lo expuesto en la “Tabla de modo de
configuración”, en la página 15, para configurar
los menús y elementos que desee.
En el caso de la condición de entrada de audio,
seleccione la fuente que desee antes de seleccionar el
elemento.
Ajuste los parámetros que desea modificar antes de ir al
paso 3.
3 Pulse KEY CONTROL para entrar en los
parámetros.
“ ” parpadea una sola vez al entrar en los parámetros.
4 Para salir del modo de configuración, apague la
unidad.
■ Menús del modo de configuración
1. Recuperación ON
Seleccione Última memoria o Preajuste para recuperar los
parámetros de volumen de MIC, nivel de ECHO, volumen de
MUSIC o ECHO MODE presentes al encender la unidad.
Última memoria*: parámetros definidos en la unidad la
última vez que se apagó.
Preajuste: se recuperan los parámetros guardados en
PRESET 1.
2. Modo de entrada
Seleccione Auto o Manual como modo de entrada.
Auto*: la fuente de entrada se ajusta automáticamente.
Manual: la fuente de entrada se selecciona con INPUT.
La fuente se selecciona en el orden siguiente: DVD, AUX**,
TAPE, BGM.
3. Condición de entrada automática
Defina las condiciones de cada fuente (DVD, AUX** y
TAPE) en el modo de entrada automática descrito en el
paso 2.
Audio*: la fuente se cambia en función de una señal de audio.
Vídeo: la fuente se cambia en función de una señal de vídeo.
Audio/Vídeo: la fuente se cambia en función de una señal de
audio o vídeo.
Solo en el caso de este menú, seleccione la fuente que desee
con INPUT antes de seleccionar el elemento que desee.
4. Habilitar mando a distancia
Permite habilitar o deshabilitar el mando a distancia.
Habilitar*: se habilita el mando a distancia.
Deshabilitar: se deshabilita el mando a distancia.
5. Modo de mando a distancia
Ajuste el dispositivo de recepción de la señal.
Front. y Ext.*: tanto el panel frontal como el satélite del
mando a distancia externo reciben la señal del mando a
distancia.
Front.: solo el panel frontal recibe la señal.
Ext.: solo el satélite del mando a distancia externo recibe la
señal.
6. Nivel máximo de MIC/MUSIC
Ajuste el volumen máximo de MIC y MUSIC.
10*: sin ajuste.
9-3: el volumen máximo se ajusta en el nivel indicado (no
puede ajustarse en un nivel de entre 2-0).
7. Selección de volumen de MIC/MUSIC
Seleccione como aumentan o disminuyen los volúmenes de
MIC y MUSIC (la curva del volumen) al girar los controles
correspondientes.
Esquema 1*: curva pronunciada.
Esquema 2: curva menos pronunciada.
Esquema 3: la curva menos pronunciada, que permite realizar
un ajuste más preciso.
8. Inicialización
Con esta opción podrá restablecer todos los parámetros del
modo de configuración a los valores predeterminados.
Cancelar: la inicialización no se ejecuta.
Inicializar: se ejecuta la inicialización.
Al pulsar KEY CONTROL con el ajuste MUSIC situado en
3, la inicialización se ejecuta.
* Configuración
predeterminada
** Solo KMA-700
14 Es
Page 59

■ Tabla de modo de configuración
Ú
Menú KEY CONTROL Elementos/MUSIC
1. Recuperación ON
+1
MODO DE CONFIGURACIÓN
ltima memoria: 1 Preajuste: 2
2. Modo de entrada
3. Condición de
entrada automática
4. Habilitar mando a
distancia
5. Modo de mando a
distancia
+2 Auto: 1 Manual: 2
+3
Seleccione la fuente que desee
con INPUT.
Ejemplo: DVD
Audio: 1 Vídeo: 2 Audio/Vídeo: 3
+4 Habilitar: 1 Deshabilitar: 2
+5 Front. y Ext.: 1 Front.: 2 Ext.: 3
FUNCIONAMIENTO
6. Nivel máximo de
MIC/MUSIC
7. Selección de
volumen de
MIC/MUSIC
8. Inicialización
–1
–2
–5
Sin ajuste: 10 Ajuste en el nivel indicado: 9-3
Ejemplo: 3
Esquema 1: 1 Esquema 2: 2 Esquema 3: 3
Cancelar: 1 Inicializar: 3
Español
15 Es
Page 60

INFORMACIÓN ADICIONAL
SOLUCIÓN DE PROBLEMAS
Si surge algún tipo de problema, consulte la tabla siguiente para encontrar soluciones sencillas.
Si continúa sin poder resolver el problema, póngase en contacto con su distribuidor.
Problemas Posibles causas Soluciones
Los altavoces no emiten
ningún tipo de sonido.
Uno de los altavoces no
emite ningún tipo de
sonido.
El micrófono no emite
ningún tipo de sonido.
El mando a distancia no
funciona o no lo hace
correctamente.
POWER está situado en OFF. Sitúe POWER en ON.
El cable de alimentación está desconectado. Conecte el cable de alimentación correctamente en la toma
MUSIC está en la posición más baja. Ajuste MUSIC.
Se ha seleccionado una fuente de música
incorrecta tras definir el modo de entrada
como Manual en el modo de configuración.
El sonido se ha cortado debido al aumento de
temperatura de la unidad.
MUSIC BALANCE está totalmente
desplazado hacia uno de los altavoces.
Uno de los cables del altavoz está
desconectado.
La clavija del micrófono no está totalmente
introducida.
El interruptor del micrófono está ajustado en
OFF.
Los controles MIC VOL o MIC
correspondientes están en la posición más baja.
Tiene el micrófono demasiado lejos de la boca
o lo sujeta de forma incorrecta.
El mando a distancia está demasiado lejos o
demasiado inclinado.
El sensor del mando a distancia de la unidad
está expuesto a la luz solar directa o a una
fuente de luz.
Habilitar mando a distancia está configurado
como Deshabilitar en el modo de
configuración.
Se ha seleccionado un Modo de mando a
distancia incorrecto en el modo de
configuración.
La pila se está agotando. Cambie la pila CR2025 por otra nueva. Consulte “Carga de
Si INPUT no funciona, el modo de entrada está
configurado como Auto.
de pared de CA.
Seleccione la fuente de música correcta con INPUT o
defina el modo de entrada como Auto en el modo de
configuración. Consulte “Modo de entrada”, en la
página 14.
Apague la unidad y deje que se enfríe.
Ajuste el control en la posición central.
Introduzca el cable correctamente en los terminales.
Introduzca la clavija correctamente en la toma
correspondiente.
Sitúe el interruptor del micrófono en ON.
Ajuste el control.
Consulte el manual del usuario suministrado con el
micrófono.
El mando a distancia funcionará a una distancia de menos
de 6 m y con una inclinación de como máximo 30 grados
en relación con el panel frontal.
Cambie la ubicación de la unidad.
Configure Habilitar mando a distancia como Habilitar en el
modo de configuración. Consulte “Habilitar mando a
distancia”, en la página 14.
Configure el Modo de mando a distancia correcto en el
modo de configuración. Consulte “Modo de mando a
distancia”, en la página 14.
la pila”, en la página 11.
Configure el modo de entrada como Manual en el modo de
configuración. Consulte “Modo de entrada”, en la
página 14.
MANTENIMIENTO
Si la unidad se ensucia, límpiela con un paño suave y seco.
Nunca utilice alcohol, disolvente, benceno, insecticida ni otros compuestos volátiles, ya que podrían dañar la pintura de
la superficie o el brillo de la unidad.
Tampoco utilice nunca un paño con sustancias químicas en la unidad ni lo deje en su superficie durante mucho tiempo,
ya que el acabado de la superficie o la pintura podrían deteriorarse.
16 Es
Page 61

SERVICIO POSVENTA
• Si la unidad presenta algún defecto, diríjase a su
distribuidor para repararla o reemplazar la pieza
defectuosa.
• Antes de solicitar la reparación a su distribuidor,
consulte “SOLUCIÓN DE PROBLEMAS” para ver las
posibles soluciones.
CONSEJOS PARA LOS USUARIOS DEL KARAOKE
Al utilizar el karaoke, puede que la música o el ruido molesten a otras personas, por lo que
debe tener en cuenta siempre la presencia de vecinos.
Recomendamos controlar el volumen del karaoke, ya que incluso el sonido más bajo puede
escucharse nítidamente en una noche silenciosa. Por tanto, respete siempre el descanso de sus
vecinos y cierre las ventanas cuando utilice el karaoke.
COPYRIGHT
Para el distribuidor:
Si el cliente solicita un servicio posventa, compruebe
primero los puntos siguientes:
• Confirme la información de cualquier incidente.
• Compruebe todos los cables y conexiones.
• Confirme las medidas de seguridad relativas al
funcionamiento y las instrucciones de uso del sistema
con el cliente.
Si la unidad se considera defectuosa y resulta difícil
repararla, envíe la unidad defectuosa al centro de servicio
autorizado Yamaha más próximo.
INFORMACIÓN
ADICIONAL
• Las fuentes de retransmisiones y de música, como por ejemplo las cintas, DVD, cintas de vídeo, CD y similares están
protegidas por la legislación sobre copyright.
• Necesita la autorización del titular del copyright para utilizar, distribuir o alquilar estas fuentes de música con
finalidades comerciales o bien para comercializar soportes doblados, salvo si son para su propio uso.
Español
17 Es
Page 62

ESPECIFICACIONES
AMPLIFICADOR
• Salida máxima
[KMA-700]
(1 kHz, 8 Ω, 10 % THD)...................................... 120 W+120 W
[KMA-500]
(1 kHz, 8 Ω, 10 % THD)...................................... 100 W+100 W
• Distorsión armónica total
[KMA-700]
(1 kHz, 93 W, 8 Ω).................................................................. 1%
[KMA-500]
(1 kHz, 76 W, 8 Ω).................................................................. 1%
• Entrada de audio (Sensibilidad/Impedancia)
DVD, TAPE, AUX (solo KMA-700) .....................200 mV/42 kΩ
BGM........................................................................200 mV/42 kΩ
MIC ..........................................................................6,0 mV/20 kΩ
• Salida de audio (Nivel de salida/Impedancia de salida)
PRE OUT ................................................................... 1,0 V/1,2 kΩ
SUBWOOFER...........................................................2,0 V/1,2 kΩ
• Respuesta de frecuencia
MUSIC....................................... de 20 Hz a 15 kHz, +1,5/–0,5 dB
MIC ............................................ de 40 Hz a 15 kHz, +1,0/–0,5 dB
• Características de control de tono
MUSIC
BASS................................................................. ±12 dB (100 Hz)
TREBLE............................................................±12 dB (10 kHz)
MIC
BASS................................................................. ±12 dB (100 Hz)
MID.....................................................................±12 dB (1 kHz)
TREBLE............................................................±10 dB (10 kHz)
• Impedancia de los altavoces
[KMA-700]
(solo 1 sistema A o B).............................. 4 Ω a 8 Ω /8 Ω a 16 Ω
(con 2 sistemas A y B) ...............................................8 Ω a 16 Ω
[KMA-500]
(solo 1 sistema) .......................................................... 8 Ω a 16 Ω
• Rango de control de clave.................................±5 pasos, ±2,5 tonos
• Entrada de vídeo
(Sensibilidad/Impedancia de entrada).........................1 Vp-p/75 Ω
• Salida de vídeo
(Nivel de salida/Impedancia) ......................................1 Vp-p/75 Ω
ACCESORIOS
• Manual del producto.........................................................................1
• Mando a distancia.............................................................................1
• Cable de alimentación (Excepto el modelo de EE.UU.) ..................1
DIMENSIONES
416
429
132
150
435
18
El diseño y las especificaciones están sujetos a cambios sin previo
aviso.
FUENTE DE ALIMENTACIÓN
• Tensión de alimentación
Modelos para Asia y otros países
......................................... CA 110/120/220/230-240 V 50/60 Hz
Modelo de EE.UU................................................ CA 120 V 60 Hz
• Consumo de energía
[KMA-700]
(IEC 60065)....................................................................... 190 W
(En reposo).......................................................................... 25 W
[KMA-500]
(IEC 60065)....................................................................... 165 W
(En reposo).......................................................................... 25 W
• AC OUTLETS (Solo para el modelo de EE.UU.)
SWITCHED (100 W máx.)........................................................... 2
• Dimensiones (An. × Al. × Prof.)........ 435 mm × 150 mm × 416 mm
• Peso ........................................................................................... 10 kg
18 Es
Page 63

Page 64

Предупреждение: Внимательно изучите это перед
использованием аппарата
Для обеспечения наилучшего результата, пожалуйста,
1
внимательно изучите данную инструкцию. Храните ее
в безопасном месте для будущих справок.
2 Данную аудиосистему следует устанавливать в
хорошо проветриваемых, прохладных, сухих, чистых
местах, не подверженных воздействию прямого
солнечного света, вибрации, пыли, влаги и/или
холода, вдали от источников тепла. Для вентиляции
обязательно обеспечьте по крайней мере 10 см
пространства над аппаратом, по обеим сторонам, а
также 20 см позади него.
3 Во избежание шумов и помех, данный аппарат
следует размещать на некотором расстоянии от
других электрических приборов, двигателей, или
трансформаторов.
4 Во избежание накопления влаги внутри данного
аппарата, что может вызвать электрошок, пожар,
привести к поломке данного аппарата, и/или
представлять угрозу жизни, не следует размещать
данный аппарат в среде, подверженной резким
изменениям температуры с холодной на жаркую, или
в среде с повышенной влажностью (например, в
комнате с увлажнителем воздуха).
5 Не устанавливайте данный аппарат в местах, где есть
риск падения других посторонних объектов на
данный аппарат, и/или где данный аппарат может
подвергнуться попаданию капель или брызгов
жидкостей. На крышке данного аппарата, не следует
располагать:
– другие компоненты, так как это может привести к
поломке и/или отцвечиванию поверхности
данного аппарата.
– горящие объекты (например, свечи), так как это
может привести к пожару, поломке данного
аппарата, и/или представлять угрозу жизни.
– емкости с жидкостями, так как при их падении,
жидкости могут вызвать поражение пользователя
электрическим током и/или привести к поломке
данного аппарата.
6 Во избежание прерывания охлаждения данного
аппарата, не следует покрывать данный аппарат
газетой, скатертью, занавеской и т.д. Повышение
температуры внутри данного аппарата может
привести к пожару, поломке данного аппарата, и/или
травме.
7 Не включайте данный аппарат в розетку
переменного тока, пока не завершены все
подключения.
8 Не используйте данный аппарат, установив его
верхней стороной вниз. Это может привести к
перегреву и возможной поломке.
9 Не применяйте силу по отношению к
переключателям, ручкам и/или проводам.
10 При отсоединении шнура питания от розетки
переменного тока, держите его за штекер, а не за
шнур.
11 Не применяйте различные химические составы для
очистки данного аппарата; это может привести к
разрушению покрывающего слоя. Используйте
чистую сухую ткань.
12 Используйте данный аппарат с соблюдением
напряжения, указанном на данном аппарате.
Использование данного аппарата при более высоком
напряжении, превышающем указанное, является
опасным, и может стать причиной пожара, поломки
данного аппарата, и/или привести к травме. Yamaha
не несет ответственности за любую поломку или
ущерб вследствие использования данного аппарата
при напряжении, не соответствующем указанному
напряжению.
13 Чтобы предотвратить повреждение аппарата во
время грозы, отключайте шнур питания от розетки
переменного тока или аппарата.
14 Не пробуйте модифицировать или починить данный
аппарат. При необходимости, свяжитесь с
квалифицированным сервис центром Yamaha.
Корпус аппарата не должен открываться ни в коем
случае.
15 Если вы не собираетесь использовать данный аппарат
в течение продолжительного времени (например, во
время отпуска), отключите штекер шнура питания
переменного тока от розетки.
16 Устанавливайте этот аппарат в непосредственной
близости от настенной розетки для кабеля питания
AC.
17 Перед тем как прийти к заключению о поломке
данного аппарата, обязательно изучите раздел
“ВОЗМОЖНЫЕ НЕИСПРАВНОСТИ И
СПОСОБЫ ИХ УСТРАНЕНИЯ”, описывающий
часто встречающиеся ошибки во время
использования.
18 Перед перемещением аппарата нажмите кнопку
POWER, чтобы выключить аппарат, а затем
отсоедините шнур питания от розетки переменного
тока.
19 Батарейки не должны подвергаться нагреву от
солнечных лучей, огня или похожих источников.
20 При внезапном изменении окружающей
температуры образуется конденсат. Отключите
кабель питания от розетки и не пользуйтесь
аппаратом.
21 При продолжительном использовании аппарат может
нагреваться. Отключите питание, затем дайте
аппарату остыть.
22 VOLTAGE SELECTOR
(за исключением модели для США)
ПЕРЕД подключением шнура питания к сетевой
розетке селектор VOLTAGE SELECTOR на задней
панели аппарата необходимо переключить в
положение, соответствующее местному напряжению.
i Ru
Page 65

ножка ножка
Следует соблюдать перечисленные ниже размеры стоек:
стойка
12 Пространство для вентиляции над аппаратом и по
обеим сторонам от него: более 10 см
3 Пространство для вентиляции позади аппарата:
более 20 см
4 Не снимайте ножки аппарата.
ПРЕДУПРЕЖДЕНИЕ
ВО ИЗБЕЖАНИЕ ПОЖАРА ИЛИ УДАРА
ЭЛЕКТРИЧЕСКИМ ТОКОМ, НЕ
ПОДВЕРГАЙТЕ ДАННЫЙ АППАРАТ
ВОЗДЕЙСТВИЯМ ДОЖДЯ ИЛИ ВЛАГИ.
Этот аппарат не отключается от источника
переменного тока, пока он подключен к
настенной розетке переменного тока, даже
если он выключен с помощью кнопки POWER.
ПРЕДУПРЕЖДЕНИЕ
Если батарейка неправильно заменена, есть
опасность взрыва. Заменяйте ее только на
такую же или эквивалентную батарейку.
СОДЕРЖАНИЕ
ВВЕДЕНИЕ
МЕРЫ ПРЕДОСТОРОЖНОСТИ ПРИ
ОБРАЩЕНИИ ...................................................2
ПЕРЕД ПОДКЛЮЧЕНИЕМ ..............................2
ПОДГОТОВКА
НАЗВАНИЯ ДЕТАЛЕЙ И ИХ ФУНКЦИИ
...............................................................................3
РАБОТА
СОЕДИНЕНИЯ СИСТЕМЫ ..............................6
СОЕДИНЕНИЯ .....................................................7
СХЕМА КОНФИГУРАЦИИ.............................10
ПУЛЬТ ДУ............................................................11
ОБЩЕЕ УПРАВЛЕНИЕ....................................13
РЕЖИМ НАСТРОЙКИ......................................14
ДОПОЛНИТЕЛЬНАЯ ИНФОРМАЦИЯ
ВОЗМОЖНЫЕ НЕИСПРАВНОСТИ И
СПОСОБЫ ИХ УСТРАНЕНИЯ ..................16
ТЕХНИЧЕСКОЕ ОБСЛУЖИВАНИЕ ............16
ПОСЛЕПРОДАЖНОЕ ОБСЛУЖИВАНИЕ
ЭТИКЕТ ИСПОЛЬЗОВАНИЯ ФУНКЦИИ
КАRАОКЕ.........................................................17
АВТОРСКИЕ ПРАВА ........................................17
ТЕХНИЧЕСКИЕ ХАРАКТЕРИСТИКИ.........18
...17
ПОДГОТОВКАВВЕДЕНИЕ
РАБОТА
ДОПОЛНИТЕЛЬНАЯ
ИНФОРМАЦИЯ
ПРЕДУПРЕЖДЕНИЕ
Использование органов управления или
регулировок или выполнение процедур,
отличных от указанных в данном руководстве,
может привести к воздействию опасных
излучений.
Русский
1 Ru
Page 66

ВВЕДЕНИЕ
Благодарим вас за покупку цифрового микширующего усилителя для караоке Yamaha KMA-700/KMA-500.
Этот документ является руководством пользователя для моделей KMA-700 и KMA-500. Названия моделей
указываются в местах с описанием функций уникальных для каждой модели. Иллюстрации для модели
KMA-700 в основном используются для описания.
Перед использованием этого аппарата обязательно прочитайте данное руководство. Это позволит вам
полностью использовать
После прочтения сохраните руководство в надежном месте для дальнейшего использования. В руководстве
описаны основные принципы работы цифрового микширующего усилителя, а также возможные решения
проблем, которые могут возникнуть при его эксплуатации.
его возможности.
МЕРЫ ПРЕДОСТОРОЖНОСТИ ПРИ ОБРАЩЕНИИ
■ Не устанавливайте аппарат в
следующих местах:
• В местах воздействия прямого солнечного света
или поблизости от источников тепла, например
радиаторов.
• В местах с недостаточной вентиляцией без
теплоотводов, а также влажных или пыльных
местах.
ПЕРЕД ПОДКЛЮЧЕНИЕМ
■ Меры предосторожности при
подключении
• Перед выполнением любых подключений
обязательно отключите питание соответствующего
оборудования.
• Белые входные/выходные гнезда усилителя
предназначены для левого канала, а красные
входные/выходные гнезда предназначены для
правого канала. Подключайте провода
надлежащим образом, в соответствии с цветовой
кодировкой для левого и правого каналов.
• Надежно вставляйте штекеры соединяющих
проводов в гнезда. Если
ненадежно, звук может отсутствовать или может
воспроизводиться шум.
• При отсоединении кабеля питания от сетевой
розетки обязательно удерживайте пластиковую
формовку самого кабеля, а затем потяните.
• Перед включением аппарата при использовании
модели KMA-700 установите IMPEDANCE
SELECTOR на задней панели. См. “IMPEDANCE
SELECTOR” на стр. 7.
• За исключением модели для США: ПЕРЕД
подключением кабеля питания
VOLTAGE SELECTOR на задней панели аппарата
необходимо переключить в положение,
соответствующее местному напряжению. См.
“VOLTAGE SELECTOR” на стр. 9.
подключение выполнено
к сетевой розетке
• На наклонной поверхности или в месте,
подверженном чрезмерной вибрации.
• В местах, подверженных воздействию дождя,
например рядом с окном.
• В местах, подверженных воздействию
испарений или тепла, например рядом с
кухонными приспособлениями.
копоти,
■ Потребляемая мощность AC OUTLETS
(только для модели для США)
• Соблюдайте осторожность, чтобы общая
потребляемая мощность не превышала значение в
ваттах, указанное на задней панели. Не
подключайте к розетке AC OUTLETS данного
аппарата другие приборы, кроме компонентов
системы.
• Не подключайте к данному аппарату телевизор,
даже если при включенном телевизоре на аппарате
отображается потребляемая мощность меньше
допустимого значения.
2 Ru
Page 67

ПОДГОТОВКА
НАЗВАНИЯ ДЕТАЛЕЙ И ИХ ФУНКЦИИ
Передняя панель
ПОДГОТОВКА
Затемненная часть ( ) относится только к модели KMA-700.
1 POWER (ON/OFF)
Используется для включения питания ON/OFF.
2 MUSIC BALANCE
Используется для регулировки баланса громкости.*
3 MUSIC TONE (BASS/TREBLE)
Используются для настройки тембра в области высоких и
низких частот.*
4 MIC ECHO DELAY
Используется для регулировки времени задержки эха.*
5 MIC ECHO REPEAT
Используется для регулировки объема обратной связи.*
6 ECHO MODE
Можно выбрать режимы эха NORMAL, WIDE (стерео)
или SPACIOUS**. Режим эха SPACIOUS - это эффект,
обеспечивающий режимы эха NORMAL и WIDE с
задержкой по времени. Светодиодный индикатор
загорится желтым/зеленым** при выборе режима эха
WIDE/SPACIOUS**.
7 MIC TONE (BASS/MID/TREBLE)
Используются для настройки тембра в области высоких,
средних и низких частот микрофонов.*
8 Гнезда MIC (1/2/3**)
Данные гнезда предназначены для подключения
микрофонов.
9 MIC VOL (1/2/3**)
Используется для регулировки входного уровня
микрофона.*
0 MIC
Используется для настройки общего уровня громкости
всех микрофонов.
A Датчик ДУ
Этот датчик получает сигналы от пульта ДУ.
B ECHO
Используется для регулировки степени эха.
C INPUT/индикаторы источника ввода (DVD/
AUX**/TAPE/BGM)
При настройке по умолчанию параметр INPUT будет
недоступен.
Для активации параметра INPUT см. “Режим ввода” на
стр. 14.
Индикаторы источника ввода показывают действующий
источник приема.
D MUSIC
Используется для регулировки уровня громкости
музыкального источника.
E KEY CONTROL
Для изменения тональности воспроизводимой музыки
поворачивайте этот регулятор. Можно установить одно
из 5 значений тональности с шагом в полтона; выше или
ниже. Чтобы восстановить обычную тональность,
используйте этот регулятор. Если звук отсутствует более
4 секунд, аппарат определяет окончание воспроизведения
композиции, при этом устанавливается обычная
тональность.
* Для регулировки используйте отвертку.
** Только для KMA-700
Русский
3 Ru
Page 68

НАЗВАНИЯ ДЕТАЛЕЙ И ИХ ФУНКЦИИ
Задняя панель
Затемненная часть ( ) относится только к модели KMA-700.
(Модель для Азии)
Для получения дополнительной информации о
подключении компонента см. “СОЕДИНЕНИЯ
СИСТЕМЫ” на стр. 6.
1 Гнезда BALANCED MIC INPUT (1/2)
Данные гнезда предназначены для подключения
микрофонов.
Это входы баланса, они подключаются к одной
схеме - гнездам MIC 1 и 2 на передней панели.
2 Гнезда аудиовхода DVD
Используются для подключения выходных гнезд
устройства KARAOKE или DVD-проигрывателя.
3 Гнезда аудиовхода AUX *
Используются для подключения выходных гнезд
кассетного проигрывателя, видеомагнитофона и т.д.
4 Гнезда аудиовхода TAPE
Используются для подключения выходных гнезд
кассетного проигрывателя, видеомагнитофона и т.д.
5 Гнезда аудиовыхода TAPE
Используются для подключения входных гнезд
кассетного проигрывателя, видеомагнитофона и т.д.
6 Гнезда аудиовхода BGM
Используется для подключения выходных гнезд
компонента-источника фоновой музыки.
7 Гнездо SUBWOOFER без фильтра низких
частот
Используются для подключения входного гнезда
сабвуфера с фильтром низких частот. C помощью
этого
гнезда напрямую выводится монофонический
сигнал.
8 Гнездо SUBWOOFER с фильтром низких
частот
Используется для подключения входного гнезда
сабвуфера.
9 Гнезда PRE OUT
Используется для подключения входных гнезд
усилителя мощности.
0 IMPEDANCE SELECTOR*
См. “IMPEDANCE SELECTOR” на стр. 7.
A Гнездо REMOTE
Используется для подключения внешнего пульта ДУ.
См. “Подключение внешнего пульта ДУ” на стр. 8.
B Гнезда VIDEO INPUT
Используется для подключения входного гнезда
видеовыхода DVD, AUX* или видеопроигрывателя/
видеокамеры и т
.д.
4 Ru
* Только для KMA-700
Page 69

(Модель для Азии)
Затемненная часть ( ) относится только к модели KMA-700.
НАЗВАНИЯ ДЕТАЛЕЙ И ИХ ФУНКЦИИ
ПОДГОТОВКА
C DVD INPUT LEVEL
Используется для регулировки баланса входного
уровня DVD в соответствии с другими входами
(AUX*, TAPE, BGM).
D AUX INPUT LEVEL*
Используется для регулировки баланса входного
уровня AUX в соответствии с другими входами
(DVD, TAPE, BGM).
E TAPE INPUT LEVEL
Используется для регулировки баланса входного
уровня TAPE в соответствии с другими входами
(DVD, AUX*, BGM).
F BGM INPUT LEVEL
Используется для регулировки баланса входного
уровня BGM в соответствии с другими входами
(DVD, AUX*, TAPE).
G SPEAKERS (Разъемы акустической
системы)
Используется для подключения акустических систем.
При использовании модели KMA-500 можно
подключить только одну акустическую систему.
H AC OUTLETS (Макс. общая потребляемая
мощность: 100 Вт, только модель для
США)
См. “AC OUTLETS” на стр. 9.
I AC IN (За исключением модели для США)
См. “AC IN” на стр. 9.
Кабель питания (только модель для США)
Вставьте этот кабель в сетевую розетку.
J VOLTAGE SELECTOR (За исключением
модели для США)
См. “VOLTAGE SELECTOR” на стр. 9.
K Разъем заземления сигналов
Этот разъем используется, если при подключении
данного усилителя слышен гудящий звук.
L Гнезда VIDEO OUTPUT
Используются для подключения
видеовхода
монитора.
* Только для KMA-700
Русский
5 Ru
Page 70

РАБОТА
СОЕДИНЕНИЯ СИСТЕМЫ
Телевизионный монитор
Телевизионный
монитор
MIC
MIC
Телевизионный
монитор
Система 2
активный
сабвуфер
Система 1
Активный сабвуфер
(с фильтром низких
частот)
Система A
Правая Левая
КАRАОКЕ/
DVD-
проигрыватель
Затемненная часть ( ) относится только к модели KMA-700.
Видеомагнитофон/
проигрыватель
лазерных дисков
(только KMA-700)
Магнитофон
Фоновый
музыкальный
проигрыватель/
проигрыватель
видео
Усилитель
мощности
(Модель для Азии)
Правая Левая
Система B
(только KMA-700)
6 Ru
Page 71

СОЕДИНЕНИЯ
■ Подсоединение проводов колонок
1 Приподнимите рычажок для открытия, а
затем вставьте провод в отверстие.
Провод (–) к разъему (–)
Провод (+) к
разъему (+)
Затемненная часть ( ) относится только к
модели KMA-700.
2 Опустите рычажок, чтобы закрепить
провод.
Перед соединением удалите с конца каждого
провода участок изоляции длиной около 15 мм с
помощью плоскогубцев или другого
инструмента.
15 мм
■ Меры предосторожности при
подключении колонок
• Максимальная выходная мощность данного
аппарата:
KMA-700.................................................120 Вт + 120 Вт
KMA-500.................................................100 Вт + 100 Вт
Следовательно, максимальная входная мощность
используемых колонок должна превышать указанную
мощность.
• Чтобы избежать каких-либо неполадок или
повреждений, вызванных несоответствием
оборудования, используйте колонки Yamaha.
[Для KMA-700]
IMPEDANCE SELECTOR
• Перед включением аппарата обязательно
установите селектор IMPEDANCE SELECTOR на
задней панели в положение, соответствующее
используемой акустической системе.
(Низкое) (Высокое)
РАБОТА
Примечание
Будьте осторожны, чтобы оголенные участки проводов,
выступающие из разъема, не соприкасались друг с другом.
Контакт оголенных участков проводов от разных колонок
может привести к повреждению системы.
Правая
колонка
Затемненная часть ( ) относится только к
модели KMA-700.
Левая
колонка
Положение
переключателя
Низкое
Высокое
Используемая
колонка
Одна колонка 4 Ω или выше
Две колонки 8 Ω или выше
Одна колонка 8 Ω или выше
Две колонки 16 Ω или выше
Уровень
сопротивления
колонки
• Не изменяйте положение селектора IMPEDANCE
SELECTOR при включенном питании аппарата,
поскольку это может привести к его повреждению.
Примеры соединений
Минимальное сопротивление колонки 4 Ω. При
параллельном подключении двух колонок
сопротивлением 6 Ω будет превышено расчетное
значение и сработает предохранитель. Если
используется две колонки и при этом часто
срабатывает предохранитель, подключите колонки
последовательно.
Русский
7 Ru
Page 72

СОЕДИНЕНИЯ
1. Параллельное соединение
(сопротивление каждой колонки должно
составлять не менее 8 Ω)
6 Ω 6 Ω
6 Ω + 6 Ω ➝ 3 Ω
(<4 Ω:
неправильно)
2. Последовательное соединение
(общее: около 4 Ω)
6 Ω 6 Ω
6 Ω + 6 Ω = 12 Ω
(>4 Ω:
правильно)
■ Подключение к входам баланса
HOT
COLD
GND
HOT
GND
COLD
■ Подключение к
несбалансированному входу
HOT
GND
или
HOT
GND
■ Подключение внешнего пульта ДУ
[Для KMA-500]
Сопротивление колонки должно составлять от 8 Ω до
16 Ω.
■ Подключение штекеров RCA
При подключении штекеров RCA убедитесь в том, что
вставляете красный штекер в красное гнездо, а белый
штекер в белое гнездо.
Белый
Левая
Белый
Правая
Красный
Красный
REMOTE
(Direct)
REMOTE
+5V
OUT
GND
Ретранслятор внешнего
пульта ДУ
RMC KMA-700/
RMC KMA-700/
GND
+5V_OUT
+5V_OUT
REMOTE
GND
KMA-500
REMOTE (Direct)
GND
KMA-500
8 Ru
Page 73

СОЕДИНЕНИЯ
1. Ретранслятор внешнего пульта ДУ
Подключите к +5V_OUT, REMOTE и GND.
Примечание
При подключении ретранслятора пульта ДУ к этому входу
этот аппарат сможет принимать сигналы от пульта ДУ.
2. REMOTE (Direct)
Подключите к REMOTE (Direct) и GND.
Подключите к выходу инфракрасного диода
(открытый коллектор) RMC.
Примечание
При подключении REMOTE (Direct) к этому входу этот
аппарат сможет принимать сигналы REMOTE.
■ Настройки питания и соединения на
задней панели
Прилагаемый кабель
питания
(За исключением модели
для США)
VOLTAGE SELECTOR
(За исключением модели для США)
ПЕРЕД подсоединением кабеля питания к сетевой
розетке селектор VOLTAGE SELECTOR на задней
панели аппарата необходимо переключить в
положение, соответствующее местному напряжению.
AC OUTLETS
(SWITCHED. Только модель для США)
Эти розетки используются для подсоединения кабелей
питания от других компонентов к данному аппарату.
Подача питания к AC OUTLETS контролируется с
помощью кнопки POWER на передней панели
аппарата. Питание из розеток подается на любой
подключенный компонент независимо от того,
включено питание аппарата или нет. Общая
потребляемая мощность 100 Вт.
Примечания
• Соблюдайте осторожность, чтобы общая потребляемая
мощность не превышала значение в ваттах, указанное на
задней панели. Не подключайте к разъемам питания
данного аппарата другие приборы, кроме компонентов
системы.
• Не подключайте к данному аппарату телевизор, даже если
при включенном телевизоре на аппарате отображается
потребляемая мощность меньше допустимого значения.
РАБОТА
(Модель для Азии)
Затемненная часть ( ) относится только к модели
KMA-700.
Дополнительные рисунки предназначены только для
моделей для США.
AC IN
(За исключением модели для США)
Подсоедините прилагаемый кабель питания к разъему
AC IN.
Кабель питания
После завершения всех соединений подсоедините
кабель питания к сетевой розетке.
Русский
9 Ru
Page 74

СХЕМА КОНФИГУРАЦИИ
* Только для KMA-700
**Вход баланса на задней панели
10 Ru
Page 75

ПУЛЬТ ДУ
■ Названия деталей и их функции
1 INPUT
При настройке по умолчанию использовать кнопку
INPUT не удастся.
Чтобы активировать кнопку INPUT, см. раздел
“Режим ввода” на стр. 14.
Чтобы сохранить текущие настройки указанных выше
параметров, нажмите и удерживайте нужную кнопку
(PRESET 1, 2, 3 или KEY CONTROL на передней
панели) в течение 3 секунд. При нажатии кнопки KEY
CONTROL настройки сохраняются для PRESET 1.
После завершения сохранения индикатор “” на
регуляторе KEY CONTROL мигнет один раз. На
данном
предварительных настроек (PRESET 1/2/3). См.
“Восстановление настроек при включении питания
ON” на стр. 14.
7 ECHO MODE
Можно выбрать режимы эха NORMAL, WIDE или
SPACIOUS (только для KMA-700).
аппарате можно сохранить до 3
■ Подготовка пульта ДУ
Пульт ДУ поставляется с установленной батарейкой.
Перед первым использованием пульта ДУ вытащите
пластиковую пластинку, как показано на рисунке.
Пластиковая
пластинка
РАБОТА
2 KEY CONTROL ( / / )
Используется для изменения тональности
воспроизводимой музыки.
3 MIC ( / )*
Используется для настройки общего уровня
громкости микрофонов.
4 ECHO ( / )*
Используется для регулировки степени эха.
5 MUSIC ( / )*
Используется для настройки уровня громкости
музыки.
* Во время настройки мигает светодиодный индикатор на
соответствующем регуляторе передней панели.
6 PRESET (1/2/3)
Используется для восстановления предварительно
сохраненных настроек для уровня громкости MIC/
объема ECHO/уровня громкости MUSIC/ECHO
MODE.
Информацию о замене батарейки см. в следующем
разделе.
■ Обращение с пультом ДУ
1. Пульт ДУ
Расстояние между пультом ДУ и датчиком ДУ
данного аппарата не должно превышать 6 м. При
управлении с помощью пульта ДУ обязательно
направляйте его на датчик ДУ, расположенный на
передней панели.
Не более 6 м
30°
30°
Русский
11 Ru
Page 76

ПУЛЬТ ДУ
2. Установка батарейки
При обычном использовании срок использования
батарейки в пульте ДУ составляет около полугода.
Если пульт ДУ не будет использоваться в течение
длительного времени, извлеките батарейку. При
слабом заряде батарейки замените ее на новую
батарейку CR2025.
Замена батарейки:
1. С помощью отвертки маленького размера
осторожно выдвиньте держатель батарейки.
2. Извлеките старую батарейку и установите
батарейку CR2025 в держатель батарейки стороной
со знаком + вверх.
3. Задвиньте держатель батарейки в пульт ДУ и
нажмите на него до щелчка.
стороной со знаком + вверх
Неправильное использование батареек может
привести к риску протекания батарейки и взрыву.
Соблюдайте следующие указания:
• Не пытайтесь перезаряжать использованную
батарейку.
• Устанавливайте батарейку в соответствии с
индикациями положительного (+) и
отрицательного (–)
• Даже при совпадении размеров напряжение
батареек разных моделей может различаться. Не
используйте другие модели батареек.
• Использованные батарейки следует утилизировать
в соответствии с местными нормами.
полюсов.
новую
Информация для пользователей по
сбору и утилизации старой аппаратуры
и Использованных батареек
Эти знаки на аппаратуре, упаковках и в
сопроводительных документах
указывают на то, что подержанные
электрические и электронные приборы
и батарейки не должны выбрасываться
вместе с обычным домашним мусором.
Для правильной обработки, хранения и
утилизации старой аппаратуры и
использованных батареек пожалуйста
сдавайте их в соответствующие
сборные пункты, согласно вашему
национальному законодательству и
директив 2002/96/EC и 2006/66/EC.
При правильном отделении этих
товаров и батареек, вы помогаете
сохранять ценные ресурсы и
предотвращать вредное влияние на
здоровье людей и окружающую среду,
которое может возникнуть из-за
несоответствующего обращения с
отходами.
За более подробной информацией о
сборе и утилизации старых товаров и
батареек пожалуйста обращайтесь в
вашу локальную
приёмный пункт или в магазин где вы
приобрели эти товары.
[Информация по утилизации в
других странах за пределами
Европейского Союза]
Эти знаки действительны только на
территории Европейского Союза. Если
вы хотите избавиться от этих
предметов, пожалуйста обратитесь в
вашу локальную администрацию или
продавцу и спросите о правильном
способе утилизации.
администрацию, в ваш
12 Ru
Обратите внимание на знак для
батареек (два знака на задней
стороне):
Этот знак может использоваться в
комбинации со
содержании химикалий. В этом случае
это удовлетворяет требованиям
установленными Директивой по
использованию химикалий.
знаком указывающим о
Page 77

ОБЩЕЕ УПРАВЛЕНИЕ
Затемненная часть ( ) относится только к модели KMA-700.
РАБОТА
1 Подключите нужное количество
микрофонов.
2 Установите переключатели POWER этого
аппарата и других требуемых
компонентов в положение ON.
3 Воспроизведите компонент
музыкального источника KARAOKE и
отрегулируйте громкость с помощью
регулятора MUSIC.
Музыкальный источник выбирается
автоматически при настройке по умолчанию. Об
установке параметров выбора см. “Условие
автоматического ввода” на стр. 14. О выборе
музыкального источника вручную см. “Режим
ввода” на стр. 14.
4 Настройте уровень громкости микрофона
с помощью регулятора MIC.
Если уровни громкости различных микрофонов
не сбалансированы, с помощью отвертки
настройте MIC VOL.
5 Настройте объем ECHO с помощью
регулятора ECHO.
6 Отрегулируйте тональность с помощью
регулятора KEY CONTROL.
■ Примечания по правильному
использованию микрофонов
• Во время пения держите микрофон на расстоянии 5 – 10 см
от рта.
• Для обеспечения чистого звука держите микрофон ниже
головки.
• Не блокируйте нижнюю часть устройства защиты от ветра.
Это приведет к нарушению правильного воспроизведения
голоса с нечеткими басами. При этом также часто
возникает воющий звук.
5 – 10 см от рта.
Держите микрофон ниже
головки.
Русский
13 Ru
Page 78

РЕЖИМ НАСТРОЙКИ
В режиме настройки можно выбрать следующие меню:
• Восстановление настроек при включении питания ON
• Режим ввода
• Условие автоматического ввода
• Включение пульта ДУ
• Режим пульта ДУ
• Максимальный уровень MIC/MUSIC
• Выбор уровня громкости MIC/MUSIC
• Возврат к исходным значениям
Чтобы выбрать каждое из перечисленных выше меню,
установите соответствующие регуляторы, как показано в
таблице “Таблица режима настройки
соответствии с описанной ниже процедурой
” на стр. 15 в
.
1 Чтобы войти в режим настройки, выключите
основное устройство и нажмите кнопку
POWER при нажатии кнопки KEY CONTROL и
ECHO MODE.
2 Чтобы выбрать нужные меню и элементы,
выберите положение регуляторов KEY
CONTROL и MUSIC в соответствии с таблицей
“Таблица режима настройки” на стр. 15.
Для условия автоматического ввода выберите нужный
источник, а затем выберите элемент.
Прежде чем перейти к шагу 3, задайте все параметры,
которые требуется изменить.
3 Нажмите кнопку KEY CONTROL, чтобы ввести
параметры.
После введения параметра индикатор “” мигнет один
раз.
4 Чтобы выйти из режима настройки, выключите
основное устройство.
■ Меню в режиме настройки
1. Восстановление настроек при включении
питания ON
Чтобы восстановить настройки уровня громкости MIC/
объема ECHO/уровня громкости MUSIC/ECHO MODE при
включении аппарата выберите “Последние настройки” или
“Предварительная настройка”.
Последние настройки*: восстановятся настройки, которые
использовались перед последним выключением аппарата.
Предварительная настройка: восстановятся настройки,
сохраненные в PRESET 1.
2. Режим ввода
Задайте ручной или автоматический режим ввода.
Автоматический*: источник ввода выбирается
автоматически.
Ручной: источник ввода выбирается с
INPUT.
Источник выбирается в соответствии с DVD, AUX**, TAPE,
BGM.
3. Условие автоматического ввода
Задайте условия для каждого источника (DVD, AUX** и
TAPE) для автоматического режима ввода, описанного в
пункте 2.
Аудио*: источник переключается в зависимости от
аудиосигнала.
Видео: источник переключается в зависимости от
видеосигнала.
Аудио/Видео: источник переключается в зависимости от
аудио– или видеосигнала.
Выберите нужный источник с помощью
прежде чем выбирать нужный элемент (только для данного
меню).
4. Включение пульта ДУ
Включение или выключение пульта ДУ.
Включить*: пульт ДУ включен.
Выключить: пульт ДУ выключен.
5. Режим пульта ДУ
Укажите устройство приема сигнала.
Передняя и Внешний*: сигнал от пульта ДУ принимают
передняя панель и ретранслятор внешнего пульта ДУ.
Передняя: сигнал принимает только передняя панель.
Внешний:
пульта ДУ.
6. Максимальный уровень MIC/MUSIC
Задайте максимальный уровень громкости MIC и MUSIC.
10*: настройка отсутствует.
9 – 3: установлен максимальный уровень громкости,
соответствующий обозначенному уровню (значение от 2 до 0
задать не удастся).
7. Выбор уровня громкости MIC/MUSIC
Выберите способ увеличения/уменьшения уровня громкости
MIC и MUSIC (т.е. кривую громкости) при повороте
регуляторов.
Способ 1*: крутая кривая.
Способ 2: менее крутая кривая.
Способ 3: наименее крутая кривая. Данный способ наиболее
подходит для точной настройки.
8. Возврат к исходным значениям
Сброс всех настроек в режиме настройки к значениям по
умолчанию.
Отмена: возврат к исходным значениям не выполняется.
Возврат: выполняется возврат к исходным значениям.
При нажатии кнопки KEY CONTROL совместно с MUSIC,
установленной в положение 3, выполняется возврат к
исходным значениям.
сигнал принимает только ретранслятор внешнего
помощью кнопки
кнопки INPUT,
* Настройка по умолчанию
** Только для KMA-700
14 Ru
Page 79

■ Таблица режима настройки
Меню KEY CONTROL Элементы/MUSIC
1. Восстановление
настроек при
включении
питания ON
+1 Последние
настройки: 1
РЕЖИМ НАСТРОЙКИ
Предварительная
настройка: 2
2. Режим ввода
3. Условие
автоматического
ввода
4. Включение пульта
ДУ
5. Режим пульта ДУ
+2 Автоматический: 1
+3
Аудио: 1 Видео: 2 Аудио/Видео: 3
+4 Включить: 1 Выключить: 2
+5
Передняя и
Внешний: 1
Ручной: 2
Выберите нужный источник
с помощью кнопки INPUT.
Пример: DVD
Передняя: 2 Внешний: 3
РАБОТА
6. Максимальный
уровень MIC/MUSIC
7. Выбор уровня
громкости
MIC/MUSIC
8. Возврат к
исходным
значениям
–1
–2
–5
Настройка
отсутствует: 10
Способ 1: 1 Способ 2: 2 Способ 3: 3
Отмена: 1 Возврат: 3
Выберите обозначаемый
уровень: 9 – 3
Пример: 3
Русский
15 Ru
Page 80

ДОПОЛНИТЕЛЬНАЯ ИНФОРМАЦИЯ
ВОЗМОЖНЫЕ НЕИСПРАВНОСТИ И СПОСОБЫ ИХ
УСТРАНЕНИЯ
При возникновении каких-либо проблем, возможно, их решение можно будет найти в следующей таблице.
Если проблему все же не удается решить, обратитесь к своему дилеру.
Неисправность Возможные причины Способы устранения
Отсутствует звук из
колонок.
Отсутствует звук
одной из колонок.
Отсутствует звук
микрофона.
Пульт ДУ не работает
или работает
ненадлежащим
образом.
Переключатель POWER установлен в
положение OFF.
Отключен кабель питания. Надежно подсоедините кабель питания к сетевой
Регулятор MUSIC установлен в
минимальное положение.
Установлен неверный музыкальный
источник, когда в режиме настройки для
режима ввода установлена ручная
установка.
Звук прерван вследствие повышения
температуры в аппарате.
Регулятор MUSIC BALANCE установлен в
положение на вывод звука одной из
колонок.
Один из проводов колонок отсоединен. Надежно вставьте провод в
Штекер микрофона вставлен не полностью. Надежно вставьте штекер в гнездо.
Переключатель на микрофоне установлен в
положение OFF.
Для соответствующего регулятора MIC
VOL или MIC установлено минимальное
положение.
Микрофон находится слишком далеко от
рта или микрофон удерживается
неправильно.
Пульт ДУ находится слишком далеко от
аппарата или слишком сильно наклонен.
Прямые солнечные лучи или свет попадают
на датчик ДУ данного
Пульт ДУ отключен в режиме настройки. Включите пульт ДУ в режиме настройки. См.
В режиме настройки установлен неверный
режим пульта ДУ.
Слабый заряд батареек. Вставьте новые батарейки CR2025.
Если регулятор INPUT не работает, для
режима ввода установлена автоматическая
установка.
аппарата.
Установите переключатель POWER в положение ON.
розетке.
Настройте положение регулятора MUSIC.
Выберите надлежащий музыкальный источник с
помощью кнопки INPUT или установите в
настройки для режима ввода автоматическую
установку. См. “Режим ввода” на стр. 14.
Отключите питание, затем дайте аппарату остыть.
Установите регулятор в среднее положение.
разъемы.
Установите переключатель на микрофоне в положение
ON.
Настройте положение регулятора.
См. руководство пользователя, поставляемое с
микрофоном
Управление с помощью пульта ДУ можно
осуществлять в пределах 6 м от аппарата и при наклоне
пульта не более 30 градусов по отношению к оси
между пультом и передней панелью.
Измените положение аппарата.
“Включение пульта ДУ” на стр. 14.
Установите надлежащий режим пульта ДУ в режиме
настройки. См. “Режим пульта ДУ” на стр. 14.
батарейки” на стр. 12.
В режиме настройки установите для режима ввода
ручную установку. См. “Режим ввода” на стр. 14.
.
режиме
См. “Установка
ТЕХНИЧЕСКОЕ ОБСЛУЖИВАНИЕ
При загрязнении устройства протрите его мягкой, сухой тканью.
Никогда не используйте спирт, разбавитель, бензин, инсектицид или другие летучие средства, так как они могут
повредить краску или полировку поверхности.
Кроме того, не вытирайте устройство тканью, содержащей химические вещества, и не оставляйте ее на
устройстве в течение длительного времени, так как от этого может испортиться отделка поверхности или сойти
краска.
16 Ru
Page 81

ПОСЛЕПРОДАЖНОЕ ОБСЛУЖИВАНИЕ
• Если будет обнаружена неисправность аппарата,
для выполнения ремонта или замены неисправных
деталей за оплату обратитесь к местному дилеру.
• Перед обращением к местному дилеру с запросом
на ремонт аппарата см. раздел “ВОЗМОЖНЫЕ
НЕИСПРАВНОСТИ И СПОСОБЫ ИХ
УСТРАНЕНИЯ”, где описаны возможные способы
устранения проблем.
Для дилера:
При поступлении запроса от клиента на
послепродажное
проверьте следующие пункты:
• Убедитесь в наличии неисправности.
• Проверьте все кабели и соединения.
• Проверьте, соблюдались ли предостережения
относительно работы и эксплуатации аппарата.
При наличии серьезных неисправностей аппарата
доставьте неисправный аппарат в ближайший
авторизованный сервисный центр компании Yamaha.
обслуживание в первую очередь
ЭТИКЕТ ИСПОЛЬЗОВАНИЯ ФУНКЦИИ КАRАОКЕ
Использование функции KARAOKE может потревожить других людей. При
исполнении KARAOKE не забывайте о своих соседях.
Уровень громкости при использовании функции KARAOKE можно регулировать.
Помните, что в тихое ночное время легко улавливаются даже слабые звуки, поэтому
будьте предельно внимательны при использовании функции KARAOKE в ночное
время. Во избежание слышимости звучания рекомендуется закрыть окна.
АВТОРСКИЕ ПРАВА
ДОПОЛНИТЕЛЬНАЯ
ИНФОРМАЦИЯ
• Транслируемые и музыкальные источники, как кассеты, диски DVD, видеокассеты, компакт-диски
строго защищаются законодательством об авторских правах.
• Для коммерческого использования или продажи копий другим пользователям (кроме личного использования)
требуется получить разрешение от владельца авторских прав на использование, распространение или сдачу в
наем таких музыкальных источников.
и т.д.
Русский
17 Ru
Page 82

ТЕХНИЧЕСКИЕ ХАРАКТЕРИСТИКИ
УСИЛИТЕЛЬ
• Максимальная выходная мощность
[KMA-700]
(1 кГц, 8 Ω, ОНИ 10%).................................... 120 Вт + 120 Вт
[KMA-500]
(1 кГц, 8 Ω, ОНИ 10%).................................... 100 Вт + 100 Вт
• Общий коэффициент нелинейных искажений
[KMA-700]
(1 кГц, 93 Вт, 8 Ω) .................................................................1%
[KMA-500]
(1 кГц, 76 Вт, 8 Ω) .................................................................1%
• Аудиовход (чувствительность/сопротивление)
DVD, TAPE, AUX (только для KMA-700)...........200 мВ/42 кΩ
BGM.........................................................................200 мВ/42 кΩ
MIC ...........................................................................6,0 мВ/20 кΩ
• Аудиовыход (выходной уровень/выходное сопротивление)
PRE OUT ................................................................... 1,0 B/1,2 кΩ
SUBWOOFER........................................................... 2,0 В/1,2 кΩ
• Частотная характеристика
MUSIC......................................от 20 Гц до 15 кГц, +1,5/–0,5 дБ
MIC ...........................................от 40 Гц до 15 кГц, +1,0/–0,5 дБ
• Характеристики управления тональности
MUSIC
BASS..................................................................±12 дБ (100 Гц)
TREBLE.............................................................±12 дБ (10 кГц)
MIC
BASS..................................................................±12 дБ (100 Гц)
MID......................................................................±12 дБ (1 кГц)
TREBLE.............................................................±10 дБ (10 кГц)
• Сопротивление колонок
[KMA-700]
(только 1 система, A или B) ............. от 4 до 8 Ω/от 8 до 16 Ω
(управление 2 системами, A и B)......................... от 8 до 16 Ω
[KMA-500]
(только 1 система) ................................................. от 8 до 16 Ω
• Диапазон
• Видеовход
• Видеовыход
управления тональностью.............±5 шагов, ±2,5 тона
(чувствительность/входное сопротивление) ..........1 Vp-p/75 Ω
(выходной уровень/сопротивление) ........................1 Vp-p/75 Ω
ДОПОЛНИТЕЛЬНЫЕ ПРИНАДЛЕЖНОСТИ
• Руководство пользователя .............................................................1
• Пульт ДУ .........................................................................................1
• Кабель питания (за исключением модели для США) .................1
РАЗМЕРЫ
416
429
(мм)
132
150
435
18
Внешний вид и технические характеристики могут быть
изменены без уведомления.
ЭЛЕКТРОПИТАНИЕ И Т.Д.
• Напряжение питания
Модели для Азии и других стран
................ 110/120/220/230-240 В переменного тока, 50/60 Гц
Модель для США ......................120 В переменного тока, 60 Гц
• Энергопотребление
[KMA-700]
(IEC 60065)....................................................................... 190 Вт
(В режиме ожидания)........................................................25 Вт
[KMA-500]
(IEC 60065)....................................................................... 165 Вт
(В режиме ожидания)........................................................25 Вт
• AC OUTLETS (Только модель для США)
SWITCHED (Макс. 100 Вт) ........................................................ 2
• Размеры (Ш × В × Г)............................435 мм × 150 мм × 416 мм
• Вес..............................................................................................10 кг
18 Ru
Page 83

Page 84

Printed in China WP48350
 Loading...