

Page 1
Contents
What is the Multi Part Editor?................................................... 2
About Studio Manager............................................................... 3
What is Total Recall? ................................................................ 3
Multi Part Editor Files ............................................................... 4
About Open Plug-in Technology ................................................ 5
Starting the Multi Part Editor ................................................... 6
An Example of the Multi Part Editor in Use.............................. 7
MIDI Port Settings When Using Remote Control Function .... 10
Menu Bar ................................................................................. 16
Window .................................................................................... 18
Toolbar..................................................................................... 19
Part Mixer Window .................................................................. 20
Dialogs..................................................................................... 29
Remote Operation ................................................................... 33
Troubleshooting....................................................................... 36
• Copying of the commercially available music sequence data and/or digital audio files is strictly
prohibited except for your personal use.
• The software and this owner’s manual are exclusive copyrights of Yamaha Corporation.
•
opying of the software or reproduction of this manual in whole or in part by any means is
C
expressly forbidden without the written consent of the manufacturer.
•Yamaha makes no representations or warranties with regard to the use of the software and
documentation and cannot be held responsible for the results of the use of this manual and the
software.
• The screen displays as illustrated in this Owner’s Manual are for instructional purposes, and
may appear somewhat different from the screens which appear on your computer.
• The company names and product names in this Owner’s Manual are the trademarks or
registered trademarks of their respective companies.
• Click on the red-colored text to jump to the related item in this manual.
This owner’s manual assumes that you are already familiar with basic Windows/Macintosh operations. If
you are not, please refer to the owner’s manual which came with your Windows/Macintosh software before
using Multi Part Editor.
For information about hardware requirements, the interconnection of devices and the installation of
the Multi Part Editor software, refer to the separate InstallatIon Manual as well as the Owner’s Manual
for the respective MIDI device.
About Menu/Button Name
When the name of the menu or button differs in Windows and Macintosh, the names are indicated as
“Windows name (Macintosh name)” in the manual.
© 2005 Yamaha Corporation. All rights reserved.
1
Page 2

What is the Multi Part Editor?
Multi Part Editor is a convenient way to edit and save the Multi parameters of your MOTIF ES6/7/8.
Thanks to its the easy-to-understand graphical interface, you can edit virtually all of the Multi
parameters of the MOTIF ES6/7/8 right from your computer — using the mouse to adjust the
virtual knobs, sliders, and buttons and entering values from the computer keyboard. Finally, all the
changes you have made to your Multis can be saved to your computer.
The Multi Part Editor can also be used in connection with devices such as the Yamaha 01X Digital Mixing
Studio, allowing you to operate the Multi Part Editor using real hardware controls.
You can use this Multi Part Editor as a plug-in for the software below.
• Studio Manager
• Sequencer compatible with Open Plug-in Technology (OPT).
Select voices
Part Detail Window
Common Detail Window
Part Mixer Window
Select parameter
Select effects
Chorus Reverb
Save data
Master
Effect
01X
MOTIF ES6/7/8
Remote operation
Display information
(parameter names / values)
2
Tr ansmit / Receive bulk data
Tr ansmit parameters
MOTIF ES6/7/8
Page 3

About Studio Manager
Studio Manager is a cross-platform application that enables you to start multiple Editors for
controlling YAMAHA hardware products remotely, and to save multiple Editor settings.
For more information, refer to the separate Installation Guide or the Studio Manager PDF manual.
What is Total Recall?
You can save and recall each Editor’s settings in Studio Manager. This enables you to recall all the
settings of multiple devices from Studio Manager and control the entire system using simple
operations. This capability is called the “Total Recall” function.
Also, if you are saving the setup files or trying to synchronize multiple devices, you can recall all
the settings for multiple devices using Studio Manager. Alternatively, you can recall the settings
only for a certain device using the Editor of the corresponding device.
For more information, refer to the Studio Manager PDF manual.
Right-click the MOTIF ES Multi Part Editor icon in the Studio Manager window. Select “Configure
Total Recall,” then select the data to be recalled. The data that can be selected differs depending
on the Editor.
The following data types can be selected in the MOTIF ES Multi Part Editor.
• All.............................................. Multi, Normal User 1/2, and Drum User Voice data
• Multi .......................................... Multi data
• Normal User 1 Voice................. Normal User 1 Voice data
• Normal User 2 Voice................. Normal User 2 Voice data
•Drum User Voice....................... Drum User Voice data
(You can select multiple data simultaneously from the Multi, Normal User 1/2, and Drum User
Voices.)
n When checking [From Hardware] from the [Synchronize] menu → [Total Recall], the Solo/Mute data will not
be recalled.
3
Page 4
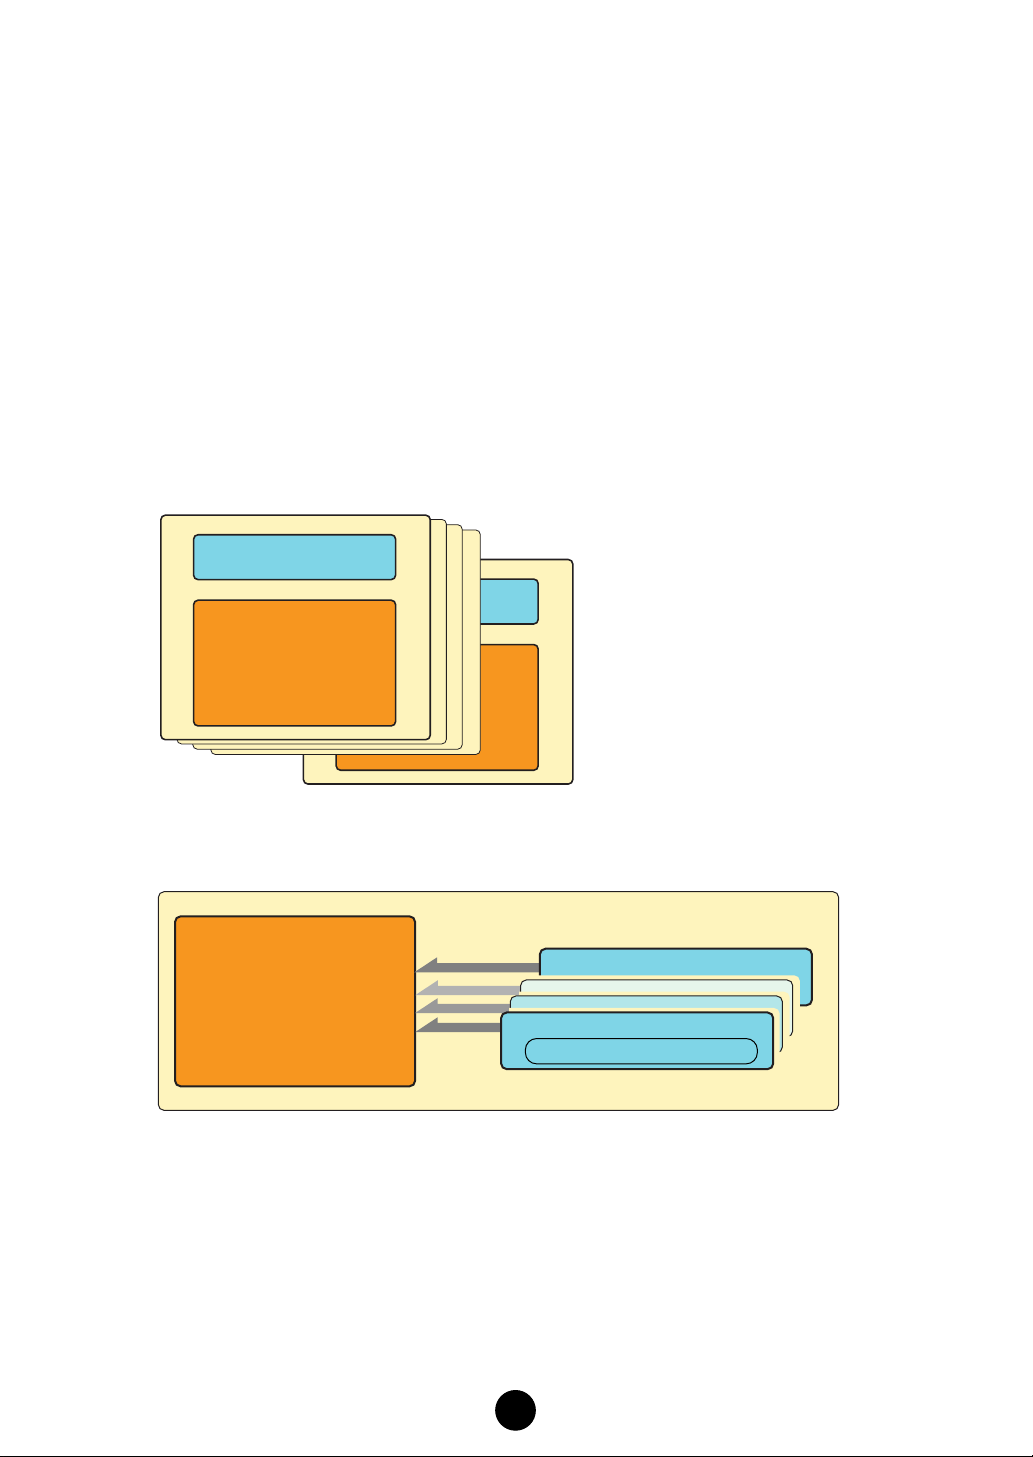
Multi Part Editor Files
All Songs in the MOTIF ES can be made up of voices selected from the collection of User Voices
stored in the MOTIF ES. When a voice is modified, each Song that utilizes that voice will be
modified as well and as a result, your Song may not sound the way they did when you first made
them. This is why Multi Part Editor files contain not only Multi data (pan, volume, effects and mixer
settings, etc.) but User Voice data as well, ensuring that the voices which were used when the
Song was made can be saved and recalled.
For example, let’s say you want to play a Multi, but you’ve edited or even overwritten some of the
voices it uses. In this case, if you saved the Multi using Multi Part Editor, you can simply send the
User Voice data from Multi Part Editor back to the MOTIF ES (page 31). The Multi will sound just
as it did when you saved it.
n When transmitting the User Voice data of the Multi Part Editor to the MOTIF ES, the User Voice data saved
in the MOTIF ES will be lost.
Structure of Multi Part Editor Files (.M4E)
Multi Data (Mixing Data)
User Voice Data
• User1 (128)
• User2 (128)
• DrumUser (32)
Structure of Song Data in MOTIF ES
User Voice Data
• User1 (128)
• User2 (128)
• DrumUser (32)
Each file contains Multi data (Mixing
data) and the User Voice data used by
the Multi.
Song Data 64
Song Data 1
Multi Data (Mixing Data)
All Songs share the same collection of
User Voices.
4
Page 5
About Open Plug-in Technology
Open Plug-in Technology (OPT) is a new software format that enables you to control MIDI devices
from a music DAW application software. For example, this allows you to start up and operate
various parts of your music system, such as plug-in board editors, and mixing control editors directly from an OPT-compatible sequencer, without having to use each separately. OPT also
makes it unnecessary to set MIDI drivers for each application, streamlining your music production
system and making all operations more convenient and seamless.
In addition to the original OPT, there is also Open Plug-in Technology Version 2 (OPT 2), designed
for use with the Total Recall software. Studio Manager is a host application that supports OPT 2.
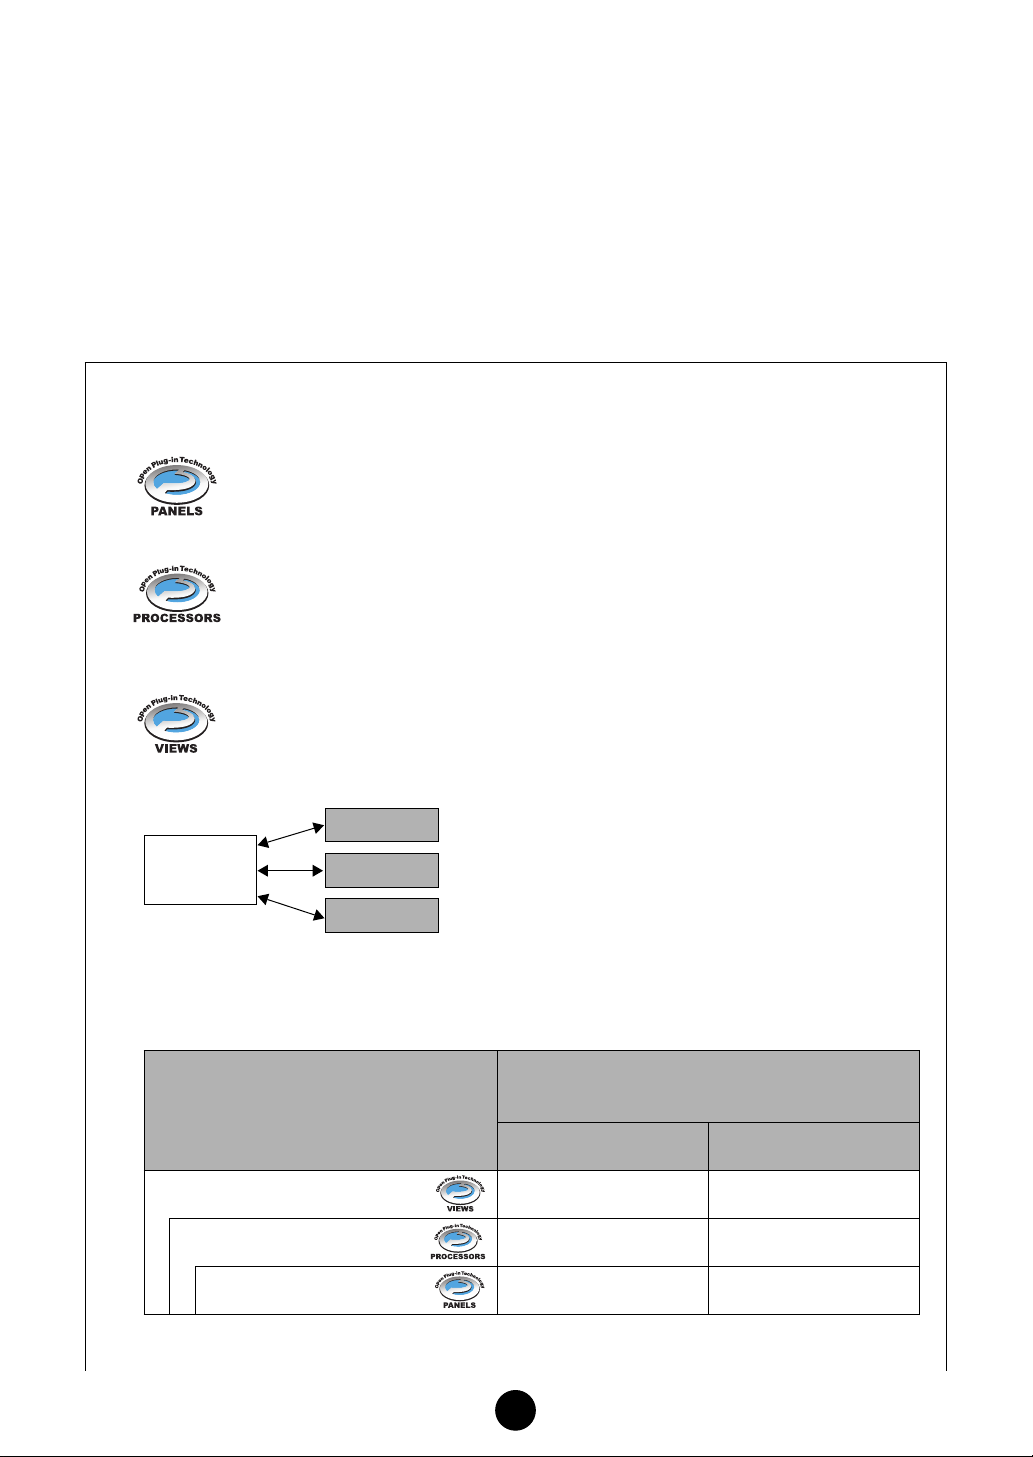
About the OPT Levels and Overview
The host application and its compatibility with OPT is divided into three levels, as shown below.
Level 1
OPT Panels provides basic support for opening and displaying OPT control panels
that can transmit data via the client’s external MIDI ports. Typically this will allow
basic hardware editor control panels to operate properly.
Level 2
OPT Processors provides support for real-time MIDI processors and panel automation.
Typically this will allow both real-time and offline MIDI effects to operate properly and
supply automation to OPT panels.
Level 3
OPT Views provides support for edit views and MIDI processors/panels that require
direct access to client program storage structures. Typically this will allow sophisticated MIDI edit views to be supported.
Editor
Host
Application
OPT Level Implementation for the MOTIF ES Multi Part Editor
This chart shows the OPT-compatibility of the MOTIF ES Multi Part Editor.
OPT levels of the host application
VIEWS (Level 3) Yes None
PROCESSORS (Level 2) Yes None
OPT
Editor
Editor
OPT-compatible plug-in software is connected directly
to an OPT-compatible host application.
MOTIF ES Multi Part Editor
operation compatibility
Operation support Operation limits
PANELS (Level 1) Yes Bulk reception
5
Page 6
All operations of the MOTIF ES Multi Part Editor can be utilized when running as a plug-in
within Level 2 (Processors) and Level 3 (Views) host applications. Some host applications may
not support remote control. Receive bulk data is not supported when running within Level 1
(Panels) host applications.
n Certain operations may not work as expected if there is no corresponding function in the host
application. The highest level of implementation for the host application is indicated by the OPT logo
which appears along with the version information in the application.
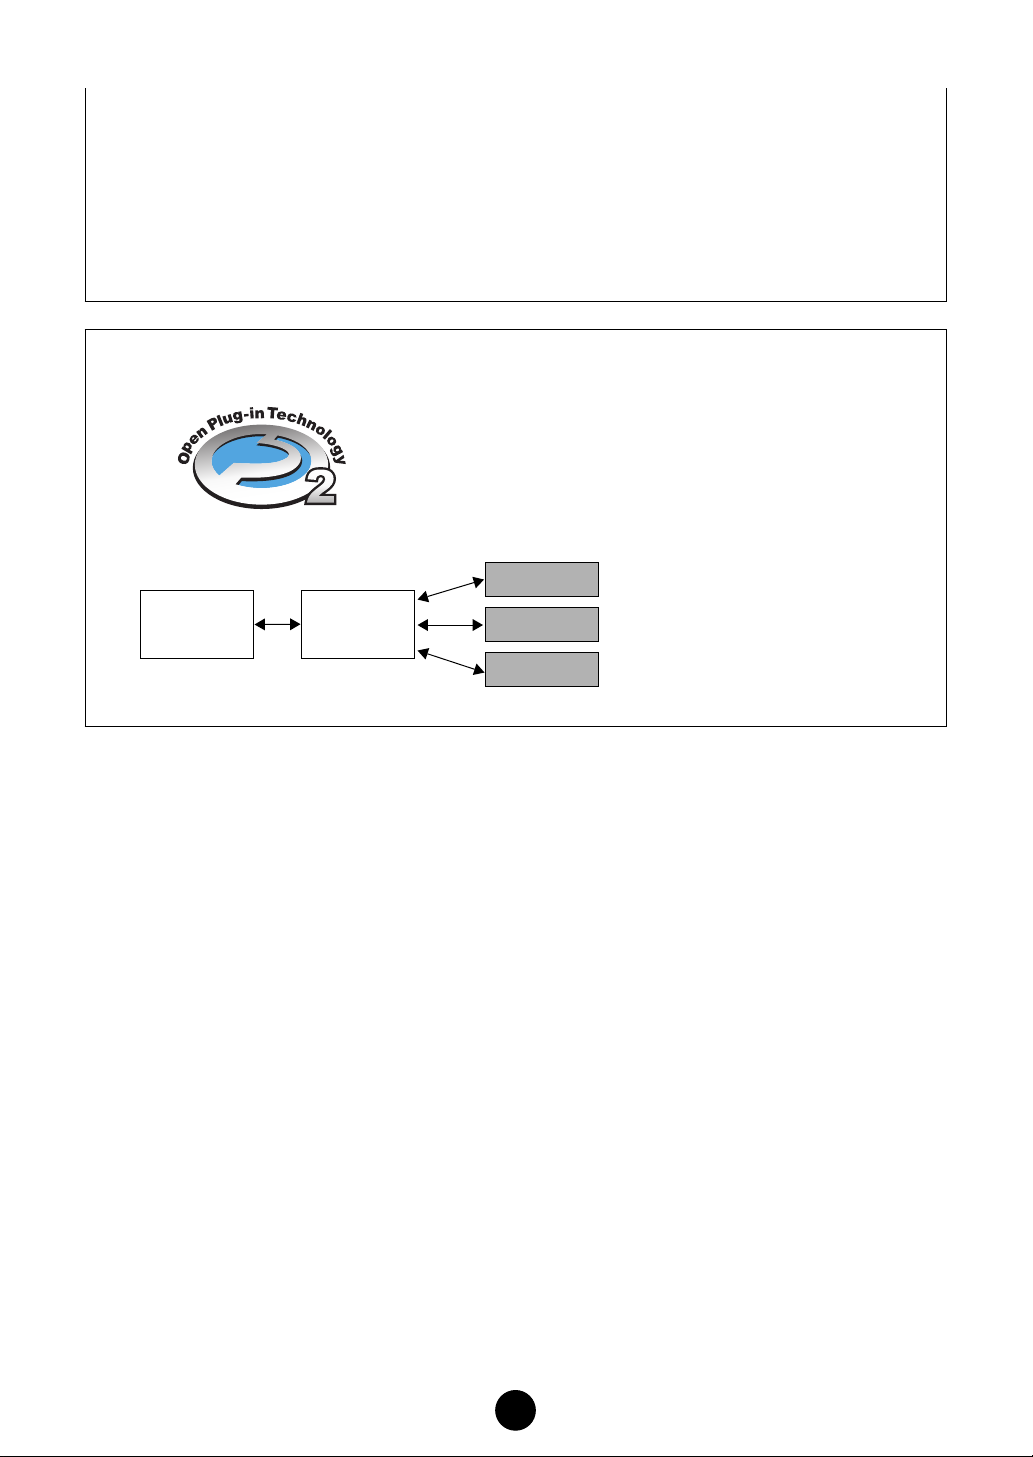
About the OPT 2 Overview
OPT 2 is a plug-in format that enhances OPT Level 1 (Panels)
and adds some convenient functions for use with Total Recall.
In addition to doing Total Recall functions using the Studio
Manager as a host application, you can use Total Recall in a
DAW application (provided it is compatible with Total Recall),
via the Studio Manager.
Plug-in software compatible with
Host
Application
Studio
Manager
Editor
OPT2
Editor
Editor
OPT 2 is indirectly connected to
the DAW application compatible
with Total Recall, via the Studio
Manager.
Starting the Multi Part Editor
After installing the Multi Part Editor and making the required connections, follow the instructions
below to start the Multi Part Editor.
Starting Multi Part Editor from Studio Manager
1. Start Studio Manager as a plug-in within DAW software compatible with Total Recall, or as a
stand-alone application.
2. Start Multi Part Editor from Studio Manager.
For more information, refer to the installation guide and Studio Manager PDF manual.
Starting the Multi Part Editor in the sequencer software compatible with OPT as a plugin software.
The Multi Part Editor can be used as a plug-in software in any host application compatible with
Open Plug-in Technology (OPT). Refer to the owner’s manual of the host application
(sequencer, etc.) for details on using plug-in software.
n For OPT-compatible software, the Multi Part Editor settings will be saved along with the song file.
1. Start the host application.
2. Select “MOTIF ES6/7/8 Multi Part Editor” in the host application’s “Plug-in” menu.
●
●
6
Page 7

An Example of the Multi Part Editor in Use
There is no single way to use the many components of the Multi Part Editor. Your editing needs
and preferences may differ; however, the following example gives you a simple step-by-step guide
in how to use the Multi Part Editor. The Part Mixer window is the first window to open, so that’s
where the explanation begins.
n Before using the Multi Part Editor, you need to set the mode of the MOTIF ES6/7/8 to the Song Mixing
mode.
1. Click “Setup” under “Setup” in the menu bar to open the Setup dialog.
Configure the parameters in this window to enable communication between Multi Part Editor and MOTIF ES6/7/8. For further information, see page 30.
n When using DAW software that is incompatible with OPT or Total Recall:
When starting the Studio Manager as a stand-alone application and using it simultaneously with
sequencer software, open the MIDI-USB Driver dialog and merge (join) the MIDI ports of the sequencer
software with the MIDI ports of the Multi Part Editor (page 8).
2. Transfer the desired User Voices from the MOTIF ES6/7/8 (page 32) or open a Voice Editor
file (page 16) with the Multi Part Editor.
n Once User Voices are updated in the Multi Part Editor, they can be used the next time Multi Part Editor
is started. If new voices are created or edited with the MOTIF ES6/7/8 or Voice Editor, the user voices
must again be updated by transferring them from the MOTIF ES6/7/8 or opening a Voice Editor file.
n If you don’t intend to use User Voices in the Multi, you can skip this step.
3. Transfer the desired Multi from the MOTIF ES6/7/8 into the Multi Part Editor. For more information, see “Receive Multi Bulk” on page 18.
n If you intend to use a default Multi, you can skip this step. In this case, transmit the Multi (page 17) in
order to synchronize the data in the Multi Part Editor and MOTIF ES6/7/8.
(1) Select the Multi data you want to send to the Multi Part Editor on the MOTIF ES6/7/8.
(2) Select “Receive Multi Bulk” under “Setup” in the menu bar.
4. Select a voice for each part.
(1) Click on the voice name or bank name for each part to display the “Voice List”.
(2) Select the voice you want to assign to the part.
5. Set parameters for each part in the Part Mixer window.
Click the [DETAIL] button for each part and for the Common Section to make further settings.
6. Save your edited data by clicking the [Save] button in the toolbar.
You can save a Multi for each of your songs. When you want to play a song, open the Multi
Part Editor file (*.M4E) corresponding to the song. It will automatically be transmitted to the
MOTIF ES6/7/8. No further settings are necessary.
Additionally, when running Multi Part Editor as a plug-in under a OPT-compatible host application such as SQ01, you can save your Multi Part Editor data as part of the host application’s song data.
• When starting the Multi Part Editor from the Studio Manager, you can save the Multi Part Editor
data into the Session file of Studio Manager.
• When using DAW (digital audio workstation) software compatible with Total Recall and the Studio
Manager together, the Multi Part Editor data will be saved into the Project file (Song file) of the
DAW.
7
Page 8
Merging the MIDI inputs/outputs when
using DAW software that is incompatible with OPT or Total Recall
When starting the Studio Manager as a stand-alone application and using it simultaneously with
sequencer software, open the MIDI-USB Driver dialog and merge (join) the MIDI ports of the
sequencer software with the MIDI ports of the Multi Part Editor.
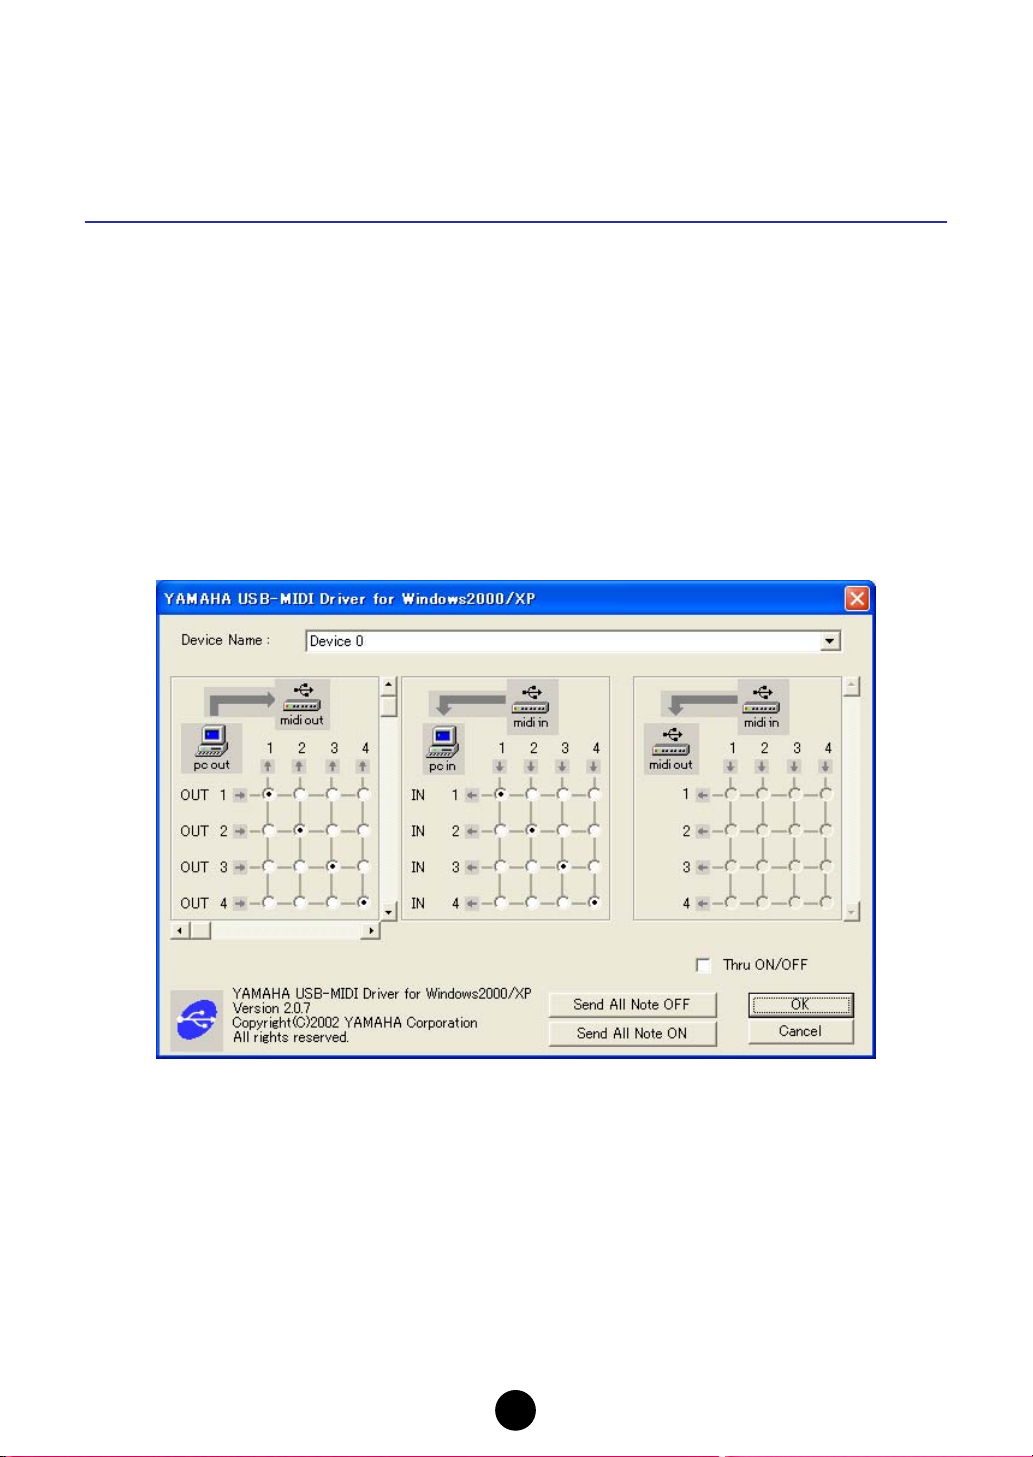
(1) Display the “YAMAHA USB-MIDI Driver” dialog.
Windows XP
From the [Start] menu, select [Control Panels] → [MIDI-USB Driver].
Mac OS X
From the Apple menu, select [System Preferences] → [YAMAHA USB-MIDI].
n The MIDI-USB Driver icon will not be displayed if MOTIF ES6/7/8 is not properly connected to the com-
puter via USB, or if MOTIF ES6/7/8 is not turned on.
n The “0” displayed in the port name (0-1, 0-2, etc.) indicates the number of the MIDI device connected to
the computer via USB. Match this number to the “Device Name” in the “YAMAHA USB-MIDI Driver” dialog.
8
Page 9
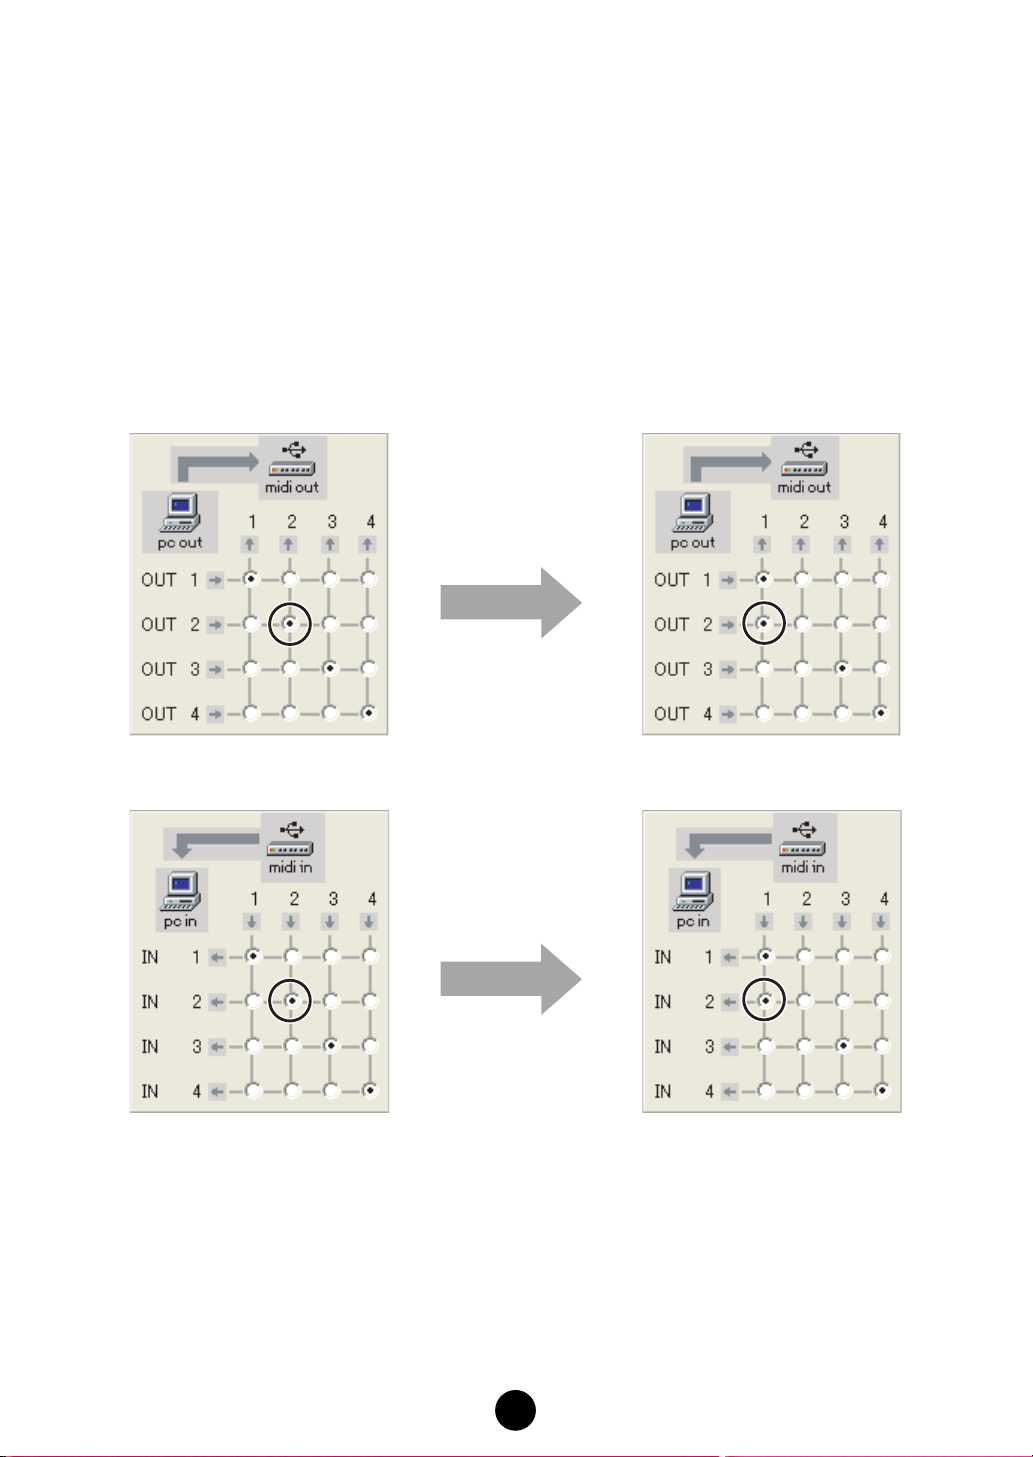
(2) In the “YAMAHA USB-MIDI Driver” dialog, merge the input/output ports.
• OUT
Change the settings to connect the two output ports which are used by the sequencer
and Multi Part Editor to MOTIF ES input port 1.
•IN
Change the settings to connect the MOTIF ES output port 1 to the two input ports
which are used by the sequencer and Multi Part Editor.
For example, change the settings as shown in the illustrations below when using the
input/output port 1 and input/output port 2 in the Studio Manager (Multi Part Editor)
and sequencer.
OUT
IN
(3) Click [OK] to close the dialog.
9
Page 10
MIDI Port Settings When Using Remote Control Function
This chapter explains how to control the Multi Part Editor or DAW (sequencer) remotely using the
01X or MOTIF ES. Set the MIDI ports of your application software or your devices following the
illustrations.
n • When receiving bulk data with the Multi Part Editor, set “MIDI Thru” on your sequencer to off.
• Configure the remote input and output ports of the Multi Part Editor (page 30).
n When using DAW software that is incompatible with OPT or Total Recall:
When starting the Studio Manager as a stand-alone application and using it simultaneously with sequencer
software, open the MIDI-USB Driver dialog and merge (join) the MIDI ports of the sequencer software with
the MIDI ports of the Multi Part Editor (page 8).
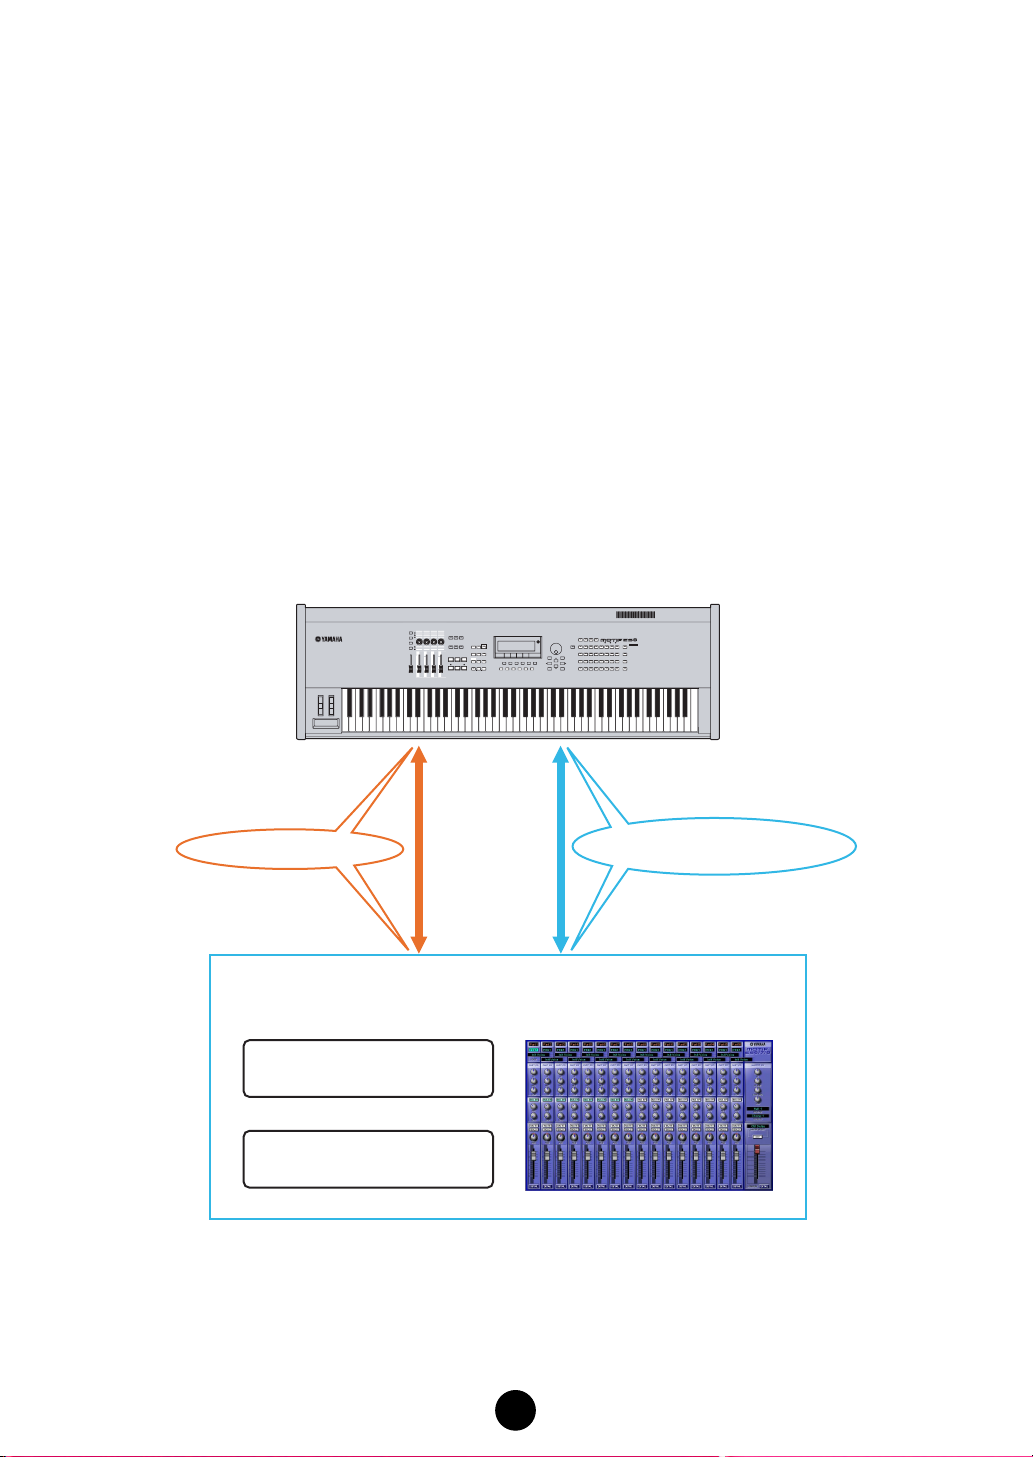
1. Remote-controlling using the MOTIF ES
1.1. MOTIF ES + Sequencer compatible with OPT (such as SQ01) + Multi Part Editor
The ports can be changed.
MOTIF ES6/7/8
USB MIDI In/Out Port 0-1
SQ01
Audio Mixer
Track View
USB Remote MIDI In/Out Port 0-4
(Mode A General)
Multi Part Editor
10
Page 11
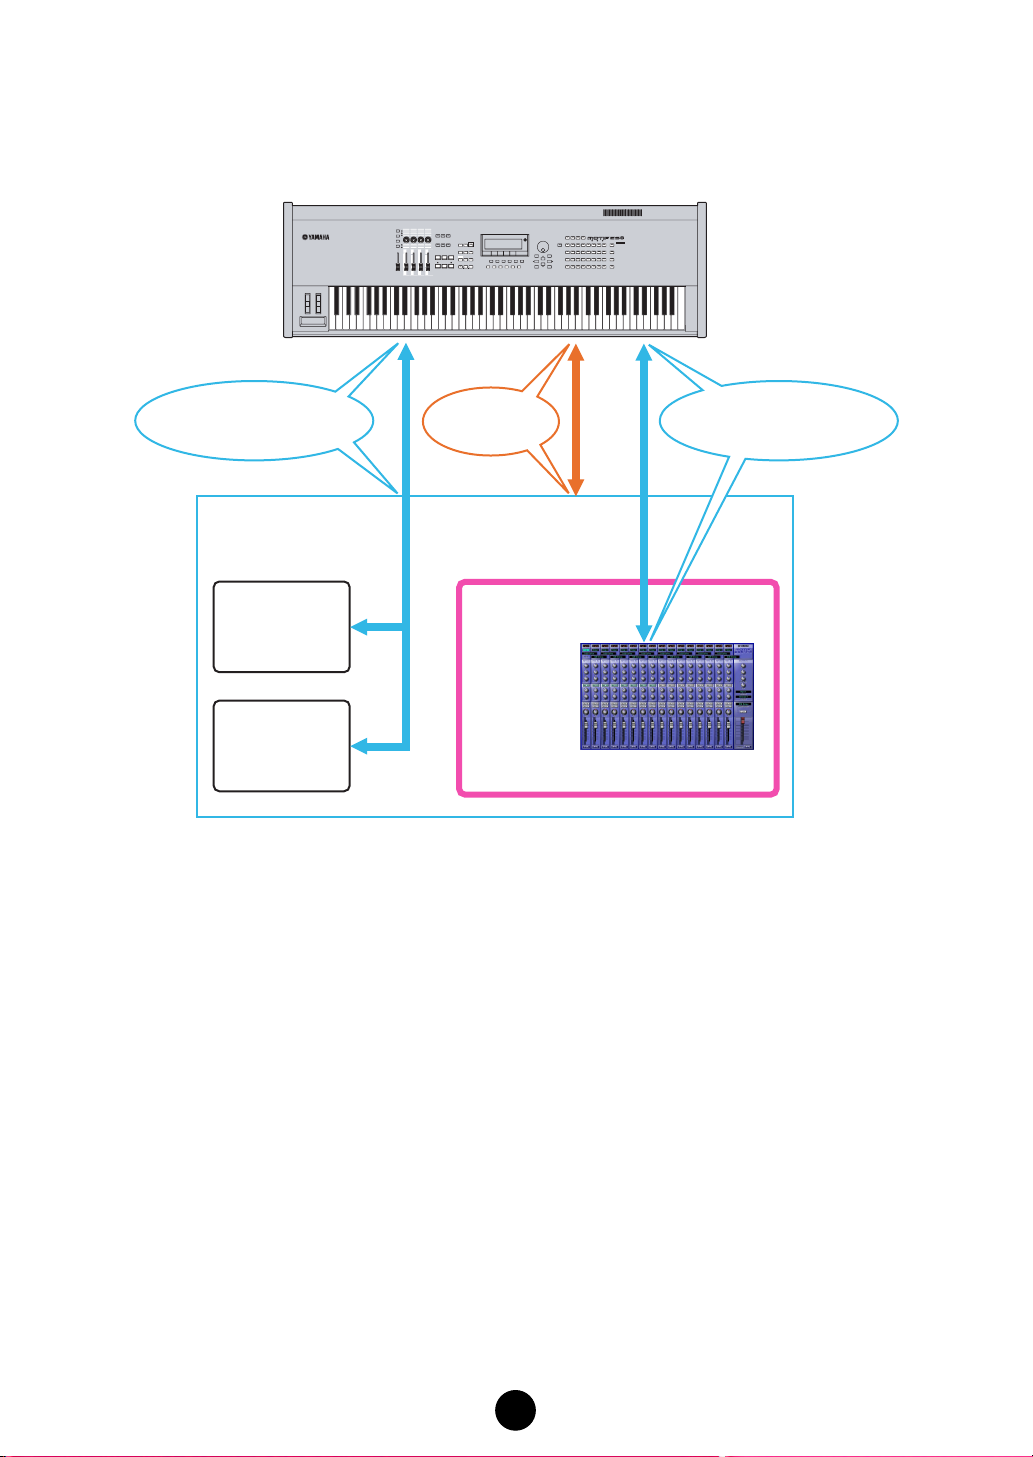
1.2. MOTIF ES + DAW compatible with Total Recall (such as Cubase SX 3) + Multi Part Editor
The ports can be changed.
MOTIF ES6/7/8
USB Remote MIDI
In/Out Port 0-4
(Mode A Cubase)
Cubase SX 3
Audio Mixer
Track View
USB MIDI
In/Out Port 0-1
Studio Manager
USB Remote MIDI
In/Out Port 0-3
(Mode B General)
Multi Part Editor
11
Page 12

1.3. MOTIF ES + DAW incompatible with OPT or Total Recall + Multi Part Editor
The ports can be changed.
MOTIF ES6/7/8
USB MIDI
In/Out Port 0-1
USB Remote MIDI
In/Out Port 0-4
(Mode A Logic)
DAW
Audio Mixer
Track View
Merge (join) Port 0-1
with Port 0-2
(page 8)
USB MIDI
In/Out Port 0-2
USB MIDI
In/Out Port 0-1
Studio
Manager
USB Remote MIDI
In/Out Port 0-3
(Mode B General)
Multi Part Editor
12
Page 13

2. Remote-controlling using the 01X
2.1. 01X + Sequencer compatible with OPT (such as SQ01) + Multi Part Editor + MOTIF ES
The ports other than those assigned for 01X remote control can be changed.
Controller: 01X
mLAN Remote MIDI In/Out Port 1
SQ01
Audio Mixer
Track View
Multi Part Editor
USB MIDI In/Out Port 0-1
MOTIF ES6/7/8
13
Page 14

2.2. 01X + DAW compatible with Total Recall (such as Cubase SX 3) + Multi Part Editor +
MOTIF ES
The ports other than those assigned for 01X remote control can be changed.
Controller: 01X
mLAN Remote MIDI In/Out Port 5mLAN Remote MIDI In/Out Port 1
Cubase SX 3
Audio Mixer
Track View
MOTIF ES6/7/8
Studio Manager
Multi Part
Editor
USB MIDI In/Out Port 0-1
14
Page 15

2.3. 01X + DAW incompatible with OPT or Total Recall + Multi Part Editor + MOTIF ES
The ports other than those assigned for 01X remote control can be changed.
Controller: 01X
mLAN Remote MIDI In/Out Port 5mLAN Remote MIDI In/Out Port 1
DAW
Audio Mixer
Track View
USB MIDI In/Out Port 0-2
MOTIF ES6/7/8
Studio Manager
Multi Part
Editor
USB MIDI In/Out Port 0-1
Merge (join) Port 0-1
with Port 0-2
USB MIDI In/Out Port 0-1
(page 8)
15
Page 16

Menu Bar
The Menu Bar contains various editing and setup functions/commands. Click the desired menu
name to open the appropriate pull-down menu, and choose the function/command you wish to
apply. Those functions/commands which are unavailable are grayed out.
File
New
Creates and opens a default Multi.
n User Voice settings in the MOTIF ES6/7/8 are not erased.
Open
Opens a Multi Part Editor file (page 29).
Import Voice
Opens Voice data files (*.W7E)
Save
Saves the current settings by overwriting the current file.
Save As...
Let you save the current Multi as a Multi Part Editor file under a new or different name (page 29).
16
Page 17

Setup
Setup...
Allows you to specify the MIDI port numbers, device numbers, etc. (page 30).
Transmit Multi Bulk
Tr ansmits the current Multi setting to the MOTIF ES6/7/8 below.
Receive Multi Bulk
Receives the current Multi setting from the MOTIF ES6/7/8 (page 18).
Transmit Voice Bulk...
Displays a dialog where you can select voice data to transmit to the MOTIF ES6/7/8 (page 31).
Receive Voice Bulk...
Displays a dialog where you can select voice data to receive from the MOTIF ES6/7/8 (page 32).
“Transmitting bulk data” Display
When transmitting the current Multi to the MOTIF ES6/7/8, the progress bar shows how much of
the data has been transmitted.
17
Page 18
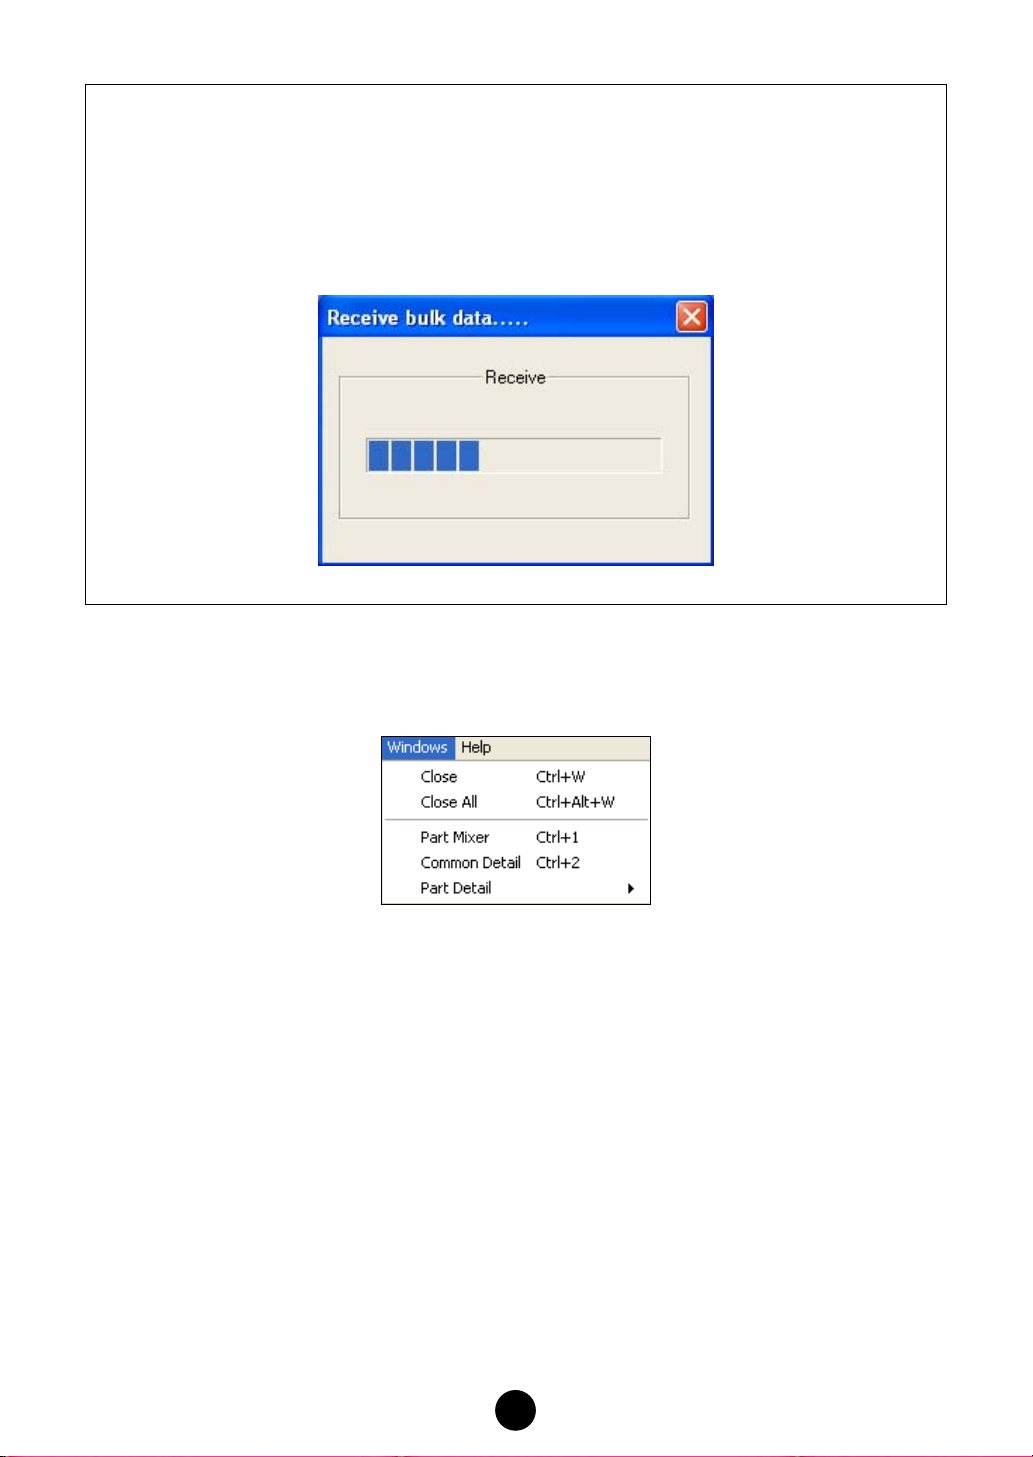
“Receive bulk data” Display
Multi data can be received in bulk from the MOTIF ES6/7/8. When receiving the current Multi from
the MOTIF ES6/7/8, the progress bar shows how much of the data has been received.
n A time-out error message will be displayed when data cannot be received from the MOTIF ES6/7/8 (page
36).
n If the part allots a mixing voice, Voice001 of voice bank Normal Preset 1 automatically replaces the
mixing voice.
Window
Close
Closes the window selected in the Editor.
Close All
Closes all windows in the Editor.
Part Mixer:
Opens the Part Mixer Window (page 20).
Common Detail
Opens the Common Detail Window (page 22).
Part Detail
Opens the Part Detail Window (page 26).
18
Page 19

Toolbar
123456
1 Open
Opens a Multi Part Editor file (page 29).
2 Save
Saves the current settings by overwriting the current file.
3 Editor Setup
Allows you to specify the MIDI port numbers, device numbers, etc. (page 30).
4 Transmit Multi Bulk
Tr ansmits the current Multi setting to the MOTIF ES6/7/8 (page 17).
5 Receive Multi Bulk
Receives the current Multi setting from the MOTIF ES6/7/8 above.
6 Part Mixer window
Makes the Part Mixer Window active.
19
Page 20

Part Mixer Window
When you start Multi Part Editor, you will first see the Part Mixer Window, which consists of the
common section and the part section. Here you can access most parameters of the Multi Part Editor.
n For more information on each parameter, refer to Reference section on the Owner’s Manual.
n • When using the MIDI echo (or “MIDI thru”) setting of the sequencer, the actual MIDI channel used for MIDI
messages (transmitted from the keyboard to this synthesizer through the computer) will differ depending
on the track selected in the sequencer. In other words, selecting a different track will automatically select a
different MIDI channel.
•To play the sound of the Part currently being edited, make sure to select the corresponding track on the
sequencer.
8
9
0
1
A
B
C
D
E
F
2
3
4
5
G
H
Part Section
Common Section
1 MASTER EQ
Adjusts each parameter of the master equalizer.
2 REVERB
Displays the current reverb type. Click to select a different reverb type.
3 CHORUS
Displays the current chorus type. Click to select a different chorus type.
4 Master Effect
Selects a master effect type.
Click to select a different master effect type.
5 Master Effect SW
Switches the master effect on/off.
6
7
Common Section
6 Master Volume
Adjusts the overall volume of the mix.
20
Page 21

7 DETAIL
Click this to open the “Common Detail” window.
Click on a tab to edit different parameters. For further details, see Common Detail Window
(page 22).
Part Section (Part 1 – Part 16)
8 Part Number
Displays the part number.
9 Voice
Displays the Bank/Voice name selected for each part. Click this to open a Voice List dialog
where you can select a voice.
For further details, see the Voice List in the “Data List” booklet.
0 PA RT EQ (High/Mid/Low)
Adjusts the equalizer settings for each part.
A Insertion Effect Switch
Switches the insertion effect on/off.
n Insertion effects can be applied to up to eight parts.
B Reverb Send
Adjusts the amount of signal sent to the reverb for each part.
C Chorus Send
Adjusts the amount of signal sent to the chorus for each part.
D Mute
Switches the mute on/off for each part.
E Solo
Switches the solo on/off for each part.
F Pan
Adjusts the pan of each part.
G Part Volume
Adjusts the volume of each part.
H DETAIL
Click this to open the “Part Detail” window for the selected part. Click on a tab to edit different
parameters. For further details, see Part Detail Window (page 26).
21
Page 22

Common Detail Window
ARPEGGIO Tab
Allows you to edit arpeggio parameters.
REVERB Tab
Allows you to edit reverb parameters.
22
Page 23

CHORUS Tab
Allows you to edit chorus parameters.
MEQ Tab
Allows you to edit the 5-band master equalizer parameters.
23
Page 24

MASTER EFF Tab
Allows you to edit master effect parameters.
INS EFF SW Tab
Switches the insertion effect for each part on/off.
n Insertion effects can be applied to up to eight parts.
24
Page 25

CTRL NUM Tab
Allows you to assign MIDI control numbers to assignable controllers 1 & 2, foot controllers 1 & 2,
and the breath controller parameters.
25
Page 26

Part Detail Window
GENERAL Tab
Allows you to edit general parameters of the selected part.
NOTE/VEL Tab
Allows you to edit note limit and velocity parameters of the selected part.
PITCH Tab
Allows you to edit pitch parameters of the selected part.
26
Page 27

AEG Tab
Allows you to edit amplitude EG parameters of the selected part.
FEG Tab
Allows you to edit filter EG parameters of the selected part.
PART EQ Tab
Allows you to edit parameters of the 3-band equalizer for the selected part.
27
Page 28

RCV SW Tab
Allows you to edit receive switch parameters for the selected part.
28
Page 29

Dialogs
“Open” Dialog
Select the desired Multi Part Editor file (*.M4E/*.M2E) to open (P.16).
n Files with the extension (*.M2E) are files of the previous version of Multi Part Editor.
n If you are using a Macintosh, the typical Macintosh “Open” dialog will appear.
1
2
3
4
1 Look in ............................ Pull-down menu choose the folder containing the desired Multi Part
Editor or Voice Editor file.
2 List box............................ Shows the contents of the current folder.
3 File name ........................Shows the name of the file selected from the list.
4 Files of type .................... Click this and choose the file type.
5 Open ...............................Click this to open the file selected from the list.
6 Cancel............................. Click this to cancel the operation.
5
6
“Save As” Dialog
Name and save the current Multi settings in Multi Part Editor file (*.M4E) format (P.16).
n Multi Part Editor files (*.M4E) consist of Multi data and user voice data.
n If you are using a Macintosh, the typical Macintosh “Save As” dialog will appear.
1
2
3
4
1 Save in ............................Pull-down menu choose the folder in which to save the file.
2 List box............................ Shows the contents of the current folder.
3 File name ........................Specify the name of the Multi Part Editor file to be saved here.
4 Save as type ...................Click this and choose the file type.
5 Save................................ Click this to save the Multi Part Editor file with the name specified in
the “File name” field.
6 Cancel............................. Click this to close the dialog without saving the file.
5
6
29
Page 30

“Setup Dialog”
Settings made here control how data is sent between the Multi Part Editor and the MOTIF ES6/7/8
or the 01X. (page 17)
1
2
3
4
5
6
7
8
1 MIDI In Remote Port .......Click this and Select a remote MIDI input port.
n When running Multi Part Editor as an SQ01 plug-in, the remote input port name set in the SQ01 will
be displayed here.
2 MIDI Out Remote Port ....Click this and Select a remote MIDI output port.
n When running Multi Part Editor as an SQ01 plug-in, the remote output port name set in the SQ01 will
be displayed here.
3 MIDI In Port..................... Click this and Select a MIDI input port.
Data from the MOTIF ES6/7/8 will be received on this port.
4 MIDI Out Port ..................Click this and Select a MIDI output port.
Multi Part Editor will control the MOTIF ES6/7/8 by sending data on
this port.
5 Device No........................ Required for transmitting/receiving system exclusive data (bulk data)
to and from MOTIF ES6/7/8. Set this to match the device number of
the MOTIF ES6/7/8.
6 Dump Interval ................. Sets the interval between packets of data when transmitting/receiving
bulk data to the MOTIF ES6/7/8.
7 Dial Mouse Control .........Changes the operation of the parameter knobs.
When “Rotate” is selected, the parameter values (of the panel
“knobs”) are changed by clicking and dragging the mouse in a circular
direction - in the same way as turning an actual knob.
When “Up/Down or Left/Right” is selected, the parameter values (of
the panel “knobs”) are changed by clicking and dragging the mouse
vertically or horizontally - in the same way as operating a slider.
n The setting made here affects all knobs.
8 OK................................... Click this to use the new settings and close the dialog.
9 Cancel............................. Click this to close the dialog without changing the settings.
9
30
Page 31

“Transmit Dialog”
Voice data can be transmitted in bulk to your synthesizer. Select the bulk voice data you wish to
receive, then click [Start]. The progress bar shows how much of the data has been transmitted.
Finally, click the [Close] button to quit the dialog.
n When transmitting user voice data to the MOTIF ES6/7/8, user voice data in the MOTIF ES6/7/8 will
be overwritten. Exercise caution so as not to accidentally overwrite a User voice that you have used in
another Multi configuration.
n When the User Voice of any given part is already selected, transmit the Multi settings to the MOTIF
ES6/7/8 after you bulk transmit the User Voice data. By transmitting the Multi settings you can play the
MOTIF ES6/7/8 the newly transmitted voice data.
n Transmission time can be set under “Dump Interval” on the “Setup dialog” (page 30).
1
2
3
4
1 Tr ansmit Type..................Click this and select which user voice data to transmit to the MOTIF
ES6/7/8.
Normal User 1+2+Drum ......... All Normal User voices and Drum voices
Normal User 1 ........................ All Normal User 1 voices
Normal User 2 ........................ All Normal User 2 voices
Normal User 1+2 .................... All Normal User voices
Drum User .............................. All Drum User voices
n Voice data for optional plug-in boards can not be transmitted.
2 Progress Bar ...................Indicates how much of the data has been transmitted.
3 Start ................................Click this to begin the transmission. Once transmission has started,
this button changes to a [Stop] button. Clicking [Stop] will stop the
transmission.
4 Close............................... Click this to close this dialog.
n The MIDI Device Number has to be set correctly in order to transmit bulk data. For further details, see
page 30.
31
Page 32

“Receive Dialog”
Voice data can be received in bulk from your synthesizer. Select the bulk voice data you wish to
receive, then click [Start]. The progress bar shows how much of the data has been received.
Finally, click the [Close] button to quit the dialog.
n User voices cannot be edited in the Multi Part Editor. You can edit user voices using the MOTIF ES6/7/8
itself or the Voice Editor software.
1
2
3
4
1 Receive Type................... Click this and select which user voice data to receive from the MOTIF
ES 6/7/8.
Normal User 1+2+Drum ......... All Normal User voices and Drum voices
Normal User 1 ........................ All Normal User 1 voices
Normal User 2 ........................ All Normal User 2 voices
Normal User 1+2 .................... All Normal User voices
Drum User .............................. All Drum User voices
Preset Voice............................ All Preset voices
n Voice data for optional plug-in boards can not be received.
2 Progress Bar ...................Indicates how much of the data has been transmitted.
3 Start ................................Click this to begin the reception. Once reception has started, this but-
ton changes to a [Stop] button. Clicking [Stop] will stop the reception.
4 Close............................... Click this to close this dialog.
32
Page 33

Remote Operation
The Multi Part Editor can be operated remotely by a hardware controller, such as the Yamaha
Digital Mixing Studio 01X. Below is an example of remote operation using the 01X, when the Multi
Part Editor is running as a plug-in under SQ01. After configuring the remote MIDI port settings,
press [REMOTE] then [MIDI] on the 01X to start the Multi Part Editor.
When starting the Multi Part Editor from the Studio Manager, press [SHIFT]+[REMOTE] to start
the Multi Part Editor.
n Set the appropriate ports required for remote operation beforehand (page 10, 30).
Edit mode & NAME Mixing mode & NAME
Part Detail
Window
Part EQ SEL<Part3>
EQL-F EQL-G EQH-F EQH-G EQM-F EQM-G EQM-Q
Parameter name
Edit mode & VALUE Mixing mode &
Parameter name
Common Detail Window
Remote
Part being edited Parameter category
Part Mixer
Window
Remote
Part name
Part1 Part2 Part3 Part4 Part5 Part6 Part7 Part8
Pan Pan Pan Pan Pan Pan Pan Pan
Parameter name
Parameter name
VALUE
EQL-F EQL-G EQH-F EQH-G EQM-F EQM-G EQM-Q
125 0.0 10.0 0.0 1.1 0.0 PEAK
Parameter value
Part Detail
Window
Common
Detail Window
Remote
33
Pan
L63 R63 L63 R63 CTR CTR CTR CTR
Parameter value
Remote
Part Mixer
Window
Page 34

Operating the Multi Part Editor
remotely from the 01X
The MOTIF ES6/7/8 can also be used as a controller for Multi Part Editor functions. For details on
operations of the MOTIF ES, refer to the MOTIF ES Owner’s Manual.
n Each channel on the 01X controls are corresponding to each part in the Multi Part Editor.
Basic Operation (common to both modes, Mixing and Edit)
01X operation (buttons) Explanation for remote control operation
[REMOTE] ➜ [MIDI] When running as a plug-in under SQ01, initiates remote operation of
the Multi Part Editor.
[SHIFT] + [REMOTE] When starting the Multi Part Editor from the Studio Manager,
initiates remote operation of the Multi Part Editor.
[NAME/VALUE] Switches the Name/Value mode displayed on the 01X.
BANK Switches the 1-8 channels to 1-8 parts.
BANK Switches the 1-8 channels to 9-16 parts.
[SELECTED CHANNEL] Switches the Mixing mode and Edit mode.
Rotating a channel knob Adjusts the selected parameter.
Pushing a channel knob Switches the selected parameter on/off when it is an “on/off” type
parameter.
[SHIFT] + rotating a channel knob Adjusts the selected parameter in large increments (ten times).
[SHIFT] + pushing a channel knob Returns the selected parameter to its default value.
Operation in the Mixing mode
Faders Controls the volume of the selected part and the master volume.
[ON] When [SOLO] button is lit, switches SOLO on/off for the selected
part. When [SOLO] button is not lit, switches the selected part on/off.
Selecting parameter controlled with a channel knob.
DISPLAY Selects a parameter one by one.
[PAGE SHIFT] + DISPLAY Selects the parameters to be edited section.
[PAN] Enables control over Pan.
[SEND] Enables control over Reverb Send level.
[GROUP] Enables control over the voice for the selected part.
[EFFECT] Enables on/off control over the Insertion Effect.
[SEL] (Master) Enables control over Master EQ.
EQ [LOW] Enables control over EQ Low for the selected part.
EQ [LOW-MID] or [HIGH-MID] Enables control over EQ Mid for the selected part.
EQ [HIGH] Enables control over EQ High for the selected part.
34
Page 35

Operation in the Edit mode
[SEL] (CH1-16) Displays the corresponding Part Detail window.
[SEL] (Master) Displays the Common Detail window.
Selecting parameter controlled with a channel knob.
[PAGE SHIFT] + DISPLAY Switches tabs.
DISPLAY Switches rows.
Knobs (CH1-8) Edit parameters from left to right (Ch1, Ch2, Ch3…) corresponding
to each knob. For example, to edit the third parameter from the left
shown on the screen, use the Ch 3 knob.
35
Page 36

Troubleshooting
If you encounter problems such as no sound output or abnormal behavior, verify the connections
before checking the following.
Sound does not change when using the knobs or sliders.
• Are the MIDI Out port and Device Number set correctly in the “Setup dialog”? (page 30)
Bulk data is not transmitted.
• Are the MIDI Out port and Device Number set correctly in the “Setup dialog”? (page 30)
• Is the Dump Interval in the “Setup dialog” too short? Make sure to adjust the Dump Interval.
Bulk data is not received. Time-out errors are frequent.
• Are the MIDI Out port and Device number set correctly in the “Setup dialog”? (page 30)
• Depending on the host application, you may need to turn MIDI Thru setting off in the host
application.
• When running the Multi Part Editor as an SQ01 plug-in, reduce the buffer size in SQ01
under [Setup] menu → [MIDI] → [System Exclusive] → Receive Buffer Size.
The MIDI In/Out port is not available in the “Setup dialog”.
• Only MIDI Ports selected in the host applications MIDI Setup can be selected in the “Setup
dialog”. Confirm the ports selected in the host application.
Remote operation functions don’t work.
• Is the remote output port set correctly in the “Setup dialog”? (page 30)
• Is the remote operation device configured correctly? When using the 01X as a remote operation device, make sure the REMOTE and MIDI buttons are on.
Parts using User Voices do not sound correctly.
• Has the User Voice data been transmitted to the MOTIF ES6/7/8? (page 31)
By transmitting the Multi settings, you can play the MOTIF ES6/7/8 with the newly transmitted voice data.
Noise is audible during remote operation
For Windows XP users:
• The condition may improve if you enable Hyper-Threading in the BIOS settings.
For information on how to enable Hyper-Threading, refer to the owner’s manual of your
computer.
36
 Loading...