

Page 1

G
DRX-730
MICRO COMPONENT SYSTEM
OWNER'S MANUAL
MODE D'EMPLOI
BEDIENUNGSANLEITUNG
BRUKSANVISNING
MANUALE DI ISTRUZIONI
MANUAL DE INSTRUCCIONES
GEBRUIKSAANWIJZING
Page 2
CAUTION
Use of controls or adjustments or performance of
procedures other than those specified herein may result in
hazardous radiation exposure.
AVERTISSEMENT
L’utilisation de commandes et l’emploi de réglages ou de
méthodes autres que ceux décrits ci-dessous, peuvent
entraîner une exposition à un rayonnement dangereux.
VORSICHT
Die Verwendung von Bedienelementen oder die
Einstellung bzw. die Ausführung von anderen als in dieser
Anleitung beschriebenen Vorgängen kann zu Gefährdung
durch gefährliche Strahlung führen.
OBSERVERA
Användning av reglage eller justeringar eller utförande av
åtgärder på annat sätt än så som beskrivs häri kan resultera i
farlig strålning.
ATTENZIONE
L’uso di controlli, regolazioni, operazioni o procedure non
specificati in questo manuale possono risultare in
esposizione a radiazioni pericolose.
PRECAUCIÓN
El uso de los controles, los ajustes o los procedimientos que
no se especifican enste manual pueden causar una
exposición peligrosa a la radiación.
LET OP
Gebruik van bedieningsorganen, instellingen of procedures
anders dan beschreven in dit document kan leiden tot
blootstelling aan gevaarlijke stralen.
ПРЕДОСТЕРЕЖЕНИЕ
Использование органов управления или выполнение
настроек или процедур, не указанных в данной
инструкции, может привести к воздействию опасного
излучения.
CAUTION VISIBLE AND / OR INVISIBLE LASER
RADIATION WHEN OPEN. AVOID EXPOSURE TO
BEAM.
VAR NI NG
LASERSTRÅLNING NÄR DENNA DEL ÄR ÖPPNAD.
STRÅLEN ÄR FARLIG.
VAR O ! AVATTAESSA OLET ALTTIINA NÄKYVÄLLE JA /
TAI NÄKYMÄTÖMÄLLE LASERSÄTEILYLLE. ÄLÄ KATSO
SÄTEESEEN.
VAR NI NG SYNLIG OCH / ELLER OSYNLIG
LASERSTRÅLNING NÄR DENNA DEL ÄR ÖPPNAD.
BETRAKTA EJ STRÅLEN.
VORSICHT ! SICHTBARE UND / ODER UNSICHTBARE
LASERSTRAHLUNG WENN ABDECKUNG GEÖFFNET.
NICHT DEM STRAHL AUSSETZEN.
AT T EN T I ON RADIATION VISIBLE ET / OU INVISIBLE
LORSQUE L’APPAREIL EST OUVERT. EVITEZ TOUTE
EXPOSITION AU FAISCEAU.
ПРЕДУПРЕЖДЕНИЕ ПPИ OTKPЫTИИ УCTPOЙCTBA
BЫ MOЖETE ПОДBEPГHУTЬСЯ ВОЗДЕЙСТВИЮ
BИДИMOГO И/ИЛИ HEBИДИMOГO ЛAЗEPHOГO
ИЗЛУЧEHИЯ. ИЗБЕГAЙTE BOЗДЕЙСТВИЯ ЛУЧA.
SYNLIG OCH / ELLER OSYNLIG
i
Page 3
DK
N
S
SF
VAROITUS
Muiden kuin tässä esitettyjen toimintojen säädön tai
asetusten muutto saattaa altistaa vaaralliselle säteilylle tai
muille vaarallisille toiminnoille.
Advarsel: Usynlig laserstråling ved åbning når
sikkerhedsafbrydere er ude af funktion. Undgå utsættelse
for stråling.
Bemærk: Netafbryderen STANDBY/ON er sekundært
indkoblet og ofbryder ikke strømmen fra nettet. Den
indbyggede netdel er derfor tilsluttet til lysnettet så længe
netstikket sidder i stikkontakten.
Luokan 1 laserlaite
Varoitus! Laitteen käyttäminen muulla kuin tässä
käyttöohjeessa mainitulla tavalla saattaa altistaa käyttäjän
turvallisuusluokan 1 ylittävälle näkymättömälle
lasersäteilylle.
Oikeus muutoksiin varataan. Laite ei saa olla alttiina tippuja roiskevedelle.
Huom. Toiminnanvalitsin STANDBY/ON on kytketty
toisiopuolelle, eikä se kytke laitetta irti sähköverkosta.
Sisäänrakennettu verkko-osa on kytkettynä sähköverkkoon
aina silloin, kun pistoke on pistorasiassa.
VARO!
Observer: Nettbryteren STANDBY/ON er sekundert
innkoplet. Den innebygdenetdelen er derfor ikke frakoplet
nettet så lenge apparatet er tilsluttet nettkontakten.
AVATTAESSA JA SUOJALUKITUS
OHITETTAESSA OLET ALTTIINA
NÄKYMÄTTÖMÄLLE LASERSÄTEILYLLE.
ÄLÄ KATSO SÄ TEESEEN.
Klass 1 laseraparat
Varning! Om apparaten används på annat sätt än i denna
bruksanvisning specificerats, kan användaren utsättas för
osynlig laserstrålning, som överskrider gränsen för
laserklass 1.
Observera! Strömbrytaren STANDBY/ON är sekundärt
kopplad och inte bryter inte strömmen från nätet. Den
inbyggda nätdelen är därför ansluten till elnätet så länge
stickproppen sitter i vägguttaget.
VARNING!
OSYNLIG LASERSTRÅLNING NÄR DENNA DEL
ÄR ÖPPNAD OCH SPÄRREN ÄR URKOPPLAD.
BETRAKTA EJ STRÅLEN.
Information for Users on Collection and Disposal of Old Equipment and
used Batteries
These symbols on the products, packaging, and/or accompanying documents mean that used electrical and
electronic products and batteries should not be mixed with general household waste. For proper treatment,
recovery and recycling of old products and used batteries, please take them to applicable collection points, in
accordance with your national legislation and the Directives 2002/96/EC and 2006/66/EC.
By disposing of these products and batteries correctly, you will help to save valuable resources and prevent any
potential negative effects on human health and the environment which could otherwise arise from
inappropriate waste handling.
For more information about collection and recycling of old products and batteries, please contact your local
municipality, your waste disposal service or the point of sale where you purchased the items.
[Information on Disposal in other Countries outside the European Union]
These symbols are only valid in the European Union. If you wish to discard these items, please contact your local
authorities or dealer and ask for the correct method of disposal.
Note for the battery symbol (bottom two symbol examples):
This symbol might be used in combination with a chemical symbol. In this case it complies with the
requirement set by the Directive for the chemical involved.
ii
English
En
Page 4
1.
2.
3.
4.
5.
6.
7.
8.
9.
■
■
Caution: Read this before operating your unit.
To assure the finest performance, please read this manual
carefully. Keep it in a safe place for future reference.
Install this sound system in a well ventilated, cool, dry, clean
place – away from direct sunlight, heat sources, vibration,
dust, moisture, and/or cold. Allow ventilation space of at
least 10 cm on the top, 10 cm on the left and right, and 10 cm
on the back of this unit.
Locate this unit away from other electrical appliances,
motors, or transformers to avoid humming sounds.
Do not expose this unit to sudden temperature changes
from cold to hot, and do not locate this unit in an
environment with high humidity (i.e., a room with a
humidifier) to prevent condensation inside this unit, which
may cause an electrical shock, fire, damage to this unit,
and/or personal injury.
Avo id installing this unit where foreign objects may fall onto
this unit and/or this unit may be exposed to liquid dripping
or splashing. On the top of this unit, do not place:
—Other components, as they may cause damage and/or
discoloration on the surface of this unit.
—Burning objects (i.e., candles), as they may cause fire,
damage to this unit, and/or personal injury.
—Containers with liquid in them, as they may fall and
liquid may cause electrical shock to the user and/or
damage to this unit.
Do not cover this unit with a newspaper, tablecloth, curtain,
etc., in order not to obstruct heat radiation. If the
temperature inside this unit rises, it may cause fire, damage
to this unit, and/or personal injury.
Do not plug in this unit to a wall outlet until all connections
are complete.
Do not operate this unit upside-down. It may overheat,
possibly causing damage.
Do not use force on switches, knobs and/or cords.
10. When disconnecting the power cable from the wall outlet,
grasp the plug; do not pull the cable.
11. Do not clean this unit with chemical solvents; this might
damage the finish.
12. Only voltage specified on this unit must be used. Using this
unit with a higher voltage than specified is dangerous and
may cause fire, damage to this unit, and/or personal injury.
Ya m a ha will not be held responsible for any damage
resulting from use of this unit with a voltage other than
specified.
13. To preve nt damage by lightning, keep the power cord
disconnected from a wall outlet or the unit during a
lightning storm.
14. Do not attempt to modify or fix this unit. Contact qualified
Ya m a ha service personnel when any service is needed. The
cabinet should never be opened for any reasons.
15. When not planning to use this unit for long periods of time
(i.e., vacation), disconnect the AC power plug from the wall
outlet.
16. Install this unit near the AC outlet and where the AC power
plug can be reached easily.
17. Be sure to read the “Troubleshooting” section in the owner’s
manual on common operating errors before concluding that
this unit is faulty.
18. Before moving this unit, press STANDBY/ON to set the unit
in standby mode, then disconnect the AC power plug from
the AC wall outlet.
19. The batteries shall not be exposed to excessive heat such as
sunshine, fire or like.
20. Excessive sound pressure from earphones and headphones
can cause hearing loss.
This unit is not disconnected from the AC power source as
long as it is connected to the wall outlet, even if this unit itself
is turned off. This state is called the standby mode. In this
state, this unit is designed to consume a very small quantity of
power.
DANGER
This unit emits visible laser radiation when open. Avoid direct
eye exposure to beam. When this unit is plugged into the wall
outlet, do not place your eyes close to the opening of the disc
tray and other openings to look into inside.
The laser component in this product is capable of emitting
radiation exceeding the limit for Class 1.
LASER SAFETY
This unit employs a laser. Due to possible eye injury, only a
qualified service person should remove the cover or attempt to
service this device.
LASER
Typ e S emi co nd uc tor laser AlGaInP
Wave length 655 nm (DVD)
790 nm (VCD/CD)
Output Power 5 mW (DVD)
7 mW (VCD/CD)
Beam divergence 20 degree
WARNING
TO REDUCE THE RISK OF FIRE OR ELECTRIC SHOCK,
DO NOT EXPOSE THIS APPLIANCE TO RAIN OR
MOISTURE.
CAUTION
Danger of explosion if battery is incorrectly replaced.
Replace only with the same or equivalent type.
iii
En
Page 5

■
■
■
■
For U.K. customers
If the socket outlets in the home are not suitable for the plug
supplied with this appliance, it should be cut off and an
appropriate 3 pin plug fitted. For details, refer to the
instructions described below.
Note:
The plug severed from the mains lead must be destroyed, as a
plug with bared flexible cord is hazardous if engaged in a live
socket outlet.
Special Instructions for U.K. Model
IMPORTANT
THE WIRES IN MAINS LEAD ARE COLOURED IN
ACCORDANCE WITH THE FOLLOWING CODE:
Blue: NEUTRAL
Brown: LIVE
As the colours of the wires in the mains lead of this
apparatus may not correspond with the coloured markings
identifying the terminals in your plug, proceed as follows:
The wire which is coloured BLUE must be connected to the
terminal which is marked with the letter N or coloured
BLACK. The wire which is coloured BROWN must be
connected to the terminal which is marked with the letter L
or coloured RED.
Making sure that neither core is connected to the earth
terminal of the three pin plug.
Handling the remote control
•The area between the remote control and this unit must be
clear of large obstacles.
•Do not spill water or other liquids on the remote control.
•Do not drop the remote control.
•Do not leave or store the remote control in the following
types of conditions:
—places of high humidity, such as near a bath
—places of high temperature, such as near a heater or a stove
—places of extremely low temperatures
—dusty places
•Do not expose the remote control sensor to strong lighting,
in particular, an inverter type fluorescent lamp; otherwise,
the remote control may not work properly. If necessary,
position this unit away from direct lighting.
Notes on batteries
•Change all of the batteries if you notice that the operation
range of the remote control decreases.
•Use AA, R6, UM-3 batteries.
•Make sure that the polarities are correct. See the illustration
inside the battery compartment.
•Remove the batteries if the remote control is not used for an
extended period of time.
•Do not use old batteries together with new ones.
•Do not use different types of batteries (such as alkaline and
manganese batteries) together. Read the packaging carefully
as these different types of batteries may have the same shape
and color.
•If the batteries have leaked, dispose of them immediately.
Avoid touching the leaked material or letting it come into
contact with clothing, etc. Clean the battery compartment
thoroughly before installing new batteries.
•Do not throw away batteries with general house waste;
dispose of them correctly in accordance with your local
regulations.
Limited Guarantee for European Economic Area (EEA) and Switzerland
Thank you for having chosen a Yamaha product. In the unlikely event that your Yamaha product needs guarantee service, please contact the dealer from
whom it was purchased. If you experience any difficulty, please contact Yamaha representative office in your country. You can find full details on our
website ( http://www.yamaha-hifi.com/ or http://www.yamaha-uk.com/ for U.K. resident).
The product is guaranteed to be free from defects in workmanship or materials for a period of two years from the date of the original purchase. Yamaha
undertakes, subject to the conditions listed below, to have the faulty product or any part(s) repaired, or replaced at Yamaha’s discretion, without any
charge for parts or labour. Yamaha reserves the right to replace a product with that of a similar kind and/or value and condition, where a model has been
discontinued or is considered uneconomic to repair.
1. The original invoice or sales receipt (showing date of purchase, product code and dealer’s name) MUST accompany the defective product, along
with a statement detailing the fault. In the absence of this clear proof of purchase, Yamaha reserves the right to refuse to provide free of charge
service and the product may be returned at the customer’s expense.
2. The product MUST have been purchased from an AUTHORISED Yamaha dealer within the European Economic Area (EEA) or Switzerland.
3. The product must not have been the subject of any modifications or alterations, unless authorised in writing by Yamaha.
4. The following are excluded from this guarantee:
a. Periodic maintenance and repair or replacement of parts due to normal wear and tear.
b. Damage resulting from:
(1) Repairs performed by the customer himself or by an unauthorised third party.
(2) Inadequate packaging or mishandling, when the product is in transit from the customer. Please note that it is the customer’s responsibility to
ensure the product is adequately packaged when returning the product for repair.
(3) Misuse, including but not limited to (a) failure to use the product for its normal purpose or in accordance with Yamaha’s instructions on the
proper use, maintenance and storage, and (b) installation or use of the product in a manner inconsistent with the technical or safety standards
in force in the country where it is used.
(4) Accidents, lightning, water, fire, improper ventilation, battery leakage or any cause beyond Yamaha’s control.
(5) Defects of the system into which this product is incorporated and/or incompatibility with third party products.
(6) Use of a product imported into the EEA and/or Switzerland, not by Yamaha, where that product does not conform to the technical or safety
standards of the country of use and/or to the standard specification of a product sold by Yamaha in the EEA and/or Switzerland.
(7) Non AV (Audio Visual) related products.
(Products subject to “Yamaha AV Guarantee Statement” are defined in our website at http://www.yamaha-hifi.com/ or
http://www.yamaha-uk.com/ for U.K. resident.)
5. Where the guarantee differs between the country of purchase and the country of use of the product, the guarantee of the country of use shall apply.
6. Yamaha may not be held responsible for any losses or damages, whether direct, consequential or otherwise, save for the repair or replacement of the
product.
7. Please backup any custom settings or data, as Yamaha may not be held responsible for any alteration or loss to such settings or data.
8. This guarantee does not affect the consumer’s statutory rights under applicable national laws in force or the consumer’s rights against the dealer
arising from their sales/purchase contract.
Conditions
English
iv
En
Page 6
■
■
■
■
Legal notices
This product incorporates copyright protection
technology that is protected by U.S. patents and other
intellectual property rights. Use of this copyright
protection technology must be authorized by
Macrovision, and is intended for home and other
limited viewing uses only unless otherwise
authorized by Macrovision. Reverse engineering or
disassembly is prohibited.
iPod™
“Ap pl e ,” “ iP od ,” and “iTunes” are trademarks of Apple Inc.,
registered in the U.S. and other countries.
Bluetooth is a registered trademark of Bluetooth SIG and is
used by Yamaha in accordance with a license agreement.
DivX, DivX Ultra Certified, and associated logos are
trademarks of DivX, Inc. and are used under license.
Memory backup
If the power cable is disconnected from the AC wall
outlet, the DRX-730 will save the radio presets and
other settings for at least 1 week.
About this manual
Unless otherwise stated, instructions in this manual
such as “press ENTER” refer to the buttons on the
remote control.
Instructions and procedures in this manual assume
that the DRX-730 is already turned on.
This manual was printed before the DRX-730 went
into production. Under our policy of continuous
improvement, design and specifications are subject to
change. In the unlikely event that an explanation in
this owner’s manual disagrees with the actual
operation on the DRX-730, the DRX-730 is to be
taken as correct.
Manufactured under license from Dolby Laboratories. Dolby
and the double-D symbol are trademarks of Dolby
Laboratories.
Manufactured under license under U.S. Patent #’s: 5,451,942;
5,956,674; 5,974,380; 5,978,762; 6,487,535 & other U.S. and
worldwide patents issued & pending. DTS and DTS 2.0 +
Digital Out are registered trademarks and the DTS logos and
Symbol are trademarks of DTS, Inc. © 1996-2007 DTS, Inc. All
Rights Reserved.
“HDMI”, the “HDMI” logo, and “High-Definition Multimedia
Interface” are trademarks or registered trademarks of HDMI
Licensing LLC.
MPEG Layer-3 audio decoding technology licensed from
Fraunhofer IIS and Thomson multimedia.
Window s Me dia is either a registered trademark or trademark
of Microsoft Corporation in the United States and/or other
countries.
v
En
Page 7

Contents
1 Introduction . . . . . . . . . . . . . . . . . . . . 2
Features . . . . . . . . . . . . . . . . . . . . . . . . . . . . . . . . . 2
Supplied accessories . . . . . . . . . . . . . . . . . . . . . 2
Front panel . . . . . . . . . . . . . . . . . . . . . . . . . . . . . . 3
Display . . . . . . . . . . . . . . . . . . . . . . . . . . . . . . . . . . 4
Rear panel . . . . . . . . . . . . . . . . . . . . . . . . . . . . . . . 5
Remote control . . . . . . . . . . . . . . . . . . . . . . . . . . 6
2 Getting Started . . . . . . . . . . . . . . . . . 8
Installing batteries in the remote control . . 8
Connecting speakers . . . . . . . . . . . . . . . . . . . . . 9
Connecting a powered subwoofer . . . . . . . 10
Connecting antennas . . . . . . . . . . . . . . . . . . . 11
Connecting a TV . . . . . . . . . . . . . . . . . . . . . . . . 12
Connecting a recorder (CDR, MDR, etc.) . . 14
Connecting an AV receiver or decoder . . . 15
Connecting the power cable . . . . . . . . . . . . 15
3 General Functions . . . . . . . . . . . . . . 16
Turning on the DRX-730 . . . . . . . . . . . . . . . . . 16
Selecting input sources . . . . . . . . . . . . . . . . . 16
Adjusting the volume . . . . . . . . . . . . . . . . . . . 17
Muting the sound . . . . . . . . . . . . . . . . . . . . . . . 17
Adjusting the bass and treble . . . . . . . . . . . 18
Adjusting the balance . . . . . . . . . . . . . . . . . . . 18
Pure Direct playback mode . . . . . . . . . . . . . . 19
Using headphones . . . . . . . . . . . . . . . . . . . . . . 19
Adjusting the display brightness . . . . . . . . 20
Using the sleep timer . . . . . . . . . . . . . . . . . . . 20
Setting the clock . . . . . . . . . . . . . . . . . . . . . . . . 21
Viewing the time . . . . . . . . . . . . . . . . . . . . . . . . 22
Auto standby . . . . . . . . . . . . . . . . . . . . . . . . . . . 22
Using Disc Navigator with MP3, WMA,
MPEG-4 AAC, DivX®, WMV, and JPEG
discs . . . . . . . . . . . . . . . . . . . . . . . . . . . . . . . . .35
Viewing disc information . . . . . . . . . . . . . . . .36
Viewing the audio format . . . . . . . . . . . . . . . .36
5 Using the Tuner . . . . . . . . . . . . . . . . 37
Tuning in to radio stations . . . . . . . . . . . . . . .37
Using presets . . . . . . . . . . . . . . . . . . . . . . . . . . . .39
Radio Data System (Europe and Russia
models only) . . . . . . . . . . . . . . . . . . . . . . . . .40
6 Using the Timer . . . . . . . . . . . . . . . . 44
Setting the input source . . . . . . . . . . . . . . . . .44
Setting the on time . . . . . . . . . . . . . . . . . . . . . .45
Setting the off time . . . . . . . . . . . . . . . . . . . . . .45
Turning the timer on and off . . . . . . . . . . . . .46
7 Portable Device Playback . . . . . . . 47
Music player playback . . . . . . . . . . . . . . . . . . .47
iPod playback . . . . . . . . . . . . . . . . . . . . . . . . . . .47
USB playback . . . . . . . . . . . . . . . . . . . . . . . . . . . .49
Bluetooth playback . . . . . . . . . . . . . . . . . . . . . .51
8 Recording . . . . . . . . . . . . . . . . . . . . . 53
Audio Settings and Video Adjust
9
Audio Settings menu . . . . . . . . . . . . . . . . . . . .54
Video Adjust menu . . . . . . . . . . . . . . . . . . . . . .55
10Initial Settings . . . . . . . . . . . . . . . . . 56
Initial Settings menu . . . . . . . . . . . . . . . . . . . .56
. . 54
1
2
3
4
5
6
7
8
4 Playing Discs . . . . . . . . . . . . . . . . . . . 23
Using the on-screen display . . . . . . . . . . . . . 23
Playing discs . . . . . . . . . . . . . . . . . . . . . . . . . . . . 23
Slow-motion playback . . . . . . . . . . . . . . . . . . 26
Frame-by-frame playback . . . . . . . . . . . . . . . 26
Selecting languages and audio . . . . . . . . . . 27
Selecting subtitles . . . . . . . . . . . . . . . . . . . . . . 27
Selecting camera angles . . . . . . . . . . . . . . . . 28
Zoom . . . . . . . . . . . . . . . . . . . . . . . . . . . . . . . . . . . 28
Repeat playback . . . . . . . . . . . . . . . . . . . . . . . . 29
A–B repeat playback . . . . . . . . . . . . . . . . . . . . 29
Random playback . . . . . . . . . . . . . . . . . . . . . . . 30
Program playback . . . . . . . . . . . . . . . . . . . . . . 31
Searching Discs . . . . . . . . . . . . . . . . . . . . . . . . . 32
Playing JPEG slideshows . . . . . . . . . . . . . . . . 33
Using Disc Navigator with DVD-Video,
VCD, and SVCD discs . . . . . . . . . . . . . . . . . 34
Appendix . . . . . . . . . . . . . . . . . . . . . . . . . 61
Supported discs and formats . . . . . . . . . . . .61
Looking after discs . . . . . . . . . . . . . . . . . . . . . .64
Looking after the DRX-730 . . . . . . . . . . . . . . .65
Resetting the DRX-730 . . . . . . . . . . . . . . . . . . .65
Language, country, and region lists . . . . . .66
Troubleshooting . . . . . . . . . . . . . . . . . . . . . . . .67
Specifications . . . . . . . . . . . . . . . . . . . . . . . . . . .74
1
En
9
10
Appendix
English
Page 8
Chapter 1: Introduction
Thank your for choosing the Yamaha DRX-730 DVD
Receiver. To get the most enjoyment from your new
Yam ah a p ro du ct , p lease read this manual carefully,
and keep it in a safe place for future reference.
Features
•Play the following discs: DVD-Video, DVD-VR
(DVD-R/RW/R DL discs recorded in VR mode),
VCD, SVCD, Audio CD, DTS CD
•Play the following files: MP3, WMA, MPEG-4
AAC, JPEG, WMV
•Official DivX
•Plays all versions of DivX
DivX
6) with enhanced playback of DivX
®
media files and the DivX
•HDMI output (1080p upscaling)
• FM/AM tuner with 40 presets
•Radio Data System (Europe and Russia models)
• D-class amp: 30 W x 2 channels into 6Ω
•Pure Direct high-fidelity playback mode
•Front panel mini jack for quick and easy playback
from portable music players.
•Front panel USB port for quick and easy playback
from USB storage devices.
•DOCK jack for connecting an optional Yamaha
iPod universal dock allows you to listen to your
iPod music in high quality. And, you can control
your iPod with the DRX-730’s remote control and
recharge it while enjoying your music.
•The DOCK jack can also be used to connect a
Ya m a h a YBA-10 Bluetooth Wireless Audio
Receiver so you can listen to the music stored on
your Bluetooth-compatible music player or
mobile phone in high quality. And you can
control your Bluetooth device with the DRX-730’s
remote control.
•Timer function
•On-screen display (OSD)
•Full-function remote control
• SCART AV jack with RGB (Europe and Russia
models)
•Optical digital output
1
Ultra Certified product.
®
video (including
®
Media Format.
®
®
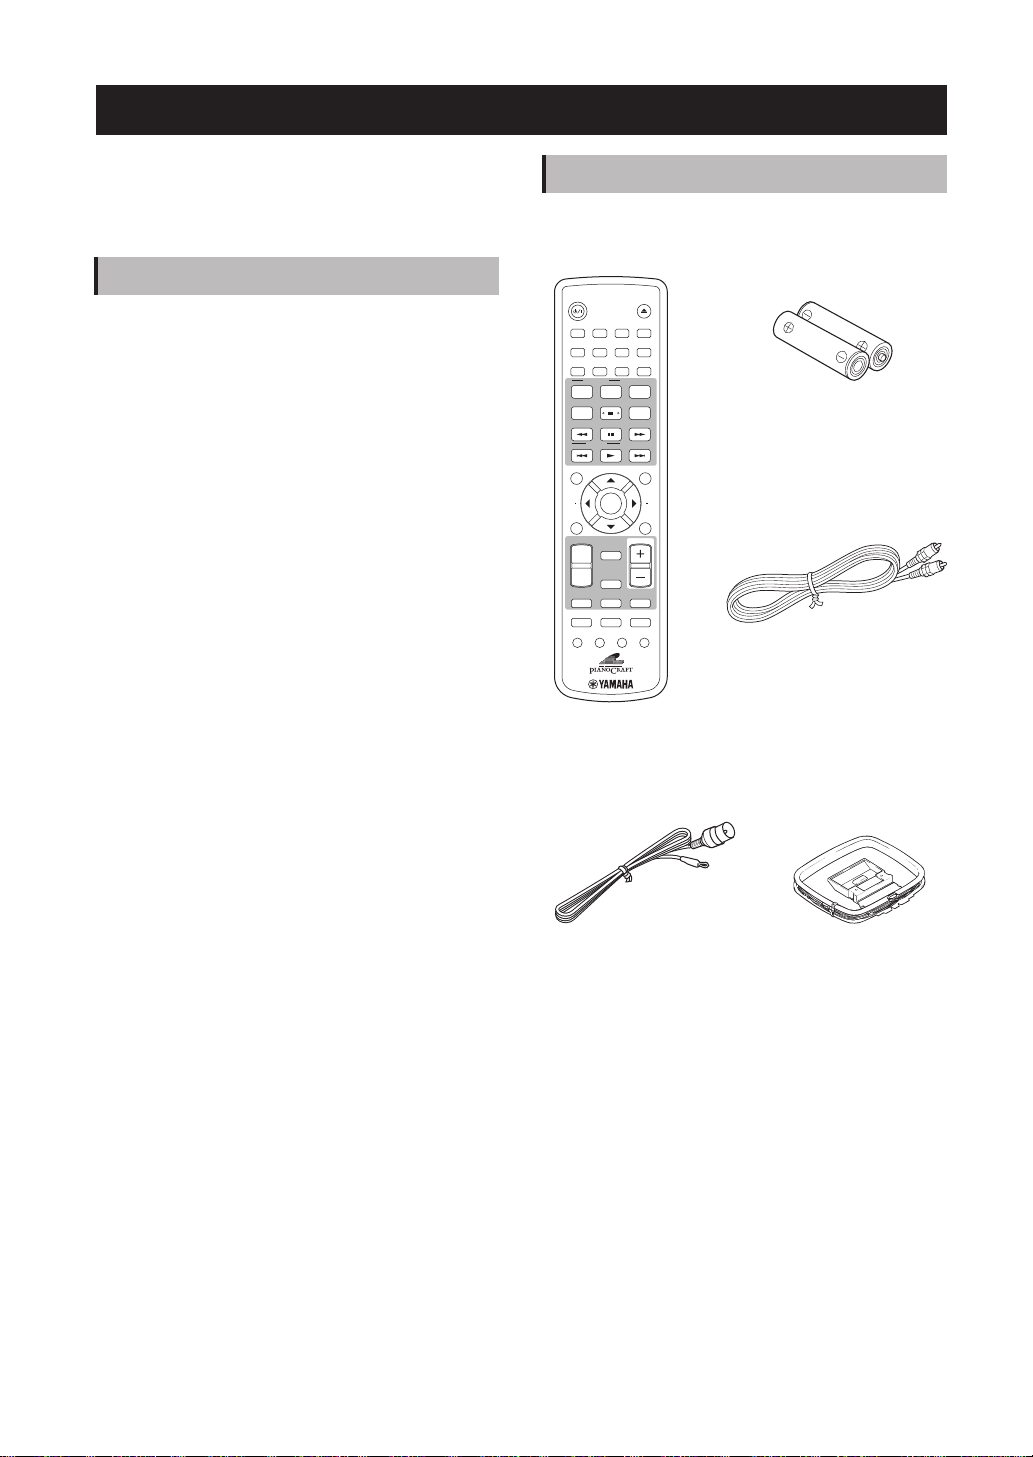
Supplied accessories
The following accessories are included with the
DRX-730. Make sure you have them all.
STANDBY/ON
ON
PLAY MODE
MODE START
TOP MENU
INFO.
SETUP
MANUAL
BAND
DVD/USB
SOUND
TIMER SLEEP
Remote control
OPEN/CLOSE
BLUETOOTH
PTY SEEK
SUBTITLE
PRESET
ENTER
MEMORY
TUNER
AUX/PORTABLE
PURE DIRECT
OFF
DIMMER
423
ZOOM
ON SCREEN
ANGLE
CLEAR
FREQ/TEXT
MENU
AEAE
RETURN
VOLUME
DOCK
MUTE
DISPLAY
1
586907
AUDIO
AUTO/
Indoor FM antenna
Two batteries (AA, R06, UM-3)
Video pin cable
AM loop antenna
1. The DRX-730 can play MP3, WMA, MPEG-4 AAC, and
JPEG files stored on CD-R/RW, DVD-R/RW, and
DVD+R/RW discs or USB storage devices, and DivX
WMV files stored on CD-R/RW, DVD-R/RW, and
®
DVD+R/RW discs. See “Supported discs and formats” on
page 61 for full details.
2
En
and
Page 9
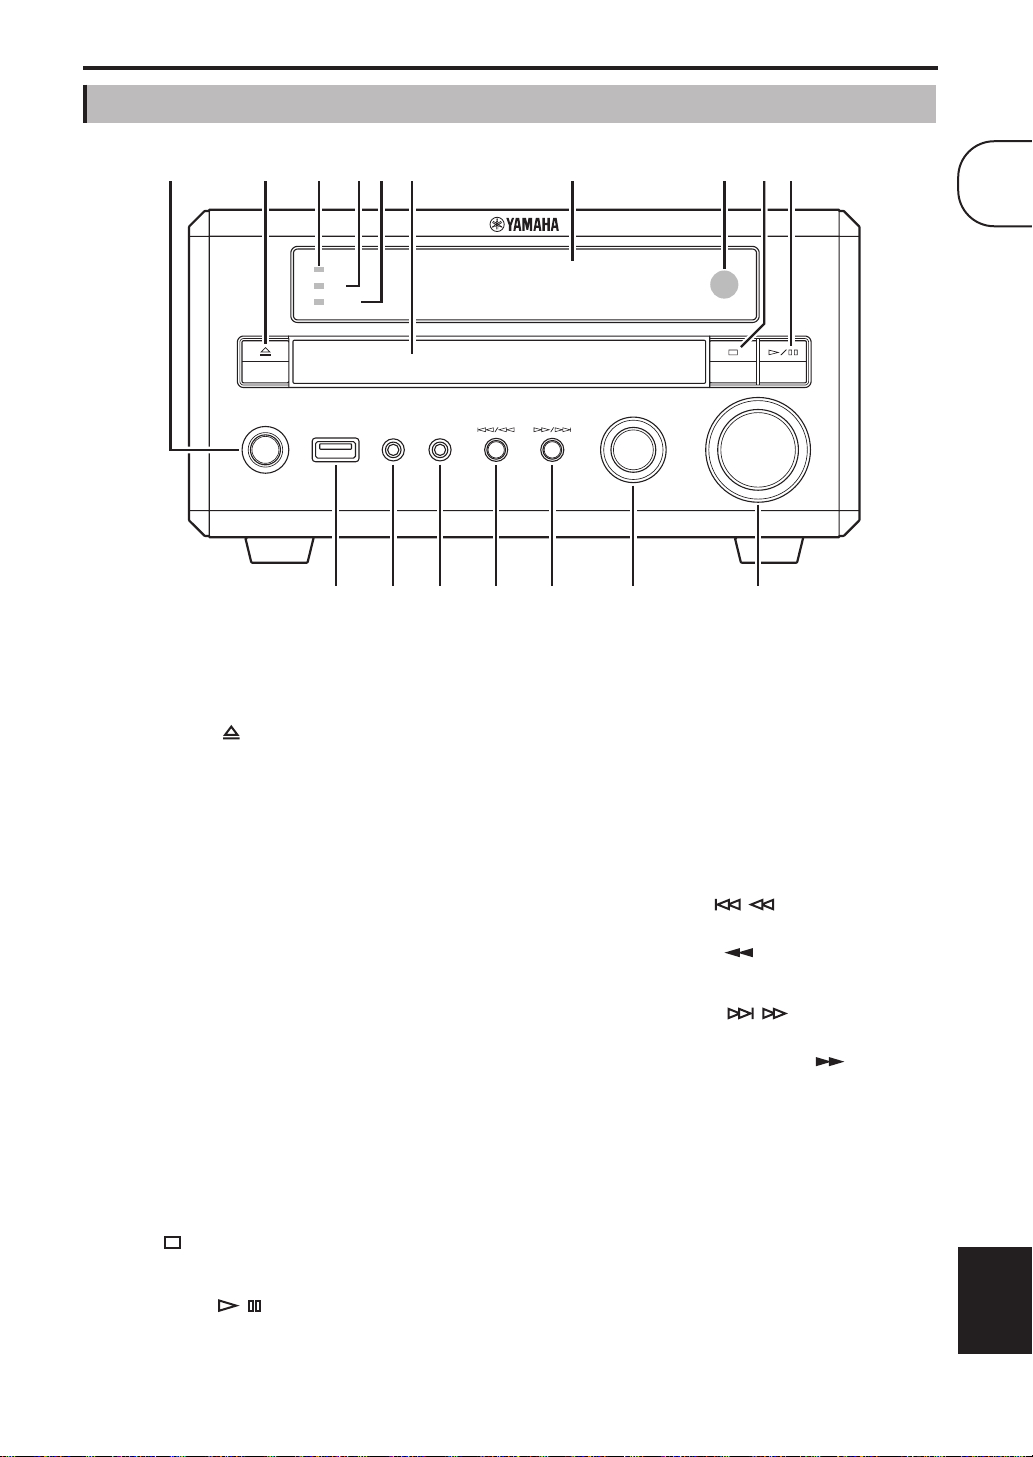
Front panel
B
9J6345 871
TIMER
HDMI
PROGRESSIVE
A
B
C
D
E
F
G
Chapter 1: Introduction
H
I
J
K
L
M
1
STANDBY/ON
USB PORTABLE PHONES
KLMNO P Q
STANDBY/ON
Sets the DRX-730 to on or standby (see page 16).
Open/Close ( )
Opens and closes the disc tray (see page 23).
TIMER LED
Lights up when the DRX-730 on standby and the
timer is on (see page 46).
HDMI LED
Lights up when the HDMI OUT is used (see page 57).
PROGRESSIVE LED
Lights up when progressive video is being output (see
page 57).
Disc tray
Used to load discs (see page 23).
Display
Displays various information. See “Display” on page 4
for more details.
Remote control sensor
Receives signals from the remote control.
Stop ( )
Stops playback (see page 24).
INPUT
VOLUME
USB port
Used to connect a USB storage device containing
music or picture files (see page 49).
PORTABLE jack
Used to connect a portable music player (see
page 47).
PHONES jack
Used to connect headphones (see page 19).
N Previous/Rewind ( / )
Selects earlier tracks or chapters (see page 25). Works
the same as the Rewind ( ) button on the remote
control when held down.
O Next/Fast Forward ( / )
Selects subsequent tracks or chapters (see page 25).
Wo rks the same as the Fast Forward ( ) button on
the remote control when held down.
P INPUT control
Selects input sources (see page 16).
Q VOLUME control
Adjusts the volume (see page 17).
English
Play/Pause ( / )
Starts and pauses playback (see page 23).
3
En
Page 10

Chapter 1: Introduction
A BC E IDFGH
KLM N
J
Display
SLEEP
PRESET
TIMER
A SLEEP
Lights up when the sleep timer has been set (see
page 20).
TUNED
STEREO
MEMORY
AUTO
DOCK MUTE
SHUFFLE
REPEATPSPTY RT CT PTY
ARTISTSPLAYLISTS
ALBUMS
H Radio Data System (Europe and Russia
models)
These indicators show the types of Radio Data System
information available from the FM station that you’re
B PRESET
Lights up when selecting radio presets (see page 40).
C STEREO
Lights up when listening to an FM station in stereo
(see page 37).
D AUTO
Lights up when Auto Tuning mode is selected. Goes
off when the Manual Tuning mode is selected (see
currently tuned in to. The PTY HOLD indicator
lights up when searching for Radio Data System
stations by type (see page 40).
I MUTE
Flashes when the sound is muted (see page 17).
J Information area
Displays various information, such as input source,
radio frequency, and the time.
page 37).
K TIMER
E DOCK
•Lights up when an iPod is inserted in an optional
Lights up when the DRX-730 is on and timer is on
(see page 46).
Ya maha iPod universal dock (YDS-10 or YDS-11)
that’s connected to the DOCK jack (see page 47).
•Lights up when a connection has been established
between a Bluetooth device and an optional
Ya m a h a YBA-10 Bluetooth Wireless Audio
Receiver (see page 51).
•Flashes while the optional Yamaha YBA-10
Bluetooth Wireless Audio Receiver is pairing or
searching for a Bluetooth device (see page 51).
L TUNED
Lights up when tuned in to a radio station (see
page 37).
M MEMORY
Lights up when presetting radio stations (see
page 39).
N iPod
These indicators show which iPod menu is selected
F SHUFFLE
Lights up when shuffle playback is selected on the
iPod (see page 48).
G REPEAT
Lights up when repeat playback is selected on the
for browsing: Playlists, Artists, Albums, Songs, or
Genres (see page 48).
O iPod control
These indicators show which cursor buttons can be
used while navigating iPod menus (see page 48).
iPod (see page 48).
HOLD
SONGS
GENRES
O
4 En
Page 11
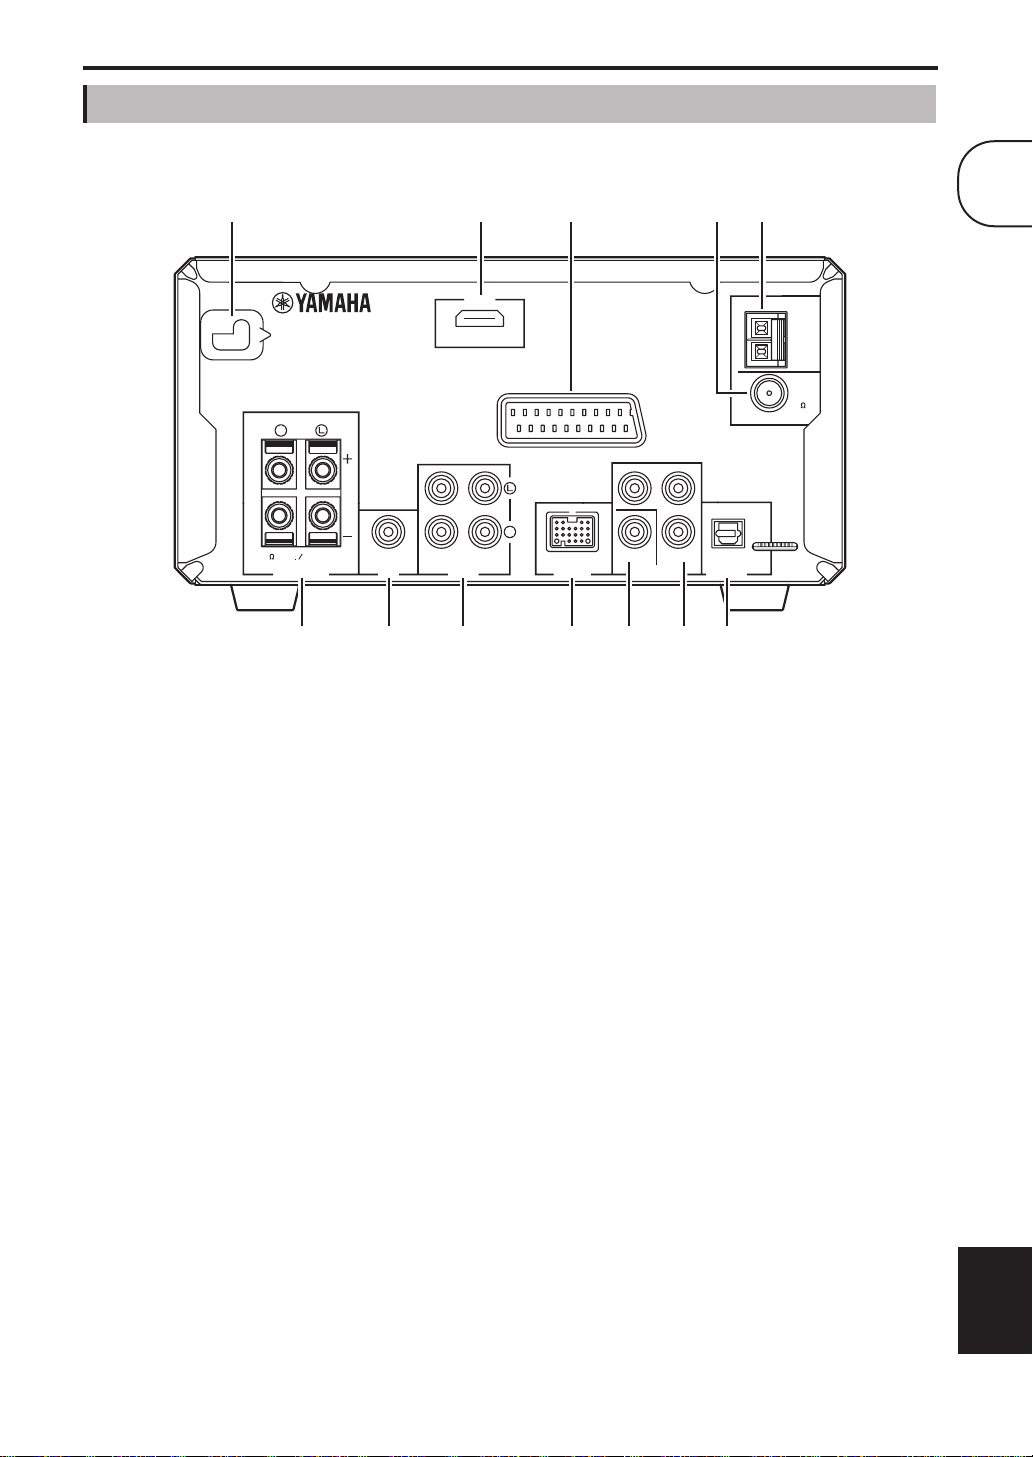
Rear panel
1 B 3 4 5
6 7 8 9 J K L
(Europe model shown here.)
Chapter 1: Introduction
1
MAINS
R
6
SPEAKER
MIN
SPEAKERS VIDEO OUT
SUBWOOFER
OUT
A MAINS (power cable)
Connect the power cable to an AC wall outlet (see
page 15).
B HDMI output
HDMI
OUT IN
AUX
AV MONITOR OUT
R
I DOCK
An optional Yamaha iPod universal dock (YDS-10 or
YDS-11) or a Yamaha YBA-10 Bluetooth Wireless
Audio Receiver can be connected here (see pages 47
and 51).
This HDMI output can be connected to an HDMI
input on your TV (see page 13).
C AV MONITOR OUT (Europe and Russia
models)
This SCART output can be connected to a SCART
input on your TV (see page 14).
D FM ANT
The FM antenna connects here (see page 11).
E AM ANT
The AM antenna connects here (see page 11).
F SPEAKERS
J VIDEO OUT
This composite video output can be connected to a
composite video input on your TV (see page 12).
K COMPONENT VIDEO OUT
This component video output can be connected to a
component video input on your TV (see page 12).
L OPTICAL DIGITAL OUT
This optical digital audio output can be connected to
an optical digital audio input on a CDR or MDR
recorder or AV receiver/decoder (see pages 14 and
15).
Speakers are connected here (see page 9).
P
R
VIDEO
B
P
Y
COMPONENT
OPTICAL
DIGITALDOCK
OUT
AM
ANT
GND
FM
ANT
75
UNBAL.
G SUBWOOFER OUT
A powered subwoofer (sold separately) can be
connected here (see page 10).
H AUX IN and OUT
A recording component, such as a CDR, MDR, or
cassette deck, can be connected here (see page 14).
English
5 En
Page 12

Chapter 1: Introduction
1
Remote control
This section provides a brief description of the remote
control’s buttons.
B
3
4
5
6
7
8
9
J
K
L
M
N
O
P
Q
R
S
T
STANDBY/ON
1
586
90
BLUETOOTH
ON
AUDIO
PLAY MODE
PTY SEEK
MODE START
TOP MENU
INFO.
SETUP
AUTO/
MANUAL
BAND
DVD/USB
TIMER SLEEP
AUX/PORTABLE
SOUND
SUBTITLE
PRESET
ENTER
MEMORY
TUNER
PURE DIRECT
7
ZOOM
OFF
DIMMER
OPEN/CLOSE
423
ON SCREEN
ANGLE
CLEAR
FREQ/TEXT
MENU
AEAE
RETURN
VOLUME
DOCK
MUTE
DISPLAY
U
V
W
X
Y
Z
a
b
c
d
e
f
g
h
i
j
k
l
A Infrared transmitter
Tr an sm its control signals to the DRX-730 (see
page 8).
B STANDBY/ON ( )
Sets the DRX-730 to on or standby (see page 16).
C Number buttons
Enter numbers.
D SUBTITLE (BLUETOOTH OFF)
•When the input source is DVD, selects subtitles
on DVDs (see page 27).
•When the input source is DOCK, disconnects
from the currently connected Bluetooth device
and makes the DRX-730 non-discoverable (see
page 51).
E AUDIO (BLUETOOTH ON)
•When the input source is DVD, selects audio
formats and foreign-language soundtracks on
DVDs (see page 27).
•When the input source is DOCK, initiates pairing
or establishes a connection with the last used
Bluetooth device and makes the DRX-730
discoverable (see page 51).
F PLAY MODE
Displays the Play Mode menu on the connected TV
when the input source is DVD.
G Pause ( )
Pauses playback.
H Rewind ( )
Rewinds playback. Also used for slow-motion
playback and frame-by-frame playback.
I Previous ( )
•Selects earlier tracks or chapters.
•On Europe and Russia models, it also works as the
Radio Data System PTY SEEK MODE button.
J TOP MENU (INFO.)
•When the input source is DVD, displays the
DVD’s top menu.
•When the input source is DOCK, selects the iPod
control mode (see page 47).
Tip:
•In addition to controlling the DRX-730, the
remote control can also be used to control
playback on an iPod (see page 47) or a Bluetooth
music player or mobile phone (see page 51).
6 En
K Cursor buttons ( )/( )/( )/( ) and ENTER
Used to navigate on-screen menus and change
settings. Also used to navigate iPod menus. The
cursor buttons are also used for radio tuning and
selecting presets.
L SETUP
Displays the Setup menu on the connected TV when
the input source is DVD.
Page 13

Chapter 1: Introduction
M MEMORY
Used to store radio presets (see page 39).
N AUTO/MANUAL
Selects the Auto and Manual Tuning modes (see
page 37).
O BAND
Selects the FM and AM radio bands (see page 37).
P DVD/USB
Selects the DVD and USB input sources (see page 16).
Q AUX/PORTABLE
Selects the AUX and PORTABLE input sources (see
page 16).
R SOUND
Used to adjust the bass, treble, and balance (see
page 18).
S TIMER
Sets the timer (see page 44).
T SLEEP
Sets the sleep timer (see page 20).
U OPEN/CLOSE ( )
Opens and closes the disc tray (see page 23).
V ON SCREEN
Displays information about the currently playing disc
on the connected TV.
d MENU
•Displays a DVD’s menu. (May work the same as
the TOP MENU button with some DVDs.)
•When the input source is USB, displays Disc
Navigator.
e RETURN
Returns to the previous menu.
f VOLUME (+/–)
Adjusts the volume (see page 17).
g TUNER
Selects the TUNER input source (see page 16).
h DOCK
Selects the DOCK input source (see page 16).
i MUTE
Mutes and unmutes the sound (see page 17).
j PURE DIRECT
Selects the Pure Direct playback mode (see page 19).
k DISPLAY
•Displays the time.
•When the input source is DVD and a disc is being
played, also displays the audio format.
l DIMMER
Dims the DRX-730’s display (see page 20).
1
W ZOOM
Zooms the picture (see page 28).
X ANGLE
Selects camera angles on DVDs (see page 28).
Y Stop ( )
Stops playback.
Z CLEAR
Clears entered numbers and deletes steps in the
program.
a Fast forward ( )
Fast forwards playback. Also used for slow-motion
playback and frame-by-frame playback.
b Play ( )
•Starts playback.
•On Europe and Russia models, it also works as the
Radio Data System PTY SEEK START button.
c Next ( )
•Selects subsequent tracks or chapters.
•On Europe and Russia models, it also works as the
Radio Data System FREQ/TEXT button.
English
7 En
Page 14
Chapter 2: Getting Started
This chapter explains how to install the batteries in
the remote control and how to connect speakers and
other components to the DRX-730.
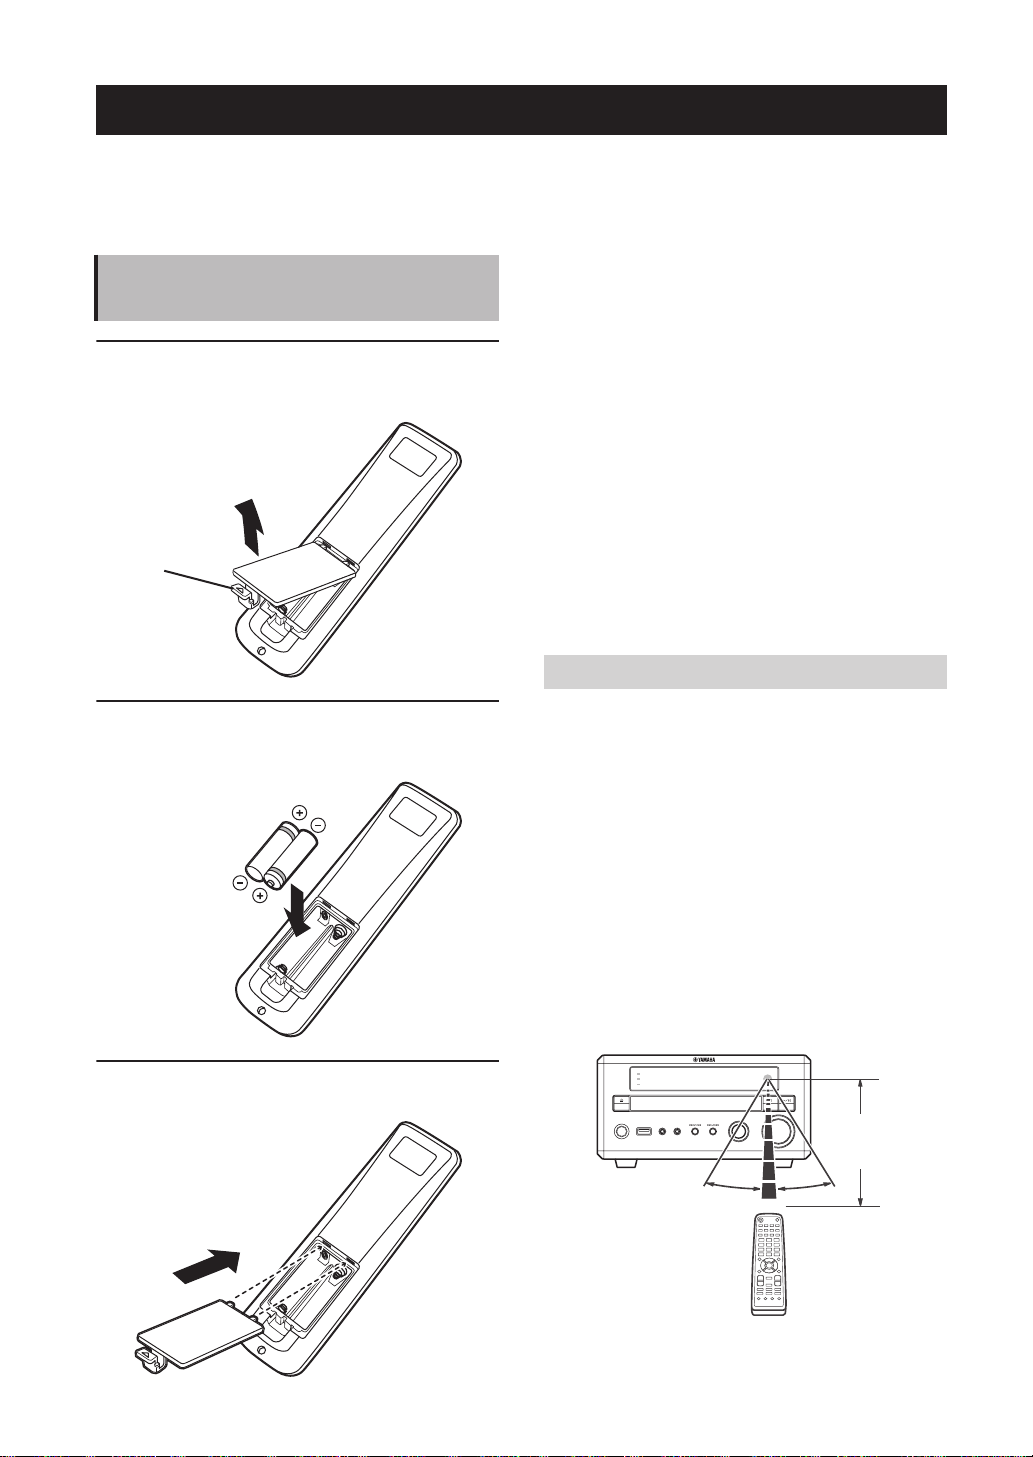
Installing batteries in the remote control
1 Push the tab on the battery compartment
cover in the direction of the arrow and remove
the cover.
Push here
2 Insert the supplied batteries into the battery
compartment with the correct polarity
(+ and –).
Notes:
•If the operating range of the remote control
decreases, replace all of the batteries with new
ones.
•Do not use old and new batteries together.
•Do not use different types of batteries together,
such as alkaline and manganese. Although they
may look similar, each type has its own
characteristics.
•When the batteries run out, remove them from
the remote control immediately to prevent an
explosion or acid leak.
•Always follow the battery disposal regulations for
your area.
•If a battery starts leaking, dispose of it
immediately. Be careful not to let leaking battery
acid come into contact with your skin or clothing.
Before inserting new batteries, wipe the battery
compartment clean.
Operating range
The remote control has an operating range of up to 6
meters (20 feet). When using the remote control,
point it toward the DRX-730’s remote control sensor,
which is next to the display, see below.
3 Replace the battery compartment cover.
Notes:
•Be careful not to spill liquid on the remote
control.
•Be careful not to drop the remote control.
•Do not leave the remote control in the following
places: hot or humid places, such as near a heater
or in a bathroom; extremely cold places; dusty
places.
TIMER
HDMI
PROGRESSIVE
VOLUME
STANDBY/ON
USB PORTABLE PHONES
INPUT
Up to 6 m
(20 feet)
30 30
8 En
Page 15
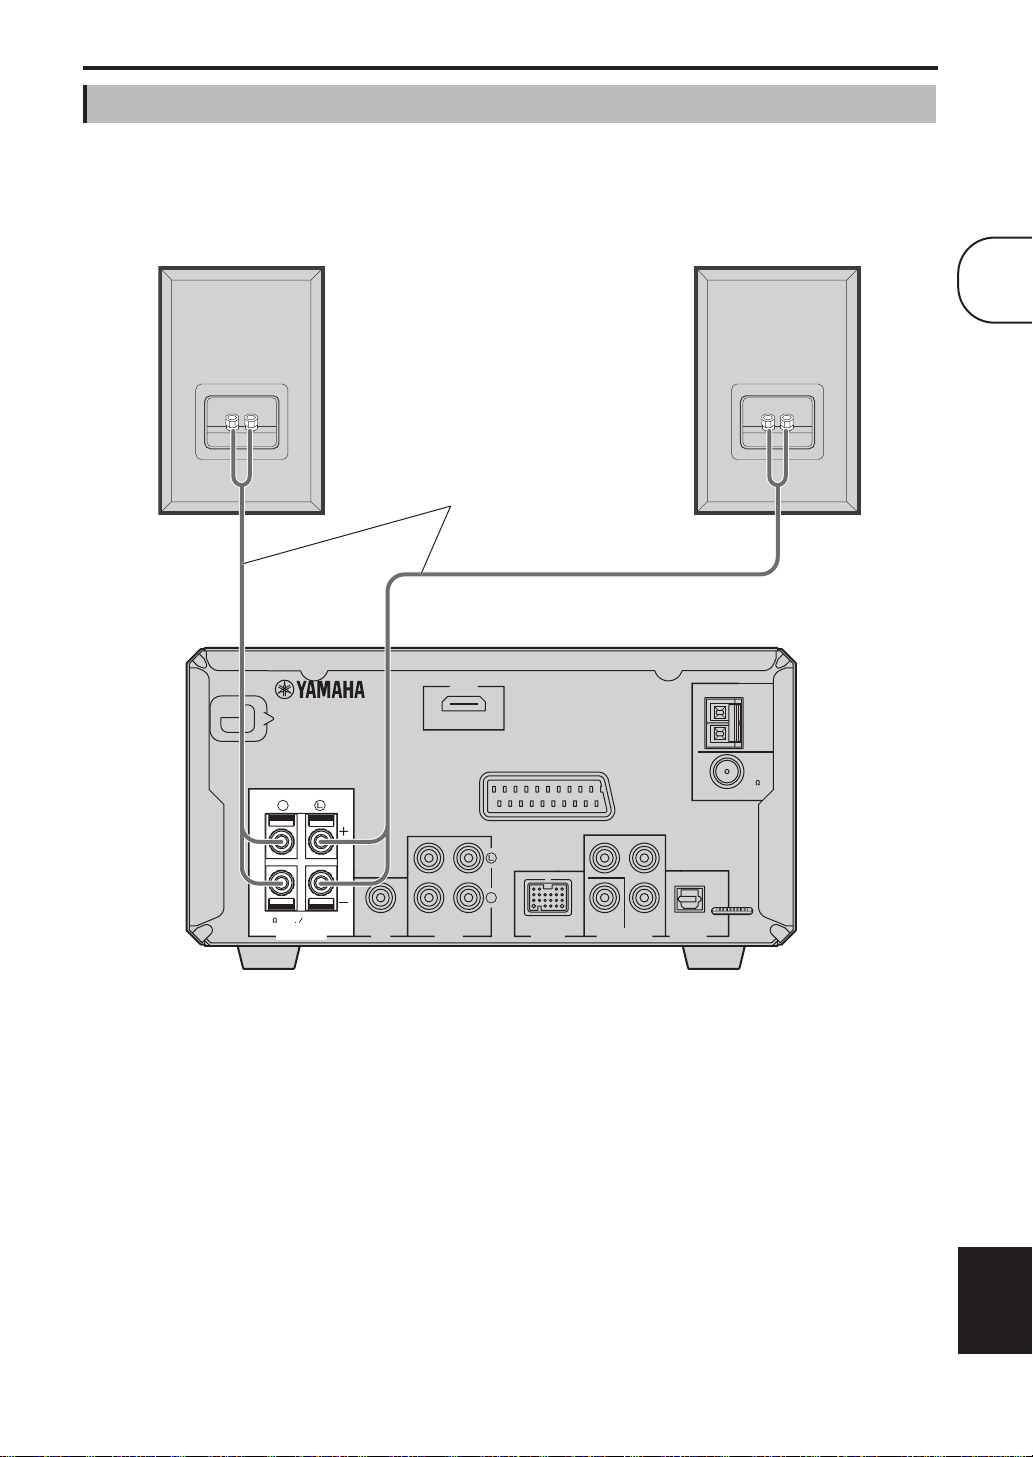
Connecting speakers
Connect the NX-E700 speakers to the DRX-730 as shown below.
Chapter 2: Getting Started
Right speaker
MAINS
Left speaker
2
Speaker cables
DRX-730
HDMI
AM
ANT
GND
FM
ANT
75
R
AV MONITOR OUT
R
P
B
P
UNBAL.
6
SPEAKER
MIN
SPEAKERS VIDEO OUT
SUBWOOFER
OUT
OUT IN
AUX
(Europe model shown here.)
Notes:
•Do not connect the power cable to the DRX-730
until all other connections have been completed.
•Be sure to connect the right speaker to the
terminals labelled “R,” and the left speaker to the
terminals labelled “L”.
•Make sure the exposed strands of each wire are
not touching any other wires or any metal parts of
the DRX-730, as this could seriously damage the
DRX-730 and your speakers.
•Do not connect speakers with an impedance
lower than the minimum impedance stated on the
rear of the DRX-730.
R
VIDEO
Y
COMPONENT
OPTICAL
DIGITALDOCK
OUT
•Use magnetically shielded speakers if you intend
to position them close to a CRT-type TV. If they
cause picture interference, move them away from
the TV.
English
9 En
Page 16
Chapter 2: Getting Started
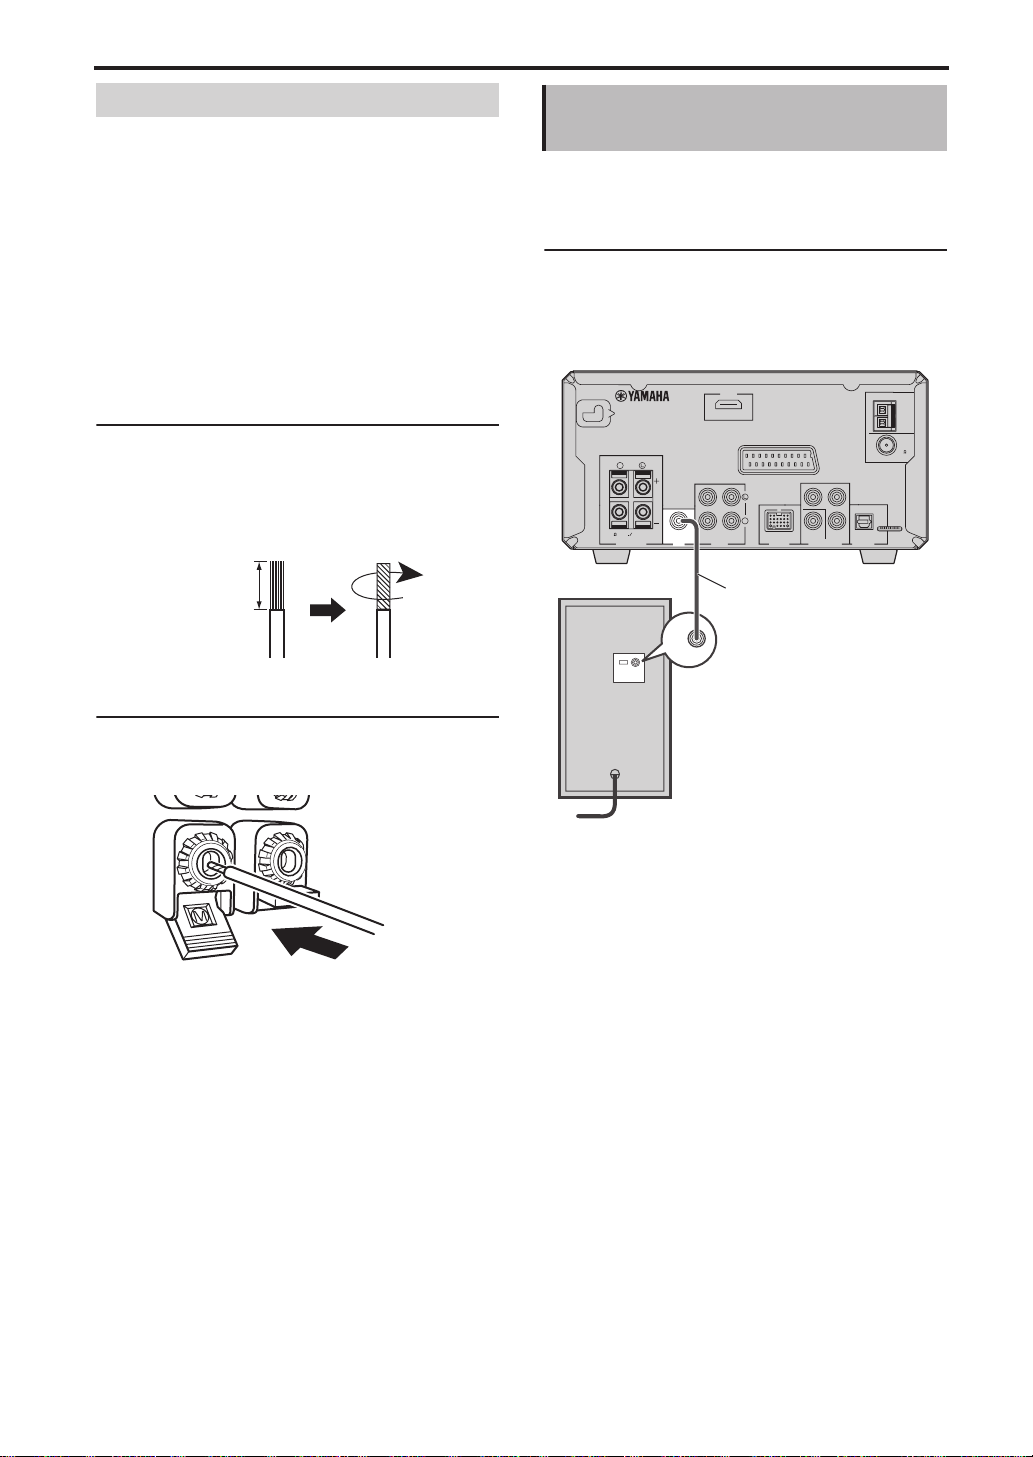
Connecting speaker cables
Speaker cables consist of two insulated wires running
together. Speaker connections are polarized and use
positive (+) and negative (–) terminals that are colorcoded red and black, respectively. To help you
connect the wires correctly, the positive wire is
usually marked with a stripe or some other identifier.
All you need to do is to connect the marked wire to
the positive (+) terminals on the DRX-730 and
speakers, and connect the unmarked wire to the
negative (–) terminals. If you get them crossed over,
your speakers will be out of phase and the sound will
be unnatural and lack bass, so take care.
1 Strip about 10 mm (3/8 in.) of insulation from
the end of each wire, and twist the exposed
strands together to prevent possible short
circuits.
10 mm (3/8 in.)
Connecting a powered subwoofer
You ca n connect a powered subwoofer (sold
separately) to the DRX-730’s SUBWOOFER OUT
jack for a really deep bass sound.
Using an audio pin cable (sold separately),
connect the DRX-730’s SUBWOOFER OUT jack to
the powered subwoofer’s input jack.
(Europe model shown here.)
MAINS
R
6
SPEAKER
MIN
SPEAKERS VIDEO OUT
INPUT
SUBWOOFER
OUT
INPUT
HDMI
AV MONITOR OUT
R
OUT IN
AUX
Audio pin cable
RPB
P
VIDEO
COMPONENT
AM
ANT
GND
FM
ANT
75
UNBAL.
Y
OUT
OPTICAL
DIGITALDOCK
2 Push open the speaker terminal lever, insert
the wire into the hole, and then close the lever.
Red: positive (+)
Black: negative (–)
Powered
subwoofer
Notes:
•Do not connect the power cables to the DRX-730
and powered subwoofer until all other
connections have been completed.
•The SUBWOOFER OUT jack outputs the lowfrequency sounds of a downmix created from all
of the channels available in the source material.
10 En
Page 17
Chapter 2: Getting Started
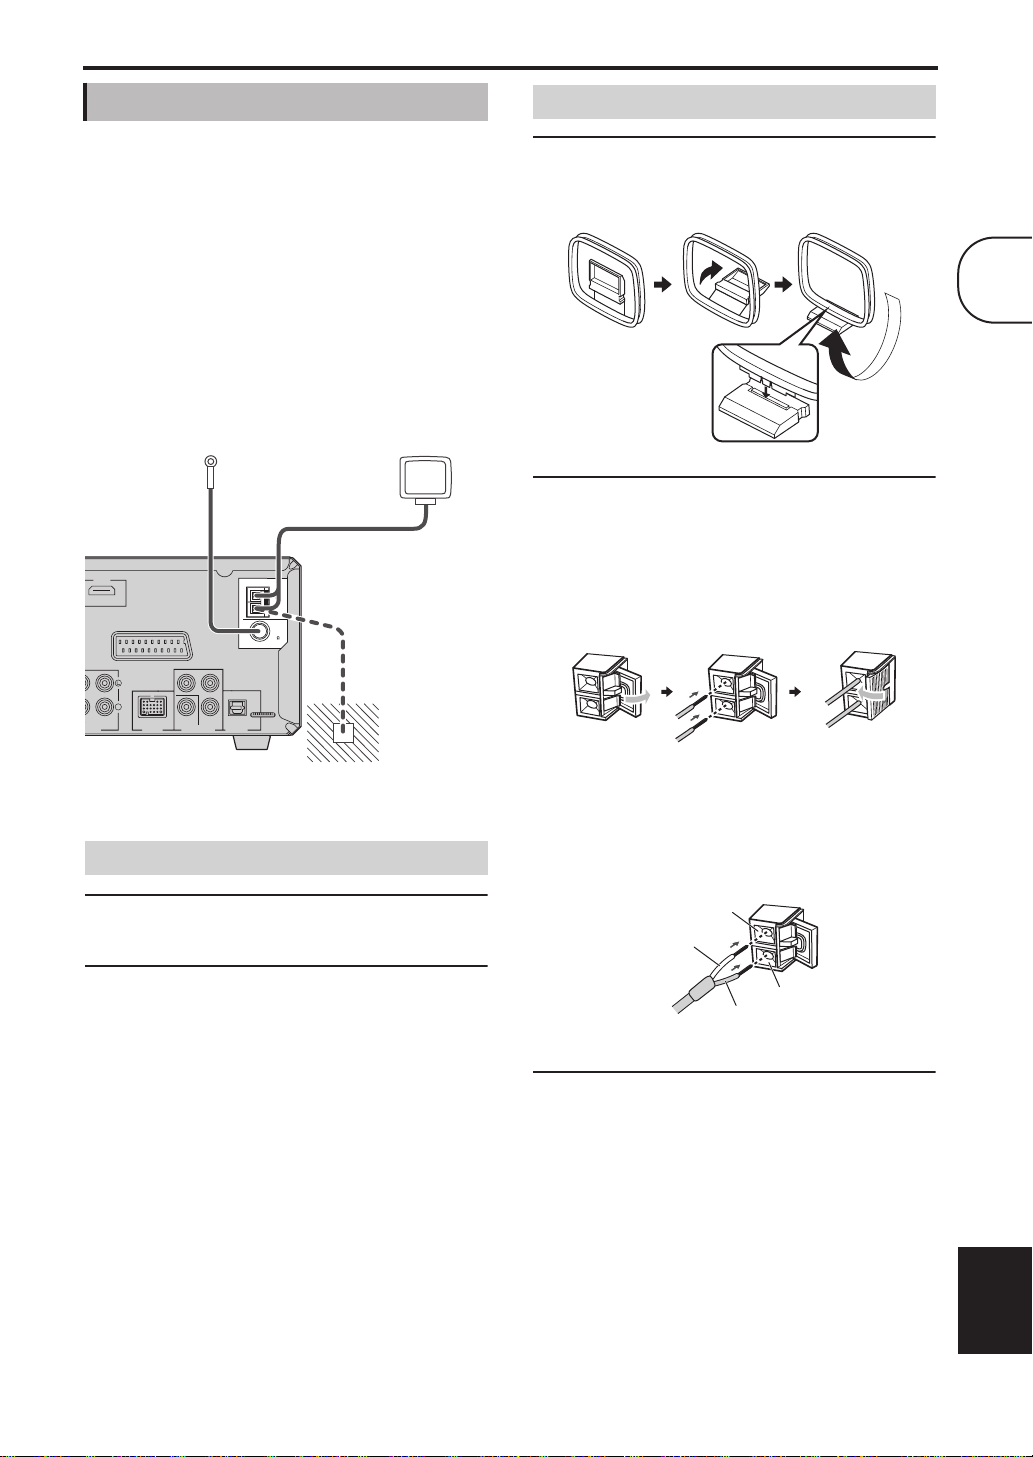
Connecting antennas
To li ste n to FM and AM radio, you must connect the
supplied antennas to the DRX-730. If radio reception
is poor in your area or you want to improve reception,
you can connect outdoor FM and AM antennas.
Consult an qualified antenna installer in your area for
more details.
■ Antenna grounding
For maximum safety and minimum interference,
connect the AM ANT GND terminal to a good earth
ground, such as a metal stake driven into moist earth.
Indoor FM antenna
(supplied)
HDMI
AV MONITOR OUT
RPB
P
R
AUX VIDEO OUT
(Europe model shown here.)
VIDEOINCOMPONENT
AM
ANT
GND
FM
ANT
75
UNBAL.
Y
OUT
OPTICAL
DIGITALDOCK
Connecting the FM antenna
AM loop antenna
(supplied)
Earth
ground
Connecting the AM loop antenna
1 Assemble the antenna’s stand as shown.
If you intend to mount the antenna on a wall, you
do not need to assemble the stand.
2
2 Push open the AM ANT terminal lever, insert
the AM loop antenna’s wires into the holes,
and then close the lever.
•If both of the wires on your antenna are black, this
means they are not polarized and can be
connected either way around.
•If one of the wires on your antenna is white and
the other one is black, connect the white wire to
the AM ANT terminal, and connect the black
wire to the GND terminal.
1 Connect the supplied indoor FM antenna to
the DRX-730’s FM ANT jack.
2 Site the antenna away from the DRX-730,
speaker cables, and power cables.
Notes:
•Do not connect the power cable to the DRX-730
until all other connections have been completed.
•Before deciding where to install the antennas
permanently, tune in to an AM or FM radio
station and adjust the position of the AM or FM
antenna, respectively, to find the best reception.
•If you connect an outdoor AM antenna, connect
the supplied AM loop antenna as well.
AM ANT terminal
White
GND terminal
Black
3 Site the antenna away from the DRX-730,
speaker cables, and power cables.
English
11 En
Page 18
Chapter 2: Getting Started
Connecting a TV
You ca n connect the DRX-730 to a TV by using any
one of four different connection types: HDMI,
component video, composite video, or SCART
(Europe and Russia models). The type you choose
will depend on the connections supported by your
TV. Refer to your TV owner’s manual for details.
HDMI provides the best picture quality. Component
video offers the next best picture quality and the
DRX-730’s component video output supports
progressive scanning for even better picture quality. If
your TV doesn’t support HDMI or component video,
use composite video. Some DRX-730 models have a
SCART jack that can output composite video or RGB
component video.
Notes:
•Do not connect the power cable to the DRX-730
until all other connections have been completed.
•Turn off your TV before connecting it to the
DRX-730.
Tip:
•If your TV has an audio output, you can connect it
to the DRX-730’s AUX IN jacks and listen to your
favorite TV programs through the speakers
connected to the DRX-730.
Composite video connection
If your TV doesn’t support HDMI or component
video, you can connect the DRX-730 to your TV with
the supplied video pin cable.
Use the supplied video pin cable to connect the
DRX-730’s VIDEO OUT jack to a composite video
input on your TV.
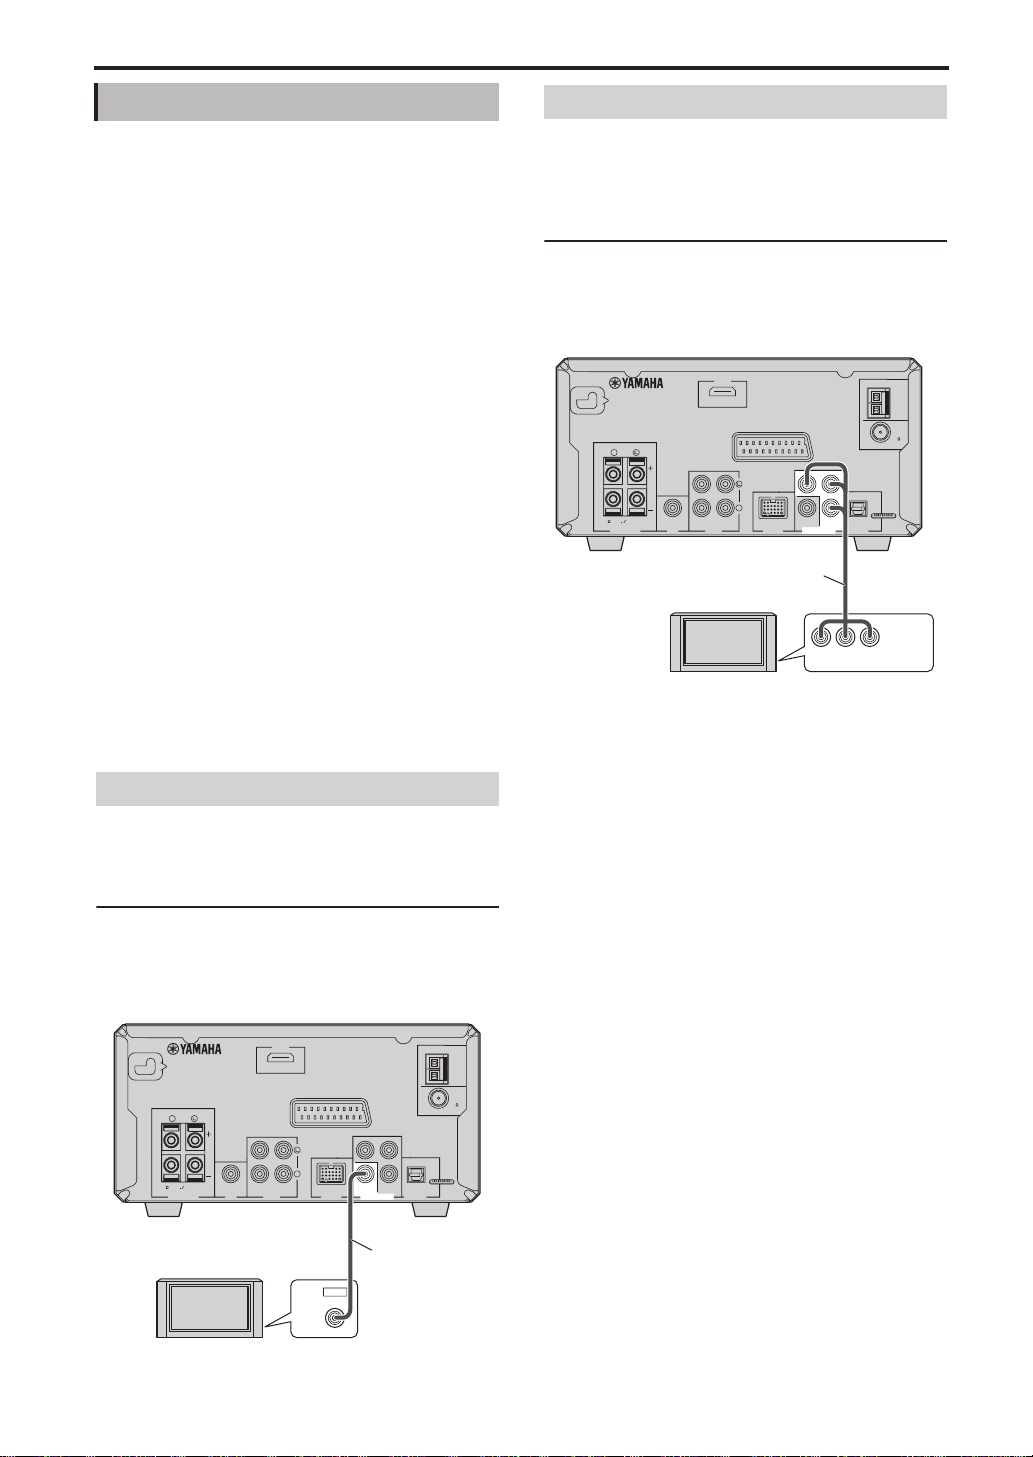
Component video connection
If your TV supports component video but not HDMI,
you can connect the DRX-730 to your TV with a
component video cable. This will provide better
picture quality than a composite video connection.
Using a component video cable (sold separately),
connect the DRX-730’s COMPONENT VIDEO OUT
jacks to a component video input on your TV.
(Europe model shown here.)
MAINS
R
6
MIN
SPEAKER
SPEAKERS VIDEO OUT
Component video cable
Notes:
•If you connect a TV that does not support
progressive scanning, make sure the Component
Out setting is set to Interlace. If it’s set to
Progressive, the TV may display no picture.
•If you use the COMPONENT VIDEO OUT and
HDMI connections simultaneously, the
COMPONENT VIDEO OUT jacks may output
progressive video regardless of the Component
Out setting.
HDMI
R
OUT IN
SUBWOOFER
AUX
OUT
(sold separately)
TV
AV MONITOR OUT
RPB
P
VIDEO
COMPONENT
Y PB PR
AM
ANT
GND
FM
ANT
75
UNBAL.
Y
OUT
OPTICAL
DIGITALDOCK
COMPONENT
VIDEO IN
(Europe model shown here.)
MAINS
R
6
MIN
SPEAKER
SUBWOOFER
OUT
SPEAKERS VIDEO OUT
TV
12 En
OUT IN
AUX
HDMI
AV MONITOR OUT
RPB
P
R
VIDEO
COMPONENT
AM
ANT
GND
FM
ANT
75
UNBAL.
Y
OUT
OPTICAL
DIGITALDOCK
Video pin cable
IN
VIDEO
(supplied)
Page 19
Chapter 2: Getting Started
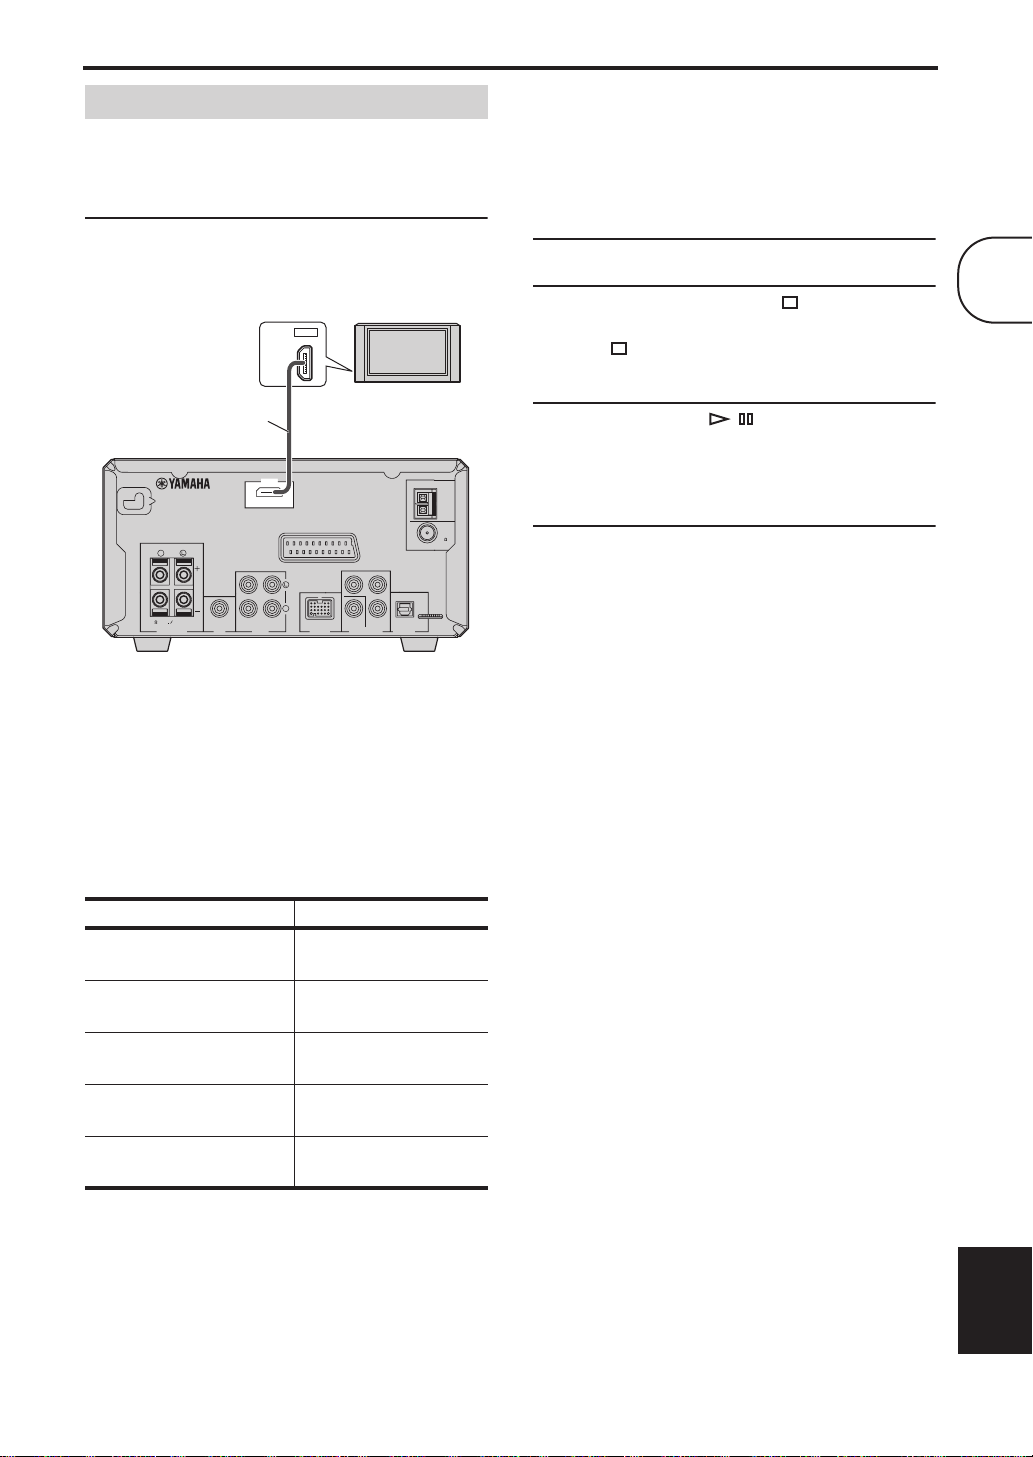
HDMI connection
If your TV has an HDMI input, you can connect it to
the DRX-730 with an HDMI cable and enjoy the best
possible picture quality.
Using an HDMI cable (sold separately), connect
the DRX-730’s HDMI jack to an HDMI input on
your TV.
HDMI-compatible TV
IN
HDMI
HDMI cable
(sold separately)
MAINS
R
6
MIN
SPEAKER
SPEAKERS VIDEO OUT
(Europe model shown here.)
Note:
•You must set the DRX-730’s HDMI resolution
and HDMI color settings to match the capabilities
of your HDMI TV (see page 57). If you select the
wrong resolution, you may loose the picture
altogether.
■ Supported HDMI output resolutions
North America models Other models
1080p/60 Hz 1080p/60 Hz (NTSC)
1080i/60 Hz 1080i/60 Hz (NTSC)
720p/60 Hz 720p/60 Hz (NTSC)
480p/60 Hz 480p/60 Hz (NTSC)
480i/60 Hz 480i/60 Hz (NTSC)
SUBWOOFER
OUT
HDMI
AV MONITOR OUT
R
OUT IN
AUX
1080p/50 Hz (PAL)
1080i/50 Hz (PAL)
720p/50 Hz (PAL)
576p/50 Hz (PAL)
576i/50 Hz (PAL)
RPB
P
VIDEO
COMPONENT
AM
ANT
GND
FM
ANT
75
UNBAL.
Y
OUT
OPTICAL
DIGITALDOCK
■ HDMI audio output
Normally, the speakers connected to the DRX-730 are
used to output the sound. However, you may want to
listen through your HDMI TV’s speakers, in which
case you can turn HDMI audio output on and off as
follows.
1 Set the DRX-730 to standby.
2 While holding down Stop ( ) on the
DRX-730, press STANDBY/ON, keeping
Stop ( ) pressed until “DVD — NO REQ.”
appears on the display.
3 Press Play/Pause ( / ) repeatedly to select
“HDMI AUDIO ON.”
If you change your mind at this point, select
“DVD — NO REQ.” instead.
4 Press STANDBY/ON.
HDMI Audio output is turned on and the
DRX-730 goes on standby. Press STANDBY/ON
again to turn it back on.
To tu rn HD MI Audio output off, repeat the above
procedure but select “HDMI AUDIO OFF” in
step 3.
Note:
•The audio output by the HDMI jack is always
2-channel PCM.
■ About HDMI
HDMI stands for High-Definition Multimedia
Interface. An extension of the DVI (Digital Video
Interface) standard used to connect computer
displays, HDMI was designed as the next generation
digital interface standard for TVs and AV equipment,
allowing uncompressed digital video and digital
audio in various formats to be delivered on a single
cable. With HDMI, separate cables for video and
audio connections are no longer necessary. And
because it’s digital, it delivers unimpaired high quality
video and audio. In addition, HDMI supports the
HDCP (High Bandwidth Digital Content Protection)
system that’s used to protect copyrighted video and
audio content from illegal copying.
2
* If your HDMI-compatible TV does not support the above
resolutions, the picture may not display correctly.
* The DRX-730 is designed to be connected to an HDMI
component. If it’s connected to a DVI component, normal
operation may not be possible depending on the DVI
component.
English
13 En
Page 20

Chapter 2: Getting Started
SCART connection (Europe and
Russia models only)
If your TV has a SCART jack, you can connect it to
the DRX-730’s AV MONITOR OUT jack and enjoy
composite video or RGB component video.
Using a SCART cable (sold separately), connect
the DRX-730’s AV MONITOR OUT jack to a SCART
input on your TV.
RPB
P
VIDEO
TV
COMPONENT
AM
ANT
GND
FM
ANT
75
UNBAL.
Y
OUT
OPTICAL
DIGITALDOCK
SCART input
SCART cable
(sold separately)
MAINS
R
6
SPEAKER
MIN
SPEAKERS VIDEO OUT
SUBWOOFER
OUT
OUT IN
AUX
HDMI
AV MONITOR OUT
R
(Europe model shown here.)
Notes:
•By default, the AV MONITOR OUT jack is set to
output composite video. To output RGB
component video, change the AV Monitor Out
setting to RGB (see page 57).
•To use the AV MONITOR OUT jack’s RGB
component video capability, you must use a
SCART cable with all 21 pins wired.
Connecting a recorder (CDR, MDR, etc.)
You ca n connect a recording component, such as a
CDR, MDR, or casette recorder, to the DRX-730 for
recording and playback.
1 Using an audio pin cable (sold separately),
connect the DRX-730’s AUX OUT jacks to the
audio input on your recording component.
2 Using another audio pin cable (sold
separately), connect the DRX-730’s AUX IN
jacks to the audio output on your recording
component.
(Europe model shown here.)
HDMI
AV MONITOR OUT
RPB
P
SUBWOOFER
OUT
OUT IN
AUX
R
VIDEO
VIDEO OUT
COMPONENT
Audio pin
cables (sold
separately)
AUDIO
OUT
IN
L
R
OPTICAL
DIGITAL
IN
■ Digital recording
If your recording component has an optical digital
input, you can connect it to the DRX-730’s OPTICAL
DIGITAL OUT jack and record digitally.
See “Recording” on page 53 for more details.
AM
ANT
GND
FM
ANT
75
UNBAL.
Y
OUT
OPTICAL
DIGITALDOCK
Optical cable
(sold separately)
Recording component
(CDR, MDR, casette deck)
14 En
Notes:
•Do not connect the power cable to the DRX-730
until all other connections have been completed.
•Turn off the recording component before
connecting it to the DRX-730.
•The OPTICAL DIGITAL OUT outputs audio
only when the input source is DVD or USB, and
with some discs and files, recording may not be
possible due to copy protection.
Page 21

Chapter 2: Getting Started
Connecting an AV receiver or decoder
The DRX-730 downmixes multi-channel sources,
such as Dolby Digital and DTS, into a 2-channel
stereo mix that you can enjoy through the speakers
connected to the DRX-730. By connecting an AV
receiver/decoder to the DRX-730’s OPTICAL
DIGITAL OUT jack, you can enjoy Dolby Digital and
DTS sources though the speakers connected to your
AV re ceiv er/decoder.
Using an optical digital audio cable (sold
separately), connect the DRX-730’s OPTICAL
DIGITAL OUT jack to a digital optical input on the
AV receiver/decoder.
Notes:
•Make sure the digital audio output settings are
configured so that the OPTICAL DIGITAL OUT
outputs MPEG, Dolby Digital, and DTS material
as it is and not as PCM.
•You may want to turn down the volume on the
DRX-730 all the way when listening through the
speakers connected to your AV receiver/decoder.
•The OPTICAL DIGITAL OUT outputs audio
only when the input source is DVD or USB.
Connecting the power cable
Once you’ve completed all of the other connections,
connect the power cable to an AC wall outlet.
Connect to
an AC wall
outlet
MAINS
R
6
SPEAKER
MIN
SPEAKERS
SUBWOOFER
OUT
OUT IN
AUX
HDMI
2
(Europe model shown here.)
MAINS
R
6
SPEAKER
MIN
SPEAKERS VIDEO OUT
SUBWOOFER
OUT
OUT IN
AUX
HDMI
Optical cable
(sold separately)
AV receiver/decoder
AV MONITOR OUT
R
RPB
P
VIDEO
OPTICAL
DIGITAL
COMPONENT
IN
AM
ANT
GND
FM
ANT
75
UNBAL.
Y
OUT
OPTICAL
DIGITALDOCK
English
15 En
Page 22
Chapter 3: General Functions
This chapter explains functions that can be used with
any input source.
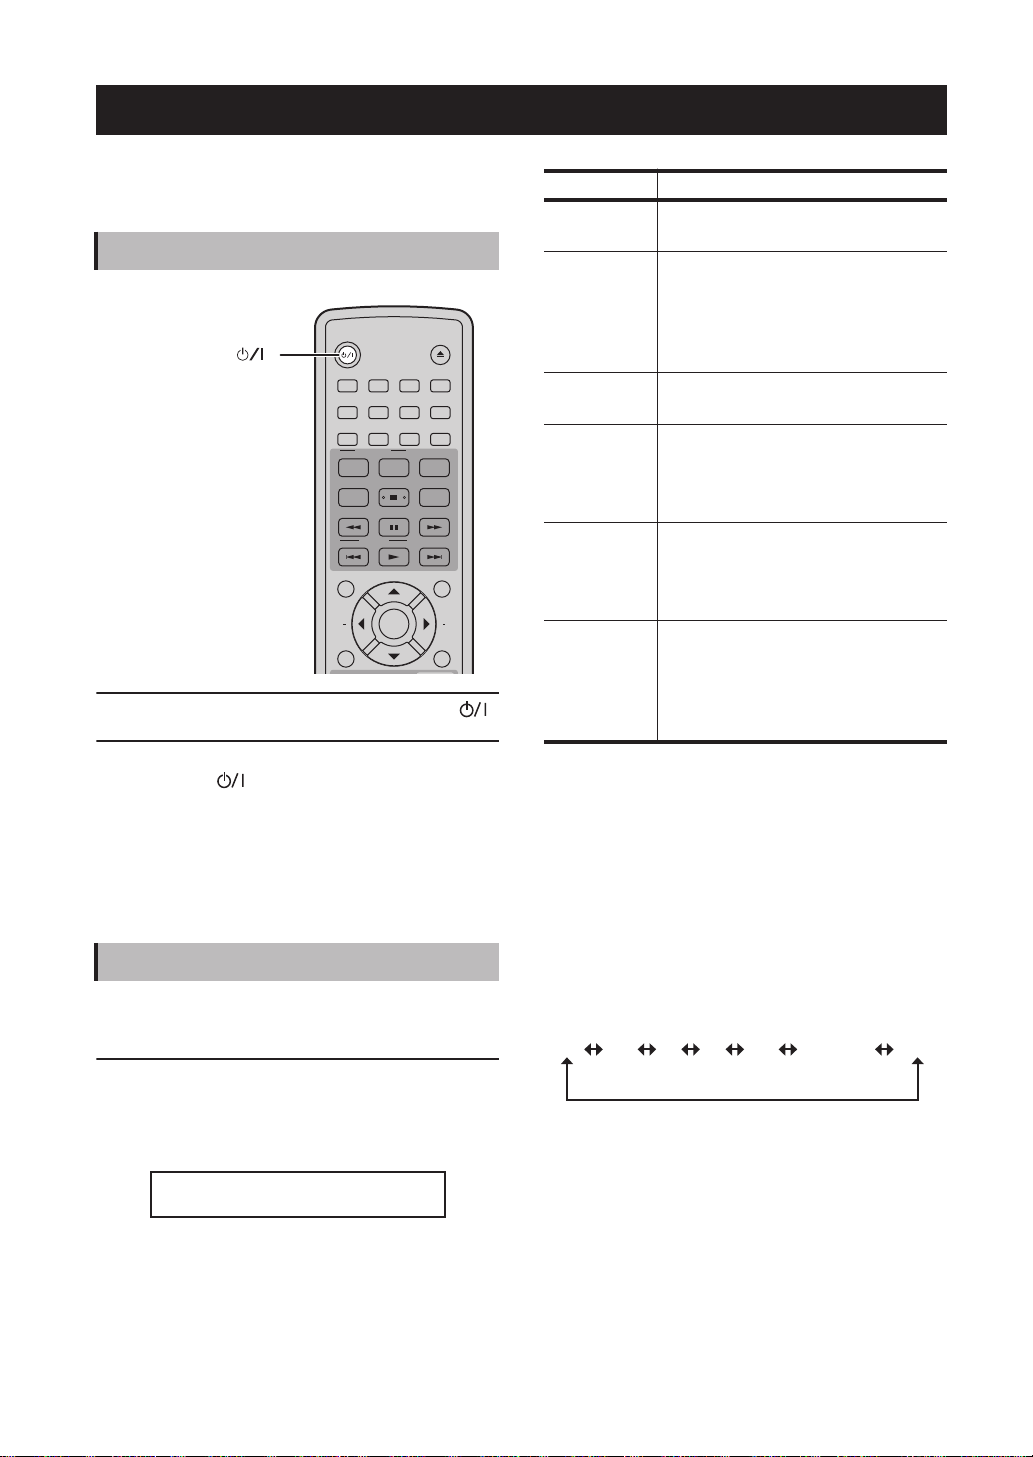
Turning on the DRX-730
)STANDBY/ON (
STANDBY/ON
1
586
90
BLUETOOTH
ON
AUDIO
PLAY MODE
PTY SEEK
MODE START
TOP MENU
INFO.
SETUP
To turn on the DRX-730, press STANDBY/ON ( ).
To set the DRX-730 to standby, press
STANDBY/ON ( ) again.
■ Front panel STANDBY/ON
You ca n also set the DRX-730 to on or standby by
using STANDBY/ON on the DRX-730.
SUBTITLE
PRESET
ENTER
OPEN/CLOSE
423
7
ZOOM
ON SCREEN
OFF
ANGLE
CLEAR
FREQ/TEXT
MENU
AEAE
RETURN
Input source Button and description
DVD DVD/USB
USB DVD/USB2 button—To listen to
TUNER TUNER button—To listen to the
AUX AUX/PORTABLE
PORTABLE AUX/PORTABLE4 button—To listen
DOCK DOCK button—To listen to music
1. Press repeatedly to select DVD or USB.
2. Press repeatedly to select DVD or USB.
3. Press repeatedly to select AUX or PORTABLE.
4. Press repeatedly to select AUX or PORTABLE.
5. Optional Yamaha iPod universal dock (YDS-10 or YDS-11)
required.
6. Optional Yamaha YBA-10 Bluetooth Wireless Audio
Receiver required.
1
button—To play a disc in
the DRX-730 (see page 23).
music or view pictures stored on a
USB storage device connected to the
USB port on the front panel (see
page 49).
radio (see page 37).
3
button—To listen
to music stored on a component
connected to the AUX IN jacks on
the DRX-730’s rear panel.
to music stored on a portable music
player connected to the PORTABLE
jack on the front panel (see page 47).
stored on an iPod
Bluetooth-compatible
5
(see page 47) or
6
music player
or mobile phone (see page 51)
connected to the DOCK jack.
Selecting input sources
You ca n enjoy various input sources with the
DRX-730.
To select an input source, use the remote control
buttons listed in the following table.
The name of the selected input source appears on the
display.
DD
DDDDVVVVDD
Note:
•It may take several seconds to switch to a new
input source, during which time the display will
flash and the sound will be muted.
16 En
■ Front panel INPUT control
Yo u can also use the INPUT control on the DRX-730
to select input sources. Turn it to the left or right to
select the input sources in the following order:
DVD USB FM AM AUX PORTABLE DOCK
Page 23
Chapter 3: General Functions
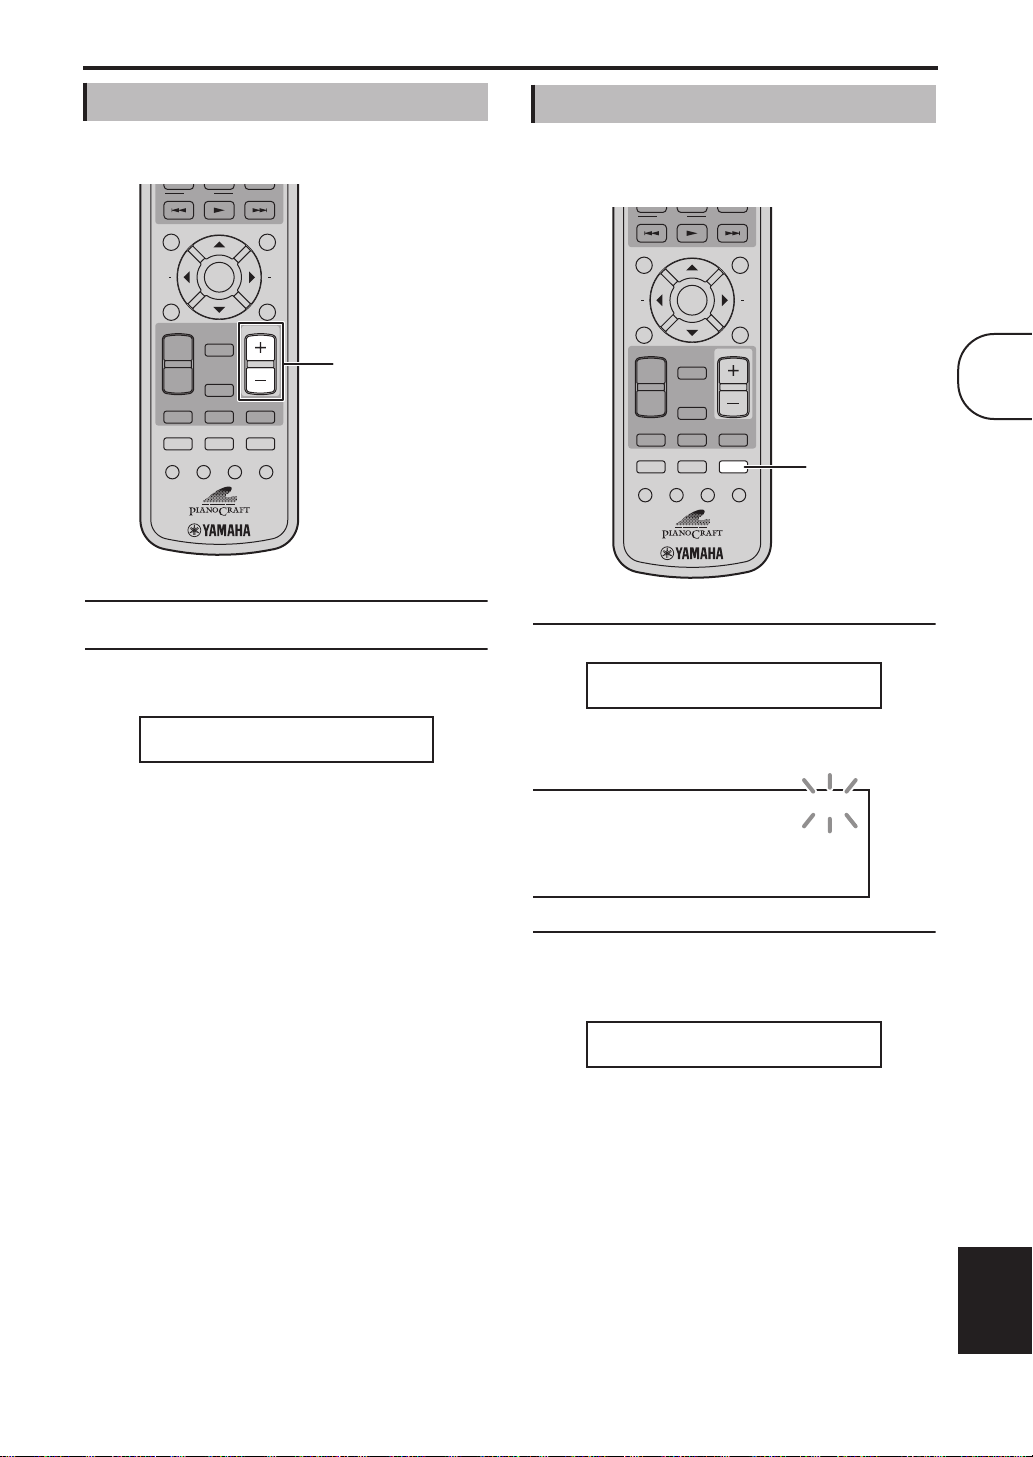
Adjusting the volume
You ca n enjoy your music at a volume level you like.
PTY SEEK
MODE START
TOP MENU
INFO.
SETUP
AUTO/
MANUAL
BAND
DVD/USB
SOUND
TIMER SLEEP
To raise the volume, press VOLUME (+).
To lower the volume, press VOLUME (–).
The volume can be set to MIN, 01 to 87, or MAX.
PRESET
ENTER
MEMORY
TUNER
AUX/PORTABLE
PURE DIRECT
DIMMER
FREQ/TEXT
MENU
AEAE
RETURN
VOLUME
VOLUME +/–
DOCK
MUTE
DISPLAY
Muting the sound
While listening to your music, you can temporarily
mute the sound.
PTY SEEK
MODE START
TOP MENU
INFO.
SETUP
AUTO/
MANUAL
BAND
DVD/USB
SOUND
TIMER SLEEP
To mute the sound, press MUTE.
FREQ/TEXT
MENU
PRESET
AEAE
ENTER
RETURN
VOLUME
MEMORY
TUNER
DOCK
AUX/PORTABLE
PURE DIRECT
MUTE
DISPLAY
DIMMER
MMMMUUUUTTTTEEEE OOOONN
MUTE
NN
3
VVVVoooolllluuuummmmeeee 333355
55
■ Front panel VOLUME control
You ca n also adjust the volume by using the
VOLUME control on the DRX-730.
“MUTE ON” appears on the display and the MUTE
indicator flashes.
MUTE
To unmute the sound, press MUTE again.
“MUTE OFF” appears on the display and the MUTE
indicator goes off.
MMMMUUUUTTTTEEEE OOOOFFFFFF
FF
Notes:
•If you adjust the volume or change the input
source while the sound is muted, muting will be
cancelled.
•Muting is cancelled automatically when the
DRX-730 is set to standby.
English
17 En
Page 24
Chapter 3: General Functions
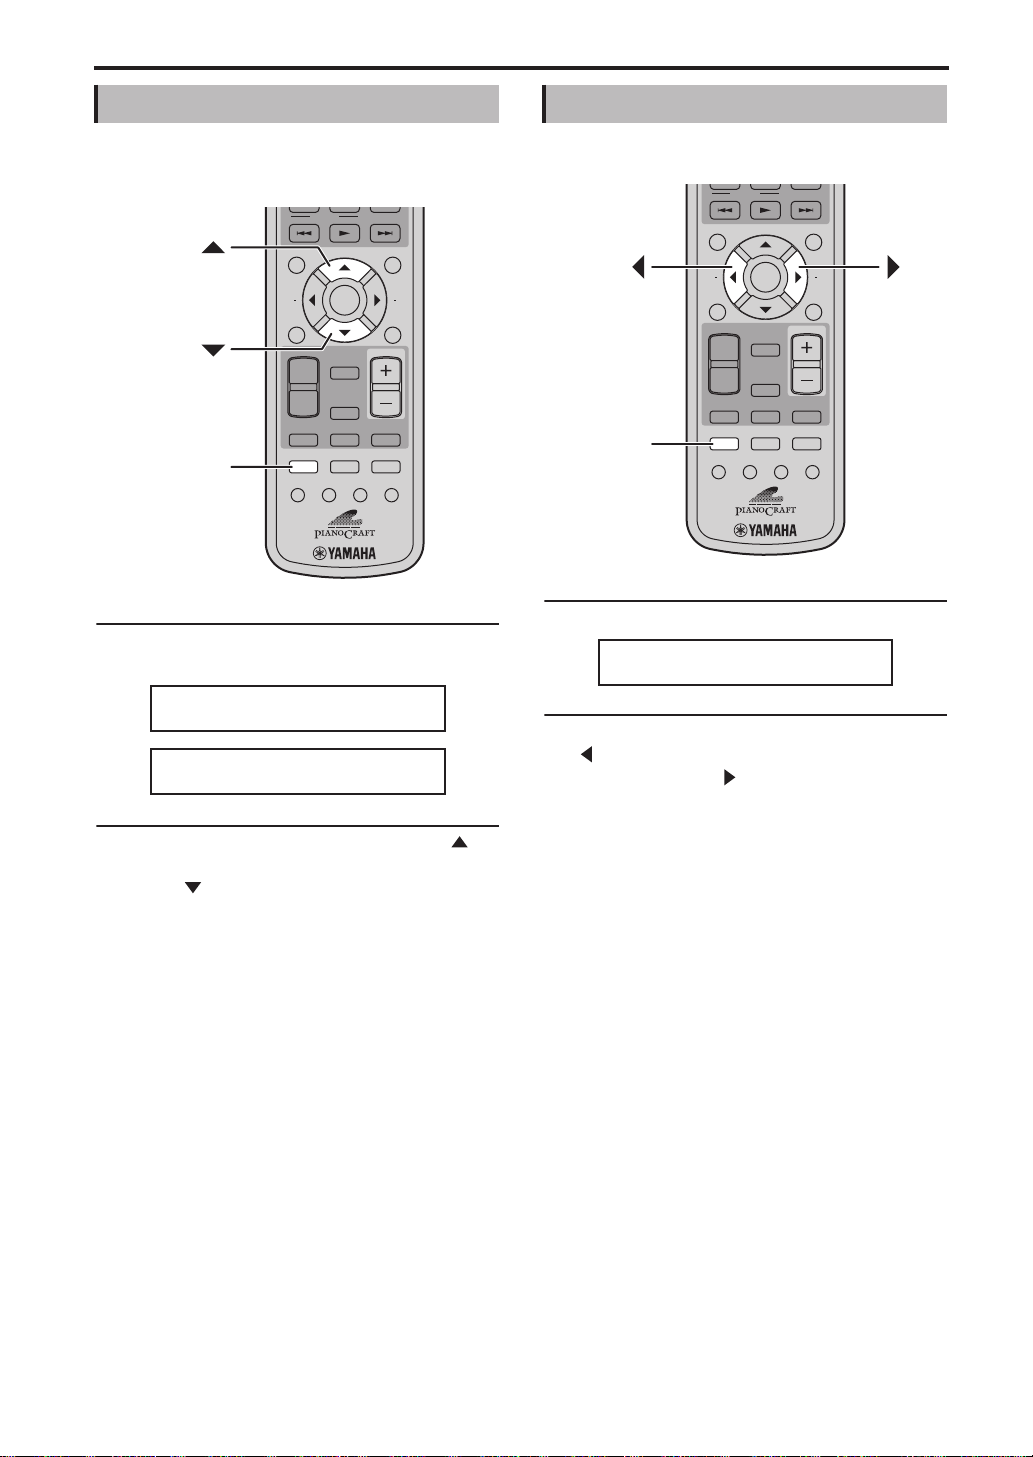
Adjusting the bass and treble
You ca n adjust the bass and treble to change the tone
as you like.
PTY SEEK
MODE START
TOP MENU
INFO.
SETUP
AUTO/
MANUAL
BAND
DVD/USB
SOUND
SOUND
TIMER SLEEP
1 Press SOUND repeatedly to select “BASS” or
“TREBLE.”
PRESET
ENTER
MEMORY
TUNER
AUX/PORTABLE
PURE DIRECT
DIMMER
FREQ/TEXT
MENU
AEAE
RETURN
VOLUME
DOCK
MUTE
DISPLAY
Adjusting the balance
You ca n adjust the left and right sound balance.
PTY SEEK
MODE START
TOP MENU
INFO.
SETUP
AUTO/
MANUAL
BAND
DVD/USB
SOUND
SOUND
TIMER SLEEP
1 Press SOUND repeatedly to select “BALANCE.”
BBBBAAAALLLLAAAANNNNCCCCEEEE ------------∫∫∫∫----------
PRESET
ENTER
MEMORY
TUNER
AUX/PORTABLE
PURE DIRECT
DIMMER
FREQ/TEXT
MENU
AEAE
RETURN
VOLUME
DOCK
MUTE
DISPLAY
--
BBBBAAAASSSSSSSS 0000ddddBB
TTTTRRRREEEEBBBBLLLLEEEE 0000ddddBB
BB
BB
2 To increase the bass or treble, press Up ( )
repeatedly. To reduce the bass or treble, press
Down ( ) repeatedly.
The bass and treble can be adjusted up or down by
10 dB in 2 dB steps: –10 dB to 0 dB to +10 dB. The
default setting is 0 dB.
Notes:
•If you make no adjustments for 5 seconds, the
Bass or Treble adjustment mode will be cancelled
and the previous display will reappear.
•Bass and treble adjustments apply to the speakers
and headphones, but not recording.
2 To move the sound toward the left, press Left
() repeatedly. To move the sound toward the
right, press Right ( ) repeatedly.
The balance can be adjusted 6 steps to the left or 6
steps to the right. The default setting is center.
Notes:
•If you make no adjustments for 5 seconds, the
Balance adjustment mode will be cancelled and
the previous display will reappear.
•Balance adjustments apply to the speakers and
headphones, but not recording.
18 En
Page 25

Chapter 3: General Functions
Pure Direct playback mode
In Pure Direct playback mode, you can enjoy high
quality audio playback.
VOLUME
MEMORY
AUTO/
MANUAL
TUNER
BAND
AUX/PORTABLE
PURE DIRECT
DIMMER
DOCK
MUTE
DISPLAY
NN
DVD/USB
SOUND
PURE DIRECT
TIMER SLEEP
To turn on Pure Direct playback mode, press PURE
DIRECT repeatedly until “PURE DIRECT ON”
appears on the display.
PPPPUUUURRRREEEE DDDDIIIIRRRREEEECCCCTTTT OOOONN
The first push of the button displays the current
setting on the display. Subsequent pushes turn Pure
Direct playback mode on and off.
Using headphones
You ca n use a pair of headphones to enjoy your music
privately or when you don’t want to disturb others.
TIMER
HDMI
PROGRESSIVE
STANDBY/ON
USB PORTABLE PHONES
Connect headphones with a mini plug to the
PHONES jack on the DRX-730’s front panel.
While headphones are plugged into the PHONES
jack, the speakers and, if connected, subwoofer
output no sound.
INPUT
3
To turn off Pure Direct playback mode, press PURE
DIRECT so that “PURE DIRECT OFF” appears on
the display.
PPPPUUUURRRREEEE DDDDIIIIRRRREEEECCCCTTTT OOOOFFFFFF
FF
While the Pure Direct playback mode is on, the tone
control circuits (bass and treble) are bypassed so that
the signal travels directly to the amp.
Note:
•If you adjust the bass or treble in Pure Direct
playback mode, Pure Direct mode will be
cancelled.
English
19 En
Page 26
Chapter 3: General Functions
Adjusting the display brightness
You ca n adjust the brightness of the display to suit
your room lighting. For example, you’re using the
DRX-730 in a darkened room and the display is too
bright.
VOLUME
MEMORY
AUTO/
MANUAL
TUNER
BAND
DVD/USB
SOUND
TIMER SLEEP
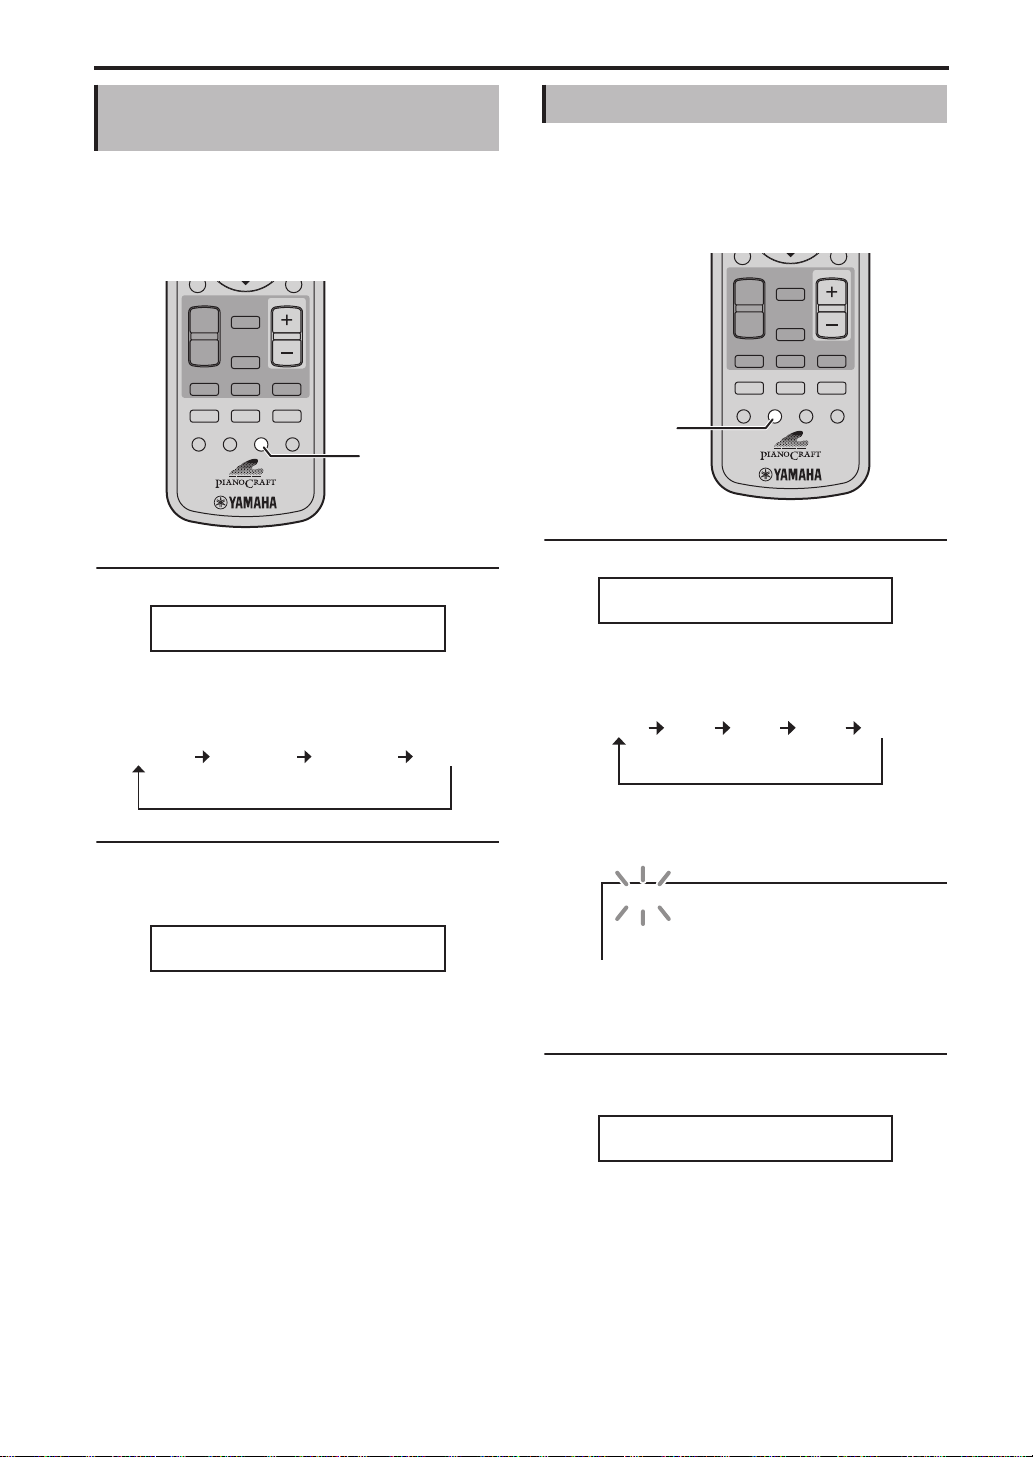
To dim the display, press DIMMER repeatedly.
The display can be set to three levels of brightness:
DIMMER –1, DIMMER –2, DIMMER –3, which can
be selected in the following order:
DIMMER OFF DIMMER –1 DIMMER –2 DIMMER –3
DOCK
AUX/PORTABLE
PURE DIRECT
MUTE
DISPLAY
DIMMER
DDDDIIIIMMMMMMMMEEEERRRR ----11
DIMMER
11
Using the sleep timer
You ca n use the sleep timer to automatically stop
playback and set the DRX-730 to standby after a
specified period of time. For example, when you want
to enjoy a movie or some music until you fall asleep.
VOLUME
MEMORY
AUTO/
MANUAL
TUNER
BAND
AUX/PORTABLE
PURE DIRECT
DIMMER
DOCK
MUTE
DISPLAY
..
DVD/USB
SOUND
TIMER SLEEP
SLEEP
Press SLEEP repeatedly to select a sleep time.
SSSSLLLLEEEEEEEEPPPP 111122220000mmmmiiiinnnn..
The sleep time can be set to 120 minutes, 90 minutes,
60 minutes, or 30 minutes, which can be selected in
the following order:
120min 90min 60min 30min OFF
To return to normal brightness, press DIMMER
repeatedly until “DIMMER OFF” appears on the
display.
DDDDIIIIMMMMMMMMEEEERRRR OOOOFFFFFF
FF
When a sleep time has been selected, the SLEEP
indicator on the display lights up.
SLEEP
Once the specified sleep time has elapsed, playback
will automatically stop and the DRX-730 will go on
standby.
To cancel the sleep timer, press SLEEP repeatedly
until “OFF” appears on the display.
SSSSLLLLEEEEEEEEPPPP OOOOFFFFFF
FF
Notes:
•The sleep timer will only set the DRX-730 to
standby. It will not turn off any connected
components.
•The sleep timer will be cancelled if the DRX-730
is set to standby before the sleep time has elapsed.
20 En
Page 27
Chapter 3: General Functions
Setting the clock
To display the time or program the timer, you must
first set the clock.
PTY SEEK
MODE START
TOP MENU
INFO.
ENTER
TIMER
SETUP
AUTO/
MANUAL
BAND
DVD/USB
SOUND
TIMER SLEEP
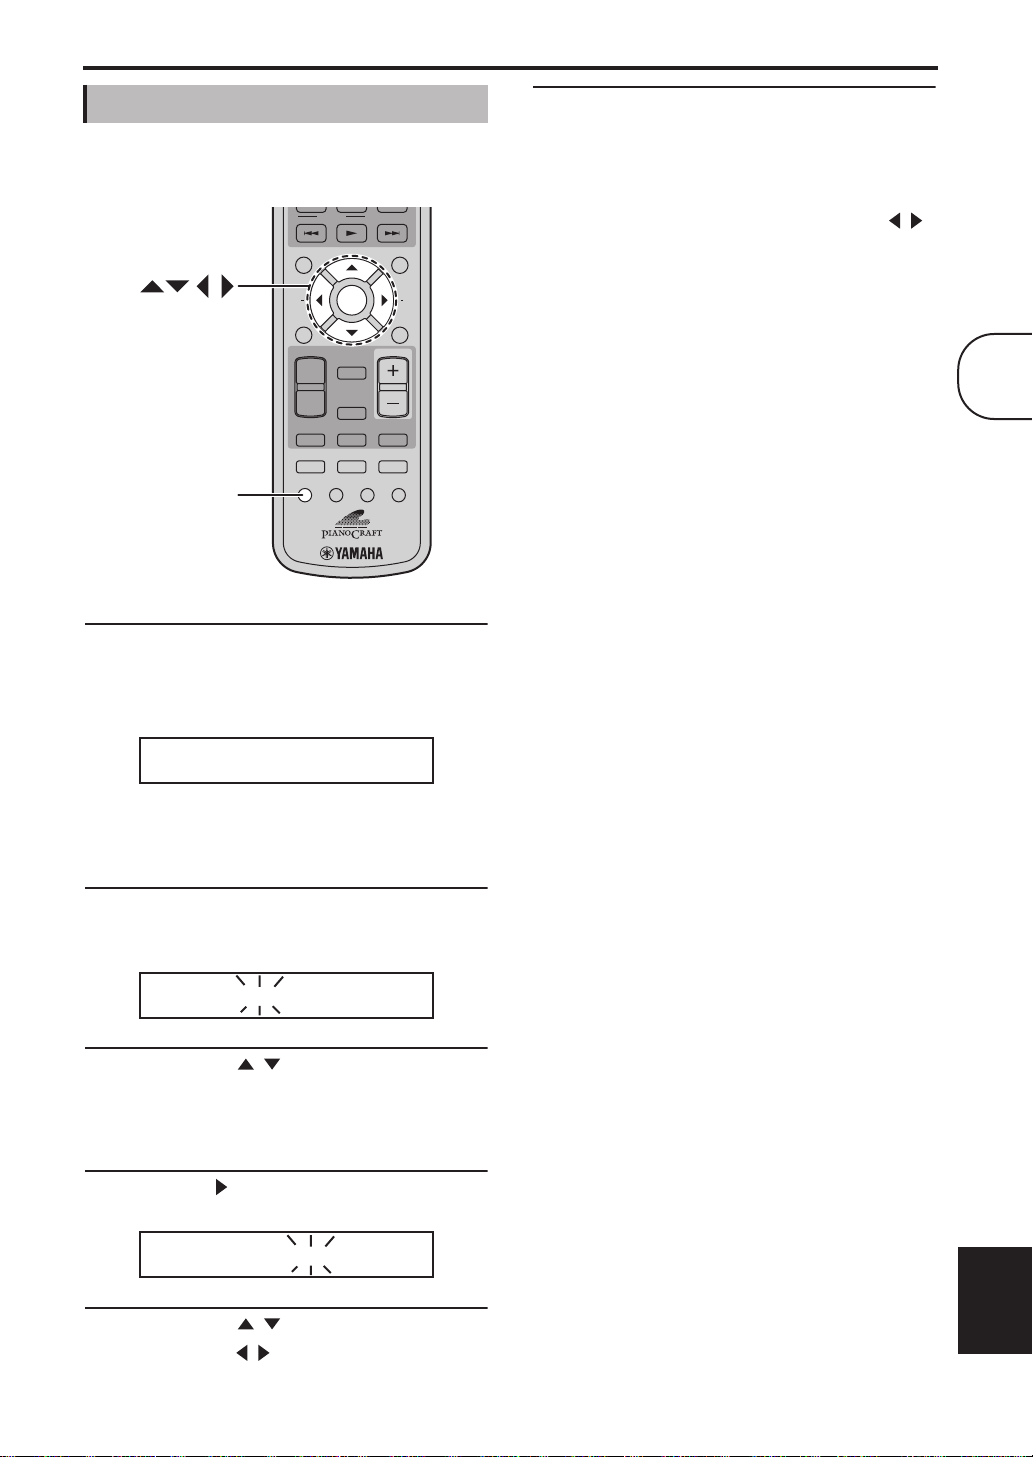
1 Press TIMER.
“Set Clock” appears on the display for a few
seconds, and then the message “Press and hold
ENTER key for 3 sec.” scrolls across the display.
PRESET
ENTER
MEMORY
TUNER
AUX/PORTABLE
PURE DIRECT
DIMMER
FREQ/TEXT
MENU
AEAE
RETURN
VOLUME
DOCK
MUTE
DISPLAY
6 Press ENTER.
The time is set and the display stops flashing.
Notes:
•To switch between 12- and 24-hour clock, while
the time is being displayed, use Left/Right ( / ).
•If the power cable is disconnected or there’s a
power failure, the clock will continue working for
approximately 5 minutes. But beyond this, the
time setting will be cleared.
3
PPPPrrrreeeessssssss aaaannnndddd hhhhoooolllldd
dd
If the clock has already been set, “Clock Time” will
appear on the displayed for a few moments, then
the time will be displayed.
2 While the message is scrolling across the
display, press and hold down ENTER for 3
seconds until the hours display starts flashing.
00000000::::000000
00
3 Use Up/Down ( / ) to set the hours.
The hours can be set from 0 to 12, AM or PM. On
some models, the default hours display uses the
24-hour clock.
4 Press Right ( ). The minutes display starts
flashing.
00000000::::000000
00
5 Use Up/Down ( / ) to set the minutes.
Use Left/Right ( / ) to toggle between the hour
and minute displays if necessary.
English
21 En
Page 28
Chapter 3: General Functions
Viewing the time
You ca n view the time while listening to a source.
PTY SEEK
MODE START
TOP MENU
INFO.
SETUP
AUTO/
MANUAL
BAND
DVD/USB
SOUND
TIMER SLEEP
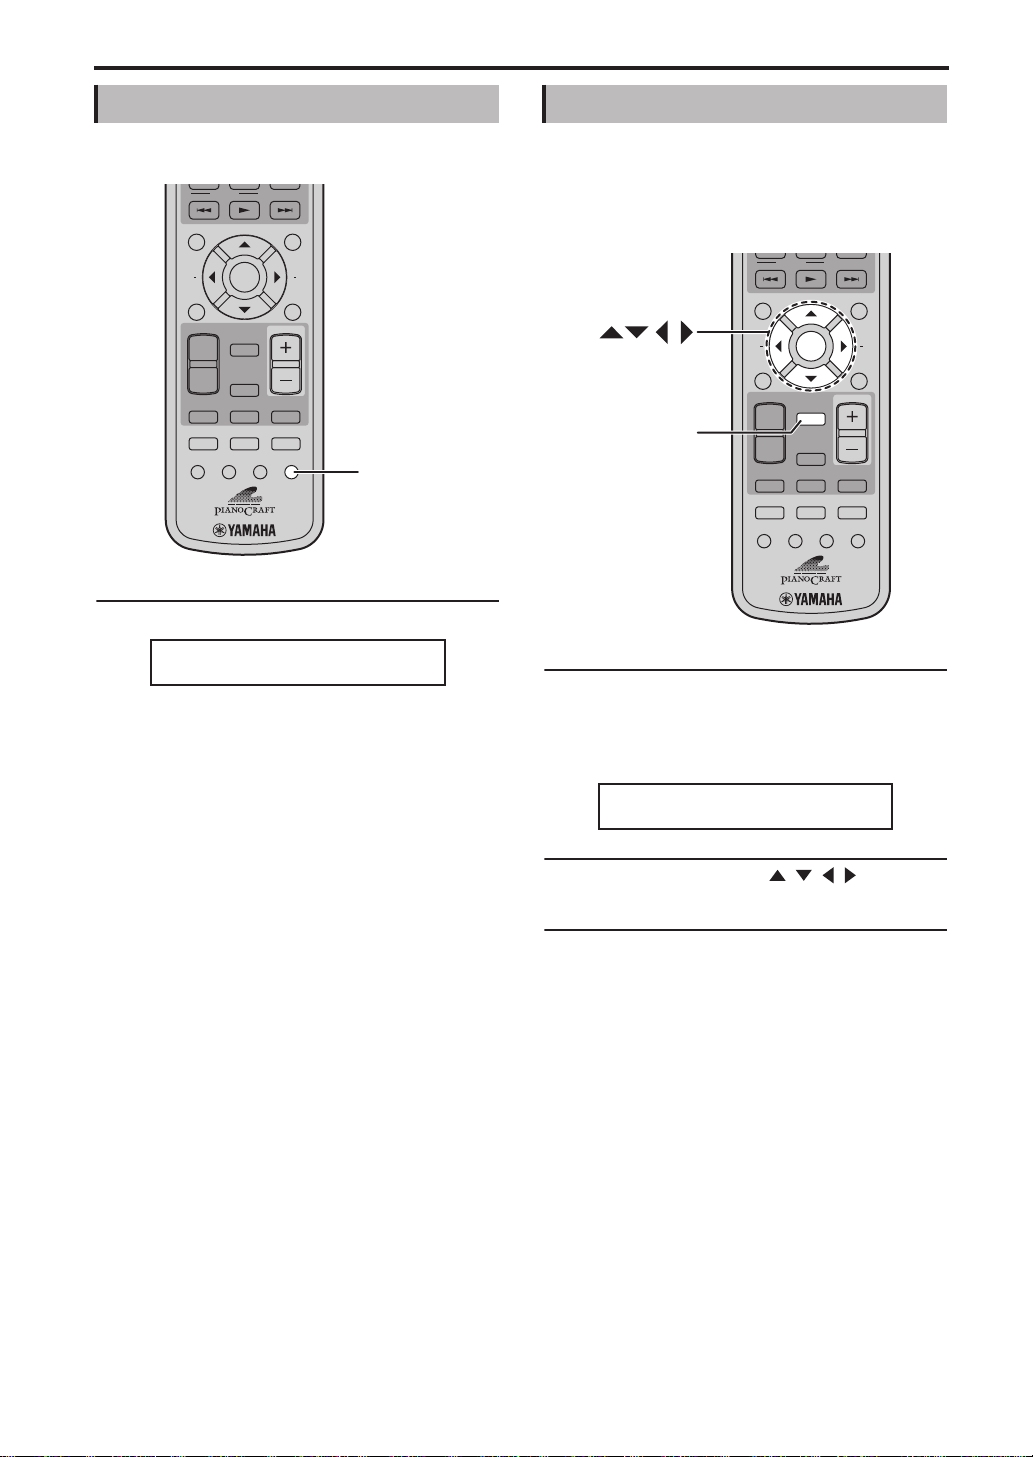
To view the time, press DISPLAY.
Notes:
•If the DVD input source is selected, you’ll need to
press DISPLAY twice in order to view the time.
•When you view the time as explained above, the
time will be displayed continuously. When you
perform an operation, a message related to that
operation will be displayed, and then the time will
reappear.
•If the clock has not yet been set, “Set Clock!” will
appear on the display for 3 seconds, then the
previous display will reappear. See page 21 for
details on setting the clock.
•The time cannot be displayed while iPod Menu
mode is selected (see page 47).
•On Europe and Russia models, the time cannot be
displayed while RT (Radio Text) is scrolling
across the display.
PRESET
ENTER
MEMORY
TUNER
AUX/PORTABLE
PURE DIRECT
DIMMER
11119999::::333300
FREQ/TEXT
MENU
RETURN
VOLUME
DOCK
MUTE
DISPLAY
AEAE
DISPLAY
00
Auto standby
To sa v e en ergy and prevent screen burn, you can set
the DRX-730 so that it automatically goes on standby
after 30 minutes of inactivity when using the DVD or
USB input source.
PTY SEEK
MODE START
TOP MENU
INFO.
ENTER
MEMORY
SETUP
AUTO/
MANUAL
BAND
DVD/USB
SOUND
TIMER SLEEP
1 With the DVD or USB input source selected,
press MEMORY.
The current Auto Standby setting appears on the
display.
AAAAUUUUTTTTOOOO SSSSTTTTNNNNBBBBYYYY OOOOFFFFFF
2 Use the cursor buttons ( / / / ) to select
“ON” or “OFF.”
3 Press MEMORY or ENTER to set.
When Auto Standby is on and the DVD or USB
input source is selected, if playback has been
stopped for 30 minutes and there’s been no
operation during that time, the DRX-730 will
automatically go on standby. Depending on the
disc, the DRX-730 may automatically go on
standby when the same menu has been displayed
for 30 minutes.
PRESET
ENTER
MEMORY
TUNER
AUX/PORTABLE
PURE DIRECT
DIMMER
FREQ/TEXT
MENU
AEAE
RETURN
VOLUME
DOCK
MUTE
DISPLAY
FF
22 En
Note:
•If you make no adjustments for 5 seconds, the
Auto Standby setting mode will be cancelled and
the previous display will reappear.
Page 29
Chapter 4: Playing Discs
This chapter explains how to play discs.
Using the on-screen display
When the input source is DVD or USB, you can
operate various functions and settings by using the
on-screen menus that appear on the connected TV.
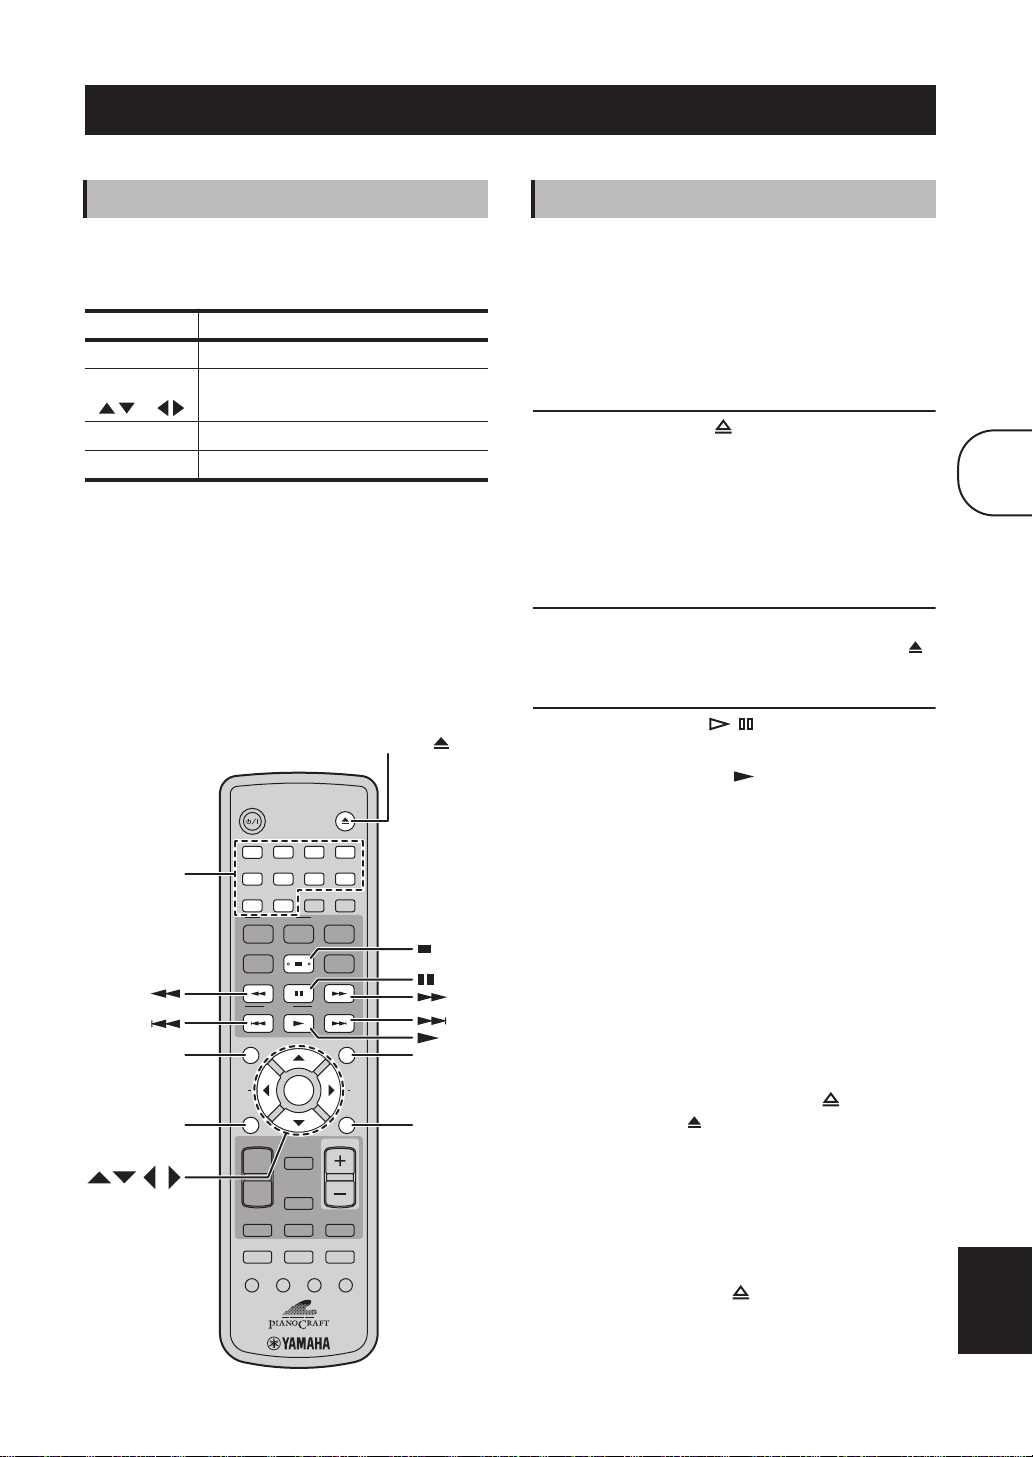
Button Description
OPEN/CLOSE
423
ON SCREEN
MENU
AEAE
RETURN
DOCK
MUTE
DISPLAY
1
)OPEN/CLOSE (
MENU
RETURN
SETUP Displays the Setup menu
Cursor
Selects menu items
( )/( )
ENTER Confirms item selection
RETURN Returns to the previous menu
1. Only when the input source is DVD.
Tips:
•You can change the language of the on-screen
display with the OSD Language setting (see
page 59).
•The buttons that you can use with each menu are
shown at the bottom of each screen.
STANDBY/ON
1
Number
buttons
TOP MENU
SETUP
ENTER
586
90
BLUETOOTH
ON
AUDIO
PLAY MODE
PTY SEEK
MODE START
TOP MENU
INFO.
SETUP
AUTO/
MANUAL
BAND
DVD/USB
AUX/PORTABLE
SOUND
TIMER SLEEP
ZOOM
OFF
SUBTITLE
PRESET
ENTER
MEMORY
TUNER
PURE DIRECT
DIMMER
7
ANGLE
CLEAR
FREQ/TEXT
VOLUME
Playing discs
You ca n play the following types of discs in the
DRX-730: DVD-Video, DVD-VR (DVD-R/RW/R
DL discs recorded in VR mode), VCD, SVCD, Audio
CD, and DTS CD. Also, data discs containing the
following types of files: MP3, WMA, MPEG-4 AAC,
JPEG, DivX
details on supported disc types and file formats.
1 Press Open/Close ( ) on the DRX-730.
The disc tray opens and the DVD input source is
selected automatically. If the DRX-730 was on
standby, it will turn on automatically.
To us e the on-screen menus or view video or
pictures, turn on your TV and select the AV input
to which the DRX-730 is connected.
2 Place the disc, label-side up, in the center of
the disc tray, and then press OPEN/CLOSE ( ).
The disc tray closes and the disc is loaded.
3 Press Play/Pause ( / ) on the DRX-730 to
start playback.
You can also use Play ( ) on the remote control
to start playback.
•If you loaded a DVD, VCD, or SVCD disc, a menu
may appear. See “DVD-Video menus” or “VCD
and SVCD menus (PBC)” on page 25 for more
details.
•If you loaded a disc containing JPEG pictures, a
slideshow will start. See “Playing JPEG
slideshows” on page 33 for more details.
•If you loaded a disc containing various file
formats, such as MP3, WMA, MPEG-4 AAC,
JPEG, DivX
format you want to play on-screen.
To eject a disc, press Open/Close ( ), or press
OPEN/CLOSE ( ) on the remote control.
Notes:
•You can also close the disc tray by pushing the
tray gently until it starts to close by itself.
•To play a double-sided DVD, load it with the side
you want to play facing down.
•Pressing Open/Close ( ) on the DRX-730 while
its on standby will turn it on, open the disc tray,
and select the DVD input source, ready for disc
playback.
Ultra, and WMV. See page 61 for more
®
, or WMV, you’ll need to select the
®
4
English
23 En
Page 30
Chapter 4: Playing Discs
•With some discs, some of the playback functions
explained in this chapter may not work as
expected, and some may not work at all.
•Some DVDs restrict the use of certain functions,
for example, random playback or repeat playback,
in some or all parts of the disc. This is not a
malfunction.
Stopping playback
To stop playback, press Stop ( ).
You ca n also use Stop ( ) on the DRX-730 to stop
playback.
If “RESUME” or “LAST MEMORY” appears on the
display after stopping playback, you can resume
playback from where you left off simply by pressing
Play ( ). See “Resume and Last Memory” below for
more details.
Resume and Last Memory
When you press Stop ( ) to stop DVD-Video, VCD,
SVCD, DivX
“RESUME” appears on the display, and you can
continue playback from where you left off simply by
pressing Play ( ).
For DVD-Video, VCD, and SVCD discs, the
DRX-730 will remember the point at which you
stopped playback even if the disc has been ejected.
The next time you load the disc, “Last Memory”
appears on-screen, and you can continue playback
from where you left off.
If you don’t want the DRX-730 to remember the Last
Memory point, instead of pressing Stop ( ), press
OPEN/CLOSE ( ) to stop playback and eject the
disc.
To ca nce l th e Resume or Last Memory function,
while “RESUME” or “LAST MEMORY” is displayed,
press Stop ( ).
Notes:
•The Last Memory function may not work with
some discs.
•The DRX-730 can remember the Last Memory
points for up to five DVD-Video discs and one
VCD or SVCD disc.
•For DivX
Resume function is cancelled when the disc is
ejected, the input source is changed, or the
DRX-730 is turned off.
, WMV, or Audio CD playback,
®
, WMV, and Audio CD discs, the
®
Pausing playback
To pause playback, press Pause ( ).
To resume playback, press Pause ( ) again, or
press Play ( ).
You ca n also use Play/Pause ( / ) on the DRX-730
to pause playback.
Rewind and fast forward
During playback, you can rewind or fast forward at
various speeds.
To rewind, press Rewind ( ) during playback.
To fast forward, press Fast Forward ( ) during
playback.
Press Rewind ( ) or Fast Forward ( )
repeatedly to change the rewind or fast forward
speed.
The speed is displayed on-screen.
To resume normal playback, press Play ( ).
You can also rewind or fast forward by holding down
Previous/Rewind ( / ) or Next/Fast Forward
(/), respectively, on the DRX-730 for a few
seconds.
Notes:
•For DivX
fast forward speed is available.
•Normal playback may resume when a new
chapter (DVD-Video) or track (PBC VCD or
SVCD) is reached while rewinding or fast
forwarding.
•For MP3, WMA, and MPEG-4 AAC discs,
normal playback will resume when the beginning
or end of a track is reached while rewinding or
fast forwarding.
and WMV discs, only one rewind and
®
24 En
Page 31
Chapter 4: Playing Discs
Selecting chapters and tracks
To select the next chapter or track, press Next
().
To select the beginning of the current chapter or
track, press Previous ( ). Press it again to select
earlier chapters or tracks.
Yo u can also use Next/Fast Forward ( / ) and
Previous/Rewind ( / ) on the DRX-730 to
select tracks.
Selecting items by number
You ca n select titles, chapters, and tracks by number.
1 Use the number buttons to enter the number
of a title, chapter, or track.
2 Press ENTER.
If playback was stopped, playback starts from the
specified title (DVD) or track (Audio CD, VCD,
SVCD).
If playback was in progress, playback goes to the
specified title (DVD-VR [VR mode
DVD-R/RW/R DL]), chapter (DVD-Video), or
track (VCD, SVCD, or Audio CD).
DVD-Video menus
Most DVD-Video discs have menus from which you
can select what you want to watch. Usually, the main
menu appears automatically, although with some
discs, you may need to press MENU or TOP MENU
to display the menu.
The following buttons can be used with menus.
Button Description
TOP MENU Displays the DVD’s top menu
MENU Displays a DVD’s menu
Cursor
( )/( )
ENTER Confirms item selection
RETURN Returns to the previous menu
Numbers
1. Depends on the disc. With some DivX® discs, a menu will be
displayed.
2. May work the same as the TOP MENU button with some
discs.
Selects menu items
Wi th some discs, playback can be
started by entering a number and
pressing ENTER.
1
2
VCD and SVCD menus (PBC)
Some VCD and SVCD discs have PBC (Playback
Control) menus from which you can select what you
want to watch.
Load a PBC VCD or SVCD disc, press Play ( ) to
display the menu, and then use the number buttons
and ENTER to select the track you want to play.
The following buttons can be used with menus.
Button Description
RETURN
Numbers
Next ( )
Previous
()
You ca n turn off PBC and start playback by pressing
Next ( ) or Previous ( ) or the number buttons
and ENTER while playback is stopped.
Notes:
•With some PBC VCD and SVCD discs, the menu
may not appear when you press Play ( ), in
which case you’ll need to press RETURN during
playback to display the menu.
•Some of the disc playback functions explained in
this chapter cannot be used with PBC playback.
To us e su ch a function, turn off PBC playback by
starting playback without using the menu, as
explained above.
•If you turn off PBC temporarily, the menu will not
be displayed when RETURN is pressed during
playback. To display the menu again, press Stop
() twice, and then press Play ( ). PBC will be
turned on and pressing RETURN will display the
menu.
Displays the PBC menu when
pressed during playback
Selects numbered menu items. Press
ENTER to confirm selection.
Displays the next menu page (if
available)
Displays the previous menu page (if
available)
4
English
25 En
Page 32

Chapter 4: Playing Discs
Slow-motion playback
You ca n play DVD-Video, VCD, SVCD, DivX®, and
WMV discs in slow motion at four different speeds.
You ca n also play DVD-Video discs in reverse slow
motion.
STANDBY/ON
1
586
90
BLUETOOTH
ON
AUDIO
PLAY MODE
PTY SEEK
MODE START
TOP MENU
INFO.
SETUP
During playback, press Pause ( ).
Press and hold down Rewind ( ) or Fast
Forward ( ) until slow-motion playback starts.
Press Rewind ( ) or Fast Forward ( )
repeatedly to change the slow-motion speed.
The speed is displayed on-screen.
To resume normal playback, press Play ( ).
Note:
•Normal playback may resume when a new
chapter (DVD-Video) or track (PBC VCD or
SVCD) is reached during slow-motion playback.
SUBTITLE
PRESET
ENTER
OPEN/CLOSE
423
7
ZOOM
ON SCREEN
OFF
ANGLE
CLEAR
FREQ/TEXT
MENU
AEAE
RETURN
Frame-by-frame playback
You ca n play DVD-Video, VCD, SVCD, DivX®, and
WMV discs frame-by-frame. You can also play
DVD-Video discs frame-by-frame in reverse.
STANDBY/ON
1
586
90
BLUETOOTH
ON
AUDIO
PLAY MODE
PTY SEEK
MODE START
TOP MENU
INFO.
SETUP
During playback, press pause ( ).
Press Rewind ( ) or Fast Forward ( ) to play
one frame at a time.
To resume normal playback, press Play ( ).
Note:
•Normal playback may resume when a new
chapter (DVD-Video) or track (PBC VCD or
SVCD) is reached during frame-by-frame
playback.
SUBTITLE
PRESET
ENTER
OPEN/CLOSE
423
7
ZOOM
ON SCREEN
OFF
ANGLE
CLEAR
FREQ/TEXT
MENU
AEAE
RETURN
26 En
Page 33

Chapter 4: Playing Discs
Selecting languages and audio
Some DVD discs have soundtracks in multiple
languages or audio formats, such as Dolby Digital and
DTS, that you can select during playback. Similarly,
some DVD-VR (VR mode DVD-R/RW/R DL) discs
have dual-mono audio soundtracks, and some DivX®
discs have multiple audio soundtracks.
STANDBY/ON
1
586
90
BLUETOOTH
ON
AUDIO
TOP MENU
AUDIO
PLAY MODE
PTY SEEK
MODE START
TOP MENU
INFO.
SETUP
During playback, press AUDIO repeatedly to
select the available soundtrack languages or
audio formats.
The name of the selected language or audio format is
displayed on-screen.
Notes:
•With some discs, you can only select language
soundtracks and audio formats by using the disc’s
menu. Use TOP MENU and MENU to display the
disc’s menu.
•You can change the default soundtrack language
for DVD-Video discs in the “Language settings”
on page 58.
•The default soundtrack language (see page 58)
may be selected if you stop playback and cancel
the Resume function, or eject the disc without
storing the Last Memory point (see page 24).
SUBTITLE
PRESET
ENTER
OFF
ZOOM
7
OPEN/CLOSE
423
ON SCREEN
ANGLE
CLEAR
FREQ/TEXT
MENU
AEAE
RETURN
MENU
Selecting subtitles
Some DVD and DivX
more languages that you can select during playback.
SUBTITLE
TOP MENU
During playback, press SUBTITLE repeatedly to
select the available subtitles.
The name of the selected subtitle language is
displayed on-screen.
Notes:
•With some discs, you can only select subtitles by
using the disc’s menu. Use TOP MENU and
MENU to display the disc’s menu.
•You can change the default subtitle language for
DVD-Video discs in the “Language settings” on
page 58
•See “About DivX®” on page 62 for details on using
DivX
subtitles.
®
•With some DivX
display correctly.
•The default subtitle language (see page 58) may be
selected if you stop playback and cancel the
Resume function, or eject the disc without storing
the Last Memory point (see page 24).
discs have subtitles in one or
®
STANDBY/ON
1
586
90
BLUETOOTH
ON
AUDIO
PLAY MODE
PTY SEEK
MODE START
TOP MENU
INFO.
SETUP
discs, the subtitles may not
®
SUBTITLE
PRESET
ENTER
ZOOM
OFF
7
OPEN/CLOSE
423
ON SCREEN
ANGLE
CLEAR
FREQ/TEXT
MENU
AEAE
RETURN
MENU
4
27 En
English
Page 34

Chapter 4: Playing Discs
Selecting camera angles
Some DVD-Video discs have content recorded at
multiple camera angles that you can select during
playback.
A camera icon ( ) appears on-screen when playing
content that features multiple camera angles. You can
turn this icon off if you prefer (see page 59).
STANDBY/ON
1
586
90
BLUETOOTH
ON
AUDIO
PLAY MODE
PTY SEEK
MODE START
TOP MENU
INFO.
SETUP
SUBTITLE
PRESET
ENTER
OPEN/CLOSE
423
7
ZOOM
ON SCREEN
OFF
ANGLE
CLEAR
FREQ/TEXT
MENU
AEAE
RETURN
ANGLE
Zoom
You ca n zoom the picture 2x or 4x when playing a
DVD-Video, VCD, SVCD, DivX
disc.
STANDBY/ON
1
586
90
BLUETOOTH
ON
OFF
AUDIO
SUBTITLE
PLAY MODE
PTY SEEK
MODE START
TOP MENU
PRESET
INFO.
ENTER
SETUP
MEMORY
AUTO/
MANUAL
TUNER
BAND
ZOOM
®
OPEN/CLOSE
423
7
ON SCREEN
ANGLE
CLEAR
FREQ/TEXT
MENU
AEAE
RETURN
VOLUME
, WMV, or JPEG
ZOOM
During playback, press ANGLE repeatedly to
select the available camera angles.
Notes:
•With some discs, even though the camera icon
() is displayed on-screen, you may not be able
to select the camera angles.
•With some discs, you can also select the camera
angles from the disc’s menu.
During playback, press ZOOM repeatedly to
select 2x, 4x, or 1x zoom.
Use the cursor buttons ( / / / ) to move
around the picture while zoomed in.
Yo u c a n change the zoom factor and move around the
picture freely while playback continues.
Notes:
•Since DVD-Video, VCD, SVCD, DivX
, WMV,
®
and JPEG discs use a fixed video resolution, the
picture quality may deteriorate when zoomed in.
This is not a malfunction.
•If the zoom indicator disappears from the screen,
press ZOOM again to display it.
28 En
Page 35

Chapter 4: Playing Discs
BLUETOOTH
BLUETOOTH
Repeat playback
You ca n play a title, chapter, track, or disc repeatedly.
Repeat playback can be combined with program
playback to play a compilation of your favorite titles,
chapters, or tracks repeatedly (see page 31).
ON
OFF
AUDIO
SUBTITLE
ANGLE
PLAY MODE
ENTER
PLAY MODE
PTY SEEK
MODE START
TOP MENU
INFO.
SETUP
SETUP
AUTO/
MANUAL
BAND
1 During playback, press SETUP.
The Setup menu appears on-screen.
2 Select “Play Mode,” and then press ENTER.
The Play Mode menu appears on-screen.
3 Select “Repeat,” select a repeat option, and
then press ENTER.
The available repeat options depends on the type
of disc.
•For DVD discs, you can select “Title Repeat” or
“Chapter Repeat.”
•For VCD, SVCD, and Audio CD discs, you can
select “Disc Repeat” or “Track Repeat.”
•For DivX
Repeat.” With some DivX
and WMV discs, you can select “Title
®
discs, you can also
®
select “Chapter Repeat.”
•During program playback (see page 31), you can
select “Program Repeat.”
4 To cancel repeat playback, select “Repeat Off,”
and then press ENTER.
5 To close the Setup menu, press SETUP.
PRESET
ENTER
MEMORY
TUNER
CLEAR
FREQ/TEXT
MENU
AEAE
RETURN
VOLUME
A–B repeat playback
You ca n specify two points (A and B) on a DVD,
VCD, SVCD, or Audio CD, and then play the section
between those two points repeatedly.
ON
OFF
AUDIO
SUBTITLE
ANGLE
PLAY MODE
ENTER
PLAY MODE
PTY SEEK
MODE START
TOP MENU
INFO.
SETUP
SETUP
AUTO/
MANUAL
BAND
1 During playback, press SETUP.
The Setup menu appears on-screen.
2 Select “Play Mode,” and then press ENTER.
The Play Mode menu appears on-screen.
3 Select “A-B Repeat,” and then press ENTER.
4 Select “A(Start point),” and then press ENTER.
5 Select “B(End point),” and then press ENTER.
The section between the A and B points plays
repeatedly.
6 To resume normal playback, select “Off,” and
then press ENTER.
7 To close the Setup menu, press SETUP.
Tip:
•You can display the Play Mode menu quickly by
pressing PLAY MODE .
Note:
•The A and B points must be within the same title
(DVD) or track (VCD, SVCD, Audio CD).
PRESET
ENTER
MEMORY
TUNER
CLEAR
FREQ/TEXT
MENU
AEAE
RETURN
VOLUME
4
Tip:
•You can display the Play Mode menu quickly by
pressing PLAY MODE .
Note:
•Repeat playback cannot be used with MP3,
WMA, MPEG-4 AAC, and JPEG discs.
English
29 En
Page 36

Chapter 4: Playing Discs
BLUETOOTH
Random playback
You ca n play titles or chapters (DVD-Video) or tracks
(VCD, SVCD, or Audio CD) in random order.
ON
OFF
AUDIO
SUBTITLE
ANGLE
PLAY MODE
PLAY MODE
CLEAR
ENTER
SETUP
PTY SEEK
MODE START
TOP MENU
INFO.
SETUP
AUTO/
MANUAL
BAND
PRESET
ENTER
MEMORY
TUNER
FREQ/TEXT
MENU
AEAE
RETURN
VOLUME
1 During playback, press SETUP.
The Setup menu appears on-screen.
2 Select “Play Mode,” and then press ENTER.
The Play Mode menu appears on-screen.
3 Select “Random,” select a random option, and
then press ENTER.
The available random options depends on the
type of disc.
•For DVD discs, you can select “Random Title” or
“Random Chapter.”
•For VCD, SVCD, and Audio CD discs, you can
select “On.”
4 To cancel random playback, select “Random
Off,” and then press ENTER.
5 To close the Setup menu, press SETUP.
Tips:
•During random playback, press Next ( ) to
select another title, chapter, or track. Press
Previous ( ) to return to the beginning of the
current title, chapter, or track.
•You can display the Play Mode menu quickly by
Notes:
•You cannot combine random playback with
•Random playback cannot be used with DVD-VR
30 En
pressing PLAY MODE .
program playback.
(VR mode DVD-R/RW/R DL), DivX
, WMV,
®
JPEG, MP3, WMA, or MPEG-4 AAC discs, or
while a DVD menu is displayed.
Page 37

Chapter 4: Playing Discs
Program playback
You ca n create a program of your favorite titles,
chapters, or tracks for playback.
ZOOM
OFF
SUBTITLE
PRESET
ENTER
MEMORY
TUNER
AUX/PORTABLE
PURE DIRECT
ON SCREEN
ANGLE
CLEAR
FREQ/TEXT
MENU
RETURN
VOLUME
DOCK
MUTE
CLEAR
AEAE
90
BLUETOOTH
ON
AUDIO
PLAY MODE
PLAY MODE
PTY SEEK
MODE START
TOP MENU
INFO.
SETUP
SETUP
AUTO/
MANUAL
ENTER
BAND
DVD/USB
SOUND
1 During playback, press SETUP.
The Setup menu appears on-screen.
2 Select “Play Mode,” and then press ENTER.
The Play Mode menu appears on-screen.
3 Select “Program,” select “Create/Edit” from the
list of program options, and then press ENTER.
6 To play the program, press Play ( ).
The items in the program are played in order.
During playback, use Next ( ) and Previous
() to select subsequent and earlier items in
the program.
■ Program menu options
In addition to “Create/Edit,” the Program menu has
the following options:
• Playback Start: Starts program playback.
• Playback Stop: Turns off program playback, but
keeps the program in memory.
• Playback Delete: Deletes the program.
7 To close the Setup menu, press SETUP.
Tip:
•You can display the Play Mode menu quickly by
pressing PLAY MODE .
Notes:
•The program will be deleted when the disc is
ejected, an input source other than DVD is
selected, or the DRX-730 is turned off.
•Program playback cannot be used with DVD-VR
(VR mode DVD-R/RW/R DL), DivX
JPEG, MP3, WMA, or MPEG-4 AAC discs, or
while a DVD menu is displayed.
, WMV,
®
4
4 Use the cursor buttons ( / / / ) to select a
title, chapter, or track, and press ENTER to add
it to the program.
The selected item is added to the program and the
program step moves down.
•For DVD discs, you can add titles or chapters to
the program.
•For Audio CD, VCD, and SVCD discs, you can
add tracks to the program.
5 Repeat step 4 to add more items to the
program.
You ca n add up to 24 items to the program.
•To insert a new item in the program, select the
step where you want to insert it, select the title,
chapter, or track you want to insert, and then
press ENTER.
•To delete a step, select it, and then press CLEAR.
English
31 En
Page 38

Chapter 4: Playing Discs
Searching Discs
Yo u c a n search discs by title, chapter, or track number,
or by time.
Number buttons
ENTER
SETUP
STANDBY/ON
1
586
90
BLUETOOTH
ON
AUDIO
PLAY MODE
PTY SEEK
MODE START
TOP MENU
INFO.
SETUP
AUTO/
MANUAL
BAND
SUBTITLE
PRESET
ENTER
MEMORY
TUNER
OPEN/CLOSE
423
7
ZOOM
ON SCREEN
OFF
ANGLE
CLEAR
FREQ/TEXT
MENU
AEAE
RETURN
VOLUME
5 Press ENTER to locate and play the specified
title, chapter, track, or time.
6 To close the Setup menu, press SETUP.
Note:
•For DivX
differ from the specified time by a few seconds.
and WMV discs, the located time may
®
1 During playback, press SETUP.
The Setup menu appears on-screen.
2 Select “Play Mode,” and then press ENTER.
The Play Mode menu appears on-screen.
3 Select “Search Mode,” select a search option,
and then press ENTER.
The available search options depends on the type
of disc.
•For DVD discs, you can select “Title Search,”
“Chapter Search,” or “Time Search.”
•For VCD, SVCD, and Audio CD discs, you can
select “Track Search” or “Time Search.”
•For DivX
Search.” For some DivX
and WMV discs, you can select “Time
®
discs, you can also select
®
“Chapter Search.”
Note:
•Time Search can only be selected during playback
and only works within the current title or track.
4 Use the number buttons to enter a title,
chapter, or track number, or a time.
Times are entered in minutes and seconds. To
enter the time 45 minutes, for example, press 4, 5,
0, and 0. To enter 1 hour, 20 minutes, and 30
seconds, press 8, 0, 3, and 0.
32 En
Page 39

Chapter 4: Playing Discs
Playing JPEG slideshows
You ca n play a slideshow of JPEG pictures on a data
disc.
STANDBY/ON
1
586
90
BLUETOOTH
ON
AUDIO
PLAY MODE
PTY SEEK
MODE START
TOP MENU
INFO.
SETUP
AUTO/
MANUAL
BAND
Load the JPEG CD, and then press Play ( ) to
start the slideshow.
Starting with the first picture in the first folder, the
slideshow displays every picture in every folder on the
CD in alphabetical order.
The pictures will be scaled automatically so that they
appear on-screen at the largest size possible.
If the disc contains JPEG picture files and music files
(MP3, WMA, MPEG-4 AAC), the music files will
play repeatedly during the slideshow. And,
Pause ( ), Next ( ), Previous ( ),
Rewind ( ), and Fast Forward ( ) will control
music playback, not the slideshow.
SUBTITLE
PRESET
ENTER
MEMORY
TUNER
OPEN/CLOSE
423
7
ZOOM
ON SCREEN
OFF
ANGLE
CLEAR
FREQ/TEXT
MENU
AEAE
RETURN
VOLUME
ZOOM
MENU
The following buttons can be used during slideshow
playback.
Button Description
Pauses the slideshow (or music
Pause ( )
playback if the disc contains music
files)
Next ( )
Previous
()
Cursor
( )/( )
Select the next picture (or track if the
disc contains music files)
Select the previous picture (or track if
the disc contains music files)
Pauses the slideshow and rotates and
flips the current picture. To resume
slideshow playback, press Play ( ).
Pauses the slideshow and zooms the
ZOOM
current picture. Press repeatedly to
select 2x, 4x, or 1x zoom. To resume
slideshow playback, press Play ( ).
MENU Displays Disc Navigator (see below)
Notes:
•Large pictures take longer to load and may not
appear immediately.
•On a single disc, the DRX-730 supports up to 299
folders, and each folder may contain a
combination of up to 648 files and folders.
4
33 En
English
Page 40

Chapter 4: Playing Discs
Using Disc Navigator with DVD-Video, VCD, and SVCD discs
Yo u c a n use Disc Navigator to browse and select titles,
chapters, and tracks on DVD, VCD, and SVCD discs.
Number buttons
SETUP
ENTER
STANDBY/ON
1
586
90
BLUETOOTH
ON
AUDIO
PLAY MODE
PTY SEEK
MODE START
TOP MENU
INFO.
SETUP
AUTO/
MANUAL
BAND
DVD/USB
SOUND
ZOOM
OFF
SUBTITLE
PRESET
ENTER
MEMORY
TUNER
AUX/PORTABLE
PURE DIRECT
OPEN/CLOSE
423
7
ON SCREEN
ANGLE
CLEAR
FREQ/TEXT
MENU
AEAE
RETURN
VOLUME
DOCK
MUTE
The following items are available for each disc type.
Disc Item
DVD-Video
VCD, SVCD
Tit le
Chapter
Tr ac k
Ti me
1
Original: Title
DVD-VR
(VR mode DVD-R/RW/R DL)
Original: Time
2
Playlist: Title
Playlist: Time
1. Only chapters within the current title can be selected.
2. Recordings made on a DVD recorder are called original titles.
Edited recordings based on those original titles are called
playlist titles.
3 Select the type of item you want to browse,
and then press ENTER.
Six thumbnail images appear on-screen showing
content of the type you specified. If you selected
“Time,” the thumbnails will display the content at
10 minute intervals.
01
04
02
05
03
06
1 During playback, press SETUP.
The Setup menu appears on-screen.
2 Select “Disc Navigator,” and then press ENTER.
A list of items appear on-screen. The items
available depends on the type of disc.
Disc Navigator
Title
Chapter
Disc Navigator: Title
01- 49: - -
4 Use Next ( ) and Previous ( ) to view
other thumbnail pages if available.
5 Use the cursor buttons ( / / / ) to select
the thumbnail you want to play, and then
press ENTER.
The selected item starts playing.
Yo u can also use the number buttons and ENTER
to select the thumbnails.
34 En
Page 41

Chapter 4: Playing Discs
Using Disc Navigator with MP3,
WMA, MPEG-4 AAC, DivX
®
,
WMV, and JPEG discs
Yo u can use Disc Navigator to browse and select MP3,
WMA, MPEG-4 AAC, DivX
on data discs.
SETUP
ENTER
1 Press SETUP.
The Setup menu appears on-screen.
, WMV, and JPEG files
®
ZOOM
OFF
SUBTITLE
PRESET
ENTER
MEMORY
TUNER
AUX/PORTABLE
PURE DIRECT
ON SCREEN
ANGLE
CLEAR
FREQ/TEXT
MENU
AEAE
RETURN
VOLUME
DOCK
MUTE
90
BLUETOOTH
ON
AUDIO
PLAY MODE
PTY SEEK
MODE START
TOP MENU
INFO.
SETUP
AUTO/
MANUAL
BAND
DVD/USB
SOUND
4 To play the selected track, file, or folder, press
ENTER.
If you selected an MP3, WMA, MPEG-4 AAC,
DivX
, or WMV file, starting with that file, all of
®
the files in the same folder will be played.
If you selected a JPEG picture file, starting with
that file, all of the files in the same folder will be
played in a slideshow.
5 To close the Setup menu, press SETUP.
Tips:
•If the disc contains JPEG picture files and music
files (MP3, WMA, MPEG-4 AAC), you can listen
to music while watching a slideshow. Simply start
music playback as described above, and then
select a JPEG picture file and start slideshow
playback. All of the files within the current folders
will be played repeatedly. And, Play ( ),
Pause ( ), Next ( ), and Previous ( ) will
control the slideshow, not music playback.
•Disc Navigator only plays the files in the current
folder. To play all of the files on the disc, close
Disc Navigator and start playback by pressing
Play ( ), see “Playing JPEG slideshows” on
page 33.
4
2 Select “Disc Navigator,” and then press ENTER.
Disc Navigator appears on-screen.
00:00/ 00:00 0kbps
Folder2
File1
File2
File3
File4
File5
3 Use the cursor buttons ( / / / ) to select
the track, file, or folder you want to play.
•Use Up/Down ( / ) to move up and down the
file and folder list.
•Use Left ( ) to move back up the directory tree
one level. Or, select the folder at the top of the list
(...) and press ENTER.
•Use ENTER or Right ( ) to open the selected
folder.
When you select a JPEG picture file, Disc
Navigator displays a thumbnail preview.
English
35 En
Page 42

Chapter 4: Playing Discs
Viewing disc information
You ca n view title, chapter, track, and other
information during playback.
STANDBY/ON
1
586
90
BLUETOOTH
ON
AUDIO
PLAY MODE
PTY SEEK
MODE START
During playback, press ON SCREEN repeatedly to
display the information.
To hide the information, press ON SCREEN
repeatedly until it disappears.
Some information, such as remaining disc time, is
also displayed on the DRX-730’s display.
SUBTITLE
ZOOM
OFF
7
OPEN/CLOSE
423
ON SCREEN
ANGLE
CLEAR
FREQ/TEXT
ON SCREEN
Viewing the audio format
You ca n view audio format during playback.
VOLUME
MEMORY
AUTO/
MANUAL
TUNER
BAND
AUX/PORTABLE
PURE DIRECT
DIMMER
DOCK
MUTE
DISPLAY
DISPLAY
DD
DVD/USB
SOUND
TIMER SLEEP
During playback, press DISPLAY.
The audio format appears on the display.
TTTTYYYYPPPPEEEE.... DDDDoooollllbbbbyyyy DD
Possible audio formats are listed below.
Display Description
PCM PCM (DVD-Video disc)
Dolby D Dolby Digital (DVD-Video disc)
MPEG2 MPEG2 (DVD-Video disc)
DTS DTS (DVD-Video disc)
CDDA Audio CD
VCD Vi d eo CD
SVCD Super video CD
DTS CD DTS CD
DATA DISC
MP3, WMA, MPEG-4 AAC, DivX
WMV, or JPEG
,
®
36 En
Note:
•The audio format can be viewed only when the
DVD input source is selected and playback is in
progress.
Page 43

Chapter 5: Using the Tuner
H
E
This chapter explains how to use the tuner to listen to
your favorite radio stations and how to store them as
presets. Europe and Russia models support the Radio
Data System, which provides additional radio
functionality.
■ Tuner display indicators
The following display indicators are used for tuning
and presetting radio stations.
A
PRESET
B
TUNED
C
STEREO
MEMORY
D
AUTO
A1 FM 100.1 MHz
F
A TUNED
Lights up when tuned in to a radio station.
B PRESET
Lights up when selecting radio presets.
C STEREO
Lights up when listening to an FM station in stereo.
G
Tuning in to radio stations
You ca n tune in to radio stations automatically or
manually.
Auto tuning
In Auto Tuning mode, the DRX-730 searches for
radio stations automatically.
PTY SEEK
MODE START
TOP MENU
INFO.
SETUP
AUTO/
AUTO/MANUAL
BAND
TUNER
MANUAL
BAND
DVD/USB
SOUND
1 Press TUNER to select the TUNER input source.
2 Press BAND repeatedly to select FM or AM.
PRESET
ENTER
MEMORY
TUNER
AUX/PORTABLE
PURE DIRECT
FREQ/TEXT
MENU
AEAE
RETURN
VOLUME
DOCK
MUTE
5
D AUTO
Lights up when Auto Tuning mode is selected. Goes
off when the Manual Tuning mode is selected.
E MEMORY
Lights up when presetting radio stations.
F Preset number
Displays the preset number.
G Band
Displays the band (FM or AM).
H Frequency
Displays the frequency.
AAAAMMMM 777700000000 kkkkHHHHzz
zz
3 Press AUTO/MANUAL repeatedly to select
Auto Tuning mode (AUTO indicator on).
In Auto Tuning mode, the AUTO indicator on the
display in on.
4 To search for stations higher up the frequency
band, press Up ( ). To search for stations
lower down the frequency band, press Down
().
The tuner searches for the next available station.
When a station is found, searching stops and the
TUNED indicator on the display lights up.
The STEREO indicator on the display will light up
when tuned to a stereo FM Station. If the signal is
weak, reception may be in mono.
Notes:
•If auto tuning doesn’t find some of the weaker
stations in your area, try using manual tuning.
•If stereo FM reception is noisy, press
AUT O/MANUAL to select Manual Tuning mode
and listen in mono.
English
37 En
Page 44

Chapter 5: Using the Tuner
Manual tuning
In Manual Tuning mode, you can tune in to radio
stations manually.
PTY SEEK
AUTO/MANUAL
BAND
TUNER
MODE START
TOP MENU
INFO.
SETUP
AUTO/
MANUAL
BAND
DVD/USB
SOUND
TIMER SLEEP
PRESET
ENTER
MEMORY
TUNER
AUX/PORTABLE
PURE DIRECT
DIMMER
FREQ/TEXT
MENU
AEAE
RETURN
VOLUME
DOCK
MUTE
DISPLAY
1 Press TUNER to select the TUNER input source.
2 Press BAND repeatedly to select FM or AM.
FFFFMMMM 111100000000....7777 MMMMHHHHzz
zz
■ Changing the frequency step
(Asia and Taiwan models only)
Depending on the frequency spacing used by radio
stations in your area, you may need to change the
Tuni ng St ep setting.
Play/Pause ( )
STANDBY/ON
STANDBY/ON
TIMER
HDMI
PROGRESSIVE
USB PORTABLE PHONES
Stop ( )
INPUT
VOLUME
1 Set the DRX-730 to standby.
2 While holding down Stop ( ) on the
DRX-730, press STANDBY/ON, keeping
Stop ( ) pressed until “DVD — NO REQ.”
appears on the display.
3 Press AUTO/MANUAL repeatedly to select
Manual Tuning mode (AUTO indicator off).
In Manual Tuning mode, the AUTO indicator on
the display is off.
4 To increase the tuning frequency, press Up
( ). To decrease the tuning frequency, press
Down ( ).
The frequency will change continuously if you
keep your finger on the button.
Note:
•Only mono reception is possible in Manual
Tuni ng mo de.
3 Press Stop ( ).
“TU – AM9/FM50” (the default setting) appears
on the display.
4 Press Play/Pause ( / ) repeatedly to select
the tuning step used in your area: “TU –
AM10/FM100” or “TU – AM9/FM50.”
• TU – AM10/FM100: AM 10 kHz/FM 100 kHz
• TU – AM9/FM50: AM 9 kHz/FM 50 kHz
5 Press STANDBY/ON.
The frequency step is set and the DRX-730 goes
on standby. Press STANDBY/ON again to turn it
back on.
38 En
Page 45
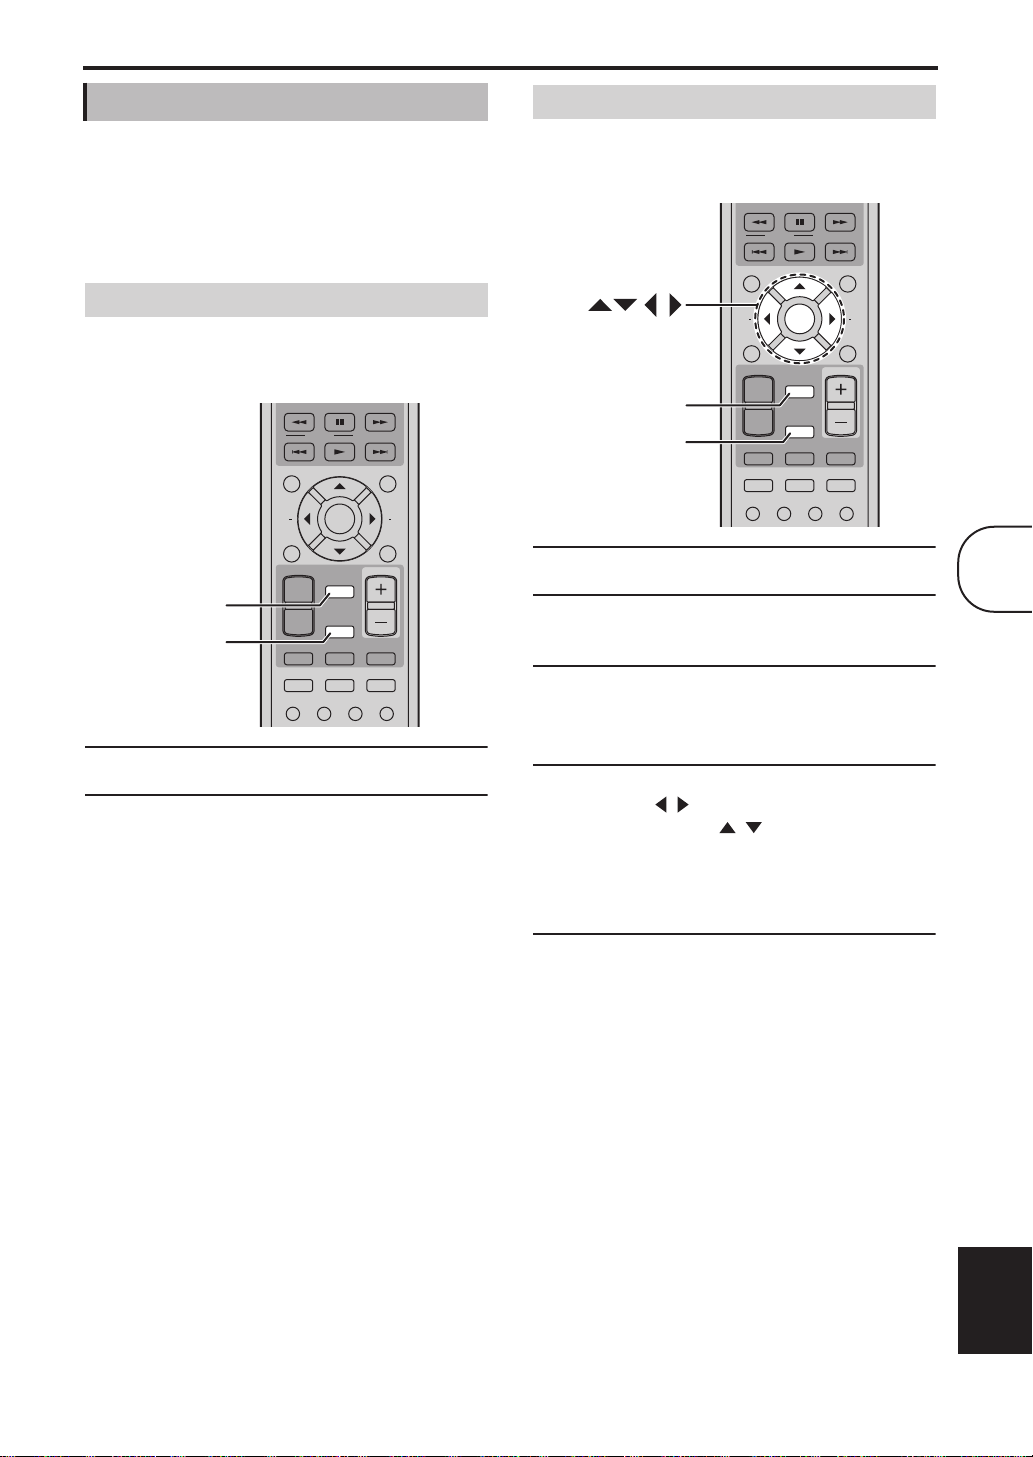
Chapter 5: Using the Tuner
Using presets
Yo u can store your favorite radio stations as presets so
that you can select them more easily. You can store up
to 40 presets, which are organized into 5 banks (A–E),
with 8 stations (1–8) in each bank. Presets can be
stored automatically or manually.
Auto presetting
In Auto Presetting mode, the DRX-730 presets all of
the radio stations available in your area automatically.
PTY SEEK
MODE START
TOP MENU
INFO.
SETUP
AUTO/
MEMORY
TUNER
MANUAL
BAND
DVD/USB
SOUND
TIMER SLEEP
1 Press TUNER to select the TUNER input source.
2 To start auto presetting, press MEMORY for 3
seconds.
Starting with the lowest FM frequency, the
DRX-730 searches the FM band for valid radio
stations and, starting with preset number A-1,
stores them one by one. When the entire FM band
has been searched, the AM band is searched, after
which auto presetting finishes.
Notes:
•If all of the available presets are stored before the
search is completed, auto presetting will finish.
•Auto presetting will overwrite all existing presets.
•On Europe and Russia models, Auto Presetting
mode will only preset FM stations that use the
Radio Data System.
PRESET
ENTER
MEMORY
TUNER
AUX/PORTABLE
PURE DIRECT
DIMMER
FREQ/TEXT
MENU
AEAE
RETURN
VOLUME
DOCK
MUTE
DISPLAY
Manual presetting
In Manual Presetting mode, you can preset radio
stations manually.
PTY SEEK
ENTER
MEMORY
TUNER
MODE START
TOP MENU
INFO.
SETUP
AUTO/
MANUAL
BAND
DVD/USB
SOUND
TIMER SLEEP
PRESET
ENTER
MEMORY
TUNER
AUX/PORTABLE
PURE DIRECT
DIMMER
FREQ/TEXT
MENU
AEAE
RETURN
VOLUME
DOCK
MUTE
DISPLAY
1 Press TUNER to select the TUNER input source.
2 Tune in to the radio station that you want to
preset (see page 37).
3 Press MEMORY.
The MEMORY indicator on the display starts
flashing.
4 While the MEMORY indicator is flashing, use
Left/Right ( / ) to select a preset bank (A–E),
and use Up/Down ( / ) to select a preset
number.
If you don’t press any buttons for 10 seconds, the
presetting process will be cancelled.
5 Press MEMORY or ENTER to store the preset.
The preset is stored and the MEMORY indicator
on the display stops flashing.
Repeat steps 2 to 5 to store more of your favorite
radio stations.
Notes:
•In addition to frequency and band (FM/AM)
information, each preset stores the Auto/Manual
Tu ni n g setting.
•To store a different radio station in a preset,
simply perform steps 2 to 5. The previous station
will be overwritten.
5
English
39 En
Page 46

Chapter 5: Using the Tuner
A DBC E
Selecting presets
Once you’ve preset a radio station, you can tune in to
it simply by selecting the appropriate preset.
Number buttons
BAND
TUNER
STANDBY/ON
1
586
90
BLUETOOTH
ON
AUDIO
PLAY MODE
PTY SEEK
MODE START
TOP MENU
INFO.
SETUP
AUTO/
MANUAL
BAND
DVD/USB
SOUND
TIMER SLEEP
ZOOM
OFF
SUBTITLE
PRESET
ENTER
MEMORY
TUNER
AUX/PORTABLE
PURE DIRECT
DIMMER
OPEN/CLOSE
423
7
ON SCREEN
ANGLE
CLEAR
FREQ/TEXT
MENU
AEAE
RETURN
VOLUME
DOCK
MUTE
DISPLAY
Radio Data System (Europe and Russia models only)
The Radio Data System allows text and other
information to be transmitted in FM radio signals,
providing additional radio functionality. FM stations
that use the Radio Data System can be found in
certain European countries and Russia.
The DRX-730 supports the following types of Radio
Data System information: PS (Program Service
name), PTY (Program Type), RT (Radio Text), and
CT (Clock Time).
■ Radio Data System display indicators
The following display indicators are used for the
Radio Data System.
PS
PTY RT CT PTY
A PS
Lights up when PS information has been received.
B PTY
Lights up when PTY information has been received.
HOLD
1 Press TUNER to select the TUNER input source.
2 Press BAND repeatedly to select “PRESET.”
The PRESET indicator on the display lights up.
3 Use Up/Down ( / ) to select a preset.
You ca n also use Left/Right ( / ) to select preset
banks A–E and number buttons 1 to 8 to select
presets.
C RT
Lights up when RT information has been received.
D CT
Lights up when CT information has been received.
E PTY HOLD
Lights up during PTY search.
40 En
Page 47

Chapter 5: Using the Tuner
Displaying Radio Data System
information
You ca n display the Radio Data System information
that’s currently being broadcast by the selected FM
station.
PLAY MODE
PTY SEEK
MODE START
TOP MENU
INFO.
SETUP
AUTO/
MANUAL
BAND
DVD/USB
SOUND
TIMER SLEEP
PRESET
ENTER
MEMORY
TUNER
AUX/PORTABLE
PURE DIRECT
DIMMER
CLEAR
FREQ/TEXT
MENU
RETURN
VOLUME
DOCK
MUTE
DISPLAY
FREQ/TEXT
AEAE
TUNER
• RT (Radio Text)
Displays any text messages being broadcast by the
station. This can be a scrolling message up to 64
characters in length. Any unsupported characters will
be replaced with an underscore (_) character.
•CT (Clock Time)
Displays the time information being broadcast by the
station.
Notes:
•Not all FM radio stations and programs broadcast
all types of Radio Data System information.
•The message “WAIT” may appear if, for some
reason, the PTY, RT, or CT information is not
received.
•If the signal from a station that uses the Radio
Data System is weak, the DRX-730 may not
receive the Radio Data System information
correctly.
5
1 Press TUNER to select the TUNER input source,
and select a preset or tune in to a station that
uses the Radio Data System.
2 Press FREQ/TEXT repeatedly to display the
available Radio Data System information.
The PS, PTY, RT, or CT indicator corresponding
to the selected Radio Data System information
flashes on the display for a few seconds.
Radio Data System information is displayed in the
following order:
PS PTY RT CT Frequency*
*This is the normal frequency display.
■ About Radio Data System information
• PS (Program Service name)
Displays the name of the station. When you select a
preset or tune in to a station that’s broadcasting PS
information, the station’s name will be displayed
shortly after the frequency has been displayed.
•PTY (Program Type)
Displays the type of program currently being
broadcast, for example, News, Sports, or Music
Genre.
English
41 En
Page 48

Chapter 5: Using the Tuner
Searching FM presets by type
You ca n search your preset FM radio stations by
program type with the PTY search function.
PTY SEEK MODE
PTY SEEK START
TUNER
PLAY MODE
PTY SEEK
MODE START
TOP MENU
INFO.
SETUP
AUTO/
MANUAL
BAND
DVD/USB
SOUND
TIMER SLEEP
PRESET
ENTER
MEMORY
TUNER
AUX/PORTABLE
PURE DIRECT
DIMMER
CLEAR
FREQ/TEXT
MENU
AEAE
RETURN
VOLUME
DOCK
MUTE
DISPLAY
■ PTY program types
Program type Description
NEWS News
AFFAIRS Current affairs
INFO General information
SPORT Sports
EDUCATE Education
DRAMA Drama
CULTURE Culture
SCIENCE Science
VARIED Light entertainment
POP M Popular music
ROCK M Rock music
M.O.R. M
Middle-of-the-road music (easy
listening)
LIGHT M Light classics
CLASSICS Serious classics
OTHER M Other music
1 Press TUNER to select the TUNER input source.
2 Press PTY SEEK MODE.
3 Use Up/Down ( / ) to select the type of
program you want.
Program types are listed below.
4 To start the PTY search, press PTY SEEK START.
The PTY HOLD indicator on the display lights
up.
Starting from preset A-1, the DRX-730 searches
for a station broadcasting a program of the type
you specified. If no such station is found, the
DRX-730 will return to the station that was
selected before the search.
42 En
Page 49

Chapter 5: Using the Tuner
Setting the clock with the Radio
Data System
By using CT (Clock Time) information, the DRX-730
can set its own clock automatically. You can turn this
function on and off, the default is on.
PTY SEEK
START
TUNER
TIMER
PLAY MODE
PTY SEEK
MODE START
TOP MENU
INFO.
SETUP
AUTO/
MANUAL
BAND
DVD/USB
SOUND
TIMER SLEEP
PRESET
ENTER
MEMORY
TUNER
AUX/PORTABLE
PURE DIRECT
DIMMER
CLEAR
FREQ/TEXT
MENU
RETURN
VOLUME
DOCK
MUTE
DISPLAY
FREQ/TEXT
AEAE
Radio Data System and daylight
saving time
By using CT (Clock Time) Local Time information,
the DRX-730 can automatically adjust its own clock
for daylight saving time or summer time. You can
turn this function on and off, the default is on.
PTY SEEK MODE
PTY SEEK START
FREQ/TEXT
TUNER
TIMER
PLAY MODE
PTY SEEK
MODE START
TOP MENU
INFO.
SETUP
AUTO/
MANUAL
BAND
DVD/USB
SOUND
TIMER SLEEP
PRESET
ENTER
MEMORY
TUNER
AUX/PORTABLE
PURE DIRECT
DIMMER
CLEAR
FREQ/TEXT
MENU
AEAE
RETURN
VOLUME
DOCK
MUTE
DISPLAY
5
1 Press TUNER to select the TUNER input source.
2 Press TIMER to display the time.
3 Press FREQ/TEXT to select “CT–>Clock.”
CCCCTTTT¬¬¬¬CCCClllloooocccckkkk:::: OOOONN
NN
4 Press PTY SEEK START repeatedly to select
“ON” or “OFF.”
5 Press FREQ/TEXT.
The setting is complete.
Note:
•If the DRX-730’s clock has not already been set,
the CT information will be used to set the clock
for the first time regardless of this setting.
1 Press TUNER to select the TUNER input source.
2 Press TIMER to display the time.
3 Press FREQ/TEXT to select “CT–>Clock.”
CCCCTTTT¬¬¬¬CCCClllloooocccckkkk:::: OOOONN
NN
4 Press PTY SEEK MODE to select “Local–>CT.”
LLLLooooccccaaaallll¬¬¬¬CCCCTTTT:::: OOOONN
NN
5 Press PTY SEEK START repeatedly to select
“ON” or “OFF.”
6 Press FREQ/TEXT.
The setting is complete.
English
43 En
Page 50

Chapter 6: Using the Timer
You ca n program the DRX-730’s timer to
automatically start and stop playback at set times. You
could, for example, use the DRX-730 like an alarm
clock to wake up to your favorite radio station or
music disc.
To us e the timer, you must:
1. Set the input source.
2. Set the on time.
3. Set the off time.
4. Turn on the timer.
These settings are explained below.
Notes:
•The DRX-730’s clock must be set in order to
program the timer (see page 21).
•Timer programming can be cancelled at any time
by pressing TIMER.
Setting the input source
You ca n specify the input source that’s to be used
when the timer turns on the DRX-730.
BAND
TUNER
DVD/USB
TIMER
PLAY MODE
PTY SEEK
MODE START
TOP MENU
INFO.
SETUP
AUTO/
MANUAL
BAND
DVD/USB
SOUND
TIMER SLEEP
PRESET
ENTER
MEMORY
TUNER
AUX/PORTABLE
PURE DIRECT
DIMMER
CLEAR
FREQ/TEXT
MENU
RETURN
VOLUME
DOCK
MUTE
DISPLAY
AEAE
DOCK
AUX/
PORTABLE
2 Use Left/Right ( / ) to select the input
source.
DD
DDDDVVVVDD
Input sources are selected in the following order:
DVD USB FM AM PRESET AUX PORTABLE DOCK
Yo u can also use DVD/USB, AUX/PORTABLE,
DOCK, TUNER, and BAND on the remote
control, or the INPUT control on the DRX-730 to
select the input source.
If you selected TUNER, use Up/Down ( / ) to
select a preset.
AAAA1111 FFFFMMMM 88887777....5555 MMMMHHHHzz
zz
3 Press ENTER.
The input source is set and the ON Time setting
appears on the display (see page 45).
Note:
•The DOCK input source can be used for timer
playback with an iPod, but not a Bluetooth device.
1 Press TIMER, and then use Up/Down ( / ) to
select “Timer Input.”
TTTTiiiimmmmeeeerrrr IIIInnnnppppuuuutt
The TIMER indicator flashes.
44 En
tt
Page 51

Chapter 6: Using the Timer
Setting the on time
You ca n set the time at which you want the DRX-730
to turn on and start playback.
PRESET
ENTER
MEMORY
TUNER
AUX/PORTABLE
PURE DIRECT
DIMMER
MENU
AEAE
RETURN
VOLUME
DOCK
MUTE
DISPLAY
TOP MENU
INFO.
ENTER
TIMER
SETUP
AUTO/
MANUAL
BAND
DVD/USB
SOUND
TIMER SLEEP
1 Press TIMER, and then use Up/Down ( / ) to
select “ON Time.” If the preset selection screen
appears, press ENTER.
OOOONNNN TTTTiiiimmmmee
ee
The TIMER indicator flashes and after a few
moments, “ON 0:00” appears on the display. (If
you’re using the 12-hour clock, “ON AM 12:00”
will be displayed.)
2 Press ENTER.
The hours display starts flashing.
00000000::::000000
00
Setting the off time
You ca n set the time at which you want the DRX-730
to stop playback and go on standby.
PRESET
ENTER
MEMORY
TUNER
AUX/PORTABLE
PURE DIRECT
DIMMER
ee
MENU
AEAE
RETURN
VOLUME
DOCK
MUTE
DISPLAY
TOP MENU
INFO.
ENTER
TIMER
SETUP
AUTO/
MANUAL
BAND
DVD/USB
SOUND
TIMER SLEEP
1 Press TIMER, and then use Up/Down ( / ) to
select “OFF Time.” If the preset selection
screen appears, press ENTER.
OOOOFFFFFFFF TTTTiiiimmmmee
The TIMER indicator flashes and after a few
moments, “OFF hh:mm” appears on the display.
(If you’re using the 12-hour clock, “OFF AM
hh:mm” will be displayed.)
Initially, the off time is set to 1 hour after the
specified on time.
2 Press ENTER.
The hours display starts flashing.
6
3 Use Up/Down ( / ) to set the hours.
4 Press Right ( ).
The minutes display starts flashing.
00000000::::000000
00
5 Use Up/Down ( / ) to set the minutes.
Use Left/Right ( / ) to toggle between the hour
and minute displays if necessary.
6 Press ENTER.
The on time is set and the OFF Time setting
appears on the display (see below).
00000000::::000000
00
3 Use Up/Down ( / ) to set the hours.
4 Press Right ( ).
The minutes display starts flashing.
00000000::::000000
00
5 Use Up/Down ( / ) to set the minutes.
Use Left/Right ( / ) to toggle between the hour
and minute displays if necessary.
6 Press ENTER.
The off time is set and the Timer Set setting
appears on the display (see page 46).
English
45 En
Page 52

Chapter 6: Using the Timer
Turning the timer on and off
You ca n turn the timer on and off as you like and it
will remember the settings. If you use the timer like
an alarm clock, for example, you may want to turn it
off while you’re on vacation.
PRESET
ENTER
MEMORY
TUNER
AUX/PORTABLE
PURE DIRECT
DIMMER
MENU
AEAE
RETURN
VOLUME
DOCK
MUTE
DISPLAY
TOP MENU
INFO.
ENTER
TIMER
SETUP
AUTO/
MANUAL
BAND
DVD/USB
SOUND
TIMER SLEEP
1 Press TIMER, and then use Up/Down ( / ) to
select “Timer Set.” If the preset selection
screen appears, press ENTER.
•When the timer has been programmed and
turned on, if the DRX-730 is on standby, it will
turn on at the specified on time and play the
specified input source. At the specified off time,
playback will stop and the DRX-730 will go on
standby.
•If the DRX-730 is already on at the specified on
time, the timer settings will have no effect.
Likewise, if the DRX-730 is already off at the
specified off time, they will have no effect.
•If you selected the DVD input source, don’t forget
to load a disc in the DRX-730. Likewise, if you
selected the USB input source, make sure a USB
storage device is plugged into the DRX-730.
•If you selected the AUX, PORTABLE, or DOCK
input source, see the owner’s manual for the
connected component for details on timer and
alarm clock operation.
•If the sleep timer and off time have both been set,
the DRX-730 will switch to standby at whichever
time occurs first.
TTTTiiiimmmmeeeerrrr SSSSeeeett
tt
After a few moments, “Timer Set—>OFF” or
“Timer Set—>ON” appears on the display.
TTTTiiiimmmmeeeerrrr SSSSeeeetttt˘˘˘˘ OOOOFFFFFF
FF
2 Use Left/Right ( / ) to select “ON” or “OFF.”
3 Press ENTER.
When the timer is on, the TIMER indicator on the
display lights up.
TIMER
Notes:
•If the on time or off time has been set, you can
turn the timer on or off while the DRX-730 is on
standby by simply pressing TIMER.
•When the timer is on, if the DRX-730 is on, the
TIMER indicator on the display lights up. If it’s on
standby, the TIMER LED on the front panel lights
up instead.
46 En
Page 53

Chapter 7: Portable Device Playback
This chapter explains how to enjoy content stored on
a portable device, such as a music player, iPod, USB
storage device, or Bluetooth-compatible music player
or mobile phone.
Music player playback
You ca n connect a music player to the PORTABLE
jack on the DRX-730’s front panel and enjoy the
music stored on it through the DRX-730’s speakers in
high quality.
1 Using a mini plug cable (sold separately),
connect the audio output on the music player
to the PORTABLE jack on the DRX-730’s front
panel.
TIMER
HDMI
PROGRESSIVE
VOLUME
STANDBY/ON
USB PORTABLE PHONES
Mini plug cable
(sold separately)
INPUT
iPod playback
With an op tional Yamaha iPod universal dock
(YDS-10 or YDS-11) connected to the DRX-730’s
DOCK jack, you can enjoy the music stored on your
iPod through the DRX-730’s speakers in high quality.
You ca n also use the DRX-730’s remote control to
control your iPod. In addition, the DRX-730 will
recharge your iPod while you enjoy your music.
The DRX-730 supports 4th Generation (Click Wheel)
and later iPod models, including iPod classic, iPod
nano, iPod mini, and iPod touch. Refer to your
Yam ah a d oc k’s ow ner’s manual to learn which iPod
models it supports and for setup details.
Notes:
•Set the DRX-730 to standby and disconnect its
power cable before connecting or disconnecting a
Yam ah a d oc k.
•Make sure your iPod has the latest firmware
installed before using it with the DRX-730. See
the Apple Web site for details.
1 Using the dock cable supplied with the
Yamaha dock, connect one end of the cable to
the Yamaha dock, and connect the other end
to the DOCK jack on the DRX-730’s rear panel.
(Europe model shown here.)
7
OUT
AUDIO
Music player
2 Press AUX/PORTABLE repeatedly to select the
PORTABLE input source.
3 Start playback on the music player.
Use the DRX-730’s VOLUME control to adjust
the volume.
Note:
•If the volume control on your music player is
turned down all the way, you may not hear
anything, so set it to a suitable level.
MAINS
R
6
MIN
SPEAKER
SPEAKERS VIDEO OUT
SUBWOOFER
OUT
OUT IN
AUX
HDMI
AV MONITOR OUT
RPB
P
R
Y
COMPONENT
OPTICAL
DIGITALDOCK
OUT
VIDEO
Dock cable
(supplied with
Yamaha dock)
Yamaha dock
2 Press STANDBY/ON ( ) to turn on the
DRX-730.
3 Insert your iPod into the Yamaha dock.
The DOCK indicator on the display lights up.
AM
ANT
GND
FM
ANT
75
UNBAL.
47 En
English
Page 54

Chapter 7: Portable Device Playback
1 C D FE2 G H
4 Press DOCK to select the DOCK input source.
“iPod connected” appears on the display.
5 Use the DRX-730’s remote control to play the
music stored on your iPod. (Point it at the
DRX-730, not your iPod.)
■ iPod display indicators
The following DRX-730 display indicators are used
for iPod playback. Indicators 2 through 9 work only
in Menu mode (see below).
DOCK
SHUFFLE
REPEAT
ARTISTSPLAYLISTS
ALBUMS
A DOCK
Lights up when an iPod is seated in the Yamaha dock.
B PLAYLISTS
Lights up when browsing playlists.
C SHUFFLE
Lights up when the iPod’s Shuffle function is on.
D REPEAT
Lights up when the iPod’s Repeat function is on.
E ARTISTS
Lights up when browsing artists.
F ALBUMS
Lights up when browsing albums.
G SONGS
Lights up when browsing songs.
H GENRES
Lights up when browsing genres.
SONGS
GENRES
I
■ Playback control
The following DRX-730 remote control buttons can
be used to control iPod playback.
Button Description
Play ( )
Pause ( )
Starts playback. In Simple
mode, it works as Play/Pause.
Pauses playback. In Simple
mode, it works as Play/Pause.
Stop ( ) Stops playback
Fast Forward ( ) Fast forwards
Rewind ( ) Rewinds
Next ( ) Selects the next track
Selects the beginning of the
Previous ( )
current track. Press again to
select earlier tracks.
■ Menu navigation
The following DRX-730 remote control buttons can
be used to navigate iPod menus.
Button Description
INFO Selects Menu mode or Simple mode
Up ( ) Moves up the menu
Moves down the menu. While track
Down ( )
information is displayed, press it
repeatedly to see more information.
Displays the menu one level up.
Left ( )
While track information is displayed,
press it to display a menu.
Right ( )
Displays the menu one level down.
(Cannot be used to start playback.)
Displays the menu one level down.
When a song is selected, press it to
ENTER
start playback. When a setting is
selected (e.g., Shuffle or Repeat),
press it repeatedly to select an option.
I Cursors ( / / )
Indicate which cursor buttons can be used.
■ Simple mode and Menu mode
You ca n use one of two modes to control your iPod:
Simple mode or Menu mode.
•In Simple mode, you use the DRX-730’s remote
control or the iPod’s controls to control the iPod
and the iPod’s display to view the menus.
•In Menu mode, the iPod menus appear on the
DRX-730’s display and you use the DRX-730’s
remote control to control the iPod. The iPod’s
controls cannot be used, and the Yamaha logo
appears on the iPod’s display.
Press INFO repeatedly to select Simple mode or
Menu mode.
48 En
Notes:
•The iPod will be charged while the DRX-730 is
turned on, but not while the DRX-730 is on
standby.
•Video and pictures stored on the iPod are not
output from the DRX-730.
•Depending on your iPod model and its firmware
version, some iPod functions may not work as
expected, and some may not work at all.
•In Menu mode, any unsupported characters will
be replaced with an underscore (_) character.
•Refer to your iPod owner’s manual for details on
using your iPod.
Page 55

Chapter 7: Portable Device Playback
USB playback
Yo u c a n connect a USB storage device to the USB port
on the DRX-730’s front panel and enjoy music (MP3,
WMA, MPEG-4 AAC) stored on it through the
DRX-730’s speakers in high quality. You can also play
a slideshow of JPEG pictures.
Notes:
•Not all USB storage devices are recognized.
•Only MP3, WMA, MPEG-4 AAC, and JPEG files
with no copy protection (DRM) can be played.
•The DRX-730 supports USB mass storage class
devices formatted with FAT16 or FAT32,
including USB flash memory devices, digital
audio players, and USB hard drives. You cannot
connect your computer directly to the DRX-730.
•Playback with all USB storage devices, and the
ability to power all USB devices is not guaranteed.
Yam ah a a ccepts no responsibility whatsoever in
the unlikely event that any data is lost while the
USB storage device is connected to the DRX-730.
•Large capacity USB storage devices will take
longer to read. High capacity devices may take
several minutes to read.
•USB hubs are not supported.
•While the USB input source is selected, the Setup
menu will be unavailable.
•Connect only USB storage devices to the USB
port.
•If the message “USB ERROR” appears on the
display, the DRX-730 may not be able to supply
enough power to the device for it to function
properly. If the device is not a USB storage device,
do not use it with the DRX-730. If the USB storage
device came with its own power adapter, use it to
power the USB storage device. If the USB storage
device came with no power adapter, do not use it
with the DRX-730.
1 Press DVD/USB repeatedly to select the USB
input source.
Tu rn on yo ur TV and select the AV input to which
the DRX-730 is connected.
2 Connect your USB storage device to the USB
port on the DRX-730’s front panel.
TIMER
HDMI
PROGRESSIVE
VOLUME
STANDBY/ON
USB PORTABLE PHONES
USB storage device
INPUT
3 Press MENU to display Disc Navigator and
select the track you want to play. Or, press Play
() to start playback of all files on the USB
storage device.
If you loaded a disc containing JPEG pictures, a
slideshow will start. See “Playing a JPEG
slideshow” on page 50 for more details.
4 To stop playback, press Stop ( ).
5 Before you disconnect the USB storage device,
select another input source first.
Playback controls
Most of the disc playback functions explained in the
“Playing Discs” chapter on page 23 can also be used
with USB storage devices.
The following table lists basic playback functions.
Button Description
Play ( ) Starts playback
Pause ( ) Pauses playback
Stop ( ) Stops playback
Fast Forward ( ) Fast forwards
Rewind ( ) Rewinds
Next ( ) Selects the next track
Selects the beginning of the
Previous ( )
MENU
current track. Press again to
select earlier tracks.
Displays Disc Navigator (see
page 50)
7
English
49 En
Page 56

Chapter 7: Portable Device Playback
Playing a JPEG slideshow
You ca n play a slideshow of JPEG pictures stored on a
USB storage device.
Press Play ( ) to start the slideshow.
Starting with the first picture in the first folder, the
slideshow displays every picture in every folder on the
USB storage device in alphabetical order.
The pictures will be scaled automatically so that they
appear on-screen at the largest size possible.
If the USB storage device contains JPEG picture files
and music files (MP3, WMA, MPEG-4 AAC), the
music files will play repeatedly during the slideshow.
And, Pause ( ), Next ( ), Previous ( ),
Rewind ( ), and Fast Forward ( ) will control
music playback, not the slideshow.
The following buttons can be used during slideshow
playback.
Button Description
Pauses the slideshow (or music
Pause ( )
Next ( )
Previous
()
Cursor
( )/( )
ZOOM
MENU Displays Disc Navigator (see below)
Notes:
•Large pictures take longer to load and may not
appear immediately.
•On a single USB storage device, the DRX-730
supports up to 299 folders, and each folder may
contain a combination of up to 648 files and
folders.
playback if the device contains music
files)
Selects the next picture (or track if
the device contains music files)
Selects the previous picture (or track
if the device contains music files)
Pauses the slideshow and rotates and
flips the current picture. To resume
slideshow playback, press Play ( ).
Pauses the slideshow and zooms the
current picture. Press repeatedly to
select 2x, 4x, or 1x zoom. To resume
slideshow playback, press Play ( ).
Using Disc Navigator with USB
storage devices
Yo u can use Disc Navigator to browse and select MP3,
WMA, MPEG-4 AAC, and JPEG files stored on a
USB storage device.
1 Press MENU.
Disc Navigator appears on-screen.
2 Use the cursor buttons ( / / / ) to select
the track, file, or folder you want to play.
•Use Up/Down ( / ) to move up and down the
file and folder list.
•Use Left ( ) to move back up the directory tree
one level. Or, select the folder at the top of the list
(...) and press ENTER.
•Use ENTER or Right ( ) to open the selected
folder.
When you select a JPEG picture file, Disc
Navigator displays a thumbnail preview.
3 To play the selected track, file, or folder, press
ENTER.
If you selected an MP3, WMA, or MPEG-4 AAC
file, starting with that file, all of the files in the
same folder will be played.
If you selected a JPEG picture file, starting with
that file, all of the files in the same folder will be
played in a slideshow.
Tips:
•If the USB storage device contains JPEG picture
files and music files (MP3, WMA, MPEG-4
AAC), you can listen to music while watching a
slideshow. Simply start music playback as
described above, and then select a JPEG picture
file and start slideshow playback. All of the files
within the current folders will be played
repeatedly. And, Play ( ), Pause ( ),
Next ( ), and Previous ( ) will control the
slideshow, not music playback.
•Disc Navigator only plays the files in the current
folder. To play all of the files on the USB storage
device, close Disc Navigator and start playback by
pressing Play ( ), see “Playing a JPEG
slideshow” above.
50 En
Note:
•With some digital music players, file names may
not display correctly.
Page 57

Chapter 7: Portable Device Playback
Bluetooth playback
With a n opt ional Yamaha YBA-10 Bluetooth Wireless
Audio Receiver connected to the DRX-730’s DOCK
jack, you can enjoy the music stored on your
Bluetooth device, for example, a Bluetoothcompatible music player or mobile phone, through
the DRX-730’s speakers in high quality. You can also
use the DRX-730’s remote control to control music
playback on your Bluetooth device.
Notes:
•Set the DRX-730 to standby and disconnect its
power cable before connecting or disconnecting
the Yamaha YBA-10.
•Refer to the Yamaha YBA-10 owner’s manual for
details on using the YBA-10.
•Refer to your Bluetooth device owner’s manual for
details on using your Bluetooth device.
•Depending on your Bluetooth device model and
its firmware version, some playback functions
may not work as expected, and some may not
work at all.
■ Bluetooth setup
Using the dock cable supplied with the Yamaha
YBA-10, connect one end of the cable to the
Yamaha YBA-10, and connect the other end to the
DOCK jack on the DRX-730’s rear panel.
■ Bluetooth pairing
Before you can use a Bluetooth device with the
DRX-730, you must pair, or register it with the
Ya m a h a YBA-10.
1 Press DOCK to select the DOCK input source.
2 Turn on the Bluetooth device and make sure
it’s discoverable.
3 Press and hold down BLUETOOTH ON for 3
seconds to start pairing.
Pairing starts, the DOCK indicator flashes, and
“Searching...” appears on the display.
During pairing, the Yamaha YBA-10 searches for
compatible Bluetooth devices and registers any
that are found. Pairing only needs to be
performed when a Bluetooth-device is used with
the Yamaha YBA-10 for the very first time, or
when the pairing information has been deleted.
See the Yamaha YBA-10 owner’s manual for more
details on pairing.
To ca ncel pairing, press BLUETOOTH OFF.
4 Make sure the Bluetooth device has detected
the Yamaha YBA-10.
The Yamaha YBA-10 will appear as “YBA-10
YAMAHA” or something similar on the Bluetooth
device.
7
(Europe model shown here.)
MAINS
R
6
MIN
SPEAKER
SPEAKERS VIDEO OUT
SUBWOOFER
OUT
OUT IN
AUX
HDMI
Yamaha YBA-10
AV MONITOR OUT
RPB
P
R
VIDEO
Dock cable
(supplied with
Yamaha YBA-10)
COMPONENT
5 On the Bluetooth device, select the Yamaha
YBA-10, and then enter the pass key “0000”.
AM
GND
75
UNBAL.
ANT
FM
ANT
When pairing is complete, the message
“Completed” appears on the display.
Note:
Y
OUT
OPTICAL
DIGITALDOCK
•Pairing will be cancelled if no compatible
Bluetooth devices are found within 8 minutes, the
input source is changed on the DRX-730, or the
DRX-730 is set to standby.
■ Connecting Bluetooth devices
Once a Bluetooth device has been paired with the
Ya m a h a YBA-10, you can connect to it and play the
music stored on it.
1 Press DOCK to select the DOCK input source.
2 Press BLUETOOTH ON.
The Yamaha YBA-10 attempts to connect to the
last Bluetooth device used or paired and
“Searching...” appears on the display.
When a connection is established, “BT
connected” appears on the display.
English
51 En
Page 58
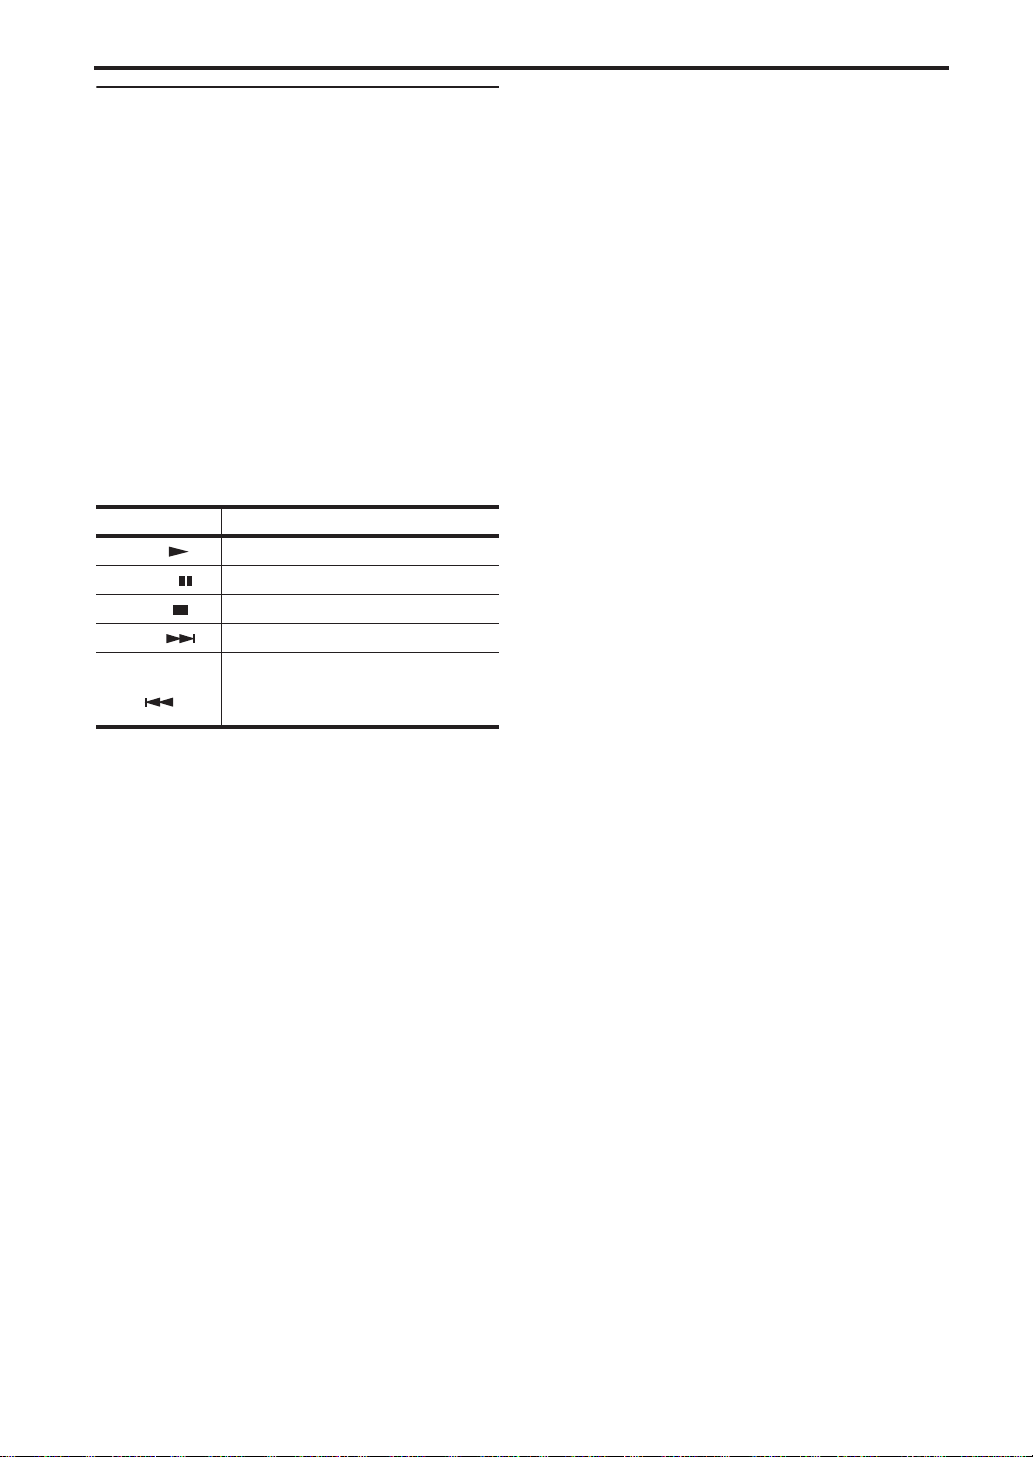
Chapter 7: Portable Device Playback
3 Use the DRX-730’s remote control, or the
Bluetooth device’s controls to play the music
stored on the Bluetooth device.
To disconnect a Bluetooth device and make the
DRX-730 non-discoverable, press BLUETOOTH
OFF. The message “Disconnected” appears on the
display.
To co nne ct to another Bluetooth device, you must
first disconnect from the currently connected device,
and then initiate a connection on the other Bluetooth
device.
■ Playback control
The following DRX-730 remote control buttons can
be used to control playback on a Bluetooth device.
Point the remote control at the DRX-730, not the
Bluetooth device.
Button Description
Play ( ) Starts playback
Pause ( ) Pauses playback
Stop ( ) Stops playback
Next ( ) Selects the next track
Previous
()
1. Depending on the Bluetooth device, the Play and Pause
buttons may work as Play/Pause buttons.
Selects the beginning of the current
track. Press again to select earlier
tracks.
1
1
Notes:
•The DRX-730’s remote control can only be used
to control a Bluetooth device while its connected
to that device.
•Even if several devices have been registered
through pairing, if the last connected Bluetooth
device is not found, the Yamaha YBA-10 will not
attempt to connect to any of the other devices.
•The DRX-730 will automatically disconnect from
the currently connected Bluetooth device when a
disconnection is initiated on that device,
communication becomes impossible because the
device is too far away, or the DRX-730 is set to
standby.
•The Bluetooth device will not be disconnected
when a different input source is selected on the
DRX-730.
•The Yamaha YBA-10 only supports Bluetooth
music players and mobile phones that are
compatible with A2DP or AVRCP.
•Bluetooth has a line of sight operating range of up
to 10 meters (33 ft.). Make sure there are no
obstacles between the Yamaha YBA-10 and your
Bluetooth device.
52 En
Page 59

Chapter 8: Recording
You ca n connect a recording component, such as a
CDR, MDR, or casette recorder, to the DRX-730 for
recording and playback.
1 Connect your recording component to the
DRX-730.
See “Connecting a recorder (CDR, MDR, etc.)”
on page 14 for details.
2 Turn on the DRX-730 and recording
component.
3 On the DRX-730, select the input source that
you want to record.
If you selected the DVD input source, load the
disc you want to record.
4 Start recording on the recording component.
5 Start playback on the DRX-730.
To pl ayb ack the recording, select the AUX input
source (see page 16).
If your recording component has an optical
digital input, you can connect it to the DRX-730’s
OPTICAL DIGITAL OUT jack and record
digitally.
Notes:
•Refer to your recording component’s owner’s
manual for details on using it.
•Adjustments to the DRX-730’s volume, bass,
treble, and balance do not affect recording.
•To prevent a signal loop, the AUX input source is
not output by the AUX OUT jacks, so you cannot
record a source connected to the AUX IN.
•The OPTICAL DIGITAL OUT does not output
signals from the radio, DOCK, AUX IN, or
PORTABLE jacks. To record from these sources,
connect the DRX-730’s AUX OUT jacks to the
analog audio input on your recording component.
•Depending on the source material, the DRX-730’s
OPTICAL DIGITAL OUT may output MPEG,
Dolby Digital, or DTS format digital audio that
the recording component cannot record. In this
case, set the digital audio output settings so that
PCM is output (see page 56).
•Discs and files that use copy protection cannot be
recorded.
8
English
53 En
Page 60

Chapter 9: Audio Settings and Video Adjust
This chapter explains the Audio Settings and Video
Adjust menus.
Audio Settings menu
These settings only affect disc playback.
PTY SEEK
MODE START
TOP MENU
INFO.
SETUP
SETUP
AUTO/
MANUAL
ENTER
BAND
DVD/USB
SOUND
TIMER SLEEP
1 Press SETUP.
The Setup menu appears on-screen.
PRESET
ENTER
MEMORY
TUNER
AUX/PORTABLE
PURE DIRECT
DIMMER
FREQ/TEXT
MENU
AEAE
RETURN
VOLUME
DOCK
MUTE
DISPLAY
■ Audio DRC
The Audio DRC (Dynamic Range Control) function
makes loud sounds quieter and quiet sounds louder,
which is ideal for watching movies late at night when
you don’t want to disturb anyone.
•High, Medium, Low, Off (default).
Notes:
•Audio DRC only works with Dolby Digital
sources.
•With some discs, Audio DRC may have little or no
effect.
•The Audio DRC function also applies to digital
output signals when the Digital Out setting is set
to On and the Dolby Digital Out setting is set to
Dolby Digital > PCM. See page 56 for details on
the digital audio output settings.
•The Audio DRC function also applies to audio
output from the HDMI output, with the same
restrictions as above.
■ Dialog
When watching a movie or other material on a DVDVi de o disc, depending on the audio format, the center
channel may be too quiet and difficult to hear. With
the Dialog function, you can make the dialog louder
and easier to hear.
•High, Medium, Low, Off (default).
2 Select “Audio Settings,” and then press ENTER.
The Audio Settings menu appears on-screen.
Audio Settings
Audio DRC
Dialog
High
Medium
Low
Off
3 Use the cursor buttons ( / / / ) and
ENTER to select and change the settings.
The settings are explained below.
4 To close the Setup menu, press SETUP.
Note:
•The effects of the Audio settings depends on your
speakers, TV, and AV receiver’s volume level and
other settings. For each setting, switch between
the available options and choose the one that
provides the best results.
54 En
Notes:
•When using the Dialog function, depending on
the source material, the dialog may distort, in
which case you should select a lower setting.
•The Dialog function also applies to digital output
signals that have been converted to 2-channel
PCM. See page 56 for details on the digital audio
output settings.
•The Dialog function also applies to audio output
from the HDMI output, with the same
restrictions as above.
Page 61

Chapter 9: Audio Settings and Video Adjust
Video Adjust menu
The Video Adjust settings affect the TV picture.
PTY SEEK
MODE START
TOP MENU
INFO.
SETUP
SETUP
AUTO/
MANUAL
ENTER
BAND
DVD/USB
SOUND
TIMER SLEEP
1 Select the DVD input source, and then press
SETUP.
The Setup menu appears on-screen.
Note:
•The Video Adjust menu is only available when the
DVD input source is selected.
2 Select “Video Adjust,” and then press ENTER.
The Video Adjust menu appears on-screen.
PRESET
ENTER
MEMORY
TUNER
AUX/PORTABLE
PURE DIRECT
DIMMER
FREQ/TEXT
MENU
AEAE
RETURN
VOLUME
DOCK
MUTE
DISPLAY
■ Sharpness
Adjusts the sharpness of edges in the picture.
•Fine, Standard (default), Soft.
■ Brightness
Adjusts the brightness of the picture.
• –20 to +20 (default: 0)
■ Contrast
Adjusts the contrast between the lightest and darkest
areas of the picture.
• –16 to +16 (default: 0)
■ Gamma
Adjusts the appearance of dark areas of the picture.
•High, Medium, Low, Off (default).
■ Hue
Adjusts the balance between green and red.
•green 9 to red 9 (default: 0)
■ Chroma Level
Adjusts the color saturation.
• –9 to +9 (default: 0)
Notes:
•The effects of the Video Adjust settings depends
on the source material and your TV and in some
cases may not be that visible.
•The Sharpness setting does not apply to video
output by the HDMI jack.
Video Adjust
Sharpness
Brightness
Contrast
Gamma
Hue
Chroma Level
Fine
Standard
Soft
3 Use the cursor buttons ( / / / ) and
ENTER to select and change the settings.
The settings are explained below.
The Brightness, Contrast, Hue, and Chroma Level
settings can be adjusted by using Left/Right
(/).
Brightness min max 0
4 To close the Setup menu, press SETUP.
9
English
55 En
Page 62
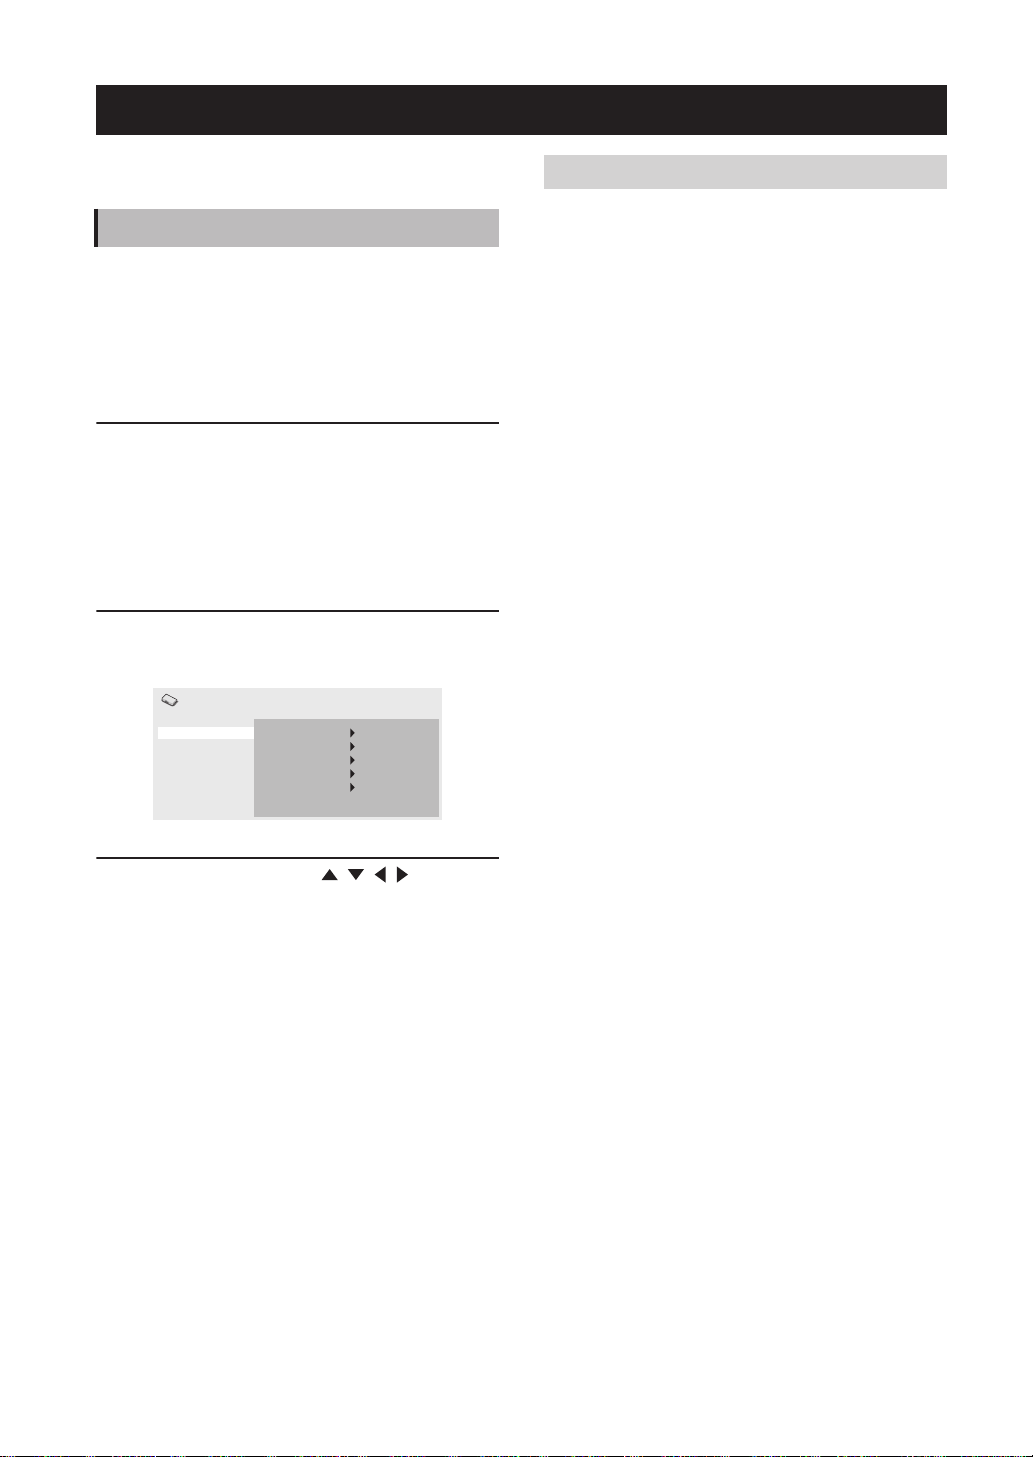
Chapter 10: Initial Settings
This chapter explains the Initial Settings menu.
Initial Settings menu
The Initial Settings menu contains digital audio
output, video, language, display, and other settings.
When a menu item is grayed out, it means that it
cannot currently be changed. The Initial Settings
cannot be changed during disc playback. You must
stop playback first.
1 Select the DVD input source, and then press
SETUP.
The Setup menu appears on-screen.
Note:
•The Initial Settings menu is available only when
the DVD input source is selected.
2 Select “Initial Settings,” and then press ENTER.
The Initial Settings menu appears on-screen.
Initial Settings
Digital Audio Out Digital Out
Video Output
Language
Display
Options
Dolby Digital Out
DTS Out
96 kHz PCM Out
MPEG Out
3 Use the cursor buttons ( / / / ) and
ENTER to select and change the settings.
The settings are explained below.
Notes:
•The HDMI Resolution and HDMI Color settings
only need to be changed if you’ve connected an
HDMI component to the HDMI jack.
•The Component Out and AV Connector Out
(Europe model) settings cannot be changed if
you’ve connected an HDMI component to the
HDMI jack.
•The Component Out and AV Connector Out
(Europe model) settings may change
automatically due to the HDMI Resolution and
HDMI Color settings.
•While HDMI Audio is set to on (see page 13), or a
component is connected to the HDMI jack, only
the Digital Out setting is available.
•When HDMI Audio is set to on (see page 13),
96 kHz PCM is downsampled to 48 kHz
regardless of the 96 kHz PCM Out setting.
On
Dolby Digital
DTS
96kHz > 48kHz
MPEG > PCM
Digital Audio Out settings
■ Digital Out
Tu rns the OPTICAL DIGITAL OUT on and off.
• On (default): OPTICAL DIGITAL OUT is on.
• Off: OPTICAL DIGITAL OUT is off.
■ Dolby Digital Out
Tu rns Dolby Digital to PCM conversion on and off. If
you’ve connected the OPTICAL DIGITAL OUT to
your AV receiver/decoder and it doesn’t support
Dolby Digital, select Dolby Digital > PCM.
• Dolby Digital (default): Dolby Digital signals are
output as they are.
• Dolby Digital > PCM: Dolby Digital signals are
converted and output as 2-channel PCM.
■ DTS Out
Tu rns DTS to PCM conversion on and off. If you’ve
connected the OPTICAL DIGITAL OUT to your AV
receiver/decoder and it doesn’t support DTS, select
DTS > PCM.
• DTS (default): DTS signals are output as they are.
• DTS > PCM: DTS signals are converted and
output as 2-channel PCM.
Notes:
•If you select DTS and your AV receiver/decoder
doesn’t support DTS, noise may be heard.
•When DTS > PCM is selected, you can also
choose the type of DTS downmix (see “DTS
Downmix” on page 59).
■ 96 kHz PCM Out
Tu r ns 96 kHz downsampling on and off. If you’ve
connected the OPTICAL DIGITAL OUT to your AV
receiver/decoder and it supports 96 kHz PCM, select
96 kHz.
• 96 kHz > 48 kHz (default): 96 kHz PCM digital
audio signals are downsampled and output at
48 kHz.
• 96 kHz: 96 kHz PCM digital audio signals are
output as they are.
■ MPEG Out
Tu rns MPEG to PCM conversion on and off. If you’ve
connected the OPTICAL DIGITAL OUT to an AV
receiver/decoder that supports MPEG, select MPEG.
• MPEG: MPEG signals are output as they are.
• MPEG > PCM (default): MPEG signals are
converted and output as 2-channel PCM.
56 En
Page 63

Chapter 10: Initial Settings
Video Output settings
■ TV Screen
Sets the aspect ratio of the picture output by the
analog and HDMI video outputs. Choose an option
that matches the aspect ratio of your TV.
• 4:3 (Letter Box) (default): Select if you have a
conventional 4:3 TV. Widescreen movies will be
displayed with black bars top and bottom.
• 4:3 (Pan & Scan): Select if you have a
conventional 4:3 TV. Widescreen movies will be
displayed with the sides trimmed so that the
picture fills the entire screen. Video from discs
that do not support Pan & Scan will be output in
4:3 Letter Box format.
• 16:9 (Wide): Select if you have a widescreen TV.
• 16:9 (Compressed): This option can only be
selected if your TV is connected to the HDMI
jack and the HDMI Resolution setting is set to
1920 x 1080p, 1920 x 1080i, or 1280 x 720p. Select
this if you want to properly display 4:3 content on
a widescreen TV. Black bars will be displayed on
either side of the picture.
■ Component Out
Sets the COMPONENT VIDEO OUT to interlaced or
progressive video output. Progressive scanning offers
better picture quality and reduced picture noise.
If your TV or projector supports progressive
scanning, select Progressive. Refer to your TV
owner’s manual for details.
• Interlace (default): The COMPONENT VIDEO
OUT outputs interlaced video.
• Progressive: The COMPONENT VIDEO OUT
outputs progressive video and the
PROGRESSIVE indicator on the display lights up.
To us e progressive video, select the Progressive option
and press ENTER. When the confirmation message
appears on-screen, press ENTER to confirm, or press
RETURN to cancel.
Notes:
•When you switch between Interlace and
Progressive, the picture may be disturbed.
•When the HDMI Resolution is set to 720 x 480i
(NTSC) or 720 x 576i (PAL), the Component Out
setting is forcibly set to Interlace. When another
resolution is selected, the Component Out setting
is forcibly set to Progressive.
•If you select Progressive inadvertently and your
TV doesn’t support it, you may lose the picture
altogether. In this case, connect the DRX-730 to a
TV with a composite video connection and
change the setting back to Interlace, or reset the
DRX-730 (see page 65).
•CONSUMERS SHOULD NOTE THAT NOT
ALL HIGH DEFINITION TELEVISION SETS
ARE FULLY COMPATIBLE WITH THIS
PRODUCT AND MAY CAUSE ARTIFACTS TO
BE DISPLAYED IN THE PICTURE. IN CASE OF
525 PROGRESSIVE SCAN PICTURE
PROBLEMS, IT IS RECOMMENDED THAT
YOU SWITCH THE CONNECTION TO THE
“STANDARD DEFINITION” OUTPUT. IF
THERE ARE QUESTIONS REGARDING YOUR
VIDEO MONITOR COMPATIBILITY WITH
THIS UNIT, PLEASE CONTACT OUR
CUSTOMER SERVICE CENTER.
■ AV Connector Out (Europe model)
Sets the AV MONITOR OUT jack to output
composite video or RGB component video.
If the SCART jack on your TV supports RGB, select
RGB. Refer to your TV owner’s manual for details. All
TVs will work with the Video option.
• Vi d eo (default): The AV MONITOR OUT
outputs composite video.
• RGB: The AV MONITOR OUT outputs RGB
component video.
Notes:
•When RGB is selected, the COMPONENT
VIDEO OUT outputs no signal.
•If you’ve connected an HDMI component to the
DRX-730’s HDMI jack, the AV Connector Out
setting is forcibly set to Video.
■ HDMI Resolution
Sets the HDMI output video resolution.
• 1920 x 1080p: Select if your HDMI TV supports
1080p progressive video.
• 1920 x 1080i: Select if your HDMI TV supports
1080i interlace video.
• 1280 x 720p: Select if your HDMI TV supports
720p progressive video.
• 720 x 480p (NTSC), 720 x 576p (PAL) (default):
Select if your HDMI TV supports 480p or 576p
progressive video.
• 720 x 480i (NTSC), 720 x 576i (PAL): Select if
your HDMI TV supports 480i or 576i interlace
video.
To c ha ng e t he re solution, select a resolution, and then
press ENTER. When the confirmation message
appears on-screen, press ENTER to confirm.
10
English
57 En
Page 64

Chapter 10: Initial Settings
Notes:
•When you change the resolution, the picture may
be disturbed and may not appear immediately.
• Resetting the HDMI settings
If no picture is displayed after changing the
resolution, use the procedure below to revert to the
default resolution of 720 x 480p (NTSC), 720 x 576p
(PAL).
1 Set the DRX-730 to standby.
2 While holding down Stop ( ) on the
DRX-730, press STANDBY/ON, keeping
Stop ( ) pressed until “DVD — NO REQ.”
appears on the display.
3 Press Play/Pause ( / ) repeatedly to select
“HDMI CLEAR.”
If you change your mind at this point, select
“DVD — NO REQ.” instead.
4 Press STANDBY/ON.
The HDMI Resolution is reset to its default
setting and the DRX-730 goes on standby. Press
STANDBY/ON again to turn it back on. The
HDMI Audio setting (page 13) is set to off.
■ HDMI Color
Sets the HDMI color output.
• Full range RGB: Provides very bright whites and
deep blacks.
• RGB: Select this if white and black areas of the
picture are too pronounced with the Full range
RGB option.
• Component: This is the standard component
video format used by HDMI components.
The default setting changes depending on the
connected HDMI component.
Language settings
For the Other Languages options of the Audio
Language, Subtitle Language, and DVD Menu Lang.
settings, you can also specify the language by using
the 2-letter abbreviations or 4-digit codes listed on
page 66.
1 Select “Other Languages,” and then press
ENTER.
2 Use Left/Right ( / ) to select a language by
abbreviation.
For some languages, only the code number is
displayed.
•To specify a language by using the 4-digit codes,
use Up/Down ( / ) or the number buttons to
enter the appropriate code, and then press
ENTER.
■ Audio Language
Sets the default soundtrack language to be used with
DVD-Video discs.
• English (default): English soundtrack will be
used if available.
• Languages: Selected language will be used if
available. (Available languages depends on where
you purchased the DRX-730.)
• Other Languages: Use the language abbreviations
and codes listed on page 66 to specify languages
not listed above.
Notes:
•With some DVD-Video discs, the soundtrack
language will be set by the disc regardless of this
setting.
•With some DVD-Video discs, you can select the
soundtrack language from a menu. In this case,
press MENU to display the menu, and then select
the soundtrack language.
■ Subtitle Language
Sets the default subtitle language to be used with
DVD-Video discs.
• English (default): English subtitles will be used if
available.
• Languages: Subtitles in the selected language will
be used if available. (Available languages depends
on where you purchased the DRX-730.)
• Other Languages: Use the language abbreviations
and codes listed on page 66 to specify languages
not listed above.
Notes:
•With some DVD-Video discs, the subtitle
language will be set by the disc regardless of this
setting.
•With some DVD-Video discs, you can select the
subtitle language from a menu. In this case, press
MENU to display the menu, and then select the
subtitle language.
•The Subtitle Language setting also applies to
DivX
discs that use external subtitle files (see
®
“Ab ou t D ivX®” on page 62).
■ DVD Menu Lang.
Sets the default language to be used for menus on
DVD-Video discs and some DivX
discs.
®
58 En
Page 65

Chapter 10: Initial Settings
• w/Subtitle Lang. (default): Menus in the same
language as that specified for the Subtitle
Language setting will be used if available.
• Languages: Menus in the selected language will
be used if available. (Available languages depends
on where you purchased the DRX-730.)
• Other Languages: Use the language abbreviations
and codes listed on page 66 to specify languages
not listed above.
■ Subtitle Display
Determines whether DVD-Video disc subtitles are
displayed by default.
• On (default): Subtitles are displayed by default if
available.
• Off: Subtitles are not displayed by default.
Note:
•Some DVD-Video discs may forcibly display
subtitles regardless of this setting.
Display settings
■ OSD Language
Sets the language of the on-screen menus.
• English (default): English on-screen menus.
• Language: Available languages depends on where
you purchased the DRX-730.
■ Angle Indicator
Determines whether the camera icon ( ) is
displayed on-screen when playing content on a
DVD-Video disc that features multiple camera angles.
• On (default): Camera icon is displayed.
• Off: Camera icon is not displayed.
Option settings
■ Parental Lock
See “Parental Lock” below.
■ DTS Downmix
Determines how mutichannel DTS audio is
downmixed when the DTS Out setting (see page 56)
is set to DTS > PCM. Select Lt/Rt if your AV
receiver/decoder supports Dolby Pro Logic but not
DTS and it’s connected to the OPTICAL DIGITAL
OUT.
• STEREO (default): Mutichannel DTS is
downmixed in to a 2-channel stereo mix.
• Lt/Rt: Mutichannel DTS is downmixed in to a
matrix-encoded surround mix that is compatible
with Dolby surround matrix decoders.
■ DivX(R) VOD
See “DivX® VOD” on page 60.
Parental Lock
DVD-Video discs containing content that may not be
suitable for everyone may use the parental lock system
to restrict viewing. (See the disc’s case for details.) You
can set the DRX-730 so that discs with a high parental
lock level cannot be played without first entering a
password. There are eight parental lock levels.
In addition, some DVD-Video discs use country or
region codes to block unsuitable content based on the
country or region that you set on the DRX-730.
To us e p aren tal lo ck, you must first enter a password,
set the parental lock level, and specify your country or
region. By default, no password is set.
• Password: Used to set the password.
• Level Change: Used to set the parental lock level.
• Country Code: Used to specify your country or
region.
■ Setting the password
You mus t s et a password before the Level Change and
Country Code settings can be set.
1 Select “Password,” and then press ENTER.
2 Use the number buttons to enter a 4-digit
password.
The numbers appear on-screen as asterisks (*).
3 Press ENTER to set the password.
The password is set.
Notes:
•We recommend that you make a note of the
password. If you forget it, you’ll need to reset the
DRX-730 (see page 65) and set a new password.
•When the password and parental lock level have
been set, when you attempt to play a disc that
exceeds the set parental lock level, you’ll be
prompted to enter the password and playback will
not be possible unless you enter the correct
password.
•Instead of preventing disc playback completely,
some DVD-Video discs may just skip unsuitable
scenes.
•Not all DVD-Video discs support parental lock
and those that don’t can be played regardless of
these parental lock settings.
10
English
59 En
Page 66

Chapter 10: Initial Settings
■ Changing the password
To ch ange the password, you’ll need to enter the old
password.
1 Select “Password,” and then press ENTER.
2 Use the number buttons to enter the old
password, and then press ENTER.
3 Enter the new password, and then press
ENTER.
The new password is set.
■ Setting the parental lock level
Discs with unsuitable content have higher levels; discs
with content suitable for all have lower levels. To
restrict, for example, playback of discs with a parental
level of 4 or higher, set the DRX-730 to level 3.
1 Select “Level Change,” and then press ENTER.
2 Use the number buttons to enter the
password, and then press ENTER.
3 Use Left/Right ( / ) to set the parental lock
level, and then press ENTER.
The parental lock level is set.
■ Setting your country or region
You ca n specify the country or region by using the 2letter abbreviations or 4-digit codes listed on page 66
1 Select “Country Code,” and then press ENTER.
2 Use the number buttons to enter the
password, and then press ENTER.
3 Use Up/Down ( / ) to select your country or
region by abbreviation, and then press ENTER.
•To specify your country or region by using the 4digit codes, use Up/Down ( / ) or the number
buttons to enter the appropriate code, and then
press ENTER.
The country or region is set.
Note:
•The new country or region code setting will take
effect the next time you load a disc. If a disc is
already loaded, you must eject and reload it for
the new setting to take effect.
DivX® VOD
To pl ay Di vX
DRX-730, you may need to provide a DivX
registration code to your DivX
provider. In this case, use the DivX
registration code displayed by the Display setting.
• Display: Displays the DivX
code.
■ Viewing the DivX
VOD (Video on Demand) files on the
®
VOD content
®
VOD
®
VOD registration
®
VOD registration code
®
VOD
®
1 Press SETUP.
The Setup menu appears on-screen.
2 Select “Initial Settings,” and then press ENTER.
The Initial Settings menu appears on-screen.
3 Select “Options,” then “DivX(R) VOD,” then
“Display,” and then press ENTER.
The DivX
Notes:
•DivX
Management) copy protection and can only be
played on the registered player.
•If you attempt to play a DivX
authorized for playback on your DRX-730, the
message “Authorization Error” will be displayed
and playback will not be possible.
•Some DivX
limited number of times. When you play such a
file on the DRX-730, the remaining number of
plays will be displayed on-screen. If you attempt
to play a file with no pl ays rem aining, the message
“Rental Expired” will be displayed and playback
will not be possible. DivX
playback limit do not display the number of plays
remaining and can be played as many times as you
like.
VOD registration code is displayed.
®
DivX(R) Video On Demand
Your registration code is : XXXXXXXX
To learn more visit www.divx.com/vod
Done
VOD files use DRM (Digital Rights
®
VOD fil e th at is n ot
®
VOD files can only be played a
®
VOD files with no
®
60 En
Page 67

Appendix
Supported discs and formats
The DRX-730 can play discs bearing the following
logos:
DVD-Video DVD-R DVD-RW
DVD+R DVD+RW DVD+R DL
Audio CD Video CD CD-R CD-RW
Fujicolor CD
VIDEO
CD
Super Video CD (Super VCD)
Notes:
•Kodak Picture CD is also supported.
•The FUJICOLOR CD COMPATIBLE logo is a
trademark of Fuji Photo Film Co. Ltd.
•The DVD logo is a trademark of DVD
Format/Logo Licensing Corporation.
•Some recordable CD and DVD discs may not be
playable due the disc’s characteristics or scratches,
or dust, dirt, or condensation on the disc or
pickup lens, etc. See “Recordable disc
compatibility” below for more details.
DVD-R DL
Copy Control CDs
The DRX-730 conforms to the Audio CD standard.
Operation and performance with discs that do not
conform to this standard cannot be guaranteed.
DualDisc
A DualDisc is a double-sided disc with a DVD layer
for video on one side and a CD layer that can be
played in a standard CD player on the other.
The DRX-730 can play the DVD side of DualDiscs.
Since the CD layer does not conform to the Audio CD
standard, some DualDiscs may not play.
For more details about the DualDisc standard, please
contact the disc’s maker or reseller.
Recordable disc compatibility
■ CD-R/RW
•The DRX-730 is compatible with CD-R/RW discs
recorded with the following formats: Audio CD,
VCD, SVCD, and ISO 9660 (CD-ROM).
•For ISO 9660 discs, use the ISO 9660 Level 1 or
Level 2 CD-ROM file system, or the extended
Joliet or Romeo file systems.
•Multisession discs are not supported.
•Unfinalized discs cannot be played. See your disc
recorder owner’s manual for details on finalizing.
•Some discs may not play, may produce noise, or
may sound distorted. This is due to the disc and is
not a malfunction.
■ DVD-R/RW/R DL
•The DRX-730 is compatible with DVD-R/RW
and DVD-R DL (Dual Layer) discs recorded with
the following formats: DVD-Video, VR mode
(Video Recording mode), and UDF Bridge
DVD-ROM.
•When playing content that’s been edited on a
DVD recorder (scenes deleted, etc.), the picture
may disappear momentarily at the edit points.
This is not a malfunction.
•Multisession discs are not supported.
•Unfinalized discs cannot be played. See your disc
recorder owner’s manual for details on finalizing.
•Some discs may not play, may produce noise, or
may sound distorted. This is due to the disc and is
not a malfunction.
Appendix
English
61 En
Page 68

Appendix
■ DVD+R/RW/R DL
•The DRX-730 is compatible with DVD+R/RW
and DVD+R DL (Dual Layer) discs recorded with
the following formats: DVD-Video.
•When playing content that’s been edited, playback
may not follow the editing exactly.
•Multisession discs are not supported.
•Unfinalized discs cannot be played. See your disc
recorder owner’s manual for details on finalizing.
•Some discs may not play, may produce noise, or
may sound distorted. This is due to the disc and is
not a malfunction.
Discs made on a computer
•Discs recorded on a computer may not be
playable due to the settings of the disc burning
software or the computer’s configuration.
•Be careful to use the correct format when burning
discs. Refer to your disc burning software owner’s
manual for details.
•Discs recorded with packet writing are not
supported.
JPEG files
•The DRX-730 can play the following picture disc
formats: Fuji Color CD, Kodak Picture CD. It can
also play JPEG files stored on CD-R/RW discs and
USB storage devices. Some picture discs may not
be playable due to the way in which they were
recorded, etc.
•Baseline JPEG files and Exif 2.2 JPEG files with a
resolution of up to 3,072 x 2,048 are supported.
(Exif, which stands for Exchangeable Image File,
is the format used by digital cameras to store
metadata.)
•Progressive JPEG files are not supported.
•Only JPEG files with a .jpg/.JPG file extension are
recognized.
•Each disc may contain up to 299 folders, and each
folder may contain a combination of up to 648
files and folders. However, depending the folder
organization, not all folders and files may be
recognized and playable.
About DivX
®
MP3, WMA, and MPEG-4 AAC files
•The DRX-730 can play the following audio file
formats: MP3 (MPEG-1 Audio Layer 3), WMA
(Windows Media Audio), and MPEG-4 AAC.
•The DRX-730 can play MP3, WMA, and
MPEG-4 AAC files stored on CD-R/RW discs
discs and USB storage devices.
•The following sampling rates are supported:
32 kHz, 44.1 kHz, and 48 kHz.
•For MP3 and WMA files, we recommend bit rates
higher than 128 kbps.
•For MPEG-4 AAC files, bit rates from 16 kbps to
320 kbps are supported.
•Variable bit rates (VBR) for MP3, WMA, and
MPEG-4 AAC are not supported.
• WMA Lossless encoding is not supported.
•Files with DRM (Digital Rights Management)
cannot be played.
•Only MP3, WMA, and MPEG-4 AAC files with
an .mp3/.MP3, .wma/.WMA, or .m4a file
extension, respectively, are recognized.
•Each disc may contain up to 299 folders, and each
folder may contain a combination of up to 648
files and folders. However, depending the folder
organization, not all folders and files may be
recognized and playable.
DivX
media technology was developed by DivX,
®
Inc. It uses compression to fit movies and video
content onto CD and DVD discs at high quality. It
supports interactive features such as menus, subtitles,
and multiple language soundtracks. Like DVD-Video,
individual DivX
The DRX-730 can play DivX
recordable CD and DVD media listed in “Recordable
disc compatibility” on page 61. When naming DivX
files prior to burning to disc, be aware that DivX
files stored on a disc are played in alphabetical order.
•The DRX-730 is an official DivX
product and can play all versions of DivX
(including DivX
DivX
®
•The DRX-730 can play DivX
CD-R/RW discs and CD-ROM discs, but not USB
storage devices.
•Only DivX
extension are recognized.
■ Using external subtitle files
movies use special files called external subtitle
DivX
®
files for displaying subtitles. The font sets listed below
are available for use with external subtitle files. Use
the Subtitle Language setting on page 58 to select the
font/language that matches the external subtitle file.
files are referred to as titles.
®
files stored on the
®
®
Ultra Certified
®
6) with enhanced playback of
media files and the DivX® Media Format.
®
files stored on
®
encoded files with a .avi or .divx file
®
video
®
®
62 En
Page 69

Appendix
The DRX-730 supports the following language
groups:
Albanian (sq), Basque (eu), Catalan
(ca), Danish (da), Dutch (nl),
English (en), Faroese (fo), Finnish
Group 1
Group 2
Group 3
Group 4 Hebrew (iw), Yiddish (ji)
Group 5 Tu r ki s h (tr)
Notes:
•Some external subtitle files may not display
correctly, and some may not display at all.
•Only external subtitle files with a .srt, .sub, .ssa, or
.smi file extension are recognized. (Note that
these files are not displayed by Disc Navigator.)
•The file name of the external subtitle file must
start with the file name of its associated movie file.
•A single movie may have up to 10 external subtitle
files.
(fi), French (fr), German (de),
Icelandic (is), Irish (ga), Italian (it),
Norwegian (no), Portuguese (pt),
Rhaeto-Romanic (rm), Scottish
(gd), Spanish (es), Swedish (sv)
Albanian (sq), Croatian (hr), Czech
(cs), Hungarian (hu), Polish (pl),
Romanian (ro), Slovak (sk),
Slovenian (sl)
Bulgarian (bg), Byelorussian (be),
Macedonian (mk), Russian (ru),
Serbian (sr), Ukrainian (uk)
About WMV
WMV, which stands for Win d ows Media Video, is a
video compression technology developed by
Microsoft Corporation. Video content can be
encoded in WMV format by using the Windows
Media Encoder.
•The DRX-730 supports WMV9 files that were
encoded with the Windows Encoder 9 Series.
•The DRX-730 can play WMV files stored on
CD-R/RW discs, but not USB storage devices.
•Only WMV9 files with a .wmv file extension are
recognized.
•Video resolutions up to 720 x 480 or 720 x 576 are
supported.
•The maximum average bit rate is about 2–3 Mbps.
(The maximum bit rate depends on the encoding
conditions.)
•Advanced Profile is not supported.
•Files with DRM (Digital Rights Management)
cannot be played.
About MPEG-4 AAC
AAC, which stands for Advanced Audio Coding, is the
audio compression technology used for MPEG-2 and
MPEG-4. The actual format of the data and file
extension depends on the application used to make
the AAC file.
•The DRX-730 can play AAC files made with
iTunes that have a .m4a file extension.
•Files with DRM (Digital Rights Management)
cannot be played, and files encoded with some
version of iTunes may not play.
About WMA
WMA, which stands for Windows Media Audio, is an
audio compression technology developed by
Microsoft Corporation. Audio content can be
encoded in WMA format by using the Windows
Media Player version 7.1.1, Windows Media Player
for Windows XP, or Windows Media Player 9 Series.
•The DRX-730 can play WMA files.
•Use only applications that have been certified
with Microsoft Corporation to encode WMA
files. If you use an application that is not certified,
the resultant files may not play properly.
DVD-Video regions
DVD players and DVD-Video discs are assigned a
region number based on the country or region in
which they are sold. DVD player’s can only play discs
with the same region number. Discs with a different
region number cannot be played.
The region number for the DRX-730 can be found on
its rear panel. The DRX-730 can only play discs with
the same region number or those marked ALL. If you
attempt to play a DVD-Video disc with a different
region number, the message “Incompatible disc
region number, Can’t play disc” will be displayed.
Appendix
English
63 En
Page 70

Appendix
Looking after discs
Storing discs
Always keep discs in their cases and store them
vertically in a place that’s not subject to extreme
temperatures, extreme humidity, or direct sunlight.
Always read the precautions supplied with the discs.
Handling discs
•Always hold discs by the edge to protect them
against fingerprints, scratches, and dirt.
•Discs with fingerprints, scratches, or dirt may not
play properly. In such cases, using a soft, dry
cleaning cloth, wipe the disc from the center
outward in straight lines. Do not wipe the disc in a
circular motion, as this may damage it. Never use
a dirty cleaning cloth.
About specially shaped discs
The DRX-730 cannot play discs with a special shape,
such as heart and hexagonal-shaped discs. Such discs
may cause a malfunction, so do not load them.
Cleaning the pickup lens
If dirt or dust collects on the DRX-730’s pickup lens,
the sound may jump or the picture may be disturbed.
In such cases, contact your Yamaha dealer. Do not use
commercially available pickup lens cleaners, as they
may damage the lens.
•For very dirty discs, try using a soft, damp cloth,
and be sure to dry the disc afterward. Never use
benzine, thinner, or other cleaning agents, such as
those designed for cleaning vinyl records.
•Do not load badly damaged, cracked, or warped
discs into the DRX-730, as they may damage it.
•Do not affix stickers or labels to discs, as they may
cause the disc to warp and become unplayable.
Rental discs often have stickers or labels attached.
Make sure there’s no glue jutting out from behind
the label before playing such discs.
•Do not load more than one disc in the DRX-730
at a time.
•For more details on disc handling, refer to the
precautions supplied with the disc.
64 En
Page 71

Appendix
Looking after the DRX-730
Installation
•Place the DRX-730 on a stable surface close to
your TV and the other AV components that you
intend to use with it.
•Do not place anything on top of the DRX-730.
•Do not place the DRX-730 on top of your TV.
And keep it away from components that are
sensitive to magnetism, such as video recorders.
•Do not place the DRX-730 on top of a power
amplifier or any other heat producing
component. If you install the DRX-730 in a rack,
place the amp or other heat producing
component on the bottom shelf to keep it as far
away as possible from the DRX-730.
Avoid locati ons that are...
•Subject to direct sunlight
•Very humid or poorly ventilated
•Subject to extreme temperatures
•Subject to vibration
•Very dusty
•Subject to smoke, steam, or hot temperatures,
such as a kitchen
Resetting the DRX-730
You ca n reset the DRX-730 to its factory defaults.
Play/Pause ( )
STANDBY/ON
TIMER
HDMI
PROGRESSIVE
STANDBY/ON
USB PORTABLE PHONES
1 Set the DRX-730 to standby.
2 While holding down Stop ( ) on the
DRX-730’s front panel, press STANDBY/ON,
keeping Stop ( ) pressed until “DVD — NO
REQ.” appears on the display.
3 Press Play/Pause ( / ) repeatedly to select
“DVD—INIT.”
If you change your mind at this point, select
“DVD — NO REQ.” instead.
Stop ( )
INPUT
VOLUME
Moving the DRX-730
Before you move the DRX-730, eject the disc if
loaded, close the disc tray, and press STANDBY/ON
to set it to standby. When the “STANDBY” message
has disappeared, disconnect the power cable from the
AC wall outlet.
Note:
•Disconnecting the power cable before the
“STANDBY” message has disappeared may reset
the DRX-730 to its factory defaults.
•Moving the DRX-730 with a disc inside may cause
damage.
4 Press STANDBY/ON.
The DRX-730 is reset to its factory defaults and
goes on standby. Press STANDBY/ON again to
turn the DRX-730 back on.
The TV Screen, HDMI Resolution, and other
settings will be set to their factory defaults. The
HDMI Audio setting will be set to off.
Appendix
English
65 En
Page 72

Appendix
Language, country, and region lists
Language list
■ Language (abbreviation), code number
Japanese (ja), 1001 Bhutani (dz), 0426 Kirghiz (ky), 1125 Sinhalese (si), 1909
English (en), 0514 Esperanto (eo), 0515 Latin (la), 1201 Slovak (sk), 1911
French (fr), 0618 Estonian (et), 0520 Lingala (ln), 1214 Slovenian (sl), 1912
German (de), 0405 Basque (eu), 0521 Laothian (lo), 1215 Samoan (sm), 1913
Italian (it), 0920 Persian (fa), 0601 Lithuanian (lt), 1220 Shona (sn), 1914
Spanish (es), 0519 Finnish (fi), 0609 Latvian (lv), 1222 Somali (so), 1915
Chinese (zh), 2608 Fiji (fj), 0610 Malagasy (mg), 1307 Albanian (sq), 1917
Dutch (nl), 1412 Faroese (fo), 0615 Maori (mi), 1309 Serbian (sr), 1918
Portuguese (pt), 1620 Frisian (fy), 0625 Macedonian (mk), 1311 Siswati (ss), 1919
Swedish (sv), 1922 Irish (ga), 0701 Malayalam (ml), 1312 Sesotho (st), 1920
Russian (ru), 1821 Scots-Gaelic (gd), 0704 Mongolian (mn), 1314 Sundanese (su), 1921
Korean (ko), 1115 Galician (gl), 0712 Moldavian (mo), 1315 Swahili (sw), 1923
Greek (el), 0512 Guarani (gn), 0714 Marathi (mr), 1318 Tamil (ta), 2001
Afar (aa), 0101 Gujarati (gu), 0721 Malay (ms), 1319 Telugu (te), 2005
Abkhazian (ab), 0102 Hausa (ha), 0801 Maltese (mt), 1320 Tajik (tg), 2007
Afrikaans (af), 0106 Hindi (hi), 0809 Burmese (my), 1325 Thai (th), 2008
Amharic (am), 0113 Croatian (hr), 0818 Nauru (na), 1401 Tigrinya (ti), 2009
Arabic (ar), 0118 Hungarian (hu), 0821 Nepali (ne), 1405 Turkmen (tk), 2011
Assamese (as), 0119 Armenian (hy), 0825 Norwegian (no), 1415 Tagalog (tl), 2012
Aymara (ay), 0125 Interlingua (ia), 0901 Occitan (oc), 1503 Setswana (tn), 2014
Azerbaijani (az), 0126 Interlingue (ie), 0905 Oromo (om), 1513 Tonga (to), 2015
Bashkir (ba), 0201 Inupiak (ik), 0911 Oriya (or), 1518 Turkish (tr), 2018
Byelorussian (be), 0205 Indonesian (in), 0914 Panjabi (pa), 1601 Tsonga (ts), 2019
Bulgarian (bg), 0207 Icelandic (is), 0919 Polish (pl), 1612 Tatar (tt), 2020
Bihari (bh), 0208 Hebrew (iw), 0923 Pashto, Pushto (ps), 1619 Twi (tw), 2023
Bislama (bi), 0209 Yiddish (ji), 1009 Quechua (qu), 1721 Ukrainian (uk), 2111
Bengali (bn), 0214 Javanese (jw), 1023 Rhaeto-Romance (rm), 1813 Urdu (ur), 2118
Tibetan (bo), 0215 Georgian (ka), 1101 Kirundi (rn), 1814 Uzbek (uz), 2126
Breton (br), 0218 Kazakh (kk), 1111 Romanian (ro), 1815 Vietnamese (vi), 2209
Catalan (ca), 0301 Greenlandic (kl), 1112 Kinyarwanda (rw), 1823 Volapük (vo), 2215
Corsican (co), 0315 Cambodian (km), 1113 Sanskrit (sa), 1901 Volof (wo), 2315
Czech (cs), 0319 Kannada (kn), 1114 Sindhi (sd), 1904 Xhosa (xh), 2408
We lsh (cy), 0325 Kashmiri (ks), 1119 Sangho (sg), 1907 Yoruba (yo), 2515
Danish (da), 0401 Kurdish (ku), 1121 Serbo-Croatian (sh), 1908 Zulu (zu), 2621
Country and region list
■ Language, code number, abbreviation
Argentina, 0118, ar Finland, 0609, fi Malaysia, 1325, my Singapore, 1907, sg
Australia, 0121, au France, 0618, fr Mexico, 1324, mx Spain, 0519, es
Austria, 0120, at Germany, 0405, de Netherlands, 1412, nl Sweden, 1905, se
Belgium, 0205, be Hong Kong, 0811, hk New Zealand, 1426, nz Switzerland, 0308, ch
Brazil, 0218, br India, 0914, in Norway, 1415, no Taiwan, 2023, tw
Canada, 0301, ca Indonesia, 0904, id Pakistan, 1611, pk Thailand, 2008, th
Chile, 0312, cl Italy, 0920, it Philippines, 1608, ph United Kingdom, 0702, gb
China, 0314, cn Japan, 1016, jp Portugal, 1620, pt USA, 2119, us
Denmark, 0411, dk Korea, Republic of, 1118, kr Russian Federation, 1821, ru
66 En
Page 73

Appendix
Troubleshooting
If you experience any issues while using the DRX-730, look them up in the following tables and try the suggested
solution. If an issue is not listed, or you cannot resolve it yourself, contact your Yamaha dealer.
General
Issue Possible cause Solution
The DRX-730 turns off as soon
as it’s turned on.
The speakers produce no
sound.
There’s no TV picture. The TV cables are connected
The TV picture is not displayed
correctly.
The power cable may not be
connected properly.
A speaker cable may be shorting. Make sure the speaker cables are
The DRX-730 may have been
subjected to a strong electrical
shock, such as lightning or
excessive static electricity.
The volume is set to minimum. Increase the volume (see page 17).
The sound is muted. Unmute the sound (see page 17).
The wrong input source is selected. Select the correct input source (see
The speaker cables are connected
incorrectly.
The loaded disc is not supported. Use only supported disc formats
incorrectly.
If the COMPONENT VIDEO OUT
and HDMI connections are used
simultaneously, the COMPONENT
VIDEO OUT jacks may output
progressive video regardless of the
Component Out setting.
The Video Output settings are
incorrect.
The Component Out setting is set
to Progressive, but the TV
connected to the COMPONENT
VIDEO OUT does not support
progressive scanning.
The AV Connector Out setting is
set to RGB, but the TV connected
to the AV MONITOR OUT jack
does not support RGB.
The TV connected to the HDMI
jack does not support the selected
resolution.
Make sure the power cable is
connected to the AC wall outlet
properly.
connected properly (see page 9).
Set the DRX-730 to standby, and
then disconnect the power cable.
Wa it 30 seconds, reconnect the
power cable, and turn it back on
again.
page 16).
Check the speaker cable
connections (see page 9).
(see page 61).
Check the TV cable connections
(see page 12).
Disconnect the HDMI component,
or connect a TV that supports
progressive video to the
COMPONENT VIDEO OUT jacks
(see page 12).
Check the Video Output settings
and correct as necessary (see
page 57).
Change the Component Out
setting to Interlace (see page 57).
Change the AV Connector Out
setting to Video (see page 57).
Change the HDMI Resolution
setting to a resolution supported by
the HDMI TV (see page 57).
Appendix
English
67 En
Page 74
Appendix
Issue Possible cause Solution
The message “HDMI ERROR” is
displayed or there’s no picture
on the HDMI TV.
The DRX-730 turned off
unexpectedly.
One speaker is quieter than the
other.
The volume can’t be increased
or the sound is distorted.
Certain input sources can’t be
recorded.
The DRX-730 doesn’t work
properly.
A digital or high-frequency
device close by emits noise.
The clock is wrong. The power has been disconnected
The wrong HDMI resolution is
selected or an HDMI error has
occurred.
The sleep timer was set. Turn the DRX-730 back on again.
The Auto Standby function
automatically set the DRX-730 to
standby.
The cables are connected
incorrectly.
The component connected to the
DRX-730’s AUX OUT jacks is
turned off.
The OPTICAL DIGITAL OUT
does not output signals from the
radio, DOCK, AUX IN, or
PORTABLE jacks.
The DRX-730 may have been
subjected to a strong electrical
shock, such as lightning or
excessive static electricity, or there’s
been a drop in the power supply.
The device may be too close to the
DRX-730.
for more than 5 minutes (power
cable disconnected from the AC
wall outlet or a power outage).
Check the HDMI Resolution
setting and correct as necessary
(see page 57).
Reset the HDMI settings (see
page 58).
Check the Auto Standby setting
(see page 22).
Check the cable connections (see
page 9).
Turn the component on.
To re cord from these sources,
connect the DRX-730’s AUX OUT
jacks to the analog audio input on
your recording component (see
page 53).
Set the DRX-730 to standby, and
then disconnect the power cable.
Wa it 30 seconds, reconnect the
power cable, and turn it back on
again.
Move the device away from the
DRX-730.
Connect the DRX-730 to an AC
wall outlet, and then set the clock
(see page 21).
Remote control
Issue Possible cause Solution
The remote control doesn’t
work.
68 En
The remote control is outside its
operating range.
The DRX-730’s remote control
sensor is subject to direct sunlight
or inverter-type fluorescent
lighting.
The wrong input source is selected.
Some buttons perform different
operations depending on which
input source is selected (see
page 6).
The batteries have run out and
need replacing.
Use the remote control within its
operating range (see page 8).
Change the lighting or move
theDRX-730.
Select the correct input source (see
page 16).
Replace both batteries with new
ones (see page 8).
Page 75

Appendix
Playing discs
Issue Possible cause Solution
Some functions don’t work. Not all discs support all of the
DRX-730’s disc playback functions.
Playback won’t start, the
picture or sound is noisy, or
playback stops unexpectedly.
When a DVD-Video disc is
loaded, the same message
keeps appearing and the disc’s
menu or content cannot be
accessed.
Can’t select foreign language
soundtracks or subtitles.
Subtitles are not displayed. Subtitles are turned off. Select a subtitle (see page 27).
Can’t select camera angles. The loaded disc does not contain
Can’t play some files. Only MP3, WMA, MPEG-4 AAC,
Can’t record a DVD. The DVD is copy protected. Most DVD-Video discs are copy
The TV picture is disturbed. The picture may be disturbed while
The picture is stretched or black
bars are displayed.
Ghosting appears in some areas
of the picture.
The disc is not properly set on the
disc tray.
The disc is dirty. Check the disc and clean as
The loaded disc is not supported. Use only supported disc formats
Condensation on the pickup lens.
When the DRX-730 is moved from
a cold environment to a warm one,
condensation may form on the
pickup lens.
The Resume or Last Memory
function is working.
The loaded disc does not contain
foreign language soundtracks or
subtitles.
Operation is restricted by the disc. Use the disc’s menu to select foreign
The loaded disc does not contain
subtitles.
When using A–B repeat playback,
subtitles outside of the specified
section may not be displayed.
multiple camera angles.
and JPEG files with no copy
protection (DRM) can be played.
The file format is not supported. Use only supported file formats
rewinding or fast forwarding.
The TV Screen setting is set
incorrectly.
The video material is incompatible
with the Progressive Scanning
function due to the way in which it
was edited or the type of material it
is.
Try anot her disc.
Place the disc, label-side up, in the
center of the disc tray (see page 23).
necessary (see page 64).
(see page 61).
Wait f or one to two hours for the
condensation to evaporate, then try
again.
Press Stop ( ) twice to cancel the
Resume function.
Reset the DRX-730 to delete the
stored Resume data (see page 65).
See the disc’s packaging for details
on foreign language soundtracks
and subtitles.
language soundtracks and subtitles.
See the disc’s packaging for details
on subtitles.
Turn off A–B repeat playback (see
page 29).
See the disc’s packaging for details
on multiple camera angles.
Use files with no copy protection.
(see pages 62 and 63).
protected and cannot be recorded.
This is not a malfunction.
Check the TV Screen setting and
change as necessary (see page 57).
Change the Component Out
setting to Interlace (see page 57).
Appendix
English
69 En
Page 76

Appendix
Issue Possible cause Solution
The disc ejected as soon as it
was loaded.
The message “No Disc” is
displayed even though a disc is
loaded.
Can’t display the Setup, Initial
Settings, or Video Adjust menu.
The loaded disc is not supported. Use only supported disc formats
(see page 61).
The disc is not properly set on the
disc tray.
These menus can be displayed only
when the DVD input source is
selected.
Place the disc, label-side up, in the
center of the disc tray (see page 23).
Select the DVD input source (see
page 16).
70 En
Page 77

Appendix
Tuner
■ FM/AM
Issue Possible cause Solution
Cannot select radio presets. The presets have been deleted. Preset the radio stations again (see
page 39).
The presets have been deleted. The DRX-730 has been
disconnected from the AC wall
outlet for more than a week.
■ FM
Issue Possible cause Solution
Reception is noisy. The FM antenna is not connected
properly.
The signal from the tuned FM
station is weak, or reception of that
station in your area is poor.
Reception is poor (sound is
distorted) even with an outdoor
FM antenna.
Auto Tuning can’t locate certain
radio stations.
Multipath interference due to the
FM signal being reflected off
mountains, tall buildings, or other
obstacles.
The signal from the FM station is
weak, or reception of that station in
your area is poor.
Make sure the power cable is
connected properly, and then
preset the radio stations again (see
page 39).
Make sure the FM antenna is
connected properly (see page 11).
Reduce the noise by switching to
Manual Tuning mode (see
page 38), or connect an outdoor
FM antenna (sold separately).
Consult an qualified antenna
installer in your area for more
details.
Adjust the FM antenna’s height,
direction, or location.
Try sw itching to Manual Tuning
mode (see page 38), or connect an
outdoor FM antenna (sold
separately). Consult an qualified
antenna installer in your area for
more details.
■ AM
Issue Possible cause Solution
Reception is very noisy. Atmospheric interference or
lightning, or the DRX-730 is
picking up noise from fluorescent
lighting, motors, or electrical
appliances with a thermostat.
The AM indoor antenna is too
close to the DRX-730.
The DRX-730 is too close to the
TV, particularly if the noise occurs
in the evening.
Auto Tuning can’t locate certain
radio stations.
The AM loop antenna is not
connected properly.
The signal from the tuned AM
station is weak, or reception of that
station in your area is poor.
It can be difficult to completely
eliminate this type of noise.
However, it can sometimes be
reduced by connecting an outdoor
AM antenna or by grounding the
antenna (see page 11).
Move the antenna away from the
DRX-730, or try adjusting the
direction of the antenna.
Move the DRX-730 away from the
TV.
Make sure the AM loop antenna is
connected properly (see page 11).
Try sw itching to Manual Tuning
mode (see page 38).
71 En
Appendix
English
Page 78

Appendix
Timer
Issue Possible cause Solution
Can’t set the timer. The clock has not yet been set. Set the clock (see page 21).
The timer didn’t work. The on and off times are set to the
same time.
Set the on and off times correctly
(see page 45).
iPod playback
Issue Possible cause Solution
iPod playback doesn’t work. The iPod is not seated in the
Ya m a h a iPod universal dock
properly.
The dock cable is not connected to
the Yamaha iPod universal dock or
DRX-730 properly.
Some iPod functions don’t work
as expected.
When playing a video on an
iPod, video playback does not
appear on the iPod’s display.
The message “Unknown iPod” is
displayed.
The message “Disconnected” is
displayed.
Depending on your iPod model
and its firmware version, some iPod
functions may not work as
expected, and some may not work
at all.
The iPod is set to display video on a
TV.
The iPod is not supported. Use only supported iPod models
There’s no iPod in the Yamaha iPod
universal dock.
Make sure the iPod is seated in the
Ya m a h a iPod universal dock
properly (see page 47).
Check the dock cable connections
and correct as necessary (see
page 47).
Make sure your iPod has the latest
firmware installed. See the Apple
Web s ite for details.
With the iPod seated in the Yamaha
iPod universal dock, set the iPod’s
TV Out setting to Off.
(see page 47).
Insert your iPod into the Yamaha
iPod universal dock (see page 47).
USB storage device playback
Issue Possible cause Solution
Can’t play content stored on a
USB mass storage device.
Can’t play some files. Only MP3, WMA, MPEG-4 AAC,
Not all USB storage devices are
recognized by the DRX-730.
Only USB storage devices
formatted with FAT16 or FAT32
are supported.
The USB storage device is
connected to a USB hub, but the
DRX-730 does not support USB
hubs.
and JPEG files with no copy
protection (DRM) can be played.
The file format is not supported. Use only supported file formats
72 En
Try another USB storage device.
Reformat the USB storage device
with FAT16 or FAT32.
Connect the USB storage device
directly to the DRX-730’s USB port.
Use files with no copy protection.
(see pages 62 and 63).
Page 79
Issue Possible cause Solution
The message “NO USB” or “USB
ERROR” is displayed.
Bluetooth playback
The USB device is not compatible,
or the DRX-730 cannot supply
enough power to the device for it to
function properly.
Appendix
Tur n th e DRX-730 off and on
again.
Set the DRX-730 to standby,
disconnect the USB storage device,
and then reconnect it.
Select the USB input source, and
then connect the USB device.
Select a different input source and
select USB again.
If the USB storage device came with
its own power adapter, use it to
power the USB storage device while
it’s connected to the DRX-730.
If the message still appears, the USB
storage device is probably
incompatible with the DRX-730.
Issue Possible cause Solution
Can’t connect to a Bluetoothcompatible music player or
mobile phone.
Some functions don’t work as
expected.
The message “Not found” is
displayed.
The message “Not Available” is
displayed.
The dock cable is not connected to
the Yamaha YBA-10 or DRX-730
properly.
The Bluetooth device doesn’t
support A2DP or AVRCP.
The Bluetooth device is too far
away from the Yamaha YBA-10.
There’s an obstacle between the
Bluetooth device and the Yamaha
YBA-10.
A device close by is transmitting at
2.4 GHz (e.g., a microwave oven or
wireless network device).
Pairing has not been performed. Pair the Bluetooth device with the
The Bluetooth functionality on the
Bluetooth device is disabled.
Depending on your Bluetooth
device and its firmware version,
some functions may not work as
expected, and some may not work
at all.
The last Bluetooth device used with
the DRX-730 cannot be found.
You ca nn ot pair the Yamaha
YBA-10 with a new Bluetooth
device while it’s already connected
to another device.
Check the dock cable connections
and correct as necessary (see
page 51).
Use a Bluetooth device that
supports A2DP or AVRCP.
Make sure the Bluetooth device is
in line of sight of the Yamaha
YBA-10 and within 10 meters
(33 ft.).
Move the Yamaha YBA-10 away
from the device.
DRX-730 (see page 51).
Make sure Bluetooth functionality
is enabled on the Bluetooth device.
Use a compatible Bluetooth device.
Make sure the Bluetooth device is
discoverable and within range (see
page 51).
Disconnect the currently
connected device before pairing
with the new device.
Appendix
English
73 En
Page 80

Appendix
Specifications
Amplifier section
•Minimum RMS output power per channel (20 kHz Factory LPF)
(6 Ω, 1 kHz, 0.9% THD)......................................... 20 W + 20 W
•Maximum RMS output power per channel (20 kHz Factory LPF)
(6 Ω, 1 kHz, 10% THD).......................................... 30 W + 30 W
•Total harmonic distortion
AUX, PORTABLE (20 kHz–LPF, 1 kHz, 1 W) . less than 0.05%
•Input sensitivity/impedance
AUX, PORTABLE (1 kHz, 20 W).........................400 mV/47 kΩ
•Frequency response
AUX, PORTABLE.....................................10 Hz to 22 kHz ±3 dB
•Signal to noise ratio
(AUX, PORTABLE, IHF-A input shorted)........more than 95 dB
Tuner section
■ FM section
•Tuning range
U.S.A. and Canada models ........................................87.5 to 107.9
Taiwan and Asia models............... 87.5 to 107.9 or 87.5 to 108.0
Other models ................................................... 87.5 to 108.0 MHz
•Signal to noise ratio (mono) ...................................................75 dB
•Sensitivity (S/N 30 dB).......................................................... 1.0 µV
■ AM section
•Tuning range
U.S.A. and Canada models .................................530 to 1710 kHz
Taiwan and Asia models...530 to 1710 kHz or 531 to 1611 kHz
Other models ....................................................... 531 to 1611 kHz
•Signal to noise ratio..................................................................32 dB
•Sensitivity (S/N 20 dB)......................................................... 700 µV
General
•Power supply
U.S.A. and Canada models.................................AC 120 V, 60 Hz
Australia model.................................................... AC 240 V, 50 Hz
U.K., Europe, and Russia models.......................AC 230 V, 50 Hz
Korea model .........................................................AC 220 V, 60 Hz
Asia model..............................................AC 220–240 V, 50/60 Hz
China model.........................................................AC 220 V, 50 Hz
Taiwan model....................................................... AC 110 V, 60 Hz
•Power consumption .................................................................30 W
•Standby power consumption.................................... less than 1 W
•Laser pickup
Type ............................................... Semiconductor laser AlGaInP
Wavelength .........................655 nm (DVD), 790 nm (VCD/CD)
Output power..........................5 mW (DVD), 7 mW (VCD/CD)
•Dimensions (W x H x D)...............................215 x 113 x 300 mm
•Weight....................................................................................... 2.9 kg
•Operating Temperature Range.................. 5 to 35ºC (41 to 95ºF)
•Operating Humidity Range ..............5 to 90% (no condensation)
Specifications are subject to change without notice.
(8.46 x 4.45 x 11.81 in.)
(6.4 lbs.)
DVD section
•AUX OUT
Output level (1 kHz 0 dB) .............................................2 V (±0.3)
Signal to noise ratio.......................................... more than 100 dB
Dynamic range (48 kHz, 24 bit)........................more than 95 dB
Total harmonic distortion ..................................less than 0.005%
Frequency response
CD-DA/VIDEO CD.........................................10 Hz–20 kHz
DVD (48 kHz)...................................................10 Hz–22 kHz
DVD (96 kHz)...................................................10 Hz–44 kHz
•Video output
Composite.....................................................................1 Vp-p/75Ω
Component............................................................1 Vp-p/75Ω (Y)
0.7 Vp-p/75 Ω (P
•RGB (SCART)......................................................................0.7 Vp-p
B, PR)
Audio format
•Dolby Digital, DTS, MPEG decoding
• PCM DATA: 16 bit
• LPCM DATA: 20/24 bit
Fs: 44.1, 48 kHz, 88.2/96 kHz downmix support
74 En
Page 81

1.
2.
3.
5.
7.
8.
9.
■
■
At tention: Veuillez lire ce qui suit avant d’utiliser l’appareil.
15.
Pour utiliser l’appareil au mieux de ses possibilités, lisez
attentivement ce mode d’emploi. Conservez-le
soigneusement pour référence.
Installez cet appareil audio dans un endroit bien aéré, frais,
sec et propre – à l’abri de la lumière directe du soleil, des
sources de chaleur ou de vibration, des poussières, de
l’humidité et du froid. Ménagez un espace libre d’au moins
10 cm au-dessus, 10 cm sur la gauche et la droite et 10 cm à
l’arrière de l’appareil pour qu’il soit bien ventilé.
Placez l’appareil loin des équipements, moteurs et
transformateurs électriques, pour éviter les ronflements
parasites.
4.
N’exposez pas l’appareil à des variations brutales de température,
ne le placez pas dans un environnement très humide (par
exemple dans une pièce contenant un humidificateur) car cela
peut entraîner la condensation d’humidité à l’intérieur de
l’appareil qui elle-même peut être responsable de secousse
électrique, d’incendie, de dommage à l’appareil ou de blessure
corporelle.
Evitez d’installer l’appareil dans un endroit où des objets
peuvent tomber, ainsi que là où l’appareil pourrait être
exposé à des éclaboussures ou des gouttes d’eau. Sur le
dessus de l’appareil, ne placez pas:
—D’autres appareils qui peuvent endommager la surface
de l’appareil ou provoquer sa décoloration.
—Des objets se consumant (par exemple, une bougie) qui
peuvent être responsables d’incendie, de dommage à
l’appareil ou de blessure corporelle.
—
Des récipients contenant des liquides qui peuvent être à
l’origine de secousse électrique ou de dommage à
l’appareil.
6.
Ne couv rez pas l’appareil d’un journal, d’une nappe, d’un rideau, etc.
car cela empêcherait l’évacuation de la chaleur. Toute augmentation
de la température intérieure de l’appareil peut être responsable
d’incendie, de dommage à l’appareil ou de blessure corporelle.
Ne branchez pas la fiche du cordon d’alimentation de
l’appareil sur une prise secteur aussi longtemps que tous les
raccordements n’ont pas été effectués.
Ne pas faire fonctionner l’appareil à l’envers. Il risquerait de
chauffer et d’être endommagé.
N’exercez aucune force excessive sur les commutateurs, les
boutons et les cordons.
Pour débrancher la fiche du cordon d’alimentation au niveau
10.
de la prise secteur, saisissez la fiche et ne tirez pas sur le
cordon.
11.
Ne nettoyez pas l’appareil au moyen d’un solvant chimique,
ce qui pourrait endommager la finition.
12.
N’alimentez l’appareil qu’à partir de la tension prescrite.
Alimenter l’appareil sous une tension plus élevée est
dangereux et peut être responsable d’incendie, de dommage
à l’appareil ou de blessure corporelle. Yamaha ne saurait être
tenue responsable des dommages résultant de l’alimentation
de l’appareil sous une tension autre que celle prescrite.
13.
Pour éviter les dommages dus à la foudre, débranchez le
cordon d'alimentation de la prise secteur ou de l’appareil
pendant les orages électriques.
14.
Ne tentez pas de modifier ni de réparer l’appareil. Consultez
le service Yamaha compétent pour toute réparation qui
serait requise. Le coffret de l’appareil ne doit jamais être
ouvert, quelle que soit la raison.
Si vous envisagez de ne pas vous servir de l’appareil pendant
une longue période (par exemple, pendant les vacances),
débranchez la fiche du cordon d’alimentation au niveau de
la prise secteur.
16.
Installez cet appareil à proximité de la prise secteur et à un
emplacement où la fiche d’alimentation est facilement
accessible.
17.
Lisez la section intitulée “Guide de dépannage” où figurent
une liste d’erreurs de manipulation ordinaires avant de
conclure à une anomalie une anomalie de l’appareil.
18.
Avant de déplacer l’appareil, appuyez sur STANDBY/ON
pour placer l’appareil en veille puis débranchez la fiche du
cordon d’alimentation au niveau de la prise secteur.
19.
Les piles ne doivent pas être exposées à une chaleur extrême,
par exemple au soleil, à une flamme, etc.
20.
Une pression excessive du son par les écouteurs et le casque
d’écoute peut entraîner la perte de l’ouïe.
Cet appareil n’est pas déconnecté du secteur tant qu’il reste
branché à la prise de courant. Il se trouve alors “en veille”. En
mode veille, l’appareil consomme une très faible quantité de
courant.
DANGER
Risque d’exposition au laser en cas d’ouverture. Eviter toute
exposition au faisceau. Lorsque cet appareil est branché à la
prise de courant, ne pas approcher les yeux de l’ouverture du
plateau changeur et des autres ouvertures pour regarder à
l’intérieur.
Le laser de cet appareil peut émettre un rayonnement
dépassant les limites de la calsse 1.
SÉCURITÉ LASER
L’a p p a r e il utilise un laser. En raison des risques de blessure des
yeux, le retrait du couvercle ou les réparations de l’appareil
devront être confiés exclusivement à un technicien d’entretien
qualifié.
LASER
Type Laser à semi-conducteur AlGaInP
Longueur d’onde 655 nm (DVD)
790 nm (VCD/CD)
Puissance de sortie 5 mW (DVD)
7 mW (VCD/CD)
Divergence de faisceau 20 degrés
AVERTISSEMENT
POUR RÉDUIRE LES RISQUES D’INCENDIE OU DE
SECOUSSE ÉLECTRIQUE, N’EXPOSEZ PAS CET
APPAREIL À LA PLUIE OU À L’HUMIDITÉ.
AT TENTION
Danger d’explosion si la pile n’est pas remplacée
correctement. La remplacer par une pile de type identique ou
équivalent.
i
Fr
Page 82

Information concernant la Collecte et le Traitement des piles usagées et des
déchets d’équipements électriques et électroniques
Les symboles sur les produits, l'emballage et/ou les documents joints signifient que les produits électriques ou
électroniques usagés ainsi que les piles ne doivent pas être mélangés avec les déchets domestiques habituels.
Pour un traitement, une récupération et un recyclage appropriés des déchets d’équipements électriques et
électroniques et des piles usagées, veuillez les déposer aux points de collecte prévus à cet effet, conformément à
la réglementation nationale et aux Directives 2002/96/EC et 2006/66/EC.
En vous débarrassant correctement des déchets d’équipements électriques et électroniques et des piles usagées,
vous contribuerez à la sauvegarde de précieuses ressources et à la prévention de potentiels effets négatifs sur la
santé humaine qui pourraient advenir lors d'un traitement inapproprié des déchets.
Pour plus d'informations à propos de la collecte et du recyclage des déchets d’équipements électriques et
électroniques et des piles usagées, veuillez contacter votre municipalité, votre service de traitement des déchets
ou le point de vente où vous avez acheté les produits.
[Information sur le traitement dans d'autres pays en dehors de l'Union Européenne]
Ces symboles sont seulement valables dans l'Union Européenne. Si vous souhaitez vous débarrasser de déchets
d’équipements électriques et électroniques ou de piles usagées,veuillez contacter les autorités locales ou votre
fournisseur et demander la méthode de traitement appropriée.
Note pour le symbole "pile" (deux exemples de symbole ci-dessous):
Ce symbole peut être utilisé en combinaison avec un symbole chimique. Dans ce cas il respecte les exigences
établies par la Directive pour le produit chimique en question.
Garantie Limitée pour l’Espace Économique Européenne et la Suisse
Merci d’avoir porté votre choix sur un produit Yamaha. Dans l’hypothèse où vous devriez recourir au service de notre garantie après-vente, veuillez
contacter votre revendeur Yamaha. Si vous rencontrez la moindre difficulté, n’hésitez pas à contacter directement Yamaha dans votre pays de résidence.
Vous pouvez trouver toutes informations complémentaires sur notre site Web ( http://www.yamaha-hifi.com/ ou http://www.yamaha-uk.com/ pour les
résidents au Royaume-Uni).
Yamaha garantit votre produit contre tout défaut de fabrication, pièces et main d’œuvre, pour une durée de 2 ans à compter de la première date de vente
au détail. Yamaha s’engage, dans les conditions décrites ci-après, à procéder à la réparation du produit défectueux (ou d’un quelconque de ses
composants) ou à son remplacement à l’appréciation de Yamaha en prenant à sa charge les coûts relatifs aux pièces détachées et à la main d’œuvre.
Yamaha se réserve le droit de remplacer le produit par un modèle semblable, de par sa valeur et ses caractéristiques, dès lors que la commercialisation
dudit produit a cessé ou bien lorsque sa réparation s’avère économiquement injustifiée.
Conditions
1. La facture d’achat originelle ou un justificatif d’achat correspondant (indiquant la date d’achat, la référence du produit et le nom du revendeur) DOIT
accompagner le produit défectueux, ainsi qu’une description précise du dysfonctionnement constaté. En l’absence de cette preuve d’achat, Yamaha
se réserve le droit de refuser le service de la garantie et le produit peut être restitué aux frais du consommateur.
2. Le produit DOIT avoir été acheté par un distributeur agréé Yamaha au sein de l’Espace Economique Européen ou en Suisse.
3. Le produit doit n’avoir fait l’objet d’aucune modification ou altération, sauf accord écrit de Yamaha.
4. Les cas suivants font obstacle à l’application de la garantie:
a. Entretien périodique et réparation ou remplacement de pièces ayant subi une usure ou défaillance normale.
b. Dommages résulótant de:
(1) Réparation effectuée par le consommateur lui-même ou par un tiers non autorisé.
(2) Emballage ou manutention inadéquats lors du transport du produit pour réparation. Veuillez noter qu’il est de la responsabilité de l’expéditeur
de s’assurer que le produit est correctement emballé.
(3) Utilisation non-conforme du produit, correspondant aux cas non limitatifs (a) d’utilisation non-conforme à l’objet normal du produit ou non-
conforme aux instructions d’utilisation, de maintenance ou d’installation publiées par Yamaha, (b) ou d’utilisation du produit incompatible
avec les normes techniques ou de sécurité en vigueur au sein du pays d’utilisation.
(4) Accidents, foudre, dégât des eaux, incendie, ventilation incorrecte, fuite de pile ou toute autre cause échappant au contrôle de Yamaha.
(5) Les défauts de la configuration dans laquelle ce produit est incorporé et/ou l’incompatibilité avec des produits tiers.
(6) Produit importé au sein de l’EEE , et/ou en Suisse, par une autre entité que Yamaha, dès lors que ce produit n’est pas conforme aux normes
techniques ou de sécurité du pays d’utilisation et/ou aux normes des produits commercialisés par Yamaha au sein de l’EEE et/ou en Suisse.
(7) Produits non audiovisuels.
(Les produits soumis à une “Déclaration de Garantie AV de Yamaha” sont indiqués sur notre site Web à l’adresse http://www.yamaha-
hifi.com/ ou http://www.yamaha-uk.com/ pour les résidents au Royaume-Uni.)
5. Lorsque la garantie diffère entre le pays d’achat et le pays d’utilisation du produit, la garantie du pays d’utilisation est applicable.
6. Yamaha ne saurait être tenu pour responsable de quelconques pertes ou dommages, directs, consécutifs ou autres, sa responsabilité au titre de la
garantie étant strictement limitée à la réparation ou au remplacement du produit.
7. Nous vous invitons à sauvegarder toutes les données ou réglages personnalisés de votre produit, Yamaha ne pouvant être tenu responsable de leur
modification ou perte.
8. La présente garantie laisse intégralement subsister les droits que le consommateur peut détenir au titre de la garantie légale en vigueur ou au titre du
contrat de vente conclu avec son revendeur.
Français
ii
Fr
Page 83

■
■
■
■
■
■
Notices légales
Ce produit intègre une technologie de protection des droits
d’auteur qui est elle-même protégée par certains brevets déposés
aux Etats-Unis ainsi que par d’autres droits relatifs à la propriété
intellectuelle. L’utilisation de cette technologie de protection des
droits d’auteur ne peut se faire qu’avec l’autorisation de
Macrovision. En outre, cette utilisation est exclusivement
autorisée dans un cadre familial et dans d’autres contextes de
diffusion limitée, sauf autorisation explicite de Macrovision.
Toute opé ration de reconstitution du code source ou de
désassemblage est strictement interdite.
iPod™
“Ap pl e”, “i Po d” et “iTunes” sont des marques commerciales
d’Apple Inc., déposées aux Etats-Unis et dans d’autres pays.
Bluetooth est une marque déposée de Bluetooth SIG et est
utilisée par Yamaha conformément à un accord de licence.
DivX, DivX Ultra Certified et les logos associés sont des
marques commerciales de DivX, Inc. et sont utilisés sous
licence.
Fabriqué sous licence de Dolby Laboratories. Dolby et le
symbole double D sont des marques commerciales de Dolby
Laboratories.
Fabriqué sous licence dans le cadre du brevet (USA): 5,451,942;
5,956,674; 5,974,380; 5,978,762; 6,487,535 et d’autres brevets
délivrés ou en cours de délivrance aux Etats-Unis et dans le
monde. DTS et DTS 2.0 + Digital Out sont des marques
déposées. Les logos et le symbole DTS sont des marques
déposées de DTS, Inc. ©1996–2007 DTS, Inc. Tous droits
réservés.
“HDMI”, le logo HDMI et “High-Definition Multimedia
Interface” sont des marques commerciales ou des marques
déposées de HDMI Licensing LLC.
La technologie d’encodage audio MPEG Layer-3 est sous licence
de Fraunhofer IIS et Thomson multimedia.
Window s Me dia est une marque déposée ou une marque
commerciale de Microsoft Corporation aux Etats-Unis et/ou
dans d’autres pays.
Sauvegarde des réglages
Si le câble d’alimentation est débranché de la prise secteur, le
DRX-730 sauvegarde les stations de radio mémorisées et les
autres réglages pour au moins 1 semaine.
A propos de ce manuel
Sauf mention contraire, les instructions de ce manuel telles que
“appuyez sur ENTER” font référence aux boutons de la
télécommande.
Les instructions et procédures de ce manuel partent du principe
que le DRX-730 est déjà allumé.
Ce manuel a été imprimé avant le début de la production du
DRX-730. Dans le cadre de notre politique d’amélioration
permanente, les apparences et les caractéristiques sont
susceptibles de changer. Dans le cas peu probable où une
explication de ce mode d’emploi ne correspondrait pas au
fonctionnement réel du DRX-730, le DRX-730 fait foi.
Manipulation du boîtier de télécommande
•Entre le boîtier de télécommande et l’appareil l’espace doit
être libre d’obstacles.
•Ne renversez aucun liquide sur le boîtier de télécommande.
•Ne laissez pas tomber le boîtier de télécommande.
•Ne conservez pas, ne rangez pas le boîtier de télécommande
dans les endroits suivants:
—très humides, par exemple près d’un bain
—très chauds, par exemple près d’un appareil de chauffage
ou d’un poêle
—exposés à des températures très basses
—poussiéreux
•Ne pas exposer le capteur de télécommande à une lumière
puissante, en particulier à une lampe fluorescente à onduleur,
sinon le boîtier de télécommande ne fonctionnera pas
correctement. Le cas échéant, faites en sorte que le boîtier ne
soit pas directement éclairé.
Remarques concernant les piles
•Changez toutes les piles lorsque vous remarquez que la
portée de la télécommande est plus courte.
•Utilisez des piles AA, R6 ou UM-3.
•Assurez-vous que les pôles sont correctement orientés. Voir
l’illustration à l’intérieur du logement des piles.
•Retirez les piles si la télécommande n’est pas utilisée pendant
un certain temps.
•N’utilisez pas tout à la fois des piles neuves et des piles
usagées.
•N’utilisez pas non plus des piles de deux types différents (par
exemple, des piles alcalines et des piles au manganèse). Lisez
attentivement les indications portées sur le boîtier des piles
car leur apparence peut être la même bien que leur type
diffère.
•Si les piles ont fui, mettez-les au rebut immédiatement. Dans
la mesure du possible, ne touchez pas le produit qui a fui et
évitez qu’il ne vienne en contact avec vos vêtements, etc.
Nettoyez soigneusement le logement des piles avant de
mettre en place des piles neuves.
•Ne vous débarrassez pas des piles comme s’il s’agissait
ordures ménagères; traitez-les conformément à la
réglementation locale.
iii
Fr
Page 84

Sommaire
1 Introduction . . . . . . . . . . . . . . . . . . . . 2
Caractéristiques . . . . . . . . . . . . . . . . . . . . . . . . . 2
Accessoires fournis . . . . . . . . . . . . . . . . . . . . . . . 2
Façade . . . . . . . . . . . . . . . . . . . . . . . . . . . . . . . . . . 3
Ecran . . . . . . . . . . . . . . . . . . . . . . . . . . . . . . . . . . . . 4
Face arrière . . . . . . . . . . . . . . . . . . . . . . . . . . . . . . 5
Télécommande . . . . . . . . . . . . . . . . . . . . . . . . . . 6
2 Prise en main . . . . . . . . . . . . . . . . . . . . 8
Installation des piles dans la
télécommande . . . . . . . . . . . . . . . . . . . . . . . 8
Connexion des enceintes . . . . . . . . . . . . . . . . . 9
Connexion d’un subwoofer actif . . . . . . . . . 10
Connexion d’antennes . . . . . . . . . . . . . . . . . . 11
Connexion d’un téléviseur . . . . . . . . . . . . . . 12
Connexion d’un enregistreur
(CD, MD etc.) . . . . . . . . . . . . . . . . . . . . . . . . 14
Connexion d’un décodeur ou
ampli-tuner AV . . . . . . . . . . . . . . . . . . . . . . 15
Connexion du câble d’alimentation . . . . . . 15
3 Fonctions générales . . . . . . . . . . . . 16
Allumer le DRX-730 . . . . . . . . . . . . . . . . . . . . . 16
Sélection de la source d’entrée . . . . . . . . . . 16
Réglage du volume . . . . . . . . . . . . . . . . . . . . . 17
Coupure du son . . . . . . . . . . . . . . . . . . . . . . . . . 17
Réglage du grave et de l’aigu . . . . . . . . . . . . 18
Réglage de la balance . . . . . . . . . . . . . . . . . . . 18
Mode de lecture “Pure Direct” . . . . . . . . . . . 19
Utilisation d’un casque . . . . . . . . . . . . . . . . . . 19
Réglage de luminosité de l’écran . . . . . . . . 20
Utilisation de la minuterie ‘Sleep’ . . . . . . . . 20
Réglage de l’horloge . . . . . . . . . . . . . . . . . . . . 21
Affichage de l’heure . . . . . . . . . . . . . . . . . . . . . 22
Veille automatique . . . . . . . . . . . . . . . . . . . . . . 22
4 Lecture de disques . . . . . . . . . . . . . 23
Utiliser l’affichage à l’écran . . . . . . . . . . . . . . 23
Lecture de disques . . . . . . . . . . . . . . . . . . . . . . 23
Lecture au ralenti . . . . . . . . . . . . . . . . . . . . . . . 26
Lecture image par image . . . . . . . . . . . . . . . . 26
Choix de la langue et du format audio . . . 27
Choix des sous-titres . . . . . . . . . . . . . . . . . . . . 27
Choix des angles de prise de vue . . . . . . . . 28
Zoom . . . . . . . . . . . . . . . . . . . . . . . . . . . . . . . . . . . 28
Lecture en boucle . . . . . . . . . . . . . . . . . . . . . . . 29
Lecture en boucle d’un passage A–B . . . . . 29
Lecture aléatoire . . . . . . . . . . . . . . . . . . . . . . . . 30
Lecture programmée . . . . . . . . . . . . . . . . . . . 31
Recherche sur disque . . . . . . . . . . . . . . . . . . . 32
Lecture d’un diaporama JPEG . . . . . . . . . . . 33
Utiliser ‘Disc Navigator’ avec des DVD
vidéo, VCD et SVCD . . . . . . . . . . . . . . . . . .34
Utiliser ‘Disc Navigator’ avec des disques
MP3, WMA, MPEG-4 AAC, DivX®, WMV
et JPEG . . . . . . . . . . . . . . . . . . . . . . . . . . . . . .35
Affichage des informations du disque . . . .36
Affichage du format audio . . . . . . . . . . . . . . .36
5 Utilisation du tuner . . . . . . . . . . . . . 37
Recherche d’une station radio . . . . . . . . . . .37
Utiliser les mémoires . . . . . . . . . . . . . . . . . . . .39
Système de diffusion de données radio
(modèles européen et russe
uniquement) . . . . . . . . . . . . . . . . . . . . . . . . .40
6 Utilisation de la minuterie . . . . . . 44
Sélection de la source d’entrée . . . . . . . . . . .44
Réglage de l’heure d’activation . . . . . . . . . .45
Réglage de l’heure de désactivation . . . . . .45
Activation/coupure de la minuterie . . . . . .46
7 Lecture sur un dispositif
portable . . . . . . . . . . . . . . . . . . . . 47
Lecture sur un lecteur de musique . . . . . . .47
Lecture sur iPod . . . . . . . . . . . . . . . . . . . . . . . . .47
Lecture de support de mémoire USB . . . . .49
Lecture via Bluetooth . . . . . . . . . . . . . . . . . . . .51
8 Enregistrement . . . . . . . . . . . . . . . . 53
9 Réglages audio et vidéo . . . . . . . . 54
Menu ‘Audio Settings’ . . . . . . . . . . . . . . . . . . .54
Menu ‘Video Adjust’ . . . . . . . . . . . . . . . . . . . . .55
10Réglages initiaux . . . . . . . . . . . . . . . 56
Menu ‘Initial Settings’ . . . . . . . . . . . . . . . . . . . .56
Appendice . . . . . . . . . . . . . . . . . . . . . . . . 62
Disques et formats compatibles . . . . . . . . . .62
Précautions liées aux disques . . . . . . . . . . . .65
Précautions liées au DRX-730 . . . . . . . . . . . .66
Initialisation du DRX-730 . . . . . . . . . . . . . . . .66
Listes de langues, de pays et de régions . .67
En cas de problème . . . . . . . . . . . . . . . . . . . . .68
Fiche technique . . . . . . . . . . . . . . . . . . . . . . . . .75
1
2
3
4
5
6
7
8
9
10
Appendice
Français
1
Fr
Page 85

Chapitre 1: Introduction
Nous vous remercions d’avoir opté pour le tuner DVD
Ya maha DRX-730. Pour profiter au mieux de votre
nouveau produit Yamaha, veuillez lire ce manuel
attentivement et le conserver dans un endroit sûr
pour toute référence ultérieure.
Caractéristiques
•Lecture des disques suivants: DVD vidéo, DVDVR (DVD-R/RW/R DL enregistrés en mode VR),
VCD, SVCD), CD audio, CD DTS
•Lecture des fichiers suivants: MP3, WMA,
MPEG-4 AAC, JPEG, WMV
•Produit DivX
Ultra Certified officiel.
®
•Lecture de toutes les versions de fichiers vidéo
DivX
(y compris DivX
®
lecture de fichiers média DivX
Media Format.
•Sortie HDMI (conversion ascendante à 1080p)
•Tuner FM/AM avec 40 présélections
•Système de diffusion de données radio (modèles
européen et russe)
•Amplificateur de classe D: 30W x 2 canaux sous 6Ω
•Mode de lecture haute fidélité “Pure Direct”
•Prise pour mini-jack en façade facilitant la lecture
sur baladeurs.
•Prise USB en façade facilitant la lecture sur clés ou
autres supports de mémoire USB.
•Prise DOCK pouvant accueillir un socle universel
Yam ah a p our iPod permettant d’écouter la
musique de l’iPod sur une installation de qualité.
Vous p ouv e z pi loter l’iPod avec la télécommande
du DRX-730 et il se recharge pendant que vous
écoutez la musique.
•La prise DOCK peut aussi accueillir un récepteur
audio sans fil Bluetooth Yamaha YBA-10
permettant d’écouter de la musique d’un lecteur
Bluetooth ou d’un téléphone portable sur une
installation de qualité. Vous pouvez piloter votre
dispositif Bluetooth avec la télécommande du
DRX-730
•Minuterie
•Affichage à l’écran
•Télécommande multifonction
•Prise AV SCART/Péritel RGB (modèles européen
et russe)
•Sortie numérique optique
1
6) amélioration de la
®
et du DivX
®
®
Accessoires fournis
Les accessoires suivants sont fournis avec le
DRX-730. Vérifiez que vous les avez tous.
STANDBY/ON
ON
PLAY MODE
MODE START
TOP MENU
INFO.
SETUP
MANUAL
BAND
DVD/USB
SOUND
TIMER SLEEP
Télécommande
Antenne FM intérieure
1
586907
BLUETOOTH
AUDIO
SUBTITLE
PTY SEEK
PRESET
ENTER
MEMORY
AUTO/
TUNER
AUX/PORTABLE
PURE DIRECT
ZOOM
OFF
DIMMER
OPEN/CLOSE
ON SCREEN
ANGLE
CLEAR
FREQ/TEXT
MENU
RETURN
VOLUME
DOCK
MUTE
DISPLAY
423
Deux piles (AA, R06, UM-3)
AEAE
Un câble vidéo
Antenne-cadre AM
1. Le DRX-730 peut lire des fichiers MP3, WMA, MPEG-4
AAC et JPEG sauvegardés sur CD-R/RW, DVD-R/RW, et
DVD+R/RW ou sur des dispositifs de mémoire USB ainsi
que des fichiers DivX
DVD-R/RW, et DVD+R/RW. Voyez “Disques et formats
et WMV sauvegardés sur CD-R/RW,
®
compatibles” à la page 62 pour en savoir plus.
2
Fr
Page 86

Façade
B
9J6345 871
TIMER
HDMI
PROGRESSIVE
A
B
C
D
E
F
G
H
I
J
K
L
M
N
O
P
Q
Chapitre 1: Introduction
1
STANDBY/ON
USB PORTABLE PHONES
KLMNO P Q
STANDBY/ON
Met le DRX-730 sous tension ou en veille (voyez
page 16).
Ouverture/fermeture ( )
Ouvre et ferme le tiroir du disque (voyez page 23).
Témoin TIMER
S’allume quand le DRX-730 est en veille alors que la
minuterie est active (voyez page 46).
Témoin HDMI
S’allume quand HDMI OUT est utilisé (voyez
page 57).
Témoin PROGRESSIVE
S’allume lors de la sortie de signaux vidéo progressifs
(voyez page 57).
Tir oir
Permet de charger des disques (voyez page 23).
Ecran
Affiche des informations diverses. Pour en savoir
plus, voyez “Ecran” à la page 4.
Capteur de télécommande
Reçoit les signaux de la télécommande.
Arrêt ( )
Arrête la lecture (voyez page 24).
INPUT
Prise USB
Permet de brancher un support de mémoire USB
contenant des fichiers de musique ou d’images (voyez
page 49).
Prise PORTABLE
Permet de brancher un baladeur (voyez page 47).
Prise PHONES
Permet de brancher un casque (voyez page 19).
Précédent/Recul ( / )
Sélectionne des plages ou des chapitres antérieurs
(voyez page 25). Fonctionne de la même façon que
bouton Recul ( ) de la télécommande quand il est
maintenu enfoncé.
Suivant/Avance rapide ( / )
Sélectionne des plages ou des chapitres ultérieurs
(voyez page 25). Fonctionne de la même façon que
bouton Avance rapide ( ) de la télécommande
quand il est maintenu enfoncé.
Commande INPUT
Sélectionne la sources d’entrée (voyez page 16).
Commande VOLUME
Règle le volume (voyez page 17).
VOLUME
Français
Lecture/Pause ( / )
Lance et interrompt la lecture (voyez page 23).
3
Fr
Page 87

Chapitre 1: Introduction
A BC E IDFGH
KLM N
J
Ecran
SLEEP
PRESET
TIMER
A SLEEP
S’allume quand vous activez la minuterie “Sleep”
(voyez page 20).
TUNED
STEREO
MEMORY
AUTO
DOCK MUTE
SHUFFLE
REPEATPSPTY RT CT PTY
ARTISTSPLAYLISTS
ALBUMS
H Système de diffusion de données radio
(modèles européen et russe)
Ces témoins indiquent les types de données
transmises par la station FM sélectionnée. Le témoin
B PRESET
S’allume lors de la sélection de stations de radio
mémorisées (voyez page 40)
C STEREO
S’allume quand le tuner reçoit une station FM stéréo
(voyez page 37).
D AUTO
S’allume quand le mode de recherche automatique de
stations est actif. S’éteint quand le mode de recherche
manuelle de stations est actif (voyez page 37).
PTY HOLD s’allume durant la recherche de stations
en fonction du type de programmation (voyez
page 40).
I MUTE
Clignote quand le son est coupé (voyez page 17).
J Zone d’informations
Affiche diverses informations comme la source
d’entrée, la fréquence radio et l’heure.
K TIMER
S’allume quand le DRX-730 est activé alors que la
E DOCK
•S’allume quand un iPod est inséré dans le socle
universel Yamaha (YDS-10 ou YDS-11) pour
iPod (disponible en option) branché à la prise
DOCK (voyez page 47).
•S’allume quand une connexion est établie entre un
dispositif Bluetooth et un récepteur audio
Bluetooth sans fil Yamaha YBA-10 disponible en
option (voyez page 51).
•Clignote quand le récepteur audio Bluetooth sans
fil Yamaha YBA-10 disponible en option est en
cours d’appairage ou de recherche de dispositif
Bluetooth (voyez page 51).
F SHUFFLE
S’allume quand la lecture aléatoire est sélectionnée sur
l’iPod (voyez page 48).
G REPEAT
minuterie est active (voyez page 46).
L TUNED
S’allume quand une station radio est captée (voyez
page 37).
M MEMORY
S’allume lors de la mémorisation de stations radio
(voyez page 39).
N iPod
Ces témoins indiquent le menu de l’iPod sélectionné
pour la navigation: Listes de lecture, Artistes, Albums,
Morceaux ou Genres (voyez page 48).
O Pilotage de l’iPod
Ces témoins indiquent les boutons de curseurs
disponibles durant la navigation dans les menus de
l’iPod (voyez page 48).
S’allume quand la lecture en boucle (“Répéter”) est
sélectionnée sur l’iPod (voyez page 48).
HOLD
SONGS
GENRES
O
4 Fr
Page 88

Face arrière
1 B 3 4 5
6 7 8 9 J K L
(L’illustration montre le modèle pour l’Europe.)
Chapitre 1: Introduction
1
MAINS
R
6
SPEAKER
MIN
SPEAKERS VIDEO OUT
SUBWOOFER
OUT
A MAINS (câble d’alimentation)
Branchez le câble d’alimentation à une prise secteur
(voyez page 15).
B Sortie HDMI
HDMI
OUT IN
AUX
AV MONITOR OUT
R
I DOCK
Vous p ouv e z br ancher un socle universel Yamaha
pour iPod (YDS-10 ou YDS-11) ou un récepteur
audio Bluetooth sans fil Yamaha YBA-10 disponible
en option (voyez pages 47 et 51).
Cette sortie HDMI peut être branchée à l’entrée
HDMI d’un téléviseur (voyez page 13).
C AV MONITOR OUT (modèles européen et
russe)
Cette sortie SCART (Péritel) peut être branchée à
l’entrée SCART d’un téléviseur (voyez page 14).
D FM ANT
Branchez l’antenne FM ici (voyez page 11).
E AM ANT
Branchez l’antenne AM ici (voyez page 11).
F SPEAKERS
Branchez les enceintes ici (voyez page 9)
J VIDEO OUT
Cette sortie vidéo composite peut être branchée à une
entrée vidéo composite sur votre téléviseur (voyez
page 12).
K COMPONENT VIDEO OUT
Cette sortie vidéo à composantes peut être branchée à
une entrée vidéo à composantes sur votre téléviseur
(voyez page 12).
L OPTICAL DIGITAL OUT
Cette sortie audio numérique optique peut être
branchée à une entrée audio numérique optique d’un
enregistreur de CD/MD ou d’un décodeur/amplituner AV (voyez pages 14 et 15).
G SUBWOOFER OUT
Vous p ouv e z br ancher un caisson de graves actif
(disponible séparément) ici (voyez page 10).
H AUX IN et OUT
Vo us pouvez brancher un enregistreur comme un
graveur CD, MD ou une platine à cassette ici (voyez
page 14).
AM
ANT
GND
FM
ANT
75
UNBAL.
R
P
VIDEO
B
P
Y
COMPONENT
OPTICAL
DIGITALDOCK
OUT
Français
5 Fr
Page 89

Chapitre 1: Introduction
1
Télécommande
Cette section décrit brièvement les boutons de la
télécommande.
B
3
4
5
6
7
8
9
J
K
L
M
N
O
P
Q
R
S
T
STANDBY/ON
1
586
90
BLUETOOTH
ON
AUDIO
PLAY MODE
PTY SEEK
MODE START
TOP MENU
INFO.
SETUP
MEMORY
AUTO/
MANUAL
BAND
DVD/USB
TIMER SLEEP
SOUND
AUX/PORTABLE
PURE DIRECT
SUBTITLE
PRESET
ENTER
TUNER
7
ZOOM
OFF
DIMMER
OPEN/CLOSE
423
ON SCREEN
ANGLE
CLEAR
FREQ/TEXT
MENU
AEAE
RETURN
VOLUME
DOCK
MUTE
DISPLAY
U
V
W
X
Y
Z
a
b
c
d
e
f
g
h
i
j
k
l
A Transmetteur à infrarouge
Tr an sm et des signaux de pilotage au DRX-730 (voyez
page 8).
B STANDBY/ON ( )
Met le DRX-730 sous tension ou en veille (voyez
page 16).
C Boutons numérotés
Entrée de numéros.
D SUBTITLE (BLUETOOTH OFF)
•Si vous avez choisi “DVD” comme source d’entrée,
vous pouvez sélectionner les sous-titres du DVD
(voyez page 27).
•Si vous choisissez la source d’entrée “DOCK”, ce
bouton déconnecte le dispositif Bluetooth connecté
et rend le DRX-730 indétectable (voyez page 51).
E AUDIO (BLUETOOTH ON)
•Si vous avez choisi “DVD” comme source d’entrée,
vous pouvez choisir le format audio ainsi qu’une
autre langue pour la bande son du DVD (voyez
page 27).
•Si vous choisissez la source d’entrée “DOCK”, ce
bouton lance l’appairage ou établit une connexion
avec le dernier dispositif Bluetooth utilisé et rend
le DRX-730 détectable (voyez page 51).
F PLAY MODE
Affiche le menu “Play Mode” sur le téléviseur branché
quand la source d’entrée est réglée sur “DVD”.
G Pause ( )
Interrompt momentanément la lecture.
H Recul ( )
Effectue un retour en arrière. Sert également pour la
lecture au ralenti et la lecture image par image
I Précédent ( )
•Sélectionne des plages ou des chapitres précédents.
•Sur les modèles européen et russe, il sert aussi de
bouton PTY SEEK MODE pour le système de
diffusion de données radio.
J TOP MENU (INFO.)
•Affiche le menu “DVD” principal quand la source
d’entrée est “DVD”.
•Si vous avez choisi “DOCK” comme source
d’entrée, ce bouton sélectionne le mode de
pilotage de l’iPod (voyez page 47).
Astuce:
•Outre le DRX-730, la télé commande vous permet
de piloter la lecture sur un iPod (voyez page 47),
un lecteur Bluetooth ou un téléphone portable
(voyez page 51).
6 Fr
K Boutons de curseur ( )/( )/( )/( ) et
ENTER
Ces boutons permettent de naviguer dans les menus
affichés et de changer des réglages. Permet également
de naviguer dans les menus de l’iPod. Les boutons de
curseur servent également à sélectionner une station
de radio (mémorisée ou non).
Page 90

Chapitre 1: Introduction
L SETUP
Affiche le menu “Setup” sur le téléviseur branché
quand la source d’entrée est réglée sur “DVD”.
M MEMORY
Mémorisation des stations radio (voyez page 39).
N AUTO/MANUAL
Sélection du mode de recherche de stations de radio
automatique ou manuel (voyez page 37).
O BAND
Sélection de la bande de fréquences radio FM ou AM
(voyez page 37).
P DVD/USB
Sélection de la source d’entrée DVD ou USB (voyez
page 16).
Q AUX/PORTABLE
Sélection de la source d’entrée AUX ou PORTABLE
(voyez page 16).
R SOUND
Réglage du grave, de l’aigu et de la balance (voyez
page 18).
S TIMER
Réglage de la minuterie (voyez page 44).
T SLEEP
Réglage de la minuterie “Sleep” (voyez page 20).
U OPEN/CLOSE ( )
Ouvre et ferme le tiroir du disque (voyez page 23).
V ON SCREEN
Affiche sur le téléviseur des informations relatives au
disque en cours de lecture.
W ZOOM
Zoom sur image (voyez page 28).
X ANGLE
Sélection des angles de caméra sur DVD (voyez
page 28).
•Sur les modèles européen et russe, il sert aussi de
bouton PTY SEEK START pour le système de
diffusion de données radio.
c Suivant ( )
•Sélectionne des plages ou des chapitres ultérieurs.
•Sur les modèles européen et russe, il sert aussi de
bouton FREQ/TEXT pour le système de diffusion
de données radio.
d MENU
•Affiche un menu du DVD. (Avec certains DVD, il
fonctionne comme le bouton TOP MENU).
•Avec la source d’entrée USB, il affiche le “Disc
Navigator”.
e RETURN
Retour au menu précédent.
f VOLUME (+/–)
Règle le volume (voyez page 17).
g TUNER
Sélectionne la source d’entrée TUNER (voyez
page 16).
h DOCK
Sélectionne la source d’entrée DOCK (voyez page 16).
i MUTE
Coupe et rétablit le son (voyez page 17).
j PURE DIRECT
Sélectionne le mode de lecture “Pure Direct” (voyez
page 19).
k DISPLAY
•Affiche l’heure.
•Durant la lecture d’un disque quand la source
d’entrée est “DVD”, il affiche aussi le format audio.
l DIMMER
Atténue la luminosité de l’écran du DRX-730 (voyez
page 20).
1
Y Arrêt ( )
Arrête la lecture.
Z CLEAR
Efface les numéros entrés et supprime des étapes de
programmation.
a Avance rapide ( )
Effectue une avance rapide. Sert également pour la
lecture au ralenti et la lecture image par image
b Lecture ( )
•Lance la lecture.
Français
7 Fr
Page 91

Chapitre 2: Prise en main
Ce chapitre explique comment installer les piles dans
la télécommande et comment brancher des enceintes
et d’autres éléments au DRX-730.
Installation des piles dans la télécommande
1 Pour ouvrir le compartiment des piles,
appuyez sur le petit levier dans le sens de la
flèche et retirez le couvercle.
Appuyez ici
2 Insérez les piles fournies dans le compartiment
en respectant la polarité (+ et –).
Remarques:
•Quand la plage de fonctionnement de la
télécommande diminue, remplacez toutes les piles
par des piles neuves.
•Ne mélangez jamais des piles usagées et des piles
neuves.
•Ne mélangez jamais des types de piles différents
(piles alcalines et piles au manganèse, par
exemple). Bien qu’elles aient l’air semblables,
chaque type a ses caractéristiques propres.
•Quand les piles sont épuisées, extrayez-les
immédiatement de la télécommande pour éviter
tout risque d’explosion ou de fuite d’acide.
•Suivez toujours la réglementation en vigueur dans
votre région pour la mise au rebut des piles.
•Si une pile fuit, mettez-la immédiatement au
rebut. Evitez tout contact de l’acide d’une pile qui
fuit avec la peau et les vêtements. Avant d’insérer
des piles neuves, essuyez le compartiment à piles.
Plage de fonctionnement
La plage de fonctionnement de la télécommande peut
aller jusqu’à 6 mètres. Quand vous utilisez la
télécommande, orientez-la toujours vers le capteur de
télécommande du DRX-730 situé à côté de l’écran,
comme illustré ci-dessous.
3 Remettez le couvercle du compartiment à
piles.
Remarques:
•Ne renversez pas de liquide sur la télécommande.
•Ne laissez pas tomber la télécommande.
•Ne laissez jamais la télécommande dans des
endroits: chauds ou humides (à proximité d’un
chauffage, dans une salle de bain etc.),
extrêmement froids ou poussiéreux.
TIMER
HDMI
PROGRESSIVE
VOLUME
STANDBY/ON
USB PORTABLE PHONES
INPUT
Jusqu’à 6m
30 30
8 Fr
Page 92

Connexion des enceintes
Branchez les enceintes NX-E700 au DRX-730, comme illustré ci-dessous.
Chapitre 2: Prise en main
Enceinte droite
MAINS
R
Câbles
d’enceintes
DRX-730
HDMI
AV MONITOR OUT
Enceinte gauche
2
AM
ANT
GND
FM
ANT
75
UNBAL.
R
P
B
P
6
SPEAKER
MIN
SPEAKERS VIDEO OUT
SUBWOOFER
OUT
OUT IN
AUX
(L’illustration montre le modèle pour l’Europe.)
Remarques:
•Ne branchez pas le câble d’alimentation au
DRX-730 tant que les autres connexions n’ont pas
été effectuées.
•Veillez à brancher l’enceinte droite aux bornes “R”
et l’enceinte gauche aux bornes “L”.
•Veillez à ce que les fils dénudés des brins ne
touchent aucun autre brin ni aucune partie
métallique du DRX-730 car cela pourrait
endommager sérieusement le DRX-730 et vos
enceintes.
•Ne branchez pas d’enceintes ayant une impédance
inférieure à l’impédance minimum indiquée à
l’arrière du DRX-730.
R
VIDEO
Y
COMPONENT
OPTICAL
DIGITALDOCK
OUT
•Utilisez des enceintes dotées d’un blindage
magnétique si vous pensez les placer à proximité
d’un téléviseur à écran cathodique. Eloignez-les
du téléviseur si elles interfèrent avec l’image.
Français
9 Fr
Page 93

Chapitre 2: Prise en main
Connexion des câbles d’enceintes
Les câbles d’enceintes sont constitués de deux fils
isolés. Les connexions des enceintes sont polarisées et
utilisent des bornes positives (+) rouges et négatives
(–) noires. Pour vous aider à brancher correctement
les fils, le fil positif est généralement indiqué par un
trait ou un autre identifiant. Branchez le fil portant
une marque d’identification aux bornes positives (+)
du DRX-730 et des enceintes puis branchez le fil non
marqué aux bornes négatives (–). Si vous croisez les
fils, vous déphasez les enceintes, ce qui génère un son
dénaturé et manquant de grave.
1 Dénudez environ 10mm à l’extrémité de
chaque fil et torsadez les brins exposés pour
éviter d’éventuels courts-circuits.
10mm
2 Poussez le levier de la borne de l’enceinte
pour l’ouvrir, insérez le fil dans l’orifice puis
fermez le levier.
Rouge: positif (+)
Noir: négatif (–)
Connexion d’un subwoofer actif
Vous p ouv e z br ancher un subwoofer (caisson de
graves) actif à la prise SUBWOOFER OUT du
DRX-730 pour obtenir un grave puissant.
Utilisez un câble audio (vendu séparément) pour
relier la prise SUBWOOFER OUT du DRX-730 à
l’entrée du subwoofer actif.
(L’illustration montre le modèle pour l’Europe.)
MAINS
R
6
SPEAKER
MIN
SPEAKERS VIDEO OUT
INPUT
OUT IN
SUBWOOFER
OUT
INPUT
Subwoofer
HDMI
R
AUX
Câble audio
actif
AV MONITOR OUT
RPB
P
VIDEO
COMPONENT
AM
ANT
GND
FM
ANT
75
UNBAL.
Y
OUT
OPTICAL
DIGITALDOCK
10 Fr
Remarques:
•Ne branchez pas les câbles d’alimentation du
DRX-730 et du subwoofer actif tant que les autres
connexions n’ont pas été effectuées.
•La prise SUBWOOFER OUT produit les sons
basses fréquences issus d’un mixage de tous les
canaux de la source.
Page 94

Chapitre 2: Prise en main
Connexion d’antennes
Pour capter des stations de radio FM et AM, il faut
brancher les antennes fournies au DRX-730. Si la
réception radio n’est pas bonne dans votre région ou si
vous souhaitez améliorer la réception, vous pouvez
brancher des antennes FM et AM extérieures. Pour en
savoir davantage, consultez un installateur d’antenne
qualifié dans votre région.
■ Mise à la terre de l’antenne
Pour maximiser la sécurité et minimiser les
interférences, branchez la borne AM ANT GND à un
bon piquet de terre comme une tige métallique
enfoncée dans de la terre humide.
Antenne FM
intérieure (fournie)
HDMI
AV MONITOR OUT
RPB
P
R
AUX VIDEO OUT
(L’illustration montre le
modèle pour l’Europe.)
VIDEOINCOMPONENT
Y
OPTICAL
DIGITALDOCK
AM
ANT
GND
FM
ANT
75
UNBAL.
OUT
Antenne-cadre
AM (fournie)
Terre
Connexion de l’antenne-cadre AM
1 Assemblez l’antenne de la façon illustrée.
Si vous avez l’intention de monter l’antenne sur un
mur, il est inutile de monter le pied.
2
2 Ouvrez le levier de la borne AM ANT, insérez
les fils de l’antenne-cadre AM dans les orifices
puis fermez le levier.
•Si les deux fils de votre antenne sont noirs, cela
signifie qu’ils ne sont pas polarisés et qu’ils
peuvent être branchés de n’importe quelle façon.
•Si un des fils de votre antenne est blanc et l’autre
noir, branchez le fil blanc à la borne AM ANT et le
fil noir à la borne GND.
Connexion de l’antenne FM
1 Branchez l’antenne FM intérieure à la prise FM
ANT du DRX-730.
2 Placez l’antenne aussi loin que possible du
DRX-730, des câbles d’enceintes et des câbles
d’alimentation.
Remarques:
•Ne branchez pas le câble d’alimentation au
DRX-730 tant que les autres connexions n’ont pas
été effectuées.
•Avant de pérenniser l’installation des antennes,
cherchez une station AM ou FM et ajustez la
position de l’antenne AM ou FM pour obtenir la
meilleure réception.
•Si vous branchez une antenne AM extérieure,
branchez également l’antenne-cadre AM fournie.
Borne AM ANT
Blanc
Borne GND
Noir
3 Placez l’antenne aussi loin que possible du
DRX-730, des câbles d’enceintes et des câbles
d’alimentation.
Français
11 Fr
Page 95
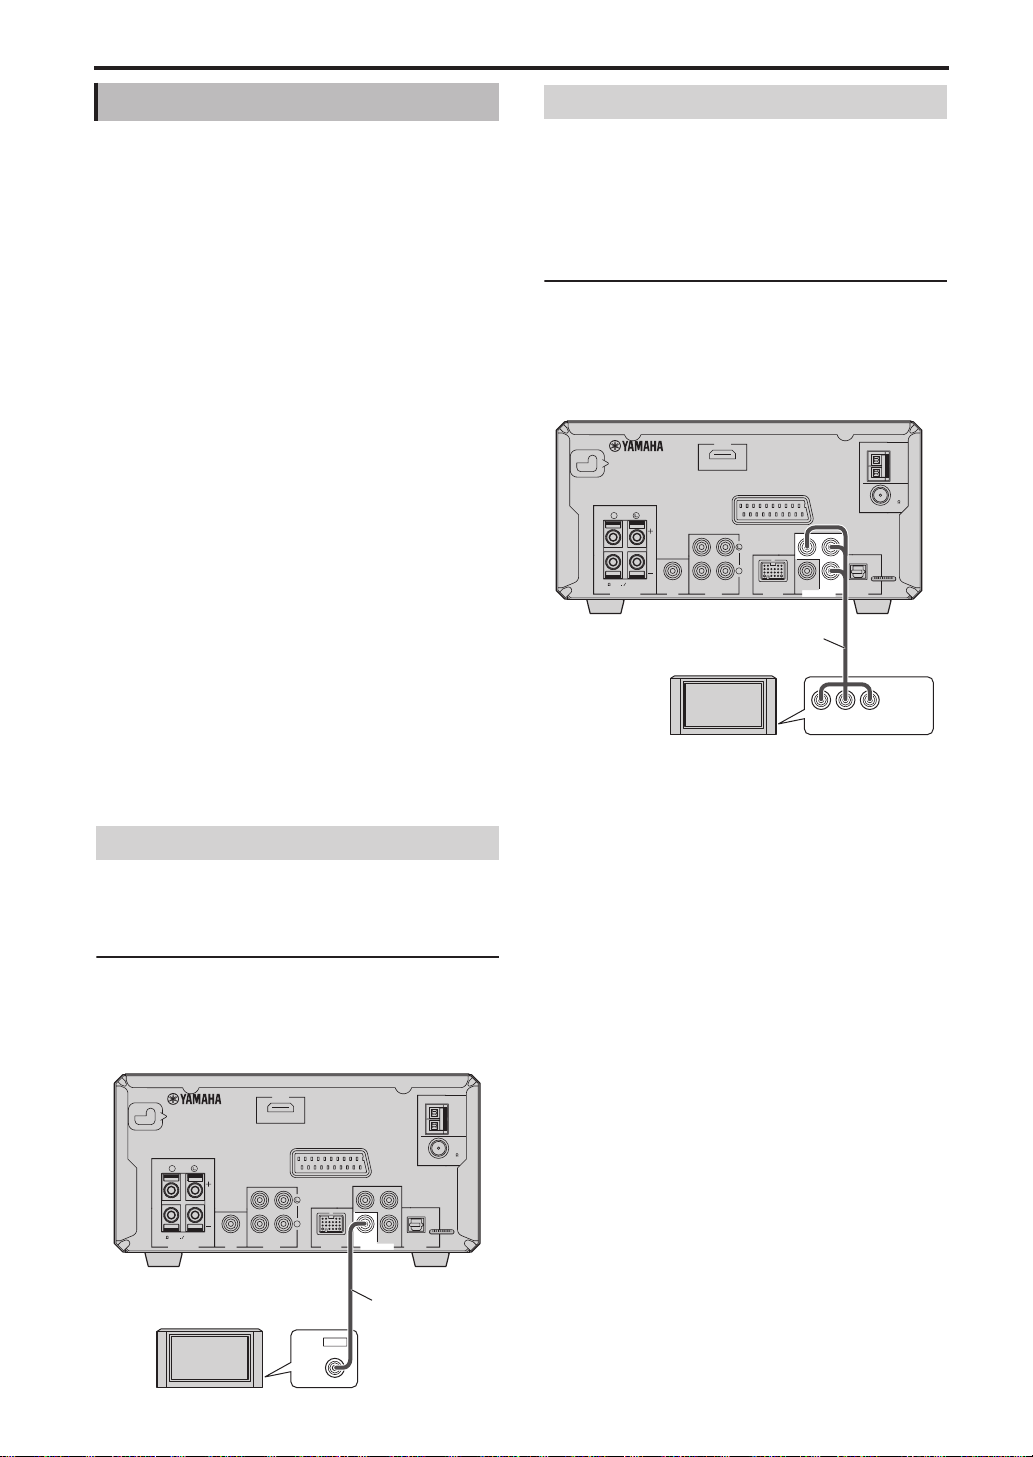
Chapitre 2: Prise en main
Connexion d’un téléviseur
Vo us pouvez brancher le DRX-730 à un téléviseur en
utilisant un des quatre types de connexion suivants:
HDMI, vidéo à composantes, vidéo composite ou
SCART/Péritel (modèles européen et russe). Le type
de connexion à utiliser dépend de votre téléviseur.
Pour en savoir plus, voyez le mode d’emploi du
téléviseur.
HDMI offre une qualité d’image optimale. La vidéo à
composantes constitue la meilleure alternative. La
sortie vidéo à composantes du DRX-730 est
compatible avec le balayage progressif qui délivre une
meilleure qualité d’image. Si votre téléviseur n’est pas
compatible avec le système HDMI ou vidéo à
composantes, utilisez la sortie vidéo composite.
Certains modèles du DRX-730 disposent d’une prise
SCART pouvant délivrer des signaux vidéo composite
ou vidéo à composantes RGB.
Remarques:
•Ne branchez pas le câble d’alimentation au
DRX-730 tant que les autres connexions n’ont pas
été effectuées.
•Eteignez votre téléviseur avant de le brancher au
DRX-730.
Connexion vidéo à composantes
Si votre téléviseur est compatible avec la vidéo à
composantes mais pas le système HDMI, vous pouvez
brancher le DRX-730 au téléviseur avec un câble
vidéo à composantes. Cette connexion offre une
meilleure qualité d’image qu’une connexion vidéo
composite.
Reliez la prise COMPONENT VIDEO OUT du
DRX-730 à une entrée vidéo à composantes du
téléviseur avec un câble vidéo à composantes
(vendu séparément).
(L’illustration montre le modèle pour l’Europe.)
MAINS
R
6
MIN
SPEAKER
SPEAKERS VIDEO OUT
Câble vidéo à composantes
(disponible séparément)
SUBWOOFER
OUT
OUT IN
AUX
HDMI
AV MONITOR OUT
RPB
P
R
VIDEO
COMPONENT
AM
ANT
GND
FM
ANT
75
UNBAL.
Y
OUT
OPTICAL
DIGITALDOCK
Astuce:
•Si votre téléviseur est doté d’une sortie audio, vous
pouvez la brancher aux prises AUX IN du
DRX-730 et écouter vos programmes de télévision
via les enceintes branchées au DRX-730.
Connexion vidéo composite
Si votre téléviseur n’est pas compatible avec le système
HDMI ou vidéo à composantes, branchez le DRX-730
à votre téléviseur avec le câble vidéo fourni.
Utilisez le câble vidéo fourni pour brancher la
prise VIDEO OUT du DRX-730 à une entrée vidéo
composite du téléviseur.
(L’illustration montre le modèle pour l’Europe.)
MAINS
R
6
MIN
SPEAKER
SPEAKERS VIDEO OUT
SUBWOOFER
OUT
OUT IN
AUX
HDMI
AV MONITOR OUT
RPB
P
R
VIDEO
COMPONENT
AM
ANT
GND
FM
ANT
75
UNBAL.
Y
OUT
OPTICAL
DIGITALDOCK
COMPONENT
TV‘‘
Y PB PR
VIDEO IN
Remarques:
•Si votre téléviseur n’est pas compatible avec un
balayage progressif, réglez le paramètre
“Component Out” sur “Interlace”. S’il est réglé sur
“Progressive”, le téléviseur peut ne rien afficher.
•Si vous utilisez les connexions COMPONENT
VIDEO OUT et HDMI simultanément, les prises
COMPONENT VIDEO OUT peuvent produire
des signaux vidéo à balayage progressif,
indépendamment du réglage “Component Out”.
12 Fr
T V
VIDEO
IN
Câble vidéo
(fourni)
Page 96

Chapitre 2: Prise en main
Connexion HDMI
Si votre téléviseur dispose d’une entrée HDMI, vous
pouvez le brancher au DRX-730 avec un câble HDMI
pour bénéficier d’une qualité d’image optimale.
Reliez la prise HDMI du DRX-730 à une entrée
HDMI du téléviseur avec un câble HDMI (vendu
séparément).
Téléviseur
compatible HDMI
IN
HDMI
Câble HDMI
(vendu séparément)
MAINS
R
6
MIN
SPEAKER
SPEAKERS VIDEO OUT
(L’illustration montre le modèle pour l’Europe.)
SUBWOOFER
OUT
OUT IN
AUX
HDMI
AV MONITOR OUT
RPB
P
R
VIDEO
COMPONENT
AM
ANT
GND
FM
ANT
75
UNBAL.
Y
OUT
OPTICAL
DIGITALDOCK
■ Sortie audio HDMI
En principe, les enceintes branchées au DRX-730
produisent les signaux audio. Vous pouvez cependant
écouter les données audio par les haut-parleurs du
téléviseur HDMI. Voici comment activer/couper la
sortie audio HDMI.
1 Mettez le DRX-730 en veille (Standby).
2 Maintenez Stop ( ) enfoncé sur le DRX-730,
appuyez sur STANDBY/ON et maintenez
Stop ( ) enfoncé jusqu’à ce que “DVD — NO
REQ.” apparaisse à l’écran.
3 Appuyez plusieurs fois sur Lecture/Pause
(/) pour sélectionner “HDMI AUDIO ON”.
Si vous changez d’avis, sélectionnez “DVD — NO
REQ.”.
4 Appuyez sur STANDBY/ON.
La sortie audio HDMI est activée et le DRX-730
passe en veille. Appuyez de nouveau sur
STANDBY/ON pour le rallumer.
Pour couper la sortie audio HDMI, recommencez
la procédure ci-dessus et sélectionnez “HDMI
AUDIO OFF” à l’étape 3.
2
Remarque:
•Réglez la résolution et la couleur HDMI du
DRX-730 en fonction de votre téléviseur HDMI
(voyez page 57). Si vous choisissez la mauvaise
résolution, vous pouvez perdre l’image.
■ Résolutions de sortie HDMI reconnues
Modèles
nord-américains
Autres modèles
1080p/60 Hz 1080p/60 Hz (NTSC)
1080p/50 Hz (PAL)
1080i/60 Hz 1080i/60 Hz (NTSC)
1080i/50 Hz (PAL)
720p/60 Hz 720p/60 Hz (NTSC)
720p/50 Hz (PAL)
480p/60 Hz 480p/60 Hz (NTSC)
576p/50 Hz (PAL)
480i/60 Hz 480i/60 Hz (NTSC)
576i/50 Hz (PAL)
* Si votre téléviseur HDMI n’est pas compatible avec les
résolutions ci-dessus, l’image risque d’être mauvaise.
* Le DRX-730 est conçu pour être branché à un élément
HDMI. S’il est branché à un élément DVI, il peut ne pas
fonctionner normalement selon l’élément DVI.
Remarque:
•Le signal audio transmis par la prise HDMI est
toujours constitué de données PCM à 2 canaux.
■ L’ interface HDMI
HDMI est le sigle de High-Definition Multimedia
Interface. Une extension de la norme DVI (“Digital
Video Int erfac e”) permettant de brancher des écrans
d’ordinateur, HDMI est une interface numérique de
nouvelle génération pour téléviseurs et matériel AV,
permettant de transmettre des données numériques
vidéo et audio non comprimées via un seul câble.
L’ i n t e r f a c e HDMI évite le recours à des câbles
distincts pour les connexions audio et vidéo. Comme
elle reste dans le domaine numérique, elle délivre des
signaux audio et vidéo de qualité optimale. En outre,
l’interface HDMI est compatible avec le système
HDCP (“High Bandwidth Digital Content
Protection”) qui protège les contenus vidéo et audio
soumis à des droits d’auteur contre toute copie
illégale.
Français
13 Fr
Page 97

Chapitre 2: Prise en main
Connexion SCART/Péritel (modèles
européen et russe)
Si votre téléviseur est doté d’une prise SCART, vous
pouvez la brancher à la prise AV MONITOR OUT du
DRX-730 pour transmettre des signaux vidéo
composite ou vidéo à composantes RGB.
Reliez la prise AV MONITOR OUT du DRX-730 à
une entrée SCART du téléviseur avec un câble
SCART (vendu séparément).
RPB
P
VIDEO
TV
COMPONENT
AM
ANT
GND
FM
ANT
75
UNBAL.
Y
OUT
OPTICAL
DIGITALDOCK
Entrée SCART
Câble SCART
(vendu séparément)
MAINS
R
6
MIN
SPEAKER
SPEAKERS VIDEO OUT
SUBWOOFER
OUT
OUT IN
AUX
HDMI
AV MONITOR OUT
R
(L’illustration montre le modèle pour l’Europe.)
Remarques:
•Par défaut, la prise AV MONITOR OUT transmet
un signal vidéo composite. Pour produire un
signal vidéo à composantes RGB, réglez le
paramètre “AV Monitor Out” sur “RGB” (voyez
page 57).
•Pour profiter des signaux vidéo à composantes
RGB de la prise AV MONITOR OUT, il faut
utiliser un câble SCART (Péritel) dont les 21
broches sont reliées.
Connexion d’un enregistreur (CD, MD etc.)
Vo us pouvez brancher un enregistreur comme un
graveur CD, MD ou une platine à cassette au
DRX-730 pour l’enregistrement et la lecture.
1 Reliez les prises AUX OUT du DRX-730 à une
entrée audio de l’enregistreur avec un câble
audio (vendu séparément).
2 Reliez les prises AUX IN du DRX-730 à une
sortie audio de l’enregistreur avec un autre
câble audio (vendu séparément).
(L’illustration montre le modèle pour l’Europe.)
HDMI
AV MONITOR OUT
RPB
P
SUBWOOFER
OUT
OUT IN
AUX
R
VIDEO
VIDEO OUT
COMPONENT
Câbles audio
(vendus
séparément)
AUDIO
OUT
IN
L
R
OPTICAL
DIGITAL
IN
■ Enregistrement numérique
Si votre enregistreur possède une entrée numérique
optique, vous pouvez la brancher à la sortie
OPTICAL DIGITAL OUT du DRX-730 pour
effectuer des enregistrements numériques.
Pour en savoir plus, voyez “Enregistrement” à la
page 53.
AM
ANT
GND
FM
ANT
75
UNBAL.
Y
OUT
OPTICAL
DIGITALDOCK
Câble optique
(vendu séparément)
Enregistreur
(CD, MD, cassette)
14 Fr
Remarques:
•Ne branchez pas le câble d’alimentation au
DRX-730 tant que les autres connexions n’ont pas
été effectuées.
•Eteignez l’enregistreur avant de le brancher au
DRX-730.
•La sortie OPTICAL DIGITAL OUT ne produit
des signaux audio que si la source d’entrée choisie
est “DVD” ou “USB”. Avec des disques ou des
fichiers protégés contre la copie, l’enregistrement
est impossible.
Page 98

Chapitre 2: Prise en main
Connexion d’un décodeur ou ampli-tuner AV
Le DRX-730 mixe les sources multicanal comme
Dolby Digital et DTS et produit un signal stéréo à 2
canaux que vous pouvez écouter avec les enceintes
branchées au DRX-730. En branchant un
décodeur/ampli-tuner AV à la prise OPTICAL
DIGITAL OUT du DRX-730, vous pouvez écouter les
sources Dolby Digital et DTS avec les enceintes
branchées à votre décodeur/ampli-tuner AV.
Reliez la prise OPTICAL DIGITAL OUT du DRX-730
à une entrée numérique optique du
décodeur/ampli-tuner AV avec un câble
numérique optique (disponible séparément).
Remarques:
•Vérifiez que les paramètres de sortie audio
numérique sont réglés pour que OPTICAL
DIGITAL OUT produise des signaux MPEG,
Dolby Digital et DTS tels quels et non sous forme
de données PCM.
•Vous pouvez régler le volume au minimum sur le
DRX-730 quand vous écoutez les signaux via les
enceintes branchées au décodeur/à l’ampli-tuner
AV.
•La sortie OPTICAL DIGITAL OUT ne produit
des données audio que si la source d’entrée choisie
est “DVD” ou “USB”.
Connexion du câble d’alimentation
Quand toutes les autres connexions sont effectuées,
branchez le câble d’alimentation à une prise secteur.
Branchez à une
prise secteur
MAINS
R
6
SPEAKER
MIN
SPEAKERS
SUBWOOFER
OUT
OUT IN
HDMI
2
AUX
(L’illustration montre le modèle pour l’Europe.)
MAINS
R
6
MIN
SPEAKER
SPEAKERS VIDEO OUT
SUBWOOFER
OUT
OUT IN
AUX
HDMI
AV MONITOR OUT
RPB
P
R
Y
VIDEO
COMPONENT
OPTICAL
DIGITALDOCK
Câble optique
(vendu séparément)
OPTICAL
DIGITAL
IN
Décodeur/ampli-tuner AV
AM
ANT
GND
FM
ANT
75
UNBAL.
OUT
Français
15 Fr
Page 99

Chapitre 3: Fonctions générales
Ce chapitre décrit des fonctions disponibles pour
toutes les sources d’entrées.
Allumer le DRX-730
)STANDBY/ON (
STANDBY/ON
1
586
90
BLUETOOTH
ON
AUDIO
PLAY MODE
PTY SEEK
MODE START
TOP MENU
INFO.
SETUP
Pour allumer le DRX-730, appuyez sur
STANDBY/ON ( ).
Pour mettre le DRX-730 en veille, appuyez de
nouveau sur STANDBY/ON ( ).
■ STANDBY/ON en façade
Vous p ouv e z aussi allumer ou mettre le DRX-730 en
veille avec le bouton STANDBY/ON en façade du
DRX-730.
SUBTITLE
PRESET
ENTER
OPEN/CLOSE
423
7
ZOOM
ON SCREEN
OFF
ANGLE
CLEAR
FREQ/TEXT
MENU
AEAE
RETURN
Source
d’entrée
DVD Bouton DVD/USB
USB Bouton DVD/USB2—Permet
TUNER Bouton TUNER—Permet d’écouter la
AUX Bouton AUX/PORTABLE
PORTABLE Bouton AUX/PORTABLE4—Permet
DOCK Bouton DOCK—Permet d’écouter la
1. Appuyez plusieurs fois pour choisir “DVD” ou “USB”.
2. Appuyez plusieurs fois pour choisir “DVD” ou “USB”.
3. Appuyez plusieurs fois pour choisir “AUX” ou “PORTABLE”.
4. Appuyez plusieurs fois pour choisir “AUX” ou “PORTABLE”.
5. Il faut un socle universel Yamaha pour iPod (YDS-10 ou
YDS-11) disponible en option.
6. Il faut un récepteur audio sans fil Bluetooth Yamaha YBA-10
disponible en option.
Bouton et description
1
—Lecture d’un
disque inséré dans le DRX-730
(voyez page 23).
d’écouter de la musique ou de
visionner des images stockées sur un
dispositif USB branché à la prise USB
en façade (voyez page 49).
radio (voyez page 37).
3
—Permet
d’écouter de la musique se trouvant
sur un élément branché aux prises
AUX IN en face arrière du DRX-730.
d’écouter de la musique stockée sur
un lecteur portable branché à la prise
PORTABLE en façade (voyez
page 47).
5
musique d’un iPod
ou d’un lecteur ou téléphone portable
Bluetooth
6
(voyez page 51) via un
(voyez page 47)
dispositif branché à la prise DOCK.
Sélection de la source d’entrée
Le DRX-730 vous laisse le choix entre plusieurs
sources d’entrée.
Pour sélectionner une source d’entrée, utilisez les
boutons de la télécommande indiqués dans le
tableau suivant.
Le nom de la source d’entrée sélectionnée apparaît à
l’écran.
DD
DDDDVVVVDD
Remarque:
• Il peut falloir quelques secondes pour changer de
source. Durant ce temps, l’affichage clignote et le
son est coupé.
16 Fr
■ Commande INPUT en façade
Vo us pouvez aussi utiliser la commande INPUT du
DRX-730 pour choisir une source d’entrée. Tournezla vers la gauche ou la droite pour sélectionner les
sources d’entrée dans l’ordre suivant:
DVD USB FM AM AUX PORTABLE DOCK
Page 100

Chapitre 3: Fonctions générales
Réglage du volume
Vous p ouv e z é videmment régler le volume du son.
PTY SEEK
MODE START
TOP MENU
INFO.
SETUP
AUTO/
MANUAL
BAND
DVD/USB
SOUND
TIMER SLEEP
Pour augmenter le volume, appuyez sur VOLUME
(+).
PRESET
ENTER
MEMORY
TUNER
AUX/PORTABLE
PURE DIRECT
DIMMER
FREQ/TEXT
MENU
AEAE
RETURN
VOLUME
VOLUME +/–
DOCK
MUTE
DISPLAY
Coupure du son
Lorsque vous écoutez de la musique, vous pouvez
couper le son momentanément.
PTY SEEK
MODE START
TOP MENU
INFO.
SETUP
AUTO/
MANUAL
BAND
DVD/USB
SOUND
TIMER SLEEP
Pour couper le son, appuyez sur MUTE.
PRESET
ENTER
MEMORY
TUNER
AUX/PORTABLE
PURE DIRECT
DIMMER
FREQ/TEXT
MENU
RETURN
VOLUME
DOCK
MUTE
DISPLAY
AEAE
MUTE
3
Pour diminuer le volume, appuyez sur VOLUME
(–).
Le volume peut être réglé sur MIN, 01~87 ou MAX.
VVVVoooolllluuuummmmeeee 333355
55
■ Commande VOLUME en façade
Vou s p ou ve z au ss i régler le volume avec la commande
VOLUME en façade du DRX-730.
MMMMUUUUTTTTEEEE OOOONN
NN
“MUTE ON” apparaît à l’écran et le témoin MUTE
clignote.
MUTE
Pour rétablir le son, appuyez à nouveau sur MUTE.
“MUTE OFF” apparaît à l’écran et le témoin MUTE
s’éteint.
MMMMUUUUTTTTEEEE OOOOFFFFFF
FF
Remarques:
•Si vous modifiez le volume ou changez de source
d’entrée quand le son est coupé, celui-ci est rétabli.
•La coupure du son est automatiquement
désactivée quand vous mettez le DRX-730 en
veille.
Français
17 Fr
 Loading...