

Page 1

powered by RemoteLive™
User’s Guide
This service is available for U.S. customers only.
For Disklavier E3 and DKC-850 Users
Ver.1.04 (9/17/2013)
Page 2

2
DisklavierTV User’s Guide (For Disklavier E3 and DKC-850 Users)
Table of Contents
Introduction ..............................................................................................................4
Names of Parts and Their Functions .............................................................4
Control Unit (Front) ..........................................................................................4
Control Unit (Rear) ........................................................................................... 5
Remote Control ................................................................................................6
Connection Diagram (Basic) ..............................................................................8
Connecting the Disklavier to the Internet ..................................................... 8
Preparation ........................................................................................................8
Connecting the Control Unit to the Internet .................................................8
Notes on Network Security ............................................................................. 9
Watching on Your Computer .........................................................................10
Watching on Your TV .......................................................................................11
Preparation ............................................................................................................. 12
Turning on Your Disklavier .............................................................................12
Registration ........................................................................................................13
Updating Your Disklavier ................................................................................14
Logging into Your Account ............................................................................17
Entering Characters ....................................................................................... 19
Activating DisklavierTV .....................................................................................20
Receiving Test....................................................................................................20
Viewing Live Broadcast or On-demand Content ...................................... 22
Adjustments ...........................................................................................................24
Adjusting the Main Volume ............................................................................24
Adjusting the Audio Volume Balance .......................................................... 25
Page 3

3
DisklavierTV User’s Guide (For Disklavier E3 and DKC-850 Users)
Connection Diagram (Advanced) ................................................................... 26
Watching on Your Computer with External Speakers ............................26
Watching on Your TV with External Speakers ..........................................27
Watching Video with High Quality Audio and External Monitor ..........28
Appendix .................................................................................................................. 29
Windows 7 and 8 Audio Considerations ....................................................29
Adjusting the Delay ..........................................................................................30
Adjusting the Depth of the Sustain Pedal ..................................................31
Network Diagnostics ........................................................................................32
Checking the Broadcast Information and Error History ......................... 33
Troubleshooting .................................................................................................... 34
Error Messages ..............................................................................................34
Table of Contents
Page 4

4
DisklavierTV User’s Guide (For Disklavier E3 and DKC-850 Users)
Introduction
Names of Parts and Their Functions
■
Control Unit (Front)
1
[ON/OFF] button
Turns on or turns off the Disklavier.
Press once to turn it on, and once again
to turn it off.
2
USB port
Used to connect a USB flash memory,
etc.
3
Remote control sensor
When using the remote control, point it
toward this sensor.
4
CD drive
Insert a PianoSoft·PlusAudio or other
audio or audio/MIDI CD here.
5
CD eject button
Used to open the CD drive.
6
[PLAY/PAUSE] button
Used to start and pause playback.
7
[STOP] button
Used to stop playback and recording.
8
[RECORD] button
Used to engage the record standby
mode before recording starts.
9
[SELECT] button
Used to select media.
10
Cursor/[ENTER] buttons
Cursor: Used to select options and
parameters.
Press this button inclining
slightly upward/downward/left/
right.
[ENTER]: Used to execute the selection.
Press in the very center of this
button.
11
Display
Shows various information.
12
Dial
Used to adjust the volume, and to set
parameter values.
12 63
45
78 9101112
Page 5

5
DisklavierTV User’s Guide (For Disklavier E3 and DKC-850 Users)
Introduction
■
Control Unit (Rear)
1
USB TO DEVICE port
Used to connect a USB flash memory,
an optional USB floppy disk drive, etc.
2
LAN port
Used to connect to the Internet.
3
OUTPUT jacks
Used to connect speaker cables to
monitor speakers*
4
ANALOG MIDI IN jacks
Used to connect audio equipment such
as an external CD changer.
5
OMNI (SYNC) OUT jacks
Used to connect the microphone/line
input of a camcorder.
6
OMNI (SYNC) IN jacks
Used to connect the audio output of a
camcorder or computer.
7
TO PIANO connectors
Used to connect the piano.
8
DC-IN 12V connector
Used to connect to the power supply
unit.
9
USB TO HOST port
Used to connect the USB cable from a
computer.
10
MIDI OUT terminal
Used to connect external MIDI
equipment for outputting MIDI data.
11
MIDI IN terminal
Used to connect external MIDI
equipment for inputting MIDI data.
* Only for models supplied with monitor speakers.
7891011
12 4356
Page 6

6
DisklavierTV User’s Guide (For Disklavier E3 and DKC-850 Users)
Introduction
1
[ON/STANDBY] button
Turns on the Disklavier or puts it in
standby mode.
2
Number keypad
Used for direct album/song selection and
to enter a start time for song playback.
3
[SYSTEM] button
Used to access the system menu.
4
[VOICE] button
Used to access the voice function.
5
[RECORD] button
Used to engage the record standby
mode before recording starts.
6
[PLAY] button
Used to start playback.
7
[REVERSE]/[FORWARD] buttons
In the play mode: used to fast preview
and review.
In the pause mode: used to fast forward
and rewind.
■
Remote Control
1
13
14
18
19
21
22
23
25
26
27
15
16
20
24
17
2
3
4
5
6
7
8
9
10
11
12
Page 7

7
DisklavierTV User’s Guide (For Disklavier E3 and DKC-850 Users)
Introduction
8
Cursor buttons
Used to select options and parameters.
9
[BACK] button
Used to cancel the selection, and return
to the previous screen.
10
[VOLUME] buttons
Used to adjust the volume.
[–] lowers the volume, [+] raises the
volume.
11
[TEMPO] buttons
Used to change the playback tempo.
[–] decreases the tempo, [+] increases
the tempo, and [0] resets the tempo to
00.
12
[TRANSPOSE] buttons
Used to transpose song playback.
[–] transposes down, [+] transposes up,
and [0] resets the transposition value to
00.
13
[INTERNET] button
Used to access the Internet menu.
14
[SEARCH] button
Used to access the search function.
15
[SETUP] button
Used to access the setup menu.
16
[METRONOME] button
Used to access the metronome function.
17
[REPEAT] button
Used to select one of the repeat modes:
ALL, RPT, RND, or OFF.
18
[A-B] button
Used to enter A and B points for the A-B
repeat mode.
19
[PART SELECT] buttons
For L/R and ensemble songs, these
buttons are used to choose which part
will play: left-hand part, right-hand part,
or both parts.
They are also used to select a part for
recording.
20
[PAUSE] button
Used to pause playback.
21
[STOP] button
Used to stop playback and recording.
22
[ENTER] button
Used to execute the selection.
23
[FUNC.] button
Used to access the function menu.
24
[SELECT] button
Used to select media.
25
[+/YES]/[–/NO] buttons
Used to select parameters, adjust setting
values, and execute or cancel the
selected functions.
26
[BALANCE] button
Used to adjust the TG, audio and voice
balance.
27
Color buttons
Green : Used to execute the shortcut
assigned to the number keypad.
Yellow : Used to switch character types
when titling albums and songs.
Other : For future use.
Page 8

8
DisklavierTV User’s Guide (For Disklavier E3 and DKC-850 Users)
Connection Diagram (Basic)
Connecting the Disklavier to the Internet
You can connect the Disklavier to a full-time online Internet connection (ADSL, optical fiber,
cable Internet, etc.) via a router or a modem equipped with a router.
■
Preparation
•To use the Internet connection, you will first need to subscribe to an Internet service or
provider.
•Use a computer to obtain and configure Internet service. You cannot obtain Internet service
or configure router settings on a local area network using the Disklavier itself.
•Use a standard LAN cable to connect the control unit and a router.
•Before connecting the LAN cable, make sure to turn off (or shut down) the Disklavier.
■
Connecting the Control Unit to the Internet
Connection example 1: Connection example 2:
Using a modem with router function Using a modem without router function
Note: •DependingonthecontractwithyourInternetprovider,youmaynotbeabletoconnecttwoor
more devices (for example, a computer and the Disklavier) to the Internet. Please check your
contract or contact your Internet provider for further information.
•Sometypesofmodems(suchasADSLmodemsorcablemodems)havemultipleportsfor
connecting two or more devices (such as computer, musical instrument, etc.). If your modem
has only one port, an optional router or hub is required in order to connect several devices
simultaneously.
Control unit (rear panel)
Modem
(with router function)
Other device
(such as computer)
LAN cable
Control unit (rear panel)
Router
Modem
(without router function)
Other device
(such as computer)
LAN cable
Page 9

9
DisklavierTV User’s Guide (For Disklavier E3 and DKC-850 Users)
Connection Diagram (Basic)
For further information on the Internet connection (only a wired LAN connection is supported),
visit the Yamaha Disklavier website:
http://services.music.yamaha.com/radio/
■
Notes on Network Security
The Disklavier attempts to achieve a balance between security and usability in its network
implementation. However, a determined hacker may be able to defeat these security
measures and utilize the network of the purchaser in an unauthorized manner. Since each
network is different, only the purchaser can determine whether the security measures
discussed here will adequately protect their network.
The purchaser acknowledges that connection to the Internet and use of the Disklavier
Internet features is done at the risk of the purchaser. In no event shall Yamaha, its
subsidiaries or Yamaha’s and/or its subsidiaries’ directors, officers, or employees be
responsible for unauthorized access, loss or alteration of the data of the purchaser or be
liable for any damage from intrusions.
Page 10

10
DisklavierTV User’s Guide (For Disklavier E3 and DKC-850 Users)
Connection Diagram (Basic)
Watching on Your Computer
LAN cable ( )
Switching
hub
Internet / LAN
Computer
LAN cable ( )
2
1
To check your bandwidth, visit
http://www.speedtest.net
Recommended:
Over 4 Mbps (download speed)
Recommended:
A wired LAN connection.
If you use a wireless connection,
communication might be unstable
depending on your environment.
Note: Turn the power off before connecting.
Control unit (rear)
Disklavier
LAN cable ( )
3
Audio cable ( )
4
Monitor
Display
cable ( )
5
Upper : white
Lower : red
Connect the cable firmly to the jack
Equipment
Computer (Windows or Mac) 1
Switching hub
*1
1
Requirements (These items are NOT supplied with Disklavier.)
Cables From To
LAN cable
1 Modem/router Switching hub
1 Switching hub Computer
1 Switching hub Disklavier
Audio cable (stereo mini pin - 2 RCA males)
*2
1 Computer Disklavier (OMNI IN)
Display cable 1 Computer Monitor
*1
You do not need the switching hub if your router has more than 2 empty LAN ports.
*2
DO NOT use cables with impedance changers.
1
2
3
4
5
For Windows 7 or 8
users: Check page 29.
Page 11

11
DisklavierTV User’s Guide (For Disklavier E3 and DKC-850 Users)
Connection Diagram (Basic)
Watching on Your TV
AUDIO
OUT
LAN cable ( )
Switching
hub
Internet / LAN
Computer
LAN cable ( )
2
1
To check your bandwidth, visit
http://www.speedtest.net
Recommended:
Over 4 Mbps (download speed)
Set the volume as follows:
• TV: 0
• Audio output jacks: fixed
For details, refer to the
manual of your TV.
Note: Turn the power off before connecting.
HDMI cable ( )
4
TV
Audio cable ( )
5
Control unit (rear)
Disklavier
LAN cable ( )
3
Recommended:
A wired LAN connection.
If you use a wireless connection,
communication might be unstable
depending on your environment.
Upper : white
Lower : red
Connect the cable firmly to the jack
Equipment
Computer (Windows or Mac) 1
Switching hub
*1
1
TV (with HDMI input and audio output) 1
Requirements (These items are NOT supplied with Disklavier.)
Cables From To
LAN cable
1 Modem/router Switching hub
1 Switching hub Computer
1 Switching hub Disklavier
HDMI cable 1 Computer TV
Audio cable (2 RCA males - 2 RCA males)
*2
1 TV Disklavier (OMNI IN)
*1
You do not need the switching hub if your router has more than 2 empty LAN ports.
*2
Cable required depends on your TV.
1
2
3
4
5
For Windows 7 or 8
users: Check page 29.
Page 12

12
DisklavierTV User’s Guide (For Disklavier E3 and DKC-850 Users)
Preparation
Turning on Your Disklavier
1
Connect the AC power cable to the AC wall outlet.
2
Press [ON/OFF] on the control unit.
The following message appears on the display, and [ON/OFF] on the control unit lights
green.
(The illustration shows an example of Disklavier E3.)
After several seconds, the loading screen will appear, and last played song will be
loaded.
PLEASE WAIT
Invention 1
=Memory=
<00:00>
LR SO V+00
A01-001
Your Disklavier is now ready for use.
Page 13
13
DisklavierTV User’s Guide (For Disklavier E3 and DKC-850 Users)
Preparation
Registration
To use the DisklavierTV service, initial registration is required using an Internet-connected
computer.
Note: If you are already subscribed to the DisklavierRadio service, the following procedure is
unnecessary.
1
Go to Yamahamusicsoft.com/dtv
2
Enter your Disklavier model and select your desired subscription (monthly or
annual).
3
Click “Subscribe,” then confirm your subscription and your auto-renew
preference.
4
At checkout, you will be asked to create an account to complete the subscription
and registration process.
Note: To use the DisklavierTV service, you are required to enter your e-mail address and password
with the remote control.
Page 14
14
DisklavierTV User’s Guide (For Disklavier E3 and DKC-850 Users)
Preparation
Updating Your Disklavier
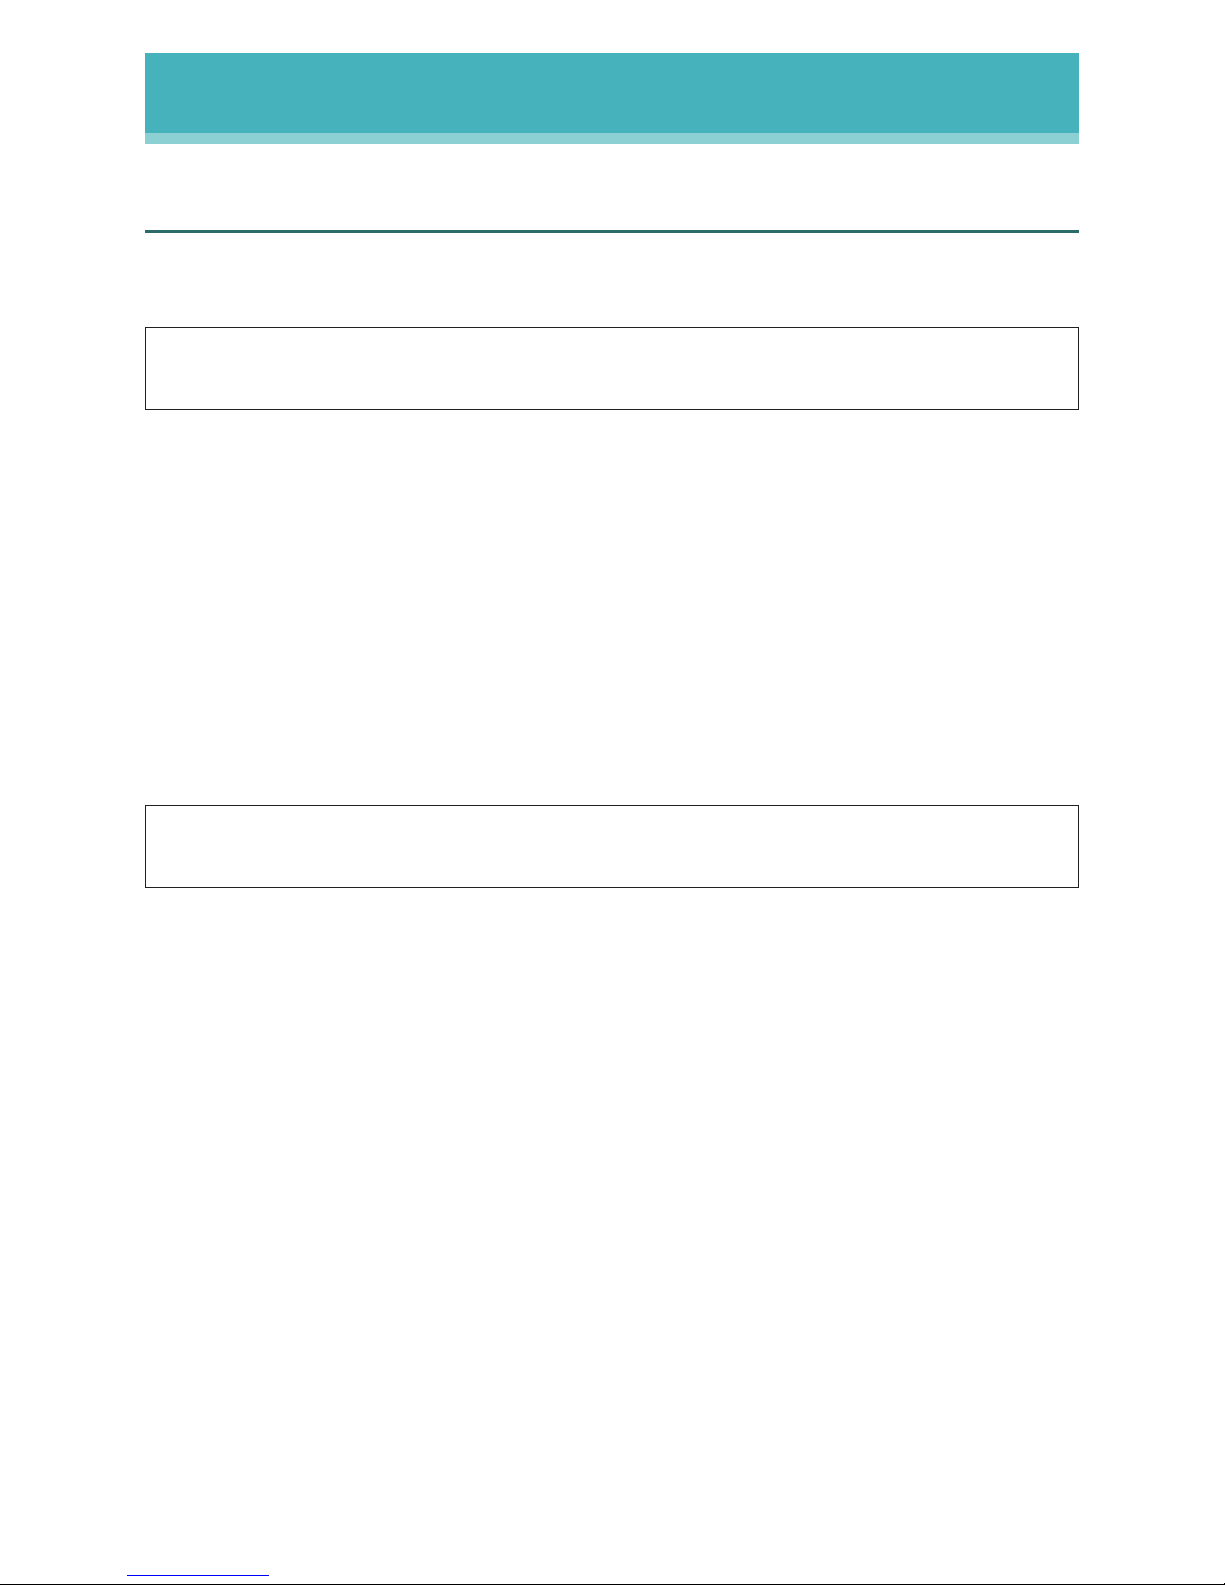
1
Confirm that your Disklavier can access the Internet.
Press [INTERNET] on the remote control.
The Internet menu screen should appear.
*D-Radio
*Update
*MyAccount
=Internet=
(1/1)
If this screen appears, your Internet connection is OK.
Note: If you have not connected your Disklavier to the Internet, see “Connecting the Disklavier
to the Internet” on page 8 and connect it properly to the Internet.
2
Select “Update” with the cursor buttons ([◄] [►] [▲] [▼]), then press [ENTER].
*D-Radio
*Update
*MyAccount
=Internet=
(1/1)
If there is any update program available, the update screen appears.
Update Available
-----------------------
=Update=
Go to step 3.
If you have the latest version of firmware, the following screen will appear.
Firmware Up To Date
-----------------------
=Internet=
Scroll down through the screens and select “Close” using the cursor button ([▼]), then
press [ENTER].
Skip the following steps and go to “Logging into Your Account” on page 17.
-----------------------
=Internet=
*Close
Page 15
15
DisklavierTV User’s Guide (For Disklavier E3 and DKC-850 Users)
Preparation
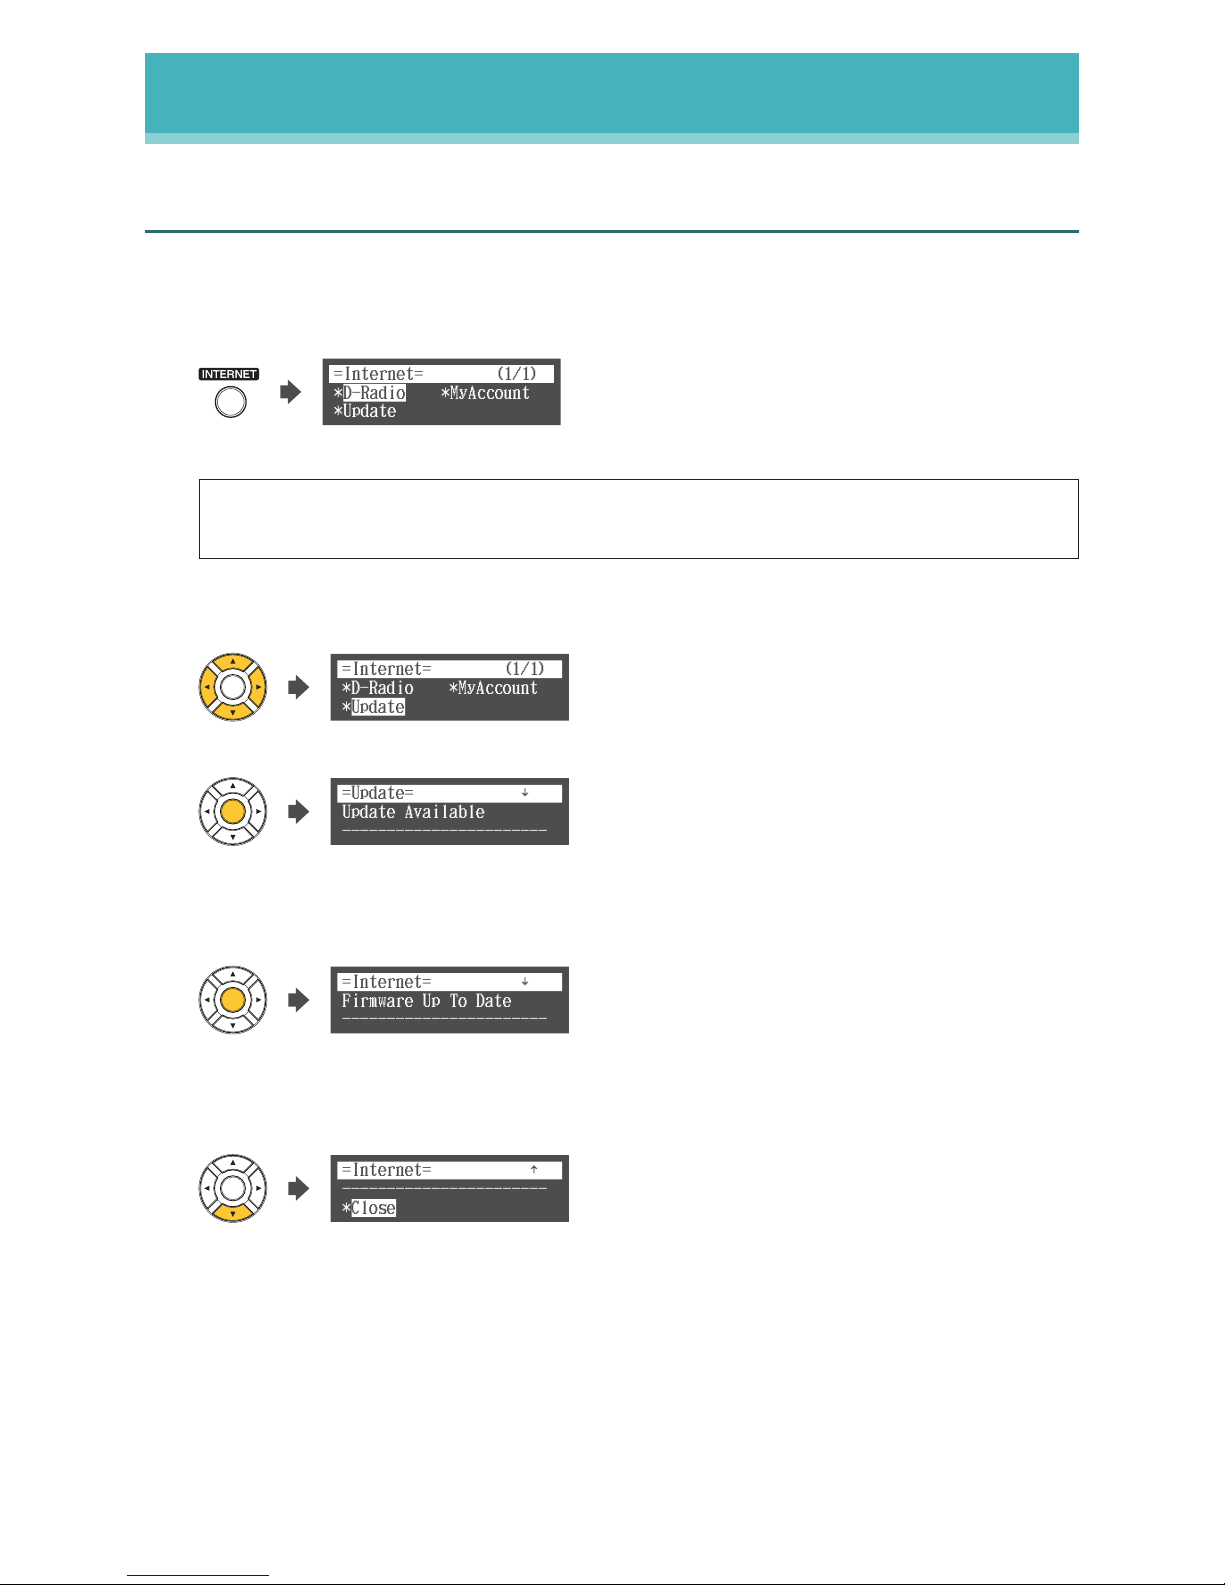
3
Scroll down through the screens and select “Firmware U” using the cursor button
([▼]), then press [ENTER].
-----------------------
*Firmware U
=Update=
*Cancel
The download process of the update program starts.
Now Downloading...
50% ( 1 / 1 )
=Update=
4
After the download process is completed, shut down the Disklavier with [ON/OFF]
on the control unit.
Turn OFF,Turn ON again
while holding [PLAY]
=Update=
The update program is now prepared.
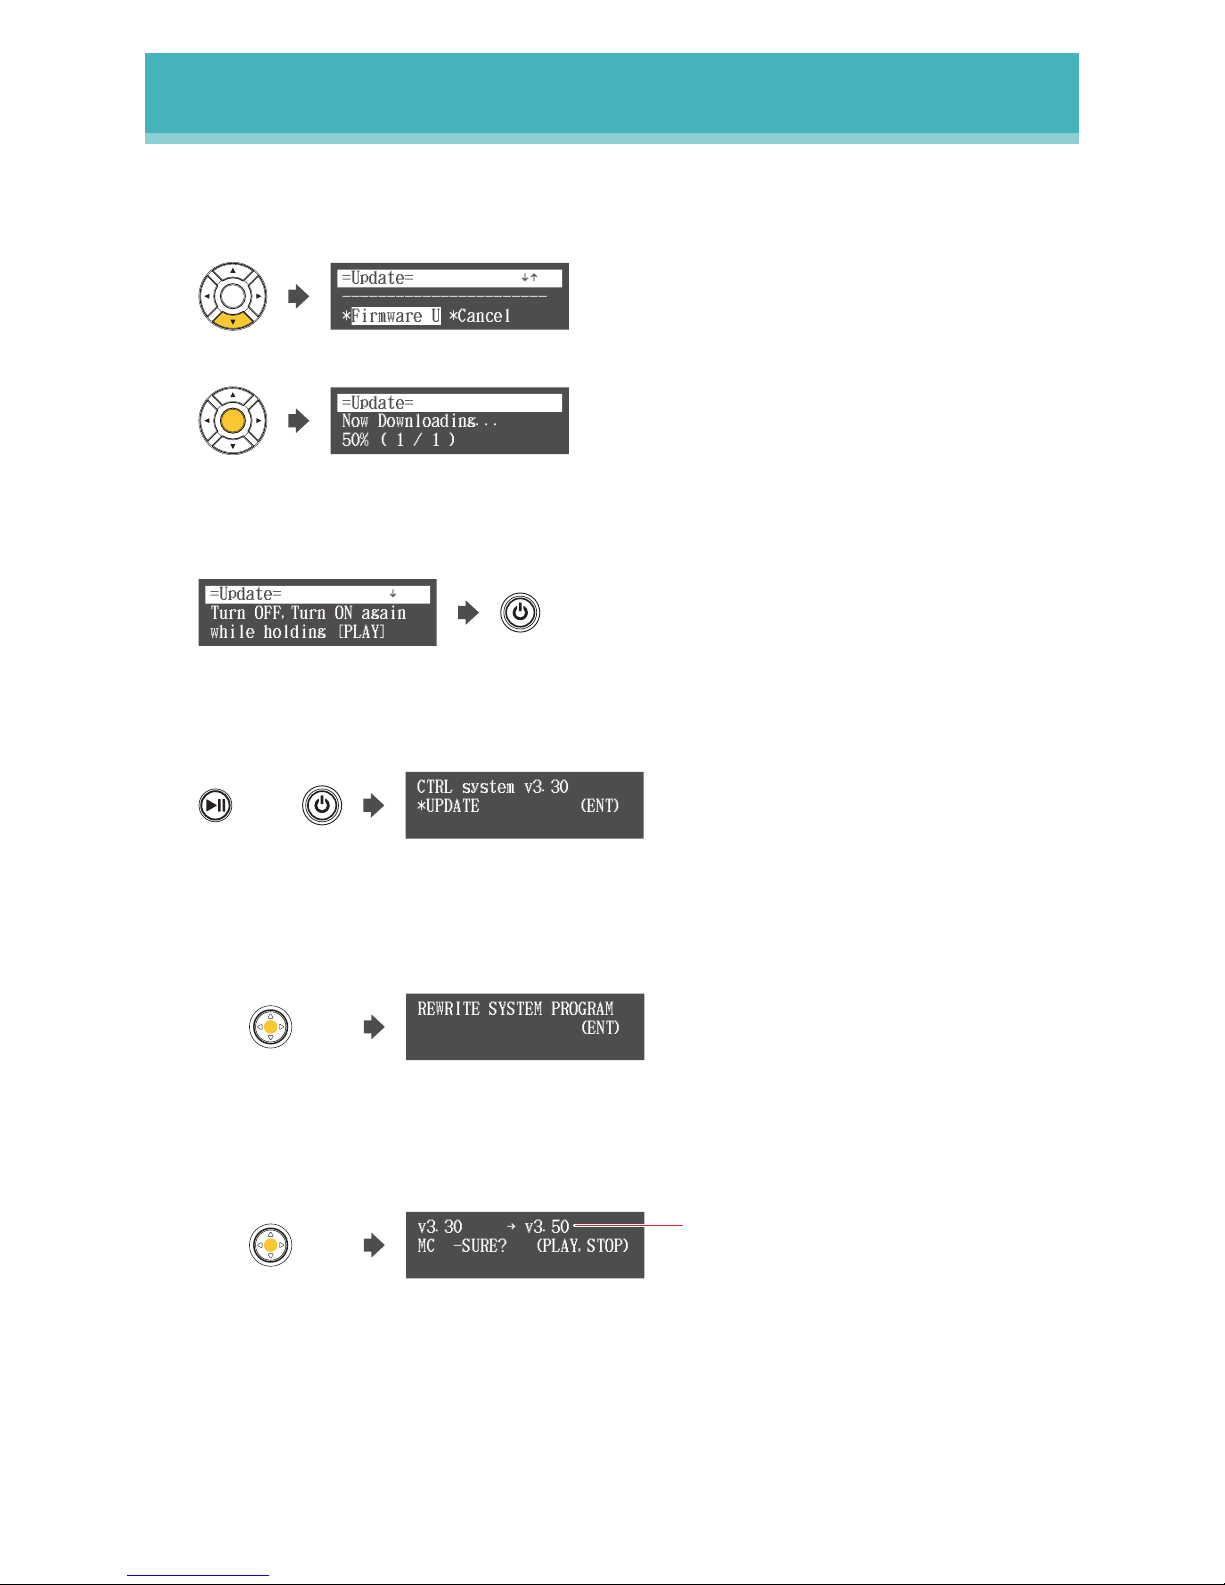
5
Holding [PLAY/PAUSE] on the control unit, press [ON/OFF].
Hold
+
CTRL system v3.30
(ENT)*UPDATE
The current version information of each module appears one after the other.
6
Press [ENTER] on the control unit.
The starting screen appears.
REWRITE SYSTEM PROGRAM
(ENT)
(Center of the button)
7
Press [ENTER] on the control unit again.
After a while, the update confirmation message of each module appears.
v3.30
(PLAY,STOP)MC -SURE?
v3.50
(Center of the button)
Updated version
(v3.50 or later for Disklavier E3;
v3.52 or later for DKC-850)
Page 16
16
DisklavierTV User’s Guide (For Disklavier E3 and DKC-850 Users)
Preparation
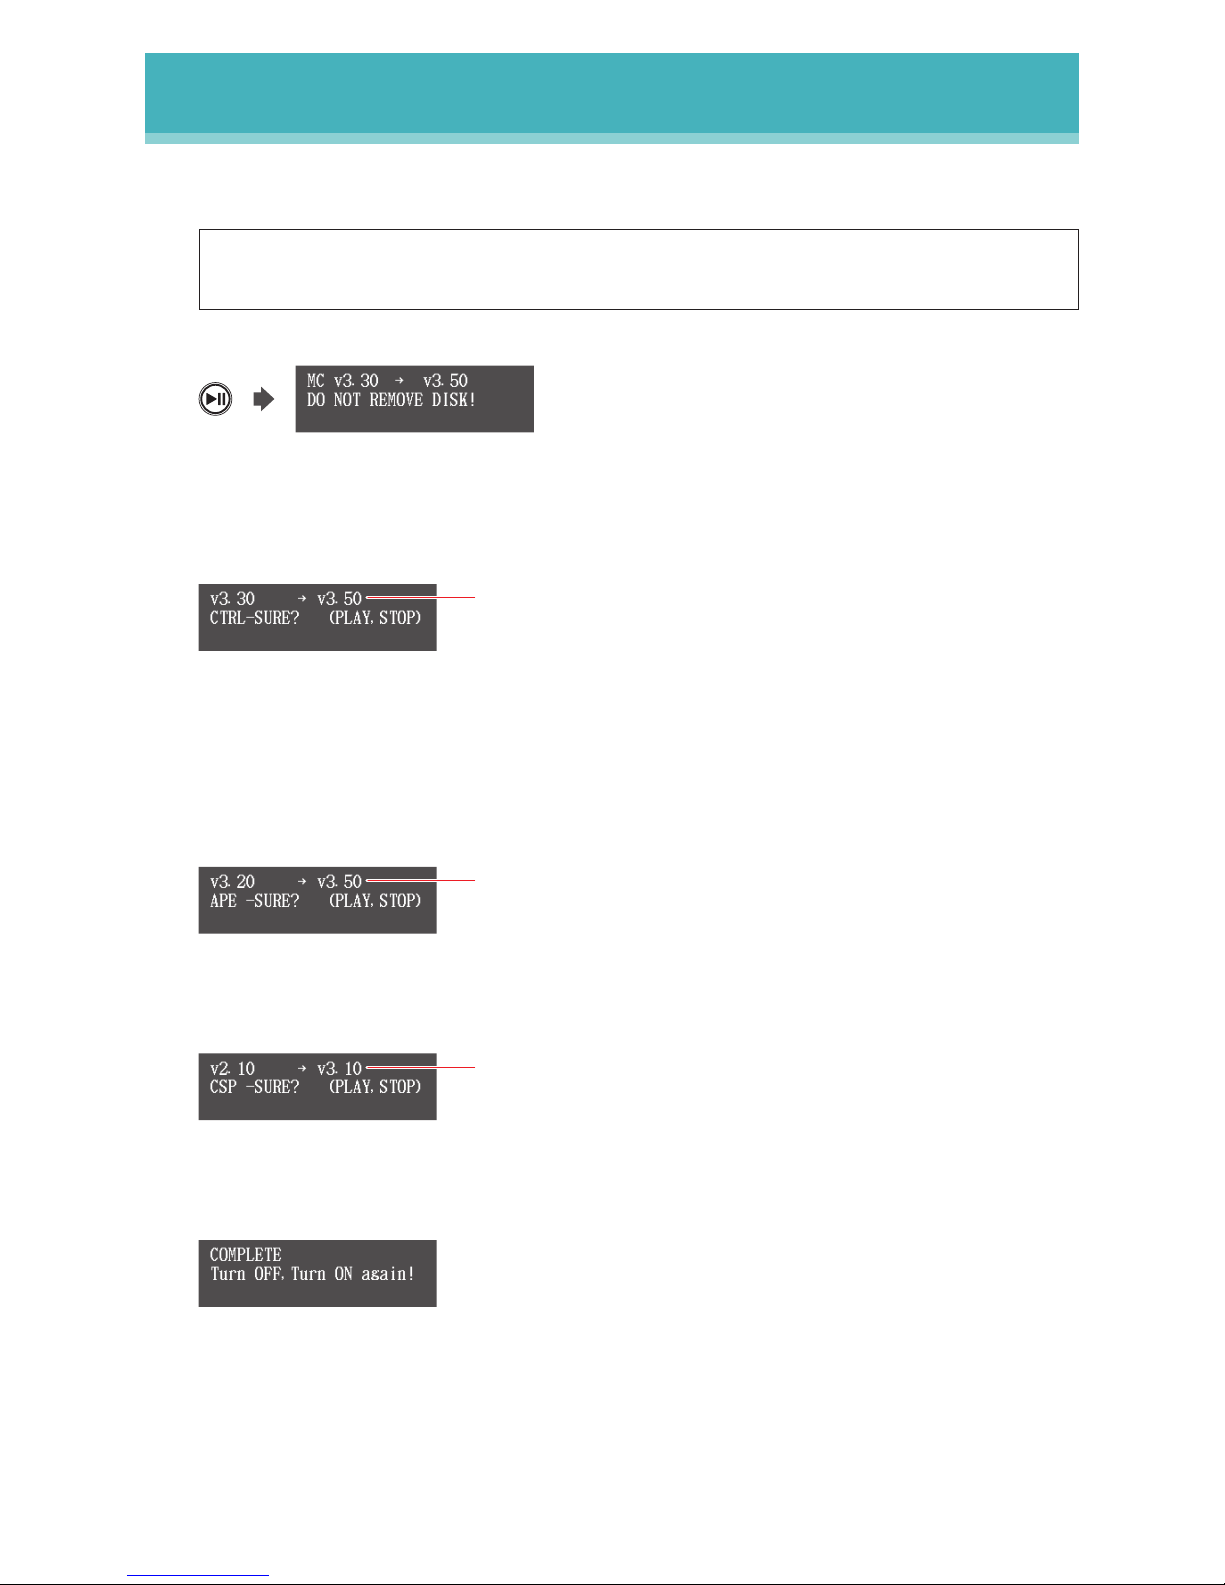
8
Press [PLAY/PAUSE] to start the update.
Important: •DONOTturnoffthisunitduringupdate.
•Besuretoupdateallthemodules.
The update process of the first module takes approximately 3 minutes.
MC v3.30
DO NOT REMOVE DISK!
v3.50
When the update of the first module completes, the following confirmation message
appears.
Confirmation message of the second module
v3.30
(PLAY,STOP)CTRL-SURE?
v3.50
Updated version
(v3.50 or later for Disklavier E3;
v3.52 or later for DKC-850)
Press [PLAY/PAUSE] to start the update of the second module.
The update process of the second module takes approximately 3 minutes.
A total of four modules needs to be updated. Repeat this step to complete the update.
Confirmation message of the third module
v3.20
(PLAY,STOP)APE -SURE?
v3.50
Updated version
(v3.50 or later for Disklavier E3;
v3.52 or later for DKC-850)
The update process of the third module takes approximately 2 minutes.
Confirmation message of the fourth module (Disklavier E3 only)
v2.10
(PLAY,STOP)CSP -SURE?
v3.10
Updated version (v3.10 or later)
The update process of the fourth module takes approximately 2 minutes.
The closing screen appears when the update for all modules is completed.
COMPLETE
Turn OFF,Turn ON again!
9
Shut down the Disklavier, then turn it on again.
Page 17
17
DisklavierTV User’s Guide (For Disklavier E3 and DKC-850 Users)
Preparation
Logging into Your Account
Note: Once you have logged in, you are kept logged in for 30 days. If you do not access the
DisklavierRadio or DisklavierTV services within that period, you need to log in again.
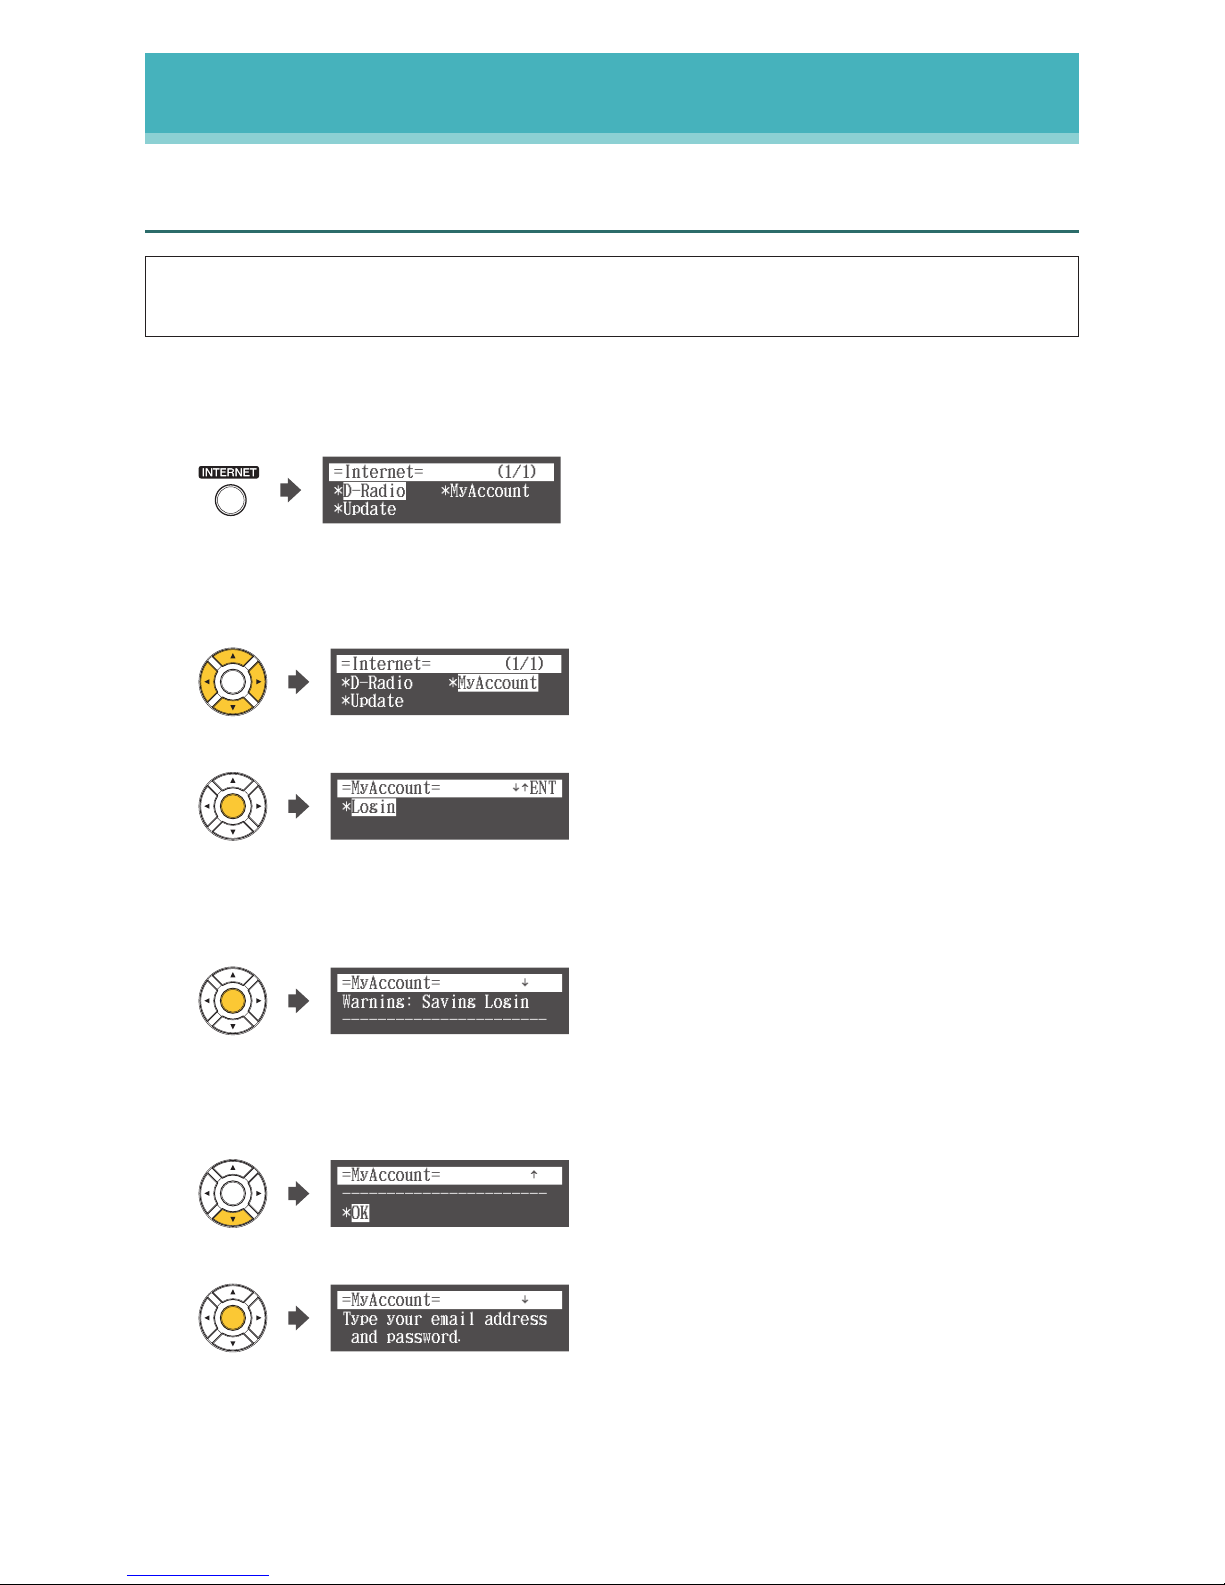
1
Press [INTERNET] on the remote control.
The Internet menu screen appears.
*D-Radio
*Update
*MyAccount
=Internet=
(1/1)
2
Select “MyAccount” with the cursor buttons ([◄] [►] [▲] [▼]), then press
[ENTER].
*D-Radio
*Update
*MyAccount
=Internet=
(1/1)
The MyAccount screen appears.
*Login
=MyAccount=
ENT
3
Press [ENTER].
The warning message appears.
=MyAccount=
Warning: Saving Login
-----------------------
4
Scroll down through the screens and select “OK” using the cursor button ([▼]),
then press [ENTER].
-----------------------
=MyAccount=
*OK
The information entry screen appears.
=MyAccount=
Type your email address
and password.
Page 18
18
DisklavierTV User’s Guide (For Disklavier E3 and DKC-850 Users)
Preparation
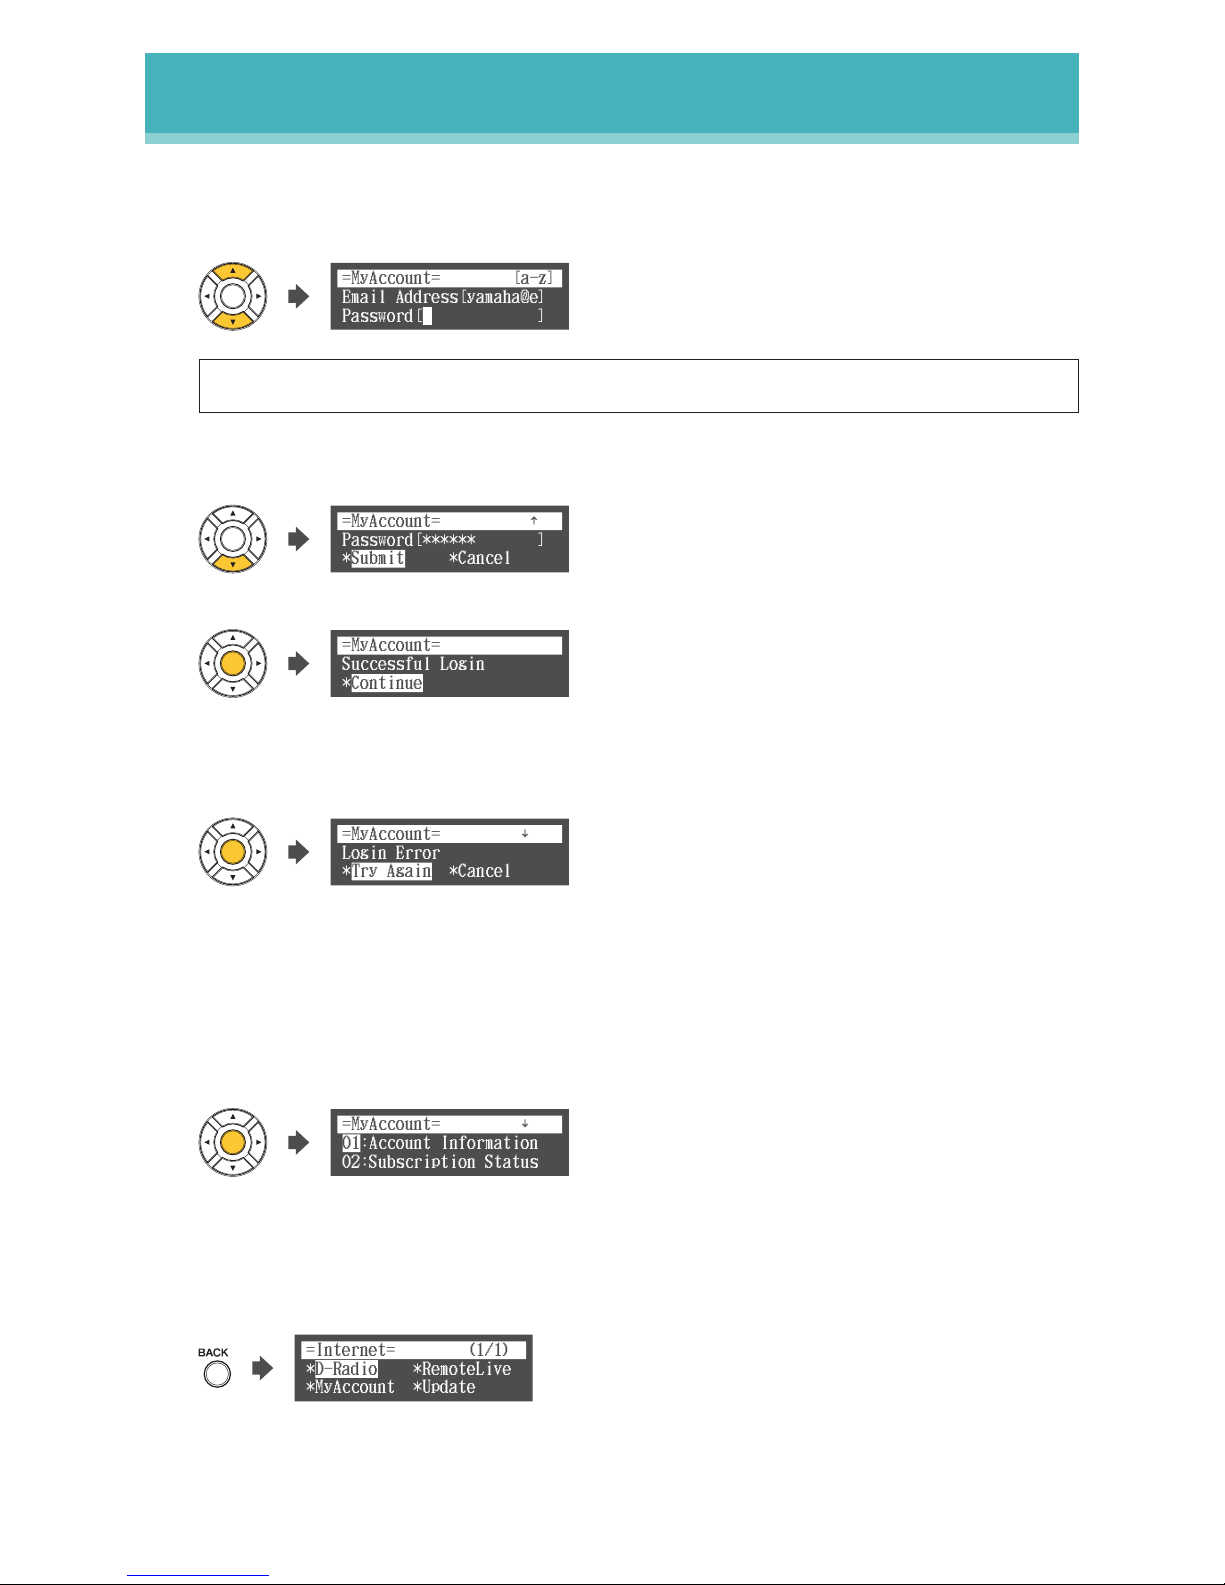
5
Select “Email Address” or “Password” with the cursor buttons ([▲] [▼]), and
enter your e-mail address and password.
=MyAccount=
Email Address[yamaha@e]
Password[ ]
[a-z]
Note: See “Entering Characters” on page 19 for information on how to enter characters.
6
Select “Submit” with the cursor button ([▼]), then press [ENTER].
Password[****** ]
=MyAccount=
* *CancelSubmit
If the login is successful, the following screen will appear.
Successful Login
=MyAccount=
*Continue
Go to step 7.
If the login fails, the following screen will appear.
Login Error
=MyAccount=
* *CancelTry Again
Select “Try Again” with the cursor button ([▼]), then press [ENTER].
Go back to step 5 and make sure that you have entered your e-mail address and
password correctly.
7
Press [ENTER].
The MyAccount screen appears.
01
02:Subscription Status
:Account Information
=MyAccount=
8
Press [BACK].
If you are successfully logged into your account, “RemoteLive” appears on the Internet
menu screen.
*D-Radio
*MyAccount *Update
*RemoteLive
=Internet=
(1/1)
You can enjoy the DisklavierTV service using the RemoteLive function.
Page 19
19
DisklavierTV User’s Guide (For Disklavier E3 and DKC-850 Users)
Preparation
■
Entering Characters
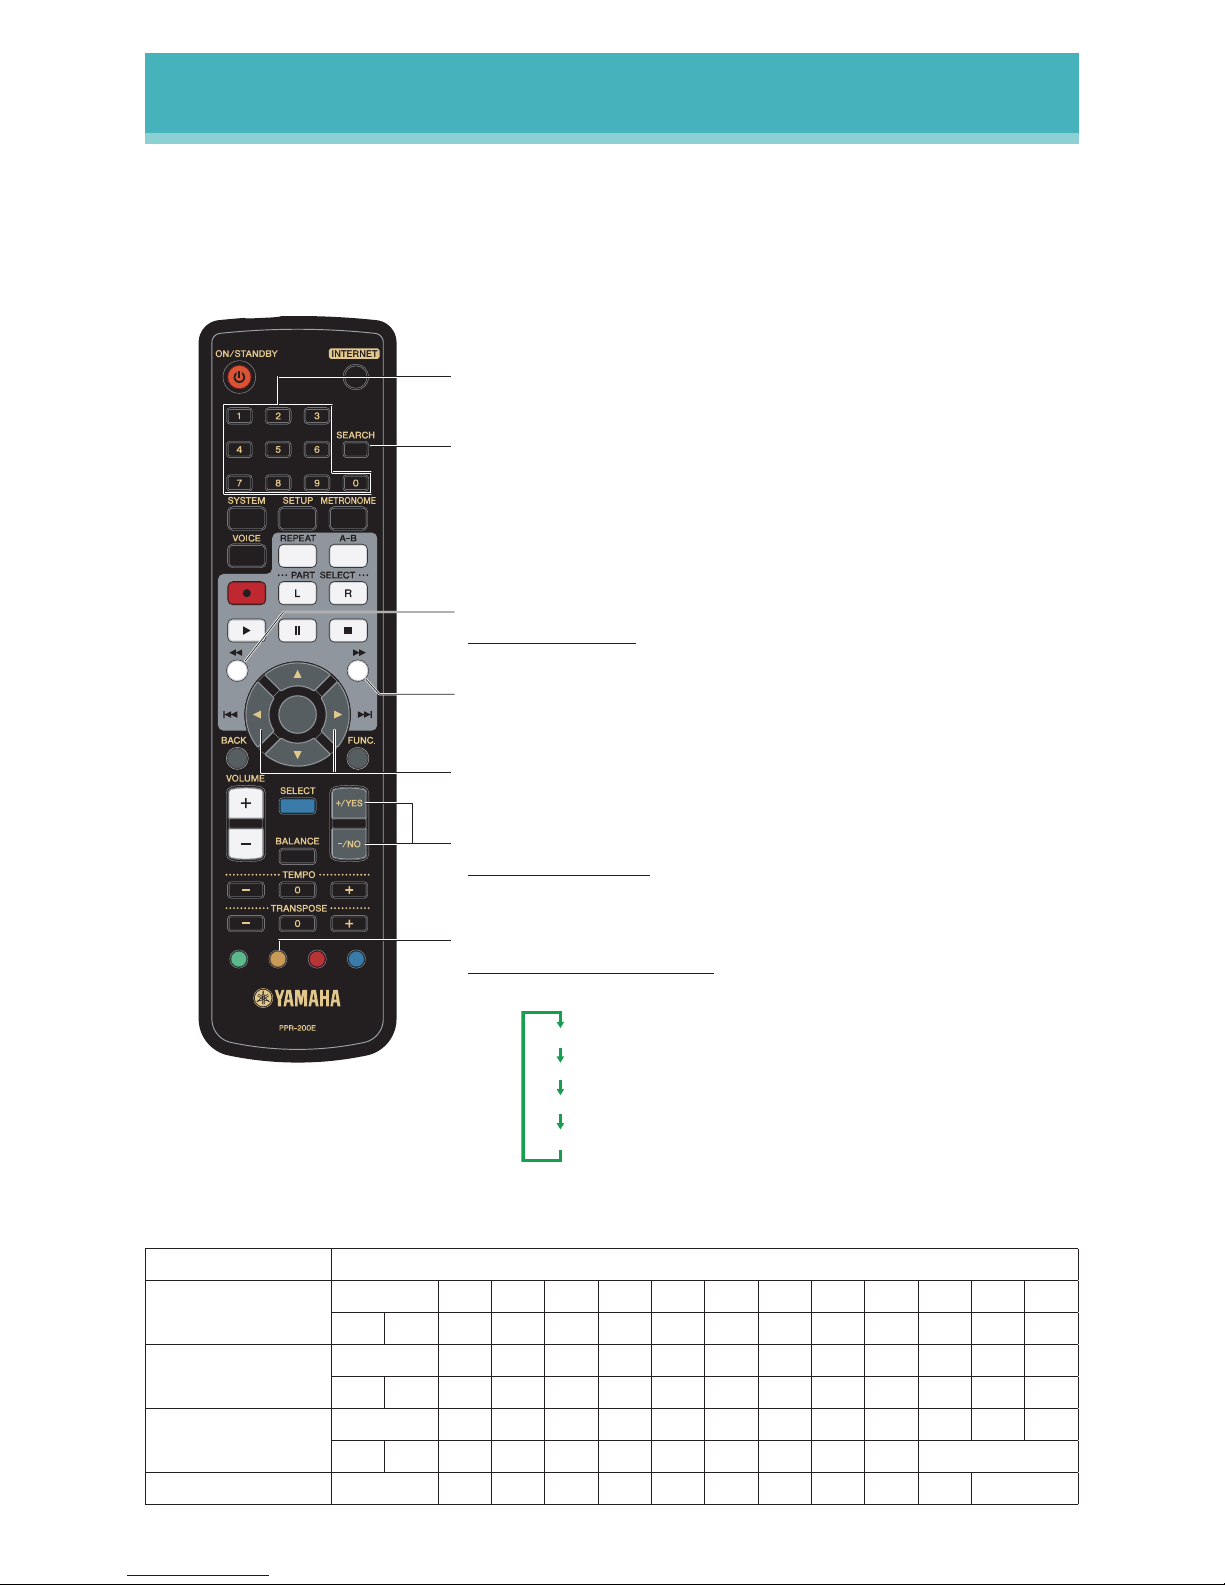
How to Enter Characters with the Remote Control
The following illustration shows how to enter characters with the remote control.
Available Characters
The following table shows which characters are available.
Character Type Characters
Letters
(Upper Case) [A-Z]
Space A B C D E F G H I J K L
M N O P Q R S T U V W X Y Z
Letters
(Lower Case) [a-z]
Space a b c d e f g h i j k l
m n o p q r s t u v w x y z
Symbols [etc]
Space ! ” # $ % & ’ ( ) * + ,
- . / : ; < = > ? _ @
Numbers [0-9] Space 0 1 2 3 4 5 6 7 8 9
Number keypad
Overwrites with a number.
[SEARCH] button
Overwrites with a dot (.).
[REVERSE] button
Deletes a character. Letters to the right of a deleted character will move
one space to the left.
[FORWARD] button
Inserts a space.
[◄]/[►] buttons
Moves the cursor left and right.
[+/YES]/[–/NO] buttons
Selects the character. Pressing these keys simultaneously overwrites a
space.
Yellow button
Switches the character types.
The character type cycles as follows each time you press this button:
[A-Z]: letters (upper case)
[a-z]: letters (lower case)
[etc]: symbols
[0-9]: numbers
Page 20
20
DisklavierTV User’s Guide (For Disklavier E3 and DKC-850 Users)
Activating DisklavierTV
Receiving Test
You can verify that you are properly set up to receive a broadcast by viewing a test video that
can be found on the website.
Caution: •Whileyouenjoylivebroadcastoron-demandcontent:
- DO NOT use other applications except your web browser on your computer.
- DO NOT visit any other websites (other than the URL provided for the broadcast) on your
computer.
Note: •ConrmthatthevolumeonyourPCissettomaximum.
•IfyouareusingaPCwithWindows7or8,makesureallsoundenhancementsaredisabled
(turned off). See “Appendix” on page 29 for additional detail.
1
Confirm that all equipment and cables are connected as shown in the
“Connection Diagram.”
2
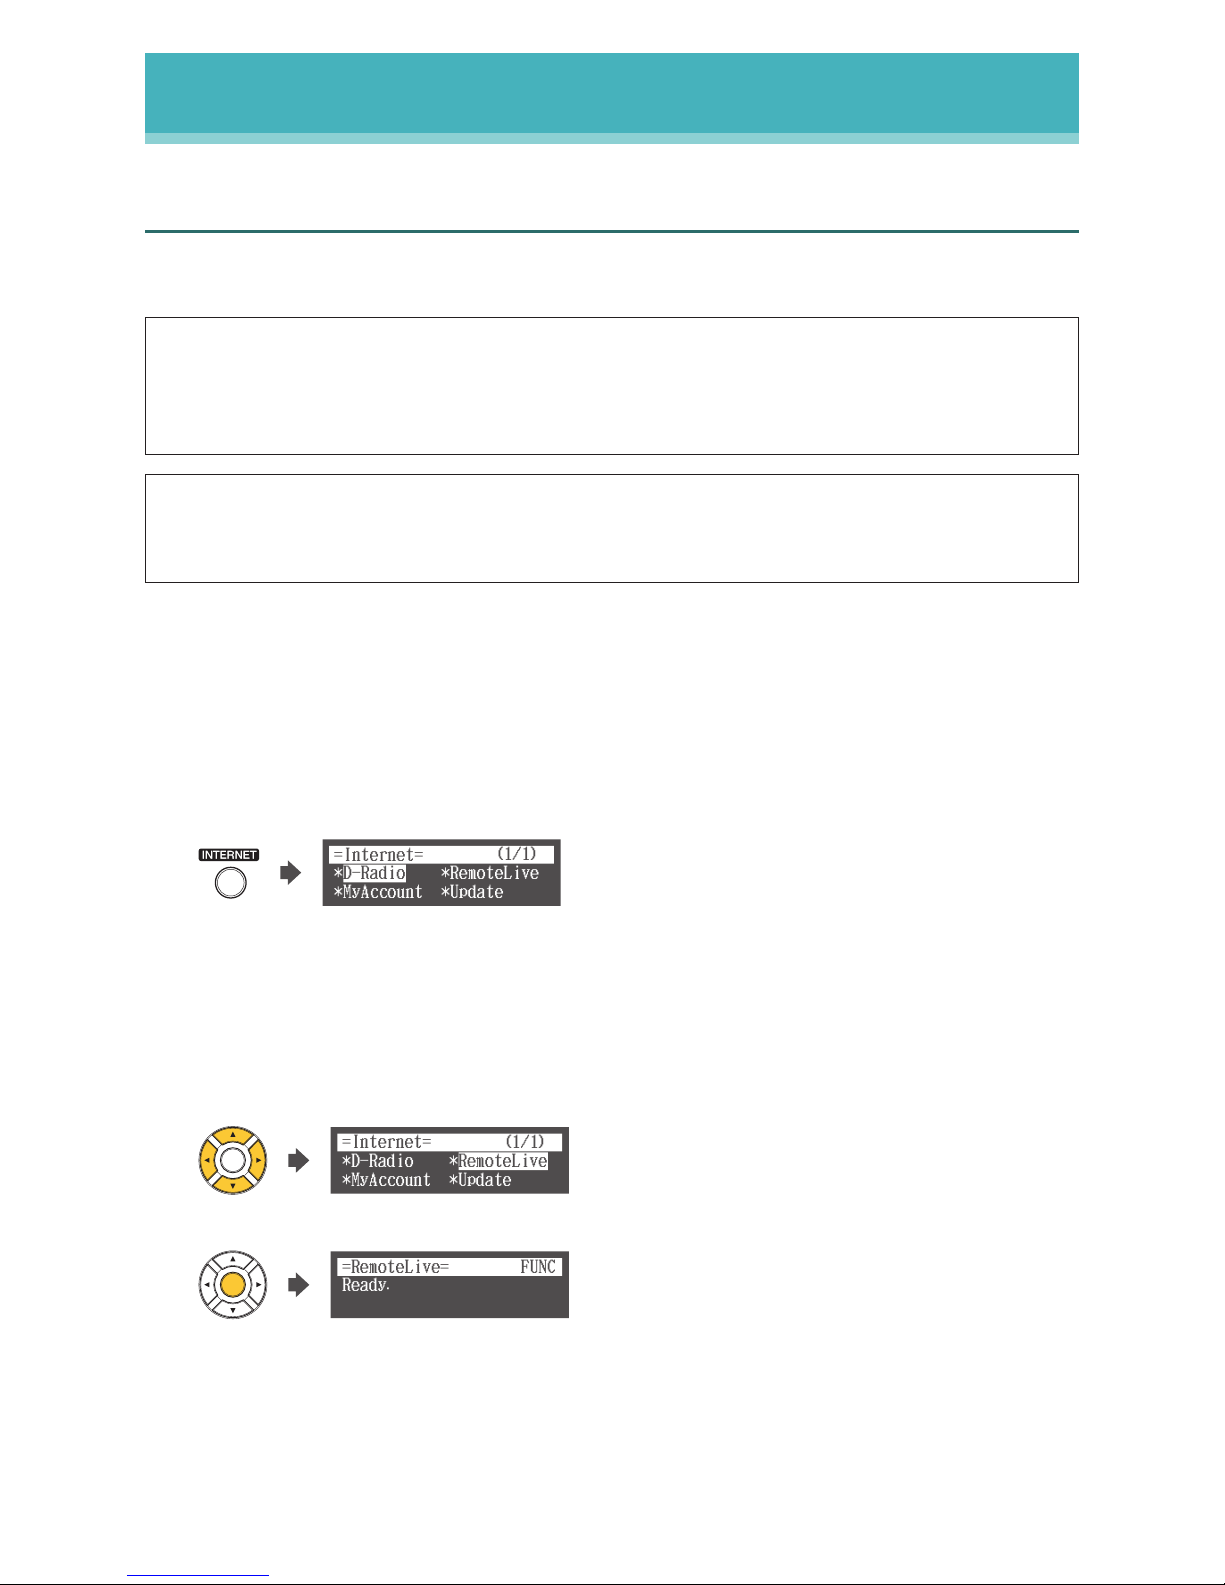
Confirm that your Disklavier can access the Internet.
Press [INTERNET] on the remote control.
The Internet menu screen should appear.
*D-Radio
*MyAccount *Update
*RemoteLive
=Internet=
(1/1)
If this screen appears, your Internet connection is OK.
You can enjoy the DisklavierTV service using the RemoteLive function.
If “RemoteLive” does not appear, see page 17 to log into your account.
3
Select “RemoteLive” with the cursor buttons ([◄] [►] [▲] [▼]), then press
[ENTER].
*D-Radio
*MyAccount *Update
*RemoteLive
=Internet=
(1/1)
The RemoteLive screen appears.
Ready.
=RemoteLive=
FUNC
4
Using the computer, enter the following URL into your browser:
4wrd.it/DisklavierTV
Page 21
21
DisklavierTV User’s Guide (For Disklavier E3 and DKC-850 Users)
Activating DisklavierTV
5
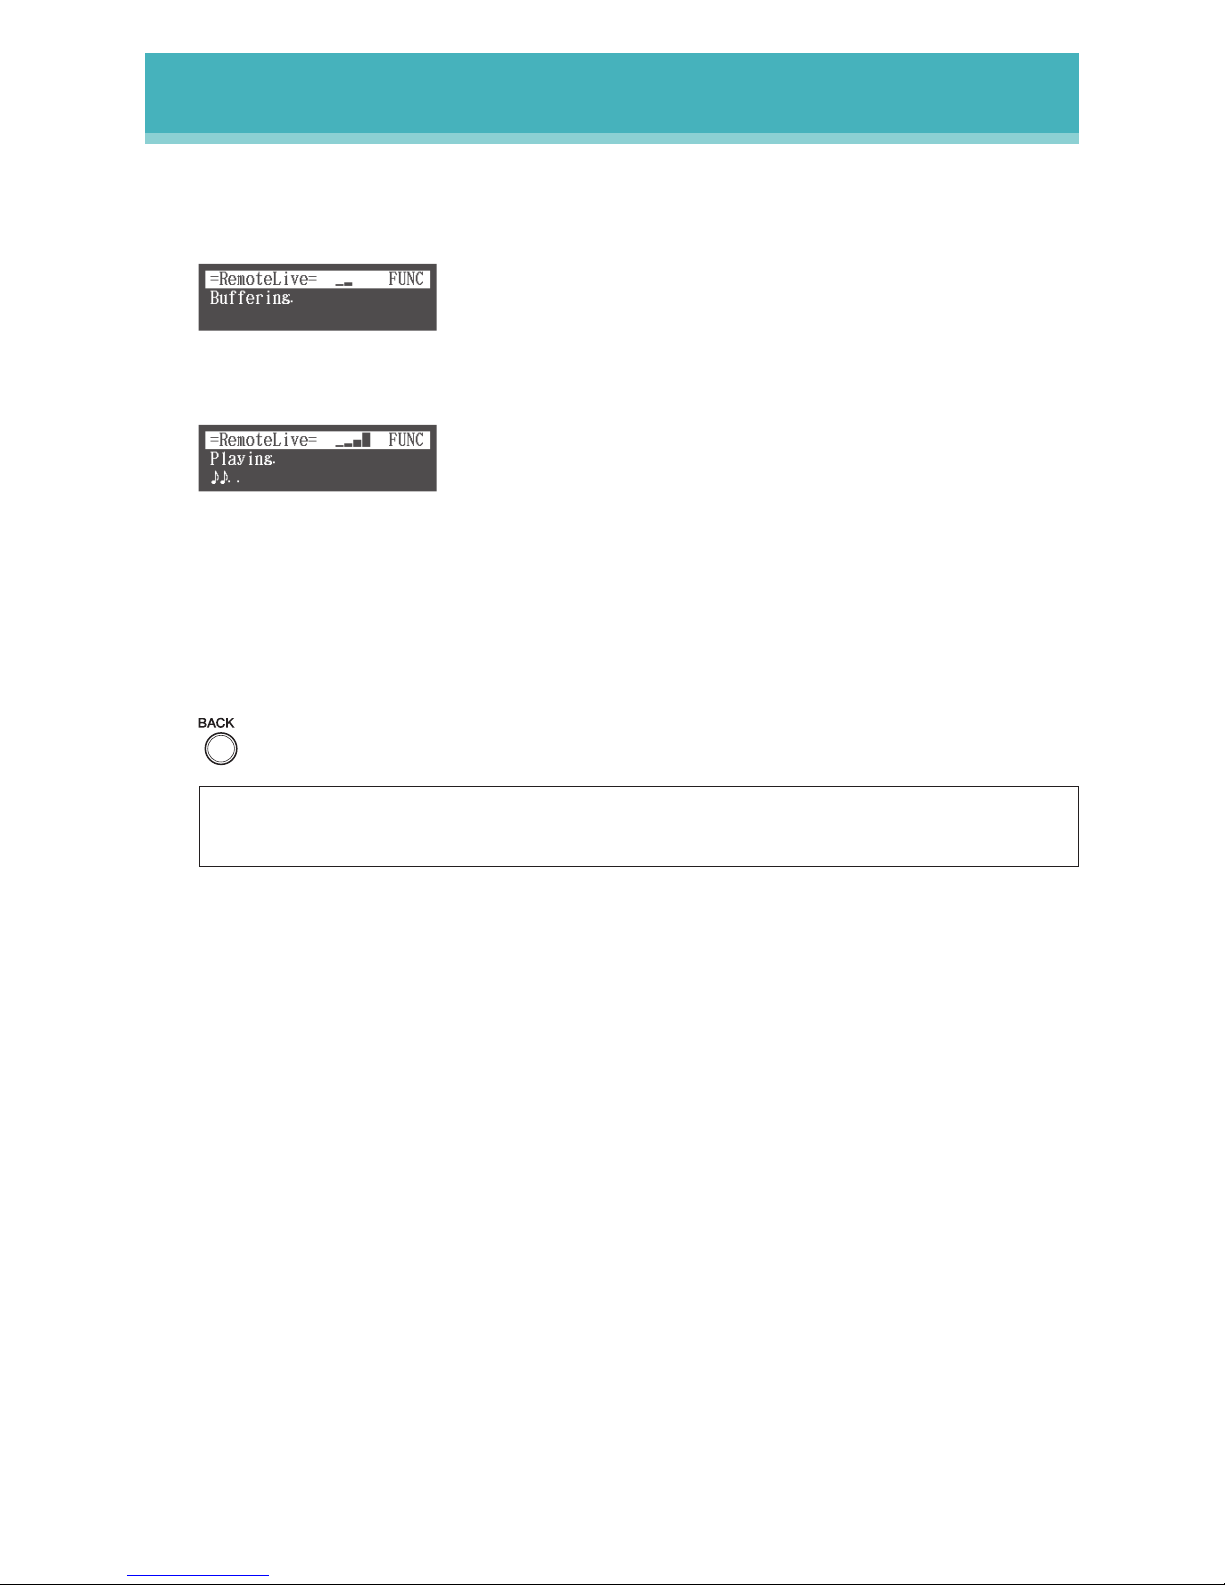
Go to the “Set Up” page, then start playing back the video on the website.
Your Disklavier starts to receive the data.
Buffering.
=RemoteLive=
FUNC
6
Confirm that piano playback is synchronized with the video.
Playing.
..
=RemoteLive=
FUNC
7
Confirm that the volume is appropriate.
See page 24 to adjust the volume.
8
Stop playing back the video, then press [BACK] on the remote control to return to
the Internet menu screen.
Note: Playback of your piano may continue for a while even after you have stopped playing
back the video content. This is not a malfunction.
Page 22
22
DisklavierTV User’s Guide (For Disklavier E3 and DKC-850 Users)
Activating DisklavierTV
Viewing Live Broadcast or On-demand Content
Caution: •Whileyouenjoylivebroadcastoron-demandcontent:
- DO NOT use other applications except your web browser on your computer.
- DO NOT visit any other websites (other than the URL provided for the broadcast) on your
computer.
Note: •ConrmthatthevolumeonyourPCissettomaximum.
•IfyouareusingaPCwithWindows7or8,makesureallsoundenhancementsaredisabled
(turned off). See “Appendix” on page 29 for additional detail.
1
Confirm that all equipment and cables are connected as shown in the
“Connection Diagram.”
2
Confirm that your Disklavier can access the Internet.
Press [INTERNET] on the remote control.
The Internet menu screen should appear.
*D-Radio
*MyAccount *Update
*RemoteLive
=Internet=
(1/1)
If this screen appears, your Internet connection is OK.
You can enjoy the DisklavierTV service using the RemoteLive function.
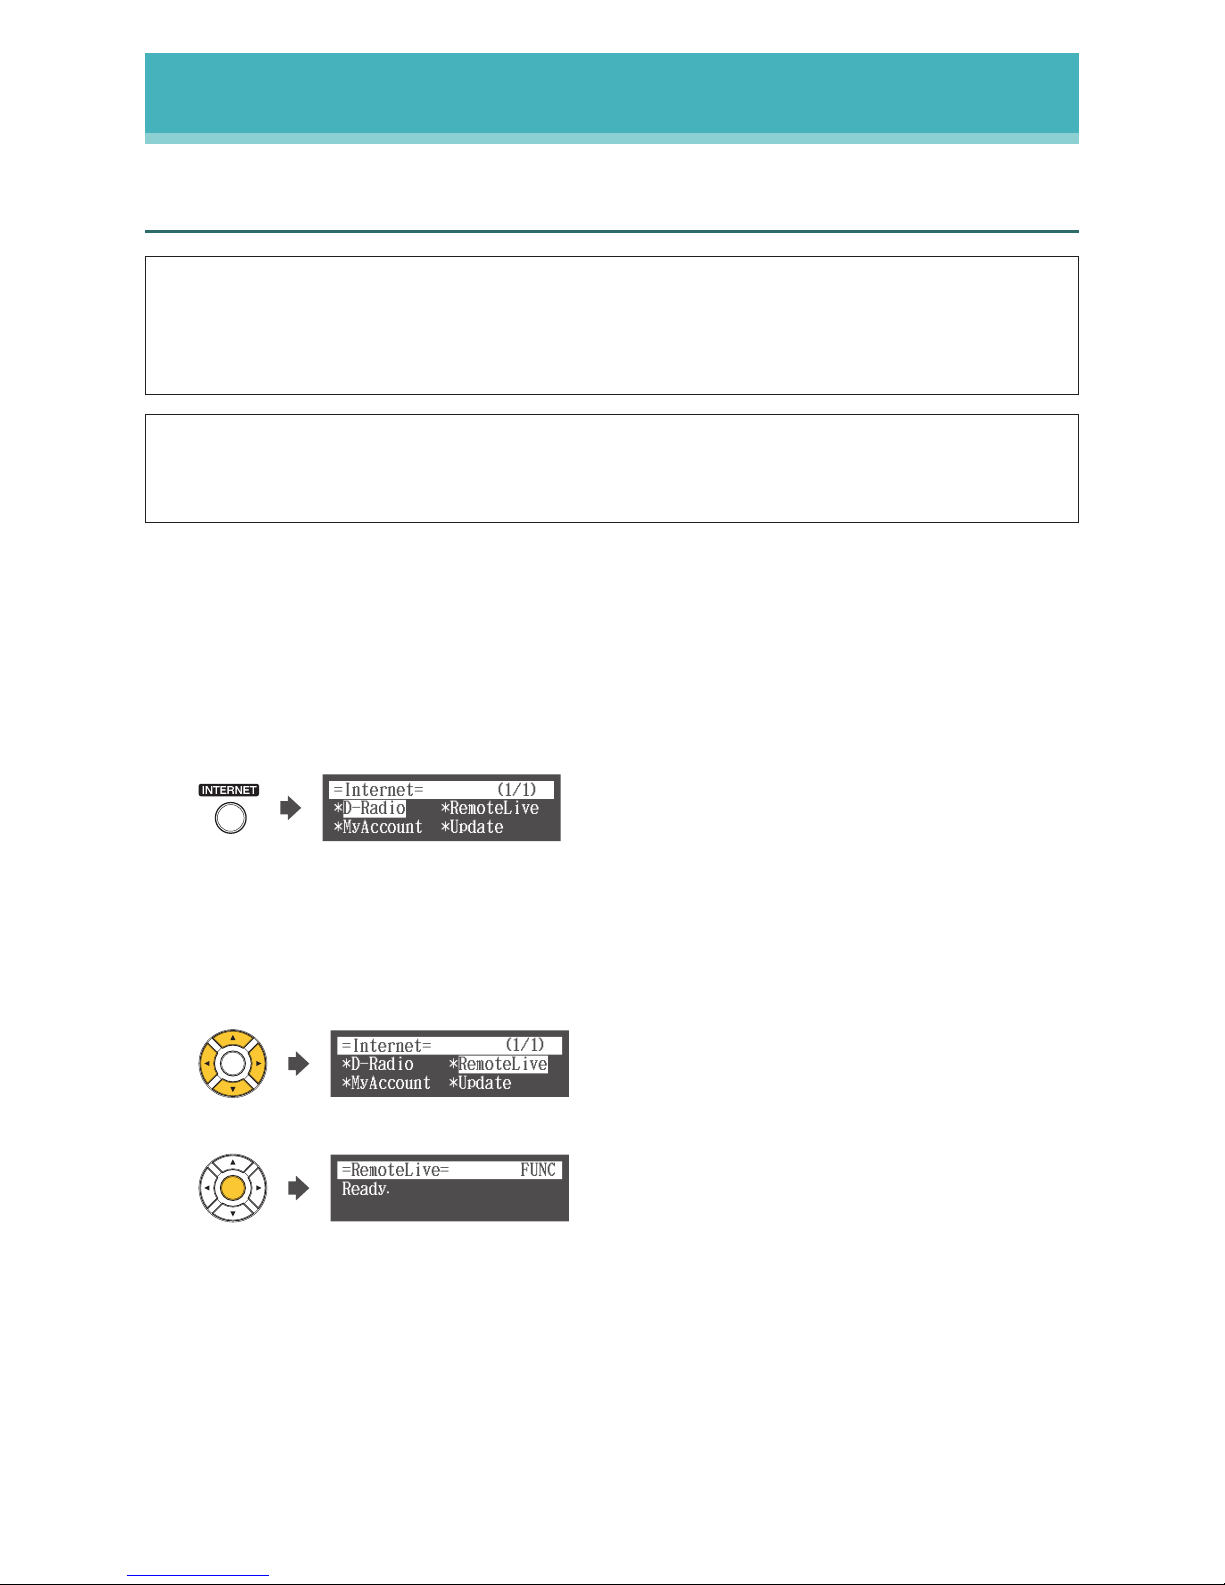
3
Select “RemoteLive” with the cursor buttons ([◄] [►] [▲] [▼]), then press
[ENTER].
*D-Radio
*MyAccount *Update
*RemoteLive
=Internet=
(1/1)
The RemoteLive screen appears.
Ready.
=RemoteLive=
FUNC
4
Using the computer, enter the following URL into your browser:
4wrd.it/DisklavierTV
Page 23
23
DisklavierTV User’s Guide (For Disklavier E3 and DKC-850 Users)
Activating DisklavierTV
5
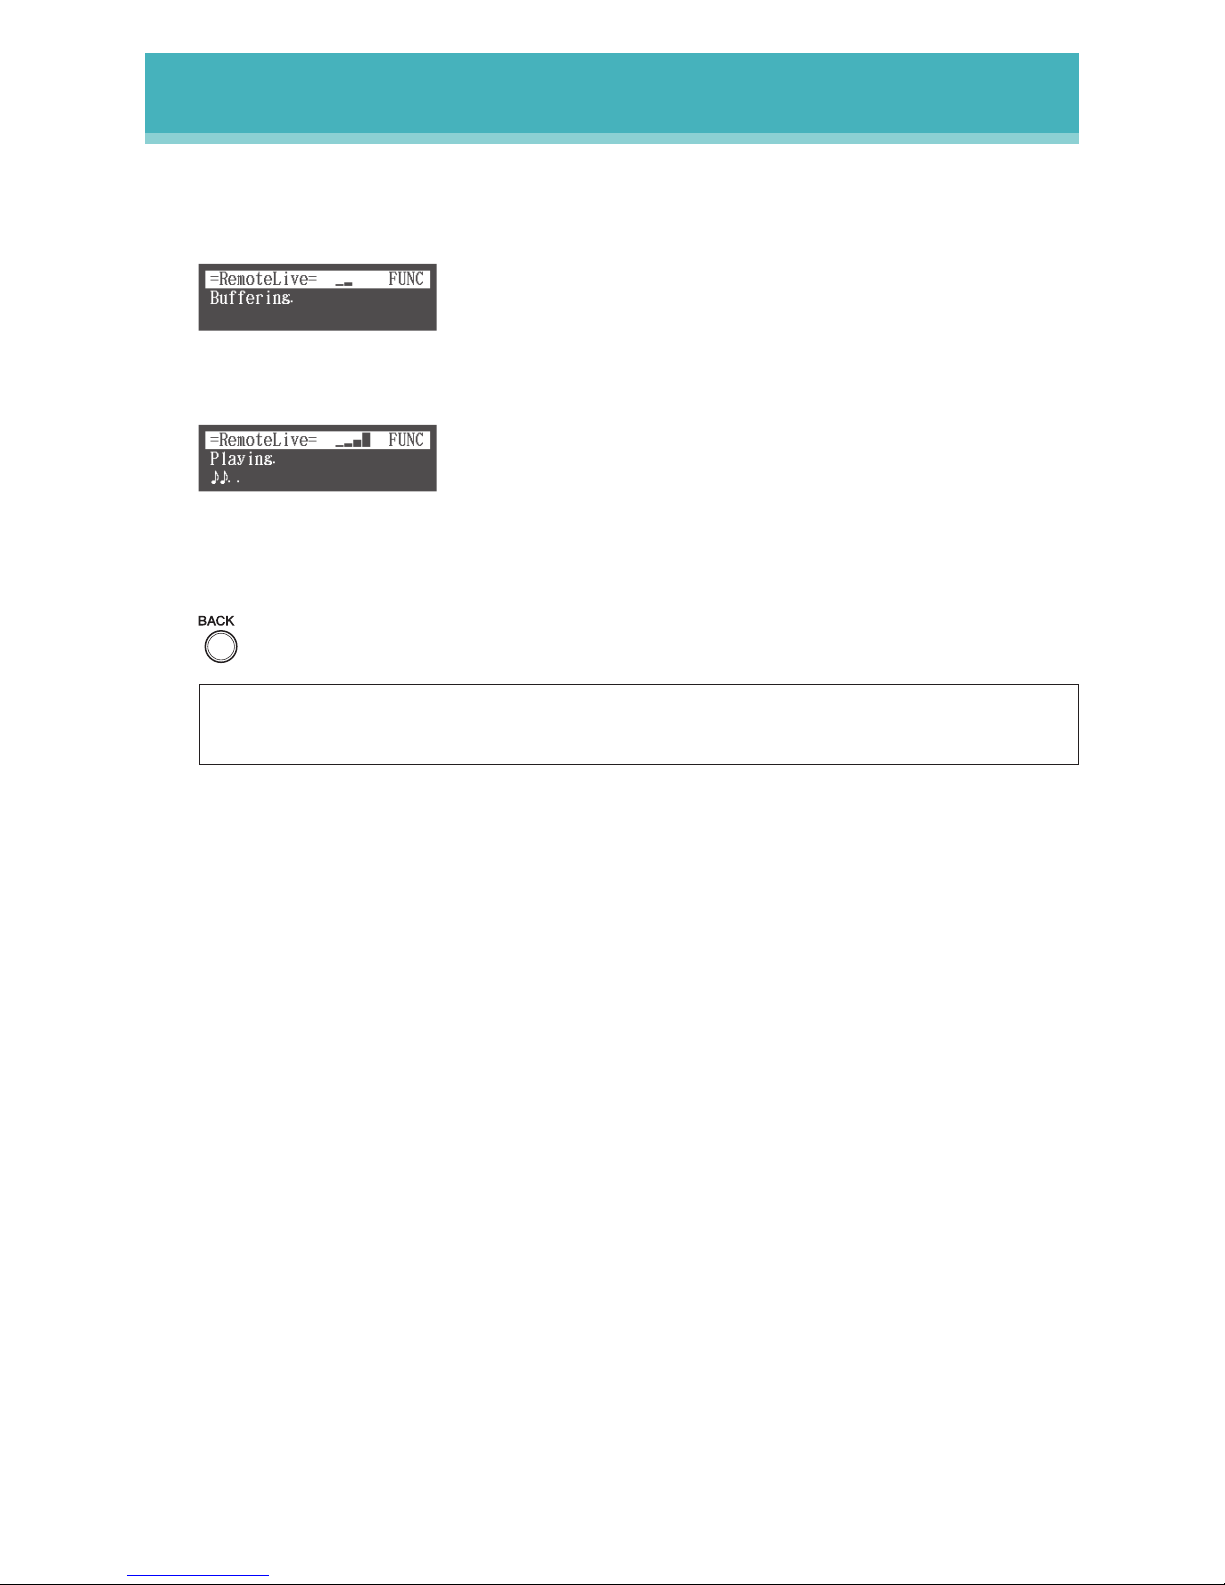
Start playing back the video on the website.
Your Disklavier starts to receive the data.
Buffering.
=RemoteLive=
FUNC
6
Confirm that piano playback is synchronized with the video.
Playing.
..
=RemoteLive=
FUNC
7
Stop playing back the video, then press [BACK] on the remote control to return to
the Internet menu screen.
Note: Playback of your piano may continue for a while even after you have stopped playing
back the video content. This is not a malfunction.
Page 24
24
DisklavierTV User’s Guide (For Disklavier E3 and DKC-850 Users)
Adjustments
Adjusting the Main Volume
You can adjust overall volume with the remote control (or the control unit).
1
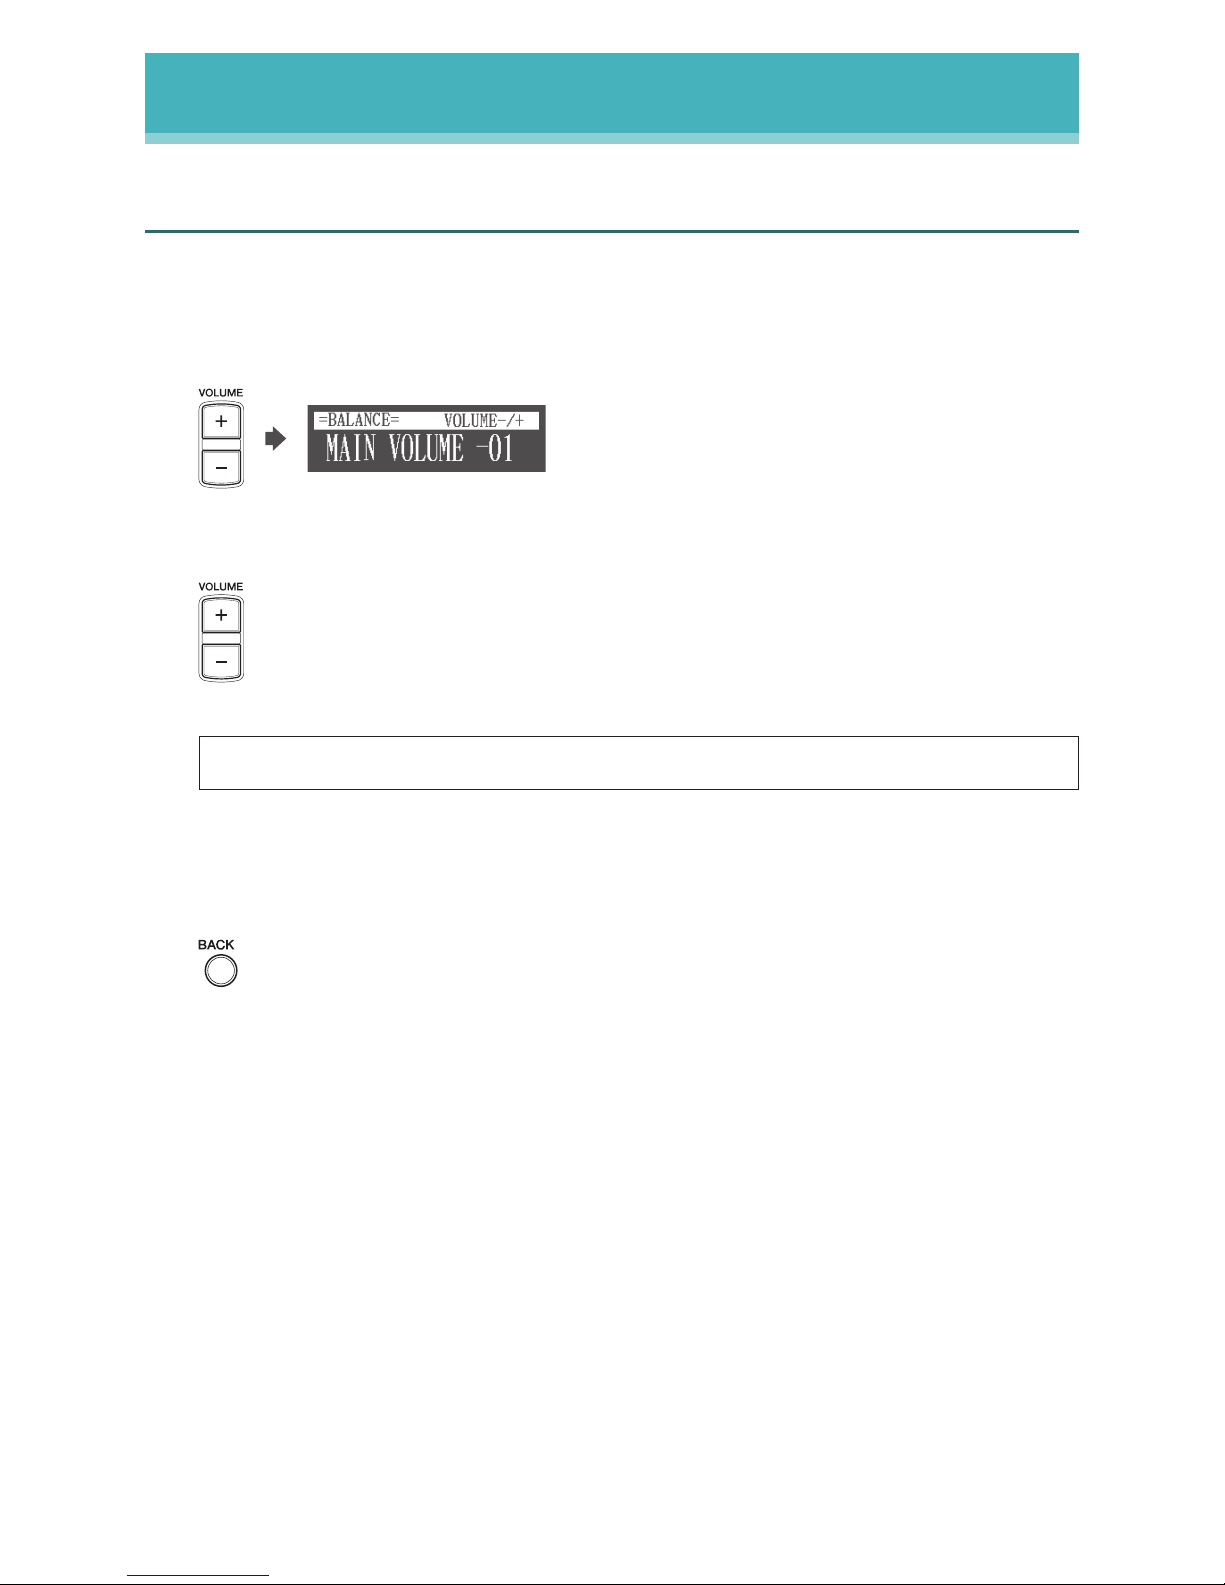
Press [VOLUME +] or [VOLUME –] on the remote control.
The main volume setting screen appears.
MAIN VOLUME -01
=BALANCE=
VOLUME-/+
2
Press [VOLUME +] or [VOLUME –] to adjust the volume.
Volume can be adjusted in a range of –10 to 0.
Note: You can also use the dial on the control unit to adjust the volume.
The main volume setting screen will disappear after 5 seconds, and the screen returns
to the previous one.
If you want to return quickly, press [BACK] on the remote control.
Page 25
25
DisklavierTV User’s Guide (For Disklavier E3 and DKC-850 Users)
Adjustments
Adjusting the Audio Volume Balance
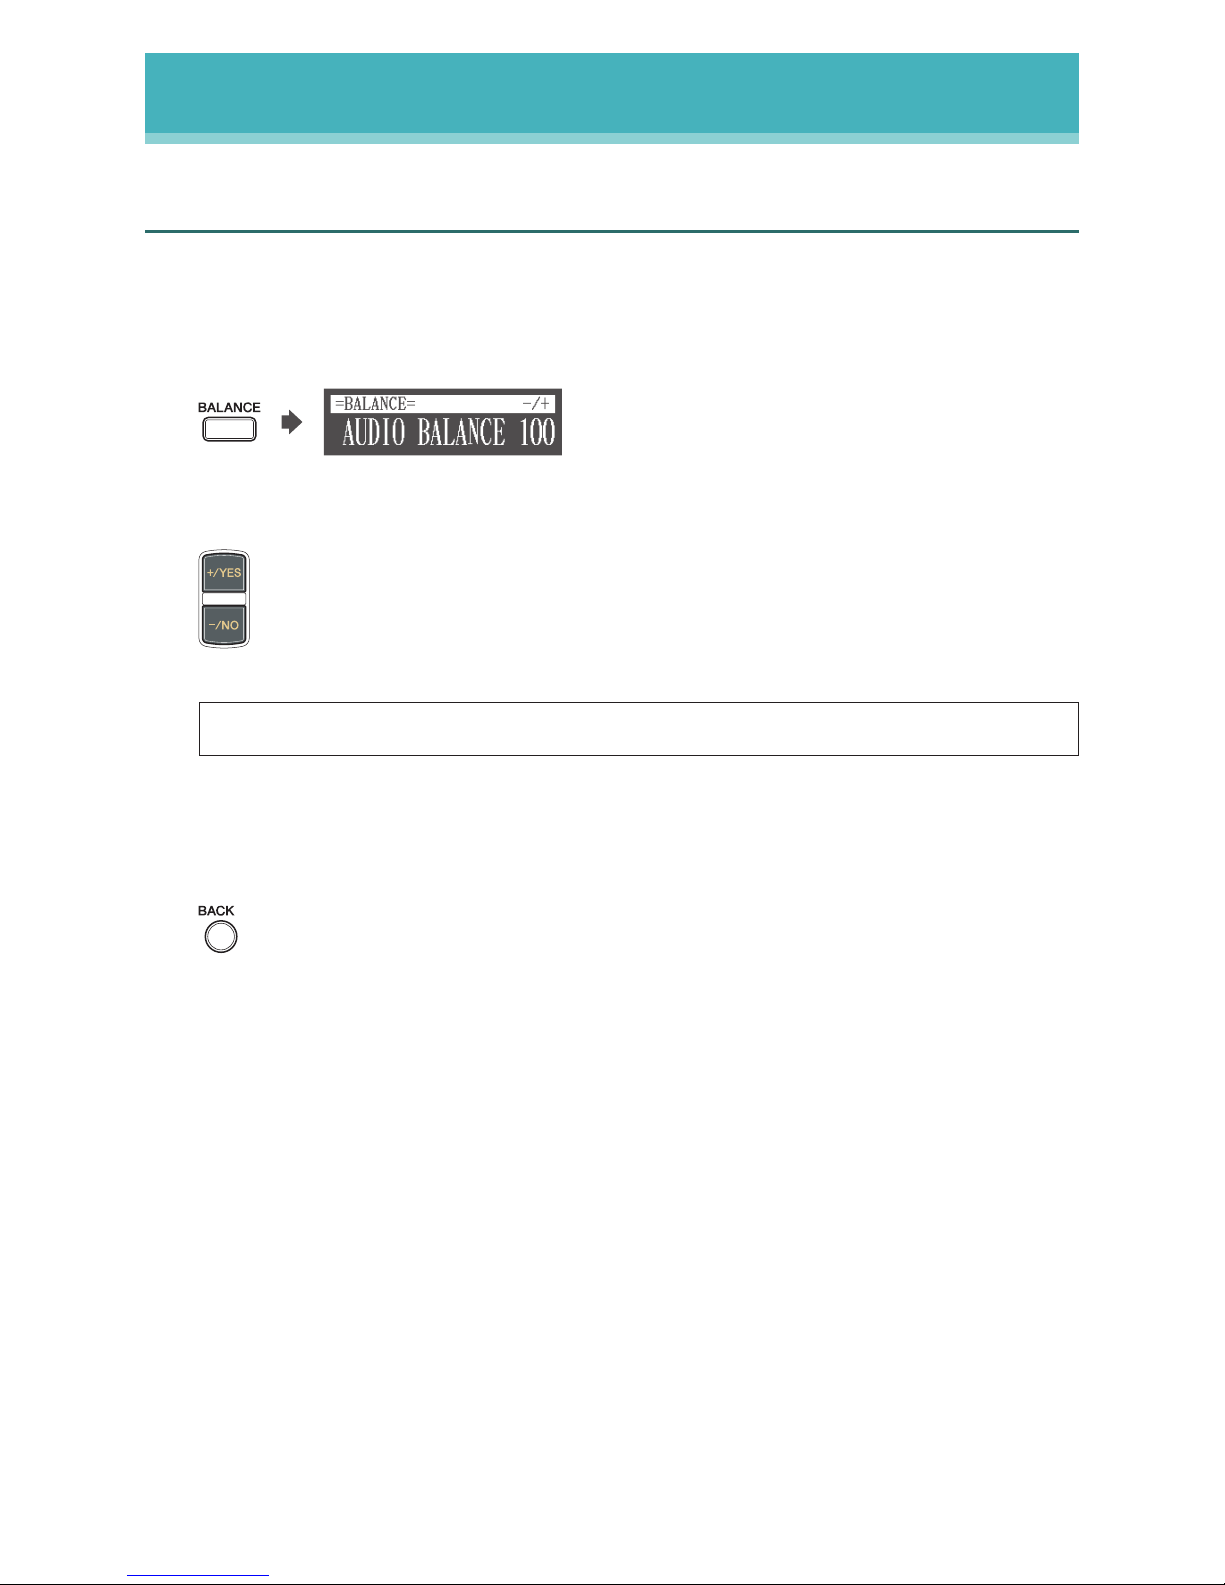
You can adjust the volume of the audio in balance with the piano sound.
1
Press [BALANCE] on the remote control.
The audio balance setting screen appears.
AUDIO BALANCE 100
=BALANCE=
-/+
2
Press [+/YES] and [–/NO] to adjust the volume of the audio.
Audio volume balance can be adjusted in a range of 0 to 127.
Note: You can also use the dial on the control unit to adjust the volume.
The audio balance setting screen will disappear after 5 seconds, and the screen returns
to the previous one.
If you want to return quickly, press [BACK] on the remote control.
Page 26
26
DisklavierTV User’s Guide (For Disklavier E3 and DKC-850 Users)
Connection Diagram (Advanced)
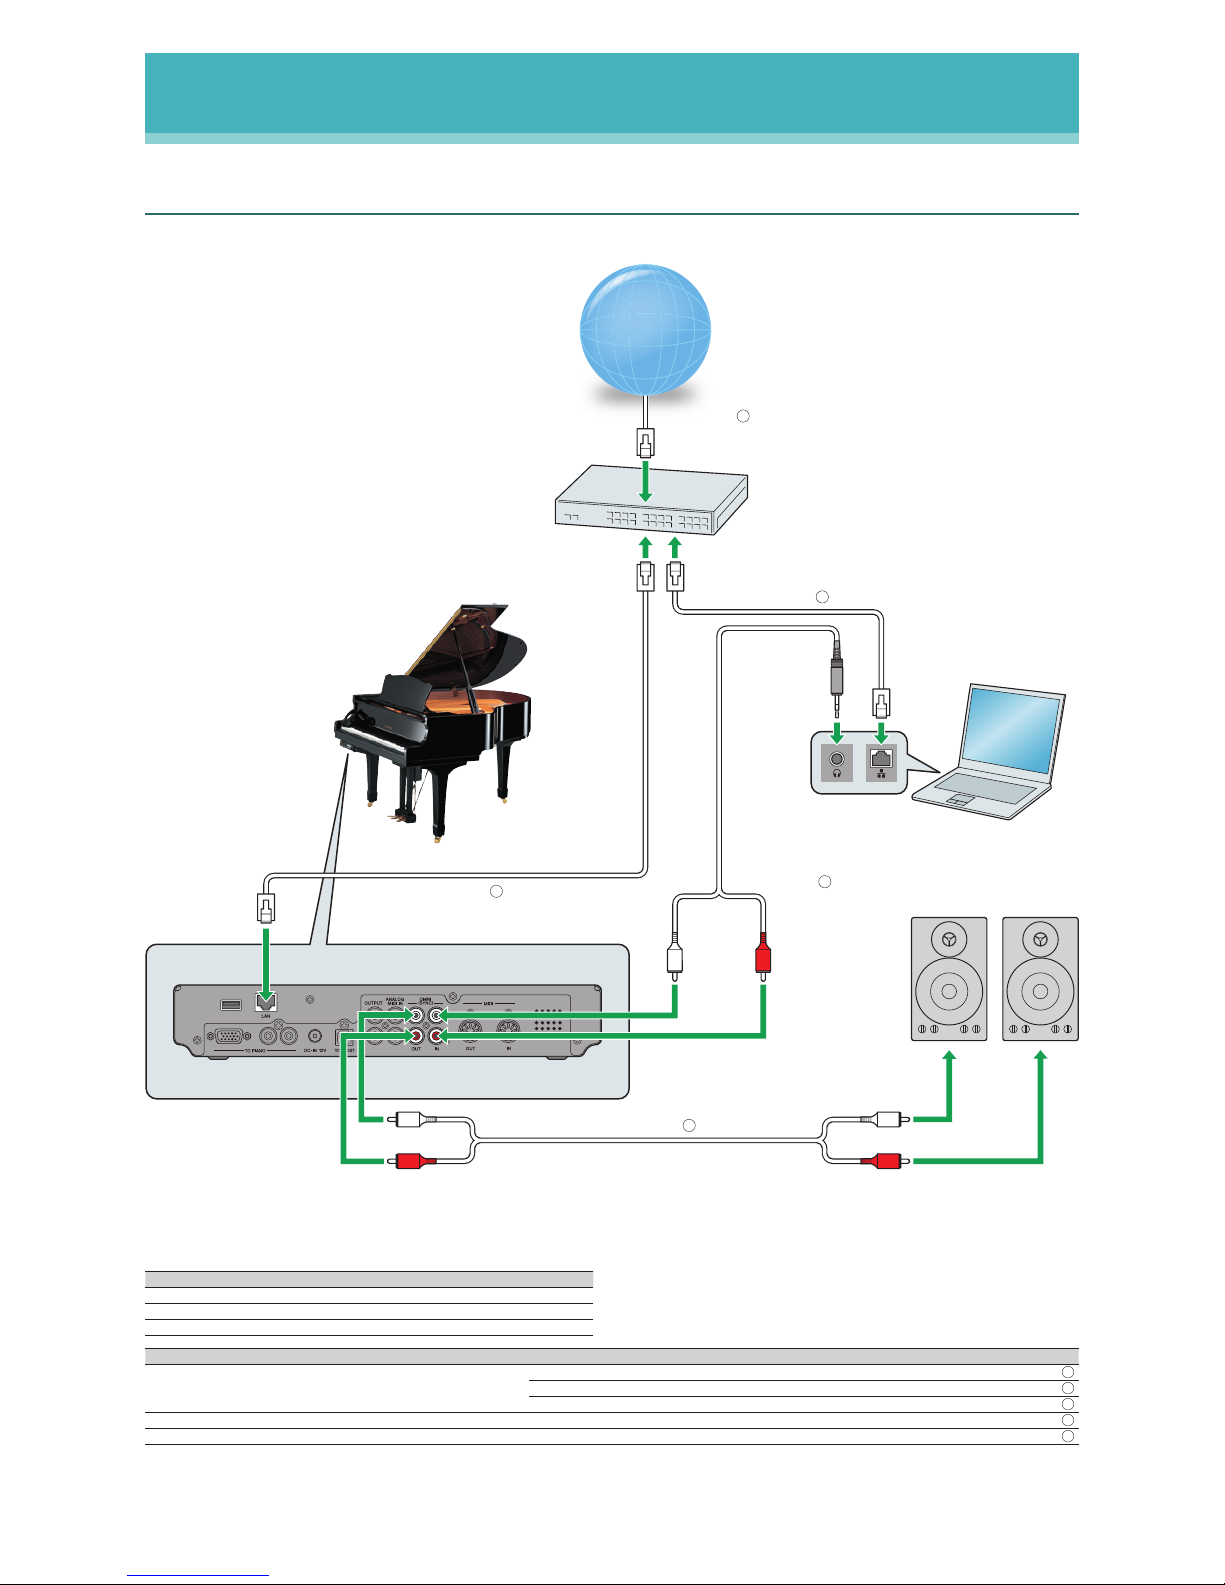
Watching on Your Computer with External Speakers
Computer
Control unit (rear)
Switching
hub
Disklavier
Amplified speakers
Internet / LAN
LAN cable ( )
LAN cable ( )
3
Audio cable ( )
4
Audio cable ( )
5
LAN cable ( )
2
1
Equipment
Computer (Windows or Mac) 1
Switching hub
*1
1
Amplified speaker 2
Cables From To
LAN cable
1 Modem/router Switching hub
1 Switching hub Computer
1 Switching hub Disklavier
Audio cable A (stereo mini pin - 2 RCA males)
*2
1 Computer Disklavier (OMNI IN)
Audio cable B (2 RCA males - 2 RCA males) 1 Disklavier (OMNI OUT)
*3
Speaker
*1
You do not need the switching hub if your router has more than 2 empty LAN ports.
*2
DO NOT use cables with impedance changers.
*3
Change the OMNI OUT setting of your Disklavier to “Output.” (Press [SETUP] > Select “AudioI/O” > Select “OMNI OUT”)
1
2
3
4
5
Requirements (These items are NOT supplied with Disklavier.)
Page 27
27
DisklavierTV User’s Guide (For Disklavier E3 and DKC-850 Users)
Connection Diagram (Advanced)
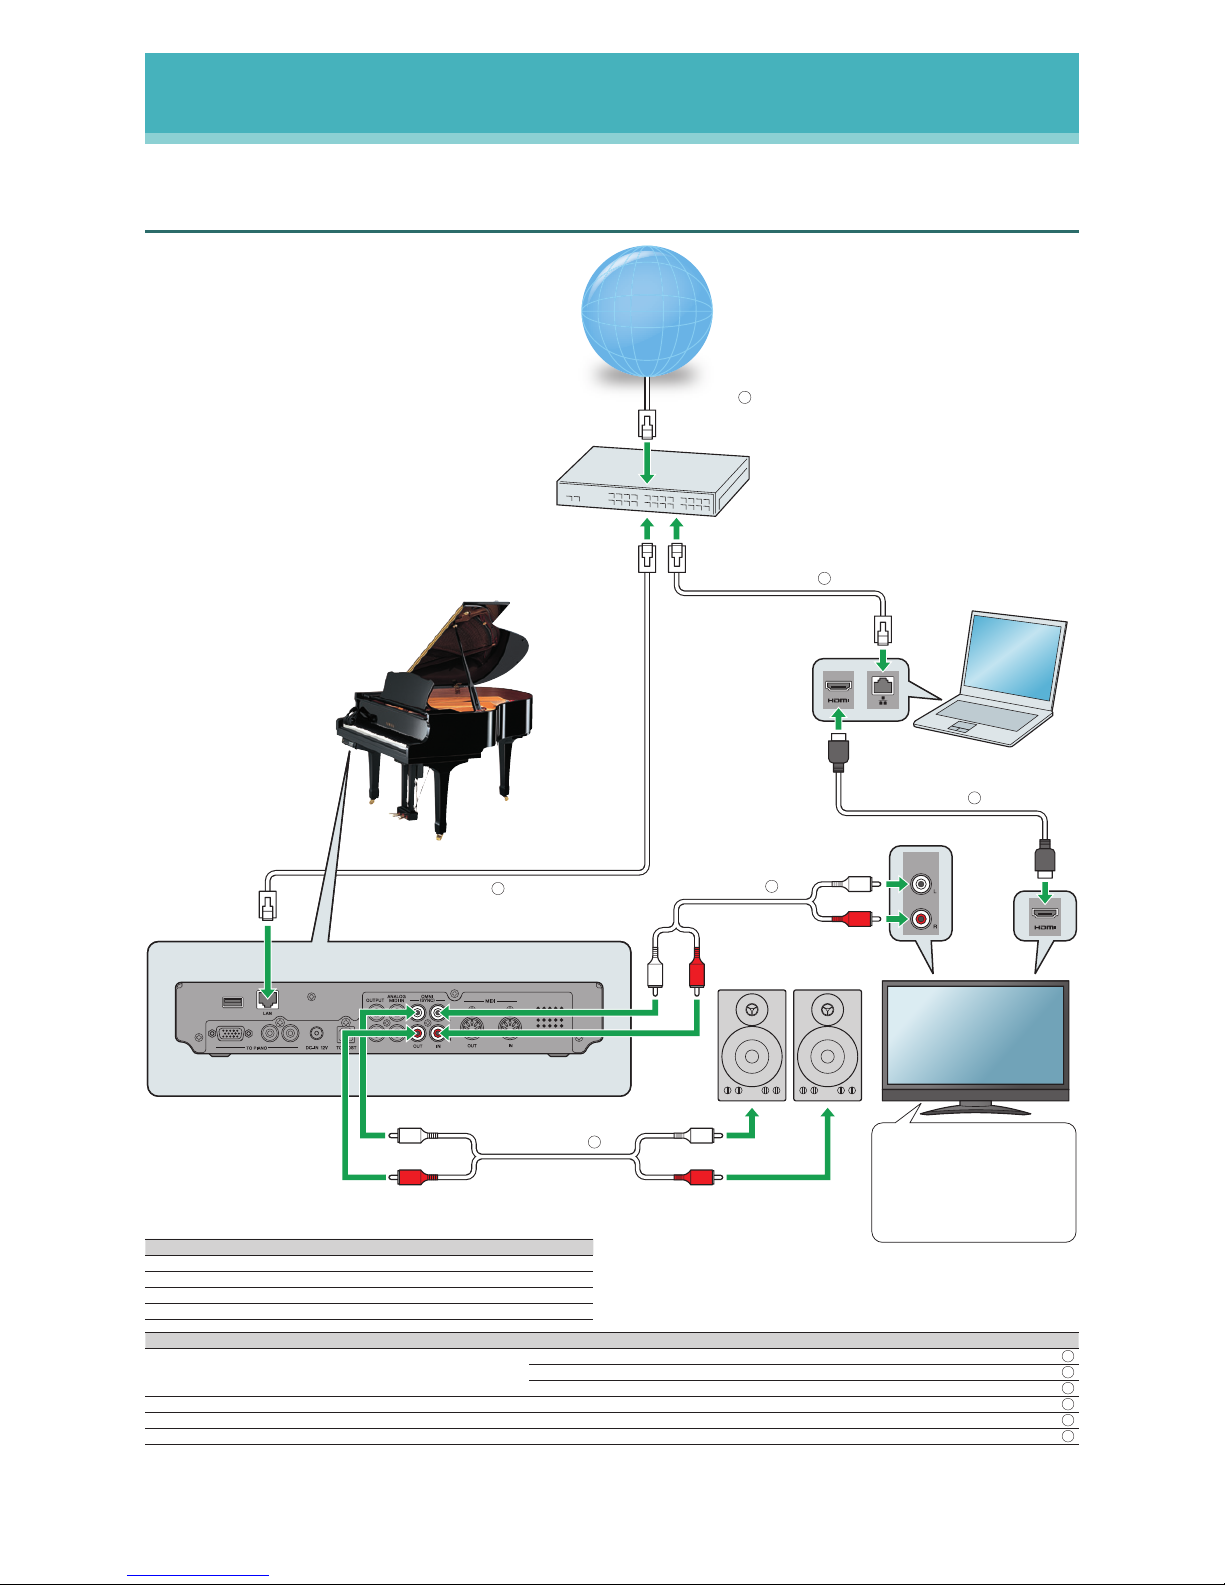
Watching on Your TV with External Speakers
AUDIO
OUT
LAN cable ( )
Switching
hub
Internet / LAN
Computer
LAN cable ( )
2
1
HDMI cable ( )
4
Amplified speakers
TV
Audio cable ( )
5
6
Audio cable ( )
Control unit (rear)
Disklavier
LAN cable ( )
3
Set the volume as follows:
• TV: 0
• Audio output jacks: fixed
For details, refer to the
manual of your TV.
Equipment
Computer (Windows or Mac) 1
Switching hub
*1
1
TV (with HDMI input and audio output) 1
Amplified speaker 2
Requirements (These items are NOT supplied with Disklavier.)
Cables From To
LAN cable
1 Modem/router Switching hub
1 Switching hub Computer
1 Switching hub Disklavier
HDMI cable 1 Computer TV
Audio cable A (2 RCA males - 2 RCA males)
*2
1 TV Disklavier (OMNI IN)
Audio cable B (2 RCA males - 2 RCA males) 1 Disklavier (OMNI OUT)
*3
Speaker
*1
You do not need the switching hub if your router has more than 2 empty LAN ports.
*2
Cable required depends on your TV.
*3
Change the OMNI OUT setting of your Disklavier to “Output.” (Press [SETUP] > Select “AudioI/O” > Select “OMNI OUT”)
1
2
3
4
5
6
Page 28
28
DisklavierTV User’s Guide (For Disklavier E3 and DKC-850 Users)
Connection Diagram (Advanced)
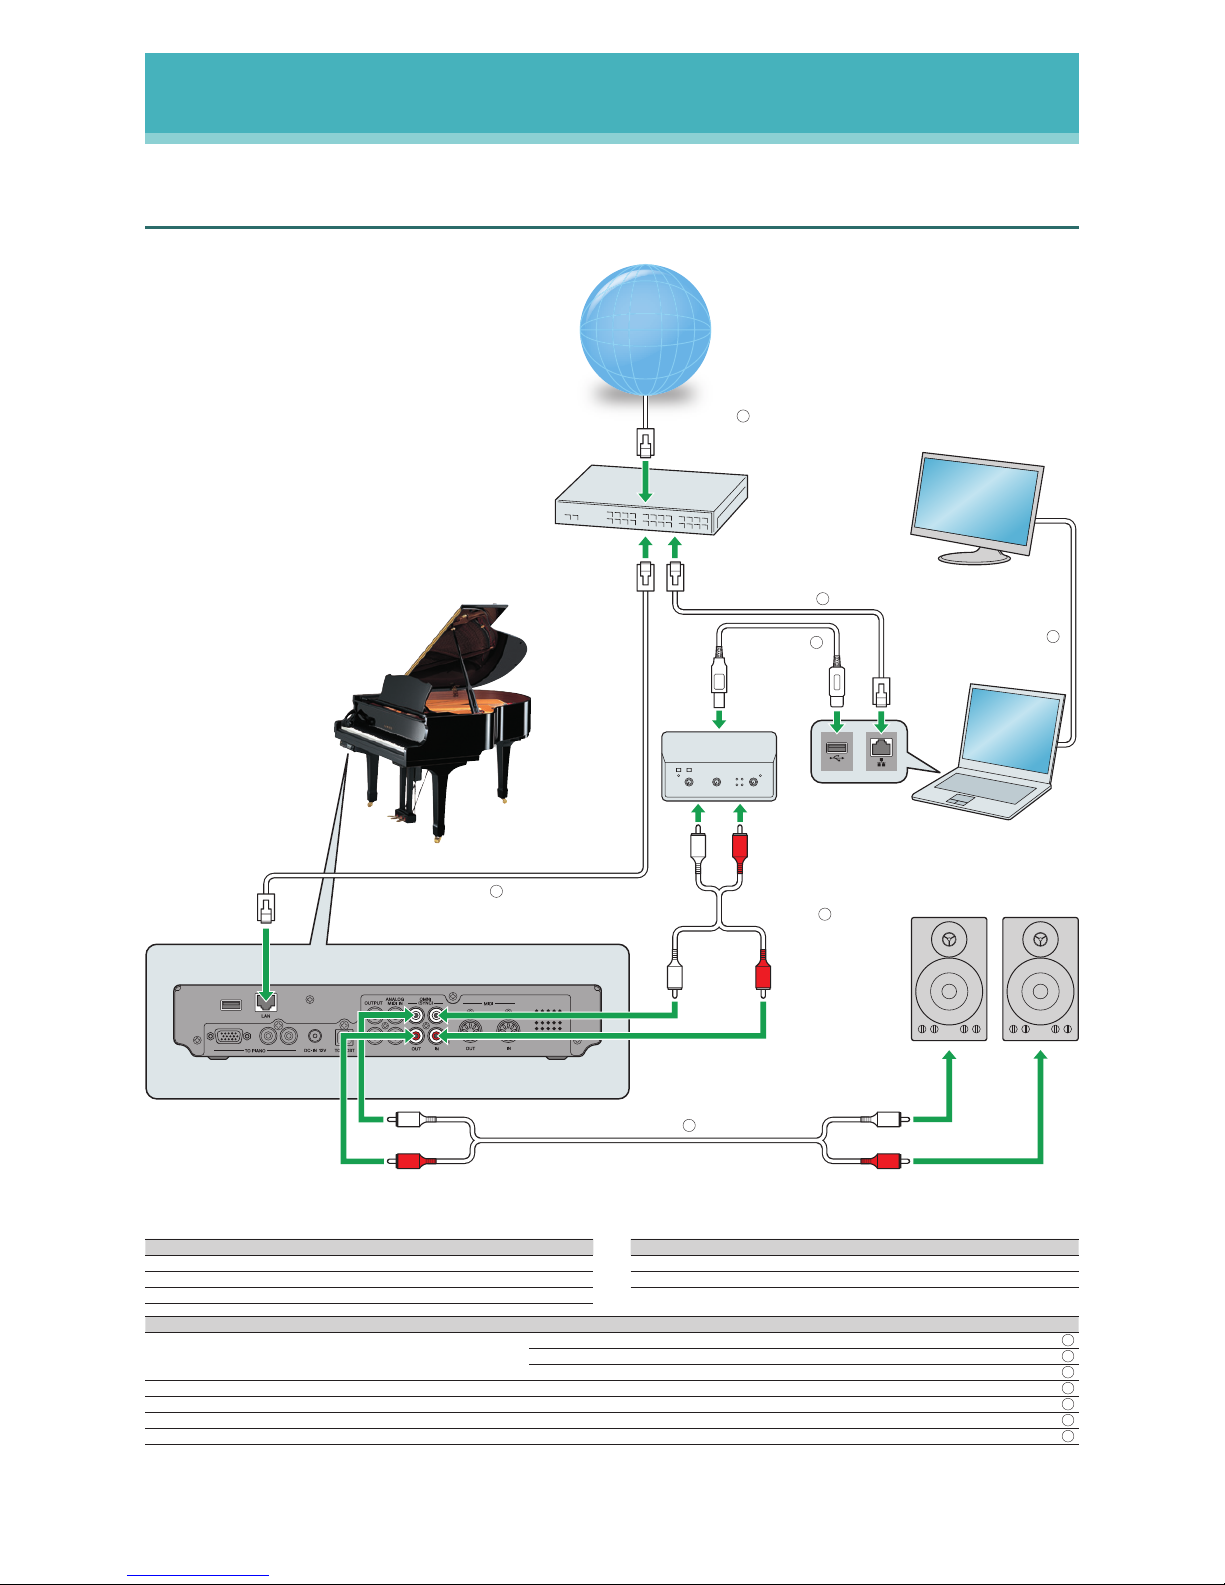
Watching Video with High Quality Audio and External Monitor
Equipment
Computer (Windows or Mac) 1
Switching hub
*1
1
Amplified speaker 2
Equipment
Yamaha AUDIOGRAM3 1
Monitor 1
Cables From To
LAN cable
1 Modem/router Switching hub
1 Switching hub Computer
1 Switching hub Disklavier
USB cable 1 Computer AUDIOGRAM3
Audio cable A (2 RCA males - 2 RCA males)
*2
1 AUDIOGRAM3 Disklavier (OMNI IN)
Audio cable B (2 RCA males - 2 RCA males) 1 Disklavier (OMNI OUT)
*3
Speaker
Display cable 1 Computer Monitor
*1
You do not need the switching hub if your router has more than 2 empty LAN ports.
*2
DO NOT use cables with impedance changers.
*3
Change the OMNI OUT setting of your Disklavier to “Output.” (Press [SETUP] > Select “AudioI/O” > Select “OMNI OUT”)
1
2
3
4
5
6
7
Control unit (rear)
Disklavier
Amplified speakers
LAN cable ( )
3
Switching
hub
Internet / LAN
Monitor
Computer
USB cable ( )
AUDIOGRAM3
LAN cable ( )
LAN cable ( )
Audio cable ( )
5
4
Audio cable ( )
6
2
Display
cable ( )
7
1
Requirements (These items are NOT supplied with Disklavier.)
Page 29
29
DisklavierTV User’s Guide (For Disklavier E3 and DKC-850 Users)
Appendix
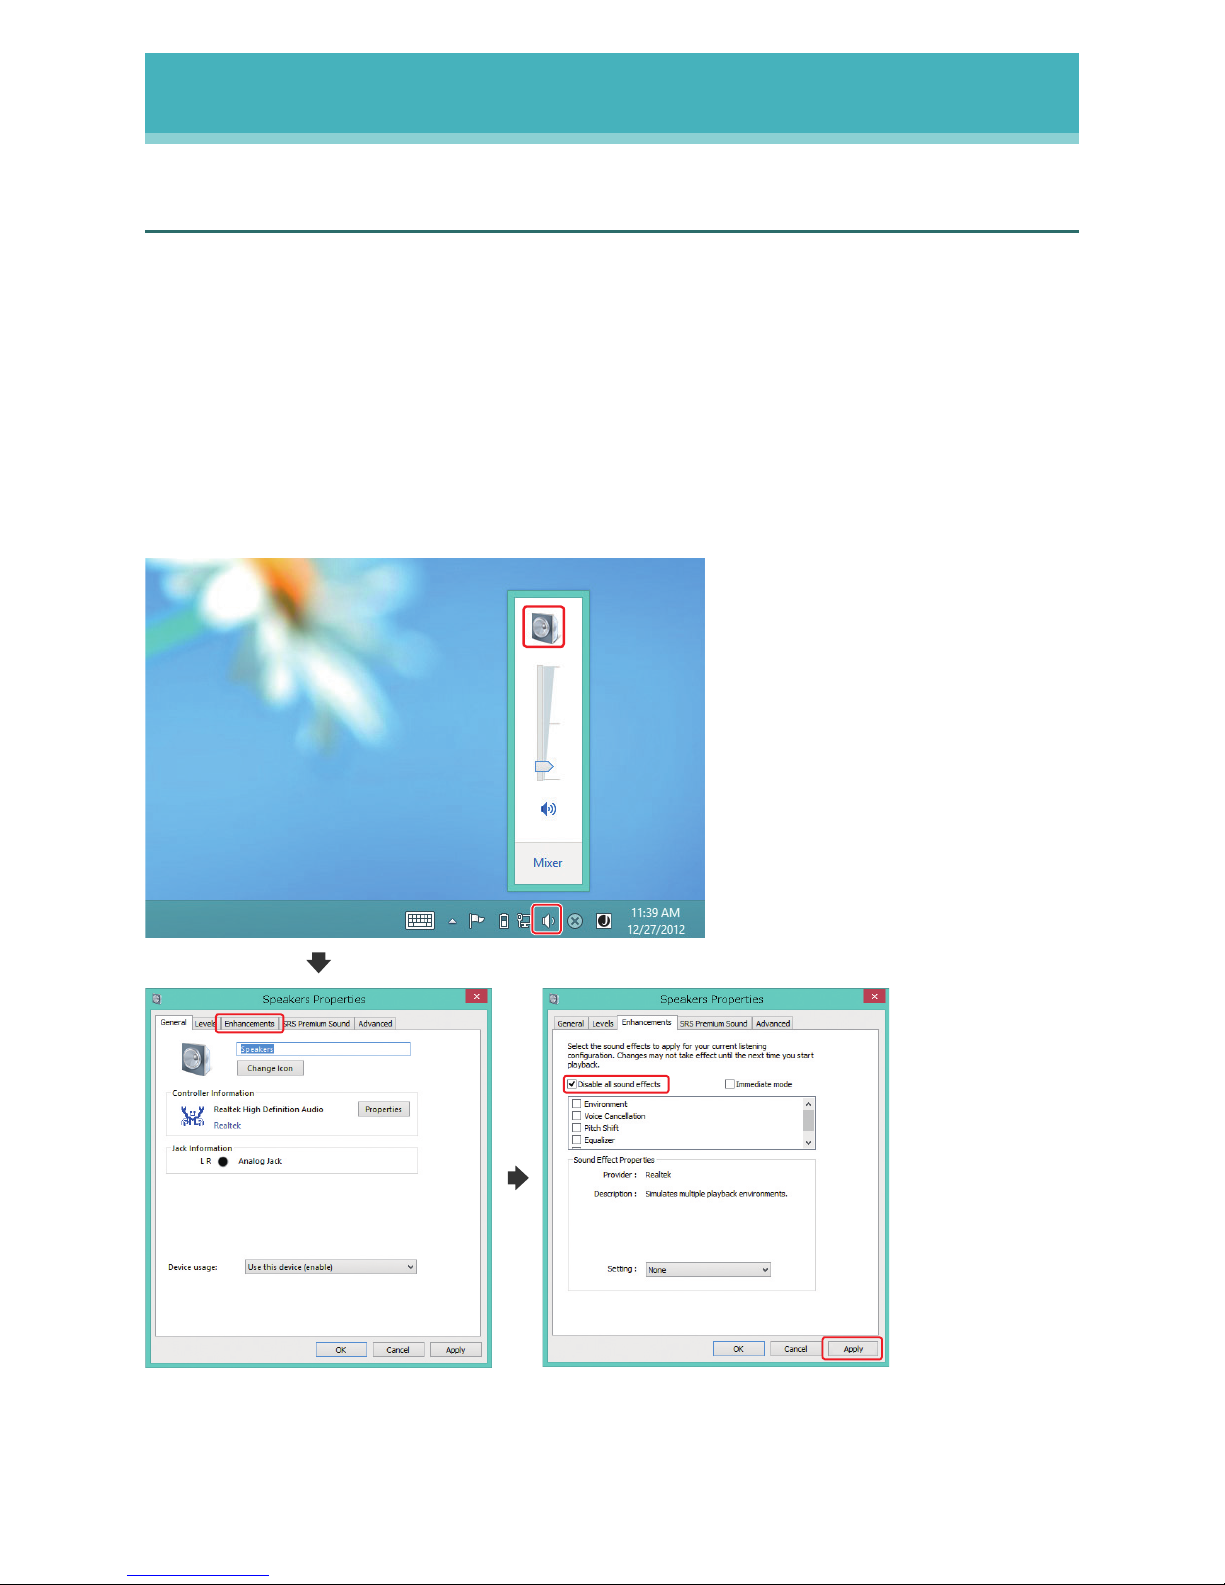
Windows 7 and 8 Audio Considerations
The “sound enhancements” provided by Windows 7 and 8 may be desirable for normal audio
enjoyment. However, these enhancements cause problems for receiving broadcast or
viewing on-demand content, because the RemoteLive technology requires discrete
separation between the left and right audio channels. For this reason, you MUST disable all
audio enhancements.
Please check the setting on your own computer. Location is different depending upon
manufacturer. Here is an example setting.
Start > Desktop > Click the speaker icon > Enhancements > Disable all sound effects > Apply
Page 30
30
DisklavierTV User’s Guide (For Disklavier E3 and DKC-850 Users)
Appendix
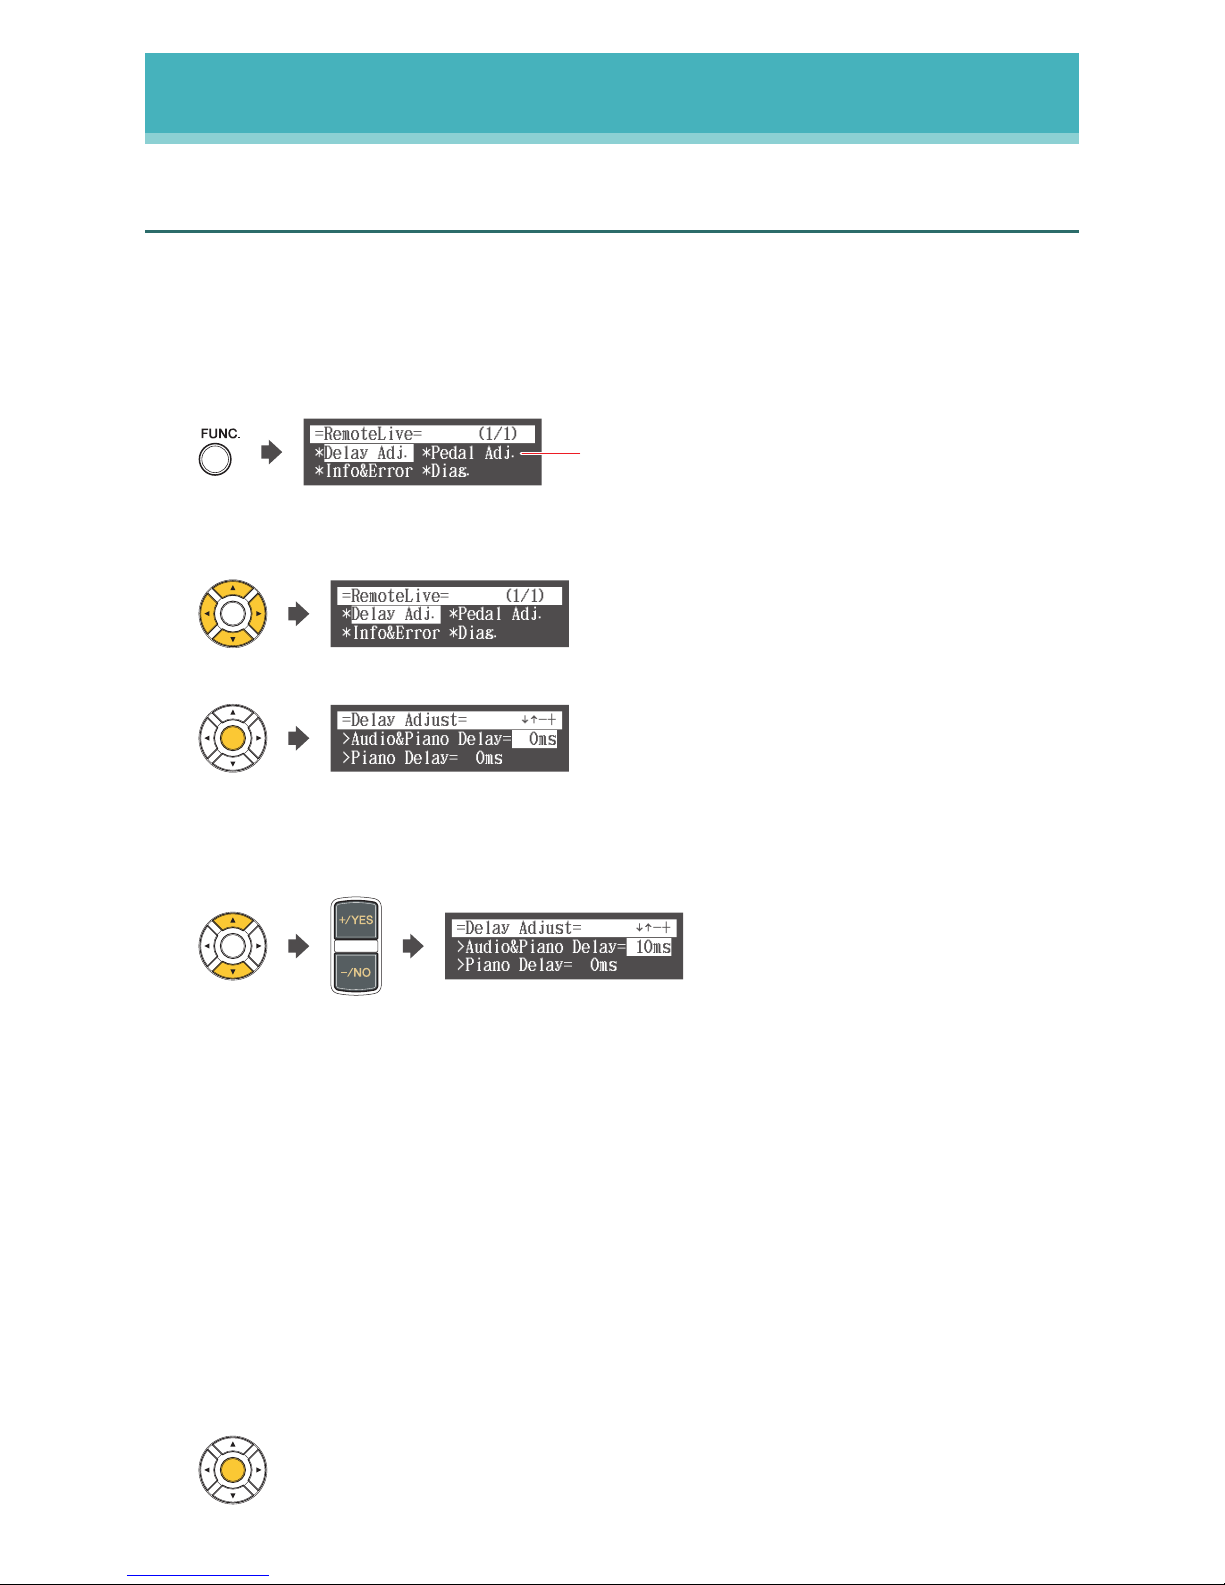
Adjusting the Delay
When there is a disparity between the video or audio and the piano playback, you can adjust
the piano playback or audio delay in order to match the video or audio.
1
Press [FUNC.] in the RemoteLive screen.
The RemoteLive function menu screen appears.
*Delay Adj.
*Info&Error *Diag.
*Pedal Adj.
=RemoteLive=
(1/1)
“Pedal Adj.” appears on Disklavier E3 only.
2
Select “Delay Adj.” with the cursor buttons ([◄] [►] [▲] [▼]), then press [ENTER].
*Delay Adj.
*Info&Error *Diag.
*Pedal Adj.
=RemoteLive=
(1/1)
The Delay Adjust screen appears.
>Audio&Piano Delay= 0ms
>Piano Delay= 0ms
=Delay Adjust=
-+
3
Select a desired option with the cursor buttons ([▲] [▼]), then press [+/YES] and
[–/NO] to change setting.
>Audio&Piano Delay= 10ms
>Piano Delay= 0ms
=Delay Adjust=
-+
Audio & Piano Delay
You can adjust the delay of the piano playback and audio input through the OMNI IN
jacks in order to match the video.
The delay time can be adjusted in a range of 0 ms to 500 ms. Increase this value to
delay the piano playback and audio input.
Piano Delay
You can adjust the piano playback delay in order to match the audio from the device
connected to the OUTPUT jacks.
The delay time can be adjusted in a range of 0 ms to 100 ms. Increase this value to
delay the piano playback.
4
Press [ENTER] to complete the operation.
Page 31
31
DisklavierTV User’s Guide (For Disklavier E3 and DKC-850 Users)
Appendix
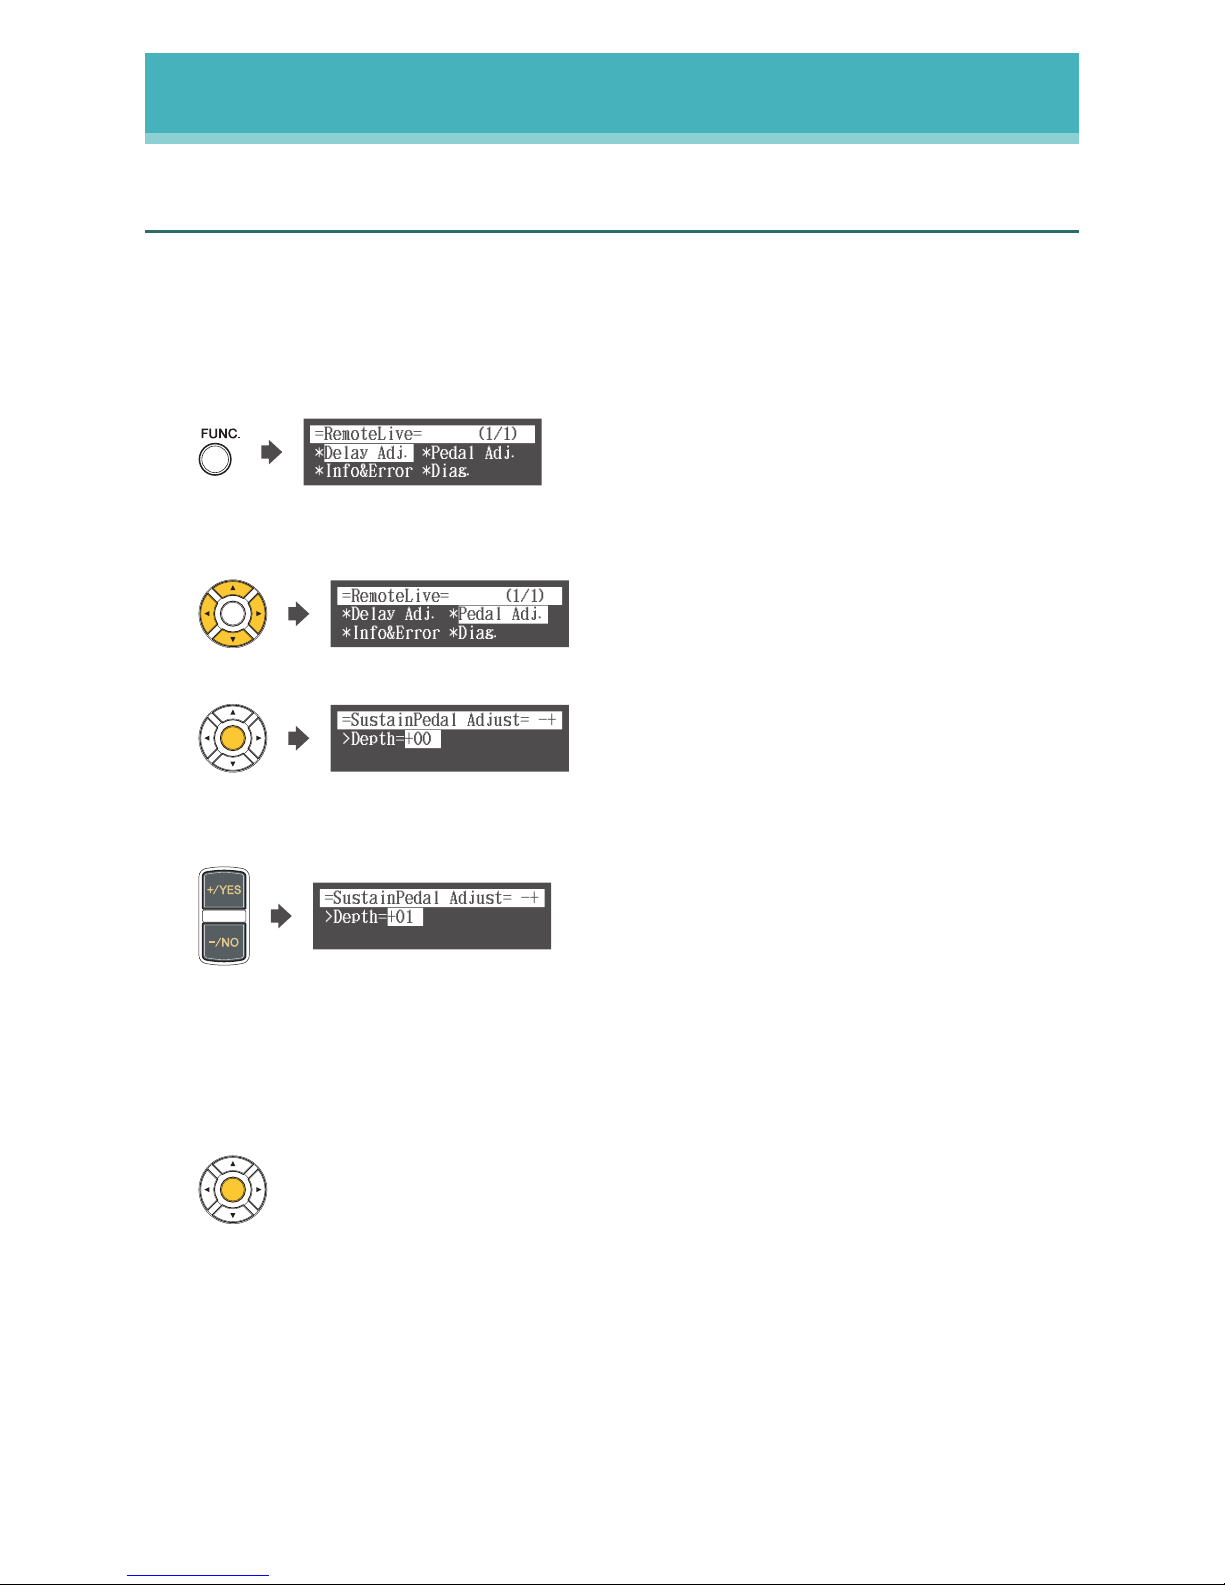
Adjusting the Depth of the Sustain Pedal
[This function is not available on the DKC-850.]
You can adjust the depth of the sustain pedal.
1
Press [FUNC.] in the RemoteLive screen.
The RemoteLive function menu screen appears.
*Delay Adj.
*Info&Error *Diag.
*Pedal Adj.
=RemoteLive=
(1/1)
2
Select “Pedal Adj.” with the cursor buttons ([◄] [►] [▲] [▼]), then press [ENTER].
*Delay Adj.
*Info&Error *Diag.
*Pedal Adj.
=RemoteLive=
(1/1)
The Sustain Pedal Adjust screen appears.
>Depth=+00
=SustainPedal Adjust=
-+
3
Press [+/YES] and [–/NO] to change setting while listening to the piano playback.
>Depth=+01
=SustainPedal Adjust=
-+
Increasing this value increases the effect of the sustain pedal, and decreasing this value
decreases the effect of the sustain pedal.
The setting range varies depending on the model and its condition.
4
Press [ENTER] to complete the operation.
Page 32
32
DisklavierTV User’s Guide (For Disklavier E3 and DKC-850 Users)
Appendix
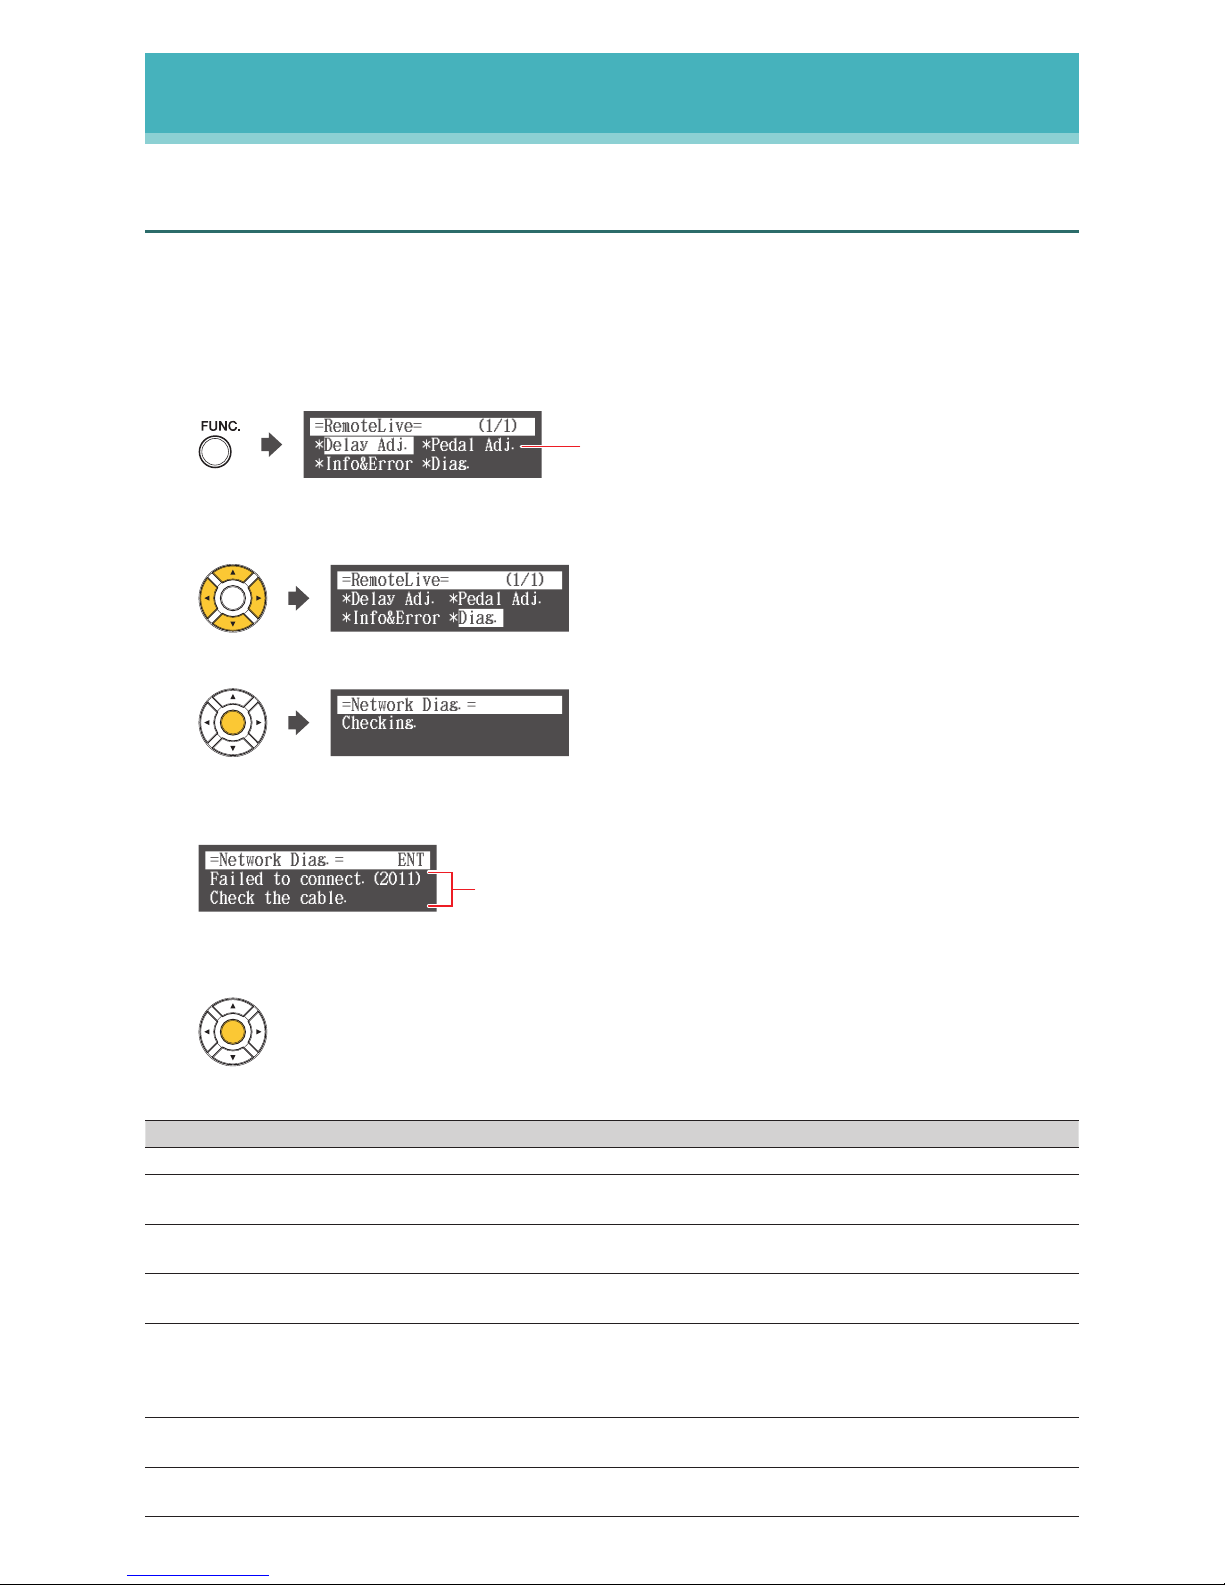
Network Diagnostics
In some cases, it may be necessary to perform network diagnostics to determine the cause
of problems. In these instances, follow the procedure below:
1
Press [FUNC.] in the RemoteLive screen.
The RemoteLive function menu screen appears.
*Delay Adj.
*Info&Error *Diag.
*Pedal Adj.
=RemoteLive=
(1/1)
“Pedal Adj.” appears on Disklavier E3 only.
2
Select “Diag.” with the cursor buttons ([◄] [►] [▲] [▼]), then press [ENTER].
*Delay Adj.
*Info&Error *Diag.
*Pedal Adj.
=RemoteLive=
(1/1)
The Network Diagnostics screen appears and the diagnostics start.
Checking.
=Network Diag.=
When the diagnostics process is completed, the resulting error number and message is
displayed.
Failed to connect.(2011)
Check the cable.
=Network Diag.=
ENT
Error number and message
3
Press [ENTER] to complete the operation.
Error Messages
Number Message Remedy
0000 Network OK.(0000) No problem.
2011 Failed to connect.(2011)
Check the cable.
Make sure that your Disklavier is connected properly to network with
a network cable.
2012 Failed to connect.(2012)
Check Network setting.
Make sure that the IP address of your Disklavier has been set
correctly.
2013 Failed to connect.(2013)
Check DNS setting.
Make sure that the DNS server address has been set correctly.
2014 Failed to connect.(2014)
DNS is not available.
Make sure that the overall network settings (DHCP setting, DNS
server address, IP address, subnet mask and gateway server
address) on your Disklavier have been set correctly. If the problem
persists, please contact your internet service provider.
2015 Failed to connect.(2015)
Check Proxy setting.
Make sure that the proxy server has been set correctly.
2010 Failed to connect.(2010)
Cannot connect to server.
The RemoteLive server may be temporarily down for maintenance.
Please try again later.
Page 33
33
DisklavierTV User’s Guide (For Disklavier E3 and DKC-850 Users)
Appendix
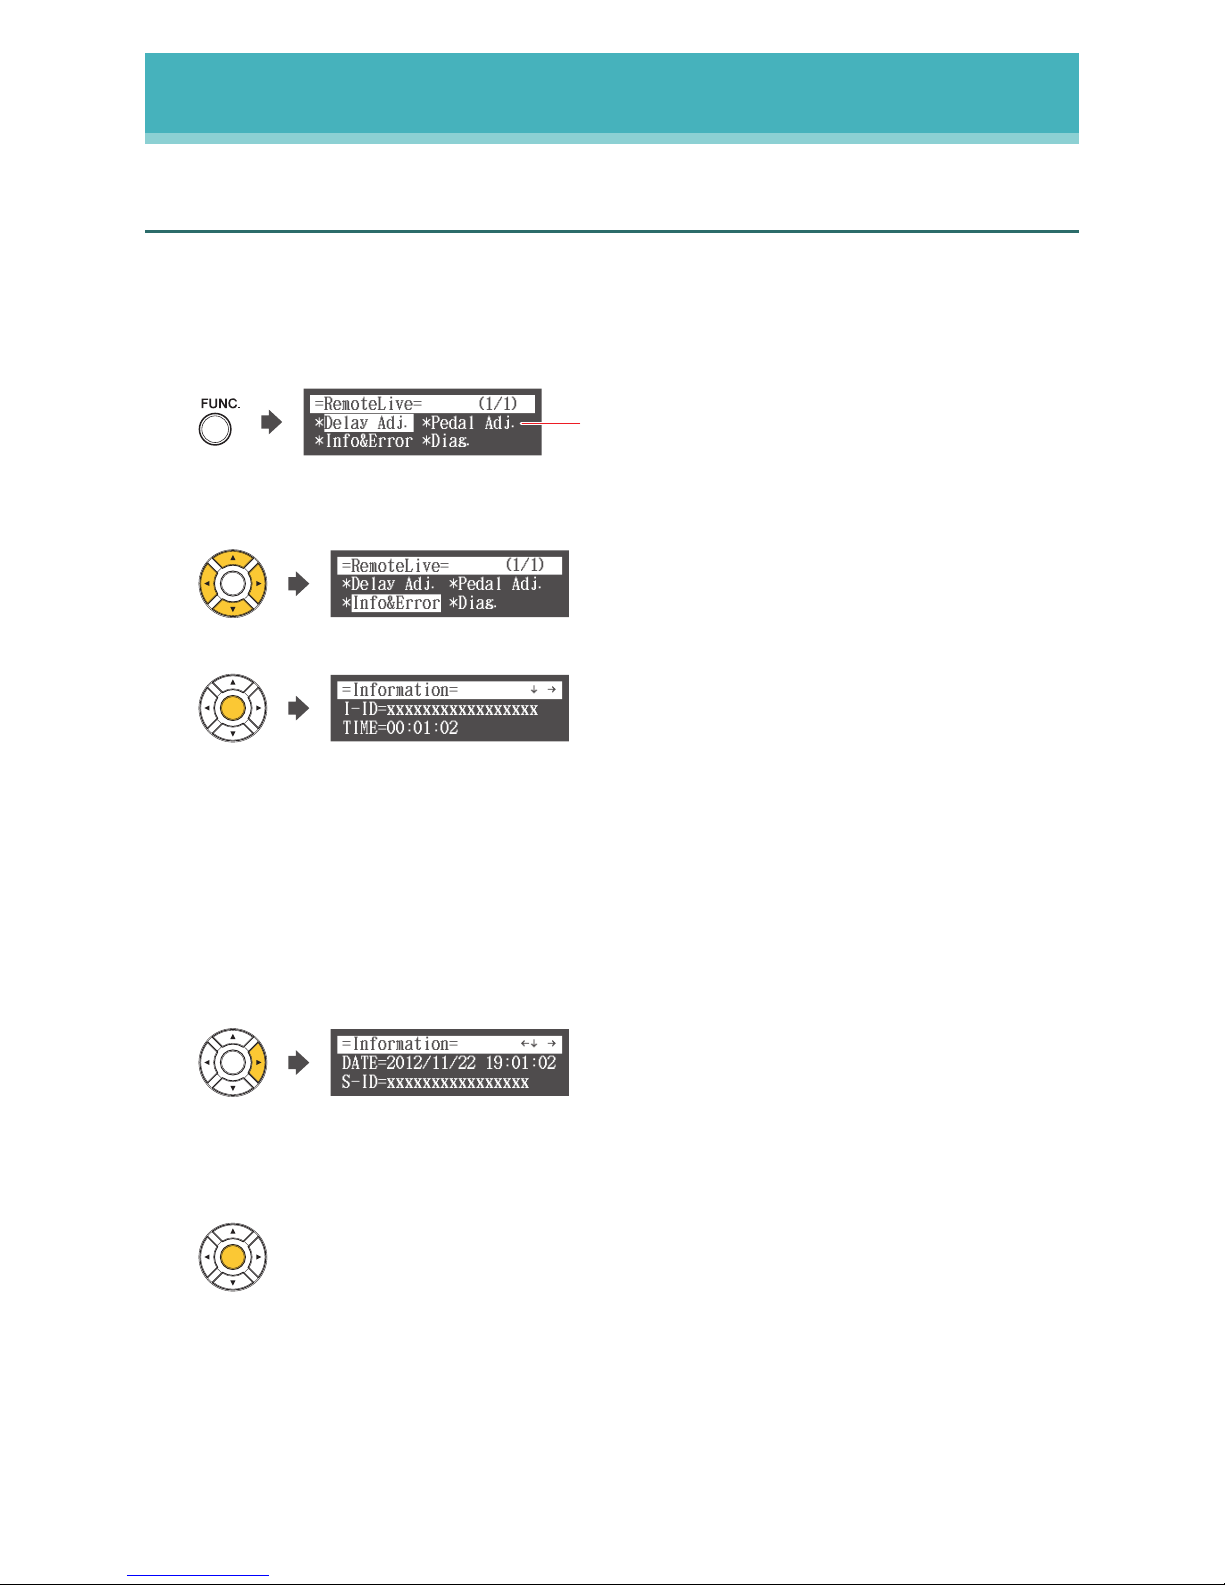
Checking the Broadcast Information and Error History
You can check the information about the broadcast and the error history.
1
Press [FUNC.] in the RemoteLive screen.
The RemoteLive function menu screen appears.
*Delay Adj.
*Info&Error *Diag.
*Pedal Adj.
=RemoteLive=
(1/1)
“Pedal Adj.” appears on Disklavier E3 only.
2
Select “Info&Error” with the cursor buttons ([◄] [►] [▲] [▼]), then press [ENTER].
*Delay Adj.
*Info&Error *Diag.
*Pedal Adj.
=RemoteLive=
(1/1)
The Information screen appears.
I-ID=xxxxxxxxxxxxxxxxx
TIME=00:01:02
=Information=
The Information screen includes the following information:
I-ID:
ID of the broadcast Disklavier
TIME: Playing time of your Disklavier
DATE: Date and time when your Disklavier was played back
S-ID: ID of the piano performance data
S-ID2: ID of the piano performance data
3
To check the next information, press the cursor button ([►]).
DATE=2012/11/22 19:01:02
S-ID=xxxxxxxxxxxxxxxx
=Information=
To return to the previous information, press the cursor button ([◄]).
4
Press [ENTER] to complete the operation.
Page 34

34
DisklavierTV User’s Guide (For Disklavier E3 and DKC-850 Users)
Troubleshooting
■
Error Messages
Number Message
Point to be Checked
2011 IDC/Diag error Controller Make sure that the Ethernet cable is securely connected
into your Disklavier.
2014 IDC/Diag error Controller Make sure that the DHCP setting on your Disklavier is
appropriate.
2015 IDC/Diag error Controller Make sure that you have entered the correct name and
port number for the proxy server.
2014 IDC/Diag error Controller Make sure that you have entered the correct address of
the gateway server.
2013, 2014 IDC/Diag error Controller Make sure that you have entered the correct address of
the DNS server.
2012, 2014 IDC/Diag error Controller Contact Yamaha customer service.
– NoSubscription Controller Confirm your subscription status on Yamaha MusicSoft.
2011 IDC/Diag error Switching Hub Make sure that the AC power cable is connected to the
switching hub.
2011 IDC/Diag error Switching Hub Make sure that the switching hub is turned on.
2011 IDC/Diag error Switching Hub Make sure that the switching hub and Disklavier are
connected with the Ethernet cable.
2014 IDC/Diag error Switching Hub Make sure that the switching hub and router are
connected with the Ethernet cable.
2010, 2014 IDC/Diag error Router Make sure that the router setting is appropriate.
2014 IDC/Diag error Router Make sure that the AC power cable is connected to the
router.
2014 IDC/Diag error Router Make sure that the router is turned on.
2014 IDC/Diag error Router Make sure that the router and switching hub are
connected with the Ethernet cable.
2014 IDC/Diag error Router Make sure that your Disklavier obtains the IP address
correctly from the DHCP server.
Press [SETUP] on the remote control. Select “Network”
in the setup menu, and then “Information”. You can
confirm the IP address of your Disklavier.
2010, 2014 IDC/Diag error Internet Contact your ISP and confirm the contract for speed.
E901 Network Error Internet Contact your ISP and confirm the contract for speed.
Page 35

35
DisklavierTV User’s Guide (For Disklavier E3 and DKC-850 Users)
Troubleshooting
Piano
Symptom Remedy
The Disklavier does not turn on. Make sure that the AC power cable is securely connected to a suitable
AC wall outlet.
Some notes drop out during
playback.
Contact Yamaha customer service.
No sound is heard from the piano
even though piano keys are
moving.
Disengage the quiet mode.
Upright:
Set the center pedal to the original position.
Grand:
Push the [QUIET] switch on the control box. The light will go out.
Pedals are not moving.
(except for Classic model)
Disengage the quiet mode.
Upright:
Set the center pedal to the original position.
Grand:
Push the [QUIET] switch on the control box. The light will go out.
The volume of the piano playback
is too low.
See page 24 to adjust main volume.
The piano playback and audio is
not synchronized with video
streaming.
See page 30 to adjust the delay.
The piano playback is not
synchronized with audio.
See page 30 to adjust the delay.
Pedal adjustment is inappropriate. See page 31 to adjust the pedal.
Piano keys are not moving. Make sure that the audio volume of computer is adequately turned up.
Make sure that the surround system on your computer is TURNED OFF.
Audio enhancements prevent DisklavierTV from working properly.
Make sure that your computer is suitable for watching DisklavierTV
contents. See page 20 to try viewing a test video.
Make sure that the audio cable is correctly connected to the audio input
jack.
Make sure that the audio cable is firmly connected to the audio input
jack on your computer. If symptom persists, connect the headphones to
the jack and try listening to audio playback to confirm whether the jack is
defective.
Replace the audio cable.
Reverse the left and right connection, and then check whether or not the
piano keys are moving.
Make sure that you are using the audio cable without impedance changer.
In case you are using the USB audio interface, make sure that the USB
audio driver is correctly installed on your computer.
In case you are using the USB audio interface, make sure that USB
audio is selected in the audio device setting on your computer.
In case you are using the USB audio interface, make sure that the USB
audio output volume is adequately turned up.
In case you are using the USB audio interface, make sure that only the
input from your computer is connected to the USB audio interface. If the
input from any other device is connected, disconnect it or set its volume
to 0.
In case you are using the USB audio interface, make sure that the input
and output on the USB audio interface are correctly connected.
Page 36

36
DisklavierTV User’s Guide (For Disklavier E3 and DKC-850 Users)
Troubleshooting
Controller
Symptom Remedy
“RemoteLive” does not appear in
the Internet menu.
Make sure that your Disklavier firmware is the latest version (V3.50 or
later).
Holding [PLAY/PAUSE] on the control unit, press [ON/OFF]. The current
version appears on the display.
See page 13 and register as a Yamaha Online Member by creating
your account on Yamaha MusicSoft.
See page 17 and log into your account (enter e-mail and password
registered on Yamaha MusicSoft) correctly.
Make sure that your credit card information includes a United States
mailing address.
The remote control sometimes
does not work.
Replace the battery of the remote control.
Switching Hub
Symptom Remedy
Failed to open the website on your
browser.
Make sure that the switching hub and router are connected with the
Ethernet cable.
Make sure that the switching hub and computer are connected with the
Ethernet cable.
Computer
Symptom Remedy
Video streaming does not start. Make sure that the operating system on your computer is suitable for
watching DisklavierTV contents.
Disable the firewall function on your computer. Be sure to enable it after
you confirm that the symptom is improved.
Video streaming is not smooth. Make sure that your computer is suitable for watching DisklavierTV
contents. See page 20 to try viewing a test video.
Disable the antivirus software on your computer. Be sure to enable it
after you confirm that the symptom is improved.
Disable the firewall function on your computer. Be sure to enable it after
you confirm that the symptom is improved.
Make sure that no other software except web browser is working.
Failed to open the website on your
browser.
Make sure that the router is turned on.
Make sure that the Ethernet cable is securely connected to the router.
Make sure that the router and switching hub are connected with the
Ethernet cable.
Make sure that the router setting is appropriate.
Failed to open the website on your
browser.
Contact your ISP and confirm the contract for speed.
Video streaming is not smooth. Check your bandwidth using the speed test site (e.g., http://www.
speedtest.net). We recommend over 4.0 Mbps for download speed. If the
symptom persists, contact your ISP and confirm the contract for speed.
Piano playback is not stable due
to unstable video streaming.
Check your bandwidth using the speed test site (e.g., http://www.
speedtest.net). We recommend over 4.0 Mbps for download speed. If the
symptom persists, contact your ISP and confirm the contract for speed.
Page 37

37
DisklavierTV User’s Guide (For Disklavier E3 and DKC-850 Users)
Troubleshooting
Speakers
Symptom Remedy
The audio from the speakers is
not in sync with the video (audio is
delayed).
See page 30 to adjust the delay.
Check the audio delay specifications of the speakers.
The audio from the speakers is
not in sync with the piano
playback (audio is delayed).
See page 30 to adjust the delay.
Check the audio delay specifications of the speakers.
No sound is heard from the
speakers.
Make sure that the speakers are turned on.
Make sure that the audio cable is firmly connected to the speaker.
Make sure that the audio cable is not disconnected.
The speaker volume is too low. Make sure that the speaker volume is adequately turned up.
Make sure that the volume of the desired input is turned up.
Make sure that you are using the audio cable without impedance
changer.
No video sound is heard from the
speakers connected to the
OUTPUT jacks.
See page 25 to adjust audio balance.
See page 24 to adjust main volume.
The left channel sound is heard
more than once or seems to have
an echo.
It is possible that you have the DisklavierTV website opened more than
once. Make sure that ONLY the DisklavierTV website is opened.
Reboot your computer.
No sound is heard from the
speakers.
Make sure that the audio volume of computer is adequately turned up.
Make sure that the audio cable is correctly connected to the audio input
jack.
Make sure that the USB audio driver is correctly installed on your
computer.
Make sure that USB audio is selected in the audio device setting on
your computer.
Make sure that the USB audio output volume is adequately turned up.
The speaker volume is too low. Make sure that the audio volume of computer is adequately turned up.
Make sure that you are using the audio cable without impedance
changer.
Replace the audio cable.
In case you are using the USB audio interface, make sure that the USB
audio output volume is adequately turned up.
Hissing sound is coming from the
speakers.
Make sure that the surround system on your computer is TURNED OFF.
Audio enhancements prevent DisklavierTV from working properly.
Reverse the left and right connection, and then check the sound is
appropriately output from the speakers.
Replace the audio cable.
Make sure that you are using the stereo audio cable.
Speaker output is unstable. Make sure that the audio cable is firmly connected to the audio input jack
on your computer. If symptom persists, connect the headphones to the
jack and try listening to audio playback to confirm whether the jack is
defective or not.
Replace the audio cable.
Audio input through the USB audio
input jack is being mixed into the
speaker sound (in case you are
using the USB audio interface).
Make sure that only the input from your computer is connected to the
USB audio interface. If the input from any other device is connected,
disconnect it or set its volume to 0.
No sound is output from the USB
audio interface.
Make sure that the output on the USB audio interface are correctly
connected to your Disklavier.
Page 38
38
DisklavierTV User’s Guide (For Disklavier E3 and DKC-850 Users)
Troubleshooting
External Monitor
Symptom Remedy
The video image on the external
monitor is not in sync with the
audio from the speakers (video is
delayed).
See page 30 to adjust the delay.
The video image on the external
monitor is not in sync with the
piano playback (video is delayed).
See page 30 to adjust the delay.
No video image is displayed on
the external monitor.
Make sure that you have selected the desired input.
Make sure that the display cable is connected.
Hissing sound is coming from the
external monitor.
Make sure that the audio volume of the external monitor is 0.
The external monitor sleeps
during playback.
Disable the power-saving setting on the external monitor.
Contact Us
Phone: 866-430-2652
Online: 4wrd.it/D-TVsupport
Page 39

P.O.Box 1, Hamamatsu, 430-8650 Japan
Sep-13Copyright © 2013 Yamaha Corporation
 Loading...