

Page 1

English
Yamaha CD Player
DCD1+PS
Operation Manual
Page 2

Welcome!
Thank you for purchasing the Yamaha Disklavier CD Player DCD1+PS!
With the DCD1+PS, you can give your Yamaha Disklavier piano many of the same
advanced capabilities as the exciting new Disklavier Mark III Series. The new
DCD1+PS Disklavier CD Player turns your Disklavier or other MIDI-equipped
Yamaha piano into a full-fledged musical entertainment system, ready to provide a
superb selection piano and ensemble concerts—complete with high-fidelity vocal
and instrumental trakcs—anytime you like.
Before using the DCD1+PS, please read this manual thoroughly and retain it for
future reference.
Trademarks & Copyright
Yamaha, Disklavier, Silent, GranTouch, MIDIPiano, PianoSoft, PianoSoft.Plus, PianoSoft.PlusAudio,
PianoSmart, and Smart PianoSoft are trademarks of Yamaha Corporation.
SmartKey, CueTIME, Disk Orchestra and You Are The Artist are trademarks of Yamaha Corporation or Yamaha
Corporation of America.
Page 3

i
English
Important
Read the following before operating the DCD1+PS.
Warnings
• Do not locate the DCD1+PS in a place subject
to excessive heat, low temperatures, or direct
sunlight. This could be a fire hazard and may
damage the finish and internal parts.
• Excessive humidity or dust can lead to fire or
electric shock.
• Connect the plug on the AC adaptor to a
compatible AC outlet. Failure to do so will
present a fire and electric shock hazard. If the
power cable plug is not compatible with your
AC outlet, consult your dealer.
• Do not plug several devices into the same AC
outlet. This can overload the AC outlet, and
lead to fire and electric shock hazard. It may
also affect the performance of some devices.
• Do not place heavy objects on the AC adaptor
cable. A damaged power cable is a potential
fire and electric shock hazard. If the power
cable runs under a carpet, make sure heavy
objects are not placed on top of it.
• If the AC adaptor cable is damaged (i.e. cut or
a bare wire is exposed), ask your dealer for a
replacement. Using the DCD1+PS in this
condition is a fire and shock hazard.
• When disconnecting the AC adaptor cable
from an AC outlet, always pull from the plug.
Never pull the cable. Damaging the cable in
this way is a potential fire and electric shock
hazard.
• The cover of the unit should be removed only
by qualified service technicians.
• Do not place liquid containers such as vases,
potted plants, glasses, cosmetic bottles,
medicines, etc., on top of the DCD1+PS.
• Do not try to modify the DCD1+PS, as this
could lead to fire or electric shock hazard.
• When moving the DCD1+PS to another
location, turn off the power, remove the AC
adaptor from the AC outlet, and remove all
cables connected to external devices.
Cautions
• Turn off all audio devices when connecting to
the DCD1+PS. Refer to the user’s guide for
each device. Use the correct cables and
connect as specified.
• Set the volume level on all the devices to
minimum before applying power.
• Do not play the DCD1+PS at a high volume
for extended periods; you may damage your
hearing. This is especially important when
using headphones. If you think your hearing
ability is impaired, consult your doctor.
• If you notice any abnormality — such as
smoke, odor, or noise — turn off the
DCD1+PS immediately, and remove the AC
adaptor from the AC outlet. Consult your
dealer for repair.
• If a foreign object or water gets inside the
DCD1+PS turn it off immediately, and remove
the AC adaptor from the AC outlet. Consult your
dealer.
• If you plan not to use the DCD1+PS for a long
period of time (such as when you are on
vacation), disconnect the AC adaptor from the
AC outlet.
• Always remove the power plug from the AC
outlet before cleaning the DCD1+PS. Leaving
the power plug connected presents a risk of
electric shock.
• Do not use benzene, thinner, cleaning detergent,
or a chemical cloth to clean the DCD1+PS.
• Do not place metal objects with rubber feet on
top of the DCD1+PS. The color and finish of
the DCD1+PS can be damaged.
• Do not place heavy objects on the DCD1+PS.
Doing so can damage the DCD1+PS.
• Use a soft, dry cloth to clean the DCD1+PS.
However, if you discover a stain, carefully use
a soft damp cloth to remove it.
Page 4

ii
Interference
• The DCD1+PS uses high-frequency digital
circuits that may cause interference to radios
and TVs placed close to it. If interference does
occur, relocate the affected equipment.
Handling Batteries
The remote control of this unit is powered by dry
batteries. Improper use or misuse of the dry
batteries can cause the dry batteries to heat up,
leak electrolyte or burst which in turn may result
in a fire, damage to equipment and/or nearby
objects or in burns, injury or other bodily harm.
Read through and familiarize yourself with the
following safety precautions prior to use to ensure
correct usage.
• Do not directly touch the chemicals
(electrolyte) which have leaked from dry
batteries.
1. If electrolyte from dry batteries has made
contact with your eyes, rinse your eyes
thoroughly with clean water and seek
medical treatment from a physician
immediately.
2. If electrolyte from dry batteries has touched
your skin or clothing, rinse it off
immediately with clean water.
3. If electrolyte from dry batteries has found
its way inside your mouth, gargle
immediately and consult a physician.
• Do not install the dry batteries with the “+”
and “–” poles reversed. Misaligning the poles
of dry batteries can lead the dry batteries to be
charged or shorted or it can cause them to heat
up, leak electrolyte or burst which in turn may
result in a fire, damage to nearby objects or in
burns, injury or other bodily harm.
• Use only the designated batteries. Do not use
used batteries with unused batteries or different
types of batteries together. This can cause them
to heat up, leak electrolyte or burst which in
turn may result in a fire or in burns, injury or
other bodily harm. Replace all the dry batteries
at the same time. Do not use new and old dry
batteries together. Do not use dif ferent types of
batteries (alkaline and manganese batteries,
batteries made by different manufacturers or
different battery products made by the same
manufacturer) together: this can cause them to
heat up, ingite or leak electrolyte.
• When the battery-powered unit is not going to
be used for a prolonged period of time, remove
the dry batteries from the unit. Otherwise the
batteries will run down and their electrolyte
may leak, resulting in damage to the unit.
• Remove spent batteries immediately from
equipment. Otherwise, batteries will
overdischarge, causing them to heat up, leak
electrolyte or burst which in turn may result in
damage to nearby objects or in burns, injury or
other bodily harm.
• Dispose of batteries in accordance with the
applicable regulations and ordinances.
Please keep this manual for future reference.
Page 5

iii
English
Table of Contents
Chapter 1 Getting Started
Addition of New Functions ..............................1
Applicable Control Unit....................................1
Updating Procedure .........................................2
New Function ....................................................3
Host Pianos........................................................6
Types of CDs That Can Be Used ........................ 7
Using the Remote Control................................8
Chapter 2 Names of Parts and
Their Functions
Front Panel ......................................................10
Rear Panel .......................................................11
Remote Control...............................................12
Chapter 3 Connecting the DCD1+PS
Connecting the DCD1+PS to Your Piano .......13
Connecting the AC Adaptor...........................19
Connecting Other MIDI Instruments .............19
Setting Piano Type ..........................................20
Piano Settings .................................................20
DCD1 Mode ..................................................... 22
Chapter 4 Playing CDs
Basic Operations .............................................23
Selecting a Song..............................................25
Fast Preview & Review (in Play mode)...........26
Fast Forward & Reverse (in Pause mode) ......26
Repeat Play......................................................27
Adjusting the Volume.....................................27
Balancing the Audio Parts..............................28
Tuning..............................................................28
Chapter 5 Using the PianoSmart
feature
PianoSmart ......................................................29
PianoSmart Playback ......................................29
Temporarily Suspending Playback .................30
Stopping Playback ..........................................31
PianoSmart Manual Adjustment....................31
Items Supplied with the
DCD1+PS
Check that the following items are supplied with
DCD1+PS:
• AC adaptor
• Remote control
• Batteries for the remote control (2)
• Sample PianoSoft.PlusAudio
TM
CD Software
• Operation Manual
• Audio Cables
Mono phone plug (L/R) — RCA pin plug
(L/R)
RCA pin plug — Mono phone plug (2)
• MIDI cable (3 m) (2)
• Update disk (for CTRL-V3)
• Update disk (for CTRL-V4)
Page 6

iv
To Delete the SPS Adjustment Value
of a Song .........................................................32
PianoSmart Recording .................................... 33
Balancing the CD Volume
(CD Master Balance) .......................................36
Chapter 6 Synchronization Using
the MTC
Synchronization Using the MTC.....................37
Summary of the MIDI Out Parameter
in a MIDI Setup ...............................................43
Chapter 7 Troubleshooting
Power...............................................................45
Main Unit ........................................................45
Remote Control...............................................45
CD Playback.....................................................45
Analog MIDI IN ...............................................46
PianoSmart ......................................................46
Disklavier Control Unit ...................................47
Chapter 8 Display Error
Messages............................48
Chapter 9 DCD1+PS
Specifications....................49
Page 7

1
English Chapter 1: Getting Started
Addition of New
Functions
In the DCD1+PS, the following new functions
have been added in comparison to the DCD1.
The following new functions are possible by
combining a Control Unit with the DCD1+PS.
PianoSmart compatible functions
• DCD1 Mode Switching
☛ see “DCD1 Mode”.
• PianoSmart Playback
• PianoSmart Recording
• CD Master Balance
• SPS Adjust
☛ see Chapter 5 “Using the PianoSmart feature”.
The following new functions are possible by
upgrading the Control Unit.
MTC Sync Playback and MTC Sync Recording
☛ see Chapter 6 “Synchronization Using the MTC”
for details.
Internal XG Tone Generator
☛ see page 3 for details.
• Playback/Track Tone Selection
• Tone Mode/Tone Selection
• Recording/Track Selection
Disk functions
☛ see page 4 for details.
• Copy All Songs
• Delete All Songs
• Disk Copy FD, Memory Disk Copy Enable
• Disk Copy FD (2DD), FD (2HD) Copy Enable
Reset functions
☛ see page 5 for details.
• Reset to Factory Initial Settings
Note: The functions may already be incorporated for
some Control Unit variations.
Applicable Control Unit
In the DCD1+PS, PianoSmart Playback is
possible by combining with the following Control
Units. Check the model name of the Control Unit
that you are using.
• DKC50R, DKC500RWXG, DKC500RW,
DSR1, DKC55
DCD1+PS functions are possible by
upgrading the Control Unit.
• DKC500R, DKC500RXG
DCD1+PS functions are possible by
upgrading to the EMK1. For details,
consult your Yamaha piano dealer.
• Other Disklavier Controllers, Yamaha
GranTouch digital piano, Silent Series piano,
MIDIPiano, Clavinova digital piano, or some
other digital pianos
DCD1+PS functions are enabled by
connecting the DSR1. For details, consult
your Yamaha piano dealer.
This chapter provides information on the new functions, Control Units and pianos compatible with the
DCD1+PS, notes on the types of CDs that can be used, and how to handle the supplied remote control.
Chapter 1
Getting Started
Page 8

2
Updating Procedure
In the DCD1+PS, PianoSmart Playback is
possible by updating your Control Unit. Be sure
to update the Control Unit before using.
The update FD is different depending on the
Control Unit that you are using.
Use the Update Disk “CTRL-V3” when the
Control Unit is DKC50R, DKC500RWXG,
DKC500RW, or DSR1, and use Update Disk
“CTRL-V4” when the Control Unit is DKC55.
To perform this update:
1
Set the MAINS switch to ON.
For details about the MAINS switch, refer
to your piano’s manual.
2
Press [STANDBY / ON] on the
front panel of the Control Unit
while depressing [PLAY].
The following message appears on the
display. The control unit’s current flash
ROM version is now displayed.
3
To continue updating, press
[ENTER] twice.
ENTER
4
Insert the update disk.
The following message appears on the
display.
5
Press [+/YES] to begin the update.
–/NO +/YES
Note: Do not eject disk while system is being
updated.
After a short time, the following message
appears on the display.
6
Press [STANDBY / ON] on the
Control Unit.
Update is now complete.
Page 9

3
English Chapter 1: Getting Started
New Function
Internal XG Tone Generator
By upgrading the Control Unit version, you can
enjoy 480 instrumental voices (plus 11 drum kits)
in comparison to the 128 instrumental voices
(plus 11 drum kits) in the current version.
Playing the Keyboard with an
Ensemble Voice
1
During playback or in Stop mode,
press [VOICE].
VOICE
The VOICE indicator lights and the
following display appears.
2
Use the [–/NO] and [+/YES]
buttons to select a voice number.
–/NO +/YES
The voice name and number change
accordingly.
Setting the voice to “##” produces no sound
from the internal XG tone generator for the
piano parts.
3
Press [>], then use the [–/NO] and
[+/YES] buttons to select a bank.
–/NO +/YES
The bank number of the selected voice
appears temporarily in place of the Vol
parameter. The bank number automatically
returns to 0 when the voice number is
changed.
The number of selectable banks varies depending
on the voice number. There are several voices that
are only for bank number 0, and selections other
than “Bnk=000” cannot be made in this voice.
4
To adjust the volume, press [>]
until the c cursor is next to the
Vol parameter, then use the
[–/NO] and [+/YES] buttons to set
a value.
–/NO +/YES
Note: In Voice mode, the volume of the parts
you play on the keyboard is set by the
Vol parameter and is not affected by the
TG Master Balance function.
5
To cancel this function, press
[VOICE] again.
VOICE
Page 10

4
Copying and Deleting Songs
By upgrading the Control Unit version, you can
copy songs between different media (such as
between FD and memory disk, and between FD
(2DD) and FD (2HD)), copy all songs, and delete
all songs.
Copying Songs
You can copy songs stored on a disk to another
one song at a time or all songs at once.
Songs stored on a floppy disk can be copied to the
same floppy disk, to another floppy disk or to a
Memory Disk.
Songs stored on a Memory Disk can be copied to
another Memory Disk or to a floppy disk.
Note: Copy-protected songs, such as PianoSoft
songs, cannot be copied to a floppy disk, but
can be copied to the Memory Disk.
2DD
2HD
2DD
2HD
Memory
Disk
Memory
Disk
To Copy All Songs
In the Song Copy screen, press
[–NO] until the following display
appears.
Press [ > ], then use the [–/NO]
and [+/YES] buttons to select the
destination disk.
Refer to your piano's manual for details.
Copying the Entire Contents of a Disk
(Disk Copy)
For details about Disk Copy, refer to your piano's
manual.
1
In the Disk Copy screen, press
[ > ] to position the c cursor next
to the Disk Copy option, then
press [ENTER].
A display similar to the following appears.
The display shows the type of source disk
(2DD, 2HD or Memory) and the default
destination disk.
2
Use the [–/NO] and [+/YES]
buttons to select the destination
disk.
3
Press [ENTER].
Disk copy of the source disk begins.
Page 11
5
English Chapter 1: Getting Started
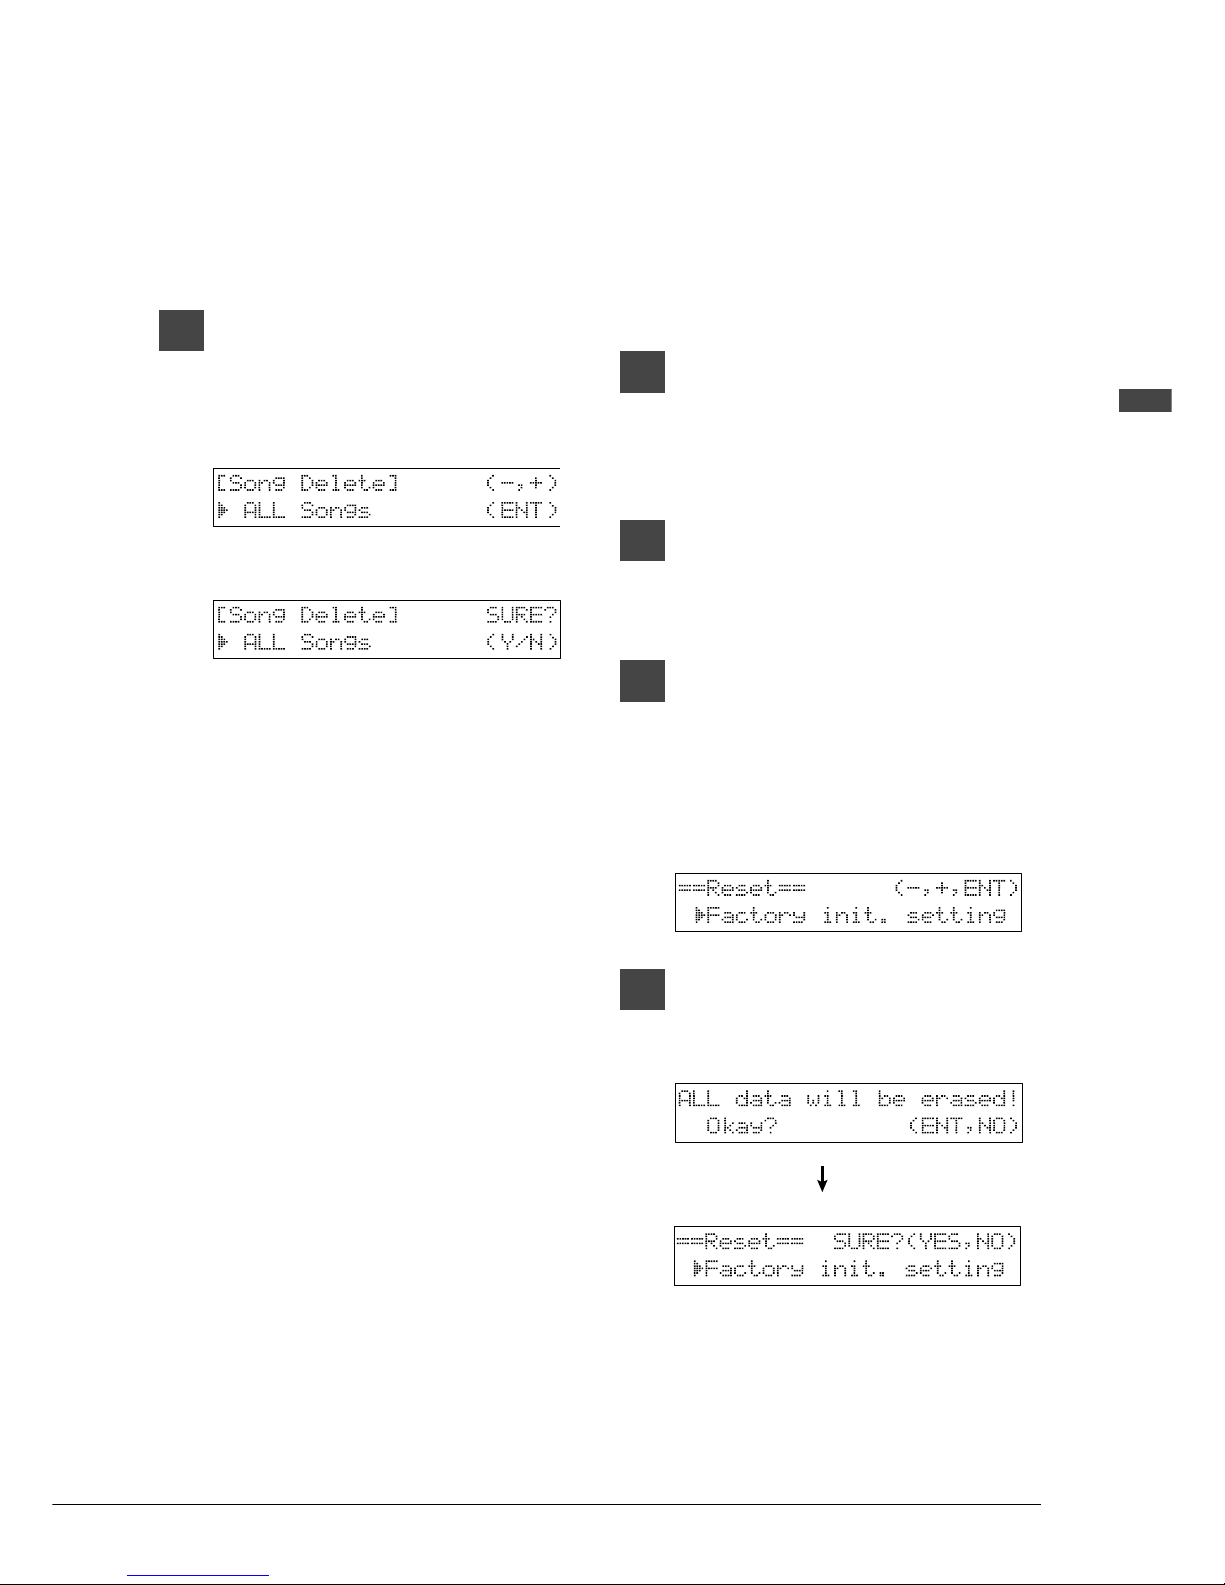
Deleting All Songs
You can delete songs stored on a disk all songs at
once.
If you want to delete all songs on a disk, it may be
quicker to re-format the disk. Refer to your
piano’s manual for details.
In the Song Delete screen, to
delete all songs, press [–/NO] until
the following display appears,
then press [ENTER].
The following display appears.
Resetting Your Disklavier
By upgrading the Control Unit version, you can
reset the piano to the factory initial settings.
Follow the Reset function below.
You can reset all settings, the Memory Disks, or
both.
1
Press [FUNC.].
The FUNC. indicator lights and the
Function menu appears.
2
Press [ > ] until c cursor is next to
the Reset option, then press
[ENTER].
3
Use the [+/YES] buttons to select
Factory init. setting. Then press
[ENTER].
This selects the factory initial settings.
The following display appears.
4
Press [ENTER] when the following
display appears, then press
[+/YES].
Page 12

6
Host Pianos
The DCD1+PS can be connected to the Yamaha Silent Series, MIDIPiano
TM
*
, GranTouch, Disklavier
pianos, Clavinova digital pianos and some digital pianos of other makes as shown in the table below.
* MIDIPiano is an acoustic/digital piano available in North America.
As the connections and setup vary depending on the piano model, find your piano type and to which
category it belongs in the table below before proceeding to set up the DCD1+PS. If you are unsure about
which piano category and type your piano belongs to, consult your Yamaha piano dealer.
In connecting with the DSR1, set to the Piano Category which was connected before connecting the
DSR1.
Piano Category
Disklavier pianos
GranTouch digital pianos
Silent Series pianos, MIDIPianos
Clavinova digital pianos
Other digital pianos
Piano T ype
*1
Disklavier
GT1
GT10
GT10
GT10
GT1
Clavinova
GT1 or GT10
*2
GT1 or GT10
*2
POWER VOLUME HEADPHONES
POWER
OFF ON VOLUME HEADPHONES
REVERB
PITCH
445
444
445
442
441
440
439
438
(Right panel)
*1 One of four piano types must be set before operating the DCD1+PS. See “Setting Piano Type” on page 20.
*2 Try both settings and select the setting in which volume adjustments are made to your preference.
Note: Full functionality of the DCD1+PS depends on the host piano.
* Yamaha Disklavier pianos reproduce piano tones on the strings of the piano, requiring external audio
equipment for ensemble sound reproduction.
* Yamaha Disklavier Silent/MIDIPianos reproduce either acoustic or digital piano tones, with digital
sound delivered through headphones or external audio equipment.
* Yamaha Silent Series/MIDIPianos reproduct digital piano and ensemble tones through headphones or
external audio equipment.
* Yamaha GranTouch, Disklavier GranTouch, and Clavinova pianos reprduce digital piano and ensemble
tones through headphones or their internal amplified speaker system.
* Reproduction of acoustic piano performance, including key and pedal movement, is possible only on
Yamaha Disklavier pianos.
Note: Instrumental and vocal reproduction requires certain components, already equipped on some Yamaha piano
models and connectable as external equipment on others.
• Reproduction of audio tracks requires an amplified speaker system or headphone capability.
Models
All models
All models excepting GT10
GT10
Upright models
Grand models; SG Type
Grand models; SN Type
XG-compatible models
Non-XG-compatible models
Page 13

7
English Chapter 1: Getting Started
Types of CDs That
Can Be Used
The DCD1+PS can be used to play CDs from the
PianoSoft.PlusAudio selection — Yamaha’s uniqe
audio/MIDI CDs, as well as standard audio CDs
sold on the market and audio/MIDI CDs of other
companies.
Note: PianoSoft.PlusAudio may not be available in
some countries.
Note: PianoSoft.PlusAudio and other audio/MIDI
CDs cannot be used for recording purposes.
Yamaha PianoSoft.PlusAudio
TM
and Other Audio/MIDI CDs
PianoSoft.PlusAudio (and audio/MIDI CDs of
other companies) contain data recorded in two
channels: Analog MIDI and audio.
When you play back a PianoSoft.PlusAudio, your
piano plays the piano parts which are recorded on
the MIDI channel, and all other instrumental and
vocal sounds recorded on the audio channel are
output from the speakers or headphones. The
DCD1+PS will faithfully reproduce the audio
sounds of the CD as a stereo system would, but
with the additional feature of a live piano
performance. (See notes at left.)
Your Yamaha Piano
PianoSoft.PlusAudio
Keyboard
Speakers
Piano Parts
(Analog MIDI channel)
Vocals, bass,
drums, guitar, etc.
(Audio channel)
Standard Audio CDs
Standard CDs contain two audio channels (R and
L). Both are output via connected speakers as a
CD stereo system would.
Handling CDs
• Do not touch the surface of a CD.
• Do not expose disks to extreme temperature or
humidity. The working temperature range is
between 5˚C and 50˚C (41˚F to 122˚F).
• Wipe the CD with a clean cloth before
playback.
• Remove the CD before you turn off the
DCD1+PS.
Page 14

8
Inserting & Removing CDs
1
Press the CD eject button so that
the CD tray pops out about 1 cm.
Then, carefully pull it out as far as
it will go.
Note: The CD eject button can be used only
when the DCD1+PS is turned on.
2
<To insert a CD> Place the CD on
the tray and gently press down
on it so that the center of the CD
is clamped in place.
Note: Always place the CD with the label
side facing up.
<To remove the CD> Slowly lift
the CD.
3
Gently push the tray back in until
it clicks into place.
S
T
A
N
D
B
Y
O
N
P
L
A
Y
/
P
A
U
S
E
D
I
S
K
L
A
V
I
E
R
C
D
P
L
A
Y
E
R
D
C
D
1
S
T
O
P
S
O
N
G
S
E
L
E
C
T
R
E
P
E
A
T
B
A
L
A
N
C
E
M
I
N
M
A
X
••
V
O
L
U
M
E
–
1
0
0
••
•
•
•
•
•
•
•
•
•
S
T
A
N
D
B
Y
O
N
P
L
A
Y
/
P
A
U
S
E
D
I
S
K
L
A
V
I
E
R
C
D
P
L
A
Y
E
R
D
C
D
1
S
T
O
P
S
O
N
G
S
E
L
E
C
T
R
E
P
E
A
T
B
A
L
A
N
C
E
M
I
N
M
A
X
••
V
O
L
U
M
E
–
1
0
0
••
•
•
•
•
•
•
•
•
•
Using the Remote
Control
The DCD1+PS is equipped with a remote control
which allows convenient control from almost
anywhere in the room. This chapter provides
notes on handling the remote control.
Installing Batteries in the
Remote Control
Before the remote control can be used, the two
batteries supplied with the DCD1+PS must be
installed.
1
Remove the battery cover from
the back of the remote control by
sliding the cover in the direction
of the arrow.
2
Insert the first battery with the
+ side first.
3
Insert the second battery by
pressing the – side to the spring
in the battery compartment while
pushing in the + side.
Note: Make sure that the + and – are properly
oriented to the markings on the inside
of the battery compartment.
4
Close the battery cover.
Page 15
9
English Chapter 1: Getting Started
Battery Replacement
When the remote control fails to work from a
distance, replace the batteries.
• Replacement batteries should be UM-3, AA,
R6P, or LR6 type.
• Always replace both batteries.
• If the remote control is not to be used for a
prolonged period of time, remove the batteries
to prevent possible damage by battery leakage.
Important: Be sure to read the section on Handling
Batteries on page ii of “Important” for
details on the safe handling of dry
batteries.
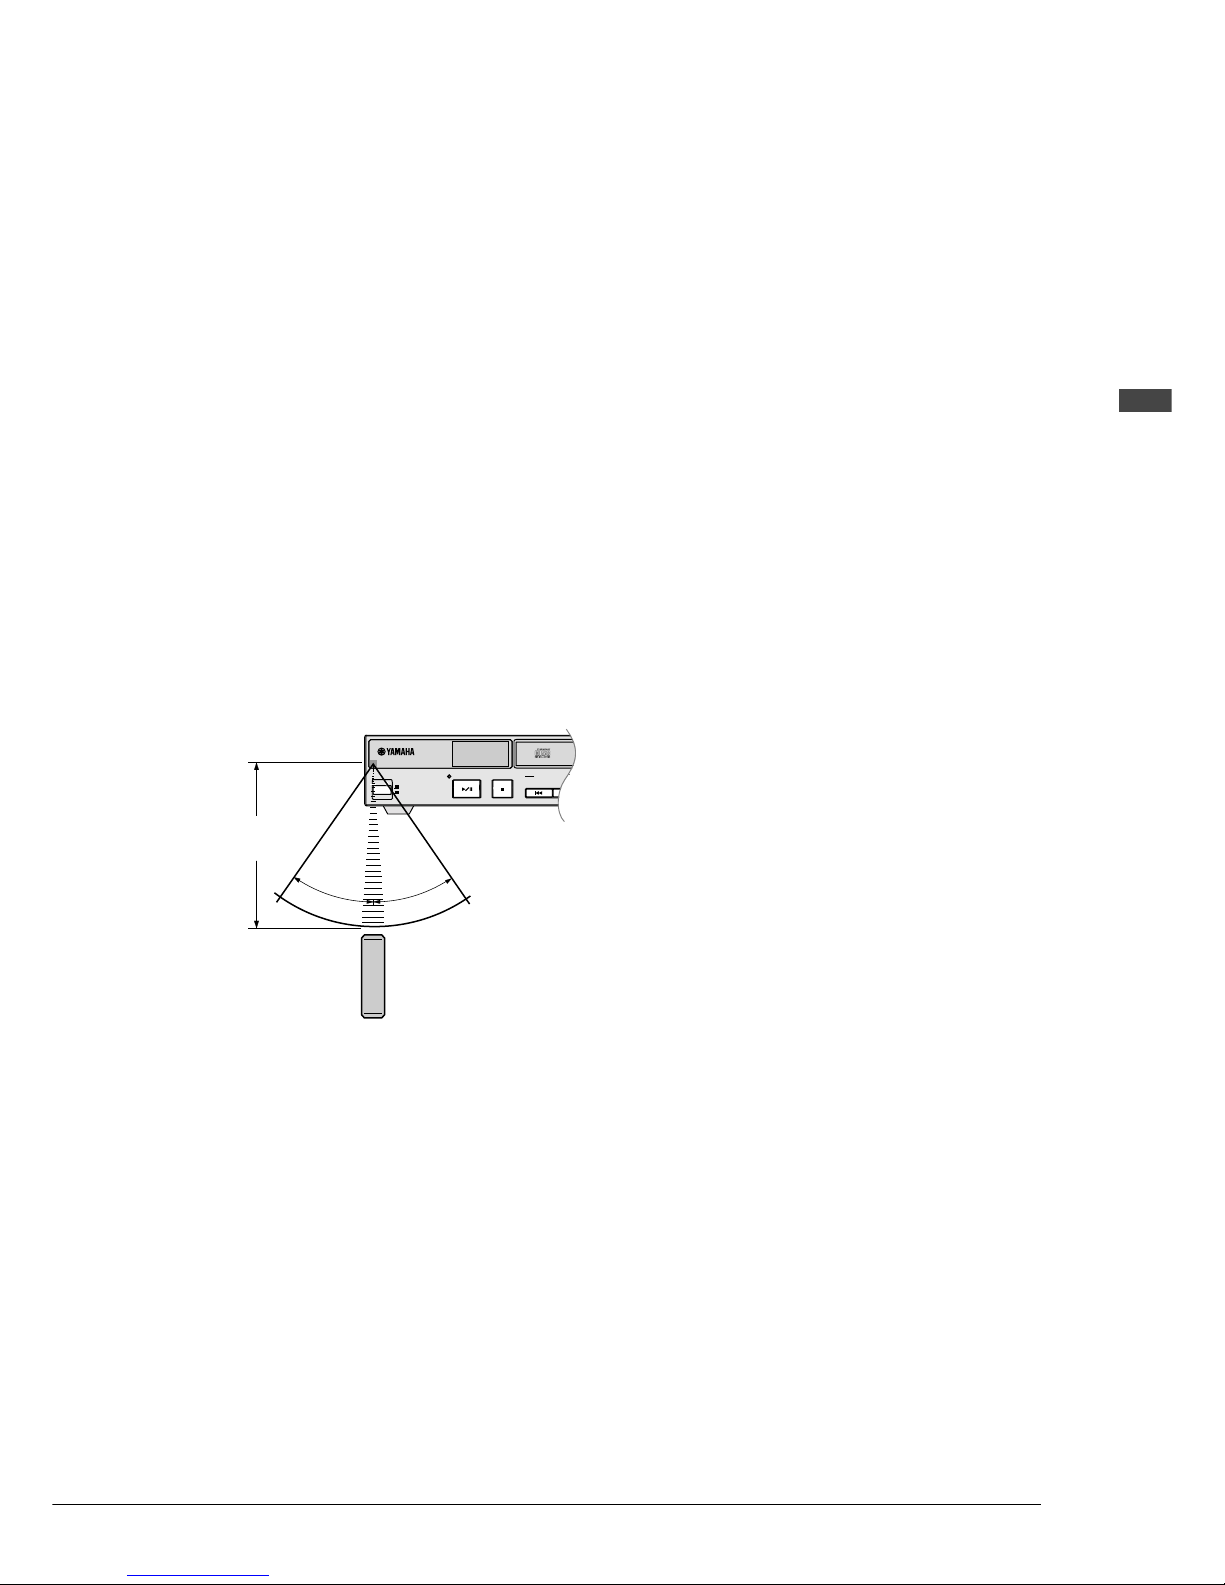
Note on Using the Remote
Control
To use the remote control, point it at the remote
control sensor on the Control Unit.
STANDBY
ON
PLAY/PAUSE
DISKLAVIER CD PLAYER DCD1
STOP
SONG SELECT
3
0
°
30°
Approx. 5 m (16 ft.)
Page 16

10
STANDBY
ON
PLAY/PAUSE
DISKLAVIER CD PLAYER DCD1
STOP
SONG SELECT
REPEAT
BALANCE
MIN MAX
••
VOLUME
–10 0
••
•
•
•
••
•
•
•
•
12 3 4 5
67 90q8
Chapter 2
Names of Parts and
Their Functions
This chapter describes the functions of the buttons and other parts of the DCD1+PS.
Front Panel
1 [STANDBY / ON] button
Turns on the DCD1+PS or puts it in Standby
mode. Press once to turn it on, and once again to
put it in Standby mode.
Note: In Standby mode, the DCD1+PS is in effect
turned off. However, electrically it is in a state
in which a very small quantity of power is
being consumed, as the AC adaptor is still
connected to the AC power receptacle.
2 Remote control sensor
When using the remote control, point it toward
this sensor.
3 Display (LED)
Shows various information.
4 CD drive
Insert a PianoSoft.PlusAudio or other audio or
audio/MIDI CD here.
5 CD eject button
Used to open the CD drive.
6 [PLAY/PAUSE] button
Used to start and pause playback.
7 [STOP] button
Used to stop playback.
8 [SONG SELECT/REV
•
FWD] buttons
In Stop mode: Used to select songs.
In Play mode: Used to fast preview and review.
In Pause mode: Used to fast forward and reverse.
9 [REPEAT] button
Used to repeatedly play all tracks.
0 [BALANCE] knob
Used to balance the level of audio parts.
q [VOLUME] knob
Used to adjust the playback volume.
Page 17

11
English Chapter 2: Names of Parts and Their Functions
Dkv
GT10
GT1
Clavinova
+
–
OUT IN
R L/L+R L/L+R
MIDI
OUTPUT
DC-IN 12V
R
RL
ANALOG MIDI IN
PIANO TYPE
VOLUME
AUX IN
12
87654
3
Rear Panel
1 DC IN
Connect the supplied AC adaptor here.
2 ANALOG MIDI IN R/L
You can connect audio instruments such as a CD
changer here for continuous playback of multiple
CDs.
3 MIDI OUT
Connect to the MIDI IN connector on your piano
to enable MIDI data from the DCD1+PS to be
output from your piano.
When using the PianoSmart function, the control
data required for PianoSmart playback is also
output.
4 MIDI IN
Used to connect external MIDI equipment for
inputting MIDI data to the piano when the MIDI
IN connector on the piano side is already being
used. In this case, however, the DCD1+PS must
be turned on and be in the Stop mode.
When using the PianoSmart function, connecting
to the MIDI OUT connector on the piano allows
the piano’s Control Unit to be used for control of
the DCD1+PS.
5 OUTPUT
Used to output audio signals from the DCD1+PS
to your piano or to other audio instruments.
If you don’t connect to the R connector, both the
L and R channel signals will be mixed and output
from the L connector.
6 AUX IN
Used to connect external audio instruments.
If you don’t connect to the R connector, the audio
signal input to the L connector will be output from
the L and R OUTPUT connectors.
7 VOLUME knob
Used to fine-adjust the volume of the audio
signals received by the AUX IN connector.
8 PIANO TYPE
Used to set the DCD1+PS to match your piano.
Page 18
12
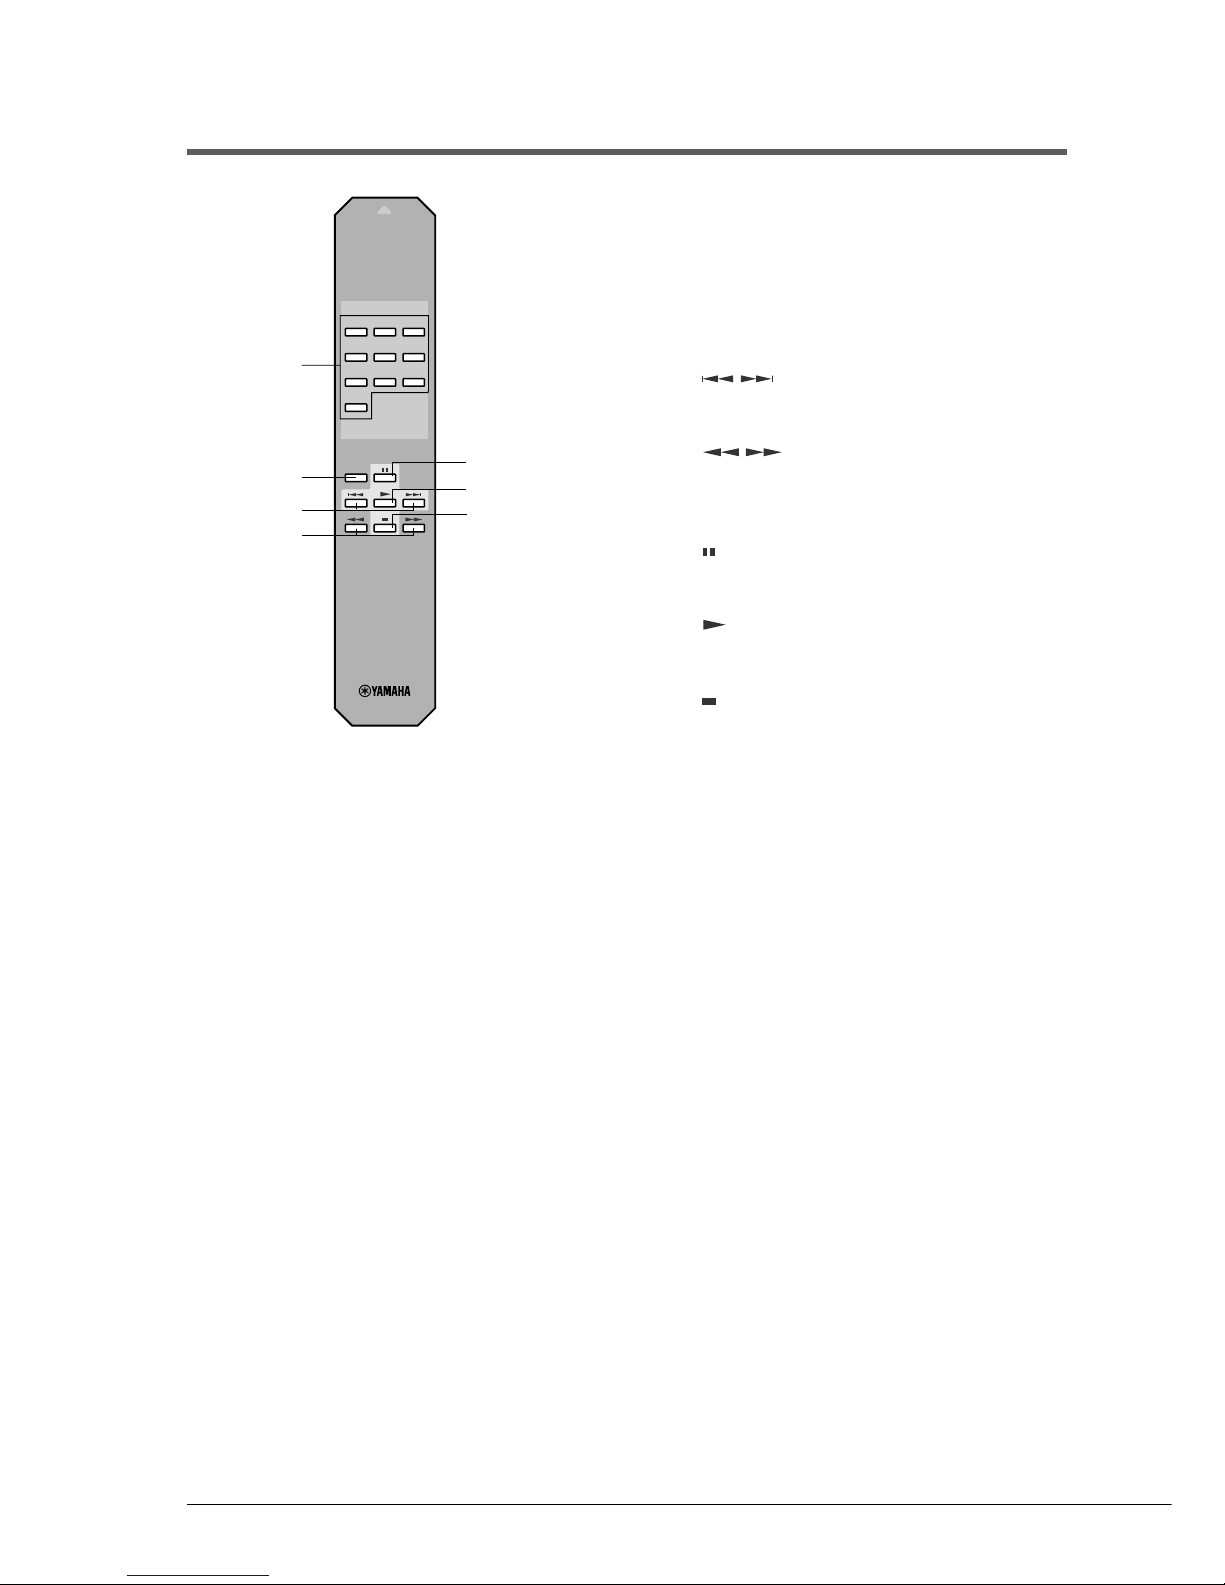
Remote Control
1 Number keypad
Used for direct song selection.
2 [REPEAT] button
Used to set the DCD1+PS to play back the CD
repeatedly.
3
(song select) buttons
Used to select a song.
4
(reverse/forward) buttons
In Play mode: Used to fast preview and review.
In Pause mode: Used to fast forward and reverse.
5
(pause) button
Used to pause playback.
6
(play) button
Used to start playback.
7
(stop) button
Used to stop playback.
REPEAT
1 2 3
4 5 6
7 8 9
0
DCR-104E
1
2
3
5
6
7
4
Page 19
13
English Chapter 3: Connecting the DCD1+PS
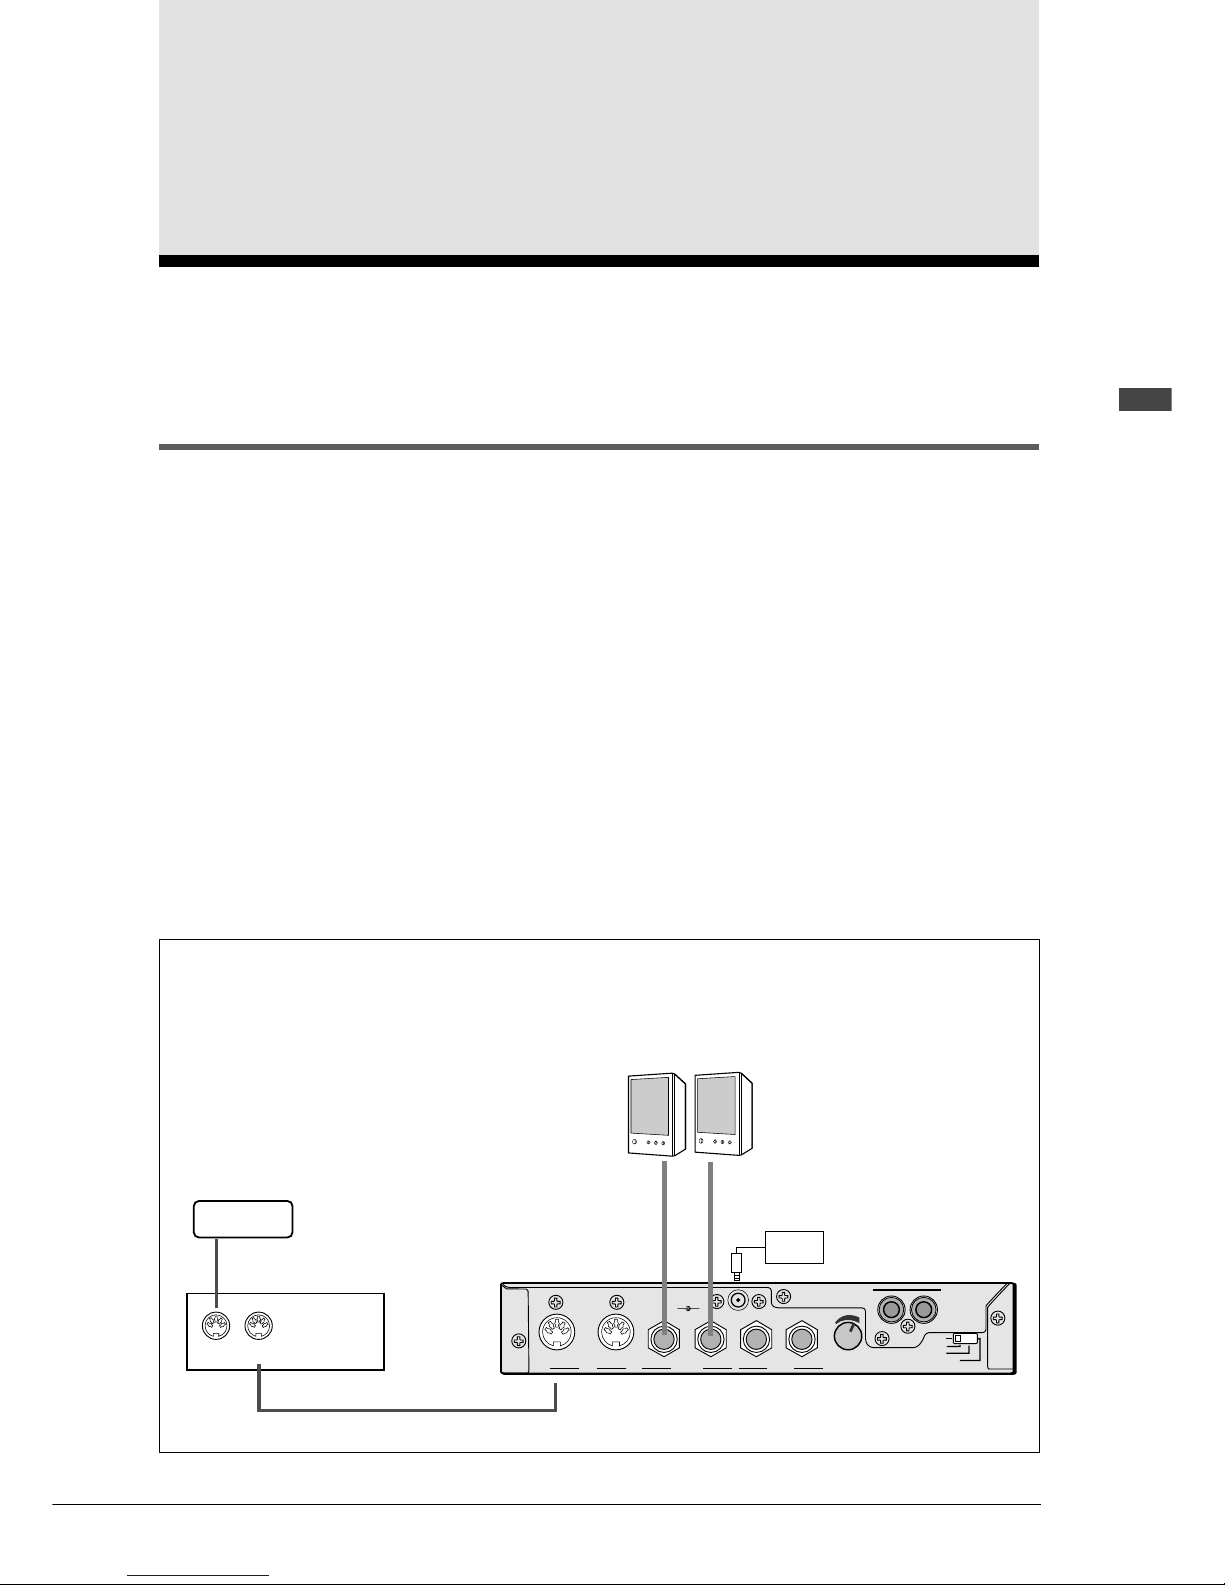
Connecting the DCD1+PS to Your Piano
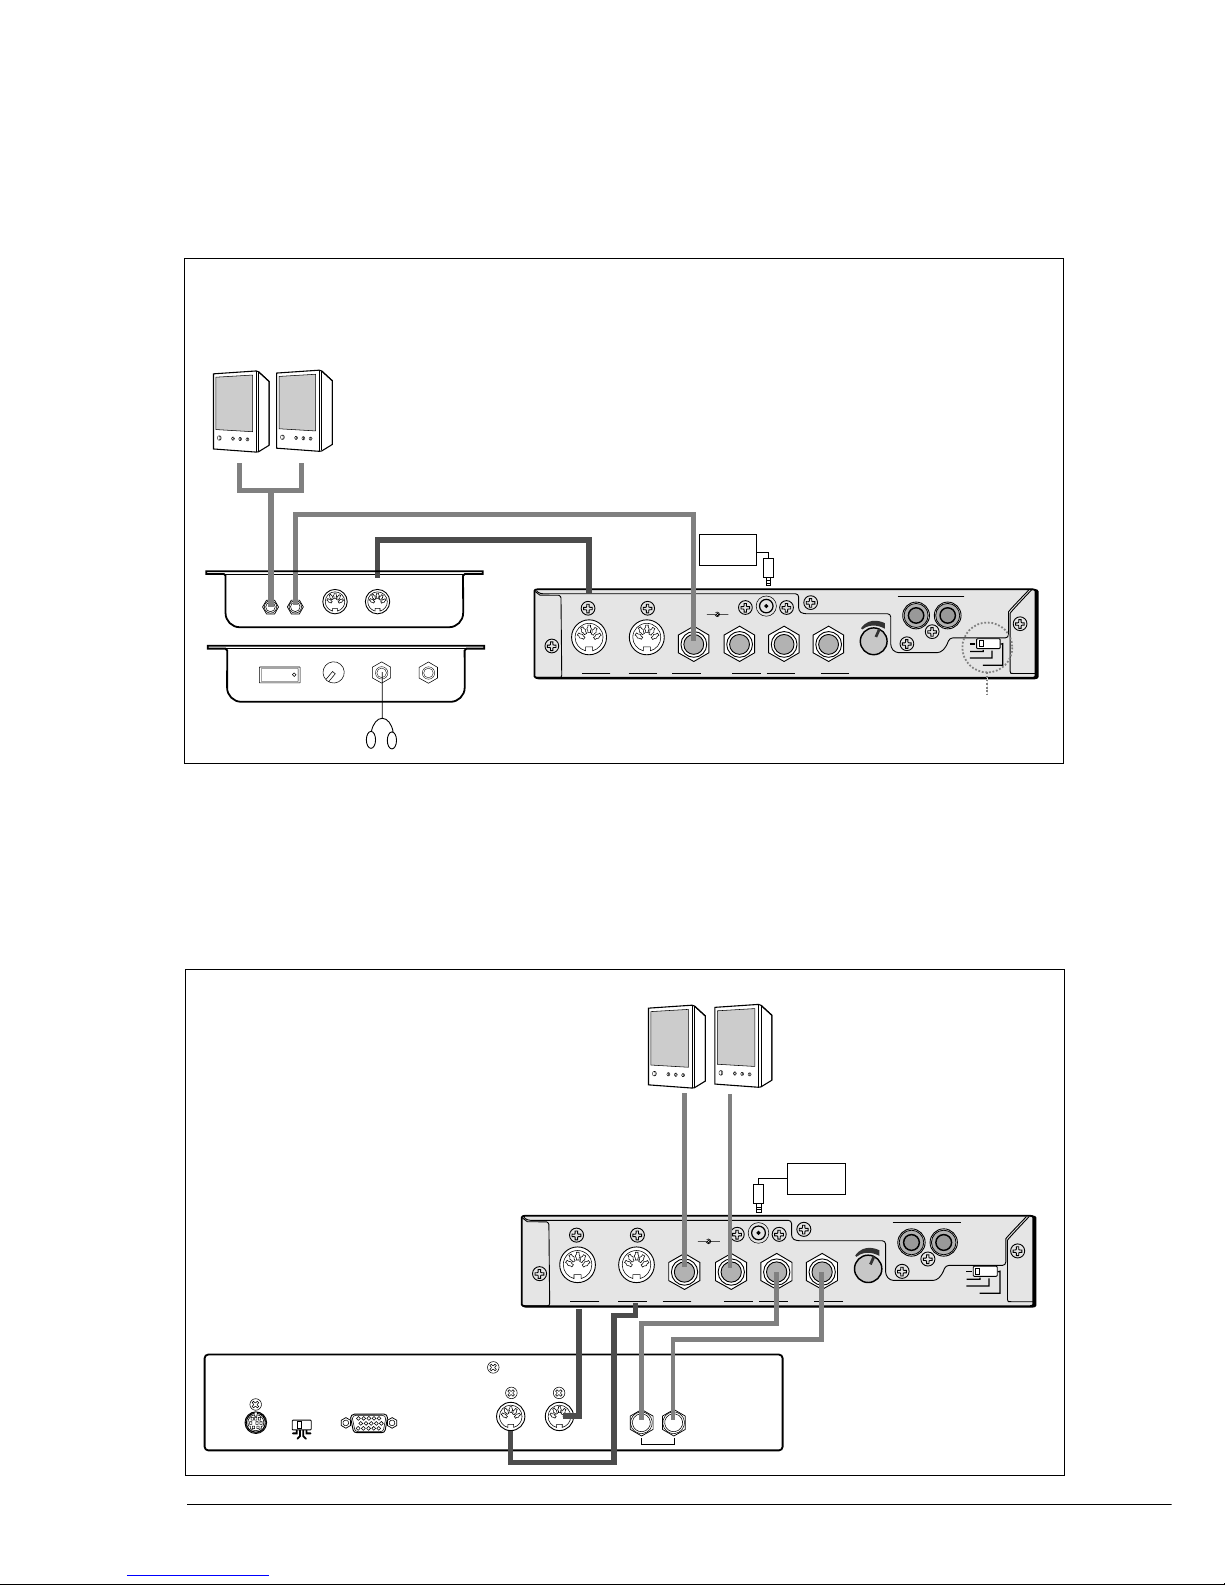
Note: For Control Units that support the PianoSmart function, the connection method differs depending on
whether the PianoSmart function will be used or not.
Note: Before connecting the DCD1+PS to your piano, make sure that both the DCD1+PS, and the Control Unit
are turned off. Connecting/disconnecting audio cables with the power left on is especially dangerous, as a
very loud noise is emitted.
Place the DCD1+PS on a flat surface not too far from the Control Unit.
Note: As the MIDI cable supplied with the DCD1+PS is 3 meters, place the DCD1+PS in a range that will leave
some slack in the cable in order to avoid accidents from tripping on the cable.
If your piano is:
MX80 Series / MX95 / MX100A/B /
Earlier Grand models / Mark II Series
PianoSmart cannot be used.
Chapter 3
Connecting the DCD1+PS
This chapter describes by category how to set up the DCD1+PS for use with your piano.
Dkv
GT10
GT1
Clavinova
+
–
OUT IN
R L/L+R L/L+R
MIDI
OUTPUT
DC-IN 12V
R
RL
ANALOG MIDI IN
PIANO TYPE
VOLUME
AUX IN
OUT IN
(L)(R)
Piano side
DCD1+PS
AC
adaptor
External speaker
system
Audio cable
MIDI cable
External tone
generator
(Connection example)
Page 20
14
Dkv
GT10
GT1
Clavinova
+
–
OUT IN
R L/L+R L/L+R
MIDI
OUTPUT
DC-IN 12V
R
RL
ANALOG MIDI IN
PIANO TYPE
VOLUME
AUX IN
(L)(R)
R
OUTPUT
MIDI
L/MONO
OUT IN
TO CONTROL CABLE
FOR PIANO
HOST
SELECT
TO HOST
MIDI
PC1
PC2
MAC
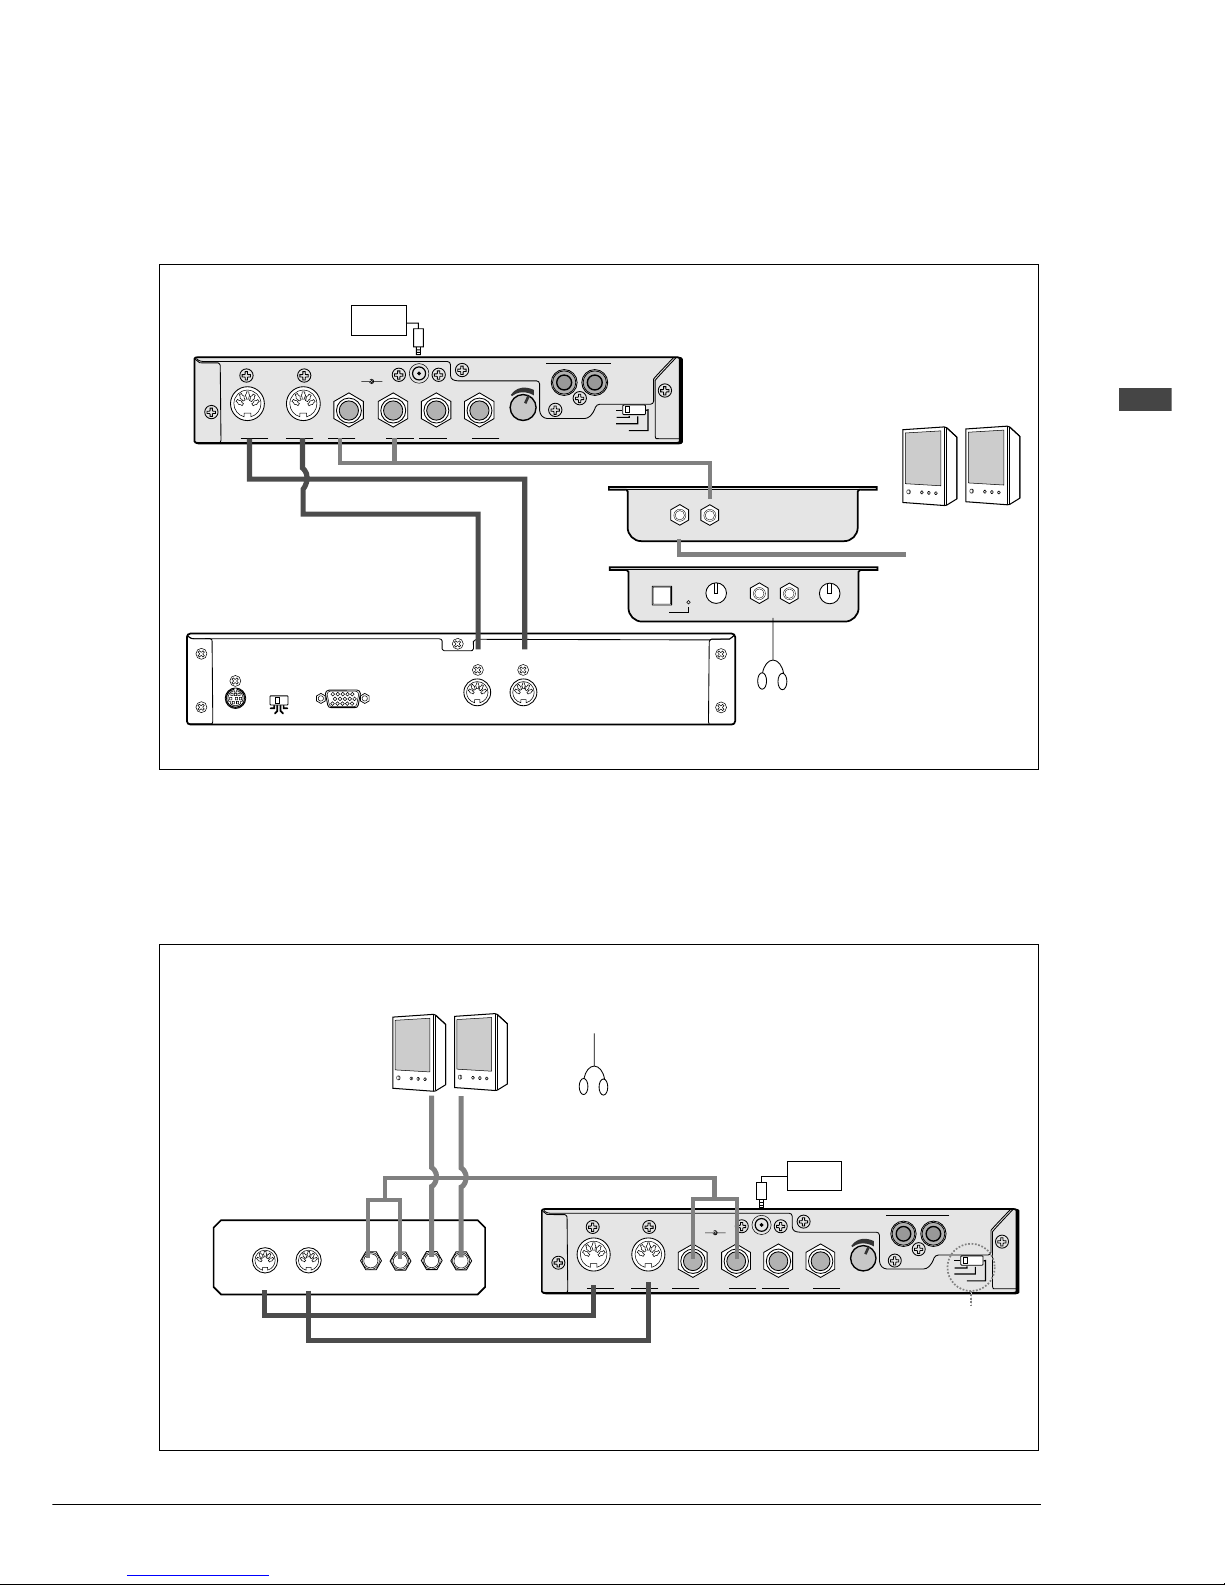
If your piano is:
Disklavier Mark II Silent Series (MPX100II) / Silent Series
Grand models (SG Type) / Silent Series Upright models
PianoSmart cannot be used.
If your piano is:
Disklavier Mark II XG Series (w/o Silent system)
PianoSmart can be used if the Disklavier Control Unit is DKC500RWXG.
PianoSmart cannot be used if the Control Unit is DKC500RXG. However, PianoSmart can be used in
DKC500RXG Control Units with an EMK1 installed since these are equivalent to the DKC500RWXG.
Dkv
GT10
GT1
Clavinova
+
–
OUT IN
R L/L+R L/L+R
MIDI
OUTPUT
DC-IN 12V
R
RL
ANALOG MIDI IN
PIANO TYPE
VOLUME
AUX IN
MAINS
OFF ON VOLUME HEADPHONES
AUX
MIDI
OUT
IN
OUT
IN
(L)
(R)
Piano side
DCD1+PS
(Connection example)
AC
adaptor
External speaker
system
Audio
cable
MIDI cable
Piano side
DCD1+PS
(Connection example)
AC
adaptor
External speaker
system
Audio cable
MIDI cable
Set
PIANO TYPE
accordingly
* When using PianoSmart, connect the
MIDI IN connector on the DCD1+PS
and the MIDI OUT connector on the
piano.
*
Page 21
15
English Chapter 3: Connecting the DCD1+PS
Dkv
GT10
GT1
Clavinova
+
–
OUT IN
R L/L+R L/L+R
MIDI
OUTPUT
DC-IN 12V
R
RL
ANALOG MIDI IN
PIANO TYPE
VOLUME
AUX IN
MIDI
OUT IN
TO CONTROL CABLE
FOR PIANO
HOST
SELECT
TO HOST
MIDI
PC1
PC2
MAC
SILENT
ON VOLUME HEADPHONES
REVERB
OUT IN
AUX
(L) (R)
Dkv
GT10
GT1
Clavinova
+
–
OUT IN
R L/L+R L/L+R
MIDI
OUTPUT
DC-IN 12V
R
RL
ANALOG MIDI IN
PIANO TYPE
VOLUME
AUX IN
L/L+R L/L+R
AUX IN
IN OUT
R
R
MIDI
AUX OUT
(L)(R)
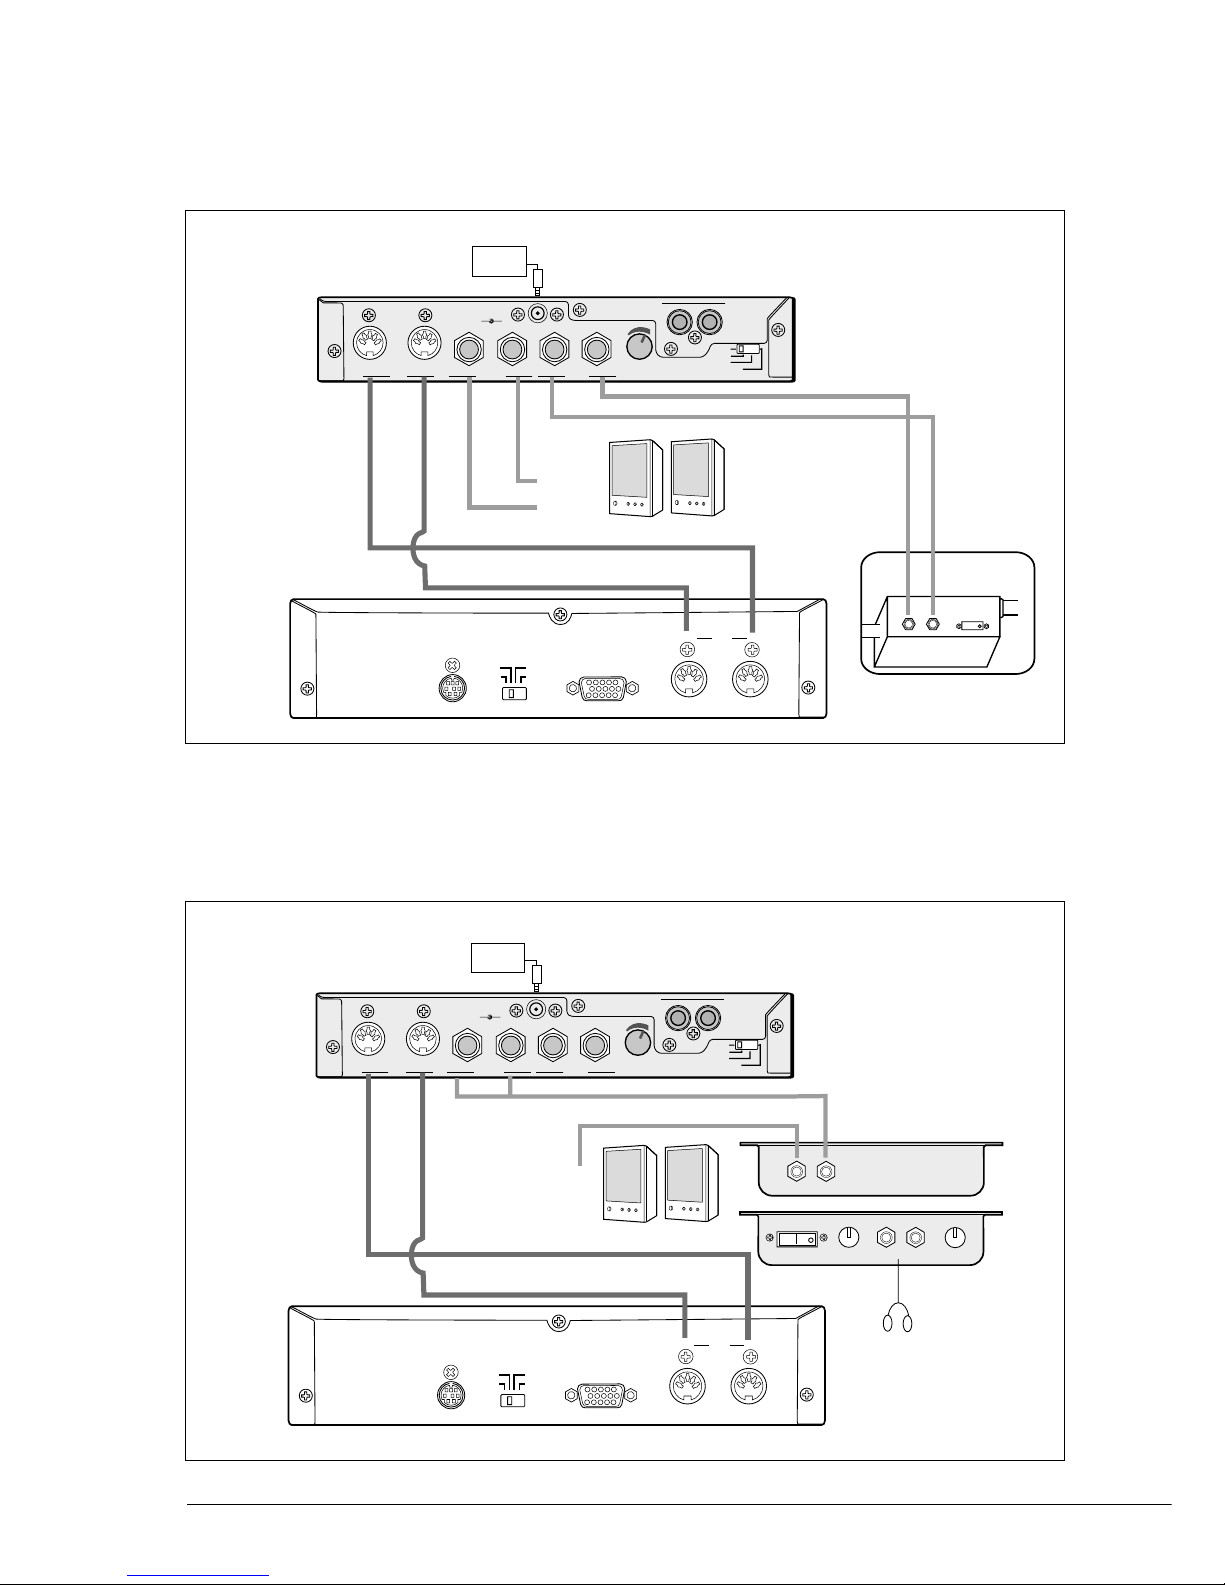
If your piano is:
Disklavier Mark II XG Silent Series / Disklavier Pro Series
PianoSmart can be used if the Disklavier Control Unit is DKC500RW.
PianoSmart cannot be used if the Control Unit is DKC500R. However, PianoSmart can be used in
DKC500R Control Units with an EMK1 installed since these are equivalent to the DKC500RW.
Piano side
DCD1+PS
(Connection example)
* When using PianoSmart, connect the MIDI
IN connector on the DCD1+PS and the
MIDI OUT connector on the piano.
*
AC
adaptor
Audio cable
MIDI cable
Head Phone
External
speaker system
If your piano is:
Disklavier Mark III Series playback models / Disklavier GranTouch
PianoSmart can be used if the Disklavier Control Unit is DKC55/DKC500RW.
PianoSmart cannot be used if the Control Unit is DKC500R. However, PianoSmart can be used in
DKC500R Control Units with an EMK1 installed since these are equivalent to the DKC500RW.
Piano side DCD1+PS
(Connection example)
* When using PianoSmart, connect the MIDI IN
connector on the DCD1+PS and the MIDI OUT
connector on the piano.
*
AC
adaptor
Audio cable
MIDI cable
or
External
speaker
system
Set
PIANO TYPE
accordingly
No external speaker system is required for the Disklavier GranTouch.
Silent Control Box
Page 22
16
Dkv
GT10
GT1
Clavinova
+
–
OUT IN
R L/L+R L/L+R
MIDI
OUTPUT
DC-IN 12V
R
RL
ANALOG MIDI IN
PIANO TYPE
VOLUME
AUX IN
VOLUME HEADPHONES
REVERB
OUT IN
AUX
ON
OFF
MAINS
(L) (R)
HOST SELECT
TO HOST
MIDI
PC1
PC2
MAC
OUT MIDI IN
TO CONTROL CABLE
FOR PIANO
Dkv
GT10
GT1
Clavinova
+
–
OUT IN
R L/L+R L/L+R
MIDI
OUTPUT
DC-IN 12V
R
RL
ANALOG MIDI IN
PIANO TYPE
VOLUME
AUX IN
HOST SELECT
TO HOST
MIDI
PC1
PC2
MAC
OUT MIDI IN
TO CONTROL CABLE
FOR PIANO
ONL R OFF
AUX OUT MAINS
(L) (R)
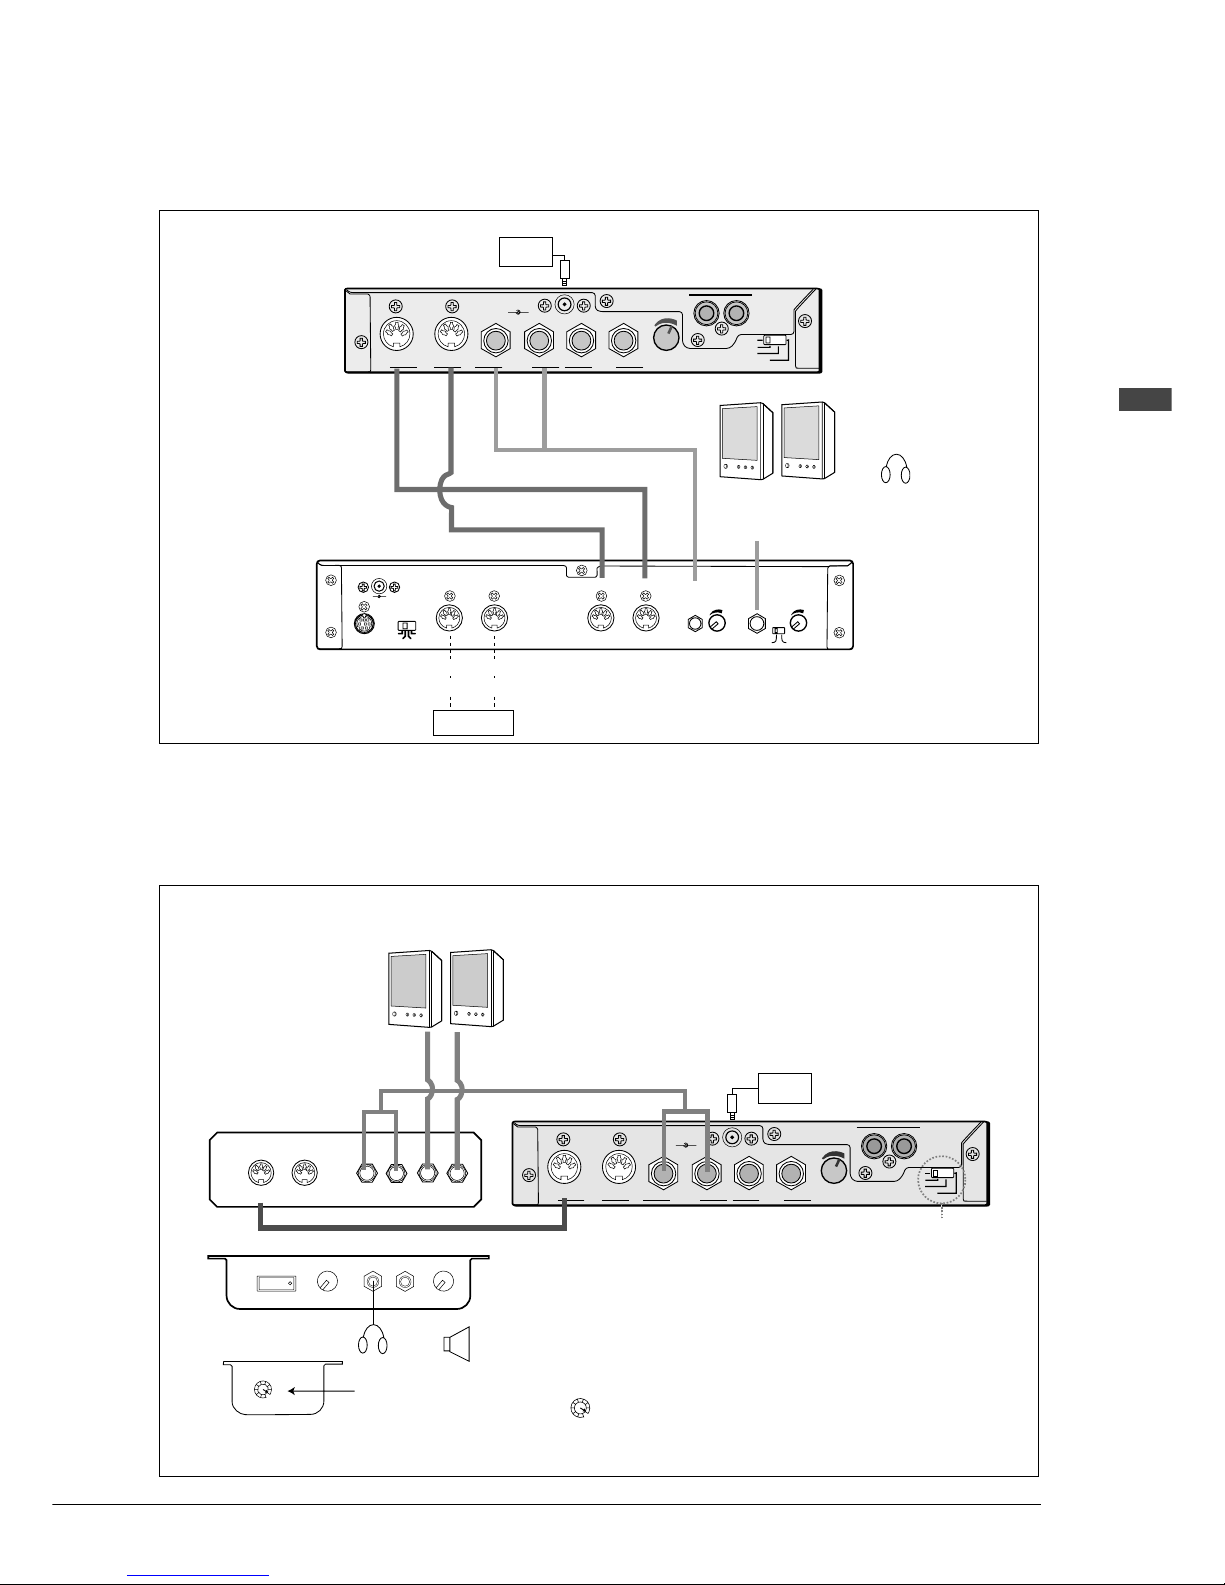
If your piano is:
Disklavier MX500/MX22/MX116 (w/o Silent system)
PianoSmart can be used.
(Connection example)
* When using
PianoSmart,
connect the MIDI IN
connector on the
DCD1+PS and the
MIDI OUT
connector on the
piano.
*
Audio cable
MIDI cable
SWITCH BOX
External
speaker
system
Located on the backside
of the piano
AC
adaptor
Piano side
DCD1+PS
If your piano is:
Disklavier Silent MPX70
PianoSmart can be used.
(Connection example)
* When using
PianoSmart,
connect the MIDI IN
connector on the
DCD1+PS and the
MIDI OUT
connector on the
piano.
*
Audio cable
MIDI cable
External
speaker
system
AC
adaptor
Piano side
DCD1+PS
Silent Control box
Page 23
17
English Chapter 3: Connecting the DCD1+PS
Dkv
GT10
GT1
Clavinova
+
–
OUT IN
R L/L+R L/L+R
MIDI
OUTPUT
DC-IN 12V
R
RL
ANALOG MIDI IN
PIANO TYPE
VOLUME
AUX IN
TO HOST
MIDI
VOLUME VOLUME
AUX IN OUTPUT
OUT IN
HOST
SELECT
MIDI
PC1
PC2
MAC
PIANODC-IN 12V
OUT IN
+
–
PHONES
LINE
(L) (R)
Dkv
GT10
GT1
Clavinova
+
–
OUT IN
R L/L+R L/L+R
MIDI
OUTPUT
DC-IN 12V
R
RL
ANALOG MIDI IN
PIANO TYPE
VOLUME
AUX IN
L/L+R L/L+R
AUX IN
IN OUT
R
R
MIDI
AUX OUT
(R)
(L)
POWER
OFF ON VOLUME HEADPHONES
REVERB
PITCH
445
444
445
442
441
440
439
438
If your model is:
DSR1
PianoSmart can be used.
(Connection example)
* When using
PianoSmart, connect
the MIDI IN connector
on the DCD1+PS and
the MIDI OUT
connector on the piano.
*
Audio cable
MIDI cable
External speaker
system
AC
adaptor
Piano side
DCD1+PS
or Headphone
Piano
Refer to DSR1 Manual for more
information concerning connection.
If your piano is:
GT1 / GT2 / GT7 / Silent Series/MIDIPiano SN Type Grand models
PianoSmart cannot be used.
(Connection example)
Piano side DCD1+PS
Turn the PITCH switch one position to
the right of the 445 position.
PITCH
445
444
445
442
441
440
439
438
This will enable the DCD1+PS to
optimize volume adjustments.
AC
Audio cable
MIDI cable
External speaker
system
Underside or
back of piano
Control Box Front Panel
Control Box
Right Panel
or
Audio cable
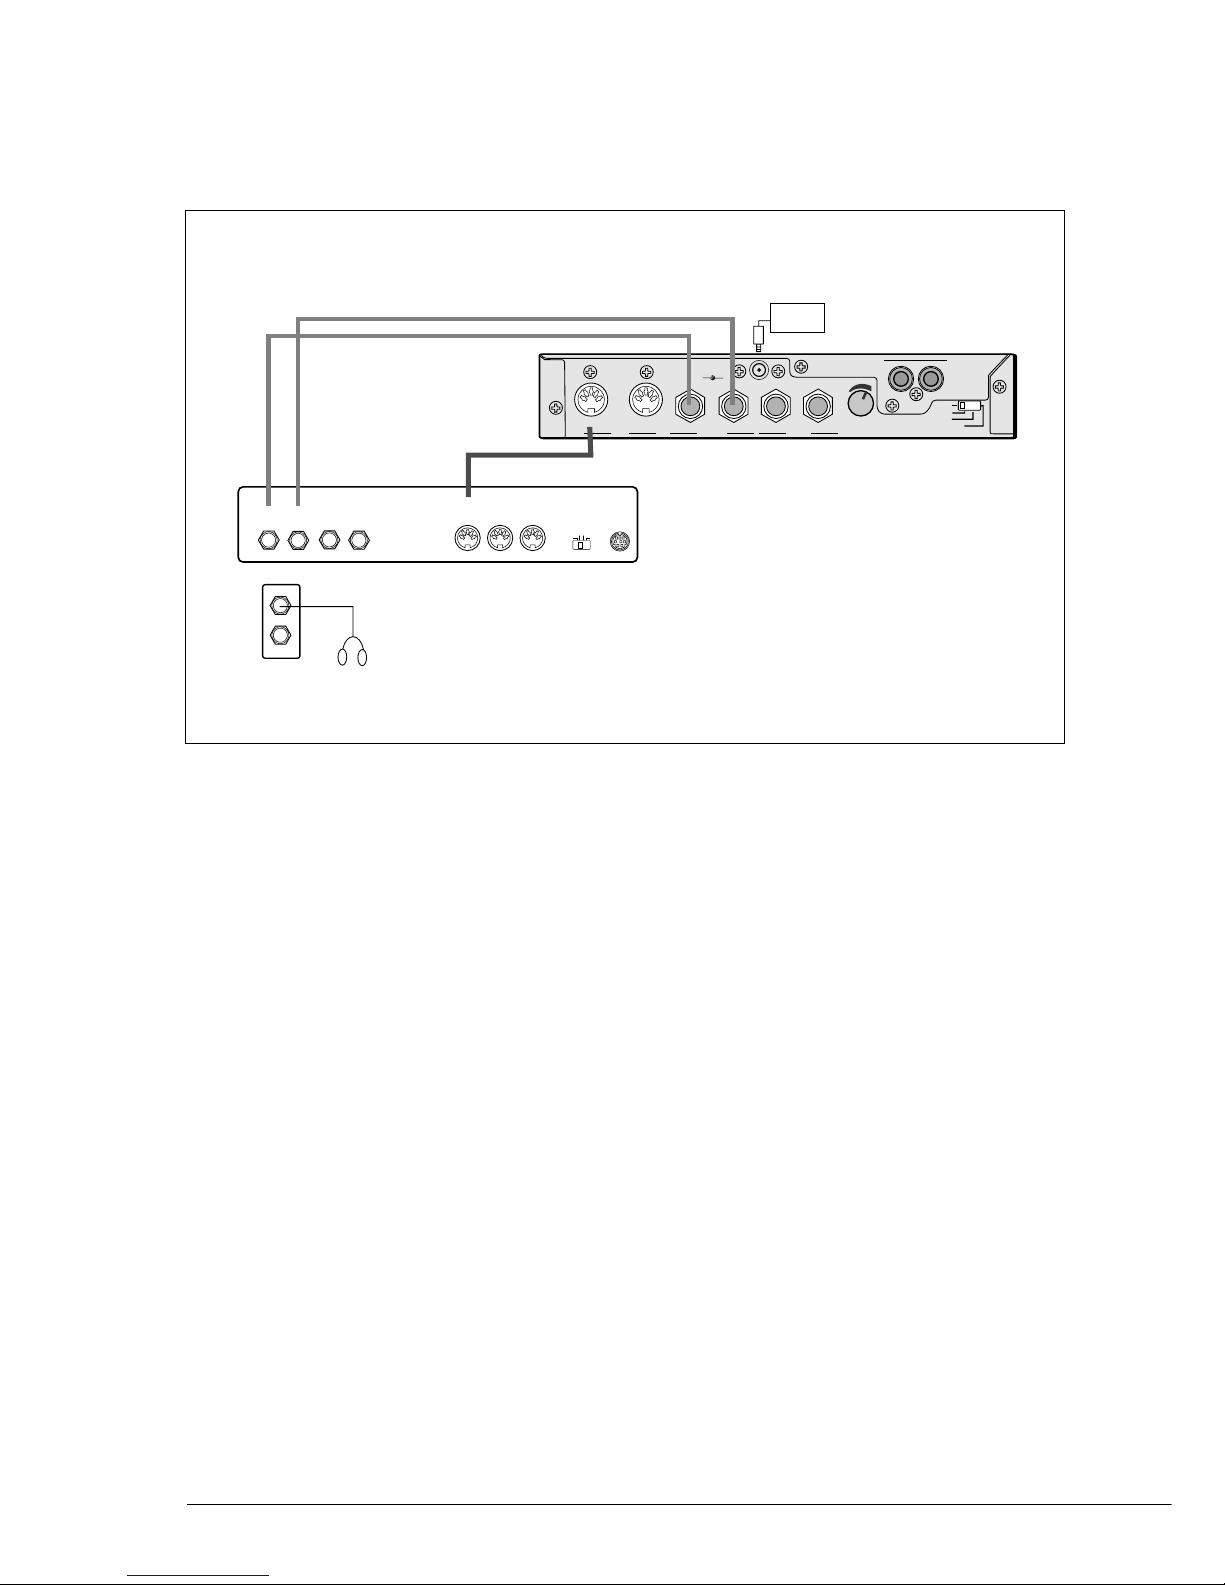
Page 24
18
Dkv
GT10
GT1
Clavinova
+
–
OUT IN
R L/L+R L/L+R
MIDI
OUTPUT
DC-IN 12V
R
RL
ANALOG MIDI IN
PIANO TYPE
VOLUME
AUX IN
LR
AUX IN AUX OUT
TO HOST
IN OUT THRU
MIDI
HOST SELECT
MIDI
PC1 PC2
MAC
If your piano is:
Clavinova Digital Piano
PianoSmart cannot be used.
(Connection example)
Audio cable
MIDI cable
AC
adaptor
Piano side DCD1+PS
Page 25
19
English Chapter 3: Connecting the DCD1+PS
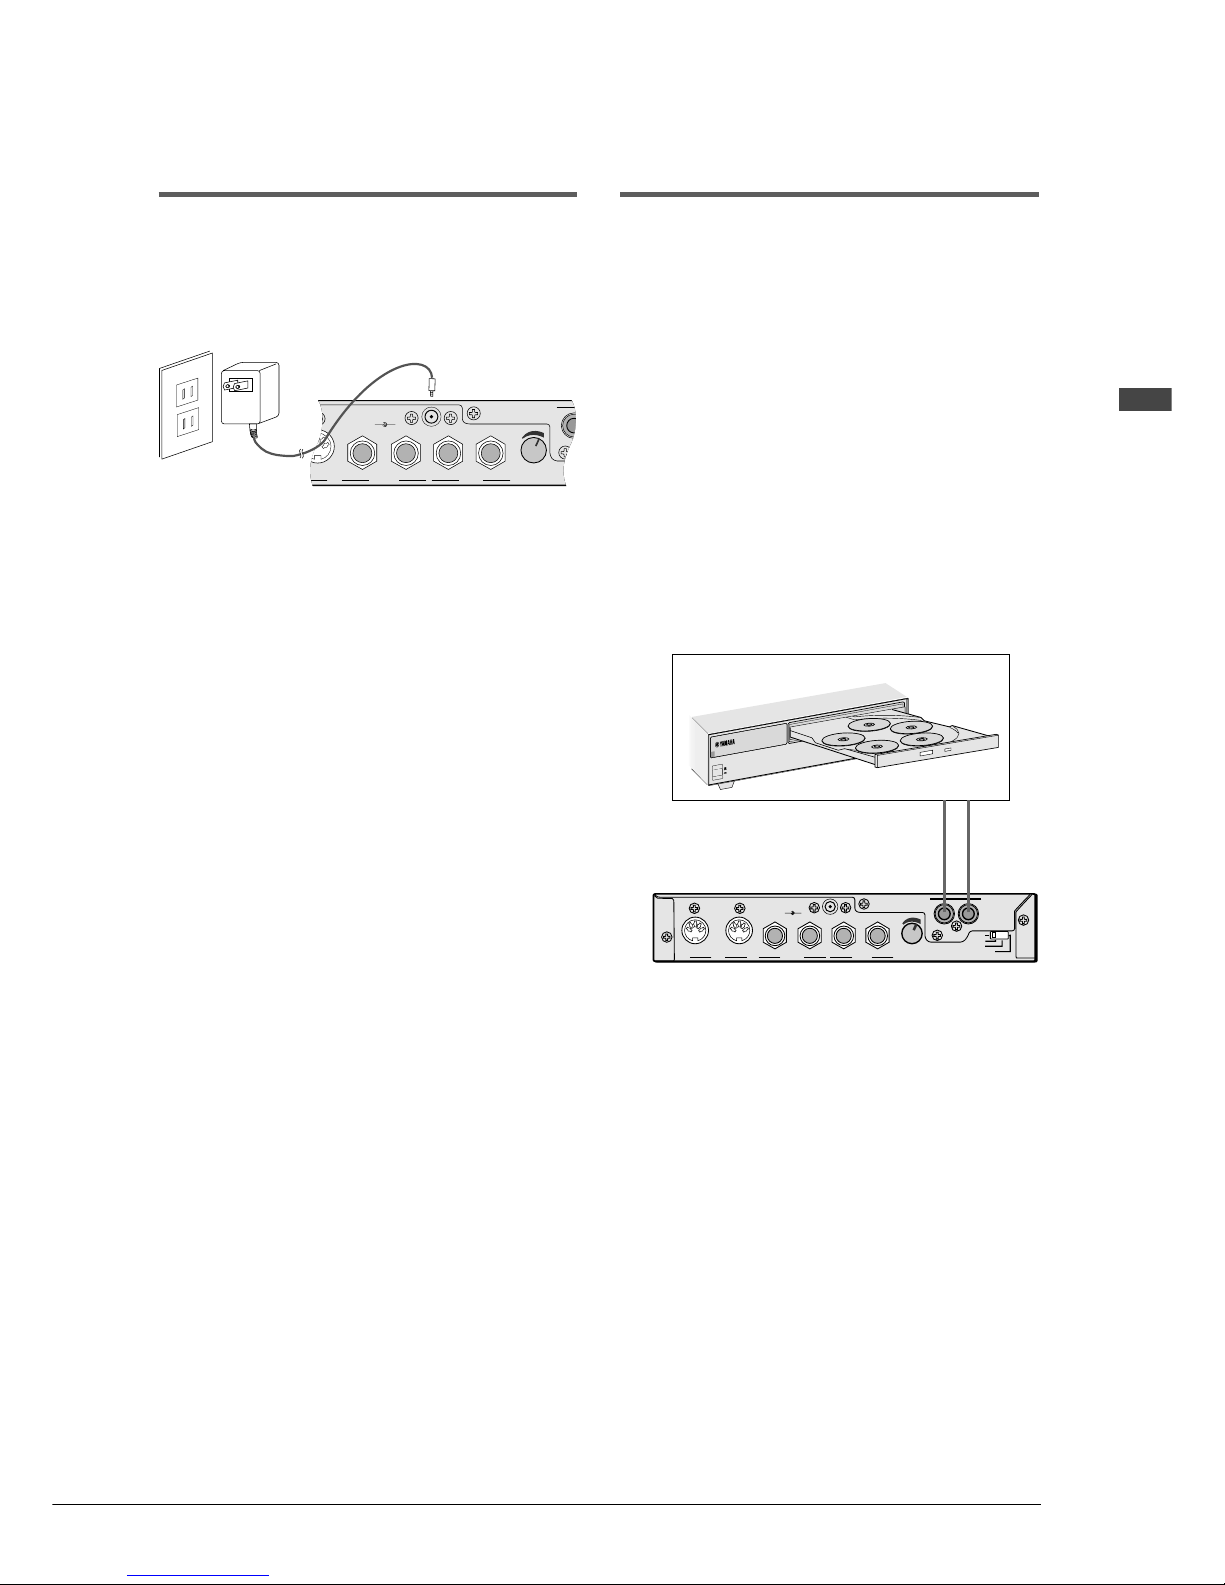
Connecting the
AC Adaptor
Connect the AC adaptor (supplied) to the DC IN
socket on the DCD1+PS and plug the adaptor into
an AC power receptacle.
+
–
IN
R L/L+R L/L+R
OUTPUT
DC-IN 12V
R
R
ANALOG MIDI IN
VOLUME
AUX IN
Note: Always use the AC adaptor supplied
with the DCD1+PS. Using other
adpators may result in damage to the
DCD1+PS.
Note: Make sure that the voltage of the AC
power receptacle matches that marked
on the adaptor.
Note: As long as the AC adaptor is plugged
into an AC power receptacle, the
adaptor will consume a small amount
of electricity. If you are not going to
use the DCD1+PS for a prolonged
period of time or if you want to turn the
DCD1+PS off completely, disconnect
the AC adaptor from the AC power
receptacle.
Connecting Other
MIDI Instruments
You can use the MIDI IN connector to connect an
external MIDI instrument and send its output to
the piano. In this case, the DCD1+PS’s MIDI
OUT and the piano’s MIDI IN connectors must be
connected, and the DCD1+PS turned on but not
playing.
e.g. Connecting a CD Changer
Although the DCD1+PS can play one CD only,
you can connect a CD changer to the DCD1+PS
and play multiple CDs continuously. The
DCD1+PS will automatically recognize both
audio/MIDI CDs and standard audio CDs that are
set in the CD changer.
S
T
A
N
D
B
Y
O
N
D
I
S
K
L
A
V
I
E
R
C
D
P
L
A
Y
E
R
D
C
D
1
R
E
P
E
A
T
B
A
L
A
N
C
E
M
I
N
M
A
X
••
V
O
L
U
M
E
–
1
0
0
••
•
•
•
••
•
•
•
•
Dkv
GT10
GT1
Clavinova
+
–
OUT IN
R L/L+R L/L+R
MIDI
OUTPUT
DC-IN 12V
R
RL
ANALOG MIDI IN
PIANO TYPE
VOLUME
AUX IN
Note: If the CD changer is connected to the AUX IN
connector, audio/MIDI CDs will not play
correctly.
The MIDI OUT conector is used to output MIDI
messages from the DCD1+PS to the piano.
CD Changer
Audio cable
DCD1+PS
Page 26
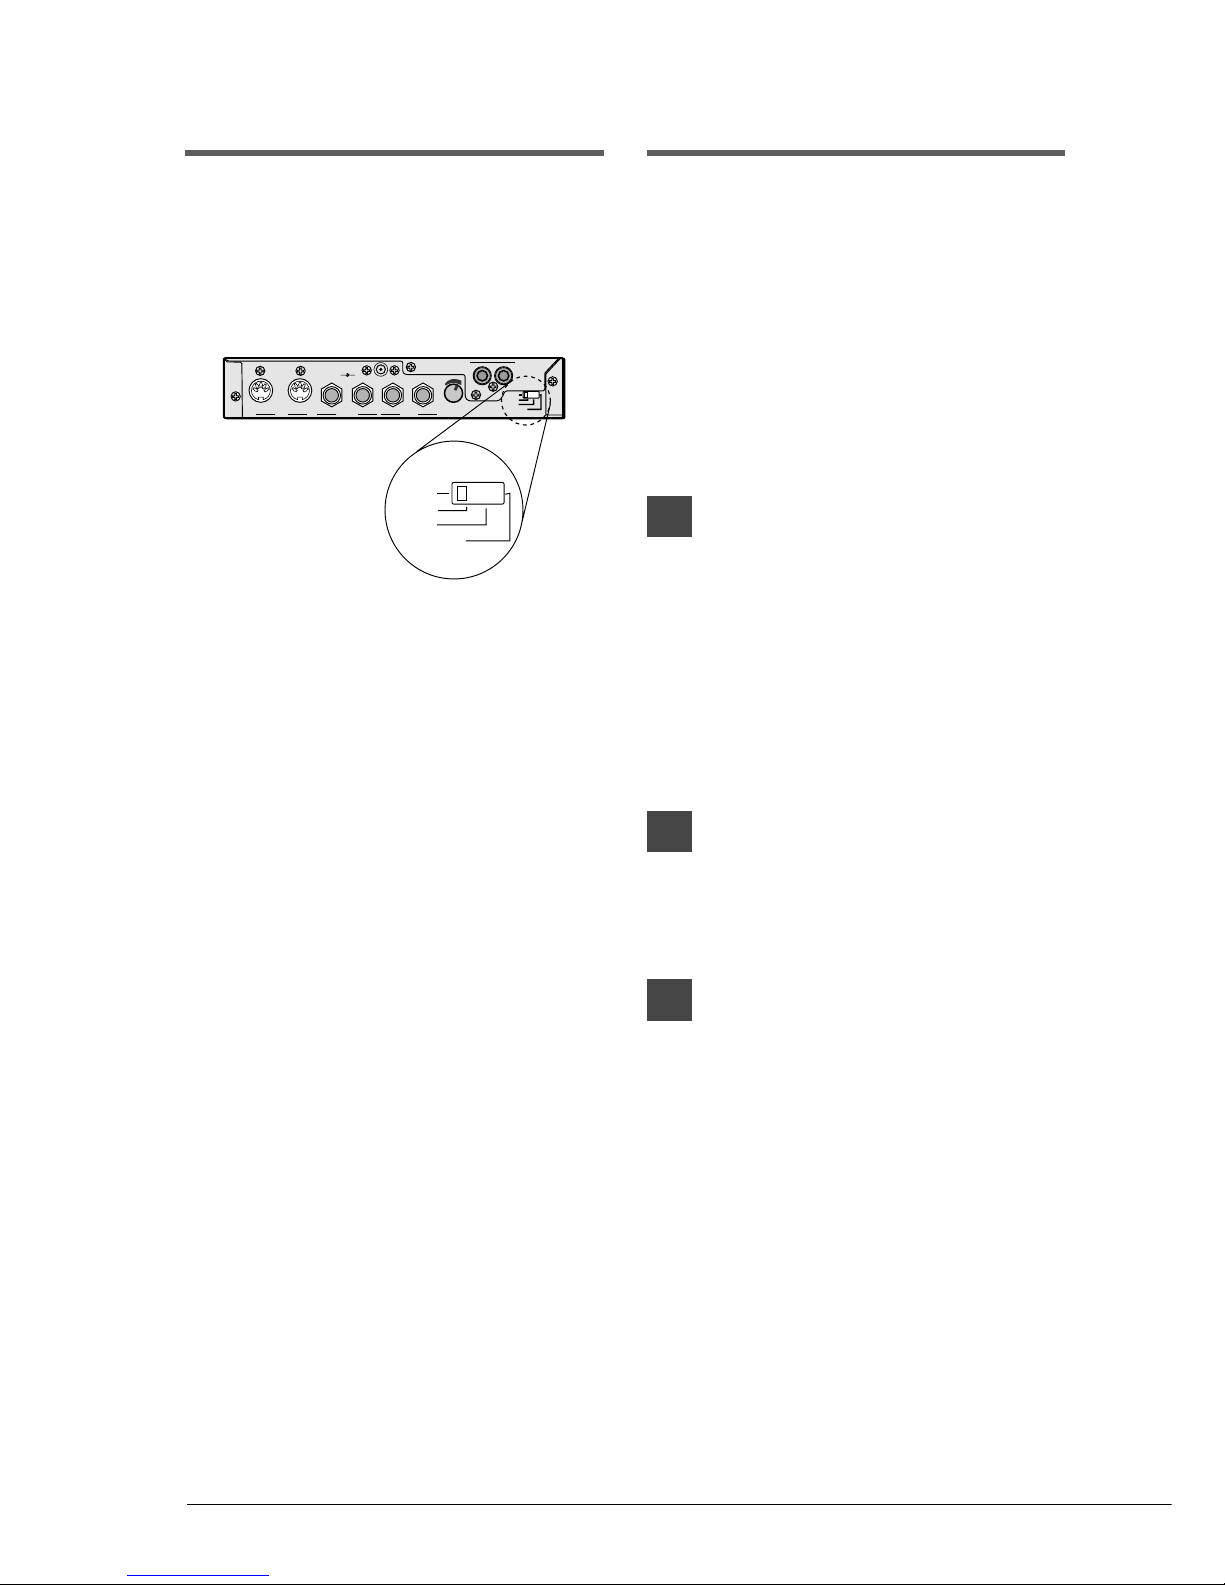
20
Piano Settings
Before you begin using the DCD1+PS to play
back CDs on your piano, you must make the
following settings according to your piano model.
MX80, MX95 (and equivalent)
No settings are necessary on the piano side.
MX100A, MX100B
(and equivalent)
Insert a 2DD floppy disk
formatted for the Disklavier into
the floppy disk drive on your
piano.
Earlier Disklavier Grand
Pianos
(w/wagon type Control Unit)
1
Insert a 2DD floppy disk
formatted for the Disklavier into
the floppy disk drive on your
piano.
2
Make the following settings on
your piano.
Refer to your piano’s owner’s manual for
details.
MIDI IN CH ----------→ HP
MIDI IN---------------→ DELAY IN
These settings are remembered when your
piano is turned off.
Setting Piano Type
After you finish connecting the DCD1+PS to your
piano, you must set the Piano Type switch on the
rear panel of the DCD1+PS to match your piano.
Set the switch according the piano type your
piano belongs to. (See “Host Pianos” on page 6.)
Dkv
GT10
GT1
Clavinova
+
–
OUT IN
R L/L+R L/L+R
MIDI
OUTPUT
DC-IN 12V
R
RL
ANALOG MIDI IN
PIANO TYPE
VOLUME
AUX IN
Dkv
GT10
GT1
Clavinova
PIANO TYPE
Page 27

21
English Chapter 3: Connecting the DCD1+PS
Note: <Connecting to a MX100 Series piano or an
earlier Disklavier Grand piano>
Normally, when no action is sent to the piano
for more than five minutes, the power supply
to the unit shuts off. In this case, pressing the
[STOP] button enables playback.
When connected to the DCD1+PS properly,
the piano’s drive unit is always powered on, as
the DCD1+PS constantly sends MIDI data
(Active Sense Data) to the piano. If the
DCD1+PS is off or is not connected to your
piano, or if it was connected to your piano
more than five minutes after you turned on
your piano, you must press the [STOP] button
to enable operations.
Mark II Series, MPX100
II
Make the following settings on
your piano.
Refer to your piano’s owner’s manual for
details.
MIDI IN CH ----------→ HP
MIDI IN---------------→ DELAY IN
These settings are remembered when your
piano is turned off.
Mark
III
Series, Mark
II
XG
Series, Disklavier GranTouch,
MPX70, Pro
Make the following settings on
your piano.
Refer to your piano’s owner’s manual for
details.
Piano Rcv CH --------→ HP
DELAY IN------------→ ON
HOST SELECT ------→ MIDI
(the HOST SELECT switch is on the rear
panel of the Control Unit.)
These settings are remembered when your
piano is turned off.
DSR1
Make the following settings on
your DSR1.
Refer to your owner’s manual for details.
Piano Rcv Ch ---------→ HP
HOST SELECT ------→ MIDI
(The HOST SELECT switch is on the rear
panel of the Control Unit.)
Other Digital Pianos
Set your piano to receive channel 1 (piano part)
from the DCD1+PS.
Refer to your piano’s owner’s manual for details.
Page 28
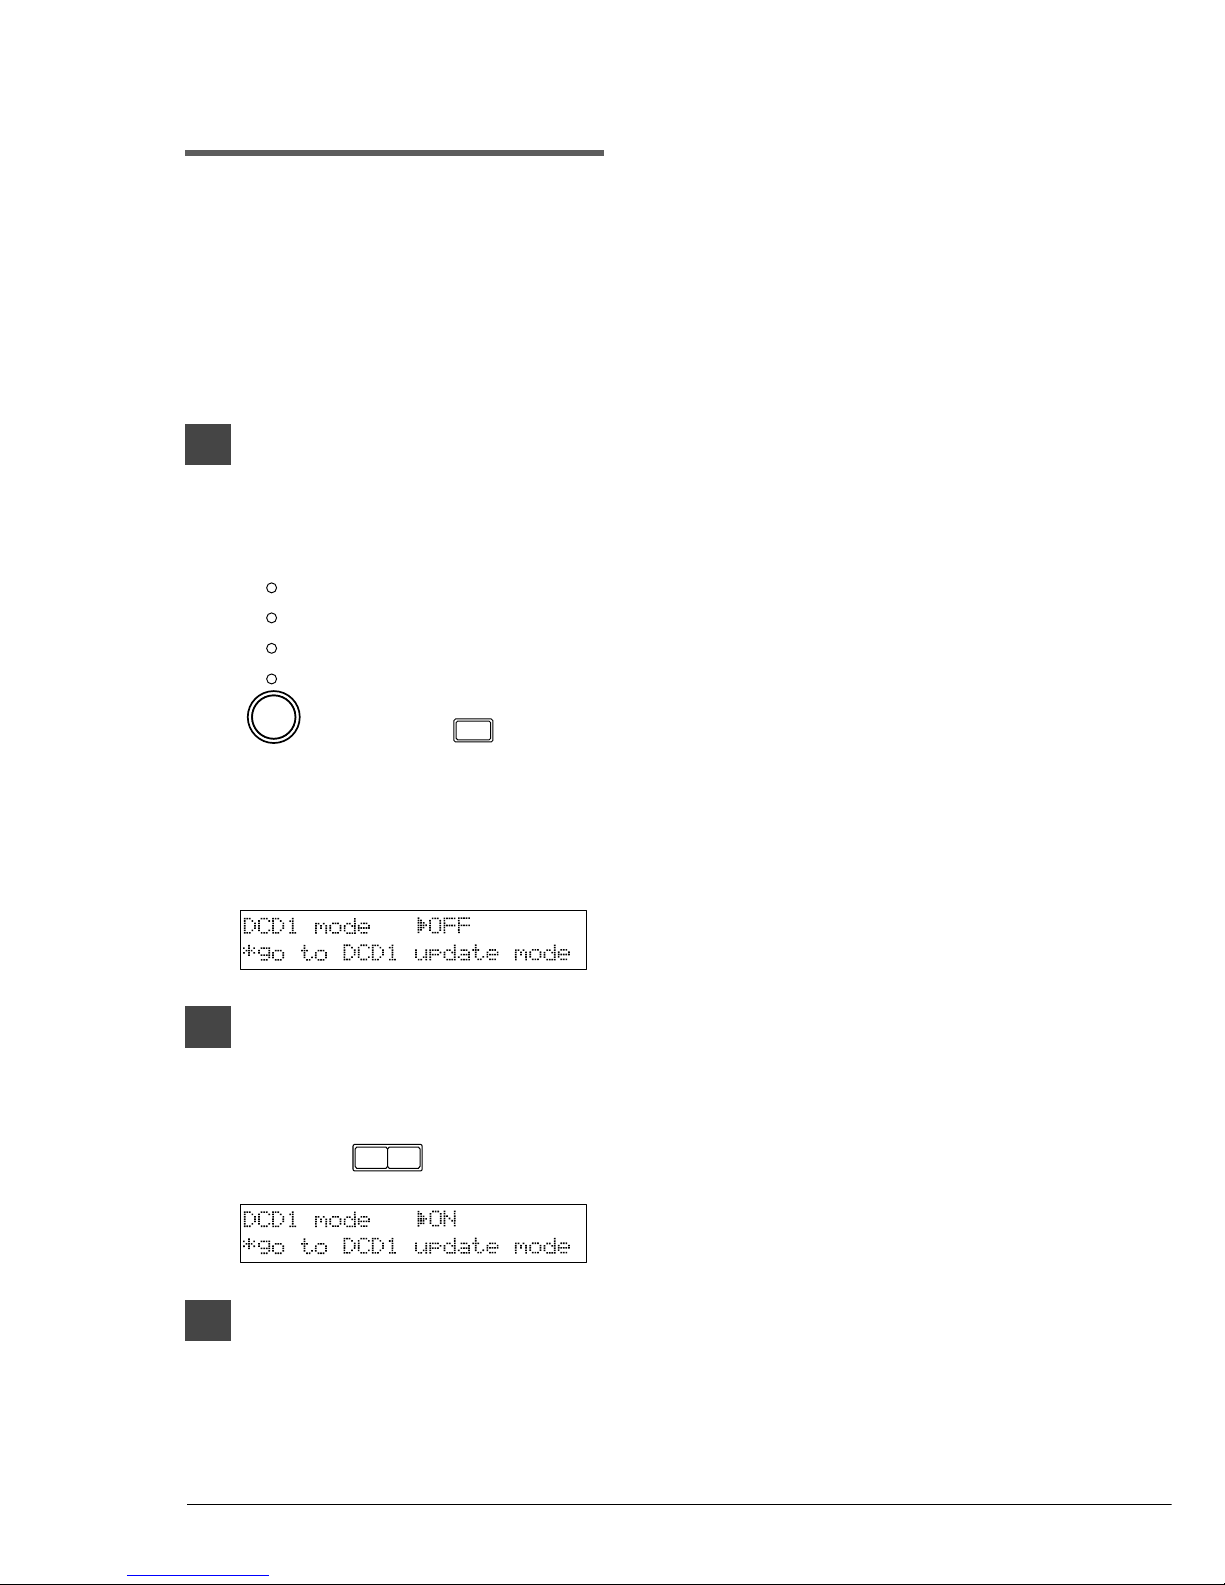
22
DCD1 Mode
Setting DCD1 mode to ON allows the exchange
of commands between the Control Unit and
DCD1+PS. In this case, it is assumed that the
MIDI IN on the Control Unit and MIDI OUT on
the DCD1+PS are connected and the MIDI OUT
on the Control Unit and MIDI IN on the
DCD1+PS are connected.
1
With the power off, press
[STANDBY/ON] while holding
down Selector on the Control Unit
to turn on the power.
BALANCE
TRANSPOSE
TEMPO
VOLUME
The DCD1 Mode Setting screen shown
below appears.
(DCD1 Mode Setting screen)
2
Press [+/YES] so that
"DCD1mode=ON" appears on the
display.
–/NO +/YES
3
Press [STANDBY/ON] to turn off
the Control Unit.
Note: Once the DCD1 mode information is
set, it remains stored even when the
power is turned off. Then, when the
power subsequently turned on, the
DCD1+PS turns on in the mode that
was set.
Note: • If the DCD1 mode is set to ON, MIDI
OUT on the Control Unit is used to
control the DCD1+PS, and so some
MIDI OUT functions that were
available before may be unable to be
used.
• If using the functions described in
“Disklavier & MIDI” in the
Disklavier operation manual, use with
DCD1 mode set to OFF and the
connection for not using PianoSmart.
☛See page 13 for details about the
connections.
Note: If DCD1 mode is set to ON and the
Control Unit is a DKC55, then when a
button on the DCD1+PS is pressed, the
DCD1+PS operates as if the same
button has been pressed on the Control
Unit.
(Control Unit )
STANDBY-O
N
Page 29
23
English Chapter 4: Playing CDs
Basic Operations
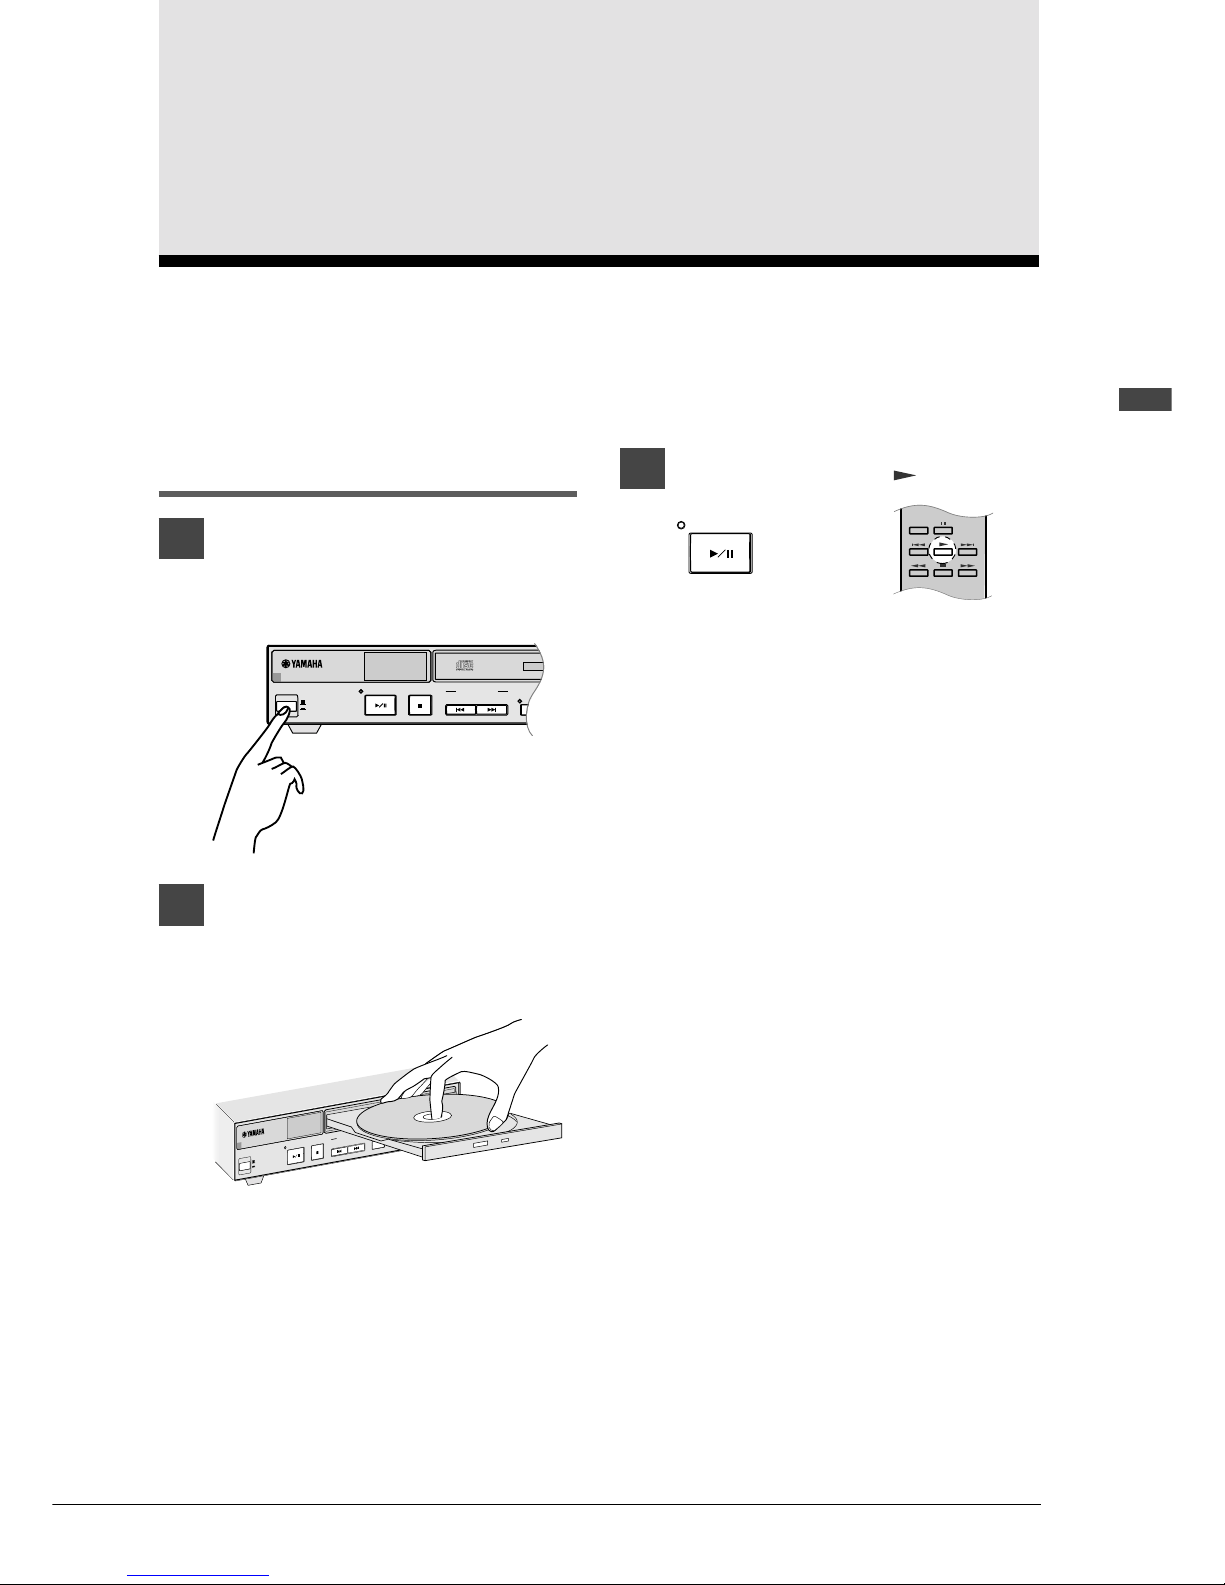
1
Press [STANDBY / ON ] on the
front panel of the DCD1+PS to
turn it on.
STANDBY
ON
PLAY/PAUSE
DISKLAVIER CD PLAYER DCD1
STOP
SONG SELECT
REPEAT
2a
Press the CD eject button and
place a CD on the CD tray. Then
gently push the tray to close the
CD drive.
S
T
A
N
D
B
Y
O
N
P
L
A
Y
/
P
A
U
S
E
D
I
S
K
L
A
V
I
E
R
C
D
P
L
A
Y
E
R
D
C
D
1
S
T
O
P
S
O
N
G
S
E
L
E
C
T
R
E
P
E
A
T
B
A
L
A
N
C
E
M
I
N
M
A
X
••
V
O
L
U
M
E
–
1
0
0
••
•
•
•
•
•
•
•
•
•
The DCD1+PS automatically reads the CD.
When “01” appears in the display, the
DCD1+PS is ready to play back the CD.
Note: You cannot operate the DCD1+PS
while “00” is displayed.
3a
Press [PLAY/PAUSE] ( ).
PLAY/PAUSE
or
REPEAT
The PLAY/PAUSE indicator lights and
song No.1 starts playing.
For PianoSoft.PlusAudio and other
audio/MIDI CDs, your piano plays the
piano parts and the audio parts are output
from speakers or headphones.
While the CD is being played back, the two
right digits of the LED shows the song
number and the segments of the left digit
moves in a square to show that a song is
being played back.
Chapter 4
Playing CDs
This chapter describes how to play CDs on the DCD1+PS. If you are using the DCD1+PS for the first
time, you can use the supplied sample PianoSoft.PlusAudio CD, which contains a sample song.
Page 30
24
Using a DKC55 Control Unit
When the Control Unit is a DKC55, turning on
the DCD1 mode allows CD playback using
operation by the Control Unit. If using other
Control Units, operation by the DCD1+PS is
needed for CD playback.
When a CD is not inserted
2b
Press the CD eject button and
place a CD on the CD tray. Then
gently push the tray to close the
CD drive.
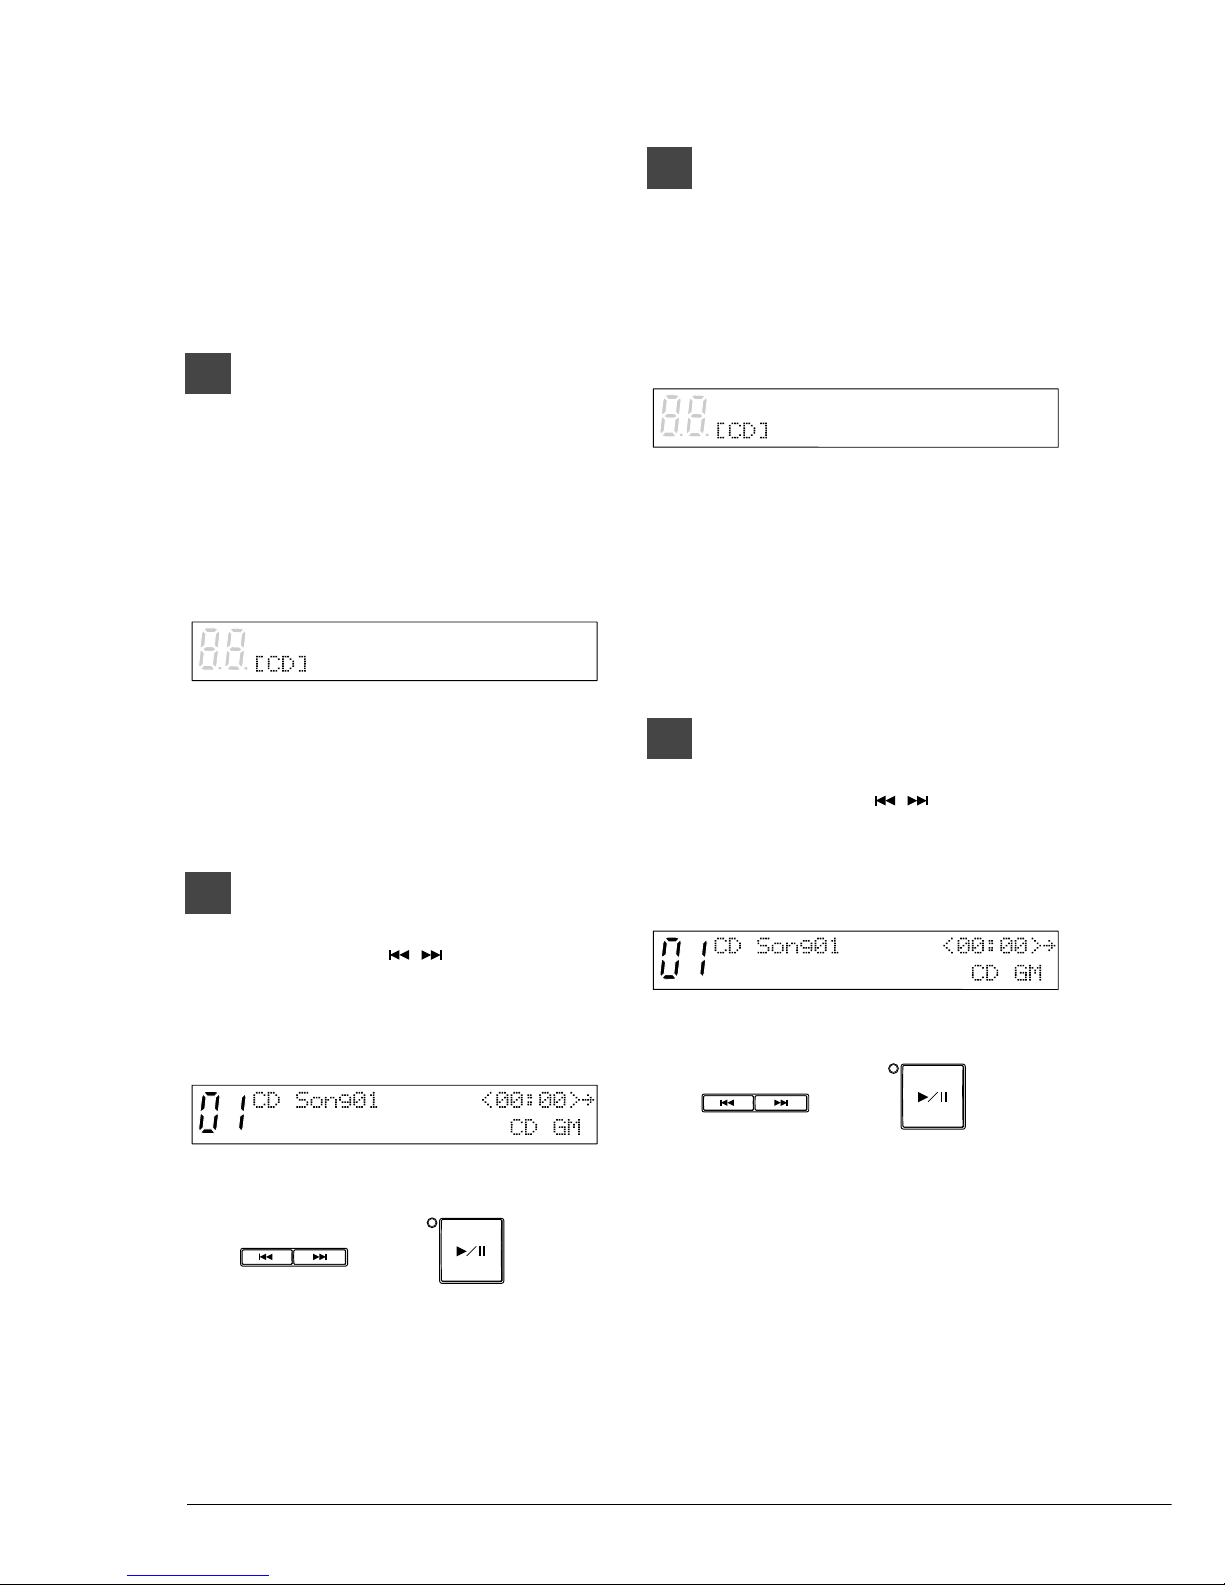
The following display appears on the panel
on the Control Unit. This indicates that the
CD drive has been selected.
Note: The DCD1+PS does not move to the
CD drive if the PianoSmart song is
selected, and the intended CD is
inserted.
3b
After several seconds, the display
switches to the Song Name
screen. Press [ ] to select the
song to listen to, and then press
[PLAY] to start playback.
SONG SELECT/REV•FWD
PLAY/PAUSE
Note: Song titles are displayed when a
PianoSoft PlusAudio (PSPA) CD is
inserted.
When a CD is inserted
2c
If the [DRIVE] button is pressed
when the FD or memory disk is
selected, the Select Drive screen
appears on the display. Press the
[DRIVE] button several times until
“CD” appears on the display.
Note: Each time that the [DRIVE] button is
pressed, the DRIVE indicator toggles
the floppy disk, CD, and Memory
Disks 0 to 9 and A to F. “FD” and
“CD” appear only when a floppy disk
or CD is inserted in their respective
drives.
3c
After several seconds, the display
switches to the song name
indicator. Press [ ] to select
the song to listen to, and then
press [PLAY] to start playback.
SONG SELECT/REV•FWD
PLAY/PAUSE
Note: Song titles are displayed when a
PianoSoft PlusAudio (PSPA) CD is
inserted.
Page 31
25
English Chapter 4: Playing CDs
Pausing
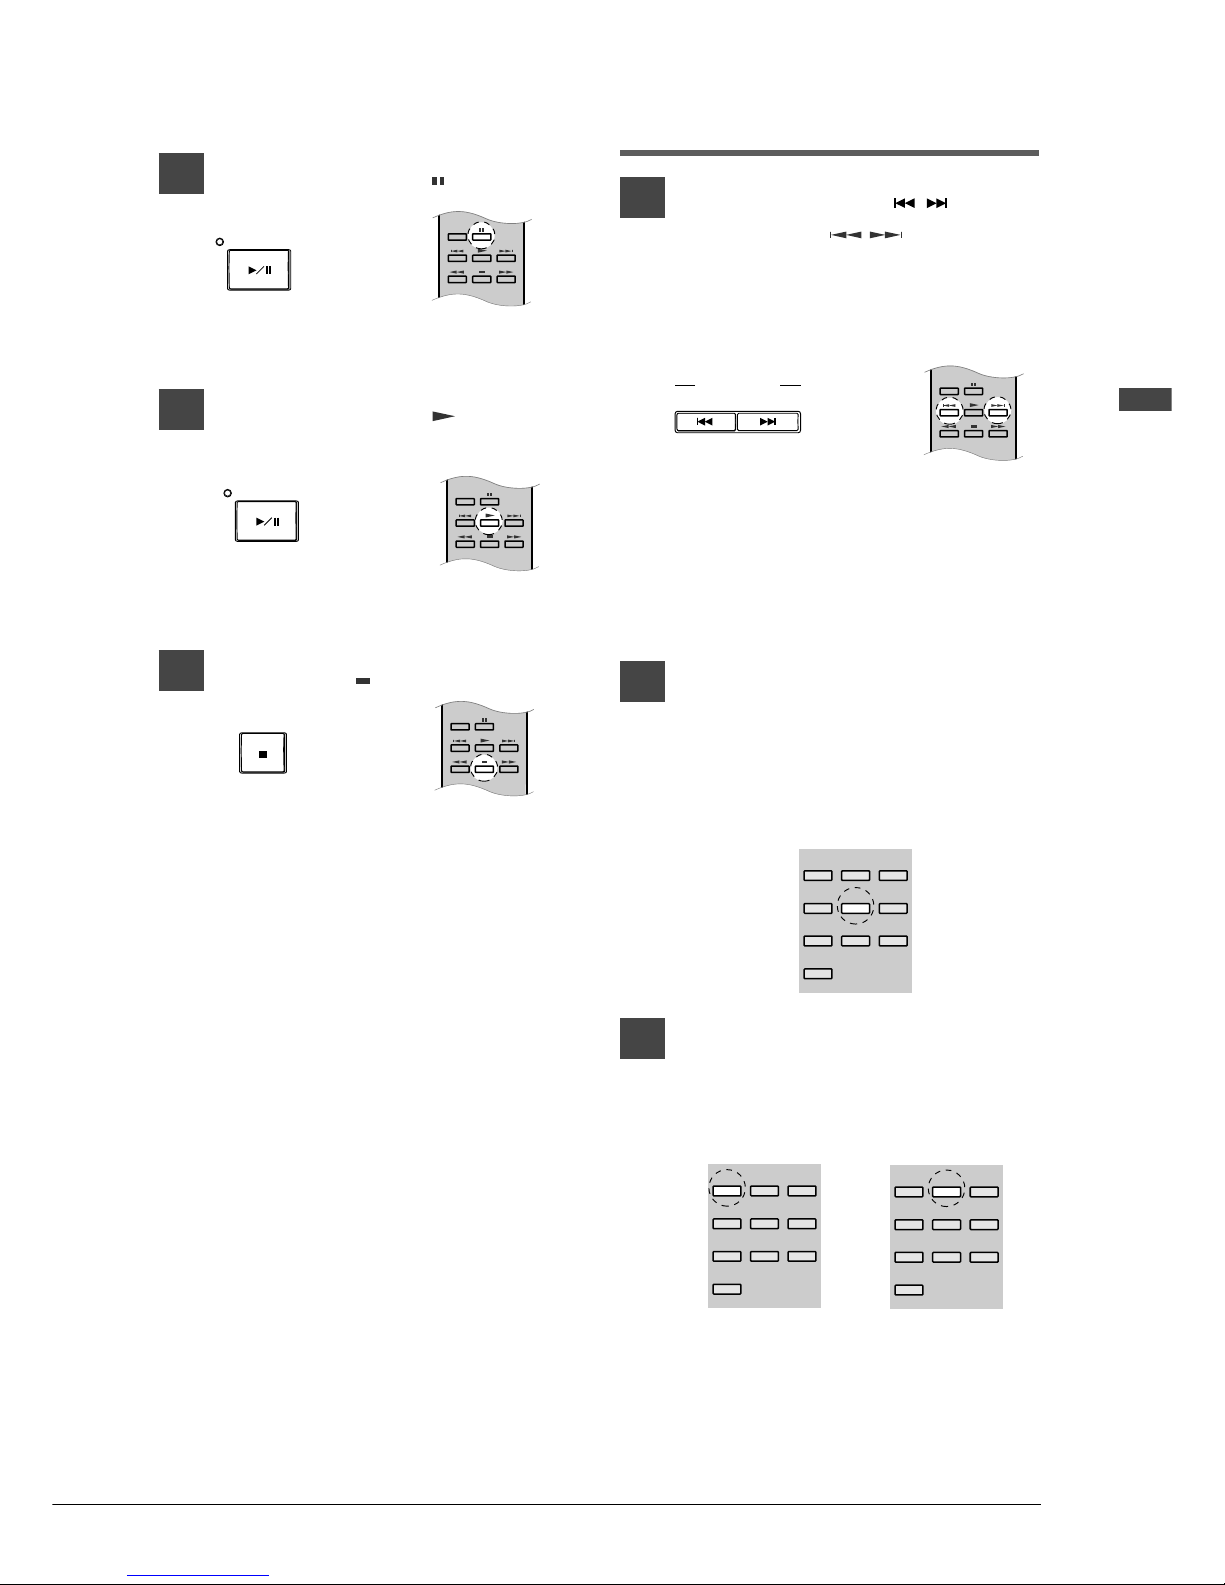
1
Press [PLAY/PAUSE] ( ).
PLAY/PAUSE
or
REPEAT
Playback stops and the PLAY/PAUSE
indicator flashes.
2
Press [PLAY/PAUSE] ( ) to resume
playback.
PLAY/PAUSE
or
REPEAT
Stopping
Press [STOP] ( ).
STOP
or
REPEAT
Playback stops and the CD returns to the
beginning.
Pressing [STOP] in Pause mode cancels
Pause mode.
Selecting a Song
Press [SONG SELECT ] in
Stop mode, or to select
the desired song number.
The remote control can be used to select a
song at any time.
SONG SELECT
or
REPEAT
Selecting a Song Using the
Number Pad
You can also select a song using the number pad
on the remote control.
1
To select a song from 1 to 9, press
the corresonding number button.
To select song number 5 for example,
simply press [5].
1 2 3
4 5 6
7 8 9
0
2
To select a song numbered 10 and
above, enter the first digit, then
within 2 seconds, enter the
second digit.
1 2 3
4 5 6
7 8 9
0
➞
1 2 3
4 5 6
7 8 9
0
Page 32
26
Fast Preview & Review
(in Play mode)
Fast Forward and Reverse allow you to quickly
search through a song with the song playing.
While fast previewing and reviewing, the LED
functions as a counter, showing the minutes and
seconds.
1
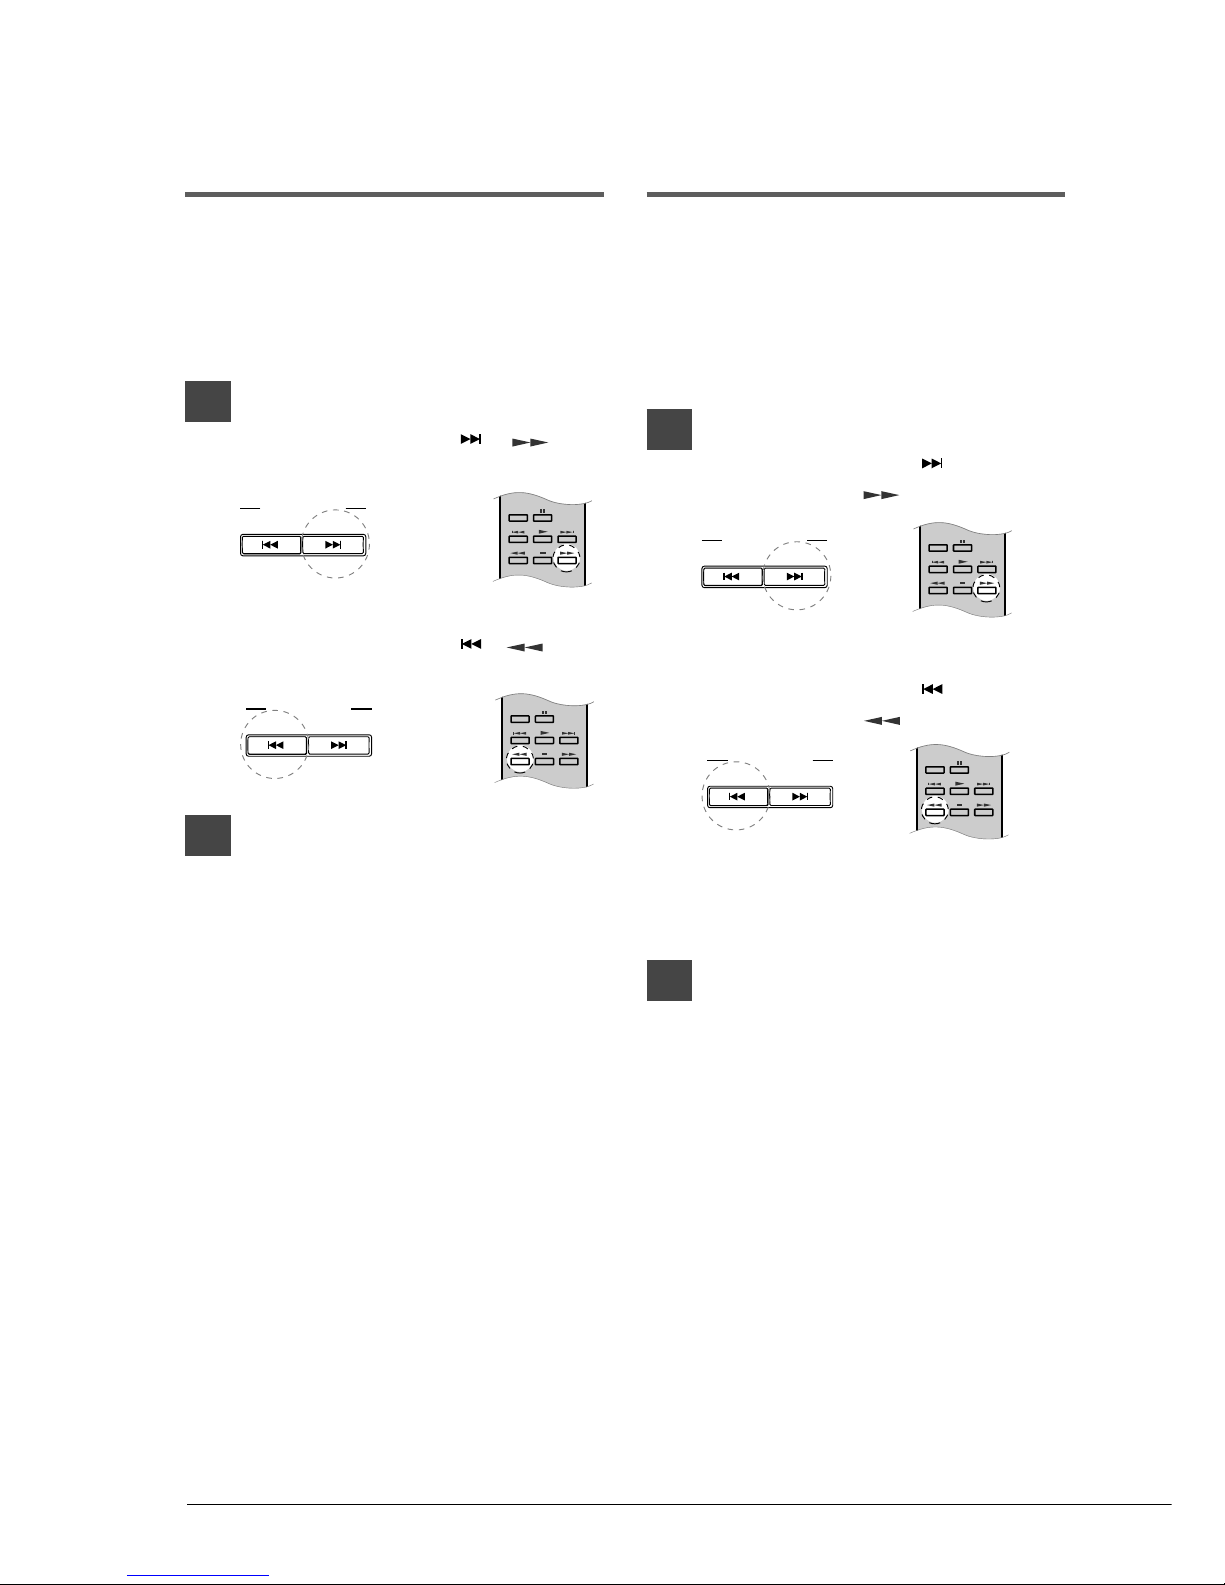
To preview,
press [SONG SELECT ] ( )
during playback.
SONG SELECT
or
REPEAT
To review,
press [SONG SELECT ] ( )
during playback.
SONG SELECT
or
REPEAT
2
Press [PLAY/PAUSE] to resume
playback, or [STOP] to engage
Pause mode.
If a CD is reviewed all the way to the
beginning, Pause mode is engaged.
Pressing [PLAY/PAUSE] starts playback
from the beginning.
If a song is previewed all the way to the
end, Pause mode is engaged. Pressing
[PLAY/PAUSE] starts playback of the next
song.
Fast Forward & Reverse
(in Pause mode)
Fast Forward and Reverse allow you to quickly go
to a desired position in a song. Unlike Fast
Preview and Review, no sound is produced while
fast forwarding or reversing.
Fast reverse can also be used to return a song to
the beginning, ready to play again.
1
To fast forward,
press [SONG SELECT ] in Pause
mode, or press .
SONG SELECT
or
REPEAT
To fast reverse,
press [SONG SELECT ] in Pause
mode, or press .
SONG SELECT
or
REPEAT
Note: The remote control can be used to fast
forward and reverse a song either in the
Pause or Stop mode.
2
Press [PLAY/PAUSE] to resume
playback, or [STOP] to re-engage
Pause mode.
If you fast forward a song all the way to the
end, Pause mode is engaged. Pressing
[PLAY/PAUSE] starts playback of the next
song.
If you reverse a song all the way to the
beginning, Pause mode is engaged. pressing
[PLAY/PAUSE] starts playback from the
beginning.
Page 33
27
English Chapter 4: Playing CDs
Repeat Play
You can listen to a CD repeatedly by simply
pressing [REPEAT].
Press [REPEAT] during playback.
REPEAT
or
REPEAT
The REPEAT indicator lights.
After the last song on the CD is played, the
entire CD is played back again
automatically.
Pressing [REPEAT] again cancels Repeat
mode.
Adjusting the Volume
You can adjust the playback volume using the
VOLUME knob.
For songs on PianoSoft.PlusAudio, set VOLUME
to 0 and set BALANCE to MIN. Then gradually
raise the BALANCE until a desired volume is
achieved.
☛ See “Balancing the Audio Parts” below.
To raise the volume,
turn the knob clockwise.
VOLUME
–10 0
••
•
•
•
••
•
•
•
•
To lower the volume,
turn the knob counterclockwise.
VOLUME
–10 0
••
•
•
•
••
•
•
•
•
Turning the knob fully counterclockwise
mutes the sound completely.
Note: With pianos whose Piano Type is Disklavier or
GT10, and with Disklavier pianos with a
Control Unit, it is recommended to play back
CDs at level “0”. Lowering the volume may
cause some distortion in the sound.
Note: With the MX100B piano, playing a CD with
the piano volume in “soft” mode may cause an
error in the timing of the piano sound output,
so that the piano parts and audio parts are not
synchronous. It is recommended to play back
CDs with the piano volume raised to a
standard audible level.
Page 34

28
Balancing the
Audio Parts
When you play back PianoSoft.PlusAudio and
other audio/MIDI CDs, you may want to balance
the volume levels of the MIDI piano and audio
parts.
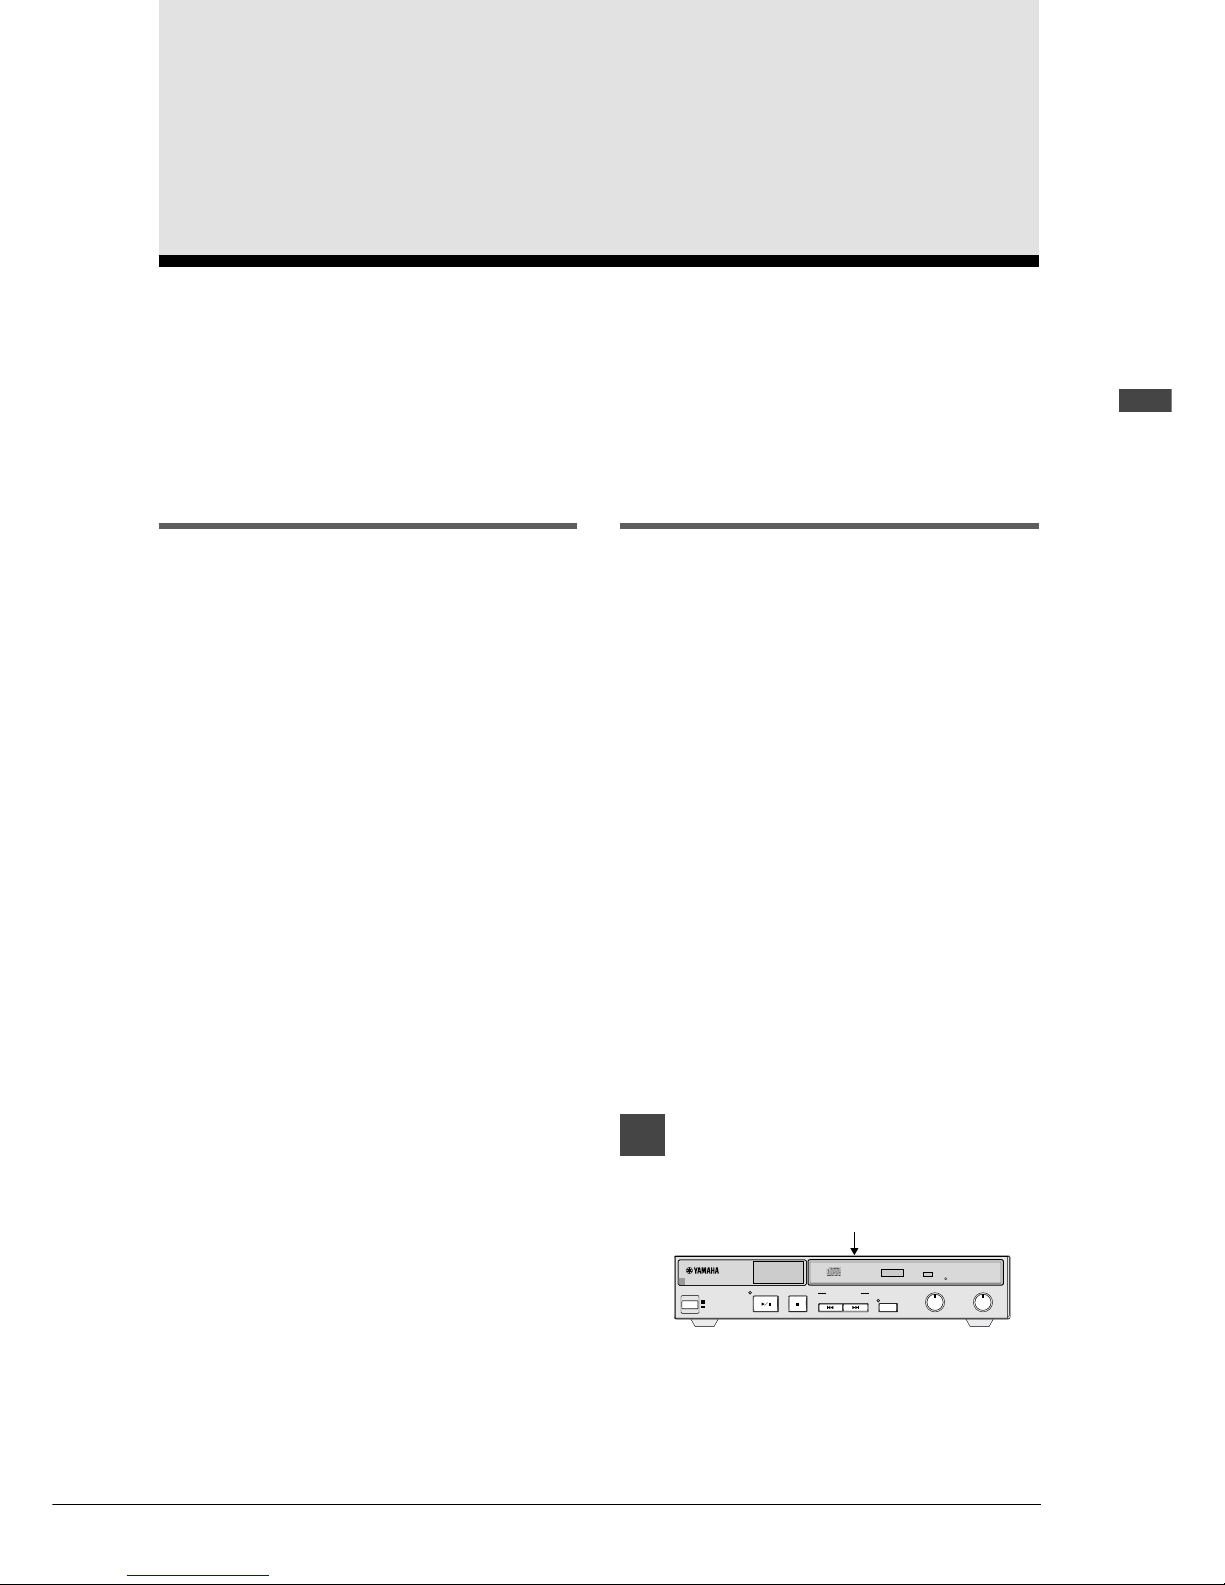
The BALANCE knob controls the volume of the
audio parts only; the VOLUME knob controls
both the piano and audio parts.
Turn the BALANCE knob clockwise
and counterclockwise until a
desired balance is achieved.
BALANCE
MIN MAX
••
Tuning
• The DCD1+PS does not have a pitch
controlling function.
• On Yamaha PianoSoft.PlusAudio CDs, the
audio parts are recorded at A = 440 Hz.
Page 35
29
English Chapter 5: Using the PianoSmart feature
Combining your contoroller with the DCD1+PS allows you to use the PianoSmart function.
A special-purpose floppy disk (Smart PianoSoft) that supports CDs available on the market and a CD can
be played back simultaneously. For models supporting the PianoSmart function, connect with the
connection method for using the PianoSmart function. See Chapter 3 “Connecting the DCD1+PS to Your
Piano” for details.
PianoSmart
Simply insert a commercial CD into the
DCD1+PS’s CD drive and a PianoSmart floppy
disk into the Control Unit’s floppy disk drive.
The floppy disk contains a recorded piano
accompaniment to the commercial CD, and the
acoustic piano accompaniment will play back
matching with the commercial CD. Yamaha’s
new Smart PianoSoft library will offer
professionally arranged MIDI piano files for
major albums in every musical genre, starting
with some of the best-selling records of all time.
Plus, you can record your own accompaniment for
your favorite commercial CDs at home; play your
piano as you listen to a CD, and PianoSmart will
match the music together during playback,
essentially adding you to famous performances.
Chapter 5
Using the PianoSmart feature
PianoSmart Playback
A special-purpose floppy disk (Smart PianoSoft)
that supports CDs available on the market and a
CD can be played back simultaneously.
Using SPS (Smart PianoSoft) disks (made by
Yamaha) purchased on the market, the Smart
PianoSoft Adjustment function automatically
corrects the synchronization shift between the
CDs as they are being played back, and it stores
the song information in the control box.
Note: Even CDs which are paired with Smart
PianoSoft and which have the same title, may
have a slightly different start position and/or
tempo depending on the version used.
It also enables adjustments to be performed
manually when automatic compensation is not
performed successfully.
The function does not work with self-recorded
songs.
1
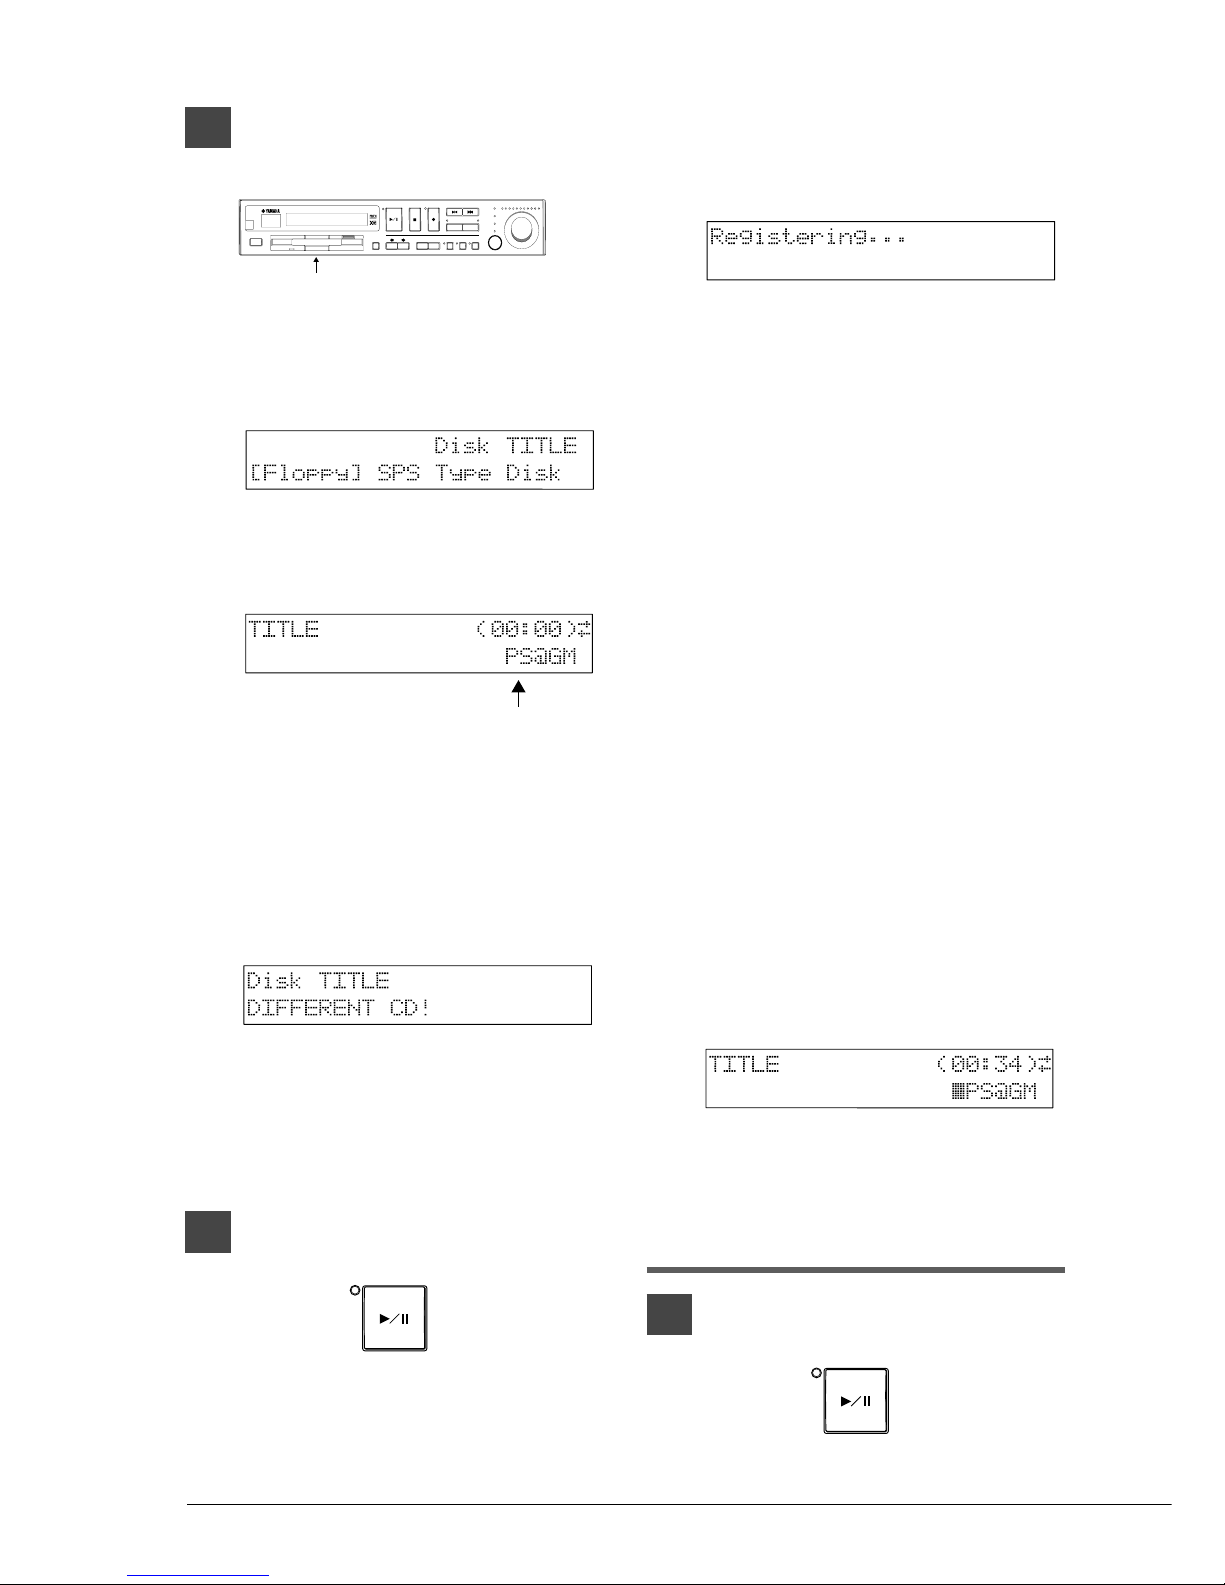
Specify the CD that is to be
played back.
Insert CDs here.
STANDBY
ON
PLAY/PAUSE
DISKLAVIER CD PLAYER DCD1
STOP
SONG SELECT
REPEAT
BALANCE
MIN MAX
••
VOLUME
–10 0
••
•
•
•
••
•
•
•
•
The CD should be inserted first without fail
so that the CD drive is selected.
When you insert CD into the CD drive, the
letter “Cd” automatically appear on the left
side of the display.
Page 36
30
The PLAY/PAUSE indicator lights.
The following display appears (during
automatic measurement).
The synchronization may shift during the
first playback of each song, but normal
operation will be restored starting with the
second and subsequent times.
If operation fails to return to normal,
proceed with the adjustments in the
manual mode which is described later.
The “Registering” display does not appear
during the second and subsequent
playbacks of a song that is being played
repeatedly.
This measurement is repeated during the
next playback.
The PLAY/PAUSE indicator lights, and
sync playback of the CD and MIDI songs
starts. The Disklavier plays the piano parts,
actually moving the keys up and down. The
CD sound is heard through the speakers.
The time display starts counting up and the
velocity meters show the velocity of the
piano part notes currently being played, as
shown.
Temporarily
Suspending Playback
1
Press [PLAY/PAUSE].
PLAY/PAUSE
2
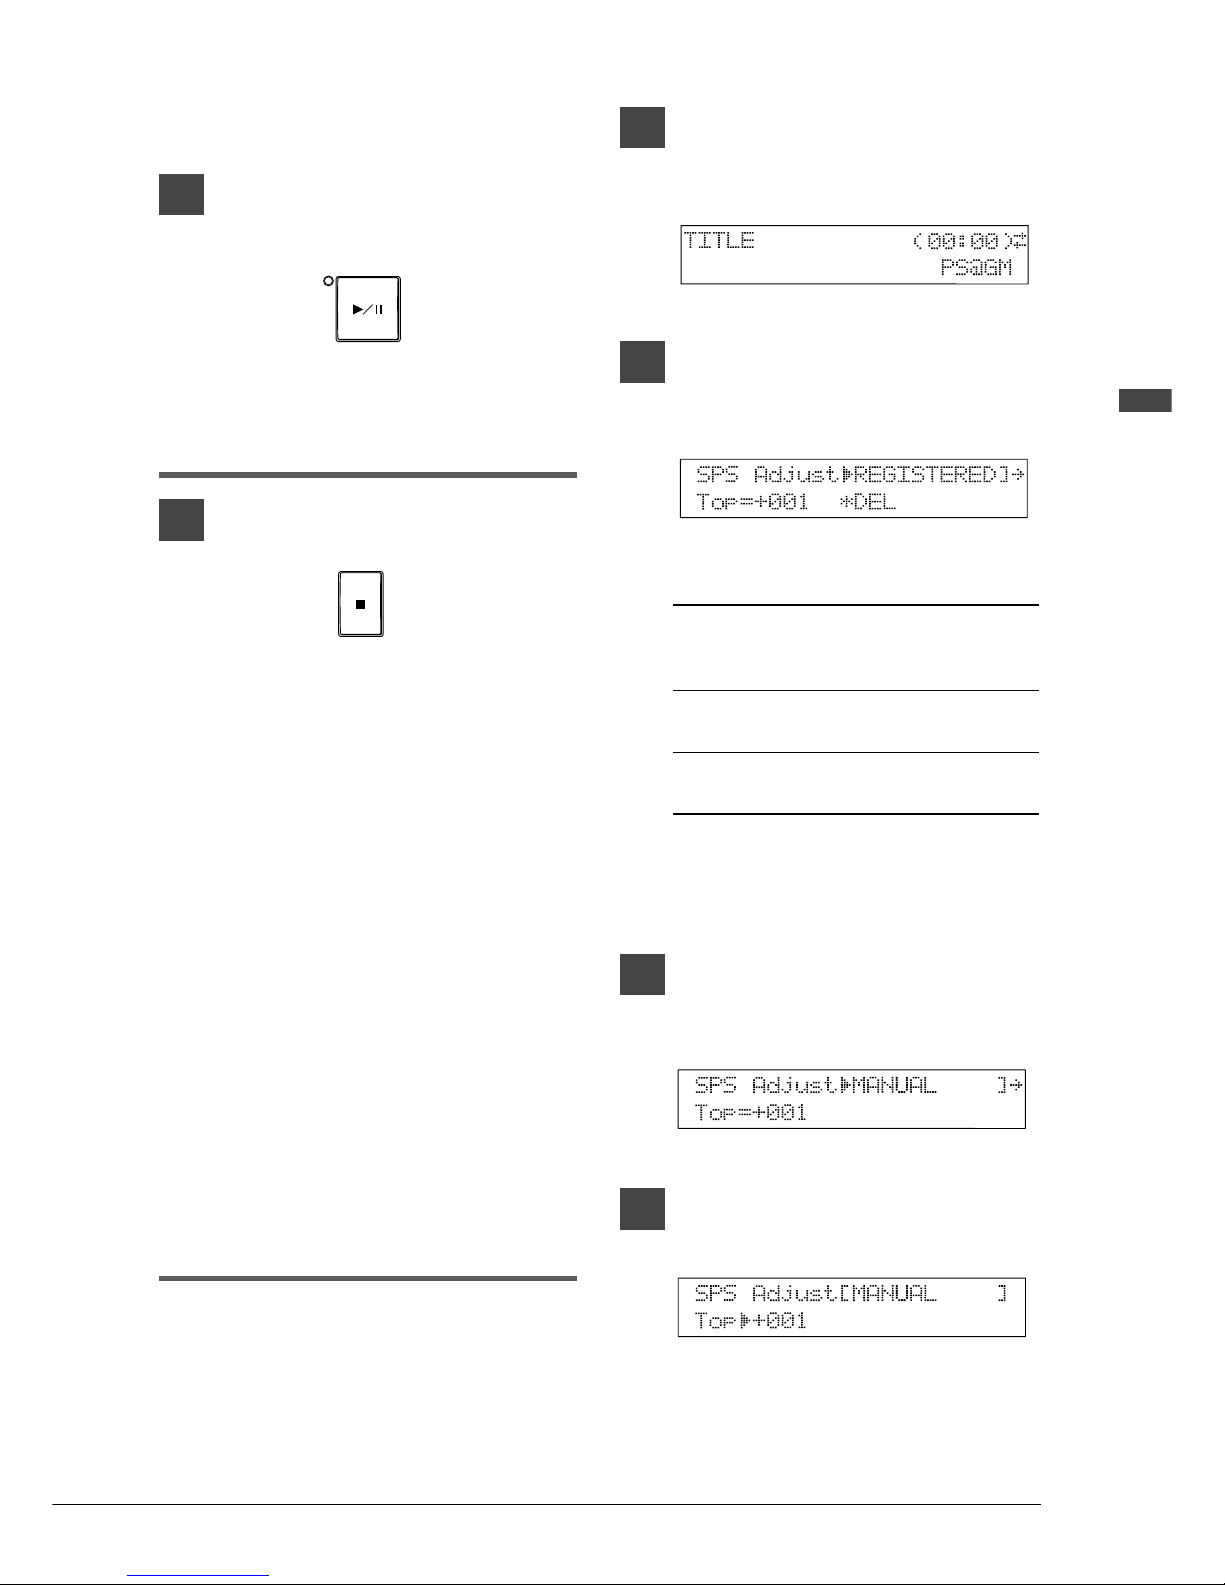
Specify a FD (Smart PianoSoft).
STANDBY - ON
-2
0
DIGITAL SEQUENCER RECORDER DSR1
GENERAL
INSTRUMENT
PLAY/PAUSE
ENTER
–/NO +/YES
VOICE
FUNC.
PART SELECT
METRO-
NOME
STOP
RECORD
SONG SELECT/RV • FWD VOLUME -10 -8 -6
-4
TEMPO
TRANSPOSE
BALANCE
L
R
Insert FDs (Smart PianoSoft) here.
“SPS Type Disk” appears as the disk title
display when a Smart PianoSoft disk
purchased on the market has been inserted.
After a moment the following display
appears.
This means “PianoSmart”.
Note: 1. The following display appears if a
different CD has been inserted in
the CD drive when Smart PianoSoft
was selected. The song name
display will be restored after a few
moments. (The song name display
is restored in a few seconds.)
2. When the floppy disk which has
been recognized is Smart PianoSoft,
the selected drive will not change to
the CD drive even when a CD is
inserted.
3
Press [PLAY/PAUSE].
PLAY/PAUSE
The following operations are performed at
the Control Unit side.
Note: The buttons on the DCD1+PS can also
be used.
Page 37
31
English Chapter 5: Using the PianoSmart feature
Playback stops and the PLAY/PAUSE
indicator flashes.
2
Press [PLAY/PAUSE] again to
continue playback.
PLAY/PAUSE
Stopping Playback
Press [STOP].
STOP
Playback stops and the song returns to the
beginning.
Pressing [STOP] while in Pause mode
cancels Pause mode.
Note: Unlike regular MIDI song playback,
the following restrictions apply to the
CD playback function.
• You cannot change the playback
tempo of songs on CDs.
• You cannot hear the MIDI sound
during fast forward or reverse of the
sound. When the normal playback
mode has been established, the MIDI
sound is simultaneously played back
properly as well.
PianoSmart Manual
Adjustment
Compensation can be performed manually in the
case of CDs for which automatic adjustment is
not performed successfully (such as ones whose
tempo cannot be adjusted or ones which, once in a
while, fail to play back).
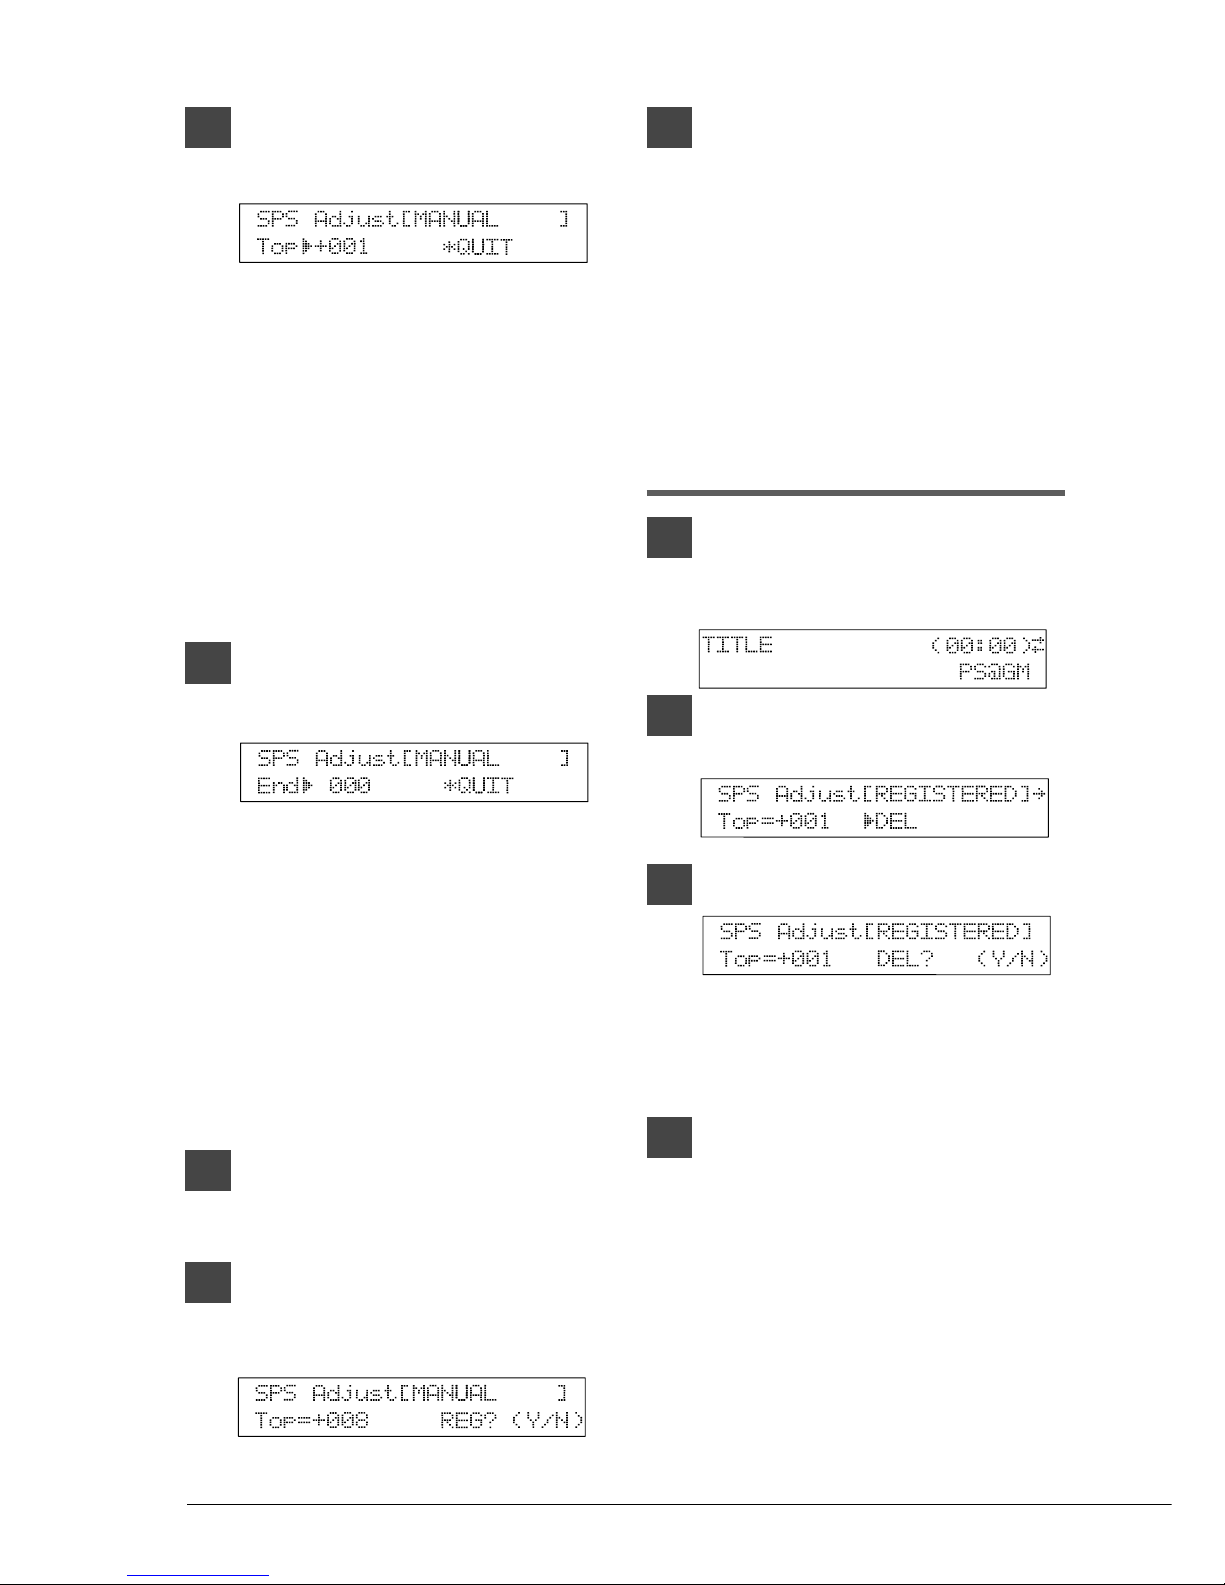
1
Specify the SPS disk and target
CD, and check that “PS@” appears
on the song name display.
2
Press [<] twice (or three times in
the Silent mode), and return to
the last but one screen.
[c***] indicates the status.
MEASURING The SPS adjustment
value has not been
recorded.
REGISTERED The SPS adjustment
value has been recorded.
MANUAL The SPS adjustment
value is set manually.
Note: “REGISTERED” appears in this
context since automatic adjustment has
already been performed once.
3
Press [+/YES] in the stop status,
and set to “SPS Adjust =
[MANUAL].”
4
Press [>], and align the cursor
with “Top.”
Page 38
32
5
Start playback, and check the
timing.
Top: This indicates the amount by which
the synchronization shift at the beginning
of the song is to be adjusted.
A change of +1 increases the speed of the
MIDI (piano) part by approximately 13ms.
The setting range is from –999 to +999.
During playback, adjust “Top” using
[–/NO] and [+/YES].
If synchronization is not achieved at the
completion of the song, adjust “End” near
the end of the song.
6
To change “End,” align the cursor
with “Top,” and press [ENTER].
“End” is now displayed.
To change “Top” again, press [ENTER]
again.
If necessary, it must be set again.
End: This indicates the amount by which
the synchronization shift near the end of the
song is to be adjusted.
A change of +1 decreases the speed of the
MIDI (piano) part by approximately 13ms.
The setting range is from –999 to +999.
Upon completion of the adjustments:
7
Align the cursor with QUIT, and
press the [ENTER] button.
8
To register the adjustment value,
press [+/YES]; to cancel the
registration, press [–/NO].
9
After the SPS adjustment value
has been recorded, the “SPS
Adjust” screen is restored.
The status changes to “REGISTERED.”
To Delete the SPS
Adjustment Value of a
Song
1
Specify the SPS disk and target
CD, and check that “PS@” appears
on the song name display.
2
Press [<], and align the cursor
with “DEL.”
3
Press [ENTER].
To delete the adjustment value, press
[+/YES]; to cancel the deletion, press
[–/NO].
4
After the SPS adjustment value
has been deleted, the “SPS
Adjust” screen is restored.
The status changes to “MEASURING.”
The cursor returns to “SPS Adjust.”
(Additional checkpoints for function)
Operations on the SPS Adjust screen can be
performed only in the stop status.
When factory reset is performed, all the
SPS adjustment values will be deleted.
Page 39
33
English Chapter 5: Using the PianoSmart feature
PianoSmart Recording
This function is available only on Disklavier
models with recording function.
During recording, songs can be recorded as MIDI
data while a CD is being played back. You can
record your song onto Memory Disks or a floppy
disk.
When Recording a Song
1
Specify the CD that is to be
recorded.
When you insert CD into the CD drive, the
letter “Cd” automatically appear on the left
side of the display.
2
Specify a disk.
Use the disk in SMF format.
Note: If you are recording to a floppy disk,
make sure that the disk’s erasure
protection tab is set to “unprotected”.
☛ Unformatted disks must be formatted before
use with the Disklavier. See “Formatting
Disks” in your piano’s manual.
If an E-SEQ type disk is used, the
following display appears when you
attempt to start recording, and
recording is disabled. Use the disk in
the SMF format.
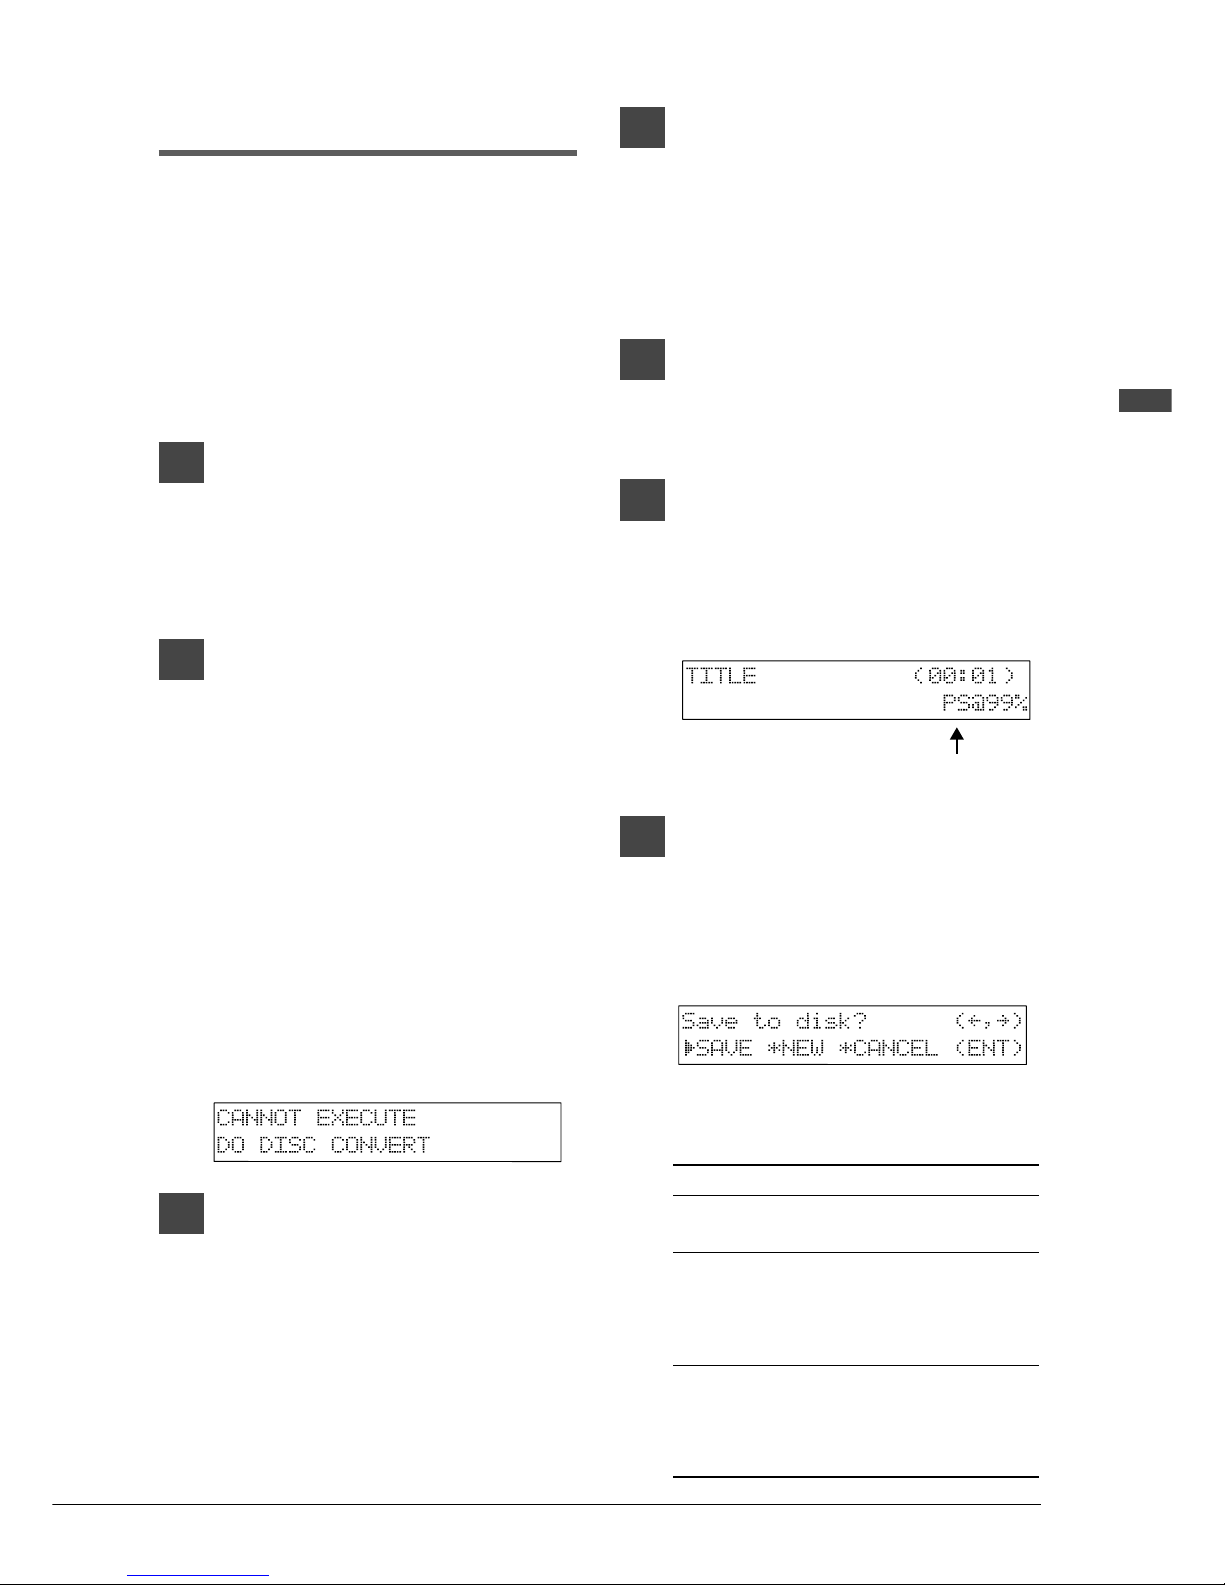
3
Press [REC] to engage the Record
Standby mode.
The REC indicator lights and the
PLAY/PAUSE indicator flashes.
A new song number is created for the new
recording. For example, if the last song to
be recorded was No.6, then the new song
will be No.7.
4
Use the [SONG SELECT] buttons to
select the song on the CD to be
played back so that it will be rerecorded.
☛ See “Recording the Left and Right Parts
Separately” in your piano’s manual.
5
Use the [PART] buttons to select
the part that you want to rerecord.
6
Press [PLAY/PAUSE] and recording
will begin.
Start playing your song with the CD sound.
The following display appears.
“PS” indicates PianoSmart.
7
When you finish playing your
song, press [STOP].
When re-recording and [STOP] is pressed,
the following display appears.
The following table gives a description of
each of options.
Option Description
SAVE The new recording is saved
under the current song number.
NEW The new recording is saved
under a new song number.
The existing song is kept
under the current song number.
CANCEL The new recording is
discarded.
The existing song is kept
under the current song number.
Page 40
34
8
Use [<] and [>] to select an
option, then press [ENTER].
The re-recording is saved as indicated or
canceled.
Note: It is also possible to re-record the
Ensemble parts.
☛ See “Recording Ensemble Tracks” in your
piano’s manual.
When Re-recording Using a
Different Song on the Same
CD
1
Specify the CD that is to be
recorded.
When you insert CD into the CD drive, the
letter “Cd” automatically appear on the left
side of the display.
2
Specify a disk.
Note: If you are recording to a floppy disk,
make sure that the disk’s erasure
protection tab is set to “unprotected”.
☛ Unformatted disks must be formatted before
use with the Disklavier. See “Formatting
Disks” in your piano’s manual.
3
Press [REC] to engage the Record
Standby mode.
The REC indicator lights and the
PLAY/PAUSE indicator flashes.
A new song number is created for the new
recording. For example, if the last song to
be recorded was No.6, then the new song
will be No.7.
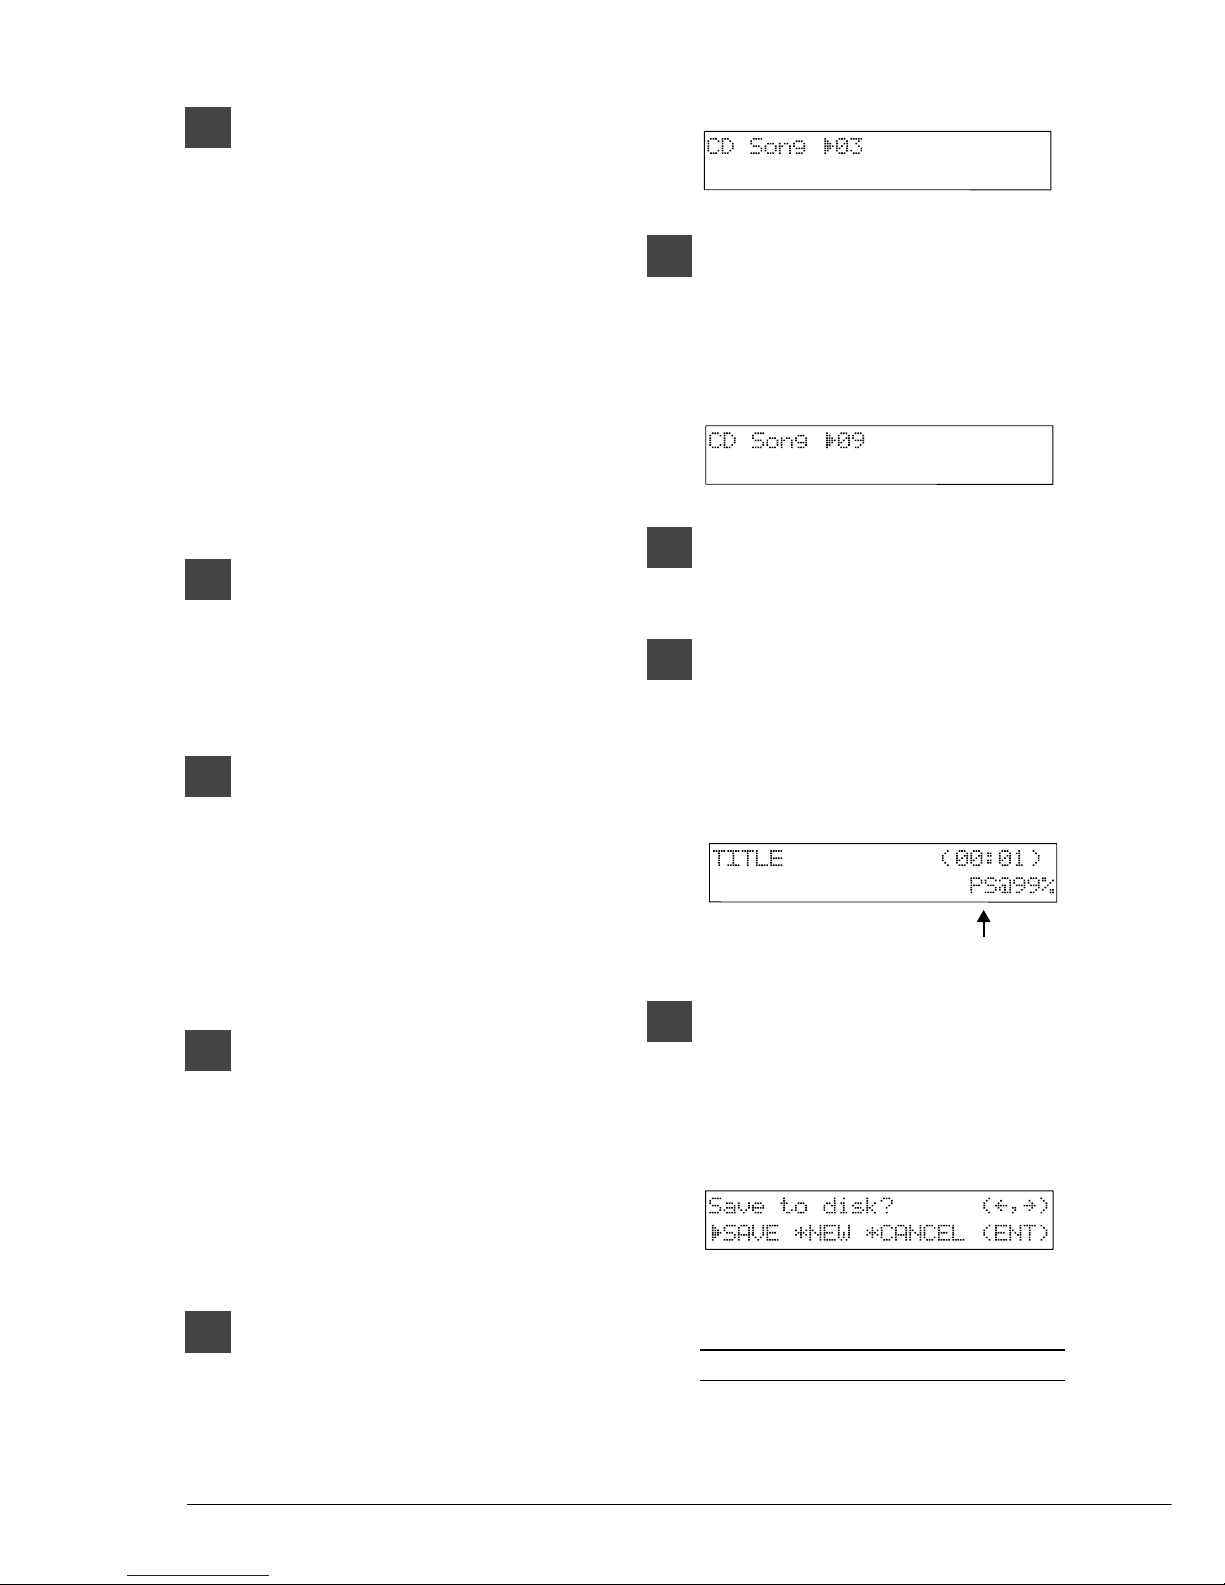
4a
Press [REC] until CD song
recording setting screen appears.
The following display appears.
4b
Use the [–/NO] and [+/YES]
buttons to select the number of
the song on the CD to be played.
The following display appears.
4c
To end now, press [STOP], and
proceed to step 6.
5
To re-record, press [PLAY/PAUSE],
and recording will begin.
Start playing your song with the CD sound.
The following display appears.
“PS” indicates PianoSmart.
6
When you finish playing your
song, press [STOP].
When [STOP] is pressed, the following
display appears.
The following table gives a description of
each of options.
Option Description
SAVE The new recording is saved
under the current song number.
Page 41
35
English Chapter 5: Using the PianoSmart feature
NEW The new recording is saved
under a new song number.
The existing song is kept
under the current song number.
CANCEL The new recording is
discarded.
The existing song is kept
under the current song number.
7
Use [<] and [>] to select an
option, then press [ENTER].
The re-recording is saved as indicated or
canceled.
When Re-recording Using
Another CD
☛ See Step 1 to 3 on pages 34.
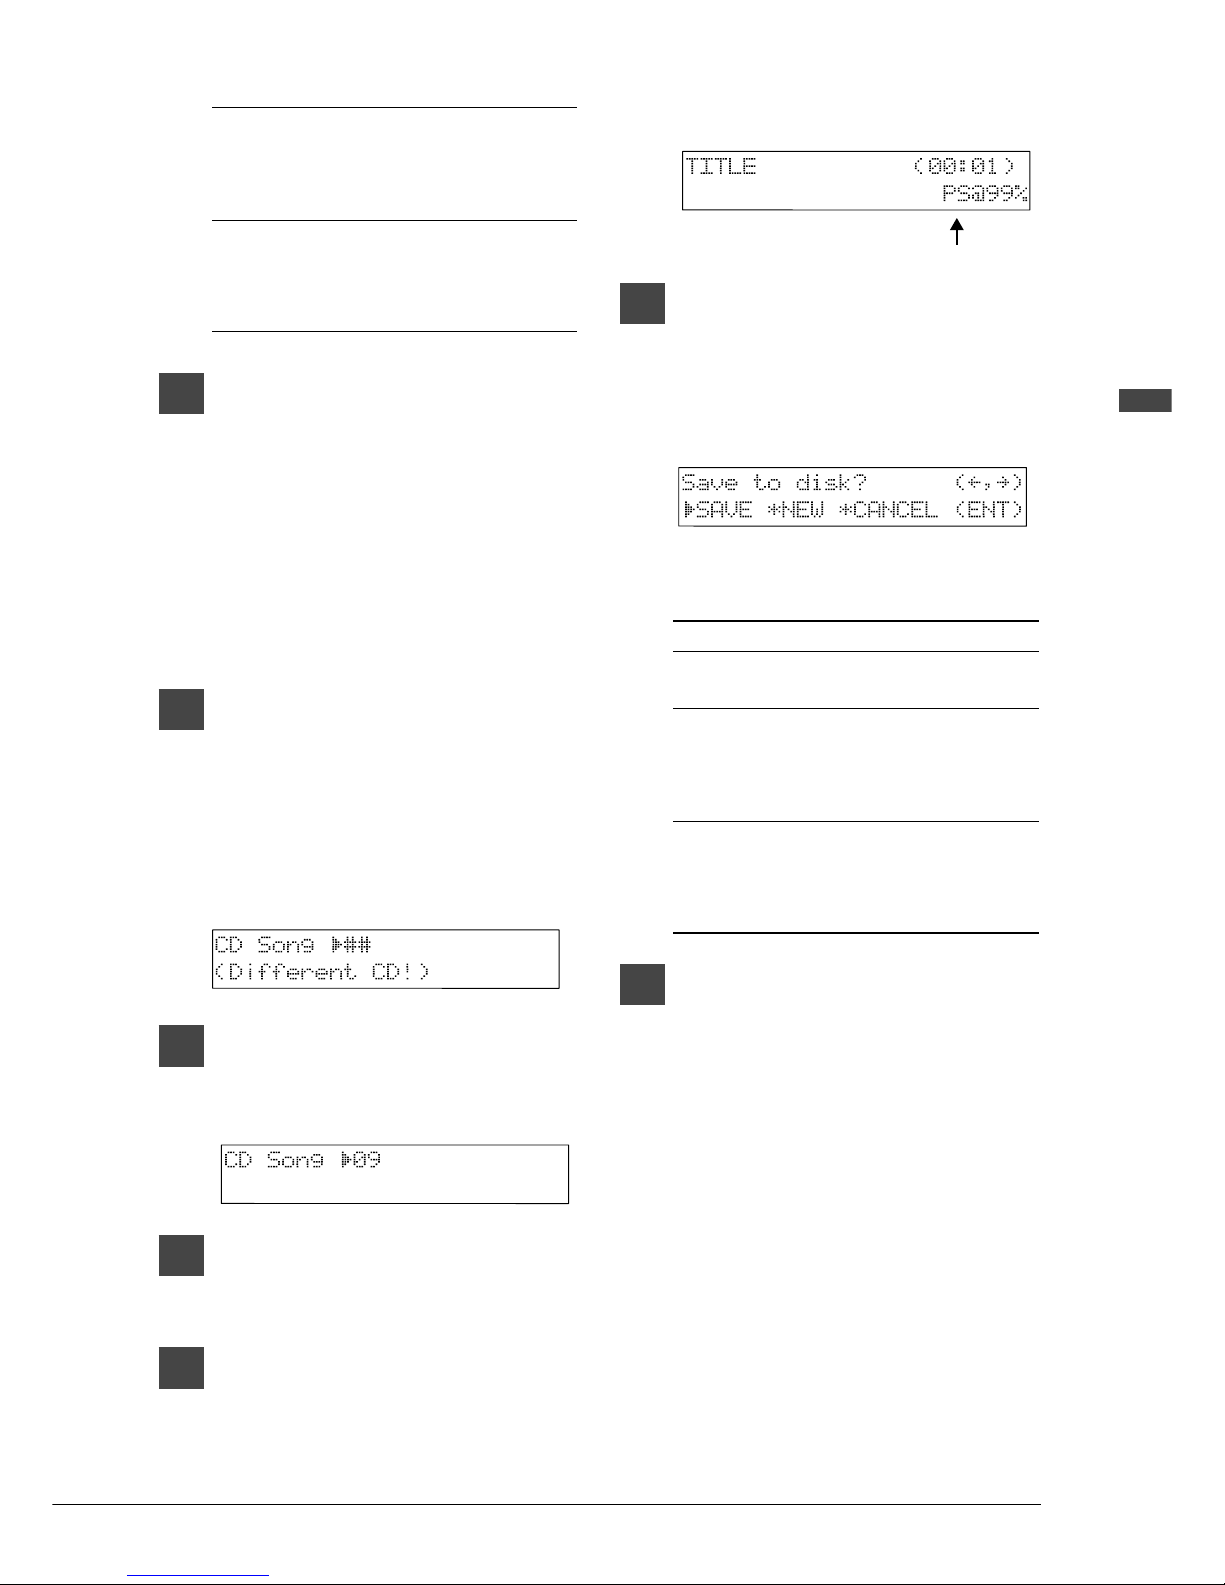
4a
Press [REC] until the CD song
recording setting screen appears.
“##” indicating that no setting has been
made appears as the CD song number, and
the “Different CD!” display indicating that
the CD is different flashes.
4b
Use the [–/NO] and [+/YES]
buttons to select the number of
the song on the CD to be played.
4c
To end now, press [STOP], and
proceed to step 6.
5
To re-record, press [PLAY/PAUSE],
and recording will begin.
Start playing your song with the CD sound.
The following display appears.
“PS” indicates PianoSmart.
6
When you finish playing your
song, press [STOP].
When [STOP] is pressed, the following
display appears.
The following table gives a description of
each of options.
Option Description
SAVE The new recording is saved
under the current song number.
NEW The new recording is saved
under a new song number.
The existing song is kept
under the current song number.
CANCEL The new recording is
discarded.
The existing song is kept
under the current song number.
7
Use [<] and [>] to select an
option, then press [ENTER].
The re-recording is saved as indicated or
canceled.
Note: Unlike regular MIDI song playback,
the following restrictions apply to the
PianoSmart playback function.
• You cannot change the playback
tempo of songs on CDs.
• You cannot pause recording.
Note: In the case of a metronome recording,
an E-SEQ-recorded song or failure to
insert the CD, PianoSmart recording
cannot be performed. Regular MIDI
recording will be performed instead.
Page 42
36
Balancing the CD
Volume (CD Master
Balance)
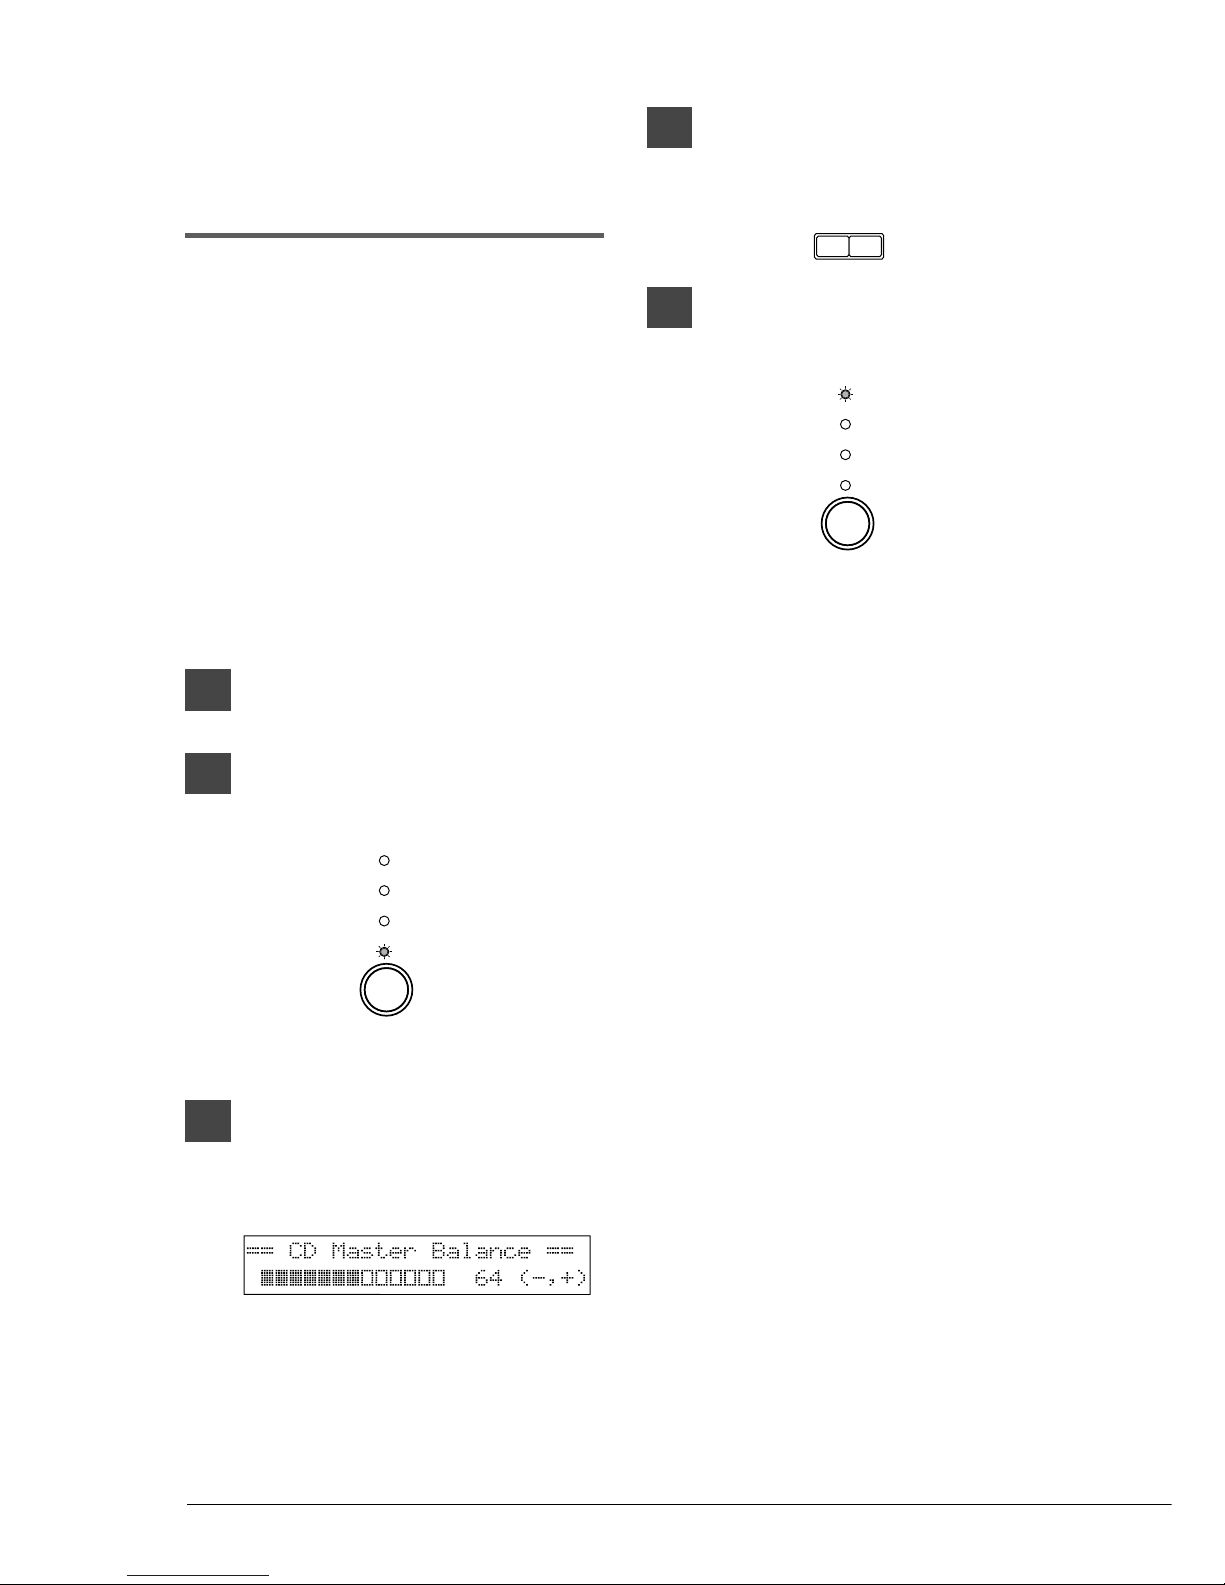
Before playing back PianoSoft.PlusAudio and
other audio/MIDI CDs, it is a good idea to first
balance the volume levels of the MIDI piano and
Audio parts.
Once you adjust the volume using the CD Master
Balance function, you can use the [VOLUME]
buttons on the remote control to conveniently
increase or decrease the overall volume in a
normal fashion.
These balance settings are stored in the Control
Unit, and are saved when the Disklavier is turned
off.
1
Play back a CD.
2
Press the Selector until the
BALANCE indicator lights.
BALANCE
TRANSPOSE
TEMPO
VOLUME
The TG Master Balance display appears.
3
Press the Selector once more.
The CD Master Balance display appears.
4
Use the [–/NO] and [+/YES]
buttons to adjust the volume of
the Audio channel.
–/NO +/YES
5
Press the Selector until the
VOLUME indicator lights.
BALANCE
TRANSPOSE
TEMPO
VOLUME
Page 43
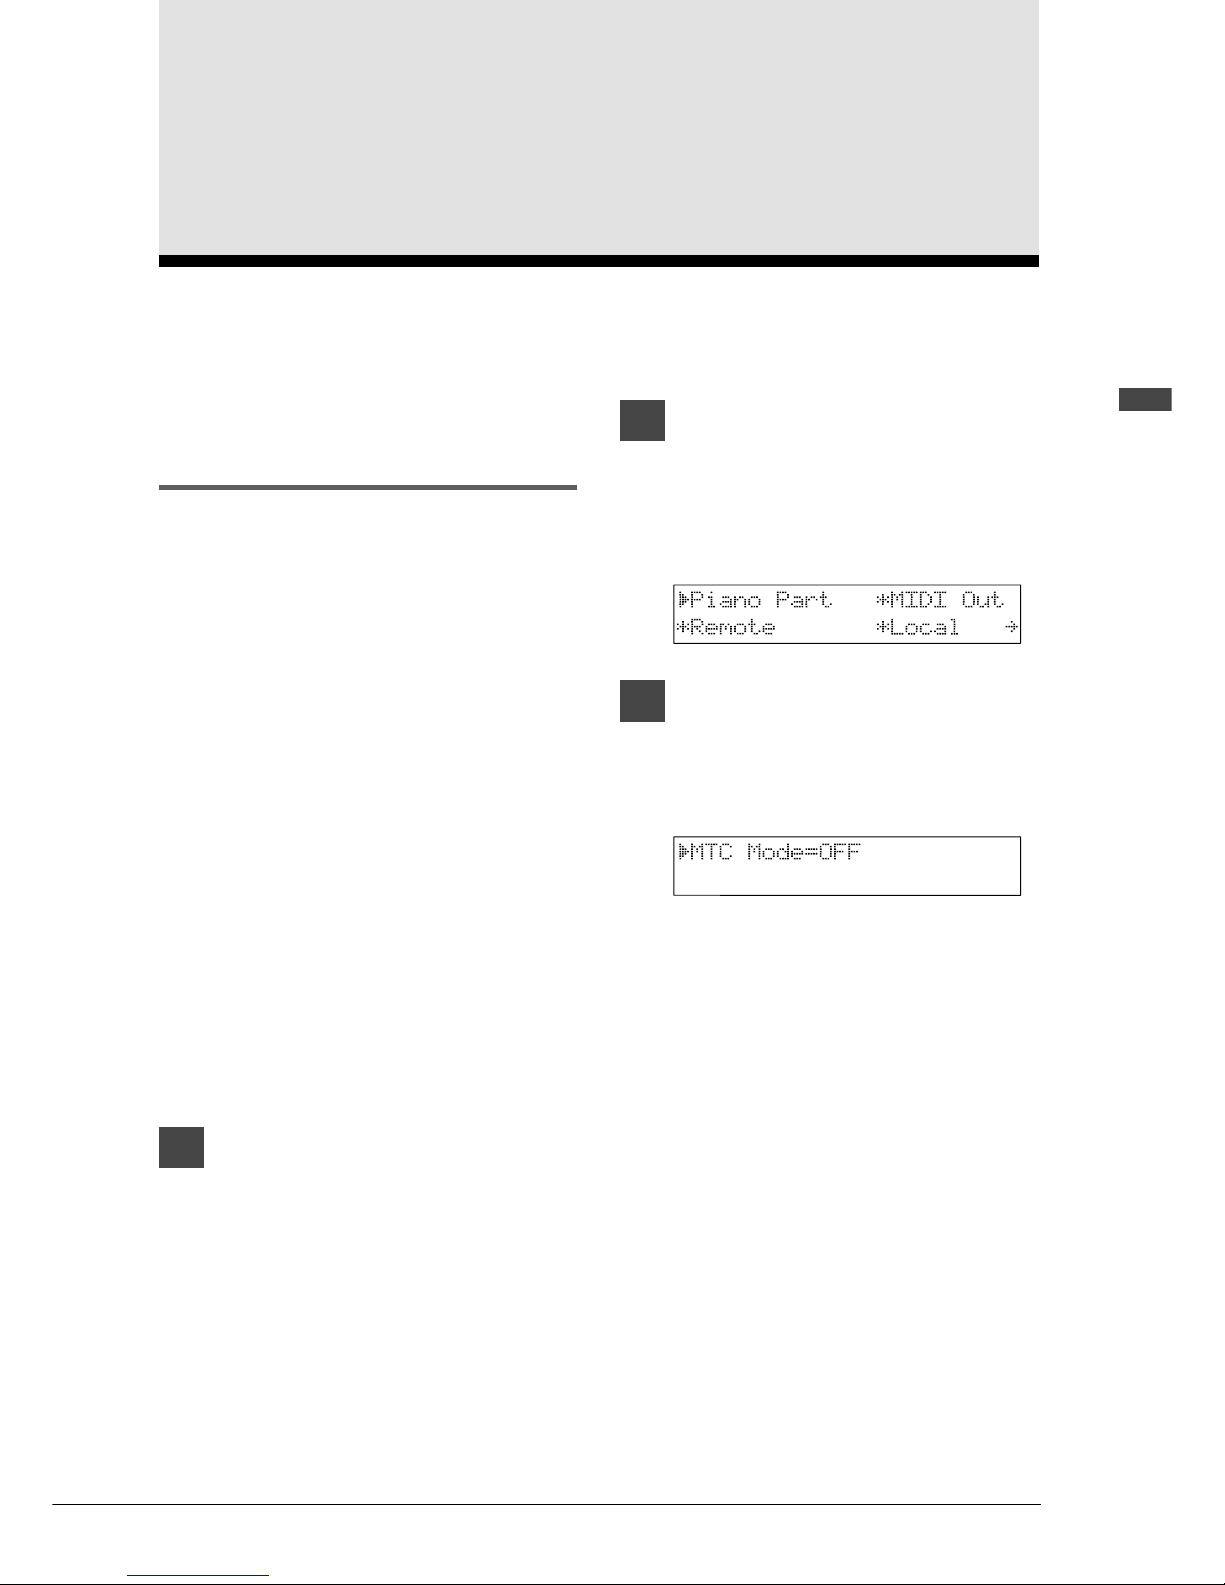
37
English Chapter 6: Synchronization Using the MTC
Chapter 6
Synchronization Using the MTC
Synchronization Using
the MTC
Upgrading the version of your controller allows
you to use the MTC (MIDI time code)
synchronization function. This function can only
be used in controllers with a recording function.
MTC Synchronization
Settings
In order to achieve synchronization using the
MTC, the settings for sending and receiving the
MTC are performed.
This Disklavier has a function that uses the MIDI
time code (MTC) to synchronize with an external
component.
This Disklavier can function either as the Master
or as the Slave when synchronization is to be
achieved using the MTC. Set the MTC-related
parameters in order to use the synchronization
function.
1
Press [FUNC.].
The FUNC. indicator lights and the
Function menu appears.
2
Press [>] until the c cursor is next
to the MIDI setup option, then
press [ENTER].
The following display appears.
3
Press [>] until the c cursor is next
to the MTC, then press [ENTER].
The following display appears.
One of the following three MTC mode
parameters can be selected.
OFF: The synchronization function is
(default) set to OFF.
Slave: Disklavier operates in response to
the MTC received from the
external component.
Master: Disklavier sends the MTC to the
external component.
Note: The MTC settings are stored in the
memory when the power is turned off.
☛ Depending on the MTC settings, some
restrictions apply to the remote function.
See “Correlation between MTC Settings and
Remote Function, and Behavior” on page
42.
This function is available only on Disklavier models with recording function.
Page 44
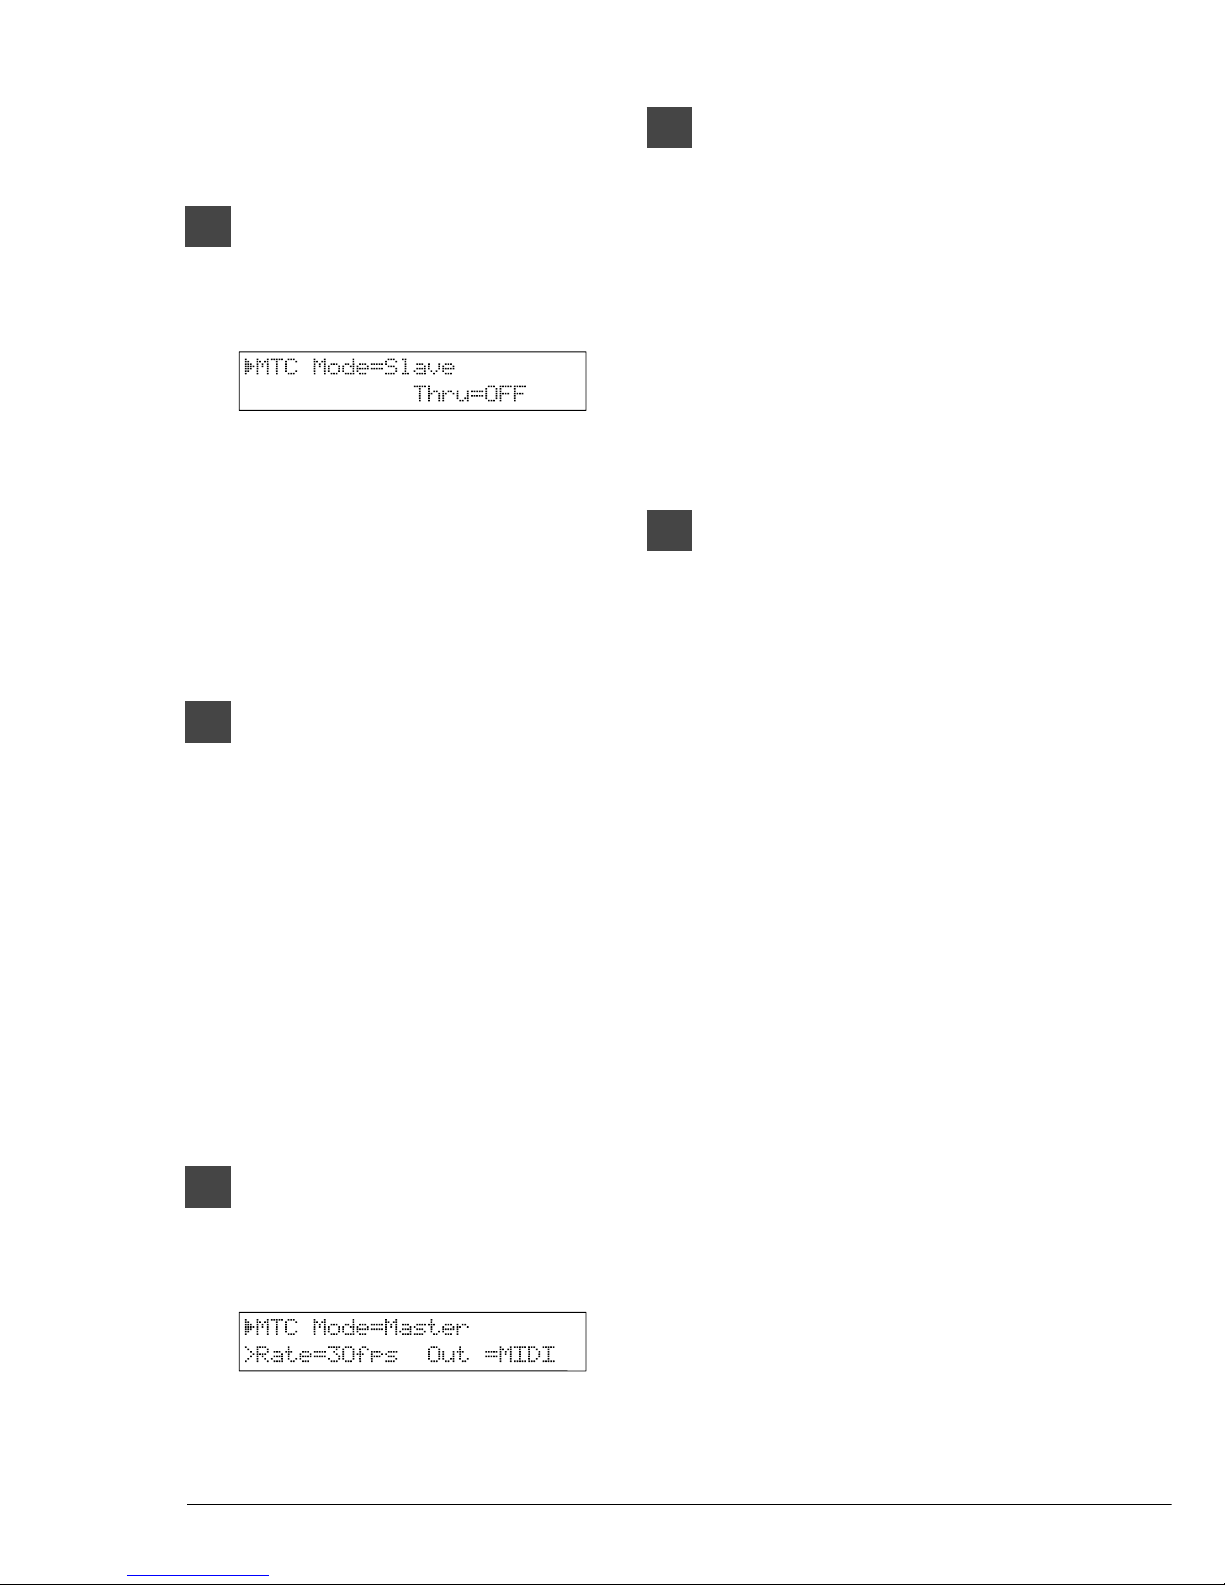
38
To Operate Disklavier in the Slave
Mode
4a
Use the [–/NO] and [+/YES]
buttons to select “MTC
Mode=Slave”.
The MTC can be received at any of the
rates shown below. The rate is detected
automatically.
Rate parameter
24fps
25fps
DF
30fps
5a
Press [>] to position the c cursor
next to the “Thru”, and set the
output port.
Set the connector from which the MTC
which has been received is to be output.
Thru parameter: OFF (default)
MIDI
HOST
“fps” stands for frames per second.
“DF” stands for dropped frame.
To Operate Disklavier in the Master
Mode
4b
Use the [–/NO] and [+/YES]
buttons to select “MTC
Mode=Master”.
5b
Press [>] to position the c cursor
next to the “Rate”, and set the
frame rate.
Select the setting that corresponds to the
Frame Rate of the external component to be
synchronized with.
Rate parameter
24fps
25fps
DF
30fps (default)
6b
Press [>] to position the c cursor
next to “Out,” and set the
destination where the MTC is to
be sent.
The MTC can be output from either the
MIDI OUT connector or TO HOST
connector. Select the output destination
here.
Out parameter: MIDI (default)
HOST
Page 45
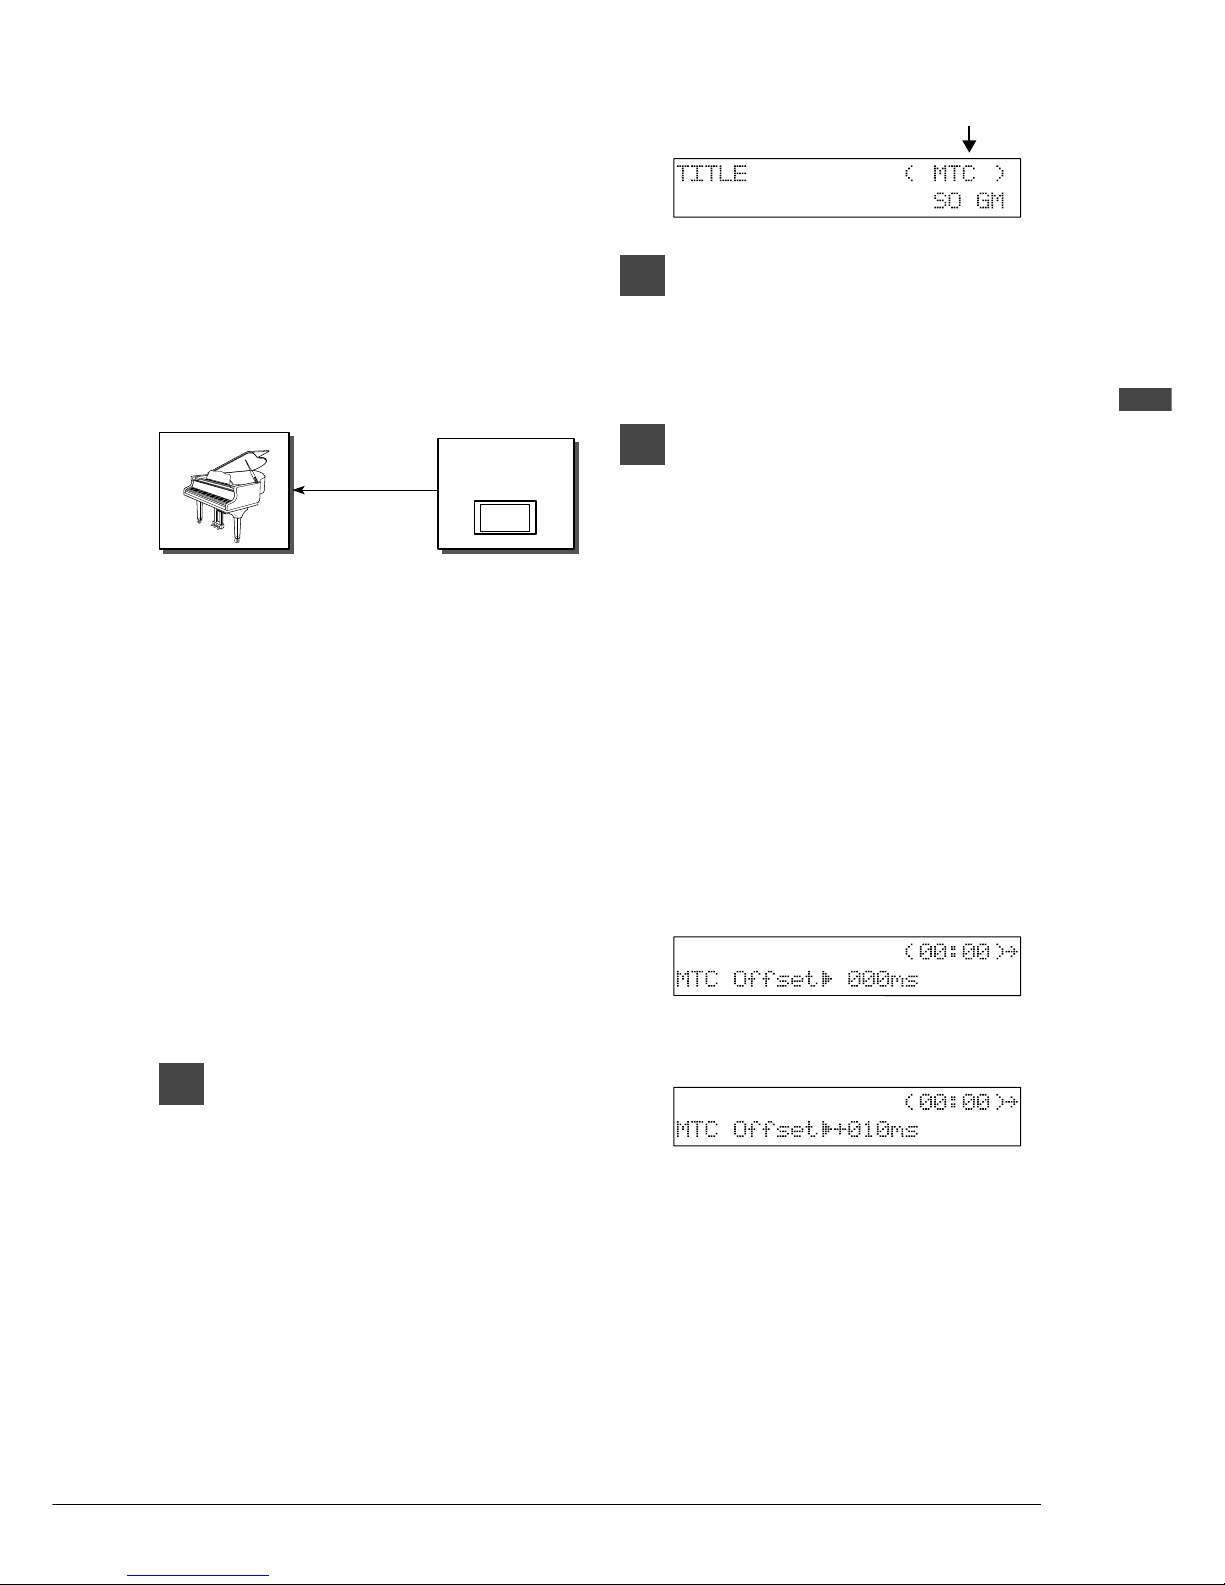
39
English Chapter 6: Synchronization Using the MTC
Using Disklavier as the MTC
Slave
In this status, Disklavier operates in
synchronization with the time information of the
external component.
Example of connections
Receiving the MTC from MIDI IN
MIDI OUT
or MTC OUT
External component
equipped with MTC
Master function
(MD4S, AW2816, etc.)
MIDI IN
MIDI CABLE
Disklavier
MTC Mode=Slave Establish the MTC
Master mode by
following the
instructions in the
manual
accompanying the
external component.
MTC Sync Playback (Slave Mode)
The MTC (MIDI time code) is received, and the
MIDI song is played back in synchronization with
the external component that supports the MTC.
“Slave” must have already been selected as the
MTC/MTC mode setting.
1
Select the song that supports
synchronization and that you
want to play using [SONG SELECT]
buttons. Press [PLAY/PAUSE]
button to engage the Playback
Standby mode.
The letters “MTC” flash on the counter area
of the playback screen, the following
display appears, and “MTC” flashes on the
display.
Flashes
2
Operate the external component.
(The external component must
first be set up to serve as the MTC
Master.)
3
Playback is performed in
synchronization with the MTC
received from the external
component.
Finely Adjusting the MTC
Synchronization Time
Playback can also be synchronized with an offset
applied to the received MTC. A deviation in the
synchronization can be adjusted using this
parameter.
During song selection, press [<] on the song
name display to display the previous screen.
The following display appears.
Set the offset time.
Parameter - 500 ms to + 500 ms (in 10ms
increments)
Note: In the case of E-SEQ format songs, songs that
do not support MTC synchronization, CD
playback or Smartkey playback, it is not
possible to perform MTC sync playback.
If pause, fast forward or reverse is performed
using the Disklavier panel or remote controller
Page 46
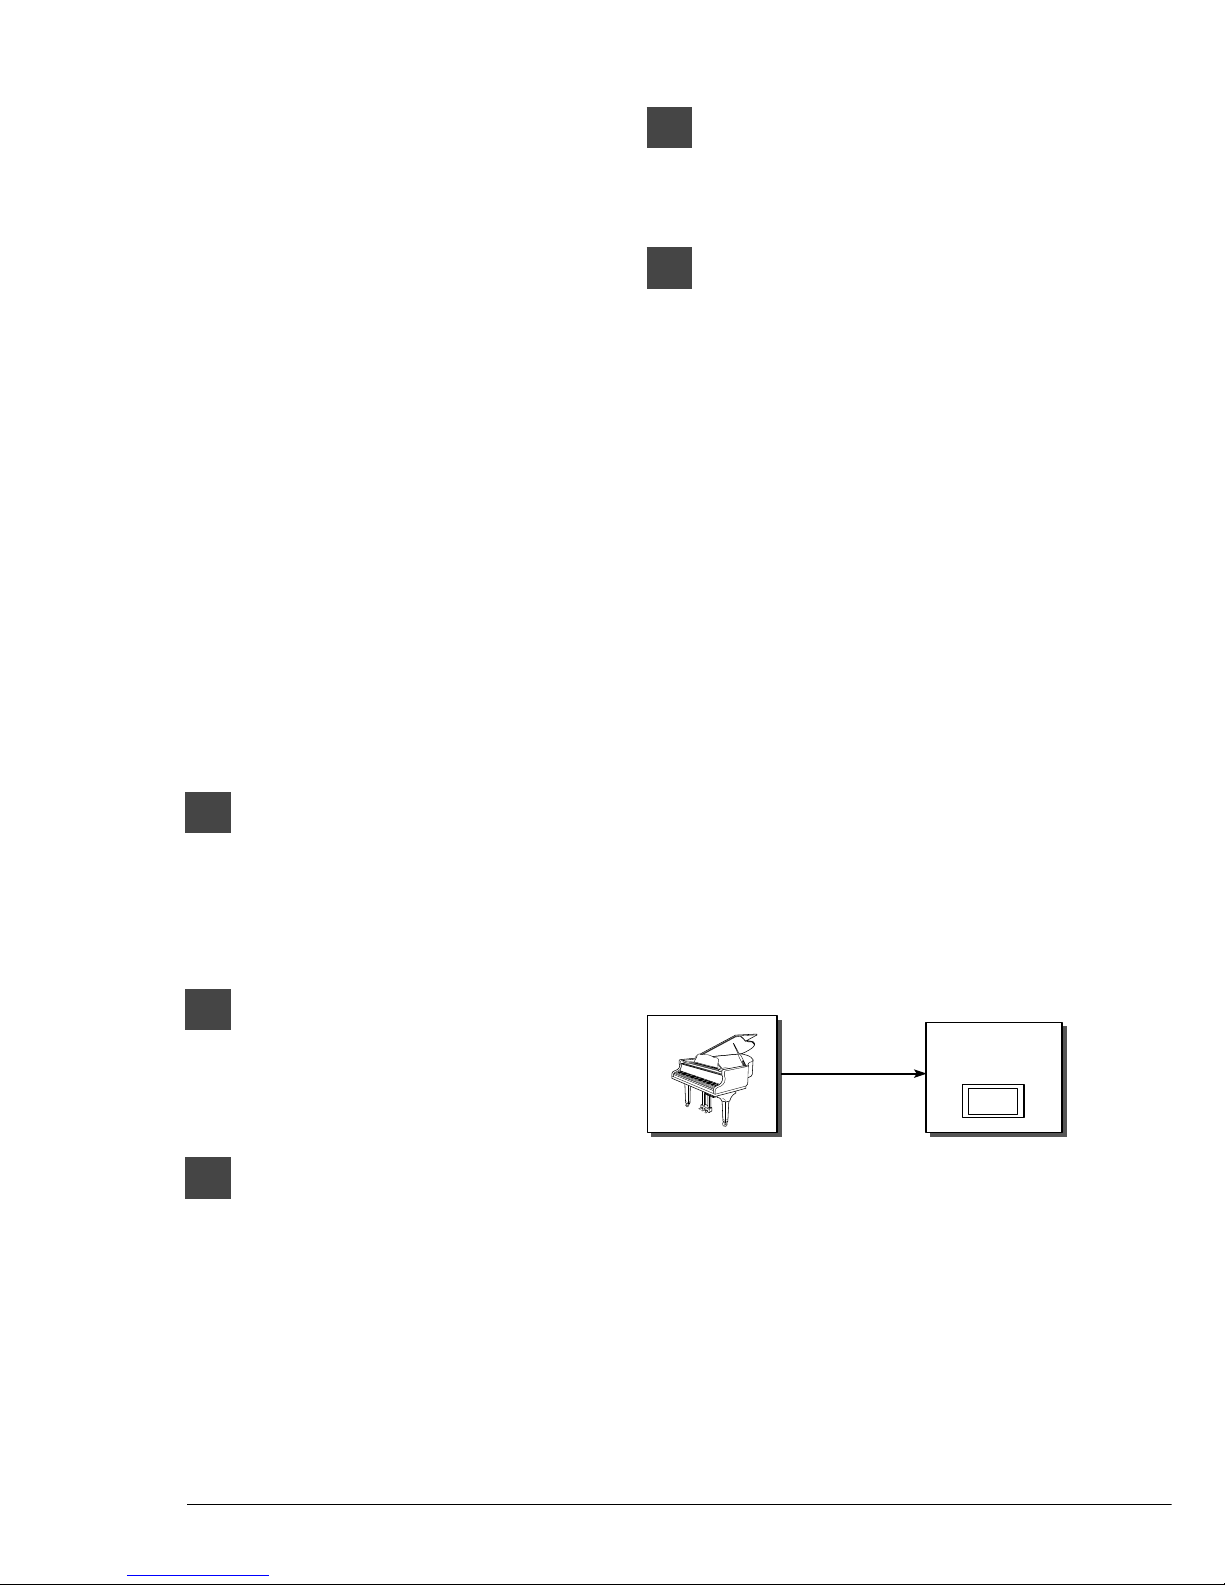
40
during MTC sync playback, the MTC sync
playback is suspended. However, sync
playback can be resumed in response to
signals from the external component by
pressing the [STOP] button, and then pressing
the [START] button.
MTC Offset appears only when a song that
supports synchronization has been selected.
The MTC Offset parameter is stored in the
memory even when the power is turned off.
Note: By pressing the [PLAY/PAUSE] button again
in the playback standby mode in step 1, a song
that supports synchronization can also be
played back in the same way as a regular song.
MTC Sync Recording (Slave Mode)
Sync recording is performed while the MTC is
received from the external component. “Slave”
must have already been selected as the MTC/
MTC mode setting.
1
Press [REC] to engage the Record
Standby mode.
The REC indicator lights and the
PLAY/PAUSE indicator flashes.
2
Press [PLAY/PAUSE] and recording
will begin.
The PLAY/PAUSE indicator stops flashing.
3
Operate the external component.
(The external component must
first be set up to serve as the MTC
Master.)
Note: Bear in mind that regular recording will
be performed if you start playing the
song before the MTC message is output
from the external component. (You
must not step on the pedals.)
4
Start playing your song in
synchronization with the external
component.
5
Upon completion of the song,
stop the external component, and
then press [STOP].
Note: MTC sync recording is for recording
new songs only.
Song recorded by MTC sync recording
are supported by MTC synchronization.
Songs recorded by E-SEQ recording,
metronome recording or CD sync
recording are not supported by MTC
synchronization.
Using Disklavier as the MTC
Master
During playback and recording, Disklavier sends
the MTC, and the external component operates in
synchronization with the MTC.
Example of connections
Sending the MTC from MIDI OUT
MIDI IN
External component
equipped with MTC
Slave function
(MD4S, AW2816, etc.)
MIDI OUT
MIDI CABLE
Disklavier
MTC Mode=Master
Rate = Adjust to the
external component’s
rate.
Out=MIDI
Establish the MTC
Slave mode by
following the
instructions in the
manual
accompanying the
external component.
Page 47
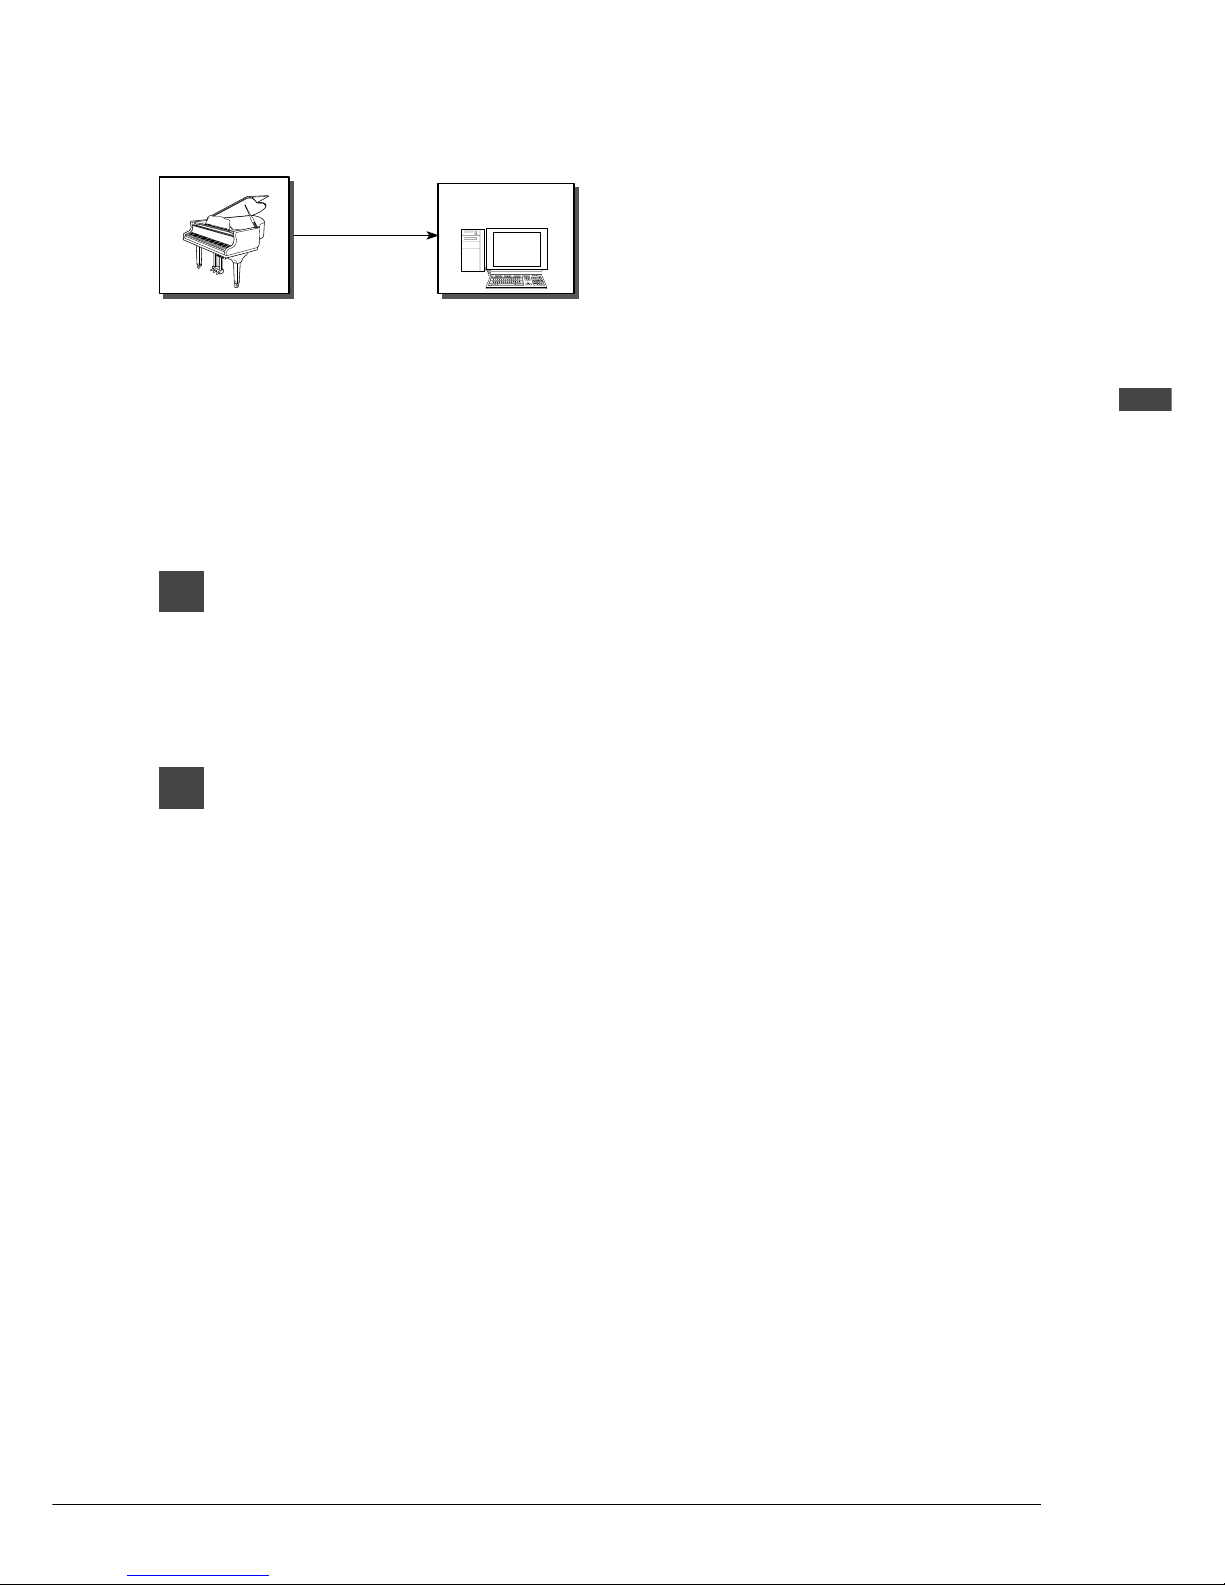
41
English Chapter 6: Synchronization Using the MTC
Sending the MTC from TO HOST
Computer
(Sequencer with MTC
Slave function, etc.)
TO_HOST COM port
Disklavier
MTC Mode=Master
Rate=Adjust to the
external component’s
rate.
Out=HOST
Establish the MTC
Slave mode by
following the
instructions in the
manual
accompanying the
soft.
1
Set the MTC-compatible external
component to the MTC receiving
standby mode.
Refer to its operating manual for details.
2
Proceed with playback or
recording using the control unit.
The MTC is sent, and the MTC-compatible
external component starts sync playback.
Page 48
42
Correlation between MTC Settings and Remote Function, and
Behavior
edoMCTM
etomeR timsnarT evieceR
tuO nI CF-AF 2F 8F CTM CF-AF 2F CTM
FFO
FFOFFO
ЧЧЧЧЧЧЧ
FFONO
××××
ΟΟ
×
NOFFO
ΟΟΟ
××××
NONO
ΟΟΟ
×
ΟΟ
×
evalS
FFOFFO
×××
urhT
××
Ο
FFONO
×××
urhT
Ο
×
Ο
NOFFO
ΟΟ
×
urhT
××
Ο
NONO
ΟΟ
×
urhT
Ο
×
Ο
retsaM
FFOFFO
×××
Ο
×××
FFONO
×××
ΟΟ
××
NOFFO
Ο
××
Ο
×××
NONO
Ο
××
ΟΟ
××
When the song position has exceeded [7F 7F], F2 (Song Position), F8 (Continue) and F8 (Timing Clock)
are not sent.
Page 49
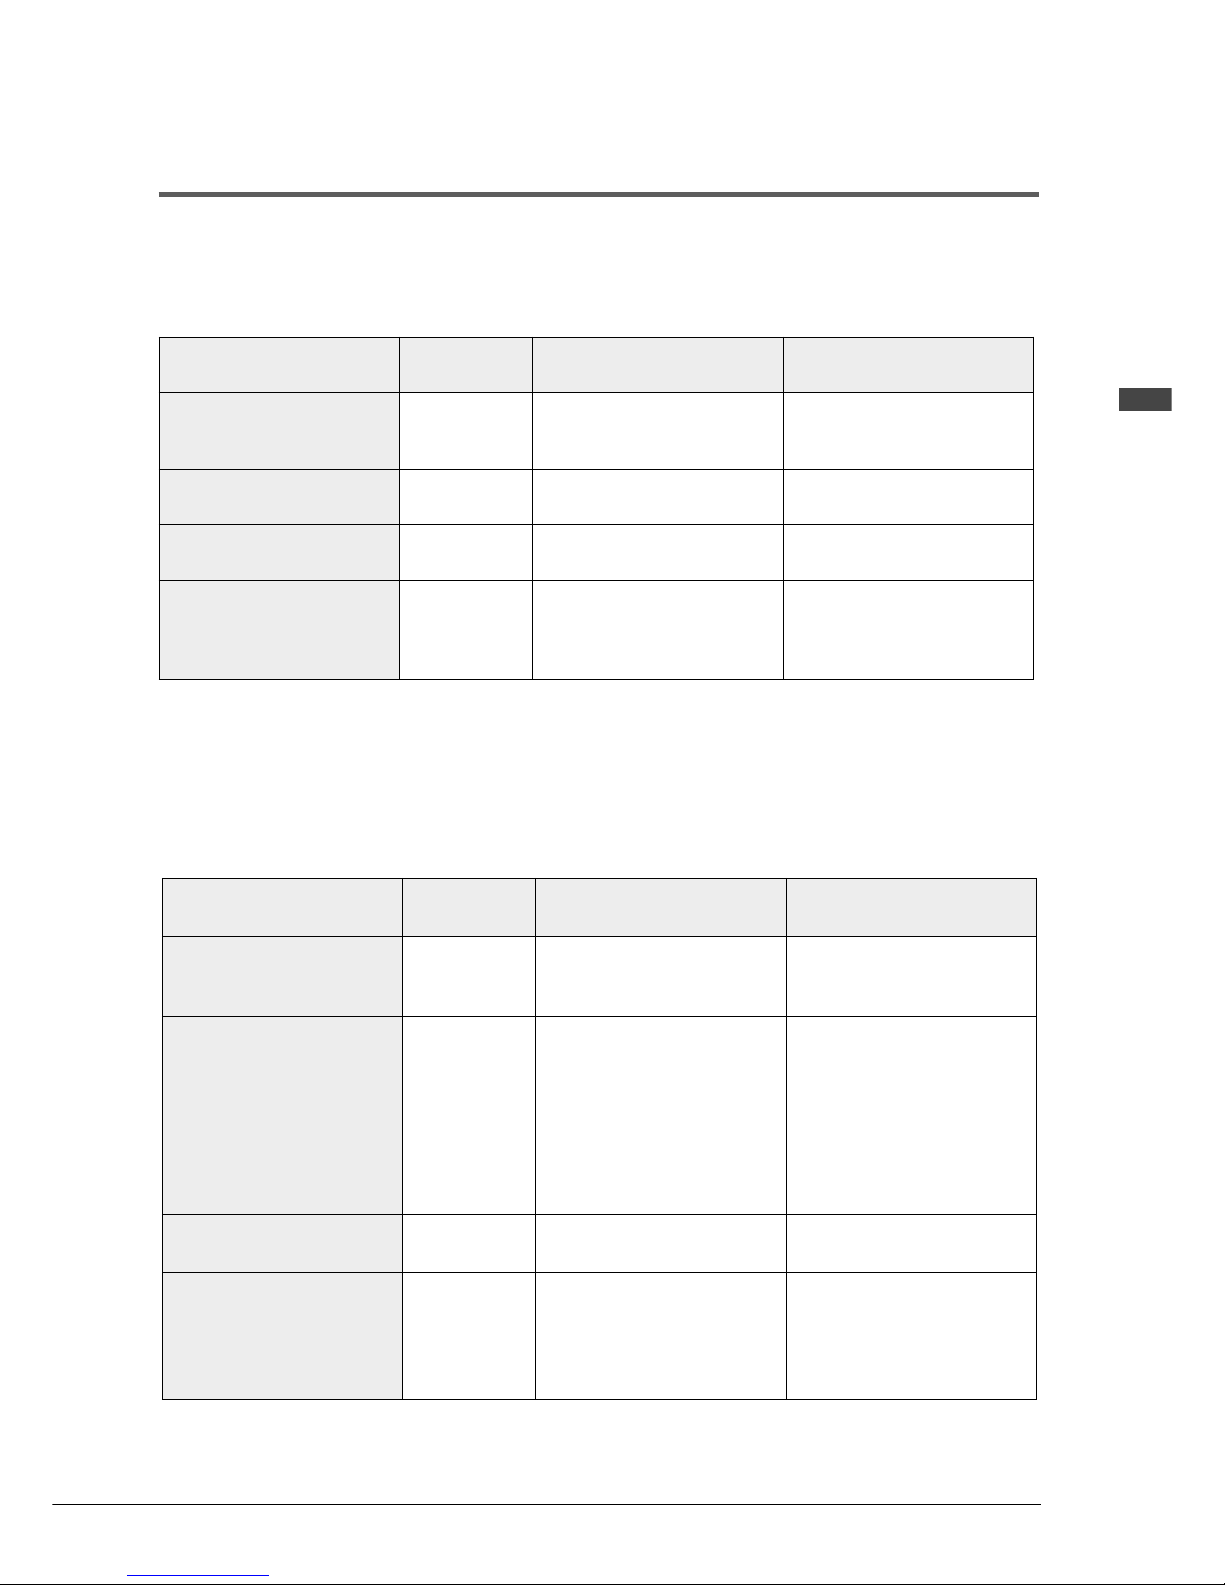
43
English Chapter 6: Synchronization Using the MTC
noitcA
TSOHOT
rotcennoc
rotcennocTUOIDIM
enotGXlanretnI/onaiP
rotareneg
draobyeknoyalP
×
sselnutnesatadIDIMoN
.NOninottubecioV
rotarenegenotlanretnioN
nottubecioVsselnusdnuos
.NO=lacoLdnaNOsi
elbmesnefokcabyalP
elifgnos
×
tpecxetnesatadIDIMllA
sladep(straponaiprof
onaipnotnessyawla
fitnesstraponaip;)lennahc
=TUOLBSEtraPonaiP
,gnosQES-Efi;NO
tnestonsladeplatnemercni
.3lennahcno
enotlanretnidnaonaiP
.yllamronyalprotareneg
morfdevieceratadIDIM
rotcennocTSOHOT
×× ×
morfdevieceratadIDIM
rotcennocNIIDIM
×
dessapatadIDIMllA
;straponaiptpecxehguorht
traPonaiPfitnesstraponaip
yaled;NO=TUOLBSE
.NO=nIyaleDfideilppa
enotlanretnidnaonaiP
;yllamronyalprotareneg
=nIyaleDfideilppayaled
.NO
noitcA
TSOHOT
rotcennoc
rotcennocTUOIDIM
enotGXlanretnI/onaiP
rotareneg
draobyeknoyalP
×
hCtuOfitnesatadIDIM
≠ .FFO
rotarenegenotlanretnioN
nottubecioVsselnusdnuos
.NO=lacoLdnaNOsi
elbmesnefokcabyalP
elifgnos
×
roftpecxetnesatadoN
).etoneeS(.atadladep
enotlanretnidnaonaiP
.yllamronyalprotareneg
morfdevieceratadIDIM
rotcennocTSOHOT
×× ×
morfdevieceratadIDIM
rotcennocNIIDIM
×
dessapatadIDIMoN
ladeproftpecxehguorht
).etoneeS(.atad
enotlanretnidnaonaiP
;yllamronyalprotareneg
=nIyaleDfideilppayaled
.NO
Summary of the MIDI Out Parameter in a MIDI
Setup
The following tables show the differences among the MIDI OUT settings (KBD Out, ESBL Out, Thru
Port2) with the HOST SELECT switch set to MIDI.
MIDI OUT = KBD Out
× = TO HOST connector inactive
Note: When pedals are played (activated) by data, the depth of the pedals is read by the sensors and sent (KBD
Out) via channels selected in the Out Ch setting (as, unlike the keyboard, the pedals cannot distinguish
whether they are being activated by foot or by data).
MIDI OUT = ESBL Out
× = TO HOST connector inactive
Page 50
44
noitcA
TSOHOT
rotcennoc
rotcennocTUOIDIM
enotGXlanretnI/onaiP
rotareneg
draobyeknoyalP
×
.tnesatadIDIMoNrotarenegenotlanretnioN
nottubecioVsselnusdnuos
.NO=lacoLdnaNOsi
elbmesnefokcabyalP
elifgnos
×
.tnesatadIDIMoNenotlanretnidnaonaiP
.yllamronyalprotareneg
morfdevieceratadIDIM
rotcennocTSOHOT
×× ×
morfdevieceratadIDIM
rotcennocNIIDIM
×
dessapatadIDIMoN
.hguorht
enotlanretnidnaonaiP
;yllamronyalprotareneg
=nIyaleDfideilppayaled
.NO
MIDI OUT = Thru Port2
× = TO HOST connector inactive
Page 51
45
English Chapter 7: Troubleshooting
Chapter 7
Troubleshooting
If you have difficulty operating the DCD1+PS, see if any of the symptoms listed below apply to your
problem and follow the recommended remedy.
Power
You cannot turn on the DCD1+PS.
• Make sure the AC adaptor is connected to a
suitable AC outlet.
☛ See “Connecting the AC Adaptor” on page 19.
Main Unit
The DCD1+PS does not appear to operate
correctly.
• Turn off the DCD1+PS, wait 5 seconds, then
turn it back on.
• Make sure the Piano Type switch is set
correctly to match your piano type.
☛ See “Setting Piano Type” on page 20.
• If the problem continues, consult your Yamaha
piano dealer.
Remote Control
You cannot control the DCD1+PS with the
remote control.
• Make sure that you are pointing the remote
control at the DCD1+PS’s remote control sensor.
• Make sure that you are within the remote
control’s specified operating range.
☛ See “Using the Remote Control” on page 8.
• Make sure that the remote control’s batteries
have been installed correctly.
☛ See “Installing Batteries in the Remote
Control” on page 8.
• Check the condition of the remote control’s
batteries.
☛ See “Battery Replacement” on page 9.
CD Playback
Even though the CD is inserted, the LED
display continues to show “00” and
playback cannot be started.
• Check if the inserted CD is an audio CD.
• The CD may not be recognized if the reading
surface of the CD is dirty. Clean the reading
surface of the CD.
• The CD may not be recognized if there is a
scratch on the reading surface of the CD.
No sound is heard.
• Make sure your piano is connected to the
DCD1+PS properly.
☛ See Chapter 3,“Connecting the DCD1+PS”.
• Turn up the volume using the VOLUME knob
on the DCD1+PS.
☛ See “Adjusting the Volume” on page 27.
The piano parts cannot be heard.
• Make sure the Piano Type switch is set
correctly.
☛ See “Setting Piano Type” on page 20.
• Make sure the DCD1+PS is connected to your
piano correctly.
☛ See Chapter 3, “Connecting the DCD1+PS”.
• Adjust the volume level using the volume
control on your piano.
The audio parts cannot be heard.
• Make sure that the amp’s volume control is set
to an appropriate level.
• Readjust the volume balance using the
BALANCE knob on the DCD1+PS.
☛ See “Balancing the Audio Parts” on page 28.
Page 52

46
When you play back a PianoSoft.PlusAudio,
the pitch of the piano does not match the
other sounds.
• PianoSoft.PlusAudio are made to be played
back on pianos tuned at 440 MHz for best
results. Consult your Yamaha dealer about
tuning your piano.
You selected a song using the remote
control’s number pad, but the last song on
the disk is selected.
• If a song number higher than the last song
number on the disk is specified, the last song
will be selected.
During playback, complex note trills and
faint pianissimo passages are occasionally
missed.
• Raise your piano’s volume level.
When using DCD1+PS to only play a CD,
Disklavier performs playback.
• If the Disklavier Control Unit is the DKC55
and the DCD1 mode is set to ON, the CD drive
must be selected.
☛ See “Using a DKC55 Control Unit” in
Chapter 4 Playing CDs.
• PianoSmart playback is performed when
DCD1 mode is set to ON and SmartPianoSoft
is selected. Either eject the SmartPianoSoft
disc or select a normal MIDI song.
CCCD (Copy Control CDs)
• The DCD1+PS was designed in compliance
with CD standards. If a disc is used that does
not match the CD standards, it may not play or
other problems can occur. The Copy Control
CDs that are currently sold are special discs
that do not match the current CD standards.
Therefore, playback and other operations using
the DCD1+PS cannot be guaranteed.
If playback of normal CDs presents no
problems, but these special disc cannot be
played back or other problems occur, then
contact the dealer of the Copy Control CDs.
Analog MIDI IN
When you connect an external audio
equipment such as a CD changer to the
DCD1+PS, it does not function properly.
• Make sure that the OUTPUT L/R on the
external audio equipment is connected
properly. It will not function properly if the left
and right connectors are reversed.
• The audio signals may be distorted. Turn off
such functions as the equalizer, tone control,
bass booster, etc.
• The volume level of the external audio
equipment may be too high or too low. It will
not play correctly if the output level is
unusually high or low compared to the
standard level.
PianoSmart
PianoSmart fails to work (fails to
synchronize).
• Check if the Control Unit is compatible with
PianoSmart.
☛ See “Applicable Control Unit”.
• Check if the correct MIDI is connected.
☛ See “Connecting the DCD1+PS to Your
Piano”.
• Check if the piano type setting on the
DCD1+PS is correct.
☛ See “Host Pianos”.
• Check that the MIDI IN/HOST SELECT
setting for the Disklavier is correct.
☛ See “Piano Settings”.
• Check whether the CD is the same as the
number of the CD printed on the Smart
PianoSoft package, etc.
• When the songs are all the same even if the
CD is different, copy Smart PianoSoft onto the
memory disk, and execute “Change to a
different CD.”
• When a copied CD and Smart PianoSoft are to
be played simultaneously, their playback
timing may not coincide.
Page 53

47
English Chapter 7: Troubleshooting
The tuning for the CD audio and piano
sounds do not match in PianoSmart
playback.
• This is based on the specifications. In the
DCD1+PS, the tone of the CD audio cannot be
changed.
Disklavier Control Unit
The KBD OUT function and MTC function
for MIDI Setup do not operate properly.
• Check the DCD1 mode. The DCD1 mode must
be turned off to use all of the MIDI Setup
functions.
☛ See “DCD1 Mode”.
Page 54
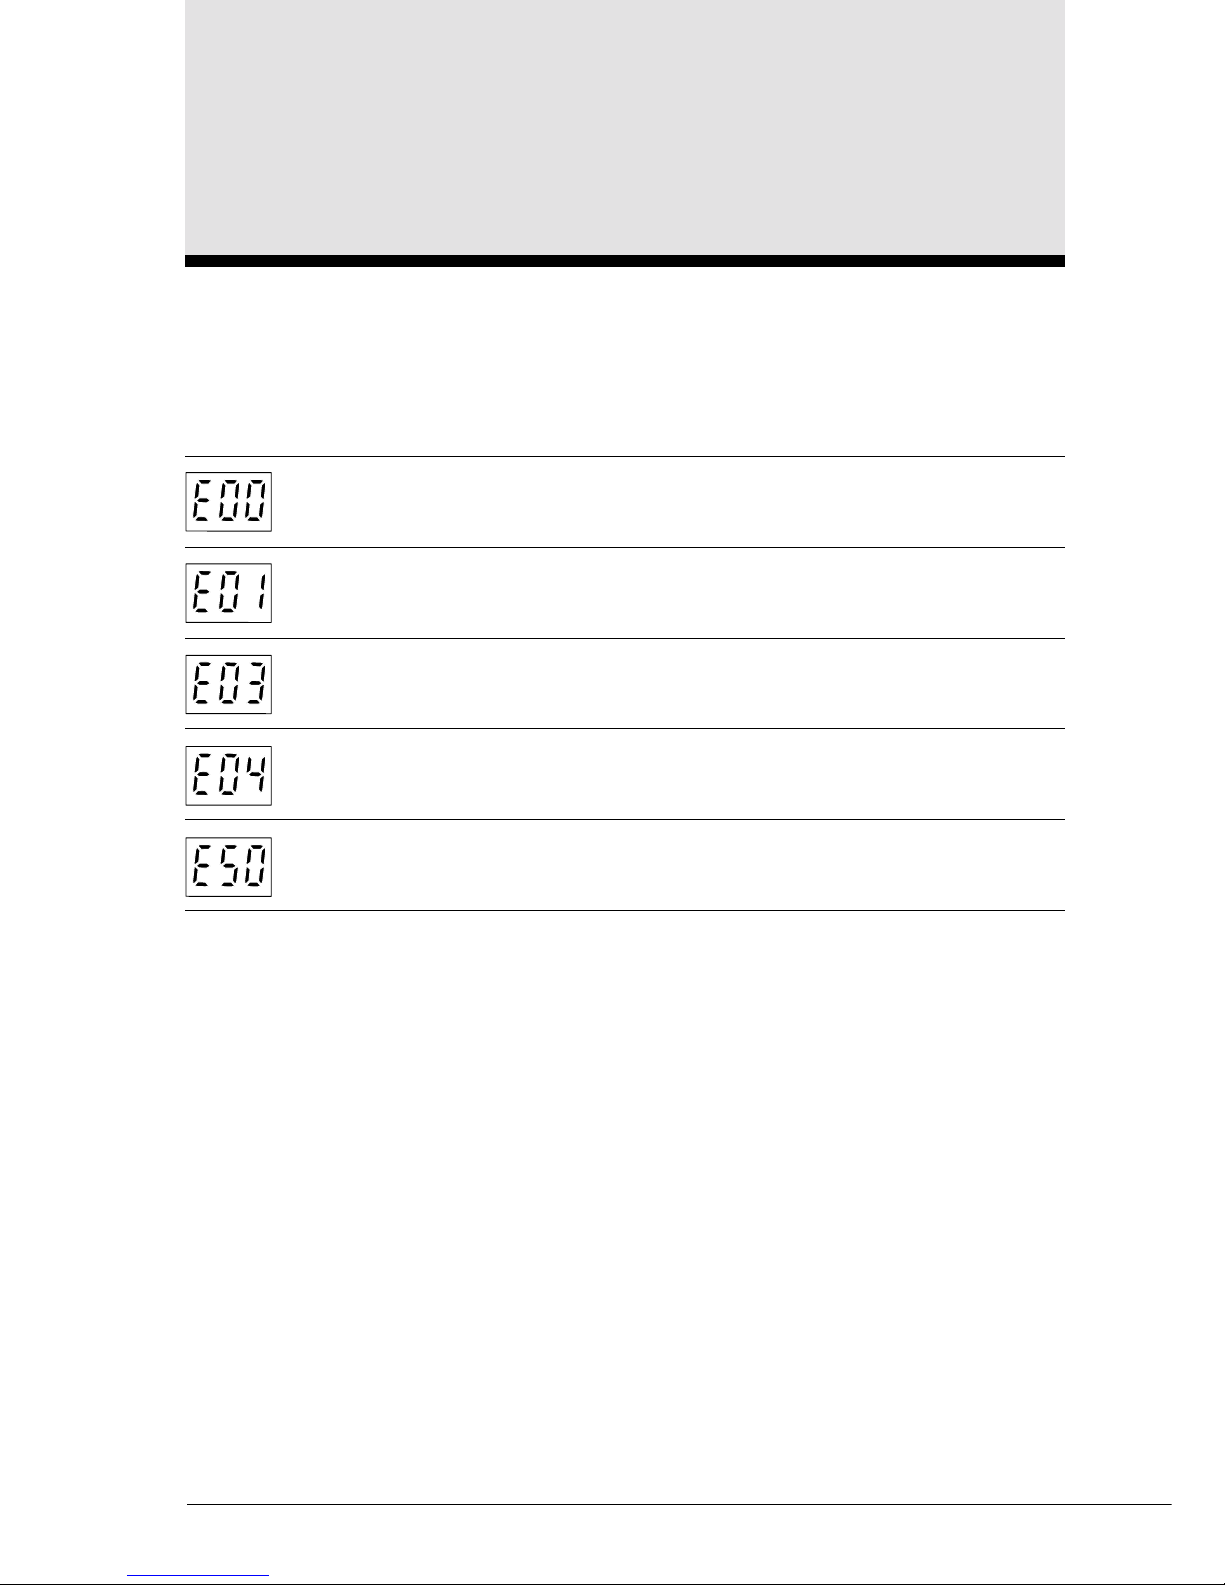
48
Chapter 8
Display Error Messages
While operating your DCD1+PS an error message may appear in the display. If an error message
appears, refer to the table below for an explanation of the message.
Note: This table does not explain every error message.
A malfunction may have occurred in the CD drive. Contact your nearest Yamaha Service
Center.
A malfunction may have occurred in the internal circuitry of the DCD1+PS. Contact your
nearest Yamaha Service Center.
The CD cannot be read because the reading surface is scratched. Check the reading
surface of the CD.
There is a problem with the CD format, and the disc cannot be read.
A disconnection may have occurred in the internal circuitry of the DCD1+PS. Contact
your nearest Yamaha Service Center.
Page 55
49
English Chapter 9: Specifications
Chapter 9
DCD1+PS Specifications
Model Compatibility Models compatible with PianoSmart (Controller Type)
Disklavier MarkIIXG Series (DKC500RWXG, DKC500RXG+EMK1)
Disklavier MarkIIXG Silent Series (DKC500RW, DKC500R+EMK1)
Disklavier GranTouch (DKC500RW, DKC500R+EMK1)
Disklavier Pro Series (DKC500RW, DKC500R+EMK1)
Disklavier MarkIII playback models (DKC55)
Disklavier Silent MPX70 (DKC50R)
Disklavier MX500/MX22/MX116 (DKC50R)
DSR1
Models not compatible with PianoSmart
Other Disklavier models
Silent Series / MIDIPiano
GranTouch
Clavinova (MIDI In terminal required)
Software Compatibility SmartPianoSoft (by combining with a Disklavier product compatible with
PianoSmart)
Audio/MIDI CDs (Yamaha PianoSoft.PlusAudioTM and others)
Standard audio CDs
Automatic type recognition
Controls Power (On/Off)
Play/Pause
Stop
Song Select (Rev/Fwd)
Repeat
Audio/Piano MIDI Balance
Volume
Piano Type Select (Disklavier, GT10, GT1, Clavinova)
Connectors MIDI In, MIDI Out
Analog MIDI In (Input impedance 10 kΩ)
Output (R, L/L+R) (Output impedance 600 Ω)
AUX In (R, L/L+R) (Input impedance 10 kΩ)
DC In
Power Supply 12V DC, 1.5 A supplied from AC adaptor
Dimensions 230 (D) x 227 (W) x 48 (H) mm
Weight 1450 g
Supplied Accessories Remote, AC adaptor (120 V;VU11370/V802910 or 230 V;VU11360/V802920),
cables, software, manuals, Control Unit update floppy disk
Specifications are subject to change without notice.
 Loading...