

Yamaha CLP-100 User Manual [en, de, fr]

Clavinova
CLP-^ OO
Owner's Manual
Bedienungsanleitung
Mode d'emploi
Manual de instrucciones
YAMAHA
Explanation of Graphical Symbols
CAUTION
RISK OF ELECTRIC SHOCK
DO NOT OPEN
CAUTION: TO REDUCE THE RISK OF ELECTRIC SHOCK.
00 NOT REMOVE COVER (OR BACK).
NO USER-SERVICEABLE PARTS INSIDE.
REFER SERVICING TO QUALIFIED SERVICE PERSONNEL.
The lightning flash with arrowhead symbol,
within an equilateral triangle, is intended to alert
the user to the presence of uninsulated “danger
ous voltage” within the product’s enclosure that
may be of sufficient magnitude to constitute a
risk of electric shock to persons.
The exclamation point within an equilateral tri
angle is intended to alert the user to the presence
of important operating and maintenance (servic
ing) instructions in the literature accompanying
the product.
IMPOR TA NT SA FET Y AND IN STA LLA TION I NST RUC TION S
INFORMATION REUTING TO POSSIBLE PERSONAL INJURY, POSSIBILITIES HAS BEEN INCLUDED IN THIS LIST.
When using electronic products, basic pre-
^cautions should always be followed, including
the following:
Read all Safety and Installation Instructions, Explanation of
I
• Graphical Symbols, and assembly instructions (where appli
cable) BEFORE using your Yamaha electronic product. Check unit
weight specifications before you attempt to move this instrument!
Main Power Supply Verification: Your Yamaha electronic prod-
2
• uct has been manufactured specifically for the main supply
voltage used in your area. If you should move, or if any doubt exists,
please contact your dealer for instructions. The main supply voltage
required by your electronic product is printed on the name plate. For
name plate location, see Before Playing item.
This product may be equipped with a polarized line plug (one
3
• blade wider than the other). If you are unable to insert the
plug into the outlet, contact an electrician to have your obsolete
outlet replaced. Do NOT defeat the safety purpose of the plug.
Yamaha products not having polarized plugs incorporate construc
tion methods and designs that do not require line plug polarization.
WARNING—Do NOT place objects on your electronic product's
4
• power cord or place the unit in a position where anyone could
trip over, walk over, or roll anything over cords of any kind. Do NOT
allow your electronic product or its bench to rest on or be installed
over cords of any type. Improper installations of this type create the
possibility of a fire hazard and/or personal injury.
Environment: Your electronic product should be installed away
5
• from heat sources such as a radiator, heat registers and/or
other products that produce heat. Additionally, the unit should not
be located in a position that exposes the cabinet to direct sunlight, or
air currents having high humidity or heat levels.
« Some Yamaha electronic products can be made to operate with
O* or without the side panels or other components that constitute
a stand. These products should be used only with the components
supplied or a cart or stand that is recommended by the manufacturer.
Do not operate for a long period of time at a high volume level
9
• or at a level that is uncomfortable. If you experience any
hearing loss or ringing in the ears, you should consult an audiologist.
Do not use your Yamaha electronic product near water or in
Ш
• wet environments. For example, near a swimming pool, spa,
or in a wet basement.
Care should be taken so that objects do not fall, and liquids
n
• are not spilled, into the enclosure through openings.
A Your Yamaha electronic product should be serviced by a
1m* qualified service person when:
a. The power-supply cord or plug has been damaged: or
b. Objects have fallen, or liquid has been spilled into the product: or
c. The product has been exposed to rain: or
d. The product does not operate, exhibits a marked change in
performance: or
e. The product has been dropped, or the enclosure of the product
has been damged.
1 Q When not in use, always turn your Yamaha electronic product
l«>*"OFF". The power-supply cord of the product should be
unplugged from the outlet when it is to be left unused for a long period
of time. Notes: In this case, some units may lose some user pro
grammed data. Factory programmed memories will not be affected.
Do not attempt to service the product beyond that described
H
• in the user-maintenance instructions. All other servicing
should be referred to qualified service personnel.
ELECTRIC SHOCK, AND FIRE HAZARD
Your Yamaha electronic product should be placed so that its
6
• location or position does not interfere with its proper ventilation.
Some Yamaha electronic products may have benches that are
7
• either a part of the product or supplied as an optional accessory.
Some of these benches are designed to be dealer assembled. Please
make sure that the bench is stable before using it. The bench
supplied by Yamaha was designed for seating only. No other uses are
recommended.
PLEASE KEEP THIS MANUAL
FOR FUTURE REFERENCE!
1 g Electromagnetic Interference (RFI). This series of Yamaha
ID*electronic products utilizes digital (high frequency pulse)
technology that may adversely affect Radio/TV reception or the
operation of other devices that utilize digital technology. Please read
FCC Information (Page 16) for additional information.

Introduction
Contents
We would like to express our thanks for your purchase of the
Yamaha Clavinova CLP-100. These instruments have the follow
ing features.
• 8 vivid voices using FM (Frequency Modulation) Tone
Generation.
• Expression which can be varied via the touch sensitive keys,
similar to an acoustic piano.
• MIDI for increased versatility and enjoyment.
In order to get the most from these instruments, we advise you
to read this manual while actually seated at the Clavinova.
Einleitung
Herzlichen Glückwunsch zum Kauf des Yamaha Clavinova CLP-
100. Diese Instrumente haben die folgenden Merkmale.
• 8 lebendige Stimmen mit FM-(Frequenzmodulation) Tonerzeu-
lischer Ausdruck, der mit den druckempfindlichen
Tasten, ähnlich wie beim Klavier, beeinflußt werden kann.
• MIDI für mehr Vielseitigkeit und Spielfreude.
Um diese Instrumente voll ausnutzen zu können, raten wir an,
diese Bedienungsanleitung zu lesen, während Sie schon am
Clavinova sitzen.
Assembly Instructions for Keyboard Stand
Before Playing.............................................................................. 4
To Start Playing............................................................................ 4
Effects and Controls..................................................................... 4
Accessory Jacks........................................................................... 5
Taking Care of Your Clavinova
Important Advice.......................................................................... 5
How to use MIDI.......................................................................... 6
Specifications............................................................................. 16
FCC Information (USA).............................................................. 16
MIDI Implementation Chart........................................................ 17
....................................................
..................................
Inhaltsverzeichnis
Zusammenbauanleitung für den Keyboard-Ständer
Vor dem Spielen.......................................................................... 7
Beginn des Spielens..................................................................... 7
Efiekte und Bedienungselemente
Ausgangsbuchsen
Pflege des Clavinova................................................................... 8
Wichtiger Hinweis....................................................................... 8
Einsatz von MIDI
Technische Daten........................................................................16
MIDI-Anwendungstabelle..........................................................17
........................................................................
........................................................................
................................................
...................
2
5
2
7
8
9
Avant-propos
Avant tout, merci d'avoir porté votre choix sur le Clavinova CLP-
100. Les caractéristiques de ce modèle sont les suivantes.
• 8 tonalités générées par système à modulation de fréquence
(FM).
• Expression variable par l'action de touches sensitives comme
on en trouve sur les pianos acoustiques.
• Option MIDI diversifiant les choix d'applications et le plaisir
de l'exécutant.
Pour obtenir de ces instruments le meilleur de leurs performances,
prière de lire attentivement ce mode d'emploi en veillant à ne
jamais séparer l'étude de la pratique.
Introducción
Muchas gracias por haber adquirido el Clavinova CLP-100 Yamaha.
Estos instrumentos possen las características silentes.
• 8 voces vividas que emplean la generación de tonos de FM
(modulación en frecuencia.)
• Expresión, que puede variarse mediante teclas sensibles al tacto,
similar a la de un piano acústico.
• MIDI para aumentar la versatilidad y el placer musical.
Para sacar el mayor partido posible de estos instrumentos, le
aconsejamos que lea este manual sentado ante su Clavinova.
Sommaire
Instructions pour le montage du support de clavier.................... 2
Avant la mise en service
Mise en service
Effets et commandes
Prises......................................................................................... 11
Entretien du Clavinova
Consignes importantes.............................................................. 11
Utilisation de la fonction MIDI..................................................... 12
Spécifications............................................................................. 16
Tableau de mise en exploitation MIDI........................................ 17
..........................................................................
............................................................
.................................................................
..............................................................
10
10
10
11
Indice
Instrucciones de montaje para el soporte del teclado
Antes de comenzar a tocar...........................................................13
Para comenzar a tocar................................................................. 13
Efectos y controles.......................................................................13
Tomas externas
Cuidado de su Clavinova
Aviso importante
Empleo de MIDI.........................................................................15
Especificaciones
Gr^ca de implementación de MIDI
............................................................................
..........................................................................
......
........................................................................
......................................................
.............................................
.................
2
14
14
14
16
17
1
2
Joint connectors
Verbindungsstücke
Connecteurs de joint
Conectores de unión
* While watching this side, install the joint
connector, making sure the arrow marks
on the surface of the connector point in
the direction as shown in the illustration.
• Diese Seite betrachten und das Verbin
dungsstück anbringen. Dabei sicherstel
len, daß die Pfeilmarkiemngen auf der
Oberfläche des Verbindungsstücks in
die Richtung weisen, wie sie in der
Abbildung gezeigt ist.
^ § i @ §
« è
• Long screws (gold) 4 pcs.
• Lange Schrauben (Gold) 4 St.
• Vis longues (or), 4 pièces
• Tornillos largos (dorados),
4 piezas
• Long screws (bronze) 4 pcs.
• Lange Schrauben (Bronze) 4 St.
• Vis longues (bronze), 4 pièces
• Tornillos largos (de color bronce),
4 piezas
• Joint connectors 8 pcs.
• Verbindungsstücke 8 St.
• Connecteurs de joint, 8 pièces
• Conectores de unión, 8 piezas
• Short screws (black) 2 pcs.
• Kurze Scharauben (schwarz) 2 St.
• Vis courtes (noires), 2 pièces
•Tornillos cortos (negros), 2 piezas
Knob bolts 4 pcs.
Knopfschrauben 4 St.
Boulons à tête ronde, 4 pièces
Pernos de perilla, 4 piezas
t Long screws (gold)
Lange Schrauben (Gold)
* • Vis longues (or)
• Torniilos largos (oro)
• Tout en regardant de ce côté, installer le
connecteur de joint en s’assurant que les
flèches inscrites pointent dans la direc
tion indiquée dans l’illustration,
* Observando esta parte, instale el
conector de union, asegurándose de que
las flechas de la superficie del mismo
apunten en el sentido mostrado en la
ilustración.
Assembly Instructions for Keyboard Stand
Zusammenbauanleitung fiir den Keyboard-
Instructions pour le montage du support
Instrucciones de montaje para el soporte
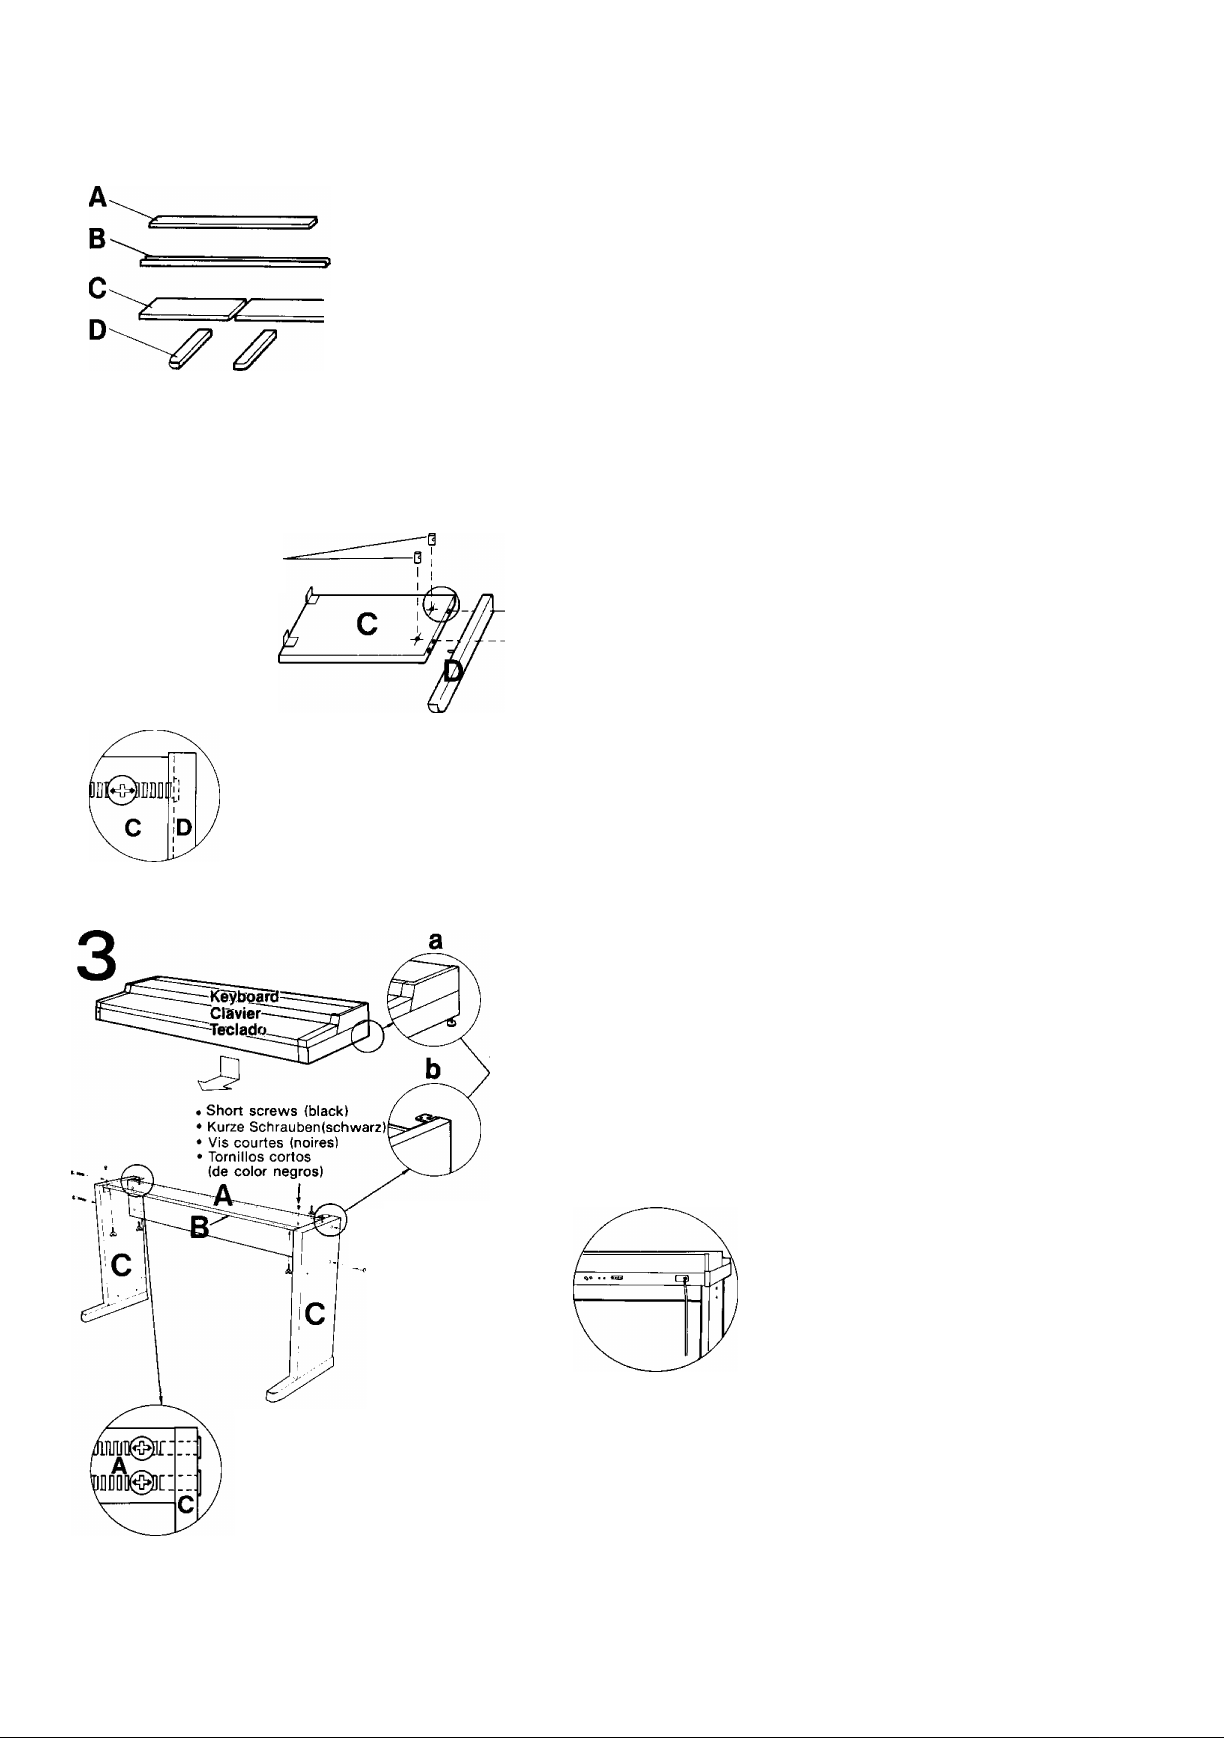
Open the box and remove all the parts.
On opening the box, you will find the parts
shown in the left' illustration. Check to
see whether all parts are provided.
Connect board (C) to parts (D).
Install the joint connectors on boardst(C) as
shown in the left I illustration, then secure
with the long gold-colored screws.
Position the rounded comers of parts (D) as shown
in the illustration.
If the keyboard and the stand are not packed
together, board (C) and parts (D) may already be
connected.
Den Karton öffnen und alle Teile
entnehmen.
Beim Öffnen des Kastens sollten alle in der
linken Abbildung gezeigten Teile vorge
funden werden. Prüfen, ob alle Teile mit
geliefert sind.
Die Platte (C) mit Teil (D) verbinden.
Die Verbindungsstücke auf Platte (C) wie
in der linken Abbildung gezeigt einbauen
und dann mit den langen goldenen Schrau
ben befestigen.
Die runden Ecken der Teile (D) wie in der
Zeichnung dargestellt plazieren.
Wenn Tastatur und Ständer nicht zusammen
geliefert werden, können Platte (C) und Teile (D)
bereits verbunden sein.
Long screws (bronze)
^ • Lange Schrauben (Bronze)
• Vis longues (bronze)
• Torniilos largos
(de color bronce)
Rear Side of Board (A)
Install the joint connectors in the holes
on the rear side of board (A) as shown in
the illustration, making sure the arrow
marks on the surface of the connectors
point in the direction indicated.
Rückseite der Platte (A)
Die Verbindungsstücke in den beiden
Löchern an der Rückseite der Platte (A)
wie in der Abbildung gezeigt einbauen
und sicherstellen, daß die Pfeilmarkierungen auf der Oberfläche der Verbin
dungsstücke in die angezeigte Richtung
weisen.
Slip the screws (a) on the rear part of
the keyboard bottom into the metal
fittings (b) of the top of boards (C).
Die Schrauben (a) an der Rückseite des
Keyboard-Bodenteils in die Mctallfassungen (b) an der Oberseite der Flatten
(C) einführen.
Faire passer les vis (a) dans la partie
arrière du socle du clavier, par les
attaches métalliques (b) au dessus des
plaques (C).
Deslice los tronidos (a) de la parte
posterior inferior del teclado dentro de
los adaptadores metálicos (b) de la parte
superior de los tableros (C).
Arrière de la plaque (A)
Installer les connecteurs de joint dans
les orifices situés à l’arrière de la plaque
(A) comme illustré, en s’assurant que les
flèches inscrites pointent dans la direc
tion indiquée.
Gara posterior del tablero (A)
Instale los conectores de unión en los
orificios de la cara posterior del tablero
(A), como se muestra en la ilustración,
asegurándose de que las flechas de la
superficie de los mismos apunten en el
sentido indicado..
1
2
Ouvrir la boîte et enlever toutes les
pièces.
Lorsqu’on ouvre la boîte. Гоп trouvera les
pièces indiquées dans l’illustration ci-à
gauche. Vérifier que toutes les pièces sont
fournies.
Connecter la plaque (C) à la pièce (D).
Installer les connecteurs de joint sur la
plaque (C) comme illustré ci-à gauche, puis
fixer avec les vis longues dorées.
Placer les coins arrondis des pièces (D) comme
illustré.
Si le clavier et le support ne sont pas sont emballés
ensemble, il se peut que les panneaux (C) et (D)
soient déjà réunis.
Abra la caja у extraiga todas las piezas.
Dentro de la caja encontrará las piezas
mostradas en la ilustración de la izquierda.
Compruebe si están todas las piezas.
Conecte el tablero (C) a la pieza (D).
Instale los conectores de unión en el tablero
(C), como se muestra en la ilustración de
la izquierda, y después asegúrelo con los
tornillos largos dorados.
Coloque las esquinas redondeadas de las piezas (D)
como se muestra en el ilustración.
Si el teclado y el soporte no se envían en la misma
caja, es posible que las piezas (C) y (D) ya estén
conectadas.
 Loading...