

Page 1

Accessory CD-ROM for Windows
Installation Guide/Installationshandbuch/Manuel d’installation/Guía de instalación
SPECIAL NOTICES
• The software and this Installation Guide are exclusive copyrights of Yamaha Corporation.
• Use of the software and this guide is governed by the SOFTWARE LICENSE AGREEMENT which the purchaser fully agrees to upon
breaking the seal of the software packaging. (Please read carefully the AGREEMENT at the end of this guide before installing the application.)
• Copying of the software or reproduction of this guide in whole or in part by any means is expressly forbidden without the written consent of
the manufacturer.
• Yamaha makes no representations or warranties with regard to the use of the software and documentation and cannot be held responsible for
the results of the use of this guide and the software.
• Copying of the commercially available music data is strictly prohibited except for your personal use.
• The company names and product names in this Installation Guide are the trademarks or registered trademarks of their respective companies.
• Software such as the USB-MIDI driver may be revised and updated without prior notice. Make sure to check and download the latest version
of the software from the following site.
http://music.yamaha.com/download
• Future upgrades of application and system software and any changes in specifications and functions will be announced separately.
BESONDERE HINWEISE
• Dieses Programm und diese Installationsanleitung sind im Sinne des Urheberrechts alleiniges Eigentum der Yamaha Corporation.
• Die Benutzung des Programms und dieser Anleitung unterliegt der SOFTWARE-LIZENZVEREINBARUNG, mit der sich der Erwerber
durch Öffnen des Siegels der Programmverpackung uneingeschränkt einverstanden erklärt. (Bitte lesen Sie die VEREINBARUNG am Ende
dieser Anleitung vor Installation der Anwendung sorgfältig durch.)
• Das Kopieren der Software und die Reproduktion dieser Anleitung, in welcher Form auch immer, in Teilen oder als Ganzes, sind nur mit
schriftlicher Genehmigung des Herstellers erlaubt und sonst ausdrücklich verboten.
• Yamaha leistet keinerlei Garantie hinsichtlich der Benutzung des Programms und der zugehörigen Dokumentation und übernimmt keine
Verantwortung für die Ergebnisse der Benutzung dieser Anleitung oder des Programms.
• Das Kopieren im Handel erhältlicher Musikdaten ist nur für Ihren Privatgebrauch zulässig und sonst streng untersagt.
• Die in dieser Installationsanleitung erwähnten Firmen- und Produktnamen sind Warenzeichen bzw. eingetragene Warenzeichen der
betreffenden Firmen.
• Software wie z.B. der USB MIDI Driver kann ohne vorherige Benachrichtigung überarbeitet und aktualisiert werden. Achten Sie darauf, auf
der folgenden Website nach der neuesten Version der Software zu suchen und sie herunterzuladen.
http://music.yamaha.com/download
• Zukünftige Aktualisierungen von Anwendungs- und Systemsoftware sowie jede Änderung der technischen Daten und Funktionen werden
separat bekanntgegeben.
EnglishDeutschFrançaisEspañol
REMARQUES PARTICULIERES
• Les droits d’auteurs (copyright) de ce logiciel et de ce manuel d’installation appartiennent exclusivement à Yamaha Corporation.
• L’usage de ce logiciel et de ce manuel est défini par l’accord de licence auquel l’acheteur déclare souscrire sans réserve lorsqu’il ouvre le sceau
de l’emballage du logiciel. (Veuillez donc lire attentivement l’accord de licence du logiciel situé à la fin de ce manuel avant d’installer le
logiciel.)
• Toute copie du logiciel et toute reproduction totale ou partielle de ce manuel, par quel moyen que ce soit, est expressément interdite sans
l’autorisation écrite du fabricant.
• Yamaha n’offre aucune garantie en ce qui concerne l’utilisation du logiciel et de la documentation. Yamaha ne peut en aucun cas être tenu
responsable des dommages éventuels résultant de l’utilisation de ce manuel et de ce logiciel.
• Toute copie de données musicales commercialisées est formellement interdite, sauf pour usage personnel.
• Les noms des firmes et des produits apparaissant dans ce manuel d’installation sont des marques commerciales ou des marques déposées
appartenant à leurs détenteurs respectifs.
• Les logiciels tels que le pilote USB MIDI sont susceptibles d’être révisés et mis à jour sans avertissement préalable. Veuillez toujours à vérifier
la version du logiciel utilisée et à télécharger la dernière version en date sur le site suivant :
http://music.yamaha.com/download
• Les remises à jour du programme et du système ainsi que toute modification des caractéristiques et fonctions seront annoncées séparément.
AVISOS ESPECIALES
• El copyright del software y de la guía de instalación es propiedad exclusiva de Yamaha Corporation.
• La utilización de este software y de esta guía debe ajustarse al CONTRATO PARA USO DE SOFTWARE BAJO LICENCIA, con el que el
comprador manifiesta su total conformidad al abrir el paquete de software. (Lea detenidamente el CONTRATO que se incluye al final de esta
guía antes de instalar la aplicación).
• La copia del software o la reproducción total o parcial de este manual por cualquier medio sin la autorización escrita del fabricante está
expresamente prohibida.
• Yamaha no asume responsabilidad alguna ni ofrece garantía alguna en relación con el uso del software y de la documentación, y no puede ser
declarada responsable de los resultados de la utilización de este manual ni del software.
• Queda terminantemente prohibida la copia de datos musicales disponibles comercialmente, excepto para uso personal.
• Los nombres de compañías y de productos que aparecen en esta guía de instalación son marcas o marcas registradas de sus respectivas
compañías.
• El software, por ejemplo el controlador USB MIDI, se puede revisar y actualizar sin previo aviso. Compruebe que existe la versión más reciente
del software y descárguela en el sitio siguiente:
http://music.yamaha.com/download
• Las futuras actualizaciones de la aplicación y del software del sistema, y cualquier cambio en las especificaciones y funciones, se anunciarán
independientemente.
Accessory CD-ROM for Windows Installation Guide 1
EN
DE
FR
ES
Page 2

Important Notices about the CD-ROM
Data Types
This CD-ROM includes application software. Please refer to page 4 for software installation instructions.
Operating System (OS)
The applications in this CD-ROM are provided in versions for Windows operating systems.
English
CD-ROM Installation Procedure
Before breaking the seal of the software packaging, please read carefully the Software License Agreement at the end of this guide.
1 Check the system requirements to make sure that the software will run on your computer (page 3).
2 Insert the included CD-ROM into the CD-ROM drive.
The Start window should appear automatically. (Users of Windows Vista will need to click [Start.exe] to open the Start window after
inserting the CD-ROM.)
3 Connect the instrument to the computer.
Refer to the Owner’s Manual of the instrument.
4 Install the USB-MIDI driver to the computer (page 4).
5 Install the software (page 6).
CAUTION
This CD-ROM is not meant for use with an audio/visual system (CD player, DVD player, etc.). Never attempt to use the disk
on equipment other than a computer.
6 Start up the software.
For subsequent operations, refer to the owner’s manual for each software program (online help/PDF manual).
If you have any problems in driver installation, refer to the “Troubleshooting” on page 7.
n To view PDF files, you must install Adobe Reader on your computer.
If you do not have Adobe Reader, you can download the application from the Adobe website at the following URL:
http://www.adobe.com
2 Accessory CD-ROM for Windows Installation Guide
Page 3

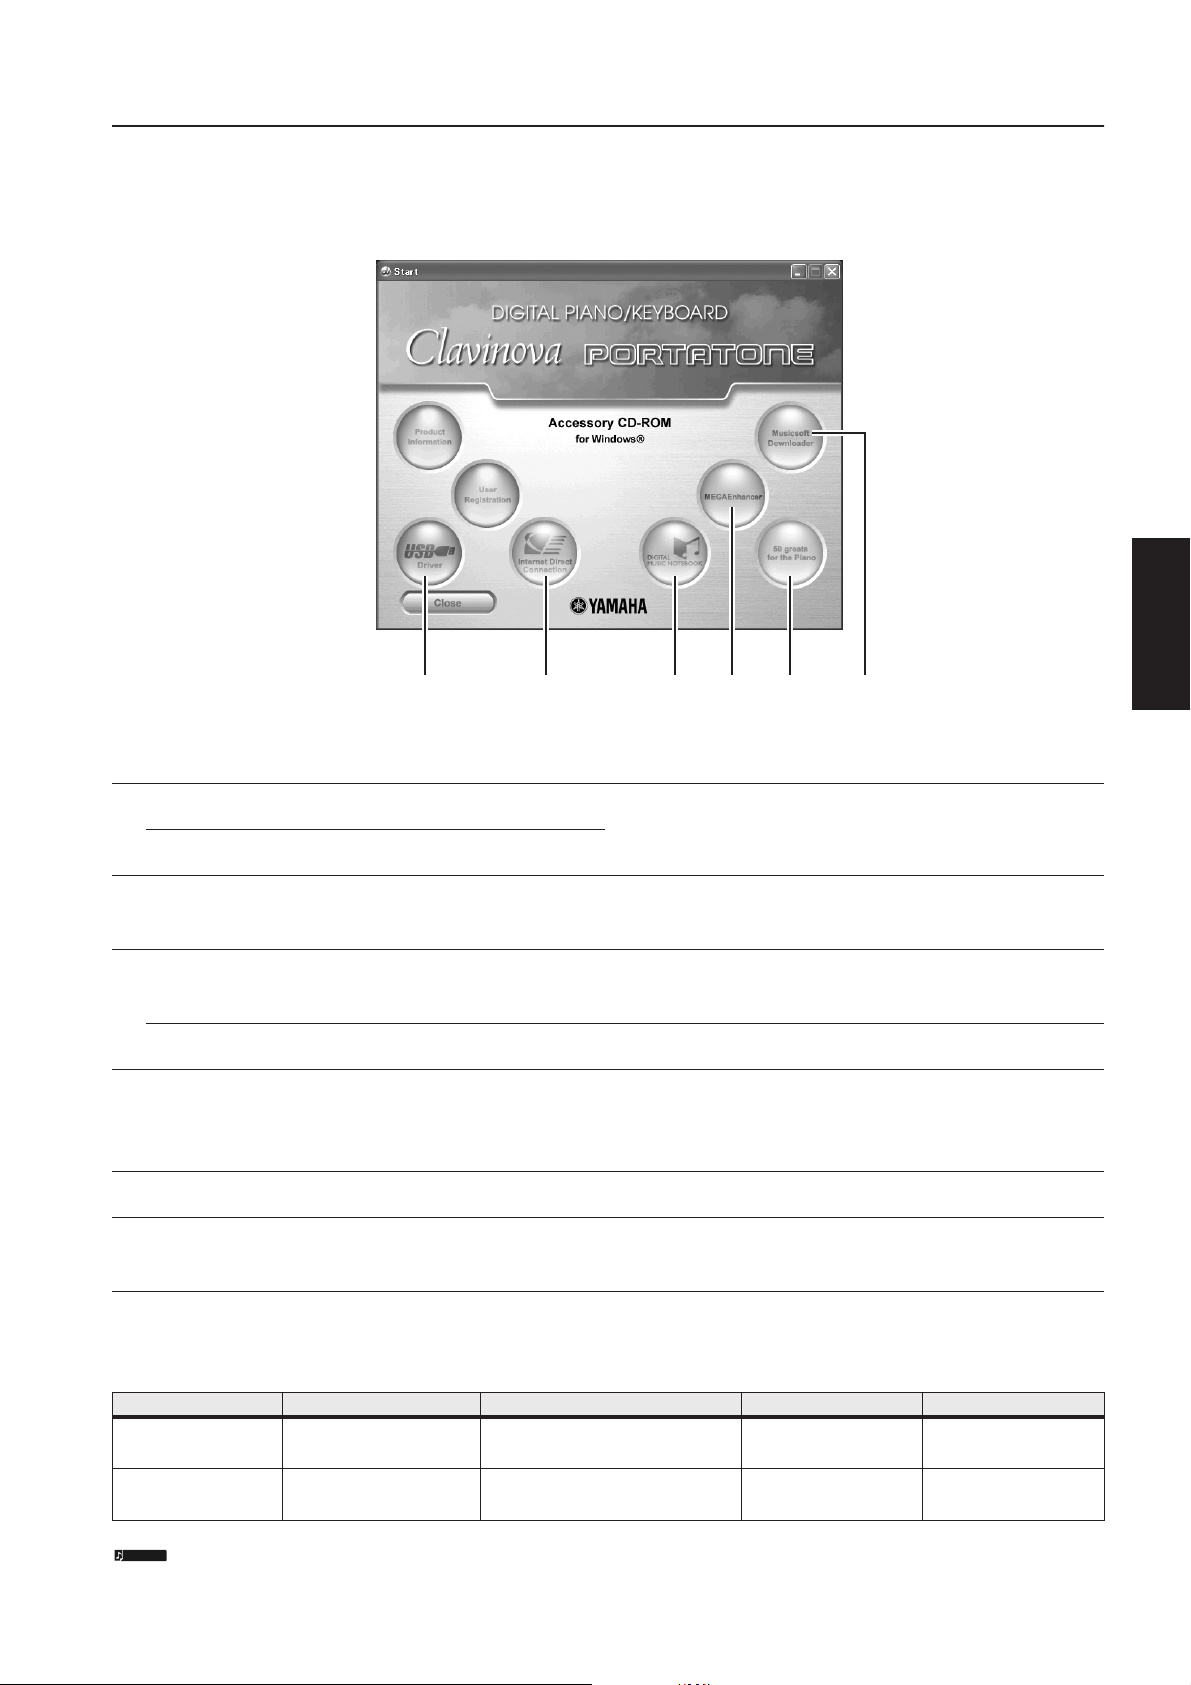
Contents of the CD-ROM
The start window as shown below will appear automatically when you insert the included CD-ROM. (Users of Windows Vista will need to
click [Start.exe] to open the Start window after inserting the CD-ROM.) By clicking each menu on the Start window, you can access the User
Registration page on the Internet and download some of the wide variety of application software available.
2 3 4 61 5
Application / Data Name Folder Name Contents
USB-MIDI Driver
(Windows 2000/XP)
1
USB-MIDI Driver
(Windows Vista/XP x64)
Internet Direct Connection Flash Demo IDC_FlashDemo
2
Digital Music Notebook (Available at Yamaha website.)
3
Digital Music Notebook Flash Demo DMN_FlashDemo
MEGAEnhancer (Available at Yamaha website.)
4
50 greats for the Piano SongData
5
Musicsoft Downloader (Available at Yamaha website.)
6
USBdrv2k_
USBdrvVista_
This software is necessary when using your instrument with a computer via a
USB connection. It enables MIDI communication and control between the
instrument and the computer.
Full-motion demo software which introduces all features of the Internet Direct
Connection, from within the program.
Please note that the Internet Direct Connection function may not be available
depending on your instrument.
Digital Music Notebook is a combination music learning program and online
service that makes it easy and fun to practice and master your favorite songs.
Digital Music Notebook can be downloaded from the Internet.
Full-motion demo software which introduces all features of the Digital Music
Notebook, from within the program.
Allows conversion of conventional XG/GM song data to song data optimized for
use with the Mega Voice feature (on a compatible instrument or tone generator.
MEGAEnhancer makes MIDI guitar and bass tracks come to life, with enhanced
realism and expression.
MEGAEnhancer can be downloaded from the Internet.
Piano Song files which can be played back via the song playback function of the
instrument.
Utilizing a connection between the instrument and a computer, this application
allows you to directly download song data to the instrument.
Microsoft Downloader can be downloaded from the Internet.
English
• All the applications listed above are supplied with online/PDF manuals.
Minimum System Requirements
Application/Data OS CPU Memory Hard Disk
USB Driver for Windows
2000/XP
USB Driver for Windows
Vista/XP x64
n For the System Requirements of the other software available in the CD-ROM, see the respective download page on the web. The download page can be
displayed by clicking the software menu on the Start window and the “download” button in the next page.
Windows 2000/XP Home
Edition/XP Professional
Windows Vista/XP
Professional x64 Edition
166 MHz or higher; Intel® Pentium®/
Celeron® Processor family
800 MHz or higher; Intel® Pentium®/
Celeron® Processor family or Intel® 64
compatible processor
32 MB or more (64 MB or
more is recommended)
512 MB or more at least 3 MB of free space
at least 3 MB of free space
Accessory CD-ROM for Windows Installation Guide 3
Page 4
Software Installation
• • • • • • • • • • • • • • • • • • • • • • • • • • • • • • • • • • • • • • • • • • • • • • • • • • • • • • •
Uninstall (Removing the installed application)
To remove any installed application software:
Select [START] → [Settings] → [Control Panel] → [Add/
Remove Programs] → [Install/Uninstall], then select the
application to be removed and click [Add/Remove...].
Follow the on-screen instructions to uninstall the
application.
n The button names or menus may differ depending on the
English
n For instructions on uninstalling the USB-MIDI driver, refer to
USB-MIDI Driver
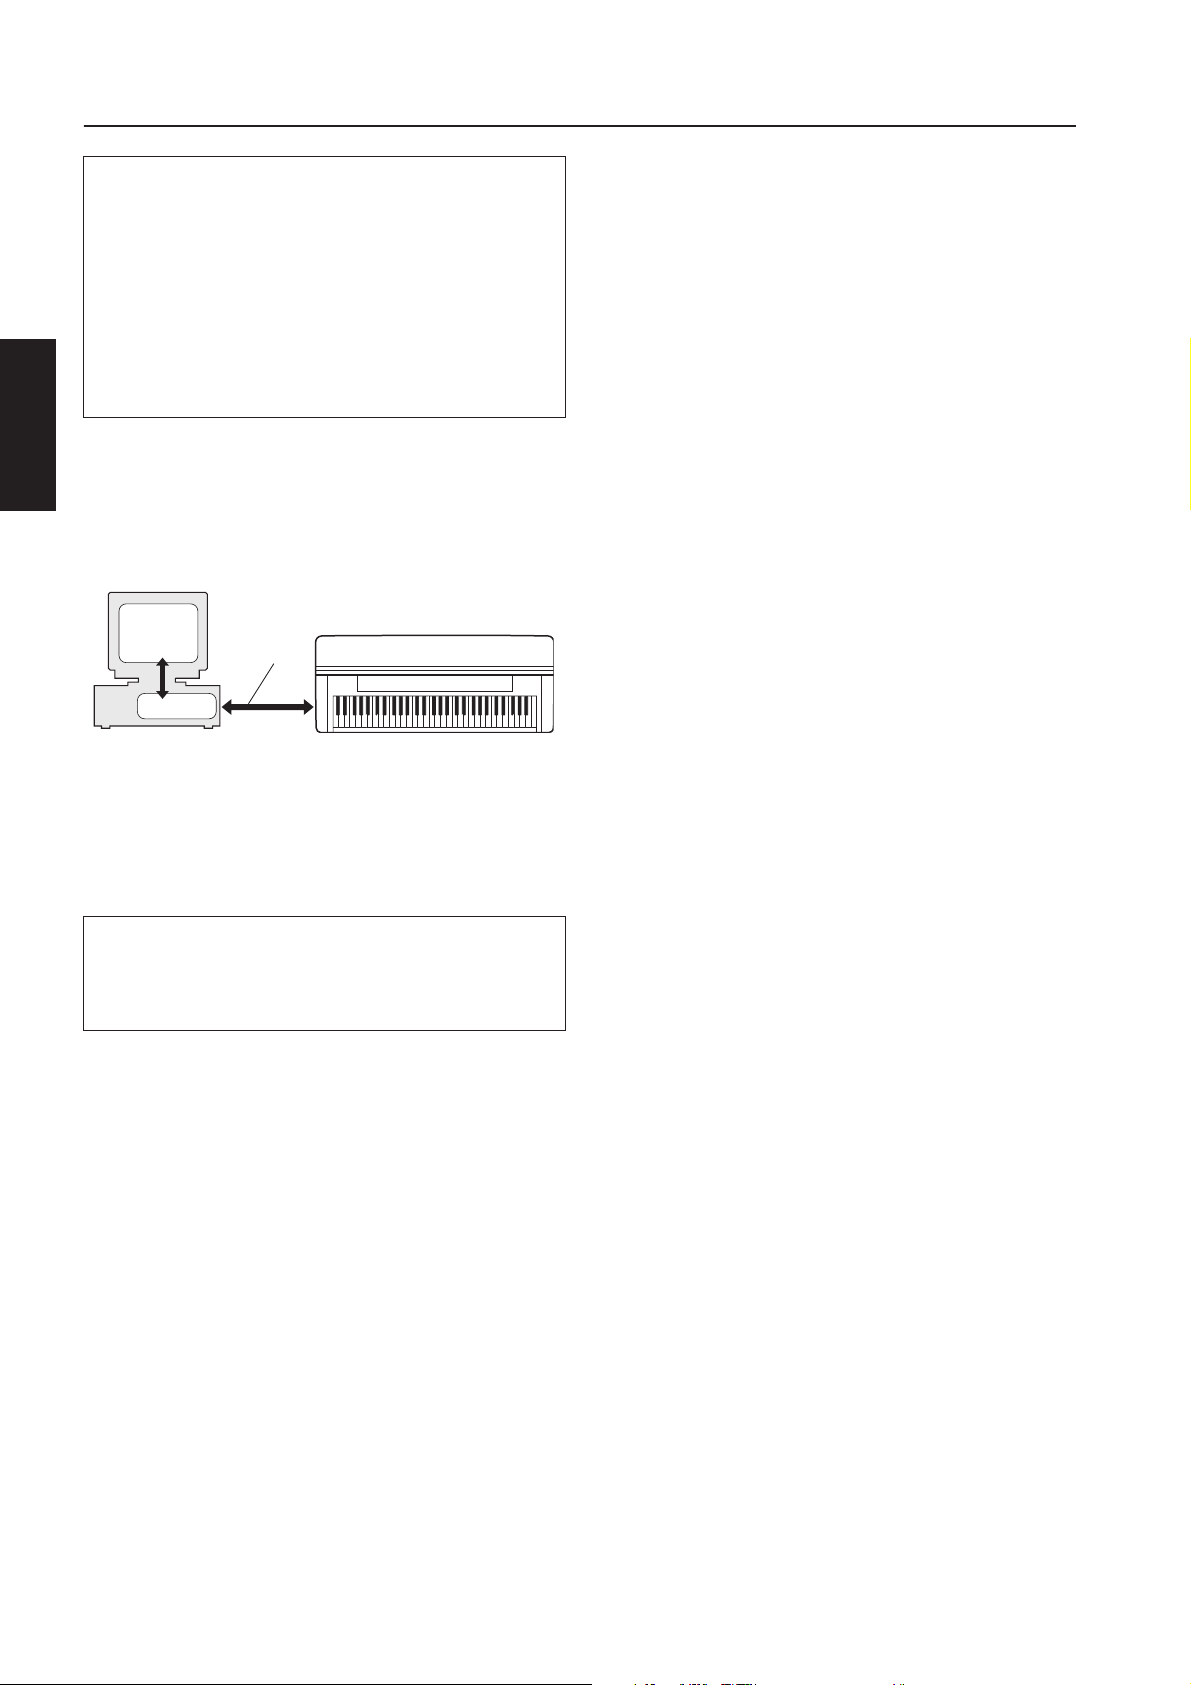
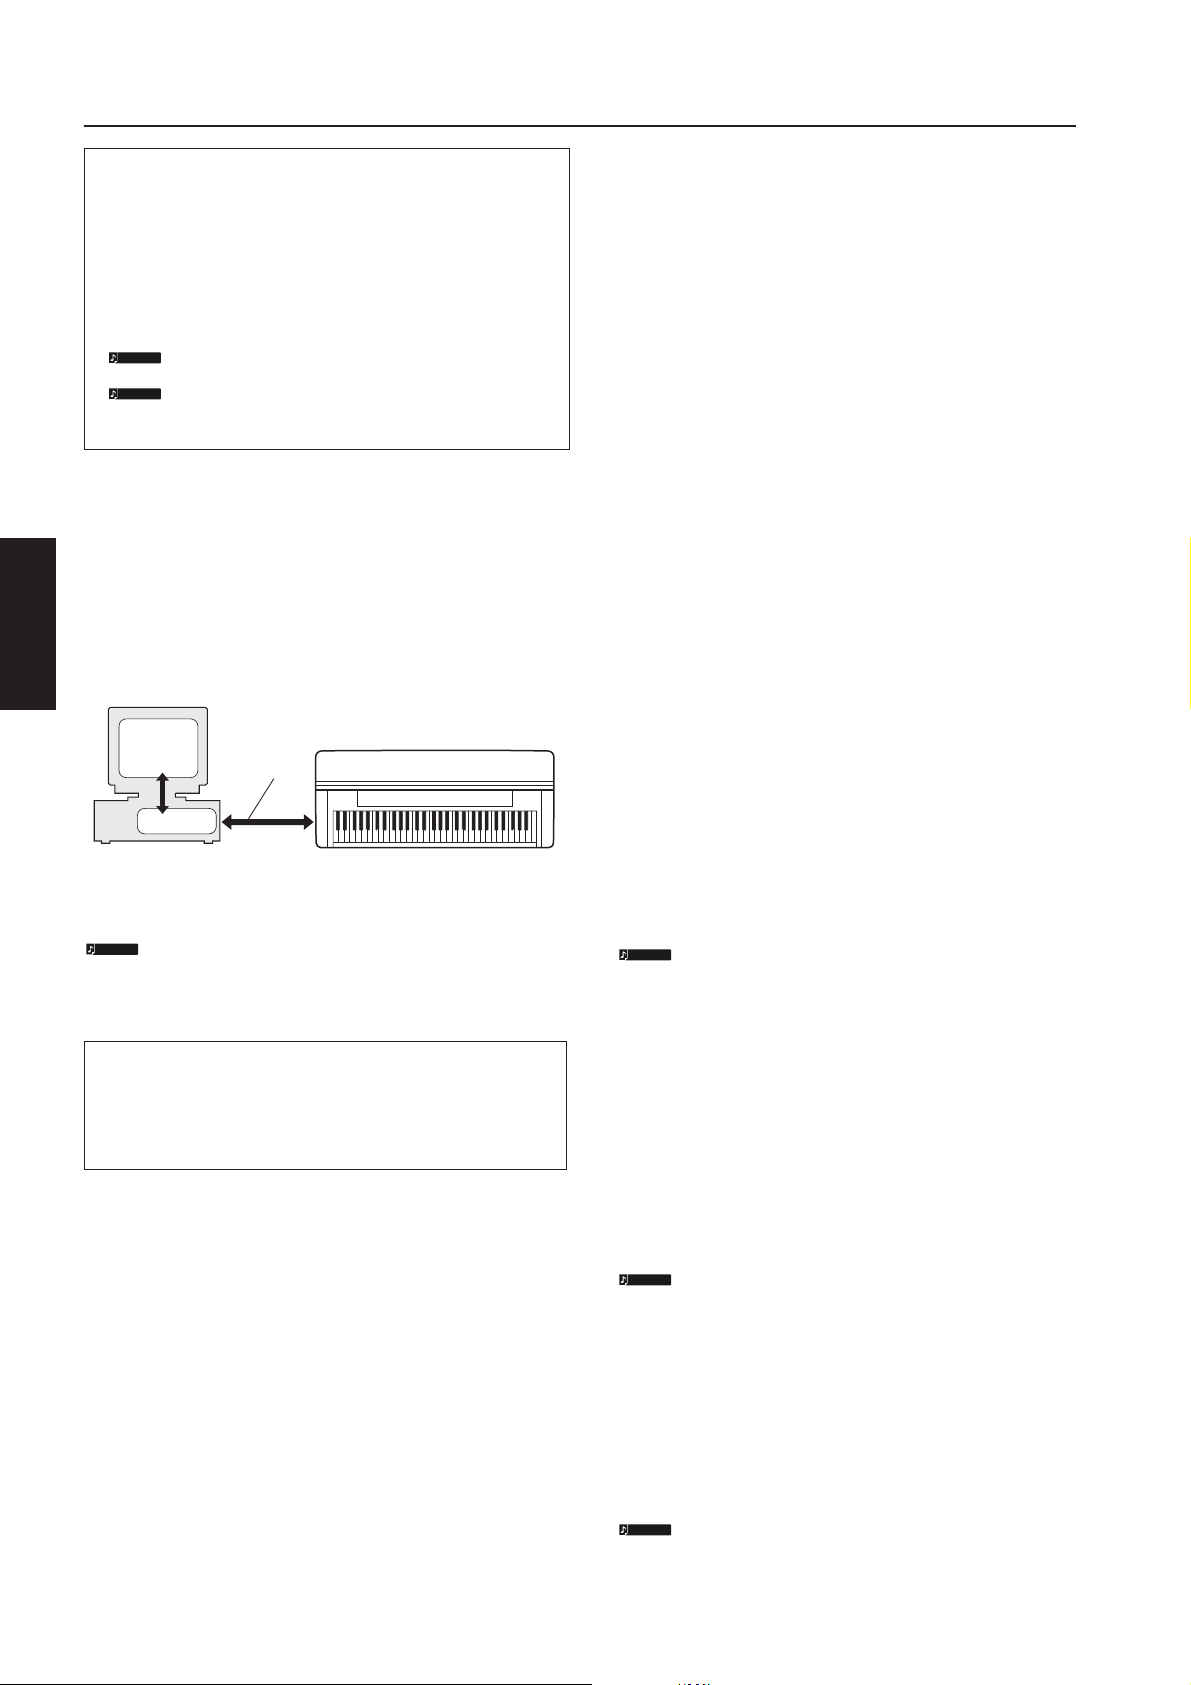
To operate the instrument from your computer via USB, you’ll
need to install the appropriate driver software.
The USB-MIDI driver is software that transfers MIDI data back and
forth between sequence software and the instrument via a USB cable.
For Windows XP: See the column at right.
For Windows 2000: See page 5.
For Windows Vista: See page 5.
n
Check the drive name of the CD-ROM drive you will be using
(D:, E:, Q:, etc.) The drive name is displayed beside the CDROM icon in your “My Computer” folder. The root directory
of the CD-ROM drive will be D:\ , E:\ , or Q:\ , respectively.
computer OS.
“How can I remove the driver?” in the “Troubleshooting”
section (page 7).
Computer
Sequence
Software
Driver
See the Yamaha Download page at the following URL for up-to-date
news on USB-MIDI driver:
http://music.yamaha.com/download/
USB cable
MIDI instrument (Clavinova, etc.)
Installing the driver on Windows XP
1 Start the computer and use the “Administrator” account
to log on to Windows XP.
2 Select [Start] → [Control Panel].
If the control panel appears as “Pick a category”, click
“Switch to Classic View” in the upper left of the window.
All control panels and icons will be displayed.
3
Go to [System] → [Hardware] → [Driver Signing
Options] and check the radio button to the left of
“Ignore” and click [OK].
4 Click the [OK] button to close System Properties, and
then click “X” in the upper right of the window to close
the Control Panel.
5 Insert the included CD-ROM into the CD-ROM drive.
The Start window will appear automatically.
6 First, make sure the POWER switch on the instrument is set
to OFF, then use a USB cable to connect the USB connector of
the computer to the USB TO HOST connector of the
instrument. When the instrument is turned on, the computer
automatically displays the “Found New Hardware Wizard.”
If the Wizard window is not displayed automatically, refer to
“Troubleshooting.”
If the system displays “Found New Hardware” in the lower right
corner, wait until “Found New Hardware Wizard” is displayed. (The
Wizard window may take a while to display on some computers.)
If the Wizard window prompts you to specify whether or not
to connect to Windows Update, select the radio button for
“No, not this time,” then click [Next].
7 Check the radio button to the left of “Install the
software automatically (Recommended).” Click [Next].
The system starts the installation.
n If during the installation the system displays “...has not passed
Windows Logo testing to verify its compatibility with Windows
XP,” click [Continue Anyway].
8 When the installation is complete, the system displays
“Completing the Found New Hardware Wizard.” Click [Finish].
(The Wizard window may take a while to display on some computers.)
4 Accessory CD-ROM for Windows Installation Guide
9 Restart the computer.
If the system displays “Found New Hardware” in the lower right
corner, wait until “System Settings Change” is displayed. (The
Wizard window may take a while to display on some computers.)
n This Wizard window will not appear when using Windows XP
Professional x64 Edition. There is no need to restart the computer.
) When using Windows XP Professional x64 Edition, the
Support Module must be installed.
After installing the USB-MIDI drivers for all the connected
USB devices, select “My Computer” from the Start menu.
Right-click the CD-ROM icon and select “Open” from the popup menu. Select “USBdrvVista_”
→ “Setup.exe” and launch “Setup.exe.” Follow the on-screen
→ “XPx64SupportModule”
directions.
n Once the Support Module is installed, this step is not necessary,
even if you’ve connected a new USB device or updated the USBMIDI driver.
The USB-MIDI driver installation is complete.
Page 5

Installing the driver on Windows 2000
Installing the driver on Windows Vista
1 Start the computer and use the “Administrator” account
to log on to Windows 2000.
2 Select [My Computer] → [Control Panel] → [System] →
[Hardware] → [Driver Signing] → [File Signature
Verification], and check the radio button to the left of
“Ignore—Install all files, regardless of file signature”
and click [OK].
3 Insert the included CD-ROM into the CD-ROM drive.
The Start window will appear automatically.
4 First, make sure the POWER switch on the instrument is set to
OFF, then use a USB cable to connect the USB connector of the
computer to the USB TO HOST connector of the instrument.
When the instrument is turned on, the computer automatically
displays the “Found New Hardware Wizard.” Click [Next].
(The Wizard window may take a while to display on some computers.)
If the Wizard window is not displayed automatically, refer to
“Troubleshooting.”
5 Check the radio button to the left of “Search for a suitable
driver for my device (Recommended).” Click [Next].
6 Check the “CD-ROM drives” box and uncheck all other
items. Click [Next].
n
The system may ask you to insert a Windows CD-ROM while it
checks for the driver. Specify the “USBdrv2k_” folder of the CDROM drive (such as D:\USBdrv2k_\) and continue the installation.
7 Click [Next].
n
If the Wizard panel informs you that “The software you are about
to install does not contain a Microsoft digital signature,” click [Yes].
8 When the installation is complete, the system displays
“Completing the Found New Hardware Wizard.” Click [Finish].
(The Wizard window may take a while to display on some computers.)
1 Start the computer and use the “Administrator” account
to log on to Windows Vista.
2 Insert the included CD-ROM into the CD-ROM drive.
The AutoPlay window will appear.
3 Click [Run Start.exe].
The Start window will appear automatically.
4 First, make sure the POWER switch on the instrument
is set to OFF, then use a USB cable to connect the USB
connector of the computer to the USB TO HOST
connector of the instrument. When the instrument is
turned on, the computer automatically displays the
“Found New Hardware” window. Click “Locate and
install driver software (recommended)”.
If the window is not displayed automatically, refer to
“Troubleshooting.” (Some computers may take a while to
display the window.)
n If the “User Account Control” window appears, click [Continue].
5 If a message allowing Windows to search online for
driver software appears, click “Don’t search online.”
6 If a message prompting you to insert the disk that came
with your device appears, click [Next].
The system starts the installation.
n If the “Windows Security” window appears, confirm this software
is authored by Yamaha Corporation then click [Install].
7 When the installation is complete, the system displays
the message “The software for this device has been
successfully installed.” Click [Close].
(Some computers may take a while to display the window.)
The USB-MIDI driver installation is complete.
English
9 Restart the computer.
The USB-MIDI driver installation is complete.
Accessory CD-ROM for Windows Installation Guide 5
Page 6

• • • • • • • • • • • • • • • • • • • • • • • • • • • • • • • • • • • • • • • • • • • • • • • • • • • • • • •
MEGAEnhancer
• • • • • • • • • • • • • • • • • • • • • • • • • • • • • • • • • • • • • • • • • • • • • • • • • • • • • • •
• • • • • • • • • • • • • • • • • • • • • • • • • • • • • • • • • • • • • • • • • • • • • • • • • • • • • • •
IMPORTANT
• Instruments not compatible with the Mega Voice feature
cannot properly play back song data created with the
MEGAEnhancer program.
• When installing MEGAEnhancer to Windows XP, 2000
or Vista, make sure to log on to the Administrator
account.
• To install MEGAEnhancer, your computer must be
connected to the Internet and be online.
Insert the included CD-ROM into the CD-ROM drive of
1
the computer.
English
The Start window appears on the screen. Each menu on the
window indicates the application or data contained in the
Accessory CD-ROM.
2 Click “MEGAEnhancer” on the Start window.
The page which explains the details about MEGAEnhancer is
displayed on the window.
3 Click “MEGAEnhancer Download” button at the bottom
of the window.
The Download page on the web is displayed. Verify that your
system meets the requirements before installing the software.
Musicsoft Downloader
IMPORTANT
• When installing Musicsoft Downloader to Windows XP,
2000 or Vista, make sure to log on to the Administrator
account.
• To install Musicsoft Downloader, your computer must be
connected to the Internet and be online.
1 Insert the included CD-ROM into the CD-ROM drive of
the computer.
The Start window appears on the screen. Each menu on the
window indicates the application or data contained in the
Accessory CD-ROM.
2 Click “Musicsoft Downloader” on the Start window.
The page which explains the details about Musicsoft
Downloader is displayed on the window.
3 Click “Musicsoft Downloader Download” button at the
bottom of the window.
The Download page on the web is displayed. Verify that your
system meets the requirements before installing the software.
n
For the instrument including this Accessory CD-ROM, you can use
only the Musicsoft Downloader as a file transfer application software.
Other applications such as File Utility and Song Filer cannot be used.
Digital Music Notebook
IMPORTANT
• When installing Digital Music Notebook to Windows XP
or Vista, make sure to log on to the Administrator account.
• To install Digital Music Notebook, your computer must be
connected to the Internet and be online.
1 Insert the included CD-ROM into the CD-ROM drive of
the computer.
The Start window appears on the screen. Each menu on the
window indicates the application or data contained in the
Accessory CD-ROM.
2 Click “DIGITAL MUSIC NOTEBOOK” on the Start window.
The page which explains the details about Digital Music
Notebook is displayed on the window.
3 Click “Digital Music Notebook Download” button at the
bottom of the window.
4 Automatically jump at the site of Digital Music
Notebook. Follow the on-screen instructions to
download the application.
IMPORTANT
Credit card settlement is required to purchase Digital Music
Notebook content. Credit card processing may not be
possible for some areas, so please check with your local
authorities to make sure that your credit card can be used.
6 Accessory CD-ROM for Windows Installation Guide
Page 7

Troubleshooting
The driver cannot be installed.
• Is the USB cable connected correctly?
→Check the USB cable connection.
→Disconnect the USB cable, then connect it again.
• Is the USB function enabled on your computer?
→When you connect the instrument to the computer for
the first time, if the “Add New Hardware Wizard” does not
appear, the USB function on the computer may be disabled.
Perform the following steps.
1 Select [Control Panel]* → [System] → [Hardware] → [Device
Manager] (for Windows XP/2000), or select [Control Panel] →
[Device Manager] (for Windows Vista).
* Classic View only in Windows XP.
2 Make sure that no “!” or “x” marks appear at “Universal serial
bus controller” or “USB Root Hub.” If you see an “!” or “x” mark,
the USB controller is disabled.
• Is any unknown device registered?
→If driver installation fails, the instrument will be marked as an
“Unknown device,” and you will not be able to install the driver.
Delete the “Unknown device” by following the steps below.
1 Select [Control Panel]* → [System] → [Hardware] → [Device
Manager] (for Windows XP/2000), or select [Control Panel] →
[Device Manager] (for Windows Vista).
* Classic View only in Windows XP.
2 Look for “Other devices” in the menu “View devices by type.”
3 If you find “Other devices,” double-click it to extend the tree to
look for “Unknown device.” If one appears, select it and click the
[Remove] button.
4 Remove the USB cable from the instrument, and make the
connection again.
5 Install the driver again. (See page 4.)
Cannot suspend or resume the computer correctly.
• Do not suspend the computer while the MIDI application is
running.
• You may not be able to suspend/resume normally, depending on the
particular environment (USB Host Controller, etc.). Even so, simply
disconnecting and connecting the USB cable will allow you to use
the instrument functions again.
How can I remove the driver?
1 Start the computer and use the “Administrator” account to
log on to Windows.
Close all applications and windows that are open.
2 Insert the included CD-ROM into the CD-ROM drive.
3 Select [Start] → [My Computer] (for Windows XP), or select
[My Computer] (for Windows 2000), or select [Start] →
[Computer] (for Windows Vista).
4 Right-click the CD-ROM icon and select “Open” from the
pop-up menu.
5 Select “USBdrvVista_” or “USBdrv2k_” folder →
“uninstall” folder → “uninstall.exe” file and launch the
“uninstall.exe.” file.
Follow the on-screen instructions to uninstall the driver.
n When using a 64-bit OS, click “uninstall_x64.exe.” from the
“USBdrvVista_” folder.
n If the “User Account Control” window appears, click [Continue].
English
When controlling the instrument from your computer via USB,
the instrument does not operate correctly or no sound is heard.
• Did you install the driver (page 4)?
• Is the USB cable connected correctly?
• Are the volume settings of the instrument, playback device, and
application program set to the appropriate levels?
• Have you selected an appropriate port in the sequence software?
• On the Clavinova, check whether the Piano Lock is engaged or
not.
• Are you using the latest USB-MIDI driver?
The latest driver can be downloaded from the web site (page 4).
Playback response is delayed.
• Does your computer satisfy the system requirements?
• Is any other application or device driver running?
Accessory CD-ROM for Windows Installation Guide 7
Page 8

Wichtige Hinweise zur CD-ROM
Datentypen
Diese CD-ROM enthält Anwendungssoftware. Anweisungen zur Installation der Software finden Sie auf Seite 4.
VORSICHT
Betriebssysteme
Die Anwendungen auf dieser CD-ROM werden in Versionen für Windows-Betriebssysteme bereitgestellt.
Verfahren zur Installation der CD-ROM
Bevor Sie das Siegel der Softwareverpackung öffnen, lesen Sie bitte die Software-Lizenzvereinbarung am Ende dieser Anleitung
sorgfältig durch.
1 Überprüfen Sie die Systemanforderungen, um sicherzustellen, dass die Software auf Ihrem Computer ausgeführt
werden kann (Seite 3).
2 Legen Sie die mitgelieferte CD-ROM in das CD-ROM-Laufwerk ein.
Deutsch
Das Startfenster sollte automatisch erscheinen. (Anwender von Windows Vista müssen nach dem Einlegen der CD-ROM auf
[Start.exe] klicken, um das Startfenster zu öffnen.)
3 Schließen Sie das Instrument an den Computer an.
Lesen Sie hierzu die Bedienungsanleitung des Instruments.
4 Installieren Sie den USB-MIDI-Treiber auf dem Computer (Seite 4).
Diese CD-ROM ist nicht zur Verwendung mit einem Audio-/Videosystem gedacht (CD-Player, DVD-Player usw.).
Verwenden Sie die Disc ausschließlich an einem Computer.
5 Installieren Sie die Software (Seite 6).
6 Starten Sie die Software.
Informationen zur weiteren Bedienung finden Sie in der Bedienungsanleitung des jeweiligen Softwareprogramms (Online-Hilfe/
Handbuch als PDF-Datei).
Falls Sie bei der Installation des Treibers Probleme haben, lesen Sie bitte im Kapitel „Fehlerbehebung“ auf Seite 7 nach.
HINWEIS
Um PDF-Dateien anzeigen zu können, müssen Sie den Adobe Reader auf Ihrem Computer installieren.
Wenn Sie den Adobe Reader noch nicht besitzen, können Sie das Programm unter der folgenden URL von der Adobe-Website herunterladen:
http://www.adobe.com
2 Accessory CD-ROM for Windows Installationshandbuch
Page 9
Inhalt der CD-ROM
Das Startfenster (siehe unten) erscheint automatisch, wenn Sie die mitgelieferte CD-ROM einlegen. (Anwender von Windows Vista müssen
nach dem Einlegen der CD-ROM auf [Start.exe] klicken, um das Startfenster zu öffnen.) Durch Anklicken des jeweiligen Eintrags im
Startfenster erreichen Sie die Seite User Registration (Anwenderregistrierung) im Internet und können aus der Vielzahl von AnwendungsSoftware auswählen und diese herunterladen.
Bezeichnung der Anwendung/
Daten
USB-MIDI-Treiber
(Windows 2000/XP)
1
USB-MIDI-Treiber
(Windows Vista/XP x64)
Flash-Demo für Internet Direct
Connection (Internet-
2
Direktverbindung)
Digital Music Notebook
3
Flash-Demo für Digital Music
Notebook
MEGAEnhancer
4
50 greats for the Piano
5
(50 Klassiker für Klavier)
Musicsoft Downloader
6
2 3 4 61 5
Ordnername Inhalt
USBdrv2k_
USBdrvVista_
IDC_FlashDemo
(Erhältlich auf der YamahaWebsite.)
DMN_FlashDemo
(Erhältlich auf der YamahaWebsite.)
SongData
(Erhältlich auf der YamahaWebsite.)
Diese Software benötigen Sie, wenn Ihr Instrument über eine USB-Verbindung
an einen Computer angeschlossen ist. Sie ermöglicht die Kommunikation und
Steuerung über MIDI zwischen dem Instrument und dem Computer.
Animierte Demo-Software, die innerhalb des Programms alle Funktionen der
Internet-Direktverbindung vorstellt.
Bitte beachten Sie, dass die Funktion Internet Direct Connection je nach
verwendetem Instrument nicht immer zur Verfügung steht.
Digital Music Notebook (Digitales Notenheft) ist eine Kombination aus einem
Musik-Lernprogramm und einem Online-Service, mit dem Sie Ihre LieblingsSongs einfach und mit Freude üben und erlernen können.
Digital Music Notebook kann auch aus dem Internet heruntergeladen werden.
Animierte Demo-Software, die innerhalb des Programms alle Funktionen von
Digital Music Notebook vorstellt.
Ermöglicht die Konvertierung herkömmlicher XG-/GM-Songdaten in
Songdaten, die für die Verwendung mit der Mega-Voice-Funktion (an einem
kompatiblen Instrument oder Klangerzeuger) optimiert sind. MEGAEnhancer
verleiht MIDI-Gitarren- und MIDI-Bassspuren Lebendigkeit sowie mehr
Realistik und stärkeren Ausdruck.
MEGAEnhancer kann auch aus dem Internet heruntergeladen werden.
Piano-Song-Dateien, die über die Song-Wiedergabefunktion des Instruments
wiedergegeben werden können.
Mithilfe einer Verbindung zwischen dem Instrument und einem Computer
ermöglicht Ihnen diese Anwendung, Songdaten direkt auf das Instrument
herunterzuladen.
Musicsoft Downloader steht auf der Yamaha-Website zum Download bereit.
Deutsch
• Zu allen oben aufgelisteten Programmen stehen Ihnen auch Online/PDF-Bedienungsanleitungen zur Verfügung.
System-Mindestanforderungen
Anwendung/Daten Betriebssystem Prozessor Arbeitsspeicher Festplatte
USB Driver for
Windows 2000/XP
USB Driver for
Windows Vista/XP x64
HINWEIS
Für die Systemanforderungen anderer Software auf der CD-ROM beachten Sie die Informationen auf der entsprechenden Download-Seite im Internet.
Die Download-Seite lässt sich aufrufen mit einem Klick in das Software-Menü im Start-Fenster und Anklicken der „Download“-Schaltfläche auf der
dann erscheinenden Seite.
Windows 2000/XP Home
Edition/XP Professional
Windows Vista/XP
Professional x64 Edition
166 MHz oder schneller; Prozessor
der Familie Intel® Pentium®/Celeron®
800 MHz oder schneller; Prozessor
der Familie Intel® Pentium®/Celeron®
oder mit Intel® 64 kompatibler Prozessor
32 MB oder mehr
(64 MB oder mehr werden
empfohlen)
512 MB oder mehr
mindestens 3 MB
freier Speicherplatz
mindestens 3 MB
freier Speicherplatz
Accessory CD-ROM for Windows Installationshandbuch 3
Page 10
Software-Installation
• • • • • • • • • • • • • • • • • • • • • • • • • • • • • • • • • • • • • • • • • • • • • • • • • • • • • • •
Deinstallieren (installierte Anwendung entfernen)
Um eine der installierten Anwendungen zu entfernen:
Wählen Sie den Befehlspfad → [START] → [Einstellungen]
→ [Systemsteuerung] → [Software] → [Programme ändern
oder entfernen], markieren Sie die zu entfernende
Anwendung, und klicken Sie auf [Entfernen…].
Befolgen Sie die Anweisungen auf dem Bildschirm zur
Deinstallation der Anwendung.
USB-MIDI-Treiber
Deutsch
Um das Instrument von einem Computer aus über USB bedienen
zu können, müssen Sie zunächst die passende Treibersoftware
(englisch: Driver) installieren.
Der USB-MIDI-Treiber ist eine Software, die über ein USB-Kabel
MIDI-Daten zwischen der Sequencer-Software und dem Instrument
überträgt.
Für Windows XP: Siehe rechte Spalte.
Für Windows 2000: Siehe Seite 5.
Für Windows Vista: Siehe Seite 5.
HINWEIS
Überprüfen Sie die Laufwerksbezeichnung (D:, E:, Q: usw.)
Ihres CD-ROM-Laufwerks, die neben dem CD-ROM-Symbol
im Ordner „Arbeitsplatz“ Ihres Computers angezeigt wird.
(Das Stammverzeichnis des CD-ROM-Laufwerks ist
beispielsweise D:\, E:\ oder Q:\ usw.)
4 Accessory CD-ROM for Windows Installationshandbuch
HINWEIS
HINWEIS
Je nach Betriebssystem können die Namen von
Schaltflächen oder Menüs anders lauten.
Anweisungen zur Deinstallation des USB-MIDI-Treibers
finden Sie unter „Wie kann ich den Treiber entfernen?“ im
Kapitel „Fehlerbehebung“ (Seite 7).
Computer
Sequenzer-
programm
Treiber
Beachten Sie die Download-Seite von Yamaha unter folgendem
URL für aktuelle Informationen zum USB-MIDI-Treiber:
http://music.yamaha.com/download/
USB-Kabel
MIDI-Instrument (Clavinova usw.)
Installieren des Treibers unter Windows XP
1 Starten Sie den Computer, und melden Sie sich mit
dem Zugang „Administrator“ bei Windows XP an.
2 Wählen Sie [Start] → [Systemsteuerung].
Falls im rechten Fenster der Systemsteuerung „Wählen Sie
eine Kategorie“ angezeigt ist, klicken Sie oben links im
Fenster auf „Zur klassischen Ansicht wechseln“. Alle
Symbole der Systemsteuerung werden angezeigt.
3
Gehen Sie zu [System] → [Hardware] →
[Treibersignaturoptionen], aktivieren Sie die Option
„Ignorieren“, und klicken Sie auf [OK].
4 Klicken Sie auf [OK], um das Fenster „Eigenschaften von
System“ zu schließen, und klicken Sie dann oben rechts
im Fenster auf die Schaltfläche „X“, um die
Systemsteuerung zu schließen.
5 Legen Sie die mitgelieferte CD-ROM in das CD-ROM-
Laufwerk ein.
Daraufhin erscheint automatisch das Startfenster.
6 Vergewissern Sie sich zunächst, dass der Netzschalter
POWER am Instrument auf OFF (Aus) gestellt ist, und
verwenden Sie dann ein USB-Kabel, um die USB-Schnittstelle
des Computers mit der Buchse USB TO HOST am Instrument
zu verbinden. Wenn das Instrument eingeschaltet wird, wird
auf dem Computer automatisch der „Assistent für das
Suchen neuer Hardware“ angezeigt.
Wenn das Assistentenfenster nicht automatisch erscheint,
lesen Sie weiter bei „Fehlerbehebung“.
Wenn das System „Neue Hardware gefunden“ in der unteren rechten
Ecke anzeigt, warten Sie, bis das entsprechende Assistentenfenster
erscheint. (Bei einigen Computern kann es eine Weile dauern, bis das
Assistentenfenster erscheint.)
Falls Sie der Assistent auffordert, anzugeben, ob eine
Verbindung zu Windows Update hergestellt werden soll,
wählen Sie die Option „Nein, diesmal nicht“, und klicken
Sie dann auf [Weiter].
7 Aktivieren Sie bitte die Option „Software automatisch
installieren (empfohlen)“. Klicken Sie auf [Weiter].
Das System beginnt mit der Installation.
HINWEIS
Falls während der Installation die Meldung „…has not
passed Windows Logo testing to verify its compatibility
with Windows XP“ (…hat den Windows-Logo-Test zur
Verifizierung seiner Kompatibilität mit Windows XP nicht
bestanden) angezeigt wird, klicken Sie auf [Continue
Anyway] (Trotzdem fortfahren).
8 Sobald die Installation erfolgreich beendet wurde, erscheint
das Fenster „Fertig stellen des Assistenten“. Klicken Sie auf
[Fertig stellen].
(Bei einigen Computern kann es eine Weile dauern, bis das
Assistentenfenster erscheint.)
9 Starten Sie den Computer neu.
Wenn das System „Neue Hardware gefunden“ in der unteren
rechten Ecke anzeigt, warten Sie, bis „System Settings
Change“ (Systemeinstellungen ändern) erscheint.
(Bei einigen Computern kann es eine Weile dauern, bis das
Assistentenfenster erscheint.)
HINWEIS
Dieses Assistentenfenster erscheint nicht, wenn Sie
Windows XP Professional x64 Edition verwenden. Es ist
nicht erforderlich, den Computer neu zu starten.
) Wenn Sie Windows XP Professional x64 Edition
verwenden, muss zunächst das Support-Modul
installiert werden.
Nach Installation der USB-MIDI-Treiber für alle
angeschlossenen USB-Geräte wählen Sie „Arbeitsplatz“ aus
dem Startmenü. Klicken Sie mit der rechten Maustaste auf
das Symbol des CD-ROM-Laufwerks und wählen Sie [Öffnen]
aus dem Aufklappmenü. Wählen Sie „USBdrvVista_“
„XPx64SupportModule“
„Setup.exe“. Folgen Sie den Anweisungen auf dem Bildschirm.
HINWEIS
Nachdem das Support-Modul installiert wurde, ist dieser
Schritt auch dann nicht mehr notwendig, wenn Sie ein
neues USB-Gerät angeschlossen oder den USB-MIDITreiber aktualisiert haben.
Die Installation des USB-MIDI-Treibers ist abgeschlossen.
→ „Setup.exe“ und starten Sie
→
Page 11

Installieren des Treibers unter Windows 2000
Installieren des Treibers unter Windows Vista
1 Starten Sie den Computer, und melden Sie sich mit dem
Zugang „Administrator“ bei Windows 2000 an.
2 Klicken Sie auf [Arbeitsplatz] → [Systemsteuerung] →
[System] → [Hardware] → [Treibersignierung] →
[Dateisignaturverifizierung], wählen Sie die Option
„Ignorieren – Alle Dateien installieren, unabhängig von
der Dateisignatur“ aus, und klicken Sie auf [OK].
3 Legen Sie die mitgelieferte CD-ROM in das CD-ROM-
Laufwerk ein.
Daraufhin erscheint automatisch das Startfenster.
4 Vergewissern Sie sich zunächst, dass der Netzschalter POWER
am Instrument auf OFF (Aus) gestellt ist, und verwenden Sie
dann ein USB-Kabel, um die USB-Schnittstelle des Computers
mit der Buchse USB TO HOST am Instrument zu verbinden.
Wenn das Instrument eingeschaltet wird, wird auf dem
Computer automatisch der „Assistent für das Suchen neuer
Hardware“ angezeigt. Klicken Sie auf [Weiter].
(Bei einigen Computern kann es eine Weile dauern, bis das
Assistentenfenster erscheint.)
Wenn das Assistentenfenster nicht automatisch erscheint,
lesen Sie weiter bei „Fehlerbehebung“.
5 Wählen Sie die Option „Nach einem passenden Treiber für
das Gerät suchen (empfohlen)“ aus. Klicken Sie auf
[Weiter].
1 Starten Sie den Computer, und melden Sie sich mit dem
Zugang „Administrator“ bei Windows Vista an.
2 Legen Sie die mitgelieferte CD-ROM in das CD-ROM-
Laufwerk ein.
Daraufhin erscheint das AutoPlay-Fenster.
3 Klicken Sie auf [Run Start.exe].
Daraufhin erscheint automatisch das Startfenster.
4 Vergewissern Sie sich zunächst, dass der Netzschalter
POWER am Instrument auf OFF (Aus) gestellt ist, und
verwenden Sie dann ein USB-Kabel, um die USBSchnittstelle des Computers mit der Buchse USB TO
HOST am Instrument zu verbinden. Wenn das
Instrument eingeschaltet wird, wird auf dem Computer
automatisch das Fenster „Assistent für das Suchen
neuer Hardware“ angezeigt. Klicken Sie auf
„Treibersoftware finden und installieren (empfohlen)“.
Wenn das Fenster nicht automatisch erscheint, lesen Sie im
Kapitel „Fehlerbehebung“ nach. (Bei einigen Computern kann
es eine Weile dauern, bis das Fenster angezeigt wird.)
HINWEIS
Wenn das Fenster „Benutzerkontensteuerung“ erscheint,
klicken Sie auf [Fortfahren]
.
5 Wenn eine Meldung erscheint, mit der Sie Windows
erlauben können, online nach Treibersoftware zu
suchen, klicken Sie auf „Nicht online suchen“.
Deutsch
6 Aktivieren Sie das Kästchen neben „CD-ROM-
Laufwerk“ und deaktivieren Sie alle anderen Kästchen.
Klicken Sie auf [Weiter].
HINWEIS
Während der Suche nach dem Treiber fordert das System
Sie möglicherweise auf, eine Windows-CD-ROM
einzulegen. Geben Sie das Verzeichnis „USBdrv2k_“ auf
dem CD-ROM-Laufwerk an (also beispielsweise
„D:\USBdrv2k_\“), und setzen Sie die Installation fort.
7 Klicken Sie auf [Weiter].
HINWEIS
Falls im Assistentenfenster die Meldung „The software you
are about to install does not contain a Microsoft digital
signature“ (Die Software, die Sie zu installieren versuchen,
enthält keine digitale Microsoft-Signatur) erscheint, klicken
Sie auf [Yes] (Ja).
8 Sobald die Installation erfolgreich beendet wurde, erscheint das
Fenster „Fertig stellen des Assistenten“. Klicken Sie auf [Fertig
stellen].
(Bei einigen Computern kann es eine Weile dauern, bis das
Assistentenfenster erscheint.)
9 Starten Sie den Computer neu.
Die Installation des USB-MIDI-Treibers ist abgeschlossen.
6 Wenn eine Meldung erscheint, die Sie auffordert, die mit
Ihrem Gerät mitgelieferte CD einzulegen, klicken Sie auf
[Weiter].
Das System beginnt mit der Installation.
HINWEIS
Wenn das Fenster „Windows-Sicherheit“ erscheint,
bestätigen Sie, dass diese Software durch die Yamaha
Corporation autorisiert wurde, und klicken Sie dann auf
[Installieren]
.
7 Nach Beendigung der Installation wird die Meldung
„Die Software für dieses Gerät wurde erfolgreich
installiert“ angezeigt. Klicken Sie auf [Schließen].
(Bei einigen Computern kann es eine Weile dauern, bis das
Fenster angezeigt wird.)
Die Installation des USB-MIDI-Treibers ist abgeschlossen.
Accessory CD-ROM for Windows Installationshandbuch 5
Page 12

• • • • • • • • • • • • • • • • • • • • • • • • • • • • • • • • • • • • • • • • • • • • • • • • • • • • • • •
MEGAEnhancer
• • • • • • • • • • • • • • • • • • • • • • • • • • • • • • • • • • • • • • • • • • • • • • • • • • • • • • •
• • • • • • • • • • • • • • • • • • • • • • • • • • • • • • • • • • • • • • • • • • • • • • • • • • • • • • •
WICHTIG
• Instrumente, die nicht mit der Mega-Voice-Funktion
kompatibel sind, können mit dem Programm
„MEGAEnhancer“ erzeugte Songdaten nicht richtig
wiedergeben.
• Achten Sie bei der Installation von MEGAEnhancer
unter Windows XP, 2000 oder Vista darauf, sich als
Administrator anzumelden.
• Für die Installation von MEGAEnhancer muss Ihr
Computer eine aktive Verbindung zum Internet haben.
Legen Sie die mitgelieferte CD-ROM in das CD-ROM-
1
Laufwerk des Computers ein.
Auf dem Bildschirm erscheint das Startfenster. Die einzelnen
Menüs in diesem Fenster stehen für die auf der Accessory
CD-ROM enthaltenen Anwendungen oder Daten.
2 Klicken Sie im Startfenster auf „MEGAEnhancer“.
Am Bildschirm wird die Seite angezeigt, auf der die
Einzelheiten zu MEGAEnhancer erläutert werden.
3 Klicken Sie im unteren Fensterbereich auf
Deutsch
„MEGAEnhancer Download“.
Es erscheint die Download-Seite im Web. Vergewissern Sie
sich, dass Ihr Betriebssystem die Anforderungen der Software
erfüllt.
Musicsoft Downloader
WICHTIG
• Achten Sie bei der Installation von Musicsoft Downloader
unter Windows XP, 2000 oder Vista darauf, sich als
Administrator anzumelden.
• Für die Installation von Musicsoft Downloader muss Ihr
Computer eine aktive Verbindung zum Internet haben.
1 Legen Sie die mitgelieferte CD-ROM in das CD-ROM-
Laufwerk des Computers ein.
Auf dem Bildschirm erscheint das Startfenster. Die einzelnen
Menüs in diesem Fenster stehen für die auf der Accessory
CD-ROM enthaltenen Anwendungen oder Daten.
2 Klicken Sie im Startfenster auf „Musicsoft Downloader“.
Am Bildschirm wird die Seite angezeigt, auf der die
Einzelheiten zu Musicsoft Downloader erläutert werden.
3 Klicken Sie unten im Fenster auf die Schaltfläche
„Musicsoft Downloader Download“.
Es erscheint die Download-Seite im Web. Vergewissern Sie
sich, dass Ihr Betriebssystem die Anforderungen der Software
erfüllt.
HINWEIS
Für das Instrument mit dieser Accessory CD-ROM können
Sie als Anwendungssoftware zur Dateiübertragung
ausschließlich Musicsoft Downloader verwenden. Andere
Anwendungen wie File Utility und Song Filer können nicht
verwendet werden.
Digital Music Notebook
WICHTIG
• Achten Sie bei der Installation von Digital Music
Notebook unter Windows XP oder Vista darauf, sich als
Administrator anzumelden.
• Für die Installation von Digital Music Notebook muss
Ihr Computer eine aktive Verbindung zum Internet
haben.
Legen Sie die mitgelieferte CD-ROM in das CD-ROM-
1
Laufwerk des Computers ein.
Auf dem Bildschirm erscheint das Startfenster. Die einzelnen
Menüs in diesem Fenster stehen für die auf der Accessory
CD-ROM enthaltenen Anwendungen oder Daten.
2 Klicken Sie im Startfenster auf „DIGITAL MUSIC
NOTEBOOK“.
Am Bildschirm wird die Seite angezeigt, auf der die
Einzelheiten zu Digital Music Notebook erläutert werden.
3 Klicken Sie im unteren Fensterbereich auf die
Schaltfläche „Digital Music Notebook Download“.
4 Automatischer Sprung auf die Website des Digital Music
Notebook. Folgen Sie den Anweisungen auf dem
Bildschirm, um das Programm herunterzuladen.
WICHTIG
Um Inhalte für Digital Music Notebook kaufen zu können,
müssen Sie eine Kreditkarte haben. Es kann sein, dass die
Verarbeitung von Kreditkarten in einigen Regionen nicht
möglich ist. Erkundigen Sie sich daher bitte bei Ihrer dafür
zuständigen Behörde, um sich zu vergewissern, dass Ihre
Kreditkarte verwendet werden kann.
6 Accessory CD-ROM for Windows Installationshandbuch
Page 13

Fehlerbehebung
Der Treiber lässt sich nicht installieren.
• Ist das USB-Kabel richtig angeschlossen?
→Überprüfen Sie die USB-Kabelverbindung.
→Ziehen Sie das USB-Kabel ab und stecken Sie es wieder an.
• Wurde die USB-Funktion auf Ihrem Computer aktiviert?
→Falls beim erstmaligen Anschließen des Instruments an
den Computer der Hardware-Assistent nicht angezeigt
wird, ist auf dem Computer die USB-Funktion
möglicherweise nicht aktiviert. Führen Sie die folgenden
Schritte durch.
1 Wählen Sie [Systemsteuerung]* → [System] → [Hardware] →
[Gerätemanager] (bei Windows XP/2000), oder wählen Sie
[Systemsteuerung] → [Gerätemanager] (bei Windows Vista).
* Klassische Ansicht nur unter Windows XP.
2 Vergewissern Sie sich, dass neben „Universeller serieller Bus
Controller“ oder „USB Root Hub“ keine der Markierungen „!“
oder „x“ angezeigt wird. Falls dort ein solches Zeichen zu sehen
ist, ist der USB-Controller nicht aktiviert.
• Wurde ein unbekanntes Gerät registriert?
→Falls die Treiberinstallation fehlschlägt, wird das Instrument
als „Unbekanntes Gerät“ registriert, und Sie können den
Treiber nicht installieren. Führen Sie die folgenden Schritte
durch, um das „unbekannte Gerät“ zu löschen.
1 Wählen Sie [Systemsteuerung]* → [System] → [Hardware] →
[Gerätemanager] (bei Windows XP/2000), oder wählen Sie
[Systemsteuerung] → [Gerätemanager] (bei Windows Vista).
* Klassische Ansicht nur unter Windows XP.
2 Wählen Sie die Option „Modelle nach Typ anzeigen“ aus, und
suchen Sie nach „anderen Geräten“.
3 Wenn Sie einen Eintrag bei „Andere Geräte“ finden, öffnen Sie
dessen Baumstruktur, indem Sie darauf doppelklicken, und
suchen Sie dort nach einem „unbekannten Gerät“. Falls Sie eines
finden, markieren Sie es, und klicken auf die Schaltfläche
[Entfernen].
4 Ziehen Sie das USB-Kabel vom Instrument ab, und stecken Sie es
gleich wieder ein.
5 Installieren Sie den Treiber erneut. (Siehe Seite 4.)
Der Standby-Modus des Rechners lässt sich nicht richtig
aktivieren bzw. beenden.
• Versetzen Sie den Computer nicht in den Ruhezustand, während
das MIDI-Programm läuft.
• Sie können je nach Systemkonfiguration (USB Host Controller
usw.) den Computer eventuell nicht wie gewohnt in den
Ruhezustand versetzen. Dennoch sollte ein simples Abziehen und
Wiederanschließen des USB-Kabels dazu führen, dass Sie das
Instrument wieder steuern können.
Wie kann ich den Treiber entfernen?
1 Starten Sie den Computer, und melden Sie sich mit dem
Zugang „Administrator“ bei Windows an.
Schließen Sie sämtliche geöffneten Anwendungen und
Fenster.
2 Legen Sie die mitgelieferte CD-ROM in das CD-ROM-
Laufwerk ein.
3 Wählen Sie [Start] → [Arbeitsplatz] (bei Windows XP),
oder wählen Sie [Arbeitsplatz] (bei Windows 2000), oder
wählen Sie [Start] → [Computer] (bei Windows Vista).
4 Klicken Sie mit der rechten Maustaste auf das Symbol des
CD-ROM-Laufwerks, und wählen Sie [Öffnen] aus dem
Popup-Menü.
5 Wählen Sie den Ordner „USBdrvVista_“ oder „USBdrv2k_“
→ Ordner „uninstall“ → Datei „uninstall.exe“, und starten
Sie die Datei „uninstall.exe“.
Folgen Sie den Anweisungen auf dem Bildschirm, um den
Treiber zu deinstallieren.
HINWEIS
Wenn Sie ein 64-Bit-Betriebssystem verwenden, klicken Sie
im Ordner „USBdrvVista_“ auf „uninstall_x64.exe“
HINWEIS
Wenn das Fenster „Benutzerkontensteuerung“ erscheint,
klicken Sie auf [Fortfahren]
.
.
Deutsch
Wenn das Instrument vom Computer aus über USB bedient
wird, funktioniert es nicht richtig oder erzeugt keinen Ton.
• Wurde der Treiber installiert (Seite 4)?
• Ist das USB-Kabel richtig angeschlossen?
• Sind die Lautstärkeeinstellungen des Instruments, des
Wiedergabegeräts und der Anwendungssoftware auf geeignete
Werte gestellt?
• Wurde im Sequenzerprogramm der richtige Port ausgewählt?
• Überprüfen Sie, ob die Klavier-Verriegelungsfunktion des
Clavinova (Piano Lock) aktiviert ist.
• Benutzen Sie den aktuellen USB-MIDI-Treiber?
Der neueste Treiber kann von der Website heruntergeladen
werden (Seite 4).
Die Wiedergabe erfolgt verzögert.
• Erfüllt Ihr Computer die Systemanforderungen?
• Werden gleichzeitig andere Anwendungen oder Gerätetreiber
ausgeführt?
Accessory CD-ROM for Windows Installationshandbuch 7
Page 14

Remarques importantes à propos du CD-ROM
Types de données
Ce CD-ROM contient des logiciels d'application. Pour obtenir des instructions relatives à l'installation des logiciels, reportez-vous à la
page 4.
ATTENTION
Ce CD-ROM n'est pas destiné à être utilisé sur un système audio/visuel (lecteur de CD ou de DVD, etc.). N'essayez donc
pas de l'insérer dans un équipement autre qu'un ordinateur.
Système d'exploitation
Les applications de ce CD-ROM sont proposées dans des versions compatibles avec les systèmes d'exploitation Windows.
Procédure d'installation du CD-ROM
Avant d'ouvrir l'emballage scellé du logiciel, lisez attentivement le contrat de licence de logiciel disponible à la fin de ce manuel.
1 Vérifiez la configuration du système afin d'être certain de pouvoir utiliser le logiciel sur votre ordinateur (page 3).
2 Insérez le CD-ROM inclus dans le lecteur de CD-ROM.
La fenêtre de démarrage apparaît automatiquement. (Les utilisateurs de Windows Vista doivent cliquer sur [Start.exe] pour ouvrir la
fenêtre de démarrage après l'insertion du CD-ROM.)
3 Connectez l'instrument à l'ordinateur.
Consultez le mode d'emploi de l'instrument.
4 Installez le pilote USB-MIDI sur l'ordinateur (page 4).
Français
5 Installez le logiciel (page 6).
6 Démarrez le logiciel.
Pour toute opération ultérieure, reportez-vous au mode d'emploi des différents logiciels (aide en ligne/manuel PDF).
En cas de problème d'installation du pilote, reportez-vous à la section « Résolution des problèmes » à la page 7.
n Pour lire les fichiers PDF, vous devez d'abord installer le logiciel Adobe Reader sur votre ordinateur.
Si vous ne disposez pas d'Acrobat Reader, vous pourrez le télécharger depuis le site Web d'Adobe à l'adresse suivante :
http://www.adobe.com
2 Accessory CD-ROM for Windows Manuel d'installation
Page 15

Contenu du CD-ROM
La fenêtre de démarrage illustrée ci-dessous s'ouvre automatiquement lorsque vous insérez le CD-ROM fourni. (Les utilisateurs de Windows
Vista doivent cliquer sur [Start.exe] pour ouvrir la fenêtre de démarrage après l'insertion du CD-ROM.) En cliquant sur les différents menus
de la fenêtre de démarrage, vous pouvez accéder à la page User Registration du site Internet et télécharger une partie des nombreux logiciels
disponibles.
2 3 4 61 5
Nom de l'application/des données Nom du dossier Contenu
Pilote USB-MIDI
(Windows 2000/XP)
1
Pilote USB-MIDI
(Windows Vista/XP x64)
Internet Direct Connection Flash Demo IDC_FlashDemo
2
Digital Music Notebook
3
Digital Music Notebook Flash Demo DMN_FlashDemo
MEGAEnhancer
4
50 greats for the Piano SongData
5
Musicsoft Downloader
6
• Toutes les applications citées ci-dessus sont fournies avec des manuels PDF/en ligne.
USBdrv2k_
USBdrvVista_
(Disponible sur le site Web
de Yamaha)
(Disponible sur le site Web
de Yamaha)
(Disponible sur le site Web
de Yamaha)
Ce logiciel est indispensable lorsque vous utilisez l'instrument avec un
ordinateur via une connexion USB. Il permet de communiquer via le protocole
MIDI et autorise le contrôle entre l'instrument et l'ordinateur.
Logiciel de démonstration complet qui présente toutes les fonctionnalités
d'Internet Direct Connection en vous plongeant au cœur du programme.
Selon l'instrument utilisé, il est possible que la fonction Internet Direct
Connection ne soit pas disponible.
Digital Music Notebook combine un programme d'apprentissage de la musique
et un service en ligne qui rend la pratique et la maîtrise de vos morceaux
préférés à la fois simples et amusantes.
Vous pouvez télécharger Digital Music Notebook à partir d'Internet.
Logiciel de démonstration complet qui présente toutes les fonctionnalités de
Digital Music Notebook en vous plongeant au coeur du programme.
Permet la conversion des données de morceau XG/GM conventionnelles en
données de morceau optimisées pour être utilisées avec la fonctionnalité Mega
Voice (sur un instrument compatible ou un générateur de sons).
MEGAEnhancer donne vie aux pistes de basse et de guitare MIDI pour plus de
réalisme et d'expression.
Vous pouvez télécharger MEGAEnhancer à partir d'Internet.
Fichiers de morceaux de piano pouvant être reproduits à l'aide de la fonction de
reproduction de morceau de l'instrument.
Grâce à une connexion entre l'instrument et un ordinateur, cette application
vous permet de télécharger directement des données de morceau sur
l'instrument.
Vous pouvez télécharger Musicsoft Downloader à partir d'Internet.
Français
Configuration minimale requise
Application/Données Système d'exploitation Processeur Mémoire Disque dur
Pilote USB pour
Windows 2000/XP
Pilote USB pour
Windows Vista/XP x64
n Pour connaître la configuration minimale requise pour les autres logiciels disponibles sur le CD-ROM, reportez-vous à la page de téléchargement
correspondante du site web. Vous pouvez afficher la page de téléchargement en cliquant sur le menu des logiciels dans la fenêtre de démarrage, puis sur le
bouton « download » sur la page suivante.
Windows 2000/XP Edition
familiale/XP Edition
professionnelle
Windows Vista/XP Edition
professionnelle x64
166 MHz ou supérieur ; processeurs
Intel® Pentium® ou Celeron®
800 MHz ou supérieur ; processeurs
Intel® Pentium®/Celeron® ou
compatibles Intel® 64
32 Mo minimum (64 Mo ou
plus sont recommandés)
512 Mo ou plus
3 Mo minimum d'espace
libre
3 Mo minimum d'espace
libre
Accessory CD-ROM for Windows Manuel d'installation 3
Page 16

Installation des logiciels
• • • • • • • • • • • • • • • • • • • • • • • • • • • • • • • • • • • • • • • • • • • • • • • • • • • • • • •
Français
Désinstallation
(suppression de l'application installée)
Pour supprimer un logiciel installé :
Sélectionnez [Démarrer] → [Paramètres] → [Panneau de
configuration] → [Ajout/Suppression de programmes]
→ [Installer/Désinstaller], puis choisissez l'application à
supprimer et cliquez sur [Ajouter/Supprimer...].
Suivez les instructions qui apparaissent à l'écran pour
désinstaller le logiciel.
n Les noms de touche ou de menu peuvent différer légèrement
selon le système d'exploitation de votre ordinateur.
n Pour obtenir des instructions sur la désinstallation et
la configuration du pilote USB-MIDI, reportez-vous au
paragraphe « Comment supprimer le pilote » de la section
« Résolution des problèmes » (page 7).
USB-MIDI Driver
Pour utiliser l'instrument à partir de votre ordinateur via un câble
USB, vous devez installer le pilote approprié.
USB-MIDI Driver est un logiciel qui permet le transfert de données
MIDI entre le logiciel de séquençage et l'instrument via un câble USB.
Ordinateur
Logiciel de
séquençage
Pilote
Câble USB
Instrument MIDI (Clavinova, etc.)
Pour Windows XP : voir la colonne de droite.
Pour Windows 2000 : voir page 5.
Pour Windows Vista : voir page 5.
Pour obtenir les toutes dernières informations sur le logiciel USB-
n
MIDI Driver, consultez la page Download du site web de Yamaha à
l'adresse suivante:
http://music.yamaha.com/download/
Vérifiez le nom du lecteur de CD-ROM (D:, E:, Q:, etc.), qui
apparaît à côté de l'icône du CD-ROM dans le dossier « Poste
de travail ». Le répertoire racine du lecteur de CD-ROM sera,
respectivement, D:\, E:\ ou Q:\.
4 Accessory CD-ROM for Windows Manuel d'installation
Installation du pilote sous Windows XP
1 Démarrez l'ordinateur et utilisez le compte
« Administrateur » pour ouvrir une session Windows XP.
2 Sélectionnez [Démarrer] → [Panneau de configuration].
Si le panneau de configuration affiche « Sélectionner une
catégorie », vous cliquerez sur « Basculer vers l'affichage
classique » dans le coin supérieur gauche de la fenêtre.
Tous les panneaux de configuration et les icônes s'affichent.
3
Allez dans [Système] → [Matériel] → [Signature du
pilote] et cochez la case à gauche de « Ignorer », puis
cliquez sur [OK].
4 Cliquez sur le bouton [OK] pour fermer la boîte de
dialogue « Propriétés système », puis cliquez sur « X »,
dans le coin supérieur droit de la fenêtre, afin de fermer
le panneau de configuration.
5 Insérez le CD-ROM fourni dans le lecteur.
La fenêtre de démarrage apparaît automatiquement.
6 Vérifiez que le commutateur POWER de l'instrument est
réglé sur OFF et raccordez le connecteur USB de l'ordinateur
au connecteur USB TO HOST de l'instrument à l'aide d'un
câble USB. Lorsque l'instrument est sous tension,
l'ordinateur affiche automatiquement l'Assistant Ajout de
nouveau matériel détecté.
Si la fenêtre de l'Assistant n'apparaît pas automatiquement,
reportez-vous à la section « Résolution des problèmes ».
Si le système affiche « Nouveau matériel détecté » dans le coin
inférieur droit, attendez que l'Assistant Ajout de nouveau matériel
détecté apparaisse. (Sur certains ordinateurs, l'affichage de la fenêtre
de l'Assistant peut prendre un certain temps.)
Si la fenêtre de l'Assistant vous invite à préciser si vous voulez
ou non vous connecter à Windows Update, sélectionnez
l'option « Non, pas cette fois », puis cliquez sur [Suivant].
7 Cochez la case à gauche de « Installer le logiciel
automatiquement (recommandé) ». Cliquez sur
[Suivant]. Le système lance l'installation.
n Si, en cours d'installation, le système affiche le message « ...n'a pas
été validé lors du test permettant d'obtenir le logo Windows et
vérifiant sa compatibilité avec Windows XP », cliquez sur
[Continuer].
8 Lorsque l'installation est terminée, l'ordinateur affiche le
message « Fin de l'assistant Ajout de nouveau matériel détecté ».
Cliquez sur [Terminer].
(Sur certains ordinateurs, l'affichage de la fenêtre de
l'Assistant peut prendre un certain temps.)
9 Redémarrez l'ordinateur.
Si le système affiche « Nouveau matériel détecté » dans le coin
inférieur droit, attendez que « Modification des paramètres
système » s'affiche. (Sur certains ordinateurs, l'affichage de la
fenêtre de l'Assistant peut prendre un certain temps.)
n Cette fenêtre de l'Assistant ne s'affiche pas sous Windows XP
Edition professionnelle x64. Il n'est pas nécessaire de redémarrer
l'ordinateur.
) Pour utiliser Windows XP Edition professionnelle x64,
il est nécessaire d'avoir préalablement installé Support
Module.
Après l'installation des pilotes USB-MIDI des périphériques
USB connectés, sélectionnez « Poste de travail » dans le menu
Démarrer. Cliquez avec le bouton droit sur l'icône du CD-ROM
et sélectionnez « Ouvrir » dans le menu déroulant.
Sélectionnez « USBdrvVista_ »
→ « Setup.exe » et lancez « Setup.exe. ». Suivez les instructions
qui s'affichent à l'écran.
n Une fois que le logiciel Support Module est installé, cette étape
n'est plus nécessaire, même en cas de connexion d'un nouveau
périphérique USB ou de la mise à jour du pilote USB-MIDI.
L'installation du pilote USB-MIDI est terminée.
→ « XPx64SupportModule »
Page 17

Installation du pilote sous Windows 2000
Installation du pilote sous Windows Vista
1 Démarrez l'ordinateur et utilisez le compte
« Administrateur » pour ouvrir une session
Windows 2000.
2 Sélectionnez [Poste de travail] → [Panneau de
configuration] → [Système] → [Matériel] → [Signature
du pilote] → [Vérification des signatures de fichiers] et
cochez la case d'option à gauche de « Ignorer : installer
tous les fichiers, quelles que soient leurs signatures »,
puis cliquez sur [OK].
3 Insérez le CD-ROM fourni dans le lecteur.
La fenêtre de démarrage apparaît automatiquement.
4 Vérifiez que le commutateur POWER de l'instrument est réglé
sur OFF et raccordez le connecteur USB de l'ordinateur au
connecteur USB TO HOST de l'instrument à l'aide d'un câble
USB. Lorsque l'instrument est sous tension, l'ordinateur
affiche automatiquement l'Assistant Ajout de nouveau matériel
détecté. Cliquez sur [Suivant].
(Sur certains ordinateurs, l'affichage de la fenêtre de
l'Assistant peut prendre un certain temps.)
Si la fenêtre de l'Assistant n'apparaît pas automatiquement,
reportez-vous à la section « Résolution des problèmes ».
5 Cochez la case d'option à gauche de « Rechercher un pilote
approprié pour mon périphérique (recommandé) ».
Cliquez sur [Suivant].
1 Démarrez l'ordinateur et utilisez le compte
« Administrateur » pour ouvrir une session
Windows Vista.
2 Insérez le CD-ROM fourni dans le lecteur.
La fenêtre AutoPlay s'ouvre.
3 Cliquez sur [Run Start.exe].
La fenêtre de démarrage apparaît automatiquement.
4 Vérifiez d'abord que le commutateur POWER de
l'instrument est réglé sur OFF et raccordez le connecteur
USB de l'ordinateur au connecteur USB TO HOST de
l'instrument à l'aide d'un câble USB. Lorsque
l'instrument est sous tension, l'ordinateur affiche
automatiquement la fenêtre « Ajout de nouveau matériel
détecté ». Cliquez sur « Localiser et installer le logiciel
automatiquement (recommandé) ».
Si la fenêtre de l'Assistant n'apparaît pas automatiquement,
reportez-vous à la section « Résolution des problèmes ».
(Sur certains ordinateurs, l'affichage de cette fenêtre peut
prendre un certain temps.)
n Si la fenêtre « Contrôle de compte utilisateur » apparaît, vous
cliquerez sur [Continuer].
5 Si un message autorisant Windows à effectuer une
recherche en ligne du pilote apparaît, cliquez sur
« Ne pas rechercher en ligne ».
6 Cochez la case « Lecteurs de CD-ROM » et décochez tous
les autres éléments. Cliquez sur [Suivant].
n
Le système peut vous demander d'insérer un CD-ROM Windows
tandis qu'il recherche le pilote. Sélectionnez le dossier
« USBdrv2k_ » du lecteur de CD-ROM (par exemple,
D:\USBdrv2k_\) et poursuivez l'installation.
7 Cliquez sur [Suivant].
n
Si l'Assistant vous informe que « Le logiciel que vous êtes sur le
point d'installer ne contient pas de signature numérique
Microsoft », cliquez sur [Oui].
8 Lorsque l'installation est terminée, l'ordinateur affiche le
message « Fin de l'assistant Ajout de nouveau matériel détecté ».
Cliquez sur [Terminer].
(Sur certains ordinateurs, l'affichage de la fenêtre de
l'Assistant peut prendre un certain temps.)
9 Redémarrez l'ordinateur.
L'installation du pilote USB-MIDI est terminée.
6 Si un message vous invitant à insérer le disque fourni
avec le périphérique s'affiche, cliquez sur [Suivant].
Le système lance l'installation.
n Si la fenêtre « Sécurité de Windows » apparaît, vous vérifierez que
l'éditeur du logiciel est Yamaha Corporation puis cliquerez sur
[Installer].
7 Lorsque l'installation est terminée, le système affiche
le message « The software for this device has been
successfully installed » vous indiquant que l'installation
du logiciel de ce périphérique a réussi. Cliquez sur
[Fermer].
(Sur certains ordinateurs, l'affichage de cette fenêtre peut
prendre un certain temps.)
L'installation du pilote USB-MIDI est terminée.
Français
Accessory CD-ROM for Windows Manuel d'installation 5
Page 18

• • • • • • • • • • • • • • • • • • • • • • • • • • • • • • • • • • • • • • • • • • • • • • • • • • • • • • •
MEGAEnhancer
• • • • • • • • • • • • • • • • • • • • • • • • • • • • • • • • • • • • • • • • • • • • • • • • • • • • • • •
• • • • • • • • • • • • • • • • • • • • • • • • • • • • • • • • • • • • • • • • • • • • • • • • • • • • • • •
IMPORTANT
• Les instruments non compatibles avec la fonctionnalité
Mega Voice ne peuvent reproduire correctement les
données de morceau créées avec le programme
MEGAEnhancer.
• Lors de l'installation de MEGAEnhancer sous
Windows XP, 2000 ou Vista, prenez soin d'ouvrir
une session avec le compte « Administrateur ».
• L'installation de MEGAEnhancer nécessite que
l'ordinateur soit connecté à Internet et en ligne.
Insérez le CD-ROM fourni dans le lecteur de CD-ROM
1
de votre ordinateur.
La fenêtre de démarrage s'affiche. Chaque menu de la fenêtre
indique l'application ou les données présentes sur le CD-ROM
Accessory.
2 Dans la fenêtre de démarrage, cliquez sur
« MEGAEnhancer ».
La page d'information de MEGAEnhancer s'affiche.
3 Cliquez sur le bouton «MEGAEnhancer Download »
(Télécharger MEGAEnhancer) en bas de la fenêtre.
La page Download du site web s'affiche. Vérifiez que votre
système est conforme à la configuration minimale requise
avant d'installer le logiciel.
Musicsoft Downloader
IMPORTANT
• Lors de l'installation de Musicsoft Downloader sous
Windows XP, 2000 ou Vista, prenez soin d'ouvrir une
session avec le compte «
• L'installation de Musicsoft Downloader nécessite que
l'ordinateur soit connecté à Internet et en ligne.
1 Insérez le CD-ROM fourni dans le lecteur de CD-ROM
de votre ordinateur.
La fenêtre de démarrage s'affiche. Chaque menu de la fenêtre
indique l'application ou les données présentes sur le CD-ROM
Accessory.
2 Dans la fenêtre de démarrage, cliquez sur « Musicsoft
Downloader ».
La page d'information de Musicsoft Downloader s'affiche.
3 Cliquez sur le bouton «Musicsoft Downloader
Download » (Télécharger Musicsoft Downloader) en bas
de la fenêtre.
La page Download du site web s'affiche. Vérifiez que votre
système est conforme à la configuration minimale requise
avant d'installer le logiciel.
n
Dans le cas de l'instrument avec lequel est fourni ce CD-ROM
Accessory, Musicsoft Downloader est le seul logiciel d'application
de transfert de fichiers valide. Il est impossible d'utiliser d'autres
applications telles que File Utility ou Song Filer.
Administrateur
».
Français
Digital Music Notebook
IMPORTANT
• Lors de l'installation de Digital Music Notebook sous
Windows XP ou Vista, veillez à vous connecter au compte
«
Administrateur
• Pour pouvoir installer Digital Music Notebook, votre
ordinateur doit être connecté à Internet et en ligne.
Insérez le CD-ROM fourni dans le lecteur de CD-ROM
1
de votre ordinateur.
La fenêtre de démarrage s'affiche. Chaque menu de la fenêtre
indique l'application ou les données présentes sur le CD-ROM
Accessory.
2 Dans la fenêtre de démarrage, cliquez sur
« DIGITAL MUSIC NOTEBOOK ».
La page d'information de Digital Music Notebook s'affiche.
3 Cliquez sur le bouton « Digital Music Notebook
Download » (Télécharger Digital Music Notebook) en
bas de la fenêtre.
4 Vous accédez automatique au site de Digital Music
Notebook. Suivez les instructions à l'écran pour
télécharger l'application.
IMPORTANT
Une carte de crédit est requise pour l'achat du logiciel
Digital Music Notebook. Il est possible que le traitement
des cartes de crédit ne soit pas admis dans certaines
régions. Veuillez dès lors vérifier avec les autorités locales
si vous pouvez utiliser votre carte.
».
6 Accessory CD-ROM for Windows Manuel d'installation
Page 19

Résolution des problèmes
Installation du pilote impossible.
• Le câble USB est-il raccordé correctement ?
→Vérifiez la connexion du câble USB.
→Déconnectez le câble USB, puis rebranchez-le.
• La fonction USB est-elle activée sur votre ordinateur ?
→Si la fenêtre « Assistant Ajout de nouveau matériel »
n'apparaît pas lorsque vous connectez l'instrument à
l'ordinateur pour la première fois, il est possible que la
fonction USB de l'ordinateur soit désactivée. Procédez
comme suit.
1 Sélectionnez [Panneau de configuration]* → [Système] →
[Matériel] → [Gestionnaire de périphériques] (sous Windows
XP/2000) ou sélectionnez [Panneau de configuration] →
[Gestionnaire de périphériques] (sous Windows Vista).
* Affichage classique uniquement sous Windows XP.
2 Assurez-vous qu'aucun symbole « ! » ou « x » n'apparaît à côté
de « Contrôleur de bus USB » ou « Concentrateur USB racine ».
Si l'un de ces symboles apparaît, cela signifie que le contrôleur
USB est désactivé.
• Des périphériques inconnus sont-ils enregistrés ?
→Si l'installation du pilote échoue, l'instrument sera considéré
comme un « Périphérique inconnu » et vous ne parviendrez pas à
installer le pilote. Supprimez le « périphérique inconnu » en
procédant de la manière suivante.
1 Sélectionnez [Panneau de configuration]* → [Système] →
[Matériel] → [Gestionnaire de périphériques] (sous Windows XP/
2000) ou sélectionnez [Panneau de configuration] →
[Gestionnaire de périphériques] (sous Windows Vista).
* Affichage classique uniquement sous Windows XP.
2 Recherchez « Autres périphériques » dans le menu « Affichage »
sous « Périphériques par type ».
3 Si vous trouvez « Autres périphériques », double-cliquez dessus
pour développer l'arborescence et rechercher « Périphérique
inconnu ». S'il en existe un, sélectionnez-le et cliquez sur le
bouton [Supprimer].
4 Retirez le câble USB de l'instrument et rebranchez-le.
5 Réinstallez le pilote. (Voir page 4.)
Impossible d'arrêter ou de relancer l'ordinateur correctement.
• N'interrompez pas l'ordinateur lorsque l'application MIDI est en
cours d'exécution.
• Il est possible que vous ne puissiez pas arrêter/redémarrer
normalement, en fonction de votre environnement spécifique
(contrôleur d'hôte USB, etc.). Même dans ce cas, le simple fait de
déconnecter et de rebrancher le câble USB vous permettra d'utiliser
à nouveau les fonctions de l'instrument.
Comment faire pour supprimer le pilote ?
1 Démarrez l'ordinateur et utilisez le compte
« Administrateur » pour ouvrir une session Windows.
Fermez toutes les applications et les fenêtres ouvertes.
2 Insérez le CD-ROM fourni dans le lecteur.
3 Sélectionnez [Démarrer] → [Poste de travail]
(sous Windows XP) ou sélectionnez [Poste de travail]
(sous Windows 2000) ou sélectionnez [Démarrer] →
[Ordinateur] (sous Windows Vista).
4 Cliquez avec le bouton droit sur l'icône du CD-ROM et
sélectionnez « Ouvrir » dans le menu déroulant.
5 Sélectionnez le dossier « USBdrvVista_ » ou « USBdrv2k_ »
→ dossier « uninstall » → fichier « uninstall.exe » et lancez
le fichier « uninstall.exe ».
Suivez les instructions à l'écran pour désinstaller le pilote.
n Si vous utilisez un système d'exploitation à 64 bits, vous devrez
cliquer sur « uninstall_x64.exe » dans le dossier « USBdrvVista_ ».
n Si la fenêtre « Contrôle de compte d'utilisateur » apparaît, vous
cliquerez sur [Continuer].
Français
Lorsque vous contrôlez l'instrument depuis votre ordinateur
via USB, il ne fonctionne pas correctement ou aucun son n'est
audible.
• Avez-vous installé le pilote (page 4) ?
• Le câble USB est-il raccordé correctement ?
• Les volumes de l'instrument, du périphérique de reproduction et
du programme d'application sont-ils réglés sur des niveaux
appropriés ?
• Avez-vous sélectionné un port approprié dans le logiciel
séquenceur ?
• Sur le Clavinova, vérifiez si la fonction Piano Lock (Verrouillage
du piano) est activée ou non.
• Utilisez-vous la version la plus récente du pilote USB-MIDI ?
Vous pouvez télécharger la dernière version du pilote à partir
du site Web (page 4).
Réponse de reproduction décalée.
• Votre ordinateur respecte-t-il la configuration minimale requise ?
• Une autre application ou un pilote de périphérique sont-ils en
cours d'exécution ?
Accessory CD-ROM for Windows Manuel d'installation 7
Page 20

Avisos importantes sobre el CD-ROM
Tipos de datos
Este CD-ROM incluye software de aplicación. Consulte las instrucciones de instalación del software en la página 4.
ATENCIÓN
Este CD-ROM no se ha diseñado para utilizarlo en sistemas audiovisuales (reproductores de CD, reproductores de DVD, etc.).
No intente nunca reproducir el disco en un equipo que no sea el ordenador.
Sistema operativo
Las aplicaciones de este CD-ROM se suministran en versiones para sistemas operativos Windows.
Procedimiento de instalación del CD-ROM
Antes de romper el precinto del paquete de software, lea detenidamente el contrato de licencia de software que encontrará al final de
esta guía.
1 Compruebe los requisitos del sistema para asegurarse de que el software funcionará en su ordenador (página 3).
2 Inserte el CD-ROM en la unidad de CD-ROM.
La ventana Inicio debe aparecer de forma automática. (Los usuarios de Windows Vista tendrán que hacer clic en [Start.exe] para
abrir la ventana Inicio después de insertar el CD-ROM.)
3 Conecte el instrumento al ordenador.
Consulte el manual de instrucciones del instrumento.
4 Instale el controlador MIDI USB en el ordenador (página 4).
Español
5 Instale el software (página 6).
6 Inicie el software.
Para los pasos siguientes, consulte el manual de instrucciones de cada programa de software (ayuda en línea y manual en formato PDF).
Si tiene problemas para instalar el controlador, consulte la sección “Solución de problemas” en la página 7.
NOTA
Para ver los archivos PDF, deberá instalar Adobe Reader en el ordenador.
Si no dispone de Adobe Reader, puede descargar la aplicación en el sitio web de Adobe en la siguiente URL:
http://www.adobe.com
2 Accessory CD-ROM for Windows Guía de instalación
Page 21

Contenido del CD-ROM
La ventana de inicio, como se muestra a continuación, aparecerá automáticamente al insertar el CD-ROM incluido. (Los usuarios de
Windows Vista tendrán que hacer clic en [Start.exe] para abrir la ventana Inicio después de insertar el CD-ROM.) Haciendo clic en cada menú
de la ventana Inicio, puede acceder a la página de registro de usuarios de Internet y descargar algunas de las distintas aplicaciones disponibles.
2 3 4 61 5
Nombre de la aplicación y
de los datos
Controlador MIDI USB
(Windows 2000/XP)
1
Controlador MIDI USB
(Windows Vista/XP x64)
Demostración Flash de conexión
2
directa a Internet
Digital Music Notebook
3
Demostración rápida de Digital Music
Notebook
MEGAEnhancer
4
50 éxitos para el Piano SongData
5
Musicsoft Downloader
6
• Todas las aplicaciones indicadas anteriormente se suministran con manuales en formato PDF o en línea.
Nombre de la carpeta Contenido
USBdrv2k_
USBdrvVista_
IDC_FlashDemo
(disponible en el sitio Web
de Yamaha)
DMN_FlashDemo
(disponible en el sitio Web
de Yamaha)
(disponible en el sitio Web
de Yamaha)
Este software es necesario cuando se utiliza el instrumento con un ordenador a
través de una conexión USB. Permite la comunicación y el control entre el
instrumento y el ordenador a través de MIDI.
Software de demostración con vídeo en movimiento que presenta todas las
funciones de la conexión directa a Internet, desde dentro del programa.
Tenga en cuenta que la función de conexión directa a Internet podría no estar
disponible, dependiendo del instrumento.
Digital Music Notebook es la combinación de un programa de aprendizaje
musical y de servicios en línea para que practicar y dominar las canciones
preferidas sea fácil y divertido.
Digital Music Notebook puede descargarse de Internet.
Software de demostración con vídeo en movimiento que presenta todas las
funciones de Digital Music Notebook, desde dentro del programa.
Permite convertir los datos de canciones XG/GM convencionales en datos de
canciones optimizados para utilizarse con la función Mega Voice (en un
instrumento o generador de tonos compatible). MEGAEnhancer da vida a las
pistas de guitarra y bajo MIDI, con mayor realismo y expresión.
MEGAEnhancer puede descargarse de Internet.
Archivos de canciones para piano que se pueden reproducir a través de las
funciones de reproducción de canciones del instrumento.
Por medio de una conexión entre el instrumento y un ordenador, esta aplicación
le permite descargar datos de canciones directamente en el instrumento.
Musicsoft Downloader puede descargarse de Internet.
Español
Requisitos mínimos del sistema
Aplicación/datos Sistema operativo CPU Memoria Disco duro
Controlador USB para
Windows 2000/XP
Controlador USB para
Windows Vista/XP x64
NOTA
Para ver los requisitos del sistema del resto de software incluido en el CD-ROM, consulte la correspondiente página de descarga en Internet. Se accede a la
página de descarga haciendo clic en el menú del software o en la ventana Inicio y en el botón “download” (descargar) de la página siguiente.
Windows 2000/XP Home
Edition/XP Professional
Windows Vista/XP
Professional x64 Edition
Procesador Intel® Pentium® o Intel®
Celeron® a 166 MHz como mínimo.
Procesador Intel® Pentium® o Intel®
Celeron® o compatible con Intel® 64 a
800 MHz como mínimo.
32 MB o más
(se recomiendan 64 MB
o más)
512 MB como mínimo
al menos 3 MB de espacio
libre
al menos 3 MB de espacio
libre
Accessory CD-ROM for Windows Guía de instalación 3
Page 22

Instalación del software
• • • • • • • • • • • • • • • • • • • • • • • • • • • • • • • • • • • • • • • • • • • • • • • • • • • • • • •
Español
Desinstalación (eliminación de la aplicación instalada)
Para eliminar cualquier software que se haya instalado:
Seleccione [Inicio] → [Configuración] → [Panel de control]
→ [Agregar o quitar programas] → [Instalar o desinstalar],
seleccione la aplicación que desee quitar y haga clic en
[Agregar o quitar].
Siga las instrucciones de la pantalla para desinstalar la
aplicación.
NOTA
Los nombres de los menús y de los botones pueden variar en
función del sistema operativo.
NOTA
Para obtener instrucciones sobre la desinstalación del
controlador USB-MIDI, consulte “¿Cómo se puede eliminar
el controlador?” en la sección “Solución de problemas”
(página 7).
Controlador MIDI USB
Para utilizar el instrumento desde el ordenador a través de USB,
deberá instalar el software de controlador adecuado.
El controlador MIDI USB es el software que transfiere datos MIDI
entre el software de secuenciado y el instrumento a través de un
cable USB.
Ordenador
Software de
secuencia
Controlador
Cable USB
Para Windows XP: Vea la columna de la derecha.
Para Windows 2000: Consulte la página 5.
Para Windows Vista: Consulte la página 5.
NOTA
Consulte la página de descargas de Yamaha en la URL siguiente para
disponer de la información más actual sobre el controlador USB-MIDI:
http://music.yamaha.com/download/
Compruebe el nombre de la unidad del CD-ROM que va a
utilizar (D:, E:, Q:, etc.) Ese nombre aparecerá al lado del
icono del CD-ROM en la carpeta “Mi PC”. El directorio raíz
de la unidad de CD-ROM será D:\, E:\ o Q:\, respectivamente.
Instrumento MIDI (Clavinova, etc.)
Instalación del controlador en un sistema con
Windows XP
1 Inicie el ordenador y utilice la cuenta de
“administrador” para conectarse a Windows XP.
2 Seleccione [Inicio] → [Panel de control].
Si el panel de control aparece como “Elija una categoría”,
haga clic en “Cambiar a Vista clásica” en la esquina
superior izquierda de la ventana. Aparecerán todos los
paneles de control e iconos.
3
Vaya a [Sistema] → [Hardware] → [Firma de
controladores], marque el botón de opción situado a la
izquierda de “Ignorar” y haga clic en [Aceptar].
4 Haga clic en el botón [Aceptar] para cerrar el cuadro de
diálogo Propiedades del sistema y haga clic en la “X” en
la esquina superior derecha de la ventana para cerrar el
Panel de control.
5 Inserte en la unidad de CD-ROM el CD-ROM incluido.
La ventana Inicio aparecerá automáticamente.
6 En primer lugar, compruebe que el interruptor POWER del
instrumento está en la posición OFF y, a continuación, utilice
el USB para conectar el USB TO HOST del ordenador al
conector USB del instrumento. Cuando se encienda el
instrumento, el ordenador mostrará automáticamente el
“Asistente para hardware nuevo encontrado”.
Si no aparece automáticamente la ventana del asistente,
consulte el apartado de solución de problemas.
Si el sistema muestra el mensaje “Hardware nuevo encontrado” en la
esquina inferior derecha, espere hasta que aparezca “Asistente para
hardware nuevo encontrado”. (En algunos ordenadores, la ventana
del asistente puede tardar un poco en aparecer.)
Si en la ventana del asistente se le indica que especifique si
desea conectarse o no a Windows Update, seleccione el botón
de opción “Esta vez no” y haga clic en [Siguiente].
7 Marque el botón de opción situado a la izquierda de
“Instalar automáticamente el software (recomendado)”.
Haga clic en [Siguiente]. El sistema inicia la instalación.
NOTA
Si, durante la instalación, el sistema muestra el mensaje
“...no ha superado la prueba del logotipo de Windows que
comprueba que es compatible con Windows XP”, haga clic en
[Continuar de todos modos].
8 Cuando se haya completado la instalación, el sistema mostrará
el asistente “Finalización del Asistente para hardware nuevo
encontrado”. Haga clic en [Finalizar].
(En algunos ordenadores, la ventana del asistente puede tardar un
poco en aparecer.)
9 Reinicie el equipo.
Si el sistema muestra el mensaje “Hardware nuevo encontrado” en
la esquina inferior derecha, espere hasta que aparezca “Cambio de
configuración del sistema”. (En algunos ordenadores, la ventana
del asistente puede tardar un poco en aparecer.)
NOTA
La ventana del Asistente no aparecerá cuando se utiliza Windows
XP Professional x64 Edition. No es necesario reiniciar el
ordenador.
) Cuando se utiliza Windows XP Professional x64 Edition,
debe instalarse el modulo de asistencia.
Después de instalar los controladores MIDI USB para todos los
dispositivos USB conectados, seleccione “Mi PC” en el menú
Inicio. Haga clic con el botón derecho del ratón en el icono de
CD-ROM y seleccione “Abrir” en el menú emergente.
Seleccione “USBdrvVista_”
“Setup.exe” y lance “Setup.exe.” Siga las indicaciones de la
pantalla.
NOTA
Una vez instalado el módulo de asistencia, este paso no es
necesario, aunque haya conectado un dispositivo USB nuevo o
haya actualizado el controlador MIDI USB.
La instalación del controlador USB-MIDI ha finalizado.
→ “XPx64SupportModule” →
4 Accessory CD-ROM for Windows Guía de instalación
Page 23

Instalación del controlador en un sistema con
Windows 2000
Instalación del controlador en un sistema con
Windows Vista
1 Inicie el ordenador y utilice la cuenta de
“Administrador” para conectarse a Windows 2000.
2 Seleccione [Mi PC] → [Panel de control] → [Sistema] →
[Hardware] → [Firmas de controladores] →
[Comprobación de firma de archivos], marque el botón de
opción de la izquierda en “Ignorar – Instalar todos los
archivos sin tener en cuenta la firma” y haga clic en
[Aceptar].
3 Inserte en la unidad de CD-ROM el CD-ROM incluido.
La ventana Inicio aparecerá automáticamente.
4 En primer lugar, compruebe que el interruptor POWER del
instrumento está en la posición OFF y, a continuación, utilice el
USB para conectar el USB TO HOST del ordenador al conector
USB del instrumento. Cuando se encienda el instrumento, el
ordenador mostrará automáticamente el “Asistente para
hardware nuevo encontrado”. Haga clic en [Siguiente].
(En algunos ordenadores, la ventana del asistente puede tardar
un poco en aparecer.)
Si no aparece automáticamente la ventana del asistente,
consulte el apartado de solución de problemas.
5 Marque el botón a la izquierda de “Buscar un controlador
apropiado para mi dispositivo (recomendado)”. Haga clic
en [Siguiente].
6 Marque la casilla “Unidades de CD-ROM” y quítele la
marca a todos los demás elementos. Haga clic en
[Siguiente].
NOTA
Puede que el sistema le pida que inserte un CD-ROM de Windows
mientras comprueba el controlador. Especifique la carpeta
“USBdrv2k_” de la unidad de CD-ROM (como por ejemplo
D:\USBdrv2k_\) y continúe con la instalación.
7 Haga clic en [Siguiente].
NOTA
Si en el panel del Asistente, se le indica que “El software que va
a instalar no posee una firma digital de Microsoft”, haga clic en
[Sí].
8 Cuando se haya completado la instalación, el sistema mostrará
el asistente “Finalización del Asistente para hardware nuevo
encontrado”. Haga clic en [Finalizar].
(En algunos ordenadores, la ventana del asistente puede tardar un
poco en aparecer.)
1 Inicie el ordenador y utilice la cuenta de
“Administrador” para conectarse a Windows Vista.
2 Inserte el CD-ROM en la unidad de CD-ROM.
Aparecerá la ventana AutoPlay.
3 Haga clic en [Ejecutar Start.exe].
La ventana Inicio aparecerá automáticamente.
4 En primer lugar, compruebe que el interruptor POWER
del instrumento está en la posición OFF y, a
continuación, utilice el cable USB para conectar el
conector USB del ordenador al conector USB TO HOST
del instrumento. Cuando se encienda el instrumento,
el ordenador mostrará automáticamente la ventana
“Asistente para hardware nuevo encontrado”. Haga clic
en “Buscar e instalar el software de controlador
(recomendado)”.
Si la ventana no aparece automáticamente, consulte la sección
“Solución de problemas” (en algunos ordenadores, la ventana
puede tardar algún tiempo en abrirse).
NOTA
Si aparece la ventana “Control de cuentas de usuario”, haga clic en
[Continuar].
5 Si aparece un mensaje que permite que Windows busque
en línea el software del controlador, haga clic en
“No buscar en línea.”
6 Si aparece un mensaje que le pide que inserte el disco
que se suministra con el dispositivo, haga clic en
[Siguiente].
El sistema inicia la instalación.
NOTA
Si aparece la ventana “Seguridad de Windows”, confirme que el
software es de Yamaha Corporation y haga clic en [Instalar].
7 Cuando la instalación esté terminada, el sistema
mostrará el mensaje “El software de este dispositivo
se instaló correctamente”. Haga clic en [Cerrar].
(Algunos equipos pueden tardar un rato en mostrar la
ventana.)
La instalación del controlador MIDI USB ha finalizado.
Español
9 Reinicie el equipo.
La instalación del controlador USB-MIDI ha finalizado.
Accessory CD-ROM for Windows Guía de instalación 5
Page 24

• • • • • • • • • • • • • • • • • • • • • • • • • • • • • • • • • • • • • • • • • • • • • • • • • • • • • • •
MEGAEnhancer
• • • • • • • • • • • • • • • • • • • • • • • • • • • • • • • • • • • • • • • • • • • • • • • • • • • • • • •
• • • • • • • • • • • • • • • • • • • • • • • • • • • • • • • • • • • • • • • • • • • • • • • • • • • • • • •
IMPORTANTE
• Los instrumentos que no son compatibles con la función
Mega Voice no pueden reproducir correctamente los
datos de canciones creados con el programa
MEGAEnhancer.
• Cuando instale MEGAEnhancer en un ordenador con
Windows XP, 2000 o Vista, asegúrese de iniciar la sesión
con la cuenta de administrador.
• Para instalar MEGAEnhancer es necesario que el
ordenador esté conectado a Internet y en línea.
Inserte en la unidad de CD-ROM del ordenador el
1
CD-ROM suministrado.
En la pantalla aparecerá la ventana de inicio. Cada menú
de la ventana indica la aplicación o los datos que contiene
el CD-ROM de accesorios.
2 En la ventana de inicio, haga clic en “MEGAEnhancer”.
En la ventana aparecerá la página en la que se explican los
detalles sobre MEGAEnhancer.
3 Haga clic en “MEGAEnhancer Download” en la parte
inferior de la ventana.
Aparece la página de descarga en Internet. Antes de instalar
el software, compruebe que el sistema reúne los requisitos
necesarios.
Musicsoft Downloader
IMPORTANTE
• Cuando instale Musicsoft Downloader en un ordenador
con Windows XP, 2000 o Vista, asegúrese de iniciar la
sesión con la cuenta de administrador.
• Para instalar Musicsoft Downloader es necesario que
el ordenador esté conectado a Internet y en línea.
1 Inserte en la unidad de CD-ROM del ordenador el
CD-ROM suministrado.
En la pantalla aparecerá la ventana de inicio. Cada menú
de la ventana indica la aplicación o los datos que contiene
el CD-ROM de accesorios.
2 En la ventana de inicio, haga clic en “Musicsoft
Downloader”.
En la ventana aparecerá la página en la que se explican los
detalles sobre Musicsoft Downloader.
3 Haga clic en el botón “Musicsoft Downloader
Download” en la parte inferior de la ventana.
Aparece la página de descarga en Internet. Antes de instalar
el software, compruebe que el sistema reúne los requisitos
necesarios.
NOTA
Con el instrumento que incluye este CD-ROM de accesorios, sólo
puede utilizar Musicsoft Downloader como software de
aplicación para transferencia de archivos. No puede utilizar otras
aplicaciones como File Utility y Song Filer.
Español
Digital Music Notebook
IMPORTANTE
• Cuando instale Digital Music Notebook en un ordenador
con Windows XP o Vista, asegúrese de iniciar la sesión con
la cuenta de administrador.
• Para instalar Digital Music Notebook es necesario que
el ordenador esté conectado a Internet y en línea.
Inserte en la unidad de CD-ROM del ordenador el
1
CD-ROM suministrado.
En la pantalla aparecerá la ventana de inicio. Cada menú
de la ventana indica la aplicación o los datos que contiene
el CD-ROM de accesorios.
2 En la ventana de inicio, haga clic en “DIGITAL MUSIC
NOTEBOOK”.
En la ventana aparecerá la página en la que se explican los
detalles sobre Digital Music Notebook.
3 En la parte inferior de la ventana, haga clic en el botón
“Digital Music Notebook Download”.
4 Se accederá automáticamente al sitio del Digital Music
Notebook. Siga las instrucciones de la pantalla para
descargar la aplicación.
IMPORTANTE
Para adquirir el contenido de Digital Music Notebook es
necesario pagar con una tarjeta de crédito. En algunas
zonas puede que no sea posible procesar las transacciones
realizadas con tarjetas de crédito. Por este motivo, consulte
a las autoridades locales para asegurarse de que puede
utilizar su tarjeta de crédito.
6 Accessory CD-ROM for Windows Guía de instalación
Page 25

Solución de problemas
No se puede instalar el controlador.
• ¿Está conectado correctamente el cable USB?
→Compruebe la conexión del cable USB.
→Desconecte el cable USB y vuelva a conectarlo.
• ¿Está habilitada la función USB en el ordenador?
→Cuando conecte por primera vez el instrumento al
ordenador, si no aparece el “Asistente para agregar nuevo
hardware”, puede que la función USB del ordenador esté
desactivada. Ejecute los siguientes pasos.
1 Seleccione [Panel de control]* → [Sistema] → [Hardware] →
[Administrador de dispositivos] (para Windows XP/2000), o
seleccione [Panel de control] → [Administrador de dispositivos]
(para Windows Vista).
* Sólo en la Vista clásica en Windows XP.
2 Asegúrese de que no hay marcas “!” o “x” en “Controladora de
bus serie universal” ni en “Concentrador raíz USB”. Si ve alguna
de estas marcas, el controlador USB está deshabilitado.
• ¿Hay registrado algún dispositivo desconocido?
→Si la instalación del controlador falla, el instrumento se
evaluará como un “Dispositivo desconocido” y no podrá instalar
el controlador. Elimine el “Dispositivo desconocido” siguiendo
los pasos que se indican a continuación.
1 Seleccione [Panel de control]* → [Sistema] → [Hardware] →
[Administrador de dispositivos] (para Windows XP/2000), o
seleccione [Panel de control] → [Administrador de dispositivos]
(para Windows Vista).
* Sólo en la Vista clásica en Windows XP.
2 Busque “Otros dispositivos” en el menú “Dispositivos por tipo”.
3 Si encuentra “Otros dispositivos”, haga doble clic en él para abrir
el árbol y buscar “Dispositivo desconocido”. Si aparece uno,
selecciónelo y haga clic en el botón [Quitar].
4 Desconecte el cable USB del instrumento y vuelva a conectarlo.
5 Vuelva a instalar el controlador. (Consulte la página 4.)
No se puede poner en suspensión ni reanudar el equipo
correctamente.
• No ponga en suspensión el ordenador mientras esté en
funcionamiento la aplicación MIDI.
• Es posible que no pueda poner en suspensión y reanudar el equipo
normalmente, dependiendo de su entorno concreto (controlador de
host USB, etc.). Aun así, tan sólo tiene que desconectar y conectar el
cable USB para poder utilizar otra vez las funciones del
instrumento.
¿Cómo se puede eliminar el controlador?
1 Inicie el ordenador y utilice la cuenta de administrador
para conectarse a Windows.
Cierre todas las aplicaciones y las ventanas que estén
abiertas.
2 Inserte el CD-ROM en la unidad de CD-ROM.
3 Seleccione [Inicio] → [Mi PC] (para Windows XP), [Mi PC]
(para Windows 2000) o [Inicio] → [Equipo] (para Windows
Vista).
4 Haga clic con el botón derecho en el icono de CD-ROM y
seleccione “Abrir” en el menú emergente.
5 Seleccione la carpeta “USBdrvVista_” o “USBdrv2k_”
→ “uninstall” → “uninstall.exe” y lance el archivo
“uninstall.exe.”.
Siga las instrucciones de la pantalla para desinstalar
el controlador.
NOTA
Al utilizar un sistema operativo de 64 bits, haga clic en
“uninstall_x64.exe.” de la carpeta “USBdrvVista_”.
NOTA
Si aparece la ventana “Control de cuentas de usuario”, haga clic en
[Continuar].
Al controlar el instrumento desde el ordenador a través de
USB, el instrumento no funciona correctamente o no se oye
ningún sonido.
• ¿Ha instalado el controlador (página 4)?
• ¿Está conectado correctamente el cable USB?
• ¿Está ajustado al nivel correcto el volumen del instrumento, del
dispositivo de reproducción y del programa de aplicación?
• ¿Ha seleccionado un puerto adecuado en el software de
secuencia?
• En el Clavinova, compruebe si la función Piano Lock (bloqueo del
piano) está activada o no.
• ¿Está utilizando el último controlador USB MIDI?
Puede descargar el controlador más reciente del sitio Web
(página 4).
La respuesta de reproducción tiene retardo.
• ¿Cumple su ordenador los requisitos de sistema?
• ¿Hay alguna otra aplicación o controlador de dispositivo en
funcionamiento?
Español
Accessory CD-ROM for Windows Guía de instalación 7
Page 26

ATTENTION SOFTWARE LICENSE AGREEMENT
PLEASE READ THIS SOFTWARE LICENSE AGREEMENT (“AGREEMENT”) CAREFULLY BEFORE USING THIS SOFTWARE. YOU ARE ONLY
PERMITTED TO USE THIS SOFTWARE PURSUANT TO THE TERMS AND CONDITIONS OF THIS AGREEMENT. THIS AGREEMENT IS BETWEEN YOU
(AS AN INDIVIDUAL OR LEGAL ENTITY) AND YAMAHA CORPORATION (“YAMAHA”).
BY BREAKING THE SEAL OF THIS PACKAGE YOU ARE AGREEING TO BE BOUND BY THE TERMS OF THIS LICENSE. IF YOU DO NOT AGREE WITH
THE TERMS, DO NOT INSTALL, COPY, OR OTHERWISE USE THIS SOFTWARE.
1. GRANT OF LICENSE AND COPYRIGHT
Yamaha hereby grants you the right to use one copy of the software program(s)
English
and data (“SOFTWARE”) accompanying this Agreement. The term
SOFTWARE shall encompass any updates to the accompanying software and
data. The SOFTWARE is owned by Yamaha and/or Yamaha’s licensor(s), and is
protected by relevant copyright laws and all applicable treaty provisions. While
you are entitled to claim ownership of the data created with the use of
SOFTWARE, the SOFTWARE will continue to be protected under relevant
copyrights.
• You may use the SOFTWARE on a single computer.
• You may make one copy of the SOFTWARE in machine-readable form
for backup purposes only, if the SOFTWARE is on media where such
backup copy is permitted. On the backup copy, you must reproduce
Yamaha’s copyright notice and any other proprietary legends that were
on the original copy of the SOFTWARE.
• You may permanently transfer to a third party all your rights in the
SOFTWARE, provided that you do not retain any copies and the
recipient reads and agrees to the terms of this Agreement.
2. RESTRICTIONS
• You may not engage in reverse engineering, disassembly, decompilation
or otherwise deriving a source code form of the SOFTWARE by any
method whatsoever.
• You may not reproduce, modify, change, rent, lease, or distribute the
SOFTWARE in whole or in part, or create derivative works of the
SOFTWARE.
• You may not electronically transmit the SOFTWARE from one
computer to another or share the SOFTWARE in a network with other
computers.
• You may not use the SOFTWARE to distribute illegal data or data that
violates public policy.
• You may not initiate services based on the use of the SOFTWARE
without permission by Yamaha Corporation.
Copyrighted data, including but not limited to MIDI data for songs, obtained by
means of the SOFTWARE, are subject to the following restrictions which you
must observe.
• Data received by means of the SOFTWARE may not be used for any
commercial purposes without permission of the copyright owner.
• Data received by means of the SOFTWARE may not be duplicated,
transferred, or distributed, or played back or performed for listeners in
public without permission of the copyright owner.
• The encryption of data received by means of the SOFTWARE may not be
removed nor may the electronic watermark be modified without permission
of the copyright owner.
3. TERMINATION
This Agreement becomes effective on the day that you receive the SOFTWARE
and remains effective until terminated. If any copyright law or provisions of this
Agreement is violated, the Agreement shall terminate automatically and
immediately without notice from Yamaha. Upon such termination, you must
immediately destroy the licensed SOFTWARE, any accompanying written
documents and all copies thereof.
4. LIMITED WARRANTY ON MEDIA
As to SOFTWARE sold on tangible media, Yamaha warrants that the tangible
media on which the SOFTWARE is recorded will be free from defects in
materials and workmanship under normal use for a period of fourteen (14) days
from the date of receipt, as evidenced by a copy of the receipt. Yamaha’s entire
liability and your exclusive remedy will be replacement of the defective media if
it is returned to Yamaha or an authorized Yamaha dealer within fourteen days
with a copy of the receipt. Yamaha is not responsible for replacing media
damaged by accident, abuse or misapplication. TO THE FULLEST EXTENT
PERMITTED BY LAW, YAMAHA EXPRESSLY DISCLAIMS ANY IMPLIED
WARRANTIES ON THE TANGIBLE MEDIA, INCLUDING THE IMPLIED
WARRANTIES OF MERCHANTABILITY AND FITNESS FOR A
PARTICULAR PURPOSE.
5. DISCLAIMER OF WARRANTY ON
SOFTWARE
You expressly acknowledge and agree that use of the SOFTWARE is at your sole
risk. The SOFTWARE and related documentation are provided “AS IS” and
without warranty of any kind. NOTWITHSTANDING ANY OTHER
PROVISION OF THIS AGREEMENT, YAMAHA EXPRESSLY DISCLAIMS
ALL WARRANTIES AS TO THE SOFTWARE, EXPRESS, AND IMPLIED,
INCLUDING BUT NOT LIMITED TO THE IMPLIED WARRANTIES OF
MERCHANTABILITY, FITNESS FOR A PARTICULAR PURPOSE AND
NON-INFRINGEMENT OF THIRD PARTY RIGHTS. SPECIFICALLY, BUT
WITHOUT LIMITING THE FOREGOING, YAMAHA DOES NOT
WARRANT THAT THE SOFTWARE WILL MEET YOUR REQUIREMENTS,
THAT THE OPERATION OF THE SOFTWARE WILL BE
UNINTERRUPTED OR ERROR-FREE, OR THAT DEFECTS IN THE
SOFTWARE WILL BE CORRECTED.
6. LIMITATION OF LIABILITY
YAMAHA’S ENTIRE OBLIGATION HEREUNDER SHALL BE TO PERMIT
USE OF THE SOFTWARE UNDER THE TERMS HEREOF. IN NO EVENT
SHALL YAMAHA BE LIABLE TO YOU OR ANY OTHER PERSON FOR
ANY DAMAGES, INCLUDING, WITHOUT LIMITATION, ANY DIRECT,
INDIRECT, INCIDENTAL OR CONSEQUENTIAL DAMAGES, EXPENSES,
LOST PROFITS, LOST DATA OR OTHER DAMAGES ARISING OUT OF
THE USE, MISUSE OR INABILITY TO USE THE SOFTWARE, EVEN IF
YAMAHA OR AN AUTHORIZED DEALER HAS BEEN ADVISED OF THE
POSSIBILITY OF SUCH DAMAGES. In no event shall Yamaha’s total liability
to you for all damages, losses and causes of action (whether in contract, tort or
otherwise) exceed the amount paid for the SOFTWARE.
7. THIRD PARTY SOFTWARE
Third party software and data (“THIRD PARTY SOFTWARE”) may be
attached to the SOFTWARE. If, in the written materials or the electronic data
accompanying the Software, Yamaha identifies any software and data as THIRD
PARTY SOFTWARE, you acknowledge and agree that you must abide by the
provisions of any Agreement provided with the THIRD PARTY SOFTWARE
and that the party providing the THIRD PARTY SOFTWARE is responsible for
any warranty or liability related to or arising from the THIRD PARTY
SOFTWARE. Yamaha is not responsible in any way for the THIRD PARTY
SOFTWARE or your use thereof.
• Yamaha provides no express warranties as to the THIRD PARTY
SOFTWARE. IN ADDITION, YAMAHA EXPRESSLY DISCLAIMS ALL
IMPLIED WARRANTIES, INCLUDING BUT NOT LIMITED TO THE
IMPLIED WARRANTIES OF MERCHANTABILITY AND FITNESS FOR
A PARTICULAR PURPOSE, as to the THIRD PARTY SOFTWARE.
• Yamaha shall not provide you with any service or maintenance as to the
THIRD PARTY SOFTWARE.
• Yamaha is not liable to you or any other person for any damages, including,
without limitation, any direct, indirect, incidental or consequential damages,
expenses, lost profits, lost data or other damages arising out of the use,
misuse or inability to use the THIRD PARTY SOFTWARE.
8. GENERAL
This Agreement shall be interpreted according to and governed by Japanese law
without reference to principles of conflict of laws. Any dispute or procedure
shall be heard before the Tokyo District Court in Japan. If for any reason a court
of competent jurisdiction finds any portion of this Agreement to be
unenforceable, the remainder of this Agreement shall continue in full force and
effect.
9. COMPLETE AGREEMENT
This Agreement constitutes the entire agreement between the parties with
respect to use of the SOFTWARE and any accompanying written materials and
supersedes all prior or contemporaneous understandings or agreements, written
or oral, regarding the subject matter of this Agreement. No amendment or
revision of this Agreement will be binding unless in writing and signed by a
fully authorized representative of Yamaha.
8 Accessory CD-ROM for Windows Installation Guide
Page 27

ACHTUNG SOFTWARE-LIZENZVEREINBARUNG
BITTE LESEN SIE SORGFÄLTIG DIESE LIZENZVEREINBARUNG („VEREINBARUNG“), BEVOR SIE DIE SOFTWARE BENUTZEN. DER GEBRAUCH
DIESER SOFTWARE IST IHNEN NUR GEMÄSS DEN BEDINGUNGEN UND VORAUSSETZUNGEN DIESER VEREINBARUNG GESTATTET. DIES IST EINE
VEREINBARUNG ZWISCHEN IHNEN (ALS PRIVATPERSON ODER ALS NATÜRLICHE PERSON) UND DER YAMAHA CORPORATION („YAMAHA“).
DURCH DAS ÖFFNEN DIESER VERSIEGELTEN VERPACKUNG BRINGEN SIE ZUM AUSDRUCK, AN DIE BEDINGUNGEN DIESER LIZENZ GEBUNDEN
ZU SEIN. WENN SIE NICHT MIT DEN BEDINGUNGEN EINVERSTANDEN SIND, INSTALLIEREN ODER KOPIEREN SIE DIESE SOFTWARE NICHT, UND
VERWENDEN SIE SIE AUF KEINE ANDERE WEISE.
1. GEWÄHRUNG EINER LIZENZ UND
COPYRIGHT
Yamaha gewährt Ihnen hiermit das Recht, eine einzige Kopie der mitgelieferten
Software-Programme und Daten („SOFTWARE“) zu nutzen. Der Begriff
SOFTWARE umfasst alle Updates der mitgelieferten Software und Daten. Die
SOFTWARE gehört Yamaha bzw. den Yamaha-Lizenzgebern und ist durch die
entsprechenden Copyright-Gesetze und internationalen Abkommen geschützt.
Sie haben zwar das Recht, Besitzansprüche auf die durch den Gebrauch der
SOFTWARE erstellten Daten zu erheben, doch die SOFTWARE selbst bleibt
weiterhin durch das entsprechende Copyright geschützt.
• Sie dürfen die SOFTWARE auf genau einem Computer verwenden.
• Sie dürfen ausschließlich zu Backup-Zwecken eine Kopie der SOFTWARE
in maschinenlesbarer Form erstellen, wenn sich die SOFTWARE auf einem
Medium befindet, welches eine solche Sicherungskopie erlaubt. Auf der
erstellten Backup-Kopie müssen Sie den Urheberrechtshinweis von Yamaha
und alle anderen Eigentumsrechte der SOFTWARE betreffenden Hinweise
wiedergeben.
• Sie dürfen dauerhaft all Ihre Rechte an der SOFTWARE an Dritte
übertragen, jedoch nur, falls Sie keine Kopien zurückbehalten und der
Empfänger die Lizenzvereinbarung liest und dieser zustimmt.
2. BESCHRÄNKUNGEN
• Sie dürfen nicht die SOFTWARE einem Reverse Engineering unterziehen,
sie dekompilieren oder auf andere Weise an deren Quell-Code gelangen.
• Es ist Ihnen nicht gestattet, die SOFTWARE als Ganzes oder teilweise zu
vervielfältigen, zu modifizieren, zu ändern, zu vermieten, zu verleasen oder
auf anderen Wegen zu verteilen oder abgeleitete Produkte aus der
SOFTWARE zu erstellen.
• Sie dürfen nicht die SOFTWARE elektronisch von einem Computer auf
einen anderen übertragen oder sie in ein Netzwerk mit anderen Computern
einspeisen.
• Sie dürfen nicht die SOFTWARE verwenden, um illegale oder gegen die
guten Sitten verstoßende Daten zu verbreiten.
• Sie dürfen nicht auf dem Gebrauch der SOFTWARE basierende
Dienstleistungen erbringen ohne die Erlaubnis der Yamaha Corporation.
Urheberrechtlich geschützte Daten, einschließlich, aber nicht darauf
beschränkt, MIDI-Songdateien, die mithilfe dieser SOFTWARE erstellt werden,
unterliegen den nachfolgenden Beschränkungen, die vom Benutzer zu beachten
sind.
• Die mithilfe dieser SOFTWARE erhaltenen Daten dürfen ohne Erlaubnis
des Urheberrechtsinhabers nicht für kommerzielle Zwecke verwendet
werden.
• Die mithilfe dieser SOFTWARE erhaltenen Daten dürfen nicht dupliziert,
übertragen, verteilt oder einem öffentlichen Publikum vorgespielt oder
dargeboten werden, es sei denn, es liegt eine Genehmigung durch den
Inhaber der Urheberrechte vor.
• Weder darf die Verschlüsselung der mithilfe dieser SOFTWARE erhaltenen
Daten entfernt, noch darf das elektronische Wasserzeichen ohne
Genehmigung des Inhabers der Urheberrechte verändert werden.
3. BEENDIGUNG DES
VERTRAGSVERHÄLTNISSES
Diese Lizenzvereinbarung tritt am Tag des Erhalts der SOFTWARE in Kraft
und bleibt bis zur Beendigung wirksam. Wenn eines der Urheberrechts-Gesetze
oder eine Maßgabe dieser Vereinbarung verletzt wird, endet die Vereinbarung
automatisch und sofort ohne Vorankündigung durch Yamaha. In diesem Fall
müssen Sie die lizenzierte SOFTWARE und die mitgelieferten Unterlagen und
alle Kopien davon unverzüglich vernichten.
4. BESCHRÄNKTE GARANTIE AUF MEDIEN
Bezüglich SOFTWARE, die auf physikalischen Medien vertrieben wird,
garantiert Yamaha, dass die physikalischen Medien, auf denen die SOFTWARE
aufgezeichnet wurde, für einen Zeitraum von vierzehn (14) Tagen nach dem per
Kaufbeleg/Lieferschein nachweisbaren Empfangsdatum und bei normalem
Gebrauch frei von Herstellungs- und Materialfehlern sind. Der volle Umfang
der Verantwortung von Yamaha und Ihre einzige Abhilfemöglichkeit ist der
Ersatz des defekten Mediums oder der defekten Medien durch Einsendung an
Yamaha oder einen autorisierten Vertragshändler von Yamaha innerhalb von
vierzehn Tagen zusammen mit einer Kopie des Kaufbelegs/Lieferscheins.
Yamaha ist nicht zum Ersatz von Medien verpflichtet, die durch Unfälle,
Misbrauch oder fehlerhafte Anwendung beschädigt wurden. YAMAHA
SCHLIESST UNTER MAXIMALER AUSSCHÖPFUNG DES GELTENDEN
RECHTS AUSDRÜCKLICH JEGLICHE STILLSCHWEIGENDEN
GARANTIEN AUF PHYSIKALISCHE MEDIEN AUS, EINSCHLIESSLICH
STILLSCHWEIGENDER GARANTIEN FÜR ALLGEMEINE
GEBRAUCHSTAUGLICHKEIT ODER DIE TAUGLICHKEIT FÜR EINEN
BESTIMMTEN EINSATZZWECK.
5. BESCHRÄNKTE GARANTIE AUF DIE
SOFTWARE
Sie erkennen ausdrücklich an, dass der Gebrauch der SOFTWARE
ausschließlich auf eigene Gefahr erfolgt. Die SOFTWARE und ihre Anleitungen
werden Ihnen ohne Mängelgewähr oder andere Garantien zur Verfügung gestellt.
UNGEACHTET DER ANDEREN BESTIMMUNGEN DIESER
LIZENZVEREINBARUNG WERDEN VON YAMAHA KEINE
AUSDRÜCKLICHEN ODER STILLSCHWEIGENDEN GARANTIEN
HINSICHTLICH DIESER SOFTWARE ÜBERNOMMEN, EINSCHLIESSLICH,
ABER NICHT BESCHRÄNKT AUF STILLSCHWEIGENDE GARANTIEN
FÜR ALLGEMEINE GEBRAUCHSTAUGLICHKEIT ODER DIE
TAUGLICHKEIT FÜR EINEN BESTIMMTEN EINSATZZWECK ODER DIE
NICHTVERLETZUNG DER RECHTE DRITTER. BESONDERS, ABER
OHNE DAS OBENGENANNTE EINZUSCHRÄNKEN, GARANTIERT
YAMAHA NICHT, DASS DIE SOFTWARE IHRE ANSPRÜCHE ERFÜLLT,
DASS DER BETRIEB DER SOFTWARE OHNE UNTERBRECHUNGEN
ODER FEHLERFREI ERFOLGT ODER DASS FEHLER IN DER SOFTWARE
BESEITIGT WERDEN.
6. HAFTUNGSBESCHRÄNKUNG
YAMAHA GEHT DIE NACHFOLGEND SPEZIFIZIERTE VERPFLICHTUNG
EIN, DIE VERWENDUNG DER SOFTWARE UNTER DEN GENANNTEN
BEDINGUNGEN ZU ERLAUBEN. YAMAHA ÜBERNIMMT IHNEN
GEGENÜBER ODER GEGENÜBER DRITTEN IN KEINEM FALL DIE
HAFTUNG FÜR IRGENDWELCHE SCHÄDEN EINSCHLIESSLICH,
JEDOCH NICHT BESCHRÄNKT AUF DIREKT ODER BEILÄUFIG
ENTSTANDENE SCHÄDEN ODER FOLGESCHÄDEN, AUFWENDUNGEN,
ENTGANGENE GEWINNE, DATENVERLUSTE ODER ANDERE
SCHÄDEN, DIE INFOLGE DER VERWENDUNG, DES MISSBRAUCHS
ODER DER UNMÖGLICHKEIT DER VERWENDUNG DER SOFTWARE
ENTSTEHEN KÖNNEN, SELBST WENN YAMAHA ODER EIN
AUTHORISIERTER HÄNDLER AUF DIE MÖGLICHKEIT SOLCHER
SCHÄDEN AUFMERKSAM GEMACHT WURDE. In keinem Fall
überschreiten Ihre Ansprüche gegen Yamaha aufgrund von Schäden, Verlusten
oder Klageansprüchen (aus Vertrag, Schadensersatz oder anderen) den
Kaufpreis der SOFTWARE.
7. SOFTWARE DRITTER
Möglicherweise werden der SOFTWARE Daten und Software Dritter beigefügt
(„SOFTWARE DRITTER“). Wenn in der schriftlichen Dokumentation oder
der die Software begleitenden elektronischen Daten irgendwelche Software und
Daten von Yamaha als SOFTWARE DRITTER bezeichnet wird, erkennen Sie
die Bestimmungen aller mit der SOFTWARE DRITTER mitgelieferten
Vereinbarungen an und erkennen an, dass der Hersteller der SOFTWARE
DRITTER verantwortlich ist für etwaige Garantien oder Haftungen für die
SOFTWARE DRITTER. Yamaha ist in keiner Weise verantwortlich für die
SOFTWARE DRITTER oder deren Gebrauch durch Sie.
• Yamaha gibt keine ausdrücklichen Zusicherungen und vertraglichen
Haftungen bezüglich der SOFTWARE DRITTER. ZUSÄTZLICH
VERNEINT YAMAHA AUSDRÜCKLICH ALLE STILLSCHWEIGENDEN
GARANTIEN, EINSCHLIESSLICH, ABER NICHT BESCHRÄNKT AUF,
STILLSCHWEIGENDE GARANTIEN AUF ALLGEMEINE
GEBRAUCHSTAUGLICHKEIT ODER DIE TAUGLICHKEIT FÜR EINEN
BESTIMMTEN ZWECK DER SOFTWARE DRITTER.
• Yamaha bietet Ihnen keinen Service oder Hilfestellung zu der SOFTWARE
DRITTER.
• Yamaha übernimmt Ihnen gegenüber oder gegenüber Dritten in keinem Fall
die Haftung für irgendwelche Schäden einschließlich, jedoch nicht
beschränkt, auf direkt oder beiläufig entstandene Schäden oder
Folgeschäden, Aufwendungen, entgangene Gewinne, Datenverluste oder
andere Schäden, die infolge der Verwendung, des Missbrauchs oder der
Unmöglichkeit der Verwendung der SOFTWARE DRITTER entstehen
können.
8. ALLGEMEINES
Diese Vereinbarung ist im Einklang mit dem japanischen Recht zu
interpretieren und wird von diesem beherrscht, ohne einen Bezug auf jegliche
Prinzipien eines Rechtskonflikts herzustellen. Alle Rechtsstreitigkeiten und verfahren sind am Tokyo District Court in Japan durchzuführen. Falls aus
irgendeinem Grund Teile dieser Lizenzvereinbarung von einem zuständigen
Gericht für unwirksam erklärt werden sollten, dann sollen die übrigen
Bestimmungen der Lizenzvereinbarung weiterhin voll wirksam sein.
9. VOLLSTÄNDIGKEIT DER VEREINBARUNG
Diese Lizenzvereinbarung stellt die Gesamtheit der Vereinbarungen in Bezug
auf die SOFTWARE und alle mitgelieferten schriftlichen Unterlagen zwischen
den Parteien dar und ersetzt alle vorherigen oder gleichzeitigen schriftlichen
oder mündlichen Übereinkünfte oder Vereinbarungen in Bezug auf diese
Thematik. Zusätze oder Änderungen dieser Vereinbarung sind nicht bindend,
wenn Sie nicht von einem vollständig authorisierten Repräsentanten von
Yamaha unterzeichnet sind.
Deutsch
Accessory CD-ROM for Windows Installation Guide 8
Page 28

Français
ATTENTION CONTRAT DE LICENCE DE LOGICIEL
VEUILLEZ LIRE ATTENTIVEMENT CE CONTRAT DE LICENCE (« CONTRAT ») AVANT D'UTILISER CE LOGICIEL. L'UTILISATION DE CE LOGICIEL
EST ENTIEREMENT REGIE PAR LES TERMES ET CONDITIONS DE CE CONTRAT. CECI EST UN CONTRAT ENTRE VOUS-MEME (EN TANT QUE
PERSONNE PHYSIQUE OU MORALE) ET YAMAHA CORPORATION (« YAMAHA »).
LE FAIT D'OUVRIR CE COFFRET INDIQUE QUE VOUS ACCEPTEZ L'ENSEMBLE DES TERMES DU CONTRAT. SI VOUS N'ACCEPTEZ PAS LESDITS
TERMES, VOUS NE DEVREZ NI INSTALLER NI COPIER NI UTILISER DE QUELQUE AUTRE MANIERE CE LOGICIEL.
1. CONCESSION DE LICENCE ET DROITS
D'AUTEUR
Yamaha vous concède le droit d'utiliser un seul exemplaire du logiciel et des
données afférentes à celui-ci (« LOGICIEL »), livrés avec ce contrat. Le terme
LOGICIEL couvre toutes les mises à jour du logiciel et des données fournis. Ce
LOGICIEL est la propriété de Yamaha et/ou du (des) concédant(s) de licence
Yamaha. Il est protégé par les dispositions en vigueur relatives au droit d'auteur
et tous les traités internationaux pertinents. Bien que vous soyez en droit de
revendiquer la propriété des données créées à l'aide du LOGICIEL, ce dernier
reste néanmoins protégé par les lois en vigueur en matière de droit d'auteur.
• Vous pouvez utiliser ce LOGICIEL sur un seul ordinateur.
• Vous pouvez effectuer une copie unique de ce LOGICIEL en un format
lisible sur machine à des fins de sauvegarde uniquement, à la condition
toutefois que le LOGICIEL soit installé sur un support autorisant la copie de
sauvegarde. Sur la copie de sauvegarde, vous devez reproduire l'avis relatif
aux droits d'auteur ainsi que toute autre mention de propriété indiquée sur
l'exemplaire original du LOGICIEL.
• Vous pouvez céder, à titre permanent, tous les droits que vous détenez sur
ce LOGICIEL, sous réserve que vous n'en conserviez aucun exemplaire et
que le bénéficiaire accepte les termes du présent contrat.
2. RESTRICTIONS
• Vous ne pouvez en aucun cas reconstituer la logique du LOGICIEL ou le
désassembler, le décompiler ou encore en dériver une forme quelconque de
code source par quelque autre moyen que ce soit.
• Vous n'êtes pas en droit de reproduire, modifier, changer, louer, prêter ou
distribuer le LOGICIEL en tout ou partie, ou de l'utiliser à des fins de
création dérivée.
• Vous n'êtes pas autorisé à transmettre le LOGICIEL électroniquement à
d'autres ordinateurs ou à l'utiliser en réseau.
• Vous ne pouvez pas utiliser ce LOGICIEL pour distribuer des données
illégales ou portant atteinte à la politique publique.
• Vous n'êtes pas habilité à proposer des services fondés sur l'utilisation de
ce LOGICIEL sans l'autorisation de Yamaha Corporation.
Les données protégées par le droit d'auteur, y compris les données MIDI de
morceaux, sans toutefois s'y limiter, obtenues au moyen de ce LOGICIEL, sont
soumises aux restrictions suivantes que vous devez impérativement respecter.
• Les données reçues au moyen de ce LOGICIEL ne peuvent en aucun cas être
utilisées à des fins commerciales sans l'autorisation du propriétaire du droit
d'auteur.
• Les données reçues au moyen de ce LOGICIEL ne peuvent pas être
dupliquées, transférées, distribuées, reproduites ou exécutées devant un
public d'auditeurs sans l'autorisation du propriétaire du droit d'auteur.
• Le cryptage des données reçues au moyen de ce LOGICIEL ne peut être
déchiffré ni le filigrane électronique modifié sans l'autorisation du
propriétaire du droit d'auteur.
3. RESILIATION
Le présent contrat prend effet à compter du jour où le LOGICIEL vous est remis
et reste en vigueur jusqu'à sa résiliation. Si l'une quelconque des dispositions
relatives au droit d'auteur ou des clauses du contrat ne sont pas respectées, le
contrat de licence sera automatiquement résilié de plein droit par Yamaha, ce
sans préavis. Dans ce cas, vous devrez immédiatement détruire le LOGICIEL
concédé sous licence, la documentation imprimée qui l'accompagne ainsi que les
copies réalisées.
4. GARANTIE LIMITEE PORTANT SUR LE
SUPPORT
Quant au LOGICIEL vendu sur un support perceptible, Yamaha garantit que le
support perceptible sur lequel le LOGICIEL est enregistré est exempt de défaut
de matière première ou de fabrication pendant quatorze (14) jours à compter de
la date de réception, avec comme preuve à l'appui une copie du reçu. Votre seul
recours opposable à Yamaha consiste dans le remplacement du support reconnu
défectueux, à condition qu'il soit retourné à Yamaha ou à un revendeur Yamaha
agréé dans un délai de quatorze jours avec une copie du reçu. Yamaha n'est pas
tenu de remplacer un support endommagé à la suite d'un accident, d'un usage
abusif ou d'une utilisation incorrecte. DANS TOUTE LA MESURE PERMISE
PAR LA LEGISLATION EN VIGUEUR, YAMAHA EXCLUT
EXPRESSEMENT TOUTE RESPONSABILITE IMPLICITE LIEE AU
SUPPORT PERCEPTIBLE, Y COMPRIS TOUTE GARANTIE IMPLICITE DE
QUALITE MARCHANDE ET D'ADEQUATION A UN USAGE
PARTICULIER LE CONCERNANT.
5. EXCLUSION DE GARANTIE PORTANT
SUR LE LOGICIEL
Vous reconnaissez et acceptez expressément que l'utilisation de ce LOGICIEL
est à vos propres risques. Le LOGICIEL et la documentation qui l'accompagne
sont livrés « EN L'ETAT », sans garantie d'aucune sorte. NONOBSTANT
TOUTE AUTRE DISPOSITION DU PRESENT CONTRAT, YAMAHA
EXCLUT DE LA PRESENTE GARANTIE PORTANT SUR LE LOGICIEL,
TOUTE RESPONSABILITE EXPRESSE OU IMPLICITE LE CONCERNANT,
Y COMPRIS, DE MANIERE NON LIMITATIVE, TOUTE GARANTIE
IMPLICITE DE QUALITE MARCHANDE, D'ADEQUATION A UN USAGE
PARTICULIER ET DE RESPECT DES DROITS DES TIERS. YAMAHA
EXCLUT EN PARTICULIER, MAIS DE MANIERE NON LIMITATIVE A CE
QUI PRECEDE, TOUTE GARANTIE LIEE A L'ADEQUATION DU
LOGICIEL A VOS BESOINS, AU FONCTIONNEMENT ININTERROMPU
OU SANS ERREUR DU PRODUIT ET A LA CORRECTION DES DEFAUTS
CONSTATES LE CONCERNANT.
6. RESPONSABILITE LIMITEE
LA SEULE OBLIGATION DE YAMAHA AUX TERMES DES PRESENTES
CONSISTE A VOUS AUTORISER A UTILISER CE LOGICIEL. EN AUCUN
CAS YAMAHA NE POURRA ETRE TENU RESPONSABLE, PAR VOUSMEME OU UNE AUTRE PERSONNE, DE QUELQUE DOMMAGE QUE CE
SOIT, NOTAMMENT ET DE MANIERE NON LIMITATIVE, DE
DOMMAGES DIRECTS, INDIRECTS, ACCESSOIRES OU CONSECUTIFS,
DE FRAIS, PERTES DE BENEFICES, PERTES DE DONNEES OU
D'AUTRES DOMMAGES RESULTANT DE L'UTILISATION CORRECTE
OU INCORRECTE OU DE L'IMPOSSIBILITE D'UTILISER LE LOGICIEL,
MEME SI YAMAHA OU UN DISTRIBUTEUR AGREE ONT ETE
PREVENUS DE L'EVENTUALITE DE TELS DOMMAGES. Dans tous les cas,
la responsabilité entière de Yamaha engagée à votre égard pour l'ensemble des
dommages, pertes et causes d'actions (que ce soit dans le cadre d'une action
contractuelle, délictuelle ou autre) ne saurait excéder le montant d'acquisition
du LOGICIEL.
7. LOGICIELS DE FABRICANTS TIERS
Des logiciels et données de fabricants tiers (« LOGICIELS DE FABRICANTS
TIERS ») peuvent être associés au LOGICIEL. Lorsque, dans la documentation
imprimée ou les données électroniques accompagnant ce logiciel, Yamaha
identifie un logiciel et des données comme étant un LOGICIEL DE
FABRICANT TIERS, vous reconnaissez et acceptez que vous avez l'obligation
de vous conformer aux dispositions de tout contrat fourni avec ce LOGICIEL
DE FABRICANT TIERS, et que la partie tierce fournissant le LOGICIEL DE
FABRICANT TIERS est responsable de toute garantie ou responsabilité liée à
ou résultant de ce dernier. Yamaha n'est en aucun cas responsable des
LOGICIELS DE FABRICANTS TIERS ou de l'utilisation que vous en faites.
• Yamaha exclut toute garantie expresse portant sur des LOGICIELS DE
FABRICANTS TIERS. DE SURCROIT, YAMAHA EXCLUT
EXPRESSEMENT TOUTE RESPONSABILITE IMPLICITE LIEE AU
LOGICIEL DE FABRICANT TIERS, Y COMPRIS, DE MANIERE NON
LIMITATIVE, TOUTE GARANTIE IMPLICITE DE QUALITE
MARCHANDE ET D'ADEQUATION A UN USAGE PARTICULIER LE
CONCERNANT.
• Yamaha ne vous fournira aucun service ni maintenance concernant le
LOGICIEL DE FABRICANT TIERS.
• En aucun cas Yamaha ne pourra être tenu responsable, par vous-même ou
une autre personne, de quelque dommage que ce soit, notamment et de
manière non limitative, de dommages directs, indirects, accessoires ou
consécutifs, de frais, pertes de bénéfices, pertes de données ou d'autres
dommages résultant de l'utilisation correcte ou incorrecte ou de
l'impossibilité d'utiliser le LOGICIEL DE FABRICANT TIERS.
8. REMARQUE GENERALE
Le présent contrat est régi par le droit japonais, à la lumière duquel il doit être
interprété, sans qu'il soit fait référence aux conflits des principes de loi. Conflits
et procédures sont de la compétence du tribunal de première instance de Tokyo,
au Japon. Si pour une quelconque raison, un tribunal compétent décrète que
l'une des dispositions de ce contrat est inapplicable, le reste du présent contrat
restera en vigueur.
9. CONTRAT COMPLET
Ce document constitue le contrat complet passé entre les parties relativement à
l'utilisation du LOGICIEL et de toute documentation imprimée l'accompagnant,
et remplace tous les accords ou contrats antérieurs, écrits ou oraux, portant sur
l'objet du présent accord. Aucun avenant ni aucune révision du présent contrat
n'auront force obligatoire s'ils ne sont pas couchés par écrit et revêtus de la
signature d'un représentant Yamaha agréé.
8 Accessory CD-ROM for Windows Installation Guide
Page 29

ATENCIÓN ACUERDO DE LICENCIA DE SOFTWARE
LEA ATENTAMENTE ESTE ACUERDO DE LICENCIA DE SOFTWARE (“ACUERDO”) ANTES DE UTILIZAR ESTE SOFTWARE. SÓLO PODRÁ UTILIZAR
ESTE SOFTWARE EN VIRTUD DE LOS TÉRMINOS Y CONDICIONES DEL PRESENTE ACUERDO. EL PRESENTE ES UN ACUERDO ENTRE USTED
(COMO PARTICULAR O COMO PERSONA JURÍDICA) Y YAMAHA CORPORATION (“YAMAHA”).
LA ROTURA DEL SELLO DE ESTE EMBALAJE SUPONE LA ACEPTACIÓN DE LOS TÉRMINOS DE ESTE ACUERDO. SI NO ESTÁ DE ACUERDO CON LOS
TÉRMINOS, NO INSTALE, NI COPIE NI UTILICE DE NINGÚN MODO ESTE SOFTWARE.
1. CESIÓN DE LICENCIA Y COPYRIGHT
Por el presente, Yamaha le otorga el derecho a utilizar una copia del programa y
de la información de software (“SOFTWARE”) que acompañan a este Acuerdo.
El término SOFTWARE abarca todas las actualizaciones del software y de la
información adjunta. El SOFTWARE es propiedad de Yamaha y/o sus
otorgantes de licencia, y se encuentra protegido por las leyes de copyright y todas
las provisiones de los tratados correspondientes. Si bien el usuario tiene derecho
a declararse propietario de los datos creados mediante el uso del SOFTWARE,
dicho SOFTWARE seguirá estando protegido por las leyes de copyright
pertinentes.
• Puede utilizar el SOFTWARE en un solo ordenador.
• Puede realizar una copia del SOFTWARE en formato para lectura mecánica
exclusivamente con fines de copia de seguridad, si el SOFTWARE se
encuentra en soportes en los que dicha copia de seguridad está permitida. En
la copia de seguridad, debe reproducirse el aviso de copyright de Yamaha y
cualquier otra inscripción de marca que conste en la copia original del
SOFTWARE.
• Puede transferir de forma permanente a un tercero todos sus derechos del
SOFTWARE, siempre y cuando no conserve ninguna copia y el destinatario
haya leído y aceptado los términos y condiciones del presente Acuerdo.
2. RESTRICCIONES
• No puede someter el SOFTWARE a tareas de ingeniería inversa con el fin
de investigar el secreto de fabricación, ni desmontar, descompilar o derivar
de cualquier otra manera un formato de código de origen del SOFTWARE
por ningún método.
• Está prohibida la reproducción, modificación, cambio, alquiler, préstamo o
distribución del SOFTWARE, en parte o en su totalidad, o la creación de
trabajos derivados del SOFTWARE.
• No puede transmitir electrónicamente el SOFTWARE de un ordenador a
otro, ni compartir el SOFTWARE con otros ordenadores conectados a una
red.
• No puede utilizar el SOFTWARE para distribuir información ilícita o que
vulnere la política pública.
• No puede iniciar servicios basados en el uso del SOFTWARE sin
autorización de Yamaha Corporation.
La información con copyright, que incluye sin limitaciones la información MIDI
para canciones, obtenida por medio del SOFTWARE, está sometida a las
restricciones que se indican a continuación y que el usuario debe acatar.
• La información recibida mediante el SOFTWARE no podrá utilizarse para
fines comerciales sin autorización del propietario del copyright.
• La información recibida mediante el SOFTWARE no puede duplicarse,
transferirse ni distribuirse, ni reproducirse ni interpretarse para ser
escuchada en público sin autorización del propietario del copyright.
• El cifrado de la información recibida mediante el SOFTWARE no podrá
eliminarse ni tampoco podrá modificarse la marca de agua electrónica
(watermark) sin autorización del propietario del copyright.
3. FINALIZACIÓN
El presente Acuerdo entrará en vigor el día en que el usuario reciba el
SOFTWARE y permanecerá vigente hasta su terminación. En el caso de
vulnerarse las leyes de copyright o las provisiones contenidas en el presente
Acuerdo, el presente Acuerdo se dará por terminado de forma automática e
inmediata, sin previo aviso de Yamaha. Una vez terminado el Acuerdo, el
usuario deberá destruir inmediatamente el SOFTWARE adquirido bajo licencia,
así como la documentación escrita adjunta y todas sus copias.
4. GARANTÍA LIMITADA DEL SOPORTE
Con respecto al SOFTWARE vendido en un soporte material, Yamaha garantiza
que el soporte material en el que está grabado el SOFTWARE no tendrá ningún
defecto en cuanto a materiales y fabricación en condiciones normales de uso y
por un período de catorce (14) días a partir de la fecha del recibo, como aparece
en la copia del recibo. La solución y la responsabilidad de Yamaha será la
sustitución del soporte defectuoso si se devuelve a Yamaha o a un distribuidor
autorizado de Yamaha dentro del período de catorce días con una copia del
recibo. Yamaha no se hará responsable de sustituir el soporte si se ha dañado por
accidente, abuso o mal uso. EN LA MEDIDA PERMITIDA POR LA LEY
APLICABLE, YAMAHA DENIEGA EXPRESAMENTE TODAS LAS
GARANTÍAS IMPLÍCITAS CON RESPECTO AL SOPORTE MATERIAL,
INCLUIDAS LAS GARANTÍAS IMPLÍCITAS DE COMERCIABILIDAD E
IDONEIDAD PARA UNA DETERMINADA FINALIDAD.
5. DENEGACIÓN DE GARANTÍA DEL
SOFTWARE
Usted conviene y acepta expresamente en que utilizará el SOFTWARE por su
cuenta y riesgo. El SOFTWARE y la documentación correspondiente se
suministran “TAL CUAL” y sin ninguna clase de garantía. SIN PERJUICIO DE
CUALESQUIERA OTRA DISPOSICIÓN CONTENIDA EN EL PRESENTE
ACUERDO, YAMAHA DENIEGA EXPRESAMENTE TODAS LAS
GARANTÍAS CON RESPECTO AL SOFTWARE, EXPRESAS, E
IMPLÍCITAS, INCLUIDO SIN LIMITACIONES LAS GARANTÍAS
IMPLÍCITAS DE COMERCIABILIDAD, IDONEIDAD PARA UNA
DETERMINADA FINALIDAD Y LA NO VULNERACIÓN DE DERECHOS
DE TERCEROS. DE MANERA CONCRETA, PERO SIN LIMITACIÓN DE
CUANTO ANTECEDE, YAMAHA NO GARANTIZA QUE EL SOFTWARE
SATISFAGA SUS REQUISITOS, QUE EL FUNCIONAMIENTO DEL
SOFTWARE SE REALICE SIN INTERRUPCIONES NI ERRORES, O QUE
LOS DEFECTOS DEL SOFTWARE PUEDAN SER CORREGIDOS.
6. RESPONSABILIDAD LIMITADA
LAS OBLIGACIONES DE YAMAHA EN VIRTUD DEL PRESENTE
ACUERDO SERÁN LAS DE PERMITIR EL USO DEL SOFTWARE EN
VIRTUD DE LOS TÉRMINOS DEL PRESENTE. YAMAHA NO SE
RESPONSABILIZARÁ EN NINGÚN CASO ANTE USTED NI ANTE OTRAS
PERSONAS DE DAÑOS, INCLUIDOS SIN LIMITACIONES LOS DIRECTOS,
INDIRECTOS, ACCESORIOS O EMERGENTES, NI DE GASTOS, PÉRDIDA
DE BENEFICIOS O DE DATOS NI DE CUALESQUIERA OTROS DAÑOS
DIMANANTES DEL USO, USO INDEBIDO O IMPOSIBILIDAD DE USO
DEL SOFTWARE, INCLUSO SI SE HA ADVERTIDO DE LA POSIBILIDAD
DE DICHOS DAÑOS A YAMAHA O A UN DISTRIBUIDOR AUTORIZADO.
En ningún caso la responsabilidad total de Yamaha en concepto de todos los
daños, pérdidas y derechos de acción (contractuales, torticeras o de cualquier
otra índole) podrá superar la suma pagada por el SOFTWARE.
7. SOFTWARE DE OTRAS MARCAS
Es posible adjuntar software e información de otras marcas (“SOFTWARE DE
OTRAS MARCAS”) al SOFTWARE. Si, en el material impreso o en la
información electrónica que acompaña al Software, Yamaha identificase
software e información pertenecientes a la categoría de SOFTWARE DE
OTRAS MARCAS, usted conviene y acepta en que deberá atenerse a las
provisiones contenidas en los Acuerdos suministrados con el SOFTWARE DE
OTRAS MARCAS y que la parte proveedora del SOFTWARE DE OTRAS
MARCAS se hará cargo de las garantías o asumirá las responsabilidades
relacionadas con o dimanantes del SOFTWARE DE OTRAS MARCAS. Yamaha
no se hace responsable del SOFTWARE DE OTRAS MARCAS ni del uso que
usted haga de él.
• Yamaha no ofrece garantías expresas con respecto al SOFTWARE DE
OTRAS MARCAS. ADEMÁS, YAMAHA DENIEGA EXPRESAMENTE
TODAS LAS GARANTÍAS IMPLÍCITAS, INCLUIDAS SIN
LIMITACIONES LAS GARANTÍAS IMPLÍCITAS DE
COMERCIABILIDAD E IDONEIDAD PARA UNA FINALIDAD
DETERMINADA, con respecto al SOFTWARE DE OTRAS MARCAS.
• Yamaha no prestará ningún servicio ni mantenimiento para el SOFTWARE
DE OTRAS MARCAS.
• Yamaha no se responsabilizará ante usted ni ante otras personas de los
daños, incluidos sin limitaciones los directos, indirectos, accesorios o
emergentes, ni de gastos, pérdida de beneficios o de datos ni de cualesquiera
otros daños dimanantes del uso, uso indebido o imposibilidad de uso del
SOFTWARE DE OTRAS MARCAS.
8. GENERAL
Este Acuerdo se interpretará y regirá de acuerdo con las leyes japonesas, con
independencia de los principios de conflicto de derecho. La vista de los
desacuerdos o procedimientos se realizará ante el Tribunal de Distrito de Tokio,
Japón. Si alguna de las cláusulas del presente Acuerdo fuese no ejecutoria en
virtud del dictamen de un tribunal competente, ello no afectará a las demás
cláusulas del Acuerdo y mantendrán plena vigencia.
9. ACUERDO COMPLETO
El presente Acuerdo contiene la totalidad de los acuerdos y pactos entre las
partes con respecto al uso del SOFTWARE y de los materiales impresos que
acompañan al mismo y sustituye a todos los demás acuerdos o contratos previos
o contemporáneos, escritos o verbales, que puedan existir en relación con el
contenido del presente Acuerdo. Las modificaciones o revisiones del presente
Acuerdo no serán vinculantes a menos que se efectúen por escrito y estén
firmadas por un representante autorizado de Yamaha.
Español
Accessory CD-ROM for Windows Installation Guide 8
Page 30

MEMO
English
Page 31

MEMO
Page 32

U.R.G., Pro Audio & Digital Musical Instrument Division, Yamaha Corporation
© 2007 Yamaha Corporation
Printed in Indonesia
WH88060 802CRZC.?-01B0
 Loading...