

Page 1
ZH
RU
IT
ES
FR
DE
EN
POCKETRAK C24 Owner’s Manual
1
Page 2

FCC INFORMATION (U.S.A.)
1. IMPORTANT NOTICE: DO NOT MODIFY THIS UNIT!
This product, when installed as indicated in
the instructions contained in this manual,
meets FCC requirements. Modifications not
expressly approved by Yamaha may void
your authority, granted by the FCC, to use
the product.
2. IMPORTANT: When connecting this prod-
uct to accessories and/or another product
use only high quality shielded cables. Cable/
s supplied with this product MUST be used.
Follow all installation instructions. Failure to
follow instructions could void your FCC
authorization to use this product in the USA.
3. NOTE: This product has been tested and
found to comply with the requirements listed
in FCC Regulations, Part 15 for Class “B”
digital devices. Compliance with these
requirements provides a reasonable level of
assurance that your use of this product in a
residential environment will not result in
harmful interference with other electronic
devices. This equipment generates/uses
radio frequencies and, if not installed and
used according to the instructions found in
the users manual, may cause interference
harmful to the operation of other electronic
* This applies only to products distributed by YAMAHA CORPORATION OF AMERICA. (class B)
devices. Compliance with FCC regulations
does not guarantee that interference will not
occur in all installations. If this product is
found to be the source of interference, which
can be determined by turning the unit “OFF”
and “ON”, please try to eliminate the problem by using one of the following measures:
Relocate either this product or the device
that is being affected by the interference.
Utilize power outlets that are on different
branch (circuit breaker or fuse) circuits or
install AC line filter/s.
In the case of radio or TV interference, relocate/reorient the antenna. If the antenna
lead-in is 300 ohm ribbon lead, change the
lead-in to co-axial type cable.
If these corrective measures do not produce
satisfactory results, please contact the local
retailer authorized to distribute this type of
product. If you can not locate the appropriate
retailer, please contact Yamaha Corporation
of America, Electronic Service Division,
6600 Orangethorpe Ave, Buena Park,
CA90620
The above statements apply ONLY to those
products distributed by Yamaha Corporation
of America or its subsidiaries.
This device complies with Part 15 of the FCC
Rules. Operation is subject to the following
two conditions:
(1) this device may not cause harmful interference, and (2) this device must accept any
interference received, including interference
that may cause undesired operation.
2
POCKETRAK C24 Owner’s Manual
CANADA
This Class B digital apparatus complies with
Canadian ICES-003.
Cet appareil numérique de la classe B est conforme à la norme NMB-003 du Canada.
• This applies only to products distributed by
Yamaha Canada Music Ltd.
• Ceci ne s’applique qu’aux produits distribués par Yamaha Canada Musique Ltée.
(class B)
Page 3

COMPLIANCE INFORMATION STATEMENT
(DECLARATION OF CONFORMITY PROCEDURE)
Responsible Party : Yamaha Corporation of America
Address : 6600 Orangethorpe Ave., Buena Park, Calif. 90620
Telephone : 714-522-9011
Type of Equipment : POCKET RECORDER
Model Name : POCKETRAK C24
This device complies with Part 15 of the FCC Rules.
Operation is subject to the following two conditions:
1) this device may not cause harmful interference, and
2) this device must accept any interference received including interference that may cause undesired operation.
See user manual instructions if interference to radio reception is suspected.
* This applies only to products distributed by YAMAHA CORPORATION OF AMERICA.
IMPORTANT
Please record the serial number of this unit in the space below.
Model
Serial No.
The serial number is located inside the battery compartment of the unit.
Retain this Owner’s Manual in a safe place for future reference.
* This applies o nly to products distributed
by YAMAHA CORPORATION OF AMERICA.
Entsorgung leerer Batterien (nur innerhalb Deutschlands)
Leisten Sie einen Beitrag zum Umweltschutz. Verbrauchte Batterien oder
Akkumulatoren dürfen nicht in den Hausmüll. Sie können bei einer Sammelstelle für Altbatterien bzw. Sondermüll abgegeben werden. Informieren Sie sich
bei Ihrer Kommune.
(Ser.No)
(battery)
(FCC DoC)
POCKETRAK C24 Owner’s Manual
3
Page 4
About MP3
• Supply of this product does not convey a license nor imply any right to distribute content created with this product in revenue-generating broadcast systems (terrestrial, satellite, cable and/
or other distribution channels), streaming applications (via Internet, intranets and/or other networks), other content distribution systems (pay-audio or audio-on-demand applications and
the like) or on physical media (compact discs, digital versatile discs, semiconductor chips, hard
drives, memory cards and the like). An independent license for such use is required. For details,
please visit http://mp3licensing.com.
• MPEG Layer-3 audio coding technology licensed from Fraunhofer IIS and Thomson.
4
POCKETRAK C24 Owner’s Manual
Page 5
PRECAUTIONS
PLEASE READ CAREFULLY BEFORE PROCEEDING
* Please keep this manual in a safe place for future reference.
DANGER
WARNING
CAUTION
These precautions include, but are not limited to, the following:
Make sure to always observe the basic precautions listed below to prevent the likelihood of serious
injury or even death from electrical shock, short-circuiting, damage, fire or other hazards.
Always follow the basic precautions listed below to avoid the possibility of serious injury or even death
from electrical shock, short-circuiting, damages, fire or other hazards.
Always follow the basic precautions listed below to avoid the possibility of physical injury to you or
others, or damage to the device or other property.
About the Device
DANGER
Handling caution
• Do not operate the device or use headphones/earphones while
driving a car or riding a motorcycle or a bicycle, since this could
result in a serious accident.
WARNING
Do not open
• Do not open the device or attempt to disassemble the internal
parts or modify them in any way. The device contains no userserviceable parts. If it should appear to be malfunctioning,
discontinue use immediately and have it inspected by qualified
Yamaha service personnel.
Water warning
• Do not expose the device to rain, use it near water or in damp or
wet conditions, or place containers near it containing liquids
which might spill into any openings. If any liquid such as water
seeps into the device, turn off the power immediately and unplug
the power cord from the AC outlet. Then have the device
inspected by qualified Yamaha service personnel.
If you notice any abnormality
• If this device should be dropped or damaged, immediately turn
off the power and have the device inspected by qualified Yamaha
service personnel.
CAUTION
Location
• Before moving the device, remove all connected cables.
• Do not expose the device to excessive dust or vibrations, or
extreme cold or heat (such as in direct sunlight, near a heater, or
in a car during the day) to prevent the possibility of panel
disfiguration or damage to the internal components.
• Do not place the device in an unstable position where it might
accidentally fall over.
• Do not use the device in the vicinity of a TV, radio, stereo
equipment, mobile phone, or other electric devices. Doing so
may result in noise, both in the device itself and in the TV or
radio next to it.
Handling caution
• Do not use the device or headphones/earphones for a long
period of time at a high or uncomfortable volume level, since this
can cause permanent hearing loss. If you experience any hearing
loss or ringing in the ears, consult a physician.
• Do not rest your weight on the device or place heavy objects on
it, and avoid use excessive force on the buttons, switches or
connectors.
Saving data
• Saved data may be lost due to malfunction or incorrect
operation. To protect against data loss, we recommend that you
save important data to an external device such as a computer.
(5)-6 1/3
POCKETRAK C24 Owner’s Manual
5
Page 6
About the Battery
DANGER
• If you notice battery leakage, discoloration,
deformation, or any strange smell, immediately
remove the battery from the device and stop operating,
and also keep away from fire.
If you continue operating the device, it could cause battery fire,
explosion, electrolyte blowout, or smoke. If a leaking battery is
close to a source of flame, the battery electrolyte could catch fire,
resulting in battery fire, explosion, electrolyte blowout, or smoke.
WARNING
• Do not leave the battery installed for an extended time.
If the battery runs out, or if the device is not to be used for a long
time (about one week), remove the battery from the device and
keep it in a dry and cool place to prevent possible leakage of the
battery fluid.
• Do not deform, disassemble, or modify the battery.
Any modifications such as deformation, disassembly, or
soldering directly to the battery terminals may cause ignition,
explosion, and leakage or ejection of the electrolyte.
• Do not allow a wire to connect the positive and
negative terminals, and do not carry or store the
battery together with metallic objects such as a
necklaces or hairpins.
Doing so may short-circuit the battery, causing excessive current
to flow, and possibly resulting in ignition, explosion, and leakage
or ejection of the electrolyte. This may also cause the wire or
necklace to heat up.
• Do not throw the battery into a fire, heat it, or expose it
to the sunlight for a long time.
Doing so may melt the insulation, impair the safety mechanism,
or ignite the electrolyte, causing ignition or explosion.
• Do not peel off or damage the external covering.
Peeling off the external covering, piercing it with a nail or sharp
object, striking it with a hammer, or stepping on it may cause a
short-circuit within the battery, causing ignition, explosion,
leakage or ejection of the electrolyte, or overheating.
• Insert the battery as instructed.
Always make sure the battery is inserted in conformity with the
+/- polarity markings. Failure to do so might cause abnormal
electric current flow in the battery, resulting in fire, explosion,
leakage or ejection of the electrolyte, or overheating in use.
6
POCKETRAK C24 Owner’s Manual
• Be sure to use the specified battery.
Do not replace the battery with any battery other than the one
specified (the same type or equivalent). Otherwise, the battery
may ignite or explode, the battery liquid may spout or leak, or the
unit may heat up.
• Do not leave the battery within reach of children.
A child may swallow the battery accidentally. Also, leaking
battery liquid may cause chemical reaction or inflammation. If a
child swallows the battery accidentally, consult a doctor
immediately.
CAUTION
• Do not remove the battery while the device is in use.
Do not remove the battery while the device is being used. Doing
so could corrupt the data or cause malfunctions.
• Check the battery capacity before recording or deleting
recorded material.
If the remaining battery capacity indication should run low during
recording, immediately stop recording, and install a fresh battery.
If the battery becomes exhausted during deletion, it will be
impossible to delete the recorded material.
If the battery fluid leaks
If the battery does leak, avoid contact with the leaked fluid. If the
battery fluid should come in contact with your eyes, mouth, skin, or
clothes, wash immediately with water and consult a doctor.
Battery fluid is corrosive and may possibly cause loss of sight or
chemical burns. Also if your skin should become inflamed when
contacted by battery fluid, consult a doctor.
(5)-6 2/3
Page 7
Information for Users on Collection and Disposal of Old Equipment and used Batteries
These symbols on the products, packaging, and/or accompanying documents mean that used electrical and electronic
products and batteries should not be mixed with general household waste.
For proper treatment, recovery and recycling of old products and used batteries, please take them to applicable collection
points, in accordance with your national legislation and the Directives 2002/96/EC and 2006/66/EC.
By disposing of these products and batteries correctly, you will help to save valuable resources and prevent any potential
negative effects on human health and the environment which could otherwise arise from inappropriate waste handling.
For more information about collection and recycling of old products and batteries, please contact your local municipality, your
waste disposal service or the point of sale where you purchased the items.
[For business users in the European Union]
If you wish to discard electrical and electronic equipment, please contact your dealer or supplier for further information.
[Information on Disposal in other Countries outside the European Union]
These symbols are only valid in the European Union. If you wish to discard these items, please contact your local authorities
or dealer and ask for the correct method of disposal.
Note for the battery symbol (bottom two symbol examples):
This symbol might be used in combination with a chemical symbol. In this case it complies with the requirement set by the
Directive for the chemical involved.
Yamaha cannot be held responsible for damage caused by improper use or modifications to the device, or data that is lost or destroyed.
Always turn the power off when the device is not in use.
The performance of components with moving contacts, such as switches, volume controls, and connectors, deteriorates over time. Consult
qualified Yamaha service personnel about replacing defective components.
Be sure to discard used batteries according to local regulations.
For France, maximum output voltage requirement, laid down in NF EN 50332-2:2003 standard as required by French Article L. 5232-1.: 150 mV
Copyrights
• Copying of the commercially available musical data is strictly prohibited except for your personal use.
• This owner’s manual is the exclusive copyrights of Yamaha Corporation.
• Windows is a registered trademark of Microsoft
• Apple, Mac and Macintosh are trademarks of Apple Inc., registered in the U.S. and other countries.
• The microSD and microSDHC logos are trademarks.
• The company names and product names in this manual are the trademarks or registered
trademarks of their respective companies.
®
Corporation in the United States and other countries.
The illustrations and LCD screens as shown in this manual are for instructional purposes only, and may appear somewhat different from those on
your instrument.
(5)-6 3/3
POCKETRAK C24 Owner’s Manual
7
Page 8

Contents
PRECAUTIONS........................................... 5
About the manuals.................................... 8
Introduction .............................................. 9
Features....................................................... 9
Accessories and attaching the mounting
clip ........................................................... 9
Names and functions................................. 11
About files, folders and memory ................ 12
Inserting a microSD card ........................... 15
About microSD cards................................. 15
Recording tips ........................................... 16
Quick Guide............................................. 18
1. Inserting a battery ................................. 18
2. Turning the power on or off .................. 19
3. Recording.............................................. 20
4. Playback ................................................ 21
5. Deleting ................................................ 22
Screens and Menu Settings.....................24
About the screens...................................... 24
About the menu settings ........................... 25
Setting the menu items ............................. 27
Setting the calendar .................................. 28
Using the Recorder with a Computer ..... 29
Computer system requirements ................. 29
Connecting the recorder to your
computer ............................................... 30
Loading audio files .................................... 31
Disconnecting the recorder from your
computer ............................................... 31
About the accessory disk.........................32
About the manuals
Operation of the POCKETRAK C24 is explained in the Owner’s Manual (this book) and also
in the Reference Manual (PDF file), which is stored in the internal memory of the recorder.
Owner’s Manual (this book): The Owner’s Manual includes information about safety
Reference Manual (PDF file): The Reference Manual includes detailed part names
The Reference Manual PDF file is stored in the internal memory of the recorder (see
page 12). You can view this file on a computer, if necessary.
To view the PDF file, you must first install Adobe Reader on your computer. Adobe Reader
can be downloaded for free at <http://www.adobe.com/>.
precautions, basic operation and setup.
and functions, troubleshooting information, and
detailed descriptions and procedures that will help you
take full advantage of the POCKETRAK C24.
8
POCKETRAK C24 Owner’s Manual
Page 9

Introduction
Features
• Light-weight, compact, and multi-function recorder
A compact body with a weight of 57g (2 ounces) encasing a built-in speaker, stereo microphone, and internal memory (2GB)
• Recording peak limiter
Automatically adjusts excessive mic input levels for distortion-free recording
• Tuner and metronome functions
Very useful in musical applications, such as musical instrument practices
• ALC (Auto Level Control) function
Automatically adjusts the recording level for easy recording
• VAS (Voice Activated System) function
Automatically triggers recording on the unit by detecting audio at a certain input level
(This function is useful when you want to record musical instrument practices.)
• Mounting clip included
Attaches the recorder to a microphone stand or music stand
• “Cubase AI” DAW software included
Enables you to edit and mix the recorded audio files
Accessories and attaching the mounting clip
• AAA-size alkaline battery x 1
• Mounting clip
• DVD-ROM
The disc includes “Cubase AI” DAW (digital audio workstation) software.
Please read “About the accessory disk” on page 32 before using the DVD-ROM package.
• Owner’s Manual
POCKETRAK C24 Owner’s Manual
9
Page 10
Introduction
CAUTION
CAUTION
Note:
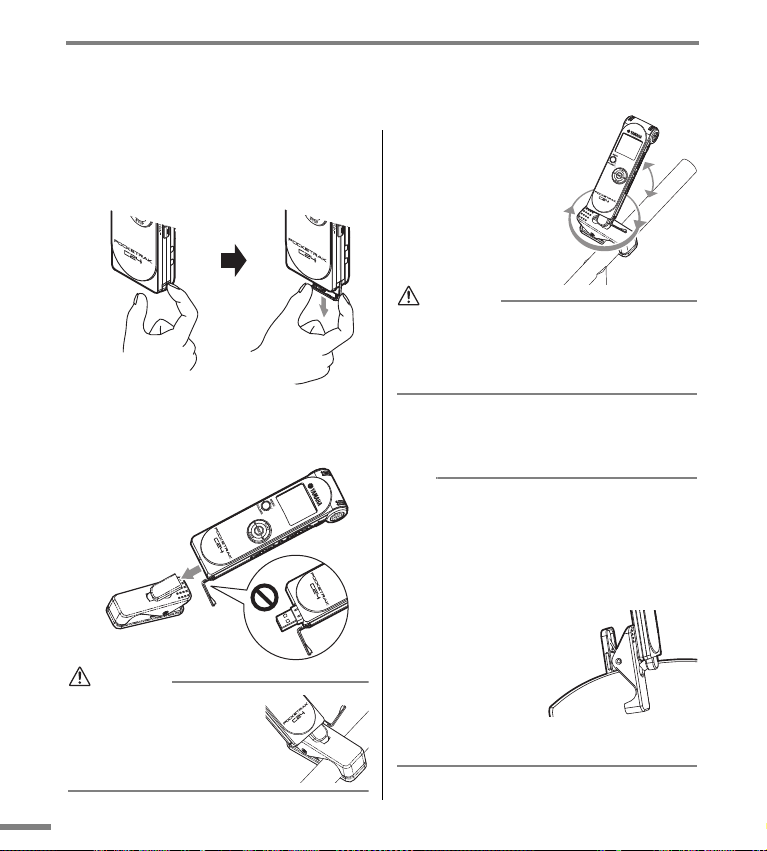
■ Attaching the mounting clip
You can attach the recorder to a microphone stand or music stand using the included mounting clip.
1. Open the USB plug compartment cover
by inserting the tip of your fingernail in
the groove between the cover and the
side of the recorder, and pulling the
cover out.
The pivotal projection rotates 360
degrees so that you
can position the
recorder at any
angle.
· Do not apply force to the recorder or mounting
clip. Do not rotate the recorder or mounting clip
unnecessarily or excessively. Otherwise, damage
to the mounting clip and/or injury to you or
other people may occur.
2. Leave the USB plug inside the compart-
ment as it is, and insert the pivotal projection on the mounting clip into the
USB plug compartment.
· Be sure to insert the projection all the way firmly, with
the USB plug retracted into
the compartment. Otherwise, the recorder may detach
from the mounting clip.
3. While holding the USB plug slide
switch at the top position, remove the
recorder from the mounting clip.
· When you remove the recorder from the mounting clip, the USB plug may pop out of the compartment. In this case, move the USB plug slide
switch toward the top (toward the built-in
microphone) to retract the USB plug.
· The mounting clip is dedicated to the POCKETRAK C24. Do not use it for other USB devices.
· If you attach the
mounting clip to a
music stand, mount
the clip onto the stand
all the way firmly.
· Be sure to avoid touching the joint part where
the lubricant is applied.
10
POCKETRAK C24 Owner’s Manual
Page 11
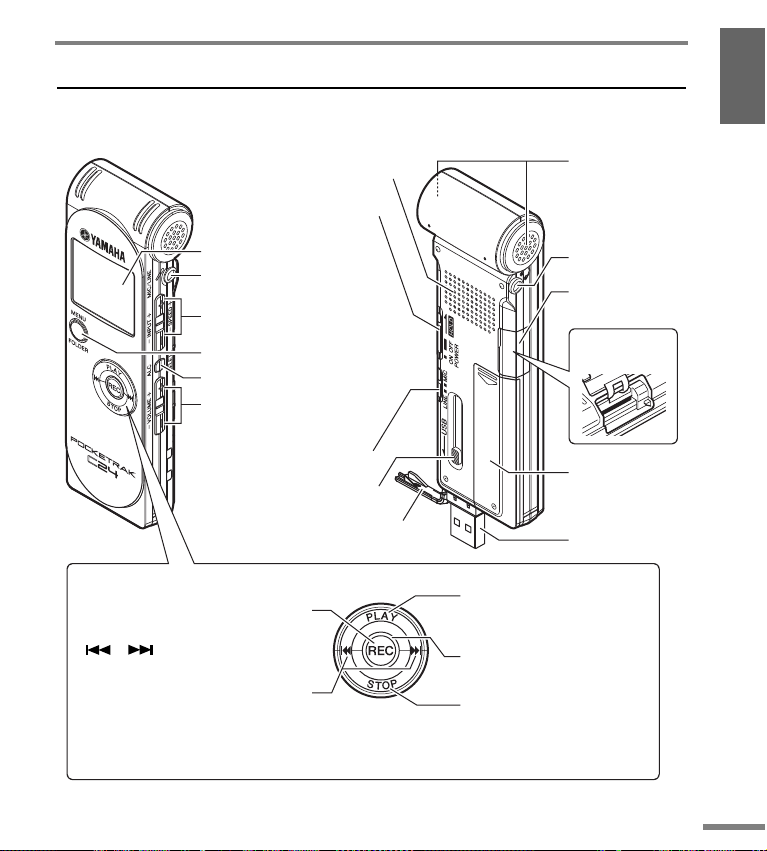
Introduction
Stereo microphone
LCD screen
MIC/LINE jack
INPUT/SPEED (+, –) buttons
VOLUME (+, –) buttons
MENU/FOLDER button
ALC/DELETE button
microSD card
slot
microSD card slot
cover
Battery cover
Speaker
PLAY button
Plays a file.
Press this button during the menu
setting operation to move the
cursor to the next item up.
LED indicator
Lights up red during recording,
and flashes red during excessive
peaks or recording standby
(factory default setting).
STOP button
Stops recording or playback.
Press this button during the menu
setting operation to move the
cursor to the next item down.
POWER/HOLD switch
MIC/LINE switch
USB plug slide switch
USB plug
USB plug compartment cover
REC button
Starts or pauses recording.
Press this button during the menu setting
operation to confirm the selection and
proceed to the next screen.
[ ]/[ ] (fast reverse, fast forward)
button
Press these buttons during playback to fast
reverse, fast forward or locate the
beginning of a file.
While the recorder is stopped, use these
buttons to select a file in the folders.
Press these buttons during the menu
setting operation to move to the next (right
or left) item or the next layer (up or down).
Headphones jack
Names and functions
Please refer to the PDF Reference Manual stored in the internal memory of the recorder for a
detailed explanation of part names and functions.
POCKETRAK C24 Owner’s Manual
11
Page 12

Introduction
I
n
t
e
r
n
a
l
m
e
m
o
r
y
m
i
c
r
o
S
D
c
a
r
d
F
o
l
d
e
r
F
o
l
d
e
r F
o
l
d
e
r
F
o
l
d
e
r
F
i
l
e
F
i
l
e
Folder name
A letter or icon in
parentheses ( ) will
appear on the LCD
as the folder name.
About files, folders and memory
■ Files and folders
One recorded session on the recorder is
called a “file.” Files are stored in a location
called a “folder.” A file is stored in one of the
following folders in the recorder’s internal
memory or on the microSD card.
From a connected computer, you can view all
recorder folders.
MIC (A–D) / MIC_(A–D)_SD:
These folders store audio files (in WAV or
MP3 format) recorded through the microphone on the recorder. There are four folders
(A–D). You can organize the files by folders.
For example, you can store musical performance files in folder A and conference
recording files in folder B so that it will be
easier for you to find desired files later.
LINE (L) / LINE (L)_SD:
These folders store files recorded from external devices via the line connection.
MUSIC (M):
This folder stores music and other audio files
(in MP3 or WMA format) transferred from a
connected computer.
12
POCKETRAK C24 Owner’s Manual
• PLAYLIST1–5 (P1–5)
The recorder offers five Playlist files (P1–5).
You can play your favorite songs in your
preferred order by creating Playlists using
the files stored in the MUSIC folder.
RECYCLE ( ):
This is the Recycle Bin folder.
DATA:
This folder stores data files. You can use the
recorder as a flash drive. (The folder name
will not be displayed on the recorder’s LCD.
This folder will be recognized only by a connected computer.)
MANUAL:
This folder stores the Owner’s Manual and
Reference Manual in PDF format. These manual files are organized in sub-folders by language. (The folder name will not be displayed
on the recorder’s LCD. This folder will be recognized only by a connected computer.)
If you initialize the internal memory, the
MANUAL folder will be erased in its entirety.
If necessary, download the latest manuals in
PDF format from the following website:
http://www.yamaha.co.jp/manual/
Page 13

Introduction
001A_091121_1200.MP3
1342 5
■ About the file naming rules
The recorder automatically names the
recorded files, in accordance with the file
naming rules shown below.
The recorder does not display the file number
1 or the folder type 2. You can view them
only via a connected computer.
1 File number (001–199)
2 Folder type (A–D: MIC folders A-D,
L: LINE folder)
3 Recording date (year, month, day)
4 Recorded time (hour, minute)
5 File format (MP3: MP3 recording, WAV:
PCM recording)
■ Memory
In addition to the internal memory, you can
also use a microSD card for recording and
playback.
As long as neither the maximum recording
time nor maximum number of files is
exceeded, you can use any folders and store
any number of files in each folder.
POCKETRAK C24 Owner’s Manual
13
Page 14

Introduction
microSD card
indicator
■ Selecting memory and a folder
• Selecting memory
1. Press and hold down the
[MENU/FOLDER] button
for at least two (2) seconds.
2. Press the [PLAY] button.
3. Press the [ ]/[ ] buttons to
select INT (internal memory) or SD
(microSD card), then press the [REC]
button.
The unit displays the [SELECT FOLDER]
screen for the selected memory, and the
cursor moves to folder A.
Select a folder.
If SD (microSD card) was selected, the
unit displays the indicator to the left of
the folder name.
• Selecting a folder
1. Press and hold down the
[MENU/FOLDER] button
for at least two (2) seconds.
2. Press the [PLAY], [STOP], or [ ]/
[ ] buttons to select the desired
folder, then press the [REC] button.
The unit switches to the selected folder.
If you selected any folder A-L or the Recycle Bin ( ), the unit will display the main
screen. If you selected folder M or any
folder P1–P5, the unit will display the list
screen.
14
POCKETRAK C24 Owner’s Manual
Page 15

Introduction
Note:
Inserting a microSD card
Besides the internal 2GB memory, you can
use a commercially-available microSD card
for recording and playback. You must format
commercially-available microSD cards before
you can use them for the first time (see
page 26, PDF reference manual).
1. Turn off the power to the recorder,
then open the microSD card slot cover.
2. Insert the card straight, in the direction
shown in the illustration, until it clicks.
3. Close the card slot cover.
4. Turn the power on.
“ ” appears on the LCD.
· If the recorder does not recognize the card,
remove the card, then insert the card again.
· The recorder may not recognize certain microSD
cards formatted by other devices, such as a
computer.
Be sure to format the card using the recorder
(See page 26, PDF reference manual).
To remove the card, open the slot cover and
push in the card gently. The card will be
ejected slightly. Pull out the card carefully.
About microSD cards
If you plan to use a microSD card, choose a
1GB – 2GB microSD card, or a 4GB – 16GB
microSDHC card (these cards are compatible
as of October 2009). However, some cards
(depending on the manufacturer or type of
card) may not work with the recorder.
For more information about microSD cards,
please visit the following Yamaha website:
http://www.yamahasynth.com/
Before using the microSD card
• Make sure that you insert the microSD card in the
recorder correctly. Otherwise, the recorder will not
record to or play from the microSD card.
• Do not apply too much force when you insert or
remove the microSD card. Otherwise, you might
injure your hand or finger or damage the card.
• If you insert the microSD card in the wrong orientation or upside down, the microSD card and/or the
card slot may be damaged.
• If the recorder does not recognize the installed
microSD card when the power to the unit is turned
on, first turn off the power, remove the card, insert
the card correctly, then turn the power on.
• Do not install or remove the microSD card while the
power to the unit is on. Otherwise, the data on the
microSD card may be damaged.
• Do not touch the terminal on the microSD card or
expose the card to water or dirt.
• Do not try to bend, fold or place a heavy object on
the microSD card.
• Do not use or keep the microSD card in a location
subject to static electricity or electric noise.
• Do not place the microSD card in the vicinity of corrosive chemicals or corrosive gas.
• Otherwise, the card may malfunction or data on the
card may be lost.
• Never place the microSD card within reach of small
children. A child may swallow the card accidentally.
• If you discard the microSD card without precautions, important or personal data that remains on
the card may become accessible to unauthorized
individuals. To avoid this risk, erase all data on the
card, destroy the card physically, then discard it.
POCKETRAK C24 Owner’s Manual
15
Page 16

Introduction
Recording tips
The recorder enables you to record audio at a superior level of quality by setting the Recording
mode, ALC (Auto Level Control) function, microphone sensitivity, recording peak limiter and
other functions. Please refer to the Reference Manual (PDF file) for information on the other
functions.
■ Recording mode
The recorder records audio in the MP3 or PCM (WAV) format. As a rule of thumb, select “PCM
44.1kHz/16 bit” (better sound quality) for the Recording mode to record a musical performance. Select “MP3 128kbps” (smaller data size) to record musical practice sessions or conference meetings. If you want to record audio at a much higher level of sound quality, select
“PCM 96kHz.”
Hint:
· In PCM mode, non-compressed audio data will be recorded. In MP3 mode, compressed audio data will
be recorded. If you choose an option that offers better sound quality, the data size will be larger and the
remaining available recording time will be shorter. Select a Recording mode that will suit your purposes,
based on your priorities (better sound quality or longer recording time).
· If you plan to create an audio CD from the recordings, select “PCM 44.1kHz/16 bit”.
Recording mode and application examples
Recording
format
PCM
MP3
Sampling frequency,
bit depth, bit rate
96kHz/16bit, 24bit
88.2kHz /16bit, 24bit
48kHz/16bit, 24bit
44.1kHz/16bit, 24bit
320kbps
192kbps
128kbps
64kbps
32kbps
File
extension
.WAV
.MP3
Application examples
Recording a musical performance,
creating a master recording, creating a CD, and recording other original sound sources
High-quality recording of musical
practice sessions, conference meetings, etc. compressed into a smaller
size file
Recordings for which extended
duration is more important than
sound quality (“32kbps” indicates a
monaural recording.)
Higher sound
quality
Standard
sound quality
Longer
recording time
16
POCKETRAK C24 Owner’s Manual
Page 17

Introduction
Estimated available recording time (with internal 2GB memory)
Recording
mode
88.2kHz About 1 hour 192kbps About 22 hours 30 minutes
24bit
PCM
* If you record multiple files, the total available recording time will be shorter than those estimated above.
* When you purchase the recorder, the manuals are stored in PDF format in the internal memory. Therefore, the actual
available recording time is less than estimated above.
* The largest available recording space (for continuous recording) in one file is 2GB.
44.1kHz About 2 hours 64kbps About 68 hours
88.2kHz About 1 hour 30 minutes
16bit
44.1kHz About 3 hours
Available recording
96kHz About 55 minutes
48kHz About 1 hour 50 minutes 128kbps About 34 hours
96kHz About 1 hour 25 minutes 32kbps About 136 hours
48kHz About 2 hours 50 minutes
time (estimated)
Recording
mode
320kbps About 13 hours 30 minutes
MP3
Available recording
time (estimated)
■ About the ALC (Auto Level Control) function
The Auto Level Control function automatically adjusts the recording level in response to the
source level so that the resulting recording will be tighter dynamically.
Feature
Application
The recording will accurately represent the original sound, and
maintain sound dynamics as is.
Musical performance and nature
recordings
ALC OFF ALC ON
The recording dynamics will be adjusted. Louder sounds
will be quieter and softer sounds will be louder. This setting
will reduce distortion and is better for recording dictation.
Musical practice, conference meetings and interview
recordings
■ Microphone sensitivity
You can set the microphone sensitivity level to high or low to accommodate the recording environment.
If the recorded audio level is too low or too high, change the microphone sensitivity setting.
Setting the microphone sensitivity
Press the [MENU/FOLDER] button while the main screen is displayed, select [REC MENU] → [MIC SENS], then
select [HIGH] or [LOW]. If the volume level is too low, select [HIGH]. If the volume level is too high, set [MIC
SENS] to [LOW].
■ Recording peak limiter
When the recording peak limiter is set to ON, the recorder reduces sound distortion by automatically adjusting excessive peaks. It is recommended that you set the limiter to ON when you record audio.
Setting the recording peak limiter
Press the [MENU/FOLDER] button while the main screen is displayed, select [REC MENU] → [REC LIMITER],
then select [ON]. The peak limiter is available only when the ALC function is set to OFF.
POCKETRAK C24 Owner’s Manual
17
Page 18

Quick Guide
1. Open the battery
cover.
2. Insert the supplied alkaline
battery.
Note:
· Insert the battery with the + and –
ends in the correct orientation.
· You can use a AAA-size nickelmetal hydride battery. However,
you cannot charge the nickel-metal
hydride battery using the unit.
3. Close the battery
cover.
AAA-size alkaline battery x1
lowfull
Remaining battery power
1. Inserting a battery
Remaining battery power
When the battery power falls to a low level, the recorder will
display the message “LOW BATTERY!.” At this time, replace
the battery with a new one.
Battery life (of an alkaline battery used for recording
to the internal memory)
PCM 96kHz, 24bit About 7 hours
PCM 44.1kHz, 16bit About 16 hours
MP3 64kbps About 26 hours
* The above estimate is based on the following assumptions: LED
off, backlight off, no recording monitoring, the ALC function on.
* Battery life varies depending on the type and manufacturer of
the battery, storage conditions, usage, ambient temperature, etc.
18
POCKETRAK C24 Owner’s Manual
Page 19

2. Turning the power on or off
Note:
at least
2 sec
Turning the power on
Slide the [POWER] switch to the [ON] position
(in the direction of the thick arrow in the figure).
· If you leave the recorder turned on for a specified period
of time without using it, the recorder will automatically
turn off (the default setting is “15min”).
· When you turn the power on for the first time, set the
calendar (see page 28).
· If a large-capacity (such as 16GB) microSD card is
inserted into the recorder, it will take some time for the
recorder to start up.
Turning the power off
Slide the [POWER] switch to the [ON] position (in the
direction of the thick arrow in the figure) and hold it for
at least two (2) seconds.
Preventing accidental operation
(Hold function)
If you set the [POWER] switch to [HOLD], the unit will
display “HOLD ON” and the control buttons will be disabled.
If you set the [POWER] switch to its original position,
the unit will display “HOLD OFF” and the Hold function
will be canceled.
Quick Guide
POCKETRAK C24 Owner’s Manual
19
Page 20

Quick Guide
Note:
ALC On
3. Recording
For more information on recording preparation, refer to “Recording tips” on page 16. Please
refer to the Reference Manual (PDF file) for information on recording musical performances or
recording through an external microphone.
Starting recording
1. Press the [ALC/DELETE] button to display on the LCD.
The ALC function is turned on.
· The ALC (Auto Level Control) function automatically adjusts the recording level in response to the mic
input volume level during recording.
2. Press the [REC] button.
The REC LED lights up red and recording begins.
Pausing recording
Press the [REC] button during recording.
Press the [REC] button again to resume recording.
Stopping recording
Press the [STOP] button.
20
POCKETRAK C24 Owner’s Manual
Page 21

4. Playback
Note:
File number
Folder name
Total file number
File name
Starting playback
Press the [PLAY] button.
The recorder starts playing the file.
· To select a file in the folder (see page 12), press the
t
]/[Y] buttons while the recorder is stopped.
[
Adjusting the volume level
Press the [VOLUME] +/– buttons.
Quick Guide
Stopping playback
Press the [STOP] button.
Press the [PLAY] button again to resume playback
from that point.
POCKETRAK C24 Owner’s Manual
21
Page 22

Quick Guide
Note:
at least
2 sec
5. Deleting
Deleting a selected file
1. Select a file to delete (see page 23), then press the
[ALC/DELETE] button located on the side panel for
at least two (2) seconds.
2. When the [DELETE MENU] screen is displayed,
press the [PLAY] or [STOP] button to select [FILE], then press
the [REC] button.
3. When the [DELETE FILE] screen is displayed, press the [ ]/
[ ] buttons to select [DELETE], then press the [REC] button.
The unit displays the message “DELETING…” and the file is deleted.
If the Recycle Bin function is active (factory default setting), the file
will move to the Recycle Bin (see page 23). When the unit displays
“MOVED TO RECYCLE BIN,” press the [REC] button to return to the
main screen.
· To delete all files along with the folder, select [FOLDER] instead of [FILE] in Step 2.
22
POCKETRAK C24 Owner’s Manual
Page 23

Selecting a folder or file
Note:
File number
Total file number
File name
1. Press and hold down the [MENU/FOLDER] button for at least two (2) seconds.
2. Press the [PLAY], [STOP], or [ ]/[ ] buttons to select a folder from which to
delete a file, then press the [REC] button.
· For more information about the folders, refer to “About files, folders and memory” on page 12.
3. Press the [ ]/[ ] buttons to select a
file to delete.
■ Managing the Recycle Bin
If you delete a file on the recorder while the Recycle Bin function is active, the file will be moved
to the Recycle Bin ( ) folder temporarily so that you can restore it later if necessary. In this
way, you do not have to worry about deleting a file accidentally.
When you purchase the recorder, the Recycle Bin function is already activated.
• The Recycle Bin folder can accommodate up to 199 files. If the Recycle Bin folder is full, you
cannot delete any more files. In this event, move some files from the Recycle Bin folder to the
original folder (see PDF reference manual) or empty the Recycle Bin folder.
• When the Recycle Bin is full, you must empty it to increase the remaining recording
time. Otherwise, if the available memory capacity is insufficient, you may be unable to
record. Empty the Recycle Bin regularly (see PDF reference manual).
• You cannot move files from the M folder to the Recycle Bin folder, regardless of
whether the Recycle Bin function is on or off. These files will be deleted completely by
the delete operation.
Quick Guide
POCKETRAK C24 Owner’s Manual
23
Page 24

Screens and Menu Settings
Note:
About the screens
[Main screen]
Appears when the power to the unit is turned
on.
Press the [STOP] button repeatedly to select
one of the indicators for the file in the following order (if the playback file exists).
• When one of folders A-D is selected:
Main screen → [REC DATE & TIME]
(Recording date & time) → [REC REMAIN
TIME] (Remaining recording time) →
[DATE & TIME] (Current time) →
[TOTAL TIME] (Total playback time) →
Main screen
• When folder M is selected:
Main screen → [DATE & TIME] (Current
time) → [TOTAL TIME] (Total playback
time) →Main screen
[Menu screen]
Appears when you press the [MENU/
FOLDER] button while the main screen is displayed.
This screen enables you to change Recording
mode, set the date and time, initialize the
recorder, and make various other settings.
For details, see pages 25–28.
· Press the [MENU/FOLDER] button to return to
the main screen.
24
POCKETRAK C24 Owner’s Manual
Page 25

Screens and Menu Settings
About the menu settings
List of menus and menu items
Menu items are categorized into six menus: [TUNER] (Tuner settings), [METRONOME] (Metronome settings), [REC MENU] (Recording settings), [PLAY MENU] (Playback settings), [COMMON MENU] (Global settings), and [EDIT MENU] (Edit settings).
[TUNER] (Tuner settings)
Menu items Description
[START] Starts the tuner’s pitch analysis.
[CALIBRATE] Sets the standard pitch (frequency).
[METRONOME] (Metronome settings)
Menu items Description
[START] Starts the metronome.
[TEMPO] Sets the metronome tempo.
[BEAT] Sets the metronome beat pattern.
[RECORD] Sets the metronome sound used for recording.
[REC MENU] (Recording settings)
Menu items Description
[REC MODE] Sets the recording quality.
[MIC SENS] Sets the microphone sensitivity high or low.
[HPF] Turns the High Pass (Low Cut) Filter on or off.
[REC LIMITER] Turns the recording peak limiter on or off.
[REC PEAK HOLD] Sets the recording peak hold time.
[EXTERNAL MIC] Selects a source connected to the external input jack.
[AUTO DIVIDE]
[SELF TIMER] Sets the time for the Self Timer recording.
[VAS] Turns the VAS (Voice activated system) on or off.
Divides a file automatically after a certain period of silence during recording.
POCKETRAK C24 Owner’s Manual
25
Page 26

Screens and Menu Settings
[PLAY MENU] (Playback settings)
Menu items Description
[TIME SEARCH] Specifies the time position of the playback start point.
[REPEAT] Sets the Repeat mode.
[PHRASE PLAY]
[SKIP PLAY]
[SOUND EQ] Adjusts the tone.
Sets the Phrase playback time (the number of seconds by which the playback point will be moved back).
Sets the Skip playback time (the amount of time by which the playback
point will skip).
[COMMON MENU] (Global settings)
Menu items Description
[BEEP SOUND] Sets the beep sound.
[REC LED] Sets the recording indicator.
[DATE & TIME] Sets the calendar (date and time).
[TIMER & ALARM] Sets the recording timer and playback timer (alarm).
[AUTO OFF] Sets the Auto Power Off function.
[BACKLIGHT] Sets the LCD backlight.
[CONTRAST] Adjusts the LCD contrast.
[RECYCLE BIN] Turns the Recycle Bin function on or off.
[FORMAT] Formats the internal memory or a microSD card (erases all data).
[MENU RESET] Initializes the menu settings.
[VERSION] Indicates the firmware version information.
[EDIT MENU] (Edit settings)
Menu items Description
[DIVIDE] Divides a file into two at the specified point.
[FADE IN] Applies a fade-in effect to the recorded file.
[FADE OUT] Applies a fade-out effect to the recorded file.
26
POCKETRAK C24 Owner’s Manual
Page 27

Screens and Menu Settings
Setting the menu items
The following section explains how to set the menu items. The example here describes how to
select “MP3 128kbps” for the Recording mode.
1. While the main screen is
displayed, press the
[MENU/FOLDER] button.
2. Press the [PLAY] or [STOP] button to
select [REC MENU], then press the
[REC] button.
3. Press the [PLAY] or [STOP] button to
select [REC MODE], then press the
[REC] button.
4. Press the [PLAY], [STOP], or [ ]/
[ ] buttons to select [MP3], then
press the [REC] button.
5. Press the [PLAY] or [STOP] buttons to
select [128 kbps], then press the [REC]
button.
6. Press the [MENU/
FOLDER] button twice.
The unit displays the main
screen.
POCKETRAK C24 Owner’s Manual
27
Page 28

Screens and Menu Settings
Setting the calendar
1. While the main screen is
displayed, press the
[MENU/FOLDER] button.
2. Press the [PLAY] or [STOP] button to
select [COMMON MENU], then press
the [REC] button.
3. Press the [PLAY] or [STOP] button to
select [DATE & TIME], then press the
[REC] button.
4. Press the [PLAY] or [STOP] button to
set the year, then press the [ ] button.
5. In the same way, set the month, day,
24/12-hour indication (24H or AM/
PM), hour and minute, then press the
[REC] button.
The calendar setting is complete.
6. Press the [MENU/FOLDER] button
twice.
The unit displays the main screen.
28
POCKETRAK C24 Owner’s Manual
Page 29

Using the Recorder with a Computer
Note:
You can transfer audio files stored in the internal memory or on a microSD card to a computer
by connecting the recorder directly to the computer. Transferred files are compatible for playback with Windows Media Player and iTunes. You can edit files using the included “Cubase AI”
DAW software. You can also transfer audio files from a computer to the recorder for playback.
Computer system requirements
Windows
Computer: Windows-based computer with built-in USB interface
OS: Windows 7, Vista, XP Professional/Home Edition
Macintosh
Computer: Macintosh computer with built-in USB interface
OS: Mac OS X 10.4, 10.5, 10.6
· Visit the web site below for the latest information on system requirements:
http://www.yamahasynth.com/
· The screens, menu items and buttons displayed on your computer may not exactly match those shown in
this manual, depending on the OS version or manufacturer of your computer. (This manual uses Windows XP and Mac OS X as examples.)
POCKETRAK C24 Owner’s Manual
29
Page 30

Using the Recorder with a Computer
1 Select
2 Click
Connecting the recorder to your computer
1. Open the USB plug compartment
cover, then move the USB plug slide
switch toward the bottom (in the direction of the arrow) so that the USB plug
will pop out.
2. Make sure the recorder is turned off,
and then connect the USB plug to the
USB terminal on the computer.
If nothing appears on the computer display,
follow the steps below:
• Exit (quit) all running applications.
• Disconnect all external USB devices
(excluding a properly working mouse and
keyboard), then connect only the recorder.
• If the computer features multiple USB terminals, use a different USB terminal to
connect the recorder.
• If the recorder is connected via a bus-powered USB hub, remove the hub, then connect the recorder directly to the
computer’s USB terminal.
Precautions when using the USB plug
Be sure to observe the following points when
connecting to the computer’s USB interface.
If you do not observe these points, you risk freezing the computer, corrupting the data, and losing
the data. If the computer or the recorder freezes,
restart the application software such as Windows
Media Player or OS.
• Never disconnect the USB plug while data is
being transferred.
• Be sure to wake the computer from sleep/
suspended/standby mode before making a
connection to the computer’s USB terminal.
• Quit all applications running on the computer before connecting or disconnecting
the USB plug.
About the AutoPlay dialog box
If the system displays the AutoPlay dialog box
when you connect the recorder to the computer, click to select [Open folder to view
files], then click [OK]. The system will display
the recorder’s folders.
30
POCKETRAK C24 Owner’s Manual
Page 31

Using the Recorder with a Computer
Loading audio files
Windows:
1. Connect the recorder to the computer.
2. Open [My Computer] from the [start] menu.
3. Double-click [PRC24] or [PRC24SD].
4. Double-click the folder that contains the file that you wish to load to your computer.
5. Copy the file to the desired location on the computer.
Macintosh:
1. Connect the recorder to the computer.
2. Double-click the drive icon [PRC24] or [PRC24SD] of the recorder that appears on the desk-
top.
3. Double-click the folder that contains the file that you wish to load to your computer.
4. Copy the file to the desired location on the computer.
Transferring audio files from the computer to the recorder
In Step 4 (for Windows) or Step 3 (for Macintosh), drag and drop the audio files that you
wish to transfer (such as MP3 files or WMA files) into the [MUSIC] folder. The MUSIC (M)
folder stores music and other audio files transferred from a connected computer.
Before transferring audio files to the MIC (A–D) folders or LINE (L) folder, rename the files
following the file naming rules (see page 13). The unit will not play files that do not comply
with the file naming rules, unless they are in the MUSIC (M) folder.
Disconnecting the recorder from your computer
Windows:
1. Click “ ” on the taskbar at the bottom
right on the Windows screen, then click
[Safely remove USB Mass Storage Device].
2. After the computer displays the message
shown on the right, disconnect the USB
plug.
Macintosh:
1. Drag and drop the drive icon [PRC24] or [PRC24SD] of the recorder on the desktop into the
Trash Can.
2. After the drive icon [PRC24] or [PRC24SD] disappears from the desktop, disconnect the USB
plug.
POCKETRAK C24 Owner’s Manual
31
Page 32

About the accessory disk
SPECIAL NOTICE
• The software included in the accessory disk
and the copyrights thereof are under exclusive
ownership by Steinberg Media Technologies
GmbH.
• Copying of the software or reproduction of this
manual in whole or in part by any means is
expressly forbidden without the written consent of the manufacturer.
• Yamaha makes no representations or warranties with regard to the use of the software and
documentation and cannot be held responsible for the results of the use of this manual and
the software.
• This disk is NOT for audio/visual purpose. Do
not attempt to play the disk on an audio/visual
CD/DVD player. Doing so may result in irreparable damage to your player.
• For information about the minimum system
requirements and latest information of the
software in the disk, check the web site below.
<http://www.yamahasynth.com/>
^
• Note that Yamaha does not offer technical support for the DAW software in the accessory
disk.
About the DAW software in the accessory disk
The accessory disk contains DAW software both
for Windows and Macintosh.
NOTE:
· Make sure to install DAW software under the
“Administrator” account.
· In order to have continuous use of the DAW
software in the accessory disk, including support and other benefits, you will need to register the software and activate your software
license by starting it while the computer is connected to the Internet. Click the “Register
Now” button shown when the software is
started, then fill in all required fields for registration. If you do not register the software, you
will be unable to use it after a limited period of
time expires.
For information about the minimum system
requirements and latest information on the software in the disk, check the web site below.
<http://www.yamahasynth.com/>
About software support
Support for the DAW software in the accessory
disk is provided by Steinberg on its website at the
following address.
http://www.steinberg.net
You can visit the Steinberg site also via the Help
menu of the included DAW software. (The Help
menu also includes the PDF manual and other
information on the software.)
32
POCKETRAK C24 Owner’s Manual
Page 33

Page 34

For details of products, please contact your nearest Yamaha representative or the authorized distributor listed below.
FRANCE
NORTH AMERICA
CANADA
Yamaha Canada Music Ltd.
135 Milner Avenue, Scarborough,
Ontario, M1S 3R1, Canada
Tel: 416-298-1311
U.S. A.
Yamaha Corporation of America
6600 Orangethorpe Ave., Buena
Park, Calif. 90620, U.S.A.
Tel: 714-522-9011
CENTRAL & SOUTH
AMERICA
MEXICO
Yamaha de México S.A. de C.V.
Calz. Javier Rojo Gómez #1149,
Col. Guadalupe del Moral
C.P. 09300, México, D.F., México
Tel: 55-5804-0600
BRAZIL
Yamaha Musical do Brasil Ltda.
Rua Joaquim Floriano, 913 - 4'
andar, Itaim Bibi, CEP 04534-013
Sao Paulo, SP. BRAZIL
Tel: 011-3704-1377
ARGENTINA
Yamaha Music Latin America,
S.A.
Sucursal de Argentina
Olga Cossettini 1553, Piso 4 Norte
Madero Este-C1107CEK
Buenos Aires, Argentina
Tel: 011-4119-7000
PANAMA AND OTHER LATIN
AMERICAN COUNTRIES/
CARIBBEAN COUNTRIES
Yamaha Music Latin America,
S.A.
Torre Banco General, Piso 7,
Urbanización Marbella,
Calle 47 y Aquilino de la Guardia,
Ciudad de Panamá, Panamá
Tel: +507-269-5311
EUROPE
THE UNITED KINGDOM/
IRELAND
Yamaha Music U.K. Ltd.
Sherbourne Drive, Tilbrook, Milton
Keynes, MK7 8BL, England
Tel: 01908-366700
GERMANY
Yamaha Music Europe GmbH
Siemensstraße 22-34, 25462
Rellingen, Germany
Tel: 04101-3030
SWITZERLAND/
LIECHTENSTEIN
Yamaha Music Europe GmbH
Branch Switzerland in Zürich
Seefeldstrasse 94, 8008 Zürich,
Switzerland
Tel: 01-383 3990
AUST RIA
Yamaha Music Europe GmbH
Branch Austria
Schleiergasse 20, A-1100 Wien,
Austria
Tel: 01-60203900
CZECH REPUBLIC/SLOVAKIA/
HUNGARY/SLOVENIA
Yamaha Music Europe GmbH
Branch Austria
Schleiergasse 20, A-1100 Wien,
Austria
Tel: 01-602039025
POLAND/LITHUANIA/LATVIA/
ESTONIA
Yamaha Music Europe GmbH
Branch Sp.z o.o. Oddzial w Polsce
ul. 17 Stycznia 56, PL-02-146
Warszawa, Poland
Tel: 022-868-07-57
THE NETHERLANDS/
BELGIUM/LUXEMBOURG
Yamaha Music Europe Branch
Benelux
Clarissenhof 5-b, 4133 AB Vianen,
The Netherlands
Tel: 0347-358 040
Yamaha Musique France
BP 70-77312 Marne-la-Vallée
Cedex 2, France
Tel: 01-64-61-4000
ITALY
Yamaha Musica Italia S.P.A.
Combo Division
Viale Italia 88, 20020 Lainate
(Milano), Italy
Tel: 02-935-771
SPAIN/PORTUGAL
Yamaha Música Ibérica, S.A.
Ctra. de la Coruna km. 17, 200,
28230 Las Rozas (Madrid), Spain
Tel: 91-639-8888
GREECE
Philippos Nakas S.A. The Music
House
147 Skiathou Street, 112-55 Athens,
Greece
Tel: 01-228 2160
SWEDEN
Yamaha Scandinavia AB
J. A. Wettergrens Gata 1, Box
30053 S-400 43 Göteborg, Sweden
Tel: 031 89 34 00
DENMARK
YS Copenhagen Liaison Office
Generatorvej 6A, DK-2730 Herlev,
Denmark
Tel: 44 92 49 00
FINLAND
F-Musiikki Oy
Kluuvikatu 6, P.O. Box 260,
SF-00101 Helsinki, Finland
Tel: 09 618511
NORWAY
Norsk filial av Yamaha
Scandinavia AB
Grini Næringspark 1, N-1345
Østerås, Norway
Tel: 67 16 77 70
Page 35

ICELAND
Skifan HF
Skeifan 17 P.O. Box 8120, IS-128
Reykjavik, Iceland
Tel: 525 5000
RUSSIA
Yamaha Music (Russia)
Office 4015, entrance 2, 21/5
Kuznetskii Most street, Moscow,
107996, Russia
Tel: 495 626 0660
OTHER EU ROPE AN
COUNTRIES
Yamaha Music Europe GmbH
Siemensstraße 22-34, 25462
Rellingen, Germany
Tel: +49-4101-3030
AFRICA
Yamaha Corporation,
Asia-Pacific Music Marketing
Group
Nakazawa-cho 10-1, Naka-ku,
Hamamatsu, Japan 430-8650
Tel: +81-53-460-2312
MIDDLE EAST
TURKEY/CYPRUS
Yamaha Music Europe GmbH
Siemensstraße 22-34, 25462
Rellingen, Germany
Tel: 04101-3030
OTHER COUNTRIES
Yamaha Music Gulf FZE
LOB 16-513, P.O.Box 17328, Jubel
Ali, Dubai, United Arab Emirates
Tel: +971-4-881-5868
ASIA
THE PEOPLE’S REPUBLIC OF
CHINA
Yamaha Music & Electronics
(China) Co.,Ltd.
2F, Yunhedasha, 1818 Xinzha-lu,
Jingan-qu, Shanghai, China
Tel: 021-6247-2211
HONG KONG
Tom Lee Music Co., Ltd.
11/F., Silvercord Tower 1, 30
Canton Road, Tsimshatsui,
Kowloon, Hong Kong
Tel: 2737-7688
INDIA
Yamaha Music India Pvt. Ltd.
5F Ambience Corporate Tower
Ambience Mall Complex
Ambience Island, NH-8, Gurgaon122001, Haryana, India
Tel: 0124-466-5551
INDONESIA
PT. Yamaha Music Indonesia
(Distributor) PT. Nusantik
Gedung Yamaha Music Center,
Jalan Jend. Gatot Subroto Kav. 4,
Jakarta 12930, Indonesia
Tel: 21-520-2577
KOREA
Yamaha Music Korea Ltd.
8F, 9F, Dongsung Bldg. 158-9
Samsung-Dong, Kangnam-Gu,
Seoul, Korea
Tel: 080-004-0022
MALAYSIA
Yamaha Music Malaysia, Sdn.,
Bhd.
Lot 8, Jalan Perbandaran, 47301
Kelana Jaya, Petaling Jaya,
Selangor, Malaysia
Tel: 3-78030900
PHILIPPINES
Yupangco Music Corporation
339 Gil J. Puyat Avenue, P.O. Box
885 MCPO, Makati, Metro Manila,
Philippines
Tel: 819-7551
SINGAPORE
Yamaha Music Asia Pte., Ltd.
#03-11 A-Z Building 140 Paya
Lebor Road, Singapore 409015
Tel: 747-4374
TAI WA N
Yamaha KHS Music Co., Ltd.
3F, #6, Sec.2, Nan Jing E. Rd.
Taipei. Taiwan 104, R.O.C.
Tel: 02-2511-8688
THAILAND
Siam Music Yamaha Co., Ltd.
4, 6, 15 and 16th floor, Siam Motors
Building, 891/1 Rama 1 Road,
Wangmai, Pathumwan, Bangkok
10330, Thailand
Tel: 02-215-2626
OTHER ASIAN COUNTRIES
Yamaha Corporation,
Asia-Pacific Music Marketing
Group
Nakazawa-cho 10-1, Naka-ku,
Hamamatsu,
Japan 430-8650
Tel: +81-53-460-2317
OCEANIA
AUSTRALIA
Yamaha Music Australia Pty. Ltd.
Level 1, 99 Queensbridge Street,
Southbank, Victoria 3006, Australia
Tel: 3-9693-5111
NEW ZEALAND
Music Works LTD
P.O.BOX 6246 Wellesley, Auckland
4680, New Zealand
Tel: 9-634-0099
COUNTRIES AND TRUST
TERRITORIES IN PACIFIC
OCEAN
Yamaha Corporation,
Asia-Pacific Music Marketing
Group
Nakazawa-cho 10-1, Naka-ku,
Hamamatsu, Japan 430-8650
Tel: +81-53-460-2312
HEAD OFFICE Yamaha Corporation, Pro Audio & Digital Musical Instrument Division
SY51
Nakazawa-cho 10-1, Naka-ku, Hamamatsu, Japan 430-8650
Tel: +81-53-460-2432
Page 36

Yamaha Web Site (English only)
http://www.yamahasynth.com/
Yamaha Manual Library
http://www.yamaha.co.jp/manual/
U.R.G., Pro Audio & Digital Musical Instrument Division, Yamaha Corporation
© 2009 Yamaha Corporation
1AJ6P1P0071-A 004IP-B0
 Loading...