

Yamaha BD-S477 Owners Manual
Blu-ray Disc Player
Lecteur Blu-ray Disc
BD-S477
Owner’s Manual
Mode d’emploi
U
English Français
USB
IMPORTANT SAFETY INSTRUCTIONS
Read these operating instructions carefully before using the unit. Follow the safety instructions on the unit and the applicable safety
instructions listed below. Keep these operating instructions handy for future reference.
1 Read these instructions.
2 Keep these instructions.
3 Heed all warnings.
4 Follow all instructions.
5 Do not use this apparatus near water.
6 Clean only with dry cloth.
7 Do not block any ventilation openings. Install in accordance
with the manufacturer’s instructions.
8 Do not install near any heat sources such as radiators, heat
registers, stoves, or other apparatus (including amplifiers)
that produce heat.
9 Do not defeat the safety purpose of the polarized or
grounding-type plug. A polarized plug has two blades with
one wider than the other. A grounding-type plug has two
blades and a third grounding prong. The wide blade or the
third prong are provided for your safety. If the provided plug
does not fit into your outlet, consult an electrician for
replacement of the obsolete outlet.
10 Protect the power cord from being walked on or pinched
particularly at plugs, convenience receptacles, and the point
where they exit from the apparatus.
11 Only use attachments/accessories specified by the
manufacturer.
12 Use only with the cart, stand, tripod, bracket, or
table specified by the manufacturer, or sold
with the apparatus. When a cart is used, use
caution when moving the cart/apparatus
combination to avoid injury from tip-over.
13 Unplug this apparatus during lightning storms
or when unused for long periods of time.
14 Refer all servicing to qualified service personnel. Servicing
is required when the apparatus has been damaged in any
way, such as power-supply cord or plug is damaged, liquid
has been spilled or objects have fallen into the apparatus, the
apparatus has been exposed to rain or moisture, does not
operate normally, or has been dropped.
The lightning flash with arrowhead symbol,
within an equilateral triangle, is intended to alert
the user to the presence of uninsulated “dangerous
voltage” within the product’s enclosure that may
be of sufficient magnitude to constitute a risk of
electric shock to persons.
The exclamation point within an equilateral
triangle is intended to alert the user to the presence
of important operating and maintenance
(servicing) instructions in the literature
accompanying the appliance.
Caution-i En
FCC INFORMATION (for US customers)
COMPLIANCE INFORMATION STATEMENT (DECLARATION OF CONFORMITY PROCEDURE)
Responsible Party: Yamaha Corporation of America
A/V Division
Address: 6600 Orangethorpe Avenue
Buena Park, CA 90620, USA
Telephone: 1-714-522-9011
Type of Equipment: Blu-ray Disc Player
Model Name: BD-S477
• This device complies with Part 15 of the FCC Rules and RSSGen of IC Rules.
• Operation is subject to the following two conditions:
1) this device may not cause harmful interference, and
2) this device must accept any interference received including
interference that may cause undesired operation.
See the “Troubleshooting” section at the end of this manual if
interference to radio reception is suspected.
1 IMPORTANT NOTICE: DO NOT MODIFY THIS
UNIT!
This product, when installed as indicated in the instructions
contained in this manual, meets FCC requirements.
Modifications not expressly approved by Yamaha may void
your authority, granted by the FCC, to use the product.
2 IMPORTANT: When connecting this product to accessories
and/or another product use only high quality shielded cables.
Cable/s supplied with this product MUST be used. Follow
all installation instructions. Failure to follow instructions
could void your FCC authorization to use this product in the
USA.
3 NOTE: This product has been tested and found to comply
with the requirements listed in FCC Regulations, Part 15 for
Class “B” digital devices. Compliance with these
requirements provides a reasonable level of assurance that
your use of this product in a residential environment will not
result in harmful interference with other electronic devices.
This equipment generates/uses radio frequencies and, if not
installed and used according to the instructions found in the
users manual, may cause interference harmful to the
operation of other electronic devices.
Compliance with FCC regulations does not guarantee that
interference will not occur in all installations. If this product
is found to be the source of interference, which can be
determined by turning the unit “OFF” and “ON”, please try
to eliminate the problem by using one of the following
measures:
Relocate either this product or the device that is being
affected by the interference.
Utilize power outlets that are on different branch (circuit
breaker or fuse) circuits or install AC line filter/s.
In the case of radio or TV interference, relocate/reorient the
antenna. If the antenna lead-in is 300 ohm ribbon lead,
change the lead-in to coaxial type cable.
If these corrective measures do not produce satisfactory
results, please contact the local retailer authorized to
distribute this type of product. If you can not locate the
appropriate retailer, please contact Yamaha Corporation of
America A/V Division, 6600 Orangethorpe Ave., Buena
Park, CA 90620.
The above statements apply ONLY to those products
distributed by Yamaha Corporation of America or its
subsidiaries.
We Want You Listening For A Lifetime
Yamaha and the Electronic Industries Association’s Consumer Electronics Group want you to get the most out of
your equipment by playing it at a safe level. One that lets the sound come through loud and clear without annoying
blaring or distortion - and, most importantly, without affecting your sensitive hearing.
Since hearing damage from loud sounds is often undetectable until it is too late, Yamaha and the Electronic
Industries Association’s Consumer Electronics Group recommend you to avoid prolonged exposure from excessive
volume levels.
IMPORTANT
Please record the serial number of this unit in the space
below.
MODEL:
Serial No.:
The serial number is located on the rear of the unit.
Retain this Owner’s Manual in a safe place for future
reference.
Caution-ii En
To obtain information about disposing unwanted, endof-life products in USA, please visit
http://usa.yamaha.com/support/
FCC WARNING
Change or modifications not expressly approved by the party responsible for compliance could void the user’s authority to operate
the equipment.
NOTICE
This equipment has been tested and found to comply with the limits for a Class B digital device, pursuant to part 15 of the FCC
Rules. These limits are designed to provide reasonable protection against harmful interference in a residential installation.
This equipment generates, uses and can radiate radio frequency energy and, if not installed and used in accordance with the
instructions, may cause harmful interference to radio communications. However, there is no guarantee that interference will not
occur in a particular installation. If this equipment does cause harmful interference to radio or television reception, which can be
determined by turning the equipment off and on, the user is encouraged to try to correct the interference by one or more of the
following measures:
– Reorient or relocate the receiving antenna.
– Increase the separation between the equipment and receiver.
– Connect the equipment into an outlet on a circuit different from that to which the receiver is connected.
– Consult the dealer or an experienced radio/TV technician for help.
To satisfy FCC RF exposure requirements, a separation distance of 20 cm or more should be maintained between the antenna of this
device and persons during device operation.
To ensure compliance, operations at closer than this distance is not recommended.
Under Industry Canada regulations, this radio transmitter may only operate using an antenna of a type and maximum (or lesser) gain
approved for the transmitter by Industry Canada. To reduce potential radio interference to other users, the antenna type and its gain should
be so chosen that the equivalent isotropically radiated power (e.i.r.p.) is not more than that necessary for successful communication.
This transmitter must not be co-located or operated in conjunction with any other antenna or transmitter.
FOR CANADIAN CUSTOMERS
To prevent electric shock, match wide blade of plug to
wide slot and fully insert.
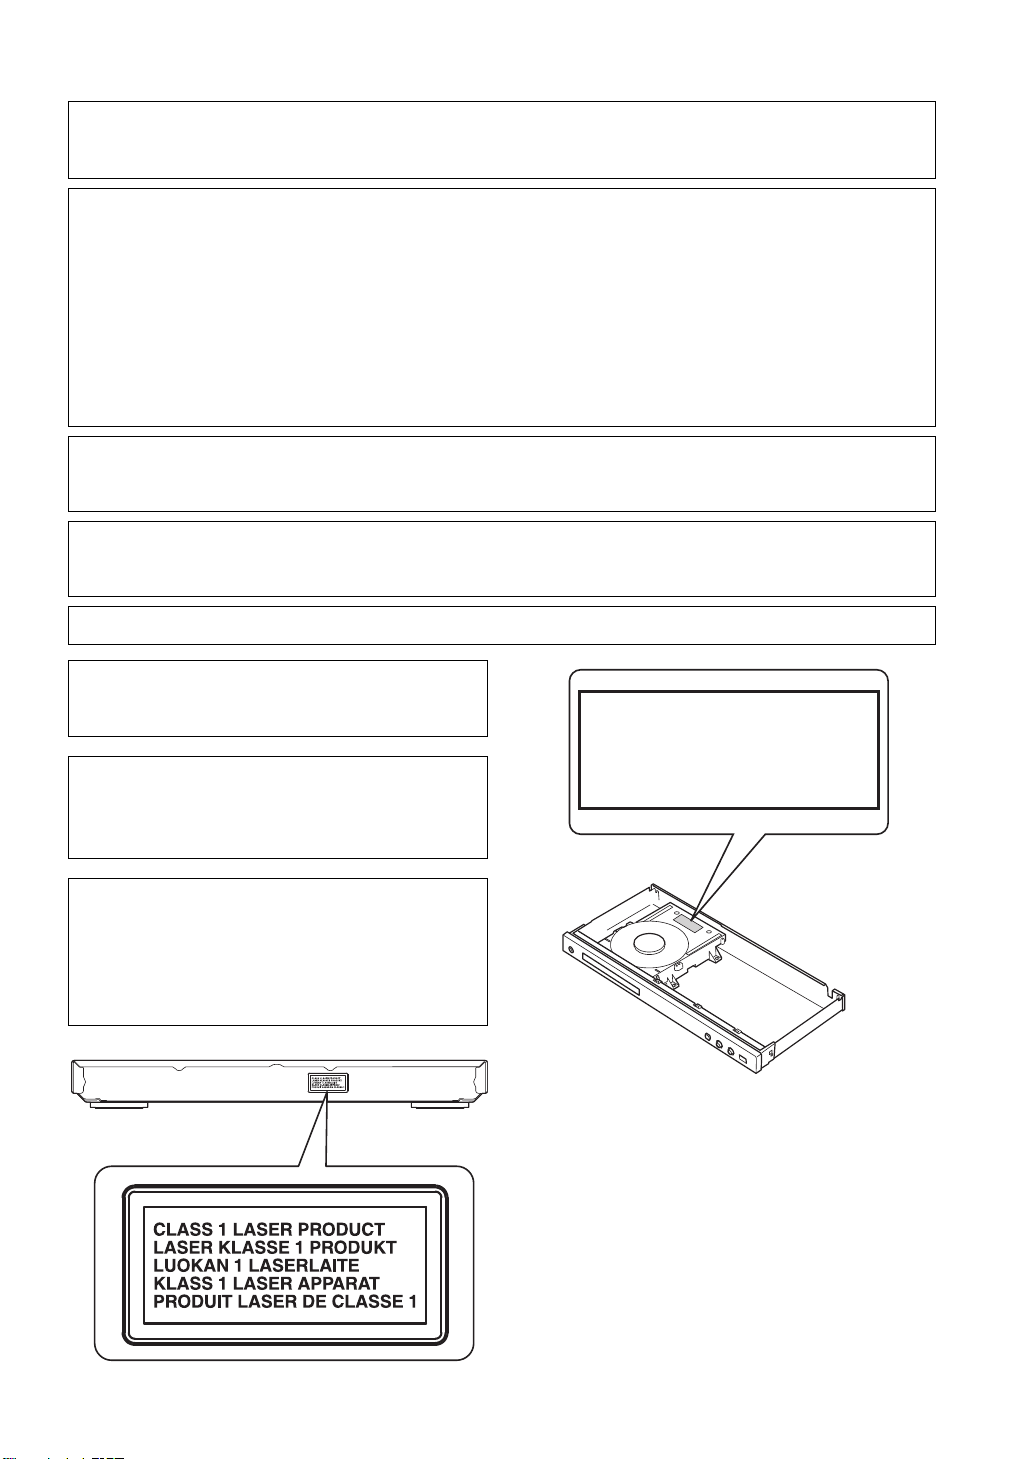
CAUTION
Use of controls or adjustments or performance of
CAUTION:
DANGER:
INVISIBLE LASER RADIATION WHEN OPEN.
DO NOT STARE INTO BEAM.
INVISIBLE LASER RADIATION WHEN OPEN.
AVOID DIRECT EXPOSURE TO THE BEAM.
procedures other than those specified herein may result
in hazardous radiation exposure.
The laser component in this product is capable of
emitting radiation exceeding the limit for Class 1.
LASER Specification:
Class 1 LASER Product
Wave length: 790 nm (CDs)/658 nm (DVDs)/405 nm (BDs)
Laser output: max. 1 mW
Caution-iii En
Caution: Read this before operating your unit.
1 To assure the finest performance, please read this manual
carefully. Keep it in a safe place for future reference.
2 Install this sound system in a well ventilated, cool, dry, clean
place-away from direct sunlight, heat sources, vibration, dust,
moisture, and/or cold. For proper ventilation, allow the
following minimum clearances.
Top : 10 cm (4 in)
Rear: 10 cm (4 in)
Side: 10 cm (4 in)
3 Locate this unit away from other electrical appliances,
motors, or transformers to avoid humming sounds.
4 Do not expose this unit to sudden temperature changes from
cold to hot, and do not locate this unit in an environment with
high humidity (i.e. a room with a humidifier) to prevent
condensation inside this unit, which may cause an electrical
shock, fire, damage to this unit, and/or personal injury.
5 Avoid installing this unit where foreign object may fall onto
this unit and/or this unit may be exposed to liquid dripping or
splashing. On the top of this unit, do not place:
– Other components, as they may cause damage and/or
discoloration on the surface of this unit.
– Burning objects (i.e. candles), as they may cause fire,
damage to this unit, and/or personal injury.
– Containers with liquid in them, as they may fall and
liquid may cause electrical shock to the user and/or
damage to this unit.
6 Do not cover this unit with a newspaper, tablecloth, curtain,
etc. in order not to obstruct heat radiation. If the temperature
inside this unit rises, it may cause fire, damage to this unit,
and/or personal injury.
7 Do not plug in this unit to a wall outlet until all connections
are complete.
8 Do not operate this unit upside-down. It may overheat,
possibly causing damage.
9 Do not use force on switches, knobs and/or cords.
10 When disconnecting the power cable from the wall outlet,
grasp the plug; do not pull the cable.
11 Do not clean this unit with chemical solvents; this might
damage the finish. Use a clean, dry cloth.
12 Only voltage specified on this unit must be used. Using this
unit with a higher voltage than specified is dangerous and
may cause fire, damage to this unit, and/or personal injury.
Yamaha will not be held responsible for any damage resulting
from use of this unit with a voltage other than specified.
13 To prevent damage by lightning, keep the power cable
disconnected from a wall outlet or this unit during a lightning
storm.
14 Do not attempt to modify or fix this unit. Contact qualified
Yamaha service personnel when any service is needed. The
cabinet should never be opened for any reasons.
15 When not planning to use this unit for long periods of time
(i.e. vacation), disconnect the AC power plug from the wall
outlet.
16 Be sure to read the “Troubleshooting” section on common
operating errors before concluding that this unit is faulty.
17 Before moving this unit, press p to set this unit to the
standby mode, and disconnect the AC power plug from the
wall outlet.
18 Condensation will form when the surrounding temperature
changes suddenly. Disconnect the power cable from the
outlet, then leave this unit alone.
19 When using this unit for a long time, this unit may become
warm. Turn the power off, then leave this unit alone for
cooling.
20 Install this unit near the AC outlet and where the AC power
plug can be reached easily.
21 The batteries shall not be exposed to excessive heat such as
sunshine, fire or the like.
Do not use this unit within 22 cm (9 inches) of persons
with a heart pacemaker implant or defibrillator implant.
Radio waves may affect electro-medical devices. Do not
use this unit near medical devices or inside medical
facilities.
This unit is not disconnected from the AC power source
as long as it is connected to the wall outlet, even if this
unit itself is turned off by p. This state is called the
standby mode. In this state, this unit is designed to
consume a very small quantity of power.
Where the mains plug or an appliance coupler is used as
the disconnect device, the disconnect device shall
remain readily operable.
WARNING
TO REDUCE THE RISK OF FIRE OR ELECTRIC
SHOCK, DO NOT EXPOSE THIS UNIT TO RAIN OR
MOISTURE.
LASER SAFETY
This unit employs a laser. Due to possible eye injury, only
a qualified service person should remove the cover or
attempt to service this device.
DANGER
This unit emits visible laser radiation when open. Avoid
direct eye exposure to beam. When this unit is plugged
into the wall outlet, do not place your eyes close to the
opening of the disc tray and other openings to look into
inside.
Caution-iv En

1
2
3
4
5
Contents
DVD
1. Introduction
What you can do with this Player ..................... 2
Wide variety of supported discs and file formats ........... 2
Enhanced network features............................................. 2
Easy setup and operations............................................... 2
Supplied parts .................................................... 2
About discs and files ......................................... 3
Types of discs/files that can be used with this Player .... 3
Loading a disc................................................................. 4
Disc precautions ............................................................. 4
Cinavia technology ......................................................... 5
Controls and functions ...................................... 6
Front panel...................................................................... 6
Rear panel ....................................................................... 6
Remote control ............................................................... 7
2. Connection
Video/audio connections................................. 10
Connecting to a TV via an AV receiver ....................... 11
Connecting to a TV directly ......................................... 11
Network connection......................................... 12
Wireless connection...................................................... 12
Wired connection.......................................................... 12
DLNA server setup....................................................... 13
USB connection ............................................... 14
3. Playback
Initial settings ................................................... 15
Setting with the Easy Setup .......................................... 15
Wireless connection setting.......................................... 15
HOME menu...................................................... 16
Playing back photo/music/video................................... 16
Using network services ................................... 18
About Picasa™ Web Albums....................................... 18
Enjoying smartphone pictures and videos
on the TV screen (Miracast™)..................... 19
Operating this Player from mobile devices
(AV CONTROLLER) ...................................... 19
Advanced playback operation ........................ 20
On Screen menu............................................................ 20
Status menu................................................................... 21
Program play................................................................. 22
Using Search ................................................................ 22
Enjoying BONUSVIEW™ and BD-Live™................. 22
Using Picture in Picture function
(secondary audio/video playback) ........................... 23
Using the feature of BD-Live™ ................................... 23
4. Settings
SETUP menu..................................................... 24
Example of SETUP menu operation ............................ 26
General Setting ............................................................. 27
Display Setting ............................................................. 29
Audio Setting................................................................ 31
System Information ...................................................... 31
About the audio output formats .................................... 32
About the HDMI video output formats ........................ 33
Software upgrade............................................. 34
Upgrading the software ................................................ 34
5. Additional information
Troubleshooting ............................................... 35
Power ............................................................................ 35
Basic operation.............................................................. 35
Disc playback................................................................ 35
Picture ........................................................................... 36
Sound ............................................................................ 36
Network......................................................................... 36
Messages on the screen ................................................. 37
Glossary ............................................................ 38
Specifications ................................................... 39
General.......................................................................... 39
Input/output................................................................... 39
Copyright ...................................................................... 40
Index .................................................................. 41
(at the end of this manual)
Information about third party software licenses... 42
New software that provides additional features or
product improvements will be released as needed. We
recommend upgrading the software of this Player to
the latest version periodically. For details, refer to
“Software upgrade” (p. 34).
■ About this manual
– This manual describes how to operate this Player
using a remote control except when it is not
available. Some of these operations are also
available using the front panel buttons.
– Notes contain important information about safety
and operating instructions. Hint(s) indicates a tip for
your operation.
– This manual is printed prior to production. Design
and specifications are subject to change in part as a
result of improvements, etc. In case of differences
between the manual and the product, the product has
priority.
The icons used in this manual
Icons are used to indicate available buttons/functions for a
particular format. For details on playable discs and
formats, see page 3.
: BD-Video
BD
: DVD-Video, DVD-VR, DVD+VR
: Audio CD
CD
: Video files
VIDEO
: Audio files
MUSIC
PHOTO
: Photo files
English
1 En

INTRODUCTION
USB contents
Wireless network
(WPS supported)
Various discs
Smartphone contents
(Miracast)
Network streaming
contents
PC/NAS contents
(DLNA)
Batteries (×2)
(AAA, R03, UM-4)
Remote control
What you can do with this Player
■ Wide variety of supported discs and file formats
■ Enhanced network features
■ Easy setup and operations
Make sure the following accessories are provided with the product.
– Blu-ray Disc™, DVDs and CDs (p. 20)
– BONUSVIEW™ and BD-Live™ (p. 22)
– Video, music and photo files on DVD-R/RW discs, CD-R/RW discs and USB memory devices (p. 16)
– Enjoying DLNA server (PC or NAS) contents (p. 16)
– Enjoying the network services (p. 18)
– Operating this player from mobile devices (AV CONTROLLER) via network (p. 19)
– Enjoying smartphone pictures and videos on the TV screen (Miracast™) (p. 19)
– Quick and easy initial setup (p. 15)
– Automatic wireless setup with the WPS (Wi-Fi Protected Setup) (p. 15)
– Software upgrade via network or USB (p. 34)
– Sequential operations of the TV, AV receiver and this Player (HDMI Control) (p. 27)
Supplied parts
2 En
Introduction
1
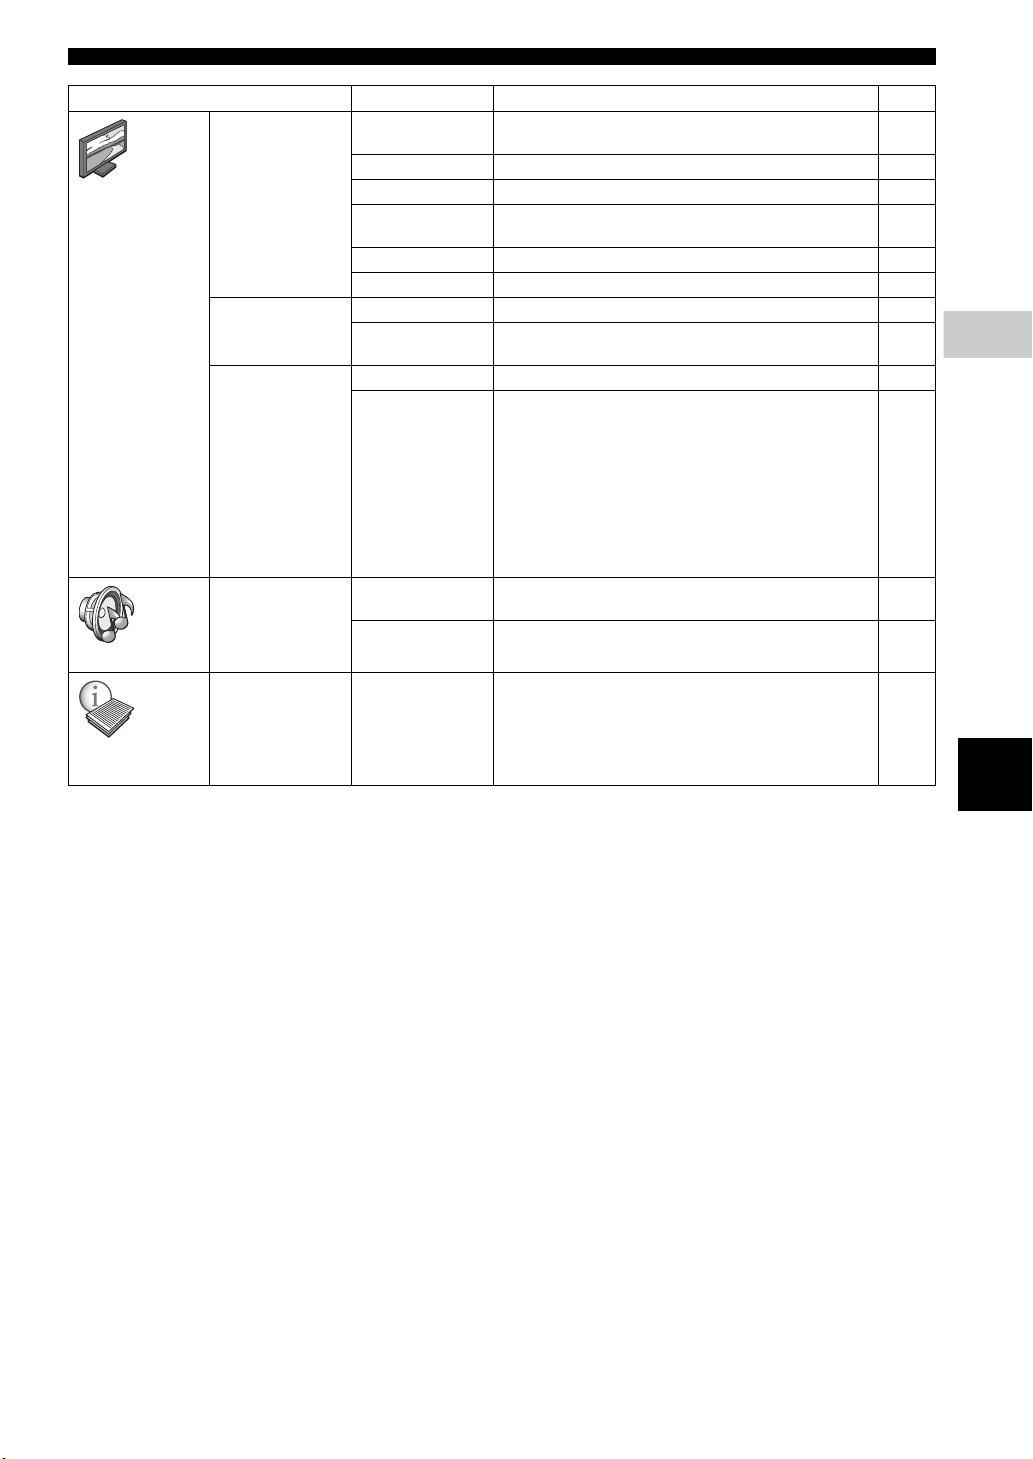
■ Types of discs/files that can be
VIDEO
1
ALL
2
ALL
3
ALL
4
ALL
4
ALL
5
ALL
used with this Player
– 12 cm (5”) and 8 cm (3”) discs can be played back in
this Player. Do not use an 8 cm (3”) to 12 cm (5”)
adapter.
– Use discs that conform to compatible standards as
indicated by the presence of official logos on the
disc label. Playback of discs not complying with
these standards is not guaranteed. In addition, the
image quality or sound quality is not guaranteed
even if the discs can be played back.
Media Type Recording Format
BD-ROM/BD-R/
BD-RE
DVD-ROM DVD-Video
DVD-R/DVD-R
DL/DVD-RW
DVD+R/DVD+R
DL/DVD+RW
CD-ROM CDDA/HDCD
CD-R/CD-RW CDDA/Data files
USB* Data files
DLNA Data files
* This Player is compatible with a USB memory device
formatted with FAT 16/32 and NTFS.
Playable audio
file formats
MUSIC
MP3 (.mp3)
WMA (.wma)
AAC (.aac/.m4a)
WAV (.wav)
FLAC (.flac)
ALAC (.m4a)
*1 Sampling frequency within 32-48 kHz (Stereo) and
bitrate within 8-320 kbps
*2 Sampling frequency within 32-48 kHz (Stereo) and
bitrate within 32-192 kbps
*3 Sampling frequency of up to 192 kHz/24 bit (LPCM/
Stereo)
*4 WMV9 (maximum resolution: 1,920 x 1,080)
Notes
– Playback of a file listed in the chart above is not
guaranteed depending on methods of file creation or
codecs used.
– Playback of all files on the disc, USB memory
device and network is not guaranteed.
– A copyright protected file cannot be played back.
– When using DLNA, a file needs to meet the DLNA
sever requirement.
BD-Video/Data files
DVD-Video/DVD-VR/AVCHD/Data files
DVD-Video/DVD+VR/AVCHD/Data files
Playable video
file formats
*1
MKV with H.264
*2
(.mkv)
MPEG PS (.mpeg/
*3
.mpg)
MPEG TS (.ts)
*3
MPEG-4 (.mp4)
*3
VOB (.vob)
AVI (.avi)
ASF (.asf)
WMV (.wmv)
*4
About discs and files
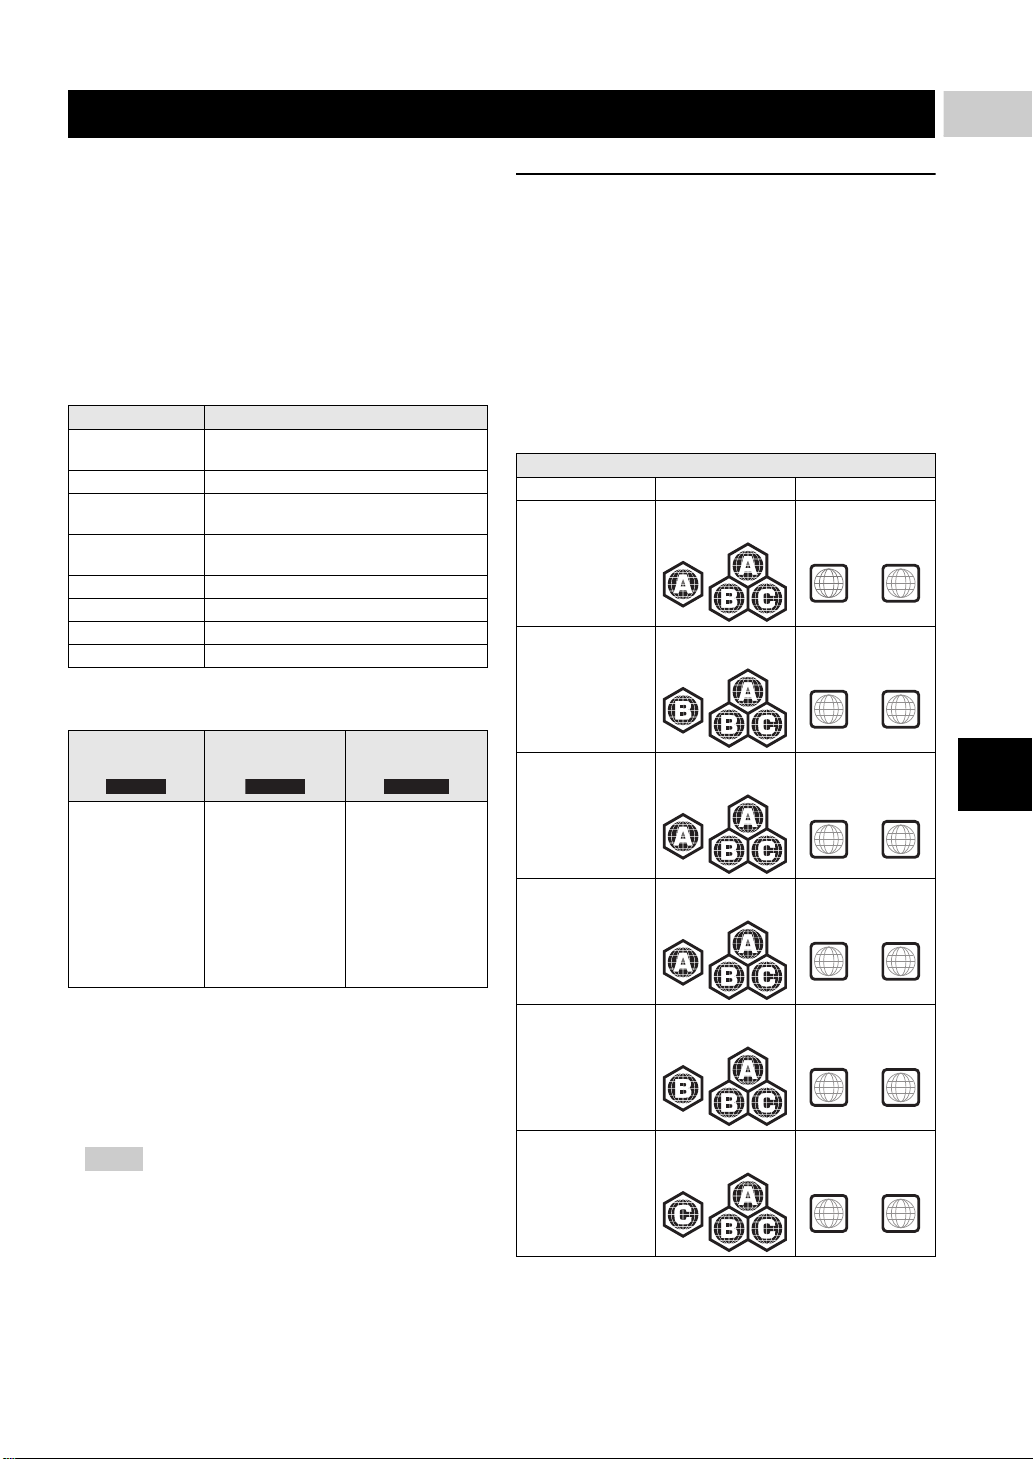
Region management information for
Blu-ray Disc/DVD videos
– Blu-ray Disc/DVD video players and discs have
region codes, which dictate the regions in which a
disc can be played. Verify the region code mark on
the rear panel of this Player.
– For a Blu-ray Disc, the disc can be played back on
this Player with the same region code mark, or the
region code “ABC” mark.
– For a DVD disc, the disc can be played back on this
Player with the same region code mark, or the region
code “ALL” mark.
Destination BD-Video DVD-Video
U.S.A. and Canada Region code “A” or
Europe Region code “B” or
Playable photo
file formats
PHOTO
JPEG (.jpeg/.jpg)
GIF (.gif)
PNG (.png)
Asia and Korea Region code “A” or
Central and South
America
Australia Region code “B” or
Russia Region code “C” or
Region management information
“ABC”
“ABC”
“ABC”
Region code “A” or
“ABC”
“ABC”
“ABC”
Region number “1”
or “ALL”
Region number “2”
or “ALL”
Region number “3”
or “ALL”
Region number “4”
or “ALL”
Region number “4”
or “ALL”
Region number “5”
or “ALL”
English
3 En
About discs and files
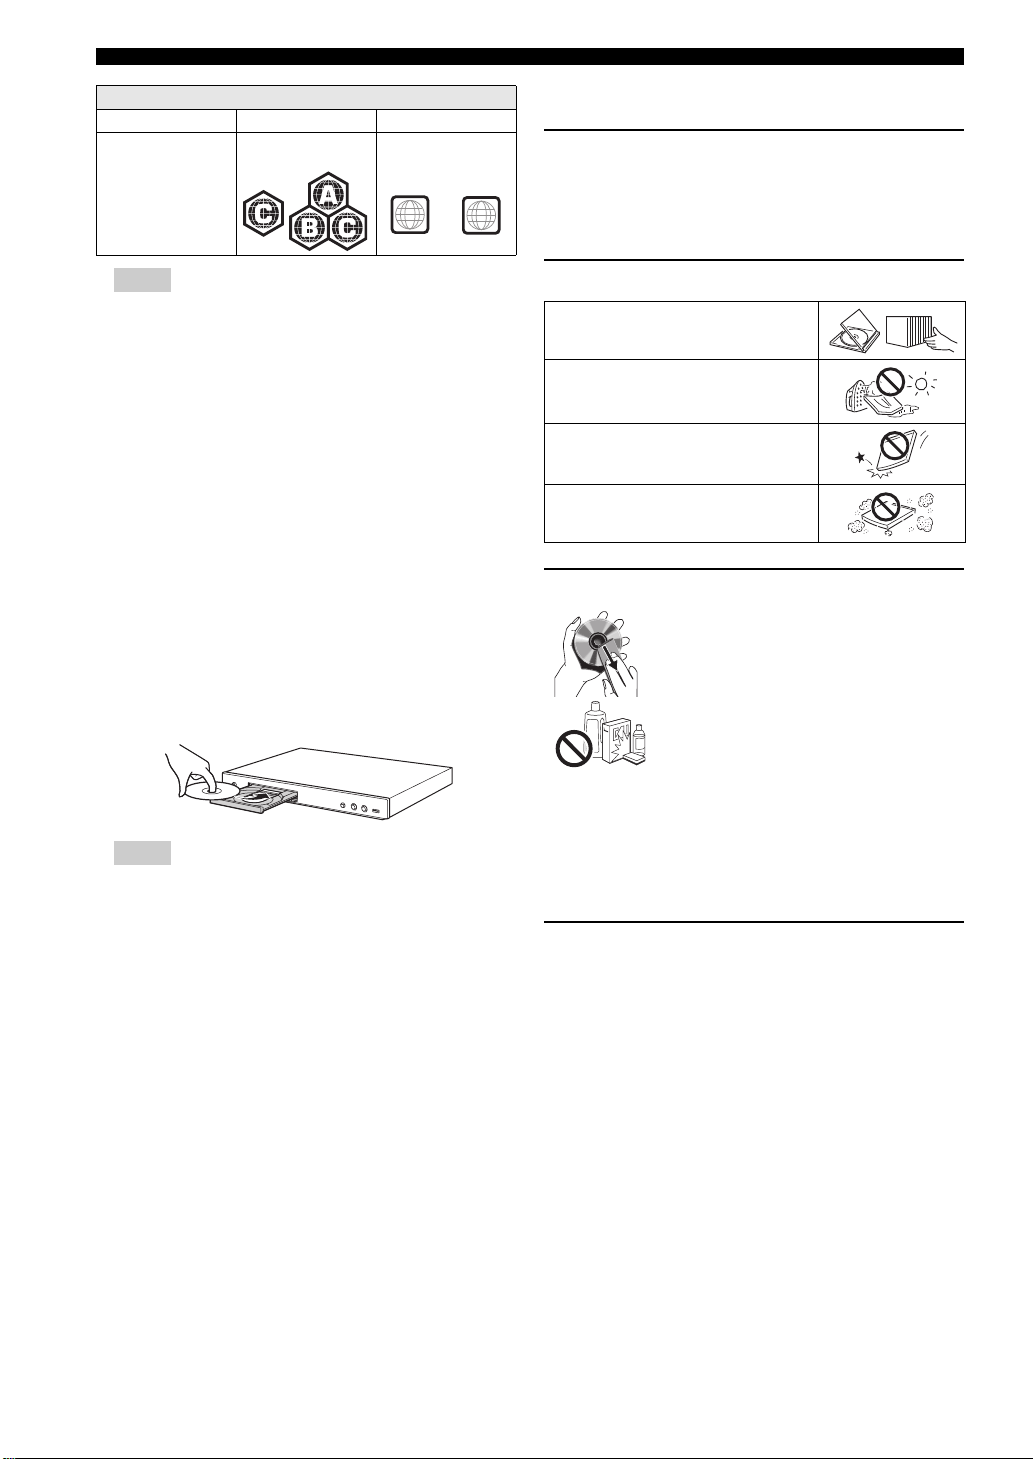
Region management information
Destination BD-Video DVD-Video
China Region code “C” or
“ABC”
Region number “6”
or “ALL”
6
Notes
– Blu-ray Disc/DVD video operations and functions
may be different from the explanations in this
manual and some operations may be prohibited due
to disc manufacturer’s settings.
– If a menu screen or operating instructions are
displayed during playback of a disc, follow the
operating procedure displayed.
– Playback for some of the discs may not be possible
depending on the disc.
– Finalize all recording media that is played back in
this Player.
– “Finalize” refers to a recorder processing a recorded
disc so that it will play in other players/recorders as
well as this Player. Only finalized discs can be
played back in this Player. (This Player does not
have a function to finalize discs.)
■ Loading a disc
– Insert the disc with the label facing up.
– In case of the disc recorded on both sides, face down
the side to play back.
Notes
– Playback may begin automatically, depending on the
disc and setting of this Player.
– The menu may be displayed first, depending on the disc.
– The disc load time may vary depending on the disc.
ALL
■ Disc precautions
Be careful of scratches and dust
– Blu-ray Disc, DVD and CD discs are sensitive to dust,
fingerprints and especially scratches. A scratched disc
may not be able to be played back. Handle discs with
care and store them in a safe place.
Proper disc storage
Place the disc in the center of the disc case
and store the case and disc upright.
Avoid storing discs in locations subject to
direct sunlight, close to heating appliances
or in locations of high humidity.
Do not drop discs or subject them to
strong vibrations or impacts.
Avoid storing discs in locations where
there are large amounts of dust or
moisture.
Handling precautions
– If the surface is soiled, wipe gently with a
soft, damp (water only) cloth. When
wiping discs, always move the cloth from
the center hole toward the outer edge.
– Do not use record cleaning sprays,
benzene, thinner, static electricity
prevention liquids or any other solvent.
– Do not touch the surface.
– Do not stick paper or adhesive labels to the disc.
– If the playing surface of a disc is soiled or scratched,
the Player may decide that the disc is incompatible
and eject the disc tray, or it may fail to play the disc
correctly. Wipe any dirt off the playing surface with
a soft cloth.
Cleaning the pick up lens
– Never use commercially available cleaning discs.
The use of these discs can damage the lens.
– Request the nearest service center approved by
Yamaha to clean the lens.
4 En
Introduction
1
■ Cinavia technology
– Cinavia technology is a part of the content protection
system included in your Blu-ray Disc Player.
Note
– The following messages may be displayed and
playback stopped or audio outputs temporarily
muted by your Blu-ray Disc player if you are playing
an unauthorized copy of content that is protected by
Cinavia technology.
These messages are displayed in English only.
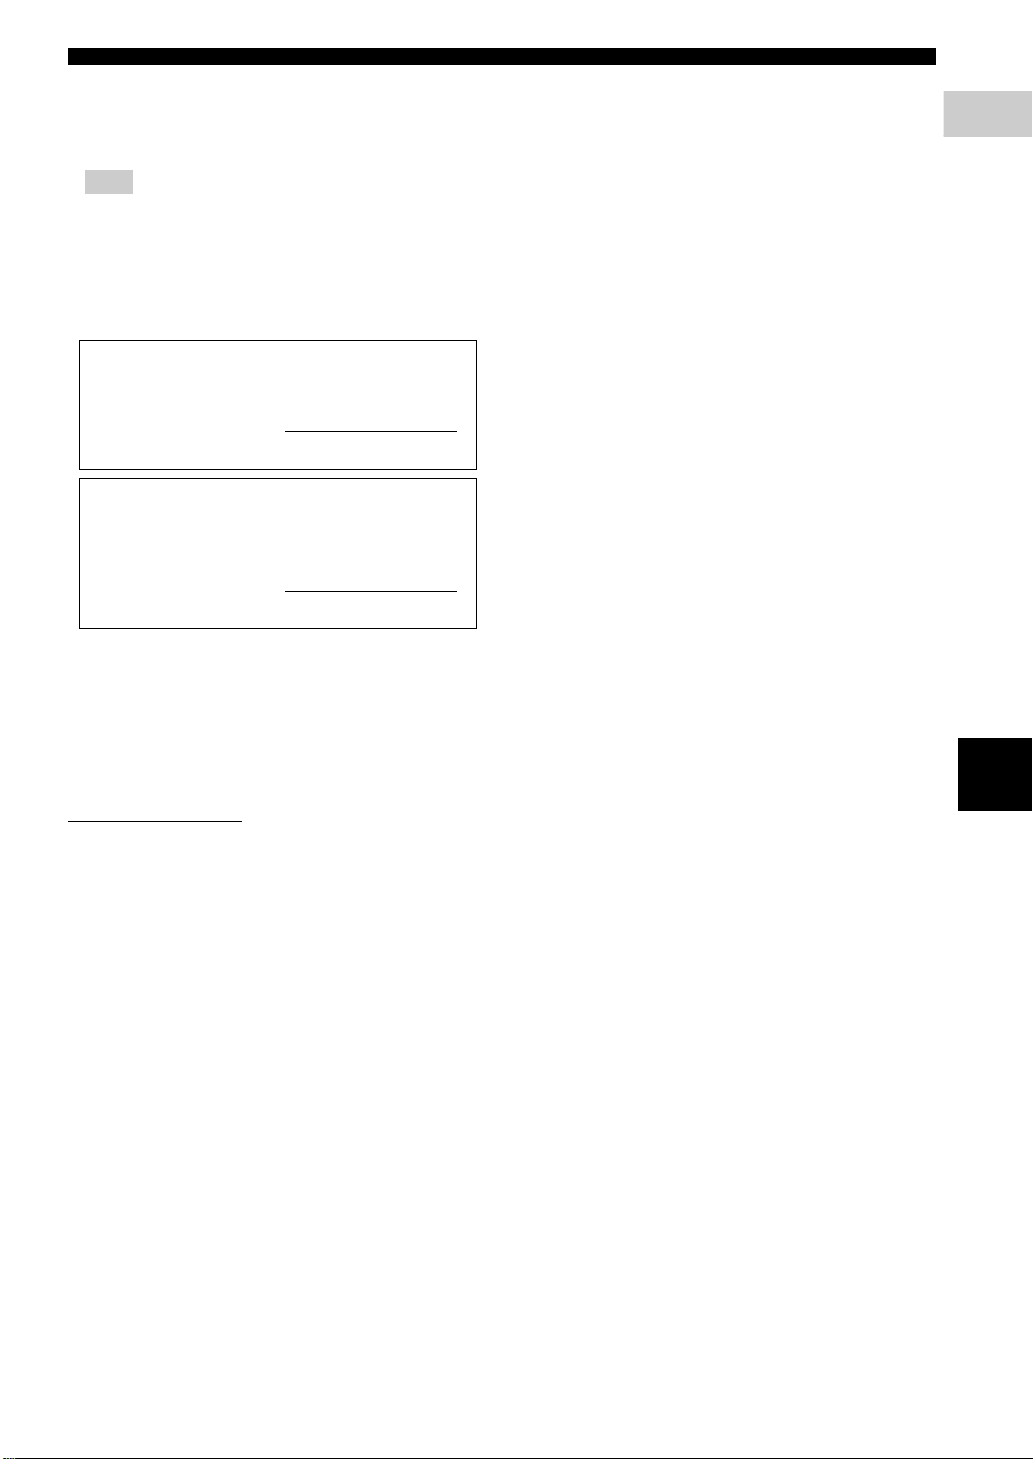
Playback stopped. The content being played is
protected by Cinavia® and is not authorized for
playback on this device.
For more information, see http://www.cinavia.com.
Message Code 1.
Audio outputs temporarily muted. Do not adjust
the playback volume. The content being played
is protected by Cinavia® and is not authorized
for playback on this device.
For more information, see http://www.cinavia.com
Message Code 3.
About discs and files
.
Cinavia Notice
This product uses Cinavia technology to limit the use of
unauthorized copies of some commercially-produced film
and videos and their soundtracks. When a prohibited use
of an unauthorized copy is detected, a message will be
displayed and playback or copying will be interrupted.
More information about Cinavia technology is provided at
the Cinavia Online Consumer Information Center at
http://www.cinavia.com
information about Cinavia by mail, send a postcard with
your mailing address to: Cinavia Consumer Information
Center, P.O. Box 86851, San Diego, CA, 92138, USA.
. To request additional
English
5 En
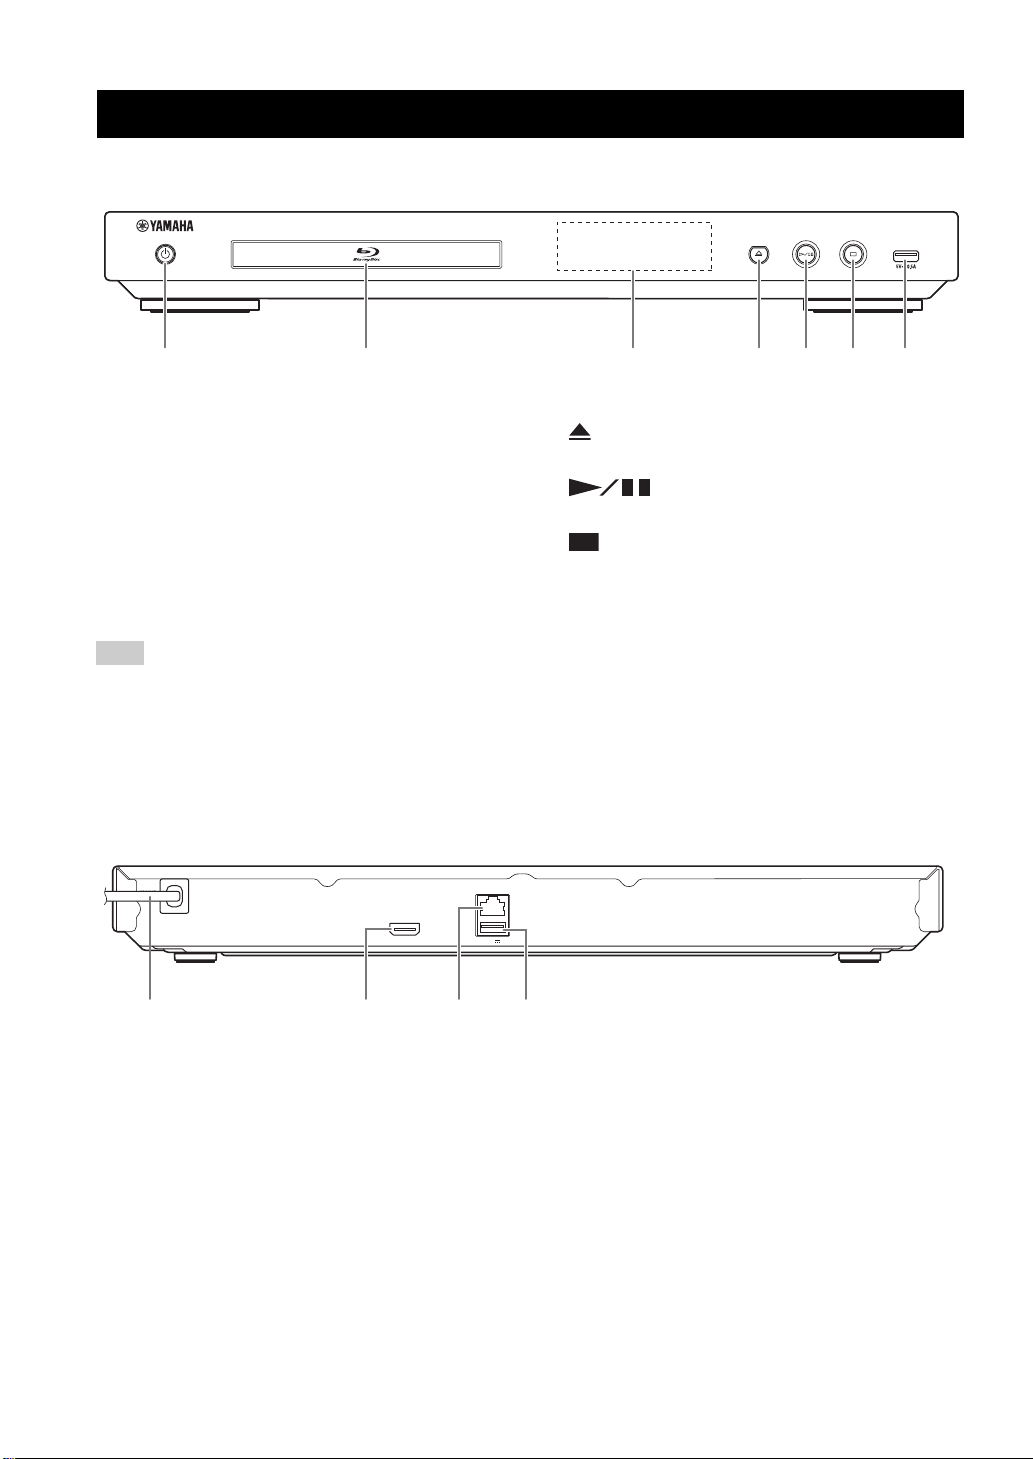
■ Front panel
USB
2 5 61 43 7
USB
0.5A5V
HDMI
NETWORK
MAINS
1 2 3 4
Controls and functions
1 p (On/Standby)
Turns this Player on/Sets to standby mode.
Press and hold p on the front panel for more than 5
seconds to reset this Player (system reset).
2 Disc tray door
3 Front panel display
Displays various information for operational status.
4 (Eject)
Opens/Closes the disc tray.
5 (Play/Pause)
Starts or pauses a playback.
6 (Stop)
Stops a playback.
7 USB connector (p. 14)
Note
– Remove the protective film from the front panel before operating the Player.
– When cleaning the front panel, use a soft dry cloth to avoid scratches.
■ Rear panel
1 Power cable
Plug the power cable into AC outlet after all
connections are completed.
2 HDMI (p. 10)
6 En
3 NETWORK (p. 12)
4 USB connector (p. 14)
Controls and functions
Introduction
1
I
J
F
H
G
7
D
C
A
3
5
6
8
0
B
9
2
1
4
E
BD
DVD
BD
VIDEO
PHOTO
CD
CD
VIDEO
Continued to the next page. \
CD
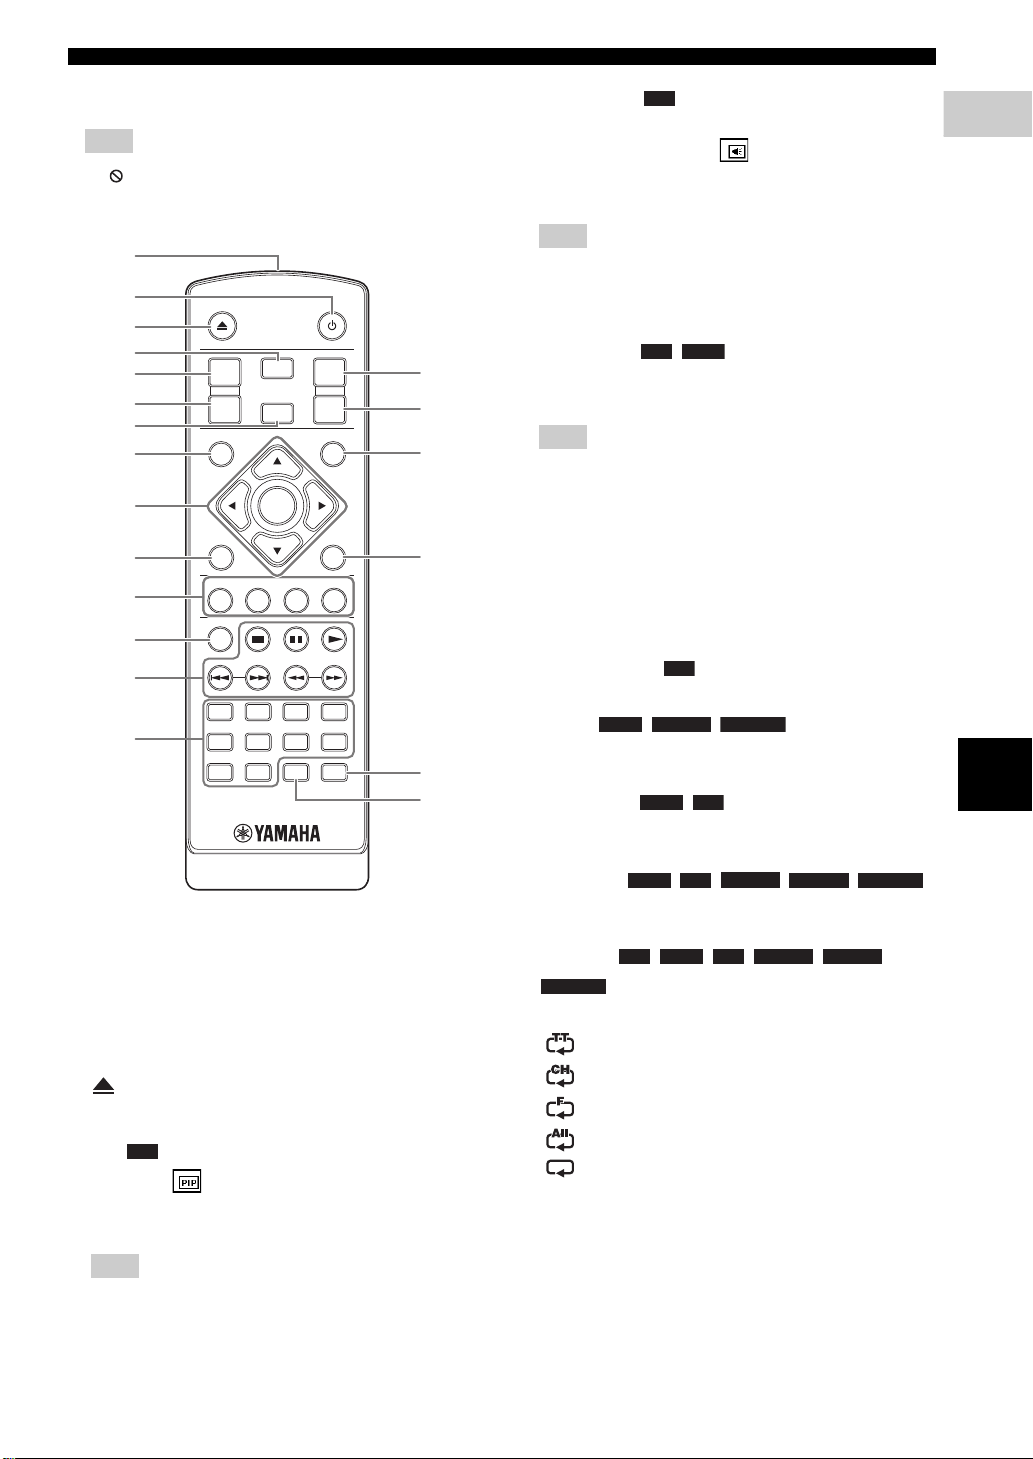
■ Remote control
Note
– will appear on the top left corner of the screen
when the pressed button is not available.
MIRACAST
PIP
2ND
AUDIO
TOP MENU
RETURN
PROGRAMGSHUFFLEYREPEAT
ZOOM
R
STATUS
2134
65
09
HOME
ENTER
POP-UP/MENU
78
CLEAR
SUBTITLE
AUDIO
ON SCREEN
B
SEARCH
1 Infrared signal transmitter: Outputs infrared
signal. Aim this window to the remote control sensor
(p. 9).
2 p: Turns this Player on or sets it to standby mode.
3 : Opens/closes the disc tray.
4 MIRACAST: Starts Miracast (p. 19).
5 PIP : Turns on/off the Picture in Picture (p. 23).
PIP Mark ( ) is displayed on the screen when this
function is available. You can also select this item from
On Screen menu (p. 20).
Note
– PIP Mark is displayed only when the PIP Mark is set
to on (p. 28).
6 2ND AUDIO : Selects the secondary audio of the
BD
Picture in Picture (p. 23) or audio commentaries. The
Secondary Audio Mark ( ) is displayed on the
screen when this function is available (p. 31). You can
also select this item from On Screen menu (p. 20).
Note
– Secondary Audio Mark is displayed only when
Secondary Audio Mark is set to on (p. 28).
7 HOME: Displays the HOME menu screen (p. 16).
8 TOP MENU : Displays the top menu
BD
screen if the disc contains a menu. Select the desired
item using 5/a/2/3 and ENTER.
Note
– Specific operations may be different depending on
the disc. Follow the instructions of each menu
screen.
9 Cursor buttons (5/a/2/3): Moves the focus in the
menu screen.
ENTER: Selects the focused menu/item.
0 RETURN: Returns to the previous menu or screen,
etc.
A Color buttons : Use these buttons according to
on-screen instructions.
ZOOM : Zooms in/out. The
DVD
size of the screen will change each time you press the
button (zoom in/out: 3 steps each).
PROGRAM : Sets the order of playback
DVD
(p. 22). You can set up to 15 tracks (for an audio disc)
or titles/chapters (DVD-Video).
SHUFFLE :
DVD
MUSIC PHOTO
Selects shuffle play mode (p. 20).
REPEAT
PHOTO
BD DVD
VIDEO MUSIC
: Changes repeat mode. Repeat mode shown
below will change each time you press the button.
at
: Repe
s the title being played back.
: Repeats the chapter being played back.
: Repeats the folder being played back.
: Repeats all tracks/files on the disc.
: Repeats the track/file being played back.
B STATUS: Displays the playback information (p. 21).
English
7 En
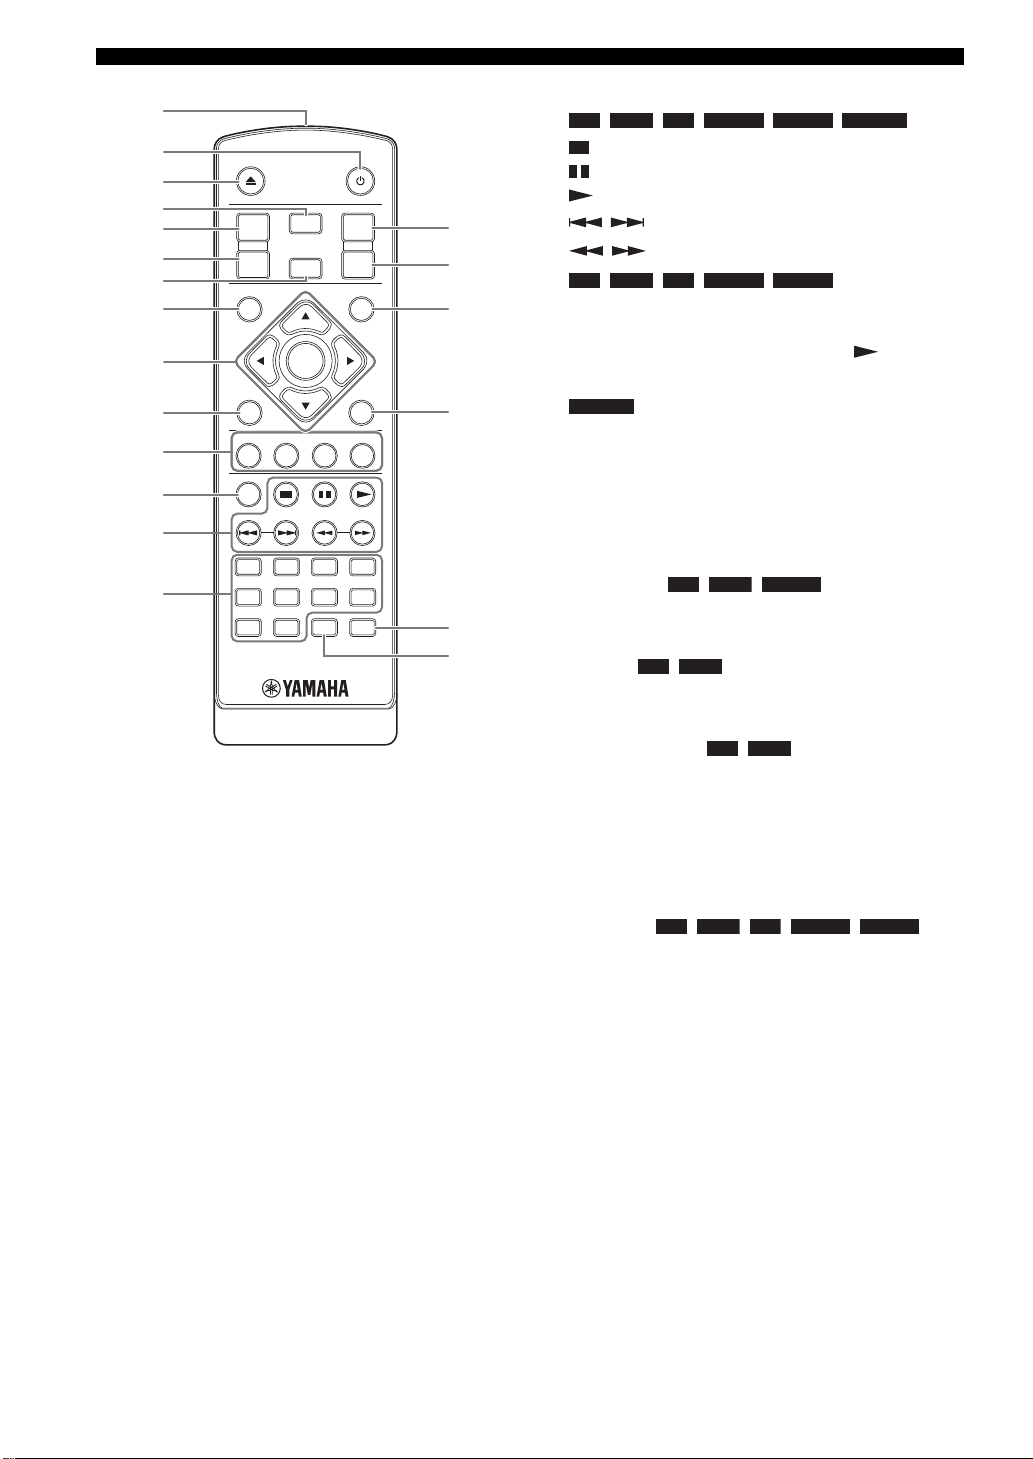
Controls and functions
I
J
F
H
G
7
D
C
A
3
5
6
8
0
B
9
2
1
4
E
CD
PHOTO
CD
PHOTO
DVD
BD
BD
DVDCDVIDEO
MUSIC
TOP MENU
RETURN
MIRACAST
PIP
2ND
AUDIO
HOME
ENTER
PROGRAMGSHUFFLEYREPEAT
ZOOM
R
STATUS
2134
65
09
POP-UP/MENU
78
CLEAR
SUBTITLE
AUDIO
ON SCREEN
B
SEARCH
C Control buttons
BD DVD
VIDEO MUSIC
: Stops playback.
: Pauses playback.
: Plays back contents.
/: Skips backward/forward.
/
:
BD DVD
VIDEO MUSIC
Searches backward/forward. The search speed will
change each time you press the button (search
backward/forward: 5 steps each). Press to resume
normal playback.
: Changes the speed of a slide show (slower/
faster: 3 steps).
D Number buttons: Enters numbers, or during
playback, jumps to the track/chapter corresponding to
the number you input. These buttons may not be
available depending on the disc type and playback
condition.
E SUBTITLE : Changes subtitle
BD
VIDEO
languages (p. 39) if available. You can also select this
item from On Screen menu (p. 20).
F AUDIO : Changes the audio language or
DVD
format. You can also select this item from On Screen
menu (p. 20).
G POP-UP/MENU : Displays pop-up
BD DVD
menu. The menu contents displayed vary depending
on the disc. For details on how to see and operate the
pop-up menu, refer to the manual for the disc.
The top menu screen may be displayed by pressing
POP-UP/MENU depending on the DVD.
H ON SCREEN: Displays On Screen menu (p. 20).
I SEARCH :
Jumps to a specified point during playback. For details
on this function, refer to “Using Search” (p. 22). You
can also select this item from status menu (p. 21).
J CLEAR: Clears entered number/set item.
8 En

Controls and functions
Introduction
1
1
3
22
Remote control sensor
6 m (20 ft)
Loading the batteries in the remote
control
Notes
– Change both batteries when the operation range of
the remote control decreases.
– Use AAA, R03, UM-4 batteries.
– Make sure that the polarities are correct. Refer to the
illustration inside the battery compartment.
– Remove the batteries if the remote control is not to
be used for an extended period of time.
– Do not use old batteries together with new ones.
– Do not use different types of batteries (such as
alkaline and manganese batteries) together. Read the
packaging carefully as these different types of
batteries may have the same shape and color.
– If the batteries have leaked, dispose of them
immediately. Avoid touching the leaked material or
letting it come into contact with clothing, etc. Clean
the battery compartment thoroughly before installing
new batteries.
– Do not throw away batteries with general house
waste; dispose of them correctly in accordance with
your local regulations.
– Keep batteries away from children. If a battery is
accidentally swallowed, contact your doctor
immediately.
– When not planning to use the remote control for long
periods of time, remove the batteries from the
remote control.
– Do not charge or disassemble the supplied batteries.
Approximate operating range of
remote control
USB
30°30°
English
9 En
CONNECTION
USB
♪
♪
This Player
AV receiver
TV
Video (HDMI)Video/audio
(HDMI)
Speakers
Audio
♪
♪
This Player
TV
Video/audio
(HDMI)
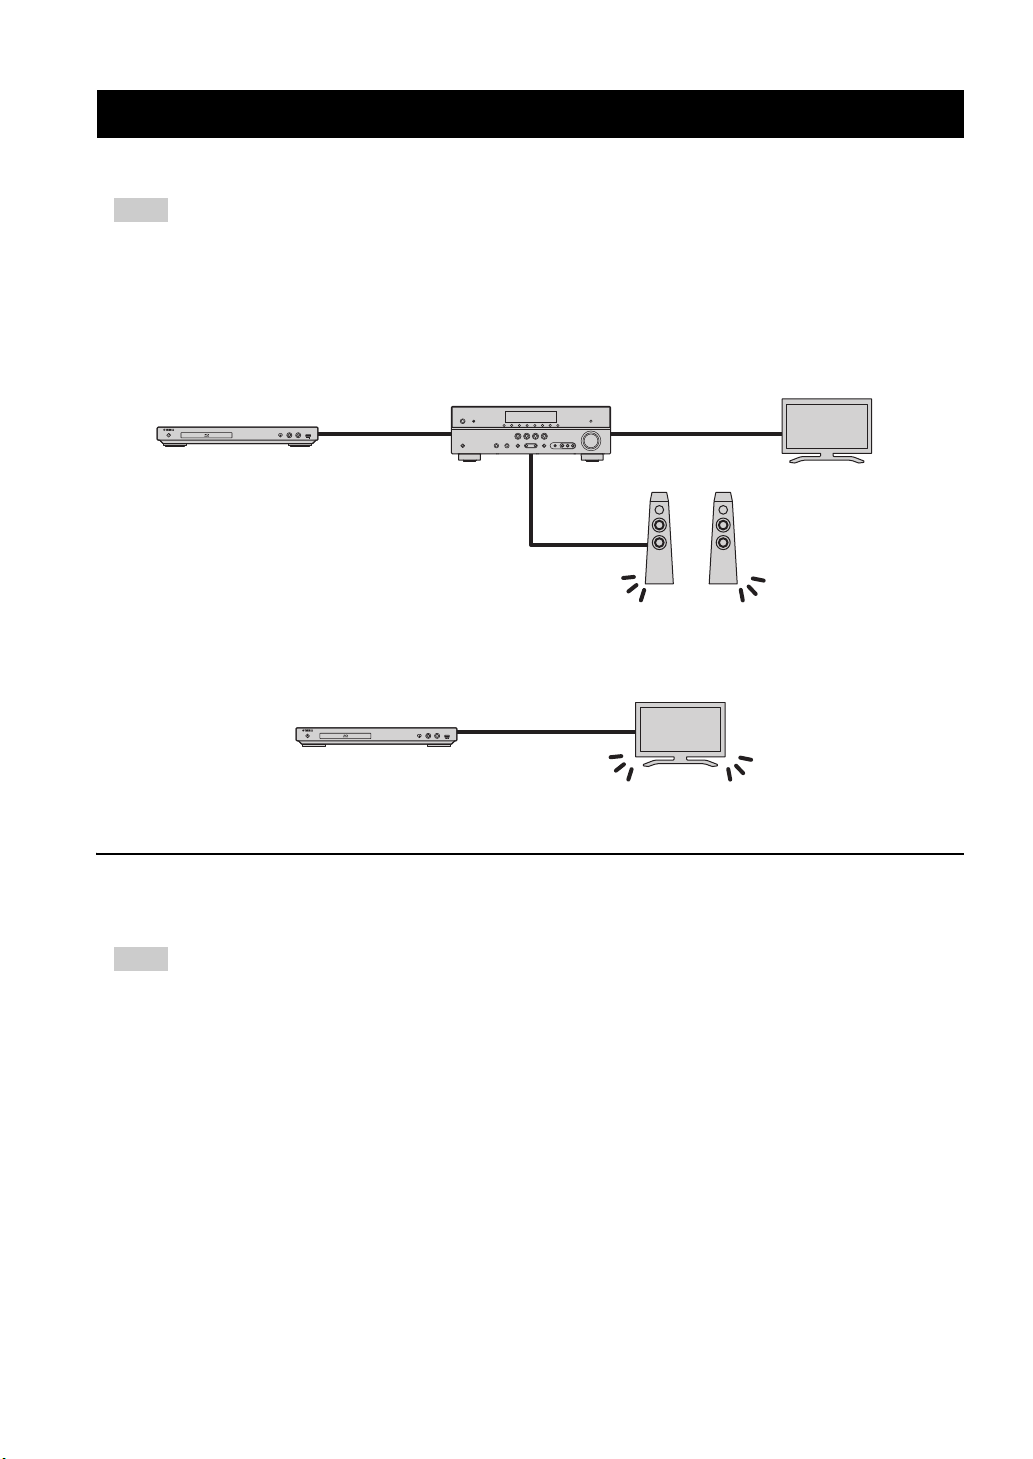
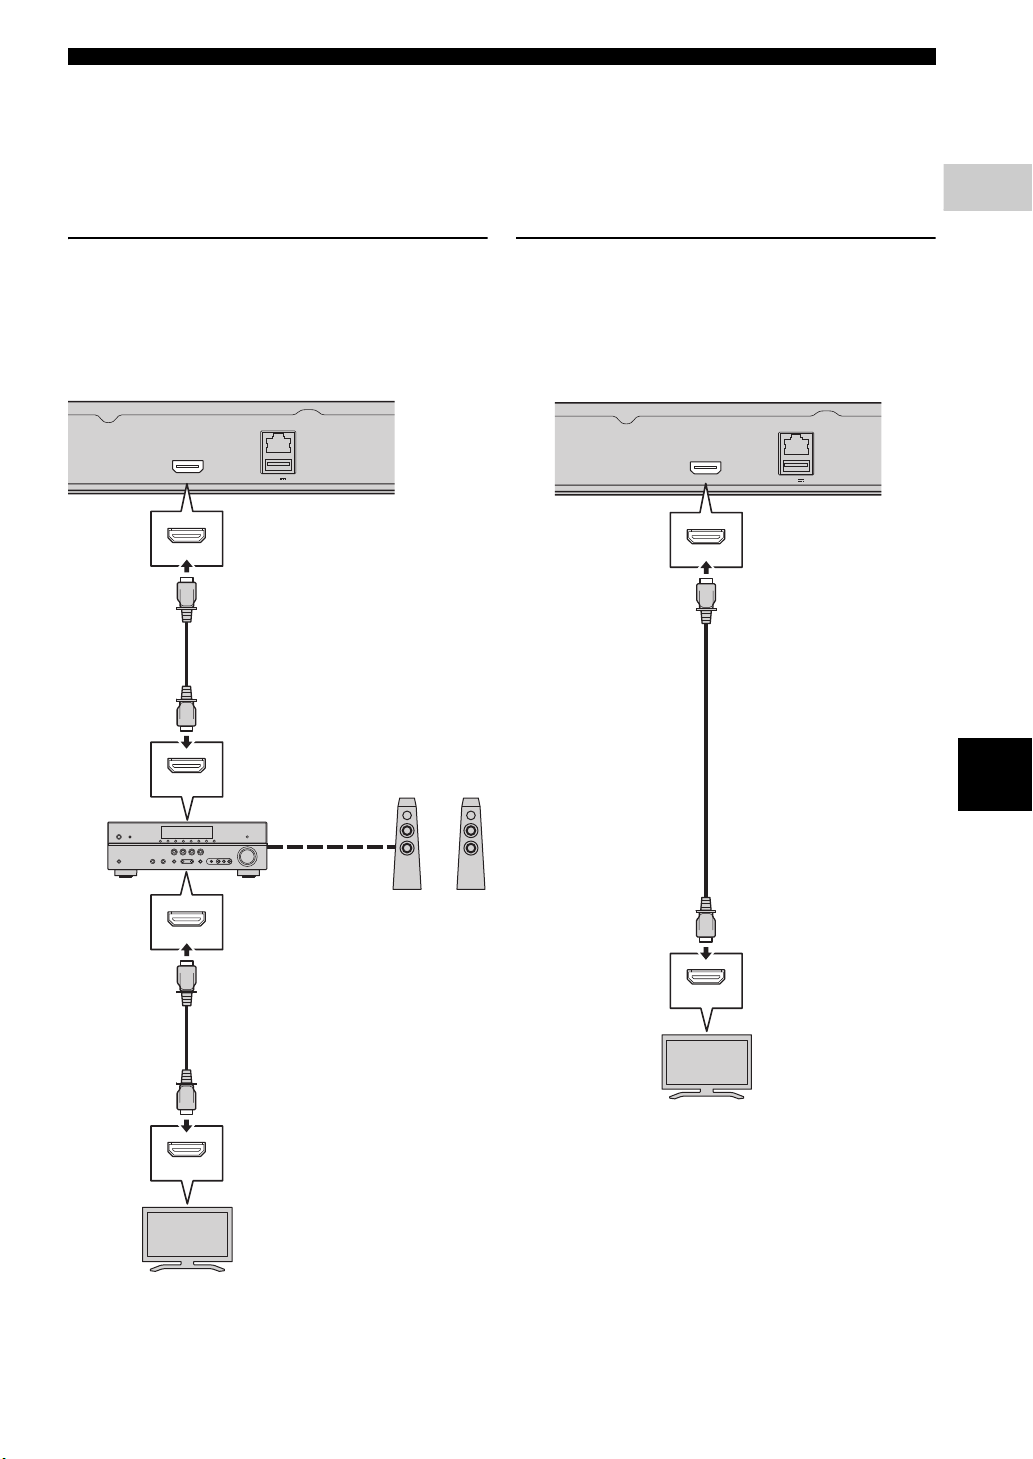
Video/audio connections
Make the corresponding video/audio cable connections depending on the equipment you want to use.
Hints
– See page 32 for information on the audio/video output formats.
– Prepare commercially available cables required for connections. The type and number of cables you need vary
depending on the equipment to be connected.
Enjoying video/audio using a TV and an AV receiver
Refer to “Connecting to a TV via an AV receiver” (p. 11).
Enjoying video/audio using only a TV
Refer to “Connecting to a TV directly” (p. 11).
USB
About HDMI
To enjoy high quality video and digital sound through the HDMI terminal, use commercially available HIGH SPEED
HDMI cables that have the HDMI logo (as shown on the back cover).
Hints
– For information on the HDMI Control function, refer to “HDMI Control” (p. 27).
– To change the audio output mode of HDMI terminal, configure “HDMI” (p. 31) in Audio Setting.
10 En
Video/audio connections
Connection
2
USB
0.5A5V
HDMI
NETWORK
HDMI IN
HDMI OUT
HDMI IN
HDMI
This Player
AV receiver
TV
HDMI terminal
Speakers
HDMI cable
HDMI input
HDMI cable
HDMI output
HDMI input
Speaker
connections
This Player
TV
HDMI terminal
HDMI cable
HDMI input
■ Connecting to a TV via an AV receiver
Connect this Player to the AV receiver and the AV
receiver to the TV with HDMI cables.
For details on speaker connections, refer to the owner’s
manuals of the AV receiver and speakers.
Caution!
Do not connect the power cable of this
Player until all connections are completed.
■ Connecting to a TV directly
Connect this Player to the TV with an HDMI cable.
Caution!
Do not connect the power cable of this
Player until all connections are completed.
NETWORK
USB
HDMI
HDMI
0.5A5V
English
HDMI IN
11 En

Network connection
This Player
Internet Modem Router PC
USB
0.5A5V
HDMI
NETWORK
LAN
NETWORK
This Player
Internet Modem Router PC
NETWORK
terminal
Network cable
LAN terminal
By connecting this Player to the network (wireless or wired), you can use the following features.
– Playing back DLNA server (PC or NAS) contents (p. 16)
– Playing back various network service contents (p. 18)
– Playing BD-Live compatible discs (p. 22)
– Operating this Player from mobile devices (AV CONTROLLER) (p. 19)
Notes
– To use the network services or BD-Live feature, a broadband internet connection is required.
– Refer to the operation manual of the equipment you have as the connected equipment and connection method may
differ depending on your network environment.
– Use a network cable/router supporting 10BASE-T/100BASE-TX.
Hint
– If you are using a router that supports DHCP, you do not need to configure any network settings for this Player, as
the network parameters (such as the IP address) will be assigned automatically to it. You only need to configure
the network settings if your router does not support DHCP or if you want to configure the network parameters
manually (p. 28).
■ Wireless connection
By using the Wi-Fi feature of this Player, you can connect
this Player to your network (router) wirelessly. To use the
Wi-Fi feature, refer to “Wireless connection setting”
(p. 15) and configure the wireless connection setting.
USB
■ Wired connection
Connect this Player to your network (router) with a
commercially available Shielded Twisted Pair (STP)
network cable.
12 En
Network connection
Connection
2
USB
5#%&
DLNA
This Player
DLNA server
(PC or NAS)
Remote control Controller
(mobile device)
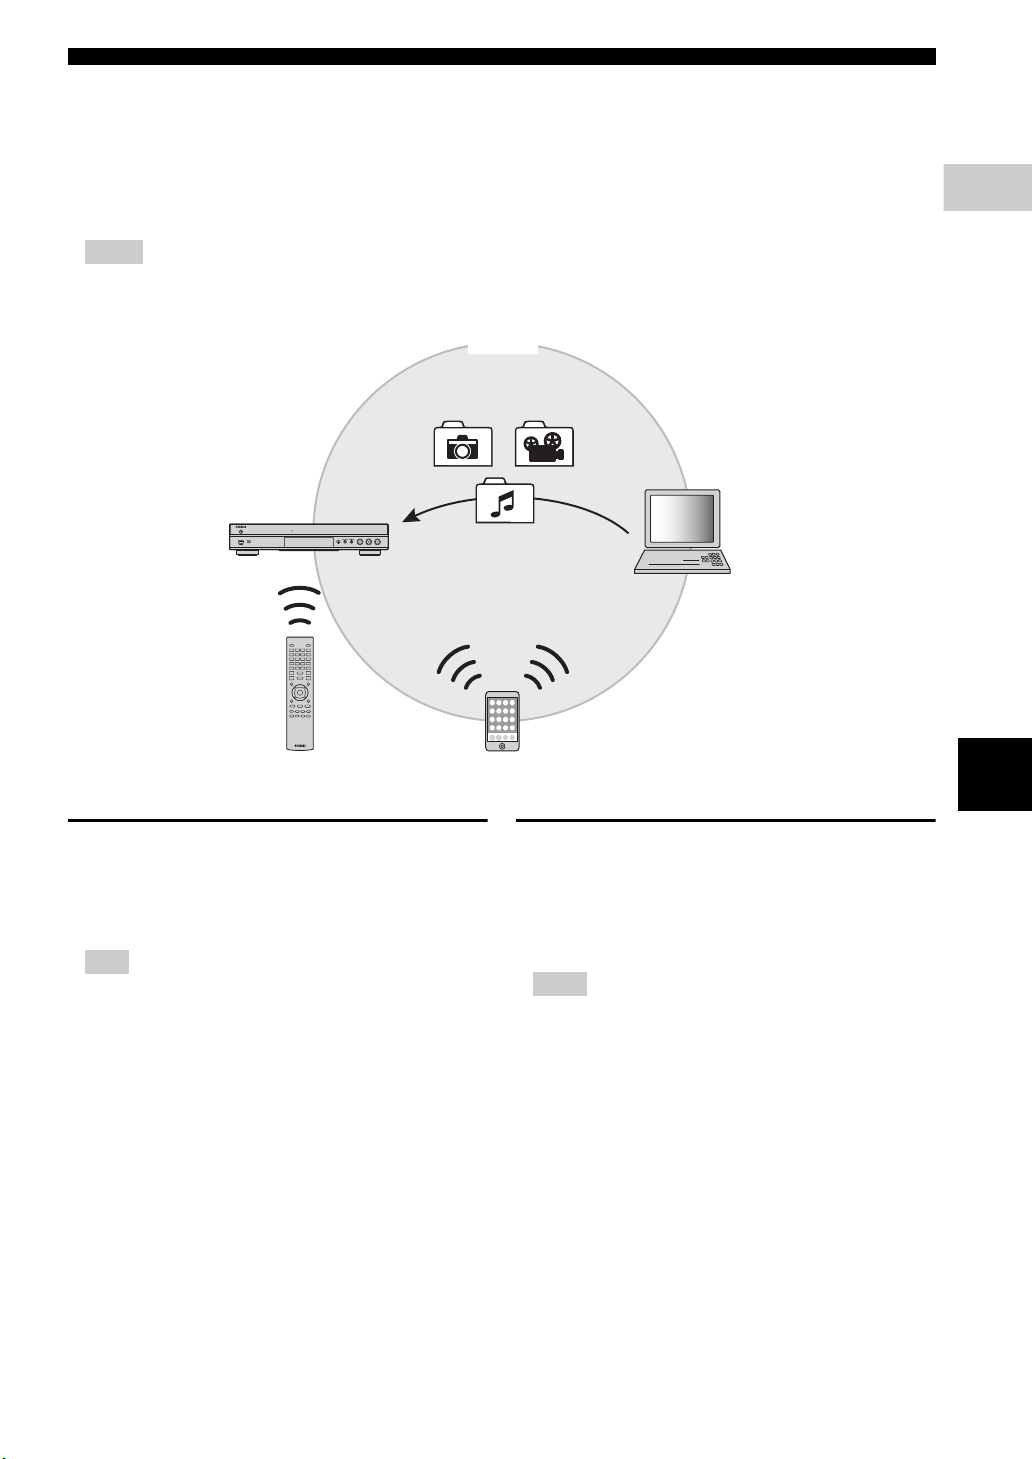
■ DLNA server setup
By using DLNA, you can share multimedia contents (such as videos, music and photos) stored on your DLNA server
(PC or NAS) connected to your network, and enjoy those contents with this Player.
In addition, you can use your mobile device (such as a smartphone and a tablet) as a wireless controller to operate this
Player through the network.
To use the DLNA features, perform the following DLNA server setup after making the network connection (p. 12).
Notes
– To use DLNA features, all the devices must be connected to the same network.
– To use a NAS as a DLNA server, the NAS must be compatible with DLNA.
Media sharing setting on DLNA server
To play back multimedia contents stored on your DLNA
server (PC or NAS), first you need to configure the media
sharing setting on the DLNA server software installed on
the DLNA server.
Hint
– For information about DLNA server setting or file
formats supported by DLNA server, refer to the
owner’s manuals of your DLNA server and its
software.
1 Turn on your DLNA server (PC or NAS) and this
Player.
2 If you are using a PC as a DLNA server, check that
DLNA server software (such as Windows Media
Player 12) is installed on your PC.
3 On your DLNA server, enable media sharing and allow
media to be shared with this Player.
Now the DLNA server setting is complete. To enjoy
the DLNA server contents on this Player, select a
DLNA server and multimedia file from the HOME
menu (p. 16).
English
Using a mobile device as a media
controller
If you have a mobile device (such as smartphone and
tablet) that supports the Digital Media Controller (DMC)
feature, you can operate this Player from your smart phone
or tablet through the network.
Hints
– To allow the mobile device to control this Player, set
DMC Control (p. 29) in the SETUP menu to Enable
(default).
– To check that your mobile device supports the DMC
feature, refer to the owner’s manuals of your mobile
device and its software.
13 En
USB connection
USB
0.5A5V
HDMI
NETWORK
USB
USB
USB
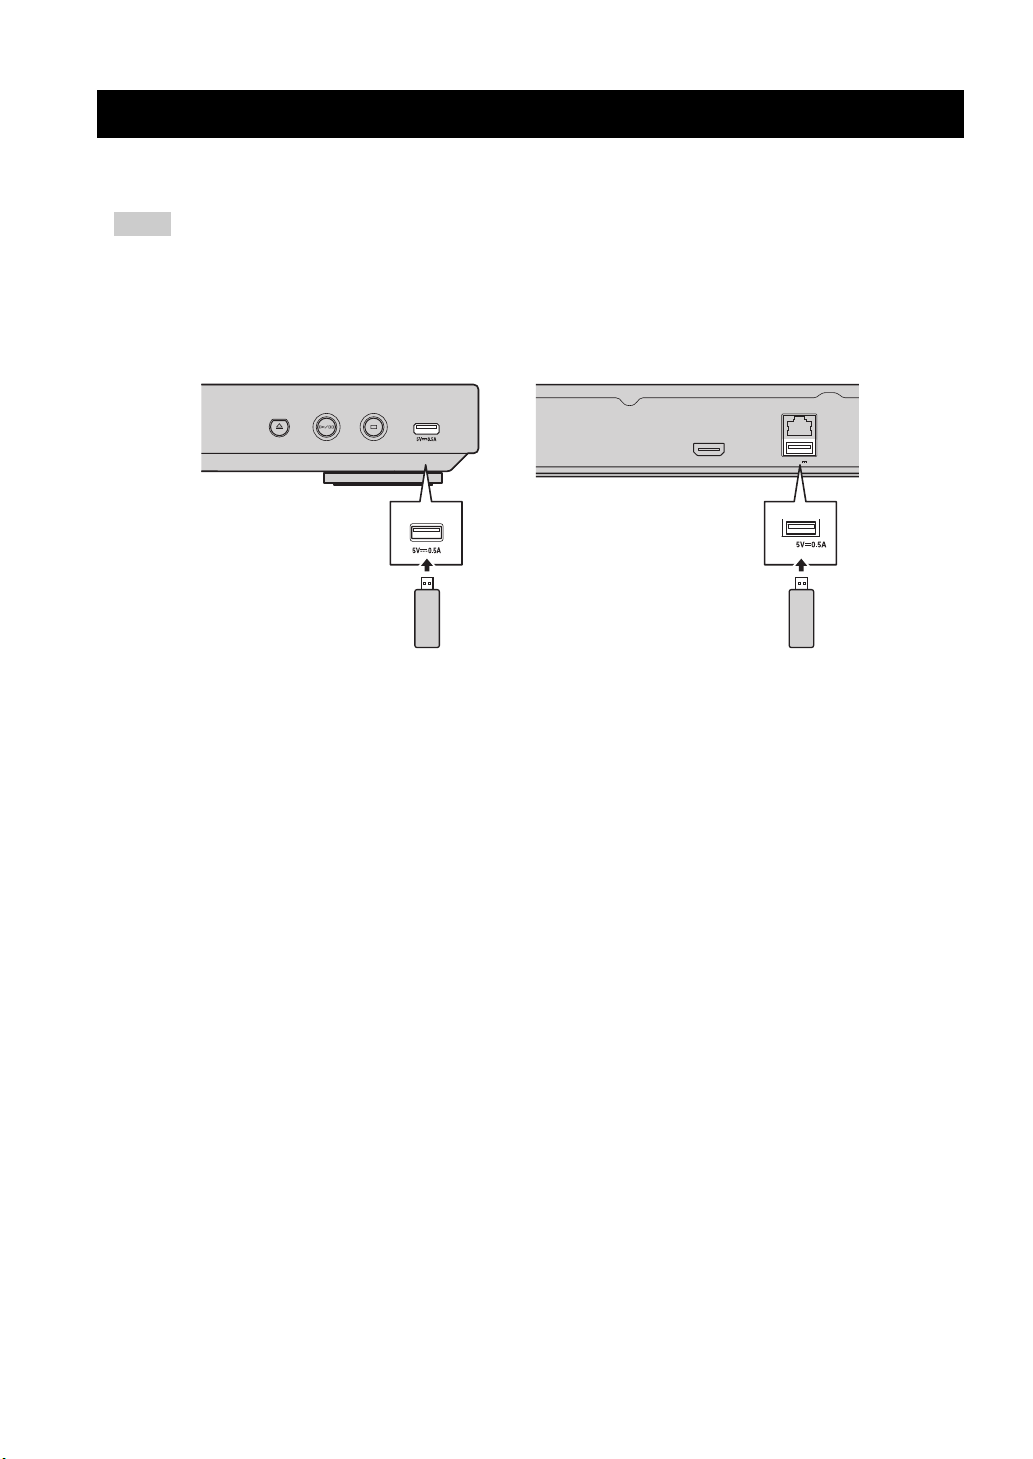
This Player
USB connector (front)
This Player
USB memory device
USB connector (rear)
USB memory device
By connecting a USB memory device to the USB connector on the front or the rear panel of this Player, you can play
multi-media files stored on the USB memory device (p. 16).
Notes
– Yamaha cannot guarantee that all brands’ USB memory devices will operate with this Player.
– Connect a USB memory device to one of the USB connectors (front/rear) of this Player when using BD-Live
feature (p. 23).
14 En
Playback
3
PLAYBACK
Initial settings
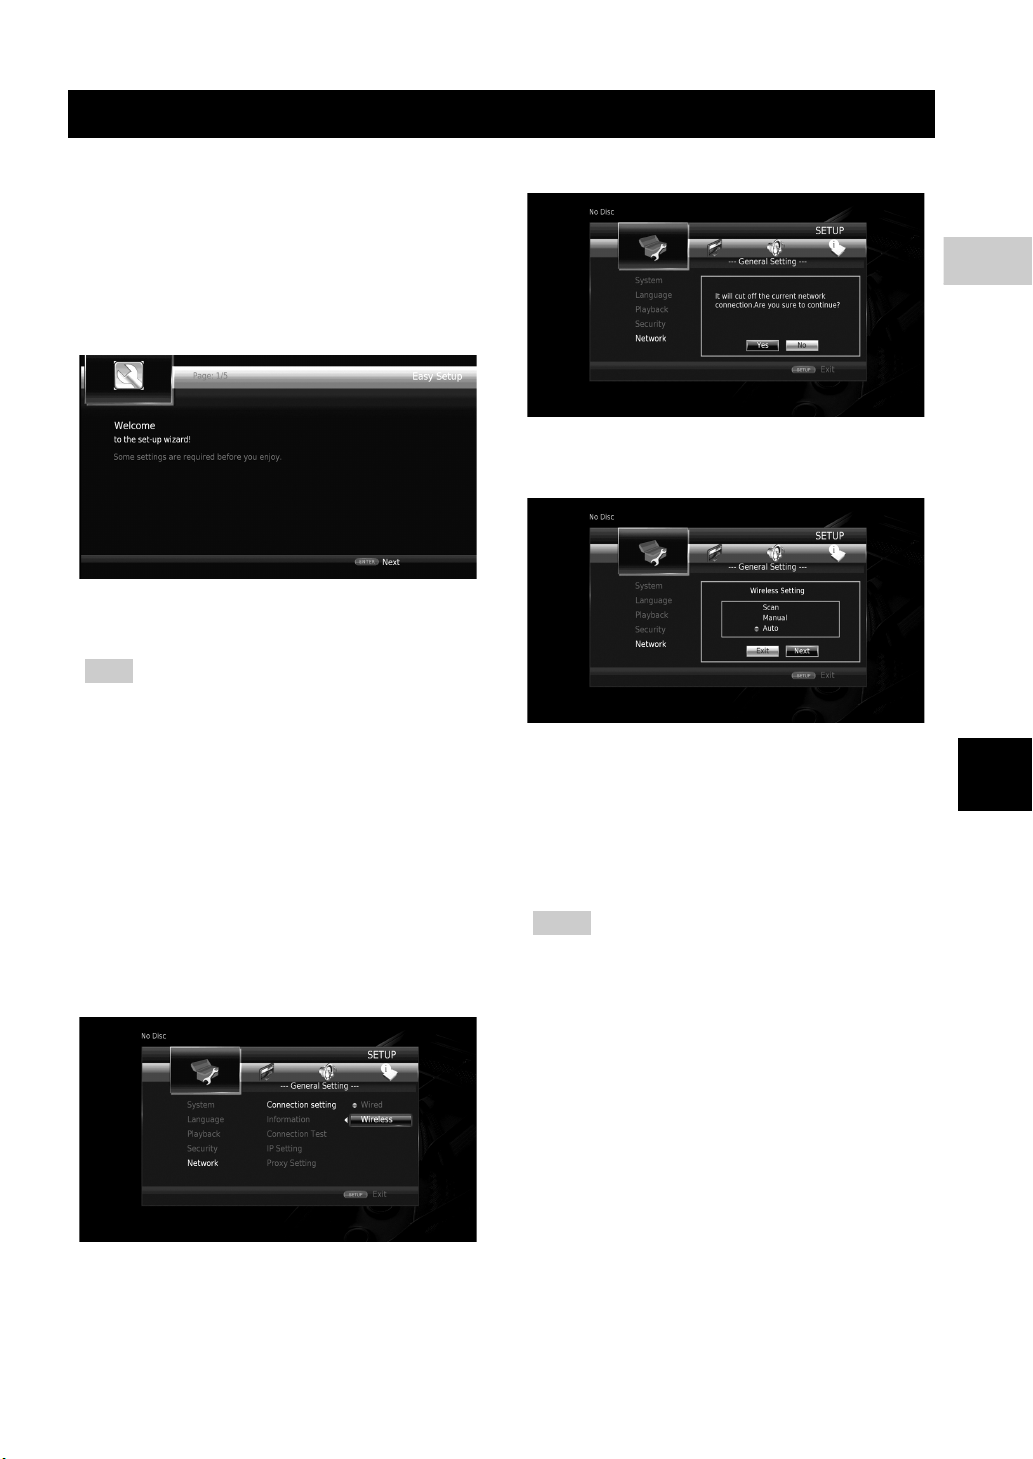
■ Setting with the Easy Setup
Easy Setup allows you to set language, resolution, and
screen aspect ratio easily. Easy Setup screen is displayed
when you turn this Player on for the first time after
purchase. Same setting can be performed from SETUP
menu = System = Easy Setup.
1 When Easy Setup screen is displayed, press ENTER to
start Easy Setup.
2 Set the language, resolution, and screen aspect ratio by
following the on-screen messages.
Note
– When no picture is displayed after Easy Setup is
completed, refer to “Troubleshooting” (p. 36).
■ Wireless connection setting
To connect this Player to your network (router) wirelessly,
follow the procedure below to configure the wireless
connection setting.
If your router (access point) supports the WPS (Wi-Fi
Protected Setup) function, you can use the auto setup
method to connect this Player to the router without
entering network information (such as SSID) manually.
1 Press HOME to display the HOME menu screen.
2 Select SETUP = General Setting = Network =
Connection setting = Wireless.
3 Press 2/3 to select Yes, then press ENTER.
4 Press 2/3 to select one of the following setup
methods, then press ENTER.
Scan: Select this option to search for available wireless
networks. When the network list is displayed, select the
SSID to be connected and enter the password.
Manual: Select this option to enter the network
information (such as SSID) manually.
Auto: Select this option to use the WPS function. Select
PBC (Push Button Configuration) or PIN code method,
then follow the on-screen messages.
Notes
– For details on operations of your router (access
point), refer to the owner’s manual of it.
– When the WPS function does not work, select
“Scan” or “Manual” to configure the wireless
connection settings.
– Devices that use a 2.4 GHz frequency band, such as
a microwave, Bluetooth, or digital cordless device,
may interrupt the wireless communication. Move
this Player away from such devices, or turn off such
devices.
– The speed of a wireless network connection depends
on your network environment (router type, distance
between the router and this Player, installation
places, etc.). In case the sound or video is interrupted
during playback, move this Player closer to the
router or change the orientation of this Player or the
antenna of the router.
English
15 En
HOME menu
The HOME menu allows you to perform the following basic operations of this Player.
– Browsing and playing multi-media files on various discs, USB memory devices and your DLNA servers (PC or
NAS)
– Accessing to various network services (p. 18)
– Displaying the SETUP menu (p. 24)
Hints
– For details on playable discs and formats, see page 3.
– To play DLNA server contents on this Player, the media sharing setting (p. 13) on the DLNA server should be
configured.
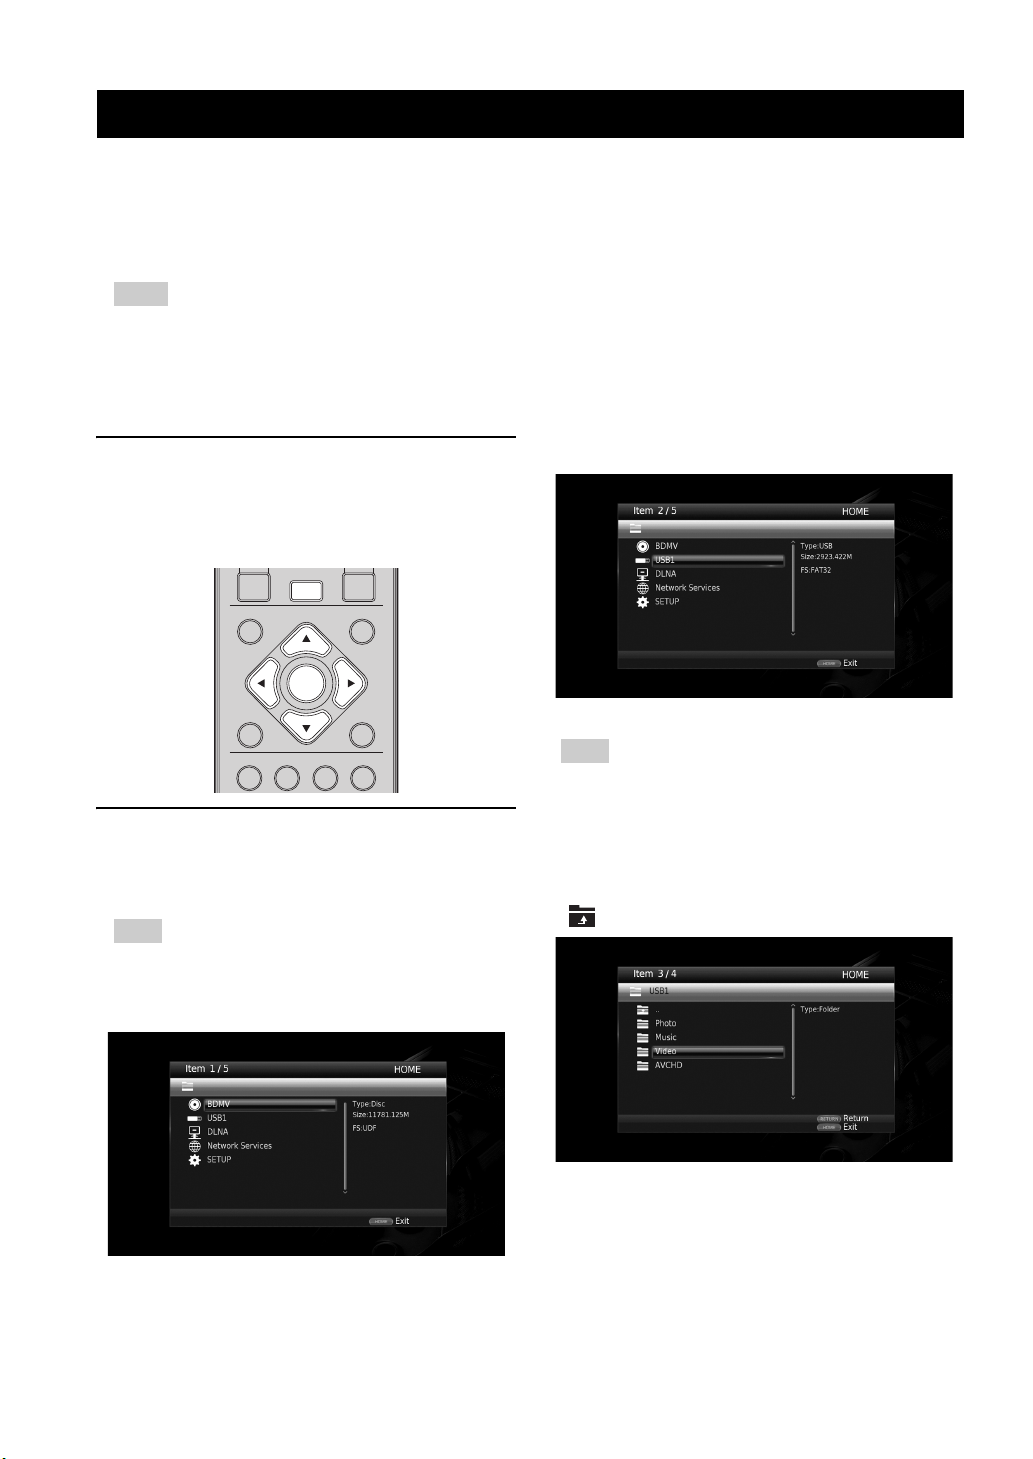
■ Playing back photo/music/video
2 Press 5/a to select the item which contains the file
Basic operation
2/3/5/a: Moves the focus.
2: Returns to the parent folder.
HOME: Moves to/exits HOME menu screen.
ENTER: Confirms the folder/file.
you want to play back, then press ENTER.
2ND
AUDIO
TOP MENU
RETURN
PROGRAMGSHUFFLEYREPEAT
ZOOM
R
HOME
ENTER
AUDIO
POP-UP/MENU
ON SCREEN
B
Common operations for playing back
files in a selected folder
Example: Selecting a movie file on a USB memory
device
Note
– Stop the playback of the video before you move to
HOME menu screen.
1 Press HOME to move to HOME menu screen.
Note
– If your DLNA server is not listed, check that the
DLNA server is turned on and select DLNA Search
to update the list.
3 Select the Photo, Music, Video or AVCHD folder you
want to play back, then press ENTER.
To return to the parent folder, press RETURN or select
.
16 En
HOME menu
Playback
3
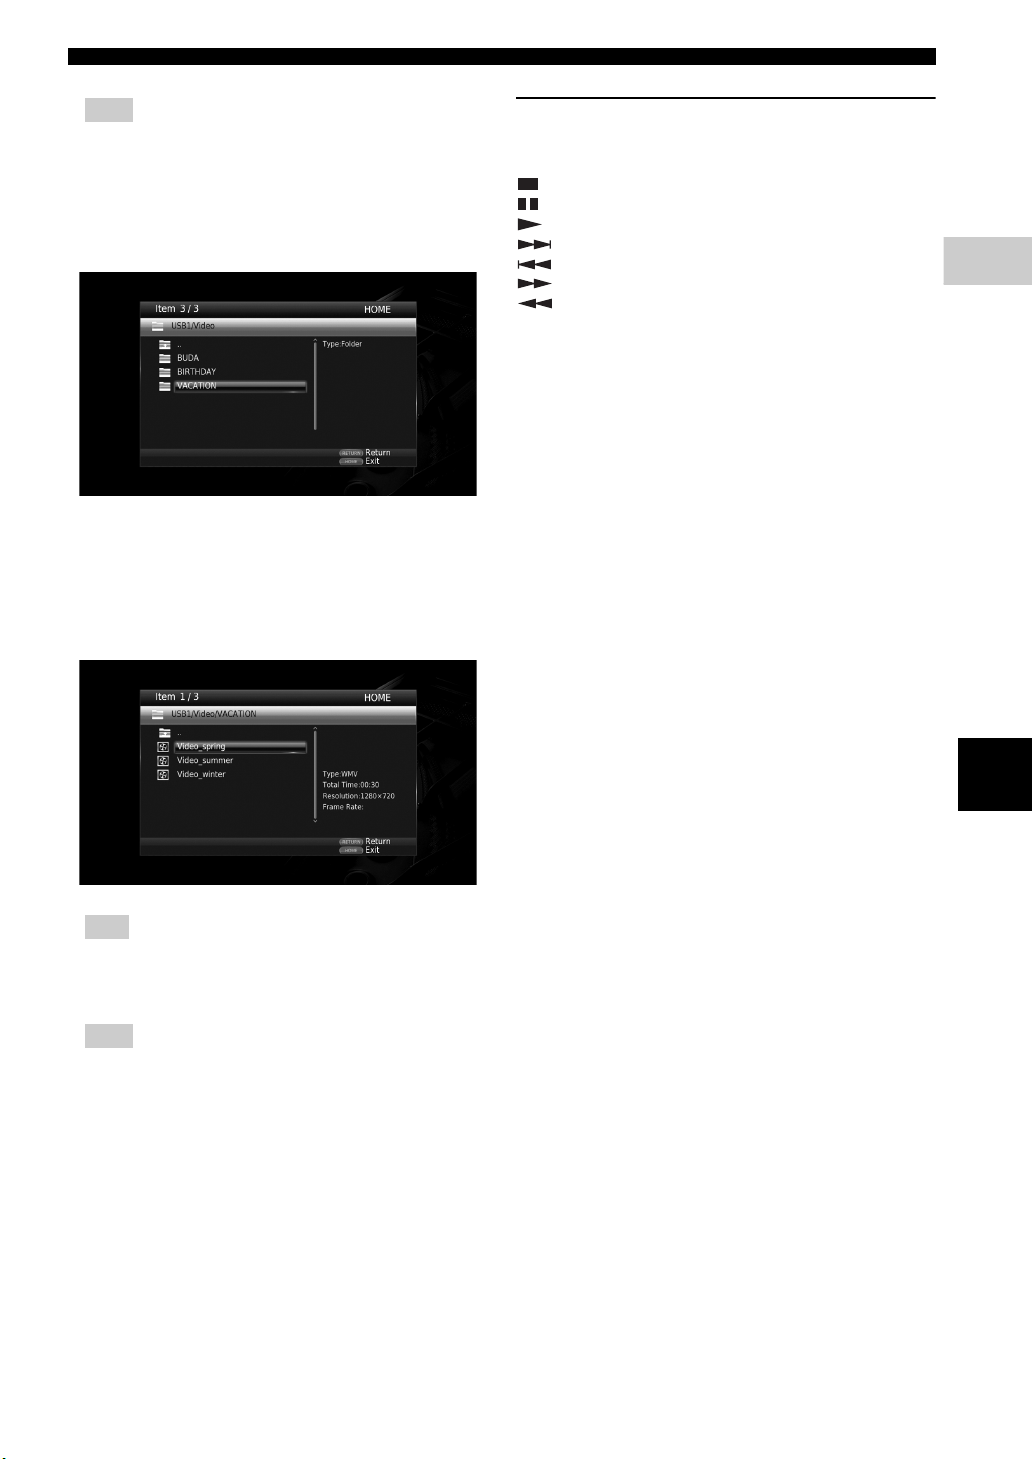
Note
– Note that the only the file type selected on this step
will be displayed in the following step. For example,
if you selected Photo folder in this step, only photo
files are displayed after this step.
4 Select the folder containing the file you want to play
back.
5 Select the file you want to play back, then press
ENTER.
When a video file is selected, playback starts.
When a music file is selected, status screen is displayed
and playback starts.
When a photo file is selected, slide show starts.
Operations for viewing photos
While viewing photos, the buttons on the remote control
work as shown below.
: Stops slide show and returns to the file browser.
: Pauses a slide show.
: Plays a slide show.
: Moves to a next photo.
: Moves to a previous photo.
: Makes a slide show faster in 3 steps.
: Makes a slide show slower in 3 steps.
5: Inverts a photo.
a: Reflects a photo.
2: Rotates a photo counterclockwise.
3: Rotates a photo clockwise.
ZOOM: Zooms in/out a photo (zoom in/out: 3 steps each).
5/a/2/3: Pans in zoom mode when a photo is larger
than the screen.
English
Hint
– To enjoy slide show with music, press HOME to
return to the HOME menu screen while music is
played back, and select photo file.
Note
– The displayed file may not be played back
depending on the content.
17 En
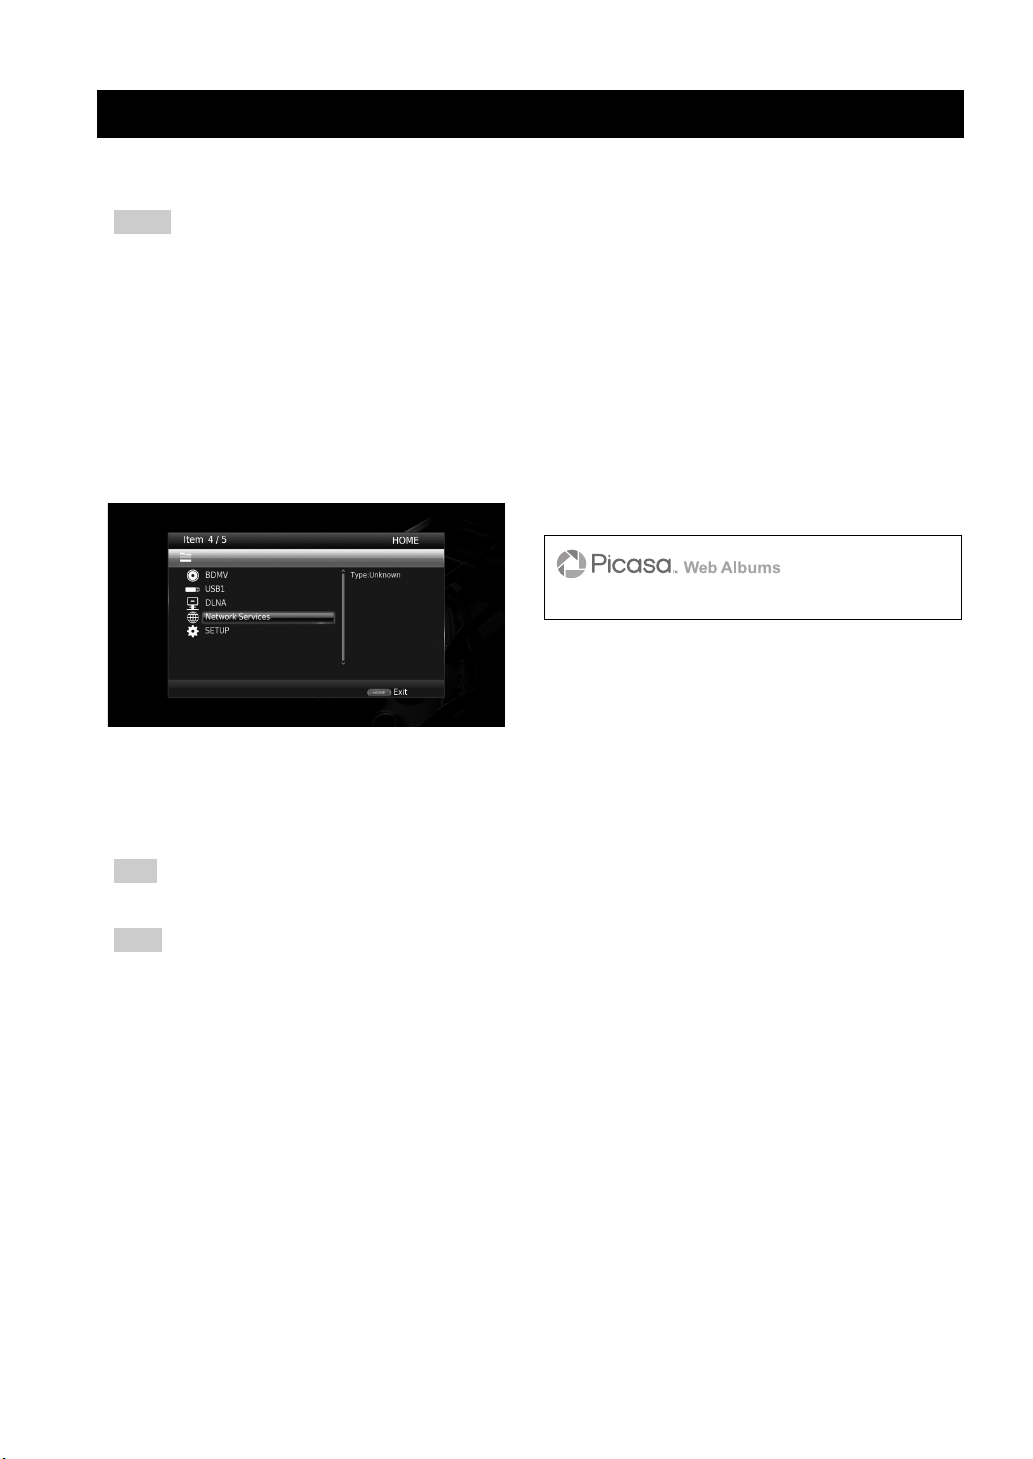
Using network services
You can enjoy photos using the following network services.
– Picasa Web Albums
Notes
– Access to content provided by third parties requires a high speed internet connection and may also require account
registration and a paid subscription.
– Third party content services may be changed, suspended, interrupted, or discontinued at any time without notice,
and Yamaha disclaims any liability in connection with such occurrences.
– Some content may only be available for specific countries and may be presented in specific languages.
– Yamaha does not represent or warrant that content services will continue to be provided or available for a particular
period of time, and any such warranty, express or implied, is disclaimed.
1 Press HOME to move to HOME menu screen.
2 Press 5/a to select Network Services, then press
ENTER.
3 Press 2/3/5/a to select the desired network service,
then press ENTER.
4 Press 2/3/5/a to select an item, then press ENTER
to confirm the selection (or start playback).
Hint
– To exit from each network service, press HOME.
Note
– Operation procedures after step 4 vary depending on
the menu items provided by each service.
■ About Picasa™ Web Albums
Picasa Web Albums is a network service that allows users
to share photos with friends and family, or explorer public
photos.
More information at picasaweb.google.com
Picasa and the Picasa logo are trademarks of Google. Inc.
18 En

Playback
3
Enjoying smartphone pictures and videos
Miracast-compatible
device
(smartphone, etc.)
This Player
TV
AV CONTROLLER
on the TV screen (Miracast™)
Miracast is a solution for seamlessly displaying video between devices, without cables or a network connection via an
access point (Wi-Fi Direct). You can do things like view pictures from a Miracast-compatible device (smartphone, etc.)
on the screen of the TV connected to this Player.
Notes
– To check if your device is Miracast compliant, refer to the owner’s manual of the device.
– When Miracast is enabled on this Player, other network functions (such as DLNA) are not available.
♪
USB
Depending on the environment, audio/video may be interrupted or noise may appear on the TV screen. In this case,
try the following solutions.
– Move the Miracast device closer to this Player.
– Turn off other wireless devices not in use.
– Move the Miracast device and this Player away from microwave ovens, Bluetooth devices or other wireless
devices.
♪
1 Press MIRACAST.
2 Within 60 seconds, operate your smartphone to enable
Miracast and select this Player as the device to be
connected.
For details on operations of your smartphone, refer to
the owner’s manual of it.
3 To exit from Miracast, press MIRACAST.
Hint
– You can also exit from Miracast by pressing HOME
or RETURN.
Operating this Player from mobile devices (AV CONTROLLER)
English
By using the application “AV CONTROLLER” on your mobile device, you can use the mobile device as a remote
control and operate this Player from it.
– You can control the basic functions of Yamaha Blu-ray Disc™ players such as Play, Pause, Skip, Power and
cursor navigations.
– The application “AV CONTROLLER” is available in many languages.
– For more information about “AV CONTROLLER”, visit the Yamaha website.
19 En
Advanced playback operation
DVD
VIDEO
DVD
VIDEO
CD
VIDEO
MUSIC
BD
CD
VIDEO
PHOTO
CD
DVD
DVD
VIDEO
VIDEO
BD
DVDCDVIDEO
MUSIC
BD
CD
DVD
MUSIC
VIDEO
PHOTO
This chapter explains playback of commercially available
Blu-ray Discs, DVDs, CDs, and recorded DVD-RW/R
discs.
Note
– For the basic playback operation, see page 7.
■ On Screen menu
To display On Screen menu, press ON SCREEN. After
that, press 5/a/2/3 to select an item, then press ENTER
to operate the desired function.
On Screen menu contains following items.
Title : Shows the title number being
BD
played back. You can skip to the desired title by selecting
it from this item.
Chapter : Shows the chapter
number being played back. You can skip to the desired
chapter by selecting it from this item.
BD
– Normal
– Shuffle CH (chapter)
– Shuffle TT (title)
– Shuffle All
– Random CH (chapter)
– Random TT (title)
– Random All
VIDEO MUSIC PHOTO
– Normal
– Shuffle F (folder)
– Random F (folder)
Audio : Shows audio language/
BD
signal of a Blu-ray Disc/DVD currently selected. You can
select the desired type of audio.
Angle : Shows the currently-selected angle
BD DVD
number. If the video is recorded with multiple angles, you
can change the angle.
Subtitle : Shows the currently-
BD DVD
selected subtitle language when the subtitle is provided.
Subtitle Style : Shows the currently-selected
subtitle style. This function is available only for Video-file
external subtitle. You can select the desired text style of
subtitle.
Bitrate : Shows
BD
bitrate of the audio/video signal.
Second Video : Turns the PIP on/off (p. 7).
BD
Track/File : Shows
PHOTO
track/file number being played back. You can skip to the
desired track/file by selecting it from this item.
Time : Shows the
DVD CD VIDEO MUSIC
playback time. Select display type from the following:
– Elapsed playback time of the title, chapter, disc,
track or file
– Remaining playback time of the title, chapter, disc,
track or file
Mode/Play Mode
: Shows current
DVD
MUSIC
playback mode. You can select playback mode from the
following:
– Normal: Normal playback.
– Shuffle: Random playback without repetition.
– Random: Random playback with repetition.
20 En
Second Audio : Turns the secondary audio on/off
(p. 7).
Ins Search
: Skips 30 seconds.
BD DVD
VIDEO MUSIC
Ins Replay
: Replays the content
BD
CD VIDEO
from 10 seconds before.
CC Select
: Sets the displayed closed caption.
BD DVD
Slide Show :
Sho
s slide show speed. You can select the slide show
w
speed from Slow/Medium/Fast.
Transition : Shows how photo appears on the
PHOTO
screen. You can select the transition type.
Playback
3
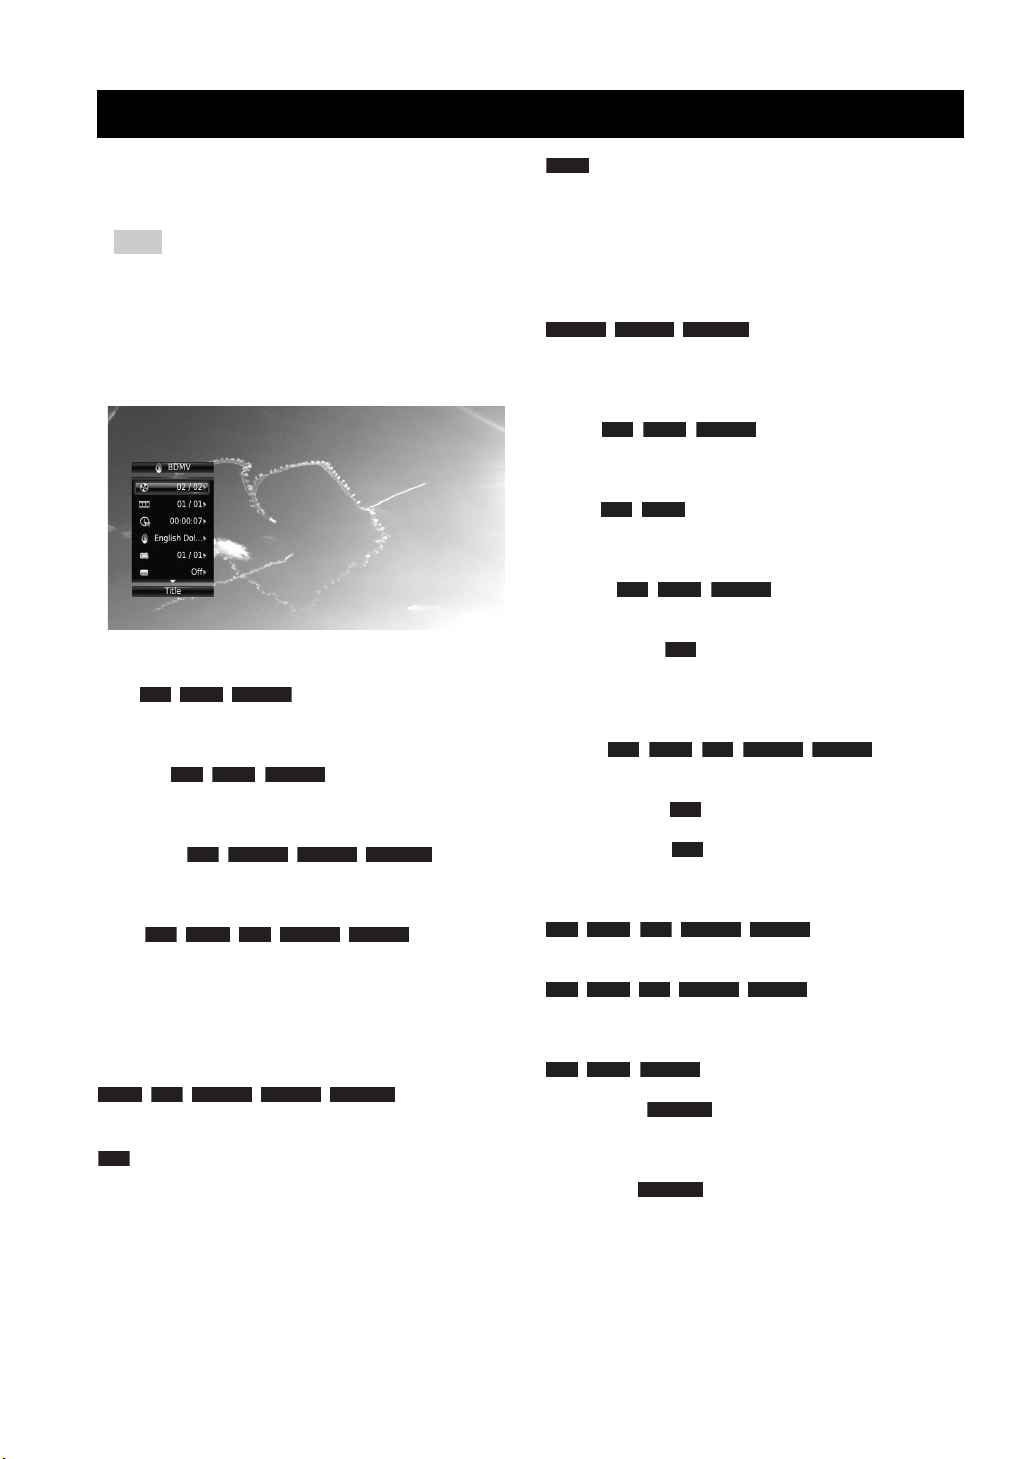
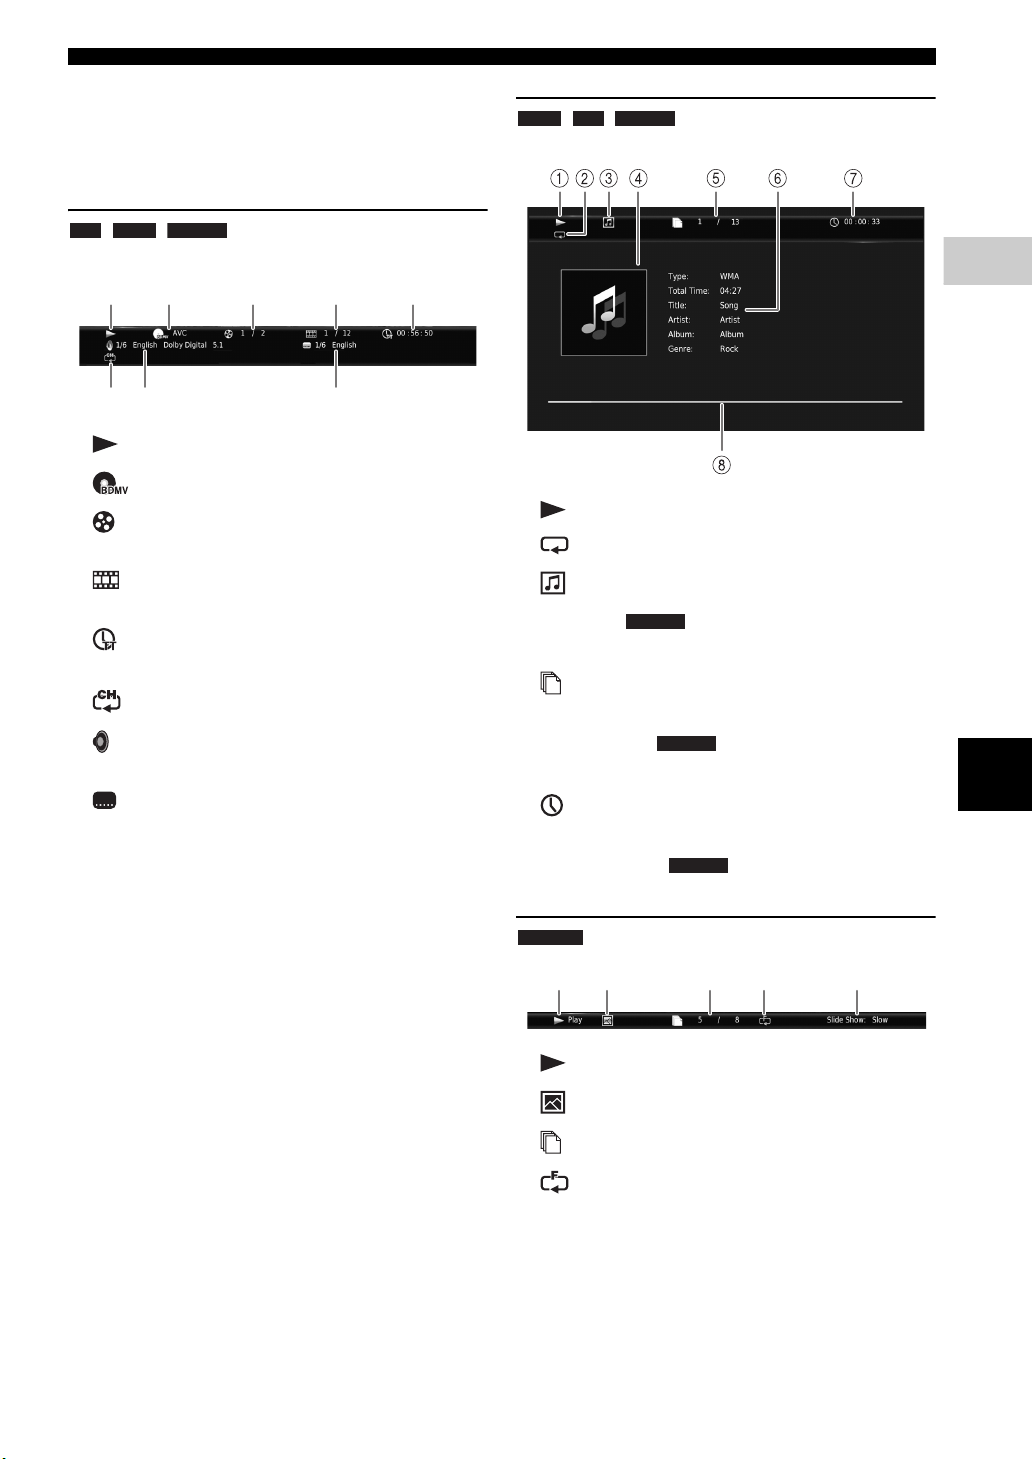
■ Status menu
BD
DVD
VIDEO
DVD
CD
MUSIC
MUSIC
MUSIC
This shows various settings, such as subtitles, angle
settings and the title/chapter/track number currently
played back. To display status menu, press STATUS.
Status menu contains following menus.
Example: Icons when playing a Blu-ray Disc
1 2 3 4 5
6 7 8
1 (Playback status)
2 (Disc type/video file icon)
3 (Title number being played): You can jump to
specified title with SEARCH button (p. 8).
4 (Chapter number being played): You can
jump to specified chapter with SEARCH button (p. 8).
5 (Elapsed playback time): You can jump to
specified point with SEARCH button (p. 8).
(Repeat mode):
6
7 (Audio currently selected): You can change the
audio language or format with AUDIO button.
8 (Subtitle currently selected): You can change
the subtitle language with SUBTITLE button.
Shows current repeat mode (p. 7).
Advanced playback operation
MUSIC
Example: Icons when playing a music file
1 (Playback status)
2
(Repeat mode):
3 (Disc type/music file icon)
4 (Artwork) : Displays artwork if the file
contains it.
5 (Track/file number being played): You can
jump to specified track with SEARCH button (p. 8).
6 (Information) : Displays music information
if the file contains them.
7 (Elapsed playback time): You can jump to
specified point with SEARCH button (p. 8).
Shows current repeat mode (p. 7).
English
8 (Progress bar) : Shows progress status of
current song.
PHOTO
1 2 3 4 5
1 (Playback status)
2 (Photo file icon)
3 (File number being displayed)
4
(Repeat mode):
5 (Slide show speed)
Shows current repeat mode (p. 7).
21 En
Advanced playback operation
DVD
CD
BD
DVDCDVIDEO
MUSIC
PHOTO
PHOTO
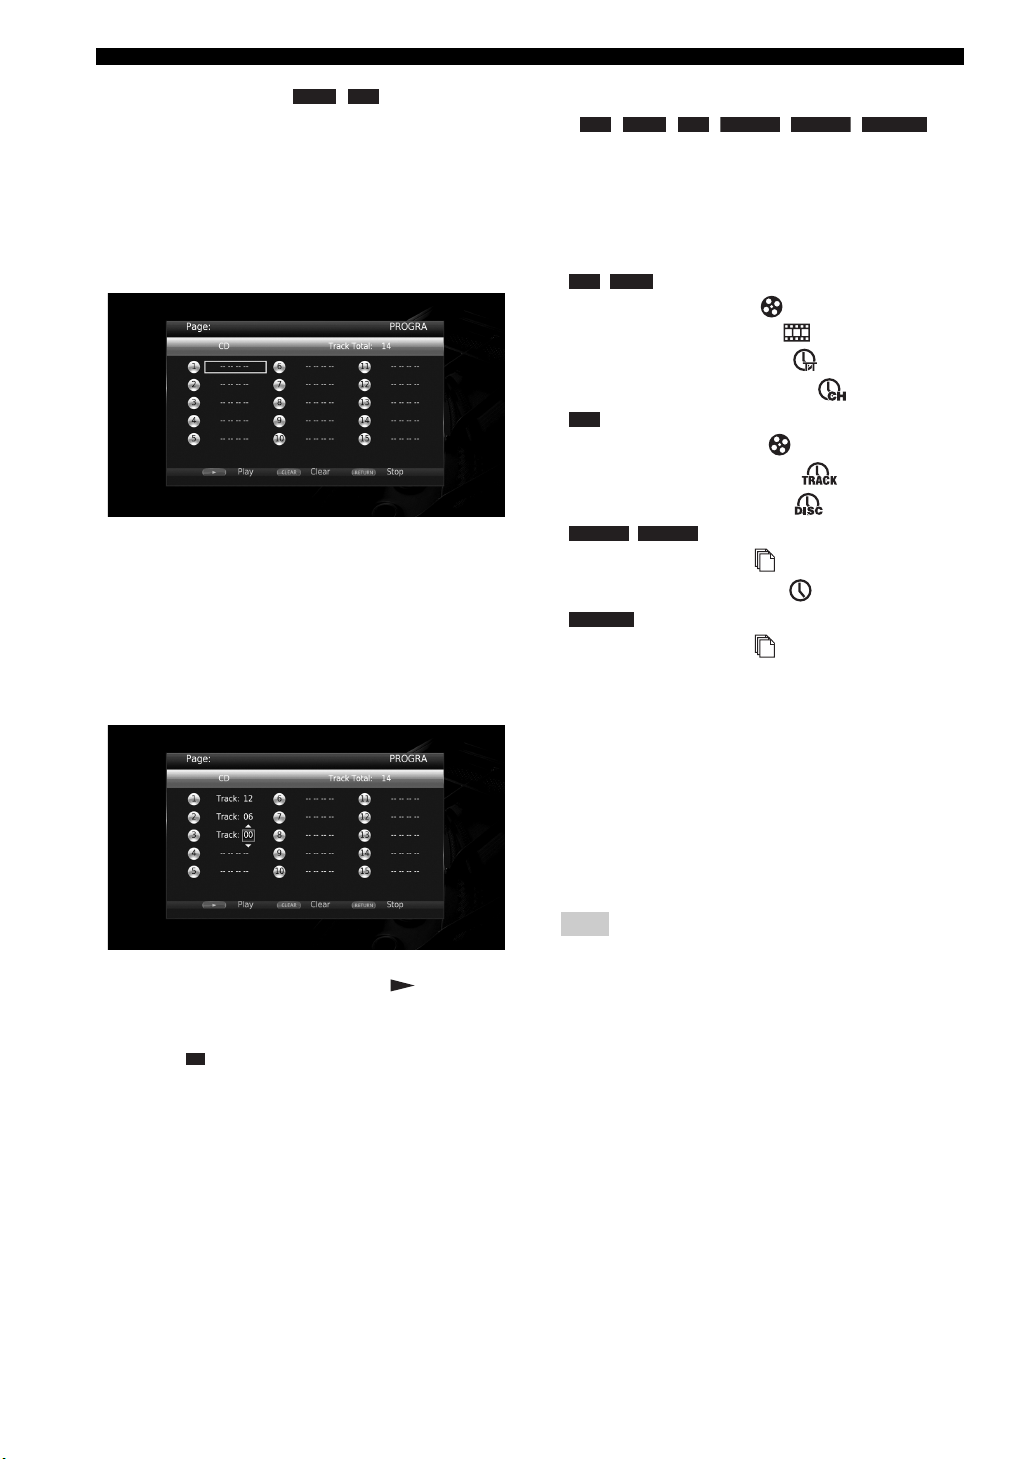
■ Program play
This allows you to program playback order of audio disc
tracks or DVD chapters.
Press PROGRAM during playback to display the
PROGRAM window to program playback order.
You can program up to 15 tracks/chapters.
Example: Programming the playback order of CD tracks
1 Press PROGRAM during playback.
2 Press ENTER to program playback order.
For audio disc, press 5/a to select a desired track then
press ENTER.
For DVD-Video disc, select a desired title (shown as
TT) and chapter (shown as CH) instead of a track.
To clear a set track, select the track you want to clear,
then press CLEAR.
Press RETURN to cancel the Program play.
■ Using Search
This allows you to jump to the specified point during
playback.
1 Press SEARCH during playback. Status bar appears.
2 Press 5/a/2/3 to select one of the item below, then
press ENTER.
:
BD DVD
– Title number (shown as )
– Chapter number (shown as )
– Elapsed title time (shown as )
– Elapsed chapter time (shown as )
:
CD
– Track number (shown as )
– Elapsed track time (shown as )
– Elapsed disc time (shown as )
:
VIDEO MUSIC
– File number (shown as )
– Elapsed file time (shown as )
:
– File number (shown as )
3 Press 5/a or number buttons to set/adjust the value of
the focused item, and press ENTER to jump to the
specified point.
4 To close the status bar, press STATUS.
3 After programming is finished, press to set and
start program playback.
4 To cancel program play, stop playback completely by
pressing .
■ Enjoying BONUSVIEW™ and BDLive™
This Player supports BONUSVIEW (p. 38) (BD-ROM
Profile 1 Version 1.1) and BD-Live (p. 38) (BD-ROM
Profile 2) playback functions.
Note
– Functions and playback method vary depending on
the disc. See the guidance on the disc or the supplied
user’s manual.
22 En
Advanced playback operation
Playback
3
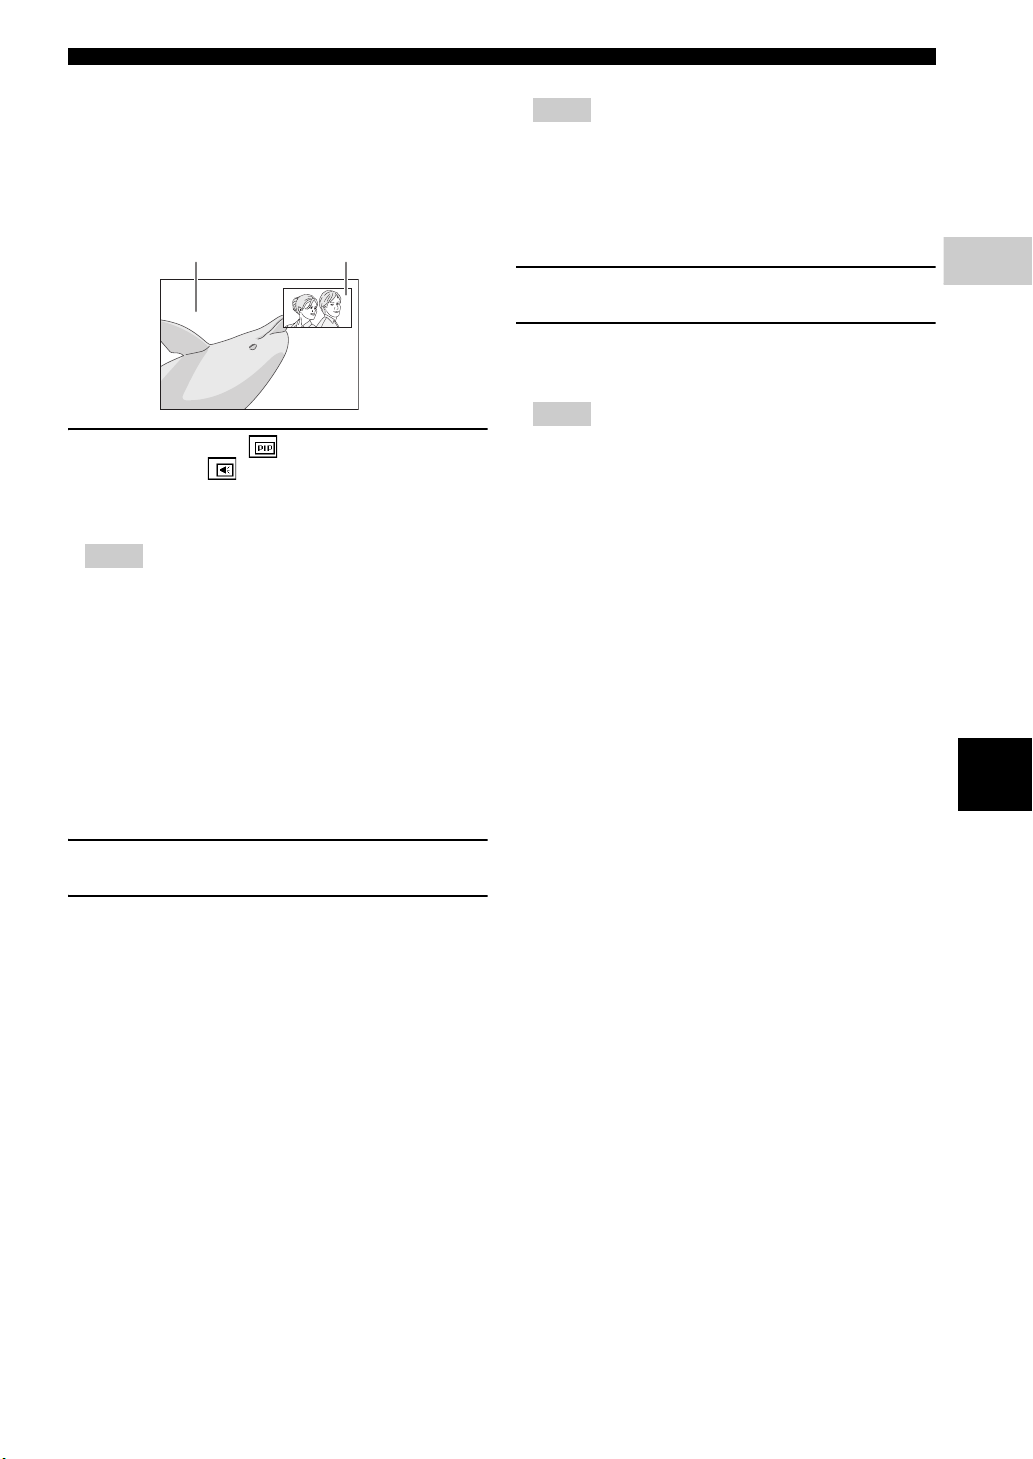
Primary video Secondary video
■ Using Picture in Picture function (secondary audio/video playback)
BD-Video that includes secondary audio and video
compatible with Picture in Picture can be played back
with secondary audio and video simultaneously as a small
video in the corner.
While PIP Mark ( ) or Secondary
Audio Mark ( ) is displayed, press
PIP to turn the Picture in Picture
function on/off.
Notes
– To listen to secondary audio, make sure that the
Audio Output setting (HDMI) is set to PCM or
Reencode (p. 31).
– Depending on the disc, to listen to secondary audio,
you may need to set secondary audio to on from the
top menu of the disc (p. 7).
– The secondary audio and video for Picture in Picture
may automatically play back and be removed
depending on the content. Also, playable areas may
be restricted.
■ Using the feature of BD-Live™
1. Set the Network setting (p. 28).
2. Connect the USB memory device
to this Player (p. 14).
BD-Live data is saved in a USB memory device
connected to this Player. To enjoy these functions,
connect a USB memory device supporting USB 2.0
High Speed (480 Mbit/s) to one of the USB
connectors (front/rear) of this Player to use the USB
memory device as Local Storage.
– Local Storage is used as an auxiliary memory when
Blu-ray Disc is played back.
– Use a USB memory device with at least 2GB of free
space.
– BUDA folder is created automatically in the USB
memory device when necessary.
– If there is insufficient storage space, the data will not
be copied/downloaded. Delete unneeded data or use
a new USB memory device.
– Some time may be required for the data to load
(read/write).
Notes
– Yamaha cannot guarantee that all brands’ USB
memory devices will operate with this Player.
– Do not use a USB extension cable when connecting
a USB memory device to the USB connector of the
Player. Using a USB extension cable may prevent
the Player from performing correctly.
3. Play back the disc.
4. Run BD-Live according to the
instructions on the disc.
Notes
– Do not remove the USB memory device or disconnect
unplug the power cable during BD-Live operations.
– Regarding playback method of BD-Live contents,
etc., perform the operations in accordance with the
instructions in the Blu-ray Disc manual.
– To enjoy BD-Live functions, perform the network
connection (p. 12) and Network settings (p. 28).
– Refer to “BD-Live Connection” (p. 29) regarding the
setup to restrict access to BD-Live contents.
– The time required to download the provided programs
into the USB memory device connected to this Player
varies depending on the internet connection speeds
and the data volume of the programs.
– BD-Live programs provided through the internet
may not be able to display the connection depending
on the status (upgrading) of the provider. In such
cases, take out the disc and try again.
– If the BD-Live screen does not appear for a while
after you select the BD-Live function in the Blu-ray
Disc menu, the USB memory device may not have
enough free space. In such cases, eject the disc from
the Player, and then erase the data in the USB
memory device using the “Format” menu in the
“Local Storage” (p. 27).
English
23 En
SETTINGS
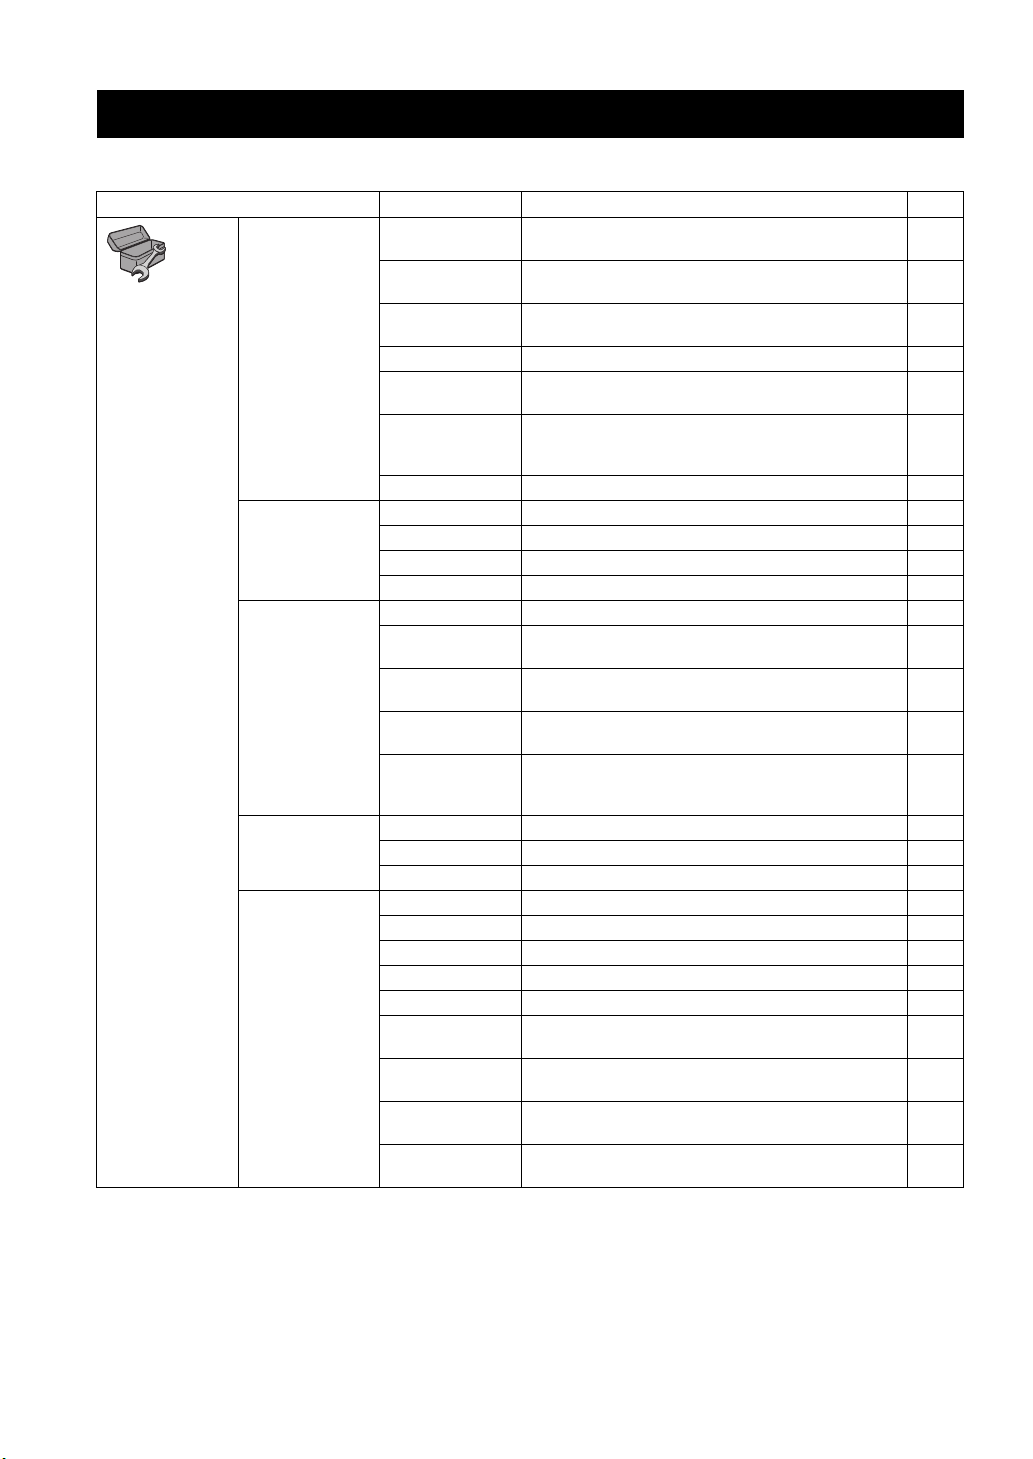
SETUP menu
The SETUP menu enables various audio/visual settings and adjustments for functions using the remote control unit.
Menu/Submenu Item Function Page
General Setting
System Auto Power
Standby
HDMI Control Sets this Player to receive control signal from the remote
Load Default Resets all settings to the default setting except Security
Upgrade Performs upgrade of this Player. 27
Upgrade
Notification
Local Storage Displays the free space of USB memory device connected to
Easy Setup Sets language, resolution, screen aspect ratio. 27
Language OSD Selects the language for On Screen Display. 27
Menu Prioritizes the language for disc menu. 27
Audio Prioritizes the language for audio. 27
Subtitle Prioritizes the language for subtitle. 27
Playback Disc Auto Playback Sets this Player to start disc playback automatically. 28
Angle Mark Sets to display the Angle Mark when Blu-ray Disc/DVD with
PIP Mark Sets to display the PIP Mark when Blu-ray Disc/DVD with
Secondary Audio
Mark
Last Memory Sets this Player to remember the last playback position of a
Security Change Password Changes password for Parental Control and Country Code. 28
Parental Control Sets the Parental Control depending on the disc content. 28
Country Code Sets your Country Code. 28
Network Connection Setting Sets a network connection method. 28
Information Displays network information screen. 28
Connection Test Performs the network connection test. 28
IP Setting Sets the IP setting to Auto/Manual. 28
Proxy Setting Sets the proxy setting. 29
Network Control Sets the control for devices, which are connected via
Network Standby Selects whether this Player can be turned on from other
DMC Control Selects whether to allow DLNA-compatible Digital Media
BD-Live
Connection
Sets the power-saving function to on/off.
control of your TV/AV receiver.
setting.
Selects whether to display the message on the screen when
this Player detects newer software over the Internet.
this Player, or formats the “BUDA” folder in the USB
memory device.
multiple angles is played back.
Picture in Picture is played back.
Sets to display the Secondary Audio Mark when Blu-ray
Disc/DVD with secondary audio is played back.
disc (Blu-ray or DVD video) when it is set to standby mode
or the disc tray is opened.
Ethernet, to On/Off.
network devices.
Controller (DMC) (p. 13) to control this Player.
Sets the BD-Live connection to Permitted/Partial Permitted/
Prohibited.
27
27
27
27
27
28
28
28
28
29
29
29
29
24 En
Settings
4
Menu/Submenu Item Function Page
Display Setting
Audio Setting
SETUP menu
TV TV Screen Sets the screen aspect ratio of the connected TV, and adjust
HDMI Resolution Selects the HDMI video output resolution. 30
TV System Selects the TV System from NTSC/PAL/Multi. 30
Color Space Selects Color Space from YCbCr 4:4:4/YCbCr 4:2:2/Full
HDMI Deep Color Selects HDMI Deep Color from 30 bits/36 bits/48 bits/Off. 30
HDMI 1080p 24Hz Sets HDMI 1080p 24Hz to auto/off. 30
Video Process Noise Reduction Sets the level of Noise Reduction. 30
De-interlacing
Mode
Closed Caption CC Attribute Sets the appearance of closed captions. 30
Font color
Font size
Font style
Font opacity
Font edge
Font edge color
BG color
BG opacity
Window color
Window opacity
Audio Output HDMI Selects the output mode of HDMI terminal from Bitstream/
DRC Sets the DRC (Dynamic Range Compression).
the video output.
RGB/RGB.
Sets how to detect the video signal.
Customize the font, background and window used for closed
captions when CC Attribute is set to Custom.
PCM/Reencode/Off.
Displays software version and MAC address (p. 39).
29
30
30
30
31
31
System
Information
31
English
25 En
 Loading...