

Yamaha BD-S2900 Owner Manual
BLU-RAY DISC PLAYER
LECTEUR BLU-RAY DISC
BD-S2900
OWNER’S MANUAL
MODE D’EMPLOI
U
IMPORTANT SAFETY INSTRUCTIONS
d th
ese operating instructions carefully before using the unit. Follow the safety instructions on the unit and the applicable safety instructions
Rea
listed below. Keep these operating instructions handy for future reference.
1 Read these instructions.
2 Keep these instructions.
3 Heed all warnings.
4 Follow all instructions.
5 Do not use this apparatus near water.
6 Clean only with dry cloth.
7 Do not block any ventilation openings. Install in accordance with
the manufacturer’s instructions.
8 Do not install near any heat sources such as radiators, heat registers,
stoves, or other apparatus (including amplifiers) that produce heat.
9 Do not defeat the safety purpose of the polarized or grounding-type
plug. A polarized plug has two blades with one wider than the other.
A grounding-type plug has two blades and a third grounding prong.
The wide blade or the third prong are provided for your safety. If the
provided plug does not fit into your outlet, consult an electrician for
replacement of the obsolete outlet.
WARNING:
TO REDUCE THE RISK OF FIRE, ELECTRIC SHOCK OR
PRODUCT DAMAGE,
• DO NOT EXPOSE THIS APPARATUS TO RAIN,
MOISTURE, DRIPPING OR SPLASHING AND THAT
NO OBJECTS FILLED WITH LIQUIDS, SUCH AS
VASES, SHALL BE PLACED ON THE APPARATUS.
• USE ONLY THE RECOMMENDED ACCESSORIES.
• DO NOT REMOVE THE COVER (OR BACK); THERE
ARE NO USER SERVICEABLE PARTS INSIDE. REFER
SERVICING TO QUALIFIED SERVICE PERSONNEL.
10 Protect the power cord from being walked on or pinched
particularly at plugs, convenience receptacles, and the point where
they exit from the apparatus.
11 Only use attachments/accessories specified by the manufacturer.
12 Use only with the cart, stand, tripod, bracket, or table
specified by the manufacturer, or sold with the
apparatus. When a cart is used, use caution when
moving the cart/apparatus combination to avoid injury
from tip-over.
13 Unplug this apparatus during lightning storms or when unused for
long periods of time.
14 Refer all servicing to qualified service personnel. Servicing is
required when the apparatus has been damaged in any way, such as
power-supply cord or plug is damaged, liquid has been spilled or
objects have fallen into the apparatus, the apparatus has been
exposed to rain or moisture, does not operate normally, or has been
dropped.
The socket outlet shall be installed near the equipment and easily accessible.
The mains plug of the power supply cord shall remain readily operable.
To completely disconnect this apparatus from the AC Mains, disconnect the
power supply cord plug from AC receptacle.
CAUTION!
DO NOT INSTALL OR PLACE THIS UNIT IN A BOOKCASE, BUILTIN CABINET OR IN ANOTHER CONFINED SPACE.
ENSURE THE UNIT IS WELL VENTILATED. TO PREVENT RISK
OF ELECTRIC SHOCK OR FIRE HAZARD DUE TO
OVERHEATING, ENSURE THAT CURTAINS AND ANY OTHER
MATERIALS DO NOT OBSTRUCT THE VENTILATION VENTS.
CAUTION!
THIS PRODUCT UTILIZES A LASER.
USE OF CONTROLS OR ADJUSTMENTS OR PERFORMANCE OF
PROCEDURES OTHER THAN THOSE SPECIFIED HEREIN MAY
RESULT IN HAZARDOUS RADIATION EXPOSURE.
DO NOT OPEN COVERS AND DO NOT REPAIR YOURSELF.
REFER SERVICING TO QUALIFIED PERSONNEL.
CAUTION
Danger of explosion if battery is incorrectly replaced. Replace only with the
same or equivalent type recommended by the manufacturer. Dispose of used
batteries according to the manufacturer’s instructions.
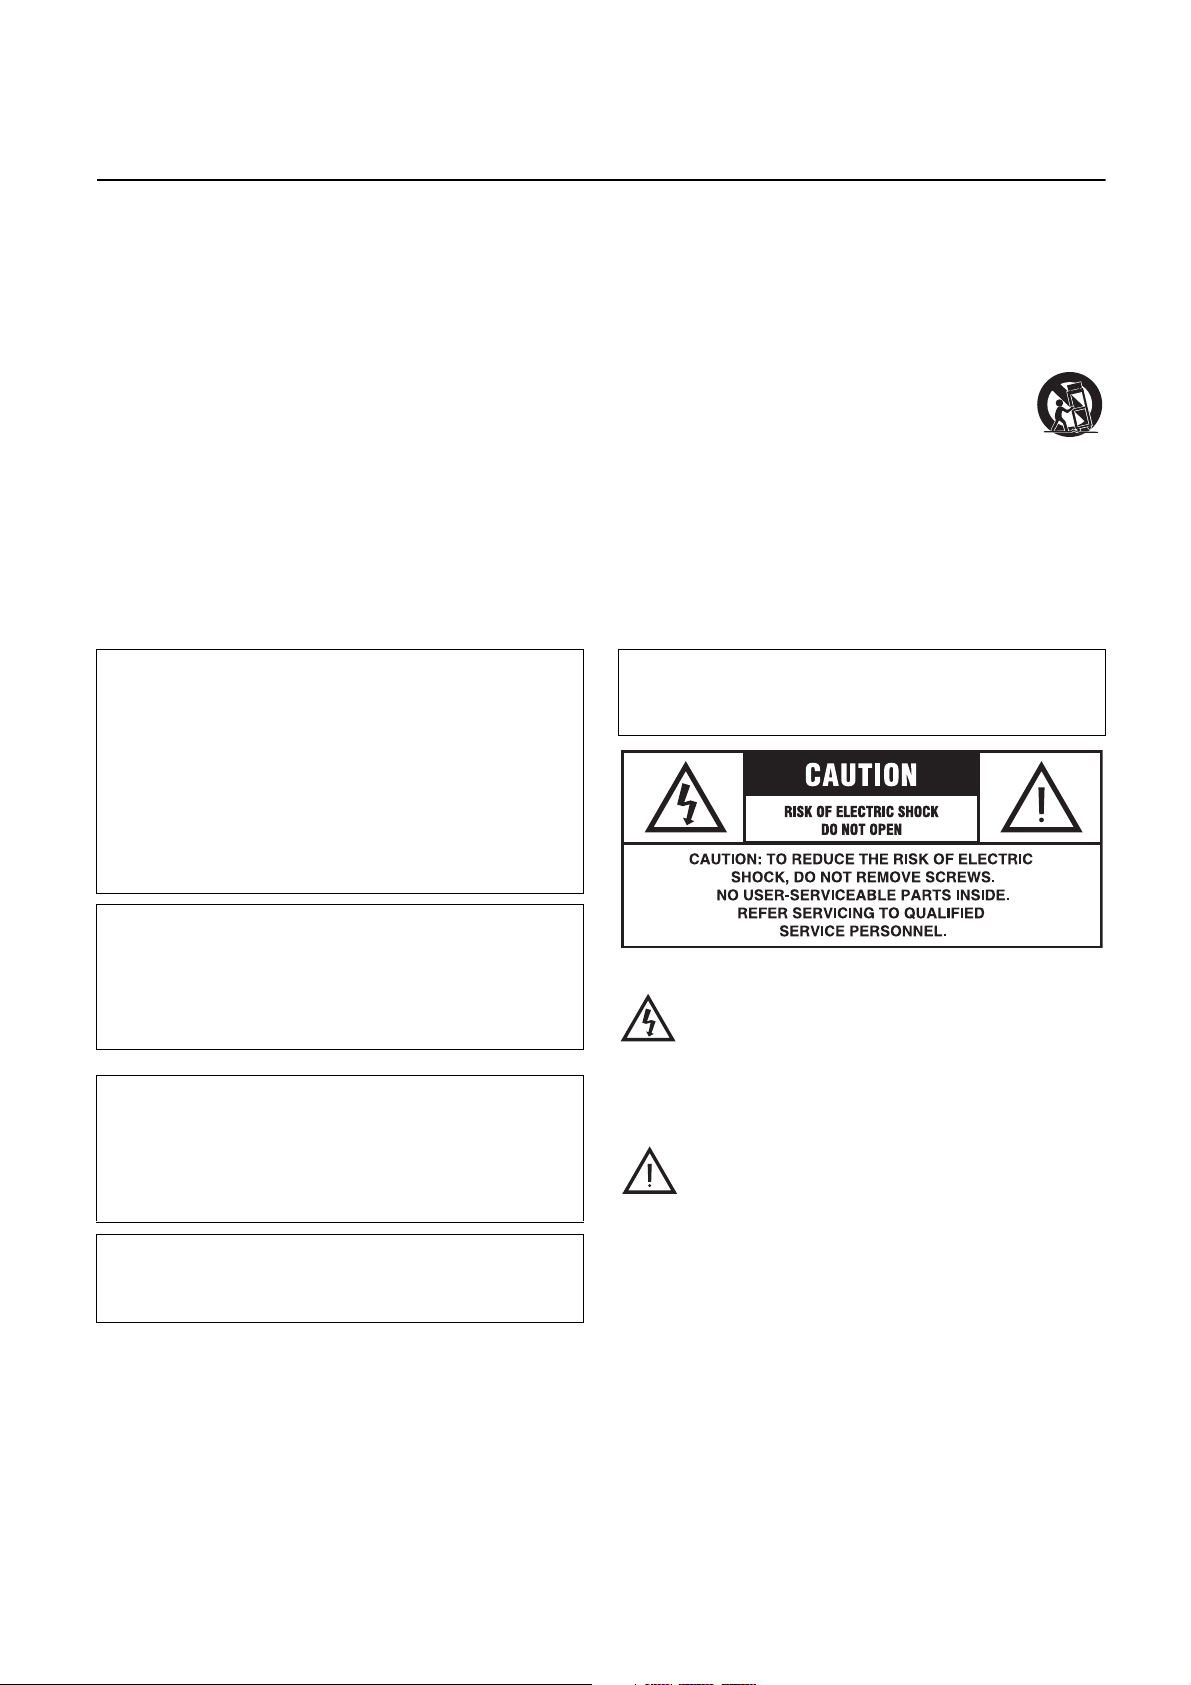
The lightning flash with arrowhead symbol, within an
equilateral triangle, is intended to alert the user to the
presence of uninsulated “dangerous voltage” within the
product’s enclosure that may be of sufficient magnitude to
constitute a risk of electric shock to persons.
The exclamation point within an equilateral triangle is
intended to alert the user to the presence of important
operating and maintenance (servicing) instructions in the
literature accompanying the appliance.
i En
FCC INFORMATION (for US customers)
1. IMPORTANT NOTICE: DO NOT MODIFY THIS UNIT!
This product, when installed as indicated in the instructions
contained in this manual, meets FCC requirements. Modifications
not expressly approved by Yamaha may void your authority, granted
by the FCC, to use the product.
2. IMPORTANT: When connecting this product to accessories and/or
another product use only high quality shielded cables. Cable/s
supplied with this product MUST be used. Follow all installation
instructions. Failure to follow instructions could void your FCC
authorization to use this product in the USA.
3. NOTE: This product has been tested and found to comply with the
requirements listed in FCC Regulations, Part 15 for Class “B” digital
devices. Compliance with these requirements provides a reasonable
level of assurance that your use of this product in a residential
environment will not result in harmful interference with other
electronic devices.
This equipment generates/uses radio frequencies and, if not installed
and used according to the instructions found in the users manual,
may cause interference harmful to the operation of other electronic
devices.
We Want You Listening For A Lifetime
Yamaha and the Electronic Industries Association’s Consumer Electronics Group want you to get the most out of your equipment by
playing it at a safe level. One that lets the sound come through loud and clear without annoying blaring or distortion - and, most
importantly, without affecting your sensitive hearing.
Since hearing damage from loud sounds is often undetectable until it is too late, Yamaha and the Electronic Industries Association’s
Consumer Electronics Group recommend you to avoid prolonged exposure from excessive volume levels.
Compliance with FCC regulations does not guarantee that
interference will not occur in all installations. If this product is found
to be the source of interference, which can be determined by turning
the unit “OFF” and “ON”, please try to eliminate the problem by
using one of the following measures:
Relocate either this product or the device that is being affected by the
interference.
Utilize power outlets that are on different branch (circuit breaker or
fuse) circuits or install AC line filter/s.
In the case of radio or TV interference, relocate/reorient the antenna.
If the antenna lead-in is 300 ohm ribbon lead, change the lead-in to
coaxial type cable.
If these corrective measures do not produce satisfactory results,
please contact the local retailer authorized to distribute this type of
product. If you can not locate the appropriate retailer, please contact
Yamaha Electronics Corp., U.S.A. 6660 Orangethorpe Ave., Buena
Park, CA 90620.
The above statements apply ONLY to those products distributed by
Yamaha Corporation of America or its subsidiaries.
LASER Specification:
Class 1 LASER Product
Wave length: 782 nm (CDs)/662 nm (DVDs)/405 nm (BDs)
Laser power: No hazardous radiation is emitted with the safety
protection
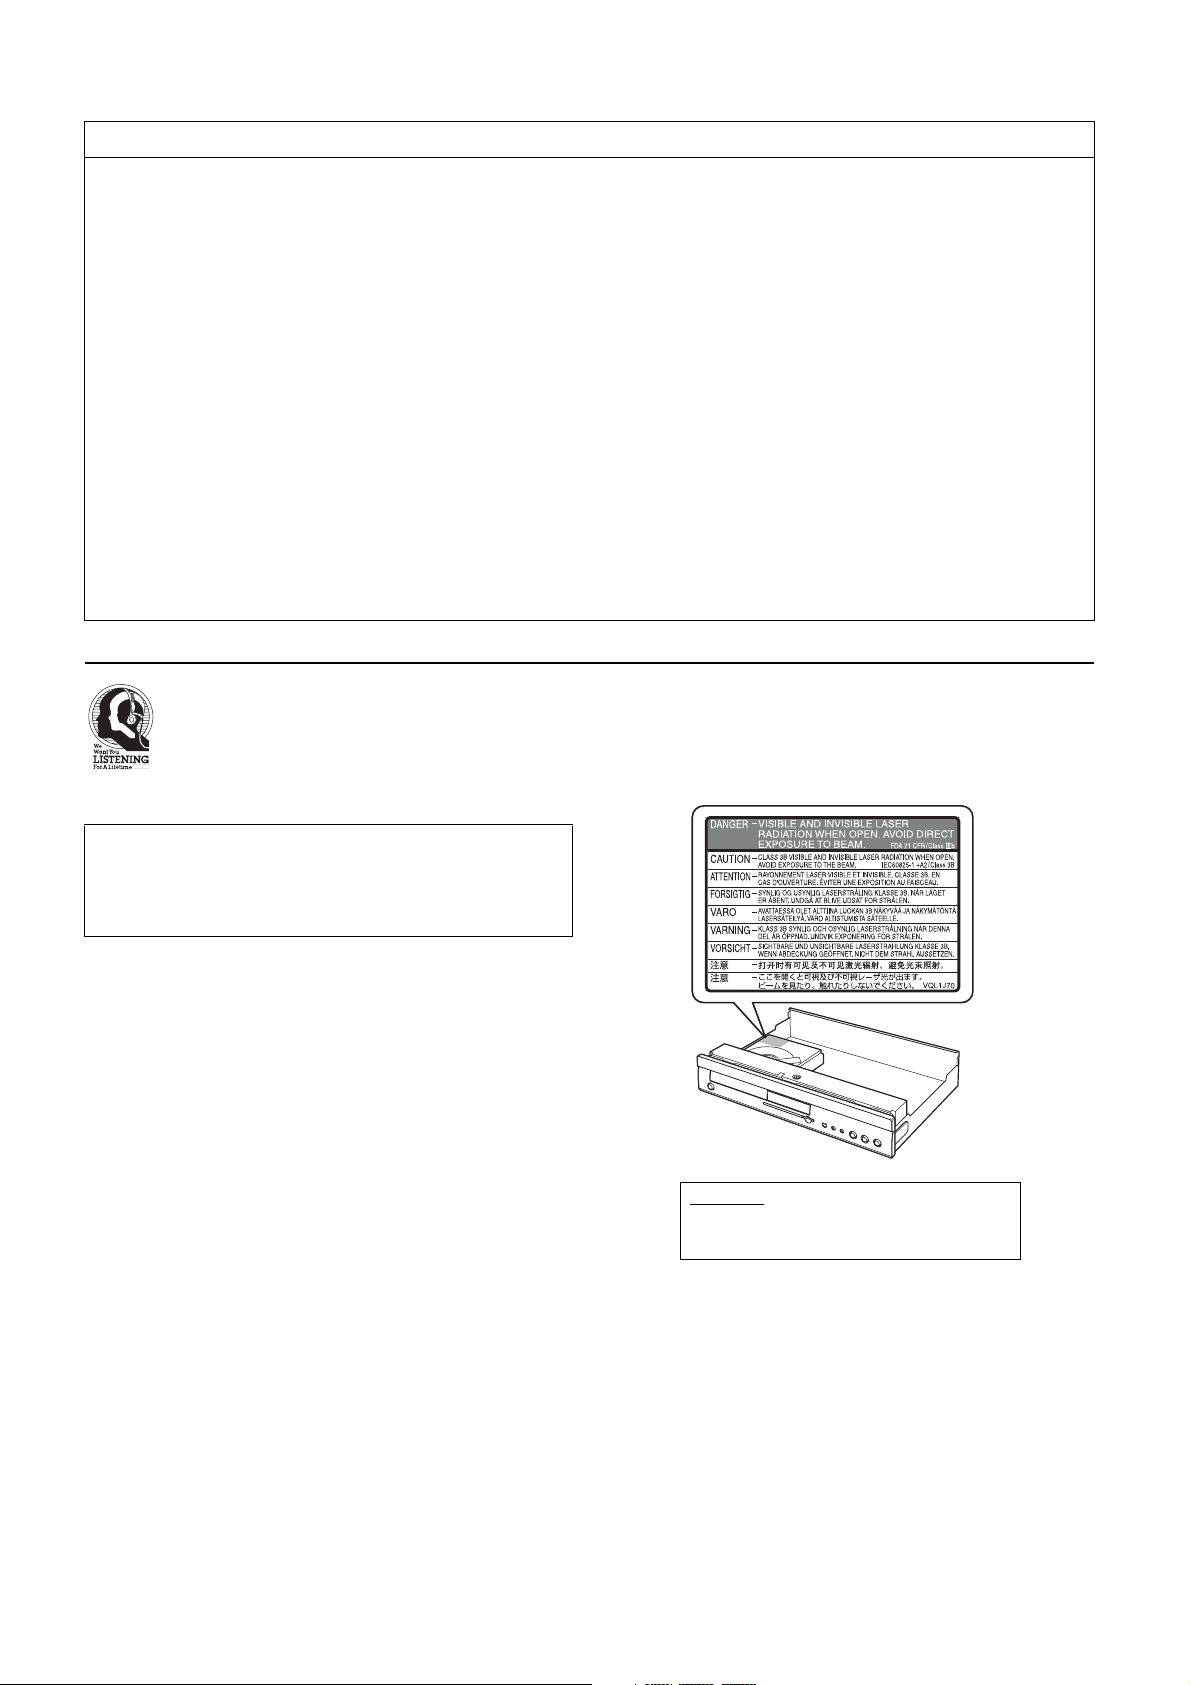
LASER SAFETY
This unit employs a laser. Due to possible eye injury, only a qualified
service person should remove the cover or attempt to service this
device.
DANGER
This unit emits visible laser radiation when open. Avoid direct eye
exposure to beam.
When this unit is plugged into a wall outlet, do not place your eyes
close to the opening of the disc tray and other openings or look inside.
DANGER–VISIBLE AND INVISIBLE
LASER RADIATION WHEN OPEN. AVOID
DIRECT EXPOSURE TO BEAM.
ii En
CAUTION: READ THIS BEFORE OPERATING THIS UNIT.
1 To assure the finest performance, please read this manual carefully.
Keep it in a safe place for future reference.
2 Install this unit in a well ventilated, cool, dry, clean place — away
from direct sunlight, heat sources, vibration, dust, moisture, or cold.
In a cabinet, allow about 2.5 cm (1 inch) of free space all around
this unit for adequate ventilation.
3 Locate this unit away from other electrical appliances, motors, or
transformers to avoid humming sounds.
4 Do not expose this unit to sudden temperature changes from cold to
hot, nor locate this unit in an environment with high humidity (i.e., a
room with a humidifier) to prevent condensation inside this unit,
which may cause an electrical shock, fire, damage to this unit, and/
or personal injury.
5 Avoid installing this unit in a location where foreign objects may
fall onto this unit or where this unit may be exposed to liquid
dripping or splashing. On the top of this unit, do not place:
– Other components, as they may cause damage and/or
discoloration on the surface of this unit.
– Burning objects (i.e., candles), as they may cause fire,
damage to this unit, and/or personal injury.
– Containers with liquid in them, as they may fall, spilling the
liquid and causing an electrical shock to the user and/or
damage to this unit.
6 Do not cover this unit with a newspaper, tablecloth, curtain, etc. in
order not to obstruct heat radiation. If the temperature inside this
unit rises, it may cause fire, damage to this unit, and/or personal
injury.
7 Do not plug in this unit to a wall outlet until all connections are
complete.
8 Do not operate this unit upside-down. It may overheat, possibly
causing damage.
9 Do not use excessive force on switches, knobs and/or cords.
10 When disconnecting the power cord from the wall outlet, grasp the
plug; do not pull the cord.
11 Do not clean this unit with chemical solvents; this might damage the
finish. Use a clean, dry cloth.
12 Use only the voltage specified on this unit. Using this unit with a
higher voltage than specified is dangerous and may cause fire,
damage to this unit, and/or personal injury. Yamaha will not be held
responsible for any damage resulting from use of this unit with a
voltage other than as specified.
13 Do not attempt to modify or fix this unit. Contact qualified Yamaha
service personnel when any service is needed. The cabinet should
never be opened for any reason.
14 When not planning to use this unit for long periods of time (i.e.,
vacation), disconnect the AC power plug from the wall outlet.
15 Be sure to read the “TROUBLESHOOTING GUIDE” section on
common operating errors before concluding that this unit is faulty.
16 Before moving this unit, press STANDBY/ON to set the unit in
standby mode, then disconnect the AC power plug from the wall
outlet.
17 Install this unit near the AC outlet and where the AC power plug
can be reached easily.
18 The batteries shall not be exposed to excessive heat such as
sunshine, fire or the like.
The unit is not disconnected from the AC power source as long as it
is connected to the wall outlet, even if this unit itself is turned off by
STANDBY/ON. This state is called the standby mode. In this state,
this unit is designed to consume a very small quantity of power.
FOR CANADIAN CUSTOMERS
To prevent electric shock, match wide blade of plug to wide slot and
fully insert.
This Class B digital apparatus complies with Canadian ICES-003.
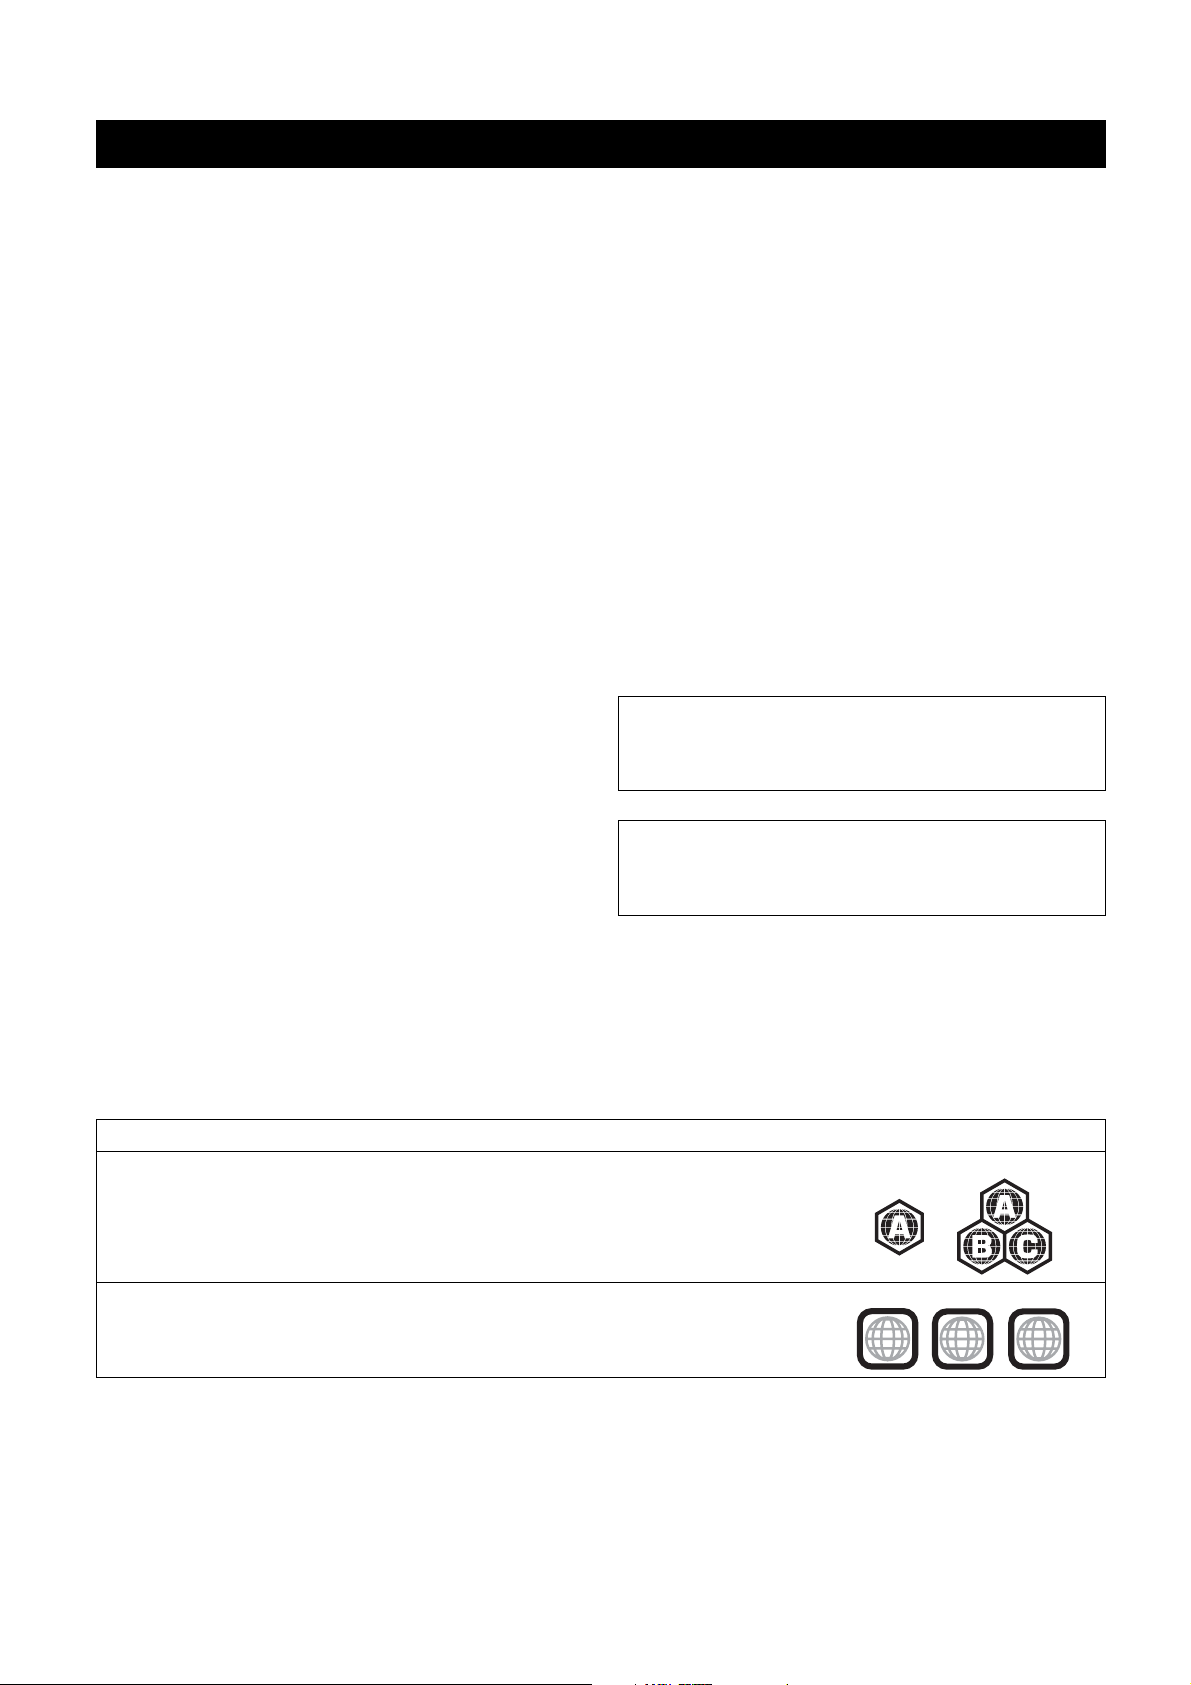
Region management information
BD-Video
This unit plays BD-Video marked with labels containing the region code A.
DVD-Video
This unit plays DVD-Video marked with labels containing the region number “1” or “ALL”.
iii En
Example:
Example:
1
ALL
1
2
4
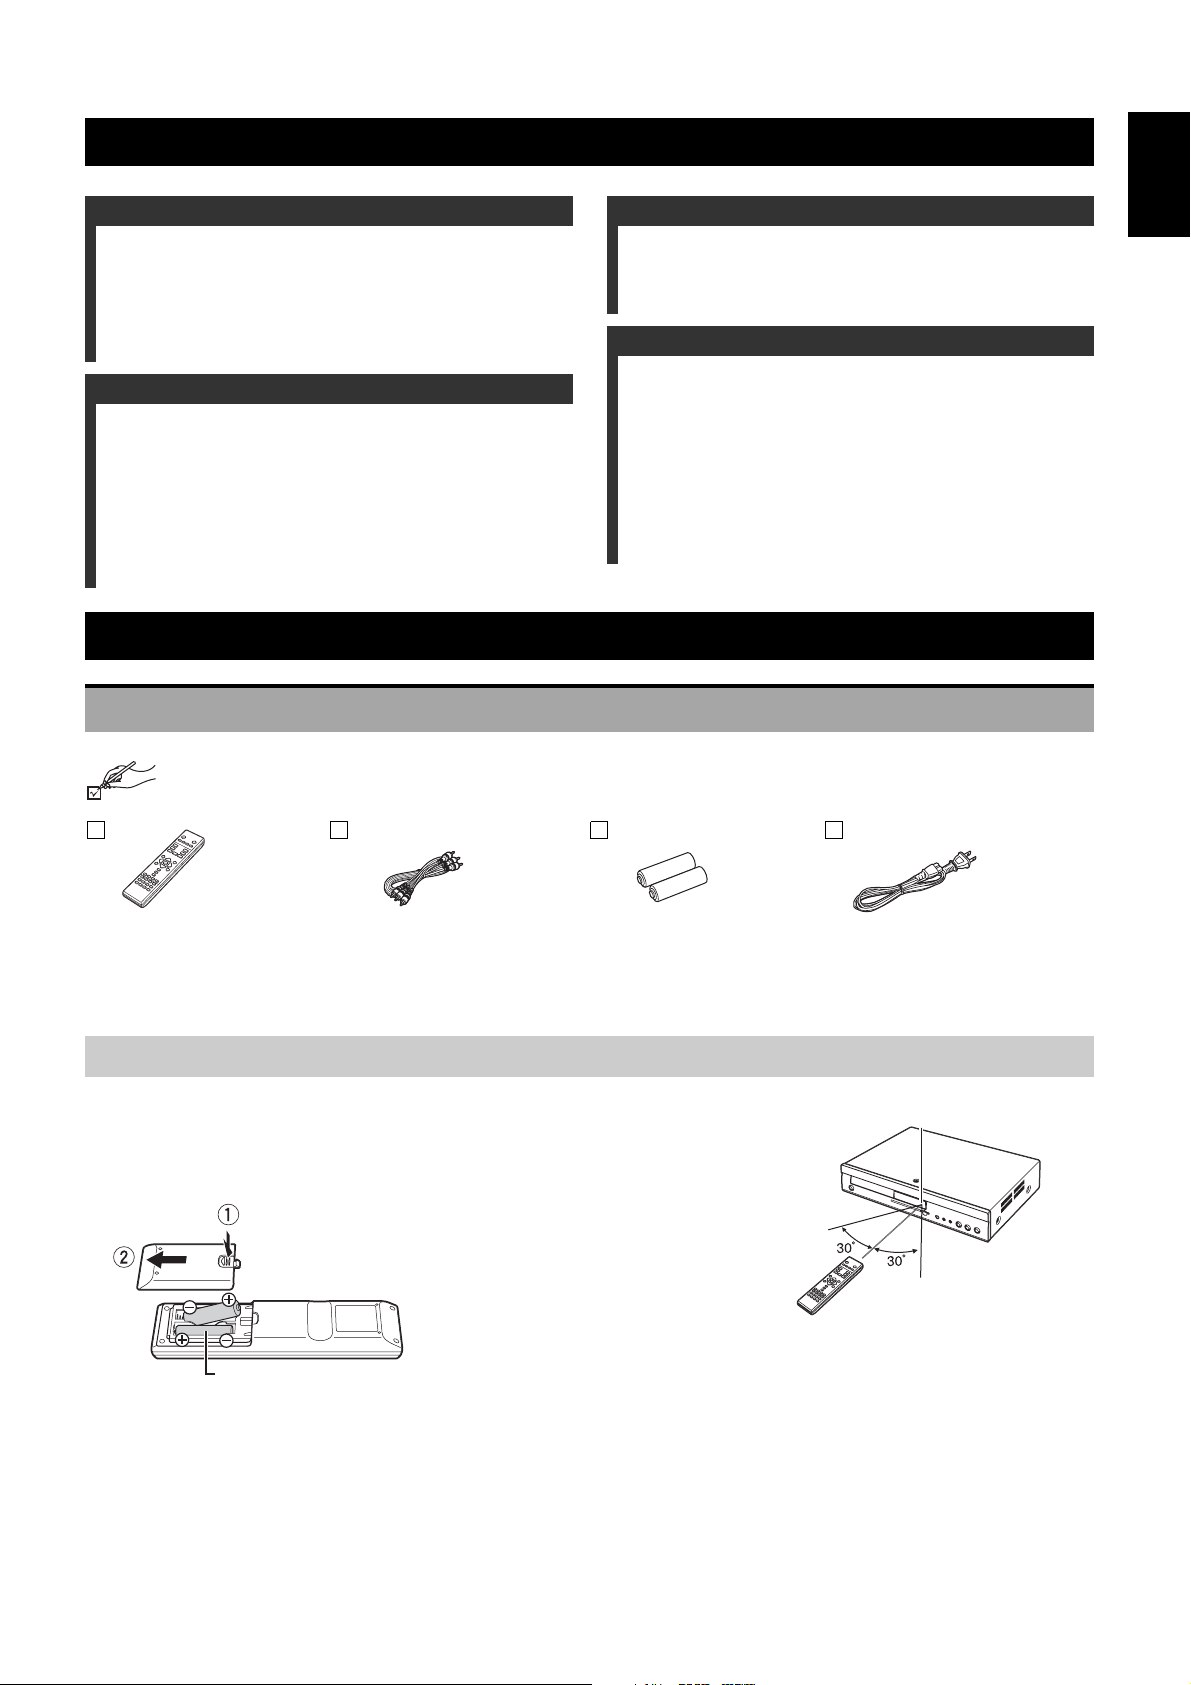
TABLE OF CONTENTS
B
U
TABLE OF CONTENTS
GETTING STARTED
ACCESSORY INFORMATION ......................................... 1
DISC AND CARD INFORMATION................................... 2
CONNECTION.................................................................. 4
CONTROL REFERENCE GUIDE..................................... 7
EASY SETTING................................................................ 8
PLAYBACK
BASIC PLAY (PLAYING VIDEO CONTENTS) ................ 9
DIFFERENT KINDS OF PLAYBACK FOR BD-VIDEO.. 11
CHAPTER PLAYBACK.................................................. 12
PLAYING STILL PICTURES.......................................... 12
PLAYING MUSIC............................................................ 14
SHOWING FUNCTIONS MENU ..................................... 14
LINKED OPERATIONS WITH THE TV.......................... 15
GETTING STARTED
English
SETTINGS
CHANGING SETTINGS WITH THE ON-SCREEN MENU
.....................................................................................16
CHANGING THE UNIT’S SETTINGS .............................18
REFERENCE
FREQUENTLY ASKED QUESTIONS.............................22
TROUBLESHOOTING GUIDE........................................23
MESSAGES ....................................................................26
DISC AND CARD HANDLING ........................................26
MAINTENANCE ..............................................................26
SPECIFICATIONS...........................................................27
GLOSSARY.....................................................................28
INDEX..............................................................................29
ACCESSORY INFORMATION
Please check and identify the supplied accessories.
Audio/Video cableRemote control Batteries (AA, R6, UM-3) (× 2)
for remote control
Using remote control
atteries
Insert so the poles (+ and –) match those in
the remote control.
When closing the lid, insert it from the –
(minus) side.
AA, R6, UM-3
• Do not use rechargeable type batteries.
• Batteries shall not be exposed to excessive heat
such as direct sunlight, fire or the like.
• Do not mix old and new batteries.
• Do not use different types at the same time.
• Do not heat or expose to flame.
• Do not take apart or short circuit.
• Do not attempt to recharge alkaline or
manganese batteries.
• Do not use batteries if the covering has been
peeled off.
Mishandling of batteries can cause
electrolyte leakage which can damage items
the fluid contacts and may cause a fire.
Remove batteries if the remote control is not
going to be used for a long period of time.
Store in a cool, dark place.
Power cable
• For use with this unit only. Do not use
it with other equipment.
Also, do not use power cables for
other equipment with this unit.
se
Remote control signal sensor
6 m (20 feet) directly
in front of the unit
1 En
GETTING STARTED
hi
(] left)
DISC AND CARD INFORMATION
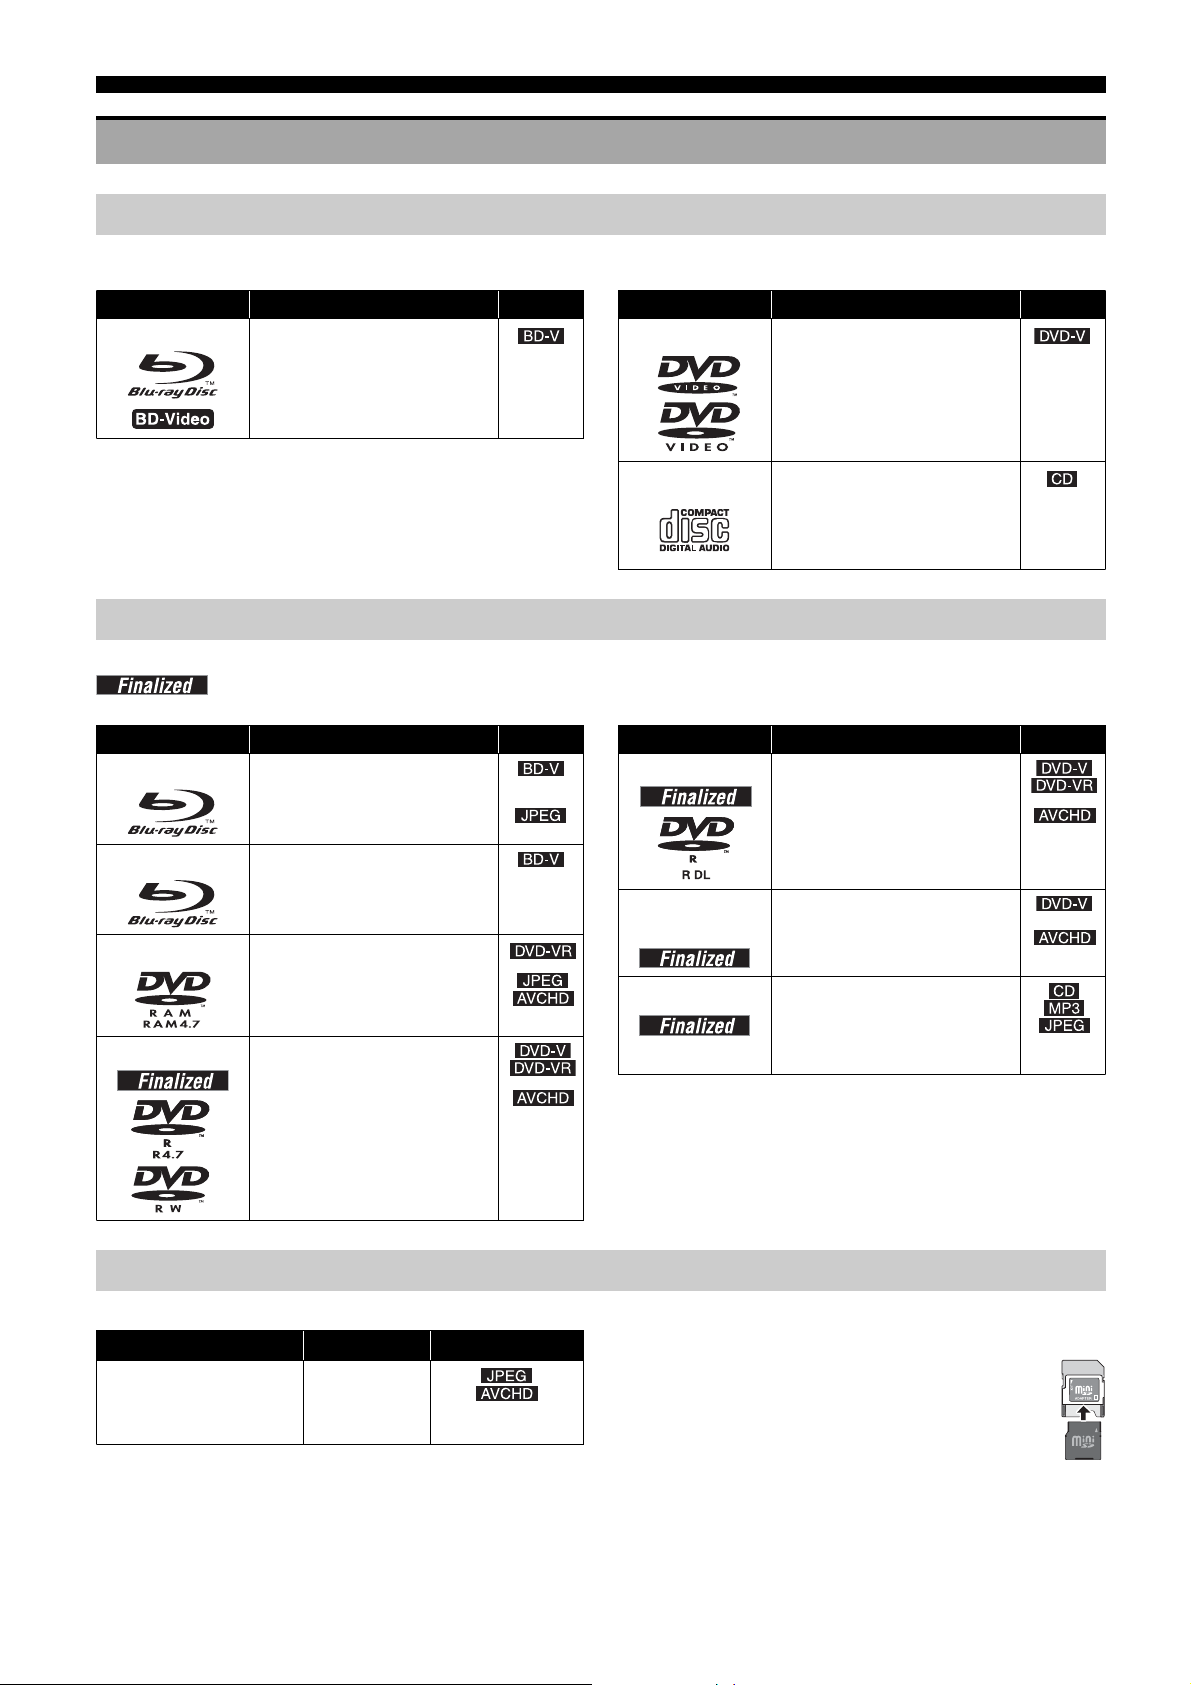
Packaged discs
This chart shows the different type of retail/commercial discs you can use, and also includes the industry-standard logos that should appear on the discs and/or
packaging.
Type of media/Logo
BD-Video
High Definition (HD) movie and music
discs
Features
Indicated as
Type of media/Logo
DVD-Video
Features
High quality movie and music discs
Indicated as
CD
Compact Discs (CD’s) that contain audio
and music
• Operation and sound quality of CDs
that do not conform to CD-DA
specifications (copy control CDs,
etc.) cannot be guaranteed.
Recorded discs
This chart shows the different type of discs recorded with DVD recorders, DVD video cameras, personal computers, etc. that you can use.
instructions for your equipment.
Type of media/Logo
BD-RE
BD-R
DVD-RAM
DVD-R/RW
This mark means you must finalize the disc with the DVD recorder, etc. before playback. For details about finalizing, refer to the operating
Formats
• Version 3 of the BD-RE Recording
Format
•JPEG format
• Version 2 of the BD-R Recording
Format
• Version 1.1 of the DVD Video
Recording Format
•JPEG format
• AVCHD format
• DVD-Video Format
• Version 1.1 of the DVD Video
Recording Format
• AVCHD format
Indicated as
Type of media/Logo
DVD-R DL
DVD+R/+RW/
+R DL
CD-R/RW
• It may not be possible to play the above discs in some cases due to the type of discs,
the condition of the recording, the recording method and how the files were created.
• When a disc recorded in the AVCHD format is being played, the video may be
paused for a few seconds at portions spliced, due to deletion or editing.
• DVD-Video Format
• Version 1.2 of the DVD Video
Recording Format
• AVCHD format
• DVD+VR (DVD+R/+RW Video
Recording) Format
• AVCHD format
• CD-DA format
•MP3 format
•JPEG format
Formats
Indicated as
SD cards
This chart shows the different type of cards recorded with High Definition Camcorder or personal computers, etc. that you can use.
• In t
Type of media Formats Indicated as
SD Memory Card*
(from 8 MB to 2 GB)
•JPEG format
• AVCHD format
SDHC Memory Card
(from 4 GB to 16 GB)
* Including miniSD Card and microSD Card
• When using from 4 GB to 16 GB SD cards, only SD cards that display the SDHC logo
can be used.
• This unit is compatible with SD Memory Cards that meet SD Card Specifications
FAT 12 and FAT 16 formats, as well as SDHC Memory Cards in FAT 32 format.
2 En
s owner’s manual, the cards shown in the table
called SD cards.
• A miniSD Card and a microSD Card must be used with the attached
adaptor that comes with the card.
• Usable memory is slightly less than the card capacity.
• If the SD card is formatted on a PC, you may not be able to use it on this
unit.
• Keep the Memory Card out of reach of children to prevent swallowing.
• When a card recorded in the AVCHD format is being played, the video
may be paused for a few seconds at portions spliced, due to deletion or
edition.
• Switch the write-protect switch to the “LOCK” position to protect the content from
accidental erasure.
are comprehensively
GETTING STARTED
BD-RE with th
p
Vid
SVCD
Regarding BD-Video
• Enjoy Final Standard Profile functions (] 11), such as picture-in-picture. The various functions differ depending on the disc.
• When playing a set of two or more BD-Video discs, the menu screen of the previous disc may continue to display even if the disc has been ejected.
• Regarding high specification audio (7.1ch) of BD-Video such as Dolby Digital Plus, Dolby TrueHD, DTS-HD High Resolution Audio and DTSHD Master Audio (] 19)
– they can be reproduced in the original format only when connected to a compatible amplifier/receiver with a HDMI AV OUT terminal (] 5) and when “BD-
Video Secondary Audio” is set to “Off” and “Bitstream” is selected in each format.
– they are output only as Dolby Digital bitstream when “BD-Video Secondary Audio” is set to “On” even when the unit is connected using the HDMI AV OUT
terminal.
– they are output only as Dolby Digital or DTS bitstream (depending to the original format) when the unit is connected using the DIGITAL AUDIO OUT terminal.
Note about using a DualDisc
The digital audio content side of a DualDisc does not meet the technical specifications of the Compact Disc Digital Audio (CD-DA) format
so play may not be possible.
Tips for making MP3/JPEG files
File format MP3 JPEG
Playable media
Extension
Picture resolution
Bit rates
Sampling frequency
Reference
*1: ISO9660 level 1 or 2 (except for extended formats), Joliet
This unit is compatible with multi-session.
This unit is not compatible with packet writing.
*2: Discs must conform to UDF 2.0.
*3: Discs must conform to UDF 2.5.
*4: Design rule for Camera File system: unified standard established by Japan Electronics and Information Technology Industries Association (JEITA).
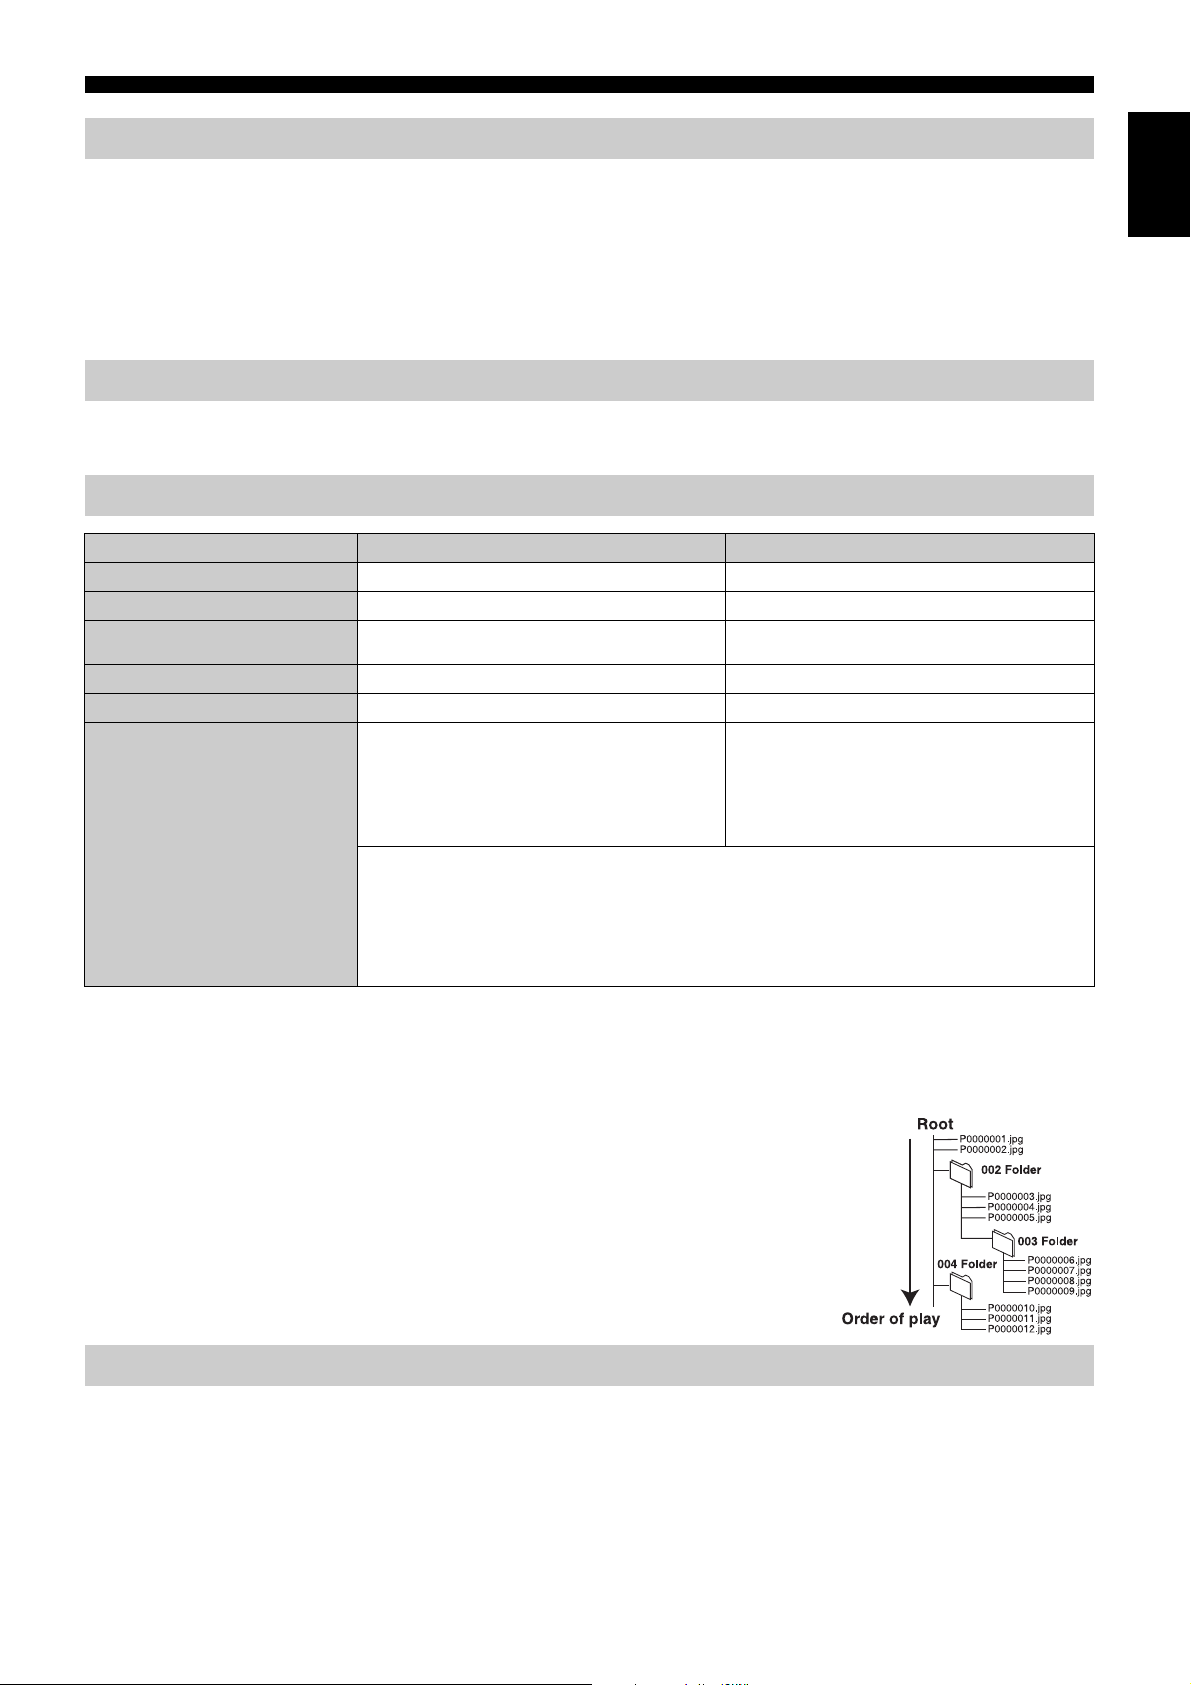
Structure of MP3 and still pictures (JPEG) folders
You can play MP3 and still pictures (JPEG) with this unit by making folders on disc as shown
(] right).
• Folder structure created on a DVD-RAM, BD-RE or an SD card is not displayed.
MP3 files and folders in CD-R/RW
Prefix with 3-digit numbers in the order you want to play them.
Still pictures (JPEG) in CD-R/RW
Files inside a folder are displayed in the order they were updated or taken.
When the highest level folders are “DCIM” folders, they are displayed first on the tree.
CD-R/RW*1 CD-R/RW*1, DVD-RAM*2, BD-RE*3, SD card
Files must have the extension “.mp3” or “.MP3”. Files must have the extension “.jpg” or “.JPG”.
– between 34 × 34 and 5120 × 3840 pixels
32 kbps to 320 kbps –
44.1 kHz/48 kHz –
ID3 tags: version 1, 2.2, 2.3, 2.4
ID3 is a tag embedded in MP3 track to provide
information about the track.
This unit supports the versions listed above but only titles
and the names of artists can be displayed.
• If there is a large amount of still picture data etc. within
a MP3 file, play may not be possible.
• English alphabet and Arabic numerals are displayed correctly. Other characters may not be displayed correctly.
• The display order on this unit may differ from how the order is displayed on a computer.
• Depending on how you create the media (writing software), files and folders may not play in the order you
numbered them.
• This unit is not compatible with packet-write format.
• Depending on the recording conditions, the media may not play.
• Operation may take time to complete when there are many files and/or folders and some files may not display or
be playable.
(sub sampling is 4:2:2 or 4:2:0)
• MOTION JPEG: not supported
• SD card: JPEG conforming DCF
Camera File system)
Thawing Time: approx. 2 sec. (7M pixels)
e.g.,
*4
(Design rule for
English
•
• 2.6 GB and 5.2 GB DVD-RAM
• 3.95 GB and 4.7 GB DVD-R for Authoring
• DVD-RAM that cannot be removed from their cartridges
• Version 1.0 of DVD-RW
• DVD+R 8 cm (3"), DVD-ROM, CD-ROM, CDV, Photo CD, MV-Disc and PD
• SACD (except for CD layer)
• DVD-Audio (exce
Discs that cannot be played
e cartridge
t for DVD-Video part)
eo CD and
•
• WMA discs
• DivX discs
•PAL discs
• HD DVD
• BD-Video discs recorded at a rate of 50 frame per second
• Other discs that are not specifically supported
3 En
GETTING STARTED
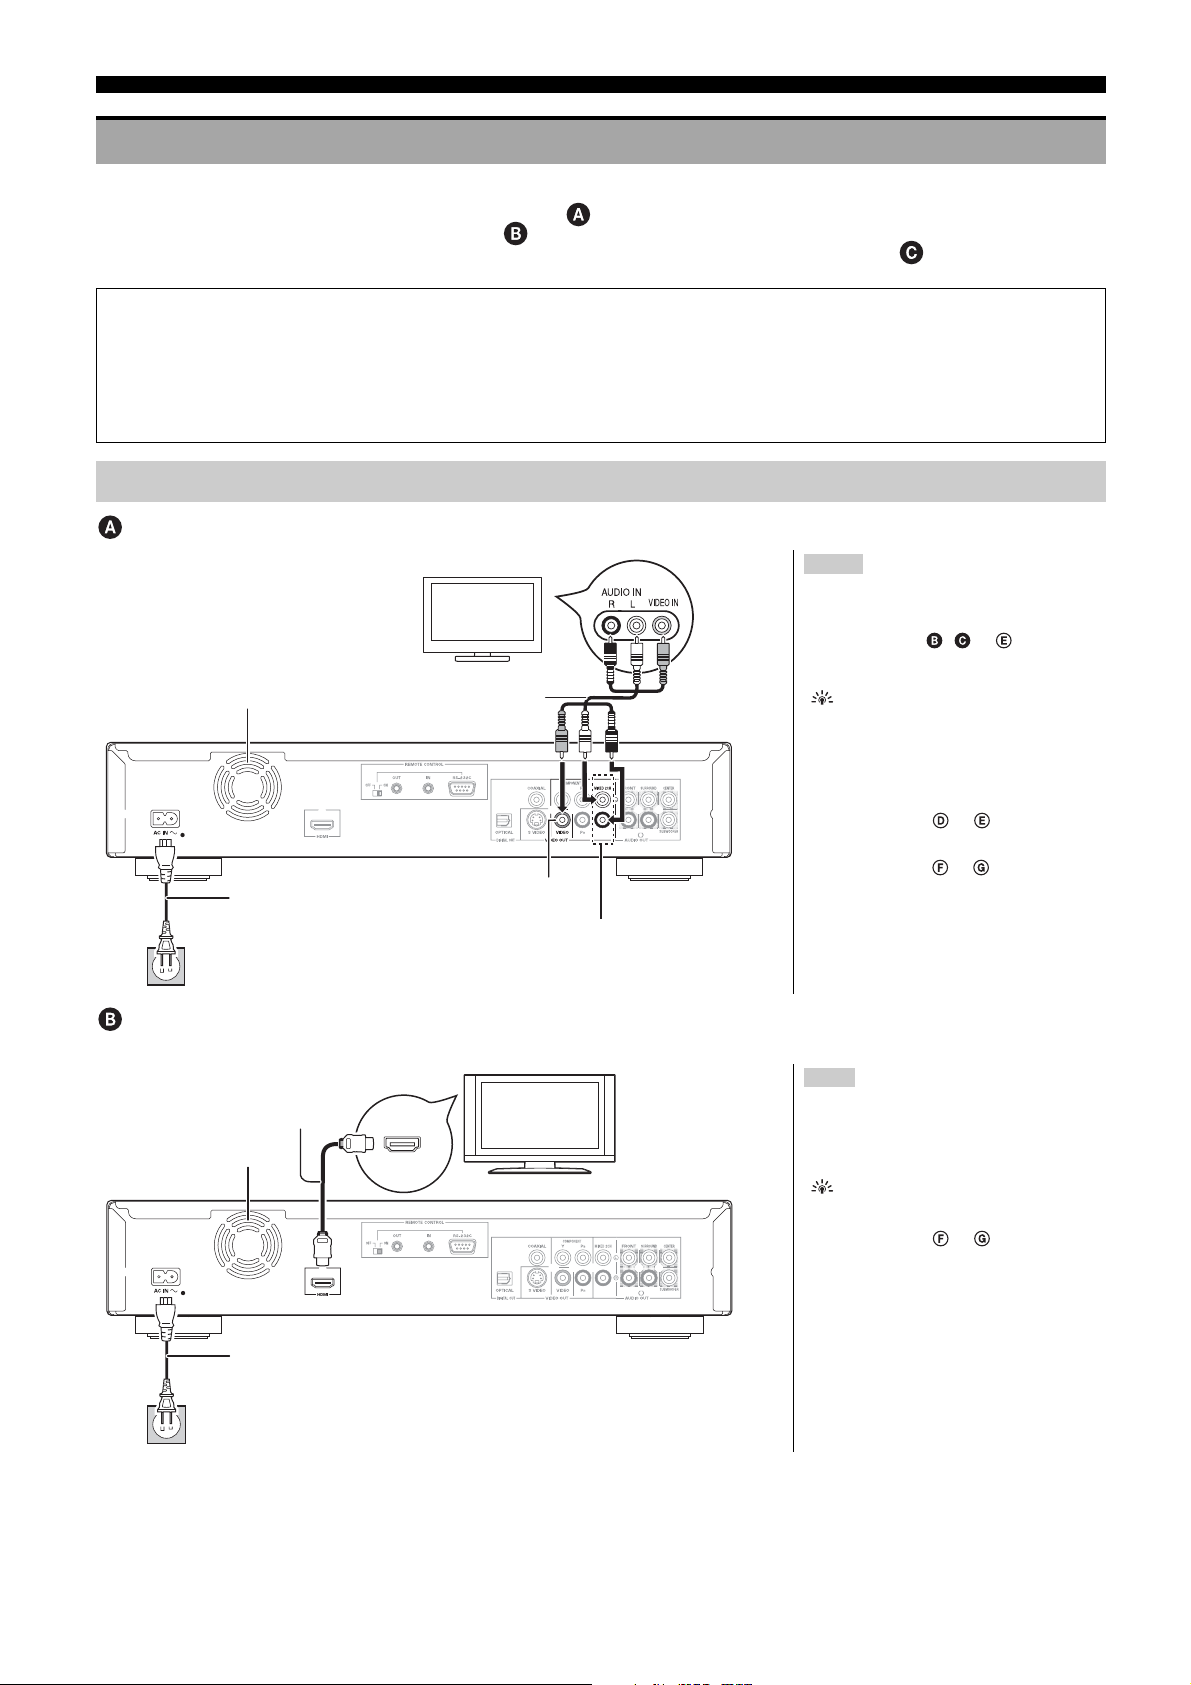
CONNECTION
From the list below, please choose the connection method that fits your TV viewing environment best.
• If you connect to a television using an included Audio/Video cable ]
• If you connect to an HDMI (] 28) compatible television ]
• If you connect to an HDMI compatible television and an HDMI compatible amplifier/receiver to enjoy surround sound ] (] 5)
• For other connection methods, please see pages 5 and 6.
• Do not connect through the video cassette recorder. Due to copy guard protection, the picture may not display properly.
• Turn off all equipment before connection and read the appropriate operating instructions.
Conserving power
This unit consumes a small amount of power even when it is turned off (less than 1 W). To save power when the unit is not to be used for
a long time, unplug it from the household AC outlet.
Please use HIGH SPEED HDMI cables that have the HDMI logo (as shown on the cover).
Basic connections
Connecting to a television with an Audio/Video cable
Notes
• Connect terminals of the same color.
• High definition video cannot be output
with this connection.
Use connection , or (] 5) for
high definition video.
Tips
* With audio cables, connect the AUDIO OUT
terminals to the two-channel audio input
terminals of an analog amplifier/receiver or
system component in place of a television to
enjoy stereo sound.
To improve picture quality
• Use connections or (] 5).
To enjoy a richer sound
• Use connections or (] 6). (Unplug
the red and white plugs.)
Back of the unit
To a household AC outlet
(AC 120 V, 60 Hz)
Cooling fan
Power cable (included)
Connect only after all other
connections are complete.
Television
Audio/Video cable
(included)
VIDEO OUT
AUDIO/
VIDEO IN
2ch AUDIO OUT*
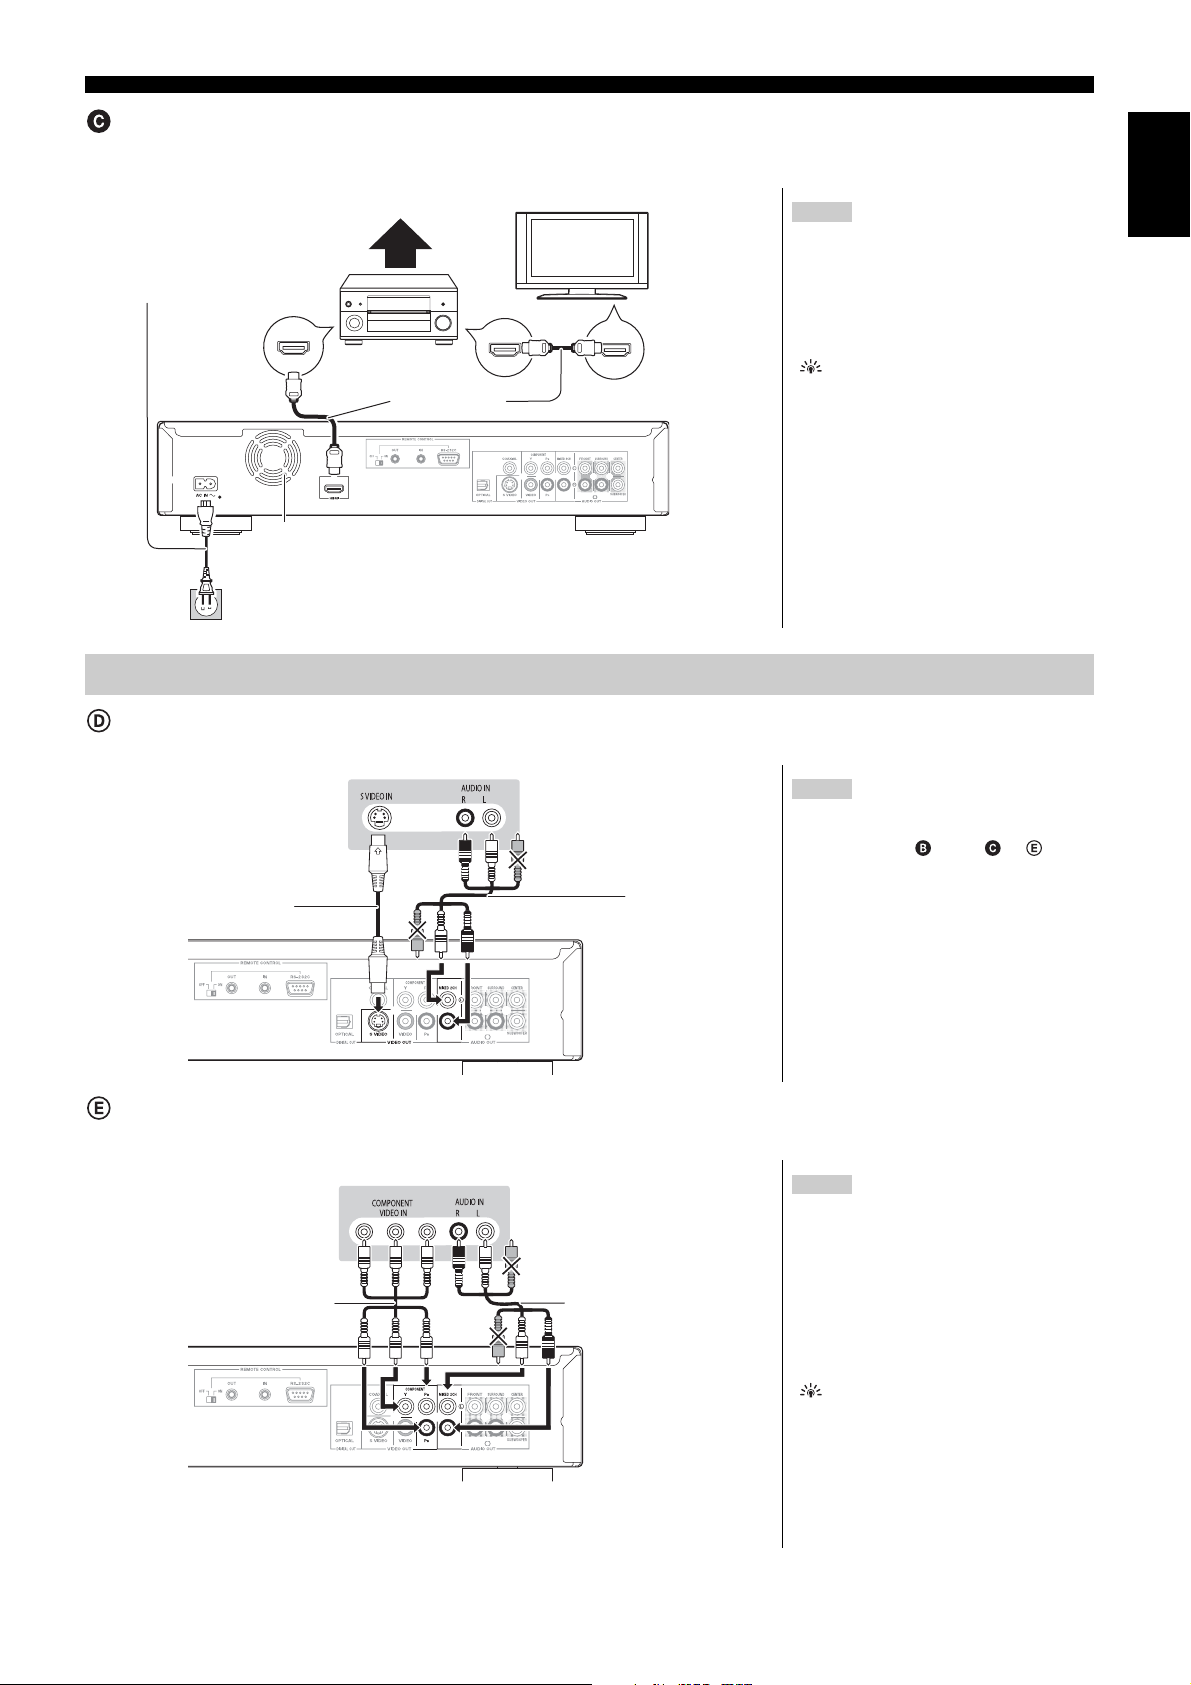
Connecting to an HDMI compatible television
You can enjoy high quality, digital video and audio.
HDMI IN
HDMI cable
Cooling fan
Back of the unit
HDMI AV OUT
Power cable (included)
Connect only after all other
connections are complete.
To a household AC outlet
(AC 120 V, 60 Hz)
HDMI
compatible
television
4 En
Note
NECESSARY SETTINGS
• “HDMI Video Mode” and “HDMI Audio
Output” : “On” (] 20)
Tips
To enjoy a richer sound
• Use connections or (] 6)
additionally.
In this case, set “HDMI Video Mode” to
“On” and “HDMI Audio Output” to “Off”
(] 20).
With this connection, you can use linked
operations with the TV (] 15)
GETTING STARTED
Connecting to an HDMI compatible television and HDMI compatible amplifier/receiver
When connected to a compatible amplifier/receiver, you can enjoy surround sound recorded with Dolby Digital Plus, Dolby TrueHD or
DTS-HD.
Power cable (included)
Connect only after all
other connections are
complete.
HDMI IN
Back of the unit
To a household AC outlet
(AC 120 V, 60 Hz)
Cooling fan
Multi channel speakers
HDMI compatible
amplifier/receiver
HDMI Cable
HDMI AV OUT
HDMI
compatible
television
HDMI OUT
HDMI IN
Notes
NECESSARY SETTINGS
• “HDMI Video Mode” and “HDMI Audio
Output” : “On” (] 20)
• “Speaker” : “Multi Channel” (] 20)
• “Digital Audio Output” : Depending on the
connected amplifier/receiver (] 19)
Tip
With this connection, you can use linked
operations with the TV (] 15)
Connection methods for using other video terminals
English
With S VIDEO OUT
The S VIDEO OUT terminal provides a more vivid picture than the VIDEO OUT terminal.
S Video cable
Back of the unit
Television
Audio/
Video cable
(included)
Notes
• High definition video cannot be output
with this connection.
Use connection (] 4), or for
high definition video.
• Unplug the yellow plug of Audio/Video
cable.
• Actual video quality depends on the
television.
With COMPONENT VIDEO OUT
You can enjoy high definition images by connecting to a component video terminals that supports 720p (750p) and 1080i (1125i) signals.
Notes
• Connect terminals of the same color.
• Unplug the yellow plug of Audio/Video
cable.
• Set “Black Level Control” to “Darker”.
(] 18)
• Some discs prohibit high definition video
output from COMPONENT VIDEO OUT
terminals. In this case, video resolution is
converted to 480p.
Component
Video cable
Back of the unit
Television
Audio/Video cable
(included)
Tip
To enjoy high definition/progressive video
• Connect to a television that supports 480p
or higher.
• Set “Component Video Resolution” to
“480p”, “720p” or “1080i”. (] 20)
• Set “HDMI Video Mode” to “Off”. (] 20)
Otherwise, the video is output as 480i.
5 En
GETTING STARTED
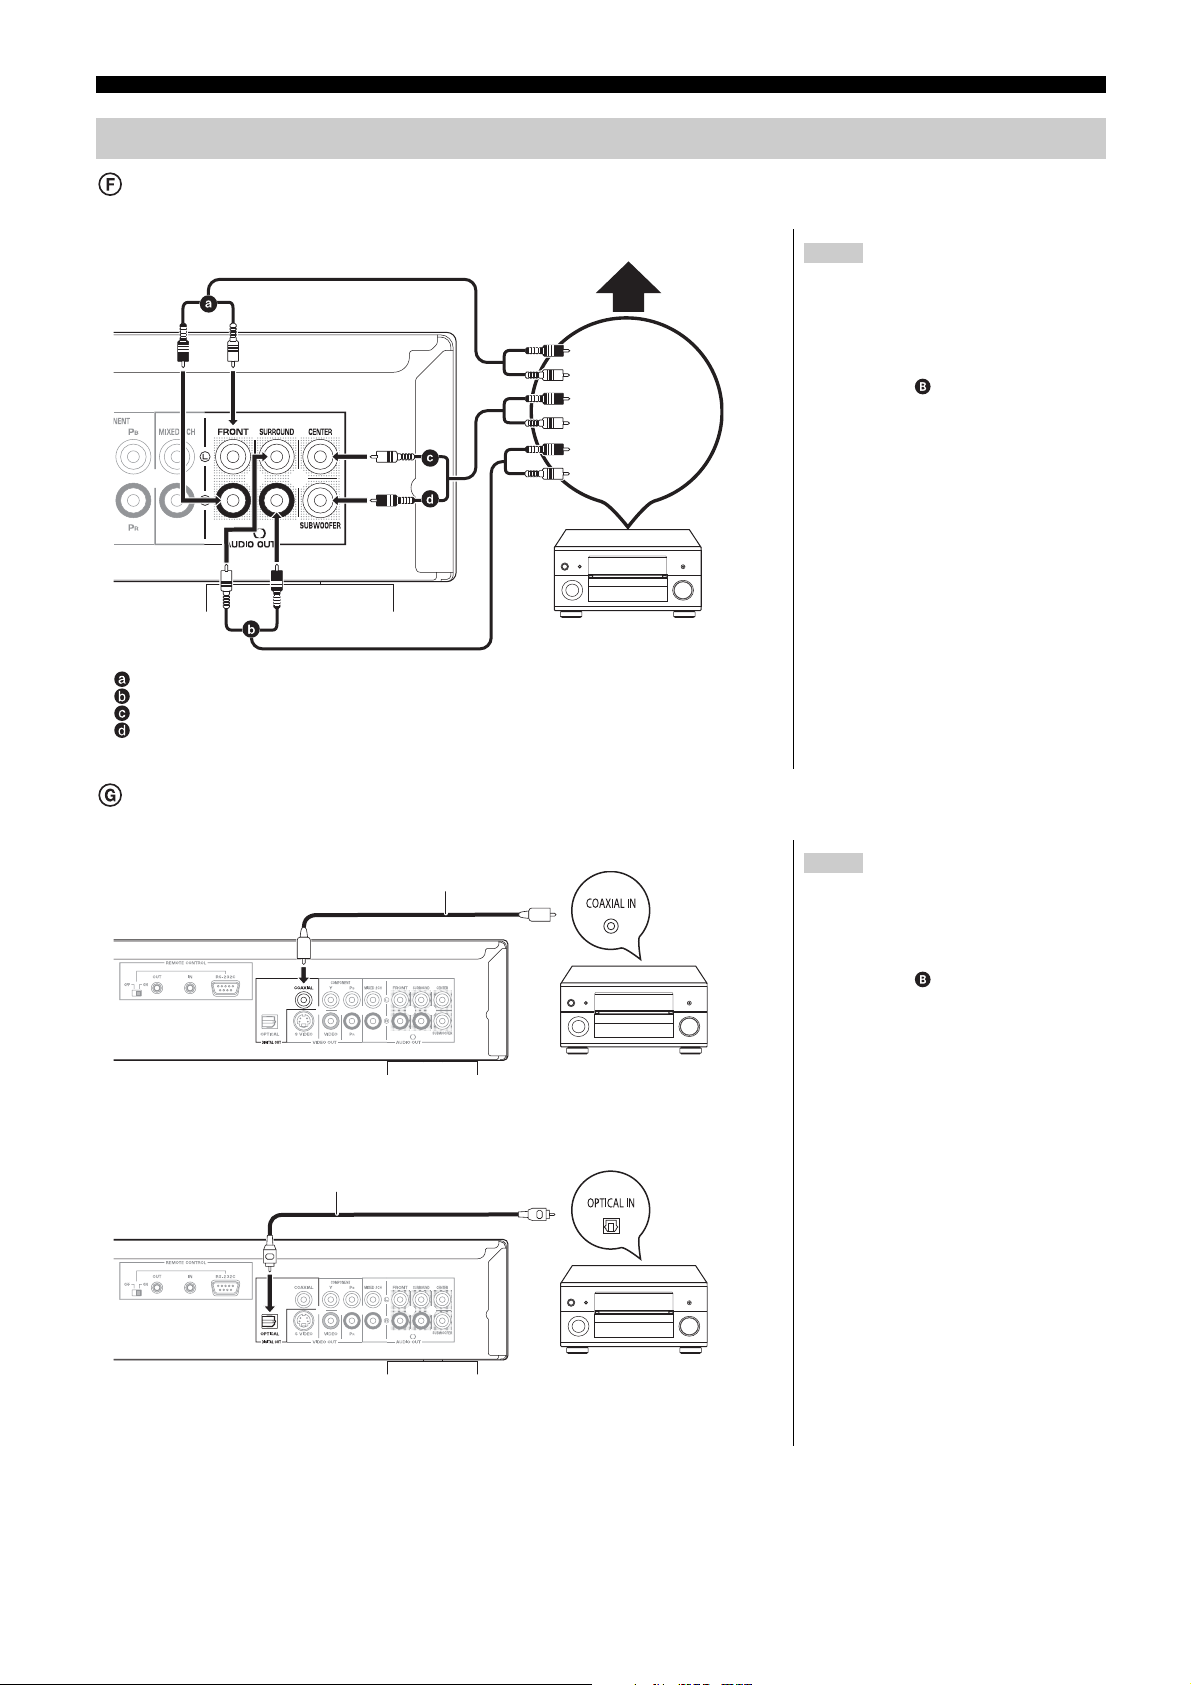
Connecting an amplifier/receiver (excluding HDMI connection)
With 5.1ch AUDIO OUT
When connected to a compatible amplifier/receiver using the 5.1ch AUDIO OUT terminals, you can enjoy surround sound.
Cable connections
Front speaker (L/R)
Surround speaker (L/R)
Center speaker
Subwoofer
Back of the
unit
Multi channel speakers
Connect Audio
cables to terminals
corresponding to
the speakers you
have connected.
Amplifier/receiver with
5.1ch AUDIO IN
Notes
NECESSARY SETTINGS
• “Speaker” : “Multi Channel” (] 20)
• 7.1 channel disc is mixed down to 5.1
channel audio.
When connected to an HDMI compatible
television (] 4, )
• “HDMI Audio Output” : “Off” (] 20)
(Otherwise, the sound is output from the
television.)
• Depending on how the disc was recorded,
the audio may not be output properly on
the number of channels desired.
With DIGITAL AUDIO OUT
You can enjoy surround sound, when connected to an amplifier/receiver using the COAXIAL or OPTICAL terminal.
With COAXIAL
Coaxial cable
Back of the unit
Notes
NECESSARY SETTINGS
• “Digital Audio Output” : Depending on the
connected amplifier/receiver (] 19)
When connected to an HDMI compatible
television (] 4, )
• “HDMI Audio Output” : “Off” (] 20)
(Otherwise, the sound may not be output
with the desired settings.)
With OPTICAL
Back of the unit
6 En
Amplifier/receiver with a
built-in decoder or a
decoder-amplifier/
receiver combination
Optical digital
audio cable
Amplifier/receiver with a
built-in decoder or a
decoder-amplifier/
receiver combination
GETTING STARTED
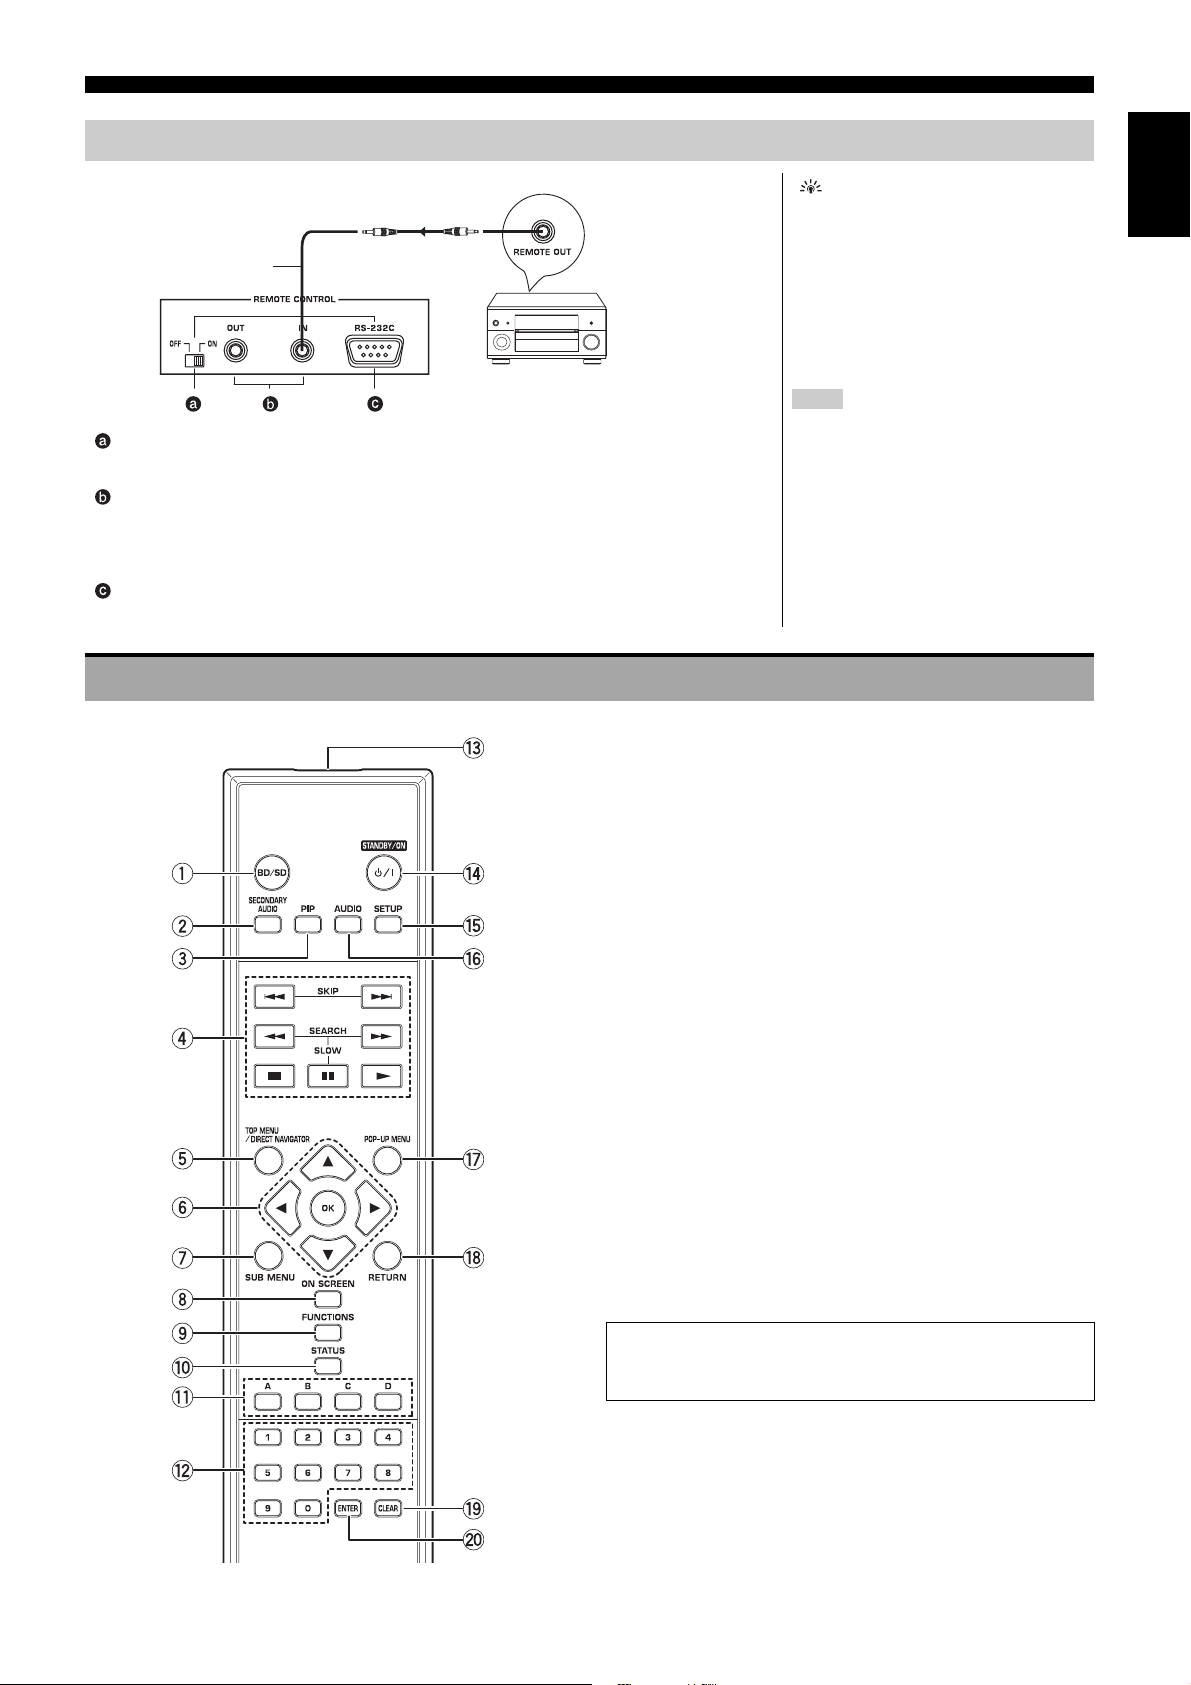
Using remote control functions
Back of the unit
Monaural 3.5mm
mini plug cable
Amplifier/receiver
with REMOTE OUT
jack
REMOTE CONTROL (ON, OFF) switch
Switches the remote control (RS-232C) on or off. When using REMOTE CONTROL (RS-232C)
terminal, set this switch to ON.
REMOTE CONTROL (IN/OUT) jacks
Connect to the remote control output/input jack of your audio/video component. If your AV
amplifier/receiver is a Yamaha product and has the capability to transmit of SCENE control
signals, you can use the SCENE function by connecting REMOTE CONTROL IN jack of this
unit to the REMOTE OUT jack of the amplifier/receiver.
REMOTE CONTROL (RS-232C) terminal
Use as an expansion terminal for commercial use. Consult your dealer for details.
CONTROL REFERENCE GUIDE
English
Tips
• For details about the SCENE function,
refer to the owner’s manual supplied with
your Yamaha AV amplifier/receiver.
• The REMOTE CONTROL (IN, OUT)
jacks are also used in custom installation.
• You can connect a Yamaha component
(such as DVD player and CD player)
corresponds with the SCENE function to
the REMOTE CONTROL (OUT) jack of
this unit.
Note
When using the SCENE function, do not
connect a power cable of this unit to AC
outlet on the rear panel of AV amplifier/
receiver.
1 Select disc drive or SD card drive (] 9)
2 Switch on/off Secondary Audio (] 11)
3 Switch on/off Secondary Video (Picture-in-picture) (] 11)
4 Basic playback control buttons (] 9, 10)
5 Show TOP MENU/DIRECT NAVIGATOR (] 9)
6 Selection/OK, Frame-by-frame (] 10)
7 Show sub menu (] 12)
8 Show on-screen menu (] 16)
9 Show FUNCTIONS menu (] 14)
0 Show status messages (] 10)
q These buttons are used when operating a BD-Video disc that
includes Java™ applications (BD-J). For more information about
operating this kind of disc, please read the instructions that came
with the disc.
The [A] and [B] buttons are also used with the “Title View”, “Picture
View” and “Album View” screens (
w Numbered buttons
Select title numbers, etc./Enter numbers (] 10)
e Transmit the remote control signal
r Turn the unit on and off (] 8)
t Show Setup menu (] 18)
y Select audio (] 10)
u Show Pop-up menu (] 11)
i Return to previous screen
o Clear
p Provides the same function as OK button
This button is used to fix the setting immediately after pressing the
numbered buttons.
] 12).
CAUTION
Do not place objects in front of the unit. The disc tray may
collide with objects when it is opened, and this may cause injury.
7 En
 Loading...