

Page 1

BLU-RAY DISC PLAYER
LECTEUR BLU-RAY DISC
BD-S1067
OWNER’S MANUAL
MODE D’EMPLOI
BEDIENUNGSANLEITUNG
BRUKSANVISNING
G
MANUALE DI ISTRUZIONI
MANUAL DE INSTRUCCIONES
GEBRUIKSAANWIJZING
Page 2

Important notes for users in the
U.K.
Mains plug
This apparatus is fitted with an approved 13 Amp
plug. To change a fuse in this type of plug proceed
as follows:
1 Remove fuse cover and fuse.
2 Fix new fuse which should be a BS1362 5 Amp,
A.S.T.
3 Refit the fuse cover.
If the fitted plug is not suitable for your jack outlets,
it should be cut off and an appropriate plug fitted in
its place.
If the mains plug contains a fuse, this should have a
value of 5 Amp. If a plug without a fuse is used, the
fuse at the distribution board should not be greater
than 5 Amp.
Note: The severed plug must be disposed to avoid a
possible shock hazard should it be inserted into a 13
Amp jack elsewhere.
How to connect a plug
The wires in the mains lead are coloured with the
following code:
blue = neutral (N), brown = live (L).
• As these colours may not correspond with the
colour markings identifying the terminals in your
plug, proceed as follows:
– Connect the blue wire to the terminal marked N
or coloured black
– Connect the brown wire to the terminal marked
L or coloured red.
– Do not connect either wire to the earth terminal
in the plug, marked E (or e) or coloured green (or
green and yellow).
VARO ITUS
Muiden kuin tässä esitettyjen toimintojen säädön tai
asetusten muutto saattaa altistaa vaaralliselle säteilylle tai
muille vaarallisille toiminnoille.
DK
Advarsel: Usynlig laserstråling ved åbning når
sikkerhedsafbrydere er ude af funktion. Undgå utsættelse
for stråling.
Bemærk: Netafbryderen p er sekundært indkoblet og
ofbryder ikke strømmen fra nettet. Den indbyggede netdel
er derfor tilsluttet til lysnettet så længe netstikket sidder i
stikkontakten.
N
Observer: Nettbryteren p er sekundert innkoplet. Den
innebygdenetdelen er derfor ikke frakoplet nettet så lenge
apparatet er tilsluttet nettkontakten.
S
Klass 1 laseraparat
Varning! Om apparaten används på annat sättþän i denna
bruksanvisning specificerats, kan användaren utsättas för
osynlig laserstrålning, som överskrider gränsen för
laserklass 1.
Observera! Strömbrytaren p är sekundärt kopplad och
inte bryter inte strömmen från nätet. Den inbyggda
nätdelen är därför ansluten till elnätet så länge
stickproppen sitter i vägguttaget.
SF
Luokan 1 laserlaite
Varoitus! Laitteen käyttäminen muulla kuin tässä
käyttöohjeessa mainitulla tavalla saattaa altistaa käyttäjän
turvallisuusluokan 1 ylittävälle näkymättömälle
lasersäteilylle.
Oikeus muutoksiin varataan. Laite ei saa olla alttiina
tippu-ja roiskevedelle.
Toiminnanvalitsin p on kytketty toisiopuolelle, eikä se
kytke laitetta irti sähköverkosta. Sisäänrakennettu verkkoosa on kytkettynä sähköverkkoon aina silloin, kun pistoke
on pistorasiassa.
Before replacing the plug cover, make certain that
the cord grip is clamped over the sheath of the lead not simply over the two wires.
Copyright in the U.K.
Recording and playback of material may require
consent. See Copyright Act 1956 and The
Performer’s Protection Acts 1958 to 1972.
Caution-i En
VARO !
AVATTAESSA JA SUOJALUKITUS
OHITETTAESSA OLET ALTTIINA
NÄKYMÄTTÖMÄLLE LASERSÄTEILYLLE.
ÄLÄ KATSO SÄ TEESEEN.
VARNING!
OSYNLIG LASERSTRÅLNING NÄR DENNA DEL
ÄR ÖPPNAD OCH SPÄRREN ÄR URKOPPLAD.
BETRAKTA EJ STRÅLEN.
Page 3
CAUTION
Use of controls or adjustments or performance of
procedures other than those specified herein may result
in hazardous radiation exposure.
AVERTISSEMENT
L’utilisation de commandes et l’emploi de réglages ou
de méthodes autres que ceux décrits ci-dessous,
peuvent entraîner une exposition à un rayonnement
dangereux.
VORSICHT
Die Verwendung von Bedienelementen oder die
Einstellung bzw. die Ausführung von anderen als in
dieser Anleitung beschriebenen Vorgängen kann zu
Gefährdung durch gefährliche Strahlung führen.
OBSERVERA
Användning av reglage eller justeringar eller utförande
av åtgärder på annat sätt än så som beskrivs häri kan
resultera i farlig strålning.
ATTENZIONE
L’uso di controlli, regolazioni, operazioni o procedure
non specificati in questo manuale possono risultare in
esposizione a radiazioni pericolose.
PRECAUCIÓN
El uso de los controles, los ajustes o los procedimientos
que no se especifican enste manual pueden causar una
exposición peligrosa a la radiación.
LET OP
Gebruik van bedieningsorganen, instellingen of
procedures anders dan beschreven in dit document kan
leiden tot blootstelling aan gevaarlijke stralen.
Caution-ii En
Page 4

CAUTION: READ THIS BEFORE OPERATING YOUR UNIT.
1 To assure the finest performance, please read this manual
carefully. Keep it in a safe place for future reference.
2 Install this unit in a well ventilated, cool, dry, clean place –
away from direct sunlight, heat sources, vibration, dust,
moisture, and/or cold. For proper ventilation, allow the
following minimum clearances.
Top: 10 cm (4 in)
Rear: 10 cm (4 in)
Sides: 10 cm (4 in)
3 Locate this unit away from other electrical appliances,
motors, or transformers to avoid humming sounds.
4 Do not expose this unit to sudden temperature changes from
cold to hot, and do not locate this unit in an environment with
high humidity (i.e. a room with a humidifier) to prevent
condensation inside this unit, which may cause an electrical
shock, fire, damage to this unit, and/or personal injury.
5 Avoid installing this unit where foreign object may fall onto
this unit and/or this unit may be exposed to liquid dripping or
splashing. On the top of this unit, do not place:
– Other components, as they may cause damage and/or
discoloration on the surface of this unit.
– Burning objects (i.e. candles), as they may cause fire,
damage to this unit, and/or personal injury.
– Containers with liquid in them, as they may fall and
liquid may cause electrical shock to the user and/or
damage to this unit.
6 Do not cover this unit with a newspaper, tablecloth, curtain,
etc. in order not to obstruct heat radiation. If the temperature
inside this unit rises, it may cause fire, damage to this unit,
and/or personal injury.
7 Do not plug in this unit to a wall outlet until all connections
are complete.
8 Do not operate this unit upside-down. It may overheat,
possibly causing damage.
9 Do not use force on switches, knobs and/or cords.
10 When disconnecting the power cable from the wall outlet,
grasp the plug; do not pull the cable.
11 Do not clean this unit with chemical solvents; this might
damage the finish. Use a clean, dry cloth.
12 Only voltage specified on this unit must be used. Using this
unit with a higher voltage than specified is dangerous and
may cause fire, damage to this unit, and/or personal injury.
Yamaha will not be held responsible for any damage resulting
from use of this unit with a voltage other than specified.
13 To prevent damage by lightning, keep the power cable
disconnected from a wall outlet or this unit during a lightning
storm.
14 Do not attempt to modify or fix this unit. Contact qualified
Yamaha service personnel when any service is needed. The
cabinet should never be opened for any reasons.
15 When not planning to use this unit for long periods of time
(i.e. vacation), disconnect the AC power plug from the wall
outlet.
16 Be sure to read the “TROUBLESHOOTING” section on
common operating errors before concluding that this unit is
faulty.
17 Before moving this unit, press p to set this unit to the
standby mode, and disconnect the AC power plug from the
wall outlet.
18 Condensation will form when the surrounding temperature
changes suddenly. Disconnect the power cable from the
outlet, then leave this unit alone.
19 When using this unit for a long time, this unit may become
warm. Turn the power off, then leave this unit alone for
cooling.
20 Install this unit near the AC outlet and where the AC power
plug can be reached easily.
21 The batteries shall not be exposed to excessive heat such as
sunshine, fire or the like.
This unit is not disconnected from the AC power source
as long as it is connected to the wall outlet, even if this
unit itself is turned off by p. This state is called the
standby mode. In this state, this unit is designed to
consume a very small quantity of power.
WARNING
TO REDUCE THE RISK OF FIRE OR ELECTRIC
SHOCK, DO NOT EXPOSE THIS UNIT TO RAIN OR
MOISTURE.
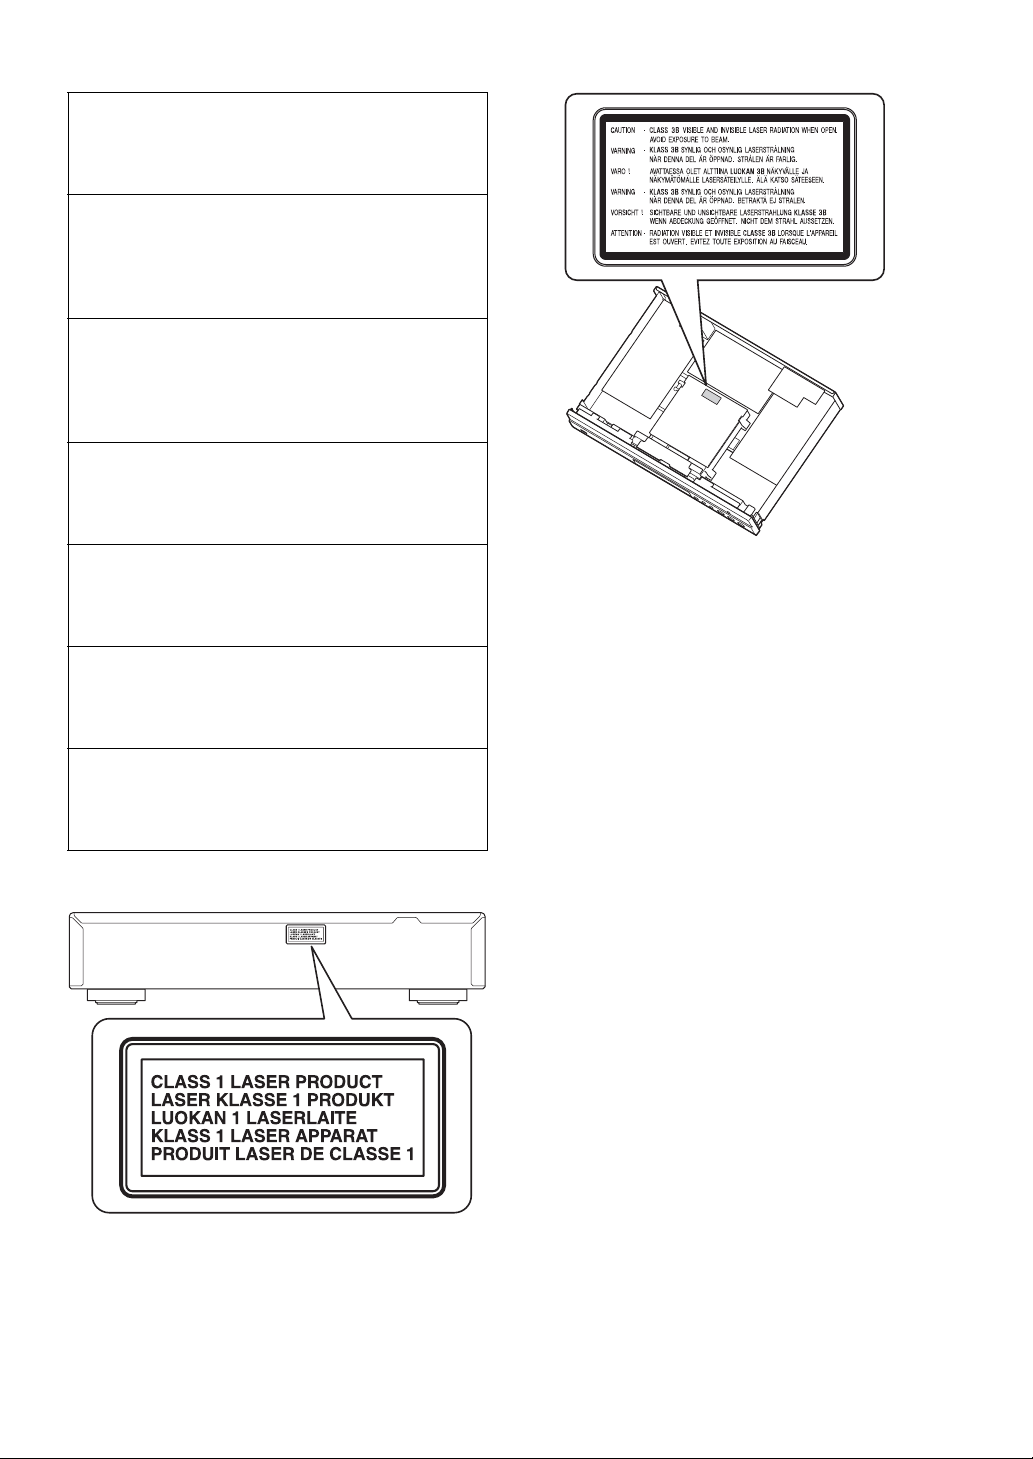
The laser component in this product is capable of
emitting radiation exceeding the limit for Class 1.
LASER Specification:
Class 1 LASER Product
Wave length: 790 nm (CDs)/655 nm (DVDs)/405 nm (BDs)
Laser output: max. 1 mW
LASER SAFETY
This unit employs a laser. Due to possible eye injury, only a
qualified service person should remove the cover or attempt
to service this device.
DANGER
This unit emits visible laser radiation when open. Avoid
direct eye exposure to beam. When this unit is plugged into
the wall outlet, do not place your eyes close to the opening of
the disc tray and other openings to look into inside.
Caution-iii En
Page 5

CONTENTS
1
1. INTRODUCTION
WHAT YOU CAN DO WITH THIS PLAYER........ 2
SUPPLIED PARTS .............................................. 2
ABOUT DISCS AND FILES................................. 3
Types of discs/files that can be used with this Player .... 3
Loading a disc................................................................. 4
Disc precautions ............................................................. 4
CONTROLS AND FUNCTIONS .......................... 5
Front panel...................................................................... 5
Remote control ............................................................... 6
2. CONNECTION
INTRODUCTION TO CONNECTIONS .............. 10
Rear panel ..................................................................... 10
HDMI CONNECTION......................................... 12
Connecting to the HDMI terminal................................ 12
VIDEO CONNECTIONS .................................... 13
Connecting to the component/video jack ..................... 13
AUDIO CONNECTIONS .................................... 14
Connecting to the digital audio jack/terminal............... 14
Connecting to the audio jacks....................................... 15
NETWORK AND USB CONNECTION .............. 16
Connecting to the NETWORK terminal and
USB port .................................................................. 16
OTHER CONNECTIONS ................................... 17
Connecting to the REMOTE CONTROL jacks ........... 17
Connecting the power cable ......................................... 17
3. PLAYBACK
INITIAL WIZARD/EASY SETUP........................ 18
Setting with the Initial Wizard/Easy Setup................... 18
HOME/MEDIA MENU ........................................ 19
Playing back photo/music/video................................... 19
Using network content.................................................. 21
ADVANCED PLAYBACK OPERATION............ 22
On Screen menu............................................................ 22
Status menu................................................................... 23
Using Bookmark........................................................... 24
Program play................................................................. 24
Using search ................................................................. 24
Enjoying BONUSVIEW and BD-Live......................... 25
Using Picture in Picture function
(secondary audio/video playback) ........................... 25
Using the feature of BD-Live ....................................... 25
4. SETTINGS
SETUP MENU.................................................... 26
Example of SETUP menu operation ............................ 28
General Setting ............................................................. 29
Display Setting ............................................................. 31
Audio Setting................................................................ 33
System Information ...................................................... 33
About the audio output formats .................................... 34
About the video output formats .................................... 35
SOFTWARE UPGRADE.................................... 36
Upgrading the software ................................................ 36
5. ADDITIONAL INFORMATION
TROUBLESHOOTING....................................... 37
Power ............................................................................ 37
Basic operation.............................................................. 37
Disc playback................................................................ 37
Picture ........................................................................... 38
Sound ............................................................................ 38
Network......................................................................... 39
Messages on the screen ................................................. 39
GLOSSARY ....................................................... 40
SPECIFICATIONS ............................................. 41
General.......................................................................... 41
Audio performance ....................................................... 41
Input/output................................................................... 41
Copyright ...................................................................... 42
(at the end of this manual)
Information about software ....................................i
■ About this manual
– This manual describes how to operate this Player
using a remote control except when it is not
available. Some of these operations are also
available using the front panel buttons.
– Notes contain important information about safety
and operating instructions. Hint(s) indicates a tip for
your operation.
– This manual is printed prior to production. Design
and specifications are subject to change in part as a
result of improvements, etc. In case of differences
between the manual and the product, the product has
priority.
The icons used in this manual
Icons are used to indicate available buttons/functions for a
particular format.
: BD-Video
BD
: DVD-Video, DVD-VR, DVD+VR, DVD-Audio
DVD
: Audio CD, Super Audio CD
CD
: AVCHD, WMV, DivX
VIDEO
: MP3, WMA
MUSIC
PHOTO
: JPEG
2
3
4
5
English
1 En
Page 6

INTRODUCTION
WHAT YOU CAN DO WITH THIS PLAYER
Easy setting for language, resolution, screen aspect ratio \ p. 18
You can perform language and TV settings.
Play back commercially-released BD/DVD/CD/SA-CD/DVD-Audio
*
discs
In addition to BD discs, this Player also supports playback of a variety of other discs.
Play back BONUSVIEW, BD-Live, etc.
You can enjoy additional movies on the latest BD discs.
Play back Video, Music, Photo files on a disc
This Player can play back discs you recorded.
*
*
Play back Video, Music, Photo files on a disc/USB memory device
Files recorded on discs/USB memory devices can be played back with this Player.
Play back Video, Music, Photo files on a Home Network Server*
PC contents can be played back with TV or AV receiver by connecting this Player to a network
server.
*
**
\ p. 22
\ p. 25
\ p. 19
\ p. 19
\ p. 21
Operation with the remote control of TV, AV receiver, etc. \ p. 29
Connecting devices with an HDMI cable, you can control devices with a single remote control
using the HDMI Control function.
* For details on playable disc and format, see page 3.
** Network setting is needed to use this function.
SUPPLIED PARTS
Make sure the following accessories are provided with the product.
Batteries (×2)
(AAA, R03, UM-4)
2 En
Power cableRemote control Audio pin cable Video pin cable
Page 7

ABOUT DISCS AND FILES
■ Types of discs/files that can be
used with this Player
– 12 cm (5”) and 8 cm (3”) discs can be played back in
this Player. Do not use an 8 cm (3”) to 12 cm (5”)
adapter.
– Use discs that conform to compatible standards as
indicated by the presence of official logos on the
disc label. Playback of discs not complying with
these standards is not guaranteed. In addition, the
image quality or sound quality is not guaranteed
even if the discs can be played back.
Disc Type
BD-ROM/BD-R/
BD-RE
DVD-ROM DVD-Video/DVD-
DVD-R/DVD-R DL/
DVD-RW
DVD+R/DVD+R
DL/DVD+RW
CD-ROM CDDA/HDCD -CD-R/CD-RW CDDA/Data Disc DivX/WMV/MP3/
SA-CD SA-CD -USB -- DivX/WMV/MP3/
Network -- WMV/MP3/WMA/
Region management information
Destination BD-Video DVD-Video
Asia Region code “A” or
Taiwan Region code “A” or
Korea Region code “A” or
Recording
Format
BD-Video --
Audio
DVD-Video/DVD-
VR/AVCHD/Data
Disc
DVD-Video/
DVD+VR/AVCHD/
Data Disc
“ALL”
“ALL”
“ALL”
Data Format
--
DivX/WMV/MP3/
WAV/WMA/JPEG
DivX/WMV/MP3/
WAV/WMA/JPEG
WAV/WMA/JPEG
WAV/WMA/JPEG
WAV/JPEG
Region number “3”
or “ALL”
3
Region number “3”
or “ALL”
3
Region number “3”
or “ALL”
3
ALL
ALL
ALL
Region management information
Destination BD-Video DVD-Video
Central and South
America
Europe Region code “B” or
Russia Region code “C” or
Region code “A” or
“ALL”
“ALL”
“ALL”
Region number “4”
or “ALL”
4
Region number “2”
or “ALL”
2
Region number “5”
or “ALL”
5
ALL
ALL
ALL
– BD/DVD Video players and discs have region
codes, which dictate the regions in which a disc can
be played.
– BD/DVD Video operations and functions may be
different from the explanations in this manual and
some operations may be prohibited due to disc
manufacturer’s settings.
– If a menu screen or operating instructions are
displayed during playback of a disc, follow the
operating procedure displayed.
Notes
– Playback for some of the discs in the left side
column tables may not be possible depending on the
disc.
– Finalize all recording media that is played back in
this Player.
– “Finalize” refers to a recorder processing a recorded
disc so that it will play in other players/recorders as
well as this Player. Only finalized discs will play
back in this Player. (This Player does not have a
function to finalize discs.)
– Playback of all files on the disc, USB memory
device and network is not guaranteed.
– A copyright protected file cannot be played back via
USB memory device and network.
MP3/WMA/WAV audio file requirement
– Sampling frequency: within 32 - 48 kHz (MP3/
WMA), LPCM 44.1 kHz/16 bit/Stereo (WAV)
– Bitrate: within 8 - 320 kbps (MP3), 32 - 192 kbps
(WMA)
1
INTRODUCTION
English
3 En
Page 8

ABOUT DISCS AND FILES
WMV file requirement
– WMV9, maximum resolution is 1,920 × 1,080.
About Super Audio CD (SA-CD)
– Audio format based upon the current CD standards
but includes a greater amount of information that
provides higher quality sound. There are three types
of discs: single layer, dual layer and hybrid discs.
The hybrid disc can be played on existing CD
players as well as Super Audio CD players since it
contains both standard audio CD and Super Audio
CD information.
Super Audio CD disc type
Single layer disc
HD layer
Hybrid Super Audio CD disc
Dual layer disc
HD layer
CD layer that plays on any
1
CD player
High Density layer containing:
- High Quality DSD Stereo
2
- High Quality DSD Multi-channel
3
Hint
– This player supports DSD data transmission via
HDMI using a compatible AV receiver.
Note
– This unit does not show the text data included in the
discs on the front panel display.
Hybrid layer disc
CD layer
HD layer
■ Disc precautions
Be careful of scratches and dust
– BD, DVD and CD discs are sensitive to dust,
fingerprints and especially scratches. A scratched
disc may not be able to be played back. Handle discs
with care and store them in a safe place.
Proper disc storage
Place the disc in the center of the disc case
and store the case and disc upright.
Avoid storing discs in locations subject to
direct sunlight, close to heating appliances
or in locations of high humidity.
Do not drop discs or subject them to
strong vibrations or impacts.
Avoid storing discs in locations where
there are large amounts of dust or
moisture.
Handling precautions
– If the surface is soiled, wipe gently with a
soft, damp (water only) cloth. When
wiping discs, always move the cloth from
the center hole toward the outer edge.
– Do not use record cleaning sprays,
benzene, thinner, static electricity
prevention liquids or any other solvent.
– Do not touch the surface.
– Do not stick paper or adhesive labels to the disc.
– If the playing surface of a disc is soiled or scratched,
the Player may decide that the disc is incompatible
and eject the disc tray, or it may fail to play the disc
correctly. Wipe any dirt off the playing surface with
a soft cloth.
■ Loading a disc
– Insert the disc with the label face up.
– In case of the disc recorded on both sides, face down
the side to play back.
Notes
– Playback may begin automatically, depending on the
disc and setting of this Player.
– The menu may be displayed first, depending on the
disc.
– The disc load time may vary depending on the disc.
4 En
Cleaning the pick up lens
– Never use commercially available cleaning discs.
The use of these discs can damage the lens.
– Request the nearest service center approved by
Yamaha to clean the lens.
Page 9

CONTROLS AND FUNCTIONS
■ Front panel
2 5 61 43 7 8 9 0 A B
1 p (On/Standby)
2 USB port (p. 16)
3 SA-CD indicator: Lights up when an SA-CD is
loaded and the SA-CD layer (p. 4) is selected.
4 Front panel display
5 Disc tray (p. 4)
6 (Eject): Opens/closes the disc tray.
7 (Search backward/Skip backward):
Press to skip backward, and press and hold to search
backward.
8 (Search forward/Skip forward):
Press to skip forward, and press and hold to search
forward.
9 (Play)
0 (Pause)
A (Stop)
B PURE DIRECT: Press to change the Pure Direct
mode (p. 7) to mode 1/mode 2/off. This button lights
up when Pure Direct mode is set to mode 1/mode 2.
1
INTRODUCTION
Loading the batteries in the remote
control
3
2
Notes
– Do not subject the remote control unit to shock,
water or excessive humidity.
– The remote control unit may not function if the
Player’s remote sensor is in direct sunlight or any
other strong light.
– Incorrect use of batteries may cause them to leak or
burst. Read the battery warnings and use the
batteries properly.
– Do not mix old and new batteries, or mix different
brands.
– Remove the batteries if you will not use the remote
control unit for an extended period of time.
– Dispose of batteries according to your regional
regulations.
1
Approximate operating range of
remote control
Remote control sensor
30˚30˚
6 m (20 ft)
English
5 En
Page 10

CONTROLS AND FUNCTIONS
■ Remote control
Note
– will appear on the top left corner of the screen
when the pressed button is not available.
1 Infrared signal transmitter: Outputs infrared
signal. Aim this window to the remote control sensor
(p. 5).
2 MARKER : Sets Bookmark (p. 24) at
DVD
VIDEO
a specified point of a movie. After Bookmark is set, to
select the set point you want to jump to, press
DIGEST. You can set up to 12 Bookmarks.
3 : Opens/closes the disc tray.
4 PROGRAM : Sets the order of playback
DVD CD
(p. 24). You can set up to 15 tracks (for an audio disc)
or titles/chapters (DVD-Video).
5 Color buttons : Use these buttons according to
BD
on-screen instructions.
6 Number buttons: Enters numbers, or during
playback, jumps to the track/chapter corresponding to
the number you input. These buttons may not be
available depending on the disc type and playback
condition.
7 CLEAR: Clears entered number/set item.
8 SETUP: Displays SETUP menu screen (p. 26).
9 PIP : Turns on/off the Picture in Picture (p. 25).
BD
PIP Mark ( ) is displayed on the screen when this
function is available. You can also select this item from
On Screen menu (p. 22).
Note
– PIP Mark is displayed only when the PIP Mark is set
to on (p. 30).
0 2ND AUDIO : Selects the secondary audio of
BD
the Picture in Picture (p. 25) or audio commentaries.
The Secondary Audio Mark ( ) is displayed on the
screen when this function is available (p. 33). You can
also select this item from On Screen menu (p. 22).
Note
– Secondary Audio Mark is displayed only when
Secondary Audio Mark is set to on (p. 30).
6 En
Page 11

CONTROLS AND FUNCTIONS
\
A TOP MENU : Displays the top menu
screen (p. 41) if the disc contains a menu. Select the
desired item using 5/a /2 /3 and ENTER.
Note
– Specific operations may be different depending on
the disc. Follow the instructions of each menu
screen.
B Cursor buttons (5/a /2 /3 ): Moves the focus in
the menu screen.
ENTER: Selects the focused menu/item.
C RETURN: Returns to the previous menu or screen,
etc.
D SUBTITLE : Changes subtitle
languages (p. 41) if available . You can also select this
item from On Screen menu (p. 22).
E STATUS: Displays the playback information (p. 23).
F Control buttons
BD DVD CD VIDEO MUSIC PHOTO
/: Searches backward/forward. The search
speed will change each time you press the button
(search backward/forward: 5 steps each). Press to
resume normal playback.
/ :
Press and hold for instant search/replay. Instant search
skips the content 30 seconds. Instant replay replays
the content from 10 seconds before.
/: Skips backward/forward.
: Stops playback. To stop playback completely,
press this button twice.
: Pauses playback.
: Plays back contents.
()/ ()
: Performs slow backward/forward. Slow
BD DVD
playback speed will change each time you press the
button (slow backward/forward: 4 steps each).
These buttons also perform frame advance/reverse
playback during pause.
Press to resume normal playback.
Many DVD-Audio discs include slide show and page
turn capabilities. Press / to move to a previous/
next page. This function is only for DVD-Audio.
BD DVD
BD DVD VIDEO
BD DVD CD VIDEO MUSIC
G SA-CD/CD: Switches the playback layer of a hybrid
SA-CD between SA-CD and CD (p. 4).
Hint
– The SA-CD/CD indicator (p. 5) on the front panel
lights up when an SA-CD is loaded and the SA-CD
layer is selected (p. 33).
Notes
– Audio signals are only output from the AUDIO OUT
jacks (p. 11) while the SA-CD layer is selected.
– Audio signals recorded in DSD multi-channel format
cannot be played on this Player.
H PURE DIRECT: Changes Pure Direct mode. Pure
Direct mode shown below will change each time you
press the button. Pure Direct mode improves audio
quality. PURE DIRECT on the front panel lights up
when Pure Direct mode is set to mode 1/mode 2.
Mode 1: Front panel display is turned off, and video
signals are not output. This mode is suitable listening
audio.
Mode 2: Front panel display is turned off, and video
signals from other than HDMI terminal are not output.
This mode is suitable for watching movies with high
quality sound.
off: Normal play back.
I DIMMER: Changes brightness of the front panel
display in 5 steps.
J DIGEST : Shows 12 photo thumbnails.
When thumbnails are displayed, you can proceed to
the next/previous page with / .
DVD VIDEO
(p. 24).
K p: Turns this Player on or sets it to the standby mode.
L ZOOM : Zooms in/out.
The size of the screen will change each time you press
the button (zoom in/out: 3 steps each).
PHOTO
: Displays Bookmark select bar
DVD VIDEO PHOTO
1
INTRODUCTION
Notes
– Some BD/DVD discs are not compatible with frame
advance/reverse playback.
– Depending on the disc, this Player resumes playback
from the point that where the Player was previously
stopped. To play back from the beginning, press
and then .
English
Continued to the next page.
7 En
Page 12

CONTROLS AND FUNCTIONS
M SEARCH :
BD DVD CD VIDEO MUSIC
Jumps to a specified point during playback. For details
on this function, refer to “Using search” (p. 24). You
can also select this item from status menu (p. 23).
N HOME: Displays the HOME menu screen (p. 19).
O REPEAT :
BD DVD CD VIDEO MUSIC
Changes repeat mode. Repeat mode shown below will
change each time you press the button.
: Repeats the title being played back.
: Repeats the chapter being played back.
: Repeats all tracks/files on the disc/folder.
: Repeats the track/file being played back.
P A/B : Plays back
BD DVD CD VIDEO MUSIC
a specific part you want to repeat.
1 Press A/B at the scene where you want to set the
start point. “A-” is displayed on the screen.
2 Press A/B again at the scene where you want to set
the end point. “A-B” is displayed on the screen.
Repeat playback starts.
3 To cancel the repeat playback, press A/B. “A-B”
disappears and the repeat playback is finished.
Note
– This function cannot be performed depending on the
specifications of the disc.
Q POP-UP/MENU : Displays pop-up
BD DVD
menu. The menu contents displayed vary depending
on the disc. For details on how to see and operate the
pop-up menu, refer to the manual for the disc.
The top menu screen may be displayed by pressing
POP-UP/MENU depending on the DVD.
R ON SCREEN: Displays On Screen menu (p. 22).
S ANGLE : Changes the camera angle if
BD DVD
video is recorded with multiple angles. The Angle
Mark ( ) is displayed on the screen when this
function is available. You can also select this item
from On Screen menu (p. 22).
Note
– Angle Mark is displayed only when the Angle Mark
is set to on (p. 30).
T AUDIO : Changes the audio language or
BD DVD
format. You can also select this item from On Screen
menu (p. 22).
8 En
Page 13

CONTROLS AND FUNCTIONS
ID function
You can change the remote control ID to prevent
unwanted operation of the other Yamaha player such as
DVD player. If you have changed the remote control ID,
make sure that you select the same ID for the main unit.
The default setting is ID1.
1 Remote control setting
To change the ID from ID1 to ID2, press and hold
the red color button and 2 of number button
simultaneously for 3 seconds. To change the ID
from ID2 to ID1, press and hold the red color button
and 1 of number button simultaneously for 3
seconds.
2 Main unit setting
Press and hold and on the
front panel simultaneously for 2 seconds to display
current ID when:
– No disc is inserted in this Player.
– The disc tray is closed.
– Playback is stopped.
– “NO DISC” is displayed on the front panel
display.
Keep pressing and holding the keys for another 2
seconds to change the ID between ID1 and ID2.
Note
– If the remote control is without batteries for a few
minutes or if exhausted batteries remain in the
remote control, the remote control ID is
automatically set to ID1. If you want to use the
remote control in ID2 setting, install new batteries
and set the remote control ID again.
1
INTRODUCTION
9 En
English
Page 14

CONNECTION
67 0 A93214 85
INTRODUCTION TO CONNECTIONS
Find the corresponding connection method on your video/audio equipment. We recommend that you use the HDMI
terminal which provides high quality digital audio and video on a single connection. If you use the other terminals/jacks,
connect the video first. Then connect the audio.
Connect video and audio to AV
HDMI terminal on
AV receiver? *
HDMI terminal on TV?
receiver with HDMI cable.
Refer to owner’s manual
of AV receiver.
START
Use AV receiver?
Yes
No
HDMI terminal on TV?
Connect video to TV with HDMI cable.
Connect video to AV receiver.
HDMI terminal on TV?
Connect video and audio to TV with HDMI cable.
Connect video to TV.
* When you connect to an AV receiver that cannot output the sound
input via its HDMI terminal, refer to the owner’s manual of your AV
receiver.
■ Rear panel
10 En
Page 15

Video and audio connection to
AV receiver
HDMI (p. 12)
A
2
CONNECTION
Video connection
to TV
HDMI (p. 12)
A’
to AV receiver
COMPONENT (p. 13)
B
or
VIDEO (p. 13)
C
Video connection to TV
COMPONENT (p. 13)
B’
or
VIDEO (p. 13)
C’
Connect audio to AV
receiver.
Connect audio to TV.
Audio connection to AV receiver
COAXIAL (p. 14)
D
or
OPTICAL (p. 14)
E
MIXED 2CH (p. 15)
F
7.1 ch surround (p. 15)
G
Video and audio connection to TV
HDMI (p. 12)
A’
Audio connection to TV
COAXIAL (p. 14)
D’
OPTICAL (p. 14)
E’
MIXED 2CH (p. 15)
F’
or
or
or
or
1 NETWORK (p. 16)
2 HDMI (p. 12)
3 USB port (p. 16)
4 REMOTE CONTROL (IN/OUT/RS-232C) (p. 17)
5 7.1 ch surround (AUDIO OUT) (p. 15)
6 MIXED 2CH (AUDIO OUT) (p. 15)
7 VIDEO (p. 13)
8 COMPONENT (p. 13)
9 COAXIAL (p. 14)
0 OPTICAL (p. 14)
A AC IN (p. 17)
English
11 En
Page 16

HDMI CONNECTION
■ Connecting to the HDMI terminal
– You can enjoy high quality digital picture and sound through the HDMI terminal.
– Firmly connect an HDMI cable (commercially available) to the HDMI terminals.
– See page 34 for information on the audio/video output formats.
– Use HIGH SPEED HDMI cables that have the HDMI logo (as shown on the back cover).
Caution!
Do not connect the power cable of this Player until all connections are completed.
This Player
Hints
– When you use the HDMI Control function,
refer to the “HDMI Control” (p. 29).
– For information on the output mode of HDMI
terminal, refer to the “HDMI” (p. 33).
To HDMI terminal
(commercially available)
A A’
AV receiver
HDMI cable
To HDMI input terminal
HDMI IN
TV
12 En
Page 17

VIDEO CONNECTIONS
■ Connecting to the component/video jack
– You can enjoy accurate color reproduction and high quality images through the component jacks.
– Firmly connect a component video cable (commercially available) or a video pin cable to the COMPONENT jacks/
VIDEO jack.
– See page 35 for information on the video output formats.
Caution!
Do not connect the power cable of this Player until all connections are completed.
This Player
This Player
2
CONNECTION
To C OMP ONEN T
jacks
(Red)
(Blue)
(Green)
Component video cable
(commercially available)
B B’
To component
input jacks
COMPONENT IN
PR
(Red)
PB
(Blue)
Y
(Red)
(Blue)
AV receiver
(Green)
(Green)
(Red)
TV
(Yellow)
To VIDEO
jack
Video pin cable
(supplied)
C C’
To video
input jack
(Yellow)
(Blue)
(Green)
AV receiver TV
(Yellow)
VIDEO
AV INPUT
(Yellow)
Note
– If you play back the image via VCR, the image may deteriorate due to the copy guard function.
English
13 En
Page 18

AUDIO CONNECTIONS
■ Connecting to the digital audio jack/terminal
– You can connect audio equipment or the TV to the COAXIAL jack/OPTICAL terminal.
– Firmly connect a Coaxial digital audio cable (commercially available) or optical cable (commercially available) to
the coaxial digital audio jack or optical digital audio terminal.
– See page 34 for information on the audio output formats.
Caution!
Do not connect the power cable of this Player until all connections are completed.
This Player
This Player
To C OAXIAL
jack
Coaxial digital audio cable
(commercially available)
D D’
To coaxial
input jack
COAXIAL
AV INPUT
D’ E E’
TVAV receiver
To optical
input terminal
DIGITAL AUDIO IN
AV receiver
To O PTI C AL
terminal
Optical cable
(commercially available)
OPTICAL
TV
Hint
– For information on the output mode of COAXIAL jack/OPTICAL terminal, refer to the “Coaxial/Optical” (p. 33).
14 En
Page 19

AUDIO CONNECTIONS
■ Connecting to the audio jacks
– You can connect audio equipment or the TV to the MIXED 2CH/7.1 ch surround jacks.
– Firmly connect audio pin cables (supplied and commercially available) to the MIXED 2CH jacks or 7.1 ch
surround jacks.
– See page 34 for information on the audio output formats.
– If you want to reproduce multi-channel SA-CD and DVD-Audio, connect 7.1 ch surround jacks to the
corresponding input jacks of your AV receiver using commercially available audio pin cables.
Caution!
Do not connect the power cable of this Player until all connections are completed.
To AUDIO OUT
MIXED 2CH jacks
This Player
(White)
(Red)
Audio pin cable
(supplied)
To 7.1 ch
surround
jacks
Audio pin
cables
(supplied and
commercially
available)
G
(White)
This Player
(Red)
(White)
(Red)
(White)
2
CONNECTION
(Red)
F F’
To audio input
jacks
(White) (Red)
AUDIO
LR
(White)
AUDIO IN
(Red)
(White)
TVAV receiver
(Red)
To
MULTI
CH IN
jacks
CENTER SUBWOOFER
(White)
(White) (Red) (White) (Red) (White) (Red)
SURROUND BACK
LR
(Red)
MULTICH IN
(White)
SURROUND
LR
(Red)
(White)
FRONT
LR
AV receiver
Hints
– You can connect a subwoofer to the SUBWOOFER jack directly. When you connect TV to this Player directly,
connect an active subwoofer such as Yamaha Active Servo Processing Subwoofer System to this jack.
– To output the audio signal from the MIXED 2CH/7.1 ch surround jacks, refer to “Speaker Setting” (p. 33).
(Red)
English
15 En
Page 20

NETWORK AND USB CONNECTION
■ Connecting to the NETWORK terminal and USB port
– PC contents can be played back by connecting this Player to the network.
– You can enjoy a variety of contents with interactive functions by connecting to the internet when playing BD-Live
compatible discs. Refer to page 25 regarding further information on BD-Live functions.
– You can connect a USB memory device (2 GB or greater and formatted with FAT 32/16) for BD Local Storage to
the USB port on the rear panel (or front panel) of the player to save the BD-Live data or to upgrade the software of
this Player. To save data on the USB memory device on the front panel, refer to “Local Storage” (p. 29).
– Firmly connect a network cable (commercially available) and a USB memory device (commercially available) to
the NETWORK terminal and USB port.
– Use only an STP (shielded twisted pair) network cable.
– When using the internet, a broadband internet connection as shown below is required.
– Connect the other connector of the network cable to the hub/broadband router.
Before using the USB memory device
CAUTION:
– Do not remove the USB memory device
or unplug the power cable while the
operations for Local Storage (p. 29) or
software upgrade are being performed.
– Do not use a USB extension cable when
connecting a USB memory device to the
USB port of the Player. Using a USB
extension cable may prevent the Player
from performing correctly.
This Player
Note
– Yamaha cannot guarantee that all brands’
To NETWORK
terminal
USB memory devices will operate with
this Player.
Notes
(commercially available)
Network cable
– When using a broadband internet
connection, a contract with an internet
service provider is required. For more
details, contact your nearest internet service
provider.
To L A N
terminal
– Refer to the operation manual of the
equipment you have as the connected
equipment and connection method may
differ depending on your internet
LAN
environment.
– Use a network cable/router supporting
10BASE-T/100BASE-TX.
Internet
Modem
Hub or
broadband router
After connecting
– When you set the Network setting manually, refer to “Network” (p. 31).
– To play back the PC contents on your network, refer to “Using network content” (p. 21).
To USB port
USB memory device
(commercially available)
PC
16 En
Page 21

OTHER CONNECTIONS
■ Connecting to the REMOTE
CONTROL jacks
– You can transmit and receive the remote control
signals by connecting to the REMOTE CONTROL
(OUT/IN) jacks.
– Firmly connect monaural 3.5 mm mini plug cables
(commercially available) to the REMOTE
CONTROL (OUT/IN) jacks.
– If your AV receiver is a Yamaha product and has the
capability to transmit SCENE control signals, you
can control the Player with the SCENE function.
Caution!
Do not connect the power cable of this
Player until all connections are completed.
This Player
To R EM OTE
CONTROL
(OUT) jack
Monaural 3.5 mm
mini plug cable
(commercially
available)
To R E M OTE
CONTROL (IN)
jack
Monaural 3.5 mm
mini plug cable
(commercially
available)
– You can connect a Yamaha component (such as CD
player) supports the SCENE function to the
REMOTE CONTROL (OUT) jack of this Player.
– The RS-232C terminal is a control expansion
terminal for commercial use. Consult your dealer for
details.
■ Connecting the power cable
– After all connections are completed, plug the
supplied power cable into the AC IN on the rear of
the Player. Then plug into AC outlet.
To AC IN
To AC outlet
Note
– TO PREVENT RISK OF ELECTRIC SHOCK, DO
NOT TOUCH THE UN-INSULATED PARTS OF
ANY CABLES WHILE THE POWER CABLE IS
CONNECTED.
2
CONNECTION
To r e mote
control in
jack
REMOTE CONTROL IN
Yamaha component
REMOTE CONTROL OUT
Infrared signal receiver
or Yamaha component
(such as AV receiver)
To r e m ote
control out
jack
Hints
– For details about the SCENE function, refer to the
owner’s manual supplied with your Yamaha AV
receiver.
English
17 En
Page 22

PLAYBACK
INITIAL WIZARD/EASY SETUP
■ Setting with the Initial Wizard/
Easy Setup
Initial Wizard/Easy Setup allows you to set language,
resolution, and screen aspect ratio easily. Initial Wizard
screen is displayed when you turn this Player on for the
first time after purchase or upgrade. Same setting can be
performed from SETUP menu = System = Easy Setup.
1 When Easy Setup screen is displayed, Press ENTER to
start Easy Setup.
2 Press 5/a to select the language you want to display
on the screen, then press ENTER.
4 Press 5/a to select the screen aspect ratio, then press
ENTER. For details on setting items, see “TV Screen”
(p. 31).
Easy Setup is completed.
Note
– When no picture is displayed after Initial Wizard/
Easy Setup is completed, refer to
“TROUBLESHOOTING” (p. 38).
3 Press 5/a to select the resolution, then press ENTER.
For details on setting items, see “Resolution” (p. 31).
18 En
Page 23

HOME/MEDIA MENU
HOME and MEDIA menus allow you to browse and play
multi-media files on data discs, USB memory devices and
your network.
Note
– For details on playable disc and format, see page 3.
■ Playing back photo/music/video
Basic operation
5/a : Moves the focus.
2: Returns to the parent folder.
3: Checks/unchecks single folder/file.
HOME: Moves to/exits HOME menu screen.
ENTER: Confirms the folder/file.
POP-UP/MENU: Opens Edit Menu.
HOME
2ND
AUDIO
TOP MENU
A/B
POP-UP/MENU
ENTER
Common operations for playing back
files in a selected folder
Example: Selecting a movie file on a USB memory
device
Note
– Stop the playback of the video before you move to
MEDIA menu screen.
1 Press HOME to move to HOME menu screen.
Press 2/3 to select MEDIA, then press ENTER.
3
PLAYBACK
RETURN
ON SCREEN
Icons on the top of MEDIA menu
: Plays back the disc on the tray, or displays contents
in the data disc.
: Displays contents in the USB memory device
connected to the USB port.
: Searches for a DLNA (p. 21) server on the network.
: Displays contents on the connected DLNA server.
2 MEDIA screen appears.
3 Select the item which contains the file you want to play
back, then press ENTER.
19 En
English
Page 24

HOME/MEDIA MENU
4 Select the Photo, Music, Video or AVCHD folder you
want to play back, then press ENTER.
To return to the parent folder, press 2 or select .
Note
– Note that the only the file type selected on this step
will be displayed in the following step. For example,
if you selected Photo folder in this step, only photo
files are displayed after this step. When you play
back other than photo, return to this hierarchy and
select file type again.
5 Select the folder(s) containing the file you want to play
back.
Hint
– To enjoy slide show with music, press HOME to
return to the HOME menu screen while music is
played back, and select photo file.
Note
– The displayed file may not be played back
depending on the content.
Operations for viewing photos
While viewing photos, the buttons on the remote control
work as shown below.
: Stops slide show and returns to the file browser.
: Pauses a slide show.
: Plays a slide show.
: Moves to a next photo.
: Moves to a previous photo.
: Makes a slide show faster in 3 steps.
: Makes a slide show slower in 3 steps.
5: Inverts a photo.
a : Reflects a photo.
2: Rotates a photo counterclockwise.
3 : Rotates a photo clockwise.
ZOOM: Zooms in/out a photo (zoom in/out: 3 steps each).
5/a /2 /3 : Pan in zoom mode when a photo is larger
than the screen.
DIGEST: Switches to thumbnail mode (p. 7). When
thumbnails are displayed, you can proceed to the next/
previous page with / .
6 Select the file you want to play back, then press
ENTER.
When a video file is selected, playback starts.
When a music file is selected, status screen is displayed
and playback starts.
When a photo file is selected, slide show starts.
20 En
Page 25

■ Using network content
This Player is a DLNA certified digital media player. You
can manage photo, music and video contents stored on
DLNA servers on your home network.
About DLNA
DLNA (Digital Living Network Alliance) provides easy
sharing of digital media through network in the home, and
you can enjoy digital contents stored on your DLNAserver-software-installed PC or other DLNA compatible
device with your TV via this Player. To connect this
Player to your DLNA servers, some settings for the
DLNA server or device are required. For details, refer to
your DLNA server software or DLNA device.
Playing back shared contents
1 To play back files on your PC, install a DLNA server
software, such as Windows Media Player 12, and share
files you want to play back.
2 Turn on the PC with DLNA server software installed or
the DLNA device connected to your home network.
3 Press HOME to display HOME menu screen. Then
select MEDIA to move to MEDIA menu. The DLNA
servers connected to the network are listed on the
screen.
HOME/MEDIA MENU
3
PLAYBACK
Notes
– If your DLNA server is not listed, select DLNA
Search to find it.
– Depending on the DLNA server, this Player may
need to be permitted from the server.
– To play the file on the DLNA server, this Player and
the server must be connected to the same access
point.
– The file requirements may not always be compatible.
There may be some restrictions depending on file
features and DLNA sever capability.
4 Select the file you want to play back.
Notes
– The playback and operating quality may be affected
by your home network condition.
– The files from removable media such as USB
memory devices or DVD-drive on your media
server, may not be shared properly.
English
21 En
Page 26

ADVANCED PLAYBACK OPERATION
This chapter explains playback of commercially available
BD and DVD discs, SA-CDs, CDs, and recorded DVDRW/R discs.
Note
– For the basic playback operation, see page 6.
■ On Screen menu
To display On Screen menu, press ON SCREEN. After
that, press 5/a /2 /3 to select an item, then press
ENTER to operate the desired function.
On Screen menu contains following items.
Title : Shows the title number being
BD DVD VIDEO
played back. You can skip to the desired title by selecting
it from this item.
Chapter : Shows the chapter
number being played back. You can skip to the desired
chapter by selecting it from this item.
Track/File : Shows
track/file number being played back. You can skip to the
desired track/file by selecting it from this item.
Time : Shows the
playback time. Select display type from the following:
Mode/Play Mode
DVD CD VIDEO MUSIC PHOTO
playback mode. You can select playback mode from the
following:
BD DVD VIDEO
CD VIDEO MUSIC PHOTO
BD DVD CD VIDEO MUSIC
– Elapsed playback time of the title, chapter, disc,
track or file
– Remaining playback time of the title, chapter, disc,
track or file
: Shows current
– Normal: Normal playback.
– Shuffle: Each track/file must play once without
repetition.
– Random: Real random playback. Repetition may
happen.
Hint
– When a DVD-Video is played back, you can select
Random All, Random TT (title), Random CH
(chapter), Shuffle All, Shuffle TT (title) and Shuffle
CH (chapter).
Audio : Shows audio language/
BD DVD VIDEO
signal of BD/DVD disc currently selected. You can select
the desired type of audio.
Angle : Shows the currently-selected angle
BD DVD
number. If the video is recorded with multiple angles, you
can change the angle.
Subtitle : Shows the currently-
BD DVD VIDEO
selected subtitle language when the subtitle is provided.
Subtitle Style : Shows the currently-selected
BD
subtitle style. This function is available only for Video-file
external subtitle. You can select the desired text style of
subtitle.
Bitrate : Shows
BD DVD CD VIDEO MUSIC
bitrate of the audio/video signal.
Second Video : Turns the PIP on/off (p. 6).
Second Audio : Turns the secondary audio on/off
BD
BD
(p. 6).
Ins Search
: Skips 30 seconds.
BD DVD CD VIDEO MUSIC
Ins Replay
: Replays the content
BD DVD CD VIDEO MUSIC
from 10 seconds before.
Slide Show :
PHOTO
Shows slide show speed. You can select the slide show
speed from Slow/Medium/Fast.
Transition : Shows how photo appears on the
PHOTO
screen. You can select the transition type.
Code Page : Selects character code of subtitle
VIDEO
you added to DivX video (p. 40).
22 En
Page 27

■ Status menu
This shows various settings, such as subtitles, angle
settings and the title/chapter/track number currently
played back. To display status menu, press STATUS.
Status menu contains following menus.
When playing BD-Video/DVD-Video or
video file
Example: Icons when playing BD
13
245
678
1 (Playback status)
2 (Disc type/video file icon)
ADVANCED PLAYBACK OPERATION
When playing audio disc or music file
Example: Icons when playing music file
1 (Playback status)
2
(Repeat mode):
3 (Disc type/music file icon)
4 (Artwork) : Displays artwork if the file
contains it.
MUSIC
Shows current repeat mode (p. 8).
3
PLAYBACK
3 (Title number being played): You can jump to
specified title with SEARCH button (p. 8).
4 (Chapter number being played): You can
jump to specified chapter with SEARCH button (p. 8).
5 (Elapsed playback time): You can jump to
specified point with SEARCH button (p. 8).
6 (Subtitle currently selected): You can change
the subtitle language with SUBTITLE button.
7 (Audio currently selected): You can change the
audio language or format with AUDIO button.
8
(Repeat mode):
Shows current repeat mode (p. 8).
5 (Track/file number being played): You can
jump to specified track with SEARCH button (p. 8).
6 (Information) : Displays music information
if the file contains them.
7 (Elapsed playback time): You can jump to
specified point with SEARCH button (p. 8).
8 (Progress bar) : Shows progress status of
current song.
9 (Audio level meter): displays current volume level.
MUSIC
MUSIC
When viewing photo
1 (Playback status)
2 (Photo file icon)
3 (File number being displayed)
4
(Repeat mode):
5 (Slide show speed)
Shows current repeat mode (p. 8).
23 En
English
Page 28

ADVANCED PLAYBACK OPERATION
■ Using Bookmark
This allows you to set Bookmark at the specified point of
the video. After Bookmark is set, you can move to the
point you set using this function. You can set up to 12
Bookmarks.
1 Press MARKER during playing back the movie to set
Bookmark. Bookmark number, and the status are
displayed.
2 After Bookmark is set, press DIGEST to display
Bookmark select bar.
3 Press 2/3 to select the Bookmark you want to play
back, then press ENTER.
Press CLEAR to delete the selected Bookmark.
Note
– When playback is finished (e.g., ejecting the disc,
pressing twice), Bookmarks are automatically
deleted.
■ Program play
This allows you to program playback order of audio disc
tracks or DVD chapters.
Press PROGRAM during playback to display the
PROGRAM window to program playback order.
You can program up to 15 tracks/chapters.
Example: Programming the playback order of CD tracks
1 Press PROGRAM during playback.
DVD CD
DVD VIDEO
2 Press ENTER to program playback order.
For audio disc, press 5/a to select a desired track then
press ENTER.
For DVD-Video disc, select a desired title (shown as
TT) and chapter (shown as CH) instead of a track.
To clear a set track, select the track you want to clear,
then press CLEAR.
Press RETURN to cancel the Program play.
3 After programming is finished, press to set and
start program playback.
4 To cancel program play, stop playback completely by
pressing twice.
■ Using search
BD DVD CD VIDEO MUSIC
This allows you to jump to the specified point during
playback.
1 Press SEARCH during playback. Status bar appears.
2 Press 5/a /2 /3 to select one of the item below, then
press ENTER.
:
BD DVD
– Title number (shown as )
– Chapter number (shown as )
– Elapsed title time (shown as )
– Elapsed chapter time (shown as )
:
CD
– Track number (shown as )
– Elapsed track time (shown as )
– Elapsed disc time (shown as )
:
VIDEO MUSIC
– File number (shown as )
– Elapsed file time (shown as )
3 Press 5/a or number buttons to set/adjust the value of
the focused item, and press ENTER to jump to the
specified point.
4 To close the status bar, press STATUS.
24 En
Page 29

ADVANCED PLAYBACK OPERATION
■ Enjoying BONUSVIEW and BDLive
This player supports BONUSVIEW (p. 40) (BD-ROM
Profile 1 Version 1.1) and BD-Live (p. 40) (BD-ROM
Profile 2) playback functions.
Note
– Functions and playback method vary depending on
the disc. See the guidance on the disc or the supplied
user’s manual.
■ Using Picture in Picture function
(secondary audio/video playback)
BD-Video that includes secondary audio and video
compatible with Picture in Picture can be played back
with secondary audio and video simultaneously as a small
video in the corner.
Primary video Secondary video
While PIP Mark ( ) or Secondary
Audio Mark ( ) is displayed, press
PIP to turn the Picture in Picture
function on/off.
Notes
– To listen to secondary audio, make sure that the
Audio Output setting (Coaxial/Optical or HDMI) is
set to PCM or Reencode (p. 33).
– Depending on the disc, to listen to secondary audio,
you may need to set secondary audio to on on the top
menu of the disc (p. 7).
– The secondary audio and video for Picture in Picture
may automatically play back and be removed
depending on the content. Also, playable areas may
be restricted.
■ Using the feature of BD-Live
1. Set the Network setting (p. 31).
2. Connect the USB memory device
to this Player (p. 16).
BD-Live data is saved in Local Storage (p. 29) (USB
memory device connected to this Player). To enjoy
these functions, connect a USB memory device
(2 GB or greater and formatted with FAT 32/16)
supporting USB 2.0 High Speed (480 Mbit/s) to the
USB port (p. 16).
– BUDA folder is created automatically in the USB
memory device when necessary.
– If there is insufficient storage space, the data will not
be copied/downloaded. Delete unneeded data or use
a new USB memory device.
– Some time may be required for the data to load
(read/write).
Notes
– Yamaha cannot guarantee that all brands’ USB
memory devices will operate with this Player.
– Do not use a USB extension cable when connecting
a USB memory device to the USB port of the player.
Using a USB extension cable may prevent the player
from performing correctly.
3. Play back the disc.
4. Run BD-Live according to the
instructions on the disc.
Notes
– Regarding playback method of BD-Live contents,
etc., perform the operations in accordance with the
instructions in the BD disc manual.
– To enjoy BD-Live functions, perform the network
connection (p. 16) and Network settings (p. 31).
– Refer to “BD-Live Connection” (p. 31) regarding the
setup to restrict access to BD-Live contents.
– The time required to download the provided
programs into the USB memory device connected to
this Player varies depending on the internet
connection speeds and the data volume of the
programs.
– BD-Live programs provided through the internet
may not be able to display the connection depending
on the status (upgrading) of the provider. In such
cases, take out the disc and try again.
– If the BD-Live screen does not appear for a while
after you select the BD-Live function in the BD disc
menu, the USB memory device may not have
enough free space. In such cases, eject the disc from
the player, and then erase the data in the USB
memory device using the “Format” menu in the
“Local Storage” (p. 29).
3
PLAYBACK
English
25 En
Page 30

SETTINGS
SETUP MENU
The SETUP menu enables various audio/visual settings and adjustments for functions using the remote control unit.
Menu/Submenu Item Function Page
System Screen Saver Sets screen saver on/off. 29
Disc Auto Playback Sets this Player to start disc playback automatically. 29
HDMI Control Sets this Player to receive control signal from the remote
General Setting
Network Control Sets the control via Ethernet to on/off. 29
Load Default Resets all settings to the default setting except Security
Upgrade Performs upgrade of this Player. 29
Easy Setup Sets language, resolution, screen aspect ratio. 29
Local Storage Displays status of Local Storage (p. 29), formats Local
Language OSD Selects the language for On Screen Display. 30
Menu Prioritizes the language for disc menu. 30
Audio Prioritizes the language for audio. 30
Subtitle Prioritizes the language for subtitle. 30
Playback Closed Caption Sets the closed caption to on/off. 30
Angle Mark Sets to display the Angle Mark when BD/DVD with multiple
PIP Mark Sets to display the PIP Mark when BD/DVD with Picture in
Secondary Audio
Mark
DivX(R) VOD
DRM
DVD-Audio Mode Sets DVD-Audio mode to DVD-Audio/DVD-Video. 30
Security Change Password Changes password for Parental Control and Country Code. 30
Parental Control Sets the Parental Control depending on the disc content. 30
Country Code Sets your Country Code. 30
Network Internet Connection Sets the internet connection to Enable/Disable. 31
Information Displays network information screen. 31
Connection Test Performs the network connection test. 31
IP Setting Sets the IP setting to Auto/Manual. 31
BD-Live
Connection
DLNA Sets the DLNA to Enable/Disable. 31
Proxy Setting Sets the proxy setting. 31
control of your TV/AV receiver.
setting.
Storage and selects the front/rear USB port for Local Storage.
angles is played back.
Picture is played back.
Sets to display the Secondary Audio Mark when BD/DVD
with secondary audio is played back.
Displays registration code for DivX(R) video.
Sets the BD-Live connection to Permitted/Partial Permitted/
Prohibited.
29
29
29
30
30
30
30
31
26 En
Page 31

Menu/Submenu Item Function Page
Display Setting
Audio Setting
SETUP MENU
TV TV Screen Sets the screen aspect ratio of the connected TV, and adjust
Resolution Selects the resolution of output video. 31
TV System Selects the TV System from NTSC/PAL/Multi. 32
Color Space Selects Color Space from RGB/YCbCr 4:4:4/YCbCr 4:2:2/
HDMI Deep Color Selects HDMI Deep Color from 30 bits/36 bits/Off. 32
HDMI 1080p 24Hz Sets HDMI 1080p 24Hz to auto/off. 32
Lip Sync Adjusts the lag between video and audio, such as when the
Video Process Video Mode Adjusts the visual image. 32
Color Adjust Adjusts Brightness/Saturation/Hue for each color. 32
Auto Contrast Adjusts contrast to optimize the played back image. 32
Noise Reduction Sets the level of Noise Reduction. 32
De-interlacing
Mode
Audio Output Coaxial/Optical Selects the output mode of COAXIAL jack/OPTICAL
HDMI Selects the output mode of HDMI terminal from Bitstream/
Downsampling Selects the digital audio signal down sampling frequency
DRC Sets the DRC (Dynamic Range Compression). 33
SACD Output SACD Priority Selects a contents when Hybrid SA-CD is played back. 33
HDMI Output Selects the output mode of HDMI terminal from DSD/PCM
Speaker Setting Configuration Sets the audio output of 7.1 ch surround jack. 33
2ch Downmix Selects down mix method to analog 2-ch. 33
Post Process Multi-channelizes the 2-channel audio signal. 33
the video output.
Full RGB.
mouth movement is out of sync with the voice.
Sets how to detect the video signal.
terminal from Bitstream/PCM/Reencode/Off.
PCM/Reencode/Off.
from 48k/96k/192k.
when SA-CD is played back.
Displays software version and MAC address (p. 41).
31
32
32
4
SETTINGS
32
33
33
33
33
System
Information
33
English
27 En
Page 32

SETUP MENU
TOP MENU
POP-UP/MENU
RETURN
ON SCREEN
ENTER
CLEAR SEARCH
SETUP
PIP
REPEAT
HOME
■ Example of SETUP menu
operation
You need to call up the SETUP menu screen to perform
settings for this Player. The following is the explanation
for basic operations of the SETUP menu.
Example: Setting Parental Control
Note
– Some items cannot be set during playback. In this
case, press twice to stop playback completely
before setting.
3. Select a menu item.
Press 5/a to select Parental Control, then press
ENTER or cursor 3.
4. Enter password.
Enter your password with number buttons.
– The default password is 0000.
– You cannot move to the next setting screen until
you have input the correct password.
– To change the password, refer to “Change
Password” (p. 30).
1. Display the SETUP menu screen.
Press SETUP to display the SETUP menu screen.
Press 2/3 to select General Setting, then press
ENTER or a .
2. Select a Submenu.
Press 5 /a to select Security, then press ENTER or
cursor 3.
5. Select a next item.
Press 5/a to select the Parental Control Level for
BD/DVD, then press ENTER.
6. Exit the menu screen.
Press 2 to return to the previous menu.
28 En
Page 33

SETUP MENU
■ General Setting
The default settings are marked with “
System
Screen Saver
You can set the screen saver to on/off.
When set to on, this Player will switch to screen saver
mode if there is no operation for 3 minutes. After that, this
Player will turn to standby mode when there is no
operation for 6 minutes.
On*, Off
Disc Auto Playback
You can set Disc Auto Playback to on/off. When set to on,
a disc will play back automatically after loading.
On*, Off
HDMI Control
You can set the Player to receive control signal from a
TV/AV receiver compatible with the HDMI Control
function via an HDMI cable (p. 12).
*
On, Off
Using HDMI Control function
Using the HDMI Control function, you can interactively
operate this Player with your TV (HDMI Control
function supported).
When you connect this Player to the TV compatible with
the HDMI Control function using an HDMI cable and
set HDMI Control in the SETUP menu to on (p. 29), you
can perform the function listed below.
• Automatic input select function
When you start playback of this Player, the input
selector of the TV (and an AV receiver if this Player is
connected to the TV via the AV receiver) is switched
to this Player automatically. TV Power is turned on
automatically depending on the TV.
• Automatic power off function
When you turn off the TV while this Player is in stop
mode and the SETUP menu screen is not displayed,
the power of this Player is also turned off
automatically.
*
”.
Network Control
You can set control via Ethernet to on/off. This player
employs Yamaha Network Control protocol (YNC).
*
On, Off
Notes
– When set to on, power consumption during standby
mode increases due to network control function.
– When set to on, the system startup time is increased.
Load Default
You can reset all settings of this Player to default setting
except Security setting (p. 30). For details on default
settings, see pages 26-33.
Upgrade
You can upgrade the software manually from Disc, USB
Storage or Network. For details on software upgrade, refer
to “SOFTWARE UPGRADE” (p. 36).
Easy Setup
You can perform Easy Setup (p. 18).
Local Storage
You can display Local Storage information, format Local
Storage, and select Front USB/Rear USB to save the BDLive data.
To format (empty) the BUDA folder in the USB memory
device, select Information and press ENTER when
“Format” is focused on the screen.
Front USB, Rear USB
*
Local Storage
It is used as an auxiliary memory when Blu-ray Disc is
played back.
4
SETTINGS
Notes
– HDMI Control function may not work properly
depending on the TV.
– Functions other than ones shown above may work
depending on the TV or AV receiver.
– In order to make the HDMI Control function
available, set up settings for the HDMI Control
function on ALL components (this Player, TV,
and AV receiver). Certain operation may also be
required.
– Each function may be set independently to
activate/deactivate depending on the TV.
– Refer to the operation manuals supplied with the
TV and/or AV receiver for details regarding setup.
English
29 En
Page 34

SETUP MENU
Language
OSD
You can select the language for On Screen Display which
is the messages or menu displayed on the screen such as
SETUP menu.
English*, , , , ,
Svenska Nederlandse
Menu
You can prioritize the language for disc menu.
Français Español Deutsch Italiano
, ,
DVD-Audio Mode
Some DVD-Audio discs contain the DVD-Video content
in addition to the DVD-Audio content. You can select
DVD-Audio mode or DVD-Video mode.
*
DVD-AUDIO
DVD-VIDEO Only the DVD-Video content is played back.
Both DVD-Audio/Video contents are played back.
Only the DVD-Audio content may be played back
depending on the disc.
Note
– This setting is only available when no disc is loaded.
English*, , , , , ,
Nederlandse Svenska
Norwegian, , Korean, Japanese, More
Français Español Deutsch Italiano
, Portuguese, Danish, , Finnish,
Audio
You can prioritize the audio language for BD/DVD
playback. For details on setting items, see “Menu” (p. 30).
Subtitle
You can prioritize the language for Subtitle.
English, , , , , ,
Nederlandse Svenska
Norwegian, , Korean, Japanese, More, Off
Français Español Deutsch Italiano
, Portuguese, Danish, , Finnish,
*
Playback
Closed Caption
You can set to display the closed caption (p. 40) when BD/
DVD with closed caption is played back.
*
On, Off
Angle Mark
You can set to display the Angle Mark ( ) when BD/
DVD with multiple angles is played back.
On*, Off
PIP Mark
You can set to display the PIP Mark ( ) when BD with
picture in picture (p. 25) is played back.
On*, Off
Secondary Audio Mark
You can set to display the Secondary Audio Mark ( )
when BD with secondary audio is played back.
On*, Off
DivX(R) VOD DRM
You can display registration code for DivX(R) video.
Security
Change Password
You can set the password for changing the Parental
Control Level and Country Code. Refer to “Parental
Control” (p. 30) and “Country Code” (p. 30).
Note
– The default password is 0000.
Parental Control
In some BD/DVD discs, a control level for disc viewing is
set depending on the age of the viewer. You can set the
Parental Control shown on the screen depending on the
disc content.
The password (see “Change Password” on p. 30) needs to
be entered before the Parental Control Levels is set.
After you set the Parental Control, when you play back a
disc with level higher than current Parental Control Level,
or you want to change the Parental Control Level, a dialog
box will pop up to ask you to enter the password.
Off*, 1 to 8
Country Code
You can set the Country Code you live in. The password
(see “Change Password” on p. 30) needs to be entered
before the Country Code is set. This setting may be used
for rating of Parental Control and disc playback.
30 En
Page 35

Network
Internet Connection
Set this item to Enable when you use BD-Live (p. 25), DLNA
(p. 21) and software upgrade from the network (p. 36).
Enable*, Disable
Information
You can display network information screen. On this
screen, you can view the information of Interface
(Ethernet), Address Type, IP Address, Subnet Mask,
Default Gateway, and DNS.
Connection Test
You can perform an internet connection test. If the test is
failed, please check “IP Setting” (p. 31) and perform the
test again.
IP Setting
You can set IP Setting to Auto/Manual. When set to Auto,
IP address is allocated automatically by system. When set
to Manual, IP Address, Subnet Mask, Default Gateway
and DNS should be set manually.
Auto*, Manual
BD-Live Connection
You can set access restriction to BD-Live contents.
Permitted
Partial
Permitted
Prohibited Prohibits all BD-Live discs to connect the network.
DLNA
You can set the DLNA (p. 21) to Enable/Disable. When
you do not use the DLNA function, set to Disable.
Enable*, Disable
Proxy Setting
You can set Proxy Setting. Set to Disable for normal use.
Set to Enable to set the proxy setting.
Enable Enables proxy host and proxy port setting.
Disable
Proxy Host Sets proxy host.
Proxy Port Sets proxy port.
Allows all BD-Live discs to connect the network.
Allows only discs with owner certification.
*
*
Sets proxy server to disable. Select this item when
proxy server is not used.
SETUP MENU
■ Display Setting
The default settings are marked with “
TV
TV Screen
You can set the screen aspect ratio of the connected TV,
and adjust the video output.
If you switch your TV (i.e. because you have bought a
new one) and the screen aspect ratio of the connected TV
changes, you will have to change the TV Screen setting.
16:9 Full Select this when this Player is connected to a TV
16:9 Normal
4:3 Pan Scan Select this when this Player is connected to a TV
4:3 Letterbox Select this when this Player is connected to a TV
Original
image size
Original
image size
Resolution
You can select the video output resolution from Auto,
480i/576i, 480p/576p, 720p, 1080i, and 1080p. When set
to Auto, resolution is set to the maximum resolution
according to the connected TV. For more details on output
formats, refer to “About the video output formats” (p. 35).
Auto*, 480i/576i, 480p/576p, 720p, 1080i, 1080p
with a 16:9 screen. When a 4:3 aspect ratio video is
played back, the video is displayed as shown below.
*
Select this when this Player is connected to a TV
with a 16:9 screen. When a 4:3 aspect ratio video is
played back, the video is displayed as shown below.
with a 4:3 screen. When a 16:9 aspect ratio video is
played back, the video is displayed as shown below.
with a 4:3 screen. When a 16:9 aspect ratio video is
played back, the video is displayed as shown below.
On 16:9 (wide screen) TV
16:9 Full 16:9 Normal
4:3
4:3 Pan Scan 4:3 Letterbox
16:9
*
”.
On 4:3 TV
4
SETTINGS
Note
– To output HD audio (such as Dolby TrueHD or
DTS-HD Master Audio) from HDMI terminal, set
Resolution to Auto or more than 720p.
English
31 En
Page 36

SETUP MENU
TV System
You can select TV System from PAL, NTSC and Multi.
Set the same TV System as your TV set. For more details
on output formats, refer to “About the video output
formats” (p. 35).
NTSC, PAL*, Multi
Color Space
You can select the Color Space (p. 40) output from
HDMI. This function is available when this Player is
connected with an HDMI cable.
RGB Outputs video signal at normal signal range.
*
YCbCr 4:4:4
YCbCr 4:2:2 Sets Color Space to YCbCr 4:2:2.
Full RGB When RGB is set and white and black on the screen
Sets Color Space to YCbCr 4:4:4.
are too faint, select this item. This setting is effective
when a connected component supports RGB 0-255
range.
Note
– This function is only available on TVs that support
this function.
HDMI Deep Color
When your TV and/or AV receiver is compatible with
Deep Color (p. 40), set this item according to your TV/AV
receiver. This function is available when this Player is
connected with an HDMI cable.
30 bits, 36 bits, Off
*
HDMI 1080p 24Hz
This outputs the BD-Video encoded in 24Hz frame rate in
HDMI 1080p 24Hz. Smoother video playback may be
available with this function. This function is available
when your TV/AV receiver support this function, and this
Player is connected with an HDMI cable. For more details
on output formats, refer to “About the video output
formats” (p. 35).
Auto*, Off
Note
– This setting is disabled when output resolution is
other than 1080p.
Lip Sync
You can set/adjust the Lip Sync (p. 41) function. To adjust
Lip Sync manually, select Manual, then press 2 /3 to
adjust the figure.
Auto*, Manual, Off
Video Process
Video Mode
You can select Video Mode below.
Standard* The image is most natural and well-balanced. This
mode suits for normal use.
Vivid The image is more vivid and sharp.
Cinema The image suits for watching movie in dark room.
Custom You can adjust the visual image manually. Press 5/
a to select the parameter, then press 2 /3 to adjust
the figure.
Brightness
Adjusts the overall brightness of the image.
Sharpness
Adjusts the sharpness of objects in the video.
Hue
Adjusts the tint of the projected image.
Saturation
Adjusts the richness of the color in the projected
image.
Contrast
Adjusts the bright areas (white levels) in the image.
CTI
Smoothes out the edges of color images. Color
images are rendered more distinct.
The default settings are 0.
Color Adjust
You can adjust Brightness/Saturation/Hue for each color
(Red/Green/Blue/Yellow/Cyan/Magenta). To use this
function, set Video Mode to Custom. For details on the
setting items, see “Video Mode” (p. 32).
The default settings are 0.
Auto Contrast
Adjusts contrast to optimize the played back image.
Off*, On
Noise Reduction
You can set the Noise Reduction to a level of 0 to 3. 0 is
off, and 3 is the maximum level.
0*, 1, 2, 3
De-interlacing Mode
You can select how to detect the video signal. Set to Auto
for normal use. When horizontal stripping noise appears
on the screen, set this to Film/Video to remove the noise.
Auto*, Film, Video
32 En
Page 37

SETUP MENU
■ Audio Setting
The default settings are marked with “
Audio Output
Coaxial/Optical
You can select the output mode of COAXIAL jack and
OPTICAL terminal. For more details on output formats,
refer to “About the audio output formats” (p. 34).
Bitstream
PCM Outputs 2-channel PCM.
Reencode
Off Mutes sound.
Outputs digital signal without any processing.
Secondary Audio is not output.
*
Outputs Bitstream with Secondary Audio. The audio
signal is output in DTS signal.
HDMI
You can select the output mode of HDMI ternminal. For
details on setting items, see “Coaxial/Optical” (p. 33). For
more details on output formats, refer to “About the audio
output formats” (p. 34).
Bitstream*, PCM, Reencode, Off
Note
– To output HD audio (such as Dolby TrueHD or
DTS-HD Master Audio) from HDMI terminal, set
Resolution to Auto or more than 720p (p. 31).
Downsampling
You can select digital audio signal down-sample
frequency. This function is effective for the audio signal
output from the COAXIAL jack/OPTICAL terminal.
*
48k
96k The highest sampling rate of digital PCM output is
192k The highest sampling rate of digital PCM output is
The highest sampling rate of digital PCM output is
48 kHz.
96 kHz.
192 kHz.
DRC
You can set the DRC (Dynamic Range Compression)
(p. 40) to on/off/Auto. When set to Auto, DRC is
automatically turned on for a source with DRC
information in Dolby TrueHD format. DRC makes the
strong sound such as plosive sound lower, and
conversations more audible. It is useful when you watch
movies in the night.
Off*, On, Auto
SACD Output
SACD Priority
You can select a content played back from multi-channel
or stereo (2-channel) contents when a Hybrid SA-CD
(p. 4) including both is loaded.
Multi-ch*, 2-ch
*
”.
HDMI Output
You can select audio signal output from HDMI terminal
when SA-CD is played back.
*
DSD
PCM Outputs PCM signal decoded by this Player.
Outputs DSD raw signal. When this Player is
connected to DSD compatible AV receiver, this item
is recommended.
Speaker Setting
Configuration
You can set the output of 7.1 ch surround depending on
the connected speaker or amplifier.
1 Press 5/a to select a speaker you want to configure,
then press ENTER.
2 Adjust the figures below. Note that some of items are
not displayed depend on the selected speaker.
Size When the woofer section of a speaker is 16 cm (6-1/
Trim -12 to 0 dB (in 0.5 dB step)
Delay 0.5 to 10 m (in 0.5 m step)
Disable When selected speaker is not in use, select Yes.
2 in) or larger, select Large. When smaller than 16
cm (6-1/2 in), select Small.
Large*, Small
The default setting is 0 dB.
The default setting is 3 m.
*
Yes, No
3 Press RETURN to go back to speaker selection.
2ch Downmix
You can select down mix method to analog 2-ch from
Stereo or Lt/Rt.
*
Stereo
Lt/Rt Select this item if this unit is connected to a Dolby
Changes channel output to stereo, which only
delivers sound from the two front speakers.
Pro Logic decoder. Sound from rear speakers is
mixed to the 2 ch stereo sound.
Post Process
You can multi-channelize the 2-channel audio signal. To
multi-channelize, select NEO6, then select Cinema or
Music mode.
Off*, NEO6
■ System Information
Software version and MAC address (p. 41) are displayed.
4
SETTINGS
English
33 En
Page 38

SETUP MENU
■ About the audio output formats
MIXED 2CH/
HDMI COAXIAL/OPTICAL
Source format Bitstream PCM Reencode Bitstream PCM Reencode
PCM 2ch PCM 2ch PCM 2ch 2ch
PCM 5.1ch PCM 5.1ch PCM 2ch 2ch/5.1ch
PCM 7.1ch PCM 7.1ch PCM 2ch 2ch/7.1ch
7.1 ch
surround
Dolby Digital Dolby Digital PCM 5.1ch Dolby Digital Dolby Digital PCM 2ch Dolby Digital 2ch/5.1ch
Dolby Digital
Plus
Dolby
TrueHD
DTS DTS
DTS HD High
Resolution
DTS-HD
Master Audio
with SA* or
**
BCS
with SA* or
**
BCS
with SA* or
**
BCS
with SA* or
**
BCS
with SA* or
**
BCS
with SA* or
**
BCS
Dolby Digital
Plus
Dolby
TrueHD
DTS HD High
Resolution
DTS-HD
Master Audio
PCM up to
7.1ch
PCM up to
7.1ch
PCM up to
5.1ch
PCM up to
7.1ch
PCM up to
7.1ch
Dolby Digital
Plus
Dolby Digital
Dolby
TrueHD
Dolby Digital
DTS DTS PCM 2ch DTS 2ch/5.1ch
DTS HD High
Resolution
DTS
DTS-HD
Master Audio
DTS
Dolby Digital PCM 2ch Dolby Digital
Dolby Digital PCM 2ch Dolby Digital
DTSPCM 2chDTS
DTSPCM 2chDTS
2ch/7.1ch
2ch/7.1ch
* “SA” is a Secondary Audio.
** “BCS” is a button click sound, the sound effect for pop-up menus, etc.
SA-CD output formats
SACD Output settings
SACD Priority HDMI Output
Multi-ch
2-ch
DSD DSD up to 5.1ch No output 2ch/5.1ch
PCM PCM up to 5.1ch No output 2ch/5.1ch
DSD DSD 2ch No output 2ch/2ch
PCM PCM 2ch No output 2ch/2ch
HDMI COAXIAL/OPTICAL
MIXED 2CH/7.1ch
surround
Notes
– When Coaxial/Optical or HDMI is set to Bitstream, secondary audio is not output. (p. 33)
– To output HD audio (such as Dolby TrueHD or DTS-HD Master Audio) from HDMI terminal, set Resolution to
Auto or more than 720p (p. 31).
– For SA-CD playback, Configuration in Speaker Setting (p. 33) is effective only when HDMI Output is set to
PCM.
34 En
Page 39

■ About the video output formats
When TV System is set to NTSC
Resolution Auto 480i/576i 480p/576p 720p 1080i 1080p
HDMI
1080p 24Hz
HDMI
COMPONENT
VIDEO
Playback BD
others 1080p 60 Hz
Playback
commerciallyreleased DVD
Playback BD
others 1080i 60 Hz
Playback BD
others 480i
When TV System is set to PAL
Resolution Auto 480i/576i 480p/576p 720p 1080i 1080p
HDMI
1080p 24Hz
HDMI
COMPONENT
VIDEO
Playback BD
others 1080p 50 Hz
Playback
commerciallyreleased DVD
Playback BD off 576p
others 576p
Playback BD
others 576i
– – – – – On Off
Max 480i 480p 720p 60 Hz 1080i 60 Hz
480i 480i 480p
480i 480i 480i 480i 480i
– – – – – On Off
Max 576i 576p 720p 50 Hz 1080i 50 Hz
576i 576i 576p 576p 576p
576i 576i 576i 576i 576i
1080p 24 Hz
480p 480p 480p
720p 60 Hz 1080i 60 Hz
off 1080i 60 Hz
off
1080p 24 Hz
off
SETUP MENU
1080p 60 Hz
4
SETTINGS
480i
1080p 50 Hz
576p
576i
When TV System is set to Multi
When TV System is set to Multi, video signal is output at the same frequency as the source. Refer to the tables above for
details on the frequency setting of the TV and resolution of the output video signal.
While a menu screen such as SETUP menu is displayed, video signal is output at the same frequency as the source.
Notes
– “Max” in the table means that resolution is set to the maximum resolution supported by the connected TV.
– HDMI 1080p 24Hz setting is disabled when output resolution is other than 1080p.
– When HDMI 1080p 24Hz setting is on, video signal is output from HDMI during BD playback.
– When commercially-released DVD is played back with component output, maximum resolution is 480p/576p.
– When TV System is set to NTSC and video source is not 60 Hz, the video output signal is converted to 60 Hz.
– When TV System is set to PAL and video source is not 50 Hz, the video output signal is converted to 50 Hz.
35 En
English
Page 40

SOFTWARE UPGRADE
Some of the newly released BD discs cannot be played
back unless you upgrade this Player software to the latest
version. We recommend upgrading the software of this
Player with software upgrade so that this Player is
operated based on the latest software.
To check for the availability of a software upgrade, visit
http://download.yamaha.com/downloads/service/top/
?site=europe.yamaha.com&language=en
Hint
– Software upgrade is automatically started after
loading the disc which contains upgrade file
package.
Note
– Do not remove the disc/USB memory device, set this
Player to standby mode or unplug the power cable/
LAN cable while the software upgrade is being
performed.
■ Upgrading the software
1. Prepare for the software upgrade.
When you upgrade the software from Disc/USB
Storage:
1 Save the upgrade file package to the appropriate
folder on the disc/USB memory device. For more
details, refer to the procedure document attached
with the upgrade file package.
2 Load the disc or connect the USB memory
device.
When the disc is loaded, software upgrade is
started automatically. Skip step 2.
When you upgrade the software from Network:
Confirm that this Player is connected to the
network.
3 Select the item which contains the upgrade file
package from Disc/USB Storage/Network.
3. The system will search for
upgrade file package.
4. Press ENTER to start upgrade.
5. Upgrade is completed. The system
will restart.
2. Select the upgrade method and
start upgrade from SETUP menu.
1 Press SETUP to display SETUP menu screen.
2 Select General Setting = System = Upgrade.
36 En
Page 41

ADDITIONAL INFORMATION
TROUBLESHOOTING
Refer to the table below when this Player does not function properly. If the problem you are experiencing is not listed
below or if the instruction below does not help, turn off this Player, disconnect the power cable, and contact the nearest
authorized Yamaha dealer or service center.
■ Power
Problem Possible causes and solutions
No power. – Connect the AC power cable properly.
The Player power is turned off. – The power will be automatically turned off after 10 continuous minutes of inactivity (no
– Press (p) on the front panel to turn on the power.
playback).
■ Basic operation
Problem Possible causes and solutions
The remote control does not work. – Use the remote control within its operating range. (p. 5)
Buttons do not work. – Press and hold p on the front panel for around 5 seconds to restart this Player.
Password is forgotten.
– Replace the batteries. (p. 5)
– Check the ID settings for the main unit and the remote control. (p. 9)
– To completely reset this Player, unplug the power cable from the AC outlet for 5 - 10
seconds, plug the power cable to the AC outlet again, and then turn on this Player.
– Press and hold and on the front panel simultaneously when no disc is inserted
and playback is stooped to set the Player to default setting (Security setting (p. 30) is
also reset).
■ Disc playback
Problem Possible causes and solutions
The Player cannot play a disc. – Take out the disc and clean it. (p. 4)
Video stops. – The Player will stop if it senses shock or vibration.
The Player makes a snapping sound
when starting playback or loading a
disc.
– Make sure that the disc is loaded properly (aligned in disc tray and label-side up). (p. 4)
– Use a disc supported by the Player. (p. 3)
– Remove the disc and then check whether the Player supports the disc or not. (p. 3)
– Check the region code. (p. 3)
– Check whether the disc is defective by trying another disc.
– The CD-R/RW, DVD+R/RW/R DL, and DVD-R/RW/R DL must be finalized. (p. 3)
– These sounds are not malfunctions of the Player but are normal operating conditions.
5
ADDITIONAL INFORMATION
37 En
English
Page 42

TROUBLESHOOTING
■ Picture
Problem Possible causes and solutions
No picture. – Make sure that the cables are connected correctly. (p. 10)
Screen freezes and operation buttons
do not work.
Video is not output with the desired
resolution.
Widescreen video appears vertically
stretched, or black bands appear at the
top and bottom of the screen. Or 4:3
video appears horizontally stretched.
Square noise (mosaic) appears on the
screen.
The playback screen will be disturbed if
DVD video is recorded to a VCR, or
played back through a VCR.
Audio is not output, or images are not
played back properly.
– Make sure that the connected TV or the AV receiver is set to the correct input. (p. 10)
– Connect this Player to the TV with VIDEO jack (p. 13) using the supplied video pin
cable and set Resolution properly. (p. 31)
– TV System is set to the incorrect setting. Press and hold DIMMER on the remote
control to reset TV System setting to default setting.
– Press , then restart playback.
– Turn off the power and turn on the power again.
– Press and hold p on the front panel for around 5 seconds to restart this Player.
– Set to the desired resolution. (p. 31)
– Change the aspect ratio of your TV. (p. 31)
– Blocks in images may be visible in scenes with rapid movement due to the
characteristics of digital image compression technology.
– This Player complies with analog copy protection. Some discs contain a copy
prohibiting signal. If you try to play back such discs through a VCR, or record to a VCR
and play back the signal, the copy protection will prevent normal playback.
– The audio may not be output or the images may not be played back properly for some
discs in which copyright-protected contents are recorded.
■ Sound
Problem Possible causes and solutions
No sound, or sound is distorted. – Turn the volume up.
Left and right channels of audio are
reversed, or sound comes out of only
one side.
Audio is not output, or images are not
played back properly.
Cannot hear the desired audio type and/
or number of channels.
Cannot hear the sound of PIP
(secondary audio).
– There is no sound during still mode, slow motion playback, fast forward and fast
reverse. (p. 7)
– Check that the audio cable is connected correctly. (p. 10)
– Audio may not be output depending on the audio recording status, such as when audio
other than an audio signal or non-standard audio is recorded for the audio content. (p. 3)
– Check the audio connection. (p. 10)
– The audio may not be output or the images may not be played back properly for some
discs in which copyright-protected contents are recorded.
– Refer to Audio Output setting and “About the audio output formats”. (p. 33, 34)
– Set Coaxial/Optical or HDMI to PCM/Reencode. (p. 33)
– To hear secondary audio, press 2ND AUDIO. (p. 6)
– Depending on the disc, you may need to set secondary audio to on on the top menu of
the disc. (p. 7)
38 En
Page 43

TROUBLESHOOTING
■ Network
Problem Possible causes and solutions
Cannot connect to the Internet. – Connect the Network cable properly.
Cannot download BD-Live contents. – Connect the Network cable properly. (p. 16)
Cannot detect the DLNA server. – Connect the network cable properly.
Cannot a play the file on the home
network server.
– Turn on the connected equipment, such as broadband router or modem.
– Connect the broadband router and/or modem properly.
– Set the proper value(s) in the network setting. Check “Network”. (p. 31)
– Connect USB memory device properly. Check that the USB memory device is
connected to the USB port of this Player. (p. 16)
– Check if the BD disc supports BD-Live.
– Check the setting for “Internet Connection”. (p. 31)
– Connect the USB memory device formatted in FAT16 or FAT32.
– It is recommended to connect the USB memory device with at least 2 GB of free space.
If there is not enough free space, format the USB memory device. (p. 29)
– Turn on the connected equipment, such as broadband router or the server.
– Confirm the Player and the server are connected to the same access point.
– Set the proper value(s) in the network setting. Check “Network”. (p. 31)
– Depending on the DLNA server, the Player may need to be permitted from the server.
– Make sure the file is playable. (p. 3)
– Check your DLNA server’s setting.
– The playback and operating quality may be affected by your home network condition.
■ Messages on the screen
– The following messages appear on the TV screen in case the disc you tried to play back is not appropriate or the
operation is not correct.
Error message Possible causes and solutions
Not Support This File! – The file is not supported with this Player. See “Types of discs/files that can be used with this Player”
Wrong region code! – The disc is an incompatible region code. See “Region management information” (p. 3).
Network has FAILED. – This Player cannot be connected to the network. Check connection (p. 16) and Network setting (p. 31).
Network is OK, proxy has
FAILED.
The Setting is prohibited,
please setup again.
No valid upgrade file is
found!
Upgrade has failed for some
reason!
(p. 3).
– This Player cannot be connected to the proxy server. See “Proxy Setting” (p. 31).
– BD-Live connection is prohibited. See “BD-Live Connection” (p. 31).
– Check if the upgrade file is in the appropriate folder.
– Upgrade is failed. Check if the upgrade file is corrupted or unreadable.
5
ADDITIONAL INFORMATION
39 En
English
Page 44

GLOSSARY
AVCHD
AVCHD is a new format (standard) for high definition
video cameras that can be used to record and play highresolution HD images.
BD-Live
BD-Live is a BD standard that utilizes a network
connection, enabling this Player to go online to
download promotional videos and other data.
BDMV
BDMV (Blu-ray Disc Movie, BD-MV) refers to one of
the application formats used for BD-ROM which is one
of the Blu-ray Disc specifications. BDMV is a recording
format equivalent to DVD-Video of the DVD
specification.
BONUSVIEW
BONUSVIEW compatible discs let you simultaneously
enjoy video sub-channel for two screens, audio subchannel and sub-titles. A small screen appears within
the main screen during playback (Picture in Picture).
Closed caption
Closed captions are kind of subtitle, and the difference
between subtitles and captions is that subtitles are
intended for hearing persons and captions are for the
hearing impaired. Subtitles rarely show all of the audio.
For example, captions show sound effects (e.g., “phone
ringing” and “footsteps”), while subtitles do not. Before
you select this setting, please ensure that the disc
contains closed caption information.
Color Space
Color Space is a color range that can be represented.
RGB is a color space based on the RGB color model
(red, green and blue) and is typically used for PC
monitors. YCbCr is a color space based on a luminance
signal (Y) and two color difference signals (Cb and Cr).
Deep Color
Deep Color refers to the use of various color depths in
displays, up from the 24-bit depths in previous versions
of the HDMI specification. This extra bit depth allows
HDTVs and other displays go from millions of colors to
billions of colors and eliminate on-screen color banding
for smooth tonal transitions and subtle gradations
between colors. The increased contrast ratio can
represent many times more shades of gray between
black and white. Also Deep Color increases the number
of available colors within the boundaries defined by the
RGB or YCbCr color space.
DivX®
DivX® is a popular media technology created by DivX,
Inc. DivX® media files contain highly compressed
video with high visual quality that maintains a relatively
small file size. DivX® files can also include advanced
media features like menus, subtitles, and alternate audio
tracks. Many DivX® media files are available for
download online, and you can create your own using
your personal content and easy-to-use tools from
DivX.com.
Dolby Digital
A sound system developed by Dolby Laboratories Inc.
that gives movie theater ambience to audio output when
the product is connected to a Dolby Digital processor or
amplifier.
Dolby Digital Plus
A sound system developed as an extension to Dolby
Digital. This audio coding technology supports 7.1
multi-channel surround sound.
Dolby TrueHD
Dolby TrueHD is a lossless coding technology that
supports up to 8 channels of multi-channel surround
sound for the next generation optical discs. The
reproduced sound is true to the original source bit-forbit.
DRC (Dynamic Range Control)
DRC lets you adjust the range between the loudest and
softest sounds (dynamic range) for playback at average
volume. Use this when it is hard to hear dialog, or
during times when playback may disturb neighbors.
DSD (Direct Stream Digital)
DSD technology stores audio signals on digital storage
media, such as Super Audio CDs. Using DSD, signals
are stored as single bit values at a high- frequency
sampling rate of 2.8224 MHz, while noise shaping and
oversampling are used to reduce distortion, a common
occurrence with very high quantization of audio signals.
Due to the high sampling rate, better audio quality can
be achieved than that offered by the PCM format used
for normal audio CDs.
DTS
This is a digital sound system developed by DTS, Inc.
for use in cinemas.
DTS-HD High Resolution Audio
DTS-HD High Resolution Audio is a new technology
developed for the next generation high definition optical
disc format.
DTS-HD Master Audio
DTS-HD Master Audio is a lossless audio compression
technology developed for the next generation high
definition optical disc format.
DTS-HD Master Audio | Essential
DTS-HD Master Audio | Essential is a lossless audio
compression technology developed for the next
generation high definition optical disc format.
HDMI
HDMI (High-Definition Multimedia Interface) is an
interface that supports both video and audio on a single
digital connection. The HDMI connection carries
standard to high definition video signals and multichannel audio signals to AV components such as HDMI
equipped TVs, in digital form without degradation.
Letterbox (LB 4:3)
A screen size with black bars on the top and bottom of
the image to allow viewing of wide-screen (16:9)
material on a connected 4:3 TV.
40 En
Page 45

SPECIFICATIONS
Linear PCM Sound
Linear PCM is a signal recording format used for Audio
CDs and on some DVD and Blu-ray discs. The sound on
Audio CDs is recorded at 44.1 kHz with 16 bits. (Sound
is recorded between 48 kHz with 16 bits and 96 kHz
with 24 bits on DVD discs and between 48 kHz with 16
bits and 192 kHz with 24 bits on BD discs.)
Lip Sync
Lip Sync, an abbreviation for lip synchronization, is a
technical term that involves both a problem and a
capability of maintaining audio and video signals
synchronized during post-production and transmission.
Whereas the audio and video latency requires complex
end-user adjustments, HDMI version 1.3 incorporates
an automatic audio and video syncing capability that
allows devices to perform this synchronization
automatically and accurately without user interaction.
Mac address
The Mac address is a unique value assigned to a network
device for identification purposes.
SPECIFICATIONS
■ General
Power supply
[Central and South America models]................AC 110–240 V, 50/60 Hz
[Europe and Russia models]...........................................AC 230 V, 50 Hz
[Asia model]......................................................AC 220–240 V, 50/60 Hz
[Taiwan model] ................................................. AC 110-120 V, 50/60 Hz
[Korea model] ................................................................ AC 220 V, 60 Hz
Power consumption (Normal) .............................................................. 25 W
Power consumption (Standby) ................................................. 0.5 W or less
Dimensions (W × H × D) ............................................. 435 × 96 × 316 mm
(17-1/8 × 3-3/4 × 12-1/2 in)
Weight ..............................................................................4.05 kg (8.93 lbs.)
■ Audio performance
Audio output level (1 kHz, 0 dB, BD/DVD/CD-DA).................... 2 ± 0.3 V
Signal to nose ratio (BD/DVD/CD-DA) ..............................115 dB or more
Dynamic range
BD/DVD ........................................................................... 105 dB or more
CD-DA ..............................................................................100 dB or more
Harmonic distortion (1 kHz)
BD/DVD ......................................................................... 0.0028 % or less
CD-DA .............................................................................. 0.003 % or less
Frequency response
BD/DVD ............................................ 2 Hz to 22 kHz (48 kHz Sampling)
2 Hz to 44 kHz (96 kHz Sampling)
CD-DA ...............................................................................2 Hz to 20 kHz
Pan Scan (PS 4:3)
A screen size that cuts off the sides of the image to allow
viewing of wide-screen (16:9) material on a connected
4:3 TV.
Subtitles
These are the lines of text appearing at the bottom of the
screen which translate or transcribe the dialog. They are
recorded on many DVD and BD discs.
Top menu
In a BD-Video/DVD-Video, this is the menu for
selecting things like the chapter to be played back and
the subtitle language. In some DVD-Videos, the top
menu may be called the “Title Menu”.
x.v.Color
x.v.Color reproduces a greater range of color than
before, showing almost all of the colors that the human
eye can detect.
■ Input/output
HDMI output.............................................................. Type A connector × 1
Component video output ..............................................Y: 1 Vp-p (75 ohms)
Video output......................................................................1 Vp-p (75 ohms)
Digital output.......................................................... Optical × 1, Coaxial × 1
Analog audio output..................................................................... 7.1 ch × 1,
USB ............................................................................ Type A connector × 2
Other output equipments .............................................Remote IN/OUT × 1,
Specifications are subject to change without notice.
480i/576i/480p/576p/720p/1080i/1080p/1080p@24Hz,
Deep Color, x.v. Color support
P
B, PR: 0.7 Vp-p (75 ohms)
Mixed 2 ch × 1
RS-232C × 1 (for custom installer),
Ethernet × 1
5
ADDITIONAL INFORMATION
41 En
English
Page 46

SPECIFICATIONS
■ Copyright
– Audio-visual material may consist of copyrighted
works which must not be recorded without the
authority of the owner of the copyright. Refer to
relevant laws in your country.
– This item incorporates copy protection technology
that is protected by U.S. patents and other
intellectual property rights of Rovi Corporation.
Reverse engineering and disassembly are prohibited.
– Manufactured under license from Dolby
Laboratories. “Dolby” and the double-D symbol are
trademarks of Dolby Laboratories.
– Manufactured under license under U.S. Patent #’s:
5,451,942; 5,956,674; 5,974,380; 5,978,762;
6,226,616; 6,487,535; 7,212,872; 7,333,929;
7,392,195; 7,272,567 & other U.S. and worldwide
patents issued & pending. DTS and the Symbol are
registered trademarks, & DTS-HD, DTS-HD Master
Audio, and the DTS logos are trademarks of DTS,
Inc. Product includes software. © DTS, Inc. All
Rights Reserved.
– is a trademark.
– “BD-LIVE” logo is a trademark of Blu-ray Disc
Association.
– “BONUSVIEW” is a trademark of Blu-ray Disc
Association.
– is a trademark of DVD Format/Logo
Licensing Corporation.
– HDMI, the HDMI logo and High-Definition
Multimedia Interface are trademarks or registered
trademarks of HDMI Licensing LLC.
– “x.v.Color” and “x.v.Color” logo are trademarks.
– “AVCHD” and the “AVCHD” logo are trademarks
of Panasonic Corporation and Sony Corporation.
– Java and all Java-based trademarks and logos are
trademarks or registered trademarks of Sun
Microsystems, Inc. in the United States and/or other
countries.
– This product is licensed under the AVC patent
portfolio license and VC-1 patent portfolio license
for the personal and non-commercial use of a
consumer to (i) encode video in compliance with the
AVC Standard and VC-1 Standard (“AVC/VC-1
Video”) and/or (ii) decode AVC/VC-1 Video that
was encoded by a consumer engaged in a personal
and non-commercial activity and/or was obtained
from a video provider licensed to provide AVC/VC-
1 Video. No license is granted or shall be implied for
any other use. Additional information may be
obtained from MPEG LA, LLC.
See http://www.mpegla.com.
– Windows Media Player is a registered trademark or
trademark of Microsoft corporation in the United
States and/or other countries.
– DLNA and DLNA CERTIFIED are trademarks and/
or service marks of Digital Living Network Alliance.
– “DivX®, DivX Certified®, DivX Plus™ HD and
associated logos are registered trademarks of DivX,
Inc. and are used under license.”
– “DivX Certified® to play DivX® and DivX Plus™
HD (H.264/.MKV) video up to 1080p HD and
premium content.”
ABOUT DIVX PLUS ™ HD: DivX® is a digital video format created
by DivX, Inc. This is an official DivX Certified® device that plays
DivX video, including DivX Plus™ HD video (H.264/.MKV) up to
1080p and premium content. Visit www.divx.com for more
information and software tools to convert your files into DivX video.
ABOUT DIVX VIDEO-ON-DEMAND: This DivX Certified® device
must be registered in order to play DivX Video-on-Demand (VOD)
content. To generate the registration code, locate the DivX VOD
section in the device setup menu. Go to vod.divx.com with this code to
complete the registration process and learn more about DivX VOD.
42 En
Page 47

Limited Guarantee for European Economic Area (EEA) and Switzerland
Thank you for having chosen a Yamaha product. In the unlikely event that your Yamaha product needs guarantee service, please contact the dealer from
whom it was purchased. If you experience any difficulty, please contact Yamaha representative office in your country. You can find full details on our
website (http://www.yamaha-hifi.com/ or http://www.yamaha-uk.com/ for U.K. resident).
The product is guaranteed to be free from defects in workmanship or materials for a period of two years from the date of the original purchase. Yamaha
undertakes, subject to the conditions listed below, to have the faulty product or any part(s) repaired, or replaced at Yamaha’s discretion, without any charge
for parts or labour. Yamaha reserves the right to replace a product with that of a similar kind and/or value and condition, where a model has been
discontinued or is considered uneconomic to repair.
Conditions
1 The original invoice or sales receipt (showing date of purchase, product code and dealer’s name) MUST accompany the defective product, along with a
statement detailing the fault. In the absence of this clear proof of purchase, Yamaha reserves the right to refuse to provide free of charge service and the
product may be returned at the customer’s expense.
2 The product MUST have been purchased from an AUTHORISED Yamaha dealer within the European Economic Area (EEA) or Switzerland.
3 The product must not have been the subject of any modifications or alterations, unless authorised in writing by Yamaha.
4 The following are excluded from this guarantee:
a. Periodic maintenance and repair or replacement of parts due to normal wear and tear.
b. Damage resulting from:
(1) Repairs performed by the customer himself or by an unauthorised third party.
(2) Inadequate packaging or mishandling, when the product is in transit from the customer. Please note that it is the customer’s responsibility to
ensure the product is adequately packaged when returning the product for repair.
(3) Misuse, including but not limited to (a) failure to use the product for its normal purpose or in accordance with Yamaha’s instructions on the
proper use, maintenance and storage, and (b) installation or use of the product in a manner inconsistent with the technical or safety standards in
force in the country where it is used.
(4) Accidents, lightning, water, fire, improper ventilation, battery leakage or any cause beyond Yamaha’s control.
(5) Defects of the system into which this product is incorporated and/or incompatibility with third party products.
(6) Use of a product imported into the EEA and/or Switzerland, not by Yamaha, where that product does not conform to the technical or safety
standards of the country of use and/or to the standard specification of a product sold by Yamaha in the EEA and/or Switzerland.
5 Where the guarantee differs between the country of purchase and the country of use of the product, the guarantee of the country of use shall apply.
6 Yamaha may not be held responsible for any losses or damages, whether direct, consequential or otherwise, save for the repair or replacement of the
product.
7 Please backup any custom settings or data, as Yamaha may not be held responsible for any alteration or loss to such settings or data.
8 This guarantee does not affect the consumer’s statutory rights under applicable national laws in force or the consumer’s rights against the dealer arising
from their sales/purchase contract.
5
ADDITIONAL INFORMATION
Information for Users on Collection and Disposal of Old Equipment and
Used Batteries
These symbols on the products, packaging, and/or accompanying documents mean that used electrical and
electronic products and batteries should not be mixed with general household waste.
For proper treatment, recovery and recycling of old products and used batteries, please take them to
applicable collection points, in accordance with your national legislation and the Directives 2002/96/EC
and 2006/66/EC.
By disposing of these products and batteries correctly, you will help to save valuable resources and prevent
any potential negative effects on human health and the environment which could otherwise arise from
inappropriate waste handling.
For more information about collection and recycling of old products and batteries, please contact your
local municipality, your waste disposal service or the point of sale where you purchased the items.
[Information on Disposal in other Countries outside the European Union]
These symbols are only valid in the European Union. If you wish to discard these items, please contact
your local authorities or dealer and ask for the correct method of disposal.
Note for the battery symbol (bottom two symbol examples):
This symbol might be used in combination with a chemical symbol. In this case it complies with the
requirement set by the Directive for the chemical involved.
43 En
English
 Loading...