

Page 1

Owner’s Manual
Bedienungsanleitung
Mode d’emploi
Page 2

Congratulations
Thank you for purchasing the Yamaha B1D Divided Pickup Unit.
The B1D Divided Pickup Unit can pick up the vibrations produced by
an electric bass guitar’s strings, and transmit those signals to a Yamaha
Guitar MIDI Converter (G50). When properly installed and adjusted it
can convert almost any steel stringed bass guitar into a controller for a
guitar synthesizer system. It can be used on normal 4-string basses as
well as 5-string, and 6-string basses.
To get the most out of your B1D, please read this owner’s manual
carefully, and follow the installation instructions within, in order to ensure proper operation. Also, keep this manual in a safe place for future
reference.
■ Features
As well as any normal 4-string electric bass, the
unit can also be used on 5-string, and 6-string
basses. A number of installation options are
provided to allow for different guitar shapes, use,
and playing styles. Choose a method that best
suits your bass and playing requirements.
Methods for Attaching the Divided Pickup:
Special Fittings (removable), double-sided
adhesive tape, screw.
Methods for Attaching the Controller:
Velcro fastener, bracket, double-sided
adhesive tape, screw.
• One touch operation allows you to switch
between bass synthesizer sound and bass
guitar sound. Also, the synthesizer’s voice
and bass guitar’s signal can be output
separately or together, offering a wide
variety of sounds for added playing enjoy-
ment.
• Of course, the bass synthesizer’s volume can
be controlled. But you can also control other
functions like octave, parameter values,
program changes (that are transmitted from
the G50’s memory), and G50’s memory
numbers (which can be changed by a value
of +1/-1).
Contents
Precautions ....................................... 2
Nomenclature & Functions................ 3
Parts List ........................................... 4
Before You Install............................... 5
Attaching the Divided Pickup ............ 6
Attaching the Controller................... 11
Connections .................................... 13
G50 Settings ................................... 14
Controller & Switch.......................... 15
Getting the Most Out of Your
B1D & G50 ...................................... 16
Troubleshooting ............................... 17
Specifications .................................. 18
English
1
Page 3

Precautions !! PLEASE READ THIS BEFORE PROCEEDING !!␣
■ Location
Do not expose the B1D to the following conditions to avoid deformation, discoloration, or more
serious damage.
• Direct sunlight (e.g. near a window).
• High temperatures (e.g. near a heat source,
outside, or in a car during the daytime).
• Excessive humidity.
• Excessive dust.
• Strong vibration.
■ Connections
• When connecting the B1D to the Yamaha G50
Guitar MIDI Converter, be sure to use the
specified multi-pin cable (supplied with the
G50 Guitar MIDI Converter).
• Always connect the direct guitar cable (page
4), even if you don’t intend to use the direct
guitar sound. The direct guitar cable is
essential for proper grounding, to minimize
noise and prevent electric shock.
• Always unplug cables by gripping the plug
firmly, not by pulling on the cable.
• Disconnect all cables before moving the
instrument or any connected equipment.
■ Handling and Transport
• Never apply excessive force to the controls,
connectors or other parts of the instrument.
• Physical shocks caused by dropping, bump-
ing, or placing heavy objects on the instru-
ment can result in scratches and more serious
damage.
• Be careful not to damage the B1D controller
when placing the guitar in a case or on a
stand.
■ Cleaning
• Clean the unit with a dry soft cloth.
• A slightly damp cloth may be used to remove
stubborn grime and dirt.
• Never use cleaners such as thinner.
■ Notes on Adhesive Tape
• Depending on the surface of the bass guitar the
finish may peel off or be altered chemically
when the pickup/controller is mounted using
adhesive tape (double-sided). To make sure, it
is recommended that you first try this method
of attachment by applying some tape at a place
on the guitar body which is not visible normally.
• If the pickup must be removed from the base guitar,
always use a fresh layer of double-sided adhesive
tape and/or cushion when reinstalling, as the
adhesive properties of used tape/cushion are reduced
drastically when peeled off the mating surface. Also,
before attaching the adhesive tape or pickup, clean
the mating surface thoroughly, as dust and grease
may cause the pickup to come loose.
■ Service and Modification
• The B1D contains no user serviceable parts.
Opening it or tampering with it in any way can
lead to irreparable damage and possibly electric
shock. Refer all servicing to qualified
YAMAHA personnel.
Yamaha is not responsible for damage caused by improper installation, handling, or operation.
2
Page 4
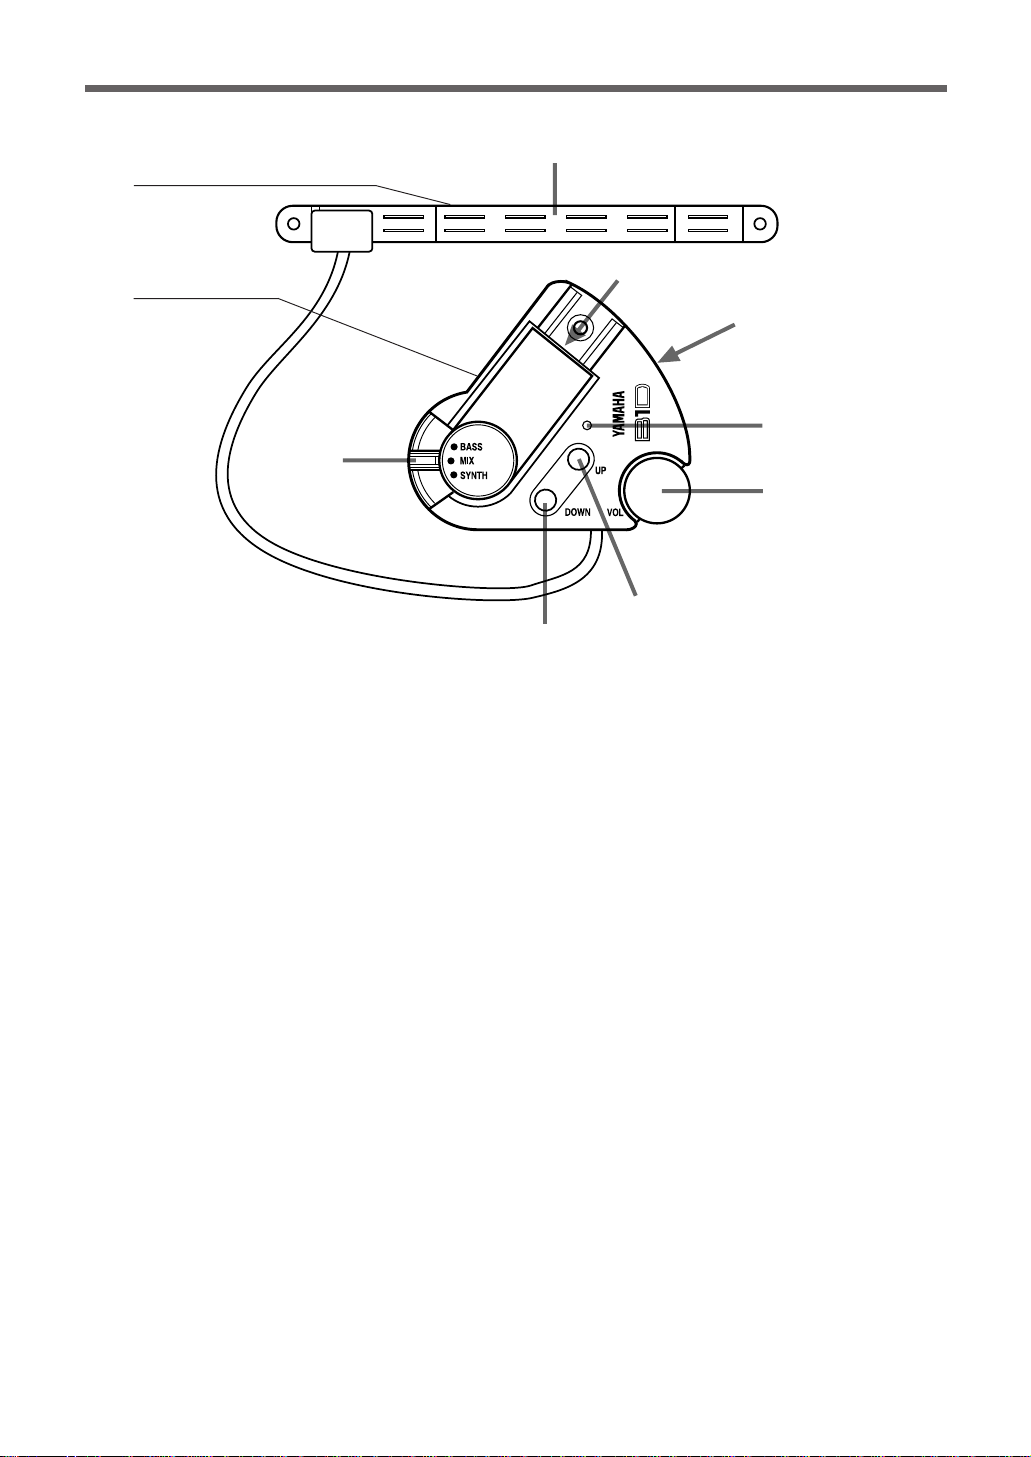
Nomenclature & Functions
Divided Pickup
Controller
y
q Divided Pickup
This magnetic type pickup converts vibrations
from the bass guitar’s individual strings into an
electrical signal.
The pickup is attached to the bass guitar’s body.
→ page 6 “Attaching the Divided Pickup”
w Synth Volume Control
Controls the volume of the synthesizer.
* Does not adjust the volume of the bass guitar.
e Power Indicator
The B1D is receiving power from the G50 Guitar
MIDI Converter when this indicator is lit. The
indicator lights when the B1D is properly connected to the G50 via the 13-pin cable.
q
t
r
e
w
u
i
t B1D Output Jack
The selected signal from the Output Selector is
transmitted to the Guitar MIDI Converter via this
jack.
y Output Selector (BASS/MIX/SYNTH)
Selects the type of output to be delivered via the
13-pin cable connector to the Guitar MIDI Converter.
BASS: Only the direct bass sound (output from
the electric bass pickup) will be heard.
SYNTH: Only the synthesizer sound (output from
the divided pickup) will be heard.
MIX: Both the direct bass guitar signal and the
synthesizer sounds will be heard.
r Direct Bass Guitar Input Jack
This jack allows the B1D to receive the combined
output from the bass guitar’s normal pickups (bass
guitar signal) from the guitar’s output jack. Use the
supplied direct bass guitar signal cable when
making connections.
The bass guitar signal is output from the GUITAR
DIRECT OUT jack of the G50 (→ pg. 13).
u UP Switch
i DOWN Switch
According to settings in the Guitar MIDI Converter, these switches can be used to increase or
decrease the values by 1 for program memory
numbers, parameter values, program change
numbers, octave shift values, etc.
→ Refer to the manual for your Guitar MIDI
Converter for further information.
* G50 owner’s manual: pg. 12
3
Page 5

Parts List
Before you install the B1D, please make sure you have all of the parts listed below.
● B1D Main Unit
(Divided Pickup + Controller)
● Divided Pickup Attachment Parts
• Spacer A (Thickness: 1mm)
............... 10 Pieces
• Pickup Double-Sided Adhesive Tape
............... 16 Pieces
● Direct Bass Guitar Cable ● Clearance Gauge
................. 2 Pieces
• Spacer B (Thickness: 0.3mm)
............... 12 Pieces
• Springs ..... 2 Pieces • Tapping Screws 3x25mm ............. 2
• Pickup Cushion
(Double-Sided Adhesive)
................. 8 Pieces
Used to attach the pickup to the body.
• Small Screws
3x6mm, with washer.................. 2
Used to attach the pickup fittings to the
base plate.
• Base Plate (Right, Left) ....... 1 Set • Double-Sided Adhesive Tape for
• Small Screws
3x6, 3x8, 3x10, 3x12mm .. 2 each
Used to attach the pickup to the pickup
fittings.
Base Plate ..................... 8 Pieces
● Controller Attachment Parts
• Bracket ................. 1
• Tapping Screw
3x16mm ............... 1
Used to attach the controller to the
body.
• Velcro Fastener .... 1 • Suction Cups ................. 3 Pieces
• Controller Cushion
(Double Sided-Adhesive Tape)
................. 6 Pieces
• Plate Tapping Screws
3x10mm, 1 type .............. 2 pieces
Used to attach the base plate to the bass
body.
• Pickup Attachment Fittings
(Right, Left) ..........................1 Set
4
Page 6

Before You Install
■ Installing on the Bass Guitar
Before you install the B1D on your bass
guitar, carefully read the advice provided
below. Select an installation method
which is best suited to your bass guitar
and playing requirements.
● The Bass Guitar
The B1D is a divided pickup designed for use with
steel string electric basses. It can be used with 4string as well as 5- and 6-string basses. If your bass
guitar is one of the types listed below, the B1D will
not function properly with it.
• 8-string basses or other non-standard string
configurations other than 4-, 5-, and 6- string
basses.
• Nylon string or other non-metallic string bass
guitars.
• Basses with extremely wide or narrow string
spacing. Any bass guitar that the strings will not
properly fit over the magnetic pickup (→ refer to
“Specifications” on pg. 18).
• Basses with extremely low string clearance.
Depending upon the manner in which the pickup is
attached, make sure that there is more than1013mm (0.39"-0.51") of clearance.
The divided pickup is specially designed
and adjusted for use on bass guitars with
up to 6-strings, the pickup will not function with 6-string guitars.
The divided pickup should be attached between the
bridge and rear pickup, ideally 10-20mm (0.39"-
0.79") from the bridge. Make sure you have adequate space for proper installation of the pickup.
Make sure your bass’ neck (truss rod) and string
height/intonation (bridge) are properly adjusted
before installing the B1D.
Disconnect the Direct Bass Guitar Signal
cable and the 13-pin cable from the B1D
controller before installation.
●
Select the Method of Installation
Three methods for installing the divided pickup
are listed below.
● Base Plate Installation (Removable)
• Height adjustment is easily performed.
• The divided pickup can easily be removed yet
pickup height adjustment is maintained.
● Double-sided Adhesive Tape
• Reduces the risk of damaging the bass guitar body.
• More time and care must be taken to achieve proper
pickup height.
● Spring and Screw Installation
• Height adjustment is easily performed.
• The pickup can be securely attached to the bass
body.
• It will be necessary to drill holes in the bass
guitar’s body.
Five methods for installing the Controller unit
are listed below.
● V elcro Installation
• Easy removal and replacement.
● Bracket Installation
• Used in conjunction with adhesive tape, the controller can be installed on bodies that are not flat.
• The bracket can also be attached using the bass
guitar’s strap pin. However, some caution must be
used to keep from damaging the strap pin screw.
● Suction Cup Installation
• Easy to remove, replace and transport the unit.
• Easy to attach the controller unit to a bass guitar
with a flat top and a smooth, shiny finish.
● Double-sided Adhesive Tape
• Easy and secure attachment is possible.
● Screw Installation
• Used in conjunction with adhesive tape, the controller can be installed on bodies that are not flat.
• It will be necessary to drill a hole in the bass
guitar body.
* If you use the base plate attachment (remov-
able) for the divided pickup, it is a good idea
to attach the controller with Velcro tape or
suctions cups so it is removable as well.
Installing the Pickup Controller
Due to the divided pickup’s magnetic strength, the
double-sided tape may peel off the bass guitar body if
the point of attachment is weak. Also, the pickup and
controller may be knocked off, if the bass guitar is
subject to strong shock or prolonged use, if an
attachment method other than screw installation is
used. Select a method of attachment according to
installation position, and the strengths of the method
of installation.
5
Page 7

Attaching the Divided Pickup
■ Mark the Installation position
for the divided Pickup.
The divided pickup should be located between the
rear pickup and bridge so that the cable end of the
pickup is oriented toward the lower bass string (the
pickup will not function if it is attached facing the
opposite direction).
The divided pickup is designed for use on basses
with up to 6 strings (6B, 5E, 4A, 3D, 2G, 1C). If the
pickup is to be used on a 4-string bass, align the 4
magnetic yokes, in the center portion of the pickup,
with the strings.
For 5-string basses with a [B, E, A, D, G] tuning,
use the 5 magnetic yokes on the cable end of the
pickup. If the tuning is [E, A, D, G, C] use the 5
magnetic yokes opposite the cable end of the
pickup.
• For 4-string basses (4E, 3A, 2D, 1G)
E A D G
Place the divided pickup on the body and decide
the optimum position for installation.
From the low end string side, slide the divided
pickup under the bass guitar strings. Using the
magnetic attraction of the pickup to the strings,
adjust the position so that each string passes over
its corresponding magnetic yoke.
Adjust the position of the pickup so that it meets the
conditions listed below.
1. Each string must pass over its corresponding
magnet.
The pickup will not function properly if the
string does not properly pass over the magnetic
yoke. Check that the strings pass over the
magnetic yokes, even when bending the strings.
OK
NGOK
• For 5-string basses (5B, 4E, 3A, 2D, 1G)
B E A D G
• For 5-string basses (5E, 4A, 3D, 2G, 1C)
E A D G C
• For 6-string basses (6B, 5E, 4A, 3D, 2G, 1C)
B E A D G C
6
String
Pickup’s Magnetic Yokes
2. The distance between the divided pickup
and the bridge should be about 10-20mm
(0.39"-0.79").
* Make sure the pickup is not in contact with
the bridge.
* The distance can be increased to more than
20mm (0.79") as long as the strings pass over
the magnetic yokes when bending the strings.
Rear Pickup
10-20mm
(0.39"-0.79")
Divided Pickup
Bridge
3. String height should not be widely varied.
Extreme variations in string height will result
in a poor output level for the pickup (The
output level can be somewhat controlled with
the G50’s Gain Setting).
Page 8

Attaching the Divided Pickup
Once the optimum installation position has
been decided, you can prepare to attach the
pickup. However, the distance between the
string and the pickup’s magnetic yoke is extremely important.
Since the height of the pickup’s magnetic yokes
cannot be adjusted individually, the pickup position, the pickup’s overall height, and string height,
can be adjusted to meet the conditions necessary
for optimum string/pickup clearance.
The distance between the top of the pickup’s
magnetic yokes and the bottom of each string
should be about 1-2mm (0.04"-0.08") when each
string is fretted at the highest note on the neck. The
distance between the pickup and the bottom of the
strings can be set to less than 1mm (0.04") as long
as the strings do not touch the pickup when the
bass is played. However, as long as other strings
can be set to a height of 2.0mm (0.08") or less, try
to set the E and B strings between 1.5 (0.06") and
2.0mm (0.08").
Also, the output level for each of the magnetic
pickups is fairly different so after the divided
pickup has been attached make sure you set Input
Gain each strings with the Guitar MIDI Converter.
The chart below lists the optimum string/pickup
distance and G50 Input Gain Settings for average
bass guitars. Use the chart as a reference when
setting up your pickup.
Distance *1 Gain Setting *2
4-string bass G string 1.0mm (0.04") 15
D string 2.0mm (0.08") 30
A string 2.0mm (0.08") 30
E string 1.5mm (0.06") 10
5-string bass G string 1.0mm (0.04") 15
D string 1.0mm (0.04") 15
A string 1.5mm (0.06") 22
E string 2.0mm (0.08") 20
B string 1.0mm (0.04") 6
6-string bass C string 1.0mm (0.04") 15
G string 1.5mm (0.06") 22
D string 1.0mm (0.04") 15
A string 1.0mm (0.04") 15
E string 2.0mm (0.08") 20
B string 2.0mm (0.08") 10
* For 4-string basses
(looking from the bridge side).
Divided Pickup
A string D string
E string
1.5
(0.06")
2.0
"
)
(0.08
Bass guitar body
G string
2.0
(0.08
"
)
1.0 (0.04")
Unit : mm (inch)
Use the supplied clearance gauge (1mm (0.04")
thick) to check pickup clearance. Put two gauges
together to check for a clearance of 2mm (0.08").
Clearance gauge
20mm
1mm (0.04")
(0.08")
■ First, make sure the truss rod and string
height are properly adjusted, then tune the
strings to their normal pitch.
■ Determine the optimum method of attach-
ing the divided pickup.
Refer to the “Select the Method of Installation” section on page 5, and determine the
optimum method of attachment in regards to
the attachment position, materials, type of
body, playing requirements, etc.
■ Use the supplied suction cups to tempo-
rarily attach the Controller to the body so
that it doesn’t get in the way while attaching the Divided Pickup.
*1 The distance between the string and magnetic
yoke when the string is fretted on its highest
note.
*2 The G50’s individual input gain settings (1-50).
7
Page 9

Attaching the Divided Pickup
■ Attach the Divided Pickup
(Removable) Fittings Attachment
The divided pickup can easily be removed yet
pickup height adjustment is still maintained.
1. Apply the base plate’s double-sided adhesive
tape, to the underside of the base plate. (Do not
remove the backing yet.)
2. Fix the Pickup Attachment Fittings to the
Divided Pickup with the screws and springs.
For proper height adjustment, select the best
length screw (6, 8, 10, 12mm).
To start with, loosely fix the pickup with the
6mm screws, and adjust the height after the base
plate is attached to the body.
3. Use the 3x6 screws (with washer) to attach the
pickup attachment fittings to the base plate.
4. With the pickup carefully positioned on the bass
body, mark the position where the base plates
(left/right) will be attached.
5. Remove the backing from the double-sided
adhesive tape on the base plates (left/right).
6. Without letting the adhesive side of the tape
come in contact with the bass body, position the
base plate over the place where it is to be
attached and then lower the base plate onto the
body surface.
* Holding both ends of the pickup, apply light
pressure to attach the pickup to the body.
* If the base plate is to be attached with screws,
remove the pickup and pickup attachment fittings
from the base plate. Drill a 2mm (0.08”, approx).
diameter hole into the bass guitar’s body making
sure that the hole is drilled vertically. Use the plate
tapping screws (3x10mm) to fix the base plate to
the bass guitar body.
7. With the bass properly tuned, use the small
screws to adjust the distance between each of
the strings and their corresponding pickup yoke.
With each string fretted at its highest note on the
neck, check the distance between each string
and its corresponding pickup using the supplied
clearance gauge (→ pg. 7).
* To remove the base plate from the bass guitar’s
body, use a minus screwdriver to gently pry the
base plate from the body, or use a pair of pliers to
lift the base plate from the body. Either way, be
careful not to scratch or damage the bass guitar
body or the base plate while removing the base
plate.
8. Once pickup height has been properly set, adjust
the individual input levels on the Guitar MIDI
Converter (Refer to pg. 14. Also, the Guitar
MIDI Converter manual).
8
The pickup can be removed by loosening the
3x6mm small screws (with washer), and sliding
the pickup attachment fittings out of the base
plate. The next time the pickup is attached to
the base plate, the previously set height
adjustment will be maintained so further
height adjustment will not be necessary.
Small Screw
(3x6 with washer)
Divided Pickup
Base Plate
(Right)
Base Plate (Left)
Small Screw
(3x6/8/10/12)
Step 2
Spring
Pickup
Attachment
Fitting (Left)
Step 1
* If the base plate is in contact with the bass
guitar’s volume knob or, removal and replacement of the divided pickup is hindered, attach
the base plate in the direction shown in the
illustration below.
Remove in the order shown (1→ 2).
Small Screw
(3x6 with washer)
Step 3
Plate Tapping
Screw (3x10)
Base Plate (Left)
Double-Sided
Adhesive Tape for
Base Plate
Volume Knob, etc.
Page 10

Attaching the Divided Pickup
Double-Sided Adhesive Tape Attachment
Use the cushions and spacers to adjust the height
of the pickup, and use the double-sided adhesive
tape to attach the pickup to the bass guitar.
1. Cut in half the spacers (A, B) used to adjust
the pickup’s height.
2. Determine how many spacers and/or cushions
will be needed to attain proper height for the
pickup.
With the backing still in place, stack spacers
A (1mm thick), B (0.3mm thick), and the
cushion underneath both ends of pickup (with
the pickup underneath the strings) until proper
clearance between the strings and magnetic
yokes is achieved (→ pg. 7). Do not remove
the backing from the cushions or spacers
when initially setting up the pickup height.
Initially use spacers A (1mm thick) and the
cushion to gain the approximate height
necessary, then use spacers B (0.3mm thick)
to fine-tune the height of the pickup.
* Before you adjust the pickup height, make sure
that the bass guitar is properly tuned.
* Please note that the cushion/spacer backing
adds about 0.1 millimeter to their thickness, so
take this added thickness into account when
using a number of spacers.
* If the body surface is not flat, use the double-
sided adhesive tape or cushion to attach the
pickup to the bass guitar body so that the
pickup properly adheres to the body.
* If you need to compensate for differences in
height between the low and high strings, cut
the double-sided adhesive tape and cushion
into one-quarter or one-third widths and adjust
the height.
3. Once the number of pieces has been determined, apply the cushions (with double-sided
adhesive) or double-sided adhesive tape to the
bottom of the pickup, then apply one spacer
and check the clearance with the clearance
gauge while the highest note on the neck is
fretted (→ pg. 7). Add spacers one by one,
continually checking the clearance, until the
proper height is attained. Do not remove the
backing from the tape that is used to attach to
the pickup to the bass guitar body until you
are sure that proper height is achieved.
4. Once the proper height is achieved, remove
the backing from the tape used to attach the
pickup to the body. Keeping the exposed tape
from coming into contact with the body, slide
the pickup under the strings. From the high
string side of the bass guitar, slide a minus
driver or similar tool under the strings, to help
support the pickup from the opposite side.
Once the pickup is slid into position, attach
the pickup/spacer assembly to the body.
* Make sure that the bass body is free from dust
and oil which might prevent the adhesive from
sticking to the body.
* Holding both ends of the pickup, apply light
pressure to attach the pickup to the body.
5. Once the pickup is attached and the height
has been adjusted, adjust the input gain levels
on the Guitar MIDI Converter (Refer to pg.
14. Also, the Guitar MIDI Converter manual).
* To remove the divided pickup from the body
without causing damage to the bass body, leave
the spacer attached to the body in place and
gently pry off the second layer spacer.
Cushion or
Double-Sided
Adhesive Tape
Spacer
A or B
Backing
9
Page 11

Attaching the Divided Pickup
Use the following steps if you need to readjust the pickup height.
1. Determine the number of spacers you need
to add or remove.
2. Remove only the pickup from the body.
Without applying any excessive force to
the pickup, carefully pry the pickup from
the spacers by sliding a thin, flat object
under the low string end of the pickup,
and gently lifting the pickup away from
the spacer.
* Bending or twisting the pickup may cause
the coil inside the pickup to snap, resulting
in a damaged pickup. Use caution.
3. Carefully remove the double-sided tape
from the underside of the pickup.
4. Readjust the height as required. If spacers
must be added, remove the double-sided
tape from the existing spacer. If spacers
must be removed, be sure to remove both
the spacer and its double-sided tape.
Screw and Spring Attachment
It will be necessary to drill holes in the bass
guitar body to attach the pickup with screws
and springs.
1. Place the pickup in the position in which it
will be attached, then carefully mark the
centers of the two screw holes at either end of
the pickup on the bass guitar body.
2. Drill the screw holes. Carefully drill a 2mm
(0.08", approx.) diameter hole at both marked
locations. Make sure that the holes are drilled
vertically.
3. Insert the springs into the underside of the
pickup, insert the tapping screws (3x25)
through the screw holes and springs, and
screw the screws in the holes in the body.
4. With the bass properly tuned, adjust the
pickup height by loosening or tightening the
pickup screws. Adjust the clearance while the
highest note on each string is fretted. Pickup
clearance can be checked using the supplied
clearance gauge (→ pg. 7).
5. If proper clearance is achieved, adjust the
input gain levels on the Guitar MIDI Converter (Refer to pg. 14. Also, the Guitar MIDI
Converter manual).
Tapping Screw
3x25
5. Finally, attach fresh double-sided tape or a
cushion to the bottom of the pickup,
remove the backing, carefully attach the
pickup to the uppermost spacer.
6. Re-tune the bass and check the clearance
with the supplied clearance gauge.
7. If proper clearance is achieved, adjust the
input gain levels on the Guitar MIDI
Converter (Refer to pg. 14. Also, the
Guitar MIDI Converter manual).
10
 Loading...