

Page 1
POWERED SPEAKER
HAUT-PARLEUR ALIMENTÉ
AKTIVLAUSPRECHER
ALTAVOZ INTEGRADO
ALTOPARLANTE ATTIVO
ACTIEVE LUIDSPREKER
Owner’s Manual
Mode d’emploi
Bedienungsanleitung
Manual del Usuario
Manuale di Istruzioni
Handleiding
Page 2
IMPORTANT NOTICE FOR THE UNITED KINGDOM
Connecting the Plug and Cord
WARNING: THIS APPARATUS MUST BE EARTHED
IMPORTANT. The wires in this mains lead are coloured in
accordance with the following code:
As the colours of the wires in the mains lead of this apparatus may not
correspond with the coloured markings identifying the terminals in your
plug proceed as follows:
The wire which is coloured GREEN-and-YELLOW must be connected
to the terminal in the plug which is marked by the letter E or by the
safety earth symbol or colored GREEN or GREEN-and-YELLOW.
The wire which is coloured BLUE must be connected to the terminal
which is marked with the letter N or coloured BLACK.
The wire which is coloured BROWN must be connected to the terminal
which is marked with the letter L or coloured RED.
• This applies only to products distributed by Yamaha-Kemble Music (U.K.) Ltd.
GREEN-AND-YELLOW : EARTH
BLUE : NEUTRAL
BROWN : LIVE
The exclamation point within the equilateral
triangle is intended to alert the user to the
presence of important operating and maintenance (servicing) instructions in the literature
accompanying the product.
The lightning flash with arrowhead symbol,
within the equilateral triangle, is intended to
alert the user to the presence of uninsulated
“dangerous voltage” within the product’s
enclosure that may be of sufficient magnitude
to constitute a risk of electrical shock.
2
Page 3

IMPORTANT SAFETY INSTRUCTIONS
INFORMATION RELATING TO PERSONAL INJURY, ELECTRICAL SHOCK,
AND FIRE HAZARD POSSIBILITIES HAS BEEN INCLUDED IN THIS LIST.
WARNING- When using any electrical or electronic product,
basic precautions should always be followed. These precautions
include, but are not limited to, the following:
1. Read all Safety Instructions, Installation Instructions,
Special Message Section items, and any Assembly Instructions
found in this manual BEFORE making any connections, including
connection to the main supply.
2. Do not attempt to service this product beyond that de-
scribed in the user-maintenance instructions. All other servicing
should be referred to qualified service personnel.
3. Main Power Supply Verification: Yamaha products are
manufactured specifically for the supply voltage in the area where
they are to be sold. If you should move, or if any doubt exists
about the supply voltage in your area, please contact your dealer
for supply voltage verification and (if applicable) instructions. The
required supply voltage is printed on the name plate. For name
plate location, please refer to the graphic found in the Special
Message Section of this manual.
4. DANGER-Grounding Instructions: This product must be
grounded and therefore has been equipped with a three pin attachment plug. If this product should malfunction, the ground pin
provides a path of low resistance for electrical current, reducing
the risk of electrical shock. If your wall socket will not accommodate this type plug, contact an electrician to have the outlet replaced in accordance with local electrical codes. Do NOT modify
the plug or change the plug to a different type!
8. This product was NOT designed for use in wet/damp loca-
tions and should not be used near water or exposed to rain. Examples of wet /damp locations are; near a swimming pool, spa, tub,
sink, or wet basement.
9. This product should be used only with the components
supplied or; a cart ,rack, or stand that is recommended by the
manufacturer. If a cart, rack, or stand is used, please observe all
safety markings and instructions that accompany the accessory
product.
10. The power supply cord (plug) should be disconnected from
the outlet when electronic products are to be left unused for extended periods of time. Cords should also be disconnected when
there is a high probability of lightening and/or electrical storm
activity.
11. Care should be taken that objects do not fall and liquids are
not spilled into the enclosure through any openings that may exist.
12. Electrical/electronic products should be serviced by a quali-
fied service person when:
a. The power supply cord has been damaged; or
b. Objects have fallen, been inserted, or liquids have been
spilled into the enclosure through openings; or
c. The product has been exposed to rain; or
d. The product does not operate, exhibits a marked change
in performance; or
e. The product has been dropped, or the enclosure of the
product has been damaged.
5. WARNING: Do not place this product or any other ob-
jects on the power cord or place it in a position where anyone
could walk on, trip over, or roll anything over power or connecting cords of any kind. The use of an extension cord is not recommended! If you must use an extension cord, the minimum wire
size for a 25' cord (or less) is 18 AWG. NOTE: The smaller the
AWG number, the larger the current handling capacity. For longer
extension cords, consult a local electrician.
6. Ventilation: Electronic products, unless specifically de-
signed for enclosed installations, should be placed in locations
that do not interfere with proper ventilation. If instructions for
enclosed installations are not provided, it must be assumed that
unobstructed ventilation is required.
7. Temperature considerations: Electronic products should be
installed in locations that do not seriously contribute to their operating temperature. Placement of this product close to heat sources
such as; radiators, heat registers etc., should be avoided.
PLEASE KEEP THIS MANUAL
92-469-3
13. This product, either alone or in combination with an ampli-
fier and headphones or speaker/s, may be capable of producing
sound levels that could cause permanent hearing loss. DO NOT
operate for a long period of time at a high volume level or at a
level that is uncomfortable. If you experience any hearing loss or
ringing in the ears, you should consult an audiologist.
IMPORTANT: The louder the sound, the shorter the time period
before damage occurs.
14. Some Yamaha products may have benches and/or acces-
sory mounting fixtures that are either supplied as a part of the
product or as optional accessories. Some of these items are designed to be dealer assembled or installed. Please make sure that
benches are stable and any optional fixtures (where applicable) are
well secured BEFORE using. Benches supplied by Yamaha are
designed for seating only. No other uses are recommended.
3
Page 4

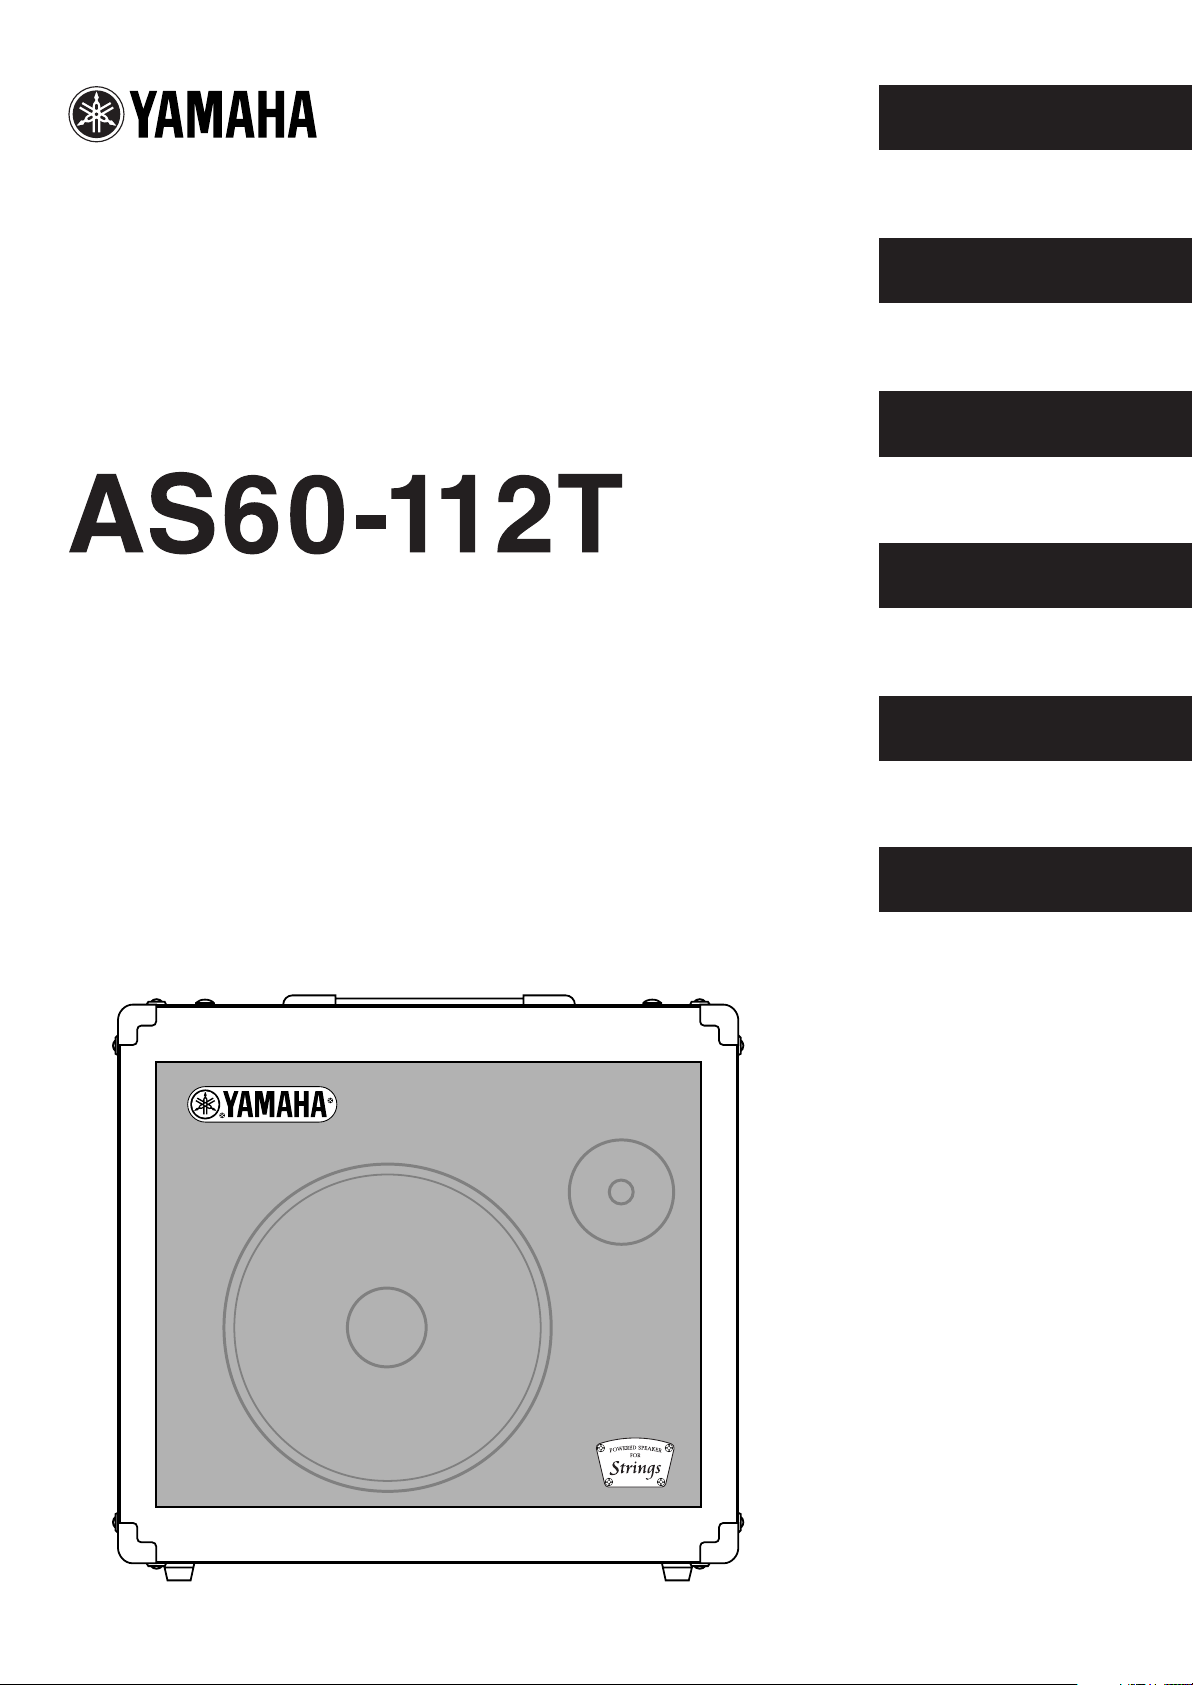
Thank you for purchasing a Yamaha AS60-112T Powered Speaker.
Designed for use with the Yamaha Silent String Instruments, the AS60-112T is equipped
with a built-in 60-watt power amplifier which powers a 30cm speaker and dome tweeter.
Thorough consideration was given to frequency range, characteristics and resonance
when designing the AS60-112T to deliver maximum expression from string instruments like the Silent Violin, Viola, and Cello. When used in combination with the
Yamaha AG-Stomp, you can make a creative sound system that delivers tremendous
potential from the string instruments. The AS60-112T is also equipped with a LINE
OUT jack, which allows you to connect multiple AS60-112Ts to create 120-watt or
180-watt high power systems.
To get the best results and longest life out of your AS60-112T, we recommend that you
carefully read this manual, and keep it in a safe place for future reference.
Specifications
Output Power 60 Wrms
Speakers 30 cm x 1, Dome Tweeter x 1
Controller/Switch VOLUME, TREBLE, MIDDLE, BASS, EQ ON/OFF, POWER
Connection Jacks INPUT : Standard Phone Mono Jack
LINE OUT : Standard Phone Mono Jack
Input Level/Impedance INPUT : 0 dBm / 100 kΩ
Output Level/Impedance LINE OUT : 0 dBm / 1 kΩ
Power Requirements U.S. and Canadian models : 120 V, 60 Hz
General model : 230 V, 50 Hz
Power Consumption 70 W
Dimensions (W x H x D) 513 x 491 x 291 mm (20.2” x 19.3” x 101.5”)
Weight 15.0 kg (33 lbs 1 oz)
* Specifications and external appearance are subject to change without notice.
4
Page 5

Precautions
● Avoid using your amplifier in the following locations to prevent
possible damage:
• In direct sunlight or next to heating equipment.
• Extremely cold or hot locations.
• Locations exposed to high humidity or excessive dust.
• Locations subject to strong shocks or vibration.
● Before making any connections, make sure that the power on the
amplifier and any external devices is switched OFF.
● To protect the speaker from possible damage, always set the
VOLUME knob to “0” before switching the power ON/OFF.
● When connecting a speaker to this unit make sure to turn OFF the
power first.
● Do not apply excessive force to the switches and controls.
● Your Yamaha powered speaker is a precision musical instrument.
Handle it with care and avoid dropping or bumping it.
● Operating temperatures will rise during use. Make sure the ampli-
fier is used in a well-ventilated area. The AS60-112T should be
placed in a position were there is at least 30cm (12”) clearance
from the wall on the sides, top and back of the amplifier.
● For safety, always remove the power plug from the AC wall outlet
if there is any danger of lightning striking in your area.
● Keep the amplifier away from neon signs or fluorescent lighting to
prevent noise pickup.
● To prevent damage and possibly electrical shock, never open the
case and tamper with the internal circuitry.
● Never use benzene, thinner or other volatile liquids for cleaning, as
these chemicals may cause damage or discoloration to the finish.
Always use a dry, soft cloth to wipe off dust and dirt.
Nomenclature
■ Control Panel
q w e r t y
q INPUT Jack (INPUT)
This is the AS60-112T’s INPUT jack.
Connect the instrument or the output from an external device to this
jack.
When using the Silent Violin, Viola, or Cello, use a standard monaural
plug cable to connect the LINE OUT jack on the instrument to this jack.
* Before making any connections, make sure that the power switch is set to
OFF.
w Volume Control (VOLUME)
Controls the volume of the speaker.
e Equalizer Switch (EQ ON/OFF)
This is the ON/OFF switch for the equalizer circuit (TREBLE, MIDDLE,
BASS). Set to ON (>), the equalizer circuit is active and the three knobs
r can be used to adjust their respective frequencies. Set the switch to
OFF (?) if you want to produce only the direct sound created by the
instrument or external device, with no additional alteration.
r Equalizer Controls (TREBLE, MIDDLE, BASS)
Controls the level of their respective frequencies. TREBLE (high frequencies), MIDDLE (middle frequencies), BASS (low frequencies). When
set to “0”, the tone will be flat, rotate the knob to the left (minus) to cut
the frequency, and rotate to the right (plus) to boost the frequency.
t Expansion Output Jack (LINE OUT)
The signal received via the INPUT jack is transmitted from this jack although with its impedance converted (the signal also bypasses the equalizer circuit). When adding another powered speaker unit, such as another AS60-112T, connect the additional unit to this jack.
y Power Switch & Lamp (POWER)
This is the AS60-112T’s power switch. When the switch is depressed,
the lamp next to the switch will light.
* To protect the speaker from damage, always make sure that the Volume
Control w is set to “0” before the power is switched ON/OFF.
5
Page 6
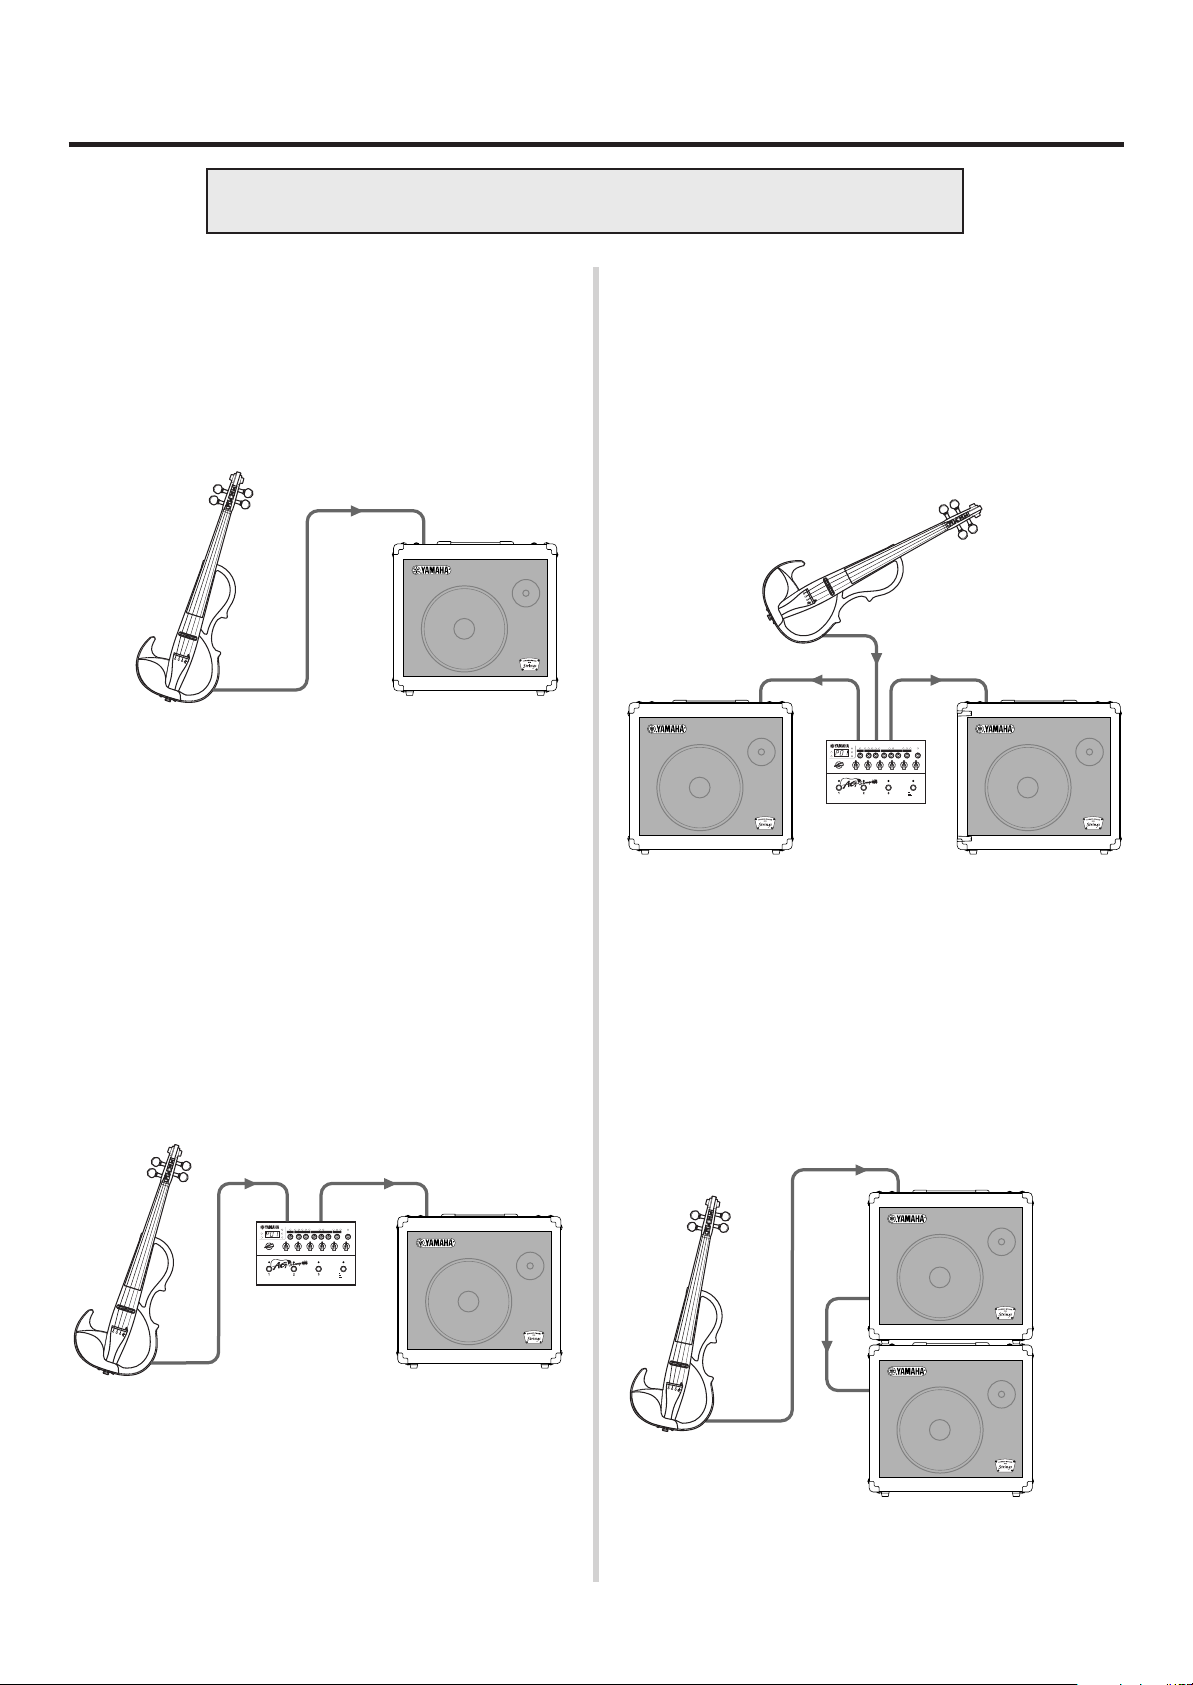
How to use the AS60-112T
AS60-112T
INPUT
LINE OUT
AS60-112T
INPUT
INPUT
LINE OUT
LINE OUT
AS60-112T
OUTPUT
L/MONO
AS60-112T
AG-Stomp
INPUT
INPUT
LINE OUT
OUTPUT
R
OUTPUT
L/MONO
AS60-112T
AG-Stomp
INPUTINPUT
LINE OUT
AS60-112T
Before making any connections, make sure that the power is
switched OFF on the AS60-112T and all other devices.
■ Connecting a Silent Violin/Viola/Cello
Use a standard monaural plug cable to connect the LINE OUT jack on
the Yamaha Silent String Instrument (Silent Violin, Silent Viola, Silent
Cello) to the INPUT jack on the AS60-112T to create a 60W amplifier
system.
* If the sound is distorted, adjust the volume on the instrument.
Silent Violin
Silent Viola
Silent Cello
■ Connecting an AG-Stomp* (Monaural)
* sold separately
The Yamaha AG-Stomp is a guitar pre-amplifier system with built-in effects.
Use a standard monaural plug cable to connect the LINE OUT jack on
the Yamaha Silent String Instrument to the INPUT jack on the AG-Stomp.
Next, use another standard monaural plug cable to connect the OUTPUT L/MONO jack on the AG-Stomp to the INPUT jack on the AS60112T. In this setup you can use the AG-Stomp to add effects such as
Chorus, Reverb, etc. to the string instrument, or to prevent feedback
during performance.
■ Connecting an AG-Stomp* (Stereo)
* sold separately
Since the AG-Stomp is equipped with stereo outputs, you can set up a
stereo amplifier system by connecting one AS60-112T to the AG-Stomp’s
OUTPUT L/MONO jack, and another AS60-112T to the OUTPUT R jack.
This setup delivers greater expansiveness from effects like Stereo Chorus, etc.
All connections should be made using standard monaural plug cables.
L Side R Side
■ Connecting Multiple AS60-112Ts
Connect the LINE OUT jack on one AS60-112T to the INPUT jack on
another AS60-112T to create a high power 120W amplifier system. You
can increase the amount of power by connecting a third or fourth unit to
the system in the same manner.
6
Page 7
HAUT-PARLEUR ALIMENTÉ
Nous vous remercions d’avoir choisi le haut-parleur alimenté Yamaha AS60-112T.
Conçu pour être utilisé avec les instruments à cordes de la série Silent Yamaha, le
haut-parleur AS60-112T est équipé d'un amplificateur d'alimentation de 60 watts
incorporé capable d'alimenter un haut-parleur de 30cm et un haut-parleur aigu en
dôme. Une considération minutieuse a été réservée à la gamme de fréquences, aux
caractéristiques et à la résonance lors de la conception du AS60-112T afin qu'il puisse
délivrer une expression maximale des instruments à cordes tels que les instruments
Silent Violin, Silent Viola, Silent Cello. Quand il est utilisé en combinaison avec le
Yamaha AG-Stomp vous pouvez créer une sonorisation créative délivrant d'incroyables possibilités des instruments à cordes. Le haut-parleur AS60-112T est également
équipé d'une prise de sortie LINE OUT qui vous permet de raccorder plusieurs AS60112T à votre système et créer ainsi des systèmes à grande puissance de 120 watts
voire de 180 watts.
Pour avoir la certitude d’obtenir les meilleurs résultats possibles et d’assurer à votre
AS60-112T une longévité optimale, nous vous recommandons de lire attentivement
ce mode d’emploi et par ailleurs, de le conserver dans un endroit sûr à des fins de
consultation ultérieure.
Fiche technique
Puissance de sortie 60 watts efficaces
Haut-parleur 30 cm: 1, Haut-parleur aigu en dôme: 1
Contrôleur / Commutateurs VOLUME, TREBLE, MIDDLE, BASS, EQ ON/OFF, POWER
Prises de raccordement INPUT : prises de téléphone standard mono
LINE OUT : prises de téléphone standard mono
Niveau d’entrée / d’impédance INPUT : 0 dBm / 100 k-ohms
Niveau de sortie / d’impédance LINE OUT : 0 dBm / 1 k-ohms
Conditions d’alimentation Modèles pour les États-Unis et le Canada : 120 V, 60 Hz
Modèle général : 230 V, 50 Hz
Puissance consommée 70 W
Encombrement 513 (largeur) x 491 (hauteur) x 291 (profondeur) mm
Poids 15,0 kg
* Sous réserve de modification des renseignements techniques et de l’aspect extérieur sans préavis.
7
Page 8

Précautions d’usage
● Pour éviter tout risque d’endommagement de votre amplificateur,
évitez de vous en servir dans les endroits mentionnés ci-dessous :
• En plein soleil ou près d’un appareil de chauffage.
• Dans les lieux à température extrême, basse comme élevée.
• Dans les lieux à très forte humidité ou excessivement poussérieux.
• Dans les lieux soumis à des chocs violents ou de fortes vibra-
tions.
● Avant d’effectuer le moindre branchement, vérifiez que l’alimentation du AS60-112T et de tous les appareils extérieurs est bien
coupée.
● Par mesure de précaution et de façon à ne pas endommager les
haut-parleurs, positionnez toujours le potentiomètre de réglage de
niveau de sortie VOLUME sur “0” avant de mettre l’appareil sous
tension ou de l’arrêter.
● N’oubliez pas de couper l’alimentation de l’amplificateur au préalable avant de raccorder un haut-parleur.
● Ne forcez jamais sur les commutateurs et les commandes de
réglage.
● Votre haut-parleur alimenté Yamaha est un instrument musical de
haute précision. Vous devez le manipuler délicatement et surtout
éviter de le buter voire de le laisser tomber par terre.
● Notez que la température des appareils croît au fur et à mesure de
leur utilisation. Par conséquent, vous devez vous assurer que
l’amplificateur est utilisé dans un endroit bien aéré. Le AS60-112T
doit être disposé de telle sorte qu’un espace d’au moins 30 cm soit
aménagé entre le mur et l’appareil, autant sur les côtés, au-dessus
que derrière l’amplificateur.
● Par mesure de sécurité, premez toujours la précaution de débrancher la prise d’alimentation secteur de la prise murale utilisée pour
l’alimentation si la foudre risque de tomber dans la région où vous
utilisez votre instrument.
● Éloignez l’amplificateur des enseignes lumineuses au néon ou des
dispositifs d’éclairage à lampes fluorescentes afin de ne pas recueillir de parasites.
● Pour éviter tout risque d’endommagement voire d’électrocution,
n’ouvrez jamais le coffret ni ne modifiez les circuits internes.
● N’utilisez jamais de benzène, diluant chimique ou autres produits
volatiles pour effectuer l’entretien de l’appareil car ceci aurait pour
effet de l’endommager voire de provoquer une décoloration de la
finition extérieure. L’accumulation de poussière et les taches doivent être retirées de l’appareil avec un morceau d’étoffe sec et
souple.
Nomenclature
■ Panneau de commande
q w e r t y
q Prise jack d’entrée INPUT (INPUT)
Il s'agit ici de la prise d'entrée INPUT du AS60-112T.
Raccordez l'instrument ou la sortie provenant d'un appareil externe à
cette prise.
Quand vous utilisez les instruments Silent Violin, Silent Viola, Silent Cello,
utilisez un câble à prise monaurale standard pour raccorder la prise
LINE OUT de l'instrument à cette prise.
* N’oubliez pas de placer l’interrupteur d’alimentation en position OFF avant
de faire des branchements.
w Potentiomètre de réglage de volume (VOLUME)
Permet d’ajuster le volume du haut-parleur.
e Commutateur de correction (EQ ON/OFF)
Il s’agit du commutateur marche-arrêt du circuit de correction (TREBLE,
MIDDLE, BASS). Enclenché en position ON (>), le circuit de correction est activé de sorte que les trois potentiomètres de réglage r adjacents peuvent être utilisés pour ajuster les fréquences respectives.
Positionnez le commutateur sur désactivé (OFF) (?) si vous voulez
reproduire uniquement le son direct créé par l'instrument ou par un appareil externe, sans y apporter de modification supplémentaire.
8
r Commandes de correction de tonalité
(TREBLE, MIDDLE, BASS)
Ils permettent d’ajuster le niveau de leurs fréquences respectives.
TREBLE (pour les fréquences élevées), MIDDLE (pour les fréquences
intermédiaires) et BASS (pour les basses fréquences). Le positionnement
des potentiomètres de réglage sur “0” produit un son linéaire, une rotation du potentiomètre vers la gauche (dans le sens de la réduction) coupe
les fréquences et une rotation du potentiomètre vers la droite (dans le
sens de l’accroissement) amplifie les fréquences.
t Prise de sortie d’expansion (LINE OUT)
Les signaux reçus par l’intermédiaire de la prise INPUT sont transmis
par cette prise jack bien que son impédance soit convertie (le signal
passe en dérivation du circuit de correction). Si un autre haut-parleur
est ajouté au système tel qu’un autre haut-parleur AS60-112T, le hautparleur supplémentaire doit être raccordé à cette prise.
y Interrupteur d’alimentation et témoin (POWER)
Il s'agit ici de l’interrupteur d’alimentation du AS60-112T. Lorsque l’interrupteur est enfoncé, le témoin placé près de l’interrupteur s’allume.
* Par mesure de précaution et de façon à ne pas endommager les haut-
parleurs, positionnez toujours le potentiomètre de réglage volume w sur
“0” avant de mettre l’appareil sous tension ou de l’arrêter.
Page 9

Comment utiliser le AS60-112T
AS60-112T
INPUT
LINE OUT
AS60-112T
INPUT
INPUT
LINE OUT
LINE OUT
AS60-112T
OUTPUT
L/MONO
AS60-112T
AG-Stomp
INPUT
INPUT
LINE OUT
OUTPUT
R
OUTPUT
L/MONO
AS60-112T
AG-Stomp
INPUTINPUT
LINE OUT
AS60-112T
Avant d'effectuer le moindre raccordement, assurez-vous que l'ali-
mentation du AS60-112T et de tous les autres appareils est coupée.
■ Raccordement d'un Silent Violin, Viola ou Cello
Utilisez un câble à prise monaurale standard pour raccorder la prise
LINE OUT de l'instrument à cordes Yamaha Silent (Silent Violin, Silent
Viola, Silent Cello) à la prise INPUT du AS60-112T de manière à constituer un système amplificateur de 60 W.
* Si le son est déformé, réglez le volume sur l'instrument.
Silent Violin
Silent Viola
Silent Cello
■ Raccordement d'un AG-Stomp* (monaural)
* Vendu séparément
Le Yamaha AG-Stomp est un système préamplificateur de guitare à effets incorporés.
Utilisez un câble à prise monaurale standard pour raccorder la prise
LINE OUT de l'instrument à cordes Yamaha Silent à la prise INPUT du
AG-Stomp. Ensuite, utilisez un autre câble à prise monaurale standard
pour raccorder la prise OUTPUT L/MONO du AG-Stomp à la prise INPUT
du AS60-112T. Avec cette configuration, vous pouvez utiliser le AG-Stomp
pour ajouter des effets tels que les effets de Chorus, Reverb, etc., à
l'instrument à cordes ou pour empêcher qu'un effet de Larsen se produise pendant l'interprétation.
■
Raccordement d'un AG-Stomp* (stéréo)
* Vendu séparément
Étant donné que le AG-Stomp est équipé de prises de sortie stéréo,
vous pouvez constituer un système amplificateur stéréo en raccordant
un AS60-112T à la prise OUTPUT L/MONO du AG-Stomp et un autre
AS60-112T à la prise de sortie OUTPUT R. Cette configuration offre une
plus grande capacité d'expansion des effets tels que Chorus Stereo,
etc.
Tous les branchements doivent être faits en utilisant des câbles à prise
monaurale standard.
Côté gauche Côté droit
■
Raccordement de plusieurs AS60-112T
Raccordez la prise LINE OUT d'un AS60-112T à la prise INPUT d'un
autre AS60-112T pour constituer un système amplificateur à grande puissance de 120 W. Vous pouvez augmenter la capacité de puissance en
raccordant un troisième ou un quatrième haut-parleur au système en
procédant de la même manière.
9
Page 10

AKTIVLAUTSPRECHER
Zunächst einmal vielen Dank für den Kauf des Aktivlautsprechers AS60-112T von Yamaha.
Der AS60-112T, der speziell für den Einsatz mit Yamahas Silent String-Instrumenten
entwickelt wurde, verfügt über eine eingebaute 60-Watt-Endstufe, die einen 30-cm-Lautsprecher und einen Kalottenhochtöner ansteuert. Bei der Entwicklung des AS60-112T
wurden Faktoren wie Kennlinie, Frequenzumfang und Resonanz besonders berücksichtigt, damit der Ton von Saiteninstrumenten wie Silent Violin, Silent Viola und Silent Cello
mit maximaler Expression wiedergegeben wird. Bei Kombination mit dem Yamaha AGStomp erhalten Sie ein kreatives Sound-System, das den Saiteninstrumenten ein beeindruckendes Potential verleiht. Der AS60-112T verfügt darüber hinaus auch über eine
LINE OUT-Buchse, über die mehrere AS60-112T zur Einrichtung leistungsstarker
Beschallungssysteme mit 120 oder 180 Watt zusammengeschaltet werden können.
Damit Sie das Leistungspotential voll nutzen können und lange Freude an Ihrem AS60112T haben, empfehlen wir Ihnen, diese Bedienungsanleitung gut durchzulesen und danach an einem sicheren Platz aufzubewahren.
Technische Daten
Ausgangsleistung 60 W
Lautsprecher 30 cm x 1, Kalottenhochtöner x 1
Regler/Schalter VOLUME, TREBLE, MIDDLE, BASS, EQ ON/OFF, POWER
Buchsen INPUT : Standard-Mono-Klinkenbuchsen
LINE OUT : Standard-Mono-Klinkenbuchsen
Eingangspegel/-impedanz INPUT : 0 dBm / 100 kΩ
Ausgangspegel/-impedanz LINE OUT : 0 dBm / 1 kΩ
Netzanschlußwerte Modelle für USA und Kanada: 120 V, 60 Hz
Allgemeines Modell: 230 V, 50 Hz
Leistungsaufnahme 70 W
Abmessungen (B x H x T) 513 x 491 x 291 mm
Gewicht 15,0 kg
10
* Änderungen der technischen Daten und des äußeren Erscheinungsbilds ohne Vorankündigung vorbehalten.
Page 11

Vorsichtsmaßregeln
● Vermeiden Sie den Gebrauch des Verstärkers an folgenden Orten,
um eine mögliche Beschädigung zu vermeiden:
• In direkter Sonnenbestrahlung oder neben einem Heizkörper.
• An extrem kalten oder heißen Orten.
• An Orten, wo das Gerät hoher Feuchtigkeit oder übermäßiger
Staubeinwirkung ausgesetzt ist.
• An Orten, wo das Gerät starken Erschütterungen oder Vibrationen
ausgesetzt ist.
● Bevor Sie irgendwelche Anschlüsse machen, sollten Sie sich stets
vergewissern, der AS60-112T sowie alle externen Geräte
AUSgeschaltet sind.
● Zum Schutz der Lautsprecher vor möglichen Schäden stellen Sie
den VOLUME-Regler auf “0”, bevor Sie das Gerät ein- oder aus-
schalten.
● Schalten Sie das Gerät vor dem Anschluß eines Lautsprechers
AUS.
● Wenden Sie beim Betätigen der Schalter und Regler nicht zu viel
Kraft auf.
● Bei Ihrem Aktivlautsprecher handelt es sich um ein Präzisions-
gerät. Behandeln Sie ihn mit entsprechender Umsicht, damit er
nicht angestoßen oder durch einen Fall beschädigt wird.
● Der Verstärker erwärmt sich beim Betrieb. Achten Sie darauf, daß
das Gerät an einem gut belüfteten Platz steht. Der AS60-112T
sollte so aufgestellt werden, daß neben, vor und hinter dem Ver-
stärker jeweils mindestens 30 cm Freiraum verbleibt.
● Ziehen Sie zur Sicherheit stets den Netzstecker aus der Steckdose,
wenn ein Gewitter aufzieht.
● Achten Sie bei Gebrauch auf ausreichenden Abstand zu
Leuchtreklametafeln oder Leuchtstofflampen, um unerwünschte
Rauscheinstreuungen zu vermeiden.
● Um eine Beschädigung und einen möglichen elektrischen Schlag
zu vermeiden, öffnen Sie bitte niemals das Gehäuse und vermei-
den ein Berühren der internen Schaltungen.
● Verwenden Sie zum Reinigen des Geräts niemals Benzin, Verdünner
oder andere flüchtige Flüssigkeiten, da solche Chemikalien die
Gehäuseoberfläche angreifen und verfärben können. Wischen Sie
Staub und Schmutz mit einem trockenen, weichen Lappen ab.
Teilebezeichnungen
■ Bedienfeld
q w e r t y
q Eingangsbuchse (INPUT)
Dies ist der Signaleingang des AS60-112T.
Schließen Sie hier das Instrument an, oder verbinden Sie die Buchse
mit dem Signalausgang eines externen Geräts.
Zum Anschließen des Silent Violin, Silent Viola oder Silent Cello verwenden Sie ein handelsübliches Monokabel und verbinden die LINE
OUT-Buchse des Instruments mit dieser Buchse.
* Vergewissern Sie sich vor dem Herstellen von Verbindungen davon, daß
der POWER-Schalter ausgeschaltet ist (OFF).
w Lautstärkeregler (VOLUME)
Mit diesem Regler stellen Sie die Lautstärke des Lautsprechers ein.
e Equalizer-Schalter (EQ ON/OFF)
Dies ist der Ein/Aus-Schalter für die Equalizer- bzw. Klangschaltung
(TREBLE, MIDDLE, BASS). Wenn der Schalter auf ON (>) steht, ist
die Equalizer-Schaltung aktiv, und Sie können mit den drei Reglern r
die betreffenden Frequenzen verstärken oder abdämpfen. Stellen Sie
den Schalter auf OFF (?), wenn der Klang des Instruments bzw. externen
Geräts direkt, d. h. ohne Equalizer-Beeinflussung, wiedergegeben werden soll.
r Equalizer-Regler (TREBLE, MIDDLE, BASS)
Mit diesen Reglern können die Pegel der zugehörigen Frequenzbereiche
gehoben bzw. gesenkt werden: TREBLE (Höhen), MIDDLE (Mitten),
BASS (Tiefen). Bei Einstellung auf “0” ist der Frequenzverlauf “linear”
(unbeeinflußt), und beim Verstellen nach links (Minus) wird die Frequenz
gedämpft, beim Verstellen nach rechts (Plus) verstärkt.
t Ausgangsbuchse für Systemerweiterung
(LINE OUT)
Das über die INPUT-Buchse eingegebene Signal liegt an dieser Buchse
mit umgewandelter Impedanz an (dieses Signal umgeht außerdem die
Equalizer-Schaltung). Falls das System durch einen weiteren Aktivlautsprecher (z. B. einen zweiten AS60-112T)erweitert werden soll, schließen Sie diesen an diese Buchse an.
y Netzschalter (POWER) mit Anzeigelampe
Mit diesem Schalter wird der AS60-112T ein- und ausgeschaltet. Bei
eingeschaltetem Lautsprecher leuchtet die Anzeigelampe neben dem
Schalter zur Bestätigung.
* Vergewissern Sie sich vor dem Einschalten davon, daß der VOLUME-Regler
w
auf “0” steht, um eine Beschädigung des Lautsprechers zu vermeiden.
11
Page 12

Verwendung des AS60-112T
AS60-112T
INPUT
LINE OUT
AS60-112T
INPUT
INPUT
LINE OUT
LINE OUT
AS60-112T
OUTPUT
L/MONO
AS60-112T
AG-Stomp
INPUT
INPUT
LINE OUT
OUTPUT
R
OUTPUT
L/MONO
AS60-112T
AG-Stomp
INPUTINPUT
LINE OUT
AS60-112T
Bevor Sie irgendwelche Anschlüsse machen, sollten Sie sich stets verge-
wissern, daß der DS60-112 sowie alle externen Geräte AUSgeschaltet sind.
■ Anschluß eines Silent Violin/Silent Viola/Silent Cello
Verbinden Sie die LINE OUT-Buchse am Yamaha Silent String-Instrument (Silent Violin, Silent Viola, Silent Cello) über ein gewöhnliches
Monokabel mit der INPUT-Buchse des AS60-112T. Sie verfügen nun
über ein System mit 60 W Beschallungsleistung.
* Falls Klangverzerrungen auftreten, regeln Sie die Lautstärke am Instru-
ment ein.
Silent Violin
Silent Viola
Silent Cello
■ Anschluß eines AG-Stomp* (Stereo-Konfiguration)
* separat erhältlich
Da der AG-Stomp über Stereo-Ausgangsbuchsen verfügt, können Sie
auch ein Stereo-Verstärkersystem konfigurieren, indem Sie zwei AS60112T an den AG-Stomp anschließen: einen an die OUTPUT L/MONOBuchse und den anderen an die OUTPUT R-Buchse. Diese Konfiguration
verleiht Effekten wie Stereo Chorus u. dgl. mehr Räumlichkeit.
Alle Verbindungen werden mit gewöhnlichen Monokabeln hergestellt.
■ Anschluß eines AG-Stomp* (Mono-Konfiguration)
* separat erhältlich
Der Yamaha AG-Stomp ist ein Gitarrenvorverstärker mit eingebauten
Effekten.
Verbinden Sie die LINE OUT-Buchse am Yamaha Silent String-Instrument (Silent Violin, Silent Viola, Silent Cello) über ein gewöhnliches
Monokabel mit der INPUT-Buchse des AG-Stomp. Danach verbinden
Sie die OUTPUT L/MONO-Buchse am AG-Stomp mit der INPUT-Buchse
des AS60-112T. Bei dieser Konfiguration können Sie den Klang des Instruments mit Effekten wie Chorus, Reverb usw. bearbeiten oder beim
Spielen Feedback unterdrücken.
L-Seite R-Seite
■
Reihenschaltung mehrerer AS60-112T
Wenn Sie die LINE OUT-Buchse eines weiteren AS60-112T mit der
INPUT-Buchse des ersten AS60-112T verbinden, erhalten Sie ein
Hochleistungs-Verstärkersystem (120 W). Sie können die Leistung weiter ausbauen, indem Sie auf dieselbe Weise einen dritten oder vierten
AS60-112T anschließen.
12
Page 13

ALTAVOZ INTEGRADO
Muchas gracias por la adquisición de un altavoz integrado Yamaha AS60-112T.
El altavoz integrado AS60-112T está provisto de un amplificador incorporado de 60
vatios y de un altavoz Celestion de 30 cm. Si se conecta un AG-Stomp, un AG-100 u
otro preamplificador al AS60-112T se crea un sistema de amplificador para guitarra
de 60 vatios. Si se añade un AS60-112T a un AG60FX-112 se crea un sistema de
amplificador de guitarra estéreo. La toma SLAVE OUT le permitirá conectar otro (o
varios) AS60-112T para poder crear un sistema de 120 W o de 180 W. El AS60-112T
también podrá utilizarse para actualizar sistemas existentes de amplificadores de
guitarra.
Para obtener los mejores resultados y muchos años de servicio del AS60-112T, le
recomendamos que lea atentamente ese manual y que lo guarde en un lugar seguro
para poderlo consultar en el futuro.
Especificaciones
Potencia de salida 60 W rms
Altavoz 30 cm x 1, Altavoz de graves de domo x 1
Controlador/conmutador VOLUME, TREBLE, MIDDLE, BASS, EQ ON/OFF, POWER
Tomas de conexión INPUT : Toma telefónica monofónica estándar
LINE OUT : Toma telefónica monofónica estándar
Nivel de Entrada / Impedancia INPUT : 0 dBm / 100 k ohmios
Nivel de Salida / Impedancia LINE OUT : 0 dBm / 1 k ohmios
Fuente de Alimentación Modelos de EE.UU. y Canadá: 120V, 60Hz
Modelo General: 230V, 50Hz
Consumo 70 W
Dimensiones 513 (anch) x 491 (Alt) x 291 (Prof) mm
Peso 15,0 kg
* Las especificaciones y el diseño están sujetos a cambios sin previo aviso.
13
Page 14

Precauciones
● Evite utilizar el amplificador en los siguientes lugares para evitar
posibles averías:
• Bajo la luz directa del sol o junto a equipos de calefacción.
• Sitios extremadamente fríos o cálidos.
• Sitios expuestos a mucha humedad o excesivo polvo.
• Sitios sujetos a fuertes vibraciones o sacudidas.
● Antes de realizar cualquier conexión, asegúrese de que la alimen-
tación del AS60-112T y de cualquier dispositivo externo haya sido
desconectada.
● Para proteger el altavoz de posibles daños, ajuste siempre el
mando VOLUME a la posición “0” antes de encender o apagar la
alimentación.
● Al conectar un altavoz a esta unidad, primero debe desconectar la
alimentación.
● No emplee demasiada fuerza con los conmutadores y controles.
● Su altavoz integrado para guitarra Yamaha es un instrumento de
precisión. Trátelo con cuidado y evite que se caiga o reciba golpes.
● La temperatura del amplificador se elevará cuando esté en funcionamiento. Compruebe que se encuentra en una zona bien ventilada. El AS60-112T deberá situarse de manera que sus paneles
laterales, posterior y superior queden como mínimo a 30 cm de la
pared.
● Por motivos de seguridad, retire siempre el enchufe de la toma de
red general de c.a. si hubiera peligro de rayos en su zona.
● Mantenga el amplificador alejado de carteles luminosos o luces
fluorescentes a fin de evitar que recoja ruidos.
● Para impedir daños y posibles descargas eléctricas, no abra nunca
el bastidor ni manipule los circuitos internos.
● No utilice nunca bencina, diluyentes, u otros líquidos volátiles para
realizar la limpieza, puesto que estos productos químicos pueden
ocasionar daños o arruinar el acabado de la unidad. Utilice siempre
un paño seco y suave para limpiar el polvo y la suciedad.
Nomenclatura
■ Panel de control
q w e r t y
q Toma de entrada (INPUT)
Ésta es la toma de entrada (INPUT) del AS60-112T’.
Conecte el instrumento o la salida de un dispositivo externo a esta toma.
Cuando emplee el Violín, Viola, o Violonchelo Silent, emplee un cable
con clavija monofónica estándar para conectar la toma LINE OUT del
instrumento a esta toma.
* Antes de realizar cualquier conexión, asegúrese de que el interruptor de la
alimentación esté en la posición OFF.
w Control de volumen (VOLUME)
Controla el volumen del altavoz.
e Interruptor del ecualizador (EQ ON/OFF)
Es el interruptor ON/OFF del circuito ecualizador (agudos (TREBLE),
medios (MIDDLE), graves (BASS)). Conéctelo (ON, >) y se activará el
circuito del ecualizador y podrá utilizar entonces los tres mandos r
para ajustar las gamas de frecuencias respectivas. Ajuste el interruptor
en la posición OFF (?) si desea reproducir sólo el sonido directo creado por el instrumento o dispositivo externo, sin ninguna alteración adicional.
14
r Controles del ecualizador (agudos, medios, graves)
(TREBLE, MIDDLE, BASS)
Controlan el nivel de sus frecuencias respectivas: TREBLE para las
altas frecuencias, MIDDLE para las frecuencias intermedias, y BASS
para las bajas frecuencias. Cuando se ajustan a “0”, el tono será plano,
girando el mando hacia la izquierda (menos) se atenuará la frecuencia,
y girándolo hacia la derecha (más) se acentuará la frecuencia.
t Toma de salida de expansión (LINE OUT)
La señal recibida por la toma INPUT se transmite desde esta toma,
pero con su impedancia convertida (la señal también pasa por alto el
circuito del ecualizador). Cuando se añade otro altavoz integrado, como
pueda ser otro AS60-112T, se conecta la unidad adicional a esta toma.
y Interruptor y piloto de la alimentación(POWER)
Éste es el interruptor de la alimentación del AS60-112T. Cuando se presiona el interruptor, se enciende la luz piloto que está al lado del interruptor.
* Para proteger el altavoz contra daños, asegúrese siempre que el control de
volumen w esté ajustado a “0” antes de conectar y desconectar la alimen-
tación.
Page 15

Modo de empleo del AS60-112T
AS60-112T
INPUT
LINE OUT
AS60-112T
INPUT
INPUT
LINE OUT
LINE OUT
AS60-112T
OUTPUT
L/MONO
AS60-112T
AG-Stomp
INPUT
INPUT
LINE OUT
OUTPUT
R
OUTPUT
L/MONO
AS60-112T
AG-Stomp
INPUTINPUT
LINE OUT
AS60-112T
Antes de realizar ninguna conexión, asegúrese de que la alimentación se
haya desconectado en el AS60-112T y en todos los otros dispositivos.
■ Conexión de un Violín, Viola, o Violonchelo Silent
Emplee un cable con clavija monofónica estándar para conectar la toma
LINE OUT del instrumento de cuerdas Silent Yamaha (Violín Silent, Viola Silent, o Violonchelo Silent) a la toma INPUT del AS60-112T para
crear un sistema de amplificador de 60 W.
* Si el sonido sale distorsionado, ajuste el volumen en el instrumento.
Violín, Viola, o
Violonchelo
Silent
■
Conexión de un AG-Stomp* (monofónico)
* vendido por separado
El AG-Stomp Yamaha es un sistema preamplificador para guitarra con
efectos incorporados.
Emplee un cable con clavija monofónica estándar para conectar la toma
LINE OUT del instrumento de cuerdas Silent Yamaha a la toma INPUT
del AG-Stomp. Luego, emplee otro cable con clavija monofónica estándar
para conectar la toma OUTPUT L/MONO del AG-Stomp a la toma INPUT
del AS60-112T. En esta configuración, podrá utilizar el AG-Stomp para
añadir efectos tales como los de Chorus (coros), Reverb (reverberación), etc., al instrumento de cuerdas, o evitar la realimentación acústica durante la interpretación.
■ Conexión de un AG-Stomp* (estéreo)
* vendido por separado
Puesto que el AG-Stomp está provisto de salidas estereofónicas, podrá
configurar un sistema de amplificador estéreo conectando un AS60-112T
a la toma OUTPUT L/MONO del AG-Stomp, y otro AS60-112T a la toma
OUTPUT R. Esta configuración proporciona mayor amplitud de los efectos tales como el de Stereo Chorus (coros estéreo), etc.
Todas las conexiones deben realizarse empleando cables con clavijas
monofónicas estándar.
Lado izquierdo Lado derecho
■ Conexión de varios AS60-112T
Conecte la toma LINE OUT del un AS60-112T a la toma INPUT de otro
AS60-112T para crear un sistema de amplificador de 120 W con más
potencia. Podrá aumentar la cantidad de potencia conectando una tercera o cuarta unidad al sistema siguiendo el mismo procedimiento.
15
Page 16

ALTOPARLANTE ATTIVO
Vi ringraziamo per avere acquistato questo altoparlante attivo Yamaha AS60-112T.
Progettato per l’uso con gli strumenti della serie Yamaha Silent String, l’AS60-112T
incorpora un amplificatore di potenza da 60 W che alimenta un altoparlante da 30
cm ed un tweeter a cupola. La gamma di frequenza, le caratteristiche sonore e la
risonanza sono state tenute nella massima considerazione durante la progettazione
dell’AS60-112T in modo da permettere a strumenti come i Silent Violin, Viola e Cello
di esprimersi al massimo. Se usato insieme allo Yamaha AG-Stomp, permette di liberare l’enorme potenziale musicale contenuto nei vostri strumenti elettrici. L’AS60112T possiede anche una presa LINE OUT che permette di collegare a catena più
AS60-112T e creare sistemi di amplificazione a 120 o 180 Watt.
Per ottenere dall’AS60-112T i migliori risultati possibile, si raccomanda di leggere
completamente questo manuale e di tenerlo in un luogo sicuro per poterlo usare di
nuovo al momento del bisogno.
SPECIFICHE TECNICHE
Potenza d’uscita 60 w rms
Altoparlante 30 cm x 1, Tweeter a cupola x 1
Controllori/selettori VOLUME, TREBLE, MIDDLE, BASS, EQ ON/OFF, POWER
Pannello posteriore INPUT : prese monofoniche standard
LINE OUT : prese monofoniche standard
Ingressi: livelli / impedenza INPUT : 0 dBm / 100 kohm
Uscite: livelli / impedenza LINE OUT : 0 dBm / 1 kohm
Alimentazione 230 V, 50 Hz
Assorbimento 70 W
Dimensioni 513 (larg.) x 491 (alt.) x 291 (prof.) mm
Peso 15,0 kg
16
* Le specifiche e l’aspetto possono subire variazioni senza preavviso.
Page 17

AVVERTENZE
● Per prevenire possibili danni, evitare di utilizzare l’amplificatore
nelle seguenti situazioni:
• luoghi direttamente esposti al sole o accanto ad apparecchi che
generano calore.
• luoghi soggetti a temperature estremamente fredde o calde.
• luoghi soggetti a livelli estremi di umidità o polvere.
• luoghi soggetti a forti urti o vibrazioni.
● Prima di effettuare qualsiasi collegamento, assicurarsi che l’AS60112T e qualunque altra apparecchiatura esterna siano spenti.
● Per proteggere gli altoparlanti da possibili danni, impostare sempre
la manopola VOLUME su “0” prima di accendere o spegnere l’apparecchio.
● Prima di collegare/scollegare un altoparlante assicurarsi di spegnere l’apparecchio.
● Non applicare eccessiva forza ai controlli ed agli interruttori.
● Questo diffusore attivo è uno strumento di precisione. È necessario
maneggiarlo con cura ed evitare cadute e maltrattamenti.
● Durante l’utilizzo, il livello di temperatura tenderà ad alzarsi. Assicuratevi che l’amplificatore venga usato in un luogo ben ventilato.
L’AS60-112T dovrebbe essere posizionato ad una distanza minima
dal muro di 30cm per ogni lato.
● Per sicurezza, staccare sempre la spina di alimentazione dalla
presa di corrente alternata in caso di fulmini.
● Per evitare di captare rumori indesiderati, posizionare l’amplificatore lontano da illuminazioni al neon e luci fluorescenti.
● Per evitare danni e rischi di scossa elettrica, non aprire in nessun
caso l’apparecchio per accedere ai circuiti interni.
● Non utilizzare mai per la pulizia benzene o solventi: gli agenti
chimici contenuti possono causare alla verniciatura danni o perdita
di colore. Usare sempre un panno soffice e asciutto per rimuovere
polvere e sporcizia.
Nomenclatura
■ Pannello di controllo
q w e r t y
q Presa di ingresso (INPUT)
Questa è la presa di ingresso INPUT dell’AS60-112T.
Collegare ad essa lo strumento o l’uscita di un dispositivo esterno.
Se si usano i Silent Violin, Viola e Cello, per collegare la presa LINE
OUT dello strumento a questa presa usare un cavo con spinotto
monoaurale.
* Prima di fare i collegamenti, controllare sempre che l’interruttore di ac-
censione si trovi su OFF.
w Controllo del volume (VOLUME)
Controlla il volume del suono prodotto.
e Interruttore dell’equalizzatore (EQ ON/OFF)
Questo è l’interruttore di attivazione del circuito di equalizzazione
(TREBLE, MIDDLE e BASS). Se si trova su ON (>), il circuito è attivo e
le tre manopole r possono venire usate per regolare le rispettive frequenze. Portarlo su OFF (?) per riprodurre solo il suono prodotto direttamente dallo strumento o da un apparecchio esterno, senza alcuna
elaborazione.
r Controlli di equalizzazione
(TREBLE, MIDDLE, BASS)
Controllano il livello delle rispettive frequenze, vale a dire le alte frequenze (TREBLE), medie frequenze (MIDDLE) e basse frequenze
(BASS). Se si trovano su “0”, il suono prodotto non viene alterato. Girare la manopola verso sinistra (meno) per attenuare la frequenza, o al
contrario girarla verso destra per rinforzarla.
t Presa di uscita di espansione (LINE OUT)
Il segnale ricevuto attraverso la presa INPUT viene ritrasmesso da questa presa, ma con l’impedenza convertita. Il segnale evita anche di passare attraverso i circuiti di equalizzazione. Se si aggiunge al sistema un
altro diffusore attivo AS60-112T, collegarlo qui.
y Interruttore e indicatore di alimentazione (POWER)
Questo è l’interruttore di alimentazione dell'AS60-112T. Se è premuto,
l’indicatore accanto si accende.
* Per proteggere il diffusore da danni, prima di accendere o spegnere il dif-
fusore controllare sempre che il comando VOLUME w si trovi su “0”.
17
Page 18

Uso dell’AS60-112T
AS60-112T
INPUT
LINE OUT
AS60-112T
INPUT
INPUT
LINE OUT
LINE OUT
AS60-112T
OUTPUT
L/MONO
AS60-112T
AG-Stomp
INPUT
INPUT
LINE OUT
OUTPUT
R
OUTPUT
L/MONO
AS60-112T
AG-Stomp
INPUTINPUT
LINE OUT
AS60-112T
Prima di fare i collegamenti, controllare che sia l’AS60-112T che
gli altri componenti siano spenti.
■ Collegamento con un Silent Violin/ Viola/Cello
Collegare con un cavo a spinotto monofonico standard la presa LINE
OUT dello strumento Yamaha Silent String (Silent Violin, Silent Viola o
Silent Cello) alla presa INPUT dell’AS60-112T in modo da creare un
sistema di amplificazione a 60 W.
* Se il suono risulta distorto, regolare il volume dello strumento.
Silent Violin
Silent Viola
Silent Cello
■ Collegamento con un AG-Stomp* (stereo)
* Da acquistarsi separatamente
Dato che l’AG-Stomp possiede uscite stereo, potete creare un sistema
di amplificazione stereofonico collegando un AS60-112T alla presa
OUTPUT L/MONO dell’AG-Stomp ed un altro AS60-112T a quella
OUTPUT R.
Questa impostazione dà maggior respiro a effetti come Stereo Chorus.
Tutti i collegamenti devono venire fatti con cavi a spinotto monofonico.
■ Collegamento con un AG-Stomp* (monofonico)
* Da acquistarsi separatamente
Lo Yamaha AG-Stomp è un preamplificatore per chitarra con effetti sonori incorporati.
Usare un cavo a spinotto monofonico per collegare la presa LINE OUT
dello strumento Yamaha Silent String alla presa INPUT dell’AG-Stomp.
Quindi, usare un altro cavo a spinotto monofonico per collegare la presa
OUTPUT L/MONO dell’AG-Stomp a quella INPUT dell’AS60-112T. In
questo modo potrete aggiungere effetti come Chorus, Reverb, ecc. allo
strumento e prevenire feedback mentre suonate.
Lato L
Lato R
■ Collegamento di più AS60-112T
Collegare la presa LINE OUT di un AS60-112T alla presa INPUT di un
altro AS60-112T e creare così un sistema di amplificazione da 120 W di
potenza. Aggiungendo altri AS60-112T alla catena allo stesso modo,
potrete aumentare la potenza prodotta.
18
Page 19

ACTIEVE LUIDSPREKER
Hartelijk dank voor het aanschaffen van deze Yamaha AS60-112T Actieve Luidspreker.
De AS60-112T is ontworpen voor gebruik met de Yamaha Silent String instrumenten
en is uitgerust met een ingebouwde 60 Watt versterker die een 30 cm luidspreker en
een dome-tweeter aanstuurt. Bij het ontwerpen van de AS60-112T is extra aandacht
besteed aan het frequentiebereik, de weergavekarakteristieken en de resonantie zodat
instrumenten zoals de Silent Violin, Viola en Cello maximaal tot hun recht kunnen
komen. Door een Yamaha AG-Stomp aan te sluiten, kunt u gemakkelijk een creatief
geluidssysteem samenstellen dat het enorme potentieel van deze snaarinstrumenten
doet uitkomen. De LINE OUT aansluiting van de AS60-112T stelt u in staat meerdere
AS60-112T's op elkaar aan te sluiten zodat u een 120 W of 180 W systeem krijgt.
Om verzekerd te kunnen zijn van de beste prestaties en een zo lang mogelijke levensduur van uw AS60-112T, raden we u aan deze handleiding zorgvuldig te lezen en deze
op een veilige plek te bewaren zodat u er later nog iets in kunt opzoeken.
Specificaties
Uitgangsvermogen 60 Wrms
Luidspreker 30 cm x 1, Dome tweeter x1
Bedieningsknoppen/Schakelaars
Aansluitingen INPUT : standaard mono penstekkeraansluitingen
Input Niveau/Impedantie INPUT : 0 dBm / 100 kΩ
Output Niveau/Impedantie LINE OUT : 0 dBm / 1 kΩ
Stroomvoorziening Algemeen model : 230V, 50Hz
Opgenomen Vermogen 70 W
Afmetingen (B x H x D) 513 x 491 x 291 mm
Gewicht 15.0 kg
VOLUME, TREBLE, MIDDLE, BASS, EQ ON/OFF, POWER
LINE OUT : standaard mono penstekkeraansluitingen
* Specificaties en uiterlijk kunnen wijzigen zonder dat hier vantevoren kennis van wordt gegeven.
19
Page 20

Voorzorgsmaatregelen
● Gebruik uw versterker liever niet op de volgende lokaties om even-
tuele schade te voorkomen:
• In direct zonlicht of naast verwarmingselementen.
• Extreme koude of warme lokaties.
• Lokaties die tentoongesteld worden aan hoge vochtigheid of
overdreven stof.
• Lokaties die onderhevig zijn aan sterke schokken of vibraties.
● Zorg ervoor, alvorens enige aansluitingen te maken, dat de AS60-
112T en eventuele externe apparaat uitstaat.
● Zet, om de luidspreker tegen mogelijke beschadigingen te bescher-
men, altijd de VOLUME knop op “0” alvorens de versterker aan te
zetten.
● Zet, als u een luidspreker op de versterker aansluit, de versterker
eerst uit.
● Oefen geen overdreven kracht op de schakelaars en knoppen uit.
● Uw Yamaha actieve luidspreker is een precisie muziekinstrument.
Behandel het toestel met zorg, laat het niet vallen en stoot er niet
tegen.
● De Werkingstemperatuur Wordt hoger tijdens het gebruik. Zorg
ervoor dat de versterker Wordt gebruikt op een lokatie die goed
geventileerd is. De AS60-112T moet geplaatst Worden op een
positie Waar er teminste 30cm (12") vrije ruimte is tussen de muur
en de zijkant, bovenkant en achterkant van de versterker.
● Haal altijd voor de veiligheid de stroomkabel uit het stopcontact als
het in uw woonomgeving onweert.
● Plaats de versterker niet in de buurt van neon verlichting of
fluoriscentie verlichting om te voorkomen dat deze storen.
● Open, om schade en een mogelijke electrische schok te voorko-
men, nooit de kast en de knoei nooit met de interne elektronika.
● Gebruik nooit benzine, verdunner of andere vluchtige stoffen om de
versterker schoon te maken, aangezien deze chemicaliën schade
of verkleuringen kunnen veroorzaken. Gebruik altijd een droge,
zachte doek om stof en vuil weg te vegen.
Benamingen
■ Bedieningspaneel
q w e r t y
q Ingangsaansluiting (INPUT)
Dit is de INPUT aansluiting van de AS60-112T.
Hierop kunt u uw instrument of de uitgang van externe apparatuur aansluiten.
Bij gebruik van de Silent Violin, Viola of Cello dient u een kabel met een
standaard monostekker te gebruiken om de LINE OUT aansluiting van
het instrument met deze ingangsaansluiting te verbinden.
* Controleer of de hoofdschakelaar inderdaad uit (OFF) staat voor u iets
gaat aansluiten.
w Volumeregeling (VOLUME)
Hiermee regelt u het volume van de luidspreker.
e Equalizer schakelaar (EQ ON/OFF)
Dit is de aan/uit schakelaar voor de equalizer-schakeling (TREBLE,
MIDDLE, BASS). Als deze schakelaar aan (ON; >) staat, is de equalizer
ingeschakeld en kunt met de drie knoppen r de bijbehorende frequenties regelen. Zet deze schakelaar uit (?) als alleen het directe geluid
van het instrument of de externe apparatuur wilt laten weergeven, zonder toevoegingen of wijzigingen.
r Equalizer knoppen (TREBLE, MIDDLE, BASS)
Hiermee kunt u het weergaveniveau van de bijbehorende tonen regelen. TREBLE (hoge tonen), MIDDLE (middentonen), BASS (lage tonen).
Wanneer u de knoppen op “0” zet, zal de toon niet gewijzigd worden,
draai de knop naar links (min) om de bijbehorende toon te verzwakken,
of naar rechts (plus) om deze te versterken.
t Uitgangsaansluiting voor extra apparatuur
(LINE OUT)
Het signaal dat via de INPUT aansluiting wordt ontvangen, zal via deze
aansluiting worden doorgegeven, alhoewel de impedantie zal worden
gewijzigd (het signaal zal ook de equalizer-schakeling ongewijzigd passeren). Wanneer u nog een actieve luidspreker, bijvoorbeeld een tweede
AS60-112T, toevoegt aan uw systeem dient u deze hierop aan te sluiten.
y Hoofdschakelaar & lampje (POWER)
Dit is de hoofdschakelaar van de AS60-112T. Wanneer deze schakelaar
is ingedrukt, zal het lampje ernaast oplichten.
* Ter bescherming van de luidspreker moet u altijd controleren of het volume
w op “0” staat voor u het toestel aan/uit zet met de hoofdschakelaar.
20
Page 21

Gebruiken van de AS60-112T
AS60-112T
INPUT
LINE OUT
AS60-112T
INPUT
INPUT
LINE OUT
LINE OUT
AS60-112T
OUTPUT
L/MONO
AS60-112T
AG-Stomp
INPUT
INPUT
LINE OUT
OUTPUT
R
OUTPUT
L/MONO
AS60-112T
AG-Stomp
INPUTINPUT
LINE OUT
AS60-112T
Voor u iets aansluit moet u controleren of de stroom van uw AS60-
112T en van alle andere apparatuur inderdaad is uitgeschakeld.
■ Aansluiten van een Silent Violin/ Viola/Cello
Gebruik een kabel met een standaard monostekker om de LINE OUT
uitgangsaansluiting van uw Yamaha Silent String instrument (Silent Violin,
Silent Viola, Silent Cello) te verbinden met de INPUT ingangsaansluiting
van de AS60-112T om zo een 60 W versterkersysteem samen te stellen.
* Als de geluidsweergave vervormt, dient u het volume op het instrument bij
te regelen.
Silent Violin
Silent Viola
Silent Cello
■
Aansluiten van een AG-Stomp* (stereo)
* los verkrijgbaar
Omdat de AG-Stomp is uitgerust met stereo uitgangsaansluitingen, kunt
u een stereo versterkersysteem samenstellen door de ene AS60-112T
aan te sluiten op de OUTPUT L/MONO uitgangsaansluiting van de AGStomp en de andere AS60-112T op de OUTPUT R aansluiting. Op deze
manier krijgen effecten zoals Stereo Chorus enz. een veel betere ruimtelijke werking.
Alle verbindingen dienen weer gemaakt te worden via kabels met standaard monostekkers.
■
Aansluiten van een AG-Stomp* (mono)
* los verkrijgbaar
De Yamaha AG-Stomp is een gitaar-voorversterker met ingebouwde effecten. Gebruik een kabel met een standaard monostekker om de LINE
OUT uitgangsaansluiting van uw Yamaha Silent String instrument te
verbinden met de INPUT ingangsaansluiting van de AG-Stomp. Gebruik
vervolgens nog een kabel met een standaard monostekker om de OUTPUT L/MONO uitgangsaansluiting van de AG-Stomp te verbinden met
de INPUT aansluiting van de AS60-112T. Op deze manier kunt u de AGStomp gebruiken om effecten zoals Chorus en nagalm enz. toe te voegen aan uw snaarinstrument, of om rondzingen (feedback) tijdens uitvoeringen te voorkomen.
Linkerkant Rechterkant
■
Gebruiken van meerdere AS60-112T's
Verbind de LINE OUT aansluiting van één AS60-112T met de INPUT
aansluiting van een andere AS60-112T om een krachtig 120 W versterkersysteem samen te stellen. U kunt het geproduceerde vermogen verder
verhogen door op dezelfde manier drie, vier of nog meer van deze toestellen aan te sluiten.
21
Page 22

Printed in Taiwan
V940990
 Loading...