

Page 1
EnglishFrançaisDeutsch
CR W4416SX
SERIES
User Guide
Guide de l’utilisateur
Bedienungsanleitung
Page 2

FCC INFORMATION (U.S.A.)
1. IMPORTANT NOTICE: DO NOT MODIFY THIS UNIT!
This product, when installed as indicated in the instructions contained in this manual, meets FCC requirements. Modifications not
expressly approved by Yamaha may void your authority, granted by the FCC, to use the product.
2. IMPORTANT: When connecting this product to accessories and/or another product use only high quality shielded cables. Cable/s
supplied with this product MUST be used. Follow all installation instructions. Failure to follow instructions could void your FCC
authorization to use this product in the USA.
3. NOTE: This product has been tested and found to comply with the requirements listed in FCC Regulations, Part 15 for Class ìBî
digital devices. Compliance with these requirements provides a reasonable level of assurance that your use of this product in a
residential environment will not result in harmful interference with other electronic devices. This equipment generates/uses radio
frequencies and, if not installed and used according to the instructions found in the users manual, may cause interference harmful to
the operation of other electronic devices. Compliance with FCC regulations does not guarantee that interference will not occur in
all installations. If this product is found to be the source of interference, which can be determined by turning the product ì OFFî
and ìONî , please try to eliminate the problem by using one of the following measures:
Relocate either this product or the device that is being affected by the interference.
Utilize power outlets that are on different branch (circuit breaker or fuse) circuits or install AC line filter/s.
In the case of radio or TV interference, relocate/reorient the antenna. If the antenna lead-in is 300 ohm ribbon lead, change the
lead-in to coaxial type cable.
If these corrective measures do not produce satisfactory results, please contact the local retailer authorized to distribute this type of
product. If you can not locate the appropriate retailer, please contact Yamaha Systems Technology, Inc. 100 Century Center Court,
San Jose, CA95112, U.S.A.
Responsible Party: Yamaha Systems Technology, Inc.
Address: 100 Century Center Court
San Jose, California 95112
Telephone: (408) 467-2330
FAX: (408) 437-8791
Page 3
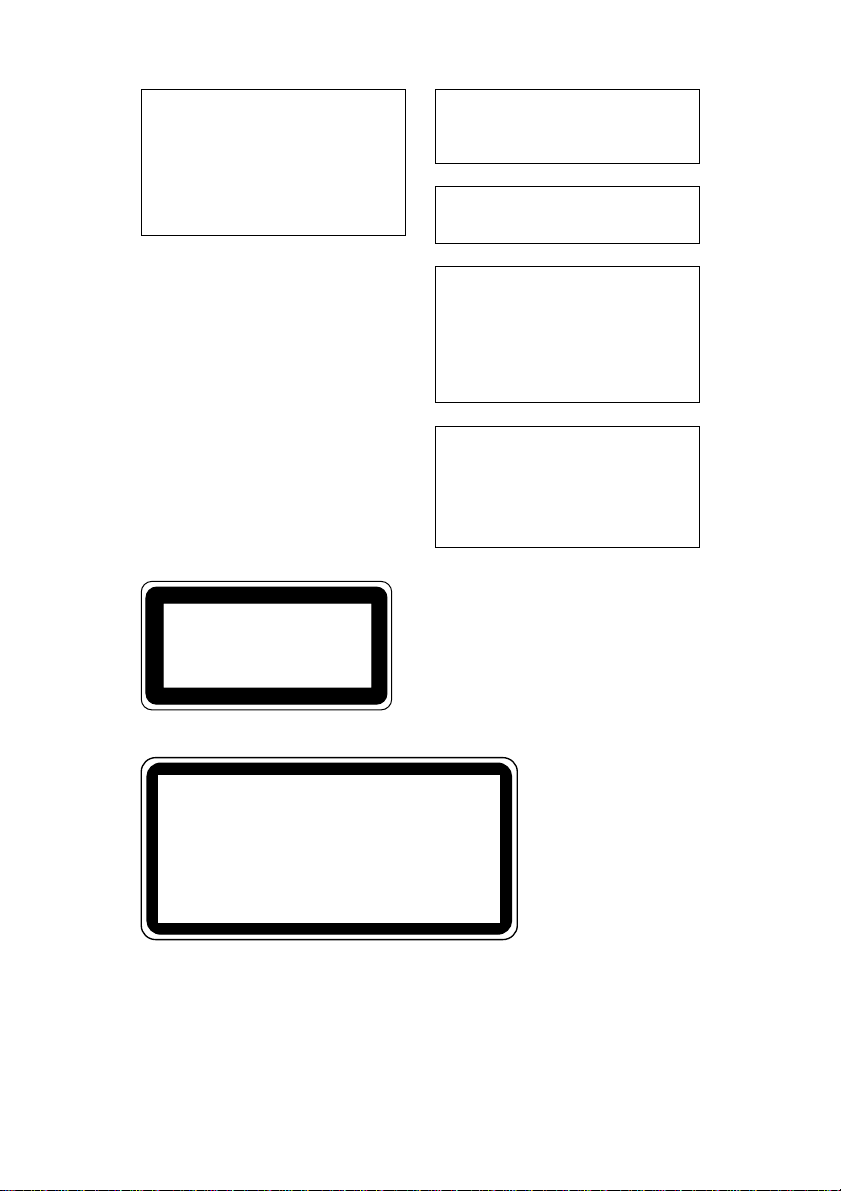
Laser Diode Properties
Material : GaAlAs
Wavelength : 783-789 nm
Emission Duration : Continuous
Laser Output Power : Less than 44.6 µW*
*
This output is value measured at a
distance 200mm from the objective lens
surface on the optical pick-up block.
ANSI Class : Class 1
CLASS 1 LASER PRODUCT
LASER KLASSE 1 PRODUKT
LUOKAN 1 LASERLAITE
PRODUIT LASER DE CLASSE 1
CAUTION
Use of controls or adjustments or performance of
procedures other than those specified herein may
result in hazardous radiation exposure.
ADVARSEL
USYNLIG LASERSTRÅLING VED ÅBNING.
UNDGÅ UDSAETTELSE FOR STRÅLING.
VAROITUS
LAITTEEN KÄYTTÄMINEN MUULLA
KUIN TÄSSÄ KÄYTTÖOHJEESA
MAINITULLA TAVALLA SAATTAA
ALTISTAA KÄYTTÄJÄN
TURVALLISUUSLUOKAN 1
YLITTÄVÄLLE NÄKYMÄTTÖMÄLLE
LASERSÄTEILYLLE.
VARNING
OM APPARATEN ANVÄNDS PÅ ANNAT
SÄTT ÄN I DENNABRUKSANVISNING
SPECIFICERATS, KAN ANVÄNDAREN
UTSÄTTAS FÖR OSYNLIG
LASERSTRÅLNING, SOM ÖVERSKRIDER
GRÄNSEN FÖR LASERKLASS 1.
This compact disc player is
classified as a CLASS 1
LASER product.
The CLASS 1 LASER
PRODUCT label must be
located on the exterior.
VORSICHT : UNSICHTBARE LASERSTRAHLUNG WENN ABDECKUNG
GEOFFNET. NICHT DEM STRAHL AUSSETZEN.
VARNING : OSYNLIG LASERSTRÅLNING NÄR DENNA DEL ÄR ÖPPNAD OCH
SPÄRREN ÄR URKOPPLAD. BETRAKTA EJ STRÅLEN ÄR FARLIG.
VARO! : AVATAESSA JA SUOJALUKITUS OHITETTAESSA OLET
ALTTINA NÄKYMÄTTÖMÄLLE LASERS TEILYLLE. ÄLÄ KATSO SÄTESSEN.
ADVARSEL : USYNLIG LASERSTRALNING VED ÅBNING NÄR SIKKERHETSAF BYDERE ER UDE AF FUNKTION. UNDGÅ UDSETTELS FOR STRÅLING.
Varningsanvisning för
laserstrålning.
Page 4

Important Precautions
Important Precautions
Please read the following precautions before operating
CRW4416SX.
• Do not remove the CRW4416SX’s top cover.
This device uses semiconductor laser.
Refer all servicing to qualified personnel.
• Do not attempt to touch the inside of the
CR W4416SX. Electricity may ha v e been built up
even after you turn of f the power.
• CRW4416SX is a sophisticated electronic device.
Handle it with care.
• If the fuse blows, CRW4416SX should be checked
by a qualified engineer . Do not just replace the fuse.
Replacing the fuse by yourself may cause the protection circuit to be damaged.
• The CRW4416SX uses high-density circuits and LSIs.
Even a small incident may cause malfunctions to
occur.
• If CRW4416SX operates incorrectly, See “Troubleshooting” on page 13.
If the problem persists, consult your CRW4416SX
dealer.
• Yamaha is not responsible for any data or information
losses resulting from the operation of CRW4416SX.
i
Page 5

Installation Precautions
• Install CRW4416SX on a level surface.
• Do not install CRW4416SX near water, in direct sunlight,
close to heating units, or in areas subject to high or low temperature extremes, excessiv e dust, vibration, or severe shocks.
• Do not expose CRW4416SX to extremes of humidity.
• The ambient temperature where CRW4416SX is installed
should be between 5 ° C and 40 ° C (41 ° F–104 ° F).
• Using CRW4416SX close to a television or radio may cause
interference. Install CRW4416SX at least one meter away
from television and radio equipment.
• Do not block the CRW4416SX ventilation slots. Install
CRW4416SX with at least 10 cm of free space all-around.
• Make sure the CRW4416SX po wer cord is not located in a posi-
tion where it is likely to be walked on or pinched by other
equipment.
Installation Precautions
ii
Page 6

Operating Precautions
Operating Precautions
• Do not subject CRW4416SX to impact or shock when in use.
This may impair recording or playback.
• Do not place heavy objects on CRW4416SX.
• Avoid moving CRW4416SX from cold to warm places, and
avoid sudden room temperature rises, as condensation that
could cause CRW4416SX to malfunction may occur.
If condensation does occur, wait at least one hour before operating CRW4416SX.
• Do not let liquid or other foreign objects enter CRW4416SX.
• T o reduce the risk of electric shock, do not e xpose
CRW4416SX to rain or moisture.
• Always remove the disc before transporting CRW4416SX.
• CRW4416SX uses an optical pickup that is sensitive to dust
and dirt. Make sure that the disc tray and disc are free of dust
and dirt before loading.
iii
• Use only the power cable supplied. Other cables may cause
interference when CRW4416SX is used near to radio and television equipment.
• CRW4416SX should be connected only to an AC receptacle of
the type described in this User Guide or as marked on the rear
panel of CRW4416SX.
• Use a soft dry cloth to clean CRW4416SX. Stubborn dirt can
be removed using a cloth dampened with water and neutral
detergent solution. Do not use benzine or solvent based cleaners on CRW4416SX.
Page 7

Preventing Premature Disc Failure
Preventing Premature Disc Failure
The NUMBER ONE cause of premature disc failure with recordable
CDs is contamination of the recording surface before recording is
completed. To minimize disc failure, use the following disc-handling
guidelines:
• Keep the disc tray and disc as clean and dust-free as humanly
possible during the record process. DO NOT touch the recording
surface, and do not expose the disc tray and disc to dust or dirt.
• DO NOT BLOW ON THE DISC to remove dust or dirt. To
remove dust from the recording surface use a camera lens bulb.
Be sure to follow the instructions when using the cloth.
• To remove stubborn dirt or grease from the recording surface
use only nonabrasive foam-tipped swabs (such as Chemtronics
Foamtips #120) with a small amount of pure, denatured alcohol.
To avoid scratching the recording surface BE SURE TO USE
ONLY LIGHT STROKES, beginning at the disc center , pulling
directly towards the disc’s outer edge.
• Always record in a dust-free environment. If the disc must be
removed from CR W4416SX before recording is finished, store
the disc in a clean, dust-free environment.
• If a disc tray accumulates dust, DO NOT USE IT FOR DISC
RECORDING. Always use a clean, dust-free tray for disc
recording.
If CRW4416SX is vibrated while recording, the recording may
fail. To avoid such failures observe the following practices:
• Place CRW4416SX on a solid, stable surface, a w ay from high-
traffic areas. The surface must allow CRW4416SX to operate
in a level, horizontal position.
• Avoid touching or handling CRW4416SX when recording.
Note: Once the disc has been finalized (and no more recording is possi-
ble), it can be handled with the same care that any CD should be
handled.
iv
Page 8

©1998
All Righ
Table of Contents
Table of Contents
Introduction ...............................................................................1
CRW4416SX Features ....................................................1
Orange Book Compatible Recording ..............................2
Chapter 1 - System Configuration ....................................... 3
Computer .........................................................................3
Software ........................................................................... 4
Discs ................................................................................4
Chapter 2 - Touring Around CRW4416SX ......................... 5
Front Panel .......................................................................5
Rear Panel ........................................................................6
Chapter 3 - Installing the Yamaha CRW4416SX
CRW4416SX drive settings .............................................7
Cable Connection ............................................................9
Drive .....................................................................7
Chapter 4 - Operation ...........................................................10
Loading a Disc ...............................................................10
Ejecting the Disc ............................................................11
Manual Eject (emergency use) ......................................12
Troubleshooting .....................................................................13
Appendix ................................................................................... 14
Specifications ................................................................. 14
Front Panel Indicator Key ..............................................15
Yamaha Corporation.
This document may not, in whole or in part, be copied, photocopied, reproduced,
translated, transmitted or reduced to any electronic medium of machine readable
form without prior consent in writing from Yamaha.
MS-DOS and Windows are registered trademarks of Microsoft, Inc.
Unix is a registered trademark of UNIX System Laboratories.
All other trademarks are the property of their respective companies.
v
ts Reserved.
Page 9

Introduction
Thank you for purchasing a Yamaha CRW4416SX drive.
Please read this manual before using the drive in order to make the best
use of the superior CRW4416SX functions.
After reading, please retain this manual for future reference.
CRW4416SX Features
4xS Recording (Rewritable) - 4xS Recording (Recordable) 16xS Reading
The CRW4416SX is able to write (overwrite) CD-RW discs at quad
speed, double speed, and is able to write CD-R discs at quad speed,
double speed, or normal speed.
CD-R discs can also be read at a maximum of 16X speed.
Compatible with Seven Different Formats
The CRW4416SX can both record and read seven different formats:
CD-ROM, CD-ROM XA, CD-I, CD-DA, CD-Bridge (multisession),
CD-Extra, and Video CD.
The CRW4416SX is also equipped with an analog audio output terminal (headphones) for CD-DA.
■
■
■
■
■
Introduction
SCSI 2 Interface for Data Transfer
The CRW4416SX features SCSI 2, the second generation SCSI interface
for connecting computers and peripheral devices.
Compatible with Windows 95, Windows 98 Plug and Play
SCSI IDs are set automatically by the SCAM protocol (level 1).
Orange Book Part 2, Part 3 Compatible 5-Mode Recording
The CRW4416SX conforms to the five recording modes outlined in the
Orange Book Part 2 and 3: Track at Once, Multisession, Disc at Once,
Session at Once, and Packet Writing.
1
Page 10

Introduction
Orange Book Compatible Recording
Track at Once
In this mode, data can be recorded to disc one track at a time.
Discs recorded in this mode cannot be played in CD players or CDROM drives other than a CD-RW or a CD-R drive until the session is
closed.
Multisession
In this mode, data can be recorded to disc in stages (one session at a
time).
Additional data can be written later.
Disc at Once
In this mode, data can be recorded to an entire disc in one pass.
It is not possible to write additional data later.
Session at Once
In this mode, data can be recorded to disc one session at a time.
T o use this mode, your softw are must support Session at Once recording.
New sessions can be written later.
Packet Writing
This is useful for data back-up. Smaller units of data can be added to
tracks.
To use this mode, your software must support Packet Writing.
The CRW4416SX supports both sequential and random packet writing.
2
Page 11

Chapter 1 - System Configuration
Chapter 1 - System Configuration
Before using the CRW4416SX, make sure that you ha ve all of the items
on the list of included items.
In order to use the CRW4416SX, you will require the following.
Computer
The following operating environment is required:
For an IBM-PC computer with DOS or Windows
• 166MHz or faster Pentium CPU (in order to write at 4x speed)
• A vacant slot in which to install a SCSI card or a pre-installed SCSI
card
• Windows 95, Windows 98, Windows NT4.0(Service Pack 3) or
Higher
• Sufficient hard disk space
Note: If you wish to create an image file and write it to a CD-R or CD-RW,
you will need approximately 750 MB of fr ee space on your har d disk as
work area.
• SCSI card
This is required in order to connect a SCSI device (the Yamaha
CRW4416SX) to your computer.
We recommend the following:
Adaptec SCSI cards: AHA-2940 (PCI), AHA-284x (VL), AHA-2740
(EISA), AHA-154x (ISA), etc.
For a Macintosh computer
• A Macintosh computer that is equipped with a 68040 CPU, or a
Power PC CPU
Note: If you wish to create an image file and write it to a CD-R or CD-RW,
you will need approximately 750 MB of fr ee space on your har d disk as
work area.
3
Page 12
Chapter 1 - System Configuration
Software
Use writing software or packet writing software which supports the
CRW4416SX.
For software-related questions, please read the owner's manual for your
software.
Discs
On the CRW4416SX, you can use conventional CD-RW and CD-R
discs that conform to the Recordable Compact Disc Systems Part 2 and
3 (Orange Book).
Yamaha recommends the following Yamaha CD-RW discs:
• CRWM74B4X (
• CRWM74R4X (
Read-only Discs
You can use discs with the logo which conform to the Compact
Disc Read Only Memory standard (CD-ROM standard, Yellow Book).
If you wish to use the audio functions, use discs with the logo,
which conform to the Compact Disc Digital Audio standard (Red
Book).
φ
120mm, 74 minutes)
φ
120mm, 74 minutes)
4
Page 13
Chapter 2 - Touring Around CRW4416SX
Chapter 2 - Touring Around CRW4416SX
Front Panel
1
READ
ON
/
/
DISC
VOL
WRITE
76
CRW4416SX
8
POWER
2 3
1
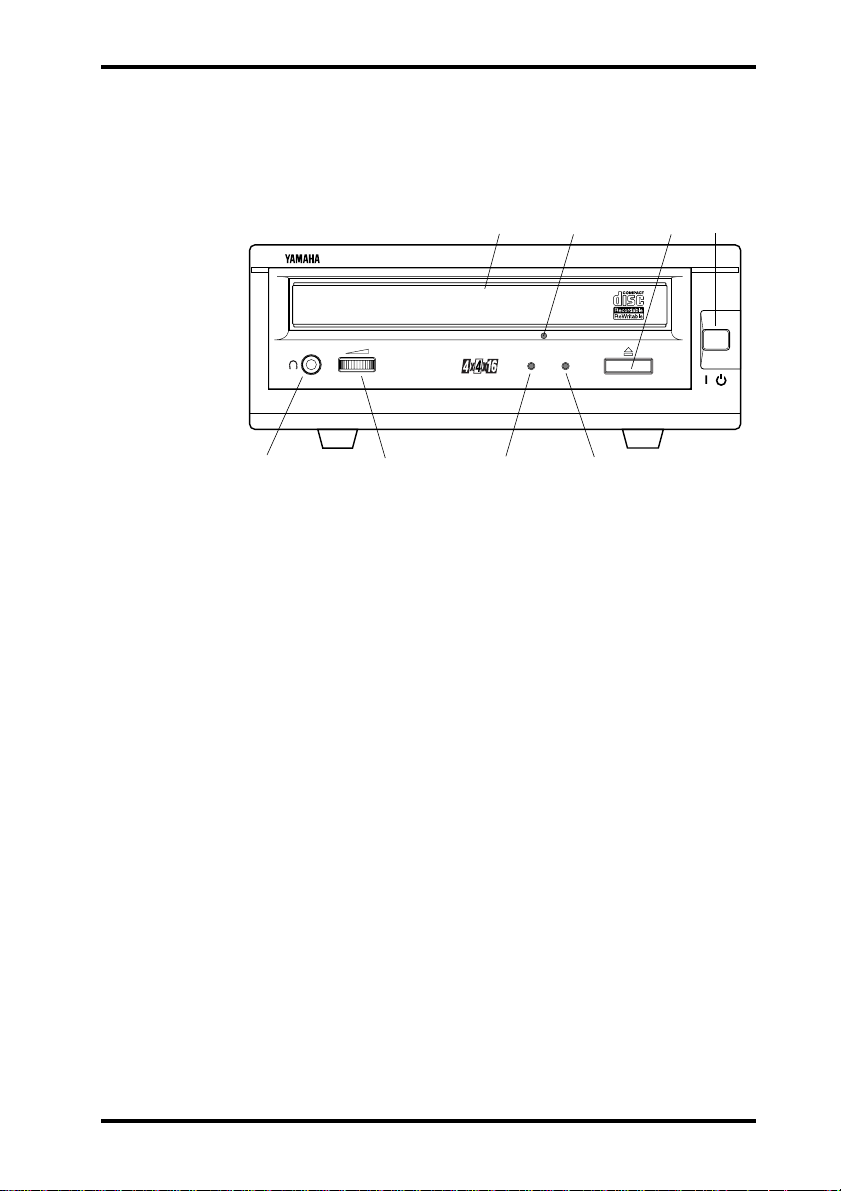
Disc tray
4 5
The disc is inserted and ejected here. Pressing the eject button will
open the tray.
2
Headphone jack
This stereo mini jack allows you to connect headphones and listen to
audio.
3
Headphone volume control
This control adjusts the volume level of the headphone output. Rotating
the control clockwise will increase the volume level.
4
ON/DISC LED
This indicator lights up in orange when the CRW4416SX is powered
on, and lights up in green when the CRW4416SX contains a disc.
5
READ/WRITE LED
This indicator lights up in green when data is being read, and flashes
when data is being accessed. It also lights up in orange when data is
being recorded on a disc.
6
Manual Eject hole
This is used to manually eject a disc that cannot be ejected in the normal way. It is for emergency use only.
5
Page 14
Chapter 2 - Touring Around CRW4416SX
7
Eject button
This button is used to open or close the tray.
8
POWER switch
This is the main power switch. Use it to power CRW4416SX on and
off. CRW4416SX and any other devices connected to the SCSI chain
must be powered on before the host computer is powered on.
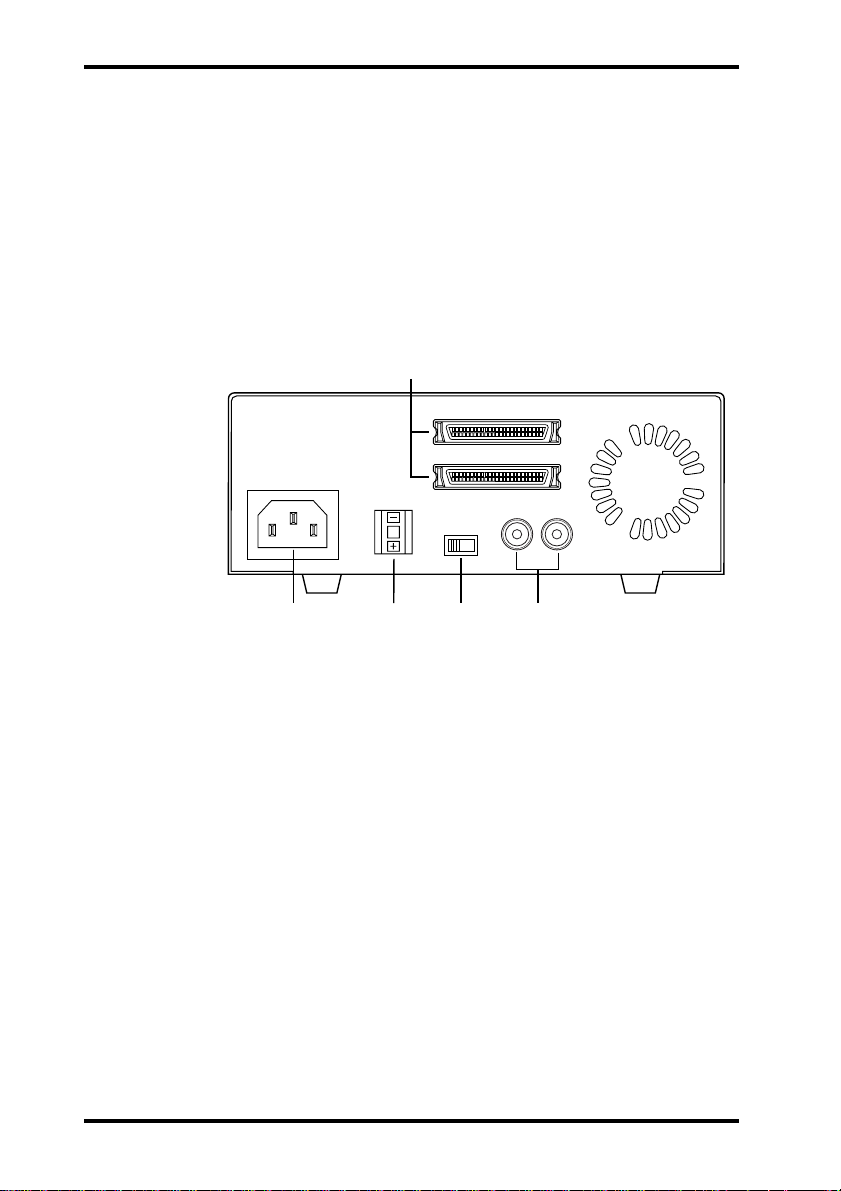
Rear Panel
5
AC I N
CDR ID
TERMINATOR
1
OFF ON
SCSI-1
SCSI-2
LINE OUT
R
L
4
1
AC IN
1
2
3
Connect the included power cable here.
2 CDR ID
Use this switch to set a unique SCSI ID number for the CRW4416SX.
3 TERMINATOR
This switch is used to set termination. Refer to the terminator setting
section for details.
4 LINE OUT (L, R)
These jacks are used to output audio to the amplifier.
5 SCSI-1, SCSI-2
These connectors are used to connect the CRW4416SX in the SCSI
daisy chain.
6
Page 15
Chapter 3 - Installing the Yamaha CRW4416SX Drive
Chapter 3 -
CRW4416SX drive settings
■ SCSI ID settings
Caution: If you are using other SCSI devices, be sure to use a unique ID number
Note: When you are using Windows 95 or Windows 98, and if the SCSI ID
Installing the Yamaha CRW4416SX Drive
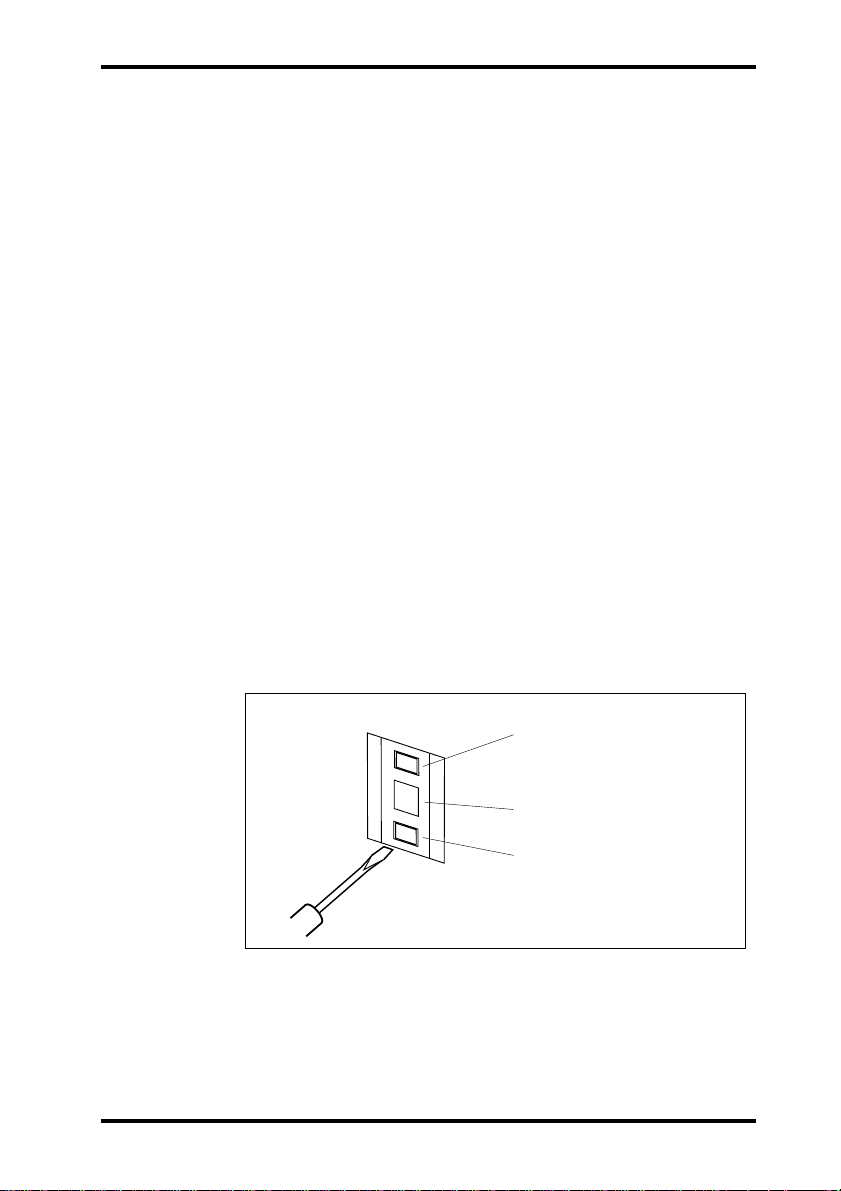
The SCSI ID number is used so that the computer will recognize a connected SCSI device. You can assign 0 through 7 as the SCSI ID number. Usually, “7” is reserved for the SCSI card ID number, and “0” is
reserved for the first SCSI device in the chain. Use a number between 1
and 6 for the CRW4416SX.
Use the switch on the rear panel to set a SCSI ID number. The factory
set ID number is “1”.
for each device. Be sure to turn off the power to the drive befor e you set
the SCSI ID number.
setting on the rear panel is the same as the number assigned to another
SCSI device, the Plug and Play component of Windows 95 or Windows
98 will automatically assign an unused number to the CRW4416SX
(SCAM protocol level 1).
CDR ID
Pressing this switch repeatedly
–
1
+
will decrease the SCSI ID
number by one each time.
SCSI ID Number
Pressing this switch repeatedly
will increase the SCSI ID
number by one each time.
7
Page 16

Chapter 3 - Installing the Yamaha CRW4416SX Drive
■ Terminator setting
The terminator setting indicates whether or not this device is the last
connected SCSI device.
Terminator ON
TERMINATOR
OFF ON
Terminator OFF
TERMINATOR
OFF ON
Use this setting if the CRW4416SX is the last device in the
SCSI daisy-chain.
Use this setting if devices other than the CRW4416SX are in
the SCSI daisy-chain and the CRW4416SX is not the last
device.
8
Page 17
Chapter 3 - Installing the Yamaha CRW4416SX Drive
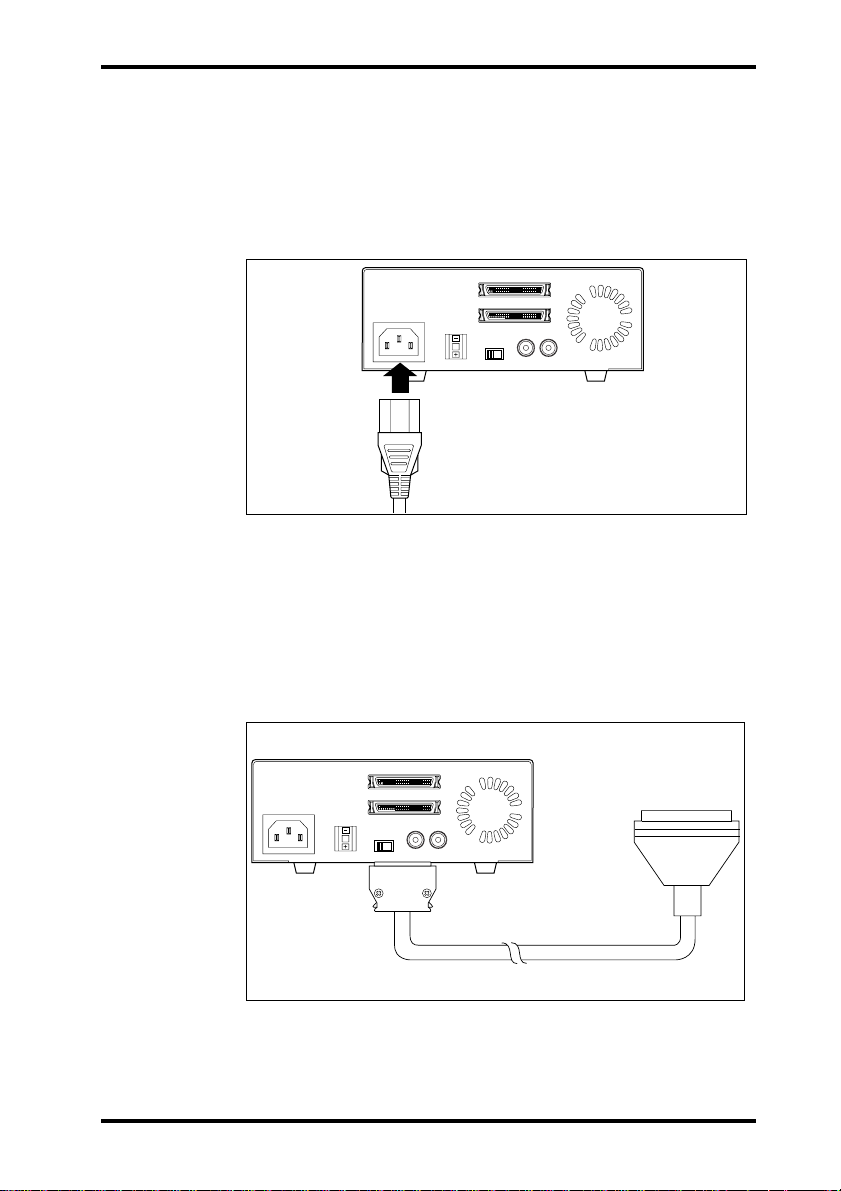
Cable Connection
Power cable
Insert the power cable securely to the “AC IN” connector on the rear
panel.
SCSI-1
AC I N
SCSI cable
Connect the SCSI cable to either of the CRW4416SX rear panel SCSI
connectors (1) or (2), and connect the other end of the SCSI cable to the
host computer.
The CRW4416SX is not supplied with a SCSI cable. You will need to
obtain one that will fit the drive and the host computer connectors.
CDR ID
1
TERMINATOR
OFF ON
SCSI-2
LINE OUT
R
L
AC I N
CDR ID
1
TERMINATOR
OFF ON
SCSI-1
SCSI-2
LINE OUT
R
To the next SCSI device: host
computer, hard disk drive, etc.
L
9
Page 18
Chapter 4 - Operation
Chapter 4 - Operation
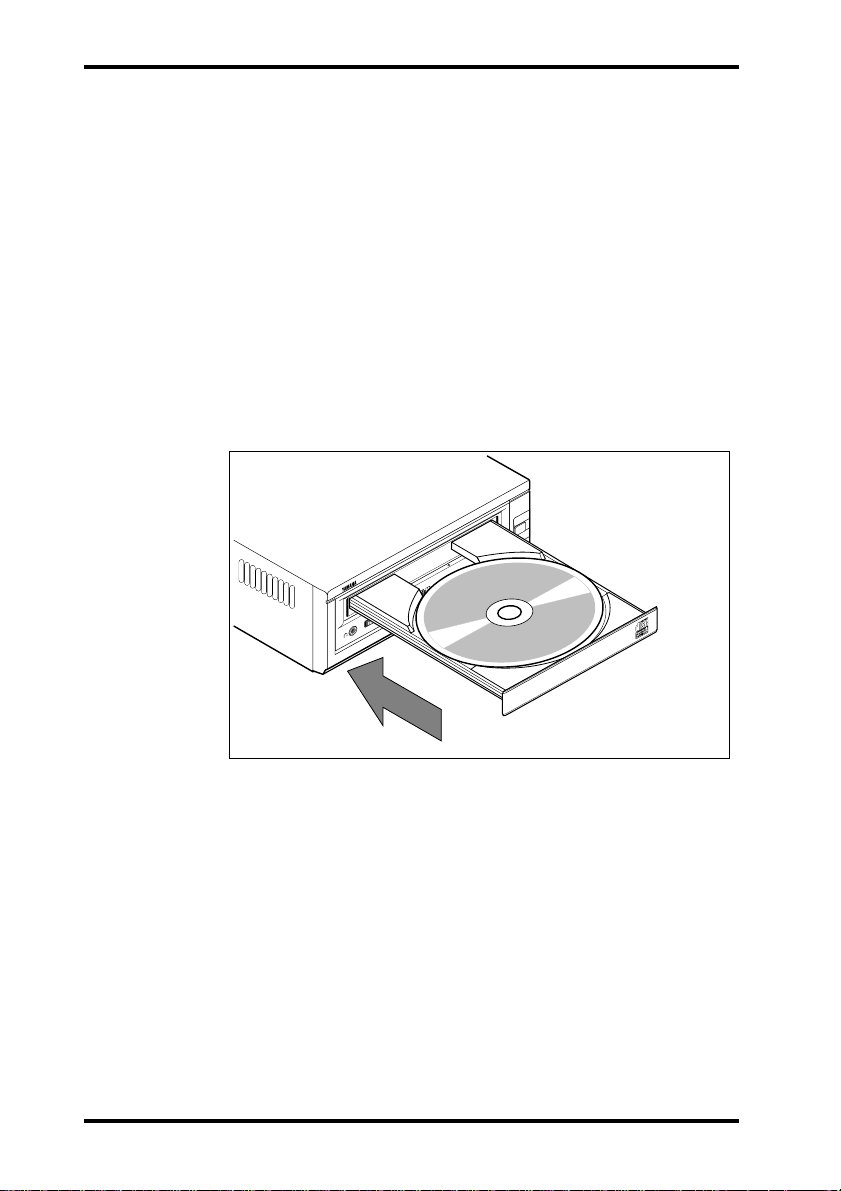
Loading a Disc
1. Press the eject button to open the tray.
2. Carefully place the disc, label-side up, on the disc tray.
3. Press the eject button again to close the disc tray.
Important: Take gr eat car e when handling CD-ROM discs. They ar e mor e sensitive
to damage than audio CDs, and the slightest scratch can render a disc
useless. Do not expose discs to dust, dirt, heat, or moisture.
POWER
X
/
S
D
A
16
E
E
4
T
R
I
4
R
W
W
/
R
N
C
O
C
S
I
D
L
O
V
10
Page 19
Chapter 4 - Operation
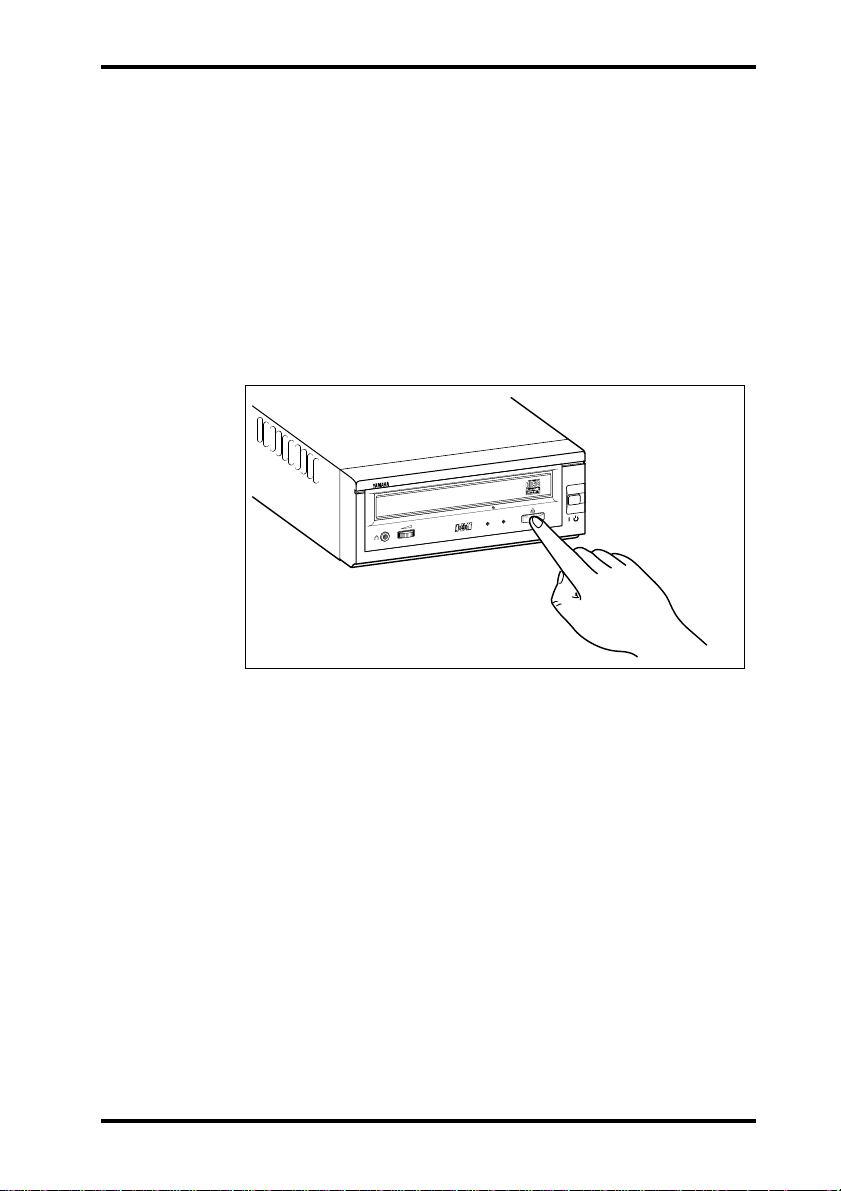
Ejecting the Disc
If the CRW4416SX is powered on:
Press the eject button to eject the disc.
Note: You cannot eject the disc if the SCSI command prohibits the eject oper-
ation while the CRW4416SX is reading data.
Caution: Be sure to remove the disc after it is completely ejected. (Trying to
remove the disc before it is completely ejected may cause the drive to
malfunction.)
R
E
W
O
P
Press the eject
V
R
C
/
D
A
E
R
/
N
O
E
IT
R
W
C
IS
D
L
O
button
X
S
6
1
4
4
W
If the CRW4416SX is not powered on:
Pressing the eject button will not eject the disc.
11
Page 20
Chapter 4 - Operation
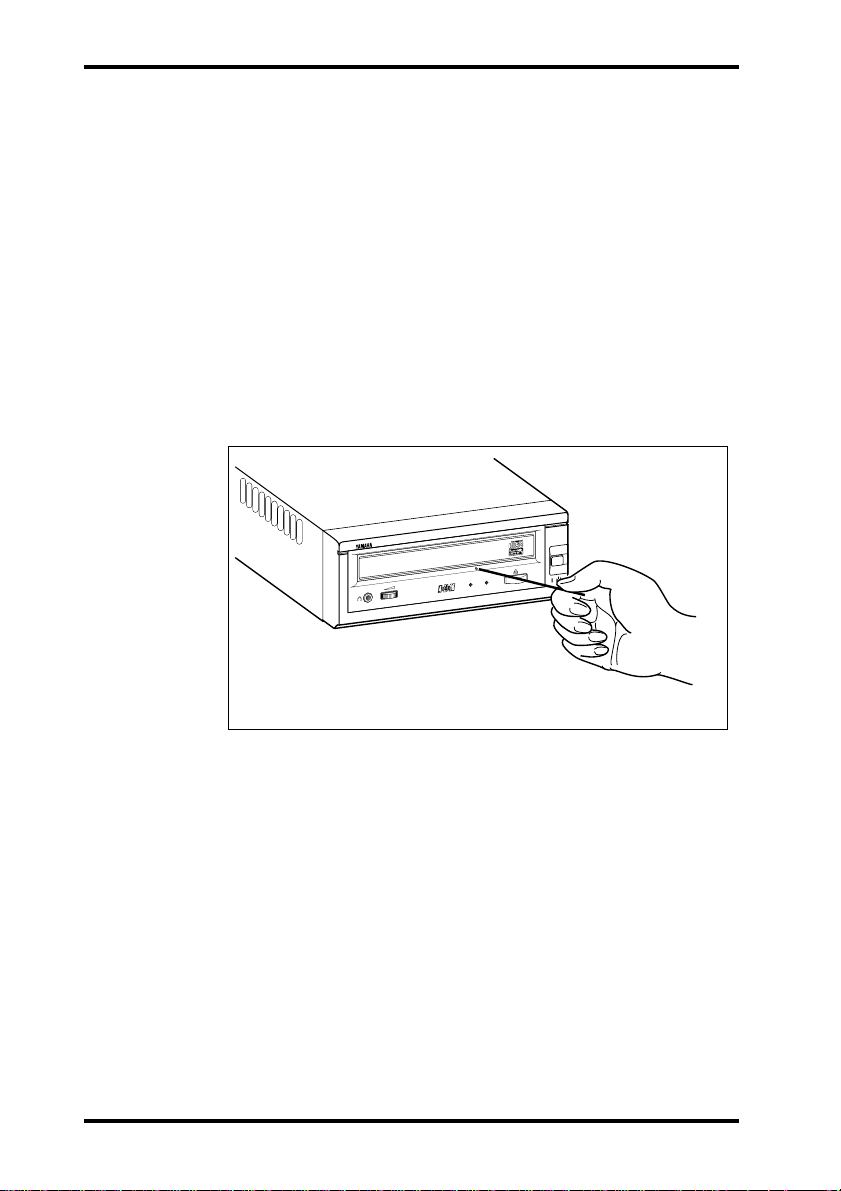
Manual Eject (emergency use)
Here we explain how to eject the disc when it cannot be ejected in the
normal way; for example, the power is shut off inadvertently or the
loading mechanism fails. This technique should be used only as a last
resort. Frequent use may lead to malfunction.
You’ll need a pin-like object of 2 mm or less in diameter to do this. A
straightened paper clip makes an ideal tool.
1. Insert the pin-like tool into the manual eject hole and push
gently.
The spring-loaded mechanism ejects the disc.
R
E
W
O
P
/
D
A
E
R
/
N
O
E
IT
R
W
C
IS
L
O
V
D
X
S
6
1
4
4
W
R
C
12
2. After manually ejecting a disc, you must turn off the power
supplied to the CRW4416SX, then turn it on before continuing.
Page 21
Troubleshooting
Troubleshooting
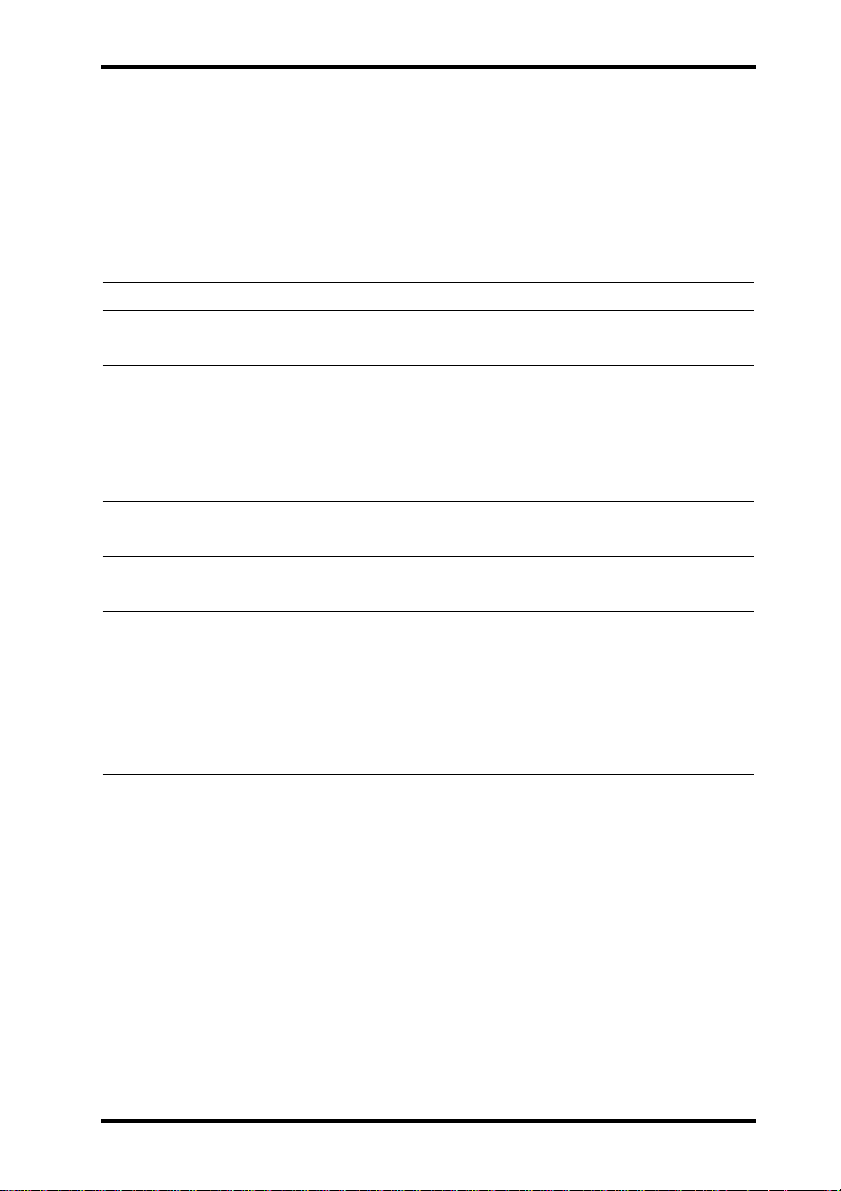
If CRW4416SX is not performing as expected, look up the symptoms in the following
table, and take the appropriate corrective action.
Symptoms Corrective action
The power to the CRW4416SX is off • Check the AC power cable connection.
The power to the computer is off • Check to see if the SCSI card is correctly
installed.
The CRW4416SX is not recognized by the
computer
The disc tray will not open • Make sure that the power to the drive is
The disc ejects • Make sure that the disc is seated in the
Incorrect operation • Make sure that the disc is seated in the
• Check the SCSI cable connection.
• Make sure that SCSI ID numbers are
assigned exclusively.
• Make sure that the last device in the SCSI
daisy chain is terminated correctly.
turned on.
tray correctly.
tray correctly.
• Make sure that you are using the correct
disc.
• Make sure that there is no dust, dirt, or
condensation on the disc or tray.
Caution: Applying physical shock or vibration to the CRW4416SX while a CD-R disc or
CD-RW disc is being written may produce writing errors.
Note: In the case of CD-RW fixed packet writing, the recordable capacity will be
approximately 100 Mbytes less than the capacity indicated on the blank disc.
This is due to differences in the recording format.
13
Page 22
Appendix
Appendix
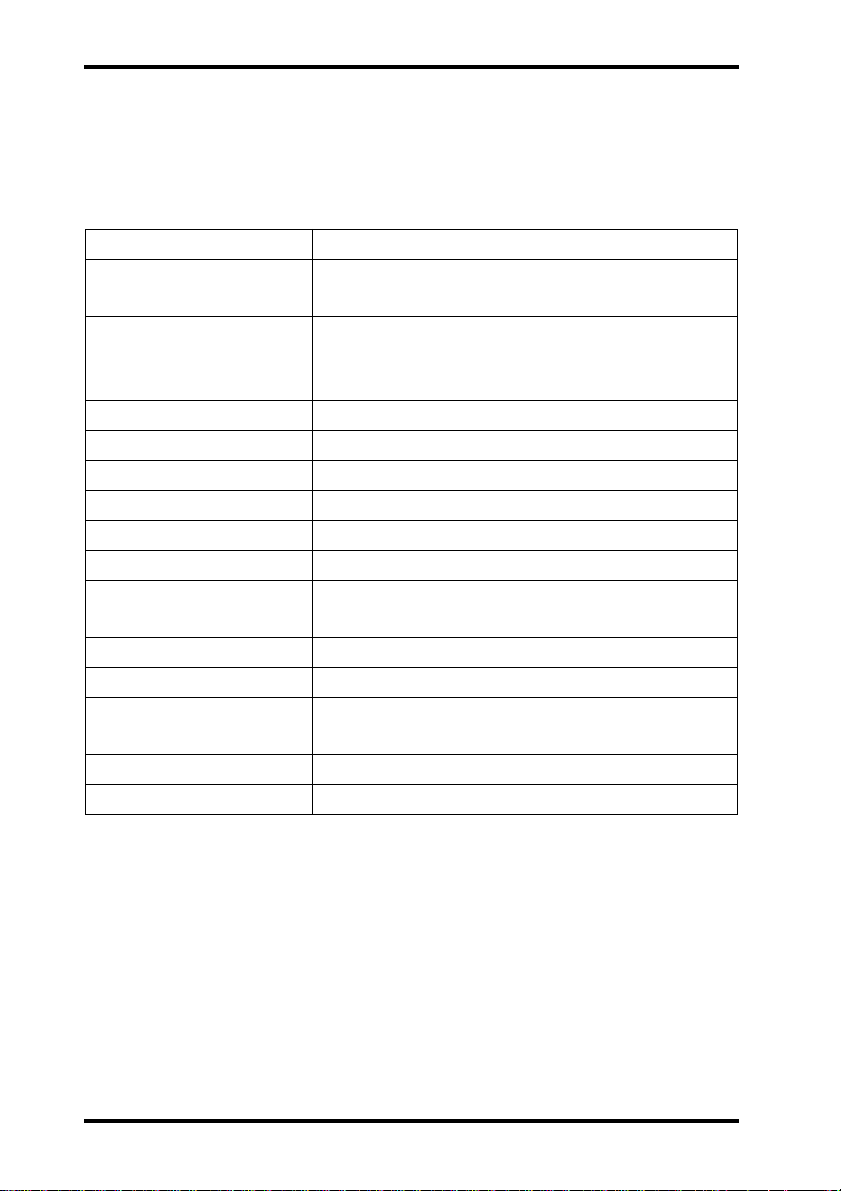
Specifications
Interface SCSI 2
Data Capacity 650MB (74 minutes disc)
550MB (63 minutes disc)
Record/Read Speed Writing (CD-RW): 2X, 4X speed
Writing (CD-R): Normal speed, 2X speed, 4Xspeed
Reading: Maximum 16X speed
Data Transfer Rate 150 - 2400KB/sec
Burst Transfer Rate Maximum 13.3 MB/sec
Buffer Size 2MB (666 sectors)
Access Speed 180 ms (Random access at reading)
Installation Horizontal
Disc Loading Tray
Audio Out
(normal speed)
Power Consumption 16W (read/write)
Power Supply 5V ±5%, 12V ±10%
Environment Temperature: +5°C - +40°C
Dimensions (WxHxD) 170 x 68 x 327 mm
Weight 2.6 kg
Frequency Response
Output Level
Humidity: 25 - 80% (condensation must not occur)
20 - 20,000Hz (Line Out)
1 Vrms (Line Out)
Specifications are subject to change without prior notice.
14
Page 23
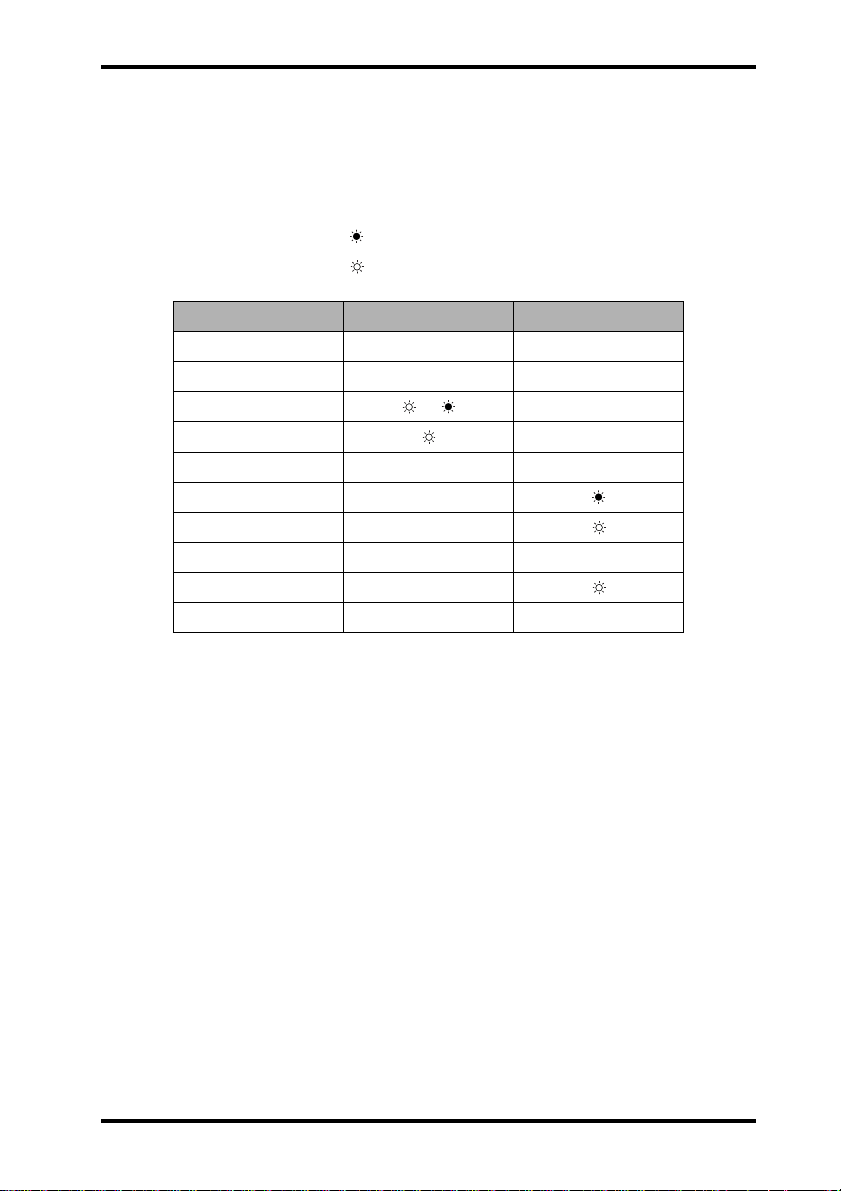
Front Panel Indicator Key
Appendix
● on: green
❍ on: orange
Status ON/DISC READ/WRITE
Reset ❍ ➠ — ❍ ➠ —
Ready (no disc) ❍ —
Inserting disc
Ejecting disc —
Ready (disc inserted) ● —
Seeking ●
Preparing to write ●
Writing ●❍
Writing (test mode) ●
Playback ●●
flashing: green
flashing: orange
➠
— off
—
15
Page 24

English: If you have any questions, please contact
your dealer or one of the following companies.
French: Pour plus de détails sur les produits,
veuillez vous adresser à Yamaha ou au distrib uteur
le plus proche figurant dans la liste suivante :
German: Bei weiteren Fragen wenden Sie sich Sitte
an Ihren Händler oder eine der folgenden Firmen.
JAPAN
Yamaha Corporation
Electronic Systems Division
203 Matsunokijima, Toyooka-mura, Iwata-gun,
Shizuoka-ken, 438-0192 JAPAN
TEL: +81 539 62 3125
FAX: +81 539 62 5346
Internet: www.yamaha.co.jp
U.S.A
Yamaha Systems Technology, Inc.
100 Century Center Court, San Jose, CA 95112
U.S.A
TEL: +1 408 467 2330
FAX: +1 408 437 8791
Internet: www.yamahayst.com
CANADA
Yamaha Canada Music Ltd.
135 Milner Avenue, Scarborough,
Ontario M1S 3R1, CANADA
TEL: +1 416 298 1311
FAX: +1 416 292 0732
UNITED KINGDOM, BENELUX,
PORTUGAL, SPAIN, GREECE,
CYPRUS, TURKEY and EGYPT
Yamaha-Kemble Music (U.K.) Ltd.
Media Technology Division
Sherbourne Drive, Tilbrook, Milton Keynes
MK7 8BL ENGLAND
TEL: +44 1 908 366700
FAX: +44 1 908 368872
GERMANY, SWITZERLAND,
AUSTRIA, EASTERN EUROPE and
RUSSIA
Yamaha Europa GmbH
Multi Media Division
Siemensstrasse 22-34,
D-25462 Rellingen, GERMANY
TEL: +49 4101 303 200
FAX: +49 4101 303 277
Internet: www.yamaha-europe.com
FRANCE
Yamaha Musique France S.A.
B.P. 70, 77312 Marne-la Vallée Cedex 2,
FRANCE
TEL: +33 1 6461 4060
FAX: +33 1 6461 4097
ITALY
Yamaha Musica Italia s.p.a.
Keyboard & Multimedia Division
Viale Italia 88, 20020, Lainate (Milano) ITALY
TEL: +39 2 935771
FAX: +39 2 9370956
SWEDEN and SCANDINAVIA
Yamaha Scandinavia AB
J A Wettergrens Gate 1, Box 300 53,
S-400 43 Gothenburg SWEDEN
TEL: +46 31 89 34 00
FAX: +46 31 45 96 07
Internet: www.yamaha.se
SINGAPORE, MALAYSIA, INDIA,
INDONESIA and PHILIPPINES
Yamaha Systems Technology, Singapore Pte Ltd.
138 Cecil Street, #03-01A Cecil Court,
SINGAPORE 069538
TEL: +65 225 0050
FAX: +65 225 3669
V325750-0
YAMAHA CORPORATION
Electronic Systems Division
Printed in Japan
 Loading...