

Page 1
User Guide
http://www.mvix.net
To get Mvixbox’s Quick Guide please visit www.mvix.net or copy it from installation CD
1
Unicorn Information System
Page 2

Table of Contents
Chapter 1. User Guide
1.1 WebDisk Execution
1.1.1 Login and Join
1.1.2 Executing Main Functions
1.1.2-1 WebDisk Explorer
1.1.2-2 Web Explorer
1.1.2-3 Window Explorer
1.1.2-4 Connector for Mac
1.1.3 Folder Definition
1.2 Run Wizard
1.2.1 Create User
1.2.1-1 Create General User
1.2.1-2 Create Guest User
1.2.2 Create Group
1.2.3 Create Shared Folder
1.2.3-1 Share with a specific user
1.2.3-2 Share with all users
1.3 Using WebDisk Explorer
1.3.1 Menu Definition
1.3.2 File Management
1.3.2-1 Creating Folder
1.3.2-2 Changing File/Folder Name
1.3.2-3 Deleting File/Folder
1.3.2-4 Moving File/Folder
1.3.2-5 File/Folder Upload
1.3.2-6 File/Folder Download
1.3.2-7 Upload/Download Environment Setting
1.3.3 Sharing Folder
1.3.3-1 Sharing Folder Setup
1.3.3-2 Shard Folder Setup
1.3.3-3 Changing Shared Folder Setup
1.3.3-4 Deleting Shared Folder Setup
1.3.3-5 Clearing Shared Folder Setup
1.3.4 Secure Folder
1.3.4-1 Definition of Secure Folder
1.3.4-2 Secure Folder Password Management
1.3.4-3 Using Secure Folder
1.3.4-4 Secure Folder file/folder Management
1.3.4-5 Secure Folder file/folder Upload/Download
2
Unicorn Information System
Page 3

Table of Contents
Chapter 1. User Guide
1.3.5 OPEN(public) Folder
1.3.6 System Folder(USB Auto Copy & Homepage)
1.3.6-1 USB Auto Copy
1.3.6-2 Personal Homepage
1.4 Using WebExplorer
1.4.1 File Management
1.4.1-1 File/Folder Upload
1.4.1-2 File/Folder Download
1.4.2 Sharing Folder
1.4.3 Attaching File
1.5 Using Window Explorer
1.5.1 Disk Connection
1.5.1-1 Connecting Disk
1.5.1-2 Using Disk
1.6 Using PC Backup
1.6.1 Run backup wizard
1.6.2 Check backup progressing status
1.6.3 Manage backup profile
1.7 Using Note/Mail
1.7.1 Sending Note/Mail
1.7.2 From Message Management
1.7.3 To Message Management
1.8 BitTorrent/RSS
1.8.1 Torrent File Download
1.8.2 Torrent Command Button
1.8.3 File download using RSS Reader
1.9 Blog
1.9.1 What is Blogging API?
1.9.2 Blog Menu
1.9.3 Create Blog
1.9.4 My Blog
1.9.5 Write Blog & WebDisk File link
3
Unicorn Information System
Page 4

Table of Contents
1.10 Service Request
1.10.1 Application for Service and Cancellation
1.11 Guest User
1.11.1 Adding Guest User
1.12 Modify my information
Chapter 2. Administrator Guide
2.1 Administrator Execution
2.2 User Management
2.2.1 User Management
2.2.1-1 User Management List
2.2.1-2 User Management Function
2.2.1-3 User Search
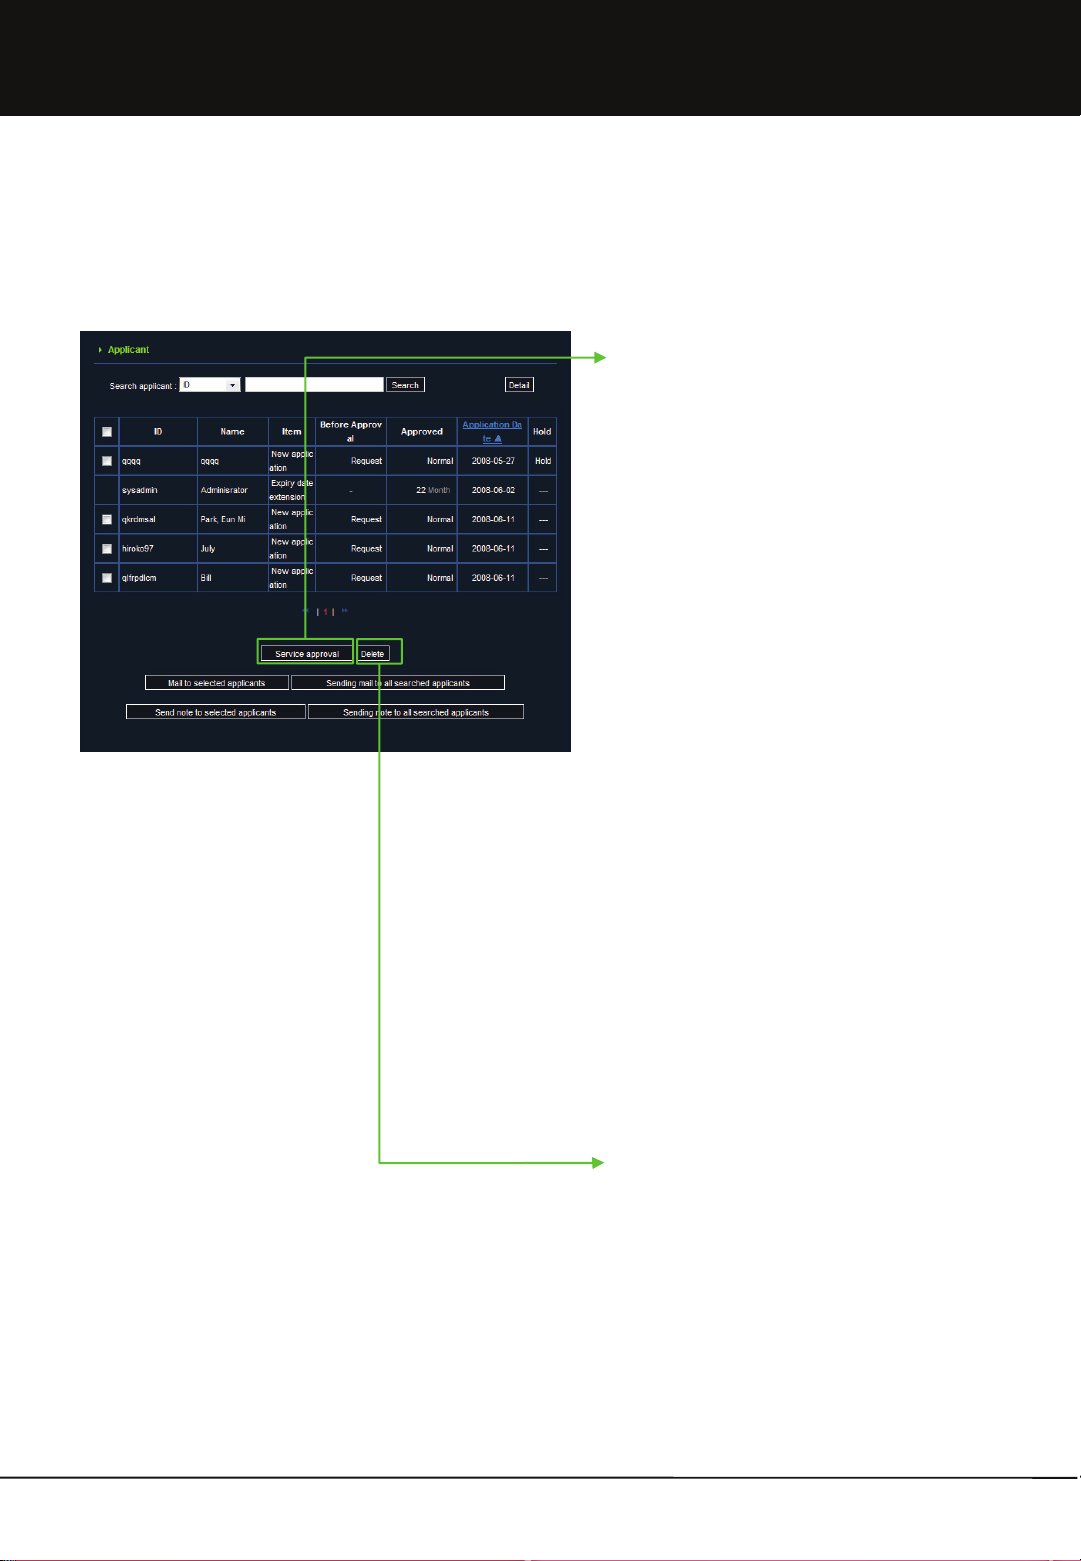
2.2.2 Applicant
2.2.2-1 Applicant Management List
2.2.2-2 Applicant Management Function
2.2.2-3 Applicant Search
2.2.3 Guest User Management
2.2.4 Group Management
2.2.4-1 Group Management List
2.2.4-2 Group Addition
2.2.4-3 Group Search
2.3 Webdisk Management
2.3.1 Registration Option
2.3.1-1 Registration Option Setup
2.3.1-2 Setup per Option
2.3.2 Service Status
2.3.3 Board
2.3.4 OPEN(public) Folder
2.4 System Management
2.4.1 System Information
2.4.2 System Management
2.4.3 Service Management
2.4.4 Disk Management
2.4.4-1 Disk & Volume Info.
2.4.4-2 Adding Disk
4
Unicorn Information System
Page 5

Table of Contents
Chapter 2. Administrator Guide
2.5 Network Management
2.5.1 Network Setup
2.5.2 Setting up DDNS
2.6 Password Initialization
Appendix.
A. Upgrade
B. Installing Printer Server
C. Using USB wireless LAN card
D. How to Check IP Address of Mvixbox
E. Backup and Recovery
F. Using DDNS
G. Using iTunes
H. Adding Hard disk
I. In case error message is displayed(in some OS, such as Vista, etc.)
J. USB Auto copy and Personal Homepage
K. Application
L. FAQ
M. Troubleshooting
N. Limited Warranty
O. Copyright & Legal Attributions
P. Contact Information
Q. Glossary
5
Unicorn Information System
Page 6

Chapter 1. User Guide
1.1 WebDisk Execution
1.1.1 Login and Join
1 2
3
1. Input IP address and domain name of applicable
equipment on internet web browser.
ex)http://192.168.0.7 or http://shinsun.mvix.net]
* It is easy to use domain name. Please refer the
establishment guide and manager function for the
domain establishment method.
1
2
3
1. [Log In] The administrator's ID and password are
‘sysadmin’ and sysadmin, respectively. The ‘sysadmin’
account is given to the owners of the device, allowing
them to use all administrator functions as well as
ordinary user functions.
2. [Password Initialization] In case manager forgets the
secret number, it can be format for secret number.
Secret number will be changed same as ID.
1. To make a user account other than ‘sysadmin’, join
the membership and get permission from ‘sysadmin’.
2. Click the ‘Register’ button on the left to move to the
membership registration page.
1. Rapid Box sends to ‘sysadmin’ those files uploaded
by anybody. It is a convenient function to get a file
from an unauthorized user.
2. Input the storing folder name when you uploading.
Present date and time will be input for basic details.
3. After you choose file and click the upload button, it will
be uploaded your requested folder name in RapidBox
folder of manager.
4. You can upload maximum 8 by using ADD button, you
can upload by 2 GB total capacity at once.
6
Unicorn Information System
Page 7
Chapter 1. User Guide
1
2 4
3
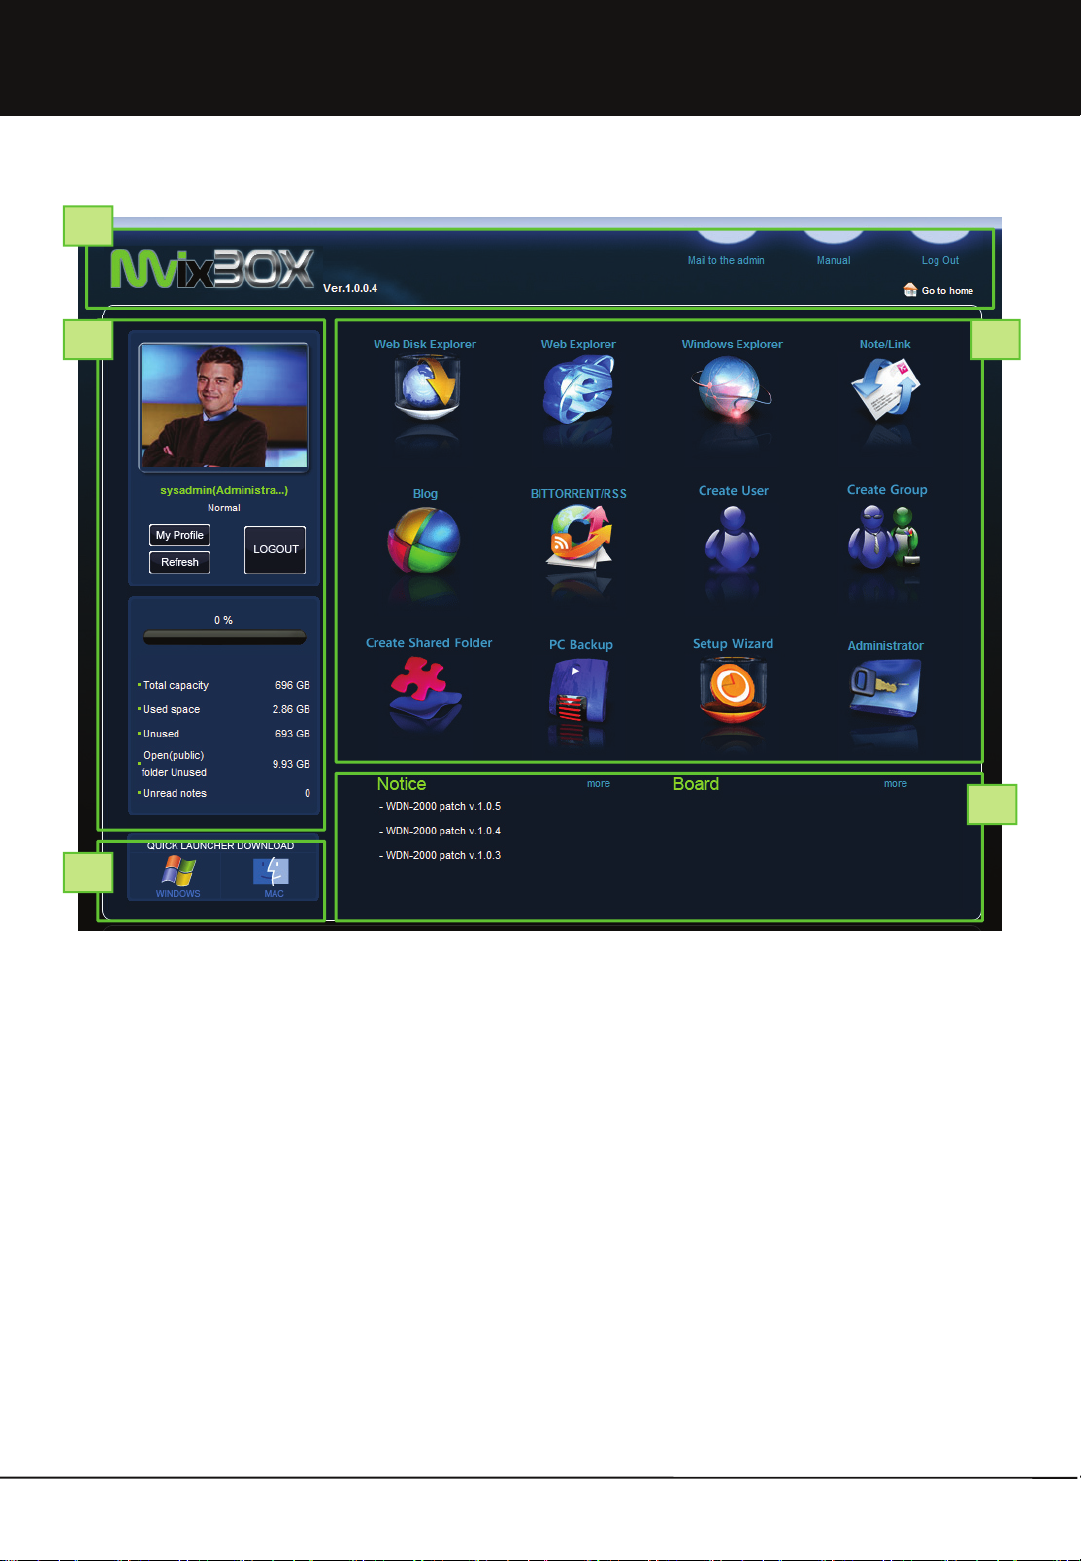
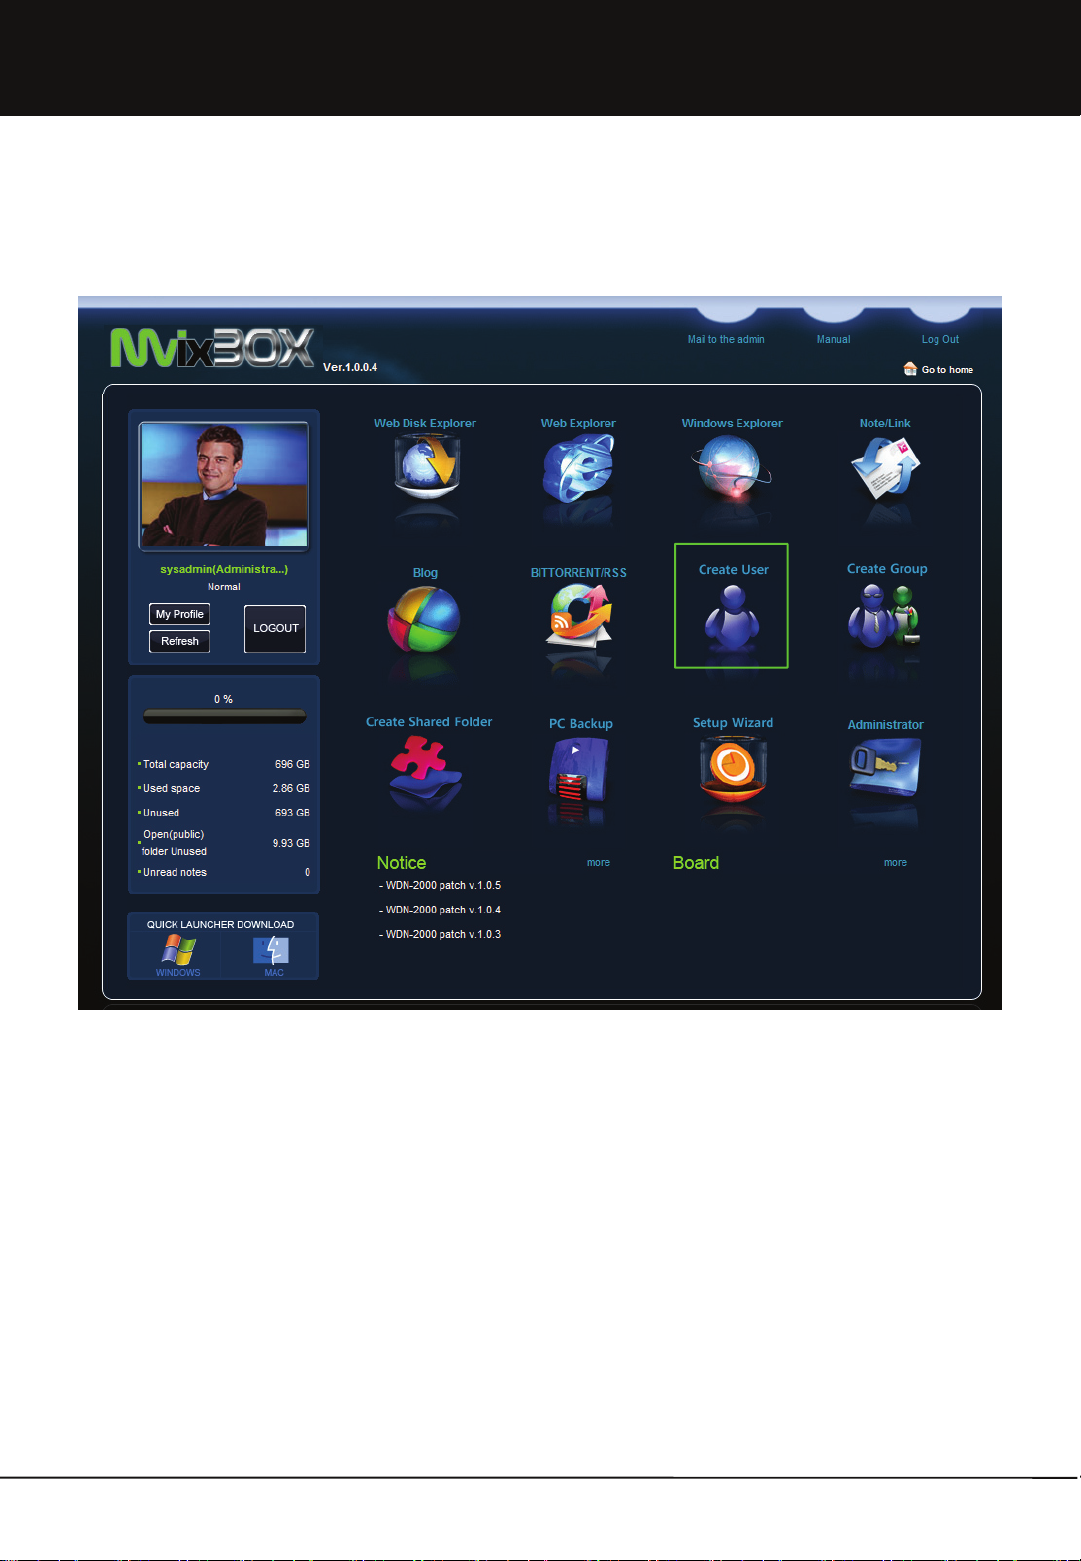
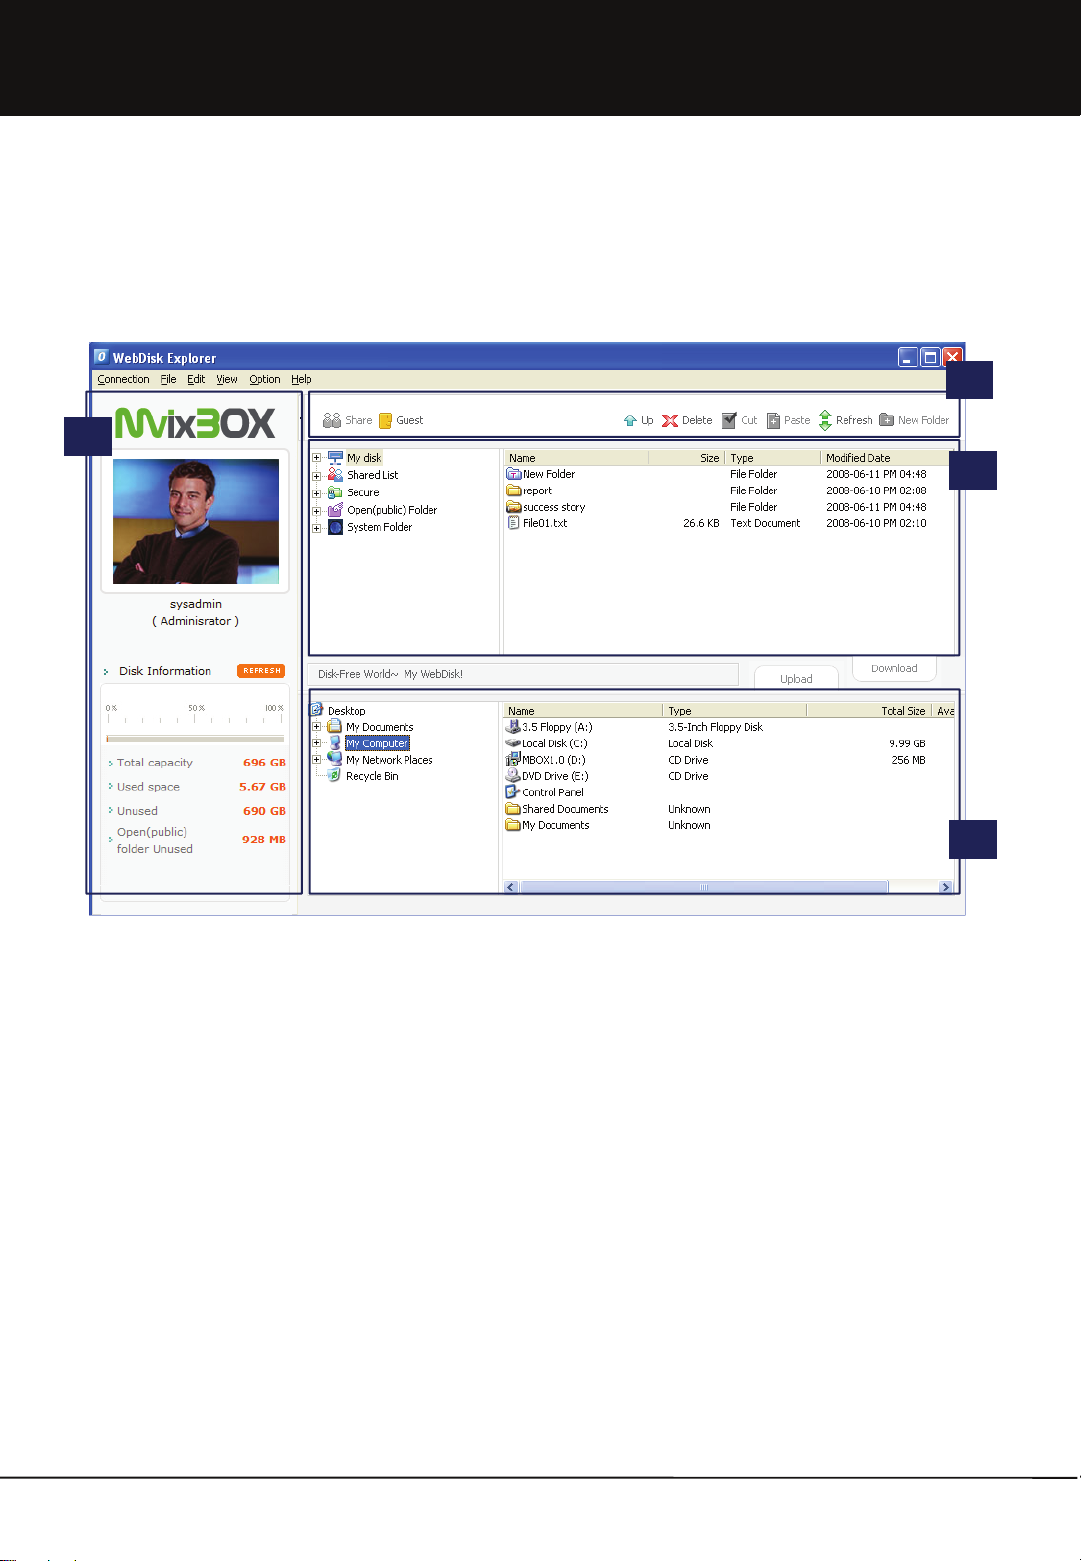
- The main page after login consists of the following:
1. Top of Screen
▪ Product Logo: Click product logo to move to main page at all times.
2. Top Left
▪ Basic Image: Image can be changed as desired by the user in ‘my profile’.
▪ My Profile: Password and basic image, etc. can be changed.
▪ Basic capacity-related information is provided.
3. Bottom Left:
▪ You download WebDisk interface adapter. In case you use WebDisk interface adapter, you can execute WebDisk
Explore or Windows Explorer directly without connecting website.
4. Top Right : Main function icons are showed.
▪ Web Disk Explorer, Web Explorer, Window Explorer, Blog, BitTorrent, RSS Menu and so on.
▪You can use manager menu when you log-in by using sysadmin ID. Service Request menu can be used only for general
user.
5. Bottom Right
▪ You can check new patch information in connection with patch upgrade and web board of Mvixbox.
▪ You can immediately check new listings in the web board through which information can be shared with Mvixbox users.
5
7
Unicorn Information System
Page 8

Chapter 1. User Guide
1.1.2 Executing Main Function
1.1.2-1 WebDisk Explorer
1. When executing Web Disk explorer, Web Disk
explorer automatically activates. Server login takes
place at the same times as execution. Therefore, there
is no need for any additional login.
2. Once Web Disk explorer is opened, it can be used
separately from the web browser.
3. Also, Web Disk explorer can be executed after login
through a WEBDISK Connector shortcut icon in
desktop of PC.
4. ‘Run' button at the bottom is activated when clicking
Login button after entering ID, password and server
address in which web disk is installed while 'Web Disk
Explorer' tab is selected.
5. Web disk explorer is executed by clicking ‘Run' button.
8
Unicorn Information System
Page 9
Chapter 1. User Guide
1.1.2 Executing Main Function
1.1.2-2 Web Explorer
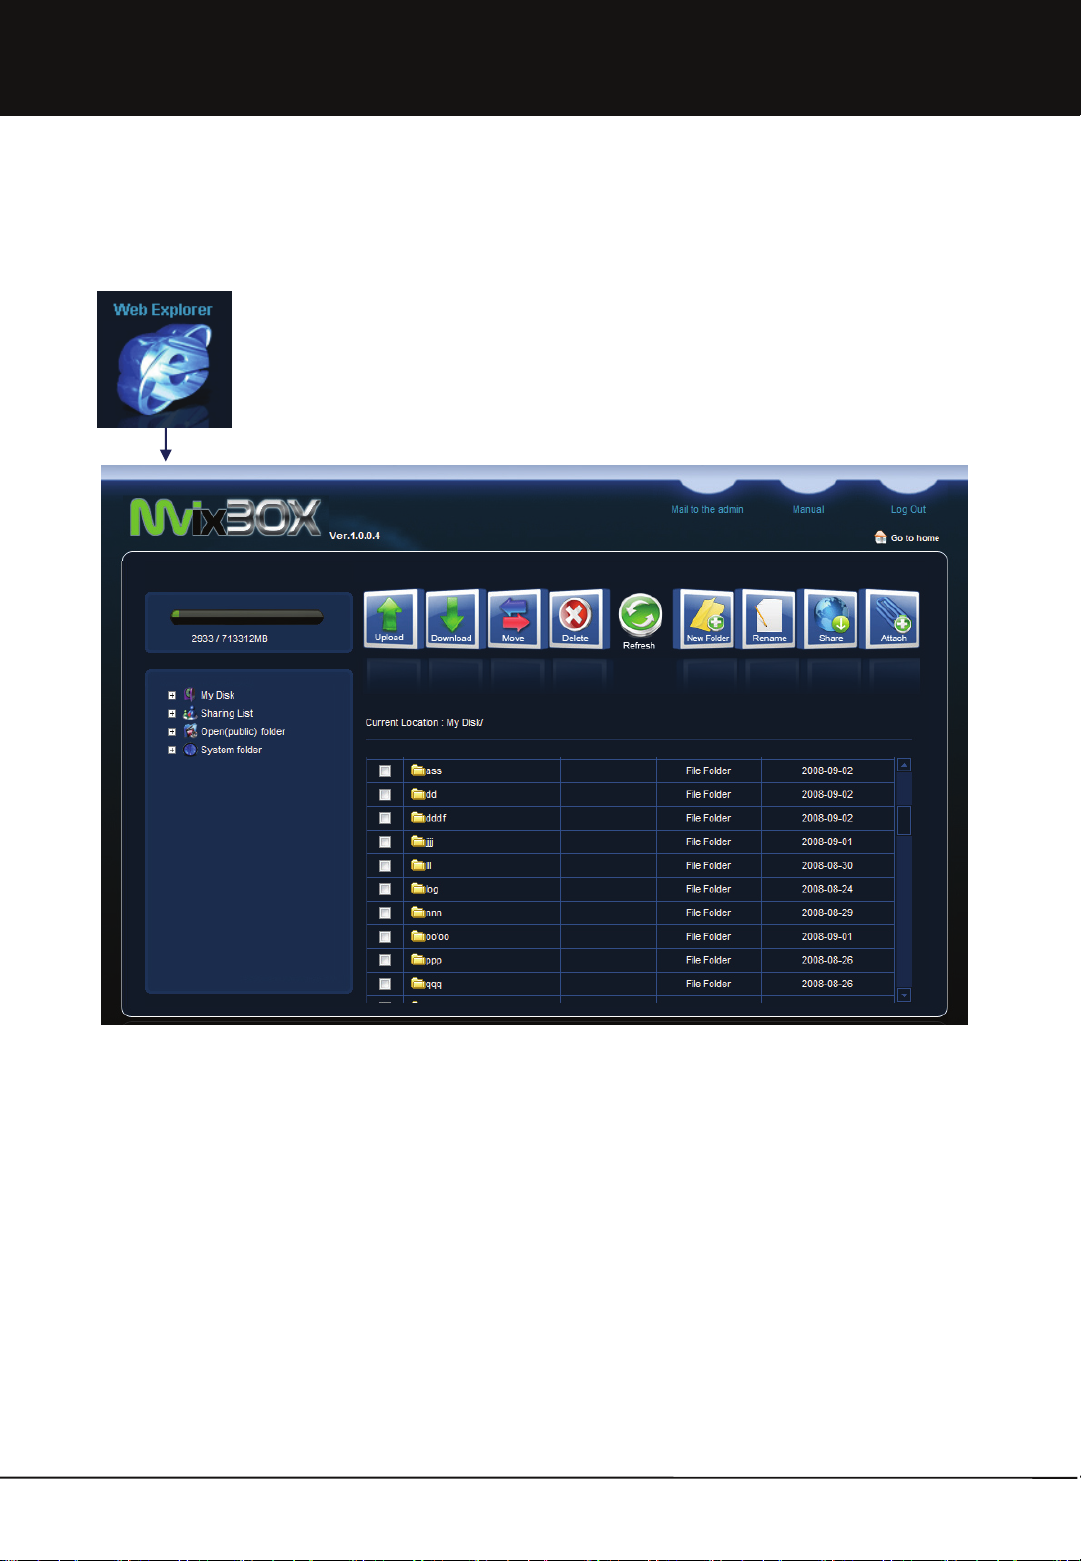
1. Web Explorer can manage My Disk only using the web browser without requiring additional program. Therefore,
Web Explorer can be used not only in the Windows operating system, but also in Macintosh and Linux.
2. Web Explorer is similar to Web Disk explorer. It is largely divided into ① a folder tree, ② menu and ③ File/
Folder list parts.
9
Unicorn Information System
Page 10
Chapter 1. User Guide
1.1.2 Executing Main Function
1.1.2-3 Window Explorer
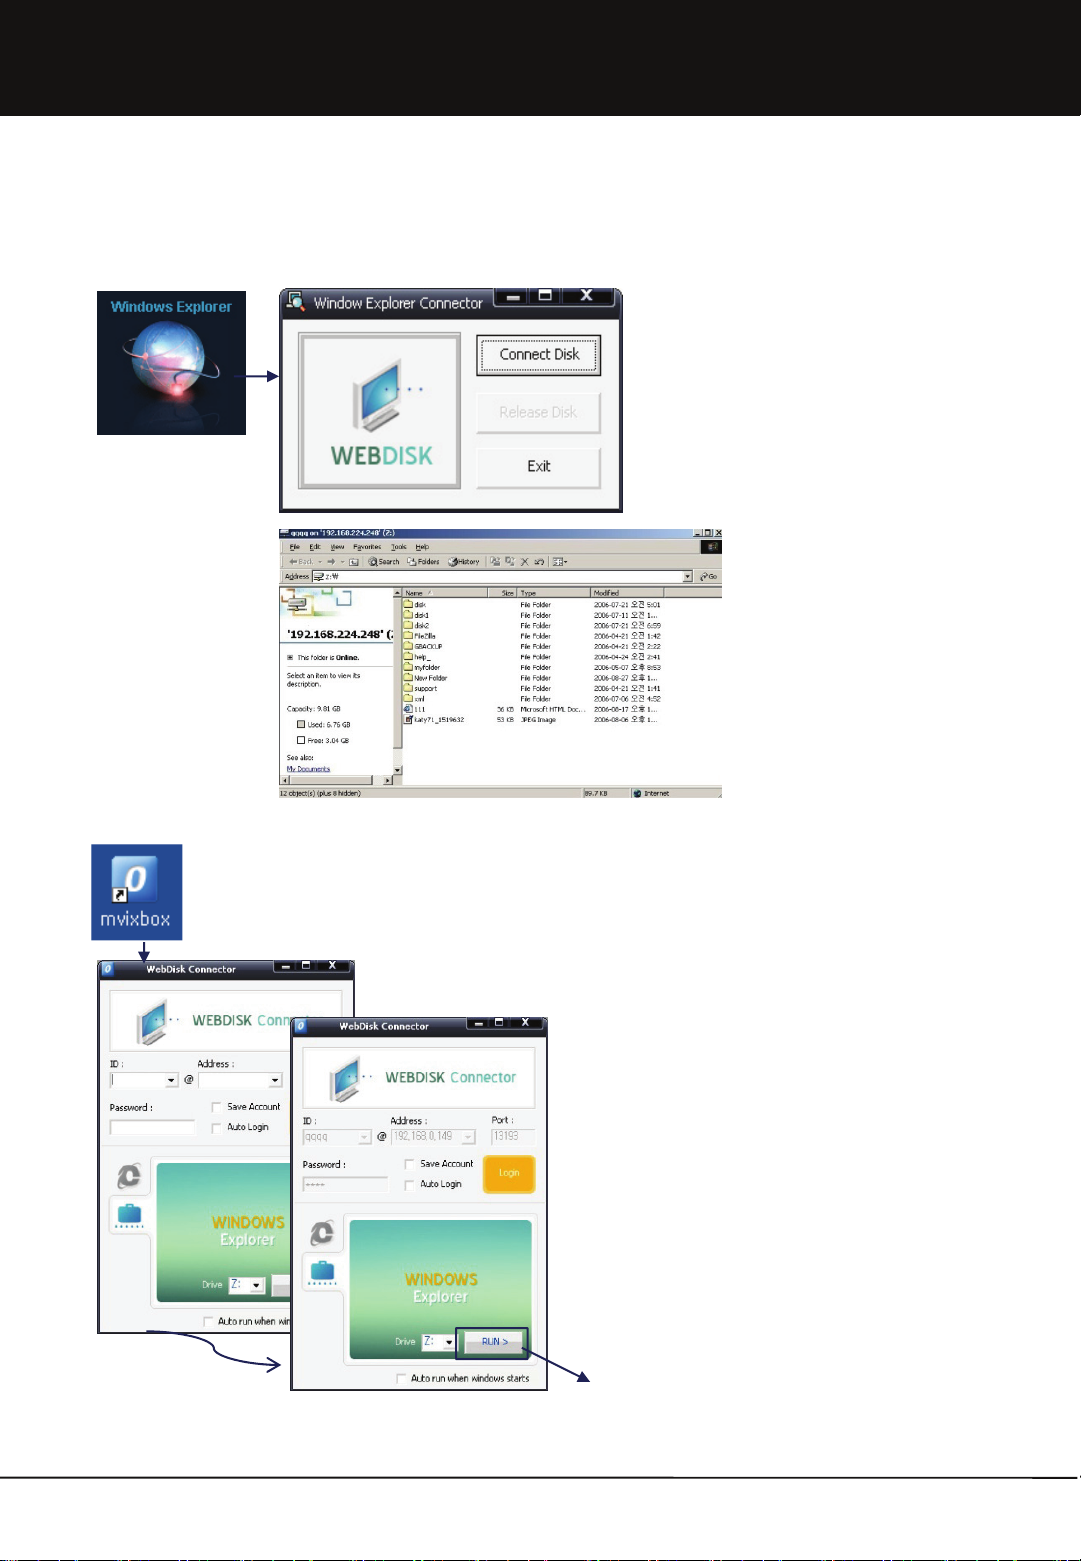
1. When executing Window Explorer, the Window
Explorer Connector is executed.
2. WebDisk can be connected to the Window
Explorer drive or can be released.
3. Also, Web Disk explorer can be executed after
login through a WEBDISK Connector shortcut
icon in desktop of PC.
4. ‘Run' button at the bottom is activated when clicking
Login button after entering ID, password and server
address in which web disk is installed while 'Window
Explorer' tab is selected.
5. Click ‘Run' button to execute window explorer.
10
Unicorn Information System
Page 11

Chapter 1. User Guide
1.1.2 Executing Main Function
1.1.2-4 Connector for Mac
1. Download WebDisk Connector from Quick Launcher
Download in the main screen after login.
2. Double click the downloaded image file
(WebDiskConnector.dmg ). Image is mounted in finder.
3. Drag and drop WebDiskConnector to application program
folder.
4. Web disk connector for Mac supports Power PC line of Mac
and Intel of OSX 10.2.8 or higher. It is not operated in Mac
operating system before OSX 10.2.8 version.
5. Execute the function by double-clicking WebDiskConnector
in application program folder.
6. Enter the following particulars in main screen.
a. Server Address : Enter address of device to be connected.
b. Login ID : Enter login ID.
c. Password : Enter password for login.
d. Protocol : Select connection protocol. There are two types
of connection protocol, such as SMB and HTTP.
- SMB : This is windows network share protocol. It is
recommended for use in case device is in the
same network as my Macintosh computer.
Although this protocol is fast in transmission
speed, there is a high possibility of this protocol
becoming blocked by firewall during connection
from the outside.
- HTTP : This is WebDAV protocol. It is recommended for
use in case device is in external network.
Although this protocol is rather slow in
transmission speed, there is a low possibility of
this protocol becoming blocked by firewall even
during connection from the outside.
7. Web disk login begins when clicking 'Connect' button.
8. When connection succeeds, program is automatically closed
and My Disk area located in web disk is mounted in finder.
9. If connection fails, check if input values are correct, if there
are no problems in network connection and if device state is
normal.
10. All values entered with the exception of password are
automatically saved and displayed again in the next
execution.
11
Unicorn Information System
Page 12
Chapter 1. User Guide
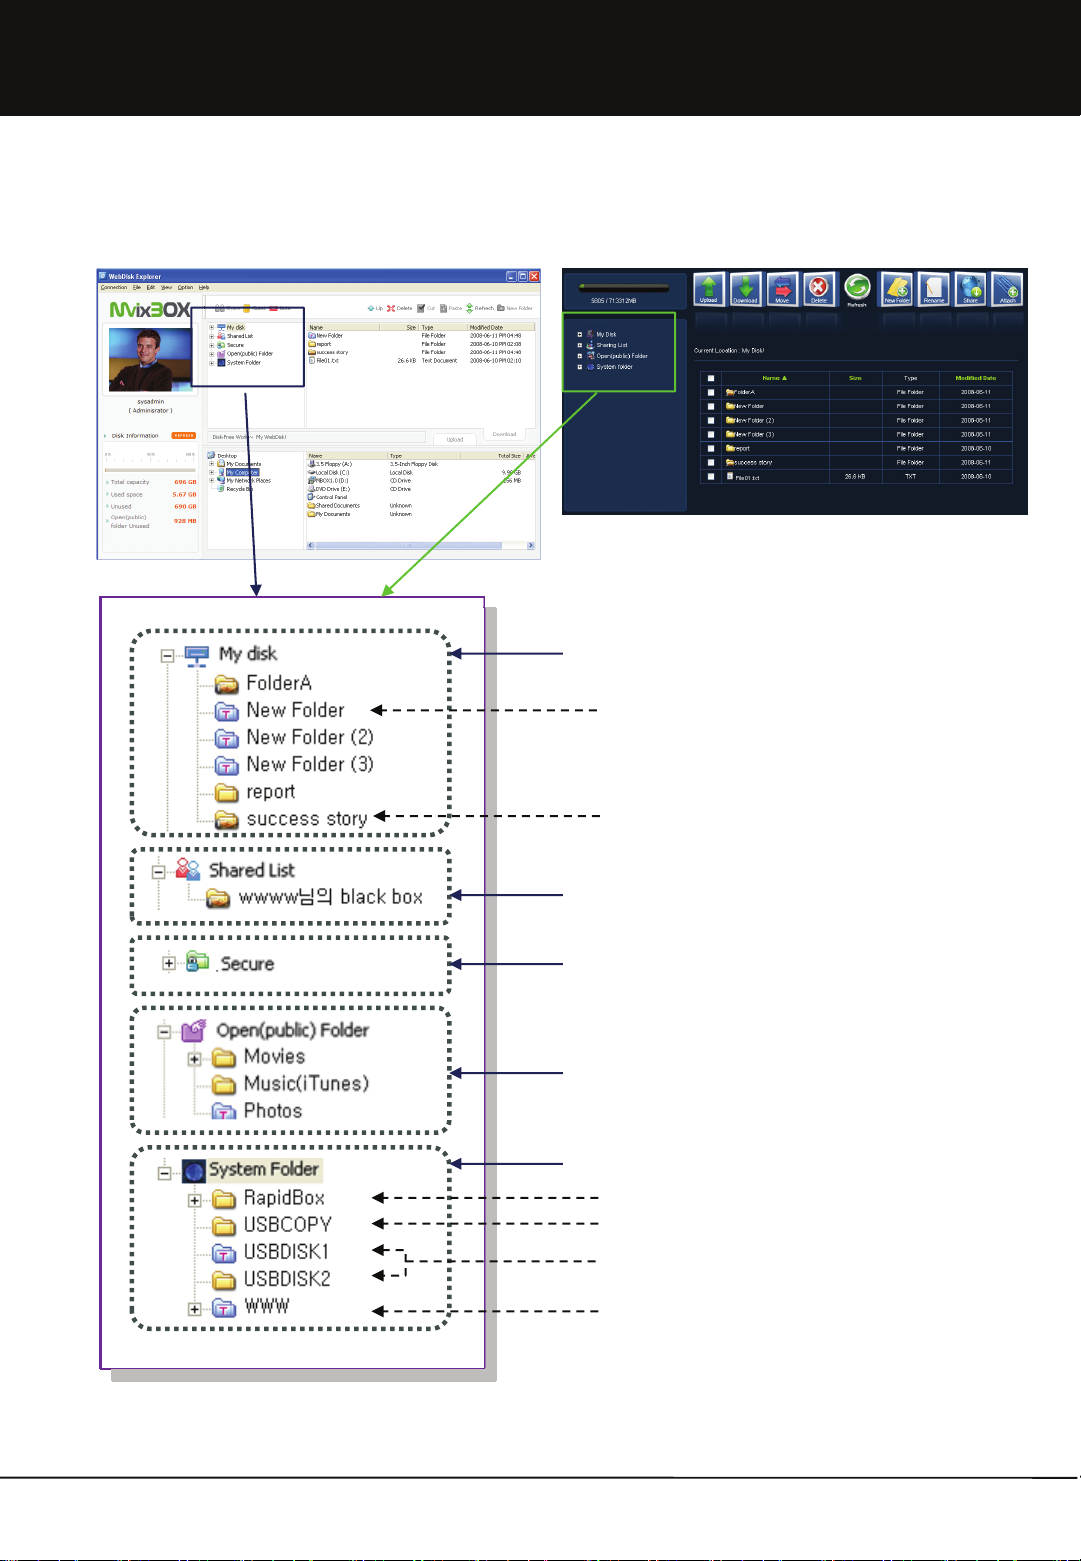
1.1.3 Folder Definition
WebDisk Explorer Web Explorer
Private WebDisk Folder
New folder and corrected folder of folder contents is
changed folder shape as T shape.
-Shared folder that I approve to share to other User
-Assign Authority Establishment per group, user, and
Guest user.
-Authority Establishment for read, write, read/write.
Shared folder that other user approved me to share
Folder for hacking protection
Store by using data encryption
Possible to use after input password
Folder for all user can share
Music(iTunes) Folder – Linked with iTunes Program
sysadim execlusive folder (only use for sysadmin)
Upload execlusive folder, Upload for user without account
Backup folder when USB Auto copy
12
USB exterior equipment
It appears when the equipment is connected.
Homepage basic folder
Private homepage using is possible when you put
homepage file on this folder.
Unicorn Information System
Page 13
Chapter 1. User Guide
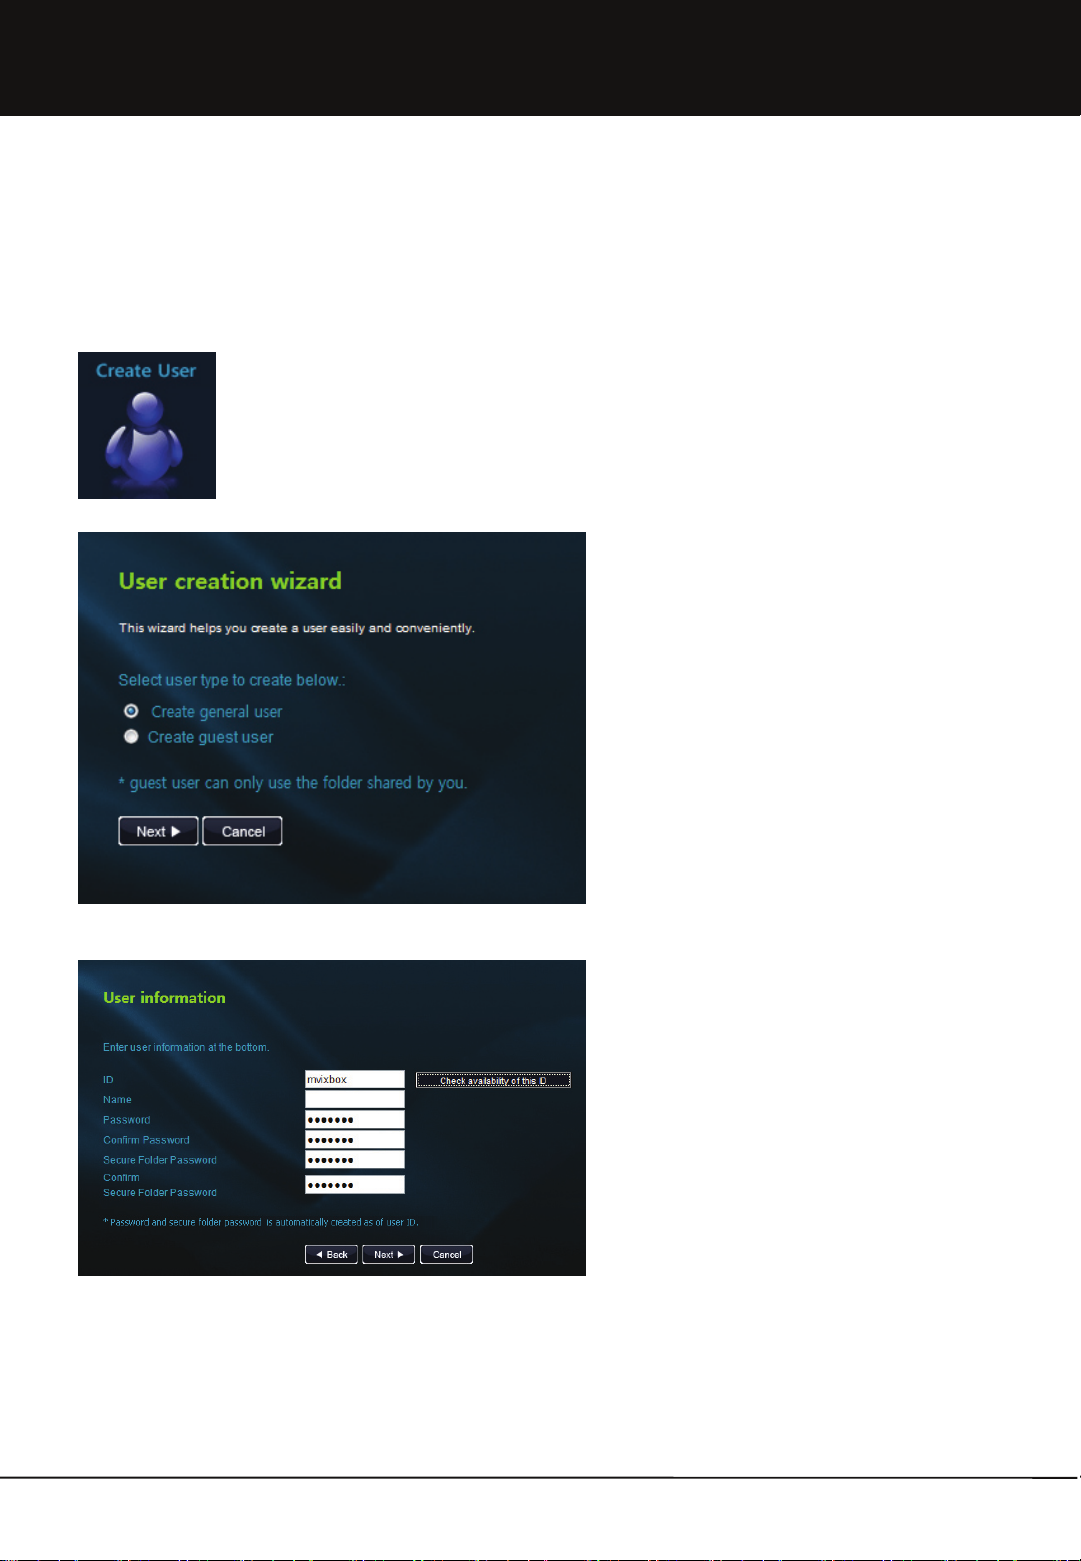
1.2 Run Wizard
1.2.1 Create User
1. Login with admin. ID for easy and fast creation of general user and temporary user by using 'user creation' wizard in the
main page.
2. General users can create Guest user by using ‘Guest user' wizard in the main page.
13
Unicorn Information System
Page 14
Chapter 1. User Guide
1.2.1-1 Create General User
‘Create general user’ is the exclusive authority of administrator. Administrator can easily create user by using 'user
creation' wizard in the main page without moving to admin. menu.
1. After login with admin. ID, click 'Create user' icon in
the main page and move to 'user creation wizard'
page.
2. Select 'create general user' in the user type to be
created.
3. Enter user information. Password and secure folder
password are automatically created as of user ID.
14
Unicorn Information System
Page 15
Chapter 1. User Guide
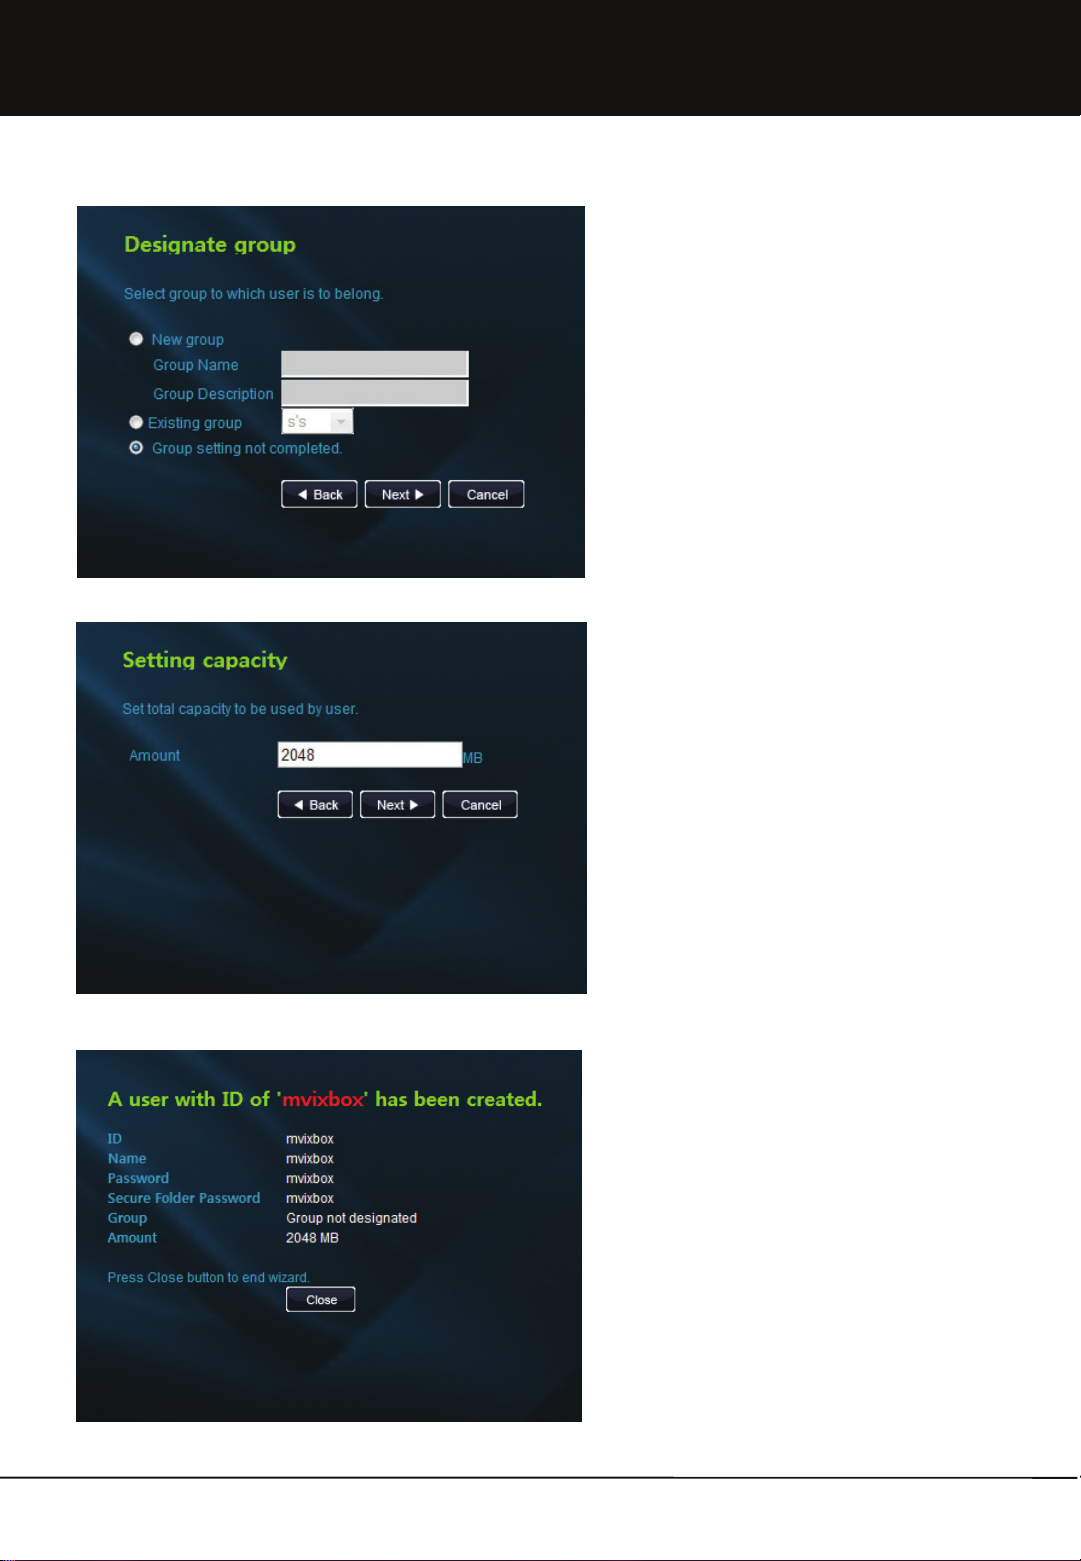
4. Select group to which user is to belong.
① In case of new group creation, enter group name and
description and press Next button.
② To select an existing group, select a group in the
selection box.
③ It is not necessary to set a group if not separately
designating a group.
15
5. Set total capacity to be used by user.
6. Check the newly created user information. Press
Close button to end wizard.
Unicorn Information System
Page 16
Chapter 1. User Guide
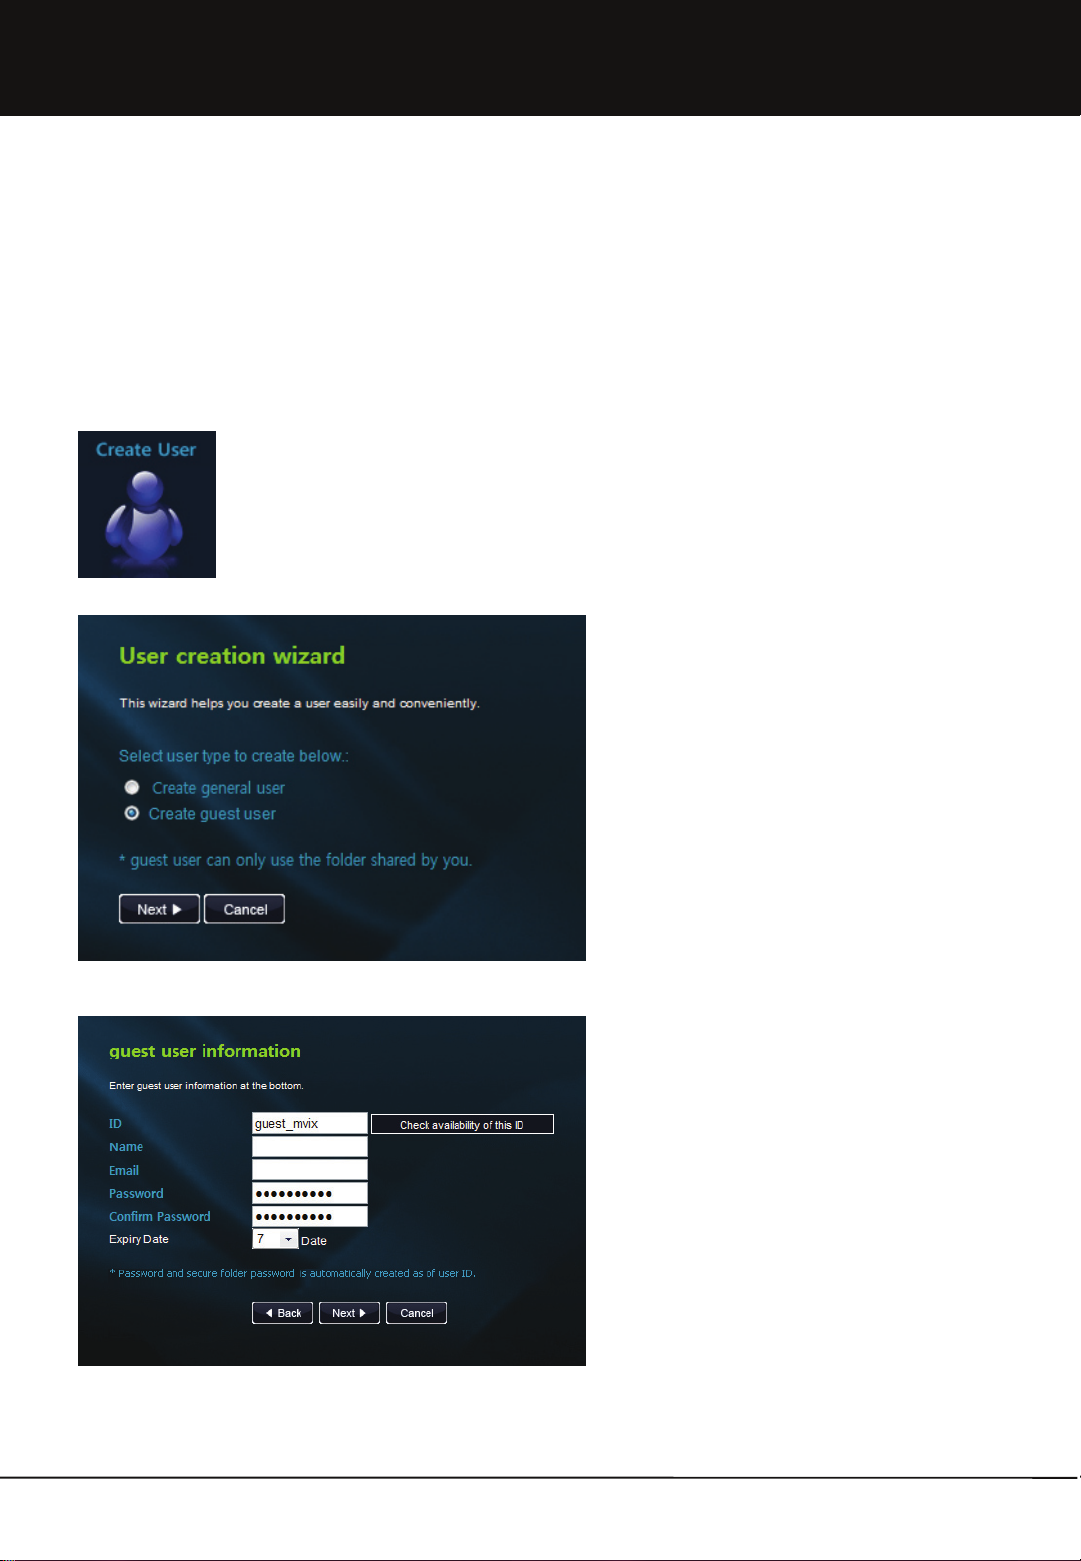
1.2.1-2 Create Guest User
It is possible to conveniently share folder with a specific person not registered as a user by creating a Guest user. Both
admin. account and general user account can create and delete Guest user.
Guest user can only use the folder shared by the person who created the Guest user.
[Create Guest user in admin. mode]
1. After login with admin. ID, click 'Create user' icon in
the main page to move to 'user creation wizard' page.
2. Select 'create guest user' in the user type to be
created.
3. Enter guest user information. Password is
automatically created as of user ID. After setting valid
term for folder sharing by guest user, click Next button.
16
Unicorn Information System
Page 17
Chapter 1. User Guide
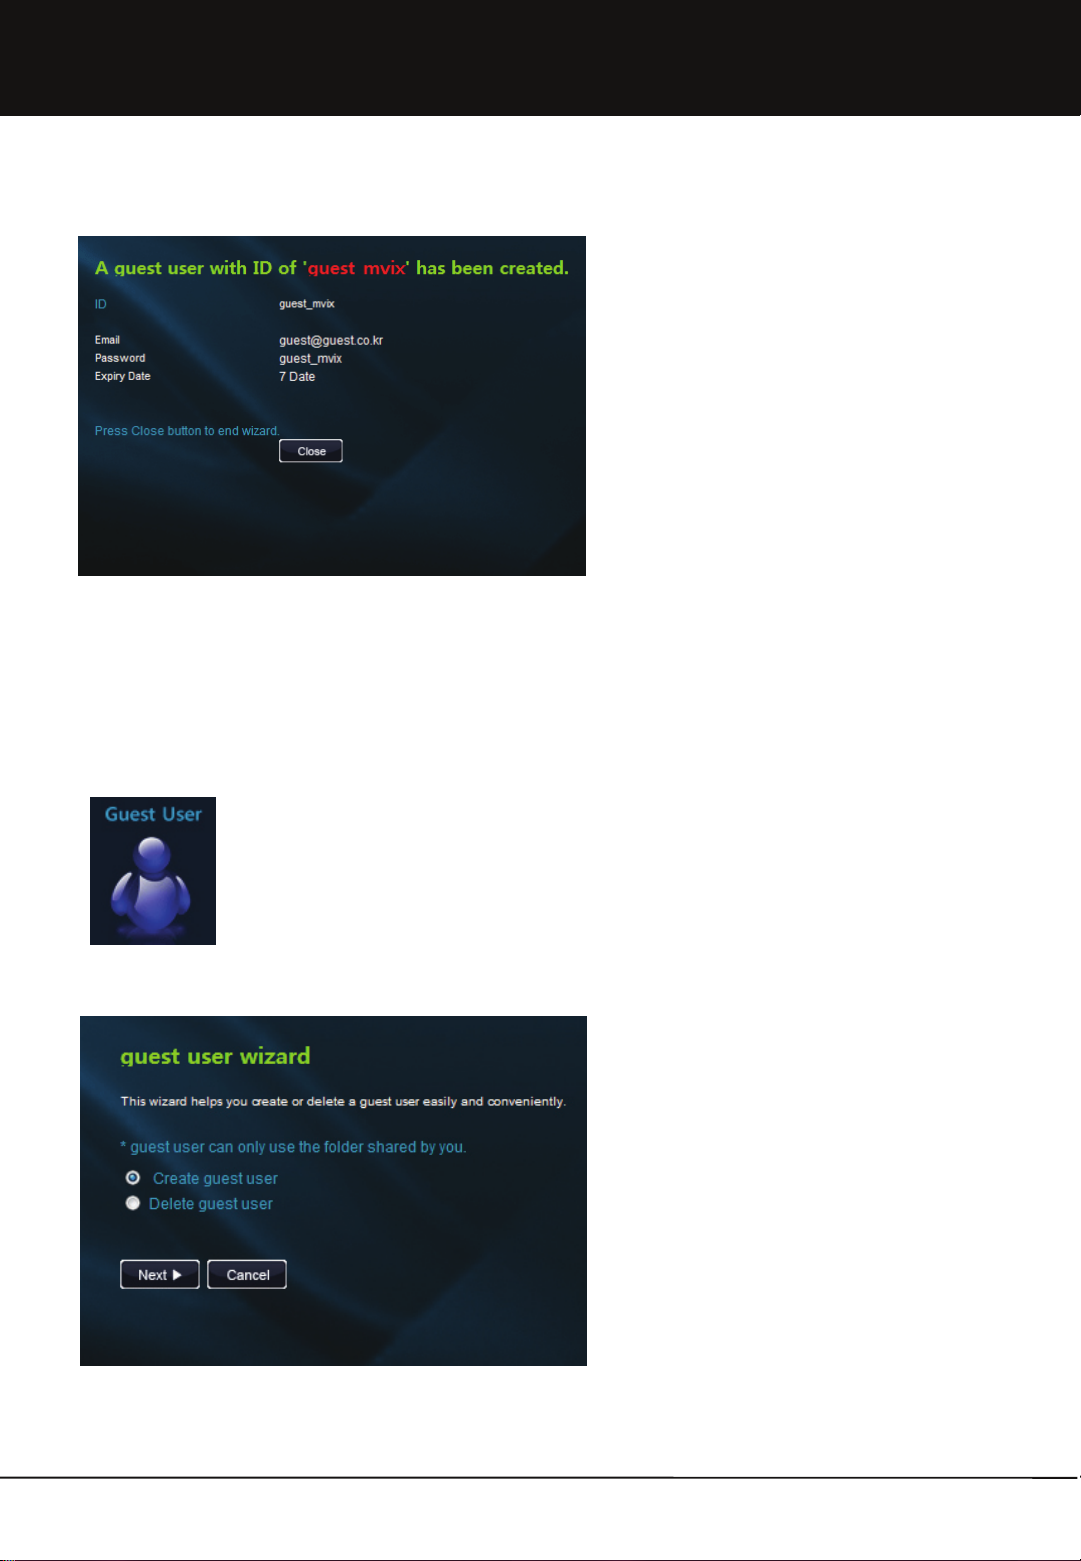
4. Check the newly created guest user information. Press
Close button to end wizard.
[Create guest user in user mode]
1. After login, select 'guest user' icon in the main page to
move to 'guest user wizard' page.
2. Select 'Create guest user' menu to create a guest user.
The following stages are the same as those of creating a
guest user in admin. mode. Refer to the previous page.
17
Unicorn Information System
Page 18
Chapter 1. User Guide
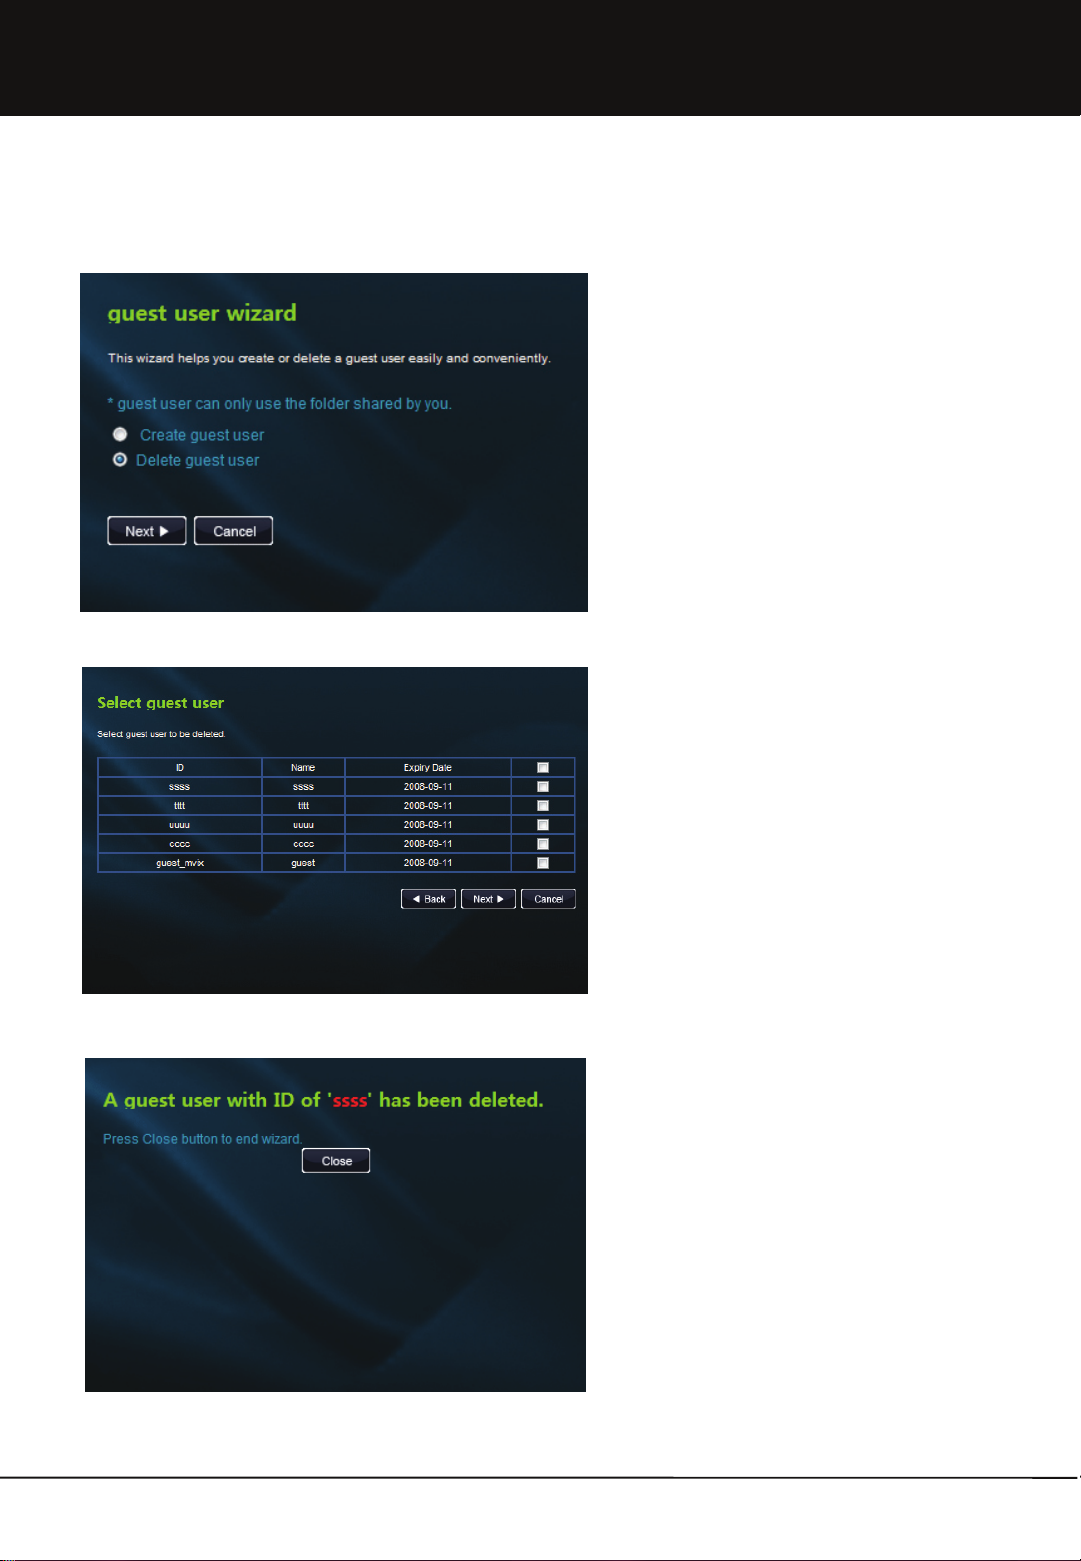
[Delete guest user in user mode]
1. Select 'Delete guest user' menu to delete guest user.
18
2. A list of the guest users created is displayed. Select
the guest user to be deleted and click Next button.
3. After checking the guest user deleted, press Close
button to end wizard.
Unicorn Information System
Page 19
Chapter 1. User Guide
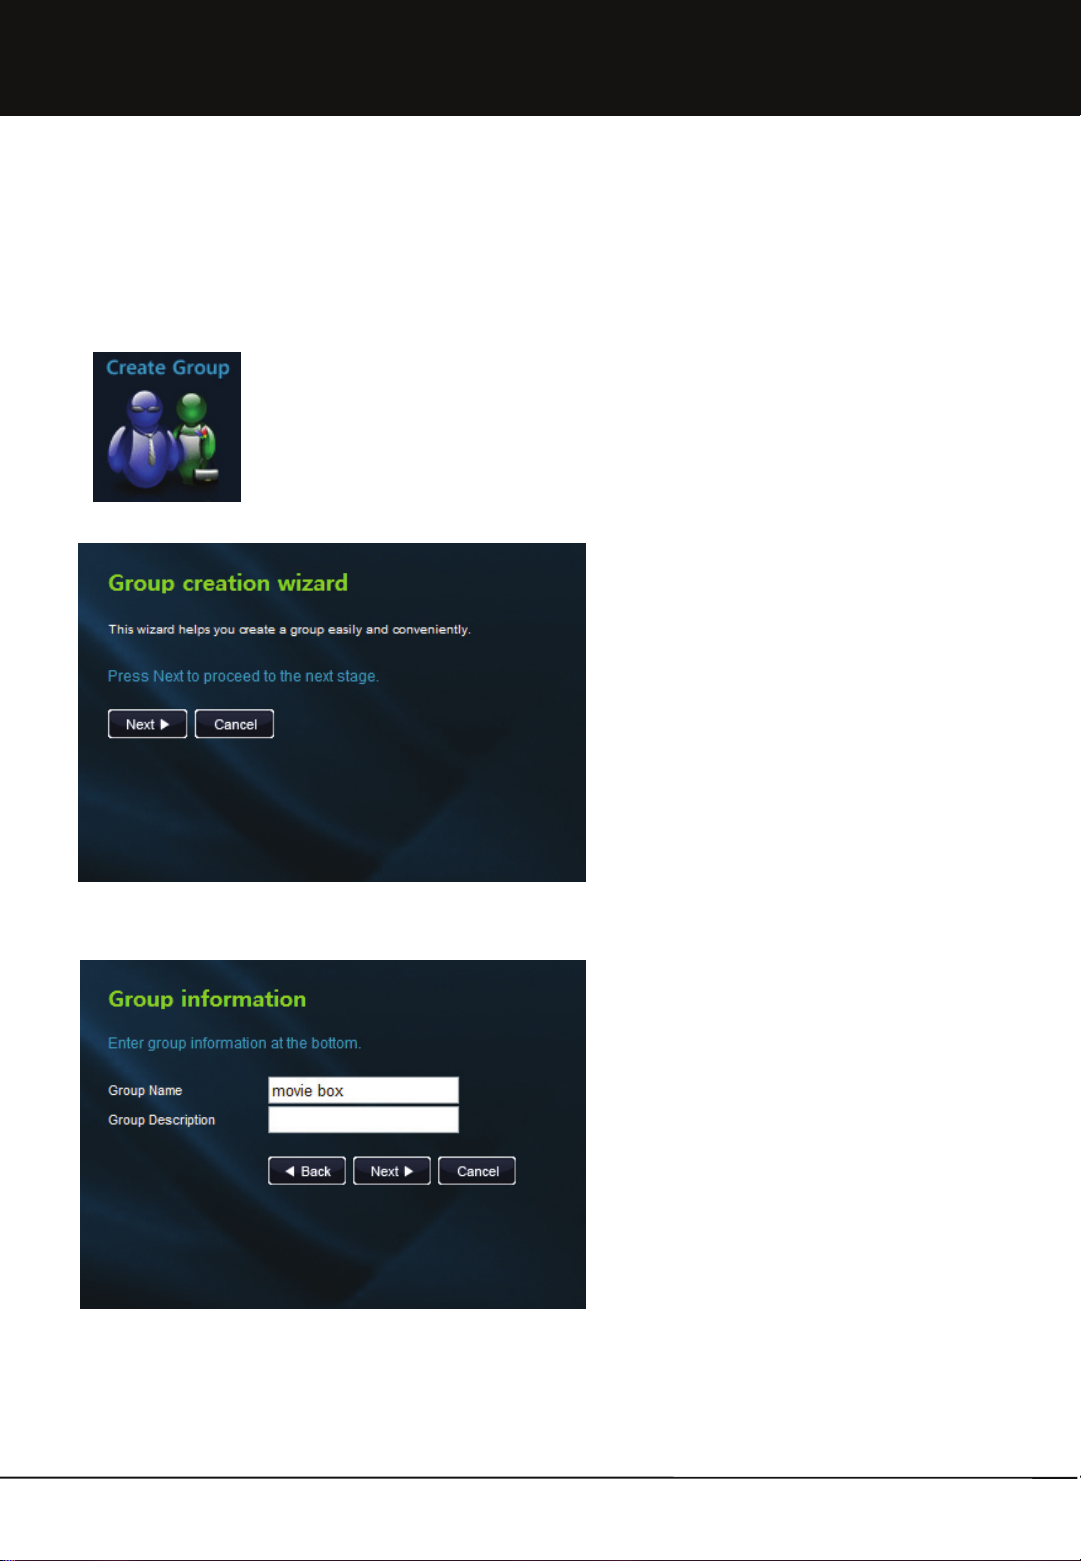
1.2.2 Create Group
Create group menu is the exclusive authority of administrator. Administrator can conveniently create a group by using
wizard without moving to admin. page.
1. After login with admin. ID, select 'Create group' icon in
the main page.
2. Move to group creation wizard page. Press Next
button to proceed to the next stage.
3. After entering name and description of the group to be
created, click Next button.
19
Unicorn Information System
Page 20
Chapter 1. User Guide
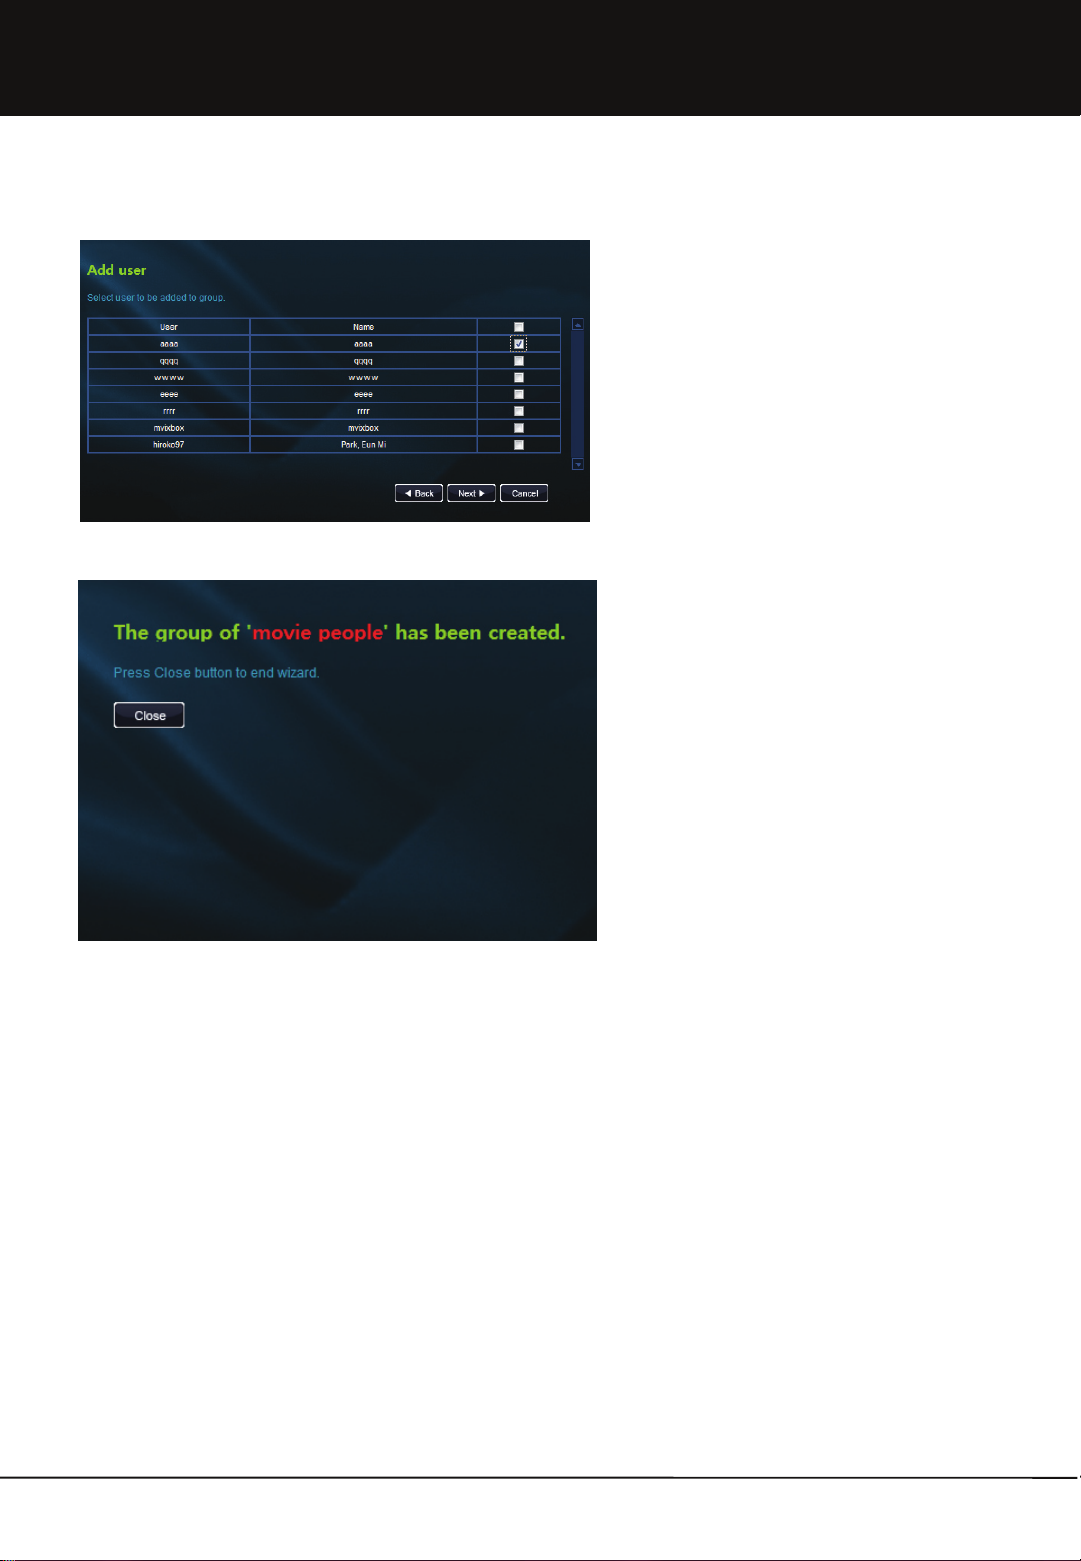
4. When a list of the registered users is created, select
the user to be added to the group. It is possible for a
single user to join multiple groups.
5. After checking the created group, press Close button
to end wizard.
20
Unicorn Information System
Page 21
Chapter 1. User Guide
1.2.3 Create Shared Folder
It is possible to easily and conveniently create a shared folder by using shared folder wizard. Shared folder can be shared
with a specific person designated by user or with all users registered in the equipment.
Location of shared folder is determined according to the type of sharing.
1.2.3-1. Share with a specific user
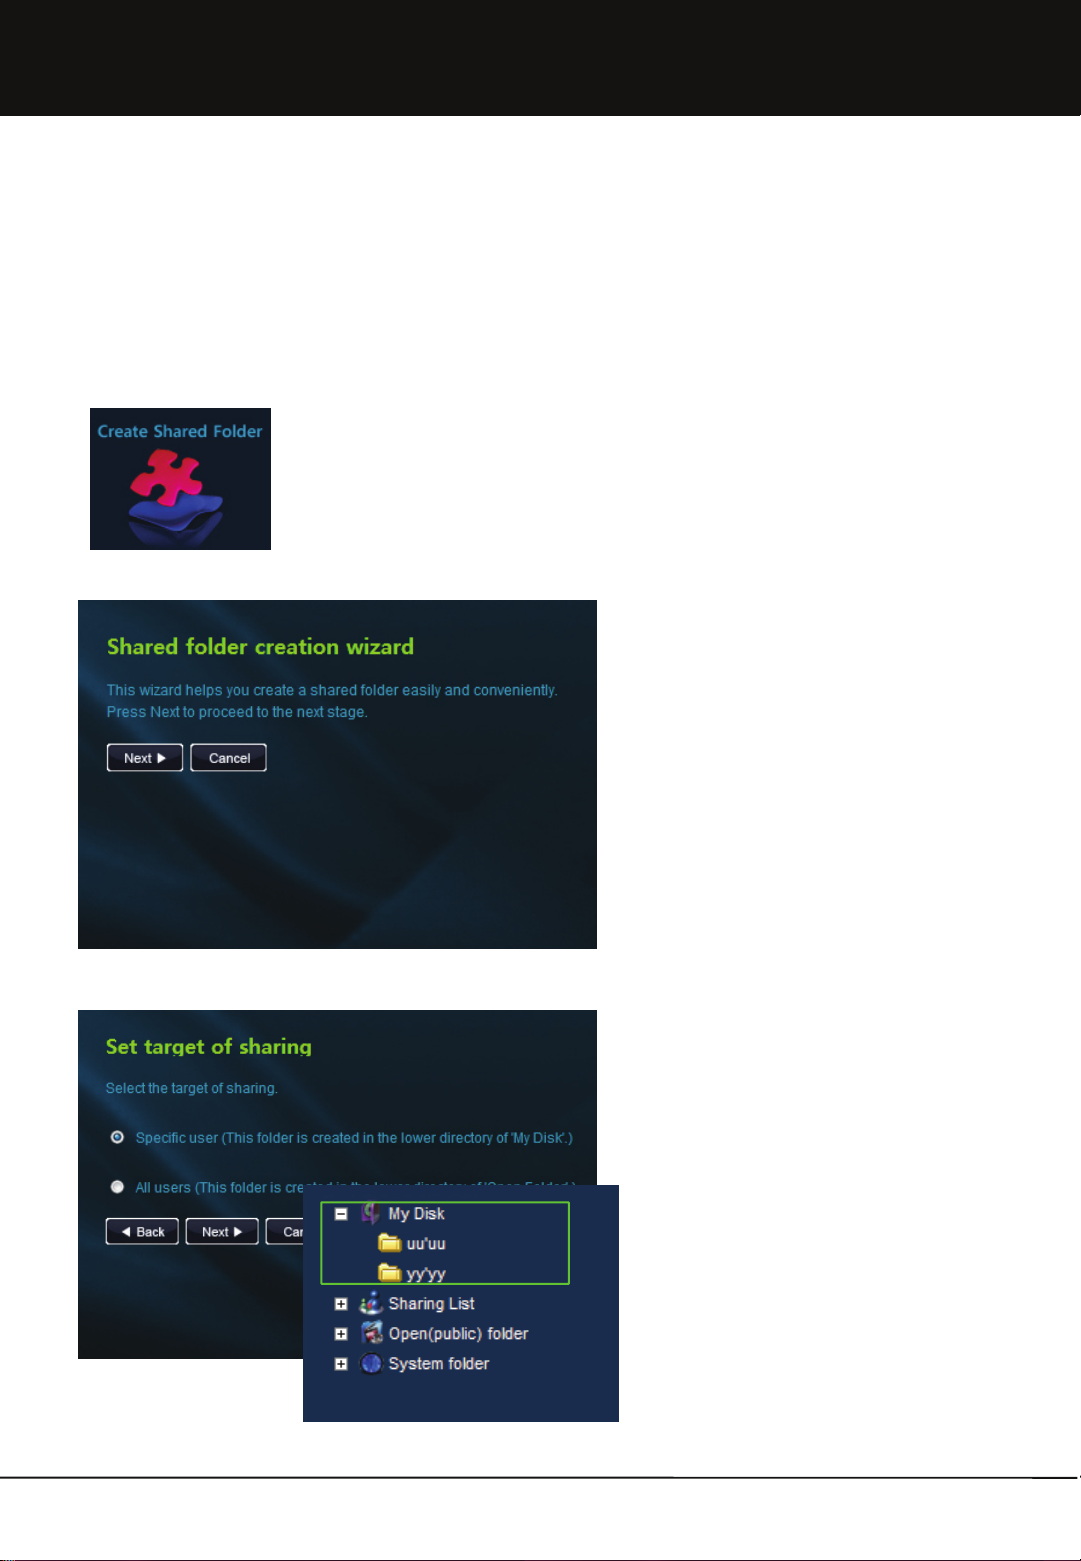
1. After login, click 'Create shared folder' icon in the main
page.
2. Move to shared folder creation wizard page. Press
Next button to proceed to the next stage.
3. Select 'specific user' in the target of sharing. Folder
shared with a specific user is created in the lower
directory of 'My Disk'.
21
Unicorn Information System
Page 22
Chapter 1. User Guide
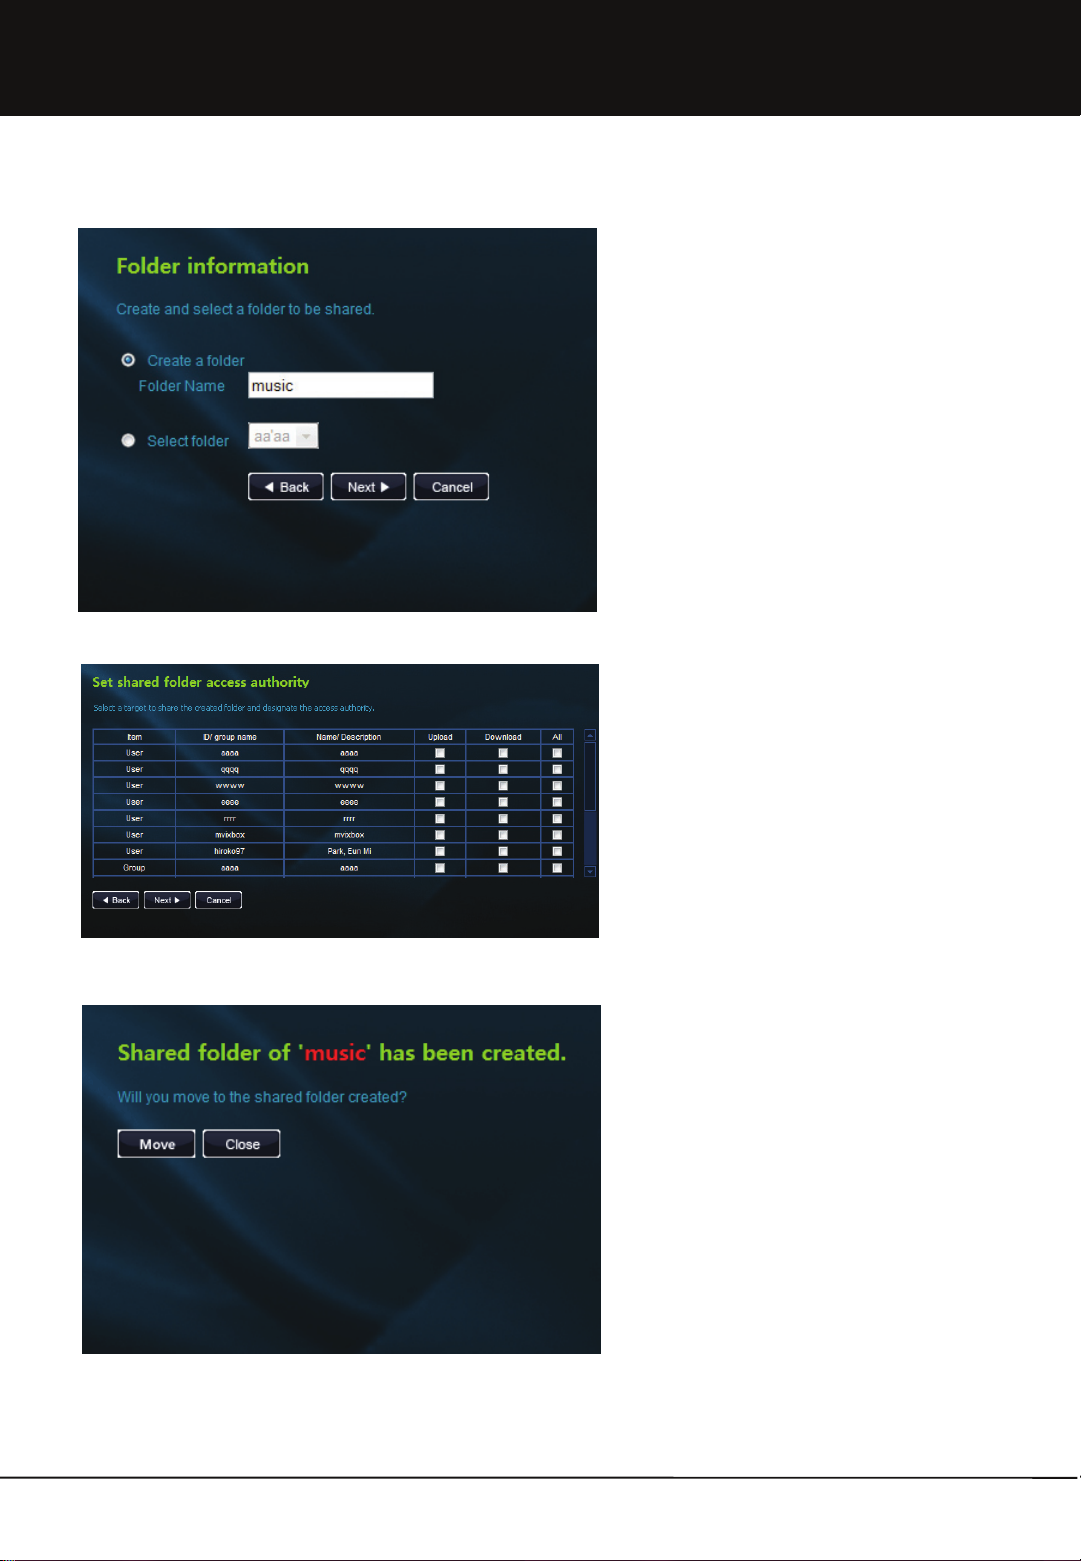
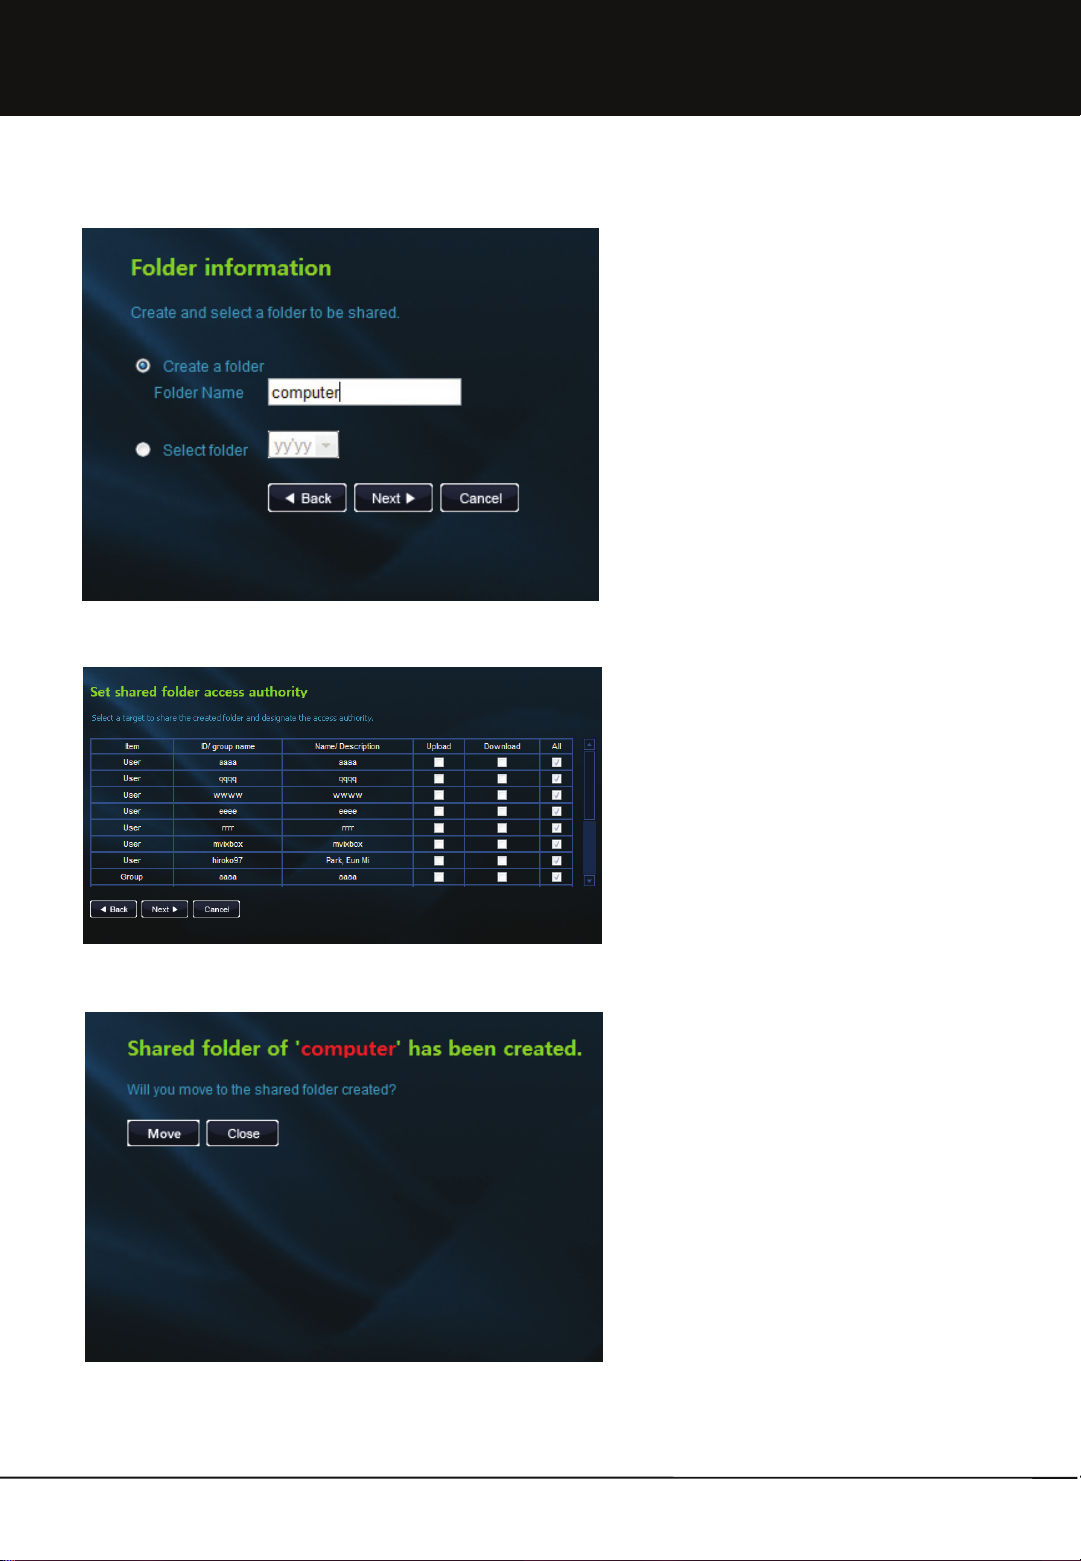
4. Select the folder to be shared. To create and share a
new folder, select 'Create folder' and enter the folder
name. To share an already existing folder, select a
folder in 'Select folder'.
5. Lists per users/ groups/ guest users are displayed.
Select a target to share the created folder and
designate the access authority. Authority designation
is possible per upload, download and upload/
download.
6. Check the shared folder created. Press move button
to move to the shared folder created. Press Close
button to end wizard.
22
Unicorn Information System
Page 23

Chapter 1. User Guide
1.2.3-2 Share with all users
1. After login, click 'Create shared folder' icon in the main
page.
2. Move to shared folder creation wizard page. Press
Next button to proceed to the next stage.
3. Select 'all users' in the target of sharing. The folder
shared with all users is created in the lower directory
of 'Open Folder'.
23
Unicorn Information System
Page 24
Chapter 1. User Guide
4. Select the folder to be shared. To create a folder
shared with all users, an existing folder cannot be
selected.
5. In shared folder access authority, upload and
download authorities are set to all users.
6. Check the shared folder created. Click Move button to
move to the shared folder created. Press Close button
to end wizard.
24
Unicorn Information System
Page 25
Chapter 1. User Guide
1.3 Using WebDisk Explorer
1.3.1 Menu Definition
1
2
3
3
1. WebDisk Explorer can be only used in windows operating system. So if you want to use another OS, please use Web
Explorer or Windows Explorer.
2. WebDisk Explorer is similar to Windows explorer. It is largely divided into ① personal and Disk information ② menu
③ WenDisk Side File/ Folder list and 4 local PC parts.
25
Unicorn Information System
Page 26
Chapter 1. User Guide
1.3 Using WebDisk Explorer
1.3.2 File Management
1.3.2-1 Creating Folder
1
2
3
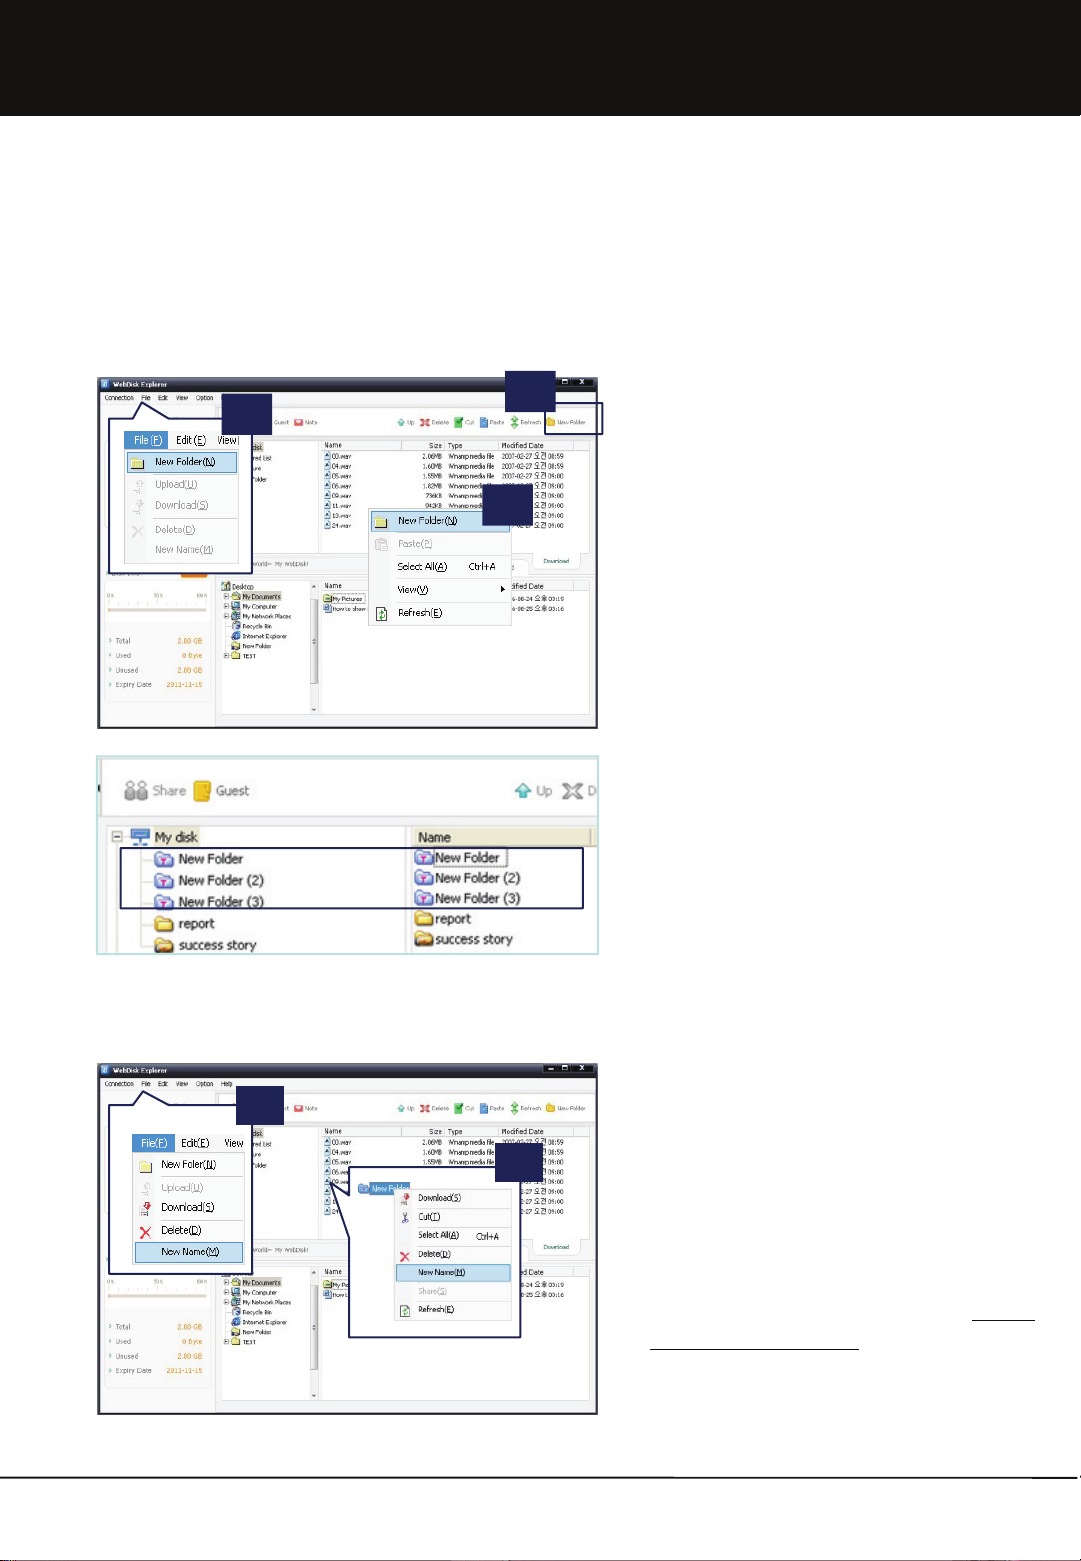
1. New folders are created in 3 ways, such as ① by
selecting ‘New Folder’ in the File menu, ②
selecting ‘New Folder’ after clicking right-mouse
on the place where a new folder is to be created or ③
clicking the New Folder icon.
1.3.2-2 Changing File/Folder Name
1
2. A new folder is created with the basic name of ‘New
Folder’. The name can be changed by the user.
3. If a ‘New Folder’ already exists, new folders are
created with names followed by numbers, such as
‘New Folder (2)’, ‘New Folder (3)’, etc.
2
1. After selecting a file or folder for name change, ①
right-click on the mouse to execute a name
change. Or, ② select ‘Change Name’ in the File
menu to change the name of File/ Folder. (Or Press
F2 after selecting that folder.)
2. The changed name can be immediately checked in
the File/ Folder list.
26
Unicorn Information System
Page 27

Chapter 1. User Guide
1.3.2-3 Deleting File/Folder
1
1.3.2-4 Moving File/Folder
1
3
1. There are 3 ways of deleting a file or folder. After
selecting the file or folder to be deleted, ① select
‘Delete’ in the File menu, or ② right-click the
mouse and select ‘Delete’. The last method is ③ to
click the ‘Delete’ icon.
2
3
2. Deleted files cannot be restored. Be careful when
deleting files.
1. Files or folders can be moved in three ways.
2
3
1
2
2. First, cut out the file or folder to be moved using ‘Cut’.
After selecting the file or folder to be deleted, ① ‘Cut’
in the Edit menu, or ② right-click the mouse and
select ‘cut’. The last method is ③ to click the ‘Cut’
icon.
3. Then, paste the cut file or folder in the desired
destination. ① ‘Paste’ in the Edit menu, or ② right-
click the mouse and select ‘Paste’. The last
method is ③ to click the ‘Paste’ icon.
4. Only the moving of a File/ Folder is possible. Copying
is not possible.
27
Unicorn Information System
Page 28
Chapter 1. User Guide
1.3.2-5 File/Folder Upload
1
2
3
1. This function is to upload files or folders in My Disk to
a storage space in the Internet.
2. To upload a file or folder, first select the file or folder
to be uploaded. ① Click ‘Upload’ in the File menu
or ② drag & drop by the mouse. Also, a file or
folder upload can be done by ③ clicking the
‘Upload’ icon.
3. Upload window to check the list of files to be
uploaded and an upload progress status is created.
4. In the File list, results of file transfers can be
checked. In the upload progress status, transfer
speed and overall progress rate can be checked.
5. In the list of transfer files in the upload window,
specific files can be deleted from the upload list or
upload priority can be adjusted by using the Delete
button and up/ down arrow buttons.
28
6. Uploading of the file in transfer stops if you click the
Stop button.
7. Transfer begins again when clicking the Upload button
again. A suspended file transfer can be transferred
again from the last part of the file previously uploaded.
8. Upload is completed when selecting ‘Exit when
transfer completed’ at the bottom of the upload
window. Then, the upload window will automatically be
closed.
Unicorn Information System
Page 29
Chapter 1. User Guide
1.3.2-6 File/Folder Download
1
2
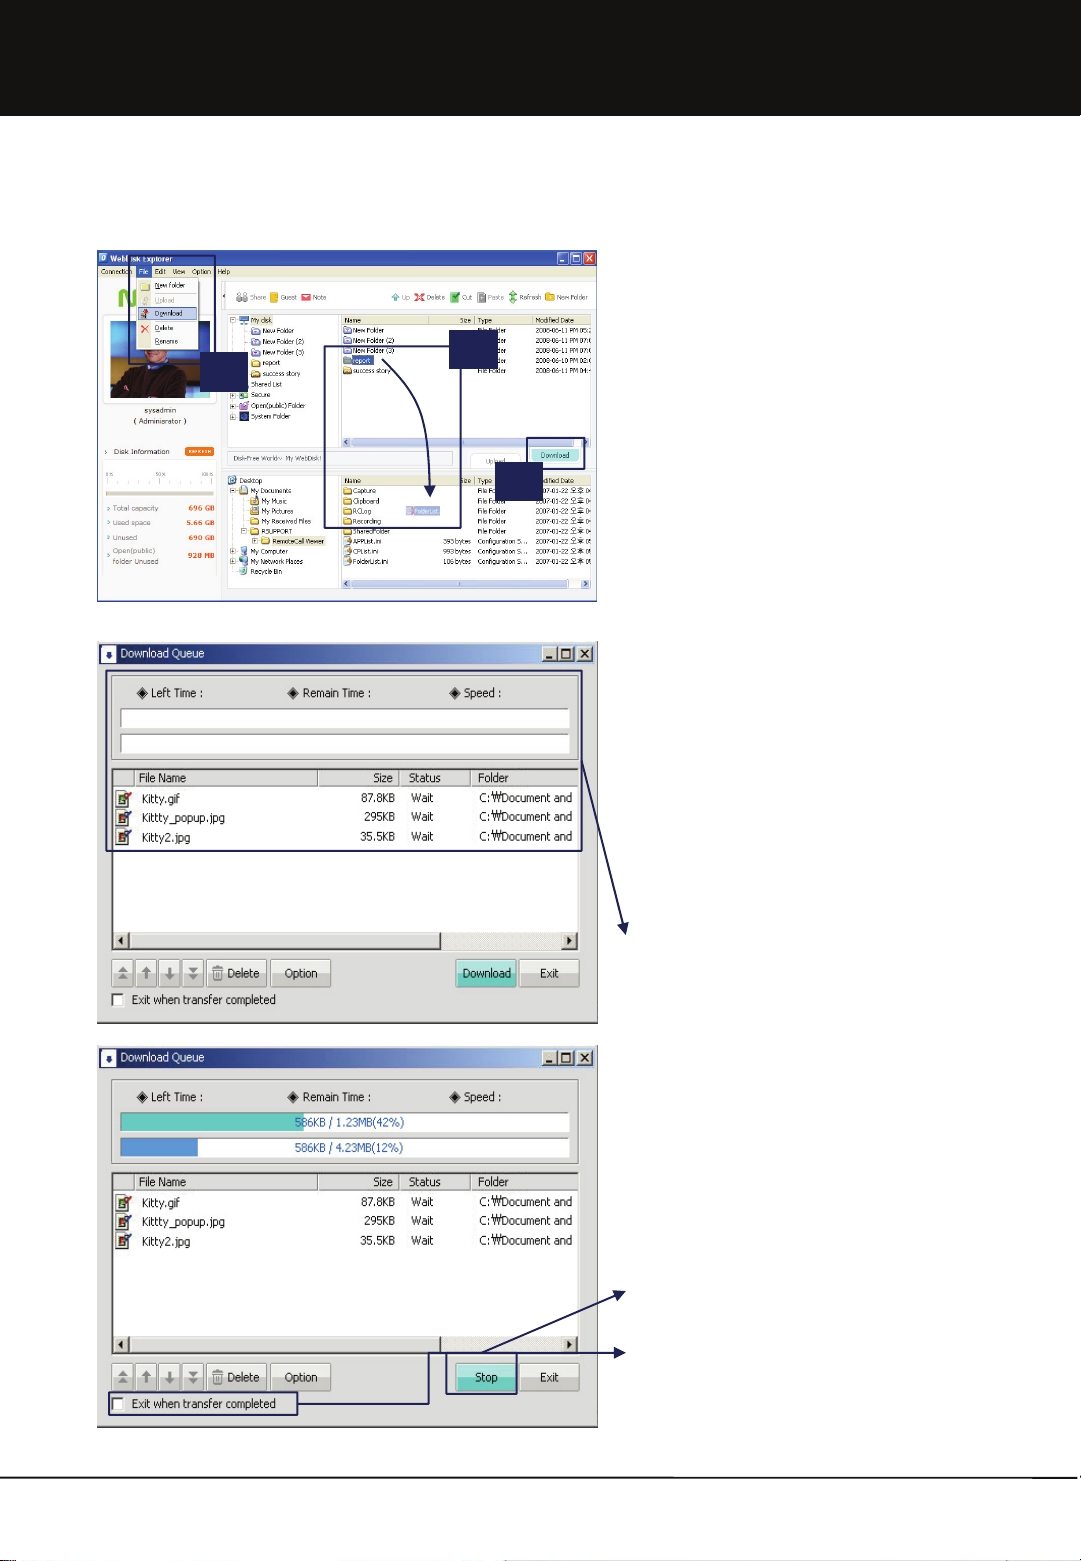
1. This function is to download files which are saved in
the Internet storage space into my own disk.
3
2. To download a file or folder, first select the file or
folder to be downloaded. ① Click ‘Download’ in the
File menu, ② drag & drop by the mouse or ③ by
clicking on the Download’ icon.
3. A Download window to check the list of files for
download and the download progress status is
created.
4. In the File list, results of the file transfer can be
checked. In the Download Progress window, the
transfer speed and overall progress rate can be
checked.
5. Downloading of a file or folder temporarily pauses if
you click the Stop button.
6. If you select ‘Exit when transfer complete’d at the
bottom of the window, after finishing transfer the
download window will be closed automatically.
29
Unicorn Information System
Page 30
Chapter 1. User Guide
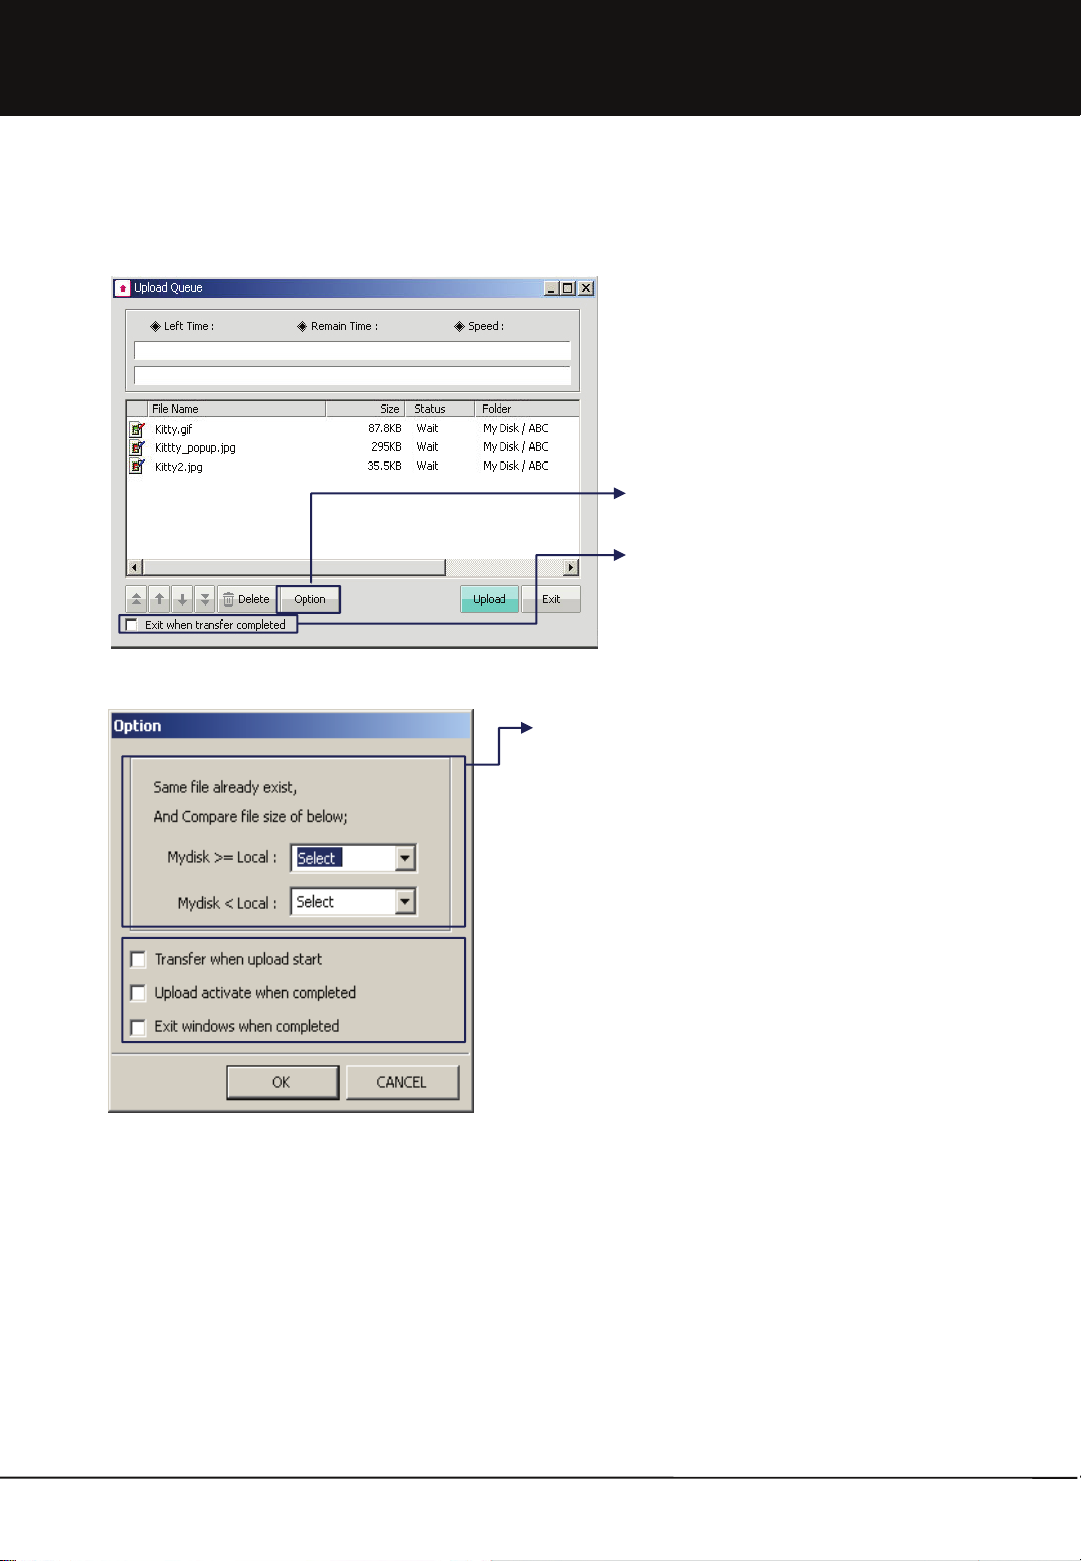
1.3.2-7 upload/download Environment setting
1. This function is to set the environment for upload and
download in the Upload and Download window.
2. Exit When Transfer Completed : Selection can be
made to automatically close the transfer window after
upload/ download. Clear this selection in order to
check the transfer status after transfer completion
per file.
3. When there are files of the same name, file size is compared. If
Mydisk file is larger than or the same as the file to be transmitted,
select one from the 3 options of Select, Overwrite, Skip to enable
upload/ download. If Mydisk file is smaller than the file to be
transmitted, select one from the 4 options of Select, Overwrite,
Resume and Skip to enable upload/ download.
a. ‘Select’ queries user about the method of processing in case there
are repetitive files.
b. ‘Overwrite’ overwrites the file to be uploaded or downloaded on
the existing file.
c. ‘Resume’ resumes the file to be uploaded or downloaded from the
last part of the existing file.
d. ‘Skip’ skips the file to be uploaded or downloaded in case there are
same files.
4. When the ‘Transfer when upload start’ is automatically selected, the
transfer window is activated and upload/ download automatically
starts even if the Upload/ Download button is not clicked.
5. Select ‘Upload/Download Activate when completed’ to display
transfer window after completion of transfer at the front of the
window to check transfer completion status.
6. Select ‘Exit windows when completed’ to automatically close the
system after completion of transmission. This function is useful
when uploading/ downloading large-capacity files before going to
bed.
30
Unicorn Information System
Page 31

Chapter 1. User Guide
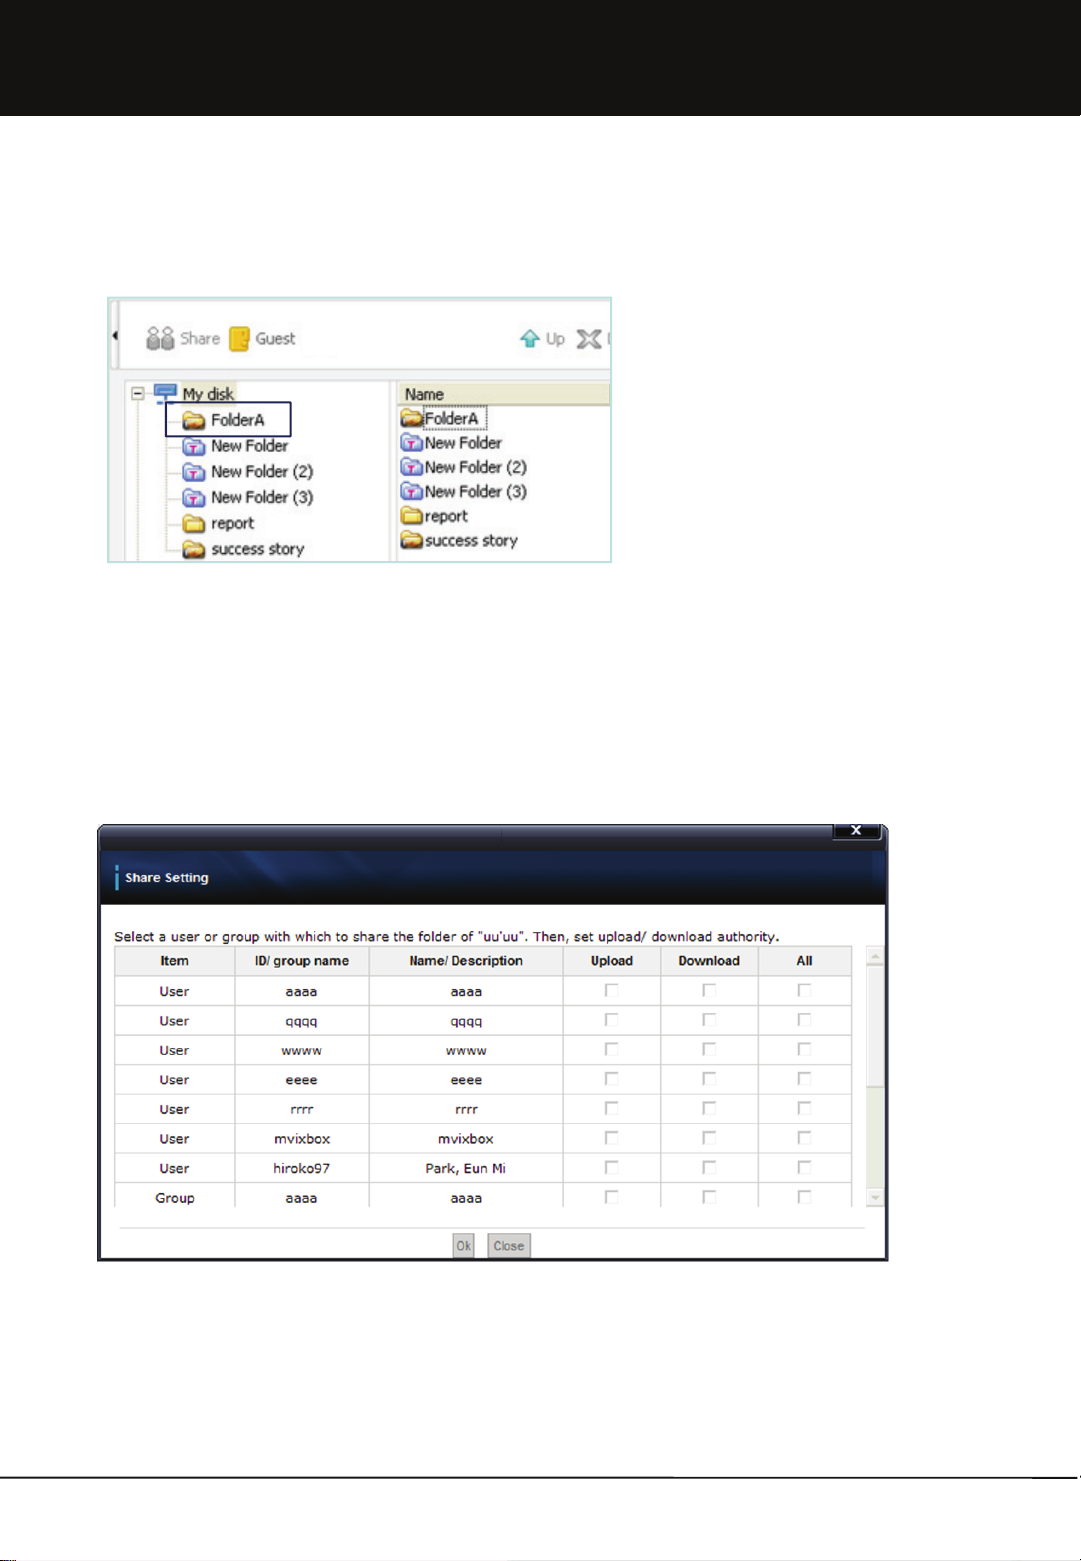
1.3.3 Sharing Folder
1.3.3-1 Sharing Folder Setup
1
2
1. Select the folder to be shared and click Share in the
Tool menu.
2. Select user/group/guest user to use the Shared folder and set authorization, such as for Upload, Download, Upload/Download.
3. Click ‘OK’ button to end share setting.
31
Unicorn Information System
Page 32
Chapter 1. User Guide
1.3.3-3 Changing Shared Folder Setup
1.3.3-4 Deleting Shared Folder Setup
1. After selecting the Shared folder to be
changed, click ‘Share’ in the tool menu.
2. Change values and press the Save button to
complete setup changes.
1. Methods and functions of deleting Shared folders are the same as for general folder deletion. Refer to the deleting
folder section.
1.3.3-5 Clearing Shared Folder Setup
1. This refers to clean the sharing function of Shared folder. In other words, the folder exists as it is with only the sharing
function removed.
2. Clear the check box for the tables.
3. Click ‘OK’ button to end clearing of share setting .
32
Unicorn Information System
Page 33

Chapter 1. User Guide
1.3.4 Secure Folder
1.3.4-1 Definition of Secure Folder
1. The Secure folder stores files not to be shared due to
security-related reasons.
2. Files in the Secure folder are encoded within the
server. Therefore, its contents cannot be seen even
when files are downloaded not only by the
administrator but also other users through the FTP
connection.
3. The encoded contents can be understood only
when upload/ download is carried out with Web
Disk explorer. Therefore, the end user must
maintain a password for the Secure folder in order to
safely store files in the Secure folder.
* Secure Folder is only support by WebDisk
Explorer.
1.3.4-2 Secure Folder Password Management
* After downloading a file in the Secure folder using
Web Disk explorer
* After downloading file in the Secure folder using a
general FTP
1. 6~16-digit case sensitive password for the Secure
folder may consists of numbers and capital/ small
letters in
English entered during the membership registration.
2. Secure folder password can be changed in ‘ My
Profile’.
3. When the password for the Secure folder has been
forgotten, it is initialized at administrator’s menu.
33
Unicorn Information System
Page 34

Chapter 1. User Guide
1.3.4-3 Using Secure Folder
1. Open Web Disk explorer and click the Secure folder
to display a popup screen asking for the Secure
folder password as seen below.
2. Enter the Secure folder password created during
membership registration.
3. The Secure folder opens if the correct password has
been entered.
1.3.4-4 Secure Folder File/Folder Management
1. Methods of using the Secure folder are the same as those of using Folder/ File of the Web Disk explorer.
2. Refer to creating folder, changing File/ Folder name, deleting File/ Folder and moving File/ Folder menu.
3. Moving File/ Folder between the Secure folder and My Disk is not possible. A File/ Folder can be moved only within the
Secure folder.
1.3.4-5 Secure Folder File/Folder Upload/Download
1. Methods of File/ Folder upload/ download in the Secure
folder are same as the methods in general folder.
2. However, in case of upload/ download in the Secure
folder, the upload/ download queue is marked in red.
34
Unicorn Information System
Page 35

Chapter 1. User Guide
1.3.5 Open(public) Folder
1. OPEN (Public) folder can share for all user.
2. Movie, Music, Photo folder is created automatically.
Extra folder will be created freely.
35
3. Music folder is linked iTunes program. The file in
Music folder can be shown on iTunes program.
4. In case you search this equipment on other
equipment in same network, basically you can see
OPEN (public) folder.
Unicorn Information System
Page 36

Chapter 1. User Guide
1.3.6 System Folder (USB Auto copy & Personal Homepage )
This is the exclusive using folder for sysadmin
This is supply the function for the managing of USB exterior equipment,
Rapid Box, and Personal homepage.
RapidBox: This is exclusive using folder for upload. In case user upload file
by using RapidBox function of intro screen, this folder is stored
automatically.
USBCOPY: This folder is for data backup in case USB Auto Copy execution.
USBDISK1.2: It shows when USB port connects USB equipment. In case
you want to separate USB equipment safely, please push Release
button for one second on front part of USB. You can remove USB
equipment from system with beep sound.
WWW: This is homepage basic folder. In case you want to manage private
homepage, you can upload the file for homepage on here ;
In case you manage private homepage, you approach http://IP address or
http://IP address:80 and you can see private homepage. Or you approach
http://IPadress:8080, you can see Mvixbox main page.
1.3.6-1. USB Auto COPY (USBCOPY folder)
• In case you execute USB Auto Copy, the file in USB equipment will be backup automatically in USBCOPY folder.
• When it execute backup, the folder harmonized date and time in USBCOPY folder will be created and data will be backup
in the folder.
• When you push Copy/Reset Button for one second on the front of USB, it is starting copy from USB Store equipment with
beep sound. In case you push the button for 5 seconds, it executes Reset order. So the system turns off and turns on
again. Please be careful to push the button more than one second.
1.3.6-2. Personal Home Page (WWW folder)
• After you connect WebDisk Explorer or Web Explorer, you upload relating file with homepage on WWW folder, located in
subordinated system folder.
• Rename the preexisting file named 'index.php' (e.g. to 'index.php_').
• In case you use Mysql, you connect sysadmin by using ssh, and you input ‘mysql-u root – p mysql’ There is no password.
After you connect Mysql, please nominate root passwork for mysql. When you enter the address of the device, you can
see your homepage.
• The old page can be accessed with 'http://the device address:8080.'
• In case you make any changes of the settings of the Apache web server or PHP, on which the existing services depend,
you should take precautions, and make sure you back up the existing settings before making any changes.
36
Unicorn Information System
Page 37

Chapter 1. User Guide
1.4 Using Web Explorer
1.4.1 File Management
1 2
3
1. Web Explorer can manage My Disk only using the web browser without requiring additional program. Therefore,
Web Explorer can be used not only in the Windows operating system, but also in Macintosh and Linux.
2. Web Explorer is similar to Web Disk explorer. It is largely divided into ① a folder tree, ② menu and ③ File/
Folder list parts.
37
Unicorn Information System
Page 38

Chapter 1. User Guide
1.4.1-1 File/Folder Upload
1. File upload can be executed by moving to the
corresponding folder for upload and selecting the
Upload button in the menu list.
2. Select ‘File Transfer One by One’ menu to display the
file upload window.
3. Click the ‘Browse’ button in the upload window and
select the required file on the computer. Click ‘Add’
button to add up to 8 files. Click ‘Upload’ button to
start file upload.
4. Select File/ Folder to be uploaded and select ‘File/
Folder Upload’ menu to execute the upload program.
Click ‘Upload’ button to start upload process.
5. For details for the upload window, refer to the Web
Disk explorer section.
38
Unicorn Information System
Page 39

Chapter 1. User Guide
1.4.1-2 File/Folder Download
Click the right button of the mouse
1. For file download, move to the corresponding folder in
My Disk and select the file or folder to be downloaded.
2. Select ‘File Transfer One by One’ menu to display the
file download window. Check if the file is correct and click
‘Open’ or ‘Save’ button.
3. After selecting ‘Save’ and the save window will be
displayed, designate the path and press the ‘OK’ button.
4. Download can also be administered by double clicking
the name of the file to be downloaded.
5. Downloading a number of files or the entire folder is
possible by selecting the ‘Multiple File/ Folder Transfer’
menu.
6. Designate the place to download the File/ Folder and
press the ‘OK’ button to display the download window.
Click the ‘Download’ button to execute the File/ Folder
download.
7. For details on the download window, refer to Web Disk
explorer section.
39
Unicorn Information System
Page 40

Chapter 1. User Guide
1.4.2 Sharing Folder
1
2
1. For share setting, click the ‘Share’ button after
checking the folder to be shared.
2. When the share setting window is displayed, setting
can be made for group share, user share or guest
user share.
40
3. Select user/group/guest user to use the Shared
folder and set authorization, such as for Upload,
Download, Upload/Download.
4. Click ‘OK’ button to end share setting.
Unicorn Information System
Page 41

Chapter 1. User Guide
1.4.3 Attaching File
1
2
1. Link to the file can be attached to a note or mail and
sent to other users to be downloaded.
2. Check file to be attached and click the ‘Attach’ button.
3. Enter ID of receiver. Then, enter title and contents. To add
more files, search file and press ‘Add’. To delete a file, press
the ‘Delete’ button. Press the ‘Send’ button when input is
completed.
4. For details, please read the note/mail section.
41
Unicorn Information System
Page 42
Chapter 1. User Guide
1.5 Using Window Explorer
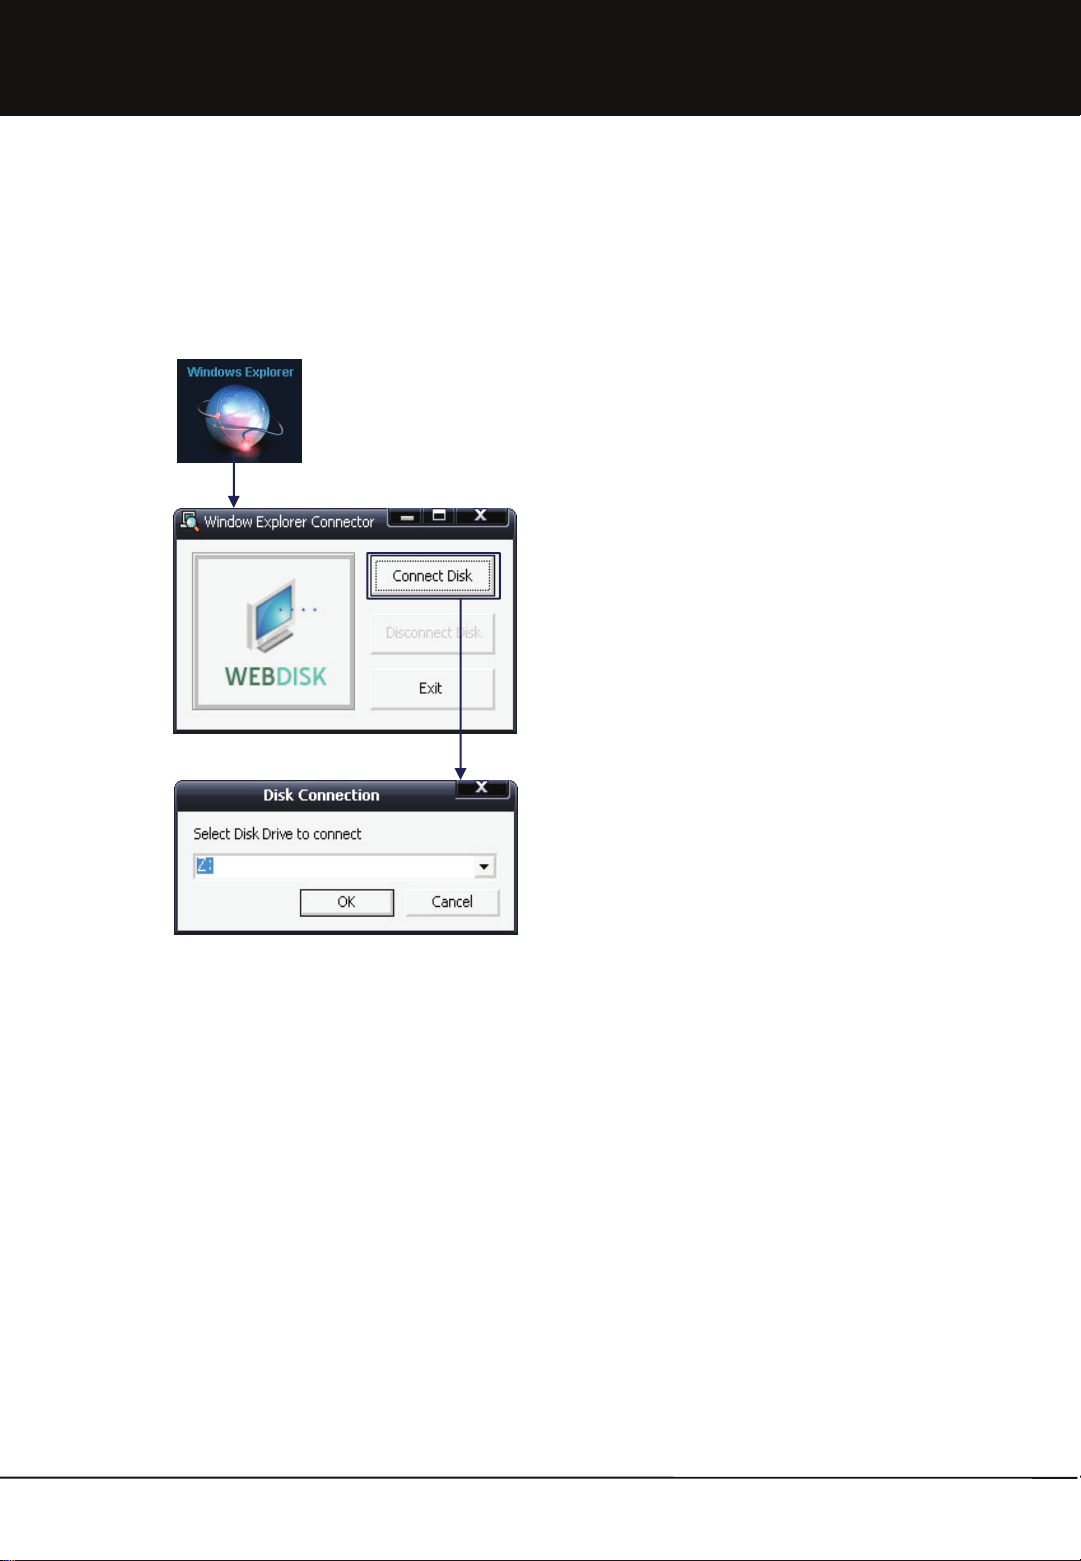
1.5.1 Disk Connection
1.5.1-1 Connecting Disk
1. Click ‘Connect Disk’ in Window Explorer connector.
2. Select the name of the disk drive to be connected.
Selection can be made among drive names
currently not existing in the user’s computer.
42
Unicorn Information System
Page 43

Chapter 1. User Guide
1.5.1-2 Using Disk
1. Check that a new network drive has been connected
in ‘My Computer’.
2. Name of network drive consists of an address and
login ID.
3. Now, web storage space can be used as if a hard
disk drive is attached to the user’s own computer.
However, it is not installed here under the operating
systems of Windows.
4. List of the Secure folders or shared folders is not
shown in Window Explorer.
Connect open
5. When connection succeeds with My Disk Connector,
the icon for My Disk Connector is executed in the
tray.
6. To clear connection, double click the My Disk
Connector icon to activate it and click the
‘Disconnect Disk’ button.
7. When My Disk is disconnected, a message that
‘succeed in disconnecting network drive’ is displayed.
In this state, My Disk connection can be achieved
through retrying disk connection by double clicking
the Window Explorer icon in the tray or clicking
Window Explorer in main menu without closing the
program.
8. Click the ‘Exit’ button to completely close the
program.
43
Unicorn Information System
Page 44

Chapter 1. User Guide
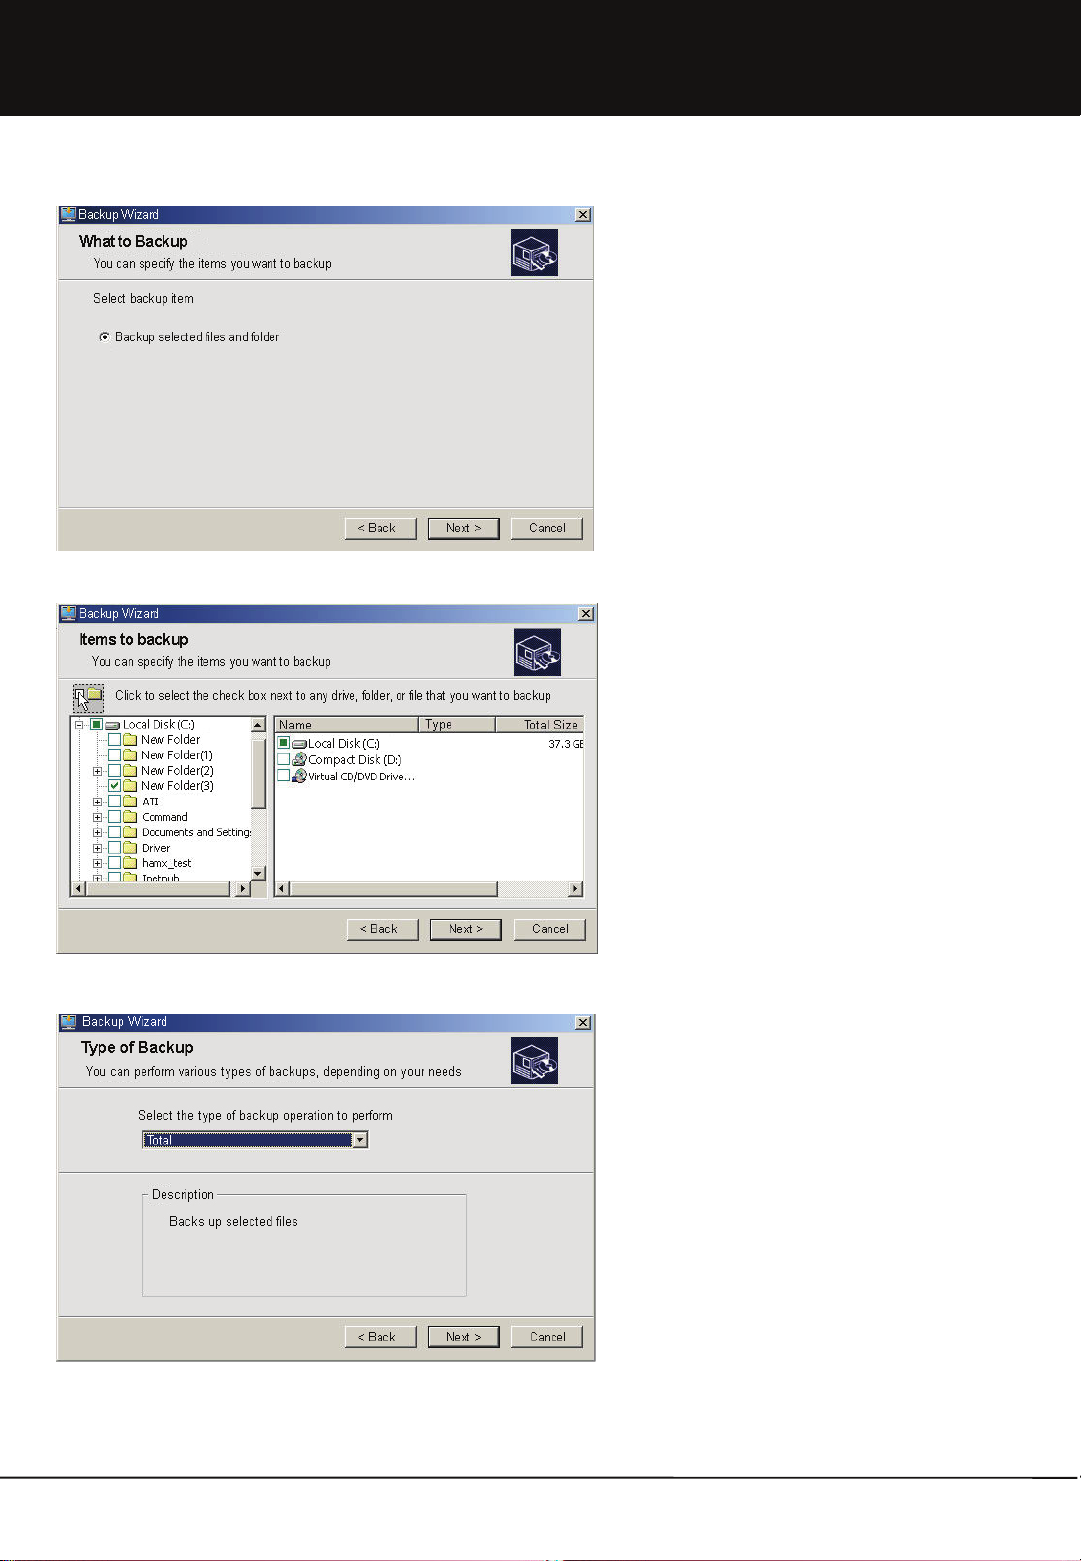
1.6 Use PC backup
1.6.1 Run backup wizard
1.Using PC backup function, files in My Computer can
be regularly/ irregularly backed up to Web Disk.
2.Click [PC backup] button at the bottom of main
screen to display execution window.
3.Run [PC Backup] located in the top middle part of
execution window.
44
4. Enter name of backup profile. Backup profile name
must not be the same as the name of a folder in Web
Hard.
Unicorn Information System
Page 45
Chapter 1. User Guide
5. Select the type of data for backup. It is currently fixed
as the selected file or folder.
6. Select backup items. Select a folder or file to be
backed up.
45
7. Select backup method.
a. All: All files are transmitted for backup. This is
selected in order to have PC data and backup data to
be consistent at all times.
b. New: Only the newly created data are transmitted.
This is selected when there is almost no change in
data and when back up takes a long time due to large
backup size.
Unicorn Information System
Page 46
Chapter 1. User Guide
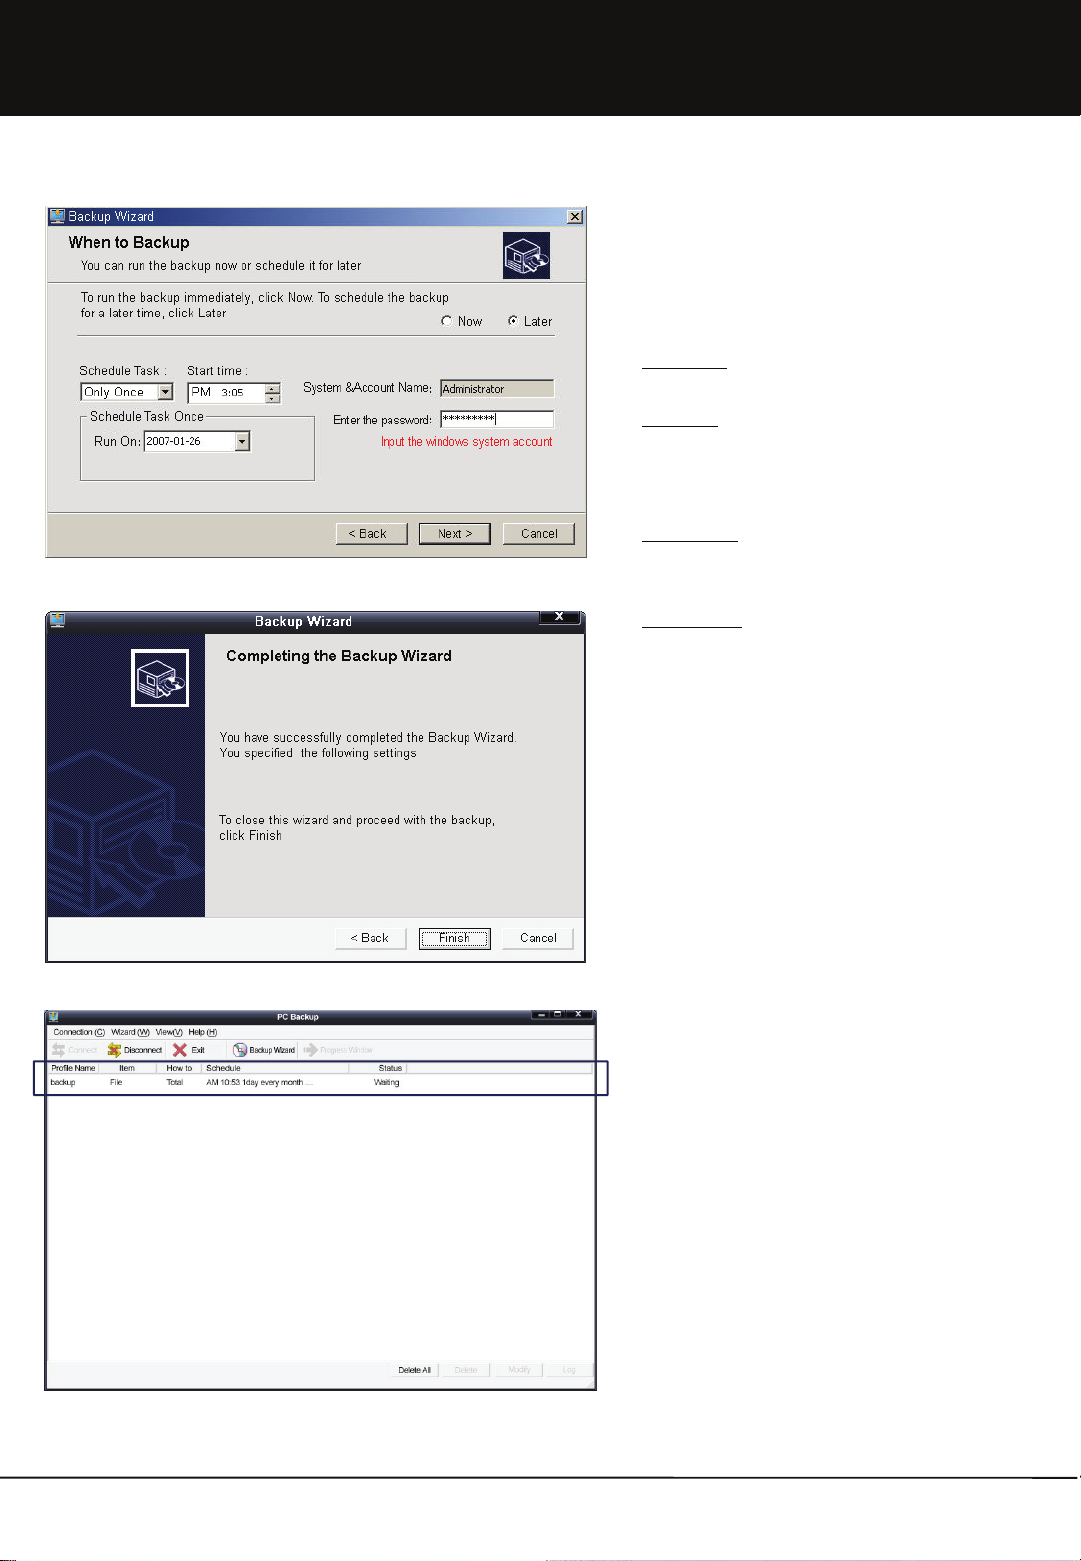
8. Set backup schedule. To execute backup
immediately, select [Now]. To execute backup on
reservation, select [Later]. To execute backup on
reservation, the following items must be additionally
set according to the 'type of reservation'.
a.Only Once:
specific time of reservation. Set starting time and date.
b.Everyday:
specific time each day. Set starting time and unit of
backup day. (For example, select 'every 2 days' for
backup once every two days.)
c.Every Week:
designated time on the specific day each week. Set
starting time and day of week.
d.Every Month:
designated time on the specific date each month. Set
starting time and specific date.
9. After completing schedule setup, enter window
account password. In case of backup on reservation,
login account password must be entered to enable
proper backup execution.
Backup is executed only once at the
Backup is repetitively executed at the
Backup is repetitively executed at the
Backup is repetitively executed at the
46
10. Press [Finish] to end backup wizard.
11. It can be checked that new profiles are added in the
backup execution window.
12. Files or folders completed of backup are created
below 'Gbackup' folder inside My Disk. To
recover the files or folders, find the required
files/ folders in the lower directory of Gbackup
folder.
13. Backup program proceeds sequentially. Unless the
reserved backup operation is completed, the
following operations do not start. If a number of
backup schedules have been set tightly, following
backup operations may not take place at the
reserved time.
Unicorn Information System
Page 47
Chapter 1. User Guide
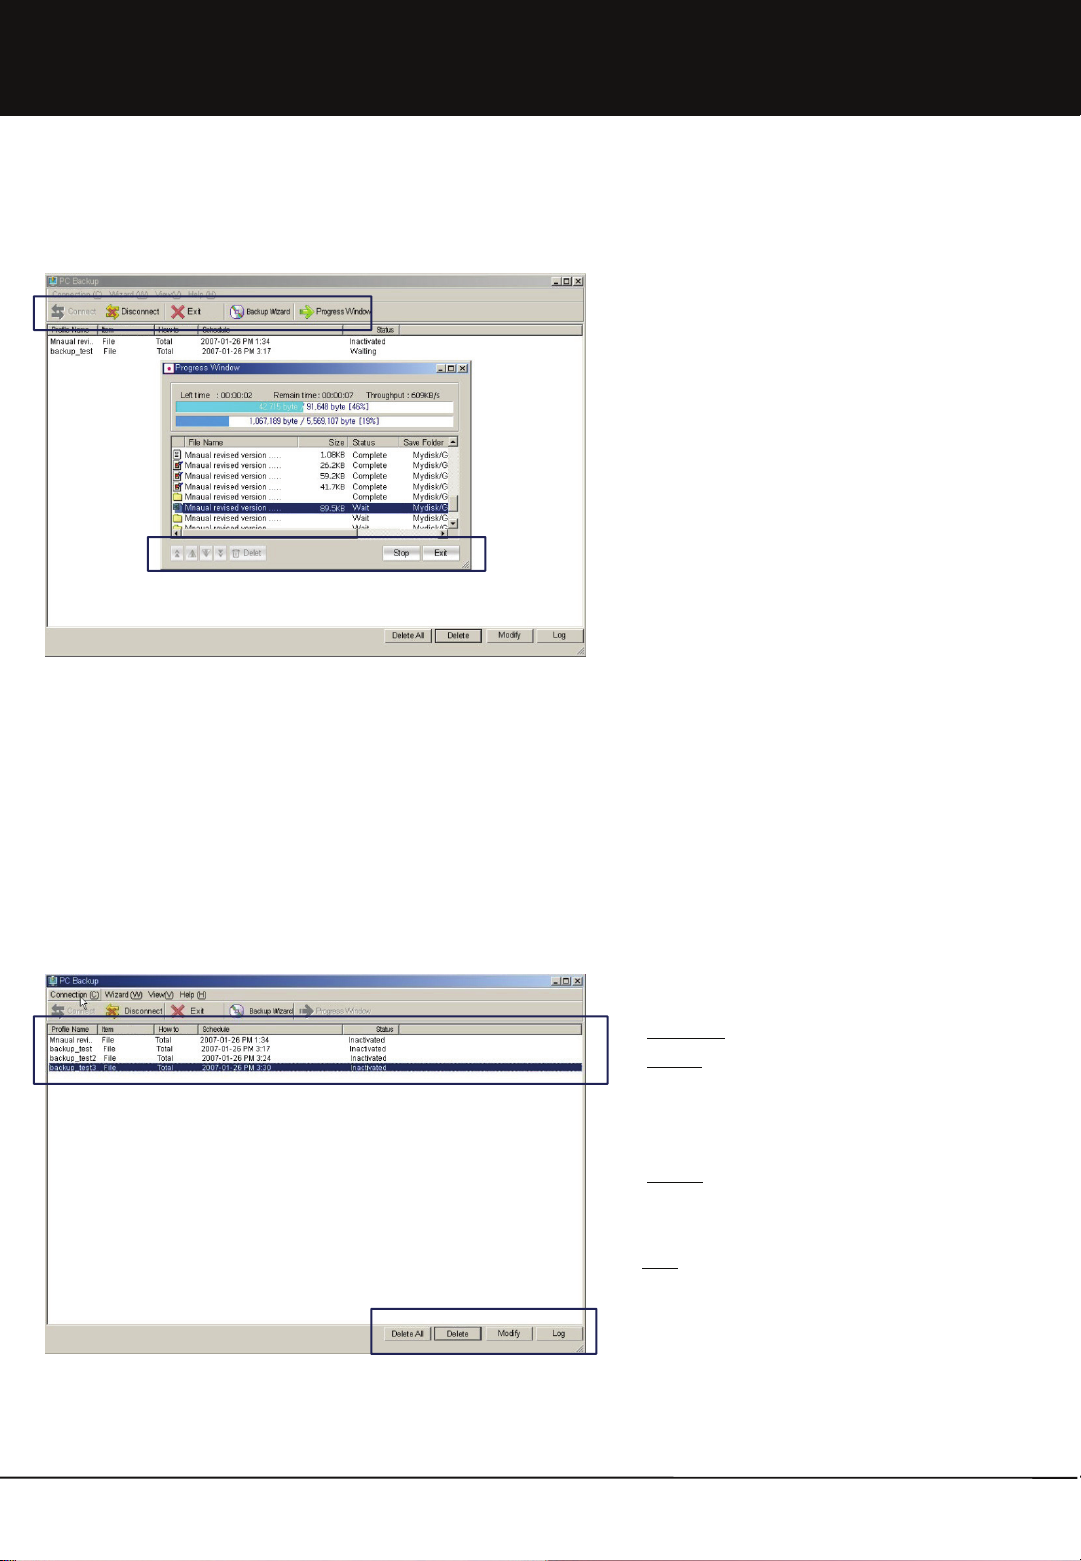
1.6.2 Check backup progressing status
1.When executing backup immediately or if backup
operation is in progress at the reserved time, the
progressing status can be checked in backup
progress window.
2.To stop backup operation temporarily, click [Stop]
button at the bottom right-hand corner of progress
window. To completely end backup operation, click
[End] button.
3.When backup is stopped, [Stop] button changes to
[Upload] button. Also, [Up/ Down] button and [Delete]
button to the left of progress window are activated.
4. Using [Delete] button, file can be removed from
backup list. Also, priority in backup list can be
changed by using [Up/ Down] button.
5.Backup is not actually ended when clicking End
button at the top right-hand corner of backup
progress window. Only the progress window is not
displayed.
6.To view the backup progress window again, click
[Backup Progress Window] button in the menu.
1.6.3 Manage backup profile
47
1. Delete All: Delete all of the currently set profile.
2. Delete:
place in the unit of a single profile. Even when profile
is deleted, folders or files backed up in Gbackup
folder are not deleted.
3. Modify:
information. Type of backup operation, backup
schedule and password can be modified.
4.Log:
selected profile.
Delete the selected profile. Deletion takes
Modify parts of the previously set profile
Check records of operations backed up with the
Unicorn Information System
Page 48

Chapter 1. User Guide
1.7 Using Note/Mail
1.7.1 Sending Note/Mail
1. Note/ mail box is a convenient tool of communication
to simply send and receive messages among users.
2. Note/ mail box consists of ‘From message’, ‘To
message’ and ‘Send Note/ Mail’ functions.
3. Click ‘Send Note/Mail’, enter contents and click ‘Send’
to send a note. User for note reception can be added
by searching ID or name through the search user
function. Receiver, title and contents must be
entered.
4. When searching a file, the corresponding folder can
be selected in the search position part on top. Or,
select the Folder icon in the list to move to the
corresponding folder. A folder cannot be attached as
a link file. Only files can be attached.
5. When the searched file is displayed, press the ‘Add’
button to add the file to the list of file link for transfer.
A file can be sent multiple times simultaneously by
administering file addition a number of times.
6. Only a single transfer is made even if the receiver is
entered a number of times.
7. Note was designed to conveniently send out short
messages to internal users. Using the group search,
a note can be sent to all users within the group.
48
※ Even if mail transmission has been completed, it
must be noted that transmission may fail in case of
mail rejection due to security-related reasons in the
mail server of the recipient.
Unicorn Information System
Page 49

Chapter 1. User Guide
1.7.2 From Message Management
1. Newly received notes are marked with ‘new’ in the From Message box. When notes have been read, the ‘new’ icon
disappears and time and date are added to ‘Read Date’. In case there are files transferred through the link, the clip icon
is displayed in the link part.
2. To delete a note, select the note to be deleted and click the ‘Delete’ button. Simultaneous deletion is also possible by
selecting a number of notes.
3. Read note by clicking title or link. Click sender to move to the ‘Send Note/ Mail’ window.
4. 10 received notes are listed at a time in the From Message box according to time received.
1.7.3 To Message Management
1. Notes transferred through Send Note/ Mail can be checked in the To Message box. Title of note is displayed and sender can
check whether the note has been read by receiver through ‘Read Date’.
2. To delete notes, select the note to be deleted and click ‘Delete’ button. Simultaneous deletion is also possible by selectinga
number of notes.
3. Click title or link to read the note.
4. 10 sent notes are listed at a time in the To Message box according to the time sent.
49
Unicorn Information System
Page 50
Chapter 1. User Guide
1.8 BitTorrent/RSS
1.8.1 Torrent File Download
1. Window for Torrent registration is opened when
clicking ‘Register Torrent File’ button.
2. Method of Torrent file registration can be
changed through URL and file at the bottom of
Register Torrent File input box. File method is to
upload Torrent file. With URL method, Torrent file
is fetched by entering URL address in which
Torrent file is located.
3. Select Torrent file to be registered and click
‘Register Torrent File’ button. Torrent file
registration is completed and Register Torrent
File window is closed.
4. Up to 30 Torrent files can be uploaded to a
Mvixbox. Up to 5 Torrent files can be uploaded
by a single user.
1. Torrent file download starts automatically when
Torrent file registration is completed and Register
Torrent File window is closed. When download
begins, name of Torrent file registered in the list,
status bar and download rate are displayed.
2. The list shows ‘Stop Download’, ‘Restart’, ‘Cancel’,
‘View Details’ and ‘Arrange Torrent File’ buttons.
‘Stop Download’, ‘Cancel’ and ‘View Details’ buttons
are activated when download is in progress.
50
Unicorn Information System
Page 51

Chapter 1. User Guide
1. Torrent file must be moved when
download has been completed.
2. To move Torrent file, click ‘Arrange Torrent
File’ button to open a window where
location to which the downloaded file is to
be moved can be selected.
3. Select the location to which the
downloaded file is to be move and click
Move Torrent button.
4. Downloaded file is moved to the
corresponding directory and Torrent file is
deleted.
1.8.2 Torrent Command button
Move
STOP
1. Stop Download
a. Download can be stopped only while download is in progress. When Stop Download button is clicked, status bar and
download rate display stops and download is not carried out any more.
b. After download has been stopped, it can be restarted by using ‘Restart’ button.
2. Restart Download
a. Download can be restarted only when download has been stopped. Click ‘Restart’ button to start download again.
Also, status bar and download rate increase to indicate that download is in progress.
b. Download can be stopped after restart.
3. Cancel Download
a. To cancel download, click ‘Cancel Download’ button while download is in progress or has been completed. All of the
currently registered Torrent files and downloaded files are deleted.
4. View Download Details
a. Detailed information on the current Torrent file is displayed when clicking View Download Details button. Torrent file
details show Torrent file name, download path, name of file downloaded, file size, download usage, download rate,
seed count, peer count and tracker address, etc.
Restart
Cancel
View Detail info
51
Unicorn Information System
Page 52

Chapter 1. User Guide
1.8.3 File download using RSS Reader
1. Select RSS Reader tab located at the top right-hand corner of Bittorrent/ RSS menu.
2. RSS Reader fetches RSS information of various torrent file providing sites and shows
it in a list.
3. When selecting a site in selection window at the top, RSS information list of the
corresponding site is displayed at the bottom. * Currently, Mininova.org is registered.
Additional sites will be registered through patch upgrade.
4. In case you select category of list, you can see total 20 RSS list in applicable
category on the bottom.
5. You can see category information, title, and updated date in list.
52
Unicorn Information System
Page 53

Chapter 1. User Guide
6. In case you click title on RSS Reader, you can see detailed information for item.
7. Detailed information shows title, category for item, updated date, link address for applicable site, torrent file download
address, and torrent file size.
8. In case you click ‘torrent file registration’ in detailed looking page, download will be started through torrent file is registered
on torrent file download page.
9. In case you click going back button, it goes back Mininova RSS Reader page.
53
Unicorn Information System
Page 54

Chapter 1. User Guide
1.9 Blog
1.9.1 What is blogging API?
1. Blogging API supports the blogging-related functions among standard communication protocols so that to enable
exchange of data through web even in different OS and different programming languages.
2. Using blogging API, remote posting is possible without connecting to my blog.
3. Blogging API can be used only when the blog supports blogging API.
4. To use blogging API, check 'use' for 'Status of blog API use' in other setups of environment setup in blog
admin page.
1.9.2 Blog Menu
1
1. Blog Main Menu
a. Meta Blog : is a community space where you can access blogs and posts of Mvixbox Blog users
b. My Blog : It shows story list made by private persons. It supplies ‘private blog page’ menu and ‘WebDisk file link’.
c. My Blog Management : It is managing environment establishment, skin, and story list for blog.
2. Blog Search : You can search the story you wanted by using information for title of story, contents, and province.
3. List : It shows the story list made by user.
2
3
54
Unicorn Information System
Page 55

Chapter 1. User Guide
1.9.3 Create Blog
1.9.4 My Blog
1. If blog-related menus are clicked without creating
a blog, you will move to the page where you can
create a blog.
2. Enter blog identifier, ID, password and language
used. Click 'Create' button to create a blog.
1.It is execlusive page for private blog.
2.You can write, delete, and correct. And you make recent post,
tag, category.
3. You can select variable skin.
55
1.You can do posting simple story on your blog.
2.You can upload the file, stored in WebDisk for link
type.
Unicorn Information System
Page 56
Chapter 1. User Guide
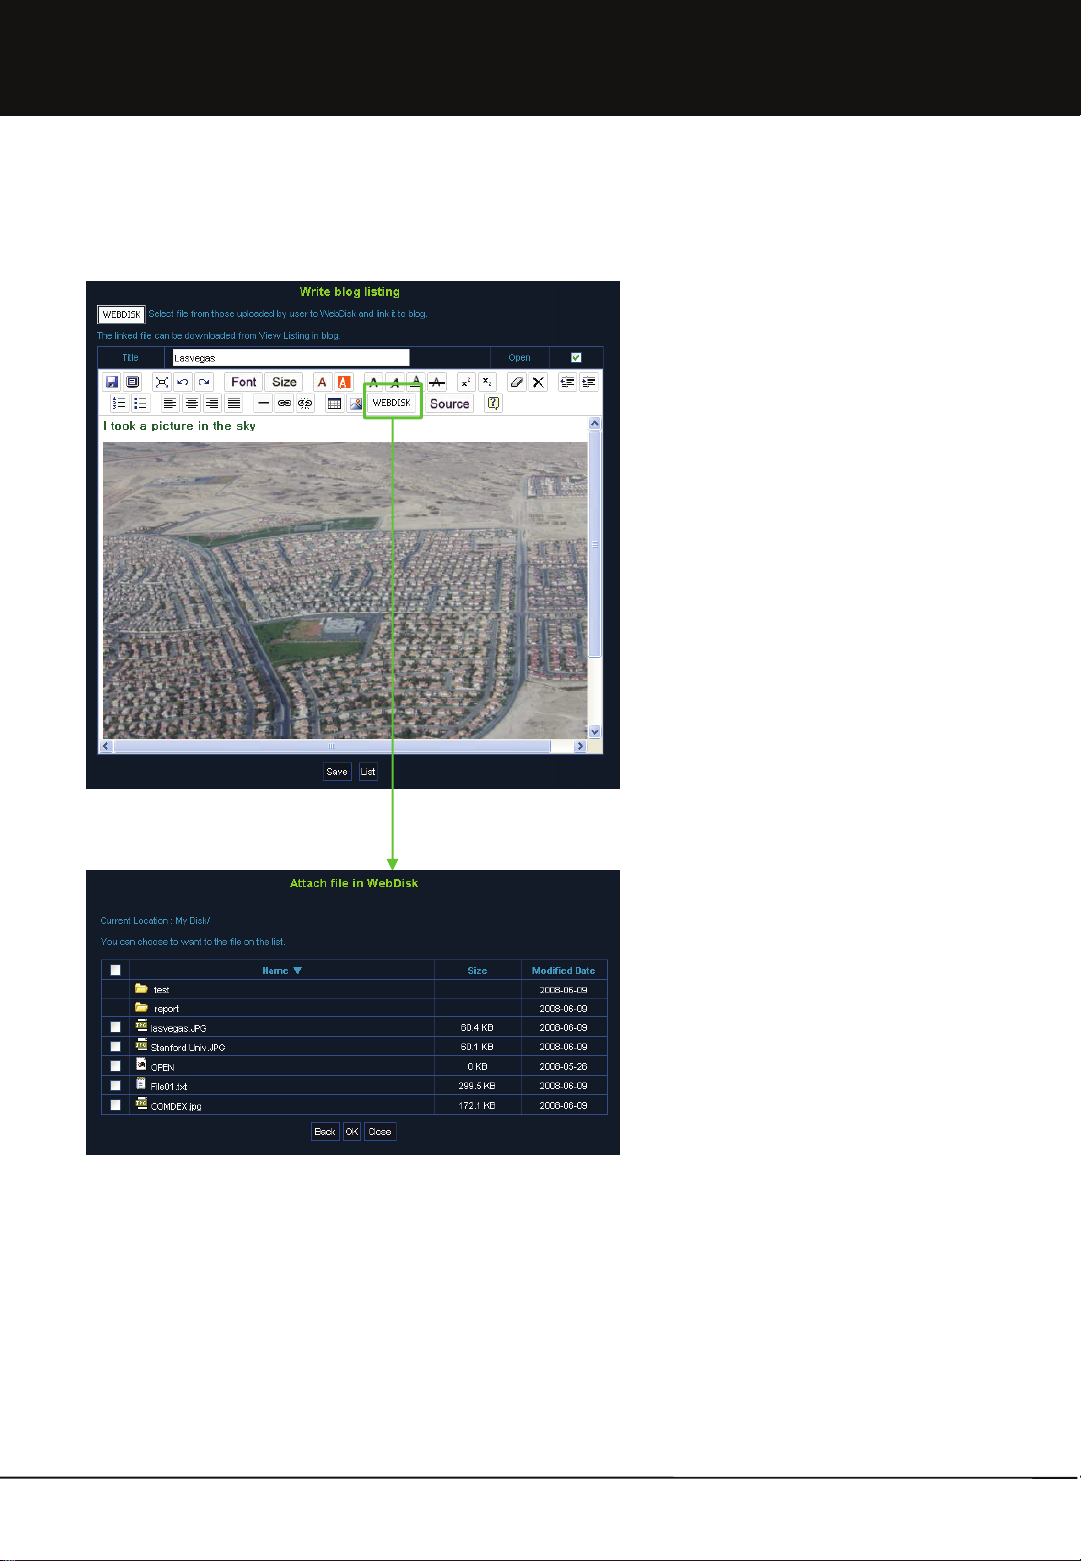
1.9.5 Write Blog & WebDisk File Link
1. Click ‘WebDisk File Link' button at the top of
posting list page to open a page to write a new
listing.
2. Title and contents of posting can be entered. Also,
open status can be selected.
3. Click 'Webdisk' icon in web editor icon to link the
files in Webdisk.
4. Title can be entered with as many as 200
characters.
5. Contents of posting can be decorated with html
editor by using font size, color, alignment and
insert table, etc.
6. Click 'Save' button to list posting.
1. ‘Webdisk File link’ links file in Webdisk and
displays it in blog posting.
2. When clicked, window opens to display the list of
files in Webdisk.
3. File list shows file name, size and modified date.
When clicking column name, the files are aligned in
the corresponding column in a list.
4. When clicking directory, contents of the
corresponding directory are redistributed to the list.
5. When clicking 'back' button, you will move to the previous list page.
6. Select file and click 'OK' button.
7. When validity test is completed, the file is linked and distributed to web editor of the corresponding file.
8. When file link is completed, multimedia files (WMA, MPG, AVI and MP3, etc.) are played with Windows Media Player. Graphic
files (BMP, GIF, JPG, PCX and PSD, etc.) are displayed as of the image. For other files, the linked file names are displayed to
enable downloading of the files.
56
Unicorn Information System
Page 57

Chapter 1. User Guide
1.9.6 Using Web editor
Contents in working are saved as source file.
Select all of the contents written. Move back one stage to the previous work state.
Move forward one stage to the work state
afterwards.
Font size is changed. Letter color is changed.
Background color of letter is changed. Letter is darkened.
Letter is slanted. Letter is underlined.
Letter is stricken. Letter is superscripted.
Letter is subscripted. All of the applied styles are cleared.
All of the selected parts are erased. Letter at cursor is indented to the right.
Letter at cursor is outdented to the left. Number list is written.
Letterhead sign is written. Text is aligned to the left.
Text is aligned to the center. Text is aligned to the right.
Text is aligned to both ends. Straight line is drawn.
The entered address is linked. Link of the linked address is cleared.
Table is inserted. Address of the image entered is linked.
Contents in working are previewed in a new
window.
Font is changed.
File in Webdisk is linked.
Editor information is shown.
Source code of the contents in working is
shown.
57
Unicorn Information System
Page 58

Chapter 1. User Guide
1.10 Service Request
1.10.1 Application for Service and Cancellation
1. If the basically allocated services are not sufficient enough, user must request for additional
service.
2. Click ‘service request’.
* This function can be only used by the general use. (sysadmin can’t use this function)
3. Items for service application are capacity change and expiration date extension. Application can be made per unit of MB for
capacity change and of the month for expiration date extensions.
4. In the initial screen, status of the current service use and particulars of an application waiting for approval are displayed. Click
the checkbox on the left of items to be applied for to activate the input window. Apply for the desired services in the Activated
Input window. Application cannot be made for items for which an application is already being processed.
5. When items for application have been entered, click ‘Save’ to complete the application and check particulars of the application.
58
Unicorn Information System
Page 59

Chapter 1. User Guide
1.11 Guest User
1.11.1 Adding Guest User
1. Using this option general users can generate guest
accounts randomly without the assistance of
administrator.
2. Click Guest User Management in the Tool menu.
3. When the Guest User Management window is
displayed, set ID, name, password and expiration
date in the add/ change section on the right and click
the Add button.
4. Expiration date is set on the basis of the number of
dates. Capacity previously allocated to the user to
create a guest user can be used within the set period.
(Note that a new saving space is not created for the
newly added guest user.)
5. ID must be 4 ~ 16 digits. Special characters or
blanks, etc. cannot be used.
6. Number of guest users to be created must be
within the limit set by the administrator.
59
7. Select Guest in the Guest User list on the left of the
‘Guest User Management’ window to display current
setup information in Add / Delete area. Make
changes and click the Save button.
8. ID cannot be modified. Click the Initialize button
during modification or creation to delete inputs and
return to default.
9. Select user to be deleted from the Guest User list on
the left of ‘Guest User Management’ window and
click the Delete button. A number of guest users can
be deleted at the same time.
10. Using ‘Guest User’ Wizard, general user can
create/delete Guest User account. Refer to ‘1.2.1-2
Create Guest User’ menu.
Unicorn Information System
Page 60
Chapter 1. User Guide
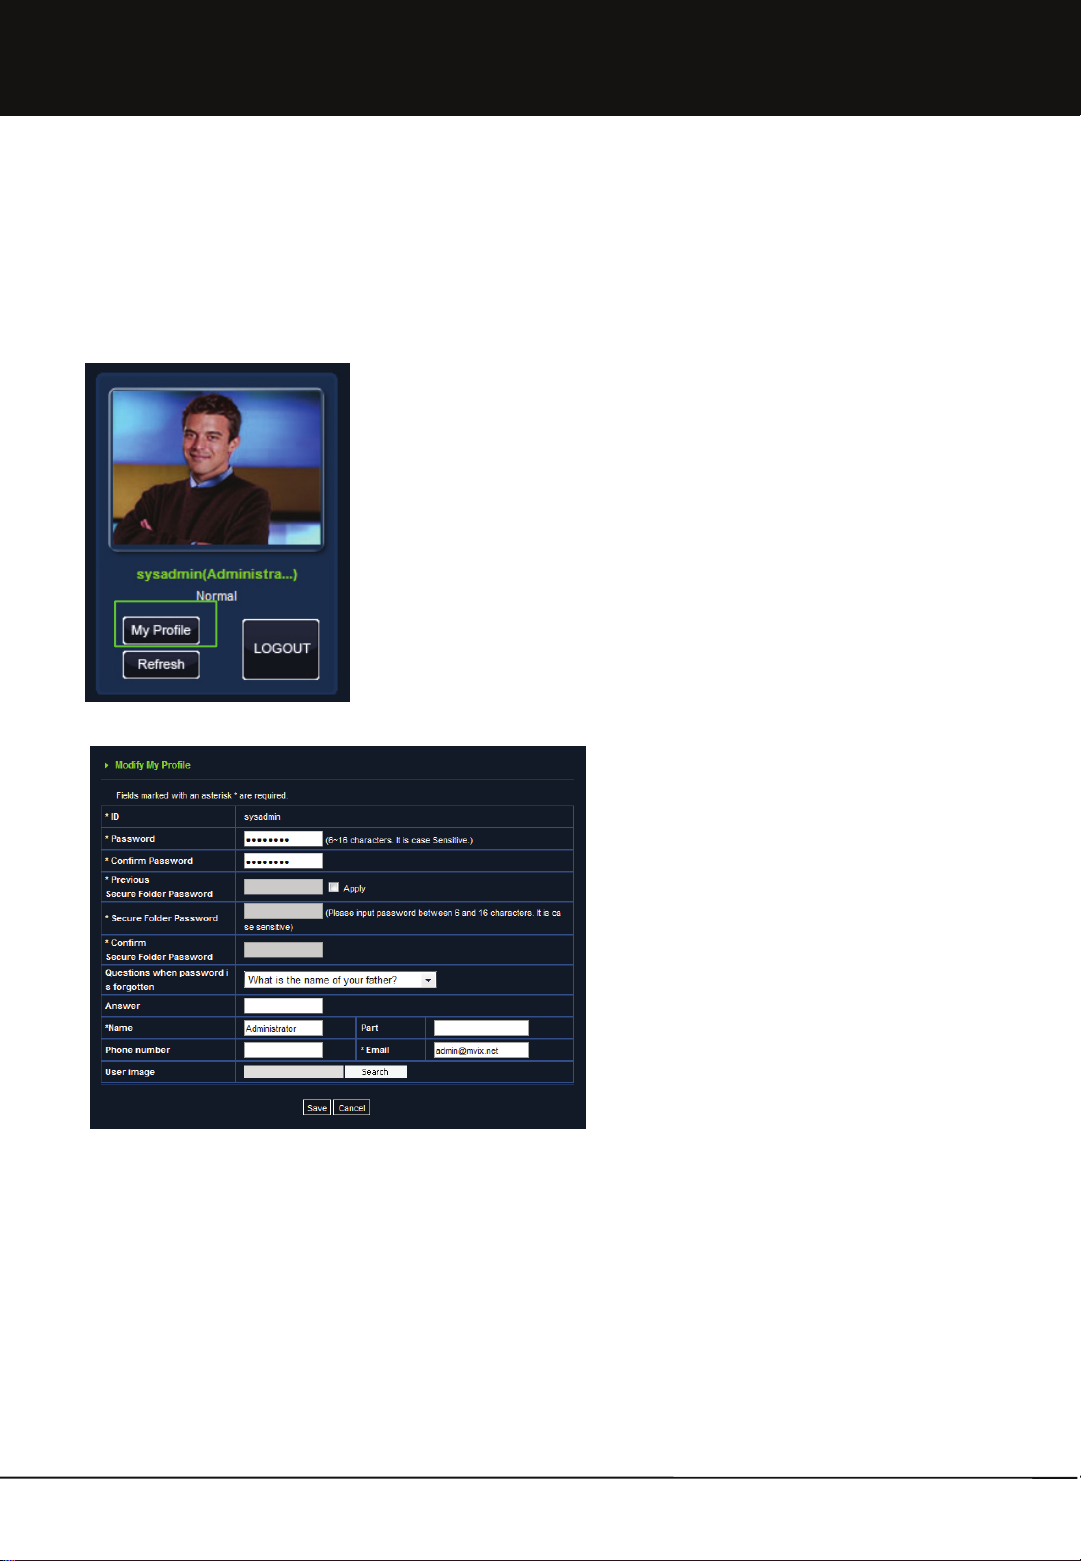
1.12 Modify my information
Information entered at member registration or user creation by administrator can be changed in [Modify My Info.] page.
1. After login, click [Modify My Info.] button at the top
left-hand corner of main page to move to the
corresponding page.
2. All information with the exception of ID can be
modified.
3. User image is displayed at the top left-hand corner of
main page after login. Press [Search] button to select
an image.
4. Modification is completed by pressing [Save] button.
60
Unicorn Information System
Page 61
Chapter 2. Administrator
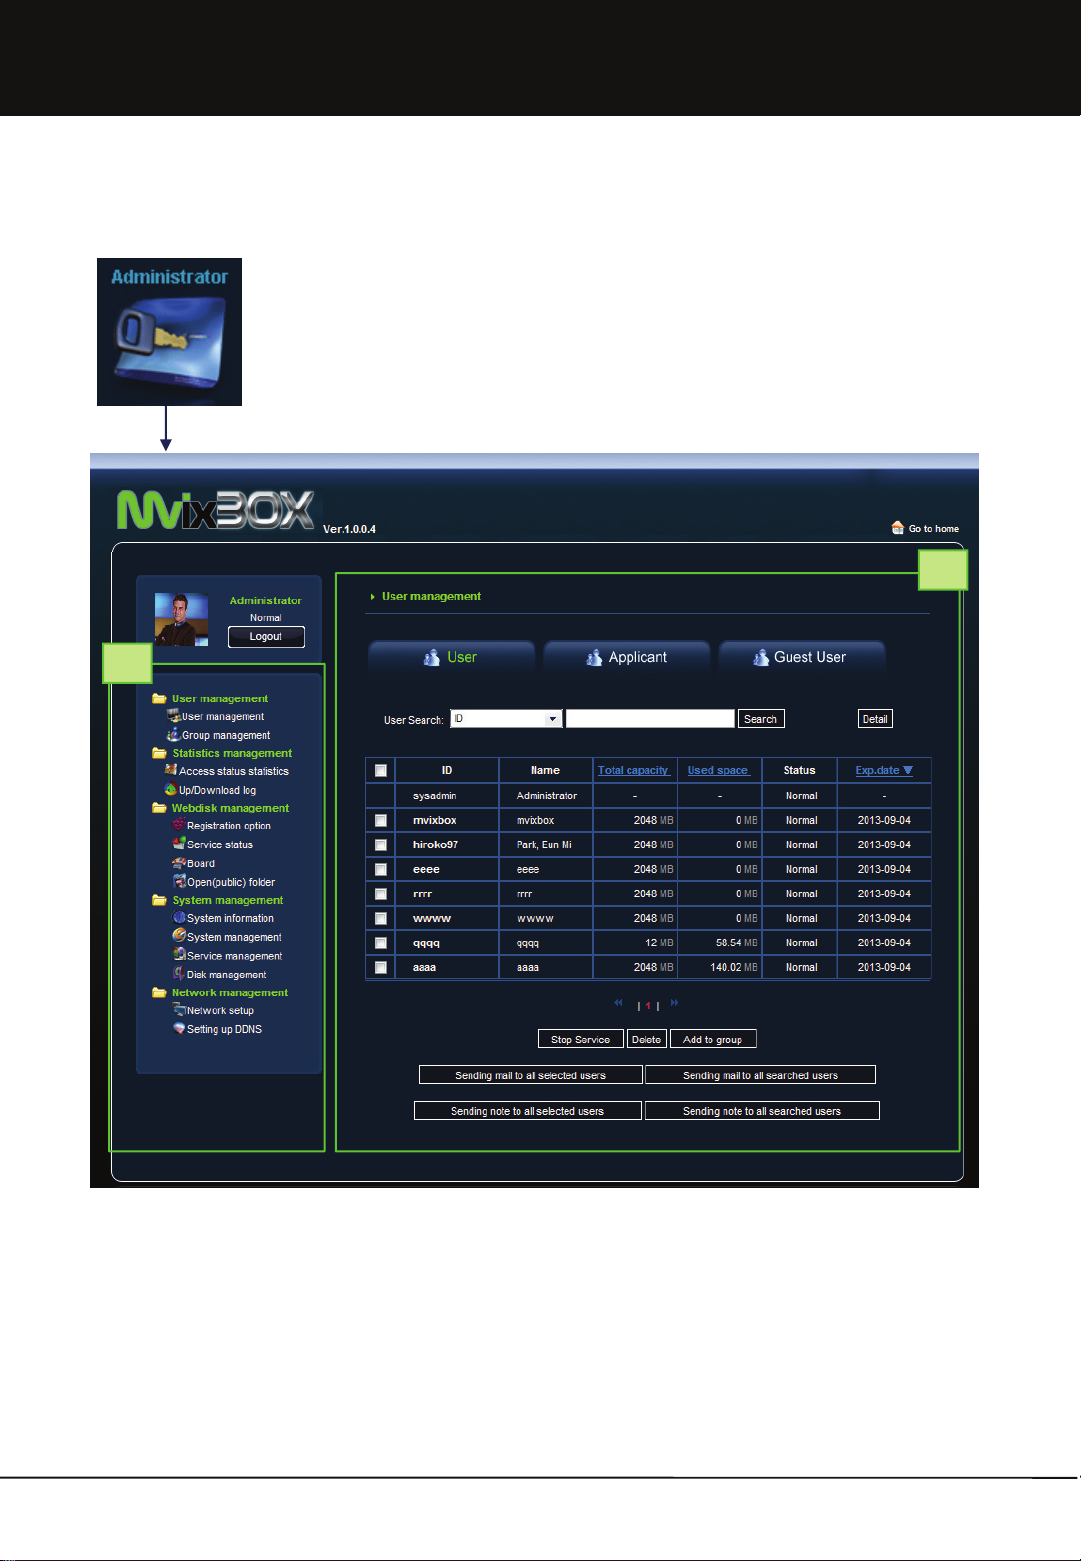
2.1 Administrator Execution
2
1
1. Administrator Main Menu
Administrator menu consists of ‘User Management’ menu for user, applicant, group, guest and administrator management,
‘Statistics Management’ to search service statistics and ‘WebDisk management’ menu to manage basic settings of
menus and services and ‘System Management’ menu to manage system, service and Disk and ‘Network management’
menu to setup IP and DDNS.
2. Main Screen
Major settings and managements are administrated.
61
Unicorn Information System
Page 62

Chapter 2. Administrator
2.2 User Management
2.2.1 User Management
2.2.1-1 User Management List
1. ‘User Management’ is where general user accounts
are managed, such as user service suspension,
deletion and modification.
2. Press ‘User Management’ in menu to see major
information at a glance, such as user ID, name, total
capacity, used capacity, status and expiration date in
the list.
3. The list can be arranged per used capacity, total
capacity and expiration date wise.
4. Mail or note can be sent to the user or applicant.
Also, users can be added to group.
5. User information is shown per 10 people on a page.
6. Users with service suspension are marked as
‘service stop’.
7. The most recently registered applicants are shown at
the top of list.
62
1. Click user ID from the list to display detailed
information of the selected user. More detailed user
information can be checked. Total capacity, status,
expiration date and division can be modified.
2. If login is not possible because the user has
forgotten the password, press ‘Initialize Password’ to
set password to be the same as the user ID.
3. The Secure folder password can also be initialized.
To initialize password of the Secure folder, a secret
key must be entered and authorized. Make sure to
click apply after entering admin password in
password input.
Unicorn Information System
Page 63

Chapter 2. Administrator
2.2.1-2 User Management Function
1. Stop Service
a. To stop service use by a user due to special reasons,
select user and click ‘Stop Service’ to suspend service
of the selected user.
b. User with expired service term is automatically changed
to service suspension status.
c. User in service suspension status can log in to the
service, but cannot use it.
d. User can apply for extension of expiration date during
suspension period and after approval he can use
services normally.
e. User in service suspension status becomes
automatically deleted once the data preservation term
(30 days by default) set by administrator expires.
2. Delete
a. To completely delete user-related information and files,
select user and click ‘Delete’.
b. When a user withdraws membership, membership
information and files of the user are left behind.
Therefore, the administrator is required to delete
continuously withdrawn members information and
neatly organize the related information.
c. Users in normal state cannot be deleted. Only the
users with service suspension are withdrawn from
membership can be deleted. To delete users in
normal state, it is required to first change the state to
service suspension.
3. Add to group
a. The selected user is assigned to a specific group. It is
possible for a single user to belong to a number of
groups.
b. For creating a group, refer to the ‘group management’
section.
63
Unicorn Information System
Page 64
Chapter 2. Administrator
2.2.1-2 User Management Function
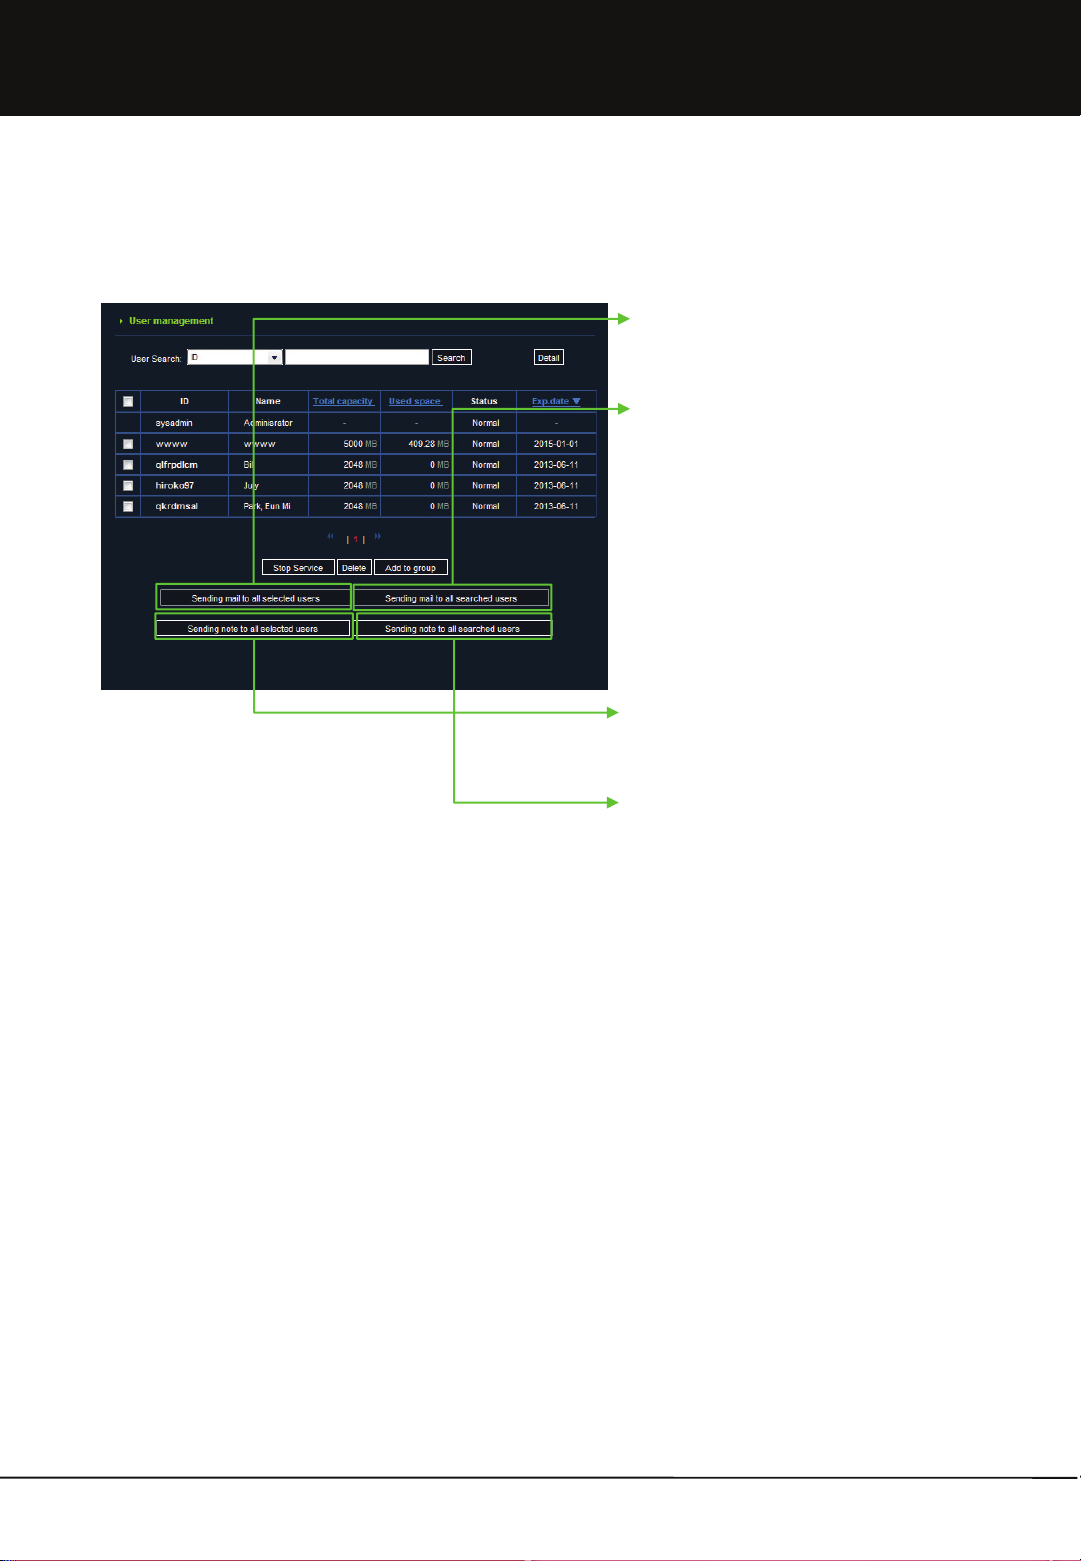
4. Mail to Selected users
E-mail can be sent to a user selected from the list.
5. Sending Mail to all searched users
E-mail can be sent to all searched users. When no
search conditions have been set, an e-mail is sent to
all users.
6. Send note to selected users
Note can be sent to a user selected from list.
7. Sending note to all users
Note can be sent to all users to satisfy the search
conditions. When no search conditions have been
set, a note is sent to all users.
64
Unicorn Information System
Page 65

Chapter 2. Administrator
2.2.1-3 User Search
1. Simple Search
a. This is used to search for users simply by user ID or
name.
b. First, select the search basis. Then enter contents
and click ‘Search’ to display the list of corresponding
users.
c. If a name like ‘Tom” is selected as the search basis,
all users with names including ‘Tom’ are searched
(Ex.: Tom Cruise, Tom Hanks etc.).
2. Detailed Search
a. This is used to search for users compositely with
various conditions.
b. Click ‘Detailed Search’ to move to the window where
search conditions can be entered. Enter the required
conditions and click ‘Search’ to display a list of users to
satisfy the search conditions.
c. Search conditions displays ID, name, total capacity,
used capacity, status, registration date and expiration
date.
65
Unicorn Information System
Page 66
Chapter 2. Administrator
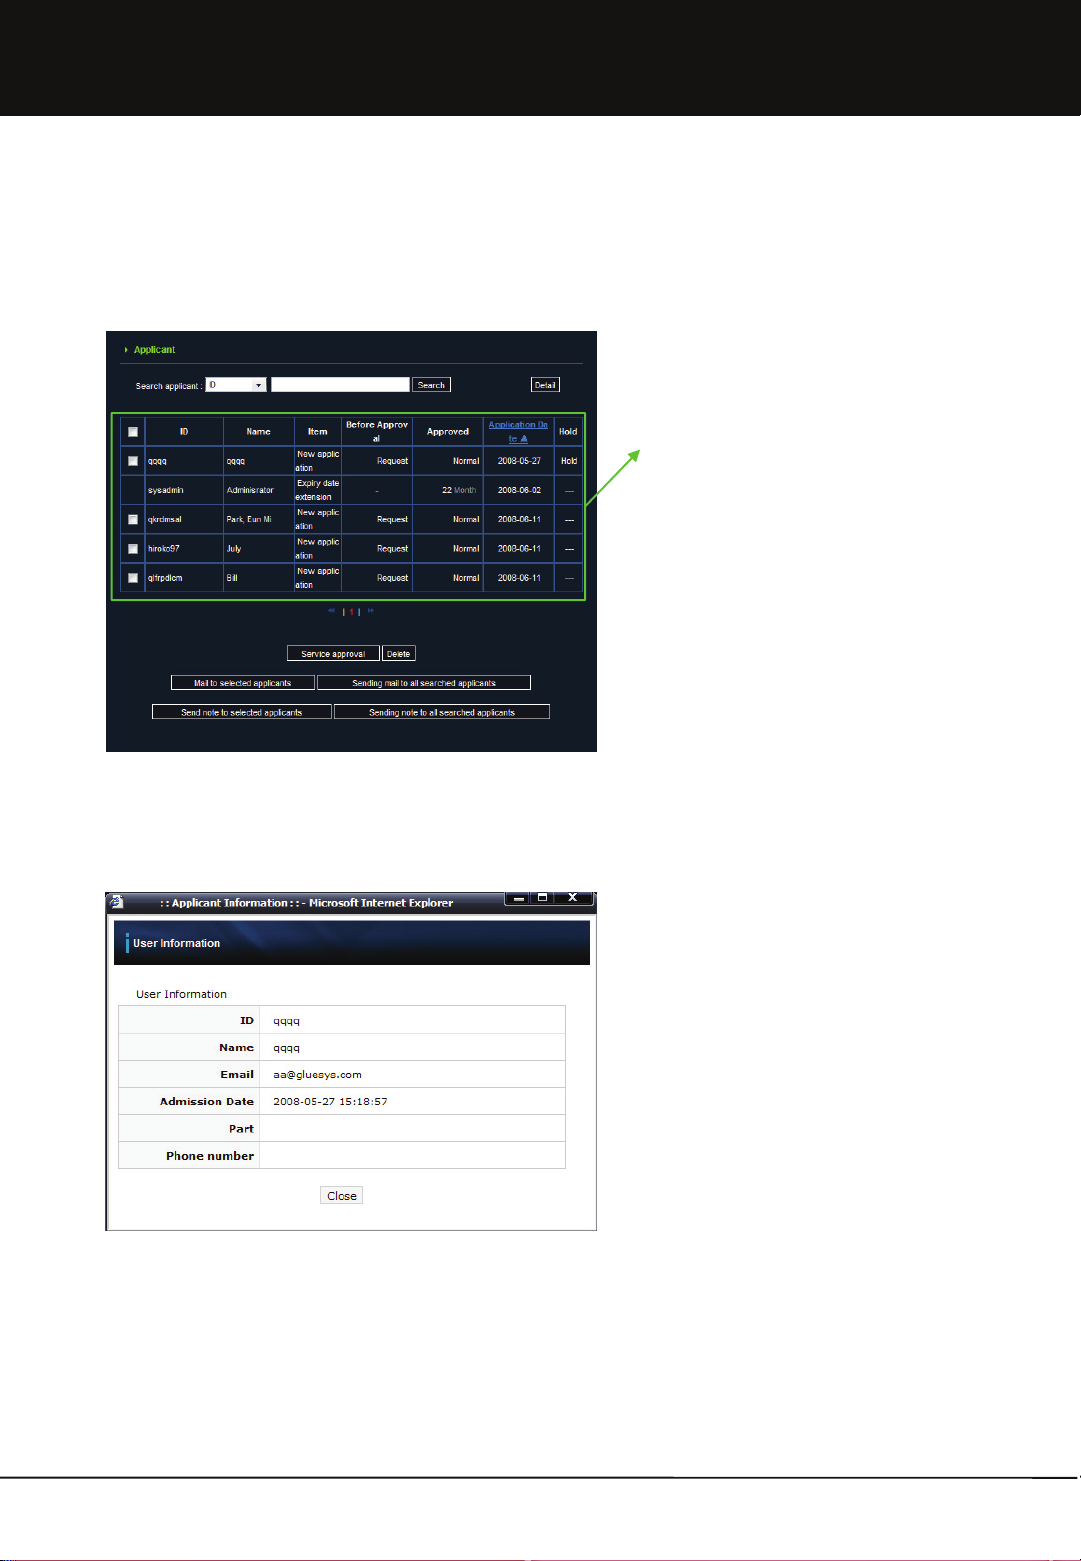
2.2.2 Applicant
2.2.2-1 Applicant Management List
1. This is where service application by users is managed,
such as approval, deletion and holding, etc. for
service application.
2. Press ‘Applicant’ in the menu to display a list of
applicants and check applicant ID, name, application
category, status before and after approval, application
date and status of application holding, etc.
3. In case approval of application is on hold, the
corresponding item of application is marked with ‘on
hold’.
4. The oldest application is displayed at the top of list.
5. The list can be arranged in a descending or ascending
order on the basis of the application date.
66
6. Click ID of the applicant to display a window showing
detailed information of the applicant.
Unicorn Information System
Page 67
Chapter 2. Administrator
2.2.2-2 Applicant Management Function
1. Service Approval
a. Applications by users for membership, capacity
increase and extension of the expiration date are
included here.
b. Application for membership is a request for access
to the user web storage service after joining as a
member.
c. When application for membership is approved, the
user can access all services. In case the registration
option is set as automatic approval, application for
membership is approved immediately after
membership registration.
d. Users with approved membership applications are
displayed in the user management list.
e. Capacity increase is a request to assign additional
storage capacity for a user. When capacity increase
request is approved, the approved additional storage
capacity can be used.
f. Expiration date extension is a request for extension
of the expiration date in monthly units.
g. When the expiration date extension is approved,
service can be used for the additional number of
months approved for extension. In case user has
requested an expiration date extension during
service suspension status, the expiration date will be
extended for the number of months applied for from
the date of approval.
67
2. Delete
This is to delete a user’s service application. This
function is used in case approval cannot be given for
service or service must be forcefully cancelled. It is
not generally used other than in special cases.
Unicorn Information System
Page 68

Chapter 2. Administrator
2.2.2-2 Applicant Management Function
3. Hold
a. This function is to share the cause for denying approval
when approval has to be deferred temporarily for
special reasons.
b. Click ‘---’ button in the list of applicants to create a
window to write down the cause for withholding
approval.
c. Enter the cause and click the ‘OK’ button to mark the
corresponding applicant as ‘on hold’.
d. In case there is more than 1 administrator, take special
caution in managing applicants in the ‘on hold’ state.
e. Service approval is possible even in the ‘on hold’ state.
68
Unicorn Information System
Page 69
Chapter 2. Administrator
2.2.2-2 Applicant Management Function
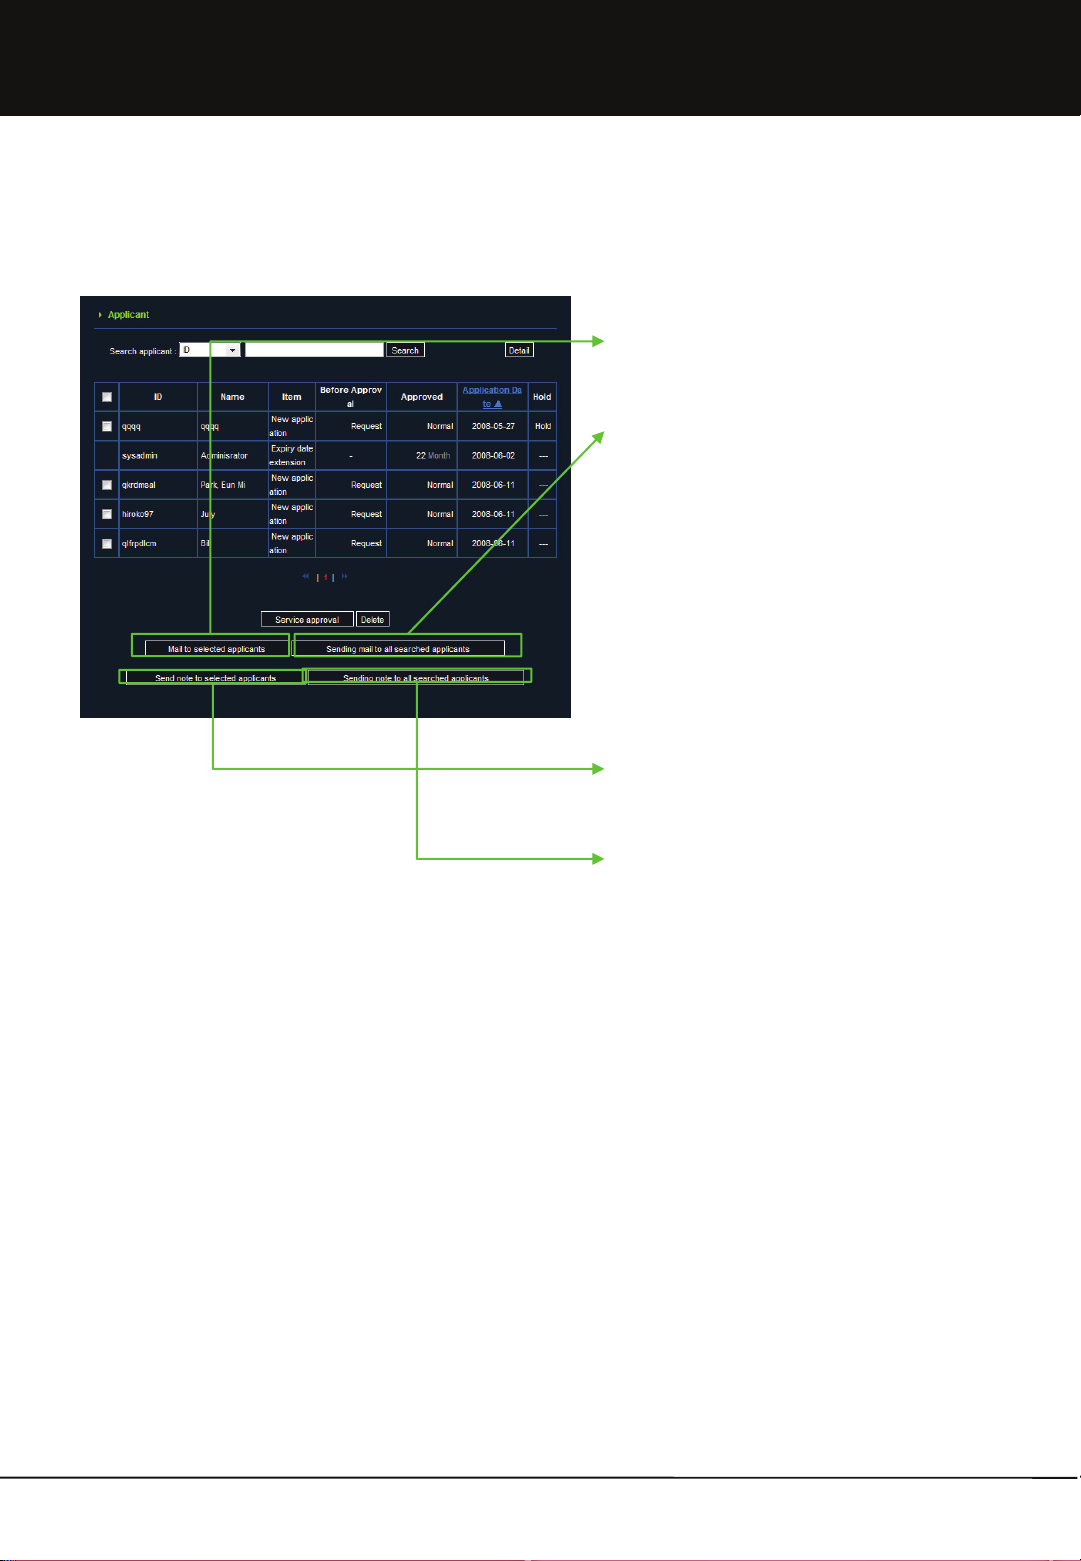
4. Mail to selected applicant
E-mail can be sent to a applicant selected from a list
5. Sending mail to all searched applicants
E-mail can be sent to all applicants to satisfy the search
conditions. When no search conditions have been set,
an e-mail is sent to all applicants.
6. Send not to selected applicant
Note can be sent to a applicant selected from a list.
7. Sending note to all searched applicants
Note can be sent to all applicants to satisfy the search
conditions. When no search conditions have been set, a
note is sent to all applicants.
69
Unicorn Information System
Page 70

Chapter 2. Administrator
2.2.2-3 Applicant search
1. Simple Search
a. This is used to search users simply based on user ID
or name.
b. Firstly, select the search basis. Then enter contents
and click ‘Search’ to display a list of corresponding
users.
c. If a name like ‘Tom” is selected as the search basis,
all users with names including ‘Tom’ are searched
(Ex.: Tom Cruise, Tom Hanks etc.).
2. Detailed Search
a. This is used to search applicants compositely with
various conditions.
b. Click ‘Detail’ to move to the window where search
conditions can be entered.
c. Enter the required conditions and click ‘Search’ to
display the list of applicants that satisfy the search
conditions.
d. Search conditions are ID, name, application category,
date of application and place of work (company).
70
Unicorn Information System
Page 71
Chapter 2. Administrator
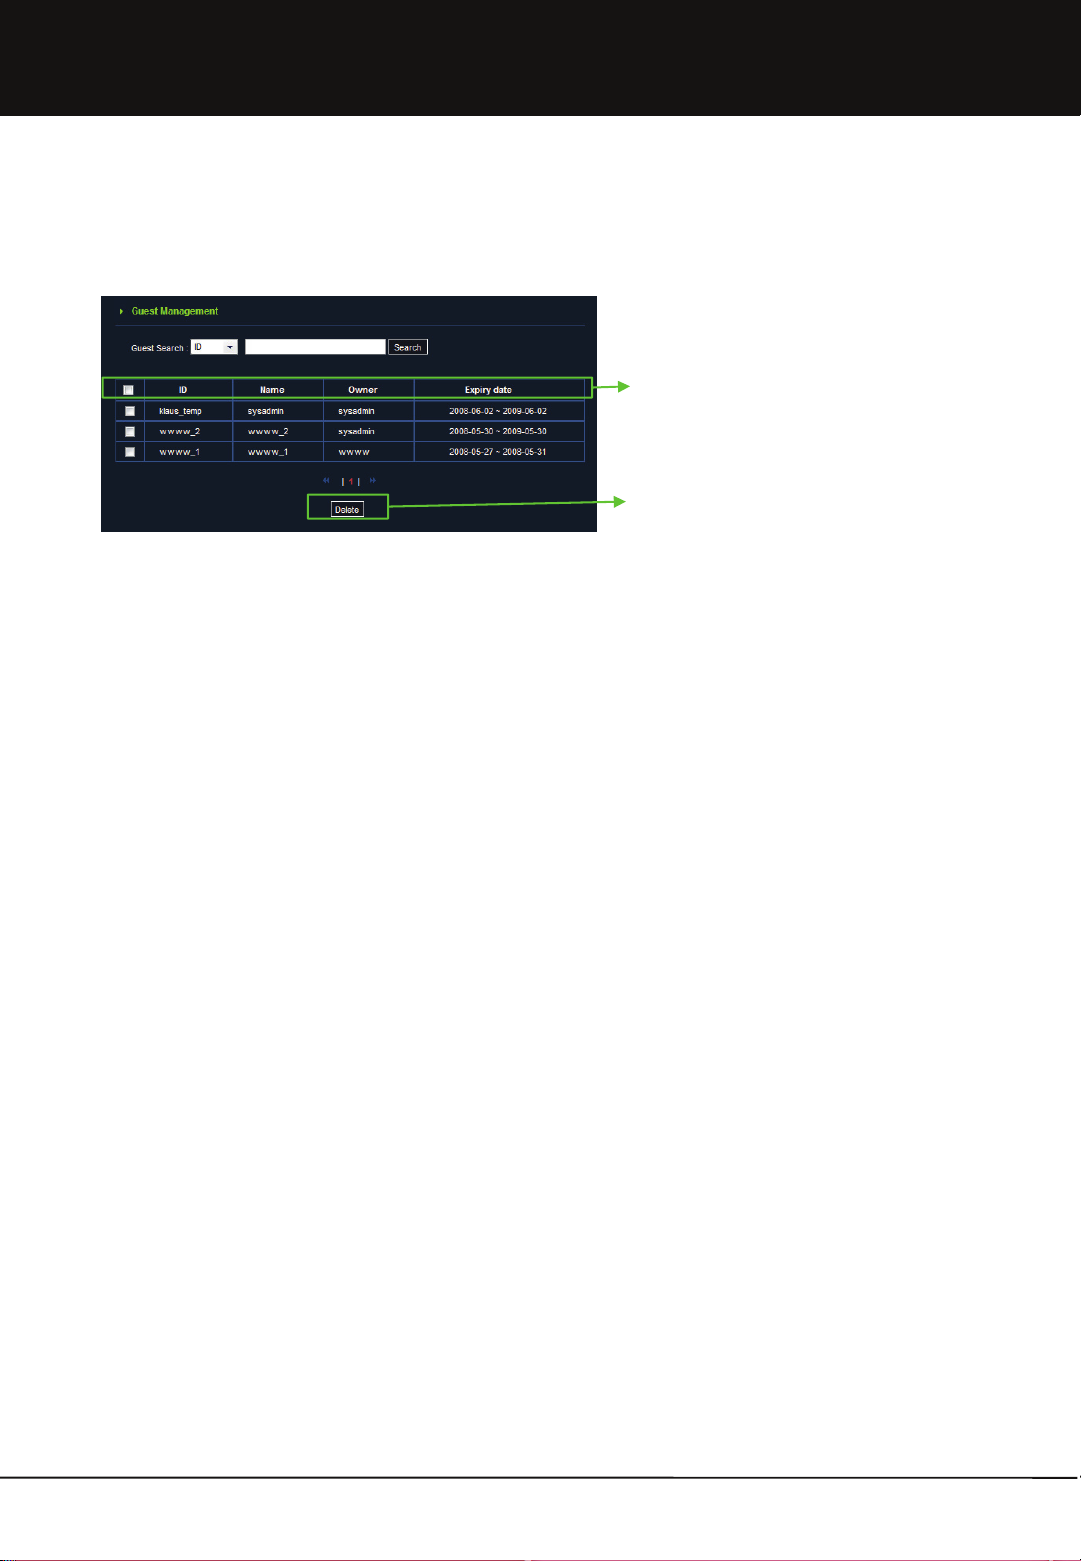
2.2.3 Guest User Management
1. Click ‘Guest Management’ to manage guest users
created by a user.
2. A list of guest users displays the ID of the guest user,
name, ID of user who created the guest user and
expiration date.
3. Basically, a guest user is managed by the user who
created the guest user. However, administrator can
forcefully delete the guest user. Select the guest
user to be deleted and click the ‘Delete’ button to
delete the selected guest user.
4. Guest users can be searched by using ID, name and
ID of the user who created the guest user.
71
Unicorn Information System
Page 72

Chapter 2. Administrator
2.2.4 Group Management
2.2.4-1 Group Management List
1. Groups can be created, modified and deleted. Press
‘Group Management’ in list to view major information
at a glance, such as group name, description,
number of users and registration date.
2. A single page shows 10 units of group information.
The Group list is arranged by the order of names.
3. Click ‘Group Name’ in the list to display detailed
information about the selected group. More detailed
information about the group user can be checked.
Also, users assigned to the group can be deleted.
2.2.4-2 Group Addition
2.2.4-3 Group Search
4. Select the group to be modified and click the ‘Modify’
button to modify group name and group description.
5. Select the group to be deleted and click the ‘Delete’
button to delete the group. When a group is deleted,
shared information of the group is also deleted.
6. By selecting a group, a note can be sent to all users
assigned to the group.
7. Click ‘Add Group’ to create a new group. Group
name and description must be entered.
72
8. Select either ‘Group Name’ or ‘Group Description’ as
the basis of a search. Enter search conditions and
press the ‘Search’ button to display a list of the
groups that satisfy the search condition.
Unicorn Information System
Page 73

Chapter 2. Administrator
2.3 Webdisk Management
2.3.1 Registration Option
2.3.1-1 Registration Option Setup
1. Registration option is used to set various default
values.
2. Options for membership registration and
options for guest user can be set.
3. Change option and click ‘Save’ to apply the setup.
2.3.1-2 Setup per Option
1. Default Value Option : Default values given at the time of service approval are designated.
a. Approval Type : Select ‘automatic’ to have application approval at the same time as registration and ‘manual’ to have
approval of an application given manually.
b. Default Capacity Allocated : This is the minimum capacity allocated to a user by default. The default capacity allocated
is 2GB.
c. Period of Data Keeping for Inactive User : User is in service suspension state. When the period set here expires,
information and files of the corresponding user are automatically deleted. The default value is 30 days.
d. Language for Administrated Mail : This is to designate language to be used in the automatically transmitted mails.
e. Default Term of Validity : This is the default term of validity given simultaneously as approval. Expiration date of a user
is when the default term of validity passes after the time of approval. Default term of validity is in monthly units. Default
value is 60 months.
2. Guest Options
a. Max. Guest User No. : The maximum number of guest users to be created by a single user is set.
b. Period of Validity : Maximum value of the period of validity of guest user is set.
73
Unicorn Information System
Page 74

Chapter 2. Administrator
2.3.2 Service Status
1. In ‘Members Current Status’, overall member status is
displayed as of the current time.
a. No. of Active Users : No. of users to normally use the
service at the current time
b. No. of Guest Users : No. of guest users created by
users at the current time
c. No. of Service Applicants : No. of service applications
made by the current time (requiring administrator’s
approval)
d. No. of Inactive Users : No. of users in service
suspension state at the current time
e. No. of Withdrawal Users : No. of users who have
withdrawn from service, yet whose information has not
been deleted
2, ‘Disk’ shows the physical state of disk allocated to
users at the current time. It briefly displays disk name,
disk count and space used by each disk. Click each
disk icon to see detailed information of the disk.
Information is given in numeric figures.
2.3.4 Board
1. It is free communication board.
2. When you write contents, string between “<“ and “>” is not stored.
74
Unicorn Information System
Page 75

Chapter 2. Administrator
2.3.5 Open(public) Folder
1. In Open(public) Folder, capacity of TV folder is set and the used space can be
checked.
2. Capacity allocated to Open(public) folder can be changed. The default
capacity allocated is 10GB.
75
Unicorn Information System
Page 76
Chapter 2. Administrator
2.4 System Management
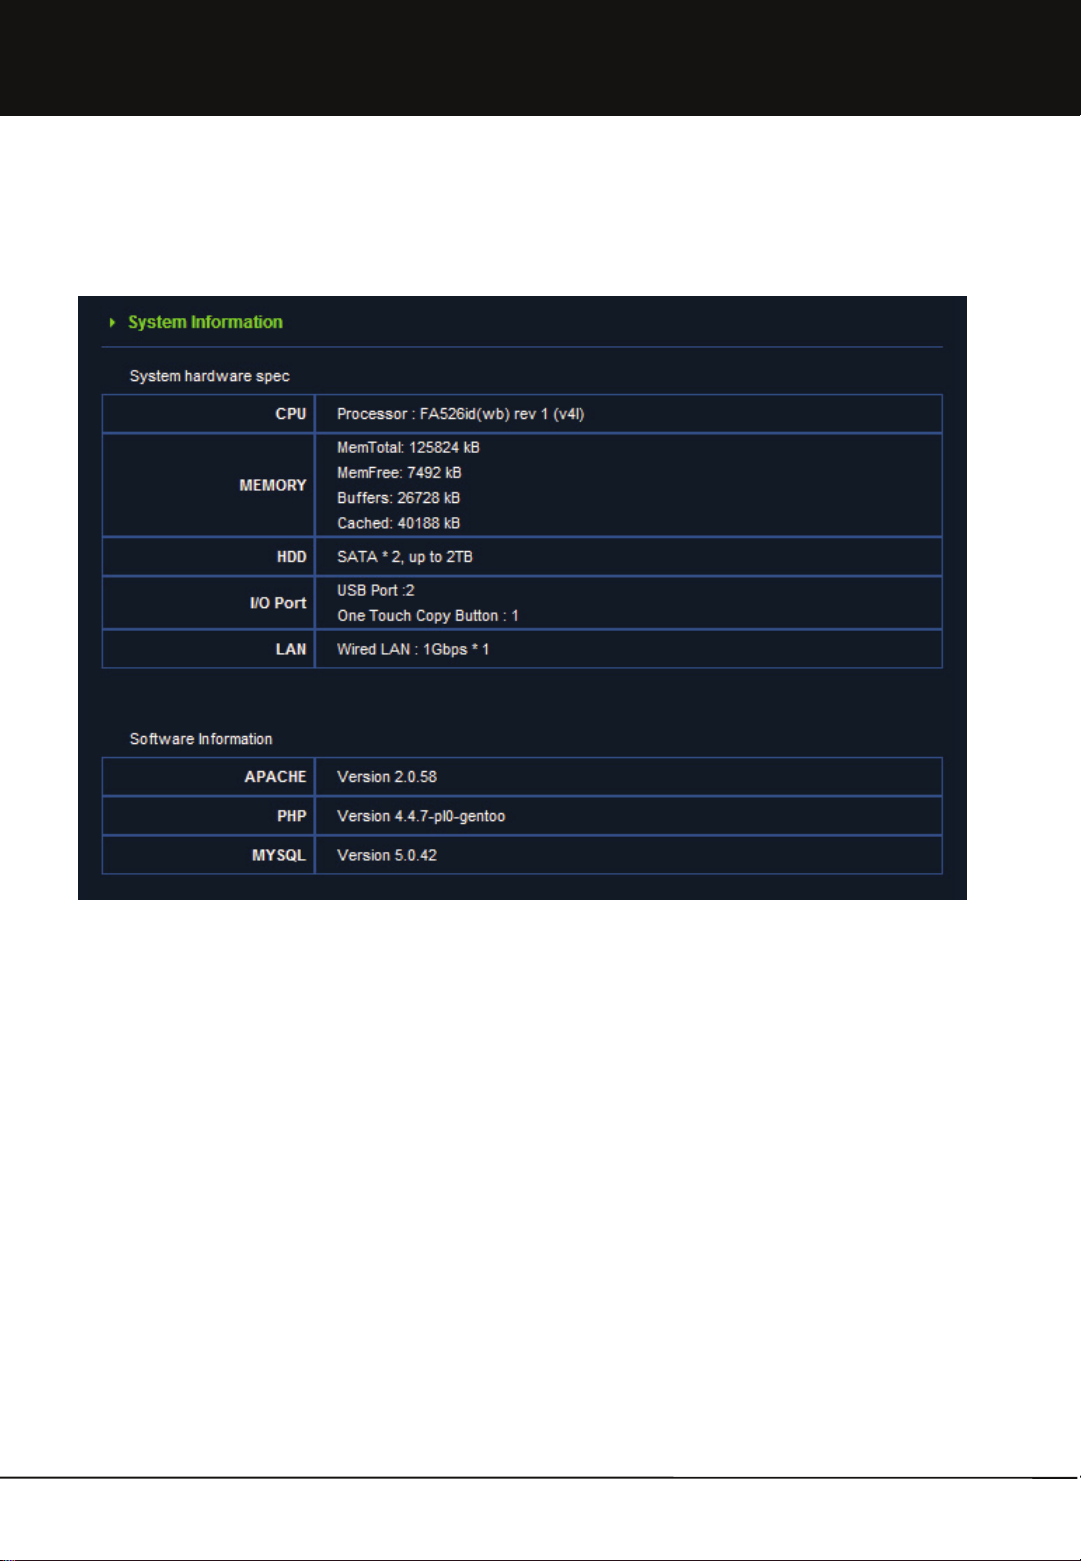
2.4.1 System Information
1. System information shows hardware formation information for present equipment.
• Formation information is as follows.
• Hardware Info.
• CPU: It shows the kind and version of main treatment equipment.
• Memory: It shows memory size and using capacity per use for present system.
• HDD: It shows the kind of hard disk, can be established, maximum size.
• I/) Port: It shows the information of exterior input and output port.
• LAN: It shows the information for wire and wireless network interface.
• Software Info.
• APACHE : version info.
• PHP : version info.
• MYSQL : version info.
76
Unicorn Information System
Page 77

Chapter 2. Administrator
2.4.2 System Management
1. Mvixbox Name : change the Mvixbox device name. iTunes or UPnP server can recognize Mvixbox device by this Mvixbox
name.
2. WorkGroup : change the WorkGroup. A WorkGroup is a collection of computers on a local area network (LAN)
that share common resources and responsibilities.
3. SMTP Server Options : SMTP server must be accurately set to have the mail sending function used in various parts of
Web Disk operate normally. After the first installation, set this with SMTP server information currently used by the
administrator. When setup is saved, a test mail is automatically sent to the mail address of the system administrator. To
change setup, check if the mail address of the system administrator is accurate.
a. SMTP Server : Accurately enter an SMTP server address. Enter the SMTP server address currently used by
administrator.
b. Mail ID (Account Name) : enter the mail account ID used for connection to SMTP server.
c. Mail Password : Accurately enter the account password used for connection to SMTP server.
d. Confirm Password : Reenter the mail password for confirmation.
4. Time Setup and Timezone Establish : Press Modify button for date or time of Mvixbox. Also, you can change the date
using by NTP server.
77
Unicorn Information System
Page 78

Chapter 2. Administrator
2.4.2 System Management
6. Shutdown : System is restarted or shut down.
7. Clear : System initialization is a function for turning all set-up information and user accounts(including data) back to
initial state. You should re-install with installation program after executing initialization and rebooting.
8. Upgrade
a. Upgraded (or debugging) patch file will be downloaded from the Web Disk Customer Center.
b. Press Search button to select the downloadable file.
c. Press Apply to execute upgrade.
d. Upgrade patch files are not an accumulated files. Therefore, to successfully apply the latest patch file, it must be
administered after sequentially patching all patch files between the current version and the latest version.
9. Backup and Recovery
a. Backup : To restore system to current state after reinstallation, make sure to press the Backup button prior to system
reinstallation to save a backup file in the PC. Only the user account and setup information are saved in the backup file.
Files are not backed up. Therefore, separate backup is required for user data area.
b. Recovery : After system reinstallation, upload recovered files and press Apply to restore user and setup information as
before reinstallation.
78
Unicorn Information System
Page 79

Chapter 2. Administrator
2.4.3 Service Management
1. uPnP
UPNP allows you to find a device on the network automatically.
In an operating system Windows XP or higher, enabling UPNP in a network environment lets you find a device connected
in the same network automatically.
When you double-click the device thus found, your web browser brings in a relevant web page automatically.
You can easily find and access a device in this way without knowing its correct IP address.
2. iTunes
The ITUNES server performs a service that lets you play with your iTunes a multimedia file on a network.
iTunes players in the same network recognize as shared the files of the music folder below the open folder.
3. Print
The printer server lets you share printers on the network. Once you connect a printer via USB and performs a search, it
comes out as a network printer. Install a device driver appropriate for a printer to be used.
4. NFS
NFS is a protocol that allows a remote disk to be used just like one on the same computer. It is mostly applied in such
operating systems as UNIX or LINUX. If a UNIX or LINUX runs on the same network as this system does, NFS lets you
mount as read-only those data that are stored on the UNIX or LINUX systems.
5. FTP
FTP is a protocol that lets you transmit files over the network. For security reasons, this system does not grant FTP
access to ordinary users. However, FTP is included for the administrators to upload files for their homepages. Refer to
the manual to create a system administrator's account.
79
Unicorn Information System
Page 80
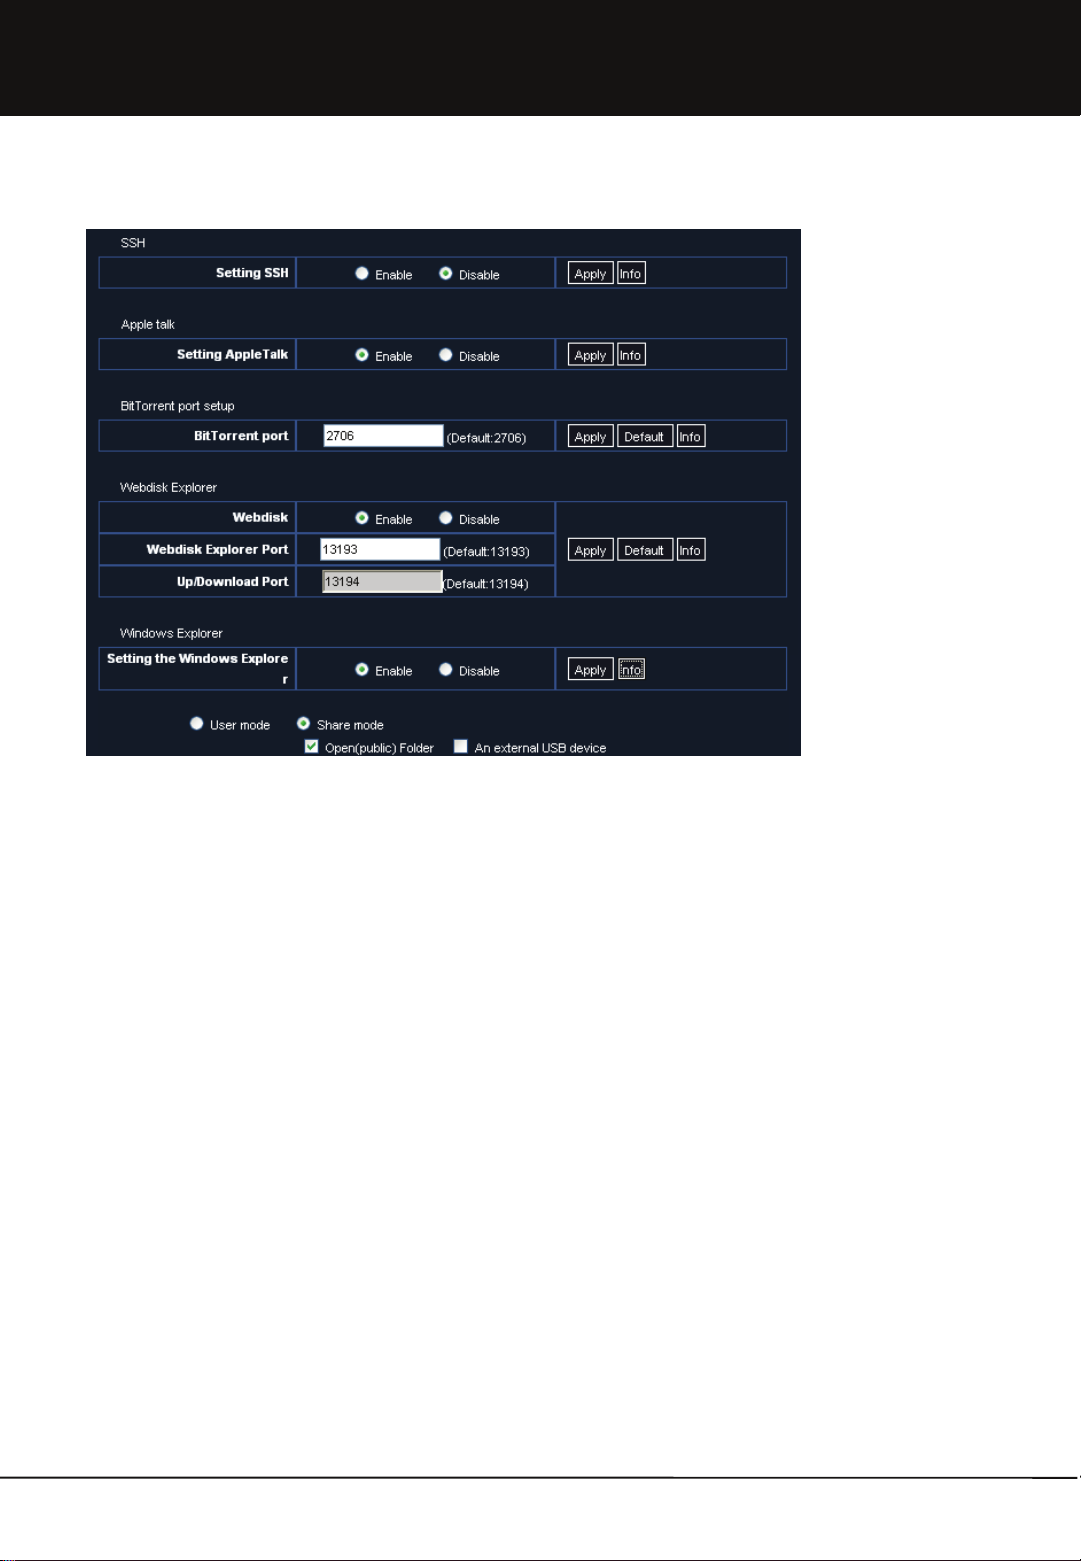
Chapter 2. Administrator
2.4.3 Service Management
6. SSH
SSH is a service performing system commands like Telnet. Unlike Telnet, however, it comes with improved security. To use
SSH, you need to install a SSH client on your computer.
7. AppleTalk
AppleTalk is a service that lets you share a network with a Apple computer. When you establish a connection as in the
following, you can access a space assigned to each user.
8. BitTorrent
Bittorrent is a P2P service for faster file download. To download a file via Bittorrent, you first need to have a torrent file.
Ordinarily, the default port is used, but if the port cannot be used for any special reason, you can assign an arbitrary port to it.
9. Webdisk Explorer
a. This is to change port numbers to which the Web Disk server responds. The server uses two ports, such as a Web Disk
explorer port and an up/ download port. This function is useful when it is inevitably required to change the default port due
to internal network firewall policy or when using a number of Web Disks under an IP-sharing machine. Web Disk explorer
and up/ download port must not be changed to the ports already being used in the server. Otherwise, service cannot be
operated because collision occurs between application programs in use and service.
b. However, it must be noted that, when the explorer port number has been set, the up/ download port number is
automatically set as explorer port number + 1. Therefore, make sure to set two port numbers (an explorer port number
and explorer port number + 1) at all times when setting port forwarding in the sharer or opening a firewall.
c. The default port is 13193 for Web Disk explorer and 13194 for up/ download service.
10. Windows Explorer
The Windows Explorer service lets you share a folder over the network. It comes with the user mode and the share mode.
In the user mode, user authentication is necessary for getting access to a folder. In the Share mode, no such authentication
is needed and a USB disk or memory space can be shared.
80
Unicorn Information System
Page 81
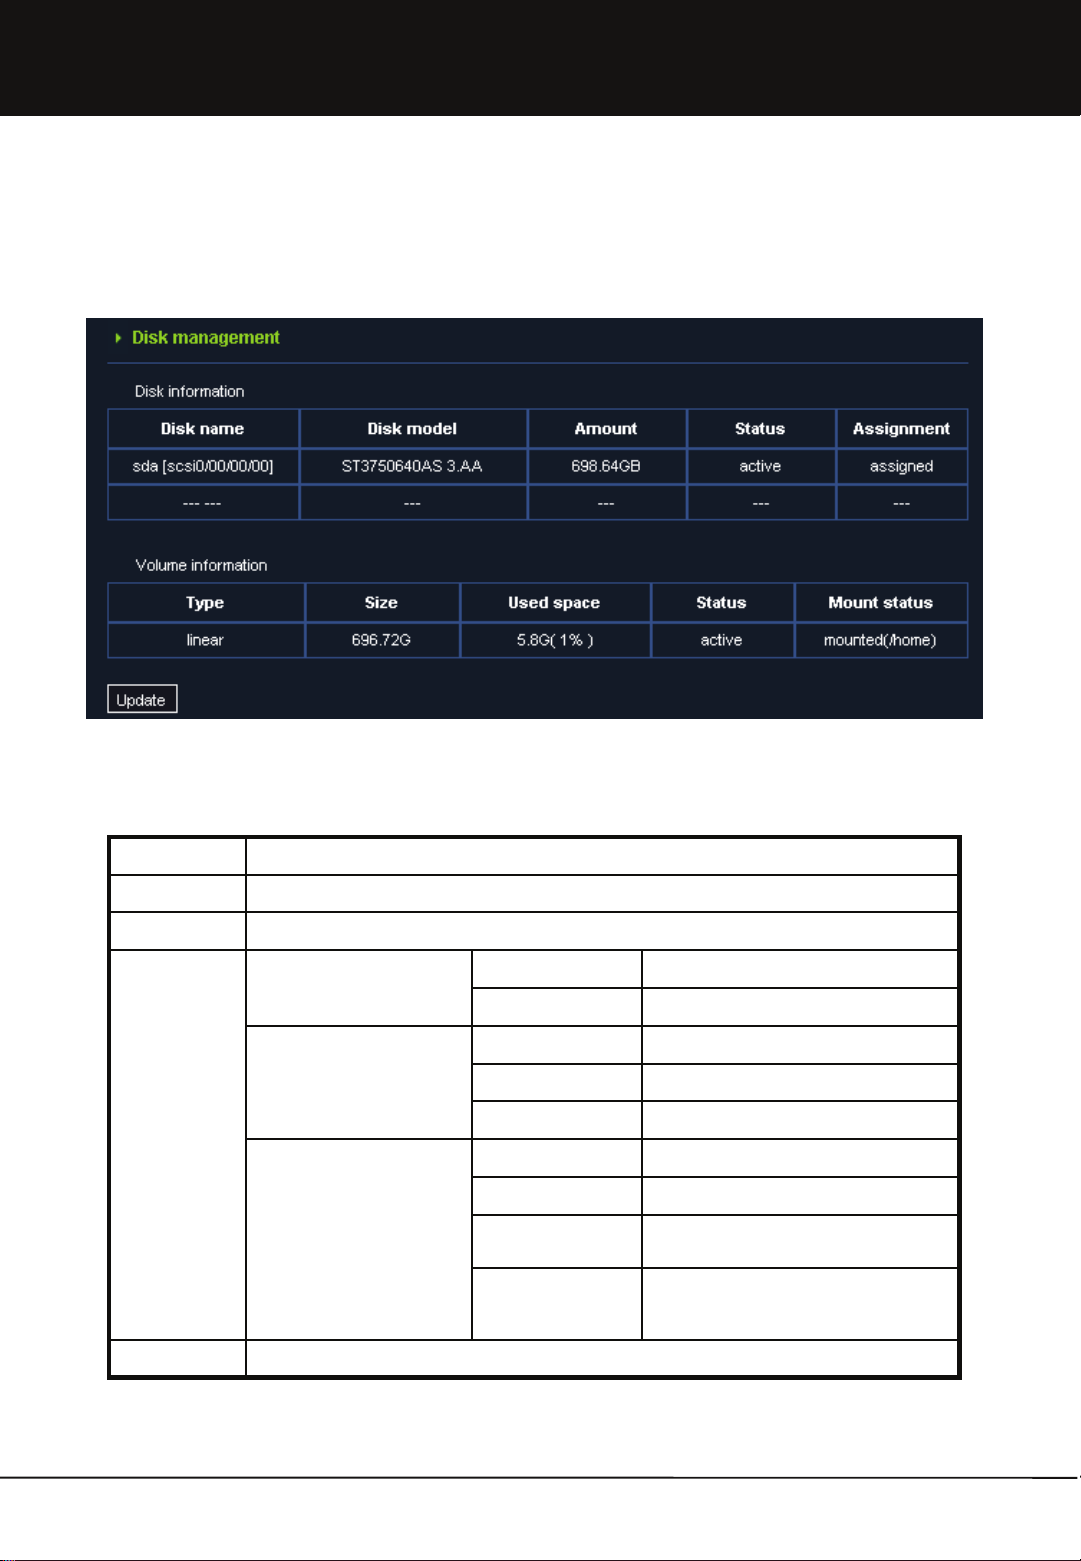
Chapter 2. Administrator
2.4.4 Disk Management
2.4.4.1 Disk & Volume Information
Disk Information
Disk Name The name of the disk the system has recognized
Disk Model The name of the disk model the system has recognized
Amount The size of the disk
Status Volumes are not assigned physical ok The disk is physically normal
physical error The disk is physically not normal
Volumes are assigned and
the volume type is linear
Volumes are assigned and
the volume type is mirroring
Assignment Indicates whether the volumes are assigned
active Volumes are assigned and active
physical error The disk is physically not normal
inactive Volumes are assigned but not active
active, sync, spare Normal state
physical error The disk is physically not normal
faulty This is a volume member but has a
problem
rebuilding This is a volume member and its volume
info is being reset for a normal use of
the volume.
81
Unicorn Information System
Page 82

Chapter 2. Administrator
Volume Information
Type Indicates whether it is under the extension mode or under the mirroring mode.
Size Volume Size
In the extension mode, this is equal to the sum of the capacities of the disks assigned the
volumes.
In the mirroring mode, this is equal to half the sum of the capacities of the disks assigned the
volumes.
Used space The current usage of the volume
Status The current volume type is linear
active The volume is activated normally
suspended The volume is not active
mapped with inactived tables Activated abnormally with wrong internal data structures
mapped without tables Activated abnormally without internal data structures for
The current volume type is mirroring
Ok The volume is activated normally
Not started The volume is not active
degraded When the volume is active and problems are faced
Recovering
Resyncing
rebuilding
Mount status Indicates whether it is assigned to a mounted volume.
operation
concerning the inner structural data, at least 1 disk needs to
be active in order to use the volume.
The initial status of volume is “degraded” if only 1 disk exists
at the time of installation, where the total of 2 disks is
premised to exist.
However, if, at least, 1 disk is active volume can be utilized
regularly.
The volume is activated and its volume info is being reset for
a normal of the volume.
Volume can be controlled in this state.
82
Unicorn Information System
Page 83

Chapter 2. Administrator
2.4.4.2 Adding Disk
1. In case you want to add disk, you add when the electricity is off. After you turn on, you can click “Update” on disk
management of [Administrator]-[System Management]-[Disk Management] menu, the disk information will be
updated.
2. In case it added new disk, the “Adding disk” button is shows up. In case you click Disk Addition, it adds new disk for
the expansion mode or mirroring mode according to the selection option of establishment of Mvixbox.
3. Disk adding is completed.
83
Unicorn Information System
Page 84

Chapter 2. Administrator
2.5 Network Management
2.5.1 Network Setup
1. In Wire/ Wireless Setup, select either wire or wireless
for network connection method.
2. In Automatic Addressing (DHCP), select either used
or unused. When used is selected, IP address, net
mask, gateway and DNS setup below are inactivated.
To designate IP manually, select unused and
accurately enter IP address, net mask and gateway.
3. In DNS Setup, enter DNS server address.
4. When wire was selected, select Save to save the
contents of setup.
5. When wireless has selected, enter additional
wireless-related information.
a. In ESSID, enter SSID of wireless AP or wired/
wireless sharer to be connected.
b. Set Channel as default [Auto]. In case connection
fails, change wired/ wireless sharer or AP channel.
c. Select Security mode. There are ‘Non’, ‘WEP Auto’,
‘WEB Open’, ‘ WEP Shared’, and ‘WPAPSK” mode.
Select one of them refer to the Network setting of the
Wireless AP.
d. In WEP Key Setup, enter the same key as the WEP
key set in wired/ wireless sharer or AP. Accurately
enter the WEP key in terms of digits and by
distinguishing between capital and lower-case letters.
e. If you choose the ‘WPAPSK Mode’, Select either
AES or TKIP for WPA Password. It must be the
same set in wired/wireless sharer or AP.
f. In WPA Key Setup, enter the same key as the WPA
key set in wired/ wireless sharer or AP. Accurately
enter the WPA key in terms of digits and by
distinguishing between capital and lower-case letters.
84
6. Select Save to save the set values.
Unicorn Information System
Page 85

Chapter 2. Administrator
2.5.2 Setting up DDNS
1. DDNS?
In general, Internet service providers allocate floating IP to subscribers. Therefore, when attempting for connection to
device from the outside, IP address is changed as floating IP. In this case, dynamic domain name service (DDNS)
function is useful. DDNS refers to the service that enables connection with own name rather than floating IP.
MBox supports DDNS function.
However, this function must be used in conjunction with the previously mentioned DMZ or port forwarding function, if IP
address of IP Sharing Router is floating IP. When connection is made with domain name without setting DMZ or port
forwarding, connection is made only to IP Sharing router, not MBox.
2. Configuring DDNS
• Type in the name you want to register and press SET.
• The name should be composed of a combination of alphanumeric letters. You can't use numeric letters alone. The
maximum length allowed is twelve letters.
• Even if this convention is satisfied, you can't register a name already taken by another user.
• When the registration is successful, you can access with the registered name from the outside.
3. Deleting DDNS
• Press DELETE to delete a registered name.
• You can registered a new name after deleting the old one.
85
Unicorn Information System
Page 86

Chapter 2. Administrator
2.6 Password Initialization
In case administrator forgets password, password can be initialized by using [Initialize Password] button in the initial screen of
Mvixbox.
1. Click [Initialize Password] button to display
password initialization window.
2. Enter serial key located in product box or
installation CD.
3. Select the 'question to retrieve password' set
at product installation and enter the answer.
4. Click [Initialize] button to change admin.
password as of admin. ID.
86
Unicorn Information System
Page 87

Appendix.
A. Upgrade
Version check
1. Login by sysadmin (if you want more information, refer to the User Guide.)
2. Select [Administrator]-[Webdisk management] menu. At the right screen, you can find the ‘Upgrade’ menu and check the
version of WebDisk.
3. Upgrade(or debugging) patch file is downloadable from the www.mvix.net.
login to your account at: http://www.mvix.net
How to Upgrade
1. Download the upgrade patch file from the www.mvix.net
2. Press search button to select the download file.
Search…
Search…
3. Press apply to execute upgrade.
* Upgrade patch files are not an accumulated files. Therefore, to successfully apply the latest patch file, it must be
administered after sequentially patching all patch files between the current version and the latest version.
87
Unicorn Information System
Page 88
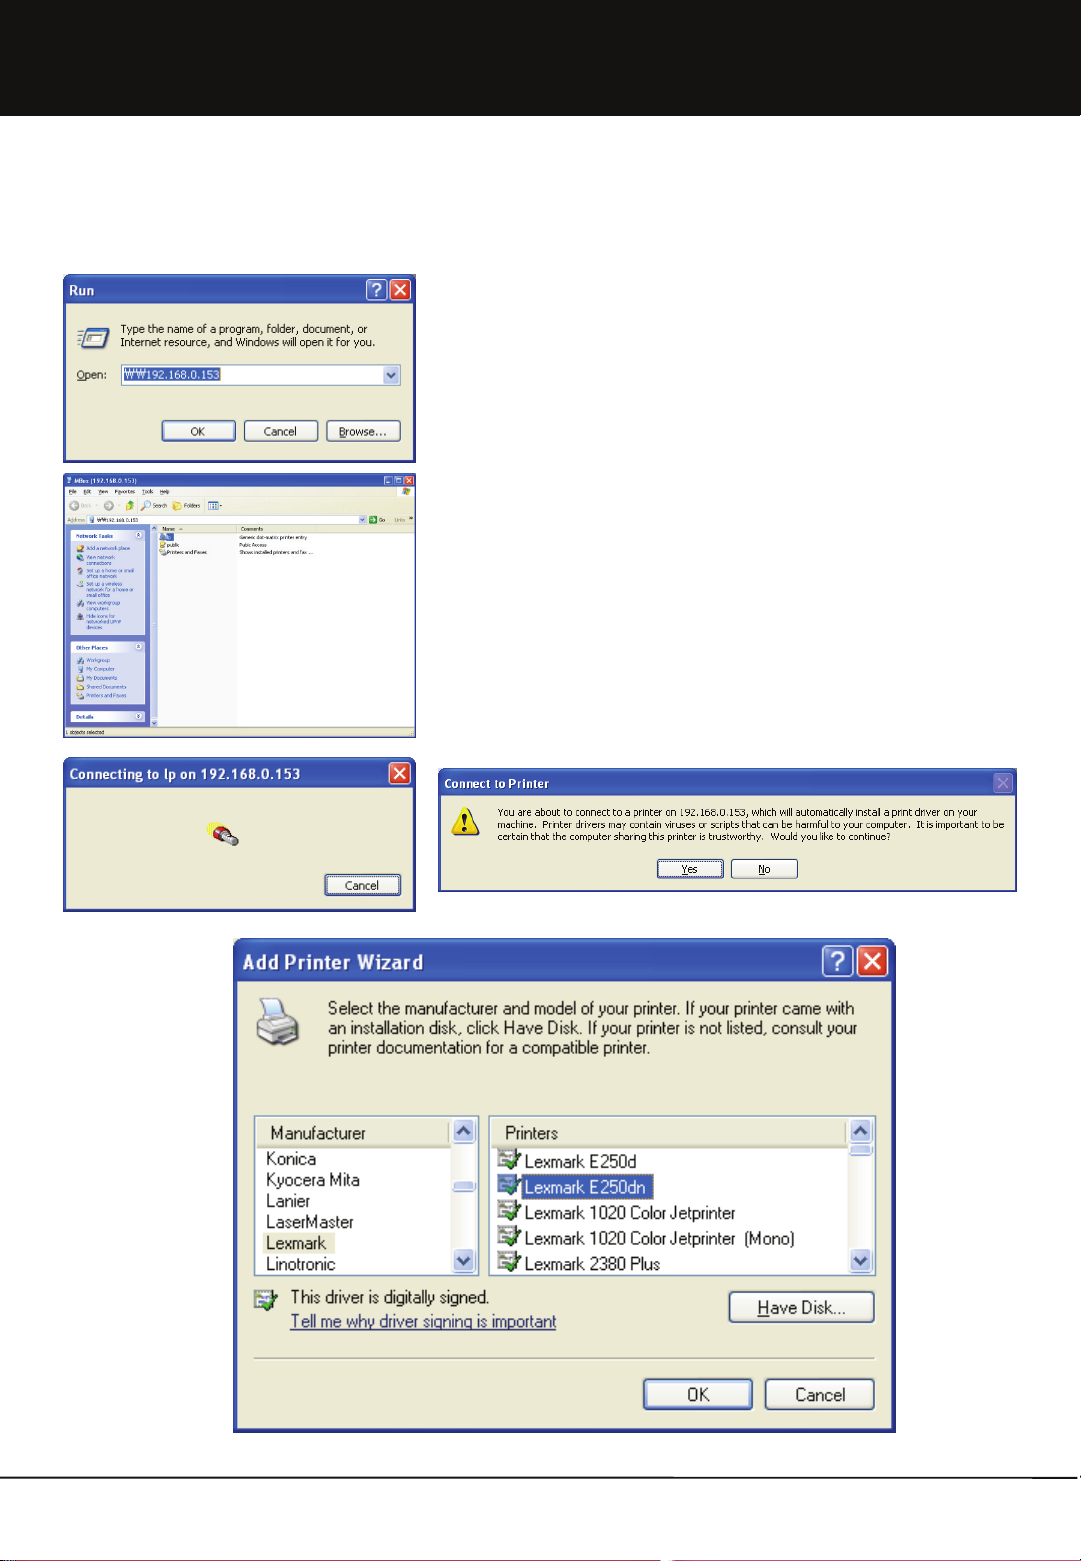
Appendix.
B. Installing Printer Server
1. Connect USB printer to USB host port of Mvixbox.
2. Select [Start]-[Run] and enter Mvixbox address in open.
(Ex. \\192.168.0.153)
3. Double click network printer icon of Lp to search printer. Printer driver is
added.
4. Select [Disk] to select the path in which installation CD provided by printer
manufacturer or printer driver file downloaded from manufacturer's
website is located. Install printer driver.
88
Unicorn Information System
Page 89
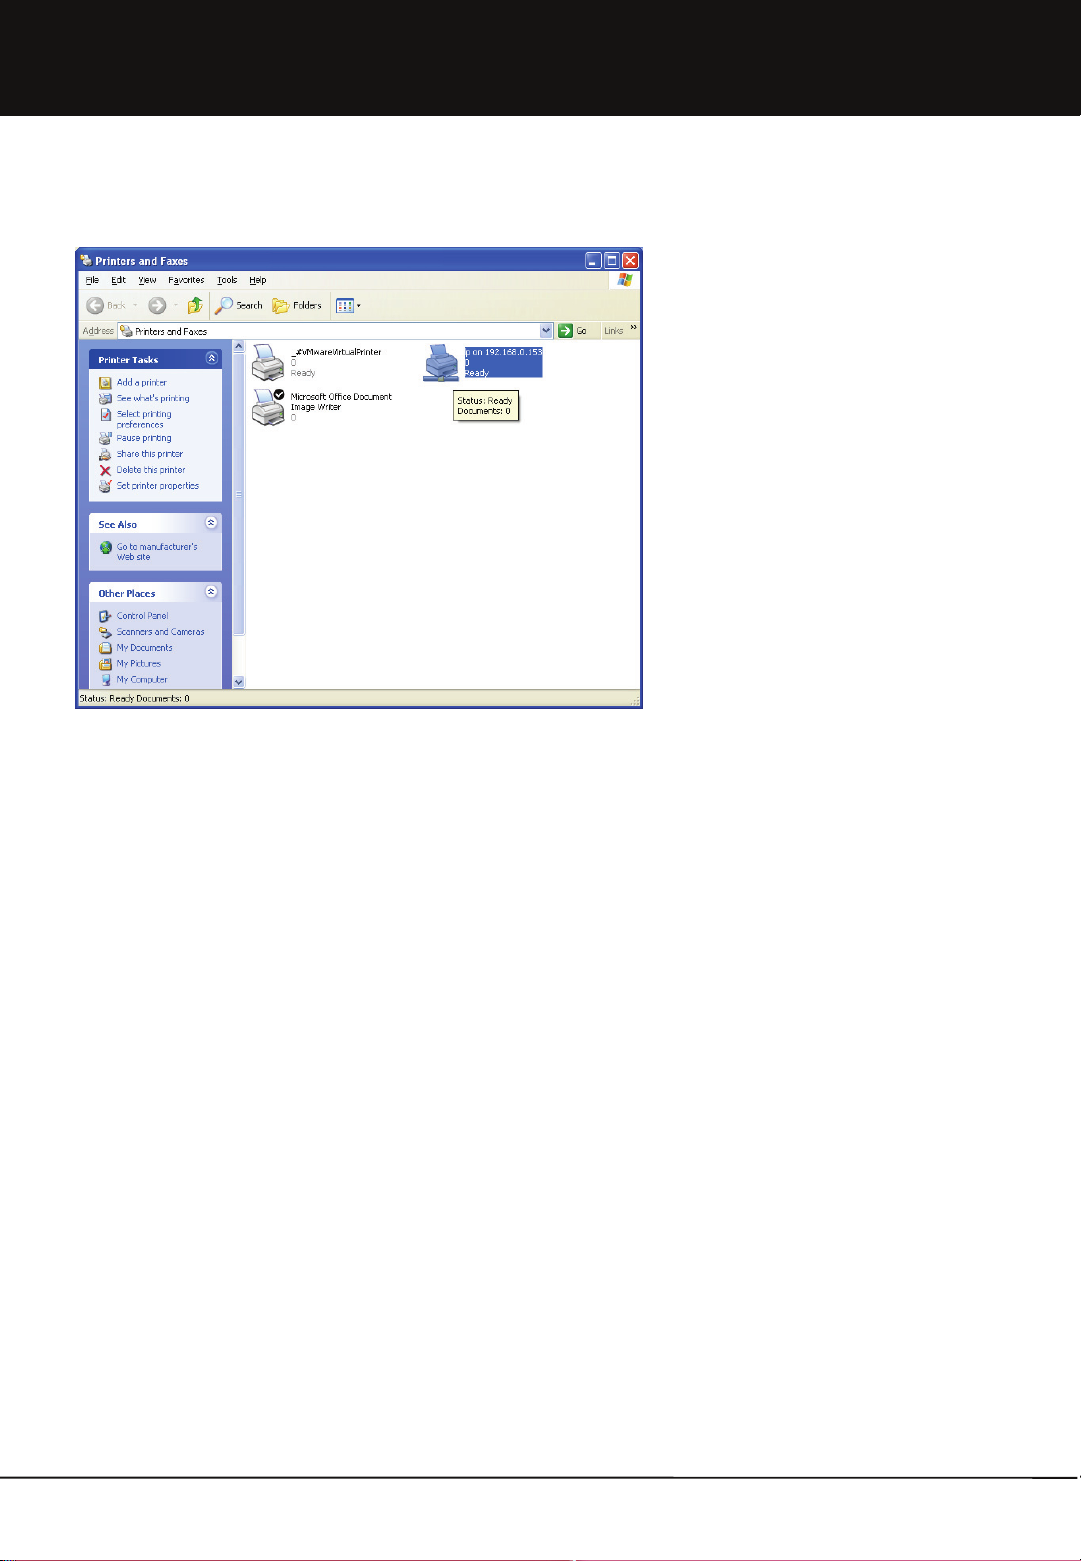
Appendix.
B. Installing Printer Server
5. Select [Start]-[Set]-[Printer and Fax] to check
that printer has been installed with IP of
Mvixbox.
89
Unicorn Information System
Page 90

Appendix.
C. Using USB wireless LAN card
1. Install the USB wireless LAN card provided to USB host. When installation is recognized, a single beep is produced.
2. In Mvixbox, login with sysadmin account. Then, select network setting menu.
3. Select 'Wireless' in wired/ wireless setup to
display wireless setup at the bottom.
4. Enter ESSID of wired/ wireless IP Router (or
AP) to be connected to ESSID
If the wired/ wireless IP Router (or AP)
is applied with security setup, make input with
the same setup.
(Caution. Capital/ small letters are distinguished
and accurate input is necessary. If not, wireless
connection is not possible.)
Note. USB wireless LAN card provided per manufacturer
Manufacturer Model Chipset
UNICORN TW-54G
D-LINK DWA-110
RT2571
IP-TIME G054U-2
ANYGATE XM-152
Note. Using of DHCP (automatic IP address) is
optional. When IP of Mvixbox is changed, set IP
with the same network as sharer, etc.
if it is difficult to check the IP change.
Contents of the above table are on LAN card that uses Ralink 2571 chip driver.
Chip sets/ model names to be added can be checked in http://www.mvix.net or http://www.eunicorn.co.kr.
90
Unicorn Information System
Page 91

Appendix.
D. How to check IP address of Mvixbox
Firstly, Mvixbox must be connected to a network (sharer, etc.) that is the same as PC.
1. How to use UPnP function
b. Double click Mvixbox icon to start web browser.
Mvixbox login page is displayed. IP can be checked in address bar at the top.
a. Double click network environment
icon. Then, PCs and Mvixbox in network
are displayed.
In case of Windows XP or 2000, double
click to execute network environment
icon. Then, select 'View Work Group
Computer‘ menu on the left. Select
‘Work Group’ to display Mvixbox icon.
2. Using installation program
a. When installation program is executed, Mvixbox in network i
s searched. If search fails, click [Search Again].
b. Check the searched IP address and log in by using web bro
wser. Click [Cancel] button of installation program to end progr
am.
Make sure not to click [Next]. This may cause data loss as inst
allation progresses.
91
Unicorn Information System
Page 92
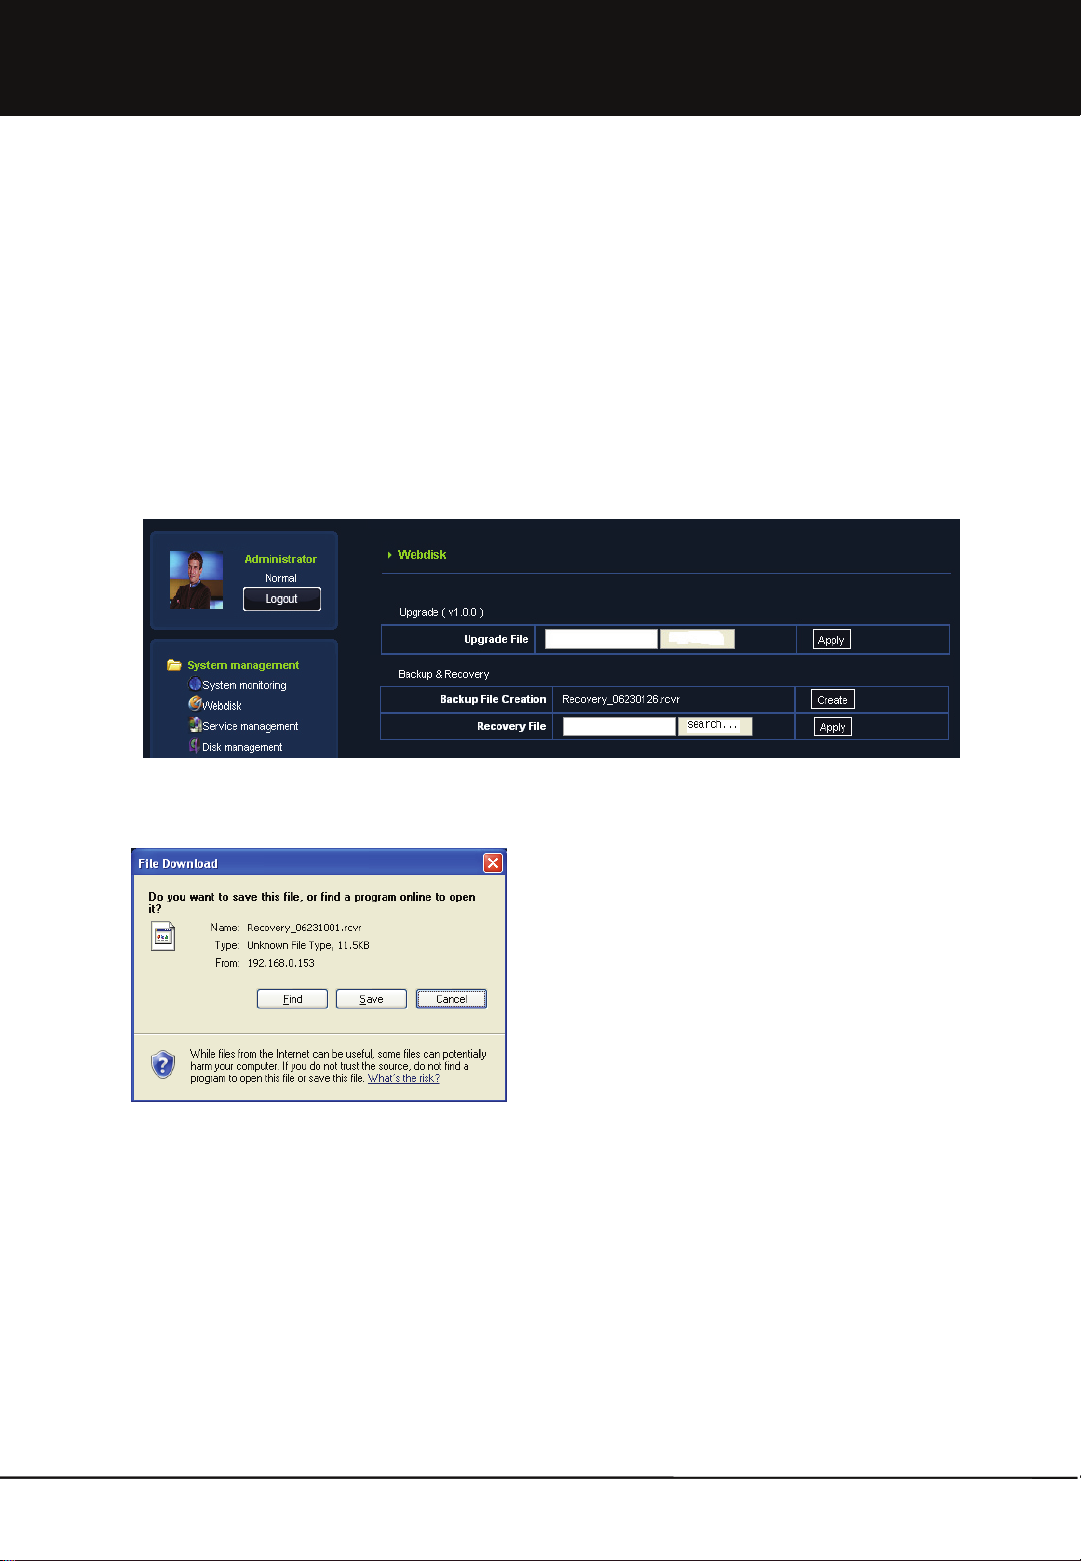
Appendix.
E. Backup and Recovery
When installing installation program again due to disk error or mistake, accounts or other setup values are initialized
although hard disk data remain. When recovery is carried out with backup file, folders and data in each account are linked
and can be used again.
1. Login as sysadmin and click [Administrator]-[System management] menu. Select on the left menu and find 'backup
and recovery' item at the bottom.
Search…
Search…
2. Click [Create] button of backup file items to display 'Recovery_06231126.rcvr’ file.
Click the name to save this file in PC. Select directory and save file.
3. For recovery, backup file is required. Click [Search] to select the
saved backup file. Then, click [Apply] button to recover data.
92
92
Unicorn Information System
Unicorn Information System
Page 93

Appendix.
F. Using DDNS
This function is very useful to most Internet users to use dynamic IP. Unlike the complicated and difficult DDNS or other
domain services, users can simply create and use their own domain.
a. Login by sysadmin ID and select [Administrator]-[Network Management]-[setting up DDNS] menu.
b. Input host name and click OK button.
c. If there is the same host name, you have to input new host name.
d. For this setting, port 80 and 8080 must be opened if using sharer. (Refer to Quick Guide.)
e. This function is renewed at Mvixbox booting or when IP is changed.
f. To change the domain used, click [Delete] to delete the existing name. Register new name for use.
g. External user must be connected through http://Entered name.mvix.net:8080.
93
93
Unicorn Information System
Unicorn Information System
Page 94

Appendix.
G. Using iTunes
a. iTunes of Apple iPod can be used. To use this function, only music (iTunes) folder of open (public) folder can be
connected. So, save mp3 files, etc. in this folder (moving picture not applicable).
* Music(iTunes) folder will be updated by every 1 minutes. If you want to update right now, click restart button on
iTunes setup in [Administrator]-[System management]-[Service Management] menu.
c. When executing iTunes, Mvixbox_music is displayed in share item on the left menu. Select this to display all audio files
located in music (iTunes) folder inside open (public) folder of Mvixbox on the right screen. If there is a lower folder, all files
in the folder are displayed as well.
d. In case Korean or other letters break, this is a problem related to id3tag. Modification in UTF-8 type is required by using
id3tag editor. (Ex. Separate download of Mp3tag freeware)
Unicorn Information System
94
94
Unicorn Information System
Page 95

Appendix.
H. Adding Hard Disk
You can use one disk at first time, and then add new disk later.
It adds new disk for the expansion mode or mirroring mode according to the selection option of installing of Mvixbox.
To install additional hard disk, make sure to do so when Mvixbox power is turned off.
1. Shutdown the Mvixbox. Press the Power button at the rear of device.
2. Add net Hard Disk and then press the Power button.
3. Login using by sysadmin ID. Click Update button on [Administrator]-[System Management]-[Disk Management] menu.
Adding Disk button will be show up. Click the Adding Disk button.
4. Assignment of Disk Information will be changed to assigned.
Unicorn Information System
95
95
Unicorn Information System
Page 96

Appendix.
I. In case class error message is displayed (in some OS, such as Vista, etc.)
a. Click to Windows in quick launcher download menu.
b. Press [Run] button to execute the corresponding program.
96
Unicorn Information System
Page 97

Chapter 1. User Guide
J. USB Auto Copy and Personal Homepage
System Folder is the exclusive using folder for sysadmin
This is supply the function for the managing of USB exterior equipment,
Rapid Box, and Personal homepage.
USBCOPY: This folder is for data backup in case USB Auto Copy execution.
USBDISK1.2: It shows when USB port connects USB equipment. In case
you want to separate USB equipment safely, please push Release
button for one second on front part of USB. You can remove USB
equipment from system with beep sound.
WWW: This is homepage basic folder. In case you want to manage private
homepage, you can upload the file for homepage on here ;
In case you manage private homepage, you approach http://IP address or
http://IP address:80 and you can see private homepage. Or you approach
http://IPadress:8080, you can see Mvixbox main page.
USB Auto COPY (USBCOPY folder)
• In case you execute USB Auto Copy, the file in USB equipment will be backup automatically in USBCOPY folder.
• When it execute backup, the folder harmonized date and time in USBCOPY folder will be created and data will be backup
in the folder.
• When you push Copy/Reset Button for one second on the front of USB, it is starting copy from USB Store equipment with
beep sound. In case you push the button for 5 seconds, it executes Reset order. So the system turns off and turns on
again. Please be careful to push the button more than one second.
Personal Home Page (WWW folder)
• After you connect WebDisk Explorer or Web Explorer, you upload relating file with homepage on www folder, located in
subordinated system folder.
• Rename the preexisting file named 'index.php' (e.g. to 'index.php_').
• In case you use Mysql, you connect sysadmin by using ssh, and you input ‘mysql-u root – p mysql’ There is no password.
After you connect Mysql, please nominate root passwork for mysql. When you enter the address of the device, you can
see your homepage.
• The old page can be accessed with 'http://the device address:8080.'
• In case you make any changes of the settings of the Apache web server or PHP, on which the existing services depend,
you should take precautions, and make sure you back up the existing settings before making any changes.
97
Unicorn Information System
Page 98

Appendix.
K. Application
When you want to share a music file with iTunes
• Store any MP3 file in the music(iTunes) folder under the open folder.
• Run the iTunes program in your computer.
• The name ‘Mvixbox-Music' will show up automatically as a shared item.
• The list of MP3 files stored in the music folder of the open folder appears.
• Play back any music file you want, and you can listen to the music on streaming (i.e. without downloading the whole file).
• This is possible only when my computer is in the same network environment.
• File list of Mvixbox-Music Folder will be updated automatically by every one minute..
If you want to share a USB printer at home or office
• Connect a USB printer to the device.
• Search the IP addresses of the devices on my computer and you will see a printer named ‘lp.'
• Connect this printer.
• You need to install a Windows printer driver for this printer to connect.
• The driver comes with the Windows operating system or is provided by the printer manufacturer.
When you want to share Open folder and USB device with other PC or Divx Player
• Set the windows explorer to enable on [Administrator]-[System Management]-[Service Management] menu.
• Select Share mode. And then Select Open Folder or USB device what you want to share with PC or Divx Player.
• Search the network folder for a media device with the network folder search function (e.g. a Divx player).
• A folder named ‘Mvixbox or Mvixbox name that is set in [System Management]' is found.
• You can play the media files in the 'home.‘
When you want to have your personal homepage
• After you connect WebDisk Explorer or Web Explorer, you upload relating file with homepage on www folder, located in
subordinated system folder.
• Rename the preexisting file named 'index.php' (e.g. to 'index.php_').
• In case you use Mysql, you connect sysadmin by using ssh, and you input ‘mysql-u root – p mysql’ There is no password.
After you connect Mysql, please assign root password for mysql.
• When you enter the address of the device, you can see your homepage.
• The old page can be accessed with 'http://the device address:8080.'
• In case you make any changes of the settings of the Apache web server or PHP, on which the existing services depend, you
should take precautions, and make sure you back up the existing settings before making any changes.
If you want to use a wireless LAN
• Connect to a USB port a USB wireless device compatible with the product.
• Choose 'wireless' at the network settings of the system administrator and set the network configuration.
• Be advised that you can't use the wired LAN when you choose the wireless LAN.
• As the wireless is slower and less stable than the wired LAN, use the latter if possible.
When you want to back up a USB flash drive
• Insert a flash drive into a USB port.
• Click the COPY button on the front for 1 seconds. (Clicking for 5 seconds or longer will turn the power off.)
• The files in the flash drive are copied to “system folder/USBCOPY” of web explorer.
• The copied files are generated with the current time and the same file names.
• A signal sound will ring twice when the copying is completed.
• If the disk is out of space, the signal sound will ring five times.
98
Unicorn Information System
Page 99

Appendix.
K. Application
If you want to expand the disk capacity with an external USB disk
• Connect a external USB disk to a USB port.
• If it is connected to a front side port, it is mounted on System folder/USBDISK1; or if it is connected to a backside port, itis
mounted on System folder/USBDISK2.
• Any partitions in the disk will show up as part01,…,part0N, in order.
If you want to keep the data safe
• The device supports the RAID 1 mirroring mode.
• Choose the mirroring mode at the time of installation if you keep the data in the disk safe.
• The mirroring mode is only meaningful when you have two separate disks.
• Even when you installed in a single disk but want to add another disk later on, you can expand the disk with the disk
manager to build a mirroring.
• In the mirroring, a single set of data is written on two disks for added safety.
• When one disk is in error, you can fetch the date from the other disk.
• However, unlike the linear (expansion) mode, the mirroring mode slows down the speed of writing on the disk and lets you
use only half the total physical disk space.
If you want to find an IP address auto
• With UPnP
- A Windows XP or higher comes with a function to find a UPnP device in the network environment. If the UPnP is not active,
activate it.
- The name of this device is searched automatically.
- Click this device and the web browser will start, getting the web page of this device. You can get the IP address from the
address of the web page.
• With the installation program
- Another way to find the IP address automatically is to run the installation program.
- The installation wizard will lead you to a part where the device is searched automatically. The IP address of the device thus
found.
- The installation program can only search for a device on the same network that the computer running the program is in. In
case the search fails, see if the network setting is identical to that of the device.
If you want to make a connection with a fixed name not IP Address
• Select [Administrator]-[Network Management]-[setting up DDNS] Menu.
• Set any name you desire. When the setting is complete, you can access with the name from the outside.
• However, if the device is hooked to a internet share point, make sure that you set DMZ or port forwarding on the share point.
• When the IP address of the share point changes, you need to update the address with the DDNS manage of the system
administrator.
If you are using a Mac
• With an Quick Launcher for a Mac
- Download WebDisk Connector from Quick Launcher Download after logging on to your account on the web.
- With a Mac access aid, you can mount the space assigned to your account to the finder with Samba or WebDAV protocol.
• With the web explorer
- The web disk explorer is exclusively for the Windows, but the web explorer can used on any operating system.
- The web explorer lets you use all the functions of the web disk explorer with HTTP alone.
- It is recommended that you use Firefox for a web browser.
• With AppleTalk
- Try connecting the server with 'aftp://the device address/your account.'
- When the authentication screen pops up, type in your account ID and password.
- Your own domain is mounted to the finder.
99
Unicorn Information System
Page 100

Appendix.
L. FAQ
L.a Installation & Setup
Not possible to install by the installation CD provided?
→ Check if PC and device are in the same network band. In DOS window, it can be checked if Ping is possible with the IP
address of device. (For example, it is normal if response is produced after the command of “ping 192.168.1.3”.)
→ Check if serial number has been correctly entered.
→ Check if hard disk has been correctly mounted.
Error occurred in the course of CD installation?
→ Forcefully close installation programs in window admin.
→ Reboot device and install CD again.
Installation does not proceed normally when entering serial number?
→ Serial number input is case sensitive. Check for capital and small letters.
Can it be used from the low end of Internet sharer?
→ Connection from outside is possible by using port forwarding function of Internet sharer..
Can it be used in the environment where Internet service is of floating IP?
→ Connection to domain address is possible by using dynamic domain service of Internet sharer.
Connection fails?
→ Check if network status is normal.
→ In system admin, check if service status is all in execution. If not, press Execute button for restarting.
Connection to window explorer fails.
→ Window explorer uses the same protocol as the network folder share protocol of window. Many Internet service companies
restrict network folder sharing on the Internet due to security-related reasons. In this case, window explorer cannot be used.
100
Unicorn Information System
 Loading...