

Page 1
EGREAT
深圳市亿格瑞科技有限公司
ShenZhen Egreat Technology Co., Ltd
高清坦克HDTANK
(EG-M31A/B)用户使用手册
EG-M31A/B
1
Page 2

WARNING:
1. Only qualified service personnel are allowed to do repair work.
2. To reduce the risk of fire and electric shock, do not expose this unit to rain or moisture.
3. IMPORTANT SAFEGUARDS:
a) Instructions should be read carefully before the product is operated.
b) Don’t touch electric plug with wet hands.
c) When unplugging the power cord from the outlet, pull by the plug head. Do not pull
the cord to unplug.
d) Press the power key to turn the power off when you are no longer using the product.
(Unplug the cable when you won’t be using it for a long time)
e) Don’t open the cover nor touch the components inside the product.
f) Don’t install nor operate this product in the sunshine or nearby heat sources to protect
it from overheating.
g) This product should be placed on a flat surface with good ventilation to avoid overheating.
h) Use a dry cloth for cleaning. Do not use liquid cleansers nor aerosol cleaners.
4. Accessory list:
EG-M31A EG-M31B
Gild HDMI cable Gild HDMI cable
Gild AV cable ESATA cable
Gild PRBPR component cable Gild USB2.0 cable
Optical cable USB2.0 extension cable
Gild USB2.0 cable AC cable
AC cable Remote control
Remote control Power supply
Power supply CD-R
CD-R Screw bag
Screw bag manual
manual
EG-M31A/B(HDTANK) User Manual
No. 1: How to install HDD into the unit …………………………………………… 2
No. 2: Connecting method ………………….…………………………………………. 5
No. 3:
No. 4: Software install and basic operations ..…………………………………. 8
No. 5: Firmware update guide .………………………………………………………. 28
No. 6:How to recover from FW update failure with fail-safe kernel
No. 7: How to change background by yourself .……………………………….. 30
No. 8: Q & A .………………………………………………………………………………… 31
Remote Control Definitions ………………….……………………………. 6
……………………………………………………………………… 30
2
Page 3
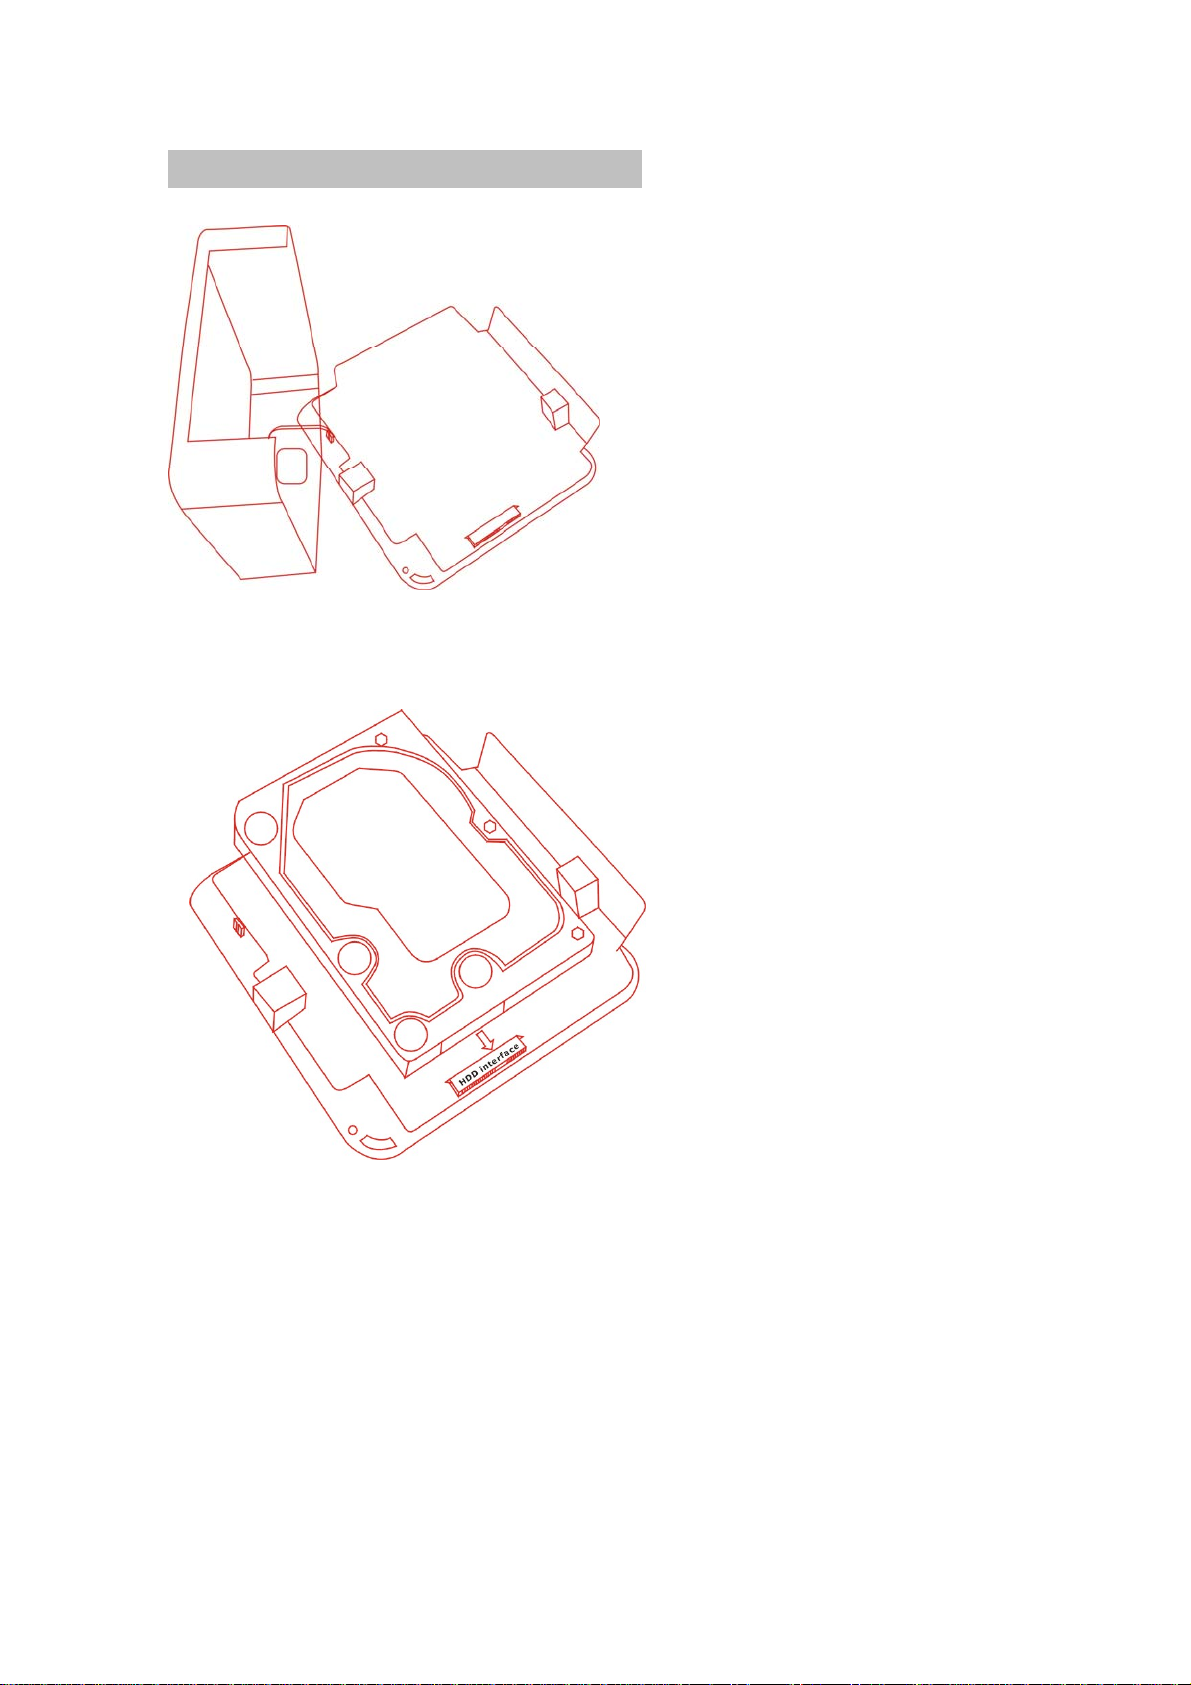
No.1 How to install the HDD into the unit
1). Open the case:
2). Plug the SATA HDD into the SATA interface. The hole locations should match with the
fixed column on the metal plate.
3). Pay attention to the fan. It should be connected to the case too.
3
Page 4
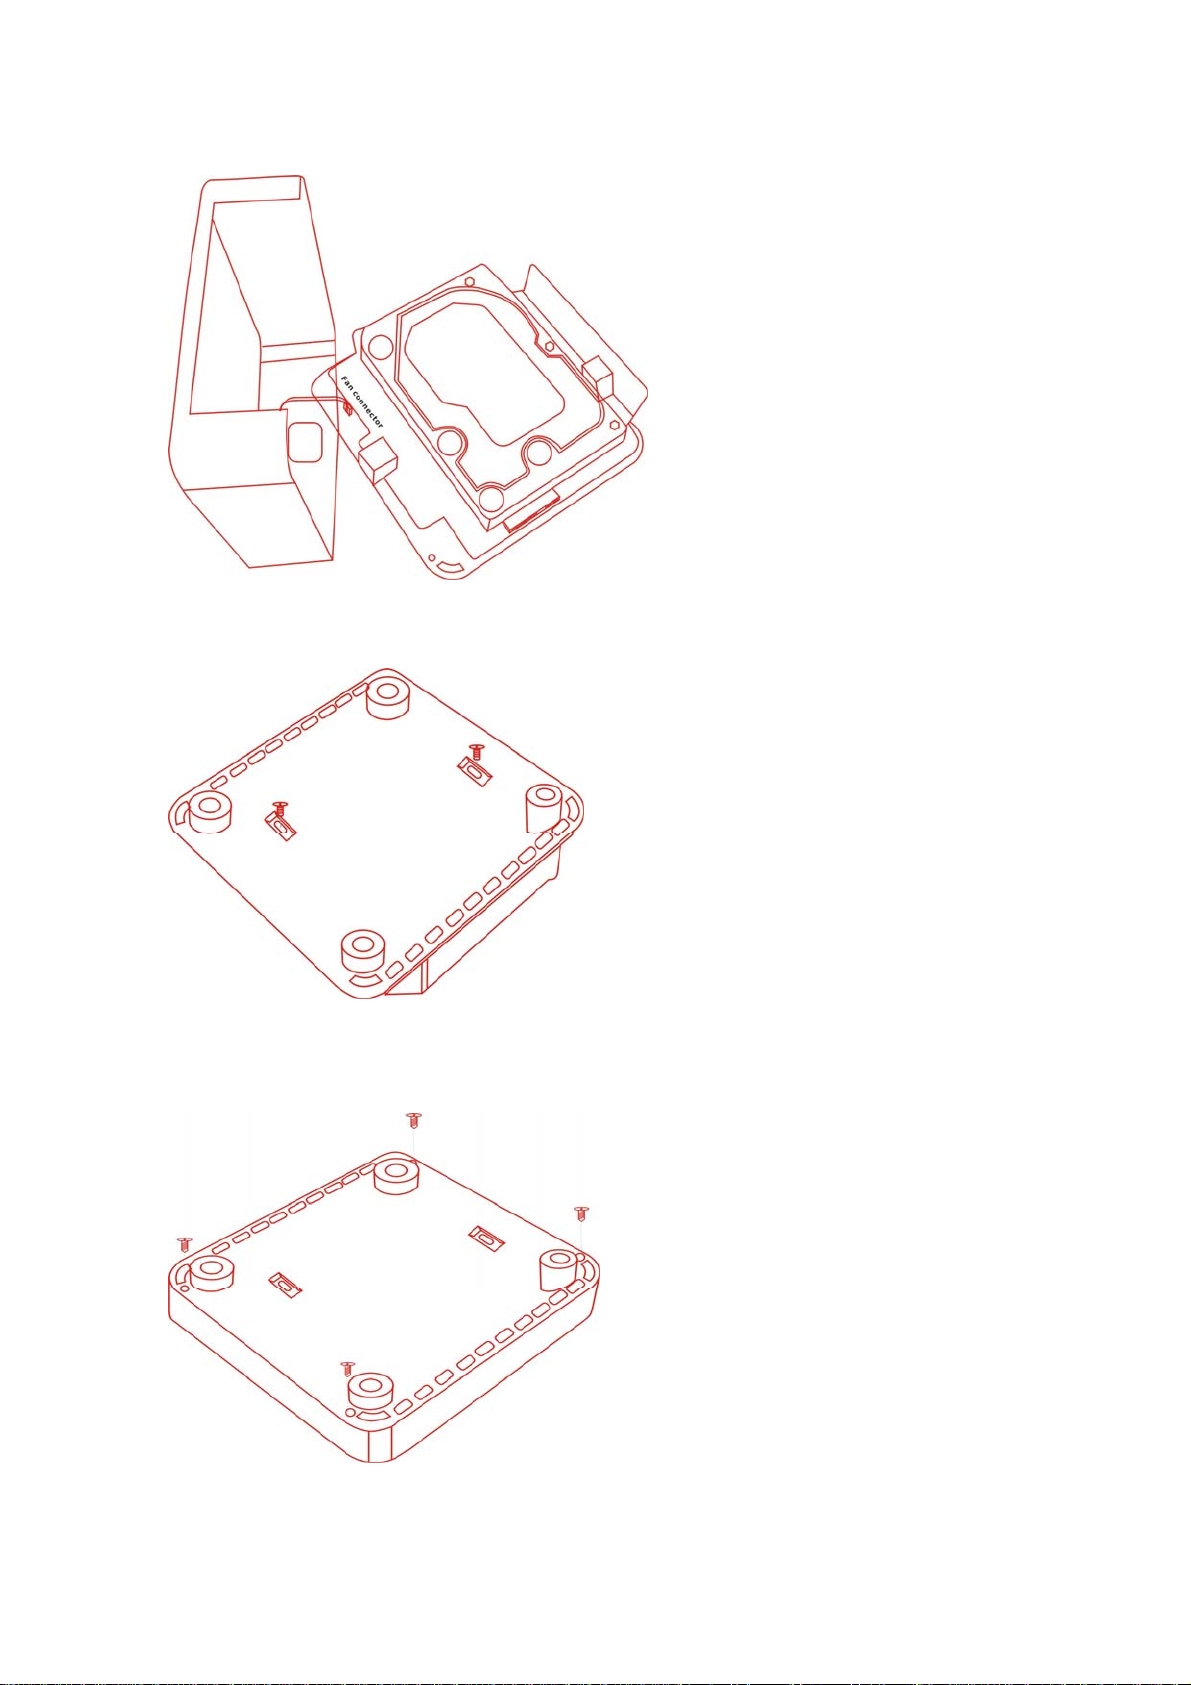
4). Fix the HDD with 2 screws as shown below.
5). Close the case using the 4 screws, which were included from the factory.
4
Page 5
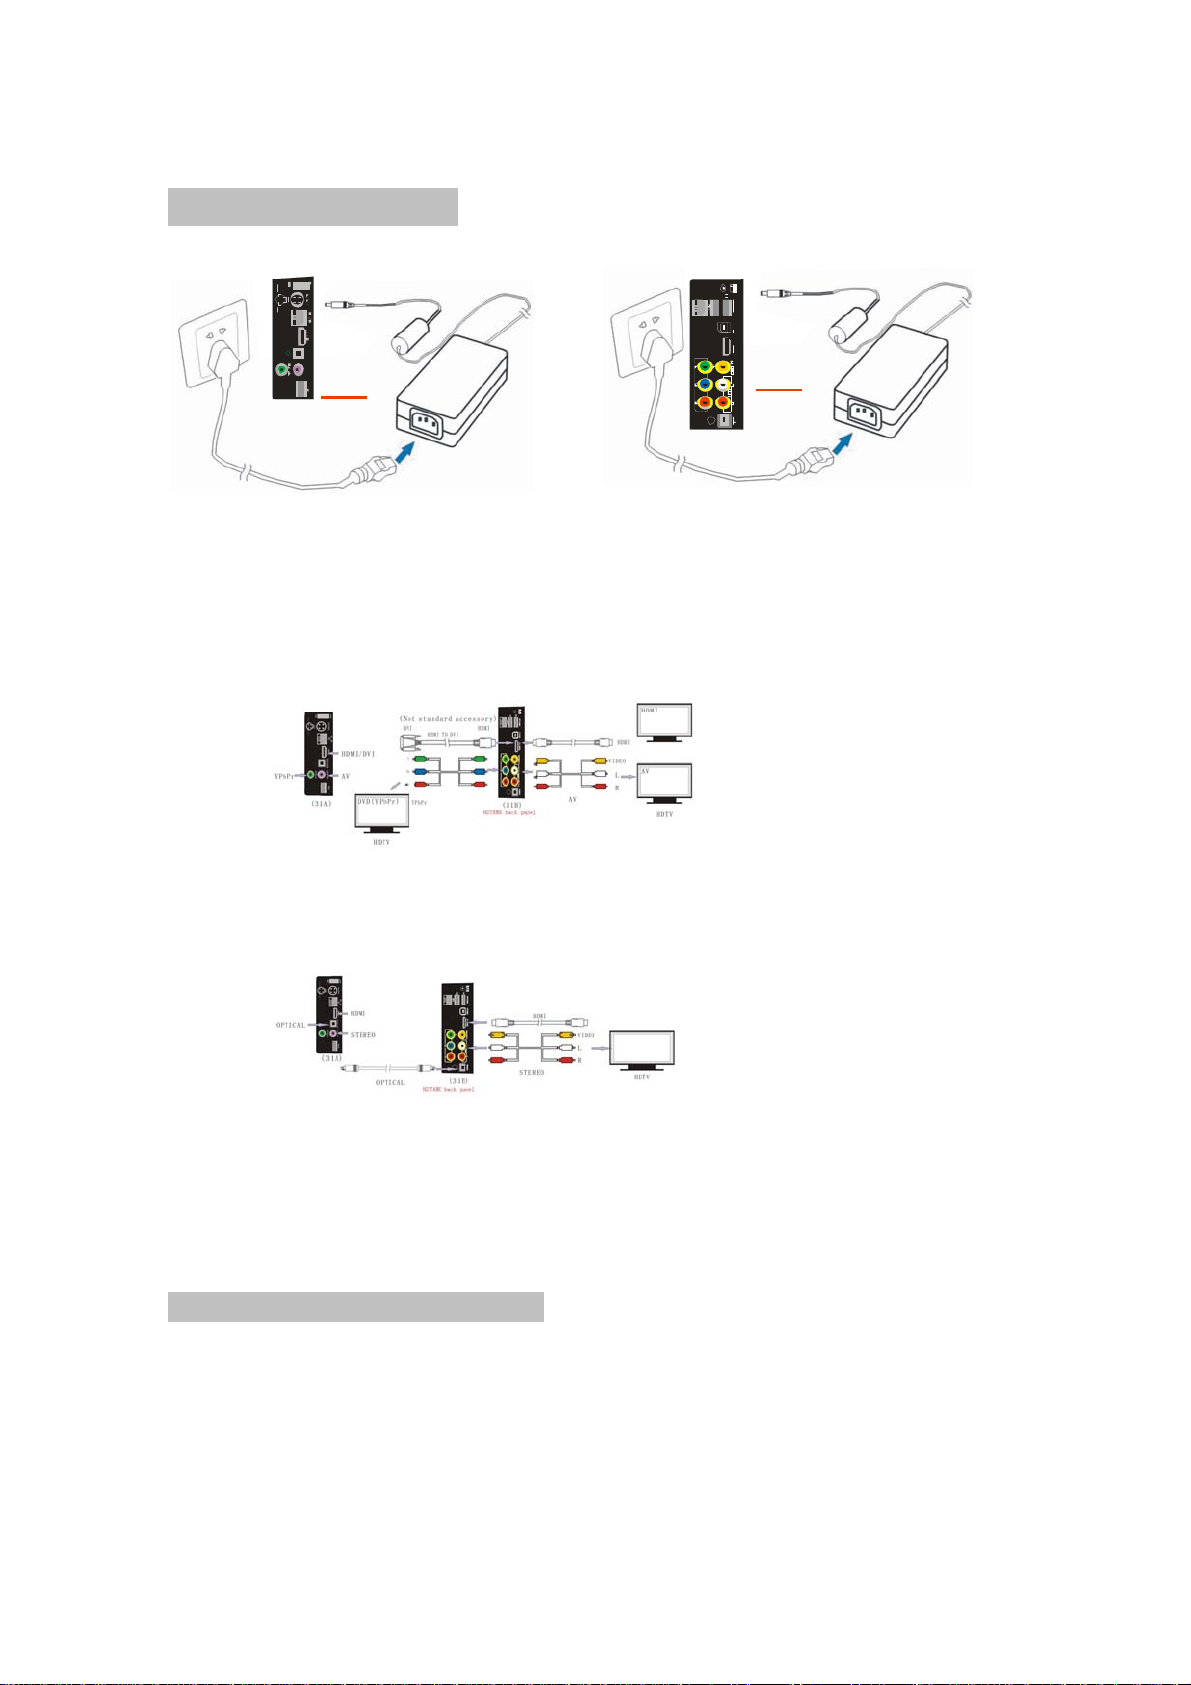
No.2 Connecting method
1). Connecting Power adapter:
(31A) (31B)
2). Connecting video and audio:
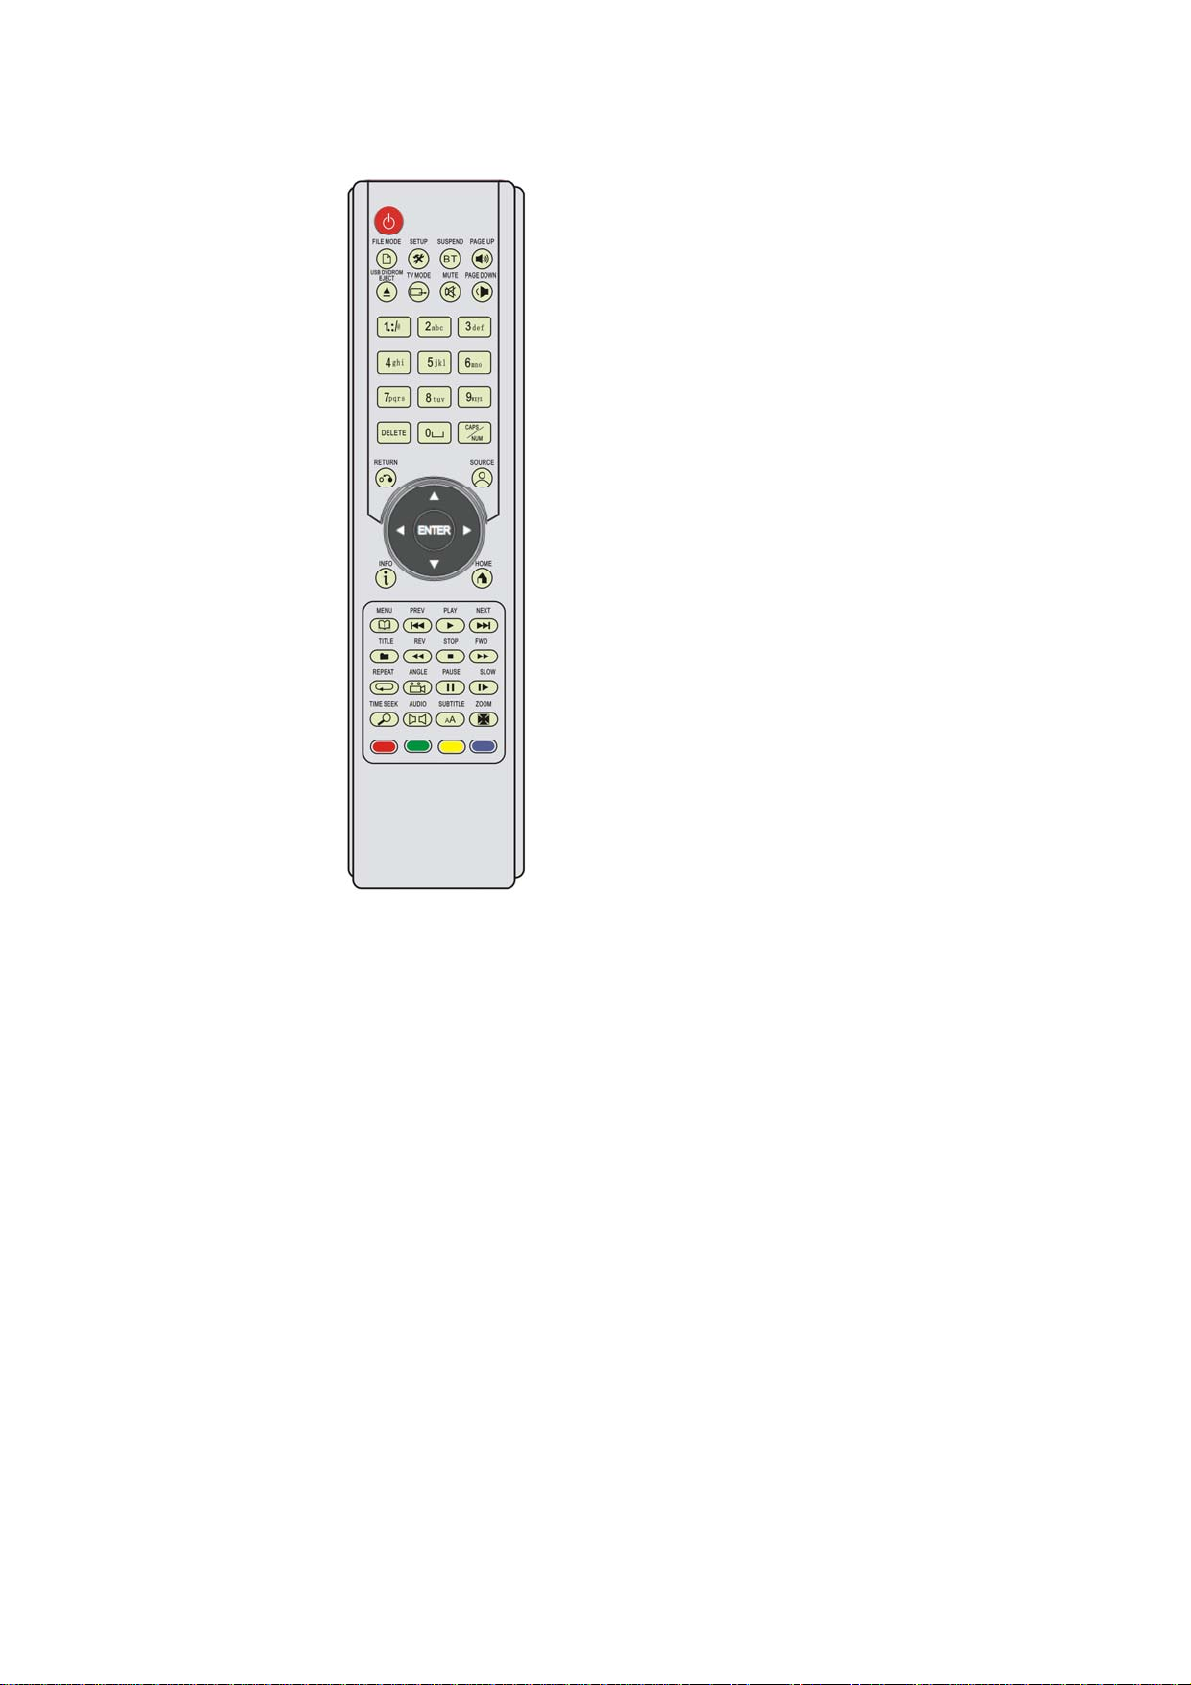
No.3 Remote Control Definitions
5
Page 6
6
Page 7
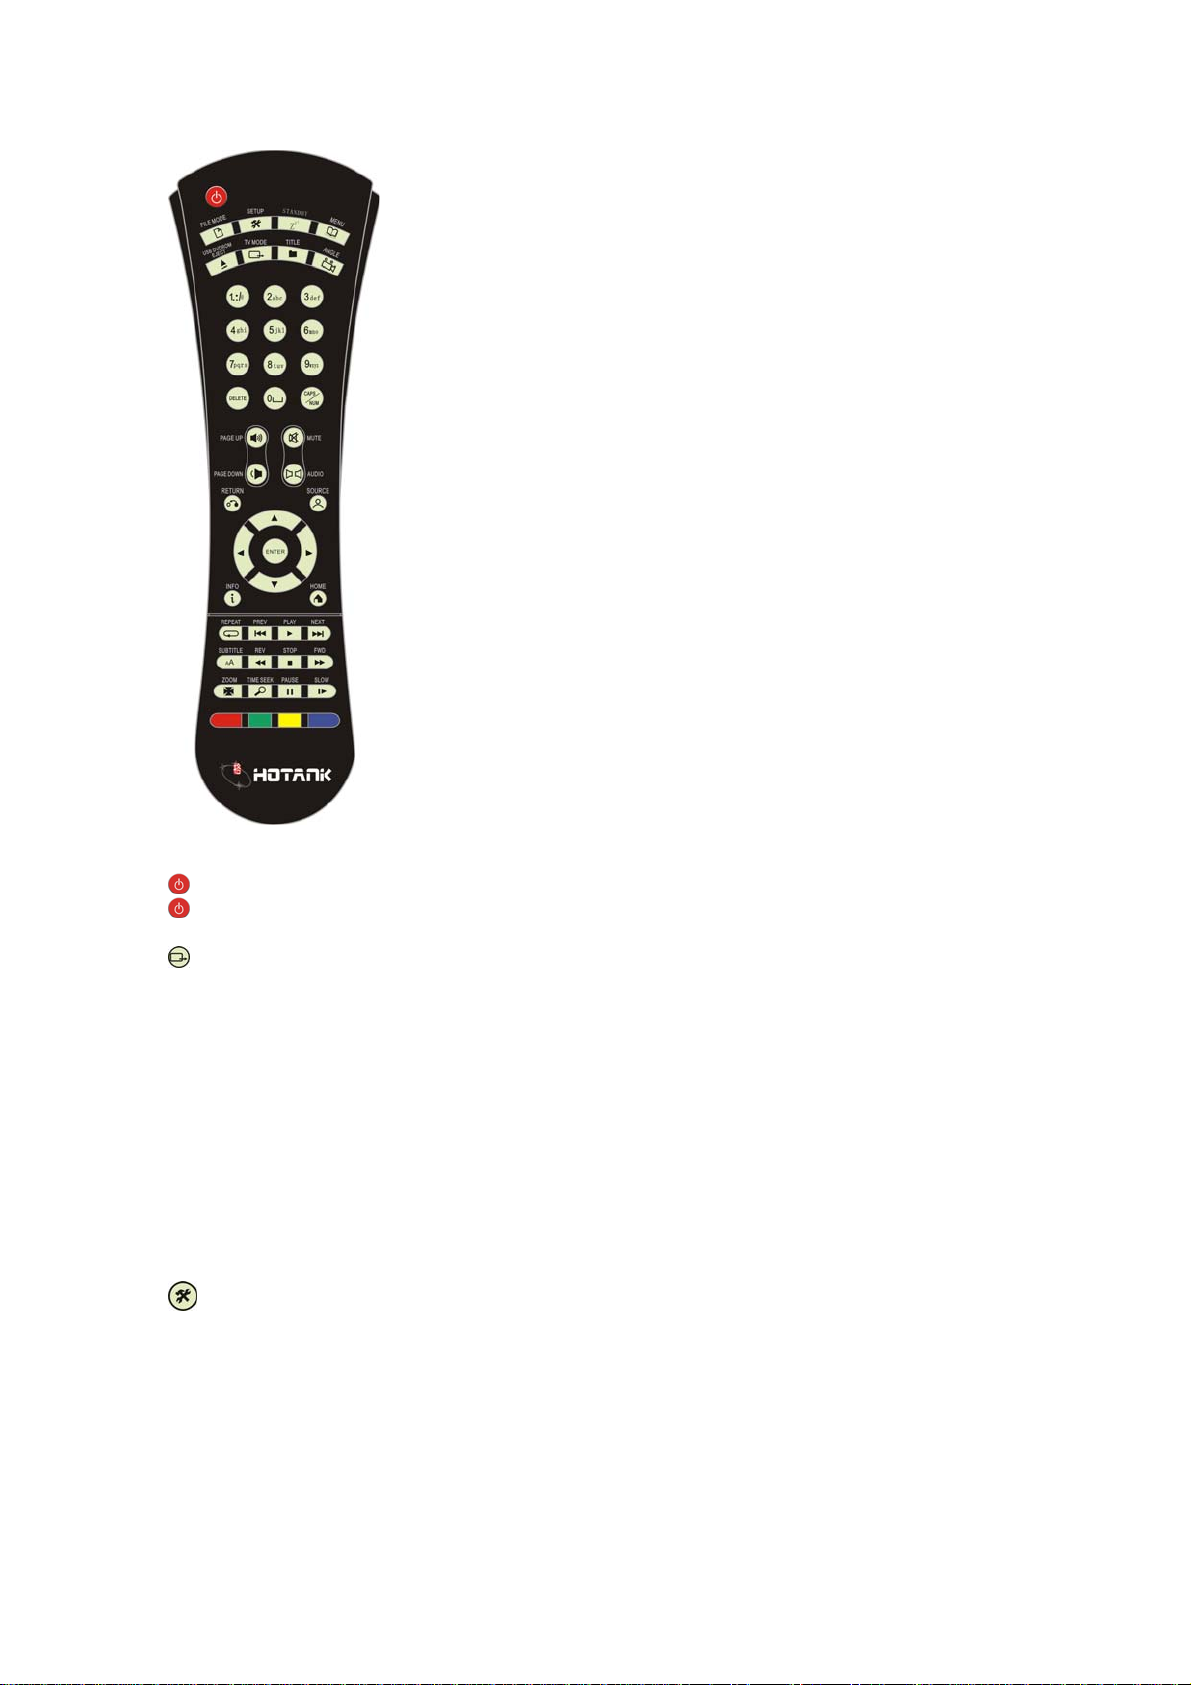
Power: sta nd by/wake up(EG-M31A)
Power on/o ff (EG-M31B)
Zzz: stand by/restart(EG-M31B)
TV MOD E : Quick setting of TV mode
1:NTSC 480i 60Hz
2:PAL 576i 50Hz
4:HDMI or P/Pb/Pr 720P 50Hz
5:HDMI or P/Pb/Pr 1080i 50Hz
6:HDMI or P/Pb/Pr 1080P 50Hz
7:HDMI or P/Pb/Pr 720P 60Hz
8:HDMI or P/Pb/Pr 1080i 59.94Hz
9:HDMI or P/Pb/Pr 1080P 59.94Hz
0: AUTO mode
System setup
1) During stand by, enter system setup mode.。
2) During playing, user can adjust picture display degree.
COLOR BRIGHTNESS [50%]
COLOR CONTRAST [50%]
COLOR HUE [50%]
COLOR SATURATION [5 0%]
7
Page 8
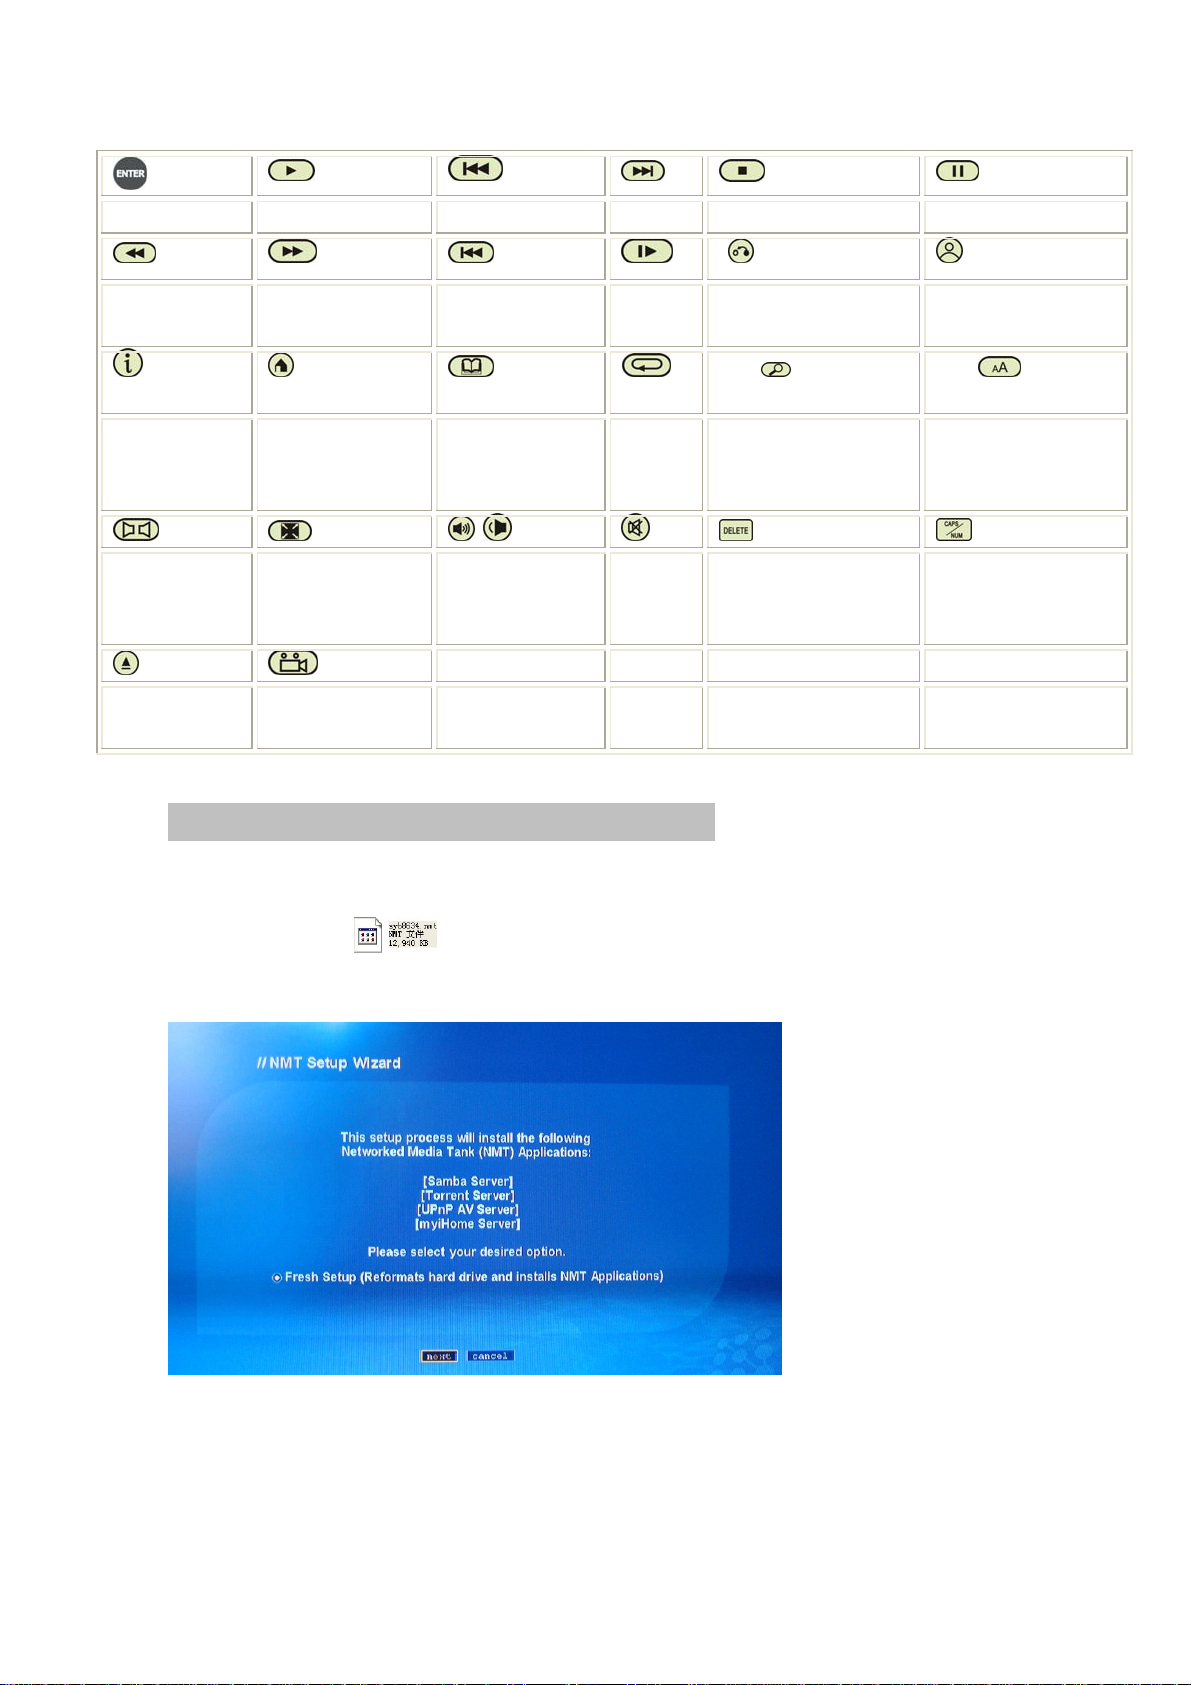
enter play prev next stop pause
rev fwd prev slow Return to before menu Source: return to
main menu
r
Info:Display
information of
the movie
home : Back to
its home menu
Menu:Go to main
menu
repeat Time seek/paste subtitle :Upload and
unload subtitle; edit
subtitle.
audio zoom caps/num
Audio switch Switch movie size;
Adjust picture size
Page up;
Page down
Control volume
mute delete Switch letter style
Unmount CD
copy
/DVD Drive
No.4 Software installation and basic operations
1) Format the HDD and install the NMT software
Note: Fresh setup will format the HDD , so pls remove and save the contents.
a) Copy the file SMP8634.NMT into USB drive.
b) Plug the USB drive into the USB HOST of the unit.
c) Connect the unit to the TV.
d) Choose the NMT setup Wizard. You’ll find the installation guide.
e) Select HDD format
8
Page 9

f) Warning
g) Select file source
h) Select USB and confirm, installation will be executed.
Note: don’t switch off the power. After finished, the unit will reboot by itself.
9
Page 10

2. How to find the partition (EXT format) in WINDOWS OS?
1). Open the CD-R, select
,according to the set up steps, select next,finish setting.
2). After setting,enter start----set up---control panel, click “IFS DRIVES”, enter below interface
to set up partitions of ext format.
10
Page 11

3). After partition setting, close this window. Click “my computer”; you can see the new
partition of EXT format. This time, you can copy file freely.
Notice:
Linux Swap is the system partition of the server, it mustn’t been delete and format.
The other two partitions needn’t be revise partition format, otherwise, system will remind user
to re-setup NMT software under play mode.
3. Myihome software installation.
11
Page 12

1). Click file button, and enter MYIHONE menu.
2). Select Edit, and set up background according to your own idea.
If you want to check it, please connect it to an HDTV.
12
Page 13

3). Select browse to seek multimedia files from your PC, and append these files into myihome,
Click “ok” to save.
4). System information default is 8000, no need to revise anywhere.
13
Page 14

5). Return to the main menu, you can see all the files has been save into this
software already. You can set up playlist or photo play interval and so on.
6). After finished setting, tick this selection before
exiting. Then the icon
will appear on th e monitor at the right bottom position.
14
Page 15

After finished with installation, this PC will be found in the media source.
4. Network share
1). Select NMT applications, start Samba server.
2). Find the unit from workgroup.
Select ‘Network Share”,default User Name is nmt, Password is 1234.
15
Page 16

In the LAN, if other computers want to enter these share units, they should input the
same user name: nmt, and Password: 1234.
3). Return to the main menu, you will see this icon.
16
Page 17

5. MSP service and BT download.
MSP interface:
17
Page 18

Other BT download method: copy BT seeds into USB drive. Insert this USB drive into USB host
of unit, select seeds from . After confirming, the above picture will appear.
6. Check schedule of BT download
User needn’t turn on TV to check BT download schedule,just use their own computer to
check.
Open BT software,input unit IP address into browser
http://(IP address):8883、torrent/bt.cgi
Notice: user can get unit IP address from “network setup”
7. Audio setup
18
Page 19

8. Video set up.
19
Page 20

20
Page 21

21
Page 22

Picture display interval setting:
22
Page 23

9. Network set up.
23
Page 24

11. Server set up.
24
Page 25

11. CD/DVD driver set up.
Premise is connecting with USB DVD device.
No.5 Firmware and NMT update guide
25
Page 26

New firmware and software will be put on our website: www.egreatworld.com
and is for firmware update; is for NMT update.
Firmware should be install first,then NMT,pls note!
1). Firmware update
Copy these three files into the USB drive, insert USB drive into USB host of unit. Enter
select , then you can see below picture,select the newest firmware code(yellow words)
and enter for upgrade.(update online will be realize in the future)
,
,
During upgrading, don’t power off or plug out usb drive.After update,unit will reboot
automatically.
2).After firmware update, please update NMT. Premise is insi de usb dri ve already.
Select USB.
26
Page 27

Checking NMT version:
No.6 How to recover from firmware update failure with fail-safe kernel?
1. Please download from www.egreatworld.com;
2. Unzip both *.bin onto the root of a USB thumbdrive and plug into NMT.
3. Connect Component or Composite output
4. Power up the unit.
5. Component or Composite video will display following colours depending on its
recovery status:
27
Page 28

RED - Required binaries on USB thumbdrive detected, starts recovery
WHITE DOTs - reprogramming
YELLOW - Recovery failed
WHITE - Recovery success
6. After successful recovery, power cycle will bring it up again to 01-17-080612-15-
POP-402-000 firmware.
No.7 How to change background by yourself?
Attention: this funciton will execute based on NMT software.
1. Unzip _theme_.zip into USB thumbdrive and plug into NMT.
2. Select file icon ,select
,after pressing“ ANGLE “,file will be marked
with a tick;
3. press“
4. press“
SOURCE”to return main menu,select hdd inside,go to “photo”
TIME SEEK”and copy the selected file folder into root of photo, or
share the HDD by LAN, copy this file into root of “photo” from other computer..
5. Change any picture under root of _theme_ according to your own idea.
6. Attention: new file name and size must be as same as the old one which you
want to instead.
7. What’s more, because of some limitation,screen saver picture must keep under
20KB.
8. 7. If you want to change font color,pls modify .config file of _theme_,parameter
is RRGGBB
9. 8. Reboot unit, then it’s ok.
10.
No.8 Q & A
Q: Movie always clips when playing via USB DVD-ROM, why?
A:
1). Bit rate of the source is too large for USB DVD-ROM, suggest to copy the files
into HDD, and then try again.
2). There are some mistakes on the file due to the DVD disk being destroyed,
suggest not to use the bad DVD disk.
3). USB2.0 chipset of DVD-ROM isn’t in accordance with the USB2.0 standard.
Suggest changing the DVD-ROM.
4). Others.
Q: I can’t find the USB device.
A:
1). Verify that the USB device is properly connected.
2). USB2.0 cable has problem, please use the cable attached in the package.
3). Others.
28
Page 29

Q: I can’t find HDD after rebooting.
A:
1). The HDD isn’t formatted. Please format your HDD first.
2). The HDD is destroyed, please change the HDD.
3). Others.
Q: Why is there no audio output?
A:
1). Please check that all the devices are connected properly.
2). If the file is DTS format, please connect with your AVR. The unit can’t support
DTS decode at present.
Q: Why there is no signal output on the monitor?
A:
1). Check that your device is connect properly.
2). Press TV MODE button repeatedly to seek the matched mode, TV MODE should
match with your HDTV. Don’t press too quickly to get the right mode.
3). After getting the right mode, please enter set up menu, adjust video output
mode and save. Then you won’t have this problem again.
29
 Loading...