

Page 1
Page 2
12345678901234567890123456789012123456789012345678901234567890121234567890123456789012345678901212345678901234567890123456789012123456789012345678901234567
1
234567890123456789012345678901212345678901234567890123456789012123456789012345678901234567890121234567890123456789012345678901212345678901234567890123456
7
1
7
1
7
1
7
1
7
1
7
1
7
1
7
1
7
1
7
1
7
1
7
1
7
1
7
12345678901234567890123456789012123456789012345678901234567890121234567890123456789012345678901212345678901234567890123456789012123456789012345678901234567
234567890123456789012345678901212345678901234567890123456789012123456789012345678901234567890121234567890123456789012345678901212345678901234567890123456
234567890123456789012345678901212345678901234567890123456789012123456789012345678901234567890121234567890123456789012345678901212345678901234567890123456
234567890123456789012345678901212345678901234567890123456789012123456789012345678901234567890121234567890123456789012345678901212345678901234567890123456
234567890123456789012345678901212345678901234567890123456789012123456789012345678901234567890121234567890123456789012345678901212345678901234567890123456
234567890123456789012345678901212345678901234567890123456789012123456789012345678901234567890121234567890123456789012345678901212345678901234567890123456
234567890123456789012345678901212345678901234567890123456789012123456789012345678901234567890121234567890123456789012345678901212345678901234567890123456
234567890123456789012345678901212345678901234567890123456789012123456789012345678901234567890121234567890123456789012345678901212345678901234567890123456
234567890123456789012345678901212345678901234567890123456789012123456789012345678901234567890121234567890123456789012345678901212345678901234567890123456
234567890123456789012345678901212345678901234567890123456789012123456789012345678901234567890121234567890123456789012345678901212345678901234567890123456
234567890123456789012345678901212345678901234567890123456789012123456789012345678901234567890121234567890123456789012345678901212345678901234567890123456
234567890123456789012345678901212345678901234567890123456789012123456789012345678901234567890121234567890123456789012345678901212345678901234567890123456
234567890123456789012345678901212345678901234567890123456789012123456789012345678901234567890121234567890123456789012345678901212345678901234567890123456
234567890123456789012345678901212345678901234567890123456789012123456789012345678901234567890121234567890123456789012345678901212345678901234567890123456
Table of Contents
Important Safety Instructions.......................................................................................................... 01
Introduction
Front Panel ................................................................................................................................... 04
Rear Panel ..................................................................................................................................... 04
Display Window ........................................................................................................................... 05
Remote Control Functions ............................................................................................................... 06
Prepare the remote Control............................................................................................................ 06
Getting Started
Video Connection ........................................................................................................................ 07
Audio Connection ......................................................................................................................... 07
Operating DVD player with the remote control.................................................................................. 08
Basic Operation
Playing a DVD ............................................................................................................................... 09
Front Panel Operation .................................................................................................................. 09
Remote Control Operation............................................................................................................. 10
Special Operation
What is MP3.?...............................................................................................................................13
MP3 Operation.............................................................................................................................. 13
What is JPEG.?...............................................................................................................................13
Playing Your JPEG Files................................................................................................................ 14
System Configuration
General Setup Page ........................................................................................................................ 15
Speaker Setup Page ....................................................................................................................... 16
Dolby Setup Page ........................................................................................................................... 16
Video Setup Page ........................................................................................................................... 16
Preference Page.............................................................................................................................. 17
Appendix
(Definition of Keywords).................................................................................................. 19
Page 3
12345678901234567890123456789012123456789012345678901234567890121234567890123456789012345678901212345678901234567890123456789012123456789012345678901234567
1
234567890123456789012345678901212345678901234567890123456789012123456789012345678901234567890121234567890123456789012345678901212345678901234567890123456
7
1
7
1
7
1
7
1
7
1
7
1
7
1
7
1
7
1
7
1
7
1
7
1
7
1
7
12345678901234567890123456789012123456789012345678901234567890121234567890123456789012345678901212345678901234567890123456789012123456789012345678901234567
234567890123456789012345678901212345678901234567890123456789012123456789012345678901234567890121234567890123456789012345678901212345678901234567890123456
234567890123456789012345678901212345678901234567890123456789012123456789012345678901234567890121234567890123456789012345678901212345678901234567890123456
234567890123456789012345678901212345678901234567890123456789012123456789012345678901234567890121234567890123456789012345678901212345678901234567890123456
234567890123456789012345678901212345678901234567890123456789012123456789012345678901234567890121234567890123456789012345678901212345678901234567890123456
234567890123456789012345678901212345678901234567890123456789012123456789012345678901234567890121234567890123456789012345678901212345678901234567890123456
234567890123456789012345678901212345678901234567890123456789012123456789012345678901234567890121234567890123456789012345678901212345678901234567890123456
234567890123456789012345678901212345678901234567890123456789012123456789012345678901234567890121234567890123456789012345678901212345678901234567890123456
234567890123456789012345678901212345678901234567890123456789012123456789012345678901234567890121234567890123456789012345678901212345678901234567890123456
234567890123456789012345678901212345678901234567890123456789012123456789012345678901234567890121234567890123456789012345678901212345678901234567890123456
234567890123456789012345678901212345678901234567890123456789012123456789012345678901234567890121234567890123456789012345678901212345678901234567890123456
234567890123456789012345678901212345678901234567890123456789012123456789012345678901234567890121234567890123456789012345678901212345678901234567890123456
234567890123456789012345678901212345678901234567890123456789012123456789012345678901234567890121234567890123456789012345678901212345678901234567890123456
234567890123456789012345678901212345678901234567890123456789012123456789012345678901234567890121234567890123456789012345678901212345678901234567890123456
Safety Precautions
The lightning flash with an arrowhead symbol within an equilateral triangle is
intended to alert the user to the presence of uninsulated "dangerous voltage"
within the product's enclosure that may be of sufficient magnitude to constitute a
risk of electric shock to persons.
The exclamation point within an equilateral triangle is intended to alert the user to
!
the presence of important operating and maintenance (servicing) instructions in
the literature accompanying the appliance.
AVIS
CAUTION: TO REDUCE THE RISK OF ELECTRIC
SHOCK, DO NOTREMOVE COVER (OR BACK). NO
USER-SERVICEABLE PART INSIDE. REFER
SERVICING TO QUALIFIED SERVICE PERSONNEL.
CAUTION
RISK OF ELECTRIC SHOCK
DO NOTOPEN
RISQUE DE CHOC ELECTRIQUE NE
PAS OUVRIR
!
WARNING: DO NOT EXPOSE THIS APPLIANCE TO RAIN OR MOISTURE, DUE TO THE HIGH RISK OF FIRE OR
ELECTRIC SHOCK, DO NOT OPEN THE CABINET DANGEROUS HIGH VOLTAGES ARE PRESENT
INSIDE THE ENCLOSURE. ONLYQUALIFIED SERVICE PERSONNELSHOULD ATTEMPT THIS.
C A U T I O N : TO PREVENT ELECTRIC SHOCK, MATCH WIDE BLADE OF PLUG TO WIDE SLOT, AND
F U L LY I N S E R T.
C A U T I O N : This Digital Video Disc Player employs a Laser System. To prevent direct exposure to the laser beam, do not
try to open the enclosure.Visible laser radiation when open and interlocks defeated. Use of controls or
adjustments or performance of procedures other than those specified herein may result in hazardous radiation
e x p o s u r e .
DO NOTS TA R EI N TO B E A M .
To ensure proper use of this product, please read this owner’s manual carefully and retain for future
reference. Should the unit require maintenance, contact an authorized service location, or contact
us.only qualified service personnel should remove the cover.
FCC NOTICE: This equipment has been tested and found to comply with the limits for a Class B digital device. Pu r s u a n t
with the FCC Rules, Part 15. These limits are designed to provide reasonable protection against harmful
interference in a residential installation.
This equipment generates,uses and can radiate radio frequency energy and,if not installed and used
in accordance with the instructions,may cause harmful interference to radio communication,However , t h i s
is no guarantee that interference will not occur in a particular installation.If this equipment does cause
harmful interference to radio or television reception,which can be determinedby turning the equipment off
and on,the user is encouraged to try to correct the interference by one of the following measures:
-Reorient or relocate the receiving antenna.
- Increase the separation between the equipment and receiver.
- Connect the equipment into an outlet on a circuit different from that to which the receiver is
connected.
- Consult the dealer or an experienced radio/TV technician for help.
FCC Caution:To assure continued compliance,(example - use only shielded interface cables when
connecting to computer orperipheral devices).Any changes or modifications not expressly approved
by the party responsible for compliance could void the user’s authority to operate this equipment.
WA R N I N G: Changes or modifications made to this equipment, not expressly approved by us or parties authorized by us
will void all the manufacture warranties.
For Customer Use:
In spaces provided below, record the Model and Serial No. located on the rear panel of your DVD video player.
Model No. Serial No.
Retain this information for future reference.
CLASS 1
LASER PRODUCT
01
Page 4

12345678901234567890123456789012123456789012345678901234567890121234567890123456789012345678901212345678901234567890123456789012123456789012345678901234567
1
234567890123456789012345678901212345678901234567890123456789012123456789012345678901234567890121234567890123456789012345678901212345678901234567890123456
7
1
7
1
7
1
7
1
7
1
7
1
7
1
7
1
7
1
7
1
7
1
7
1
7
1
7
12345678901234567890123456789012123456789012345678901234567890121234567890123456789012345678901212345678901234567890123456789012123456789012345678901234567
234567890123456789012345678901212345678901234567890123456789012123456789012345678901234567890121234567890123456789012345678901212345678901234567890123456
234567890123456789012345678901212345678901234567890123456789012123456789012345678901234567890121234567890123456789012345678901212345678901234567890123456
234567890123456789012345678901212345678901234567890123456789012123456789012345678901234567890121234567890123456789012345678901212345678901234567890123456
234567890123456789012345678901212345678901234567890123456789012123456789012345678901234567890121234567890123456789012345678901212345678901234567890123456
234567890123456789012345678901212345678901234567890123456789012123456789012345678901234567890121234567890123456789012345678901212345678901234567890123456
234567890123456789012345678901212345678901234567890123456789012123456789012345678901234567890121234567890123456789012345678901212345678901234567890123456
234567890123456789012345678901212345678901234567890123456789012123456789012345678901234567890121234567890123456789012345678901212345678901234567890123456
234567890123456789012345678901212345678901234567890123456789012123456789012345678901234567890121234567890123456789012345678901212345678901234567890123456
234567890123456789012345678901212345678901234567890123456789012123456789012345678901234567890121234567890123456789012345678901212345678901234567890123456
234567890123456789012345678901212345678901234567890123456789012123456789012345678901234567890121234567890123456789012345678901212345678901234567890123456
234567890123456789012345678901212345678901234567890123456789012123456789012345678901234567890121234567890123456789012345678901212345678901234567890123456
234567890123456789012345678901212345678901234567890123456789012123456789012345678901234567890121234567890123456789012345678901212345678901234567890123456
234567890123456789012345678901212345678901234567890123456789012123456789012345678901234567890121234567890123456789012345678901212345678901234567890123456
Safety Precautions
CAUTION: Use of controls or adjustments or performance of procedures other than those specified herein may result in hazardous radiation exposure.
Please carefully study this manual and always keep it available. There are, however, some installation and operation precautions which you
should be aware of.
1.Read Instructions - All the safety and operating instructions should be read before the product is operated.
2.Retain Instructions - The safety and operating instructions should be retained for future reference.
3.Heed Warnings - All warnings on the product and in the operating instructions should be adhered to.
4.Follow Instructions - All operating and use instructions should be followed.
5.Cleaning - Unplug this product from the wall outlet before cleaning. Do not use liquid cleaners or aerosol cleaners. Use a damp cloth for cleaning.
6.Attachments - Do not use attachments not recommended by the product manufacturer as they may cause hazards.
7.Water and Moisture - Do not use this product near water - for example, near a bath tub, wash bowl, kitchen sink, or laundry tub; in a wet
basement; or near a swimming pool; and the like.
8.Accessories - Do not place this product on an unstable cart, stand, tripod, bracket, or table. The product may fall, causing serious injury to a child or
adult, and serious damage to the product. Use only with a cart, stand, tripod, bracket, or table recommended by the manufacturer, or sold with the product.
Any mounting of the product should follow the manufacturer’s instructions, and should use a mounting accessory recommended by the manufacturer.
9.Aproduct and cart combination should be moved with care. Quick stops, excessive force, and uneven surfaces may cause the product and cart
combination to overturn.
1 0. Ventilation - Slots and openings in the cabinet are provided for ventilation and to ensure reliable operation of the product and to protect it from
overheating, and these openings must not be blocked or covered. The openings should never be blocked by placing the product on a bed, sofa, rug, or
other similar surface. This product should not be placed in a built-in installation such as a bookcase or rack unless proper ventilation is provided or the
m a n u f a c t u r e r’s instructions have been adhered to.
11.Power Sources - This product should be operated only from the type of power source indicated on the marking label. If you are not sure of the
type of power supply to your home, consult your product dealer or local power company. For products intended to operate from battery power, or
other sources, refer to the operating instructions.
1 2.Grounding or Polarization - This product may be equipped with a polarized alternating-current line plug (a plug having one blade wider than the
other). This plug will fit into the power outlet only one way. This is a safety feature. If you are unable to insert the plug fully into the outlet, try reversing
the plug. If the plug should still fail to fit, contact your electrician to replace your obsolete outlet. Do not defeat the safety purpose of the polarized plug.
Alternate Warnings - This product is equipped with a three-wire grounding-type plug, a plug having a third (grounding) pin. This plug will only fit
into a grounding-type power outlet. This is a safety feature, If you are unable to insert the plug into the outlet, contact your electrician to replace
your obsolete outlet. Do not defeat the safety purpose of the grounding-type plug.
13.Power-Cord Protection - Power-supply cords should be routed so that they are not likely to be walked on or pinched by items placed upon or
against them, paying particular attention to cords at plugs, convenience receptacles, and the point where they exit from the product.
14.Protective Attachment Plug - The product is equipped with an attachment plug having overload protection. This is a safety feature. See
Instruction Manual for replacement or resetting of protective device. If replacement of the plug is required, be sure the service technician has
used a replacement plug specified by the manufacturer that has the same overload protection as the original plug.
15.Outdoor Antenna Grounding - If an outside antenna or cable system is connected to the product, be sure the antenna or cable system is
grounded so as to provide some protection against voltage surges and built-up static charges. Article 810 of the National Electrical Code,
ANSI/NFPA 70, provides information with regard to proper grounding of the mast and supporting structure, grounding of the lead-in wire to an
antenna discharge unit, size or grounding conductors, location of antenna-discharge unit, connection to grounding electrodes, and requirements
for the grounding electrode. See Figure 131.1.
16.Lightning - For added protection for this product during a lightning storm, or when it is left unattended and unused for long periods of time,
unplug it from the wall outlet and disconnect the antenna or cable system. This will prevent damage to the product due to lightning and powerline surges.
17.Power Lines - An outside antenna system should not be located in the vicinity of overhead power lines or other electric light or power circuits,
or where it can fall into such power lines or circuits. When installing an outside antenna system, extreme care should be taken to keep from
touching such power lines or circuits as contact with them might be fatal.
1 8.Overloading - Do not overload wall outlets, extension cords, or integral convenience receptacles as this can result in a risk of fire or electric shock.
19.Object and Liquid Entry - Never push objects of any kind into this product through openings as they may touch dangerous voltage points or
short-out parts that could result in a fire or electric shock. Never spill liquid of any kind on the product.
20.Servicing - Do not attempt to service this product yourself as opening or removing covers may expose you to dangerous voltage or other
hazards. Refer all servicing to qualified service personnel.
2 1.Damage Requiring Service - Unplug this product from the wall outlet and refer servicing to qualified service personnel under the following conditions:
a. When the power-supply cord or plug is damaged.
b. If liquid has been spilled, or objects have fallen into the product.
c. If the product has been exposed to rain or water.
d. If the product does not operate normally by following the operating instructions. Adjust only those controls that are covered by the operating
instructions as an improper adjustment of other controls may result in damage and will often require extensive work by a qualified technician to
restore the product to its normal operation.
e. If the product has been dropped or damaged in any way, and
f. When the product exhibits a distinct change in performance - this indicates a need for service.
22.Replacement Parts - When replacement parts are required, be sure the service technician has used replacement parts specified by the
manufacturer or have the same charateristics as the original part. Unauthorized substitutions may result in fire, electric shock, or other hazards.
23.Safety Check - Upon completion of any service or repairs to this product, ask the service technician to perform saftey checks to determine
that the product is in proper operating condition.
24.Wall or Ceiling Mounting - The product should be mounted to a wall or ceiling only as recommended by the manufacturer.
25. Heat - The product should be situated away from heat sources such as radiators, heat registers, stoves or other products (including amplifiers)
that produce heat.
2
02
Page 5
12345678901234567890123456789012123456789012345678901234567890121234567890123456789012345678901212345678901234567890123456789012123456789012345678901234567
1
234567890123456789012345678901212345678901234567890123456789012123456789012345678901234567890121234567890123456789012345678901212345678901234567890123456
7
1
7
1
7
1
7
1
7
1
7
1
7
1
7
1
7
1
7
1
7
1
7
1
7
1
7
12345678901234567890123456789012123456789012345678901234567890121234567890123456789012345678901212345678901234567890123456789012123456789012345678901234567
234567890123456789012345678901212345678901234567890123456789012123456789012345678901234567890121234567890123456789012345678901212345678901234567890123456
234567890123456789012345678901212345678901234567890123456789012123456789012345678901234567890121234567890123456789012345678901212345678901234567890123456
234567890123456789012345678901212345678901234567890123456789012123456789012345678901234567890121234567890123456789012345678901212345678901234567890123456
234567890123456789012345678901212345678901234567890123456789012123456789012345678901234567890121234567890123456789012345678901212345678901234567890123456
234567890123456789012345678901212345678901234567890123456789012123456789012345678901234567890121234567890123456789012345678901212345678901234567890123456
234567890123456789012345678901212345678901234567890123456789012123456789012345678901234567890121234567890123456789012345678901212345678901234567890123456
234567890123456789012345678901212345678901234567890123456789012123456789012345678901234567890121234567890123456789012345678901212345678901234567890123456
234567890123456789012345678901212345678901234567890123456789012123456789012345678901234567890121234567890123456789012345678901212345678901234567890123456
234567890123456789012345678901212345678901234567890123456789012123456789012345678901234567890121234567890123456789012345678901212345678901234567890123456
234567890123456789012345678901212345678901234567890123456789012123456789012345678901234567890121234567890123456789012345678901212345678901234567890123456
234567890123456789012345678901212345678901234567890123456789012123456789012345678901234567890121234567890123456789012345678901212345678901234567890123456
234567890123456789012345678901212345678901234567890123456789012123456789012345678901234567890121234567890123456789012345678901212345678901234567890123456
234567890123456789012345678901212345678901234567890123456789012123456789012345678901234567890121234567890123456789012345678901212345678901234567890123456
Introduction
Your new DVD player is designed for you to enjoy several
different forms of disc media. Your player will allow you to enjoy
full-length motion pictures with "at-the-movies" picture and
cinema quality sound.
Your new player also supports CD, and MP3. Your player also
has several unique features, including S-video and component
video output for greater picture clarity, Parental Control (to
prevent children from viewing inappropriate content) and Kodak
Picture CD compatibility (so you can show photos on your TV).
This is a true multimedia machine designed for the multimedia
world to enjoy.
UNPACKING
First check and identify the contents of your DVD video player package, as listed below:
- DVD video player
- Remote control handset with separately packed batteries
- RCA cables (3) (1 yellow, 1 red, and 1 white)
- Owner’s manual
- Size AAA batteries (2)
If any item should be damaged or missing, please inform your supplier without delay.
Keep the packaging materials, you may need them to transport your player in the future.
ABOUT THIS OWNER’S MANUAL
This owner’s manual explains the basic instructions of this DVD video player. Some DVD video discs are produced in a manner
that allows specific or limited operation during playback. As such, the DVD video player may not respond to all operating
commands. Refer to instruction notes of disc.
” may appear on TV screen during operation.
“
” means that the operation is not permitted by the DVD video player.
“
NOTES ON REGIONAL NUMBERS
DVDs are divided into seperate regions. Your DVD video
player plays region 2 DVDs only.
TYPE OF TV SYSTEM
Connect this DVD video player to a TV compatible with PAL/3.58 NTSC system.
03
Page 6
12345678901234567890123456789012123456789012345678901234567890121234567890123456789012345678901212345678901234567890123456789012123456789012345678901234567
1
234567890123456789012345678901212345678901234567890123456789012123456789012345678901234567890121234567890123456789012345678901212345678901234567890123456
1
1
1
1
1
1
1
1
1
1
1
1
1
12345678901234567890123456789012123456789012345678901234567890121234567890123456789012345678901212345678901234567890123456789012123456789012345678901234567
234567890123456789012345678901212345678901234567890123456789012123456789012345678901234567890121234567890123456789012345678901212345678901234567890123456
234567890123456789012345678901212345678901234567890123456789012123456789012345678901234567890121234567890123456789012345678901212345678901234567890123456
234567890123456789012345678901212345678901234567890123456789012123456789012345678901234567890121234567890123456789012345678901212345678901234567890123456
234567890123456789012345678901212345678901234567890123456789012123456789012345678901234567890121234567890123456789012345678901212345678901234567890123456
234567890123456789012345678901212345678901234567890123456789012123456789012345678901234567890121234567890123456789012345678901212345678901234567890123456
234567890123456789012345678901212345678901234567890123456789012123456789012345678901234567890121234567890123456789012345678901212345678901234567890123456
234567890123456789012345678901212345678901234567890123456789012123456789012345678901234567890121234567890123456789012345678901212345678901234567890123456
234567890123456789012345678901212345678901234567890123456789012123456789012345678901234567890121234567890123456789012345678901212345678901234567890123456
234567890123456789012345678901212345678901234567890123456789012123456789012345678901234567890121234567890123456789012345678901212345678901234567890123456
234567890123456789012345678901212345678901234567890123456789012123456789012345678901234567890121234567890123456789012345678901212345678901234567890123456
234567890123456789012345678901212345678901234567890123456789012123456789012345678901234567890121234567890123456789012345678901212345678901234567890123456
234567890123456789012345678901212345678901234567890123456789012123456789012345678901234567890121234567890123456789012345678901212345678901234567890123456
234567890123456789012345678901212345678901234567890123456789012123456789012345678901234567890121234567890123456789012345678901212345678901234567890123456
Introduction
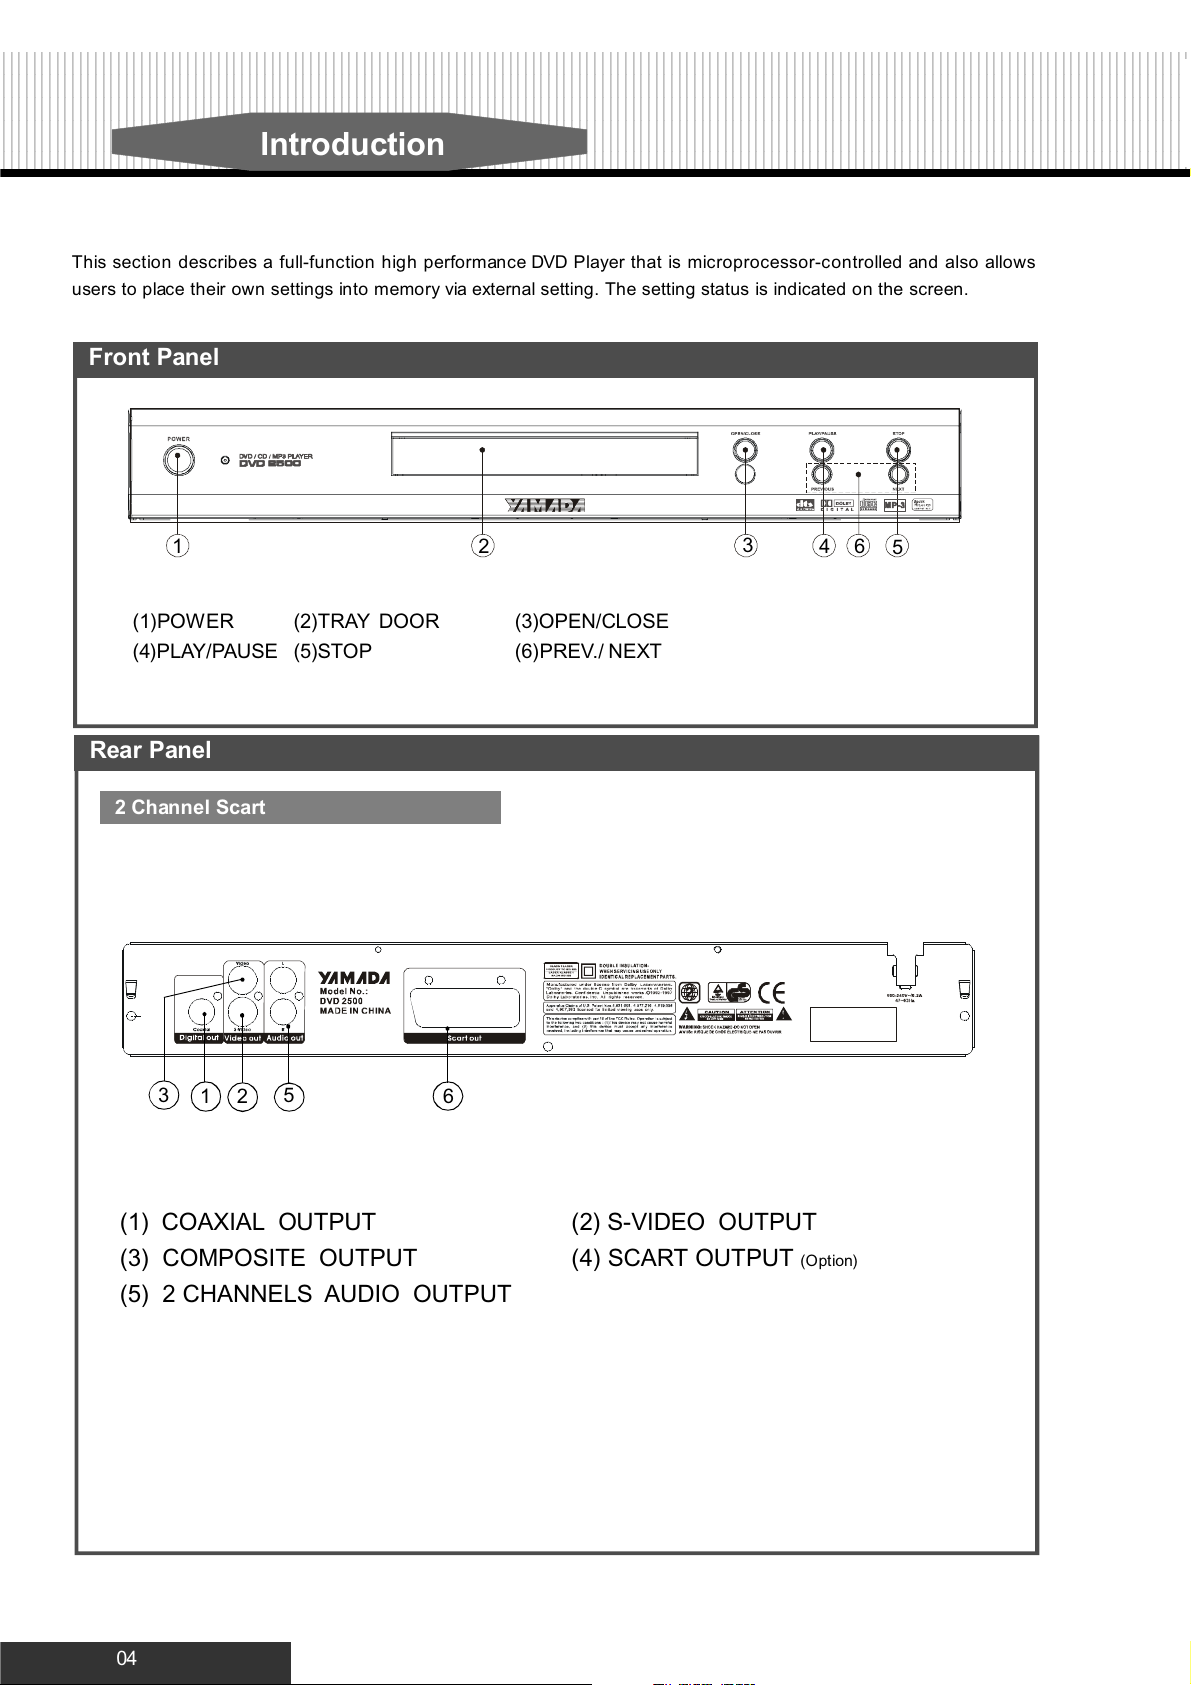
This section describes a full-function high performance DVD Player that is microprocessor-controlled and also allows
users to place their own settings into m emo r y via external setting. The setting status is ind icated on the screen.
Front Panel
(1)POWER
(4)PLAY/PAUSE
Rear Panel
2 Channel Scart
3
2
(2)TRAY DOOR
(5)STOP
1
5
2
6
(3)OPEN/CLOSE
(6)PREV./ NEXT
3
41 6
5
(1) COAXIAL OUTPUT
(3) COMPOSITE OUTPUT
(2) S-VIDEO OUTPUT
(4) SCART OUTPUT
(Option)
(5) 2 CHANNELS AUDIO OUTPUT
04
Page 7
89012123456789012345678901234567890121234567890123456789012345678901212345678901234567890123456789012123456789012345678901234567890121234567890123456789012
8
901212345678901234567890123456789012123456789012345678901234567890121234567890123456789012345678901212345678901234567890123456789012123456789012345678901
2
8
2
8
2
8
2
8
2
8
2
8
2
8
2
8
2
8
2
8
2
8
2
8
2
8
2
89012123456789012345678901234567890121234567890123456789012345678901212345678901234567890123456789012123456789012345678901234567890121234567890123456789012
901212345678901234567890123456789012123456789012345678901234567890121234567890123456789012345678901212345678901234567890123456789012123456789012345678901
901212345678901234567890123456789012123456789012345678901234567890121234567890123456789012345678901212345678901234567890123456789012123456789012345678901
901212345678901234567890123456789012123456789012345678901234567890121234567890123456789012345678901212345678901234567890123456789012123456789012345678901
901212345678901234567890123456789012123456789012345678901234567890121234567890123456789012345678901212345678901234567890123456789012123456789012345678901
901212345678901234567890123456789012123456789012345678901234567890121234567890123456789012345678901212345678901234567890123456789012123456789012345678901
901212345678901234567890123456789012123456789012345678901234567890121234567890123456789012345678901212345678901234567890123456789012123456789012345678901
901212345678901234567890123456789012123456789012345678901234567890121234567890123456789012345678901212345678901234567890123456789012123456789012345678901
901212345678901234567890123456789012123456789012345678901234567890121234567890123456789012345678901212345678901234567890123456789012123456789012345678901
901212345678901234567890123456789012123456789012345678901234567890121234567890123456789012345678901212345678901234567890123456789012123456789012345678901
901212345678901234567890123456789012123456789012345678901234567890121234567890123456789012345678901212345678901234567890123456789012123456789012345678901
901212345678901234567890123456789012123456789012345678901234567890121234567890123456789012345678901212345678901234567890123456789012123456789012345678901
901212345678901234567890123456789012123456789012345678901234567890121234567890123456789012345678901212345678901234567890123456789012123456789012345678901
901212345678901234567890123456789012123456789012345678901234567890121234567890123456789012345678901212345678901234567890123456789012123456789012345678901
Introduction
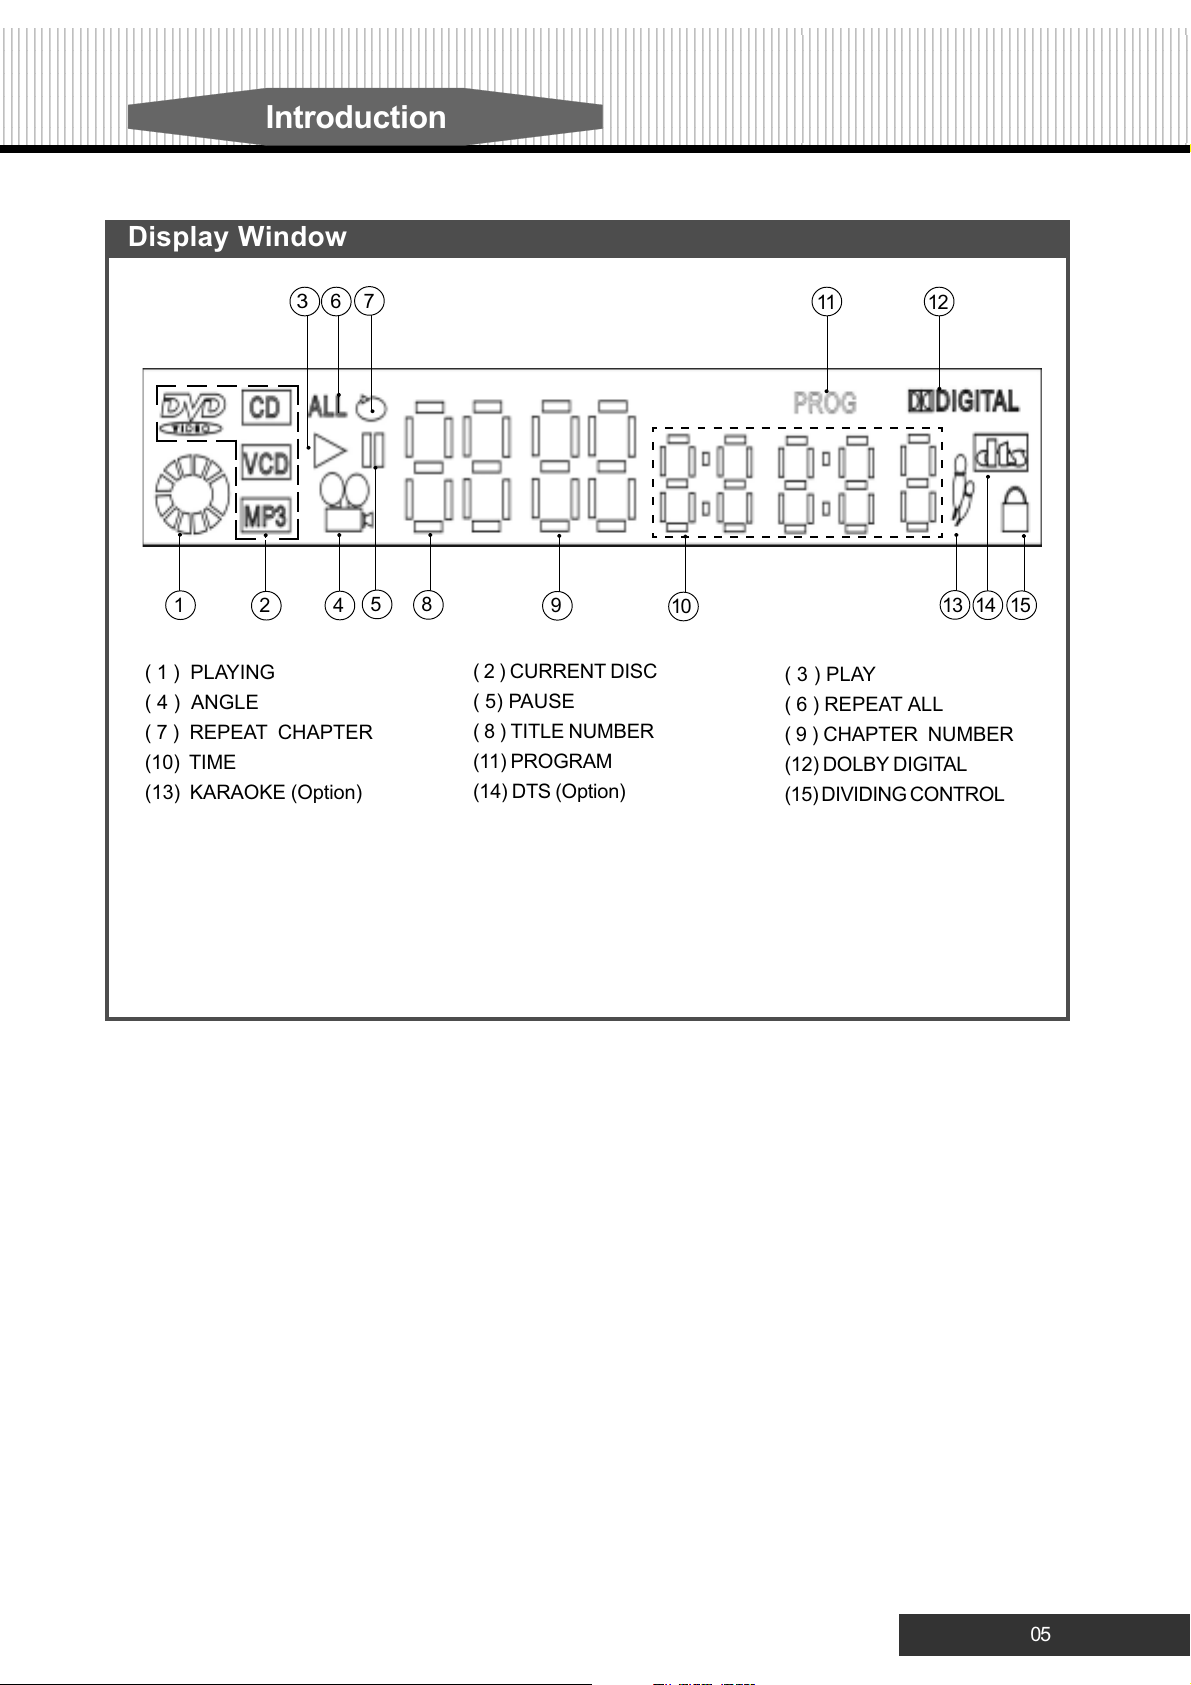
Display Window
3
6
1
2
4
( 1 ) PLAYING
( 4 ) ANGLE
( 7 ) REPEAT CHAPTER
(10) TIME
(13) KARAOKE (Option)
7
5
8
9
10
( 2 ) CURRENT DISC
( 5) PAUSE
( 8 ) TITLE NUMBER
(11) PROGRAM
(14) DTS (Option)
11 12
13
14
( 3 ) PLAY
( 6 ) REPEAT ALL
( 9 ) CHAPTER NUMBER
(12) DOLBY DIGITAL
(15) DIVIDING CONTROL
15
05
Page 8

12345678901234567890123456789012123456789012345678901234567890121234567890123456789012345678901212345678901234567890123456789012123456789012345678901234567
1
234567890123456789012345678901212345678901234567890123456789012123456789012345678901234567890121234567890123456789012345678901212345678901234567890123456
7
1
7
1
7
1
7
1
7
1
7
1
7
1
7
1
7
1
7
1
7
1
7
1
7
1
7
12345678901234567890123456789012123456789012345678901234567890121234567890123456789012345678901212345678901234567890123456789012123456789012345678901234567
234567890123456789012345678901212345678901234567890123456789012123456789012345678901234567890121234567890123456789012345678901212345678901234567890123456
234567890123456789012345678901212345678901234567890123456789012123456789012345678901234567890121234567890123456789012345678901212345678901234567890123456
234567890123456789012345678901212345678901234567890123456789012123456789012345678901234567890121234567890123456789012345678901212345678901234567890123456
234567890123456789012345678901212345678901234567890123456789012123456789012345678901234567890121234567890123456789012345678901212345678901234567890123456
234567890123456789012345678901212345678901234567890123456789012123456789012345678901234567890121234567890123456789012345678901212345678901234567890123456
234567890123456789012345678901212345678901234567890123456789012123456789012345678901234567890121234567890123456789012345678901212345678901234567890123456
234567890123456789012345678901212345678901234567890123456789012123456789012345678901234567890121234567890123456789012345678901212345678901234567890123456
234567890123456789012345678901212345678901234567890123456789012123456789012345678901234567890121234567890123456789012345678901212345678901234567890123456
234567890123456789012345678901212345678901234567890123456789012123456789012345678901234567890121234567890123456789012345678901212345678901234567890123456
234567890123456789012345678901212345678901234567890123456789012123456789012345678901234567890121234567890123456789012345678901212345678901234567890123456
234567890123456789012345678901212345678901234567890123456789012123456789012345678901234567890121234567890123456789012345678901212345678901234567890123456
234567890123456789012345678901212345678901234567890123456789012123456789012345678901234567890121234567890123456789012345678901212345678901234567890123456
234567890123456789012345678901212345678901234567890123456789012123456789012345678901234567890121234567890123456789012345678901212345678901234567890123456
Introduction
Remote Control Functions
2
1
5
10
9
13
17
15
18
20
21
3
6
13A
1
5
10
9
4
7
8
11
12
14
17
16
19
22
15
18
20
21
2
23
24
25
28
24
3
6
4
7
8
11
12
14
16
19
22
23A
26
27
25
(FOR KARAOKE FUNCTION)
( 1 ) POWER
( 6 ) SEARCH
(11) MENU
(14) PAUSE
(18) PREVIOUS / NEXT .
(22) VOL+ / VOL-
( 2 ) PBC
( 7 ) ANGLE
(12) ZOOM
(15) SLOW
(19) F.F./F.R.
(23) MUTE
(24) P-Scan(Option) / VOCAL-ASSIST(Option)
(26) KARAOKE (FOR KARAOKE FUNCTION)
(28) KEY SHIFT (FOR KARAOKE FUNCTION)
( 3 ) DISPLAY
( 8 ) LANGUAGE
(13) RESUME
(16) STOP
(20) 1/ALL
(23
A)RESUME(FOR KARAOKE FUNCTION)
( 4 ) EJECT
( 9 ) SETUP
(13A) NTSC / PAL (FOR KARAOKE FUNCTION)
(17) PLAY/ENTER
(21) A-B
(25) PROGRAM
(27) MUTE
(FOR KARAOKE FUNCTION)
Prepare the Remote Control
To operate the DVD player , you must place the batteries in the remote control first.
1. Open the cover.
21
2. Insert batteries (size
AAA). Make sure the
position of + and - on the
batteries match the marks inside
the battery compartment.
-
+
+
-
3
3. Close the cover.
( 5 ) SUBTITLE
(10) TITLE
06
Page 9

89012123456789012345678901234567890121234567890123456789012345678901212345678901234567890123456789012123456789012345678901234567890121234567890123456789012
8
901212345678901234567890123456789012123456789012345678901234567890121234567890123456789012345678901212345678901234567890123456789012123456789012345678901
2
8
2
8
2
8
2
8
2
8
2
8
2
8
2
8
2
8
2
8
2
8
2
8
2
8
2
89012123456789012345678901234567890121234567890123456789012345678901212345678901234567890123456789012123456789012345678901234567890121234567890123456789012
901212345678901234567890123456789012123456789012345678901234567890121234567890123456789012345678901212345678901234567890123456789012123456789012345678901
901212345678901234567890123456789012123456789012345678901234567890121234567890123456789012345678901212345678901234567890123456789012123456789012345678901
901212345678901234567890123456789012123456789012345678901234567890121234567890123456789012345678901212345678901234567890123456789012123456789012345678901
901212345678901234567890123456789012123456789012345678901234567890121234567890123456789012345678901212345678901234567890123456789012123456789012345678901
901212345678901234567890123456789012123456789012345678901234567890121234567890123456789012345678901212345678901234567890123456789012123456789012345678901
901212345678901234567890123456789012123456789012345678901234567890121234567890123456789012345678901212345678901234567890123456789012123456789012345678901
901212345678901234567890123456789012123456789012345678901234567890121234567890123456789012345678901212345678901234567890123456789012123456789012345678901
901212345678901234567890123456789012123456789012345678901234567890121234567890123456789012345678901212345678901234567890123456789012123456789012345678901
901212345678901234567890123456789012123456789012345678901234567890121234567890123456789012345678901212345678901234567890123456789012123456789012345678901
901212345678901234567890123456789012123456789012345678901234567890121234567890123456789012345678901212345678901234567890123456789012123456789012345678901
901212345678901234567890123456789012123456789012345678901234567890121234567890123456789012345678901212345678901234567890123456789012123456789012345678901
901212345678901234567890123456789012123456789012345678901234567890121234567890123456789012345678901212345678901234567890123456789012123456789012345678901
901212345678901234567890123456789012123456789012345678901234567890121234567890123456789012345678901212345678901234567890123456789012123456789012345678901
Getting Started
Video Connection
Video Output
Connect the DVD player’s video output (RCA con-
nector or S-Video) on the rear panel to the TV’s video
input (or other devices) using AV, S-Video or
Component.
YEL LOW
S-Video Output
If your display device supports S-Video terminal,
you can also connect your display device to DVD
player’s S-Video Output connector on the rear
panel.
YELLOW
V C R
T V
X
CD / DVD
PLAYER
Notes:
1.Refer to the instructions supplied with the component to
be connected.
2.Do not connect this player to a video deck. If you do,
noise may appear in the picture.
Audio Connection
Stereo Configuration
Connect your TV stereo audio inputs (L for left chan-
nel and R for right channel) to the DVD player’s ste-
reo audio output L and R respectively.
Connect
directly
Analog 2 Channel Output
For your convenience and cost concern, DVD-Player
supports Dolby 2 Channel audio output directly.
Besides, you still need to connect the 2 Channel
audio output to your audio amplifier relatively as
following.
Note:
When you connect the DVD player to another device, be
sure to turn off the power and unplug all of the equipment
from the wall outlet before making any connections. The
output sound of the DVD player has a wide dynamic range.
Be sure to adjust the receiver’s volume to a moderate listening level. Otherwise, the speakers may be damaged by a
sudden high volume sound. Turn off the receiver before you
connect or disconnect the DVD player’s power cord. If you
leave the receiver power on, the speakers may be damaged.
White
Red
White
Red
07
Page 10

12345678901234567890123456789012123456789012345678901234567890121234567890123456789012345678901212345678901234567890123456789012123456789012345678901234567
1
234567890123456789012345678901212345678901234567890123456789012123456789012345678901234567890121234567890123456789012345678901212345678901234567890123456
1
1
1
1
1
1
1
1
1
1
1
1
1
12345678901234567890123456789012123456789012345678901234567890121234567890123456789012345678901212345678901234567890123456789012123456789012345678901234567
234567890123456789012345678901212345678901234567890123456789012123456789012345678901234567890121234567890123456789012345678901212345678901234567890123456
234567890123456789012345678901212345678901234567890123456789012123456789012345678901234567890121234567890123456789012345678901212345678901234567890123456
234567890123456789012345678901212345678901234567890123456789012123456789012345678901234567890121234567890123456789012345678901212345678901234567890123456
234567890123456789012345678901212345678901234567890123456789012123456789012345678901234567890121234567890123456789012345678901212345678901234567890123456
234567890123456789012345678901212345678901234567890123456789012123456789012345678901234567890121234567890123456789012345678901212345678901234567890123456
234567890123456789012345678901212345678901234567890123456789012123456789012345678901234567890121234567890123456789012345678901212345678901234567890123456
234567890123456789012345678901212345678901234567890123456789012123456789012345678901234567890121234567890123456789012345678901212345678901234567890123456
234567890123456789012345678901212345678901234567890123456789012123456789012345678901234567890121234567890123456789012345678901212345678901234567890123456
234567890123456789012345678901212345678901234567890123456789012123456789012345678901234567890121234567890123456789012345678901212345678901234567890123456
234567890123456789012345678901212345678901234567890123456789012123456789012345678901234567890121234567890123456789012345678901212345678901234567890123456
234567890123456789012345678901212345678901234567890123456789012123456789012345678901234567890121234567890123456789012345678901212345678901234567890123456
234567890123456789012345678901212345678901234567890123456789012123456789012345678901234567890121234567890123456789012345678901212345678901234567890123456
234567890123456789012345678901212345678901234567890123456789012123456789012345678901234567890121234567890123456789012345678901212345678901234567890123456
Getting Started
Digital Audio Output
If you have another audio deco der which can decode Dolby Digital / Dts, connect the optical jack of the DVD player
to the audio decoder (such as amplifier)via optical cable.
Then set the SPDIF “o n” on OSD. you can use the optical digital audio output to enjoy the original audio.The instruc-
tion is as follows:
Surroun d left
speaker
(Option)
DVD pla ye r
Optical or c oaxial
Audio deco der
Center spe aker
Surround ri ght
speaker
Front left
speaker
Speaker amplifi er
Subwoofer
speaker
Operating DVD player with the remote control
W hen using the remote control, point to the remote sensor on the DVD player.
30
Front r ight
speaker
30
Distance:
Maximum of 7m
Angle:
Approximately 30 from each direction.
*Do not expose the remote sensor directly to direct sunlight or lighting appliances. The DVD player will be malfunctioned if
you do so.
08
06
Page 11

12345678901234567890123456789012123456789012345678901234567890121234567890123456789012345678901212345678901234567890123456789012123456789012345678901234567
1
234567890123456789012345678901212345678901234567890123456789012123456789012345678901234567890121234567890123456789012345678901212345678901234567890123456
1
1
1
1
1
1
1
1
1
1
1
1
1
12345678901234567890123456789012123456789012345678901234567890121234567890123456789012345678901212345678901234567890123456789012123456789012345678901234567
234567890123456789012345678901212345678901234567890123456789012123456789012345678901234567890121234567890123456789012345678901212345678901234567890123456
234567890123456789012345678901212345678901234567890123456789012123456789012345678901234567890121234567890123456789012345678901212345678901234567890123456
234567890123456789012345678901212345678901234567890123456789012123456789012345678901234567890121234567890123456789012345678901212345678901234567890123456
234567890123456789012345678901212345678901234567890123456789012123456789012345678901234567890121234567890123456789012345678901212345678901234567890123456
234567890123456789012345678901212345678901234567890123456789012123456789012345678901234567890121234567890123456789012345678901212345678901234567890123456
234567890123456789012345678901212345678901234567890123456789012123456789012345678901234567890121234567890123456789012345678901212345678901234567890123456
234567890123456789012345678901212345678901234567890123456789012123456789012345678901234567890121234567890123456789012345678901212345678901234567890123456
234567890123456789012345678901212345678901234567890123456789012123456789012345678901234567890121234567890123456789012345678901212345678901234567890123456
234567890123456789012345678901212345678901234567890123456789012123456789012345678901234567890121234567890123456789012345678901212345678901234567890123456
234567890123456789012345678901212345678901234567890123456789012123456789012345678901234567890121234567890123456789012345678901212345678901234567890123456
234567890123456789012345678901212345678901234567890123456789012123456789012345678901234567890121234567890123456789012345678901212345678901234567890123456
234567890123456789012345678901212345678901234567890123456789012123456789012345678901234567890121234567890123456789012345678901212345678901234567890123456
234567890123456789012345678901212345678901234567890123456789012123456789012345678901234567890121234567890123456789012345678901212345678901234567890123456
Basic Operation
Playing a DVD
1.Press the Power bu tto n to turn on the player.
3.Insert a disc.
Front Panel Operation
1.POWER
Turn on or turn off the player.
3.PLAY/PAUSE
Play or momentarily stop the program on the disc.
2.Press the Ej ect button (
4.Press the Eject button (
2
2.OPEN/CLOSE
Open o r close the tray.
4.STOP
Stop playing.
) to open the tray door..
)toclosethetraydoor..
315
4
5.F.R. and F.F./PREV. and NEXT
Press NEXT during pla y
Go to the next chapter or track.
Press
Go back to the preceding chapter or track.
PREVIOUS during play
09
Page 12

12345678901234567890123456789012123456789012345678901234567890121234567890123456789012345678901212345678901234567890123456789012123456789012345678901234567
1
234567890123456789012345678901212345678901234567890123456789012123456789012345678901234567890121234567890123456789012345678901212345678901234567890123456
7
1
7
1
7
1
7
1
7
1
7
1
7
1
7
1
7
1
7
1
7
1
7
1
7
1
7
12345678901234567890123456789012123456789012345678901234567890121234567890123456789012345678901212345678901234567890123456789012123456789012345678901234567
/
/
234567890123456789012345678901212345678901234567890123456789012123456789012345678901234567890121234567890123456789012345678901212345678901234567890123456
234567890123456789012345678901212345678901234567890123456789012123456789012345678901234567890121234567890123456789012345678901212345678901234567890123456
234567890123456789012345678901212345678901234567890123456789012123456789012345678901234567890121234567890123456789012345678901212345678901234567890123456
234567890123456789012345678901212345678901234567890123456789012123456789012345678901234567890121234567890123456789012345678901212345678901234567890123456
234567890123456789012345678901212345678901234567890123456789012123456789012345678901234567890121234567890123456789012345678901212345678901234567890123456
234567890123456789012345678901212345678901234567890123456789012123456789012345678901234567890121234567890123456789012345678901212345678901234567890123456
234567890123456789012345678901212345678901234567890123456789012123456789012345678901234567890121234567890123456789012345678901212345678901234567890123456
234567890123456789012345678901212345678901234567890123456789012123456789012345678901234567890121234567890123456789012345678901212345678901234567890123456
234567890123456789012345678901212345678901234567890123456789012123456789012345678901234567890121234567890123456789012345678901212345678901234567890123456
234567890123456789012345678901212345678901234567890123456789012123456789012345678901234567890121234567890123456789012345678901212345678901234567890123456
234567890123456789012345678901212345678901234567890123456789012123456789012345678901234567890121234567890123456789012345678901212345678901234567890123456
234567890123456789012345678901212345678901234567890123456789012123456789012345678901234567890121234567890123456789012345678901212345678901234567890123456
234567890123456789012345678901212345678901234567890123456789012123456789012345678901234567890121234567890123456789012345678901212345678901234567890123456
Basic Operation
2
3
6
Remote Control Operation
1.POWER
Turn on or turn off the player.
1
5
4
2.PBC
Playback control. Press PBC (on) to program selected chapter. The root menu will
appear. Press “PBC”(off) to play movie uninterrupted.
3.DISPLAY
Each time you press the Display button, the on-screen display changes as follows:
Title, Chapter and Elapsed time
Title time
Title remain time
Chapter Elapsed time
Chapter remain time
Display off
4.EJECT
Press “EJECT” to open the disc tray. Place a Disc on the tray dish. Hold the disc
without touching the surface, position it with the printed title side facing up, align it with
the guides, and place it in its proper position.
Press “EJECT” to start playing. The disc tray will automatically close and start playing
. If the disc has one or more titles recorded on it, the menu screen will appear on the
TV monitor.
2 3
6
6
5.SUBTITLE
If the disc has two or more subtitles recorded on it, they can either be displayed or
cleared on the screen.
1
5
1. Press “SUBTITLE” during play. It will show as many subtitles as the disc has.
4
2. Keep on pressing,selected subtitle (including subtitle off) will
appear in turn.
3. Stop pressing the button after the selected subtitle appears.
Note: In some cases, the subtitle language is not changed immedi
ately to the selected one. When the selected language is not working,
even after pressing the button several times, it means that
the language is not available on the disc. This function is only for
DVD discs.
6.SEARCH
This description is divided into 3 parts,
When you are playing a “DVD”
Press ”SEARCH” while a disc is playing and a menu will be shown on the screen.
There are 9 modes can be chosen, including: “Title”, “Chapter”, “Audio”, “Subtitle”,
“Angle”, “TT Time”, “Ch Time”, “Repeat” and “Time Disp.”. Press “
different modes, press “Enter” to select the detail information.
When you are playing a “VCD”
Press ”SEARCH” while a disc is playing and a menu will be shown on the screen.
There are 5 modes can be chosen, including: “Track”, “Disc Time”, “Track Time”,
“Repeat” and “Time Disp.”. Press “
” to select different modes, press “Enter” to
c /d
select the detail information.
(FOR KARAOKE FUNCTION)
When you are playing a “CD”
Press “SEARCH” while a disc is playing. There are 3 modes can be chosen,
including: “Disc Go To”, “Track Go To” and “Select Track”.
10
c /d
” to select
Page 13

89012123456789012345678901234567890121234567890123456789012345678901212345678901234567890123456789012123456789012345678901234567890121234567890123456789012
8
901212345678901234567890123456789012123456789012345678901234567890121234567890123456789012345678901212345678901234567890123456789012123456789012345678901
2
8
2
8
2
8
2
8
2
8
2
8
2
8
2
8
2
8
2
8
2
8
2
8
2
8
2
89012123456789012345678901234567890121234567890123456789012345678901212345678901234567890123456789012123456789012345678901234567890121234567890123456789012
901212345678901234567890123456789012123456789012345678901234567890121234567890123456789012345678901212345678901234567890123456789012123456789012345678901
901212345678901234567890123456789012123456789012345678901234567890121234567890123456789012345678901212345678901234567890123456789012123456789012345678901
901212345678901234567890123456789012123456789012345678901234567890121234567890123456789012345678901212345678901234567890123456789012123456789012345678901
901212345678901234567890123456789012123456789012345678901234567890121234567890123456789012345678901212345678901234567890123456789012123456789012345678901
901212345678901234567890123456789012123456789012345678901234567890121234567890123456789012345678901212345678901234567890123456789012123456789012345678901
901212345678901234567890123456789012123456789012345678901234567890121234567890123456789012345678901212345678901234567890123456789012123456789012345678901
901212345678901234567890123456789012123456789012345678901234567890121234567890123456789012345678901212345678901234567890123456789012123456789012345678901
901212345678901234567890123456789012123456789012345678901234567890121234567890123456789012345678901212345678901234567890123456789012123456789012345678901
901212345678901234567890123456789012123456789012345678901234567890121234567890123456789012345678901212345678901234567890123456789012123456789012345678901
901212345678901234567890123456789012123456789012345678901234567890121234567890123456789012345678901212345678901234567890123456789012123456789012345678901
901212345678901234567890123456789012123456789012345678901234567890121234567890123456789012345678901212345678901234567890123456789012123456789012345678901
901212345678901234567890123456789012123456789012345678901234567890121234567890123456789012345678901212345678901234567890123456789012123456789012345678901
901212345678901234567890123456789012123456789012345678901234567890121234567890123456789012345678901212345678901234567890123456789012123456789012345678901
Basic Operation
7.ANGLE
Some DVD discs may contain scenes that have been filmed simultaneously
from a number of different angles. For these discs, the same scene can be
viewed from various angles using the “ANGLE” button. (The recorded angles
varies depending on the disc.)
This function is only for DVD discs.
8.LANGUAGE
It is possible to change the audio soundtrack language from the one selected at
the initial setting to a different language, if available. (This operation works only
with discs on which multiple audio soundtrack languages are recorded.)
Press “Language” during play. The options will appear on the screen. Continue pressing the “Language” button until your desired language is displayed.
The language will be back to the initial setting if “Language Off” appears on the
TV screen.
10
9
13
15
7
8
11
12
14
9.SETUP
Access the System Setup Menu.
10.TITLE
Press “TITLE” to select preferred options. Use direction keys to select.
Press “PLAY” to enter the selection.
11.MENU
Some discs with movies, for example, come with two or more titles. If the
disc has a title menu recorded on it, the “ MENU ” button can be used to
select the movie title. (The details of this operation differ depending on the
disc used.) This function is only used for DVD disc.
1. Press “ MENU ” during play. A list of the titles on the
disc will be displayed.
2. Press direction key to select the preferred title.
3. Press “ PLAY ”. The selected title now starts to play
12.ZOOM
Each time this button is pressed, the enlarged image changes as followed:
ШШ
ШШ
ШШ
ШШ
ШШ
2x
Ш 3x
ШШ
Ш 4x
ШШ
Ш 1/2x
ШШ
Ш 1/3x
ШШ
ШШ
Ш 1/4x
Ш restore image’s normal size
ШШ
ШШ
You can move the scene with direction key.
13/(23A).RESUME (PS:23AFOR KARAOKE FUNCTION)
Press “RESUME” to exit the menu system of the DVD returning to normal
playback mode.
7
10
9
11
13A 14
15
8
12
23A
13A.NTSC / PAL(FOR KARAOKE FUNCTION)
Choosing TV mode from
ϘϘ
ϘNTSC”, “PAL” and “Auto”.
ϘϘ
14.PAUSE
Press “ PAUSE ” during play to get a still picture. Press “ PLAY” again to
return to normal play.
15.SLOW
Press “ SLOW ” in the play mode. The slow motion changes each time this
button is pressed as followed,
:1/2x Ш 1/4x Ш 1/8x Ш 1/16x Ш , : 1/2x Ш 1/4x Ш 1/8x Ш 1/16x Ш restore
normal play mode.
(FOR KARAOKE FUNCTION)
11
Page 14

12345678901234567890123456789012123456789012345678901234567890121234567890123456789012345678901212345678901234567890123456789012123456789012345678901234567
1
234567890123456789012345678901212345678901234567890123456789012123456789012345678901234567890121234567890123456789012345678901212345678901234567890123456
7
1
7
1
7
1
7
1
7
1
7
1
7
1
7
1
7
1
7
1
7
1
7
1
7
1
7
12345678901234567890123456789012123456789012345678901234567890121234567890123456789012345678901212345678901234567890123456789012123456789012345678901234567
234567890123456789012345678901212345678901234567890123456789012123456789012345678901234567890121234567890123456789012345678901212345678901234567890123456
234567890123456789012345678901212345678901234567890123456789012123456789012345678901234567890121234567890123456789012345678901212345678901234567890123456
234567890123456789012345678901212345678901234567890123456789012123456789012345678901234567890121234567890123456789012345678901212345678901234567890123456
234567890123456789012345678901212345678901234567890123456789012123456789012345678901234567890121234567890123456789012345678901212345678901234567890123456
234567890123456789012345678901212345678901234567890123456789012123456789012345678901234567890121234567890123456789012345678901212345678901234567890123456
234567890123456789012345678901212345678901234567890123456789012123456789012345678901234567890121234567890123456789012345678901212345678901234567890123456
234567890123456789012345678901212345678901234567890123456789012123456789012345678901234567890121234567890123456789012345678901212345678901234567890123456
234567890123456789012345678901212345678901234567890123456789012123456789012345678901234567890121234567890123456789012345678901212345678901234567890123456
234567890123456789012345678901212345678901234567890123456789012123456789012345678901234567890121234567890123456789012345678901212345678901234567890123456
234567890123456789012345678901212345678901234567890123456789012123456789012345678901234567890121234567890123456789012345678901212345678901234567890123456
234567890123456789012345678901212345678901234567890123456789012123456789012345678901234567890121234567890123456789012345678901212345678901234567890123456
234567890123456789012345678901212345678901234567890123456789012123456789012345678901234567890121234567890123456789012345678901212345678901234567890123456
234567890123456789012345678901212345678901234567890123456789012123456789012345678901234567890121234567890123456789012345678901212345678901234567890123456
Basic Operation
16.STOP
Stop playing a disc.
17.PLAY/ENTER
Start playing the program on the disc.
18.PREVIOUS, NEXT
Ϙ ϙ
Press
NEXT during play
Go to the next chapter or track.
17
16
18
20
21
19
22
23
24
25
Press
PREVIOUS during play
Ϙϙ
19.F.R .and F.F.
The speed changes everytime when you press
“ ”, “ ”
ing play as follows: 2xШ 4x Ш8x Ш 16x Ш 32x. Press again to
restore normal play mode.
: Reverse Direction : Forward Direction
dur-
20.1/ALL
Repeat Chapter
Press “1/ALL” during play. Each time this button is pressed, repeat options are
shown as follows:
Repeat Chapter
Repeat All
Note: Repeat play works only with discs for which the elapsed playing time appears in the unit’s display
during playback. Repeat play may not work correctly with some DVDs. For MP3 disc, there are three modes
to repeat the contents: Folder (default value), Rep-one and Folder Rep.
Repeat Title
Cancel Repeat Mode
21.A-B
Repeat A-B
1. Press “A-B” during play at the point where repeat play is to set point A. Press“ A-B”
again at the point where repeat play is to be set point B. Repeat play of the selection
between points A and B status.
2. Press “A-B” again. (Standard playback appears on the TV monitor.)
Note: A-B repeat play works only with discs for which the elapsed playing time appears on the unit’s
17
16
18
20
21
19
22
23A
display during playback. This funciton is not available for MP3 discs. Some subtitles recorded around
point A or B may fail to appear.
22.VOLUME
Use “ VOL+ ” or “ VOL- ” button to adjust the output volume.
23/27.MUTE(PS:27 FOR KARAOKE FUNCTION)
Press this button to mute sound. Press it again to restore sound.
24.P-Scan (Option)
28
24
26
27
25
You may select the P-SCAN TV mode to get better resolution and picture.
Note: If your TV doesn’t support P-SCAN mode, the screen will disappear, press it again to solve the problem.
24.VOCAL-ASSIST (Option)
you can select Left channel output only or Right channel output only or Stereo output.
25.PROGRAM
You can arrange the orders of the titles, chapters, or tracks on the disc and create your
own program. This function is only active in PBC (Play Back Control) OFF mode.
(FOR KARAOKE FUNCTION)
12
26.KARAOKE(FOR KARAOKE FUNCTION)
Press“KARAOKE” button once to control KARAOKE function on , press it again
to control.
28.# KEY AND b KEY (FOR KARAOKE FUNCTION)
Press these buttons to select items.
Page 15

89012123456789012345678901234567890121234567890123456789012345678901212345678901234567890123456789012123456789012345678901234567890121234567890123456789012
8
901212345678901234567890123456789012123456789012345678901234567890121234567890123456789012345678901212345678901234567890123456789012123456789012345678901
2
8
2
8
2
8
2
8
2
8
2
8
2
8
2
8
2
8
2
8
2
8
2
8
2
8
2
89012123456789012345678901234567890121234567890123456789012345678901212345678901234567890123456789012123456789012345678901234567890121234567890123456789012
/
/
/
901212345678901234567890123456789012123456789012345678901234567890121234567890123456789012345678901212345678901234567890123456789012123456789012345678901
901212345678901234567890123456789012123456789012345678901234567890121234567890123456789012345678901212345678901234567890123456789012123456789012345678901
901212345678901234567890123456789012123456789012345678901234567890121234567890123456789012345678901212345678901234567890123456789012123456789012345678901
901212345678901234567890123456789012123456789012345678901234567890121234567890123456789012345678901212345678901234567890123456789012123456789012345678901
901212345678901234567890123456789012123456789012345678901234567890121234567890123456789012345678901212345678901234567890123456789012123456789012345678901
901212345678901234567890123456789012123456789012345678901234567890121234567890123456789012345678901212345678901234567890123456789012123456789012345678901
901212345678901234567890123456789012123456789012345678901234567890121234567890123456789012345678901212345678901234567890123456789012123456789012345678901
901212345678901234567890123456789012123456789012345678901234567890121234567890123456789012345678901212345678901234567890123456789012123456789012345678901
901212345678901234567890123456789012123456789012345678901234567890121234567890123456789012345678901212345678901234567890123456789012123456789012345678901
901212345678901234567890123456789012123456789012345678901234567890121234567890123456789012345678901212345678901234567890123456789012123456789012345678901
901212345678901234567890123456789012123456789012345678901234567890121234567890123456789012345678901212345678901234567890123456789012123456789012345678901
901212345678901234567890123456789012123456789012345678901234567890121234567890123456789012345678901212345678901234567890123456789012123456789012345678901
901212345678901234567890123456789012123456789012345678901234567890121234567890123456789012345678901212345678901234567890123456789012123456789012345678901
Special Operation
What is MP3
MP3 is a new music format which is capable to play the music on the internet.
MP3 Operation
1. Turn on the TV and insert an MP3 CD, the MP3 menu folder will be shown on the screen when the tray is closed. (picture 1)
2. Press
3. Press “PLAY/
4. Press
5. Press ”PLAY” to play the selected MP3 file. (picture 3)
“
” to select the desired folder. (picture 1)
c/d
” to see the MP3 list under the selected folder. Press “PLAY/ “ to return to the previous page. (picture 2)
“
” to select the desired MP3 file. (picture 2)
c/d
6. Select “
7. You can also press “PROGRAM” to see all the MP3 files in the disc and press “
” mark and press “PLAY/ ” to return to the previous page.
” to select the desired MP3 file and press
c /d
“PLAY” to play the selected MP3 file. (picture 4)
Ϙ ϙ
or
8. Press
to go to the next/previous page.
Ϙϙ
9. Press “ 1/ALL” to select different play modes including: Single, Repeat Folder, Folder, Shuffle, Random and Repeat
One.
(picture 1) (picture 2)
(picture 3) (picture 4)
• The “ “ sign in front of a file name indicates that this is a folder, not an MP3 file.
• The“MP3” sign in front of a file name indicates that this is an MP3 file.
13
Page 16

12345678901234567890123456789012123456789012345678901234567890121234567890123456789012345678901212345678901234567890123456789012123456789012345678901234567
1
234567890123456789012345678901212345678901234567890123456789012123456789012345678901234567890121234567890123456789012345678901212345678901234567890123456
7
1
7
1
7
1
7
1
7
1
7
1
7
1
7
1
7
1
7
1
7
1
7
1
7
1
7
12345678901234567890123456789012123456789012345678901234567890121234567890123456789012345678901212345678901234567890123456789012123456789012345678901234567
234567890123456789012345678901212345678901234567890123456789012123456789012345678901234567890121234567890123456789012345678901212345678901234567890123456
234567890123456789012345678901212345678901234567890123456789012123456789012345678901234567890121234567890123456789012345678901212345678901234567890123456
234567890123456789012345678901212345678901234567890123456789012123456789012345678901234567890121234567890123456789012345678901212345678901234567890123456
234567890123456789012345678901212345678901234567890123456789012123456789012345678901234567890121234567890123456789012345678901212345678901234567890123456
234567890123456789012345678901212345678901234567890123456789012123456789012345678901234567890121234567890123456789012345678901212345678901234567890123456
234567890123456789012345678901212345678901234567890123456789012123456789012345678901234567890121234567890123456789012345678901212345678901234567890123456
234567890123456789012345678901212345678901234567890123456789012123456789012345678901234567890121234567890123456789012345678901212345678901234567890123456
234567890123456789012345678901212345678901234567890123456789012123456789012345678901234567890121234567890123456789012345678901212345678901234567890123456
234567890123456789012345678901212345678901234567890123456789012123456789012345678901234567890121234567890123456789012345678901212345678901234567890123456
234567890123456789012345678901212345678901234567890123456789012123456789012345678901234567890121234567890123456789012345678901212345678901234567890123456
234567890123456789012345678901212345678901234567890123456789012123456789012345678901234567890121234567890123456789012345678901212345678901234567890123456
234567890123456789012345678901212345678901234567890123456789012123456789012345678901234567890121234567890123456789012345678901212345678901234567890123456
234567890123456789012345678901212345678901234567890123456789012123456789012345678901234567890121234567890123456789012345678901212345678901234567890123456
Special Operation
What is JPEG?
JPEG is short for the “Joint Photographic Experts Group”, a group of experts nominated to produce standards for
continuous tone image coding.
The best known standard from JPEG is IS 10918-1 (ITU-T T.81), which is the first of a multi-part set of standards
for still image compression. This allows you to create files (such as photographs, drawings, and most clip-art)
that can be archived on a CD-R for viewing on the RDV650, computer, or the web.
Playing Your JPEG Files
Normal Slide Show Presentation
When a JPEG disc is loaded into the player, a menu will appear on screen. (the same as the on screen menu of MP3)
Each picture in the current directory will be displayed consecutively in a slideshow presentation and will be automatically
displayed using the largest size that fits in your television screen. Sixteen slideshow “transition” modes are provided. Use
the “PROGRAM” button to select one of the following transition effects:
mode 1: Wipe Top (by default)
mode 3: Wipe Left
mode 5: Diagonal Wipe Left Top
mode 7: Diagonal Wipe Left Bottom
mode 9: Extend From Center H
mode 11: Compress To Center H
mode 13: Window H
mode 15: Wipe From Edge To Center
mode 2: Wipe Bottom
mode 4: Wipe Right
mode 6: Diagonal Wipe Right Top
mode 8: Diagonal Wipe Right Bottom
mode 10: Extend From Center V
mode 12: Compress To Center V
mode 14: Window V
mode 16: Move In From Top
Press “1/ALL” button to select different play modes including: Random, Repeat One, Repeat All, Repeat Off, Single
and Shuffle.
Image Rotation
There are four modes to rotate a picture: Invert, Mirror, Left, and Right. These operations are allowed only when a
picture is being displayed normally, and will be cancelled automatically when the next picture is displayed (press”next”
or “prev”)The arrow key are used to select the different rotation modes:
Up -Mirror/Vertical
Down -Mirror/Horizontal
Left -Turn left
Right -Turn right
Zoom
This features allows you to view a picture at 50%-200% in several increments. Press the “ZOOM” button. An on
screen message (“ Zoom 100% ”) will verify your selection. Use “F.F” and “F.R” keys to control the amount of zoom in and
out. Press the direction keys to move the picture in any direction. Press “Zoom” button again to exit the “Zoom” mode and
back to normal operation.
Note: When in the “ZOOM” mode, the slideshow transition and image transformation features are disabled.
Menu
When JPEG CD is played, the “MENU” key is used to display JPEG folders and the corresponding files. During the
playback, press “STOP” to access thumbnail menu.
14
Page 17

12345678901234567890123456789012123456789012345678901234567890121234567890123456789012345678901212345678901234567890123456789012123456789012345678901234567
1
234567890123456789012345678901212345678901234567890123456789012123456789012345678901234567890121234567890123456789012345678901212345678901234567890123456
7
1
7
1
7
1
7
1
7
1
7
1
7
1
7
1
7
1
7
1
7
1
7
1
7
1
7
12345678901234567890123456789012123456789012345678901234567890121234567890123456789012345678901212345678901234567890123456789012123456789012345678901234567
/
/
/
/
/
/
234567890123456789012345678901212345678901234567890123456789012123456789012345678901234567890121234567890123456789012345678901212345678901234567890123456
234567890123456789012345678901212345678901234567890123456789012123456789012345678901234567890121234567890123456789012345678901212345678901234567890123456
234567890123456789012345678901212345678901234567890123456789012123456789012345678901234567890121234567890123456789012345678901212345678901234567890123456
234567890123456789012345678901212345678901234567890123456789012123456789012345678901234567890121234567890123456789012345678901212345678901234567890123456
234567890123456789012345678901212345678901234567890123456789012123456789012345678901234567890121234567890123456789012345678901212345678901234567890123456
234567890123456789012345678901212345678901234567890123456789012123456789012345678901234567890121234567890123456789012345678901212345678901234567890123456
234567890123456789012345678901212345678901234567890123456789012123456789012345678901234567890121234567890123456789012345678901212345678901234567890123456
234567890123456789012345678901212345678901234567890123456789012123456789012345678901234567890121234567890123456789012345678901212345678901234567890123456
234567890123456789012345678901212345678901234567890123456789012123456789012345678901234567890121234567890123456789012345678901212345678901234567890123456
234567890123456789012345678901212345678901234567890123456789012123456789012345678901234567890121234567890123456789012345678901212345678901234567890123456
234567890123456789012345678901212345678901234567890123456789012123456789012345678901234567890121234567890123456789012345678901212345678901234567890123456
234567890123456789012345678901212345678901234567890123456789012123456789012345678901234567890121234567890123456789012345678901212345678901234567890123456
234567890123456789012345678901212345678901234567890123456789012123456789012345678901234567890121234567890123456789012345678901212345678901234567890123456
System Configuration
Use the Setup Menu display to change the system configuration. In this section, each item on the Setup Menu display will be
described.Use “
c/d/e/f
” buttons to select the item that you want and press “PLAY” or “ENTER” button to confirm.
General Setup Page
General Setup Page
General Setup Page
General Setup Page
General Setup Page
General Setup Page
TV Display
The type TV set (4:3 or 16:9) connected to the player and the wide screen picture type for a 4:3 TV can be set. Select “General Setup
Page”. You will see the following table on the screen. Press “
c /d
”to
select “TV Display”. Press “PLAY” to confirm your choice. This setting
can only be changed on the setup menu.
Normal/PS
Select this option when you connect a normal TV to the player.
Displays the wide picture with a portion automatically cut off (the
left and right edges).
Normal/LB
Select this for a conventional sized TV set. Black bands appear in both
upper and down sides. (Letter-Box Style)
Wide
Select this for a wide-screen TV set, played in full size. Setting the
side-screen TV to FULL mode is also necessary.
Angle Mark
Press “
or “Off.” This function only works on the discs that support the multiple
angle view feature.
”“ to select “Angle Mark”. This function can be set to “On”
c /d
OSD Lang
The setup menu can be shown in other languages. You can choose
another language by pressing “
the power off will not effect the setting. The setting can only be
changed on the setup menu.
Note:Some DVD may not include the pre-selected languages. In this case, the player
automatically displays menu which is consistent with the disc’s initial language setting.
” to select “OSD Lang”. Turning
c /d
Spdif Output
Press “
Output”.
General Setup Page
Captions
Press “
subtitles on or off.
General Setup Page
Screen Saver
Press “
“On” or “Off.”
” to select “SPDIF
c /d
” to select “Captions”. This function allows you to turn the
c /d
” to select “Screen Saver”. This function can be set to
c /d
15
Page 18

12345678901234567890123456789012123456789012345678901234567890121234567890123456789012345678901212345678901234567890123456789012123456789012345678901234567
1
234567890123456789012345678901212345678901234567890123456789012123456789012345678901234567890121234567890123456789012345678901212345678901234567890123456
7
1
7
1
7
1
7
1
7
1
7
1
7
1
7
1
7
1
7
1
7
1
7
1
7
1
7
12345678901234567890123456789012123456789012345678901234567890121234567890123456789012345678901212345678901234567890123456789012123456789012345678901234567
/
234567890123456789012345678901212345678901234567890123456789012123456789012345678901234567890121234567890123456789012345678901212345678901234567890123456
234567890123456789012345678901212345678901234567890123456789012123456789012345678901234567890121234567890123456789012345678901212345678901234567890123456
234567890123456789012345678901212345678901234567890123456789012123456789012345678901234567890121234567890123456789012345678901212345678901234567890123456
234567890123456789012345678901212345678901234567890123456789012123456789012345678901234567890121234567890123456789012345678901212345678901234567890123456
234567890123456789012345678901212345678901234567890123456789012123456789012345678901234567890121234567890123456789012345678901212345678901234567890123456
234567890123456789012345678901212345678901234567890123456789012123456789012345678901234567890121234567890123456789012345678901212345678901234567890123456
234567890123456789012345678901212345678901234567890123456789012123456789012345678901234567890121234567890123456789012345678901212345678901234567890123456
234567890123456789012345678901212345678901234567890123456789012123456789012345678901234567890121234567890123456789012345678901212345678901234567890123456
234567890123456789012345678901212345678901234567890123456789012123456789012345678901234567890121234567890123456789012345678901212345678901234567890123456
234567890123456789012345678901212345678901234567890123456789012123456789012345678901234567890121234567890123456789012345678901212345678901234567890123456
234567890123456789012345678901212345678901234567890123456789012123456789012345678901234567890121234567890123456789012345678901212345678901234567890123456
234567890123456789012345678901212345678901234567890123456789012123456789012345678901234567890121234567890123456789012345678901212345678901234567890123456
234567890123456789012345678901212345678901234567890123456789012123456789012345678901234567890121234567890123456789012345678901212345678901234567890123456
System Configuration
Speaker Setup Page
Speaker setup options should only be changed if the DVD
player is connected to a LEFT or RIGHT surround sound
processor.
Speaker Setup Page
VIDEO
Dolby Digital Setup
Dolb y Digit al Se tup
Speaker Setup Page
Dolb y Digit al Setup
Downmix
Switches the mixing down methods
when you play a DVD with rear signal
components.This function can be set
to “Lt/Rt”,“Stereo ”.
Dual Mono
This is the output mode of the L and
R signals of the set audio output. If it
is set to “Mix-Mono”, this function
only works when the DVD is being
played in 2 channel.
Dynamic
Press “
pression rate of the signal.
” to adjust the linear com-
c /d
Video Setup Page
Video Setup Page
Video Setup Page
VIDEO
Video Setup Page
16
Component
Enable componet video output.
Please note that VGA is an option.
Note:
If the player is with SCART output, the
factory setting will be set to “SCART”.
Besides, if the TV supports P-Scan function and you would like to enable P-Scan
function, please change the “Compo-
nent” setting into Yuv, then select “PScan” in TV Mode.
TV Mode
Select the interlace or P-SCAN
(Option) TV mode. (Component
should be set to YUV.)
17
Page 19

12345678901234567890123456789012123456789012345678901234567890121234567890123456789012345678901212345678901234567890123456789012123456789012345678901234567
1
234567890123456789012345678901212345678901234567890123456789012123456789012345678901234567890121234567890123456789012345678901212345678901234567890123456
7
1
7
1
7
1
7
1
7
1
7
1
7
1
7
1
7
1
7
1
7
1
7
1
7
1
7
12345678901234567890123456789012123456789012345678901234567890121234567890123456789012345678901212345678901234567890123456789012123456789012345678901234567
/
/
234567890123456789012345678901212345678901234567890123456789012123456789012345678901234567890121234567890123456789012345678901212345678901234567890123456
234567890123456789012345678901212345678901234567890123456789012123456789012345678901234567890121234567890123456789012345678901212345678901234567890123456
234567890123456789012345678901212345678901234567890123456789012123456789012345678901234567890121234567890123456789012345678901212345678901234567890123456
234567890123456789012345678901212345678901234567890123456789012123456789012345678901234567890121234567890123456789012345678901212345678901234567890123456
234567890123456789012345678901212345678901234567890123456789012123456789012345678901234567890121234567890123456789012345678901212345678901234567890123456
234567890123456789012345678901212345678901234567890123456789012123456789012345678901234567890121234567890123456789012345678901212345678901234567890123456
234567890123456789012345678901212345678901234567890123456789012123456789012345678901234567890121234567890123456789012345678901212345678901234567890123456
234567890123456789012345678901212345678901234567890123456789012123456789012345678901234567890121234567890123456789012345678901212345678901234567890123456
234567890123456789012345678901212345678901234567890123456789012123456789012345678901234567890121234567890123456789012345678901212345678901234567890123456
234567890123456789012345678901212345678901234567890123456789012123456789012345678901234567890121234567890123456789012345678901212345678901234567890123456
234567890123456789012345678901212345678901234567890123456789012123456789012345678901234567890121234567890123456789012345678901212345678901234567890123456
234567890123456789012345678901212345678901234567890123456789012123456789012345678901234567890121234567890123456789012345678901212345678901234567890123456
234567890123456789012345678901212345678901234567890123456789012123456789012345678901234567890121234567890123456789012345678901212345678901234567890123456
System Configuration
Sharpness
Press “
” to adjust “Sharpness”.
c /d
Preference Page
Video Setup Page
Vide o Setup Page
Preference Page
Brightness
Press “ ” to adjust “Brightness”.
Press “PLAY” to return to
“Brightness”.
Contrast
Press “ ” to adjust “Contrast”.
Press “PLAY” to return to “Contrast”.
TV Type
Press “
Select the TV type according to the
TV set. ( Including NTSC, PAL and
Multi.)
” to select “TV Type”.
c /d
Preference Page
Preference Page
Audio
This function can be set to
“English”, “French”, “Spanish”,
“Chinese”, “Japanese” or
“German” and etc. (depending on
the DVD format).
Preference Page
Subtitle
This function can be set to
“English”, “French”, “Spanish”,
“Chinese”, “Japanese” or
“German” and etc. (depending on
the DVD format).
18
17
Page 20

12345678901234567890123456789012123456789012345678901234567890121234567890123456789012345678901212345678901234567890123456789012123456789012345678901234567
1
234567890123456789012345678901212345678901234567890123456789012123456789012345678901234567890121234567890123456789012345678901212345678901234567890123456
7
1
7
1
7
1
7
1
7
1
7
1
7
1
7
1
7
1
7
1
7
1
7
1
7
1
7
12345678901234567890123456789012123456789012345678901234567890121234567890123456789012345678901212345678901234567890123456789012123456789012345678901234567
234567890123456789012345678901212345678901234567890123456789012123456789012345678901234567890121234567890123456789012345678901212345678901234567890123456
234567890123456789012345678901212345678901234567890123456789012123456789012345678901234567890121234567890123456789012345678901212345678901234567890123456
234567890123456789012345678901212345678901234567890123456789012123456789012345678901234567890121234567890123456789012345678901212345678901234567890123456
234567890123456789012345678901212345678901234567890123456789012123456789012345678901234567890121234567890123456789012345678901212345678901234567890123456
234567890123456789012345678901212345678901234567890123456789012123456789012345678901234567890121234567890123456789012345678901212345678901234567890123456
234567890123456789012345678901212345678901234567890123456789012123456789012345678901234567890121234567890123456789012345678901212345678901234567890123456
234567890123456789012345678901212345678901234567890123456789012123456789012345678901234567890121234567890123456789012345678901212345678901234567890123456
234567890123456789012345678901212345678901234567890123456789012123456789012345678901234567890121234567890123456789012345678901212345678901234567890123456
234567890123456789012345678901212345678901234567890123456789012123456789012345678901234567890121234567890123456789012345678901212345678901234567890123456
234567890123456789012345678901212345678901234567890123456789012123456789012345678901234567890121234567890123456789012345678901212345678901234567890123456
234567890123456789012345678901212345678901234567890123456789012123456789012345678901234567890121234567890123456789012345678901212345678901234567890123456
234567890123456789012345678901212345678901234567890123456789012123456789012345678901234567890121234567890123456789012345678901212345678901234567890123456
234567890123456789012345678901212345678901234567890123456789012123456789012345678901234567890121234567890123456789012345678901212345678901234567890123456
System Configuration
Preference Page
Preference Page
Preference Page
Disc Menu
This function can be set to
“English”, “French”, “Spanish”,
“Chinese”, “Japanese” or
“German” and etc. (depending on
the DVD format).
Parental
Move the arrow to “Parental”. There
are 8 options of selections. Parental
control only works with DVD discs
that have this protection system
encoded. Parental control does not
work for VCD or audio CD discs.
Preference Page
Password
The initial factory setting for “Old
Password” is 1234 for 2CH DVD
player. You need to enter this num-
ber if you want to change the
password.
Note:
Do not forget your password.
Currently, there is no way to over-
ride the password.
Preference Page
Default
This function will change all param-
eter to the default setting.
18
19
Page 21

12345678901234567890123456789012123456789012345678901234567890121234567890123456789012345678901212345678901234567890123456789012123456789012345678901234567
1
234567890123456789012345678901212345678901234567890123456789012123456789012345678901234567890121234567890123456789012345678901212345678901234567890123456
7
1
7
1
7
1
7
1
7
1
7
1
7
1
7
1
7
1
7
1
7
1
7
1
7
1
7
12345678901234567890123456789012123456789012345678901234567890121234567890123456789012345678901212345678901234567890123456789012123456789012345678901234567
234567890123456789012345678901212345678901234567890123456789012123456789012345678901234567890121234567890123456789012345678901212345678901234567890123456
234567890123456789012345678901212345678901234567890123456789012123456789012345678901234567890121234567890123456789012345678901212345678901234567890123456
234567890123456789012345678901212345678901234567890123456789012123456789012345678901234567890121234567890123456789012345678901212345678901234567890123456
234567890123456789012345678901212345678901234567890123456789012123456789012345678901234567890121234567890123456789012345678901212345678901234567890123456
234567890123456789012345678901212345678901234567890123456789012123456789012345678901234567890121234567890123456789012345678901212345678901234567890123456
234567890123456789012345678901212345678901234567890123456789012123456789012345678901234567890121234567890123456789012345678901212345678901234567890123456
234567890123456789012345678901212345678901234567890123456789012123456789012345678901234567890121234567890123456789012345678901212345678901234567890123456
234567890123456789012345678901212345678901234567890123456789012123456789012345678901234567890121234567890123456789012345678901212345678901234567890123456
234567890123456789012345678901212345678901234567890123456789012123456789012345678901234567890121234567890123456789012345678901212345678901234567890123456
234567890123456789012345678901212345678901234567890123456789012123456789012345678901234567890121234567890123456789012345678901212345678901234567890123456
234567890123456789012345678901212345678901234567890123456789012123456789012345678901234567890121234567890123456789012345678901212345678901234567890123456
234567890123456789012345678901212345678901234567890123456789012123456789012345678901234567890121234567890123456789012345678901212345678901234567890123456
234567890123456789012345678901212345678901234567890123456789012123456789012345678901234567890121234567890123456789012345678901212345678901234567890123456
Appendix (Definition of Keywords)
Angle
Recorded onto some DVD discs are scenes which have been
simultaneously shot from a number of different angles (the
same scene is shot from the front, from the left side, from the
right side, etc.) With such discs, the ANGLE button can be
used to view the scene from different angles.
Chapter number
These numbers are recorded on DVD discs. A title is subdi-
vided into many sections, each of which is numbered, and
specific parts of video presentations can be searched quickly
by using these numbers.
DVD
This refers to a high-density optical disc on which high-quality
pictures and sound have been recorded by means of digital
signals. Incorporating a new video compression technology
(MPEG II) and high-density recording technology, DVD enables
aesthetically pleasing full-motion video to be recorded over
long periods of time (for instance, a whole movie can be
recorded.)DVD has a structure consisting of two 0.6mm thin
discs that are adhered to each other. Since the thinner the
disc, the higher the density at which the information can be
recorded, a DVD disc has a greater capacity than a single 1.
2mm thick disc. Since the two thin discs are adhered to each
other, there is the potential to achieve double-sided play some-
time in the future for even longer duration play.
Dolby Digital
Dolby Digital is an advanced form of digital audio coding that
makes it possible to store and transmit high-quality digital sound
far more efficiently than was previously possible. First used
in movied theaters in 1992, it is the result of decades spent by
Dolby Laboratories developing signal-processing systems that
exploit the characteristics of human hearing.
Dolby Digital 2 Channel
At the option of their producers, Dolby Digital programs can
deliver surround sound with two discrete range channels-
left and right .
Subtitle
These are the printed lines appearing at the bottom of the
screen that translate or transcribe the dialogue. They are
recorded on DVD discs.
Time number
This indicates the playing time that has elapsed from the start
of a disc or a title. It can be used to find a specific scene
quickly. (It may not work with some discs.)
Title number
These numbers are recorded on DVD discs. When a disc
contains two or more movies, these movies are numbered as
title1, title2,etc.
CSS
CSS stands for "Content Scramble System". It is the data scram-
bling method used to garble the content of a DVD disc. Ac-
cording to most sources, CSS was put into use for the pur-
pose of ensuring that copyrighted material placed in this for-
mat would only be usable with licensed DVD playback
mechanisms.
20
19
Page 22

 Loading...