

Page 1
+
Page 2
INTRODUCTION
2
Thank you for choosing a Yale Digital Lock.
The new Yale Digital Lock uses the latest technology to
make life so much easier.
This user manual enables you to operate the product safely and to
its full potential.
Be sure to read this completely before using the Yale Digital Lock product.
Unlock your life!
Page 3
CONTENTS
3
ENGLISH
Safety Precautions
Product Features
04
05
33
Emergency Power
06
07
08
10
13
15
15
16
17
18
19
20
21
22
23
24
24
24
25
26
27
28
29
30
31
32
32
Components Overview
Specifications
Identification
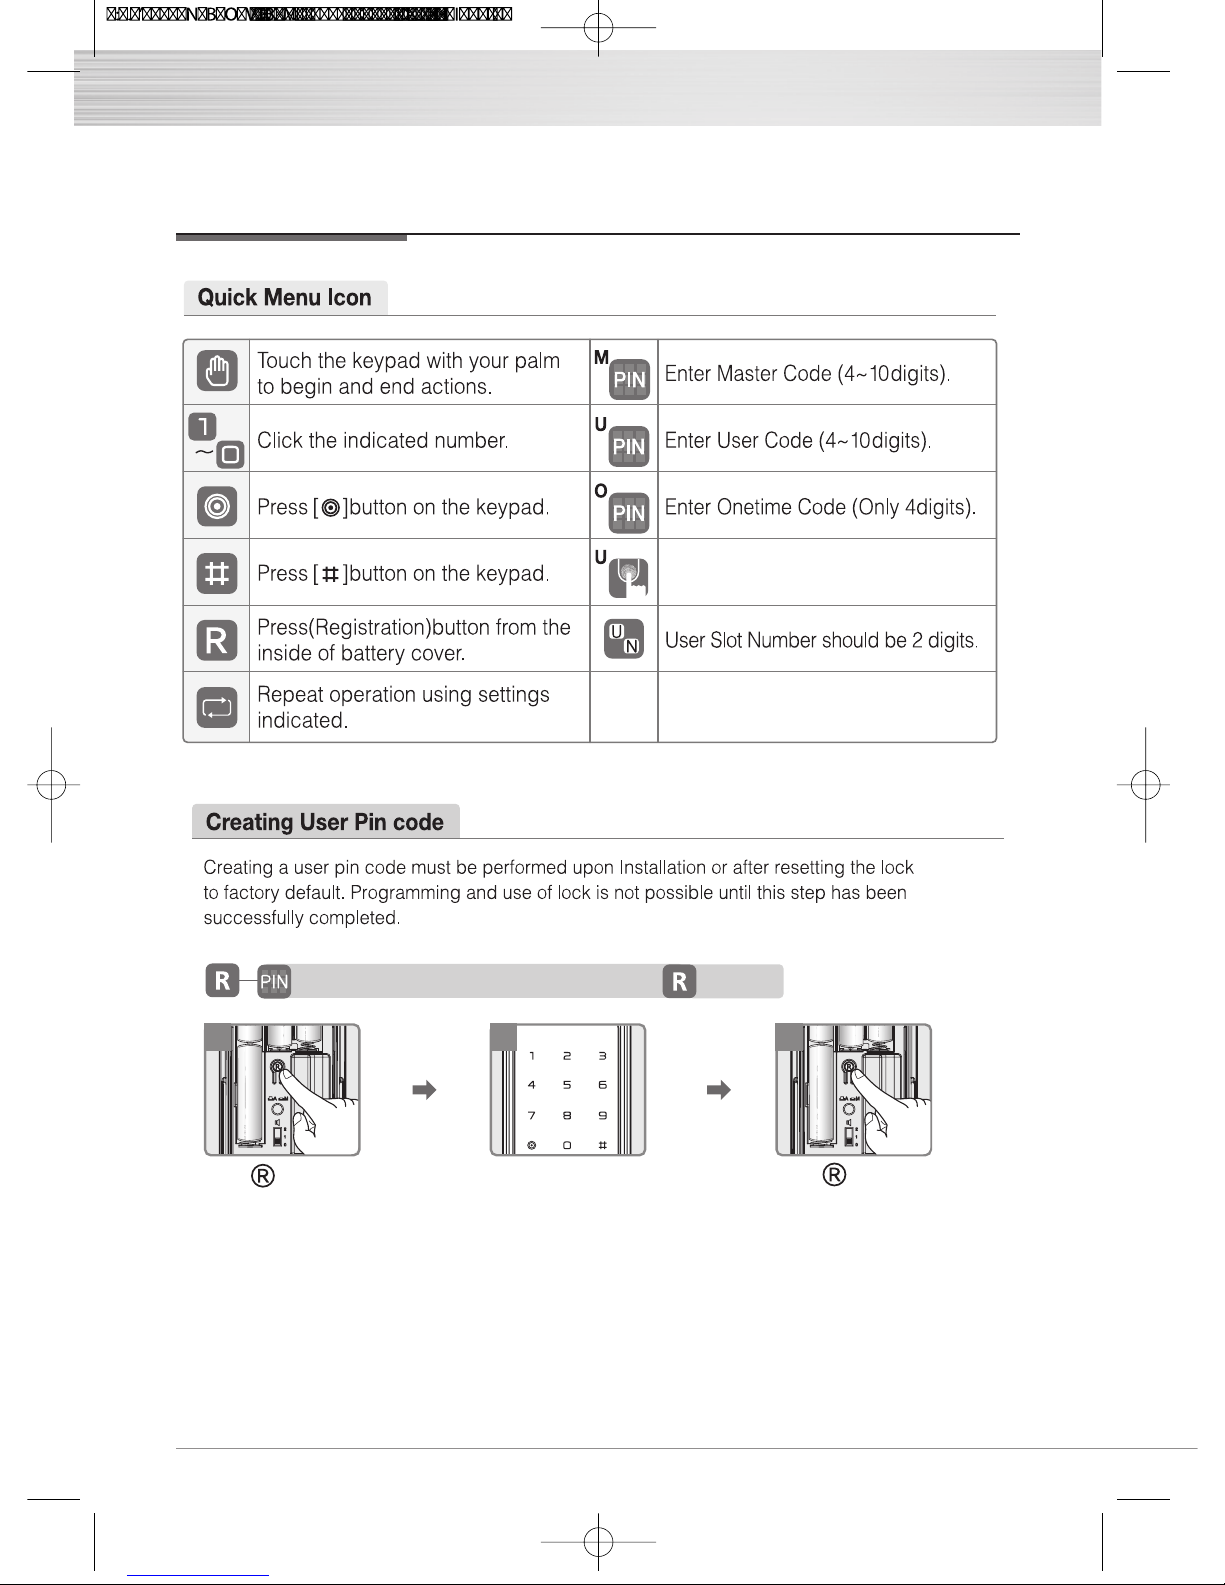
Quick Menu (
Advanced mode)
Quick Menu (Normal mode)
10
Creating User Pin code
Configuration
Normal mode
User Code registration / User Fingerprint registration
Unlocking Door with Code
Unlocking Door with Fingerprint
Locking the door
Unlocking the door from the inside
Safe Handle Setting
Open Door with fake Code
External Forced Lock / Internal Forced Lock
Automatic and Manual Lock / Volume
Break-in Alarm 3-minute Lock Out Feature
Emergency mechanical key override Product malfunction
Resetting Lock to Factory Default
How to Use
Advanced mode
Change the Master code
Register and delete User code
Register and delete Fingerprint
Register and delete Onetime code
Delete All Credentials
Lock Setting
Register and delete Remote control
Register and delete Controller
Page 4
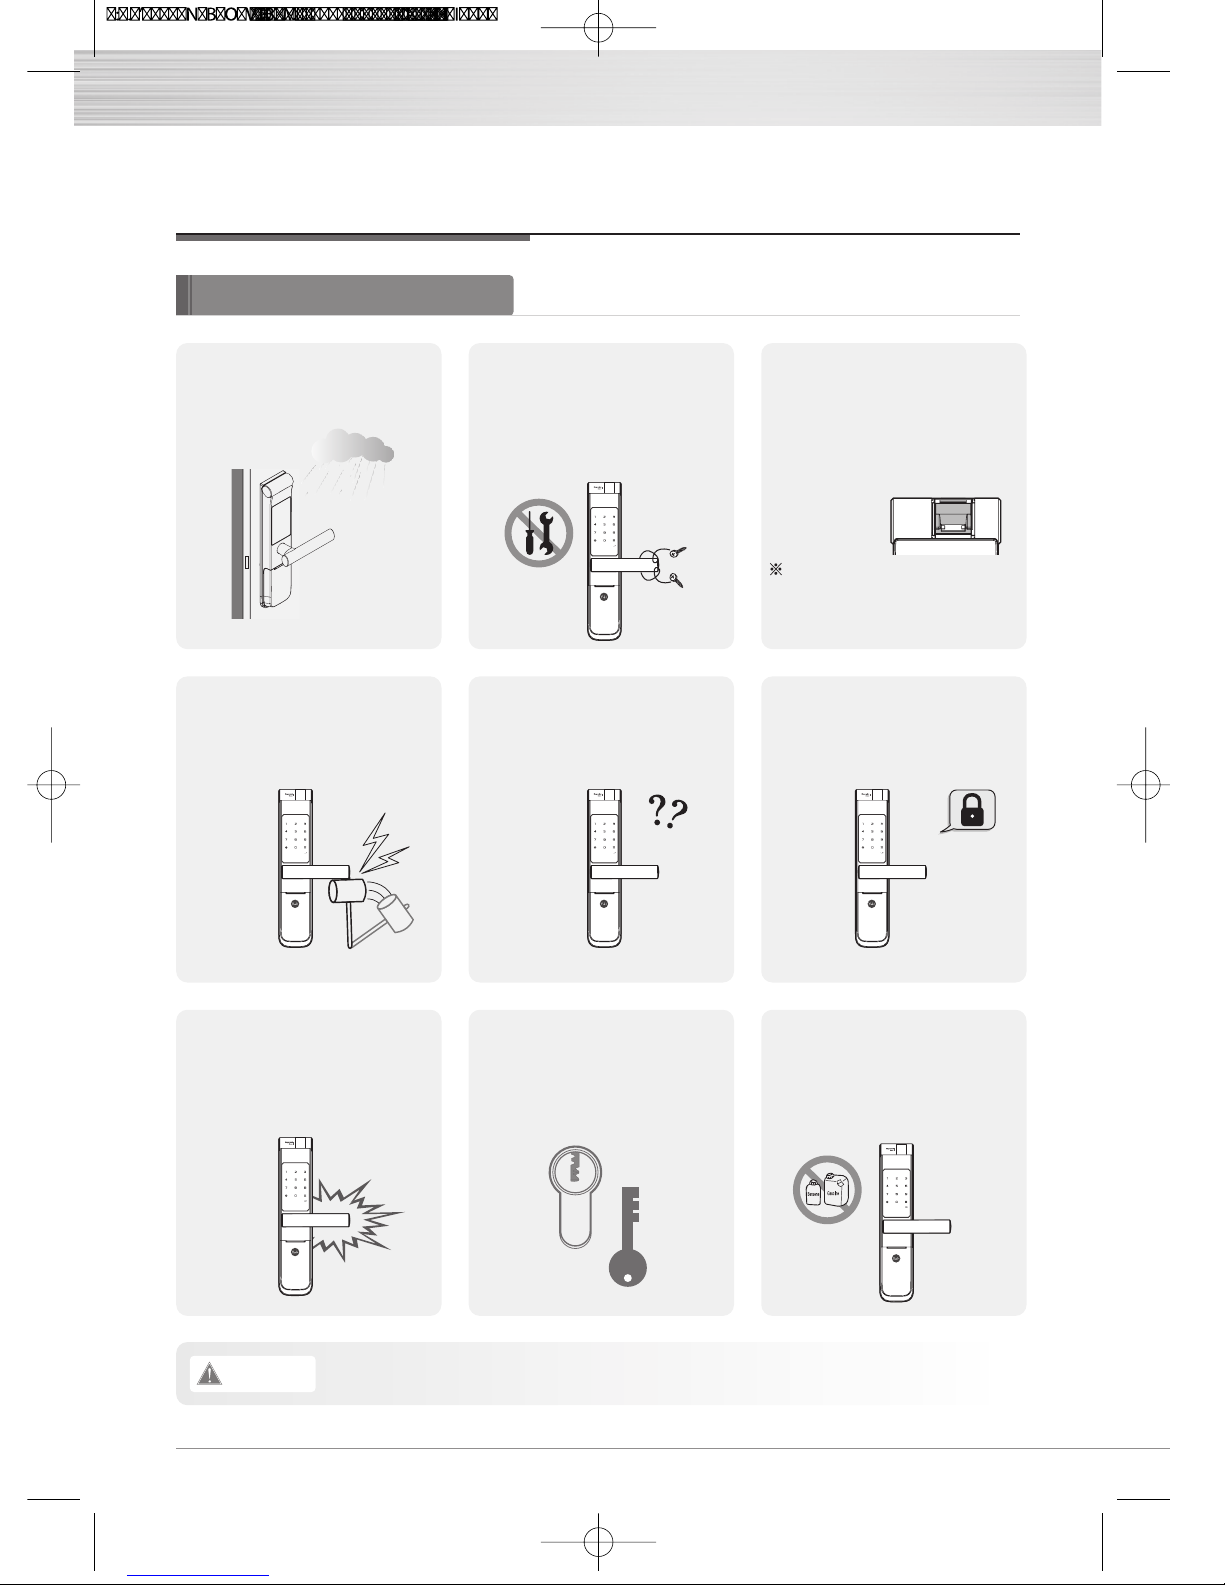
Safety Precautions
Please read this carefully
Do not install the digital door
lock in an outdoor
environment
Do not attempt to disassemble
the digital door lock by your
self. By doing so, you may get
an electronic shock and
damage the product.
Do not use force with a tool
onto the product.
Please keep your Code
safely.
For total peace of mind, please
store your back up key in a safe
& convenient place after the
door installation is complete.
Do not use water and any type of
solvent to clean the product such as
gasoline or benzene as they can
cause damage to electronic circuit,
deterioration and or paint peel-off.
Be careful not to hit the
handle as it may cause
injuries.
Make sure to lock the door
tight when you go out.
Make sure to follow the above instructions to avoid any injuries or damages on the properties .
Caution
4
An infant and some users who
have unusual fingerprints
(those which are difficult to
register) may not be
registered for fingerprint
verification.
Scan-type fingerprint modules do
not recognize fingerprints with
water or foreign materials and set
off alarm sounds.
Page 5
ENGLISH
Alarmed Door Lock
Yale Digital door lock has a built in damage alarm.
If the keypad area is damaged an alarm will sound.
One-touch Fingerprint Verification Method (Easy Scan)
Easy Scan technology has been applied to conveniently read a fingerprint in one shot without
the need to open or close the cover to enter a fingerprint.
Electronic Code System
You can open the door conveniently with Code.
Yale Digital door lock gives you the freedom and convenience of key-free.
Remote control System(Optional)
Use a Remote control to unlock your door “remotely”
Emergency power back up
9V battery source is available if your batteries run out.
Fake Code
To prevent the Code being exposed.
Yale Digital door lock allows you to enter decoy numbers before or after entering your Code
Auto Locking
The handle automatically disengages on the outside once you have entered your home,
preventing anyone from following you.
Product Features
5
Page 6
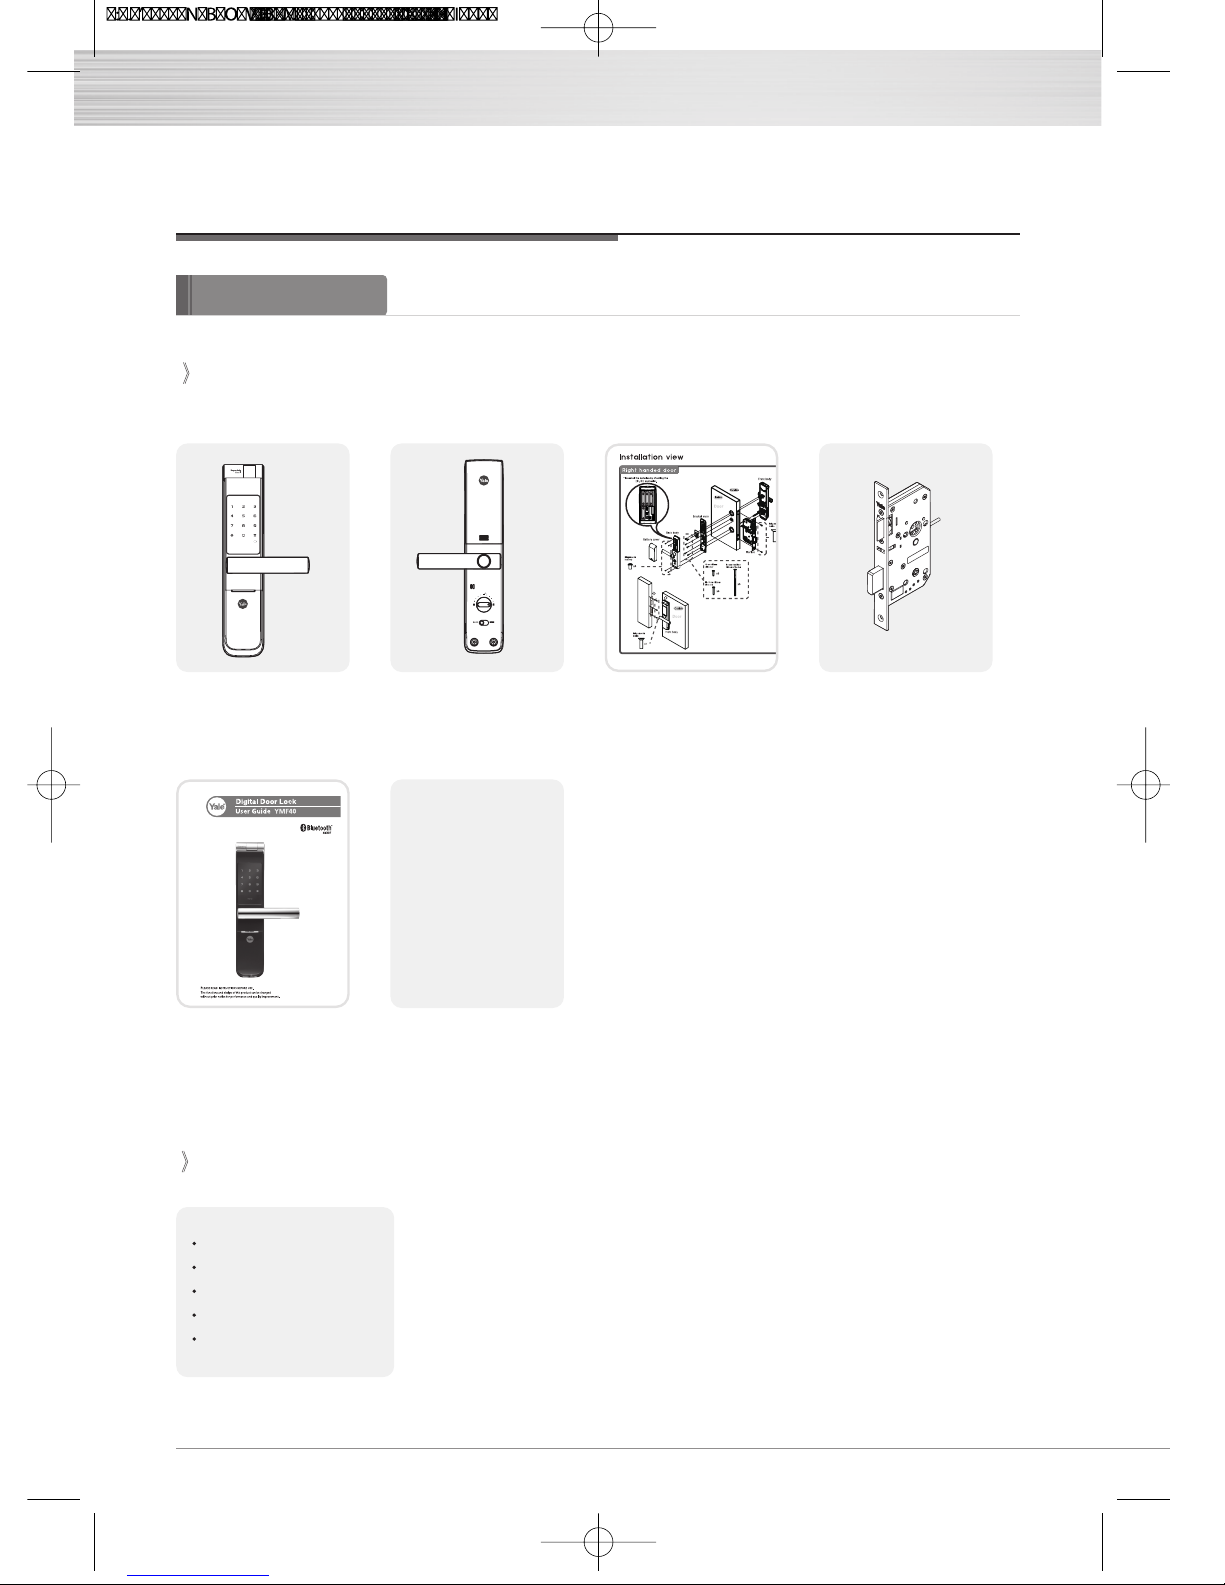
Components Overview
The contents of this product may be subject to change without notice for performance or quality improvement.
Basic Contents
Front (Front Body) Back (Main Body) Installation Template Lock case
Users Guide
Remote control
Remote control module
Zwave module
Zigbee module
Bluetooth module
4 AA Batteries
Emergency Keys
Striker
Screws
6
Basic Contents
Optional Accessory
Page 7
Packaging of this product can be recycled.
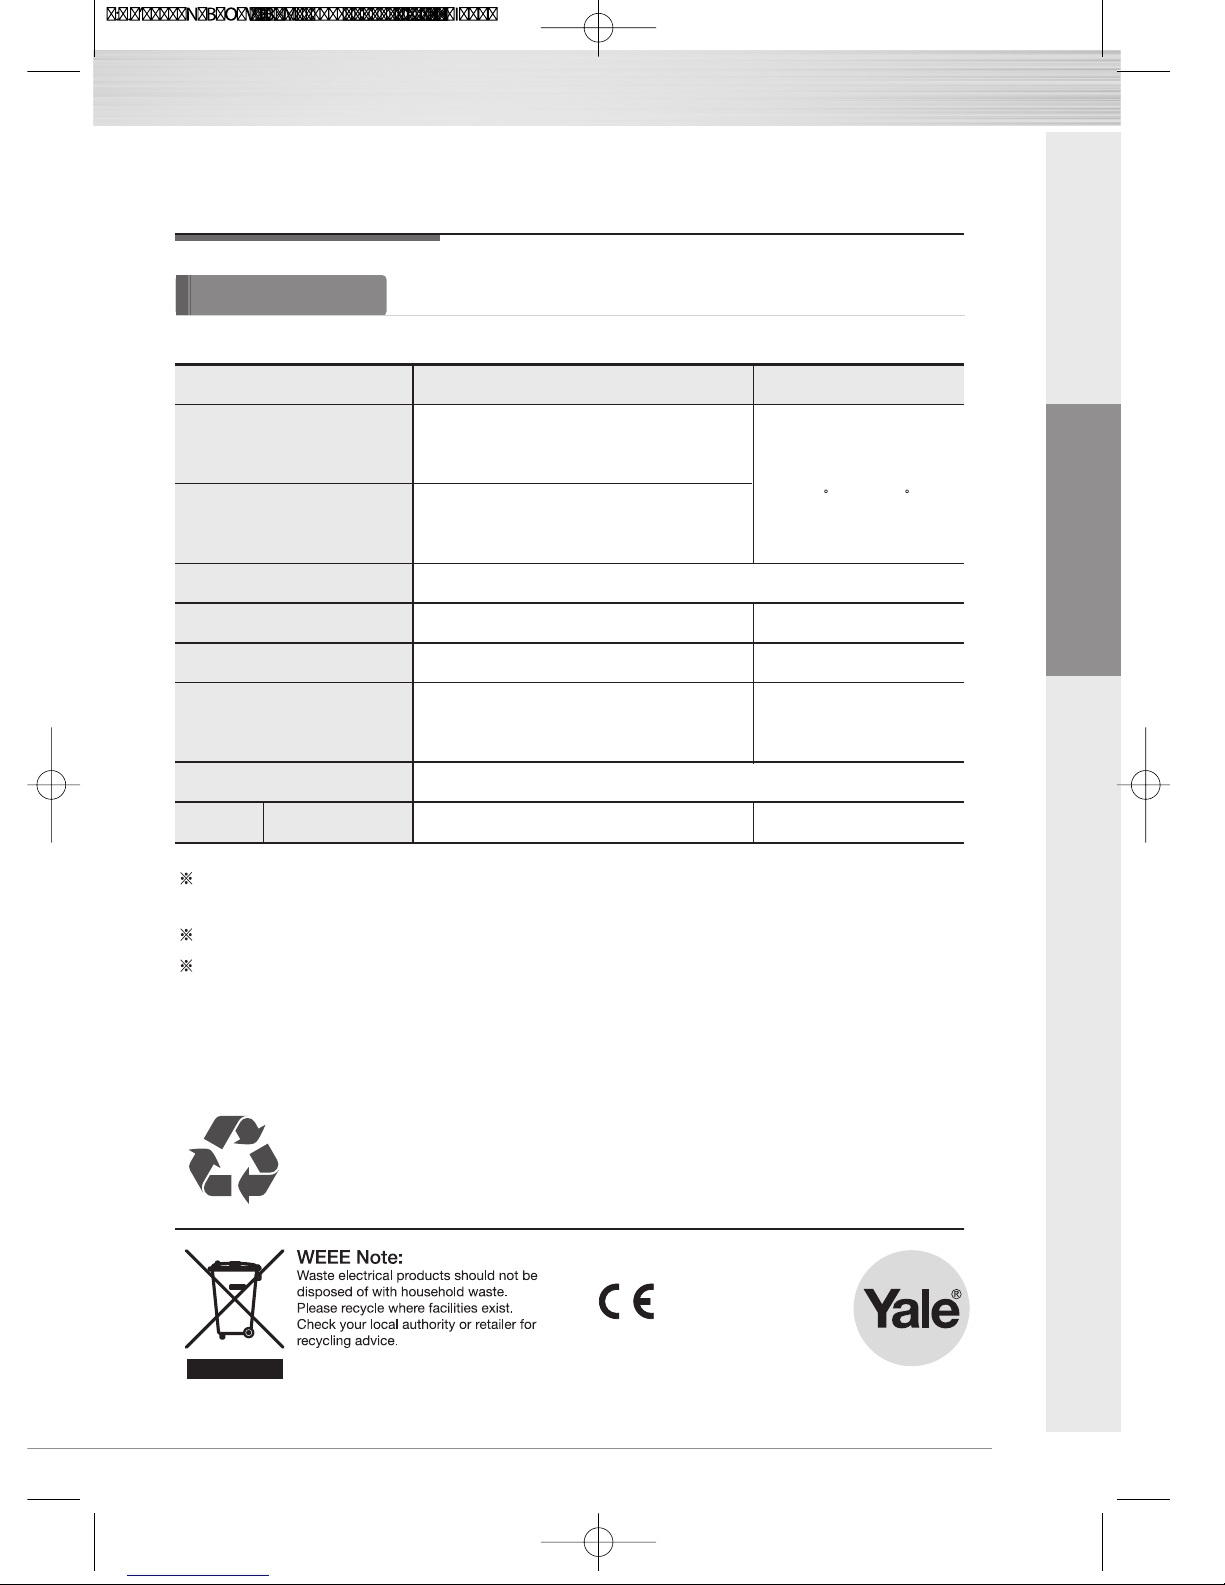
Specifications
Specifications
Front (Front Body)
Back (Main Body)
Lever
Battery
66mm(W) x 320mm(H) x 25mm(D)
Aluminum
66mm(W) x 320mm(H) x 31mm(D)
Aluminum die-casting, Cover(ABS+PC)
Aluminum die-casting
User code
30 different User codes
4EA 1.5V AA alkaline batteries
(Operating voltage: 4.5 ~ 6 V)
Operating temperature :
-15~55 C (5~131 F)
Last up to 1 year
(10 times used a day)
Remarks
Battery life may vary depending on temperature, moisture levels,
frequency of use and the quality of the batteries.
Please make sure that all parts are included when purchasing the product.
Optional products may not be available depending on your country or local dealer.
Lock case
Steel and SUS430
Option Remote Control
Wireless Optional
Up to 30 User code
Fingerprint
20 different fingerprints
Up to 20 fingerprints
Parts
Specifications
7
ENGLISH
Page 8

Identification
Pull down Emergency Cover
9V Emergency
battery
(Sold separately)
Front body
(Front Body, Installation on the outside of the door)
Keypad (10-Key)
Wake up Button
Fingerprint Cover
Battery Change Lamp
Lever
Fingerprint Sensor
Emergency Power Supply Terminal
Reset button
Emergency Key
Emergency Cover
8
Page 9
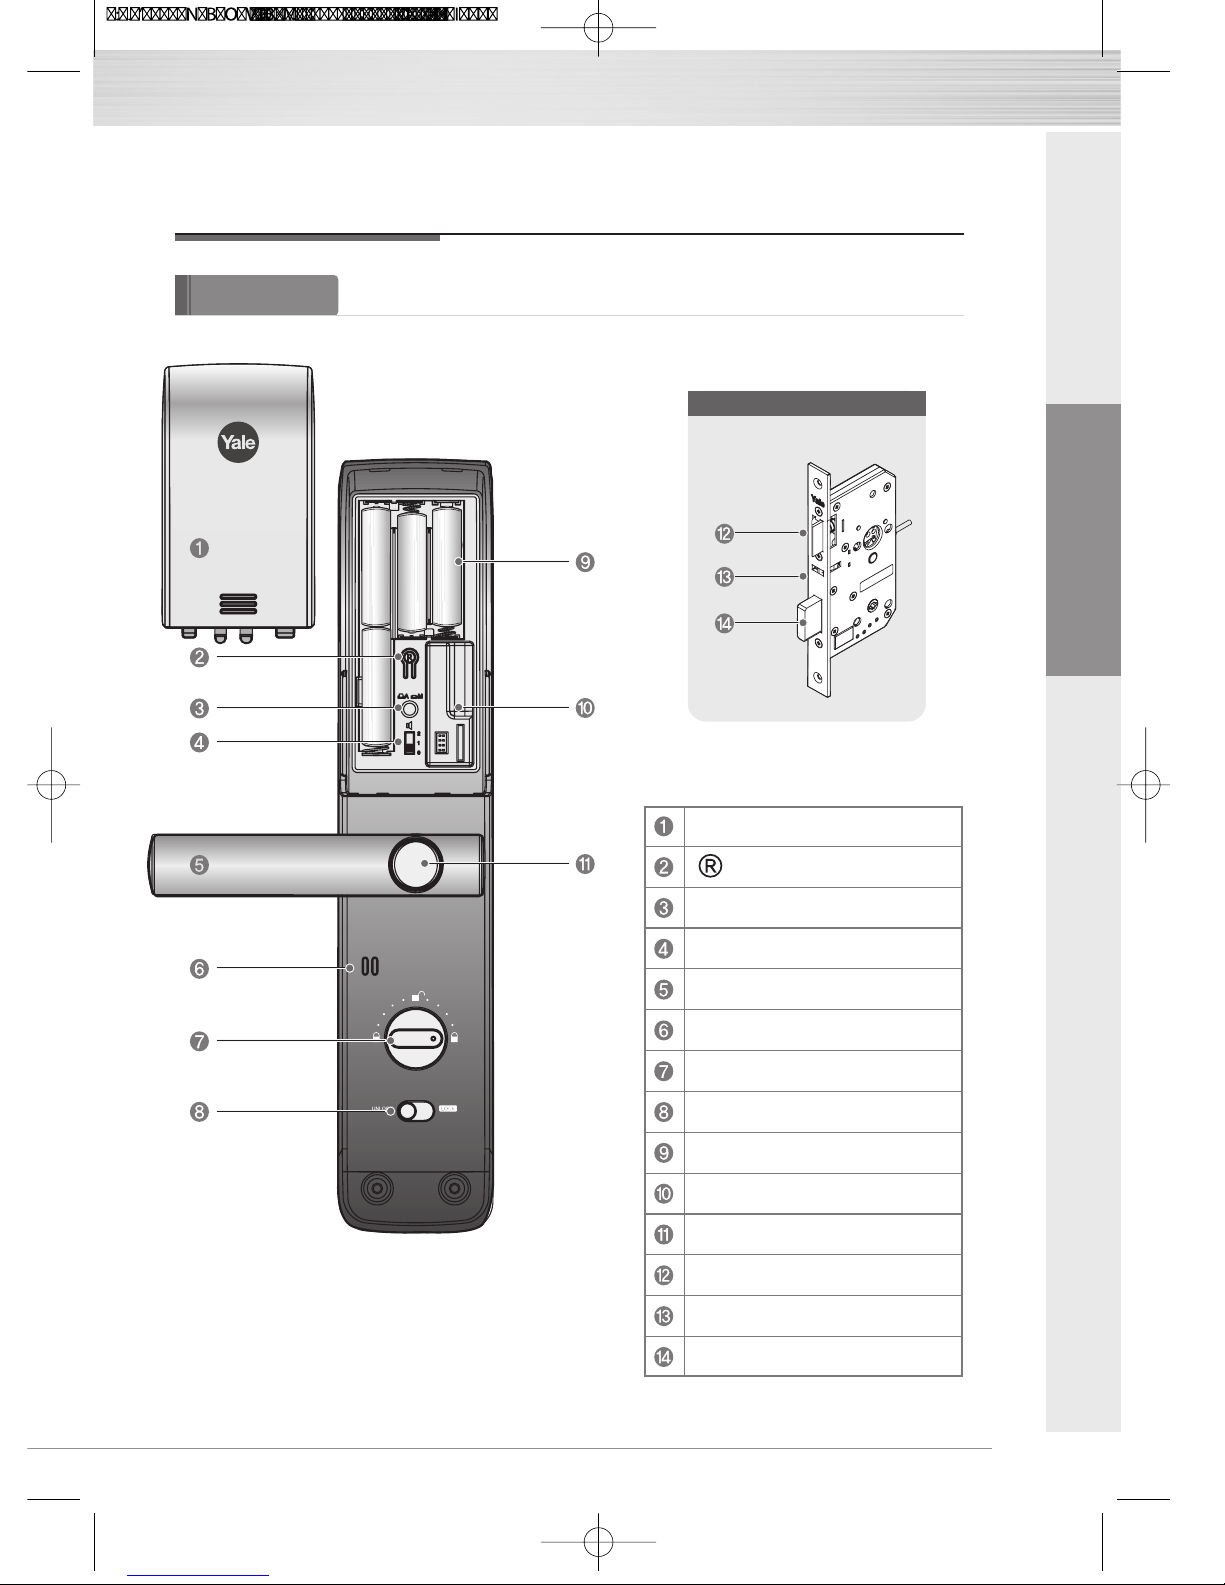
Main body
(Main Body, Installation on the inside of the door)
Battery Cover
Registration button
Automatic / Manual Lock button
Volume Control Switch
Lever
Speaker
Thumb turn knob
Internal Forced Lock Switch
1.5V AA Alkaline Batteries
Slot for Remote control module
(Option)
Safe handle button
Latch Bolt
Automatic Locking Sensor
Dead Bolt
Identification
9
Lock case
ENGLISH
Page 10
10
Quick Menu
Enter User Fingerprint(Up to 20ea).
Press
(Registration)
button.
1
Enter New User Code.
2
Press
(Registration)
button.
3
User Code Registration(4 ~10) - Only One User Code
U
Complete
Page 11

11
ENGLISH
Continue
Complete
Quick Menu (Normal mode)
Normal mode
Quick Menu
U
User Code Registration(4 ~10) - Only One User Code
User Fingerprint Registration - Up to 20ea
U
Complete
3times
Register
U
Visitor
Code
4 digits Only
V
Complete
Continue
Delete
User Code
U
Complete
Continue
Register
Onetime
Code
4 digits Only
O
Complete
Continue
Delete
User Code
U
Complete
Continue
Delete All Fingerprint
User Code
U
Complete
Continue
Change to
Advanced mode
Lock
Setting
New
Master Code
M
Master
Code again
M
Complete
Page 12

12
Quick Menu (Normal mode)
Normal mode
Quick Menu
U
Register
Remote
controller
Complete
Continue
Delete
U
Complete
Continue
Press button on Remote
Register
Controller
Complete
Continue
Delete
U
Complete
Continue
Register Controller
Page 13

13
ENGLISH
Advanced mode
Quick Menu (Advanced mode)
Quick Menu
M
Continue
Register 4 ~ 10User Code 01 ~ 30
U
Continue
New
Master Code
Change the
Master code
Master
Code again
MM
Complete
Delete
Complete
Continue
01 ~ 30
Enter User Fingerprint(Up to 20ea).
Complete
Page 14

Advanced mode
Quick Menu (Advanced mode)
Quick Menu
14
Onetime Code
Press button
on Remote
M
Registration
U
Register
Delete
Register
Delete
Register
Delete
Register
Delete
Continue
Complete
Continue
Complete
Continue
Complete
01 ~ 20
01 ~ 20
01 ~ 05
01 ~ 05
Continue
Complete
Continue
Complete
Continue
Complete
Master Code
Fingerprint
Delete All Credentials
3times
O
M
Master Code
M
M U
Master Code
M
4 digits Only
Continue
Complete
Lock Setting
Change to
Normal mode
New
User Code
User
Code again
Complete
Continue
Complete
Remote
controller
Controller
Register Controller
Continue
Complete
Page 15

15
ENGLISH
Normal mode
Configuration
User Code Registration
(4 ~10 digits)
Make sure to leave the door open when registering User Code and Fingerprints because you may accidentally
lock the door while trying to register or change a credential.
The previously registered User Code will automatically be deleted when a new credential is registered.
It is recommended to change User Code on a regular basis.
Caution
User Fingerprint Registration
(Up to 20ea)
Press
(Registration)
button.
1
Enter New User Code.
2
Press
(Registration)
button.
3
User Code Registration(4 ~10) - Only One User Code
U
Complete
Continue
Complete
U
User Fingerprint Registration - Up to 20ea
3times
Press
(Registration)
button.
1
Enter the [ ] Wake
up button on the
keypad.
2
After opennig the
cover, swipe your
finger 3 times through
the fingerprint sensor
followed by the voice
guide.
3
Enter the [ ] Wake up
button on the keypad
to continue.
4
Press (Registration)
button to complete.
4
It is impossible to make same number for Master code / Visitor code /Onetime code/User code.
Page 16

Delete
01 ~ 30
Complete
Continue
Advanced mode
Register User Code
Delete User Code
Configuration
Press button. Enter [ ] , [ ] buttons. 3Enter [ ] , [ ] buttons
to register User code.
4
2
Enter the Master
Code.
Enter the
User number (01~30)
and [ ] button.
5
Press [ ] button
to continue.
OR
77
Enter the
User Code (4 ~10 digits)
and [ ] button.
Press button.
to complete.
M
Register
User Code
01 ~ 30
M
User Code
U
4 ~ 10
Complete
Continue
1
6
16
Page 17

Advanced mode
Press button. Enter [ ] , [ ] buttons
to change the Master
code.
3
Enter New Master Code
and [ ] button.
4
2
Enter the Master
Code.
1
Change the Master Code
Configuration
M
Complete
Continue
New
Master Code
Change the
Master code
M
Master
Code again
M
Press [ ] button
to continue.
OR
66
Again enter the
Master Code and
[ ] button.
5
Press button.
to complete.
17
ENGLISH
Page 18

Advanced mode
Register Fingerprint
Configuration
Delete
01 ~ 20
Complete
Continue
Delete Fingerprint
M
Fingerprint
Press button. Enter [ ] , [ ] buttons. 3Enter [ ] , [ ] buttons
to register
fingerprint
.
4
2
Enter the Master
Code.
Enter the
User number (01~20)
and [ ] button.
5
Press [ ] button
to continue.
OR
77
After opennig the cover,
swipe your finger 3 times
through the fingerprint
sensor followed by the
voice guide.
Press button.
to complete.
1
6
M
Register
Fingerprint
01 ~ 20 Registration
Complete
Continue
3times
U
18
Page 19

19
ENGLISH
Delete
Master Code
M
Complete
Continue
Advanced mode
Register Onetime Code
Delete Onetime Code
Configuration
M
Onetime Code
M
Onetime Code
Register
4 digits Only
O
Continue
Complete
Press button. Enter [ ] , [ ] buttons. 3Enter [ ] , [ ] buttons
to register Onetime
Code.
4
2
Enter the Master
Code.
Enter Onetime Code
(4 digits)
and [ ] button.
5
Press [ ] button
to continue.
OR
66
Press button.
to complete.
1
Page 20

20
Delete All Credentials
Master Code
M
Complete
Continue
Advanced mode
Delete All Credentials
Configuration
M
Press button. Enter [ ] , [ ] buttons. 3Enter the Master code
and [ ] buttons.
4
2
Enter the Master
code.
Press [ ] button
to continue.
OR
55
Press button.
to complete.
1
Page 21

Change to Normal mode
Language Setting
Advanced mode
Configuration
Press button.
3
Enter [ ] , [ ] buttons
to change to
Normal mode.
42
Enter the Master
Code.
Enter the New
User Code and
[ ] button.
5 7
Again enter the
User Code .
1
6
Enter [ ] , [ ] buttons.
Press button.
to complete.
M
Lock
Setting
Lock Setting
M
Lock
Setting
Change to
Normal mode
New
User Code
U
User
Code again
U
Complete
21
ENGLISH
Page 22

22
Advanced mode
Configuration
Register Remote control
Delete Remote control
Press button. Enter [ ] , [ ] buttons. 3Enter [ ] , [ ] buttons
to register Remote
control.
4
2
Enter the Master
Code.
1
M
Register
Remote
control
M
Remote
control
Continue
Delete
Complete
Continue
Press button
on Remote
Complete
01 ~ 05
01 ~ 05
Press registration button on
Remote controller followed
by press [ ] button to
complete after beep sound
from digital door lock.
6
Press [ ] button
to continue.
OR
77
Press button.
to complete.
Enter the
User Number
(01~05) and
[ ] button.
5
Page 23

Advanced mode
Register Controller
Delete Controller
Configuration
Press button. Enter [ ] , [ ] buttons. 3Enter [ ] , [ ] buttons
to register controller.
4
2
Enter the Master
Code.
Register Controller followed
by press [ ] button to
complete after beep sound
from digital door lock
5
Press [ ] button
to continue.
OR
6
Press button.
6
to complete.
1
M
Controller
Register
Continue
Complete
Register
Controller
M
Controller
Delete
Continue
Complete
Master Code
M
ENGLISH
23
Page 24

Unlocking Door with Code
Touch the keypad of
the Front Body with
your palm.
1
Enter the registered
Code on the
keypad.
2
Touch the keypad of
the Front Body with
your palm.
3
Enter the [ ] Wake up
button on the keypad.
1
After opennig the
cover, swipe your
fingerprint through
the fingerprint sensor.
2
OR
Enter the [ ]
button.
3
Make sure to examine if the door opens normally with the
registered User Code after the registration is complete.
Check if the door opens!
Normal mode Advanced mode
How to Use
Unlocking Door with Fingerprint
24
Page 25

ENGLISH
25
Normal mode Advanced mode
Locking the door
Automatic Lock Mode
As the automatic lock function does not work in manual lock mode, make sure to check
that the door is securely locked when leaving the premises.
Caution
Please check Automatic / Manual Lock Mode
When set on automatic lock mode, the automatic lock sensor detects the door closing and
locks the door automatically within 5 seconds.
Within 5
seconds
Manual Lock Mode
The door locks when touching the keypad
with the palm.
Within 5
seconds
Use Thumb turn knob on the main body.
(Default)
Outside Inside
Outside Inside
How to Use
Page 26

Unlocking the door from the inside
Safe Handle Setting is not fixed as a default .
To Open Door when the safe handle button is released.
Keep pushing the safe handle button.
And then, press and open the door.
The safe handle button is found on the
inner handle.
To Open Door when the safe handle button is fixed.
Press the inner handle and
open the door.
(Closed) (Open)
(Closed) (Open)
Make sure to fully familiarize yourself with the operation of the Safe Handle
in preparation for emergencies.
Important
Normal mode Advanced mode
How to Use
26
Page 27

Normal mode Advanced mode
How to Use
Safe Handle Setting
- Be careful that the fixing screw is not separated during the safe handle setting.
Note
To Disable Safe Handle Setting
(Default Setting)
To Enable Safe Handle Setting
Turn the fixing screw counterclockwise by
Philps screw driver until the safe handle button
is released.
Turn the fixing screw clockwise by
Philps screw driver to fix the button while
keeping to push the safe handle button.
The technology to prevent a forced attempt to drill a hole in the door and unlock the doorlock has been applied.
ENGLISH
27
Page 28

Normal mode
How to Use
(Only Normal mode)
This is an extra security measure to prevent your Code being accidentally exposed.
It is only available for your User and Visitor Code ; not for use with the Onetime Code.
Enter the
Enter the
Method
Method
fake numbers Code
Code fake numbers
Opening Door with fake Code
Touch the keypad
of the Front Body
with your palm.
1 2
Press [ ] button to confirm.
or Touch the keypad with
palm to confirm.
3
28
Page 29

ENGLISH
29
External Forced Lock
Internal Forced Lock
- If you open a door with the handle from inside in External Forced Lock, the alarm will sound.
- Deactivate External Forced Lock by entering User Code or touching Fingerprint reader with registered Fingerprint.
- Internal Forced Lock is only activated when door is closed.
Note
External Forced Lock Setting - Fingerprint
External Forced Lock Setting - User Code
When External Forced Lock mode is activated the Alarm will go off if someone press the
handle to exit the property.
When internal forced lock mode is activated the keypad is
not functioning.
A warning beep sound will go off if anyone attempts to
access using Code or the Fingerprint from outside.
Normal mode Advanced mode
How to Use
Touch the keypad of
the Front Body with
your palm.
1
Enter registered
User Code on the
keypad.
2
Enter [ ]button for 5 seconds.
(The beep sound sets off
for 3 times.)
3
Swipe with registered fingerprint and
touch the button for 5 seconds [ ]
until you hear 3 beeps.
(Except Onetime Code)
1 2
Page 30

Even though the operation sound is set to ‘Mute’ , the error and alarm will sound.
Note
Default High
Default Automatic lock
Main body Automatic/Manual Lock
button released to set Auto
Main body Automatic/Manual Lock
button pressed to set Manual
Automatic / Manual Lock
Volume
Normal mode Advanced mode
How to Use
The operation sound volume will be adjusted
according to the Volume Switch Setting.
(2 : High / 1: Low / 0 : Mute)
Automatic Lock Setting
Manual Lock Setting
30
Page 31

ENGLISH
31
Break-in Alarm
Break-in Alarm : When the front body is seperated from
the door, the damage alarm will sound.
Method Enter the registered Codes.
Method Press the interior button for 5 seconds.
Method Enter the registered Fingerprint.
After five(5) unsuccessful attempts at entering a valid code or
fingerprint, 3-minute Lock Out mode is activated.
Method Press button.
Method Depress inside lever handle.
During the 3-minute Lock Out mode, the lock will shut down and not allow operation.
3-minute Lock Out Feature
Normal mode Advanced mode
How to Use
To turn off Alarm
To Release 3-minute Lock Out
Page 32

Operate the lock with the mechanical key
when there is a problem with the lock.
Such as :
- Forgotten User Code
- Electronic malfunction
Pull down the
emergency
cover
Location of
key hole
Emergency mechanical key override
Product malfunction
Reset Button
Press reset button located in the center of
[Emergency power terminal] with a finger and
try again testing the Fingerprint or the Code.
If it still does not work, call the after-sales service.
Normal mode Advanced mode
How to Use
Reset Button
Resetting Lock to Factory Default
When lock is reset to factory defaults all user codes
(including the Master code*) are
deleted and all programming features are reset to
original default settings (see below).
1. Remove the battery cover and batteries.
2. Remove the interior escutcheon to access the reset pads.
3. The reset pads are located on bottom of the PCB board
(See image)
4. While pressing the reset pads with tweezer,
reinstall batteries and release reset pads with tweezer.
5. Replace battery cover.
Upon reset, the Master Code creation is the
only option available and must be performed
prior to any other programming of the lock.
32
Page 33

ENGLISH
33
Emergency Power
In case the batteries are dead, you can open the door by using 9V battery as shown.
To supply emergency power
One-on-one real-life size
1.5V(LR6) alkaline AA battery
Expiry period
Low battery alarm
The product uses four 1.5V alkaline AA batteries.
They may sustain 1 year if used 10 times a day.
(Users are advised to use authentic alkaline batteries.)
You must replace all 4 batteries in the following cases:
* The Low Battery LED on key pad flickers red.
* When low battery notification message is played.
RISK OF EXPLOSION IF BATTERY IS REPLACED BY AN
INCORRECT TYPE. DISPOSE OF USED BATTERIES ACCORDING
TO THE NATIONAL CODE OR RECYCLING PROGRAM
The battery life varies according to ambient temperature, humidity, the frequency of use, and the quality of
the battery.
Do not use rechargeable batteries. Only alkaline batteries are recommended.
Note
Low battery lamp (red)
Emergency power supply for discharged batteries
Power supply
Place the 9V battery
onto the emergency
power supply terminal.
Touch the keypad with
your palm.
Enter the registered Code
on the keypad.
Touch the keypad with
palm or Press [ ] button
to confirm and
replace the batteries.
2 31 4
Page 34

Page 35

Page 36

An ASSA ABLOY Group brand
ISL-1645-01 Ver.1
 Loading...