

Page 1

Ver. PMU-0808-01
Page 2
※
The functions and design of this product can be changed without notice for quality improvement.
User Manual
YDM2107 / YDM3107
Page 3
2
1 Specifications
2 Identification of Product
1. Front Body
2. Back Body
3 How to use
1. Registering Card / Touch key
2. Registering security code
3. Locking the door from the outside
4. Unlocking the door from the outside
5. Locking the door from the inside
6. Unlocking the door from the inside
7. Automatic / Manual Lock Mode
8. Forced Lock Mode
9. Break-in / Damage Alarm
10. Heat Alarm
11. Volume control
12. Battery
4 Option
1. Remote control module
2. Remote control
5 Caution / Note
1. Emergency power supply
2. Lost key
3. Product malfunction
4. Mechanical key override
Page 4

3
Overview
1. Security code : Use any code number 4-12.
2. Touch key or Proximity card key.
3. Emergency mechanical key : can lock and unlock the door at anytime.
4. Automatic locking locks automatically after 7 seconds.
5. Anti-panic egress : For convenience and in case of emergency, the door automatically unlocked
whenever the inner lever is used.
6. Backlit keypad : The keypad will illuminate when any buttons are pushed.
7. Volume control : volume of signals can be adjusted to suit the environment.
8. The lock features a one-touch lock/unlock system.
9. Power consumption : A power saving circuit ensures long battery life.
10. Damage alarm : This product incorporates an alarm system that can trigger a sensor when the
lock is subject to attack or force.
Page 5

4
Please read the following safety instructions to prevent any accident, property damage and
inconvenience. Children should be well educated in the operation procedure before use. Keep
this manual in a convenient place so that you can refer to it when necessary.
IMPORTANT SAFETY
INSTRUCTION
Do not attempt to dismantle or repair product. Please contact your nearest authorised service agent for
any repairs or maintenance.
When cleaning use only a damp cloth to clean the lock body.
Note : Do not use any chemicals when cleaning.
This product may be damaged by impact.
This could result in a malfunction.
symbol
prohibited must observe
Caution must be followed to protect yourself and your property
Note explains product functions and features.
Page 6

5
1 Specifications
Parts Specifications Remarks
Front Body 72(W) x 304(H) x 75(D)mm
Input power : DC 6V
Operating temperature : -15~55℃
Back Body 81(W) x 323(H) x 78(D)mm High temperature alarm : 55℃
Keys 4 pcs Up to 20keys (sold separately)
Battery 8 x 1.5V AA alkaline batteries
Last up to 1 year
(based on 10 cycles per day)
Remote control wireless Sold separately
Remote control module
wireless Sold separately
■■
Basic contents
※Battery life may vary
depending on
temperature, moisture
levels, frequency of
use and the quality of
the batteries.
※Please make sure that
all parts are included
when purchasing the
product.
※Optional products may
not be available
depending on your
country or local
dealer.
Front Body
YDM2107
Front Body
YDM3107
Back Body Mortise
Card keys
YDM3107
Mechanical keyTouch keys
YDM2107
Option
- Remote control
-
Remote control module
- User's manual
- Installation template
- Battery (8ea)
Option
Page 7
6
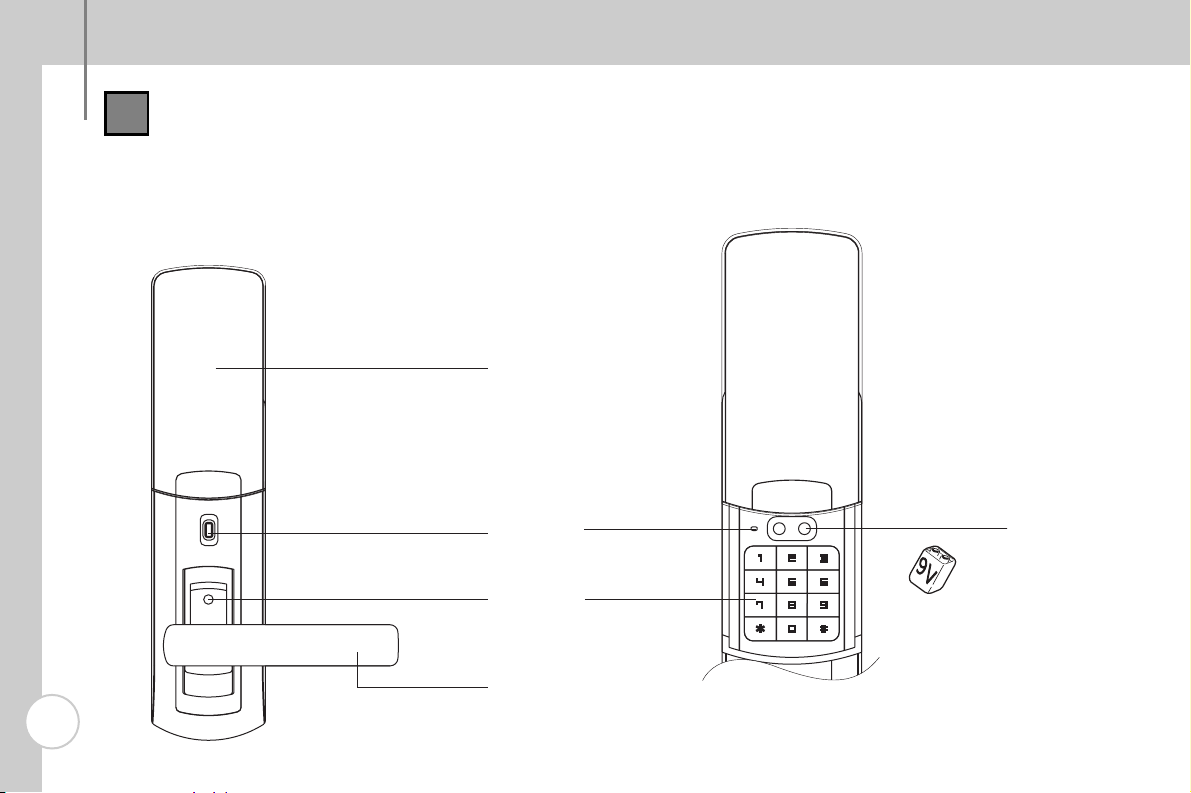
2 Identification of Product
1. Front Body - YDM2107
Keypad cover
Key reader
Emergency Power
Supply Terminal
9V Emergency battery
(sold separately)
Mechanical key override
Lever
Reset button
Keypad (10-key)
Page 8

7
2 Identification of Product
1. Front Body - YDM3107
Keypad cover
Emergency Power
Supply Terminal
9V Emergency battery
(sold separately)
Mechanical key override
Lever
Reset button
Keypad (10-key)
Page 9
8
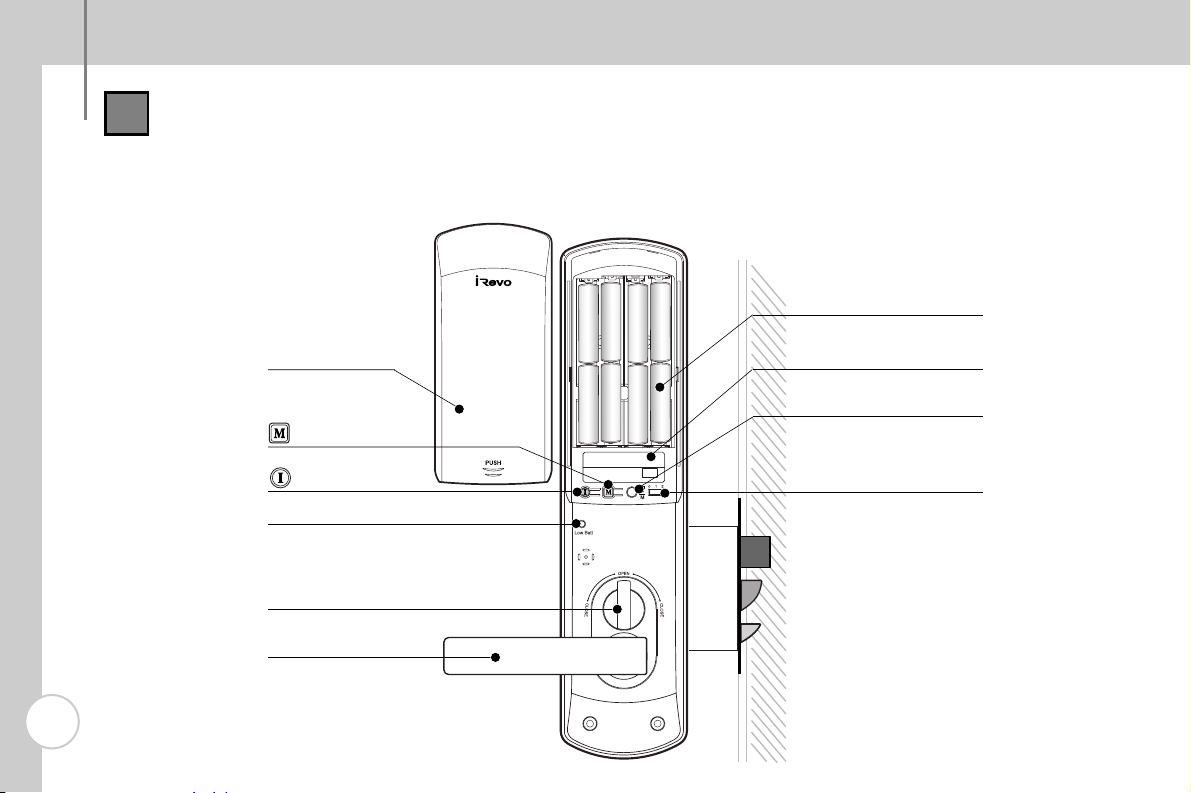
2 Identification of Product
2. Back Body - YDM2107 / YDM3107
Registration Button
Volume Control Switch
1.5V AA Alkaline
Batteries (8EA)
Manual Knob
Battery cover
Low battery indicator LED
Menu Button
Lever
Slot for Remote Control
Module (Option)
Auto / Manual Lock button
Page 10

9
3 How to Use
1. Registering Touch keys (YDM2107)
Press
[Registration Button]
➔
Touch key
contact
➔
Press
[Registration Button]
again
Check the key
operation
➔
Open [Battery
Cover] and Press
Registration
button
“BI-BING”sound
Contact all the
Touch keys you
wish to register on
the [Key reader] one
by one
“BIK”sound
The registration
is completed with a
sound.
“BI-BI-BING”sound
Opening the door
with your Key.
Contact your
Touch key to [Key
reader]
Page 11

10
3 How to Use
1. Registering Card keys (YDM3107)
Press
[Registration Button]
➔
Card key
contact
➔
Press
[Registration Button]
again
Check the key
operation
➔
Open [Battery
Cover] and Press
Registration
button
“BI-BING”sound
Contact all the
Card keys you wish
to register on the
[Key reader] one by
one
“BIK”sound
Press [Registration
Button] again.
The registration is
completed with a
sound.
“BI-BI-BING”sound
Opening the door
with your Key.
Contact your
Card key to [Key
reader]
Page 12

11
3 How to Use
2. Registering Security Code
Press [Registration]
button
➔
Enter your security code
(4-12 digits)
➔
Press [Registration]
button again
Check the key
operation
➔
Open [Battery
Cover] and Press
[Registration]
button.
“BI-BING”sound
Open [Keypad
cover] and enter
your code you wish
to register.
(4-12 digits)
Press [Registration
Button] again. The
registration is completed
with a sound.
“BI-BI-BING” sound
Once registration is
completed, make it
sure to open the
lock with your new
security code.
If it takes too long (over 20
seconds) to enter the code after
pressing [register security code]
button, the code will not be
registered.
[*] and [#] buttons can not be used
for security codes.
Page 13

12
3 How to Use
3. Locking the door from Outside
Automatic
lock mode
Automatic Manual
The automatic lock sensor detects the door
closing and locks the door automatically
within 5 seconds.
Manual mode
Automatic Manual
The door locks when you slide [Keypad
Cover] up and back down again.
Within 5
seconds
“BI-BI-BING”sound
“BI-BI-BING”sound
If the LED is not turned on slide up the [keypad cover] and press
*
button to lock the door.
Note
Page 14

13
3 How to Use
4. Unlocking the door from the Outside (YDM2107)
Contact the Touch key on [Key
reader]. After hearing "BI-BIBING" sound, push the lever
down to open the door.
Slide [Keypad cover] up. Enter your code and close down [keypad cover] to unlock the
door. If the LED is not turned on with [keypad cover], press *button to turn on the LED,
enter your code and press button again or slide [keypad cover] down.
If incorrect codes or invalid Touch keys are entered 5 times, the lock is blocked out for about 3 minutes.
Unlocking the
door with Touch
key
Unlocking the
door with
security code
Page 15

14
3 How to Use
4. Unlocking the door from the Outside (YDM3107)
If incorrect codes or invalid card keys are entered 5 times, the lock is blocked out for about 3 minutes.
Contact the Card key on [Key
reader]. After hearing "BI-BIBING" sound, push the lever
down to open the door.
Slide [Keypad cover] up. Enter your code and close down [keypad cover] to unlock the door.
If the LED is not turned on with [keypad cover], press *button to turn on the LED, enter your
code and press button again or slide [keypad cover] down.
Unlocking the
door with Card
key
Unlocking the
door with
security code
Page 16

15
3 How to Use
5. Locking the Door from the Inside
Automatic lock
mode
Automatic Manual
When set on automatic lock mode, the
automatic lock sensor detects the door
closing and locks the door automatically
within 5 seconds.
Manual lock
mode
Automatic Manual
Use [Manual Knob] on the back body.
Within 5
seconds
“BI-BI-BING”sound
This lock features anti-panic egress, which means that the door is automatically unlocked whenever
the inner lever handle is used.
Note
Page 17

16
3 How to Use
6. Unlocking the Door from the Inside
Manual knob or Lever
Turn the manual knob to open position or
push down the lever on the Back Body.
This lock features anti-panic egress, which means that the door is automatically unlocked whenever the inner lever
handle is used.
Note
In case Lever
doesn't work
Turn the manual knob to open position.
Page 18

17
3 How to Use
7. Automatic/Manual Lock Mode
Automatic locking sensor detects the door closing and automatically locks the door in 5 seconds. Automatic lock
mode is a factory default setting.
Setting it on
automatic lock
mode
Push up the Button
on Mode.
Manual Mode Automatic Mode
Setting it on
manual lock
mode
Push down the Button
on Mode
Automatic Mode Manual Mode
In case Manual lock mode, door will not lock automatically. Make sure to check the door when you go out.
Caution
Page 19

18
3 How to Use
8. Forced Lock Mode
The last person to leave the home can set the lock in externally forced lock mode. A burglar who enters through a window will
then not e able to exit through the door without setting off an alarm.
Setting forced
lock mode
on with Key
Contact your Touch key or Card key
on [Key reader] for 5 seconds until
your hear 3 beeps.
Locking with
security code
Slide up the [keypad
cover] and enter your
security code.
“BI-BI-BING”
“BI-BI-BING”
5 seconds
5 seconds
Press # button for 3
seconds until your hear 3
beeps.
YDM2107
YDM3107
Page 20
19
If the door didn't lock properly, alarm can ringing.
Caution
Turning off the alarm
3 How to Use
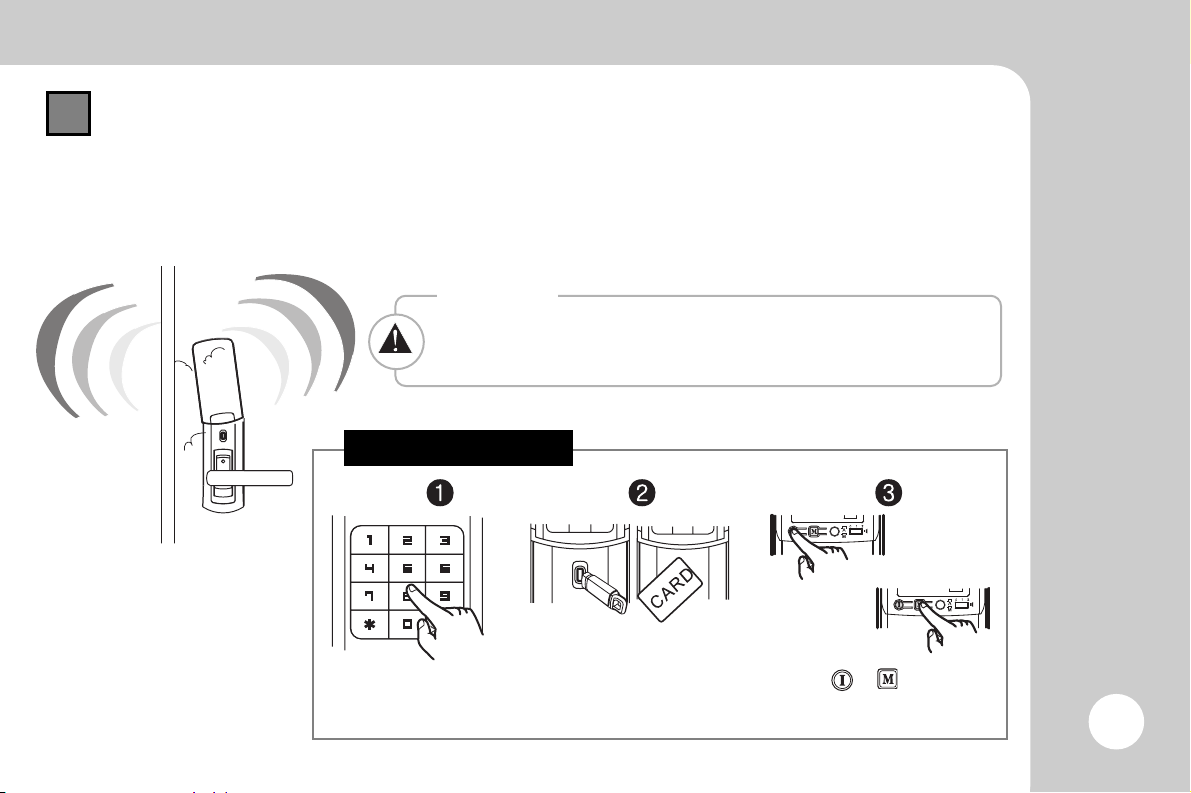
9. Break-In/Damage Alarm
If the lock is damaged or entry is forced while the door is locked, an 80dB alarm is triggered. Turning off the alarm.
Enter your security
code
Press or button for
5 seconds
Method Method Method
Contact your key on
[key reader]
or
Page 21

20
[Lock] [Unlock]
3 How to Use
10. Heat Alarm
❶ What is heat alarm
If the lock detects the temperature as high as 60 degrees Celsius (140 degree Fahrenheit). it triggers the alarm and
automatically unlocks. The detection temperature can be different depending on the installation circumstance.
❷ Turning off the alarm
Enter your security code or Contact your key on [key reader] (See Break-in, Damage alarm off page) to turn off the alarm.
Page 22

21
3 How to Use
11. Volume Control
This function controls the operating sounds so the lock can be used without any audible beeps.
❶ Mute
Set the Volume Button to “ 0 ”
❷ Middle level
Set the Volume Button to “ 1 ”
❸ High level
Set the Volume Button to “ 2 ”
In mute mode, the Error, Break-in, Damage and Heat alarms will still function.
Note
Page 23

22
3 How to Use
12. Battery
❶ Battery type
This product uses 8 1.5V alkaline AA batteries
❷ Battery replacement warning
Replace all 8 batteries when the low battery warning sound is
heard and the LED turns red. (Use only alkaline batteries)
1.5V AA size alkaline battery
1:1 actual size
Input power : DC 6V
Low battery LED
Always check the + and - directions when inserting batteries. Use only alkaline batteries.
Caution
Page 24

23
4 Option
1. Remote Control Module
Remote Control Module should be installed in advance in order to use a Remote Control. Open [Battery Cover] and
insert the module into the slot. Proper functioning of the module can be checked by operating a Remote Control .
Remote control module
Open [battery cover]
and remove all
batteries.
Insert remote control
module into the slot
Put batteries back in
(Check +, - directions)
Confirming with the
“DI-RI-RI-RING”
sound
“DI-RI-RI-RING” sound
Installing Remote control module
Page 25

24
4 Option
2. Remote control
The Remote Control is FM frequency (FSK) type that uses Floating ID encoding system, which continuously changes the wireless code
each time you use the Remote Control, so that there is no risk of hacking. It is non-directional and the operational range is up to 10-20m.
The photo frame design allows you to create different atmospheres by putting in a photo and hanging the remote control on the wall.
Registering remote control
Open the [Battery cover]
and Press button.
Open the [keypad cover]
and press the 0 and 5
button on keypad.
You can register up to 5
remote controls
consecutively. In order to
register consecutively, press
the [Registration Button] on
the Remote Control with 10
seconds intervals. Each
Remote Control is registered
with a beep.
Press [open] or [close]
button to check the
operation.
Press button again.
Press [Menu]
button
Press the
M button
➔
Press 0,5 buttons
➔
Press [registration]
button located on the
front of the remote
control with a pin
➔
Check remote
control operation
➔
Page 26

25
4 Option
2. Deleting remote control
Press [menu] button
Deleting remote control
registration
➔
Press 7, 5
buttons
➔
Press [menu]
button
➔
Open [Battery cover]
and Press button.
Press 7 then 5
button.
Press [menu]
button.
Remote control
registration is cancalled
with a sound.
Press[menu]button
Page 27

26
5 Caution / Note
1. Emergency power supply
In case the batteries are completely discharged a 9V battery can be used to supply an electronic charge to the unit. Unlock with
the Key or Security Code while contacting a 9V battery as illustration below. Discharged batteries should be replaced
immediately.
Replace all 8 batteries at the same time.
Note
Page 28

27
Enter the Security code in case you misplace the key.
Note
5 Caution / Note
2. Lost key
If a key is lost you must re-register all other keys to deactivate the lost one. You should always keep a spare key
handy to deactivate a lost registered one.
[lost key]
[Re-registering key]
Page 29

28
5 Caution / Note
3. Product malfunction
Should you experience any operating of programming problems you can reset the lock to its original factory setting as follows.
1. Press the Reset Button located in the left of [Emergency Power Supply Terminal ]with a pin.
Then retry the desired function with the key or code.
2. Should you continue to experience any problems contact your nearest authorised service agent.
reset button
Page 30

29
5 Caution / Note
4. Emergency mechanical key override
To lock or unlock the door use the emergency mechanical key.
Push up the
key cover
Mechanical
key
Key hole
Keep the mechanical override key in a safe place.
Caution
Page 31

30
MEMO
 Loading...